

Page 1
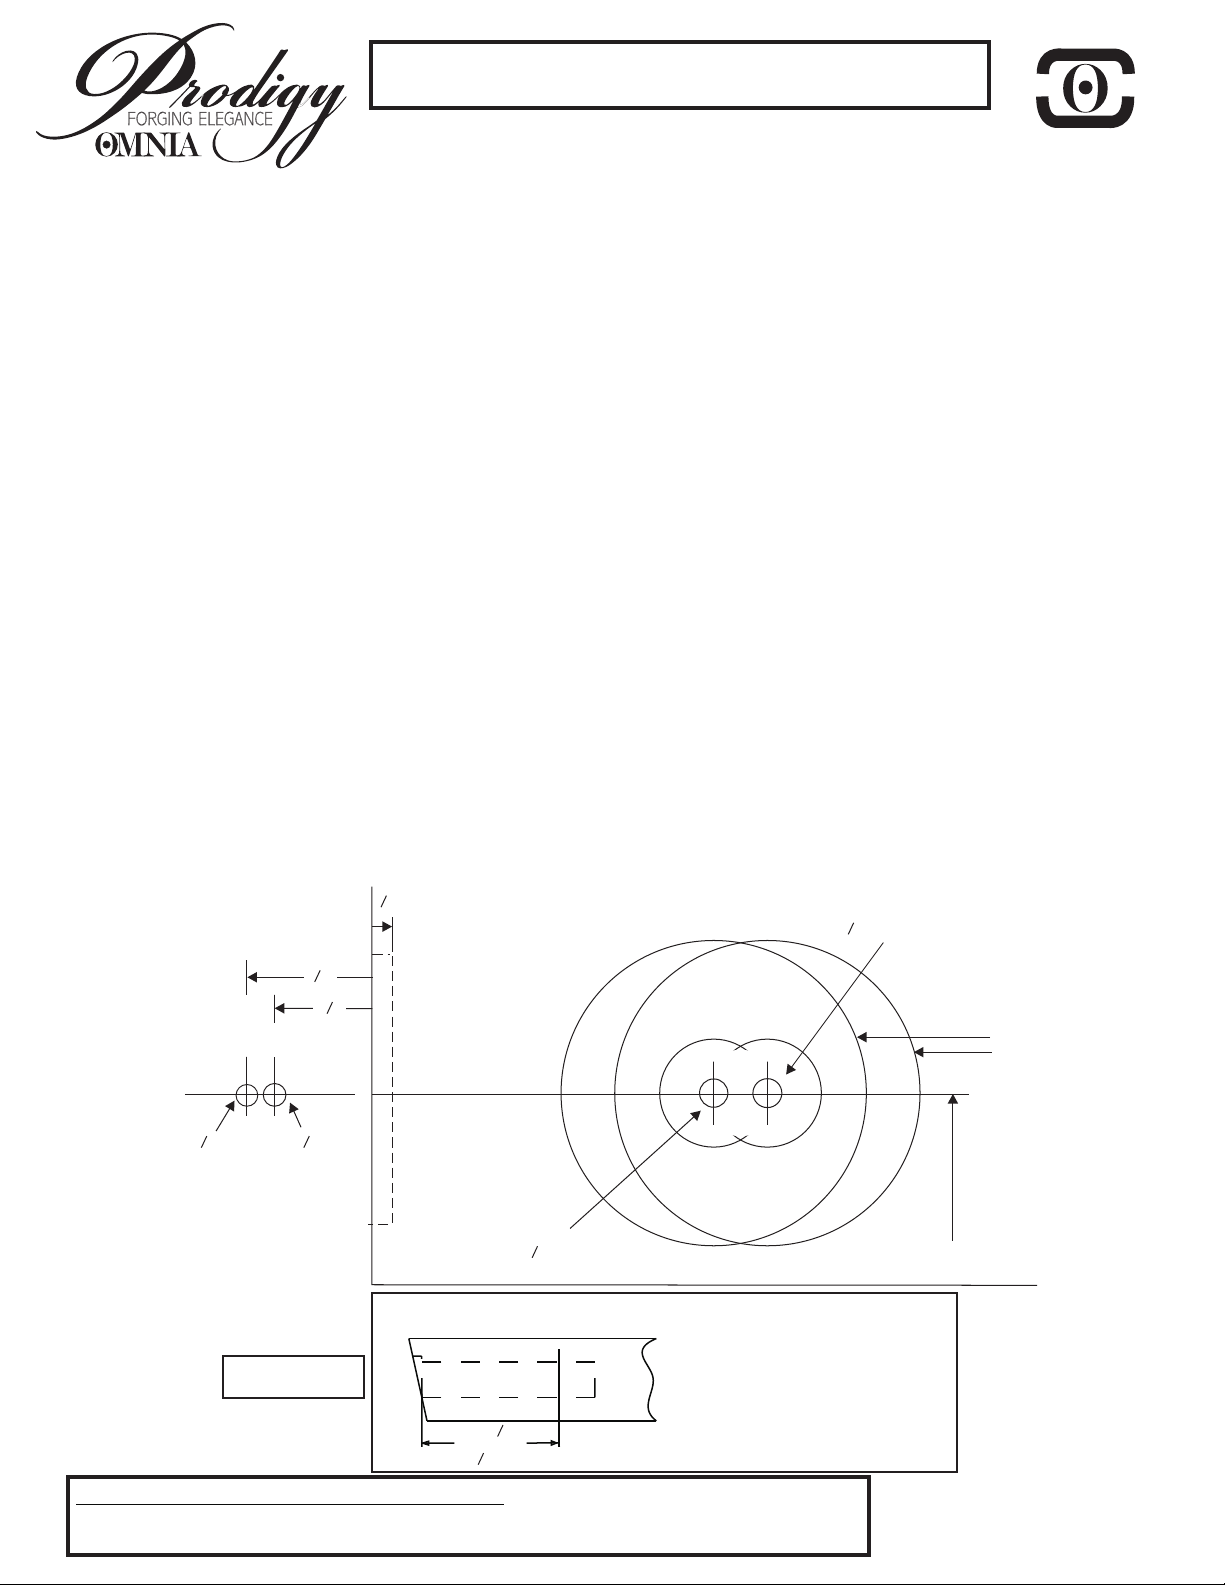
NOTE: Template may not be true-to-size. Please use for reference
purposes only. DO NOT drill until measurements are verified.
INSTALLATION INSTRUCTIONS FOR LATCHSETS
Installing Latch - Skip to #4 Instruction if door is pre-bored.
1. Following template, mark all points for drilling. Use correct
backset for latch. Drill 2 " bore first.
roses or narrow plates drill ¾" diameter hole instead of
1
/
2 " bore.
8
2. Using 1" bit, drill from door edge across the bore to
accommodate latch length.
3. With face cover in place, position latch and mark perimeter
of latch faceplate on door edge. Mortise to accommodate
latch face and face cover, approximately deep (refer to
Figure #1).
PASSAGE :
4. When installing a passage latch, hold latch
with writing on label facing upwards.
PRIVACY :
When installing privacy latch, the side of the
privacy that is inside of the room must be towards locking
side of room. (refer to Figure #2 on reverse side).
5. Position latch [G] in door to suit bevel (refer to Figure #1).
To change latch bolt bevel, pull latch bolt out slightly and
rotate 180 degrees. faceplate [H] and
door.
BEFORE INSTALLING ROSE
Insert spindle [F] through latch hub. FOR PRIVACY
6.
FUNCTION: Insert split spindle until spindle stop hits
latch hub.
DRILL 1" DIA. HOLE
IN DOOR EDGE
1
/
8
"
For 2 diameter
5
"
/
32
Screw latch [G] to
:
"
5
32
7
"
8
11
16
"
FACEPLATE
1 x 2” ”
TUBULAR LATCH TEMPLATE
1
/
4
CEDAR GROVE, NJ 07009
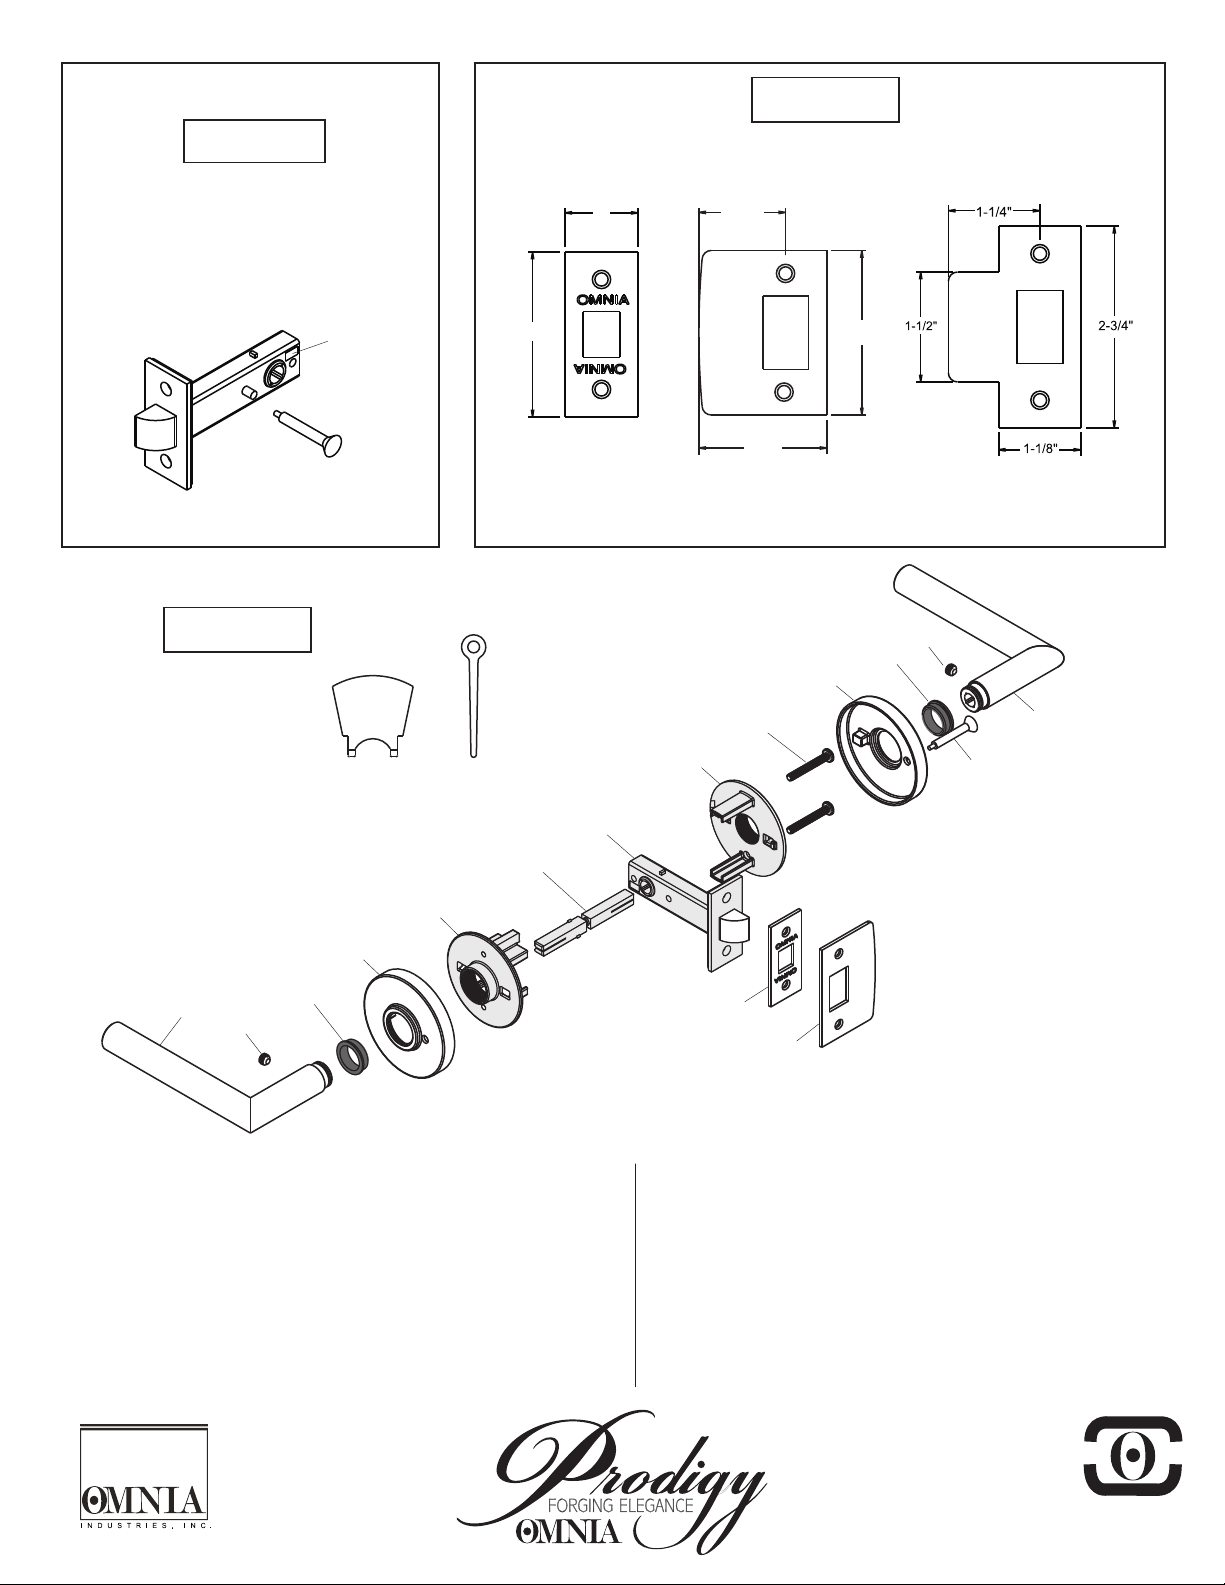
Installing Passage and Privacy Rose Set (refer to Figure #4)
1. Place the adaptor [E] and adaptor [J] into the door prep,
on either side of the door. Fasten the adaptors together
using the (2) screws [K] provided by passing them through
the adaptor [J] and into the adaptor [E]. (do not fully
tighten).
the adaptors before applying roses [D] and [L].
Install the nylon threaded washers [C] onto
Make
sure the spindle [F] is centered in the hole of the adaptors
[E] and [J].
2. Place levers [A] onto each end of spindle [F] and test
operation of latch. If operation is smooth, fully tighten
screws [K] and remove levers [A] and washers [C].
3. Place a finished rose [D] and [L] onto each adaptor. For
privacy function, ensure that the privacy hole is towards the
door edge. Thread washers [C] onto inside and outside
adaptors securing the finished roses [D] and [L]. Use the
washer installation tool [N] to fully tighten each threaded
washer [C].
4. Slide both levers [A] onto the spindle [F] until securely
seated into the threaded washers [C]. (For privacy
function, ensure the spindle [F] is centered in the latch [G]
so that each lever [A] works independently). Insert the set
screws [B] provided into the levers [A] and secure the
levers [A] to the spindle [F]. If installing privacy function,
thread the privacy pin [M] through the rose [L] into the
latch.
Your Omnia Dealer/Distributor can help you with any further
questions or information on other Omnia Products.
3
2 " BACKSET
4
1
/
2 " BORE
8
3
1 "
4
DOOR
3
1 "
8
DOOR
FOLD ALONG DOOR EDGE
3
2 " BACKSET
8
For beveled edged door
WIDER WIDTH (HIGH SIDE)
*
Figure #1
3
2 "
8
or
3
2 " B.S
4
CAUTION: DOOR AND FRAME MANUFACTURERS
When door gasketing or silencers are used, proper allowances must be made for strike location to
maintain a common centerline with lock and door so that the bolt will freely enter strike
NARROWER WIDTH (LOW SIDE)
* Cut high side of door deeper on the
face to compensate for bevel.
.
38" FROM FLOOR
OM-PDY1
9/26/2012
Page 2
INSTALLATION OF PRIVACY LATCH
(PRIVACY LATCH ONLY)
Figure #3
Figure #2
Hold latch with writing on label facing
inside. The side of the latch that is inside of
the room must be towards you.
*NOTE Thread privacy pin into latch after
trim is applied.
Label
Privacy Pin
(Inside of Room)
Figure #4
FACEPLATE AND STRIKES
DRAWINGS NOT TO SCALE
1”
2-1/4"
FACEPLATE
1-3/16"
“FULL LIP” STRIKE -
Prodigy Latchset
1-3/4"
NO. 14
STANDARD
K
2-1/4"
NO. 13
“T”STRIKE -
OPTIONAL
B
C
L
A
N
O
J
M
G
F
E
D
A
B
C
H
I
Latchset Component List
A) Door knob/lever (2)
B) Set screws (2)
C) Nylon threaded washers (2)
D) Finished Rose
E) Adaptor E
F) Spindle (Teardrop groove positioned
towards set screw)
G) Tubular latch
H) Tubular latch faceplate
I) Tubular latch strike plate
J) Adaptor J
K) Thru-bolts (2)
L) Finished Rose
M) Privacy locking pin
N) Washer Installation Tool
O) Emergency Release Key
CEDAR GROVE, NJ 07009
OM-PDY1
9/26/2012
 Loading...