

Page 1

Table of Contents
Table of Contents............................................................................................................................1
1 Outlook Description.....................................................................................................................3
2 Power Button Usage.....................................................................................................................4
3 Using microSD Card....................................................................................................................4
4 Getting Started.............................................................................................................................4
Charge the device....................................................................................................................4
Turn the device on...................................................................................................................4
Wi-Fi Network Setup..............................................................................................................4
5 DESKTOP ....................................................................................................................................5
6 Screen Lock ..................................................................................................................................6
7 Pre-loaded Applications ..............................................................................................................6
8 Desktop Function Menu ..............................................................................................................8
9 Application Management............................................................................................................9
Install Android Applications ..................................................................................................9
Download Android Applications direct from a Website....................................................10
Uninstalling Android Applications ......................................................................................10
10 WmtWeather............................................................................................................................10
11 CLOCK..................................................................................................................................... 11
Alarm .....................................................................................................................................11
Gallery....................................................................................................................................11
12 APP MARKET......................................................................................................................... 12
Download Applications.........................................................................................................12
App Market Function Menu................................................................................................12
13 BROWSER...............................................................................................................................12
14 CALENDAR.............................................................................................................................13
Add Event..............................................................................................................................13
15 CAMERA..................................................................................................................................13
Function Menu ......................................................................................................................14
16 CALCULATOR....................................................................................................................... 14
17 EMAIL......................................................................................................................................14
Add Email accounts..............................................................................................................14
Email Inbox ...........................................................................................................................14
Edit Email Account...............................................................................................................15
Delete Email Accounts ..........................................................................................................15
18 MY MUSIC...............................................................................................................................16
Play Music..............................................................................................................................16
The Operation with Music and Playlist...............................................................................17
19 MY VIDEO...............................................................................................................................17
Play Video..............................................................................................................................17
1
Page 2

The Operation with Video and Playlist...............................................................................17
20 MY PHOTO .............................................................................................................................18
Doodle.....................................................................................................................................18
21 GALLERY................................................................................................................................18
Photos.....................................................................................................................................18
Videos .....................................................................................................................................19
Delete Photos or Videos ........................................................................................................19
22 CONTACTS .............................................................................................................................19
Add New Contacts.................................................................................................................19
Add Contact to Favorites......................................................................................................20
Edit Contacts.........................................................................................................................20
Delete Contacts......................................................................................................................20
23 PICTURE CAPTURE .............................................................................................................20
24 PK MANAGER........................................................................................................................20
Stopping Applications...........................................................................................................21
Uninstall Applications...........................................................................................................21
25 YouTube....................................................................................................................................21
26 TUDOU.....................................................................................................................................21
27 MY BOOK................................................................................................................................22
How to Start........................................................................................................................... 22
28 Wi-Fi Settings...........................................................................................................................22
29 SETTINGS................................................................................................................................22
Frequently Asked Questions........................................................................................................24
Battery Management....................................................................................................................25
Important Safety Precautions......................................................................................................26
2
Page 3
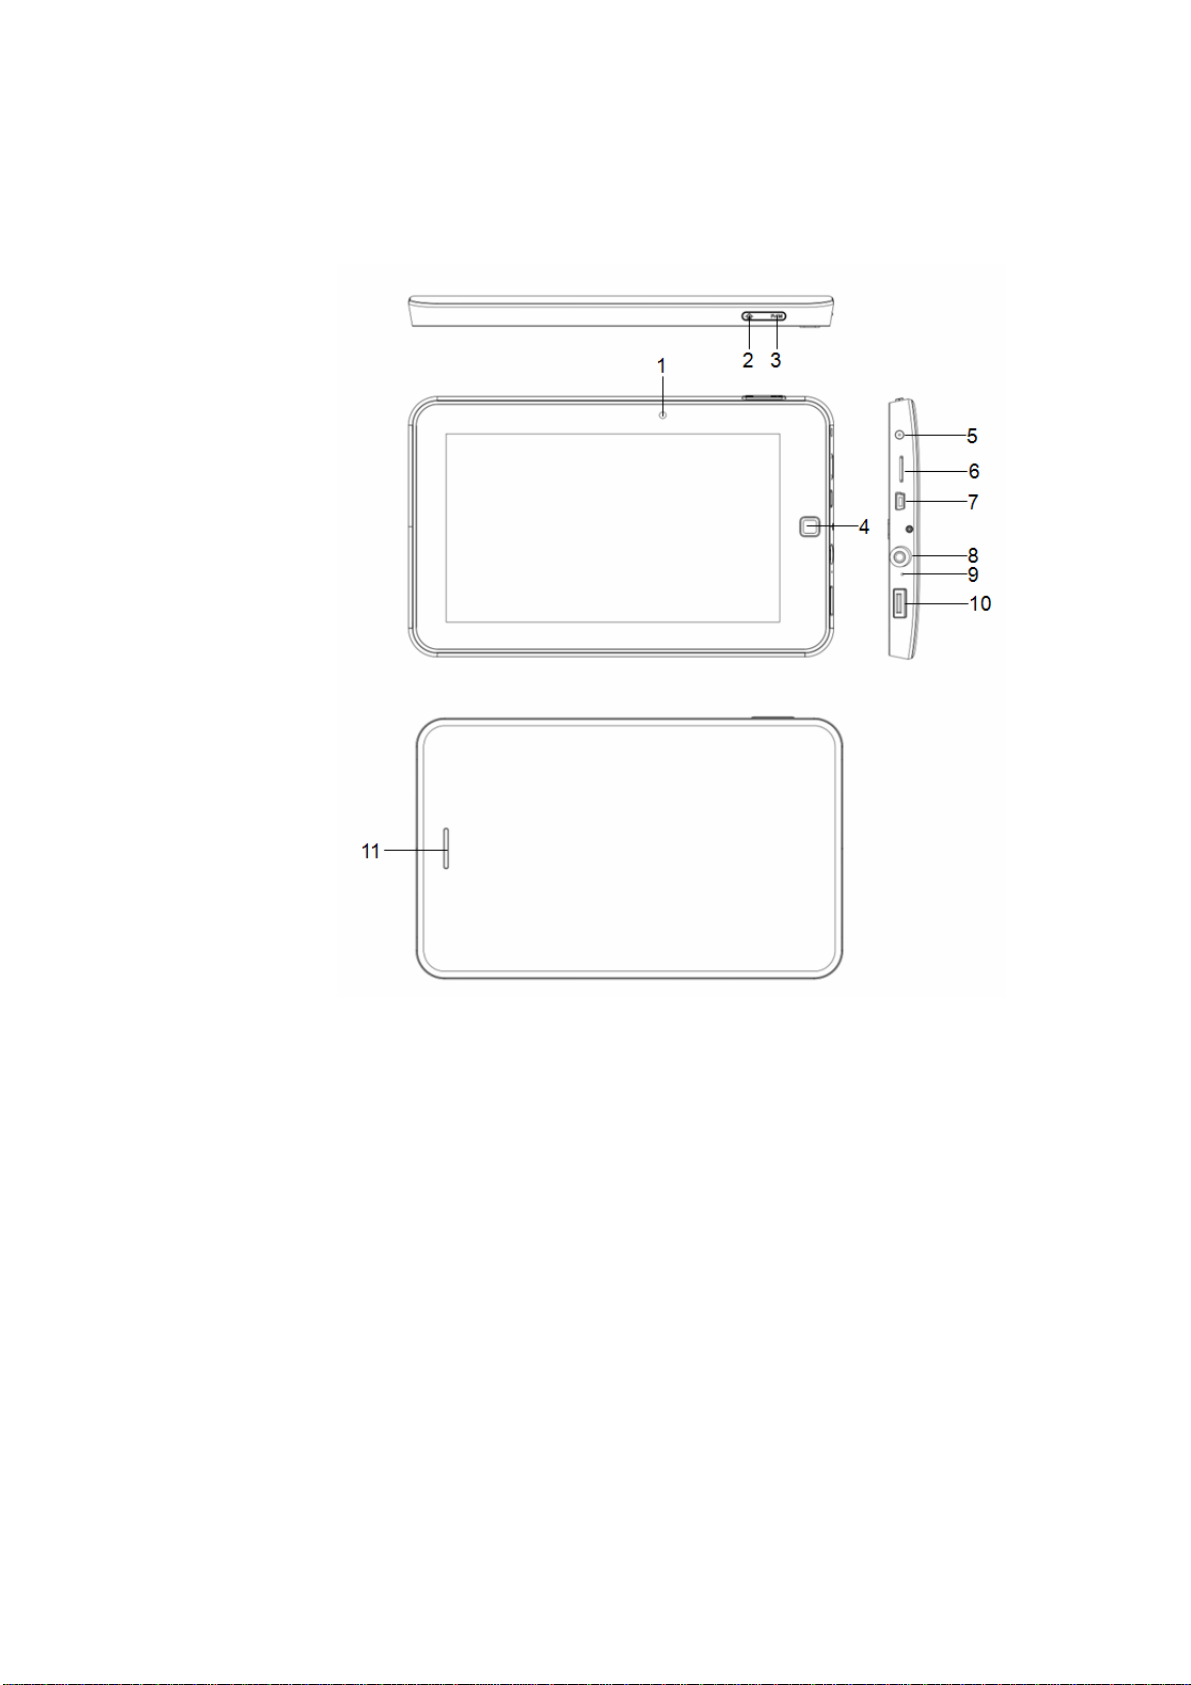
1 Outlook Description
1: Camera
2: Homepage
3: Power on/off / Menu
4: BACK
5: DC IN
6: Micro SD Card slot
7: Mini USB jack
8: Earphone
9: MIC/REST
10: Standard USB jack
11: Speaker
3
Page 4
2 Power Button Usage
Turn O n: Press the power button and hold for 2 seconds.
Turn Off: Press the power button and hold for 2 seconds, →tap OK.
Sleep Mode On/Off: Press & release the power button quickly to turn sleep mode on and off.
Force Off: If device does not respond, press and hold the power button for 8 seconds.
Note: If it is necessary, we don’t suggest use Force Off. You should follow the steps to perform
the shutdown.
3 Using microSD Card
☆ The device supports a maximum 32GB microSD card.
Insert your card into the microSD slot until it clicks into place. it’s OK
Remove microSD Card
Use one of the following methods for moving the microSD card.
Close all applications or documents which have been opened on the card. Tap
→ Settings → SD card & device storage → Unmount SD card. Press the card
lightly; it is partially ejected allowing you to pull the card out.
☆ Don’t insert and remove the U-disk repeatedly in a short time, as this may cause
damage to the card.
☆ We recommend using major brands of memory cards to avoid incompatibility.
4 Getting Started
Charge the device
☆ You ca nn ot charge the battery using the USB cable.
☆ You can use the device while the battery is charging, although the charging time is
longer when operating and charging at the same time.
Plug the power adapter into an electrical wall outlet, and then connect to the device to fully
charge the battery before use (approx. 4hour).
While charging, the battery indicator light is red. When fully charged, the battery indicator
light is green.
Turn the device on
Press the power button and hold for 2 seconds.
Wi-Fi Network Setup
Since many features require a Wi-Fi connection, we recommend you set up your Wi-Fi
4
Page 5

network now.
1. Tap
2. Select Wi-Fi to turn on.
The device automatically scans and lists all local Wi-Fi Network found. A
indicates secure networks that require login name/password to connect.
3. Tap the desired network to which you want to connect, → enter the Network
Password if applicable, → tap Connect.
4. Tap
☆ If your Wi-Fi network is set as hidden, it won’t be found
by the auto scan. Tap Add Wi-Fi network and follow the prompts
to add your network.
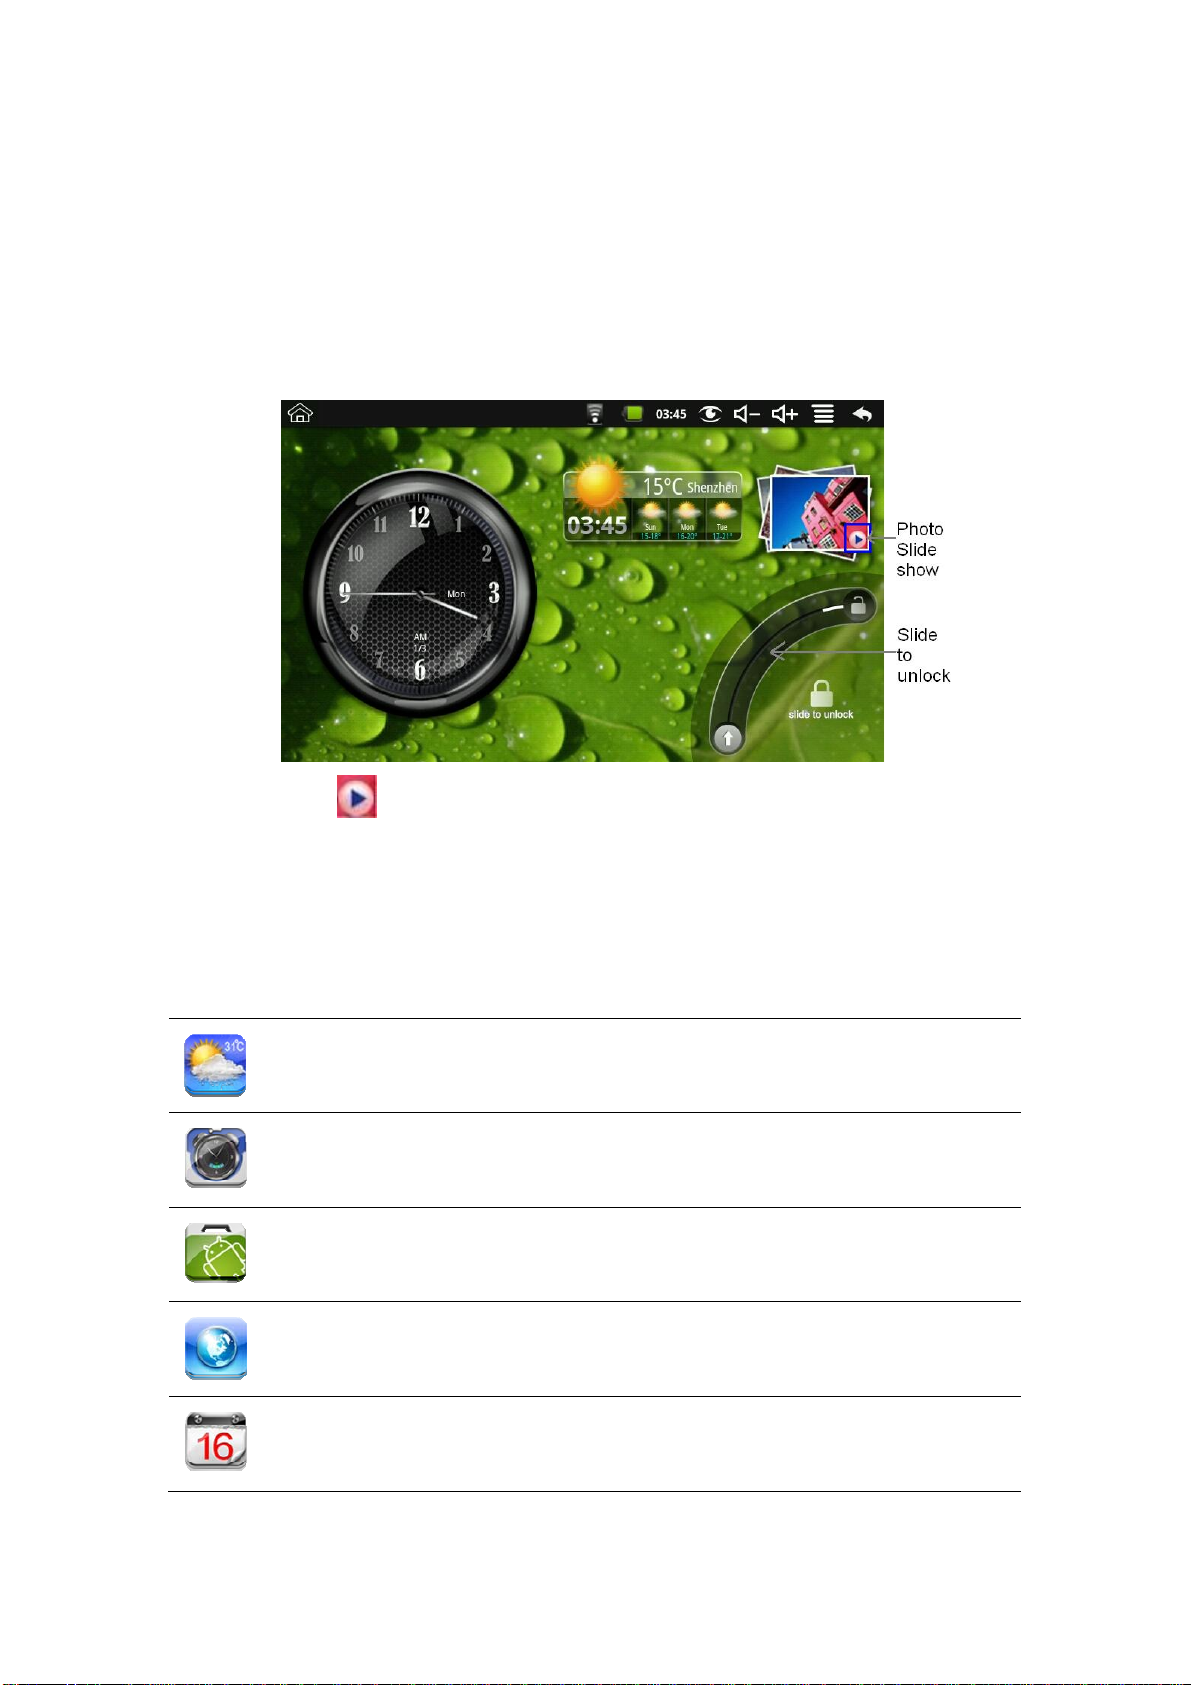
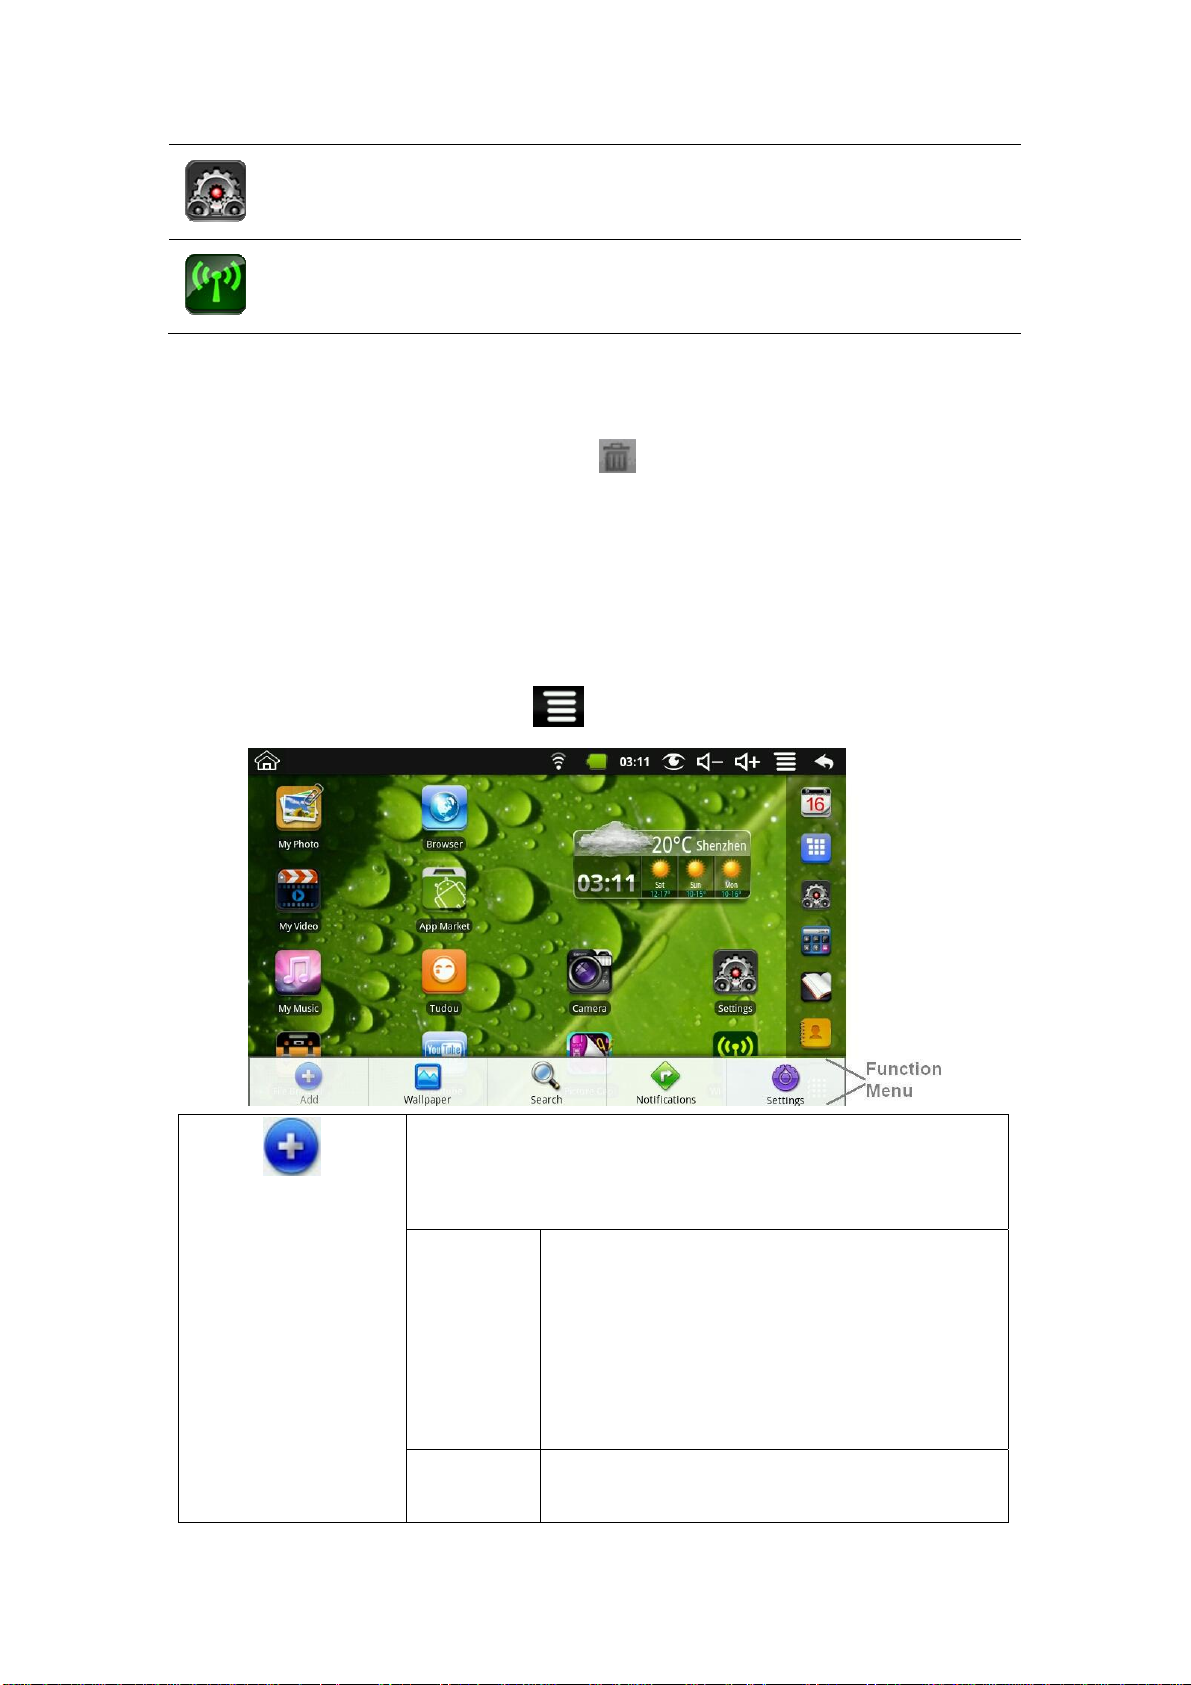
5 DESKTOP
, → Settings, → Wireless & network.
to return to the Desktop scre en.
① Return to Desktop from other apps
② Battery charge status
③ Current Time
④ Picture capture icon
⑤ Volume reduction icon
⑥ Volume increase icon
⑦ Function Menu icon
⑧ Back icon
☆ Tap on any application icon to launch it.
☆ Touch, hold and then slide icons to reposition then on the screen.
☆ Touch, hold and slide icons onto
5
to remove them from the
Page 6
Desktop screen.
6 Screen Lock
Can be set to automatically lock screen or quickly press the power button to manually lock
screen. Lock screen displays the following:
Ta p the icon to enter My Photo to do slide show. And slide the track like the picture to
unlock.
7 Pre-loaded Applications
Wmtweather
Clock
App
Market
Display the weather.
Use as alarm clock with scheduled alarms.
Downloaded applications quickly & easily.
Browser
Calendar
6
Access the Internet and “surf the web” whenever desired.
Calendar with ability to set events.
Page 7
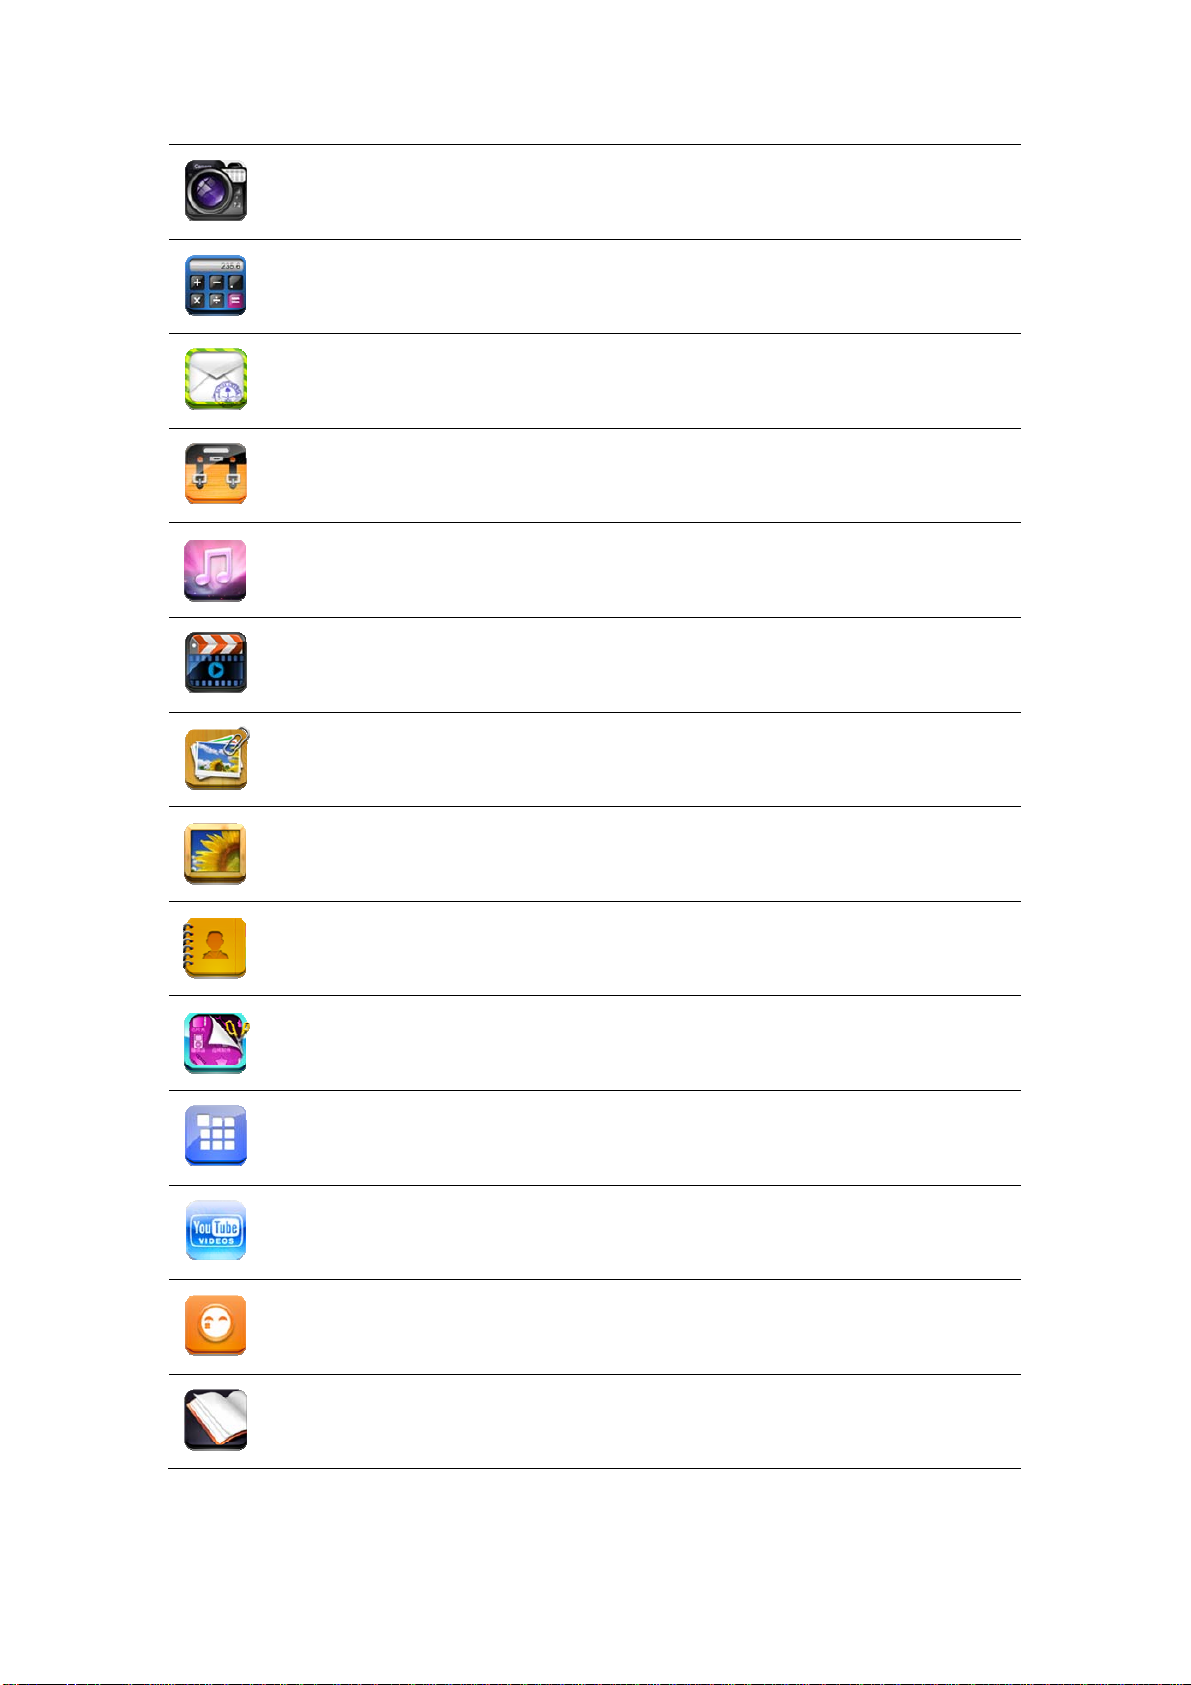
Camera
Calculator
Email
File
Browser
My
Music
My
Video
My
Photo
Take photos and save to internal memory or your memory device.
Do calculation.
Send/Receive email using your existing email addresses.
File manager application for viewing and managing files and apps.
Use to install Android apps, and to backup files to your SD card.
Play and manage audio files.
Play and manage video files.
View and manage photo files.
Gallery
Contacts
Picture
Capture
PK
Manager
YouTube
Tudou
MyBook
View Photos and Videos.
Create a list of personal contacts, which can also be linked with
your email.
Capture image of the screen.
Application manager for managing processes.
Quick launch to YouTube.com videos.
Quick launch to Tudou.com videos.
Read book easily.
7
Page 8
r
Settings
Wi-Fi Settings
Multiple settings for personalizing and enhancing your Device.
Set Wi-Fi network.
☆ To move an icon to the Desktop screen, touch & hold on the icon,
and then release it when it appears on the Desktop screen.
☆ Touch, hold and then slide icons to reposition then on the screen.
☆ Touch, hold and slide icons onto
screen.
to remove them from the Desktop
8 Desktop Function Menu
On the Desktop screen, you can tap to display the Function Menu.
The viewable portion of the Desktop screen allows only 16 icons. In
Add
8
order to add more items, finger slide the screen horizontally to
expose available space, and then tap the Add button again.
Add quick launch shortcuts on the Desktop to
applications, bookmarks or settings.
☆ If you select items that are
Shortcuts
Widgets
shortcuts already on the Desktop
screen, they will be duplicated,
esulting in multiple icons for the
same item.
Analog clock: Add a round analog clock.
Calendar: Add a calendar widget to display current
Page 9

Folders
date & events.
Music Player: Add a music widget to quickly begin
playing music without launching the music
application.
New Folder: Add a folder into which you can add
applications as desired. To move applications on the
Desktop screen into the folder, touch, hold & drag
the icons directly on top of the folder icon.
To add applications from the All Application
screen, first tap on the folder to open it, open the All
Application screen, and then touch & hold on an
application icon. It is copied into the folder.
Wallpaper
Search
Notifications
Settings
Select wallpaper from Picture and Wallpapers.
Perform a quick Google search.
Tap in the entry field, → enter the desired search
text, → tap
List any pending notifications (i.e., new email,
calendar events, etc).
See “Settings” on page 26.
9 Application Management
.
Install Android Applications
☆ There are many interesting and free Android applications that can be found on the
web. Just launch your web browser and do a search for “Android applications”.
Purchased or free Android applications that you have downloaded to your computer can
be installed quickly & easily on your Tablet using the
1. Copy the .apk files that you want to install onto a SD card or USB device, →
insert or connect to your Device.
2. Tap the
9
File Browser application icon.
File Browser application.
Page 10
3. Tap or and locate the folder in which the .apk application files were
saved.
4. Tap on a .apk file → Install.
The application is installed and the application icon is added to the Applications
screen.
5. Tap Open to launch the application now, or tap Done to return to the File Browser
screen.
Download Android Applications direct from a Website
You can download Android applications directly from websites, and then quickly and
easily install them on your device.
1. Tap the
2. Enter the desired website URL, and tap the download link for the application you
want to install on your device.
3. After the download is complete, touch & hold on the download file (in the
Download history screen), → tap Open → Install.
Web application icon to launch the internet browser.
Uninstalling Android Applications
You can also quickly and easily uninstall the Android applications that you have
installed.
1. Tap → Settings → Applications → Manage applications.
2. Tap the application you want to uninstall, → Uninstall.
3. Tap OK to confirm the Uninstall.
10 WmtWeather
Tap the WmtWeather application icon.
General setting
You can set Temperature Unit(℃), Update frequency and Auto Wallpaper.
My cities
You can add city and set it to be my city.
You can make the weather displayed on the Desktop through adding widget. The way is: tap
→ Add → Widgets → WmtWeather。
10
Page 11
11 CLOCK
Tap the Clock application icon. You can see the time and date.
Alarm
You can use your device as an alarm clock by setting multiple alarms.
☆ This clock icon
that one or more alarms have been set and are active.
Add Alarm
1. Tap the
2. Tap
3. Set up your alarm as desired.
☆ If you don’t select a repeat, the alarm is automatically
deleted after it is activated.
4. Tap Turn alarm on.
5. Tap Done.
Shut Off Alarm Alert
When a scheduled alarm is activated, a pop-up window with the alarm title appears.
Tap Snooze if you want to be reminded again in 10 minutes.
Tap Dismiss to cancel the alert.
Turn Alarm on
On alarms that you have set to repeat, you may want to temporarily turn on alarms
rather than delete them.
Clock application icon.
→ Add alarm.
displayed at the top of screens indicates
1. In the Alarm screen, tap
2. Tap
Edit Alarm
1. Tap the
2. Tap on the alarm you want to edit, → make desired edits.
Delete Alarm
1. Tap the
2. Tap on the alarm you want to delete.
3. Tap
to turn on again.
Clock application icon.
Clock application icon.
→ Delete alarm.
Gallery
Please refer to “24 GALLERY”.
Tap
11
to return to the Desktop screen.
on the alarm(s) you want to turn on.
Page 12
12 APP MARKET
The App Market has many applications that you can quickly and easily download to your
Tablet.
Download Applications
1. Tap the App Market application icon.
2. You can select applications from the default Featured group, by Categories, Top
(latest, hottest, random), or search by name.
3. Tap on an application, → Download.
☆ The first time, you are prompted for your App Market login information. If you
have not yet registered an account, tap Register an Account.
Otherwise, enter your login information and tap Yes.
4. After the app is downloaded, tap Install.
5. Tap Open to launch now, or Done to return to the App Market screen.
History
After downloading apps, tap on History to manage the installed applications. You
can add and/or view comments from other users, launch apps, and uninstall them.
App Market Function Menu
Tap to display the App Market Function Menu.
Profile
Tap to access your profile information. You can change your Password or Email
address.
Login/Logout
Tap Login to quickly launch the login dialog box to login to your account. While
logged in, tap Logout to exit your account.
Settings
By default, applications that you download are saved in the internal memory. You
can set the applications to save to your SD card if desired.
About
Displays App store version and support information.
13 BROWSER
Users can connect to the Internet through a browser.
12
Page 13
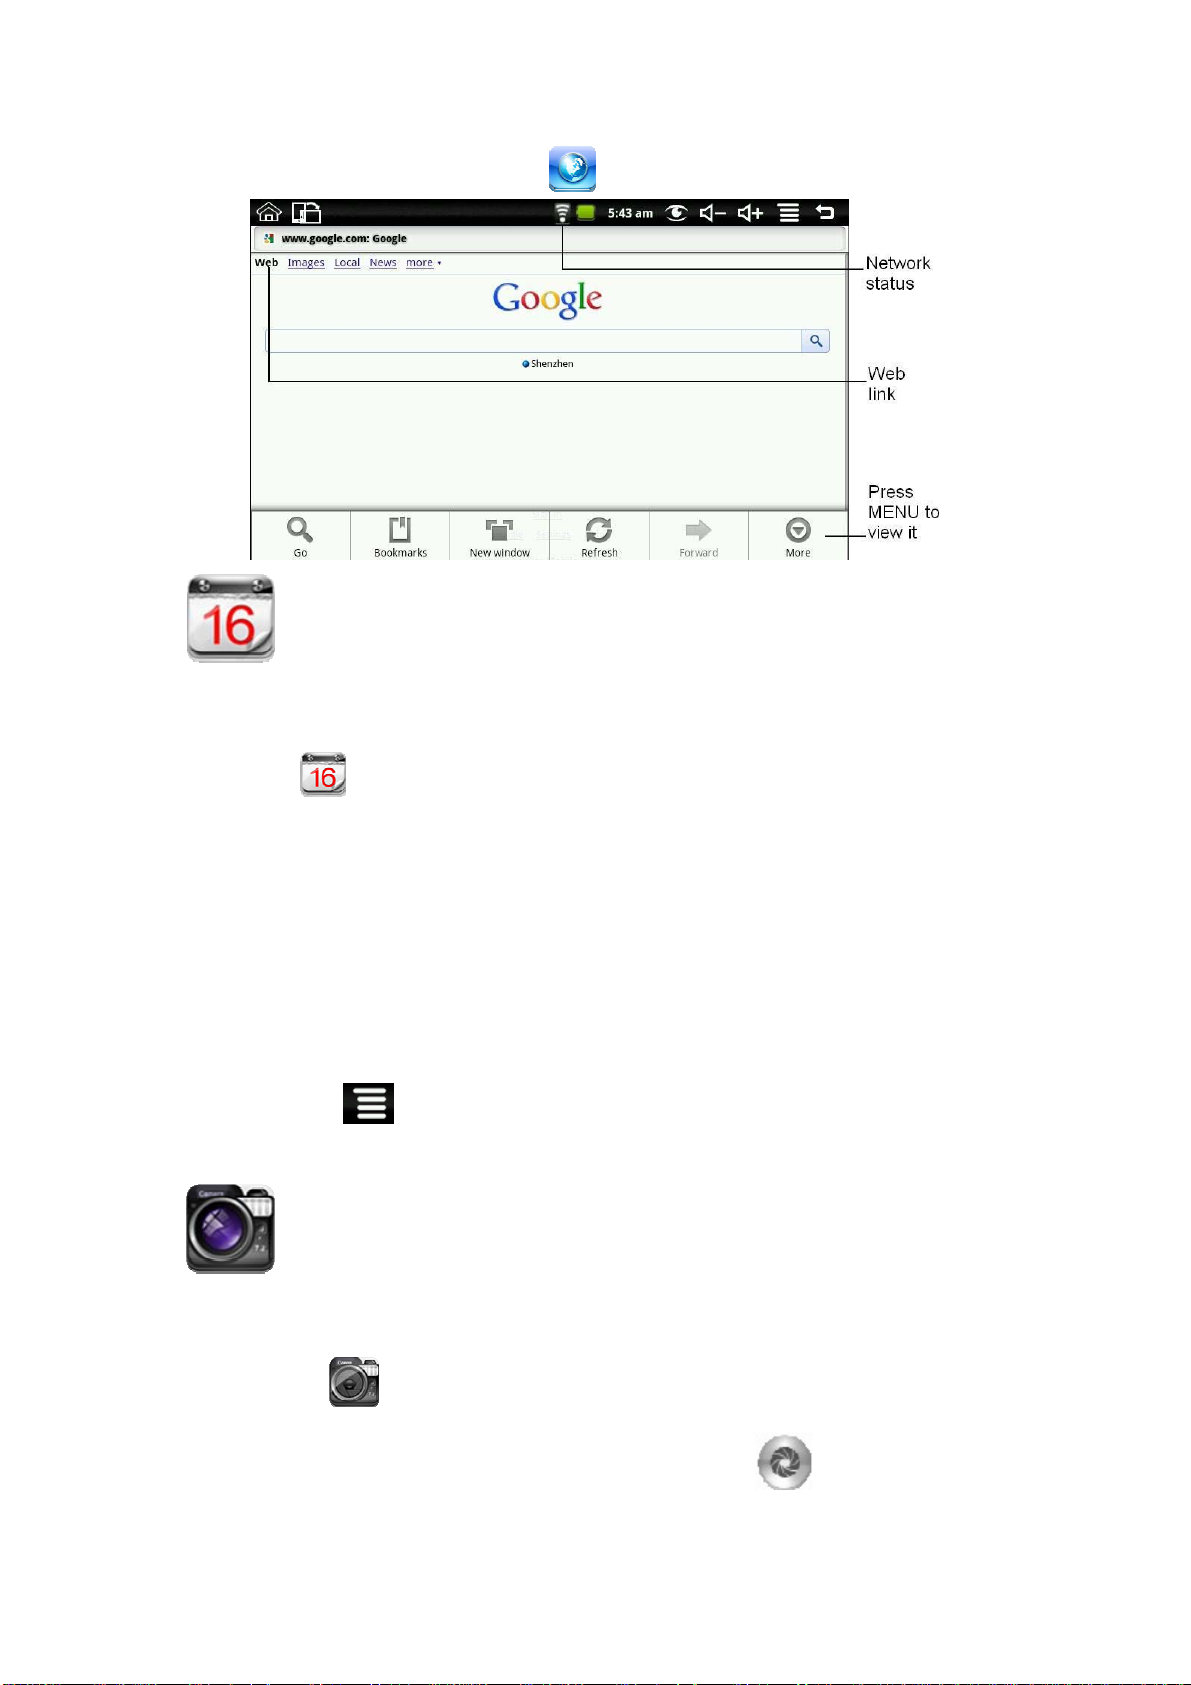
Click the browser icon on the Desktop , and then you can open the Web browser.
14 CALENDAR
Tap the Calendar application icon.
For the first time using the Calendar, you need to add an Exchange account. Enter account
email address and password. Click Next and follow the prompts to complete the account
configuration. Then you can use the Calendar.
Add Event
1. On the Calendar screen, tap on the date to which you want to add an event.
2. Tap on the event time, → tap in each entry field to enter the desired event
information.
3. Tap Done.
4. Tap to select desired Calendar screen.
☆ Dates with green bars indicate scheduled events.
15 CAMERA
1. Tap the Camera application icon.
2. Aim the top of the device at your intended subject, → tap
3. The picture will be saved.
13
to take the picture.
Page 14
Note: Please insert an SD card before using the camera.
Function Menu
Tap Menu button to display the camera function menu.
Switch to video
Switches to video mode, allowed you to immediately take a video rather a picture.
Gallery
Display all pictures you have taken with the camera.
16 CALCULATOR
1. Tap the Calculator application icon.
2. Tap the numbers and sign of operation to do the calculation.
3. Tap CLEAR to clear the result.
17 EMAIL
☆ POP3 and SMTP accounts are supported.
Add Email accounts
You can enter one or more personal email addresses that you would like to access
through your Tablet.
1. Tap the
2. On the Your Accounts screen, tap Next.
3. Tap in the Email address entry field, → enter your email address.
4. Tap in the Password entry field, → enter your email password.
5. Tap Done.
6. Manual Setup (optional): The server settings are automatically populated based on
your email account provider (i.e., gmail.com, etc). However, if you need to change
the server settings tap Manual Setup and make necessary changes.
7. Tap Next.
8. Optional: Enter a name for the account.
9. Enter name for outgoing message, → tap Done.
☆ After setup, if you are unable to connect to a free
email provider to make sure their servers support free accounts on Post Office
Protocol (POP) or Simple Mail Transfer Protocol (SMTP).
Email application icon.
email account, check with your
Email Inbox
14
Page 15
1. Tap the Email application icon.
2. If you set up only one email account, it opens immediately. If you set up multiple
accounts, they are listed in the Accounts screen.
3. Tap on the desired email account, → tap Inbox.
Open Email Message
1. On the Inbox screen, tap on an email to open it.
2. For attachments, tap Open to launch appropriate application, or tap Save to
save attachment to a SD card.
3. To replay, tap Reply or Reply all.
a. Tap in the Compose Mail entry field to enter your reply message.
b. Tap Send to send immediately, Save as draft to save without send or Discard
to discard without saving or sending.
4. To delete the email immediately, tap Delete.
Compose New Email Message
1. On the Inbox screen, tap
2. Tap in the To entry field and then enter the recipient’s email address.
3. Optionally, if you want to add Cc or Bcc recipients, tap
Cc/Bcc, and then enter the recipient’s email address.
4. Tap in the Subject entry field to enter your desired subject title.
5. Tap in the Compose Mail area to enter your personal message.
6. If desired, tap
7. When ready to send the email, tap
→ Add Attachment to attach a file.
→ Compose.
→ Send.
Edit Email Account
1. Tap the Email application icon.
2. On the Inbox screen, tap
3. Set your desired preferences to customize your email account.
4. Tap
to return to the Inbox screen.
→ Account settings.
→ Add
Delete Email Accounts
☆ If you have multiple accounts, and you delete the account designated as the default
account, the next email listed is automatically set as the default.
1. Tap the
2. On the Inbox screen, tap
3. Touch & hold on the account you want to delete.
15
Email application icon.
→ Accounts.
Page 16
4. In the pop-up Account options window, tap Remove account.
5. Tap OK to confirm the deletion.
Set Default Email Account
You must always have one account designated as the default account, so if you have
multiple email accounts, you can select any one as the default.
1. Tap the
2. On the Inbox screen, tap
3. Tap Default Account to select it.
If you delete the account that was designated as the default account, the next email listed
is automatically designated as the default.
Email application icon.
→ Account Settings.
18 MY MUSIC
☆ Audio file formats supported: MP2, MP3, WAV, AAC, WMA.
Play Music
1. Tap the My Music application icon.
2. Select an audio file from All/Albums/Artists/Directories/My Favourites/User
Defined Playlists to play it.
3. To stop the music, tap the Pause
4. To leave the music playing and return to previous screens, tap or tap
to return to the Desktop screen.
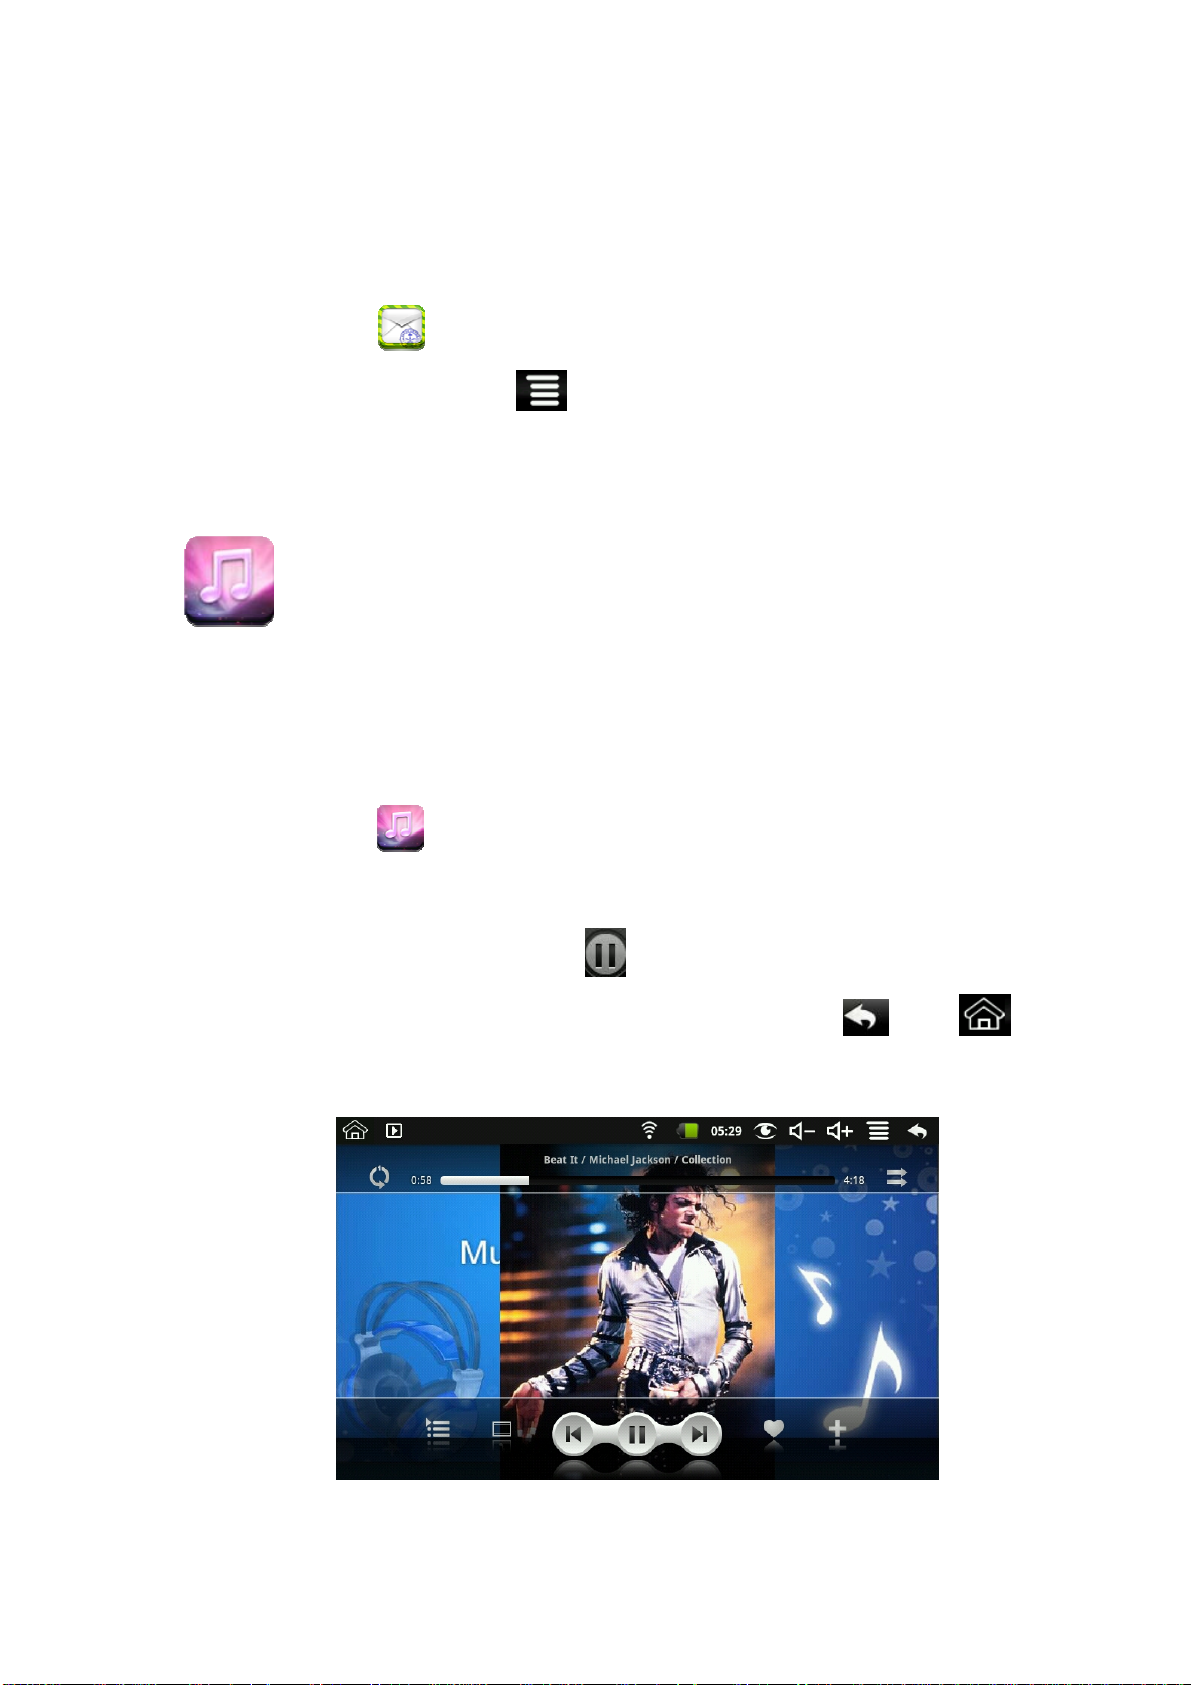
Tap the photo on the left corner can enter the Music Player interface. It shows like:
At this interface, you can do: view the lyrics, play / pause, switch to the previous / next,
icon.
16
Page 17
added to favorites, loop and random operation etc.
The Operation with Music and Playlist
Add playlist
1. Tap
2. Input the playlist name.
3. Tap Add.
Rename or Delete playlist
Tap and hold in the playlist, → tap Rename or Delete.
Add music
1. Tap and hold in the music you want to add, → tap Add.
2. Click the following item to add music in it (if you don’t want to add, tap
Cancel).
Delete music
Tap and hold in the music you want to delete, → tap Delete.
on the left corner.
19 MY VIDEO
☆ Video file formats supported: MPEG1/2/4、MJPG、H263、H264. In
addition to H264 which is supported by (720× 480) resolution,
the other video formats are supported (1280×720) resolution.
Play Video
1. Tap the My Video application icon.
2. Select a video file from All/ Directories/My Favourites/User Defined Playlists to
play it.
3. Tap on the screen to display video controls (adjust volume, pause/play,
previous/next, adjust brightness).
4. Tap Back button or to return to the My Video screen.
The Operation with Video and Playlist
Add playlist
1. Tap
2. Input the playlist name.
3. T ap Add.
Rename or Delete playlist
Tap and hold in the playlist, → tap Rename or Delete.
Add video
1. Tap and hold in the video you want to add, → tap Add.
on the left corner.
17
Page 18
2. Click the following item to add video in it (if you don’t want to add, tap
Cancel).
Delete video
Tap and hold in the video you want to delete, → tap Delete.
20 MY PHOTO
☆ Photo file formats support: JPG, JPEG, BMP, and PNG.
1. Tap the
2. To view individual photo, tap on the desired photo.
3. Tap Back button to return to the photo gallery screen.
4. Tap
Tranquil and Fresh.
5. Tap
6. Tap
7. Tap
My Photo application icon, → tap on a photo group.
to make slideshow. There is Normal play, Reminiscently, Activity, Romantic,
to make the picture sort by color.
to make the picture sort by time.
to make the picture sort by name.
Doodle
In My Photo you can do doodle.
Click the icon
operations, including: word balloons, titles, stickers and brush.
to enter doodle interface. You can select different doodle
21 GALLERY
You can view all Photos and Videos though the Gallery.
Tap the
☆ Media files are sorted into groups by local disk (internal
memory), SD card and camera.
Photos
1. Tap the Gallery application icon, → tap on a photo group.
2. To view individual photo, tap on the desired photo. Tap Back button to return to
18
Gallery application icon.
Page 19
the photo group screen.
3. For slideshow of all photos in group, tap
to return to the photo group screen.
Photo settings
There are multiple photo-related settings you can set as desired.
1. In the Gallery screen, tap
2. Tap on an option to set your preference.
3. Tap
to return to the photo group screen.
→ Settings.
→ Slideshow. Tap Back button
Videos
1. Tap the Gallery application icon, → tap on a video group.
2. Tap on the desired video to view it.
3. Tap on the screen to display video controls (adjust volume, pause/play,
previous/next, adjust brightness).
4. Tap Back button to return to the Gallery screen.
Delete Photos or Videos
1. Tap the Gallery application icon, → tap on a photo or video group.
2. Tap
3. Tap on the desired photo(s) or video(s) that you want to delete.
4. Tap Delete → OK to confirm deletion.
5. Tap
→ Multiselect.
to return to the Gallery screen
22 CONTACTS
You can create an address book of your personal contacts, including personal notes as
desired.
Add New Contacts
1. Tap the Contacts application icon.
2. Tap
3. Tap in the name fields to enter the contact’s first & last name.
4. Tap
19
→ New Contact.
at the right of options to reveal additional choices.
Page 20
5. Tap on the option name to reveal choices.
6. Tap in the option entry fields to enter the contact’s information.
7. Tap Done.
Add Contact to Favorites
1. In the Contacts screen, tap on the desired contact name.
2. Tap
3. Tap
4. Tap Favorites to view list of favorite contacts.
in the upper right corner.
to return to the Contacts screen.
Edit Contacts
1. In the Contacts screen, tap on the desired contact name you want to edit.
2. Tap
3. Make desired changes, → tap Done.
→ Edit Contact.
Delete Contacts
1. In the Contacts screen, touch & hold on the contact, → tap Delete contact.
OR
In the Contacts screen, tap on the contact you want to delete, tap → Delete
Contact.
2. Tap OK to confirm the deletion.
23 PICTURE CAPTURE
You can capture a screen image by tapping at any time.
Tap the
●Select a delay timer to automatically capture the screen in desired number of seconds.
●Select the default storage device for saving your images.
After the images are saved, they can be viewed though
Picture Capture application icon to set options for a screen capture.
24 PK MANAGER
Use PK Manager to manager applications and widgets.
My Photo application.
20
Page 21
Stopping Applications
Android does not automatically stop applications after they are loaded, so you can
manually stop the applications as desired.
1. Tap the
running is displayed.
2. Tap on an application you want to stop, → tap Force stop.
PK Manager application icon. The list of applications that are
Uninstall Applications
1. Tap the PK Manager application icon. The list of applications that are
running is displayed.
2. Tap
3. Tap on an application you want to uninstall, → tap Uninstall.
4. Tap OK to confirm uninstall.
, → tap Third Party or All to list more applications.
25 YouTube
1. Tap the YouTube application icon to view YuTube.com videos.
2. Tap on a video to launch it.
3. Tap on the screen to display video controls (adjust volume, pause/play, previous/next,
adjust brightness).
4. Tap Back button
to return to the YouTube screen.
26 TUDOU
1. Tap the Tudou application icon to view Tudou.com videos.
2. Tap on a video to launch it.
3. Tap on the screen to display video controls (adjust volume, pause/play, previous/next,
adjust brightness).
4. Tap Back button
to return to the Tudou screen.
21
Page 22
27 MY BOOK
Tap the My Book application icon.
You can configure My Book to read books with a pleasure. Colors, fonts, key bindings and
many other properties can be changed in the Preferences Dialog.
How to Start
There are 2 ways to add book into My Book library.
The first one is to copy book file to your device into the directory/sdcard/Books (or any
its subdirectory). My Book will add this book automatically.
The second way is to click a book link in the standard Android browser. A book will be
downloaded to the device and opened in My Book. If you’ll click the same link again, a
book will not be downloaded again, local copy will be used for readin g.
28 Wi-Fi Settings
Tap Wi-Fi Settings application icon.
1. Select the box behind to open Wi-Fi;
2. All the AP in the vicinity will be listed, click to select the name you want to connect to
AP;
3. If the AP is connected successful before, the AP information will be saved in the pop-up
window, select "Connect" starts to connect, choose "forget" to remove AP information;
4. If the AP is not encrypted, in the pop-up window, select "Connect" Start Connection;
5. If the AP is encrypted, enter the password in the pop-up window, and click "Connect"
Start Connection;
6. When internet connections are successful, the wireless connection icon in the status bar
appears.
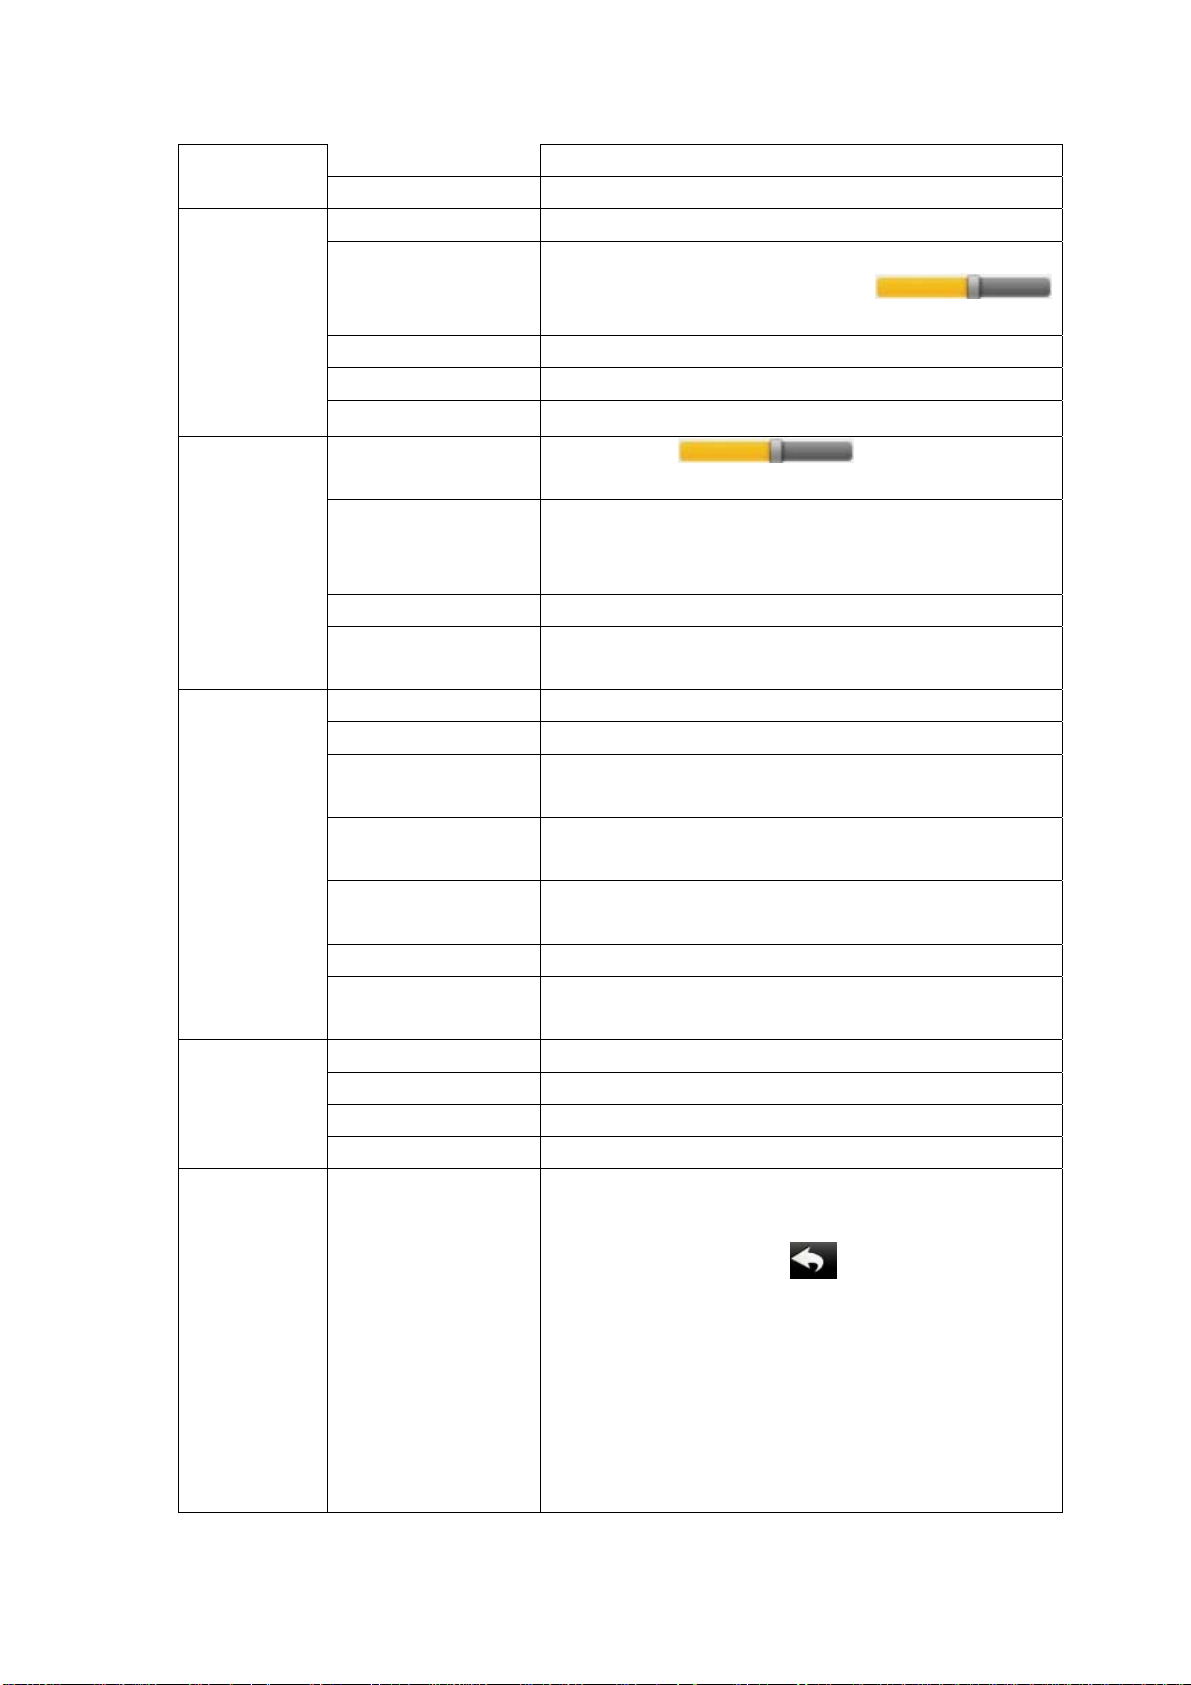
29 SETTINGS
Wi-Fi
Wireless &
networks
Ethernet
Pppoe
settings
22
Wi-Fi Settings
Airplane mode
3G network settings
Turn on Wi-Fi.
Set up & manage wireless access points.
Disable all wireless connections.
Set up 3G network.
Configure Ethernet.
Do ADSL settings. Input user name and password to
connect.
Page 23
USB
Sound
Display
Security
Applications
Mass storage
ADB
Silent mode
volume
Notification ringtone
Audible selection
Screen lock sounds
Brightness
Auto-rotate screen
Screen timeout
Suspend timeout
Set up screen lock
Visible passwords
Select device
administrators
Use secure
credential
Install from
SD card
Set password
Clear storage
Unknown sources
Manage applications
Running services
Development
Configure USB to mass storage.
Configure USB to ADB.
Silence all sounds except media & alarms.
To adjust the Media volume, Alarm volume and
Notification volume. Tap & slide
and then tap OK.
Select desired ringtone sound.
Select to enable a sound when making a screen selection.
Play sounds when locking and unlocking the screen.
Tap & slide
to adjust the screen
brightness as desired, and then tap OK.
When selected, the orientation of the screen switches
between Portrait and Landscape automatically when you
rotate the device.
Adjust the delay before the screen automatically turns off.
Adjust the delay before the device automatically suspend
after the screen turn off.
Lock screen with a pattern, PIN, or password.
Show password as you type.
Add or remove device administrators.
Allow applications to access secure certificates and other
credentials.
Install encrypted certificates from SD card.
Set or change the credential storage password.
Clear credential storage of all contents and rest its
password.
Allow installation of non-Market applications.
Manage and remove installed applications.
View and control currently running services.
Set options for application development.
Tap to reset the device to its initial factory state, erasing all
data and downloaded applications. Tap Reset Device to
proceed with reset, or tap
previous screen.
Privacy Factory data reset
WARNING! The following will be erased during the
factory reset:
23
to cancel and return to
~ Google account
~ System and application data and settings
~ Downloaded applications
Page 24
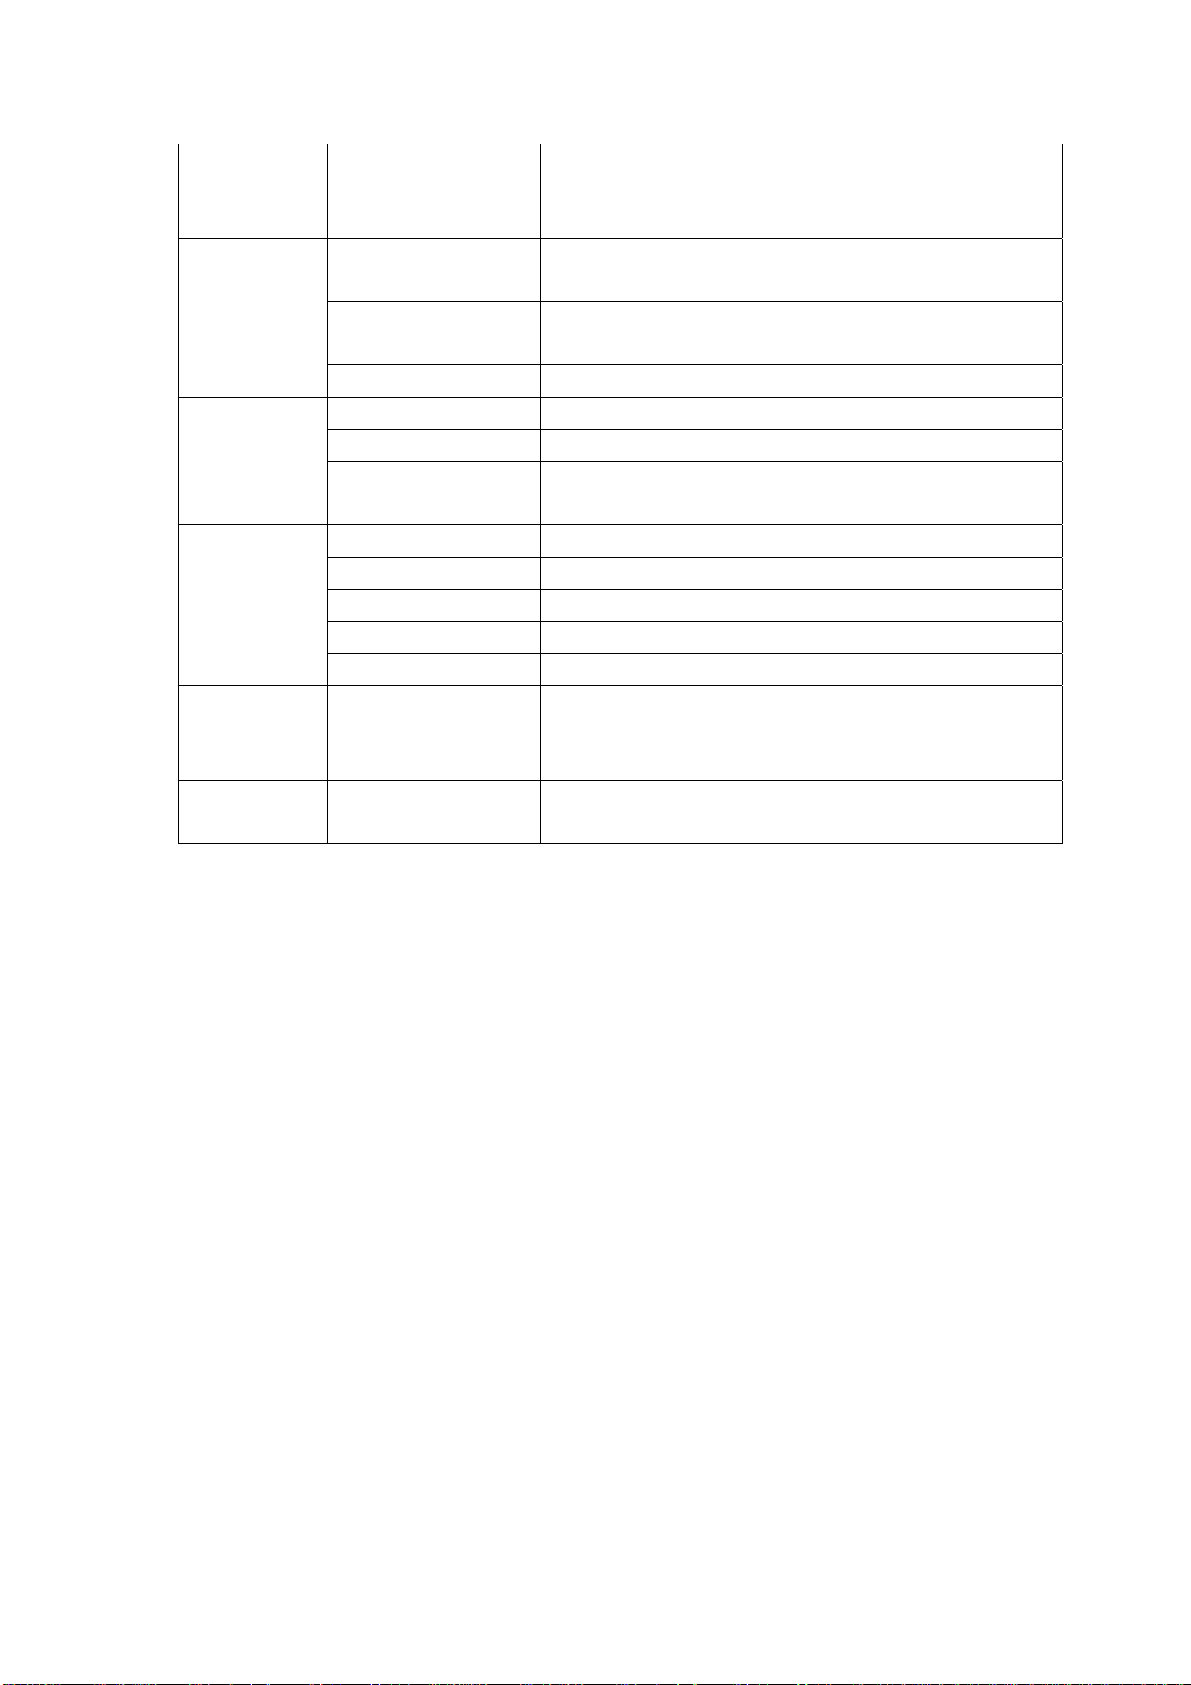
SD card &
device storage
Language &
keyboard
Date & time
About device
Touchpanel
calibration
Total space,
Available space
Unmount SD card
Format SD card
Select language
Android keyboard
User dictionary
Set date
Select time zone
Set time
Use 24-hour format
Select date format
The factory reset will NOT erased:
~ Current system software and bundled applications
~ SD card files, such as music or photos
It values appears when a SD card is inserted in device.
When the SD card is inserted, tap it to safety remove the
SD card.
N/A for this device.
Select the language and region according to your location.
Onscreen keyboard settings.
You can add words to a personal dictionary, words that
may not be included in the default dictionary.
Set the date.
Select the time zone.
Set the time.
You can choose to use 24-hour format or 12-hour format.
You can select the date format.
View Status (Battery, Wi-Fi, etc), Battery use, Legal
information, Model number, Android version, Kernel
version and Build number.
Calibrate the touch screen.
Frequently Asked Questions
Android
Q: What Android OS version is on my Device?
A: 2.2
Basic Device Functionary
Q: Do I have to charge the battery before use?
A: You should charge the battery for at least 4 hours, but you can use the device whil e
it’s charging. Use the include power adapter to charge; this device does not charge
via the USB cable.
Email
Q: Can I use any of my personal email addresses to send/receive email?
A: The device supports POP3 and SMTP accounts. Some free email accounts are not
supported on mobile devices. Check with your email provider to see if you account
is supported.
24
Page 25

Media Cards
Q: Which media cards are compatible with my Device?
A: micro SD cards.
Music
Q: What type of music files can I play on my device?
A: MP2, MP3, W AV, AAC, WMA
Q: How do I add music files to my device?
A: Copy the music files from your computer onto a SD card or USB storage device, and
then use the File Browser application to copy the files into the device.
Photos
Q: What type of photo files can I view on my device?
A: JPG, JPEG, BMP and PNG.
Q: How do I add photo files to my device?
A: Copy the photo files from your computer onto a SD card or USB storage device, and
then use the File Browser application to copy the files into the device.
Video
Q: What type of video files can I play on my device?
A: MPEG1/2/4、MJPG、H263、H264. In addition to H264 which is supported by (720
× 480) resolution, the other video formats are supported (1280 × 720) resolution.
Q: Can I play YouTube videos on my device?
A: Yes. You can tap the YouTube application icon to quick access videos.
Q: How do I add video files to my device?
A: Copy the video files from your computer onto a SD card or USB storage device, and
then use the File Browser application to copy the files into the device.
Wi-Fi
Q: Do I need a Wi-Fi adapter to connect to the Internet?
A: No. The Wi-Fi adapter is built-in to the device.
Battery Management
The battery is not fully charged out of the box, so it is recommended that you charge the
battery for at least 4 hours before you start to use the device.
The rechargeable battery is designed and manufactured to be used and recharged frequently.
As with all batteries, the capacity of the battery reduces each time it is charged/depleted.
However, you can still try to prolong the battery’s lifetime by following the suggestions
below:
● Use your Tablet at least once a week.
25
Page 26

● Charge the battery regularly and fully.
● Never leave the battery fully discharged for a long period of time.
● Always keep the device and the battery away from heat.
Charge battery
Plug the power adapter into an electrical wall outlet, and then connect to the device to
fully charge the battery before use (approx. 4hour).
☆ You ca nn ot charge the battery using the USB cable.
When fully charged, the battery icon displays as:
A fully discharged battery takes approximately 5 hours to fully charge, but you can use
the device while plugged in when desired.
.
Important Safety Precautions
Always follow these basic safety precautions when using your Tablet. This reduces the risk of
fire, electric shock, and injury.
● Do not expose this product to rain or moisture.
● Keep the device out of direct sunlight and heat sources.
● Protect the power cord. Route power cords so that they are not likely to be walked
on or pinched by items placed on or against them. Pay particular attention to the
point where the cord attaches to the device.
● Only use the AC adapter included with the device. Using any other power adapter
voids your warranty.
● Do not remove the cover. There are no user-serviceable parts inside.
Clean your Device
Treat the screen gently. To clean fingerprints or dust from the screen, we recommend
using a soft, non-abrasive cloth such as a camera lens cloth.
FCC STATEMENT
:
the following two conditions:
2. Changes or modifications not expressly approved by the party responsible for
26
1. This device complies with Part 15 of the FCC Rules. Operation is subject to
(1) This device may not cause harmful interference.
(2) This device must accept any interference received, including interference that
may cause undesired operation.
Page 27

compliance could void the user's authority to operate the equipment.
NOTE: This equipment has been tested and found to comply with the limits for a
Class B digital
device, pursuant to Part 15 of the FCC Rules. These limits are designed to provide
reasonable protection against harmful interference in a residential installation.
This equipment generates uses and can radiate radio frequency energy and, if not
installed and used in accordance with the instructions, may cause harmful
interference to radio communications.
However, there is no guarantee that interference will not occur in a particular
installation. If this equipment does cause harmful interference to radio or
television reception, which can be determined by turning the equipment off and on,
the user is encouraged to try to correct the interference by one or more of the
following measures:
Reorient or relocate the receiving antenna.
Increase the separation between the equipment and receiver.
Connect the equipment into an outlet on a circuit different from that to which
the receiver is
connected.
Consult the dealer or an experienced radio/TV technician for help.
RF warning statement:
The device has been evaluated to meet general RF exposure requirement. The
device can be used
in portable exposure condition without restriction.
27
 Loading...