

Page 1
User Manual
Omeo Evolution 1.1
1
|
OMEO EVOLUTION USER MANUAL
Page 2

Your Omeo Evolution (Omeo) is operated by
Omeo’s patented Active Seat Control system (ASC)
and is powered by the safest and most reliable
self-balancing technology available, the Segway PT.
The Segway PT User Manual is referenced here and
throughout this Omeo User Manual.
Segway and Segway PT are registered trademarks
of Segway Inc.
July 2019 | V2.0
2
|
OMEO EVOLUTION USER MANUAL
Page 3
Warnings / Cautions and Notices
Codes used for safety
In this manual, the code used for prioritising
information relative to safety is as follows:
WARNING
CAUTION
NOTICE Highlights information that
Warns about actions that
could result in serious
injury or death.
Warns you about action
that could result in minor
or moderate injury.
is important but not related
to injury. Examples include
usage tips and damage to
the Omeo or property.
The Omeo Evolution (Omeo) is a Personal
Mobility Device.
NOTICE
The Omeo is not designed or intended for use
as a medical device or health product, and is not
intended or designed, and should not be used as
a substitute for a medical device or health product.
CAUTION
Before raising the legs to ride, you must always
check that the Omeo is powered on and the
Balance Indicator lights on the Control Panel
are green.
CAUTION
When sitting on the Omeo, you must never
attempt to raise the Stabilising Legs if the Omeo
is powered o.
WARNING
Whenever you ride the Omeo you risk serious injury
from loss of control, collisions, and falls.
WARNING
The Omeo is not for everybody. It is critical that
the User is able to react quickly in the case of an
emergency, device errors and warnings to complete
Safety Shutdown Mode within 10 seconds.
WARNING
It is your responsibility to always safely ride the
Omeo to reduce the risk of injury or harm to
yourself and others.
NOTICE
You must always use your Omeo within the laws of
the jurisdiction in which you are using it.
NOTICE
You must follow all instructions in the User
Materials, including the Omeo User Manual and
Safety Video and the Segway User Materials.
These Omeo materials will be available on the
Omeo Technology website (omeotechnology.com).
WARNING
It is recommended that the rider always wears
an approved bicycle or skateboard helmet while
operating the Omeo in accordance with local laws,
regulations, bylaws, standards and conventions.
(All Omeo Technology media presented without
the use of a helmet is conducted under controlled
conditions by Omeo professionals and is not to be
considered as standard practise.)
WARNING
Avoid obstacles and slippery surfaces that could
result in a loss of balance or traction and cause a fall.
WARNING
Do not attempt to ride the Omeo without proper
training.
3
|
WARNING
Hold onto the handles when riding the Omeo over
rough terrain. Do not attempt to do this hands-free.
OMEO EVOLUTION USER MANUAL
Page 4

Warnings / Cautions and Notices (cont.)
NOTICE
Do not submerse the Batteries in water.
CAUTION
Slow down when crossing puddles, avoid use in
heavy rainfall.
WARNING
Pay attention to all Safety Warnings and Alerts.
They may indicate unsafe operating conditions.
You must learn about and understand the Omeo
Safety Alerts described in the Omeo & Segway User
Materials and subsequent updates and respond as
instructed.
CAUTION
Do not get back on or start up the Omeo after a
Safety Shutdown until the condition that caused the
Safety Shutdown has been identified and corrected.
NOTICE
Practice Safety Shutdown Mode until the method
becomes second nature to you.
NOTICE
All auditory safety cues are accompanied by a shake
or rumble
If you restart and continue riding, you risk falling.
Also, you risk damaging your batteries, resulting in
reduced battery life and capacity.
WARNING
While the Omeo is designed to keep you upright
under a variety of conditions, you can overpower
the balancing capability of your Omeo by
aggressively leaning into and ignoring the Speed
Limiter. You should avoid doing this for your own
and others’ safety.
CAUTION
Always be prepared to stop.
WARNING
Do not attempt to get o the Omeo while it is
still moving.
CAUTION
Do not attempt to dismount the Omeo until the
Stabilising Legs are down and the Omeo is
powered o.
WARNING
Do not insert the power cord if the Omeo Charge
Port is wet.
WARNING
Always power o your Omeo and unplug all
Charging cords before performing any maintenance
or installing any part or accessory.
WARNING
All Omeo & Segway parts must be properly installed.
Using your Omeo without all parts properly installed
could damage your Omeo and result in serious
injury from loss of control, collision, and/or falls.
WARNING
Use only Omeo & Segway approved parts and
accessories. Do not modify the Omeo. Modifications
to the Omeo that are not performed by Omeo
Technology or Certified Omeo Service Technicians,
could interfere with the operation of the Omeo.
This has the potential to result in serious injury and/
or damage and could void the Omeo Worldwide
Limited Warranty and Segway Limited Warranty.
WARNING
Theft detection systems, such as the type used in
some libraries and retail stores can interfere with the
Omeo’s ability to balance and/or cause the Omeo
to perform a Safety Shutdown. Do not ride within
1.5m (5 ft.) of any theft detection system.
CAUTION
Never restart and ride your Omeo after it has
indicated an empty battery condition or performed
a Safety Shutdown due to low battery. The Omeo
may not have enough power to keep you balanced,
especially if you demand a lot of power at once.
4
|
NOTICE
Use a surge protector when charging the Omeo to
help protect it from damage due to power surges
and voltage spikes.
OMEO EVOLUTION USER MANUAL
Page 5

Warnings / Cautions and Notices (cont.)
NOTICE
Whilst extremely rare, some security scanners
could interfere with the electronics* and cause
the Omeo to go into Shutdown Mode (refer to
Safety Shutdown, Pg. 40). If you are going to be
near a security scanner it is recommended you
do a controlled test to make sure that you can
operate safely from day to day, otherwise you
must stay at least 1.5m (5ft) away from the security
scanners in all buildings. Alternatively, you can make
arrangements with the manager of the premises to
turn o the scanner temporarily.
NOTICE
The Omeo can be used by children aged from
12 years and above and persons with reduced
physical, sensory or cognitive capabilities, or lack of
experience and knowledge if they have been given
supervision or instruction concerning use of the
Omeo in a safe way and understand the hazards
involved.
NOTICE
Children should not play with the Omeo.
NOTICE
Cleaning and user maintenance should not be
made by children without supervision.
* The Omeo complies with international emissions and immunity standards. (Refer to Compliance & Warnings, Pg. 102)
5
|
OMEO EVOLUTION USER MANUAL
Page 6

Copyright, Trademark, Patent and Contact Information
Copyright 2019 Omeo Technology Limited. All
Rights reserved.
Trademarks
Omeo Holdings Limited owns numerous
trademarks including the name ‘Omeo’ and
the ‘Omeo man’ logo (Figure 1) that have been
registered in New Zealand and other countries.
Those trademarks followed by ® are registered
Trademarks of Omeo Holdings Limited. Omeo
Holdings Limited reserves all rights in its trademarks.
All other trademarks on the device are the property
of respective suppliers.
Omeo Holdings Limited
Patent Information
The Active Seat Control system of the Omeo
is covered by patents in numerous countries
and jurisdictions. For more information go to
omeotechnology.com/patents.
Contact Information
For support, please contact your Authorised
Omeo Agent or Omeo Technology direct. For a
listing of Authorised Omeo Agents, visit the Omeo
Technology website at omeotechnology.com
Omeo Technology Limited (New Zealand &
worldwide)
Omeo Technology USA Inc. (North America)
Omeo Technology Pty Limited (Australia)
Figure 1: ‘Omeo man’ logo.
6
|
OMEO EVOLUTION USER MANUAL
Page 7

Table of Contents
Warnings / Cautions and Notices 3
Codes used for safety 3
Copyright, Trademark, Patent and Contact Information 6
Trademarks 5
Omeo Holdings Limited Patent Information 6
Contact Information 6
Section 1: Contents and Layout 13
Introduction 13
About this Manual 13
Significance of this manual 13
Using this manual 13
Section 2: Introduction to your Omeo 14
Recording the Serial Number for your Omeo 15
The Warning Labels on your Omeo 16
Using your Omeo 17
Omeo Specifications 18
Operating Limits 20
Weight Limit 20
Minimum Rider Weight 20
Cargo Weight 20
Transferring Weight 20
Maximising Range 20
Alerts 20
7
|
OMEO EVOLUTION USER MANUAL
Page 8

Section 3: Setting up the Omeo 21
Unpacking your Omeo 21
Assembling your Omeo 22
Section 4: How the Omeo Works 24
Roll Compensation 25
Omeo Parts and Subsystems 26
Redundancy / Safety 28
Active Seat Control and Joystick 28
Standard and O-Road Wheel and Tyre Kits 28
On Board Control Panels 30
Operational Modes 31
Display Panel 33
Controller Boards 35
Motors 36
Balance Sensor Assembly 36
Running Lights 36
Batteries 37
Stabilising Legs 38
Seating Attitude 38
Section 5: The InfoKey™ Controller 39
Section 6: Safety Alerts 40
Speed Limiter 40
Shake Warning 40
Safety Shutdown 40
Empty Battery Condition (Lithium-ion Batteries) 41
Omeo Auxiliary Batteries (Lead Acid) 41
8
|
OMEO EVOLUTION USER MANUAL
Page 9

Section 7: Learning to ride your Omeo 42
Riding Behaviour and Method 43
Control 43
Avoiding Hazards 44
Avoiding Loss of Traction 45
Avoiding Tripping 47
Avoiding Tipping 48
Avoiding Skidding 48
Learning to Ride your Omeo 49
Learning Sequence 50
Directional riding 54
Eyes Up! 57
Safety Shutdown 57
Stopping 57
Expanding Riding Skills 58
Dampening Control 58
Dismounting your Omeo 59
Shutting down your Omeo 61
Securing your Omeo 61
Riding Etiquette 61
Riding Tips and Safety Guidelines 62
Tips for when you are learning to ride your Omeo 62
Report All Incidents 63
Section 8: Batteries & Charging 64
Battery Safety 64
Battery Specifications 65
Omeo Lithium-Ion / Segway PT Batteries 65
Auxiliary Batteries 66
9
|
OMEO EVOLUTION USER MANUAL
Page 10

Charging your Batteries 67
Omeo Lithium-Ion / Segway Batteries (Drive-Batteries) 68
Omeo Auxiliary Batteries 69
Battery Management Indicators for the Auxiliary Batteries 70
Battery Charge Indicator Lights (for the Segway PT Lithium-ion Batteries) 72
Charging Failures (Segway Lithium-ion Batteries) 72
Regenerative Braking 72
Reading the Battery Charge Level Display 72
Recalibrating the Battery Charge Level Display 72
How Temperature Aects Performance 72
Replacing Batteries 72
Lithium-ion Batteries 72
Auxiliary Batteries 72
Battery Transportation, Shipping and Disposal 73
Shipping Lithium-ion Batteries 73
Lifting your Omeo 76
Handling Your Omeo When Transporting 77
Section 9: Maintaining your Omeo 80
Maintaining Tyres and Wheels 80
Cleaning your Omeo 81
Storing your Omeo & Batteries 81
Section 10: Servicing your Omeo 82
Replacing Parts 82
Torque Specifications 82
Accessories 82
Service Procedures 83
Segway Components 83
10
|
OMEO EVOLUTION USER MANUAL
Page 11

Removing the Segway Lithium-ion Batteries 83
Checking Tyre Inflation Pressure 83
Install and Remove Tyre / Wheel Assembly 84
Remove / Install O-Road Kit Wheel Guards (Fenders) 85
Replacing the InfoKey™ Controller Battery 86
Seat Cushion 86
Seat Cover 86
Section 11: Customisations 87
Seat Location 88
Seat Pan Forward and Back 88
Seat Height 89
Footplate Height 91
Seat Cushion 92
Seat Cover 92
Wheels and Tyres 92
Steering Resistance and Dampening Control 92
Accessories 93
Railblaza Accessories 93
Seat Cover 93
Protector Cover 93
O-Road Kit 93
Section 12: Troubleshooting 94
Power Base, Drive-train, Tyres and Wheels 94
Omeo Specific 95
Balance Mode Error Conditions 98
Error Codes: Related to the Omeo System Interface 98
Critical Auxiliary Indicator Light Warnings 100
11
|
OMEO EVOLUTION USER MANUAL
Page 12

Section 13: Contact and Legal 102
Report All Incidents 102
How to reach Omeo Technology 102
Compliances & Warnings 102
Segway 102
Omeo 103
Section 14: Owner’s Maintenance Schedule 105
Recommended Maintenance for your Omeo Evolution 105
Pre-ride Checks 105
Monthly Checks 107
My Omeo 109
Service Record 110
12
|
OMEO EVOLUTION USER MANUAL
Page 13

Section 1: Contents and Layout
Introduction
Welcome to your new self-balancing personal
mobility device, the Omeo Evolution (Omeo).
The Omeo described in this manual has been
designed and manufactured according to relevant
safety regulations and standards.
WARNING
Your Omeo must be regularly used and
maintained plus handled safely. You must
always adhere to the instructions laid out
in this manual and comply with all relevant
local laws, regulations, bylaws, standards and
conventions for the locality or jurisdiction in
which it is being used.
Your Omeo must only be serviced by a Certified
Omeo Service Technician or in consultation
with Omeo Technology.
About this manual
This manual contains guidelines for operation of
the Omeo and is to be used in conjunction with
the Segway Personal Transporter (PT) User Manual.
Omeo Technology have applied best practice in
writing this manual to make sure that it is correct
for the device described. Discrepancies, errors
and omissions, however, may be found from time
to time. Should you encounter any we would
welcome your feedback. Please contact Omeo
Technology.
Users of the Omeo are expected to apply good
judgment at all times. This User Manual is to
be kept with the Omeo at all times including if
ownership or custody is transferred.
Check the website regularly for Omeo user
updates and for the most up to date online copy of
the manual at omeotechnology.com.
Significance of this manual
• This Manual and the Segway Personal
Transporter (PT) User Manual are components
of the Omeo and are necessary for safe and
responsible use and care of your Omeo.
• These are to be accessible throughout the
Omeo’s useful life.
Using this manual
This manual is relevant only for the Omeo model
purchased and is to be used in conjunction with
the Segway PT User Manual. The manual has been
written by Omeo Technology for the use by any
persons authorised to use and maintain the Omeo.
No part of this Manual is to be copied, reproduced
or transmitted to third parties without written
permission from Omeo Technology. All products
and registered brands that appear in this document
belong to the rightful owners.
The Manual provides information that will guide
the owner and authorised parties in the safe use
and care of the Omeo.
13
|
SECTION 1 CONTENTS & LAYOUT
WARNING
When riding the Omeo, the user risks death or
serious injury from loss of control, collisions
and / or falls. To reduce the risk of injury the
user must read and follow all the instructions
and warnings contained in this manual.
OMEO EVOLUTION USER MANUAL
Page 14
Section 2: Introduction to your Omeo
This section introduces the Omeo, and includes:
• How to locate and record the Omeo master
Serial Number
• Omeo model, descriptions and specifications
• The operating limits of the Omeo.
NOTICE
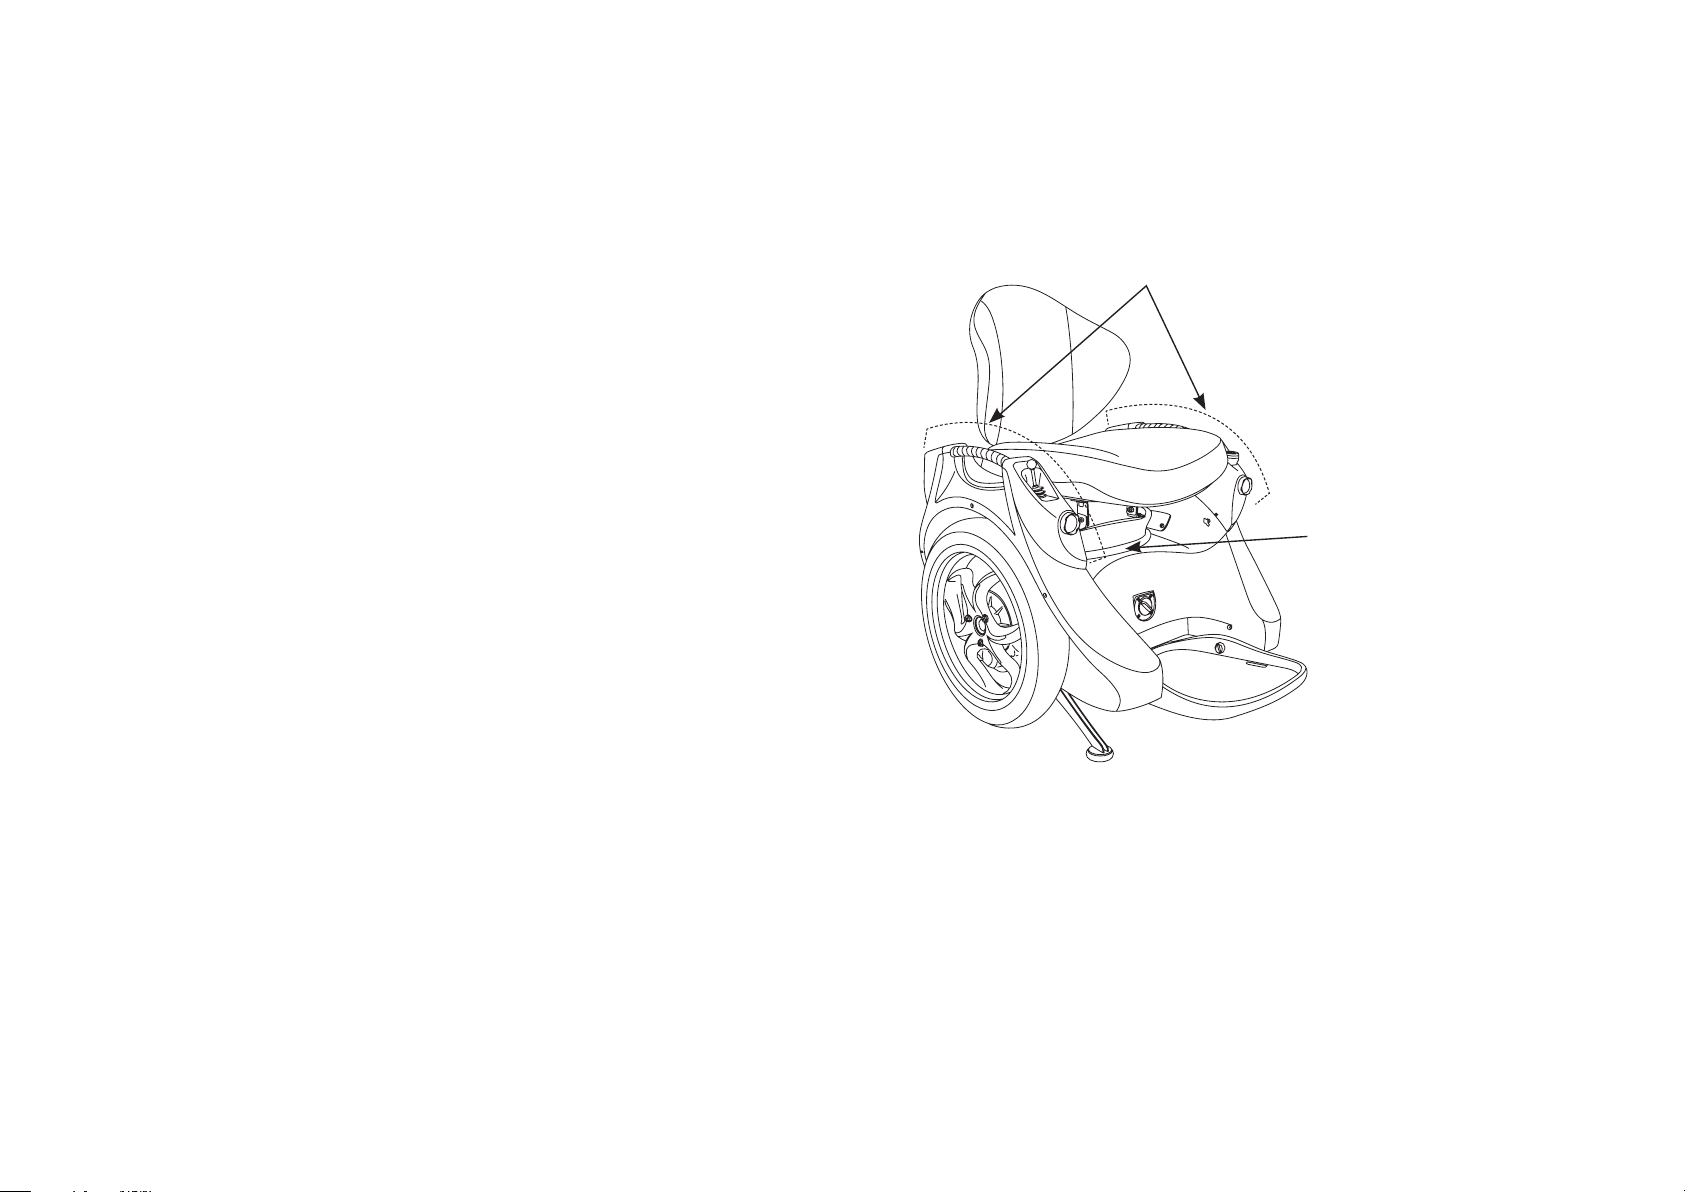
Voiding of warranty – unauthorised opening
and breaking of the Seat Seal or the Arm Covers
(Figure 2), or the Power Base unit or other
components will void the Omeo Worldwide
Limited Warranty.
These areas contain critical components that must
only be serviced and adjusted by Authorised Omeo
Agents or Certified Omeo Service Technicians.
Arm Covers
Under Seat Seal
Figure 2: Under Seat Seal and Arm Covers.
SECTION 2 INTRODUCTION TO YOUR OMEO EVOLUTION (OMEO)
14
|
OMEO EVOLUTION USER MANUAL
Page 15
Recording the Serial
Number for your Omeo
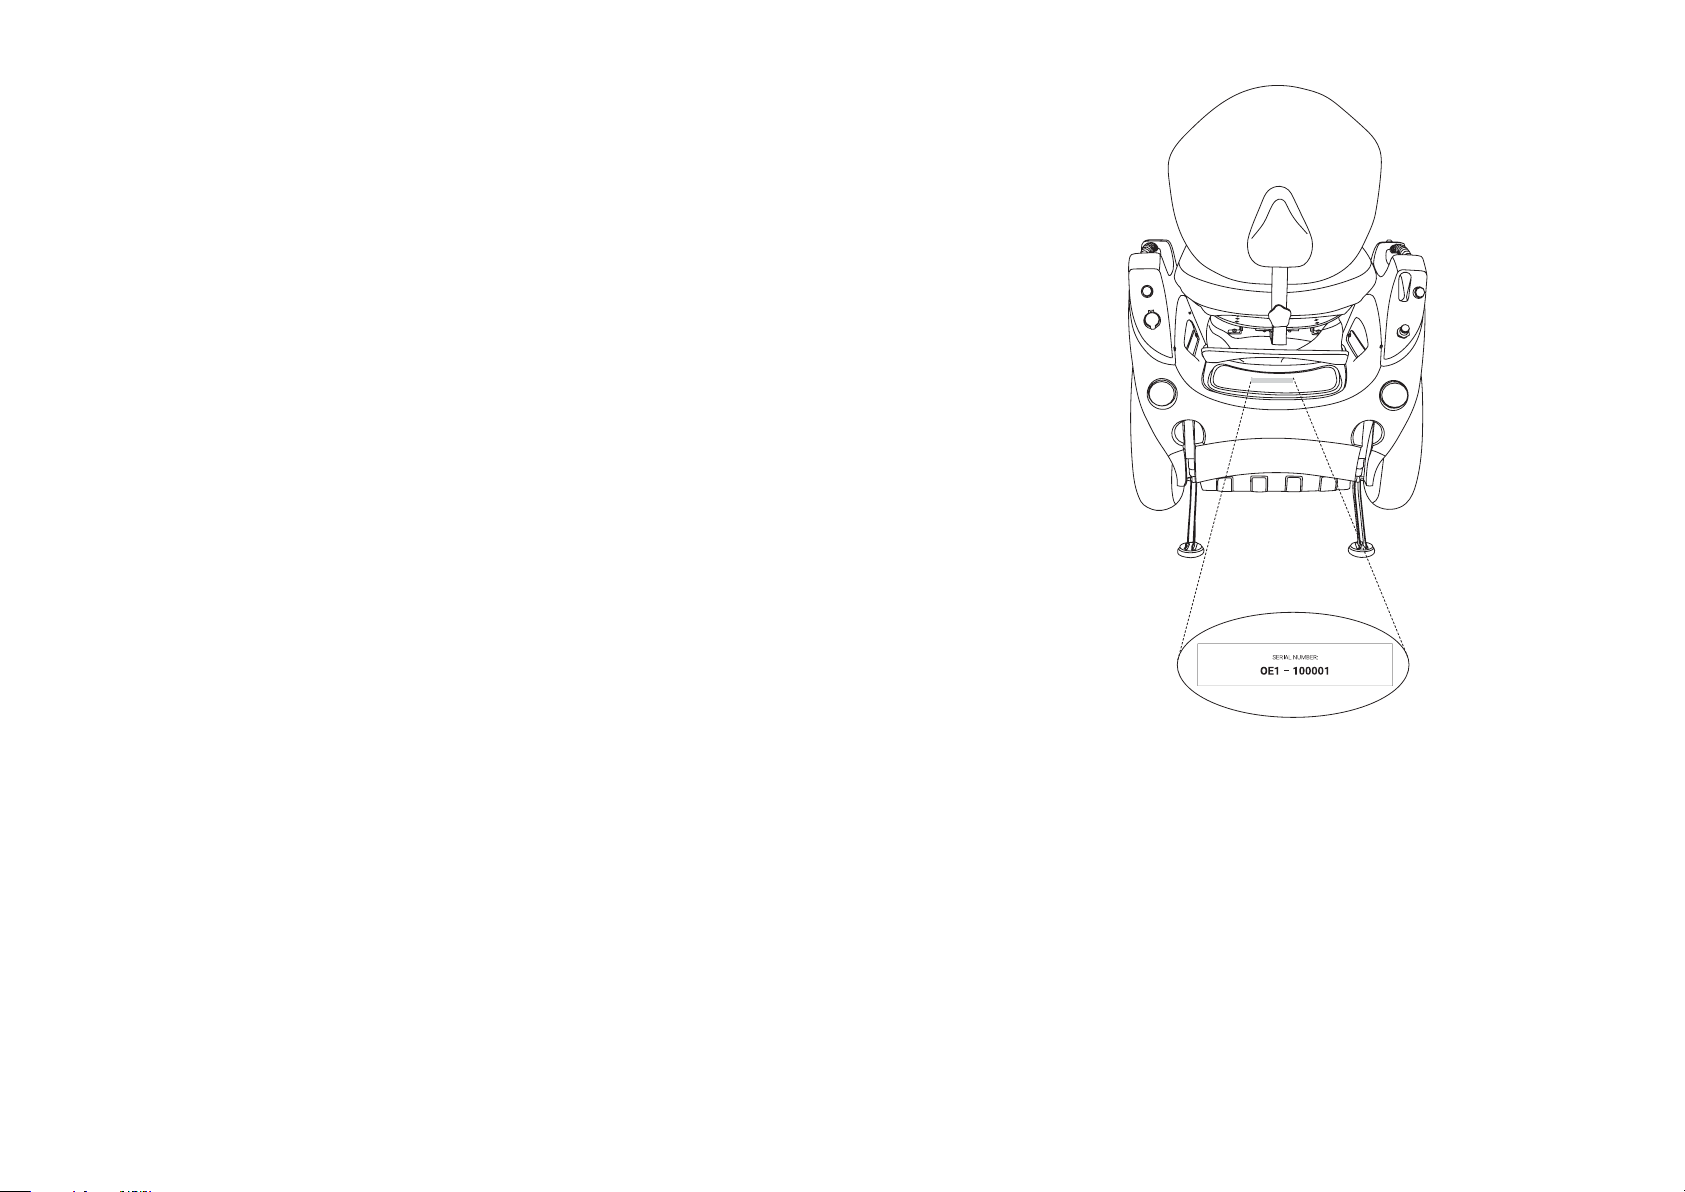
The Omeo has a master Serial Number in the rear
storage hatch which is unique to each device.
This will allow service, maintenance, parts,
ownership and warranty to be tracked
appropriately by Omeo Technology. It is
recommended that the serial number be kept
recorded in a safe place separate from the device
in case you need to contact Omeo Technology to
order a replacement InfoKey™ Controller, Batteries
or for other parts and support.
To record the Omeo master Serial Number:
1. Place the Omeo in a secure upright position
with the Stabilising Legs down
2. Lift the lid of the rear storage hatch to locate
the serial number (as shown in Figure 3)
3. Record your unique Omeo master Serial
Number in the “My Omeo” section of this User
Manual or some other secure place
4. Re-secure the lid of the rear storage hatch.
SECTION 2 INTRODUCTION TO YOUR OMEO EVOLUTION (OMEO)
15
|
Figure 3: Location of Omeo master Serial Number.
OMEO EVOLUTION USER MANUAL
Page 16
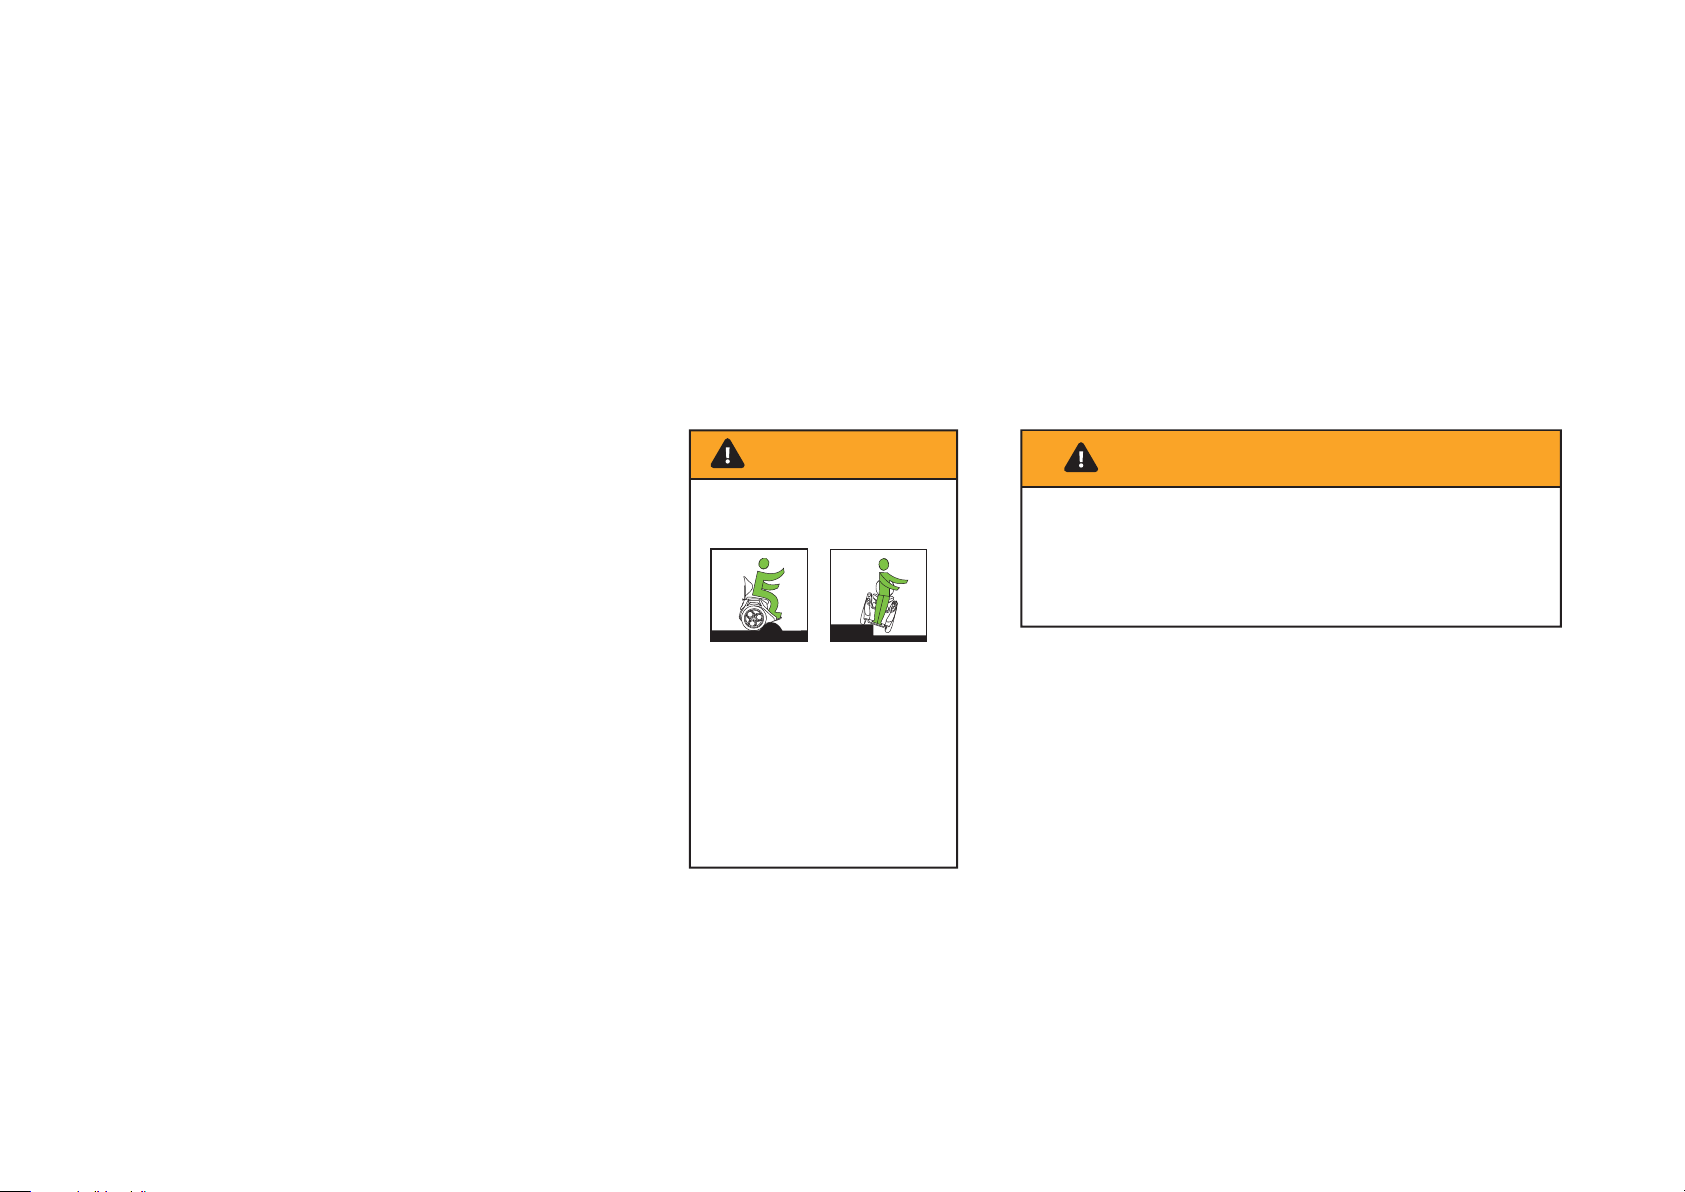
The Warning Labels on
English
95.5mm x 35mm
your Omeo
You must take notice of the warning labels on the
Omeo.
The warning labels on your Omeo are located:
• On the right Arm Cover (Figure 4)
• On the Seat Pan underneath the cushion
(Figure 5).
WARNING
RISK OF DEATH OR SERIOUS
INJURY FROM LOSS OF
CONTROL, COLLISIONS & FALLS.
Only persons trained to operate
the Omeo should operate it.
To use safely, thoroughly review all
instructions and safety warnings in
the User Materials before riding.
To obtain the User Materials, report
any incidents or if you have any
questions, please contact your
nearest Omeo Agent or Omeo
Technology.
omeotechnology.com
SKU#80020
Figure 4: Warning Label located on the Arm Cover.
The opening and breaking of the under-seat seal or arm covers will
void the Omeo Technology Limited Warranty. In order to maintain the
warranty, these areas and components must only be serviced by a
registered Omeo Technician.
To find your nearest registered Omeo Technician, contact your nearest
Omeo Agent or visit omeotechnology.com
WARNING
Figure 5: Warning Label on the Seat Pan.
SECTION 2 INTRODUCTION TO YOUR OMEO EVOLUTION (OMEO)
16
|
OMEO EVOLUTION USER MANUAL
Page 17

Using your Omeo
Your Omeo is a self-balancing multi-purpose
personal mobility device with a patented
Active Seat Control system. It is designed for
recreational and o-road use.
NOTICE
The principle use of the Omeo is:
• As a personal mobility device only
The rider (you) must:
• Always be in control of speed, direction,
braking and traction
• Act responsibly and safely, always with
consideration to self and others, and the
environment
• Operate within all applicable laws,
regulations, bylaws, standards and
conventions for the locality and jurisdiction
in which the Omeo is being used and within
the guidelines of this manual.
Refer to Section 4: How the Omeo Works, (Pg. 24)
for information on how the Omeo works and how
to identify parts.
SECTION 2 INTRODUCTION TO YOUR OMEO EVOLUTION (OMEO)
17
|
OMEO EVOLUTION USER MANUAL
Page 18

Omeo Specifications
Table 1: Omeo Specifications
Model Omeo Standard Omeo with O-Road Kit
Rider Weight and Cargo Limits*
Maximum Payload
Minimum Rider Weight 40kg (88lbs) 40kg (88lbs)
Performance
(Rider and Cargo) 110kg (243lbs) 110kg (243lbs)
NOTICE
Users must comply with
all local and government
regulations regarding the use
of personal mobility devices.
Maximum Speed ** 20kph (12.5mph)
Energy – to Drive/Power Base
(Rechargeable Batteries)
Energy – to Stabilising Legs, Lights, USB
(Rechargeable Batteries)
2 x Lithium-ion (Li-ion)
5.2 Ah, 73.6V
2 x Lead Acid
2.2Ah, 12V
Up to 20kph (12.5mph)
(Depends upon conditions)
2 x Lithium-ion (Li-ion)
5.2Ah, 73.6V
2 x Lead Acid
2.2Ah, 12V
Range of Drive batteries on a full charge*** 26–39km (16–24mi) 14–19km (9–12mi)
Power Requirements
Turning Radius
(Worldwide) 100–240V @ 50 or 60Hz 100–240V @ 50 or 60Hz
The wheels can rotate in opposite directions, enabling the Omeo to turn
on its own axis.
Tyre Type Standard All-Terrain
SECTION 2 INTRODUCTION TO YOUR OMEO EVOLUTION (OMEO)
18
|
OMEO EVOLUTION USER MANUAL
Page 19

Model Omeo Standard Omeo with O Road Kit
Tyre Diameter 483mm (19in) 483mm (19in)
Tyre Inflation Pressure – Road 15psi (1.03 bar) 5psi (0.344 bar)
Dimensions
Device Weight without Batteries 65kg (143lbs) 75kg (165lbs)
Battery Weight
Ground Clearance
Length
Length
(Footrest up) 740mm (29in) 740mm (29in)
(Footrest down) 900mm (35in) 900mm (35in)
(pair) 10.3kg (22.7lbs) 10.3kg (22.7lbs)
(Unloaded) 85mm (3.3in) 85mm (3.3in)
Width 650mm (25in) 865 mm (34in)
Height 990mm (39in) 990 mm (39in)
Height
(Backrest o) 650mm (25in) 650 mm (25in)
InfoKey™ Controller
Battery CR2430 replacement batteries are available at electronics stores.
The weights, performance speeds and Battery
range are a guideline for optimal device
performance and user safety. Variables will aect
NOTICE
* See Weight Limit (Pg. 20) for rider and
cargo limits.
actual performance levels.
** The speed is the capability of the device in
optimal conditions.
*** See Maximising Range (Pg. 20) for factors
that increase or decrease the user range on
the Omeo.
SECTION 2 INTRODUCTION TO YOUR OMEO EVOLUTION (OMEO)
19
|
OMEO EVOLUTION USER MANUAL
Page 20

Operating Limits
The Omeo is a dynamic device that is designed
to perform safely, within limits. An increased risk
of damage to the device, its components and
injury to the rider and others may occur when the
recommended limits are exceeded.
Weight Limit
The maximum weight limit of 110kg (243lbs) for
rider and cargo (payload) is calculated to ensure
reliability, safety, functionality and undue stress on
componentry.
Exceeding the weight limit will void the Omeo
Worldwide Limited Warranty.
WARNING
Exceeding weight limits could compromise
safety, reliability, functionality and durability
especially when operated:
• At higher speed
• Inappropriately to conditions
• By aggressive and abrupt riding
• On irregular surfaces
• On incline / steep slope
• With uneven weight distribution.
Minimum Rider Weight
The rider’s weight should not be less than 40kg
(88lbs).
Cargo Weight
Add the weight of the cargo and the rider to
determine the total weight to make sure you are
operating within the weight limits.
Cargo carried on the front, back or sides of your
Omeo will likely require a change in the position
on the seat to re-establish the central or Neutral
Balance point.
WARNING
Exceeding cargo weights of 4.5kg may interfere
with your Omeo’s balancing ability and could
lead to uncontrolled acceleration or steering,
leading to injury or damage to you and / or
your Omeo.
Transferring Weight
Eective performance of your Omeo requires
weight transference over the central balance
point. Weight transference generates forward and
back drive and stopping and slowing down by the
same actions in opposite directions. For example,
transferring weight to the right will cause your
Omeo to move to the right and transferring
weight to the rear will cause your Omeo to slow
down and stop then go backwards.
Maximising Range
The range of your Omeo is aected by many
variables, such as o-road use, climbing hills,
operating continuously at high speed.
Maximum range distances are provided in the
Segway PT User Manual (Pg. 16).
Alerts
Your Omeo has a range of alerts that will activate
when some limits are being exceeded. You must
learn to recognise and manage these alerts and
adapt your riding style accordingly. For example,
the Seat will tilt backwards when approaching
maximum speed. For further information about
these alerts, refer to Section 6: Safety Alerts (Pg. 40).
SECTION 2 INTRODUCTION TO YOUR OMEO EVOLUTION (OMEO)
20
|
OMEO EVOLUTION USER MANUAL
Page 21

Section 3: Setting up the Omeo
Unpacking your Omeo
The following parts are included in your box upon
delivery:
• Seat Back
• Omeo – complete with Seat, Wheels, Power
Base unit
• Power cord for charging the Lithium-ion
Batteries
• InfoKey™ Controller x2
• User Manual and User Video (USB drive)
• Auxiliary Battery Charger*
• Omeo Worldwide Limited Warranty
• Tools:
- 1x 3mm Allen key (for Segway Batteries)
- 1x 4mm Allen key
- 1 x 10mm spanner.
Separately:
• 2 x Segway Lithium-ion Batteries for the Power
Base unit (in a separate box)
• (If ordered) O-Road Kit comprising of; 2 x
All-Terrain Tyres, Wheel Guards and 6 screws.
* USA/Canada – XP Power Model ACM 240US24
Rest of the world – Sunny Billion Model SBP 240100
21
SECTION 3 SETTING UP YOUR OMEO EVOLUTION
|
OMEO EVOLUTION USER MANUAL
Page 22
Assembling your Omeo
WARNING
Always power o your Omeo and unplug
the AC Power Cords before performing any
maintenance or installing any part or accessory.
NOTICE
The Omeo Auxiliary Batteries are pre-installed.
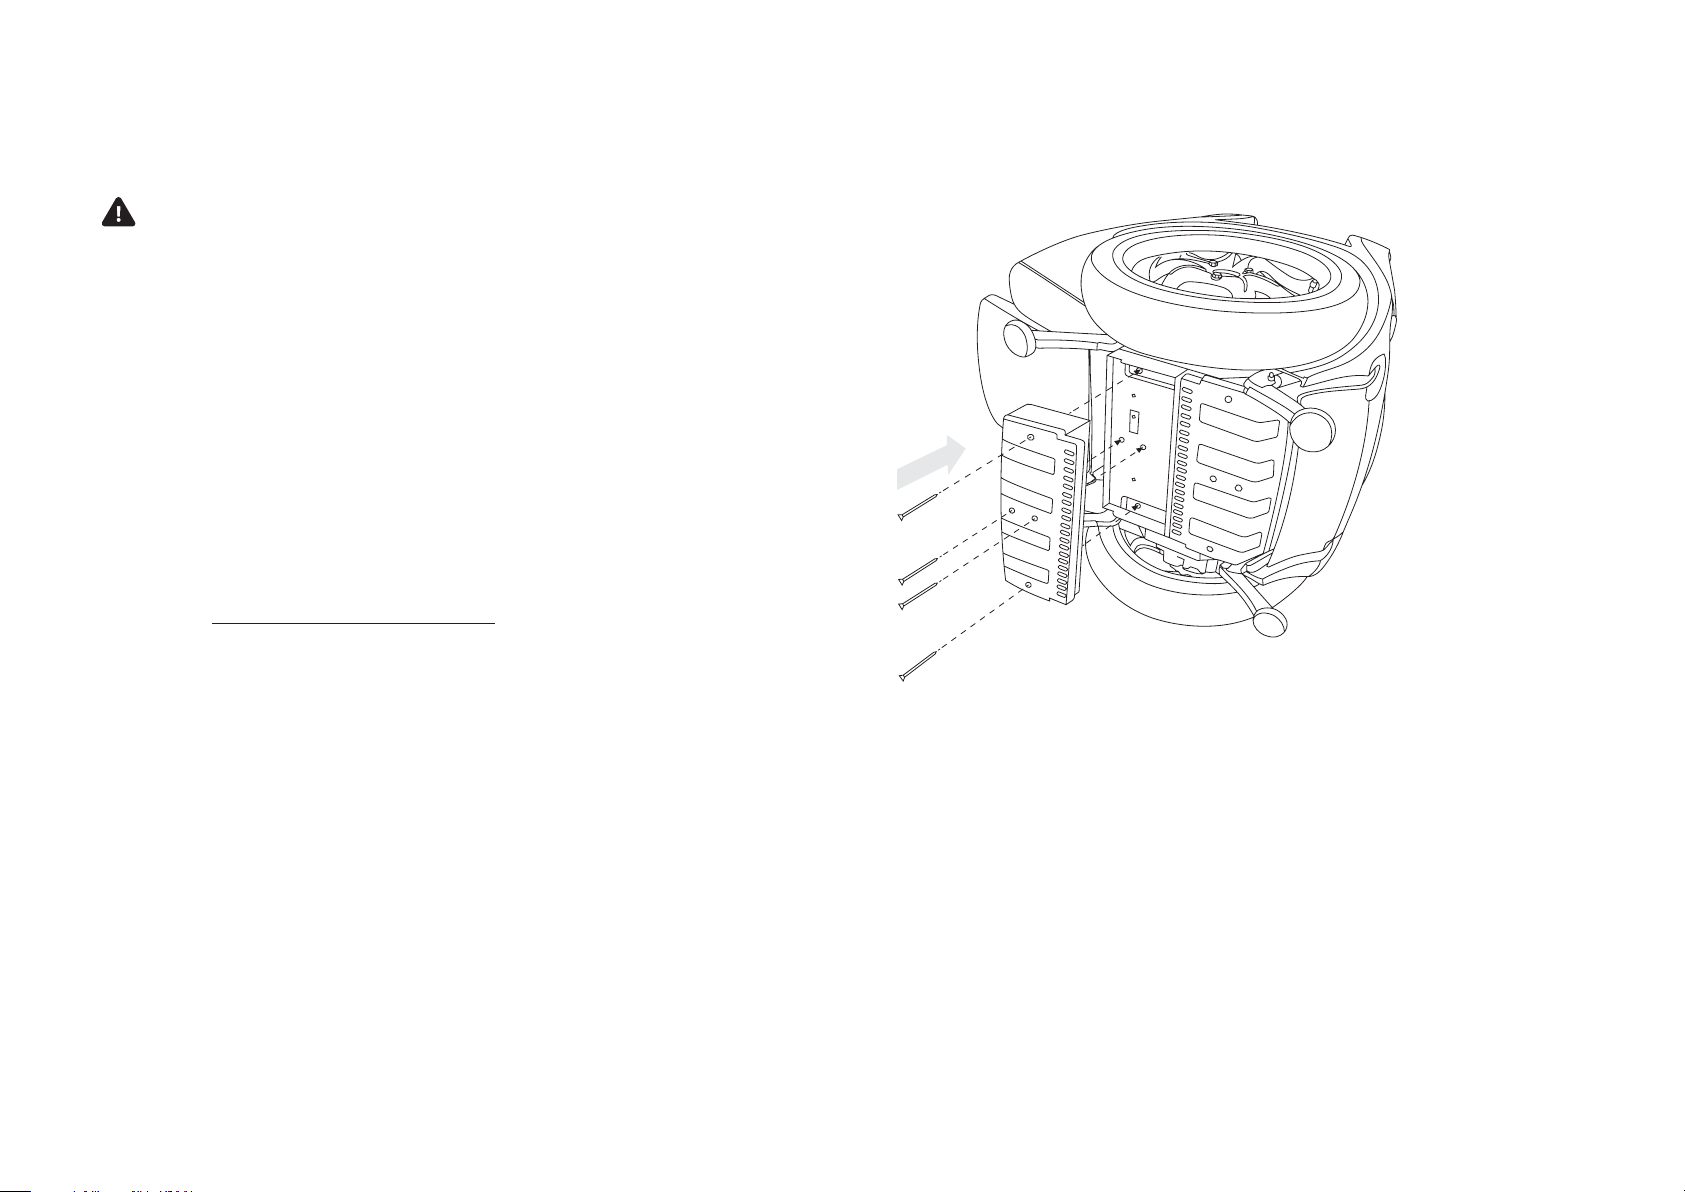
Installing the Segway Lithium-ion (Li-ion)
Batteries (if not pre-installed)
Fasten the Batteries onto the chassis of the
machine and once installed do not remove them
unless under service conditions.
Refer to the Segway PT User Manual (Pg. 22)
for installation, charging and safety precautions.
Additional instructions:
1. Make sure that your Omeo is powered o
2. The Stabilising Legs can be either lowered
or raised
3. Find a soft area (e.g. soft carpeted area) and
gently tip the Omeo onto its side.
22
SECTION 3 SETTING UP YOUR OMEO EVOLUTION
|
Figure 6: Installing the Lithium-ion Batteries.
OMEO EVOLUTION USER MANUAL
Page 23
Assembling your Omeo (cont.)
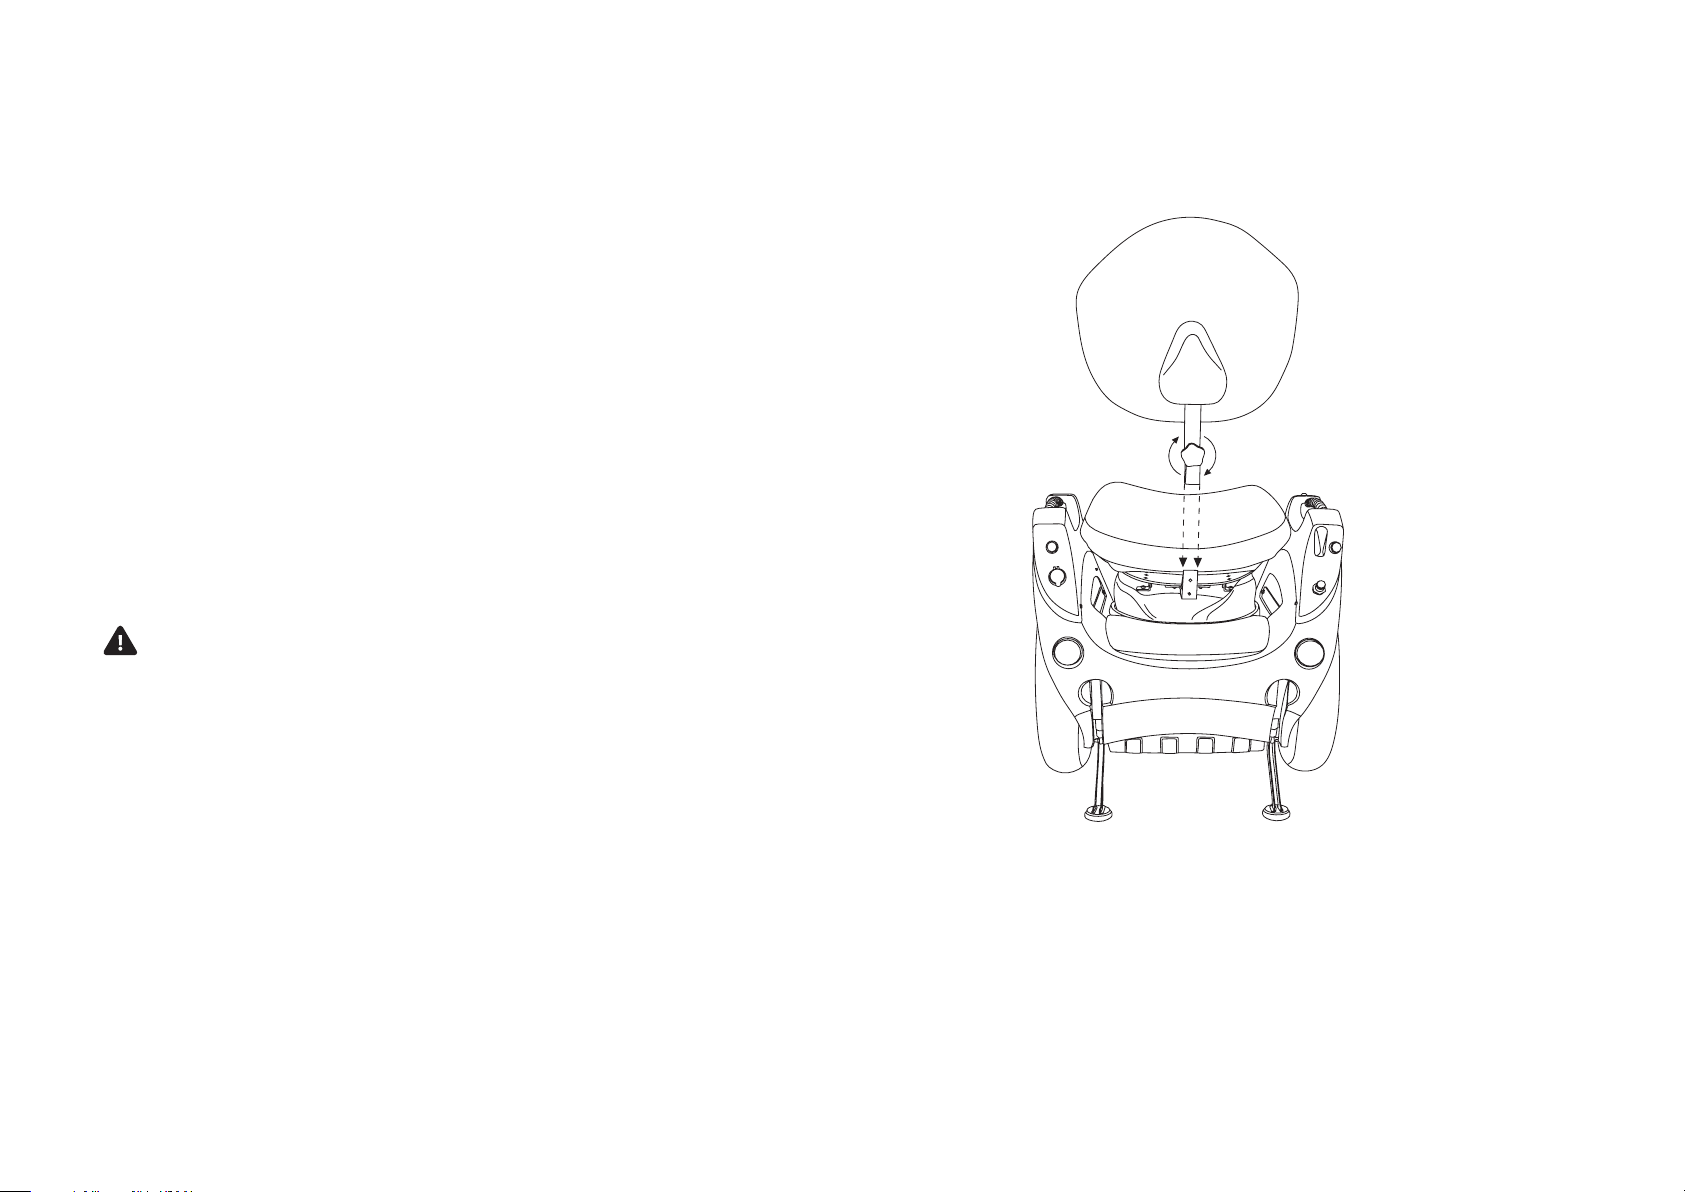
Attach the Seat Back and lock into place by turning
the knob in a clockwise direction (As shown in
Figure 7).
Seat and Footplate
Your Omeo Seat and Footplate will be factory set
in accordance with the information provided by
you to Omeo Technology on your order form.
Customisation should be minimal to start,
however as you progress through initial training
you may want to adjust the Seat and or Footplate.
Refer to Section 11: Customisations (Pg. 87).
Now you are ready to understand how your Omeo
works.
WARNING
Do not attempt to ride your Omeo before you
receive formal training from a Certified Trainer
or an Authorised Omeo Agent.
23
SECTION 3 SETTING UP YOUR OMEO EVOLUTION
|
Figure 7: Attaching the Seat Back.
OMEO EVOLUTION USER MANUAL
Page 24
Section 4: How the Omeo Works
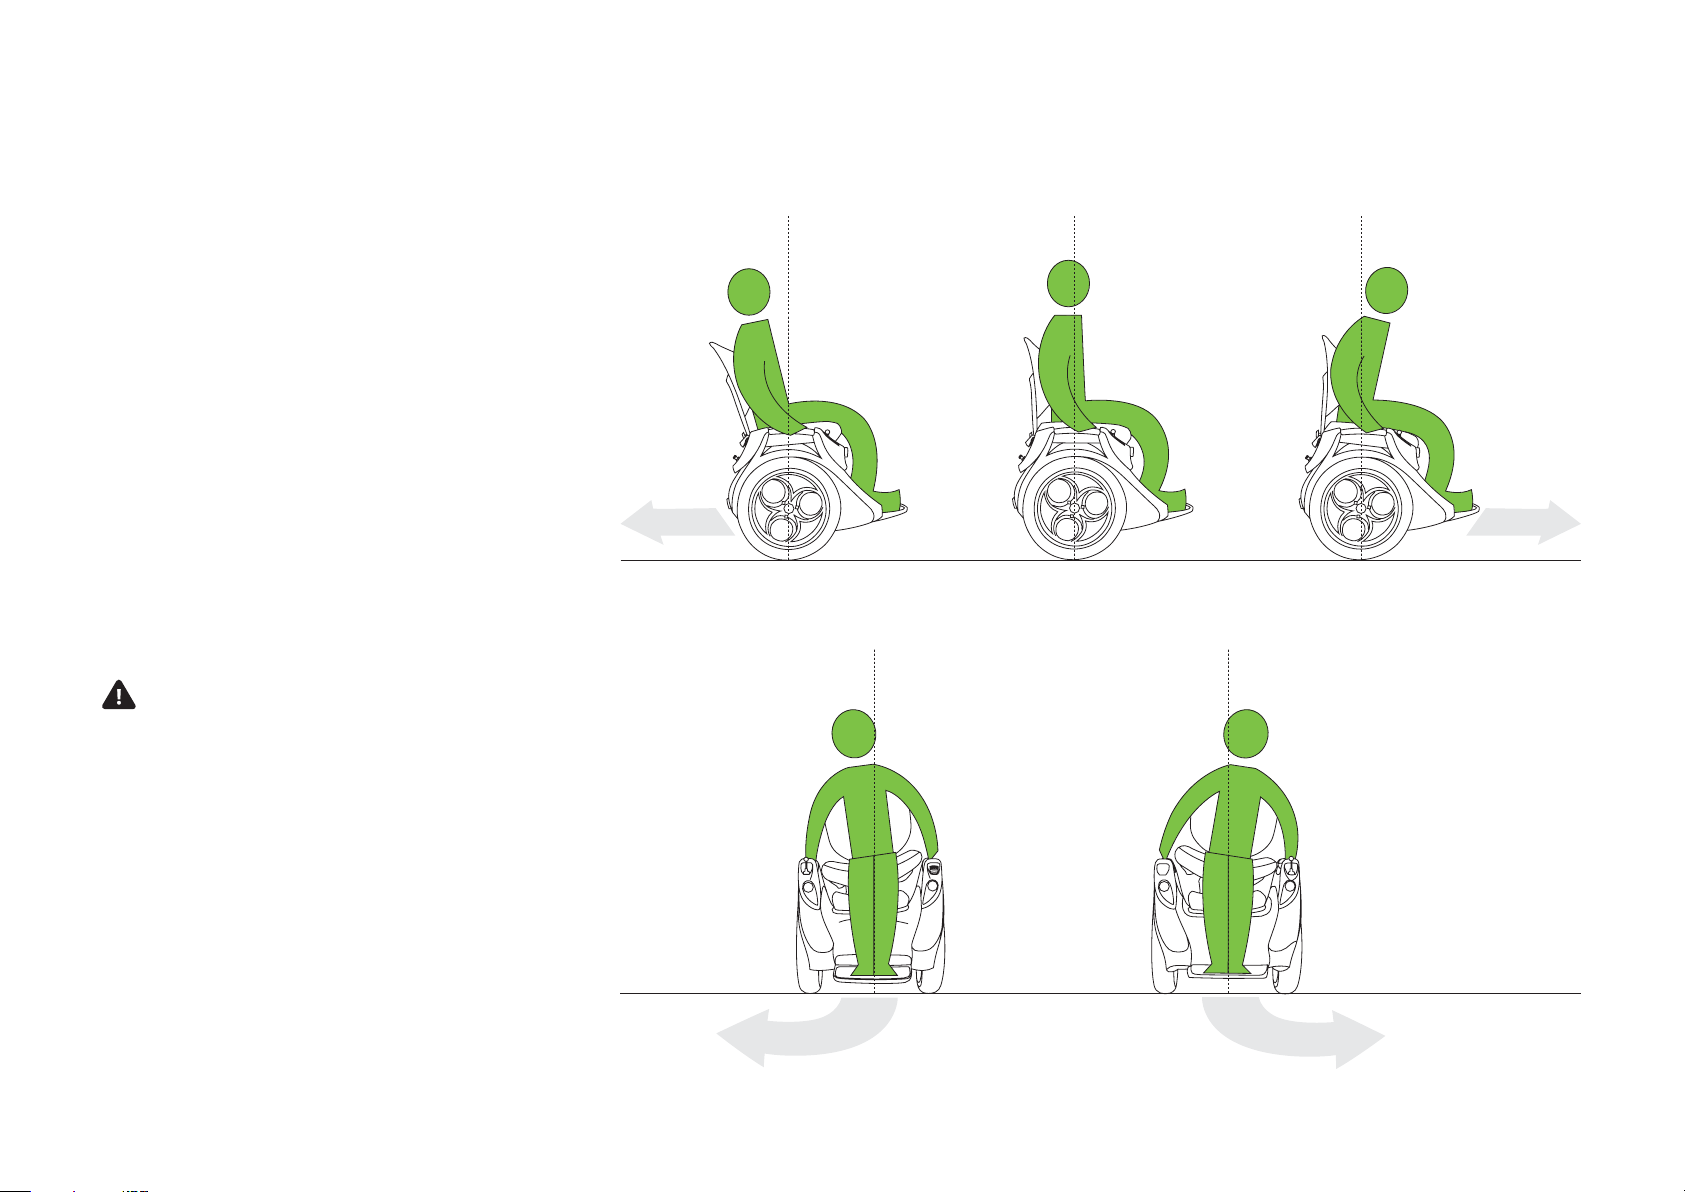
Your Omeo works by the rider transferring their
weight on the seat over a central point creating
electronic signals to control balance, drive and
direction. Alternatively, the steering can be
operated by the Joystick.
The Omeo uses self-balancing technology to
maintain balance and movement forward and
backward when the rider changes their centre
of gravity.
The Omeo’s patented ‘Active Seat Control’
system (ASC) incorporates the forward,
backwards and steering control with the Power
Base unit, to provide a “go in the direction you
are leaning” system.
When the rider holds their weight in the centre,
the device will stay still, or in Neutral Position.
WARNING
The Omeo will only self-balance on a forward
and back axis. It will not self-balance on a side
to side axis. This means that your Omeo can
tip over sideways when forced over its natural
balance point. You must stay in control to
maintain side to side stability.
Figure 8: Forward and back movement across a central point.
SECTION 4 HOW THE OMEO EVOLUTION WORKS
24
|
Figure 9: Seat steer left and right movement across a central point.
OMEO EVOLUTION USER MANUAL
Page 25
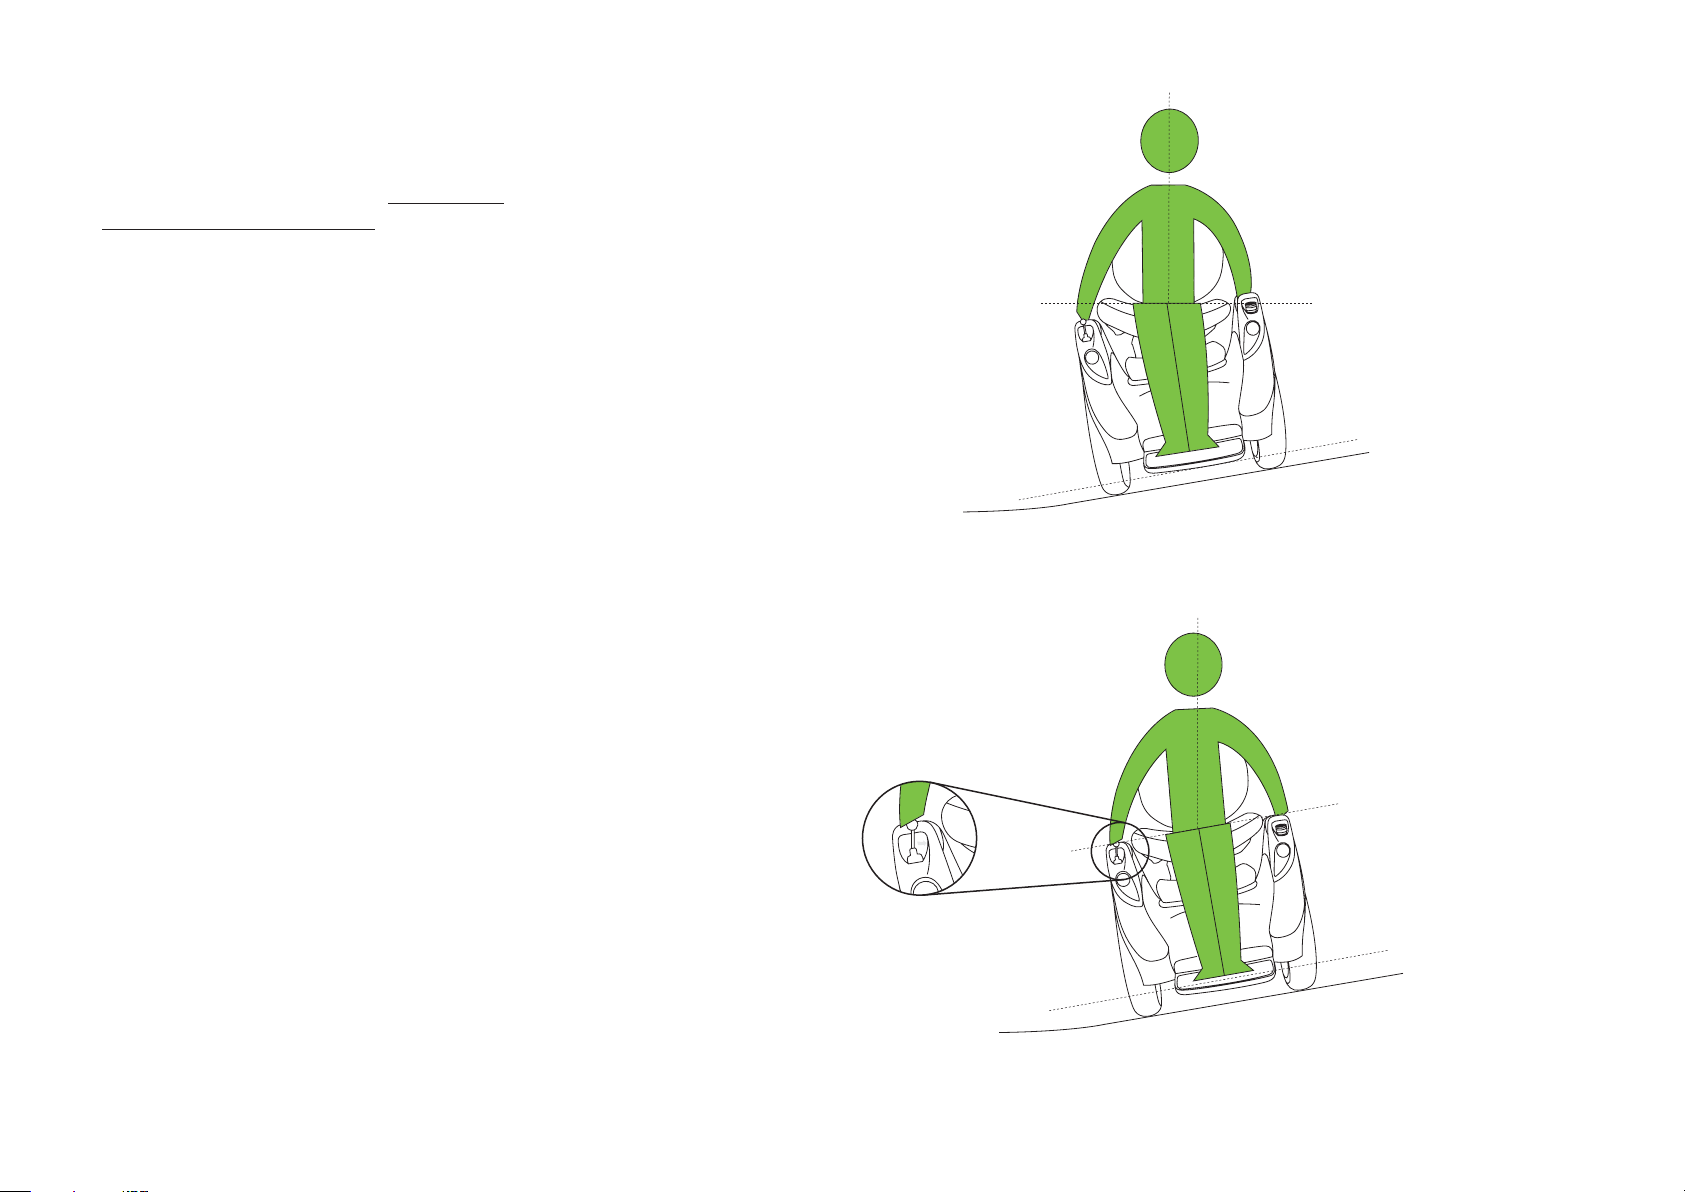
Roll Compensation
The Omeo utilises the Segway PT feature called
Slow Speed Roll Compensation (Refer to the
Segway PT User Manual Pg. 26) that separates
steering input from terrain changes. This allows
you to ride in a straight line over uneven terrain by
keeping the Active Seat Control (ASC) straight up
and down.
Your Omeo manages steering input and balance
by either the seating position or Joystick control.
Your Omeo is a live platform, moving in response
to your weight distribution on the seat, generating
drive and steering.
Figure 10: Seat steer – Roll compensation across a slope.
SECTION 4 HOW THE OMEO EVOLUTION WORKS
25
|
Figure 11: Joystick control – Roll compensation across a slope.
OMEO EVOLUTION USER MANUAL
Page 26

Omeo Parts and Subsystems
WARNING
All of your Omeo’s parts are approved by Omeo
Technology and have been properly installed.
As the owner of this Omeo you must make
sure that all user adjustable parts are installed
and adjusted correctly in accordance with the
directions contained within this manual.
Using your Omeo without following these
instructions may result in you losing control
resulting in serious injury or death, or damage
to you, your Omeo and / or property.
WARNING
Do not modify your Omeo. Modifications
may alter the operation of your Omeo and
cause serious injury or damage. Modifications
may also void the Omeo Worldwide Limited
Warranty.
SECTION 4 HOW THE OMEO EVOLUTION WORKS
26
|
OMEO EVOLUTION USER MANUAL
Page 27
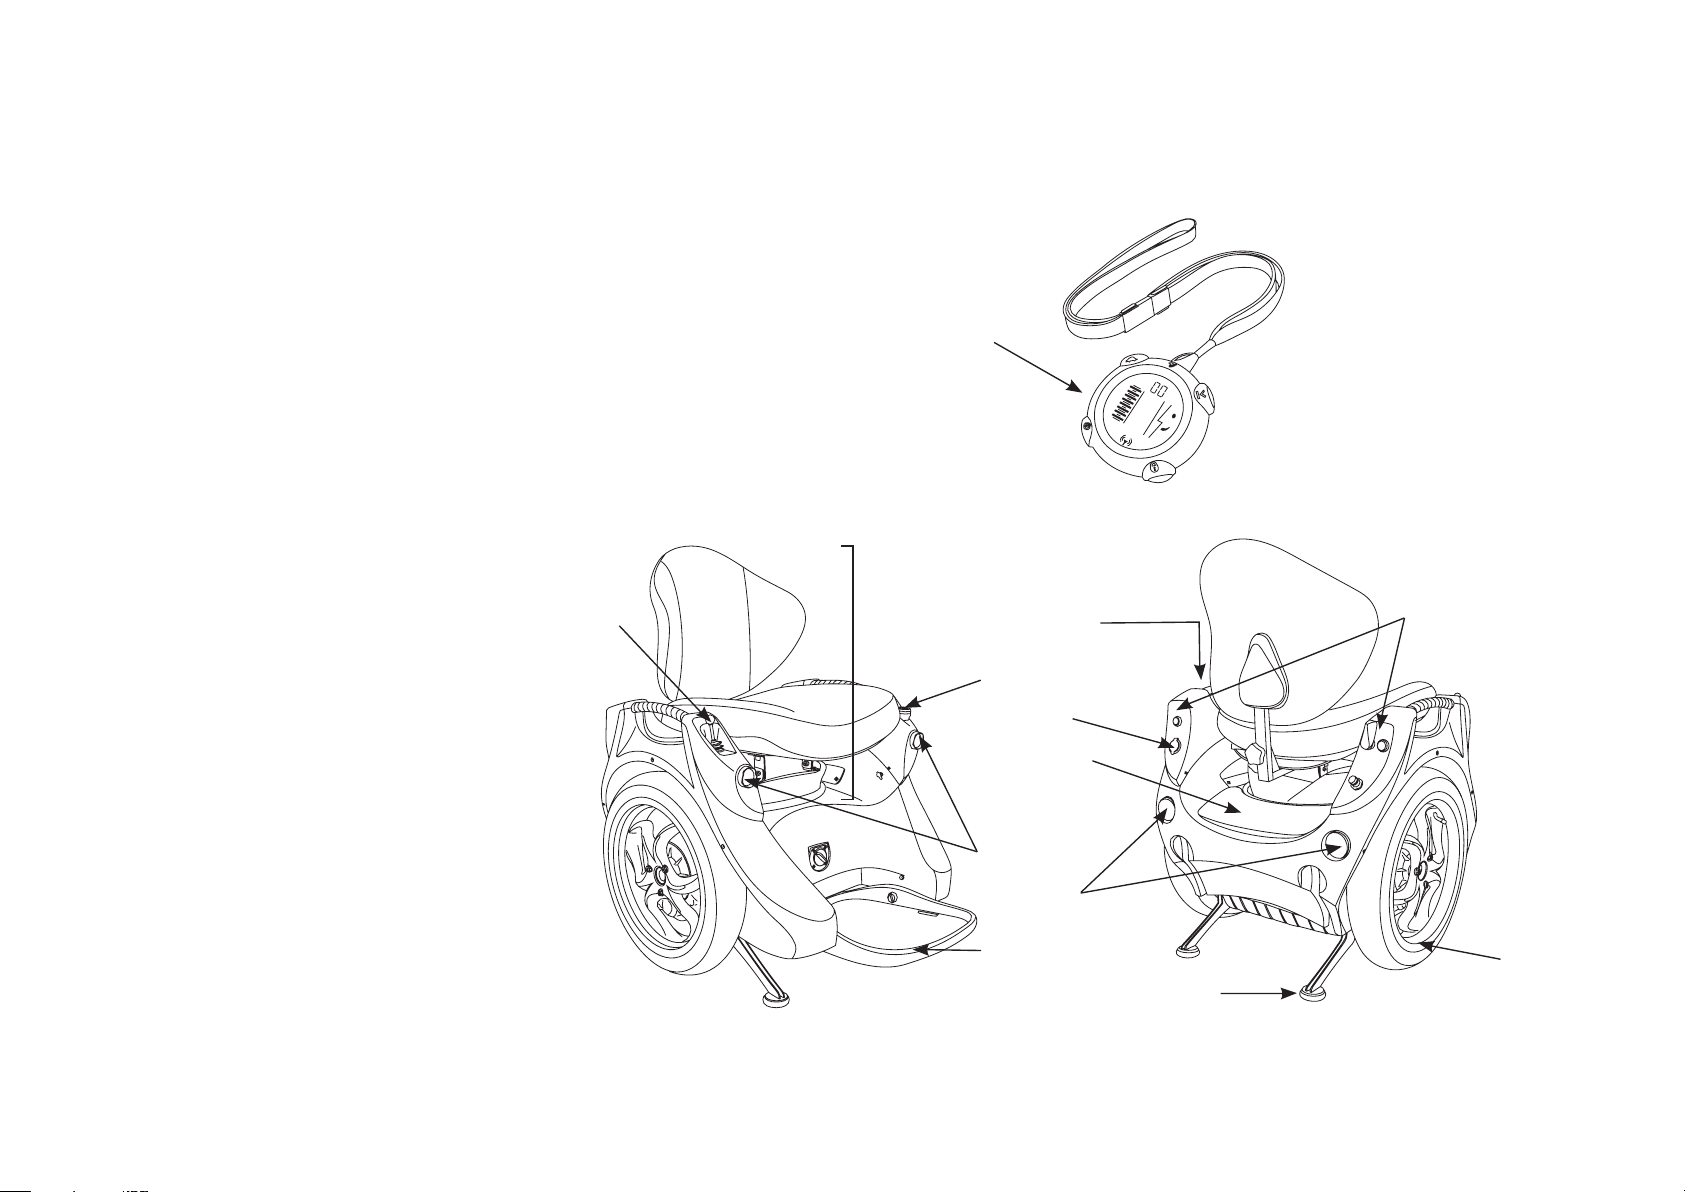
Omeo Parts and Subsystems (cont.)
The Omeo has the following parts and
subsystems:
• Power Base unit and Body
• InfoKey™ Controller
• Tyres / Wheel Assembly and Guards
(fenders)
• Active Seat Control (adjustable Seat Pan,
Back Rest, Cushions and Covers)
• On Board Switching Controls
• Stabilising Legs
• Front and Rear Running Lights
• Joystick
• Footplate
• Rear Storage Hatch
• Display Panel (with Indicator and
Warning Lights)
• USB Port
• Accessory Lock
• Batteries; 2x Li-ion (main-drive) and 2x
Lead Acid (Auxiliary).
Joystick
InfoKey™ Controller
Active
Seat
Control
Display Panel
Accessory Lock
USB Port
Rear
Storage
Hatch
On Board
Switching Controls
SECTION 4 HOW THE OMEO EVOLUTION WORKS
27
|
Front lights
Rear lights
Footplate
Stabilising Legs
Figure 12: Omeo Parts and Subsystems.
Tyre / Wheel
Assembly
OMEO EVOLUTION USER MANUAL
Page 28

Omeo Parts and Subsystems (cont.)
Redundancy / Safety
Omeo’s redundancy and safety features set
it apart from any other self-balancing device.
In-built redundancies provide for a backup to
take over from a particular part in the unlikely
event of failure, minimising the possibility of
an accident.
Omeo has multiple redundancy subsystems:
• Controller Boards
• Motors
• Batteries
• The Balance Sensor Assembly.
Active Seat Control and Joystick
The Active Seat Control (ASC) is a dynamic system
that allows you to pivot the seat using your
weight on all lateral axes. This in turn controls the
switching for drive, steering and braking.
The ASC also ensures your sitting position is
maintained level on slopes so that the device can
be controlled as if it was on a flat surface.
The Joystick working in conjunction with
the ASC.
When the Joystick is engaged (see Steering
Selection Lever (Pg. 31) for details on Seat control
and Joystick control settings) the steering control
is transferred to the Joystick. The side-to-side
movement of the ASC is locked and inoperable.
The drive and braking system of the Omeo is still
controlled by the forward and back movement of
the seat and not the Joystick.
Standard and O-Road Wheel
and Tyre Kits
Your Omeo uses either the Standard Kit or the
O-Road Kit for more extreme terrain.
WARNING
Do not use the Omeo without Wheel Guards
(Fenders) at any time. Using the Omeo without
Wheel Guards / Fenders could result in injury or
damage to the device or rider.
NOTICE
Use of non-approved wheels and tyres may void
the Omeo Worldwide Limited Warranty.
NOTICE
Always run and maintain both the Standard and
All-Terrain Tyres with the proper tyre inflation
as noted in Table 1 (Pg. 18).
SECTION 4 HOW THE OMEO EVOLUTION WORKS
28
|
CAUTION
The Joystick does not provide any forward
drive or braking. The steering only is controlled
by the Joystick.
OMEO EVOLUTION USER MANUAL
Page 29
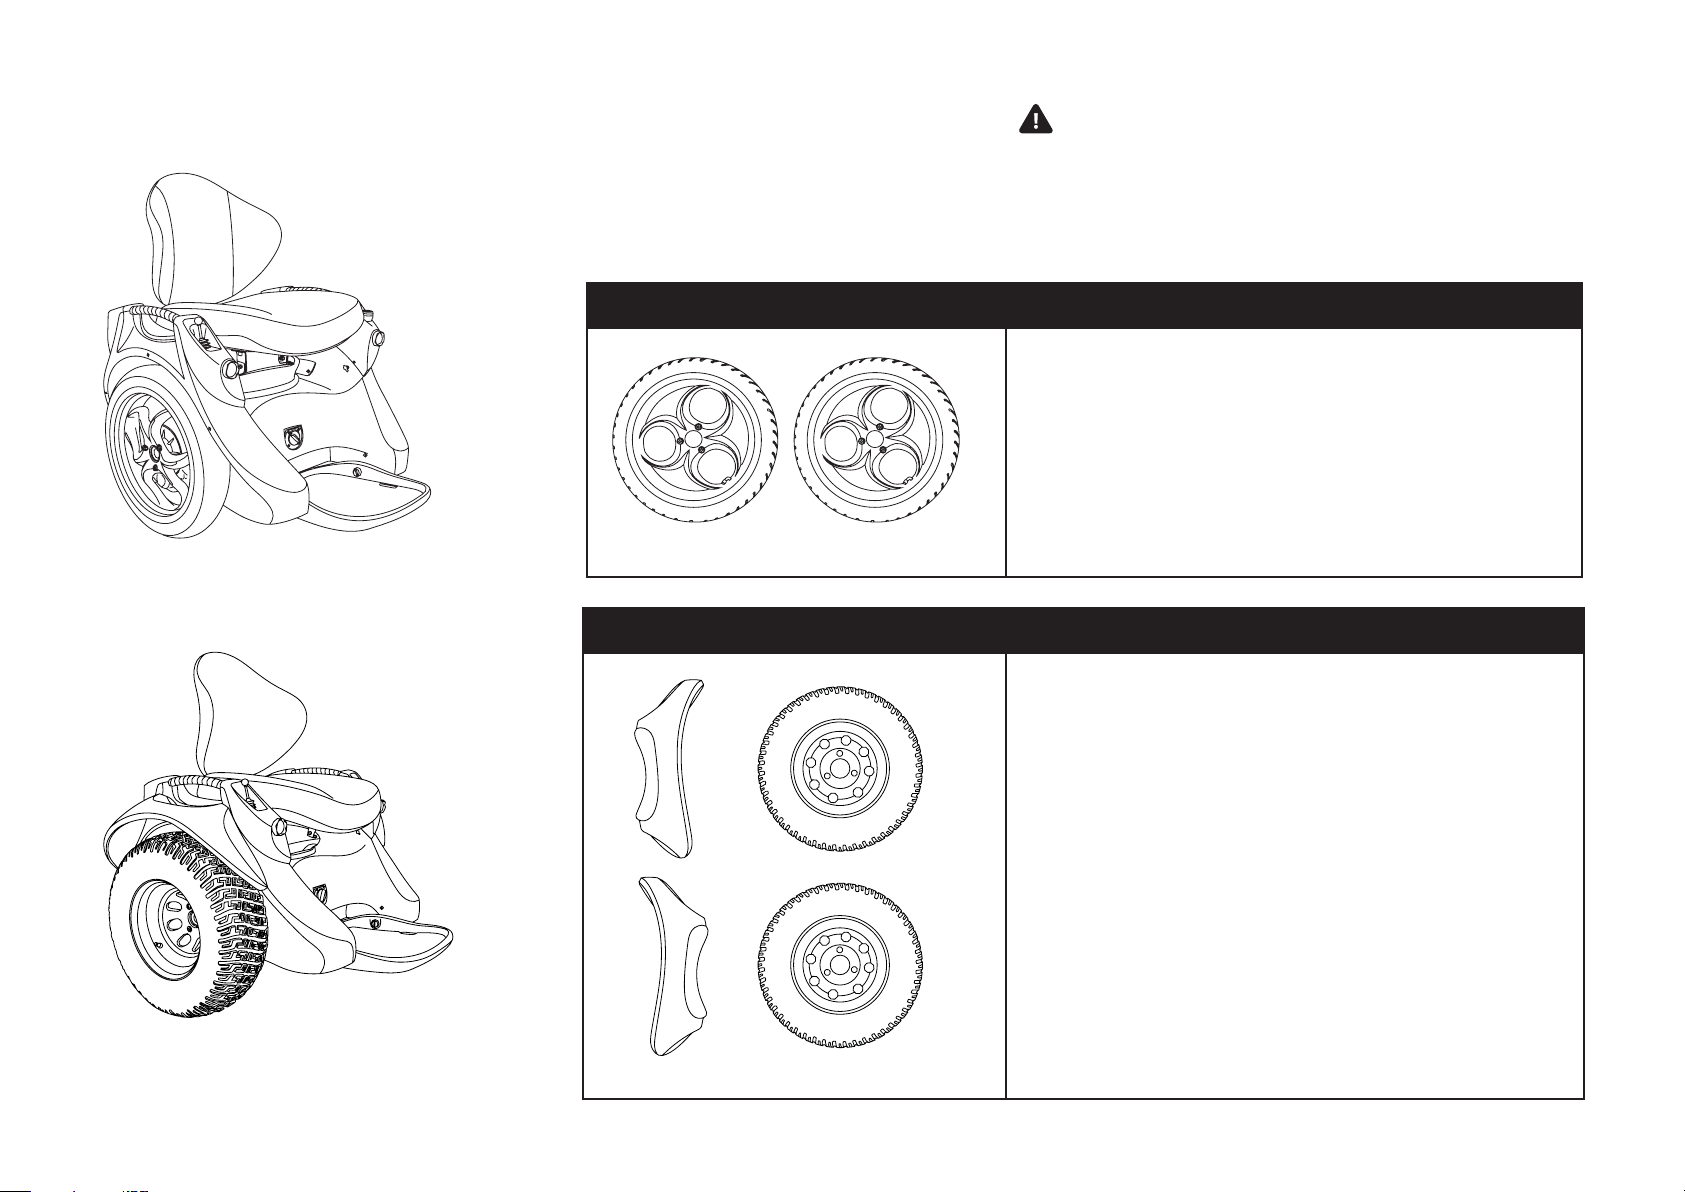
Figure 13: Omeo Standard Kit.
Table 2: Omeo Kits available.
WARNING
Never ride an Omeo without the wheels covered by the
Wheel Guards. Doing so could result in equipment damage
and / or serious injury.
Omeo Standard Kit
The Omeo Standard Kit will fit through most doorways
(650mm / 25in). It is best suited to indoors and firm outdoor
surfaces like formed tracks and pathways.
The wheel guards for the Standard Kit are built into the body.
Omeo O-Road Kit
The Omeo O-Road Kit comprises the All-Terrain Tyres and
Wheel Guards (Fenders). It is suitable for outdoor use and a
wide range of surfaces.
Figure 14: Omeo with the O-Road Kit.
SECTION 2 INTRODUCTION TO YOUR OMEO EVOLUTION (OMEO)
29
|
The wide flared guards and bigger tyres increase the width
(865 mm / 34in.), traction and scope of your Omeo. The Omeo
is not suitable for close or indoors use in this configuration.
The O-Road Guards, which are attached by screws to the
body, are designed to give some protection from excess
ground water, mud and loose debris. The Guards also protect
you from making contact with the moving wheel when leaning
into turns.
Because the All-Terrain Tyres have no crown and operate
at low pressure, they provide a smooth ride; great traction
(including on soft sand, gravel and dirt), and are gentle on
delicate surfaces (particularly in a straight line), such as lawns
and other fragile flora and substrates.
OMEO EVOLUTION USER MANUAL
Page 30
Omeo Parts and Subsystems (cont.)
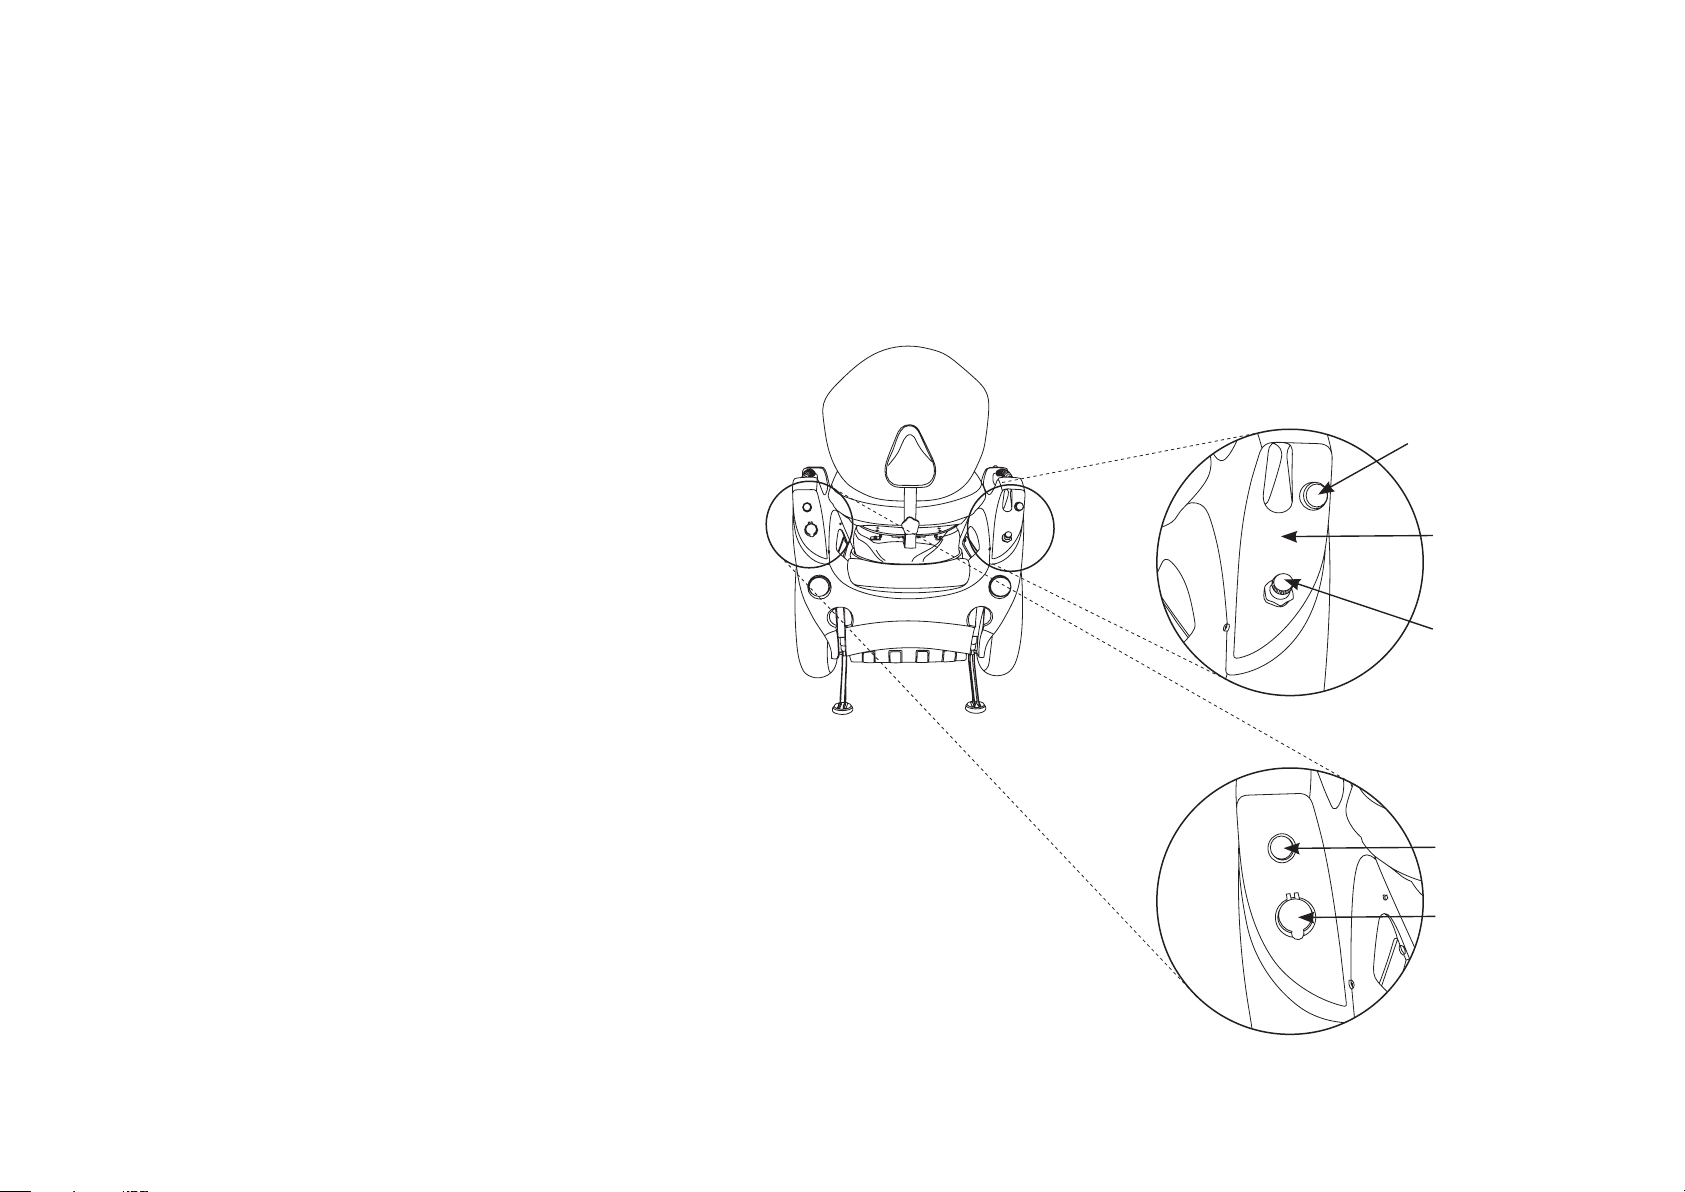
On Board Control Panels
NOTE: Panels A and B can be set up on either the
left or right side, depending on the preference
indicated on the Omeo order form. Panel A will
always contain the Steering Selection Lever, Main
Control Switch and Seat Steering Dampening
Control, whereas Panel B will always contain the
Light Switch and USB Port (Figure 15).
Main Control Switch
The Main Control Switch is located at the top of
Panel A (see Figure 15). To access the Main Control
Switch function, ensure your Omeo is in Joystick
Mode, that is, the Steering Selection Lever is in a
vertical position.
The function of the Main Control Switch is to
simultaneously raise / lower the Stabilising Legs and
enter / exit Balance Mode.
When in Standby Mode: (The Omeo is powered
on and the 5 Balance indicator lights are green):
NOTICE
Your Omeo must be in Joystick Mode to expose
and therefore use the Main Control Switch.
PANEL A
Main
Control Switch
Steering
Selection Lever
Seat Steer
Dampening Control
• Press the Main Control switch once to raise
the Stabilising Legs and enter Balance Mode
• Press the Main Control Switch only once to
then lower the Stabilising legs and exit Balance
Mode.
NOTICE
Do not press the Main Control Switch more
than once to lower the Stabilising Legs.
SECTION 4 HOW THE OMEO EVOLUTION WORKS
30
|
Light Switch
USB Port
PANEL B
Figure 15: On-Board Control Panels (A & B).
OMEO EVOLUTION USER MANUAL
Page 31

Steering Selection Lever
The Steering Selection Lever is beside the Main
Control Switch (Figure 15: On-Board Control
Panels (A & B) Pg. 30). Use the Steering Selection
Lever to switch the Omeo between Joystick and
full ASC Mode.
When the Steering Selection Lever is in a vertical
position and the Main Control Switch is exposed,
the Omeo is in Joystick Mode and the side to side
movement (ASC) of the seat is locked.
When the Steering Selection Lever is in a
horizontal position, covering the Main Control
Switch, the Omeo is in full ASC Mode with the side
to side movement of the seat enabled.
Seat Steer Dampening Control
The Seat Steer Dampening Control knob
(Figure 15: On-Board Control Panels (A & B)
Pg. 30) controls the steering sensitivity (side to
side movement) of the ASC. The Seat Dampening
Control can be adjusted at any time, even while
the Omeo is in ASC Balance Mode and moving.
Turn the knob clockwise to decrease steering
sensitivity.
Turn the knob anti-clockwise to increase steering
sensitivity.
For more information refer to the User video in
the User Materials provided (or on the Omeo
Technology website (omeotechnology.com) and
Section 11: Customisations (Pg. 87).
SECTION 4 HOW THE OMEO EVOLUTION WORKS
31
|
Light Switch
The Light Switch (on / o) is located on Panel
B (Figure 15: On-Board Control Panels (A & B)
Pg. 30). It controls both the LED headlights and tail
lights (See Running Lights Pg. 36).
Operational Modes
Your Omeo has several Modes of operation:
• Standby Mode
• Active Standby Mode
• Balance Modes
- Joystick Mode
- ASC Mode
• Riderless Modes
- Walker Balance Mode
- Free Wheel Mode.
Standby Mode
When you sit on the seat of the Omeo and turn
the power on with the InfoKey™ Controller your
Omeo will be in Standby Mode with the Stabilising
Legs down.
Before you can ride your Omeo you need to
switch to Balance Mode.
Active Standby Mode
This is when you have been riding your Omeo
and you come to a stop and put the stabilising
legs down.
In this mode, the Omeo is still powered on and has
the potential to move when the Joystick is moved.
To change from Active Standby Mode to Standby
Mode, quickly press the Power button on the
InfoKey™ Controller once. The Omeo will beep to
confirm that you have entered Standby Mode.
To enter Balance Mode from Active Standby Mode,
press the Main Control Switch once to raise the
stabilising Legs.
You cannot enter Active Standby Mode when
you first power on your Omeo. You need to have
been in Balance Mode before you can enter Active
Balance Mode.
E.g. Power On, Standby Mode, Balance Mode,
Active Standby Mode, Standby Mode
WARNING
Always make sure that you are in Standby
Mode before attempting move on your Omeo.
If you are in Active Standby Mode and attempt
to move or dismount your Omeo, you risk
damage and / or injury.
Balance Mode
You need to be in Balance Mode to ride your
Omeo.
Balance Mode engages the drive and selfbalancing platform.
Balance Mode has two options: Joystick Mode or
ASC Mode.
Before entering Balance Mode, the Steering
Selection Lever must be vertical, so you have
access to the Main Control Switch (This is
Joystick Mode.)
Enter Balance Mode by fully depressing the Main
Control Switch for 1 second. This will raise the
Stabilising Legs and activate the self-balancing
platform, releasing the forward and backward
movement of the seat.
OMEO EVOLUTION USER MANUAL
Page 32

Omeo Parts and Subsystems (cont.)
You are now ready to ride your Omeo with weight
transfer and Joystick steering.
NOTICE
Be prepared for your Omeo to move
immediately after the Stabilising Legs
start raising. It is important that you are
seated comfortably and have found your
neutral / centre point of balance, so the Omeo
does not move unexpectedly.
Joystick Mode
Use Joystick Mode when learning to ride
your Omeo, or in tight confines where micro
movements may be required.
Joystick Mode locks out the side-to-side
movement of the seat. You still need to lean
forward to move your Omeo forwards, and back
to brake or reverse.
Active Seat Control Mode (ASC)
In ASC mode your Seat is fully alive to you
transferring or distributing your weight by moving
forward, backward and side to side; to move your
Omeo forward, reverse, brake or steer.
ASC can be operated hands-free by shifting weight
through your hips, or you can grip the handles
and leverage your torso through your arms and
shoulders.
See also Section 7: Learning to ride your Omeo
(Pg. 42).
Riderless Modes
Your Omeo also has two Riderless Modes:
• Walker Balance Mode, which is power assisted
(when the Omeo is still turned on),
• Free Wheel Mode, which is non-power
assisted (when the Omeo is powered o).
Both Riderless Modes allow you to move the
Omeo when it is not being ridden.
Walker Balance Mode
NOTICE
Walker Balance Mode is best suited for
situations where it is dicult to manage the
weight of your Omeo, for example, moving
your Omeo up a ramp and into a vehicle.
To activate Walker Balance Mode, dismount your
Omeo and power it on.
With your Omeo now in Standby Mode, push the
Main Control Switch 5 times within 3 seconds.
The Stabilising Legs will rise to allow you to easily
move your Omeo for walking up slopes and
around obstacles.
In this mode your Omeo is best controlled in
Joystick Mode as you will easily be able to push
the Joystick for left and right movements.
When you have manoeuvred your Omeo to the
desired location, push the Main Control Switch
once to lower the Stabilising Legs and power o
the Omeo using the InfoKey™ Controller.
You will know your Omeo is in Balance Mode or
Walker Balance Mode when the Balance Indicator
Lights are pulsing or rotating green and your
InfoKey™ Controller displays a happy face.
For more information on how to put your Omeo
into Balance Mode, see Turning on and riding your
Omeo (Pg. 52).
Free Wheel Mode
NOTICE
Free Wheel Mode is possible when the Omeo is
powered o completely. It oers no power to
assist (i.e. when pushing the Omeo up a slope) so
you will need to manage the entire weight of the
device. You may need another person to assist
with this.
Free Wheel Mode (non-power assisted) is best
suited for simply moving your Omeo from one
place to another where there is no resistance.
To activate Free Wheel Mode, make sure your
Omeo is powered o and there is no rider on the
Seat. Push the Main Control Switch 3 times within
3 seconds. The Stabilising Legs will rise to allow
you to easily move your Omeo around manually.
NOTICE
The Omeo can go into error mode if tilted
beyond 30° either side while in Walker
Balance Mode.
SECTION 4 HOW THE OMEO EVOLUTION WORKS
32
|
OMEO EVOLUTION USER MANUAL
Page 33
Timeout Function
Display Panel
Balance Indicator Lights
After a period of inactivity in Standby Mode, your
Omeo will power o / shut down. This is called the
Timeout function.
The Timeout Function will not activate when the
Omeo is in Active Standby Mode, it only occurs in
Standby Mode.
The factory default time that the Omeo will remain
powered on in Standby Mode is set to 15 minutes
but can be adjusted manually with the Info Key
Controller. For more information on how to adjust
the Timeout function, refer to Segway PT User
Manual (Pg. 47).
WARNING
ALWAYS REMEMBER – When you are on your
Omeo in Standby Mode, you must check that
your Omeo is still powered on and the Balance
Indicator Lights are green before raising the
Stabilising Legs.
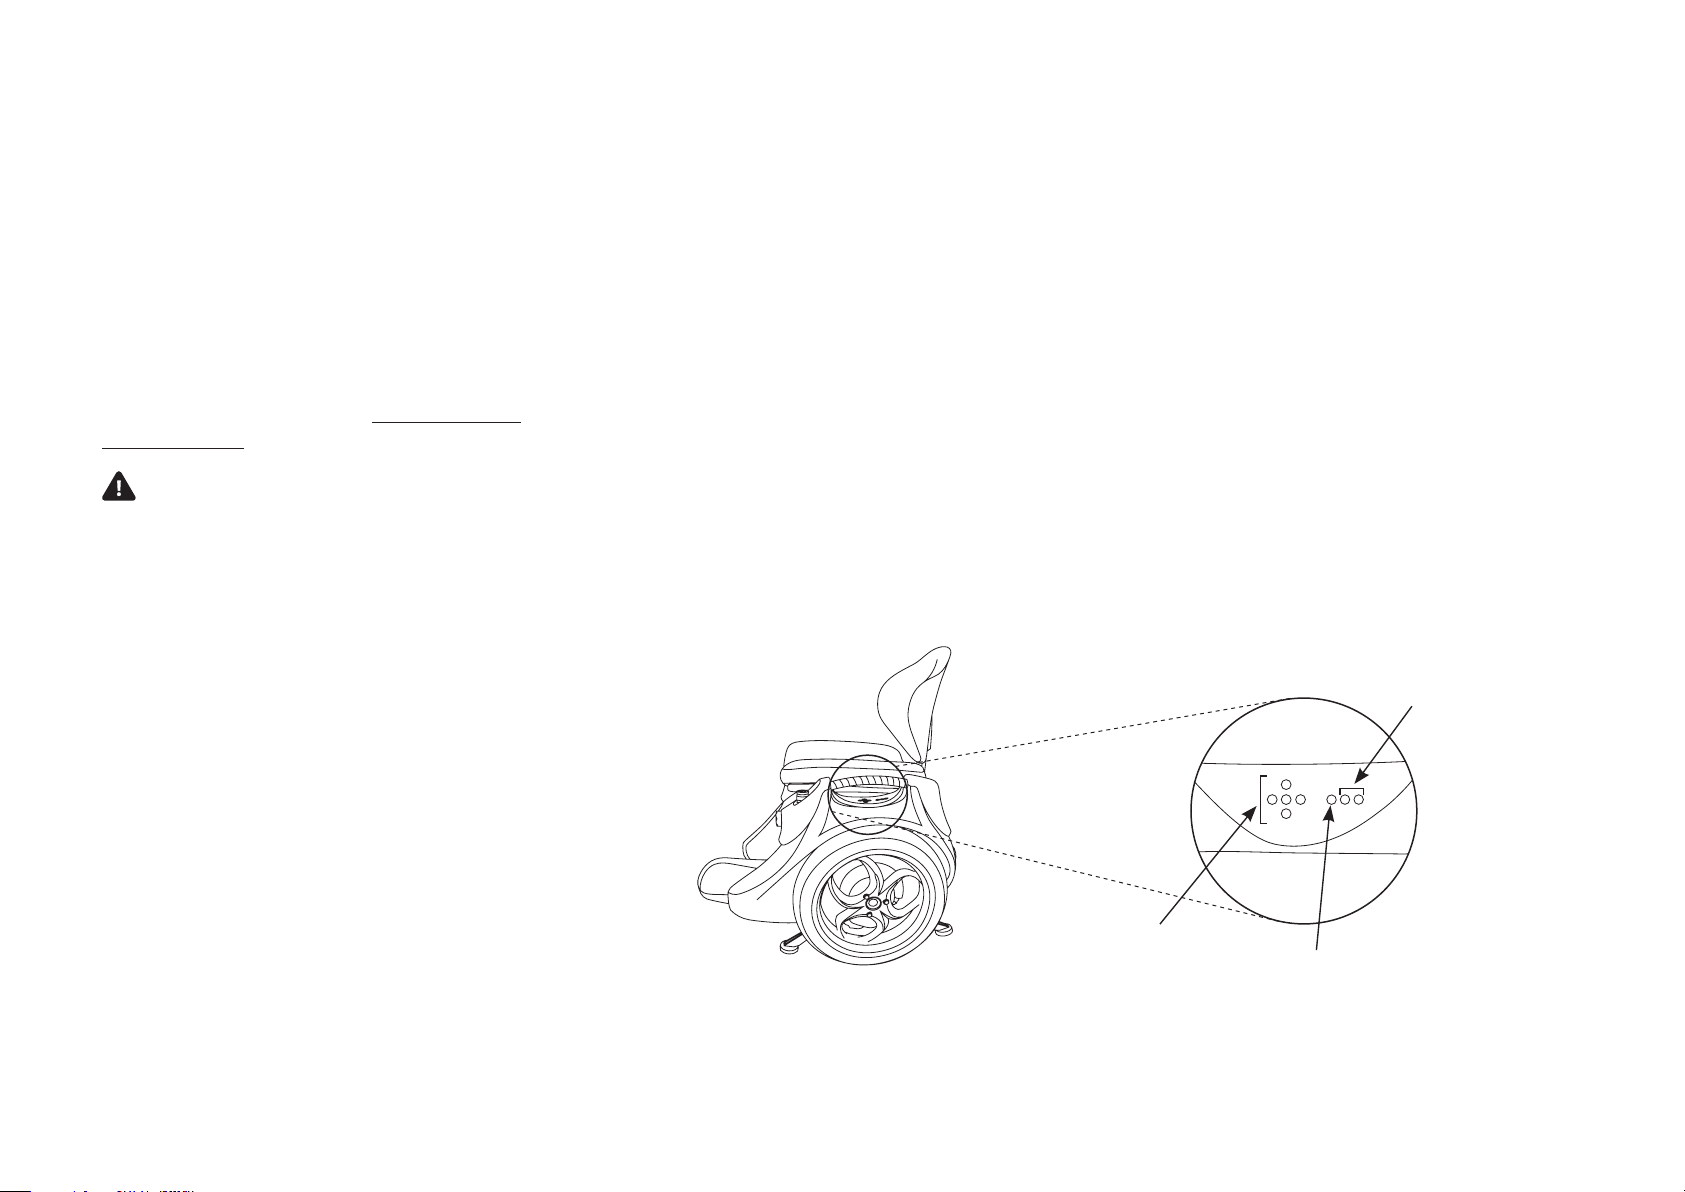
The Display Panel is located on the left Arm
Cover of your Omeo (Figure 16). It consists of 8
Indicator Lights of the Power Base, Lithium-ion
and Auxiliary signal systems. There are three sets
of lights on the Display Panel:
• Balance Indicator lights that provide visual
information as to the Omeo being in either
Balance Mode, or not
• Lithium-ion Charge Indicator lights are active
when the Omeo is plugged into the AC power
and indicates the charge status of the Lithiumion drive batteries.
• Auxiliary Indicator light that provide
information about the charge level of the
Auxiliary Batteries.
The Display Panel has 5 Balance Indicator Lights.
These lights indicate the balancing status of the
Omeo and helps the rider determine when it is
safe to raise the Stabilising Legs and enter Balance
Mode.
When the Omeo is powered on the Indicator
Lights must display a green pattern before the
rider pushes the Main Control Switch to raise the
Stabilising Legs, activate Balance Mode and begin
to ride the Omeo.
Table 3 (Balance Indicator Light Patterns, Pg.34):
describes the light pattern on the Display Panel
and the relevant balance status of the Omeo.
Lithium-ion
Charge Indicator
Lights
SECTION 4 HOW THE OMEO EVOLUTION WORKS
33
|
Balance
Indicator Lights
Figure 16: Display Panel with Indicator & Warning Lights.
Auxiliary
Indicator Light
OMEO EVOLUTION USER MANUAL
Page 34

Red Balance Indicator Lights indicate that the
steering is not centred and the Omeo is not ready
to engage into Balance Mode:
• One red left or right Balance Indicator Light
Ensure the Steering Selection Lever is set to
Joystick Mode. Check the Joystick to make
sure there is nothing pushing or obstructing it
in anyway. Gently shift and centre the Joystick
until the Red Balance Indicator lights are
replaced by one green Balance Indicator Light
in the centre.
Green Balance Indicator Lights indicate that the
Omeo is ready to enter Balance Mode and is safe
for riding:
• One green Balance Indicator Light in the
centre The Omeo is in Standby Mode, ready
for the rider to raise the Stabilising Legs and
enter Balance Mode
• Five green Balance Indicator Lights pulsing
The Omeo is in Walker Balance Mode with no
rider on the seat and ready for power assisted
relocation
• Four green Balance Indicator Lights rotating
The Omeo is in Balance Mode with the rider
on, ready to go.
Lithium-ion Charge Indicator Lights
The two rear Indicator Lights are the Segway
battery (Lithium-ion) Charge Indicator Lights.
They should be solid green when the Omeo is
plugged into AC power, then start flashing when
fully charged. If either or both of the lights flash
red, it means there is a fault with either or both
of the Batteries and the Omeo will go into error
Shutdown. For more information, refer to the
Segway PT User Manual (Pg. 89).
Auxiliary Indicator Light
The third light is the Omeo/Auxiliary Battery
Indicator light. It should be solid green when the
Auxiliary Batteries are charging, then will start
flashing when fully charged. For more information
refer to Balance Mode Error Conditions (Pg. 98).
Table 3: Balance Indicator Light Patterns.
Omeo Status Light Pattern
O: No Balance Indicator Lights are
Not ready.
illuminated.
Do not raise the Stabilising
Legs and enter Balance Mode.
Red: One or more Balance Indicator Lights
are red.
SECTION 4 HOW THE OMEO EVOLUTION WORKS
34
|
Ready.
Raise the Stabilising Legs to
enter Balance Mode or Walker
Balance Mode.
Green: Only the centre Balance Indicator
Light is green. All four other lights are not
illuminated.
Green: All five Balance Indicator Lights are
pulsing green.
OMEO EVOLUTION USER MANUAL
Page 35
Omeo Parts and Subsystems (cont.)
Controller Boards
There are two sets of Controller Boards in the
Omeo – the Segway Power Base Controller Board
and the Auxiliary Controller Board.
Segway Power Base Controller Boards
Refer to Segway PT User Manual (Pg. 34)
Replacements required in the Segway User
Manual:
• Where there are references to Lean Steer
Sensors replace with Seat Steer Sensors.
• Where there are references to Tilt Sensors
replace with Seat Steer Sensors.
Auxiliary Controller Boards
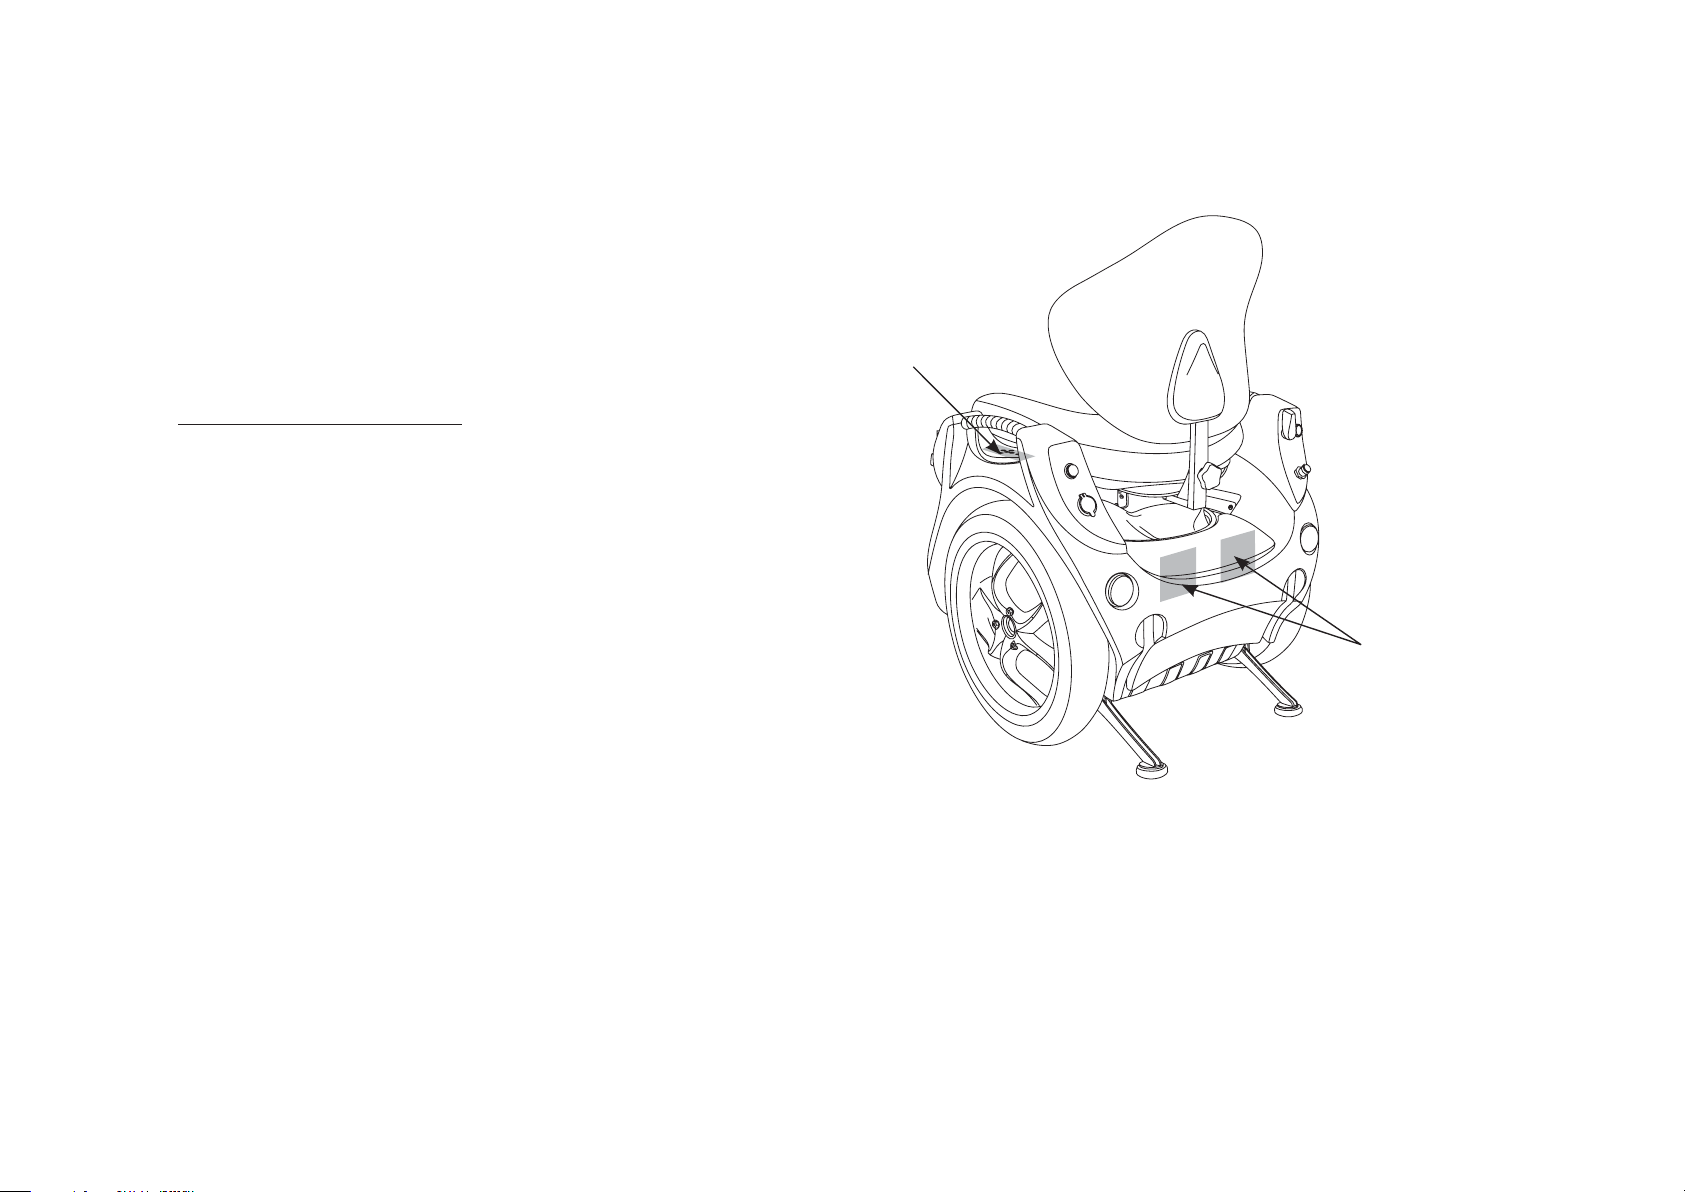
Radio Board
Auxiliary
Controller Boards
The Auxiliary Controller Boards receive input from
the Control Panel and manage the power level of
the Auxiliary Batteries.
They also manage the Omeo’s Balance and Walker
Modes and are the electronic control system for
the Stabilising Legs.
Radio Board
This is located in the left Arm Cover of the Omeo
(Figure 17). It contains the LEDs for the Display
Panel and is responsible for receiving and sending
signals from the InfoKey™ Controller.
SECTION 4 HOW THE OMEO EVOLUTION WORKS
35
|
Figure 17: Location of the Omeo Auxiliary Controller
and Radio Boards.
OMEO EVOLUTION USER MANUAL
Page 36
Omeo Parts and Subsystems (cont.)
Motors
Refer to Segway PT User Manual (Pg. 35).
Balance Sensor Assembly
Refer to Segway PT User Manual (Pg. 36).
Running Lights
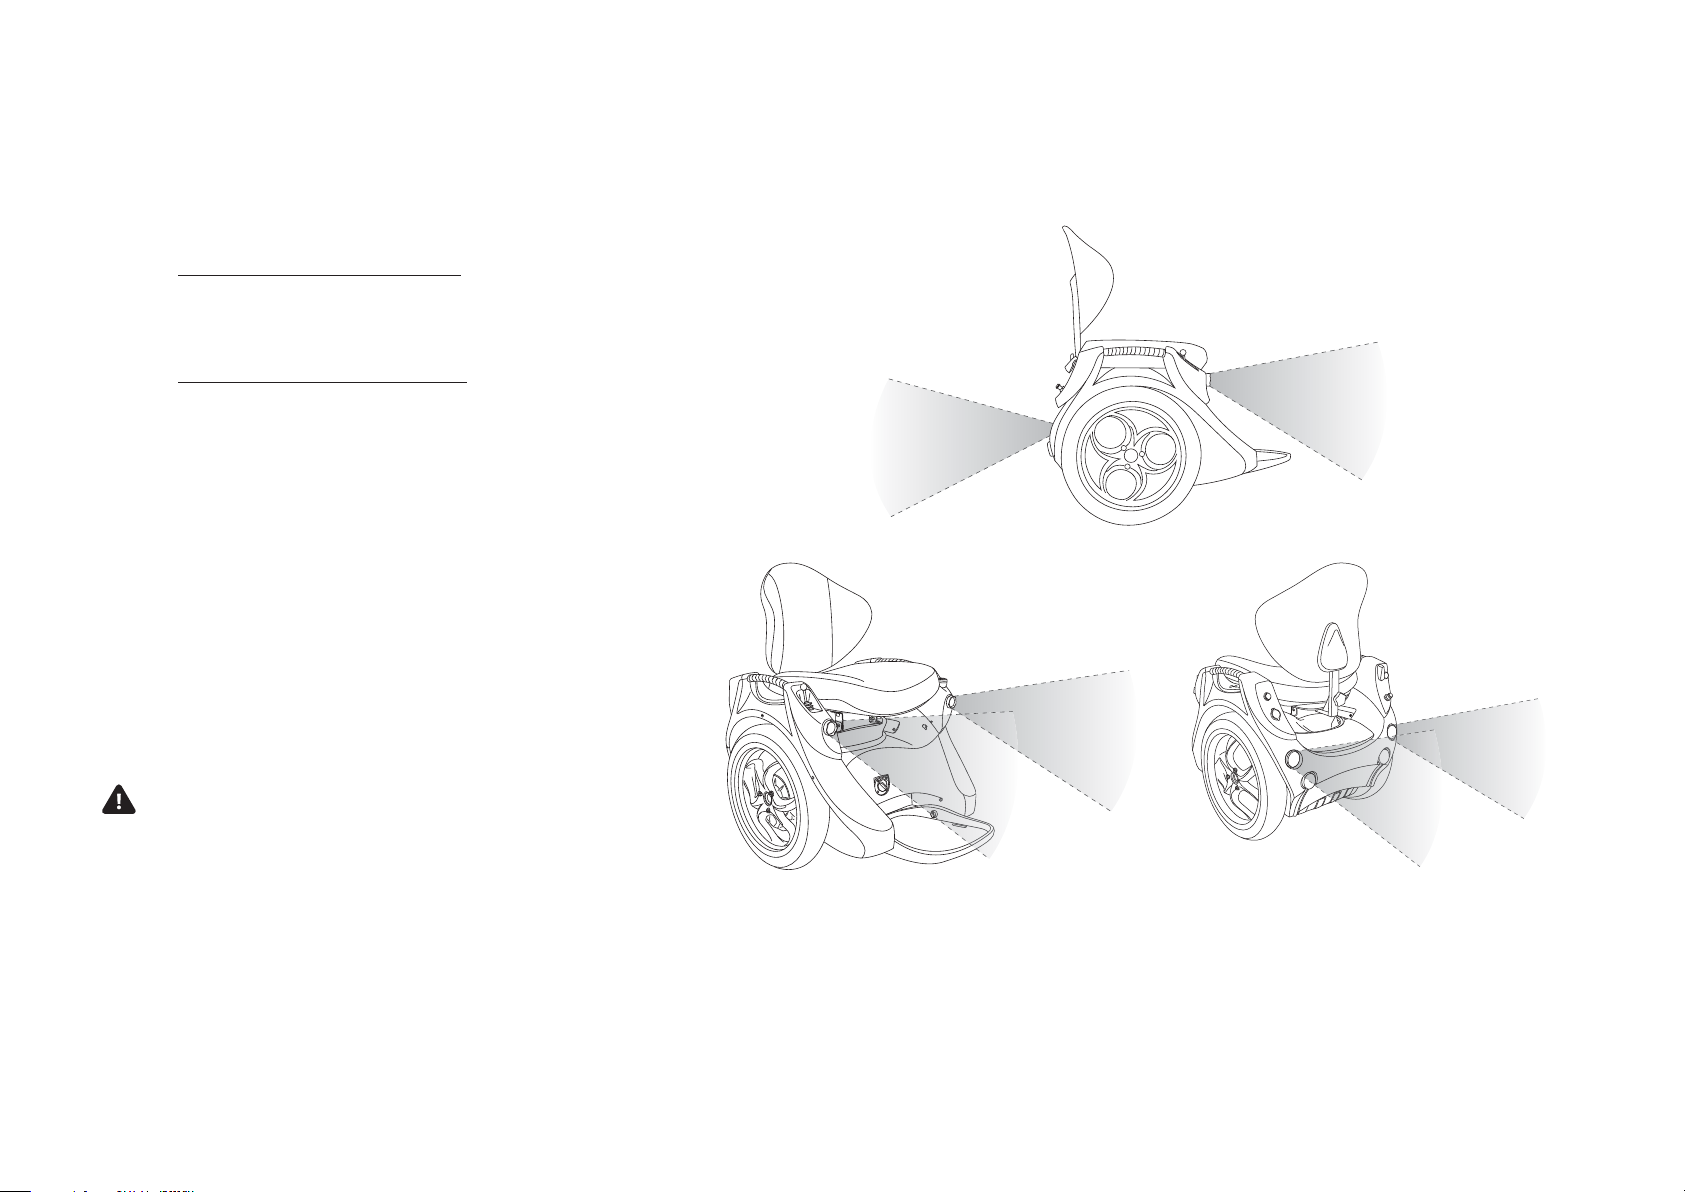
Your Omeo has front and rear LED running lights
powered by the Auxiliary Batteries. The lights are
activated by the Light Switch. This is located above
the USB Port on the Control Panel B (Figure 15:
On-Board Control Panels (A & B) Pg. 30).
If the lights go o unexpectedly, this will be
because the Auxiliary Battery levels are discharged
below 50%. The Auxiliary Indicator Light (Figure
16: Display Panel with Indicator & Warning Lights
Pg. 33) will flash yellow to show low Auxiliary
Battery levels. (See the Auxiliary Batteries, Pg. 37).
WARNING
To ride safely, you must be able to clearly see
what is in front of you and you must be clearly
visible to others.
SECTION 4 HOW THE OMEO EVOLUTION WORKS
36
|
Figure 18: Omeo front and rear lights.
OMEO EVOLUTION USER MANUAL
Page 37

Omeo Parts and Subsystems (cont.)
Batteries
Your Omeo operates with two battery systems:
• The Segway Power Base (the self-balancing
platform and drive) is powered by two
Lithium-ion Batteries
• The Stabilising Legs, Lights and USB power
supply port are powered by two 12 Volt Lead
Acid Batteries (Auxiliary Batteries).
Refer Section 8: Batteries and Charging (Pg. 67).
The Auxiliary Batteries
The Auxiliary Batteries are 2x 12V Lead Acid Sealed
Batteries.
They are factory axed inside the body to
the chassis, are interchangeable and can be
removed / replaced by a Certified Omeo Service
Technician only.
The Batteries operate the Stabilising Legs, USB Port
and Lights.
If the Lights and USB Port shut down and the
Auxiliary Indicator Light flashes yellow once, the
Batteries have run to below 50% of charge.
The Auxiliary Indicator Light will flash red and the
Stabilising Legs will not raise when the Batteries
are discharged to below 20%.
For safety reasons, there will always be enough
charge to lower the Stabilising Legs for you to
dismount the Omeo.
Charging the batteries is then required to resume
normal operation.
Refer to Charging Your Batteries – Omeo Auxiliary
Batteries (Pg. 69).
Segway Lithium-ion (Li-ion) Batteries
Refer to Segway PT User Manual (Pg. 38).
NOTICE
For more information on these two battery
systems, Refer to Section 8: Batteries and
Charging (Pg. 67).
Lithium-ion Charge Indicator Lights
Two Battery Charge Indicator lights on the Display
Panel indicate the charge status of the Lithiumion Batteries when the Omeo is plugged in to AC
power. The front Battery Charge Indicator light
corresponds to the front Battery and the rear
Battery Charge Indicator light corresponds to the
rear Battery (See Figure 16: Display Panel with
Indicator & Warning Lights, Pg. 33).
For more information, refer to Segway PT User
Manual (Pg. 89).
For more information about Auxiliary Battery Lights
refer to Battery Management Indicators for the
Auxiliary Batteries (Pg. 70).
SECTION 4 HOW THE OMEO EVOLUTION WORKS
37
|
NOTICE
Extreme use of the head / tail lights or USB Port
may cause the lights to turn o and the USB
Port to de-activate. The Auxiliary Batteries will
then need re-charging.
OMEO EVOLUTION USER MANUAL
Page 38

Stabilising Legs
The Stabilising Legs are used to provide a stable
platform for you to transfer on and o your Omeo
or to rest when not in Balance Mode.
CAUTION
Only operate the Stabilising Legs when your
Omeo is stationary.
You can raise the Stabilising Legs to free wheel
or power walk the Omeo around without a rider
or lower the Stabilising Legs to keep the Omeo
upright and stable when stationary.
The Stabilising Legs are electrically operated by the
Auxiliary Batteries. They do not require the main
drive or Power Base to be switched on.
WARNING
In the event of a Safety Shutdown, the rider has
approximately 8 to 10 seconds from the start
of the Safety Shutdown to come to a controlled
stop in a safe location. Refer to Safety Shutdown
(Pg. 40).
WARNING
Do not attempt to lower the Stabilising Legs
whilst moving. The Omeo must be stationary to
lower the Stabilising Legs.
WARNING
Your Omeo cannot be used as a self-drive
platform seat in a motor vehicle.
Seating Attitude
The Active Seat Control (ASC), along with the
self-balancing system of your Omeo, keeps you
in a level seating position at all times, including
when on slopes. This helps you to secure in the
seat and able to operate your Omeo eciently
and safely.
NOTICE
Your Omeo is not a medical device or health
product. Your Omeo’s ASC is fundamentally
dierent to the static seats found on manual or
electric chairs. Accordingly, the usual methods
a seating specialist may use to determine seat
attitude, seat back angle and height may not
apply to your Omeo.
Each Stabilising Leg operates independently of
the other and stops when it touches the ground,
so that the Omeo is level and stable on uneven
ground or slopes.
Sensors are built into your Omeo so that in the
event of a Stabilising Leg becoming jammed,
the Auxiliary Indicator Light will emit a light flash
pattern: alternate white-blue, yellow-blue, or
red-blue.
WARNING
Blue light will flash. (Refer to Section 12:
Troubleshooting, Pg. 94).
SECTION 4 HOW THE OMEO EVOLUTION WORKS
38
|
WARNING
After a period of inactivity while in ‘standby
mode’, the Omeo will power o / Shutdown.
This is called the Time-out function.
When you are on the Omeo, you must always
ensure it is powered on and the Balance
Indicator Lights are green before raising the
Stabilising Legs.
Please trial a flat and upright seat setting prior
to making further adjustments. (See Section 11:
Customisations, Pg. 87).
OMEO EVOLUTION USER MANUAL
Page 39

Section 5: The InfoKey™ Controller
NOTICE
The Battery levels indicated on the InfoKey™
Controller display apply to the Segway
Lithium-ion Batteries only. They do not apply
to the Omeo’s Lead Acid Auxiliary Batteries.
This chapter in the Segway PT User Manual
(Pg. 39) describes how the InfoKey™ Controller
works. It includes a description of the InfoKey™
Controller and its display, buttons and icons plus
functionality.
InfoKey™ Controller
Use the InfoKey™ Controller to operate and
monitor your Omeo. The InfoKey™ Controller has
four buttons around the outer edge and a display
in the centre.
The InfoKey™ Controller must be within 5m (16 t)
in order to communicate with your Omeo.
InfoKey™ Controller Buttons
The InfoKey™ buttons allow you to select the
Omeo’s Segway Power Base and Battery functions
and scroll through various information.
WARNING
The buttons on the InfoKey™ Controller
are quite sensitive, so only a light touch is
needed. If at any time you find that a button
isn’t working, it is important not to push it any
harder. Instead we recommend that you check
the batteries in the InfoKey™ Controller and
change if required. (Refer to Replacing the
InfoKey™ Controller Battery Pg. 86.)
NOTICE
It is vitally important you become very familiar
with the InfoKey™ Controller functions,
buttons and icons. Replace in the Segway
User Manual:
• Where it references PT replace with Omeo
• Where it references Stand replace with Sit
• Where it references Step On replace with Raise
Stabilising Legs
• Where it references Step O replace with
Lower Stabilising Legs / Coming away from
• Where it references Mat replace with Seat.
Rider Detect Error: Applies to Segway. It does not
apply to the Omeo.
NOTICE
The Omeo will only accept commands from the
InfoKey™ Controller when the Stabilising Legs
are down.
SECTION 5 THE INFOKEY™ CONTROLLER
39
|
OMEO EVOLUTION USER MANUAL
Page 40

Section 6: Safety Alerts
In addition to safety alerts contained elsewhere
in this manual, this chapter describes some other
Omeo safety alerts and refers to the Segway PT
User Manual (Pg. 51).
The safety alerts include:
• Speed Limiter
• Shake Warning
• Safety Shutdown.
It is important that you recognise these alerts and
know how to respond appropriately before you
ride your Omeo.
WARNING
Read and follow all the instructions in the
User Manuals and watch the User Video for
important safety information about the
Speed Limiter, Shake Warning, and Safety
Shutdown alerts.
NOTICE
Not every safety issue triggers an alert. For
additional safety tips and guidelines, see
Segway PT User Manual (Pg. 62).
Speed Limiter
Refer to Segway PT User Manual (Pg. 52).
Shake Warning
Refer to Segway PT User Manual (Pg. 54).
Safety Shutdown
Refer to Segway PT User Manual (Pg. 57).
If the Omeo detects a critical fault, or if the battery
is too low it will perform a Safety Shutdown.
You will know this is happening when your Omeo
automatically reduces its speed, gives a shake
warning, emits a warning tone and the InfoKey™
controller displays an unhappy face.
You then have approximately 8 to 10 seconds
from the start of the safety shutdown to come to
a controlled stop in a safe location. In this mode
the legs should automatically lower before the
machine powers down, but it is good practice to
come to come to a complete stop and deploy the
legs within the 8-10 second period.
NOTICE
After going through a Safety Shutdown
sequence it is important that you re-centre
the seat and put the steering selection lever to
joystick before restarting your machine.
WARNING
Do not restart your Omeo until you have
identified and fixed the fault that caused the
Shutdown.
WARNING
Whilst in balance mode, if you are separated
from the seat for longer than 1 second, then
sit back down (re-engaging the pressure plates)
your Omeo will enter the Safety Shutdown
sequence and the legs will automatically
deploy. If the pressure plates are not
re-engaged then the Riderless Shutdown
sequence will complete, the legs will not
deploy and your Omeo will fall over.
Riderless Shutdown
If you are separated from your seat the Omeo
will automatically go into the Riderless Shutdown
sequence and power down.
The Riderless Shutdown sequence takes
approximately 10 seconds – reducing speed,
giving a shake warning, emitting a warning tone
and finally powering down. In this mode the legs
will not deploy. You will then need to upright your
machine, lower the stabilising legs and engage the
seat lock by gently tilting the seat back until you
hear a mechanical click.
WARNING
If the Omeo is on uneven ground and goes
through the Riderless Shutdown sequence it
is important that you re-centre the seat and
switch the Omeo to joystick mode before
restarting your machine.
SECTION 6 SAFETY ALERTS
40
|
OMEO EVOLUTION USER MANUAL
Page 41

WARNING
Do not restart your Omeo until you have
identified and fixed the fault that caused the
safety shutdown.
WARNING
In a Safety shutdown, pressing the Main
Control Switch more than once will raise the
Stabilising Legs back up. This may result in
injury from tipping as the Omeo powers o at
the end of a Safety shutdown
WARNING
Do not raise the Stabilising Legs after a Safety
Shutdown until the condition that caused
the Safety Shutdown has been identified and
corrected.
Replace in Segway User Manual:
• References to Handlebar replace with Seat
Back
• References to Stick Shake Warning replace
with Shake Warning
• References to Step o replace with Lower the
Stabilising Legs
• References to Standing replace with Sitting
• References to Powerbase replace with Seat
• References to Riderless replace with Walker.
Empty Battery Condition
(Lithium-ion Batteries)
Refer to Segway PT User Manual (Pg. 59).
Omeo Auxiliary Batteries
(Lead Acid)
The Stabilising Legs, Lights and USB Port are
powered by two 12V Lead Acid Batteries secured
inside the Omeo chassis. They are charged
separately to the Lithium-ion Batteries with their
own Charger and cord with a pin plug (Refer to
Charging your Batteries – Omeo Auxiliary Batteries,
Pg. 69).
It is essential that there is always power to lower
the Stabilising Legs. The Omeo has redundancies
that will turn o the USB and Lights once a single
Auxiliary Battery is less than 50% charge, leaving
sucient charge to activate the Stabilising Legs for
at least 100 activations (raise or lower).
NOTICE
Things that will drain the Lead Acid Batteries:
• Excessive raising and lowering of the
Stabilising Legs between normal charges
• Running the head / tail lights for more than
one hour at a time
• Excessive use of the USB Port for example
charging your Smart Phone.
Auxiliary Charger*
We have provided an Auxiliary Battery Charger to
charge the Omeo’s Auxiliary Batteries. Plug in for
12 hours from minimum charge or keep topped
up to ensure there is always charge in the Lead
Acid Batteries to use all functions. You cannot
overcharge these Batteries.
Management of the Omeo Auxiliary
Battery System
Use and enjoy your Omeo more with careful
management of the Battery system.
Regularly monitor the charge in the Batteries by
checking your running lights are working. If they
have stopped working, your Auxiliary Batteries
are less than 50% charged and need recharging /
topping up. (Refer to Charging your Batteries –
Omeo Auxiliary Batteries, Pg. 69).
NOTICE
The Omeo is not intended for use at elevations
greater than 2,000 metres (6,500ft) above sea
level. Use above these heights will adversely
aect the performance of the Omeo.
SECTION 6 SAFETY ALERTS
41
|
* USA / Canada – XP Power Model ACM 240US24 (100-240VAC, 0.5A; 24VDC, 1.0A)
Rest of the world – Sunny Billion Model SBP 240100 (100-240VAC; 50 / 60Hz)
OMEO EVOLUTION USER MANUAL
Page 42

Section 7: Learning to ride your Omeo
This section gives you guidelines to help you learn
to ride your Omeo.
Learning to ride your Omeo is dierent to
learning to use any new device, for example a
bicycle, car or other new technology. Simply, the
more time and eort you put into learning about
and riding your Omeo the more confident and
skilled you will become.
At first your Omeo will be unfamiliar and you
may lack confidence - this is not unusual.
Your confidence and ability will grow with
practise. For many it takes only 5 minutes to feel
in control. For others, it can take 30-90 minutes.
It is important that you develop your riding skills in
a progressive manner as outlined by the learning
exercises in this manual.
It is essential that all learning and practise is
undertaken in a controlled, familiar environment
free of obstacles, until you are comfortable
and confident in the use of your Omeo and its
InfoKey™ Controller.
WARNING
Your Omeo is a dynamic device with forward,
back and steering motion controlled by your
body movement. There is risk of personal
injury, or damage to the device and / or
environment if you are not in control.
WARNING
Beware of the behaviour of pets, small children
and machinery around your Omeo.
WARNING
It is recommended that you wear an approved
bicycle or skateboard helmet while operating
your Omeo. Ensure you are not wearing loose
clothing or carrying anything else (e.g. bags)
that could get caught in moving parts such
as wheels.
NOTICE
All Omeo Technology media presented without
the use of a helmet is conducted under
controlled conditions by Omeo professionals
and is not to be considered as standard practise.
NOTICE
Operate within the laws of the jurisdiction you
are riding. For example, some jurisdictions
restrict use on footpaths (sidewalks), or have
speed limits.
Inspect your Omeo before each use (see Pre-ride
Checks, Pg. 105). Do not ride if any part is loose,
damaged, or if the tyres are not properly inflated.
Refer to Segway PT User Manual (Pg. 98).
Before using, it is important to make sure that your
Omeo is assembled and charged correctly.
See Assembling your Omeo (Pg. 22) and Charging
your Batteries (Pg. 67).
SECTION 7 LEARNING TO RIDE YOUR OMEO EVOLUTION
42
|
OMEO EVOLUTION USER MANUAL
Page 43

Riding Behaviour
and Method
See also Segway PT User Manual (Pg. 79).
Control
It is critical that you are in control of your balance
when using the Omeo. Controlling direction
(unless in Joystick Mode) and speed is by way of
body movement. You must maintain coordination
in all aspects of riding including when stationary,
accelerating, moving, turning and stopping.
NOTICE
If you cannot control the Omeo independently
you will need to practise with a Spotter or
reconsider whether the Omeo is appropriate
for you.
You must select the path, speed and device
settings with a view to staying in control of your
Omeo always with total regard to the safety of
both yourself and others. Your Omeo responds
directly to the terrain and surface conditions in
which you choose to ride. It is up to you to use
good judgment in selecting safe and manageable
terrain and environments in which to operate
your Omeo.
There are numerous factors to understand for safe
operation of your Omeo:
• Remain centred: both axes, forward and back
and side to side. This is your “Neutral” Position
• Aim for calm and controlled movement
• While leaning, use hands or body to maintain
balance
• Stabilise your feet and legs
• Be alert and aware of your surroundings
• Ride within your capabilities: test yourself with
controlled acceleration and stops
• Practise accurate and purposeful steering
• Avoid obstacles
• Be familiar with all controls; firstly, in Joystick
Mode, gently move forward and back
• Then in Active Seat Control (ASC) gently
forward and back and steering using weight
transfer through your hips onto the seat
• Understand other controls: Dampening
Control for seat resistance, Lights, Stabilising
Legs
• Control settings: set the variable controls
available on the InfoKey™ Controller to the
appropriate level for your riding environment
and skill level. Refer to Segway PT User Manual
(Pg. 43)
• Make sure that the seat geometry is right for
you; aspect, centre setting and Footplate to
Seat height – see Section 11: Customisations
(Pg. 87) for Seat setting
• Operate with care, respect and awareness
for other people in your environment, for
example, at walking pace among pedestrians
• Operate within the laws of the jurisdiction
you are riding, for example, some jurisdictions
restrict use on footpaths (sidewalks), or have
speed limits
• Do not wear loose clothing or jewellery or
carry or hang anything that could become
entangled in the wheels
• We strongly recommend you wear a good
safety helmet.
SECTION 7 LEARNING TO RIDE YOUR OMEO EVOLUTION
43
|
OMEO EVOLUTION USER MANUAL
Page 44

Avoiding Hazards
Your Omeo is a two-wheeled self-balancing
device with a dynamic steering system designed
to keep you in an upright seated position when
powered on. It will not tip over when operated
properly.
Proper use includes being aware of and avoiding
hazards:
• Traction – Your Omeo’s Tyres must have
traction at all times to avoid slipping. Traction
and control can be lost where your weight
or payload reaches a point where the motors
can no longer keep the device upright, for
example down or across very steep slopes.
See also factors that influence traction (Pg. 46)
• Tripping – Your Omeo can trip if it hits a low
obstacle with force, coming to a sudden stop.
This action could catapult your Omeo and you
forward or backward.
• Tipping – Your Omeo may tip if the sideways
weight transfer is too excessive.
• Skidding – Your Omeo may skid with
Stabilising Legs down if you lean forward
too much.
See also Segway PT User Manual (Pg. 62).
SECTION 7 LEARNING TO RIDE YOUR OMEO EVOLUTION
44
|
OMEO EVOLUTION USER MANUAL
Page 45
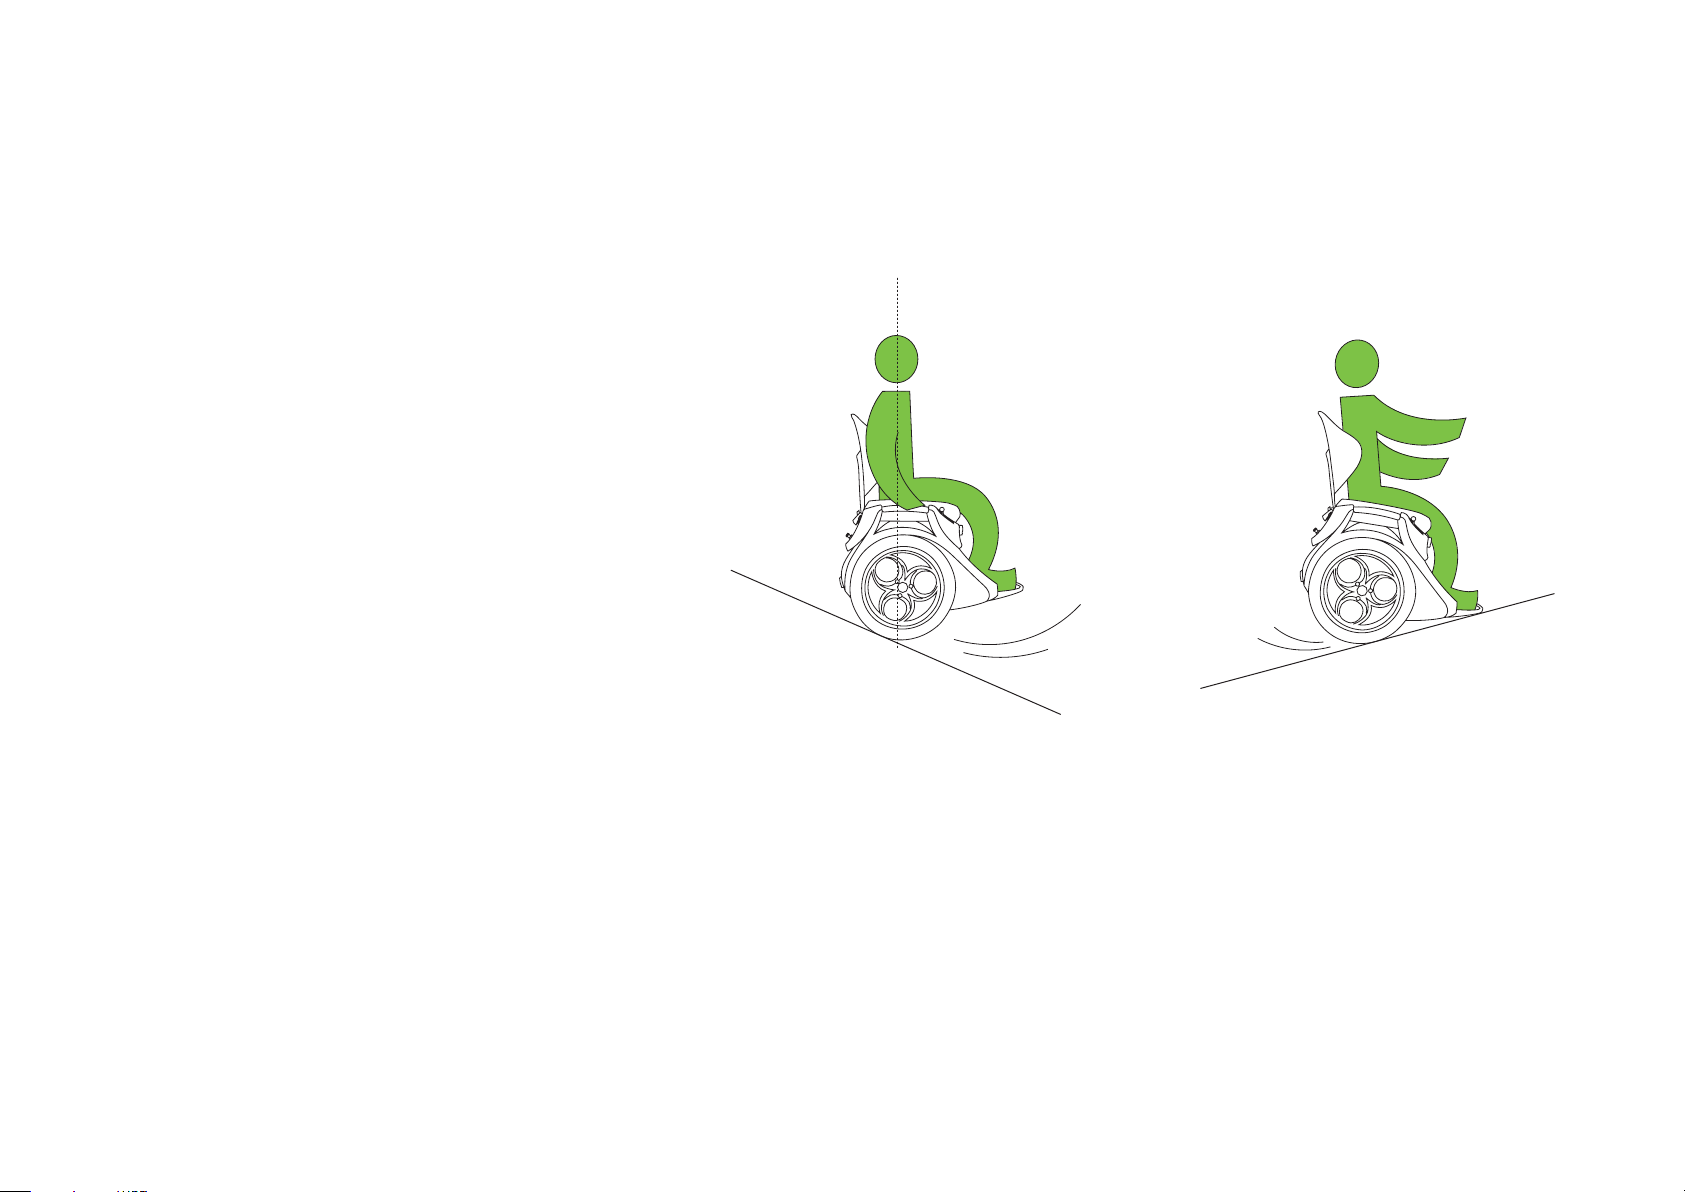
Avoiding Loss of Traction
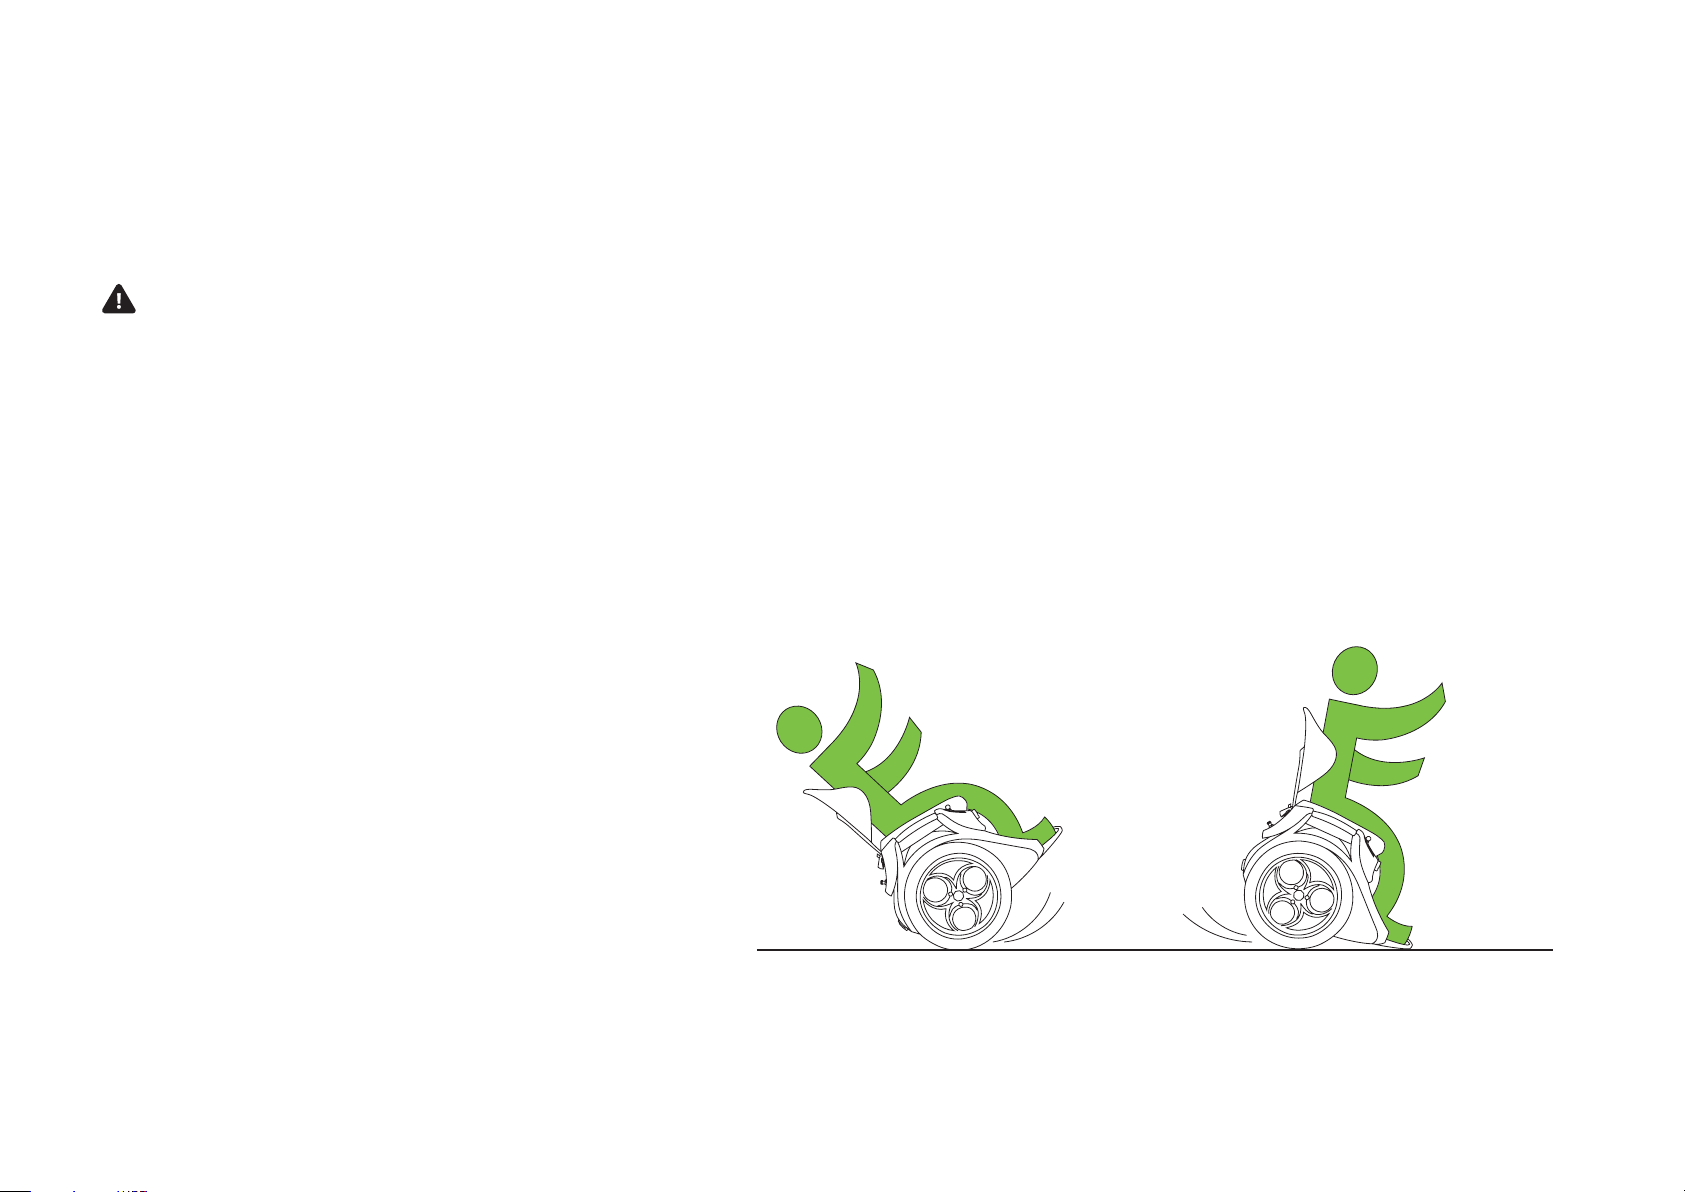
Your Tyres must be able to grip the ground to
stay upright. Slipping happens when the tyres
lose traction. This can cause a loss of control and
potentially a fall. Aggressive riding and riding over
loose or slippery surfaces may result in slips.
WARNING
Riding your Omeo on a slope, wet or loose
surface increases the risk of losing traction
and slipping and may result in serious injury
or damage.
NOTICE
Alerts will activate when significant loss
of traction occurs. You will hear an alarm
sound which is also accompanied by a shake
and rumble. This is known as a Safety Shake
Warning – refer to Shake Warning (Pg. 40).
Sustained loss of traction will result in a Safety
Shutdown (Refer to Safety Shutdown Pg. 40).
SECTION 7 LEARNING TO RIDE YOUR OMEO EVOLUTION
45
|
Figure 19: Loss of traction on a flat surface.
OMEO EVOLUTION USER MANUAL
Page 46
Avoiding Loss of Traction (cont)
Factors that influence traction are, but not
limited to:
• Slope / pitch
• Speed
• Weight
• Loose surface
• Wet grass and vegetation
• Sand
• Gravel
• Snow
• Ice
• Polished concrete
• Wet wood.
Your Omeo will perform on these surfaces.
User confidence and performance improves
with experience and common sense. Take care.
SECTION 7 LEARNING TO RIDE YOUR OMEO EVOLUTION
46
|
Figure 20: Loss of traction on an incline.
OMEO EVOLUTION USER MANUAL
Page 47
Avoiding Tripping
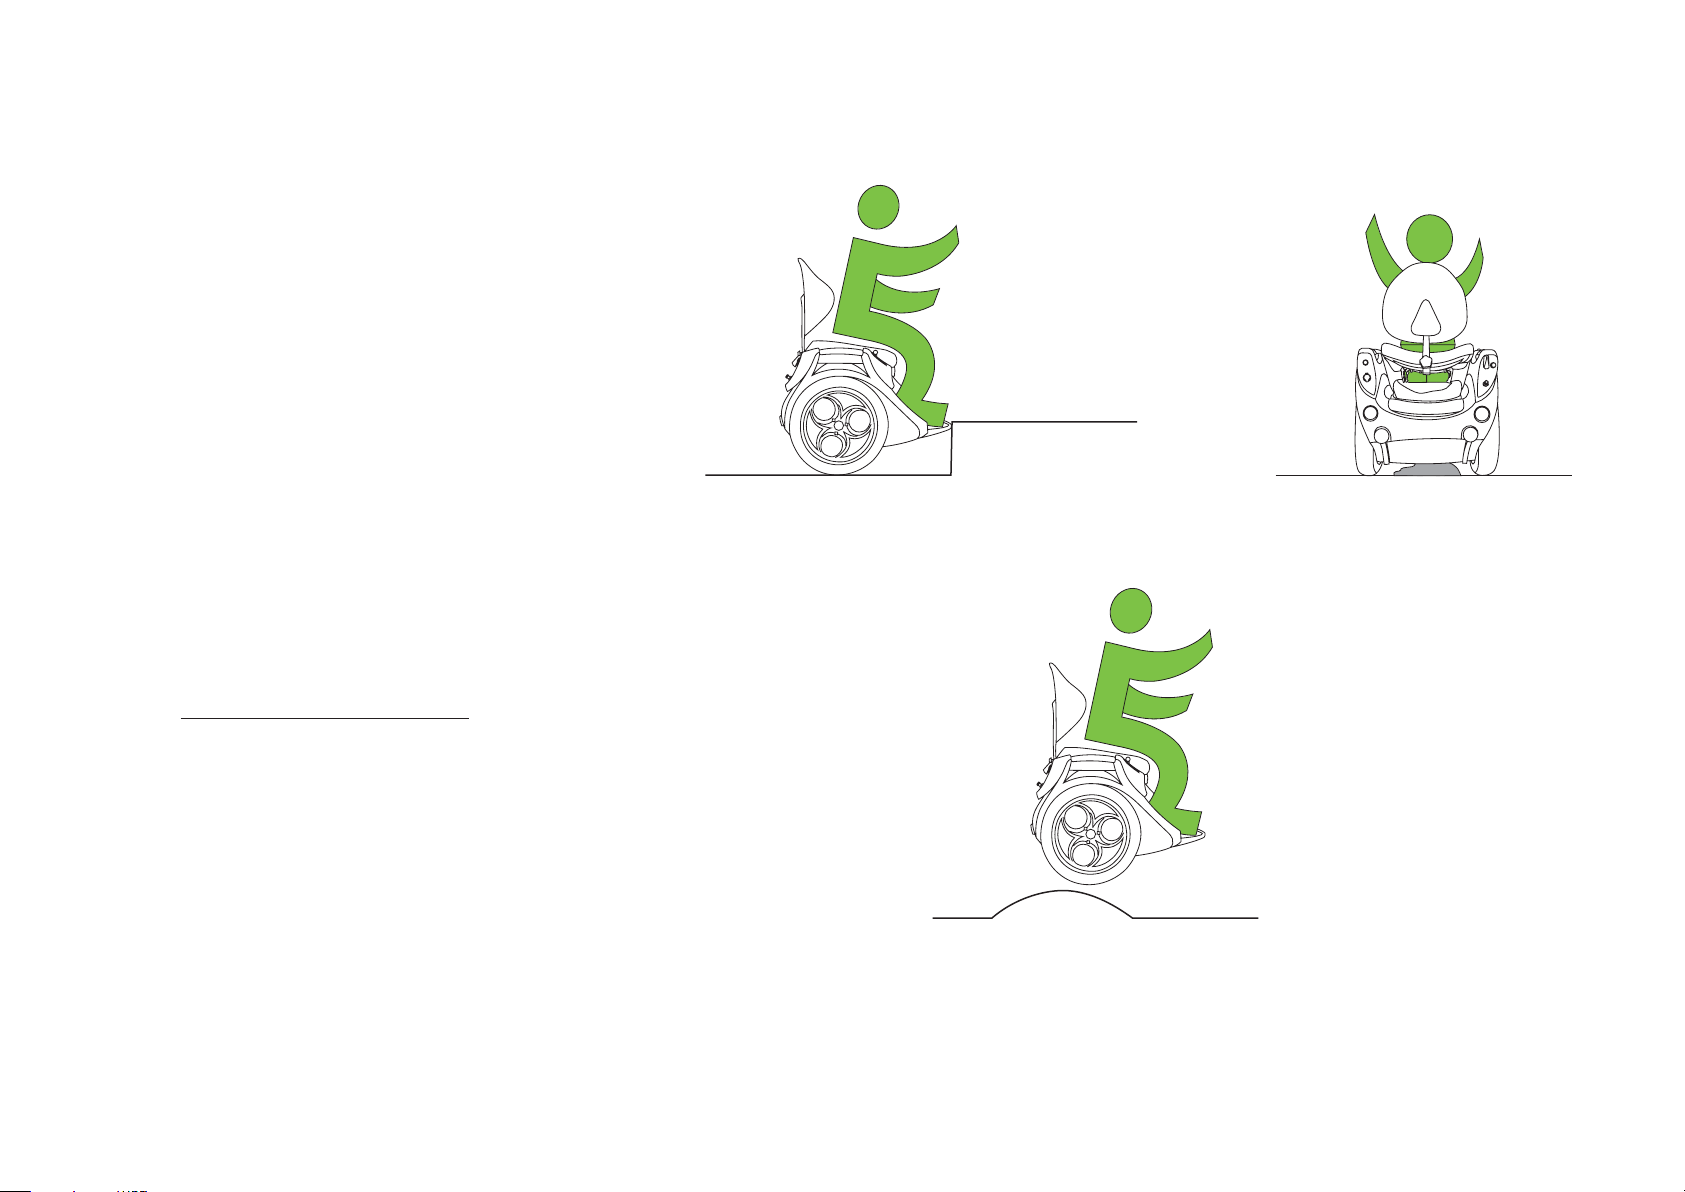
Your Omeo will trip if it encounters an obstacle
that it can’t get over. It will come to a sudden stop;
the alerts will sound, and the device will rumble
and shake. This is known as a Safety Shake Warning
(Refer to Shake Warning Pg. 40).
A sudden stop against an obstacle could
overpower the balance motors, throw you o and
potentially damage the device.
To avoid tripping, you must be aware of the
riding environment and use the device within
its capabilities.
Avoid:
• Obstacles that the wheels cannot roll over
with ease (greater than 40 mm/1.5 inches), for
example, steps, curbs and potholes
• Surfaces where the body of the Omeo may get
caught up due to contact
• Becoming airborne, as a change in orientation
of your Omeo at speed could cause tripping.
See also Segway PT User Manual (Pg. 63).
SECTION 7 LEARNING TO RIDE YOUR OMEO EVOLUTION
47
|
Figure 21: Avoid Tripping.
OMEO EVOLUTION USER MANUAL
Page 48
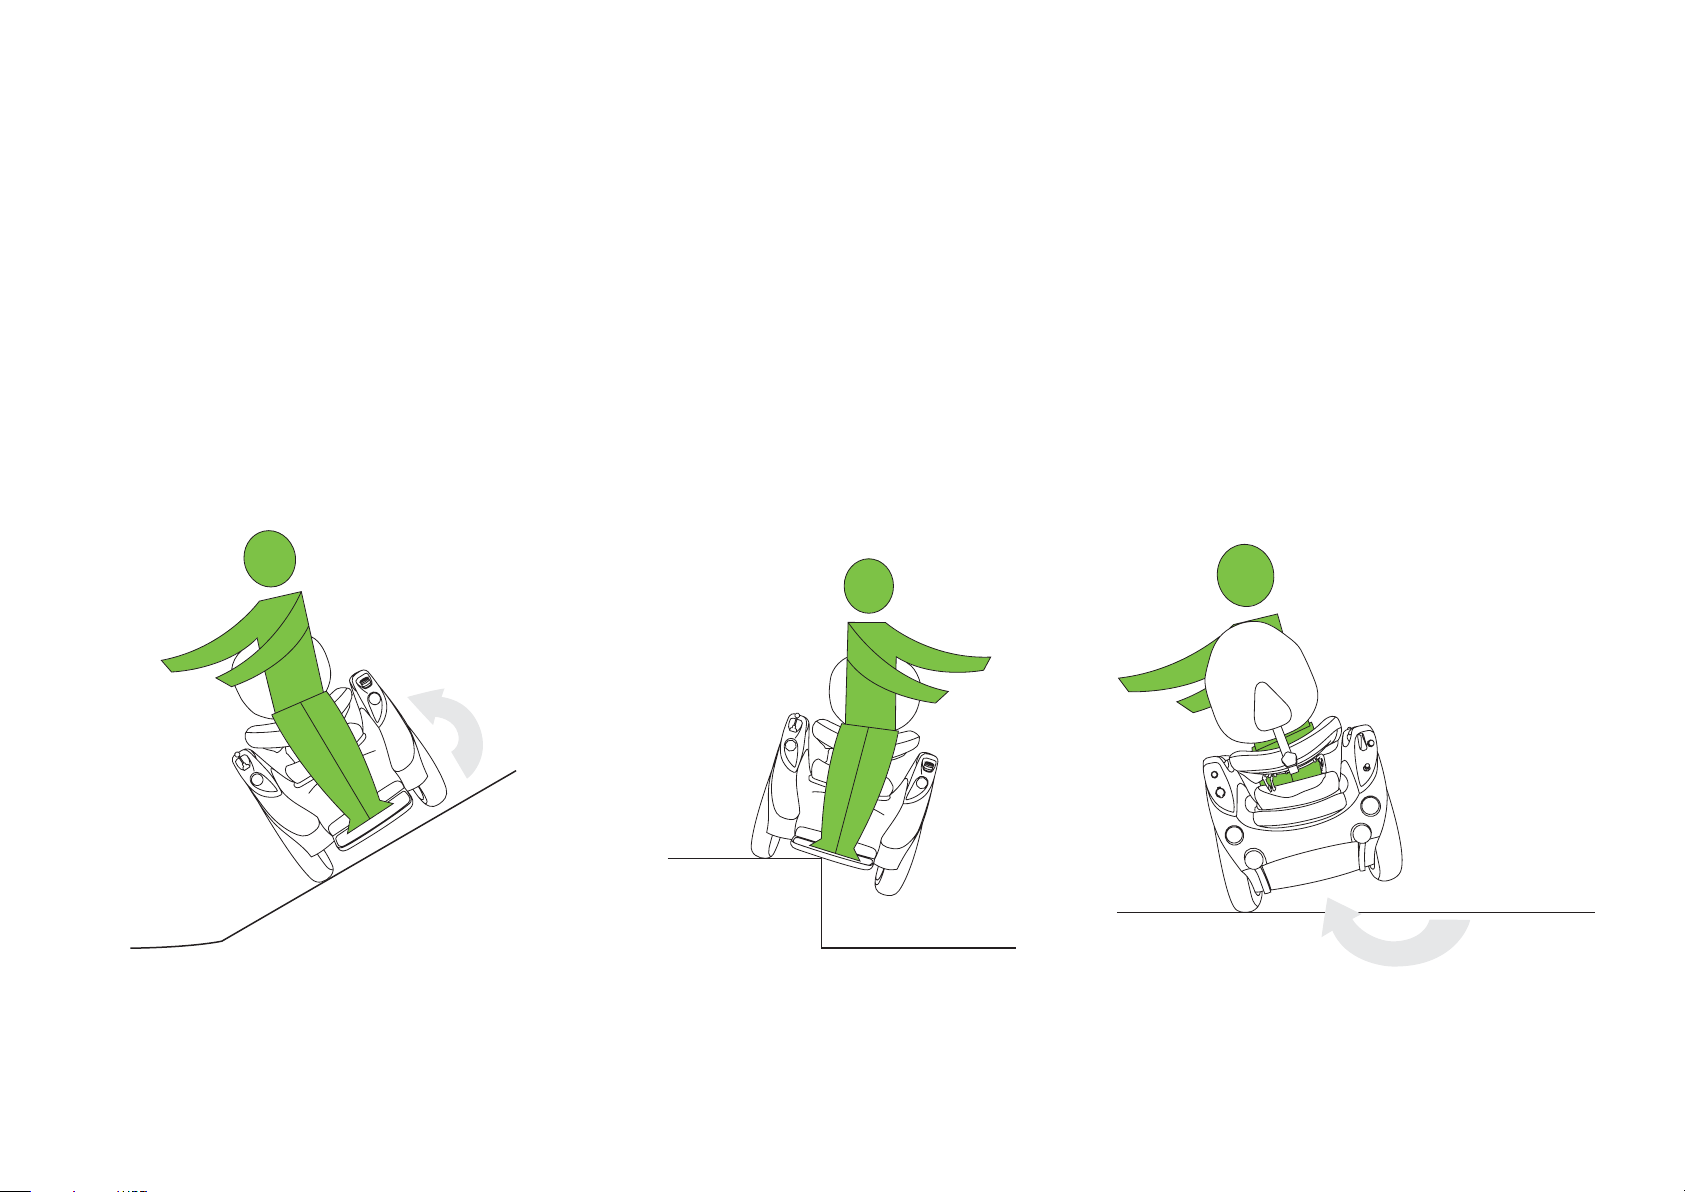
Avoiding Tipping
Tipping the Omeo is possible on excessively steep
slopes, a slope beyond the recommended limits
of the device, or when being ridden over an object
that drops away quickly.
Riding at speed on a firm surface and making a
sudden change of direction can also cause tipping.
To avoid tipping make sure you are fully in control
at all times.
Avoid:
• Sudden changes of direction at speed
• Riding across slopes greater than 20 degrees
• Riding into or onto changeable surfaces at
speed where one wheel will rise above the
other
• Dropping one wheel down a slope or hole.
Avoiding Skidding
Your Omeo may skid when the Stabilising Legs are
lowered on some slippery or unstable surfaces on
slopes, or if you lean forward too much while the
Omeo is still powered on.
Avoid:
• Slippery or unstable surfaces on slopes
• Leaning forward too much whilst powered on.
SECTION 7 LEARNING TO RIDE YOUR OMEO EVOLUTION
48
|
Figure 22: Avoid Tipping.
OMEO EVOLUTION USER MANUAL
Page 49

Learning to Ride your Omeo
Your Omeo can be ridden by users with a wide
range of physical capabilities. The performance
level of the device will vary according to your
physical capability.
The learning sequence contained in this Manual
has been developed from years of practice
among numerous riders of varying levels of ability.
It covers your initial ride through to a level of
competence. It is important to always ride within
your capabilities and develop your riding skills in a
progressive manner.
NOTICE
SPOTTER TO BE IN ATTENDANCE.
When you are learning to ride your Omeo,
you must have an able-bodied assistant, or
“Spotter” who is alert, physically able to keep
up with and react quickly enough to stop the
Omeo by pulling back on the Seat at any time.
They must be able to keep up with your Omeo
set to Turtle Mode -10 kph / 6 mph. (Refer to
Turtle Mode Pg. 52).
Your Spotter should only touch the moving
Omeo/Seat when required, as it is important for
you to learn uninterrupted and at your own pace.
Your Spotter must understand how your Omeo
works and be able to activate the Stabilising
Legs in both Joystick Mode and ASC Mode; and
manage a Safety Shutdown competently.
It would be an advantage for the spotter to be a
competent user.
WARNING
Before learning to ride, your Omeo must be
set up and fitted for your height. Your Omeo
should arrive at the correct height setting if
you advised Omeo when ordering. Otherwise
adjustments should be done under the
guidance of your Authorised Omeo Agent or by
reference to customisations in this Manual.
(See Section 11: Customisations, Pg. 87).
NOTICE
The environment you select for learning should
be free of distractions for both you and your
Spotter so that you can both focus on learning.
SECTION 7 LEARNING TO RIDE YOUR OMEO EVOLUTION
49
|
OMEO EVOLUTION USER MANUAL
Page 50
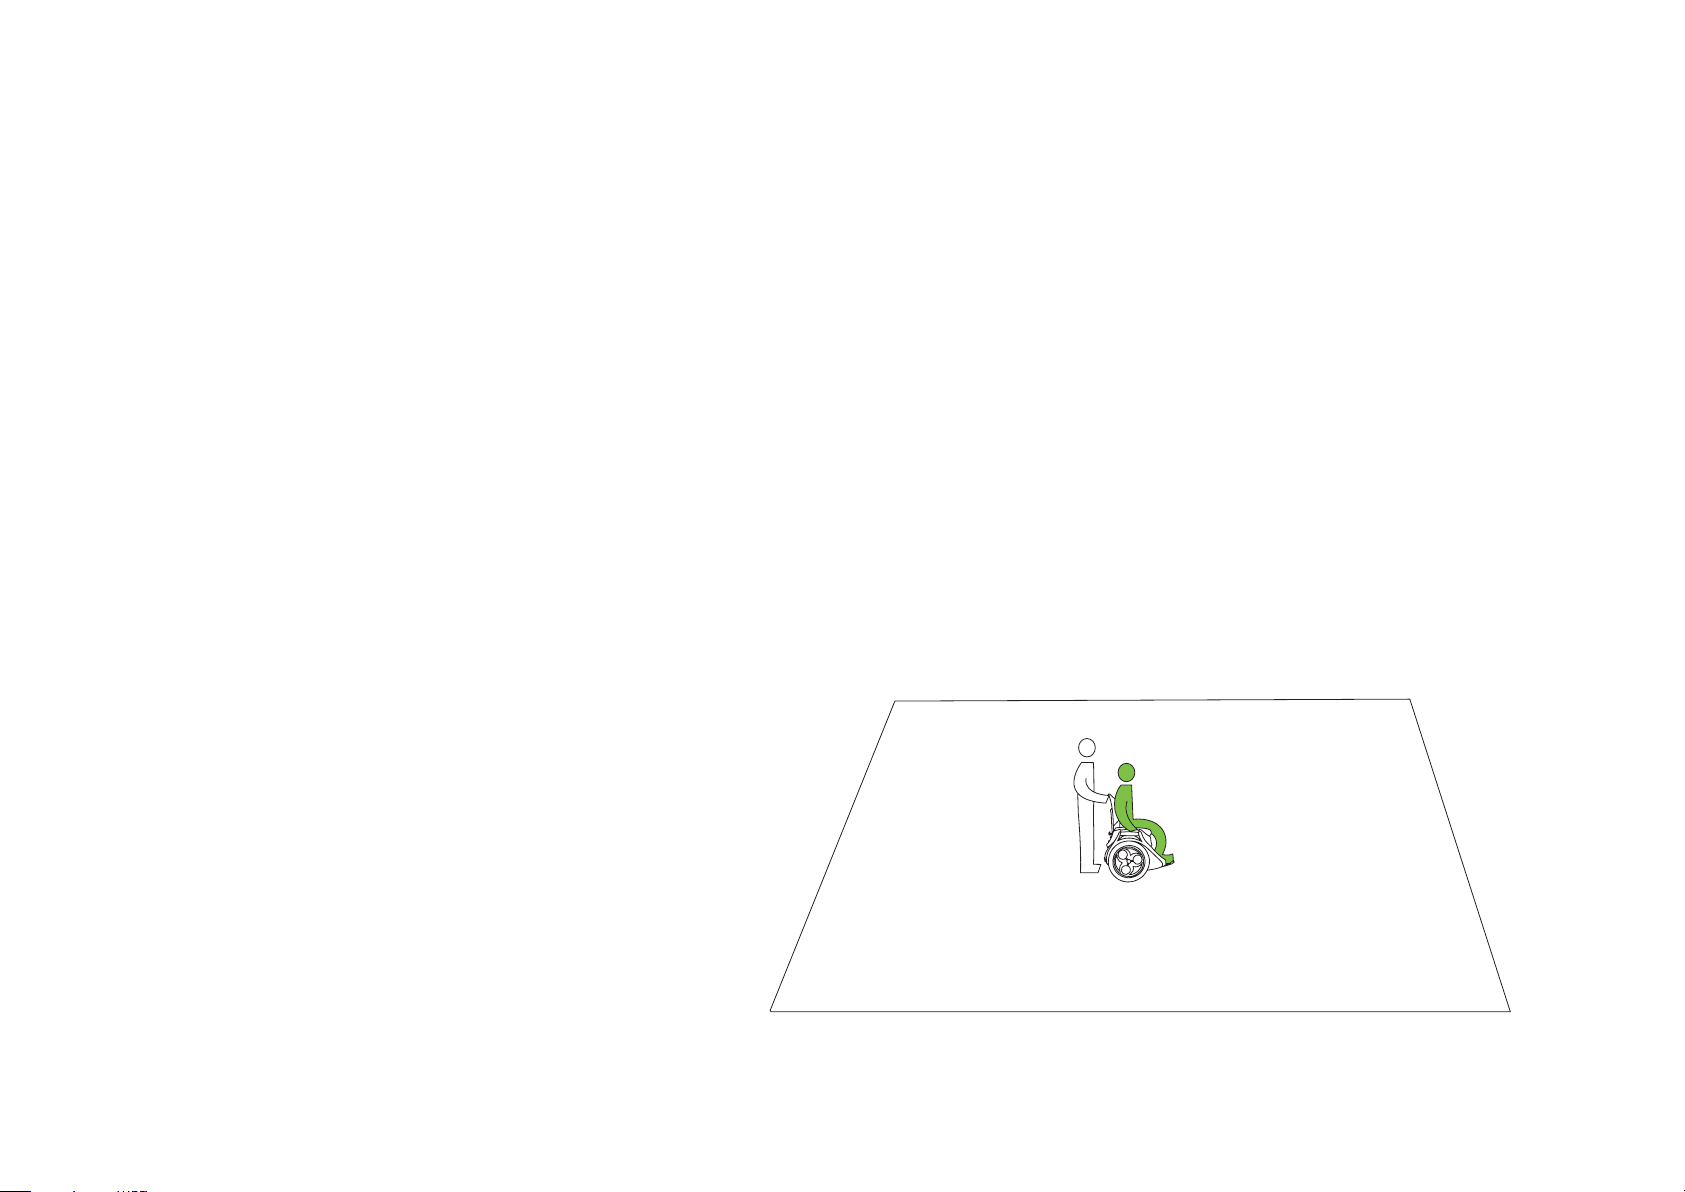
Learning Sequence
1. Select your environment
NOTICE
When you are learning to ride the Omeo, it is
very important that you are in an appropriate
environment where you are least likely to harm
yourself, others or property in the event of loss
of control.
Start on firm, smooth and level ground, for
example short dry grass, compacted earth,
concrete, asphalt and non-slippery flooring.
Make sure that you have adequate clear space to
practise. Clear space also means no obstructions
at head or waist height, (such as low branches
and signs), and free from vehicles, bicycles, pets
and small children. It is recommended that you
have an area of at least 100 sqm (1000 sqft)
initially, expanding the area as confidence and
skill level develops.
Site selection in summary when learning to ride:
• Have a spotter in attendance
• Clear space, at least 100sqm (1000 sqft)
• Flat, level and firm ground
• Not slippery
• No overhanging obstructions
• No pets or small children about
• No other vehicles
• Expand area and type of terrain as skill level
develops and include lumpy surface and
minor obstacles.
SECTION 7 LEARNING TO RIDE YOUR OMEO EVOLUTION
50
|
Figure 23: When learning to ride, it is strongly recommended that you have an
able-bodied assistant (Spotter).
OMEO EVOLUTION USER MANUAL
Page 51
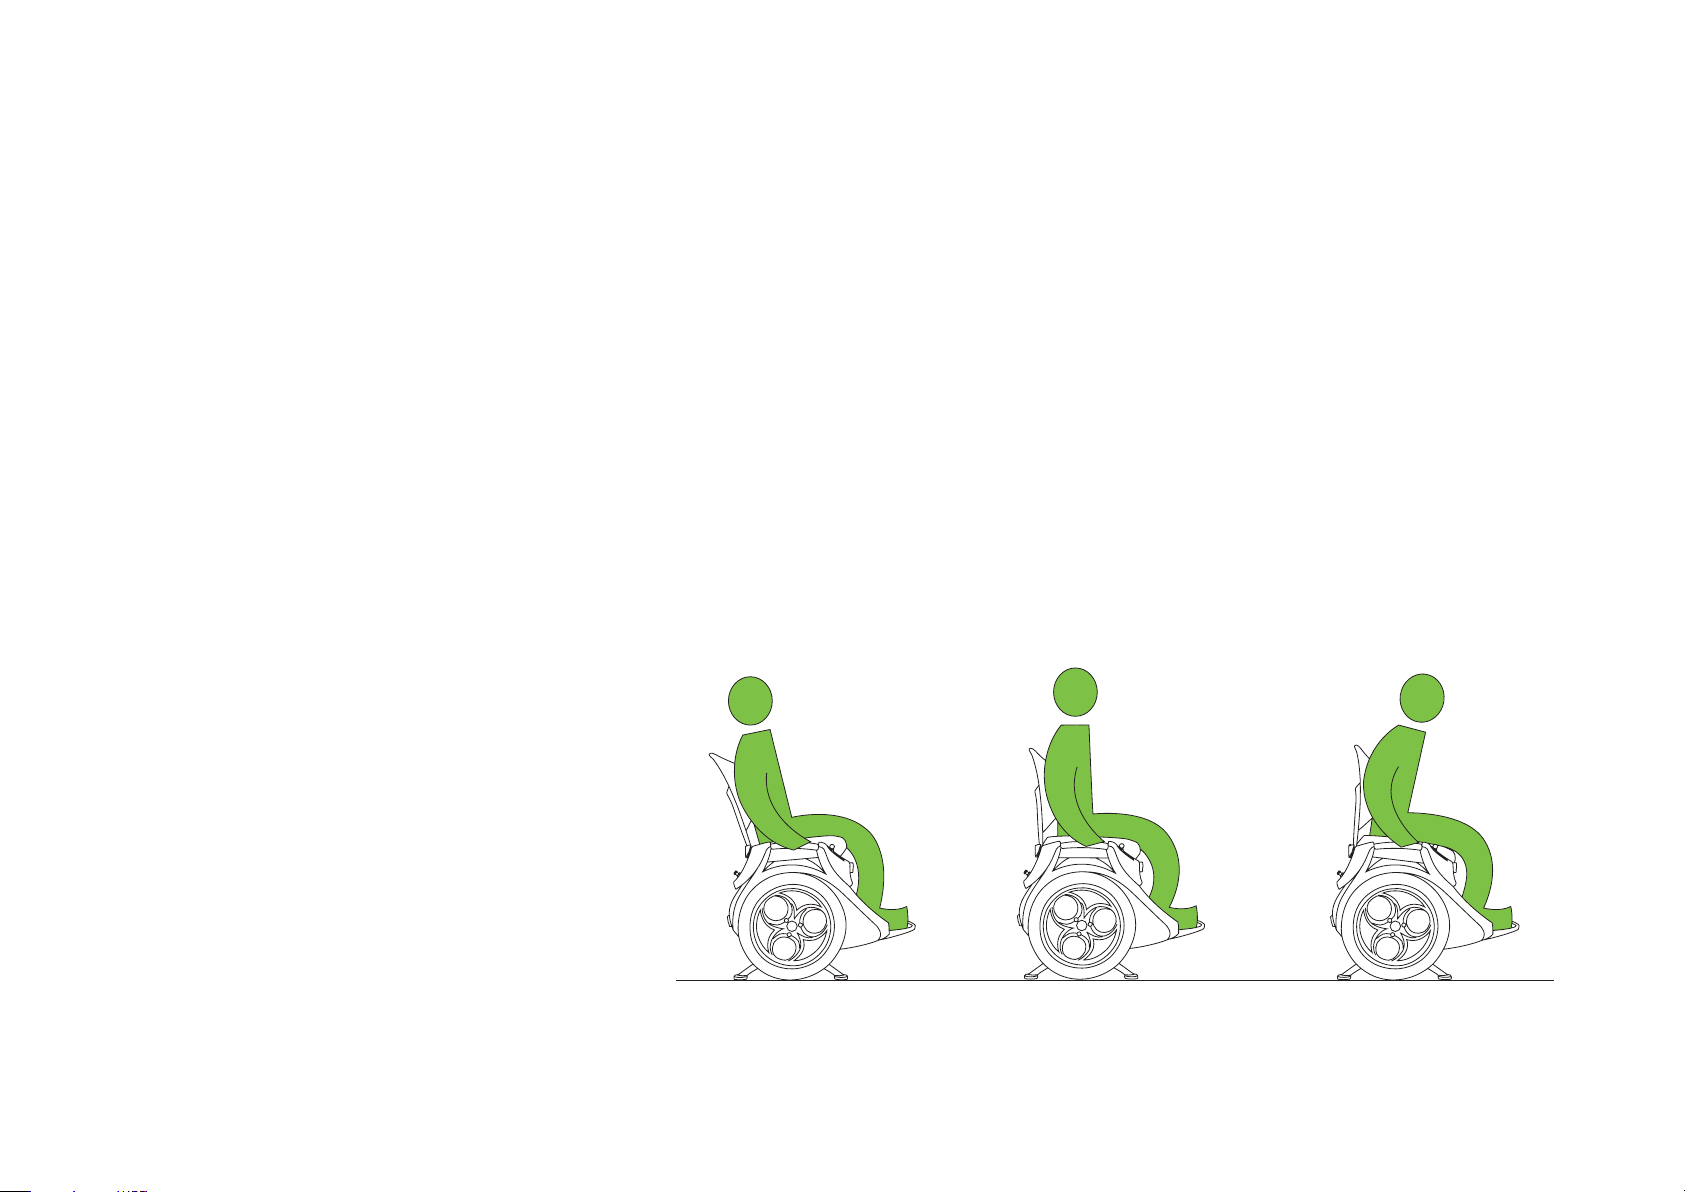
Learning to Ride (cont.)
2. Set up the Omeo for learning and
transferring onto the Seat
1. You may require assistance with lifting,
using a transfer board or crutches
NOTICE
This is your responsibility. Omeo Agents are not
trained or authorised to assist with transferring
or lifting
2. Orientate your Omeo in the direction that
you want to ride and lower the Stabilising
Legs
3. Ensure that there are no obstacles on the
Seat or in the way of your transfer path
4. Ensure the power is o
5. You may find it easier to transfer with the
Footplate up to get you closer to the Seat
6. Switch to Joystick Mode. This will lock
the Seat so that it won’t move in a lateral
motion when you transfer onto your
Omeo
8. If transferring from another device,
make sure that device and any assistive
equipment such as transfer boards and
crutches are removed from the immediate
riding zone after use
9. Find a comfortable and balanced seating
position, hold onto the Hand Grips and
rock gently forward and back to get your
sense of balance (Figure 24)
10. It is important to familiarise yourself with
this new sensation.
7. Transfer onto your Omeo according to
your preference and capability
SECTION 7 LEARNING TO RIDE YOUR OMEO EVOLUTION
51
|
Figure 24: Getting your sense of balance.
OMEO EVOLUTION USER MANUAL
Page 52

Learning to Ride (cont.)
3. Turning on and riding your Omeo
Turning on the Omeo is a two-stage process:
1. The first stage is to switch on the Omeo by
using the InfoKey™ Controller by pressing the
Power button, to engage Standby Mode
2. The second stage is to push the Main Control
Switch on the Control Panel which raises
the Stabilising Legs and puts the Omeo into
Balance Mode.
You are now on a live platform ready to ride.
When learning to ride, have your Spotter stand at
the rear quarter of the device ready to hold the
Seat Back to stabilise it. This is the ‘Ready to Help’
position.
NOTICE
Always complete a pre-ride check for centre of
balance / control, environment, obstructions,
Battery charge, Tyre pressure and dress before
turning your Omeo on.
Turtle Mode
NOTICE
Your Omeo arrives pre-set in Turtle Mode to
10 kph / 6 mph.
This is so that you begin to ride your Omeo with
caution, before progressing to Standard Mode as
your skill level develops.
To unlock this setting for the first time, you
must press the Turtle Button on the Infokey™
Controller and the Information Display Button for
10 seconds.
Once unlocked you can simply revert to or from
Turtle Mode by pressing the Turtle Button once.
When in Turtle Mode your Omeo is more stable
and less aggressive when moving.
Before learning to ride your Omeo, you must
make sure that you are familiar with the InfoKey™
Controller codes and operation, and all other
operational procedures and warnings.
SECTION 7 LEARNING TO RIDE YOUR OMEO EVOLUTION
52
|
OMEO EVOLUTION USER MANUAL
Page 53
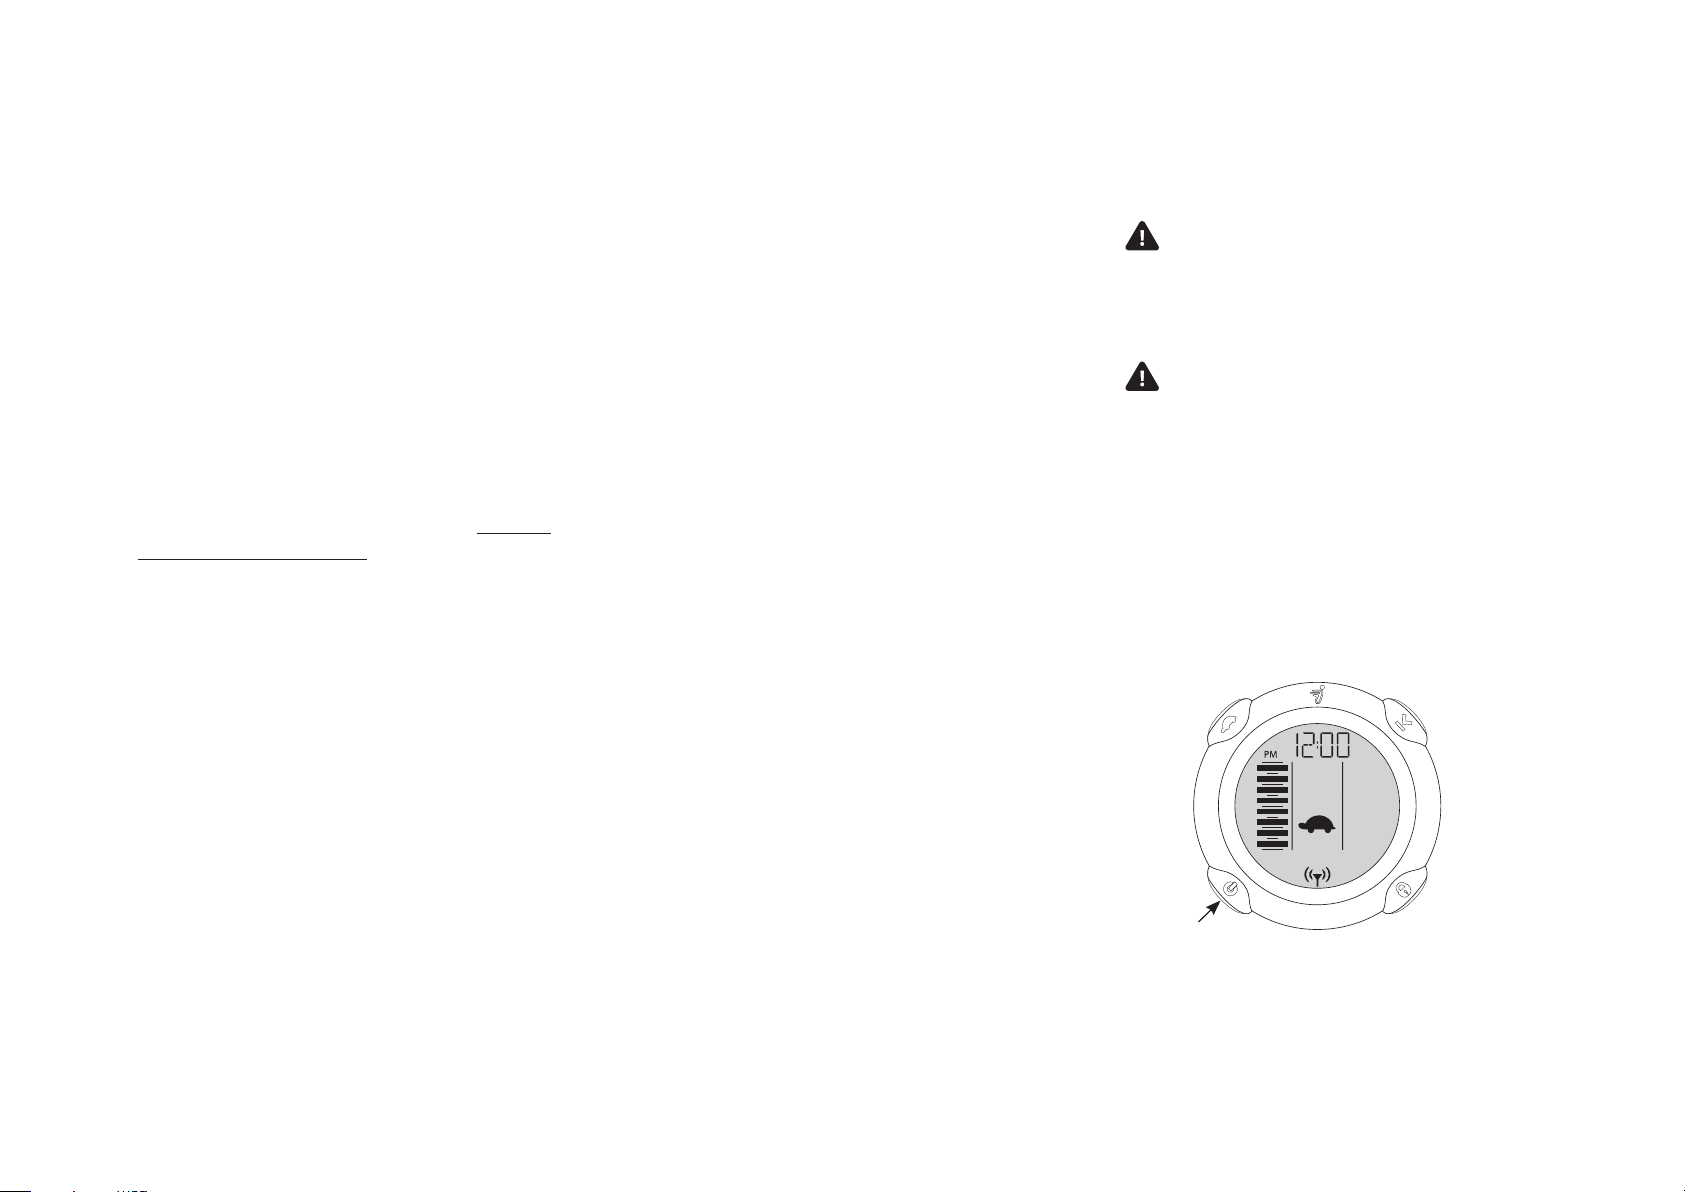
Learning to Ride (cont.)
NOTICE
Neutral Balance, referred to below, is where
you have centred your body mass on the Seat,
such that you can maintain balance whilst
keeping your Omeo stationary.
Steps to Riding Your Omeo
1. Power on the machine by pressing the Power /
Standby Button on the InfoKey™ Controller
(as shown in Figure 25) and confirm that your
Omeo is in ‘Turtle Mode’ (Refer to the Segway
PT User Manual Pg. 41-42)
2. Make sure that the Balance Indicator Lights are
green. These indicate the Omeo is balanced
(for further information refer to Balance
Indicator Lights, Pg. 33)
3. While sitting in Neutral Balance, familiarise
yourself with all the control switches.
4. Test that you can reach each one while
keeping Neutral Balance
7. Maintain Neutral Balance to ensure your
Omeo does not rotate while the Stabilising
Legs are still down. Moving while Stabilising
Legs are down may cause damage to your
Omeo
8. Raise the Stabilising Legs and activate Balance
Mode by pushing the Main Control Switch
9. Whilst in Joystick Mode gently rock forward
and back – approximately 30cm, (12in.) to
familiarise yourself and establish control with
basic drive operation
10. Expand and speed up the forward and back
movement to 100cm (40in.) as you develop
confidence. This process will teach you how
to brake
11. You can brake or stop the forward motion
of your Omeo by rapidly leaning backward
or thrusting your body into the back of
seat. Immediately after braking adjust your
balance to Neutral Balance, otherwise you will
continue to reverse.
WARNING
When you are sitting on the Omeo preparing to
power on and ride, make sure that you push the
Main Control Switch only once.
WARNING
If you push the switch 5 times within 3 seconds
of each activation, then the Stabilising Legs will
raise and the Omeo will be in ‘Walker Balance
Mode’. Walker Balance Mode is an assistive
mode and does not deliver enough power
to maintain balance with a rider on board.
The Omeo could fall over potentially causing
serious harm.
5. Maintain Joystick Mode initially whilst learning
6. Hold the Hand Grips initially whilst learning,
until you are confident with balance and
weight transfer
SECTION 7 LEARNING TO RIDE YOUR OMEO EVOLUTION
53
|
NOTICE
Be mindful that pressing the Main Control
Switch activates the Power Base to Balance
Mode, unlocks / activates the seat (forward
and back only) and lifts the Stabilising Legs in
one action. Be prepared to immediately find
your centre of balance / neutral to prevent
unexpected forward or back movement.
Power/Standby button
Figure 25: InfoKey™ controller indicating Turtle
Mode is activated.
OMEO EVOLUTION USER MANUAL
Page 54
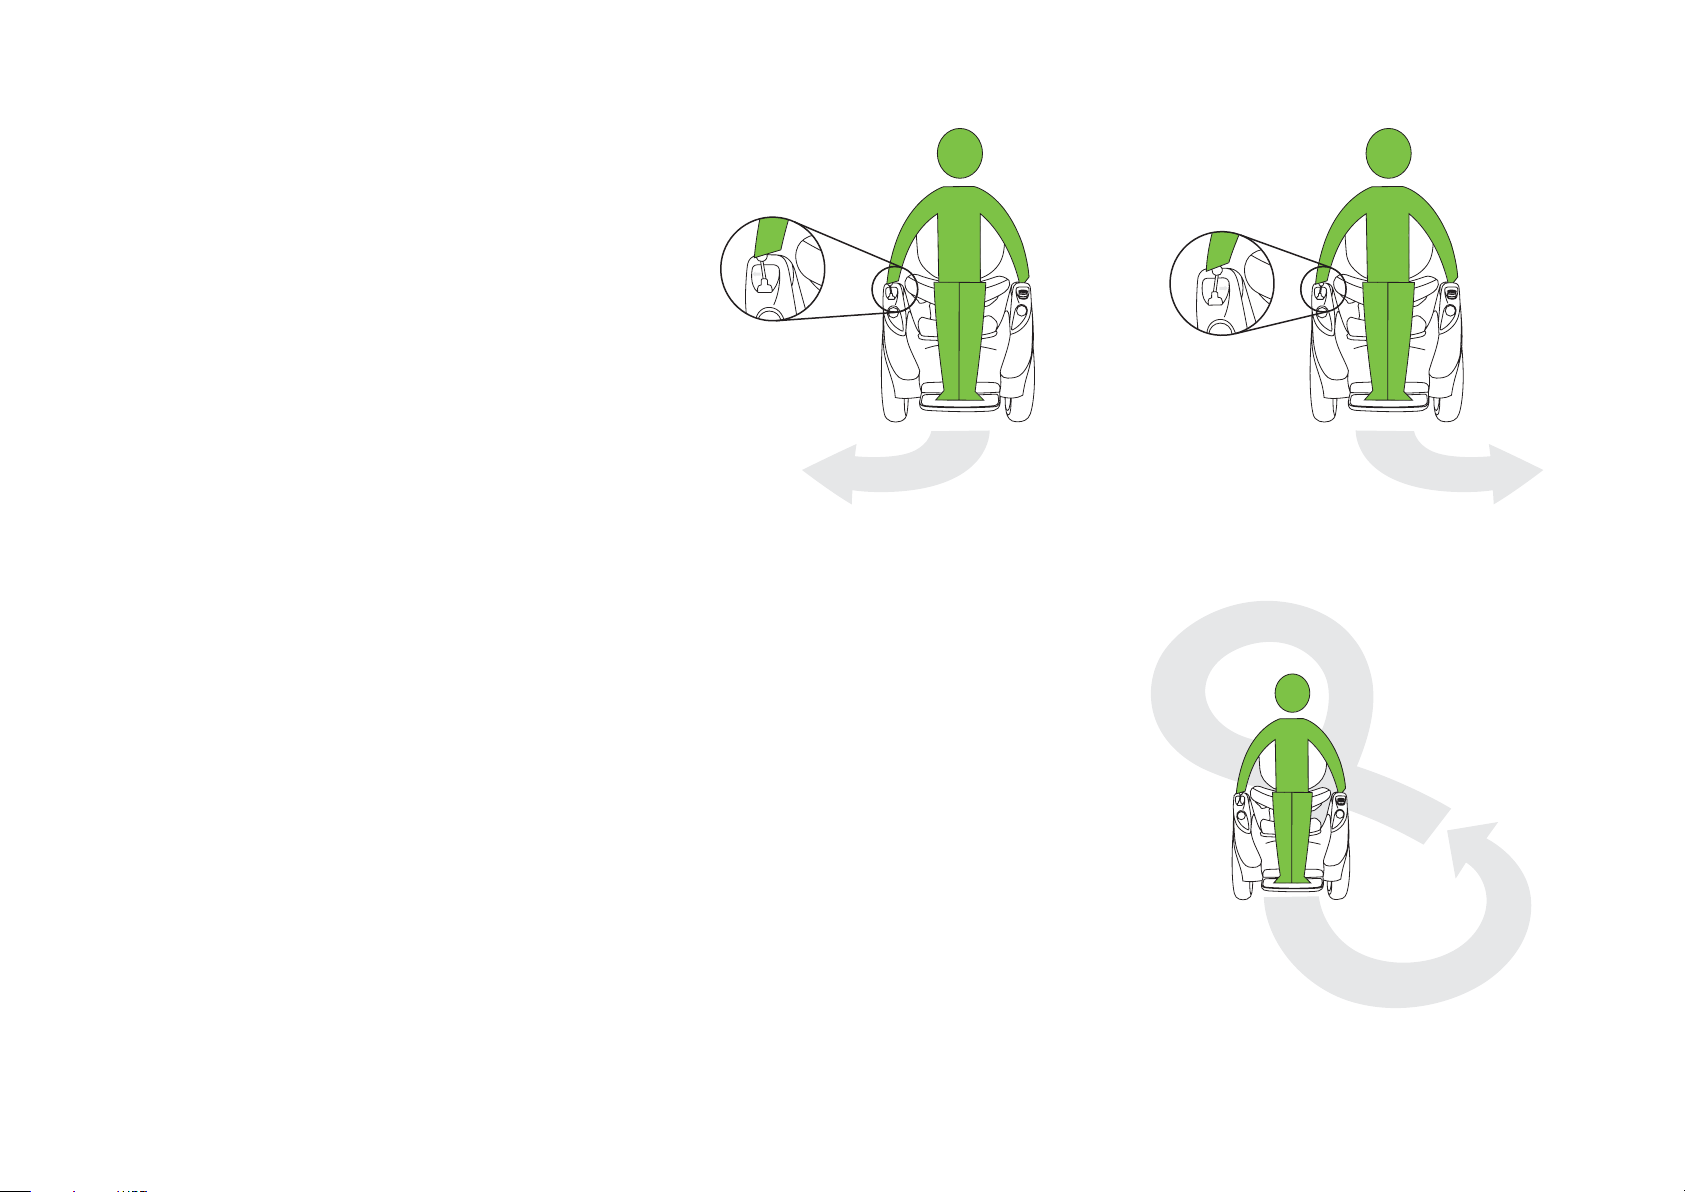
Learning to Ride (cont.)
Directional riding
When you can control moving and stopping,
you can ride in your chosen direction using the
Joystick or the ASC (leaning) to steer.
NOTICE
The Joystick only controls directional steering
and not forward and backward movement.
The forward and backward (and therefore
braking) motion is always controlled by moving
your weight forward and backward whilst
sitting on your Omeo.
Figure 26: Directional riding using the Joystick.
Joystick
1. Hold the Joystick firmly by bracing your hand
on the Body of your Omeo
2. Move the Joystick left and right while
stationary until familiar with the sensitivity,
action and response
3. Now lean/ride forward and turn a quarter of
a circle and stop. Repeat this until you have
completed a circle
4. Now ride a circle in the opposite direction in a
start and stop manner
5. Ride in circles and then figure 8 patterns of
approximately 2m (6.5ft) in a controlled and
purposeful manner. (Figure 27)
SECTION 7 LEARNING TO RIDE YOUR OMEO EVOLUTION
54
|
6. Both yourself and your spotter must use
your best judgement as to when you are in
control and that you feel and look safe and
are independent of physical help in balance,
motion, steering and stopping
7. Practise stopping and lowering the Stabilising
Legs by choosing a specific spot and
orientation to bring the Omeo to a complete
stop
8. Whilst stationary reach around and push the
Main Control Switch once. The Stabilising
Legs will lower and the Omeo will go into
‘Active Standby Mode’ which is indicated by a
single beep
9. Press the Power button on the InfoKey™
Controller once to enter Standby Mode which
will be indicated by another single beep.
Figure 27: Directional riding with the Joystick
in figure 8 patterns.
OMEO EVOLUTION USER MANUAL
Page 55
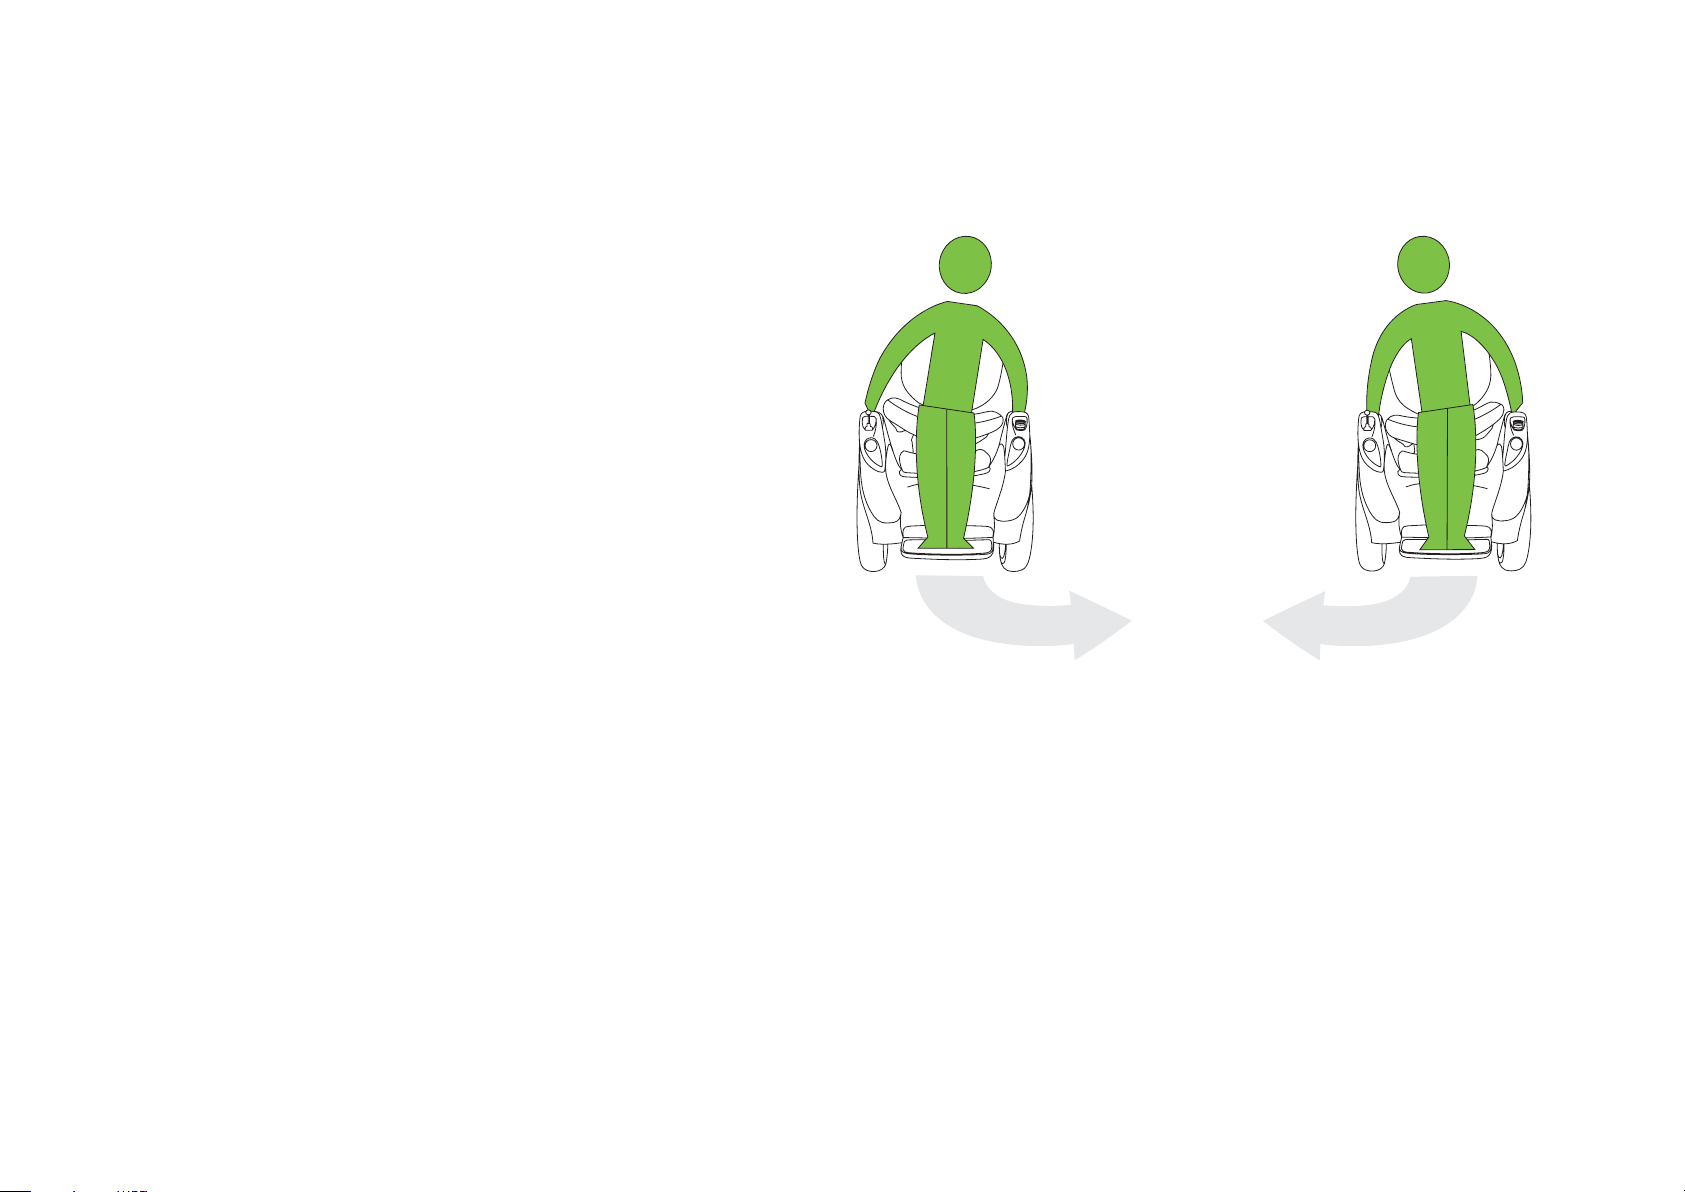
Learning to Ride (cont.)
Activate Seat Control (ASC)
ASC allows you to steer by applying downward
pressure from either side of your hips. This can be
done hands-free or by leveraging your torso using
your arms through the Hand Grips.
To activate ASC, you first need to be in Balance
Mode, then turn the Steering Selection Lever to
a horizontal position (covering the Main Control
Switch).
Using ASC to steer:
1. Your Spotter must be on standby, in the ‘Ready
to Help’ position in case of need
2. You need to remain stationary, in Neutral
Balance.
3. Hold onto the Hand Grips throughout
4. Switch the Steering Selection Lever to
a horizontal position. (Refer to Steering
Selection Lever, Pg. 31). Your Omeo will now
be in ASC Mode and the Seat is a live platform
and able to move in all directions
5. With both hands on the Hand Grips, lean
gently from side to side to create rotational
movement on the spot
6. Now ride forward and turn a quarter of a circle
and stop. Repeat this until you have completed
a circle
SECTION 7 LEARNING TO RIDE YOUR OMEO EVOLUTION
55
|
Figure 28: Directional riding using the ASC Steering.
OMEO EVOLUTION USER MANUAL
Page 56
Learning to Ride (cont.)
7. Now ride a circle in the opposite direction in
a start and stop manner
8. Ride in circles and then figure 8 patterns of
approximately 2m (6.5ft) in a controlled and
purposeful manner (Figure 29)
9. Both yourself and your Spotter must use
best judgment to acertain that you are fully
in control, that you both feel and look safe,
and independent of physical help in balance,
motion, steering and stopping
10. Practice stopping and lowering the
Stabilising Legs by choosing a specific spot
and orientation to bring the Omeo to a
complete stop
11. While holding stationary, reach around
and switch the steering mode from ASC to
Joystick by turning the Steering Selection
Lever to a vertical position and then
push the Main Control Switch once. It is
important that you keep the Seat level when
performing this action
12. The Stabilising Legs will lower and the Omeo
will go into ‘Active Standby Mode’ which is
indicated by a single beep
13. Press the Power button on the InfoKey™
Controller once to enter Standby Mode
which will be indicated by another single
beep.
SECTION 7 LEARNING TO RIDE YOUR OMEO EVOLUTION
56
|
Figure 29: Directional riding with ASC in figure 8 patterns.
OMEO EVOLUTION USER MANUAL
Page 57
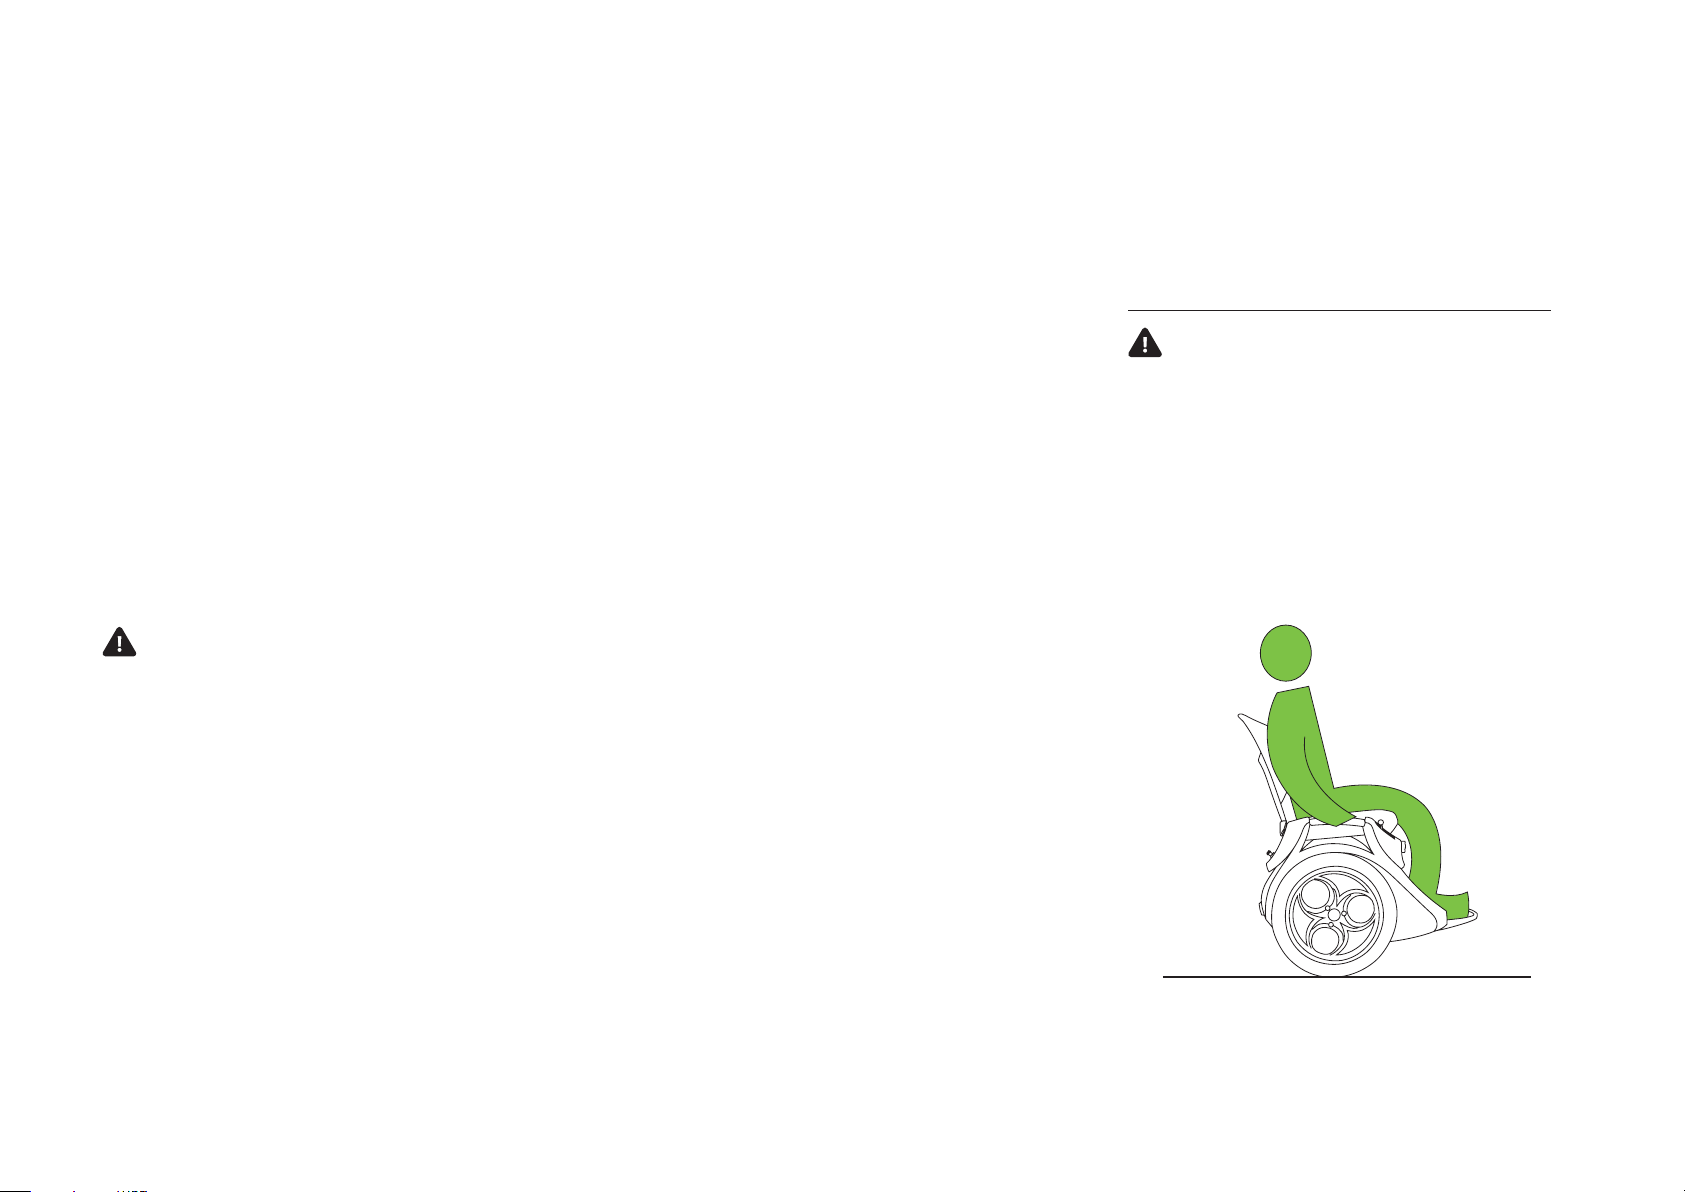
Learning to Ride (cont.)
Eyes up!
NOTICE
Keep your eyes and head up to the direction
you want to go. Just as with learning to ride
other devices, your body (and Omeo) will
follow your eyes. Looking down at the ground
directly in front of you may cause you to lose
focus and balance.
Keeping your eyes up and moving will make
you more aware of your surroundings and
connected with other trac / pedestrians.
Safety Shutdown
WARNING
When learning to ride the Omeo with the Active
Seat Control you must practise activating
the Stabilising Legs under simulated Safety
Shutdown conditions:
1. Immediately come to a controlled stop in a
safe location
2. Find your neutral balance otherwise the
Omeo will tend to reverse
3. Switch the Steering Selection Lever to
vertical position/Joystick Mode
4. When at a standstill, press the Main
Control Switch once only to lower the
Stabilising Legs.
Stopping
Going Forward
Stop the Omeo by shifting your weight away from
the direction you are travelling.
When travelling forward lean back into the Seat
Back, causing the Seat base to tilt.
If you are wanting to stop quickly, throw your
weight back into the Seat Back.
You will not fall backwards whilst in Balance
Mode unless you are using excessive force or lose
traction.
Once stopped, centre your weight to find Neutral
Balance in order to remain stationary.
When Reversing
To reverse the Omeo gently lean your weight
back.
To stop the Omeo when reversing, gently lean
your weight forward.
Tip: It may be easier to ascend steeper slopes in
reverse.
NOTICE
You will find that with practise, all forward,
backward and steering movement can be done
through your hips. Movement will become
intuitive.
NOTICE
The Omeo limits the speed and distance of
reversing by activating the Shake Warning
(Refer to the Segway PT User Manual Pg. 54).
WARNING
Always perform a controlled stop with gentle
movements, avoiding slippery surfaces and
potential to lose traction.
Figure 30: Stop the Omeo by gently
shifting your weight in the opposite
direction you are travelling.
SECTION 7 LEARNING TO RIDE YOUR OMEO EVOLUTION
57
|
OMEO EVOLUTION USER MANUAL
Page 58

Learning to Ride (cont.)
Expanding Riding Skills
When you can start, steer and stop with control
and accuracy on a flat smooth surface, you are
ready to progress riding on varied terrain and
settings.
By this stage you should be familiar with all the
switching controls such as lowering and raising the
Stabilising Legs, Joystick to ASC, power on and o,
and Safety Shutdown Mode. You should be starting
to enjoy the sensation of riding your Omeo.
NOTICE
Your Omeo moves in response to the nature
of the surface. An uneven surface may create
action that may throw you o balance, which in
turn can aect your Omeo’s drive and steering.
NOTICE
Hold onto the handles when riding the Omeo
over rough terrain. Do not attempt to do this
hands-free.
Your Omeo is a live platform. It is essential that
you develop the skill to move in response, and
if necessary, compensate for what your Omeo
is doing. For example, hitting a bump may push
you to one side, causing an unintended steering
response. Be prepared to compensate to maintain
your course.
Learning to ride is exciting and can be very easy so
long as you progress in controlled stages through
awareness, practise and progressive development
of skills. Choose riding surfaces and environments
that will allow you to grow your skill set whilst also
maintaining constant control.
NOTICE
It is important to develop good habits when
learning to ride the Omeo. Good habits will
form the foundation for safe and skilful use of
the Omeo over time.
Progression - Practise Riding
(Refer also to the Segway PT User Manual Pg. 77).
Always keep within your capabilities when
controlling your Omeo. Approach unfamiliar
terrain with caution and start cautiously.
Refer to the Omeo Technology website for the
latest video series showing ways to practise and
progress your riding skills.
Dampening Control
The Dampening Control (Figure 15: On-Board
Control Panels (A & B), Pg. 30), allows you to
loosen or tighten (dampen) the side to side
movement in the seat, according to the various
riding environments or terrain.
A loose setting (Turn knob to the left) makes your
Omeo more responsive and agile, allowing you to”
throw” your body weight around quickly for crisp
and accurate response. A loose setting is suited for
a smooth and open terrain with no hazards.
A tightened or stier setting (dampened)
(Turn knob to the right) will mean you have to lean
harder to turn your Omeo. It has a more stable
feel. This setting is best suited for controlled riding
over varied and bumpy terrain, for stability when
going fast and for situations where there could be
potential hazards.
To lessen unwanted steering, the Seat Dampening
Control can be adjusted at any time, even while
you are in control and moving.
Your Omeo is a live platform and reacts to the
terrain it is traversing. With practise you will learn
to anticipate and set up your seat positioning and
dampening to the terrain ahead. In time riding your
Omeo will seem very intuitive.
WARNING
Turning the knob clockwise fully will lock the
seat resulting in having no steering.
WARNING
It is important that you practise riding in
clear open spaces away from trac, bicycles,
children, pets and natural hazards such as clis,
water and steep slopes.
Tip: When first learning to ride, it is best to start
with a stier (or dampened) setting. Then start
to loosen the dampening of the seat (by turning
the knob left) progressively as your ability and
confidence grows.
SECTION 7 LEARNING TO RIDE YOUR OMEO EVOLUTION
58
|
OMEO EVOLUTION USER MANUAL
Page 59

Dismounting your Omeo
WARNING
Never try to dismount your Omeo before it
comes to a complete stop and the Stabilising
Legs are fully down.
To dismount the Omeo you must:
1. Come to a complete stop, ideally on a stable
and flat surface. A level surface is not critical
however, as the self-levelling Stabilising Legs
will level out the Omeo on uneven ground or
moderate slopes
2. Switch the Steering Selection Lever to vertical
(Joystick Mode) and push the Main Control
Switch once to lower the Stabilising Legs.
Make sure that the Seat is level throughout this
action
3. The Omeo will now be in Standby Mode
4. Power o using the InfoKey™ Controller.
You may now safely dismount.
CAUTION
Before you dismount it is important that
your Omeo is powered o. If dismounting in
Standby Mode there may be some residual
power which may slightly move your Omeo.
This may place strain on the Stabilising Legs,
potentially causing damage or a fall and injury.
SECTION 7 LEARNING TO RIDE YOUR OMEO EVOLUTION
59
|
OMEO EVOLUTION USER MANUAL
Page 60
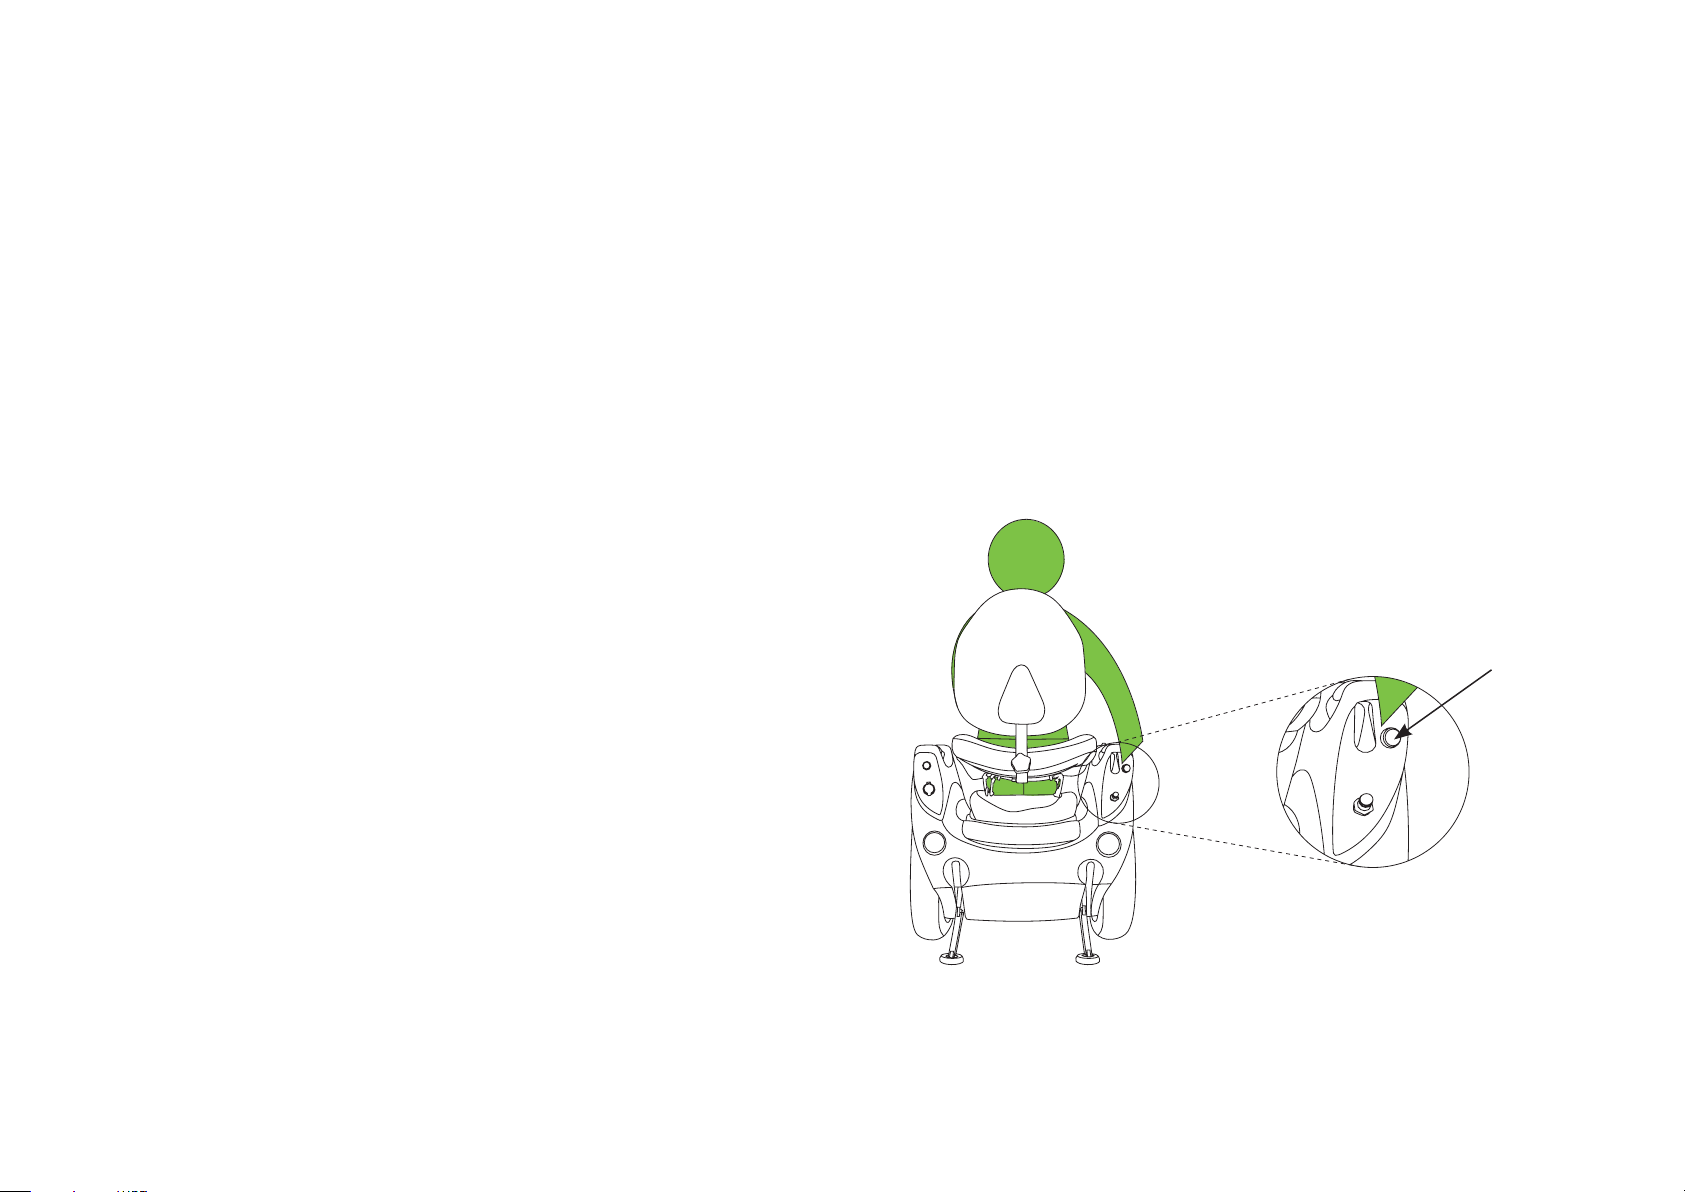
NOTICE
If the Seat is angled when switching from ASC
to Joystick Mode, the Seat will lock in that
position and this may cause the Omeo to go
into Safety Shutdown Mode.
If this happens and your seat is locked in an
undesirable position (e.g. tilted to one side),
Lower the stabilising the legs and dismount your
Omeo safely.
With the help of your Omeo Agent or trained
spotter:
1. Hold onto the seat back and raise the
stabilising legs, entering balance mode.
2. Switch the Steering Selection lever into ACS
mode and manually adjust the position of
the seat.(Switch back into Joystick Mode and
lower the Stabilising Legs
3. It is now safe to get back on and ride your
Omeo.
NOTICE
Be careful when switching into ASC mode as
the Omeo may want to move according to the
position of the seat. Keep control of the
Omeo at all times by firmly holding onto the
seat back. It is strongly advised that you do
this with the help of your Omeo Agent or a
trained spotter.
Main
Control Switch
SECTION 7 LEARNING TO RIDE YOUR OMEO EVOLUTION
60
|
Figure 31: Dismounting your Omeo.
OMEO EVOLUTION USER MANUAL
Page 61

Shutting down your
Riding Etiquette
Omeo
1. Power o your Omeo by pressing and holding
the Power / Standby button on the InfoKey™
Controller for two seconds
2. The display on the InfoKey™ Controller will
show a sleepy face and a tone will emit from
the Omeo as it powers o.
NOTICE
Make sure the Stabilising Legs are down before
you power o. Refer also to the Segway PT User
Manual (Pg. 76).
Securing your Omeo
The Omeo uses the Segway PT security system.
Refer to the Segway PT User Manual (Pg. 75).
The Security function is essential in case you need
to leave your Omeo unattended. When activated,
an alarm sounds and the motors are engaged
making the Omeo dicult to move.
• Always be careful and considerate of others
• Always ride within your capabilities, in full
control and at a speed that is safe for you and
those around you
• Always be prepared to stop
• Yield right of way to all pedestrians
• Avoid startling pedestrians. When approaching
from behind, sound a bell or announce
yourself and pass with care. When approaching
a pedestrian from the front, indicate your
intended path, or customary passing side, and
slow down
• When riding with other personal mobility
devices, maintain a safe distance between each
other and be mindful of the potential threat to
others
• Do not park your Omeo across doorways or in
the path of mainstream trac
• Use designated crosswalks or signalled
intersections to cross roads. Do not jaywalk or
ride across junctions
• Your Omeo is designed for o-road use.
Only travel on a road when necessary
• Do not ride your Omeo on private property
(inside or outside) unless you have obtained
permission to do so
• Always abide by the rules and regulations of
the jurisdiction of where you are riding your
Omeo
• Do not impede the use or enjoyment of other
Omeo or personal mobility device users by
irresponsible behaviour.
SECTION 7 LEARNING TO RIDE YOUR OMEO EVOLUTION
61
|
• It should not be used on roads, except in
emergency or it is unavoidable
OMEO EVOLUTION USER MANUAL
Page 62

Riding Tips and
Safety Guidelines
The Omeo’s unique balancing ability combined
with the Active Seat Control system and ease
of use may lead you, at times, becoming
overconfident.
If you exceed the ability of the Omeo to balance,
such as by riding over obstacles, uneven terrain,
slippery surfaces, loose materials, or steep slopes,
there is the possibility that you could lose control,
which may result in collisions, falls and / or injury.
As with any other personal mobility device, using
an Omeo exposes you to risk of injury.
By following all the instructions and warnings in
the User Materials you can significantly reduce the
risk, but you cannot eliminate the risk entirely.
The guidelines referred to in the Segway PT User
Manual (Pg. 80) also apply to your Omeo.
Replace in Segway PT User Manual:
• References to Mats replace with Seat
• References to Segway PT replace with Omeo
• References to Handlebar replace with Seat
Back
• References to Riderless replace with Walker,
Balance, Free wheel.
Tips for when you are learning to
ride your Omeo
• Make sure that you know how to use all Omeo
controls, settings and InfoKey™ Controller
readings
• Progress to the next learning stage only when
you are confident and competent with the
previous stage. Have confidence in operating all
the control settings on the Omeo
• Start with ‘Turtle Mode’, switching out only
when you feel you have good control and can
drive your Omeo with confidence
• All new riders should have an able-bodied
person spotting for them
• Start learning in Joystick Mode, switching
over to ASC only when you feel you have
good control and can drive your Omeo with
confidence
• Progressively develop your Omeo control in
confined spaces, slopes and on dierent types
of terrain
• Practise the transition between surfaces such as
concrete and grass and various types of terrain
• Practise riding 1 and 2 wheels over changes of
surface levels that are less than 40mm (1.5in.) in
height
• Practise going through doorways that have level
entry (no lip or ramp), making sure you have
clear space around the wheels and door frame
and keeping your hands clear
• In tight areas and rough surfaces, or on a
compound slope, you are advised to start out in
Joystick Mode
• Practise using the Dampening Control so that
you can anticipate when you will need to make
a suitable adjustment for the type of riding
ahead
• Until you can ride with precision and control
on various types of surfaces you must avoid
riding your Omeo near hazards, children, pets,
bicycles and other vehicles
• Practise the ‘Safety Shutdown’ simulation,
coming to a purposeful stop, orientating the
Omeo, switching the Steering Selection Lever
to vertical, depressing the Main Control Switch
once and lowering the Stabilising Legs, all within
10 seconds. Do this in a variety of terrain in both
ASC and Joystick steering modes
• Do not try to dismount your Omeo while it
is still in Balance Mode or when the Omeo is
moving
• Always come to a complete stop and activate
the Stabilising Legs (switch the Steering
Selection Lever to vertical, depressing the Main
Control Switch once) before dismounting your
Omeo
SECTION 7 LEARNING TO RIDE YOUR OMEO EVOLUTION
62
|
OMEO EVOLUTION USER MANUAL
Page 63

NOTICE
When powering o, the Omeo may attempt to
balance (though less aggressively) when the
Stabilising Legs are down. The Wheels may skid
if the Stabilising Legs are lowered and the rider
aggressively leans while getting o.
• Always ride within your capabilities
• Do not ride any Omeo if you suer any
impairment to balance
• Try to be relaxed when riding
• When riding, keep your torso upright, your head
up and looking in the direction you want to go
• If you feel at all unsure using your Omeo hands
free, use the Hand Grips
• Avoid moving backward as much as possible.
Manoeuvre backward only when necessary to
open a door, back away from an obstacle, or
to carefully ascend a steep slope. Avoid turning
while manoeuvring backward
• Your Omeo has been designed for o-road
use. If you must ride on the road, be extremely
careful. Ride as far away from trac as possible
and always allow plenty of time. Remember the
speed limiter or an unexpected obstacle could
slow your crossing
• Your Omeo, like the Segway PT, has a
regenerative braking system for the Lithium-ion
Batteries that recharges the batteries as you go
down a slope / hill
- The amount of charging is directly
proportionally to the size and duration of
the decline and as you progress down a
slope you may notice the battery levels
change on the InfoKey™ Controller
- It is important to note that if your batteries
are fully charged at the top of a slope /
hill, when you descend, you may feel your
Omeo’s speed being limited to prevent from
overcharging the Lithium-ion Batteries.
Report All Incidents
If you or any other rider of your Omeo is involved
in an accident, of if your Omeo performs in a way
that you do not intend or in a way that it is not
supposed to, contact your Authorised Omeo Agent
or Omeo Technology directly. It is very important
we are contacted immediately.
Omeo Technology
SECTION 7 LEARNING TO RIDE YOUR OMEO EVOLUTION
63
|
OMEO EVOLUTION USER MANUAL
Page 64

Section 8: Batteries and Charging
The Omeo has two Battery systems;
1. The Segway Lithium-ion 2x Battery system for
drive and balance
2. 2x Auxiliary sealed Lead Acid Batteries that run
the Stabilising Legs, Lights and USB Port.
NOTICE
For optimal satisfaction you must maintain your
Batteries according to these guidelines.
NOTICE
To ride the Omeo the Auxiliary Batteries must
have enough charge to operate the selflevelling Stabilising Legs.
This section describes:
• Battery Safety
• Battery Specifications
• Charging the Batteries.
Battery Safety
WARNING
• Do not use a Battery if the Battery casing is
broken, or if the Battery emits an unusual
odour, smoke, or excessive heat or leaks
any substance. Avoid contact with any
substances seeping from the Batteries.
• Keep out of reach of children and pets.
Exposure to Battery voltage could result in
death or serious injury.
• Unplug or disconnect the Omeo from
AC power before removing or attaching
Batteries or performing any service. Never
work on any part of the Omeo when it is
plugged into AC power. You risk serious
bodily injury from electric shock as well as
damage to the Omeo.
• The cells within the Batteries contain toxic
substances. Do not attempt to open the
Batteries. Do not insert any object into the
Batteries or use any device to pry at the
Battery casing. If you insert an object into
any of the Battery ports or openings you
could suer electric shock, injury, burns, or
cause a fire. Attempting to open the Battery
casing will damage the casing and could
release toxic and harmful substances and
will render the pack unusable.
• Observe and follow all safety information on
the warning label found on the Batteries.
• Failure to charge the Batteries could result in
permanent damage to them. Left unplugged,
the Batteries could fully discharge over time,
causing permanent damage.
• Use only charging devices approved by
Omeo Technology or Segway and never
attempt to bypass or override their
charging protection circuits.
• Do not wash the Omeo with a power washer
or high-pressure hose. Avoid getting water
into the Charge Port. Always close the
Charge Port Cover after charging. Avoid
exposure to heavy downpours or extended
periods of heavy rain (including during
riding, storage, or while being transported).
Clean with soap and water and a soft cloth.
Make sure that the Charge Port is dry before
you plug in the Power Cord. Failure to follow
these instructions could expose you to
electric shock, injury, burns, or cause a fire.
SECTION 8 BATTERIES & CHARGING
64
|
OMEO EVOLUTION USER MANUAL
Page 65

• Do not submerge the Batteries or powerbase
in water. If you suspect the Batteries
or Powerbase have been submerged or
experienced water intrusion, call Omeo
Technology Technical Support immediately
at +64 6 9296548. Until you receive further
instructions, store the Omeo upright,
outdoors, and away from flammable objects.
Do not attempt to remove the batteries.
Do not plug the Power Cord into the Omeo.
Failure to follow these instructions could
expose you to electric shock, injury, burns,
or cause a fire.
• As with all rechargeable batteries, do not
charge near flammable materials.
• Never sit on the Omeo while charging either
of the Battery systems.
Use only charging devices approved by Omeo
Technology and never attempt to bypass or
override their charging protection circuits.
Omeo Lithium-ion / Segway PT
Batteries
Refer to Table 4: Omeo Lithium-ion / Segway PT
Battery Specifications.
Table 4: Omeo Lithium-ion / Segway PT Battery Specifications.
Lithium-Ion Battery Specifications
Charging Time
Before first use 12 hours
Recharge from empty ~ 8 hours
Temperature Ranges
Battery Specifications
NOTICE
If you use, charge, or store your Batteries
outside the limits specified, you may void the
Limited Warranty, damage or destroy your
Batteries, and /or experience reduced range
and ineective Battery charging.
SECTION 8 BATTERIES & CHARGING
65
|
Operating 0 C – 50 C (32 F – 122 F)
Charging 10 C – 50 C (50 F – 122 F)
Storage and transport -20 C – 50 C (-4 F – 122 F)
General
Capacity (Ah) and Voltage 5.2Ah, 73.6V
Dimensions 357 x 190 x 82mm (14 x 7.5 x 3.2in.)
Battery weight 10.3kg (22.7lbs)
OMEO EVOLUTION USER MANUAL
Page 66

Auxiliary Batteries
Refer to Table 5: Auxiliary Battery Specifications.
Table 5: Auxiliary Battery Specifications.
Auxiliary Battery Specifications – Sealed Lead Acid
Charging Time
Before first use 12 hours
Recharge from empty ~ 8 hours
Temperature Ranges
Operating 0 C – 50 C (32 F – 122 F)
Charging 10 C – 45 C (50 F – 113 F)
Storage and transport -20 C – 50 C (-4 F – 122 F)
General
Capacity (Ah) and Voltage 2.2Ah, 12V
Dimensions 117 x 34 x 60mm (7 x 1.3 x 2.3in.)
Battery weight 0.9kg (2lbs)
Auxiliary Power Supply
USA / Canada – XP Power Model ACM 24US24 100-240 VAC, 0.5A; 24VDC, 1.0A
Rest of the world – Sunny Billion Power Model SBP-240100 100-240 VAC; 50 / 60Hz
SECTION 8 BATTERIES & CHARGING
66
|
OMEO EVOLUTION USER MANUAL
Page 67

Charging your Batteries
WARNING
Never sit on your Omeo whilst charging either
of the Battery systems.
To maintain best performance of both Battery
systems, ensure the Batteries are fully charged for
at least 12 hours once a month, or once every 12
hours of operation, whichever comes first.
The Batteries will handle all voltage. You will just
need a local adaptor for the Main Charging lead /
plug and Auxiliary Battery Charger lead / plug
supplied.
Batteries systems 1 & 2 are charged separately:
1. The Segway Batteries use the Main Charging
Lead and Plug. This is inserted into the Main
Charge Port on the front of the Omeo and
connected into an AC wall socket
2. The Auxiliary Batteries use a separate charger
(supplied) with a pin plug. This is inserted
into the Auxiliary Battery Charge Port directly
adjacent to the Omeo Seat and connected
into an AC wall socket.
CAUTION
Failure to charge the Batteries could result
in damage to the Batteries. Left unplugged,
the Batteries could fully discharge over
time, causing permanent damage. Use
only charging devices approved by Omeo
Technology / Segway.
Charging times vary depending on the following:
• Amount of charge already stored in the
Batteries – the lower the Battery Charge
Level is, the longer it will take to complete the
charging process
• Temperature of the Batteries – Batteries that
are too hot or too cold may not charge or
may take much longer to charge. Batteries
charge most eciently when they are
close to the centre of the recommended
charging temperature range. (Refer to Battery
Specifications, Pg. 64).
• If storage temperature is below 0° C / 32° F, do
not charge your batteries. Instead, bring them
into a warm (above 10° C / 50° F) environment
for charging. Doing so will ensure optimal
battery life and performance.
SECTION 8 BATTERIES & CHARGING
67
|
Tip: Both of the Omeo’s charging systems
automatically prevent overcharging. It is
recommended that you leave your Omeo plugged
into AC power when it is not in use.
OMEO EVOLUTION USER MANUAL
Page 68
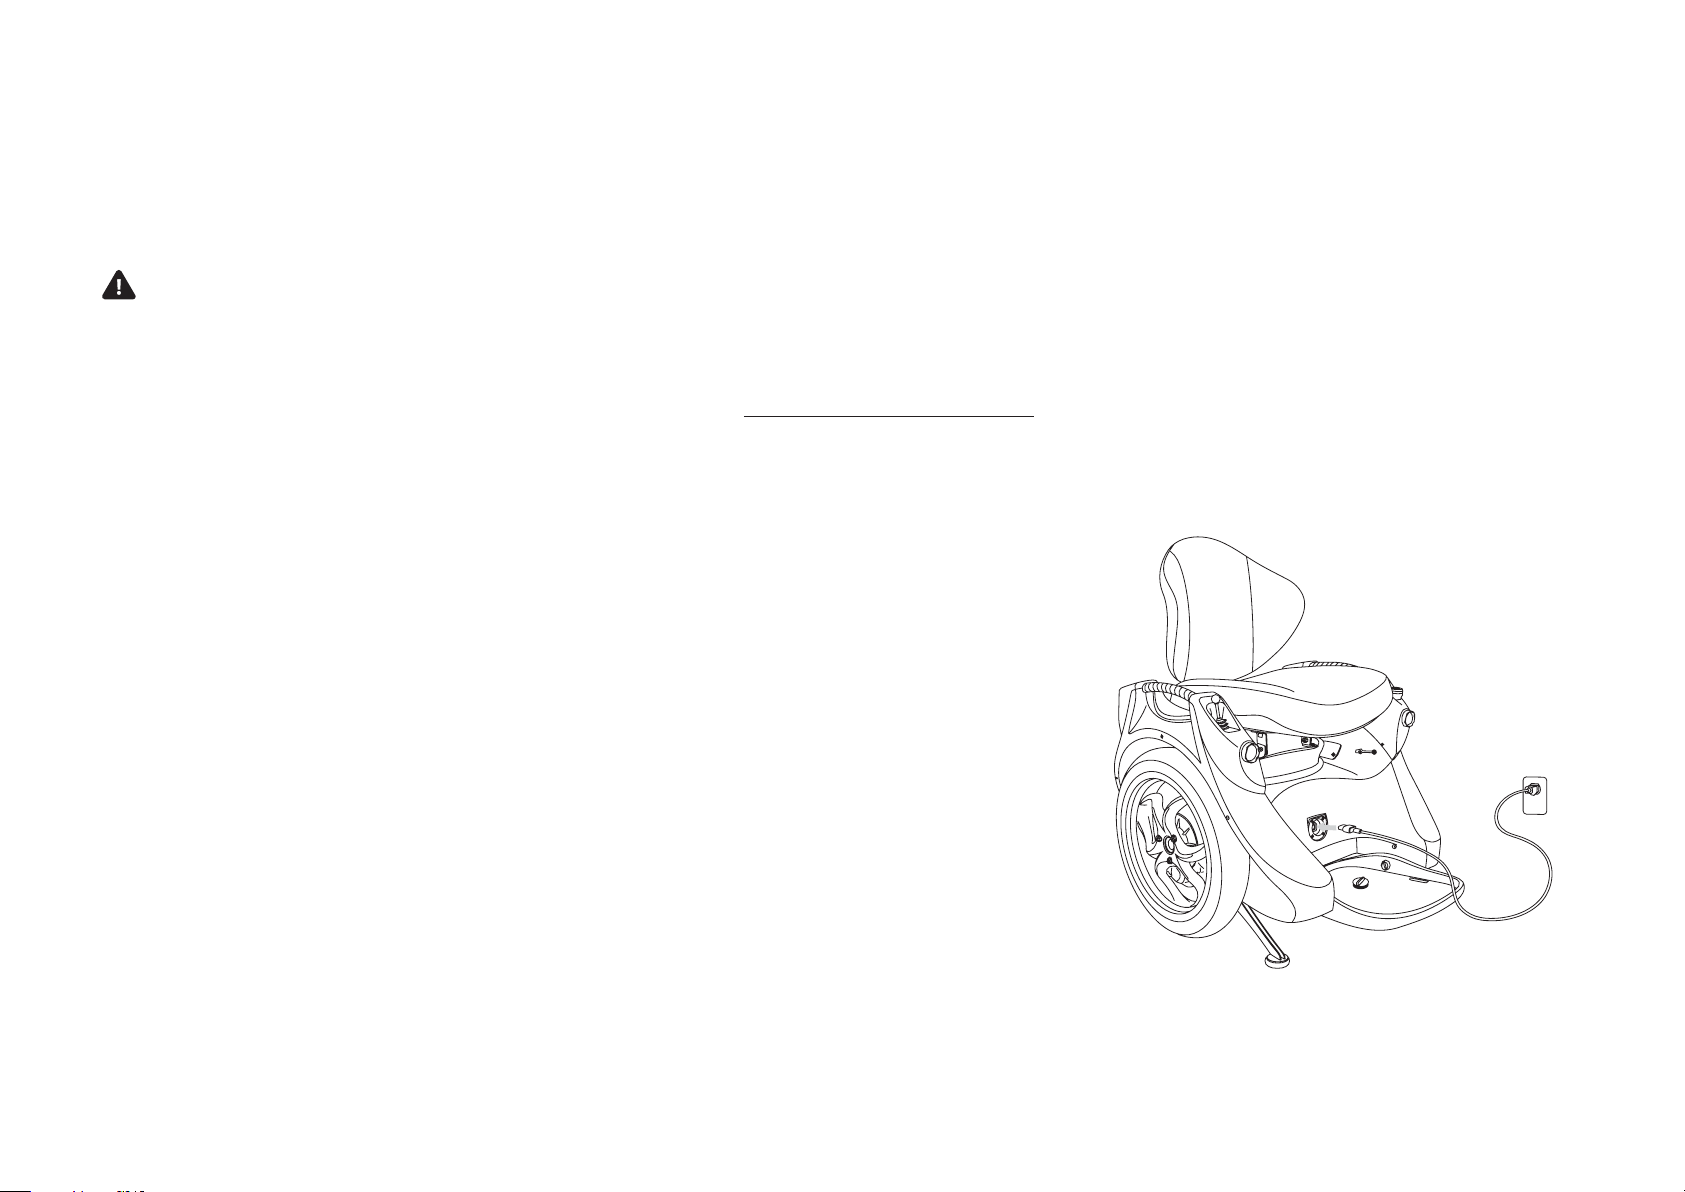
Omeo Lithium-ion / Segway PT
Batteries (Drive batteries)
The Main Charge Port for the Omeo Lithium-ion /
Segway PT Batteries is behind the screw in plug in
the front of the Omeo body above the Footplate.
WARNING
Do not insert the Main Power Cord if the
Charge Port, Power Cord or AC Power outlet
is wet.
To charge the Lithium-ion Batteries:
6. The Charge Indicator Lights on the Omeo’s
Display Panel should illuminate green to
confirm that the Batteries are charging
(Figure 34: Indicator lights showing charging
Batteries, Pg. 69).
7. For more information on the Charge Indicator
Lights, see Segway PT User Manual (Pg. 89).
1. Put your Omeo in a clean, dry place that
is within the recommended charging
temperature range
2. It must be stable, in an upright position with
the Stabilising Legs down
3. Open the Main Charge Port on the front of the
Omeo (see Figure 32) and verify that the Main
Charge Port, along with the Power Cord and
AC Power outlet, are dry, clean, and free of
any debris
4. Plug one end of the Power Cord into the Main
Charge Port
5. Plug the other end of the Power Cord into
a grounded AC outlet (100V – 240V; 50Hz
–60Hz) and switch on
Unplugging Your Omeo’s Auxiliary Battery
Charger
When you are ready to use your Omeo:
1. Unplug the Power Cord from both the AC
outlet and your Omeo and store it in a safe
place (for example, the rear hatch of your
Omeo)
2. Close the Charge Port Cover.
Figure 32: Charge your Omeo’s Lithium-ion
Batteries through the Main Charge Port at the front
of the unit.
SECTION 8 BATTERIES & CHARGING
68
|
OMEO EVOLUTION USER MANUAL
Page 69
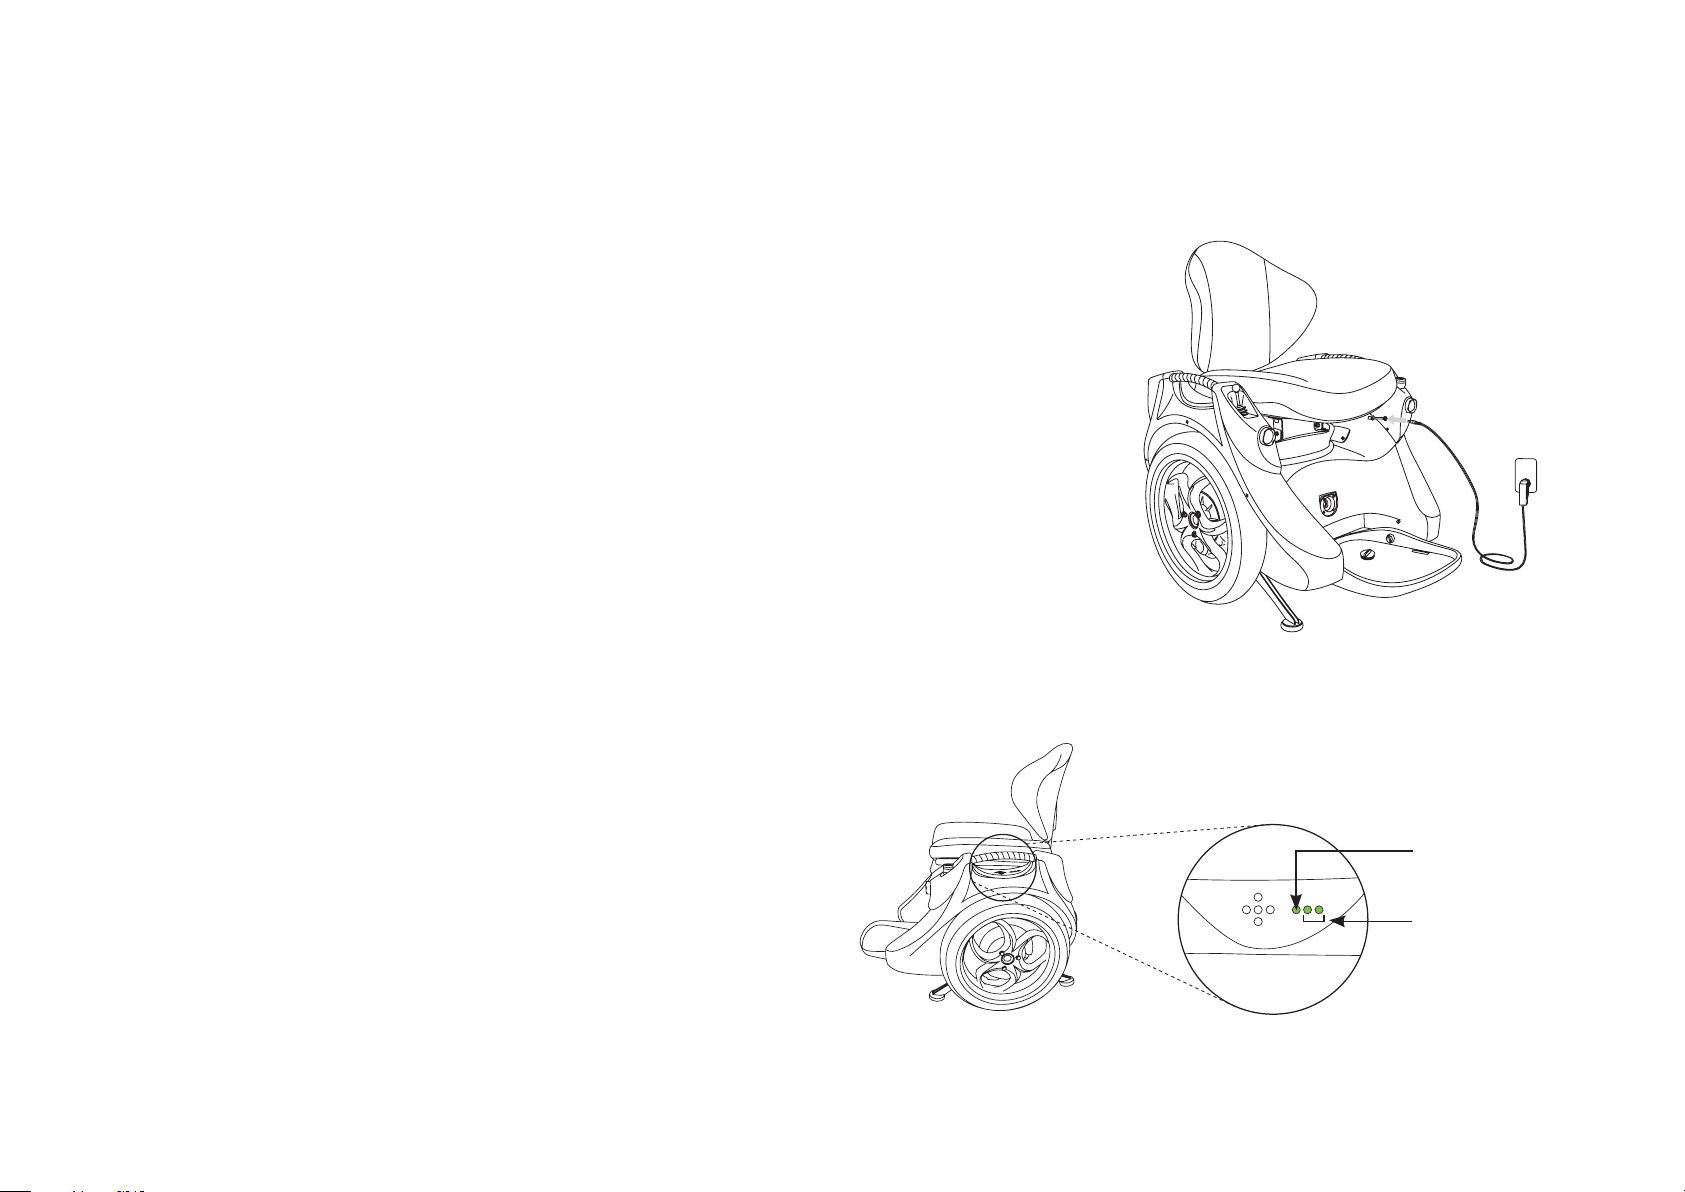
Charging your Batteries (cont.)
Omeo Auxiliary Batteries
To charge your Omeo’s Auxiliary Batteries:
1. Put your Omeo in a clean, dry place that
is within the recommended charging
temperature range. It must be stable, in an
upright position with the Stabilising Legs down
2. Open the Auxiliary Battery Charge Port on the
front of the Omeo (see Figure 33) and verify
that the Auxiliary Battery Charge Port, along
with the Auxiliary Battery Charger and AC
Power outlet, are dry, clean, and free of any
debris
3. Plug one end of the Auxiliary Battery Charger
into the Auxiliary Battery Charge Port
4. Plug the other end of the Auxiliary Battery
Charger into a grounded AC outlet (100V
–240V; 50Hz – 60Hz) and switch on
5. The Auxiliary Indicator Light on the Omeo’s
Display Panel should illuminate green to
confirm that the Auxiliary Batteries are
charging (as shown in Figure 34)
6. When the Auxiliary Batteries are fully charged,
the green light will start to flash / pulse.
Unplugging Your Omeo’s Auxiliary Battery
Charger
When you are ready to use your Omeo:
1. Unplug the Auxiliary Battery Charger from
both the AC outlet and your Omeo and
store it in a safe place (for example, the Rear
Storage Hatch of your Omeo)
2. Close the Auxiliary Battery Charge Port
Cover.
Figure 33: Charging your Omeo’s Auxiliary Batteries.
Auxiliary
Indicator Light
Lithium-ion
Charge Indicator
Lights
SECTION 8 BATTERIES & CHARGING
69
|
Figure 34: Indicator lights showing charging Batteries.
OMEO EVOLUTION USER MANUAL
Page 70

Battery Management Indicators for
Table 6: Auxiliary Battery system Indicators when the Omeo is Powered on (with InfoKey™ Controller).
the Auxiliary Batteries
The Indicator Lights for the Auxiliary Battery
system are located on the Omeo Display Panel
(as shown in Figure 34: Indicator lights showing
charging Batteries, Pg. 69).
The dierent indicators for the Auxiliary Battery
system are outlined in Table 6: Auxiliary Battery
system Indicators when the Omeo is powered on
and Table 7: Auxiliary Battery system Indicators
when the Omeo is powered o (Pg. 71).
NOTICE
It is important to note that when the Auxiliary
Batteries run below 20% charge and the red
warning light is flashing, the rider must use
the remaining power to get to a safe place
where they can charge the Auxiliary Batteries.
Ensure you have alternative mobility solutions
available.
When the Omeo is powered on (Standby or Balance Mode)
Is only activated when the Main Control Switch is pushed
White single flash
Yellow flash every 3 seconds in a continuous
pattern – (Warning Signal)
Red slow flash every 1.5 seconds in a
continuous pattern – (Warning Signal)
Alternating white and blue flashing light –
(Warning Signal)
to activate the Stabilising Legs to put the Omeo into
Balance Mode. This is a positive signal of function.
Is activated when the Auxiliary Batteries are discharged
to 50%. At this level the Lights and USB charging port will
shut down and not function.
Is activated when the Auxiliary Batteries are discharged to
20%. In this situation the standard function of raising the
Stabilising Legs by one push on the Main Control Switch
is no longer available.
To raise the Stabilising Legs so that ‘drive’ is available,
the rider must hold the Main Control Switch down for 7
seconds to override the system. This may be repeated
while power remains.
Is activated when there is high voltage drain on the
Auxiliary Batteries when the Stabilising Legs are activated.
This is possibly caused by a jam between the Stabilising
Legs and Omeo Body and may require the rider to clear
the jam.
SECTION 8 BATTERIES & CHARGING
70
|
OMEO EVOLUTION USER MANUAL
Page 71

Battery Management Indicators for the Auxiliary Batteries (cont.)
Table 7: Auxiliary Battery system Indicators when the Omeo is powered o.
When the Omeo is powered o
White single flash
Solid green light with eventual progression to
flashing green light
Yellow flash every 3 seconds in a pattern that
runs for 20 seconds only – (Warning Signal)
Red slow flash every 1.5 seconds in a pattern
that runs for 20 seconds only – (Warning
Signal)
Alternating white and blue flashing light
running for 20 seconds only – (Warning
Signal)
Is activated when the Main Control Switch is pushed for a sucient amount of time (e.g. 1,2, 3 x) for a
command to be received, no matter what status of the Omeo. This is a positive signal of function.
Is activated when the Auxiliary Batteries are charging and will progress to a constant flashing green light
when fully charged. The Auxiliary Batteries take 8-12 hrs. approximately for a full charge.
Is activated when the Main Control Switch is pressed once (or number of presses) to raise the Stabilising
Legs or once to lower the Stabilising Legs and the Auxiliary Batteries have run down to less than 50% charge.
Is activated when the Main Control Switch is pushed to raise or lower the Stabilising Legs and the Auxiliary
Batteries have run down to less than 20% charge.
Is activated when there is high voltage drain on the Auxiliary Batteries when the Stabilising Legs are
activated. This is most likely caused by a jam between the Stabilising Legs and Omeo Body and possibly
could require the rider to clear the jam.
SECTION 8 BATTERIES & CHARGING
71
|
OMEO EVOLUTION USER MANUAL
Page 72

Battery Charge Indicator Lights
(for the Segway PT Lithium-ion
Reading the Battery Charge
Level Display
Replacing Batteries
Batteries)
Refer to the Segway PT User Manual (Pg. 89).
Charging Failures
(Segway Lithium-ion Batteries)
Refer to the Segway PT User Manual (Pg. 89).
Replace in the Segway User Manual:
• References to Authorised Segway Dealer
replace with Omeo Agent.
• References to Distributor replace with Omeo
Technology.
Regenerative Braking
Refer to the Segway PT User Manual (Pg. 90).
Refer to Segway PT User Manual (Pg. 90).
Replace in the Segway User Manual:
• References to Step o with stop and replace
with lower the Stabilising Legs and dismount.
Recalibrating the Battery Charge
Level Display
Refer to Segway PT User Manual (Pg. 92).
Replace in the Segway User Manual:
• Reference to WARNING!... Balance Mode
leaning against the wall and replace with
...Omeo in Standby Mode with the Stabilising
Legs down
• Reference to Riderless Balance Mode and
replace with Standby Mode.
How Temperature Aects
Performance
Refer to Segway PT User Manual (Pg. 93).
Lithium-ion Batteries
Refer to Segway User Manual (Pg. 94).
Replace in the Segway User Manual:
• References to Authorised Segway Dealer and
replace with Omeo Agent
• References to Distributor and replace with
Omeo Technology.
Auxiliary Batteries
The Auxiliary Batteries should have a useful life of
2 years but may be less depending on the nature
of use.
An indication that the Batteries may need
replacing would be that the Stabilising Legs slow
down noticeably in their speed of operation.
The Batteries should be checked by a Certified
Omeo Service Technician at service intervals and
replaced as required.
NOTICE
If a Certified Omeo Service Technician is not
available please contact Omeo Technology to
make alternative arrangements.
SECTION 8 BATTERIES & CHARGING
72
|
OMEO EVOLUTION USER MANUAL
Page 73

Battery Transportation, Shipping, and Disposal
Refer also to Segway PT User Manual (Pg. 95).
Shipping Lithium-ion Batteries
Replace in the Segway User Manual:
• References to US Department of Transportation
and replace with most jurisdictions
• References to Contact the US Department of
Transportation and replace with your local
Shipping Agent or Omeo Technology.
Travel Advisory
When wanting to travel with your Omeo with
Lithium-ion Batteries fixed, notify your travel
agent, airline or shipper. Most will have guidelines
for transporting wheelchairs/mobility devices with
Lithium-ion batteries, but you cannot assume
they will.
Airlines may allow transportation (as checked-in
baggage) of the Omeo with Lithium-ion Batteries
intact and ignition switch (InfoKey™ Controller)
separate from the device, if it is required as a
mobility aid.
Allow yourself plenty of time prior to departure to
establish whether you can transport your Omeo
as personal checked in baggage, if using it as a
mobility aid.
SECTION 8 BATTERIES & CHARGING
73
|
OMEO EVOLUTION USER MANUAL
Page 74

Table 8: Key information about the Omeo for Airlines and Shipping providers.
Key information about the Omeo (for airlines and shipping providers)
Make and Model Omeo Evolution 1
Manufacturer Omeo Technology Limited (omeotechnology.com)
Drive Batteries Lithium-ion
Switch
UN Number
Land transport (ADR / RID)
Inland waterway
Sea Transport (IMDG)
Air Transport (ICAO/IATA)
InfoKey™ Controller held with operator. Battery removed.
Batteries cannot be activated if InfoKey™ Controller is more than 2m (6.5ft) away.
UN 3480.
UN3481 when packed with or contained in the device for which the cells or batteries will provide
electrical power for its operation.
UN3171 for battery powered devices with installed batteries.
Complies with: 2.3.2.4 Wheelchairs / Mobility Aids with Lithium Batteries
2.3.2.4 (a); “the batteries must be of a type which meets the requirements of each test in the UN Manual
of Test and Criteria, Part III, subsection 38.3”
IATA (Dangerous Goods
Regulations)
2.3.2.4 (c) (1) - “the battery terminals are protected from short circuits, e.g. by being enclosed within a
battery container”
2.3.2.4 (c) (2) the battery is either
(i.) “securely attached to the wheelchair or mobility aid and the electrical circuits are isolated following
the manufacturer’s instructions”, (Yes) or
(ii.) - “removed by the user.....” (No) this clause does not apply as batteries are not removed by user.
Transport Hazard Class 9
Environmental hazards Not applicable
SECTION 8 BATTERIES & CHARGING
74
|
OMEO EVOLUTION USER MANUAL
Page 75

2 x Sealed Lead Acid (2.2Ah and 12V)
Auxiliary Batteries
Fixed inside body to chassis
No switch
External / independent charger
UN number
UN 2800
Batteries, Non spillable, electric storage
Hazardous Goods Non-hazardous. Unrestricted for transportation by any means
Switch Button on body will turn on lights
Tare weight of Omeo 75kg (165lbs)
Size (dimensions) H 610mm / 24in x W 650mm / 25.2in x L 770mm / 39.4in
SECTION 8 BATTERIES & CHARGING
75
|
OMEO EVOLUTION USER MANUAL
Page 76
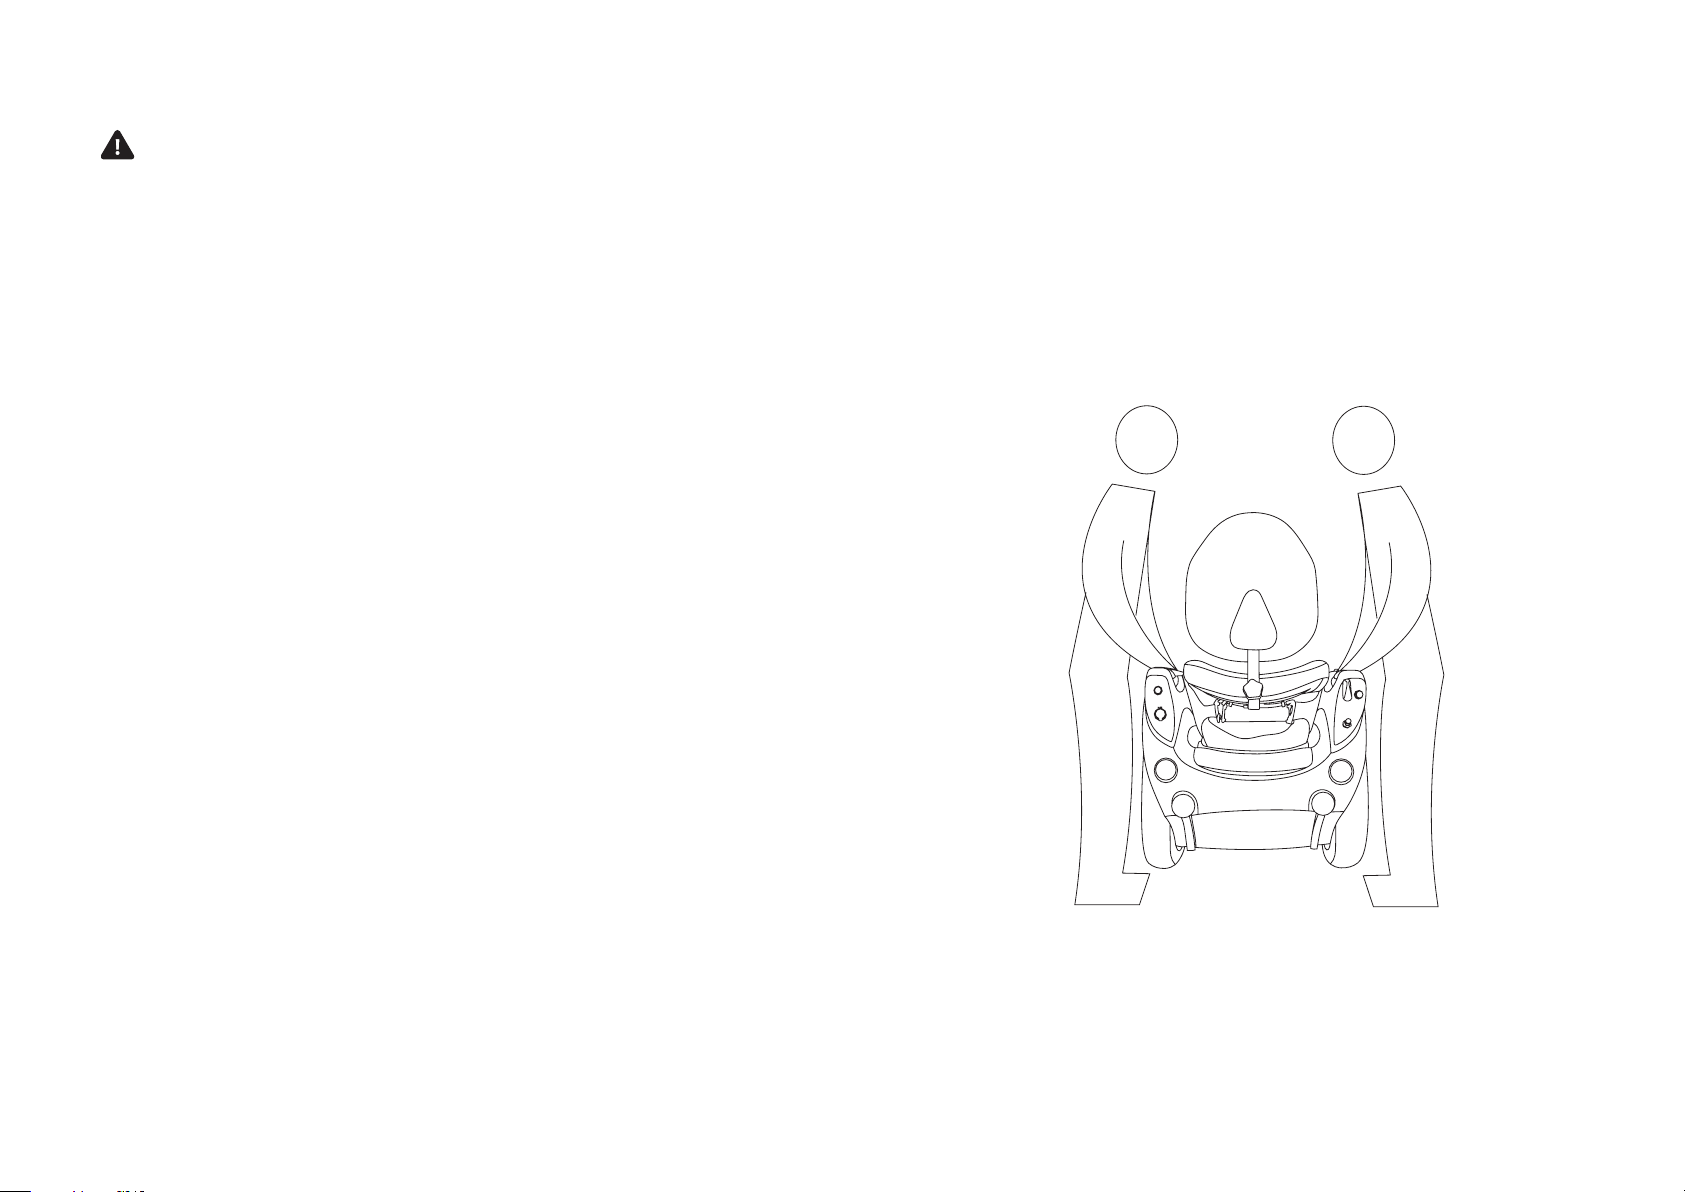
Lifting your Omeo
WARNING
Never lift your Omeo by its Tyres,
Guards / Fenders or Wheels as to doing so
could cause injury by getting hand and fingers
caught.
As the Omeo weights 75kg (165lbs), it is important
to use proper techniques to safely lift and load
your Omeo. Omeo Technology recommends that
two people work together to lift the Omeo by the
Hand Grips (See Figure 35).
Ideally you want to use a mechanical or electrical
lift, hoist, or wheel up it and down ramps.
SECTION 8 BATTERIES & CHARGING
76
|
Figure 35: Lifting the Omeo.
OMEO EVOLUTION USER MANUAL
Page 77

Handling Your Omeo When
Table 9: Best ways to Transport your Omeo using various methods
Transporting
The Batteries are contained within the device
and are ‘factory installed’ with no moving parts or
exposed wiring.
The switch for the drive Batteries (Lithium-ion) is
on the InfoKey™ Controller which must be within
2m (6.5ft) of your Omeo to function.
When you remove the InfoKey™ Controller from
the vicinity of your Omeo, the Omeo’s drive
Batteries cannot be switched on.
The Auxiliary Lead Acid Batteries remain
operational so that the Stabilising Legs may be
raised and lowered for secure storage.
Transportation Best ways to handle your Omeo
It is recommended to transport your Omeo as checked in baggage with your
airline.
• Take a copy of Table 8 (Pg. 74) with you to give to the Airline upon check-in.
• We highly recommend that you use the Omeo travel cover
• Keep the Omeo powered o with the Stabilising Legs up. Fold the footrest up so
the Omeo can be tilted forward and rest on the edge of the footplate.
Air
• Instruct the airlines on how to move the Omeo and advise them to tie down
using the tie down points or the Handgrips.
NOTICE
Do not instruct the Airlines on how to lower the Stabilising Legs. In doing so
you expose them to risk of damage.
TIP: we recommend that you allow plenty of time to check-in with your Omeo.
• We highly recommend that you use the Omeo travel cover
• Put the Omeo back into its original box
• Lower the Stabilising Legs
Freight
• Give to Freight company with instructions about the weight and hazardous
goods. (It might be helpful give the Freight company a copy of Table 8)
Alternatively, if you no longer have your Omeo’s original packaging, secure your
Omeo onto a pallet with the stabilizing legs down.
• Use a ramp or hoist to get the Omeo into position in a vehicle safely
Personal Transport
(e.g. in your car)
• The Walker Balance assist mode (Pg. 32) can help with this.
• Lower the Stabilisng Legs
• Secure using the tie down points and / or Handgrips
SECTION 8 BATTERIES & CHARGING
77
|
OMEO EVOLUTION USER MANUAL
Page 78
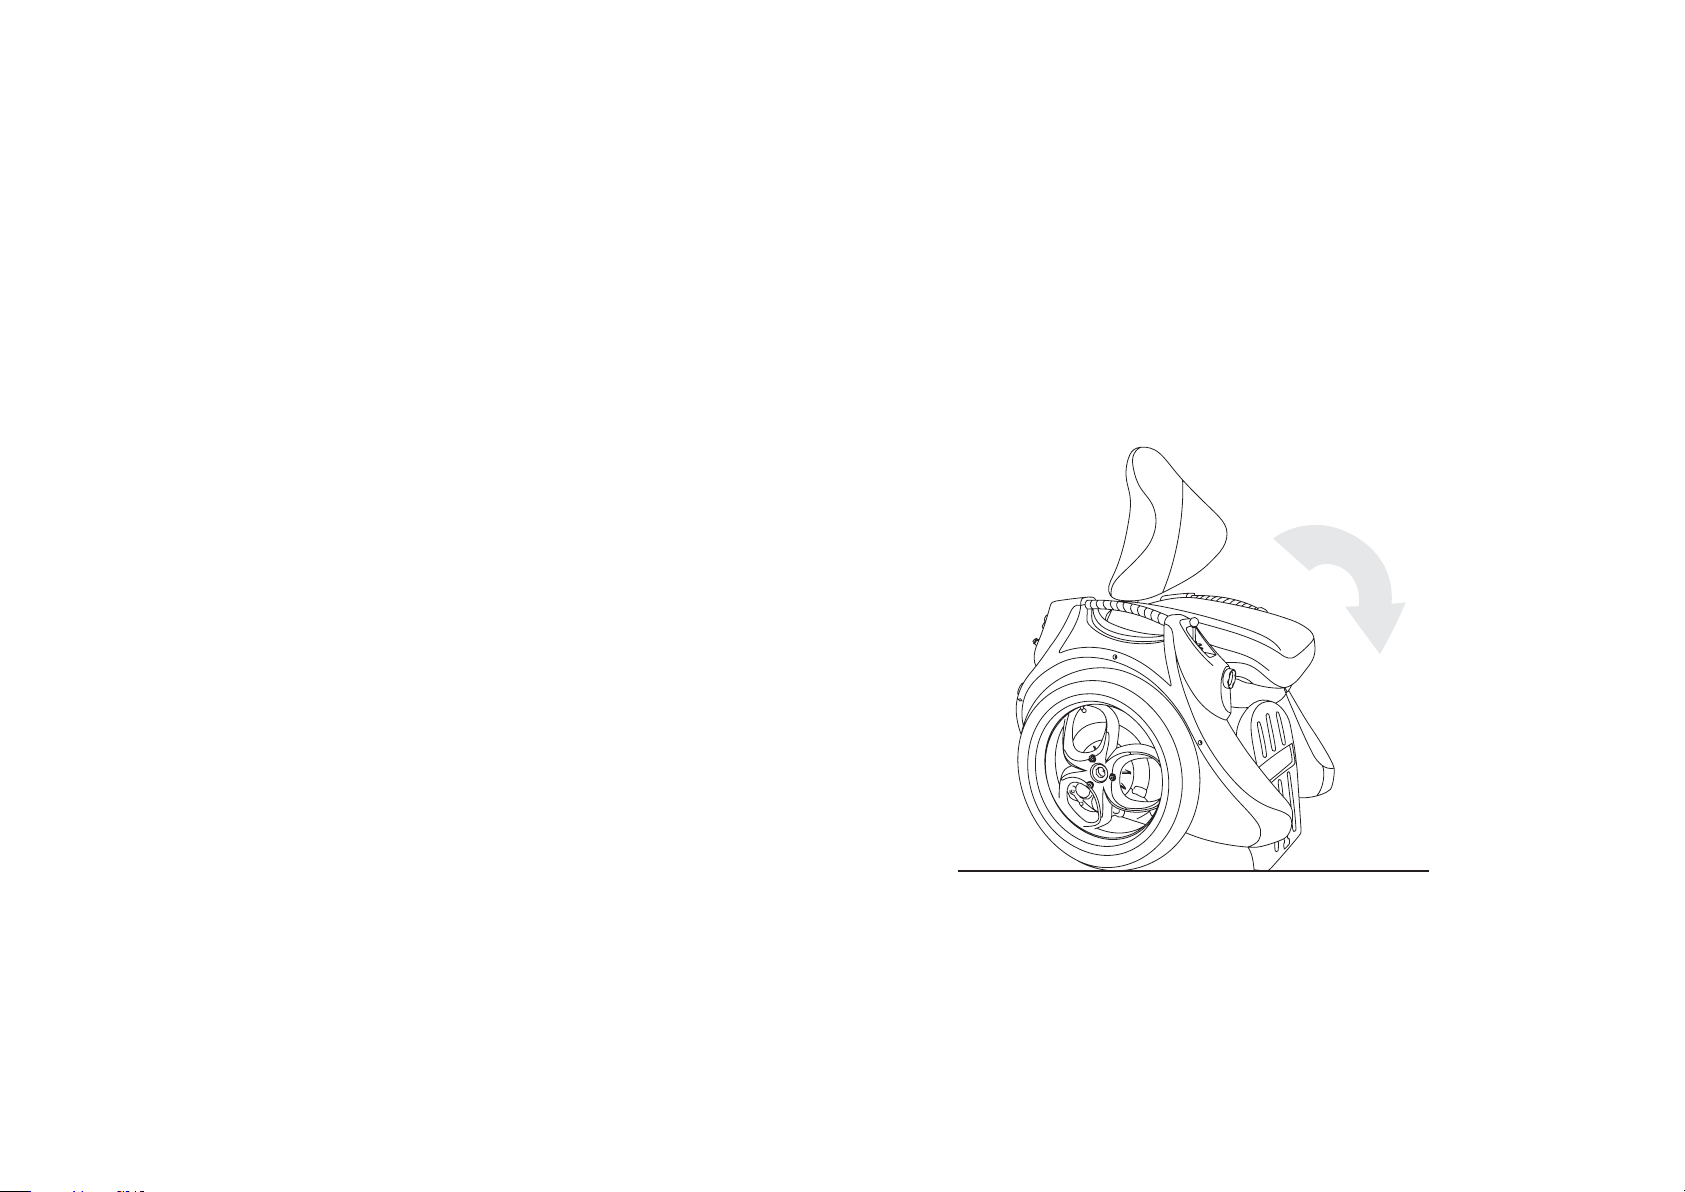
NOTICE
The Stabilising Legs are to be raised when
leaving your Omeo with third party handlers /
transporters e.g. Airlines. Your Omeo can be
tilted forward to rest on the back of the raised
Footplate (Figure 36).
Leaving the Stabilising Legs lowered could
result in damage by handlers or movement in
the transporter.
SECTION 8 BATTERIES & CHARGING
78
|
Figure 36: Your Omeo can be tilted forward to rest
on the back of the raised Footplate.
OMEO EVOLUTION USER MANUAL
Page 79
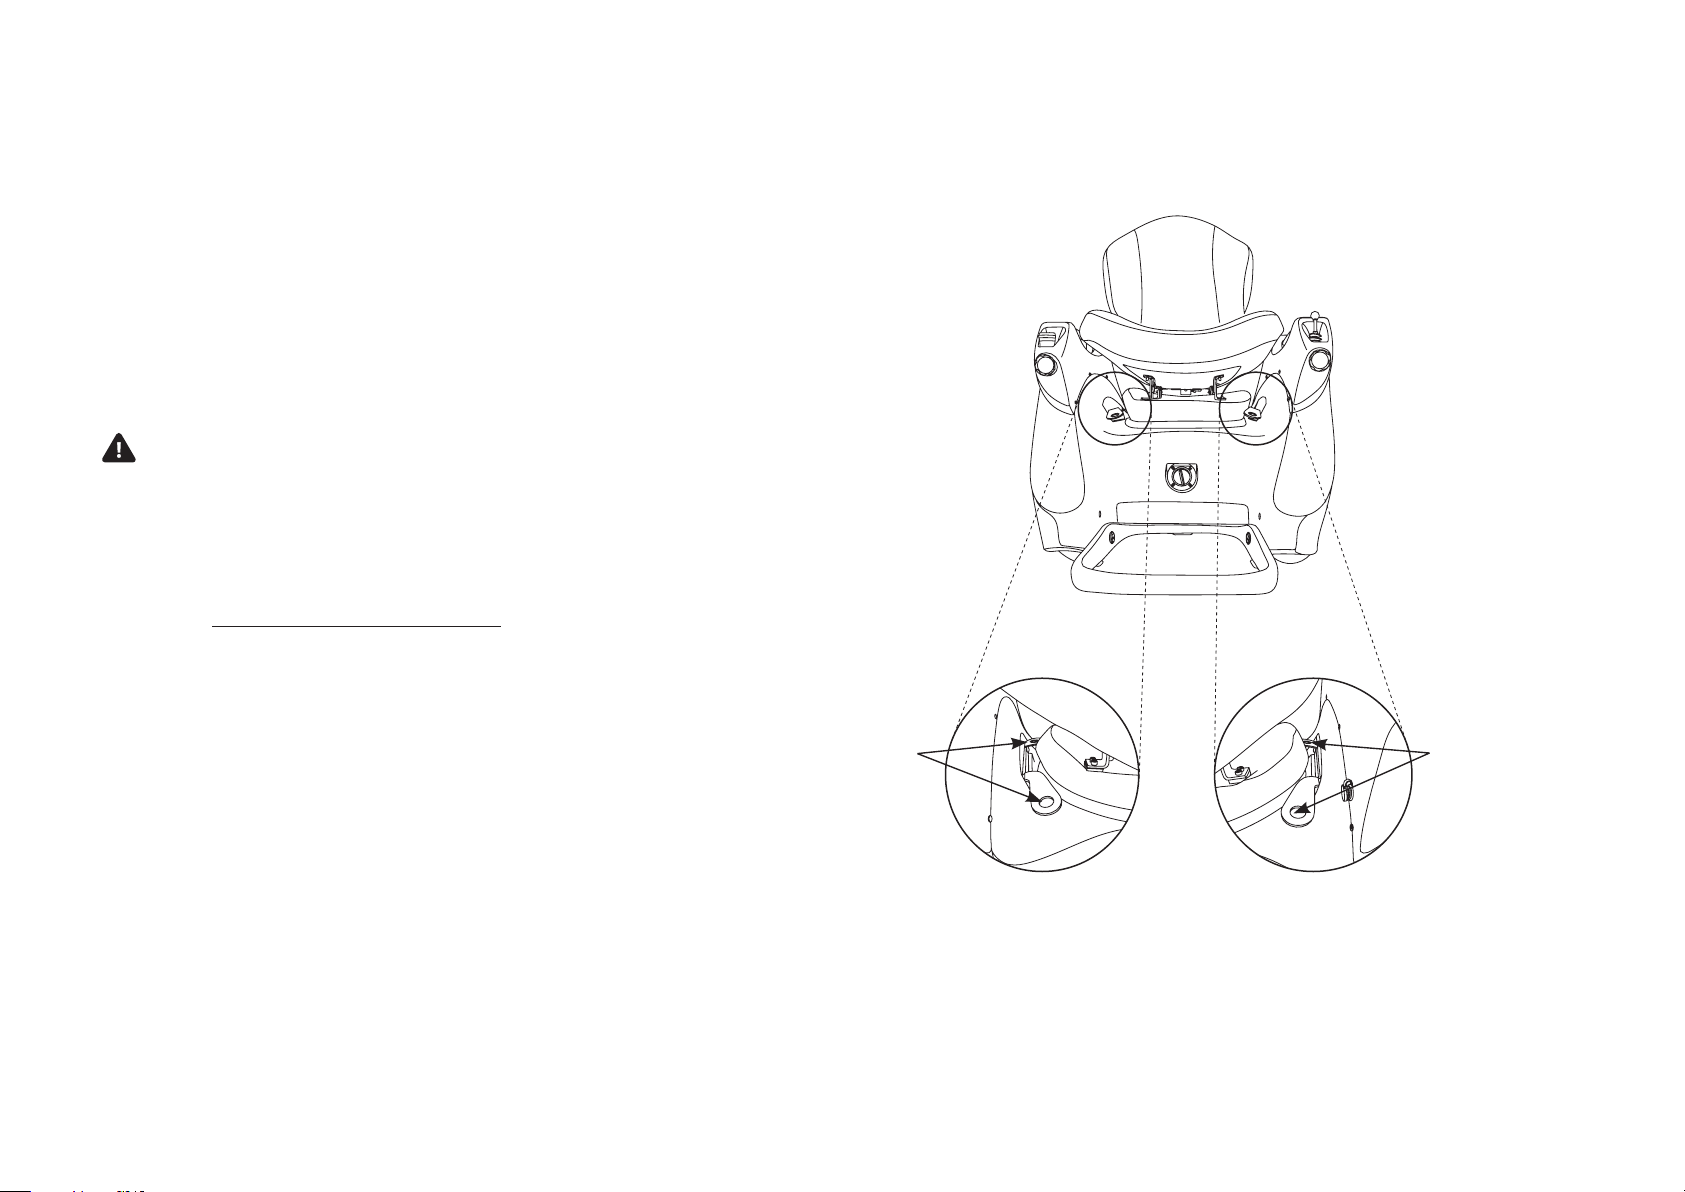
Tie Down Points
There are four Tie Down Points on the Omeo to
secure it when transporting (a requirement on
some public transport) (Figure 37).
The Hand Grips on your Omeo can be also be
used as the tie down point to secure it whilst being
transported.
WARNING
The Omeo is not designed for a user to remain
seated as a passenger or driver in a vehicle.
Battery Disposal
Refer to the Segway PT User Manual (Pg. 95).
Replace in the Segway User Manual:
• Reference to Segway contact details
and replace with Omeo Agent or Omeo
Technology.
Tie down points
Tie down points
SECTION 8 BATTERIES & CHARGING
79
|
Figure 37: The Omeo also has four Tie Down
Points to secure it when transporting.
OMEO EVOLUTION USER MANUAL
Page 80

Section 9: Maintaining your Omeo
Your Omeo is a low maintenance device
constructed from durable, waterproof materials
designed to be weather and low-impact resistant.
To ensure optimal performance you need to
maintain your Omeo by keeping it clean, dry and
correctly assembled with Tyres inflated to correct
pressures and the Batteries charged.
The Power Base, gearboxes, electrics and the
ASC components are not serviceable by the
user / owner.
NOTICE
Even though the Omeo is weather resistant
and can be ridden in the rain, it should not be
stored outside in damp conditions or direct
sunlight for extended periods of time. Doing
so without the use of a protective covering
may cause water damage to electronics and
other components. The Omeo should be stored
indoors when not in use.
WARNING
Make sure that your Omeo is powered o
and unplugged before performing any of the
following procedures.
Maintaining Tyres
and Wheels
Refer to the Segway PT User Manual (Pg. 98).
SECTION 9 MAINTAINING YOUR OMEO
80
|
OMEO EVOLUTION USER MANUAL
Page 81
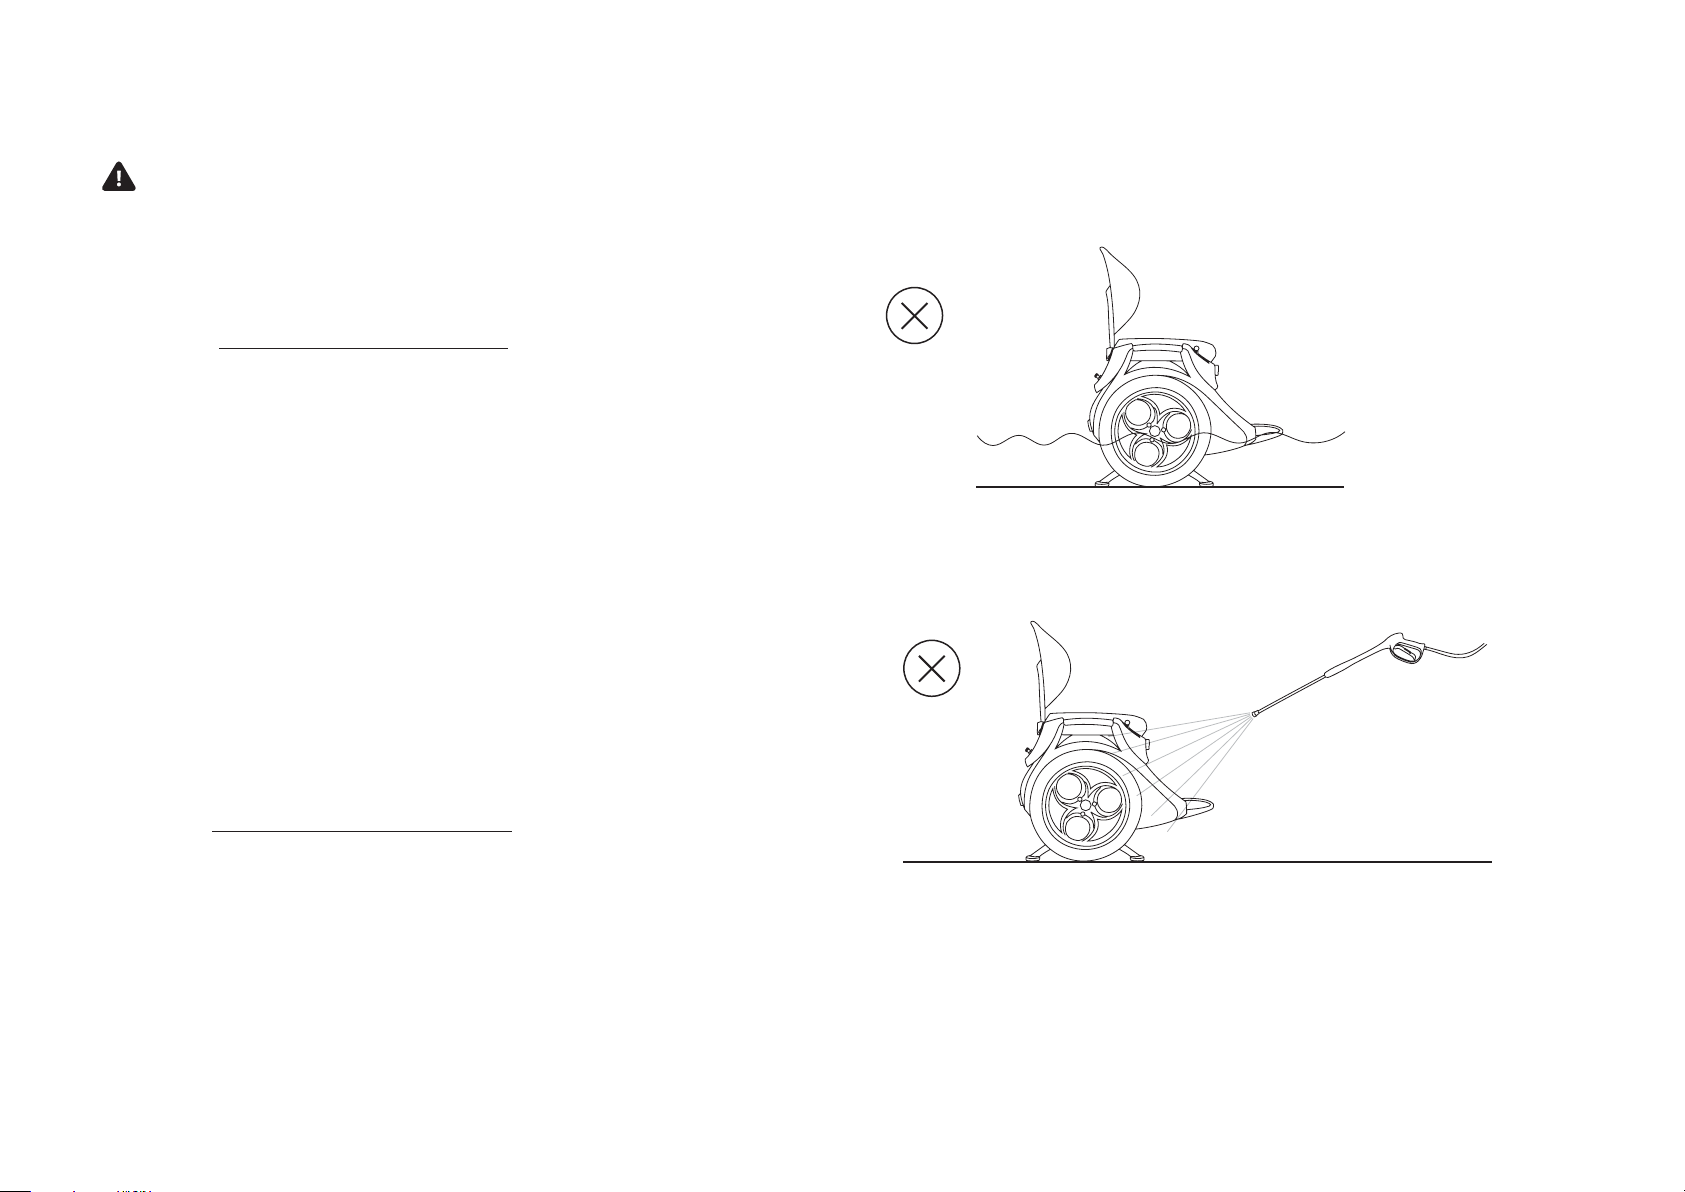
Cleaning your Omeo
WARNING
Do not clean your Omeo’s Body or Tyres with
any abrasive or solvent chemicals. Use of such
products may reduce traction or damage your
Omeo, increasing the risk of a fall.
Refer also to Segway PT User Manual (Pg. 99).
Replace in the Segway User Manual:
• References to Segway contact details
and replace with Omeo Agents or Omeo
Technology contact details.
Storing your Omeo
and Batteries
NOTICE
Prolonged exposure to UV rays, rain and the
elements may damage the body materials.
Store indoors when not in use.
Refer to the Segway PT User Manual (Pg. 100).
SECTION 9 MAINTAINING YOUR OMEO
81
|
Figure 38: Avoid submersion. Do not use a power washer.
OMEO EVOLUTION USER MANUAL
Page 82

Section 10: Servicing your Omeo
WARNING
Before performing any maintenance or
installing any part or accessories, you must
always power o your Omeo and ensure the AC
Power Cords are unplugged.
There are no user-serviceable parts inside the
Power Base unit. You must never attempt to
open it. By doing so, you not only risk electric
shock and unsafe damage to your Omeo, you
will also void the Omeo warranty.
When performing any maintenance or
installations, use only Omeo approved parts,
screws and accessories.
To decrease your risk of injury, you should wear
safety glasses when performing any service on
your Omeo.
WARNING
Risk of Fire-No User Serviceable Parts.
Replacing parts
If a part of your Omeo breaks or you have any
questions regarding replacement parts, contact
your nearest Authorised Omeo Agent, a Certified
Omeo Service Technician or Omeo Technology.
Torque Specifications
CAUTION
Adhere to torque specifications when
tightening screws or fasteners. Over-tightening
or under-tightening screws or fasteners can
result in damage or malfunction.
Accessories
Add only Omeo approved accessories to your
Omeo. Various accessories are currently being
developed and will become available over time.
For a range of accessories refer to the Omeo
Technology website.
SECTION 10 SERVICING YOUR OMEO EVOLUTION
82
|
OMEO EVOLUTION USER MANUAL
Page 83
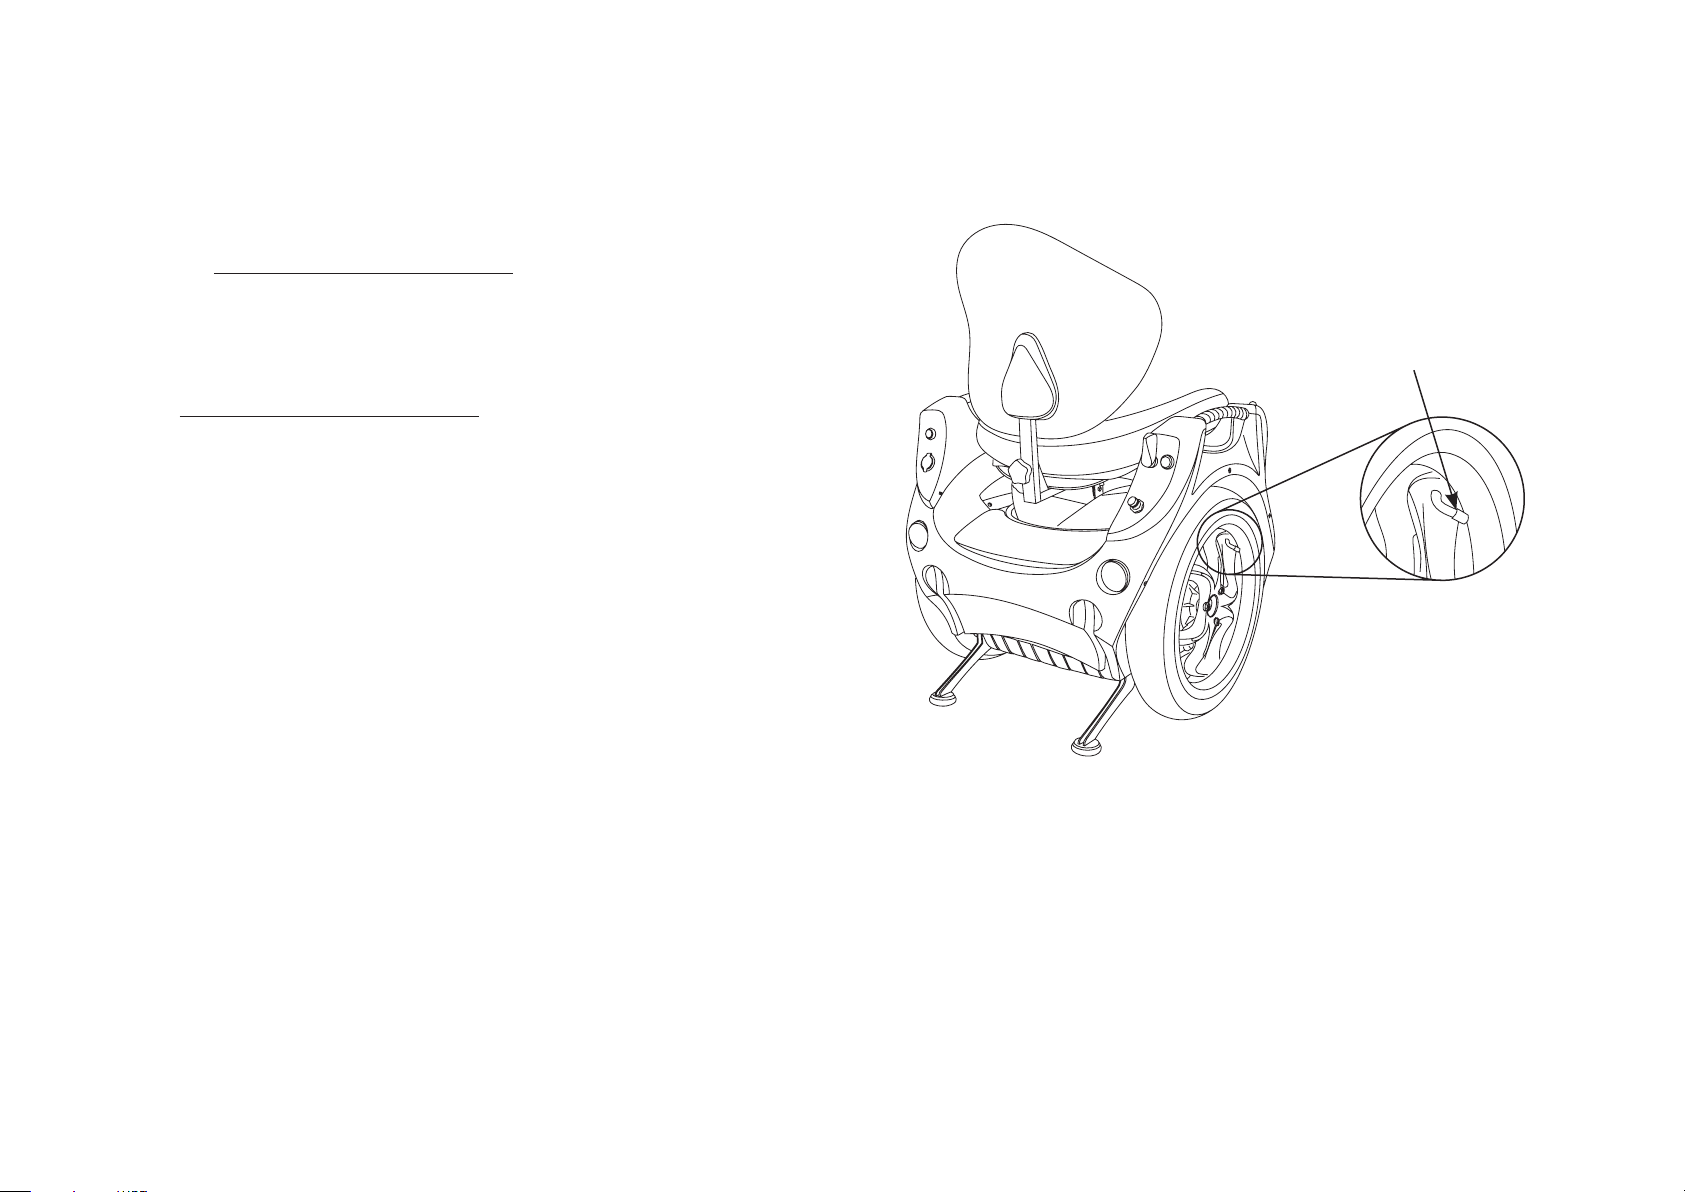
Service Procedures
Segway Components
Refer to the Segway PT User Manual (Pg. 104).
Removing the Segway
Lithium-ion Batteries
Refer to Segway PT User Manual (Pg. 106).
Checking Tyre Inflation Pressure
The tyre pressures for the Omeo Standard and
All-Terrain are as for the Segway (Refer to Table 1:
Omeo Specifications, Pg. 18).
Make sure the Omeo is powered o and in a stable
upright position with the Stabilising Legs down in
the first instance (see Figure 39).
NOTICE
As the valve system is visible there is no need
to tip the Omeo onto its side to check the
tyre inflation pressure. A slight rotation of
the Wheel may be required to allow the best
location / access to the valve system.
There are no wheel caps on the Omeo wheels.
Tyre valve system
Figure 39: Checking the tyre inflation pressure.
SECTION 10 SERVICING YOUR OMEO EVOLUTION
83
|
OMEO EVOLUTION USER MANUAL
Page 84
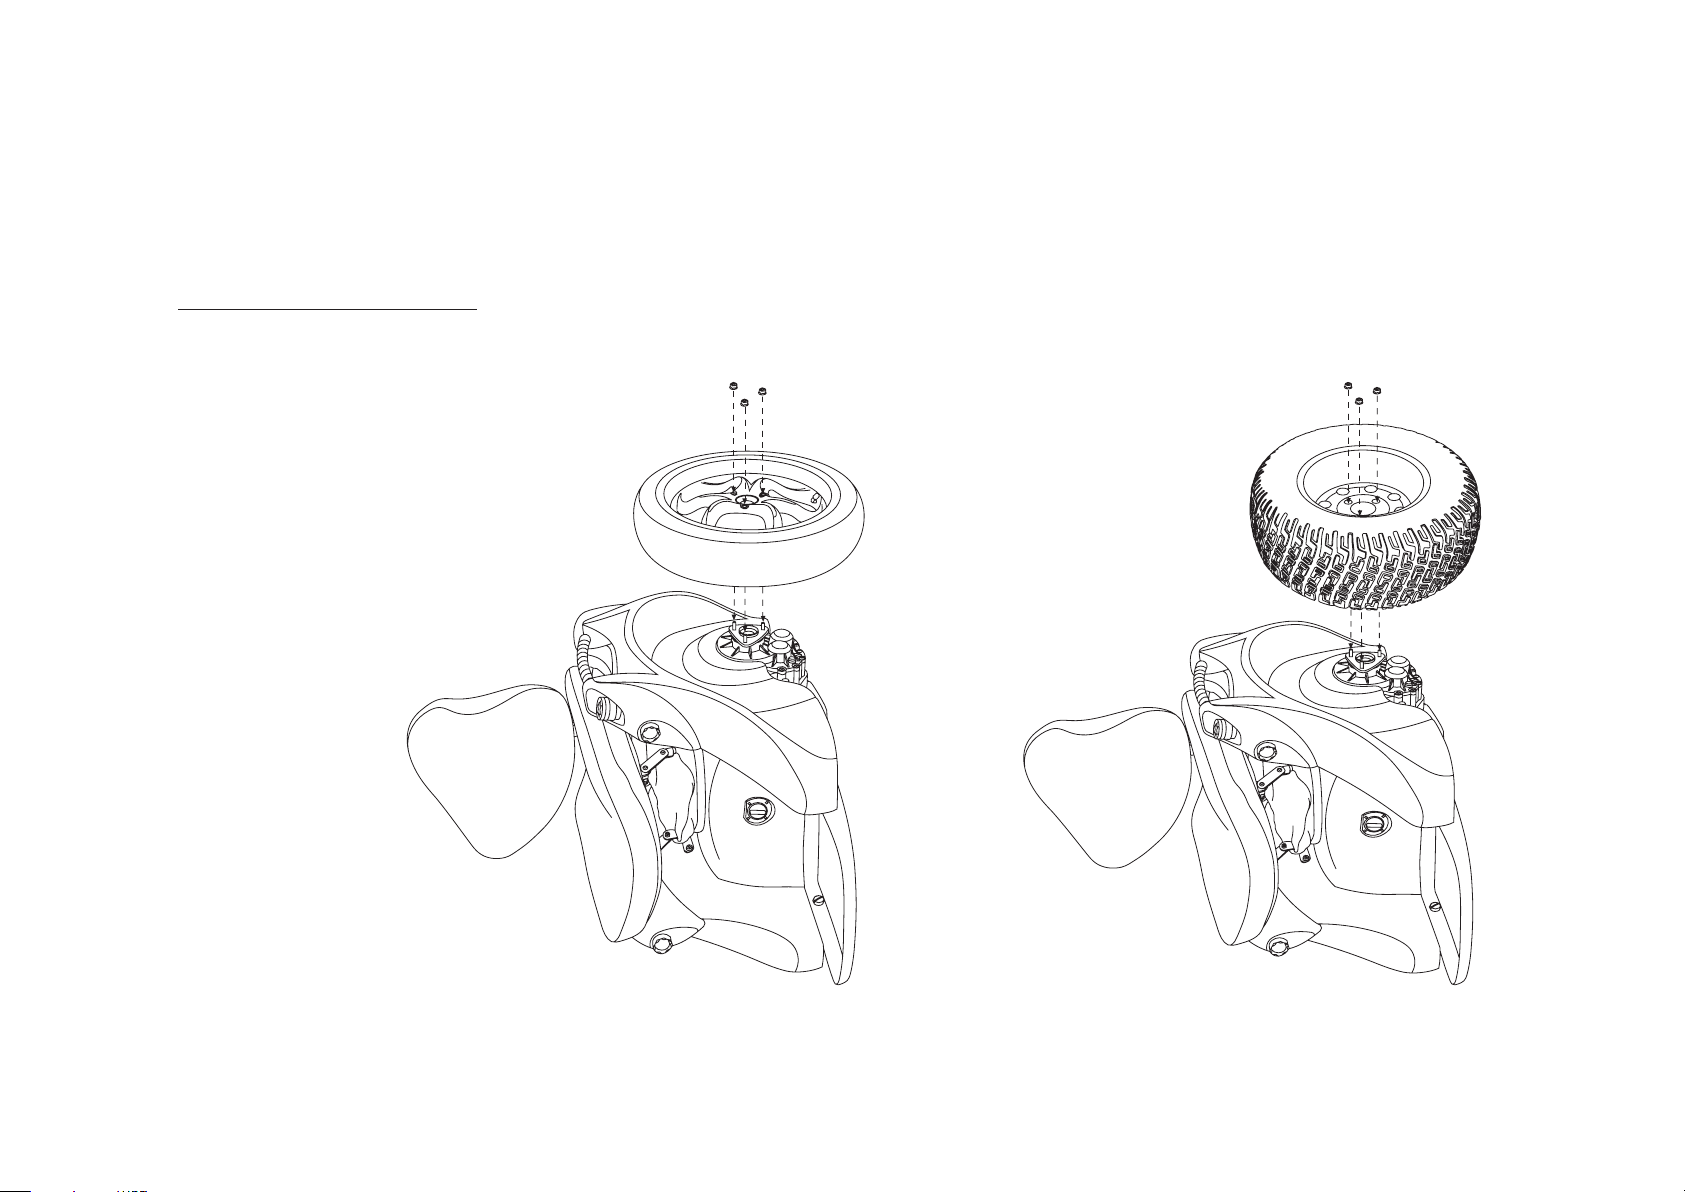
Service Procedures (cont.)
Install and Remove Tyre / Wheel
Assembly
Refer to Segway PT User Manual (Pg. 108).
SECTION 10 SERVICING YOUR OMEO EVOLUTION
84
|
Figure 40: Install and remove standard tyres / wheels. Figure 41: Install and remove All-Terrain tyres / wheels.
OMEO EVOLUTION USER MANUAL
Page 85
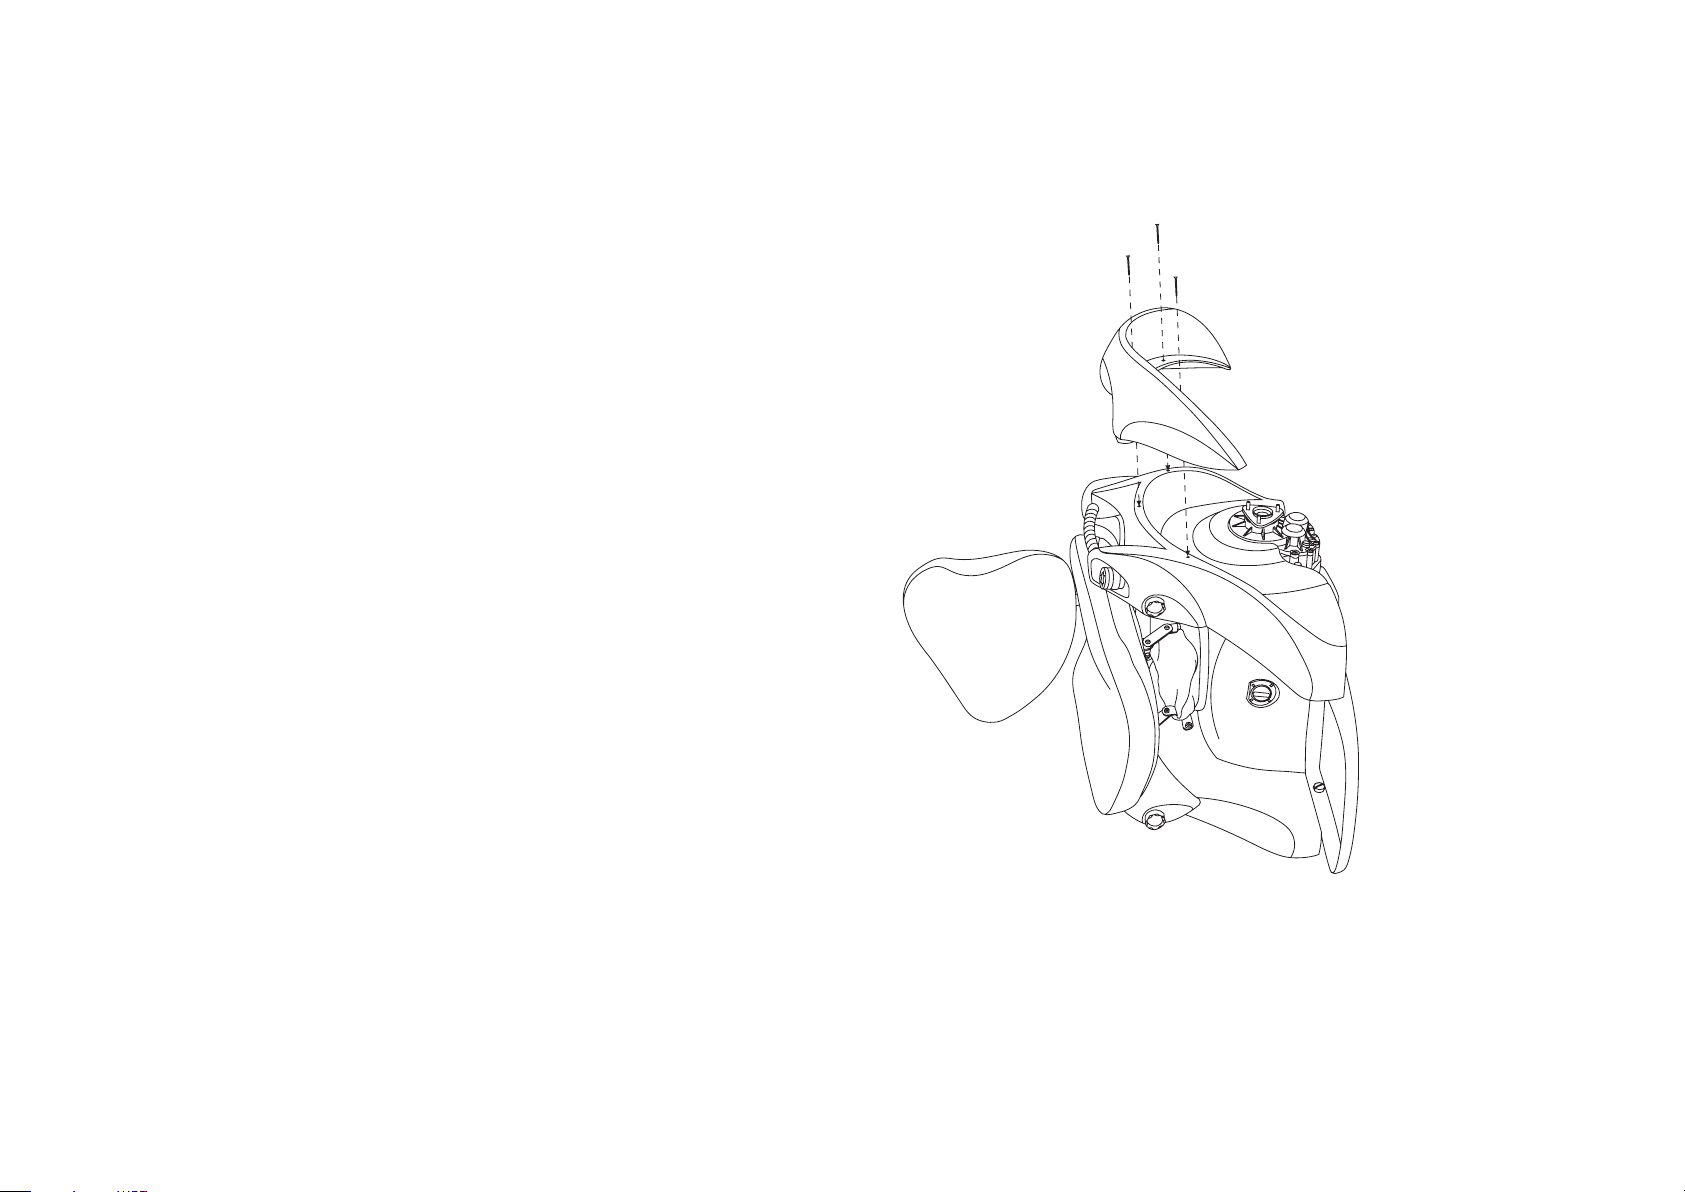
Service Procedures (cont.)
Remove / Install O-Road Kit
Wheel Guards (Fenders)
Tools required: Phillips screwdriver
To remove the guards (fenders):
1. Make sure that the Omeo is unplugged and
powered o
NOTICE
The Omeo does not have to be on its side to take
o the Guards. It is safe to take the Guards o
whilst the Omeo is in an upright position.
2. Remove the three screws / fasteners that attach
the guard to the Body of the Omeo
3. Remove the Guard and store along with the
screws / fasteners in a safe location.
To install the Guards (fenders):
1. Position the Guard so that it aligns with the
three holes in the Omeo Body (as seen in
Figure 42)
2. Insert and thread the screws through the
guard into the Omeo Body and tighten to
1.5N-m (13in-lbs) / hand tight.
SECTION 10 SERVICING YOUR OMEO EVOLUTION
85
|
Figure 42: Remove / install the O-Road Kit Wheel Guards (Fenders).
OMEO EVOLUTION USER MANUAL
Page 86

Replacing the InfoKey™
Controller Battery
Refer to Segway PT User Manual (Pg. 115).
When it comes to replacing your InfoKey™
Controller batteries it is highly recommended
that you get in contact with your Omeo Agent or
Omeo Technology to source high quality batteries.
It is important that you use high quality batteries to
maximise the useful life of your InfoKey™.
NOTICE
By using low quality (or cheap) batteries, you
risk damage to your InfoKey’s™ buttons and
the potential to not being able to power on
your Omeo.
Seat Cushion
The Seat Cushion can be removed for cleaning or
replacing by unzipping the Cover.
Seat Cover
Seat Cushion Cover can be removed for airing and
professional cleaning.
The Seat Cover is made of vinyl and can be
cleaned with soap and water, or water-based
cleaners. Do not use solvent based cleaners.
SECTION 10 SERVICING YOUR OMEO EVOLUTION
86
|
OMEO EVOLUTION USER MANUAL
Page 87

Section 11: Customisations
Your Omeo can be customised to the needs
of individual riders. This can allow each rider to
optimise control of the Omeo according to their
abilities.
You can adjust:
• Seat Location
• Seat Height
• Footplate Height
• Seat Cushion
• Seat Cover
• Wheels
• Steering Resistance – Dampening Control
• Accessories
Adjustments should be undertaken with the
support of your Authorised Omeo Agent.
SECTION 11 CUSTOMISATIONS
87
|
OMEO EVOLUTION USER MANUAL
Page 88
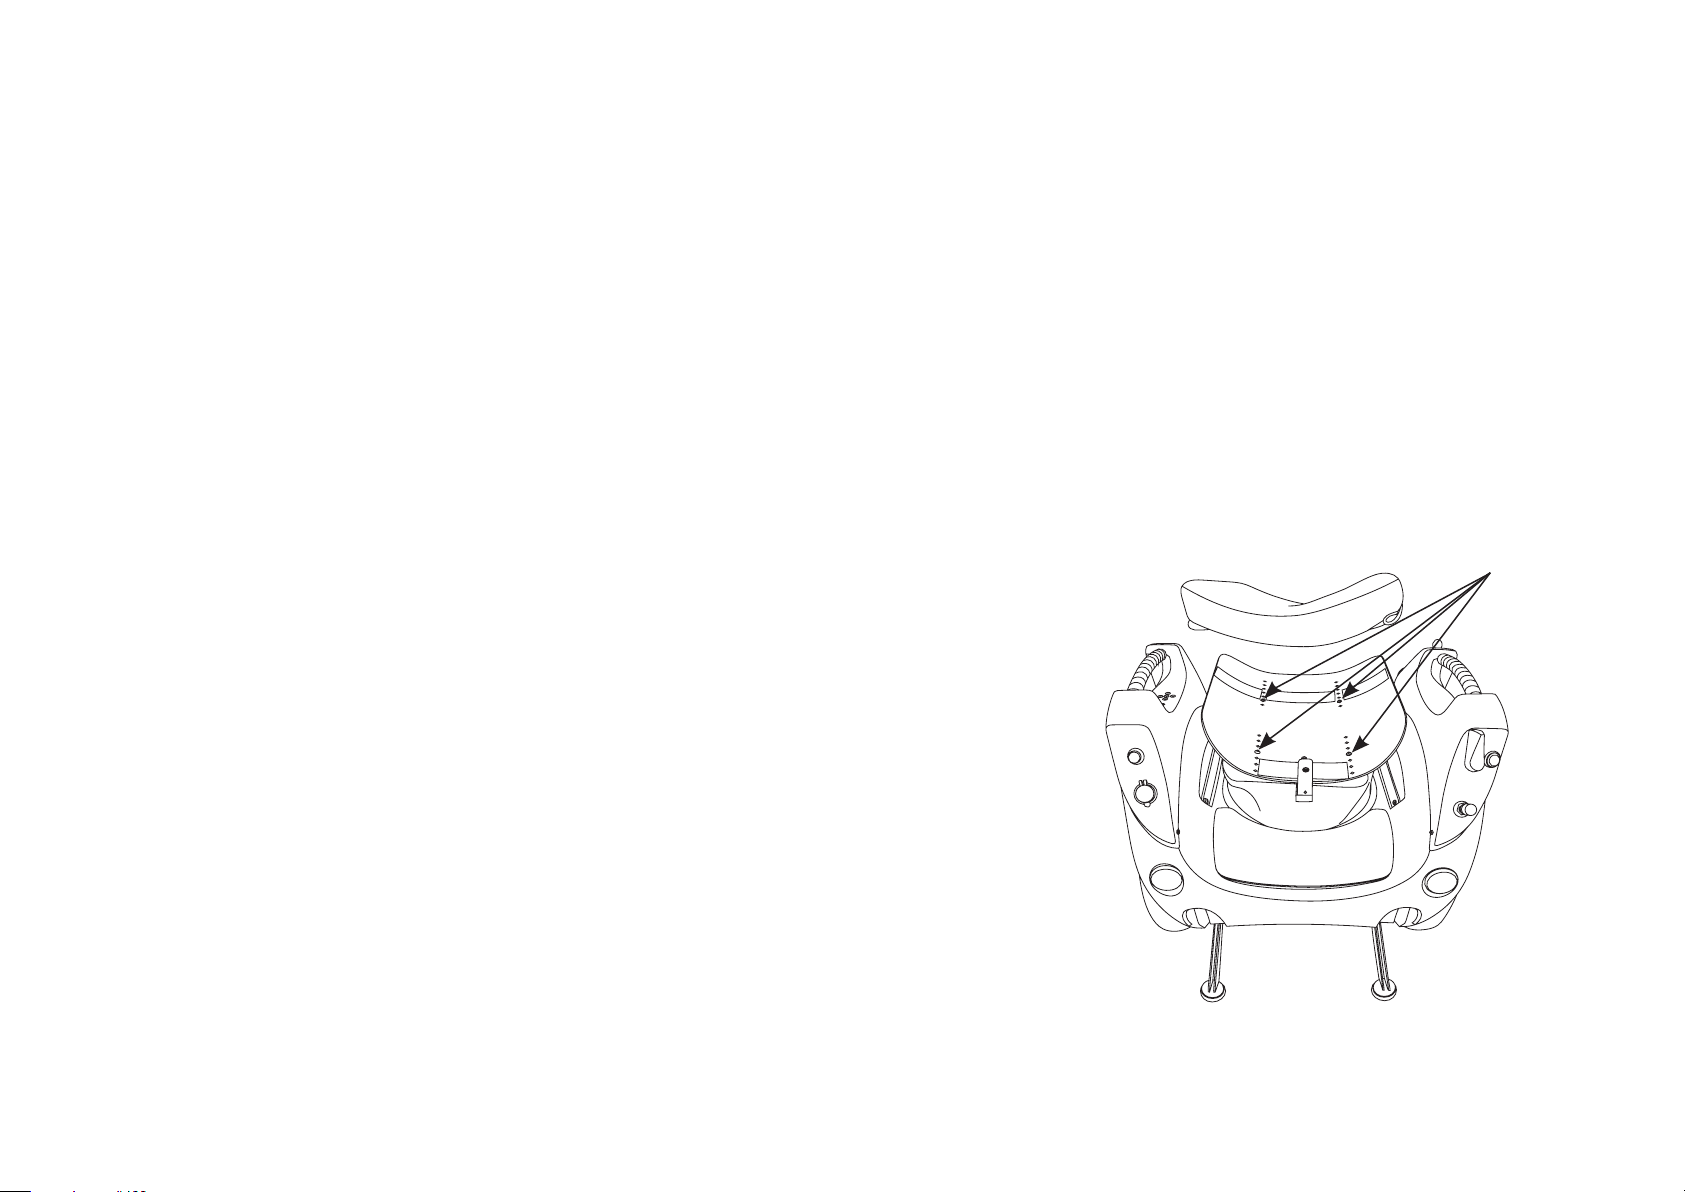
Seat Location
Seat Pan Forward and Back
The Seat Pan on your Omeo is adjustable forward
and back in 20mm (0.78in) increments. Adjustment
may be necessary to help you find the centre of
balance. You will know when the Seat is centred
as it should require the same amount of eort to
lean forward and return to centre as it does to lean
back and return to centre.
To adjust the Seat forward and back:
1. Sit as far back in the Seat as possible in an
upright position (making contact with the
Seat Back)
2. Have an assistant or Spotter hold onto the
top of the Seat Back, ready to take control if
required
3. Push the Main Control Switch to go to Balance
Mode and test. Your goal is to be stationary
in Balance Mode to identify your centre of
balance in a front to rear axis
4. If you have to lean forward to maintain a
stationary position, then the Seat Pan will need
to be adjusted forward
How to adjust the Seat Pan:
1. Remove the Seat Cushion by releasing the
Velcro on the underside and rear then slide
forward
2. Remove the 4 screws from the top of the Seat
Pan as shown in Figure 43
3. Move the Seat Pan forward or back as
required. Align the 4 holes, insert the screws
then tighten (hand tight) before reattaching
the Seat Cushion.
NOTICE
Make sure that the number of holes between
the forward and rear screws remains the
same throughout the adjustment to keep the
Seat height and dump (angle or rake of seat)
constant.
Seat Pan screws
3
1
4
2
5. If you have to lean back to maintain a
stationary position, then the Seat Pan will need
to be adjusted backward
6. Do one adjustment at a time
7. Repeat the process until you are in a
comfortable upright position whilst remaining
stationary.
SECTION 11 CUSTOMISATIONS
88
|
Figure 43: Adjusting the Seat Pan.
OMEO EVOLUTION USER MANUAL
Page 89

Seat Location (cont.)
Seat Height
The Seat height can be adjusted by 45mm
(2in) at 15mm (0.6in) increments up and down
to customise to leg length and transfer heights.
The Seat dump can also be adjusted in this
process. (Refer to How to adjust the Seat Dump,
Pg. 90).
Testing for the appropriate Seat height:
1. Test the fit for Seat to Footplate by sitting on
your Omeo with the Stabilising Legs down.
Check to see if your feet are in contact with
the Footplate and that you have no undue
pressure on the Seat under your thighs
2. Have an Assistant / Spotter hold onto the top of
the Seat Back, ready to take control if required
3. Rock the Seat back and forward to check that
your feet stay in contact with the Footplate at
all times
4. Raise / lower the Seat to suit. (Refer to How to
raise and lower the Seat height, Pg. 90)
NOTICE
The ASC’s pivoting Seat and the self-levelling
function of your Omeo must be taken into
account when selecting the most suitable Seat
to Footplate height.
When braking or going down-hill, the Seat will
pivot back increasing the distance between the
front of the Seat and the Footplate. Conversely
the distance will decrease when going uphill or on
initial take o.
NOTICE
A good guide to indicate if adjustment may be
needed is if your feet lift o the Footplate when
braking hard or descending a steep slope.
(Refer to Riding Behaviour and Method Pg. 43).
For maximum adjustment both Seat height and
Footplate height may need adjustment in tandem
(Refer to How to raise and lower the Seat, (Pg. 90),
and Adjust the Footplate Height, (Pg. 91)).
5. For a more level transfer, you can change the
Seat height to ground height in the same way
as above.
SECTION 11 CUSTOMISATIONS
89
|
OMEO EVOLUTION USER MANUAL
Page 90
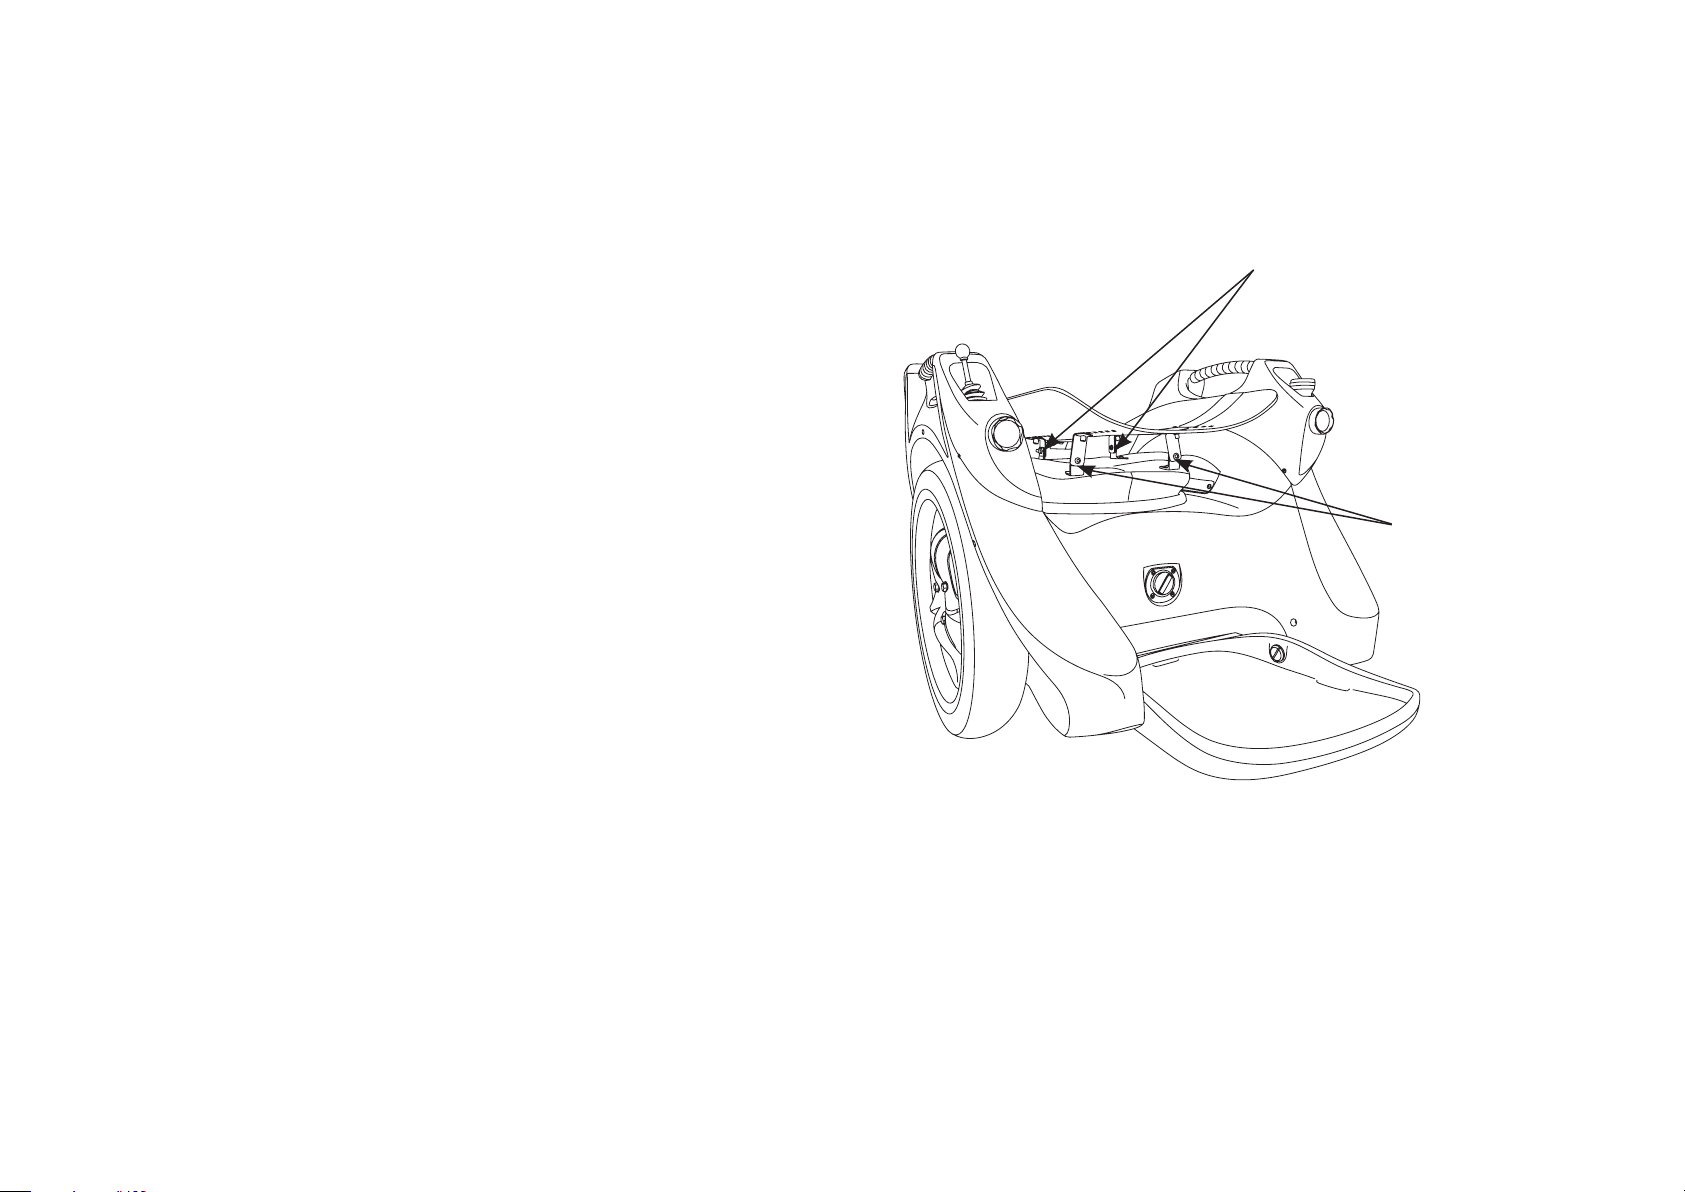
Seat Location (cont.)
How to raise and lower the Seat height:
1. Remove the Seat Cushion
2. Undo and remove the four mounting screws
from the top of the Seat Pan (Figure 43:
Adjusting the Seat Pan, Pg. 88)
3. Using the 5mm Allen key and 10mm
Spanner provided, loosen the 4 screws on
the Mounting Arms (as located in Figure 44).
This will allow you to move the Mounting
Arms (brackets) up or down to suit.
How to adjust the Seat Dump (sometimes
referred to Angle or Rake):
To adjust the dump (the rear of the seat lowered or
front raised):
1. Follow the same procedure as above however
you are only adjusting the front or the rear
Mounting Arms
Rear
Mounting Arms
Front
Mounting Arms
2. For a finer adjustment for dump, washers
can be added between the Seat Pan and the
Mounting Arm.
SECTION 11 CUSTOMISATIONS
90
|
Figure 44: The Omeo Seat showing the Mounting Arms.
OMEO EVOLUTION USER MANUAL
Page 91
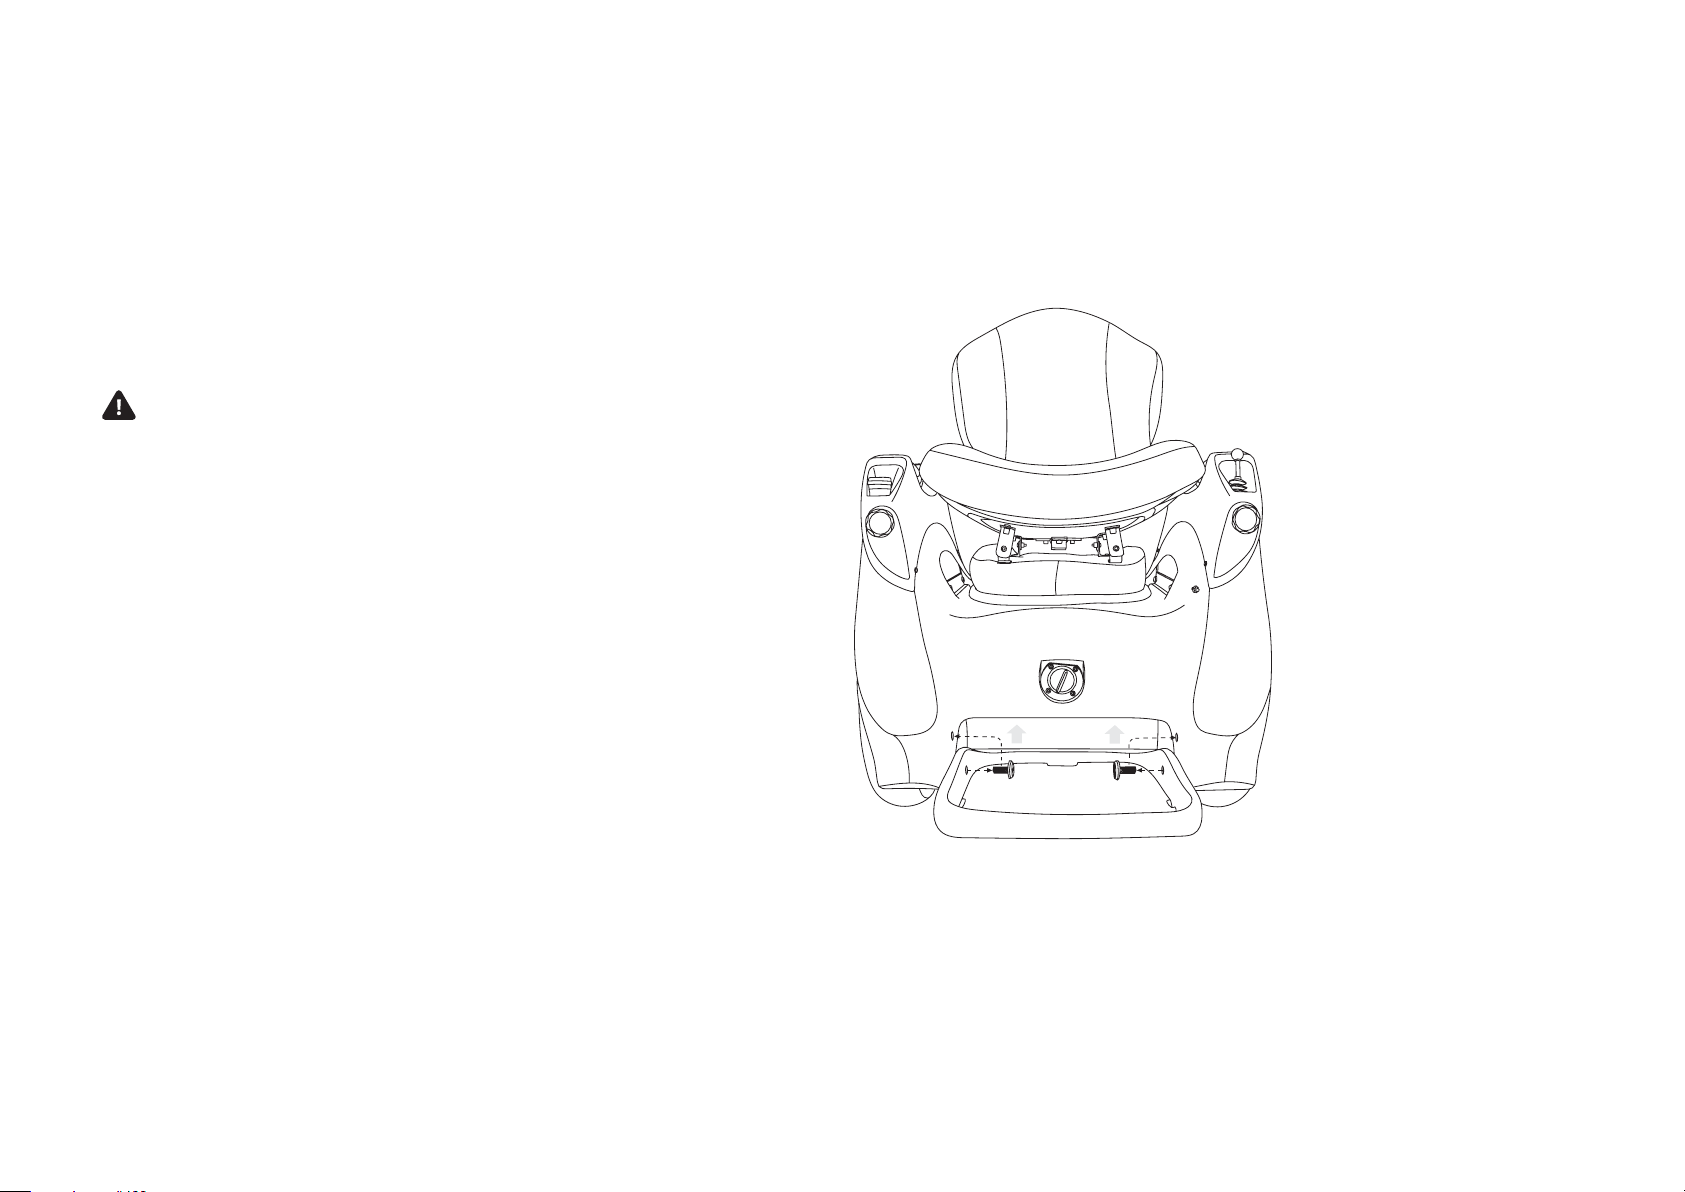
Footplate Height
The Footplate has 2 adjustments of 50mm (2in.)
increments in height to:
1. Increase the ground clearance
2. Allow for the Seat to Footplate height to be
adjusted according to your leg length.
Your feet should sit level within the boundary of
the Footplate.
WARNING
You must keep your feet within the Footplate
when in use.
Adjust the Footplate Height
Adjusting Footplate height can be done
independently of, or in conjunction with Seat
height adjustment.
Tool required: Large Screwdriver
1. Adjust the Footplate height by using a
screwdriver to undo the Footplate pivot bolts
(Figure 45) and release the Footplate
2. Re-tighten the Footplate pivot bolts. Be careful
not to over-tighten the bolts.
NOTICE
Whilst it is desirable that your feet are resting
on the Footplate and can be used for leverage,
it is not necessary for operational or safety
purposes.
SECTION 11 CUSTOMISATIONS
91
|
Figure 45: Adjust the Footplate height.
OMEO EVOLUTION USER MANUAL
Page 92

Seat Cushion
Seat Cover
Steering Resistance and
Your Omeo comes with a carefully selected
Seat Cushion which seems to suit most riders.
Nevertheless, each owner / rider will have their own
preference for comfort.
The Seat Cushion can be easily replaced and
cleaned.
Remove and replace Seat Cushion fill:
1. To remove the Cushion from Seat Pan, pull the
Cushion to separate the Velcro away from the
Seat Pan
2. To remove / replace the Cushion fill, unzip the
Cushion Cover
3. Insert desired fill, re-zip the Cushion Cover
4. Re-attach the Seat Cushion to the Seat Pan
using the Velcro.
NOTICE
When customising the Cushion, it is important
to keep the shape and size of the original
Cushion. This will ensure that the correct
clearance between the Seat and Body is
maintained.
Your Omeo comes with a standard vinyl Seat
Cover which is hard-wearing and suitable for
wet weather.
A breathable Seat Cover is also available as an
accessory. This is more suited to hot conditions
and prolonged use.
Please contact your seat specialist or Omeo Agent
if you wish to change your Seat Cover.
Changing the Seat Cover:
1. To remove the Cushion from Seat Pan, pull the
Cushion to separate the Velcro away from the
Seat Pan
2. Unzip the Cover
3. Fit and zip the new Cover
4. Re-attach the Seat Cushion to the Seat Pan
using the Velcro.
Wheels and Tyres
The Omeo is supplied with the Standard Wheel
and Tyre kit. The Standard Kit suits many o-road
situations.
Dampening Control
Dampening control is integrated into the seat
steering (ASC) to help you maintain control of your
Omeo at speed, over bumpy terrain and / or with a
variable payload.
NOTICE
If you are riding at speed o-road, increasing
the dampening can help you to retain a
straighter line.
To adjust the Dampening Control:
1. To increase the resistance / dampening, turn
the knob clockwise
2. To decrease the resistance / dampening, turn
the knob anti-clockwise
Refer to Section 7: Learning to ride your Omeo
(Pg. 42).
NOTICE
Turning the Dampening Control knob fully
to the right and increasing the stiness too
much will lock the seat and stop the steering
function completely.
SECTION 11 CUSTOMISATIONS
92
|
The O-Road Kit (Wheels, Tyres and Guards) are
supplied as an accessory and are suitable for more
extreme terrain.
Changing between the two options is easy.
Refer to Install and Remove Tyre / Wheel Assembly
(Pg. 84).
OMEO EVOLUTION USER MANUAL
Page 93

Accessories
Railblaza Accessories
The Omeo is fitted with a RailBlaza Star-lock on
the opposite arm to the Joystick.
There are numerous Omeo by RailBlaza
accessories designed to fit the Star-lock which are
available on the Omeo Technology website.
Seat Cover
Vinyl suited to hot conditions and prolonged use.
Protector Cover
Adjustable, for both Standard and O-Road Kits.
Hard wearing, shower proof material, large pocket.
Form fitting.
O-Road Kit
• All-Terrain Wheels
• Wheel Guards (Fenders).
SECTION 11 CUSTOMISATIONS
93
|
OMEO EVOLUTION USER MANUAL
Page 94

Section 12: Troubleshooting
This section describes numerous troubleshooting
techniques for identifying certain problems with
your Omeo, before needing to contact a Certified
Omeo Service Technician.
NOTICE
If you attempt to fix problems yourself that
require approved Omeo Technology Service
Technician you may void your Omeo Worldwide
Limited Warranty.
NOTICE
If you are unsure of what the problem is or if
you need service assistance please contact
the nearest Authorised Omeo Agent, Certified
Omeo Service Technician or Omeo Technology.
WARNING
Your Omeo must be unplugged and powered
o prior to doing any maintenance, repairs or
adding on any approved accessories.
Power Base, Drive-train,
Tyres and Wheels
PROBLEM:
The Omeo will not power on.
RECOMMENDED ACTION:
(Refer to the Segway PT User Manual, Pg. 120).
PROBLEM:
The Omeo will not enter Balance Mode.
RECOMMENDED ACTION:
• Confirm the Omeo is powered On
• Confirm the Joystick is centred
• Confirm the Stabilising Legs are down and the
Omeo is level
• If the Omeo will still not enter Balance Mode,
identify the error icon on the InfoKey™
Controller, and refer to Segway PT User
Manual (Pg. 127).
PROBLEM:
Tyre/Wheel Assembly is loose and / or wobbles.
RECOMMENDED ACTION:
(Refer to the Segway PT User Manual, Pg. 122).
PROBLEM:
The Omeo pulls to one side when riding.
RECOMMENDED ACTION:
(Refer to the Segway PT User Manual, Pg. 123).
PROBLEM:
Tyre is flat or will not maintain inflation pressure.
RECOMMENDED ACTION:
(Refer to the Segway PT User Manual, Pg. 124).
Replace in the Segway User Manual:
• References to Authorised Segway Dealer
and replace with Certified Omeo Service
Technician
• References to Distributor and replace with
Omeo Technology.
SECTION 12 TROUBLESHOOTING
94
|
OMEO EVOLUTION USER MANUAL
Page 95

PROBLEM:
Safety Shutdown occurs when entering or leaving
a building.
RECOMMENDED ACTION:
(Refer to the Segway PT User Manual, Pg. 125).
Replace in the Segway User Manual:
• Reference to Step o at... And replace with
Go into Safety Shutdown procedure.
Come to a standstill, press Main Control Switch
to lower Stabilising Legs, within 10 seconds.
Contact building manager to deactivate
detection system in order to progress through.
Omeo Specific
PROBLEM:
The Seat Back moves side to side when riding
RECOMMENDED ACTION:
1. Review Seat Back installation
2. Loosen the knob on the Seat Back Stem and
remove the Seat Back
3. Check for wear and cracks in the post
4. If showing signs of any damage, contact
the nearest Authorised Omeo Agent,
Certified Omeo Service Technician or Omeo
Technology
PROBLEM:
The Omeo turns by itself when in Joystick Mode.
RECOMMENDED ACTION:
1. Turn your Omeo o and make sure that the
Joystick moves side to side evenly and returns
to centre when let go
2. If the problem persists, contact your
Authorised Omeo Agent, Certified Omeo
Service Technician or Omeo Technology.
PROBLEM:
The Seat is not level, making control and balance
for steering dicult.
PROBLEM:
The Omeo will not power o.
RECOMMENDED ACTION:
(Refer to the Segway PT User Manual, Pg. 126).
PROBLEM:
InfoKey™ Controller Error Icons
RECOMMENDED ACTION:
(Refer to the Segway PT User Manual, Pg. 127).
5. If all is in order, then reinstall the Seat Back
ensuring the knob is tightly fastened.
PROBLEM:
The seat is not level
RECOMMENDED ACTION:
1. Lower the Stabilising Legs with the Omeo
powered o
2. Switch the Steering Selection lever into ACS
mode and manually adjust the position of
the seat
3. Switch back into Joystick Mode.
RECOMMENDED ACTION:
1. Dismount your Omeo and check that the
Seat is installed correctly according to the
instructions in Seat set up
2. Check that each Mounting Arm (bracket) is set
at the same height or numbered location as its
mirror / counterpart on the Seat
3. If the adjustable Mounting Arms are set
unevenly then adjust so they are even. Test the
Omeo for balance and control
4. If the problem persists, contact your
Authorised Omeo Agent, Certified Omeo
Service Technician or Omeo Technology.
SECTION 12 TROUBLESHOOTING
95
|
OMEO EVOLUTION USER MANUAL
Page 96

PROBLEM:
Stabilising Leg will not raise fully. (The error code
displayed will be an alternating blue and white
blinking light on the Omeo Display Panel).
RECOMMENDED ACTION:
1. Lower all Stabilising Legs and check for debris
such as sticks, stones and other foreign objects
caught in the housing that the legs retract into
2. Remove any debris carefully making sure not to
cause damage to your Omeo
3. If the Stabilising Leg will still not fully retract,
check to see if any extraordinary force from a
collision or rotational movement has bent the
leg. This will be noticeable if the leg is hitting
the housing and stopping
4. If the Stabilising Leg is damaged, then contact
your Authorised Omeo Agent or Certified
Omeo Service Technician or Omeo Technology.
PROBLEM:
Stabilising Leg will not meet the ground when
lowered. (The error code displayed will be an
alternating blue and white blinking light on the
Omeo Display Panel).
RECOMMENDED ACTION:
1. Check for debris caught in the housing around
the Stabilising Leg
2. Clear debris carefully so as not to cause
damage to the Omeo.
PROBLEM:
ASC steering and motion is inhibited or not
working at all.
RECOMMENDED ACTION:
1. Check for foreign debris or build-up of sand,
ice, mud and / or grime in, around and under
the Seat
2. Clear any obstructions
3. Check the Steering Selection Lever is fully
horizontal
4. If the problem still persists then contact your
Authorised Omeo Agent or Omeo Technology.
PROBLEM:
Headlights stop working
RECOMMENDED ACTION:
1. Check on the Omeo Display Panel to see if the
Auxiliary Indicator Light is either flashing yellow
or red
2. If the Auxiliary Indicator Light is yellow or red
the Batteries are discharged to less than 50%
3. Charge / top up the Auxiliary Batteries by
plugging in the Auxiliary Battery Charger
provided. Batteries may need replacing
4. If the problem persists after full charge, then
contact your Authorised Omeo Agent or Omeo
Technology.
PROBLEM:
Stabilising Legs will not raise when the Omeo is
powered on.
RECOMMENDED ACTION:
1. Check on the Omeo Display Panel to see if the
Auxiliary Indicator Light is flashing red
2. If the Auxiliary Indicator Light is red and
flashing once every 1.5 seconds in a
continuous pattern, then charge up the Omeo
Auxiliary Batteries with the Auxiliary Battery
Charger
3. If the red warning light is active and you need
to be mobile, then hold down the Main Control
Switch on the Omeo for 7 seconds to override the system to raise the Stabilising Legs and
enter Balance Mode
4. Ride to a safe location where you can charge
the Omeo and have access to alternative
mobility solutions
5. If the problem persists after full charge then
contact your Authorised Omeo Agent, or Omeo
Technology.
SECTION 12 TROUBLESHOOTING
96
|
OMEO EVOLUTION USER MANUAL
Page 97

PROBLEM:
Stabilising Legs will not raise when the Omeo is
powered o.
RECOMMENDED ACTION:
1. Check on the Omeo Display Panel after pushing
the Main Control Switch to see if the Auxiliary
Indicator Light is flashing red
2. If the light is red and flashing once every
1.5 seconds in a continuous pattern for 20
seconds, your Batteries are discharged to less
than 20%
3. Charge/top up the Omeo Auxiliary Batteries
with the Auxiliary Battery Charger
4. If the red warning light is flashing and you need
to raise the Stabilising Legs hold down the Main
Control Switch for 7 seconds.
The Stabilising Legs will raise
5. Push Main Control Switch once to lower the
Stabilising Legs
6. If the problem persists after full charge then
contact your Authorised Omeo Agent, or Omeo
Technology.
PROBLEM:
The Omeo is making unusual noise from the
Gearbox area.
RECOMMENDED ACTION:
1. Check that there is no debris caught between
the wheels and body
2. If the noise is always present when the Omeo
is moving, or problem persists contact your
Authorised Omeo Agent or Omeo Technology.
PROBLEM:
Stabilising Legs, Lights and USB Port do not
perform as expected after a full charge.
For example:
• Stabilising Legs raise / lower for less than
200 cycles
• Lights run for less than 1 hour
• USB charging shuts down prior to a full cell
phone charge.
RECOMMENDED ACTION:
1. Indicates excessive use of USB Port and Lights
or faulty Batteries
2. Try charging to full
3. If unsuccessful refer to Section 8: Batteries and
Charging (Pg. 64)
4. If the problem persists, contact your
Authorised Omeo Agent or Omeo Technology
direct.
PROBLEM:
Unexpected Safety Shutdown entering / exiting
building.
RECOMMENDED ACTION:
1. Safety Shutdown procedure: Switch Steering
Selection Lever to vertical. Come to a standstill
and depress the Main Control Switch once to
lower the Stabilising Legs within 10 seconds
2. Try turning the power back on as you might be
far enough away
3. If getting o the machine is not an option,
then you may need to get in contact with
4. the building manager to have the scanner
turned o
5. Make appropriate arrangements for future and
ongoing access.
NOTICE
Some security scanners can interfere with
the base unit and cause it to go into Safety
Shutdown Mode. While we understand this is
very rare it is a good idea to do a controlled test
when near to a security scanner to make sure
that you can operate safely daily.
To avoid Safety Shutdown Mode being
triggered it is recommended that you stay at
least 1.5m / 5ft away from the security scanners
in all buildings.
SECTION 12 TROUBLESHOOTING
97
|
OMEO EVOLUTION USER MANUAL
Page 98
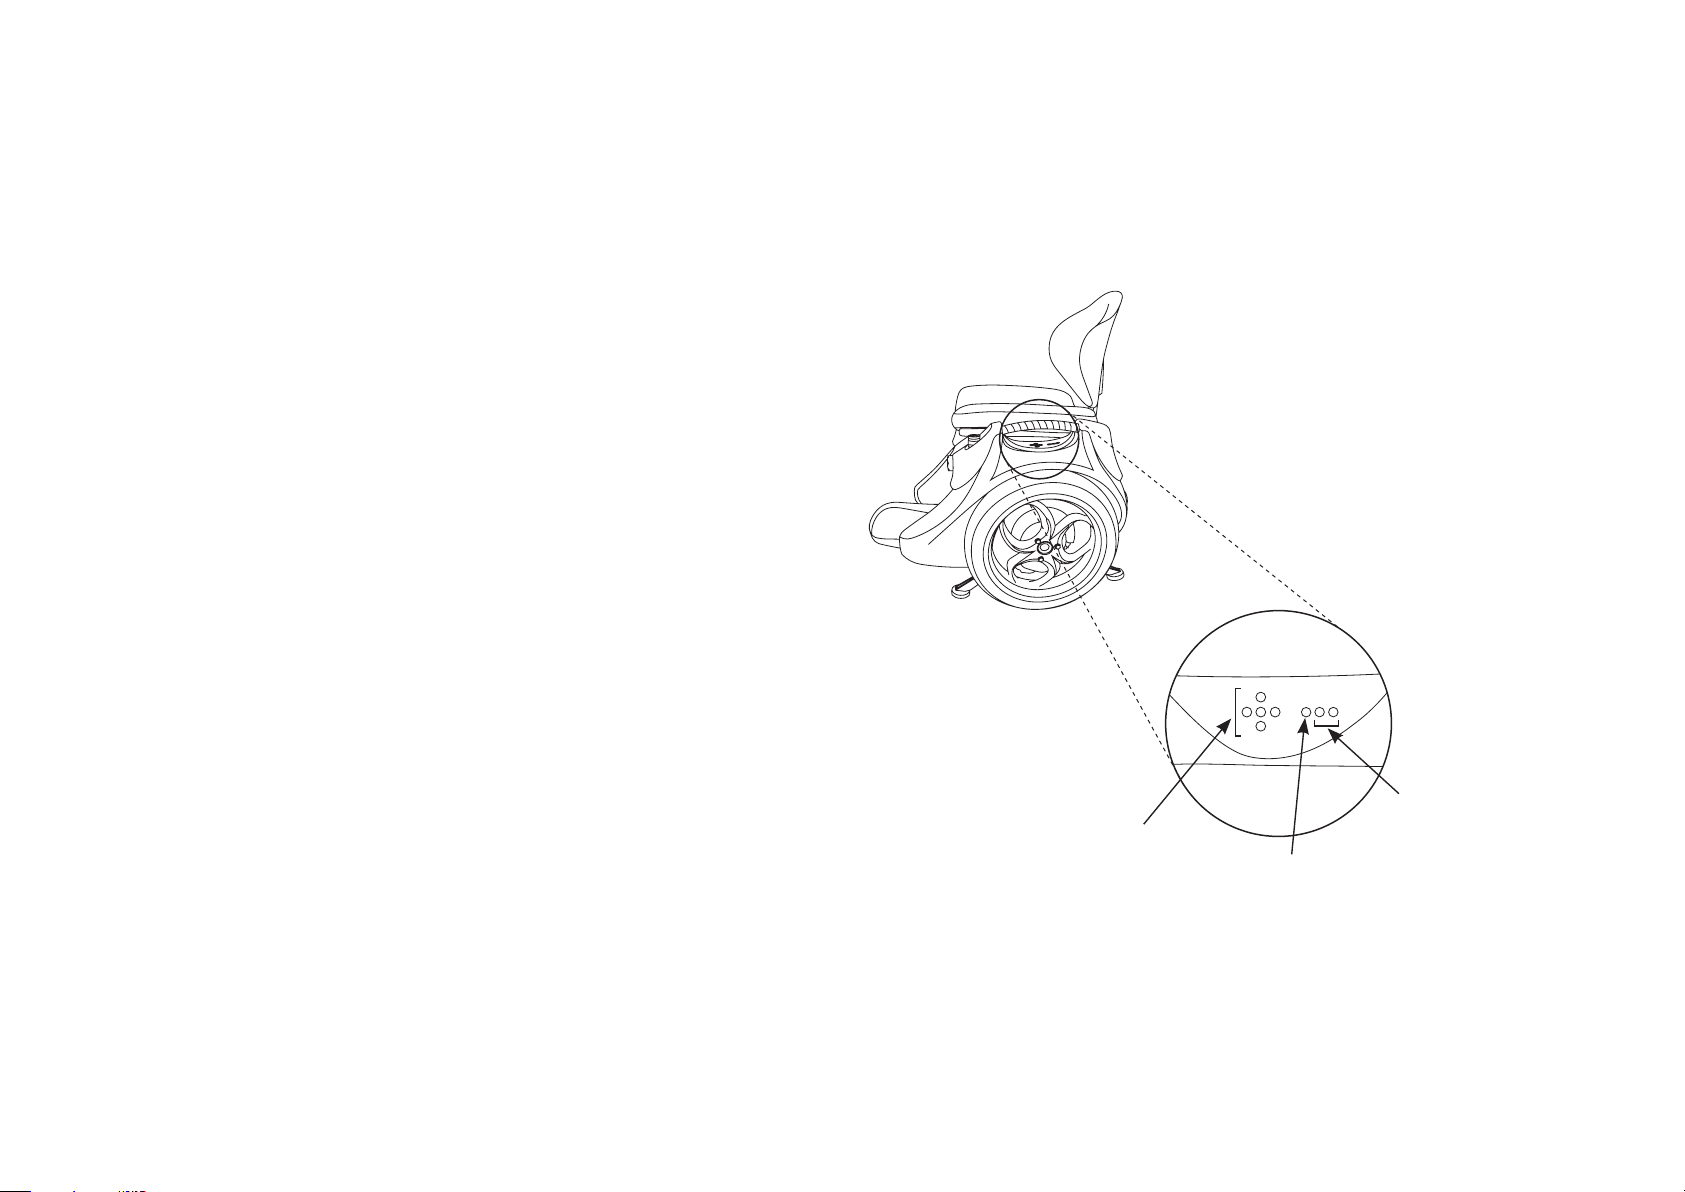
Balance Mode
Error Conditions
If your Omeo will not enter Balance Mode,
contact your Authorised Omeo Agent or Omeo
Technology to fix the system error.
Error Codes: Related
to the Omeo System
Interface
Codes are displayed by the Auxiliary Indicator Light
on the Display Panel (Figure 46).
If the Auxiliary Indicator Light:
• Flashes white momentarily when pressing the
Main Control Switch = confirms normal activity
• As above, flashes white momentarily but the
Stabilising Legs do not raise = it is likely an error
is active
• Flashes blue = indicates critical errors (Refer to
Table 11: Auxiliary Indicator Light Error Codes,
(Pg. 101), and contact a Certified Omeo Service
Technician or Omeo Technology)
• Various flashes – white, yellow, red, singularly
and alternating = indicates Non-critical errors
(Table 10: Non-critical Auxiliary Indicator Light
Warnings, Pg. 99).
SECTION 12 TROUBLESHOOTING
98
|
Balance
Indicator Lights
Figure 46: Display Panel with Indicator Lights.
Auxiliary
Indicator Light
Lithium-ion
Charge Indicator
Lights
OMEO EVOLUTION USER MANUAL
Page 99

Table 10: Non-critical Auxiliary Indicator Light warnings.
Non-critical Auxiliary Indicator Light warnings
This is not an error code. It indicates the battery is charging.
Green Light constantly on, or
periodically flashing green
YELLOW pulse every 3 seconds
RED pulse every 1.5 seconds
Flashes between white and blue,
yellow and blue, or red and blue
When the Auxiliary Batteries get close to full the Auxiliary Indicator Light will flash green.
However, once the Auxiliary Batteries are very close to 100% full, the Auxiliary Indicator Light will once again turn o, even
when plugged into AC power via the Auxiliary Battery Charger.
This indicates the Auxiliary Battery is discharged to less than 50%.
The Lights and USB Port will NOT function at this point.
NOTICE
This error can show briefly immediately right after raising or lowering Stabilising Legs, as this activity briefly
lowers the detected Battery capacity.
This indicates the Auxiliary Battery levels are discharged to less than 20% and are too low for continuous operation.
Charge the Auxiliary Batteries as soon as possible.
There will be sucient power to activate the Stabilising Legs several times immediately after the red light begins to flash.
However once the Batteries are fully discharged, there is no further signal, and the Stabilising Legs will no longer function.
Press the Main Control Switch for seven seconds to raise the Stabilising Legs if no other errors are present.
NOTICE
This error can also show briefly immediately after raising or lowering the Stabilising Legs, as this activity briefly
lowers the detected Auxiliary Battery capacity.
This indicates a Stabilising Leg jammed on the last attempt to raise the Stabilising Legs.
The Auxiliary Indicator Light pattern should only flash for 30 seconds after an attempt to raise the Stabilising Legs has
been made.
SECTION 12 TROUBLESHOOTING
99
|
OMEO EVOLUTION USER MANUAL
Page 100

Critical Auxiliary Indicator
Light Warnings
Blue Flash
A flashing Blue Light indicates critical errors that
likely require a Certified Omeo Service Technician
to diagnose.
Diagnosing these errors will likely require some
disassembly of the unit by a Certified Omeo
Service Technician.
NOTICE
A blue Light flashing indicates the error was
present in the last 60 seconds. It does not mean
that the error still exists.
This allows time for diagnosis of intermittent errors
such as faulty / jammed cabling.
Therefore, the Stabilising Legs can be raised even
though the blue Light is still flashing, as long as the
error no longer exists.
Stabilising Legs will lower on critical errors but
won’t be able to raise.
The blue Auxiliary Indicator Light will continue to
flash beyond 60 seconds if the errors persist, and
the Omeo is powered on.
Interpreting the flashing of the
Blue Auxiliary Indicator Light
error signal:
The light pattern is 7 flashes long.
At the end of 7 flashes there is a brief pause, after
which another 5 flashes begin.
A long pulse indicates an error.
A short pulse indicates no error.
The first flash indicates “error 1”, the second “error
2”, etc. as per Table 11: Auxiliary Indicator Light
Error Codes (Pg. 101).
For example
Error pattern: short, long, long, short, short, short,
short
= no error, error, error, no error, no error, no error,
no error
Resulting errors (see Table 11: Auxiliary Indicator
Light Error codes, Pg. 101).
2. Steering Sensor Disagreement
3. Button Disagreement.
If the Omeo is powered o, pressing the Main
Control Switch will flash an error code for a further
60 seconds, but note that not all errors can be
seen when the Omeo is powered o.
SECTION 12 TROUBLESHOOTING
100
|
OMEO EVOLUTION USER MANUAL
 Loading...