

Instructions

What’s in the box
1x Universe2go viewer incl. detachable cover,
1x customizable foam cut-out for various smartphone
sizes, 1x protection pouch, 1x carrying strap, 1x activation
code for the app, 1x operating manual
Warnings
Do not use Universe2go to look at the sun.
Risk of eye damage!
Do not leave Universe2go directly exposed to the sun.
Use Universe2go only in a safe environment.
Always insert the smartphone securely and tightly.
Children should only use Universe2go under supervision.
Index
1. Activation 5
1.1 Components 5
1.2 Functions 5
1.3 Activation 5
2. Setup and calibration 6
2.1 Customizing the foam rubber
cut-out (passepartout) 6
2.2 Setting eye calibration 8
2.3 Star calibration 10
3. Controlling Universe2go 12
3.1 The options 13
3.2 Standard settings 16
3.3 Expert settings 17
4. Menu control 19
5. App settings 20
6. Online help 24
7. System requirements 24

4 5
Universe2go – My personal Planetarium
Thank you very much for purchasing the Omegon
Universe2go star viewer. With this hand-held planetarium
you are certain to experience many pleasant hours under
the starry sky and become familiar with it at the same
time. As a result, Universe2go considerably exceeds the
benefits of a common star map. You can see the night
sky and simultaneously orient yourself with the help of
constellation lines and highlighted objects as well as
object data. Moreover, the planetarium recounts some
of the most interesting facts. With Universe2go it is
almost like being in a real planetarium, only under real
conditions. Relax, enjoy the starry sky and learn. Become
an expert of the night sky!
1. Activation
How to activate your Universe2go
Note: The app is being continuously
refined. You can find information on
updates and new functions at
www.universe2go.com.
1.1 Components
Universe2go consists of two parts
Part 1. The app “Universe2go” – which
runs on your smartphone
Part 2. The “Universe2go” viewer –
which holds your smartphone
1.2 Functions
The app “Universe2go” features
two different functional modes, the
planetarium mode and the star-map
mode.
In planetarium mode the app
generates the display for the
Universe2go unit and guides you
through the night sky as an audiovisual sky guide.
In star-map mode the app can
be used without the device as an
electronic star map. In star map mode
only a very limited scope of functions
is available.
1.3 Activation
First download the Universe2go
app from the App Store or Google
Playstore and install it on your
smartphone.
Attention: There are various language
versions available. Please make sure
you download the correct language.
6 7
The planetarium mode requires the
input of a ten-digit code that can be
found on the inside of the product
package.
This code is requested only once when
first starting the planetarium mode
and requires an internet connection
for activation.
The star-map mode can be used
without an activation code.
2. Setup and calibration
Universe2go can be used with a vast
variety of smartphones with different
dimensions, screen sizes, number of
pixels and pixel density.
Note: System requirements can be
found at the end of this operating
manual. [page 24]
Note: The gyroscope, compass,
geolocation, microphone and sound
must all be activated, both in your
Smartphone and in the Universe2go
app
(iPhone)
.
For this purpose, Universe2go must
first be set up on your smartphone.
The number and variety of smart-
phones currently available on the
market is almost inestimable and we
have spent a lot of time and effort to
make the setup procedure as simple
and reliable as possible. Therefore
please take care during initial setup
and, if necessary, refer to online
help under www.universe2go.com
under the menu option “CUSTOMER
SERVICE”.
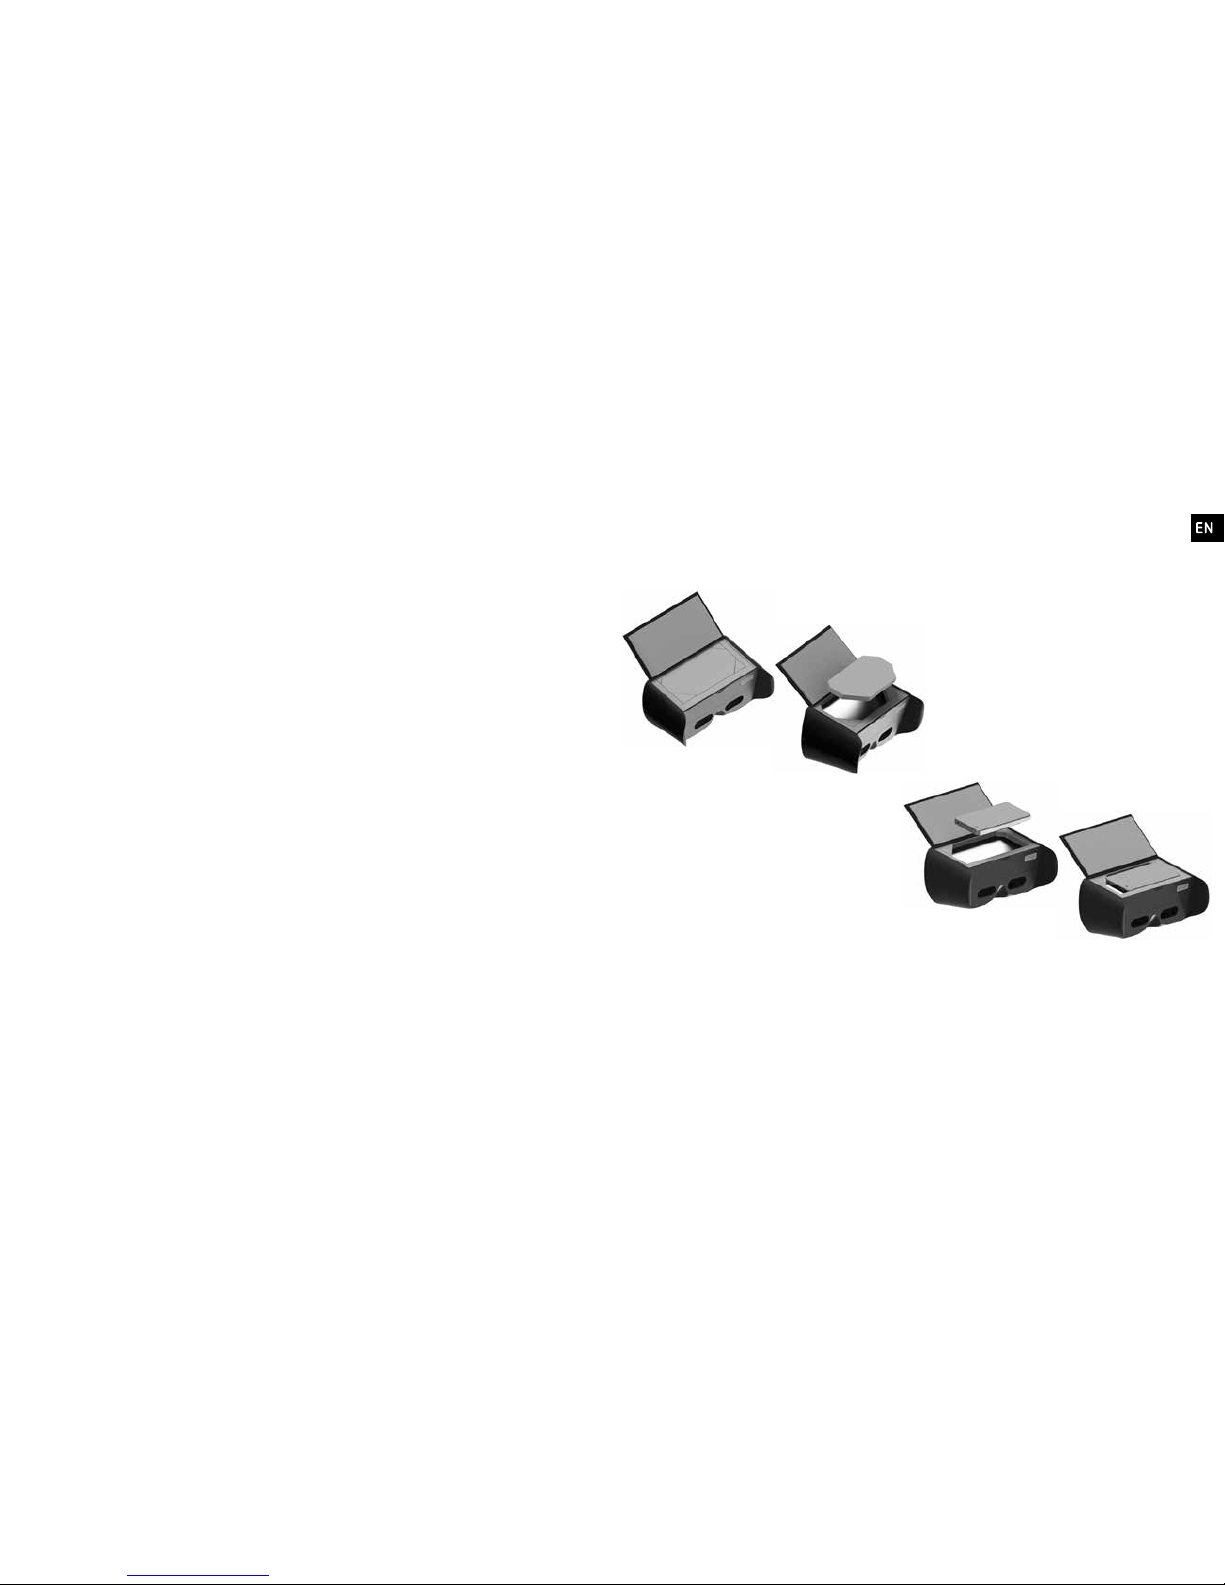
2.1 Customizing the foam rubber
cut-out
(passepartout)
The passepartout must first of all be
customized to the smartphone.
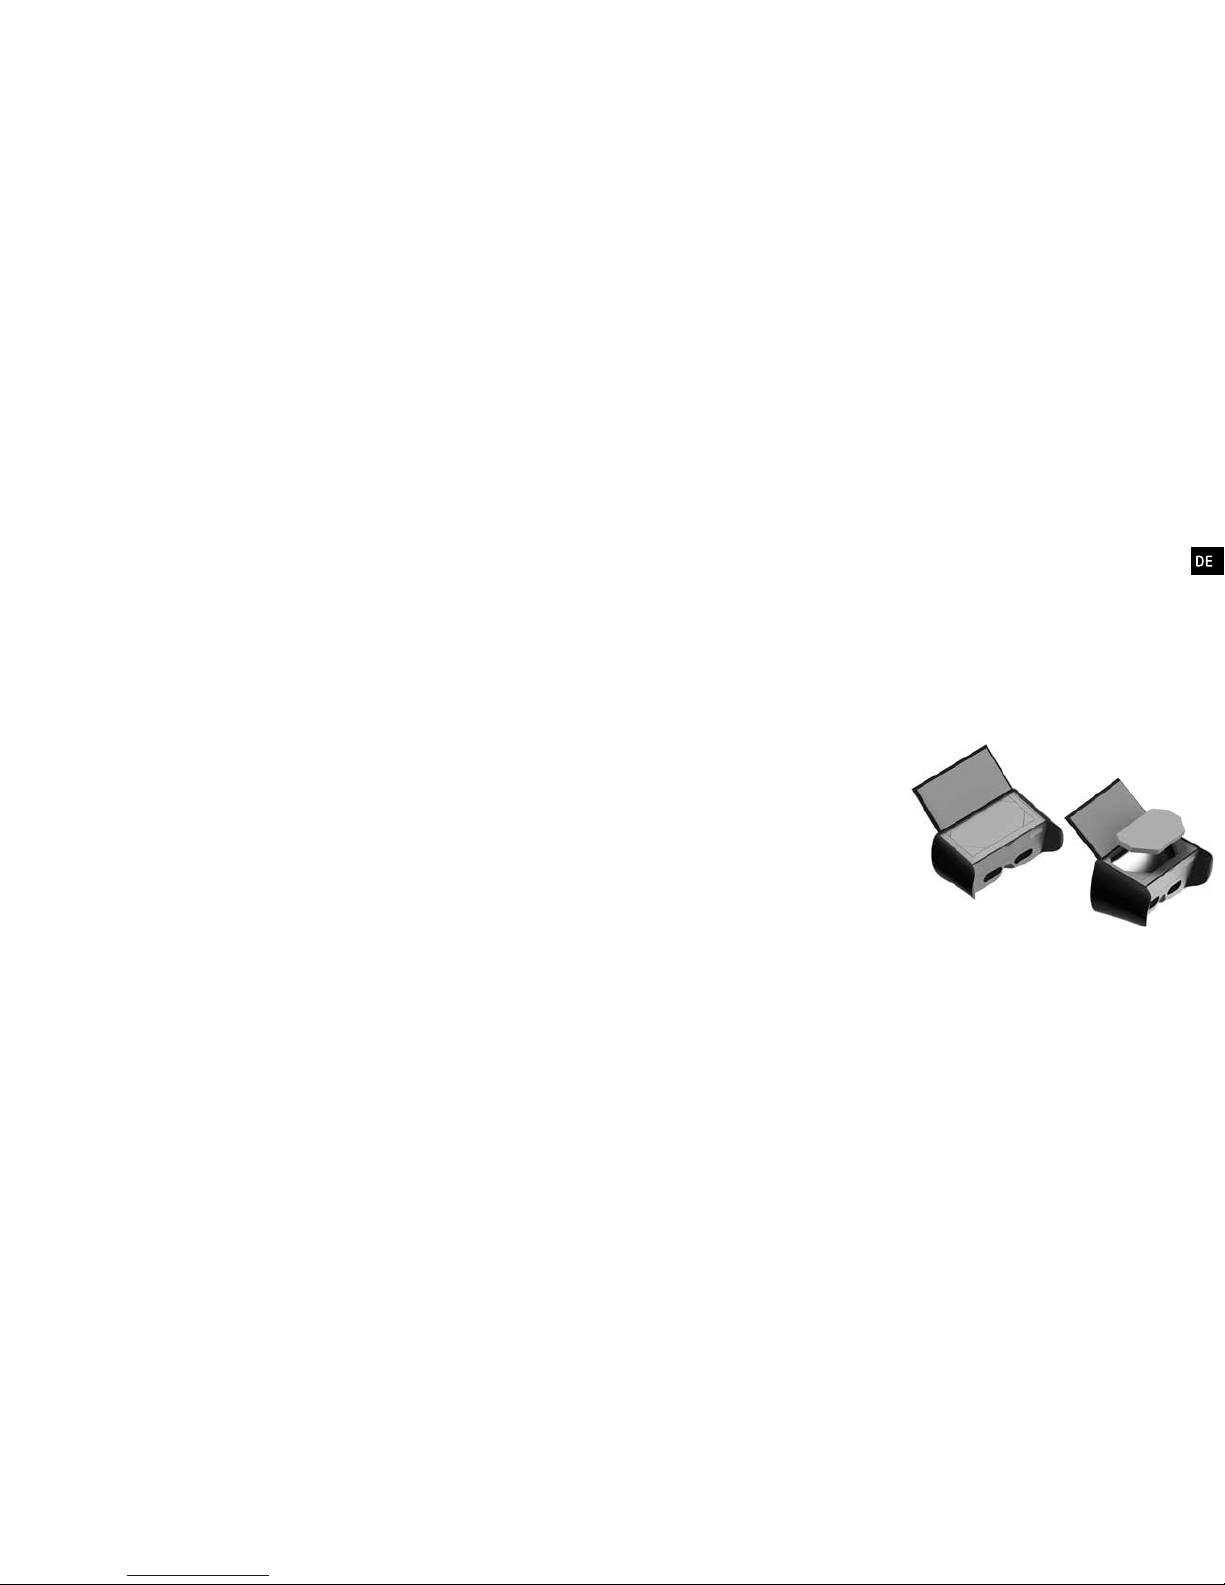
A. Open the lid and remove as many
foam rubber parts as necessary to
be able to fit the smartphone loosely.
[fig. 1]
B. To secure the smartphone in place,
stick a large triangle in the left upper
corner
(the device is placed in viewing
direction in front of you)
and a small
triangular piece of foam in the top
right corner.
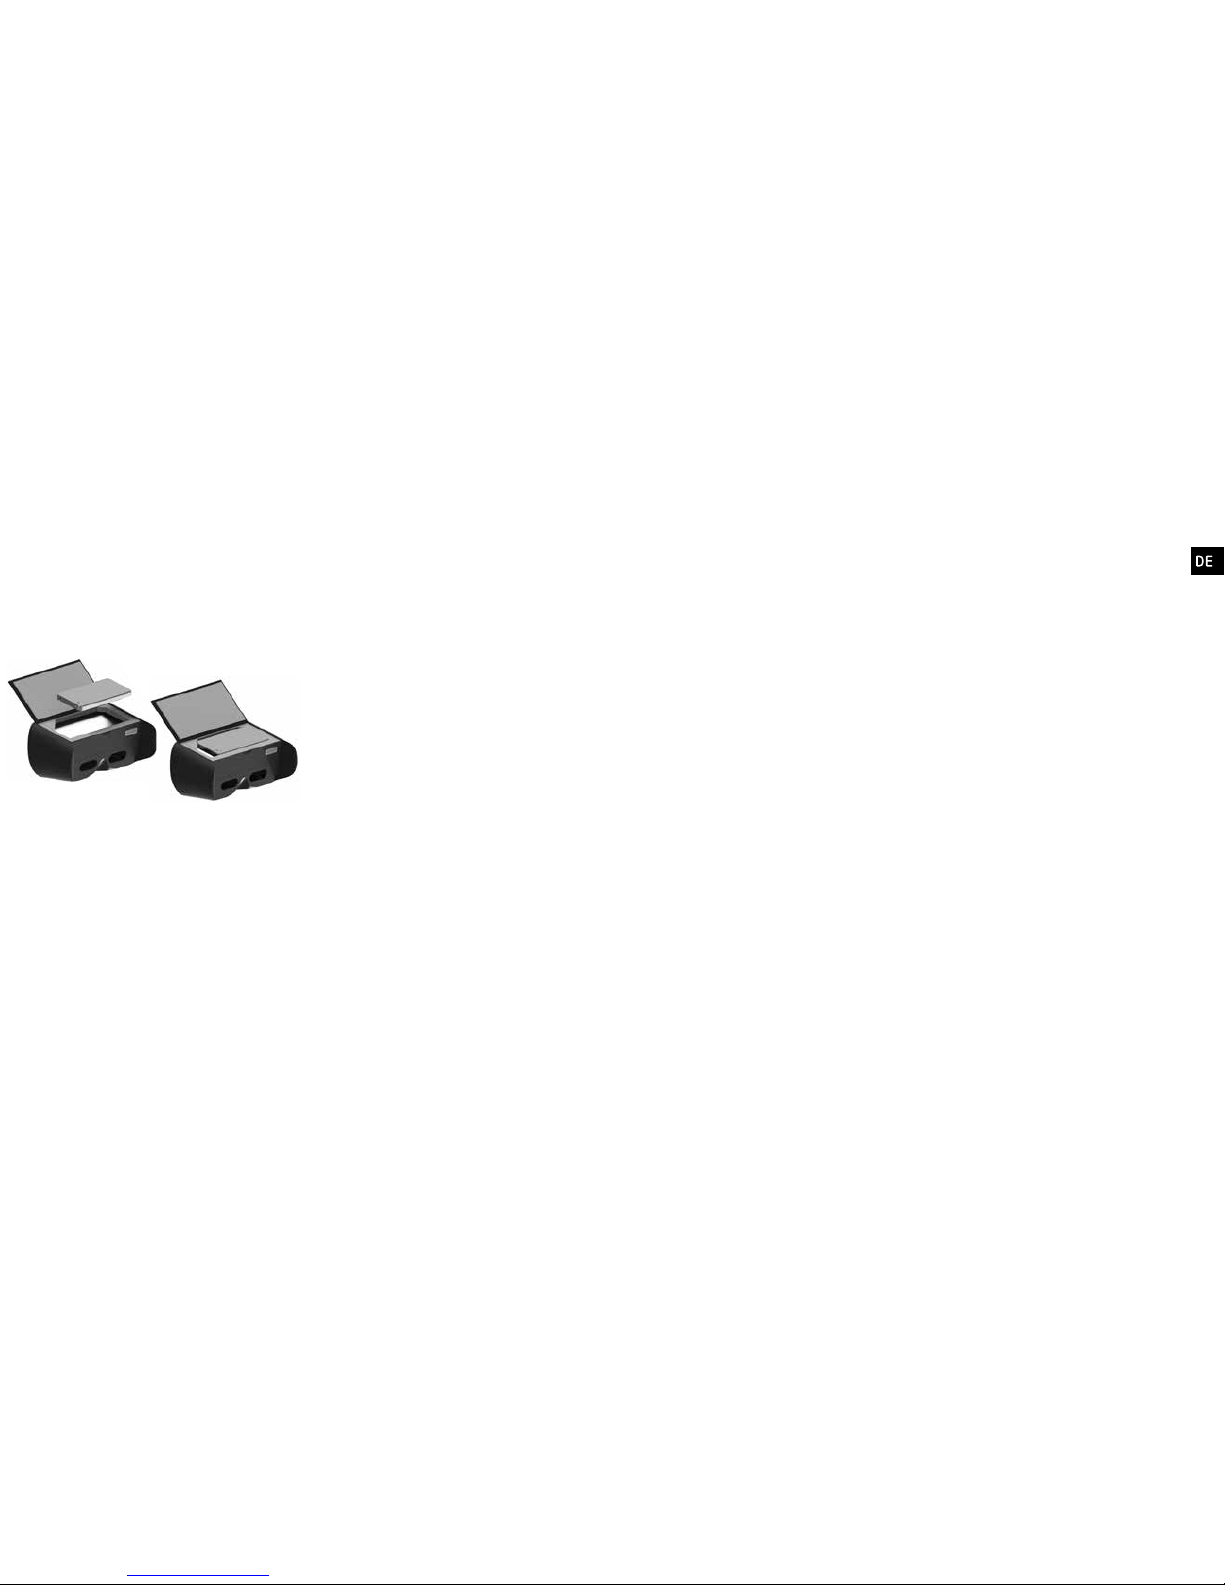
With some models, a different
arrangement of the foam pieces may
be required, while other models require
extra care that no control button on
the smartphone is pressed during use.
Place the triangles in such a way that
the smartphone fits tightly, but can still
be easily removed and installed when
required. [fig. 2]
C. First, check the fit without removing
the adhesive foil from the triangles.
To test the fit, you may close the lid
and carefully shake the device, during
fig. 1
fig. 2

8 9
which your phone should not move in
any direction.
Once you are satisfied with the
installation you can choose to
permanently install the foam rubber
parts, after removing the adhesive film
from the back of these parts.
If, at a later date, you would like
to use a different smartphone
with Universe2go, you can buy an
additional passepartout.
Note: Once you have attached the cutout it is no longer possible to remove
it without damage. Traces of adhesive
will also remain on its the surface after
its removal.
2.2 Setting eye calibration
The next step allows you to set up the
device to match the distance between
your eyes.
Note: Setting the interpupillary
distance is only necessary if the “Both
eyes” option is activated in the settings.
Note: Setting the interpupillary
distance takes place with the
assistance of speech recognition. That
means Universe2go must have access
to the microphone.
2.2.1 Microphone Test
A screen with a controller bar will
appear for the microphone level test.
Please carry out the test in a quiet
environment with no background
noise.
Say “S TART“ and then ”STOP“.
The Eye calibration screen will then
appear.
2.2.2 Eye calibration
A. You will see the start screen for eye
calibration and a brief explanation on
how to proceed.
Please follow the instructions on the
screen.
First say “S TART” to begin the eye
calibration.
B. Two green circles will then appear
that move apart from each other and
then back again.
C. If the circles are offset in height, tilt
the device until the circles run on a
horizontal line.
D. As soon as the display changes
from two circles to just one, say “STOP“.
E. You will receive the message: “Stop
recognized”. Tilt the device to the right
to complete the calibration.
Tilt the device to the left to repeat the
calibration.
Note: Wait a few seconds before
saying “START“ and “STOP“, for
Universe2go to be able to recognize
your voice commands more reliably.
If the program has problems
recognizing your speech commands,
check the following:
1. Is there a lot of background noise or
is it windy?
2. Is the microphone covered by the
foam of the cut-out?

10 11
3. Have you permitted Universe2go to
access the microphone?
Note: If the calibration is unsuccessful,
you can measure your interpupillary
distance with the aid of a ruler and
enter it directly into the settings.
Further information can be found on
www.universe2go.com under menu
option “CUSTOMER SERVICE” > FAQs
on operation.
Note: Nearby metal objects
(fences,
pipes, cars, etc.)
can adversely affect
the accuracy of the compass in your
Smartphone. You should be several
metres away from any metal objects in
order to ensure precise calibration of
your Universe2go.
2.3 Star calibration
2.3.1 Standard star calibration
For Universe2go to be able to
precisely display the real positions of
astronomical objects, three bright
stars need to be targeted.
Note: Please make sure that the cover
of the Star Viewer has been removed,
otherwise you will not be able to see
any stars.
A. If you look at the night sky though
Universe2go, you will see a green
targeting circle and some stars, which
also have green borders. You can see
the name of the stars above them.
Aim at one of these stars, positioning
it in the centre of the targeting circle.
Calibration will commence as soon
as the star is held, motionless, in the
targeting circle. You will see a circular
progress bar, which forms a complete
ring around the star after a successful
calibration.
After calibrating this star, a small red 1
(or, later, a 2 or a 3)
will appear on the
display.
B. Now calibrate the second and third
stars, using the same procedure.
After star calibration, you will receive
information regarding current sensor
qualit y.
If the sensor quality is reported as
being poor, try the following:
Compass is inaccurate:
1. Change your position and ensure no
metal objects are in the vicinity.
2. Repeat the star calibration using a
different star.
Make sure you do not use a star that
is either too near the horizon or too
near the zenith
(directly overhead)
.
Select stars that are as far as possible
away from each other.
3. Use the “Expert calibration” or
“Compass fine adjustment” in the app
(Android only)
.
Gravitation sensor is inaccurate:
Make sure that the Universe2go is
sitting securely on your nose during
calibration. Any vertical movement of
the Star Viewer on your nose during
calibration can lead to poor sensor
qualit y.
2.3.2 Star calibration with compass
fine adjustment
(Android only)
This type of calibration is of use if the
compass is very inaccurate.
12 13
A. Look downwards with the
Universe2go until the menu appears.
Check “SET TINGS” > select Compass
fine adjustment.
B. Follow the instructions then
provided by Universe2go.
2.3.3 Expert calibration
A. Look downwards with the
Universe2go until the menu appears.
Check “SET TINGS” > select Expert
calibration.
B. You will now see a calibration list
consisting of the names of stars and
planets.
Select a star – you will need to know
exactly where to find it in the night
sky. This method is hence only suitable
for those already well acquainted with
the night sky.
C. Calibrate the star, as described in
2.3.1 - A.
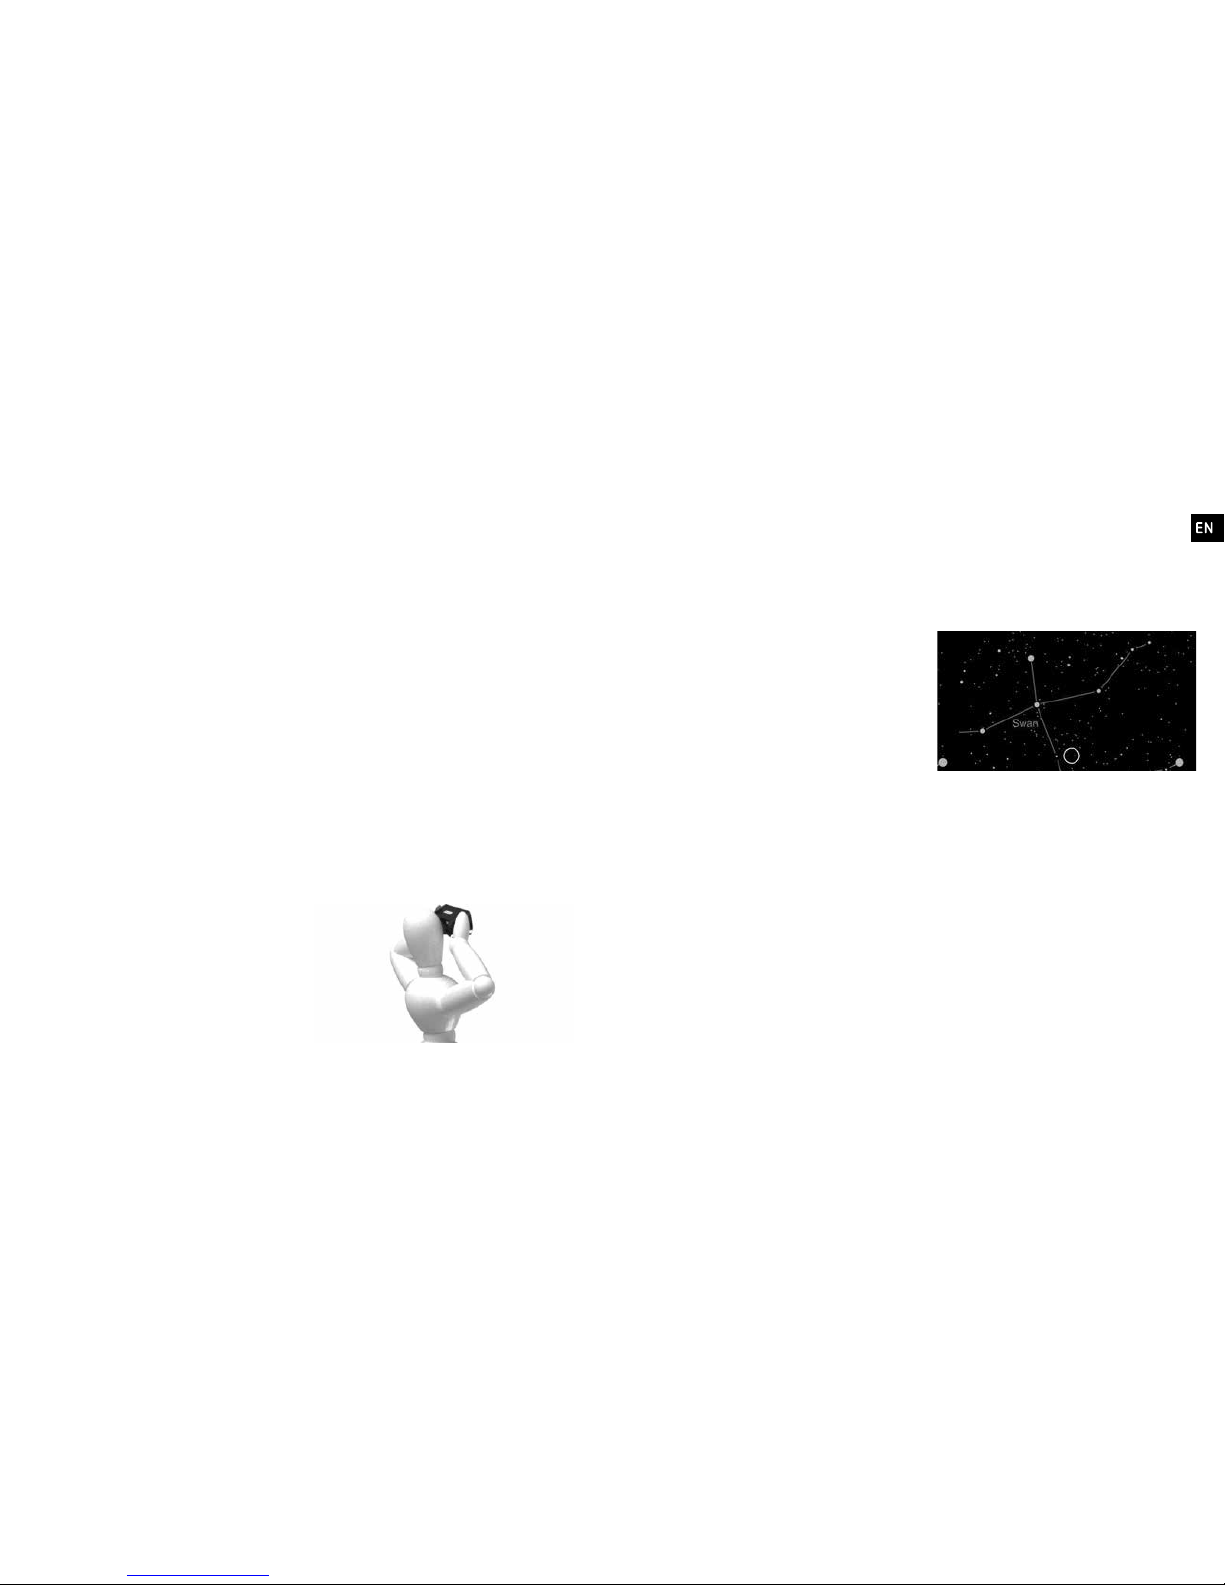
3. Controlling Universe2go
Focus on a star in the sky by hovering
above it with the small green circle,
which you see in the middle of your
view when looking through the device.
[fig. 3]
Universe2go will then try to identify
this star.
Universe2go works best if you slowly
shift from star to star in the night sky.
This allows Universe2go to always
align itself on the current star and
means the coverage of the real and
virtual night sky is at its most reliable.
Note: Point at the astronomical
object as precisely as possible - the
Star Viewer carries out frequent
recalibrations during observation. That
means that calibration will be less
effective if you do not aim directly
at the object, but even slightly away
from it.
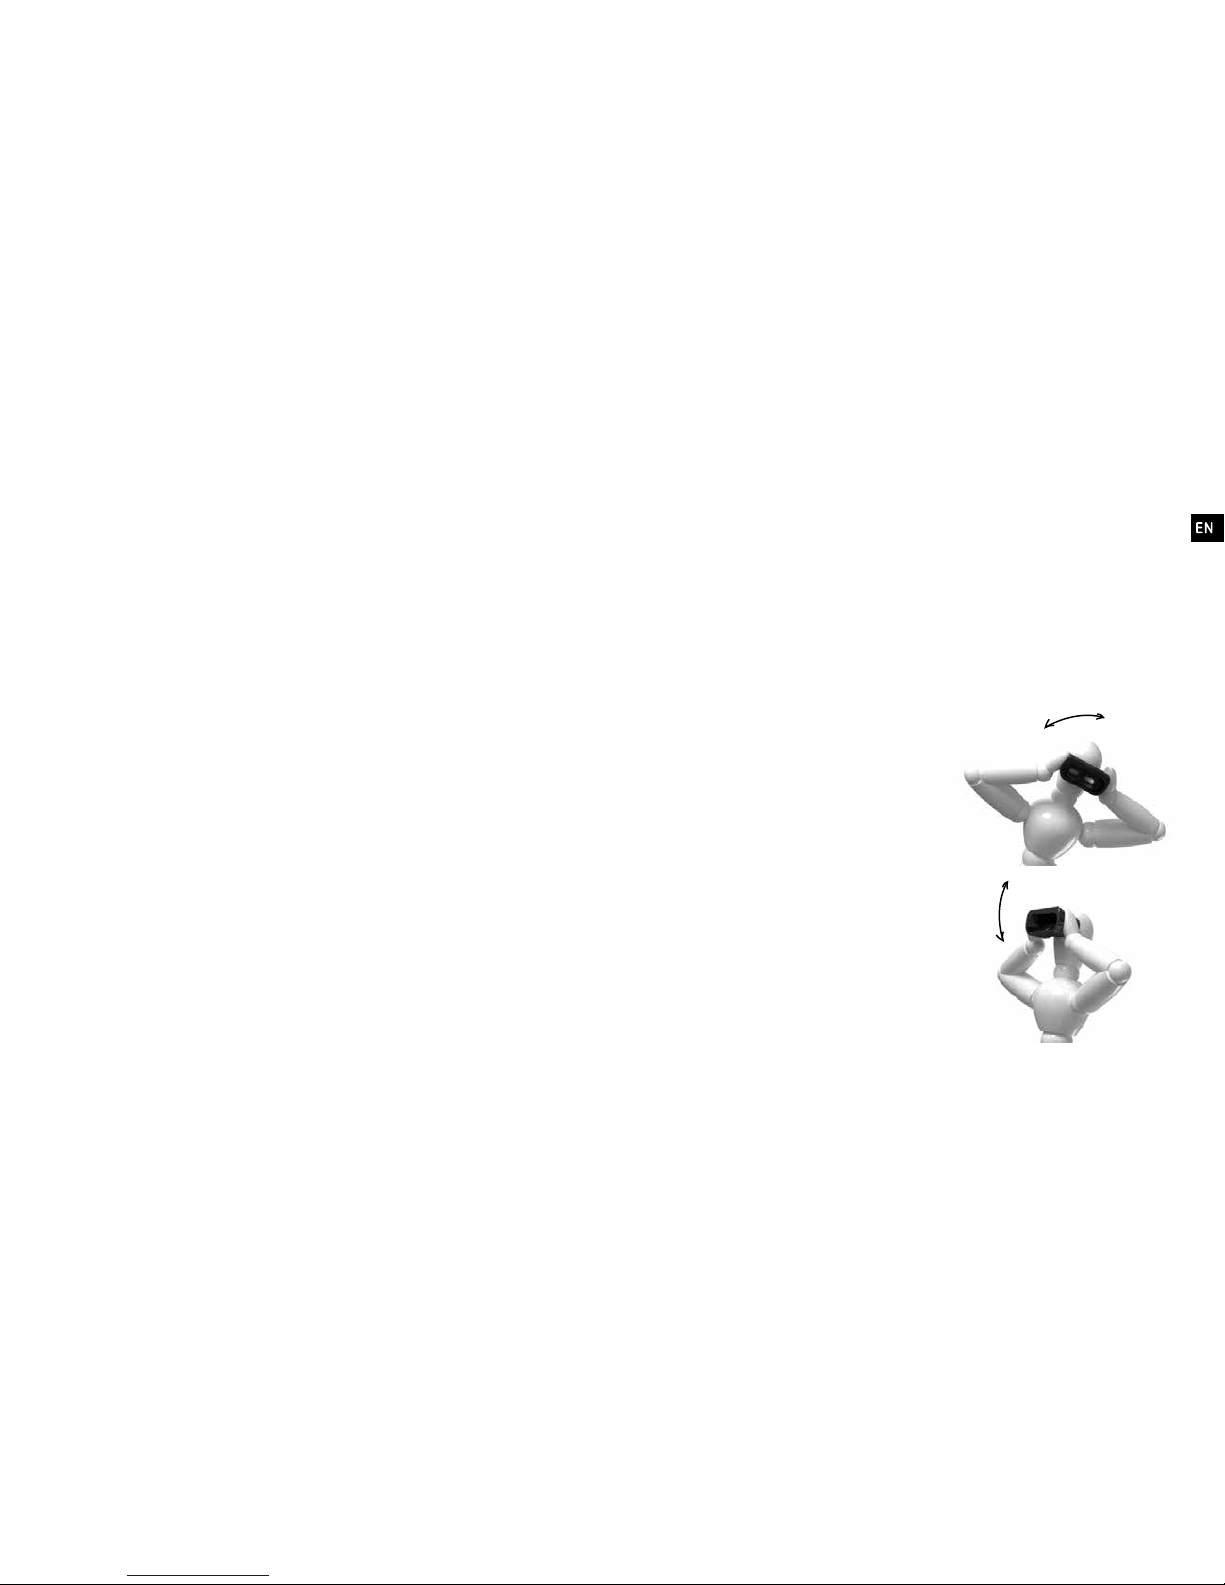
Note: Shake the device to and fro
(ideally with a rapid right and left
rotation of the wrist)
to cancel
the audio guide or to return from
a zoomed view of an astronomical
object.
3.1 The options
For your journey through the night sky
you have the following eight options
available.
Beginner mode – This is the simplest
mode of all, which only shows you
stars and constellation lines. When you
focus on the name of a constellation
with the focusing circle, the name
will be enlarged and the constellation
highlighted with yellow lines. If you
hold the focusing circle on the name
for two seconds, Universe2go will
start an audible explanation of the
constellation. [fig. 4]
fig. 3
fig. 4
14 15
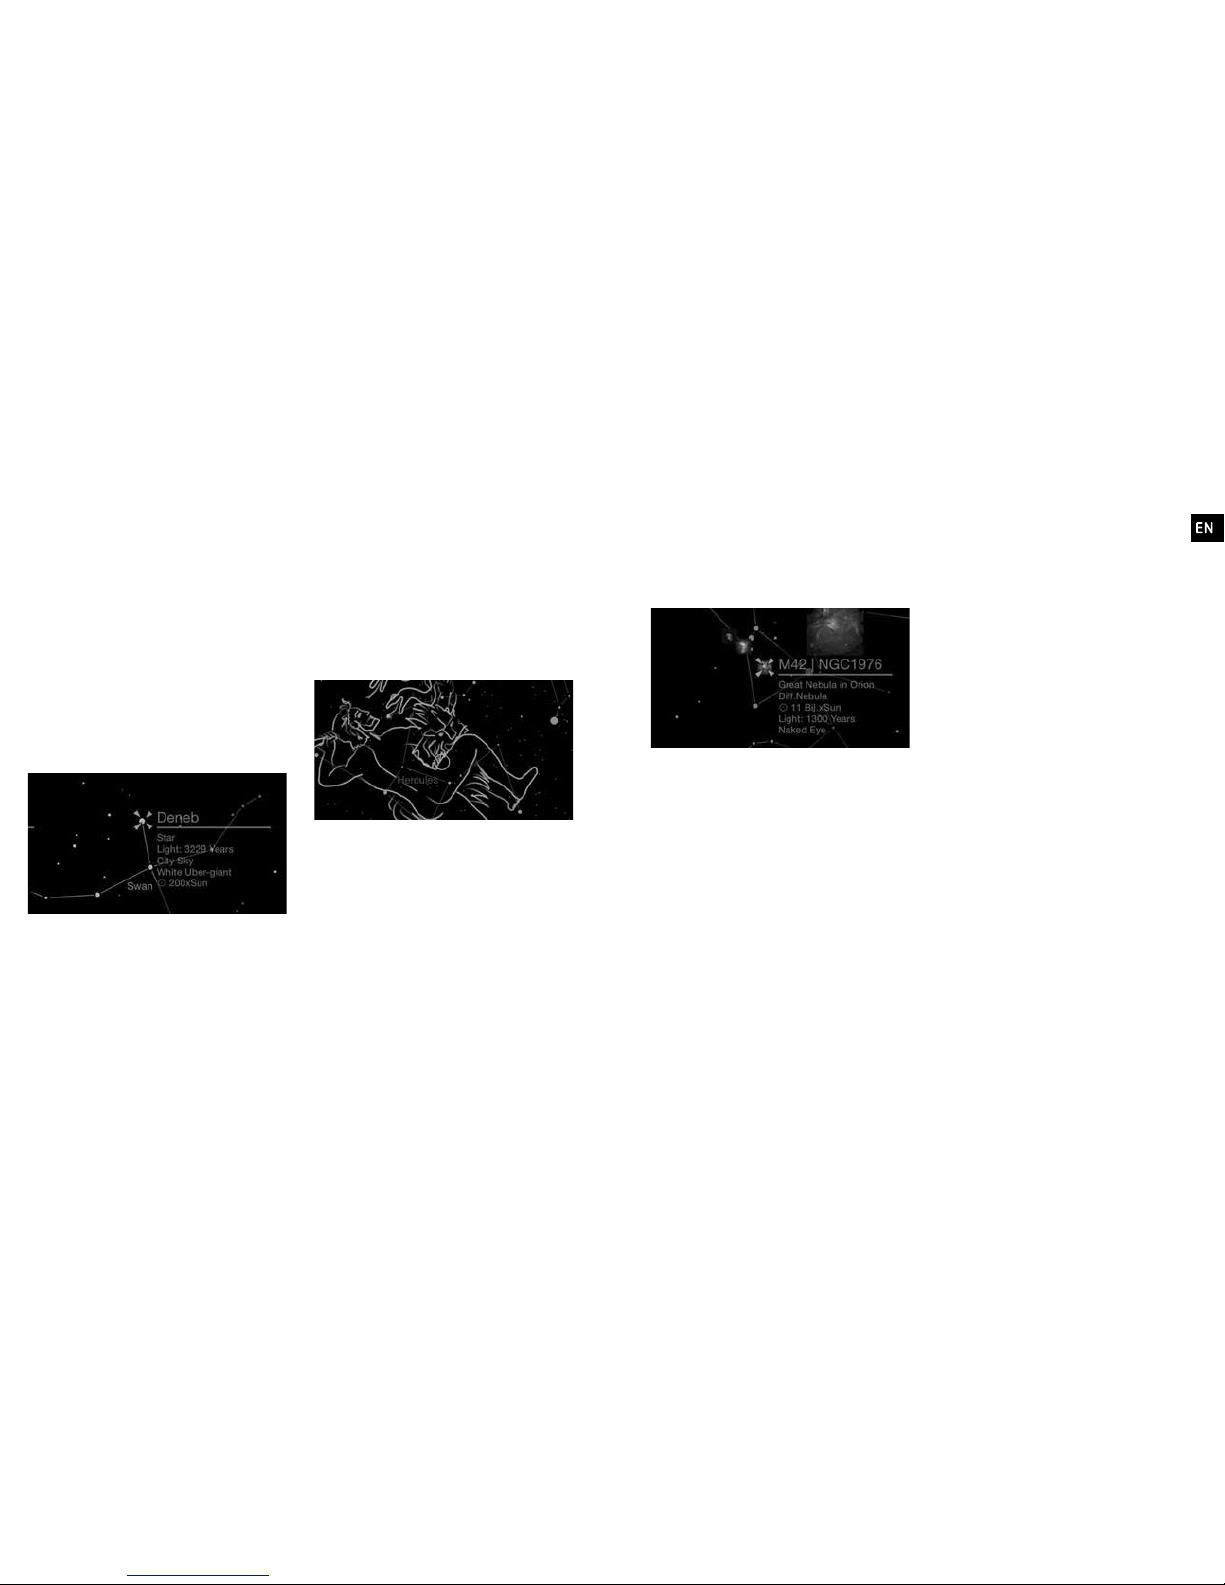
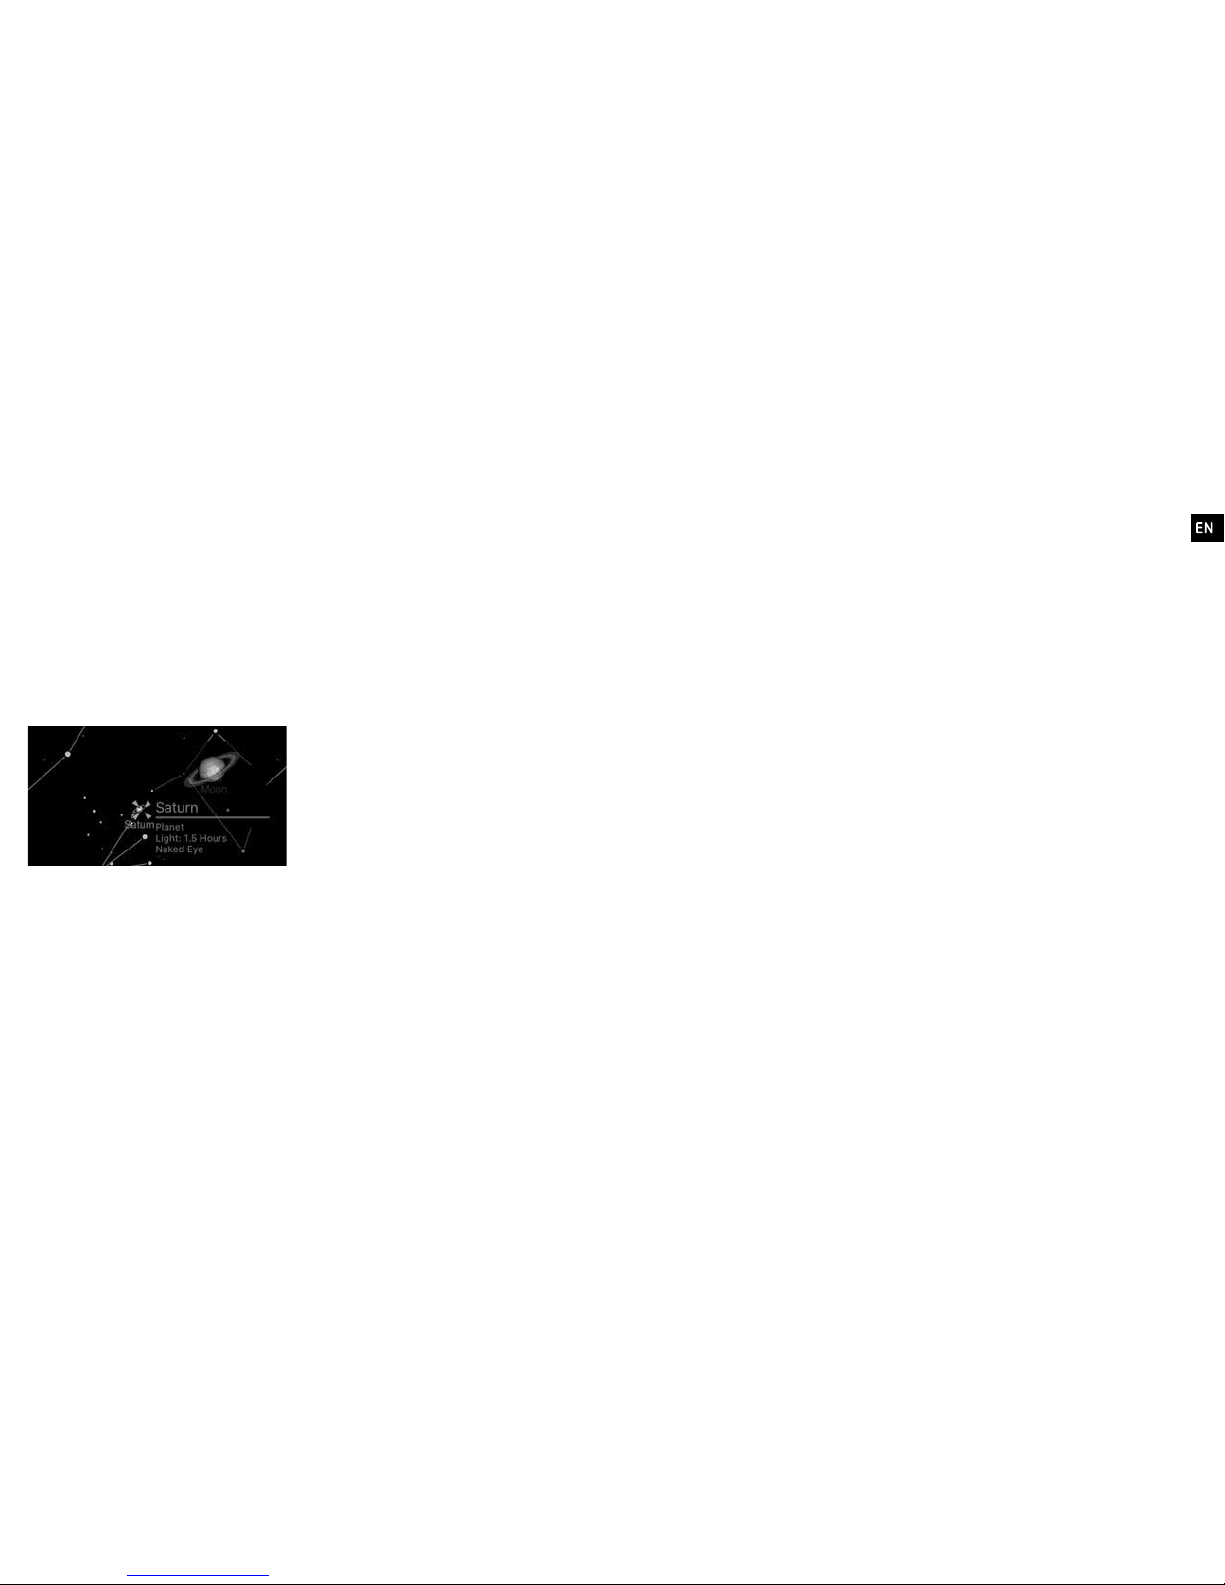
Discovery mode – Receive additional
information about the stars in the
constellations. When you focus on a
star in the display with the target, an
info frame with the most important
data about the star appears next to
it on the right. For brighter stars you
will also receive audible information
on interesting facts and peculiarities
about the star. [fig. 5]
Mythology mode – Universe2go tells
you the stories of heroes, monsters,
kings and beautiful maidens, which the
ancient Greeks linked with the stars.
In addition to the lines, a pictorial
representation is shown for every
constellation. If you focus on the name
of the constellation, just like in Starter
mode, after two seconds a voice will
tell an interesting story about the
mythological figure. [fig. 6]
Deep-Sky mode – Dive deep
into the Universe and discover far
away galaxies, beautiful nebulae,
magnificent star clusters and
exploding supernovae – things you
would never be able to see with the
naked eye. As with the stars, you can
also activate an info frame by focusing
on the Deep-Sky object in the display.
If you focus on the object for longer
than two seconds, the app will zoom in
on the object. [fig. 7]
3-D mode – In this mode the sky
becomes dynamic and gains depth.
You discover many colourful nebulae,
similar to Deep-Sky mode, but now
you will immediately realize that
these nebulae are much further away
than the stars of our constellations,
providing a better indication of the
vastness of the Universe.
Quiz mode – After gaining some
experience, you are now ready for a
quiz about the cosmos. Universe2go
will show a randomly selected
constellation, which you will have to
find in the night sky.
Search – With this function you
can search for stars, planets,
constellations, Deep-Sky objects,
comets or even satellites. In the
corresponding sub-menus you will
find numerous objects in alphabetical
order. Once you have chosen an object,
another circle will appear around the
yellow target with a line that you can
follow to find the object you were
looking for.
Note: You cannot search for objects
below the horizont.
Expert mode – In Expert mode you
can adjust the display individually
fig. 5
fig. 6
fig. 7
16 17
to meet your requirements. You
can switch the object classes
(stars,
planets, Deep-Sky objects, comets,
etc.)
on and off, you can set the
display of names, the background
music, and the depth of displayed
details and even fade in an azimuthal
and equatorial grid. [fig. 8]
3.2 Standard settings
Here you can make various individual
adjustments. The most important
functions:
Music: Here you can turn the
background music on and off.
Eye calibration: Use this menu item to
repeat the automatic eye calibration
process to improve the digital picture
or if you give the Star Viewer to
another user.
Star calibration: Should Universe2go
lose its orientation, or you pass the
device to a different user, you should
repeat the star calibration. Simply
choose the menu option and focus on
any bright star.
This way Universe2go can be
conveniently used by a group of
observers.
Expert calibration: Select a star –
which you know the position of – from
the list of bright stars and point at it
for the calibration process.
Compass fine adjustment
(Android
only)
: Select this option if the position
of a star or astronomical object
pointed at is imprecise.
Compass sensor correction
(Android
only)
: To test the effect of compass
fine tuning.
Brightness: It may be sensible to
adjust the display brightness in such
a way that you will see the starry sky,
but without being distracted by the
digital picture.
Four different settings are possible,
depending on the location: “city,
village, rural, dark”.
Application example: For instance, if
you observe the stars from a town,
you will only see brighter stars and
you will be additionally distracted by
the environmental brightness of the
city lights. In this case the display
must be set to “bright”.
If you watch in a rural area, “rural” or
“dark” may be the correct choice. The
brightness of the display will in this
case be reduced to such an extent
that the real starry sky will not be
obstructed.
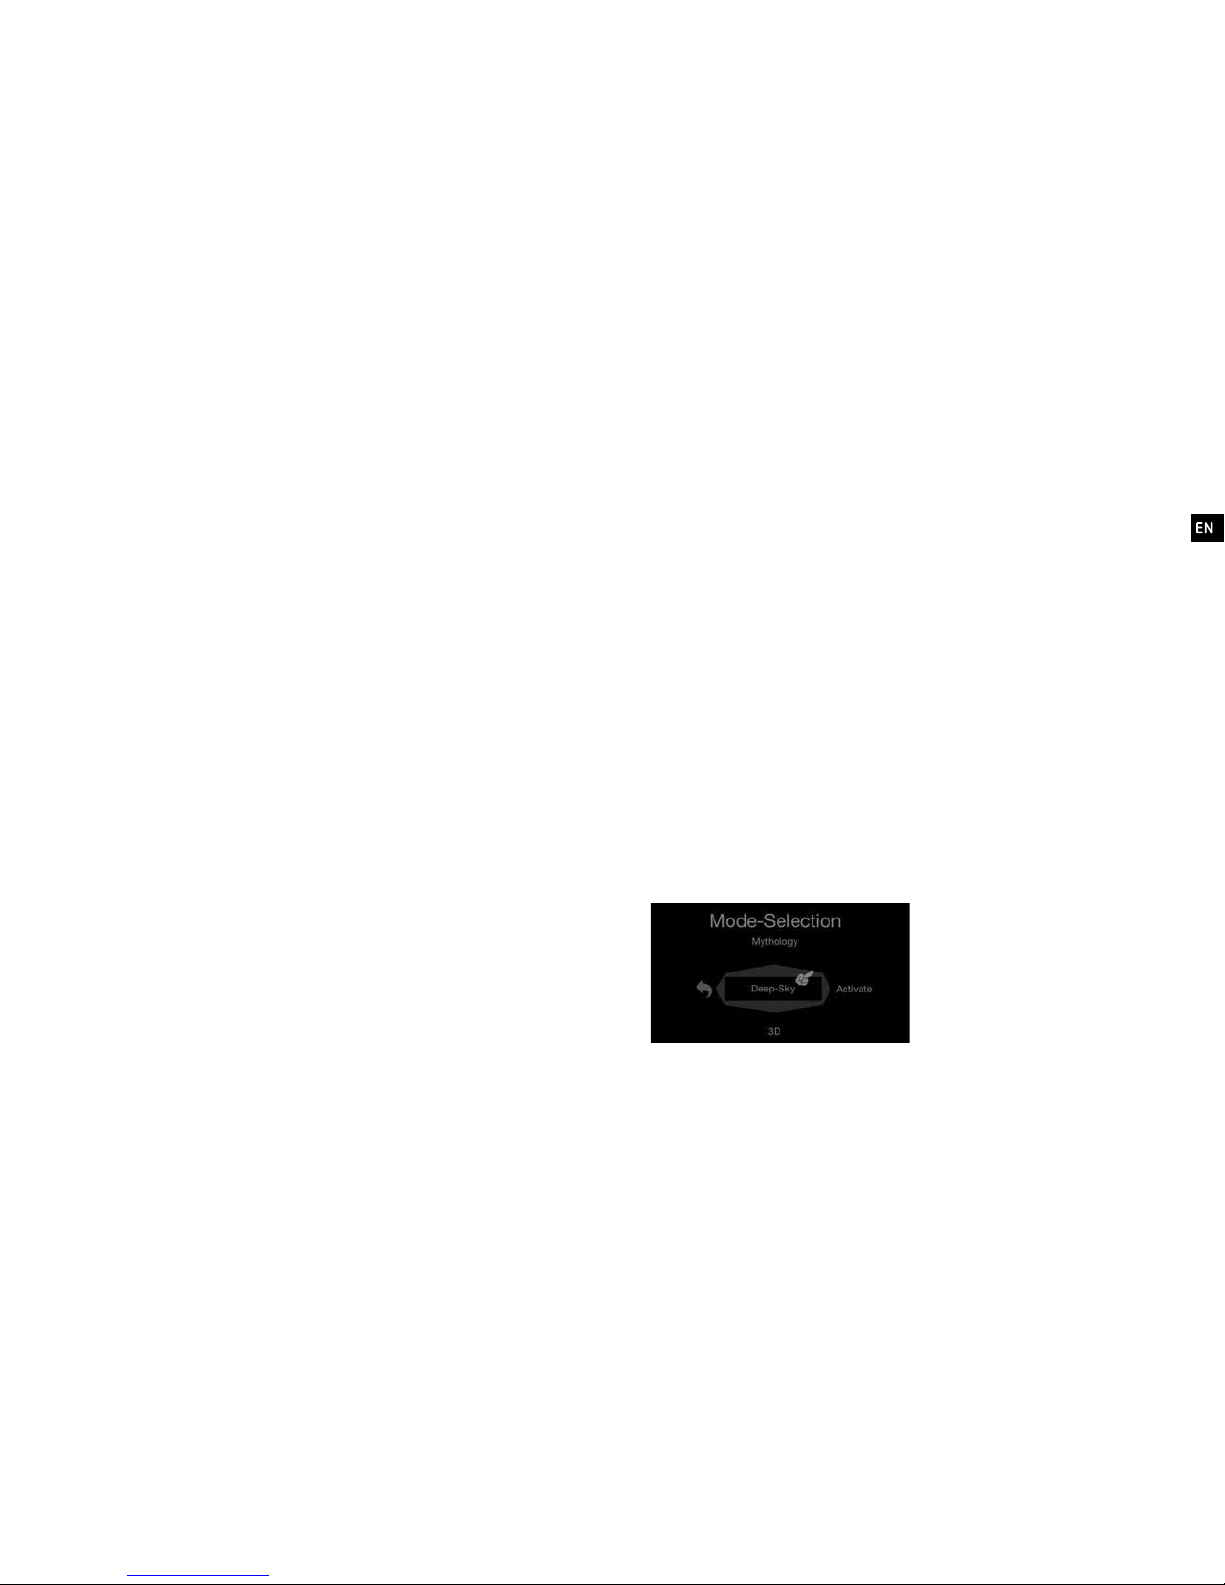
3.3 Expert settings
Use the following selections to set up
the view of the night sky as you wish
to view it.
Select between “Activate” and
“Deactivate” in each sub-menu. You
will then be able to see the results of
your settings in “Expert mode”.
fig. 8
18 19
Stars
Display: shows the stars, on/off
Colour: displays the colours of stars
Name: displays the name or
description of the stars on the star
map
Info: You will receive information as
soon as you point at a star
(name of
star, catalogue designation, distance
in lightyears, visibility, status, size as
compared to the Sun)
.
Info all: you receive information about
all the stars in a constellation
Image Info: the image of a star
appears in addition to the information
Planets
Display: shows the planets, on/off
Name: labels the planet
Invisible: Select whether you want to
see all the planets, or just those which
can be seen with the naked eye.
Constellations
Display: shows the constellations, on/off
Name: labels the constellations
Lat. Names: labels the constellations
with their official Latin names
Lines: displays the constellation lines
Images: displays the mythological
figures of a constellation as soon as
you point at it
Deep-Sky
Display: Shows Deep-Sky objects,
on/off.
(These include open clusters,
globular clusters, nebulae, galaxies, etc.)
Name: labels the Deep-Sky objects
with their real names
Info: You will receive information as
soon as you point at an object
(name
or catalogue designation, type of
object, size as compared to the Sun,
distance in lightyears, visibility).
NGC Cat. compl.: Displays the full NGC
catalogue
(New General Catalog)
.
Comets
Display: shows comets, on/off
Names: labels the comets
Satellites
Display: shows satellites, on/off
Names: labels the satellites
Coordinates
Alt-azimuth: displays the alt-azimuth
coordinates
Equatorial: displays the equatorial
coordinates
4. Menu control
How do you change to another mode?
Simply direct your view down to the
ground, this will activate the menu.
You control the menu by tilting your
head. When the menu appears it is
initially blocked, so that nothing can
be activated by accident. To unlock the
menu, look up again with the device
and look straight forward. The cursor
will then be released in the form of a
little hand. [fig. 9]
Once the cursor has been released, the
little hand will follow the movement of
the device. If you move your head with
the device upwards, the list with menu
options will scroll up, if you look down,
the list will scroll down. The little hand
thereby informs you about the angle
of your view.
fig. 9

20 21
In order to select or activate a menu
option you must first move the hand
into the middle, which is highlighted
by a frame. You should now make
sure that the little hand also stops in
the middle by simply looking straight
ahead. You can activate the setting by
tilting your head to the right.
By tilting your head to the left you can
move back through the menu or close
the menu without choosing anything.
When you start the menu for the first
time, the system will provide an audio
explanation, so that you can get to
know the operation step by step.
5. App settings
You can make changes of the most
important settings in the app under
the menu point “SETTINGS”. You
can find more setting options
(in the
iPhone)
outside the app under the
settings of your smartphone and
(in
Android)
at the beginning of the app
behind the cogwheel symbol at the
bottom right hand corner.
Left eye: Determines on which eye
the display is laid if the display only
appears on one eye.
(Set automatically
during calibration.)
Irrelevant if “Both eyes” is activated.
Both eyes: Display on both eyes.
Automatically activated if the device
is used by day, since the restriction is
only beneficial at night.
3-D presentations are only possible if
“Both eyes” is activated.
Search objects below horizon: Allows
you to search for objects below the
horizon.
Reset help audio: All help texts are
repeated again if activated.
Calibrate gyro: Universe2go checks
and calibrates the gyro sensor at the
start.
Eye distance: Enter your eye distance
here in millimetres. There is a
measurement guide in the FAQs on
the website www.universe2go.com.
Calibrate eye distance: If you do
not know your eye distance, you can
determine it with the help of the
Universe2go eye distance calibration.
Longitude: Determined automatically.
Can be entered manually if GPS is not
available
(e.g. if the smartphone
flight mode is activated)
. The entry
must be made in angular degrees.
Latitude: Determined automatically.
Can be entered manually if GPS is not
available
(e.g. if the smartphone flight
mode is activated)
. The entry must be
made in angular degrees.
(RAD = longitude in degrees/ 57.3)
Brightness settings: Enter value
between 0.0 and 1.0 or set slide
control.
Currently only available for iPhone:
Reset calibration: Carry out
calibrations
(screen & eye distance)
again at the next start.
22 23
Audio guide: Activate input help for
those with impaired sight.
The speech output of the smartphone
is activated and a guiding tone emitted
which indicates the proximity
(pitch)
and brightness
(relative volume)
of
whatever object is closest.
Audio guide level: Volume of the
guiding tone.
Audio guide speed: Speed of the
speech output.
Wiki audio: In addition to the vocallyentered texts, other Wikipedia texts
are provided on even more objects via
speech output.
Simulator: Universe2go runs automatically according to a script. The script
is entered under the “scriptName”.
Only the “simulatorScript.txt” script is
currently available.
Mars special: An animation of the
planet Mars. When you point at Mars,
you will see a rotating planetary
sphere. You will then land on the
dust-red surface of our neighbouring
planet!
You will then have to carry out a task:
locate a rocket between the hills and
rocks, in which you can then fly home.
If you want to skip or cancel various
sequences of Mars special, just shake
the hand planetarium up and down.
Screen calibration: In order for
the Universe2go app to recognize
the positioning of the smartphone
as placed in the viewer, you must
calibrate the screen.
A target, consisting of several circles,
will appear on the screen, when you
place your smartphone into the viewer.
A. You must move the circles in the
target to the middle of the view by
tilting your head up and down and
sideways to left and right. [fig. 10]
The “field of image” is the part of
your surrounding that you see when
you look through your Universe2go.
B. This should preferably be done
with the front cover on, in a slightly
darkened room or outdoors during
dusk or dawn. Under such conditions
you can recognize the circles
particularly well.
C. Once the alignment is good, you
should hold the device in place for at
least two seconds. The app will then
ask you to confirm the alignment by
leaning your head to the right, or to
correct it again by leaning your head
to the left.
Currently only available for Android:
fig. 10

24 25
Version: Version number of the app.
6. Online help
If you have questions or encounter
problems with the operation of
Universe2go, you will find further
information under
www.universe2go.com under the
menu option “CUSTOMER SERVICE”.
Here you will also find answers to the
most frequently asked questions.
7. System requirements
Compatible smartphones:
iPhone 5, 5s, 6, 6s, 7; Samsung Galaxy
S3, S4, S5, S6, S7 and many more
models.
You can find a list of further suitable
Smartphones at the following website:
www.universe2go.com.
Maximum dimensions of the
smartphone:
L 147 x W 74 x H 11 mm
Required sensors:
GPS, Gyro, Acceleration, Compass
Supported operating systems:
iOS Version 8.0 or later, Android
Version 4.2 or later.
We reserve the right to make technical
changes.
With the included activation code you
can download and use the app free of
charge.
We wish you lots of fun with
Universe2go.
Let’s go explore the night sky!
Lieferumfang
1x Universe2go Sichtbrille, 1x abnehmbare Blende,
1x passendes Passepartout für verschiedene
Smartphonegrößen, 1x Schutzbeutel, 1x Trageriemen,
1x Aktivierungscode für die App, 1x Bedienungsanleitung
Warnhinweise
Blicken Sie nicht mit Universe2go in die Sonne.
Gefahr der Augenschädigung!
Lassen Sie Universe2go nicht in der Sonne liegen.
Benutzen Sie Universe2go nur in sicherer Umgebung.
Smartphone immer sicher und fest einlegen.
Kinder sollten Universe2go nur unter Aufsicht benutzen.
Index
1. Aktivierung 29
1.1 Bestandteile 29
1.2 Funktionsarten 29
1.3 Freischaltung 29
2. Einrichtung und Kalibrierung 30
2.1 Passepartout anpassen 31
2.2 Augenabstand einstellen 32
2.3 Sternkalibrierung 35
3. Die Steuerung von Universe2go 37
3.1 Die Optionen 38
3.2 Standardeinstellungen 41
3.3 Experteneinstellungen 42
4. Menüsteuerung 44
5. App-Einstellungen 45
6. Onlinehilfe 49
7. Systemanforderungen 49

28 29
Universe2go – My personal Planetarium
Vielen Dank, dass Sie das Omegon Universe2go
Planetarium gekauft haben. Mit diesem Handplanetarium werden Sie viele schöne Stunden unter dem
Sternenhimmel erleben und ihn gleichzeitig sehr
gut kennenlernen. Universe2go bietet Ihnen dabei
einen deutlich höheren Nutzen als eine gewöhnliche
Sternkarte. Sie sehen den Sternenhimmel und gleichzeitig Sternbildlinien für die Orientierung, Objekte
und Objektdaten. Über die Audiofunktion erhalten Sie
zusätzlich alle interessanten Fakten. Mit Universe2go
ist es fast wie in einem echten Planetarium, nur
unter realen Bedingungen. Entspannen Sie sich und
genießen Sie den Sternenhimmel. Werden Sie zum
Himmelsexperten.
1. Aktivierung
So aktivieren Sie Ihr Universe2go
Hinweis: Die App wird laufend
weiterentwickelt. Infos zu Updates
und neuen Funktionen finden Sie auf
www.universe2go.de.
1.1 Bestandteile
Universe2go besteht aus zwei Teilen
Teil 1. der App „Universe2go“ – die auf
dem Smartphone läuft,
Teil 2 . der Sichtbrille „Universe2go“ –
in welche das Smartphone eingelegt
wird.
1.2 Funktionsarten
Zunächst können Sie sich in der App
für eine von zwei verschiedenen
Funktionsarten entscheiden:
Planetarium oder Sternkarte.
Wählen Sie den Planetariummodus
um die Anzeige für die Universe2go
Hardware zu erhalten. Dieser führt
Sie als audio-visueller Himmelsführer
durch den Nachthimmel.
Im Sternkartenmodus können
Sie die App ohne die Sternenbrille
nutzen. Hier steht Ihen, im Gegensatz
zum Planetariumsmodus, ein sehr
eingeschränkter Funktionsumfang zur
Verfügung.
1.3 Freischaltung
Laden Sie zuerst die App Universe2go
im App Store oder Google Playstore
herunter und installieren Sie diese auf
Ihrem Smartphone.
Achtung: Es stehen verschiedene
Sprachversionen zum Download zur
Verfügung. Bitte achten Sie darauf,
30 31
dass Sie die richtige Sprachversion
wählen.
Um den Planetariummodus nutzen
zu können, ist die Eingabe eines zehnstelligen Codes notwendig, den Sie auf
der Innenseite der Produktverpackung
finden.
Dieser Code wird einmalig beim
ersten Aufruf des Planetariumsmodus
abgefragt.
Hinweis: Zur Aktivierung benötigen
Sie eine Internetverbindung.
Der Sternkartenmodus kann frei ohne
einen Aktivierungscode betrieben
werden.
2. Einrichtung und
Kalibrierung
Universe2go kann mit vielen
verschiedenen Smartphones
unterschiedlichster Maße, Bildschirmgrößen, Anzahl von Bildpunkten
oder Pixeldichten des Bildschirms
verwendet werden.
Hinweis: Die Systemanforderungen
finden Sie am Ende der Bedienungsanleitung. [Seite 49]
Hinweis: Gyroskop, Kompass,
Ortungsdienste, Mikrofon und Ton
Ihres Smartphones müssen in den
Einstellungen des Telefons und in den
Einstellungen der App Universe2go
aktiviert sein
(iPhone)
.
Dazu muss Universe2go einmalig auf
Ihr Smartphone eingerichtet werden.
Die Anzahl und Variation der heutigen
Smartphones ist fast unüberschaubar.
Wir haben sehr viel Energie darauf
verwendet, die Einrichtung so einfach
und sicher wie möglich zu gestalten.
Bitte seien Sie daher beim ersten
Einrichten besonders sorgfältig und
beachten ggf. die Onlinehilfe auf
www.universe2go.de im Menüpunkt
„KUNDENSERVICE“.
2.1 Passepartout anpassen
Zunächst muss das Passepartout an
das Smartphone angepasst werden.
A. Öffnen Sie den Deckel
und entnehmen Sie so viele
Schaumstoffteile wie nötig aus
dem Aufnahmeschacht, damit das
Smartphone locker hineinpasst.
[Abb. 1]
B. Um das Smartphone sicher in der
Sternenbrille zu befestigen, kleben
Sie ein großes Dreieck in die linke
obere Ecke
(das Gerät liegt dabei
in Blickrichtung vor Ihnen)
und ein
kleines Dreieck in die rechte obere
Ecke.
Je nach Smartphone-Modell kann
auch eine andere Platzierung der
Schaumstoffteile notwendig sein.
Bei manchen Modellen sollten Sie
außerdem darauf achten, dass der
Schaumstoff nicht während der
Nutzung einen Bedienknopf des
Smartphones betätigt.
Abb. 1
32 33
Wählen Sie die Dreiecke entsprechend
so, dass das Smartphone einen
sicheren Halt hat, aber dennoch gut
eingelegt und herausgenommen
werden kann. [Abb. 2]
C. Testen Sie den Sitz zunächst
ohne die Klebefolie der Dreiecke
zu entfernen. Zum Test können
Sie den Deckel schließen und das
Gerät vorsichtig schütteln, um
sicherzustellen, dass Ihr Smartphone
sich nicht hin- und herbewegt.
Wenn Sie mit dem Halt zufrieden
sind, können Sie die Schaumstoffteile
durch Entfernen der Klebefolie auf
der Rückseite des Schaumstoffs
permanent einkleben.
Falls Sie später einmal ein anderes
Smartphone in Verbindung mit
Universe2go benutzen möchten,
können Sie zusätzlich ein neues
Passepartout erwerben.
Hinweis: Eingeklebt lässt sich
das Passepartout nicht wieder
herausnehmen, ohne es zu
beschädigen. Außerdem verbleiben
auf der Scheibe Kleberückstände.
2.2 Augenabstand einstellen
Im nächsten Schritt der Kalibrierung
stellen Sie Ihren persönlichen
Augenabstand ein.
Hinweis: Die Augenkalibrierung ist nur
notwendig, wenn in den Einstellungen
„Beide Augen“ aktiviert ist.
Hinweis: Die Augenkalibrierung wird
mit Hilfe einer Spracherkennung
durchgeführt. Dazu benötigt
Universe2go den Zugriff auf das
Mikrofon.
2.2.1 Mikrofon-Test
Im Bildschirm erscheint ein Regler für
den Mikrofon-Test.
Führen Sie den Test bitte in
einer ruhigen Umgebung ohne
Hintergrundgeräusche aus.
Sagen Sie nun „S TART“ und danach
„STOPP“.
Jetzt erscheint der Bildschirm der
Augenkalibrierung.
2.2.2 Augenkalibrierung
A. Sie sehen den Startbildschirm für
die Augenkalibrierung und eine kurze
Erklärung zum Vorgehen.
Bitte folgen Sie den Anweisungen auf
dem Bildschirm.
Sagen Sie zunächst „S TART“, um die
Augenkalibrierung zu beginnen.
B. Es erscheinen zwei grüne Kreise,
die sich auseinander bewegen und
anschließend wieder aufeinander
zuwandern.
C. Sind die Kreise zueinander in ihrer
Höhe versetzt, neigen Sie das Gerät
nach oben oder unten, bis die Kreise
auf einer horizontalen Linie laufen.
D. Sobald Sie nicht mehr zwei, sondern
Abb. 2

34 35
nur noch einen Kreis sehen, sagen Sie
„STOPP“.
E. Sie erhalten die Meldung: „Stopp
erkannt“. Kippen Sie das Gerät
nach rechts, um die Kalibrierung
abzuschließen.
Kippen Sie das Gerät nach links, um
die Kalibrierung zu wiederholen.
Hinweis: Warten Sie einige Sekunden,
bevor Sie „START“ und „STOPP“
sagen, Universe2go erkennt Ihren
Sprachbefehl dann zuverlässiger.
Falls das Programm Probleme bei der
Erkennung Ihrer Spracheingabe haben
sollte, überprüfen Sie die folgenden
Punkte mit diesen Fragen:
1. Gibt es laute Hintergrundgeräusche
oder ist es windig?
2. Ist das Mikrofon durch den
Schaumstoff des Passepartouts
verdeckt?
3. Haben Sie dem Programm Zugriff
auf das Mikrofon gewährt?
Hinweis: Falls die Kalibrierung des
Augenabstands nicht zufriedenstellend
ist, können Sie Ihren Augenabstand
auch mithilfe eines Messlineals
ermitteln und diesen direkt in den
Einstellungen eingeben.
Weitere Informationen dazu finden
Sie auf www.universe2go.de unter
dem Menüpunkt „KUNDENSERVICE“ >
FAQs zur Bedienung.
Hinweis: Metallkörper in Ihrer Nähe
(Zäune, Rohre, Autos etc.)
können den
Kompass Ihres Smartphones erheblich
stören. Für eine genaue Kalibrierung
von Universe2go sollten Sie zu
metallischen Objekten mehrere Meter
Abstand halten.
2.3 Sternkalibrierung
2.3.1 Standardsternkalibrierung
Damit Universe2go den Sternenhimmel
exakt darstellt, müssen Sie zunächst
drei helle Sterne anvisieren.
Hinweis: Bitte achten Sie darauf,
dass die Blende der Sternenbrille
abgenommen wurde, da Sie sonst
keine Sterne sehen können.
A. Wenn Sie mit Universe2go zum
Sternenhimmel blicken, sehen Sie
einen grünen Peilkreis und einige
Sterne, die ebenfalls eine grüne
Umrahmung besitzen. Außerdem
erkennen Sie oberhalb den Namen
des Sterns.
Visieren Sie einen dieser Sterne
an und bringen Sie ihn in die Mitte
des Peilkreises. Während Sie den
Stern ruhig im Ziel halten, beginnt
die Kalibrierung. Sie sehen einen
kreisförmigen Fortschrittsbalken, der
nach erfolgreicher Kalibrierung einen
vollständigen Kranz um den Stern
bildet.
Nach der Kalibrierung dieses Sterns
erscheint im Display eine kleine rote 1
(bzw. eine 2 und 3)
.
B. Kalibrieren Sie nun den zweiten und
dritten Stern, wie unter A. beschrieben.
Nach der Sternkalibrierung erhalten
Sie eine Rückmeldung über die
aktuelle Sensorqualität.
Wenn die Sensorqualität schlecht ist,
befolgen Sie bitte diese Tipps.

36 37
Kompass ungenau:
1. Wechseln Sie den Standort und
entfernen Sie sich von Metallkörpern.
2. Wiederholen Sie die
Sternkalibrierung mit anderen Sternen.
Achten Sie darauf, keine Sterne in
der Nähe von Horizont oder Zenit
(direkt über Ihnen)
zu wählen. Suchen
Sie nach Sternen, die möglichst weit
voneinander entfernt stehen.
3. Wählen Sie innerhalb der App
die Funktion „Expertenkalibrierung“
oder „Kompass-Feinjustierung“
(nur
Android)
.
Gravitationssensor ungenau:
Achten Sie darauf, dass die
Universe2go Sternenbrille während
der Kalibrierung direkt auf der Nase
sitzt. Ein Neigen der Sternenbrille
unabhängig von der Nase kann zu
einer schlechteren Sensorqualität
führen.
2.3.2 Sternkalibrierung mit KompassFeinjustierung
(nur Android)
Diese Art der Kalibrierung ist
interessant, wenn der Kompass sehr
ungenau arbeitet.
A. Blicken Sie mit Universe2go nach
unten, bis das Menü erscheint.
Wählen Sie unter „EINSTELLUNG“ >
Kompass-Feinjustierung.
B. Folgen Sie den Anweisungen von
Universe2go.
2.3.3 Expertenkalibrierung
A. Blicken Sie mit Universe2go nach
unten, bis das Menü erscheint.
Wählen Sie unter „EINSTELLUNG“ >
Expertenkalibrierung.
B. Sie befinden sich nun in einer
Expertenkalibrierung, die aus den
Namen von Sternen und Planeten
besteht.
Wählen Sie einen Stern aus, müssen
Sie genau wissen, wo Sie ihn finden.
Daher ist diese Methode vor allem
dann geeignet, wenn Sie sich schon
sehr gut am Himmel auskennen.
C. Kalibrieren Sie den Stern wie unter
2.3.1 - A. beschrieben.
3. Die Steuerung von
Universe2go
Peilen Sie einen Stern am Himmel an,
indem Sie ihn in die Mitte des kleinen
grünen Kreises
(Peilkreis)
bringen,
welchen Sie beim Blick durch das
Gerät in der Mitte des Bildfeldes
sehen. [Abb. 3]
Universe2go wird dann versuchen,
diesen Stern zu identifizieren.
Am besten funktioniert Universe2go,
wenn Sie von Stern zu Stern am
Himmel wandern. Dadurch kann
sich Universe2go immer wieder am
aktuellen Stern ausrichten und die
Zuverlässigkeit in der Deckung von
realem und virtuellem Sternenhimmel
ist am höchsten.
Abb. 3
 Loading...