

Omegon Pro Ritchey Chretien 154, Pro Ritchey Chretien 203, Pro Ritchey Chretien 254 Operating Manual
1
Any form of reproduction of the entire contents of this document or parts thereof beyond the private use is strictly prohibited.
Subject to alterations and errors. All texts, illustrations and symbols are the property of nimax GmbH.
Operating Manual
Full Tube Ritchey Chretien Telescopes
Omegon® Pro Ritchey Chretien
154/203/254
German Version 6.2017 Rev A 53809; 53810; 53811

2
Any form of reproduction of the entire contents of this document or parts thereof beyond the private use is strictly prohibited.
Subject to alterations and errors. All texts, illustrations and symbols are the property of nimax GmbH.
Omegon® Pro Ritchey Chretien Full Tube
Congratulations for the purchase of your new Omegon® Pro Ritchey Chretien telescope. Among the Cassegrain systems the RitcheyChretien is the unrivalled champion: it is the two-mirror telescope with the highest correction level available. In contrast to other
variants, like Pressmann-Charmichel, Dall-Kirkham or the classical Cassegrain, the Ritchey-Chretien reflector shows you a completely
coma-free field full of round stars even without an additional corrector. The difference to other types of design is so significant, that
almost all large telescopes used for scientific purposes are of the Ritchey-Chretien design.
Due to the high production costs for the mirrors, real Ritchey-Chretien telescopes were, until recently, unaffordable for amateur
astronomers, because of their high price. Now we are glad to be able to present fully matured, real Ritchey-Chretien reflectors for a
reasonable price.
The Omegon® Pro Ritchey Chretien reflectors can be used for visual observations and photography without limitations, but develop
their full strength, above all, when used for Deep-Sky observation and photography. When visually panning across the milky way
they show innumerable small stars right to the edge of a well corrected eyepiece. From an aperture of 250mm a camera with APS-C
format chip will produce dot shaped stars right to the edge without the use of an additional corrector – with smaller telescopes the
remaining blurring can be completely corrected by using a field flattener.
Ritchey-Chretien units are compromising pieces of equipment for professionals, the superior image quality requires a certain amount
of adjustment work. The generously dimensioned focussing range gives the expert the opportunity to use field flatteners for large
chips, focal length reducers and focal length extension optics. There remains nothing to be desired. The included eyepiece holder is
able to carry a conventional DSLR without any problems and the size of its diameter ensures vignette free exposure of almost all
cameras. Special heavy duty eyepiece f´holders are available for extra heavy cooled cameras.
1. Included accessories:
For easy use the product is delivered with several accessory parts: Please have a look at the parts list for later
recognition.
53809 Omegon® Pro Ritchey-Chrétien 154/1370
Optical tube with 1 x fastening rail 44mm Vixen standard, 2” Crayford focuser and reducing sleeve 2”/1. 25”,
Vixen/Skywatcher finderbase.
Focuser extension sleeves: 2x 25mm, 1x 50mm
53810 Omegon® Pro Ritchey-Chrétien 203/1624
Optical tube with 1x 3” Losmandy fastening rail and 1x combination fastening rail 3” Losmandy/44mm Vixen, 2”
Crayford focuser with reducing sleeve 2”/1.25”, Vixen/Skywatcher finderbase
Focuser extension sleeves: 2x 25mm, 1x 50mm
53811 Omegon® Pro Ritchey-Chrétien 254/2000
Optical tube with 1x 3” Losmandy fastening rail and 1x combination fastening rail 3” Losmandy/44mm Vixen, 3”
Crayford focuser with reducer M74x0.75 to 2” plug-in and reducing sleeve 2”/1.25”, Vixen/Skywatcher finderbase
Focuser extension sleeves: 2x 25mm, 1x 50mm
Battery holder for tube ventilator
3
Any form of reproduction of the entire contents of this document or parts thereof beyond the private use is strictly prohibited.
Subject to alterations and errors. All texts, illustrations and symbols are the property of nimax GmbH.
2. Preparation.
Before you start using the equipment it is important to know the main control elements. There are two groups of control
elements, as shown (Fig. 1 - 6).
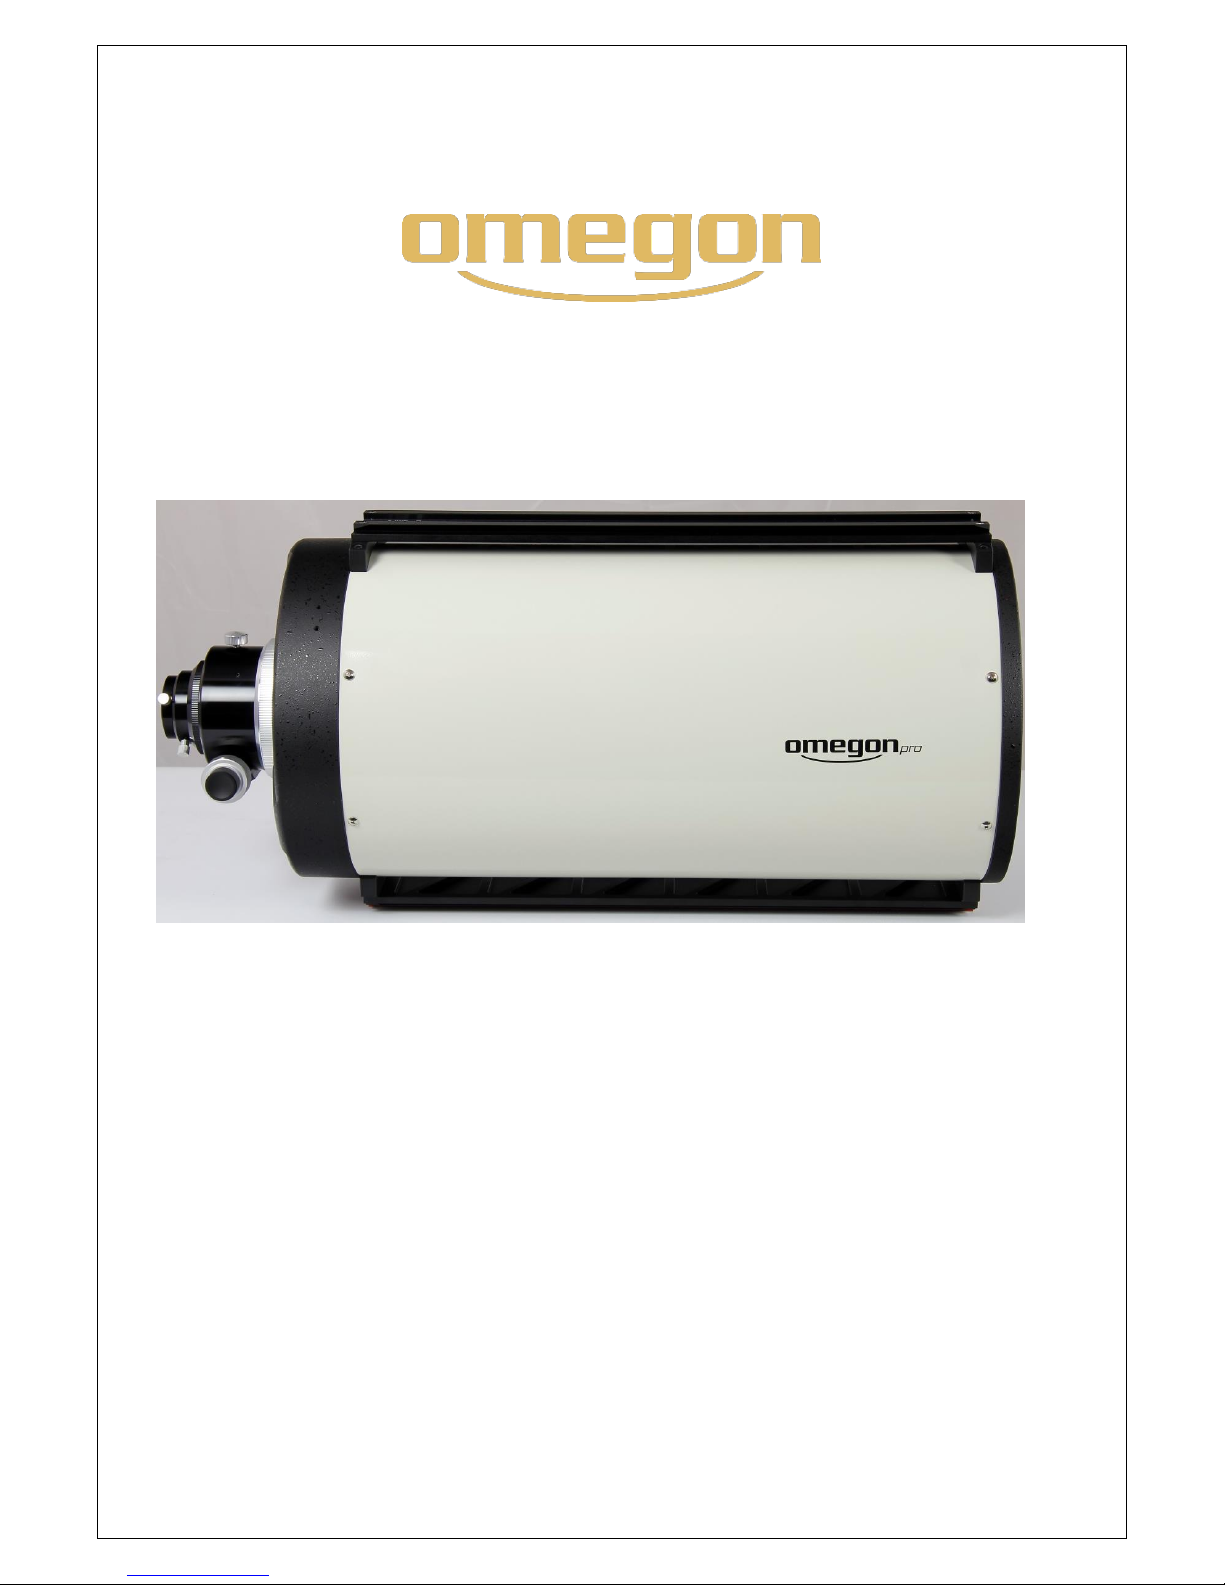
1) Optical tube
2) Secondary mirror
3) Secondary mirror holding screw
4) 3x secondary mirror adjustment screws
5) Secondary mirror cell with lens shade
6) Lower dovetail rails (3” Losmandy standard and
44mm Vixen standard combination rails)
7) Dovetail rail top (3” Losmandy standard)
7
Figure 2
Figure 3
Figure 1
4
Any form of reproduction of the entire contents of this document or parts thereof beyond the private use is strictly prohibited.
Subject to alterations and errors. All texts, illustrations and symbols are the property of nimax GmbH.
)
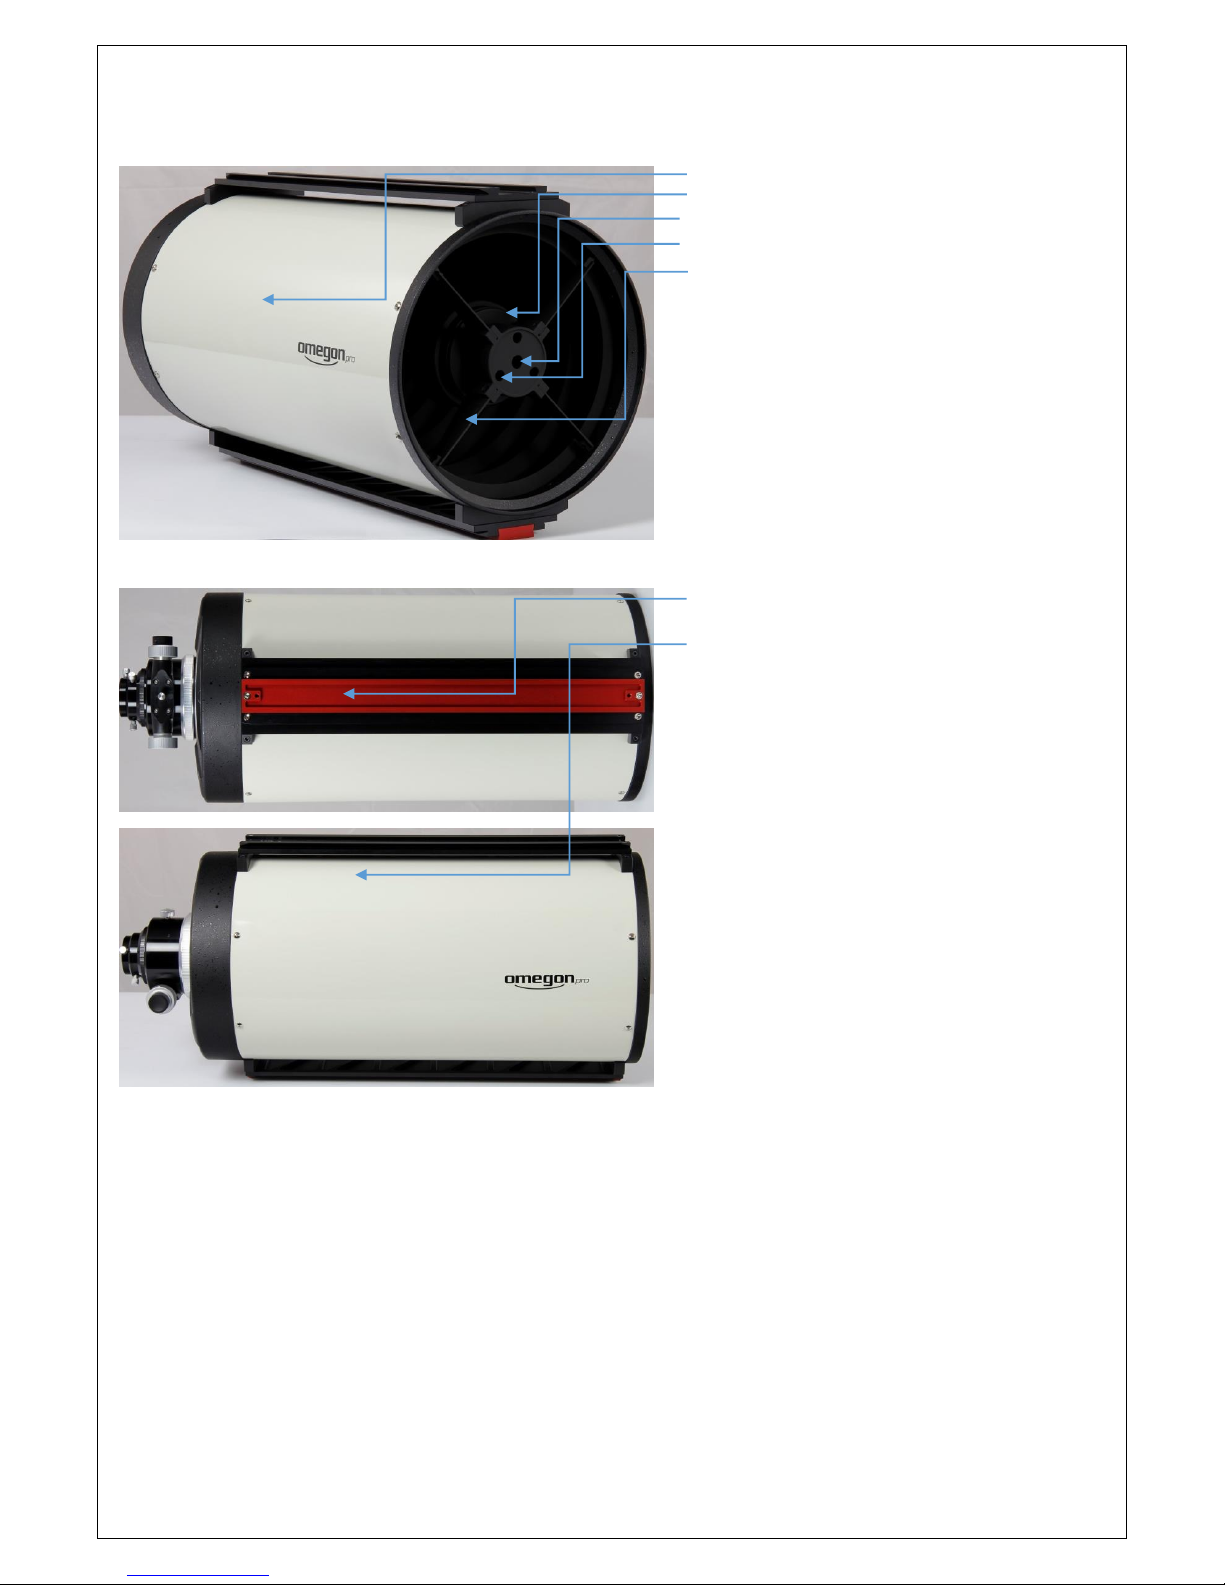
8) Finderbase, Vixen standard
9) Cap nut to fasten the focuser
10) Focuser
11) Eyepiece clamping
12) Thumbscrew for 2” connection
12) Reducing adapter 2”/1.25” with protection ring and
thumbscrew
12) Coarse focusing right
13) Fine focusing
14) Coarse focusing left
15) Focuser clamping screw
16) 50mm focuser extension sleeve
17) 2x 25mm focuser extension sleeve
Figure 4
Figure 5
Figure 6

5
Any form of reproduction of the entire contents of this document or parts thereof beyond the private use is strictly prohibited.
Subject to alterations and errors. All texts, illustrations and symbols are the property of nimax GmbH.
3. Commissioning
a) Mounting the tube
The telescope is equipped with a rail (8” and 10” versions with two rails), which enable secure
fastening of the telescope tube on a mount. In order to do so open the dovetail clamping on your
mount so far, that the rail can be inserted into the receptacle. Make sure that the rail is properly
seated in the receptacle – with larger tubes you will have no direct vision to the receptacle of the
mount, because the tube is in the way. In such a case it may happen that one assumes that the tube is
correctly clamped, even though it is canted in the receptacle. If this is the case, the tube will most
certainly fall out at some time and hit the ground of the observer. Depending on the size of the tube,
not only the tube will be destroyed, but it will cause further damage or injuries.
Once you have made sure that the rail is perfectly seated in the receptacle, just clamp the rail down
with the clamping facilities of the mount. If you intend to balance the tube, just slacken the clamping
so that the tube can be moved – but will not fall out.
If you perform this step for the first time you should ask a second person for assistance and to check
whether everything is fitted correctly. Practice this tube installation for a few times – later you must
be able to do this work in the dark and without any help.
b) Using focuser and spacer sleeves
Your Ritchey-Chretien telescope is equipped with a focuser for focusing the image. Several spacer
rings for installation between focuser and tube are also included. This design gives you the benefit of
being flexible when it comes to usable accessories. Depending on the aperture, your Omegon RitcheyChretien telescope is either fitted with a 2” or a 3” focuser and the matching spacer sleeves.
At the first glance spacer sleeves appear to be very impractical – wouldn’t it be much easier to simply
make the tube of the eyepiece holder longer and do without spacer sleeves. However, this would be
of disadvantage, because the longer eyepiece holder tube would bend more extremely under load –
this is why we decided on a short eyepiece holder tube with approx. 50mm draw tube travel and the
use of several spacer sleeves. The fact that the large diameter of the spacer sleeves prevents
vignetting is an additional advantage. The rear end of the tube features a large thread. This thread
carries the focuser, and the spacer sleeves also use this thread. When working in the dark please
make sure not to cant the spacer sleeves – this would damage the thread.
The focuser has a big adjusting wheel for coarse focusing on either side, and a smaller black
adjustment wheel for fine tuning on one side. Apart from this there is an additional knurled screw
under the adjusting unit to fix the eyepiece holder and a pressing screw for the adjusting unit. This
pressing screw should never be loosened completely to avoid slipping of the eyepiece holder. Do not
apply force to turn to a certain position, if something blocks the eyepiece holder. Over the course of
time the feed shaft would damage the running surface and the eyepiece holder would no longer work
correctly. Should the eyepiece holder be blocked, do not continue to turn to the same direction, but
check, whether the eyepiece holder is blocked or has reached its end position. Or may be its only a
tightened eyepiece holder thumbscrew. In order to rule out any operating faults when working in the
dark, you should become familiar with the eyepiece holder and its control elements during the
daytime. The focuser can be removed from the tube by simply unscrewing the silver fastening ring on
the tube side end of the focuser. At this point one can install one or several spacer rings between
focuser and tube in order to match the position of the focuser to your own accessories. Depending on
whether to use a diagonal mirror for visual observations or directly attach a camera for
astrophotography, just use a appropriate spacer sleeve to achieve a convenient focal position and the
best possible stability. When photographing with a DSLR without any additional accessories, one will
 Loading...