

Page 1
1
Instructions Manual
Omegon® Dobson Advanced 203
English version 10.2015 Rev A
Page 2
2
The Omegon® Advanced Dobson 203
Congratulations on the purchase of
the new Omegon® Advanced
Dobson 203 telescope. This
telescope will give you hours of fun,
with its optical glass mirrors and
light gathering capability, it is the
ideal companion to start in the
world of amateur astronomy. With
this telescope you will be able to see
the craters on the Moon, star
clusters, many nebulae, the Jupiter’s
disc features and its Galilean moons
and the rings of Saturn, Mars and
Venus and many more objects.
Included parts. The telescope is
supplied either as a basic set or
as a complete set, or as a
personalized set (configured at
purchase) - please check which
version you purchased – the
following instructions are valid
for basic and complete set. The
basic set does not include any accessories, only the optical tube and base. At the end of this
Instruction Manual you will find the available accessory list which includes focuser, eyepieces,
finderscope and eyepiece rack for completion of your telescope if necessary
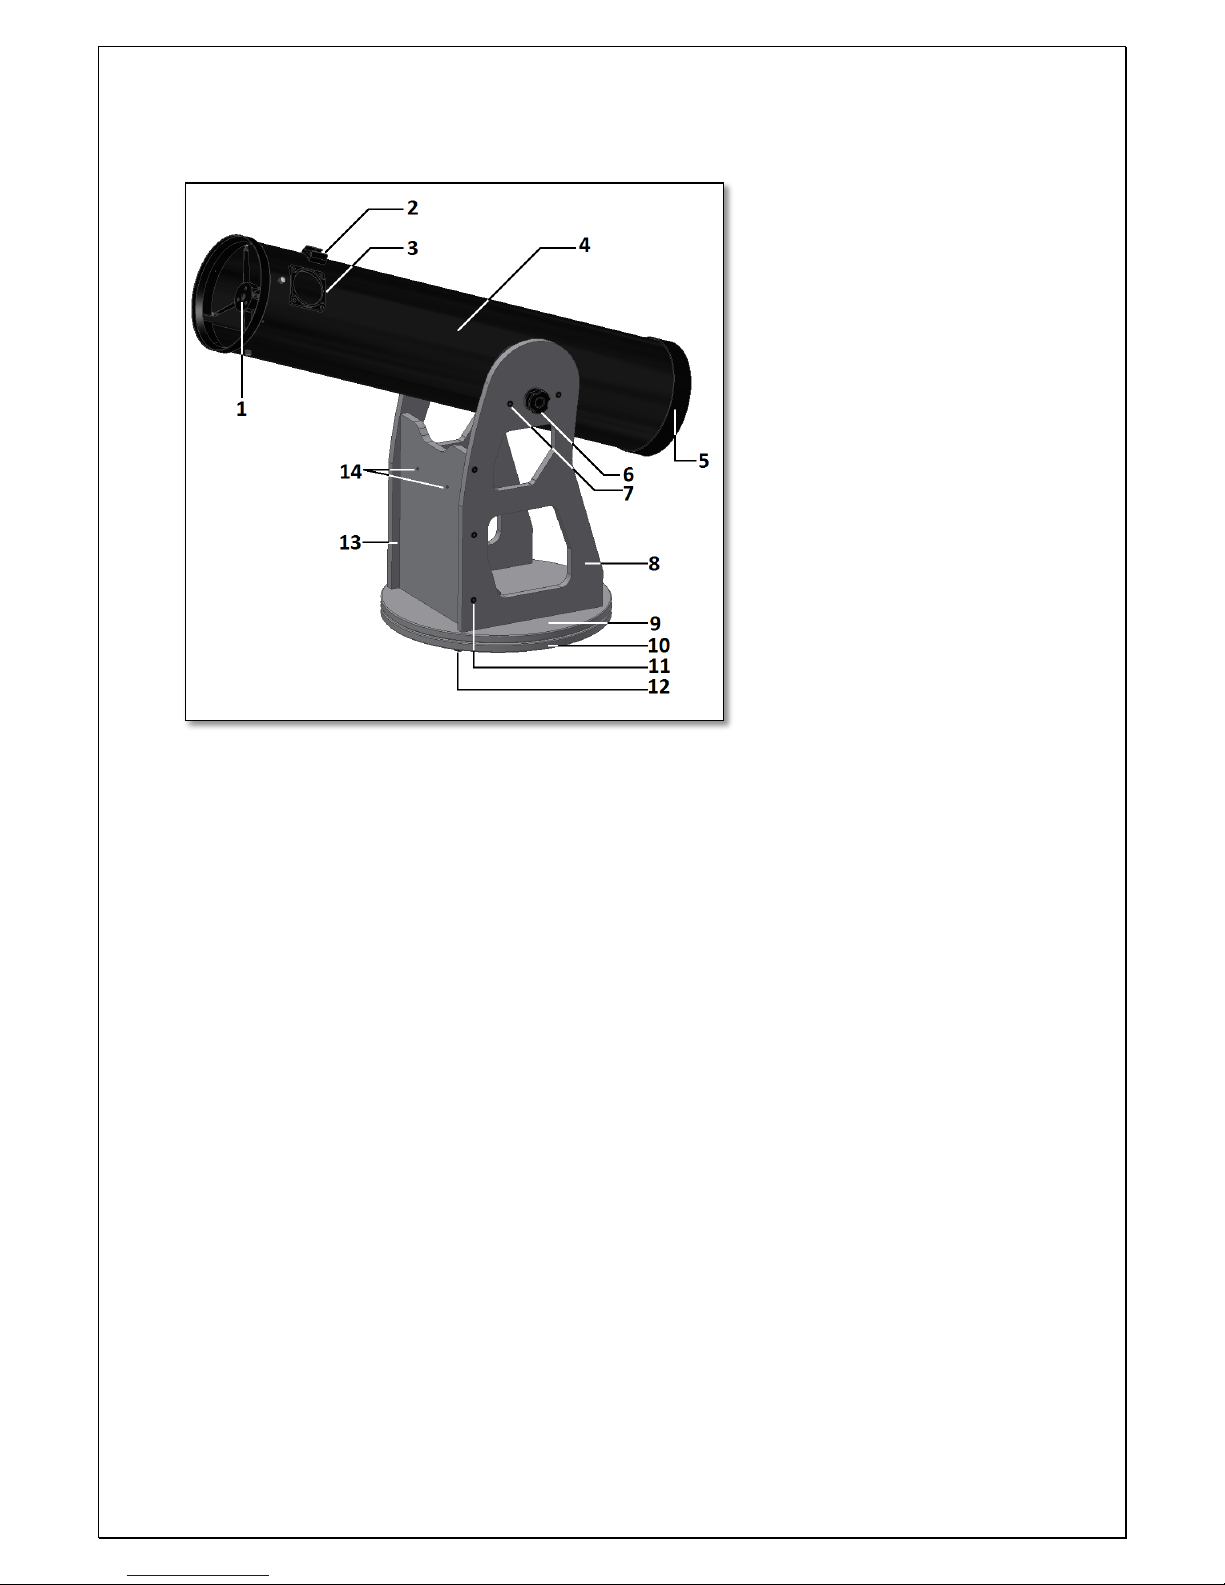
1. Knowing your telescope.
1- Spider (secondary mirror) 6- Balance adjustment knob 11- Flat head bolt (point)
2- Finderscope shoe 7- Flat head bolt; 12- Rubber foot
3- Focuser base 8- Left panel; 13- Right panel
4- Optical tube 9- Top base disc; 14- Front panel’s holes
5- Primary mirror cell 10- Bottom base disc;
2. Getting Started. The telescope is supplied with two boxes marked OTA 1/2 and Base 2/2. Each
containing the optical tube and the Dobson base respectively. Start by opening the smaller flat box
(should be marked Base 2/2). Remove the wooden panels, the tools and accessories. Place them on
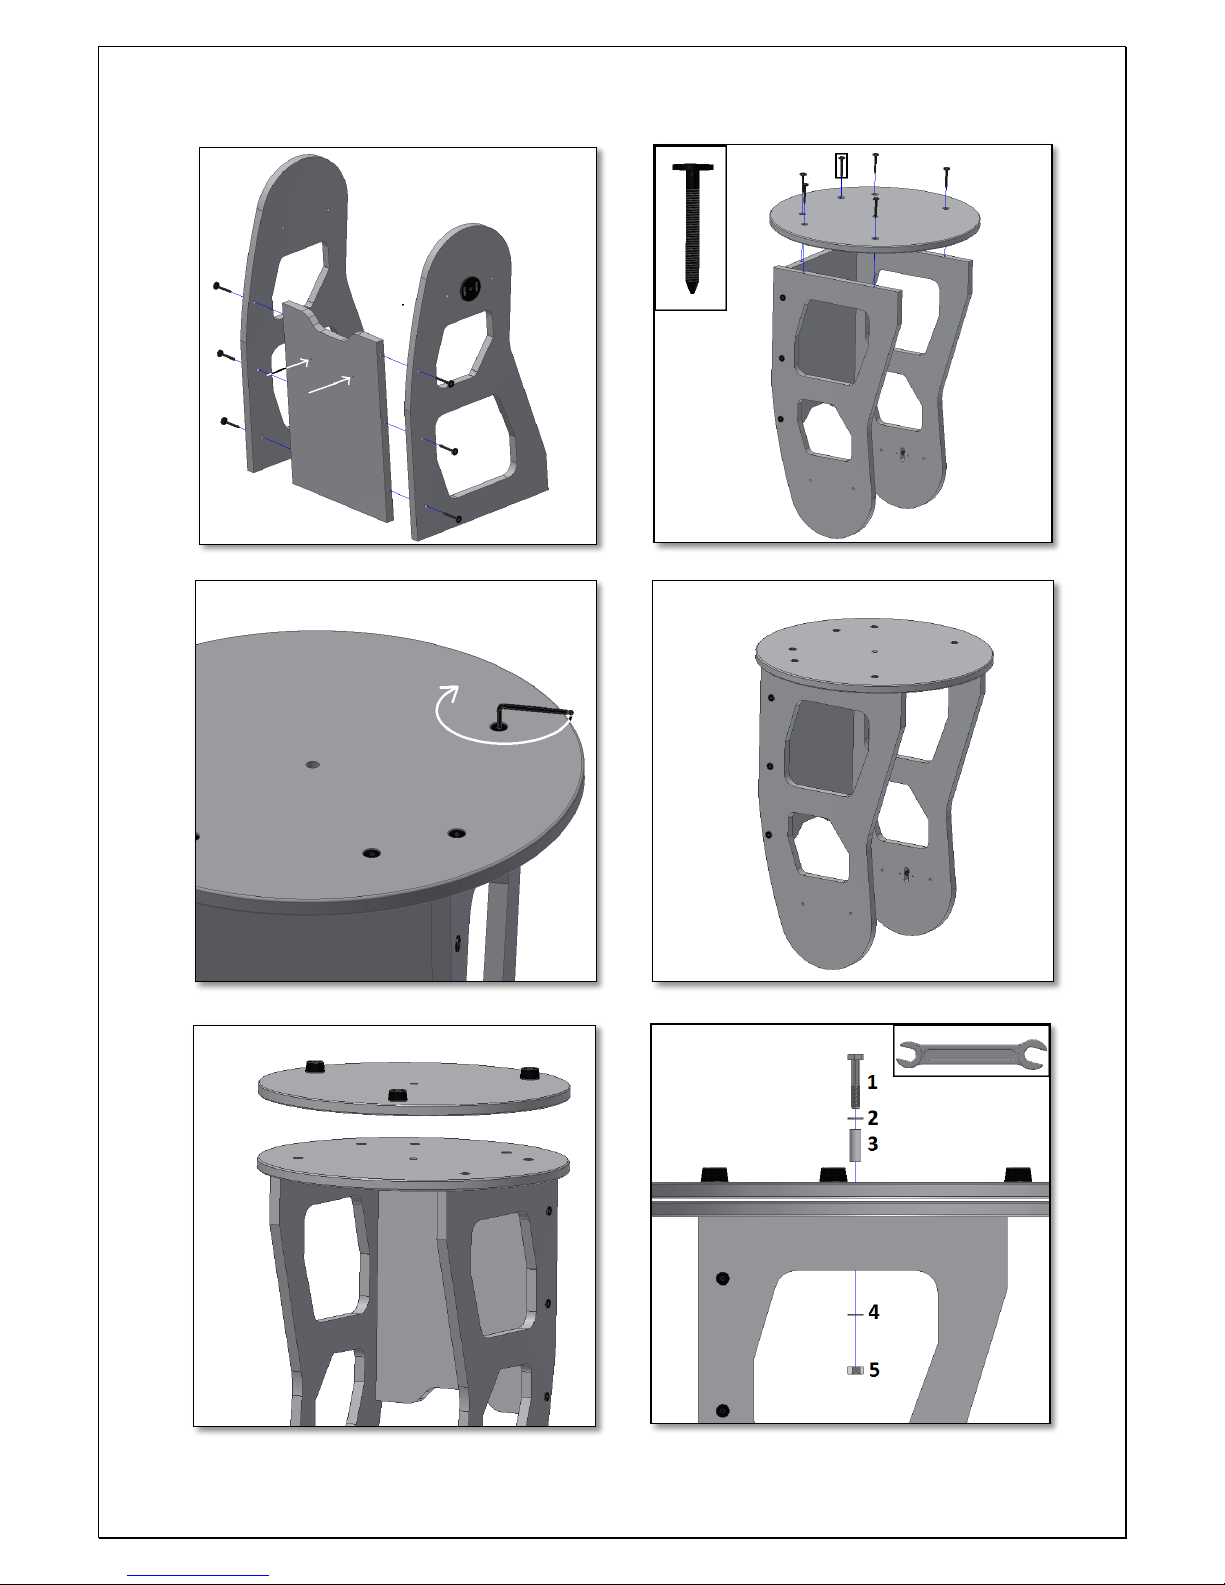
a flat and soft surface (we recommend carpeted floor to avoid scratches). 3. Assembly. Start by
setting the side panels and front panel together. Use the supplied Allen wrench and the flat bolts
with pointed tip #11 (as shown in fig. 2). Make sure that the front panel’s two eyepiece-rack holes
are pointing out (the two white arrow as show in fig. 1). This is important because the eyepiece-rack
(not included) may be fixed to those two holes. Start with one of the side panels and the move to
the other one. Make sure the front panel is mounted upwards as shown in fig. 1. Now place the top
base disc as shown in fig 3. You will need another 6 Flat head bolts, as used before. For each hole
there is a recess on the Top base disc where the flat head bolts thread. Make sure to place the
surface with the recess oriented to the outside. Use the supplied Allen wrench as shown in figure 4.
At this point all panels and Top base disc should be firmly tightened. Now place the Bottom base disc
as shown in fig. 6. Use the supplied bolt, nuts, and washer and central shaft to assemble as shown in
fig. 7. Correct placement is very important. Start by inserting the aluminium tube (shaft – part 4
fig.7) -text continues page 6.
Figure 1. Parts description.
Page 3
3
Figure 2. Assemble side and front panels.
Figure 3. Assemble top base’s disc. Pay attention to the right side.
Figure 4. Tighten the parts using the supplied allen wrench.
Figure 5. Base is ready to receive base’s bottom disc.
Figure 6. Rubber feet should point out.
Figure 7. Use supplied nut wrenches to tightent.
Page 4
4
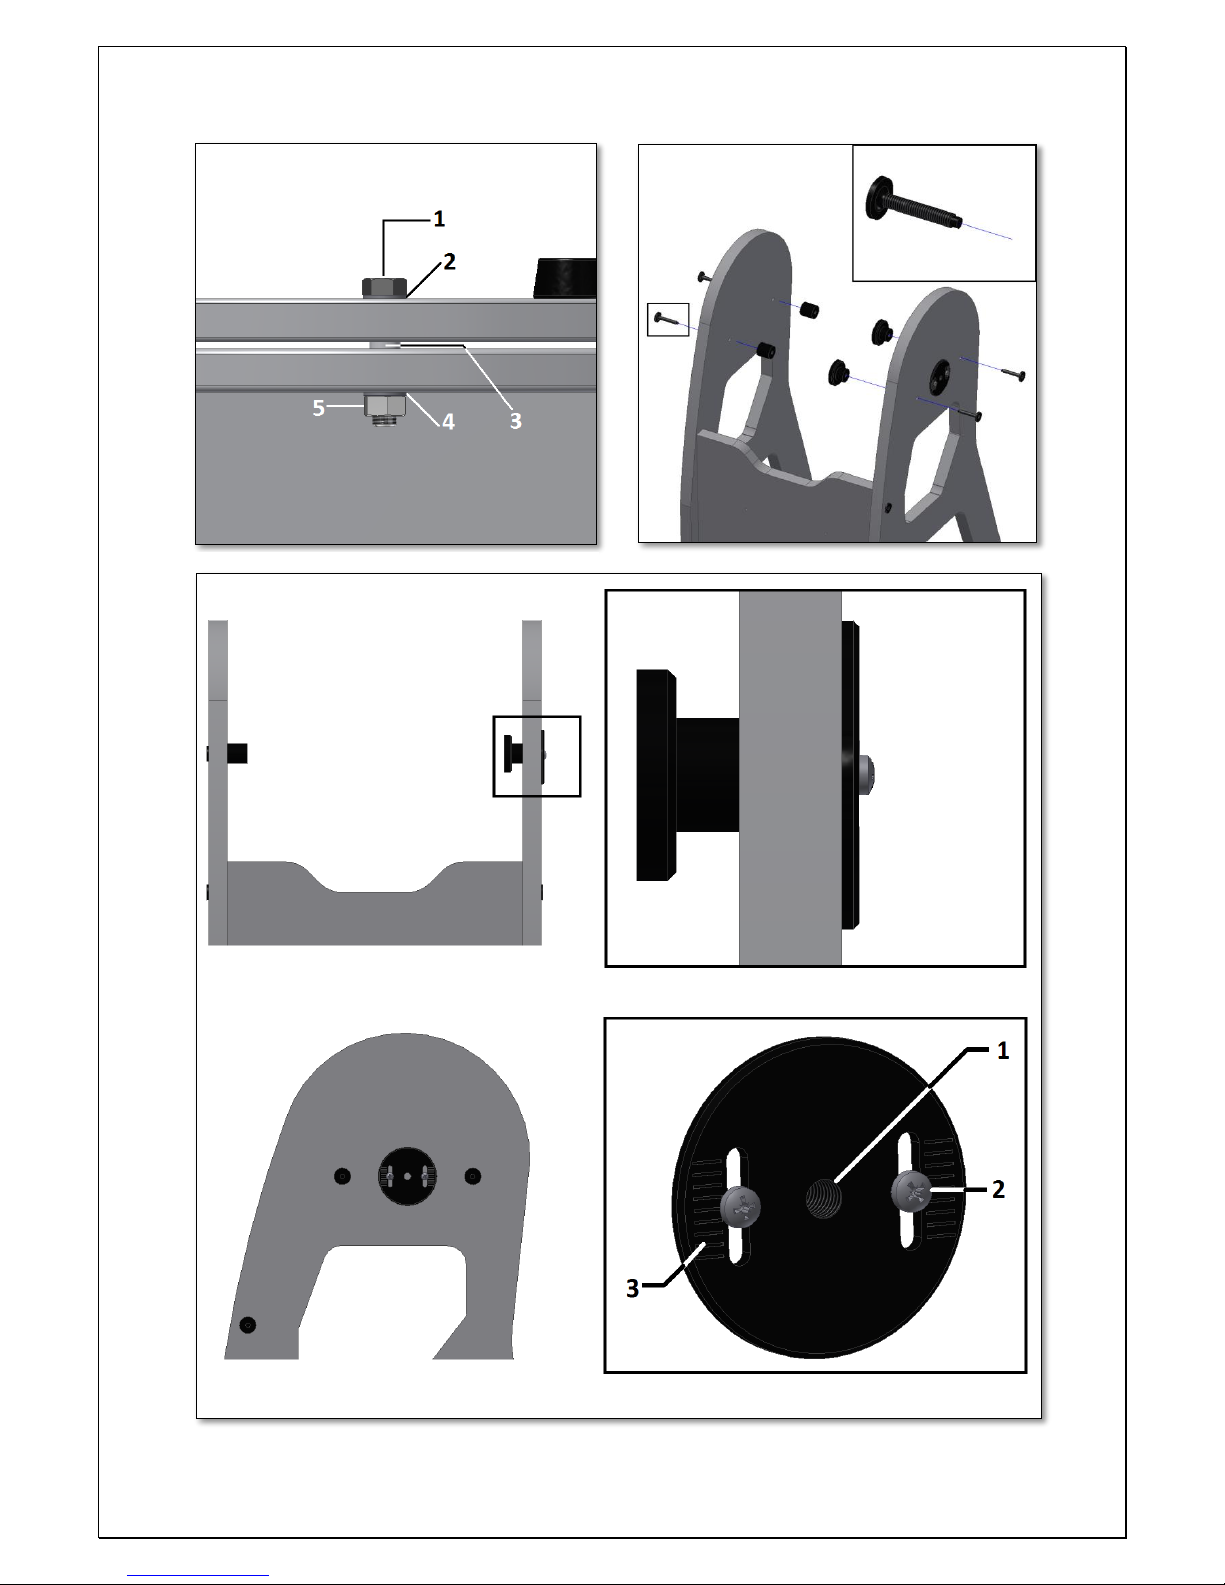
Figure 8. Shaft placement sequence is important.
Figure 9. Tighten telescope’s side bearings cylinders.
Figure 10. Balance the R.A. axis with counterweight.
Page 5

5
This shaft will aligned both base’s discs. Insert
the bolt (part 1 fig.7) and make sure to use the
washers (part 2 and 4 fig 7.) between the bolt
and the disc. On the opposite side insert the
washer and nut. Use the supplied nut wrenches
(top-right fig.7). One should hold the bolt in
place with one wrench (to avoid it from
rotating) and tighten the nut with the other
wrench. Make sure that at the end of this
procedure the discs rotate freely, but no
noticeable wobbling between them exists. Place
the assembled set so that the rubber feet are
now touching the ground. Now it is time to
install the black metal bearing cylinders. These
are used to support the optical tube on top of
the Dobson base. Use the supplied 4 flat head
bolts #7 as shown in fig. 9. Use the supplied
Allen wrench for this matter. Make sure the
bearing cylinders match the correct side panel.
The cylinder-shaped ones should be fitted to
the right panel while the T-shaped (fig. 11)
should be fitted to the left panel. Please tighten
all 4 flat-head screws firmly. Place the tube on
the base (fig. 12). The tube should now tilt
freely. 4. What is the Balance Adjustment
System and how to use it? The balancing
system is only required when the optical tube is
out of balance – tilts either to the front or the
back - and additional friction is required. Using
a heavier eyepiece for example may tilt the
telescope tube to the front. On the surface of
the left panel there is also a black metal disc (#6
–fig.1). The disc is part of the telescope’s
balancing system. The balancing system includes
the metal disc and the supplied hand-knob (fig.
13). Thread the Knob to the disc #1 – fig.10.
Make sure the washer set is included (fig. 13).
Keep on threading until the plastic tip hits the
telescope’s side bearing (fig. 14). Inspect the
plastic tip as shown in figure 14. The knob’s
plastic tip should be hitting the telescope’s
plastic side bearing. We want this plastic tip to
be inside the telescope’s bearing recess as
shown in figure 14 - bottom. The telescope’s left
panel with this disc was previously adjust but
might require further adjustment. 4.1. How to
adjust the friction? Release (without
Figure 11. R.A. Axis.
Figure 12. Place tube on base.
Figure 13. Insert tube in the base.
Page 6

6
removing) the two cross head screw that
secure the disc – fig.15. Use the supplied
screwdriver. This allows the disc to be adjusted
up-down if necessary so that the knob’s tip
matches the exact position as seen in figure 14.
The plastic tip should be touching the recess at
is lowest position. Jittering may occur if the
knob is not properly aligned with the recess.
Take your time to adjust the knobs’ up-down
position for optimal performance.
Tighten the hand-knob firmly to get
more friction. Unthread the handknob by 3 turns to remove the optical
tube from the base.
Figure 2
Figure 3
Figure 14. The Balancing System.
Figure 15. Disc up-down adjustment.
Page 7

7
5. Optional accessories (not included). The Omegon Dobson telescope is supplied as a basic
setup configuration i.e. only the optical tube and base. The focuser, finder scope and other
accessories such as eyepieces are not included. Why? Because we want to give users the chance to
configure the telescope to their own needs. For example if you have your own telescope eyepieces
you surely don’t need to buy new ones, simply use the existing ones and save. For the focuser we
offer different focusers, basic and high-end focusers, the user can choose the ones which better suit
their needs. Because these optional accessories are being constantly improved and update the
following instructions are a basic guideline on how to install them to the telescope. 5.1. The
focuser. The focuser is an essential part of the telescope as it is used to get precise focused images.
To install the focuser release the two set-screws as shown in figure 17 and insert the focuser base
tube. Make sure the base tube fits the focuser base. The set screws should now be retightened to
hold secure the focuser.
5.2. Finderscope. The finderscope is also an
essential part of your telescope as it helps to
locate the objects to be observed through the
telescope’s eyepiece. There are two main types
of finderscopes, LED finders or the optical
finders. This Dobson telescope uses Vixencompatible-type findershoes, this means it is
compatible with the original
Vixen®/Celestron®/Orion®/ Meade® and other
compatible finderscopes. See Appendix A to
learn how to use a LED finderscope.
5.3. Eyepiece Rack. The eyepiece rack (not
included) is used during the observation
sessions. Eyepieces, Barlow lenses, adapters or
other accessories can be kept in the rack and
changed whenever necessary. This a great time
and accessory saver as well.
Figure 18. LED finderscope (not included)
Figure 17. Installing the focuser (not included)
Figure 16. Crayford focuser (not included)
Page 8

8
6. What can been seen with this telescope?
Below you will find some examples of what you can expect to see when using this telescope.
6.1. The Moon is one of the most spectular objects
to be seen through a telescope. Even a small
telescope will reveal high detail of the Moon’s
surface. You will be able to see the craters on the
Moon’s surface and other features like the Marea.
The moon is a very bright object. It is better to
observe it when the Moon is not full. Try the
crescent Moon and look for features along the
terminator (between illuminated and dark surfaces).
6.2. Jupiter is the biggest planet of our solar system.
It is also one of the favorite targets for beginners.
Galileo was able to discover that the four tiny dots
that turn around the planet were in fact part of
Jupiters system of moons. With this telescope you
will not only be able to see Jupiter’s planet disc with
its two major discernible bands, but also its biggest
moons, Io, Europa, Ganymedes and Callisto.
6.3. The “lord of the rings” of the night skies, Saturn
is by far the most popular target for small
telescopes. Saturn’s rings are discernible even at
60x magnification. In a very good night you will be
able to see the Cassini’s division (the darker band
on the Saturn’s rings).
Page 9

9
7. Using the accessories, a bit of math
to understand how all it works.
Using the accessories is easy and fun. To
change magnification simply swap
eyepieces. To get more magnification
simply use the barlow lens. But how does
all of this work?
7.1. Power (magnification)
Your telescope has a focal length of
1200mm. This is approximately the distance
between the telescope’s primary mirror
and its focal point (very similar to the
distance between the focus point of a loupe
and the loupe lens). This is a very important
feature, that allows to determine several
interesting facts such as magnification.
The magnification is determined by the
telescope’s focal length and the used
eyepiece. To determine the magnification
when using a 20mm eyepiece (just an
example, there any many eyepieces with
different focal lenghts – all 1.25” and 2”
should be compatible with this telescope)
just divide the telescope’s focal length by
the eyepiece’s focal length. Let’s give an
example for our telescope and the eyepiece
from the example above:
Telescope’s focal length is 1200mm.
Eyepiece’s focal length is 20mm.
1200𝑚𝑚
20𝑚𝑚
= 60 𝑝𝑜𝑤𝑒𝑟
This means that the 20mm eyepiece
provides a 60x power (magnification). This
seems low, but when you try it, you will
see a bright image with some (very good)
details.
7.2. Barlow Lens (not included)
The barlow lens is a very interesting device.
It is a negative lens, that multiplies the
telescope’s focal length. So a 2x Barlow
multiplies the original focal length by 2x, in
this case 1200𝑚𝑚 𝑥 2 = 2400𝑚𝑚.
A 3x Barlow lens multiplies by 3x.
When used with the 20mm eyepiece a 2x
Barlow provides 2x the magnification as
obtained before
:
60 𝑝𝑜𝑤𝑒𝑟 𝑋 2𝑥 𝐵𝑎𝑟𝑙𝑜𝑤 = 120 𝑝𝑜𝑤𝑒𝑟
7.3. Erecting lens (not included)
The erecting lens gets you an upright image
view with the telescope. It also adds some
power like the barlow lens. The Erecting
Lens provides an extra 1.5x power.
Some possible accessory combinations
Terrestrial
View
Moon
Deep Sky
Jupiter and
Saturn
Barlow Lens 2x
Yes
20mm Eyepiece
Yes
Yes
6mm Eyepiece
Yes
Power
Does not apply
200x
60x
120x
Omegon®/Vixen®/Celestron®/Orion®/ Meade® are registered trademarks.
Page 10

Reproduction of part or all of the contents of this document in any form is expressly prohibited other than for individual use only. All text, images and labels are property of Nimax Gmbh.
APPENDIX A
The Omegon® Red-dot
finderscope (included only in the
complete set)
1. Knowing your finderscope.
1- Red-dot case;
2- Potentiometer ON/OFF switch;
3- Optical window;
4- Azimuth adjustment knob;
5- Battery compartment (1x battery CR2032);
6- Base fixing screws;
7- Finderscope bracket;
8- Altitude adjustment knob.
2. Getting Started.
The finderscope is powered by a coin shaped
battery CR2032 (supplied). For battery protection a plastic protection is placed between the battery
and the battery contact. Remove the plastic protection by securing the finderscope with one hand
and then pulling firmly on the outstanding plastic tip (figure 2). The plastic protection should be
completely removed and discarded. Turn power on by rotating the potentiometer to its ON position
as shown in figure 3 (you will hear a click when ON), rotate all the way to get maximum power.
When powered, the red-dot point on the red-dot case (#1 – figure1) lights up (figure 4 and figure 5).
A small red point is projected to the optical window (#3 – figure 1). This red point, when aligned with
the telescope, allows precise pointing to objects. To precisely align the finderscope with the
telescope both the altitude and azimuth (#8 and #4 figure 1) adjustment knobs need to be adjusted
(figure 6 and figure 7) – please see detailed instructions on how to align in page 3. To power off the
finderscope just turn the potentiometer counter-clockwise until you hear a click – red-dot dims until
off (figure 8). Place the finderscope’s bracket in the telescope’s finderbase. Use a low power
eyepiece to align the finderscope.
Figure 2. Remove plastic protection.
Figure 3. Turn power ON by rotating potentiometer.
Figure 1. Parts List.
Page 11

Reproduction of part or all of the contents of this document in any form is expressly prohibited other than for individual use only. All text, images and labels are property of Nimax Gmbh.
Figure 4. Red-dot lights up when ON.
Figure 5. A red-dot is projected to the optical window.
Figure 6. Turn azimuth adjustment knob to align finder.
Figure 7. Turn altitude adjustment knob to align finder.
Figure 8. Turn potentiometer OFF.
Figure 9. Place finderscope and eyepiece at the telescope.
Page 12

Reproduction of part or all of the contents of this document in any form is expressly prohibited other than for individual use only. All text, images and labels are property of Nimax Gmbh.
3. Aligning the finderscope
3.1. A distant object is centered at the telescope’s
field of view. In this example we have a house with a
chimney. The chimney is the reference point to
place at the center of the field of view. We first look
through the telescope with the lowest magnification
possible, so we have the widest field of view.
3.2. Looking through the finderscope (it should be
powered ON) we see the same building, but in this
case the red dot and chimney are not centered. We
adjust the finderscope using the two altitude and
azimuth knobs so that the finderscope red point
moves slightly until it matches the chimney. This is
enough to correct the objects position in the
finderscope. Trial and error is required to get a
satisfactory result.
3.3. After playing with the two findercope
thumbscrews and some trial and error, we get the
finderscope red dot close to the center (in this case
the chimney). The finderscope is now ready to use!
Page 13

Reproduction of part or all of the contents of this document in any form is expressly prohibited other than for individual use only. All text, images and labels are property of Nimax Gmbh.
4. Replacing the battery. The red-dot needs to be bright enough to be seen during the observation.
After some hours of use the brightness may dim until it no longer can be seen. The battery needs to
be replaced. Turn the potentiometer OFF. Now remove the battery cap and the battery from the
battery compartment and replace with a new battery (figure 9 and 10). Make sure the battery clip
has solid contact with the battery base. Place the plastic battery cap back to protect the battery.
Turn the potentiometer ON and check if the red-dot is brighter now. When not in use the
finderscope should always be powered OFF to prolong the battery’s life.
Figure 9. Remove battery.
Figure 10. Place battery.
 Loading...