

Page 1
Any form of reproduction of the entire contents of this document or parts thereof beyond the private use is strictly prohibited.
Subject to alterations and errors. All texts, illustrations and symbols are the property of nimax GmbH.
49761_1_EN_Instruction Manual_REV_A 1 / 3
Instruction Manual
Omegon® Red Dot Finder for DSLR hot-shoe
English Version 03.2019 Rev. A Art. nr. 49761
Page 2
Any form of reproduction of the entire contents of this document or parts thereof beyond the private use is strictly prohibited.
Subject to alterations and errors. All texts, illustrations and symbols are the property of nimax GmbH.
49761_1_EN_Instruction Manual_REV_A 2 / 3
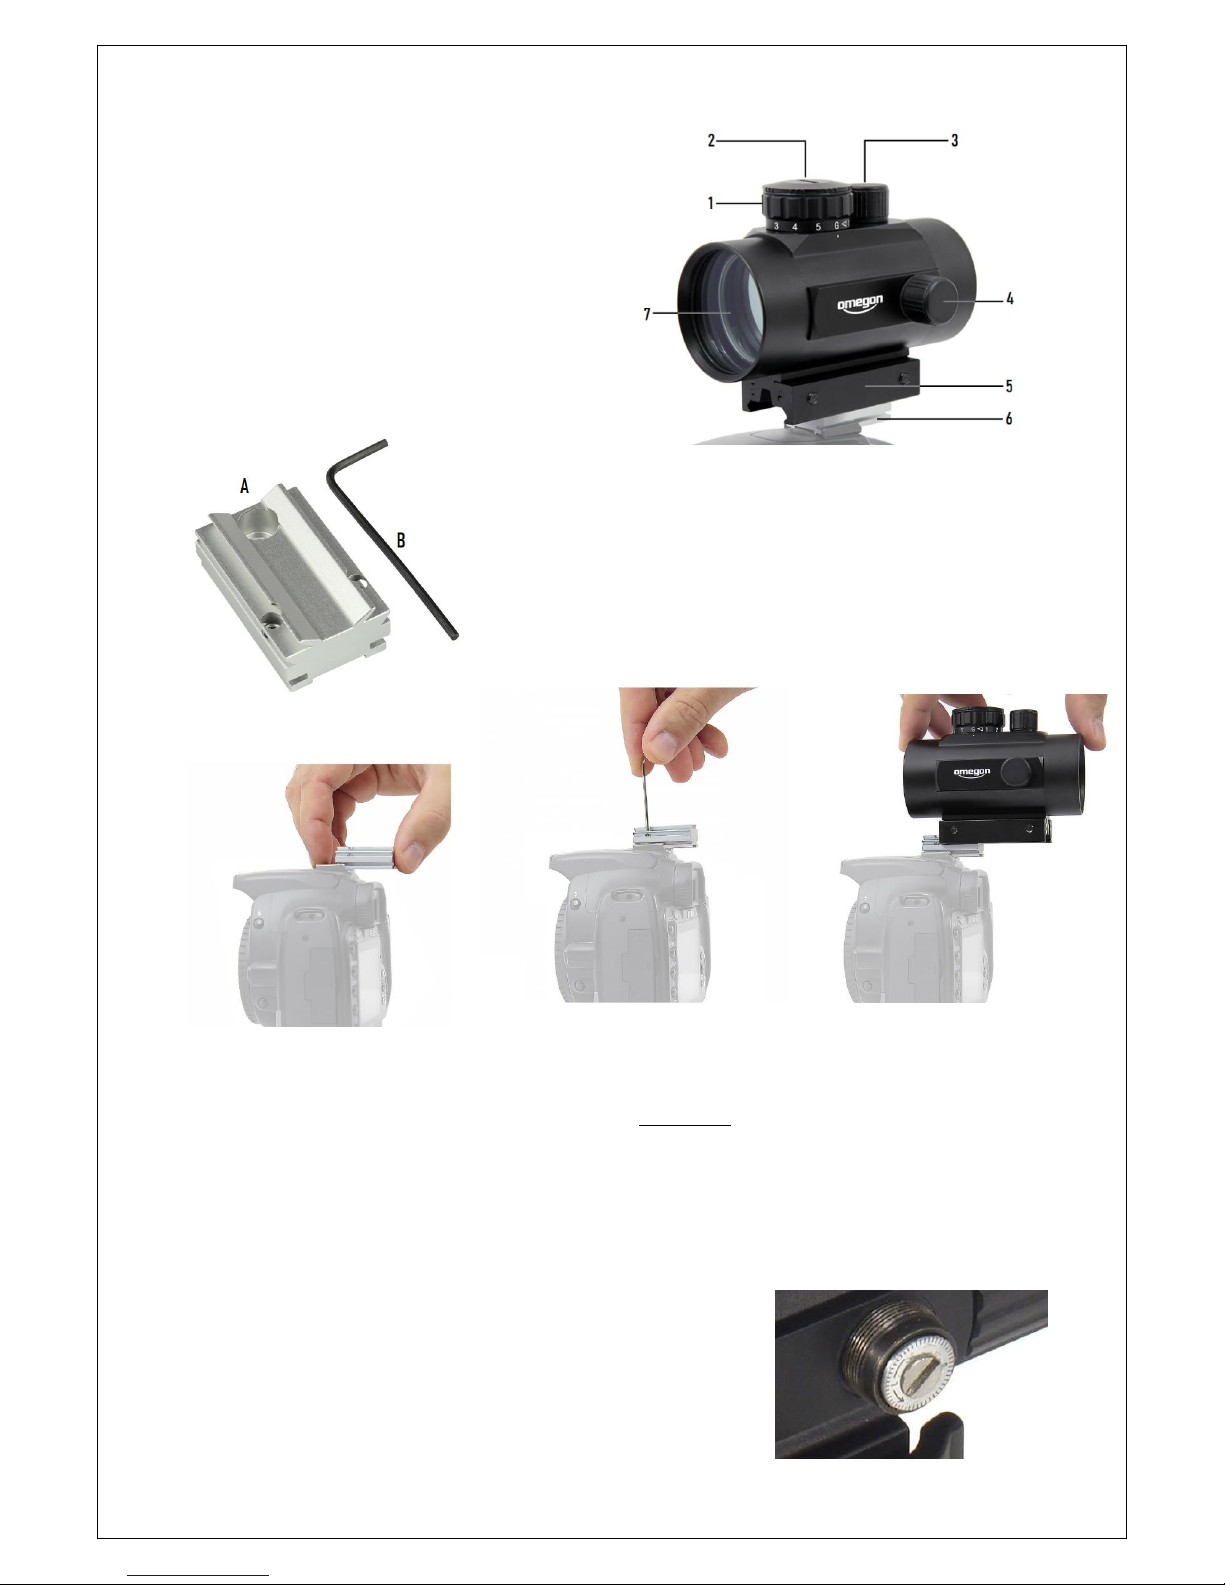
Features
1. Brightness and colour knob;
2. Battery compartment;
3. Azimuth adjustment;
4. Elevation adjustment;
5. Rail base;
6. Hot-shoe adapter;
7. Aperture.
1. Getting started.
1.1. Installing the Red Dot finder to the hot-shoe.
Slide the supplied hot-shoe adapter (A) as shown below and fix the two set
screws using the supplied Hex-key. Please make sure the set screws are facing
forward (to the camera lens). The Red Dot Finder should now slide on top of
the Hot-shoe adapter (A). Use the other supplied Hex-screw to fix the the rail
base (#5) to the hot-show adapter (#6).
A- Hot-shoe adapter;
B- Hex-key.
2. Powering the LED dot.
Release the cap (rotating counter-clock wise) to open the battery compartment (#2) make sure to verify if the included
coin-shaped CR2032 battery is correctly placed (battery writing facing up).
Rotate the brightness and colour knob (#1) and peak through the opposite side of the aperture (#7). A tiny bright dot (red
or green) should be visible.
2.1. Adjusting brightness.
Rotate the brightness and colour knob (#2)to adjust the LED’s brightness and to change the colour.
G = Green (to be used during the day).
R = Red (to be used at night).
There are five levels of brightness. Select the one that better fit the view conditions.
3. Adjustment in Azimuth and Altitude. The finderscope can be adjusted in
Azimuth and Altitude by turning the azimuth adjuster (#3) and the elevation
adjuster (#4). Use a small cent coin to rotate these adjusters.
Page 3

Any form of reproduction of the entire contents of this document or parts thereof beyond the private use is strictly prohibited.
Subject to alterations and errors. All texts, illustrations and symbols are the property of nimax GmbH.
49761_1_EN_Instruction Manual_REV_A 3 / 3
4. How to use and how to align the finderscope?
4.1. An object is centered in the camera’s display.
In this example we have a house with a chimney. The
chimney is the reference point. The LED finder point should
point exactly at the center.
4.2. Looking through the finderscope (it should be powered
on) we see the same building but in this case the red dot
and chimney are not centered. We adjust the finderscope
removing the caps from the adjusters so that the
finderscope’s red point moves slightly until it matches the
chimney. This is enough to correct the objects position in
the finderscope. Trial and error is required to get a
satisfactory result.
4.3. After playing with the twoadjusters and some trial and
error we get the finderscope recticle close to the center (in
this case the chimney). The finderscope is now ready to
use!
 Loading...