

Page 1
Reproduction of part or all of the contents of this document in any form is expressly prohibited other than for individual use only. All text, images and labels are property of nimax Gmbh.
Art.- Nr. 49754
Instruction Manual
Congratulations on the purchase of the new Omegon® Smartphone and Camera Adapter. This adapter is designed to hold most modern
smartphones and digital compact cameras. It fits to most 1.25” telescope eyepieces making afocal high-power telescope astrophotography
easy and fun. It can also be used with spotting scopes eyepieces for terrestrial afocal photography. This adapter allows precision
mechanical to optical axis centring thus providing sharp pictures and giving consistent results.
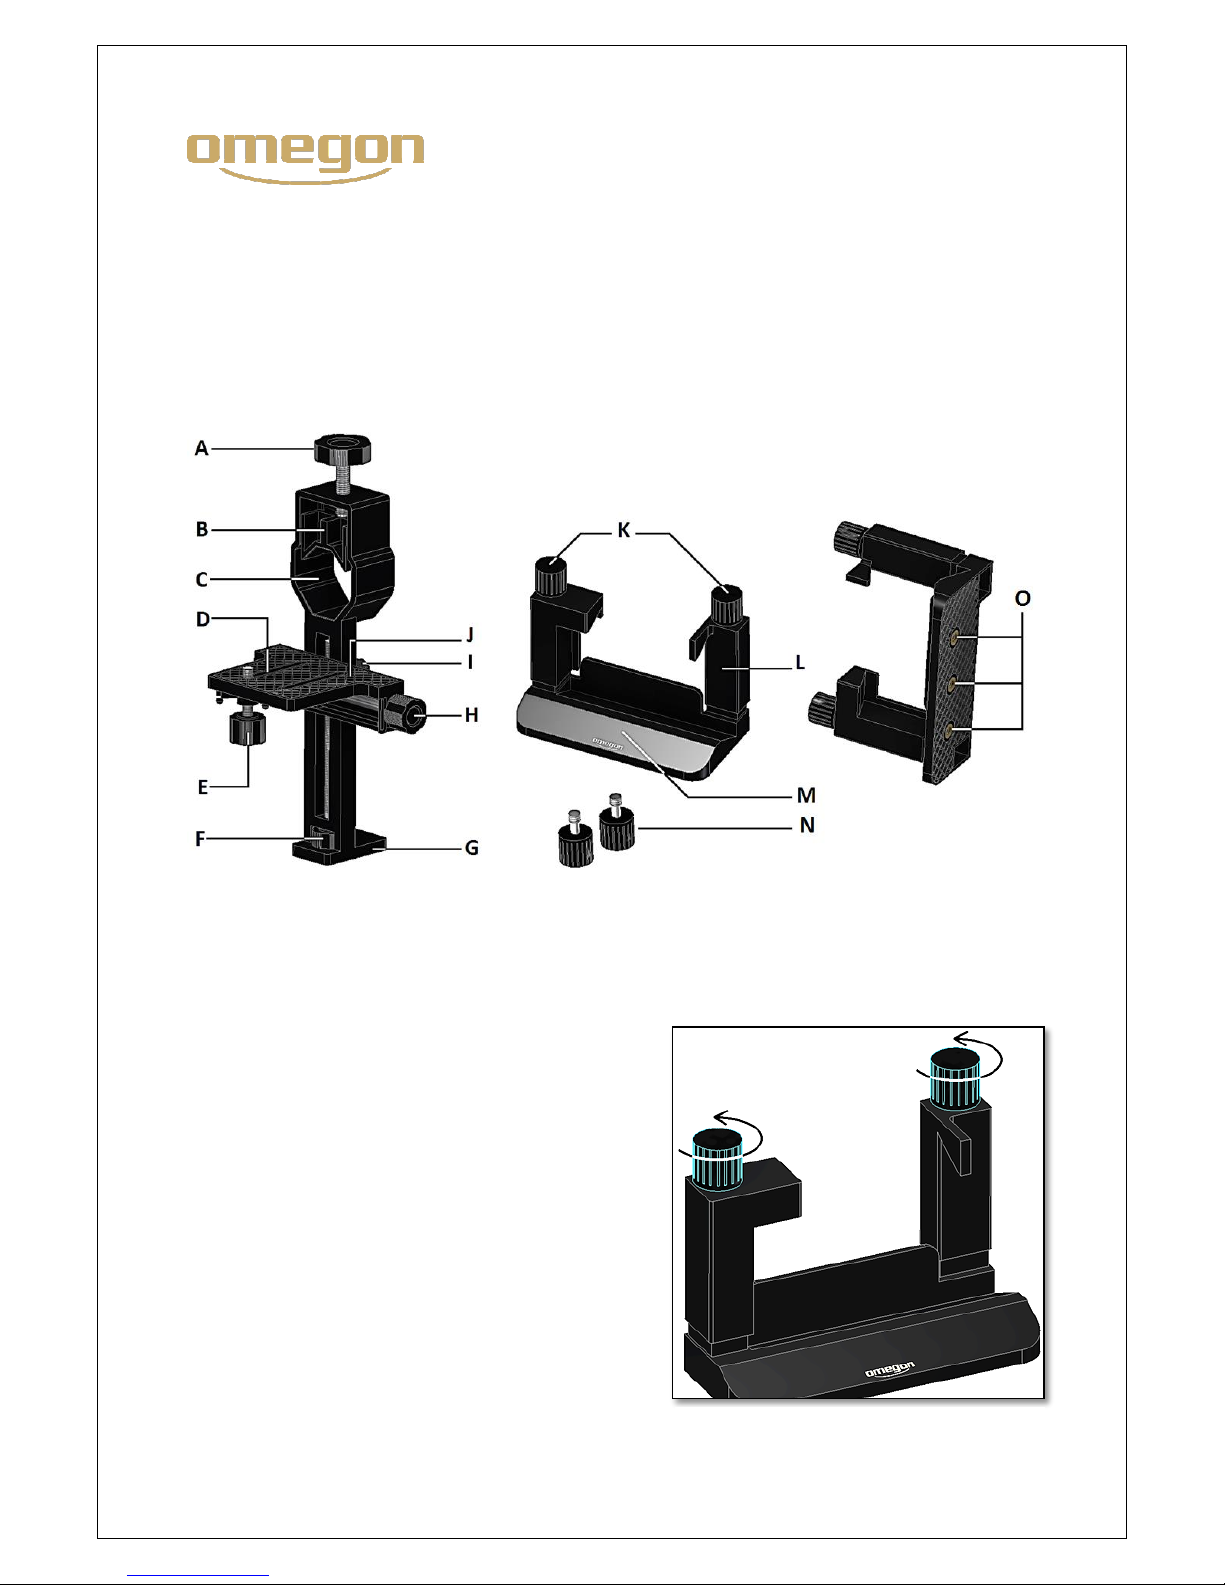
1. Parts
The adapter consists of two main parts.
The adapter’s body which is made from aluminium (figure 1) with its two built-in thumbscrews and threaded shafts to adjust the
platform’s (J – figure 1) position to the smartphone bracket. The bracket (M) securely holds a smartphone or a digital compact camera.
Besides that, the two additional supplied ¼”-20 knobs (N) are used to fix the bracket (M) to the platform (J).
2. What is afocal photography. The Omegon® Smartphone and Camera adapter is designed for afocal photography with a telescope. A
camera or a smartphone captures the image formed by the telescope’s eyepiece. This technique, called afocal photography, is very
popular as it is very easy to do. The object centred in the eyepiece’s field of
view (FOV) - focused like you would do for visual use - can be
photographed by a smartphone’s camera or a compact camera. Although it
is possible to take afocal photos by holding a smartphone by hand and
reaching it close to the telescope’s eyepiece, the results obtained with
such a technique are usually mediocre. The hand is not a stable platform.
In order to obtain consistent quality sharp images a rock solid platform is
required. It is also important to align the camera’s objective parallel to the
eyepiece and that all optical axes are aligned. This is only possible by using
an adapter that allows to finely adjust the position of the camera and fixing
it to the eyepiece! The eyepiece should be a long eye relief eyepiece.
These types of eyepieces, when compared to traditional eyepieces, create
the focused image much farther away from the eyepiece lens itself, making
it easier for the camera to photograph the complete FOV.
2.1. Getting started. Start by releasing the two post knobs (K) - as shown in
figure 1 - the internal built-in spring system will push the posts up allowing
for the device to be slided-in. Make sure to release it so there is enough
room for the smartphone to slide-in. Remember that the device’s
maximum width should not exceed 80mm. Sliding the device is easy but
make sure the smartphone slides in the direction of the left L-shaped post
Figure 1.
A- clamp knob F- height adjustment knob K- post knobs
B- clamp G- base L- post (left and right)
C- eyepiece housing H- sideways adjustment knob M- bracket
D- slot I- locking knob N- ¼”-20 knobs
E- ¼”-20 three lobed knob J- platform O- ¼”-20 holes
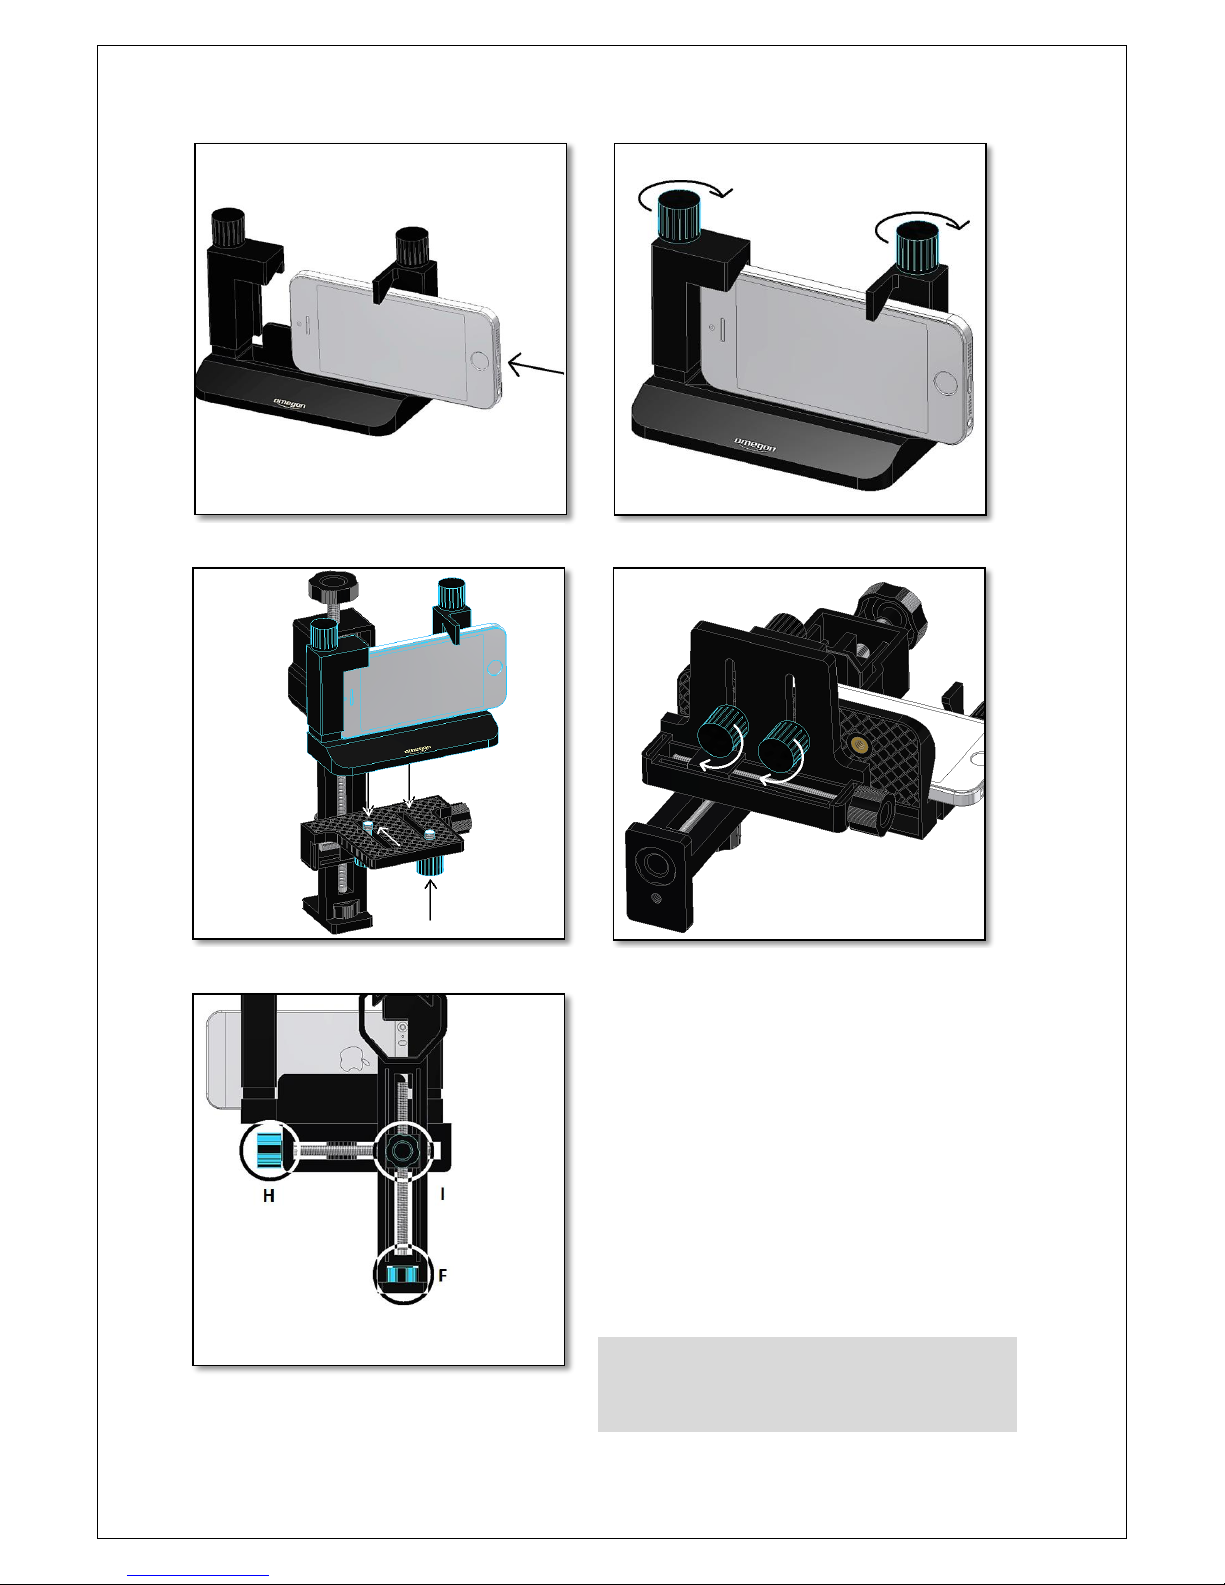
Figure 2. Release the two Smartphone fixing knobs (I)
Page 2
Reproduction of part or all of the contents of this document in any form is expressly prohibited other than for individual use only. All text, images and labels are property of nimax Gmbh.
Art.- Nr. 49754
– figure 3. Now tighten the two post knobs (K) so that the device is
securely fastened to the bracket (K) as shown in figure 4. Place the
bracket (M) with previously secured smartphone on the platform (J) so
that it is flush with the clamp (B) - figure 5. This is important because
the distance from the eyepiece to the smartphone should be kept to a
minimum. Thread and slide the ¼”-20 knobs (N) until the phone is at
its closest position to the clamp. Make sure to tighten both as shown in
figure 6. Next step is to adjust the smartphone’s camera position so
that is more or less centered to the clamp. At this point, it is not of
extreme importance for both camera lens and clamp to be centred, but
a rough centring is desirable. The clamp (B) will hold the telescope’s
eyepiece. Both the camera and eyepiece should be centred in relation
to one another. The sideways adjustment knob (H) adjusts the
smartphone position sideways while the height adjustment knob (F)
adjusts fit up-down. Rotating these knobs only make small adjustments
and several turns may be necessary to center the smartphone camera
with the eyepiece housing (C).
Make sure that the locking knob (I) is released before adjusting
the platform’s position. The movements on both axes must
also be friction-free. Locking is only necessary when the camera
is centred to the eyepiece housing (C).
Figure 3. Slide the smartphone making sure the smartphone slides to
the left.
Figure 4. Tighten the two Smartphone fixing knobs (I) to securely fix
the smartphone.
Figure 5. Place the bracket (M) with the smartphone on the platform (J).
Slide the ¼”-20 knobs and match it with the bracket’s threaded holes.
Figure 6. Tighten the two post knobs (K) so that the bracket (M) is well
fixed. The smartphone should be flush to the Clamp (B).
Figure 7. Centre the camera in relation to the eyepiece housing (C)
system by using the height, sideways and the fixing knobs.
Page 3

Reproduction of part or all of the contents of this document in any form is expressly prohibited other than for individual use only. All text, images and labels are property of nimax Gmbh.
Art.- Nr. 49754
3. Installing the eyepiece to the clamp. The long eye-relief eyepiece
should not exceed 45mm on the outside diameter. Most 1.25” eyepieces
are small enough to fit the clamp. Slide the eyepiece in the clamp so that
the eye side lens points to the smartphone. The smartphone camera will
“look” through the eyepiece to take photos. It is important that the
eyepiece is as close to the camera lens as possible. Turn the clamp knob
(A) so that the eyepiece is securely fixed and does not move or wobble –
figure 9. Most eyepieces have a rubber eye guard that can be removed –
figure 10. Usually this rubber eye guard is flexible so it will fold down
when touching the smartphone’s surface. If this rubber eye guard is
however hard we suggest removing it and keeping it safely stored. By
removing this rubber eye guard, the eyepiece will be free from any
additional unnecessary spacing. This will keep the distance between the
eyepiece lens and the smartphone camera at its minimum as desired. At
this point it is now necessary to make small adjustments so that both the
optical axes of the camera and the smartphone are perfectly aligned.
3.1. Fine tuning. Before starting to take photos with the smartphone,
one last step is required. Turn on the smartphone’s camera. A close-up
and defocused image of the eyepiece lens will be visible. A circle or a
part of a bright circle will be clear on the screen– figure 11. This white
circle is the light coming from the eyepiece, as seen by the camera. The
circle has now to be centred to the camera lens. Adjust the camera
position using the height and sideways knobs as depicted in figure 7.
Some few turns should be sufficient because the initial coarse centring
was already done. Do not worry if you do not see a complete white
circle centred to the camera screen. Some smartphones have the
camera’s optical axis off-set in relation to the screen centre - so even
when adjusting the position of the camera a complete perfectly centred
circle may not be possible to achieve. Try to centre the circle as best as
you can. When you are done, fix the system in position using the fixing
knob I – figure 7. 3.2. Connecting to the telescope. Slide the eyepiece to
the focuser and make sure to tighten the barrel firmly so that the system
does not tip to any side – figure 12. Focus the eyepiece, as you would
normally do when doing visual observation. The focused image will show
on the smartphone’s screen. If the edges of the illuminated circle are
too dark, use the zoom function on the capture features – use just
enough zoom so that the image is uniformly bright.
All the weight from the photographic setup will be hanging on the
eyepiece! It is very important that the clamp pushes the
eyepiece’s body firmly to avoid it from slipping when in operation.
Figure 8. A coarse centring between the eyepiece housing(C) and the
smartphone’s camera is important.
Figure 9. Turn the clamp knob (A) to clamp the eyepiece.
Figure 10. A coarse centring between the clamp and the
smartphone’s camera is important.
Figure 11. The round lens circle as seen on the screen.
Page 4

Reproduction of part or all of the contents of this document in any form is expressly prohibited other than for individual use only. All text, images and labels are property of nimax Gmbh.
Art.- Nr. 49754
3.3. Which astronomical objects can be photographed?
3.3.1. Deep-Sky objects. These objects are so dim that afocal photography is
very difficult. Most smartphone cameras are not designed to capture night
pictures, so they are also not good for faint deep sky objects. The captured
images have too much electronic noise to be used. There are some apps
that allow to add multiple images to increase the signal/noise ratio, giving a
“pseudo” long-exposure result. Some smartphones are more sensitive than
others. Give it a try!
3.3.2. The Sun. Is by far one of the most exciting objects to photograph. It
has unique features on its surface that can be easily photographed. Make
sure to always use a suitable solar filter when taking pictures of the Sun.
Select “Solar Rate” when using a motorized mount to track the Sun. This
way the telescope will follow the Sun’s apparent movement on the day-sky.
3.3.3. Planets and the Moon. Mercury, Venus, Mars, Jupiter, Saturn and of
course the Moon are targets that are easily photographed by using the
afocal photography method. The Moon can be a very bright object - we
recommend the use of a Moon filter for telescopes with more than 6” in aperture. Using colour filters for planet photography is also
recommended, these allow to emphasize surface details. Just thread them to the eyepiece threaded barrel as you would do with a Moon
filter. A barlow lens is also recommended. It allows to magnify the planet’s disc and photograph it in more detail. Use a planetarium
software to check the current planet position on the night sky making it easier to locate it on photograph.
4. Product Specifications.
Never photograph the sun without an adequate dedicated sun
filter. A front aperture telescope filter must always be used. Even
looking briefly through the telescope’s eyepiece may cause
permanent eye damage or even blindness.
Smartphone Bracket
Size: 88mmx60mmx120mm
Weight: 150g
Maximum smartphone width: 80mm
Threaded holes: ¼”-20
Material: ABS Plastic and Brass
Adapter body
Size: 105x115x195mm
Weight: 350g
Eyepiece diameter: from 28mm to 45mm
Platform maximum load: 1.5kg
Material: Injected Aluminium, ABS Plastic and steel
Figure 12. Slide the eyepiece to the focuser as you would do for
visual use. Make sure to tighten all eyepiece thumbscrews.
 Loading...