

Page 1

• • • • • • • • • • • • • • • • • • •• • • • • • • • • • • • • • • • • • • • • • • • • • • •
2
Colorimeter
Page 2

TABLE OF CONTENTS
GENERAL INFORMATION
Packaging & Delivery ······································································ 3
General Precautions ········································································ 3
Safety Precautions ··········································································· 3
Limits of Liability ············································································ 3
Specifications ·················································································· 4
Contents and Accessories ································································ 5
EPA Compliance ············································································· 5
CE Compliance················································································ 6
CHEMICAL TESTING
Water Sampling for Chemical Analysis ··········································· 7
Filtration ························································································· 8
An Introduction to Colorimetric Analysis ······································ 9
Reagent Blank ················································································· 10
Colorimeter Tubes ··········································································· 10
Selecting an Appropriate Wavelength ············································ 10
Calibration Curves ·········································································· 11
Standard Additions ········································································· 13
Sample Dilution Techniques & Volumetric Measurements ············ 14
Interferences ··················································································· 15
Stray Light Interference ·································································· 15
OPERATION OF THE SMART 2 COLORIMETER
Overview ························································································· 16
Power Source ··················································································· 16
Components ···················································································· 17
Quick Start ····················································································· 18
GENERAL OPERATING PROCEDURES
The Keypad ····················································································· 20
Sample Holders················································································ 20
The Display & the Menus ······························································· 21
Looping Menus ················································································ 23
TESTING
Testing Menu ·················································································· 24
Sequences of Tests ··········································································· 25
General Testing Procedures ····························································· 26
Testing With the LaMotte Pre-Programmed Tests ·························· 26
Measuring in the %T/ABS Mode ···················································· 28
1 SMART 2 COLORIMETER OPERATOR’S MANUAL
Page 3

TABLE OF CONTENTS (cont.)
EDITING MENU
Edit a Sequence ·············································································· 30
Adding or Deleting Tests ································································· 31
Edit User Tests ················································································ 34
Naming the Test ·············································································· 35
Selecting the Vial and Wavelength ················································· 37
Entering a New Calibration ···························································· 38
Selecting the Numerical Format of the Result ································ 40
Selecting Units of Concentration····················································· 41
Setting the Clock ············································································· 42
Turning the Data Logger On and Off ·············································· 43
Factory Setup ··················································································· 44
Setting the Power Saver Function···················································· 44
PC LINK
Output ···························································································· 45
Computer Connection····································································· 45
BATTERY OPERATION
Replacing the Battery······································································· 45
MAINTENANCE
Cleaning ·························································································· 46
TROUBLESHOOTING GUIDE
Error Messages ················································································· 46
Helpful Hints ··················································································· 46
SMART REAGENT SYSTEMS
······································································································· 47
SMART 2 COLORIMETER TEST INSTRUCTIONS
APPENDIX
SMART 2 COLORIMETER OPERATOR’S MANUAL 2
Page 4

GENERAL INFORMATION
PACKAGING & DELIVERY
n
Experienced packaging personnel at LaMotte Company assure adequate
protection against normal hazards encountered in transportation of shipments.
After the product leaves the manufacturer, all responsibility for its safe delivery
is assured by the transportation company. Damage claims must be filed
immediately with the transportation company to receive compensation for
damaged goods.
Should it be necessary to return the instrument for repair or servicing, pack
instrument carefully in suitable container with adequate packing material. A
return authorization number must be obtained from LaMotte Company by
calling 1-800-344-3100. Attach a letter with the authorization number to the
shipping carton which describes the kind of trouble experienced. This valuable
information will enable the service department to make the required repairs
more efficiently.
GENERAL PRECAUTIONS
n
Before attempting to set up or operate this instrument it is important to read
the instruction manual. Failure to do so could result in personal injury or
damage to the equipment.
The SMART 2 Colorimeter should not be stored or used in a wet or corrosive
environment. Care should be taken to prevent water or reagent chemicals from
wet colorimeter tubes from entering the colorimeter chamber.
NEVER PUT WET TUBES IN COLORIMETER.
SAFETY PRECAUTIONS
n
Read the labels on all LaMotte reagent containers prior to use. Some
containers include precautionary notices and first aid information. Certain
reagents are considered hazardous substances and are designated with a * in the
instruction manual. Material Safety Data Sheets (MSDS) are supplied for these
reagents. Read the accompanying MSDS before using these reagents.
Additional emergency information for all LaMotte reagents is available 24
hours a day from the Poison Control Center listed in the front of the phone
book. Be prepared to supply the name and four-digit LaMotte code number
found on the container label or at the top of the MSDS. LaMotte reagents are
registered with a computerized poison control information system available to
all local poison control centers.
Keep equipment and reagent chemicals out of the reach of young children.
Protect Yourself and Equipment: Use Proper Analytical Techniques
LIMITS OF LIABILITY
n
Under no circumstances shall LaMotte Company be liable for loss of life,
property, profits, or other damages incurred through the use or misuse of its
products.
3 SMART 2 COLORIMETER OPERATOR’S MANUAL
Page 5

SPECIFICATIONS
n
n
INSTRUMENT TYPE: Colorimeter
Readout Graphical 4 line, 16 character per line LCD
Wavelengths 430nm, 520 nm, 570 nm, 620 nm
Wavelength Accuracy ± 2 nm
Readable Resolution Determined by reagent system
Wavelength Bandwidth 10 nm typical
Photometric Range −2 to +2A
Photometric Precision ± 0.001Α
Sample Chamber Accepts 25 mm diameter flat-bottomed test tubes, 10
mm square cuvettes, 16 mm COD test tubes
Light Sources 4 LEDs
Detectors 4 silicon photodiodes with integrated interference
filters
Modes Absorbance, pre-programmed tests
Pre-Programmed Tests YES, with automatic wavelength selection
User Defined Tests Up to 10 user tests can be input
RS232 Port 8 pin mDIN, 9600b, 8, 1, n
Power Requirements Battery Operation: 9 volt alkaline
Line Operation: 120/220V, 50/60 Hz with adapter
Dimensions (LxWxH) 8.5 x 16.2 x 16.7 cm, 3.4 x 6.4 x 2.6 inches
Weight 312 g, 11 oz (meter only)
Data Logger 350 test results stored for download to a PC
SMART 2 COLORIMETER OPERATOR’S MANUAL 4
Page 6

CONTENTS AND ACCESSORIES
n
n
CONTENTS
SMART 2 Colorimeter
Test Tubes, with Caps
Sample Cell Holder, Universal
Sample Cell Holder, 10 mm Square
Power Cable
Battery Charger
Power Supply, 110/220V
SMART 2 Colorimeter Quick Start Guide
SMART 2 Colorimeter Manual
n
ACCESSORIES
Cigarette Lighter Adapter
Carrying Case
SMARTLink 2 Software with Cable
EPA COMPLIANCE
n
The SMART 2 Colorimeter is an EPA-Accepted instrument. EPA-Accepted
means that the instrument meets the requirements for instrumentation as
found in test procedures that are approved for the National Primary Drinking
Water Regulations (NPDWR) or National Pollutant Discharge Elimination
System (NPDES) compliance monitoring programs. EPA-Accepted
instruments may be used with approved test procedures without additional
approval.
5 SMART 2 COLORIMETER OPERATOR’S MANUAL
Page 7
CE COMPLIANCE
Standards to which
Conformity Declared:
Manufacturer's Name:
Manufacturer's Address:
Type of Equipment:
Model Name:
Year of Manufacture:
Testing Performed By:
Place
Date
Signature
Name
Position
n
The SMART 2 Colorimeter has earned the European CE Mark of Compliance
for electromagnetic compatibility and safety.
SMART 2 COLORIMETER OPERATOR’S MANUAL 6
Page 8

CHEMICAL TESTING
WATER SAMPLING FOR CHEMICAL ANALYSIS
n
n
Taking Representative Samples
The underlying factor to be considered for any type of water sampling is
whether or not the sample is truly representative of the source. To properly
collect a representative sample:
l
Sample as frequently as possible.
l
Collect a large sample or at least enough to conduct whatever tests are
necessary.
l
Make a composite sample for the same sampling area.
l
Handle the sample in such a way as to prevent deterioration or
contamination before the analysis is performed.
l
Perform analysis for dissolved gases such as dissolved oxygen, carbon
dioxide, and hydrogen sulfide immediately at the site of sampling. These
factors, as well as samples for pH, cannot be stored for later examination.
l
Make a list of conditions or observations which may affect the sample.
Other considerations for taking representative samples are dependent
upon the source of the sample. Taking samples from surface waters
involves different considerations than taking samples from impounded and
sub-surface waters.
n
Sampling of Open Water Systems
Surface waters, such as those found in streams and rivers, are usually well
mixed. The sample should be taken downstream from any tributary, industrial
or sewage pollution source. For comparison purposes samples may be taken
upstream and at the source of the pollution before mixing.
In ponds, lakes, and reservoirs with restricted flow, it is necessary to collect a
number of samples in a cross section of the body of water, and where possible
composite samples should be made to ensure representative samples.
To collect samples from surface waters, select a suitable plastic container with a
tight fitting screw cap. Rinse the container several times with the sample to be
tested, then immerse the container below the surface until it is filled to
overflowing and replace the cap. If the sample is not to be tested immediately,
pour a small part of the sample out and reseal. This will allow for any
expansion. Any condition which might affect the sample should be listed.
Sub-surface sampling is required to obtain a vertical profile of streams, lakes,
ponds, and reservoirs at specific depths. This type of sampling requires more
sophisticated sampling equipment.
For dissolved oxygen studies, or for tests requiring small sample sizes, a Water
Sampler (LaMotte Code 1060) will serve as a subsurface or in-depth sampler.
7 SMART 2 COLORIMETER OPERATOR’S MANUAL
Page 9

This weighted device is lowered to the sampling depth and allowed to rest at
this depth for a few minutes. The water percolates into the sample chamber
displacing the air which bubbles to the surface. When the bubbles cease to rise,
the device has flushed itself approximately five times and it may be raised to
the surface for examination. The inner chamber of the sampling device is lifted
out and portions of the water sample are carefully dispensed for subsequent
chemical analysis.
A Snap-Plunger Water Sampler (LaMotte Code 1077) is another “in-depth”
sampling device which is designed to collect large samples which can be used
for a multitude of tests. Basically, this collection apparatus is a hollow cylinder
with a spring loaded plunger attached to each end. The device is cocked above
the surface of the water and lowered to the desired depth. A weighted
messenger is sent down the calibrated line to trip the closing mechanism and
the plungers seal the sample from mixing with intermediate layers as it is
brought to the surface. A special drain outlet is provided to draw off samples for
chemical analysis.
n
Sampling of Closed System
To obtain representative samples from confined water systems, such as pipe
lines, tanks, vats, filters, water softeners, evaporators and condensers, different
considerations are required because of chemical changes which occur between
the inlet and outlet water. One must have a basic understanding of the type of
chemical changes which occur for the type of equipment used. Also,
consideration should be given to the rate of passage and retaining time for the
process water.
Temperature changes play an important part in deciding exactly what test
should be performed. Process water should be allowed to come to room
temperature, 20–25°C, before conducting any tests.
When drawing off samples from an outlet pipe such as a tap, allow sample to
run for several minutes, rinsing the container several times before taking the
final sample. Avoid splashing and introduction of any contaminating material.
FILTRATION
n
When testing natural waters that contain significant turbidity due to suspended
solids and algae, filtration is an option. Reagent systems, whether EPA,
Standard Methods, LaMotte or any others, will generally only determine
dissolved constituents. Both EPA and Standard Methods suggest filtration
through a 0.45 micron filter membrane, to remove turbidity, for the
determination of dissolved constituents.** To test for total constituents,
organically bound and suspended or colloidal materials, a rigorous high
temperature acid digestion is necessary.
**LaMotte offers a filtering apparatus: syringe assembly (Code 1050) and membrane
filters, 0.45 micron, (Code 1103).
SMART 2 COLORIMETER OPERATOR’S MANUAL 8
Page 10

AN INTRODUCTION TO COLORIMETRIC ANALYSIS
n
Most test substances in water are colorless and undetectable to the human eye.
To test for their presence we must find a way to “see” them. The SMART 2
Colorimeter can be used to measure any test substance that is itself colored or
can be reacted to produce a color. In fact a simple definition of colorimetry is
“the measurement of color” and a colorimetric method is “any technique used
to evaluate an unknown color in reference to known colors”. In a colorimetric
chemical test the intensity of the color from the reaction must be proportional
to the concentration of the substance being tested. Some reactions have
limitations or variances inherent to them that may give misleading results.
Many such interferences are discussed with each particular test instruction. In
the most basic colorimetric method the reacted test sample is visually
compared to a known color standard. However, accurate and reproducible
results are limited by the eyesight of the analyst, inconsistencies in the light
sources, and the fading of color standards.
To avoid these sources of error, a colorimeter can be used to photoelectrically
measure the amount of colored light absorbed by a colored sample in reference
to a colorless sample (blank).
White light is made up of many different colors or wavelengths of light. A
colored sample typically absorbs only one color or one band of wavelengths
from the white light. Only a small difference would be measured between white
light before it passes through a colored sample versus after it passes through a
colored sample. The reason for this is that the one color absorbed by the sample
is only a small portion of the total amount of light passing through the sample.
However, if we could select only that one color or band of wavelengths of light
to which the test sample is most sensitive, we would see a large difference
between the light before it passes through the sample and after it passes
through the sample.
The SMART 2 Colorimeter passes one of four colored light beams through one
of four optical filters which transmits only one particular color or band of
wavelengths of light to the photodectector where it is measured. The difference
in the amount of colored light transmitted by a colored sample is a
measurement of the amount of colored light absorbed by the sample. In most
colorimetric tests the amount of colored light absorbed is directly proportional
to the concentration of the test factor producing the color and the path length
through the sample. However, for some tests the amount of colored light
absorbed is inversely proportional to the concentration.
The choice of the correct wavelength for testing is important. It is interesting
to note that the wavelength that gives the most sensitivity (lower detection
limit) for a test factor is the complementary color of the test sample. For
example the Nitrate-Nitrogen test produces a pink color proportional to the
nitrate concentration in the sample (the greater the nitrate concentration, the
darker the pink color). A wavelength in the green region should be selected to
analyze this sample since a pinkish-red solution absorbs mostly green light.
9 SMART 2 COLORIMETER OPERATOR’S MANUAL
Page 11

REAGENT BLANK
n
Some tests will provide greater accuracy if a reagent blank is determined to
compensate for any color or turbidity resulting from the reagents themselves. A
reagent blank is performed by running the test procedure on 10 mL of
demineralized water. Use sample water to SCAN BLANK. Insert the reagent
blank in the colorimeter chamber and select SCAN SAMPLE. Note result of
reagent blank. Perform the tests on the sample water as described. Subtract
results of reagent blank from all subsequent test results. NOTE: Some tests
require a reagent blank to be used to SCAN BLANK.
COLORIMETER TUBES
n
Colorimeter tubes which have been scratched through excessive use should be
discarded and replaced with new ones. Dirty tubes should be cleaned on both
the inside and outside. Fingerprints on the exterior of the tubes can cause
excessive light scattering and result in errors. Handle the tubes carefully,
making sure the bottom half of the tube is not handled.
LaMotte Company makes every effort to provide high quality colorimeter
tubes. However, wall thicknesses and diameter of tubes may still vary slightly.
This may lead to slight variations in results (e.g. if a tube is turned while in the
sample chamber, the reading will likely change slightly). To eliminate this error
put the tubes into the sample chamber with the same orientation every time.
The tubes that are included with the colorimeter have an index mark to
facilitate this. If possible, use the same tube to SCAN BLANK and SCAN
SAMPLE.
SELECTING AN APPROPRIATE WAVELENGTH
n
The most appropriate wavelength to use when creating a calibration curve is
usually the one which gives the greatest change from the lowest reacted
standard concentration to the highest reacted standard concentration.
However, the absorbance of the highest reacted standard concentration should
never be greater than 2.0 absorbance units. Scan the lowest and highest reacted
standards at different wavelengths using the absorbance mode to find the
wavelength which gives the greatest change in absorbance without exceeding
2.0 absorbance units. Use this wavelength to create a calibration curve.
SMART 2 COLORIMETER OPERATOR’S MANUAL 10
Page 12

Below is a list of suggested wavelengths for the color of the reacted samples.
Use these as a starting point.
Green and Blue 620
CALIBRATION CURVES
n
Sample
Color
Yellow 430
Pink 520
Red 570
Wavelength
Range
The SMART 2 Colorimeter contains precalibrated tests for the LaMotte
reagent systems (see Page 45). The first step in using a non-LaMotte reagent
system with your SMART 2 Colorimeter is to create a calibration curve for the
reagent system. To create a calibration curve, prepare standard solutions of the
test factor and use the reagent system to test the standard solutions with the
SMART 2 Colorimeter. Select a wavelength for the test as described above.
Plot the results (in ABS or %Transmittance) versus concentration to create a
calibration curve. The calibration curve may then be used to identify the
concentration of an unknown sample by testing the unknown, reading
Absorbance or %T, and finding the corresponding concentration from the
curve. The linear range of the reagent system can be determined and this
information can be used to input a User Test into the SMART 2 Colorimeter
(see EDIT USER TESTS, page 34).
n
PROCEDURE
1. Prepare 5 or 6 standard solutions of the factor being tested. The
concentration of these standards should be evenly distributed throughout
the range of the reagent system, and should include a 0 ppm standard
(distilled water). For instance, the solutions could measure 0, 10%, 30%,
50%, 70%, and 90% of the system’s maximum range.
2. Turn on the SMART 2 Colorimeter. Select the appropriate wavelength from
the absorbance mode. Be sure to select the appropriate wavelength for the
color produced by the reagent system.
3. Use the unreacted 0 ppm standard to standardize the colorimeter by using it
to scan blank.
4. Following the individual reagent system instructions, react each standard
solution beginning with 0 ppm. Continue with standards in increasing
concentration. Record the reading and the standard solution concentration
on a chart. Readings can be recorded as percent transmittance (%T) or
absorbance (A).
11 SMART 2 COLORIMETER OPERATOR’S MANUAL
Page 13
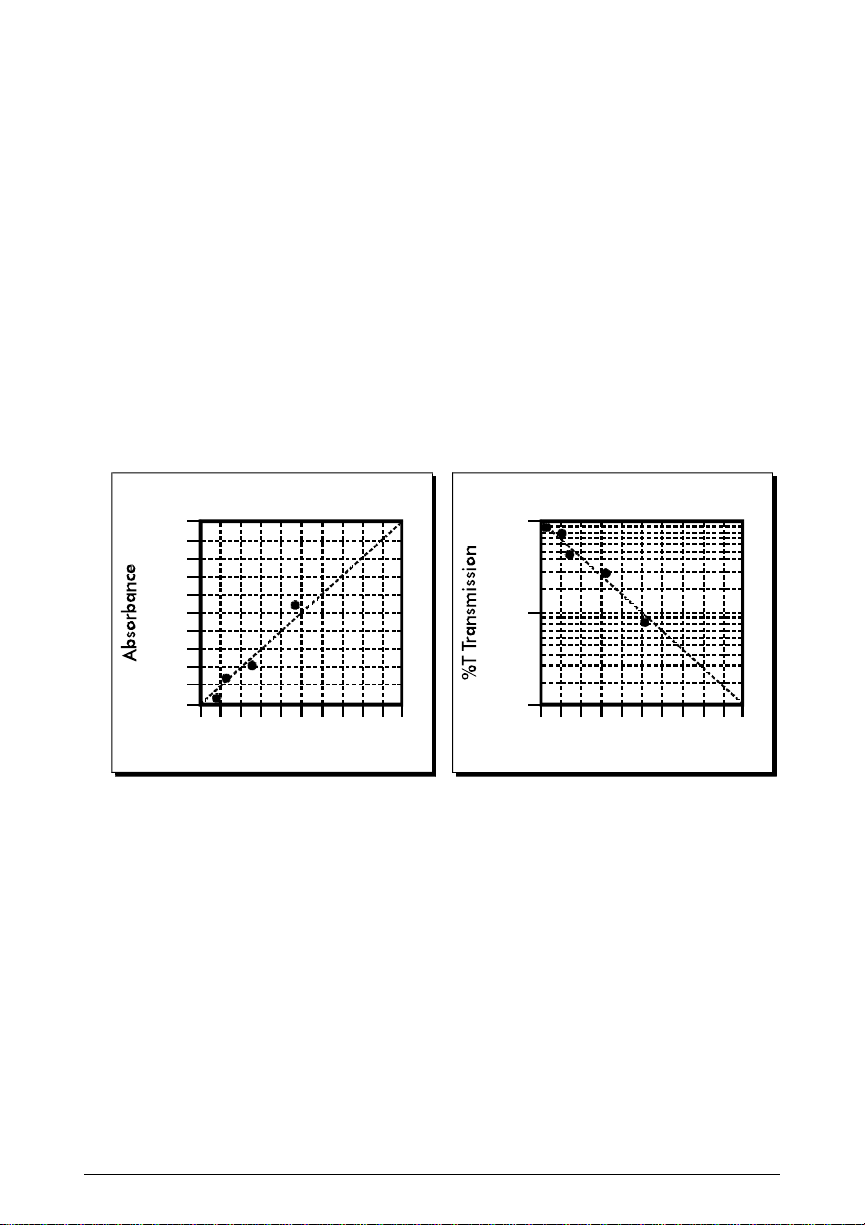
5. Plot results on graph paper or computer using any available plotting
0
1
10
100
1 2 3 4 5 6
Concentration in ppm
%T vs. Concentration
CALIBRATION CURVE
891070
0.0
0.2
0.4
0.6
0.8
1.0
1.2
1.4
1.6
1.8
2.0
1 2 3 4 5 6
Concentration in ppm
Absorbance vs. Concentration
CALIBRATION CURVE
89107
program. If results are as %T versus concentration, semilog graph paper
must be used. Plot the standard solution concentrations on the horizontal,
linear axis, and the %T on the vertical, logarithmic axis. If results are as
absorbance versus standard solution concentration, simple linear graph
paper can be used. Plot the standard solution concentration on the
horizontal axis, and the absorbance on the vertical axis.
6. After plotting the results, draw a line, or curve, of best fit through the
plotted points. The best fit may not connect the points. There should be
approximately an equal number of points above the curve as below the
curve. Some reagent systems will produce a straight line, while others
produce a curve. Many computer spreadsheet programs can produce the
curve of best fit by regression analysis of the standard solution data.
NOTE: Only reagent systems which produce a straight line can be used for a
User Test.
A sample of each type of graph appears below:
SMART 2 COLORIMETER OPERATOR’S MANUAL 12
Page 14

n
PREPARING DILUTE STANDARD SOLUTIONS
Standard solutions should be prepared to create a calibration curve. Standard
solutions can be prepared by diluting a known concentrated standard by
specified amounts. A chart or computer spreadsheet can be created to
determine the proper dilutions. Use volumetric flasks and volumetric pipets for
all dilutions.
1. In Column A – Record the maximum concentration of test as determined
by the range and path length.
2. In Column B – Record the percent of the maximum concentration the
standard solution will be.
3. In Column C – Calculate the final concentration of the diluted standard
solutions by multiplying the maximum concentration (In Column A) by the
% of maximum concentration divided by 100. (C = A x
B
).
100
4. In Column D – Record the final volume of the diluted sample (i.e. volume
of volumetric flask).
5. In Column E – Record the concentration of the original standard.
6. In Column F – Calculate the milliliters of original standard required
(C x
D
E
= F).
A sample chart appears below:
A B C = A x
B
I 00
D E F = C x
Final
Maximum
concentration
of test
% of
Maximum
concentration
concentration
of Diluted
Standard
Volume of
Standard
Concentration
of Original
Standard
Standard
Required
10.0 ppm 90 9.0 ppm 100 mL 1000 ppm 0.90 mL
10.0 ppm 70 7.0 ppm 100 mL 1000 ppm 0.70 mL
10.0 ppm 50 5.0 ppm 100 mL 1000 ppm 0.50 mL
10.0 ppm 30 3.0 ppm 100 mL 1000 ppm 0.30 mL
10.0 ppm 10 1.0 ppm 100 mL 1000 ppm 0.10 mL
10.0 ppm 0 0 ppm 100 mL 1000 ppm 0 mL
mL of
Original
D
E
STANDARD ADDITIONS
n
A common method to check the accuracy and precision of a test is by standard
additions. In this method a sample is tested to determine the concentration of
the test substance. A second sample is then “spiked” by the addition of a
known quantity of the test substance. The second sample is then tested. The
determined concentration of the spiked sample should equal the concentration
of the first plus the amount added with the spike. The procedure can be
repeated with larger and larger “spikes.” If the determined concentrations do
not equal the concentration of the sample plus that added with the “spike”,
then an interference may exist.
13 SMART 2 COLORIMETER OPERATOR’S MANUAL
Page 15

For example, a 10.0 mL water sample was determined to contain 0.3 ppm iron.
To a second 10.0 mL sample, 0.1 mL of 50 ppm iron standard was added. The
concentration of iron due to the “spike” was (0.10 mL x 50 ppm)/10.0 mL =
0.50 ppm. The concentration of iron determined in the spiked sample should
be 0.3 + 0.5 = 0.8 ppm iron. (Note: any error due to the increased volume from
the “spike” is negligible).
LaMotte offers a line of calibration standards which can be used to generate
calibration curves and perform standard additions.
SAMPLE DILUTION TECHNIQUES
n
& VOLUMETRIC MEASUREMENTS
If a test result using the SMART 2 Colorimeter gives an OVERRANGE message
then the sample concentration could be over range or under range. If it is over
range, the sample must be diluted. Then the test should be repeated on the
diluted sample to obtain a reading which is in the concentration range for the
test. (Note: This is not true for colorimetric determination of pH.)
Example:
Measure 5 mL of the water sample into a graduated cylinder. Add
demineralized water until the cylinder is filled to the 10 mL line. The sample
has been diluted by one-half, and the dilution factor is therefore 2. Perform the
test procedure, then multiply the resulting concentration by 2 to obtain the test
result.
The following table gives quick reference guidelines on dilutions of various
proportions. All dilutions are based on a 10 mL volume, so several dilutions
will require small volumes of the water sample. Graduated pipets should be
used for all dilutions.
Deionized Water to Bring
Size of Sample
10 mL 0 mL 1
5 mL 5 mL 2
2.5 mL 7.5 mL 4
1 mL 9 mL 10
0.5 mL 9.5 mL 20
Volume to 10 mL Multiplication Factor
If the above glassware is not available, dilutions can be made with the
colorimeter tube. Fill the tube to the 10 mL line with the sample then transfer
it to another container. Add 10 mL volumes of demineralized water to the
container and mix. Transfer back 10 mL of the diluted sample to the tube and
follow the test procedure. Continue diluting and testing until a reading, which
is in the concentration range for the test, is obtained. Be sure to multiply the
concentration found by the dilution factor (the number of total 10 mL volumes
used).
Example:
10 mL of sample is diluted with three 10 mL volumes of demineralized water;
the dilution factor is four.
SMART 2 COLORIMETER OPERATOR’S MANUAL 14
Page 16

INTERFERENCES
n
LaMotte reagent systems are designed to minimize most common interferences.
Each individual test instruction discusses interferences unique to that test. Be
aware of possible interferences in the water being tested.
The reagent systems also contain buffers to adjust the water sample to the ideal
pH for the reaction. It is possible that the buffer capacity of the water sample
may exceed the buffer capacity of the reagent system and the ideal pH will not
be obtained. If this is suspected, measure the pH of a reacted distilled water
reagent blank using a pH meter. This is the ideal pH for the test. Measure the
pH of a reacted water sample using the pH meter. If the pH is significantly
different from the ideal value, the pH of the sample should be adjusted before
testing.
Interferences due to high concentration of the substance being tested, can be
overcome by sample dilution (see page 14).
STRAY LIGHT INTERFERENCE
n
When scanning samples in 16 mm tubes, such as COD, the sample chamber lid
can not be closed. The COD adapter minimizes stray light. To further reduce
stray light interference, do not scan sample in direct sunlight.
15 SMART 2 COLORIMETER OPERATOR’S MANUAL
Page 17

OPERATION OF THE
SMART 2 COLORIMETER
OVERVIEW
n
The SMART 2 Colorimeter is a portable, microprocessor controlled, direct
reading colorimeter. It has a graphical 4 line, 16 character liquid crystal display
for graphical, alphabetical and numerical messages. The operation is controlled
with the keypad through menu driven software in response to selections shown
on the display.
The test library consists of 100 LaMotte tests (not all 100 may be available at
present) and 10 “User Tests”. The LaMotte tests are precalibrated for LaMotte
reagent systems. The colorimeter displays the results of these tests directly in
units of concentration. The 10 “User Tests” may be used to enter additional
calibrations. All of these tests may be arranged in any of 3 sequences. These
sequences can be modified a limitless number of times to meet changing testing
needs.
The optics feature 4 different colored LEDs. Each LED has a corresponding
silicon photodiode with an integrated interference filter. The interference
filters select a narrow band of light from the corresponding LED for the
colorimetric measurements. The microprocessor automatically selects the
correct LED/photodiode combination for a test.
A RS-232 serial port on the back of the colorimeter, and optional software,
allows the SMART 2 to be interfaced with an IBM compatible personal
computer for real time data acquisition and data storage. This port also allows
an interface with a RS-232 serial printer.
Due to its portability, alternate power sources, and rugged construction, the
SMART 2 Colorimeter is ideal for lab and field use.
POWER SOURCE
n
The SMART 2 Colorimeter uses a 6V AC adapter. Please refer to the Parts
List for the code number for the correct adapter.
USE OF ANY AC ADAPTER OTHER THAN THE ONE SPECIFIED
FOR USE WITH THE SMART 2 COLORIMETER MAY DAMAGE
THE METER AND WILL VOID THE WARRANTY. Do not use the
adapter sold with the original SMART Colorimeter.
To use the adapter, slide the connector pin from the AC adapter into the small
hole on the left side of the meter. Plug the AC adapter into an appropriate wall
socket or power source.
SMART 2 COLORIMETER OPERATOR’S MANUAL 16
Page 18

COMPONENTS
Serial
Number
Battery
Compartment
Rs232
Serial Port
AC
Adapter Socket
Lid
Top View
Bottom View
Side Views
ENTER
• • • • • • • • • • • • • • • • • •
OFF EXIT
ON
*
n
Figure 1 shows a diagram of the SMART 2 Colorimeter and its components.
17 SMART 2 COLORIMETER OPERATOR’S MANUAL
Figure 1
Page 19

QUICK START
n
Some quick instructions to get into testing.
1. Press ON to turn on the SMART 2. The
LaMotte logo screen will appear for about 2
seconds and then the Start screen appears. Press
Q/ENTER to start testing.
2. The Main Menu will appear. Press
Q/ENTER to select TESTING MENU.
3. Press Q/ENTER to select All Tests.
4. Press t or s to move the * to the desired
test.
5. Press Q/ENTER to select test.
VER 1.0
Smart 2
* Start
MAIN MENU
*Testing Menu
Editing Menu
PC Link
TESTING MENU
*All Tests
Sequence 1
Sequence 2
ALL TESTS
*001 Alk - UDV
002 Aluminum
003 Ammonia - NLF
ALL TESTS
*015 Chlorine
016 Cl F-UDV-LR
017 Cl F-UDV-HR
6. Insert blank, press Q/ENTER to scan blank.
7. The screen will display Blank Done for about
1 second.
015 Chlorine
* Scan Blank
015 Chlorine
Blank Done
* Scan Blank
Continued...
SMART 2 COLORIMETER OPERATOR’S MANUAL 18
Page 20

8. Insert the reacted sample. Press Q/ENTER to
scan sample. The SMART 2 will scan the sample
and display the concentration.
015 Chlorine
* Scan Sample
9. After recording test result, scroll with t or s
and make another selection with Q/ENTER.
Press EXIT to escape to previous menus.
015 Chlorine
1.28 ppm
* Scan Sample
19 SMART 2 COLORIMETER OPERATOR’S MANUAL
Page 21

GENERAL OPERATING PROCEDURES
The operation of the SMART 2 Colorimeter is controlled by a microprocessor.
The microprocessor is programmed with menu driven software. A menu is a list
of choices. This allows a selection of various tasks for the colorimeter to
perform, such as, scan blank, scan sample, and edit test sequences. The keypad
is used to make menu selections which are viewed in the display. There are
three selections accessible from the MAIN MENU: Testing Menu, Editing
Menu and PC Link.
THE KEYPAD
n
The keypad has 6 buttons which are used to perform specific tasks.
ON This button is used to turn the colorimeter on.
t This button will cause the display to scroll down through a list of
menu choices. It will move through a list viewed in the display. It
will auto scroll when held down.
s
This button will cause the display to scroll up in a list of menu
choices. It will move through a list viewed in the display. It will
auto scroll when held down.
ENTER
Q
EXIT This button is an exit or escape button. When pressed, the display
OFF
SAMPLE HOLDERS
n
The sample chamber is designed for 25 mm round tubes. Additional sample
holders for 16 mm COD tubes and for 1 cm square UDV cuvettes are available
for the SMART 2 Colorimeter.
This button is used to select the menu choice adjacent to the “*” in
a menu viewed in the display.
will exit from the current menu and go to the previous menu.
This button turns the colorimeter off.
SMART 2 COLORIMETER OPERATOR’S MANUAL 20
Page 22

THE DISPLAY & THE MENUS
n
The display allows menu selections to be viewed and chosen. These choices
instruct the colorimeter to perform specific tasks. The menus are viewed in the
display using two general formats which are followed from one menu to the
next. Each menu is a list of choices or selections.
There are four lines in the display. The top line in each menu is a title or
pertinent instruction. The top line does not change unless a new menu is
selected. The second and third lines are used in two ways. One way is to display
menu choices. The second way takes advantage of the graphical capabilities of
the display. Both lines are used to display important messages, such as test
results, in a large, easy to read format. The fourth line is used for menu choices.
DISPLAY
TESTING MENU
*FIRST CHOICE
SECOND CHOICE
ANOTHER
AND ANOTHER
AND SO ON
TITLE or INSTRUCTION
MENU CHOICE WINDOW
Think of the menu choices as a vertical list in the display which moves up or
down each time an arrow button is pressed. This list or menu is viewed through
a window, the menu choice window, in the display. The menu choice window
is the lower 2 or 3 lines of the display. Pushing the arrow buttons brings another
portion of the menu into menu choice window. This is referred to as scrolling
through the menu.
TESTING MENU
*FIRST CHOICE SECOND CHOICE ANOTHER
SECOND CHOICE * ANOTHER AND ANOTHER
ANOTHER AND ANOTHER *AND SO ON
AND ANOTHER AND SO ON LAST CHOICE
AND SO ON LAST CHOICE
LAST CHOICE
t
TESTING MENU
t
TESTING MENU
An asterisk, “*”, will start in the far left position of the top line in the menu
choice window. As the menu is scrolled through, different choices appear next
to the “*”. The “*” in the display corresponds with the Q/ENTER button.
Pushing the Q/ENTER button selects the menu choice which is adjacent to
the “*” in the menu choice window.
21 SMART 2 COLORIMETER OPERATOR’S MANUAL
Page 23

The second general format of the display takes advantage of the graphics
capabilities of the display. The top line of the display is still a title line. The
middle two lines of the display are used to display important messages, results or
graphics in a large, easy to read format. The menus work in the same way as
described previously but only one line of the menu is visible at the bottom of
the display.
TESTING MENU
Result or Message Result or Message Result or Message
*ANOTHER * AND ANOTHER *AND SO ON
AND ANOTHER AND SO ON LAST CHOICE
AND SO ON LAST CHOICE
LAST CHOICE
TESTING MENU
t
TESTING MENU
t
As described previously, the EXIT button allows an exit or escape from the
current menu and a return to the previous menu. This allows a rapid exit from
an inner menu to the main menu by repeatedly pushing the EXIT button.
Pushing OFF at any time will turn the colorimeter off.
SMART 2 COLORIMETER OPERATOR’S MANUAL 22
Page 24

LOOPING MENUS
n
Long menus, such as All Tests, incorporate a looping feature which allow
the user to quickly reach the last choice in the menu from the first choice. In a
looping menu the last choices in the menu are above the first choice and
scrolling upward moves through the menu in reverse order. Scrolling downward
moves through the menu from first choice to last but the menu starts over
following the last choice. So all menu choices can be reached by scrolling in
either direction. The diagrams below demonstrate a looping menu.
AND SO ON AND ANOTHER ANOTHER
: : : AND SO ON AND ANOTHER
: : : : : : AND SON ON
THIRD TO LAST : : : : : :
SECOND TO LAST THIRD TO LAST : : :
LAST CHOICE SECOND TO LAST THIRD TO LAST
TESTING MENU
*FIRST CHOICE * LAST CHOICE *SECOND TO LAST
SECOND CHOICE FIRST CHOICE LAST CHOICE
ANOTHER SECOND CHOICE FIRST CHOICE
AND ANOTHER ANOTHER SECOND CHOICE
AND SO ON AND ANOTHER ANOTHER
: : : AND SO ON AND ANOTHER
: : : : : : AND SO ON
LAST CHOICE : : : : : :
TESTING MENU
s
TESTING MENU
s
23 SMART 2 COLORIMETER OPERATOR’S MANUAL
Page 25

TESTING
TESTING MENU
n
The Testing Menu is used to run all LaMotte pre-programmed tests, USER
TESTS and Absorbance test at one of four wavelengths. Testing from any of
three sequences can also be done.
1. Press the ON button to turn on the
SMART 2 Colorimeter. The LaMotte logo will
appear for about 2 seconds and the the Start
screen appears. Press the Q/ENTER button to
begin testing.
2. The MAIN MENU will appear. Press the
Q/ENTER button to select Testing Menu.
3. Scroll with the t or s buttons and make
a selection with the Q/ENTER button. All
Tests has all the available tests. The three
sequences have selected tests and
Absorbance has %T/ABS tests.
VER 1.0
Smart 2
* Start
MAIN MENU
* Testing Menu
Editing Menu
PC Link
TESTING MENU
*All Tests
Sequence 1
Sequence 2
Sequence 3
Absorbance
SMART 2 COLORIMETER OPERATOR’S MANUAL 24
Page 26

SEQUENCES OF TESTS
n
SEQUENCE 1, SEQUENCE 2, and SEQUENCE 3 are alterable sequences. They
may be edited using the Editing Menu. Any of the LaMotte
pre-programmed tests or User Tests may be placed in these sequences in
whatever testing order that is preferred. Some examples of typical sequences are
given below.
SEQUENCE 1 SEQUENCE 2 SEQUENCE 3
*015 Chlorine *002 Aluminum *003 Ammonia-N L F
079 Phosphate H 035 Cyanide 032 Cu - DDC
009 Bromine - LR 041 Fluoride 064 Nitrate-N L
076 pH TB 053 Iron Phen 067 Nitrite-N L
061 Moly - HR 055 Manganese L 074 pH CPR
086 Silica Hi 064 Nitrate-N L 078 Phosphate L
045 Hydrazine 067 Nitrite-N L 085 Silica Lo
032 Cu - DDC 077 Phenol
051 Iron Bipyr 078 Phosphate L
090 Sulfide - LR
These alterable sequences allow a series of tests to be setup that are run
frequently. The order of the individual tests in the sequence is determined by
the user. After running a test, use the t button to scroll to the next test and
press the Q/ENTER button to select the next test in the sequence. Continue
this pattern until the entire sequence has been completed.
All Tests is a fixed sequence containing the LaMotte pre-programmed tests,
User Tests, and Absorbance tests.
Modification of the alterable sequences is accomplished through the Editing
Menu. This menu is explained in greater detail in EDITING MENU (p. 30).
Pressing the EXIT button while in a sequence menu will escape back to the
Testing Menu.
Pressing the OFF button at any time will turn the colorimeter off.
25 SMART 2 COLORIMETER OPERATOR’S MANUAL
Page 27
GENERAL TESTING PROCEDURES
n
The following are some step by step examples of how to run tests from the
Testing Menu. These test procedures are designed to be used with LaMotte
SMART Reagent Systems.
TESTING WITH THE LaMOTTE
n
PRE-PROGRAMMED TESTS
Press ON to turn on the SMART 2 Colorimeter. The
LaMotte logo will appear for about 2 seconds and
then the Start screen appears. Press the Q/ENTER
button to start testing
The MAIN MENU will appear. Press the Q/ENTER
button to select Testing Menu.
Press the Q/ENTER button to select All Tests.
Press the t button to move to the 002 Aluminum
to *.
VER 1.0
Smart2
*Start
MAIN MENU
*Testing Menu
Editing Menu
PC Link
TESTING MENU
*All Tests
Sequence 1
Sequence 2
ALL TESTS
*001 Alk - UDV
002 Aluminum
003 Ammonia - NLF
Press the Q/ENTER button to select 002
Aluminum.
ALL TESTS
*002 Aluminum
003 Ammonia - NLF
004 Ammonia - NLS
Continued...
SMART 2 COLORIMETER OPERATOR’S MANUAL 26
Page 28

The SMART 2 Colorimeter is ready to scan at the
correct wavelength. Place the blank in the sample
chamber, close the lid and press the Q/ENTER
button to scan blank.
NOTE: Do not keep the button depressed.
002 Aluminum
*Scan Blank
The screen will display Blank Done for about 1
second. Scan Sample will be positioned next to *.
Place the reacted sample in the chamber, close the
lid and press the Q/ENTER button to scan sample.
The colorimeter will scan the sample and the results
screen will appear.
Record test result. To repeat the test, press the
Q/ENTER button to scan the sample again. The
last blank scanned is used to zero the colorimeter for
repeated scans. A different blank can be used by
pressing the s button to scroll back to Scan
Blank and then scanning another blank. Scroll with
the t or s buttons and make another selection
with the Q/ENTER button. The %T or Absorbance
of the last test can be viewed by choosing %T/Abs.
Press the EXIT button to escape to previous menus.
NOTE: The menus loop in this screen so either the
s or t buttons will lead to the menu selection
needed.
002 Aluminum
Blank Done
*Scan Blank
002 Aluminum
*Scan Sample
002 Aluminum
0.09 ppm
*Scan Blank
Next Test
Previous Test
%/Abs
Scan Blank
27 SMART 2 COLORIMETER OPERATOR’S MANUAL
Page 29

MEASURING IN THE ABSORBANCE MODE
n
Press ON to turn on the SMART 2 Colorimeter.
The LaMotte logo will appear for about 2 seconds
and then the Start screen appears. Press the
Q/ENTER button to start testing
The MAIN MENU will appear. Press the Q/ENTER
button to select Testing Menu.
Press the t button to scroll to Absorbance.
Press the Q/ENTER button to select Absorbance.
VER 1.0
Smart2
*Start
MAIN MENU
*Testing Menu
Editing Menu
PC Link
TESTING MENU
All Tests
Sequence 1
Sequence 2
Sequence 3
*Absorbance
TESTING MENU
*Absorbance
Press the tor s buttons to move to the desired test.
Press the Q/ENTER button to select test.
Absorbance
*101 Abs 430
102 Abs 520
103 Abs 570
104 Abs 620
Absorbance
*102 Abs 520
103 Abs 570
104 Abs 620
Continued...
SMART 2 COLORIMETER OPERATOR’S MANUAL 28
Page 30

Insert blank, press the Q/ENTER button to scan
blank.
102 Abs 520
*Scan Blank
The screen will display Blank Done for about 1
second.
Insert the reacted sample. Press the Q/ENTER
button to scan the sample.
Record test result. To repeat the test, press the
Q/ENTER button to scan the sample again. The
last blank scanned is used to zero the colorimeter for
repeated scans. A different blank can be used by
pressing the s button to scroll back to Scan
Blank and then scanning another blank. Scroll with
t or s and make another selection with
Q/ENTER. The %T or Absorbance of the last test
can be viewed by choosing %T/Abs. Press EXIT to
escape to previous menus.
NOTE: The menus loop in this screen so either t or
swill lead to the menu selection needed.
102 Abs 520
Blank Done
*Scan Blank
102 Abs 520
*Scan Sample
102 Abs 520
0.95
*Scan Sample
Next Test
Previous Test
%T/Abs
Scan Blank
29 SMART 2 COLORIMETER OPERATOR’S MANUAL
Page 31

EDITING MENU
The EDITING MENU allows the user to edit sequences, edit user tests, set the
clock, edit the logging function, and set the power saving function.
EDIT A SEQUENCE
n
The EDIT SEQUENCE menu allows three alterable test sequences (SEQUENCE
1, SEQUENCE 2, and SEQUENCE 3) to be edited.
Press ON to turn on the SMART 2 Colorimeter.
The LaMotte logo will appear for about 2 seconds
and then the Start screen appears. Press the
Q/ENTER button to start testing.
The Main Menu will appear. Press the t button
to scroll to Editing Menu.
Press the Q/ENTER button to select Editing
Menu.
The Editing Menu appears. Press the Q/ENTER
button to select Editing Sequence.
VER 1.0
Smart2
*START
MAIN MENU
Testing Menu
*Editing Menu
PC Link
MAIN MENU
*Editing Menu
PC Link
EDITING MENU
*Edit Sequence
Edit User Test
Set Clock
The Edit Sequence menu appears. Press the
Q/ENTER button to scroll to select Edit
Sequence 1.
EDIT SEQUENCE
*Edit Sequence 1
Edit Sequence 2
Edit Sequence 3
Continued...
SMART 2 COLORIMETER OPERATOR’S MANUAL 30
Page 32

Sequence 1 appears.
ADDING OR DELETING TESTS
n
EDIT SEQUENCE 1
*015 Chlorine
079 Phosphate H
009 Bromine - LR
There are three ways to alter a sequence: Insert Before, Insert After,
and Delete. Insert Before adds a new test to the sequence before the
selected test. Insert After adds a new test to the sequence after the selected
test. Delete is used to remove an existing test from a sequence.
Below is a step by step example of how to add a test to SEQUENCE 1 starting
from theEDIT SEQUENCE 1 menu.
Press the t button to scroll to 009 Bromine LR.
Press the Q/ENTER button to select009 Bromine
- LR.
Press the Q/ENTER button to select Insert
Before.
The ALL TESTS menu appears. Press the t button
to move the 002 Aluminum to *.
EDIT SEQUENCE 1
015 Chlorine
079 Phosphate H
*009 Bromine - LR
EDIT SEQUENCE 1
*009 Bromine - LR
076 pH TB
060 Moly - LR
EDIT SEQUENCE 1
*Insert Before
Insert After
Delete
ALL TESTS
*002 Aluminum
003 Ammonia - NLF
004 Ammonia - NLS
31 SMART 2 COLORIMETER OPERATOR’S MANUAL
Page 33

Press the Q/ENTER button to select 002
Aluminum.
ALL TESTS
*002 Aluminum
003 Ammonia - NLF
004 Ammonia - NLS
Sequence 1 appears in EDIT SEQUENCE 1 menu
and 002 Aluminum is now before Bromine - LR
in the sequence. All changes to Sequence 1 are
automatically saved. Press the EXIT button to exit
the EDIT SEQUENCE 1 menu and return to the
EDIT SEQUENCE menu or continue editing.
The EDIT SEQUENCE menu appears. Select another
sequence to edit or press the EXIT button to return
to the EDITING MENU. Press the EXIT button
again to return the the MAIN MENU.
EDIT SEQUENCE 1
*015 Chlorine
079 Phosphate H
002 Aluminum
009 Bromine - LR
076 pH TB
060 Moly - LR
EDIT SEQUENCE 1
*Edit Sequence 1
Edit Sequence 2
Edit Sequence 3
Below is a step by step example of how to delete a test from SEQUENCE 1
starting from the EDIT SEQUENCE 1 menu. The test 002 Aluminum, added
in the previous example, will be deleted.
SMART 2 COLORIMETER OPERATOR’S MANUAL 32
Page 34

Press the t button to scroll to 002 Aluminum.
EDIT SEQUENCE 1
*015 Chlorine
079 Phosphate H
002 Aluminum
009 Bromine - LR
076 pH TB
060 Moly - LR
Press the Q/ENTER button to select 002
Aluminum.
Continued...
EDIT SEQUENCE 1
*002 Aluminum
009 Bromine - LR
076 pH TB
33 SMART 2 COLORIMETER OPERATOR’S MANUAL
Page 35

Press the t button to scroll to Delete.
EDIT SEQUENCE 1
*Insert Before
Insert After
Delete
Press the Q/ENTER button to select Delete.
Sequence 1 appears in the EDIT SEQUENCE 1
menu and 002 Aluminum has been deleted. All
changes to SEQUENCE 1 are automatically saved.
Press the EXIT button to exit the EDIT SEQUENCE
1 menu and return to the EDIT SEQUENCE menu
or continue editing.
The EDIT SEQUENCE menu appears. Select another
sequence to edit or press the EXIT button to return
to the EDITING MENU. Press the EXIT button again
to return the the MAIN MENU.
EDIT SEQUENCE 1
*Delete
EDIT SEQUENCE 1
*015 Chlorine
079 Phosphate H
009 Bromine - LR
076 pH TB
060 Moly - LR
EDIT SEQUENCE 1
*Edit Sequence 1
Edit Sequence 2
Edit Sequence 3
SMART 2 COLORIMETER OPERATOR’S MANUAL 34
Page 36

EDIT USER TESTS
n
If a test other than the LaMotte programmed tests is performed regularly, a
calibration for it may be entered in one of the 10 User Tests. These tests are
originally named “User Test 1 - 10". It will be possible to rename the test,
select a wavelength, enter a new calibration, select the number of decimal
places used to display the results, and select the units. A User Test may be
added for a reagent system for which no precalibrated test exists. A calibration
of a LaMotte reagent system may also be entered. The calibration of a User Test
can be changed at any time.
The User Tests have the ability to handle 2 data points. The colorimeter will
determine the absorbance of the standards and calculate a response that will be
stored to determine the concentration of future samples of unknown
concentration. These standards should cover all the concentrations for the
range of the test being performed and be scanned beginning with the low
concentration and finishing with the high concentration (for more information
about this, see CALIBRATION CURVES, page 11). Prepare these solutions
prior to entering a new calibration.
NOTE: A calibration procedure must be performed before using any of the
User Tests.
The User Tests can be placed in any of the alterable sequences using EDIT
SEQUENCES.
To edit a User Test, start at the EDITING MENU.
Scroll down to Edit User Test.
Press the Q/ENTER button to select the Edit
User Test.
From the EDIT USER TEST menu, select the User
Test to be entered or changed. In this example,
choose 105 User Test 01. Use the t and s
buttons to scroll to other User Tests if desired. Select
the User Test by pressing the Q/ENTER button.
EDITING MENU
*Edit Sequences
Edit User Test
Set Clock
EDITING MENU
*Edit User Test
Set Clock
Edit Logging
EDIT USER TEST
*105 User Test 01
106 User Test 02
107 User Test 03
108 User Test 04
: : :
114 User Test 10
35 SMART 2 COLORIMETER OPERATOR’S MANUAL
Page 37

NAMING THE TEST
n
A User Test can be up to 11 characters long. The menu choices for each
character are 26 upper case letters A to Z, 26 lower case letters a to z, ten
numerals 0 to 9, a space (SP), a dash (-) and a decimal point (.). The existing
name is displayed on the bottom line of the display. A cursor will be over the
character which is to be edited and that character is also displayed in the
center of the display. The character can be changed by using the t and s
buttons to scroll to other characters. Use the Q/ENTER button to select a
character. The edited name is saved at any time by pressing EXIT or by
pressing the Q/ENTER button after selecting the eleventh character.
From the Edit User Test01 menu press the
Q/ENTER button to select Name The Test and
change the name of User Test 01
The cursor is over the letter “U” in 105 User
Test01 and the letter “U” is displayed in the large
font in the center of the display.
Change the name to H2O. Use the t and s buttons
to scroll to the letter “H” into the center of the
display. Press the Q/ENTER button to select the
letter “H”.
The letter “H” has been entered in the first position
of the name and the cursor has moved to the second
letter “s”.
EDIT USER TEST01
*Name The Test
Select Vial/WL
New Calibration
Decimal Places
Select Units
NAME THE TEST
U
*105 User Test01
NAME THE TEST
H
*105 User Test01
NAME THE TEST
s
*105 User Test01
Use the t and s buttons to scroll to the number
“2” into the center of the display. Press the
Q/ENTER button to select the number “2”.
SMART 2 COLORIMETER OPERATOR’S MANUAL 36
NAME THE TEST
2
*105 Hser Test01
Page 38

The number “2” has been entered in the second
position of the name and the cursor has moved to
the third letter “e”.
NAME THE TEST
e
*105 H2er Test01
Use the t and s buttons to scroll to the letter “O”
into the center of the display. Press the Q/ENTER
button to select the letter “O”.
The letter “O” has been entered in the third position
of the name and the cursor has moved to the fourth
letter “r”. Press the EXIT button to save the name
entered up to this point.
The meter will display the message “Storing” and
return to the EDIT USER TEST01 menu.
NAME THE TEST
O
*105 H2Or Test01
NAME THE TEST
r
*105 H2Or Test01
Storing
EDIT USER TEST01
*Name The Test
Select The Vial/WL
New Calibration
Decimal Places
Select Units
37 SMART 2 COLORIMETER OPERATOR’S MANUAL
Page 39

SELECTING THE VIAL AND WAVELENGTH
n
The Smart 2 Colorimeter has three different vials (the 25 mm 0290 tube,
UDVs and COD tubes) and 4 different wavelengths (430, 520, 570, and
620 nm). The colorimeter uses different settings for each of the twelve
combinations of vial and wavelength. These twelve settings are called
channels. Choose the channel with the correct wavelength and vial for the
test.
Use the t button to scroll to Select Vial/WL
and press Q/ENTER button to select.
Use the t and s buttons to scroll to the
appropriate channel and press Q/ENTER button to
select.
NOTE: This is a looping menu.
The meter will display the message “Storing” and
return to the EDIT USER TEST01 menu.
EDIT USER TEST01
*Name The Test
Select Vial/WL
New Calibration
Decimal Places
Select Units
: : :
Ch11 620nm COD
Ch12 570nm COD
SELECT CHANNEL
*Ch1 520nm 25mm
Ch2 430nm 25mm
Ch3 620nm 25mm
Ch4 570nm 25mm
Ch5 520nm UDV
Ch6 430nm UDV
: : :
Storing
EDIT USER TEST01
*Select The Vial/WL
New Calibration
Decimal Places
Select Units
SMART 2 COLORIMETER OPERATOR’S MANUAL 38
Page 40

ENTERING A NEW CALIBRATION
n
To enter a new calibration two reacted standards solutions of known
concentration are required: a “low standard” and a “high standard”. These
should be ready to use.
Use the t button to scroll to New Calibration
and press Q/ENTER button to select.
Input the concentration of the LOW STANDARD by
using the t and s buttons to scroll the first digit of
the concentration into the first position on the
display. Press Q/ENTER button to select that digit
(1 for this example).
The number “0” is always the starting point for the
next digit. Continue selecting digits or a decimal
point to enter the concentration (up to seven
characters).
“1.5” has been entered in this example. Press
Q/ENTER button four times to input “0” as the last
four digits. Pressing Q/ENTER after selecting the
last digit saves the concentration.
EDIT USER TEST01
Select Vial/WL
*New Calibration
Decimal Places
Select Units
LOW STANDARD
0______
*Continue
LOW STANDARD
10_____
*Continue
LOW STANDARD
1.50___
*Continue
Input the concentration of the HIGH STANDARD by
using the same method as for the low standard.
HIGH STANDARD
0______
*Continue
Continued...
39 SMART 2 COLORIMETER OPERATOR’S MANUAL
Page 41

Place a clear blank in the sample chamber. Press the
Q/ENTER button to scan the blank.
The screen will display Blank Done for about 1
second.
Insert Blank
*Continue
Blank Done
*Scan Blank
Place the reacted low standard in the sample
chamber. Press Q/ENTER to scan the low standard.
Place the reacted high standard in the sample
chamber. Press Q/ENTER to scan the high
standard.
The meter will display the message “Storing” and
return to the EDIT USER TEST01 menu.
Insert Lo Standard
*Continue
Insert Hi Standard
*Continue
Storing
EDIT USER TEST01
*New Calibration
Decimal Places
Select Units
SMART 2 COLORIMETER OPERATOR’S MANUAL 40
Page 42

SELECTING THE NUMERICAL FORMAT OF THE RESULT
n
To input tests with very different ranges, the number of decimal places
displayed for a result can be selected. A test which ranges from 20 to 1000 ppm
should not be displayed with three decimal places. A test with a range from
0.010 to 0.500 needs three decimal places (the microprocessor will always
calculate the concentration to many more significant figures than will be
displayed). Menu choices of 0, 1, 2, or 3 decimal places will be given for the
display.
Use the t button to scroll to Decimal Places
and press Q/ENTER button to select.
Use the t button to scroll to the number of decimal
places to be shown and press Q/ENTER to select.
The meter will display the message “Storing” and
return to the EDIT USER TEST01 menu.
EDIT USER TEST01
*New Calibration
Decimal Places
Select Units
DECIMAL PLACES?
*None 0
One 0.0
Two 0.00
Three 0.000
Storing
EDIT USER TEST01
*Decimal Places
Select Units
41 SMART 2 COLORIMETER OPERATOR’S MANUAL
Page 43

SELECTING THE UNITS OF CONCENTRATION
n
The SMART 2 Colorimeter has seven options for units of concentration. They
are No Units, ppm, pH, FTU, ppb, ppt, and mgL.
Use the t button to scroll to Select Units and
press Q/ENTER to select.
Use the t button to scroll to the appropriate unit
and press Q/ENTER to select.
The meter will display the message “Storing” and
return to the EDIT USER TEST01 menu.
EDIT USER TEST01
*Decimal Places
Select Units
SELECT UNITS
*No Units
ppm
pH
FTU
ppb
ppt
mgL
Storing
EDIT USER TEST01
*Select Units
SMART 2 COLORIMETER OPERATOR’S MANUAL 42
Page 44

SETTING THE CLOCK
n
Setting the clock allows the correct time and date stamp to be stored with each
reading in the data logger and with each reading sent out the serial port.
From the EDITING MENU use the t button to scroll
to Set Clock. Press Q/ENTER to select.
The current date and time are displayed as month day - year on the first line and as hours : minutes :
seconds on the second line. A two-digit number is
displayed for each setting. Use the t and s buttons
to scroll to the appropriate number and press
Q/ENTER to select. The cursor will move to the
next digit. Set all subsequent numbers in the same
manner. Selecting the final digit in the seconds field
stores the date and time and returns to the EDITING
MENU.
NOTE: These are looping menus.
EDITING MENU
*Edit Sequences
Edit User Test
Set Clock
Editing Logging
Factory Setup
Set PWR Save
SET TIME
MM - DD - YY
HH : MM : SS
EDITING MENU
*Set Clock
Editing Logging
Factory Setup
Set PWR Save
43 SMART 2 COLORIMETER OPERATOR’S MANUAL
Page 45

TURNING THE DATA LOGGER ON AND OFF
n
The default setting for the datalogger is “Disabled” or turned off. If there is no
need for data logging, this setting is suggested. If data logging is needed, the
data logger can be “Enabled” or turned on.
From the EDITING MENU use the t button to
scroll to Edit Logging. Press Q/ENTER to
select.
The current setting is always displayed next to the *.
To change the setting, use the t or s buttons to
scroll to the other setting. Press Q/ENTER to select.
The meter will display the message “Storing” and
return to the EDITING MENU.
EDITING MENU
*Edit Sequences
Edit User Test
Set Clock
Editing Logging
Factory Setup
Set PWR Save
EDIT LOGGING
*Disabled
Storing
EDITING MENU
*Editing Logging
Factory Setup
Set PWR Save
SMART 2 COLORIMETER OPERATOR’S MANUAL 44
Page 46

FACTORY SETUP
n
The Factory Setup menu is used in the manufacturing of the SMART 2
Colorimeter. This menu is not for use by the operator in the field.
SETTING THE POWER SAVING FUNCTION
n
The SMART 2 Colorimeter has a power saving function that turns the meter
off after an interval of inactivity. If no buttons have been pressed during that
interval the meter will turn itself off. This interval can be disabled or set for 5,
15, 30, or 60 minutes. The default setting is 5 minutes.
From the EDITING MENU use the t button to
scroll to Set PWR Save. Press Q/ENTER to select.
The current setting is always displayed next to the *.
To change the setting, use the t or s buttons to
scroll to the appropriate setting. Press Q/ENTER to
select.
The meter will display the message “Storing” and
return to the EDITING MENU.
EDITING MENU
*Edit Sequences
Edit User Test
Set Clock
Editing Logging
Factory Setup
Set PWR Save
Disabled
AUTO SHUTOFF
*5 Minutes
15 Minutes
30 Minutes
60 Minutes
Storing
EDITING MENU
*Set PWR Save
45 SMART 2 COLORIMETER OPERATOR’S MANUAL
Page 47

PC LINK
The SMART 2 Colorimeter may be interfaced with any Windows-based
computer by using the LaMotte SMARTLink2 Program and Interface Cable
(Order Code 1971). The program stores customer information and test data in
a database. It can be used to download data stored in the SMART 2 datalogger
for each test site.
The colorimeter may also be interfaced with an RS-232 serial printer, using an
interface cable (order Code 1971) and setting the printer configuration to the
Output below (see Computer Connection, below).
Choose PC Link from the Main Menu. The user can download the entire
datalogging buffer. Downloading does not delete or empty the datalogger.
OUTPUT
n
RS-232 compatible, asynchronous serial, 9600 baud, no parity, 8 data bits, 1
stop bit.
COMPUTER CONNECTION
n
RS-232 interface connection, 8 pin mDIN/9 pin F D-submin. (Cable Code
27359-04)
BATTERY OPERATION
The colorimeter may be run on battery power or AC using the AC adapter. It
may also be run on a car battery with the optional Cigarette Lighter adapter. If
using the meter as a benchtop unit, keep it plugged in if possible. If used on
only battery power, always have a spare battery on hand.
If the battery power is low, the SMART 2 will
display “LOW BATT” and turn off.
REPLACING THE BATTERY
n
The SMART 2 Colorimeter uses a standard 9-volt alkaline battery that is
available worldwide. The battery compartment is located on the bottom of the
the case.
To replace the battery:
1. Open the battery compartment lid.
2. Remove the battery and disconnect the battery from the polarized plug.
3. Carefully connect the new battery to the polarized plug and insert it into the
compartment.
4. Close the battery compartment lid.
SMART 2 COLORIMETER OPERATOR’S MANUAL 46
LOW BATT
Page 48

MAINTENANCE
CLEANING
n
Clean with a damp, lint-free cloth.
DO NOT ALLOW WATER TO ENTER THE COLORIMETER
CHAMBER OR ANY OTHER PARTS OF THE METER.
TROUBLESHOOTING GUIDE
ERROR MESSAGES
n
n
OVER RANGE
If the message OVERRANGE is displayed when scanning a sample, the sample
may be over range or under range. If the sample is over range the sample should
be diluted and tested again (see Sample Dilution Techniques and Volumetric
Measurements, page 14).
If OVERRANGE is displayed, press the Q/ENTER
button to continue testing on diluted samples.
HELPFUL HINTS
n
n
STRAY LIGHT
The SMART 2 Colorimeter should have no problems with stray light. Make
sure that the sample compartment lid is always fully closed, except when
testing COD with the adapter.
015 Chlorine
OVERRANGE
*Continue
47 SMART 2 COLORIMETER OPERATOR’S MANUAL
Page 49

SMART REAGENT SYSTEMS
SMART REAGENT SYSTEMS LIST
n
Test # Test Factor Range(ppm) Test Method (# of Reagents)
1 Aluminum 0.00-0.30 Eriochrome Cyanine R (4) 50
2 Alkalinity 0-200 UDV (1) 50
3 Ammonia Nitrogen-
Low Range, Fresh Water
4 Ammonia Nitrogen-
Low Range, Salt Water
5 Ammonia Nitrogen-
High Range
6 Arsenic
7 Barium
8 Boron
9 Bromine-Low Range 0.00-9.00 DPD Tablets (3) 100
10 Bromine-High Range DPD (3)
11 Bromine-UDV DPD (3)
12 Cadmium 0.00-1.00 PAN (4) 50
13 Ca & Mg Hardness-UDV 10-500 UDV (1) 50
14 Carbohydrazide
15 Chlorine 0.00-4.00 DPD (3) 100
16 Chlorine-Free-
UDV, Low Range
17 Chlorine-Free-
UDV, High Range
18 Chlorine-Total-
UDV, Low Range
19 Chlorine-Total-
UDV, High Range
20 Chlorine Dioxide 0.00-7.00 DPD (3) 50
21 Chloride-TesTab
22 Chromium 0.00-1.00 Diphenylcarbohydrazide (1) 100
23 Chromium-TesTab
24 Cobalt
25 COD-Low Range 5-150 Digestion (1) 25
25 COD-Standard Range 0-1500 Digestion (1) 25
27 COD-High Range 0-15000 Digestion (1) 25
28 Color
29 Copper-BCA-Low Range 0.00-3.50 Bicinchoninic Acid (1) 50
30 Copper-BCA-High Range Bicinchoninic Acid (1)
31 Copper-Cuprizone 0.00-2.00 Cuprizone (2) 50
32 Copper-DDC 0.00-6.00 Diethyldithiocarbamate (1) 100
33 Copper-Zincon-
High Range
34 Copper-UDV 0.00-3.50 Bicinchoninic Acid, UDV (1) 50
0.00-1.00 Salicylate (3) 25
0.00-4.00 Salicylate (3)
0.00-4.00 Nesslerization (2) 50
UDV (1)
UDV (1)
UDV (1)
UDV (1)
# of
Tests
SMART 2 COLORIMETER OPERATOR’S MANUAL 48
Page 50

Test # Test Factor Range(ppm) Test Method (# of Reagents)
# of
Tests
35 Cyanide 0.00-0.50 Pyridine-Barbituric Acid (5) 50
36 Cyanuric Acid 0-200 Melamine (1) 50
37 Cyanuric Acid-UDV 0-200 Melamine, UDV (1) 50
38 Diethylhydroxylamine
39 Dissolved Oxygen 0.0-12.0 Winkler colorimetric 300
40 Erythorbic Acid
41 Fluoride 0.00-2.00 SPADNS (2) 50
42 Formaldehyde-Low Range
43 Formaldehyde-High
Range
44 Formaldehyde-TesTab
45 Hydrazine 0.00-1.00 P-dimethylaminobenzaldehyde (2) 50
46 Hydrogen Peroxide-
0.00-1.50 DPD (2) 100
Low Range
47 Hydrogen Peroxide-
High Range
48 Hydrogen Peroxide-UDV
49 Hydroquinone
50 Iodine 0.00-14.00 DPD (2) 100
51 Iron-Bipyridyl 0.00-6.00 Bipyridyl (2) 50
52 Iron-UDV 0.00-10.00 Bipyridyl (2)
53 Iron-Phenanthroline 0.00-4.50 1,10 Phenanthroline (2) 50
54 Lead 0.00-5.00 PAR (5) 50
55 Manganese-Low Range 0.00-0.50 PAN (3) 50
56 Manganese-High Range 0.0-15.0 Periodate (2) 50
57 Mercury
58 Methylethylketone
59 Molybdenum-
Very Low Range
60 Molybdenum-Low Range
61 Molybdenum-High Range 0.0-50.0 Thioglycolate (3) 50
62 Morpholine
63 Nickel 0.00-8.00 Dimethylglyoxime (6) 50
64 Nitrate Nitrogen-
0.00-3.00 Cadmium Reduction (2) 20
Low Range
65 Nitrate Nitrogen-
High Range
66 Nitrate-TesTab
67 Nitrite Nitrogen-
0.00-0.80 Diazotization (2) 20
Low Range
68 Nitrite Nitrogen-
High Range
69 Nitrite-TesTab
70 Oil/Grease
71 Ozone-Low Range 0.00-0.40 Indigo (3) 100
72 Ozone-High Range
49 SMART 2 COLORIMETER OPERATOR’S MANUAL
Page 51

Test # Test Factor Range(ppm) Test Method (# of Reagents)
# of
Tests
73 Palladium
74 pH-Chlorophenol Red 5.0-6.8 Chlorophenol Red (1) 100
75 pH-Phenol Red 6.6-8.4 Phenol Red (1) 100
76 pH-Thymol Blue 8.0-9.5 Thymol Blue (1) 100
77 Phenol 0.00-6.00 Aminoantipyrine (3) 50
78 Phosphate-Low Range 0.00-3.00 Ascorbic Acid Reduction (2) 50
79 Phosphate-High Range 0.0-70.0 Vanodomolybdphosphoric Acid (1) 50
80 Polyacrylate
81 Potassium 0.0-10.0 Tetraphenylboron (2) 100
82 QAC
83 SDMBT
84 Selenium
85 Silica-Low Range 0.00-2.50 Heteropoly Blue (4) 50
86 Silica-High Range 0-50 Silicomolybdate (3) 50
87 Silver
88 Sulfate-Low Range
89 Sulfate-High Range 5-100 Barium Chloride (1) 50
90 Sulfide-Low Range 0.00-1.00 Methylene Blue (3) 50
91 Sulfide-High Range
92 Sulfite-Low Range
93 Sulfite-High Range
94 Surfactants
95 Suspended Solids
96 Tannin 0.0-10.0 Tungsto-molybdophosphoric Acid (2) 50
97 TMIO
98 Turbidity 0-400 Absorption (0) ∞
99 Zinc-Low Range 0.00-3.00 Zincon (6) 50
100 Zinc-High Range
SMART 2 COLORIMETER OPERATOR’S MANUAL 50
 Loading...