

Page 1
User’s Guide
http://www.omega.com
e-mail: info@omega.com
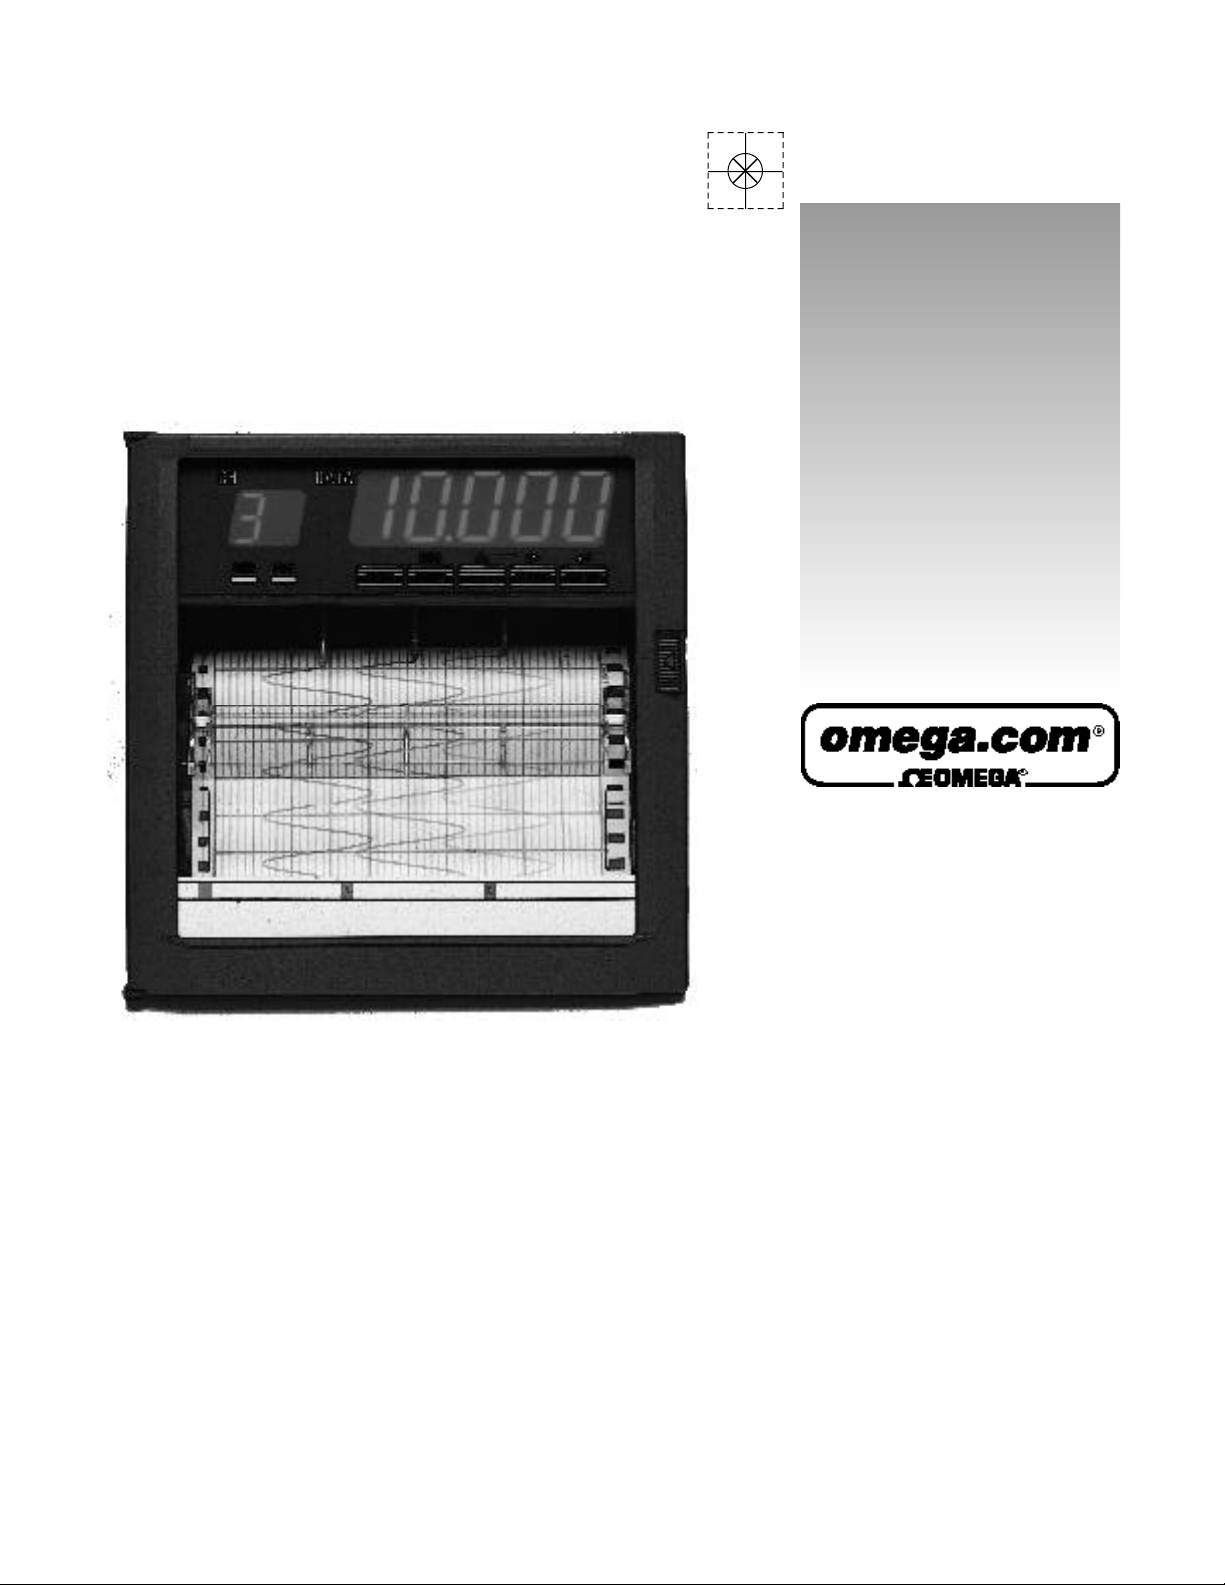
RD260 RECORDER
Technical Manual
Page 2

OMEGAne t®On-Line Service Internet e-mail
h t t p : / / w w w.omega.com i n f o @ o m e g a . c o m
Servicing North America:
USA: One Omega Drive, Box 4047
ISO 9001 Certified Stamford, CT 06907-0047
Tel: (203) 359-1660 FAX: (203) 359-7700
e-mail: info@omega.com
Canada: 976 Bergar
Laval (Quebec) H7L 5A1
Tel: (514) 856-6928 FAX: (514) 856-6886
e-mail: info@omega.ca
For immediate technical or application assistance:
USA and Canada: Sales Service: 1-800-826-6342 / 1-800-TC-OMEGA
Customer Service: 1-800-622-2378 / 1-800-622-BEST
Engineering Service: 1-800-872-9436 / 1-800-USA-WHEN
TELEX: 996404 EASYLINK: 62968934 CABLE: OMEGA
Mexico and
Latin America: Tel: (001) 800-826-6342 FAX: (001) 203-359-7807
En Espan˜ol: (001) 203-359-7803 e-mail: espanol@omega.com
SM
SM
SM
Servicing Europe:
Benelux: Postbus 8034, 1180 LAAmstelveen, The Netherlands
Tel: (31) 20 6418405 FAX: (31) 20 6434643
Toll Free in Benelux: 0800 0993344
e-mail: nl@omega.com
Czech Republic: ul. Rude armady 1868, 733 01 Karvina-Hranice
Tel: 420 (69) 6311 8 9 9 FAX: 420 (69) 631111 4
Toll Free: 0800-1-66342 e-mail: czech@omega.com
France: 9, rue Denis Papin, 78190 Trappes
Tel: (33) 130-621-400 FAX: (33) 130-699-120
Toll Free in France: 0800-4-06342
e-mail: france@omega.com
Germany/Austria: Daimlerstrasse 26, D-75392 Deckenpfronn, Germany
Tel: 49 (07056) 3017 FAX: 49 (07056) 8540
Toll Free in Germany: 0130 11 21 66
e-mail: info@omega.de
United Kingdom: One Omega Drive, River Bend Technology Centre
ISO 9002 Cert i f i e d Northbank, Irlam, Manchester
M44 5EX, United Kingdom
Tel: +44 (0) 161 777-6611 FAX: +44 (0) 161 777-6622
Toll Free in United Kingdom: 0800-488-488
e-mail: info@omega.co.uk
It is the policy of OMEGA to comply with all worldwide safety and EMC/EMI regulations that
a p p l y. OMEGA is constantly pursuing certification of its products to the European New Appro a c h
D i rectives. OMEGA will add the CE mark to every appropriate device upon cert i f i c a t i o n .
The information contained in this document is believed to be correct, but OMEGA Engineering, Inc. accepts
no liability for any errors it contains, and reserves the right to alter specifications without notice.
WARNING: These products are not designed for use in, and should not be used for, patient-connected applications.
Page 3

All Rights Reserved, Copyright © 1988
Notes
• The contents of this manual are subject to change without prior notice as a result of
improvements in the instrument’s performance and functions. Display contents
illustrated in this manual may differ slightly from what actually appears on your screen.
• Every effort has been made in the preparation of this manual to ensure the accuracy
of its contents. However, should you have any questions or find any errors, please
contact OMEGA Engineering.
i
Page 4
SAFETY PRECAUTIONS
This recorder is developed to satisfy and to be used under the following conditions:
• It is a component type instrument to be installed on an instrumentation panel or
rack.
• It complies with the IEC class II safety standard.
• It complies with the EN61010-1 safety standard.
• It complies with the CSA1010-1 safety standard.
• It is based on EN55011 (EMI) Group 1, Class A (for commercial and industrial use).
• It complies with the EN50082-2 (EMS) safety standard.
General definitions of safety symbols used on the recorder and in this manual:
Make sure to comply with the following safety precautions. Not complying might result in
injury, death of personnel, or cause damage to the instrument. We assume no liability for
customer’s failure to comply with these requirements.
Where this mark is found on the In-position of bistable push control
recorder there is danger of injury
or death.
Please check the manual carefully
Power ON Alternating current
Out-position of bistable push control
Power OFF Functional earth terminal (This
terminal should not be used as a
Equipment protected throughout by “Protective earth terminal”.)
double insulation or reinforced insulation
(Class II)
WARNING
Power Supply
Ensure the source voltage matches the voltage of the power supply before turning
ON the power.
Grounding
Make sure to ground the recorder before turning on the power.
Necessity of Grounding
Grounding is necessary to prevent noise interference.
Do not Operate in an Explosive Atmosphere
Do not operate the recorder in the presence of flammable liquids or vapors.
Operation of any electrical instrument in such an environment constitutes a safety
hazard.
Keep Away from Live Circuits
Inside this recorder there are areas of high voltage; therefore, never touch the
interior when the power supply is connected. The recorder has replacable parts
and subassemblies; however, the replacement must be carried out only by our
service personnel.
External Connection
Before connecting to measurement and control unit, connect the grounding wire.
ii
Page 5

Using the Technical Manual
This manual contains information about the instrument’s functions and operating
procedures as well as precautions that should be observed during use. To ensure
proper use of the instrument, please read this manual thoroughly before operating it.
Keep the manual in a safe place for quick reference whenever a question arises.
Two manuals are provided with the instrument, including this Technical Manual.
Manual Name Description
User’s Manual Basic information for recorder operators.
Technical Manual Detailed technical manual for recorder engineers,
Structure of this Manual
This Manual is intended for technicians in charge with installing, and wiring, and with the
making of the recorder settings.
The additional User’s Manual is intended for simple daily operation of the recorder.
including mounting, wiring and setting
information.
Read this manual first.
Chapter Title Content
1 Preparation Read this before unpacking the recorder. List of accesories
2 Regular Settings Explains the Regular Setting mode mode, in which daily-
3 Basic (SETUP) Settings Explains the Basic (SETUP) Setting Mode, for the
4 Calibration and Explains how to calibrate the recorder and how to
Adjustment adjust pen, dot and ribbon posiions.
5 Periodic Inspection About periodic maintenance and cleaning of the recorder.
6 Troubleshooting Explains the meaning of error messages on recorder
Index
and explanation of the basic functions and display. Also
describes the mounting and wiring required before use.
used settings such as input range, recording span, alarm
setpoints, and chart feed speed are made.
adjustment of a whole range of detailed settings such as
the pen’s position, dot printing postion and color, the noise
input filter, a remote trigger settings.
display and a troubleshooting check list.
iii
Page 6

Using the Technical Manual
Conventions Used in this Manual
Displayed characters
Bold alphanumeric characters enclosed with [ ] refer to characters or setting values that
are displayed on the screen.
Symbols
The following symbol marks are used to attract the operator’s attention.
Affixed to the instrument. Indicates danger to personnel or
instrument and the operator must refer to the User’s Manual.
ThinUser’s Manual to indicate the reference.
WARNING
CAUTION
Note
Describes precautions that should be observed to prevent injury or
death to the user.
Describes precautions that should be observed to prevent minor or
moderate injury, or damage to the instrument.
Provides important information for the proper operation of the
instrument.
iv
Page 7

1
2
3
4
5
6
Index
Contents
SAFETY PRECAUTIONS ................................................................................................................ ii
Using the Technical Manual ......................................................................................................... iii
Chapter 1 Preparation........................................................................................................................... 1-1
1.1 Checking Accessories and Appearance ............................................................................... 1-1
1.2 Removing Packings.............................................................................................................. 1-2
1.3 Checking Model Codes ........................................................................................................1-3
1.4 Front/Rear Panels: Functions and Display ........................................................................... 1-4
1.5 Handling Precautions ...........................................................................................................1-6
1.6 Mounting............................................................................................................................... 1-7
1.7 Wiring .................................................................................................................................1-10
Chapter 2 Regular Settings .................................................................................................................. 2-1
2.1 Introduction to Regular Settings ........................................................................................... 2-1
2.2 Setting Input Range and Recording Span ............................................................................ 2-3
2.3 Setting Alarm Functions........................................................................................................ 2-8
2.4 Adjusting the Chart Speed..................................................................................................2-10
2.5 Setting the Dot Printing Interval (Dot Model) ...................................................................... 2-11
2.6 Setting the Key-Lock ..........................................................................................................2-12
Chapter 3 Basic (SETUP) Settings ...................................................................................................... 3-1
3.1 Introduction to Basic (SETUP) Settings................................................................................3-1
3.2 Setting Relay for post-Alarm (de-)Energizing ....................................................................... 3-4
3.3 Setting Alarm Hysteresis ...................................................................................................... 3-5
3.4 Selecting A/D Integration Time (Pen Model).........................................................................3-6
3.5 TC Burnout Registration Method ..........................................................................................3-7
3.6 Setting the Noise Input Filter (Pen Model)............................................................................3-8
3.7 Setting Moving Average Calculation (Dot Model) ................................................................. 3-9
3.8 Offset Values ......................................................................................................................3-10
3.9 Assigning Channel Printing Colors (Dot Model) ................................................................. 3-12
3.10 Selecting Celsius or Fahrenheit..........................................................................................3-13
3.11 Remote Trigger for Recording or Chart Speed................................................................... 3-14
Chapter 4 Calibration and Adjustment................................................................................................ 4-1
3.12 Protecting Settings .............................................................................................................3-15
3.13 Initializing Settings..............................................................................................................3-16
4.1 Calibration ............................................................................................................................4-1
4.2 Re-adjusting the Pen-Position (Pen Model) ........................................................................4-3
4.3 Re-adjusting the Dot-Position (Dot Model) .......................................................................... 4-5
Chapter 5 Periodic Inspection ............................................................................................................. 5-1
5.1 Periodic Inspection ............................................................................................................... 5-1
Chapter 6 Troubleshooting .................................................................................................................. 6-1
6.1 Error Messages .................................................................................................................... 6-1
6.2 Troubleshooting.................................................................................................................... 6-2
Index ................................................................................................................................ Index-1
v
Page 8
1
Chapter 1 Preparation
1.1 Checking Accessories and Appearance
Checking and Unpacking
This recorder has been thoroughly inspected before shipment; however, when you
receive the recorder, check that all accessories are present and in the correct quantities.
Also check the external appearance of the recorder to ascertain that no damage has
occurred.
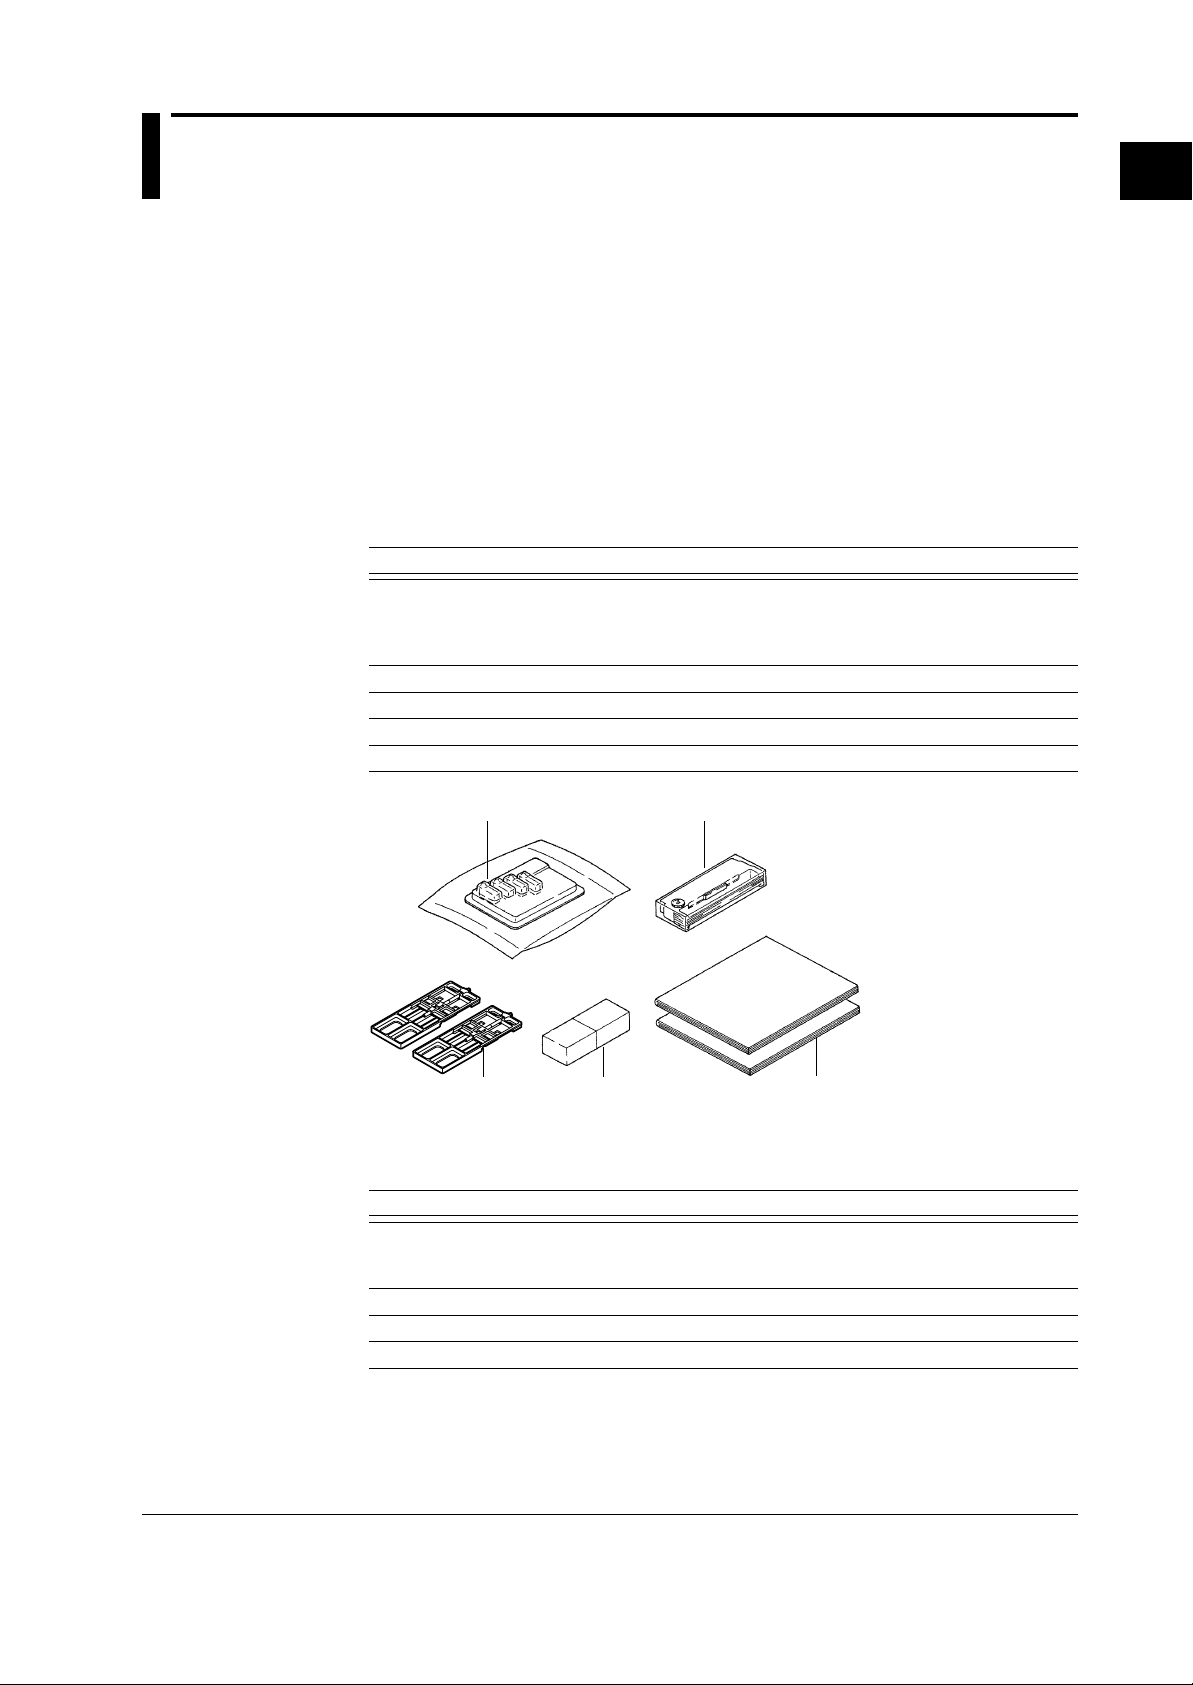
Checking Accessories and Appearance
The recorder should be accompanied by the accessories indicated below. Check that all
are present in the correct quantities. Also check the external appearance of the recorder
to ascertain that no damage has occurred.
Accessories
No. Name Quantity Remarks
1 Disposable felt pen Only for pen models
1-pen model 1 Red
2-pen model 2 Red, green
3-pen model 3 Red, green, blue
2 Ribbon cassette 1 Only for dot model
3 Mounting brackets 2
4 Z-folded chart paper 1 Approx. 16 meter
5 Instruction manuals 2 1 User’s Manual & 1 Technical Manual
Preparation
1
34
Spare Parts
Name Part No. Quantity* Remarks
Disposable felt pen (red) RD260-01 3 Only for pen models
Disposable felt pen (green RD260-02 3 Only for pen models
Disposable felt pen (blue) RD260-03 3 Only for pen models
Ribon cassette RD260-RC 1 Only for dot model
Mounting brackets B9962CG 2
Z-folded chart paper RD260ZFP 10 Approx. 16 meter
*The amount of items per ordered Part No.
2
5
1-1
Page 9
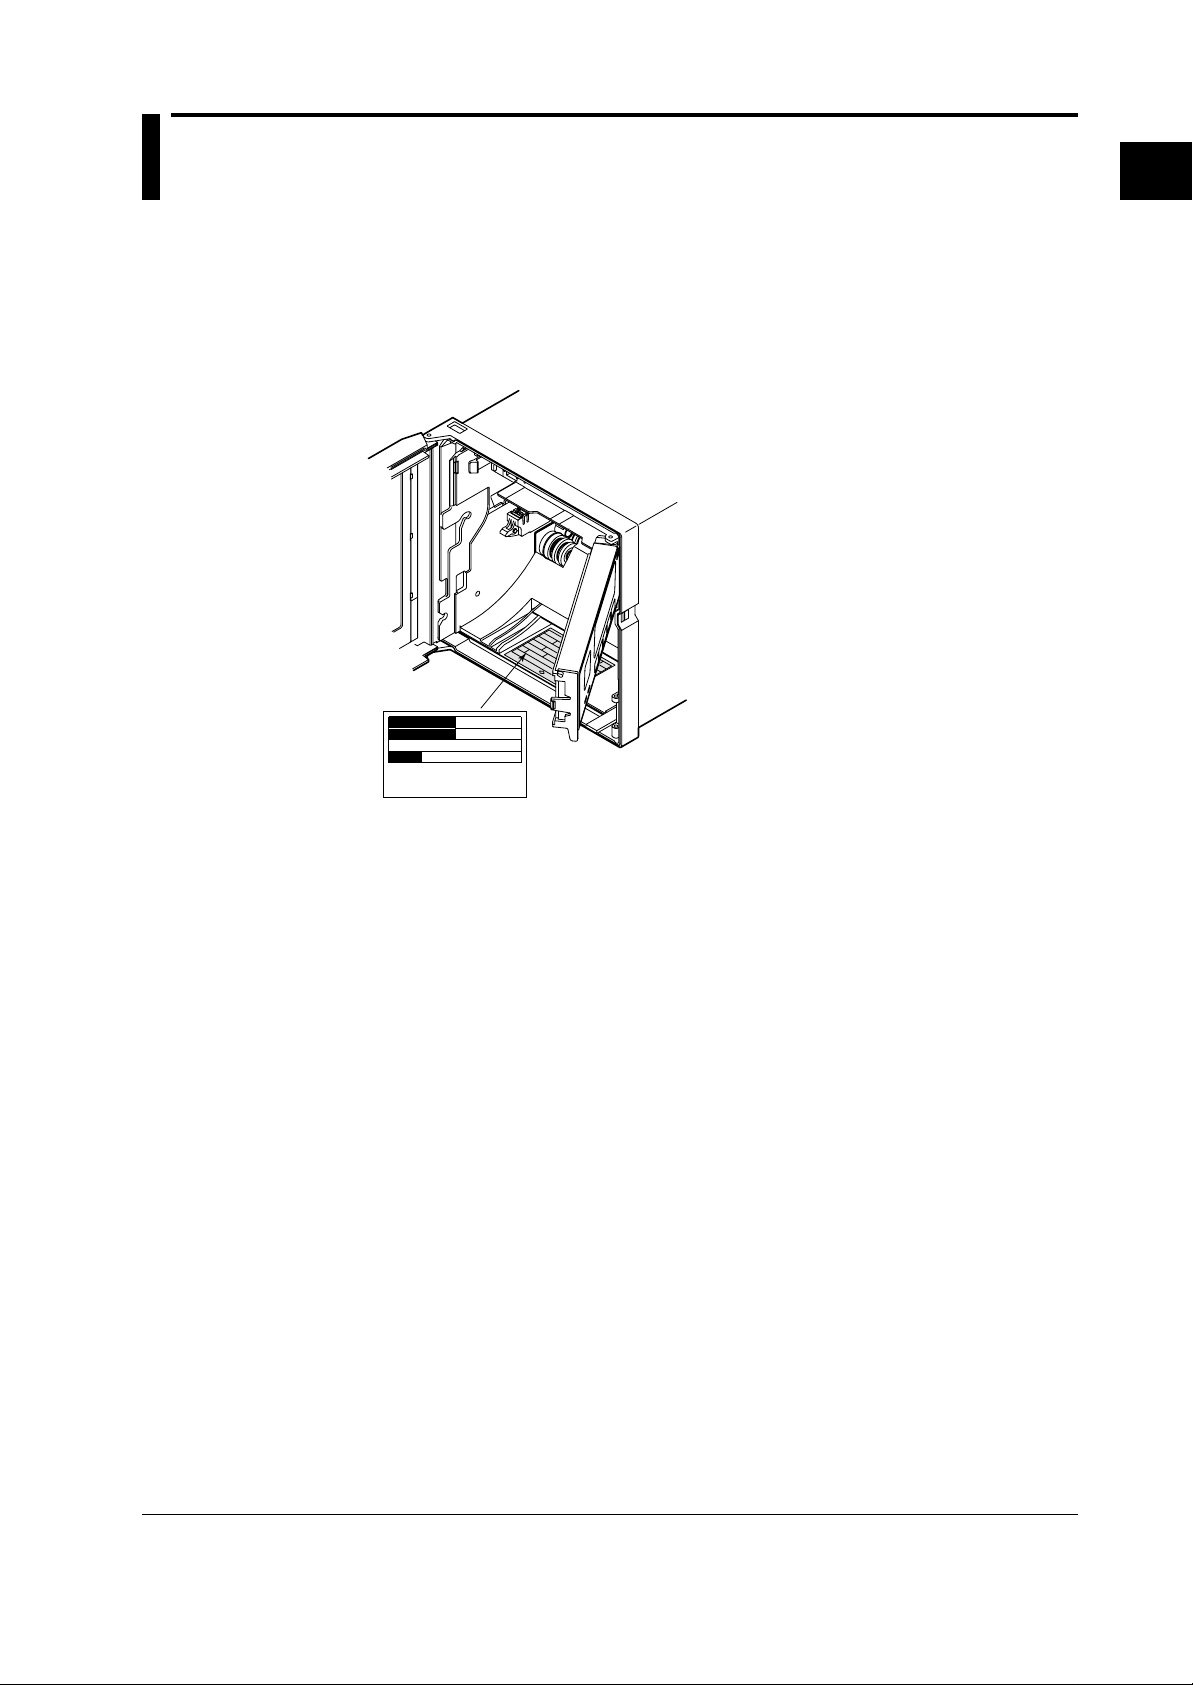
1.2 Removing Packings
The internal assembly is secured in position by packings to safeguard against damages
during transit. Before you unpack the recorder please read the following.
Opening the front door
Open the front door by pushing and then puling the clip on the right, as shown below,
and open the display by pulling its left end after removing the adhesive tape.
Do not push the display bar
further after you feel a click.
CAUTION
• Please take care not to apply any undue pressure in an
upward or downward direction to the display.
This might cause a strain on the hinges.
100°
• When you open the display further than about
100 degrees you will feel a clicking resistance which
marks the largest possible opening for the display. Do
not try to open the display further than upto that point
as it may break.
Removing Protective Lock Screw and Packings
Pen model Dot model
Packing material
Display
4 Status display
CH DATA
RCD ALM
5 Display
ESC
RCD CH UPFEEDMENU
2 Key panel
3 Chart cassette
1 Power switch
1-2
Page 10
1
1.3 Checking Model Codes
MODEL
SUFFIX
NO.
Check the model codes on the nameplate to make sure they are as specified by your
order.
The nameplate is visible after you removed the chart cassette and is as shown in the
figure below. When you contact Omega, inform the model code (MODEL) and the serial
number (No.).
MODEL
SUFFIX
NO.
OMEGA
Made in Japan
Nameplate
Preparation
1-3
Page 11

1.4 Front/Rear Panels: Functions and Display
Front Panel
5 Display
CH DATA
RCD CH UPFEEDMENU
ESC
2 Key panel
3 Chart cassette
1 Power switch
4 Status display
RCD ALM
1.Power switch (push-button type)
Pressing the switch turns the power ON and OFF.
2.Key panel (push-key type)
The panel contains the follwing five keys:
RCD
ESC
DISP
FEED
RCD key
Pressing the key starts or stops the recording.
DISP key, ESC key
DISP function: Cycles through the modes of display in the order of
AUTO, MANUAL, and OFF. Also selects between the Regular Setting
mode and Operation mode (see Section 2.1).
If this key is pressed for three seconds, the recorder enters the Regular
Setting Mode.
ESC function: Exits from the menu in the middle of setting or selecting
procedures.
key
Selects setting parameters (numerics or command codes). Selecting
step is upward circulation.
If the recorder is a pen model, pressing this key for three seconds in
operation mode causes the recorder to enter the pen-replacement
mode.
FEED key, key
FEED function: The chart is fed as long as this key is being pressed.
key function: Changes the number of digits for setting numeric
values. The digit moves from high to low.
1-4
CH UP
CH UP key , ENT key
CH UP function: Selects a channel for which the display shows the
screen in the MANUAL display mode.
function: Makes a parameter entry or executes a function after
selecting parameters (numerals or command codes). Pressing the key
executes the settings.
Page 12
1
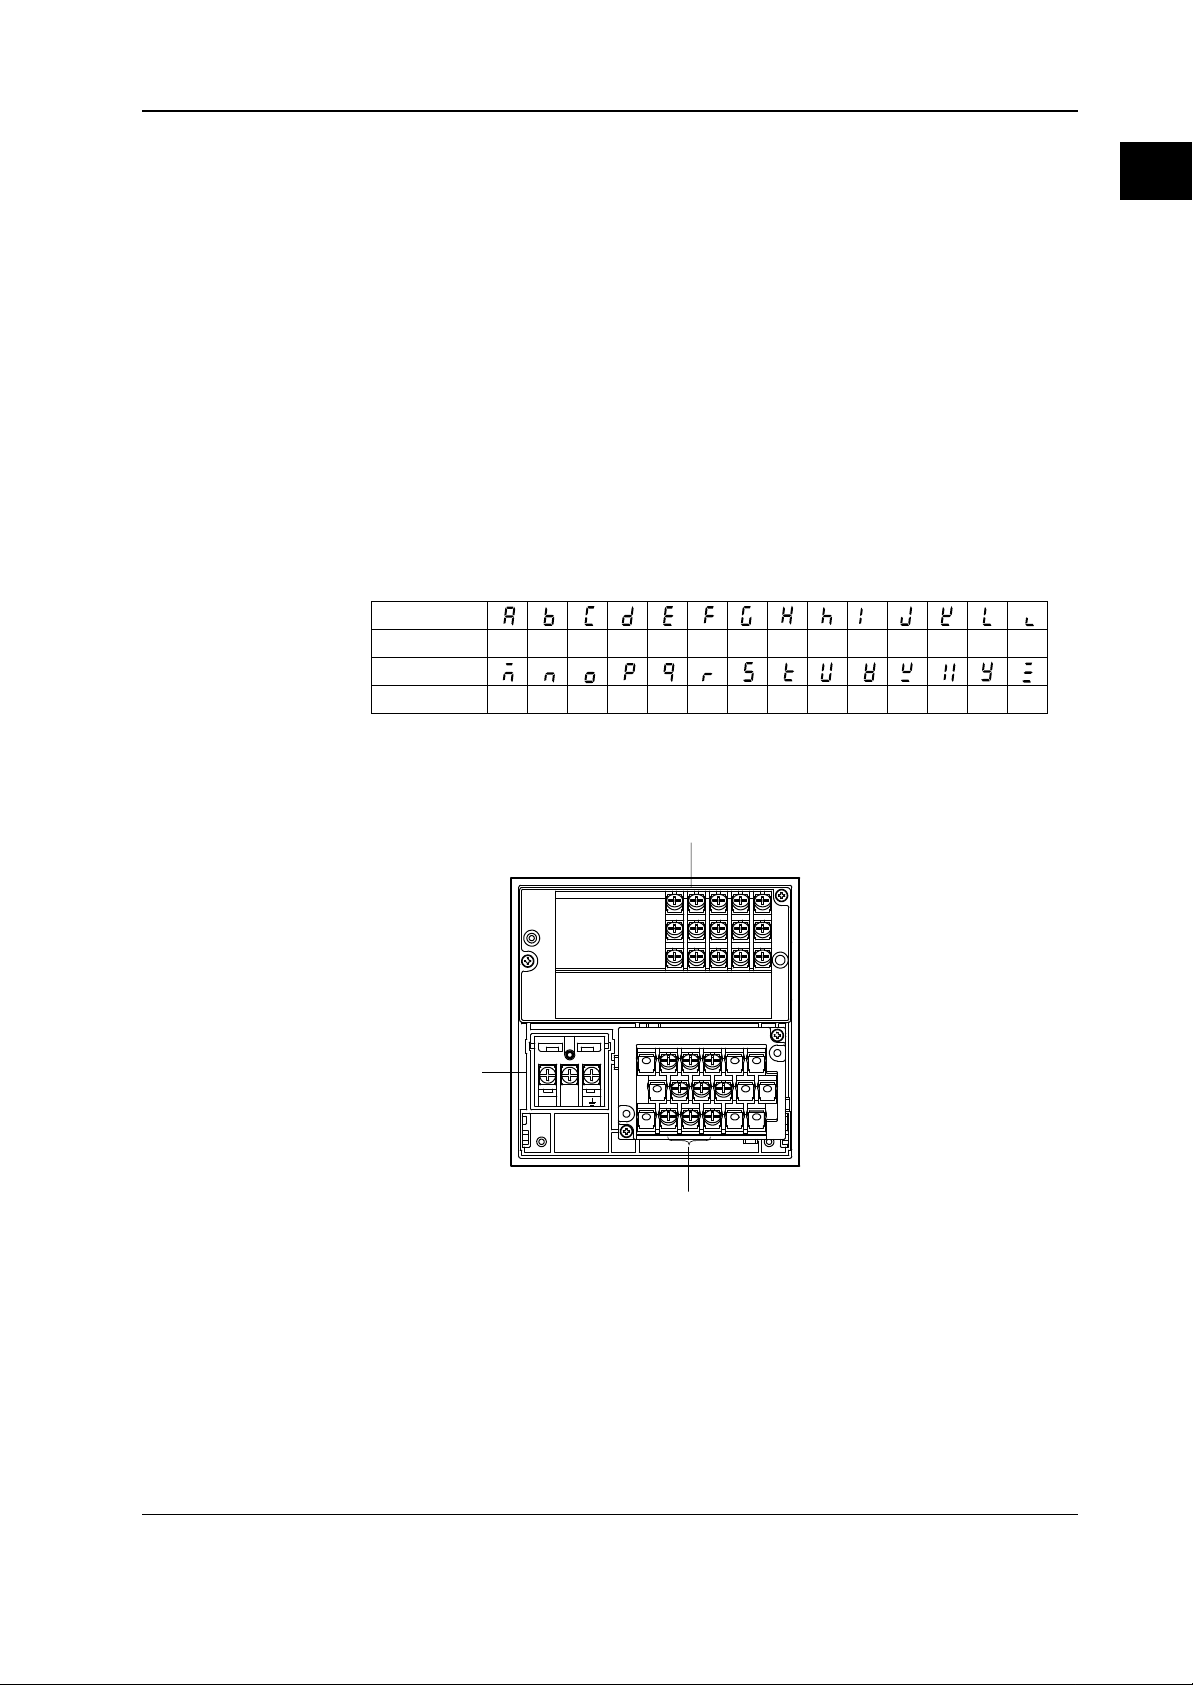
Characters on Display
The display consists of seven segments, and therefore characters exist which are
difficult to display.
Characters are presented on the display as shown in the following table.
Front/Rear Panels: Functions and Display
3.Chart cassette
Contains a Z-fold chart (width: 100 mm, length: 16 m).
4.Status Display
RCD indicator: Illuminated when recording of measurement values is in progress.
ALM indicator:Will illuminate when an alarm occurs.
5.Seven-segment character display
Used to display data, setting screen, etc.
• Data display: Displays channel No., type of alarms, and measured data.
• Setting screen: Displays various settings of the recorder.
Display
Alphabet
Display
Alphabet
A
BCDEFGHhI JKLl
MN OP QR S TUVWXY Z
Preparation
Rear Panel
Below, the rear panel of the dot model reorder, for more details and the rear of the pen
model recorder see Section 1.7,
Power terminal
L
N
Wiring
.
Optional terminals
Input terminals
1-5
Page 13

1.5 Handling Precautions
Safety precautions
• Before you use this recorder make sure to read the Safety Precautions on page 2 of
this manual.
• Do not touch the interior of this recorder. For the replacement of parts, please
contact OMEGA Engineering.
• Turn the recorder power switch off as soon as any symptoms of malfunction such as
unusual sound, smell, or smoke yield from the recorder. Also turn the main power
switch off. If a malfunction occurs, contact OMEGA Engineering.
General handling precautions
• The recorder contains many plastic parts. To clean, use a soft, dry cloth. Do not
use chemicals such as benzene or thinner, since these may cause discoloration or
damage.
• Do not bring any objects charged with static electricity near the signal terminals.
This might cause malfunction.
• Do not allow any volatile substances to the front or key panel. Do not allow rubber
or vinyl to remain in contact with the recorder for long periods.
• Whenever the recorder is not used, turn the power switch OFF.
1-6
Page 14
1
1.6 Mounting
Before mounting the recorder make sure to read this chapter carefully.
Installation Site
Panel and rack mounting
• The recorder is designed to be installed on an instrumentation panel or rack.
Well ventilated location
• Install the recorder in a well ventilated site to prevent internal overheating.
Avoid mechanical vibration
• To install the recorder in a location susceptible to mechanical vibration will adversely
Horizontal installation
• The recorder must be installed horizontally from left to right. Backward or forward
Avoid direct sunshine or heater radiation.
• The recorder will be adversely affected if the unit is exposed to direct sunlight or
Keep out of soot, steam, moisture, dust, corrosive gases
• The recorder will be damaged if exposed to soot, steam, moisture, dust, corrosive
Avoid electro-magnetic fields
• To use the recorder within strong electro-magnetic fields may cause malfunction.
Preparation
affect the mechanical parts and the quality of recording. Please choose an installation site with minimal mechanical vibration.
mounting may slant 0˚ to 30˚.
installed near a heater. Choose a location near room temperature (23˚C) with
minimal temperature fluctuation.
gases, etc.,
Please avoid installing near electro-magnetic objects.
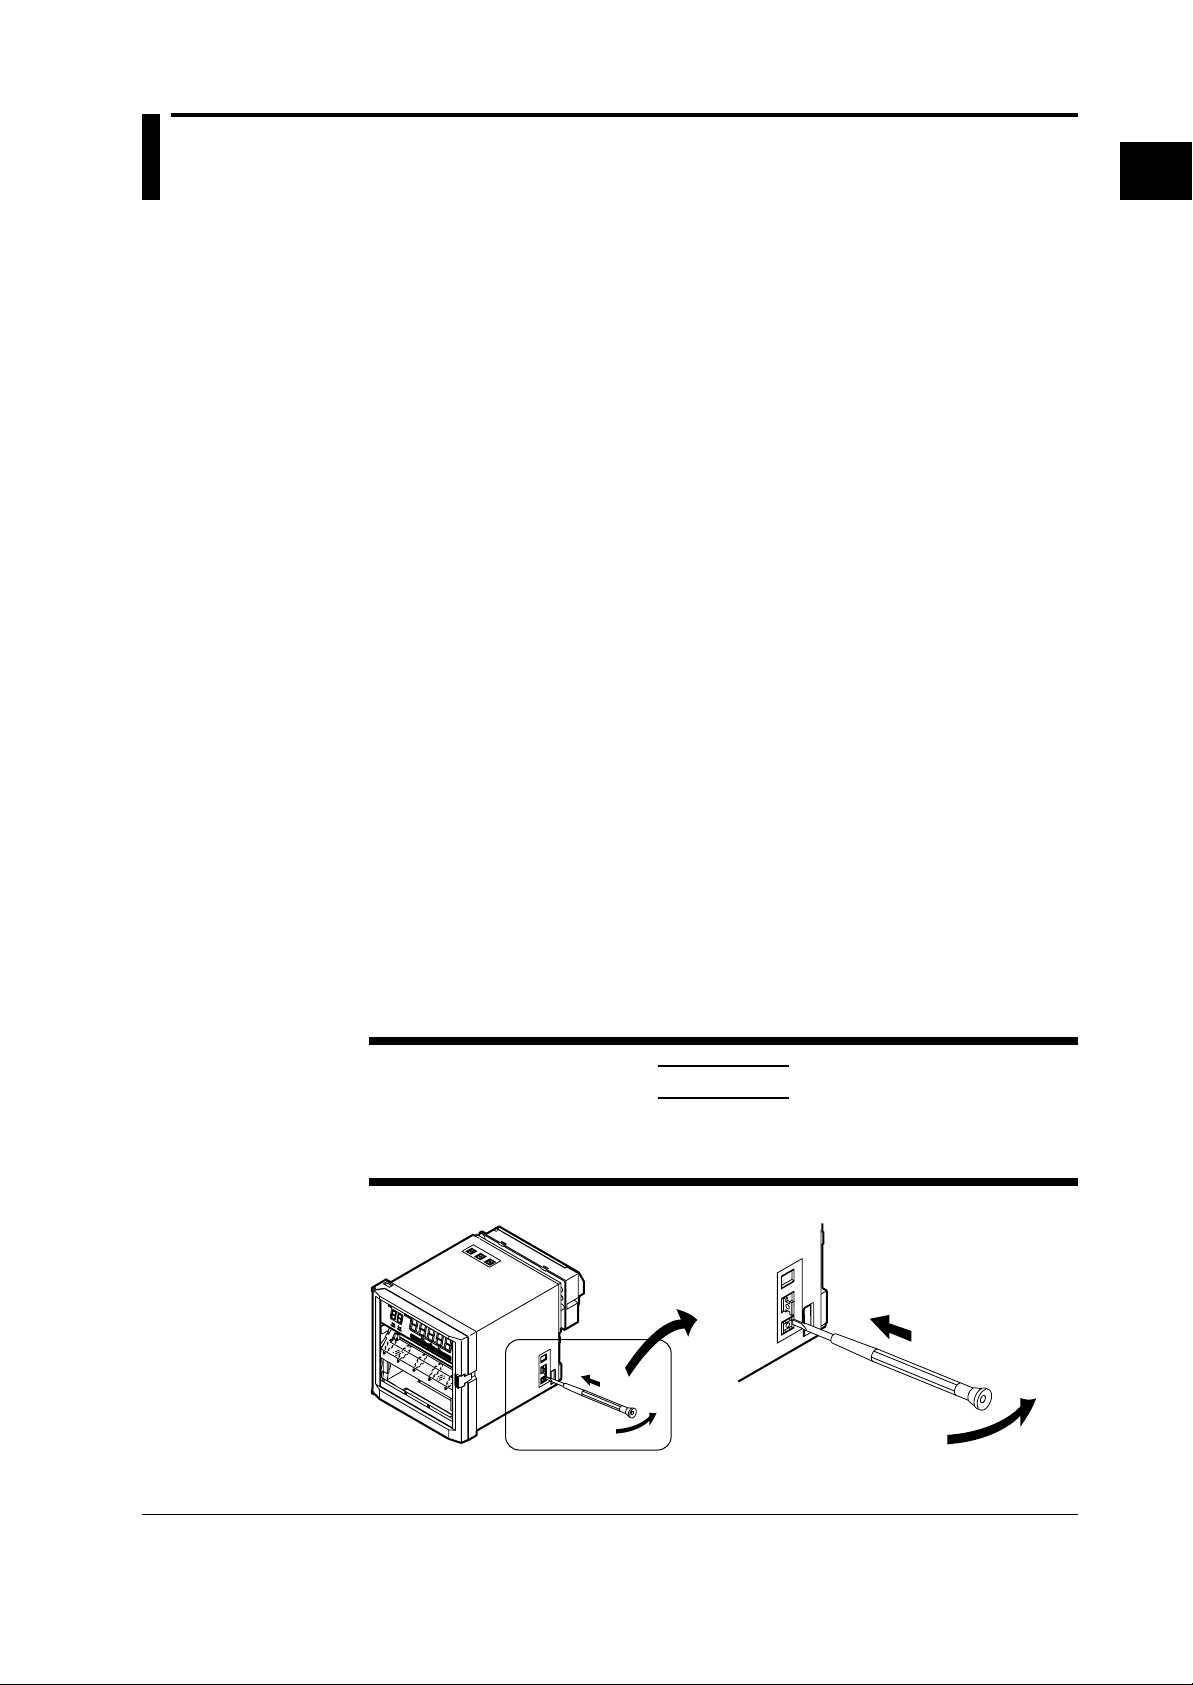
Mounting Methods
1 The recorder has three small square windows lined on the right, left, bottom and top
of the recorder to apply mouting brackets. Remove the plastic inside frames of the
square windows ,as shown in the below illustration, by flipping them out with a
small screwdriver. Don’t let the frames fall inside.
CAUTION
• Take care not to damage the interior of the recorder when flipping the plastic
frames out of the windows. Don’t insert the driver too far.
2 Insert the recorder into the panel-front face (continued on next page).
1-7
Page 15

Mounting
3 Mount the recorder on a steel panel which thickness is at least 2 mm (and up to 26
mm).
Fix the recorder to the panel using the mounting brackets as shown in below.
Adequate screw tightening torque is approximately 3 to x kg-cm. A pair of mounting
brackets can be applied to the recorder’s top and bottom, or to both side faces.
CAUTION
• A tightening torque exceeding the above-mentioned adequate values may cause
deformation of the recorder case or brackets.
Mounting bracket
1-8
Page 16
1
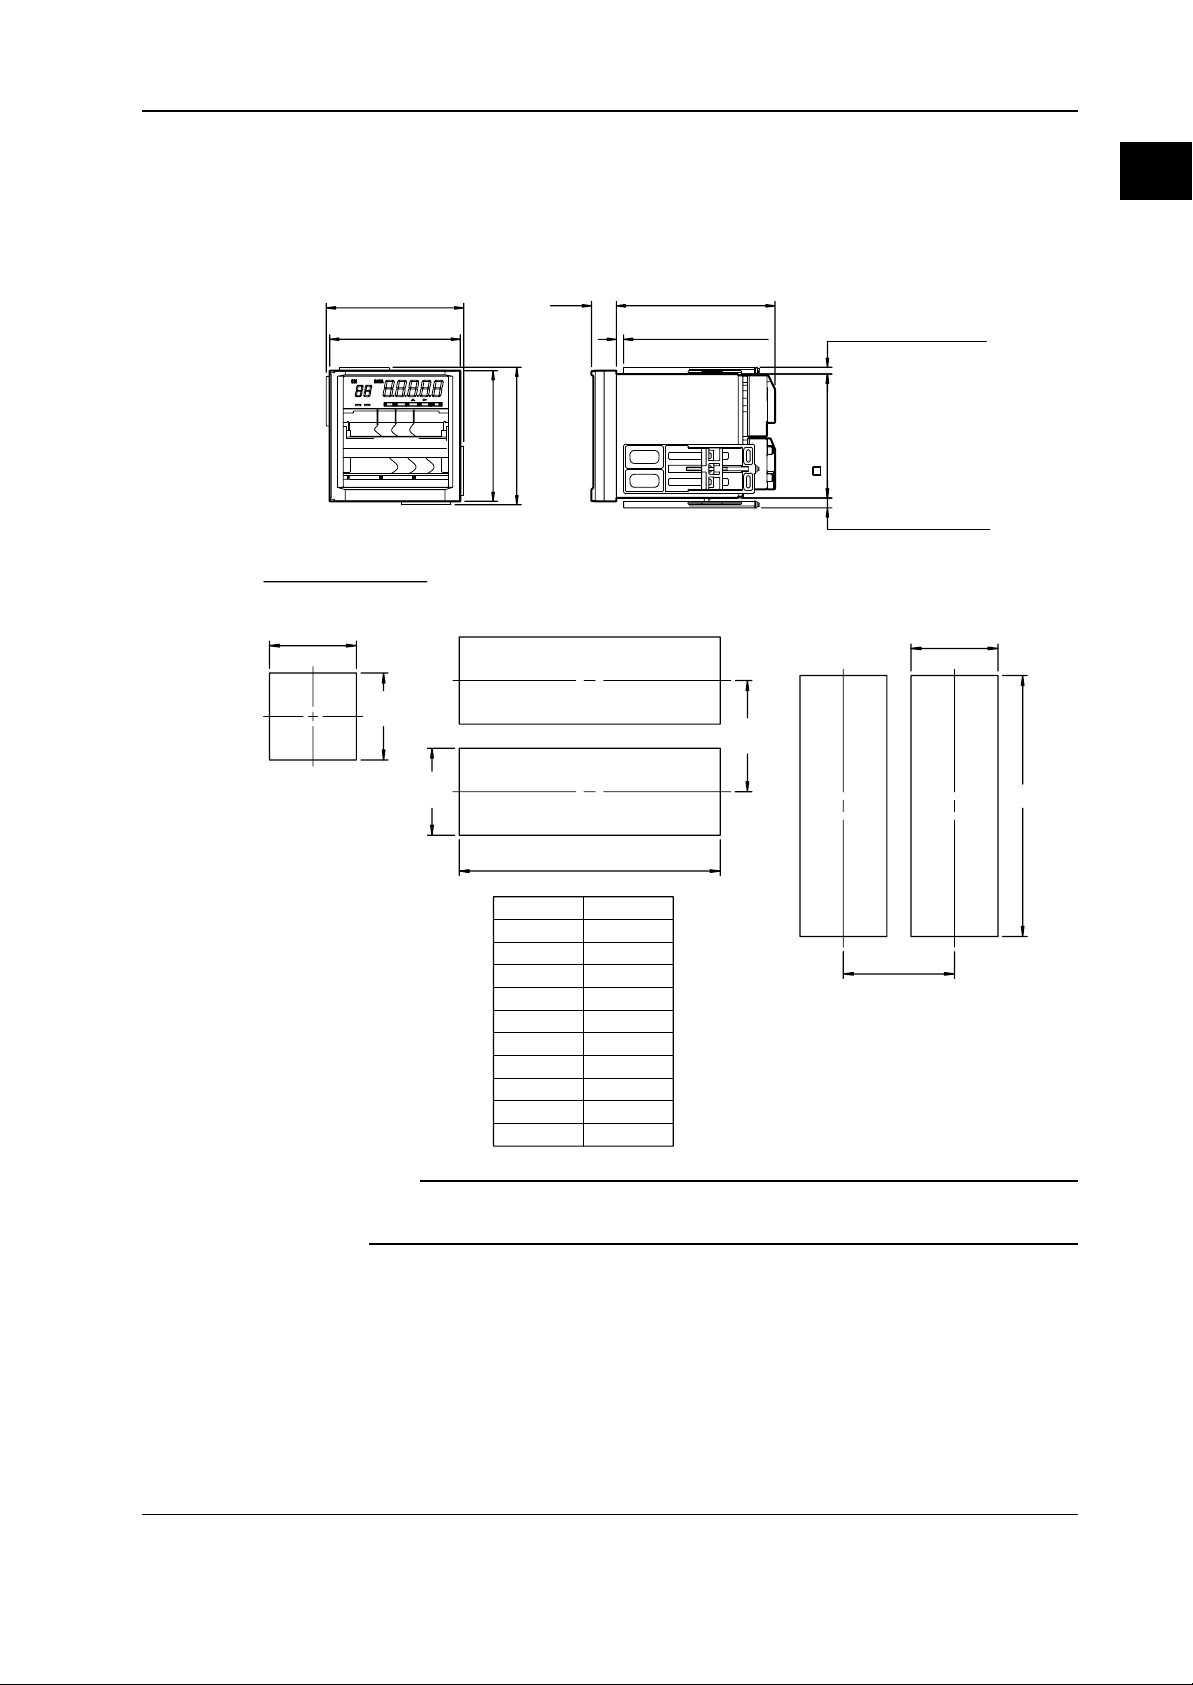
External Dimensions
Panel Cutout and External Dimensions (including Mounting Brackets).
Unit : mm (approx. inch)
If not specified, the tolerance is ± 3%. When less than 10 mm, however, tolerance is ± 3 mm.
151.5 (5.96)
144 (5.67)
Panel Cutout & Spacing
Single-Unit Mounting
+2
137
0
(5.39)
27.5
144 (5.67)
(1.08)
151.5 (5.96)
175
2 to 26 (panel thickness)
Side-by-Side Mounting (horizontally)
(6.89)
Mounting
(min. space for mounting )
(0.3)
0
+0.2
(5.37)
136.5
(dimension after mounting )
11 7.5
(0.43)
Side-by-Side Mounting (vertically, max. 3 units)
+2
137
0
(5.39)
Preparation
+2
137
0
(5.39)
137
(5.39)
+2
0
+2
L
0
+2
(mm)
Units
L
0
175 MIN
(6.89)
2 282
3 426
4 570
5 714
175 MIN
(6.89)
6 858
7 1002
8 1146
9 1290
10 1434
n
(144xn)-6
Note
• A pair of mounting brackets should be used on the top and bottom, or on both sides of the
recorder.
+2
L
0
1-9
Page 17
1.7 Wiring
Wiring should be done only after you have read this section. The section consists of the
following subsections:
page:
1-10 Rear Panel Terminal Arrangement
1-11 Power Supply Wiring
1-12 Input Signal Wiring
1-14 Alarm Output Wiring
1-15 Remote Control Wiring
• Make sure to fasten the wiring at the rear wall of the mounting panel and
employ some kind of strain relief between the rear wall and the recorder to
prevent an electric shock.
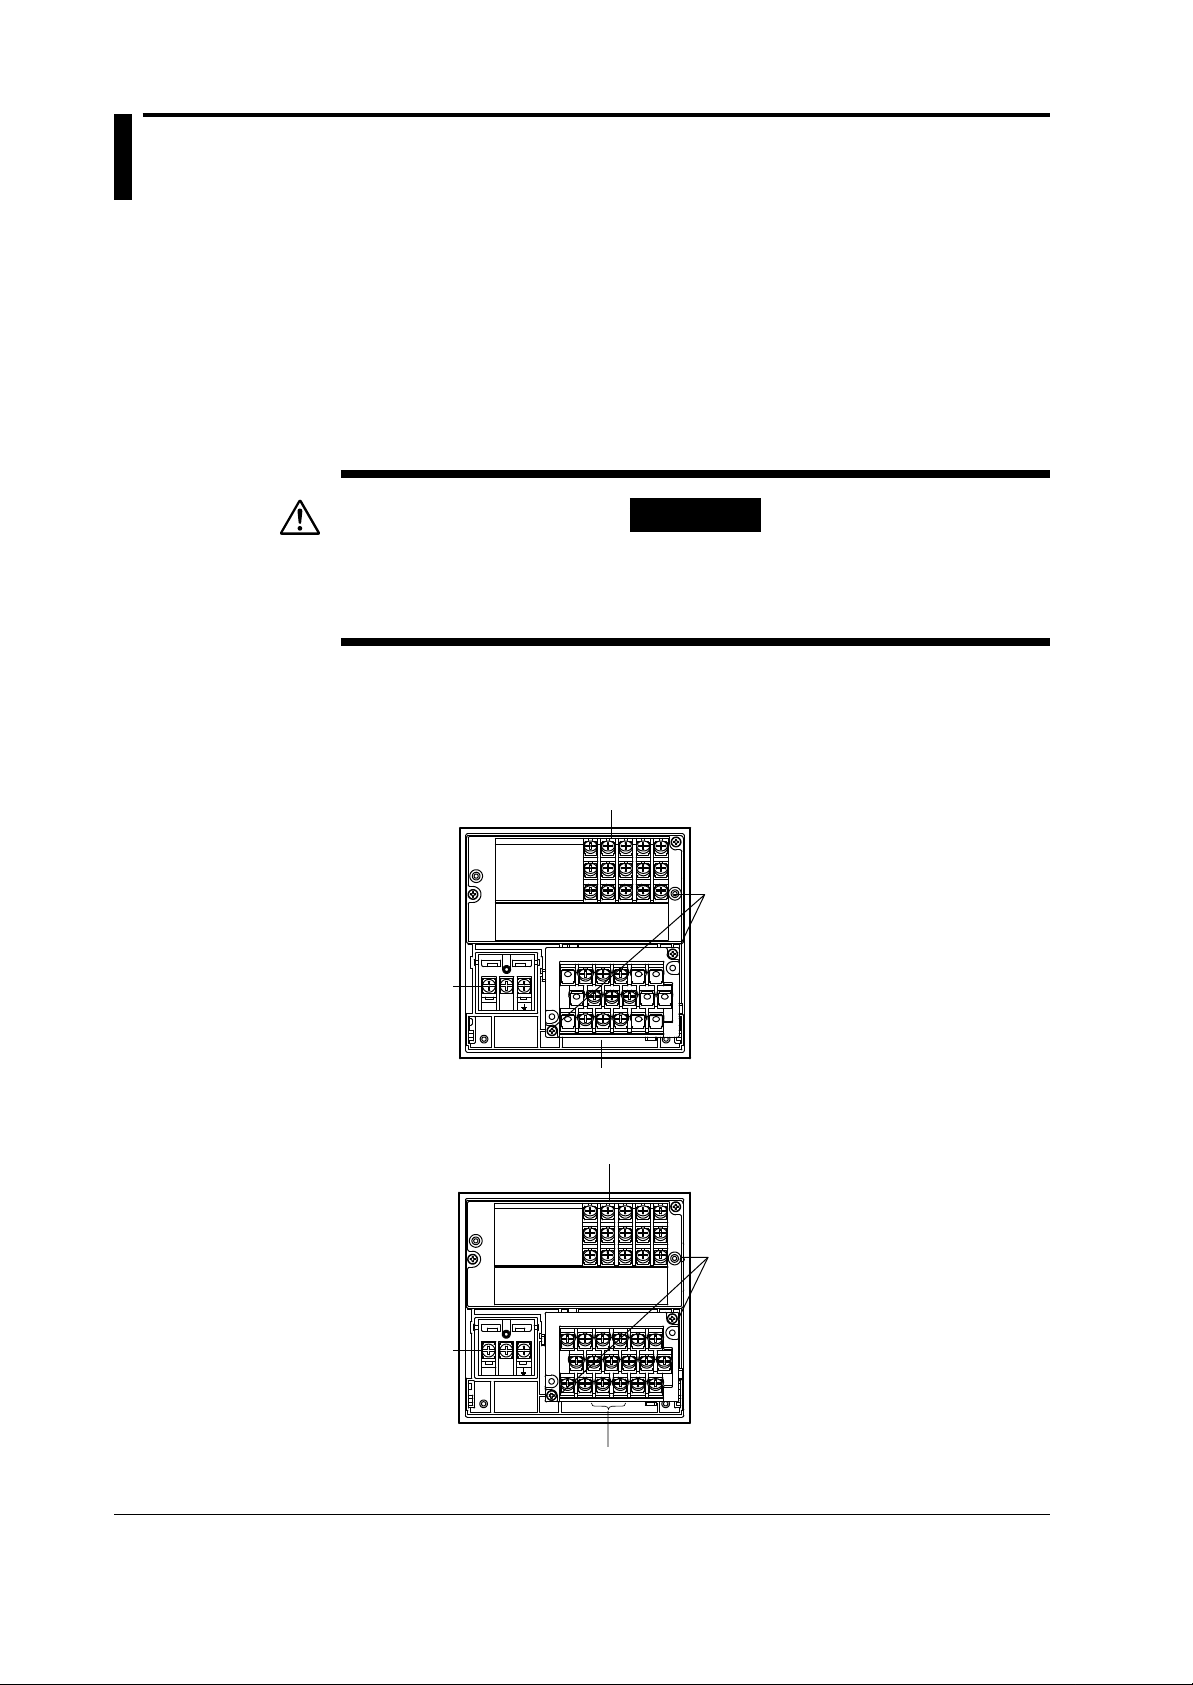
Rear Panel Terminal Arrangement
WARNING
Pen Model
Power terminal
Dot-Printing Model
Power terminal
Optional terminals
Terminal screws: ISO M4,
nominal length 6 mm
The terminal blocks can be
detached from the case by removing
these screws for easy wiring.
Tighten the terminal screws
L
N
Input terminals
Optional terminals
L
N
properly to ensure proper contact.
Terminal screws: ISO M4,
nominal length 6 mm
The terminal blocks can be
detached from the case by removing
these screws for easy wiring.
Tighten the terminal screws
properly to ensure proper contact.
1-10
Input terminals
Page 18
1
Power Supply Wiring
Wiring
Preparation
WARNING
• To prevent an electric shock, ensure the main power supply is turned off before
wiring.
• To prevent fire, use 600 V PVC insulated wire (AWG18) for power and ground
wiring (cross sectional area of 0.83 mm2 or thicker, anti-galvanic corrosion finish,
insulation thickness should be more than 0.8 mm, insulation resistance ahould
be more than 50 M Km at 20˚C, approved EN60 320 (VDE0625) ), or
equivalent cables.
• Connect the protective grounding wire to the earth through grounding resistance
less than 100 before turning on the power .
• Use crimp on lugs (for 4 mm screws) with insulation sleeves.
• To prevent an electric shock, cover the power terminals certainly with the
transparent cover.
• Make sure to apply a power switch with the following characteristic:
rated power current > 1A
rated rush current > 60A
fuse(s) of 2 to 15A
Wiring method
1 The rated power supply voltage for the recorder is 100 to 240 V AC.
2 Turn the recorder’s power switch OFF.
3 Open the transparent cover of the power terminal after releasing the cover screw.
4 Connect the power supply wires and the protective ground wire to the terminal. To
prevent an emission of electromagnetic disturbances, separate the input wires from
the other wires at least 0.1 m. Over 0.5 m is recommended.
5 Cover the terminals with the transparent cover, and secure the screw.
Power Supply Wiring
LN
Functional earthing cord
Power supply wires
Note
• Do not apply a power supply in the range from 132 V to 180 V AC. Doing so might affect the
measuring accuracy.
• To prevent emission of electromagnetic disturbances, separate the power supply wires from the
other wires at least 0.1 m. Over 0.5 m is recommended.
1-11
Page 19
Wiring
Input Signal Wiring
WARNING
To prevent an electric shock, ensure the main power switch is turned off when wiring.
CAUTION
Do not apply inputs exceeding the rated range as follows to prevent the recorder
from damage:
• Maximum input voltage
±10 V DC for TC, and for the voltage range of 2 V DC or less
±30 V DC for the voltage range of 6 to 20 V DC
• Maximum common mode voltage
250 V AC rms (50/60 Hz)
• This instrument complies with Installation Category II.
1 Turn off the recorder power switch.
2 Remove the transparent cover for the input signal terminals.
3 Connect the input signal wires to the terminals. To prevent an emission of electro-
magnetic disturbances, separate the input wires from the other wires at least 0.1 m.
Over 0.5 m is recommended.
4 Attach the cover on the terminals, and secure the screws.
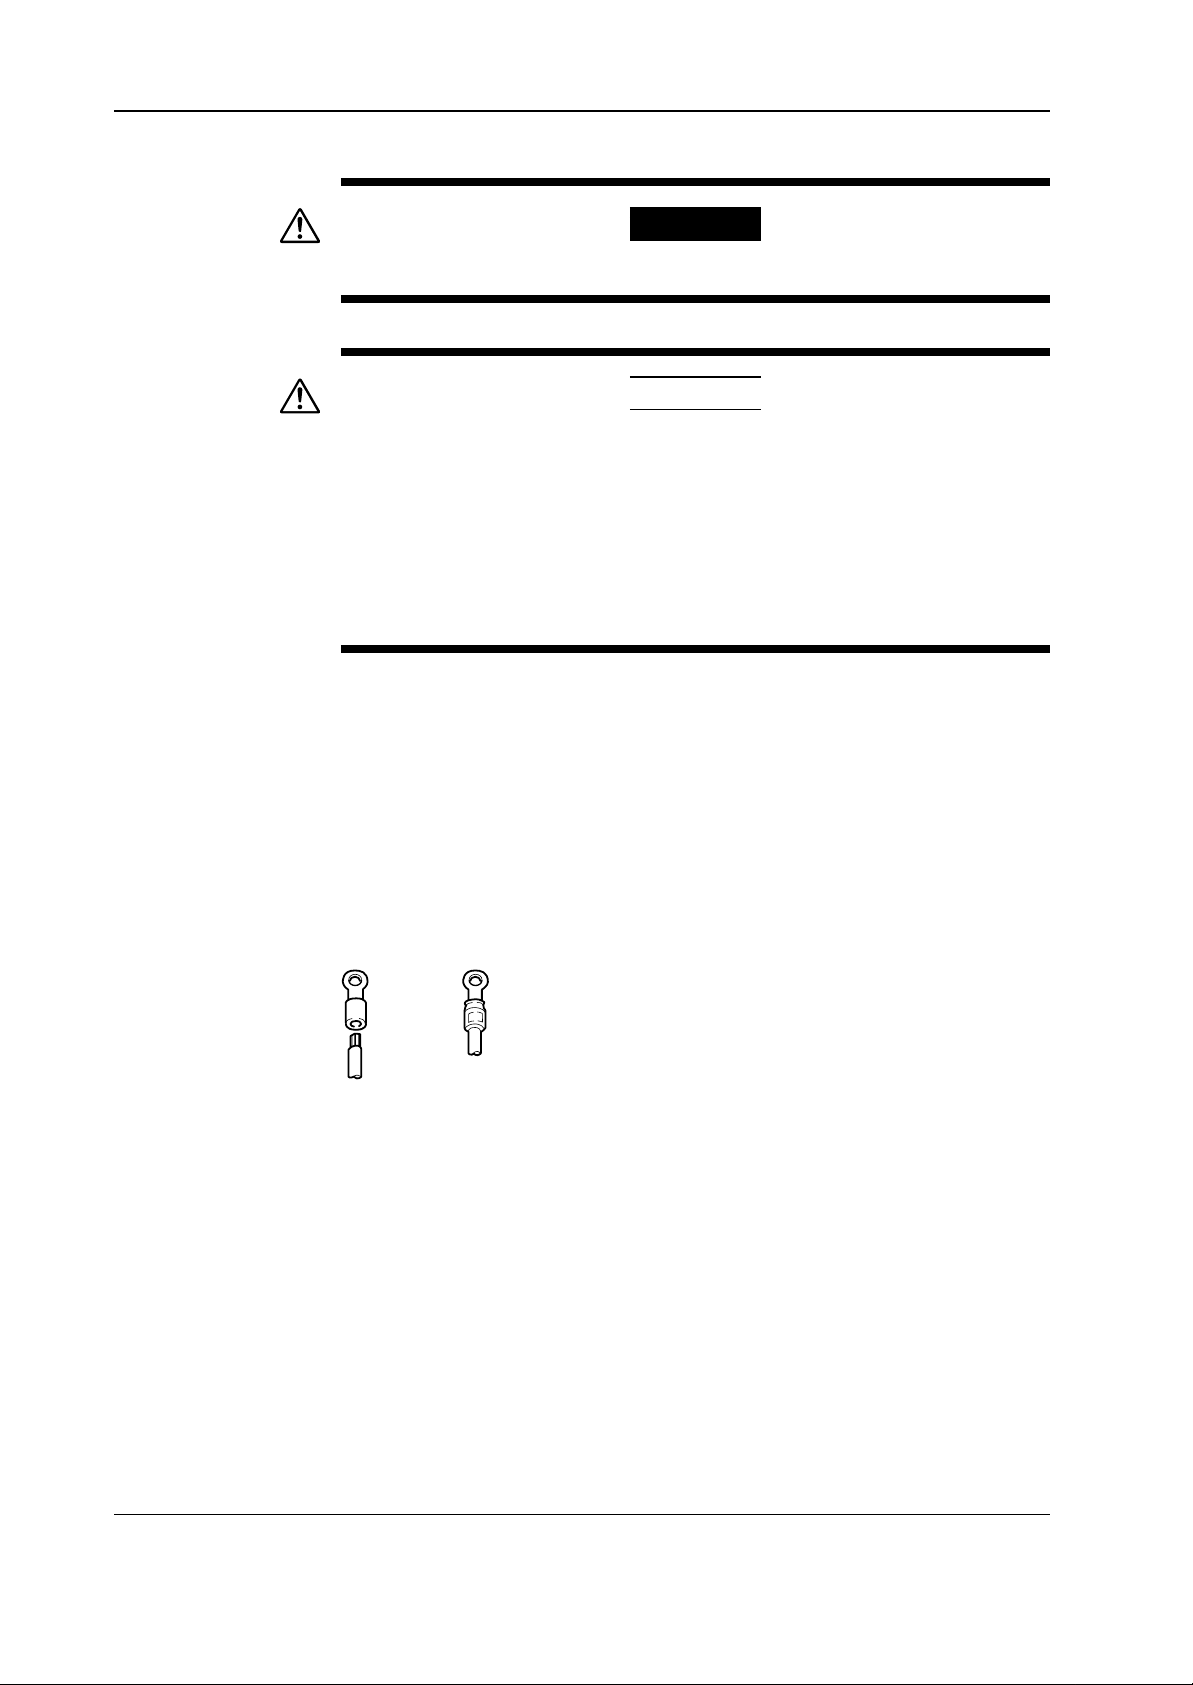
It is recommended to use the crimp-on lugs (for 4 mm screws) with insulation sleeves for
lead wire ends, but they are not required for thermocouples (TC) .
Crimp-On Lugs
Suggestions to minimize noise pickup:
• Separate the measuring-signal wires from power lines and grounding lines.
• It is desirable that the measuring object is not a noise source; if not, insulate it from
the measuring signal wires and ground the object.
• It is recommended to use shielded wires to minimize noise pickup from an electrostatic induction source. The shields are connected to the recorder’s grounding
terminal, if necessary. In that case, avoid two-point grounding.
• To minimize the noize from an electrostatic induction noise, twist the measuring
wires (a pair of wires) in short and equal intervals.
• The grounding line must have low resistance.
1-12
Page 20
1
Wiring
For TC (thermocouple) inputs the ambient temperature around the recorder’s terminal
board should be kept as stable as possible.
• Cover the input terminals with the transparent cover.
• Do not use a large-diameter wire (cross sectional area of more than 0.5 mm
because it has a large radiation rate.
• Keep the ambient temperature as stable as possible; start/stop of a nearby fan can
considerably affect the temperature.
If input signal wires are connected to two or more receivers with parallel connection,
measured values sometimes affect each other. The following notes should be observed
for parallel connection:
• Ground each receiver at the same point.
• Do not turn on/off the power of a receiver while other receivers are in measuring
operation.
• A resistance temperature sensor (RTD) cannot be used essentially in parallel
connection.
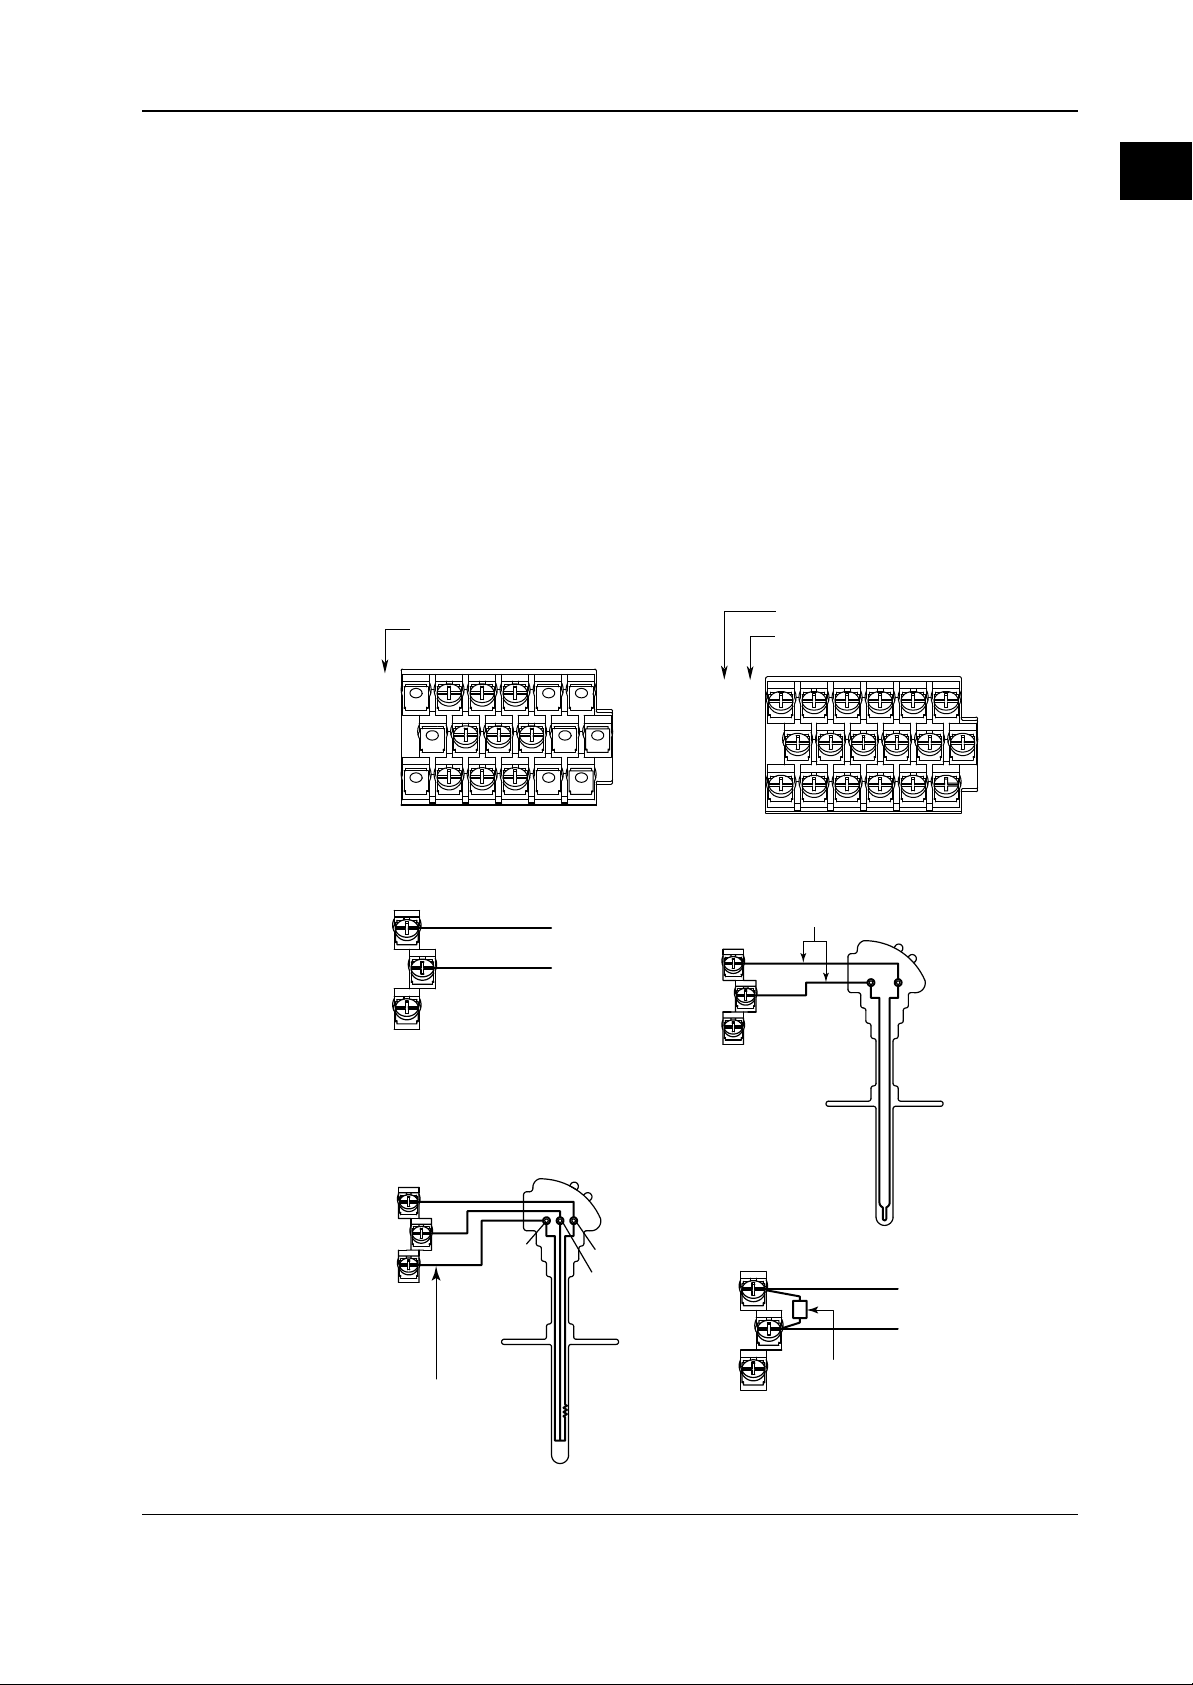
Terminal Board (Pen Model) Terminal Board (Dot Model)
DC Voltage, TC
1 ch 2 ch 3 ch
RTD
DC Voltage, TC
1 ch 2 ch 3 ch 4ch 5 ch 6 ch
2
)
Preparation
+
_
Input terminal
Wiring for Input Terminals
DC voltage Inputs
+
--
RTD input (for dot model only)
A
B
b
+
DC voltage Input
B
A
b
A
+
_
B
b
Input terminals
TC input
Extension wires
+
-
DC current input
+
-
+
DC current input
-
Wire resistance per
one line: 10 Ω or less
Three wires should
have the same
resistamce values
Example: The shunt resistor rating
is 250 Ω ± 0.1% for the current input
of 4 to 20 mA.
Shunt resistor
1-13
Page 21

Wiring
Alarm Output Wiring (optional)
To prevent an electric shock, ensure the power switch is turned off before wiring.
Depending on the type (the number of outputs) of alarm relay options, the terminal
arrangement changes as shown in the following:
Alarm Output Terminal Arrangements
NO
NC
ALARM
1
C
NO
NC
WARNING
2
C
-A2 Option
(2 outputs)
1234
NO
NC
NO
C
NC
NO
C
NC
NO
C
NC
C
-A4 Option
(4 outputs)
Contact characteristics
Output type : Relay transfer contacts
Output capacity : 250 V AC (50/60 Hz), 3 A. 250 V DC, 0.1 A (resistive load)
Dielectric strength : 1500 V AC (50/60 Hz) for one minute between output
terminals and grounding terminals
Wiring method
1 Turn the power switch off.
2 Remove the transparent cover of the optional terminals.
3 Connect the alarm output wires to the optional terminals.
To prevent an emission of electromagnetic disturbances, separate the alarm output
wires from the power supply and input wires at least 0.1 m. Over 0.5 m is recommended.
4 Cover the terminals with the transparent cover and secure the screws.
ALARM
1-14
Page 22

1
Remote Control Wiring (optional)
To prevent an electric shock, ensure the power switch is turned off before wiring.
Remote Control Terminals Arrangements:
Input characteristics
Input signal:
Dry contact, open-collector (TTL or transistor) signal.
Control functions and signal types:
(1) Recording start/stop level
(2) Chart speed change level
Signal characteristics:
ON voltage 0.5 V or less (30 mA DC)
Leakage current in OFF state 0.25 mA or less
Signal duration 250 ms or more
Input types:
Photocoupler isolation (one line common).
Internal isolated power source (5 V ±5%).
Dielectric strength:
500 V DC for one minute between input terminals and grounding terminal.
Wiring
Preparation
WARNING
REMOTE
1
2
C
Wiring method
1 Turn the power switch off to revent an electric shock.
2 Remove the transparent cover of the optional terminals.
3 Connect the wires for remote control to the optional terminals. The C is the terminal
common to other 1 to 2. To prevent an emission of electromagnetic disturbances,
separate the input wires from the other wires at least 0.1 m. Over 0.5 m is recommended.
4 Cover the terminals with the transparent cover and secure the screws.
Note
• Use shielded cables for remote control signals to prevent noise pickup. The shield should be
grounded at the recorder’s terminal.
1-15
Page 23

2
Chapter 2 Regular Settings
2.1 Introduction to Regular Settings
Three Recorder Modes
Operation Mode
This is the mode for daily operation, described in the ; when the power turns on, the
recorder automatically enters this mode.
Select from the following functions by pressing the appropriate keys on the key panel.
key Replacement of pens (pen model only). See
RCD key Starting/stopping the recording.
FEED key Feeding the chart. See
DISP key Selection from the modes on display. See
Regular Setting Mode
In the Regular Setting mode, described in this Chapter, daily-used settings such as input
range, recording span, alarm setpoints, and chart feed speed are made. Pressing the
DISP key three seconds in the operation mode changes the mode to the Regular Setting
mode.
Basic (SETUP) Setting Mode (see Section 3)
In the Basic (SETUP) Setting Mode, you can adjust a whole range of detailed settings
such as the pen’s position, dot printing postion and color, the noise input filter, and
remote trigger settings. Enter this mode by turning the power ON while pressing the CH
UP(ENT) key.
User’s Manual
User’s Manual
Section 2.1.
User’s Manual
Regular Settings
Section 2.5.
Section 1.1.
Note
While in the Basic (SETUP) mode, measurement, recording, and alarm detection are not carried
out.
Using the settings protection function, you can protect your settings by defining a password when
you enter the Regular or Basic (SETUP) mode.
Turning the Recorder Modes ON
Power ON while pressing
Power ON
Operation
mode
Mode changes to the other by pressing
the DISP key for three seconds.
Regular
Setting mode
Turning the Recorder Modes OFF
Power ON
the CH UP (ENT) key.
Basic
SET UP mode
Leaving the Basic SET UP
mode is done by the
SET UP END procedure.
Power ON while pressing
the CH UP (ENT) key.
SET UPQUIT
Password
Operation
mode
*1
*1 Mode changes to the other by pressing
the DISP key for three seconds.
*1
Password
Regular
Setting mode
Leaving the Basic SET UP
mode is done by SET UP
END procedure.
Basic
SET UP mode
2-1
Page 24

Introduction to Regular Settings
Flow Chart Regular Setting Mode
Range
Type
Type
Span (L)
Span (L)
Span (L)
Span (R)
Span (R)
Span (R)
2.2 Voltage input
setting and span
2.2 TC input setting
and span setting
2.2 RTD input setting
and span setting
3.8 Offsets (when offset
settings protection function
is ON only)
2.3 Alarm functions
2.4 Chart feed speed
Range
Channel No.
Channel No.
Contact output
Relay No.
Span (L)
Scale (L)
Offset
Alarm level
Span (R)
Scale (R)
Alarm on/off
2.6 Scaling setting
2.2 No measurement,
recording, or display
of unused channel
Alarm
Type of alarm
point
2.5 Dot-printing interval in
analog records (dot model)
2.6 Key lock
2-2
First/second speed
Chart feed speed
: Numeric value input
Page 25

2
2.2 Setting Input Range and Recording Span
Setting Input Range and Recording Span
One of the following parameters can be set for every channel:
SKIP Prevents the specified channel from being measured, recorded and displayed .
VOLT Measures and records DC-voltage.
TC Measures and records temperatures using Thermocouple.
RTD Measures and records temperatures using Resistance Temperature Detector .
SCL Performs scaling on voltage measurements.
Scaling results in appending a different scale to the measured values.
Restrictions apply to the measurable types of input depending on the type of recorder
used. Check your recorder type as indicated on the nameplate (see Section 1.3 for
details on the nameplate), and then refer to the following table:
Model Code Measurable Type of Input
RD260 Voltage (VOLT), thermocouple (TC), SCL
RD266-RTD Resistance temperature detector (RTD, dot–models only)
SKIP Setting
Unused channels can be skipped, which means that these channels will not be measured, recorded or displayed.
Regular Settings
Setting Procedures
ESC
DISP
3 sec
CH UP
CH UP
CH UP
CH UP
or
ESC
DISP
3 sec
Press the DISP key for three seconds to enter the Regular
Setting mode.
Select the [Range] display by using the key.
Then press the ENT key .
.
.
.
.
.
.
Use the key to select the desired channel.
Press the ENT key.
Use the key to select [Skip].
Press the ENT key.
[Range] is displayed and the setting is completed.
Press the ENT key to set another channel; or press the
DISP key for three seconds to return to the Operation mode.
2-3
Page 26

Setting Input Range and Recording Span
Voltage Measurement Setting (VOLT Setting)
If the measured signal is a DC-voltage, the range can be set as follows:
Setting Procedures
ESC
DISP
CH UP
CH UP
CH UP
CH UP
3 sec
Press the DISP key for three seconds to enter the Regular
Setting mode.
Select the [Range] display by using the key.
Then press the ENT key .
.
.
.
Use the key to select the desired channel.
Press the ENT key.
Use the key to select [Volt].
Press the ENT key.
.
.
.
Select the desired range using the keys and press the
ENT key.
Display
Range
–20.00 to 20.00mV
–60.00 to 60.00mV
–200.0 to 200.0mV
–2.000 to 2.000V
–6.000 to 6.000V
–20.00 to 20.00V
CH UP
CH UP
CH UP
FEED
FEED
or
ESC
DISP
3 sec
Select the minimum value of the recording span (SPAN L)
using the
and keys. Then press the ENT key.
The display which appears will allow you to enter the
maximum value of the recording span (SPAN R). Select it
the same way as for the minimum value and press the ENT
key.
The recording span cannot be beyond the input range, nor
can SPAN L be equal to SPAN R.
[Range] is displayed and the setting is completed.
Press the ENT key to set another channel; or press the
DISP key for three seconds to return to the Operation mode.
2-4
Page 27

2
Setting Input Range and Recording Span
Setting Thermocouple and Resistance Temperature Detector (dot model only)
In the case that the measured signal is a TC (Thermocouple), or -for dot models onlyRTD (Resistance Temperature Detector), the range can be set the same way as if it were
a DC-voltage.
Setting Procedures
ESC
DISP
3 sec
CH UP
CH UP
CH UP
CH UP
Regular Settings
Press the DISP key for three seconds to enter the Regular
Setting mode.
Select the [Range] display by using the key.
Then press the ENT key .
.
.
.
Use the key to select the desired channel.
Press the ENT key.
Use the key to select [TC], or [RTD].
.
.
.
Press the ENT key.
Select the desired type (R, S, B, K, E, J, T, N, W, L, U in
.
.
.
case of TC, or PT, JPT in case of RTD) using the
and press the ENT key.
key
TC Type Description and RTD Type Description
CH UP
CH UP
FEED
or
ESC
DISP
3 sec
( Type R )
( Type S )
( Type B )
( Type K )
( Type E )
( Type J )
( Type T )
( Type N )
( Type W )
( Fe-CuNi )
( Cu-CuNi )
TC Type Description
0.0 to 1760.0°C
0.0 to 1760.0°C
0.0 to 1820.0°C
–200.0 to 1370.0°C
–200.0 to 800.0°C
–200.0 to 1100.0°C
–200.0 to 400.0°C
0.0 to 1300.0°C
0.0 to 2315.0°C
–200.0 to 900.0°C
–200.0 to 400.0°C
RTD Type Description
(pt 100 Ω)
(jpt 100 Ω)
–200.0 to 600.0°C
–200.0 to 550.0°C
Range
32 to 3200°F
32 to 3200°F
32 to 3308°F
–328 to 2498.0°F
–328.0 to 1472.0°F
–328.0 to 2012.0°F
–328.0 to 752.0°F
32 to 2372°F
32 to 4199°F
–328.0 to 1652.0°F
–328.0 to 752.0°F
Range
–328.0 to 1112.0°F
–328.0 to 1022.0°F
Select the desired minimum value (SPAN L) and maximum
value of the recording span (SPAN R) in the same way as
described under ‘VOLT setting’.
The recording span cannot be beyond the input range, nor
can SPAN L be equal to SPAN R.
[Range] is displayed and the setting is completed.
Press the ENT key to set another channel; or press the
DISP key for three seconds to return to the Operation mode.
2-5
Page 28

Setting Input Range and Recording Span
Scale Setting (SCL Setting)
To assign a different scale to the measured data, the range can be set as described
below. Note that the measured data which can get a different scale must be of the
voltage (VOLT).
Setting Procedures
ESC
DISP
3 sec
CH UP
Press the DISP key for three seconds to enter the Regular
Setting mode.
Select the [Range] display by using the key.
Then press the ENT key .
CH UP
CH UP
CH UP
CH UP
FEED
.
.
.
.
.
.
.
.
.
Use the key to select the desired channel.
Press the ENT key.
Use the key to select [SCL].
Press the ENT key.
Select the desired range using the key and press the
ENT key.
VOLT Input Ranges
Display
The display which appears will allow you to enter the
minimum value of the recording span. Select the desired
minimum value using the and keys. Then press the
ENT key.
Range
–20.00 to 20.00mV
–60.00 to 60.00mV
–200.0 to 200.0mV
–2.000 to 2.000V
–6.000 to 6.000V
–20.00 to 20.00V
2-6
CH UP
CH UP
FEED
FEED
The display which appears will allow you to enter the
maximum value of the recording span. Select it the same
way as the minimum value and press the ENT key .
The recording span cannot be beyond the input range, nor
can SPAN L be equal to SPAN R.
This display allows you to enter the minimum value of the
scale corresponding to the minimum value of the recording
span. Select it using the and the keys. The position of
the decimal point can be moved using the
is flashing. Note that the allowable range is –19999 to
20000. Then press the ENT key.
key in case [t]
Page 29

2
Setting Input Range and Recording Span
CH UP
CH UP
FEED
or
ESC
DISP
3 sec
This display allows you to enter the desired maximum value
of the scale corresponding to the maximum value of the
recording span. Select it the same way as the minimum
value. Then press the ENT key. Note that the decimal point
will be in the same position as for SCL L. SCL L and SCL R
cannot be same.
In this example, 0.000V input will be scaled to –100.0.
2.000V input will be scaled to 100.0.
[Range] is displayed and the setting is completed.Press the
ENT key to set another channel; or press the DISP key for
three seconds to return to the Operation mode.
Regular Settings
2-7
Page 30

2.3 Setting Alarm Functions
Alarms can be set on the measured data of any channel.
Up to two alarms (i.e. two levels) can be set on one channel.
After an alarm is set, and the measured value reaches the setpoint, the ALM LED will be illuminated.
Alarms can be used on models with the alarm output relay option (-A2, -A4) only.
[H]: High alarm Occurs when a measuring value is on or over the alarm setpoint.
[L]: Low alarm Occurs when a measuring value is under the alarm setpoint.
Setting Procedures
ESC
DISP
CH UP
3 sec
.
.
.
.
.
.
Press the DISP key for three seconds to enter the Regular
Setting mode.
Select [Alarm] by pressing the key, and press the ENT
key.
Select a channel by the key, and press the ENT key.
CH UP
CH UP
CH UP
CH UP
CH UP
FEED
Select an alarm level by the key, and press the ENT key.
Up to two levels can be set.
Select ON/OFF of the alarm settings by the key, and
press the ENT key . Setting [Off] shows [Alarm] and ends
this setting.
Select a type of alarms by the key, and press the ENT
key.
The display which appears will allow you to enter the alarm
value.
Set the alarm value using the and keys. After setting,
press the ENT key .
The decimal point is predetermined by the input range.
Relationship between Input Range and Decimal Points
DC Voltage
Type of Input
–20.00 to 20.00 mV
-60.00 to 60.00 mV
–200.0 to 200.0 mV
–2.000 to 2.000 V
–6.000 to 6.000 V
–20.00 to 20.00 V
Thermocouple/RTD
Position of Decimal Point
XXX. XX
XXX. XX
XXXX. X
XX. XXX
XX. XXX
XXX. XX
XXXX. X
2-8
Page 31

2
Relay Option Alarm Settings
Setting Alarm Functions
The following settings are available only for the model with
relay options (-A2, -A4). For models without these options,
the alarm setting ends by pressing the ENT key until
[Alarm] appears.
CH UP
CH UP
CH UP
Determines whether the relay outputs a signal or not when
an alarm occurs.
Select ON/OFF by the key, and press the ENT key.
Sets the number of the relay after the alarm output ON is
.
.
.
ESC
DISP
or
3 sec
selected. A numeric to be set is selected from I01 to I04 by
the key. Then press the ENT key.
If a number larger than the available number of output
relays is selected, the alarm output will not implemented.
The setting ends with the [Alarm] indication.
When you want to set alarm settings for other channels
continuously, press the ENT key to return to the channel
setting.
In order to return to the operation mode, press the DISP key
for three seconds.
Regular Settings
Note
As a merged function, a combination of remote control option (-R) and alarm output relay option
is available to change the chart speed when an alarm occurs.
2-9
Page 32

2.4 Adjusting the Chart Speed
Relationships between chart speeds and their code numbers are shown below.
Chart Speed (unit: mm/h)
10 15 20 25 30 40 50 60 75 80
90 100 120 150 200 300 600 1200 1500 3000
6000
The data for a dot model (10 mm/h to 1200 mm/h) are shown within the bold border.
Setting Procedures
ESC
DISP
CH UP
CH UP
3 sec
Press the DISP key for three seconds to enter the Regular
Setting mode. Then press the ENT key.
Select [Chart] by pressing the
.
.
.
key.
Using the key, select one of the two kinds of chart speed,
the No.1 and No.2 chart speeds. Then press the ENT key.
The No.2 chart speed identifies the chart speed which takes
effect in case the speed is changed by remote control
(optional function).
For models without the remote control function, the setting
of the No.2 chart speed is invalid.
Select a numeric code referring to the table above using the
key and press the ENT key.
The setting ends with the [Chart] indication.
When you want to continue to set another chart speed ,
press the ENT key. In order to return to the operation mode,
press the DISP key for three seconds.
key, and press the ENT
2-10
Page 33

2
2.5 Setting the Dot Printing Interval (Dot Model)
This recorder prints in FIX or AUTO mode.
In FIX mode, dot printing is performed with a constant interval regardless of the chart
speed (approx. 30 sec).
AUTO mode is provided to prevent the chart from being damaged during repetitive dot
printing. This mode is useful for low chart speeds. The chart is protected from damage
because the printout timing changes with the chart speed (approx. 30 to 90 sec).
Single printout
(0.5mm dia.)
Repetitive dot
printing
FIX AUTO
The initial value is ‘AUTO’. To set the trend recording mode, proceed as follows:
Regular Settings
Setting Procedures
ESC
DISP
3 sec
CH UP
CH UP
ESC
3 sec
DISP
Press the DISP key for three seconds to enter the Regular
Setting mode. Then press the ENT key.
.
.
.
Select the [Trend] display using the key, and press the
ENT key.
Specify [Auto] or [Fix] using the key. Then press the
ENT key.
[Trend] is displayed and the setting is completed. Press the
DISP key for three seconds to return to the Operation mode.
2-11
Page 34

2.6 Setting the Key-Lock
The key-lock can be set to be either ON or OFF for each key separately. Keys which
can be locked are the RCD, and FEED keys.
Setting Procedures
ESC
DISP
CH UP
CH UP
CH UP
CH UP
3 sec
or
ESC
DISP
3 sec
Press the DISP key for three seconds to enter the Regular
Setting mode. Then press the ENT key.
.
.
.
Select the [Key] display using the key, and press the
ENT key.
Select a key to be locked using the key and press the
ENT key.
Select [Lock] to turn the key-lock on or select [Free] to turn
it off, using the
key and press the ENT key.
[Key] is displayed and setting is completed. Press the ENT
key to set another key; Press the CH UP (ESC) key or the
DISP key for three seconds to return to the Operation mode.
2-12
Page 35

3
Chapter 3 Basic (SETUP) Settings
3.1 Introduction to Basic (SETUP) Settings
Three Recorder Modes
OperationMode
This is the mode for daily operation, described in the
turns on, the recorder automatically enters this mode.
Select from the following functions by pressing the appropriate keys on the key panel.
key Replacement of pens (pen model only). See
RCD key Starting/stopping the recording.
FEED key Feeding the chart. See
User’s Manual
DISP key Selection from the modes on display. See
Regular Setting Mode, (see Section 2)
In the Regular Setting mode daily-used settings such as input range, recording span,
alarm setpoints, and chart feed speed are made. Pressing the DISP key three seconds
in the operation mode changes the mode to the Regular Setting mode.
Basic (SETUP) Setting Mode
In the Basic (SETUP) Setting Mode, described in this Chapter,you can adjust a whole
range of detailed settings such as the pen’s position, dot printing postion and color, the
noise input filter, a remote trigger settings. Enter this mode by turning the power on
while pressing the CH UP(ENT) key.
User’s Manual
User’s Manual
Section 2.1.
User’s Manual
; when the power
Section 2.5.
Basic (SETUP) Settings
Section 1.1.
Note
While in the Basic (SETUP) mode, measurement, recording, and alarm detection are not carried
out.
Using the settings protection function, you can protect your settings by defining a password when
you enter the Regular or Basic (SETUP) mode.
Turning the Recorder Modes ON
Power ON while pressing
Power ON
Operation
mode
Mode changes to the other by pressing
the DISP key for three seconds.
Regular
Setting mode
Turning the Recorder Modes OFF
Power ON
the CH UP (ENT) key.
Basic
SET UP mode
Leaving the Regular
Setting mode is done by
the SET UP END procedure.
Power ON while pressing
the CH UP (ENT) key.
SET UPQUIT
Password
Operation
mode
*1
*1 Mode changes to the other by pressing
the DISP key for three seconds.
*1
Password
Regular
Setting mode
Leaving the Basic SET UP
mode is done by SET UP
END procedure.
Basic
SET UP mode
3-1
Page 36

Introduction to Basic (SETUP) Settings
Flow Chart Basic (SETUP) Settings
3.2 Relay for post
alarm (de-)energizing
3.3 Alarm hysteresis
3.4 A/D integration time
(pen model only)
3.5 TC burnout
registration method
3.5 TC burnout on/off
3.6 Noise input filter
(pen model only)
Channel No.
3.7 Moving average calculation (dot model only)
3.8 Offset settings
protection
3.9 Channel printing
colors (dot model only)
3.10 Selecting Celcius
or Fahrenheit
3.11 Remote trigger
setting
Channel No.
Channel No.
Channel No.
3-2
3.12 Protecting settings
(key lock)
Password
Page 37

3
4.2/4.3 Pen/dot position
adjustment
Introduction to Basic (SETUP) Settings
Pen-ZERO adjustment
(pen model only)
Dot-ZERO adjustment
(dot model only)
Pen-FULL adjustment
(pen model only))
Dot-FULL adjustment
(dot model only)
3.13 Initialization of settings
Explanations for these
settings are not in this
manual.Consult your
purchasing source.
Termination of SETUP mode
Basic (SETUP) Settings
: Numeric value input
3-3
Page 38

3.2 Setting Relay for post-Alarm (de-)Energizing
The alarm output relays can be selected to be energizing or de-energizing on alarm.
Using de-energizing, alarm output relay is activated either when an alarm occurs, or
when power off occurs (common for all relays). This enables simple monitoring of power
supply.
The initial value is ‘ENERG’.
Setting Procedure
CH UP
CH UP
CH UP
Energize
De-energize
Press
power switch
NO C NC NO C NC
NO C NC NO C NC NO C NC
Power OFF
Enter the Basic SET UP Mode by turning ‘ON’ the power
while pressing and holding the CH UP (ENT) key until the
SET UP display appears.
Use the key to select the display [Alarm]. Press the ENT
key.
Press the key until the display [Relay] appears. Press
the ENT key .
Use the
ENT key. The display [Alarm] appears.
Alarm OFF
key to select [Energ] or [De_En]. Press the
NO C NC
Alarm ON
3-4
CH UP
CH UP
CH UP
Before leaving the Basic SET UP Mode, you have to store
.
.
.
your new settings. Use the
display, and press the ENT key.
Select [Store] to keep your new settings or [Abort] to abort
the settings, and press the ENT key. After a few seconds,
the Operation Mode will appear.
key to select the [End]
Page 39

3
3.3 Setting Alarm Hysteresis
The alarm hysteresis is the difference between the levels of alarm occurrence and reset.
You can choose between two levels of hysteresis: 0% (=OFF) and approx. 0.5% of the
recording span (=ON) (common for all alarms).
The initial value is ON.
High Limit Alarm (H)
Alarm generated
Alarm setting value
Basic (SETUP) Settings
Setting Procedure
CH UP
CH UP
1V
Measured value
Low Limit Alarm (L)
1V
Alarm generated
Press
power switch
Measured value
- - Hysteresis (approx. 0.5%)
Alarm release
Alarm release
- - Hysteresis (approx. 0.5%)
Alarm setting value
Enter the SET UP Mode by turning the power ON while
pressing and holding the CH UP (ENT) key until the Basic
SET UP display appears.
Use the key to select the display [Alarm]. Press the ENT
key.
CH UP
CH UP
CH UP
CH UP
Press the key until the display [Hys] appears. Press the
ENT key.
Use the key to select the [On], or [Off]. Press the ENT
key . The display [Alarm] appears.
Before leaving the Basic SET UP Mode, you have to store
.
.
.
your new settings. Use the
display, and press the ENT key.
Select [Store] to keep your new settings or [Abort] to abort
the settings, and press the ENT key. After a few seconds,
the Operation Mode will appear.
key to select the [End]
3-5
Page 40

3.4 Selecting A/D Integration Time (Pen Model)
Setting 50-60Hz A/D Integration Time
The purpose of the following setting is to specify which A/D integration time will be used.
Depending on the power supply, the integration time will affect the ability of noise
rejection and therefore the recording.
If the power supply of the recorder and of the measuring object are the same, the effect
of noise will be automatically minimized and the (initial) value of AUTO is the recommended one.
If the power supplies are different, you should select from 50Hz or 60Hz integration time.
The choice depends on the power supply of the instrument with the highest noise level.
There are three possibilities:
• AUTO: integration time depends on the power supply of the recorder. AUTO is the
initial value.
• 50 Hz.
• 60 Hz.
Setting Procedure
CH UP
CH UP
CH UP
CH UP
CH UP
Press
power switch
Enter the SET UP Mode by turning ON the power while
pressing and holding the CH UP (ENT) key until the Basic
SETUP display appears.
.
.
.
.
.
.
Use the key to select the display [Intg]. Press the ENT
key.
Select AUTO, 50Hz or 60Hz according to your situation
using the
[Intg] appears.
Before leaving the Basic SET UP Mode, you have to store
your new settings. Use the
display, and press the ENT key.
Select [Store] to keep your new settings or [Abort] to abort
the settings, and press the ENT key. After a few seconds,
the Operation Mode will appear.
key. Then press the ENT key. The display
key to select the [End]
3-6
Page 41

3
3.5 TC Burnout Registration Method
The purpose of the following setting is to specify where the pens will move in the case of
a TC-burnout. You can choose from moving to the right (UP) or to the left (DOWN).
This is common for every channel. You can select ON or OFF for each channel.
The initial value is [UP], and [OFF] for every channel.
Setting Procedure
CH UP
Press
power switch
.
.
.
Enter the Basic SET UP Mode by turning the power ON
while pressing and holding the CH UP (ENT) key until the
SET UP display appears.
Use the key to select the display [B_Out]. Press the CH
UP (ENT) key.
Basic (SETUP) Settings
CH UP
CH UP
CH UP
CH UP
CH UP
CH UP
CH UP
Use the key to select the display [Mode]. Press the CH
UP (ENT) key.
Select [UP] or [DOWN] using the key. Press the ENT
key.
The display [B_Out] appears.Press the ENT key.
Note that this burnout processing is ON/OFF selectable per
.
.
.
.
.
.
channel.
Use the key to select the display [B_Set]. Press the
[ENT] key.
Select the channel No. using the key for which you want
to specify this burnout processing. Then press the ENT key.
Select [ON] or [OFF]. Then press the ENT key. The display
[B_Out] appears.
CH UP
CH UP
.
.
.
Before leaving the Basic SET UP Mode, you have to store
your new settings. Use the
display, and press the ENT key.
Select [Store] to keep your new settings or [Abort] to abort
the settings, and press the ENT key. After a few seconds,
the Operation Mode will appear.
key to select the [End]
3-7
Page 42

3.6 Setting the Noise Input Filter (Pen Model)
Configuring the Input Filter
Noise in the measured signal can be suppressed in the final measurement by using an
input filter. The purpose of this setting is to select for each channel whether or not to use
a filter, and if so, to select a time constant of damping.
A filter works as follows:
Setting Procedure
CH UP
CH UP
Input
Meas.
values
2, 5 or 10 sec.
when input filter is in use
If a filter is used, the response time can be selected from 2, 5 or 10 seconds. The initial
value is ‘OFF’.
Press
power switch
.
.
.
.
.
.
Response curve
(Filter OFF)
63.2%
Response curve
(Filter ON)
Enter the Basic SET UP Mode by turning ON the power
while pressing and holding the CH UP (ENT) key until the
SET UP display appears.
Use the key to select the display [Filtr]. Press the ENT
key.
Select the channel No. using the key for which you want
to specify a filter. Then press the ENT key.
3-8
CH UP
CH UP
CH UP
CH UP
Use the key to select the type of filter you want to use.
You can choose from no filter (OFF), 2 seconds, 5 seconds
or 10 seconds. Press the ENT key. The display [Filtr] will
appear.
Press the ENT key to continue the setting for other channels.
.
.
.
The filter setting has been completed, but has not been
stored yet. Before leaving the Basic SET UP Mode, you
have to store your new settings. Use the key to select
the [End] display, and press the ENT key.
Select [Store] to keep your new settings or [Abort] to abort
the settings, and press the ENT key. After a few seconds,
the Operation Mode will appear.
Page 43

3
3.7 Setting Moving Average Calculation (Dot Model)
Noise in the measured signal can be suppressed in the final measurement by computing
a moving average. It is possible to record a moving average calculated over the previous
X samples, selectable from the previous 2 to 16 samples. The purpose of the following
setting is to select for each channel whether or not to compute a moving average, and if
so, over how many samples.
One sampling period is 10 seconds. The initial value is ‘OFF.’
Example: (assuming a moving average over 5 samples is selected)
Buffer data for
sample n
1
10.0mV
2
5.0mV
3
0.0mV
4
–5.0mV
5
–10.0mV erased
new data new data
Buffer data for
sample (n+1)
15.0mV
10.0mV
5.0mV
0.0mV
–5.0mV
erased
Buffer data for
sample (n+2)
10.0mV
15.0mV
10.0mV
5.0mV
0.0mV
Basic (SETUP) Settings
Setting Procedure
CH UP
CH UP
CH UP
CH UP
CH UP
Moving
average
Press
power switch
.
.
.
.
.
.
.
.
.
.
.
.
0.0mV
5.0mV
Enter the Basic SET UP Mode by turning ON the power
while pressing and holding the CH UP (ENT) key until the
SET UP display appears.
Use the key to select the display [M_Ave]. Press the
ENT key.
Select the channel No. using the key for which you want
to compute a moving average. Then press the ENT key.
Use the key to select the number of samples. You can
choose from OFF, 2 samples, 3 samples, ... up to 16
samples. Of course you can also select OFF. Press the ENT
key . The display [M_Ave] will appear.
Press the [ENT] key to continue the setting for other
channels.
The moving average setting has been completed, but has
not been stored yet. Before leaving the Basic SET UP
Mode, you have to store your new settings. Use the key
to select the [End] display and press the ENT key.
8.0mV
Select [Store] to keep your new settings or [Abort] to abort
the settings, and press the ENT key. After a few seconds,
CH UP
the Operation Mode will appear.
3-9
Page 44

3.8 Offset Values
Offset Value Security Lock
Configure the recorder so changes can (ON) or cannot (OFF) be made to the Offset
settings in the Regular Setting mode.
When protection is turned on, you can set an offset value in the SET mode.
The initial value is [OFF].
Setting Procedure
CH UP
CH UP
CH UP
CH UP
CH UP
Press
power switch
Enter the SET UP Mode by turning ON the power while
pressing and holding the CH UP (ENT) key until the Basic
SET UP display appears.
.
.
.
.
.
.
Use the key to select the display [Offst]. Press the ENT
key.
Use the key, select either [ON] or [OFF] and then press
the ENT key. The display [Offst] will appear. The setting is
then complete.
Before leaving the Basic SETUP mode, you have to store
your new settings. Use the
press the ENT key .
Select [Store] to keep your new settings or [Abort] to abort
the settings, and press the ENT key. After a few seconds,
the Operation Mode will appear.
key to select [End] and
3-10
Page 45

3
Setting Offsets (Regular Setting)
When recording and showing data using the current input as the reference, measured
values can be corrected within 10% of the span. For example, assume the reading is
1.998 V for the current level of input. If you want to change the reading to 2.000 V, set
0.002 V as the offset. This menu opens only when offset settings protection is turned on
in the SETUP mode.
Setting Procedures
Offset Values
ESC
DISP
CH UP
CH UP
CH UP
CH UP
3 sec
FEED
or
ESC
DISP
3 sec
Press the DISP key for three seconds to enter the SET
mode. Using the
CH UP (ENT) key.
.
.
.
Using the key, select the channel to be configured and
.
.
.
then press the ENT key. Configurable channels are those
whose measuring range is VOLT, TC, RTD or SCL.
Type the value of offset. Use the key to move through
the digits and the
is complete, press the ENT key . Set the offset within 10% of
the recording span.
[Offst] appears and the setting is then complete. To
continue, press the ENT key and start again with channel
selection. Pressing the ESC key while making settings
returns to the screen showing [Offst]. To return to the
OPERA TION mode, hold down the DISP key for 3 seconds.
key, select [Offset] and then press the
key to select a numeral. When setting
Basic (SETUP) Settings
3-11
Page 46

3.9 Assigning Channel Printing Colors (Dot Model)
You can assign any of the six provided colors to any channel. The initial setting is as
follows:
ch.1 = purple
ch.2 = red
ch.3 = green
ch.4 = blue
ch.5 = brown
ch.6 = black
Setting Procedure
CH UP
CH UP
Press
power switch
.
.
.
Enter the SET UP Mode by turning ON the power while
pressing and holding the CH UP (ENT) key until the Basic
SET UP display appears.
Use the key to select the display [Color]. Press the ENT
key.
CH UP
CH UP
CH UP
CH UP
.
.
.
.
.
.
.
.
.
Select the channel No. for which you want to change a
color. Then press the ENT key.
Select the color. Then press the ENT key. The display
[Color] will appear.
Before leaving the Basic SET UP Mode, you have to store
your new settings. Use the
display and press the ENT key.
Select [Store] to keep your new settings or [Abort] to abort
the settings, and press the ENT key. After a few seconds,
the Operation Mode will appear.
key to select the [End]
3-12
Page 47

3
3.10 Selecting Celsius or Fahrenheit
You can set the standard unit of temperature to either Celsius or Fahrenheit.
The default setting for recorders is Celsius.
Setting Procedure
Enter the SET UP Mode by turning ON the power while
pressing and holding the CH UP (ENT) key until the Basic
SET UP display appears.
Use the key to select the display [Rem]. Press the ENT
key.
Choose the standard unit of temperature from[Deg_C]
(degrees Celsius), or [Deg_F] (degrees Fahrenheit). Press
the ENT key . The display [Temp] appears.
CH UP
CH UP
CH UP
Press
power switch
.
.
.
Basic (SETUP) Settings
CH UP
CH UP
.
.
.
Before leaving the Basic SET UP Mode, you have to store
your new settings. Use the
display, and press the ENT key.
Select [Store] to keep your new settings or [Abort] to abort
the settings, and press the ENT key. After a few seconds,
the Operation Mode will appear.
key to select the [End]
3-13
Page 48

3.11 Remote Trigger for Recording or Chart Speed
This paragraph describes the way to change default settings for REMOTE operation.
The settings concerning the REMOTE option are always accessible, and data entry will
be ignored if your instrument is not equipped with this option.
The -R option allows you to execute functions on this instrument by a remote trigger
(contact input).
The functions which can be executed by a remote trigger are:
• start/stop the recording
• change the chart speed to a preset second chart speed
However, the -R terminal has only two terminals, which means that only two functions
can be triggered.
Initially the functions are assigned to the terminals as follows:
1: start/stop the recording [RCD] (Record)
2: change the chart speed to a preset second chart speed [C_Spd] (Chart Speed)
Setting Procedure
CH UP
CH UP
Press
power switch
.
.
.
Enter the SET UP Mode by turning ON the power while
pressing and holding the CH UP (ENT) key until the Basic
SET UP display appears.
Use the key to select the display [Rem]. Press the ENT
key.
CH UP
CH UP
CH UP
CH UP
Select the terminal No. [Rem1] or [Rem2] ( /R1 has two
terminals.) Press the ENT key .
Select the function which you want to assign to that terminal. You can choose from [RCD] (start/stop recording), or
[C_Spd] (second chart speed). Press the ENT key. The
display [Rem] appears.
.
.
.
Before leaving the Basic SET UP Mode, you have to store
your new settings. Use the
display, and press the ENT key.
Select [Store] to keep your new settings or [Abort] to abort
the settings, and press the ENT key. After a few seconds,
the Operation Mode will appear.
key to select the [End]
Note
If you select ‘start/stop recording,’ recording stops if the remote input terminal is open and starts if
the terminal is closed. If you press the RCD key during the startup of remote-controlled recording, recording stops. In contrast, if you press the RCD key during the shutdown of remotecontrolled recording, recording starts. You can start/stop remote-controlled recording even during
the start/stop sequence of recording based on the RCD key.
3-14
Page 49

3
3.12 Protecting Settings
You can protect your settings made in the Regular Setting or Basic SETUP modes using
a password.
• If you select [OFF]:
the choice does not affect operation in any mode.
• If you select [ON]:
You must type in a password to enter the Regular Setting or Basic SETUP modes. The
password discussed here is one you set in the following procedure.
The initial value is [OFF].
Setting Procedure
Basic (SETUP) Settings
CH UP
CH UP
CH UP
CH UP
CH UP
CH UP
Press
power switch
.
.
.
.
.
.
Enter the SET UP Mode by turning ‘ON’ the power while
pressing and holding the CH UP (ENT) key until the Basic
SET UP display appears.
Use the key to select the display [Lock]. Press the ENT
key.
Select [ON] or [OFF]. Press the ENT key. In the case you
selected Off, the setting is completed.
Select a password composed of four digits. After setting is
finished, press the ENT key. The display [Lock] appears.
Before leaving the SET UP Mode, you have to store your
new settings. Use the
press the ENT key .
Select [Store] to keep your new settings or [Abort] to abort
the settings, and press the ENT key. After a few seconds,
the Operation Mode will appear.
key to select the [End] display and
3-15
Page 50

3.13 Initializing Settings
The settings which can be initialized concern the settings done in the Regular setting
Mode only. This initialization does not affect any settings in the Basic SET UP Mode.
Setting Procedure
CH UP
CH UP
CH UP
CH UP
CH UP
Press
power switch
.
.
.
Enter the Basic SET UP Mode by turning ON the power
while pressing and holding the CH UP (ENT) key until the
SET UP display appears.
Use the key to select the display [Init]. Press the ENT
key.
Select [Yes] or [No] using the key.
Press the ENT key . The display [Init] appears.
.
.
.
When leaving the Basic SET UP Mode, and you want to
initialize your settings, select the [End] display with the
key and press the [ENT] key.
Select [Store] to keep your new settings or [Abort] to abort
the settings, and press the ENT key. After a few seconds,
the Operation Mode will appear.
3-16
Page 51

4
Chapter 4 Calibration and Adjustment
4.1 Calibration
Calibration is a comparing operation between standard inputs and measured values.
It is recommended to carry out a calibration once a year to assure the measuring
accuracy.
Required Instruments
The instruments for calibration should have the required resolution. If necessary, ask the
sales office from whom you purchased the recorder about those instruments.
Required instruments:
DC voltage standard
Decade resistance box
Calibration Connections
1. Connect the instruments to the recorder; connecting the terminals is shown below.
Give enough warm-up time to the instruments (more than 30 minutes for the recorder).
Temperature Measurement for Resistance Temperature Detector (RTD)
Calibration and Adjustment
LN
Power
terminals
L
+
+
-
Input terminals
(for DC voltage or TC)
DC voltage standard
Temperature Signal as RTD for Dot-printing Model
(for dot-printing model, the wire connection exchanges between the terminal B and b.)
The three lead wires should have
the same resistance values.
A
N
Input terminal for RTD
b
B
Decade reistance box
4-1
Page 52

Calibration
Temperature Compensation for Thermocouple Signal
Reference Temperature Compensating Connection for Pen Model (same as Dot-Printing
Model)
Copper wires
TC wires or extention wires
++
CoupleMeter
--
Reference Junction Compensation for Thermocouple Input
A DC voltage generated by a thermocouple differs from a value calculated from the table
of thermo-electromotive force (EMF) because the table is based on the 0˚C reference
temperature but the temperature at the recorder input terminal is generally equal to the
room temperature.
The recorder measures the temperature at the input terminal for compensation; when the
input terminals are shorted (equivalent to 0˚C of the thermocouple in the EMF table), the
recorder indicates the temperature at the input terminal.
For calibrating a recorder, an input voltage after the compensation (after subtraction of
the compensating voltage) should be applied to the recorder.
Operating Conditions
2. Check that the ambient temperature and humidity are within the standard operating
Standard operating conditions
However, when the calibration is conducted under normal operating conditions, check
Chart paper yields thermal expansion or shrinkage, sometimes resulting in differences
Examples of expansion are shown below assuming the reference temperature 20˚C and
Executing Calibration
3. Input the standard signals equivalent to 0, 50, and 100% of the setting range of the
If the error is not within the specified accuracy, contact the dealer from which you
A reference input for a thermocouple (TC) signal needs temperature compensation; the
+
-
DC voltage standard
reference junction compensator
Copper
wires
TC wires
Ice pieces packed to
remain the temperature at 0°C
L
N
Power terminals
123
+
-
conditions.
Ambient temp.:23±2˚C
Humidity:55±10% RH
Power supply:90 to 132 V AC, or 180 to 250 V AC
Power frequency:50/60 Hz±0.1%
Warm-up time:30 minutes or more
Mechanical vibration:Within the range not affecting recorder operation
the accuracy influenced by the conditions.
from the calibrated values.
humidity 65% RH:
Expansion at 85% RH:0.4% or less
Expansion at 35% RH:0.45% or less
recorder, then check the difference error between input signals and measured values.
purchased the recorder.
temperature at the recorder input terminal should be measured to make voltage
compensation (adding) due to the reference junction temperature compensation.
4-2
Page 53

4
4.2 Re-adjusting the Pen-Position (Pen Model)
It is recommended to adjust pen positions on the chart at least once a year.
Preparation
1 Turn the recorder power on and allow a warm-up time of more than 30 minutes.
2 Check that the environmental conditions are within normal operating conditions.
Normal operating conditions
Power supply: 90 to 132 V AC, or 180 to 250 V AC
Power frequency: 50/60 Hz±2%
Ambient temp.: 0 to 50˚C
Ambient humidity: 20 to 80% RH (under 5 to 40˚C)
Mechanical vibration: 10 to 60 Hz, 0.2 m/s2 or less
Mechanical shock: Not permitted
Magnetic field: 400 AT/m or less (DC and 50/60 Hz)
External noise: Normal mode (50/60 Hz)
DC voltage: Noise peak value with signal is limited to 1.2 times
larger value than the measuring range.
Setting Procedure
TC signal:
RTD signal: 50 mV or less
Common mode noise (50/60 Hz): 250 V AC rms or less for any range.
Maximum noise voltage between channels (50/60 Hz):250 V AC rms or less.
Mounting inclination : Backward 0 to 30˚
Chart paper yields thermal expansion or shrinkage, sometimes resulting in differences
from the calibrated values. Adjust the pen position, if necessary.
Examples of expansion are shown below assuming the reference temperature 20˚C and
humidity 65% RH:
Expansion at 85% RH: 0.4% or less
Expansion at 35% RH: 0.45% or less
Noise peak value with signal is limited to 1.2 times larger
value than the measuring thermoelectromotive force.
Calibration and Adjustment
CH UP
CH UP
CH UP
Press
power switch
.
.
.
To enter the Basic SET UP mode, turn the power switch off,
and turn on again while pressing the CH UP (ENT) key.
Select [P_Adj] using the key, and press the ENT key.
Select [Null] (leftward movement) or [Full] (rightward
movement) using the
Adjust the pen positions in the order of NULL to FULL
(continued on next page).
key, and press the ENT key.
4-3
Page 54

Re-adjusting the Pen-Position (Pen Model)
.
.
.
CH UP
FEED
CH UP
Select the number of the channel to be adjusted using the
key, and press the ENT key.
The selected pen moves leftward (for NULL) or rightward
(for FULL). Increase or decrease the setpoint value to make
the pen accurately overlap the graduated line of the chart.
Select the digit by pressing the
by the
1100 for FULL. Finally press the ENT key after all codes are
entered.
The pen will move after pressing the ENT key. The pen
movement corresponding to [1] is 0.1 mm. Decreasing the
numeral moves the pen leftward, and increasing moves the
pen rightward.
If the ENT key is pressed while setting the numeric codes,
the indication changes to [-Set-] , and the numeric codes
already set remain valid. However, they will become invalid
if the ESC key is pressed.
key. Setting range is 126 to 229 for NULL, 900 to
key, and select a numeral
CH UP
or
ESC
DISP
CH UP
CH UP
The indicator displays [-Set-] , and the pen will move to the
adjusted position.
Confirm the pen position and press the ENT key.
The indicator returns to [Null] or [Full]. When you want to
carry out the position adjustment again, press the ENT key
and start) again. When another adjustmens are required,
select [Null] or [Full] again by pressing the
In order to finish the adjustment, press the ESC key to
return to the [P_Adj] indication.
Before leaving the SET UP mode, its contents should be
.
.
.
stored.
Select [End] by pressing the key, and press the ENT
key.
Select [Store] to keep setting values valid, or select [Abort]
to abort them by pressing the
key.
The Basic SET UP mode finishes, and several seconds
after, the mode returns to the Operation mode.
key, and press the ENT
key.
4-4
Page 55

4
4.3 Re-adjusting the Dot-Position (Dot Model)
It is recommended to adjust the position of dots at least once a year.
Preparation
1 Turn the recorder power on and allow a warm-up time of more than 30 minutes.
2 Check that the environmental conditions are within normal operating conditions.
Normal operating conditions
Power supply: 90 to 132 V AC, or 180 to 250 V AC
Power frequency: 50/60 Hz±2%
Ambient temp.: 0 to 50˚C
Ambient humidity: 20 to 80% RH (under 5 to 40˚C)
Mechanical vibration
Mechanical shock: Not permitted
Magnetic field: 400 AT/m or less (DC and 50/60 Hz)
External noise: Normal mode (50/60 Hz)
Mounting inclination : Backward 0 to 30˚
Chart paper yields thermal expansion or shrinkage, sometimes resulting in differences
from the calibrated values. Adjust the pen position, if necessary.
Examples of expansion are shown below assuming the reference temperature 20˚C and
humidity 65% RH:
Expansion at 85% RH: 0.4% or less
Expansion at 35% RH: 0.45% or less
: 10 to 60 Hz, 0.2 m/s2 or less
DC voltage: Noise peak value with signal is limited to 1.2 times
larger value than the measuring range.
TC signal:Noise peak value with signal is limited to 1.2 times larger
value than the measuring thermoelectromotive force
RTD signal:50 mV or less
Common mode noise (50/60 Hz): 250 V AC rms or less for any range.
Maximum noise voltage between channels (50/60 Hz): 250 V AC rms or less.
Calibration and Adjustment
.
Setting Procedure
CH UP
CH UP
CH UP
FEED
CH UP
Press
power switch
.
.
.
or
To enter the SET UP mode, turn the power switch off, and
turn on again while pressing the ENT key.
Select [P_Adj] by pressing the key, and press the ENT
key.
Select [Null] (leftward movement) or [Full] (rightward
movement) by pressing the
Increase or decrease the setpoint value to make the dot
position accurately overlap the graduated line of the chart.
The setting range is 1 to 15 for [Null], and 980 to 1017 for
[Full]. Finally press the ENT key after all codes are
entered.
key, and press the ENT key.
4-5
Page 56

Re-adjusting the Dot-Position (Dot Model)
CH UP
or
ESC
DISP
The dot position movement corresponding to [1] is 0.1 mm.
Decreasing the numeral moves the dot position leftward,
and increasing moves it rightward.
If the ENT key is pressed while setting the numeric codes,
the indication changes to [-Set-], and the numeric codes
already set stay valid. However, pressing the ESC key
turns them invalid.
The indicator displays [-Set-], and the dot carriage will
move to the adjusted position.
Confirm the dot carriage position and press the ENT key .
The indication returns to [Null] or [Full]. When you want to
carry out the position adjustment again, press the ENT key
and start again.
In order to finish the adjustment, press the ESC key to
return to the [P_Adj] indication.
When other adjustments are required, select [Null] or [Full]
again by pressing the key.
CH UP
CH UP
.
.
.
stored.
Select [End] by pressing the key, and press the ENT
key.
Select [Store] to keep setting values valid, or select [Abort]
Before leaving the SET UP mode, its contents should be
to abort them by pressing the
key, and press the ENT
key.
The Basic SET UP mode finishes, and several seconds
after, the mode returns to the Operation mode.
4-6
Page 57

5
Chapter 5 Periodic Inspection
5.1 Periodic Inspection
Check the following items periodically, and replace parts, if necessary:
Character printing
Are recorded lines or printed characters clear, not blurred?
To replace a felt-tip pen, refer to the
; also, refer to
Pens
to replace the ribbon cassette of a dot-printing model.
Chart paper
Is there enough chart paper left in the chart compartment ?
Remaining chart length (cm) is printed on the left margin of the chart at intervals of 20
cm. See also
Indication of Remaining Chart Length:
User’s Manual
User’s Manual
User’s Manua
Section 2.6
Section 2.4
l Section 2.5
Installing/Replacing Ribbon Cassette
Loading Chart Paper
Installing/Replacing
.
Maintenance
Remaining chart length
Cleaning the Carriage Shafts (Dot Model)
To maintain proper recording functions, it is recommended to, if necessary, wipe up dust
from the shaft of the printer carriage with a piece of soft cloth or paper without fluffing.
Shaft
IM 4D8B2-04E
5-1
Page 58

Chapter 5 Periodic Inspection
5.2 Fuse
Don’t replace the fuse by yourself. Never take the recorder apart if the fuse needs to be
replaced.
Contact your nearest Omega sales representative if the fuse needs to re replaced.
Fuse Ratings
Rated Voltage: 250V
Rated Current 1.25A
Type: Time Lag
Approved Standard: IEC/VDE
5-2
IM 4D8B2-04E
Page 59

6
Chapter 6 Troubleshooting
6.1 Error Messages
This chapter describes the causes and recovering methods of recorder errors.
Error Code List
Error Codes Meaning Recovery
Main memory reading error.
Main memory writing error.
A/D converter memory reading error.
A/D converter memory writing error.
Calibration data error of A/D converter.
System ROM failure.
System RAM failure.
Ribbon shift, ribbon feed failure (dot model).
Printer failure (dot model).
Range memory reading/writing error.
System failure.
Entered value exceeds allowable setting range.
Wrong password.
Attempt to replace pen ( ) while recording.
Span L and span R have the same value.
Scale l and scale r have the same value .
Attempt to set alarm to a SKIPped channel.
Attempt to set the offset value to a SKIPped channel.
Offset is a value surpassing 10% of the recording span.
Contact OMEGA Engineering.
Enter correct data.
Enter the correct password.
Stop recording.
Change the span value. See Section 2.1.
Change the scale value. See Section 2.1.
Set the alarm setting to OFF. See Section 2.2.
Set the offset protection OFF. See Section 3.8.
Enter the correct value.
Troubleshooting
6-1
Page 60

6.2 Troubleshooting
• Errors exceed specified limits
• Measuring value indications fluctuate
• Pen/printer carriage goes off-scale at 0% or 100%.
Does input signal satisfy
the specifications?
YES
Is the input free of noise?
YES
Are measures applied
to prevent ambient
temperature changes?
YES
Are input wires correctly
connected to the terminals?
YES
NO
NO
NO
NO
•
Correct the input according to specifications
• Separate the input signal wires from
the noise source.
• Ground the recorder.
• Ground the measuring object.
• Insulate TC from the measuring object.
• Use shielded cables for input signals.
• Correctly attach the terminal cover.
• Check the wind from appliances such
as cooling fan.
• Decrease the temperature change
around the input terminals.
• Check the wiring connection being
correct. (Refer to 1.7.)
• Attach the terminal block correctly.
• Tighten the terminal screws again.
• Insulate the RTD from grounding wire.
• Replace the TC if its wire is broken.
6-2
Is the recorder parallel
connected with other
instruments?
YES
Is pen position/dot-printing
position correctly adjusted?
YES
Contact OMEGA Engineering.
NO
NO
• Halt the burnout function of other
instruments.
• Make one-point grounding together
with other instruments.
• Cancel the parallel connection (for
example, use a double element TC).
• Readjust the pen position/dot-
printing position. Refer to 4.2, 4.3
Page 61

6
• Recorder is completely inoperative
Troubleshooting
Is the power switch ON?
Does the switch
turn properly?
YES
Is the power supply
properly connected?
YES
Does the power
meet the specified rating?
YES
Contact OMEGA Engineering.
NO
NO
NO
•
Turn the switch on properly
•
Connect the supply lines properly.
•
Supply the power with specified
voltage/frequency.
Troubleshooting
• Glitch found other than the above mentioned:
• Separate the input/communication
signal wires from the noise source.
• Ground the recorder.
• Use shielded cable for input/
communication signal.
• Attach an insulation transformer for
the power line.
• Use a power line filter.
• When an inductive load is used in the
alarm output line, insert a surge
suppressor into this line.
Is the input free of noise?
YES
Contact OMEGA Engineering.
NO
6-3
Page 62

Index
Index
A
A/D Integration Time ......................................................... 3-6
Accessories....................................................................... 1-1
Adjustment
of Dot-Position (Dot Model) ........................................... 4-5
Alarm
Functions.......................................................................2-8
Hysteresis ..................................................................... 3-5
Output Wiring .............................................................. 1-14
AUTO mode .................................................................... 2-11
B
B_Out ................................................................................ 3-7
B_Set ................................................................................ 3-7
Basic (SETUP) Settings
Flow Chart ..................................................................... 3-2
Introduction to ............................................................... 3-1
Burnout Registration ......................................................... 3-7
C
C_Spd ............................................................................. 3-14
Calibration
Execution ...................................................................... 4-2
Operation Conditions .................................................... 4-2
Wiring ............................................................................ 4-1
Carriage Shafts ................................................................. 5-1
Celcius ............................................................................ 3-13
CH UP key ........................................................................1-4
Characters on Display....................................................... 1-5
Chart Speed adjustment ................................................. 2-10
Chart Speed Trigger........................................................3-14
Cleaning ............................................................................ 5-1
Color ............................................................................... 3-12
Colors for Channel Printing (Dot Model) ......................... 3-12
H
Hys.................................................................................... 3-5
I
Init ................................................................................... 3-16
Initializing Settings .......................................................... 3-16
Input
Range Setting ............................................................... 2-3
Signal Wiring ............................................................... 1-12
terminal for RTD ............................................................ 4-1
terminals ( for DC voltage or TC) .................................. 4-1
Installation Site..................................................................1-7
Intg .................................................................................... 3-6
L
Lock ................................................................................ 3-15
M
M_Ave ............................................................................... 3-9
Model Codes ..................................................................... 1-3
Moving Average Calculation ............................................. 3-9
N
Noise Input Filter ............................................................... 3-8
Null......................................................................4-3, 4-4, 4-5
O
Offset
Setting ......................................................................... 3-11
Value Security Lock.....................................................3-10
Offst................................................................................. 3-11
Index
D
D2 Option ........................................................................ 3-13
DC current input .............................................................. 1-13
DC voltage Inputs ........................................................... 1-13
De_En ............................................................................... 3-4
Deg_C ............................................................................. 3-13
Deg_F ............................................................................. 3-13
Dimensions ....................................................................... 1-9
DISP key ........................................................................... 1-4
Display .............................................................................. 1-4
Dot-Position Adjustment....................................................4-5
DOWN............................................................................... 3-7
E
Energ ................................................................................ 3-4
Energizing (-de) Alarm Output Relays .............................. 3-4
ENT key ............................................................................1-4
Error Code List .................................................................. 6-1
ESC key ............................................................................ 1-4
F
Fahrenheit ....................................................................... 3-13
FEED key .......................................................................... 1-4
Filter for Noise Input.......................................................... 3-8
FIX .................................................................................. 2-11
Full ...................................................................... 4-3, 4-4, 4-5
Functions .......................................................................... 1-4
P
P_Adj .........................................................................4-3, 4-5
Packings ........................................................................... 1-2
Password ........................................................................ 3-15
Power Supply Wiring....................................................... 1-11
Power terminals ................................................................ 4-1
Printing Interval ............................................................... 2-11
R
R1 option.........................................................................3-14
Range .................................................................2-3, 2-4, 2-5
RCD key............................................................................1-4
Rear Panel ........................................................................ 1-5
Rear Panel Arrangement ................................................ 1-10
Recording Span Setting .................................................... 2-3
Recording Trigger ........................................................... 3-14
Regular Settings
Flow Chart ..................................................................... 2-2
Introduction to ............................................................... 2-1
Relay ................................................................................. 3-4
Relay Option Alarm Settings ............................................. 2-9
Rem ................................................................................ 3-14
Remote Control Wiring....................................................1-15
Resistance Temperature Detector Setting ........................ 2-5
RTD.....................................................................2-3, 2-5, 4-1
RTD input ........................................................................ 1-13
Index-1
Page 63

Index
S
Scale Setting ..................................................................... 2-6
SCL ............................................................................2-3, 2-6
SKIP.................................................................................. 2-3
T
TC .............................................................................. 2-3, 2-5
TC input .......................................................................... 1-13
Temp ............................................................................... 3-13
Temperature Unit Selection.............................................3-13
Terminal Board ................................................................ 1-13
Thermocouple ................................................................... 2-5
Trigger
for Chart Speed ........................................................... 3-14
for Recording...............................................................3-14
U
Unpacking ......................................................................... 1-1
UP ..................................................................................... 3-7
V
VOLT.................................................................................2-3
Voltage Measurement Setting...........................................2-4
W
Wiring .............................................................................. 1-10
for Alarm Output .......................................................... 1-14
for Calibration ................................................................ 4-1
for Input Signal ............................................................1-12
for Input Terminals.......................................................1-13
for Power Supply ......................................................... 1-11
for Remote Control...................................................... 1-15
Index-2
Page 64

WARRANT Y/DISCLAIMER
OMEGA ENGINEERING, INC. warrants this unit to be free of defects in materials and workmanship for a
period of 25 months f rom date of purchase. OMEGA Warranty adds an additional one (1) month grace
period to the normal two (2) year product war r a n t y to cover handling and shipping time. This
ensures that OMEGA’s customers receive maximum coverage on each product.
If the unit malfunctions, it must be re t u rned to the factory for evaluation. OMEGA’s Customer Serv i c e
D e p a rtment will issue an Authorized Return (AR) number immediately upon phone or written re q u e s t .
Upon examination by OMEGA, if the unit is found to be defective, it will be re p a i red or replaced at no
c h a rge. OMEGA’s WARRANTY does not apply to defects resulting from any action of the purc h a s e r, including but not limited to mishandling, improper interfacing, operation outside of design limits,
i m p roper re p a i r, or unauthorized modification. This WARRANTY is VOID if the unit shows evidence of
having been tampered with or shows evidence of having been damaged as a result of excessive corro s i o n ;
or current, heat, moisture or vibration; improper specification; misapplication; misuse or other operating
conditions outside of OMEGA’s c o n t rol. Components which wear are not warranted, including but not
limited to contact points, fuses, and triacs.
OMEGA is pleased to offer suggestions on the use of its various products. However,
OMEGA neither assumes responsibility for any omissions or errors nor assumes liability for any
damages that result from the use of its products in accordance with information provided by
OMEGA, either verbal or written. OMEGA warrants only that the parts manufactured by it will be
as specified and free of defects. OMEGA MAKES NO OTHER WARRANTIES OR
R E P R E S E N T ATIONS OF ANY KIND WHATSOEVER, EXPRESS OR IMPLIED, EXCEPT THAT OF TITLE,
AND ALL IMPLIED WARRANTIES INCLUDING ANY WARRANTY OF MERCHANTABILITY AND FITNESS FOR A P A RTICULAR PURPOSE ARE HEREBY DISCLAIMED. LIMITATION OF
L I A B I L I T Y : The remedies of purchaser set forth herein are exclusive, and the total liability of
OMEGA with respect to this or d e r, whether based on contract, war r a n t y , negligence,
indemnification, strict liability or otherwise, shall not exceed the purchase price of the
component upon which liability is based. In no event shall OMEGA be liable for
consequential, incidental or special damages.
CONDITIONS: Equipment sold by OMEGA is not intended to be used, nor shall it be used: (1) as a “Basic
Component” under 10 CFR 21 (NRC), used in or with any nuclear installation or activity; or (2) in medical
applications or used on humans. Should any Product(s) be used in or with any nuclear installation or
a c t i v i t y, medical application, used on humans, or misused in any way, OMEGA assumes no re s p o n s i b i l i t y
as set forth in our basic WA R R A N TY/DISCLAIMER language, and, additionally, purchaser will indemnify
OMEGA and hold OMEGA h a rmless from any liability or damage whatsoever arising out of the use of the
P roduct(s) in such a manner.
RETURN REQUEST S / INQUIRIES
Direct all warranty and repair requests/inquiries to the OMEGA Customer Service Department. BEFORE
RETURNING ANY PRODUCT(S) TO OMEGA, PURCHASER MUST OBTAIN AN AUTHORIZED RETURN
(AR) NUMBER FROM OMEGA’S CUSTOMER SERVICE DEPA RTMENT (IN ORDER TO AV O I D
PROCESSING DELAYS). The assigned AR number should then be marked on the outside of the return
package and on any correspondence.
The purchaser is responsible for shipping charges, freight, insurance and proper packaging to prevent
breakage in transit.
FOR WARRANTY RETURNS, please have the
following information available BEFORE
contacting OMEGA:
1 . P u rchase Order number under which the pro d-
uct was PURCHASED,
2. Model and serial number of the product under
warranty, and
3. Repair instructions and/or specific problems
relative to the product.
OMEGA’s policy is to make running changes, not model changes, whenever an improvement is possible. This affords our
customers the latest in technology and engineering.
OMEGA is a registered trademark of OMEGA ENGINEERING, INC.
© Copyright 1998 OMEGA ENGINEERING, INC. All rights reserved. This document may not be copied, photocopied, re p ro-
duced, translated, or reduced to any electronic medium or machine-readable form, in whole or in part, without the prior
written consent of OMEGA ENGINEERING, INC.
FOR NON-WARRANTY REPAIRS,
for current repair charges. Have the following
information available BEFORE contacting OMEGA:
1. Purchase Order number to cover the COST
of the repair,
2. Model and serial number of the product, and
3. Repair instructions and/or specific problems
relative to the product.
consult OMEGA
Page 65

W h e re Do I Find Everything I Need for
P rocess Measurement and Control?
OMEGA…Of Course!
T E M P E R AT U R E
Thermocouple, RTD & Thermistor Probes, Connectors, Panels & A s s e m b l i e s
Wi re: Thermocouple, RTD & Thermistor
Calibrators & Ice Point Refere n c e s
R e c o rders, Controllers & Process Monitors
I n f r a red Pyro m e t e r s
PRESSURE, STRAIN AND FORCE
Transducers & Strain Gauges
Load Cells & Pre s s u re Gauges
Displacement Tr a n s d u c e r s
I n s t rumentation & A c c e s s o r i e s
F L O W / L E V E L
Rotameters, Gas Mass Flowmeters & Flow Computers
Air Velocity Indicators
Turbine/Paddlewheel Systems
Totalizers & Batch Contro l l e r s
p H / C O N D U C T I V I T Y
pH Electrodes, Testers & A c c e s s o r i e s
Benchtop/Laboratory Meters
C o n t rollers, Calibrators, Simulators & Pumps
Industrial pH & Conductivity Equipment
D ATA ACQUISITION
Data Acquisition & Engineering Software
Communications-Based Acquisition Systems
Plug-in Cards for Apple, IBM & Compatibles
Datalogging Systems
R e c o rders, Printers & Plotters
H E AT E R S
Heating Cable
Cartridge & Strip Heaters
Immersion & Band Heaters
Flexible Heaters
Laboratory Heaters
E N V I R O N M E N TA L
MONITORING AND CONTROL
Metering & Control Instru m e n t a t i o n
R e f r a c t o m e t e r s
Pumps & Tu b i n g
A i r, Soil & Water Monitors
Industrial Water & Wastewater Tre a t m e n t
pH, Conductivity & Dissolved Oxygen Instru m e n t s
M03288/0299
 Loading...