

Page 1
M-5071/1111
Electronic Pressure Switch
PSW14 series
Page 2
Page 3

NOTES
TABLE OF CONTENTS
1 Intended Applications.................................................................................................... 1
2 Safety Instructions......................................................................................................... 1
3 Standards........................................................................................................................ 2
4 Warranty/Guaranty......................................................................................................... 2
5 Installation/Commissioning .......................................................................................... 2
6 Maintenance/Cleaning ................................................................................................... 3
7 Technical Data................................................................................................................ 4
8 Operation ........................................................................................................................ 5
9 Programming.................................................................................................................. 5
Electronic Pressure Switch PSW14 Series
i
Page 4

1 Intended Applications
The pressure switch serves for monitoring a pressure system and has one or two switching outputs.
DANGER
The switch may only be used in the specified fields of application.
The stated pressures and electrical load values must not be exceeded.
Observe also the applicable national safety instructions for assembly, commissioning and
operation of the switch.
The switch is not designed to be used as the only safety relevant element in pressurized systems
according to DGR 97/23/EC.
2 Safety Instructions
The safety instructions are intended to protect the user from dangerous situations and/or material
damage.
In the operating instructions the seriousness of the potential risk is designated by the following
signal words:
DANGER
Refers to imminent danger to men.
Nonobservance may result in fatal injuries.
WARNING
Refers to a recognizable danger.
Nonobservance may result in fatal injuries, and destroy the equipment or plant parts.
CAUTION
Refers to a danger.
Nonobservance may result in light injuries and material damage to the switch and/or to the plant.
IMPORTANT
Refers to important information essential to the user.
Disposal
The switch must be disposed of correctly in accordance with the local regulations for
electric/electronic equipment.
The switch must not be disposed of with the household garbage!
Function Membrane keys LED
Activate/actuate
Reset RS
Switch the pressure switch on while
pressing the membrane key T2.
Press the membrane keys T1 and T2
for 4 s.
Error
IMPORTANT
SP > RS: increasing pressure evaluation
SP < RS: decreasing pressure evaluation
9.2 Version with two switch points
*** Re-actuation hysteresis 15 %, increasing pressure evaluation
Function Membrane keys LED
Activate teaching
SP1 teaching
Press the membrane keys
(T2) for 4 s.
Press the membrane key T1 for 4 s. The
current value for SP1 is transferred to the
pressure switch.
NOTE
When the operation is aborted, SP1 is not
updated.
SP2 teaching
Press the membrane key T2 for 4 s. The
current value for SP2 is transferred to the
pressure switch.
NOTE
When the operation is aborted, SP2 is not
updated.
Activate/actuate
Reset SP1
Switch the pressure switch on while
pressing the membrane key T1.
Press the membrane keys T1 and T2 for
4 s.
Activate/actuate
Reset SP2
Switch the pressure switch on while
pressing the membrane key T2.
Press the membrane keys T1 and T2 for
4 s.
Error
(T1) and
The LED flashes for 12 s green and red at
the ratio of 1:3. Subsequently the LED
shines green.
The LED flashes alternatingly red and
green. The LED shines green, when the
fault has been eliminated.
The LED flashes alternatingly for 12 s red
and green. During these 12 s SP1 and/or
SP2 have to be teached. Subsequently the
LED shines green.
The LED shines red for 4 s.
The LED flashes red 3x, after the pressure
switch has updated SP1.
Subsequently the LED shines green.
The LED shines green for 4 s.
The LED flashes green 3x, after the
pressure switch has updated the SP2.
Subsequently the LED shines green.
The LED flashes for 12 s red and green at
the ratio of 1:3. Subsequently the LED
shines green.
The LED flashes for 12 s green and red at
the ratio of 1:3. Subsequently the LED
shines green.
The LED flashes alternatingly red and
green. The LED shines green, when the
fault has been eliminated.
1
6
Page 5

8 Operation
The switch may only be put into service and operated by authorized persons. Do not use any hard
objects for making entries. A self-test is performed on first commissioning.
The pressure switch is operated via two membrane keys. These must not be touched by means of
hard objects.
IMPORTANT
When power supply is switched on the operational status of the switch is indicated by a green
LED. The switching function is not optically indicated.
9 Programming
IMPORTANT
The pressure switch is programmed by means of the membrane keys (T1) and (T2).
9.1 Version with one switch point
* The switch point SP is set to the measuring range end value.
** The re-actuation point RS is set to the measuring range end value.
Function Membrane keys LED
Activate teaching
SP teaching
RS teaching
Activate/actuate
Reset SP
Press the membrane keys
(T2) for 4 s.
Press the membrane key T1 for 4 s.
The current value for the SP is
transferred to the pressure switch.
NOTE
When the operation is aborted, the SP
is not updated.
Press the membrane key T2 for 4 s.
The current value for the RS is
transferred to the pressure switch.
NOTE
When the operation is aborted, the RS
is not updated.
Switch the pressure switch on while
pressing the membrane key T1.
Press the membrane keys T1 and T2
for 4 s.
(T1) and
The LED flashes alternatingly for 12 s red
and green. Subsequently the LED shines
green.
The LED shines red for 4 s.
The LED flashes red 3x, after the pressure
switch has updated the SP.
Subsequently the LED shines green.
The LED shines green for 4 s.
The LED flashes green 3x, after the
pressure switch has updated the RS.
Subsequently the LED shines green.
The LED flashes for 12 s red and green at
the ratio of 1:3. Subsequently the LED
shines green.
3 Standards
The standards applied during development, manufacture and configuration are listed in the CE
conformity and manufacturer's declaration.
4 Warranty/Guaranty
Warranty
Our scope of delivery and services is governed by the legal warranties and warranty periods.
Terms of guaranty
We guaranty for function and material of the pressure switch under normal operating and
maintenance conditions in accordance with the statutory provisions.
Loss of guaranty
The agreed guaranty period will expire in case of:
• incorrect use
• incorrect installation or
• incorrect handling or operation contrary to the provisions of these operating instructions
No liability is assumed for any damage resulting there from, or any consequential damage.
5 Installation/Commissioning
DANGER
Only install or uninstall the switch when deenergized (electrically and
hydraulically/pneumatically).
Pressure connection and electrical connection must be carried out by trained or instructed
personnel according to state-of-the-art standards.
The switch must only be installed in systems where the maximum pressure P
(see type label).
WARNING
Be aware of the fact that in case of operation with higher temperatures the casing surface may
become very hot!
CAUTION
Mount the pressure switch from the bottom to the •tting with a wrench SW 24 and tighten to a
torque of 45 Nm torque.
Do not put the switch into operation when the switch itself or the connection cable is damaged.
Avoid impact and severe vibration during transport. Even if the switch housing remains
undamaged inside parts may be damaged and cause malfunctions.
is not exceeded
max
5
2
Page 6

()
5
)
∅
Electrical connection is to be carried out dependent on the type of switch (see type label) according
to the chart below. Wrong assignment of the connections may cause malfunctions or incorrect
switch outputs.
Plug
M 12x1
4-pin
Pin 1
Version with
1 switching output
(1 switch point SP1)
Version with 2 switching
outputs
(2 switch points SP1/SP2)
+Ub (15... 32 V DC) +Ub (15... 32 V DC)
brown
Pin 2
white
Pin 3
- SP2 (0.2 A max.)
NO
0 V 0 V
blue
Pin 4
black
SP1 (0.2 A max.)
NO
SP1 (0.2 A max.)
NO
1
4
2
3
+Ub
SP1
0 V
1
4
2
SP2
3
WARNING
Check the operation of the switch regularly. If the switch does not work properly, stop operation
immediately!
6 Maintenance/Cleaning
The switch requires no maintenance.
CAUTION
The membrane keys may be damaged by the use of unsuitable cleaning agents. Do not use any
cleaning agents containing solvents or abrasive additives.
SP1
+Ub
0 V
7 Technical Data
PSW14
Measuring element Piezoresistive silicon measuring cell with internal stainless steel
diaphragm or ceramic measuring cell
Measuring ranges 0 ... 10 bar to 0 ... 600 bar
0 ... 150 psi to 0 ... 9000 psi
relative pressure
Transistor switching outputs PNP 1 or 2 x NO contacts
Operating temperature range -10... +70 C / +14... +158 °F
Media temperature range -25 ... +100°C / -13 ... +212 °F
Process connection
G1/4
(fitting "A" without adapter)
Protection system/class IP65/III
Electrical connection Plug 4-pin, M 12x1
Auxiliary power 15...•32 V DC
For further technical data and options please refer to the data sheets
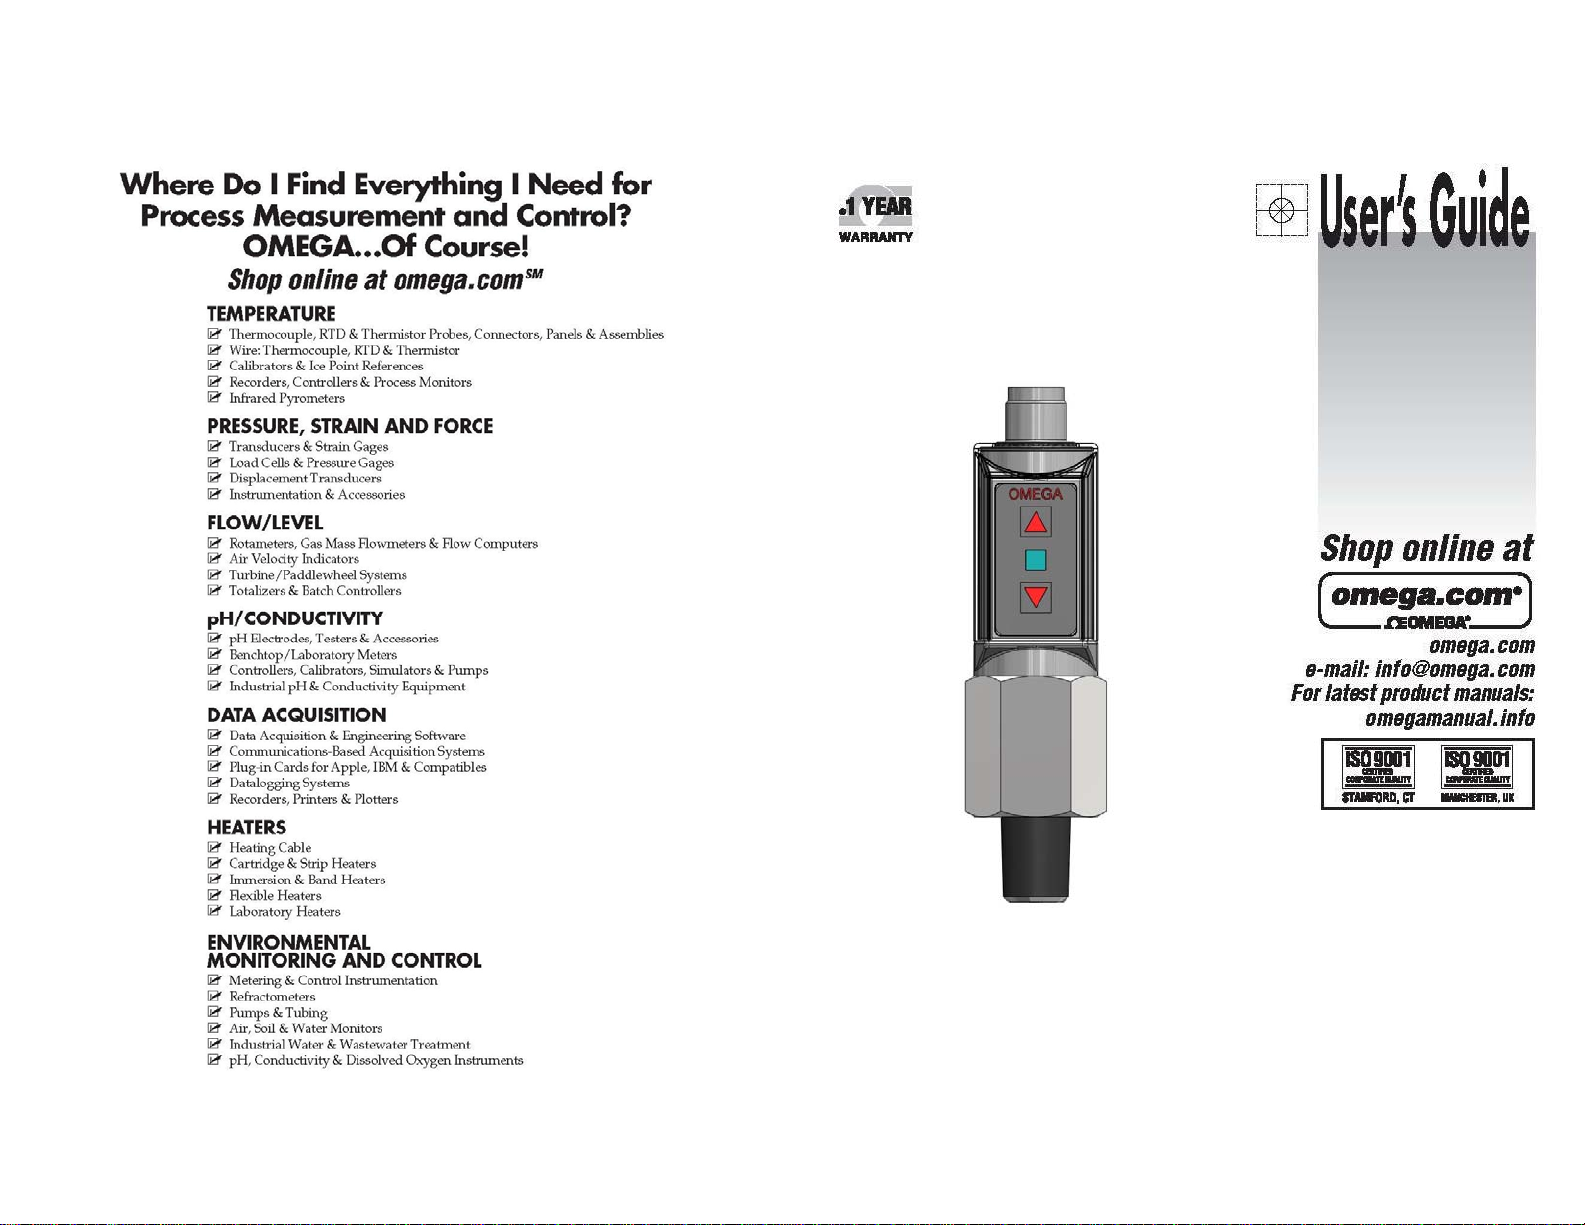
Operating and display elements/Dimensions
M12x1
11
(0.29)
Dimensions (example) mm (in)
Item 1: LED
2
1
2
green
red
Operational status
indicator
approx. 100
24 (0.94)
Item 2: Membrane keys
T1
42 (1.6
17
(0.67)
1/4" NPT
SW 24
Programming keys
"Up“ and "Down“
T2
3
4
 Loading...