

Page 1
”
I.
Shop online a t
p:$:;Espm@J
wwwmega.com
e-mail=
info@omega=com
PHH-860
pH/MV/Temp Handheld Meter
with
RS232 Capability
4
i
Page 2
. _ ‘~
_.
_
‘
~,
-_ _ ’ _
I
_
_
_ ..
I
F UNC T I ONA L DESCR IPT ION
I
The m e te r w ill d isp lay a ll L CD segmen ts when it i s fir s t t u rned on
fo r app rox . 3 seconds . Though you m igh t have seen
DATALOGGER , Y /M /D ,
m g ll, p mS ,
pp m .. These a re no t ava ilab le
fo r t he m e te r m ode l nu m be r PHH -860 .
:
The LCD is d iv ided in to th ree d is tinc t sec ti ons
O ne la rge (P ri m a ry)
top sc reen and tw o s m a lle r bo tt o m sc reens (Seconda ry and
R e la ti ve C lock ). The 3 d isp lay a reas keep you cons tan tl y upda ted
w it h the
p H
m easu re m en ts and re la tive
D ISPLAY
-
The p rim a ry d isp lay sho ws the m easu red
-
The seconda ry d isp lay sho ws the te m pe ra tu re o f t he read ing .
mV
-
U n it of
p H
o r
i s d isp layed in the ri gh t t op o f t he sc reen . U n less
mV va lue w h ile ca lib ra ting .
c
mV
p H
o r
r ead ing .
the senso r p robe is p lugged in to the m e te r, t hose read ings keep
chang ing in the sc reen a re no t r e fe rab le .
“F
-
U n it of
“C
and ATC a re d isp layed a t t he bo tt o m in the m idd le
o r
o f t he sc reen .
-
N o “ATC ” w ill be appea red w it hou t t e m pe ratu re senso r p robe .
Page 3
1
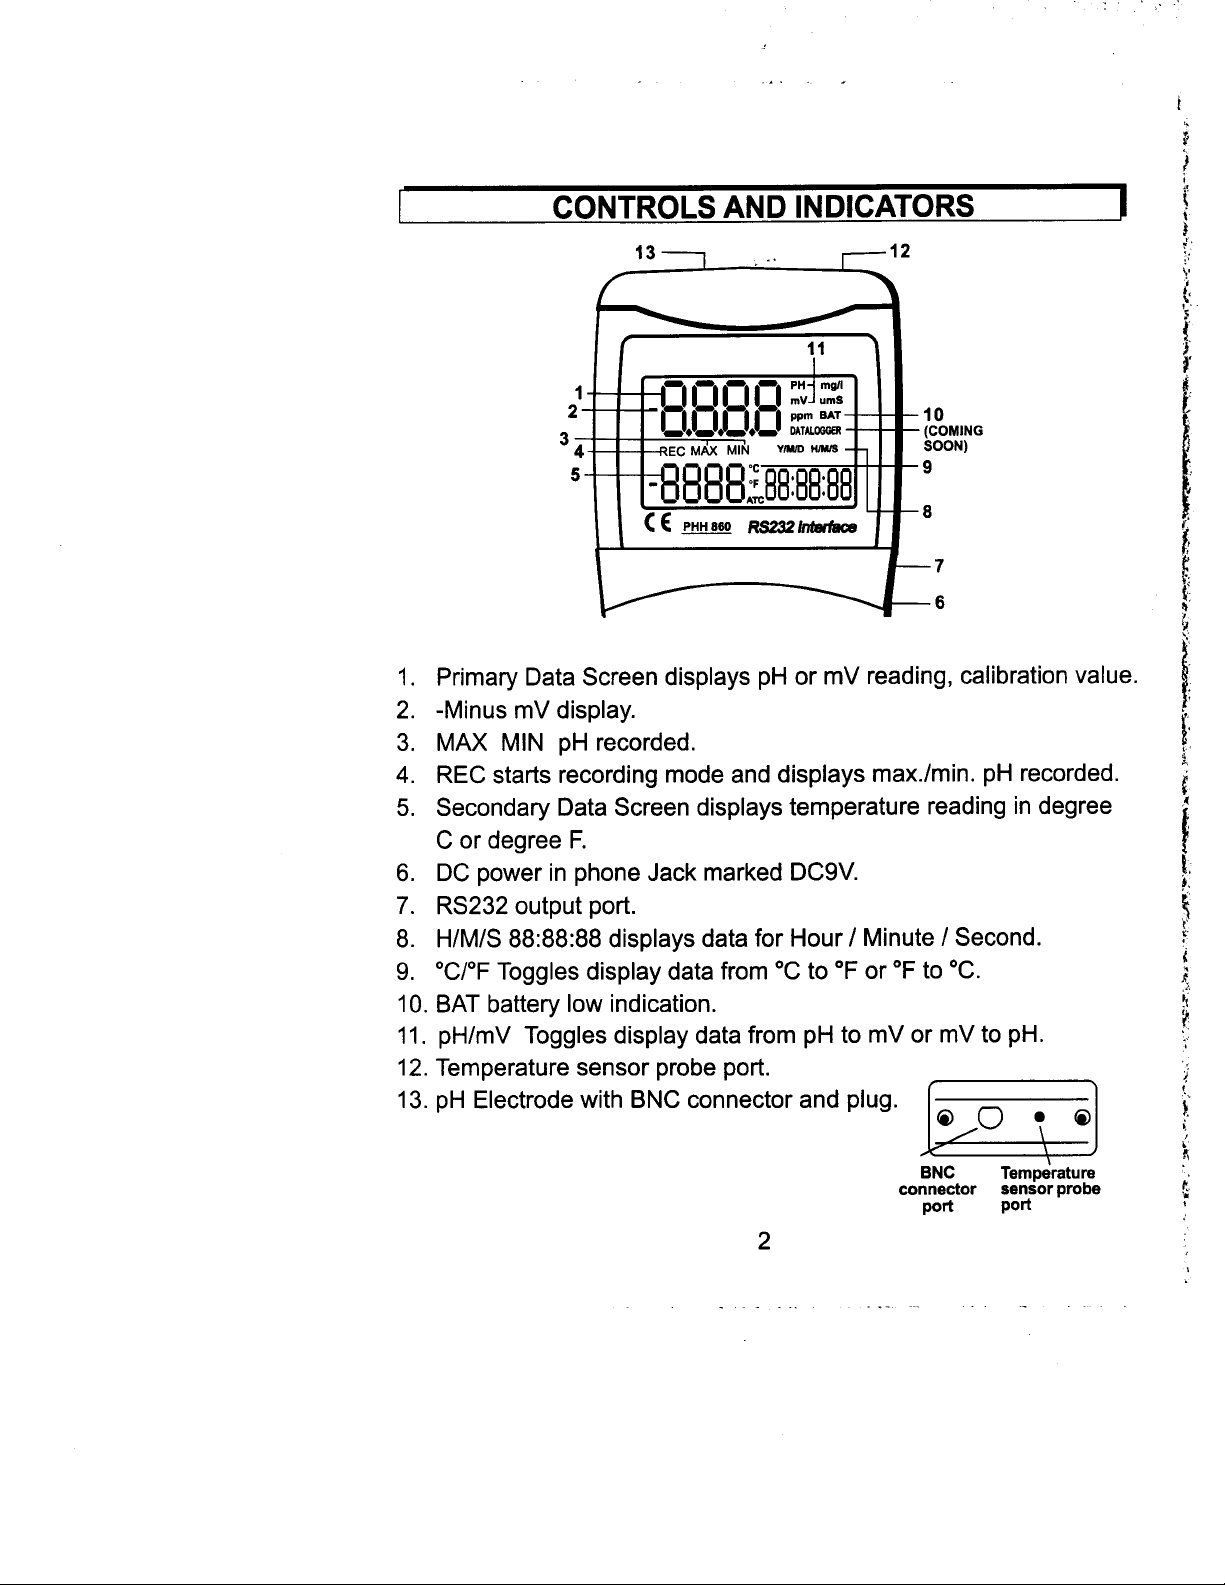
CON T RO LS AND IND I CA T OR S
I
I
pH
1.
Prima ry Data Screen d isp lays
mV
2.
-M inus
MAX M IN
3.
REC s tarts recording mode and d isp lays
4.
5.
Secondary Data Screen d isp lays temperature read ing in degree
d isp lay.
pH
recorded.
or
\
11
mV read ing, ca libration value.
max./min.
pH
recorded.
C or degree F.
DC power in phone Jack marked
6.
7.
RS232 output port.
a.
H/M /S
“C/OF
9.
Togg les d isp lay data from
DCSV .
“F
/ Second./ M inute 88:88:88 d isp lays data for Hour
“C.
to “F or “C to
10. BAT battery low ind ication.
11.
pH /mV
pH
Togg les d isp lay data from
to
mV
or
mV
to
pH.
12. Temperature sensor probe port.
13.
pH
E lectrode w ith BNC connector and p lug.
connec t o r
Po rt
senso r p r obe
Po ti
2
Page 4
_...
_ .d
..__
.._. . .I -.
_.
1
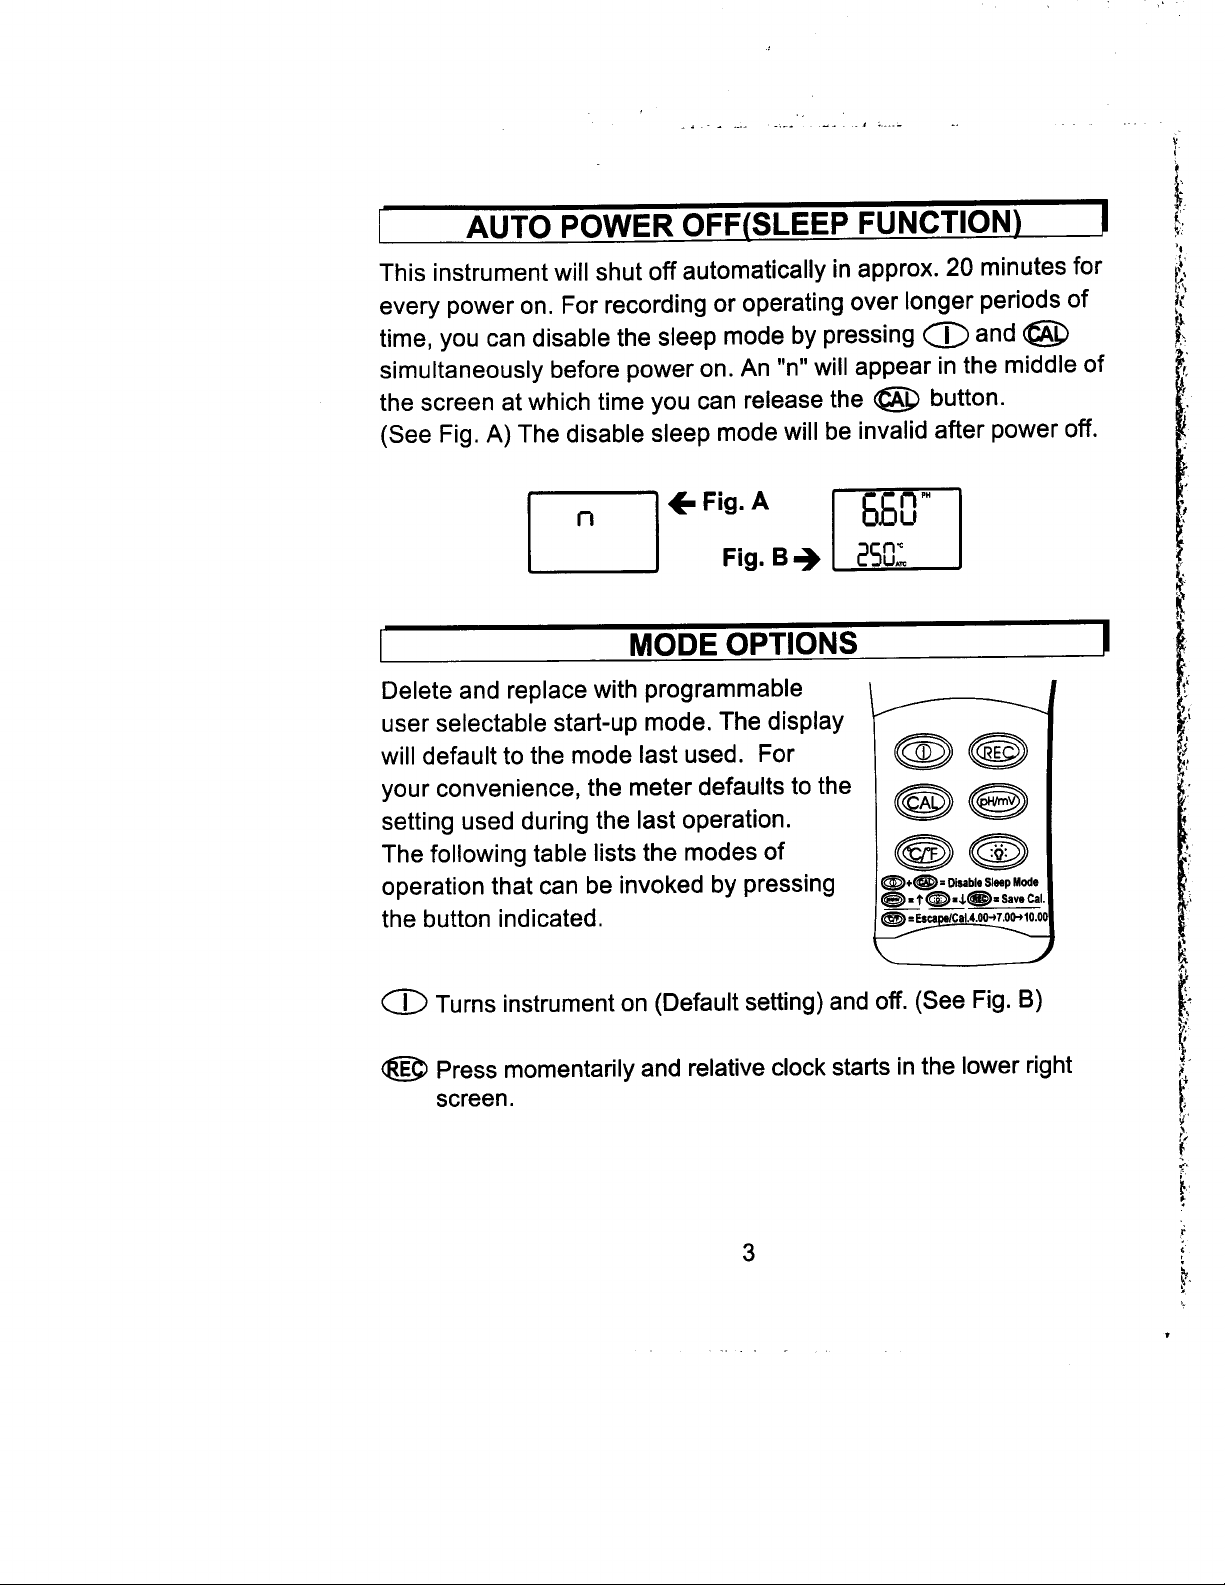
This instrument will shut off automatically in approx. 20 minutes for
every power on. For recording or operating over longer periods of
time, you can disable the sleep mode by pressing
simultaneously before power on. An
the screen at which time you can release the
(See Fig. A) The disable sleep mode will be invalid after power off.
Delete and replace with programmable
user selectable start-up mode. The display
will default to the mode last used. For
your convenience, the meter defaults to the
setting used during the last operation.
The following table lists the modes of
operation that can be invoked by pressing
the button indicated.
AUTO POWER OFF(SLEEP FUNCTION)
and
(@
a
“n” will appear in the middle of
@
button.
MODE OPTIONS
A
@X@
a@
@a
@+@&
Disable
~.r~~J@&savecal.
Sleep Mode
c
I
a
Q@
Turns instrument on (Default setting) and off. (See Fig. B)
Press momentarily and relative clock starts in the lower right
screen.
Page 5
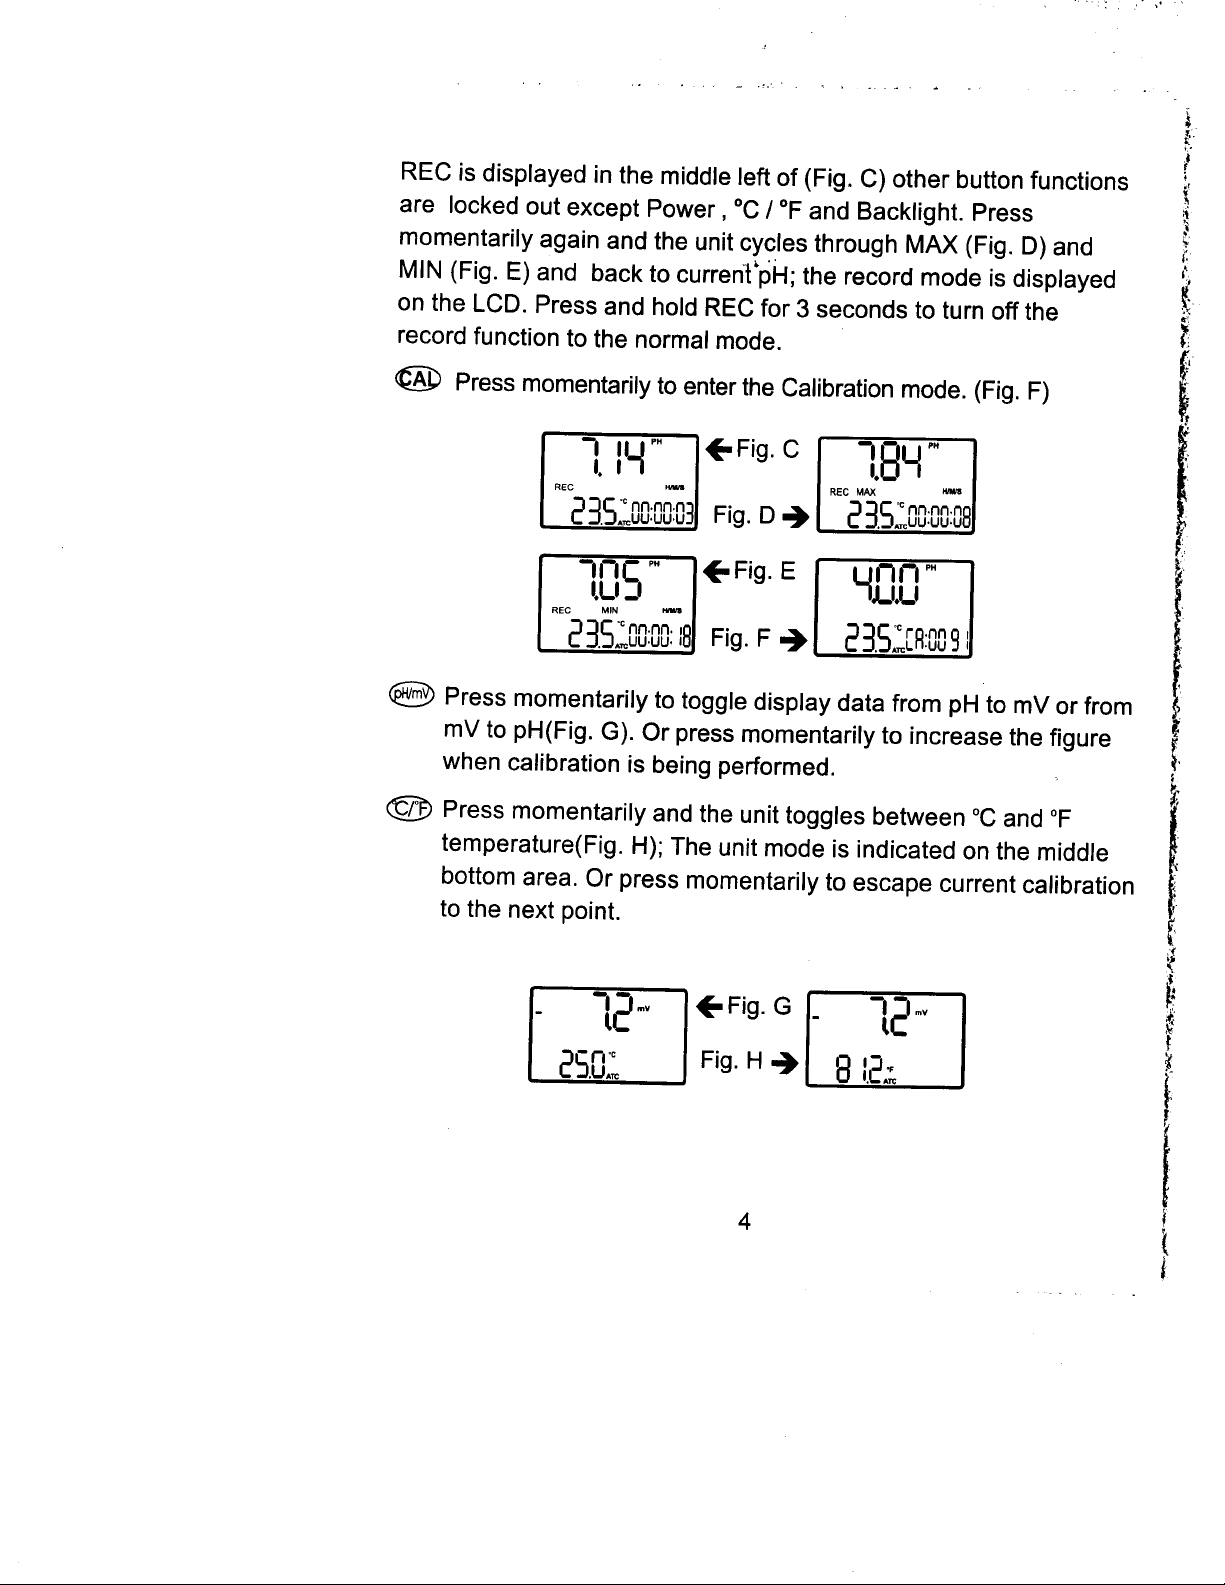
REC is displayed in the middle left of (Fig. C) other button functions
“F
and Backlight. Press
I “C
are locked out except Power,
momentarily again and the unit cycles through MAX (Fig. D) and
MIN (Fig. E) and back to
current*&;
the record mode is displayed
on the LCD. Press and hold REC for 3 seconds to turn off the
record function to the normal mode.
Press momentarily to enter the Calibration mode. (Fig. F)
pH
to
Press momentarily to toggle display data from
mV
to pH(Fig. G). Or press momentarily to increase the figure
mV or from
when calibration is being performed.
Press momentarily and the unit toggles between
“C
“F
and
temperature(Fig. H); The unit mode is indicated on the middle
bottom area. Or press momentarily to escape current calibration
to the next point.
4
Page 6

@
Press momentarily and the backlight illuminates for approx. 30
seconds then turns off automatically. Or press momentarily to
decrease the figure when calibration is being performed.
1
AUTOMATIC TEMPERATURE COMPENSATION (ATC)
The meter is recommended to use PHE-860 three in one epoxy
combination probe with a temperature sensor probe for the automatic
temperature compensation (ATC), the meter is capable of taking
measurements with automatic or manual temperature compensation.
Ensure the PHE-860 probe is plugged into the meter for ATC,
otherwise use a standard
additional temperature probe, the probe must be submersed in
the liquid you are measuring.
If there is no temperature sensor plugged into the meter, the default
manual temperature setting is automatically 25 degree C
set the temperature to match your working conditions using a
separate thermometer and record the working condition (temperature
of the liquid) to convert the
1. Power on the meter.
a
2. Press
”
4.00
button to enter
pH” on the LCD readout.
pH
probe with a BNC connection and an
pH
value for what you are measuring.
pH
calibration mode, you will first see
,
Manually
1
5
Page 7

If the buffer is incorrectly inserted or the probe is damaged, “Err” will
appear on the bottom-right corner. (Fig. I)
.
,
II)
Fig.
m
3. Press
@
button to increase(Fig. J)Or press
to decrease
(Fig.K) the figures to refer to the calibration buffer solution which
you have, the range for 4. 00
pH
calibration point figures from
3.50 to 4.50. (Fig. J, K)
4
Ensure the measured
pH
value to stabilize in the bottom-right
corner, it means the meter is now calibrated to the current buffer,
4.0pH calibration point is now completed. (Remark: The value
the
shows beside CAL is the relative
mV reference mV reading, as an
value, o divide by 10 and with a 0.1 resolution from the 4 digits)
5.
Press
@@
to save the calibration,
“SA” will appear on the
LCD( Fig. L).
Fig. L
If you are performing multipoint calibration
pH
7.0 calibration procedure.
I)
@
,
press
to go to next
’
Page 8

6
Rinse the probe with de-ionized water or a rinse solution, and place
pH
it in the next
additional
pH
pH
buffer. Follow the procedures as
7.0 calibration, the range for 7.0
4.0 for
pH
calibration point
figures from 6.50 to 7.50. When calibration is complete, save the
calibration by pressing
to additional calibration
7.
Follow the same procedure as
calibration point. The range for
from 9.50 to
10.5O.(Fig.
N)
,
otherwise, escape by pressing @
@
(pH
10). (Fig. M)
pH
pH
4.0 and
pH
10.0 calibration point figures
7.0 for
pH
10
8
After saving the calibration of the last
pH
10.0 point by pressing
button, you will see an “END ” appears on the LCD, it means the
calibration has been completely finished. (Fig. 0)
P.S.The meter features can be manually set up the temperature
pH
value for ensuring an accurate
case you are using the
pH
electrode which is without A.T.C.
measurement. (This is in
Feature.)
7
..
.
-
Page 9

_
__ .._
I
a)Simutaneously press
Q
.. .I .
and
a
. . . .
to enter temperature setting
mode, set the temperature value you measured by a general
purpose temperature probe,
temperature value, or press
temperature value. The temperature range is
press@
b)Easy to measure the
or any compatible
button to save the temperature value.
pH
pH
electrode without temperature compensation,
@
press@
button to decrease the
button to increase the
-50%8O”C,
value with 2 in one electrode
now you will see the temperature setting value replaced pre-set
temperature.
1
JPlease
/Always
JNever
?
M A I N TE NANCE
pH
always keep the
to protect and store our electrode, you can also store in a
l/100
buffer with
rinse the
part of saturated KCL.
pH
electrode and reference junction in de-ionized
glass bulb wet by using the rubber cap
pH
I
4.0
1
water before next use.
pH
touch or rub glass bulb for lasting
electrode life.
T ROUB LES HOO T I NG
’
I
’
:i
Power on but no display. Check the battery are in place and
,
making good contact or correct polarity
replace a new battery or
attach optional AC adaptor for the weak battery caused.
Page 10

Unstable readinq.
?
Clean the probe and recalibrate or make sure
sample entirely covers the probe sensor, or replace a new probe
and re-calibrate if you find a broken probe.
i
Slow response. Clean probe by immersing the electrode in tap
?
water for 1 O-l 5 minutes, then thoroughly rinse with distilled water
or use a general purpose electrode cleaner.
CAL: Err. Calibration error. Replace wrong buffer with correct one,
?
or buffer input value incorrect, otherwise, the probe damaged or
broken, replace a new one and re-calibrate.
BAT indication. Replace with a new battery. (Fig. P)
?
E.l. Out of
?
?
E.2. Out of
pH
range, too acid
pH
range
,
too alkali
and temperature sensor probe (if any).(Fig. R)
(<lpH).
(Fig. Q)
(>14pH). Plug in the
pH
electrode
9
Page 11

I
REPLAC ING T HE BA TTE RY
!
R ep l ace you r
JThe
JThe
4
Even if the battery was recently replaced, check its voltage level if
you get no response from your instrument. To replace the battery:
1. Remove the
2. Lay the instrument face-down on a clean, flat surface.
3. Remove the battery by screw driver and observe indicated polarity
Remove battery from instruments that you do not plan to use for a
month or more. Do not leave battery in instrument.
BAT icon appears on the right of the screen.
meter will not power on.
Use of the back-light causes the BAT
icon to appear.
instrument.
and close the cover after replacing with a new battery.
g - vo lt ba tt e r y w hen :
pH
electrode and temperature sensor of the
10
._.
,-.
.
Page 12

J
Input Impedance = 10
/Operating temperature
doperating
Humidity Max. 80% RH
JCalibration
-
USA buffers
-
-
DIN buffers
:
JPower
One 9.0 volt battery
OPERATING CONDITIONS
,I‘
c
10.01,12.45)
buffer solution suggested:
(pH
(pH
(pH
1.09,
1.68,4.01,
1.68,4.01,6.86,9.18,12.45)
NIST buffers
I2
ohms
3.06,4.65,
(32~122°F)O”-50°C
7.00,
6.79, 9.23, 12.75)
*I
r
SPECIFICATION
PH
Range
Resolution
Accuracy
Dimension
Unit
Weight
Temperature compensation from -5 to
Accuracy
Format
:Pxx.xx:txxx.xc;Pxx.xx:txxx.xF
:ormxxx.xmV:txxx.xc;mxxx.xmV:txxx.xF
ormxxxxmV:txxx.xc;mxxxxmV:txxx.xF
:
or m
--- -
P____
1
1
Approx. 220 gram (with battery)
f0.3”C
:
I
:t
___Jw/o
t____Wo :
-
0.00
pH
0.01
72x182
Baud Rate
Data Bit
14.00 -499
O.lmV
mV
1
x 30 mm (meter)
:
2400
,
Stop Bit
:
8
probe)
probe)
MATERIAL SUPPLIED
This oackaae contains:
JThe
/Battery x 1 (9.0 volt)
J
JHard
meter x 1
Operation manual
carrying case
mV
+499
-
(fO.l-195)
@190-499)
8O”C,
biffsec
:
1
I
I
I
I
r
11
Page 13
_,i
*-
I
I/
PHE - 860
40 ” ( 102cm) cab le and rubber cap inc luded.
PHE -1311
4
I/
RS232 software d isk or CD w ith D -sub connector
4
S tandard Buffer So lut ion.
I/
DC Adap tor
O PT IONA L ACCESSORY :
pH
Three in one Epoxy comb inat ion
pH
e lectrode w ith BNC connector w ithout ATC.
e lectrode w ith ATC
RS 232 OU TPUT :
The meter can link w ith persona l computer to capture on- line data
O
F records w ith rea l-ti me output, you can
disp lay
retrieve file
stat ist ic
your cho ice.Connect ion procedures:
.Plug
1
(
at the r ight s ide of the meter)
2.lnsert
port or....
3.Star-t
diskette.
4. W hen i nsta lling the RS232 software,p lease fo llow the operat ion
manua l procedure in the software package.
,
save the datas for operat ing data ana lysis, records
,mu lti-fil es d isp lay in the screen,....versat ile funct ions for
the opt iona l accessory Rs232 cab le onto the DC jack port
the D-sub
to set up RS232 software by insert ing the CD-ROM or F loppy
9P
/ OC pH pH /mV or
type connector onto computer ’s Co rn.1 or 2
I
1
12
Page 14

I
FindWhere Do
Everythin$
Need for
Process
Measurement and Control?
OMEGA ...Of
Shop online at
TEMPERATURE
B
Thermocouple, RTD
0
Wire: Thermocouple, RTD
0
Calibrators
0 Recorders, Controllers
LB
Infrared Pyrometers
PRESSURE, STRAIN AND FORCE
B
Transducers &Strain Gages
0 Load Cells
0 Displacement Transducers
0 Instrumentation
FLOW/LEVEL
@’
Rotameters, Gas Mass Plowmeters
0 Air Velocity Indicators
0
Turbine/Paddlewheel
0 Totalizers
&
pH/CONDUCTlVlTY
pH Electrodes, Testers
@’
0
Benchtop/Laboratory Meter s
0 Controllers, Calibrators,
0
Industrial
DATA ACQUISITION
0
Data Acquisition
0 Communications-Based Acquisition Systems
0 Plug-m Cards for Apple, IBM &Compatibles
0 Datalogging Systems
0 Recorders, Printers
&
Ice Point References
&
Pressure Gages
&
Accessories
Batch Controllers
&
Conductivity Equipment
pH
&
&
Thermistor Probes,
Systems
Engineering Software
&
Plotters
www.ome#a.com
Monitors
&
Plow Computers
Pumps
&
Connectors,
&
Accessories
Siiulators
Thermistor
&
&
Pr-
Couke !
Panels
Assemblies
8~
HEATERS
B
Heating Cable
0 Cartridge
0 Immersion
0 Flexible Heaters
0 Laboratory Heaters
&
Strip Heaters
&
Band Heaters
ENVIRONMENTAL
MONITORING AND CONTROL
&
0
Metering
0 Refractometers
0 Pumps
0 Air, Soil
0
Industrial Water
0
PHH-860
Control Instrumentation
&
Tubing
&
Water Monitors
&
Wastewater Treatment
&
Dissolved Oxygen InstrumentspH, Conductivity
M3734/0601
I.
c
 Loading...