

Page 1
INST.No.MR-24-16
Portable Handheld Data Logger
OM-SPN
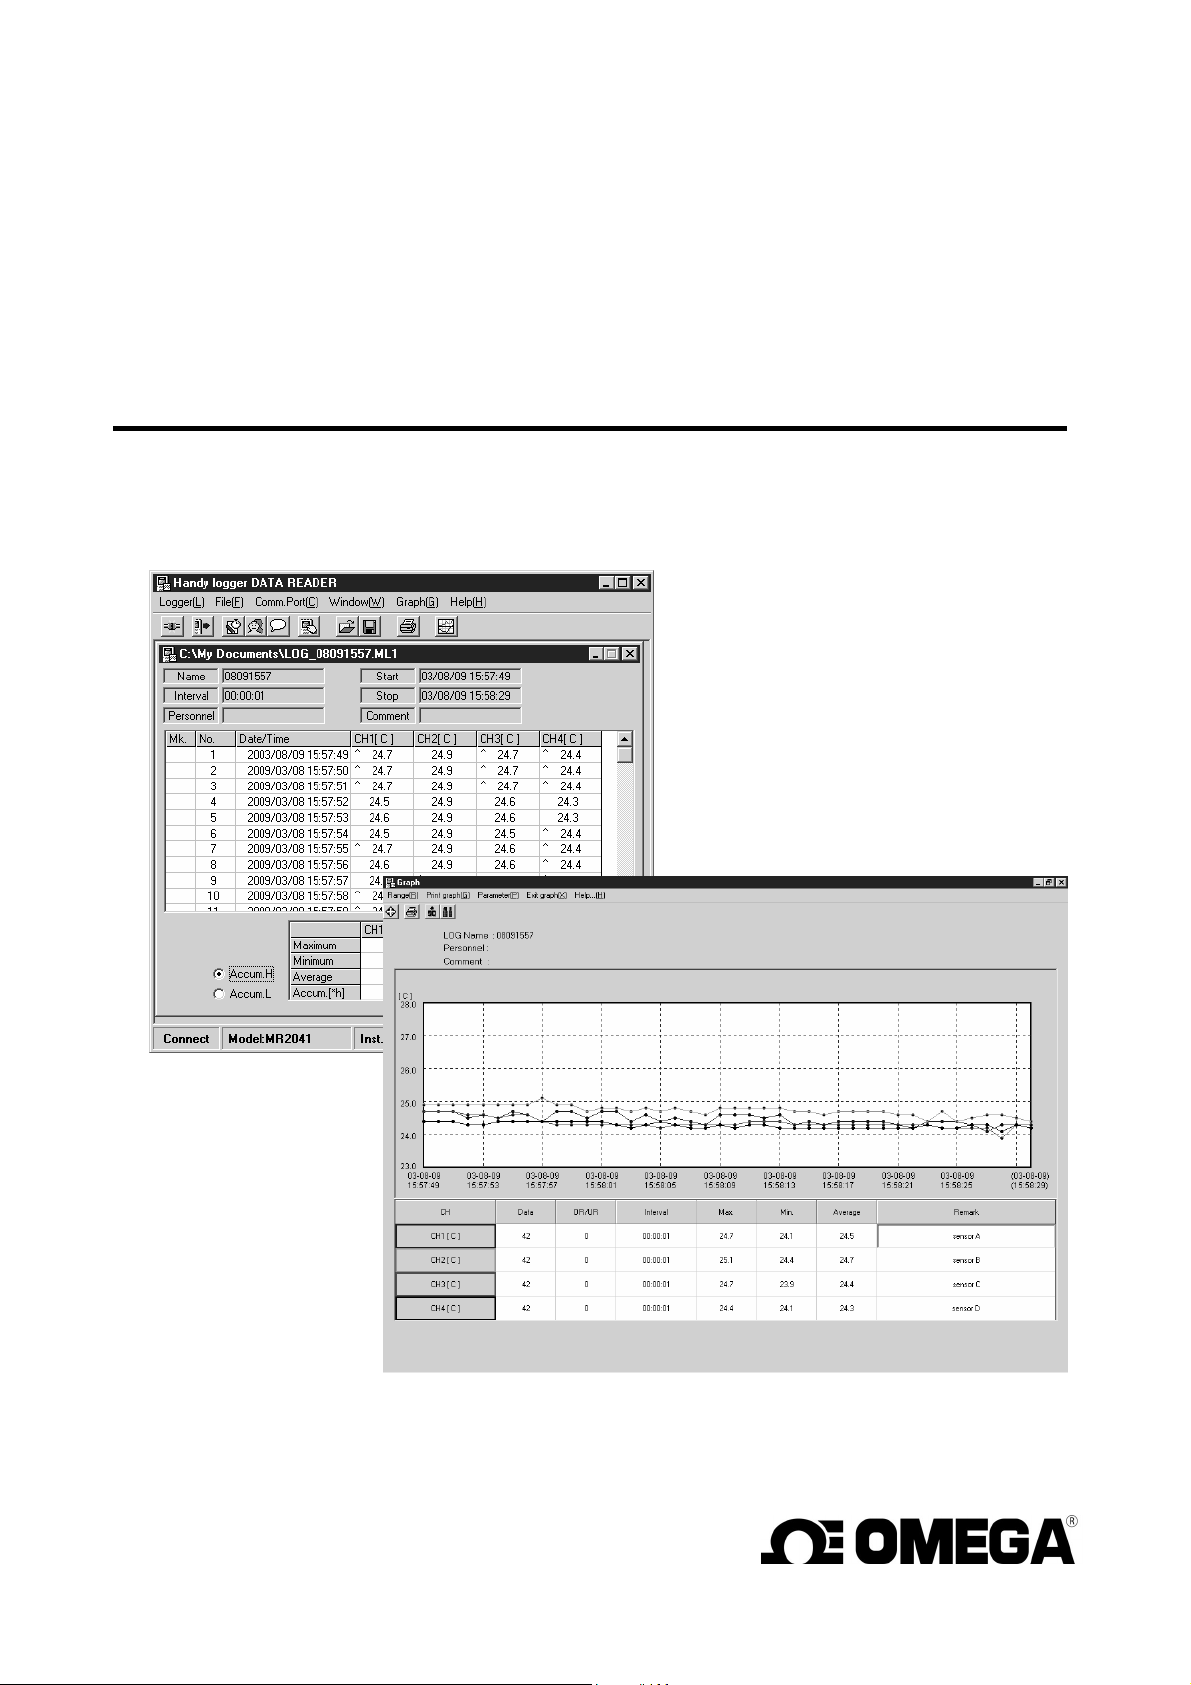
Handy Logger Data Reader
Software Version 2.1
Instruction Manual
Page 2
Introduction
Thank you for your purchasing of this handy logger model OM-2041/Data read software.
To safely operate this product, always thoroughly read this instruction manual to fully understand the
proper operating procedures and safety precautions before starting operation.
After this manual has been read, carefully store it in a safe place.
Check items before starting operation
When unpacking this product, carefully check the package contents.
If any package contents are missing, contact your local sales representative or sales office.
Name Q’ty
Communication cable(USB or RS-232C Cable) 1
Software CD-ROM 1
Instruction manual (this manual) 1
About this instruction manual
• No parts of this instruction manual are reproduced or transmitted in any form or by any means
without the written permission.
• The contents of this manual are subject to change without prior notice.
• Figures and illustrations stated in this manual may be emphasized, simplified, or omitted to describe
the contents.
• If any unclear point, incorrect description, or missing description is found in the contents of this
manual, contact your nearest sales representative or contact our sales office.
• Company and product names used in this manual are the trademarks or registered trademarks of
their respective owners.
Indemnities
• OMEGA Engineering, Inc. shall not be held responsible for any defects beyond the specified
guarantee terms of this product.
• OMEGA Engineering, Inc. shall not be held responsible for any direct, indirect or consequential
damages, losses, or expenses of the customer or third party resulting from use of this product.
System requirements
Applicable PC model: IBM PC/AT and its compatibles
OS: System environment where Windows98, Me, 2000, or XP runs correctly.
Communication port: One RS-232C compatible communication port (COM) or One USB 1.1/2.0
compatible port.
Hard disk drive: At least 10MB is required to install this software.
Free memory capacity: At least 64MB (128MB or more of memory recommended)
CPU: Pentium MMX 200MHz or higher
Printer: Printer running correctly on the OS listed above.
Printer driver: Printer driver allowing of correct operation of the printer on the OS listed
above.
• “IBM” is the trademark or registered trademark of International Business Machines Corporation in
the United States.
• “Microsoft” and “Windows” are the trademarks or registered trademarks of Microsoft Corporation
in the United States.
• “Intel” and “Pentium” are the trademarks or registered trademarks of Intel Corporation in the
United States.
I
Page 3
Safety Precautions
z Cautions stated in this manual indicate important contents about operational safety. Therefore,
carefully read the contents and strictly follow the instructions.
z In this instruction manual, the following warning labels are provided to indicate possible hazards
and ensure operational safety.
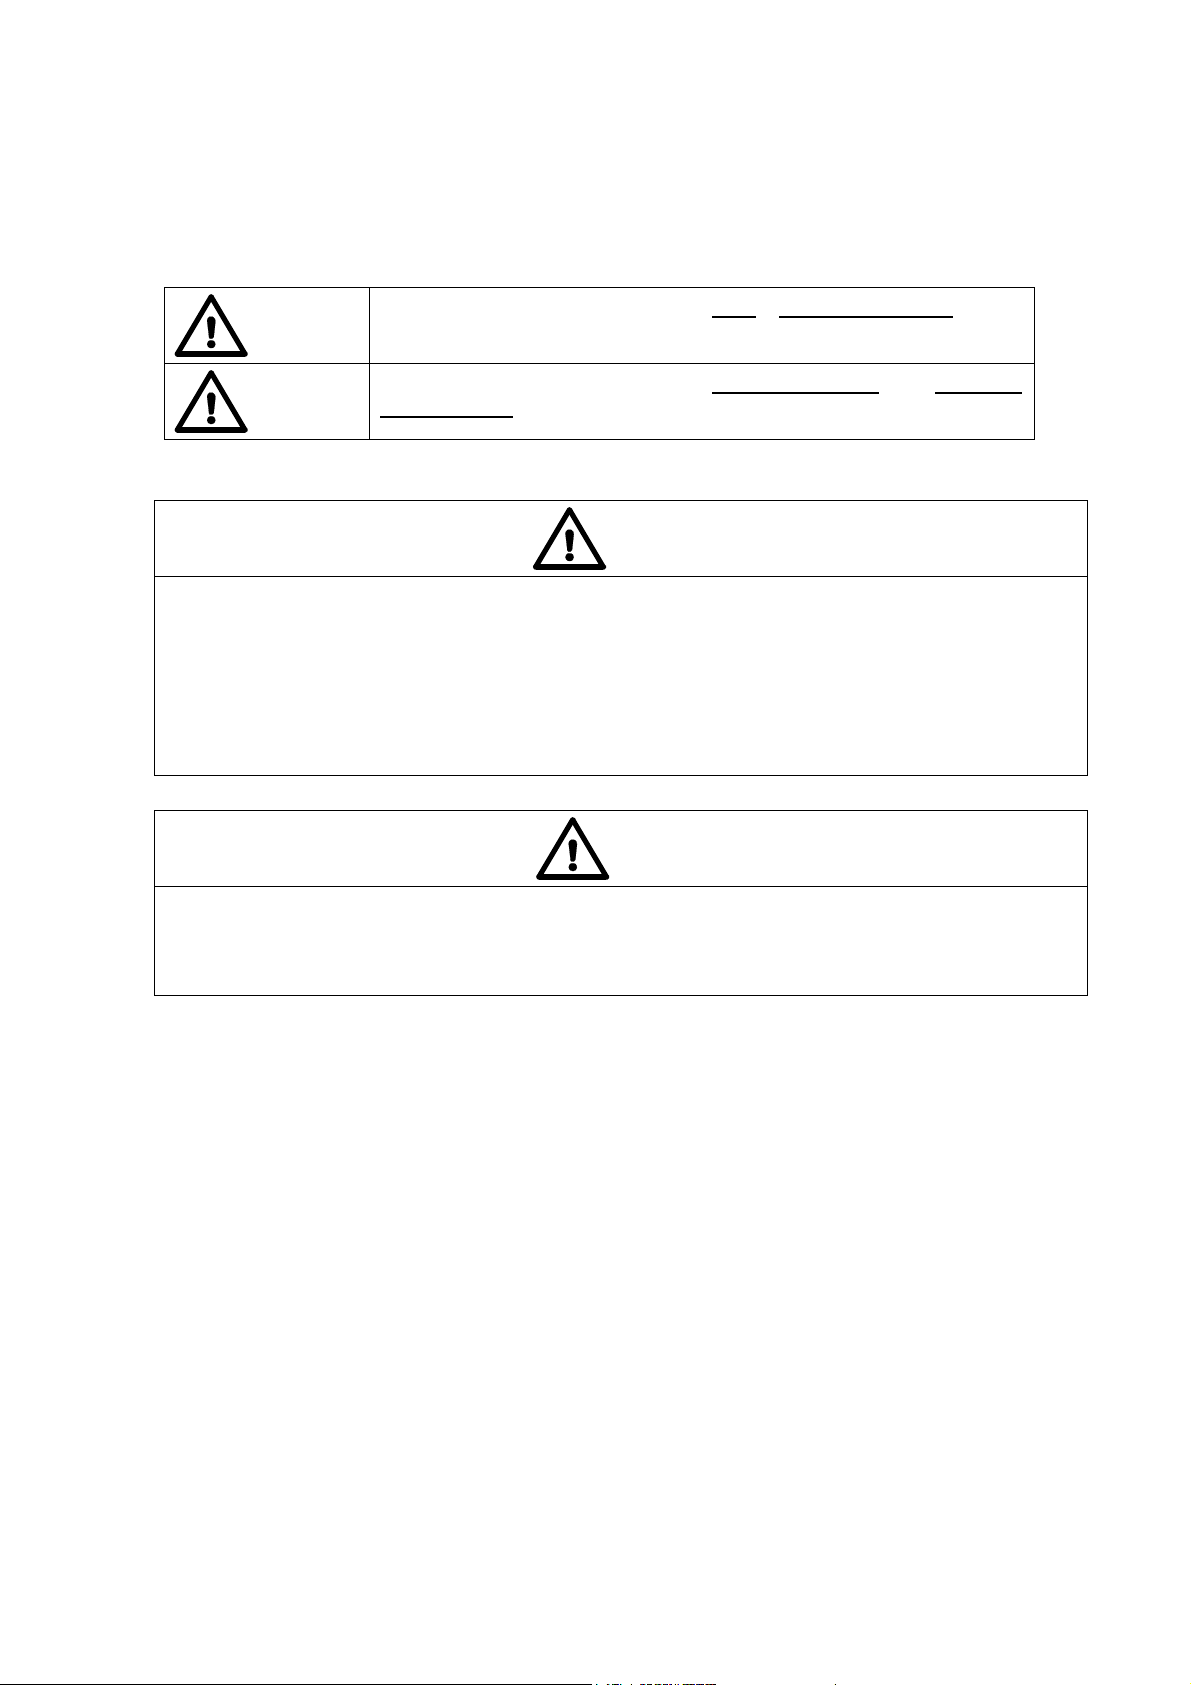
WARNING
CAUTION
[Safety precautions]
This denotes hazards which COULD result in death or severe personal injury, if not
avoided.
This denotes hazards which COULD result in minor personal injury and/or product or
property damage, if not avoided.
WARNING
z Do not connect the communication cable by wet hand. Doing so may cause an electrical shock.
z Do not connect the communication cable with the logger main unit and/or communication cable getting damp. Doing so
may cause an electrical shock or a fire to occur due to short-circuit.
z After the communication cable has been connected, pay special attention so that any water does not splash onto the
logger main unit or communication cable. Failure to do so may cause an electrical shock or a fire to occur due to
short-circuit.
z Do not use the communication cable for purpose other than that specified.
CAUTION
z Do not expose the communication cable and/or CD-ROM to the direct sunlight or put them in a place where the
temperature is high. Additionally, do not leave the communication cable and/or CD-ROM in a place where the high
temperature continues for an extended period of time, such as inside of a car. Doing so may cause the communication
cable and/or CD-ROM to be discolored or deformed.
z Even though this product is used together with other units, always strictly follow the safety
precautions stated in this manual. OMEGA shall not be held responsible for any defect arising from
negligence of such cautions and instructions.
Handling Precautions
z When storing the CD-ROM, do not store it in a place where it is exposed to the direct sunlight, or
any dirt, dust, or fluid, such as water is not sticking to it.
z Always carefully handle the CD-ROM. If the data recorded surface or label surface is scratched,
this may cause the data not to be read.
z Always carefully handle the communication cable so that any excessive load is not applied to it.
When connecting or disconnecting the cable, always hold the connector firmly and connect or
disconnect it straight.
Failure to do so may cause the cable or logger main unit to break.
z Do not wet the communication cable with water or other fluid. If the communication cable gets
damp, dry it completely before use.
z After the communication cable has been connected, pay special attention so that any water does not
splash onto the logger main unit or communication cable since the water-proof performance of the
logger main unit cannot be kept with the communication cable connected.
z Do not operate the system close to a unit producing the strong static electricity or electromagnetic
wave, such as television set or microwave oven. Doing so may cause a malfunction or fault.
II
Page 4

Contents
Introduction······················································································································· I
Check items before starting operation ·········································································· I
About this instruction manual······················································································ I
Indemnities············································································································· I
System requirements································································································ I
Safety Precautions ············································································································ II
Handling Precautions ········································································································ II
Installing the Software ······································································································· 1
Uninstalling (Deleting) the Software ···················································································· 4
Connecting to the Logger (USB) ························································································· 6
Installing USB driver ········································································································· 7
Connecting to the Logger (RS-232C) ··················································································13
Starting up the Software ···································································································14
Making the Initial Settings of the Software ··········································································15
Software Functions and Displays······················································································· 17
Function Flow··················································································································21
Troubleshooting ··············································································································22
Page 5
Installing the Software
The following describes how to install the software.
1. Power ON the personal computer to start up Windows.
CAUTION
If other applications are running when installing this software, such application may adversely affect
the installation of the software. To avoid such troubles, exit all currently running applications
completely before starting the installation.
2. Set the software CD-ROM supplied with this data read software package in the CD drive.
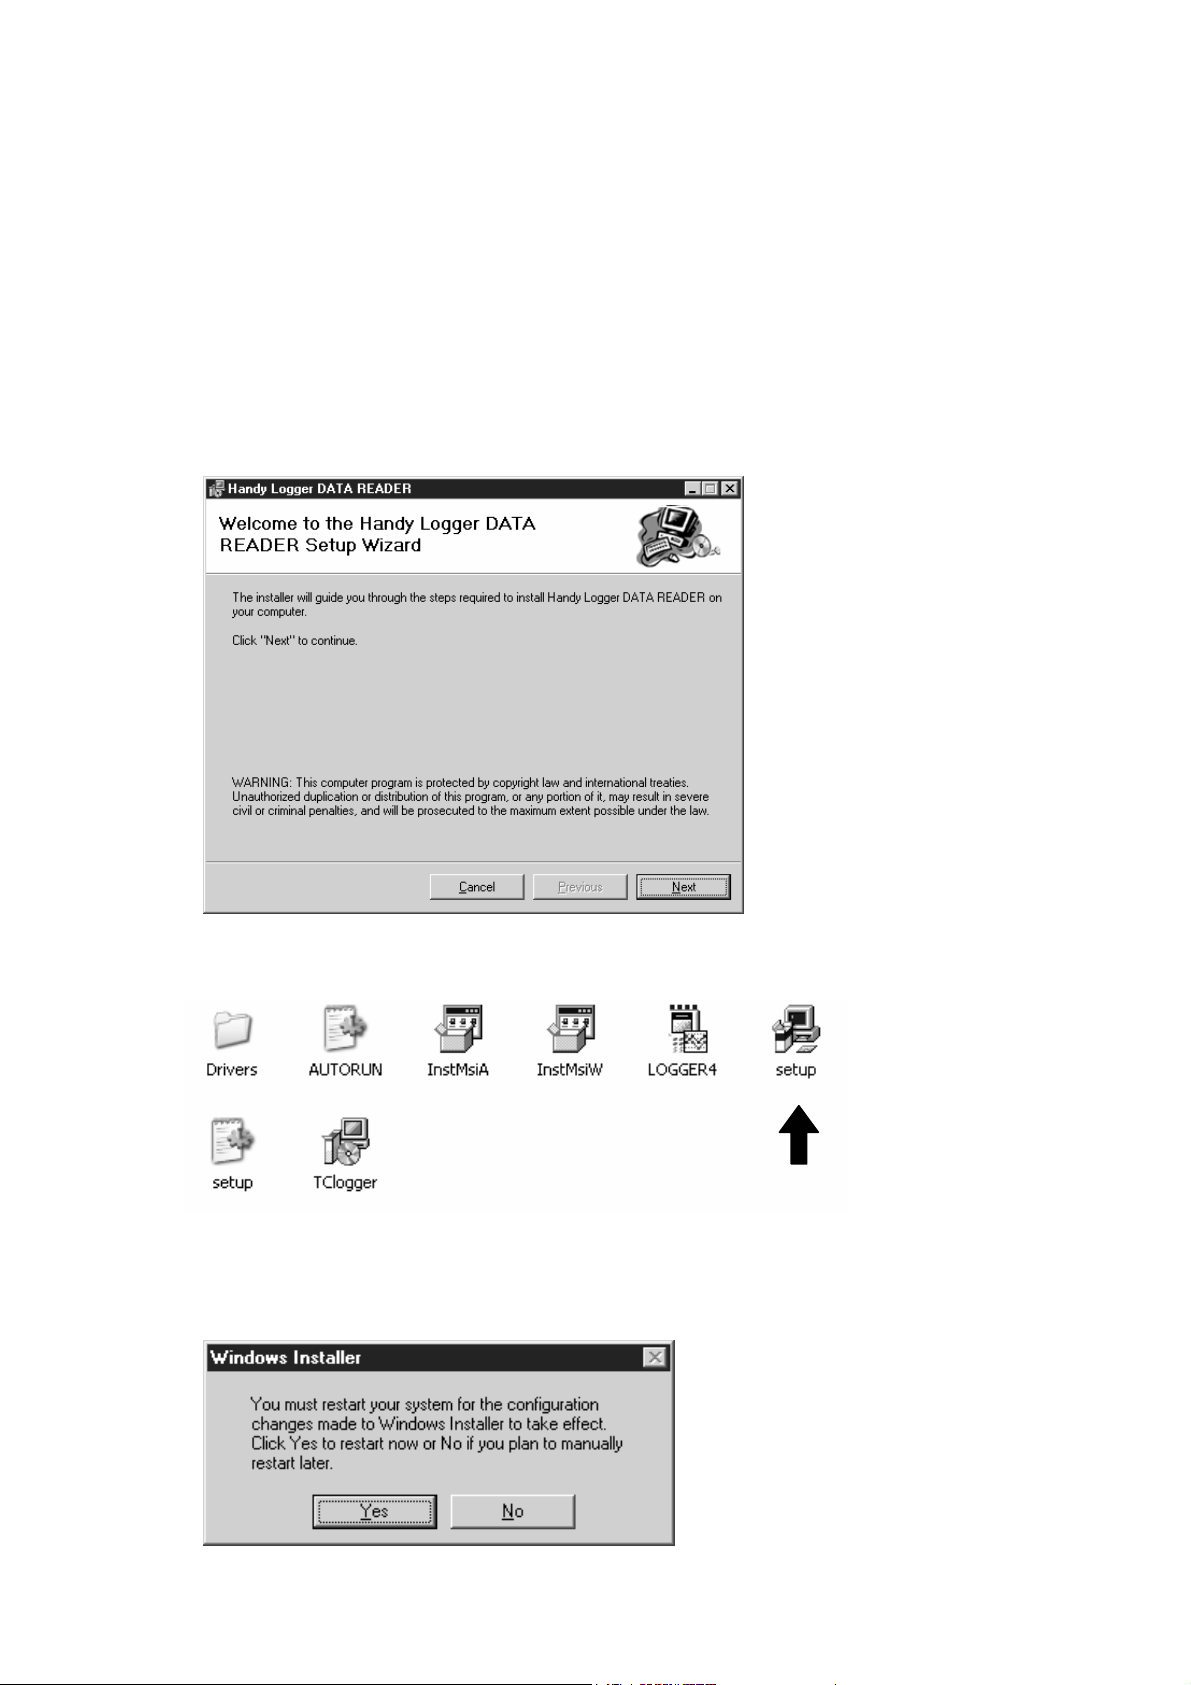
The setup program will start running automatically.
CAUTION
If the installation of the software is not started up even though the CD-ROM is set, double-click the
[setup.exe] file contained in the CD-ROM to start installing the software.
CAUTION
If the Windows installer is not installed on your computer, the following window will appear.
Follow the instructions that appear in the window and click the [Yes] button. The system will be
restarted, but the installation will be continued subsequently.
1
Page 6
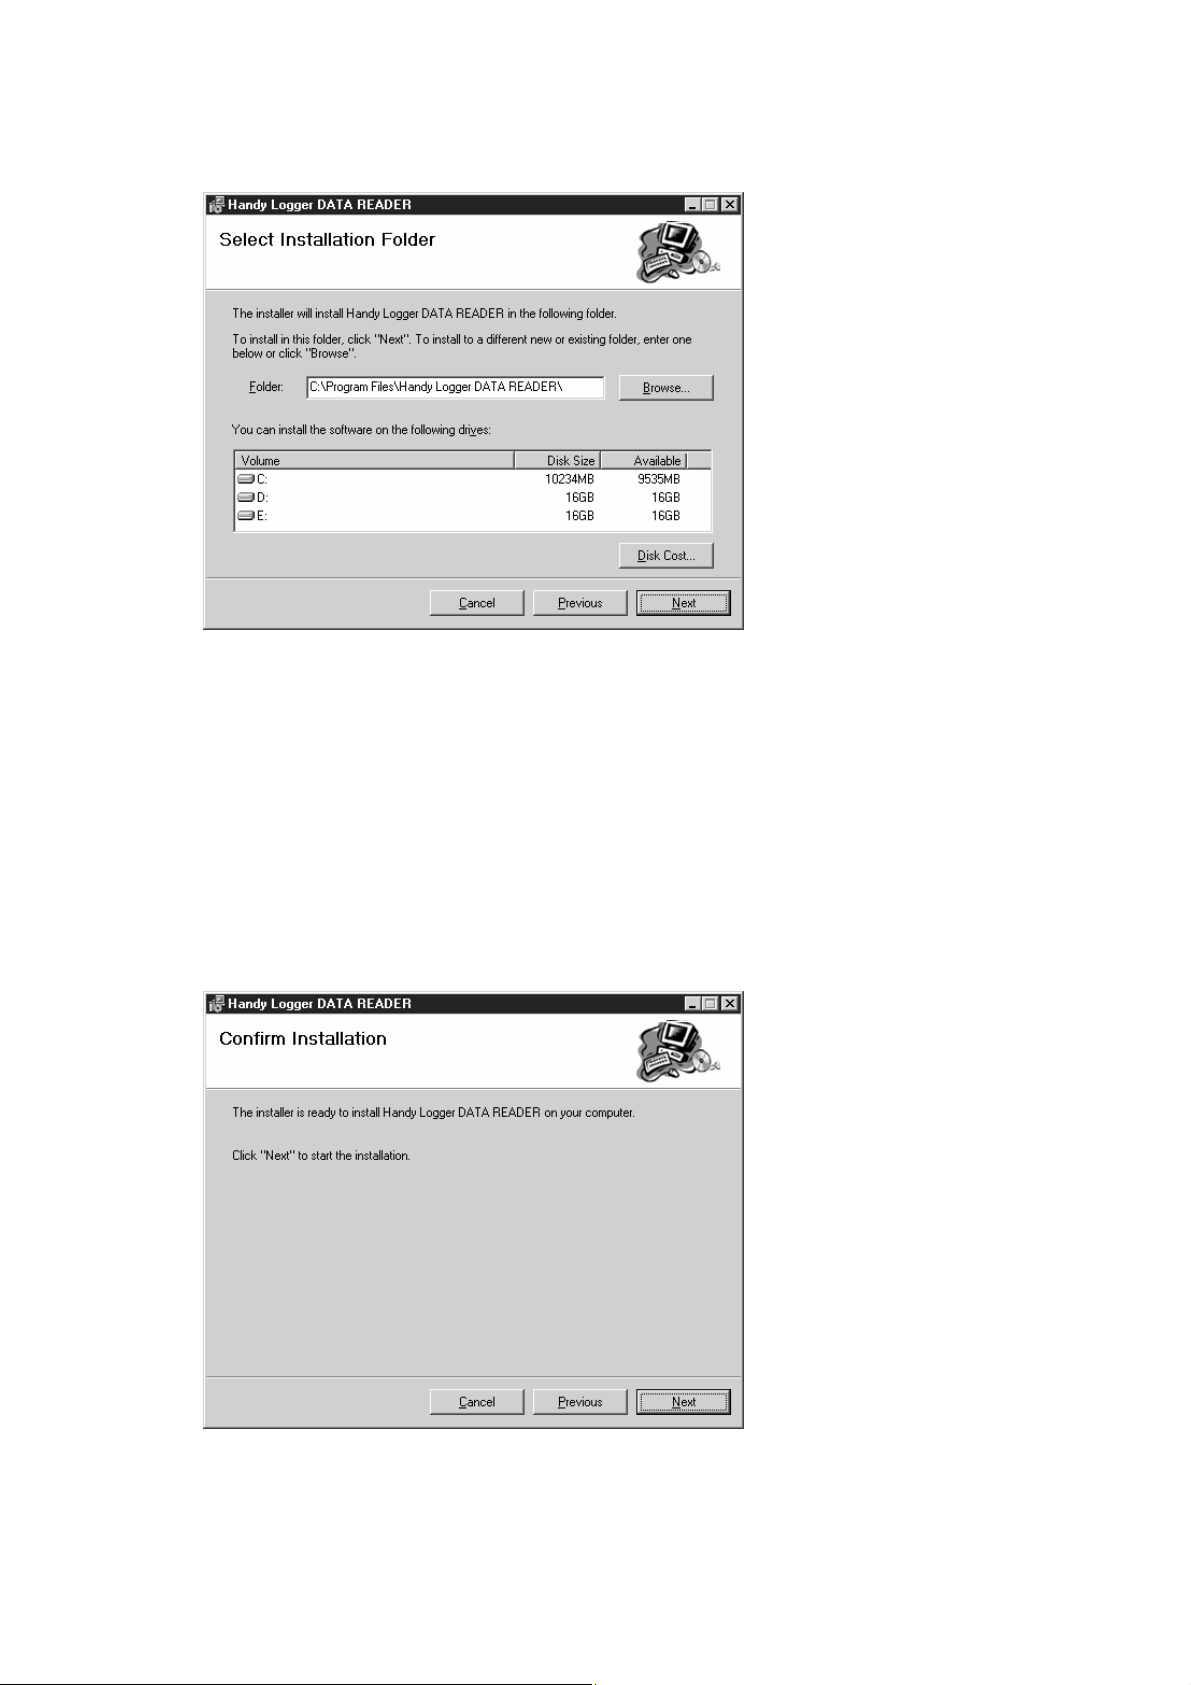
3. “Select Installation Folder”
The following window will appear.
Specify a folder where you wish to install the software. The default folder is “C:\Program Files\
Handy Logger DATA READER\”. Normally, the software is installed into this folder.
If you accept this default folder, click [Next] to proceed the installation.
CAUTION
The drive No. (such as “C:\”) that appears in the window may vary depending on the system
configuration of the personal computer you are using. When reading the message shown in the above
window, change the drive No. to that corresponding to your personal computer environment.
4. “Confirm Installation”
The following confirmation window will appear. Clicking the [Next] button will start installing the
software.
CAUTION
If other applications are running when installing this software, such application may adversely affect
the installation of the software. To avoid such troubles, exit all currently running applications
completely before starting the installation.
2
Page 7
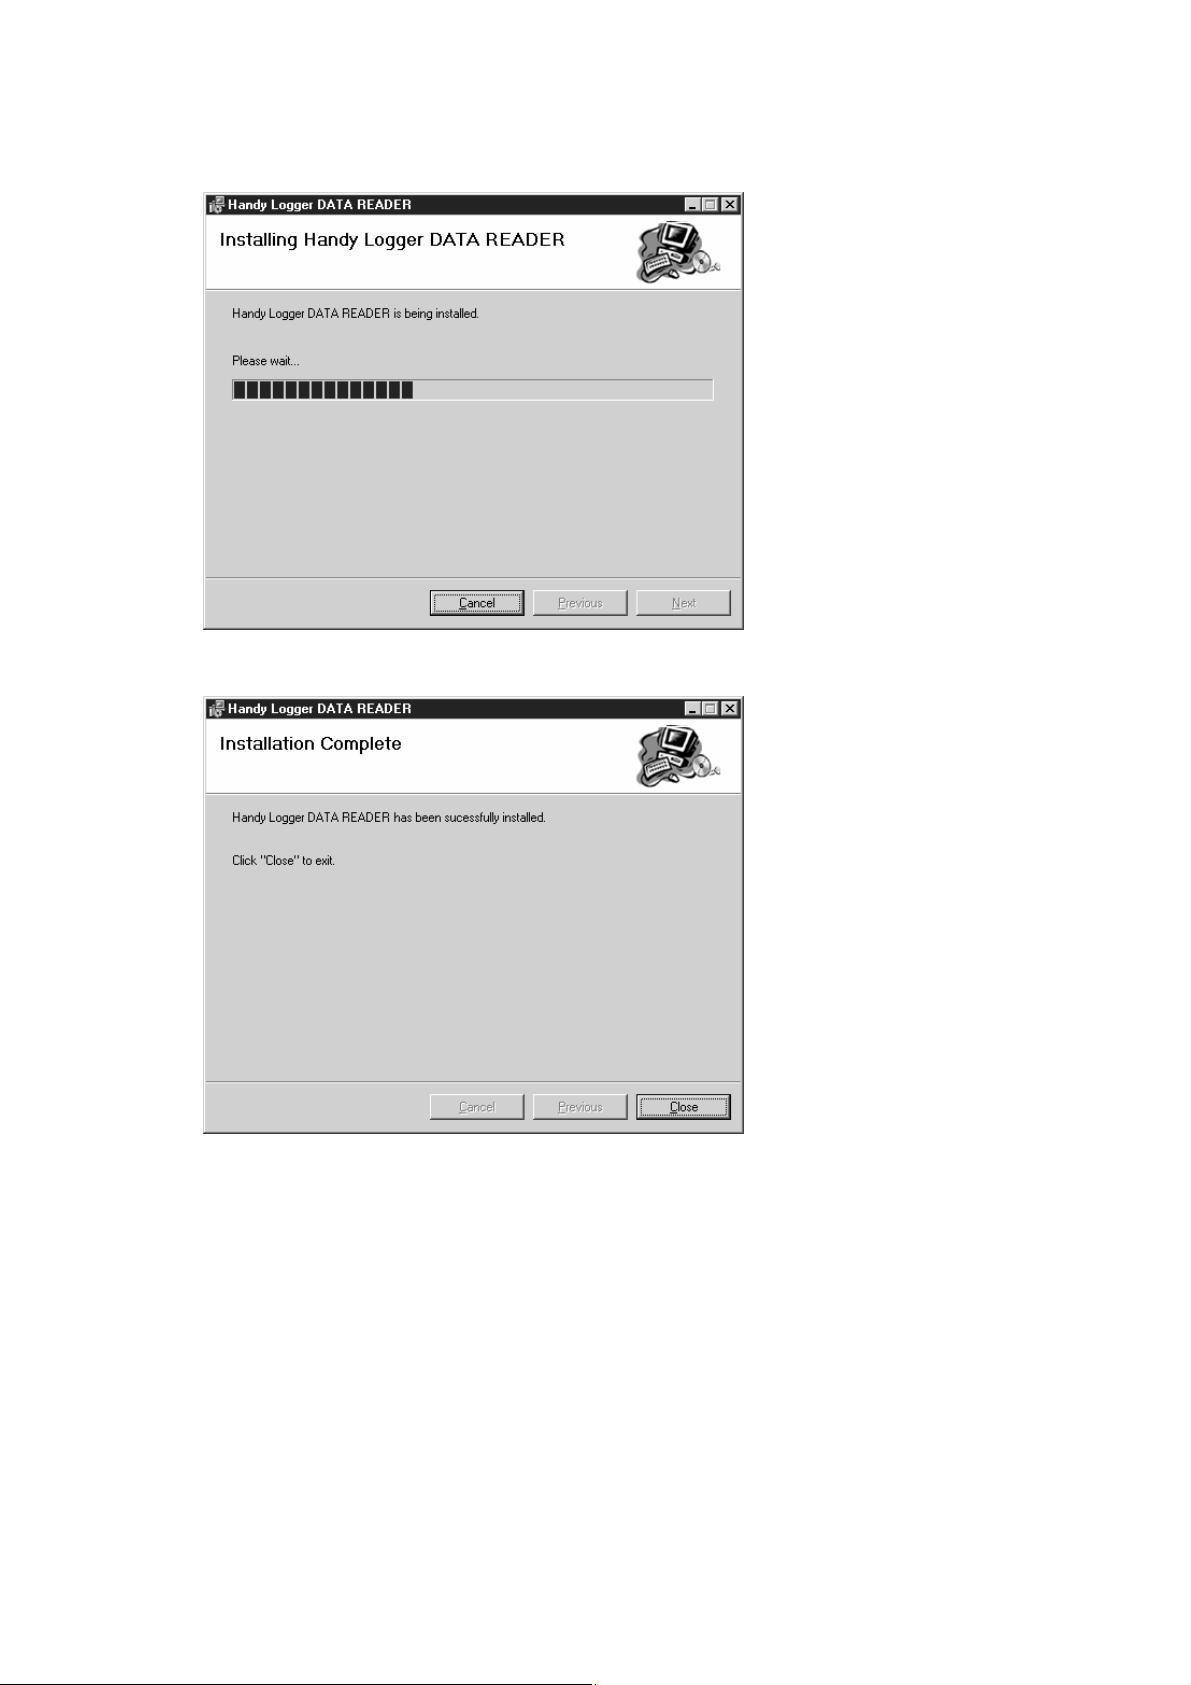
5. “Installing Handy Logger DATA READER”
The software installation will be started.
After the software has been installed completely, the following window will appear. After checking
the message shown in the window, click the [Close] button to exit the software installation.
3
Page 8
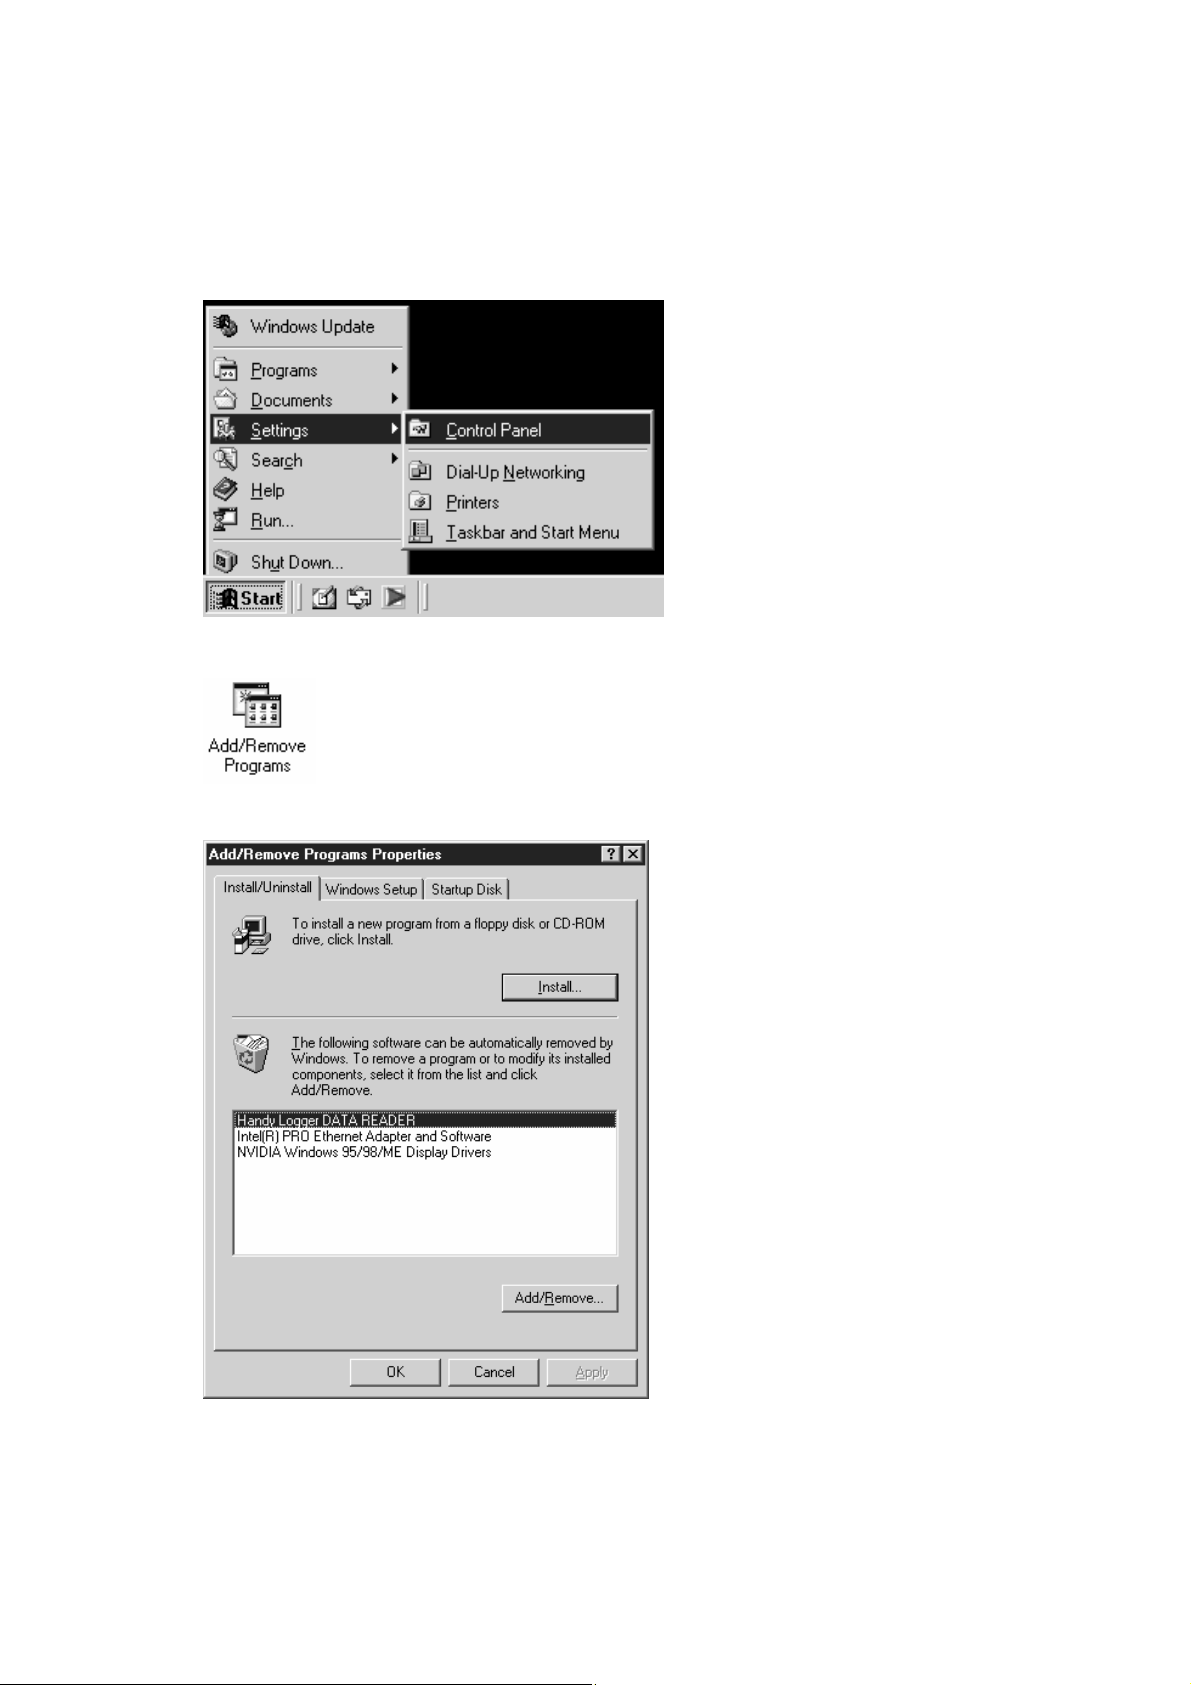
Uninstalling (Deleting) the Software
The following describes how to uninstall (delete) the handy logger data read software from your
personal computer.
1. From the [Start] menu, select [Settings] and [Control Panel] in that order.
2. Double-click [Add/Remove Programs].
3. Select [Handy Logger DATA READER] and click the [Add/Remove] button.
4
Page 9
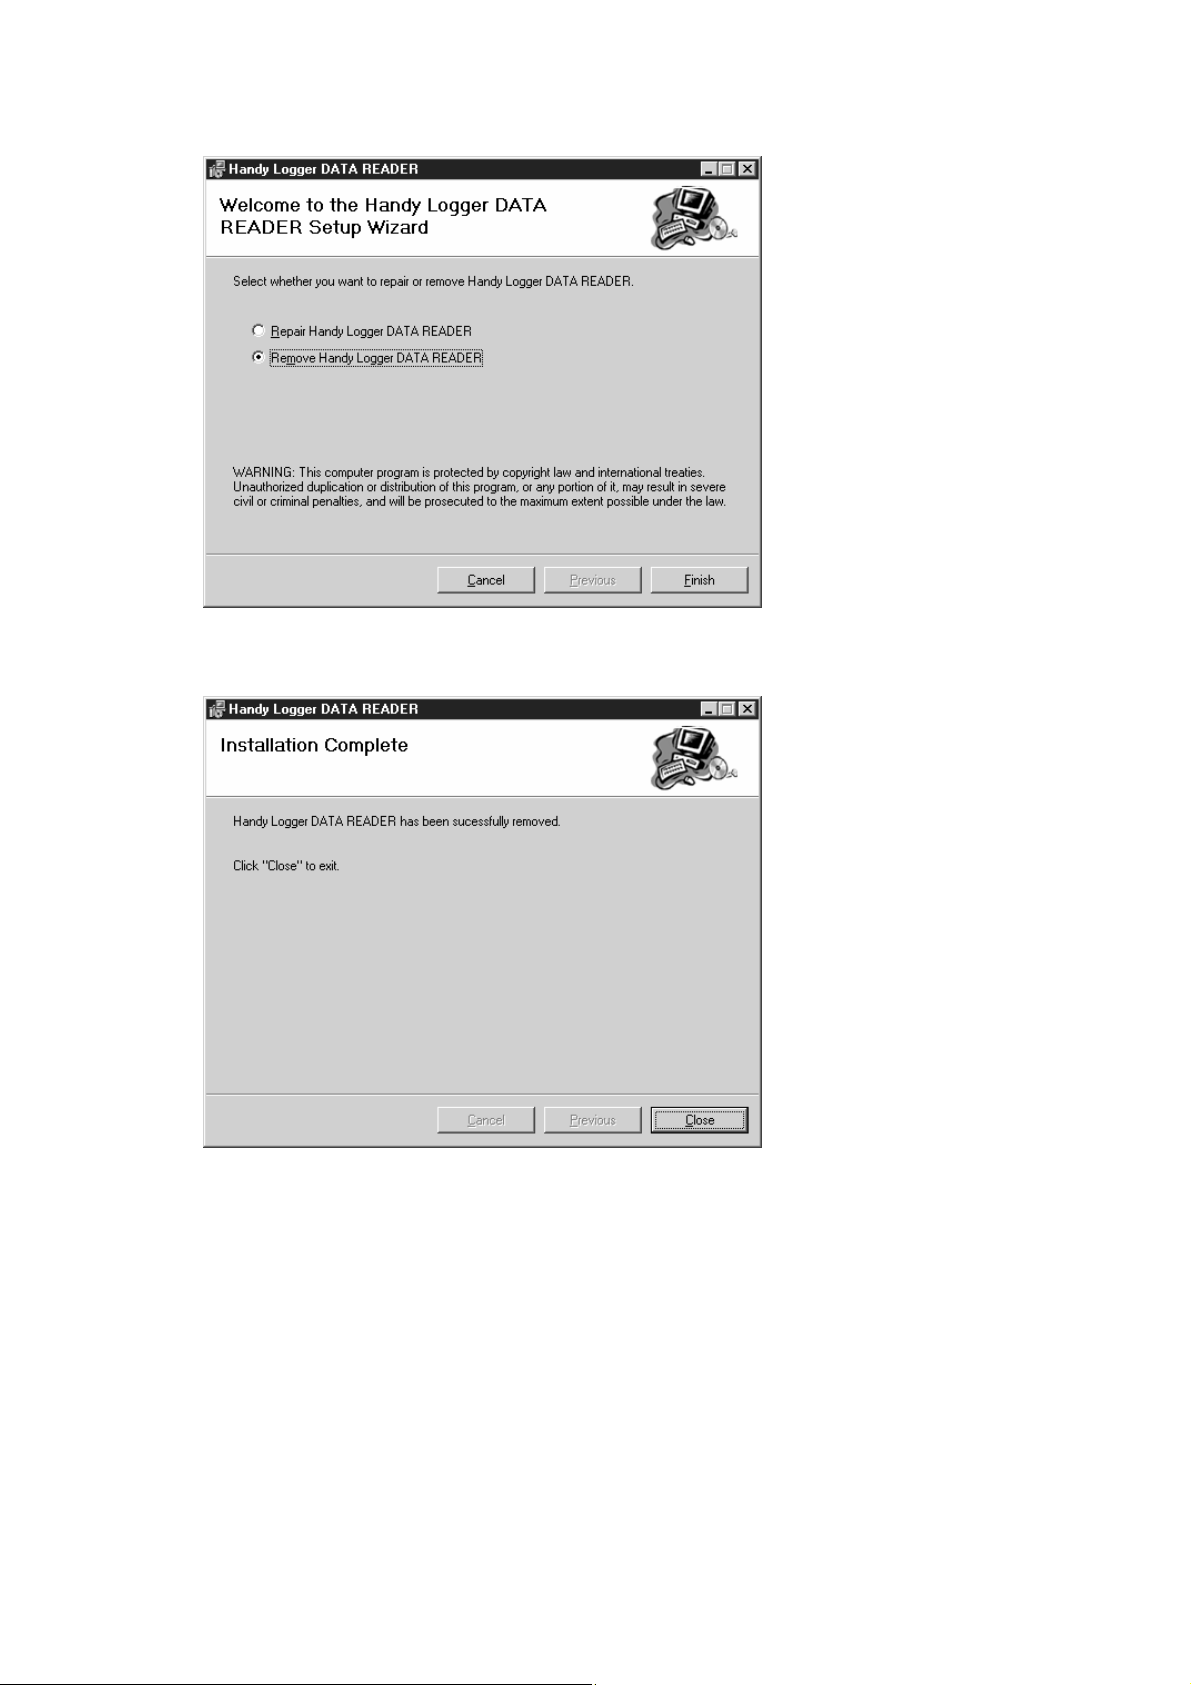
4. Check on [Remove Handy Logger DATA READER] and click the [Finish] button.
After the software has been uninstalled successfully, the following dialog box will appear. Click the
[Close] button to exit the software uninstallation.
5
Page 10
Connecting to the Logger (USB)
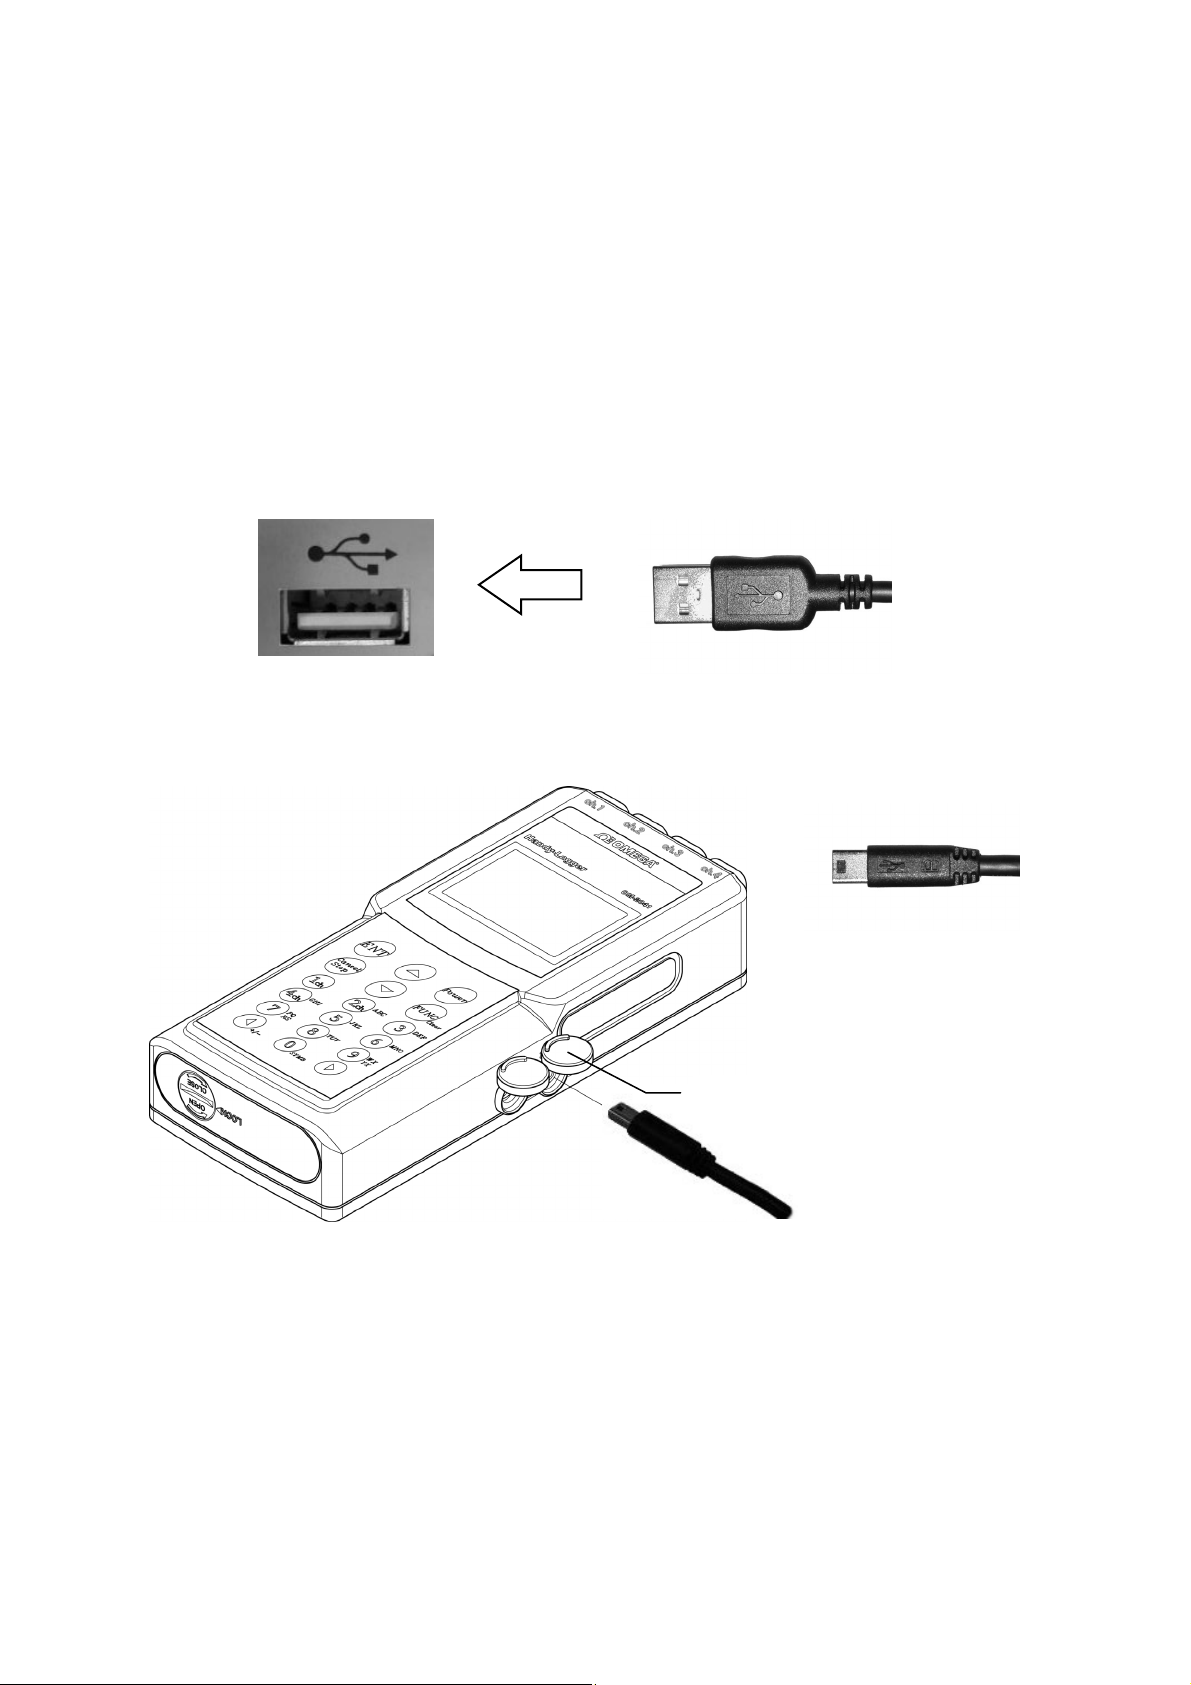
When this unit is connected to your PC (personal computer) with the special USB cable, the recorded
data can be read and saved into a file on the PC. The setting of recording can be written from the PC
too. Also, the special USB cable (supplied with the charged software) is naturally required to
communication the data with the PC.
1 Connecting the special cable to the logger
[On the side of PC] Connect the A connector of the USB cable to the USB port.
CAUTION
• Hold the plug of the cable and pull it out when disconnecting the cable connector.
• If the lead cable is pulled to disconnect the connector, the cable may malfunction.
USB port A connector
[On the side of the unit] Connect the mini B connector of the USB cable to the communication port.
Mini B connector
Communication port
Open the cover of the communication port with the “PC” marking and insert the plug of the USB
cable firmly into the communication port until it is in contact with the far side. Also, use the special
cable supplied with the charged software.
CAUTION
• Hold the plug and pull it out when disconnecting the cable connector.
If the lead cable is pulled to disconnect the connector, the cable may malfunction.
• Use the special cable (supplied with the software) only.
• Close the cover firmly if the port is not used.
Otherwise, the drip-proof performance may be damaged.
6
Page 11
Installing USB driver
This paragraph describes the installation of the driver software for MR2041 on your OS.
NNootteess
Installation in Windows2000 or WindowsXP (For Windows98 and WindowsME, refer to Page 10.)
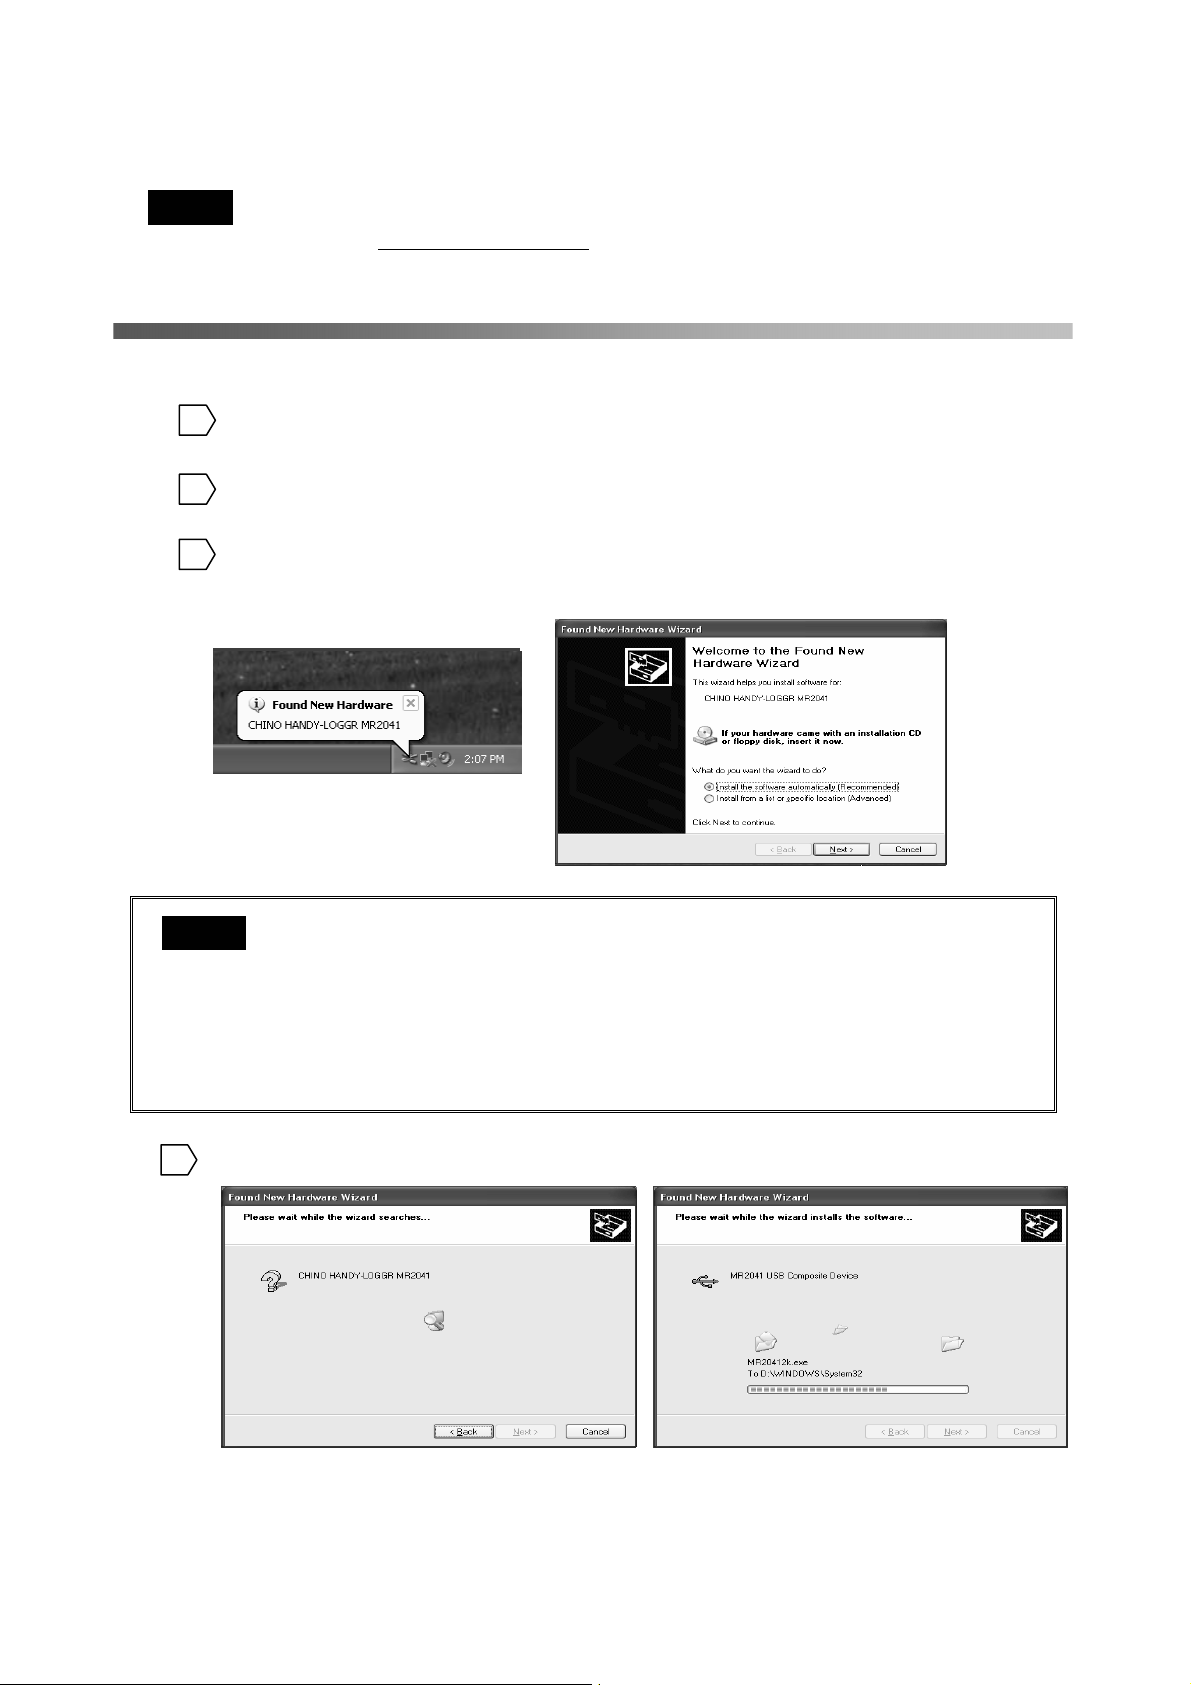
1
The installation of application will start but cancel it.
2
3
NNoottees
4
For the installation of this driver software on your personal computer with plural USB ports, we
recommend to choose one USB port only
* When you change the USB port, the installation of this software for a new USB port may be
necessary.
Power on your personal computer and start Windows. (Don’t connect the logger at this moment.)
* Wait until the desktop screen appears.
Caution: For Windows XP/2000, log on as a user belonging to Administrators group.
After Windows starts, insert the CD-ROM.
Connect the logger to a USB port. The below screen will appear.
After several seconds, the right screen will appear.
Select the [Install the Software Automatically.] and click the [Next] button.
The above screen may appear when you connect the logger to other USB port. In this case, install
s
the software with the same procedure.
The above screen will not appear when you re-connect the logger to the USB which you
connected this unit once and completed the installation successfully.
If the above screen does not appear on condition that the installation is not completed, the
following cause is considered.
Cause: The logger is not correctly connected to the USB port.
Confirm that the logger is correctly connected to the USB port again.
Change the USB port to other port for the connection with the logger and try again.
The below screen will appear. By clicking the [Next] button, the right screen will appear and the
wizard will start to install the software.
for using this unit and then install this software.
7
Page 12
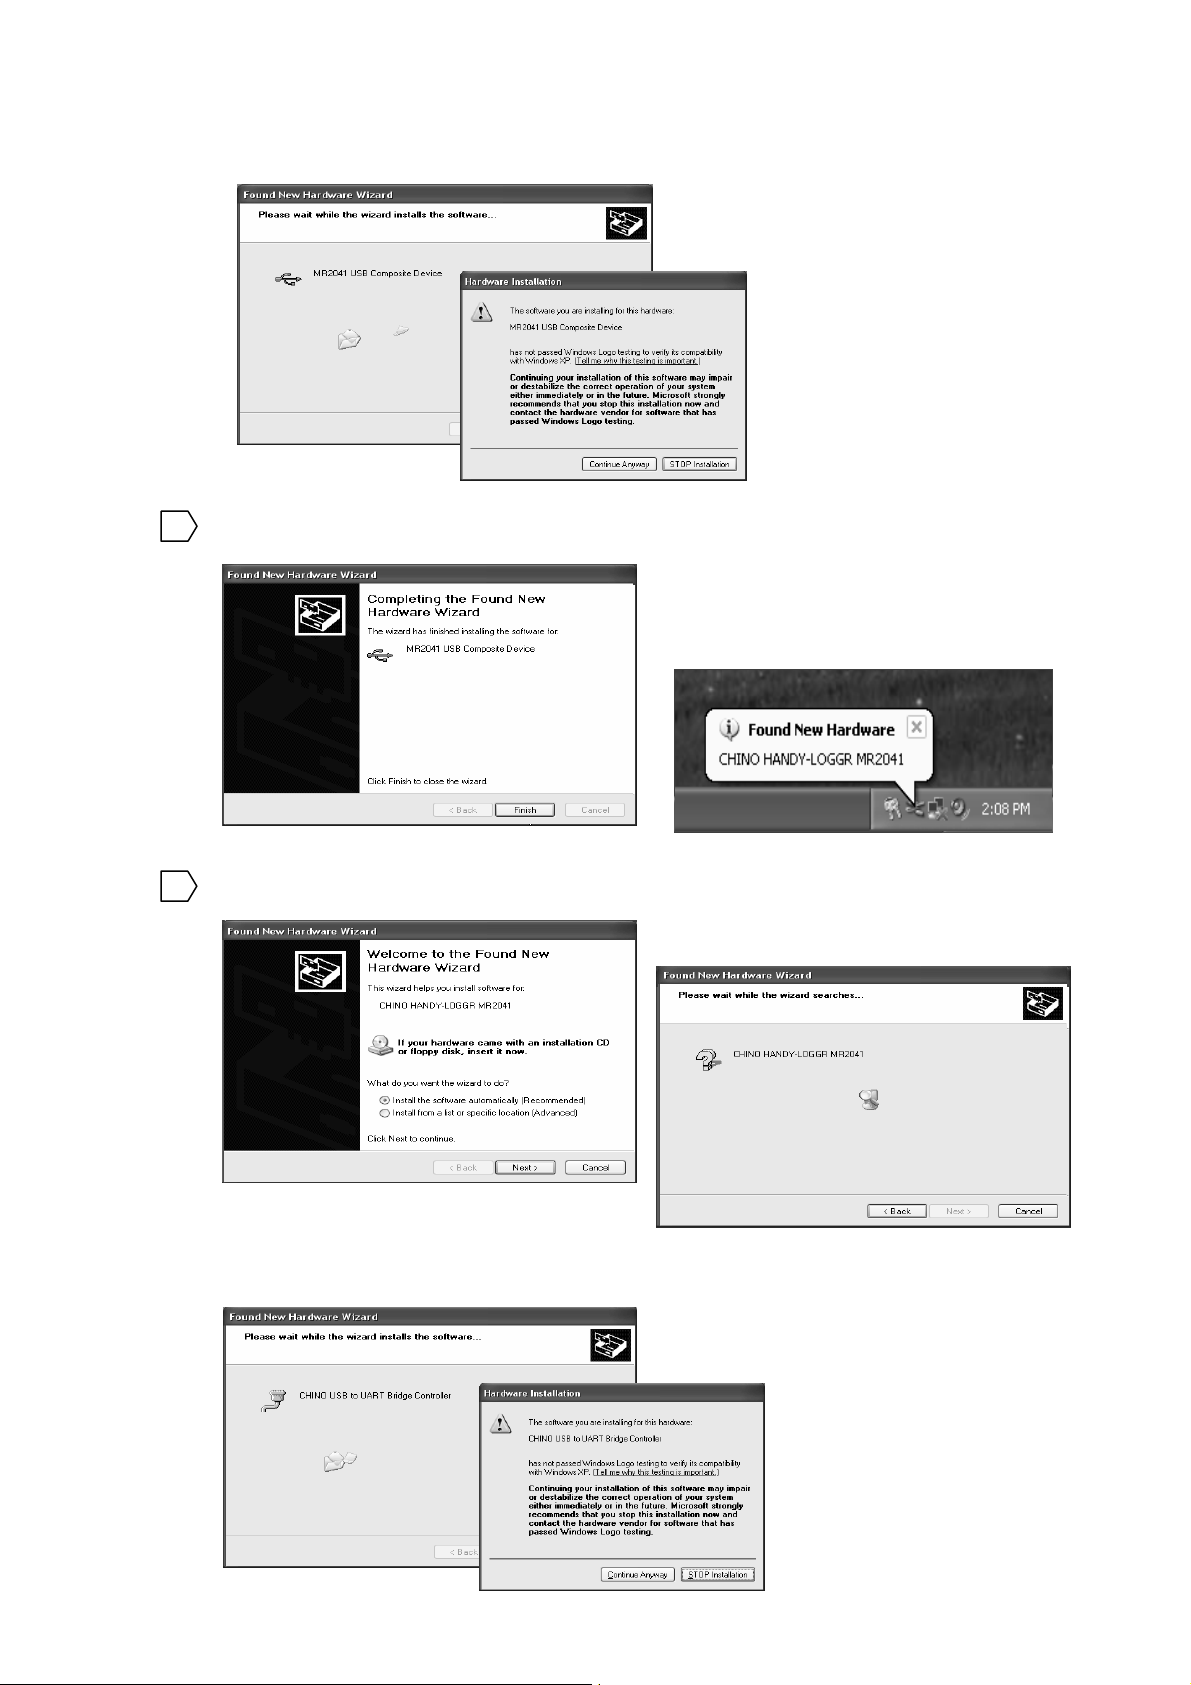
When below screen will appears, click the [Continue Anyway] button.
The wizard will be continued to the following step.
The below screen will appear. By clicking the [Finish] button, the right screen will appear and the
5
next hardware will be searched.
The Found New Hardware Wizard will appear. By clicking the [Next] button, the wizard will detect
6
the software and start to install it.
When below screen will appears, click the [Continue Anyway] button.
The wizard will be continued to the following step.
8
Page 13
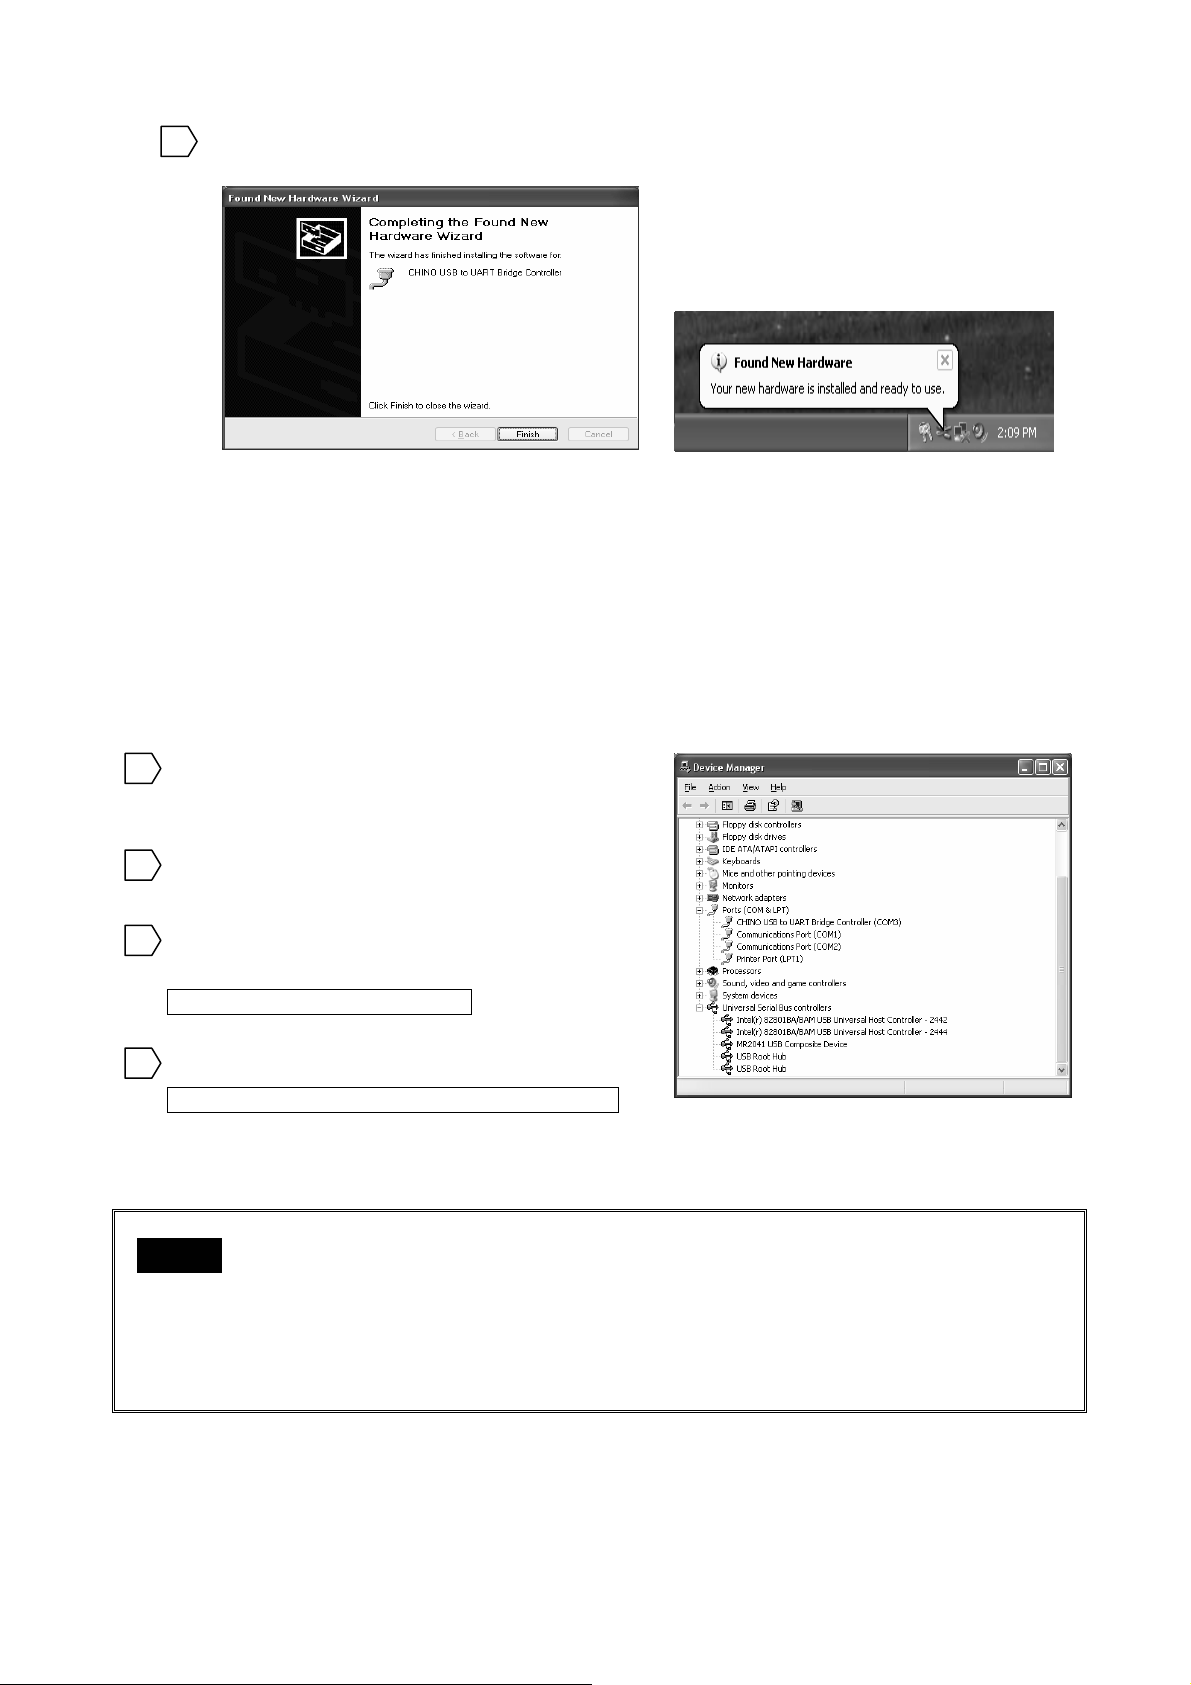
The below screen will appear when the installation is complete. By clicking the [Finish] button, the
7
right screen will appear and the logger becomes ready-to-use.
Verification of connections after the installation of the driver (Windows2000, WindowsXP)
The following procedure is for your verification that the driver has been installed correctly and the logger
has been recognized.
*Please keep the logger connected to the USB port of your PC.
Right-click the [My Computer] and click the [Property
1
(R)]. If the [My Computer] is not available, click the
[Start] button and then right-click the [My Computer].
Click the [Hardware] tab and then click the [Device
2
Manager (D)] button.
Double-click the “USB (Universal Serial Bus)
3
Controller” in the Device Manager screen and verify that
the below title is listed.
MR2041 USB Composite Device
Double-click the “Port (COM and LPT)” in the Device
4
Manager screen and verify that the below title is listed.
CHINO USB to UART Bridge Controller (COMx)
* The COM port number differs depending on your PC.
After your verification, close the screen.
NNoottees
The logger is assigned to a COM port number in ascending order from the COM port 3 in currently
s
unused COM ports of your PC.
(The COM port number differs depending on your PC.)
● When an OS is installed into your PC, remove the logger from it.
● The logger does not correspond to Standby, Suspend or Sleep condition of your PC.
● Plural sets of the logger can not be used simultaneously.
9
Page 14
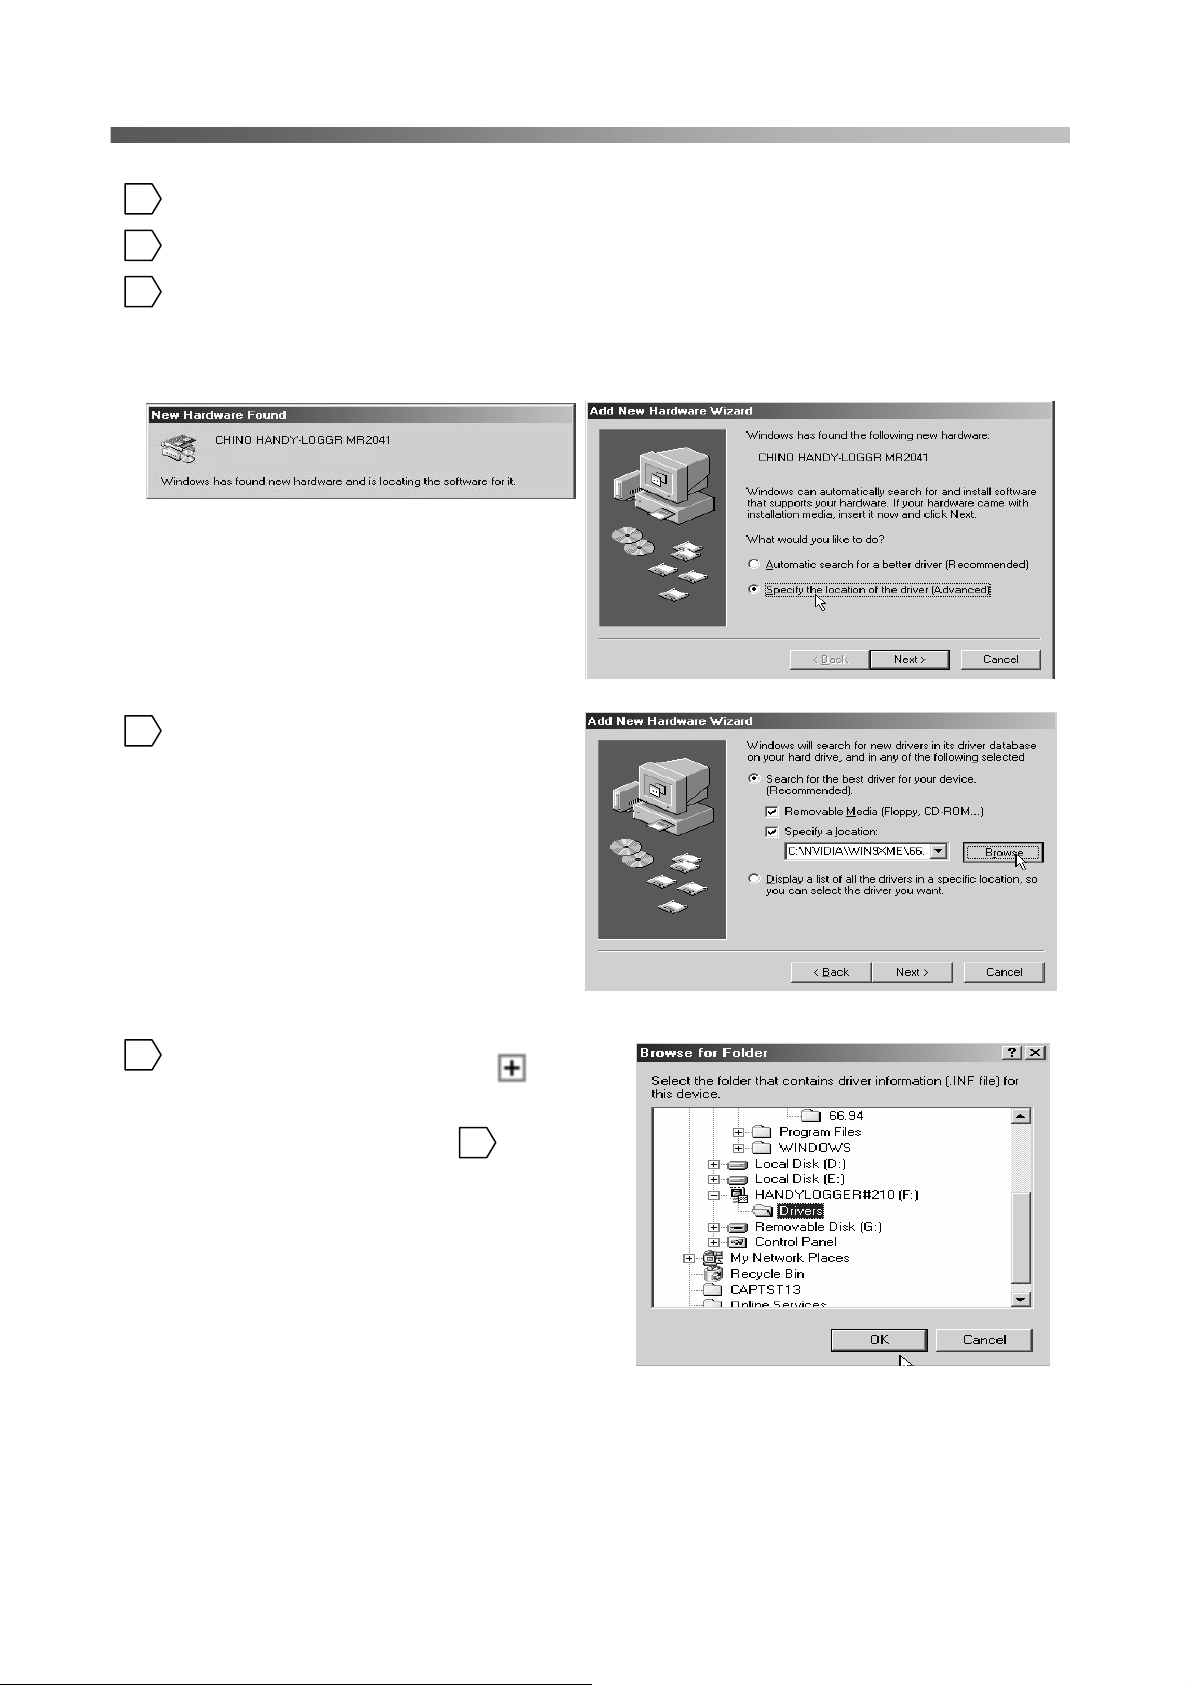
Installation in Windows98 or WindowsMe
Power on your personal computer and start Windows. (Don’t connect the logger at this moment.)
1
* Wait until the desktop screen appears.
After Windows starts, insert the CD-ROM.
2
The installation of application will start but cancel it.
Connect the logger to a USB port. The below screen will appear.
3
After several seconds, Windows will recognize the logger and the Add New Hardware Wizard will appear. The
right screen will appear. Select the radio button of “Specify the location of the driver (advanced)” and then click
the [Next] button.
The right prompt screen will appear. Select the
4
radio button of “Search for the best driver for
your device. (Recommended)” and place a
check mark in the “Specify a location:” box.
Click the [Browse…] button.
At the right screen, select the drive that the
5
CD-ROM is inserted and then click its
button to display the “Drivers”. Highlight the
“Drivers” and click the [OK] button. The
screen will return to the screen of .
Click the [Next] button.
4
10
Page 15
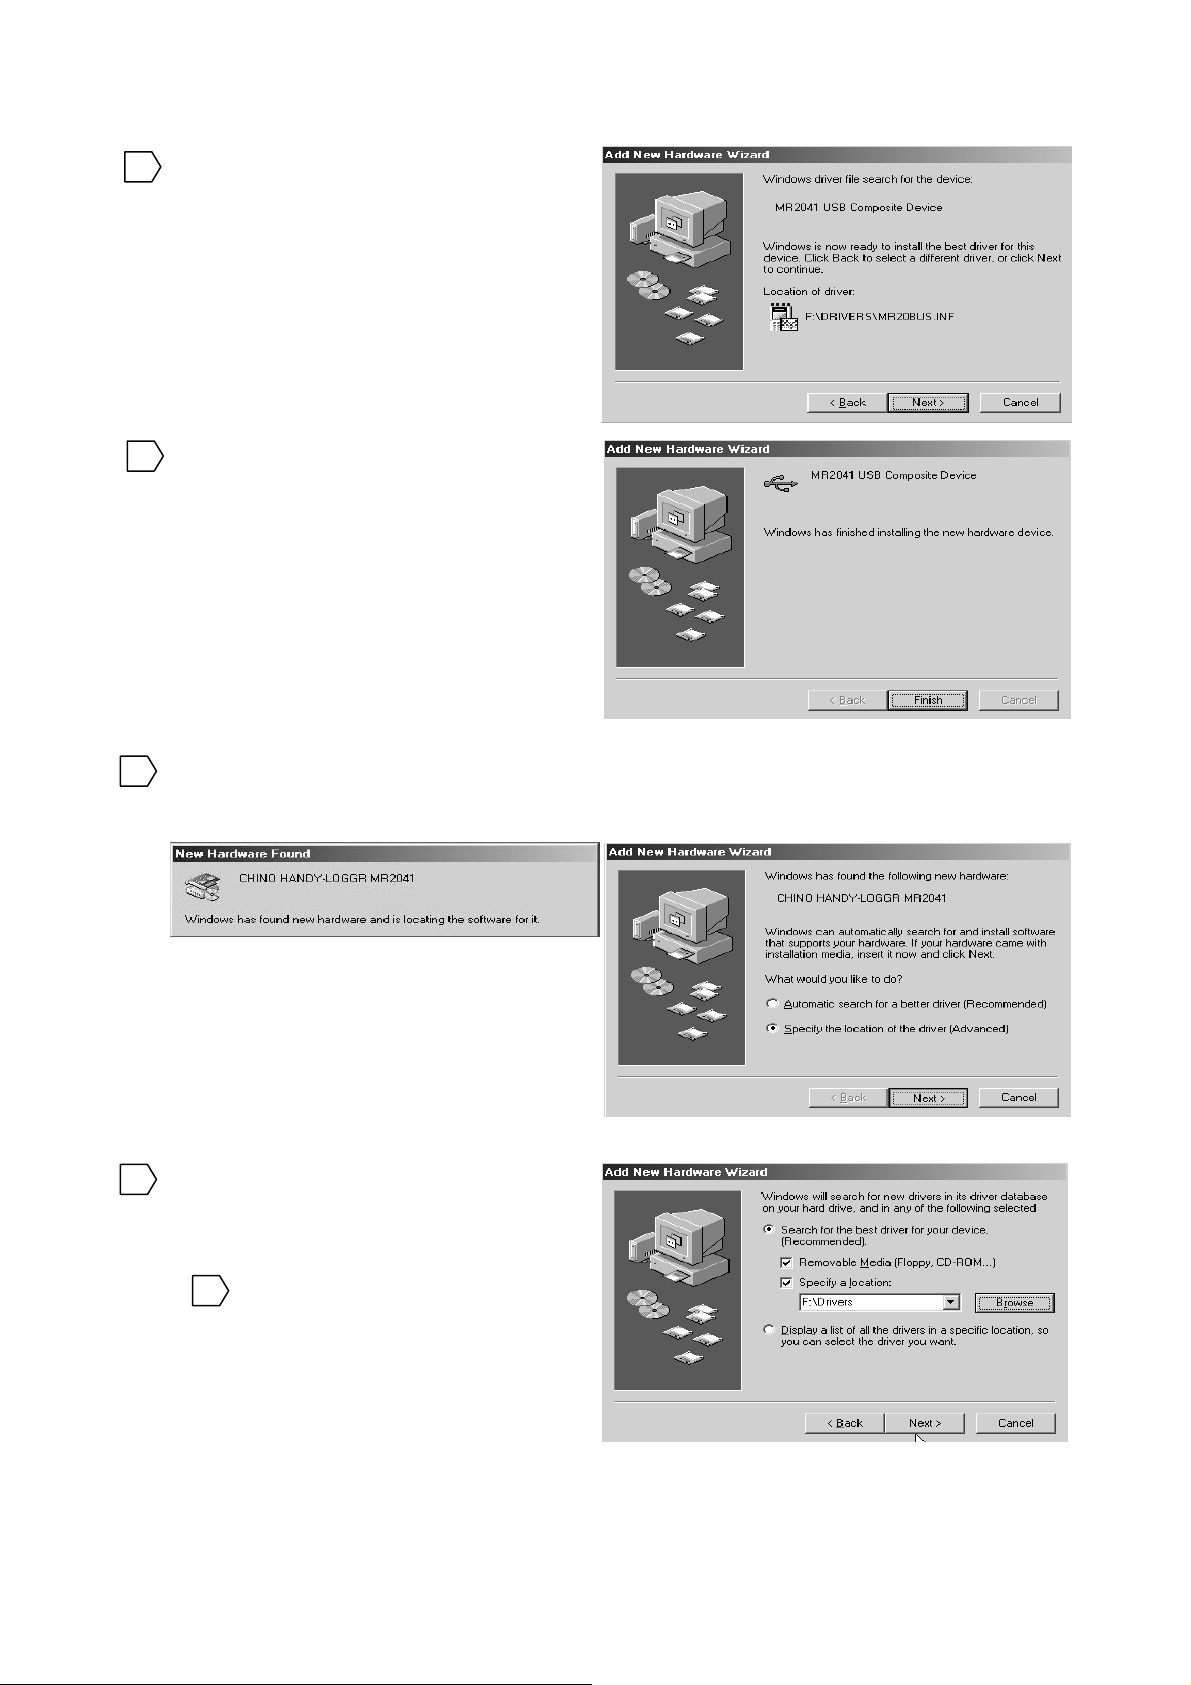
The right screen will appear. Click the [Next]
6
button.
The right screen will appear. The installation of
7
one driver in your PC is completed. Click the
[Finish] button.
After several seconds, the right screen will appear for the installation of another driver.
8
Select the radio button of “Search for the best driver for your device. (Recommended)” and then click the
[Next] button.
At the right screen, place a check mark in the
9
“Specify a location:” box.
Verify the box indicates “F:¥Drivers” that
CD-ROM is inserted and then click the [Next]
button. If a different location is indicated, refer
to .
5
11
Page 16
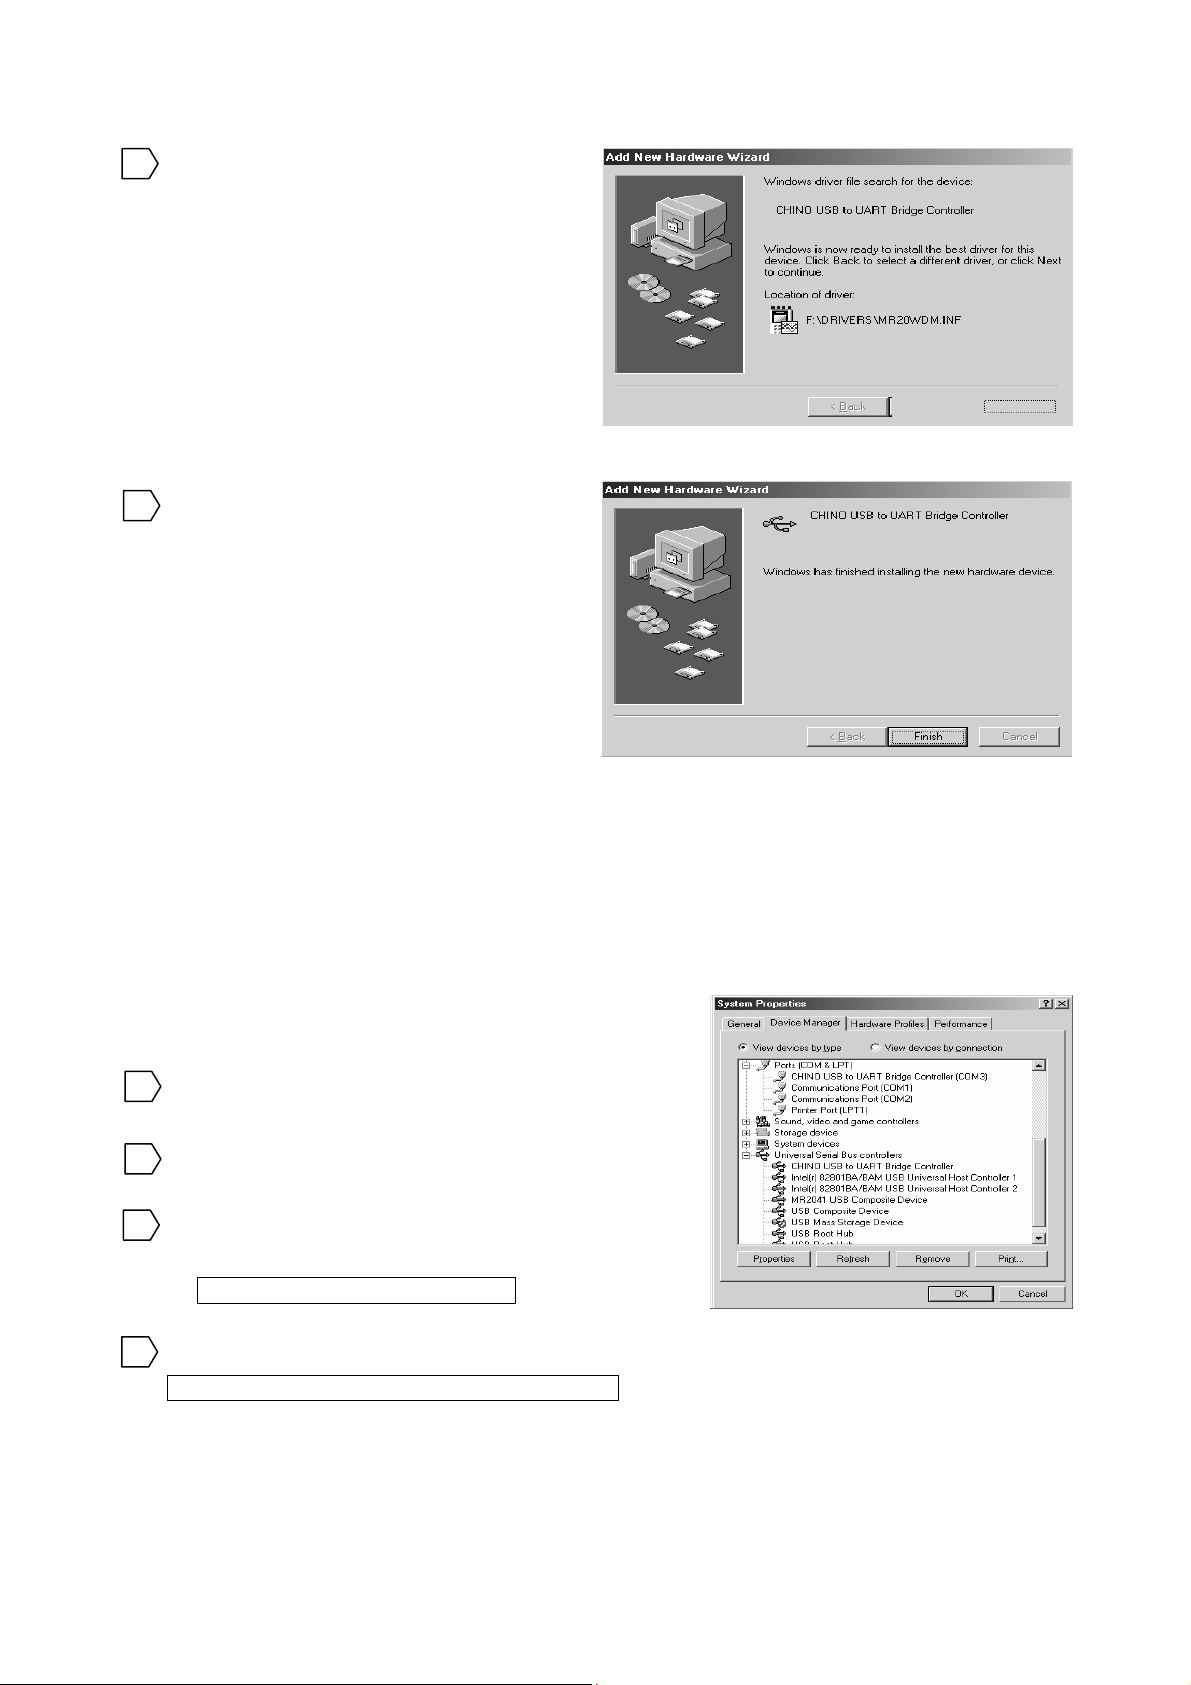
The right screen will appear. Verify the
10
location of driver is the driver that the
CD-ROM inserted and then click the [Next]
button.
The right screen will appear. The installation of
11
another driver in your PC is completed. Click
the [Finish] button.
Verification of connections after the installation of the driver (Windows98, WindowsME)
The following procedure is for your verification that the driver has been installed correctly and the logger
has been recognized.
*Please keep this unit connected to the USB port of your PC.
Right-click on the [My Computer] icon and select the
1
[Property (R)].
The right window will appear. Click the [Device Manager
2
(D)] tab.
Double-click the “USB (Universal Serial Bus) Controller”
3
in the Device Manager screen and verify that the below title
is listed.
MR2041 USB Composite Device
Double-click the “Port (COM and LPT)” in the Device Manager screen and verify that the below title is
4
listed.
CHINO USB to UART Bridge Controller (COMx)
* The COM port number differs depending on your PC.
After your verification, close the screen.
12
Page 17
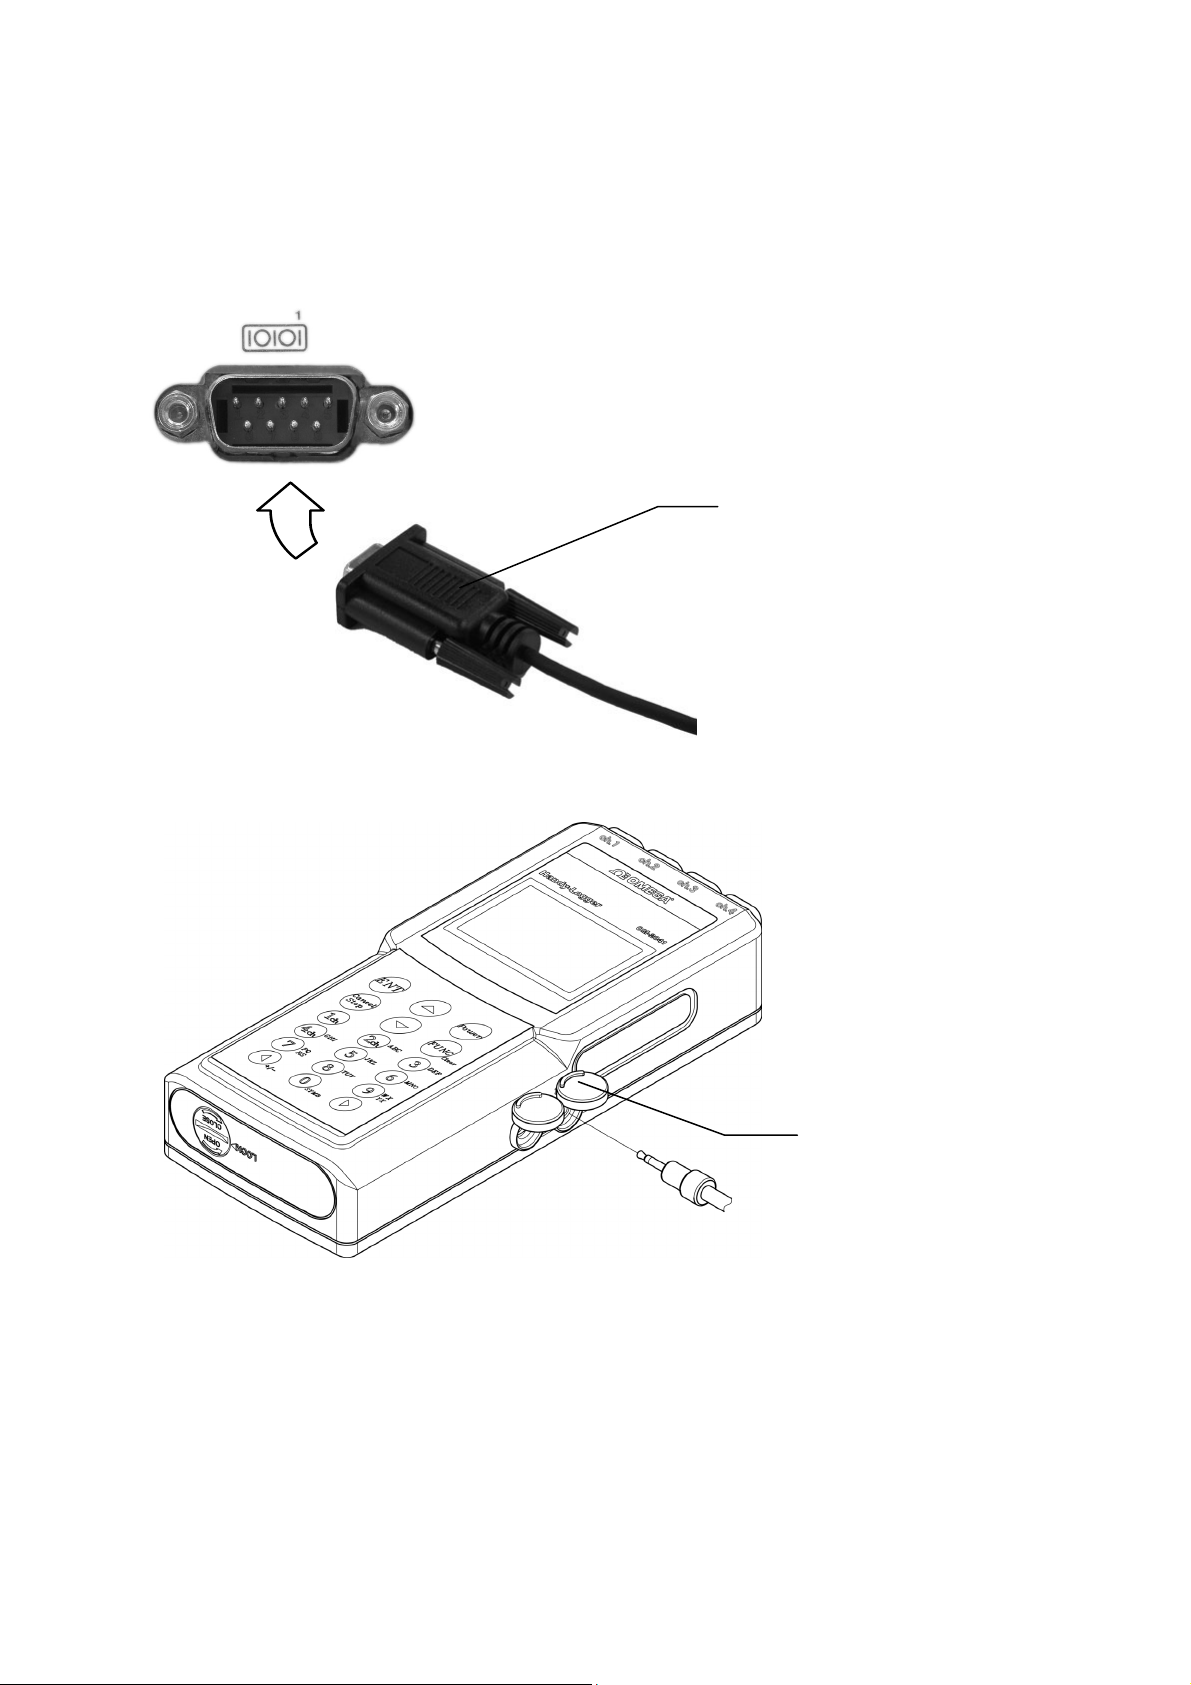
Connecting to the Logger (RS-232C)
To connect your personal computer to the logger for data communication, use the communication cable
supplied with the software.
[Personal computer side] Connect the DSUB 9-pin connector of the communication cable to the
COM port on the personal computer (see the Fig. below).
CAUTION
• Before connecting the communication cable, always power OFF
the personal computer completely.
• When disconnecting the cable, hold the plug firmly and pull it
out. At this time, do not pull the cable.
[Logger side] Connect the mini jack of the communication cable to the communication port on the
logger (see the Fig. below).
DSUB 9-pin
connector
Open the cover of the communication port with the “PC” marking put and insert the mini jack firmly
until it is in contact with the far side.
CAUTION
• When disconnecting the communication cable, hold the plug firmly and pull it out. At this time,
do not pull the cable.
• To connect the personal computer and logger, always use the communication cable supplied with
the data read software. Do not use any cable other than that specified.
• The drip-proof performance cannot be kept when the communication cable is connected.
• If the communication cable is not used, close the cover on the port firmly. Failure to do so may
cause the drip-proof performance to lower.
13
Communication port
Page 18
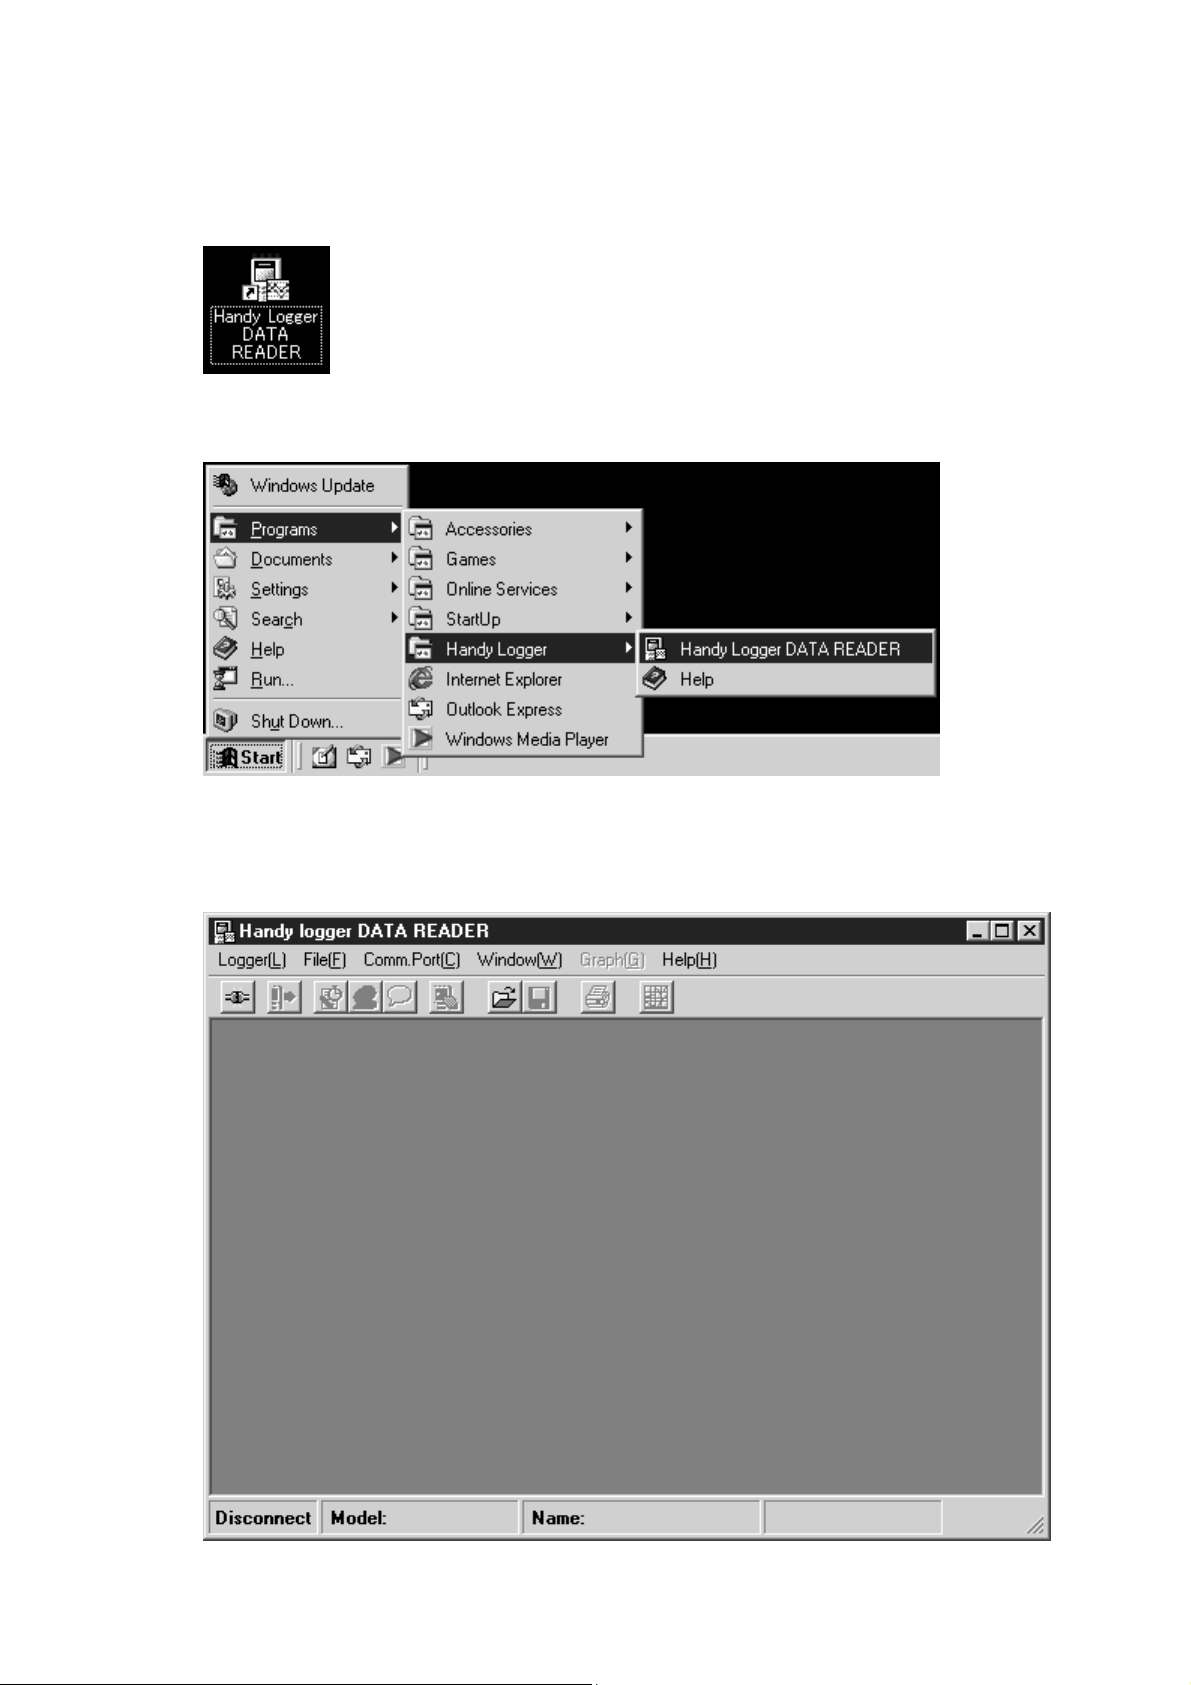
Starting up the Software
The following describes how to start up the software.
[Starting up procedure 1] Double-click the icon on the desktop.
[Starting up procedure 2] From the [Start] menu, select [Programs], [Handy Logger], and [Handy
Logger DATA READER] in that order.
The application will then be started up.
14
Page 19
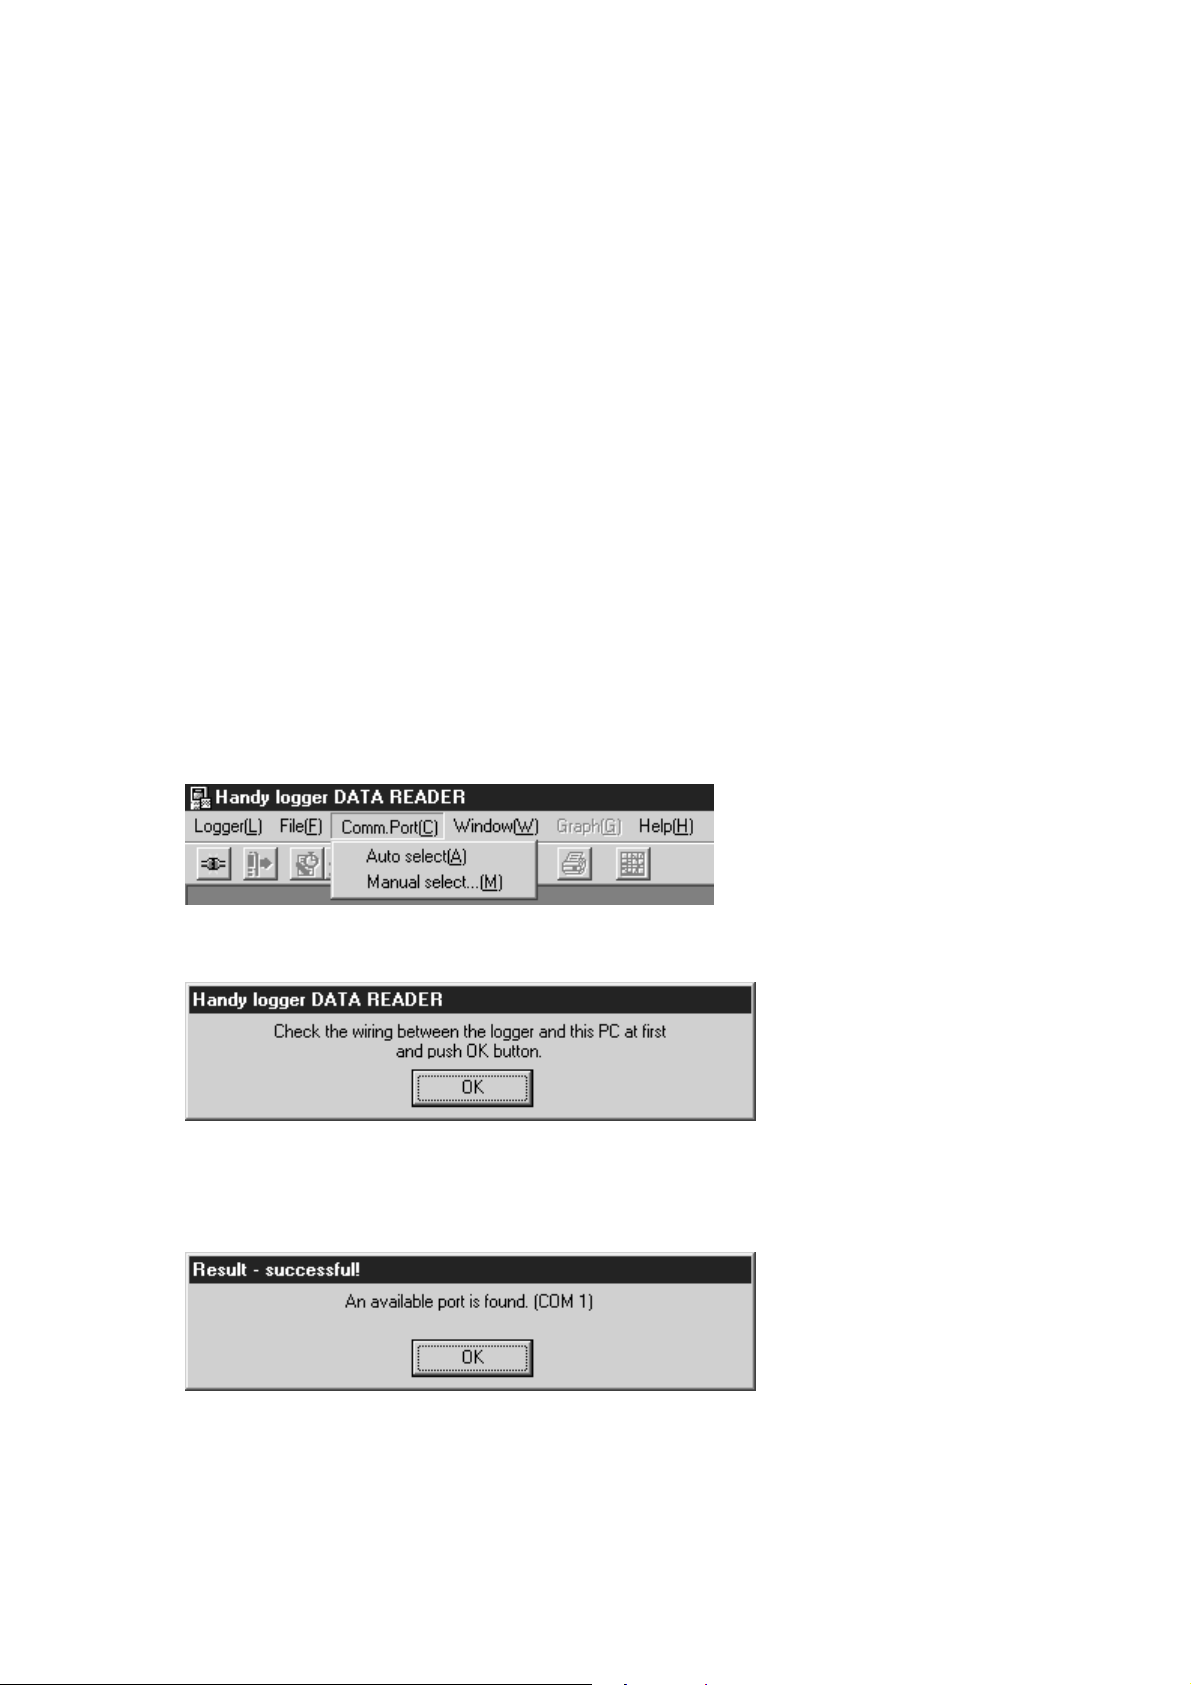
Making the Initial Settings of the Software
After this software has been installed successfully, first make the [Comm.Port] setting. With this
[Comm.Port] menu, specify a communication port that the personal computer uses.
1. Connect the logger and personal computer with the cable.
Connect the logger and personal computer while referring to the section Connecting to the logger.
Additionally, put the logger in the communication mode that the data communication can be started.
[Preparations for logger]
c Connect the logger and personal computer correctly with the communication cable.
d Power ON the logger and put it in the communication mode.
To put the logger in the communication mode, follow the steps below.
• Display the home screen.
• Press [FUNC] key to display the main menu.
• Using the [] or [] key, select [Communication] and press the [ENT] key.
The communication standby screen will appear on the display panel of the logger, and then the logger
becomes ready for data communication.
2. Start up this software.
3. From the [Comm. Port] menu, select [Auto select].
4. Check the cable connection and click the [OK] button.
After that, the software will automatically search for the communication port, to which the logger is
connected. When the software searches for the communication port successfully, the following dialog
box will appear. (The following dialog box shows that the logger is connected to “COM1”.)
15
Page 20
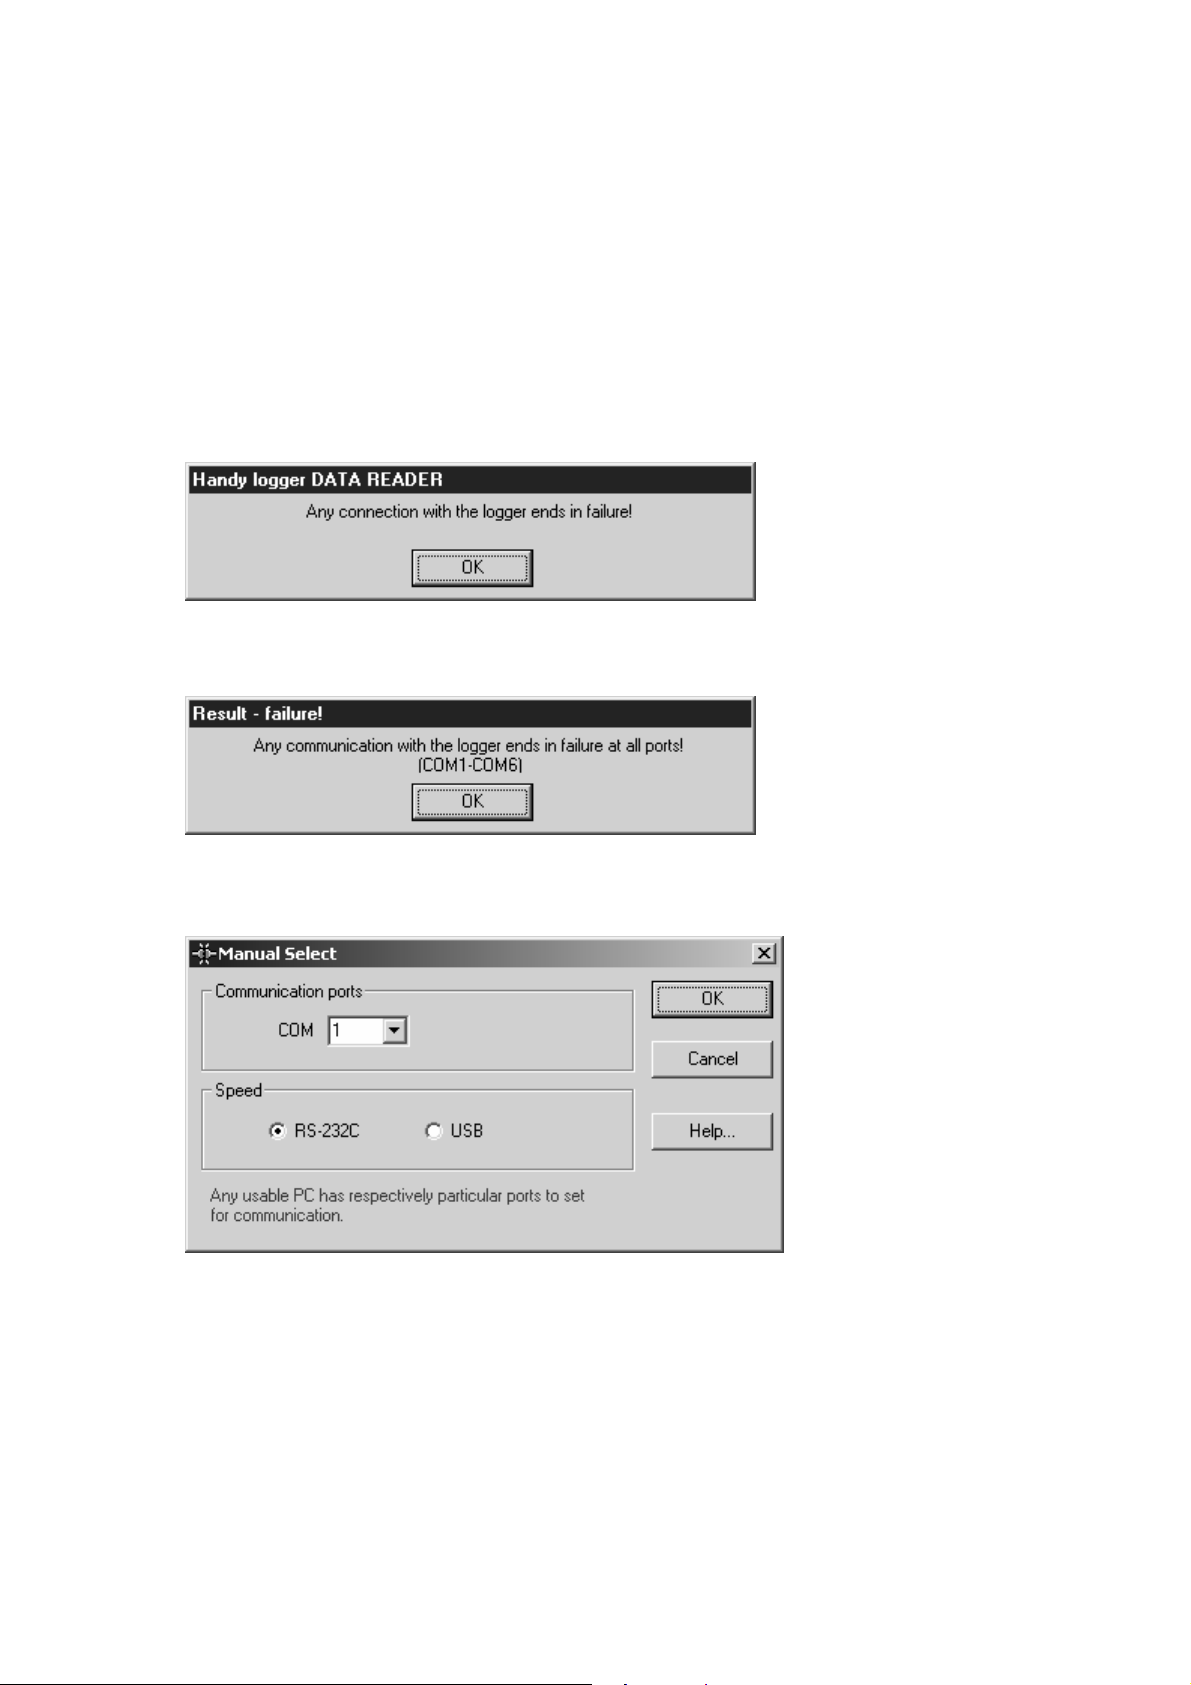
CAUTION
Once the communication port has been set, this setting is then saved into the personal computer.
Therefore, it is not necessary to set the communication port from the next operation.
However, it is absolutely necessary to set the communication port if any of the following arises.
• This software is uninstalled, and then it is installed again.
• The communication port, to which the cable is connected, is changed.
• As the system configuration of the personal computer is changed, the communication port setting is
changed.
If the connection is failed even though the cable is connected properly and the communication mode of
the logger functions correctly, set the communication port again.
U If the auto select is failed:
If the above dialog box appears during auto select of the communication port setting and the
communication port cannot be found, select [Manual Select] from the [Comm. Port] menu.
16
Page 21
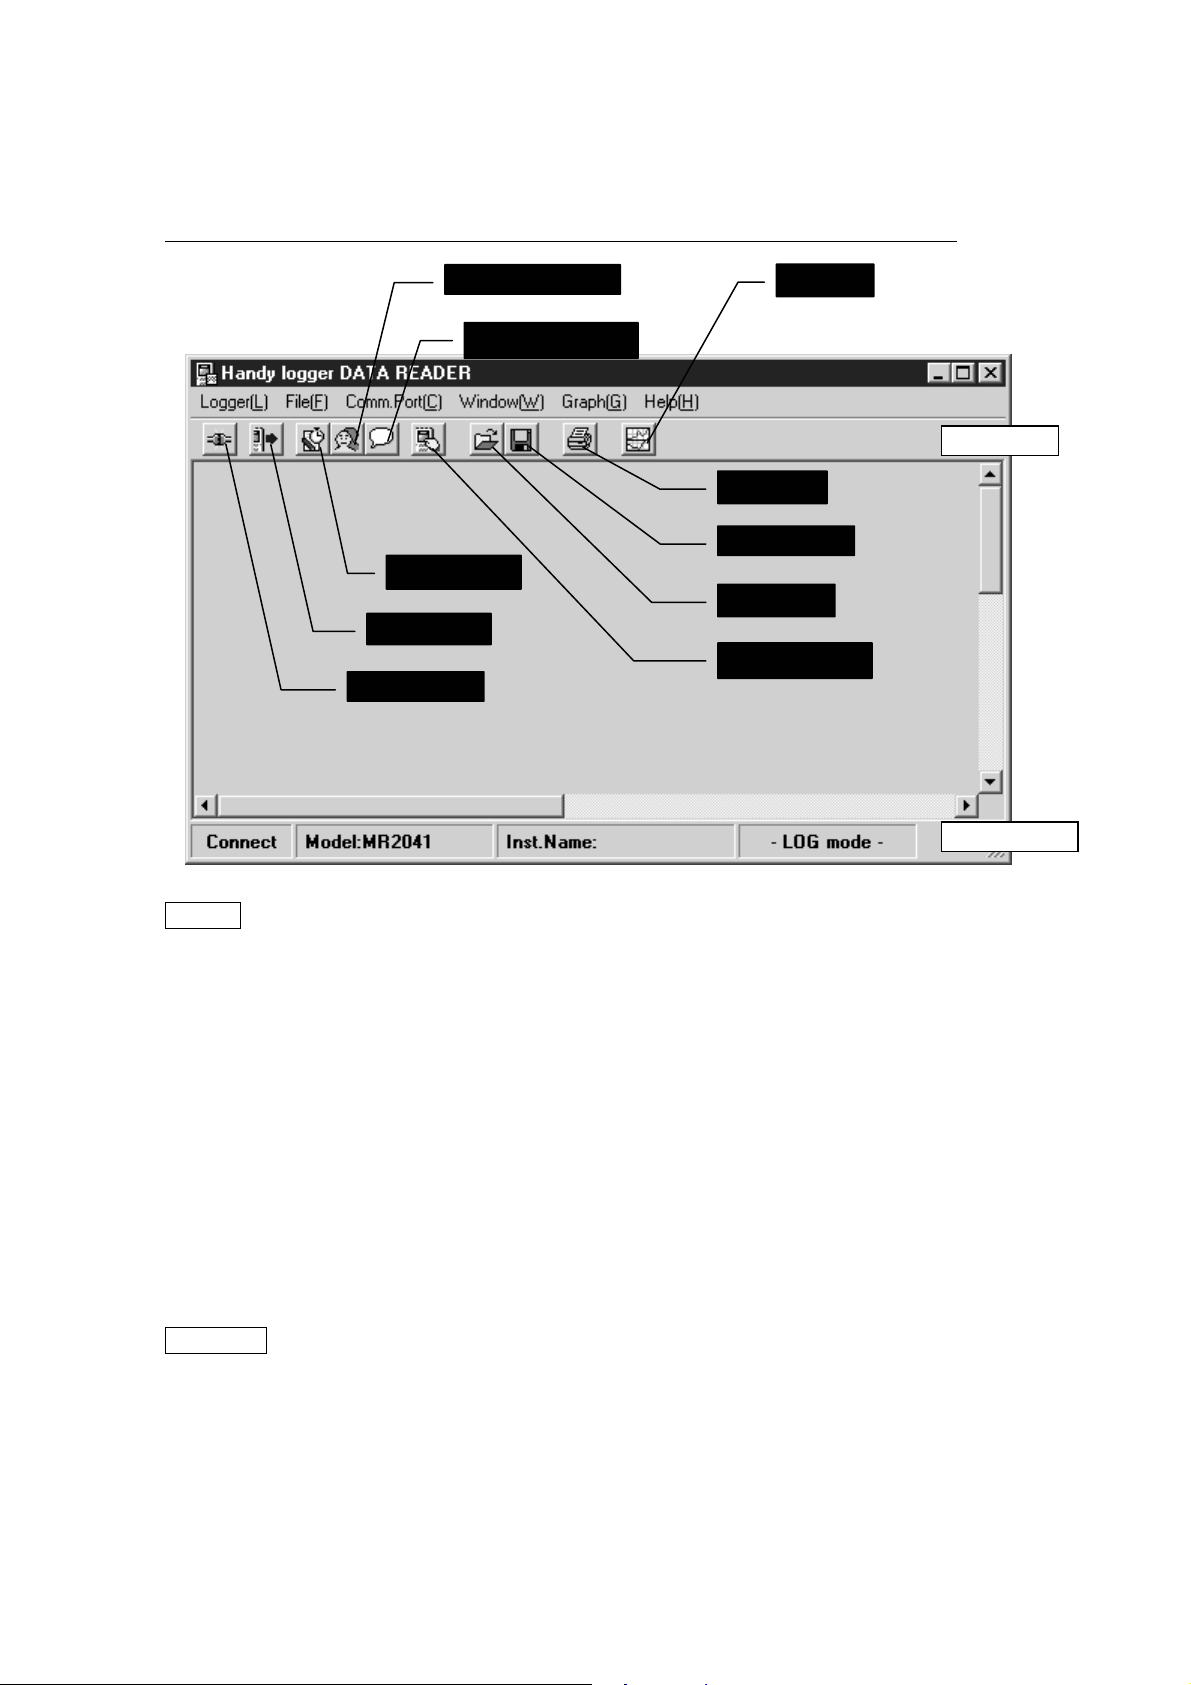
Software Functions and Displays
The following describes the basic functions and displays of the application software.
For details about functions, displays, and operations, run [Help] of the application.
e Settings...
d Import…
c Connect
f Personnel List
g Comment List
l Graph
k Print…
j Save As…
i Open…
Tool Bar
h Clock/Name
Status Bar
Toolbar
c Connect Connects the logger and personal computer to make them ready for
communication.
d Import.... Loads the recorded data from the logger to the personal computer.
e Settings... Makes the recording settings (log setting/tag setting) and saves them into
the logger.
f Personnel List Registers work personnel and saves them into the logger.
g Comment List Registers comments and saves them into the logger.
h Clock/Name Changes the logger settings and saves them.
i Open... Loads a saved file and displays it on the screen.
j Save As... Saves the selected display data with a file name put.
k Print... Prints the selected display data in the table format.
l Graph Displays and prints the graph of the selected display data.
Status bar
[Connect/Disconnect] Displays the logger connection status.
[Model] Displays the model name of the connected logger.
[Inst.Name] Displays the instrument name of the connected logger.
[Mode] Displays the current operation mode (log mode/tag mode).
17
Page 22
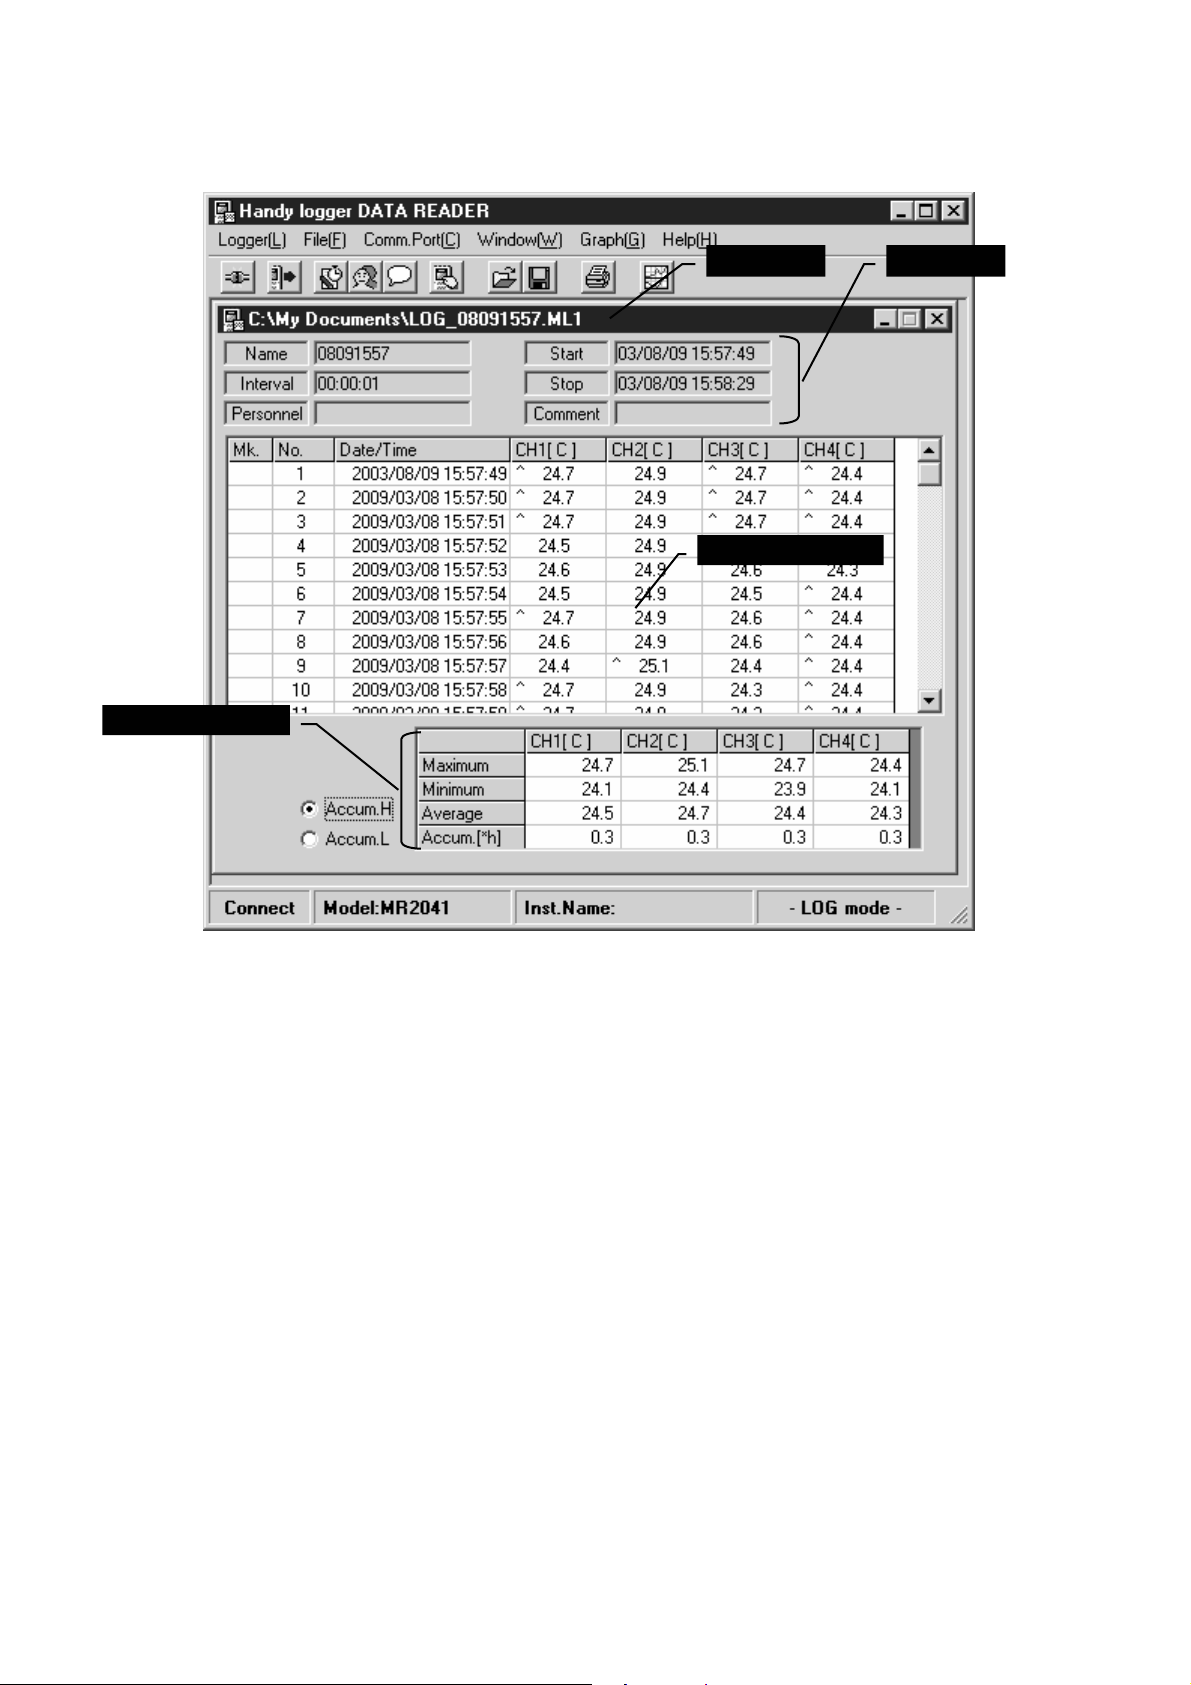
Data display [Log mode]
Calculation values
Set valuesTitle bar
Recorded values
On the title bar, “LOG□□” (01 to 20) is shown when the data read from the logger is displayed.
File location (path) is shown when the data read from the file stored in the PC is displayed.
[Set values]
Name: 8-digit numeric value automatically allocated during recording.
(For example, “05231456” means “14:56 on May 23”.)
Interval: Data recording interval
Start: Data recording start date and time
Stop: Final data recording date and time
Personnel: Work personnel recorded during data recording
Comment: Comment recorded during data recording
[Recorded values]
Mk.: Mark put during data recording
No.: Data No.
Date/Time: Date and time when the data was recorded.
CH1-CH4: Measured value of each channel
[Calculation values]
Max.: Maximum value of each channel
Min.: Minimum value of each channel
Average: Average value of each channel
Accum.: Accumulation value of each channel
18
Page 23
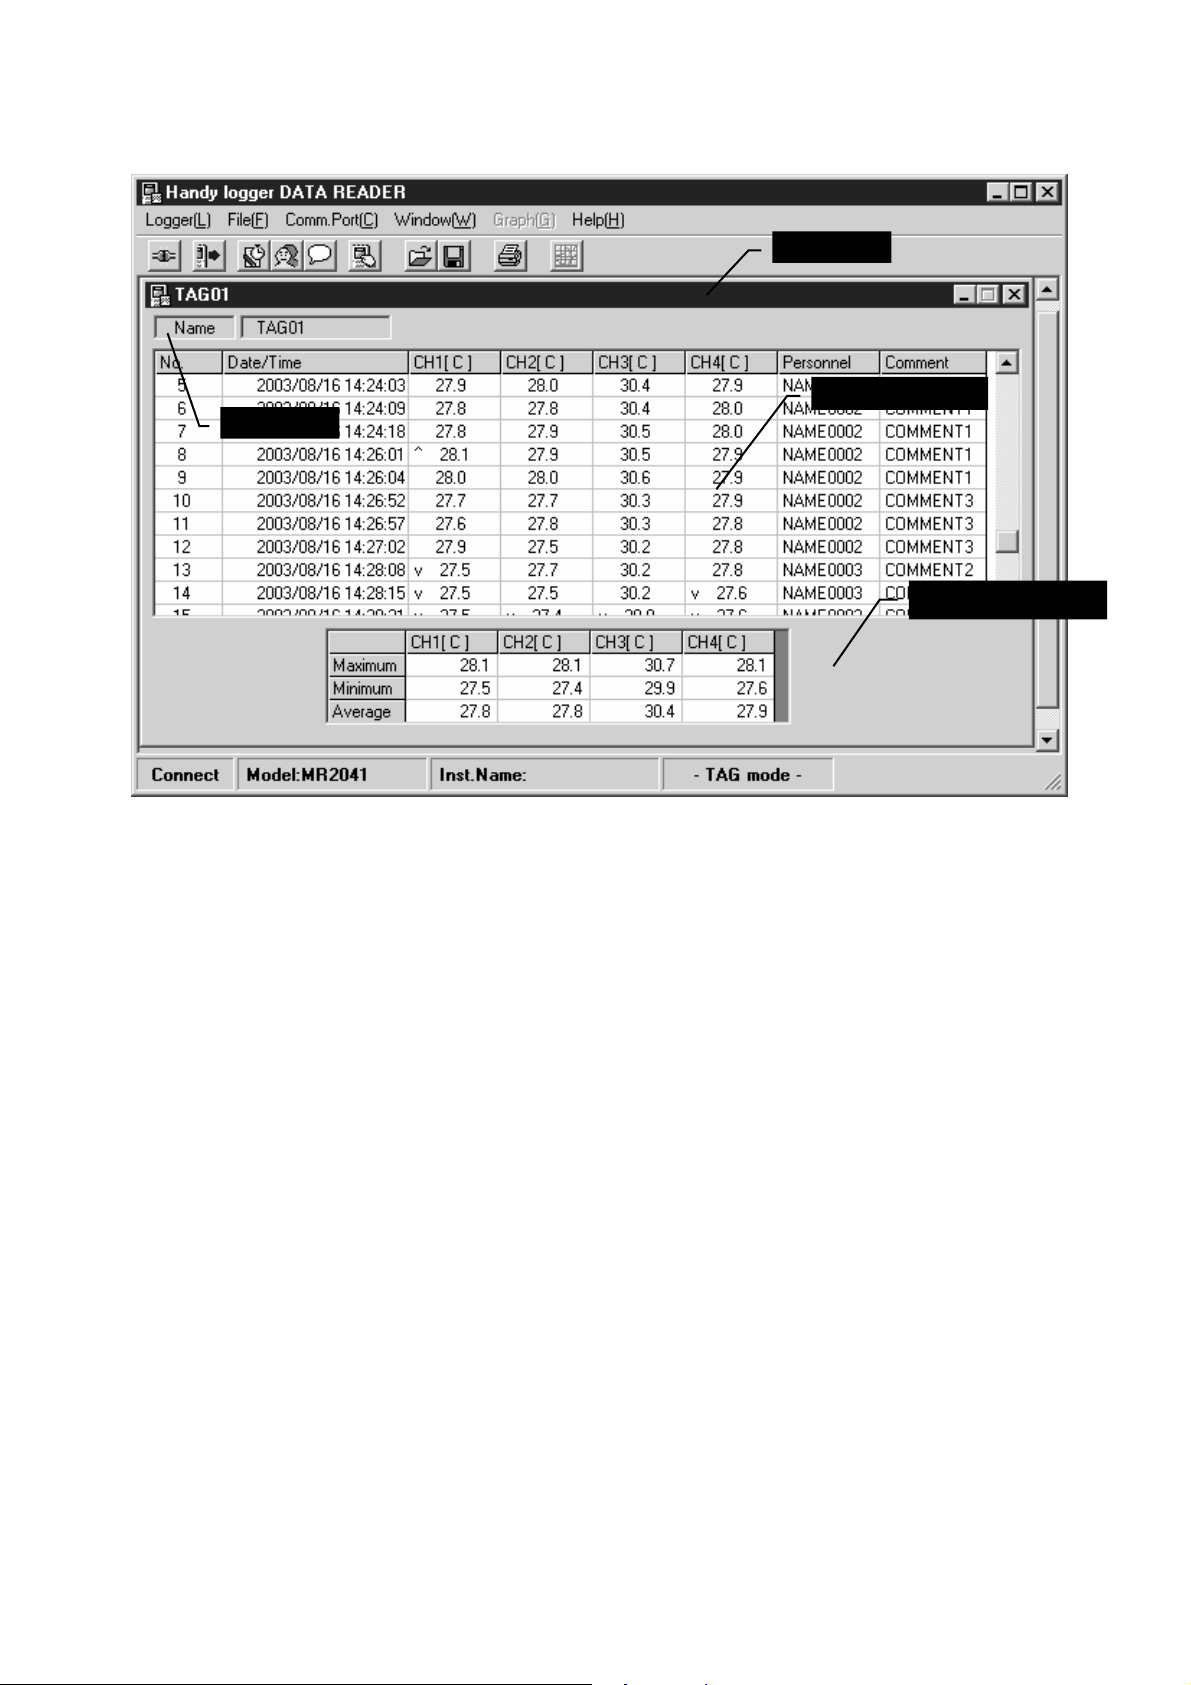
Data display [Tag mode]
Set values
Title bar
Recorded values
Calculation values
On the title bar, “TAG□□” (01 to 20) is shown when the data read from the logger is displayed.
File location (path) is shown when the data read from the file is displayed.
[Set values]
Name: TAG01 to TAG20 (Tag name cannot be changed.)
[Recorded values]
No.: Data No.
Date/Time: Date and time when the data was recorded.
CH1-CH4: Measured value of each channel
Personnel: Work personnel recorded during data recording
Comment: Comment recorded during data recording
[Calculation values]
Max.: Maximum value of each channel
Min.: Minimum value of each channel
Average: Average value of each channel
19
Page 24
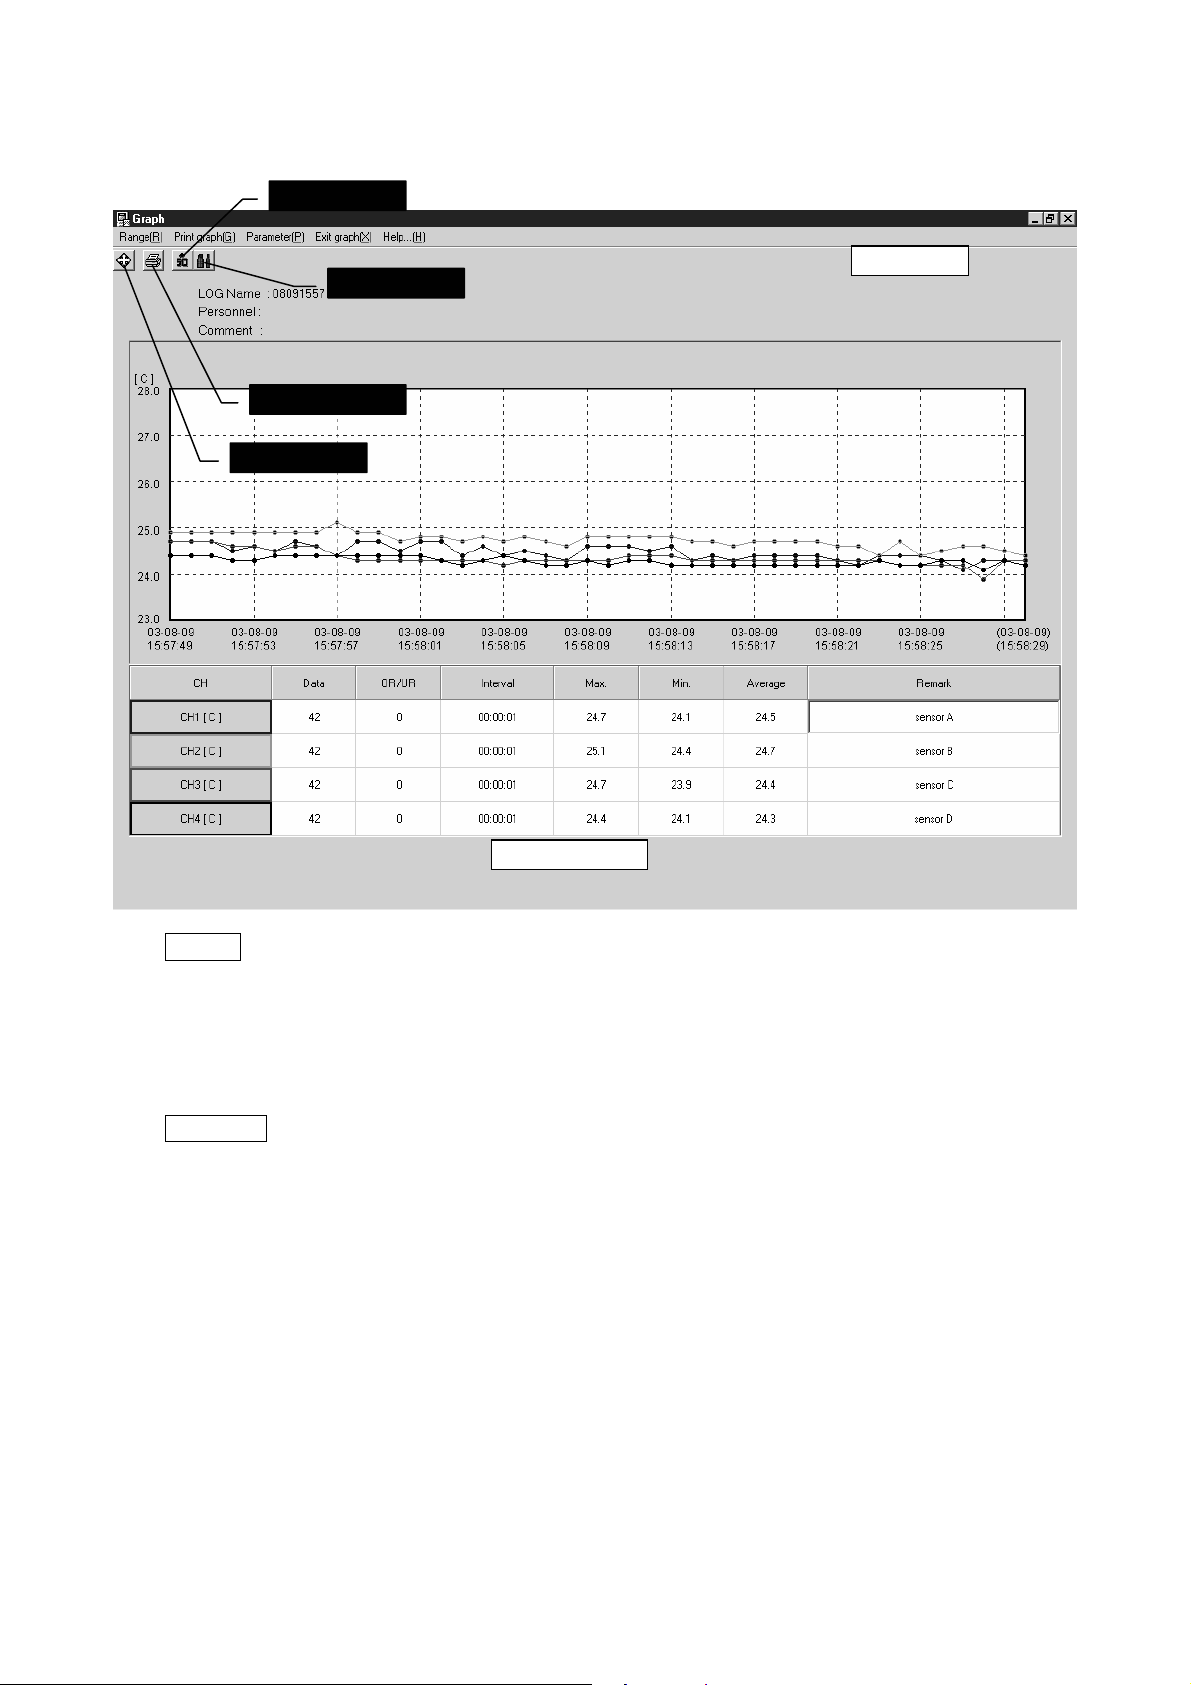
Graph display (Log mode only)
e Label
d Print Graph
c Range
f Line
Toolbar
Data table
Toolbar
c Range Changes the graph range (X-axis and Y-axis).
d Graph Print Prints the displayed graph.
e Label Displays the data label (recorded date and time, and recorded values).
f Line Changes the line width of the graph (thin/thick).
Data table
CH Displays the channel No. and unit.
Data Displays the number of data in the graph display area.
OR/UR Displays the number of over/under range data in the graph display area.
Interval Displays the data recording interval.
Max. Displays the maximum value in the graph display area.
Min. Displays the minimum value in the graph display area.
Average Displays the average value in the graph display area.
Remark Allows inputting of a comment for each channel.
20
Page 25
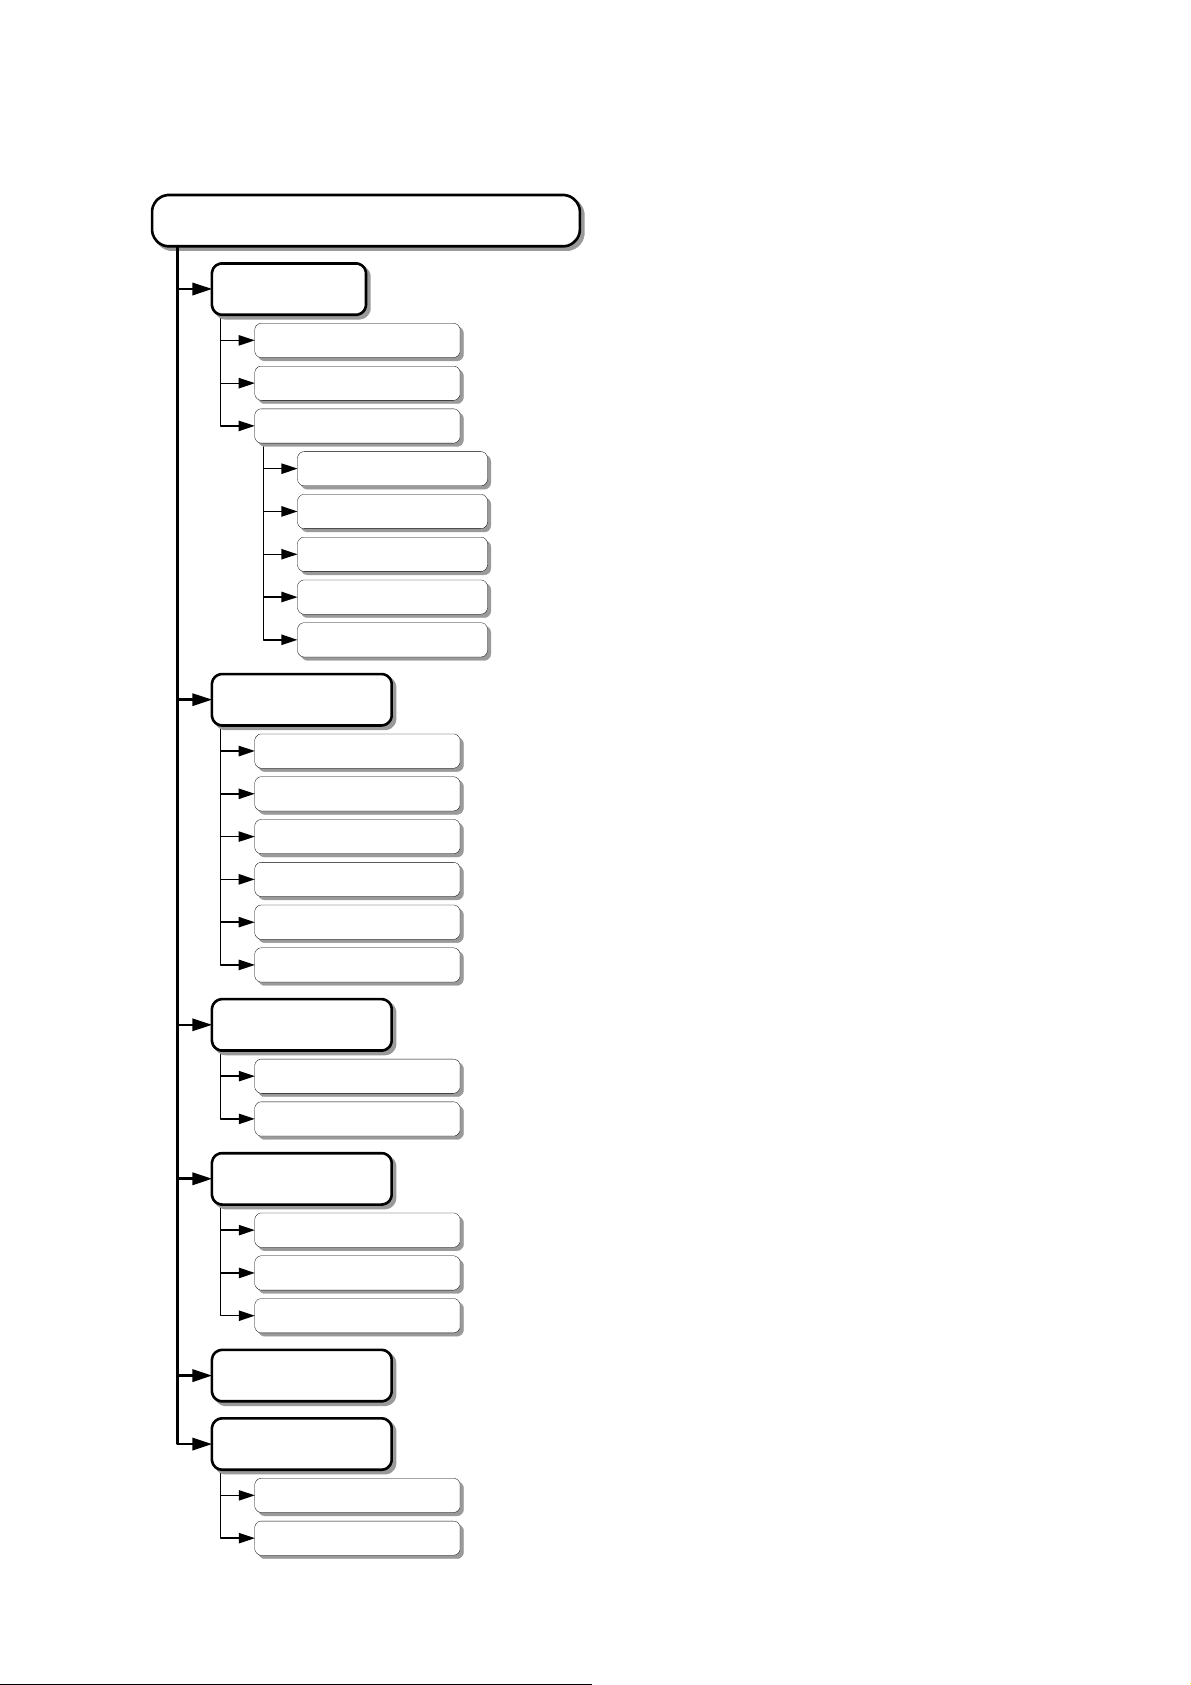
Function Flow
Handy Logger DATA READER
Logger(L)
Connect(C)
Import...(I)
Logger Settings(L)
Settings...(S)
Personnel List...(P)
Comment List...(C)
Clock/Name...(M)
Default Settings...(D)
()File F
Open...(O)
Close(C)
All Close(E)
Save As...(A)
Print...(P)
Makes the logger and personal computer ready for
communication.
Saved data of the logger is selected, and then it is loaded.
Makes the logger recording setting and reservation setting,
and then saves them.
Makes the list of work personnel and saves it into the
logger.
Makes the list of comments and saves it into the logger.
Changes the logger unit setting and saves it.
Changes the existing recording setting of the logger and
saves it.
Loads a file.
Closes the selected data display screen.
Closes all data display screens.
Saves the selected data into a file.
Prints the selected data in the table format.
Exit(X)
Comm.Port(C)
Auto Select(A)
Manual Select...(M)
Window(W)
Tile Vertically(V)
Tile Horizontally(H)
Cascade(C)
Graph(G)
Help...(H)
Help(H)
Version Info...
Exits the software.
Selects a communication port automatically.
Selects a communication port manually.
Tiles the data display screens vertically.
Tiles the data display screens horizontally.
Cascades the data display screens.
Displays or prints the graph of the selected data.
Displays the help about this data read software.
Displays the version information about this data read software.
21
Page 26
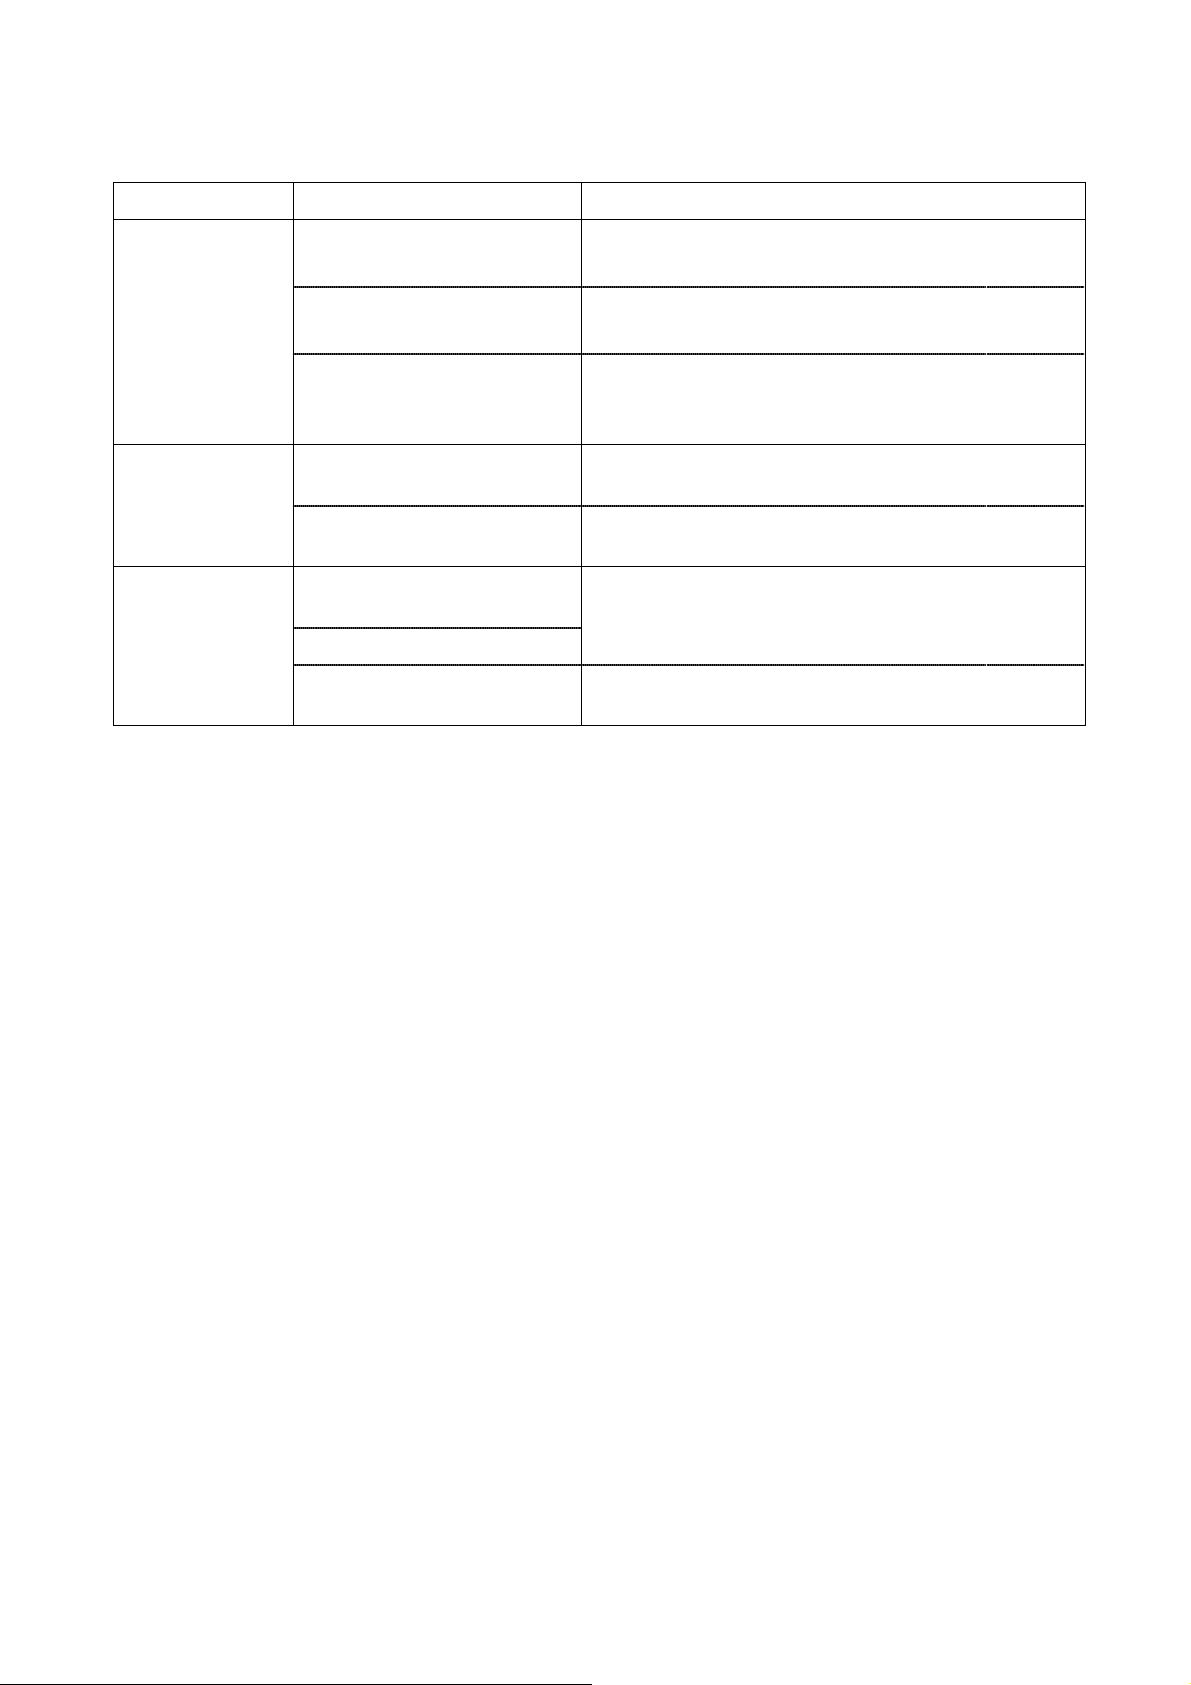
Troubleshooting
Trouble Cause Corrective action
The logger
connection is failed.
The data reading
from the logger is
failed.
The software
operation is slow.
The communication cable is not
connected correctly.
The logger is not ready for
communication.
The connection port is incorrect.
The floppy disk is accessed during
communication (Window98, etc.).
The screen saver is started up.
(Win98, etc.)
Other applications are running at the
same time.
The memory capacity is insufficient.
The remaining capacity of the hard
disk drive is insufficient.
Connect the communication cable correctly.
For details, see Connecting to the logger.
Put the logger in the communication mode.
For details, see Making the initial settings of the software.
Select the correct port using the [Comm. Port] menu of the
software.
For details, see Making the initial settings of the software.
When the OS is Windows98 or ME, the communication error may
occur. Do not access the floppy disk when using such OS.
Deactivate the screen saver or other application.
This software needs relatively large memory area for operation.
If the operation is slow, exit other applications currently running.
If the capacities of both the memory and hard disk drive become
insufficient, the operation may become too slow.
22
Page 27

 Loading...