

Page 1
User’s Guide
Orbit Network Card
(Up to 4 cards per PC)
Channel 1
Channel 2
Up to 31
Modules
6
9
51
Simple installation
using T-CON
Mixed probe
capability
Up to 31 Modules
per Channel
network.wmf
http://www.omega.com
e-mail: info@omega.com
LDN101
Network Card and Driver
LDN101 M-3338 02/99
Page 1 of 54
Page 2

OMEGAnet® On-Line Service
http://www.omega.com
Internet e-mail
info@omega.com
Servicing North America:
USA: One Omega Drive, Box 4047
ISO 9001 Certified
Stamford, CT 06907-0047
Tel: (203) 359-1660 FAX: (203) 359-7700
e-mail: info@omega.com
Canada: 976 Bergar
Laval (Quebec) H7L 5A1
Tel: (514) 856-6928 FAX: (514) 856-6886
e-mail: info@omega.ca
For immediate technical or application assistance:
USA and Canada: Sales Service: 1-800-826-6342 / 1-800-TC-OMEGA
Customer Service: 1-800-622-2378 / 1-800-622-BEST
Engineering Service: 1-800-872-9436 / 1-800-USA-WHEN
TELEX: 996404 EASYLINK: 62968934 CABLE: OMEGA
Mexico and
Latin America: Tel: (95) 800-826-6342 FAX: (95) 203-359-7807
En Espan˜ol: (95) 203-359-7803 e-mail: espanol@omega.com
SM
SM
SM
Servicing Europe:
Benelux: Postbus 8034, 1180 LA Amstelveen, The Netherlands
Tel: (31) 20 6418405 FAX: (31) 20 6434643
Toll Free in Benelux: 0800 0993344
e-mail: nl@omega.com
Czech Republic: ul. Rude armady 1868, 733 01 Karvina-Hranice
Tel: 420 (69) 6311899 FAX: 420 (69) 6311114
Toll Free: 0800-1-66342 e-mail: czech@omega.com
France: 9, rue Denis Papin, 78190 Trappes
Tel: (33) 130-621-400 FAX: (33) 130-699-120
Toll Free in France: 0800-4-06342
e-mail: france@omega.com
Germany/Austria: Daimlerstrasse 26, D-75392 Deckenpfronn, Germany
Tel: 49 (07056) 3017 FAX: 49 (07056) 8540
Toll Free in Germany: 0130 11 21 66
e-mail: info@omega.de
United Kingdom: One Omega Drive, River Bend Technology Centre
ISO 9002 Certified
Northbank, Irlam, Manchester
M44 5EX, England
Tel: 44 (161) 777-6611 FAX: 44 (161) 777-6622
Toll Free in the United Kingdom: 0800-488-488
e-mail:
info@omega.co.uk
It is the policy of OMEGA to comply with all worldwide safety and EMC/EMI regulations that apply. OMEGA is constantly pursuing certification of
its products to the European New Approach Directives. OMEGA will add the CE mark to every appropriate device upon certification.
The information contained in this document is believed to be correct, but OMEGA Engineering, Inc. accepts
no liability for any errors it contains, and reserves the right to alter specifications without notice.
WARNING
LDN101 M-3338 02/99
: These products are not designed for use in, and should not be used for, patient-connected applications
Page 2 of 54
.
Page 3

TRADEMARKS
IBM and PC-DOS are registered trademarks of International Business Machines.
MS-DOS, Quick Basic, Quick C, Quick Pascal and are registered trademarks of Microsoft Corporation.
Turbo Pascal is a registered trademark of Borland International.
LDN101 M-3338 02/99
Page 3 of 54
Page 4

CONTENTS
Section Page
1 Introduction
1.1 Safety Summary 6
1.2 This Manual 6
1.3 PC System Requirements 6
1.4 Carton Contents 6
1.5 Glossary 6
2 Installing The Orbit Network Card
2.1 Introduction 7
2.2 Precautions 7
2.3 Card Preparation 7
2.4 Installation 9
2.5 Software Installation 11
2.6 Orbit Network Card Specification 12
3 Setting-Up The Orbit Network Measurement System
3.1 Introduction 13
3.2 Connecting The Orbit Network 13
3.3 System Power Requirements 13
4 The Orbit Network Card Driver
4.1 Making Backup Copies 15
4.2 Driver Types 15
4.3 Memory Driver Installation and PC Configuration 16
4.4 Linkable Network Card Driver 16
4.5 Driver Error Codes 17
5 Using the Utility Programs
5.1 ORBSET.EXE 18
5.2 ORBINST.EXE 20
6 Orbit Network Commands
6.1 Introduction 23
6.2 Orbit Command Summary 24
6.3 Orbit Command Application Table 26
6.4 Orbit Command Detail Descriptions 27
6.5 Probe Error Codes 41
7 Example Application Programs
8 Installation of PIE and T-CON
Warranty/Disclaimer
18
23
42
48
53
LDN101 M-3338 02/99
Page 4 of 54
Page 5

This page intentionally left blank.
LDN101 M-3338 02/99
Page 5 of 54
Page 6

1.0 Introduction
1.1 Safety Summary
Terms in this manual :-
WARNING
CAUTION
statements identify conditions or practices that could result in personal injury or loss of life.
statements identify conditions or practices that could result in damage to the equipment or other property.
Symbols in this manual :-
This symbol indicates where applicable cautionary or other information is to be found.
!
WARNINGS:
Do not operate in an explosive atmosphere
To avoid explosion, do not operate this equipment in an explosive atmosphere.
NOTES:
This equipment contains no user serviceable parts
This equipment must be returned to an Omega Dealer for all service and repair.
Low Voltage
This equipment operates at below the SELV and is therefore outside the scope of the Low Voltage Directive.
1.2 This Manual
This manual covers the Orbit Network installation and provides information and guidance on using the Orbit software
driver, installation of software together with detailed descriptions of Module commands. The information is principally
for users of IBM PC systems who wish to develop applications programs for use with the Orbit Network Measurement
System.
1.3 PC System Requirements
The Orbit Network and accompanying software have been designed for use on IBM PC/XT/AT and fully compatible
systems with:
(a) A minimum of 640K user memory;
(b) DOS version 3.0 or higher;
(c) One free slot (half card);
(d) Sufficient +5V power available from the PC to operate the Orbit Network(s) and Orbit module(s).
1.4 Carton Contents
The Orbit Network Card is supplied in a carton with the following accompanying items:
(a) Cable 6.5 feet (2 metre) long 9 Pin D-Type plug to socket;
(b) 9-Pin D-Type Terminator plug;
(c) A 3
(d) This operating manual.
1
/
” disk carrying the Driver and installation software;
2
1.5 Glossary
Orbit Module Generic description for any module that can attach to the Orbit
Network. This may have built in intelligence or be a simple interface.
Probe Interface Electronics
(PIE)
An Orbit Module that contains Electronic circuit to interface between
a particular type of Probe or Transducer and the Orbit network i.e.
Digital Probe PIE and Linear Encoder PIE.
Interface Module (IM) An Orbit Module used to interface in a non-probe application such as
power supplies (PSIM) and RS232 (RS232IM)
LDN101 M-3338 02/99
Page 6 of 54
Page 7

2.0 INSTALLING THE ORBIT NETWORK CARD
2.1 Introduction
This chapter describes the preparation and installation of the Orbit Network card in an IBM PC/XT/AT or fully
compatible system.
2.2 Precautions
Before handling the Orbit Network card read the following warning information.
Static Electricity
2.2.1
The Orbit Network card contains components that can be damaged by static electricity. To reduce
the risk of damage to the card keep it in its conductive plastic packaging until it is required. When
!
fitting the card handle it by its free edges and do not touch the card edge
connector
High Voltages
2.2.2
Before opening the cabinet of the computer, switch the power off and disconnect the supply lead
from the mains power supply. Do not operate the unit with the cover removed.
!
This equipment contains no user serviceable parts
2.2.3
This equipment contains no user serviceable parts except for the card number and base
selection switch. This equipment must be returned to a Omega Dealer for all service and repair.
!
2.3 Card Preparation
2.3.1 Card Number and Base address Switch
Before fitting the Orbit Network card in the host computer, the card number and base address have to be set. These
are set by means of the 8 way DIL (dual in line) switch on the card, see below.
ON
OFF
Card
Number
ON
OFF
Not
Used
1 2 3 4 5 6 7 8
All Cards (1 - 4 )
Base Address
cardswit.wmf
LDN101 M-3338 02/99
Page 7 of 54
Page 8

Base Address Selection
2.3.2
The base address can be set to any even address in the range 100(Hex) to 11E(Hex) and 300(Hex) to 31E(Hex).
The only restrictions on the choice of address are those due to conflicting port usage within the PC. The following
table shows some of the I/O channel port assignments originally defined by IBM.
I/O CHANNEL PORT ASSIGNMENTS
Port values (Hex) Function
1F0 - 1F8 Fixed Disk
200 - 20F Game control
210 - 217 Expansion unit
220 - 24F Reserved
278 - 27F Reserved
2F0 - 2F7 Reserved
2F8 - 2FF Asynchronous communications (secondary)
300 - 31F Prototype card
320 - 32F Fixed disk
378 - 37F Printer
380 - 38C SDLC communications
380 - 389 Binary synchronous communications (secondary)
3A0 - 3A9 Binary synchronous communication (primary)
3B0 - 3BF IBM monochrome display/printer
3C0 - 3CF Reserved
3D0 - 3DF Color/graphics
3E0 - 3F7 Reserved
3F0 - 3F7 Diskette
3F8 - 3FF Asynchronous communications (primary)
To avoid conflicting port assignments, ensure that both the base address and the base address +1 are not assigned
to other hardware in the PC. Card base address section is shown in the table below:
SWITCH
45678 (HEX)
OFF OFF OFF OFF OFF 100
OFF OFF OFF OFF ON 102
OFF OFF OFF ON OFF 104
OFF OFF OFF ON ON 106
OFF OFF ON OFF OFF 108
OFF OFF ON OFF ON 10A
OFF OFF ON ON OFF 10C
OFF OFF ON ON ON 10E
OFF ON OFF OFF OFF 110
OFF ON OFF OFF ON 112
OFF ON OFF ON OFF 114
OFF ON OFF ON ON 116
OFF ON ON OFF OFF 118
OFF ON ON OFF ON 11A
OFFONONONOFF 11C
OFFONONONON 11E
ON OFF OFF OFF OFF 300
ON OFF OFF OFF ON 302
ON OFF OFF ON OFF 304
ON OFF OFF ON ON 306
ON OFF ON OFF OFF 308
ON OFF ON OFF ON 30A
ON OFF ON ON OFF 30C
ON OFF ON ON ON 30E
ON ON OFF OFF OFF 310
ON ON OFF OFF ON 312
ON ON OFF ON OFF 314
ON ON OFF ON ON 316
ON ON ON OFF OFF 318
ON ON ON OFF ON 31A
ON ON ON ON OFF 31C
ON ON ON ON ON 31E
CARD BASE
ADDRESS
LDN101 M-3338 02/99
Page 8 of 54
Page 9
Orbit Network Card Number Selection
2.3.3
The card number switch allows up to 4 cards to share the same base address in the PC. For correct operation each
card in the PC must have the same base address and a different card number. The method of card number selection
is shown in the table below.
SWITCH CARD NUMBER
12
OFF OFF 1
OFF ON 2
ON OFF 3
ON ON 4
Note: Orbit Network cards are shipped as base address 100(Hex) and card number 1.
2.4 Installation
The Orbit Network card can be installed in one half slot of either the system unit or an expansion unit. The procedure
is the same in both cases.
2.4.1 Refer to the user manual of the computer being used for instructions on removing the outer casing or access
panels. Be sure to follow any special instruction that may apply to installation of cards in the computer being
used.
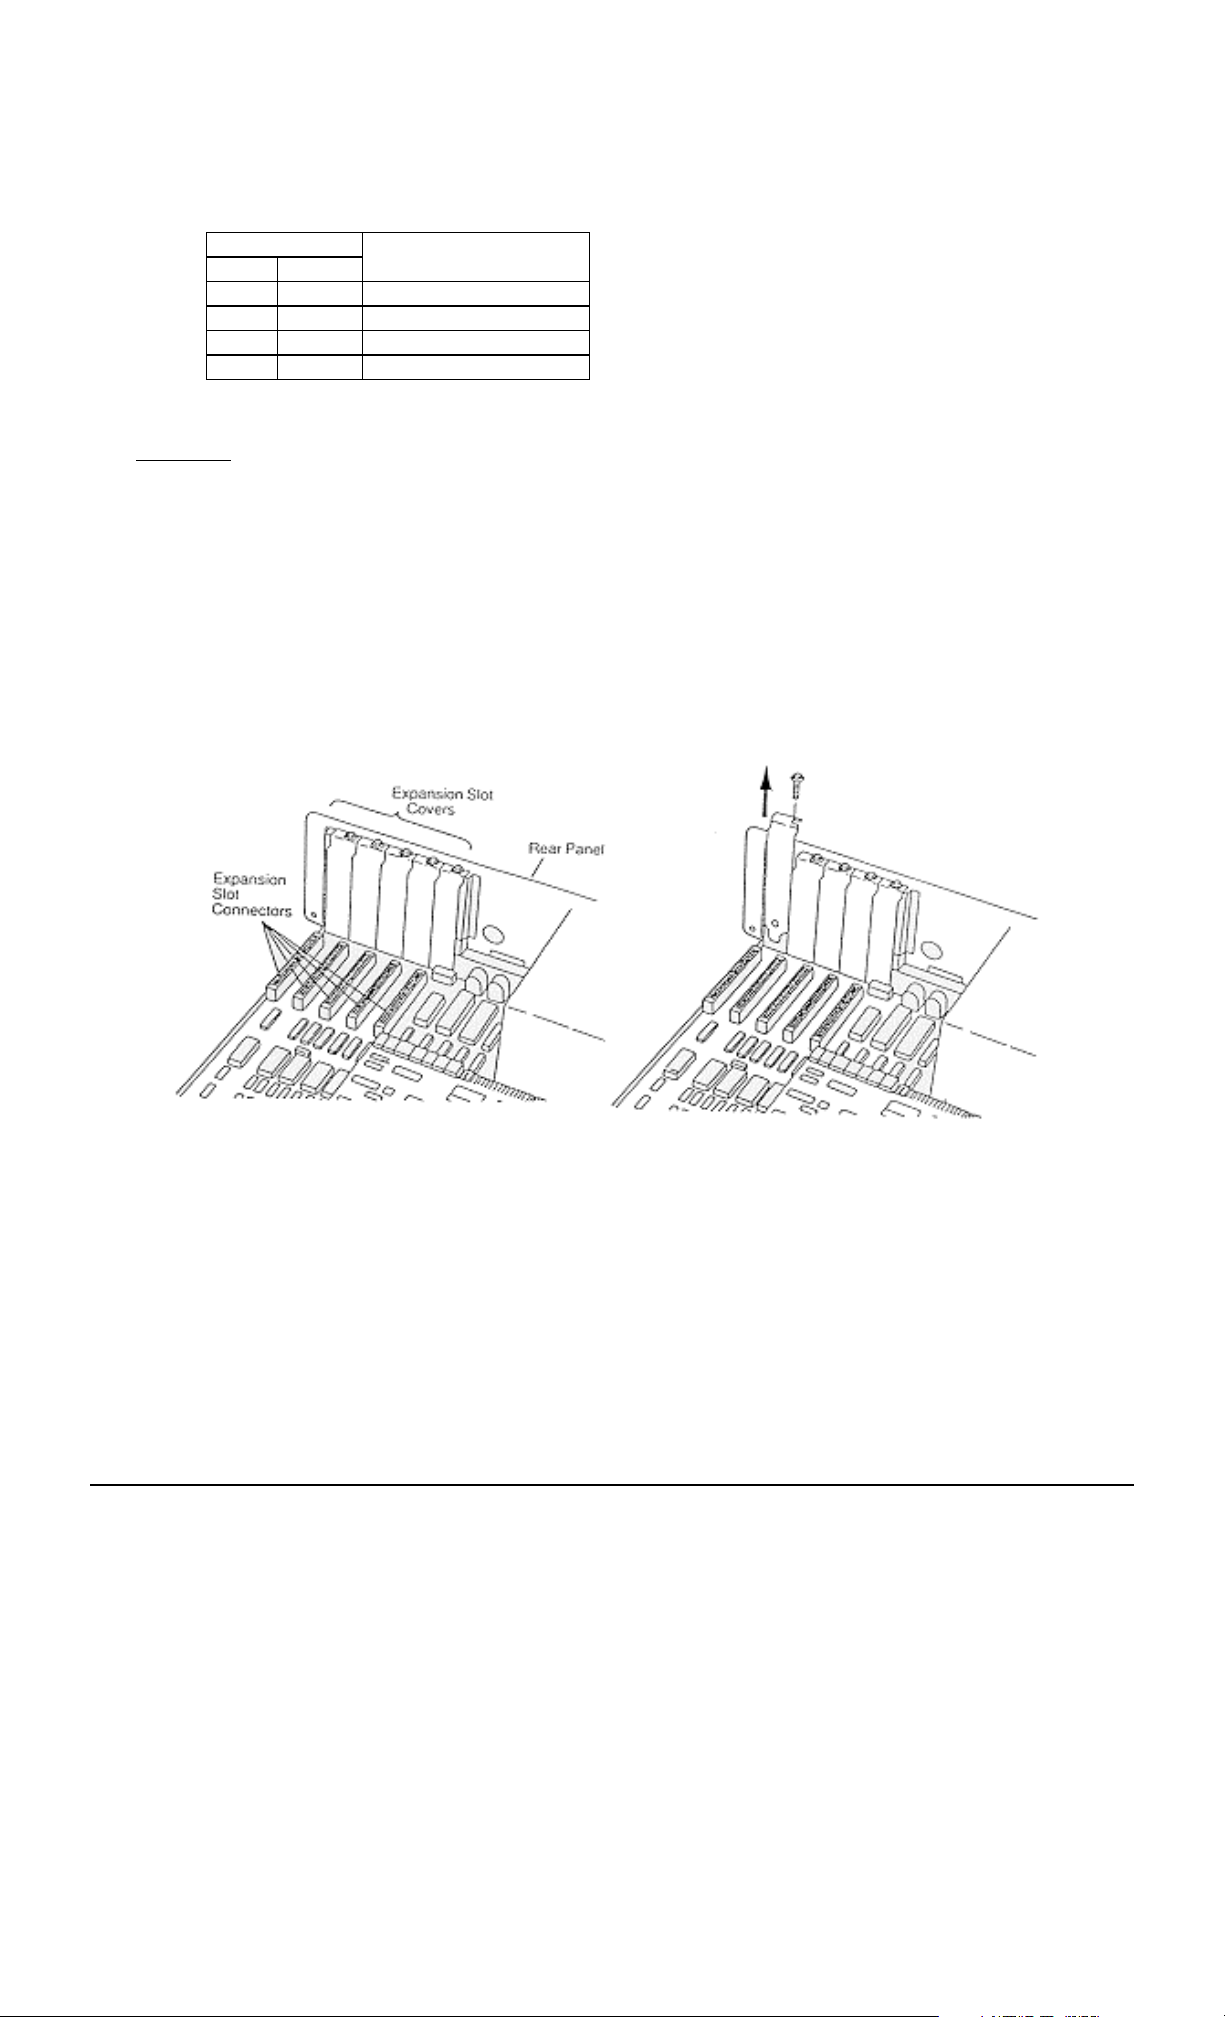
2.4.2 Remove the screw holding the expansion slot cover in place and slide out the expansion slot cover. Save this
screw for fitting the Orbit Network card later. Card support brackets that provide additional security for long
option cards are available from IBM sources. These may already be fitted. If required, fit these now, to the front
panel of the PC chassis, by pushing into the holes
provided.
LDN101 M-3338 02/99
Page 9 of 54
Page 10

2.4.3 Remove the Orbit Network card from its conductive packaging. Handle the card by its edges only. Set switches
to appropriate address.
2.4.4 Holding the Orbit Network card by its corners, press it firmly into the expansion slot.
2.4.5 Align the ’U’ shaped slot in the card-retaining bracket with the hole in the rear of the unit. When
fitted, the screw should be snug against the inside of the ’U’. Fit and tighten the screw.
2.4.6 Refit the cabinet cover and retaining screws according to the computer manufactures Instructions.
LDN101 M-3338 02/99
Page 10 of 54
Page 11

2.5 Software Installation
The Orbit Network card requires a driver program to interface between the application programs and the Orbit
Network card. For further details refer to the section on the Orbit Network Card Driver.
LDN101 M-3338 02/99
Page 11 of 54
Page 12

2.6 Orbit Network Card Specification
Electrical
Power Consumption 200 mA max.(no Orbit Modules connected)
RS485 serial two wire differential
Dual channel 9 Pin sub D (sockets fitted to PC card)
Network terminator 120R (between 2 and 3) of 9 Pin D-type
Parallel connected 9 Pin D connectors male and female are pin to pin connected on the network
9 Pin D designations
1 = Not used
2 = A (RS485)
3 = B (RS485)
4 = 0V
5 = 0V
Pin 1
1
6
9
5
Channel 1
6 = +5V
7 = +5V
8 = +5V
9 = 0V
Pin 1
1
6
9
5
Channel 2
orbcard.wmf
ORBIT Network
:
General The Orbit Measurement System communicates with multiple Orbit
Modules, via an RS485 multi-drop network.
Communications Method Asynchronous, half duplex, poll / response
Baud Rate 187.5 K Baud
Data Byte Structure 1 start, 8 data, 1 odd parity, 1 stop bit
Network Control Break character implemented
(low(space) signal of >90 µs)
Network 1,000 readings per second minimum
Reading Rate
Max. Number of Orbit Modules 31 addressed per channel (62 per PC card)
Max. Cards per System 4 off Orbit Network Cards giving Max. 248 Orbit Modules
PC Bus:
Communication Method A special hardware protocol allows data to be passed between the
Orbit Network Card and the device driver (ORBITDVR.SYS)
Command Set The commands available via ORBITDVR.SYS are listed in the Orbit
Network Commands section.
LDN101 M-3338 02/99
Page 12 of 54
Page 13
3.0 SETTING UP THE ORBIT MEASUREMENT SYSTEM
3.1 Introduction
This section gives some basic information on the connection of the various components of an Orbit Measurement
Network. It is assumed that an Orbit Network card has been installed in a PC and that this PC will be used to provide
power to the Orbit Network. For further details about the mechanical installation of PIE, Orbit Modules, probes and TCON refer to the section on Installation of PIE and T-CON.
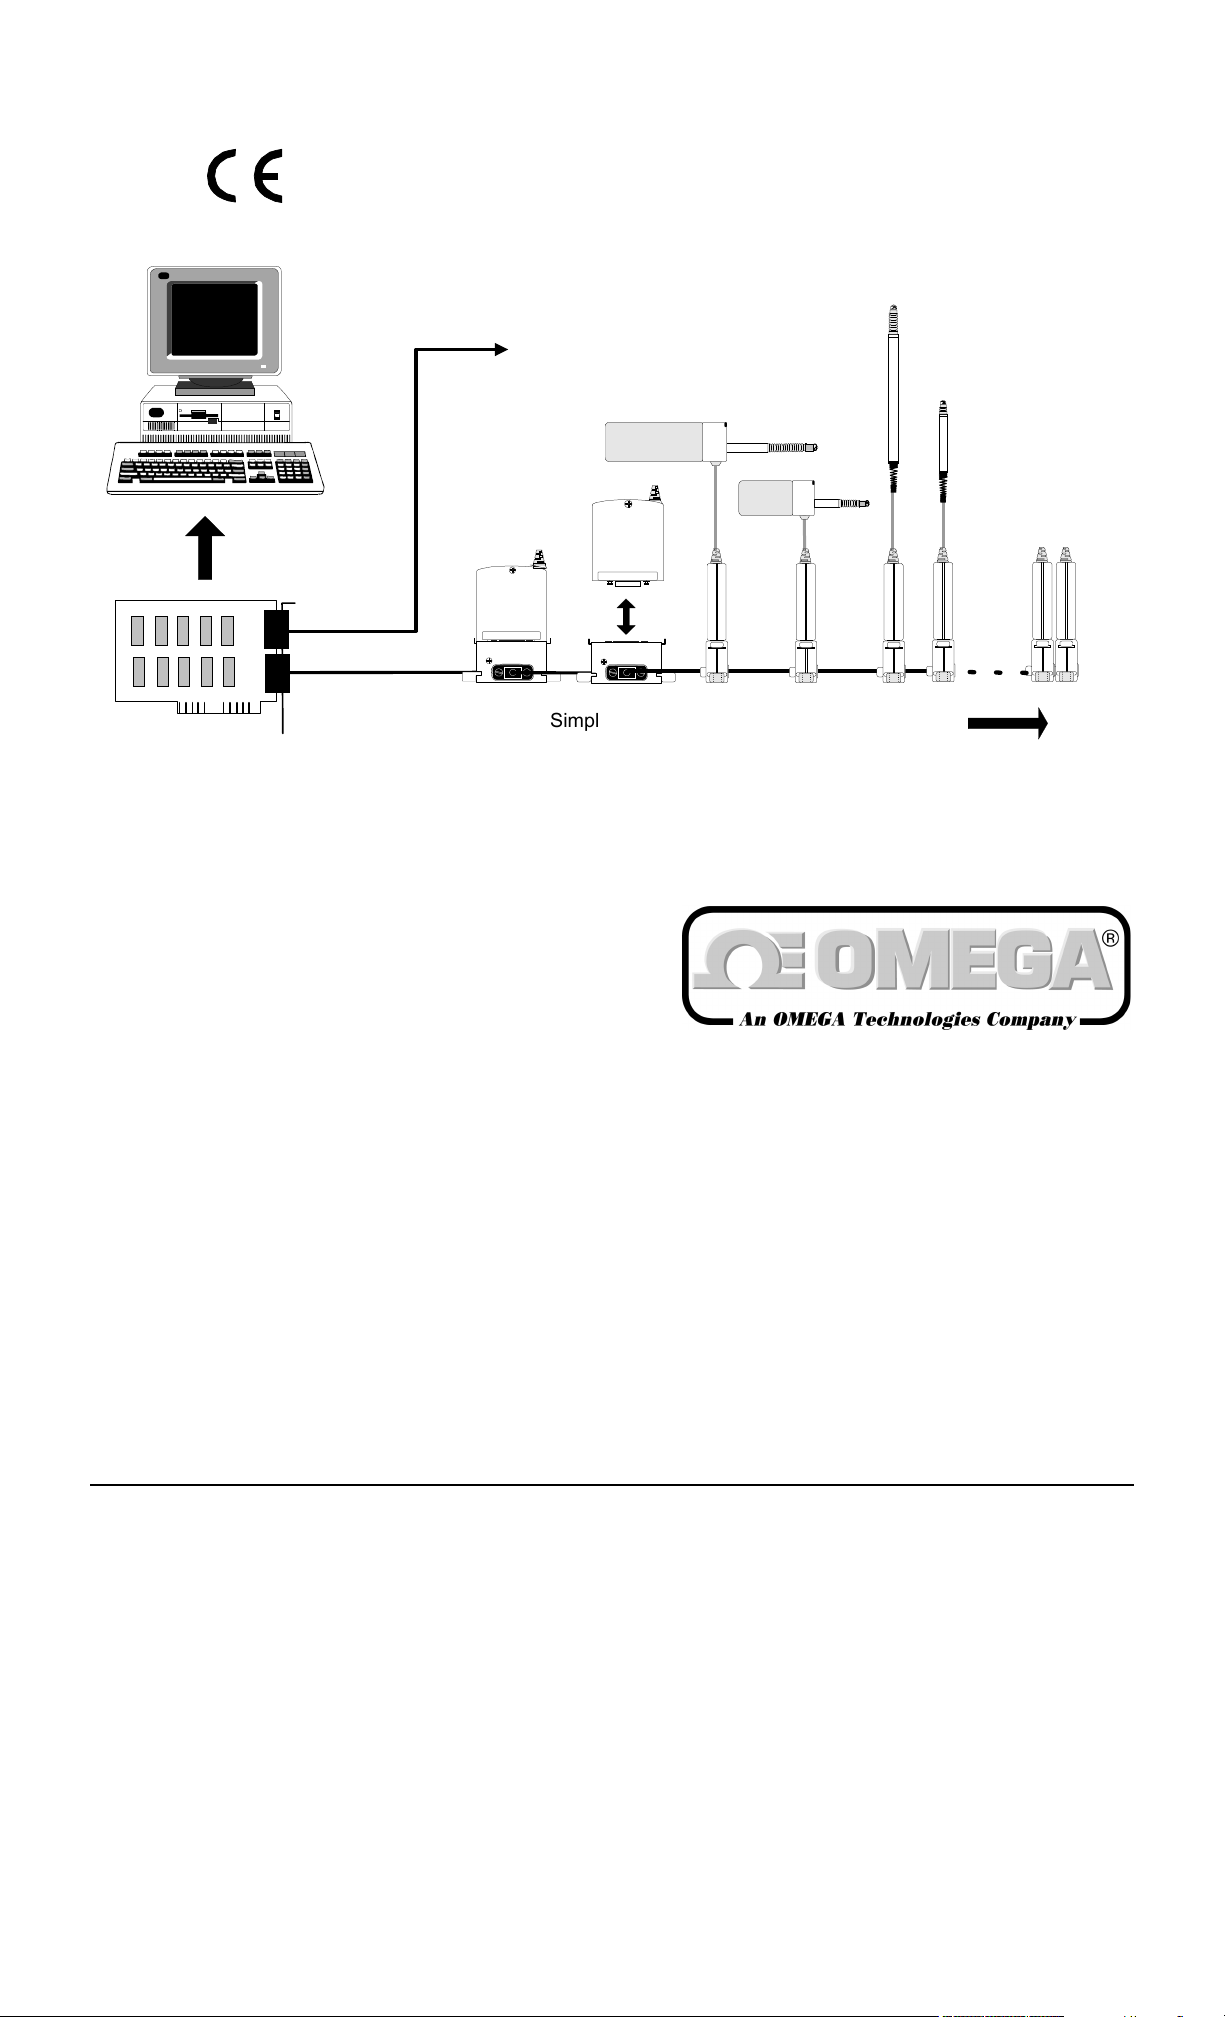
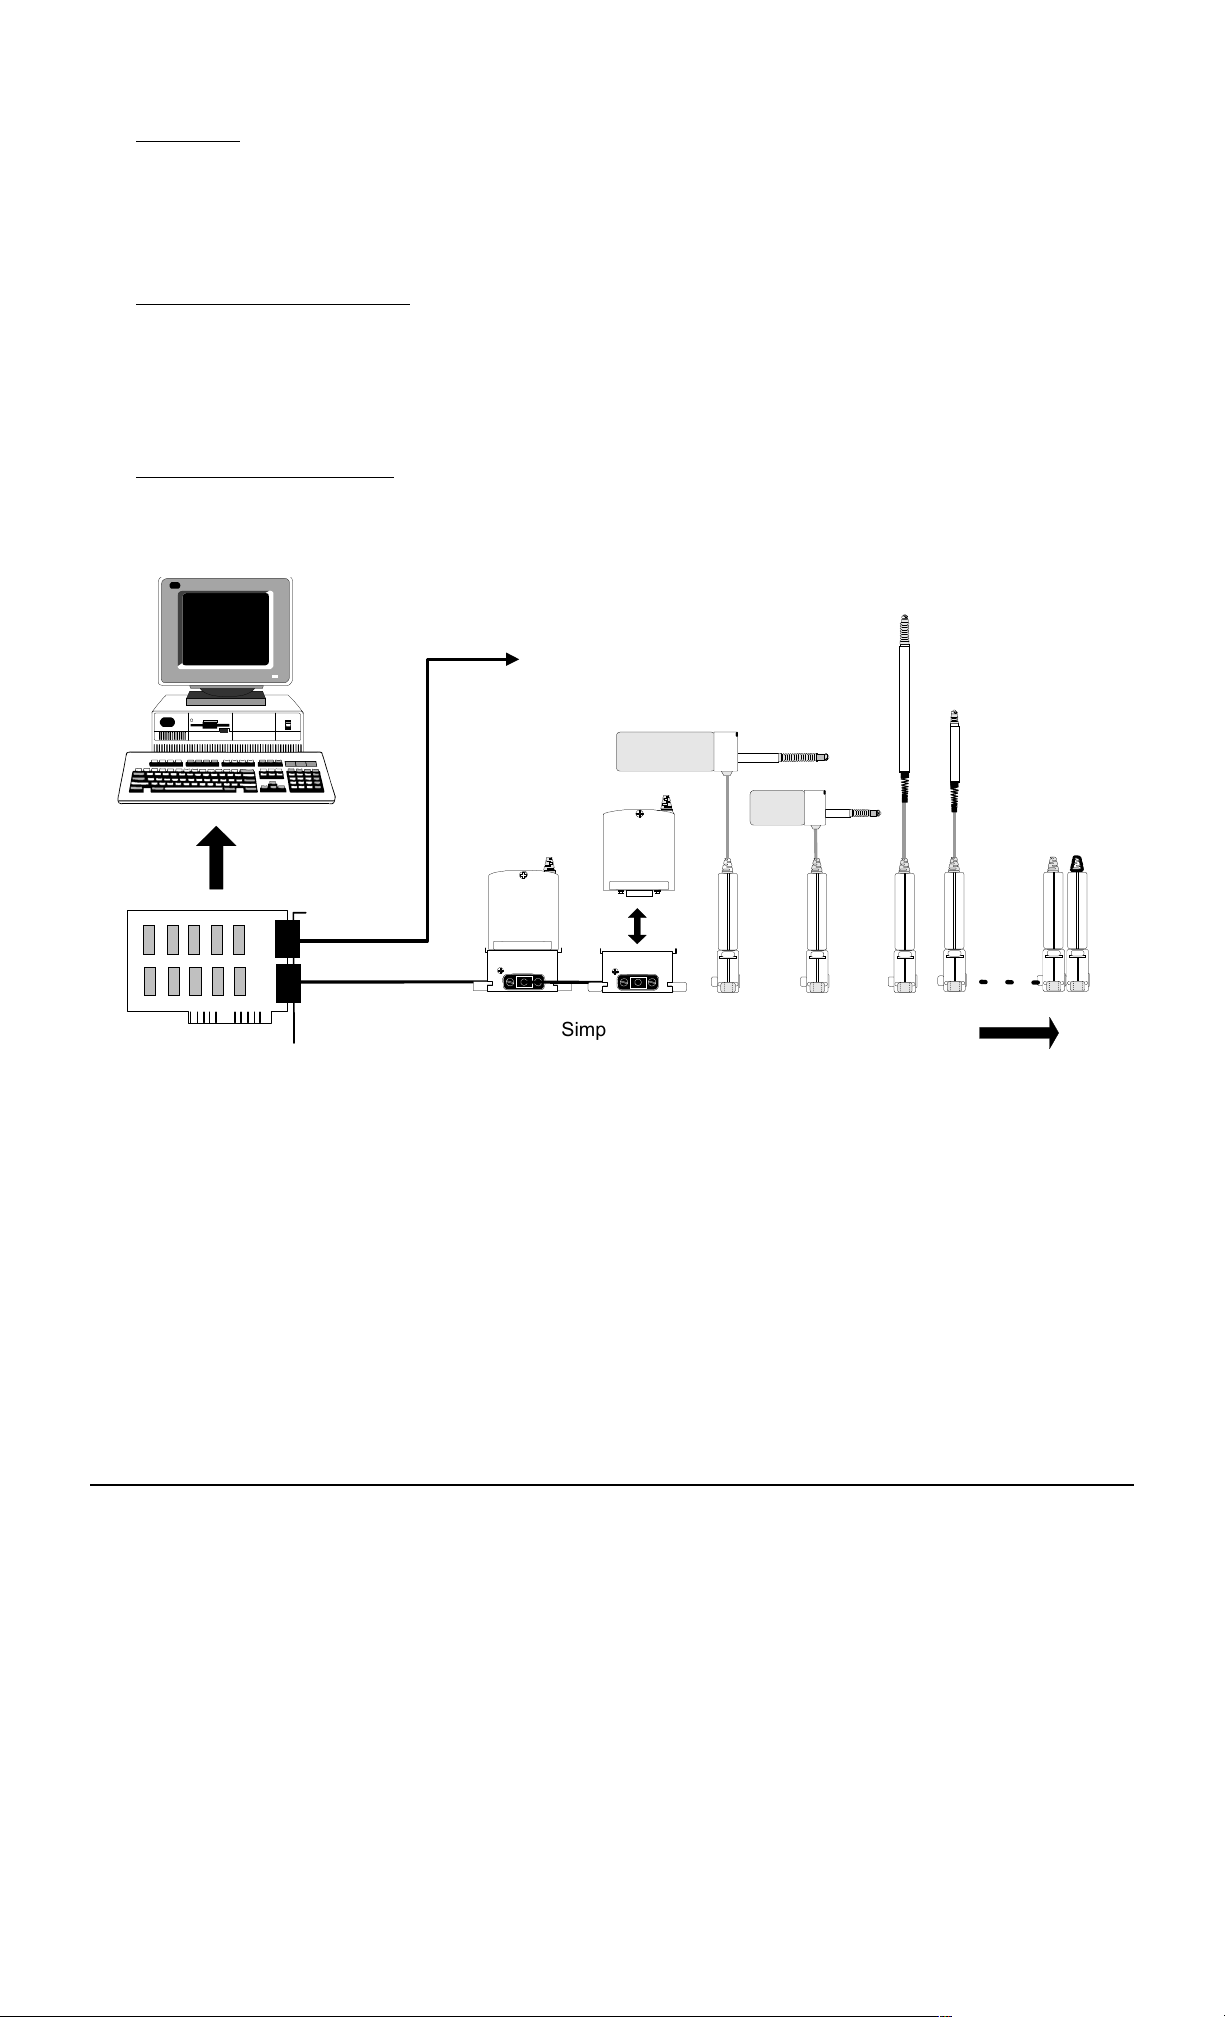
3.2 Connecting The Orbit Network
The Orbit network must be fully connected before switching on the PC or other power supply. Using the 9 pin ’D’
type cable provided, connect between the appropriate channel on the Orbit Network card and the Orbit Module(s), an
example Orbit Network is shown below.
3.3 System Power Requirements
Because the Orbit Network obtains its power from the PC the following factors should be taken into account to
ensure correct operation. If this is not possible consult your Omega Dealer for advice.
Up to 31
Modules
Mixed probe
capability
Channel 1
6
9
51
Channel 2
Up to 31 Modules
per Channel
network.wmf
Orbit Network Card
(Up to 4 cards per PC)
PC’s +5V Power Supply Capacity
3.3.1
Simple installation
using T-CON
All PC’s have a nominal +5.0 Volt regulated DC supply which is available to the Orbit Network. This supply must
have sufficient capacity to power the number of Orbit Modules required for the system. Although most PC’s will have
enough power supply capacity, it is worth checking the total system power requirement before switching the PC on.
Note that a Orbit Network with 62 Orbit Modules connected will require about 4 Amps (typically 60 mA per Orbit
Module plus 200 mA for the Orbit Network card). For power requirements of individual Orbit components refer to
sections relating to those modules.
LDN101 M-3338 02/99
Page 13 of 54
Page 14

Orbit Network Voltage Drop
3.3.2
All Orbit Modules are designed to work from a supply voltage of 4.75 to 5.25 V d.c. and care must be taken to
ensure that all modules especially those furthest from the power supply have the right working voltage applied.
When being used with a PC power supply it is unlikely that the upper voltage limit will be exceeded, but the possibility
of Orbit Module voltages dropping below the lower voltage limit can exist. Factors that will contribute to a drop in
voltage are connecting cable length and resistance.
If any doubt exists, a digital voltmeter should be used to check the voltage at the last Orbit Module in the Orbit
Network. This can be done by removing the terminator plug and measuring the voltage between pins 6 and 9 on the
socket, as shown below.
If the voltage is below 4.75 V dc the configuration must be re-arranged to reduce the voltage drop.
Orbit Network Card
Installed in PC
up to 31 Orbit
Modules per
channel
1 = No connection
2 = RS485 (A)
3 = RS485 (B)
4 = 0V
5 = 0V
6 = +5V
7 = +5V
8 = +5V
9 = 0V
5
9
1
6
V
Must be within 4.75 V
dc and 5.25 V dc
LDN101 M-3338 02/99
Page 14 of 54
Page 15
4.0.THE ORBIT NETWORK CARD DRIVER
4.1 Making Backup Copies
Before using the software provided make a backup copy of the Software Support disk supplied. The copy should be
stored in a safe place and used only to restore the original if it gets damaged. All the files on the disk are listed in the
file CONTENTS.LST.
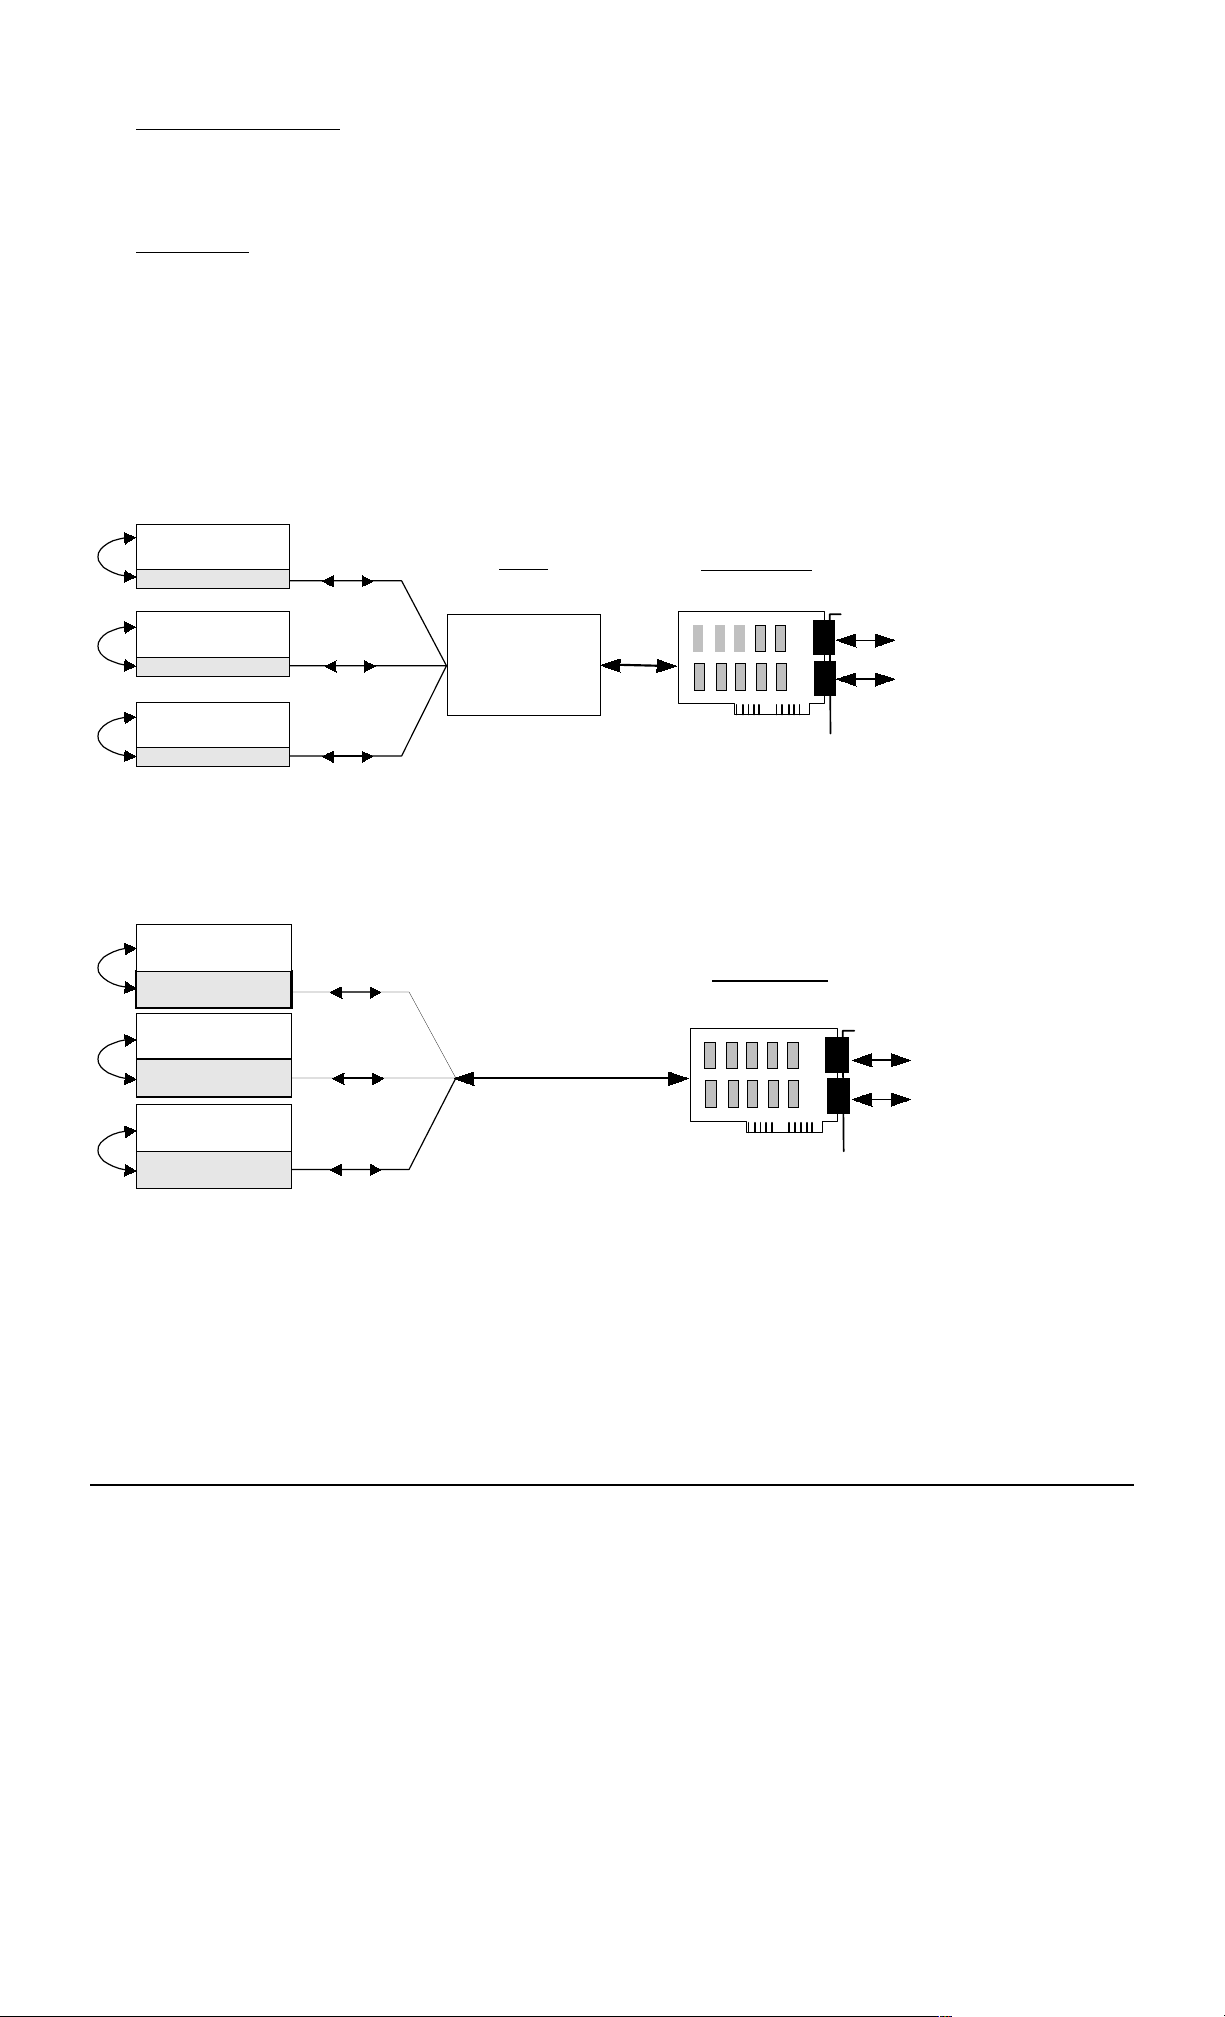
4.2 Driver Types
There are two ways an application program can be interfaced with the Network Card; via a resident driver which is
loaded into the PC’s memory or via an object module which is linked with each application program. See diagrams
below.
The first method, in which the link to the driver is through the small section of code called ODVRIFxx.OBJ, is more
efficient if several programs will need access to the Network Card. See Software Support disk.
The second method has the advantage of being ‘stand alone’ and does not involve a change to the PC’s config.sys
file. The link to the Network Card is through the larger ONCIFxx.OBJ. which is linked with each application during
code compilation. See Software Support disk.
Application 1
ODVRIF code
Application 2
ODVRIF code
Application 3
ODVRIF code
Application 1
ONCIF code
Application 2
ONCIF code
Driver
loaded via config.sys
Network Card
ORBITDVR
Resident in
PC memory
Card Interface Using Memory Resident Driver
Network Card
Orbit
Network
Orbit
Network
Application 3
ONCIF code
dvr_drg.wmf
Card Interface Using Linkable Driver
LDN101 M-3338 02/99
Page 15 of 54
Page 16

4.3 Memory Driver Installation and PC Configuration
The Driver is an installable device Driver which occupies approximately 1.5K bytes of the PC’s memory.
To load the Driver the ORBITDVR.SYS file should be copied from the disk supplied to the boot disk of the PC. The
CONFIG.SYS file on the PC should then be edited to include the line:
DEVICE = <path> ORBITDVR.SYS /QB /QP /CA XXX
Where: <path> is the path to the ORBITDVR.SYS file.
/QB is the Quick Basic language interface.
/QC is the C / Quick C language interface.
/QP is the Quick / Turbo Pascal language interface.
/CA XXX is the required card base address for the Orbit Network(s).
( see note below for details )
Example : DEVICE=C:\ORBIT\ORBITDVR.SYS /QB /CA 100
This is for the driver installed in the C drive, in a directory ORBIT, language interface for Quick Basic and card at
base address 100h
Since each language interface uses an additional 3K of memory it is advisable to include only the language
interface(s) required. Note that at least one language interface (/QB /QC or /QP) must be selected. If the /CA switch
is omitted the card base address will be assumed to be set to 100h. See Installing The Orbit Network Card chapter
for a list of valid base addresses.
After the CONFIG.SYS file has been modified the PC should be re-booted via the <ctrl> <alt> <del> keys or a power
down. The PC will then restart with the Orbit Network Driver loaded into memory. The PC should then display a
screen similar to:-
ORBITDVR Orbit Network Card Driver Vx.xx
loading ORBITDVR at CS=ddddh
loading /QB at IP=bbbbh
loading /QC at IP=cccch
loading /QP at IP=pppph
card(s) Base Address : 0100h
Driver Ends At Offset : 3025h
To conserve conventional memory the Driver can be loaded into high memory by means of a suitable memory
manager as in example below.
device=C:\DOS\HIMEM.SYS
device=C:\DOS\EMM386.EXE NOEMS
devicehigh=C:\ORBITDVR.SYS /QB /QC /QP /CA100
See your DOS manual for details on memory manager usage.
4.4 Linkable Network Card Driver
With this technique the applications program is linked with an object module that contains the Network Card Interface
code appropriate to the language being used. These interface modules ONCIFB.OBJ, ONCIFC.OBJ etc. are linked to
the application via the LINK command line, Quick Libraries or .MAK files etc. to give access to the Orbit Network.
LDN101 M-3338 02/99
Page 16 of 54
Page 17

4.5 Driver Error Codes
The Driver can detect two forms of error: General and Parameter. In both cases the error code is passed to the
applications program via the ‘errorword’ , for correct operation errorword must be ‘visible’ to all sections of the
applications program that call the driver. An example can be seen in the Example Application Programs chapter.
Error codes can be produced by Orbit Modules and passed to the application program via the Orbit Network. Refer to
the Orbit Network Commands section for details.
General Errors
: upper byte 00h
Error Errorword Description
No Driver: 0001h A call to ODVRIFx has been made when the Driver is not loaded in
the PC’s memory or incorrect driver version.
Card Timeout: 0002h PC interface error. Contact Omega.
I/F Write TO: 0003h PC interface error. Contact Omega.
I/F Read TO: 0004h PC interface error. Contact Omega.
Bad Reply: 0006h Orbit Module reply byte 1 was not a valid ack byte or ’!’.
No Language 007Fh Language interface not loaded (check ORBITDVR.SYS).
Parity error: 00FEh The Orbit Network Card received a character with a parity error.
Timeout: 00FFh The duration between the last transmitted command byte from the
Orbit Network and the last received reply byte is greater than 65 µs.
Applications Program Parameter Errors
: upper byte 10h
Variables shown () are as used in Quick Basic example programs.
Error Errorword Description
bad_base 1001h Base address (BASEADDR%) out of range.
bad_card 1002h Card number (CARD%) not between 1 and 4.
bad_chnl 1004h Channel number (CHNL%) not between 1 and 2.
bad_oaddr 1008h Orbit Module address (OADDR%) not between 1 and 31.
bad_lgth_1 1010h First string in parameter list is wrong length
bad_lgth_2 1020h Second string in parameter list is wrong length
bad_lgth_3 1040h Third string in parameter list is wrong length
addr_alloc 1080h Address (OADDR%) already allocated (call to OrbitSetaddr).
Example :
OrbitIdentify
command parameters are :- card, channel, address, identity, devtype, version, stroke
where identity, devtype, version are strings (the rest are numbers)
bad_lgth_1 (errorword 1010h) would be returned if “identity” was the wrong length.
bad_lgth_2 (errorword 1020h) would be returned if “devtype” was the wrong length.
bad_lgth_3 (errorword 1040h) would be returned if “version” was the wrong length.
Note that more than one parameter error may be reported. The lower byte shows all error codes or’ed together, e.g.
1006h is bad_card and bad_chnl.
Depending on the type of error, the code may be for a single error type or for a combination (or’ed). Allocation of
error codes means that or’ed codes cannot be interpreted as individual codes.
LDN101 M-3338 02/99
Page 17 of 54
Page 18

5.0 USING THE UTILITY PROGRAMS
Two utility programs are provided: ORBSET.EXE and ORBINST.EXE, these programs offer an easy way to set-up
(or initialize) and interrogate networks of Orbit modules and can be used to verify the correct operation of the Orbit
Measurement System.
ORBSET.EXE is a simple text based DOS program that enables each module on a network to be identified and
assigned an address ID. Readings from modules can then be displayed. This program can save an ASCII file
(ORBITxy.DAT) that can be used by other programs to initialize a network of Orbit modules.
ORBINST.EXE is a program that uses ORBITxy.DAT (either created by ORBSET.EXE or entered directly as a text
file) to initialize an ORBIT network.
5.1 ORBSET.EXE
This program can initialize an Orbit module by reading the module identity and assigning it an address ID. The
program can then display readings from up to 31 modules. It is also able to create and modify ORBITxy.DAT files
(refer to ORBINST.EXE section for further details on ORBITxy.DAT files). To run the ORBSET.EXE program type:
ORBSET <return>
Input Orbit Network Card Base Address in hex (Q to quit) ? 100
Input card Number (1 to 4 or < Q > to quit ) ? 1
Input channel number (1 or 2) ? 1
Press < M > for millimetres < I > for inches or < Q > to quit ? M
Underscored values are defaults and will be selected if
If a ORBITxy.DAT file exists for the card and channel selected the following will appear:
Data file for Card x channel y exists - load(L) or Create new file (N)
<Esc> to quit
New file (N)
Load (L)
the screen. Any errors in the ORBITxy.DAT file will be displayed prior to the load being terminated.
The following screen examples demonstrate show this.
will load the address ID and Comment data from the ORBITxy.DAT file into the program and display it on
, you will then see the following screen:
<return>
,the default, will display a blank table ready for module ID’s and comments to be entered.
is pressed without entering a new value.
LDN101 M-3338 02/99
Page 18 of 54
Page 19

Create new file (N)
will display the screen:
FILE: ORBIT11.DAT Card: 1 Channel: 1
Addr ID Comments Addr ID Comments
01: 17:
02: 18:
03: 19:
04: 20:
05: 21:
06: 22:
07: 23:
08: 24:
09: 25:
10: 26:
11: 27:
12: 28:
13: 29:
14: 30:
15: 31:
16:
Address: 1 UNASSIGNED
-----Alternate Menu----
L
OAD DISPLAY RESET NETWORK
<TAB>
ADD COMMENT CLEAR ADDRESS
<SPACE>
NEXT MENU
The cursor keys can now be used to select the Orbit Module address between 1 and 31. When the desired address
has been selected the Menu keys can be used to perform the following actions:
<N>
Activates the notify mode. Any unaddressed Orbit Module will send back its ID when it is
displaced by approximately 1% of its stroke. The user can use this mode when
manual entry of ID is not practical, use the following sequence:
(1) Press N to select notify mode
(2) Press the Probe tip, the PIE will send back its ID (4) Press the return key to
accept the PIE ID - Address allocation. The address will then be
automatically incremented and the procedure can then be repeated for the
next unaddressed PIE.
<M>
<RETURN>
<S>
Moves an addressed Orbit Module to another address. The destination address is
selected by pressing the
<RETURN>
key. Press
<ESC>
or
<M>
to abort.
Allows the user to enter an ID at the selected address.
Saves the updated configuration to a data file ”ORBITxy.DAT” - where x and y are the
card and channel numbers respectively.
<SPACE>
Toggles between the two menu displays. Note that all menu keys are active even
when not displayed.
<L>
Re-loads the whole program. Use this to look at a different Orbit Network.
<D>
Displays the readings for the addressed Orbit Modules. It also shows the ID, its
software version and the transducer stroke.
See Screen display below:
<R>
<TAB>
LDN101 M-3338 02/99
Resets the whole Orbit Network. All IDs and comments are deleted.
Allows a comment to be added to any address.
Page 19 of 54
Page 20

<C>
Allows the user to de-allocate an ID at the selected address. The Orbit Module can then be
allocated to any free address.
<SPACE>
toggles between the two menu displays. Note that all menu keys are active even
when not displayed.
<Q>
Quit the program, the option of saving the data as a ORBITxy.DAT file is given before
terminating.
Load (L)
Selecting
D
(Display)
loads an existing ORBITxy.DAT file and will display the identities of each module. Selecting
will display the screen below:
FILE: ORBITxy.DAT Card: x Channel: y
READING IDENTITY VER MODULE READING IDENTITY VER MODULE
01: 0.9896 MODULEyz01 Vxx DP5 17:
02: 18:
03: UNDER MODULEyz02 Vxx DP2 19:
04: 0.3421 MODULEyz03 Vxx LE12 20:
05: 21:
06: 22:
07: 23:
08: 24:
09: 25:
10: 26:
11: 27:
12: 28:
13: 29:
14: 30:
15: 31:
16:
Displaying <Esc>To Exit
Q
UIT NOTIFY ID MOVE
<RET>
ENTER ID SAVE
<F1>
HELP
↑↓→←
<SPACE>
NEXT MENU
5.2.ORBINST.EXE
This program can be used in conjunction with ORBITxy.DAT files to initialize networks of Orbit Modules. The DAT
files are an easy way to recall a network configuration.
ORBITxy.DAT files
5.2.1
The ORBITxy.DAT file is an ASCII file which holds the set-up information for each of the 8 possible networks (4
cards, 2 channels). Each Orbit Network has its own DAT file which holds the Address - Identity map and any
comments for the Orbit Modules on the Orbit Network. The ORBITxy.DAT file name is always ORBITxy.DAT where x
is the card number and y is the channel, hence the file for card 3 channel 2 would be called Orbit32.dat.
LDN101 M-3338 02/99
Page 20 of 54
Page 21

The structure of the file is as shown below.
;This is an example of a ORBITxy.DAT file
;It holds the set-up data for a complete network of Orbit Modules
;
;Header comment lines must start with a ”;” there can be as many comment lines
;as required as long as they are not placed between Address - Identity lines
;
;Address - Identity line structure:- aa-iiiiiiiiii cccccccccccccccccccc
;a=address, i=identity [10 characters] c = comment [up to 20 characters maximum]
;
01-IDENTITY01 comment for address1
020304050607080910111213-IDENTITY02 comment for addr 13
1415161718192021222324-IDENTITY03 comment for addr 24
25262728293031-
Running ORBINST.EXE
5.2.2
To run the ORBINST.EXE program type:
ORBINST /CA100 <return>
The program will then search the current directory for ORBITxy.DAT files. Before the appropriate Orbit
Network is initialized the ORBITxy.DAT file is checked for syntax errors. Note that syntax errors can only occur
if the ORBITxy.DAT file has been created or edited outside of the ORBSET environment. If any Orbit Module
identities referred to in the ORBITxy.DAT file cannot be found during the initialization of the Orbit Network, the
error will be reported to the screen.
Note: /CA100 is the default network card base address and will be used if no extension is used. For more
information on base addresses refer to the section on Installing The Orbit Network Card.
LDN101 M-3338 02/99
Page 21 of 54
Page 22

With an error free ORBITxy.DAT file and the relevant Orbit Modules connected to the Orbit Network the screen
should look as below:
ORBINST Version 3.3 22/09/97
Base address set to be: 100H
FILE: ORBIT11.DAT CARD: 1 CHANNEL: 1
Finished: 0 Errors - 1 address set
FILE: ORBIT12.DAT CARD: 1 CHANNEL: 2
FILE NOT FOUND
FILE: ORBIT21.DAT CARD: 2 CHANNEL: 1
FILE NOT FOUND
FILE: ORBIT22.DAT CARD: 2 CHANNEL: 2
FILE NOT FOUND
FILE: ORBIT31.DAT CARD: 3 CHANNEL: 1
FILE NOT FOUND
FILE: ORBIT32.DAT CARD: 3 CHANNEL: 2
FILE NOT FOUND
FILE: ORBIT41.DAT CARD: 4 CHANNEL: 1
FILE NOT FOUND
FILE: ORBIT42.DAT CARD: 4 CHANNEL: 2
FILE NOT FOUND
The Report.dat file is a log file which records errors in any of the ORBITxy.DAT files found in the current directory,
this hard copy can help when correcting files with several errors.
LDN101 M-3338 02/99
Page 22 of 54
Page 23

6.0 ORBIT NETWORK COMMANDS
6.1 Introduction
The Orbit Network Measurement System uses a differential 2-wire RS485 interface to connect between the various
types of Orbit Network PIE and Interface Module. Each Orbit Module is capable of operating at 9600 Baud or 187.5K
Baud, speed setting is by means of the
bits, 1 parity bit and 1 stop bit, odd parity.
Orbit modules are programmed with a unique 10 digit identity during manufacture. The 10 digit identity is not very
efficient for high speed communications so each module is given a temporary address during the initialization. All
subsequent commands make use of this temporary address. When power is removed from an Orbit network the
temporary addresses are lost and must be re-initialized when power is re-applied.
Because the data to and from each Orbit Module travels along a 2-wire link some form of protocol is required to stop
all the Orbit Modules from ”talking” at once. The protocol used has two basic command types: Addressed and
Broadcast.
”ADDRESSED” Commands - Only the Module being addressed will respond to an addressed command. The
Orbit Module responds with an acknowledgement followed by some information, all other Orbit Modules on the Orbit
Network will ignore the command and continue operating in their present mode.
”BROADCAST” Commands - All Modules on the Orbit Network will react to a broadcast command depending on
their previous set-up. No acknowledgement from Modules is expected after a broadcast command. Further
information from a Module can be obtained by using addressed commands.
OrbitRst
command. The character format used consists of 1 start bit, 8 data
In conjunction with the two command types the Orbit Network uses a BREAK character to get the attention of all the
Modules on the Orbit Network. The BREAK character is a low (space) signal which has a duration of >90 µs (187.5K
Baud) or >1.2 ms (9600 Baud).
Note that although the Orbit Module can operate at 9600 or 187.5 K Baud, Orbit Modules set to different speeds
cannot be used on the same network. To set the Orbit Module Baud rate a
network after power up and before any other command.
Orbit Modules may not respond to all commands as different types of module have different operating requirements.
The Command Application Table lists the appropriate commands for each module. Refer to the command detail
sections as there may be additional information on commands, error codes or special requirements for a particular
module type.
OrbitRst
command must be sent to the
LDN101 M-3338 02/99
Page 23 of 54
Page 24

6.2 Command Summary
This summary gives a brief description of each command. Orbit Modules may not respond to all commands as
different types of module have different operating requirements. Refer to the Orbit Command Detail section and
Command Application Table for full details of each command.
[OrbitSetaddr]
Module Type:
Type :
Parameters:
Set Orbit Module address.
Digital Probe, Linear Encoder
addressed
card, channel, address, identity, option
Each Orbit Module is given a unique 10 byte identity (ID) during manufacturing. When used on a network it is
more efficient to use a shorter temporary ADDRESS stored in the Orbit Module memory; this is a number
between 1 and 31. This command is used to set the temporary address.
[OrbitNotify]
Module Type:
Type :
Parameters:
This is a method for obtaining the Orbit Module ID During initial network setup, re-configuring or when using unknown
Orbit Modules. In this mode any unaddressed Orbit Module will return its ID if the measurement parameter is altered
from its initial state after
Send ID if displacement > ±1%.
Digital Probe, Linear Encoder
broadcast
card, channel, identity
OrbitRst
OrbitClr
or
commands.
[OrbitIdentify]
Module Type:
Type :
Parameters :
Returns the Orbit Module ID, type (LE12, DP2 etc.), software version and (calibrated) stroke. Additional information
may be returned by using the
[OrbitGetinfo] Command.
Module Type:
Type :
Parameters :
Will return information about the type of module and / or probe. Additional information may be returned by using the
OrbitIdentify
[OrbitGetstatus]
Module Type:
Type :
Parameters :
Returns 1 ERROR code byte and 2 STATUS bytes. The ERROR code indicates whether the Orbit Module has a
problem, or why it has not responded to a particular command. For information on ERROR codes refer to Error
Codes section. The STATUS bytes gives information on the present mode or set-up of the Orbit Module.
[OrbitRead1]
Module Type:
Type :
Parameters :
Returns a reading from the Orbit Module. Readings are updated at fixed intervals.
Identify addressed Orbit Module.
Digital Probe, Linear Encoder
addressed
card, channel, address, identity, devtype, version, stroke
OrbitGetinfo
Returns information on the Module / Probe
Linear Encoder, Digital Probe*
addressed
card, channel, address, module type, hardware type, resolution,
module info.
command. (*not currently implemented)
Returns error and status information from Orbit Module.
Digital Probe, Linear Encoder
addressed
card, channel, address, error code, status
Returns a 16 bit signed (integer) reading.
Digital Probe
addressed
card, channel, address, reading
command.
[OrbitRead2]
Module Type:
Type :
Parameters :
Returns a reading from the Orbit Module. Readings are updated at fixed intervals.
[OrbitClr]
Module Type:
Type :
Returns a 32 bit signed (long integer) reading
Linear Encoder
addressed
card, channel, address, reading
Clear addressed Orbit Module.
Digital Probe, Linear Encoder
addressed
Parameters : card, channel, address
Performs a software reset on a particular Orbit Module. The Orbit Module will then need to be re-addressed. Allow at
least 0.5 second for completion of the command.
LDN101 M-3338 02/99
Page 24 of 54
Page 25

[OrbitRst]
Module Type:
Type :
Parameters :
Reset all Orbit Modules.
Digital Probe, Linear Encoder
broadcast
card, channel
Has the same affect as OrbitClr but will reset ALL the Orbit Modules on a network at the same time. To set the Orbit
Modules to the required Baud rate this command MUST be sent after the network is powered up and before any
other command. Allow at least 0.5 second for completion of the command.
[OrbitAcquire]
Module Type:
Type :
Parameters :
Set Orbit Module to acquire mode.
Digital Probe
addressed
card, channel, address, readings, delay
Set the Orbit Module to record 1 to 25 readings with a specific time delay (0.1s to 819.1s) between readings.
OrbitTrigger command is required to start taking of readings. The stored readings are read using the OrbitReadia
command. Orbit Module reading synchronization is also possible using this command.
[OrbitTrigger]
Module Type:
Type :
Parameters :
Trigger all Orbit Modules set to OrbitAcquire mode.
Digital Probe
broadcast
card, channel
Trigger all Orbit Modules that have previously been set by an OrbitAcquire command. The first reading will be taken
immediately.
[OrbitReadia]
Module Type:
Type :
Parameters :
Return integer array.
Digital Probe
addressed
card, channel, address, reading
Allows information stored during OrbitAcquire to be read. Stored Readings can be read at any time during the
OrbitAcquire period. Readings are stored until read or cleared.
[OrbitDifference]
Module Type:
Type :
Parameters :
Set Orbit Module to difference mode.
Digital Probe, Linear Encoder
addressed
card, channel, address
Readings are taken continuously once started via OrbitStartdiff. The maximum, minimum, sum and number of
readings are stored. Up to 16.7 million readings can be taken.
[OrbitStartdiff]
Module Type:
Type :
Parameters :
Start recording difference readings.
Digital Probe, Linear Encoder
broadcast
card, channel
Orbit Modules that have previously been set to OrbitDifference mode will start taking readings. All Orbit Modules will
start at the same time. Use for synchronization.
[OrbitStopdiff]
Module Type:
Type :
Parameters :
Stops all Orbit Modules that have previously been set to OrbitDifference mode and started using the
Stop recording difference readings.
Digital Probe, Linear Encoder
broadcast
card, channel
OrbitStartdiff
command.
[OrbitReaddiff1]
Module Type:
Type :
Parameters :
Return result of OrbitDifference command. 16 bit signed (integer) readings.
Digital Probe
addressed
card, channel, address, minimum, maximum, sum, number
Returns results from a Orbit Module that has been set in OrbitDifference mode and received a OrbitStopdiff or will
return the latest result from a Orbit Module still taking readings in OrbitDifference mode.
LDN101 M-3338 02/99
Page 25 of 54
Page 26

[OrbitReaddiff2]
Module Type:
Type :
Parameters :
Returns results from a Orbit Module that has been set in OrbitDifference mode and received a OrbitStopdiff or will
return the latest result from a Orbit Module still taking readings in OrbitDifference mode.
Return result of OrbitDifference command. 32 bit signed (long integer) readings.
Linear Encoder
addressed
card, channel, address, minimum, maximum
[OrbitPreset]
Module Type:
Type :
Parameters :
Preset is used where Orbit modules may be preset with a value (i.e. Linear Encoder).
[OrbitRefmark]
Module Type:
Type :
Parameters :
Probe (i.e. Linear Encoder) is set waiting until the reference marker is found. Can be interrogated using
OrbitGetstatus or set back to normal mode using and OrbitRead2.
[OrbitDirection]
Module Type:
Type :
Parameters :
This command will toggle the readings form an Orbit module to change direction. In the case of a Linear Encoder the
count from the probe would change from counting in the positive direction to the negative direction.
6.3 Command Application Table
OrbitSetaddr
OrbitNotify
OrbitIdentify
OrbitGetinfo
OrbitGetstatus
OrbitRead1
OrbitRead2
OrbitClr
OrbitRst
OrbitAcquire
OrbitTrigger
OrbitReadia
OrbitDifference
OrbitStartdiff
OrbitStopdiff
OrbitReaddiff1
OrbitReaddiff2
OrbitPreset
OrbitRefmark
OrbitDirection
Presets a reading into the Orbit Module. 32 bit signed (long integer) value.
Linear Encoder
addressed
card, channel, address, preset
Activates reference marker mode
Linear Encoder
addressed
card, channel, address
Changes direction of reading count
Linear Encoder
addressed
card, channel, address
Probe / Module Type
COMMAND Digital Probe Linear Encoder
99
99
9
9
*
9
9
9
9
9
9
9
9
9
9
9
9
9
9
9
9
9
9
9
9
9
9
9
9
NOTE: If a module receives a command it does not use or recognize (see table above) the module will not respond
and a network timeout will occur.
Refer to the command detail sections as there may be additional information on commands, error codes or special
requirements for a particular module type.
*not currently implemented
LDN101 M-3338 02/99
Page 26 of 54
Page 27

6.4 Orbit Command Detail Descriptions
This section gives details of all of the Orbit Module commands. Included in the description is network information on
the sequence of bytes sent to and received from the Orbit Module.
Characters marked ” ” mean that the ASCII representation of the character is transmitted/received.
Data shown as [00110111] is the binary representation of the byte.
Quick Basic is used for command examples, the following notations are used :
num! is a single precision number
num# is a double precision number
num% is a 16 bit signed integer
numLong& is a 32 bit signed long integer
text$ is a string
Not all Orbit modules respond to all Orbit commands. If a call is made using a command the module does not support
the module will not respond and the network will timeout.
The probe position or module reading is returned by
OrbitReadia
commands must be interpreted in different ways depending on the module type. For probes with a
OrbitRead1, OrbitRead2, OrbitReaddiff1, OrbitReaddiff2
and
calibrated stroke (such as Digital Probe) the position is given by Eq. 1 For probes that have incremental outputs
(such as Linear Encoder) the position is given by Eq. 2.
Eq. 1 position = N x stroke Eq. 2 position = N x resolution
16384
Where N is the returned value (rd% etc.). The probe stroke can be obtained by using the
and probe resolution can be given by the
[OrbitSetaddr] Command.
6.4.1
Module Type:
Type :
Parameters:
Digital Probe, Linear Encoder
addressed
card, channel, address, identity, option
Set Orbit Module address.
OrbitGetinfo
command.
OrbitIdentify
command
Each Orbit Module is given a unique 10 byte identity (ID) during manufacturing. When used on a network it is more
efficient to use a shorter temporary ADDRESS stored in the Orbit Module memory; this is a number between 1 and
31. This command is used to set the temporary address.
Quick Basic example: CALL
OrbitSetaddr
(card%, chnl%, oaddr%, id$, opt%)
[oaddr% → 000AAAAA, id$ → ID, reso% → resolution]
Network: To Module. <BREAK>,
”S”
,[000AAAAA],10 byte ID, 1 byte option.
From Module. “S”,[000aaaaa]
where aaaaa is the previous address allocated to this ID.
Notes: “S” and 10 byte ID are in ASCII;
[000AAAAA] and 1 byte option are in binary.
This command will set the Orbit Module with the identity ID to respond to the address 000AAAAA. The option byte is
at present not implemented and should be set to 0.
The ID used by
OrbitNotify
Note: A gap of at least 50 µS
OrbitSetaddr
command.
could be obtained from a previously stored data file, keyboard entry or from the
must
be allowed between each byte of the 10 byte ID string.
When using the Orbit Network card this gap is automatically inserted between bytes.
LDN101 M-3338 02/99
Page 27 of 54
Page 28

6.4.2 [
OrbitNotify] Command.
Send ID if displaced from an initial position
Module Type:
Type :
Parameters:
Digital Probe, Linear Encoder
broadcast
card, channel, identity
This is a method for obtaining the Orbit Module ID During initial network setup, re-configuring or when using unknown
Orbit Modules. In this mode any unaddressed Orbit Module will return its ID if the measurement parameter is altered
from its initial state after
OrbitRst
Quick Basic example: CALL
OrbitClr
or
OrbitNotify
commands.
(card%, chnl%, ID$)
[ID → ID$ when Displacement > ±1%]
Network: To Module. <BREAK>,
”N”
[00000000]
From Module. ”N”, 10 byte ID when disp > 1%
Notes. “N” and 10 byte ID are in ASCII.
[00000000] is in binary.
This command is not an alternative to
OrbitSetaddr
, it is only a method for obtaining a module ID.
OrbitSetaddr
must still be used to set the temporary network address.
This command will cause the Module to send its ID only when the displacement > ±1% of the calibrated stroke for
Digital Probe or 0.5 mm for Linear Encoder, otherwise the Orbit Module does not respond, causing a network timeout
error.
The Probe position or module value on power up or after a
OrbitRst
position for this command. Orbit Modules that have had their addresses set using the
not respond to
OrbitNotify
.
OrbitClr
or
command is used as the reference
OrbitSetaddr
command will
[OrbitIdentify] Command
6.4.3
Module Type:
Type :
Parameters :
Linear Encoder, Digital Probe
addressed
card, channel, address, identity, devtype, version, stroke
. Identify addressed Orbit Module.
Returns the Orbit Module ID, type (LE12, DP2 etc.), software version and (calibrated) stroke. Additional information
may be returned by using the
Quick Basic example: CALL
OrbitGetinfo
OrbitIdentify
command.
(card%, chnl%, oaddr%, id$, devtype$, ver$, stroke%)
[oaddr% → 000AAAAA, ID → id$, type → devtype$, version → ver$,
stroke → stroke %]
Network: To Module. <BREAK>
”I”
,[000AAAAA]
From Module. “I”,10 byte ID, 12 byte devtype, 5 byte version, 2 byte stroke).
Notes. “I” , 10 byte ID, 12 byte type, 5 byte version are in ASCII.
[000AAAAA] and 2 byte stroke are in binary.
For multi byte parameters byte order is 0(LS),1,2,3 etc..
LDN101 M-3338 02/99
Page 28 of 54
Page 29

[OrbitGetinfo] Command.
6.4.4
Returns information on the Module / Probe
Module Type:
Type :
Parameters :
Linear Encoder, Digital Probe*
addressed
card, channel, address, module type, hardware type, resolution, module info.
*not currently implemented
Will return information about the type of module and / or probe. Additional information may be returned by using the
OrbitIdentify
Quick Basic example: CALL
command.
OrbitGetinfo
(card%, chnl%, oaddr%, moduletype$, hwtype%,
reso%, moduleinfo$)
[oaddr% → 000AAAAA]
Network: To Module. <BREAK>, "B",[000AAAAA]
From Module "B", 4 byte moduletype, 2 byte hwtype, 2 byte reso, 32 byte moduleinfo
Notes. “B” , 4 byte moduletype and 32 byte moduleinfo are in ASCII.
[000AAAAA], 2 byte hwtype and 2 byte reso are in binary.
For multi byte parameters byte order is 0(LS),1,2,3 etc..
moduletype - 4 byte string - Returns a constant that identifies the module / probe type regardless of options or
version. Examples :- “DP ” for Digital Probe
“LE “ for Linear Encoder
hwtype - 2 byte integer - Code indicating hardware option or special configuration, i.e. buffering etc. for most
modules this will be set to 1 meaning “standard”. Refer to appropriate module or probe documentation
for detailed information.
reso - 2 byte integer - Number representing resolution of module. Currently set to 0 for DP and 5 for LE, the
moduletype$ will dictate how to interpret reso%
moduleinfo - 32 byte string - Information specific to a particular module / probe type. This may be unassigned (set to
all spaces) or be sub-divided into fields as defined by moduletype. For field descriptions refer to
appropriate module or probe documentation.
LDN101 M-3338 02/99
Page 29 of 54
Page 30

[OrbitGetstatus] Command.
6.4.5
Returns status and error code from Orbit Module.
Module Type:
Type :
Parameters :
Digital Probe, Linear Encoder
addressed
card, channel, address, error code, status
This command will return 1 ERROR code byte and 2 STATUS bytes. The ERROR code indicates whether the Orbit
Module has a problem, or why it has not responded to a particular command. For information on ERROR codes refer
to Error Codes section. The STATUS bytes gives information on the present mode or set-up of the Orbit Module.
Quick Basic example: CALL
OrbitGetstatus
(card%, chnl%, oaddr%, errcode%, status%)
[oaddr% → 000AAAAA, error code → errcode%, status → status%]
Network: To Module. <BREAK>
”G”
,[000AAAAA]
From Module. “G”,1 byte error code 2 byte status
Notes. “G” is in ASCII
[000AAAAA], 1 byte error code and 2 byte status are in binary.
For multi byte parameters byte order is 0(LS),1,2,3 etc..
Digital Probe
Byte 1
2 Byte Status format:
(sent after byte 0)
Byte 0
(sent first)
D7 D6 D5 D4 D3 D2 D1 D0 D7 D6 D5 D4 D3 D2 D1 D0
TR ST NU NU NR C C C NU RT RT RT RT RT RT RT
Default values
00001000 00000000
Flag meaning when set:
TR Orbit Module triggered (after
1 = triggered via
OrbitTrigger
ST Orbit Module stopped (after
1 = stopped via
OrbitAcquire stop
OrbitAcquire
OrbitStartdiff
or
OrbitAcquire
OrbitStopdiff
or
OrbitDifference
and
.
OrbitDifference
and
.
NR New Value. 1 = new rdg available. If the module is read (using
this flag is set to 0 and is only set to 1 when the next new reading is available. Because the
network reading rate can be much greater than the Orbit Module reading rate this bit can be
checked to ensure that the same reading is not read twice.
RT No. of readings taken (
OrbitAcquire
mode).
NU Not used. (currently set to 0)
CCC 000 - Normal mode
001 - OrbitDifference mode
010 - OrbitAcquire mode
011 - Sync mode
100 - 111 reserved
commands).
commands).
OrbitRead1
for example)
OrbitRst
If
OrbitClr
or
is used all status bytes will be set to their default values. This command also clears the Orbit
Module ‘hard’ error flag if set, see Error Codes section for details.
LDN101 M-3338 02/99
Page 30 of 54
Page 31

Linear Encoder
2 Byte Status format:
This command is the same as for Digital Probe except the 16 bit status word returned has a different meaning.
Byte 1
(sent after byte 0)
Byte 0
(sent first)
D7 D6 D5 D4 D3 D2 D1 D0 D7 D6 D5 D4 D3 D2 D1 D0
TR ST NU NU NR NU NU NU NU NU RS RR RF D NU NU
Default values
00001000 00000100
Flag meaning when set:
TR Orbit Module triggered (after
ST Orbit Module stopped (after
OrbitDifference
OrbitDifference
command). 1 = triggered via
command). 1 = stopped via
NR New Reading. 1 = new rdg available. If the module is read (using
OrbitRead2
OrbitStartdiff
OrbitStopdiff
.
.
for example) this flag is set to 0
and is only set to 1 when the next new reading is available. Because the network reading rate can be much
greater than the Orbit Module reading rate this bit can be checked to ensure that the same reading is not read
twice.
D Indicates direction of count. 1 = positive or 0 = negative direction (via
RS 1 = looking for reference marker (applies to
RF 1 = reference marker is found (applies to
RR 1 = reference point has been read (applies to
OrbitRefmark
OrbitRefmark
OrbitRefmark
mode)
mode)
mode)
OrbitDirection
command).
NU Not used. (currently set to 0)
OrbitRst, OrbitClr
If
occurred
OrbitGetstatus
OrbitPreset
or
is used both status bytes will be set to default values. If an overspeed has
will return both the relevant error code and the status of the module just before the
overspeed occurred. All status flags will then be set to default values and the module reading will be reset to zero.
The next
OrbitGetstatus
will return the new status of the module, if no errors have occurred or modes entered the
error code and status bytes will be at their default values. The Module will retain its network address.
LDN101 M-3338 02/99
Page 31 of 54
Page 32

[OrbitRead1] Command.
6.4.6
Returns a 16 bit signed (integer) reading.
Module Type:
Type :
Parameters :
Digital Probe
addressed
card, channel, address, reading
Returns a reading from the Orbit Module. Readings are updated at fixed intervals.
Quick Basic example: CALL
OrbitRead1
(card%, chnl%, oaddr%, rd%)
[oaddr% → 000AAAAA, 2 byte reading → rd%]
Network: To Module. <BREAK>,
”1”
,[000AAAAA]
From Module. “1”,2 byte reading
Notes: “1” is in ASCII.
[000AAAAA] and 2 byte reading are in binary.
For multi byte parameters byte order is 0(LS),1,2,3 etc..
The Digital Probe has a calibrated stroke (i.e. 1, 2, 5 or 10 mm) and a 14 bit resolution over that calibrated stroke.
Each ‘bit’ represents a distance which different for each stroke (other probe types may have a fixed resolution per bit
but no fixed stroke).
The probe position or module reading (0 to 16384) is returned by
OrbitRead1, OrbitReaddiff1
OrbitReadia
and
commands, but must be multiplied by a constant depending on module type to give a scaled result.
Eq. 1 position = N x stroke
16384
Where N is the returned value (rd% etc.). The probe stroke can be obtained by using the
OrbitIdentify
command.
Stroke / 16384 is the resolution for a particular probe. Refer to the PIE specification.
Example : 2 mm probe returned reading rd% = 18FCh (6396 dec.)
position = 6396 x 2 = 0.7808 mm
16384
If there is a fault or condition where a reading is not possible an error code sequence is returned instead of the
reading. Refer to the Error Codes section for details.
When a Digital Probe is working within its calibrated range rd% will return a reading in the range 0 to 16384. The
probe has enough mechanical travel to move outside of the calibrated range, if this happens the error code sequence
for Under Range or Over Range is returned instead of a reading. As soon as the probe is moved back within the
calibrated range rd% will return a value.
Digital Probe has an internal reading update time of 4 ms. This means that a new reading is available every 4 ms.
LDN101 M-3338 02/99
Page 32 of 54
Page 33

[OrbitRead2] Command
6.4.7
. Returns a 32 bit signed (long integer) reading.
Returns a reading from the Orbit Module. Readings are updated at fixed intervals, refer to module specifications.
Module Type:
Type :
Parameters :
QuickBASIC Example: CALL
Linear Encoder
addressed
card, channel, address, reading
OrbitRead2
(card%, chnl%, oaddr%, rdLong&)
[oaddr%→ 000AAAAA, 4 byte reading→ rdLong&]
Network: To Module: <BREAK>,”L”,[000AAAAA]
From Module “L”, 4 byte reading.
Notes: “L” is in ASCII.
[000AAAAA] and 4 byte reading are in binary.
For multi byte parameters byte order is 0(LS),1,2,3 etc..
If there is a fault or condition where a reading is not possible, such as overspeed, an error code sequence is
returned instead of the reading. Refer to the Error Codes section for details.
The Linear Encoder has a fixed resolution regardless of stroke, each ‘bit’ represents a fixed distance (other probe or
module types may have a fixed stroke but no fixed resolution per bit).
The Incremental position or reading is returned by
OrbitRead2
OrbitReaddiff2
and
commands, but must be
multiplied by the resolution depending on probe type to give a reading in mm.
Incremental position = N x resolution
Where N is the returned reading (
rdLong&
etc.). The probe stroke can be obtained by using the
command and probe resolution can be given by the
OrbitGetinfo
command.
OrbitIdentify
Linear Encoder has an internal reading update time of 1 ms. This means that a new reading is available every 1 ms.
This command will return the reference mark position if
or clear
OrbitRefmark
if the probe reference mark has not been passed. Refer to
OrbitRefmark
is set and the probe reference mark is passed,
OrbitRefmark
command for
details.
LDN101 M-3338 02/99
Page 33 of 54
Page 34

[OrbitClr] Command.
6.4.8
Clear addressed Orbit Module.
Module Type:
Type :
Parameters :
Digital Probe, Linear Encoder
addressed
card, channel, address
This command will perform a software reset on a particular Orbit Module. The Orbit Module will then need to be readdressed. Allow approximately 0.5 second for completion of the command.
Quick Basic example: CALL
OrbitClr
(card%, chnl%, oaddr%)
[oaddr% → 000AAAAA]
Network: To Module. <BREAK>,”C”,[000AAAAA]
From Module. ”C”,[000AAAAA]
Notes: “C” is in ASCII.
[000AAAAA] is in binary.
This command will clear previously set values from the addressed Orbit Module as follows :-
Clear address (cancels
Orbit Module will now respond to the
OrbitAcquire
Clear
OrbitDifference
Clear
OrbitSetaddr
)
OrbitNotify
command.
command status (single sample no delay)
command status (don’t record difference)
Reset Orbit Module software
Note: Leave at least 0.5 second delay after an
OrbitClr
command before sending any other command.
[OrbitRst] Command.
6.4.9
Module Type:
Type :
Parameters :
Digital Probe, Linear Encoder
broadcast
card, channel
This command has the same affect as
Reset all Orbit Modules.
OrbitClr
but will reset ALL the Orbit Modules on a network at the same time.
To set the Orbit Modules to the required Baud rate this command MUST be sent after the network is powered up and
before any other command. Allow approximately 0.5 second for completion of the command.
Quick Basic example: CALL
OrbitRst
(card%, chnl%)
Network: To Module. <BREAK>,”R”,[00000000]
From Module. No response
Notes: “R” is in ASCII.
[00000000] is in binary.
This command will reset all Orbit Modules as follows :-
Clear address (cancels
Orbit Module will now respond to the
OrbitAcquire
Clear
OrbitDifference
Clear
OrbitSetaddr
)
OrbitNotify
command.
command status (single sample no delay).
command status (don’t record difference)
Reset Orbit Module software and perform self test.
Note: Leave at least 0.5 second delay after a
LDN101 M-3338 02/99
OrbitRst
Page 34 of 54
command before sending any other command.
Page 35

6.4.10
[OrbitAcquire] Command.
Set Orbit Module to acquire mode.
Module Type:
Type :
Parameters :
Digital Probe
addressed
card, channel, address, readings, delay
This command will set the Orbit Module to record 1 to 25 readings with a specific time delay (0.1s to 819.1s) between
readings. The taking of readings will not start until a
read using the
Quick Basic example: CALL
OrbitReadia
command. Orbit Module reading synchronization is also possible using this command.
OrbitAcquire
OrbitTrigger
command is received. The stored readings are
(card%, chnl%, oaddr%, rdgs%, dly%)
[oaddr% → 000AAAAA, rdgs% → rdgs, dly% → delay]
Network: To Module. <BREAK>, ”A”,[000AAAAA],1 byte no of rdgs
(1 - 25 [0 and 255 special case]), 2 byte delay (1 - 1FFFh)
From Module. ”A”,[000AAAAA]
Notes: “A” is in ASCII.
[000AAAAA], 1 byte number of rdgs and 2 byte delay are in binary.
For multi byte parameters byte order is 0(LS),1,2,3 etc..
Once set the Orbit Module will start taking readings immediately after a
Module has been triggered it will only respond to
OrbitAcquire
and
. This command cannot be used if the Orbit Module is already in
OrbitRst, OrbitClr, OrbitIdentify, OrbitGetstatus, OrbitReadia
OrbitTrigger
OrbitDifference
command. Once the Orbit
mode.
Special Cases :-
1.
OrbitAcquire
stop i.e. to leave OrbitAcquire mode. Call the
OrbitAcquire
command again with the
number of rdgs byte set to 0.
2.
Orbit Module
synchronization. Call the
OrbitAcquire
command with the number of readings byte set to
255 (0FFh) all
Orbit Modules set in this mode will start their first measurement cycle after the
(i.e. 12 ms for Digital Probe) after the
OrbitTrigger
before taking a reading from the module. This time may be
OrbitTrigger
command. Allow time
different for other Orbit Modules, refer to module specifications.
6.4.11
Module Type:
Type :
Parameters :
[OrbitTrigger] Command
Digital Probe
broadcast
card, channel
. Trigger all Orbit Modules set to
This command will trigger all Orbit Modules that have previously been set by an
OrbitAcquire
mode.
OrbitAcquire
reading will be taken immediately, any further readings will be taken after the delay set by the
command. (See OrbitAcquire special cases)
Quick Basic example: CALL
OrbitTrigger
(card%, chnl%)
Network: To Module. <BREAK>, ”T”,[00000000]
From Module. No response
Notes: “T” is in ASCII.
[00000000] is in binary.
command. The first
OrbitAcquire
LDN101 M-3338 02/99
Page 35 of 54
Page 36

6.4.12
[ OrbitReadia] Command
. Return integer array.
Module Type:
Type :
Parameters :
This mode allows information stored during
OrbitAcquire
Digital Probe
addressed
card, channel, address, reading
OrbitAcquire
to be read. Readings can be taken at any time during the
period, though obviously all readings may not have been taken. Readings are stored until read or
cleared.
Quick Basic example: CALL
OrbitReadia
(card%, chnl%, oaddr%, rdarray%( ))
[oaddr% → 000AAAAA, 25 x 2 byte readings → rdarray%( )]
Network: To Module. <BREAK>, ”E”,[000AAAAA]
From Module. ”E”,25 x 2 byte readings
Notes: “E” is in ASCII.
[000AAAAA] and 25 x 2 byte readings are in binary.
For multi byte parameters byte order is 0(LS),1,2,3 etc..
On receiving the
reading transmitted will be the first one taken after the Orbit Module received the
readings that have not been logged yet will be transmitted as zero’s. If the
stopped the Orbit Module will be set back to single reading mode on the first
OrbitReadia
OrbitReadia
command.
command the Orbit Module will transmit the 25 reading buffer to the network. The first
OrbitTrigger
OrbitAcquire
OrbitRead1
command. Any
command has been
after a successful
Note: Reading errors are signified by the most significant bit being set, hence over and under range readings are
saved as FFFFh and 8000h, respectively.
LDN101 M-3338 02/99
Page 36 of 54
Page 37

6.4.13
[OrbitDifference] Command
Module Type:
Type :
Parameters :
. Set Orbit Module to difference mode.
Digital Probe, Linear Encoder
addressed
card, channel, address
Readings are taken continuously once started via
OrbitStartdiff
. The following is stored depending on module type :-
1. Maximum reading (2 bytes)
2. Minimum reading (2 bytes)
3. (optional) Sum of all readings (5 bytes, > 4.6 hours of readings)
4. (optional) Number of readings taken (3 bytes, 16.7 million readings)
Numbers 3 and 4 allow the calculation of the average reading. See
Quick Basic example: CALL
OrbitDifference
(card%, chnl%, oaddr%)
OrbitStopdiff, OrbitReaddiff1
(and 2).
[oaddr% → 000AAAAA]
Network: To Module. <BREAK>, ”F”,[000AAAAA]
From Module. ”F”,[000AAAAA]
Notes: “F” is in ASCII.
[000AAAAA] is in binary.
The maximum and minimum readings will start to be recorded as soon as the Orbit Module receives a
command. Once the Orbit Module has received
OrbitStartdiff
it will only respond to
OrbitIdentify, OrbitRead1, OrbitRead2, OrbitGetstatus, OrbitReaddiff1, OrbitReaddiff2
OrbitRst, OrbitClr
and
OrbitStartdiff
,
OrbitStopdiff
depending on module type. This command cannot be used if the Orbit Module is already in Acquire mode.
Orbit Modules set in this mode will start their first measurement cycle after the
(i.e. 12 ms for Digital Probe) after the
OrbitStartdiff
before taking a reading from the module. This time may be
OrbitStartdiff
command. Allow time
different for other Orbit Modules, refer to module specifications.
6.4.14
Module Type:
Type :
Parameters :
Orbit Modules that have previously been set to
start at the same time. Useful for reading synchronization. See
Quick Basic example: CALL
[OrbitStartdiff] Command
Digital Probe, Linear Encoder
broadcast
card, channel
. Start recording difference readings.
OrbitDifference
mode will start taking readings. All Orbit Modules will
OrbitStopdiff, OrbitReaddiff1
OrbitStartdiff
(card%, chnl%)
(or 2).
Network: To Module. <BREAK>, ”O”,[00000000]
From Module. No response
Notes: “O” is in ASCII.
[00000000] is in binary.
Depending on module type the contents of the buffer can be read using
OrbitReaddiff1
(or 2),
OrbitRead1
(or 2).
OrbitReaddiff commands will return a snap-shot of the buffer contents. OrbitRead commands will return a single
reading in the normal manner.
Once the Orbit Module has received
OrbitStartdiff
it will only respond to
OrbitGetstatus, OrbitRead1, OrbitRead2, OrbitReaddiff1, OrbitReaddiff2
OrbitRst, OrbitClr, OrbitIdentify
OrbitStopdiff
and
.
,
LDN101 M-3338 02/99
Page 37 of 54
Page 38

6.4.15
[OrbitStopdiff] Command
. Stop recording difference readings.
Module Type:
Type :
Parameters :
Digital Probe, Linear Encoder
broadcast
card, channel
Stops all Orbit Modules that have previously been set to
command. See
Quick Basic example: CALL
OrbitReaddiff1
(or 2).
OrbitStopdiff
(card%, chnl%)
Network: To Module. <BREAK>, ”H”,[00000000]
From Module. No response
Notes: “H” is in ASCII.
[00000000] is in binary.
The contents of the buffer can be read by the
OrbitRead1
(or 2) is used before an
OrbitReaddiff1
the OrbitReaddiff buffer will remain until cleared. See
6.4.16
Module Type:
Type :
Parameters :
[OrbitReaddiff1] Command
Digital Probe
addressed
card, channel, address, minimum, maximum, sum, number
. Returns result of OrbitDifference command. 16 bit signed (integer) readings.
OrbitReaddiff1
(or 2) a single reading is returned as normal and the contents of
OrbitReaddiff1
OrbitDifference
mode and started using the
(or 2) command depending on module type. If an
(and 2).
OrbitStartdiff
Returns results from an Orbit Module that has been set in
OrbitDifference
will return the latest result from an Orbit Module still taking readings in
mode and received an
OrbitDifference
mode.
OrbitStopdiff
or
1. Maximum reading (2 bytes)
2. Minimum reading (2 bytes)
3. Sum of all readings (5 bytes, max. 4.6 hours of readings at full stroke, more readings at less than full stroke)
4. Number of readings taken (3 bytes, up to 16.7 million readings)
Quick Basic example: CALL
OrbitReaddiff1
(card%, chnl%, oaddr%, min%, max%, sum#, num!)
[oaddr% → 000AAAAA, Min rdg → min%, Max. rdg → max%
Sum of all rdgs → sum#, Number of rdgs taken → num!]
Network: To Module. <BREAK>, ”D”,[000AAAAA]
From Module. ”D”,2 bytes - Min rdg, 2 bytes - Max. rdg, 5 bytes -
Sum of all rdgs, 3 bytes - Number of rdgs taken
Notes: “D” is in ASCII.
[000AAAAA], 2 bytes min rdg, 2 bytes max. rdg, 5 byte sum of all rdgs and
3 byte number of rdgs taken are in binary.
For multi byte parameters byte order is 0(LS),1,2,3 etc..
OrbitDifference
If the
command has been stopped via
reading mode, on the first
OrbitRead1
after a successful
OrbitStopdiff
OrbitReaddiff1
the Orbit Module will be set back to single
command.
Note: Reading errors are signified by the most significant bit being set, hence over and under range readings are
saved as -1 (FFFFh). and -32768 (8000h) respectively. If an out of range reading is detected, the sum reading is set
to zero and Max./Min. readings continue to be taken.
LDN101 M-3338 02/99
Page 38 of 54
Page 39

6.4.17
[OrbitReaddiff2] Command.
Return result of OrbitDifference command. 32 bit signed
(long integer) readings
Module Type:
Type :
Parameters :
Linear Encoder
addressed
card, channel, address, minimum, maximum
Returns minimum and maximum results from a Orbit Module that has been set in
received a
OrbitStopdiff
or will return the latest result from a Orbit Module still taking readings in
mode.
OrbitReaddiff2
is a 32 bit version analogous to
OrbitReaddiff1
which is 16 bit. Only maximum and minimum
readings are taken.
QuickBASIC Example: CALL
OrbitReaddiff2
(card%, chnl%, oaddr%, maxLong&, minLong&)
[oaddr%→ 000AAAAA, 4 byte reading→minLong&, 4 byte reading, maxLong&]
Network: To Module: <BREAK>,”X”,[000AAAAA]
From Module: “X”, 4 Byte min. reading, 4 byte max. reading.
Notes: “X” is in ASCII.
[000AAAAA], 4 byte min rdg and 4 byte max. rdg are in binary.
For multi byte parameters byte order is 0(LS),1,2,3 etc..
OrbitDifference
If the
command has been stopped via
reading mode, on the first
OrbitRead2
after a successful
OrbitStopdiff
OrbitReaddiff2
the Orbit Module will be set back to single
command.
OrbitDifference
mode and
OrbitDifference
6.4.18
[OrbitPreset] Command.
Presets a value into the Orbit Module. 32 bit signed
(long integer) value.
Module Type:
Type :
Parameters :
Linear Encoder
addressed
card, channel, address, preset
Preset is used where Orbit modules may be preset with a value (i.e. Linear Encoder).
QuickBASIC Example: CALL
OrbitPreset
(card%, chnl%, oaddr%, pstLong&)
[oaddr%→ 000AAAAA, pstLong& →4 byte reading]
Network: To Module: <BREAK>,”P”,[000AAAAA],4 byte Reading.
From Module “P”,[000AAAAA]
Notes: “P” is in ASCII.
[000AAAAA] and 4 byte preset reading are in binary.
For multi byte parameters byte order is 0(LS),1,2,3 etc..
This command will set the Reference Read flag (RR - refer to
the probe datum is affected. If necessary the
OrbitRefmark
OrbitGetstatus
command) to the default reading as
command should be used. This preset could also be
applied effectively using the application software in which case the datum would not be affected.
This command cannot be used when the module is set in certain modes such as
OrbitDifference
The status flags can be interrogated to determine module mode.
OrbitRefmark
or
.
There is a delay before this command is implemented and the result valid. Linear Encoder has an internal update
time of 1 ms.
LDN101 M-3338 02/99
Page 39 of 54
Page 40

6.4.19
[OrbitRefmark] Command
Activates reference marker mode.
Module Type:
Type :
Parameters :
Linear Encoder
addressed
card, channel, address
This command sets the Orbit Module to waiting until the reference mark signal is received from the probe connected
to it (such as Linear Encoder). The Module can be interrogated to see whether the reference mark has been found
using the
OrbitRead2
QuickBASIC Example: CALL
OrbitGetstatus
is used.
command. When found, the reading at the reference mark is returned the first time
OrbitRefmark
(card%, chnl%, oaddr%)
[oaddr%→000AAAAA]
Network: To Module: <BREAK>,”K”,[000AAAAA]
From Module “K”, [000AAAAA]
Notes: “K” is in ASCII.
[000AAAAA] is in binary.
When in
OrbitGetstatus
using
normal operating mode again.
OrbitRefmark
). When the reference mark is passed the flag RF = 1. The reading at the reference mark can be read
OrbitRead2
mode the module is waiting until the reference mark is passed, status flag RS = 1 (refer to
, once read flag RR = 1, at the same time RS and RF will be reset to 0 and the module will be in
OrbitRead2
will reset the Module back to its normal mode of operation at any time
even if the reference mark had not been passed.
OrbitRefmark
cannot be used when the module is set in certain modes such as
OrbitDifference
mode. The status
flags can be interrogated to determine module mode.
The RR flag will equal 1 until the datum is changed in some way. This will occur if
OrbitDirection
6.4.20
[OrbitDirection] Command.
Module Type:
Type :
Parameters :
OrbitRefmark
or
are used or
Linear Encoder
addressed
card, channel, address
OrbitRead2
is used to clear an overspeed error.
Changes direction of reading count
OrbitRst, OrbitClr, OrbitPreset
,
This command will toggle the readings form an Orbit module to change direction. In the case of a Linear Encoder the
count from the probe would change from counting in the positive direction to the negative direction.
QuickBASIC Example: CALL
OrbitDirection
(card%, chnl%, oaddr%)
[oaddr%→ 000AAAAA]
Network: To Module: <BREAK>,”U”,[000AAAAA]
From Module “U”, [000AAAAA]
Notes: “U” is in ASCII.
[000AAAAA] is in binary.
This command will set the Reference Read flag (RR - refer to
the probe datum is affected. If necessary
OrbitPreset
or
OrbitGetstatus
OrbitRefmark
command) to the default reading as
commands should be used.
There is a delay before this command is implemented and the result valid. Linear Encoder has an internal update
time of 1 ms.
LDN101 M-3338 02/99
Page 40 of 54
Page 41

6.5 Orbit Module Error Codes
When an addressed command is sent to a Orbit Module it responds by sending an acknowledge byte followed by
data. Under error conditions the acknowledge byte, which is a specific ASCII character for each command, is
replaced with the ! character (21h) followed by an error code. The rest of the reply is padded out with dummy bytes to
keep the message length correct for the particular command. Some error codes are module type specific.
With communication and broadcast command errors the error code cannot be sent in the reply. To find the error code
OrbitGetstatus
the
command can be used, this will also clear the error if it is not permanent.
[*] = This error sets the ’hard’ error flag. The error code can be found/cleared via the
OrbitGetstatus
There are additional error codes in Driver Error Codes section.
General Errors
Errorstring Description
21h,01h Orbit Module receive parity error [*]
21h,04h Broadcast address not allowed [*]
21h,05h Broadcast address [00] expected [*]
21h,06h Address change not allowed [acq/diff set]
21h,09h Missed reading
21h,0Ah Reading holdoff, Orbit Module has not updated reading yet
21h,12h Underrange
21h,13h Overrange
21h,C4h Overspeed, LE only
Difference mode errors
Errorstring Description
21h,21h Not set to difference mode
21h,22h Waiting for
OrbitStartdiff
command
21h,23h Difference mode not allowed, Orbit Module in acquire mode
21h,24h Num (of readings) overflow > 3 bytes [*]
21h,25h Sum (of readings) overflow > 5 bytes [*]
21h,26h Difference mode already set or running
Acquire mode errors
Errorstring Description
21h,31h Not set to acquire mode
21h,32h Waiting for
OrbitTrigger
command
21h,33h Acquire mode not allowed, Orbit Module in difference mode
21h,34h Sync mode not allowed
21h,35h ‘rdgs’ parameter out of range
21h,36h ‘dly’ parameter out of range
21h,37h Acquire mode already set or running
command.
Hardware errors
Errorstring Description
21h,02h Coil value out of range [*]
21h,07h Omega use only, contact dealer
21h,08h Omega use only, contact dealer
21h,11h Count to cal point >16 bit [*]
21h,14h Multiply overflow [*]
21h,C5h Low Signal Level, LE only - contact dealer
21h,81h to 21h,8Bh Digital Probe, Omega use only, contact dealer
21h,B0h to 21h,C3h Linear Encoder, Omega use only, contact dealer
LDN101 M-3338 02/99
Page 41 of 54
Page 42

Section 7.0 Example Programs
The Orbit Network Card Software Support disk contains example programs written in various popular programming
languages and for several PC operating systems
All the examples supplied are based on one standard user interface, which is described below.
The examples are intended to show programmers how to interface their chosen language with the Orbit Network.
Examples of a typical screen display are shown in a different font i.e. :-
This is an example screen display
Actions on Start Up
a) A call is made to the appropriate interface code e.g. odvrifc (orbit driver interface C)
calling odvrifc: errorword = 0
b) The user is prompted to select which card to use.
Note: The card number is set via the DIL switches on the Orbit Network Card.
Enter card (1 - 4) ? _
c) The user is prompted to select which channel to use.
Note: The channel represents which 9 Pin D-type connector on the Orbit Network Card the commands will be
sent to.
Enter channel (1 - 2) ?
d) After card and channel have been selected the following text will be written to the screen:
1 =OrbitRst 2 =OrbitNotify 3 =OrbitSetaddr 4 =OrbitClr
5 =OrbitRead1 6 =OrbitIdentify 7 =OrbitGetstatus 8 =OrbitDifference
9 =OrbitStartdiff 10=OrbitStopdiff 11=OrbitReadiff1 12=OrbitAcquire
13=OrbitTrigger 14=OrbitOrbitReadia 15=OrbitRead2 16=OrbitPreset
17=OrbitRefmark 18=OrbitReaddiff2 19=OrbitDirection 20=OrbitGetinfo
Enter Choice: (0=QUIT) ? _
By selecting the appropriate choice the user can send any Orbit command to a module or modules on the Orbit
network . The menu of choices will appear after the completion of each command ready for another selection. For
more details on each Orbit command refer to the Orbit Network Commands Section.
Details of each of the choices is shown below, in all cases the card and channel refers to those already selected in
b) and c). Responses to commands are examples only and will vary depending on module type, set up and the
command used.
1 =OrbitRst
Reset all the Orbit Modules on the card and channel specified.
calling OrbitRst:( card=1 , chnl=1 )
errorword=0h
_
LDN101 M-3338 02/99
Page 42 of 54
Page 43

2 =OrbitNotify
The network is continuously sent the OrbitNotify command, any module that has its measurement parameter altered
from its initial state (i.e. press probe tip)will send back its ID.
called OrbitNotify:( card=1 ,chnl=1 ,id= xxxxxxxxxx )
errorword=FFh
Running [*] - Press Probe Tip or Any Key To Return To Menu
After tip of probe M892780-36 has been pressed for example
called OrbitNotify:( card=1 ,chnl=1 ,id= M892780-36 )
errorword=0h
Running [*] - Press Probe Tip or Any Key To Return To Menu
3 =OrbitSetaddr
This command is used to set the address of the module with the specified ID, note that once a module has had its
address set, it will not respond to the OrbitNotify command.
The sample output is slightly different if the ID has been obtained via the OrbitNotify command.
ID manual entry
Orbit addr (1 - 31) ?
id (10 characters)
1
M892780-36
calling OrbitSetaddr:( card=1 ,chnl=1 ,oaddr=1 ,id=M892780-36 ,opt=0 )
errorword=0h
ID entry via OrbitNotify command. ID will appear as soon as addr is entered.
Orbit addr (1 - 31) ?
1
id$ (from Notify) = M892780-36
calling OrbitSetaddr:(card=1 ,chnl=1 ,oaddr=1 ,id=M892780-36 ,opt=0 )
errorword=0h
4 =OrbitClr
Clears the module at the given address.
Orbit addr (1 - 31) ?
1
called OrbitClr:( card=1 ,chnl=1 ,oaddr=1 )
errorword=0h
5 =OrbitRead1
Continuously performs an OrbitRead1 command from the module at the given address.
Note : a) Some Orbit module types will not respond to the OrbitRead1 command.
b) rd is a ‘live’ reading and will change as the probe tip is moved
Screen display after Orbit address has been entered.
called OrbitRead1:( card=1 ,chnl=1 ,oaddr=1 ,rd=2687 )
errorword=0h
Running [*] - Press Any Key To Return To Menu
6 =OrbitIdentify
Sends an OrbitIdentify command to the module at the given address.
Screen display after Orbit address has been entered.
called OrbitIdentify:( card=1 ,chnl=1 ,oaddr=1 ,id=M892780-36
,devtype=970100-DP2 ,ver=v3.0 ,stroke=2 )
errorword=0h
LDN101 M-3338 02/99
Page 43 of 54
Page 44

7 =OrbitGetstatus
Sends an OrbitGetstatus command to the module at the given address.
Screen display after Orbit address has been entered.
called OrbitGetstatus:( card=1 ,chnl=1 ,oaddr=1 ,errcode=0h ,status=800h )
errorword=0h
8 =OrbitDifference
Sets the module at the given address into the OrbitDifference mode.
Screen display after Orbit address has been entered.
calling OrbitDifference:( card= 1 ,chnl= 1 ,oaddr= 1 )
errorword = 0h
9 =OrbitStartdiff
Starts difference logging in all modules set to OrbitDifference mode.
calling OrbitStartdiff:( card=1 ,chnl=1 )
errorword = 0h
10=OrbitStopdiff
Stops difference logging in all modules set to OrbitDifference mode.
calling OrbitStopdiff: ( card=1 ,chnl=1 )
errorword = 0h
11=OrbitReaddiff1
Continuously performs an OrbitReaddiff1 command from the module at the given address.
Note: a) If difference logging has not been stopped via OrbitStopdiff, the displayed numbers will be ‘live’.
b) Some Orbit module types will not respond to the OrbitReaddiff1 command.
Screen display after Orbit address has been entered.
called OrbitReaddiff1:( card=1 , chnl=1 ,oaddr=1 ,
min= 2299 , max= 2884 ,
sum= 2540651 , num= 984 )
errorword = 0h
Running [*] - Press Any Key To Return To Menu
12=OrbitAcquire
Sets the Acquire mode parameters for the module at the given address.
Note: Some Orbit module types will not respond to the OrbitAcquire command.
Screen display after Orbit address has been entered.
Enter dly ?
Enter rdgs ?
10
15
called OrbitAcquire:( card=1 , chnl=1 , oaddr=1 , rdgs=15 , dly=10 )
errorword=0h
LDN101 M-3338 02/99
Page 44 of 54
Page 45

13=OrbitTrigger
Starts Acquire mode logging in all modules set to OrbitAcquire mode.
Note: Some Orbit module types will not respond to the OrbitTrigger command.
calling OrbitTrigger:(card= 1 ,chnl= 1 )
errorword = 0h
14=OrbitReadia
Continuously performs an OrbitReadia command from the module at the given address.
Note: a) Each new reading will displayed as soon as it is acquired.
b) Some Orbit module types will not respond to the OrbitReadia command.
c) For Digital probe underrange and over range are displayed as -32768 and -1 respectively
Screen display after Orbit address has been entered.
called OrbitReadia:(card%= 1 ,chnl%= 1 ,oaddr%= 1 ,rdarray:rdg 1 6232 rdg 6 6232 rdg 11 6233 rdg 16 0 rdg 21 0
rdg 2 6233 rdg 7 6233 rdg 12 6233 rdg 17 0 rdg 22 0
rdg 3 6233 rdg 8 6233 rdg 13 6233 rdg 18 0 rdg 23 0
rdg 4 6233 rdg 9 6233 rdg 14 6233 rdg 19 0 rdg 24 0
rdg 5 6233 rdg 10 6233 rdg 15 6233 rdg 20 0 rdg 25 0
errorword% = 0h
Running [*] - Press Any Key To Return To Menu
15=OrbitRead2
Continuously performs an OrbitRead2 command from the module at the given address.
Note: Some Orbit module types will not respond to the OrbitRead2 command.
Screen display after Orbit address has been entered.
called OrbitRead2:(card=1 ,chnl=1 , oaddr=1 , rdlong= 159182)
errorword=0h
Running [*] - Press Any Key To Return To Menu
16=OrbitPreset
Sets the Preset value for the module at the given address.
Note: Some Orbit module types will not respond to the OrbitPreset command.
Screen display after Orbit address has been entered.
Enter Preset ( x 0.05 um )
1000
called OrbitPreset:(card=1 ,chnl=1 , oaddr=1 , pst=1000)
errorword=0h
LDN101 M-3338 02/99
Page 45 of 54
Page 46

17=OrbitRefmark
Demonstrates the use of the OrbitRefmark command - sample output is for a Linear Encoder.
Note: Some Orbit module types will not respond to the OrbitRefmark command.
Screen display after Orbit address has been entered.
Example of Reference mode operation
Recall=1 New=2
Enter Choice: (1 or 2) ?
2
←
Note 1
Reference mode - New
set machine (probe) datum, then press any key ←
RdgAtDatum=200 ←
Note 2
Note 3
Move Probe tip through Ref Marker
RdgAtRefmark=84961(could be saved in a file, to make non volatile)←
Note 4
called OrbitRead2:(card=1,chnl=1,oaddr=1,compensated rdlong =0) ←
Note 5
Running [*] - Press Any Key To Return To Menu
Notes :-
1. Always select New for first run
2. Move tip to datum point. This point will be set to zero.
3. rdlong from module at datum ( zero) point.
4. Difference in reading from datum point to ref mark posn = 84961-200 = 84761
5. Compensated rdlong = rdlong (from OrbitRead2) - 200 = 0
If the probe is powered off and on the LE module re-initializes at a different position from previous setting. The
uncompensated reading at datum position is now 406 not 200 as before hence the difference in ref mark positions
should be 206.
Screen display after Orbit address has been entered.
Example of Reference mode operation
Recall=1 New=2
Enter Choice: (1 or 2) ? 1 ←
Reference mode - Recall
Move Probe tip through Ref Marker
RdgAtRefmark(recalled)= 84961
RdgAtRefmark(current)= 85166 ←
RefOffset=200
called OrbitRead2:(card=1,chnl=1,oaddr=1,compensated rdlong = 0) ←
Running [*] - Press Any Key To Return To Menu
Notes :-
1. Use recall to establish previous setup.
2. Difference in ref positions = 85161 - 84961 = 206
3. Was saved in previous setup
4. Uncompensated rdlong at datum point would be 406
Compensated rdlong = rdlong (from OrbitRead2) - 200 - 206 = 0
←
Note 1
Note 2
Note 3
Note 4
LDN101 M-3338 02/99
Page 46 of 54
Page 47

18=OrbitReaddiff2
Continuously performs an OrbitReaddiff2 command from the module at the given address.
Note: a) If difference logging has not been stopped via OrbitStopdiff, the displayed numbers will be ‘live’.
b) Some Orbit module types will not respond to the OrbitReaddiff2 command.
Screen display after Orbit address has been entered.
called OrbitReaddiff2:(card=1, chnl=1, oaddr=1,
minlong=325, maxlong=2628 )
errorword=0h
Running [*] - Press Any Key To Return To Menu
19=OrbitDirection
Changes the count direction for the module at the given address.
Note: a) For Linear Encoder the default state at power on is count
increases
for
inward
stroke.
b) Some Orbit module types will not respond to the OrbitDirection command.
Screen display after Orbit address has been entered.
called OrbitDirection:(card=1 , chnl=1 , oaddr=1)
errorword=0h
20=OrbitGetinfo
Sends an OrbitGetinfo command to the module at the given address.
Screen display after Orbit address has been entered.
called OrbitGetinfo:(card=1 , chnl=1 , oaddr=1 ,
moduletype=LE , hwtype=1, reso=5,
moduleinfo=)
errorword=0h
LDN101 M-3338 02/99
Page 47 of 54
Page 48

8.0 Installation of PIE and T-CON
Probe Interface Electronics (PIE) and other Orbit Modules are primarily designed to be mounted using the T-CON, a
building block style of system construction. This allows for easy connection as the various system components which
allows individual Orbit modules to be simply plugged in or removed without having to disturb other parts of the
system. When the T-CON has been mounted the PIE simply plugs into place and is locked into position using the
slide locking bar.
Up to 31
Modules
Mixed probe
capability
Channel 1
69
51
Channel 2
Up to 31 Modules
per Channel
network.wm
Orbit Network Card
(Up to 4 cards per PC)
Simple installation
using T-CON
Mounting Methods
There are 3 mounting methods. See diagrams below. With each method it is important to ensure there is an electrical
connection between the T-CON case and a good earth (usually the chassis or frame of the equipment onto which the
T-CON is being fixed). For each mounting method a possible way of achieving this is shown. If more than one T-CON
is being used it is not necessary (thought best) to ground each one. It is recommend that one in five are properly
grounded. Screening for the remainder will be maintained via the connector shells.
LDN101 M-3338 02/99
Page 48 of 54
Page 49

Using Captive Nuts (recommended)
Ensure the screws make good electrical contact with the metal mounting surface, plain and lock washers are
suggested.
Using Plastic Mounting Feet
These feet are a tight snap fit into the T-CON case. An upward and inward force is best. If the T-CON is mounted on
a grounded metal surface, paint can be removed from the base pads to ensure a connection.
0.394”
10.00mm
M4
M4
MAX. SCREW INSERTION DEPTH
WASHER
M4 SCREW
100.4mm
3.953”
”
1.390
35.3mm
T-CON BASE PADS
2.394”
60.8mm
2.913
74.0
3.425” Max.
87.0mm Max.
0.020”
±
0.5mm
±
0.157 ” 4.0mm
MIN BEND RADIUS
0.906”
23.0mm
∅
0.335” x 90
∅
8.5mm x 90
COUNTERSINK
0.319”
°
°
8.1mm
0.945”
24.0mm
∅
0.177”
∅
4.5mm
1.890”
0.681”
48.0mm
MOUNTING OPTION
USING CAPTIVE NUTS
LDN101 M-3338 02/99
17.3mm
Page 49 of 54
0.492”
12.5mm
MOUNTING OPTION
USING PLASTIC FEET
0.681”
17.3mm
Page 50

Mounting Pitch
The T-CON are best mounted pushed fully together for best connector mating. Slotted holes are preferable as this
will allow for manufacturing tolerance to be taken up when finally tightening the mounting screws.
THE USE OF SLOTTED HOLES ENABLES THE
T-CONS TO BE ALIGNED AS CLOSE AS
POSSIBLE. WHEN IN THIS POSITION THEY
SHOULD BE LOCKED IN PLACE.
0.700” 17.78mm
PITCH
0.015”
0.5mm
±
FOR PLASTIC FEET
2.196
±
74.0
1.890”
48.0mm
FOR CAPTIVE NUTS
DRILLING TEMPLATE TO MOUNT T-CON
0.700” 17.78mm
PITCH
T-CON Dimensions
0.248”
6.3mm
0. 197”
5. 0mm
0. 158”
4. 0mm
0.394”
10.0mm
0.236”
6.0mm
DETAI L A ( FOOT NOT SHOWN)
SCALE 5: 1
0. 414”
10. 5mm
1.390”
35.3mm
0. 039”
1. 0mm
T- CON BASE PADS
0.492”
12.5mm
2. 632”
66. 8mm
2. 913 ±0. 020”
74. 0 ±0. 5mm
3. 425”
87mm
1. 890”
48. 0mm
Æ
0. 177”
Æ
4. 5mm
Æ
0.335 x 0. 355”
Æ
8.5 x 90mm
COUNTE RSI NK
0.319”
8.1mm
M4 CAPTI VE NUT
0.681”
17.3mm
Orientation
LDN101 M-3338 02/99
Page 50 of 54
Page 51

The T-CON and PIE may be mounted in any position. The recommended orientation is with the PIE vertical and
uppermost. This is the condition under which IP rating testing was carried out. If the T-CON and PIE are mounted
horizontally it is recommended that the orientation notch in the locking bar is facing down (see drawing). This will
prevent any vibration from putting the locking bar into the unlocked position.
ORIENTATION NOTCH
VERTICAL MOUNTING PREFERRED
HORIZONTAL MOUNTING PREFERRED THIS WAY
Mounting Clearances
If the T-CON is to be mounted near a wall or other obstruction ensure there is sufficient space for the locking bar to
operate. Also consider that hand access may be required for removal of PIE during servicing.
0.181” 4.6mm
MINIMUM CLEARANCE
A LARGER CLEARANCE MAY
BE NEEDED IF THE PROBE
INTERFACE ELECTRONICS
NEED TO BE HANDLED
SIDE WALL
SIDE WALL
LDN101 M-3338 02/99
Page 51 of 54
Page 52

Additional Mounting Ideas
The recessed slots in the T-CON allow for the use of continuous mounting strip such as miniature DIN rail or a
joggled metal strip. Removing the paint from the bottom inside of the slot will ensure a good electrical contact (a few
stokes with a small file should suffice).
MINIATURE
TOP HAT RAIL
‘JOGGLE STRIP’
MOUNTING USING A MINIATURE TOP HAT
RAIL OR A MADE TO FIT ‘JOGGLE STRIP’
LDN101 M-3338 02/99
Page 52 of 54
Page 53

WARRANTY/DISCLAIMER
OMEGA ENGINEERING, INC. warrants this unit to be free of defects in materials and workmanship for a period of
13 months
one (1) year product warranty
from date of purchase. OMEGA Warranty adds an additional one (1) month grace period to the normal
to cover handling and shipping time. This ensures that OMEGA’s customers receive
maximum coverage on each product.
If the unit malfunctions, it must be returned to the factory for evaluation. OMEGA’s Customer Service Department
will issue an Authorized Return (AR) number immediately upon phone or written request. Upon examination by
OMEGA, if the unit is found to be defective, it will be repaired or replaced at no charge. OMEGA’s WARRANTY does
not apply to defects resulting from any action of the purchaser, including but not limited to mishandling, improper
interfacing, operation outside of design limits, improper repair, or unauthorized modification. This WARRANTY is
VOID if the unit shows evidence of having been tampered with or shows evidence of having been damaged as a
result of excessive corrosion; or current, heat, moisture or vibration; improper specification; misapplication; misuse
or other operating conditions outside of OMEGA’s control. Components which wear are not warranted, including but
not limited to contact points, fuses, and triacs.
OMEGA is pleased to offer suggestions on the use of its various products. However, OMEGA neither
assumes responsibility for any omissions or errors nor assumes liability for any damages that result from
the use of its products in accordance with information provided by OMEGA, either verbal or written. OMEGA
warrants only that the parts manufactured by it will be as specified and free of defects. OMEGA MAKES NO
OTHER WARRANTIES OR REPRESENTATIONS OF ANY KIND WHATSOEVER, EXPRESS OR IMPLIED,
EXCEPT THAT OF TITLE, AND ALL IMPLIED WARRANTIES INCLUDING ANY WARRANTY OF
MERCHANTABILITY AND FITNESS FOR A PARTICULAR PURPOSE ARE HEREBY DISCLAIMED. LIMITATION
OF LIABILITY: The remedies of purchaser set forth herein are exclusive, and the total liability of OMEGA
with respect to this order, whether based on contract, warranty, negligence, indemnification, strict liability
or otherwise, shall not exceed the purchase price of the component upon which liability is based. In no
event shall OMEGA be liable for consequential, incidental or special damages.
CONDITIONS: Equipment sold by OMEGA is not intended to be used, nor shall it be used: (1) as a “Basic
Component” under 10 CFR 21 (NRC), used in or with any nuclear installation or activity; or (2) in medical
applications or used on humans. Should any Product(s) be used in or with any nuclear installation or activity,
medical application, used on humans, or misused in any way, OMEGA assumes no responsibility as set forth in our
basic WARRANTY / DISCLAIMER language, and, additionally, purchaser will indemnify OMEGA and hold OMEGA
harmless from any liability or damage whatsoever arising out of the use of the Product(s) in such a manner.
RETURN REQUESTS / INQUIRIES
Direct all warranty and repair requests/inquiries to the OMEGA Customer Service Department. BEFORE
RETURNING ANY PRODUCT(S) TO OMEGA, PURCHASER MUST OBTAIN AN AUTHORIZED RETURN (AR)
NUMBER FROM OMEGA’S CUSTOMER SERVICE DEPARTMENT (IN ORDER TO AVOID PROCESSING
DELAYS). The assigned AR number should then be marked on the outside of the return package and on any
correspondence.
The purchaser is responsible for shipping charges, freight, insurance and proper packaging to prevent breakage in
transit.
WARRANTY
FOR
RETURNS, please have the
following information available BEFORE contacting
OMEGA:
1. Purchase Order number under which the product
was PURCHASED,
2. Model and serial number of the product under
warranty, and
3. Repair instructions and/or specific problems
relative to the product.
NON-WARRANTY
FOR
REPAIRS, consult OMEGA for
current repair charges. Have the following information
available BEFORE contacting OMEGA:
1. Purchase Order number to cover the COST of the
repair,
2. Model and serial number of the product, and
3. Repair instructions and/or specific problems relative
to the product.
OMEGA’s policy is to make running changes, not model changes, whenever an improvement is possible.
This affords our customers the latest in technology and engineering.
OMEGA is a registered trademark of OMEGA ENGINEERING, INC.
© Copyright 1999 OMEGA ENGINEERING, INC. All rights reserved. This document may not be copied, photocopied, reproduced,
translated, or reduced to any electronic medium or machine-readable form, in whole or in part, without the prior written consent of
OMEGA ENGINEERING, INC.
LDN101 M-3338 02/99
Page 53 of 54
Page 54

Where Do I Find Everything I Need for
Process Measurement and Control?
OMEGA…Of Course!
TEMPERATURE
Thermocouple, RTD & Thermistor Probes, Connectors, Panels & Assemblies
Wire: Thermocouple, RTD & Thermistor
Calibrators & Ice Point References
Recorders, Controllers & Process Monitors
Infrared Pyrometers
PRESSURE, STRAIN AND FORCE
Transducers & Strain Gauges
Load Cells & Pressure Gauges
Displacement Transducers
Instrumentation & Accessories
FLOW/LEVEL
Rotameters, Gas Mass Flowmeters & Flow Computers
Air Velocity Indicators
Turbine/Paddlewheel Systems
Totalizers & Batch Controllers
pH/CONDUCTIVITY
pH Electrodes, Testers & Accessories
Benchtop/Laboratory Meters
Controllers, Calibrators, Simulators & Pumps
Industrial pH & Conductivity Equipment
DATA ACQUISITION
Data Acquisition & Engineering Software
Communications-Based Acquisition Systems
Plug-in Cards for Apple, IBM & Compatibles
Datalogging Systems
Recorders, Printers & Plotters
HEATERS
Heating Cable
Cartridge & Strip Heaters
Immersion & Band Heaters
Flexible Heaters
Laboratory Heaters
ENVIRONMENTAL MONITORING AND CONTROL
Metering & Control Instrumentation
Refractometers
Pumps & Tubing
Air, Soil & Water Monitors
Industrial Water & Wastewater Treatment
pH, Conductivity & Dissolved Oxygen Instruments
LDN101 M-3338 02/99
Page 54 of 54
 Loading...