

Page 1

Instruction Manual
HH610-SW
Application Software for
Portable & Bench Meters
Page 2

Dear Customer,
Thank you for choosing an Omega product. Please
read this instruction manual carefully before using the
software. This manual will provide you with the necessary information for the correct installation and use of
the program.
TABLE OF CONTENTS
Preliminary Examination ......................................... 3
General Description ............................................... 4
Installation ............................................................ 7
Initial Preparation ................................................ 20
Using HH610-SW................................................ 23
Accessories ......................................................... 53
Warranty ............................................................ 54
Windows®, Excel® are Registered Trademarks of “Microsoft Co.”
PRELIMINARY EXAMINATION
Remove the diskettes from the packing material and
examine them to make sure that no damage has occurred during shipping. If any diskette is missing or
damaged, please notify your Dealer.
Note: Save all packing material until you are sure that
the diskettes function correctly. Any defective
item must be returned in the original packing
with the supplied accessories.
32
Page 3

GENERAL DESCRIPTION
HH610-SW is an application software that allows the
transfer of data from Omega portable and bench meters
to a personal computer.
The software is available in two versions, HH610-SW16
(for Windows®3.11) and HH610-SW32 (for Windows®95) and it helps the elaboration of data collected
by Omega models.
The data can be stored in XLS format and exported in CSV
format. The stored data can be displayed and printed
using commercial spreadsheet programs such as Excel®.
During setup, the program will ask for the Omega
Instruments model and for additional information such
as user name. The software provides a list of all Omega
meters that can be chosen.
Make sure that you select the correct meter. In
fact, once a model number is selected, that will
be the only operative model.
54
Page 4

HARDWARE REQUIREMENTS
To use HH610-SW on your computer, make sure you
have the following minimum system requirements:
• IBM-PC AT, PS/2 or compatible PC (386 or higher)
• 4 Megabyte of RAM memory
• A hard disk with 5 Megabyte free disk space
• One mouse serial port and another one for the
communication cable (if a mouse port is not available, the keypad can also be used)
• HH610Logg, infrared transmitter for portable meters,
or connection cables for GLP portable meters and
bench meters respectively, both available with 9-pin or
25-pin RS 232 connector.
INSTALLATION
The files on the HH610-SW diskettes are compressed
and cannot be used until the installation has been
completed.
Turn your computer on and start Windows®.
Place the HH610-SW diskette #1 into
the appropriate drive.
SOFTWARE REQUIREMENTS
The program needs Windows®3.11 (HH610-SW16) or
Windows®95 (HH610-SW32). The program may not
work properly if other communication programs (modem, fax, etc.) are running at the same time.
Prior to running the setup program, close all Windows
applications. Then choose the Run command from the
startup menu in Windows®95 or from the File menu of
the Program Manager window in Windows®3.11 and
type a:\setup.
76
®
Page 5
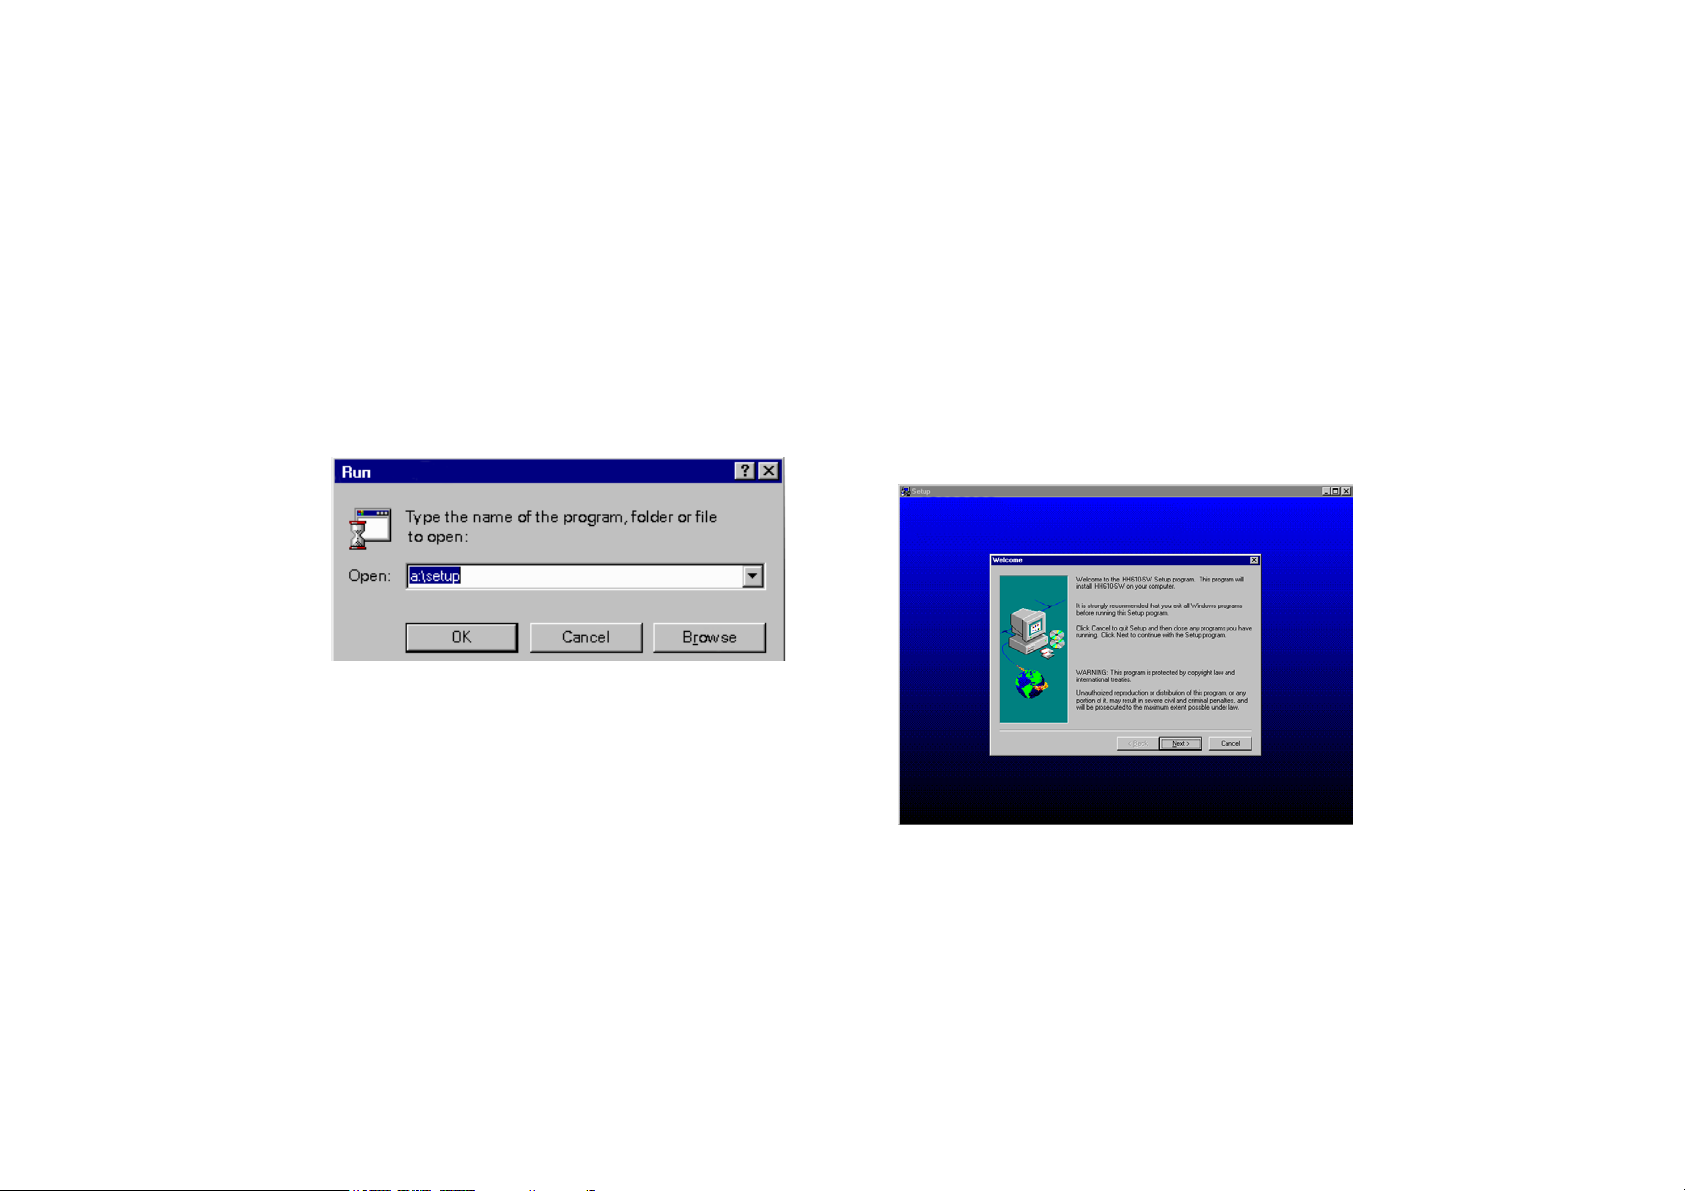
The setup program will be running and loading the
setup files into memory.
Follow the instructions and insert the successive diskettes when requested.
The dialog boxes of the installation program are described step-by-step in the following pages.
The Installation Program dialog box appears. To
proceed with installation, click on Next or press the
Enter key (click Cancel to abort the setup program).
98
Page 6
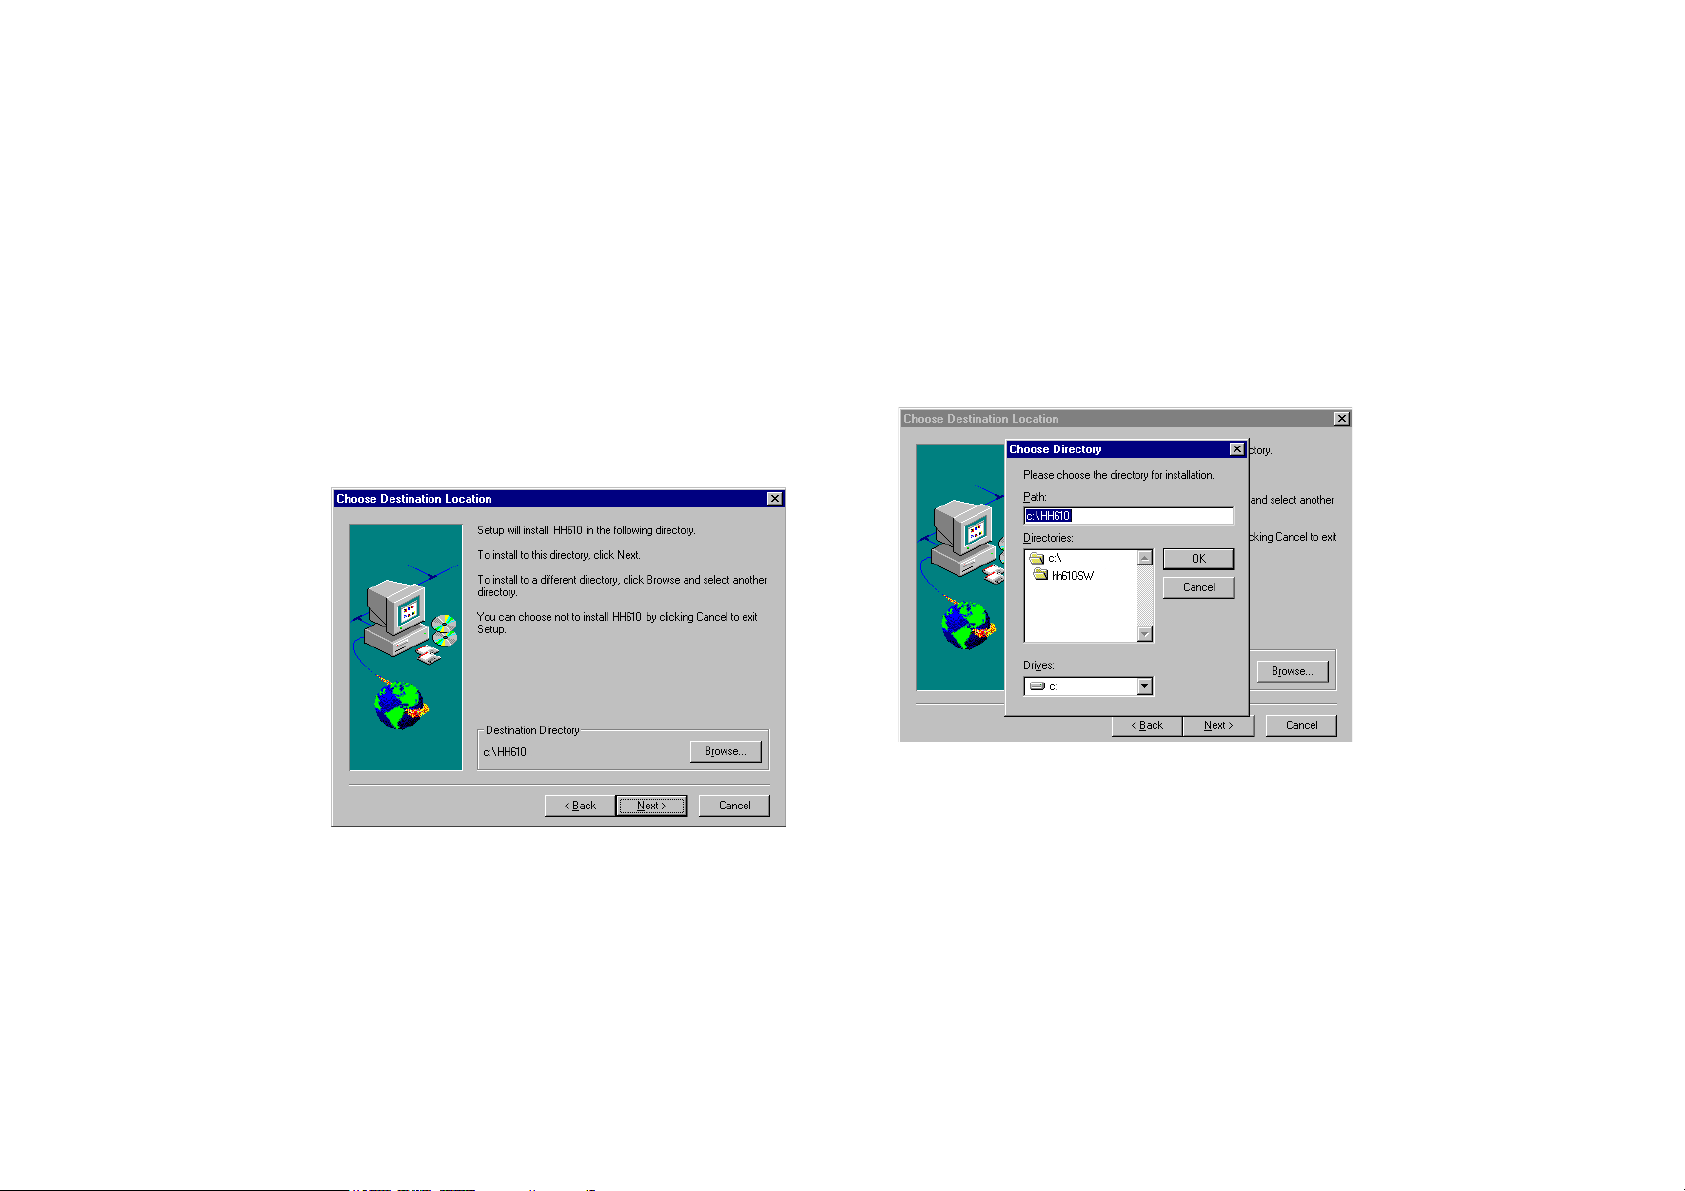
The program will then display a dialog box to confirm
the installation directory for the HH610-SW software.
The default directory is: C:\HH610.
To change the directory, press the Browse button. The
following window appears:
From the Directories box, select the new directory. If
you want to change the drive, use Drives menu to
select the drive where the program files will be installed.
1110
Page 7
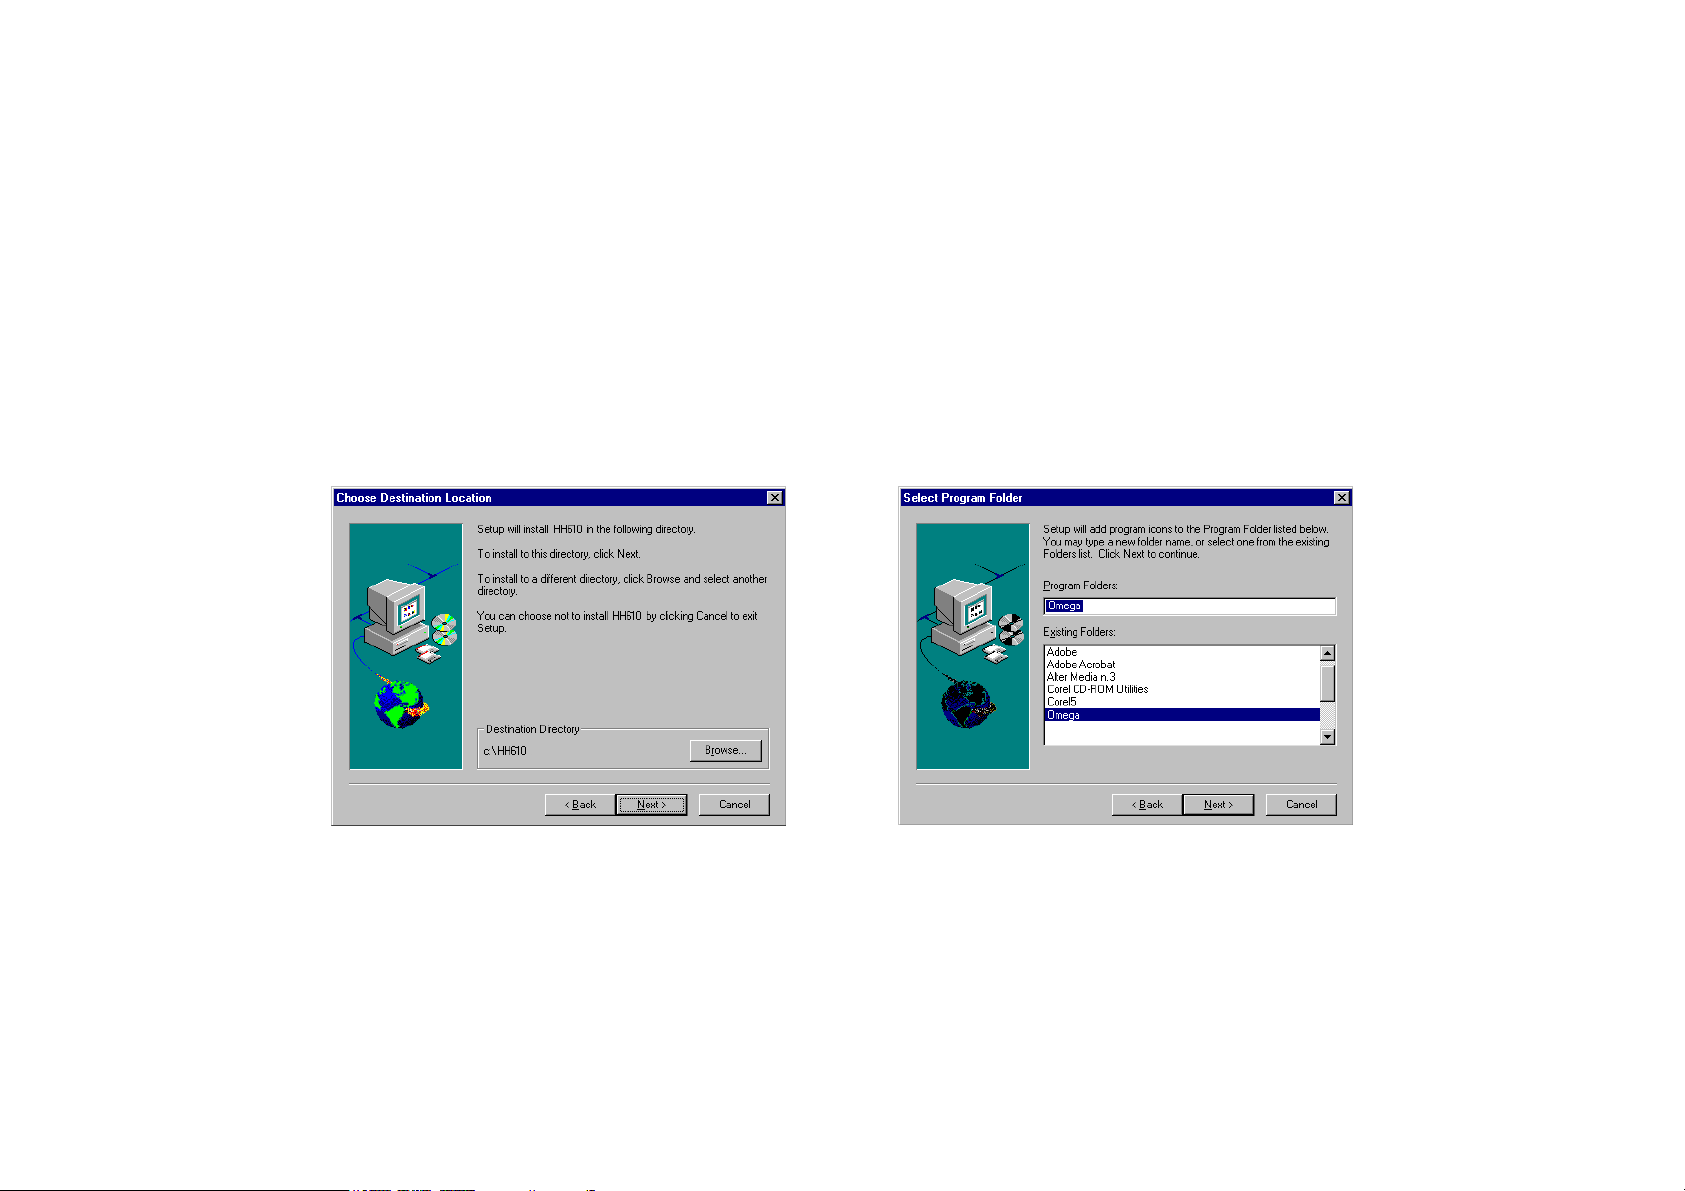
Note: You can create a new directory by simply writing
the correct path in the appropriate box.
To confirm your choice press the Enter key or click on
the OK button and the program will return to the
previous window (Choose Destination Location).
Click Next to proceed with the installation.
The program will then display a window to confirm or
change the program folder to which HH610-SW will
be added. The default folder is Hanna Instruments. You
can either choose an existing one by simply clicking on
1312
Page 8
its name, or write a new name in the Program
Folders box.
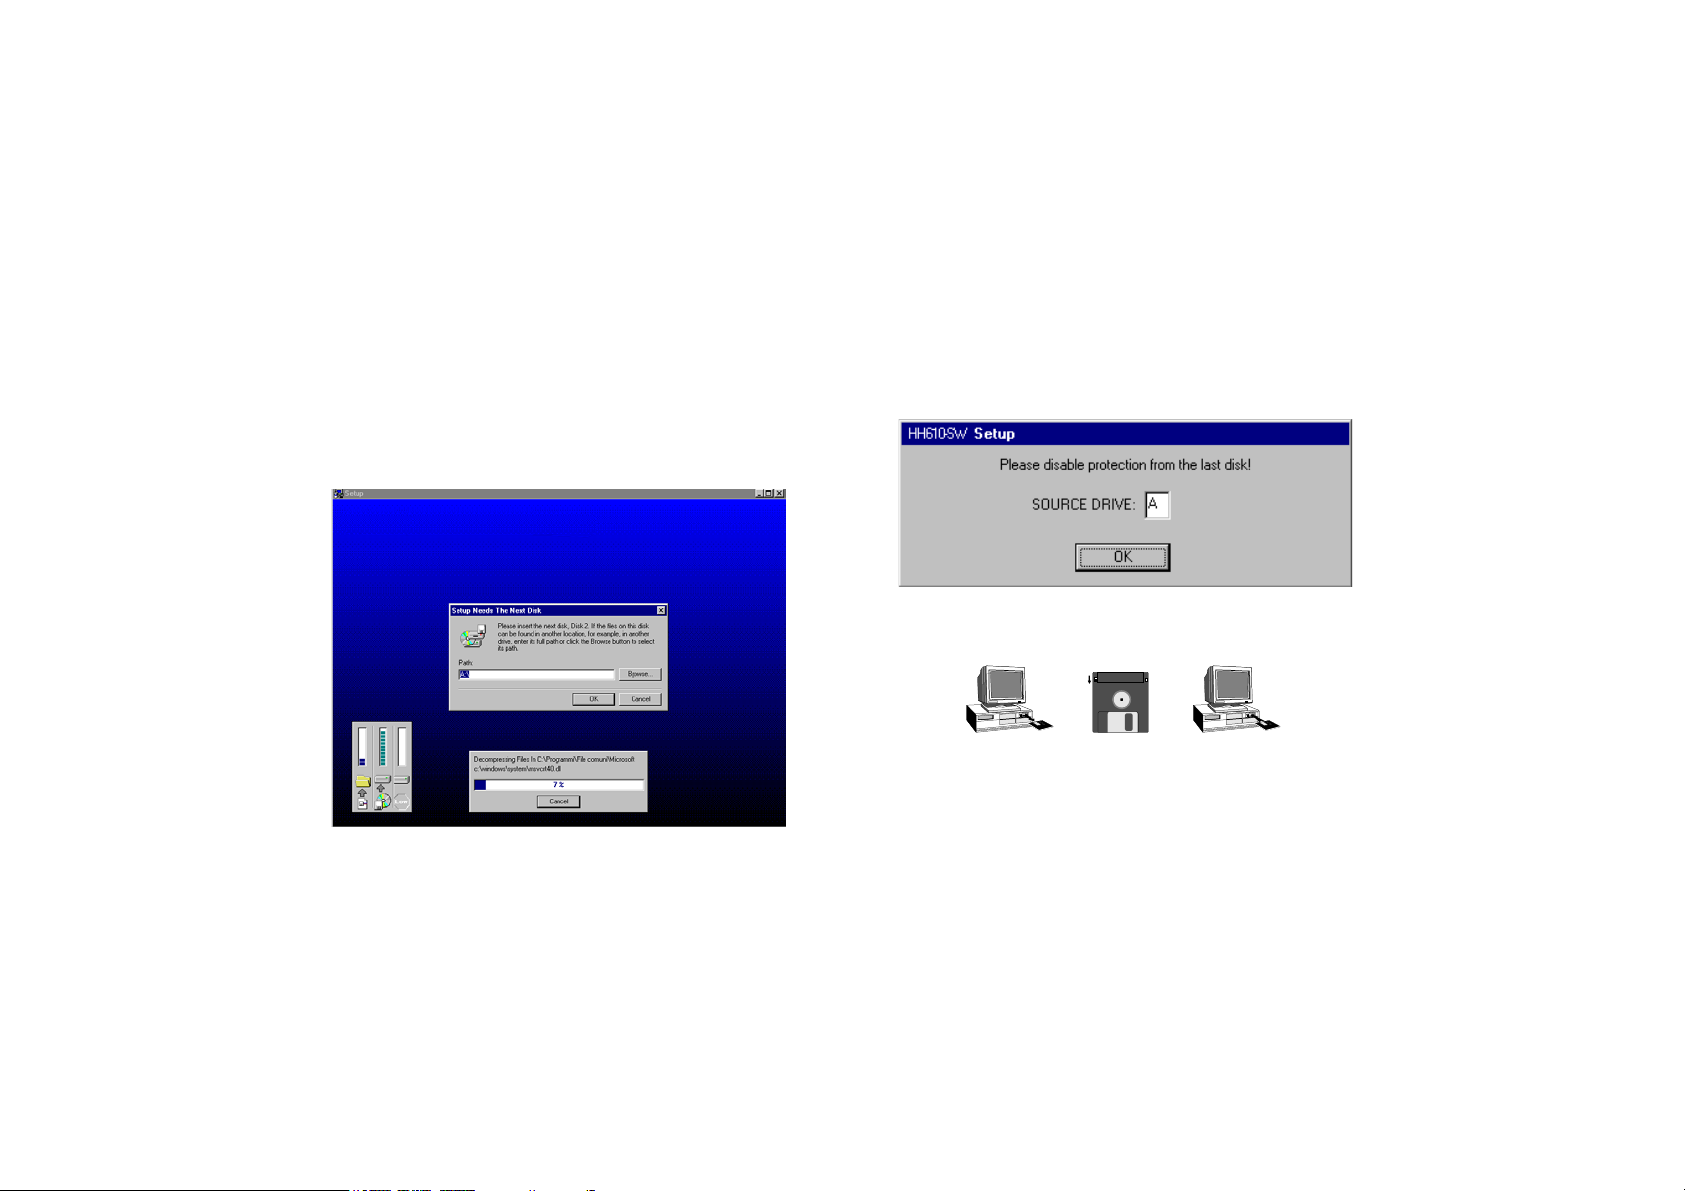
Click on Next to continue the installation. The program
will now install the program files. Insert the successive
diskettes and press OK or the Enter key when requested.
Prior to finishing the installation, the program will ask
you to remove the protection from the last disk.
Remove the diskette, remove the writing protection and
reinsert the diskette.
Press the OK button and the Registration window will
appear.
1514
Page 9
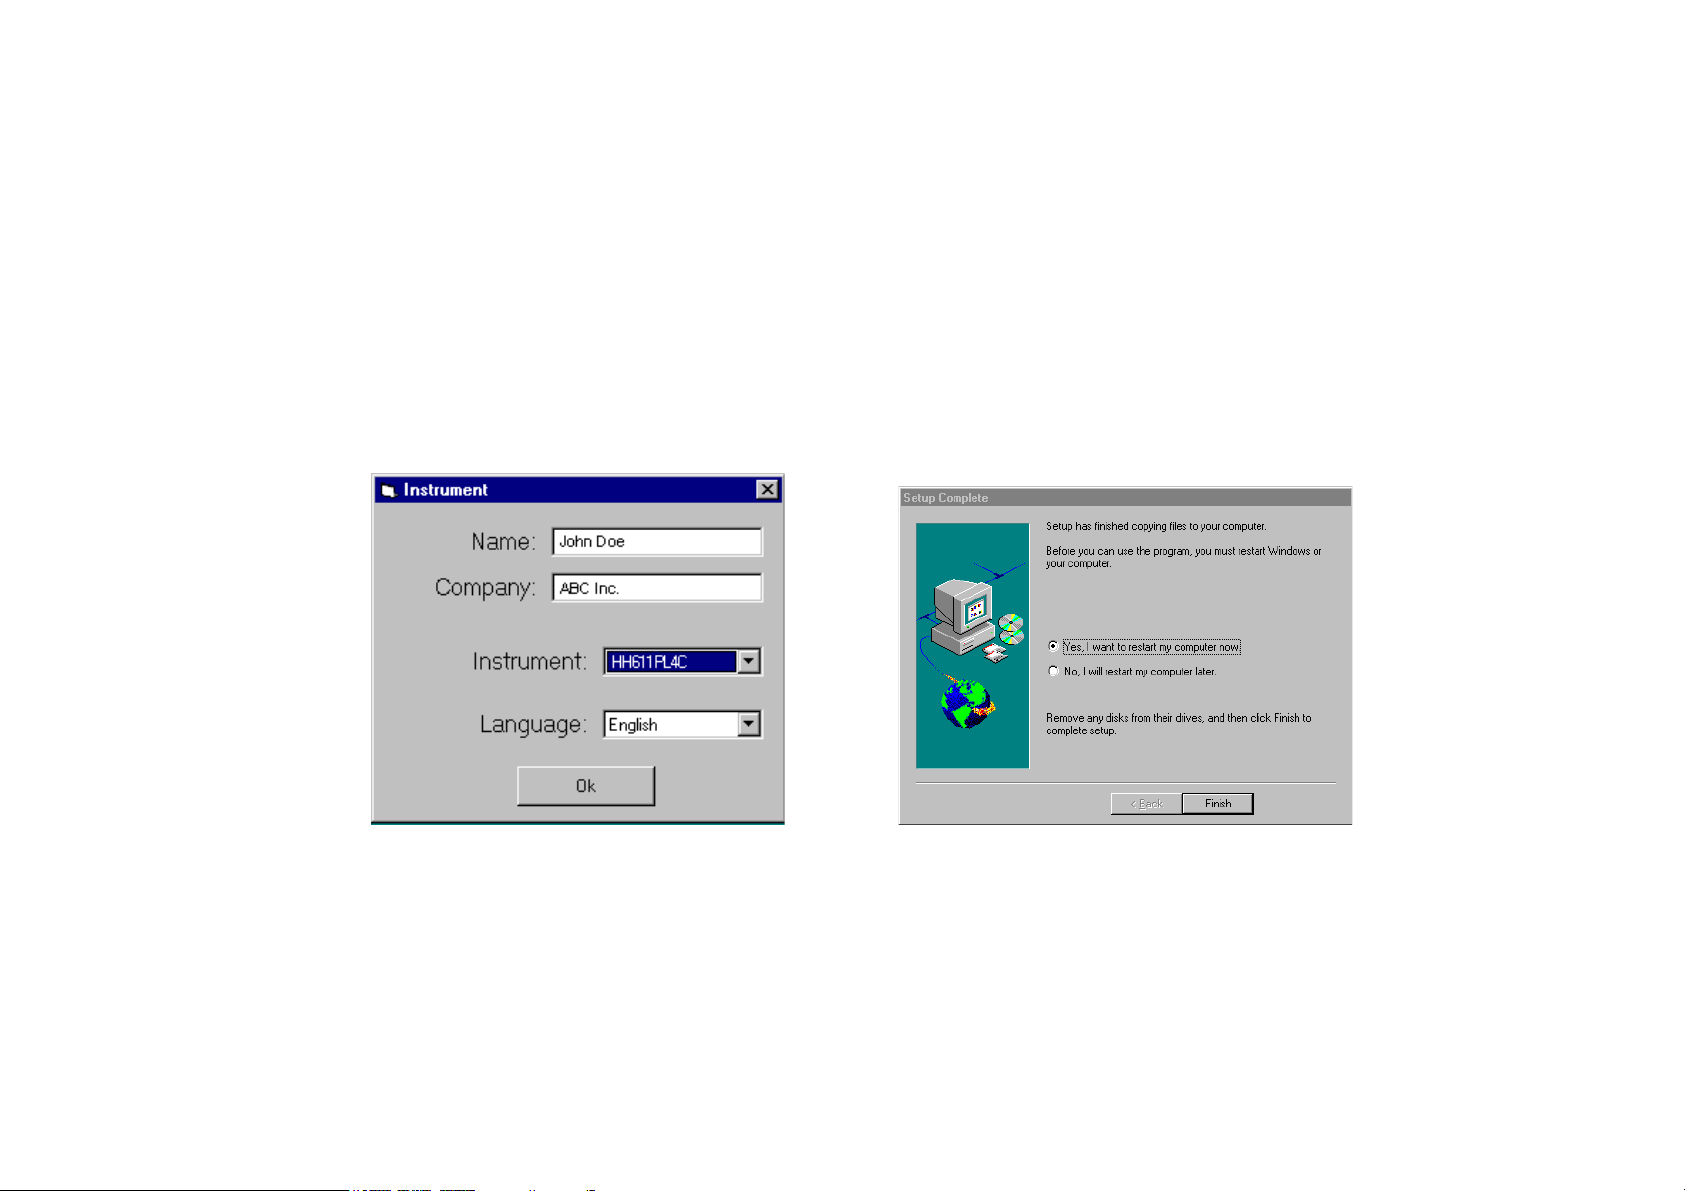
Enter the requested information and select the part
number of your instrument and the language from the
respective lists. The setup program will then notify your
selections asking for confirmation in a new window.
Note: It is very important that you make sure the
correct part number is selected since after the
installation this entry cannot be changed.
After a few seconds the program will notify the end of
the installation and may ask to restart the computer.
1716
Page 10

In any case, remove the diskette from the drive and
click Finish to complete the Setup procedure.
Note: If the programs asks to restart your system, you
can choose to do this immediately or later, but
in order to complete the installation of the
software, you must restart the system in either
case.
When the installation is
complete, a HH610-SW
Program Folder (Program
Group for Windows®3.11)
and icon are created.
Note: Store the set of diskettes in a safe place away
from heat, dust and magnetic fields.
REMOVING THE PROGRAM
In case you need to remove the HH610-SW program
from your computer, it is always recommended not to
simply delete the files, but to remove the application
correctly. To do this for Windows®95, run install/disinstall
applications from the control panel; for Windows®3.11
simply run the disinstallation program with a double
click on the icon provided in the HH610-SW Program
Group.
1918
Page 11

INITIAL PREPARATION
For Bench (non-logging) meters only:
To connect your Omega Instruments bench-top meter
to the PC use the 9-25 pin RS232 connection cable,
available through your Omega Dealer.
Make sure that your meter is switched off and plug the
connectors, one into the meter’s RS 232 connector, the
other into the serial port of your PC.
Note: Cables different from the 9-25 pin RS232 may
use a different configuration. In such cases no
communication between the meter and the PC is
possible.
For Portable (logging) meters only:
All Hanna portable meters with the possibility of storing
data contain an infrared emitting circuitry.
Simply place your portable meter on a HH610Logg
Infrared Transmitter (ensuring that the two infrared LEDs
are placed on top of each other). The memory can be
downloaded to your PC through the HH610Logg’s
RS232 port.
2120
Page 12

Using the HH610Logg Infrared Transmitter, all recorded data can be fed to your Personal Computer for
easy reproduction, storage or elaboration without the
interference of cables or cords between the meter and
the transmitter.
When all connections are ready turn the Omega meter
on. Refer to your instrument instruction manual for
transferring the data to your PC.
USE
There are two different windows for non-logging (bench)
and logging (portable) instruments. When you start the
program you are requested to choose the kind of meter
you have by pressing the corresponding button in this
window.
See pages 4
and 5 for a
full list of
meters and
whether they
are regarded
as bench or
portable by
the software.
2322
Page 13

In both versions, in the main window the title bar
displays the name of the program and its version and the
status bar displays messages during execution.
FOR BENCH METERS
With the bench meters communication program, you
can retrieve the measurements taken by your bench
instrument (or by the GLP portable meters and process
meters regarded by the program as bench meters – see
list on page 5).
The connection between the instrument is by an RS 232
cable attached to one of your PC’s serial ports.
The setting window contains information about data
communication rate, port number and so on.
Readings can be logged and then saved in Excel®4.0
format (XLS) or exported as a CSV text file (see below).
When the HH610-SW program is connected to a bench
meter, the data available on the LCD of the instrument is
displayed in a large frame on the upper part of the screen.
Before connection, the main window will show:
2524
Page 14

In this window several functions are available from the
buttons:
To open the help window
To show the setting window
To start/stop the communication with
the instrument, depending on the communication status
To start a logging session (with a
fixed interval between two samples)
To stop a logging session
To log the current sample on the PC
screen
To exit the application
To open the general information window
To obtain a graphic plot of the data
To print the data or graph
To save the data to a .XLS format file
To review previously saved data
To export in .CSV format
To clear all data from the worksheet
Note: Commands are also available by holding the ALT
key and then pressing the underlined character.
2726
Page 15

SETTINGS
When you click on the Setting button the screen will
show the Bench-Top Settings window:
In this window the following settings of the program may
be entered:
Auto Log
Sample Delay: the logging interval between two con-
secutive samples
Max. Sample: the maximum number of measurements
to be taken
LCD
Delay: the interval of time the program will hold a
reading of the meter on the PC screen before updating it
Communication
Port: the COMM port to which your meter is connected
Baud Rate: the transmission speed
Note: the instrument and the mouse cannot use the
same COMM port. If the ‘Port not available’
message is shown, the system is already using
the port that you have selected. In this case, you
should select another port number.
2928
Page 16

CONNECTION
To connect the meter to the computer click on Connect.
The main window will then look like the following:
This will enable the Auto Log and the Log Sample
functions and will start the LCD updating process.
Note: Before connection the correct communication port
and baud rate have to be selected in the Set-
tings window.
LCD Display Information
An LCD simulator displays the readings on the upper
part of the main window.
Note: This feature is available only after the connection
has been completed (by pressing Connect).
During connection, the program will update the readings
of the LCD on the PC screen with the interval set in the
delay dialog box of the Settings window (see above).
There can be up to 4 values displayed, depending on
the model of the meter connected and channels in use.
3130
Page 17

AUTO LOG
When the instrument is connected, you can log subsequent readings automatically. The sampling interval and
the maximum number of samples must be set in the
Settings window. To start logging, click on Auto Log.
During automatic logging, the samples are shown on
the worksheet in the main window. The user can add a
remark for each sample in the last column.
To stop logging before the maximum number of samples
is reached, click on the Stop button (which is now
displayed in place of Auto Log).
When logging is stopped, you can save, export, print or
clear the table by pressing the proper button on the main
window.
LOGGING A SINGLE SAMPLE
If you need to log a single sample (even during auto
logging) click on the Log Sample button and the
current LCD reading will be added to the table.
3332
Page 18

PRINTING, PLOTTING, SAVING,
REVIEWING AND EXPORTING YOUR DATA
The Print, Open, Save and Export buttons bring up
the dialog boxes where standard print and save options
are available.
If you have a printer installed in your system, when you
click Print, the printer’s dialog box will appear and
allow you to print data on the worksheet.
By pressing Save, you can save data on the worksheet
as an Excel®4.0 worksheet file.
By pressing Export, you can export data on the worksheet
as a .CSV text file (Comma Separated Values), which is
well recognized by most of worksheets programs.
By pressing Open, you can select a previously saved file
(in Excel®4.0 .XLS format) of data to review.
The Plot button is to obtain the data selected on the
worksheet in graphic format. If no data is selected, all
data will be plotted.
Note: To select desired lines, just press the left mouse
key and drag over the lines.
Plotting of selected lines is disabled when logging is in progress.
Once Plot is pressed, the Plot window pops up. This
window includes:
• graphs of selected magnitudes;
3534
Page 19

• checkboxes for showing/hiding magnitudes;
• selection list for plot period (i.e. the time span for the
displayed graph, for example 30 minutes);
• checkboxes for showing/hiding dots and lines on the
graphs;
• Range button, to pop up the Plot settings window to
select ordinate axis minimum and maximum values for
each magnitude and decimal points;
• Print button, to pop up a Print preview window and
then print it by means of the Print button or escape by
pressing Close; user can also obtain a magnified
view of a part of the graph by clicking on it. Another
click will revert back to the full view;
3736
Page 20

• Save button, to save graphs to a Windows MetaFile
(with .WMF extension) that can be imported by a
number of applications;
• Close button, to close Plot window.
GETTING HELP
When in the main window, click on Help and the
HH610-SW Guide window will pop up.
EXIT THE PROGRAM
Before quitting the program, stop the logging sequence,
if it has been active. Then press the Unconnect button
to disconnect the meter and then press Exit.
The program will prompt the following message:
If you press Yes, the save dialog box will be opened
before exiting.
If you press No, the program will exit and discard the
memorized data.
If you press Cancel, the program will return to the main
window.
3938
Page 21

HH610-SW FOR PORTABLE METERS
With the portable communication program you can
retrieve the logged data of your portable instrument (see
list on page 4).
The connection with the PC is via one of the computer’s
serial ports. Information about data communication rate
and port number can be found in the Settings window.
Make sure that your portable meter has some data
memorized prior to connecting it to the PC (refer to the
meter’s instruction manual).
Logged data can be saved in Excel® 4.0 format or
exported as a CSV text file.
When the HH610-SW program is used with a portable
meter, the main window will look like the one shown on
next page.
In this window several functions are available from the
corresponding buttons:
To show the setting window
4140
Page 22

To start the communication with the
instrument
To stop the communication with the
instrument
To load a sample lot from the instrument
To review a previously saved file of
data
To exit the application
To open the help window
To open the general information window
Note: Commands are also available by holding the
ALT key and then pressing the underlined character.
SETTINGS
The Portable Settings window make it possible to set
communication parameters. Click on the Settings but-
ton and the following window will appear:
In this window the two following parameters can be set:
Port: the COMM to which the meter is connected;
4342
Page 23

Baud Rate: the transmission speed.
Note: The meter and the mouse cannot use the same
COMM port. If the ‘Port not available’ message
is shown, the system is already using the port that
was selected.
CONNECTION
To connect the meter to the computer, press Connect in
the main window of the program.
During connection, the instrument status is loaded and
displayed in the Instrument Status window. This window reports, for each lot of data previously logged by the
instrument, the lot number, the channel number and the
number of samples logged.
The Instrument Status is only available while the instrument is connected and it is closed when the
Unconnect button is pressed.
Note: If your portable meter has no data stored in its
memory, you cannot connect it to the PC. The
program will then display a message to notify that
this condition has occurred; refer to the meter’s
instruction manual for the logging procedure.
Before connection starts, it is necessary to select
the correct COMM port and the Baud rate in the
Settings window (see above).
4544
Page 24

RETRIEVING A SAMPLE LOT
To load a sample lot from the instrument, the program
must be connected to the instrument, so that the Instru-
ment Status is displayed. Select the desired lot in the
Instrument Status and then press Get Lot in the main
window. The Lot window will be opened reporting the
samples measured.
In this window, you can add remarks to your data by
typing them in the last column. You also can save, print
and export the data.
To close the window, press the Discard
button at the bottom of the Instrument
Status window.
The program will ask if you want to save or to discharge
without saving the current lot by displaying the following
message:
4746
Page 25

PRINTING, PLOTTING, SAVING,
REVIEWING AND EXPORTING YOUR DATA
The Print, Save and Export buttons in the Lot window
and the Open button in the Main window bring up the
dialog boxes where standard options are available.
If you have a printer installed in your system, when you
click Print, the printer's dialog box will appear and allow
you to print data on the worksheet.
By pressing Save, you can save data on the worksheet
as an Excel®4.0 worksheet file.
By pressing Export, you can export data on the worksheet
as a .CSV text file (Comma Separated Values), which is
well recognized by most of worksheets programs.
By pressing Open, you can select a previously saved file
(in Excel®4.0 .XLS format) of data to review.
The Plot button in the Lot window is to obtain the data
selected on the worksheet in graphic format. If no data
is selected, all data will be plotted.
Note: To select desired lines, just press the left mouse
key and drag over the lines.
Once Plot is pressed, the Plot window pops up. This
window includes:
• graphs of selected magnitudes;
• checkboxes for showing/hiding magnitudes;
4948
Page 26

• selection list for plot period (i.e. the time span for the
displayed graph, for example 30 minutes);
• checkboxes for showing/hiding dots and lines on the
graphs;
• Range button, to pop up the Plot settings window to
select ordinate axis minimum and maximum values for
each magnitude and decimal points;
view of a part of the graph by clicking on it. Another
click will revert back to the full view;
• Print button, to pop up a print preview window and
then print it by means of the Print button or escape by
pressing Close; user can also obtain a magnified
• Save button, to save graphs as Windows MetaFile
(.WMF) that can be imported by many applications;
• Close button, to close Plot window.
5150
Page 27

GETTING HELP
When in the main window, click on Help and the
HH610-SW Guide window will pop up.
EXIT THE PROGRAM
Before quitting the program, press the Unconnect but-
ton (if still connected) and then press Exit. This will close
all open windows.
WARRANTY
Except as specifically stated in this agreement, the software and software
documentation is provided and licensed “as is” without warranty of any
kind, either express or implied, including but not limited to the implied
warranties of merchantability and fitness for a particular purpose.
Omega warrants to a period of 90 days from the date of delivery to you
that the Software will substantially conform to the Software documentation
and specifications published by Omega, and the media on which the
Software is furnished and the documentation will be warrant free from
defects in materials and workmanship under normal use. Omega does
not warrant that the functions contained in the Software will meet your
requirements or that the operation of the Software will be either error free
or appear precisely as described in the Software documentation. You are
responsible for selecting the Software to achieve your intended results
and for the installation, use and results obtained from the Software. The
Software must be used with the computer and operating system for which
it is designed, and in accordance with the Software documentation and
specification requirements.
Omega will replace defective media and documentation and correct
substantial Software non-conformities at no charge, provided you return
the item with dated proof of payment (in case of defect) or otherwise
notify Omega in writing (in case of substantial Software non-conformity)
5352
Page 28

within 90 days from the date of delivery to you. If Omega is unable to
replace defective media or documentation or correct substantial Software
non-conformities, Omega will refund the license fee. These are your
sole remedies for any breach of warranty. You or your dealer must return
the enclosed registration card to Omega in order for these remedies to
be available to you and for you to be eligible for customer support and
service during the warranty period.
In no event will Omega be liable to you for any damages, including
without limitation lost profits or revues, loss of data, business interruption
loss, recovery or substitution costs, or claims by third parties, or other
indirect incidental or consequential damages, arising out of the use of or
inability to use the software, even if Omega or Omega Dealer has been
advised of the possibility of such damages. In no case shall Omega
liability exceed the amount of the license fee paid by you for the
software.
This limited warranty gives you specific legal rights, and some jurisdictions
do not allow the exclusion or limitation of implied warranties or limitation
of liability for incidental or consequential damages. As a result, the above
limitations and/or exclusions may not apply to you.
All rights are reserved. Reproduction in whole or in part is prohibited without
the written consent of the copyright owner.
Omega reserves the right to modify the design, construction and
appearance of its products without advance notice.
54
 Loading...