

Page 1
MADE IN
User’s Guide
Shop online at
omega.com
e-mail: info@omega.com
®
For latest product manuals:
omegamanual.info
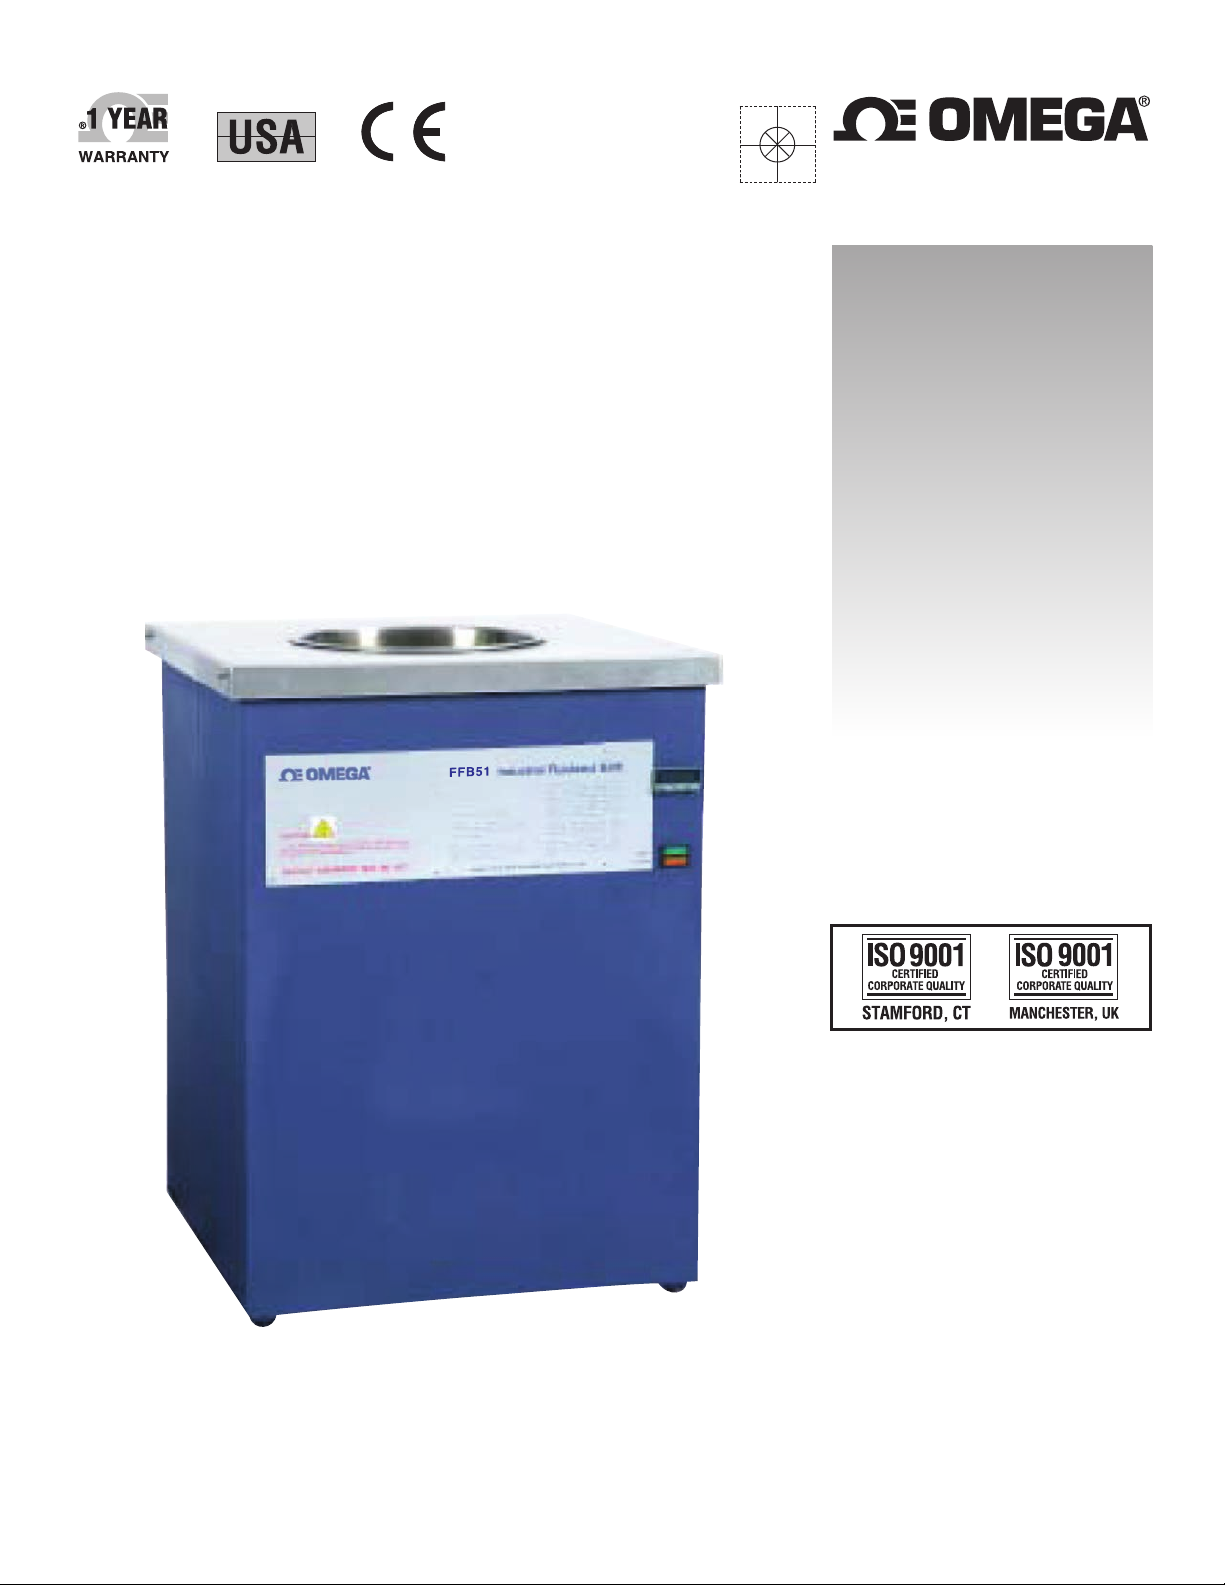
FFB51 and FFB52
Industrial Fluidized Bath
Page 2

OMEGAnet®Online Service Internet e-mail
omega.com info@omega.com
Servicing North America:
U.S.A.: Omega Engineering, Inc., One Omega Drive, P.O. Box 4047
ISO 9001 Certified Stamford, CT 06907-0047 USA
Toll Free: 1-800-826-6342 TEL: (203) 359-1660
FAX: (203) 359-7700 e-mail: info@omega.com
Canada: 976 Bergar
Laval (Quebec), H7L 5A1 Canada
Toll-Free: 1-800-826-6342 TEL: (514) 856-6928
FAX: (514) 856-6886 e-mail: info@omega.ca
For immediate technical or application assistance:
U.S.A. and Canada: Sales Service: 1-800-826-6342/1-800-TC-OMEGA
Customer Service: 1-800-622-2378/1-800-622-BEST
Engineering Service: 1-800-872-9436/1-800-USA-WHEN
Mexico/ En Español: 001 (203) 359-7803 FAX: 001 (203) 359-7807
Latin America: info@omega.com.mx e-mail: espanol@omega.com
®
®
®
Servicing Europe:
Benelux: Managed by the United Kingdom Office
Toll-Free: 0800 099 3344 TEL: +31 20 347 21 21
FAX: +31 20 643 46 43 e-mail: sales@omegaeng.nl
Czech Republic: Frystatska 184
733 01 Karviná, Czech Republic
Toll-Free: 0800-1-66342 TEL: +420-59-6311899
FAX: +420-59-6311114 e-mail: info@omegashop.cz
France: Managed by the United Kingdom Office
Toll-Free: 0800 466 342 TEL: +33 (0) 161 37 29 00
FAX: +33 (0) 130 57 54 27 e-mail: sales@omega.fr
Germany/ Austria: Daimlerstrasse 26
D-75392 Deckenpfronn, Germany
Toll-Free: 0800 6397678 TEL: +49 (0) 7056 9398-0
FAX: +49 (0) 7056 9398-29 e-mail: info@omega.de
United Kingdom: OMEGA Engineering Ltd.
ISO 9001 Certified One Omega Drive, River Bend Technology Centre, Northbank
Irlam, Manchester M44 5BD United Kingdom
Toll-Free: 0800-488-488 TEL: +44 (0) 161 777-6611
FAX: +44 (0) 161 777-6622 e-mail: sales@omega.co.uk
It is the policy of OMEGA Engineering, Inc. to comply with all worldwide safety and EMC/EMI
regulations that apply. OMEGA is constantly pursuing certification of its products to the European New
Approach Directives. OMEGA will add the CE mark to every appropriate device upon certification.
The information contained in this document is believed to be correct, but OMEGA accepts no liability for any
errors it contains, and reserves the right to alter specifications without notice.
WARNING: These products are not designed for use in, and should not be used for, human applications.
Page 3

OPERATING MANUAL
FFB51 & FFB52
Page 4

PACKAGING
Inspect all shipping containers for signs of damage which may have been caused by rough handling in
transit. If damage exists, immediately contact the shipping agent.
Remove the packing list and verify that all equipment has been received.
Retain the cartons in which the bath was received until the unit is tested and found to be in good
condition.
ELECTRICAL
Check that the voltage and current rating on the serial number plate near the power cord are correct.
INTRODUCTION
Our equipment, as described in the manual, has been designed for use by properly trained personnel.
It is important that all relevant information, relating to our equipment, be distributed to employees who
may handle or come into contact with it. In particular, we would stress the importance of standard,
commonsense rules and adherence to normal, safety standards and procedures. (For example, any
covers or enclosures should only be removed by trained personnel.) Please ensure that all those involved
in the operation of this equipment are knowledgeable of the design criteria and that it is used in
accordance with the instructions and recommendations contained in this manual. If there is any doubt
whatsoever relating to the proper use of this equipment, we’ll be pleased to assist you with
technical data, etc.
The fluidized bed is housed in a circular container manufactured from 0.075" (14 gage) stainless steel.
This container is surrounded by electrical heating elements and housed in a square insulated case. The
temperature of the fluidized bed is set and maintained by digital PID temperature controller, which is
governed by the electrical signal from a type "K" (chrome/alumel) thermocouple placed along the
fluidized bath container inner wall. Current to the heating elements is switched on and off by means of
solid state relay actuated by the temperature controller. The controller has a resolution of 1º and can be
switched between ºC and ºF.
Page 5

The FFB51 and FFB52 are supplied with an internal contactor that disables power to the heaters in the
event that one of the following conditions occur; thermocouple failure, loss of power to or controller
fault and/or exceeding the factory set high temperature limit of 620°C(1148°F). The controller will
flash a message when one of these conditions has occurred and can be reset for operation once the
situation is corrected. See page 6 for more details on the PID temperature controller.
The air supply to the bed must be clean and dry. An air filter and pressure regulator can be supplied as
optional equipment (Omega Part No. 6035915).
The Omega Industrial Fluidized Bath has been specially designed for removing plastic residue from
extruder and molding machine tools, paint build up and carry out various heat treatment processes.
When used for burning plastic residues, the “FFB’s” should be installed with an adequate fume
extraction system. A fan and fume extraction collar can be provided, along with other fume cleaning
equipment.
FUME CLEANING
When the Industrial Fludized Bath is installed with a fan and exhaust ducting system, fumes will be
removed from the top of the fluidized bed.
Page 6

TECHNICAL SPECIFICATIONS – FFB51
Overall external dimensions: length: 518 mm (20.4")
width: 518 mm (20.4")
height: 675 mm (26.6")
Bath internal dimensions: 255 mm (10.1") diameter
405 mm (16") deep
Working volume: 255 mm (10.1") diameter (8.4” diameter when using parts basket)
305 mm (12") deep
Temperature range: 50°C to 600°C (122°F to 1112°F)
Temperature stability: ±1.0º C (8” immersion depth, with lid on after 2 hours controlling at setpoint )
Display accuracy: ±10.0º C (8” immersion depth, with lid on after 2 hours controlling at setpoint )
Heat up time*: Ambient to 300°C -- .8 hrs
Ambient to 450°C – 1.75 hrs
Ambient to 600°C - 2.5 hrs
Air supply: Clean, dry and oil free air, at a constant pressure
of 30 psi, using a minimum ID air line
of ½ inch.
(Air flow adjustment is necessary when
changing temperatures.)
Fluidizing bed medium: Aluminum oxide 120 mesh 85 lbs
Electrical requirements: 240V, 1 phase, 60Hz, 4kW
Exhaust fan requirements: 7125 1/min. (250 ft3 /min.) at 5 in W.G.
Gross weight: 215 lb.
Net weight: IFB-51 - 130 lbs.
Alum Oxide - 85 lbs.
-----------------------
* Indicated heat up time applies for a well fluidized bed with a lid on and extraction fan off.
Page 7

TECHNICAL SPECIFICATION – FFB52
Overall external dimensions: length: 518 mm (20.4")
width: 602 mm (23.7")
height: 1049 mm (41.3")
Bath internal dimensions: 255 mm (10.1") diameter
762 mm (30") deep
Working volume: 255 mm (10.1") diameter (8.4” diameter when using parts basket)
660 mm (26") deep
Temperature range: 50°C to 600°C (122°F to 1112°F)
Temperature stability: ±1.0º C (18” immersion depth, with lid on after 2 hours controlling at setpoint )
Display accuracy: ±10.0º C (18” immersion depth, with lid on after 2 hours controlling at setpoint )
Heat up time*: Ambient to 300°C - 2 hrs
Ambient to 450°C - 3.5 hrs
Ambient to 600°C - 5 hrs
Air supply: Clean, dry and oil free air, at a constant pressure
of 30 psi, using a minimum ID air line of ½ inch.
(Air flow adjustment is necessary when
changing temperatures.)
Fluidizing bed medium: Aluminum oxide 120 mesh 160 lbs.
Electrical requirements: 240V, 1 phase, 60Hz, 6kW
Exhaust fan requirements: 7125 1/min. (250 ft3 /min.) at 5 in W.G.
Gross weight: 345 lb.
Net weight: IFB-52 - 185 lbs.
Alum Oxide - 160 lbs.
----------------------* Indicated heat up time applies for a well fluidized bed with a lid on and extraction fan off.
Page 8

INSTALLATION & SETUP
1) The bath should be placed in a location that is level and dry.
2) Connect a 30 PSI air supply to the input that is capable of delivering 5 CFM maximum flow. The
supply should be dry and free of particulate. A 6’ length of tubing should be used to connect the
air supply to the bath. The tubing and any fittings should not be less than 1/2” ID at any one
point or bath performance may be reduced.
3) Wire up the bath to your 220 to 240 volt single phase power supply. A 208 volt supply is too
low and should be boosted to 230 volts with a boost transformer. The catalog number for the
boost transformer that has a rating of 7200VA for use with the FFB51 and FFB52 is 7032838.
4) Fill the bath with Aluminum oxide sand to within 3 or 4 inches of the top. Fill with sand before
placing the extraction collar into the bath.
5) Turn on power and air to the unit. Set the air flow per the front label to 4 CFM when at ambient
temperature. When Fluidized and bubbling make sure the Aluminum oxide sand level is still
within 3 or 4 inches of the top.
6) Place the extraction collar (if purchased) into the bath and place the lid on. Set the controller to
your operating temperature.
7) Important; as the bath heats up you will need to adjust the air down based on the front label
chart settings or the heat up time will greatly increase. The reverse needs to happen when cooling
down.
8) Once the controller has reached your set point allow 1 hour for the bath to fully stabilize before
attempting to use it. (IF YOU ARE NOT CLEANING TOOLING JUMP TO LINE 13)
9) With your first tool cleaning start with a smaller number of tools and at a lower temperature.
Adjust the bath set temperature and the number of tools cleaned based on your expected results
and the amount of time required. It is always a good idea to clean at the lowest possible
temperature.
10) Extraction Air setup; if you use an exhaust hood for ventilation this step doesn’t apply to you.
a. Make sure the exhaust system is plumbed according to our recommendation in the
manual.
b. With the exhaust fan on, close the damper so there is no extraction to the bath
c. Put parts in basket and lower into the bath
d. Place lid on the bath
e. When smoke and fumes start to come up and around the lid slowly open the damper just
to the point where they are pulled back into the bath and no longer entering the room,
then stop adjusting.
f. This setting will give good results with minimal heat and sand loss.
11) After repeated tool cleanings heavier clumps and larger particulate should be sieved from the
sand.
12) In time the sand may become dense and fluidize poorly at which point it should be replaced.
13) The bath air supply and power can be turned off after the temperature has cooled to 200ºC/400ºF
Alternatively if used daily reduce the overnight temperature to 300ºC for quicker startup
Page 9

Indicated bath temperature
Flow setting – CFM
Ambient to 50°C (122°F)
4.0
50°C (122°F) to 100°C (212°F)
3.5
100°C (212°F) to 200°C (392°F)
3.0
200°C (392°F) to 300°C (572°F)
2.2
300°C (572°F) to 400°C (752°F)
1.9
400°C (752°F) to 500°C (932°F)
1.7
500°C (932°F) to 600°C (1112°F)
1.4
OP1 – Heating
OP2 – Cooling
Alarm Indicator
Measured
Temperature
Set-point
temperature
Page
Scroll
Down
Up
AIR ADJUSTMENT
Set the inlet air pressure to a value of 30 psi. Use the factory default air flow settings below as viewed
on the air flow meter to obtain optimum bath results. Note that the air flow must be adjusted while
cooling the bath also as indicated.
BATH TEMPERATURE
The bath should allowed to stabilize for at least 1 hour after the controller has reached the setpoint
temperature before placing parts to be cleaned into the bath. An initial temperature drop or quenching of
the bath can occur after inserting a workpiece to be cleaned. This temperature drop depends on the size
of the immersed object, but is generally in the order of 77°F (25°C). Carbon is burned to carbon dioxide
quickly above 752°F (400°C). It may be found desirable to pre-heat the bath to as high as 1020°F
(550°C) in order to obtain quick results, but caution should be exercised not to damage tools by
overheating.
PID TEMPERATURE CONTROLLER
The control parameters in the PID temperature controller have been optimized by the factory during
manufacture to give the best results for most applications. Per the image below use the “scroll” button to
navigate to the menu option UNITS for changing display from ºC to ºF and vice versa.
Two setpoints can be entered for future recall, press the “scroll” button to access SP1 and SP2. Set a
different setpoint in each of these. Then “Scroll” to SP.SEL to select either setpoint SP1 or SP2. The
up/down buttons are used to set the bath setpoint temperature. If an alarm indicates an overtemperature
condition or thermocouple failure the two buttons labeled as ACK need to be depressed together after
the alarm condition is corrected. If the alarm cannot be cleared please contact the factory for support.
Page 10

OPERATION
The industrial fluidized baths detailed in this booklet were designed specifically for "burning off"
residue from plastic machinery tools. However the FFB baths are also a good choice for many heat
treatment, reactive chemistry and exothermic reaction type of applications.
Our systems are effective on the full range of plastics, including polyethylene, polypropylene, PVC,
nylon, polyester, polycarbonates, acrylic, polystyrene and acetyl. In addition, they are effective with
rubber, EPR, epoxy resins and acrylic paints. They provide a safe, dry and fast means of removing all
plastic residue with a minimum amount of effort and physical contact with the tools. The "burning off"
operation is controlled at a uniform temperature so that distortion is avoided. Furthermore, as the
fluidized bath is non-abrasive, physical damage to parts is minimal. Each of these factors extends tool
life.
The cleaning process itself is very simple using the heat transferred from the fluidized bath to the tools
to degrade the plastic residue. Objects to be cleaned, supported in a wire basket for ease of handling, are
placed in the fluidized bath, operating at a temperature between 842°F (450°C) and 1020°F (550°C)
depending on the polymer, for approximately 20 to 30 minutes. Actual burn off times and temperatures
vary depending upon the weight, complexity and material composition of the item to be cleaned, in
addition to the quantity of residue to be removed. Our technical staff will always advise on specific
applications.
THE CLEANING PROCESS
The first two thirds, of the total time required for tool cleaning, sees the plastic reduced to a tar mix
state. In this phase, all the initially combustible products of the plastic leave the bath through an
appropriate fume extraction system. In the last third of the immersion time, the tar mix state is reduced
to carbon which either burns away or remains loosely bound to the tool. In the latter case, it can be
blown away or brushed off without causing damage, after the part is removed from the fluidized bath.
The clean item can then be put to one side, preferably on a steel plate, to cool before refitting on a
machine or returned to the tool store. In some cases, particularly with dies from blow molding machines
using PVC, a further operation of polishing with a soft cloth may be required.
The aluminum oxide fluidizing medium is not degradable but will need to be replenished due to loss
from spillage or extracted in the exhaust. In the particular case of PVC, chlorinated hydrocarbons
remain in the fluidized bath after burn off which dictates special maintenance procedures.
CAUTION
Care should be taken when handling hot parts which have been removed from a fluidized bath. We
recommend that protective clothing (safety glasses, etc.) be worn when working with fluidized baths and
that the installation and maintenance procedures outlined in this booklet be followed explicitly.
Page 11

MAINTENANCE
The aluminum oxide, not being degradable, will only require replacement when losses occur due to
attrition, spillage or contamination with inert pigments, filler or acidic by-products from the burn-off
process.
On at least daily intervals, the bed should be cleaned of floating residues by means of a wire mesh hand
scoop. This procedure removes carbon char which impairs fluidization and acts as an absorbent. More
importantly, it can also remove uncharred plastic and so reduce the quantity of fumes produced and the
time of processing.
The optional air-line filter into the bed is self-draining. However, it should be kept in good condition by
inspection at two week intervals and by cleaning the bowl and washing or replacing the filter element as
necessary. With exceptionally dirty or wet air supplies this frequency may have to be increased. Fe
water or water vapor in the air supply is a notorious source for the production of hydrochloric acid in the
bed when PVC is burned off. In addition, oil vapors in the air supply which reach the fluidizing plate
are carbonized within the pores of the plate, quickly causing blockage and consequent poor fluidization.
All articles should be completely cleaned and removed from the bed before shut down. Corrosion of
processed parts could be seriously increased if they are left immersed overnight. Furthermore, residual
plastic, instead of being burned off in a fluidized state, could perculate down through a static bed and
settle on the porous plate causing blockage and poor fluidization.
When parts are removed from the bed, they should be allowed to cool in the air and, while still warm,
wiped with on oily cloth to prevent rusting.If the bath is left unused for long periods of time, empty the
aluminum oxide and store it in a separate container. Keep the inside of the bath clean and dry.
SPECIAL MAINTENANCE PROCEDURES FOR OMEGA INDUSTRIAL FLUIDIZED BATHS
WHEN BURNING OFF PVC OR OTHER HALOGENATED POLYMERS
Burning off PVC (polyvinyl chloride) in a fluidized bath offers one of the most severe conditions of
operation. Hydrogen chloride (HCl) liberated on the breakdown of PVC is absorbed by the bed medium
creating an acidic environment within the bed. This happens especially when the bed also absorbs water
from the atmosphere or when the fluidizing air is cold. HCl is extremely corrosive, especially when it is
aerated and wet. In addition, in water it produces chloride ions which, even in neutral or alkaline
solutions, promote corrosion and rusting in steel. Witness, for example, the corrosive nature of sea
water and calcium chloride road de-icer.
Consequently, fluidizing beds used for burning off PVC require strict supervision to minimize corrosion
of the bed itself and of parts cleaned in it, especially if these are of un-coated steel. The purpose of most
of the recommended maintenance procedures is aimed at keeping the bed medium clean, free-flowing,
free of gums, acids, agglomerates, partly decomposed plastic, char and larger particles. These cleaning
processes have the additional benefit of ensuring good fluidization and thus good heat transfer
throughout the bed and through immersed parts. This, in turn, reduces burn-off time, uneven heating of
parts and thus distortion, increases heater life by eliminating localized hotspots and makes cleaning
easier on a regular basis.
Page 12

The following procedures are essential when PVC is burned off on a regular basis, but they can also be
followed profitably by users of other plastics.
The bed should be completely emptied at monthly intervals and visually inspected for signs of corrosion.
Examination should include the walls of the inner cylinder, the porous fluidizing plate, the thermocouple
sheath and the loading baskets with particular emphasis on exposed weld lines. Serious corrosion
should be dealt with immediately by improving maintenance procedures or by replacing the inner
container before holes appear and cause failure of the heating element and corrosion in more
inaccessible parts.
The fluidizing media should be screened by passing through a 50 to 70 mesh sieve on at least monthly
intervals to remove foreign bodies, agglomerated gummy material and, periodically, be completely
changed for a new charge of aluminum oxide.
During shutdown overnight or over the weekend, the temperature should be reduced to 212°F (100°C) to
ensure that the moisture from the atmosphere is not condensed into the bed to create a hydrochloric acid
solution. Fluidizing air may be turned off in these circumstances but it is better that it should be
continued when it is practical to do so. For extended shutdowns exceeding two days, the medium
should be removed and the inside of the bath wiped out with a rag wetted with a 5% washing soda
solution (sodium carbonate).
FAULT FINDING
If the heater indicator fails to go off, the unit fails to reach its operating temperature or heat up rate
decreases, check:
1) Fluidization – remove aluminum oxide from bath leaving approximately 2 inches in the
bottom. If an area ¼ or more is not bubbling then most likely the porous plate is blocked
and should be replaced. Check that the porous plate is not blocked with plastic residue or
other material.
2) Heater - Empty medium from the bed and disconnect the main supply. Turn the unit
upside down and check the resistance of the heater. If one or more heater windings are
faulty, replace the heater. Reassemble in the reverse order.
3) Thermocouple – check with an instrument that can measure and simulate thermocouple
signals to verify its operation.
4) Controller and/or SSR – the controller will output a DC signal to the SSR when heat is
called for. If the SSR is receiving a DC control signal but not passing power to the
heaters then it should be replaced. Alternatively a problem may exist with the controller.
If the fluidization deteriorates, check the air filter assembly for clogging of the filter element; if
necessary, replace the element. If the fault remains, run your bath at 1100°F (600°C) for a period of one
hour to allow any accumulated residue in the bath to burn off. If the fault still remains, empty the
medium from the bed, check the stainless steel porous plate for damage due to clogging by plastic
residue, distortion of the plate or corrosion.
Page 13

FACTORY PID PARAMETERS (For FFB51 S/N: 451 & higher, FFB52 S/N: 214 & higher)
Parameter FFB51 FFB52
Pb 15 12
Ti 450 480
Td 75 80
1PLS 5.0 5.0
SPARE PARTS
A list of spare parts is provided below, all of which are available. Less commonly used parts, which are
not listed, are also available upon request. For clear identification, please refer to the part number as
well as the item description.
FFB51 Part # Description FFB52 Part #
7030464 Aluminum Oxide (100 lb. drum) 7030464
6002437 Gate Valve 6002437
7032619 1/32 DIN PID temperature Controller
1
7032619
7002694 1/16 DIN PID Controller3 7002694
7001149 Inner Container Assembly 7001642
7001072 Heater, 240V, 1ph, 2kW (2 each) 7001667
n/a Heater, 240V, 1ph, 1kW (2 each) 7001657
7001157 Porous Plate/Air Chamber Assembly 7001157
7002849 Thermocouple 7002850
7001574 Single Pole Relay (FFB51’s prior to S#388) n/a
7032434 Solid State Relay (FFB51’s S#388 and after) 7032434
7032588 O/T Contactor2 7032588
7001560 Fuse – 25 amp (FFB51), 30 amp (FFB52) 7001665
7002870 Acrylic flow meter 4 CFM 4 7002870
1. FFB51’s with S# 388 to 451; FFB52’s with S#189 to 213. For FFB52’s prior to S#189,
order 808 controller part #7032433.
2. FFB51’s with S# 397 and higher; FFB52’s with S#172 and higher.
3. FFB51’s with S# 452 and higher; FFB52’s with S# 214 and higher.
4. FFB51’s with S# 457 and higher, FFB52’s with S# 219 and higher.
Page 14

ACCESSORIES
FFB51 Part # Description FFB52 Part #
6035915 Pressure Regulator and Filter 6035915
7031103 Basket (standard) 7031658
7031102 Basket (long) 7031659
6036157 Extraction Collar 6036157
6036156 Lid Assembly 6036156
3031500 Cyclone CN-100 3031500
3031200 Afterburner AB-100 3031200
3031300 Scrubber SR-100 3031300
7032838 7200 VA Boost transformer, 208 to 230V 7032838
Page 15

FFB51 Wiring diagram
Page 16

FFB52 Wiring diagram
Page 17

Page 18

WARRANTY/DISCLAIMER
OMEGA ENGINEERING, INC. warrants this unit to be free of defects in materials and workmanship for a
period of 13 months from date of purchase. OMEGA’s WARRANTY adds an additional one (1) month
grace period to the normal one (1) year product warranty to cover handling and shipping time. This
ensures that OMEGA’s customers receive maximum coverage on each product.
If the unit malfunctions, it must be returned to the factory for evaluation. OMEGA’s Customer Service
Department will issue an Authorized Return (AR) number immediately upon phone or written request.
Upon examination by OMEGA, if the unit is found to be defective, it will be repaired or replaced at no
charge. OMEGA’s WARRANTY does not apply to defects resulting from any action of the purchaser,
including but not limited to mishandling, improper interfacing, operation outside of design limits,
improper repair, or unauthorized modification. This WARRANTY is VOID if the unit shows evidence of
having been tampered with or shows evidence of having been damaged as a result of excessive corrosion;
or current, heat, moisture or vibration; improper specification; misapplication; misuse or other operating
conditions outside of OMEGA’s control. Components in which wear is not warranted, include but are not
limited to contact points, fuses, and triacs.
OMEGA is pleased to offer suggestions on the use of its various products. However,
OMEGA neither assumes responsibility for any omissions or errors nor assumes liability for any
damages that result from the use of its products in accordance with information provided by
OMEGA, either verbal or written. OMEGA warrants only that the parts manufactured by the
company will be as specified and free of defects. OMEGA MAKES NO OTHER WARRANTIES OR
REPRESENTATIONS OF ANY KIND WHATSOEVER, EXPRESSED OR IMPLIED, EXCEPT THAT OF
TITLE, AND ALL IMPLIED WARRANTIES INCLUDING ANY WARRANTY OF MERCHANTABILITY
AND FITNESS FOR A PARTICULAR PURPOSE ARE HEREBY DISCLAIMED. LIMITATION OF
LIABILITY: The remedies of purchaser set forth herein are exclusive, and the total liability of
OMEGA with respect to this order, whether based on contract, warranty, negligence,
indemnification, strict liability or otherwise, shall not exceed the purchase price of the
co mponent upon wh ich li ability is bas ed. In no event shall OMEGA be lia b le for
consequential, incidental or special damages.
CONDITIONS: Equipment sold by OMEGA is not intended to be used, nor shall it be used: (1) as a “Basic
Component” under 10 CFR 21 (NRC), used in or with any nuclear installation or activity; or (2) in medical
applications or used on humans. Should any Product(s) be used in or with any nuclear installation or
activity, medical application, used on humans, or misused in any way, OMEGA assumes no responsibility
as set forth in our basic WARRANTY/DISCLAIMER language, and, additionally, purchaser will indemnify
OMEGA and hold OMEGA harmless from any liability or damage whatsoever arising out of the use of the
Product(s) in such a manner.
RETURN REQUESTS/INQUIRIES
Direct all warranty and repair requests/inquiries to the OMEGA Customer Service Department. BEFORE
RETURNING ANY PRODUCT(S) TO OMEGA, PURCHASER MUST OBTAIN AN AUTHORIZED RETURN
(AR) NUMB E R FR OM OMEGA’ S CUS T OME R SERVI C E DE PARTME NT (I N OR DER TO AVOID
PROCESSING DELAYS). The assigned AR number should then be marked on the outside of the return
package and on any correspondence.
The purchaser is responsible for shipping charges, freight, insurance and proper packaging to prevent
breakage in transit.
FOR WARRANTY
following information available BEFORE
contacting OMEGA:
1. Purchase Order number under which the product
was PURCHASED,
2. Model and serial number of the product under
warranty, and
3. Repair instructions and/or specific problems
relative to the product.
OMEGA’s policy is to make running changes, not model changes, whenever an improvement is possible. This affords
our customers the latest in technology and engineering.
OMEGA is a registered trademark of OMEGA ENGINEERING, INC.
© Copyright 2012 OMEGA ENGINEERING, INC. All rights reserved. This document may not be copied, photocopied,
reproduced, translated, or reduced to any electronic medium or machine-readable form, in whole or in part, without the
prior written consent of OMEGA ENGINEERING, INC.
RETURNS, please have the
FOR NON-WARRANTY REPAIRS,
for current repair charges. Have the following
information available BEFORE contacting OMEGA:
1. Purchase Order number to cover the COST
of the repair,
2. Model and serial number of the product, and
3. Repair instructions and/or specific problems
relative to the product.
consult OMEGA
Page 19

Where Do I Find Everything I Need for
Process Measurement and Control?
OMEGA…Of Course!
Shop online at omega.com
SM
TEMPERATURE
䡺⻬
Thermocouple, RTD & Thermistor Probes, Connectors, Panels & Assemblies
䡺⻬
Wire: Thermocouple, RTD & Thermistor
䡺⻬
Calibrators & Ice Point References
䡺⻬
Recorders, Controllers & Process Monitors
䡺⻬
Infrared Pyrometers
PRESSURE, STRAIN AND FORCE
䡺⻬
Transducers & Strain Gages
䡺⻬
Load Cells & Pressure Gages
䡺⻬
Displacement Transducers
䡺⻬
Instrumentation & Accessories
FLOW/LEVEL
䡺⻬
Rotameters, Gas Mass Flowmeters & Flow Computers
䡺⻬
Air Velocity Indicators
䡺⻬
Turbine/Paddlewheel Systems
䡺⻬
Totalizers & Batch Controllers
pH/CONDUCTIVITY
䡺⻬
pH Electrodes, Testers & Accessories
䡺⻬
Benchtop/Laboratory Meters
䡺⻬
Controllers, Calibrators, Simulators & Pumps
䡺⻬
Industrial pH & Conductivity Equipment
DATA ACQUISITION
䡺⻬
Data Acquisition & Engineering Software
䡺⻬
Communications-Based Acquisition Systems
䡺⻬
Plug-in Cards for Apple, IBM & Compatibles
䡺⻬
Data Logging Systems
䡺⻬
Recorders, Printers & Plotters
HEATERS
䡺⻬
Heating Cable
䡺⻬
Cartridge & Strip Heaters
䡺⻬
Immersion & Band Heaters
䡺⻬
Flexible Heaters
䡺⻬
Laboratory Heaters
ENVIRONMENTAL
MONITORING AND CONTROL
䡺⻬
Metering & Control Instrumentation
䡺⻬
Refractometers
䡺⻬
Pumps & Tubing
䡺⻬
Air, Soil & Water Monitors
䡺⻬
Industrial Water & Wastewater Treatment
䡺⻬
pH, Conductivity & Dissolved Oxygen Instruments
M5178/0612
 Loading...