

Page 1
EZSeries Text Panel
Re-Order from
omegamation.com
Omegamation
TM
1-888-55-OMEGA
1-888-55-66342
1-888-55-66342
Programming Software
Getting Started Manual
P/N EZTEXT-GS
Page 2

This page intentionally left blank.
Page 3

The Most Sensible Automation Products
Re-Order from
omegamation.com
Omegamation
TM
1-888-55-OMEGA
1-888-55-66342
1-888-55-66342
Direct From the Factory
EZSeries Text Panel
Programming Software
Getting Started Manual
P/N EZTEXT-GS
Page 4

WARNING!
Programmable control devices such as EZSeries Text Panels are not fail-safe devices and as such
must not be used for stand-alone protection in any application. Unless proper safeguards are used,
unwanted start-ups could result in equipment damage or personal injury . The operator must be made
aware of this hazard and appropriate precautions must be taken.
In addition, consideration must be given to the use of an emergency stop function that is independent
of the programmable controller.
The diagrams and examples in this user manual are included for illustrative purposes only. The
manufacturer cannot assume responsibility or liability for actual use based on the diagrams and
examples.
CAUTION
Do not press the EZSeries Text Panel pushbuttons with any sharp objects. This practice may damage the unit beyond repair.
Trademarks
This publication may contain references to products produced and/or offered by other companies.
The product and company names may be trademarked and are the sole property of their respective
owners. EZAutomation disclaims any proprietary interest in the marks and names of others.
P/N EZTEXT-GS
© Copyright 2005, EZAutomation
All Rights Reserved
No part of this manual shall be copied, reproduced, or transmitted in any way without the prior written consent of EZAutomation. EZAutomation retains the exclusive rights to all information included
in this document.
MANUFACTURED by AVG
4140 Utica Ridge Rd. • Bettendorf, IA 52722-1327
MARKETED by EZAutomation
4140 Utica Ridge Rd. • Bettendorf, IA 52722-1327
Phone:
1-877-774-EASY • Fax: 1-877-775-EASY • www.EZAutomation.net EZTEXT-GS
Page 5

Programming Software Getting Started Manual
Table of Contents
CHAPTER 1: Introduction/Installation
Introduction to the EZSeries Text Panel ........................................... 2
What you need to get started ................................................................. 3
Need HELP? .......................................................................................... 3
EZSeries Text Panel Setup .............................................................. 4
SETUP Mode ......................................................................................... 4
Installing EZSeries Text Panel Programming Software ......................... 5
Installation Screens ................................................................................ 6
CHAPTER 2: What’s Inside
Create a Multi-Panel Project using EZSeries Text Panel ..................... 8
Programming Software ........................................................................... 8
Right Click Menu .................................................................................... 13
Confi gure Panel PLC System Address Dialog Box ................................ 16
Message Edit Dialog Box ....................................................................... 17
Changes to Memory Mapping/PLC Data Registers ............................... 18
CHAPTER 3: Main Menu Items - Reference
Welcome Screen .................................................................................... 20
Main Confi guration Screen ..................................................................... 21
Main Menu Items .................................................................................... 23
File Menu ........................................................................................ 23
Panel Menu ..................................................................................... 27
View Menu ...................................................................................... 34
Port Menu ....................................................................................... 34
Window Menu ................................................................................. 34
Help Menu ....................................................................................... 35
Help Topics ............................................................................................. 35
About EZSeries Text Panel.................................................................... 35
INDEX
Page 6

Programming Software Getting Started Manual
This page intentionally left blank.
Page 7

1
Introduction/Installation
In this chapter....
— Introduction
— What you need to get started
— Need Help?
— EZSeries Text Panel Setup
— Installing EZSeries Text Panel Programming Software
— Installation Sceens
Page 8

Programming Software Getting Started Manual
Introduction to the EZSeries Text Panel
This manual provides information about getting started with EZSeries
Text Panel Programming Software. Hardware installation and panel
programming are covered in depth in the EZ-Text Panel User Manuals
( EZ-TEXT-M-E for the EZ-220, EZ-220V, EZ-220L, EZ-420, EZ-220P,
EZ-220PV, EZ-TEXT-SP-M-E for the EZ-SP model).
The EZSeries Text Panels provide a hu man-machine interface to your
PLC automation system. The panels provide features such as 5 userdefi ned pushbuttons with LED indicators, annunciator lamps, numeric
keypad, arrow adjust buttons, LCD message display, numeric LED set
point display , and a built-in menu system. The panels communicate with
a PLC using either RS-232C or RS-422A/485A serial communication.
The panels allow you to confi gure up to 256 20-character text strings ( 16-
character for the EZ-SP Set Point Panel) confi gured as PLC Messages
and Local Messages. Local Messages are internal panel messages that
the operator can scroll in a menu tree hierarchy. PLC Messages are
displayed when prompted from the PLC program. A PLC Message LED
illuminates whenever a PLC Message is being displayed. Either message
type can have up to three embedded data variables, one of which can be
edited by using the arrow adjust buttons or numeric keypad.
Some of the panels have sealed membrane function pushbuttons
that allow you to trigger PLC actions with the push of a button. These
pushbuttons are used for input signals to the PLC.
The LCD display window supports one (EZ-SP), two, or four message
lines that can display 16 to 20 characters each. The messages are
programmed using the EZSeries Text Panel Programming Software.
The message control type may be either static—text displays that have
NO embedded data, dynamic —text messages that include embedded
data (READ access only), or interactive —text messages that allow
the operator to enter data, or change values that are stored in the PLC
registers (READ/WRITE access).
The EZSeries Text Panel is available in a variety of
models to suit your application.
2
Page 9

Programming Software Getting Started Manual
What you need to get started
Hardware
• EZSeries Text Panel (Models EZ-220, EZ-220V, EZ-220P, EZ220PV, EZ-220L, EZ-420, or EZ-SP)
• 24 Volt DC Power Supply (FA-24PS recommended)
• RS-232C Programming Cable (P/N EZTEXT-PGMCBL)
• RS-232C or RS-422A PLC Cable
• Programmable Logic Controller (PLC)
• PC requirements:
— IBM or compatible PC (486 or better) with a mouse
and separate serial port
— VGA display with at least 800 x 600 resolution (1024 x 768
recommended)
— Standard Windows 95/98 (Second Edition)/NT4.0/2000
requirements
— CD ROM Drive
• EZSeries Text Panel User Manual for your type panel
— EZ-TEXT-M-E or the EZTEXT-SP-M-E
Software
• EZSeries Text Panel Programming Software
®
Need HELP?
Onscreen HELP
One of the most important features of the EZSeries Text Panel
Programming Software is the availability of context sensitive onscreen
help. T o access the Help windows, simply press the F1 function key while
on the topic where you need help. For example, if you need help while
working with panel confi guration, hit the F1 function key when that dialog
box is open and a pop-up HELP window will be displayed.
PLC HELP
If you need help with the PLC to EZSeries T ext Panel Interface, consult the
EZSeries Text Panel Programming Software Help. Each PLC Driver has
a Help T opic that lists the error messages and provides an explanation for
each. Also provided are PLC to EZSeries Text Panel wiring diagrams.
Technical Support
Although most questions can be answered with EZSeries T ext Panel HELP
or the manuals, if you are still having diffi culty with a particular aspect
of installation or system design, technical support is available at 1-877-
774-EASY, Monday through Friday, 6 a.m. to Midnight CST, or F AX us at
1-877-774-EASY. Visit our website at www.EZAutomation.net.
3
Page 10

Programming Software Getting Started Manual
EZSeries Text Panel Setup
SETUP Mode
In order to download the program to the
EZSeries Text Panel using the EZSeries Text
Panel Programming Software, you must be in
the Setup Mode. Setup Mode is also where
you will adjust the display contrast of the
EZSeries T ext Panel. If connected to multiple panels using the EZMultiplexer,
you must set the Mode Switch on the front panel of the EZ Multiplexer into
Program Mode. The EZSeries Text Panel will start up in the RUN Mode. T o access
the SETUP Mode, follow these steps:
1. Press the UP Arrow Pushbutton and hold while simultaneously pressing
the DOWN Arrow Pushbutton to enter the SETUP Mode.
2. At any time you may press the Escape (esc) button to go back to RUN
Mode. You will be taken back to the start of the Local Message menu
(cursor will be placed at the root level when you return from setup).
SETUP MODE
DRV. REV.:
Adjust Display Contrast
You may only adjust the Display Contrast when in Setup Mode. To adjust the
display contrast use the UP and DOWN arrows to increase or decrease the
contrast.
Internal Software and Hardware Revisions
While in SETUP Mode the Panel Hardware Revision, Driver Revision, Boot
Revision, and Exec (Firmware) Revision numbers will display on the panel.
Preparing for Confi guration
If you prepare and plan ahead of time, your use of the EZSeries Text Panel
Programming software will be successful. Below are a few important steps to
take to prepare to program your application.
•
of the EZSeries Text Panel Programming Software
Prepare your personal computer and ensure proper installation
• Know your operator interface requirements. Determine the
type of EZSeries Text Panel and the number of EZSeries Text
Panels required by your application
• Know your PLC type and available resources, such as,
programming tools, CPU capabilities, user memory, etc.
• Verify type of communications port, as well as protocol used.
• Determine the CPU link(s) available for connecting an EZSeries Text
Panel Enhanced Panel(RS-232/RS-422, baud rate, parity, stop bits.
4
Page 11
Programming Software Getting Started Manual
• Determine how the pushbuttons, LEDs, PLC Messages, and Local
Messages will be assigned in your panels with respect to your
machine or process.
• To prepare your application, use the application worksheets
provided in appendix A of the EZSeries Text Panel User Manuals.
The example worksheets will help you understand how the EZSeries
Text Panel program is confi gured. Blank worksheets can be used in
planning, implementing, and using your EZSeries Text Panels.
Installing EZSeries Text Panel Programming Software
EZSeries Text Panels are confi gured with software running on an IBM or
compatible personal computer. This software is available through EZAutomation
(P/N EZ-TEXTEDIT-E). The software is used to download your confi guration
before connecting the panel and communicating with a PLC. Help Topics are
provided to help you confi gure your panel. You design and confi gure your
EZSeries Text Panel program off-line and save it to disk. The program may
then be transferred to the EZSeries Text Panel. To install EZSeries Text Panel
Programming Software, perform the following steps:
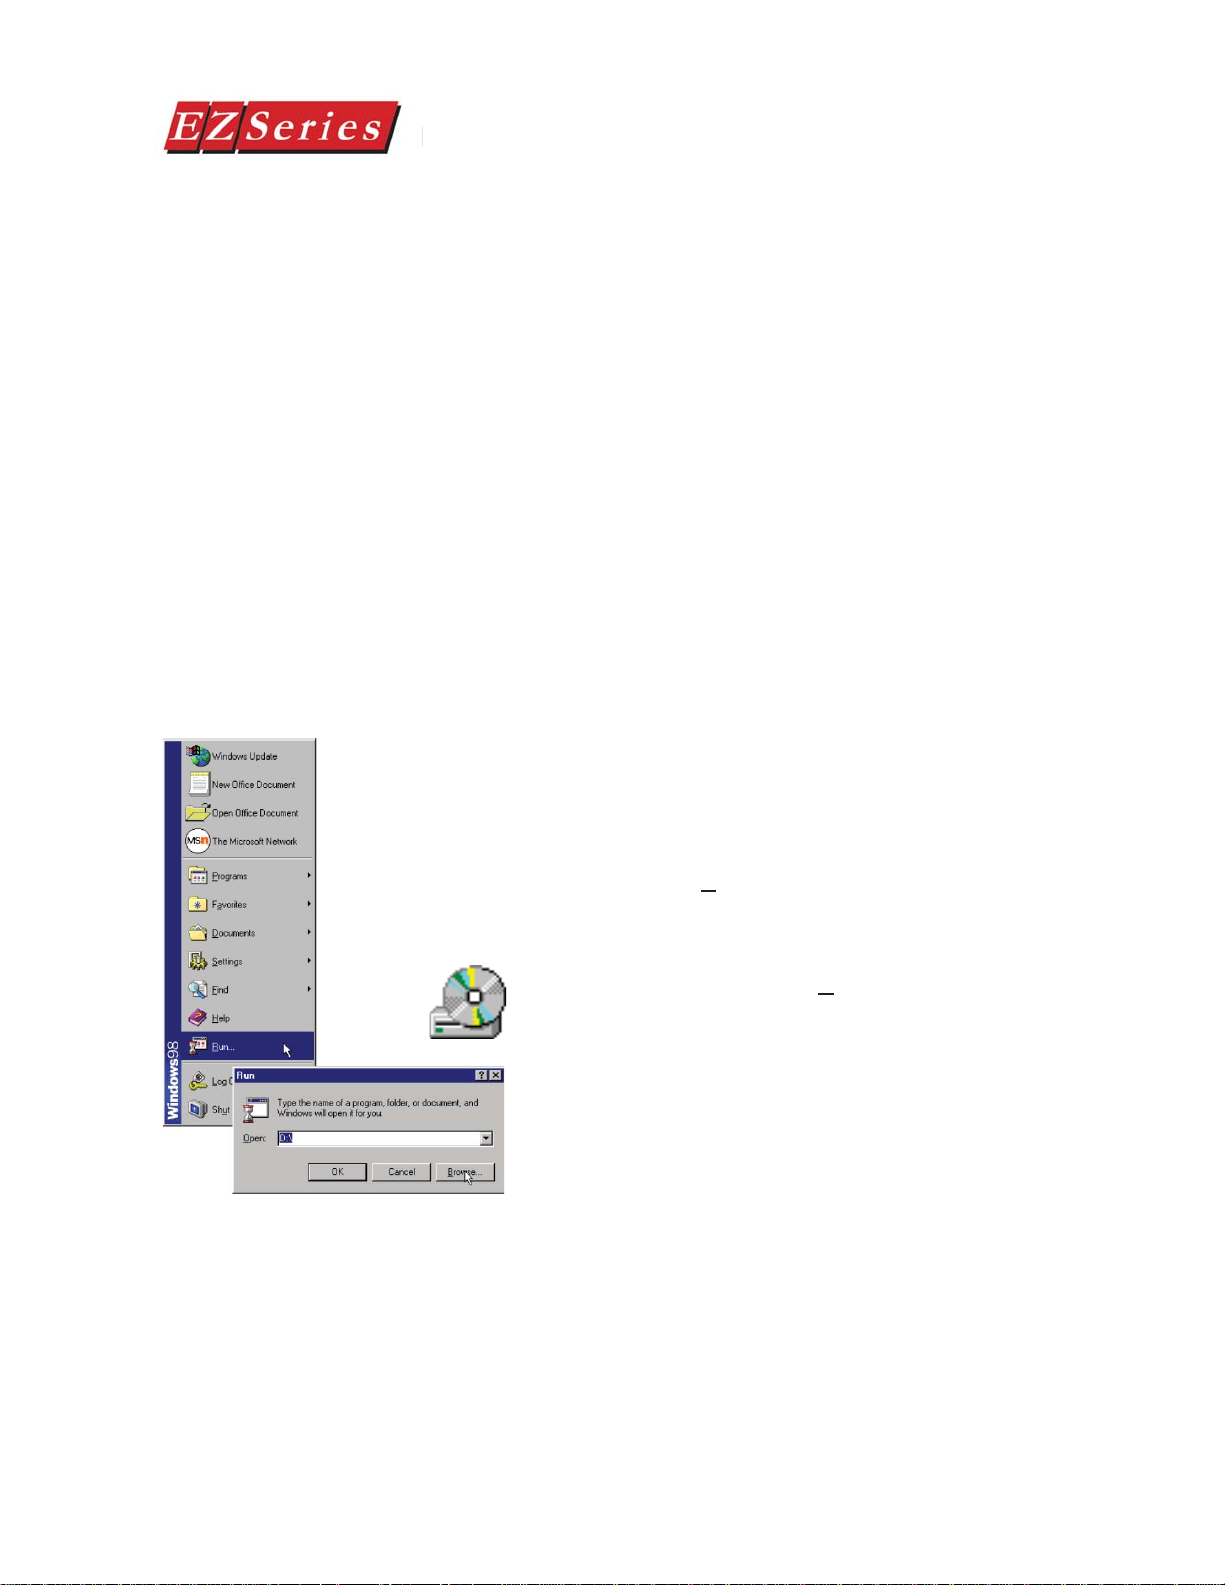
• Place the CD into your CD ROM Drive. The install
program should launch automatically. If it does not,
perform the following steps:
— From Windows click on the Start Button, and
then click on Run from the menu. The Run
dialog box will pop up.
— At the prompt type D:\ (or your CD Drive)
\setup.exe or click on the Browse Button and
fi nd the Setup.exe fi le for EZSeries Text Panel
Programming Software.
— Click on the OK button to begin the
installation. The EZSeries Text Panel Programming
Software Installation Screen will appear.
• Follow the onscreen prompts to load the software.
5
Page 12

Programming Software Getting Started Manual
Installation Screens
EZSeries Text Panel
Programming
Software Icon
This icon will appear
on your desktop after
installation.
This is the fi nal installation screen. Here
you select the destination folder where
your software program will be installed.
The default destination location is C:\
Program Files\EZSeries. If you wish to
select another destination, click on the
Browse button.
To complete the installation, click
on Next> button. That’s all there is
to it! The EZSeries Text Panel Icon
shown above will appear on your
desktop. Simply click on it to open the
6
Page 13

2
What’s Inside
In this chapter....
— Create a Multi-Panel System
— Right Click Menu for Multi-Panel System
— Changes to Panel System PLC Address Dialog Box
— Changes to Message Edit Dialog Box
— Changes to Memory Mapping/PLC Data Registers
Page 14
Programming Software Getting Started Manual
Create a Multi-Panel Project using EZSeries Text Panel Programming Software
With the programming software installed, connect the EZ Multiplexer to
your PC using the P/N EZTEXT-PGMCBL cable. Set the MODE Switch on
the front panel of the Multiplexer to PROGRAM (ON). Connect from 1 to 5
EZSeries T ext Panels to the COM1, COM2, COM3, COM4, and/or COM5
ports on the front panel of the EZ Multiplexer using cable P/N EZ-MUL TICBL. Apply 24 VDC to the EZSeries T ext Panels and EZ Multiplexer power
connectors. Click on the EZSeries T ext Panel Programming Software icon
to start the program.
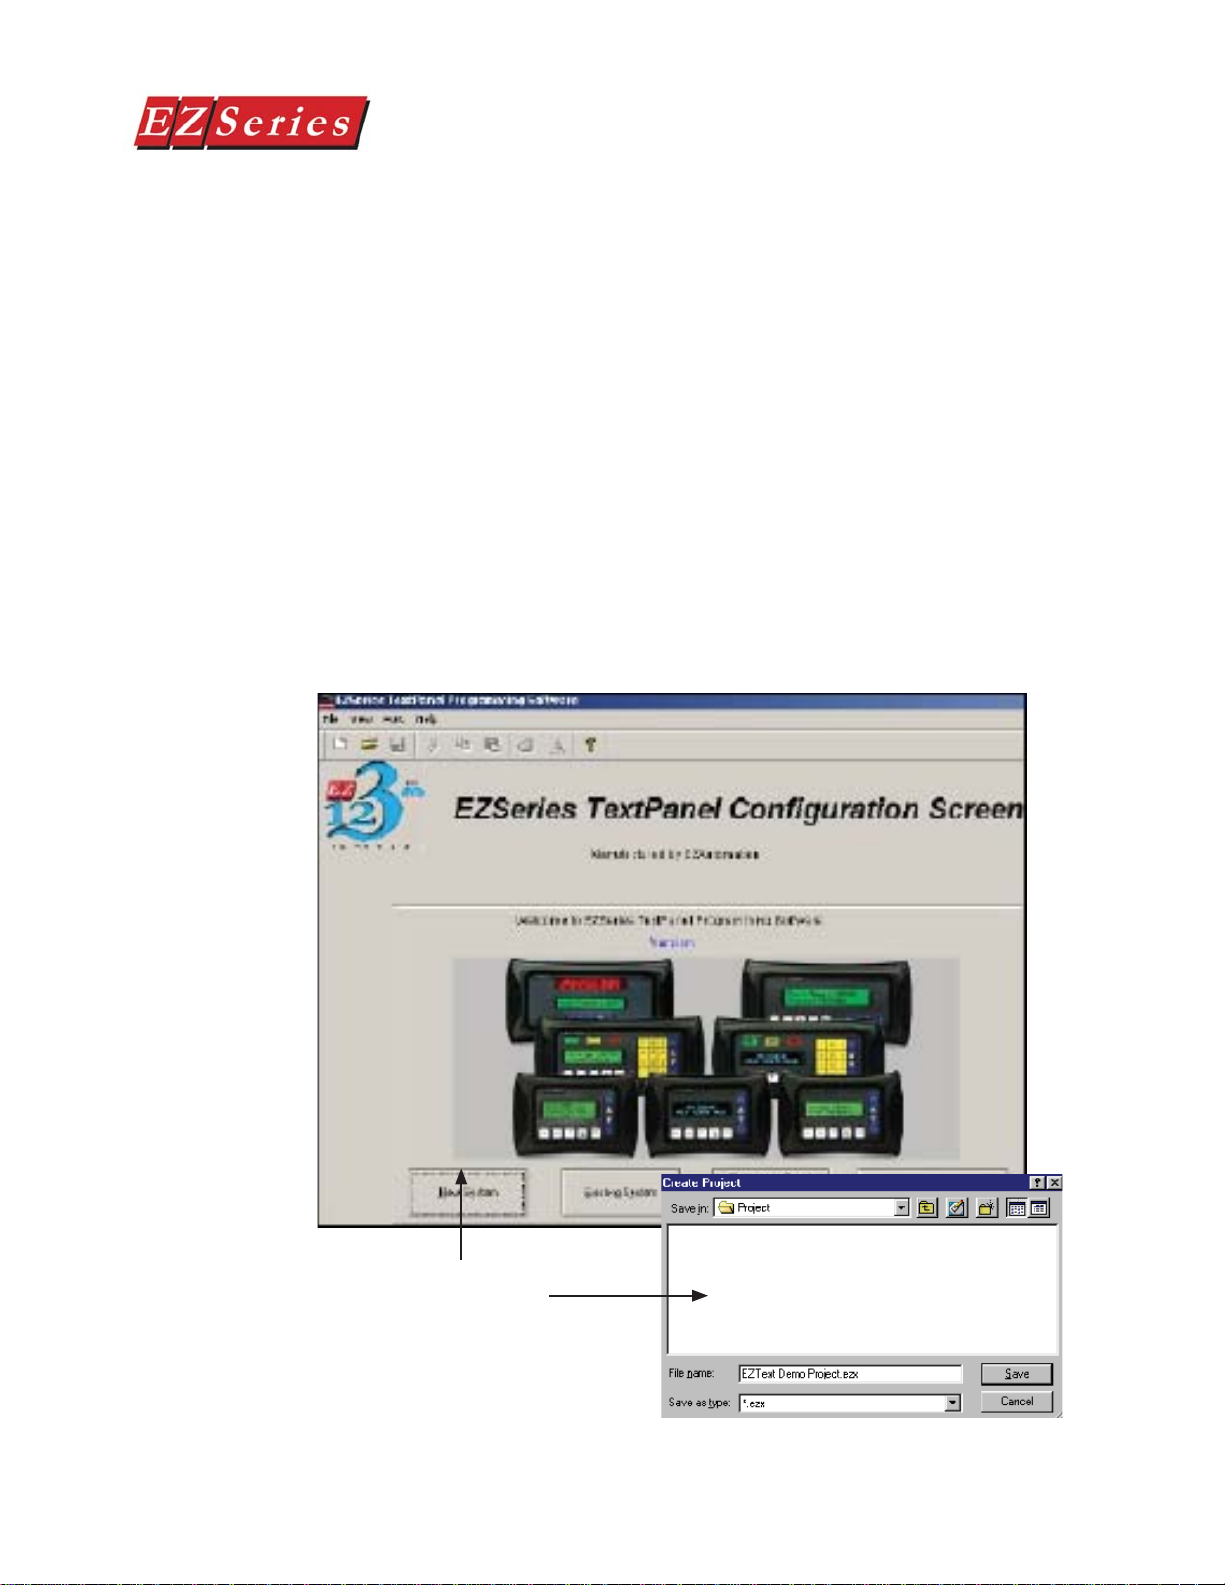
1. From the Welcome screen, click on the New System button.
2. The Create Project window will appear. Type in the name of
your project in the File name fi eld. Click on Save. (If you don’t
want your project saved to the default “Project” folder, navigate
to the directory and/or folder where you want it to reside.)
Click here to open
this window
8
Page 15

Programming Software Getting Started Manual
3. In Step 1, select Multi-Panel System. When Multi-Panel
System is selected, Step 1a on the right hand side of the screen
will become available. You will also notice that two buttons at
the bottom of the screen will change to “Write to Multiplexer”
and “Read from Multiplexer.” You may program up to 5 panels
connected to a Multiplexer. Click on the Port 1, Port 2, Port 3,
Port 4, or Port 5 button.
a. Under Step 1a, Select a Panel, you will choose the fi rst
panel that you want to confi gure. There are three ways that
Right Click Menu —
choose Select
b. The Select Panel dialog box will open. Under Panel Type,
you can choose the panel type for each port. Click on Port
1 and then click on the Select Panel T ype button under Step
1, or double click on Port 1, or click on Port 1 and then right
click your mouse to open the popup menu and choose Select
Panel. You may confi gure the panel connected to Port 1,
2, 3, 4, or 5 in any order. They do not have to be confi gured
sequentially.
click on the panel type that is connected to that port. A
picture of the panel will appear under Panel Preview,
and key features of the panel are displayed under Panel
Attributes.
9
Page 16

Programming Software Getting Started Manual
c. Click on the OK button to select and close the dialog box.
The Panel type you have selected will appear above Port 1,
2, etc.
4. You may also import a panel confi guration from
another project. Click on the Port/Panel that you
want to copy the project to. Right click your mouse
button to bring up the Right Click Menu. Select
Import Confi guration.
5. The Open project dialog will open. Y ou may select either a Single
Panel or a Multi-Panel project. Click on the project you want to
import to highlight it, and then click on the Open button.
6. If you have selected a
Multi-Panel project to
import, the dialog box
to your right will open
allowing you to select
the particular Port/
Panel configuration
that you want to import
into your current
project. Click OK. In
a Multi-Panel EZSeries Text Panel project, you may only import
one Port/Panel confi guration from an existing project into one
Port/Panel in the current project with each Import Confi guration
command.
10
Page 17

Programming Software Getting Started Manual
7. In Step 2, Select PLC, you will choose
the type PLC you are using. You will
only be able to select one PLC type
per project (whether it is a Single Panel
System or a Multi-Panel System). If
you need more information on PLC
confi guration, consult your EZSeries
Text Panel Hardware User Manual,
EZSeries Text Panel Programming
Software Help Topics, or your PLC
Manual.
a. Click on the DOWN arrow next to the Select PLC fi eld to
view the drop down menu of available PLCs. Click on the
PLC Type to select.
b. Click on the Press for communication confi guration for
Selected PLC button.
c. The PLC Communications Attributes window will appear
for the PLC you have selected. Set the appropriate attributes
and Click on the OK button.
During configuration, ensure that your address and
communications parameters match the PLC port settings.
There will be a selection for PLC timeout. When the panel
sends a message to the PLC and does not receive a
response or does not understand the response, it will wait
the timeout period before sending the message again.
11
Page 18

Programming Software Getting Started Manual
8. For Step 3, click on the Confi gure Panel System PLC Addresses
button. The Panel System PLC Address Setup window will
appear.
Step 3 is the same whether you have a Single Panel System or
a Multi-Panel System. For each Port/Panel you have connected,
follow the instructions in the EZSeries Text Panel User Manual
that came with your unit or consult the EZSeries Text Panel
Programming Software Help Topics.
12
Page 19

Programming Software Getting Started Manual
Right Click Menu — Items Unique to Multi-Panel System Confi guration
A “right click” menu is availble for Multi-Panel Systems. T o access the right
click menu, put your cursor arrow in the Port 1, Port 2, Port 3, Port 4, or
Port 5 box on the Main Confi guration Screen and click your right mouse
button. The Right Click Menu will appear (as shown to the left).
If you have not yet selected a panel
type to associate with the port, some
menu items will not be available —they
will be appear in gray.
The Port currently selected for confi guration will appear
in yellow. Those ports not yet confi gured or without an
EZSeries Text Panel associated with it will appear in gray .
Ports with an EZSeries Text Panel associated with it that is
not selected for confi guration will appear in green.
The six menu items available on the Multi-Panel System’s Right Click
Menu are described below.
Select Panel
The Select Panel menu
item allows you to select an
EZSeries Text Panel Type to
assign to the port you have
clicked on. You may click
on a port to reassign the
panel type at any time. If
the Panel/Port has already
been configured, and you
choose another type panel,
you may lose information
when switching if the panel
types are not compatible. Y ou
may also open this screen by double clicking in the Port/Panel box under
Step 1a, Select Panel, or click on the Select Panel button under Step 1.
13
Page 20

Programming Software Getting Started Manual
Delete Panel
Click in the Panel/Port box that you
want to select on the Main Confi guration
Screen. Right click to bring up the
menu and then click on the Delete
Panel menu item. The message to the
right will appear. Click on Yes to Delete
the Panel confi guration for that Port or
No to abort the operation.
Import Confi guration
If you have an existing Single
Panel or Multi-Panel project that
has the panel confi guration that
you want for your current project,
click on Import Confi guration.
The window to the right will
appear. Click on the EZSeries
Text Panel Project where the
confi guration that you want to
import resides.
If you have selected a Multi-Panel project,
the window shown to the right will appear
allowing you to select the particular Panel/
Port confi guration to import. Click OK to
import. The following warning will appear.
Click on Yes to continue, No to abort the
import.
Export Confi guration
You may also export a
Single Panel or Multi-Panel
Confi guration. Click on Export
14
Page 21

Programming Software Getting Started Manual
Confi guration. The Save As screen will appear. T ype in the name of the
project where you want to save the selected panel confi guration. Click on
the Save button to export.
Information
Click on the panel you wish to receive information on and then click on
Information to access the Panel Status window for the Panel/Port you
have selected. A picture of the panel type, key features of the current
panel, and Panel and PLC information is provided (panel model, Firmware
Revision, Memory Size, PLC Driver, and PLC Driver Revision number
are displayed).
Upgrade Firmware
Consult your EZSeries T ext Panel Hardware User Manual that came with
your unit before you upgrade your panel fi rmware!
Click on the panel you wish to upgrade, right click your mouse for the
menu, and then click on Upgrade Firmware. The following window will
appear. Select the correct fi rmware and click on the OK button.
15
Page 22

Programming Software Getting Started Manual
Confi gure Panel PLC System Address Dialog Box
The EZ-220P model’s
Password feature
allows double words.
You may choose a
32-bit BCD or Binary
Data Type.
Enable Beeper is
a check box. PLC
Message Delay is
selectable, as is Display cursur when
a PLC message is
displayed.
1. Passwords are increased to
32-bit BCD or Binary. The
range for 32-bit Binary is
extended to 4294967295 (a
10-digit value can be used).
The range for 32-bit BCD is
extended to 99999999 (an 8-digit value can be used).
2. The Enable Beeper is programmed with a check box which
allows you to deselect this feature. Enable Beeper is selected
by default. If you do not want to hear the beeper each time a
button is pressed on the panel, click on the box in front of Enable
Beeper to remove the check mark.
3. The PLC Message Delay is selectable. When a PLC Message is
displayed on the panel, panel buttons won’t function for 3 seconds.
This allows time for the operator to view the PLC Message before
inadvertently pressing a button to perform another operation.
The PLC Message Delay is enabled by default. To disable the
3 second delay , click on the check box in front of PLC Message
Delay to remove the check mark.
4. A check box appears that will let you select whether or not the
cursor will display in the EZSeries Text Panel message window
16
Page 23

Programming Software Getting Started Manual
when a PLC Message has been triggered. The cursor will display
by default. To disable this option, click in the box in front of
Display cursor when a PLC Message is displayed to remove
the check mark.
Message Edit Dialog Box
1. Check boxes appear in the Message Edit, Data 1, Data 2, and
Data 3 confi guration that allow you to choose whether or not
you want Leading Zeroes to appear before a data value in the
message window.
2. There is support for double words in each data set. You can
choose a 32-bit integer address BCD and binary. The range
for 32-bit Binary is extended to 4294967295 (a 10-digit value can
be used). The range for 32-bit BCD is extended to 99999999 (an
8-digit value can be used).
17
Page 24

Programming Software Getting Started Manual
Changes to Memory Mapping/ PLC Data Registers
The EZSeries T ext Panels communicate with the PLC through user-defi ned
PLC data registers. PLC registers are assigned during confi guration using
the EZSeries T ext Panel Programming Software. For discrete operations,
such as pushbuttons and LEDs, the register bits are accessed by the
PLC control program.
The LED control register uses B17 to allow you to take the panel out
of PLC Message Mode. If the PLC sets this bit (from 0 to a 1) when
the panel has a PLC Message on the display , the panel will go back into
Local Message Mode.
18
Page 25

Main Menu Items – Reference
In this chapter....
— Welcome Screen
— Main Confi guration Screen
— Main Menu Items
3
Page 26

Programming Software Getting Started Manual
Welcome Screen
Title Bar
Main Menu Bar
Standard Tool Bar
Status Bar
Title Bar
The Title Bar tells you the name of the EZSeries Text Panel project fi le
that you currently have open.
Main Menu Bar
This is the Main Menu Bar. EZSeries Text Panel Programming Software
menus are represented by the names listed across the top of the Main
Confi guration Screen and directly under the Title Bar. The selections
shown above are available after you click on New System or Existing
System (open a project).
Standard Tool Bar
The Standard Tool Bar consists of icons for frequently used commands.
These commands are also found in, and accessible from, the Main Menu
Bar. From left to right the icons represent:
20
Page 27

Programming Software Getting Started Manual
• Open new project
• Open existing project
• Save the active project
• Cut the selection and put it on the clipboard
• Copy the selection and put it on the clipboard
• Paste clipboard contents
• Print the active project
• Print Preview
• About EZSeries Text Panel Programming Software
Status Bar
The Status Bar is located at the bottom of the Main Confi guration Screen
and shows the status of the current screen. It provides information about
a tool bar item that the pointer passes over.
Main Confi guration Screen
When you click on the New System button from the Welcome Screen,
a Create Project window opens. Enter the name of the project and
where to save it, then click on the Save button. You will open to the Main
Confi guration Screen. From this screen you will select a Single or Multi-
Panel System, your EZSeries Text Panel and PLC Type, and confi gure
your system. Shown below is the Main Confi guration Screen for a Single
Panel System.
Notice that Step 1a
is grayed out, and on
the bottom right, the
two center buttons
say Write to Panel
and Read from Panel,
these will change
when a Multi-Panel
System is selected.
See next page.
Main Confi guration Screen for a Single Panel System.
21
Page 28

Programming Software Getting Started Manual
Main Confi guration Screen for a Multi-Panel System.
Notice that Step 1a is now available, allowing you to select a panel model
for each of the fi ve ports. The fi ve ports are available on an EZ Multiplexer
communication master unit (P/N EZ-MUL TIDROP). For more information
on the EZ Multiplexer unit that allows you to connect up to 5 EZSeries T ext
Panels to a single PLC, visit EZAutomation’s website (www .EZAutomation.
net), consult the EZSeries T ext Panel Programming Software V ersion Help
topics, or your EZ Multilplexer’s manual, P/N EZ-MULTIDROP-M.
On the bottom right, the two center buttons now say Write to Multiplexerl
and Read from Multiplexer. Multi-Panel Projects are stored in the
EZMultiplexer master communication unit that sends and receives data
from a PLC and connected EZSeries Text Panels.
22
Page 29

Programming Software Getting Started Manual
Main Menu Items
In this section we’ll take you through the menu items. Any differences
between the menu items (in terms of functionality or availability) for a
Single Panel System and a Multi-Panel System are so noted.
File Menu*
New
1. Click on New to open a new project. The following screen will
appear.
* The File Menu is
the same for both a
Single Panel System
and a Multi-Panel
2. Enter a name for your project in the File Name fi eld. Navigate
to the directory/folder where you want the project to reside (if
different than the default Project directory created for you when
you install EZSeries Text Panel Programming Software.)
3. Click on Save to save this project name and exit this window.
4. The Main Confi guration Screen will open allowing you to begin
confi guring your system.
Open
1. Click on Open to open an existing project for editing. The following
screen will appear.
23
Page 30

Programming Software Getting Started Manual
2. Navigate to the directory/folder where the project resides (if
different than the default Project directory created for you when
you install EZSeries Text Panel Programming Software.) Select
the project you wish to edit from those listed.
3. Click on Open and exit this window.
4. The Main Confi guration Screen will open allowing you to begin
confi guring your system.
Close
Click on Close to close the current project.
Save or Save As
Click on Save to save the current project confi guration. Click on Save
As to save project under a different name.
Print, Print Preview, Print Setup
If a Single Panel System, the current project will print. If a Multi-Panel
System, click on a port/panel to see the confi guration for that panel and
then click on print.
Click on Print to send the current EZSeries Text Panel project to the
printer.
Click on Print Preview to see how the current project will look when
printed. The following window will appear.
24
Page 31

Programming Software Getting Started Manual
On the fi rst page, the following will be listed (all or in part, depending
upon the Panel Type):
File Name: (*.ezx fi le)
System Type: (Single or Multiple Panel System)
Panel Type: (shows the Panel type you have selected)
Button (Bit Write) PLC Word: (the PLC address is shown)
LED (Bit Read) PLC Word: (the PLC address is shown)
Line 1 PLC: (the PLC address is shown)
Line 2 PLC: ( “ )
Line 3 PLC: ( “ )
Line 4 PLC: ( “ )
PLC TYPE: (shows the PLC type you have selected)
PLC Password Register: (PLC address is shown, EZ-220P &
EZ-220PV only)
Annunciator Word: (PLC word register is shown, EZ-220P &
EZ-200PV only)
BUTTON/LED Information
F1: (whether button action is Momentary , Alternate or
Panel Set & PLC Release)
F2: ( “ )
F3: ( “ )
F4: ( “ )
F5: ( “ )
LED 1: (whether it is illuminated By Button, By Button &
Flash, or By PLC)
Print Preview
PLC Messages
LED 2: ( “ )
LED 3: ( “ )
LED 4: ( “ )
LED 5: ( “ )
25
Page 32

Programming Software Getting Started Manual
The second page lists the PLC Messages and confi guration information
about each, such as:
Data 1 Reg (PLC register where value is located)
Date Type (BCD or Binary)
R/W (Read/Write or Read Only access)
L/R Password (whether it is stored as Local—L, or in a PLC
Register—R) (EZ-220P & EZ220PV Panel only)
Dec Pt Reg (PLC register that controls data value decimal point
for Data 1 item)
Data 2 Reg (PLC register where value is located)
Data Type (BCD or Binary)
Data 3 Reg (PLC register where value is located)
Data Type (BCD or Binary)
Print Preview
Local Messages
After listing of PLC Messages, the Local Messages are listed, with the
following information:
Data 1 Reg (PLC register where value is located)
Date Type (BCD or Binary)
R/W (Read/Write or Read Only access)
Dec Pt Reg (PLC register that controls data value decimal
point for Data 1 item)
Data 2 Reg (PLC register where value is located)
Data Type (BCD or Binary)
Data 3 Reg (PLC register where value is located)
Data Type (BCD or Binary)
Click on Print Setup to change the print settings.
26
Page 33

Programming Software Getting Started Manual
Recent Files
A list of recently opened project fi les (up to 4) are provided here. You
may click on one of these fi les to open the project.
Exit
Click here to Exit EZSeries Text Panel Programming Software.
Panel Menu
Write Project
1. Click on Write Project when you are ready to write the program
to the EZSeries Text Panel. If you are confi guring a Multi-Panel
Project, you will be writing the project to the EZ Multiplexer. The
following window will appear.
27
Page 34

Programming Software Getting Started Manual
Ensure that the EZSeries Text
Panel(s) is in SETUP Mode
BEFORE attempting to Write
Project. If it is a Multi-Panel
Project, ensure that the EZ
Multiplexer is in PROGRAM Mode (Mode Switch is located
on front panel of Multiplexer) and the EZSeries Text Panels
are in SETUP Mode.
2. Make sure the correct Port is selected and then click on the Start
button.The progress bar at the bottom of the window will let you
know where you are in the write to panel process. A check mark
will appear next to the items that are completed.
3. When the write to panel process is complete, the message to
the right will appear letting you know that the current EZSeries
Text Panel program was successfully written to the panel. Click
on OK.
Read Project
1. If you want to edit an existing program already loaded into the
panel or Multiplexer, create a new project, then click on Read
Project to transfer it to the EZSeries Text Panel Programming
Software. The following screen will appear.
28
Page 35

Programming Software Getting Started Manual
Ensure that the EZSeries Text
Panel(s) is in SETUP Mode
BEFORE attempting to Read
or Verify Project. If it is a
Multi-Panel Project, ensure
that the EZ Multiplexer is
in PROGRAM Mode (Mode
Switch is located on front panel of Multiplexer) and the
EZSeries Text Panels are in SETUP Mode.
2. Make sure the correct Port is selected and then click on the Start
button. The progress bar at the bottom
of the window will let you know where
you are in the Read Project process. A
check mark will appear next to the items
that are completed.
3. When the Read Project process is
complete, the message to the right
will appear letting you know that the current program was
successfully read from the panel or multiplexer and transferred
to your project. Click on OK.
Verify
Click on Verify to compare the
program open in EZSeries Text
Panel Programming Software to the
program loaded in the EZSeries T ext
Panel. The Reading from Panel
window will appear, showing the
progress of the verifi cation. When
complete, a message will appear telling you if they are the
same or if they are different.
Clear Memory
Put the EZSeries Text Panel(s) in
Setup Mode (and the EZ Multiplexer, if
applicable, into the Program Mode) and
click on Clear Memory to erase the user
project from the EZSeries T ext Panel (and
EZ Multiplexer) memory. If you have
a system project loaded into the panel
that you want to keep, be sure to save
it before you clear the memory. To save
it, click on Read Project, and save the
29
Page 36

Programming Software Getting Started Manual
Click on Panel >
Upgrade Firmware
This window will
open
Upgrade Firmware
There may be occasional upgrades to the EZSeries Text Panel internal
software, also referred to as the Exec or Firmware. Check www.
EZAutomation.net periodically for information about software and fi rmware
upgrades.
To Upgrade Firmware:
1. Place the panel in Setup Mode by pressing the UP/DOWN arrows
on the EZSeries Text Panel simultaneously.
2. Under the Panel Menu, click on Upgrade Firmware. The
following screen will appear.
(this is available if project is Single Panel System)
30
3. Click on the Browse button. The window, shown below, will
open to the default folder, Firmware (located in the EZSeries
Text Panel Program directory). If the fi rmware fi le has been
downloaded from the EZAutomationirect website to another
Page 37

Programming Software Getting Started Manual
location, navigate to the new fi rmware fi le (.hex fi le). There are
fi ve types of fi rmware fi les ( .hex) for the different types of EZSeries
Text Panels: EZ220xy — for the EZ-220 & EZ-220V panels;
EZ220Lxy — for the EZ-220L panel; EZ420xy — for the EZ-420
panel; EZ220Pxy — for EZ-220P & EZ-220PV panels; and the
EZSPPxy —for the EZ-SP Set Point Panel. The “x” represents
the major revision of the fi rmware (e.g., A). “y” represents the
minor revision (e.g., 1). Make sure that you select the correct
fi rmware.hex fi le for your type panel, and send the upgrade
to the panel.
4. Select the appropriate COM port under Port Selected (if
necessary) and click on the Start button to begin downloading
the fi rmware to the EZSeries Text Panel. A status bar will let
you know when the upgrade is complete. Click on Close when
complete.
When you initialize the Upgrade Firmware process, the EZSeries Text
Panel Message display will read SELF TESTING. When the download
begins, the display will read LOADING EXEC. When the download is
complete, the panel will enter the Run Mode.
If the message INCOMPA TIBLE EXEC is displayed on the panel while the
Upgrade is in process, it means that the wrong fi rmware fi le has been sent
to the panel. You will also receive an error message from the EZSeries
Text Panel Programming Software, as shown below. If this happens, do
the following:
31
Page 38

Programming Software Getting Started Manual
1. Click on the OK button on the Error Message.
2. Click on the Cancel button on the Downloading Firmware
window.
3. Click on Upgrade Firmware to start the process over, being
careful to select the correct fi rmware.hex fi le.
Upgrade Firmware, when
you press the Start button,
the panel will display SELF
TESTING while the upgrade
is initializing.
If you get the message,
INCOMPATIBLE EXEC, you
have sent the wrong fi rmware
file. Exit all windows and
start the Upgrade Firmware
process again, being careful
to select the correct fi le.
When the download begins,
the panel will display LOADING
EXEC.
32
Page 39

Programming Software Getting Started Manual
Upgrade MUX Firmware
System)
There may be occasional upgrades to the EZ Multiplexer internal software,
also referred to as the Exec or Firmware. Check www.EZAutomation.net
periodically for information about software and fi rmware upgrades.
Download the fi le in the same way you would the panel fi rmware.
Remember to set the EZ Multiplexer Mode Switch on the front panel to
PROGRAM Mode.
(this is available if project is a Multi-Panel
33
Page 40

Programming Software Getting Started Manual
View Menu
Toolbar
Click on T ool Bar (Standard Tool Bar) to open or close the tool bar that
appears in the main confi guration window.
Status Bar
The Status Bar is located at the bottom of the Main Confi guration Screen
and shows the status of the current screen. It provides information about
a tool bar item on the main confi guration screen that the pointer passes
over.
Port Menu
COM1
COM2
COM3
COM4
The Port Menu allows you to view the current port, or change to another
COM port on your computer. Select the port that is connected to the
EZSeries Text Panel. Choose from COM1, COM2, COM3, or COM4.
Window Menu
New Window
Click here to open a new window.
Cascade
Click here to view open fi les in the window. Screens will cascade down
window, overlapping each other, but with their title bars in view. This is
helpful when you are making changes to two or more systems at the same
time. Click on the title bar of one of the screens to bring it to the front.
The title bar is grayed out in screens that are not currently active.
Tile
Click here to view open screen fi les in the window. Screens will be
arranged within the window. The title bar is grayed out in screens that
are not currently active.
Arrange Icons
Click on this to rearrange minimized project windows ( icons) within the
main window.
Active Windows
This is a list of the screens that are currently open. Click on a screen in
this list to bring it into view. A check mark will appear in front of the active
screen in this list.
34
Page 41

Programming Software Getting Started Manual
Help Menu
Help Topics
Click on Help Topics to view the help topics for EZSeries Text Panel
Programming Software. The help window is in Windows 2000 format.
Use the Contents tab to view help topics by category . Click on the Index
tab to view an alphabetical list of all help topics. Click on the Search tab
and then enter a word or words to search the help topics for.
About EZSeries Text Panels
Click on About EZSeries Text Panel for copyright, manufacturer, and
version number of the EZSeries Text Panel Programming Software.
35
Page 42

Programming Software Getting Started Manual
This page intentionally left blank.
36
Page 43

Programming Software Getting Started Manual
Index
Symbols
.hex 31
16-character 2
20-character text strings 2
24 VDC Power Supply 3
A
About EZ Seiies Text Panel 35
Active Windows 34
address 11
Adjust Display Contrast 4
annunciator lamps 2
application 4,5
Arrange Icons 34
arrow adjust buttons 2
B
Boot Revision 4
built-in menu system 2
C
Cascade 34
CD ROM Drive 3,5
Clear Memory 29
Close 24
COM1 COM2 COM3 COM4 34
communications
parameters 11
port 4
computer 34
COM port 31
Confi guration 4
Preparing for 4
software 2
Confi gure
Panel System PLC Addresses 12
Confi gure Panel System PLC Addresses
button 12
context sensitive onscreen help 3
copyright 35
CPU 4
CPU link(s) 4
Create Project 21
D
default destination 6
desktop 6
destination folder 6
discrete operations 18
Display Contrast 4
download 5
Downloading Firmware 32
Driver Revision 4
Dynamic 2
E
Error Message 32
Escape 4
Exec 30,33
Exec Revisions 4
Exit 27
EZ-220 2
EZ-220L 2
EZ-SP 2
EZ-TEXT-M 2,3
EZ-TEXT-P-M 3
EZ-TEXT-SP-M 2
EZ-TEXTEDIT 5
EZ-Text Panel User Manuals 2
EZ420xy 31
EZSPPxy 31
EZTEXT-SP-M 3
EZTEXT2xy 31
EZTEXT4xy 31
EZSeries T ext Panel Programming Software
Icon 6
EZTEXTSPxy 31
EZSeries Text Panel Icon 6
EZSeries Text Panel wiring diagrams 3
EZ Serie T ext Panel Programming Software
Icon 6
EZSeries T ext Panel Programming Software
3
F
F1 function key 3
File Menu 23
Close 24
Exit 27
New 23
Open 23
Print 24
Print Preview 24
Print Setup 24
Recent Files 27
I-1
Page 44

Programming Software Getting Started Manual
Save or Save As 24
Firmware 30,33
fi rmware fi les 31
H
Hardware 3
Hardware Revisions 4
Help 3
Topics 3,5,35
windows 3
Help Menu 35
About EZSeries Text Panel 35
Help Topics 35
I
IBM or compatible PC 3
icon 6
icons 34
INCOMPATIBLE EXEC 31
Information 29
input signals 2
Installation Screens 6
Installing EZSeries T ext Panel Programming
Software 5
interactive 2
Internal Software 4,30,33
Introduction to the EZSeries Text Panel 2
L
LCD Display window 2
LCD message display 2
LOADING EXEC 31
Local Messages 2
M
Main Confi guration Screen 21
Main Menu Bar 20
Main Menu Items 23
man-machine interface 2
manufacturer 35
mouse 3
N
New System 21
New Window 34
numeric keypad 2
numeric LED set point display 2
O
Onscreen HELP 3
onscreen prompts 5
operator interface
requirement 4
P
P/N EZ-PGMCBL 8
Panel System PLC Address Setup 12
Panel Hardware Revision 4
Panel Menu 27
Clear Memory 29
Information 29
Read from Panel 28
Upgrade Firmware 30,33
Verify 29
Write to Panel 27
Panel System PLC Address Setup 12
PC requirements 3
personal computer 4
PLC
automation system 2
Cable 3
control program 18
Data Registers 18
HELP 3
port settings 11
PLC Messages 2
PLC Message LED 2
PLC to EZSeries Text Panel Interface 3
pop-up HELP 3
Port Menu 34
COM1 COM2 COM3 COM4 34
Port Selected 31
Print 24
Print Preview 24
BUTTON/LED Information 25
Local Messages 26
PLC Messages 26
project 24
Print Setup 24,26
Programmable Logic Controller (PLC) 3
Programming Cable 3
prompt 5
Pushbuttons 2
R
Read from Panel 28
Recent Files 27
register bits 18
registers 18
I-2
Page 45

Programming Software Getting Started Manual
RS-232C 2
RS-422A/485A 2
Run 5
RUN Mode 4
S
Save or Save As 24
sealed membrane pushbuttons 2
SELF TESTING 31
serial communication 2
serial port 3
Setup 4
Setup.exe 5
SETUP Mode 4
Software 3
Standard Tool Bar 20
static text 2
Status Bar 21,34
Step 3 12
system design 3
T
Technical Support 3
Tile 34
timeout 11
Title Bar 20
Toolbar 34
Tutorial
Step 2, Select PLC 11
U
Upgrade Firmware 30,33
V
Verify 29
version number 35
VGA display 3
view 34
View Menu 34
Status Bar 34
Toolbar 34
W
website 3
Welcome Screen 20
Windows 98 3
Window Menu 34
Active Windows 34
Arrange Icons 34
Cascade 34
I-3
Page 46

Programming Software Getting Started Manual
This page intentionally blank.
I-4
 Loading...