

Page 1
omega.com
e-mail: info@omega.com
For latest product manuals:
omegamanual.info
User’s Guide
D5000 Series
Four Channel Digital Transmitters
MADE IN
Shop online at
Page 2

Servicing North America:
U.S.A.: Omega Engineering, Inc., One Omega Drive, P.O. Box 4047
ISO 9001 Certified
Stamford, CT 06907-0047
Toll-Free: 1-800-826-6342 Tel: (203) 359-1660
FAX: (203) 359-7700 e-mail: info@omega.com
Canada: 976 Bergar
Laval (Quebec), H7L 5A1 Canada
Toll-Free: 1-800-826-6342 TEL: (514) 856-6928
FAX: (514) 856-6886 e-mail: info@omega.ca
For immediate technical or application assistance:
U.S.A. and Canada: Sales Service: 1-800-826-6342/1-800-TC-OMEGA
®
Customer Service: 1-800-622-2378/1-800-622-BEST
®
Engineering Service: 1-800-872-9436/1-800-USA-WHEN
®
Mexico En Español: 001 (203) 359-7803 FAX: 001 (203) 359-7807
Latin America info@omega.com.mx e-mail: espanol@omega.com
Servicing Europe:
Benelux: Managed by the United Kingdom Office
Toll-Free: 0800 099 3344 TEL: +31 20 347 21 21
FAX: +31 20 643 46 43 e-mail: sales@omegaeng.nl
Czech Republic: Frystatska 184
733 01 Karviná, Czech Republic
Toll-Free: 0800-1-66342 TEL: +420-59-6311899
FAX: +420-59-6311114 e-mail: info@omegashop.cz
France: Managed by the United Kingdom Office
Toll-Free: 0800 466 342 TEL: +33 (0) 161 37 29 00
FAX: +33 (0) 130 57 54 27 e-mail: sales@omega.fr
Germany/Austria: Daimlerstrasse 26
D-75392 Deckenpfronn, Germany
Toll-Free: 0800 6397678 TEL: +49 (0) 7056 9398-0
FAX: +49 (0) 7056 9398-29 e-mail: info@omega.de
United Kingdom: OMEGA Engineering Ltd.
ISO 9001 Certified
One Omega Drive, River Bend Technology Centre, Northbank
Irlam, Manchester M44 5BD United Kingdom
Toll-Free: 0800-488-488 TEL: +44 (0) 161 777-6611
FAX: +44 (0) 161 777-6622 e-mail: sales@omega.co.uk
OMEGAnet®Online Service Internet e-mail
omega.com info@omega.com
It is the policy of OMEGA Engineering, Inc. to comply with all worldwide safety and EMC/EMI
regulations that apply. OMEGA is constantly pursuing certification of its products to the European New
Approach Directives. OMEGA will add the CE mark to every appropriate device upon certification.
The information contained in this document is believed to be correct, but OMEGA accepts no liability for any
errors it contains, and reserves the right to alter specifications without notice.
WARNING: These products are not designed for use in, and should not be used for, human applications.
Page 3

D5000 SERIES USERS MANUAL
REVISED: 2/1/11
Omega Engineering
One Omega Drive
P O Box 4047
Stamford, CT 06907
Phone: 1-800-DAS-IEEE
Fax: 203-359-7990
e-mail: das@omega.com
www.omega.com
The information in this publication has been carefully checked and is
believed to be accurate; however, no responsibility is assumed for possible
inaccuracies or omissions. Applications information in this manual is intended as suggestions for possible use of the products and not as explicit
performance in a specific application. Specifications may be subject to
change without notice.
D5000 modules are not intrinsically safe devices and should not be used in
an explosive environment unless enclosed in approved explosion-proof
housings.
Page 4

TABLE OF CONTENTS
Warranty 4
CHAPTER 1 Getting Started
Default Mode 1-1
Quick Hook-Up 1-2
CHAPTER 2 Functional Description
Block Diagram 2-2
CHAPTER 3 Communications
Data Format 3-2
RS-232 3-2
Multi-party Connection 3-3
Software Considerations 3-4
Changing Baud Rate 3-5
Using a Daisy-Chain With a Dumb Terminal 3-5
RS-485 3-6
RS-485 Multidrop System 3-8
CHAPTER 4 Command Set
Table of Commands 4-6
User Commands 4-6
Error Messages 4-14
CHAPTER 5 Setup Information and Command
Command Syntax 5-1
Setup Hints 5-11
CHAPTER 6 Power Supply
CHAPTER 7 Troubleshooting
CHAPTER 8 Calibration
CHAPTER 9 Extended Addressing
Appendix A (ASCII TABLE )
Appendix B D5000 Specifications
Appendix C Factory Values
Page 5

Chapter 1
Getting Started
Default Mode
All D5000 modules contain an EEPROM (Electrically Erasable Programmable Read Only Memory) to store setup information and calibration
constants. The EEPROM replaces the usual array of switches and pots
necessary to specify baud rate, address, parity, etc. The memory is
nonvolatile which means that the information is retained even if power is
removed. No batteries are used so it is never necessary to open the module
case.
The EEPROM provides tremendous system flexibility since all of the
module’s setup parameters may be configured remotely through the communications port without having to physically change switch and pot
settings. There is one minor drawback in using EEPROM instead of
switches; there is no visual indication of the setup information in the module.
It is impossible to tell just by looking at the module what the baud rate,
address, parity and other settings are. It is difficult to establish communications with a module whose address and baud rate are unknown. To
overcome this, each module has an input pin labeled DEFAULT*. By
connecting this pin to Ground, the module is put in a known communications
setup called Default Mode.
The Default Mode setup is: 300 baud, one start bit, eight data bits, one
stop bit, no parity, any address is recognized.
Grounding the DEFAULT* pin does not change any of the setups stored in
EEPROM. The setup may be read back with the Read Setup (RS) command
to determine all of the setups stored in the module. In Default Mode, all
commands are available.
Each channel of the D5000 has its own channel address and all four
channels are enabled in Default Mode. The addresses assigned to a module
must be four consecutive ASCII values, such as 0, 1, 2, 3. A module in
Default Mode will respond to any address except the six identified illegal
values (NULL, CR, $, #, {, }). A dummy address must be included in every
command for proper responses. The ASCII value of the module's first
channel address may be read back with the RS command. A properly
addressed channel can read data values and can modify calibration values,
such as trim span in the Default Mode. However it must be noted that in
Default Mode a module that is addressed with any value other than the four
proper addresss values assigned to it will always respond with the data from
its first channel. For example if a module as described above is addresses
with any character other than 0, 1, 2, 3, it will respond with or modify data
from channel 0.
Setup information in a module may be changed at will with the SetUp (SU)
Page 6
command. Baud rate and parity setups may be changed without affecting
the Default values of 300 baud and no parity. When the DEFAULT* pin is
released, the module automatically performs a program reset and configures itself to the baud rate and parity stored in the setup information.
The Default Mode is intended to be used with a single module connected to
a terminal or computer for the purpose of identifying and modifying setup
values. In most cases, a module in Default Mode may not be used in a string
with other modules.
RS-232 & RS-485 Quick Hook-Up
Software is not required to begin using your D5000 module. We recommend
that you begin to get familiar with the module by setting it up on the bench.
Start by using a dumb terminal or a computer that acts like a dumb terminal.
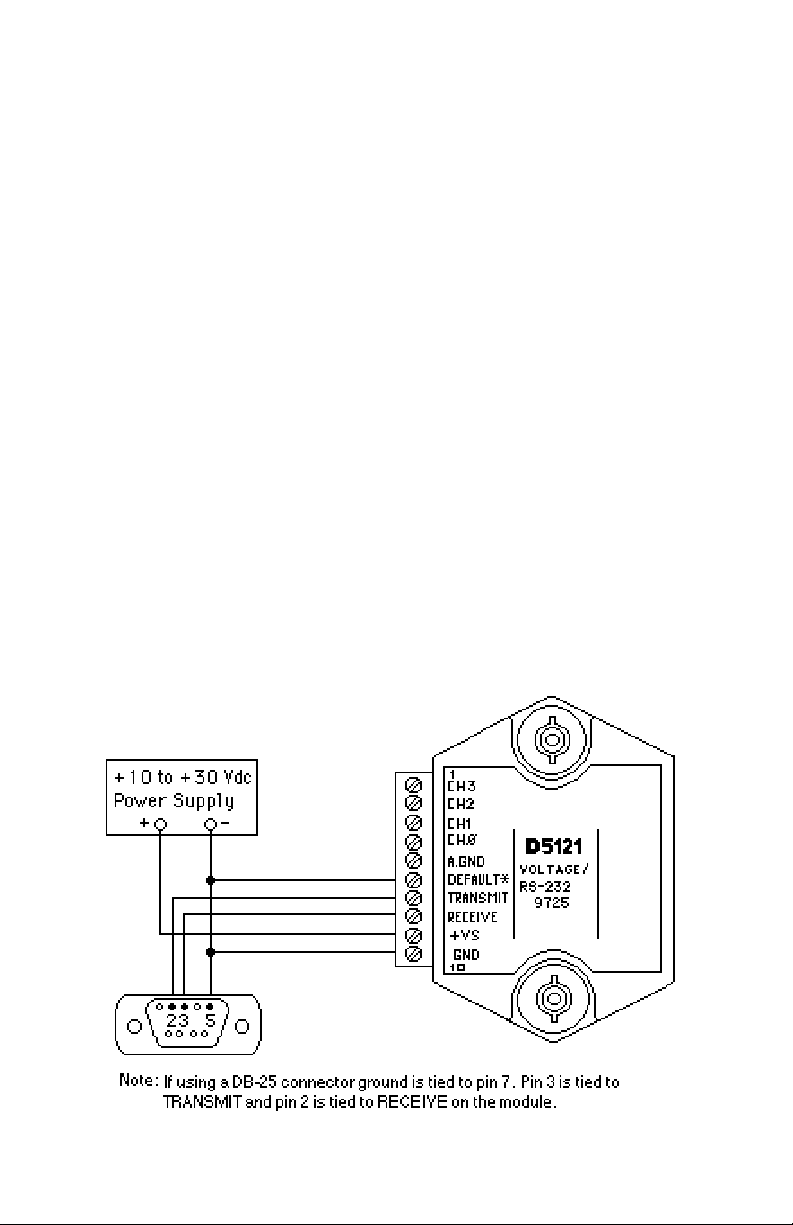
Make the connections shown in the quick hook-up drawings, Figures 1.1 or
1.2. Put the module in the Default Mode by grounding the Default* terminal.
Initialize the terminal communications package on your computer to put it
into the “terminal” mode. Since this step varies from computer to computer,
refer to your computer manual for instructions.
Begin by typing $1RD and pressing the Enter or Return key. The module will
respond with an * followed by the data reading at the input. The data includes
sign, seven digits and a decimal point. For example, if you are using a
thermocouple module and measuring room temperature your reading might
be *+00025.00. The temperature reading will initially be in °C which has
Figure 1.1 RS-232C Quick Hook-Up.
Page 7
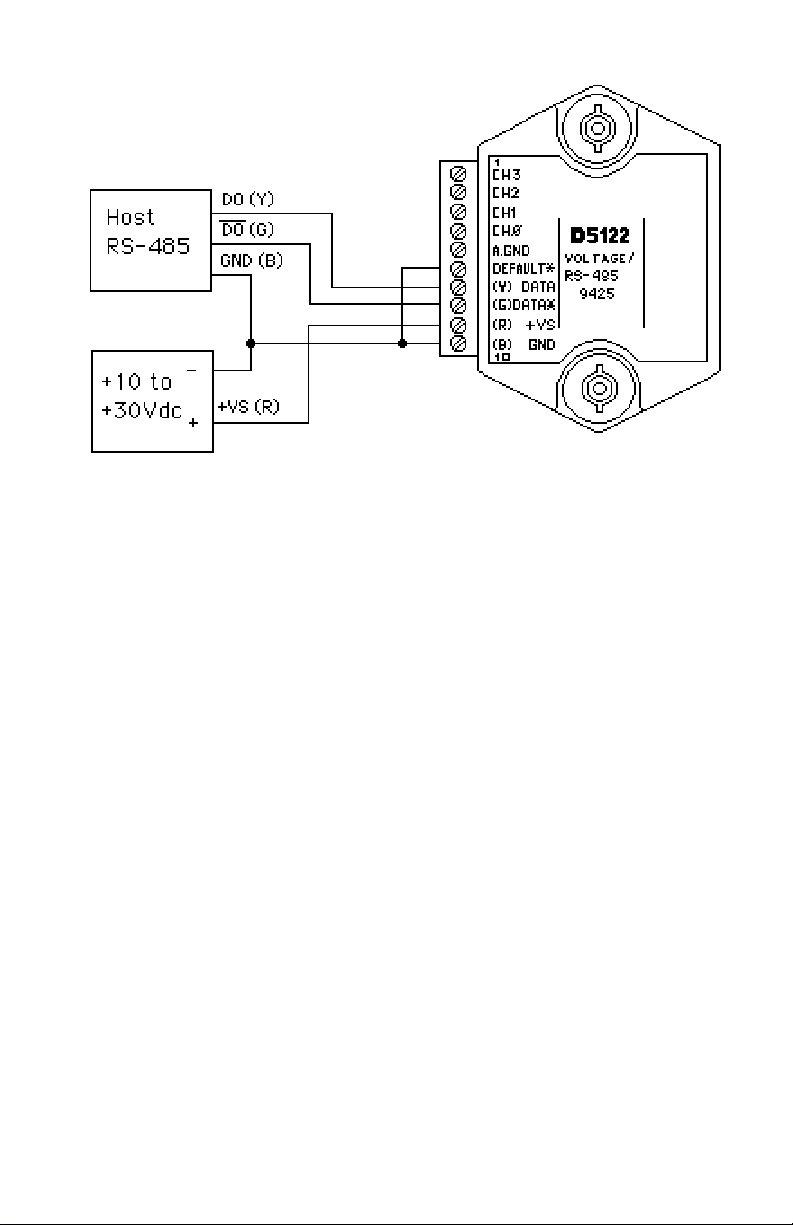
Figure 1.2 RS-485 Quick Hook-Up.
been preset at the factory. Once you have a response from the module you
can turn to the Chapter 4 and get familiar with the command set.
All modules are shipped from the factory with a setup that includes a channel
address of 1, 300 baud rate, no linefeeds, no parity, alarms off, no echo and
two-character delay. Refer to the Chapter 5 to configure the module to your
application.
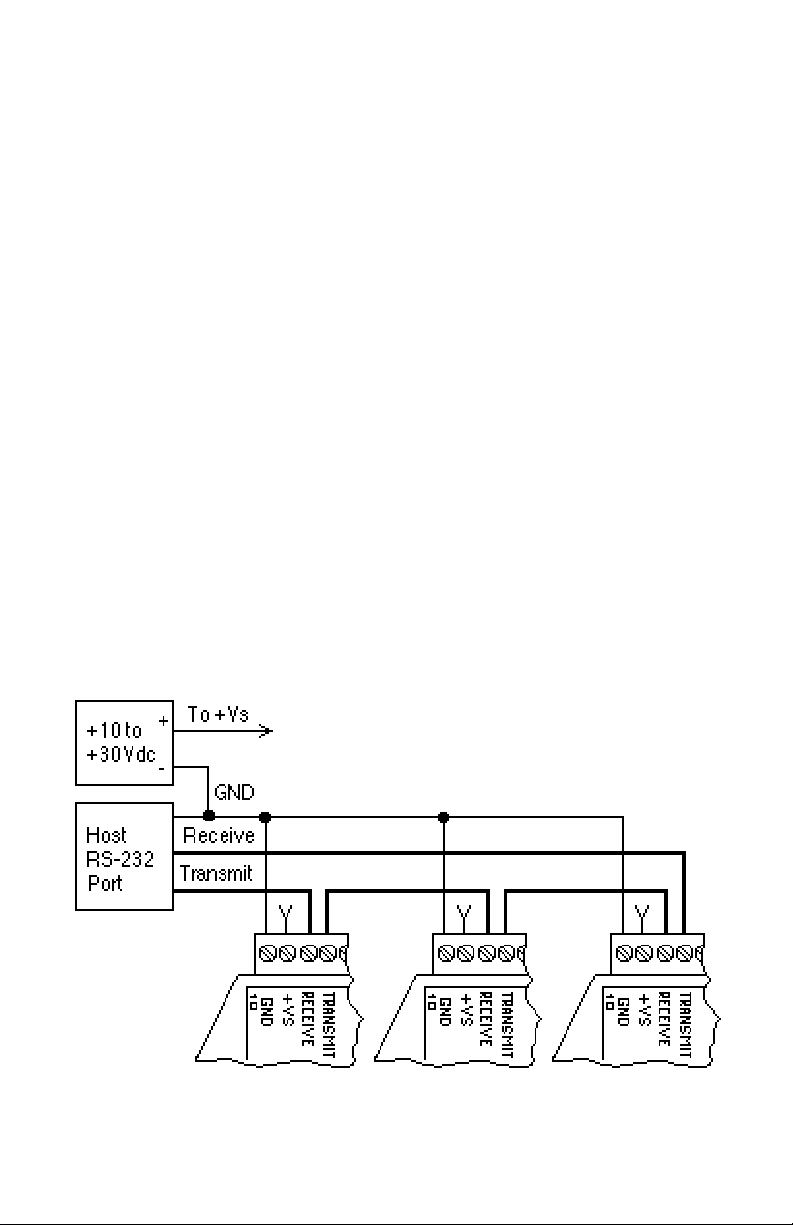
RS-485 Quick Hook-up to a RS-232 port
An RS-485 module may be easily interfaced to an RS-232C terminal for
evaluation purposes. This connection is only suitable for benchtop operation
and should never be used for a permanent installation. Figure 1.3 shows the
hook-up. This connection will work provided the RS-232C transmit output is
current limited to less than 50mA and the RS-232C receive threshold is
greater than 0V. All terminals that use 1488 and 1489 style interface IC’s will
satisfy this requirement. With this connection, characters generated by the
terminal will be echoed back. To avoid double characters, the local echo on
the terminal should be turned off.
If the current limiting capability of the RS-232C output is uncertain, insert a
100Ω to 1kΩ resistor in series with the RS-232 output.
In some rare cases it may be necessary to connect the module’s DATA
pin to ground through a 100Ω to 1kΩ resistor.
Page 8
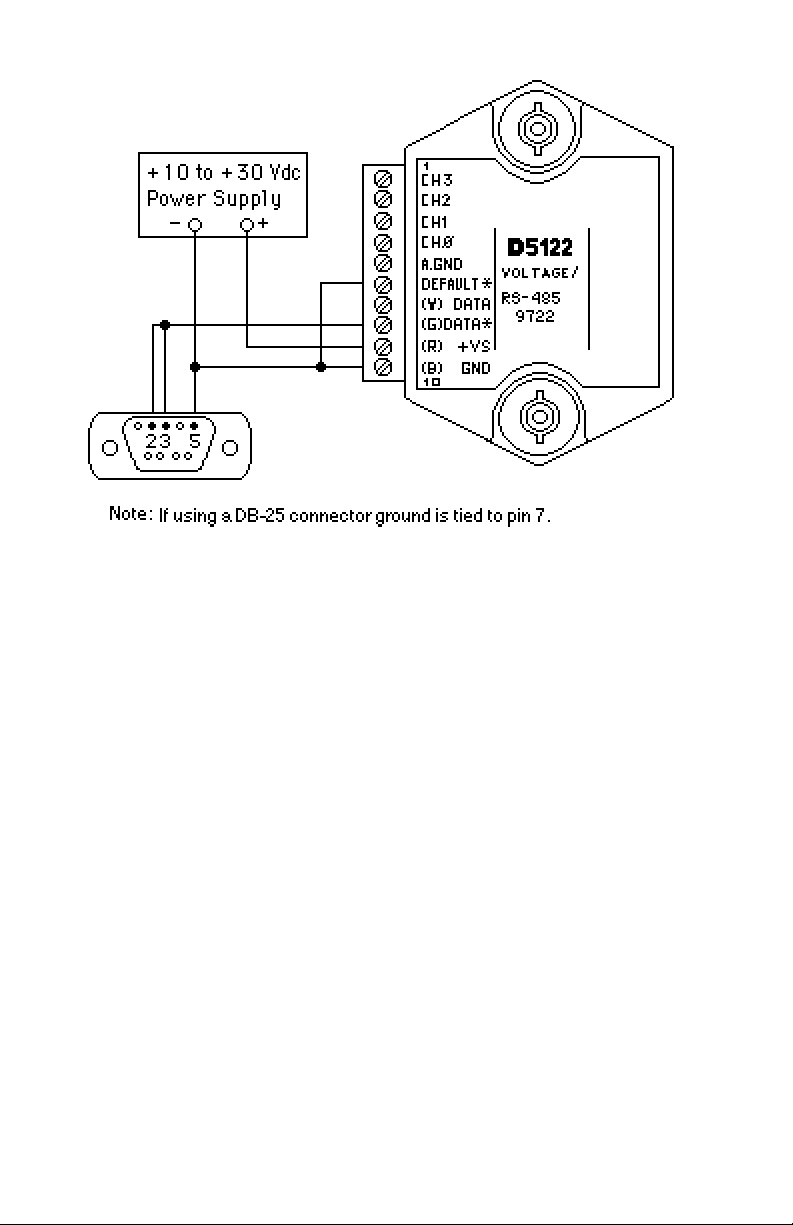
Figure 1.3 RS-485 Quick Hook-Up with RS-232C Port.
Page 9

Chapter 2
Functional Description
A functional diagram of a typical module is shown in Figure 2.1. It is a useful
reference that shows the data path in the module and to explain the function
of many of the module’s commands.
The first step is to acquire the sensor signal and convert it to digital data. In
Figure 2.1, all the signal conditioning circuitry has been lumped into one
block, the analog/digital converter (A/D). Autozero and autocalibration is
performed internally and is transparent to the user.
The full-scale output of each channel may be trimmed using the Trim Span
(TS) command. The TS command adjusts the calibration values for each
channel that stored in the internal EEPROM. The TS command should only
be used to trim the accuracy of the unit with a laboratory standard reference
applied to the sensor input.
The trimmed data flows into either of two digital filters. The filter selection is
performed automatically by the microprocessor after every A/D conversion.
The filter selection depends on the difference of the current A/D output data
and the previous data stored in the output data register. If the least significant
decimal digit from the A/D differs from the old output data by more than 10
counts, the large signal filter is selected. If the change is less than 10 counts,
the small signal filter is used.
The two-filter system allows for different degrees of filtering depending on
the rate of the input change. For steady-state signals, the small-signal filter
averages out noise and small input changes to give a stable steady-state
output. The large-signal filter is activated by step changes or very noisy input
signals. The time constants for the two filters can be specified independently
with the SetUp (SU) command. The filter values are stored in nonvolatile
memory. Typically, the small-signal filter is set to a larger time constant than
the large-signal filter. This gives very good noise rejection along with fast
response to step inputs.
The modules allow user selectable output scaling in °C or °F on temperature
data. This selection is shown in Figure 2.1 as a switch following the digital
filters. The default scaling in the modules is °C, but this may be converted
to °F by feeding the data through a conversion routine. The switch position
is controlled by a bit in the setup data and may be changed with the SetUp
(SU) command. The scaling selection is nonvolatile. In non-temperature
applications, °C should always be selected.
The scaled data is summed with data stored in the Output Offset Register
to obtain the final output value. The output offset is controlled by the user and
has many purposes. The data in the Output Offset Register may be used to
Page 10
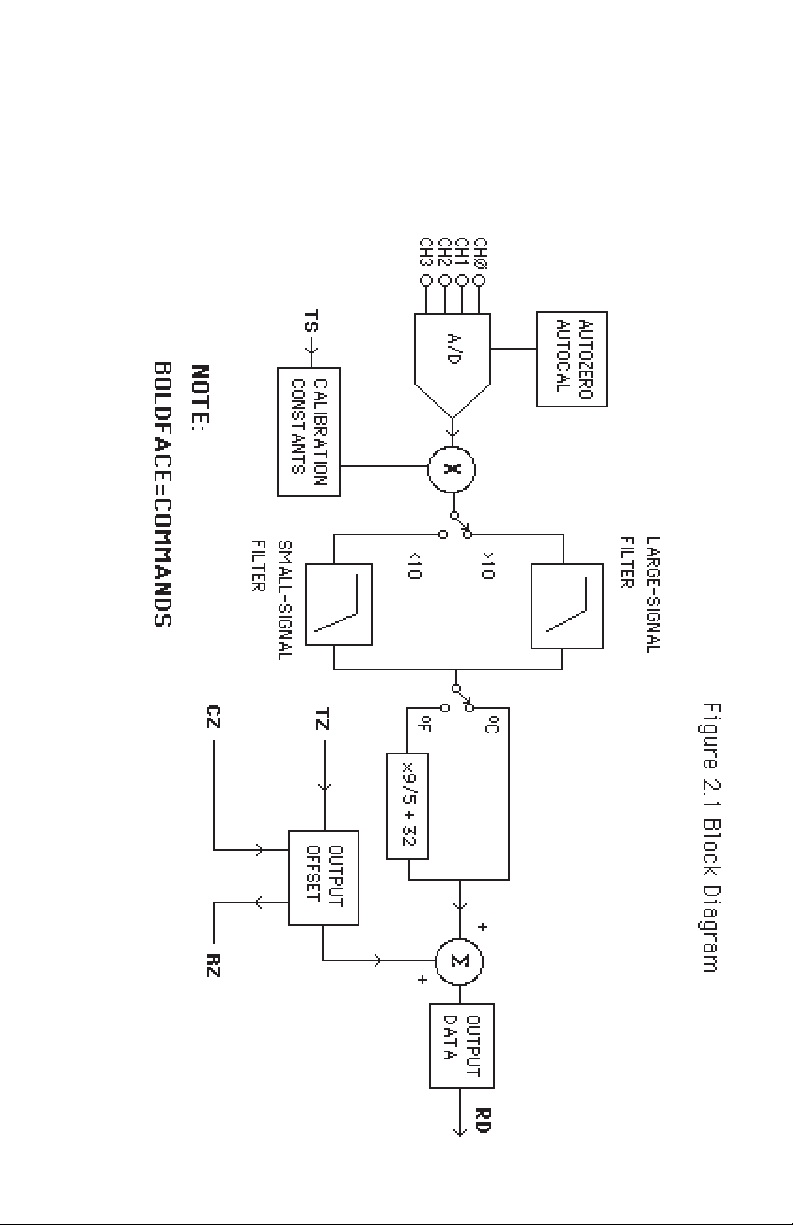
trim any offsets caused by the input sensor. It may be used to null out
undesired signal such as a tare weight. The Trim Zero (TZ) command is used
to adjust the output to any desired value by loading the appropriate value in
the offset register. The offset register data is nonvolatile.
The output data may be read with the Read Data (RD) command.
Page 11

Chapter 3
Communications
Introduction
The D5000 modules has been carefully designed to be easy to interface to
all popular computers and terminals. All communications to and from the
modules are performed with printable ASCII characters. This allows the
information to be processed with string functions common to most high-level
languages such as BASIC. For computers that support RS-232C, no special
machine language software drivers are necessary for operation. The
modules can be connected to auto-answer modems for long-distance
operation without the need for a supervisory computer. The ASCII format
makes system debugging easy with a dumb terminal.
This system allows multiple modules to be connected to a communications
port with a single 4-wire cable. Up to 30 RS-485 modules may be strung
together on one cable. A practical limit for RS-232C units is about ten,
although a string of 30 units is possible. Extended Addressing Mode allows
many more modules to be connected into high channel count systems.
Refer to Extended Addressing Mode in Chapter 9.
The modules communicate with the host on a polling system; that is, each
module responds to its own unique address and must be interrogated by the
host. A module can never initiate a communications sequence. A simple
command/response protocol must be strictly observed to avoid communications collisions and data errors.
Communications to the D5000 modules is performed with two-character
ASCII command codes such as RD to Read Data from the analog input. A
complete description of all commands is given in the Chapter 4. A typical
command/response sequence would look like this:
Command: $1RD
Response: *+00123.00
A command/response sequence is not complete until a valid response is
received. The host may not initiate a new command until the response from
a previous command is complete. Failure to observe this rule will result in
communications collisions. A valid response can be in one of three forms:
1) a normal response indicated by a ‘ * ‘ prompt
2) an error message indicated by a ‘ ? ‘ prompt
3) a communications time-out error
When a module receives a valid command, it must interpret the command,
perform the desired function, and then communicate the response back to
the host. Each command has an associated delay time in which the module
is busy calculating the response. If the host does not receive a response in
Page 12

an appropriate amount of time specified in Table 3.1, a communications
time-out error has occurred. After the communications time-out it is assumed that no response data is forthcoming. This error usually results when
an improper command prompt or address is transmitted. The table below
lists the timeout specification for each command:
Mnemonic Timeout
RD 10 mS
All other commands 100 mS
Table 3.1 Response Timeout Specifications.
The timeout specification is the turn-around time from the receipt of a
command to when the module starts to transmit a response.
Data Format
All modules communicate in standard NRZ asynchronous data format. This format provides one start bit, seven data bits, one parity bit
and one stop bit for each character.
RS-232C
RS-232C is the most widely used communications standard for information
transfer between computing equipment. RS-232C versions of the D5000 will
interface to virtually all popular computers without any additional hardware.
Although the RS-232C standard is designed to connect a single piece of
equipment to a computer, the D5000 system allows for several modules to
be connected in a daisy-chain network structure.The advantages offered by
the RS-232C standard are:
1) widely used by all computing equipment
2) no additional interface hardware in most cases
3) separate transmit and receive lines ease debugging
4) compatible with dumb terminals
However, RS-232C suffers from several disadvantages:
1) low noise immunity
2) short usable distance
3) greater communications delay in multiple-module systems
4) less reliable–loss of one module; communications are lost
5) wiring is slightly more complex than RS-485
6) host software must handle echo characters
Page 13
Single Module Connection
Figure 1.1 shows the connections necessary to attach one module to a host.
Use the Default Mode to enter the desired address, baud rate, and other
setups (see Setups). The use of echo is not necessary when using a single
module on the communications line.
Multi-party Connection
RS-232C is not designed to be used in a multiparty system; however the
D5000 modules can be daisy-chained to allow many modules to be
connected to a single communications port. The wiring necessary to create
the daisy-chain is shown in Figure 3.1. Notice that starting with the host,
each Transmit output is wired to the Receive input of the next module in the
daisy chain. This wiring sequence must be followed until the output of the last
module in the chain is wired to the Receive input of the host. All modules in
the chain must be setup to the same baud rate and must echo all received
data (see Setups). Each module must be setup with its own unique address
to avoid communications collisions (see Setups). In this network, any
characters transmitted by the host are received by each module in the chain
and passed on to the next station until the information is echoed back to the
Receive input of the host. In this manner all the commands given by the host
are examined by every module. If a module in the chain is correctly
addressed and receives a valid command, it will respond by transmitting the
response on the daisy chain network. The response data will be ripple
through any other modules in the chain until it reaches its final destination,
the Receive input of the host.
Figure 3.1 RS-232 Daisy Chain Network.
Page 14

The daisy chain network must be carefully implemented to avoid the pitfalls
inherent in its structure. The daisy-chain is a series-connected structure and
any break in the communications link will bring down the whole system.
Several rules must be observed to create a working chain:
1. All wiring connections must be secure; any break in the wiring,
power, ground or communications breaks the chain.
2. All modules must be plugged into their own connectors.
3. All modules must be setup for the same baud rate.
4. All modules must be setup for echo.
Software Considerations
If the host device is a computer, it must be able to handle the echoed
command messages on its Receive input along with the responses from the
module. This can be handled by software string functions by observing that
a module response always begins with a ‘ * ‘ or ‘ ? ‘ character and ends with
a carriage return.
A properly addressed D5000 module in a daisy chain will echo all of the
characters in the command including the terminating carriage return. Upon
receiving the carriage return, the module will immediately calculate and
transmit the response to the command. During this time, the module will not
echo any characters that appear on its receive input. However, if a character
is received during this computation period, it will be stored in the module’s
internal receive buffer. This character will be echoed after the response
string is transmitted by the module. This situation will occur if the host
computer appends a linefeed character on the command carriage return. In
this case the linefeed character will be echoed after the response string has
been transmitted.
The daisy chain also affects the command timeout specifications. When a
module in the chain receives a character it is echoed by retransmitting the
character through the module’s internal UART. This method is used to
provide more reliable communications since the UART eliminates any
slewing errors caused by the transmission lines. However, this method
creates a delay in propagating the character through the chain. The delay
is equal to the time necessary to retransmit one character using the baud
rate setup in the module:
Baud Rate Delay Baud Rate Delay
300 33.30ms 9600 1.04ms
600 16.70ms 19200 0.52ms
1200 8.33ms 38400 0.26ms
2400 4.17ms 57600 173.6µs
4800 2.08ms 115200 86.8µs
Page 15

One delay time is accumulated for each module in the chain. For example,
if four modules are used in a chain operating at 1200 baud, the accumulated
delay time is 4 X 8.33 mS = 33.3 mS This time must be added to the times
listed in Table 3.1 to calculate the correct communications time-out error.
For modules with RS-232C outputs, the programmed communications
delay specified in the setup data (see Chapter 5) is implemented by sending
a NULL character (00) followed by an idle line condition for one character
time. This results in a delay of two character periods. For longer delay times
specified in the setup data, this sequence is repeated. Programmed
communications delay is seldom necessary in an RS-232C daisy chain
since each module in the chain adds one character of communications
delay.
Changing Baud Rate
It is possible to change the baud rate of an RS-232C daisy chain on-line. This
process must be done carefully to avoid breaking the communications link.
1. Use the SetUp (SU) command to change the baud rate setup on each
module in the chain. Be careful not to generate a reset during this process.
A reset can be caused by the Remote Reset (RR) command or power
interruptions.
2. Verify that all the modules in the chain contain the new baud rate setup
using the Read Setup (RS) command. Every module in the chain must be
setup for the same baud rate.
3. Remove power from all the modules for at least 10 seconds. Restore
power to the modules. This generates a power-up reset in each module and
loads in the new baud rate.
4. Change the host baud rate to the new value and check communications.
5. Be sure to compensate for a different communications delay as a
result of the new baud rate.
Using A Daisy-Chain With A Dumb Terminal
A dumb terminal can be used to communicate to a daisy-chained system.
The terminal is connected in the same manner as a computer used as a host.
Any commands typed into the dumb terminal will be echoed by the daisy
chain. To avoid double characters when typing commands, set the terminal
to full duplex mode or turn off the local echo. The daisy chain will provide the
input command echo.
Page 16

RS-485
RS-485 is a recently developed communications standard to satisfy the
need for multidropped systems that can communicate at high data rates
over long distances. RS-485 is similar to RS-422 in that it uses a balanced
differential pair of wires switching from 0 to 5V to communicate data. RS-485
receivers can handle common mode voltages from -7V to +12V without loss
of data, making them ideal for transmission over great distances. RS-485
differs from RS-422 by using one balanced pair of wires for both transmitting
and receiving. Since an RS-485 system cannot transmit and receive at the
same time it is inherently a half-duplex system. RS-485 offers many
advantages over RS-232C:
1) balanced line gives excellent noise immunity
2) can communicate with D5000 modules at 115200 baud
3) communications distances up to 4,000 feet.
4) true multidrop; modules are connected in parallel
5) can disconnect modules without losing communications
6) up to 30 modules on one line or up to 3721 using Extended Address
Mode and RS-485 repeaters
7) no communications delay due to multiple modules
8) simplified wiring using standard telephone cable
RS-485 does have disadvantages. Very few computers or terminals have
built-in support for this new standard. Interface boards are available for the
IBM PC and compatibles and other RS-485 equipment will become available as the standard gains popularity. An RS-485 system usually requires
an interface.
We offer the A1000 and A2000 interface converters that will convert RS-232
signals to RS-485 or repeat RS-485 signals. The A1000 converters also
include a +24Vdc, one amp power supply for powering D5000 series
modules. The A1000 or A2000 connected as an RS-485 repeater can be
used to extend an existing RS-485 network on one serial port.
Page 17
Page 18

RS-485 Multidrop System
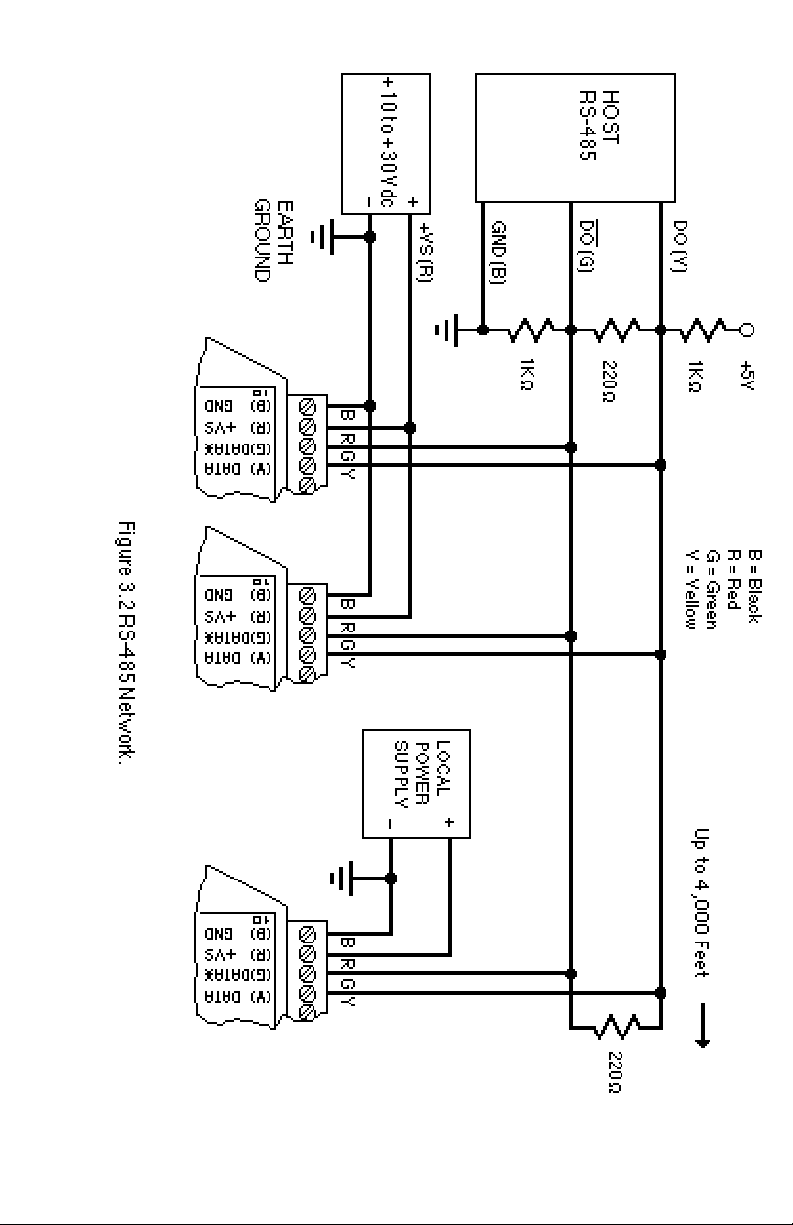
Figure 3.2 illustrates the wiring required for multiple-module RS-485 system. Notice that every module has a direct connection to the host system.
Any number of modules may be unplugged without affecting the remaining
modules. Each module must be setup with a unique address and the
addresses can be in any order. All RS-485 modules must be setup for no
echo to avoid bus conflicts (see Setup). Also note that the connector pins on
each module are labelled with notations (B), (R), (G), and (Y). This
designates the colors used on standard 4-wire telephone cable:
Label Color
(B) GND Black
(R) V+ Red
(G) DATA* (-) Green
(Y) DATA (+) Yellow
This color convention is used to simplify installation. If standard 4-wire
telephone cable is used, it is only necessary to match the labeled pins with
the wire color to guarantee correct installation.
DATA* on the label is the complement of DATA (negative true).
To minimize unwanted reflections on the transmission line, the bus should
be arranged as a line going from one module to the next. ‘Tree’ or random
structures of the transmission line should be avoided. When using long
transmission lines and/or high baud rates, the data lines should be terminated at each end with 200 ohm resistors. Standard values of 180 ohms or
220 ohms are acceptable.
During normal operation, there are periods of time where all RS-485 drivers
are off and the communications lines are in an 'idle' high impedance
condition. During this condition, the lines are susceptible to noise pickup
which may be interpreted as random characters on the communications
line. To prevent noise pickup, all RS-485 systems should incorporate 1K
ohm bias resistors as shown in Figure 3.2. The resistors will maintain the
data lines in a 'mark' condition when all drivers are off.
A1000 series converter boxes have the 1KΩ resistors built-in. The resistors
are user-selectable via dip switch located on the rear panel of the A1000.
Special care must be taken with very long busses (greater than 1000 feet)
to ensure error-free operation. Long busses must be terminated as described above. The use of twisted cable for the DATA and DATA* lines will
greatly enhance signal fidelity. Use parity and checksums along with the ‘#’
form of all commands to detect transmission errors. In situations where
many modules are used on a long line, voltage drops in the power leads
Page 19

becomes an important consideration. The GND wire is used both as a power
connection and the common reference for the transmission line receivers in
the modules. Voltage drops in the GND leads appear as a common-mode
voltage to the receivers. The receivers are rated for a maximum of -7V. of
common-mode voltage. For reliable operation, the common mode voltage
should be kept below -5V.
To avoid problems with voltage drops, modules may be powered locally
rather than transmitting the power from the host. Inexpensive 'calculator'
type power supplies are useful in remote locations. When local supplies are
used, be sure to provide a ground reference with a third wire to the host or
through a good earth ground. With local supplies and an earth ground, only
two wires for the data connections are necessary.
Communications Delay
All D5000 modules with RS-485 outputs are setup at the factory to provide
two units of communications delay after a command has been received (see
Chapter 5). This delay is necessary when using host computers that transmit
a carriage return as a carriage return-linefeed string. Without the delay, the
linefeed character may collide with the first transmitted character from the
module, resulting in garbled data. If the host computer transmits a carriage
return as a single character, the delay may be set to zero to improve
communications response time.
Page 20

Chapter 4
Command Set
The D5000 modules operate with a simple command/response protocol to
control all module functions. A command must be transmitted to the module
by the host computer or terminal before the module will respond with useful
data. A module can never initiate a communications sequence. A variety of
commands exists to exploit the full functionality of the modules. A list of
available commands and a sample format for each command is listed in
Table 4.1.
Command Structure
Each command message from the host must begin with a command prompt
character to signal to the modules that a command message is to follow.
There are four valid prompt characters; a dollar sign character ($) is used to
generate a short response message from the module. A short response is
the minimum amount of data necessary to complete the command. The
second prompt character is the pound sign character (#) which generates
long responses (will be covered later in this chapter). The other two prompt
characters: left curly brace ({ ) and right curly brace ( }) are part of the
Extended Addressing mode described in chapter 10.
The prompt character must be followed by a single address character
identifying the channel of the module to which the command is directed.
Each module attached to a common communications port must be setup
with its own unique addresses so that commands may be directed to the
proper unit. Module addresses are assigned by the user with the SetUp (SU)
command. Printable ASCII characters such as ‘1’ (ASCII $31) or ‘A’ (ASCII
$41) are the best choices for address characters. Each D5000 module
requires from one to four addresses.
The address character is followed by a two or three-character command that
identifies the function to be performed by the module. All of the available
commands are listed in Table 4.1 along with a short function definition. All
commands are described in Chapter 4. Commands must be transmitted as
upper-case characters.
A two-character checksum may be appended to any command message as
a user option. See ‘Checksum’ in Chapter 4 .
All commands must be terminated by a Carriage Return character (ASCII
$0D). (In all command examples in this text the Carriage Return is either
implied or denoted by the symbol ‘CR’.)
In addition to the commmand structure discussed above there is a special
command format called Extended Addressing. This mode uses a different
prompt, either '{' or '}' to distinguish it from the regular command syntax. The
Extended Addressing mode is described in chapter 10.
Page 21

Data Structure
Many commands require additional data values to complete the command
definition as shown in the example commands in Table 4.1. The particular
data necessary for these commands is described in full in the complete
command descriptions.
The most common type of data used in commands and responses is analog
data. Analog data is always represented in the same format for all models
in the D5000 series. Analog data is represented as a nine-character string
consisting of a sign, five digits, decimal point, and two additional digits. The
string represents a decimal value in engineering units. Examples:
+12345.68
+00100.00
-00072.10
-00000.00
When using commands that require analog data as an argument, the full
nine-character string must be used, even if some digits are not significant.
Failure to do this results in a SYNTAX ERROR.
Analog data responses from the module will always be transmitted in the
nine-character format. This greatly simplifies software parsing routines
since all analog data is in the same format for all module types.
In many cases, some of the digits in the analog data may not be significant.
For instance, the D5300 thermocouple input modules feature 1 degree
output resolution. A typical analog data value from this type of module could
be +00123.00. The two digits to the right of the decimal point have no
significance in this particular model. However, the data format is always
adhered to in order to maintain compatibility with other module types.
The Setup command uses hexadecimal representations of data. The data
structure for this command is detailed in the command description.
Write Protection
Many of the commands listed in Table 4.1 are under the heading of ‘Write
Protected Commands’. These commands are used to alter setup data in the
module’s EEPROM. They are write protected to guard against accidental
loss of setup data. All write-protected commands must be preceded by a
Write Enable (WE) command before the protected command may be
executed.
Miscellaneous Protocol Notes
The address character must transmitted immediately after the command
prompt character. After the address character the module will ignore any
Page 22

character below ASCII $23 (except CR). This allows the use of spaces
(ASCII $20) within the command message for better readability if desired.
The length of a command message is limited to 20 printable characters. If
a properly addressed module receives a command message of more than
20 characters the module will abort the whole command sequence and no
response will result.
If a properly addressed module receives a second command prompt before
it receives a CR, the command will be aborted and no response will result.
Response Structure
Response messages from the module begin with either an asterisk ‘ * ‘
(ASCII $2A) or a question mark ‘ ? ‘ (ASCII $3F) prompt. The ‘ * ‘ prompt
indicates acknowledgment of a valid command. The ‘ ? ‘ prompt precedes
an error message. All response messages are terminated with a CR. Many
commands simply return a ‘ * ‘ character to acknowledge that the command
has been executed by the module. Other commands send data information
following the ‘ * ‘ prompt. The response format of all commands may be found
in the detailed command description.
The maximum response message length is 20 characters.
A command/response sequence is not complete until a valid response is
received. The host may not initiate a new command until the response from
a previous command is complete. Failure to observe this rule will result in
communications collisions. A valid response can be in one of three forms:
1) a normal response indicated by a ‘ * ‘ prompt
2) an error message indicated by a ‘ ? ‘ prompt
3) a communications time-out error
When a module receives a valid command, it must interpret the command,
perform the desired function, and the communicate the response back to the
host. Each command has an associated delay time in which the module is
busy calculating the response. If the host does not receive a response in an
appropriate amount of time specified in Table 3.1, a communications timeout error has occurred. After the communications time-out it is assumed that
no response data is forthcoming. This error usually results when an
improper command prompt or address is transmitted.
Long Form Responses
When the pound sign ‘ # ‘ command prompt is used, the module responds
with a ‘long form’ response. This type of response will echo the command
message, supply the necessary response data and will add a two-character
checksum to the end of the message. Long form responses are used when
Page 23

the host wishes to verify the command received by the module. The
checksum is included to verify the integrity of the response data. The ‘ # ‘
command prompt may be used with any command. For example:
Command: $1RD (short form)
Response: *+00072.10
Command: #1RD (long form)
Response: *1RD+00072.10A4 (A4=checksum)
Checksum
Checksum is a two character hexadecimal value appended to the end of a
message. It verifies that the message received is exactly the same as the
message sent. The checksum ensures the integrity of the information
communicated.
Command Checksum
A two-character cumulative checksum may be appended to any command
transmitted to the module as a user option. When a module interprets a
command, it looks for the two extra characters and assumes that it is a
checksum. If the checksum is not present, the module will perform the
command normally. If the two extra characters are present, the module
calculates the checksum for the message. If the calculated checksum does
not agree with the transmitted checksum, the module responds with a ‘BAD
CHECKSUM’ error message and the command is aborted. If the checksums
agree, the command is executed. If the module receives a single extra
character, it responds with ‘SYNTAX ERROR’ and the command is aborted
For example:
Command: $1RD (no checksum)
Response: *+00072.10
Command: $1RDEB (with checksum)
Response: *+00072.10
Command: $1RDAB (incorrect checksum)
Response: ?1 BAD CHECKSUM
Command: $1RDE (one extra character)
Response: ?1 SYNTAX ERROR
Response Checksums
If the long form ‘ # ‘ version of a command is transmitted to a module, a
checksum will be appended to the end of the response. For example:
Page 24

Command: $1RD (short form)
Response: *+00072.10
Command: #1RD (long form)
Response: *1RD+00072.10A4 (A4=checksum)
Checksum Calculation
The checksum is calculated by summing the hexadecimal values of all the
ASCII characters in the message. The lowest order two hex digits of the sum
are used as the checksum. These two digits are then converted to their
ASCII character equivalents and appended to the message. This ensures
that the checksum is in the form of printable characters.
Example: Append a checksum to the command #1RD
Characters: # 1 R D
ASCII hex values: 23 31 52 44
Sum (hex addition) 23 + 31 + 52 + 44 = EA
The checksum is EA (hex). Append the characters E and Ato the end of
the message: #1RDEA
Example: Verify the checksum of a module response *1RD+00072.10A4
The checksum is the two characters preceding the CR: A4
Add the remaining character values:
*1RD+00072. 10
2A + 31 + 52 + 44 + 2B + 30 + 30 + 30 + 37 + 32 + 2E + 31 + 30 = A4
The two lowest-order hex digits of the sum are A4 which agrees with the
transmitted checksum.
The transmitted checksum is the character string equivalent to the calculated hex integer. The variables must be converted to like types in the host
software to determine equivalency.
If checksums do not agree, a communications error has occurred.
If a module is setup to provide linefeeds, the linefeed characters are not
included in the checksum calculation.
Parity bits are never included in the checksum calculation.
Page 25

Table 4.1 D5000 Command Set
Command and Definition Typical Typical
Command Response
Message Message
($ prompt)
RB Read Block of data $1RB *+00072.00
*+00836.00
*+01234.00
*-00932.00
RD Read Data $1RD *+00072.00
REA Read Extended Address $1REA *3031
RID Read IDentification $1RID * BOILER
RMN Read displayed MiNimum $1RMN *-00100.00
RMX Read displayed MaXimum $1RMX *+00025.00
RS Read Setup $1RS *31070142
RZ Read Zero $1RZ *+00000.00
WE Write Enable $1WE *
Write Protected Commands
CZ Clear Zero $1CZ *
ID IDentification $1IDBOILER ROOM *
RR Remote Reset $1RR *
SU Setup Module $1SU31070142 *
TS Trim Span $1TS+00600.00 *
TZ Trim Zero $1TZ+00000.00 *
WEA Write Extended Address $1WEA3031 *
WMNWrite displayed MiNimum $1WMN *
WMX Write displayed MaXimum $1WMX *
D5000 User Commands
Note that in all command and response examples given below, a carriage
return is implied after every character string.
Clear Zero (CZ)
The Clear Zero command clears the channel output offset register value to
+00000.00. The D5000 series modules contain an output offset register for
each channel. Specify the correct channel address with this command to
clear the proper output offset register. This command clears any data
resulting from a Trim Zero (TZ).
Command: $1CZ
Response: *
Command: #1CZ
Response: *1CZF8
Page 26

IDentification (ID)
The IDentification command allows the user to write a message into the
internal nonvolatile memory which may be read back at any time using the
Read IDentification (RID) command. The message may be up to 16
characters long and has no affect on the module operation. Useful information such as the module location, calibration date or model number may be
stored for later retrieval.
The ID command is write protected and checksums are not supported. The
module will abandon any ID command with a message length in excess of
16 characters.
Command: $1IDBOILER ROOM
Response: *
Command: #1IDBOILER ROOM
Response: *1IDBOILER ROOM02
Read Block of data
The Read Block of data command is used to read data values from all used
channels in a D5000 series module. Since the read data command is the
most frequently used command in normal operation the read block of data
command provides a special "shorthand" way of reading data. The read
block of data command decreases communications time by removing the
need to send a command for every response. The data from each channel
is seperated by a carriage return or carriage return and line feed (if lines feed
is enabled) used as a delimiter. This command can be very useful in
spreadsheet applications.
In order to properly parse the data values from each channel the Read Block
command returns an asterisk ("*") followed by a carriage return as response
message for any disabled channel(s). The asterisk response message
applies to both same the long form and short form prompts.
Command: $1RB
Response: *+00072.00
*+00123.00
*+78900.00
*-00072.00
Command: #1RB
Response: *1RB+00072.10A2
*2RB+00123.009F
*3RB+78900.00B2
*4RB-00072.00A6
Page 27

Read Data (RD)
The Read Data command is the basic command used to read the buffered
sensor data. The output buffer (Figure 2.1) allows the data to be read
immediately without waiting for an input A/D conversion. For example:
Command: $1RD
Response: *+00072.00
Command: #1RD
Response: *1RD+00072.10A4
Since the RD command is the most frequently used command in normal
operation, a special shortened version of the command is available. If a
module is addressed without a two-letter command, the module interprets
the string as an RD command.
Command: $1
Response: *+00072.10
Command: #1
Response: *1RD+00072.10A4
Read Extended Address (REA)
The Read Extended Address is used to read back two character address
stored by the Extended Address (EA) command. The response message is
four characters representing the hex ASCII codes for the two-character
address :
Command: $1REA
Response: *3031
Command: #1REA
Response: *1REA3031FA
In this example the '30' and '31' are the hex ASCII codes for the characters
'0' and '1' respectively. The Extended Address is '01'.
Read IDentification (RID)
The Read Identification (RID) command is used to read data previously
stored by the ID command. The RID command response message length
is variable depending on the stored message length. The maximum response length can be up to 25 characters using the long form prompt and
linefeeds enabled.
Command: $1RID
Response: *BOILER ROOM
Command: #1RID
Response: *1RIDBOILER ROOM54
Page 28

Read MaXimum (RMX)
The Read MaXimum (RMX) command reads the displayed output value
corresponding to analog input + full scale. The + full scale displayed data
value may be changed by using the WMX command.
Command: $1RMX
Response: *+00020.00
Command: #1RMX
Response: *1RMX+00020.00FD
Read MiNimum (RMN)
The Read MiNimum (RMN) command reads the displayed output value
corresponding to the analog input - full scale. The - full scale displayed data
value may be changed with the WMN command.
Command: $1RMN
Response: *+00000.00
Command: #1RMN
Response: *1RMN+00000.00F1
Remote Reset (RR)
The reset command allows the host to perform a program reset on the
module’s microprocessor. This may be necessary if the module’s internal
program is disrupted by static or other electrical disturbances. Once a reset
command is received, the module will recalibrate itself. The calibration
process takes approximately 3 seconds. For example:
Command: $1RR
Response: *
Command: #1RR
Response: *1RRFF
Any commands sent to the module during the self-calibration sequence will
result in a NOT READY error.
Read Setup (RS)
The read setup command reads back the setup information loaded into the
module’s nonvolatile memory with the SetUp (SU) command. The response
to the RS command is four bytes of information formatted as eight hex
characters.
Command: $1RS
Response: *31070142
Page 29

Command: #1RS
Response: *1RS3107014292
The response contains the module’s channel address, baud rate and other
parameters. Refer to the setup command (SU), and Chapter 5 for a list of
parameters in the setup information.
When reading the setup with a checksum, be sure not to confuse the
checksum with the setup information.
Read Zero (RZ)
The Read Zero command reads back the value stored in the Output Offset
Register.
Command: $1RZ
Response: *+00000.00
Command: #1RZ
Response: *1RZ+00000.00B0
The data read back from the Output Offset Register may be interpreted in
several ways. The commands that affect this value are: Trim Zero (TZ) and
Clear Zero (CZ).
Setup Command (SU)
Each D5000 module contains an EEPROM (Electrically Erasable Programmable Read Only Memory) which is used to store module setup information
such as address, baud rate, parity, etc. The EEPROM is a special type of
memory that will retain information even if power is removed from the
module. The EEPROM is used to replace the usual array of DIP switches
normally used to configure electronic equipment.
The SetUp command is used to modify the user-specified parameters
contained in the EEPROM to tailor the module to your application. Since the
SetUp command is so important to the proper operation of a module, a whole
section of this manual has been devoted to its description. See Chapter 5.
The SU command requires an argument of eight hexadecimal digits to
describe four bytes of setup information:
Command: $1SU31070182
Response: *
Command: #1SU31070182
Response: *1SU3107018299
Page 30

Trim Span (TS)
The Trim Span command is the basic means of trimming the accuracy of a
D5000 module. The TS command loads a calibration factor into nonvolatile
memory to trim the full-scale output of an analog input channel. The D5000
series modules contain a seperate calibration span trim for each channel.
This command is intended only to compensate for long-term drifts due to
aging of the analog circuits, and has a useful trim value of ±10% of the
nominal calibration set at the factory. It is not to be used to change the basic
transfer function of the module. Full information on the use of the TS
command may be found in Chapter 8.
Command: $1TS+00500.00
Response: *
Command: #1TS+00500.00
Response: *1TS+00500.00B0
Caution! TS is the only command associated with the span trim. There is no
provision to read back or clear errors loaded by the TS command. Misuse
of the TS command may destroy the calibration of the unit which can only
be restored by using laboratory calibration instruments in a controlled
environment. An input signal must be applied when using this command.
Trim Zero (TZ)
The Trim Zero command is used to load a value into a channel Output Offset
Register and null out an offset errors in the output data. Each D5000 series
module contains four output offset registers. Specifiy the correct channel
address in the command string for trim values to be loaded into the proper
output offset register and trim offsets created by sensors. It may also be
used to null out data to create a deviation output.
Example: Assume a D5111 voltage input module is being used and an initial
reading with no input signal applied reveals an initial offset error:
Command: $1RD
Response: *+00005.00
With no signal applied, trim the output to read zero. To trim, use the TZ
command and specify the desired output reading:
Command: $1TZ+00000.00 (zero output)
Response: *
The TZ command will load a data value into the Output Offset Register to
force the output to read zero. The module will compensate for any previous
value loaded into the Output Offset Register. If another output reading is
taken, it will show that the offset has been eliminated:
Command: $1RD
Response: *+00000.00
Page 31

Although the TZ command is most commonly used to null an output to zero,
it may be used to offset the output to any specified value. Assume that with
the previously nulled system we performed this command:
Command: $1TZ-00100.00
Response: *
The new data output with no signal applied would be:
Command: $1RD
Response: *-00100.00
The output is now offset by -100.
The offset value stored by the TZ command is stored in nonvolatile memory
and may be read back with the Read Zero (RZ) command and cleared with
the Clear Zero (CZ) command.
Write Enable (WE)
Each module is write protected against accidental changing of setup, or
span and zero trims. To change any of these write protected parameters, the
WE command must precede the write-protected command. The response
to the WE command is an asterisk indicating that the module is ready to
accept a write-protected command. After the write-protected command is
successfully completed, the module becomes automatically write disabled.
Each write-protected command must be preceded individually with a WE
command. For example:
Command: $1WE
Response: *
Command: #1WE
Response: *1WEF7
If a module is write enabled and the execution of a command results in an
error message other than WRITE PROTECTED, the module will remain
write enabled until a command is successfully completed resulting in an ‘ *
‘ prompt. This allows the user to correct the command error without having
to execute another WE command.
Write Extended Address (WEA)
The Write Extended Address (WEA) command allows the user to set the
two-byte address to be used with Extended Addressing (see Chapter 7). The
argument of the command specifies the hex ASCII values of the two
characters to be used as the Extended Address. For example, if the address
is to be set for characters '01':
Command: $1WEA3031
Response: *
Page 32

Command: #1WEA3031
Response: *1WEA3031FF
Note that '30' and '31' are the hex ASCII values for characters '0' and '1'
respectively.
The EA command is write-protected and must be preceded with a WE
command.
The address data may be read back with the Read Extended Address (REA)
command.
Write MaXimum displayed value (WMX)
Write MiNimumdisplayed value (WMN)
The MaXimum (MX) and MiNimum (MN) commands are used to rescale the
input ranges of D5000 modules to units that may be more appropriate to a
particular application.
Command: $1WMX+00020.00
Response: *
Command: #1WMX+00020.00
Response: *1WMX+00020.00AB
Command: $1WMN+00000.00
Response: *
Command: #1WMN+00000.00
Response: *1WMN+00000.009F
The Write MiNimum displayed value (WMN) command assigns an output
data value corresponding to the -full scale analog output value.
The Write MaXimum displayed value (MX) command assigns an output data
value corresponding to the +full scale analog output value.
Lets say that you want to scale an input to desired engineering units.
For example, many sensor output signals are transmitted as 4 to 20mA
signals. The following example demonstrates scaling a 4 to 20mA signal
to 0 to 100% using a D5251 or D5252 module. The actual input range of
these modules is 0 to 25mA to make it easier to adjust for zero and span
and to allow for drift in the end points of the input.
Since the input range is 0 to 25mA and you want to use a portion of that
range, you must determine the new minimum and maximum values. The
two desired values: 4mA, 0% and 20mA, 100% determine the desired
transfer function. Extrapolate this function to the full-scale range of the
module, which is 0-25mA. This results in endpoints at 0mA, -25% and
25mA, 131.25%.
Page 33

To input the new minimum and maximum values send a Write Enable
command, $1WE, followed by a Write MiNmum displayed value command, $1WMN-00025.00. The response to both commands should be an
*. Send a $1WE command followed by a Write MaXimum displayed
value command, $1WMX+00131.25. The response to both commands
should be an *.
The entire range for all four input channels of the module are rescaled
and all values are read in percent.
ERROR MESSAGES
The D5000 modules feature extensive error checking on input commands
to avoid erroneous operation. Any errors detected will result in an error
message and the command will be aborted.
All error messages begin with “?”, followed by the channel address, a space
and error description. The error messages have the same format for either
the ‘ $ ‘ or ‘ # ‘ prompts. For example:
?1 SYNTAX ERROR
There are eight error messages, and each error message begins with a
different character. It is easy for a computer program to identify the error
without having to read the entire string.
ADDRESS ERROR
There are six ASCII values that are illegal for use as a module address:
NULL ($00), CR ($0D), $ ($24), # ($23), { ($7B) and } ($7D). The ADDRESS
ERROR will occur when an attempt is made to load an illegal address into
a module with the SetUp (SU) command. An attempt to load an address
greater than $7F will produce an error.
BAD CHECKSUM
This error is caused by an incorrect checksum included in the command
string. The module recognizes any two hex characters appended to a
command string as a checksum. Usually a BAD CHECKSUM error is due to
noise or interference on the communications line. Often, repeating the
command solves the problem. If the error persists, either the checksum is
calculated incorrectly or there is a problem with the communications
channel. More reliable transmissions might be obtained by using a lower
baud rate.
COMMAND ERROR
This error occurs when the command is not recognized by the module. Often
this error results when the command is sent with lower-case letters. All valid
commands are upper-case.
Page 34

NOT READY
If a module is reset, it performs a self-calibration routine which takes 2-3
seconds to complete. Any commands sent to the module during the selfcalibration period will result in a NOT READY error. When this occurs, simply
wait a couple seconds and repeat the command.
The module may be reset in three ways: a power-up reset, a Remote Reset
(RR) command, or an internal reset. All modules contain a ‘watchdog’ timer
to ensure proper operation of the microprocessor. The timer may be tripped
if the microprocessor is executing its program improperly due to power
transients or static discharge.
If the NOT READY error persists for more than 30 seconds, check the power
supply to be sure it is within specifications.
PARITY ERROR
A parity error can only occur if the module is setup for 'even' or 'odd' parity.
Usually a parity error results from a bit error caused by interference on the
communications line. Random parity errors are usually overcome by simply
repeating the command. If too many errors occur, the communications
channel may have to be improved or a slower baud rate may be used.
A consistent parity error will result if the host parity does not match the
module parity. In this situation, the easiest solution may be to change the
parity in the host to obtain communication. At this point the parity in the
module may be changed to the desired value with the SetUp (SU) command.
The parity may be changed or turned off by using Default Mode.
SYNTAX ERROR
A SYNTAX ERROR will result if the structure of the command is not correct.
This is caused by having too few or too many characters, signs or decimal
points missing or in the wrong place. Table 4.1 lists the correct syntax for all
the commands.
VALUE ERROR
This error results when an incorrect character is used as a numerical value.
Data values can only contain decimal digits 0-9. Hex values used in the
SetUp (SU) can range from 0-F.
WRITE PROTECTED
All commands that write data into nonvolatile memory are write-protected to
prevent accidental erasures. These commands must be preceded with a
Write Enable (WE) command or else a WRITE PROTECTED error will
result.
Page 35

Chapter 5
Setup Information/SetUp Command
The D5000 modules feature a wide choice of user configurable options
which gives them the flexibility to operate on virtually any computer or
terminal based system. The user options include a choice of baud rate,
parity, address, and many other parameters. The particular choice of
options for a module is referred to as the setup information.
The setup information is loaded into the module using the SetUp (SU)
command. The SU command stores 4 bytes (32 bits) of setup information
into a nonvolatile memory contained in the module. Once the information is
stored, the module can be powered down indefinitely (10 years minimum)
without losing the setup data. The nonvolatile memory is implemented with
EEPROM so there are no batteries to replace.
The EEPROM has many advantages over DIP switches or jumpers normally
used for option selection. The module never has to be opened because all
of the options are selected through the communications port. This allows the
setup to be changed at any time even though the module may be located
thousands of feet away from the host computer or terminal. The setup
information stored in a module may be read back at any time using the Read
Setup command (RS).
The following options can be specified by the SetUp command:
Channel address
Linefeeds
Parity (odd, even, none)
Baud rate (300 to 115,200)
Addressing Mode: Extended/Normal
Fahrenheit / Celsius
Echo
Communication delay (0-6 characters)
Number of displayed digits
Large-signal filter constant
Small-signal filter constant
Each of these options will be described in detail below. For a quick look-up
chart on all options, refer to Tables 5.1-4.
Command Syntax
The general format for the SetUp (SU) command is:
$1SU[byte1][byte 2][byte 3][byte 4]
A typical SetUp command would look like: $1SU31070182.
Notice that each byte is represented by its two-character ASCII equivalent.
In this example, byte 1 is described by the ASCII characters ‘31’ which is the
Page 36

equivalent of binary 0011 0001 (31 hex). The operand of a SU command
must contain exactly 8 hex (0-F) characters. Any deviation from this format
will result in a SYNTAX ERROR. The Appendix contains a convenient hexto-binary conversion chart.
For the purposes of describing the SetUp command, ‘bit 7’ refers to the
highest-order bit of a byte of data. ‘Bit 0’ refers to lowest-order bit:
‘bit number’: 7 6 5 43210
binary data: 0 0 1 10001 = $31 (hex)
The SU command is write protected to guard against erroneous changes in
the setup data; therefore each SU command must be preceded by a Write
Enable (WE) command. To abort an SU command in progress, simply send
a non-hex character (an ‘X’ for example) to generate a SYNTAX ERROR,
and try again.
CAUTION: Care must be exercised in using the SU command. Improper use
may result in changing communications parameters (address, baud rate,
parity) which will result in a loss of communications between the host and
the module. In some cases the user may have to resort to using Default
Mode to restore the proper setups. The recommended procedure is to first
use the Read Setup (RS) command to examine the existing setup data
before proceeding with the SU command.
Byte 1
Byte 1 contains the module (base-channel) address. The module contains
four channels but only the base channel or channel 0 address is specified
in the SetUp message. The microprocessor automatically assigns the next
three consecutive ASCII values as channel addresses for channels one thru
3. The address is stored as the ASCII code for the string character used to
address channel 0 of the module. In our example command $1SU31070080
, the first byte ‘31’ is the ASCII code for the character ‘1’. If our sample
command is sent to a module, the EEPROM will be loaded with the address
‘1’, which in this particular case remains unchanged. To change the module
base-channel address to ‘2’ , byte 1 of the SetUp command becomes ‘32’,
which is the ASCII code for the character ‘2’. Now the command will look like
this: $1SU32070080. When this command is sent, the module basechannel address is changed from ‘1’ to ‘2’ and will no longer respond to
address ‘1’. Keep record of module addresses in order to avoid overlaps in
channel addressing.
When using the SU command to change the address of a module, be sure
to record the new address in a place that is easily retrievable. The only way
to communicate with a module with an unknown address is with the Default
Mode. Note that when communicating with a D5000 module in Default Mode
Page 37

the module will respond with the address value of channel 0 unless the
channel was properly addressed. Therefore if address 'a' is sent to a module
in default mode that is addressed as 0 thru 3, channel 0 data is returned. But
if the same module is addressed as '2', channel 2 data is returned.
The most significant bit of byte 1 (bit 7) must be set to ‘0’. In addition, there
are six ASCII codes that are illegal for use as an address to any channel.
These codes are $00, $0D, $24, $23, $7B, $7D which are ASCII codes for
the characters NUL, CR, $, #, { and }. Using these codes for an address will
cause an ADDRESS ERROR and the setup data will remain unchanged.
This leaves a total of 122 possible addresses that can be loaded with the SU
command. Take care not to assign channel 0 values within three values of
an illegal address value as the microprosser automatically assigns the next
three consecutive vales to the channel 0 value. It is highly recommended
that only ASCII codes for printable characters be used ($21 to $7E) which
greatly simplifies system debugging with a dumb terminal. Refer to Appendix A for a list of ASCII codes. Table 5.1 lists the printable ASCII codes that
may be used as addresses.
Table 5.1 Byte 1 ASCII Printable Characters.
HEX ASCII HEX ASCII HEX ASCII HEX ASCII
21 ! 3A : 51 Q 68 h
22 “ 3B ; 52 R 69 i
25 % 3C < 53 S 6A j
26 & 3D = 54 T 6B k
27 ‘ 3E > 55 U 6C l
28 ( 3F ? 56 V 6D m
29 ) 40 @ 57 W 6E n
2A * 41 A 58 X 6F o
2B+ 42B 59Y 70p
2C , 43 C 5A Z 71 q
2D - 44 D 5B [ 72 r
2E . 45 E 5C \ 73 s
2F/ 46F 5D] 74t
300 47G 5E^ 75u
31 1 48 H 5F _ 76 v
32 2 49 I 60 ‘ 77 w
33 3 4A J 61 a 78 x
34 4 4B K 62 b 79 y
35 5 4C L 63 c 7A z
36 6 4D M 64 d 7B {
37 7 4E N 65 e 7C |
38 8 4F O 66 f 7D }
39 9 50 P 67 g 7E ~
Page 38

Byte 2
Byte 2 is used to configure some of the characteristics of the communications channel; linefeeds, parity, and baud rate.
Linefeeds
The most significant bit of byte 2 (bit 7) controls linefeed generation by the
module. This option can be useful when using the module with a dumb
terminal. All responses from the D5000 are terminated with a carriage return
(ASCII $0D). Most terminals will generate a automatic linefeed when a
carriage return is detected. However, for terminals that do not have this
capability, the D5000 module can generate the linefeed if desired. By setting
bit 7 to ‘1’ the module will send a linefeed (ASCII $0A) before and after each
response. If bit 7 is cleared (0), no linefeeds are transmitted.
When using the ‘#’ command prompt, the linefeed characters are not
included in the checksum calculation.
Parity
Bits 5 and 6 select the parity to be used by the module. Bit 5 turns the parity
on and off. If bit 5 is ‘0’, the parity of the command string is ignored and the
parity bit of characters transmitted by the module is set to ‘1’.
If bit 5 is ‘1’, the parity of command strings is checked and the parity of
characters output by the module is calculated as specified by bit 6.
If bit 6 is ‘0’, parity is even; if bit 6 is ‘1’, parity is odd.
If a parity error is detected by the module, it will respond with a PARITY
ERROR message. This is usually caused by noise on the communications
line.
If parity setup values are changed with the SU command, the response to
the SU command will be transmitted with the old parity setup. The new parity
setup becomes effective immediately after the response message from the
SU command.
Baud Rate
Bits 0-3 specify the communications baud rate. The baud rate can be
selected from ten values between 300 and 115200 baud. Refer to Table 5.2
for the desired code.
The baud rate selection is the only setup data that is not implemented
directly after an SU command. In order for the baud rate to be actually
changed, a module reset must occur. A reset is performed by sending a
Remote Reset (RR) command (see Communications) or powering down.
This extra level of write protection is necessary to ensure that communications to the module is not accidently lost. This is very important when
Page 39

changing the baud rate of an RS-232C string. For more information on
changing baud rate, refer to Chapter 3.
Let’s run through an example of changing the baud rate. Assume our sample
module contains the setup data value of ‘31070080’. Byte 2 is ‘07’. By
referring to the SU command chart we can determine that the module is set
for no linefeeds, no parity, and baud rate 300. If we perform the Read Setup
command with this module we would get:
Command: $1RS
Response: *31070080
Let’s say we wish to change the baud rate to 9600 baud. The code for 9600
baud is ‘0010’ (from Table 5.2). This would change byte 2 to ‘02’. To perform
the SU command we must first send a Write Enable command because SU
is write protected:
Command: $1WE
Response: *
Command: $1SU31020080
Response: *
This sequence of messages is done in 300 baud because that was the
original baud rate of the module. The module remains in 300 baud after this
sequence. We can use the Read Setup (RS) command to check the setup
data:
Command: $1RS
Response: *31020080
Notice that although the module is communicating in 300 baud, the setup
data indicates a baud rate of 9600 (byte 2 = ‘02’). To actually change the
baud rate to 9600, send a Remote Reset (RR) command (RR is write
protected):
Command: $1WE
Response: *
Command: $1RR
Response: *
Up to this point all communications have been sent at 300 baud. The module
will not respond to any further communications at 300 baud because it is now
running at 9600 baud. At this point the host computer or terminal must be set
to 9600 baud to continue operation.
If the module does not respond to the new baud rate, most likely the setup
data is incorrect. Try various baud rates from the host until the module
Page 40

responds. The last resort is to set the module to Default Mode where the
baud rate is always 300.
Setting a string of RS-232C modules to a new baud rate requires special
consideration. Refer to Chapter 3 for instructions.
Bit 4
Bit 4 is used to enable or disable extended addressing mode.
Table 5.2 Byte 2: Linefeed, Parity, Addressing and Baud Rate.
FUNCTION DATA BIT
76543210
LINEFEED 1
NO LINEFEED 0
NO PARITY 0 0
NO PARITY 1 0
EVEN PARITY 0 1
ODD PARITY 1 1
NORMAL ADDRESSING 0
EXTENDED ADDRESSING 1
115200 BAUD 1000
57600 BAUD 1001
38400 BAUD 0000
19200 BAUD 0001
9600 BAUD 0010
4800 BAUD 0011
2400 BAUD 0100
1200 BAUD 0101
600 BAUD 0110
300 BAUD 0111
Byte 3
The default value for this byte is ‘01’.
Channel Enable/Disable
Input channels may be enabled and disabled at will by using the SetUp
command. The factory setting for the D5000 series is all four channels
enabled. However the user can choose to disable one to three unnecessary
channels (channel 0 is always enabled). Disabling channels increases the
sampling rate, for example two channels sample at four times per second
instead of twice per second for four channels. Disabling channels effects the
digital filter, see byte 4 four details. This feature can also be useful in long
term experiments where one or two inputs may not need to be monitored for
a length of time those inputs could simply be disabled until such time as they
were needed again. Note that if a disabled channel in a D5000 is addressed
with a valid command it will not respond.
Page 41

Disable CJC
This function pertains only to the D5300 series of thermocouple input
modules. If the bit is set to ‘1’ the Cold Junction Compensation is disabled.
The module calculates the temperature output with a fixed cold junction
temperature of 0 degrees Celsius. This setup is useful for calibrating the
module or in cases where remote CJC is used. Normally this bit is cleared
to ‘0’.
Celsius/Fahrenheit
The default scaling for temperature output modules is Celsius which is
selected by making bit 3 = 0. To change the scaling to Fahrenheit, set bit 3
to ‘1’. All modules that do not have temperature output must have bit 3
cleared to zero. The scaling factors are operative only on the sensor data;
HI and LO limits and setpoints must be modified by appropriate commands
to reflect a scaling change (see Figure 2.1).
Echo
When bit 2 is set to ‘1’, the D5000 module will retransmit any characters it
has received on the communications line. This option is necessary to ‘daisychain’ multiple RS-232C modules. Echo is optional for systems with a single
RS-232C module. Bit 2 must be cleared to ‘0’ on RS-485 models. See
Chapter 3 for a more complete description.
Delay
Bits 0 and 1 specify a minimum turn-around delay between a command and
the module response. This delay time is useful on host systems that are not
fast enough to capture data from quick-responding commands such as RD.
This is particularly true for systems that use software UART’s. The specified
delay is added to the typical command delays listed in the Software
Considerations section of Chapter 3. Each unit of delay specified by bits 0
and 1 is equal to the amount of time required to transmit one character with
the baud rate specified in byte 2. For example, one unit of delay at 300 baud
is 33.3 mS; for 38.4 kilobaud the delay is 0.26 mS. The number of delay units
is selectable from 0 to 6 as shown in Table 5.3.
In some systems, such as IBM BASIC, a carriage return (CR) is always
followed by a linefeed (LF). The D5000 modules will respond immediately
after a command terminated by a CR and will ignore the linefeed. To avoid
a communications collision between the linefeed and the module response,
the module should be setup to delay by 2 units.
Page 42

Table 5.3 Byte 3 Options.
FUNCTION DATA BIT
76543210
CHANNEL 3 DISABLE 0
CHANNEL 3 ENABLE 1
CHANNEL 2 DISABLE 0
CHANNEL 2 ENABLE 1
CHANNEL 1 DISABLE 0
CHANNEL 1 ENABLE 1
CJC (D5300'S) 0
NO CJC (D5300'S) 1
CELSIUS 0
FAHRENHEIT 1
NO ECHO 0
ECHO 1
NO DELAYS 0 0
2 BYTE TIME DELAYS 0 1
4 BYTE TIME DELAYS 1 0
6 BYTE TIME DELAYS 1 1
Byte 4
This setup byte specifies the number of displayed digits and the digital filter
time constants.
Number of displayed digits
For ease of use, the data outputs of all modules are standardized to a
common 7-digit output consisting of sign, 5 digits, decimal point, and two
more digits. Typical output data looks like: +00100.00. However, best-case
resolution of the A/D converter is 1 part in 32,768. In some cases, the
resolution of the output format is much greater than the resolution of the
measurement system. In such cases, the trailing digits of the response
would display meaningless information. Bits 6 and 7 are used to insert
trailing zeros into the output data to limit the output resolution and mask off
meaningless digits.
Bit 7 Bit 6
0 0 XXXX0.00 (4 displayed digits)
0 1 XXXXX.00 (5 displayed digits)
1 0 XXXXX.X0 (6 displayed digits)
1 1 XXXXX.XX (7 displayed digits)
For example, the D5311 model for thermocouples has 1.0 degree output
resolution. The appropriate number of digits for this module is 5, to mask off
the 0.xx digits which have no meaningful data. In some cases, the user may
want to limit the output resolution to 10 degrees. To do this, select bits 6 and
Page 43

7 to display 4 digits. With this selection, the right-most three digits will always
be set to ‘0’.
The number of displayed digits affects only data received from an RD or ND
command.
Large Signal Filter, Bits 3,4,5
Small Signal Filter, Bits 0,1,2
The modules contain a versatile single-pole, low-pass digital filter to smooth
out unwanted noise caused by interference or small signal variations. The
digital filter offers many advantages over traditional analog filters. The
filtering action is done completely in firmware and is not affected by
component drifts, offsets, and circuit noise typically found in analog filters.
The filter time constant is programmable through the SetUp (SU) command
and can be changed at any time, even if the module is remote from the host.
The digital filter features separate time constants for large and small signal
variations. The Large Signal Filter time constant is controlled by bits 3,4,5.
This time constant is used when large signal variations are present on the
input. The Small Signal Filter time constant is controlled by bits 0,1,2. This
filter time constant is automatically selected when input signal variations are
small. The microprocessor in the module automatically selects the correct
filter constant after every A/D conversion. The constant selected depends
on the magnitude of the change of the input signal and the setup for the
number of digits displayed. The microprocessor always keeps the value of
the last calculated output to compare to a new data conversion. If the new
data differs from the last output by more than ten counts of the last displayed
digit, the large signal time constant is used in the digital filter. If the result of
the most recent A/D conversion differs from the last output value by less than
ten counts of the last displayed digit, the small signal time constant is used.
Let’s look at an example:
The D5451 thermistor module has been changed from a standard resolution
of 0.01 degrees to an output resolution of 0.1 degrees. The number-ofdisplayed-digits setup for this module is now 6 digits, from byte 4 of the
setup data. Therefore, the large signal filter will be selected if a new input
conversion differs from the previous value by > 1.0 degree:
Previous data New data Filter selected
+00098.00 +00098.50 small
+00098.00 +00099.50 large
+00099.00 +00099.90 small
+00099.00 +00097.90 large
-00050.50 -00050.00 small
-00050.50 -00060.00 small
Page 44

If the number of displayed digits is changed to reduce output resolution, filter
selection is also affected. If the number of displayed digits in the previous
example is changed to 5, the output resolution becomes 1.0 degree.
In this case the large signal time constant is used if the new reading differs
from the old by more than 10.0 degrees:
Previous data New data Filter selected
+00090.00 +00095.00 small
+00089.00 +00100.00 large
+00090.00 +00091.00 small
+00090.00 +00075.00 large
-00050.00 -00045.00 small
-00050.00 -00039.00 large
Large Signal Time Constant
The large signal filter time constant is specified by bits 3,4,5 of byte 4. It may
be specified from 0 (no filter) to 64 seconds. The time constant for a firstorder filter is the time required for the output to reach 63% of its final value
for a step input.
Small Signal Time Constant
Bits 0,1, 2 specify the filter time constant for small signals. Its values are
similar to the ones for the large signal filter. Most sensors can benefit from
a small amount of small signal filtering such as T = 1 second. In most
applications, the small signal time constant should be larger than the large
signal time constant. This gives stable readings for steady-state inputs while
providing fast response to large signal changes.
Disabled channels and filtering time constants
Disabling channels will change the digital filter time constants the table
below describes the changes.
Large and Small Signal Channels Enabled
Filter Time Constants 1234
0 0000
1 .25 .5 .65 1
2 .5 1 1.3 2
3 1 2 2.6 4
4 2 4 5.2 8
5 4 8 10.4 16
6 8 16 20.8 32
7 16 32 41.6 64
Page 45

Table 5.4 Byte 4 Displayed Digits and Filter Time Constants.
BYTE 4
FUNCTION DATA BIT
76543210
+XXXX0.00 DISPLAYED DIGITS 0 0
+XXXXX.00 DISPLAYED DIGITS 0 1
+XXXXX.X0 DISPLAYED DIGITS 1 0
+XXXXX.XX DISPLAYED DIGITS 1 1
NO LARGE SIGNAL FILTERING 0 0 0
1 SECOND TIME CONSTANT 0 0 1
2 SECOND TIME CONSTANT 0 1 0
4 SECOND TIME CONSTANT 0 1 1
8 SECOND TIME CONSTANT 1 0 0
16 SECOND TIME CONSTANT 1 0 1
32 SECOND TIME CONSTANT 1 1 0
64 SECOND TIME CONSTANT 1 1 1
NO SMALL SIGNAL FILTERING 0 0 0
1 SECOND TIME CONSTANT 0 0 1
2 SECOND TIME CONSTANT 0 1 0
4 SECOND TIME CONSTANT 0 1 1
8 SECOND TIME CONSTANT 1 0 0
16 SECOND TIME CONSTANT 1 0 1
32 SECOND TIME CONSTANT 1 1 0
64 SECOND TIME CONSTANT 1 1 1
Setup Hints
Until you become completely familiar with the SetUp command, the best
method of changing setups is to change one parameter at a time and to verify
that the change has been made correctly. Attempting to modify all the setups
at once can often lead to confusion. If you reach a state of total confusion,
the best recourse is to reload the factory setup shown in Table 5.5 and try
again, changing one parameter at a time. Use the Read Setup (RS)
command to examine the setup information currently in the module as a
basis for creating a new setup.
For example: Assume you have a D5111 unit and you wish to set the unit
to echo so that it may be used in a daisy-chain (See Communications). Read
out the current setup with the Read Setup command:
Command: $1RS
Response: *310701C2
By referring to Table 5.3, we find that the echo is controlled by bit 2 of byte
3. From the RS command we see that byte 3 is currently set to 01. This is
Page 46

the hexadecimal representation of binary 0000 0001. To set echo, bit 2 must
be set to ‘1’. This results in binary 0000 0101. The new hexadecimal value
of byte 3 is 05. To perform the SU command, use the data read out with the
RS command, changing only byte 3:
Command: $1WE (SU is write-protected)
Response: *
Command: $1SU310705C2
Response: *
Verify that the module is echoing characters and the setup is correct.
By using the RS command and changing one setup parameter at a time, any
problems associated with incorrect setups may be identified immediately.
Once a satisfactory setup has been developed, record the setup value and
use it to configure similar modules.
If you commit an error in using the SetUp command, it is possible to lose
communications with the module. In this case, it may be necessary to use
the Default Mode to re-establish communications.
Table 5.5 Factory Setups by Model.
(All modules from the factory are set for address ‘1’, 300 baud, no parity)
Model Setup Message
D511X, D515X, D525X 310701C2
D512X 31070182
D513X, D514X 31070142
D53XX, 31070142
D545X 31070182
Page 47

Chapter 6
Power Supply
D5000 modules may be powered with an unregulated +10 to +30Vdc.
Power-supply ripple must be limited to 5V peak-to-peak, and the instantaneous ripple voltage must be maintained between the 10 and 30 volt limits
at all times. The modules contain a low voltage detection circuit that shuts
down all circuits in the module at approximately 9.5 Vdc. All power supply
specifications are referred to the module connector; the effects of line
voltage drops must be considered when the module is powered remotely.
All D5000 modules employ an on-board switching regulator to maintain
good efficiency over the 10 to 30 volt input range; therefore the actual current
draw is inversely proportional to the line voltage. D5000 modules without
sensor excitation consume a maximum of .75 watts and this figure should
be used in determining the power supply current requirement. For example,
assume a 24 volt power supply will be used to power four modules. The total
power requirement is 4 X .75 = 3 watts. The power supply must be able to
provide 3 / 24 = 0.125 amps.
The low voltage detection circuit shuts down the module at approximately
9.5Vdc. If the module is interrogated while in a low power supply condition,
the module will not respond. Random NOT READY error messages could
indicate that the power supply voltage is periodically drooping below the 10V
minimum.
Small systems may be powered by using wall-mounted calculator-type
modular power supplies. These units are inexpensive and may be obtained
from many retail electronics outlets.
For best reliability, modules operated on long communications lines (>500
feet) should be powered locally using small calculator-type power units. This
eliminates the voltage drops on the Ground lead which may interfere with
communications signals. In this case the V+ terminal is connected only to the
local power supply. The Ground terminal must be connected back to the host
Page 48

Chapter 7
Troubleshooting
Symptom:
RS-232 Module is not responding to commands
RS-485 Module is not responding to commands
Error in displayed value.
Read Data (RD) values are factor of two times normal values.
Module responds with ?1 COMMAND ERROR to every command.
Characters in each response message appear as graphics characters
RS-232 Module response message preceeded by <NULL> character.
• RS-232 Module is not responding to commands
1. Using a voltmeter, measure the power supply voltage at the
+Vs and GND terminals to verify the power supply voltage is constantly
between +10 and +30Vdc.
2. Verify using an ohmmeter that there are no breaks in the
communications data lines.
3. Connect the module to the host computer and power-up each device
(module and computer) then using a voltmeter measure the voltage between RECEIVE and GND. This voltage should be approximately - 10Vdc.
Repeat the measurement between TRANSMIT and GND terminals and
confirm the voltage value to be approximately -10Vdc. If either of the two
readings is approximately 0.0Vdc then the communications data lines are
wired backwards. Proper communications levels on both TRANSMIT and
RECEIVE terminals should idle at -10Vdc.
4. If you are using a serial communications converter (A1000) ensure that
the communications Baud Rate switch is set to the proper Baud Rate value.
5. Confirm software communications settings in Host computer match
those values being used by the connected module(s).
6. If the Baud Rate value being used in the application is greater than 300
Baud and the module will only communicate 300 Baud then make sure that
the DEFAULT* terminal is not connected to Ground (GND).
7. If the module(s) are being used in a RS-232 daisy-chain communications configuration then ensure that the "Echo Bit" is enabled in the
setup(SU) message of each module.
8. If the problem is not corrected after completing the steps above then
connect the module by itself to a Host computer as outlined in Chapter 1.0
under "Quick Hook-up". Start the supplied Utility software and please call the
factory for further assistance.
Page 49

• RS-485 Module is not responding to commands
1. Perform steps 1, 2, 4, 5 and 6 listed above.
2. Ensure that module RS-485 "Data" line (module terminal pin #7) is
connected to the Host RS-485 "Data+" line.
3. Ensure that module RS-485 "Data*" line (module terminal pin #8) is
connected to the Host RS-485 "Data-" line.
4. If the problem is not corrected after completing the steps above then
connect the module by itself to a Host computer as outlined in Chapter 1.0
under "Quick Hook-up". Start the supplied Utility software and please call the
factory for further assistance.
• Error in displayed value
Make sure that the °C/°F bit is set to a 0. Otherwise the values will be
scaled by the °F equation.
• Read Data (RD) values are factor of two times normal values
Ensure that the Degree C/Degree F bit in the setup (SU) message is set
to Degree C.
• Module responds with ?1 COMMAND ERROR to every command
Ensure that characters in the command message are uppercase char-
acters. All commands consist of uppercase characters only.
• Characters in each response message appear as graphics characters
1. Set the communications software parity setting to "M" for 'MARK' parity
type and 7 data bits. Or, utilize any parity type in both the module and
software other than "NO" parity.
2. In custom written software routines, mask off the most significant bit of
each received character to logic "0". Thus forcing the received character to
7-bit ASCII value.
• RS-232 Module response message preceeded by <NULL> character
Set "Delay" value to "NO DELAYS" in setup message.
Page 50

Chapter 8
Calibration
The D5000 module is initially calibrated at the factory and has a recommended calibration interval of one year. Seperate calibration constants for
each channel are stored in the EEPROM and may be trimmed using the Trim
Span (TS) and Trim Zero (TZ) commands. There are no pots to adjust.
Calibration procedure is as follows.
Voltage and current inputs: clear the output offset register using the Clear
Zero (CZ) command. Zero trims are not neccessary due to the built-in autozero function. Apply a known calibrated voltage or current to the input of the
module. The calibrated stimulus should be adjusted to be near 90% of the
full scale output of the modules for best results. Obviously, the accuracy of
the calibrated voltage or current must be better than the rated accuracy of
the module, which in most cases is 0.02% of full scale. Use the Read Data
(RD) command to obtain an output reading. If the output corresponds to the
applied input, no calibration is necessary. If the output is in overload, check
the circuit connections or use a different input value to obtain an output within
the operating range of the module.
To trim the output, use the Trim Span (TS) command. The argument of the
TS command should correspond to the desired module output. After
performing the TS command, verify the trim with the RD command. For
example to trim a channel in a D5121 module:
1. Clear the output offset register.
Command: $1WE
Response: * (CZ is write protected)
Command: $1CZ
Response: *
2. Apply an input voltage near 90% of rated full scale. In this case we will use
a +900mV input voltage that is accurate to at least 0.02%. Obtain an output
reading.
Command: $1RD
Response: *+00900.30
In this case, the output of the module is off by 300µV. To trim:
Command: $1WE
Response: * (TS is write protected)
Command: $1TS+00900.00
Response: *
Page 51

This sequence will trim the output to +00900.00. Verify:
Command: $1RD
Response: *+00900.00
This same procedure should be repeated for all four channels in the module.
The calibration procedure is complete when all four channels have been
calibrated.
Table 9.1 Calibration Values
Model Input Stimulus Output Data °F
D511X +90mV +00090.00
D512X +900mV +00900.00
D513X +4.5V +04500.00
D514X +9V +09000.00
D515X +90V +00090.00
D525X +20mA +00020.00
D531X +39.13mV +00700.00 +01292.00
D532X +41.269mV +01000.00 +01832.00
D533X +17.816mV +00350.00 +00662.00
D534X +68.783mV +01000.00 +01832.00
D545X 206.1Ω +00090.00 +00194.00
Page 52

Chapter 9
Extended Addressing
The D5000 may be configured to a special command format called
Extended Addressing. This mode uses a different prompt, either '{' or '}'
to distinguish it from the regular command syntax. The major difference
in syntax for the Extended Addressing mode is that it uses a two-character address. A typical command in Extended Address mode would look
like this:
Command: {01WE
Response: *
Both the command and response messages are terminated with a
carriage return. Note that the command uses a two-character address,
'01.'
There are two benefits to using Extended Addressing with the D5000:
1) Greatly expanded addressing capability.
2) Allow for a more structured addressing method in
large systems.
With single-byte addressing of the normal command structure, address
space is limited to 122 address values. Extended addressing mode uses
a two-byte address and each byte has 122 possible address values.
Therefore, the Extended Addressing mode supports 14884 channel
addresses or 3721 D5000 series modules (14884/4 chans per module).
Extended Address Syntax
The command syntax used with Extended Addressing is quite similar to
the normal protocol. The Extended Address commands are initiated with
a '{' character (left curly brace, ASCII $7B), or a '}' character (right curly
brace, ASCII $7E). The '{' prompt is analogous to the '$' prompt in that it
returns the shortest possible response to complete the command. The '}'
prompt is similar to the '#' prompt in that the command is echoed and a
checksum is generated along with the other data necessary to complete
the response. The '*' response prompt is used in all command forms.
The Extended Address commands use a two-character ASCII address,
each character may be one of 122 legal possibilities. Illegal characters
are: NULL ($00), CR ($0D), $ ($24), # ($23), { ($7B), and } ($7E).
Page 53

Command examples with Extended Address '01':
Command: {01WE
Response: *
Command: }01WE
Response: *01WE27
Command: {01RS
Response: *31070000 (typical)
Command: }01RS
Response: *01RS31070000BB (typical)
Checksums may be appended to commands:
Command: {01WE78
Response: *
All commands that are available with single-byte addressing may be
accessed with Extended Addressing, and vice-versa.
Page 54

Appendix A
ASCII Table
Table of ASCII characters (A) and their equivalent values in Decimal (D),
Hexadecimal (Hex), andBinary.Claret (^) represents Control function.
A D Hex Binary D Hex Binary
^@ 0 00 00000000 128 80 10000000
^A 1 01 00000001 129 81 10000001
^B 2 02 00000010 130 82 10000010
^C 3 03 00000011 131 83 10000011
^D 4 04 00000100 132 84 10000100
^E 5 05 00000101 133 85 10000101
^F 6 06 00000110 134 86 10000110
^G 7 07 00000111 135 87 10000111
^H 8 08 00001000 136 88 10001000
^I 9 09 00001001 137 89 10001001
^J 10 0A 00001010 138 8A 10001010
^K 11 0B 00001011 139 8B 10001011
^L 12 0C 00001100 140 8C 10001100
^M 13 0D 00001101 141 8D 10001101
^N 14 0E 00001110 142 8E 10001110
^O 15 0F 00001111 143 8F 10001111
^P 16 10 00010000 144 90 10010000
^Q 17 11 00010001 145 91 10010001
^R 18 12 00010010 146 92 10010010
^S 19 13 00010011 147 93 10010011
^T 20 14 00010100 148 94 10010100
^U 21 15 00010101 149 95 10010101
^V 22 16 00010110 150 96 10010110
^W 23 17 00010111 151 97 10010111
^X 24 18 00011000 152 98 10011000
^Y 25 19 00011001 153 99 10011001
^Z 26 1A 00011010 154 9A 10011010
^[ 27 1B 00011011 155 9B 10011011
^\ 28 1C 00011100 156 9C 10011100
^] 29 1D 00011101 157 9D 10011101
^^ 30 1E 00011110 158 9E 10011110
^_ 31 1F 00011111 159 9F 10011111
32 20 00100000 160 A0 10100000
! 33 21 00100001 161 A1 10100001
“ 34 22 00100010 162 A2 10100010
Page 55

A D Hex Binary D Hex Binary
# 35 23 00100011 163 A3 10100011
$ 36 24 00100100 164 A4 10100100
% 37 25 00100101 165 A5 10100101
& 38 26 00100110 166 A6 10100110
‘ 39 27 00100111 167 A7 10100111
( 40 28 00101000 168 A8 10101000
) 41 29 00101001 169 A9 10101001
* 42 2A 00101010 170 AA 10101010
+ 43 2B 00101011 171 AB 10101011
, 44 2C 00101100 172 AC 10101100
- 45 2D 00101101 173 AD 10101101
. 46 2E 00101110 174 AE 10101110
/ 47 2F 00101111 175 AF 10101111
0 48 30 00110000 176 B0 10110000
1 49 31 00110001 177 B1 10110001
2 50 32 00110010 178 B2 10110010
3 51 33 00110011 179 B3 10110011
4 52 34 00110100 180 B4 10110100
5 53 35 00110101 181 B5 10110101
6 54 36 00110110 182 B6 10110110
7 55 37 00110111 183 B7 10110111
8 56 38 00111000 184 B8 10111000
9 57 39 00111001 185 B9 10111001
: 58 3A 00111010 186 BA 10111010
; 59 3B 00111011 187 BB 10111011
< 60 3C 00111100 188 BC 10111100
= 61 3D 00111101 189 BD 10111101
> 62 3E 00111110 190 BE 10111110
? 63 3F 00111111 191 BF 10111111
@ 64 40 01000000 192 C0 11000000
A 65 41 01000001 193 C1 11000001
B 66 42 01000010 194 C2 11000010
C 67 43 01000011 195 C3 11000011
D 68 44 01000100 196 C4 11000100
E 69 45 01000101 197 C5 11000101
F 70 46 01000110 198 C6 11000110
G 71 47 01000111 199 C7 11000111
H 72 48 01001000 200 C8 11001000
I 73 49 01001001 201 C9 11001001
J 74 4A 01001010 202 CA 11001010
K 75 4B 01001011 203 CB 11001011
Page 56

A D Hex Binary D Hex Binary
L 76 4C 01001100 204 CC 11001100
M 77 4D 01001101 205 CD 11001101
N 78 4E 01001110 206 CE 11001110
O 79 4F 01001111 207 CF 11001111
P 80 50 01010000 208 D0 11010000
Q 81 51 01010001 209 D1 11010001
R 82 52 01010010 210 D2 11010010
S 83 53 01010011 211 D3 11010011
T 84 54 01010100 212 D4 11010100
U 85 55 01010101 213 D5 11010101
V 86 56 01010110 214 D6 11010110
W 87 57 01010111 215 D7 11010111
X 88 58 01011000 216 D8 11011000
Y 89 59 01011001 217 D9 11011001
Z 90 5A 01011010 218 DA 11011010
[ 91 5B 01011011 219 DB 11011011
\ 92 5C 01011100 220 DC 11011100
] 93 5D 01011101 221 DD 11011101
^ 94 5E 01011110 222 DE 11011110
_ 95 5F 01011111 223 DF 11011111
‘ 96 60 01100000 224 E0 11100000
a 97 61 01100001 225 E1 11100001
b 98 62 01100010 226 E2 11100010
c 99 63 01100011 227 E3 11100011
d 100 64 01100100 228 E4 11100100
e 101 65 01100101 229 E5 11100101
f 102 66 01100110 230 E6 11100110
g 103 67 01100111 231 E7 11100111
h 104 68 01101000 232 E8 11101000
i 105 69 01101001 233 E9 11101001
j 106 6A 01101010 234 EA 11101010
k 107 6B 01101011 235 EB 11101011
l 108 6C 01101100 236 EC 11101100
m 109 6D 01101101 237 ED 11101101
n 110 6E 01101110 238 EE 11101110
o 111 6F 01101111 239 EF 11101111
p 112 70 01110000 240 F0 11110000
q 113 71 01110001 241 F1 11110001
r 114 72 01110010 242 F2 11110010
s 115 73 01110011 243 F3 11110011
t 116 74 01110100 244 F4 11110100
Page 57

A D Hex Binary D Hex Binary
u 117 75 01110101 245 F5 11110101
v 118 76 01110110 246 F6 11110110
w 119 77 01110111 247 F7 11110111
x 120 78 01111000 248 F8 11111000
y 121 79 01111001 249 F9 11111001
z 122 7A 01111010 250 FA 11111010
{ 123 7B 01111011 251 FB 11111011
| 124 7C 01111100 252 FC 11111100
} 125 7D 01111101 253 FD 11111101
~ 126 7E 01111110 254 FE 11111110
127 7F 01111111 255 FF 11111111
Page 58

Appendix B
D5000 Specifications
Specifications (typical @ +25° C and nominal power supply unless
otherwise noted.)
Analog
• Four analog input channels.
• Maximum CMV, input to output at 60Hz: 500V rms.
• Leakage current, input to output at 115Vrms, 60Hz: <2µA rms.
• 15 bit measurement resolution.
• 8 conversions per second.
• Autozero & autocalibration—no adjustment pots.
Digital
• 8-bit CMOS microcomputer.
• Digital scaling, linearization and calibration.
• Nonvolatile memory eliminates pots and switches.
Digital filtering
• Small and large signal with user selectable time
constants from 0 to 64 seconds.
Communications
• Communications in ASCII via RS-232C, RS-485 ports.
• Selectable baud rates: 300, 600, 1200, 2400, 4800, 9600, 19200,
38400, 57600, 115200.
• NRZ asynchronous data format; 1 start bit, 7 data bits, 1 parity bit and 1
stop bit.
• Parity: odd, even, none.
• User selectable channel address.
• ASCII format command/response protocol.
• Communications distance up to 4,000 feet (RS-485).
• Transient suppression on RS-485 communications lines.
• Communications error checking via checksum.
• Can be used with "dumb terminal".
• Scan up to 250 channels per second.
• All communications setups stored in EEPROM.
Power
Requirements: Unregulated +10V to +30Vdc, 0.75W max
Internal switching regulator.
Protected against power supply reversals.
Page 59

Environmental
Temperature Range: Operating -25°C to +70°C.
Storage -25°C to +85°C.
Relative Humidity: 0 to 95% noncondensing.
Warranty
12 months on workmanship and material.
D5100 Voltage Inputs
• Voltage ranges: ±100mV, ±1V, ±5V, ±10V, ±100Vdc.
• Resolution: 0.01% of FS (4 digits).
• Accuracy: ±0.02% of FS max.
• Common mode rejection: 100dB at 50/60Hz.
• Zero drift: ±1 count max (autozero).
• Span tempco: ±50ppm/°C max.
• Input burnout protection to 250Vac .
• Input impedance: ≤ ±1V input = 100MΩ min.
≥ ±5V input = 1MΩ min.
D5200 Current Inputs
• Current ranges: 4-20mAdc.
• Resolution: 0.04% of FS.
• Accuracy: 0.04% of FS.
• Common mode rejection: 100dB at 50/60Hz.
• Zero drift: ±1 count max (autozero).
• Span tempco: ±50ppm/°C max.
• Voltage drop: 1.0V max.
D5300 Thermocouple Inputs
• Thermocouple types: J, K, T, E (factory set).
• Ranges:J = -200°C to +760°C
K = -150°C to +1250°C
T = -200°C to +400°C
E = -100°C to +1000°C
• Resolution: ±1°.
• Overall Accuracy (error from all sources) from 0 to +40°C ambient:
±1.0 °C.
• Common mode rejection: 100dB at 50/60Hz.
• Input impedance: 100MΩ min.
• Lead resistance effect: <20µV per 350Ω.
• Open thermocouple indication.
• Input burnout protection to 250Vac.
• User selectable °C or °F.
• Overrange indication.
• Automatic cold junction compensation and linearization.
Page 60

D5450 Thermistor Inputs
• Thermistor types: 2252Ω at 25°C
• Range: -0°C to +100°C.
• Resolution: 0.01°C or F.
• Accuracy: ±0.1°C.
• Common mode rejection: 100dB at 50/60Hz.
• Input protection to 30Vdc .
• User selectable °C or °F.
Page 61

Appendix C
Factory Values
Listed below is a table of factory installed values for minimum and
maximum displayed values for each model. This information can be used
to reinstall the factory scaling vaues to a module using the WMN and
WMX commands (see Chapter 4)
Model Factory Factory
Mininmum Maximum
Value Value
511x -00100.00 +00100.00
512x -01000.00 +01000.00
513x -05000.00 +05000.00
514x -10000.00 +10000.00
515x -00100.00 +00100.00
525x +00000.00 +00025.00
531x -00200.50 +00760.50
532x -00150.50 +01250.50
533x -00200.50 +00400.50
534x -00100.00 +01000.00
545x +00000.00 +00100.00
Page 62

WARRANTY/DISCLAIMER
OMEGA ENGINEERING, INC. warrants this unit to be free of defects in materials and
workmanship for a period of 13 months from date of purchase. OMEGA’s WARRANTY adds
an additional one (1) month grace period to the normal one (1) year product warranty to
cover handling and shipping time. This ensures that OMEGA’s customers receive maximum
coverage on each product.
If the unit malfunctions, it must be returned to the factory for evaluation. OMEGA’s Customer
Service Department will issue an Authorized Return (AR) number immediately upon phone or
written request. Upon examination by OMEGA, if the unit is found to be defective, it will be
repaired or replaced at no charge. OMEGA’s WARRANTY does not apply to defects resulting
from any action of the purchaser, including but not limited to mishandling, improper
interfacing, operation outside of design limits, improper repair, or unauthorized modification.
This WARRANTY is VOID if the unit shows evidence of having been tampered with or shows
evidence of having been damaged as a result of excessive corrosion; or current, heat, moisture
or vibration; improper specification; misapplication; misuse or other operating conditions
outside of OMEGA’s control. Components in which wear is not warranted, include but are not
limited to contact points, fuses, and triacs.
OMEGA is pleased to offer suggestions on the use of its various products. However,
OMEGA neither assumes responsibility for any omissions or errors nor assumes
liability for any damages that result from the use of its products in accordance with
information provided by OMEGA, either verbal or written. OMEGA warrants only
that the parts manufactured by the company will be as specified and free of
defects. OMEGA MAKES NO OTHER WARRANTIES OR REPRESENTATIONS OF ANY
KIND WHATSOEVER, EXPRESSED OR IMPLIED, EXCEPT THAT OF TITLE, AND ALL
IMPLIED WARRANTIES INCLUDING ANY WARRANTY OF MERCHANTABILITY AND
FITNESS FOR A PARTICULAR PURPOSE ARE HEREBY DISCLAIMED. LIMITATION OF
LIABILITY: The remedies of purchaser set forth herein are exclusive, and the total
liability of OMEGA with respect to this order, whether based on contract, warranty,
negligence, indemnification, strict liability or otherwise, shall not exceed the
purchase price of the component upon which liability is based. In no event shall
OMEGA be liable for consequential, incidental or special damages.
CONDITIONS: Equipment sold by OMEGA is not intended to be used, nor shall it be used: (1)
as a “Basic Component” under 10 CFR 21 (NRC), used in or with any nuclear installation or
activity; or (2) in medical applications or used on humans. Should any Product(s) be used in or
with any nuclear installation or activity, medical application, used on humans, or misused in
any way, OMEGA assumes no responsibility as set forth in our basic WARRANTY/ DISCLAIMER
language, and, additionally, purchaser will indemnify OMEGA and hold OMEGA harmless from
any liability or damage whatsoever arising out of the use of the Product(s) in such a manner.
RETURN REQUESTS/INQUIRIES
Direct all warranty and repair requests/inquiries to the OMEGA Customer Service Department.
BEFORE RETURNING ANY PRODUCT(S) TO OMEGA, PURCHASER MUST OBTAIN AN
AUTHORIZED RETURN (AR) NUMBER FROM OMEGA’S CUSTOMER SERVICE DEPARTMENT
(IN ORDER TO AVOID PROCESSING DELAYS). The assigned AR number should then be
marked on the outside of the return package and on any correspondence.
The purchaser is responsible for shipping charges, freight, insurance and proper packaging to
prevent breakage in transit.
FOR WARRANTY
RETURNS, please have
the following information available BEFORE
contacting OMEGA:
1. Purchase Order number under which
the product was PURCHASED,
2. Model and serial number of the product
under warranty, and
3. Repair instructions and/or specific
problems relative to the product.
FOR NON-WARRANTY REPAIRS,
consult
OMEGA for current repair charges. Have the
following information available BEFORE
contacting OMEGA:
1. Purchase Order number to cover the
COST of the repair,
2. Model and serial number of theproduct, and
3. Repair instructions and/or specific problems
relative to the product.
OMEGA’s policy is to make running changes, not model changes, whenever an improvement is possible.
This affords our customers the latest in technology and engineering.
OMEGA is a registered trademark of OMEGA ENGINEERING, INC.
© Copyright 2011 OMEGA ENGINEERING, INC. All rights reserved. This document may not be copied, photocopied,
reproduced, translated, or reduced to any electronic medium or machine-readable form, in whole or in part, without
the prior written consent of OMEGA ENGINEERING, INC.
Page 63

Where Do I Find Everything I Need for
Process Measurement and Control?
OMEGA…Of Course!
Shop online at omega.com
SM
TEMPERATURE
䡺⻬
Thermocouple, RTD & Thermistor Probes, Connectors, Panels & Assemblies
䡺⻬
Wire: Thermocouple, RTD & Thermistor
䡺⻬
Calibrators & Ice Point References
䡺⻬
Recorders, Controllers & Process Monitors
䡺⻬
Infrared Pyrometers
PRESSURE, STRAIN AND FORCE
䡺⻬
Transducers & Strain Gages
䡺⻬
Load Cells & Pressure Gages
䡺⻬
Displacement Transducers
䡺⻬
Instrumentation & Accessories
FLOW/LEVEL
䡺⻬
Rotameters, Gas Mass Flowmeters & Flow Computers
䡺⻬
Air Velocity Indicators
䡺⻬
Turbine/Paddlewheel Systems
䡺⻬
Totalizers & Batch Controllers
pH/CONDUCTIVITY
䡺⻬
pH Electrodes, Testers & Accessories
䡺⻬
Benchtop/Laboratory Meters
䡺⻬
Controllers, Calibrators, Simulators & Pumps
䡺⻬
Industrial pH & Conductivity Equipment
DATA ACQUISITION
䡺⻬
Data Acquisition & Engineering Software
䡺⻬
Communications-Based Acquisition Systems
䡺⻬
Plug-in Cards for Apple, IBM & Compatibles
䡺⻬
Data Logging Systems
䡺⻬
Recorders, Printers & Plotters
HEATERS
䡺⻬
Heating Cable
䡺⻬
Cartridge & Strip Heaters
䡺⻬
Immersion & Band Heaters
䡺⻬
Flexible Heaters
䡺⻬
Laboratory Heaters
ENVIRONMENTAL
MONITORING AND CONTROL
䡺⻬
Metering & Control Instrumentation
䡺⻬
Refractometers
䡺⻬
Pumps & Tubing
䡺⻬
Air, Soil & Water Monitors
䡺⻬
Industrial Water & Wastewater Treatment
䡺⻬
pH, Conductivity & Dissolved Oxygen Instruments
M3130/0211
 Loading...