

Page 1
CONTROLS
Re-Order from
omegamation.com
Omegamation
TM
1-888-55-OMEGA
1-888-55-66342
1-888-55-66342
Instruction Manual
PROGRAMMABLE DIGITAL CLOSED LOOP MOTOR SPEED
CONTROL SYSTEM FOR AC AND DC DRIVES
LT20 (0208)
ASP10 CONTROL SERIES
P.O. Box 10
5000 W. 106th Street
Zionsville, Indiana 46077
Phone (317) 873-5211
Fax (317) 873-1105
www.dartcontrols.com
A-5-3022D
Page 2

Quick Jump
What models and options are available?
See page 3.
Looking for detailed specifications?
See page 3.
W ant to get started fast?
See basic electrical hook-up details on page 6.
See mechanical installation details on page 4.
See some sample applications starting on page 21.
Need Help?
See troubleshooting on page 25.
Warranty
Dart Controls, Inc. (DCI) warrants its products to be free from defects in material and workmanship. The exclusive remedy
for this warranty is DCI factory replacement of any part or parts of such product which shall within 12 months after delivery
to the purchaser be returned to DCI factory with all transportation charges prepaid and which DCI determines to its satisfaction
to be defective. This warranty shall not extend to defects in assembly by other than DCI or to any article which has been
repaired or altered by other than DCI or to any article which DCI determines has been subjected to improper use. DCI assumes
no responsibility for the design characteristics of any unit or its operation in any circuit or assembly. This warranty is in lieu
of all other warranties, express or implied; all other liabilities or obligations on the part of DCI, including consequential
damages, are hereby expressly excluded.
NOTE: Carefully check the control for shipping damage. Report any damage to the carrier immediately. Do not attempt to
operate the drive if visible damage is evident to either the circuit or to the electronic components.
All information contained in this manual is intended to be correct, however information and data in this manual are subject
to change without notice. DCI makes no warranty of any kind with regard to this information or data. Further, DCI is not
responsible for any omissions or errors or consequential damage caused by the user of the product. DCI reserves the right
to make manufacturing changes which may not be included in this manual.
WARNING
Improper installation or operation of this control may cause injury to personnel or control failure. The control must
be installed in accordance with local, state, and national safety codes. Make certain that the power supply is
disconnected before attempting to service or remove any components!!! If the power disconnect point is out of sight,
lock it in disconnected position and tag to prevent unexpected application of power. Only a qualified electrician or
service personnel should perform any electrical troubleshooting or maintenance. At no time should circuit continuity
be checked by shorting terminals with a screwdriver or other metal device.
Page 3

Table of Contents
Introduction .......................................................................................................................................2
General Features ...............................................................................................................................2
Models & Options ............................................................................................................................. 3
Model Options ............................................................................................................................... 3
Available Options ..........................................................................................................................3
Recommended Accessories .........................................................................................................3
Specifications ....................................................................................................................................3
Electrical........................................................................................................................................3
Mechanical ....................................................................................................................................3
Environmental ............................................................................................................................... 4
Mechanical Installation ..................................................................................................................... 4
Exploded Panel View ..................................................................................................................... 4
Cut-out and Mounting Dimensions ................................................................................................ 4
PU-E Series Pickup Installation ....................................................................................................5
Electrical Installation & Diagrams ...................................................................................................6
P1 Terminal Block Hook-Up Diagram ............................................................................................6
P1 Terminal Block Descriptions ..................................................................................................... 7
-1 Option Wiring .............................................................................................................................7
Basic Operating Instructions ........................................................................................................... 8
Control Algorithm Discussion ........................................................................................................8
Pulse-Accumulation Loop PI Tuning ............................................................................................. 8
Master (Rate and Time) and Follower (Ratio) Modes Explained ...................................................9
Visual Reference ........................................................................................................................... 9
How to Change a Parameter's Value (The Short Story) ..............................................................10
Operating the User Interface (The Long Story) ........................................................................... 10
Detailed Configuration Instructions ..............................................................................................11
Default Configuration ...................................................................................................................11
Resetting the Unit to Factory Defaults......................................................................................... 11
JP1 (Program Enable Jumper).................................................................................................... 11
Software Parameters ................................................................................................................... 12
Parameter Descriptions............................................................................................................... 14
Application Examples ..................................................................................................................... 21
Pump Controller with Audible and Visual Alarm .......................................................................... 21
Conveyor Oven Controller with Two Preset Process Times .......................................................22
Synchronized Conveyor Controller with Jog Switch ................................................................... 23
Troubleshooting ..............................................................................................................................25
Technical Support Options ..........................................................................................................25
What's Special About www.dartcontrols.com? ...........................................................................25
1
Page 4

Introduction
The ASP10 process controller is a compact, microprocessor-based unit capable of being either field
or factory configured for a number of industry's motion control needs. These controls are designed
around a pulse-accumulation PI algorithm. They can be easily configured to operate as a digital speed
controller, time-based process controller, or a ratiometric follower controller in master-slave systems.
Utilizing Dart's new modular bus design techniques, the ASP series is ideal for volume OEM
applications requiring specialized inputs and outputs. Contact Dart Controls' Sales Department for
details. This flexibility makes the ASP series ideal for applications such as:
Water and Waste Treatment Systems
Conveyor Oven Controllers
Synchronized Conveyor Lines
Its durable 1/8 DIN aluminum housings can be easily mounted in a panel or control cabinet. New optional
pluggable terminal block allows the installer to quickly install or replace units without the hassle of
physically removing and reattaching wires. The units can be ordered with either standard Europeanstyle terminal block or optional “pluggable” connector.
General Features
- Microprocessor-based design combines the ultimate in responsiveness and accuracy in one package
- Digital closed-loop algorithm ensures long-term accuracy of +/-1/2 RPM of set speed or equiv.
- Non-volatile memory stores adjustable parameters even when power has been removed
- Factory or field programmable via front-panel keypad
- Adjustable parameters include min, max, accel, decel, display options, alarm options, etc.
- Internal program-enable jumper selectively prevents tampering with unit’s configuration
- Universal power supply accepts line voltages inputs from 85-265VAC @ 50-60Hz without switches
or jumpers. The unit automatically adjusts as needed.
- Transient voltage protection prolongs unit's life in harsh industrial environments
- Compatible with a variety of signal input types including: Hall-Effect Pickups, Photoelectric, TTL, etc.
Note: Open collector devices must be capable of sinking 3mA.
- Self-contained power supply for external sensor, limited to 5V @ 50mA
- Programmable alarm output with Form C contacts rated to 250VAC @ 5A
- 1/8 DIN durable aluminum housing for panel mounting.
- Large 4 digit, 1/2” LED display
- G.E. Lexan membrane and gasket (which are included) meet NEMA 4X standards when used with
NEMA 4X enclosures
- European terminal block or pluggable terminal block available
- Wide operating ambient temperature range of -10C to 45C (14F to 113F)
- Multiple operating modes including:
• Master, Rate Mode – Controls in rate unit such as RPM, Gallons per Second, etc.
• Master, Time Mode – Controls in time unit such as HH:MM, MM:SS, SS:TT, or other unit
• Follower Mode – Controls in percentage of master rate. This mode allows the ASP10 controller
to precisely follow the actions of a master process without any long-term loss of position.
2
Page 5

Models & Options
Model Options
Pickup or
Input V o ltage
Model
ASP10 85-265VAC 0-2 VDC
@ 50 - 60Hz
Available Options
Option Suffix Description Example
-1 Expansion board which adds support for remote push button wiring
via a European-style terminal block.
-P Optional pluggable European-style terminal block ASP10-P
-9 Blank Lexan ASP10-9
Recommended Accessories
Model Description
PU-2E Hall-Effect Pickup, Single Channel 1 1.0 – 50,000 RPM
PU-4E Hall-Effect Pickup, Single Channel 2 0.5 – 25,000 RPM
PU-10E Hall-Effect Pickup, Single Channel 5 0.2 – 10,000 RPM
PU-20E Hall-Effect Pickup, Single Channel 10 0.1 – 5,000 RPM
Output Voltage
THROUGH
0-24 VDC
Pulses per
Revolution
Encoder
Required?
Yes
ASP10-1
RPM Range When Used With
MD10P & MD3P
Specifications
Electrical
Line Input Voltage ..................................................................................................... Any Voltage from 85-265 VAC
Line Input Frequency .................................................................................................... Any Freq. from 48-62 Hertz
Pulse Signal Input Voltage Range....................................................................... 0-5VDC to 0-24VDC square wave
Pulse Signal Input Frequency Range......................................................................... 0 – 50,000 Pulses per Minute
(Higher frequencies are possible when using internal frequency divisor / prescaler)
Display Range......................................................................................................................................0.001 – 9999
Units of Operation .................................................................................................... User Programmable, any Unit
Onboard Sensor / Pickup Power Supply............................................................................................... 5V @ 50mA
Isolated Alarm Relay Output Ratings ................................................................................................ 250VAC @ 5A
Pot Lo/Hi supply VDC range .........................................................................................0-2 VDC through 0-24 VDC
Pot wiper VDC range ......................................................................................Pot Lo +50mV through Pot Hi -50mV
Mechanical
Display Type .............................................................................................................. LED, Red, 4 Digit, ½” Height
Housing Type (with supplied gasket in NEMA 4X panel) .............................................................1/8 DIN NEMA 4X
Connector Style (pluggable connector optional)....................................................12-position 5mm European Style
Terminal Block Torque Setting..............................................................................................4.4 in. lb. Max or .5Nm
Faceplate Material........................................................................................ Polycarbonate with GE Lexan Overlay
Housing Material .......................................................................................................................................Aluminum
Length (Required Panel Depth)....................................................................................................4.625", 117.48mm
Faceplate Width ..........................................................................................................................4.539", 115.29mm
Weight ASP10................................................................................................................. 0.900 lb, 14.4 oz, 408.22g
3
Page 6
Environmental
Operating Temperature Range....................................................................................... -10C to 45C (14F to 113F)
Operating Humidity Range .................................................................................................... 95%, non-condensing
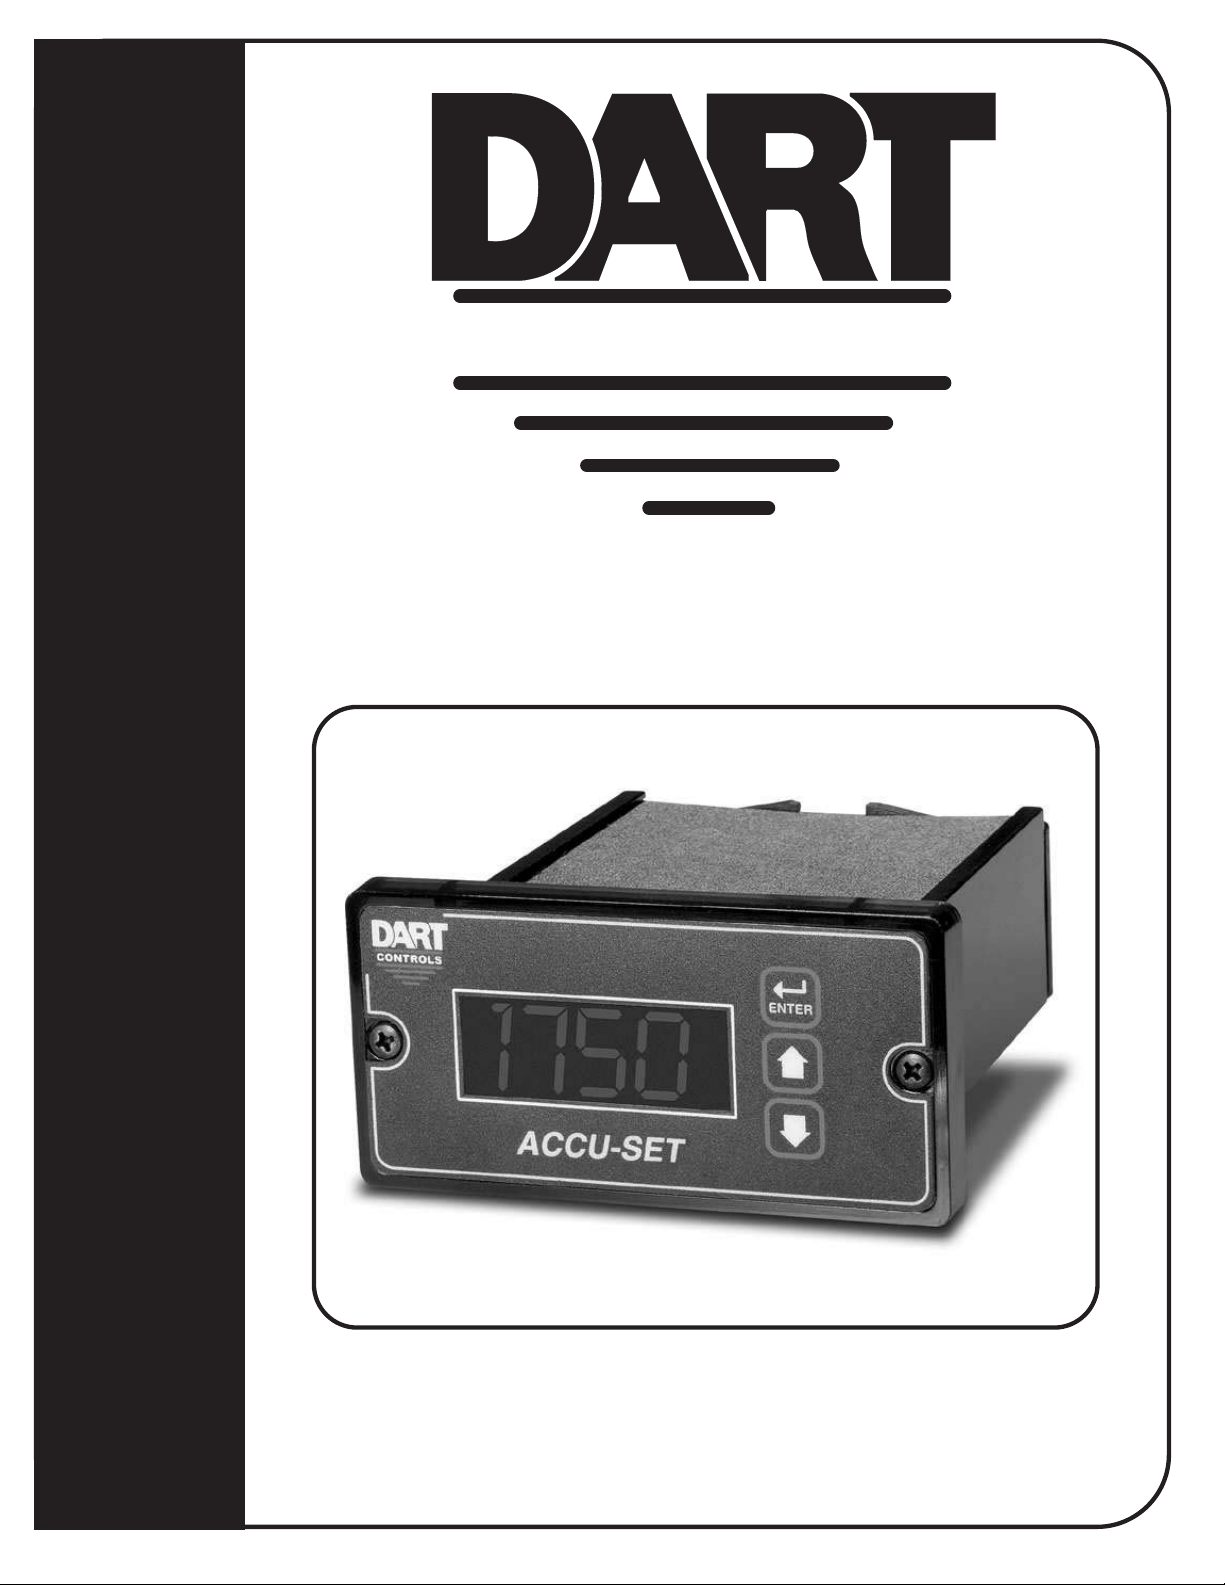
Mechanical Installation
Exploded Panel View
PANEL MOUNTING GASKET
CUSTOMER
MOUNTING PANEL
(HOLE CUT-OUT FOR CONTROL
HOUSING APPROXIMATELY
3.622" WIDE BY 1.770" HIGH)
(WITH THE ADHESIVE SIDE OF
GASKET FACING THE CUSTOMER
MOUNTING PANEL)
ASP10
CONTROL
1) GASKET
2) (2) 6-32 X 3/4 PANHEAD BLACK OXIDE STAINLESS SCREWS
3) (2) #6 NUT WITH LOCKWASHER
Cut-out and Mounting Dimensions
4.000"
SUPPLIED WITH EACH CONTROL:
CONTROLS
Ite
Ite
m
MICRO-DRIVE
ACCU-SET
Tac h
ValuPage
Tac h
ValPage
ENTER
.140" x 2
5.000"
2.289"
4.000"
3.622"
ASP10
HOUSING DEPTH
4.625"
PANEL CUT-OUT
1.656"
0.885"
1.770"
4.625"
4
Page 7
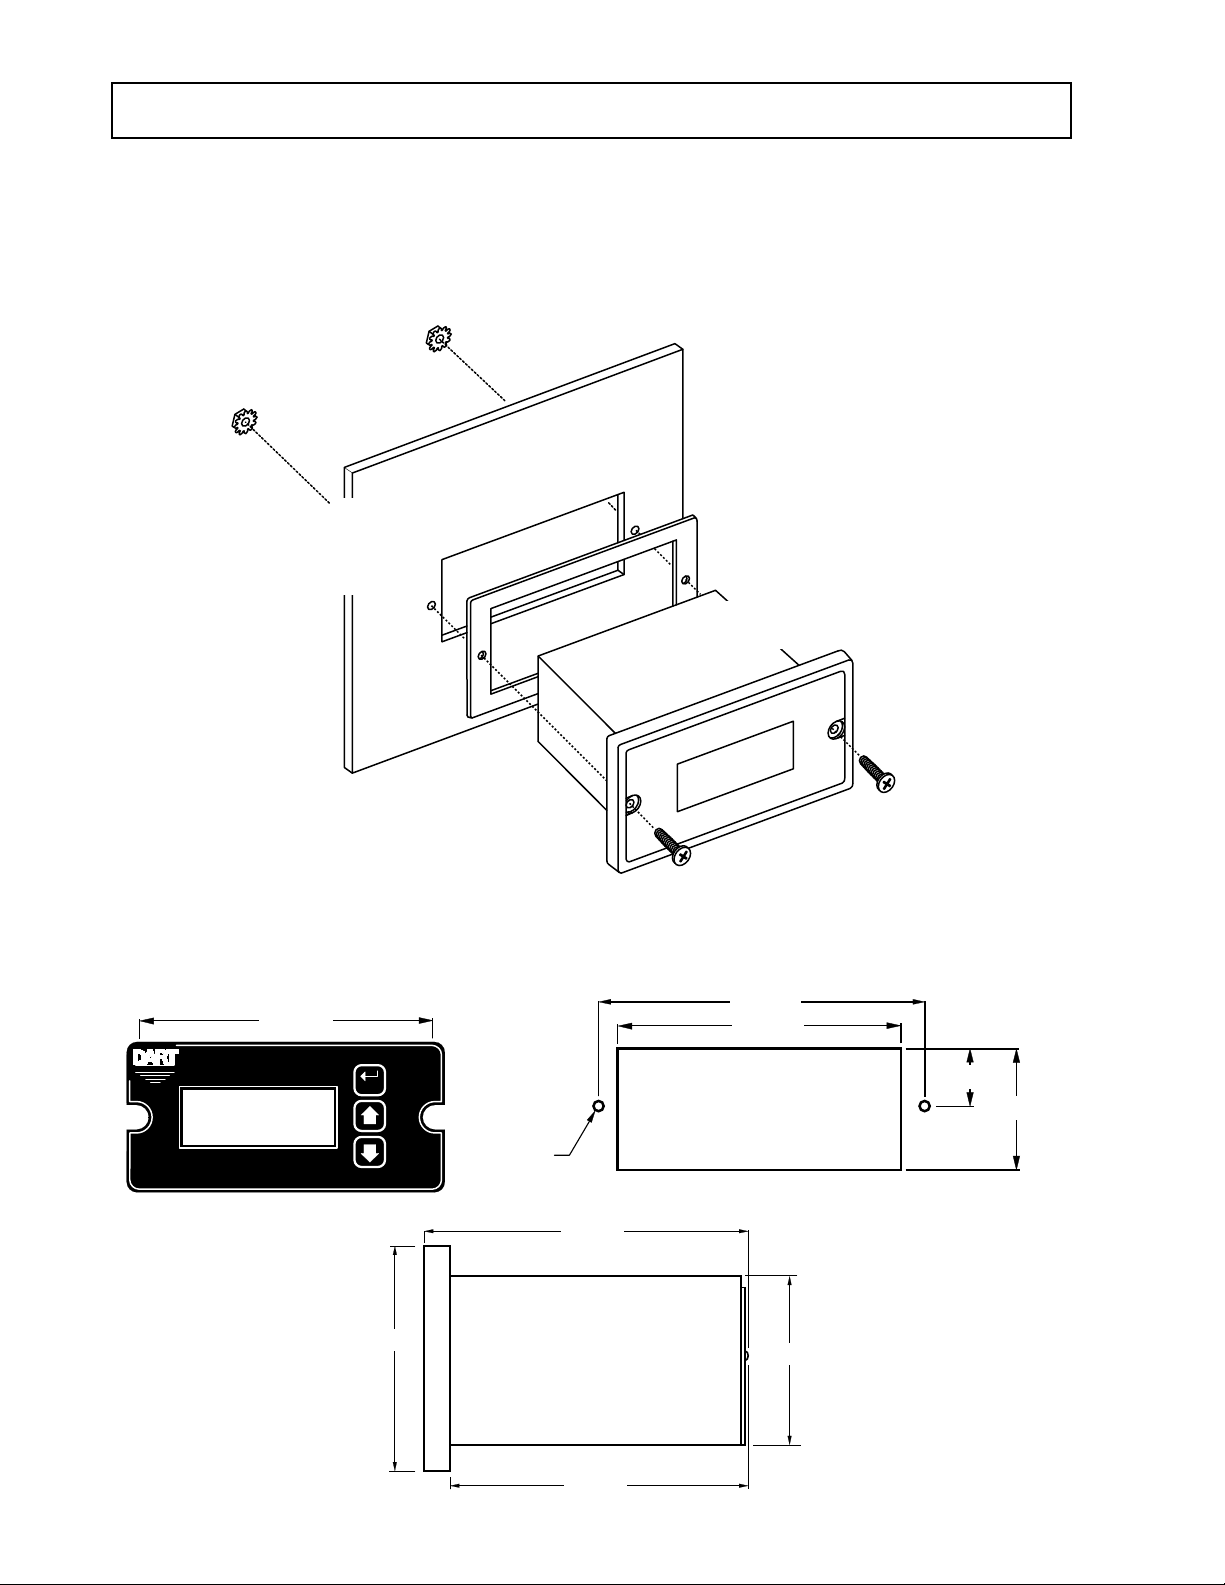
PU-E Series Pickup Installation
The PU-E series pickup is an economical way to monitor motor speed. Its patented design provides for
ease of installation in otherwise difficult to reach areas. The PU-E operates from a +5V power supply,
producing a 5 volt square wave whose frequency is proportional to speed. This signal is fed into the
ASP10 controller as a speed or position reference for the microprocessor.
PU-E
bearing
flat
dust
cover
10-32
screw
DO NOT OVER TIGHTEN MOUNTING SCREW !!
magnet
disc
black wire
washer
common
CAUTION:
white wire
signal
3/16"
spacer
red wire
+5 volts
No other mounting screws are necessary, as the
cord will keep the unit from rotating.
tapped
motor
shaft
Model
Number
PU-2E
PU-4E
PU-10E
PU-20E
Pulses per
Revolution
1
2
5
10
Dimensions
1.60 .875
2.40
72.00
Caution: The PU-E cord should not be grouped with other wires or cords. For applications with PUE wire over 6 feet long, or noisy environments, a shielded cable is recommended. Connect the shield
to the common terminal on the ASP10 controller, leaving the shield on the PU-E end floating.
5
Page 8
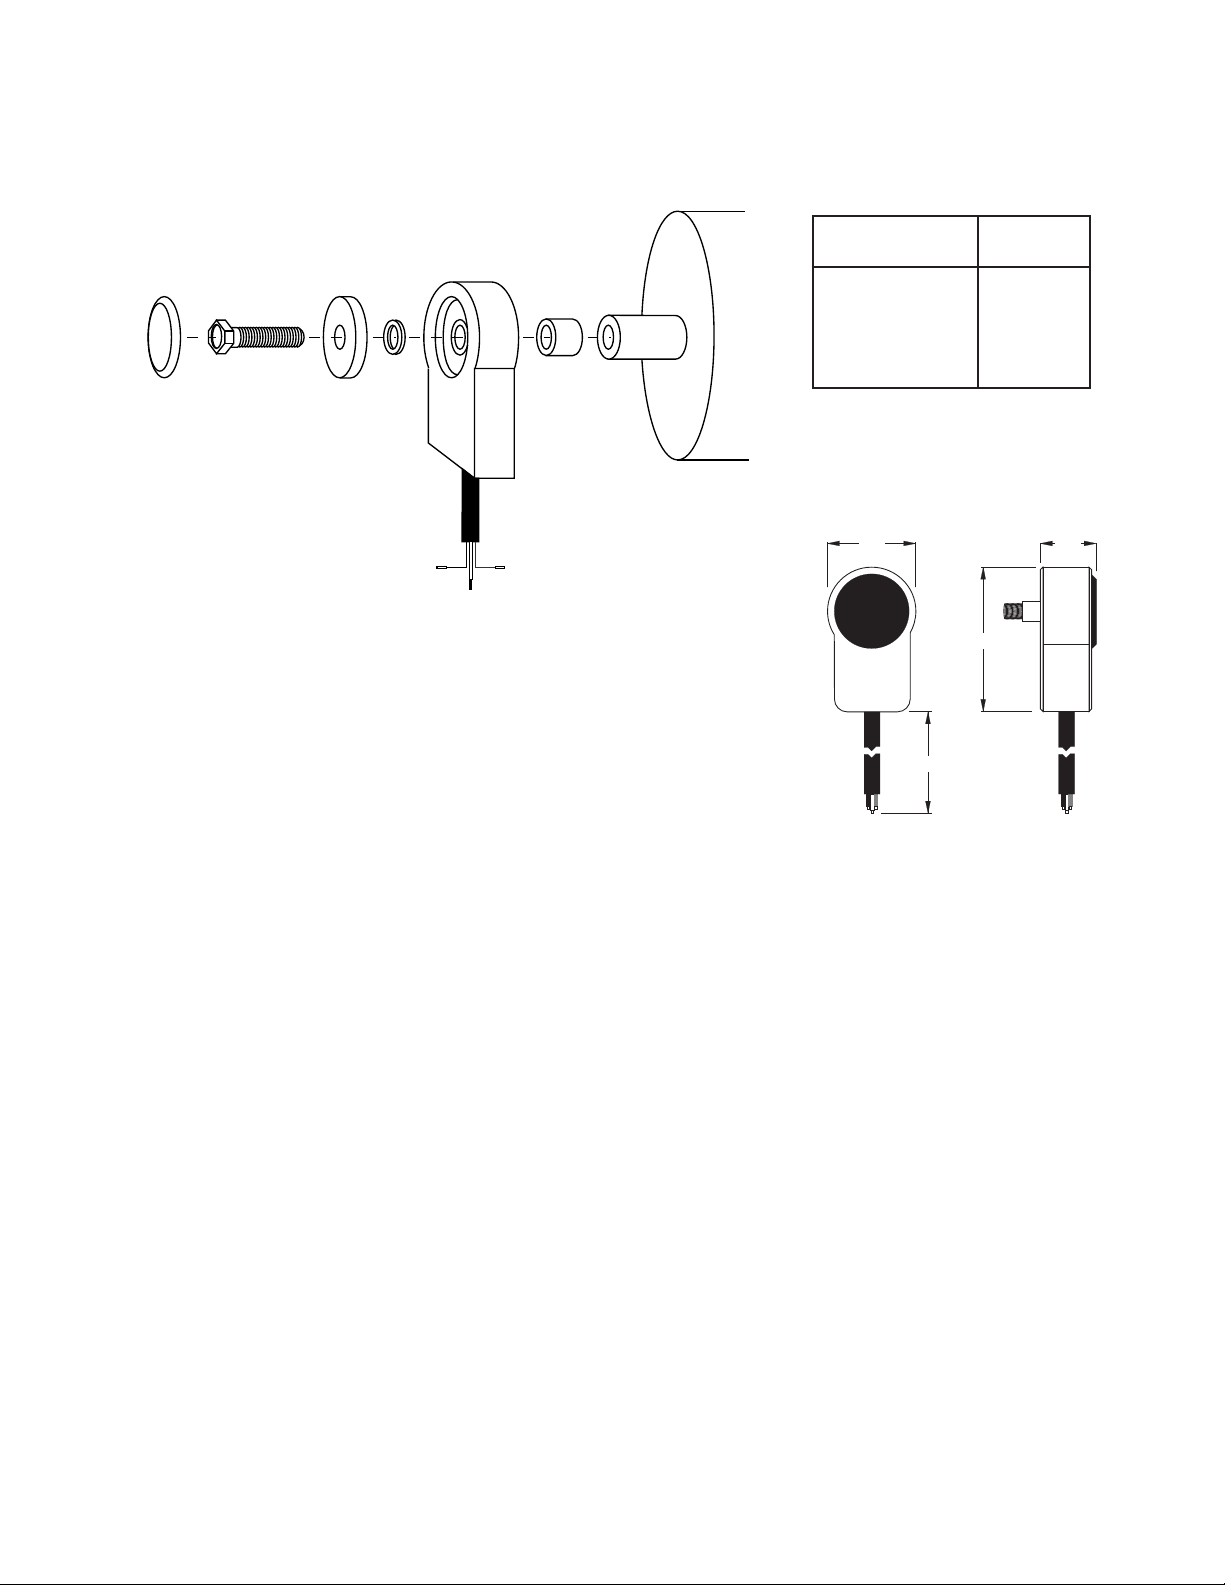
Electrical Installation & Diagrams
P1 Terminal Block Hook-Up Diagram
ASP
MASTER
* P1-9 signal input may be programmed for a number of functions. Incl (jog, inhibit, etc.)
ASP
FOLLOWER
P1-1
P1-2
P1-3
P1-4
P1-5
P1-6
P1-7
P1-8
P1-9
P1-10
P1-11
P1-12
P1-1
P1-2
P1-3
P1-4
P1-5
P1-6
P1-7
P1-8
P1-9
P1-10
P1-11
P1-12
2 AMP
HIGH OUTPUT
WIPER OUTPUT
LOW OUTPUT
COMMON
+5VDC
SIGNAL 1
SIGNAL 2
Alarm Output - Normally Open
Alarm Output - Common
Alarm Output - Normally Closed
2 AMP
HIGH OUTPUT
WIPER OUTPUT
LOW OUTPUT
COMMON
+5VDC
SIGNAL 1
Alarm Output - Normally Open
Alarm Output - Common
Alarm Output - Normally Closed
AC INPUT
AC INPUT
black
red
white
SIGNAL 2
85-265VAC
}
Connect to the speedpot
of the control being driven.
High must be positive
}
voltage with respect to low.
*
Form C
Relay output
}
(Programmable)
AC INPUT
AC INPUT
Connect to the speedpot
of the control being driven.
High must be positive
}
voltage with respect to low.
}
85-265VAC
}
Form C
Relay output
(Programmable)
*
black
white
PICK-UP MOUNTED
TO MOTOR SHAFT
(Mounts on rotating
end shaft with 10-32
tapped hole, 1/2" deep)
black
white
FOLLOWER PICK-UP
MOUNTED TO
MOTOR SHAFT
red
(Mounts on rotating
end shaft with 10-32
tapped hole, 1/2" deep)
* Optional Inhibit Switch
6
Page 9
P1 Terminal Block Descriptions
P1-1 (AC / N) – For single phase AC lines connect the Neutral side of your AC line to this terminal.
For systems with two hot AC lines, connect either of the Hot AC lines to this terminal.
P1-2 (AC / L) – For single phase AC lines connect the Hot side of your AC line to this terminal. For
systems with two hot AC lines, connect either of the Hot AC lines to this terminal.
P1-3 (HI) - This is the POT HI reference terminal. This terminal must be connected to the most positive
speed pot input terminal of the partner control. This terminal will generally be referred to as Pot
HI or +V for positive supplies and Com for negative supplies.
P1-4 (WP) - This is the Wiper output terminal. This terminal will output an analog voltage signal
proportional to the referenced voltage signals connected to P1-3 (HI) and P1-5 (LO). This
terminal should be connected to the wiper or signal input of the partner control.
P1-5 (LO) - This is the POT LO reference terminal. This terminal must be connected to the most
negative speed pot input terminal of the partner control. This terminal will generally be referred
to as Pot LO or Com for positive supplies and –V for negative supplies.
P1-6 (COM) – This is the common point for the control logic. The speed sensor common lead as well
as any other source needing to reference the control common will be connected to this terminal.
P1-7 (+5V) – This is a self-contained +5VDC power supply capable of up to 50mA. The speed sensor
supply lead can be connected to this terminal for its power source.
P1-8 (S1) – This is the signal input terminal for the motor’s digital pickup or encoder.
P1-9 (S2) – This input can be programmed to perform a number of advanced functions. In Follower
Mode, this input is the signal input terminal for the master’s digital pickup or encoder. In Master
modes (Rate and Time), this input can be configured to function as an emergency stop, inhibit,
or jog command.
P1-10 (1NO) – This is the normally-open contact of the user assignable relay output.
P1-11 (1C) – This is the common contact of the user assignable relay.
P1-12 (1NC) – This is the normally-closed contact of the user assignable relay output.
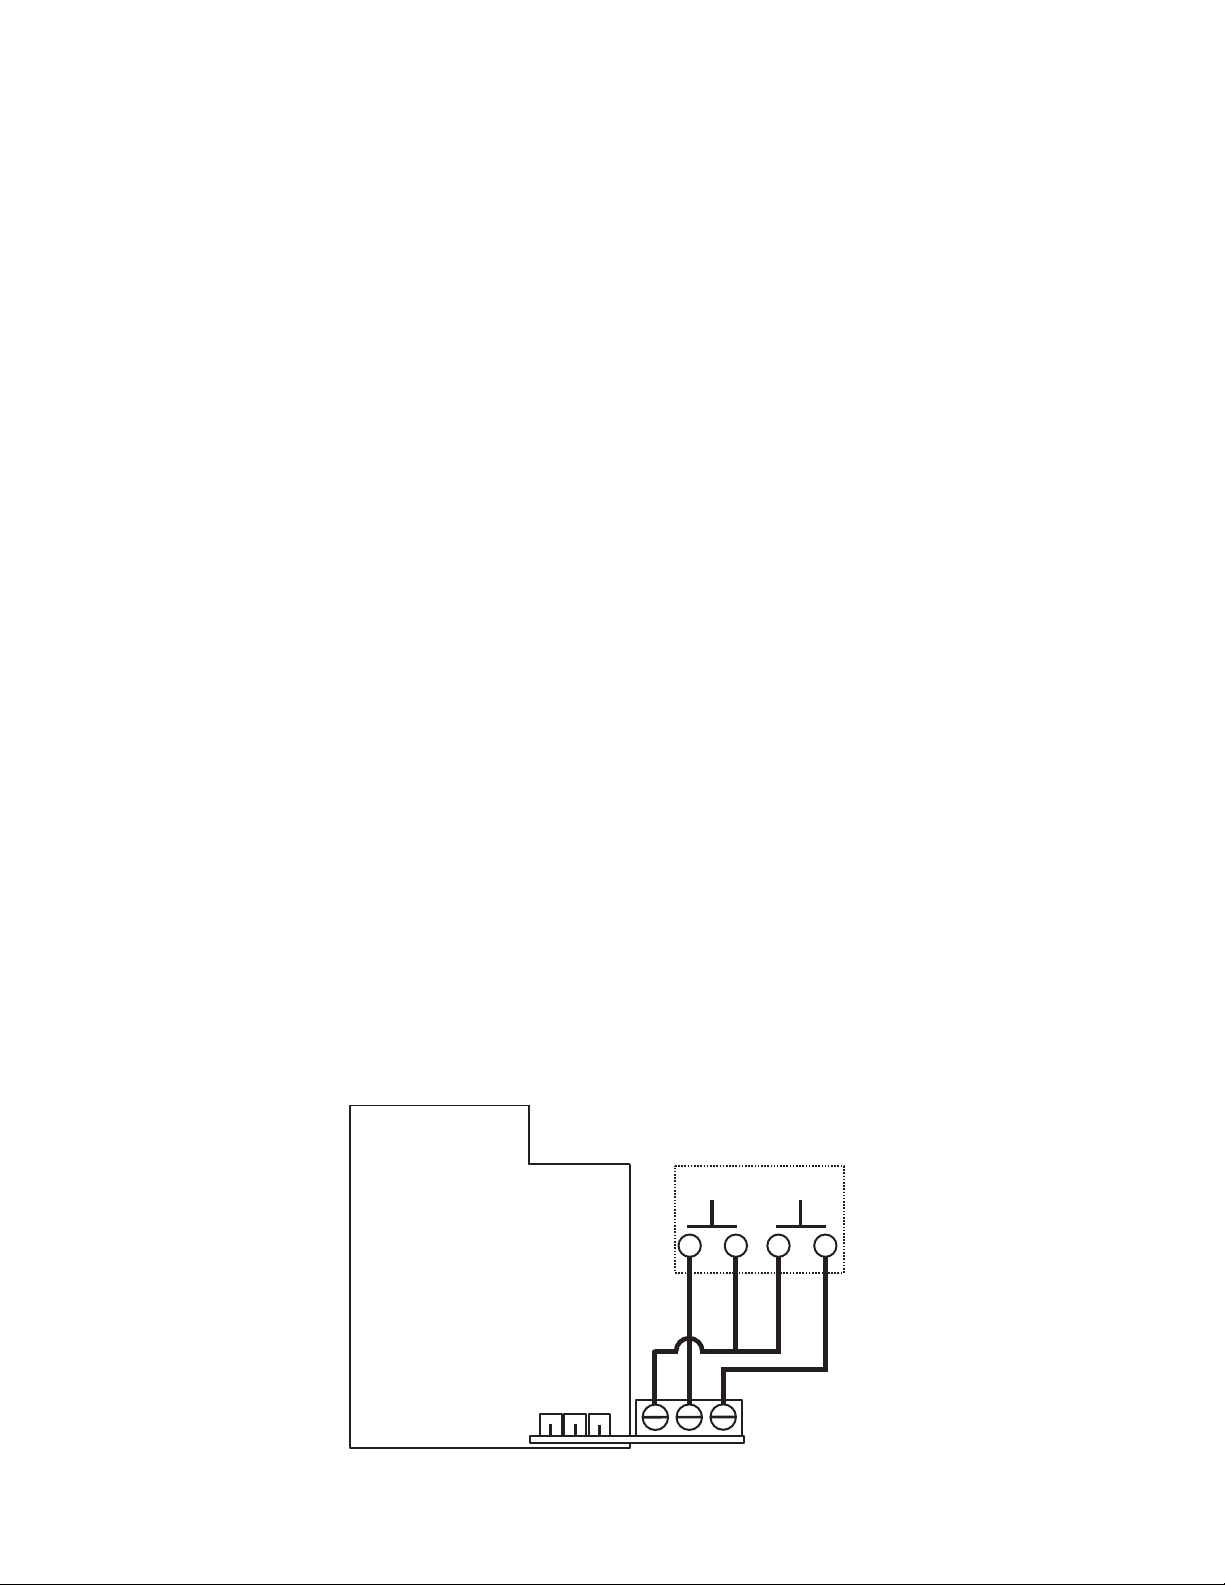
-1 Option Wiring
The -1 option board is a module which allows external up and down push buttons to be wired to the unit.
These buttons operate exactly like the Up and Down buttons on the user interface. This module is
commonly used to allow PLCs or hand-held pendants to operate the front-panel remotely. Wires for the
external buttons are attached via a 3mm European terminal block on the -1 option board. The buttons
are activated by shorting the terminal labeled Com to either the Up or Down terminal.
REMOTE SWITCHING
MICROPROCESSOR
SERIES PC BOARD
DOWN UP
-1 OPTION
BOARD
COMMON
7
-3
DOWN
-2
-1
UP
Page 10

Basic Operating Instructions
Control Algorithm Discussion
The ASP10 controller is based on a pulse-accumulation algorithm. The advantage to this type of
algorithm is that it allows the control to follow a master process with exceptional long-term accuracy.
The ASP10 controller has three parameters which allow the user to adjust how aggressively the unit
drives the partner motor control to achieve the motor target speed. These 3 parameters are as follows:
P Gain - This is the proportional gain for the control loop. In pure pulse-accumulation algorithms, there
is no loop error to base a 'P' factor on; therefore, these units must estimate error based on several control
loop factors. Those who are familiar with PID control tuning should be aware that the ASP10 control's
P Gain is somewhat different than that of standard velocity-form PID algorithms. The P Gain is a
function of instantaneous error, a measure of the difference between the target (desired) speed and the
current speed of the motor.
I Gain -This is the integral gain for the control loop. The I Gain is a function of accumulated error, a
measure of the difference between the target (desired) speed and the current speed of the motor.
Pulse Accumulation Limit - This parameter allows the user to limit the maximum number of pulses the
drive will accumulate prior to intentionally losing count and therefore long-term accuracy. See the
details for parameter 29 in the Parameter Description section.
Pulse-Accumulation Loop PI Tuning
Many applications do not require tuning of the P and I Gain parameters beyond the supplied factory
default settings. If more responsiveness is desired or if the motor oscillates an unacceptable amount
when changing speeds, it may be necessary to adjust the P and I gains to obtain optimal performance.
Increasing the P and/or I gains will cause the control to drive the motor more aggressively. Decreasing
the P and/or I gains will cause the control to perform more sluggishly. Properly tuning the P and I gains
encompasses more than independently adjusting the P and I. The ratio between the two is very
important as well. Although initial tuning can be a time-consuming task, here is a basic outline of how
to proceed:
Test Procedure: Adjust the target (displayed) speed as expected during normal operation, including
testing inhibit and jog transitions if applicable.
Tuning Method:
Step 1 - Connect the ASP10 and the partner motor control it is driving to a loaded motor with
application's anticipated load for realistic tuning.
Step 2 - Make the following adjustment to the controller being driven by the ASP10. Set
compensations settings such as IR or slip to minimum setting. Set any accel, decel
adjustments to their minimum setting. Min. setting should not be set to a value high enough
to cause motor rotation. A Max. adjustment must be set to a setting that is equal to or
greater than the highest speed required for your application.
Step 3 - Perform test procedure.
Step 4 - If control performs adequately, stop tuning and record settings.
Step 5 - If control is too sluggish or takes too long to reach the target speed, then try increasing
I Gain slightly (add 250). Perform the test procedure again. Continue increasing I Gain
until motor starts to slightly oscillate or become unstable. At this point, decrease the I Gain
by 250.
Step 6 - If control is too aggressive or is causing the motor to oscillate or become unstable, then
try decreasing I Gain slightly (subtract 250). Perform the test procedure again. Continue
decreasing I Gain until motor starts to stabilize and regulate more accurately.
Step 7 - Once I is set, adjust P Gain and perform test procedure. In this control, additional P Gain
may or may not improve response or stability. Experimentation will be required.
8
Page 11

Accel and decel settings have a small impact on PI tuning as well. Specifically, when accel and decel
settings are extremely fast, they can cause the control loop to perform more sluggishly. Another thing
to keep in mind is that PI tuning also affects accel and decel times. For instance, a sluggishly tuned
PI control loop may take longer than the programmed accel and decel times to reach the target;
whereas, an aggressively tuned PI control loop will reach the target faster.
Master (Rate and Time) and Follower (Ratio) Modes Explained
The ASP10 controller has two basic modes of operation, master and follower. In the Master modes,
the controls are capable of operating independently; whereas, in the Follower Mode, the control requires
a signal from a master to operate. The Follower Mode is used in applications which require the ASP10
to closely follow a master process. For example, if a factory has ten conveyors which must be
synchronized over long periods of time, an industrial engineer could use one ASP10 as a master control
for the first conveyor and nine ASP10s as slaves or followers which would receive their speed
commands from the first conveyor's master control or pickup.
In Master Rate Mode, the ASP10 controls the rate of the motor by tracking the motor's pickup pulses
which are applied to signal input 1 (S1). In this mode, the display indicates in rate units such as Gallonsper-minute, feet-per-second, and RPM.
In Master Time Mode, the ASP10 controls the process time by tracking the motor's pickup pulses which
are applied to signal input 1 (S1). In this mode, the display indicates in time units such as HH:MM or
MM:SS, where HH is hours, MM is minutes, and SS is seconds. This mode is most-commonly used
in time-sensitive processes such as conveyor ovens and plating applications.
In Follower Mode, the ASP10 tracks the number of pulses which are applied to the master signal input
(S2). From these pulses, it calculates the rate of the master process. This rate is then multiplied by
the percentage which is displayed on the user interface. The display is in 0.1% of master units. For
example, 675 = 67.5 percent of master speed. A master running at 1350 RPM, would cause the follower
to run its motor at 67.5% * 1350 RPM or 911.25 RPM. Typical follower applications include
synchronized rotation, synchronized conveyors, and some web-material processes.
Visual Reference
ENTER (Select) Button
Display Window
CONTROLS
Ite
m
MICRO-DRIVE
ACCU-SET
Ite
Val uPage
Tach
ValPage
Tach
ENTER
Up & Down Buttons
9
Page 12

How to Change a Parameter's Value (The Short Story)
1. Hold down the Enter button until Parameter-Selection Mode is entered
2. Using the Up and Down buttons, select the desired parameter number to view or edit
3. Press the Enter button to change the value of the parameter
4. Using the Up and Down buttons, change the parameter's value as desired
5. Press the Enter button to permanently save the changes (Return to Parameter-Selection Mode)
6. Select parameter zero and press the Enter button to return to Running Mode
Operating the User Interface (The Long Story)
Although the ASP10 user interface is very versatile, it is also simple to setup and operate. With just a
few button presses, it allows the user to configure a number of adjustable parameters. The LED display
has three basic operating modes: Running Mode, Parameter-Selection Mode, and Value Mode. Each
of the three modes have specific visual indicators that allow the user to immediately determine the
current state or mode of the user interface. Parameter-Selection Mode and Value Mode can only
be entered if the Program Enable jumper is in the “On” position.
Running Mode is the default display of the unit when power is applied. The ASP10 will spend the majority
of its time in this mode. In Running Mode, the display shows the target value in the appropriate userdefined format of rate, time, or percentage. The control will continuously attempt to drive the motor at
the requested target rate. In this display mode, the Up and Down buttons increase or decrease the
displayed target value until either the display minimum or display maximum limit is reached. Depending
on the alarm configuration, these buttons may also serve as an alarm-silence or alarm-reset button.
Example displays for rate, time, and follower operating modes are 13.60, 45:30, and 9301.
Parameter-Selection Mode can be entered by simply pressing and holding the Enter button down for
three seconds. Once in Parameter-Selection Mode, the far left of the display will be a ‘P’. The right side
of the display will indicate the currently selected parameter number for editing purposes. Pressing the
Up or Down button will increase or decrease the selected parameter number on the display. Although
the parameter numbers are in numerical order, some numbers are skipped. These numbers represent
reserved parameters that are not yet implemented and are not displayed. Once the desired parameter
number is displayed, a press of the Enter button will change the display to the Value Mode. When in
Parameter-Selection Mode, pressing the Enter button with parameter 0 selected will cause the
unit to return to Running Mode. Example displays for Parameter-Selection Mode are P 1, P 12, and
P 54. See the Software Parameters for a list of available parameters.
Value Mode is used to modify the value of the selected parameter. When in Value Mode, the two dots
which form the colon, between digits two and three, will alternately flash (one, then the other) to inform
the user that a parameter’s value is being edited. Pressing the Up or Down button increases or
decreases the selected parameter’s value. See the Software Parameters for a list of allowable values
and ranges. Value changes take effect immediately. For example, when scrolling through the alarm
output conditions, the relay will activate as the always-active selection is passed. Once the desired
value is showing in the display window, pressing the Enter button again will return to ParameterSelection Mode. The new value is not saved in permanent memory until the Enter button is pressed.
Removing power from the unit while in Value Mode may result in the specified new value being lost.
10
Page 13

Detailed Configuration Instructions
Default Configuration
When shipped from the factory, the following basic settings are in place:
Rate Mode Operation in RPM
S1 and S2 Signal Input Pulses per Revolution: 1
Decimal Point Display: Off
Display Range: 0 - 2400
Speed Range: 0 - 2400 RPM
Accel and Decel: 2500 RPM per second
Signal Input 2 (S2) Mode: Jog @ 1000 RPM when Low
User Input 1 (UIN1) Mode: Emergency Stop when Low
Alarm Output: Disabled
Resetting the Unit to Factory Defaults
The factory-default settings can be easily restored using either of two methods. Both methods require
the Program Enable jumper to be in the “On” position. The first is to apply power to the unit with both
the Enter and Down buttons pressed for 3 seconds. The second is to change the value of parameter
95 to 5.
JP1 (Program Enable Jumper)
The JP1 jumper is located under the dust cover on the back end of the upper board. When the jumper
is set to the "Off" position, all programming features are locked out to the front panel user. When the
jumper is in the "On" position, the programming parameters are open to change. JP1 is shipped from
the factory set in the "On" position.
11
Page 14

Software Parameters
Value Range
Parameter Description
0 Selecting this item exits to Running Mode n/a n/a
Read-Only Parameters
1 Model Number 12 – ASP10 Unit 12
2 Software Build 1 – 9999 n/a
3 Hardware Version 1 – 9999 n/a
4 Serial Number – Major (reserved) n/a n/a
5 Serial Number – Minor (reserved) n/a n/a
General Se tup
10 Operating Mode 1 – Rate Mode
2 – Time Mode
3 – Follower Mode
11 Display Intensity 0 – 31 (Dim – Bright) 26
13 Decimal Point Position 0 – DP Disabled (XXXX)
1 – X.XXX
2 – XX.XX
3 – XXX.X
4 – XXXX.
14 Keypad Mode 1 – Linear, Constant Rate
2 – Non-linear, Acceler ati n g Rate
15 Keypad Scroll Delay 0 – 30 (Fast – Slow) 10
16 S1 / S2 Input Edge & Prescaler Configuration 0 – S1 is Rising/1 S2 is Rising/1
1 – S1 is Fallin g/1 S2 is Rising/1
2 – S1 is Fallin g/4 S2 is Rising/1
3 – S1 is Fallin g/16 S2 is Rising/1
4 – S1 is Rising/1 S2 is Falling/1
5 – S1 is Fallin g/1 S2 is Falling/1
6 – S1 is Fallin g/4 S2 is Falling/1
7 – S1 is Fallin g/16 S2 is Falling/1
8 – S1 is Rising/1 S2 is Falling/4
9 – S1 is Fallin g/1 S2 is Falling/4
10 – S1 is Falling/4 S2 is Falling/4
11 – S1 is Falling/16 S2 is Falling/4
12 – S1 is Rising/1 S2 is Falling/16
13 – S1 is Falling/1 S2 is Falling/16
14 – S1 is Falling/4 S2 is Falling/16
15 – S1 is Falling/16 S2 is Falling/16
18 Power-up Mode 1 – Default to Zero Displ ay
2 – Default to Power-up Value
3 – Default to Previous Running Val.
19 Power-up Value 0 – 9999 (Display Units) 0
(units)
Factory
Default
1
0
2
0
3
User
Settings
Display & Control Loop Setup
20 Display Minimum 0 – 9998 (Display Units) 0
21 Display Maximum 1 – 9999 (Display Units) 2400
23 Accel Setting 1 – 9999 (Display Units) 2500
24 Decel Setting 1 – 9999 (Display Units) 2500
26 Proporti onal Gain 0 – 9999 (Not Unit-specific ) 0
27 Integral Gain 1 – 9999 (Not Unit-specific ) 5000
29 Pulse Accumulati on Limi t 2 – 5000 (Not Unit-specific ) 15
Signal Input #1 (S1) Setup
30 S1 Display Referenc e 0 – 9999 (Display Units) 2400
31 S1 Reference RPM 0 – 9999 (RPM) 2400
32 S1 Pulses per Revolution 1 – 2048 (PPR) 1
33 S1 Deadband (Follower Mode Only) 0 – 1000 (Seconds) 0
12
Page 15

Software Parameters, cont'd
Parameter
Description
Value Range
(units)
Factory
Default
User
Settings
Signal Input #2 (S2) Setup
35 S2 Input Configuration 1 – Disabled (Follower Mode)
2 – E-Stop When S2 High
3 – E-Stop When S2 Low
4 – Inhibit When S2 High
5 – Inhibit When S2 Low
6 – Jog When S2 High
7 – Jog When S2 Low
7
36 S2 Setpoint 1 – 9999 (Display Units) 1000
37 S2 Pulses per Revolution 1 – 2048 (PPR) 1
40 Reserved
41 Reserved
Alarm Output Configuration
50 Activation Conditions 0 – Always Off
1 – Always On
2 – Active when Above upper limit
3 – Active when Below lower limit
4 – Active inside Range
5 – Active outside Range
6 – Active when Target = 0
7 – Active when no Pickup Pulses
detected
8 – Active when at Max. Conduction
0
51 Output Style & Reset Mode 1 – Constant & Auto Reset
2 – Constant & Manual Reset
3 – Pulsed & Auto Reset
4 – Pulsed & Manual Reset
1
52 Reset Configuration 1 – No Sil., Reset on Key
2 – No Sil., Reset on S2 High
3 – No Sil., Reset on S2 Low
4 – Sil., Reset on Key
5 – Sil., Reset on S2 High
6 – Sil., Reset on S2 Low
1
53 Display Flash On Active Alarm 0 – Alarm Flash Disabled
1 – Alarm Flash Enabled
0
54 Pulse on Time 1 – 3600 (seconds) 1
55 Pulse off Time 1 – 3600 (seconds) 1
56 Pulse Count 0 – 9999 (pulses) 0
57 Lower Limit 0 – 9999 (display units) 0
58 Upper Limit 0 – 9999 (display units) 9999
Parameter Memory Commands
Do Nothing & Exit
5 – Restore Factory Defaults
0
98 Save to User Default Area 0 – Do Nothing & Exit
5 – Save Setting
0
99 Restore from User Default Area 0 – Do Nothing & Exit
1 – Restore Settings
0
13
Page 16

Parameter Descriptions
Parameter 0 – Exit to Running Mode
When parameter 0 is selected in Parameter-Selection Mode, the unit will return to Running Mode
and display the running value. This should be selected once changes to parameters are
completed.
Parameter 1 – Model Number (Read Only)
This is a number which represents the base model number for the product. The model code for
the ASP10 is 12.
Parameter 2 – Software Build (Read Only)
The software build is a code which identifies the software version of the unit.
Parameter 3 – Hardware Version (Read Only)
The hardware version is a code which identifies which hardware was used to build the unit.
Parameter 4 & 5 – Serial Number, Major & Minor (Read Only)
These parameters are reserved for future use as an electronic serial number and are unique to
each manufactured unit.
Parameter 10 – Operating Mode
This parameter defines the operating mode for the entire unit. There are two basic modes of
operation, master and follower. In master modes, the unit controls the load using either rate or
time units. In follower mode, the unit controls the load in percentage of master rate. The following
modes are available for the ASP10:
Mode 1 – Master, Rate Mode
In Rate Mode, the ASP10 displays in user-defined rate units such as RPM, Gallons per
Hour, or Feet per Second. See applications for examples.
Mode 2 – Master, Time Mode
In Time Mode, the ASP10 displays in time units using the format AA:BB. By default AA:BB
represents minutes (AA) and seconds (BB). Optionally, it can be configured to represent
hours (AA) and minutes (BB) or other user-defined units with a 1:60 relationship. When
setting parameters which are configured in display units, the programmed value is the
determined by the formula (AA * 60) + BB. In HH:MM displays, this is the total number of
minutes. In MM:SS displays, this is the total number of seconds. See applications for
examples.
Mode 3 – Follower Mode
In Follower Mode, the ASP10 displays in percentage units, where 1000 equals 100.0
percent of the master rate. For example, if the display indicates 985, 98.5, or 9.85, the
ASP10 will attempt to run at exactly 98.5 percent of the master rate. Display settings are
always entered ignoring the decimal point's position. See applications for more examples.
Parameter 11 – Display Intensity
This parameter adjusts the intensity of the LED display digits in the front panel of the unit. The
values of 0 – 31 correspond to a gradual change from very dim to very bright. This is often useful
when the ASP10 is used in the same panel as other pieces of equipment with LED displays and
a uniform display brightness is desired. Simply adjust the ASP10 to match its surroundings.
Parameter 13 – Decimal Point (DP) Position
This selects the format of the display with respect to the decimal point’s position. This parameter
does not effect the value entry for other parameters. For example, if the user desires to display
10.00 at 300RPM, then parameter 30 would be set to 1000, parameter 31 would be set to 300,
and parameter 13 would be set to 2.
Mode 0: Fixed XXXX
Mode 1: Fixed X.XXX
Mode 2: Fixed XX.XX
Mode 3: Fixed XXX.X
Mode 4: Fixed XXXX.
14
Page 17

Parameter 14 – Keypad Mode
This parameter selects the operating mode of the front-panel push buttons. In some applications,
increasing or decreasing the scroll rate provides the user more controllability when entering
settings. Parameters 14 and 15 affect only the Up and Down buttons when the user interface
is in Running Mode. These settings also apply to remote Up / Down buttons which are attached
via the -1 option board.
Mode 1: Linear, Constant Rate
In linear mode, pressing and holding the Up or Down buttons will cause the display to
continuously change value in the requested direction until either the Display Minimum or
Display Maximum is reached. The displayed value will scroll at a constant rate which is
specified using parameter 15.
Mode 2: Non-linear, Accelerating Rate
In non-linear mode, pressing and holding the Up or Down buttons will cause the display
to continuously change value in the requested direction until either the Display Minimum
or Display Maximum is reached. The displayed value will initially scroll at a slow rate and
increase in speed until the maximum scroll rate is achieved. The initial scroll rate is
specified using parameter 15.
Parameter 15 – Keypad Scroll Mode
This parameter sets the scroll speed for the front-panel push buttons. The function of this
parameter varies slightly depending on the Keypad Mode. See parameter 14 for more details.
Parameter 16 – S1 / S2 Input Edge & Prescaler Configuration
This parameter determines how the ASP10 processes the S1 and S2 signal inputs. It specifies
which signal edge is used for measurements and the value of the internal frequency dividers or
prescalers. Modes with prescalers greater than 1 should only be used if the input pulse rate on
S1 or S2 exceeds the unit's maximum native pulse rate (see specifications for details);
otherwise, the control loop may become sluggish and unnecessarily inaccurate. Use the
following chart to configure this parameter. As an example, assume an application requires input
pulse rates on S1 of 120,000 pulses-per-minute and S2 of 35,000 pulses-per-minute. According
to the electrical specifications, the unit can only accept 50,000 pulses-per-minute on each the
S1 and S2 inputs. With this in mind, the S1 and S2 prescalers should be selected as Falling /
4 and Rising / 1, respectively. In this case, parameter 16 would be set to 2.
S2 Inpu t Edge
and Prescaler
Rising / 1
Falling / 1
Falling / 4
Falling / 16
Parameter 18 – Power-up Mode
This parameter defines the mode which determines the default Running Value when power is
initially applied to the ASP10.
Mode 1: Default to Zero
When in this mode, the unit will default to zero (display units).
Mode 2: Default to Power-Up Value
When in this mode, the unit will default to the Power-up Value, parameter 19.
Mode 3: Default to Previously Running Value
When in this mode, the unit will default to the previous running value before power was
removed.
A previous running value must have been active for at least 3 seconds to be
recalled after power has been disconnected and reapplied.
S1 Input Edge and Prescaler Selection Chart
Rising / 1 Falling / 1 Falling / 4 Falling / 16
0 1 2 3
4 5 6 7
8 9 10 11
12 13 14 15
15
Page 18

Parameter 19 – Power-up Value
When Power-up Mode is set to 2, this parameter will designate the default display value at
power-up in display units.
Parameter 20 – Display Minimum
This parameter defi nes the lower end of the display range. This is the value which limits how
low the user is able to scroll the displayed value in Running Mode. In Rate and Time modes,
this value is set in display units. In Follower Mode, this is set in percentage of the master rate.
For example, in Follower Mode, 1250 represents 125.0 percent of the master rate.
Parameter 21 – Display Maximum
This parameter defi nes the upper end of the display range. This is the value which limits how
high the user is able to scroll the displayed value in Running Mode. In Rate and Time modes,
this value is set in display units. In Follower Mode, this is set in percentage of the master rate.
For example, in Follower Mode, 150 represents 15.0 percent of the master rate.
Parameter 23 – Acceleration Setting
This parameter determines how fast the ASP10 will accelerate toward the displayed target
setting. This parameter is set in display units of change per second such as RPM, GPM, or
feet per second. In Follower Mode, this parameter is set in RPM units.
Parameter 24 – Deceleration Setting
This parameter determines how fast the ASP10 will decelerate toward the displayed target
setting. This parameter is set in display units of change per second such as RPM, GPM, or
feet per second. In Follower Mode, this parameter is set in RPM units.
Parameter 26 – Proportional (P) Gain
The Proportional Gain is the fi rst of two parameters which defi ne the responsiveness of the
control with respect to how fast it responds to changing loads. Because the ASP10 is a pulseaccumulation drive, the P Gain responds differently than the same parameter in a standard
velocity-form PID control. The higher the P Gain, the more aggressively the unit will drive the
load. See the PI Control Tuning section of the manual for more details.
Parameter 27 – Integral (I) Gain
The Integral Gain is the second of two parameters which defi ne the responsiveness of the
control with respect to how fast it responds to changing loads. The higher the I Gain, the more
aggressively the unit will drive the load. When using high PPR pickups or encoders, it will be
necessary to decrease the I Gain to prevent unwanted oscillation and instabilities. See the PI
Control Tuning section of the manual for more details.
Parameter 29 – Pulse Accumulation Limit
This parameter sets the limit for the maximum number of pulses the drive will accumulate prior
to intentionally losing count and therefore long-term accuracy. Because the ASP10 is a pulseaccumulation drive, it is able to accurately track a master (in Follower Mode) pulse-by-pulse.
That is, the ASP10 is able to run for days, weeks, or months and remain completely in sync
with a master drive or process; unfortunately, this functionality comes at a small cost.
By default, if the main pickup signal were lost and then reattached, the unit may run at high
speeds for many seconds while attempting to make-up what would have been lost pulses.
Once it catches up, it returns to normal operation. In some applications, this is a nuisance. In
these cases, the Pulse Accumulation Limit, parameter 29, can be lowered to limit the maximum
number of pulses the drive will remember.
This parameter is set from 0 to 9999, where 0 is no accumulation and 9999 is maximum
accumulation. As this value approaches zero, the unit will gradually lose its ability to drive the
motor and eventually stop the motor completely. It may be necessary to increase the value of
this parameter for application which demand higher long-term accuracy.
16
Page 19

Parameter 30 – Signal Input 1 (S1) Display Reference
This is the number to be displayed when at the user-specifi ed motor Reference RPM. In Rate
Mode, this value represents rate units such as feet, ounces, or revolutions. In Time Mode,
this value represents the reference time measured in seconds or minutes. If the desired
display is HH:MM, then all values should be entered in minutes. If MM:SS is desired, then
all values should be entered in seconds. In Follower Mode, this value is the percentage of
the master rate in 0.1% units. For example, 1000 equates to 100%. See applications for
more examples.
Parameter 31 – Signal Input 1 (S1) Reference RPM
This is the reference RPM at which the Display Reference value should be displayed. In
Rate and Time Modes, this value represents the RPM of the encoder to which the Display
Reference corresponds. In Follower Modes, this value is not used. See applications for
examples.
Parameter 32 – Signal Input 1 (S1) Pulses per Revolution
This is the number of pulses per revolution for the signal input 1 (S1). The ASP10 supports
pickups and encoders from 1 to 2048 pulses per revolution.
Parameter 33 – Signal Input 1 (S1) Deadband (Follower Mode Only)
When in Follower Mode, it is often desirable for the follower unit to continue to slowly makeup the small pickup pulse differential between the master and follower's position. In some
applications, it is not necessary for the follower to continue to slowly seek the master's exact
pulse position when the master rate is at zero. In these cases, the Deadband parameter
can be set above zero to force the ASP10 to stop driving the motor slowly and cause it to
inhibit until the master starts rotating again. At that point, the follower will automatically
make-up the pulse differential as it starts to rotate. The deadband is disabled by setting it
to zero seconds.
Parameter 35 – Signal Input 2 (S2) Input Confi guration
This parameter determines the operating mode of signal input 2 (S2).
Mode 1: Disabled (Follower Mode)
The S2 input is inactive. This is the required setting for Follower Mode.
Mode 2: Emergency Stop When S2 High (Not Wired To Common)
When the S2 input is at an electrically high (+5V) state or allowed to fl oat disconnected,
the ASP10 will enter emergency-stop mode. While in this mode, the output will
immediately be turned off. Once the S2 input returns to an electrically low state or
wired to the unit's common, the output will become active.
Mode 3: Emergency Stop When S2 Low (Wired To Common)
When the S2 input is at an electrically low state or wired to the unit's common, the
ASP10 will enter emergency-stop mode. While in this mode, the output will immediately
be turned off. Once the S2 input returns to an electrically high (+5V) state or allowed
to fl oat disconnected, the output will become active.
Mode 4: Inhibit When S2 High (Not Wired To Common)
When the S2 input is at an electrically high (+5V) state or allowed to fl oat disconnected,
the ASP10 will enter inhibit mode. While inhibited, the output will decrease according
to the decel setting until zero output is reached. Once the S2 input returns to an
electrically low state or is wired to the unit's common, the output will start to accelerate
toward the previous running value.
Mode 5: Inhibit When S2 Low (Wired To Common)
When the S2 input is at an electrically low state or wired to the unit's common, the
ASP10 will enter inhibit mode. While inhibited, the output will decrease according to the
decel setting until zero output is reached. Once the S2 input returns to an electrically
high (+5V) state or allowed to fl oat disconnected, the output will start to accelerate
toward the previous running value.
17
Page 20

Mode 6: Jog When S2 High (Not Wired To Common)
When the S2 input is at an electrically high (+5V) state or allowed to fl oat disconnected,
the ASP10 will enter jog mode. While in jog mode, the display will immediately change to
the programmed jog setpoint, parameter 36. The unit will start accelerating or decelerating
toward the jog setting at the confi gured accel and decel rates. Once the S2 input returns to
an electrically low state or is wired to the unit's common, the output will start to accelerate
or decelerate toward the previous running value. In Follower Mode, the unit will operate
as its own master. This allows an application to jog by overriding a stopped master.
Mode 7: Jog When S2 Low (Wired To Common)
When the S2 input is at an electrically low state or wired to the unit's common, the
ASP10 will enter jog mode. While in jog mode, the display will immediately change to the
programmed jog setpoint, parameter 36. The unit will start accelerating or decelerating
toward the jog setting at the confi gured accel and decel rates. Once the S2 input returns
to an electrically high (+5V) state or allowed to fl oat disconnected, the output will start to
accelerate or decelerate toward the previous running value. In Follower Mode, the unit
will operate as its own master. This allows an application to jog by overriding a stopped
master.
Parameter 36 – Signal Input 2 (S2) Setpoint
When the S2 confi guration, parameter 35, is set to one of the jog modes, this parameter
defi nes the jog setpoint in display units. If the ASP10 operating mode is set to Follower Mode,
then this parameter is set in RPM units. This allows a follower control to be jogged when the
master is stopped.
Parameter 37 – Signal Input 2 (S2) Pulses per Revolution
This is the number of pulses per revolution for the signal input 2 (S2). The ASP10 supports
pickups and encoders from 1 to 2048 pulses per revolution.
Parameter 40 – Reserved
Parameter 41 – Reserved
Parameter 50 – Alarm 1 Conditions
This defi nes which conditions will result in the alarm 1 output being activated.
Mode 0: Always Inactive
The alarm output will remain in an inactive state. In this state, the NC and C contacts
will be internally electrically connected.
Mode 1: Always Active (When Power Is Applied)
The alarm output will become active when the power is applied to the unit. In this state,
the NO and C contacts will be internally electrically connected.
Mode 2: Active When Display Value Above Limit
The alarm output will activate when the displayed value is above the upper limit setting,
parameter 48.
Mode 3: Active When Display Value Below Limit
The alarm output will activate when the displayed value is below the lower limit setting,
parameter 47.
Mode 4: Active When Display Value Inside Range
The alarm output will activate when the displayed value is greater than or equal to lower
limit settings and less than or equal to the upper limit setting.
Mode 5: Active When Display Value Outside Range
The alarm output will activate when the displayed value is less than the lower limit setting
or greater than upper limit setting.
Mode 6: Active When Target (Display) = Zero
The alarm output will activate when the displayed value is equal to zero. This allows the
alarm output to be used to drive a mechanical brake to decrease stopping time or to
provide holding torque at zero speed.
18
Page 21

Mode 7: Active When Main Pickup Signal (S1) Stalled or stopped
The alarm output will activate when the main pickup signal input (S1) has stalled or
stopped. The alarm lower limit (Parameter 57) is used to specify the stall timeout, in
seconds, under a motor stall condition. When using the lower limit to set the stall timeout,
an inhibit command or zero speed command will not be recognized as a stall condition.
The pickup is considered to have stalled if the timeout passes with no pickup pulses when
the target (displayed) value is greater than zero and the control has not been given an
inhibit command. The alarm upper limit (Parameter 58) is used to specify a zero speed or
stopped timeout condition in seconds. When using the upper limit to set a zero speed or
stopped timeout, an inhibit command, a zero speed command or a motor stall condition
will all be recognized as a stopped condition. The pickup is considered to have stopped
after the timeout passes with no pickup pulses.
Note: When using the upper limit to set a stopped timeout the lower limit should
be set to zero.
Mode 8: Active When Driving At Maximum Conduction Angle
The alarm output will activate when the control is driving the motor at the maximum
conduction angle. This can be used to determine if the control is running away due to a
broken pickup signal wire when stall-detection is not desired.
Parameter 51 – Alarm 1 Output Style & Reset Confi guration
This setting confi gures the output mode and reset method for the alarm output.
Mode 1: Constant & Auto Reset
In this mode, the alarm output will remain active until the alarm condition ceases to exist.
The alarm will automatically reset when the conditions return to normal.
Mode 2: Constant & Manual Reset
In this mode, the alarm output will remain active until the alarm is reset manually. See
parameter 52 for details.
Mode 3: Pulse & Auto Reset
In this mode, the alarm output will pulse on and off until the alarm condition ceases to
exist. The pulsed modes are commonly used for audible alarms where a constant output
would be considered distracting or awkward. The alarm will automatically reset when the
conditions return to normal.
Mode 4: Pulse & Manual Reset
In this mode, the alarm output will pulse on and off until the alarm is reset manually. See
parameter 52 for reset details. The pulsed modes are commonly used for audible alarms
where a constant output would be considered distracting or awkward.
Parameter 52 – Alarm 1 Reset Confi guration
This setting determines which actions will cause an active alarm to be silenced or reset.
Mode 1: No Silencing, Reset On Any Button Press
In this mode, an active alarm cannot be silenced. Once the alarm condition ceases to
exist, however, any user-interface button may be pressed to cause a manual reset.
Mode 2: No Silencing, Reset On S2 Input High (Not Wired To Common)
Similar to Mode 1. Once the alarm condition ceases to exist, setting the S2 input to a
high (+5V) state or allowing it to fl oat disconnected will cause a manual reset.
Mode 3: No Silencing, Reset On S2 Input Low (Wired To Common)
Similar to Mode 1. Once the alarm condition ceases to exist, setting the S2 input to a low
(COM) state or wiring it to common will cause a manual reset.
Mode 4: Silencing Enabled, Reset On Any Button Press
When the conditions for an active alarm persist, pressing any user-interface button will
result in the alarm being silenced or deactivated, but not reset. A second attempt to reset
the alarm must be made after the condition cease to exist to clear the alarm.
Mode 5: Silencing Enabled, Reset On S2 Input High (Not Wired To Common)
Similar to Mode 4. Setting the S2 input to a high (+5V) state or allowing it to fl oat
disconnected will cause the alarm to be silenced or reset depending on the current state
of the alarm conditions.
19
Page 22

Mode 6: Silencing Enabled, Reset On S2 Input Low (Wired To Common)
Similar to Mode 4. Setting the S2 input to a low (COM) state or wiring it to common
will cause the alarm to be silenced or reset depending on the current state of the alarm
conditions.
Parameter 53 – Alarm 1 Display Flash On Alarm
This will cause the display to fl ash when an alarm condition is active.
Parameter 54 – Alarm 1 Pulse on Time
This parameter defi nes the number of seconds the output should be enabled during the ‘on’
phase of an active pulsing alarm’s output.
Parameter 55 – Alarm 1 Pulse off Time
This parameter defi nes the number of seconds the output should be disabled during the ‘off’
phase of an active pulsing alarm’s output.
Parameter 56 – Alarm 1 Pulse Count
This setting determines how many pulses are output when the alarm is activated and is
confi gured in pulse output style. When 0 is entered, the unit will be set for continuous pulses
while the alarm is active.
Parameter 57 – Alarm 1 Lower Limit
This setting defi nes either the lower limit, the lower end of a range for the alarm region or a stall
timeout. Alarm limits are set in display units without regard to decimal point or colon position.
In Rate and Follower Modes, a limit of 123 could represent a display value of 123, 12.3, 1.23, or
0.123. When in Time Mode, a limit of 123 would represent 1:23 on the display. When the lower
limit is being used to set a stall timeout for parameter 50 mode 7, the setting is in seconds.
Parameter 58 – Alarm 1 Upper Limit
This setting defi nes either the upper limit, the upper end of a range for the alarm region or
a stop timeout. Alarm limits are set in display units without regard to decimal point or colon
position. In Rate and Follower Modes, a limit of 123 could represent a display value of 123,
12.3, 1.23, or 0.123. When in Time Mode, a limit of 123 would represent 1:23 on the display.
When the upper limit is being used to set a stop timeout for parameter 50 mode 7, the setting
is in seconds.
Parameter 95 – Factory Default Command
When set to a value of 5, the unit will be reset to factory default settings. This can also be
achieved by applying power to the unit with both the Enter and Down buttons depressed. The
programming jumper must be in the "On" position for this method to function.
Parameter 98 – Save to User Default Area Command
When set to a value of 5, the unit will store all adjustable parameters to the user default area.
The user default area is intended to be a location where an OEM or integrator can store settings
specifi c to their application. Using this, an OEM can easily refresh their custom settings in the
fi eld if an end-user accidentally reconfi gures the unit unsuccessfully. Another common use for
this area is testing and initial setup. The user can store known-good settings here and easily
experiment without the fear of losing the optimal confi guration.
Parameter 99 – Restore from User Default Area Command
When set to a value of 1, the unit will restore all adjustable parameters from the user default
area. See parameter 98 for additional information.
20
Page 23

Pump Controller with Audible and Visual Alarm
Description:
A waste pump control which displays the pump rate in liters per minute with an audible and visual
alarm output which will warn the operator if the waste flow has stopped. The alarm should not
be able to be silenced and should automatically reset when flow rates have returned to normal.
The display should indicate in the format "xxx.x" (LPM).
Application Diagram:
Dart ASP10
Control
CONTROLS
Tach
ValuPage
Ite
m
153.0
ACCU-SET
Application Examples
ENTER
Audible
Annunciator
PARTNER
MOTOR
CONTROLLER
Wiring Diagram:
Dart 253G
DC Motor
ASP10
P1-1
P1-2
P1-3
P1-4
P1-5
P1-6
P1-7
P1-8
P1-9
P1-10
P1-11
P1-12
Pump
Pump Specs:
19 Shaft Rotations = 2 Liters
N
L
HI
W
LO
COM
+5V
S1
S2
NOT USED
NO
C
NC
NOT USED
Flow Transducer
(73 Pulses per Liter)
Fluid
Inlet
*FUSE
AC Line Input 85-265VAC, 50-60 Hz
}
GND
+V
SIGNAL OUT
Fluid
Outlet
PARTNER
MOTOR
CONTROLLER
HI
(DART 253G)
W
LO
FLOW TRANSDUCER
(Frequency Output)
240VAC
Audible
Annunciator
* Size fuse according to unit and application. See
electrical specifications for maximums.
21
Page 24

Parameter Configuration:
Parameter Value Notes
10 1 Master, Rate Mode Setting (LPM is a rate-based unit)
13 3 Decimal point position set to XXX.X on display
30 10 Display should in dicate 1.0 LPM (10) when pickup at Reference RPM, parameter 31
31 73 This is the RPM at which the Display Reference, parameter 30, should be displayed
32 1 Pulses per revolut i on of shaft encoder or pickup is 1 PPR
50 7 Alarm active wh en pickup stalled
53 1 F lash di sp lay when al ar m is active
57 10 Lower limit sett ing for pickup stall timeout. Set for 10 seconds.
Conveyor Oven Controller with Two Preset Process Times
Description:
An oven monitor displaying the “tunnel” time in minutes and seconds. The tunnel time is defined
as the time it takes for the heated object on the conveyor to travel from point A to point B in the
application diagram below. An external time-select switch should allow the user to choose
between the displayed process time or a second fixed process time. The time should be
displayed in MM:SS (minutes:seconds) format. The process time should only be allowed to
be adjusted between 6:30 and 12:15.
Application Diagram:
AB
Heat Source
Tunnel Oven
CONTROLS
Tach
Ite
ValuPage
m
6:30
ACCU-SET
Dart ASP10
Contol
Oven Speed Select Switch
SPEED 1 SPEED 2
Connect to
Coupling
Partner
Motor
Controller
Dart PU-2E
or equivalent
ENTER
DART
125DV-C
Non-Reduced
Shaft
Coupling to
Chain Drive
Gear Motor
Drive Train Specs:
1380 RPM at non-reduced
motor shaft equates to
6 minutes and 40 seconds
of tunnel time
22
Page 25

Wiring Diagram:
N
L
HI
W
LO
COM
+5V
S1
S2
NO
C
NC
* Size fuse according to unit and application. See
electrical specifications for maximums.
black
red
white
NOT USED
NOT USED
NOT USED
*FUSE
AC Line Input 85-265VAC, 50-60 Hz
}
Speed 1 Select
Speed 2 Select
NC
HI
W
LO
Dart PU-2E or
Equivalent
Encoder
ASP10
P1-1
P1-2
P1-3
P1-4
P1-5
P1-6
P1-7
P1-8
P1-9
P1-10
P1-11
P1-12
Parameter Configuration:
Parameter Value Notes
10 2 Time Mode Setting (MM:SS is a time-based unit)
20 390 Display mini mum set to 6:30 (MM:SS)
For example : (6 minutes * 60 seconds-per-minute) + 30 seconds = 390 seconds
21 735 Display maximum set to 12:12 (MM:SS)
For example : (12 minutes * 60 seconds-per-minute) + 15 seconds = 735 seconds
30 400 Display should indicate 6:40 (MM:SS) when motor at Reference RPM, paramete r 31
For example : (6 minutes * 60 seconds-per-minute) + 40 seconds = 400 seconds
31 1380 This is the RPM at which the Di splay Reference, parameter 30, should be displayed
32 1 Pulses per revolution of shaft encoder or pickup is 1 PPR
35 7 Set S2 input mode to jog when low
36 530 Set fixed process time during jog to 8:50 (MM:SS)
For example : (8 minutes * 60-seconds-per-minute) + 50 = 530 seconds
PARTNER
MOTOR
CONTROLLER
(DART 125DV-C)
Synchronized Conveyor Controller with Jog Switch
Description:
A synchronized conveyor system comprised of two conveyors with no mechanical
linkage between them. The master conveyor is driven by a basic Dart analog DC motor
control. The slave or follower conveyor should follow the master's position with exacting
long-term accuracy. The slave conveyor should be able to be jogged into position when
the master is stopped at a rate of 350 RPM. The slave conveyor may be adjusted from
90.0% to 110.0% of the master conveyor rate using the user interface.
23
Page 26

Application Diagram:
Master Side
Follower Side
Box A
Conveyor 1
Box B
Conveyor 2
or equivalent
Dart PU-20E
or equivalent
Dart PU-10E
Belt
DC
Gear Motor
Belt
DC
Gear Motor
Partner
Motor
Controller
DART
253G
6
Motor
2
4
0
CONTROLS
8
ON
10
OFF
Dart 253G or other Motor Control
Jog Switch
Jog
Run
Wiring Diagram:
ASP10
P1-1
P1-2
P1-3
P1-4
P1-5
P1-6
P1-7
P1-8
P1-9
P1-10
P1-11
P1-12
N
L
HI
W
LO
COM
+5V
S1
S2
NO
C
NC
CONTROL
100.0
Dart ASP10
NOT USED
NOT USED
NOT USED
Ite
ValuPage
m
ACCU-SET
Control
*FUSE
white red
Tach
ENTER
AC Line Input 85-265VAC, 50-60 Hz
}
black
red
white
black
HI
W
LO
PARTNER
MOTOR
CONTROLLER
(DART 253G)
FOLLOWER PICK-UP
Dart PU-10E or
MASTER PICK-UP
MOUNTED TO
MOTOR SHAFT
Equivalent
Encoder
MOUNTED TO
MOTOR SHAFT
* Size fuse according to unit and application. See
electrical specifications for maximums.
24
Dart PU-2E or
Equivalent
Encoder
Page 27

Parameter Configuration:
Parameter Value Notes
10 3 Follower Mode Setting
13 3 Decimal point position set to XXX.X on display
20 900 Display minimum is 90.0% of master rate
21 1100 Display maximum is 110.0% of master rate
32 5 Pulses per revolut ion of shaft encoder or pick up is 5 PPR
37 10 Pulses p er revolution of shaft encoder or pickup is 10 P PR
Troubleshooting
Problem Possible Case Solution
Display is blank Power not applied
Using a volt meter, verify that a voltage between 85 and 265VAC is measured between
the L and N terminal block positions.
Defective unit
Display is dim Display intensity
When power is
applied, “LF-L” is
displayed
When power is
applied, “LF-H” is
displayed
The alarm output
does not seem to
function
parameter is too low
AC line supplying
power to unit has too
much noise
AC line supplying
power to unit has an
abnormally low
frequency
AC line supplying
power to unit has too
much noise
AC line supplying
power to unit has an
abnormally high
frequency
Alarm output
parameters not
configured properly
Contact technical support for additional help and instructions.
Editing and increasing the display intensity parameter should cause the display digits to
become brighter.
Review routing of power wires in machine to minimize electrical noise. Look for other
devices which share the same circuit which may be producing unacceptable levels of
line noise. In some applications, such as welding equipment, a careful regiment of
applying an AC line filter, re-routine wires, dividing circuits, using shielded cable, and
properly grounding devices will usually solve the problem.
The unit is designed to operate with AC lines from 48-62 Hertz (cycles per second).
This is typically not a problem because the international standards are 50 and 60 Hertz.
Alarm output parameters not configured properly
Review alarm output parameters. The alarm relay output can be tested by selecting
the “Always On” value for the Activation Condition parameters for the alarm output.
When doing this, the relay click should be audible and the NC (Normally Closed) and C
(Common) terminals should become internally shorted at the terminal block.
Technical Support Options
• Visit the Dart Controls Web Site at:
• Email technical support at:
techsupport@dartcontrols.com
• Telephone technical support at 317-733-2133 ext. 4
www.dartcontrols.com
What's Special About www.dartcontrols.com?
• Changes to printed material and product offerings first appear online
• Product manuals and other literature are easily accessible
• All information can be easily displayed or printed as needed
25
Page 28

REPAIR PROCEDURE
Re-Order from
omegamation.com
Omegamation
TM
1-888-55-OMEGA
1-888-55-66342
1-888-55-66342
In the event that a Product manufactured by Dart Controls Incorporated (DCI) is in need of
repair service, it should be shipped, freight paid, to: Dart Controls, Inc., 5000 W. 106th Street,
Zionsville, IN. 46077, ATTN: Repair Department.
Those orders received from anyone without and existing account with DCI will need to specify
if they will be paying COD or Credit Card (Master Card or Visa). This information is required
before work can begin. If you have an account with Dart your order will be processed according
to the terms listed on your account.
Completed repairs are returned with a Repair Report that states the problem with the control
and the possible cause. Repair orders are returned via UPS Ground unless other arrangements
are made. If you have further questions regarding repair procedures, contact your Dart Controls,
Inc. at 317-733-2133 Ext.460.
YOUR MOTOR SPEED CONTROL SOLUTIONS PROVIDER
125D SERIES
AC INPUT - VARIABLE DC OUTPUT
1/50 HP through 1.0 HP
700/COMMUTROL SERIES
DC BRUSHLESS
5 & 20 Amp for
12,24,& 36VDC Inputs
Dart Controls, Inc. is a designer, manufacturer, and
marketer of analog and digital electronic variable speed
drives, controls, and accessories for AC, DC, and DC
brushless motor applica-
tions.
Shown above is just a sampling of the expanded line of
Dart controls that feature the
latest in electronic technology
and engineering. Products are
manufactured in the U.S.A. at
our Zionsville (Indianapolis,
250G SERIES
AC INPUT - VARIABLE DC OUTPUT
1/50 HP through 2.0 HP
MDP SERIES
PROGRAMMABLE
CLOSED LOOP DC
SPEED CONTROL
Indiana) production and headquarters facility - with over
2,000,000 variable speed units
in the field.
In addition to the standard offthe-shelf products, you can select from a wide variety of options to customize controls for
your specific application. For
further information and application assistance, contact your
local Dart sales representative, stocking distributor, or
Dart Controls, Inc.
www.dartcontrols.com
ISO9001:2000 REGISTERED
DC INPUT - VARIABLE DC OUTPUT
CURRENT RATINGS OF 20, 40, AND
60 AMPS
DM SERIES
65 SERIES
FIELD PROGRAMMABLE
DIGITAL TACHOMETER
Dart Controls, Inc.
Manufacturer of high quality DC and AC motor speed
controls and accessories
since 1963.
P.O. Box 10
5000 W. 106th Street
Zionsville, Indiana 46077
Phone: (317) 733-2133
Fax: (317) 873-1105
 Loading...