

Page 1
instruction manual
Dishwasher
Model number:DW101WA
Page 2
Dear Cu s to me r,
Pleasecarefullyreading it before usingthedishwasher
will help you to u se and maint ai n the dishw as her pr ope rly.
Keepit to refer to at a laterdate.
Passitontoanysubsequ entowneroftheappliance.
This manua l con tain s sec t ion s of S afety In stru c t ion s ,
OperatingInstructions,Installation Instructions and
Troubles hooting Tips , etc.
ControlPanel...................................................2
Dishw as h er Feat u re s.......... ... .. . ... .. ... . .. . ... .. ... ... 2
A Fill theRinseAid Dispenser.........................3、
B Functiono fDetergent ......................... ........4、
Attentio n b efore or after loading the Di sh washer
Baskets..........................................................6
Loading t he Basket ...... ...... ... ... ...... ... ...... ...... ... .7
CutleryBasket................................. ...............8
WashCycleTable.... ............... .......... ..............9
Turn ing onthe Appliance................................9
ChangetheProgramme........... ... ............ ....10....
At theEndofthe Wash Cycle...........................10
Toreview the sectionon Troubleshooting Tips
willhelp youtosolve some commonproblems
byyourself .
Ifyou can not resolve t he troub les b y yourself ,
please ask fo r the help of p rofessional techni cians.
The manufactu rer,following a p olicy ofconstant
development a nd updati ng of the product , may
make modificatio ns witho ut givi ng prior notice.
FilteringSystem................ .............................11
Caring for the Dishwasher.................... . .........12.
PositioningtheApplian ce................... ....... ...14..
About Powe r Connec tion.... . ..... ... . .. ...... . . .......1 4.
Water Co nnec ti on.... ... .... .. . ... ..... . .. .... ... .. .......14.
ConnectionofDrainHoses..................... .......15.
Startof dishwasher............................. .. ......16.. ..
Beforecallingforservice........................... .....17.
Errorcodes.................................... ..............18.
Technical information....... ....................... .....19..
Page 3
When using your dishw asher, fo l low t he pr ecaut i ons lis ted below:
This appliance must be grounded. In the event of a
malfunction or breakdown, grounding will reduce
the risk of electricshock by providing a path of
least resistance of electric current. This appliance
is equipped with a cord having an equipmentgrounding conductor and a grounding plug.
The plug must be plugged into an appropriate outlet
that is installed and grounded in accordance with
all local codes and ordinances.
Do not abuse, sit on, or stand on the door or dish
rack of the dishwasher.
Do not touch the heating element during or
immediately after use.
(This instruction is only applicable to machines
with a visual heating element.)
Do not operate your dishwasher unless all
enclosure panels are properly in place. Open
the door very carefully if thedishwasher is
operating, there is a risk of water squirting out.
Do not place any heavy objects of stand on the
door when it is open. The appliance could tip
forward.
When loading items to be washe d:
1) L ocate sharpitemsso thatthey are not likely
todamage the doorseal;
2 Warning: Knives and other ute nsils wi th
)
sh a rp points m u st be l oa ded in th e bask et
with their points down or place din a
horizonta lposition.
When using y our di shwasher, you shoul d
prevent plast ic items from comin g int o contact
with heating element.(This instruction is only
applicable to machines wit h a visual heating
element.)
Check that the dete rgent re ceptible is empty
after compl etion of thewash cycle.
Do not wash plastic items unless they are marked
dishwasher safe or the equivalent. For plastic items
n
ot so marked, check the manufacturer's
recommendations.
Use only det ergent and rins e additiv es
designed for an automatic dishwasher.
Never use s oap, l aundr y de tergent, orhand
washing deterg ent inyour dishwash er.K eep
these produ cts out of th e reach of children.
Improper connection of the equipment-grounding
conductor can resultin a risk of electric shock.
Check with a qualified electrician or service
representative if you are in doubt whether the
appliance is properly grounded. Do not modify the
plug provided with the appliance; If it is not fit for
the outlet. Have a proper outlet installed by a
qualified electrician.
Keep children away from detergent and rinse aid, keep
child away fromthe opendoor of the dishwasher,
ren
there could still be somedetergent left inside.
This appliance is not intended for use by persons
(including children with reduced physical, sensory or
mental capabilities, or lack of experience and
knowledge ,unless they have been given supervision
or instruction concerning use ofthe appliance by a
person responsible for their safety.
Children should be supervised to ensure that they do
not play with the appliance.
Dishwasher det ergents are stron gly alkal ine, t hey
can be extre mely da ngerous i f swallo wed.Av oid
contactwithskinand eyesand keepchildren away
from th e dishwasherwhen the d oor isopen.
Thedoor shouldnot beleft inthe open position
sincethiscoul d presentatrippinghazards.
If the suppl y cord i s dam aged, it must be repl aced
by the m anufacturer or its se rvice agent or a
similar ly qualifi ed person in orderto avo id a
hazard.
Remove thedoor tothewashingcompartmentwhen
removing an old dishwasher from service or discarding
it.
Please dispos e of pack ing m aterials properly.
Use the dishwasher only for its intended function.
During installation,thepower supplymustnot
beexcessivelyor dangerouslybentorflattened.
Do not tamper with controls.
The appliance is to be co nnected tothe water
mains usingnew hose setsand thatoldhose-sets
sho ul d n ot b e re u sed.
Themaximumnumber of placesettings to be
washed is 6 .
Themaximumpermissibleinletwater pressureis
1Mp a .
Theminimum permissibleinletw ater pressure is
0.04Mpa.
)
1
Page 4
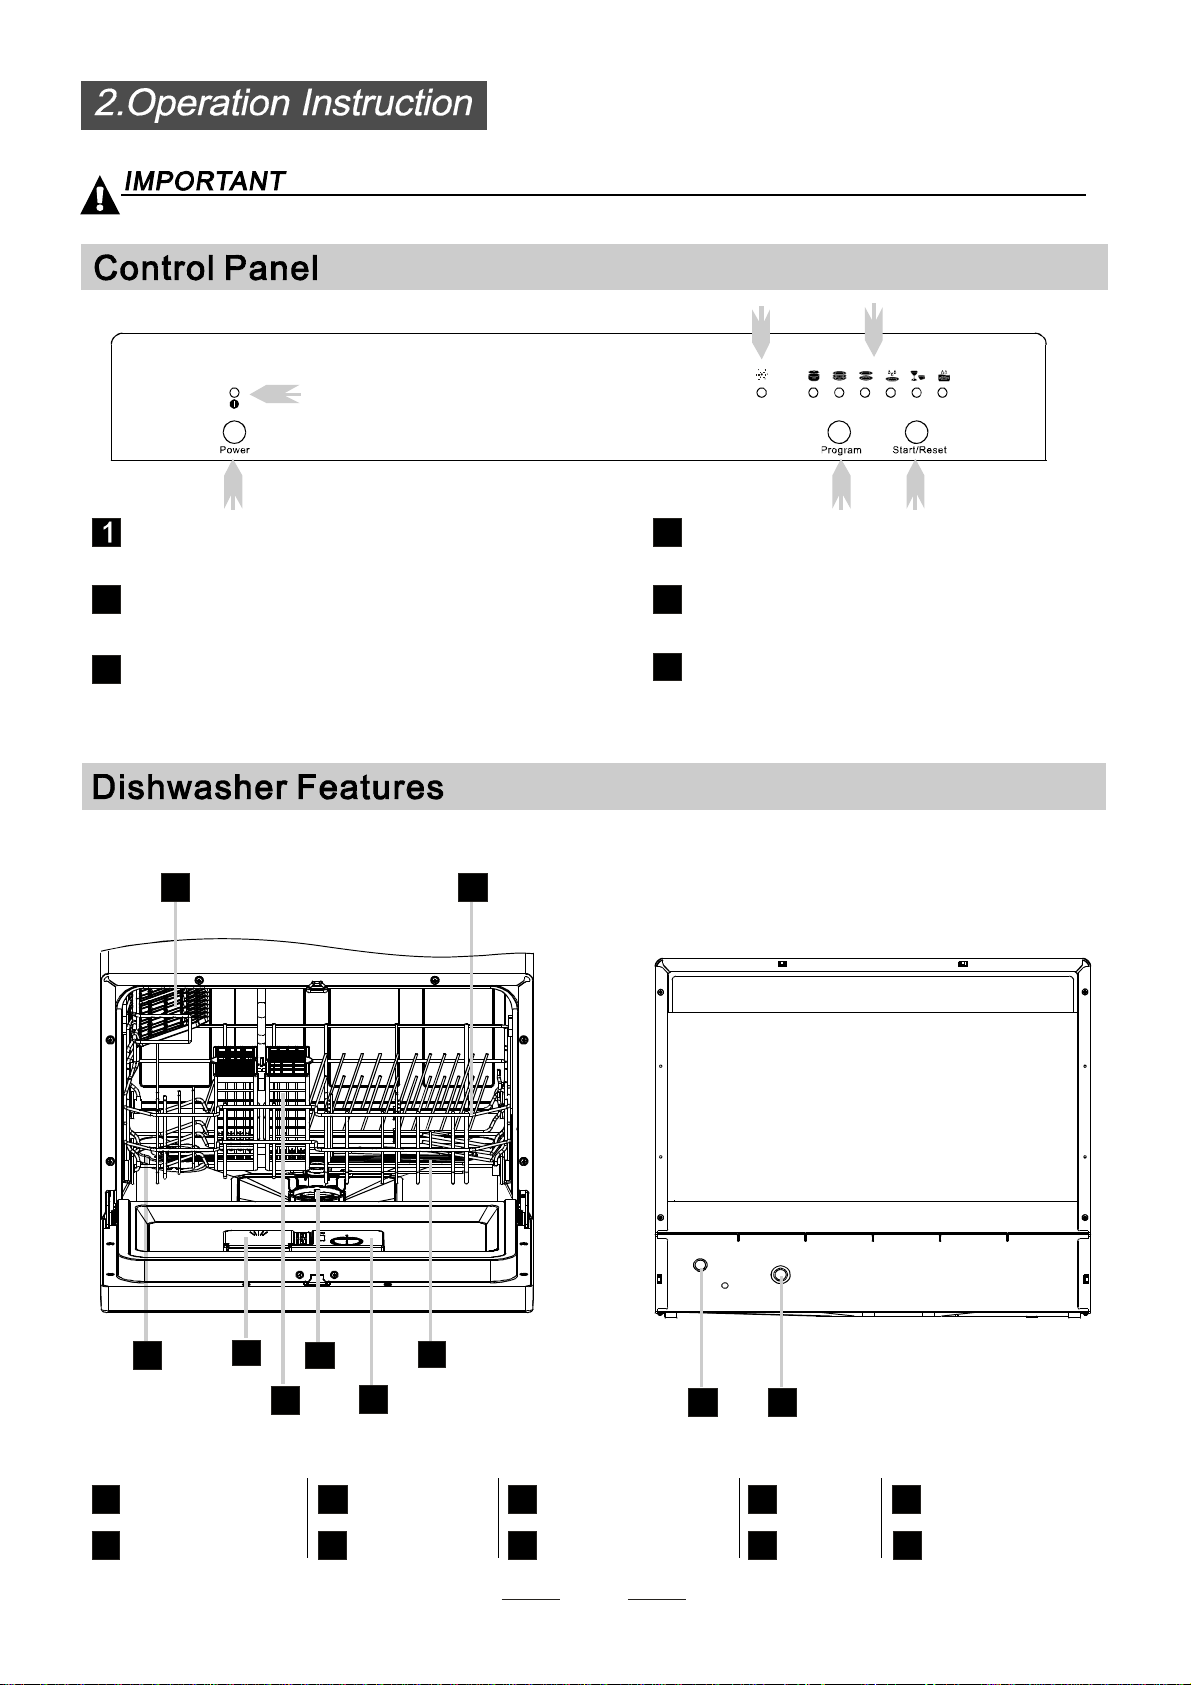
To g etthe best performance from your dishwasher,read alloperatinginstructions
beforeusing it for the first time.
2
1
PowerButton: Toturn on/off the powers upply.
Power Light : To be on wh e n the ON/OFF Butt on
2
is Press ed d own .
Rinse A id Warn ing L i ght : To be o n when the
3
rinseaid dis penser need s to be refilled.
7 8
Front view
3
4
5 6
Program indicator light.
4
Washing Program Selector:Press the button
5
tos ele ct wash cycles
Start/Reset But ton: P ress thi s bu tton t o start
6
orpause thedi shwasher, the pro cess p ilot
lampwill be blinking when starting.
Back View
1
2
4
3
Salt Container
1
2 4
5
Cutlery Basket
3
Filter as se mblyDetergent Di spenser
6
9 10
RinseAidDispenser
5
Spray Arms
6
2
CupShelf
7
Basket
8
Drainpipeconnector
9
Inlet pipe connector
10
Page 5
RinseAid Dispenser
The ri nse a id i s relea se d d uring t he final rinse to prevent water from forming droplet s o n y our dishe s. That can l eave
spots and strea ks. It al so improve s drying by allowing water to sheet offthe dishes. Yourdishwasher is d esigned to
useliquid rins e aids. The rinse aid di spenser i s located inside the do or next tothe deter gent dispense r.Tofillthe
dispenser, open thecap andpourthe rinse aid i ntothe dispenser untilthe level indicatorturns c ompletelyblack.
Thevolume of the rins eaid contai ner is about 110ml.
Function ofR inseAid
Rinse aid is automa tically a dded during t he last rinse, ensuring thorough rinsing, and spo t an d st reak free drying.
Attention!
Only use branded rinse aidfordishwasher. Neverfilltherinseaiddispenserwithany o thersubstances
(e.g. Dishwasher cleaning ag ent, liquid dete rge nt). Th is would damage the app liance.
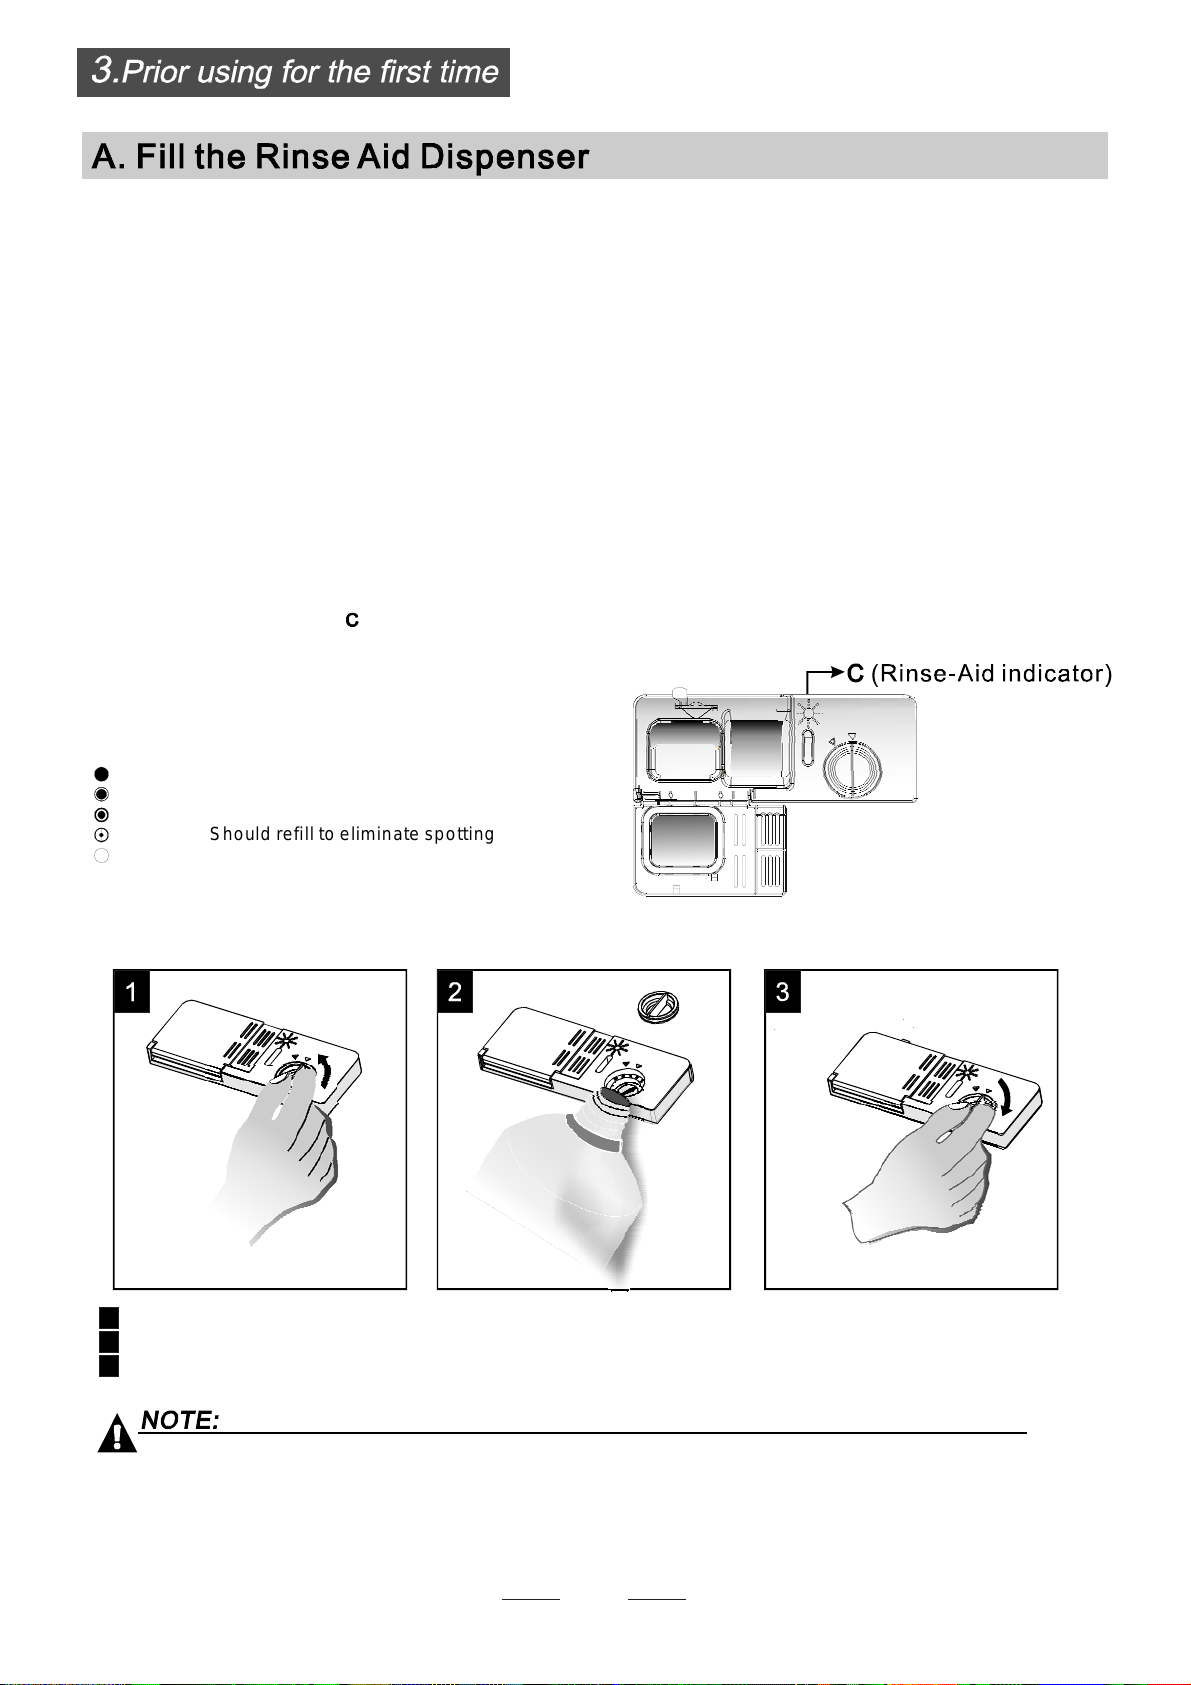
Whento Refill the RinseAid D ispenser
Ifthere is no rinse-aid warning light in t he cont rol panel, you can judge the am ount of rinse-aid by the color
of the optical levelindicator located nexttothecap. Whentherinse-aid container isfull,thewhole
indicator will be dark .As the rinse -aid dim inishes, th e size o f the dark dot de creases. Youshouldnever l et
therinseaidgetbelow1/4full.
Asthe rinse aid dimin ishes, th e siz eof the black dot
ontherinse aidlevelindicator changes,as illustratedb elow.
Full
3/4full
1/2full
1/ 4 full- Should refill toeliminatespotting
Empty
""
To op en the dispenser,t urn the cap to the "open"(left) arrow and lift it out.
1
Pourtherinse aidinto the dispenser, beingcareful not to overfill.
2
Replace the cap by inse rting italigned w ith "open" arr ow and turnin g it to the closed (right) arrow.
3
Clean up an y rinse aid split during fill ing with an absorbent cloth to a void excessive foam ing
duringthenext wash.
Don't forget to replace t he cap before you close dishwasher door.
3
Page 6
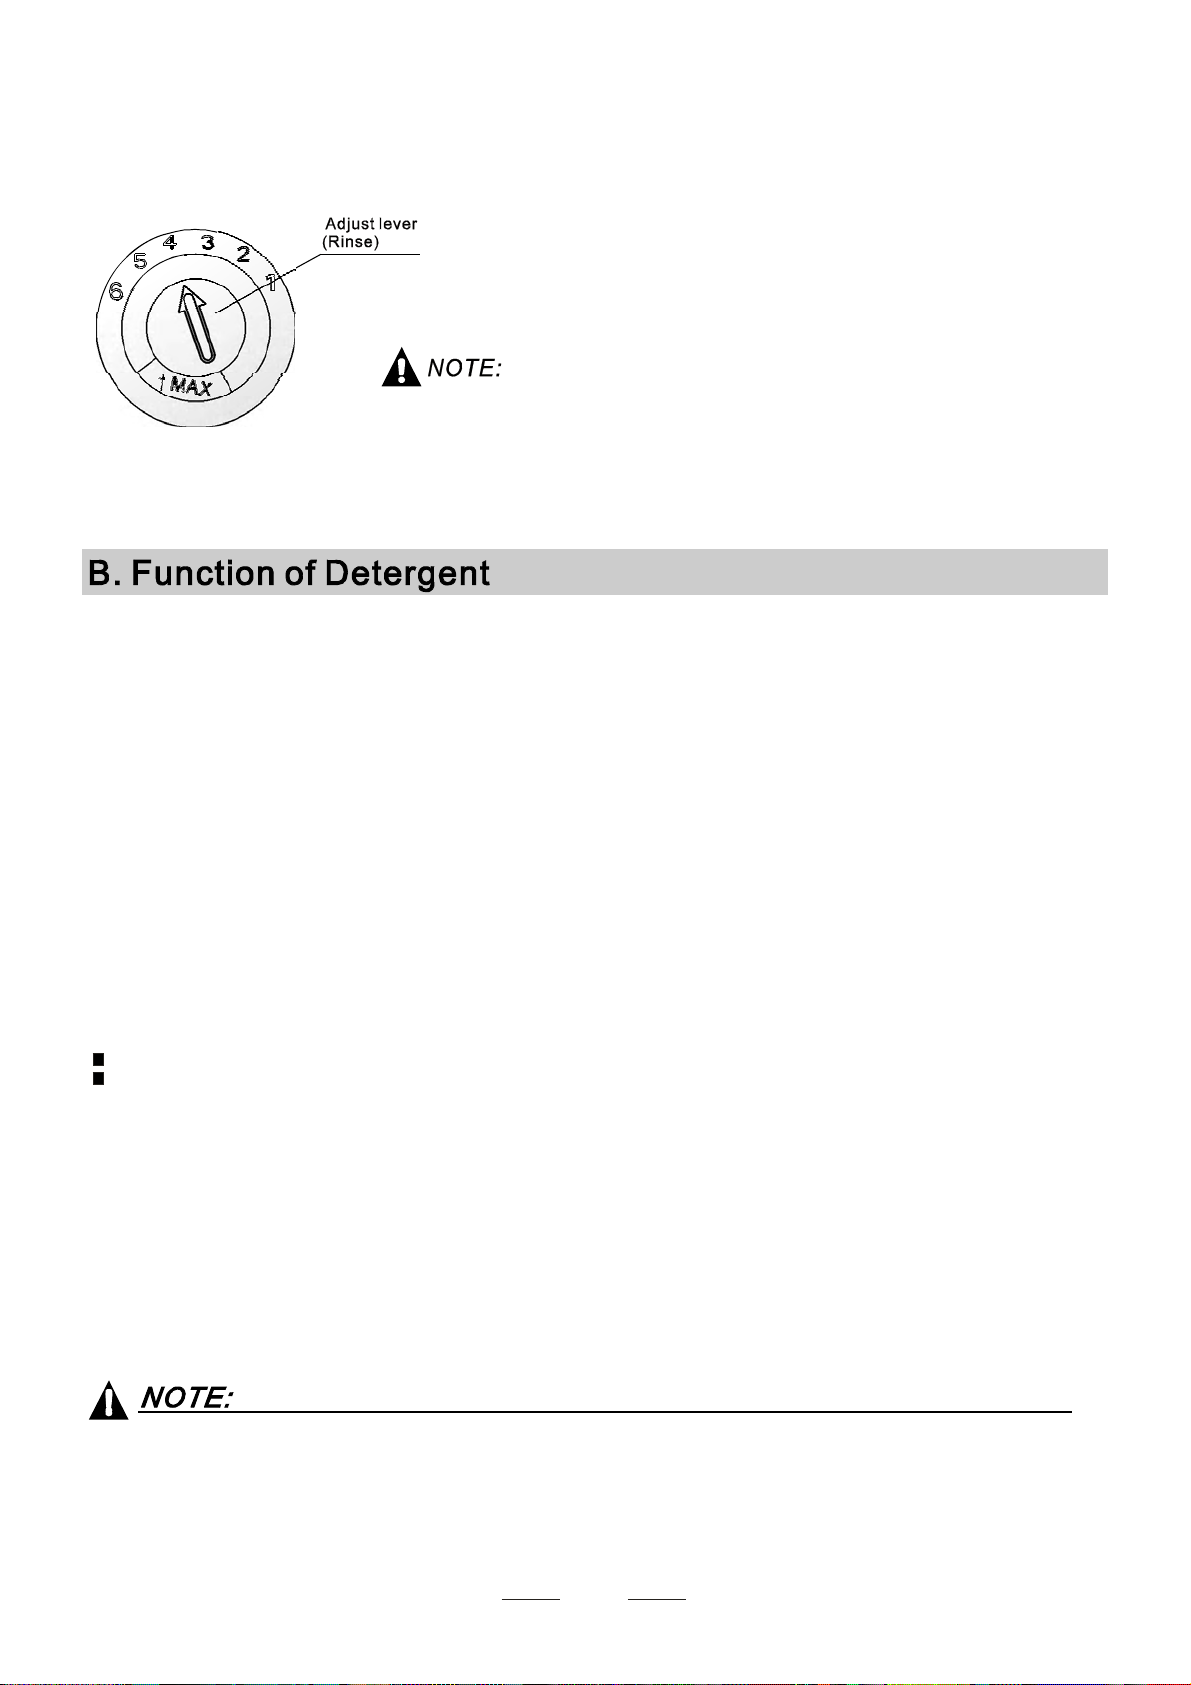
Adjusti ng R inseA id Di spenser
The rinse aid dispe nser ha s six or four s ettings. Always start with the d ispens er
set on "4". If spot s and p oor drying are problems, i ncreas e the amount of rinse
aid dispensed b y removing thedispenser lid and r otating the dial to "5". If the
dishes stil l are not drying properly o r are spotted, ad just thedial to the next
higher number until yo ur dis hes are s pot- free. The recommended s etting i s "4" .
(Factoryvalue is "4".)
Increasethedoseif there aredrops ofwater o rlimespots on thedishesafter washing.
Reduce it ifthereare stickywhitis hstains on yourdisheso rabluishfilm onglassware or
knifeblades.
Detergents w ith its chemic al ingred ients are ne cessary t o re move dirt, c rush dirt and trans port it out of the di shwas her.
Most of c ommer cia l q uality detergents are su itab le for th is purpose.
Deterg ents
There a r e 3 sorts of dete rgen t s
1.With phosphateand withch lorine
2.Withphos phate and without c hlorine
3.Withoutph osphate and without chloride
Normally new pu lverised detergent is without phosphate. T hewater so ftene r functio n of
phosphate is not gi ven. In this c a se we re comm end t o fi ll salt in th e sa lt co ntai n er even when
the hardness of wateris only6 dH.If dete rgents w itho utphosphate wereusedin caseof hardwater
often white spot s appear at dishes an d glasse s. In this case please add moredetergent toreach
better r esults. Dete r gent s wi thou t ch lorin e do only bl e ach a li ttl e. S t ro ng a nd coloured spots wi ll no t
removed co m p let el y. In this c ase pl ease c ho ose a prog ra mme wit h hi g her Temperature.
°
Concentr ated Deter gent
Based on their chemicalcomposition, dishwashercanbe splitin twobasictypes:
conventional, alkalinedete rgents w ith caustic components
lo w alkali ne conce nt rat ed d eter ge nts with natural en zy mes
The use of normal washingprogrammes i n co njunction wi th conce ntrated d etergen ts
reduces poll ution and is good for your dishes; these wash p rogram mes are specially ma tched
tothe di rt- diss olvin g propert i es o f the e nz yme s of the concent rate d de tergent. For this reason
normal wash programmes in whichconcentrated detergents are used ca n achieve the same
“”
resultsthat canotherwise only be achieved using intensive programmes.
“”
“”
Detergent Tablets
Dete rgent tabletsofdifferentbrands dissolve atdifferentspeeds. Forthisr easonsome
detergent tablets ca nnot dissolve and develop the irfull cle aning power during short
prog rammes. Thereforeplease uselong programmeswhen usingdete rgenttablets, to
ens ure t he comp l ete re mova l of d e t erge n t re siduals.
Detergent tablets are only for the models wi th 3 in 1 function or 3 in 1 p rogram.
4
Page 7
DetergentDispenser
The dispenser m ust be re filled be fore the start of e ach was h cycle f ollowing the instructions
provided in t he Wash Cycle Table . Yourdishwasher uses less dete rgent and rin se ai d then
conventionaldishwasher.Generally, only onetablespoon ofdetergentis needed for
anormalwashload. Also, more heavily soileditemsneedmore detergent.Always addthe
detergen t j ust before star ting the dish was her, otherw ise it could ge t da mp a nd w ill not
dissolv e pr operly.
Amountof Detergentto Use
Detergent powder
Detergenttablet
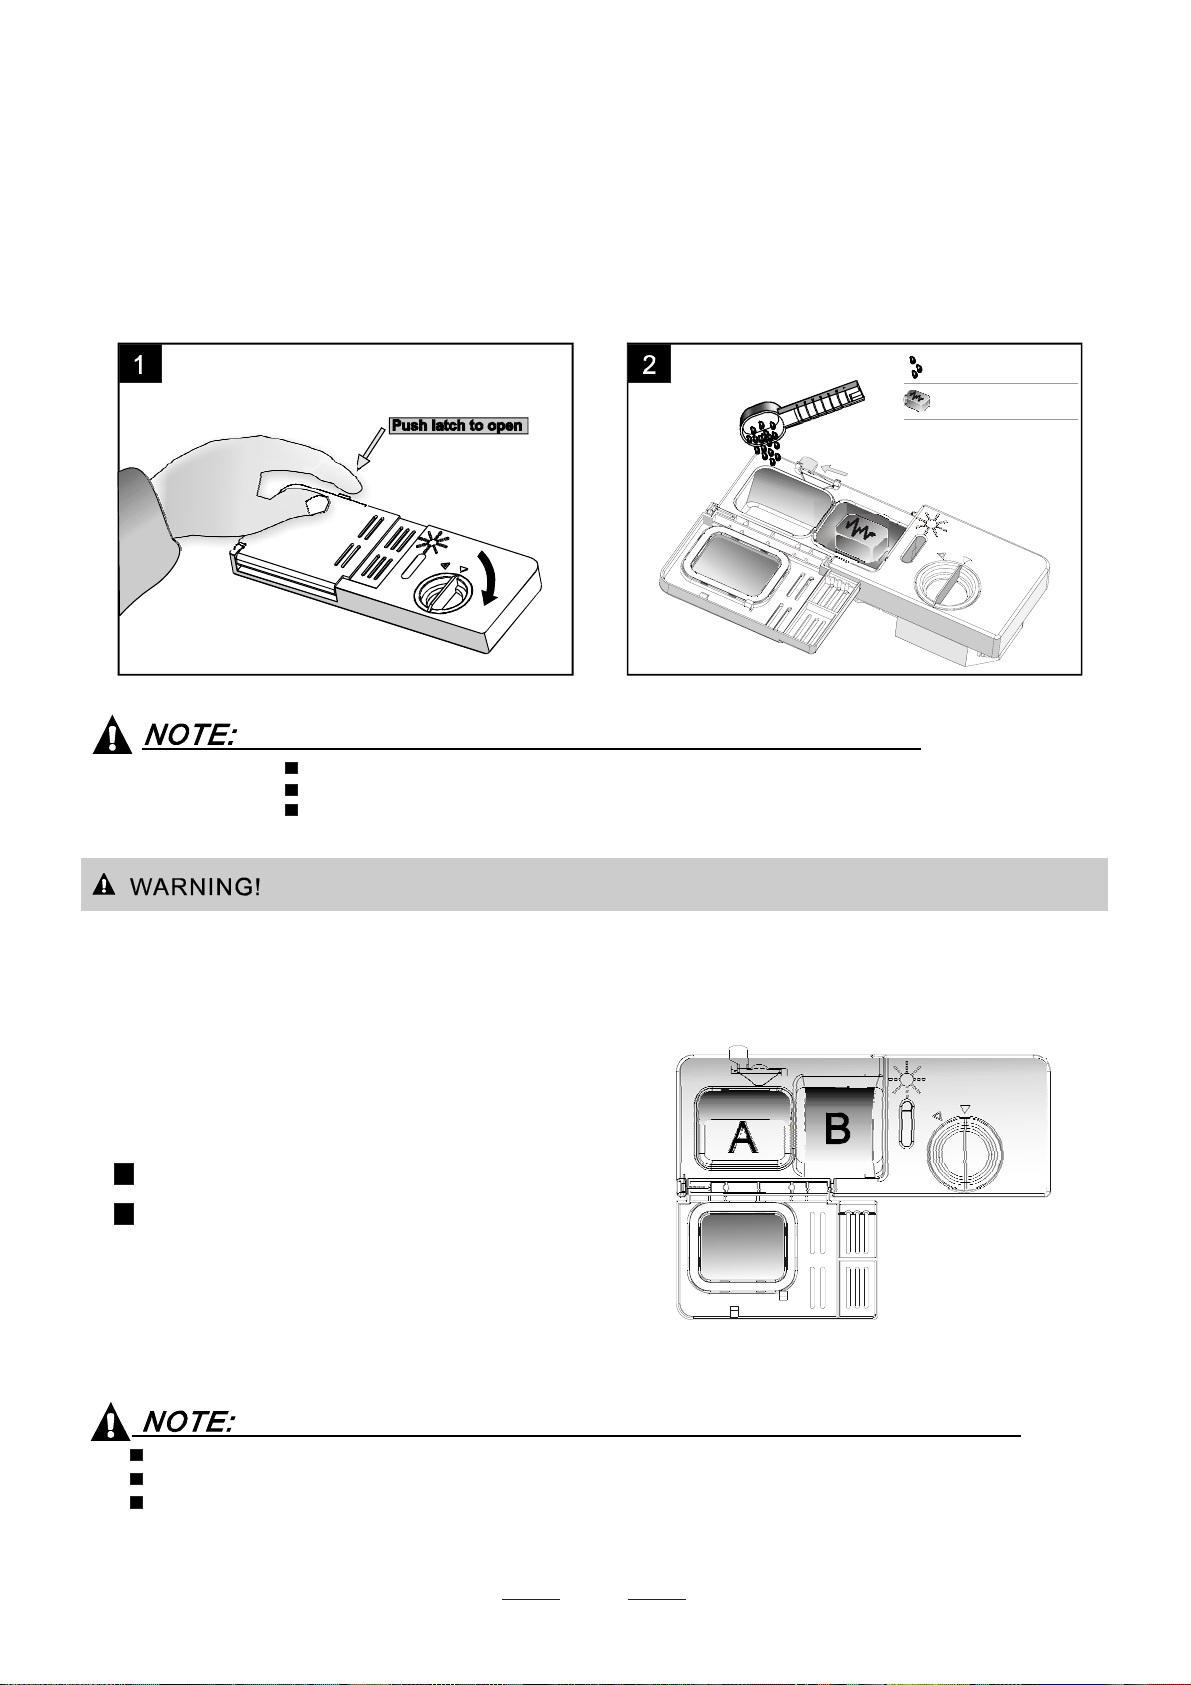
If the lid is closed: press release button.The li d spring s open.
Always add th e detergent just before st arting ea ch wash cycl e.
Only usebrandeddetergentaid fordishwasher.
Dishwasher de tergent i s corrosive! Take c are to keep it out of reach ofchildren.
Proper Use o f Deterg ent
Use onl y det e r gent sp e c ifica lly made for use i n di shwa sher s. K e ep y our dete rg ent fres h an d dry.
Don't put powderdetergentinto the dispenser untilyou're readytowashdishes.
Fillin deterge nt
Fillthe de tergent disp enser w ith deter gent.
The marki ng in d ica tes the dos i ng levels , as
illustratedonright:
The place o f main wash cycle deterg ent placed.
A
The place o f pr e-wash cycle det ergent place d.
B
Pleaseobserve th e manu facturers do sing and storage
Recommendationsas stated onthe detergentpackaging.
Close the li d and p r e ss until it lock s in place.
If the dishes a r e heavily s o i led, place an a d di tional
detergentdosein thepre-wash detergent chamber.This detergentwilltakeeffect duringthepre-washphase.
Youfind i nformatio n about the amo unt of de tergent for the single programme on the lastpage.
Please aw are, tha t according t o the level soi ling and the spec ific hardnes s of waterd ifference s are possib le.
Please observethe manufacturer'srecommendationsonthe detergent packaging.
5
Page 8

Con sider buy ing uten s i ls w h i ch ar e identi fie d as di shwashe r -p r oof.
Use a mild detergent that is de scribed as'kind of d ishes'. If necessa ry,s eek further
inform a t ion f rom dete rgen t ma nu fact urers .
For partic ular items, select aprogr amme with a s low a temperat ure.
Toprevent da mage, d o no t tak e glass a nd c utlery o ut of the dishwasher immediat ely
after theprogram me h asended.
Are not suitable
Cutlery w ith w ooden, horn china or
mother-of -pearl handl es
Pl as tic ite ms that are not
Ol der cu tlery wi t h glued parts tha t isnot
temperature resistant
Bonded cutle ry ite ms or di shes
Pewteror cooperitems
cr ys tal glass
St eel items subject to r usti ng
Wooden platte rs
Items ma de from s ynthetic fibres
(For best perf ormance of the dishwa sher,follow these l oading gu idelines.
Features and appeara nce of bas ke ts a nd cutler y ba sket s m ay vary from y our m od el.)
Scrape off any large amount s of leftover fo od. Soften remnants of burnt f ood in pan s
It is not necessary to rinse the d ishes u nder running water.
Place object s in the dishwas he r i n fol l owing way:
1.Itemssuch as cups, glasses, po ts/pans, etc . are face down.
2.Curveditems, or t hose with recesses, s hould be loaded at a slant s o that water c an run off.
3.All utensils are stacked securelyand cannot tip over.
4.Allutensils are pla ced in the way t hat the spray arms can rotated freely duri ng wash ing.
heat resistant
Are of lim ited suitab ility
Sometypes ofglasses canbecome
dull after a large numberof washes
Silverandaluminiumpartshavea
tendenc y to disc olour dur ing w ashi ng
Glaz e d p a tterns m ay fa de if m a ch i ne
washed fr eque nt ly
Very small items should n ot be w ashed in the dish washer as they could ea sily fall out of the basket.
Load hollow ite ms suc h as cup s, glasses, p ans etc. With the opening downwards sothat
wat e r c annot co l l ect i n t he c ontainer or a deepba se.
Dishesanditems of cutlerymustnot lieins ide oneanother,orcovereachoth er.
Toavoid da mage to glasses, th ey mus t not touch.
Loadlargeitemswhicharemostdifficulttocleanintothebasket.
Long blad ed kni ves sto red in a n uprigh t po sition are a potenti al hazard !
Long and/or sharp items of cutlery such as carvi ng knives m ust bepositione d
horizontally in the basket.
Please do not ove rload yo ur di shwashe r. T his is importan t for g ood resu lts a nd for
reasonab le ene rgy con sume.
6
Page 9

Position the dishes an d cookware so that t hey will not get m oved by the spray of water.
1
Cups
3
Glasses
5
Dinne r plat es
Cutlery basket
2
Saucers
4
Dessert dishes
6
Soup plates
7
Plateracks of Basket
The basket is f itted with p late racks which
can be st owed hor izontal if required.
7
Page 10

Cutlery should be placed inthe cut lery basket with handles at the b ottom. If the rack has side bas kets, the spoon
should be loadedindividuallyintothe appropriateslots, especiallylongutensilsshould be placedinthehorizontal
position at th e front o f the upper basket as show n.
3
1
1
5
4
2
33
1
2
4
2
4
2
1
2
4
5
5
5
1
5
5
1
3
4
5
1
4
2
4
3
3
2
Do not le t any item extend through bot tom.
Always loa d sharp u tensils w ith t he sharp point dow n!
3
Soupspoons
Forks
Kni v e s
Dessertspoon s
Teaspoons
8
Page 11

AS/NZS 2007. 1
Inte nsive
()
Means:need tofillrinseintothe R inse-Aid Dispenser.
* :T hisprogramis the test cycle,therinse-aiddispenser
AS/NZS2007. 1
setting is r ecommended to Positi on 6.
Fortheheaviest soi ledl oads,
such as pots,pans,casserole
dishesand dishes that have
been sitting with dried food
onthem for a while.
Pre-wash 50
Wash (7 0 )
()
℃
Rinse
Rinse
Rinse (7 0 )
℃
Drying
℃
4/18.5g
140
0.94
11.0
Heavy
Normal
*
AS/NZS 2007.1
Rinse
Rapid
Soak
For normally soiled loads,
suchaspots, plates,glasses
and lightly soiledpans.
standarddailycycle.
Forlightly soiled loads,such
as plates,glasses,bowlsand
lightlysoiled pans.
Fordishes that need to be
Rinsedand dried only.
Ashorter wash for lightly
soiledloads that do not
needdrying.
To rinse di shes that you
plan to wash later t hat day.
Pre-wash
Wash (60 )
℃
Rinse
Rinse (70 )
℃
Drying
Wash (55 )
℃
Rinse
Rinse
Rinse (50 )
℃
Drying
wash
(40 )
℃
Rinse
Rinse (7 0 )
℃
Drying
Wash (40 )
℃
Rinse
Rinse
Pre-w ash
4/18.5g
4/18.5g
/
15g.
/
120
115
0.70
0.5
80 0.48
30 0.30 6.0
14
0.01
8.4
8.7
6.8
2.1
Startingawashcycle...
1.Draw o ut the baske t(see the section entitled Loading the Dishwasher ).
2.Pour in thedetergent(seethe sectionentitle d Detergentand Rinse Aid ).
“”
“”
3. Inse rt the pl ug in to the socket. The powe r supply is 220-240VAC 50 HZ ,
thespecification ofthe socket is 10 A250 VAC.
4. Make s ure t hat the water supply is turned on to ful l pressure.
5.Turnonthe po wer button, press th e program b utton , to select a progra m , the r esponse light wil l light.
Then press t h e St art/R ese t b utton, the dishwashe r be gins to s tar t.
When you pressthe Start/Resetbuttonto pause during w ashing,
the p ro gram l ig ht wi ll st op bli nki n g and th e d i shw as her w ill mooing
everyminuteunlessyoupressthe Start/Res et button to s tart.
9
Page 12

Premise:
runs for a short t ime.
You can modify the was hing prog ram, W hen the dishwash er just
Otherwise, the detergentmay have a lready been
released, and the appliancemay have already drained the w ashwater.If this
isthe case,the detergent dispenser must be refilled (see the section entitled
" Loading the Detergent ").
PressStart/Reset Button morethan three seconds the machine will be in stand
bystate ,then y ou can change the program to th e desired c ycle setting(see
thesection entitled " S tarting a wash cycle. . ." ).
NOTE : If you o pe n t he do or du ri ng washi n g, t he ma ch ine w il l pa use . W hen yo u
closethe door,the machine wil l kee p onworking after 10 seco nds.
The program lights show the st ate of the dishwasher:
a) Al l program lights off---------------stand by
b)One of t he p rograml ights on----------pause
c)One of theprogram lights blinking----- run
If you ope n the doo r when washing, t he machin e will pau se. Whe n you c lose t he door , the mac hine
will keep on working aft er 10 seconds.
Aforgottendish can be added any time before the detergent cup opens.
Press the start/reset button
1
Open thedoor a little to stop the washing.
2
Afterthe spray arms stop working, you can open the
3
door completely.
When the working cycle has fi nished, thebuzzer of dis hwasher will sound 8 seconds , then st op. Turn off
the appliance using th e ON/O FF butto n, shut o ff the wa ter s upply and open the d oor ofthe di shwasher.
Wait a few mi nutes be fore unloadi ng the d ishw asher to av oid handl ing t he dishes an d utensi ls wh ile they
are still hot and m ore suscept ible tobreakage. The y will al so dry be tter.
Add forgotten dishes.
4
Close the door
5
Press the start/reset button, the dishwasher will run
6
after 10 seconds.
SwitchOff the Dishwasher
In the digi tal disp lay app ears 0 (remaining p rogramme time), only in this case the progr amme has ended.
1.Switchoff the dishwa sher by pressing the ON/OFF button.
2.Turn off thewatertap!
Openthe door carefully.
Hot dishes ar e sensit ive to kn ocks. The di shes shou ld ther efore be a llowed t o cool d own arou nd 15 minutes
beforeremoving from the appliance.
Open the d ishwasher's door,leave it ajar and w ait a f ew minut es bef ore remov ing the dishes. In this way they
will be cool er and t he dryi ng will b e impr oved.
Unloadingthe dishwasher
Itis normal that the dishwasher is wet inside.
It is dan gerous to ope n t he do or when w as hi ng , be c a use the hot wate r may scald you.
10
Page 13

The filter prevent larger remna nts of fo od o r other o bjects f rom getting insid e the pum p.
The filter system con sists of a coarse f ilter,a f lat (Mainfilter)
and a mic ro f ilter (fi n e fi lter).
1
2
3
1
3
2
Main filter
Foodand soilparticlestrappedby thisfilterar epu lverized by a
special jet onthe s p ray arm a nd wa s hed down to d ra i n.
Fine fil ter
This filte r holds s oil and f ood residue in th e sump a rea and
prevents it from being redeposit on t he dishes during wa sh cycle.
Coarsefilter
Larger items,suchaspiecesof boneorglass, thatcouldblock
the drain are trapped inthe coars e filter. Toremov ethe items
caughtb yt he filter,gentlysqueezethe tap on the top of this
filterand lift out.
Filterassembly
Thefilterefficiently
Fo r best performa n c e an d res u l ts, t he fil t er assem bly must be regularly. this reason, it i s a good i dea t o
remove the la rger food particles trapp ing in the filter after e ach wash cy cle b y rinsing the filter and cu p under
running w ater.Toremove the filte r assemb ly,pull on the cu p handle i n the u pward di rection.
removes food particles fro m the wa sh wate r,al lowin g it to be re-cyclated during th e cycle.
For
Nev er ru n t h e di shwasher witho u t the f il ter s in place.
Th e d i sh washer must never be used w i t hout the fi lters.
Improper replacement of the filter may reduce the perform ance level of the appliance
anddamagedishes and utensils.
1
2
Step1:contrarotate the Fine ,
liftitup;Step2:
Step3:lift the Main filter up
filter
3
If do it from step1 t o step 3, the filter systemwill be removed; while if do it from Step 3 to Step 1,
the filter system will be inst alled.
11
Page 14

Remarks:
- Inspect t he filter s for blo cking e very time the dishwa sher has bee n used.
- By unscrew ing the c oarse fi lter.you can rem ove the f ilter sys tem.Remove any food rem nants and
clean thefilters under running water.
Theentire filterassemblyshould be cleanedoncea week.
CleaningThe Filter
To cl ean the co a rse f ilt er a nd the fine f i l t e r, use a c l eanin g b rush. R e as semble t he filter parts as s ho wn in the figures
inthe las t page a nd reinse rt the e ntire ass embly in the dish washer, positioni ng in its seat an d pressin g downward .
Whenc leaningthefilters,don'tknockonthem.Otherwise,thefilterscouldbe
contorted andtheperformanceof dishwashercould be debased.
The control p anel can be clea ned by u sing a l ightly dampened cloth and dry thoroughly.
The exterior use a good a ppliance p olish wa x.
Neveruse sh arp obje cts, scouring pads or har sh c leaners onany part o f the di shwa sher.
CleaningThe Door
To clean theedge around thedoor,you shoulduseonly a soft warm,
damp cloth. To avoi d penetra tion of water into the door lock an d
electrical comp onents, do not use a spray cleane r of any kind.
Never use a spr ay c leaner t o clean t he d oor panel as it m ay damage the door loc k
and electricalcomponents.
Abrasive agent or some paper towel sho uld not be used bec ause of t he ri sk of
scra tching or l eaving sp ots on the s t ainl es s steel su rfac e.
Protec tAga inst Freez ing
please take frost prot ection meas ures on d ishwasher i n winte r.E fter washing cycles,
please op erate as follows
1.Cut off electrica l power t o the di shwashe r.
2.Turnoff the water su pply an d disco nnect the water inl et pipe from the w ater val ve.
3.Drain water from the inle t pipe a nd water valve. ( Use a pan to catch the water)
4.Reconnect the wate r inlet pipe to t he wa ter valve.
5.Removethe filterat thebottom of thetub andusea sponge to useup waterin sump.
:
ach tim e a
If you r dis hwas he r cannot w ork bec a u s e of the i c e, please contact professio nal servi ce persons.
12
Page 15

Cleani ng the Spra yArms
Thesprayarmscan be easily removed forperiodic cleaning
of the nozzles, to p revent poss ible c logging. Wash th em
under running water a nd carefu lly replace them in th eir s eats,
checking that theirrotary movementisinno wayimp eded .
Grasp the middle of the spray a rm, pull it up wards to remove
it. Washt hearmsunder a jetofrunning water andreturn them
car e fully toth e i r seat. Af t er re assembly, c heck t hat t he spray
arms turn freely. Otherwise, check thattheyhavebe en
in stall ed corr ectly.
AfterEvery Wash
After ever y wash, turn off t he water supply to the
appliance and leave th e doo r slightl y open sothat
moisture a nd odor s are not trapped inside.
Removethe Plug
Before cleani ng or p erformi ng mainten ance, always
remove the plug from the socket.
No Solvents orAbrasive Cleaning
Tocleantheexterior and rubber parts of the dishwasher,
donot usesolventsor abrasive cleaningproducts.
Only use a cloth with warm so apy wate r.
Torem ove spots orstains from the surface of t he
interi or, use a clot h da mpe ned with wa ter w ith a li tt le
vinegar,o r a cleaning pro duct mad e speci fically fo r
dishw ashers.
When it isnot in needfo ra longtime
It isrecommend that yourunawas h cyclewith the
dishwasher empt y and the n remove th e plu g from the
socket, turn o ff the wa ter supp ly and l eave the door of
the app lian ce sl ight ly open. Thi s will help th e door
sealsto astlonger andprevent odoursfromforming
withinthe appliance.
Moving the Applia nce
If the app liance m ust be mo ved, tr y to keep it in the
vertical position. If absolutely necessary, itcan be
positioned on its back.
Seals
Oneofthefactors that causeodorstoforminthe
dishwasher is foo d th at remain s trappe din the seals.
Periodic cleaning with a damp sponge will p reve nt this
fro m oc curring.
ElectricalShock Hazard
Theinstallationof the pipes
and electricalequipments
shouldbe done byprofessionals.
Disconnect electricalpower before
installingdishwasher.
Failureto do so can result indeath
or elec tric al s hoc k.
Theinstallationpositionof dishwashershouldbe nearthe existinginlet anddrain
hosesand powercord.
Oneside of the cabinet sink should be chosen to facilitatethe connection of drain
hosesof the dishwasher.
13
Page 16

Positi on the appli ance in the desir ed locat ion. The back should rest against thewall behind it,
and the s ides, along the a djacent cabinets or w all. The dishwasher i s equipped w ith water supply
anddrainhoses t hat can bepositioned to therightortheleft tofacilitate proper installation.
For personal safety:
DO NOT USEAN EXTENSION CORD OR AN ADAPTER PLUG WITH THIS APPLIANCE.
DONOT, UNDERANY CIRCUMSTANCES, CUT OR REMOVETHE EARTHING
CONNECTION FROM THE POWER CORD.
Please look at the rat ing label to know the r at ing voltage a nd conn ect t he dishwash er to t he appropriate power supply.
Use the r equired fuse 10 amp, time de lay f use or c ircui t breake r recommended and provide separate circuit servi ng
only this appliance.
Ensure the v oltage a nd frequenc y of thepower being corresponds to
those on the rating plate . Only insert the plug into an electrical so cket whi ch is ear thed
properly.Ifthe el ectrical sock et to whi ch the a pplianc e must b e conne cted is not
appropriate f or the plug , replace thesocket, rather thanusinga adaptors orthelikeas
theycould causeove rheatingand burns.
This appliance must be earthed. In the event of a malfunction or breakdown, earthing will reduce the risk of
electric shock by providing a path of least resistance for the electric current. This appliance is equipped with
a cord having an equipment-earthing conductor and anearthing plug. The plug must be pluggedinto an
appropriate outlet that is installedand earthed in accordance with all local standards and requirements.
Improper connection of the equipment earthing conductor can result in the risk of an
electric shock.
Check with a qualified electrician or service representative if you are in doubt whether the
appliance is properly earthed.
Do not modify the plug provided with the appliance. If the plug does not fit properly to the
outlet, please have a qualified electrician to install a proper outlet.
for personal safety:
DO NOT USE AN EXTENSION CORD OR AN ADAPTER PLUG WITH THIS APPLIANCE.
DO NOT, UNDERANY CIRCUMSTANCES, CUT OR REMOVE THE
CONNECTION
Connect the co ld w ater supply hose to a threaded 3/4(inch) conn ector and ma ke su re
that it is fastened tigh tly in place. If t he wate r pipes a re new o r ha ve not be en used for
an extended period of time, let the water run to mak e sure t hat the water is clear and
freeofimpurities. Ifthisp recautionis n ottaken,thereis a risk thatthe water inletcan
get blocked a nd dama ge the a pplia nce.
The water supply to the appliance can a lso be conne cted to t he h ouse hot waterline
(centralized system,heating system),as longas itdoesnotexceed a temperatureof
60 C. I n this ca se, th e wash cycle time w ill be shortened by about 15 minutes a nd th e
wash efficiency slightly red uced. The co nnection must be ma de to t he hot w ater line
following t he same procedures as those for the conn ection to the cold wa ter li ne.
FROM THE POWER CORD.
EARTHING
In order to avoidthat there is mo re water staying in the inlet hose, pleaseclose
thehydrant after u sing.(Not applicable to appli ances without aqua-stop.)
14
Page 17

Insertthe drain hose into a drain pipe witha minimumdiameter of 4cm, or let it
runintothesink,makingsuretoavoidbendingorcrimpingit.Usethespe ial
c
plasticsupportthatcomes with the appliance.The free endof the hosemustbe
ata height between400 and1000mm and mustnot be immersedin waterto
avoidthe backflow of it.
Thespecial plastichose supportmust be solidlyfastenedto the wallto
preventthedrain hosefrommovingand allowingwater to spilloutside
thedrain.
15
Page 18

How to Dr ain Exc ess Water F rom Hos es
If the si nk is 100 0 higher from the floor,the exces s water i n hoses cannot be dr ained di rectly
intothe sink.It will b en ecessaryto d rain excesswater from hosesintoab owlor suitable
container th at is he ld outside and lower than the si nk.
Wate r Outlet
Connectthewater d rain hose. The drainhose mustbecorrectlyfittedtoavoid wate rleaks.
Ensure that the wat er inlet h ose i s not ki nked orsquashed .
Ext ensi on Hose
If you need a d rain hose ex tens ion, o bs erve t o use a s imil ar d rain hos e.
Itmustbe no longer than4 metres; otherwisethe cleaning effect of the dishwasher could be reduced.
Thefollowingthings shouldbe checked beforestartingthe dishwasher.
1
Thedishwasheris level andfixed properly
2
The inlet val ve i s o pen
3
Thereis a leakageat the connectionsof theconducts
4
The wires aretightly connected
5
The poweris switched on
6
The i nlet and drain hoses are knotte d
7
Allpacking materials andprintingsshouldbe takenout fromthe dishwasher
After installation, please make sure to keep this manual.
The conten t of this manual is very helpful t o the u sers.
16
Page 19

Fuse blown, or the
circuit breakertripped.
Replace fuse or reset circuit breaker. Remove any other
appliances sharing the same circuit with the dishwasher
Technical
problem s
Power supplyis not
turned on.
Door of dishwasher
not properly closed.
Kink in drain hose
Filter clogged.
Kitchen sinkclogged.
Improper detergent
Spilled rinse-aid
Detergent with
colourant was used.
Make sure the dishwasher is turned on and the door is
closed securely.
Make sure the power cord is properly plugged into the
wall socket.
Closeddishwasher making sure that door latches.
Check drain hose.
Check coarse the filter.
(see section titled )"CleaningTheFilter"
Check kitchen sink to make sure it is draining well.
If problem is kitchen sink not draining ,you may need
a plumber rather than a serviceman for dishwasher.
Use only the special dishwasher detergent to avoid
suds. If this occurs, open the dishwasher and let suds
evaporate.Add 1 gallon of cold water to the tub. Close
and latch the dishwasher, then Start the "soak" wash
cycle to drain out the water . Repeat if necessary.
Always wipe up rinse-aid spills immediately.
Make sure that the detergent is the one without
colourant.
General
problem s
Noise
Hard water minerals
The affected items are
notcorrosion resistant.
A programme was not
run after dishwasher
salt was added.
Traces of salt have
gotinto the washcy le.c
The lid of softer
is loose.
Thesp ay arm is
r
knocking against
an itemin a basket.
Item of crockery
are insecure
in the wash cabinet.
This may be caused
by on-site installation
or the cross-section of
the piping.
T o clean the interior, use a damp sponge with
dishwasher detergent and wear rubber gloves.
Never use any other cleaner than dishwasher
detergent for the risk of foaming or suds.
Always run the Quick wash programme .
without any crockery in the dishwasher and
without selecting the Turbo function (if present),
after adding dishwasher salt.
Check the lip .Ensure thefixis fine.
Interrupt the programme, and rearrange the items
whichare obstructing thesp ay arm.r
Interrupt the programme,
and rearrange the items of crockery.
This has no influence on dishwasher function.
if in doubt, contacta suitably qualified plumber.
17
Page 20

The dishes were not
loaded correctly.
See notes in " Loading the Dishwasher Baskets ".
Unsa ti s
-factory
washin g
resu lt
Theprogramme was
notpowerful enough.
Not enough detergent
wasdispensed.
Item are blocking
the path of sp ay arms.r
The filter combination
inthebaseofwash
cabinet is not clean or
is not correctly fitted.
This may cause
the sp ay arm jets
r
to get blocked.
Combination of soft
water and too much
detergent.
Aluminum utensils
have rubbed against
dishes.
Dishes block
detergent cups.
Improper loading
Too little rinse-aid
Select a more intensive programme.
See" Wash Cycle Table ."
Use more detergent, or change your detergent.
Rearrange the items so that the sp ay can rotate freely.r
Clean and/or fit the filter combinationcorrectly.
Clean the sp ay arm jets. See "Cleaning the Spray
Arms".
Use less detergent if you have soft water and select
a shortest cycle to wash the glassware and to get
them clean.
Use a mild abrasive cleaner to eliminate those marks.
Re-loadin g the dishes properly.
Load the dishwasher as suggested in the directions.
Increase the amount of rinse-aid/Refill the rinse-aid
dispenser.
r
Unsa ti s
-factory
dryi ng
resu lt
Dishes are removed
too soon.
Wrong programme
selection
Using cutlery with
a low-quality coating
Do not empty your dishwasher immedia tely after
washing. Open the door slightly so that the steam can
escape. Begin unloadingthe dishwasher only once t
he dishes are barely warm to the touch. Empty the low
basket first. This prevents water form dropping off
dishes in the upper basket.
In short programmes the washing temperature is lower.
This also lowers cleaning performance. Choose a
programmewith a long washing time.
Water drainage is more difficult with these items.
Cutlery or dishes of this type are not suitable for
washing in the dishwasher.
When some malfunctions come on, the appliance will display error cod es to warn you:
Longer inlet time.
Overflow.
Faucets is not opened, or water intake is restricted,
or water pressure is too low.
Some element of dishwasher leaks .
If overflow occurs, turn off the main water supply befo re calling a service.
If there is water in the base pan because of an overfill or small leak,
the water should be removed before restarting the dishwasher.
18
Page 21

Height : 438mm
Width : 550mm
Depth : 500mm
Voltage connected Load : see rating label
Water pressure: 0.04-1.0MPa
Hot water connection : max 60 ℃
Power supply: see rating label
Capacity: 6 Place settings
19
 Loading...