

Page 1
THERMAL BUFFER
BOTTLE KIT
Installation & Operation Instructions
Phone: 1-888-967-5224
Website: workaci.com
GENERAL INFORMATION
ACI Thermal Buers counter rapid temperature
uctuations typically caused by doors opening in a
walk-in freezer or cooler. The ACI Thermal Buer
Bottle comes with all the items needed to add a
buer to any new or existing sensor installation. All
the parts include the food grade Glycol or Glass
beads buer, 304 series stainless steel Mounting
bracket, stainless steel screws, Nalgene Bottle, and
probe tting. The 2.0 oz Thermal Buer bottle
includes a PG7 Cable Gland with Neoprene Gasket
(Seal) that will t 3/16” to ¼” probe sizes. The 8.5
Thermal Buer bottle includes a 316 stainless steel
well(s) with a compression tting that will t 3/16”
diameter sensing probes only.
ACI’s Glycol buer should be used in freezer/fridge
applications, rated down to -40ºC(-40ºF). ACI’s Glass
Bead Buer should be used in extreme low
temperature applications, rated down to
-100ºC(-148ºF).
The “-3PT” Triple Point Thermal buer should be used
in pharmaceutical or critical applications where
multiple sensor redundancy is required with the 3rd
sensing opening available for insertion of your NIST
Certied standard or reference.
For optimal temperature measurement, follow
these tips:
• The sensor should be installed inside the bottle such
that the tip of the sensor is suspended approximately
½ inch above the bottom of the bottle. Make sure the
tip is fully submerged in solution. Make certain the
end of the probe where the wires exit, are kept above
the liquid.
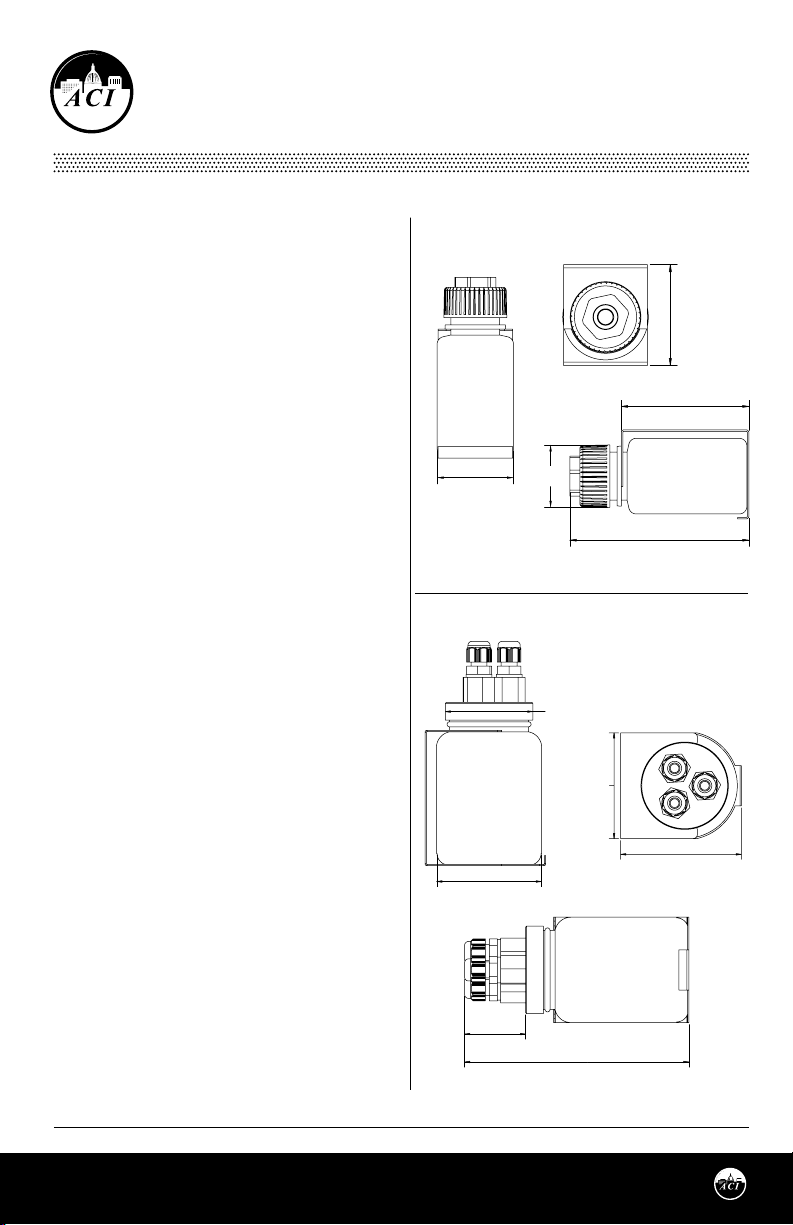
FIGURE 1: BOTTLE DIMENSIONS
2.0 oz Bottle
1.81”
(45.97mm)
2.59” (65.81mm)
Ø1.27”
1.53” (38.96mm)
8.5 oz Bottle
(32.16mm)
Ø2.18” (55.25mm)
Ø2.60” (66.04mm)
2.63”
(66.68mm)
3.63” (92.28mm)
3.00” (76.20mm)
SENSOR INSTALLTION
Note: 2.0 (2oz) models are shipped with the original
lid in place along with an additional lid drilled out
with the sensor cord grip.
Automation Components, Inc.
2305 Pleasant View Road | Middleton, WI 53562
Phone: 1-888-967-5224 | Website: workaci.com
1.52” (38.62mm)
5.58” (141.71mm)
Page 1
Version: 1.0
I0000938
Page 2
A/TB-2.0-GLY
Insert the sensor probe into the water tight tting. Insert from top of cap, and press down until the sensor is
approximately ½ inch above the bottom of the bottle. Make sure the tip is fully submerged in solution. If the
probe is tight, and not going in smoothly, unscrew the water tight tting cap slightly.
While holding the probe against the nut, turn the cap clockwise to tighten to the probe. This will hold the
depth position, so the probe does not slip.
Using the torque wrench with socket attachment, tighten the inner cap to 14.7 lb. inch (1.66 Nm).
A/TB-2.0-GLA
Remove the compression nut and ferrule. Insert the sensor probe into the compression tting body from top
of cap, and press down until the sensor is approximately ½ inch above the bottom of the bottle. Insert the
ferrule onto the probe rst, followed by the compression nut. The ferrule is cone shaped, and can only be
placed into the tting body in one direction. The tip of the cone must be facing into the tting body.
While holding the probe against the compression nut, turn the compression nut clockwise to tighten to the
probe. This will hold the depth position, so the probe does not slip.
Hand tighten the compression nut rst, followed by 1-2 turns with a pliers. Do not over tighten.
A/TB-8.5-X-GLY
Insert the sensor probe into the water tight tting/thermowell. Insert from top of cap, and press down until
the sensor bottoms out. If the probe is tight, and not going in smoothly, unscrew the water tight tting cap
slightly. Turn the cap clockwise to tighten to the probe.
MOUNTING INSTRUCTIONS
Take care when mounting. The sensor should be
mounted in an area where air circulation is well
mixed and not blocked by obstructions. The Thermal
Buer comes with a stainless steel mounting bracket
available for wall mounting.
MOUNTING BRACKET INSTALLATION
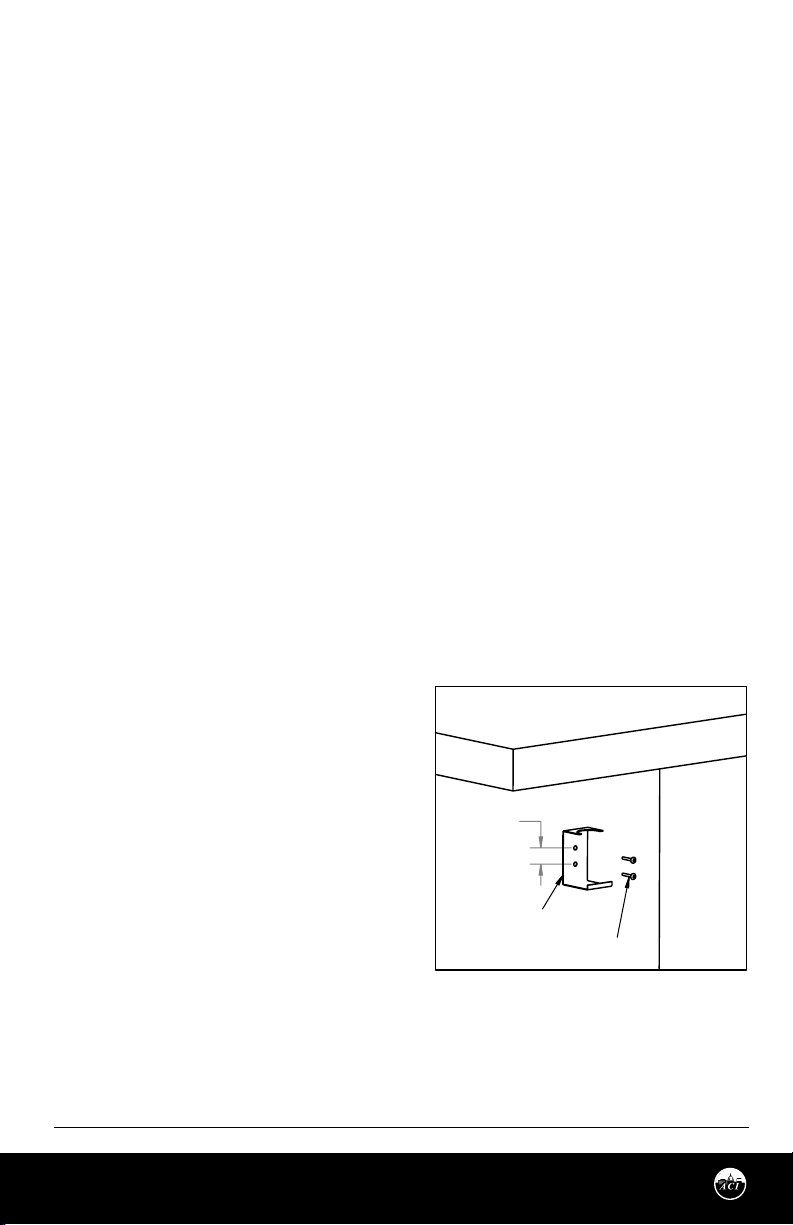
Drill pilot holes for the provided mounting screws. Use
the mounting clip holes as a guide - see FIGURE 2.
Drill the #10-16 1/2“ screws through the bracket holes
and fasten it to the wall. Insert the bottle into the
bracket, and make sure it is seated securely.
Automation Components, Inc.
2305 Pleasant View Road | Middleton, WI 53562
Phone: 1-888-967-5224 | Website: workaci.com
FIGURE 2: STAINLESS STEEL
MOUNTING BRACKET (Optional)
.77”
(19.56 mm)
GLYCOL BRACKET
MOUNTING SCREWS
#10-16 x 1/2”
Page 2
Version: 1.0
I0000938
Page 3
WIRE INSTALLATION
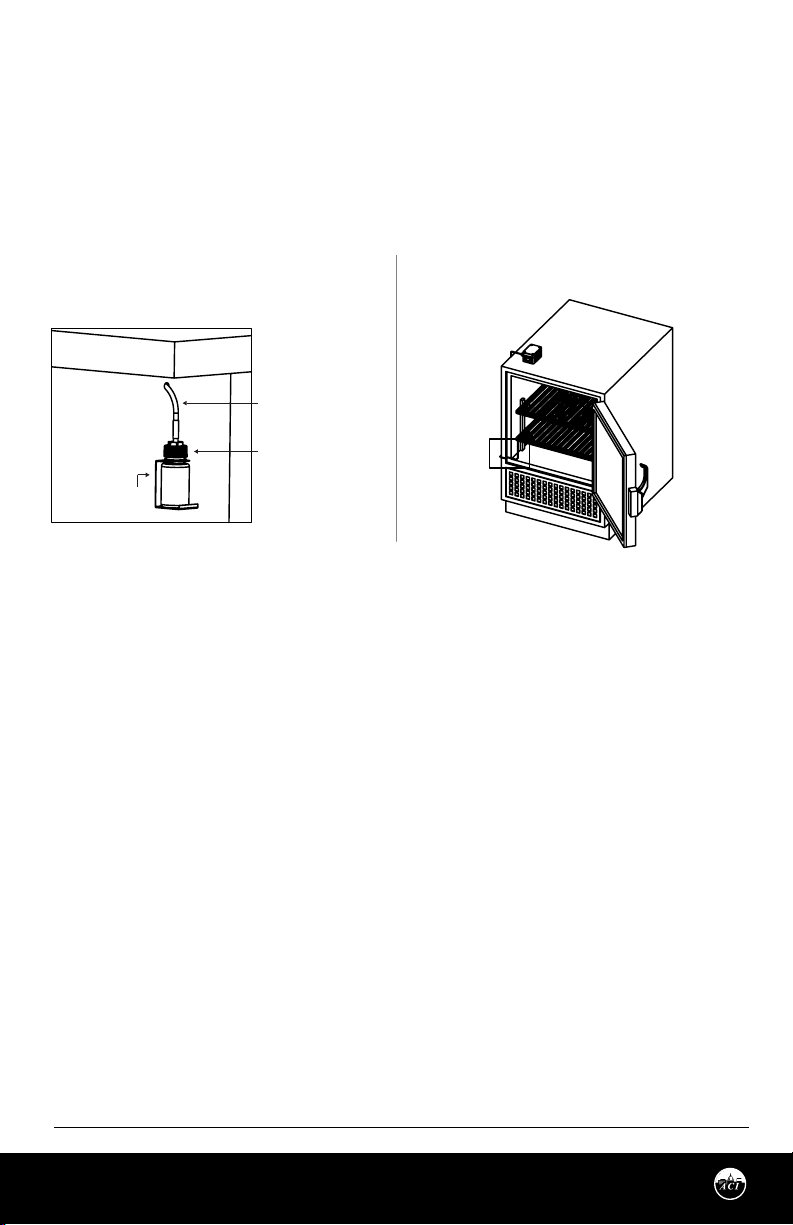
ACI recommends installing the wire through the door seal, probe access port, or cooler wall. On
horizontal units, the preferred method is using the rear door seal as shown in FIGURE 4. On
vertical units, remove the rear panel. There is typically a probe access hole. Probe and wires can
be ran into that access hole. Alternatively, you can drill a hole just larger than the diameter of the wire
(0.125” (3.175 mm)) through the wall. From inside the cooler/freezer, push the wire through the hole.
Use mounting clips to secure the wire to the interior wall or shelving. Use silicone caulking to seal the
hole around the wire.
FIGURE 4: WIRE ROUTINGFIGURE 3: GLYCOL SENSOR
w/ BRACKET
SENSOR WIRES
GLYCOL BOTTLE AND
STANDARD 4” SENSOR
PROBE
STEEL MOUNTING
BRACKET
WARRANTY
The ACI Thermal Buer Series temperature sensors are covered by ACI’s Five (5) Year Limited Warranty, which is
located in the front of ACI’S SENSORS & TRANSMITTERS CATALOG or can be found on ACI’s website:
www.workaci.com.
W.E.E.E. DIRECTIVE
At the end of their useful life the packaging and product should be disposed of via a suitable recycling
centre. Do not dispose of with household waste. Do not burn.
Page 3
Automation Components, Inc.
2305 Pleasant View Road | Middleton, WI 53562
Phone: 1-888-967-5224 | Website: workaci.com
Version: 1.0
I0000938
Page 4
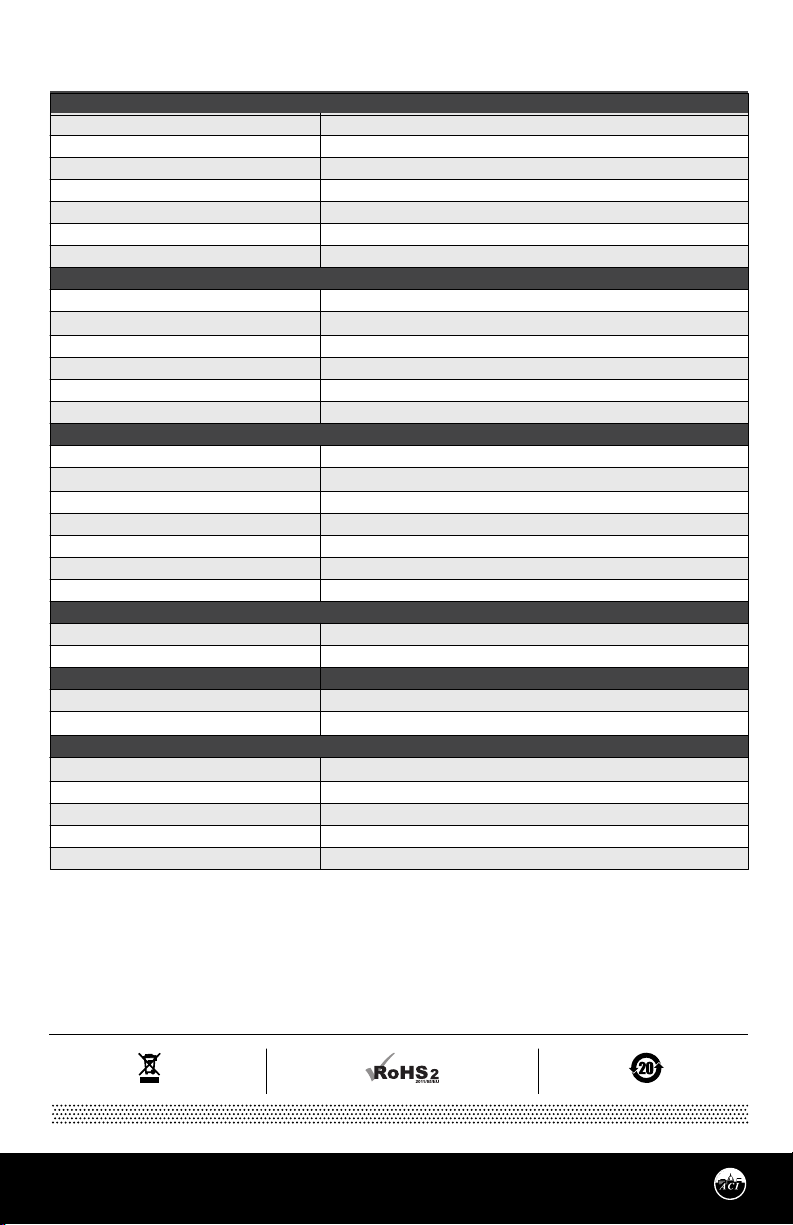
PRODUCT SPECIFICATIONS
2 oz Thermal Buer Bottle - Glycol
Thermal Media:
Bottle Material/Cap Material:
Fluid Capacity:
Cable Gland Material / Gland Material
Cable Gland Torque Rating
Probe Size Accepted:
Operating Temperature Range:
2 oz Thermal Buer Bottle - Glass Bead
Thermal Media:
Bottle Material/Cap Material:
Fluid Capacity:
Compression Fitting Material:
Probe Size Accepted:
Operating Temperature Range:
8.5 oz Thermal Buer Bottle
Thermal Media:
Bottle Material/Cap Material:
Fluid Capacity:
Thermowell Material (3PT only):
Probe Size Accepted:
Operating Temp Range – Glycol:
Operating Temp Range – Glass Bead:
Bracket
Bracket Material:
Mounting Screws / Material:
Thermal Buer Media
Glycol Properties / Glycol Freezing Point:
Glass Bead Properties / Glass Freezing Point:
General Specs
Chemical Resistance:
Bottle Sterility:
Storage Temperature Range:
Operating Humidity Range:
Agency Approvals:
Glycol
Nalgene (HDPE) / Polypropylene
67 ml (2 oz)
Polyamide 6 / Neoprene
1.66 Nm (14.7 lb. inch)
0.098” to 0.256” (2.49mm to 6.50mm)
-40 to 120ºC (-40 to 248ºF)
Glass Beads
Nalgene (HDPE) / Polypropylene
67 ml (2 oz)
316 Stainless Steel
0.1875” (4.762 mm)
-100 to 120°C (-148 to 248°F)
Glycol or Glass Beads
Nalgene (HDPE) / Polypropylene w/ PTFE Foam Liner
250 ml (8.5 oz)
316 SS Steel
0.1875” (4.762 mm)
-40 to 120°C (-40 to 248°F)
-100 to 120°C (-148 to 248°F)
304 Stainless Steel
#10-16 Thread x 1/2” (12.7mm) / 410 Stainless steel
Food Grade USP (Propylene Glycol); Non-Toxic | -59°C (-74.2°F)
Soda Lime Glass / NA
Resistant to most acids, bases, and alcohols
Lab Quality, Non-Sterile
-40 to 85°C (-40 to 185°F)
10 to 100% RH, condensing
RoHS2, WEEE
Automation Components, Inc.
2305 Pleasant View Road | Middleton, WI 53562
Phone: 1-888-967-5224 | Website: workaci.com
Page 4
Version: 1.0
I0000938
 Loading...