

Page 1

SWD-Collect
Version 4.0
Users Guide
Page 2
Page 3

Table of Contents
Chapter 1 An Introduction to SWD-Collect
Introductory Notes ...................................................................... 1
The Software .......................................................................... 1
Conventions in this Manual .................................................... 2
Special Keys and Procedures ................................................ 3
<Alt><Tab> ..................................................................... 3
The OK and Cancel Buttons ........................................... 3
Words With An Underlined Letter ................................... 3
Mouse Procedures and Terms........................................ 4
On-Line Help ................................................................... 5
Status Line and Tool Tips Help ....................................... 5
Exiting from SWD-Collect ............................................... 5
Last Minute Changes ............................................................. 5
Installation .................................................................................... 6
Contents of the SWD-Collect Package .................................. 6
Preparing your System (Computer Requirements) ................ 6
Hardware Requirements ................................................. 6
Software Requirements .................................................. 6
Installing the Software ............................................................ 7
Registering the Software ........................................................ 7
Copyright ................................................................................ 8
License ................................................................................... 8
Chapter 2 Quick Start - Just the Basics
Configuring your Instrument ...................................................... 10
Setting up a New Instrument .................................................. 10
Defining your Instrument Protocol................................... 11
Saving the Instrument Protocol Setup ............................ 12
Defining Instrument Commands ................................................ 13
How to Set up Commands for your Instrument ............... 14
i
Page 4

TABLE OF CONTENTS
Opening the Instrument .............................................................. 15
Where to Send the Instrument Data....................................... 16
Sending Commands .................................................................... 17
Closing the Instrument ............................................................... 18
Chapter 3 Configuring Instruments
Setting up a New Instrument ...................................................... 19
Defining your Instrument Protocol .......................................... 20
Defining Instrument Commands ................................................ 24
How to Set Up Commands ..................................................... 25
Repeating, Delaying and Pacing Commands ........................ 26
Exiting the Instrument Setup .................................................. 28
Repeating Commands ................................................... 26
Delaying Commands ....................................................... 26
Pacing Commands .......................................................... 26
Sending Commands at Specified Intervals ..................... 26
Chapter 4 Opening Instruments
Opening an Instrument ............................................................... 29
Specifying the User Info ......................................................... 30
Moving around the [Open Instrument] dialog box ........... 30
Where to send the Instrument Data ....................................... 31
Sending the Data to a File .............................................. 32
Sending the Data to an Application ................................ 32
Opening the Instrument .......................................................... 34
Opening Another Instrument ...................................................... 35
SWD-Collecting to Other Applications ...................................... 35
One Instrument to One Application ........................................ 35
Multiple Instruments to Multiple Applications ......................... 36
Sending Commands .................................................................... 36
Interrupting a Command ................................................. 37
ii
Page 5

TABLE OF CONTENTS
Using the Additional Options Available .................................... 38
Viewing the User Prompts ...................................................... 38
Importing a File ....................................................................... 38
Viewing the Data Destination ................................................. 39
AutoScrolling the Spreadsheet............................................... 40
AutoStarting your Instrument ................................................. 40
AutoLoading a Spreadsheet................................................... 41
AutoOpening the Commands ................................................. 41
Using the Spreadsheet Menu Options ................................... 42
Using Standard Windows® Options ....................................... 42
Closing all Open Instruments ................................................. 42
Closing the Instrument ............................................................... 42
Chapter 5 Setting up the Instrument Parser
Basic Steps to Creating a Parser ............................................... 43
Accessing the Parser Setup ................................................... 44
Defining a Destination for Incoming Data ....................... 45
Defining a Parser Name .................................................. 46
Setting up the Parser ............................................................. 46
Specifying the Parser ...................................................... 47
Removing Carriage Return or Line Feed from Data ....... 47
Defining Macros .............................................................. 47
Discarding Data using Identifiers ................................... 47
Designing a Parser ................................................................. 49
Parser Types ................................................................... 49
Tips to follow when trying to designing a suitable Parser49
Parser Syntax .................................................................. 50
Choosing a Suitable Parser Type .......................................... 52
Using the Numbers Parser Type..................................... 52
Using the Position Parser Type ...................................... 53
Using the Scales Parser Type ........................................ 54
Using the Delimiter Parser Type ..................................... 56
Using Macros ............................................................................... 58
Defining a Macro .................................................................... 58
Including Keyboard Characters in the Macro .................. 60
Including Special Functions in the Macro ...................... 61
iii
Page 6

TABLE OF CONTENTS
Adding a Macro to a Parser ................................................... 64
Removing Macros from a Parser ........................................... 65
Displaying the User Prompts ..................................................... 66
Using What We have Learned so far ......................................... 67
Chapter 6 The SWD-Collect Spreadsheet
Spreadsheet Basics .................................................................... 69
Using the Menu Commands ................................................... 69
Using the Toolbar Buttons...................................................... 70
Choosing Commands ............................................................. 70
Selecting Cells ....................................................................... 70
Moving Around in a Spreadsheet ........................................... 71
Scrolling Through the Spreadsheet ....................................... 71
Loading a Spreadsheet .......................................................... 71
Saving a Spreadsheet ............................................................ 72
Formatting the Spreadsheet................................................... 73
Making Entries in the Spreadsheet ........................................ 74
Copying and Moving Cells in the Spreadsheet ...................... 75
Filling a Series of Cells........................................................... 75
Clearing the Spreadsheet ...................................................... 76
Setting Fonts in a Spreadsheet .............................................. 76
Printing a Spreadsheet........................................................... 77
Previewing the Print ............................................................... 78
Including ASCII Characters in the Macro ........................ 63
Including User Prompts in the Macro .............................. 63
Displayed Value vs. Stored Value .................................. 74
Defining the Print Options ............................................... 77
Enhanced Spreadsheet Features ............................................... 79
Using Formulas to Analyze Your Data ................................... 79
Formula Operators .......................................................... 79
Formula Functions .......................................................... 80
Combining Expressions With Parentheses ..................... 81
Displaying Formulas on the Spreadsheet ....................... 82
Editing Within a Cell ............................................................... 82
Changing Column Widths and Row Heights .......................... 82
iv
Page 7

TABLE OF CONTENTS
Appendix A ASCII Numbers ............................... 83
Appendix B Troubleshooting
Problem: ................................................................................. 87
Possible Solutions: ................................................................. 87
Index .......................................... Index-1
v
Page 8
Printed in Canada.
Page 9

CHAPTER 1 Introduction to SWD-Collect
Chapter
An Introduction to
1
SWD-Collect
Introductory Notes
The Software
SWD-Collect is designed for those who simply want to turn on their
computer and begin collecting data. It is ideal in laboratory and
production environments where an easy-to-use system is required. In
particular, SWD-Collect can carry out the following basic steps:
1. SWD-Collect will receive data directly from an instrument by
collecting data arriving at an RS232 port. It can also import an
existing ASCII (also known as text only) data file.
2. The collected data is then processed. This consists of modifying
the data by selectively breaking it into required components
(referred to as parsing the data). Using macros, required key
strokes and other characters are then added to the data. Userspecified prompts such as operators name and sample description
may also be added to the data.
3. The modified data can then be sent to any of four destinations. It
can be sent to a disk file, to the screen, to a built-in spreadsheet,
or directly to the keyboard for entry in another Windows®-based
application.
By sending the data to the keyboard, SWD-Collect fools any other
application running in the foreground into thinking that you are
manually entering the data. For example, you can use your favorite
spreadsheet while SWD-Collect is collecting data in the background.
Whenever data becomes available, it will be sent to the keyboard,
resulting in the data being added to the spreadsheet in real-time.
1
Page 10

CHAPTER 1 Introduction to SWD-Collect
When selecting destinations other than the keyboard, SWD-Collect
works in the background of the computer. This is done in such a way
that it will not interfere with other programs running on the computer
at the same time.
SWD-Collect will permit data collection from up to 9 instruments at
one time. Most computers can support up to 4 standard RS232 COM
ports, and these can be located on the mother board or an add-on
board. The software will work with multi-port boards configured to
work under your operating system.
Conventions in this Manual
The following conventions are used in this manual:
· The word press is used for keys you press.
· The word type is used when asking you to type a response through
the keyboard.
· The word click is used when asking you to respond with the
mouse.
· Dialog boxes have special command buttons, and these are shown
in Bold Italic print when referenced.
· Special keyboard keys such as Shift, Alt, Ctrl, ESCape, Tab, INSert,
DELete, etc. will be enclosed in triangular brackets. For example:
<INSert> <DELete> <TAB> <SHIFT> <ALT> etc.
· Two keys in a row without a space such as <CTRL><INSert> means
press and hold down the <CTRL> key while pressing <INSert>.
· Computer input such as file names are specified within double
quotes in the manual. Do not include the quotation marks when
entering the input. For example, if a:\setup is included in the
manual to explain how to enter a file name, you would not enter the
quotation marks.
· Menu selections are referenced in bold print, with the hot key
character for the selection underlined. For example, when a menu
option must be chosen, the manual will say something such as
Pull down the Configure Menu and select Instrument. To do
this you would click on the Configure menu option, and then select
the Instrument option from the sub-menu which appears when
you select Configure.
2
Page 11

CHAPTER 1 Introduction to SWD-Collect
· Proper names used in the program are denoted by a leading capital
letter, for example Instrument Data Destination or Parser Setup.
· An instrument refers to any external device other than the computer.
This manual assumes you know the theory and principles of the
laboratory instruments being used and their resultant data.
· Dialog boxes are shown for your reference. However, any examples
of Instrument Setups, Parsers, Macros or data are included for
demonstration purposes only. When the program has a default
value, it will be referenced.
Special Keys and Procedures
Certain keys, combinations and procedures give consistent behaviors
when using Windows
®
-based applications. The following are just a
few to note.
<Alt><Tab>
When running any Windows
<Alt><Tab> to switch to another program, which is already running.
The program you were using will continue to operate in the background.
®
-based program, you can press
The OK and Cancel Buttons
Many of the Dialog Boxes used in the program contain both an OK
button and a Cancel button. Selecting the OK button will accept
any input you provided in the Dialog Box and then close the Box.
Selecting the Cancel button will ignore any input you provided and
close the Dialog Box.
Words With An Underlined Letter
Many menu options and button labels will contain a letter, which is
underlined. This indicates that the letter is a hot key. Generally
speaking, pressing <Alt> in combination with a hot key is equivalent
to clicking on the selection.
3
Page 12

CHAPTER 1 Introduction to SWD-Collect
For a Menu from the Menu bar, you can type <Alt> plus the hot key.
For example, the Instruments Menu has an underlined I. Instead of
using the mouse, you could press <Alt><I>, or <Alt> then <I>.
For an option from a Menu, you only need to press the hot key. For
example, Open is an option in the Instruments Menu that has an
underlined O. Once you have selected the Instruments Menu, you
could press <O> to activate the option.
For a button, pressing <Alt> in combination with a hot key is equivalent
to clicking on the selection. For example, the Create button on the
[Setup Instruments] dialog box has an underlined C. Instead of clicking
on the Create button, you could press <Alt><C>. Note that these
two keys must be pressed simultaneously.
Mouse Procedures and Terms
Many actions in Windows®-based programs require the use of a
mouse. This manual uses certain terms to indicate that a mouse action
is required.
When a menu option must be chosen or a button needs to be pushed,
the manual will say something such as Pull down the Configure
Menu and select Instrument, or Click on the OK button. This
means you should use the mouse to position the arrow cursor on the
specified menu, option or button, and then push the left mouse button
once.
Some selections require you to click and drag the mouse. This means
to hold the left mouse button down while you move the mouse, known
as dragging. This operation is often used within a spreadsheet - see
Chapter 6 of this manual for more details on selecting spreadsheet
cells.
Some selections in Windows®-based applications are accomplished
by double-clicking the mouse. This means to position the arrow
cursor on the item to be selected and then push the left mouse button
twice in rapid succession.
4
Page 13

On-Line Help
CHAPTER 1 Introduction to SWD-Collect
The On-Line Help is a Windows
®
Help file, allowing you to choose
subjects relevant to the program. When you choose Help from the
menu bar, the Help window will open on the screen. If you are unfamiliar
with using a windows help file you can obtain instructions from the
Help programs menu item Help | How to Use Help .
Status Line and Tool Tips Help
At the bottom of the SWD-Collect screen is a status line that shows
messages to help you use the program. It lets you know what a certain
menu option will do by displaying a message as you position the
mouse pointer on it. For example, if you pull down the Configure
Menu and position the pointer over Instrument, Setup an Instrument
is the message that appears on the status line. The status line also lets
you know which open instrument is the active window, as well as what
port the instrument is connected to.
To get help with a toolbar button, point to it (rest the mouse pointer on
the button). A tool tip will appear with a brief description of the buttons
function.
Exiting from SWD-Collect
To exit from the SWD-Collect program, pull down the Instruments
Menu and choose Exit.
Last Minute Changes
From time to time, improvements are made to both the software and the
manual. The latest changes will be explained in a README file that will
be installed with the program. To list this information:
1. Double-click on the README question-mark icon that was
installed in the same Program Group as SWD-Collect.
2. The readme.hlp file will be displayed in a standard Windows®-
based on-line help format, allowing you to jump to various topics.
3. To exit the README, simply pull down the File menu and select
Exit.
5
Page 14

CHAPTER 1 Introduction to SWD-Collect
If such a file exists, you may look at the README file at any time,
although it is a good idea to look at it before installing the program.
Installation
Contents of the SWD-Collect Package
Two 3.5" SWD-Collect Program Disks
One SWD-Collect Users Manual
Preparing your System (Computer Requirements)
Hardware Requirements
SWD-Collect requires that your computer has the following minimum
specifications:
· An IBM compatible 80486DX or higher
· 8 MB RAM minimum, 16 MB recommended
· Hard Disk with at least 5 MB of free disk space
· At least one 3.5" floppy disk drive
· VGA or higher resolution
· COM1 / COM2 etc. ports to support RS232 communications (the
minimum is one available COM port)
· For RS232 communications, please ensure that you have a cable
that is certified by the instrument manufacturer.
Software Requirements
SWD-Collect can run under the Microsoft® Windows
98, Windows® NT and Windows® 2000 operating systems. Check
®
95 , Windows
your disks to verify you have the correct version for your operating
system.
6
®
Page 15

CHAPTER 1 Introduction to SWD-Collect
Installing the Software
SWD-Collect comes with an automated setup program. The setup
program must be run from within Windows
Windows
®
NT or Windows® 2000.
®
95, Windows® 98,
1. First have your Windows® operating system running.
2. Insert the SWD-Collect disk #1 into your computers floppy drive.
3. Click on the Start button at the bottom left corner of your screen,
and choose the Run... item from the pop-up menu.
4. You will advance to a [Run] dialog box, where you may enter the
name of a program, folder or document to be run. This is called
Open:. Type a:\setup (or b:\setup), then click on the OK
button.
5. The setup program will specify a drive and directory to install to.
If you wish to change the default simply enter the appropriate
information here. The setup program will create the necessary
directories and copy the files over.
6. Double-click on the SWD-Collect icon to start the program. You
will see the main window for SWD-Collect. Chapter 2 of this manual
gives a Quick Start introduction to the program, while Chapters
3-6 provide complete details.
Registering the Software
Each new installation of the software requires its own registration.
You may install SWD-Collect from the original master disks or from
copies of these master disks. Once installed, the program is fully
functional for 30 days; registration of the installation with OMEGA
Engineering Inc. is required for further use. This must be done within
30 days of installing the program.
7
Page 16

CHAPTER 1 Introduction to SWD-Collect
When you first start SWD-Collect you will advance to the [Register]
dialog box. Enter the 10 digit Registration Code found on the Product
Installation Disk. If a registration code was not supplied with the
product, contact OMEGA directly to obtain one. Before registering
the product, please ensure that you are complying by your current
license agreement with OMEGA before activating this copy of the
product.
If you do not register the program now, you will be permitted to use a
fully functional unregistered copy of the program for a period of 30
days, after which you are required to register the product.
Should you require technical support, you will be required to provide
the serial number. This can be retrieved from the products About Box.
Select the About sub-menu item from the Help menu.
While using the program, you may also see the [Register] dialog
box by choosing the About item from the Help menu. You will first
see an information window about SWD-Collect, and you may click on
the Register button there.
Copyright
SWD-Collect is copyright protected by Labtronics Inc. with all rights
reserved. This manual is copyright protected by OMEGA
ENGINEERING INC. with all rights reserved. No part of this software
or manual may be copied, in whole or in part without written consent
except to make a backup copy for normal use.
License
Labtronics Inc. grants you a non-exclusive license to use SWD-Collect
on a single machine and to copy it for a backup in support of your use
of the program on a single machine.
8
Page 17
CHAPTER 2 Quick Start - Just the Basics
Chapter
The purpose of this Chapter is to introduce you to the SWD-Collect
environment. Following this chapter will show you how to quickly
configure one of your instruments, and then see the program collect raw
data from that instrument. Comprehensive details of the SWD-Collect
software are provided in Chapters 3, 4, 5 and 6 for your reference.
You should first be familiar with your Windows® operating system,
and you should know how to use the mouse to click and drag the
pull-down menus as well as select options. More importantly, you
should first have your instrument connected to a COM port on the
back of your computer, and you should be able to provide the comport
details that must be entered in SWD-Collect.
If you have not yet installed SWD-Collect onto your computer, go back
to the Installation section now (Pages 6 to 8) and follow the required
steps. Once installed, you are ready to start the program.
Start SWD-Collect from Windows® by selecting the program icon from
Start½Programs½SWD-Collect V4.0.
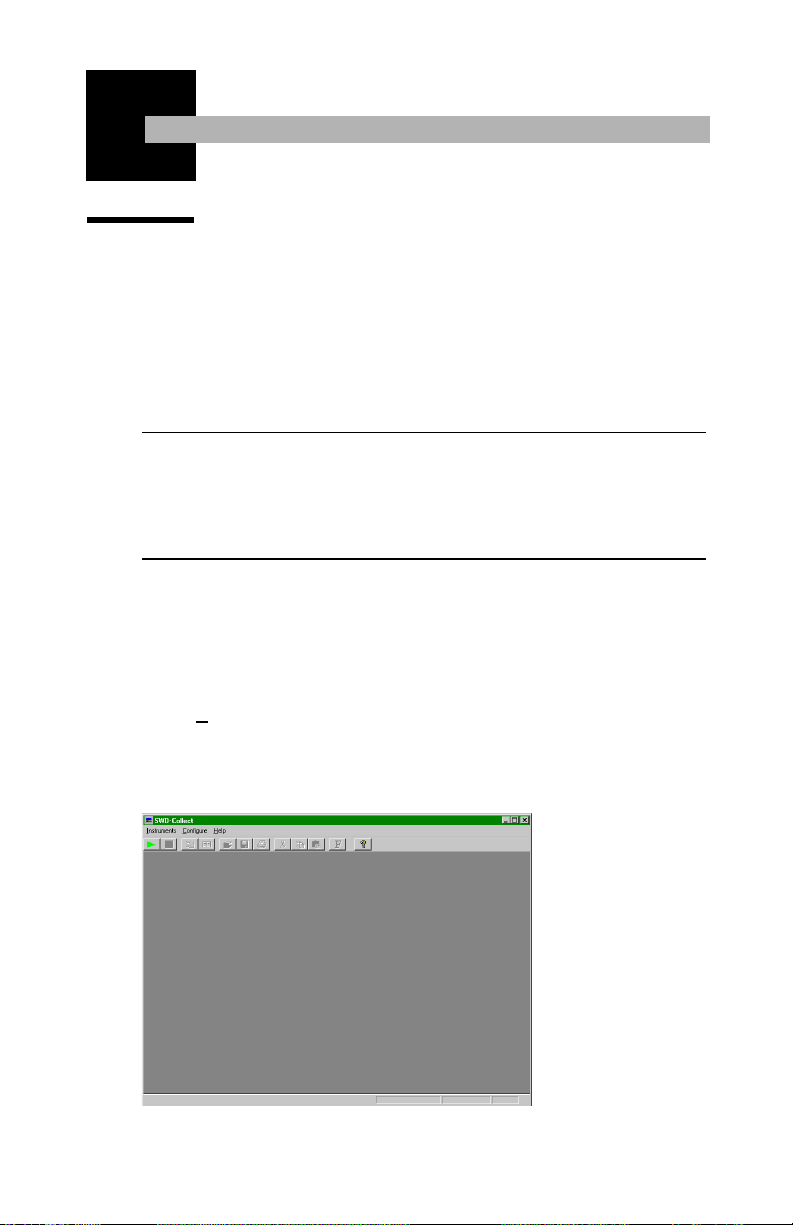
Upon entering the program you will see the SWD-Collect main screen,
as shown in Figure 2.1.
Quick Start - Just the Basics
2
Figure 2.1: SWD-Collect main screen - Access to the programs features
9
Page 18
CHAPTER 2 Quick Start - Just the Basics
Configuring your Instrument
The first step is to configure your instrument to work with SWDCollect.
1. From the main screen, pull down the Configure menu item.
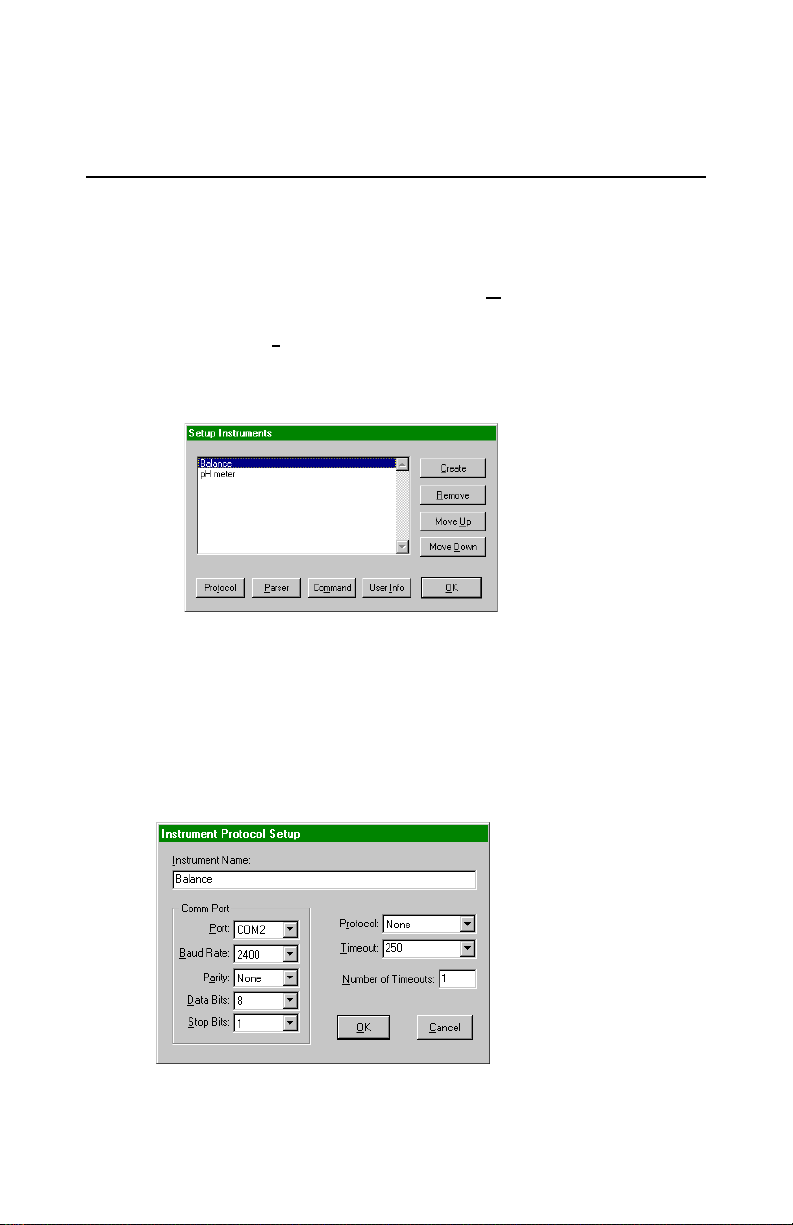
2. Select the Instrument sub-menu item. The [Setup Instruments]
dialog box similar to the one shown in Figure 2.2 will appear. (Please
note the listed instruments are examples only.)
Figure 2.2: Setup Instruments dialog box
10
Setting up a New Instrument
Click on the Create button. You will advance to the [Instrument
Protocol Setup] dialog box as shown in Figure 2.3.
Figure 2.3: Define the instrument protocol
Page 19

CHAPTER 2 Quick Start - Just the Basics
Defining your Instrument Protocol
There are some key communication parameters associated with serial
(RS232) communication that must be matched exactly between your
instrument and the configuration in SWD-Collect. In particular, if the
Baud Rate, Data Bits, Stop Bits, and Parity are not matched exactly
between the instrument and SWD-Collect, serial data transfer will
not work. The computer does not automatically determine what these
parameters are for your instrument - YOU MUST ENTER THEM HERE.
Specifying the Instrument Name
The cursor will be flashing in the Instrument Name text box. Type in
the name of the instrument so that you will be able to identify the
instrument throughout the SWD-Collect program. Do not press
<Enter> after typing in the name, as this will cause you to close the
dialog box.
Specifying the Comport Information
You must enter the correct Comport information based on the details
supplied in the user manual for your instrument. It is important that
these details match exactly those of your instrument. Note that by
clicking on the arrow to the right of each box, you can see a list of items
from which you can make your selections. Simply click on the up and
down arrows to scroll through the list, and click on the desired entry.
Port Select the port that is connected to your instrument. COM2 is
Baud Rate Select the Baud Rate that corresponds to the data transmission
Parity Indicate what parity bit should be added to your data for
Data Bits
(Word Length)
Stop Bits Indicate how many stop bits are added to the data unit. The
the default selection.
speed of your instrument. 2400 is the default Baud Rate
selection.
successful communication. None is the default value and
this is often selected.
Eight (8) appears as the default value. This indicates how
many bits of data are in a data unit for communication purposes.
default selection is 1.
11
Page 20

CHAPTER 2 Quick Start - Just the Basics
Defining a Protocol for Data Transmission
The Protocol is also known as handshaking, which establishes the
method for controlling the flow of data between devices so that one
device transmits only when the other device is ready. SWD-Collect is
designed to be ready for your devices transmission at all times, so you
need only select the default protocol, NONE. Any additional protocols
that may be listed are custom-designed methods reserved for highly
specialized applications.
Specifying a Timeout for Data SWD-Collection
The program will collect data until an interval of time occurs when no
more data is received. This time interval is known as the Timeout.
After the Timeout occurs, the program will organize (parse) the data
and send it to either the keyboard, a spreadsheet, the monitor or to a
specified disk file. SWD-Collect then gets ready to receive the next
segment of data.
For now, leave the Timeout default value of 250 milliseconds.
12
Defining the Number of Timeouts for Data SWDCollection
Here you may specify the number of timeouts the program is to detect
before parsing begins. For now, leave the default for this option at 1
(one), which will be the most common selection.
Please refer to Chapter 3, (see Pages 20 to 23) for additional information on defining protocols and timeouts.
Saving the Instrument Protocol Setup
Once you have completed your entries to the [Instrument Protocol
Setup] dialog box (see Figure 2.3, Page 10), click on the OK button to
save the configuration. Selecting OK will return the [Setup
Instruments] dialog box (see Figure 2.2, Page 10), with the name of the
created instrument listed and highlighted.
Page 21
CHAPTER 2 Quick Start - Just the Basics
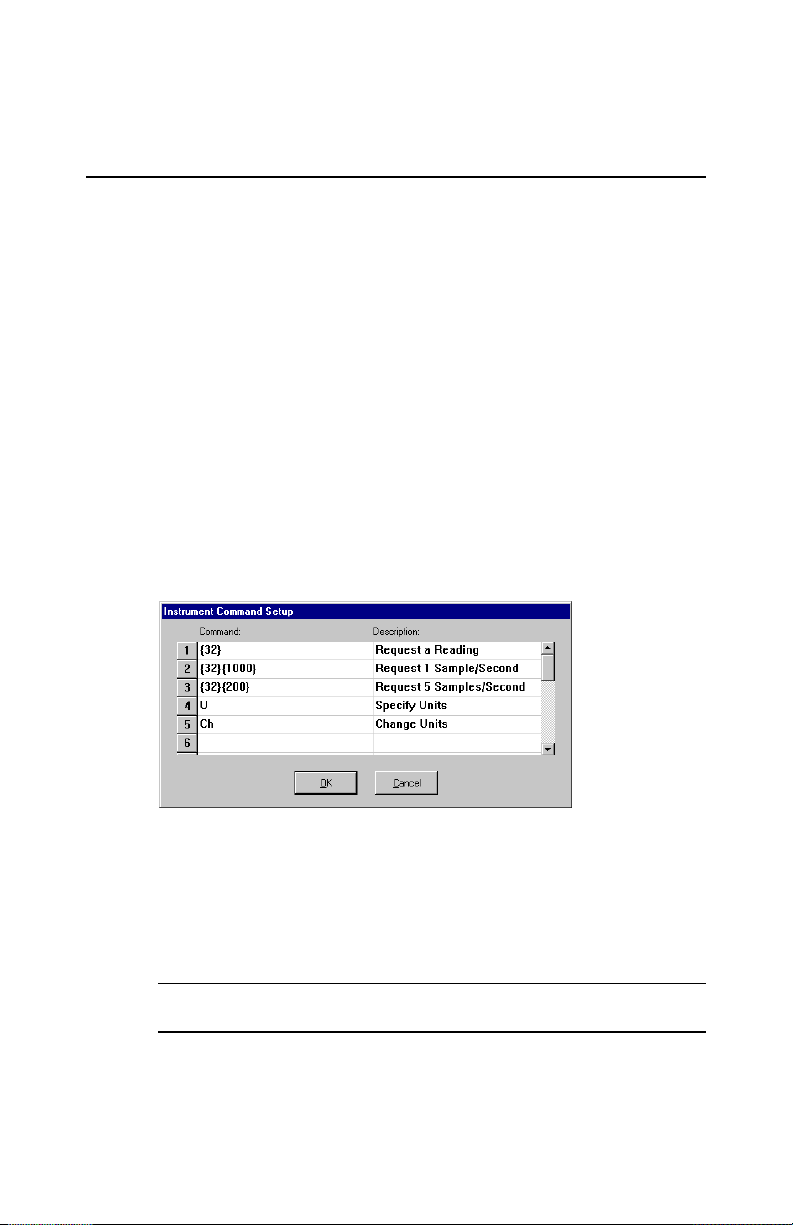
Defining Instrument Commands
Does your instrument require a command from the computer to prompt
it to start or stop transmitting data? Check your instruments manual
for a section on External Control.
1. If your instrument does require such commands, work your way
through the following section.
2. If your instrument does not require a command from the computer,
click the OK button and skip ahead to the section, Opening the
Instrument, Page 15.
If your instrument requires a command from the computer, click on the
Command button located along the bottom of the [Setup Instruments]
dialog box (see Figure 2.2, Page 10) to open the [Instrument Command
Setup] dialog box, shown in Figure 2.4.
Figure 2.4: Define the instrument commands
You can enter up to twenty commands here, which you can then send
to the instrument to control its operation. For example, your instrument
may require SWD-Collect to send a command of S to prompt the
instrument to send data.
Please refer to Chapter 4, (see Pages 36 to 38) for additional information on sending commands.
13
Page 22

CHAPTER 2 Quick Start - Just the Basics
How to Set up Commands for your Instrument
1. Using the mouse, move the pointer to a Command box (on the left
side) and click on it.
2. Type the required command through the keyboard. It is fairly common
that the command will include non-printable characters, such as a
carriage return or line feed. These should be entered as ASCII
numbers enclosed in { } brackets . For example, the carriage return
is {13} and the line feed is {10}. A listing of ASCII numbers appears
in Appendix A.
3. Click the pointer on the box beside it, under the heading
Description.
4. Enter a description for the command. For example, you could enter
Start sending data as the description.
Please Note: It is mandatory that you enter a description here for
each command.
14
5. Complete steps 1-4 for each command that is specified in your
instruments user manual. Note that when youre actually running
the instrument and choose to send commands, these commands
will be listed in the order they appear here, from top to bottom. If
you would like the commands to appear in a certain order, for ease
of selection, then ensure you enter them in order here.
6. When you have finished entering the command for the instrument,
click on the OK button to save the details.
Please refer to Chapter 3, Pages 24 to 28 for additional information
on defining instrument commands.
Page 23
CHAPTER 2 Quick Start - Just the Basics
Opening the Instrument
Before SWD-Collect can start collecting data, you must first open
the instrument.
To open an instrument, do one of the following:
1. From the SWD-Collect main screen (see Figure 2.1, Page 9), pull
down the Instruments menu.
2. Select the Open sub-menu item.
or
1. From the SWD-Collect main screen (see Figure 2.1, Page 9),
click the Open button from the Toolbar, as shown here in the
margin.
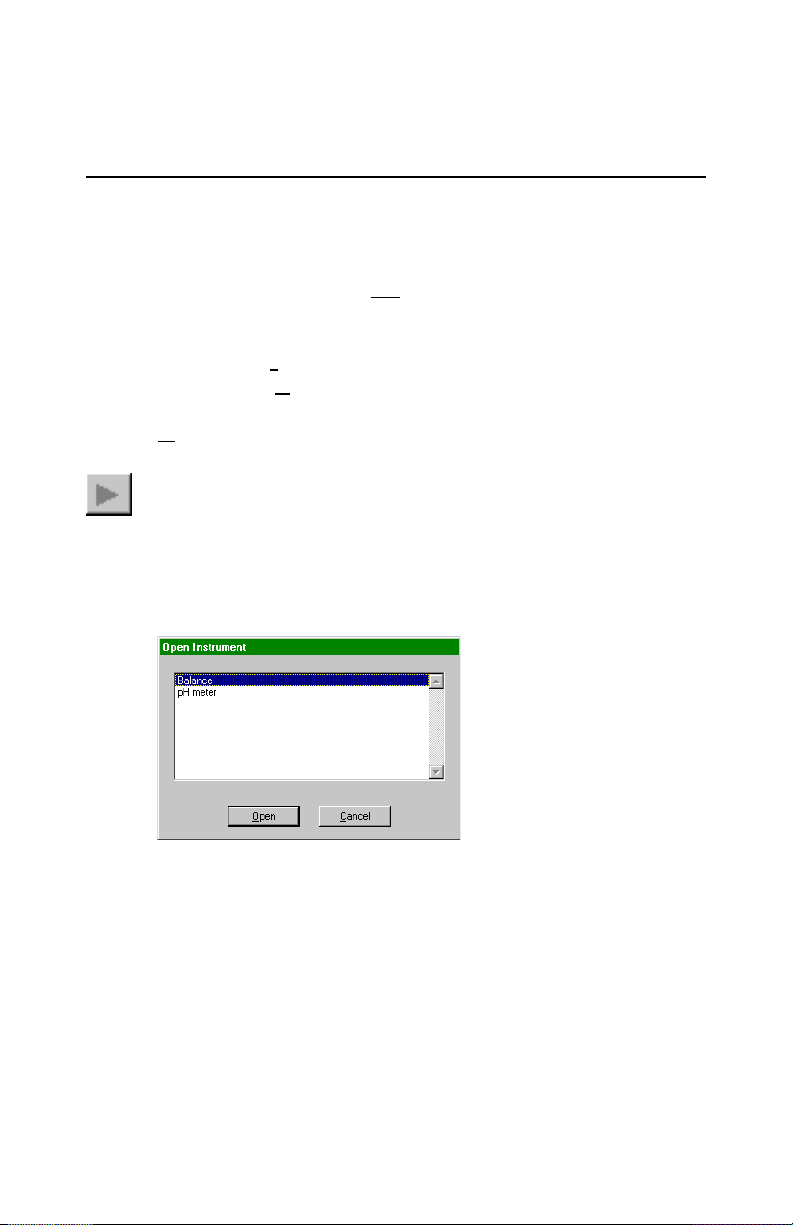
In either case, you will advance to the [Open Instrument] dialog box
will appear, similar to the example shown in Figure 2.5.
Figure 2.5: Open Instrument dialog box
You will see a listing with the instrument(s) that you have just configured
for the SWD-Collect program. Clicking once on an instrument name will
highlight it. Click on the Open button to proceed to the [Instrument
Data Destination] dialog box (see Figure 2.6, Page 16), or Cancel to
return to the main SWD-Collect window.
Double-clicking on the instrument name will automatically select it and
open the [Instrument Data Destination] dialog box (see Figure 2.6, Page
16).
15
Page 24
CHAPTER 2 Quick Start - Just the Basics
Where to Send the Instrument Data
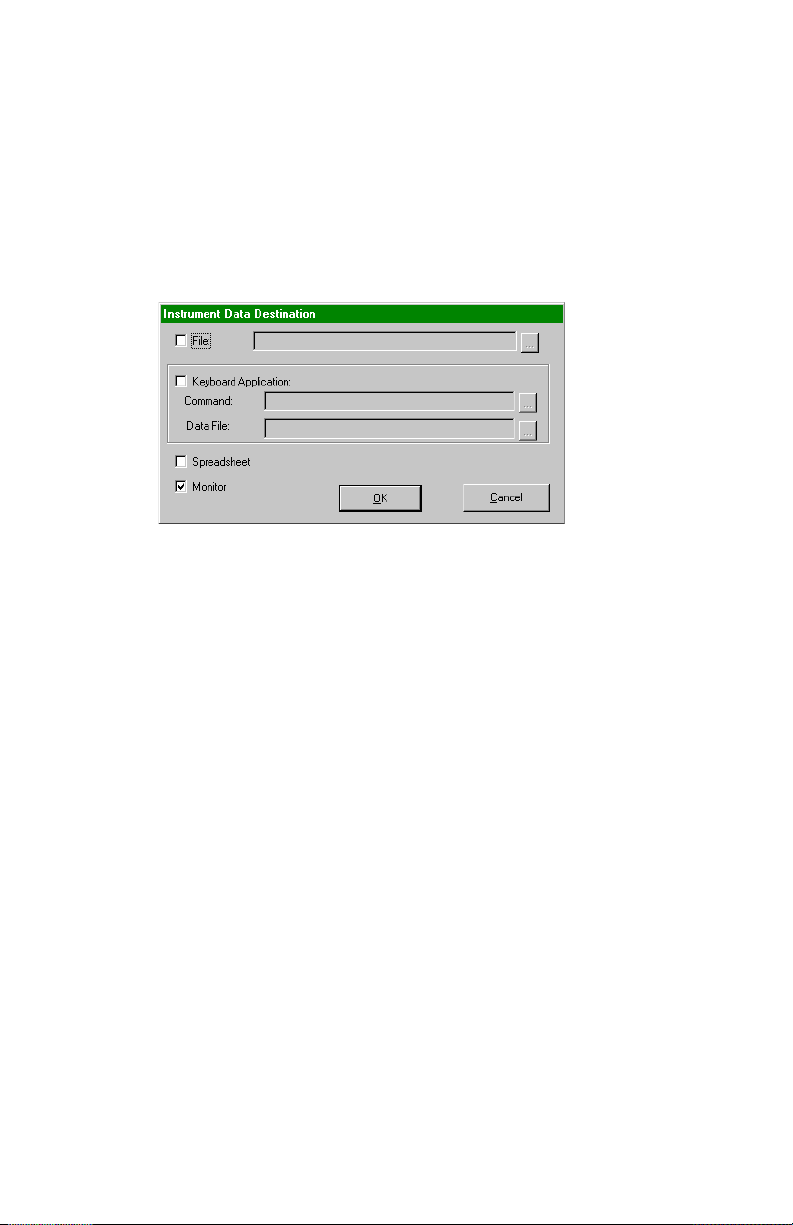
When opening an instrument you must complete the [Instrument Data
Destination] dialog box and click on the OK button. Clicking on the
Cancel button will return you to the previous dialog box.
Figure 2.6: Instrument Data Destination dialog box
Simply click the check box beside the destination name to toggle it on
or off. An indicator will mark the square when it has been selected. You
are able to specify one or all of the following destinations: File;
Keyboard Application; Spreadsheet; or Monitor.
16
For now, specify the monitor destination by clicking the check box
beside the word Monitor. An indicator will mark the small square
when it has been selected.
Click on the OK button to open the instrument. A window will open
with that instruments name appearing at the top, similar to the example
shown in Figure 2.7 (see Page 17).
Page 25
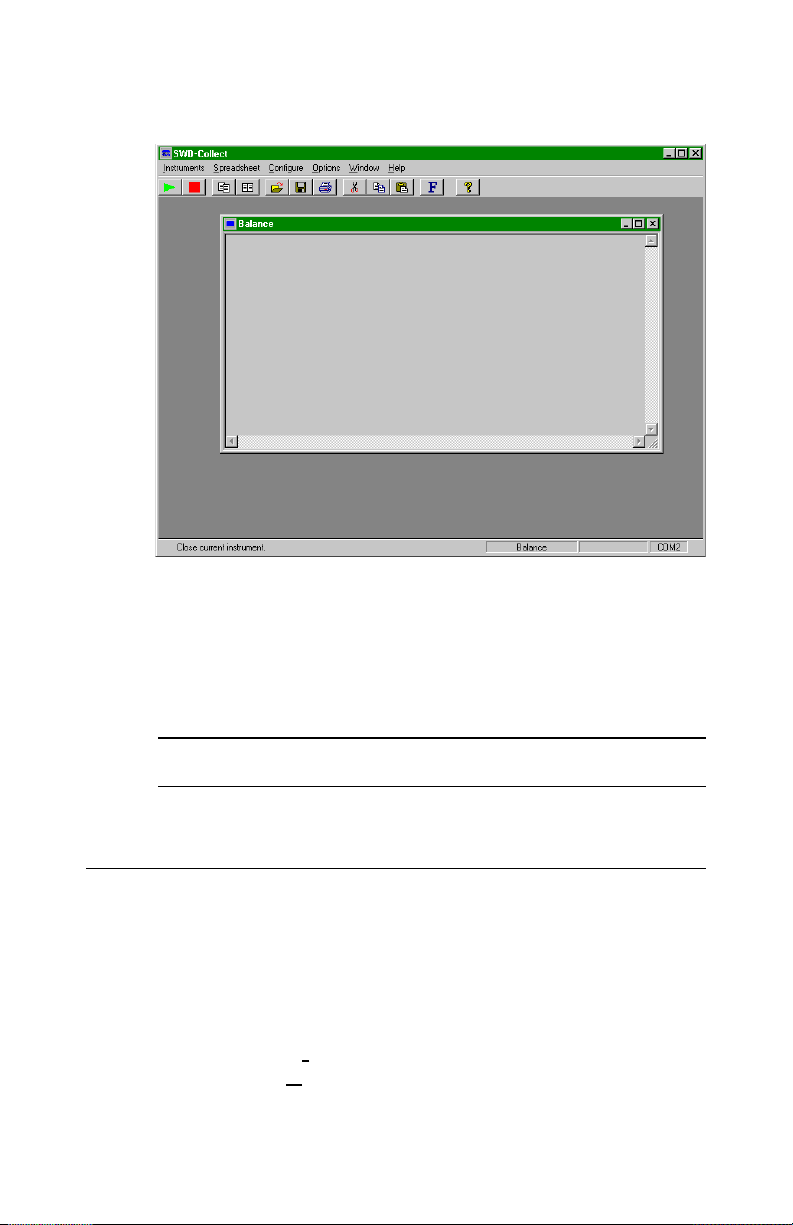
Figure 2.7: An open instrument
CHAPTER 2 Quick Start - Just the Basics
You may already see data being displayed on the monitor, or you may
have to press the Print or Send key on your instrument to have it
start transmitting data.
Please refer to Chapter 4, Pages 31 to 35 for additional information
on Instrument Data Destination.
Sending Commands
If you do not see data immediately, you may need to prompt your
instrument to transmit the data to the PC with one of the commands
you entered during the setup. (Note: if your instrument does not require
commands, ensure you have correctly entered the instrument
configuration.)
1. Pull down the Instruments menu from the top of the screen, and
select the Command option.
17
Page 26

CHAPTER 2 Quick Start - Just the Basics
2. The commands that you entered for this instrument will appear in
the [Commands] dialog box.
3. Click on the command that will prompt the instrument to transmit
data, then click on the Send button.
Follow these steps for all other commands to your instrument.
Closing the Instrument
Data will be received and collected until you close the instrument.
1. Click on the window associated with the instrument.
2. If applicable, follow the Sending Commands procedure to prompt
the instrument to stop transmitting data.
3. Click on the Close button on the toolbar, shown here in the margin.
You will be prompted to confirm that you are closing the instrument.
18
4. Click the OK button to close the instrument.
Page 27
CHAPTER 3 Configuring Instruments
Chapter
If you have not yet installed SWD-Collect onto your computer, go
back to the Installation section now (Page 6 to Page 8) and follow the
required steps. Once you have installed SWD-Collect onto your
computer, you are ready to start the program.
Start SWD-Collect from Windows® by selecting the program icon from
Start½Programs½SWD-Collect V4.0.
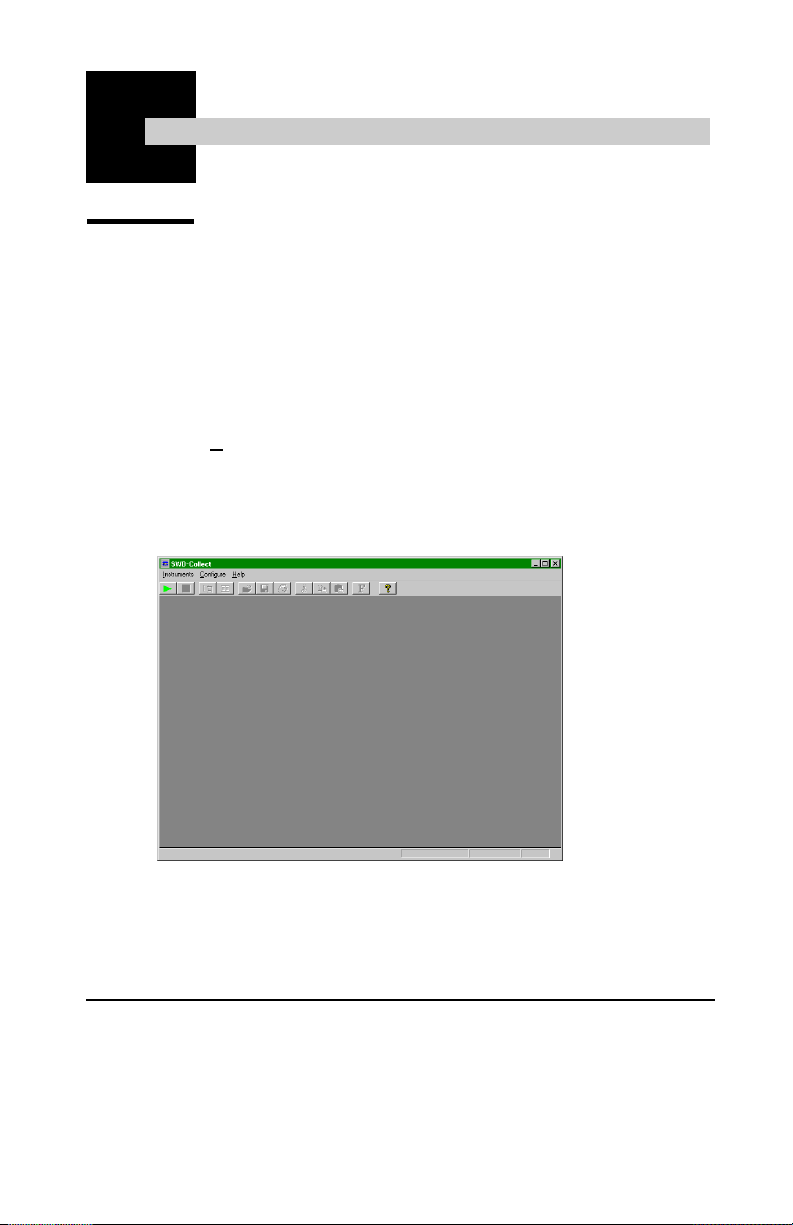
Upon entering the program you will see the main SWD-Collect screen,
shown in Figure 3.1.
Configuring Instruments
3
Figure 3.1: SWD-Collect main screen - Access to the programs
features
Setting up a New Instrument
Your first task is to configure your instruments to work with SWDCollect.
19
Page 28
CHAPTER 3 Configuring Instruments
1. From the main screen, pull down the Configure menu.
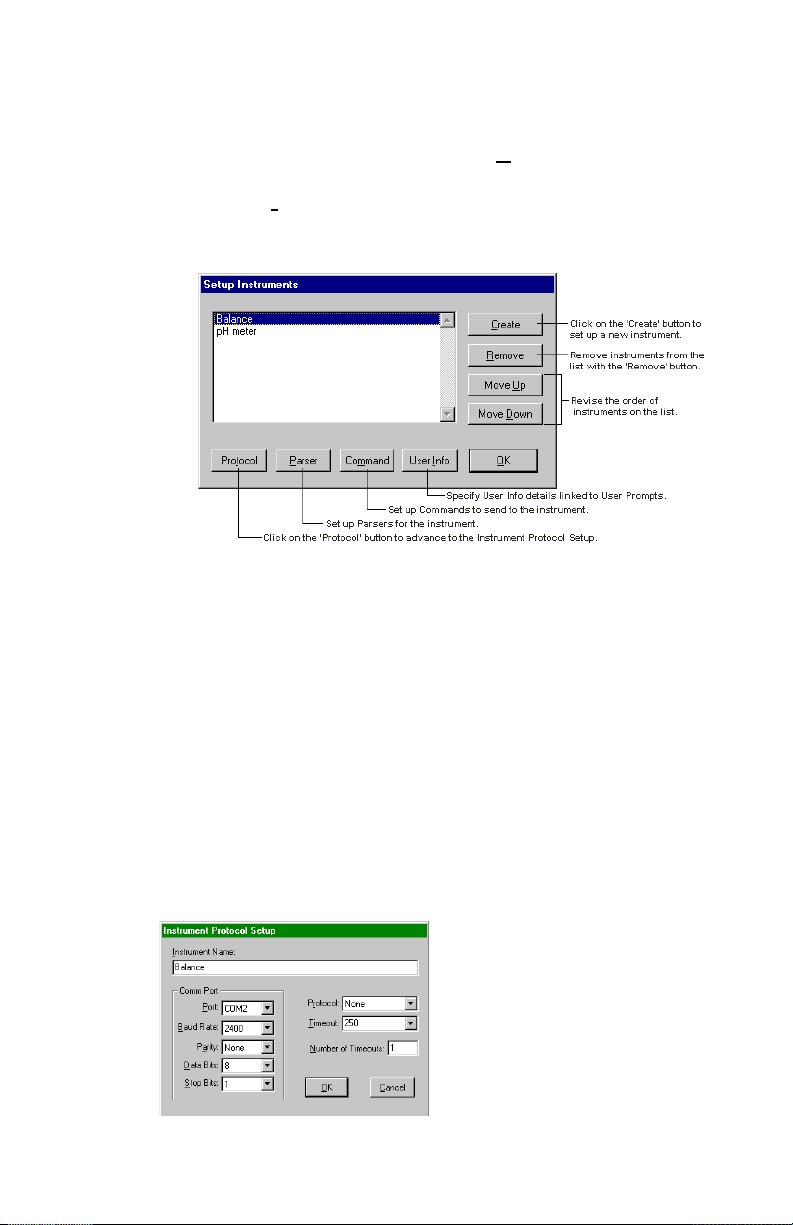
2. Select the Instrument sub-menu item. The [Setup Instruments] dialog
box will appear, similar to the sample shown in Figure 3.2.
Figure 3.2: Setup Instruments dialog box
Here you are able to create and update the configuration for each
instrument connected to SWD-Collect. If you have already
opened an instrument, you must first close it before reconfiguring.
Then you can re-open it to see the new configuration in effect.
20
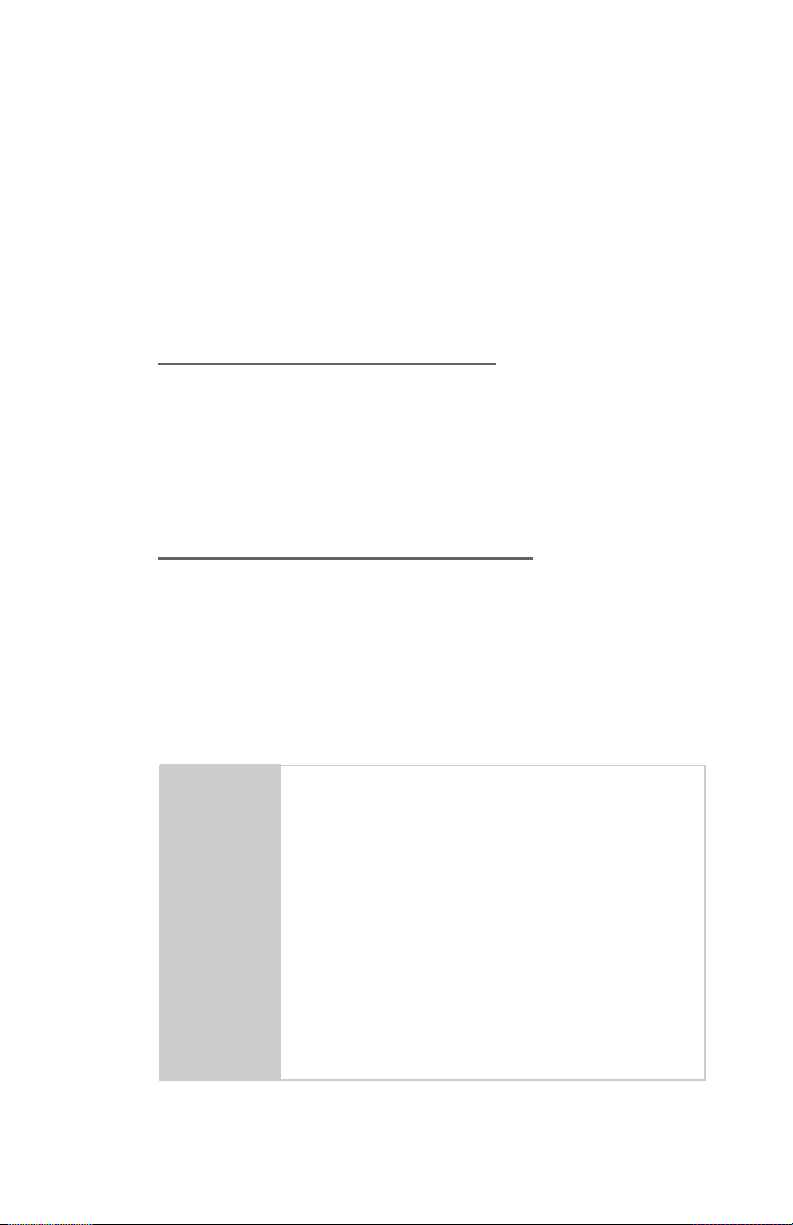
3. Click on the Create button to set up a new instrument. You will
advance to the [Instrument Protocol Setup] dialog box, as seen in
Figure 3.3.
Defining your Instrument Protocol
Figure 3.3: Instrument Protocol Setup dialog box
Page 29
CHAPTER 3 Configuring Instruments
There are some key communication parameters associated with serial
(RS232) communication that must be matched exactly between your
instrument and the configuration in SWD-Collect. In particular, if the
Baud Rate, Data Bits, Stop Bits, and Parity are not matched exactly
between the instrument and SWD-Collect, serial data transfer will
not work. The computer does not automatically determine what these
parameters are for your instrument - YOU MUST ENTER THEM HERE.
Specifying the Instrument Name
The cursor will be flashing in the Instrument Name box. Type in the
name of the instrument so that you will be able to identify the instrument
you are using throughout the SWD-Collect program. Do not press
<Enter> after typing in the name, as this will cause you to close the
dialog box.
Specifying the Comport Information
Enter the correct Comport information based on the details supplied in
the user manual for your instrument. It is important that these details
match exactly those of your instrument. Note that by clicking on the
arrow to the right of each box, you can see a list of items from which
you can make your selections. Simply click on the up and down arrows
to scroll through the list, and click on the desired entry.
Port Select the port that is connected to your instrument. COM2
Baud Rate Select the Baud Rate that corresponds to the data
Parity Indicate what parity bit should be added to your data for
Data Bits
(Word Length)
Stop Bits Indicate how many stop bits are added to the data unit. The
is the default selection.
transmission speed of your instrument. 2400 is the default
Baud Rate selection.
successful communication. None is the default value and
this is often selected.
Eight (8) appears as the default value. This indicates how
many bits of data are in a data unit for communication
purposes.
default selection is 1.
21
Page 30

CHAPTER 3 Configuring Instruments
Defining a Protocol for Data Transmission
The Protocol is also known as handshaking, which establishes the
method for controlling the flow of data between devices so that one
device transmits only when the other device is ready. SWD-Collect is
designed to be ready for your devices transmission at all times, so
you need only select the default protocol, NONE. Any additional
protocols that may be listed are custom-designed methods reserved
for highly specialized applications.
Specifying a Timeout for Data SWD-Collection
When the program detects data arriving at the comport, it starts an
internal clock and will collect data until an interval of time occurs when
no more data is received. This time interval is known as the Timeout.
After the Timeout occurs, the program will organize (parse) the data
and send it where you specify: the keyboard, a spreadsheet, the monitor
or to a specified file. SWD-Collect then gets ready to receive the next
segment of data.
A Timeout that is too short will result in data being chopped up into
small segments. A Timeout that is too large will result in long delays
between receiving the data and seeing the data at the specified
destination. An overly large Timeout also can result in missing data.
22
Click on the arrow to the right of the Timeout box. The Timeout (in
milliseconds) can be specified by scrolling through the list of available
times and selecting one, or you may specify a timeout value that is not
listed, by clicking in the text box and typing in the desired time in
milliseconds. The default Timeout value of 250 milliseconds will work
for most data collection. Leave this default setting unless you are
certain that your instruments timing will require a different value.
Defining the Number of Timeouts for Data SWDCollection
Here you may specify the number of Timeouts the program is to detect
before parsing begins. The default for this option is 1 (one), which
will be the most common entry. This means that after every Timeout
the program will parse the data and send it to the specified destination.
Page 31
CHAPTER 3 Configuring Instruments
If your instrument transmits data over more than one stage, you may
want to delay Parsing until all the data is received. For example, if you
know that your instrument describes a sample in 3 stages, then you
can set the Number of Timeouts to 3. In this case the program will keep
the incoming data in memory until it counts 3 Timeouts, then it will
begin parsing all the data.
Saving the Instrument Protocol Setup
Once the [Instrument Protocol Setup] dialog box has been completed,
click on the OK button to save the configuration, or click on Cancel
to proceed without saving the setup. Selecting OK will return the
[Setup Instruments] dialog box (see Figure 3.2, Page 20), with the name
of the created instrument listed and highlighted.
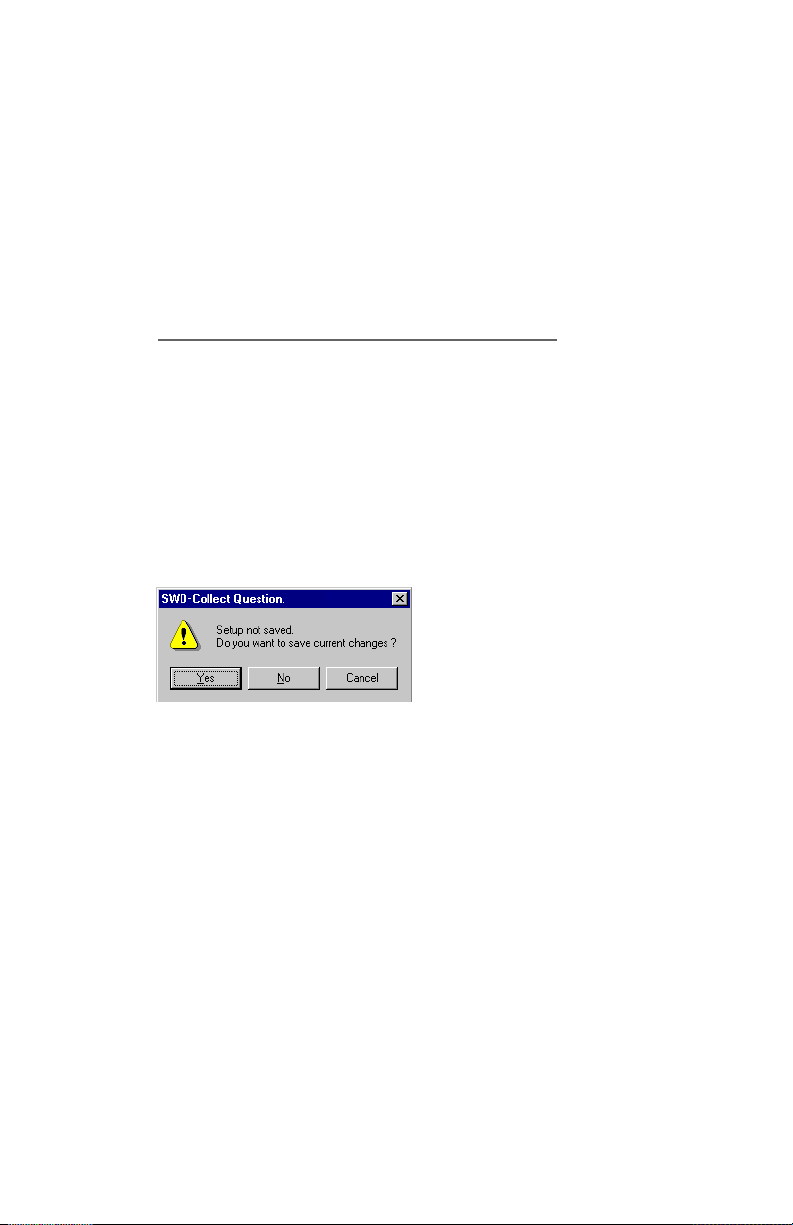
If you clicked on Cancel, a Caution message will appear (see Figure
3.4).
Figure 3.4: Do you want to save current changes?
Click on the Ye s button if you wish to save the changes, the No
button to proceed without saving the configuration, or the Cancel
button to return to the [Instrument Protocol Setup] dialog box (see
Figure 3.3, Page 20).
23
Page 32
CHAPTER 3 Configuring Instruments
Defining Instrument Commands
Does your instrument require a command from the computer to prompt
it to start or stop transmitting data? Check your instruments manual
for a section on External Control.
1. If your instrument does require such commands, proceed through
the following instructions.
2. If your instrument does not require a command from the computer,
skip ahead to Chapter 4 - Opening Instruments.
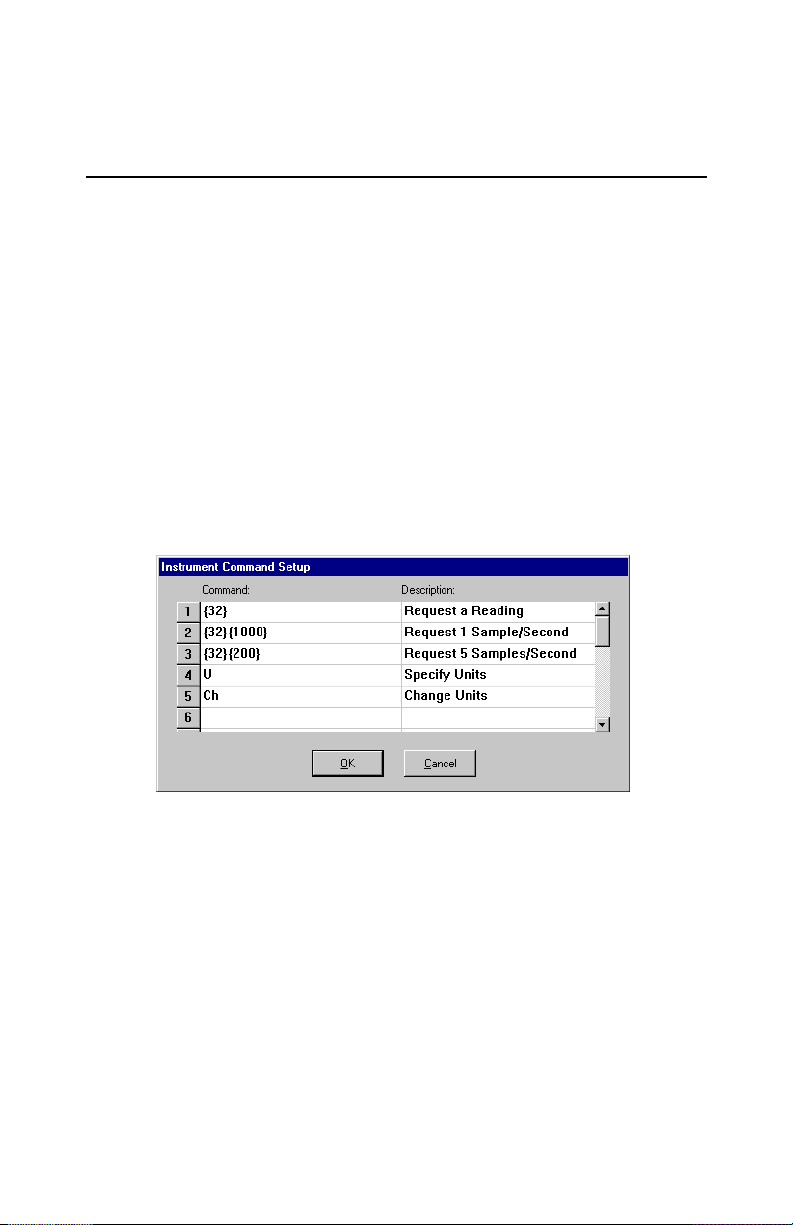
If your instrument does require one or more commands from the
computer, click on the Command button (along the bottom of the
[Setup Instruments] dialog box) to open the [Instrument Command
Setup] dialog box, as seen in Figure 3.5.
24
Figure 3.5: Instrument Command Setup dialog box
You can enter up to twenty commands here, which you then can send
to the instrument to control its operation. Please refer to section
Sending Commands in Chapter 4 (see Page 36) for more complete
details.
Page 33

CHAPTER 3 Configuring Instruments
How to Set Up Commands
1. With the mouse, move the pointer to a Command box (on the
left side) and click on it.
2. Type the required command through the keyboard. Nonprintable characters such as a carriage return should be entered
as ASCII numbers enclosed in { } brackets. (A listing of ASCII
numbers appears in Appendix A). Please see the section
Repeating, Delaying and Pacing Commands (see Page 26)
for further details on sending commands.
3. Click the pointer on the box beside it, under the heading
Description.
4. Enter a description for the command. For example, you could
enter Start sending data as the description.
Please Note: It is mandatory that you enter a description here for
each command.
5. Complete steps 1-4 for each command that is specified in your
instruments user manual.
· Double-clicking on a cell will highlight any text that is
present, or will show the text insertion bar in an empty cell.
Use the scroll bar to reveal other cells.
· When youre actually running the instrument and choose
to send commands, these commands will be listed in the
order they appear here, from top to bottom. If you would
like the commands to appear in a certain order, for ease of
selection, then ensure you enter them in order here.
6. When you have finished entering the command(s) for the
instrument, click on the OK button to save the details, or click
on Cancel to leave the dialog box without saving any changes.
You will return to the [Setup Instruments] dialog box (see Figure
3.2, Page 20).
25
Page 34

CHAPTER 3 Configuring Instruments
Repeating, Delaying and Pacing
Commands
You are able to repeat, delay, pace or send commands at variable intervals
by including specific times within the command line.
Repeating Commands
To have the command re-sent repeatedly, enter a cycle time (in milliseconds)
in square brackets [ ] at the end of the command. For example, suppose
your instrument requires a command X to transmit each data value. You
could enter a cycle time of 1000 milliseconds beside the command like
this: X[1000]. Sending this command means that SWD-Collect will
prompt the instrument to send a data value every second until you interrupt
it, by clicking on the Interrupt button found on the window listing your
Commands at run time, or until you close the instrument.
Delaying Commands
A time delay can be entered between commands also using square brackets
[ ]. Suppose your instrument will transmit the units of measurement
following the command U, and then requires a command X to transmit
each data value. You could enter the command as U[1000]X, and then
SWD-Collect will insert a 1000 milliseconds delay between each command.
26
Pacing Commands
The - character can also be used to pace the command. Again, suppose
your instrument will change the units of measurement with the command
C, transmit the units of measurement following the command U, and
then requires a command X to transmit each data value. You could enter
the command as C-U-X[1000], and SWD-Collect will insert a 100
milliseconds delay between each command, and then repeat it every
second. The - character can be used cumulatively, if desired.
Sending Commands at Specified Intervals
In addition to the cycle times, you may also send a command at specified
time intervals. The time intervals are variable, based on the following
formula:
Page 35

CHAPTER 3 Configuring Instruments
TIME INTERVAL = START TIME x (MULTIPLICATION FACTOR)
n
Where:
START TIME Is the number of milliseconds past time=0sec, the
MULTIPLICATION
FACTOR Is a whole number used to multiply the START TIME,
n Is an integer number representing a total of n time
time when the command is sent.
and is raised to the power of 0,1,2,... etc., depending
on the n specified. If n=4, then this factor would be
calculated to the power of 0,1,2 and 3.
intervals to prompt the instrument for data.
Example 1:
Suppose that your instrument requires the command X to transmit
each data value, and suppose you require 50 data values from your
instrument at a fixed time interval of 10 seconds apart. You could enter
a time interval command where the START TIME is 10 seconds (10000
msec) after the command is first sent, and with a MULTIPLICATION
FACTOR of 1, to be raised to the power of n 50 times.
These components are specified in square brackets following the
command, and separated by commas. The command that you type
into the Command box would be as follows: X[10000,1,50]
SWD-Collect will then prompt the instrument n times. The program
will do this at the following time intervals past time=0sec, when the
command is first sent, and then SWD-Collect will stop.
TIME TIME PAST
n CALCULATION INTERVAL TIME=0sec
1 10000 10 sec 10 sec
2 10000 x (1) 10 sec 20 sec
3 10000 x (1x1) 10 sec 30 sec
..
50 10000 x (1x1x1) etc. 10 sec 500 sec
Please note that the n=50 means the number of time intervals and not
the value of the power integer itself.
27
Page 36

CHAPTER 3 Configuring Instruments
Example 2:
Suppose you require data from your instrument more frequently at
first, but then less often as time progresses. You could specify a time
interval command where the START TIME is 10 seconds (10000 msec)
after the command is first sent, and with a MULTIPLICATION
FACTOR of 2, to be raised to the power of n 4 times. The command
would be: X[10000,2,4]. The program will prompt the instrument 4
times, at the following time intervals past time=0sec:
n CALCULATION INTERVAL TIME=0sec
1 10000 10 sec 10 sec
2 10000 x (2) 20 sec 20 sec
3 10000 x (2x2) 40 sec 40 sec
4 10000 x (2x2x2) 80 sec 80 sec
TIME TIME PAST
Example 3:
To send the same sequence as above but in reverse order, specify the
n as -4. You may want to use this if the instruments data is required
more frequently as time goes on. The command would be: X[10000,2,4]. In this case, the program uses a slightly different calculation but
would still prompt the instrument 4 times, at the following times past
time=0sec.
n INTERVAL TIME=0sec
1 0 sec 0 sec
2 40 sec 40 sec
3 20 sec 60 sec
4 10 sec 70 sec
TIME TIME PAST
Exiting the Instrument Setup
28
At the bottom right of the [Setup Instruments] dialog box (see Figure
3.2, Page 20) , click on the OK button to return to the main SWD-
Collect window (see Figure 3.1, Page 19).
Your instruments are now configured to work with SWD-Collect.
Proceed to Chapter 4 - Opening Instruments for complete details.
Page 37
CHAPTER 4 Opening Instruments
Chapter
Before SWD-Collect can start collecting data, you must first open
the instrument.
Opening Instruments
4
Opening an Instrument
To open an instrument, do one of the following:
1. From the main screen, pull down the Instruments menu and
select Open.
2. Press <Shift><PgDn> on the keyboard.
3. Click the special Open button from the Toolbar, pictured in the
margin.
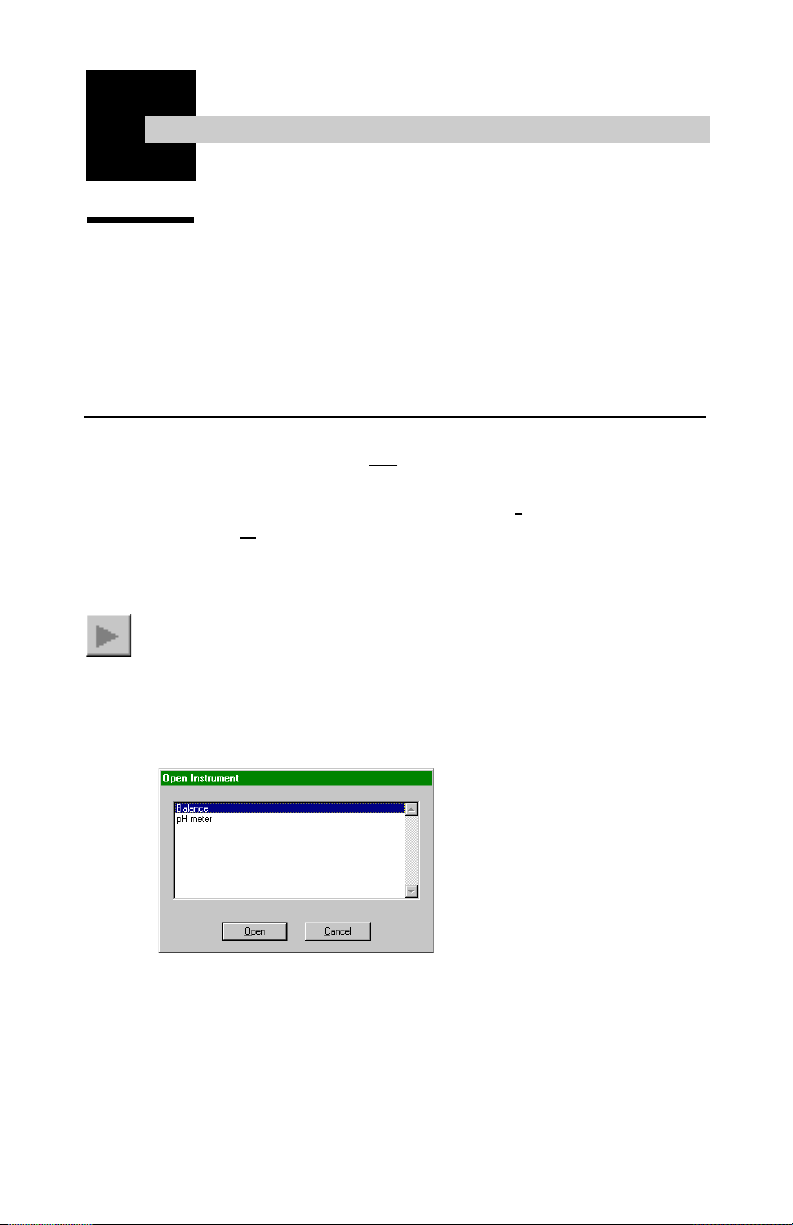
In all cases, you will advance to the [Open Instrument] dialog box, as
seen in Figure 4.1.
Figure 4.1: Open Instrument dialog box
You will see a list of the instruments that you have configured for the
SWD-Collect program.
29
Page 38
CHAPTER 4 Opening Instruments
Moving around the [Open Instrument] dialog box
1. You may scroll through the instrument names with the up and
down arrow keys, or you may click on the scroll bar.
2. If you have an extensive list of instruments, you may also type
the first letter of the instrument name to move the highlighted
line to the next listed device beginning with that letter. Upon
reaching the bottom of the list, the highlighted line returns to
the top.
3. Clicking once on an instrument name will highlight it.
4. Click on the Open button to proceed to the next dialog box, or
Cancel to return to the main SWD-Collect window.
5. Double-clicking on the instrument name will automatically select
it and open the next dialog box.
30
Specifying the User Info
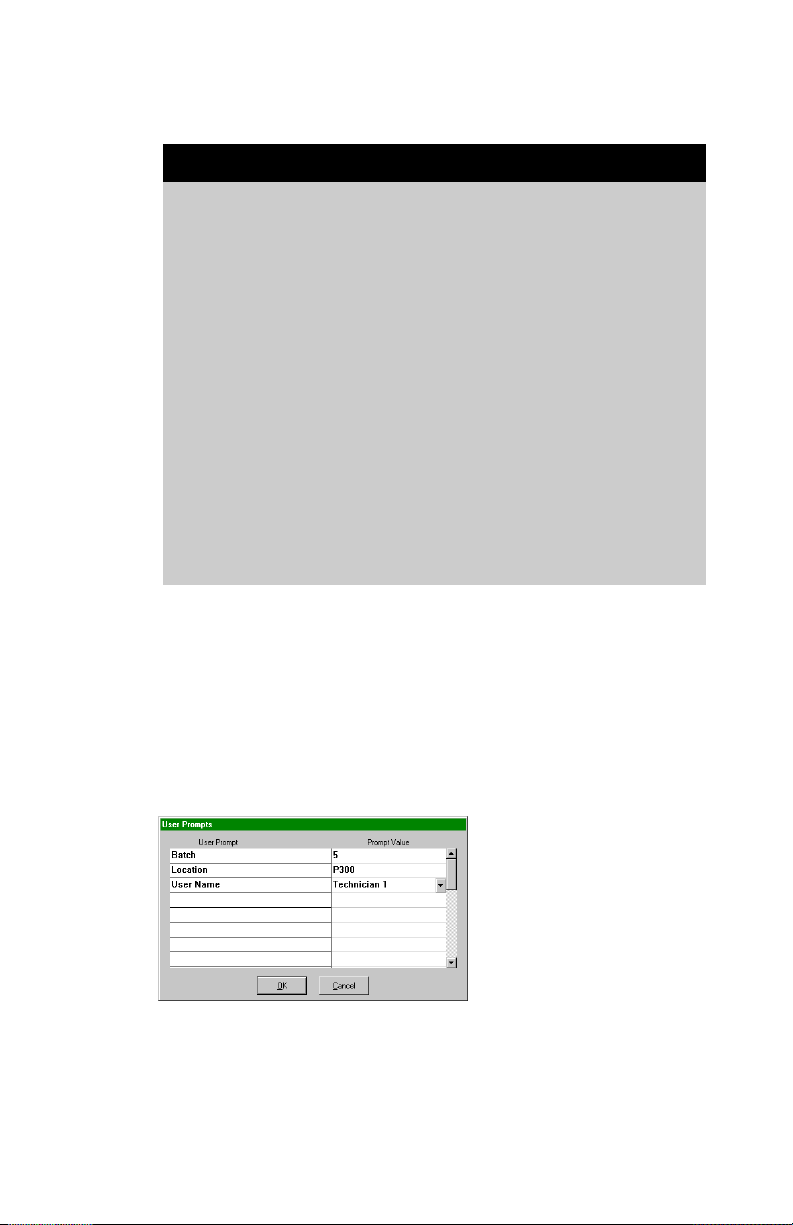
If you have specified a Macro (see Chapter 5, Page 63) that includes
User Prompts asking the operator to enter information, you will see the
[User Prompts] dialog box as shown in Figure 4.2. If not, skip ahead to
the next section Where to Send the Instrument Data (see Page 31).
Figure 4.2: Specify the prompt values
On the left side are the User Prompts defined within the Macro. You
should enter the appropriate Prompt Value on the right side of the
dialog box.
Page 39
CHAPTER 4 Opening Instruments
1. Click on the cell that is opposite to the User Prompt.
2. Click on the down arrow to reveal a list of previously entered
Prompt Values.
3. Click on the appropriate value to select it.
4. If the appropriate response is not listed, double-click on the cell
and type in your response to the prompt.
5. Click on the OK button to proceed to the [Instrument Data
Destination] dialog box (see Figure 4.3). Clicking on the Cancel
button will return you to the previous dialog box.
For further information, please refer to the section Displaying the
User Prompts in Chapter 5 (see Pages 66-67).
Where to send the Instrument Data
SWD-Collected data is parsed and then combined with Macros (see
chapter 5 - Instrument Parser Setup). Data can then be sent to a
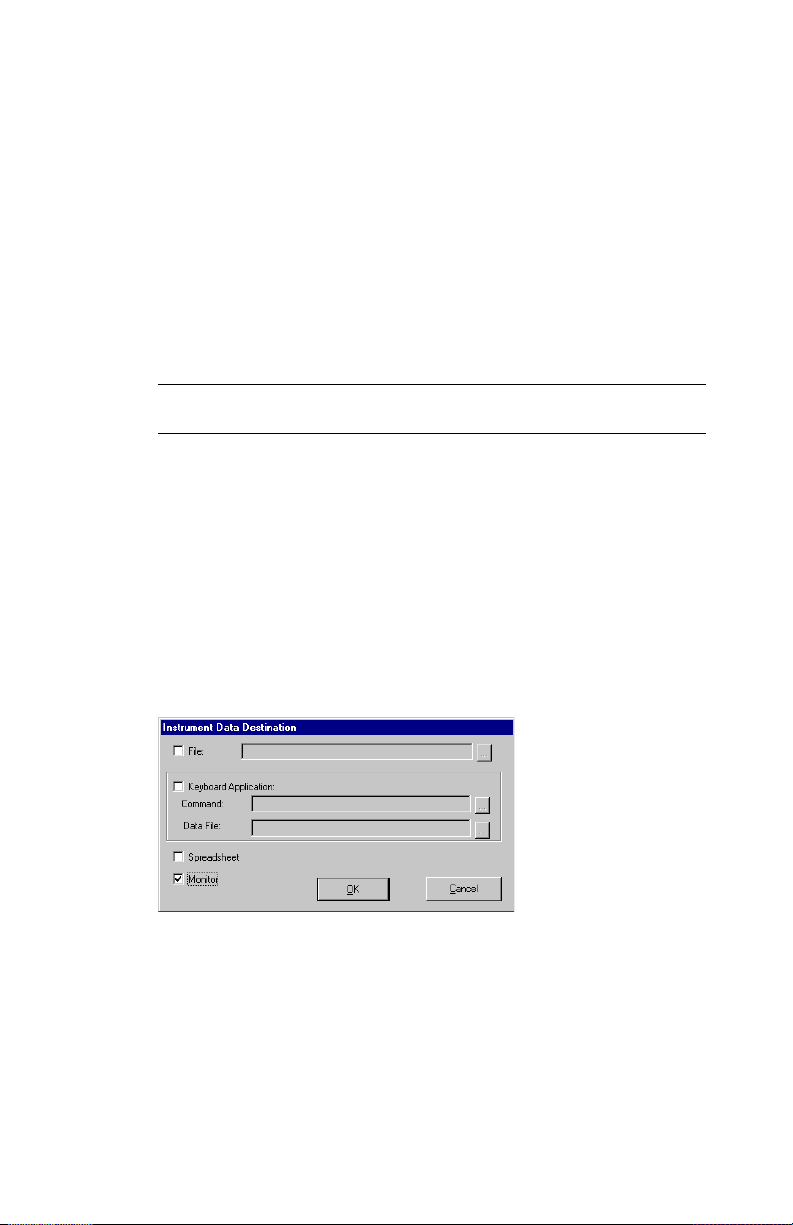
specified destination. When opening an instrument you must complete
the [Instrument Data Destination] dialog box (see Figure 4.3) and click
on the OK button. Clicking on the Cancel button will return you to
the previous dialog box.
Figure 4.3: Instrument Data Destination dialog box
Simply click the check box beside the destination name to toggle it on
or off. An indicator will mark the square when it has been selected. You
can specify one or all of the following destinations: File, Keyboard
Application, Spreadsheet or Monitor.
31
Page 40
CHAPTER 4 Opening Instruments
Sending the Data to a File
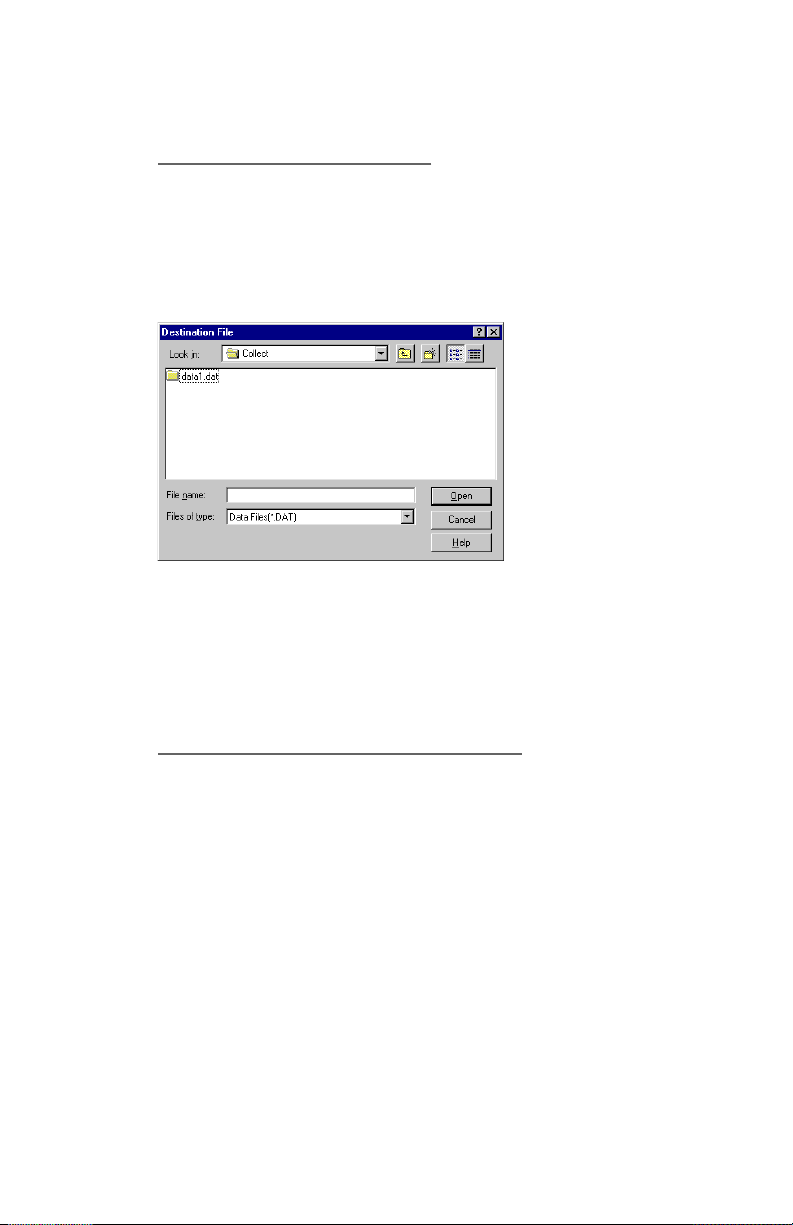
Data is sent directly to a specified disk file. When you specify the file
destination, you must enter a path to the file. Clicking on the Browse
button (pictured as an ellipsis ...) beside the File text box opens the
[Destination File] dialog box, as illustrated in Figure 4.4.
Figure 4.4: Destination File dialog box
32
Specify the required information for the file destination, then click on
the OK button. You will return to the [Instrument Data Destination]
dialog box (see Figure 4.3, Page 31).
Sending the Data to an Application
When Keyboard Application is selected, the data is entered directly
into the Windows®-based application that you specify here, such as
your own spreadsheet program. The Command Line and Data File
fields will default whatever entries were made there previously for that
instrument.
This section allows you to take advantage of the Automatic Focus
Locking feature of SWD-Collect, where the Instrument and another
application are locked together. If no entries are made for these fields,
then the program will send the instrument data through the keyboard
into whatever application that is the window of focus (identified as
the one with the highlighted title bar). This occurs with the first
measurement, after which SWD-Collect is locked to the application.
Page 41

CHAPTER 4 Opening Instruments
Specifying a Command Line to run the Destination
Application
Enter the command line to run the desired destination application. The
Instrument and the application will then be locked together, so that
data from the Instrument will always be directed to the specified
application. This field may be left blank, if desired. If no Command Line
is specified, then the Application specified in the above field will not
be started if it isnt found already running.
You may click on the Browse button (pictured as an ellipsis ...) to
see the [Destination Application] dialog box, where you may specify
the required information for the destination. Click on the OK button
in the Destination Application window to return to the [Instrument
Data Destination] dialog box (see Figure 4.3, Page 31).
Opening a Data File with the Application
You may enter the name of a specific data file to be opened by the
destination application. For example, you may have the application
open a template file for your data, which you can then later save as
another file name.
Again, you may click on the Browse button (pictured as an ellipsis
...), to advance to the [Keyboard Application Data File] dialog box.
Specify the required information.
Sending the Data to a Spreadsheet
Select this destination to have the data entered directly into the builtin spreadsheet program, known as the QuickSheet.
Sending the Data to the Monitor
When monitor is selected, the data transmitted from the instrument
will be shown directly on the monitor. Unprintable ASCII characters
are displayed within curly braces ( { } ) as their decimal equivalents.
For example, {13} would represent a carriage return.
33
Page 42
CHAPTER 4 Opening Instruments
Opening the Instrument
Once you have specified where to send the instrument data through
the [Instrument Data Destination] dialog box (see Figure 4.3, Page 31),
click on the OK button located along the bottom of the dialog box.
Doing so will confirm the Destination details and open the instrument.
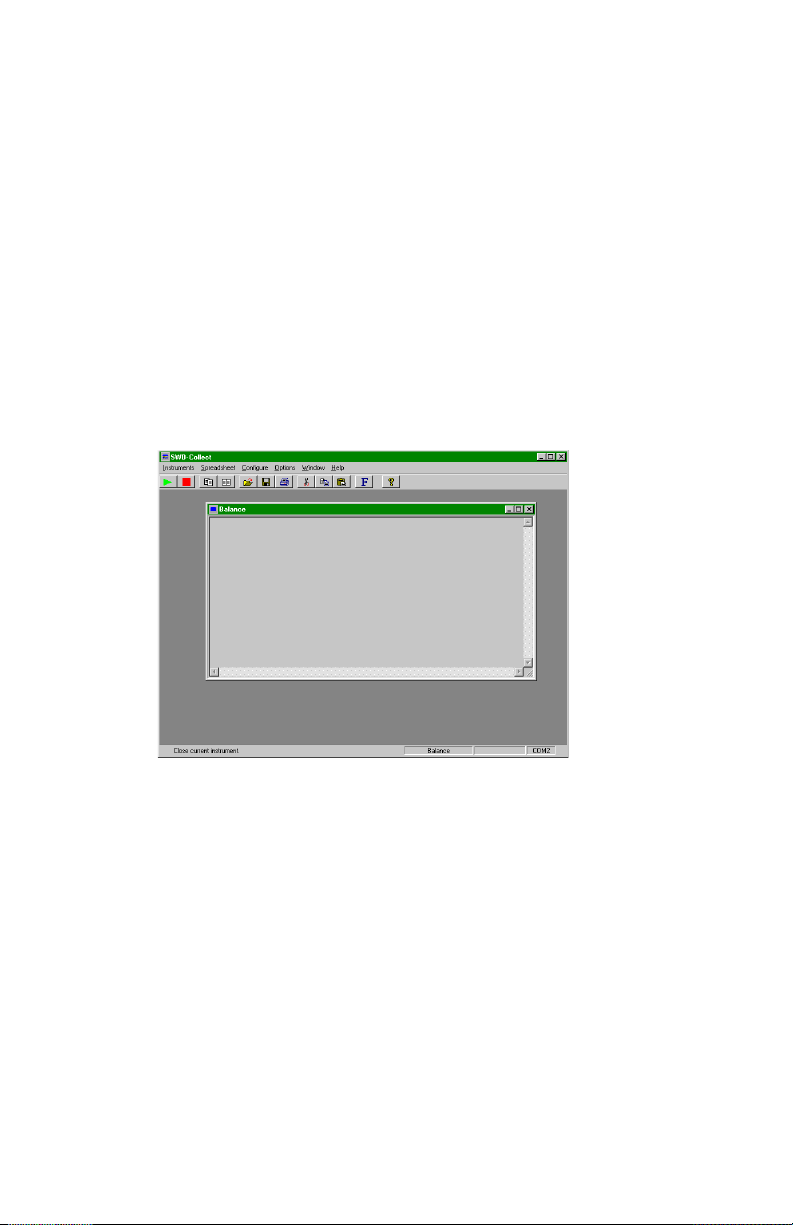
A new window will open in SWD-Collect with that instruments name
appearing at the top. Depending upon which destinations were
specified, you will see either a blank window (Monitor selected) or a
window that includes the spreadsheet (Spreadsheet selected), similar
to the example shown in Figure 4.5.
34
Figure 4.5: Spreadsheet
Note the additional menu options available across the top of the dialog
box. Please refer to the section Using the Additional Options Available
on Page 38.
If you selected the Keyboard destination, then SWD-Collect will search
your system for any running version of the specified Application, or
of the program identified through the Command Line. If the application
is already running, you will see a warning message. Clicking on the
OK button will open a new version of the application.
If there are no versions of the application running, then the Command
Line is executed and the application is run. The specified data file will
be opened automatically if one was specified.
Page 43

CHAPTER 4 Opening Instruments
In all cases you may see the data being collected immediately from the
instrument and displayed in the chosen destination(s), or you may
first have to press the Print or Send button on your instrument to
actually transmit the data.
Opening Another Instrument
If you wish to open more than one instrument, simply follow the same
procedure. Note that any devices which are already open will not
appear on the list of instruments.
While the procedure for configuring instruments can be followed for
an indefinite number of devices, SWD-Collect will permit data collection
from up to 9 instruments at one time, provided you have up to 9 serial
communications ports available. Since most computers have only 2 or
4 standard COM ports, additional ports must be added to your computer
through an add-on board. The software will work with multi-port boards
configured to work under your operating system.
SWD-Collecting to Other Applications
The procedure for opening one or more instruments is the same. The
data from each instrument can be sent to any or all of the four
destinations. One of these destinations is named Keyboard, which
allows you to have data transferred to another Windows®-based
application through the keyboard.
One Instrument to One Application
When specifying the Keyboard destination, it is necessary to follow a
certain order to ensure the data is successfully transferred to another
Windows
instrument into an application can be achieved through the following
steps:
1. In SWD-Collect, open the instrument with Keyboard as one of
®
-based application. A simple case of sending data from one
the data destinations. The specified Windows®-based application
35
Page 44

CHAPTER 4 Opening Instruments
will be located or started, according to your entries in the
[Instrument Data Destination] dialog box (see Figure 4.3, Page 31).
The SWD-Collect Instrument and the Destination Application
will be locked together.
2. In the Destination Application, position the cursor or click on the
location where the first data value is to go.
3. Start sending data into SWD-Collect. The instrument data will be
sent to the Destination Application.
Multiple Instruments to Multiple Applications
A more complicated situation may arise when you would like data from
more than one instrument to be sent to more than one application. For
example, suppose you want data from two instruments to be saved in
two separate Windows®-based spreadsheet applications. To do this,
you simply repeat the above steps for One Instrument to One
Application.
Sending Commands
If you do not see data immediately upon opening the instrument or
after transmitting the data with the instruments Print or Send button,
you may need to prompt your instrument to transmit the data to the PC
with one of the commands entered during the setup.
Please Note: If your instrument does not require commands, ensure you have correctly configured the instrument, and that you are
using a cable certified by the instrument manufacturer).
1. Pull down the Instruments menu from the top of the screen (see
Figure 4.5, Page 34), and select the Command sub-menu item.
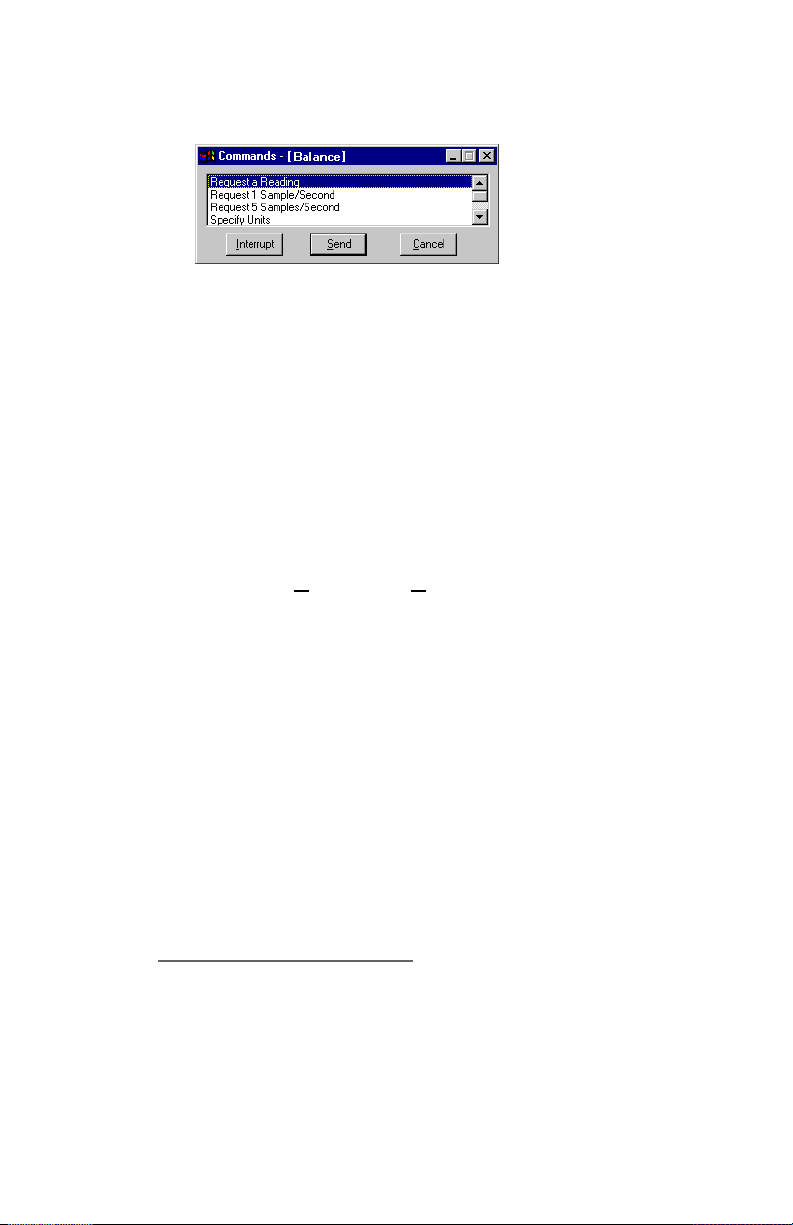
2. The commands that you entered for this instrument (see Figure
3.5, Page 24) will appear in the [Commands] dialog box, similar to
the example shown in Figure 4.6 (see Page 37).
36
Page 45
CHAPTER 4 Opening Instruments
Figure 4.6: Commands dialog box
This dialog box remains open and floats on top of all applications.
You may close the [Commands] dialog box at any time by selecting
the Cancel button.
3. You may minimize the Commands dialog to a button in the
Taskbar by clicking on the button with a dash in the top right
corner of the Commands box.
4. Please note that if you wish, you may have the [Commands] dialog
box open automatically, each time you open this instrument, by
selecting the Options | AutoOpen Commands menu item.
5. If you have opened an Instrument with the Keyboard destination,
you will be able to switch to the Destination Application (using
the Windows
®
<Alt><Tab> functionality makes this easier) and
the [Commands] dialog box will float on top of that applications
screen as well.
6. Click on the command that will prompt the instrument to transmit
data, or carry out any other desired actions. If necessary, use the
scroll bar to reveal your complete list of commands.
7. Click on the Send button located along the bottom of the dialog
box.
Interrupting a Command
Note there is also an Interrupt button located along the bottom of
[Commands] dialog box (see Figure 4.6) that you can click to stop
SWD-Collect from sending commands to the instrument. For example,
if you have set up a command to prompt the instrument to send data
every 5000 milliseconds, you could use the Interrupt button to stop
this command. If data collection is occurring at a fast rate (multiple
37
Page 46

CHAPTER 4 Opening Instruments
readings per second), activating the Interrupt button may require
more than one attempt.
Please Note: If the rate of data collection is occurring at a very fast
rate, you may be unable to activate the Interrupt button. If this is the
case, quickly press on the <Pause Break> key as many times as is
necessary to terminate data collection. Use of the <Pause Break>
key to halt data collection is only applicable when Keyboard Application has been specified through the [Instrument Data Destina-
tion] dialog box (see Figure 4.3 Page 31).
Using the Additional Options Available
Once you have opened an instrument, you will notice additional menu
options across the top of the SWD-Collect window. There are
additional options under the Instruments menu, and there are three
new pull-down menus: Spreadsheet, Options, and Window. You may
use these menus and options for each open instrument. Click on the
open instrument to make it the active window, then pull down the
desired menu and select the option.
38
Viewing the User Prompts
This option is the same as clicking on the User Info button in the
[Setup Instruments] dialog box (see Figure 3.2, Page 20). The User Info
option will reveal a list of User Prompts only if you have specified a
Parser that includes User Prompts asking the operator to enter
information. Prompt Values for an open instrument may be changed at
any time.
Please refer to the section Displaying the User Prompts in Chapter
5 (see Pages 66-67).
Importing a File
This feature allows you to import an ASCII data file for SWD-Collect
(Binary files cant be imported with this program).
Page 47
CHAPTER 4 Opening Instruments
1. Click on the open instrument to make it the active window
2. Pull down the Instruments menu.
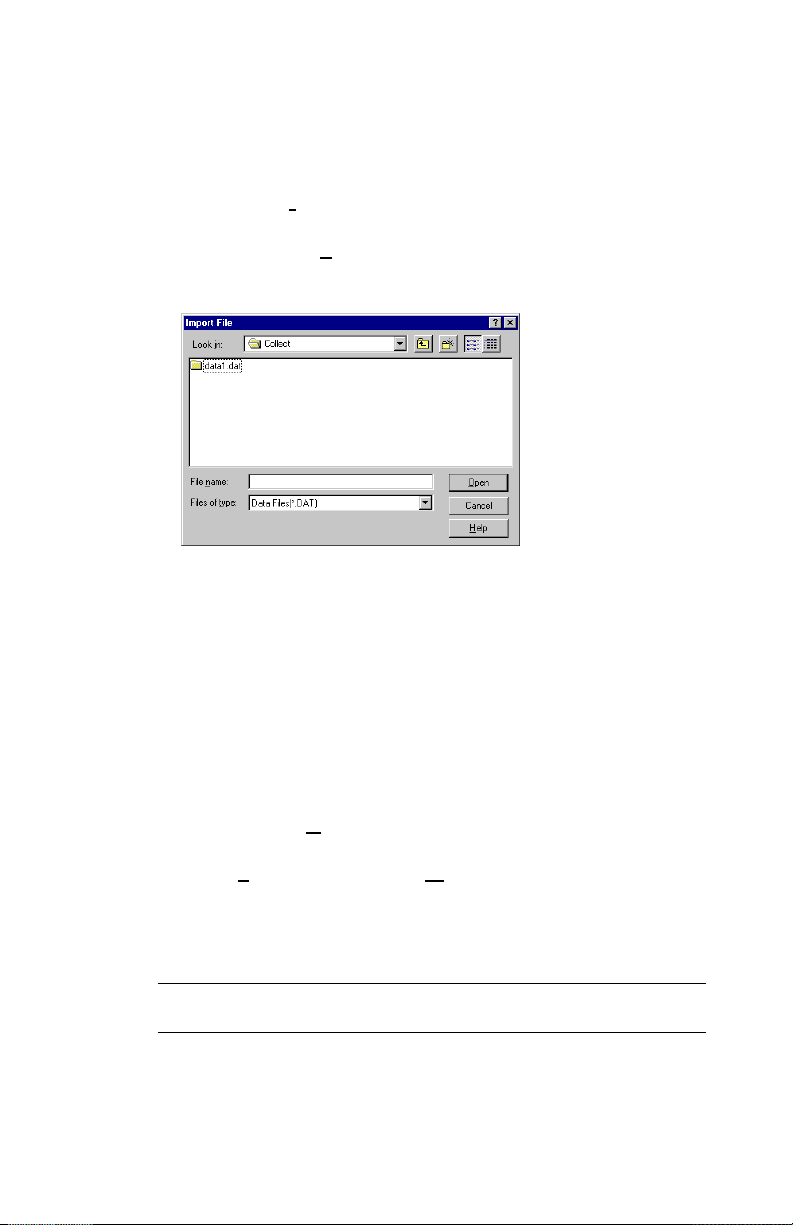
3. Select the Import File sub-menu item. You will advance to the [Import
File] dialog box, similar to the example shown in Figure 4.7.
Figure 4.7: Importing a File
4. Specify the required information of the file to be imported.
5. Click on the OK button.
Viewing the Data Destination
1. Click on the open instrument to make it the active window
2. Pull down the Options menu.
3. Depending upon your selections for the Data Destination, the
ViewSpreadsheet and ViewMonitor options will have a check
mark beside them if they were specified. Clicking on these options
toggles the destination on or off. If you disable the destination,
data will not be collected there.
If you turn off both of these destinations, the open instrument will
be minimized to an icon in the SWD-Collect window.
You must double-click on the icon to maximize it. Remember, however,
that the destinations were turned off and data was not collected in
them. If you wish to minimize an open instrument but continue to
39
Page 48

CHAPTER 4 Opening Instruments
collect data in the monitor and/or spreadsheet destinations, click on
the button in the top left corner of the instrument window and select
minimize from the sub-menu. This is a standard Windows
AutoScrolling the Spreadsheet
This feature is used only when the Spreadsheet is specified as a
destination.
1. Click on the open instrument to make it the active window
2. Pull down the Options menu.
3. Click on the AutoScroll sub-menu item to have a check mark appear
beside the word AutoScroll.
This feature enables the spreadsheet to automatically scroll down as
data is transmitted into it from your instrument, so that you can observe
the entry of data. AutoScroll also causes data to be placed in the
currently selected cell, so you may direct where the data values appear.
The AutoScroll feature will be active every time this instrument is
opened with the Spreadsheet as a destination, unless you switch it off
again.
®
feature.
40
Click AutoScroll again to turn this feature off.
AutoStarting your Instrument
1. Click on the open instrument to make it the active window
2. Pull down the Options menu.
3. Click on the AutoStart sub-menu item to have a check mark appear
beside the word AutoStart.
SWD-Collect will automatically open this instrument when you restart
the program, with the current configuration and destinations. The
AutoStart must be switched on for each instrument that you want to
have opened automatically. Note that User Prompts will not be
automatically requested when an instrument is AutoStarted.
Click AutoStart again to turn this feature off.
Page 49

CHAPTER 4 Opening Instruments
AutoLoading a Spreadsheet
This feature is used only when the Spreadsheet is selected as a
destination.
1. Click on the open instrument to make it the active window.
2. Pull down the Options menu.
3. Click on the AutoLoad sub-menu item to have a check mark appear
beside the word AutoLoad.
A Set Spreadsheet for Autoload dialog box will open, asking you to
specify the drive, directory and file name for an existing spreadsheet.
SWD-Collect will automatically load this spreadsheet every time you
open the instrument. The AutoLoad must be switched on for each
instrument that you want to have opened automatically.
Autoloading only supports the loading of spreadsheets in the native
spreadsheet format (*.WSP).
When using AutoLoad, you must first click on the appropriate cell
in the spreadsheet where the new data is to be entered, before you
start data transmission from your instrument.
Click AutoLoad again to turn this feature off.
AutoOpening the Commands
1. Click on the open instrument to make it the active window
2. Pull down the Options menu.
3. Click on the AutoOpen Commands sub-menu item to have a check
mark appear beside the AutoOpen Commands item.
SWD-Collect will automatically open the [Commands] dialog box (see
Figure 4.6, Page 37) for this instrument every time you open the
instrument.
41
Page 50

CHAPTER 4 Opening Instruments
Using the Spreadsheet Menu Options
Pulling down the Spreadsheet menu provides options for use with the
built-in spreadsheet. See Chapter 6 for complete details on using the
spreadsheet.
Using Standard Windows® Options
1. Click on the open instrument to make it the active window
2. Pull down the Window menu to see the available options.
These are standard options within the Windows
Please take note of the two special toolbar buttons that produce the
same results as selecting the Cascade and Tile options.
Closing all Open Instruments
1. Click on the open instrument to make it the active window
2. Pull down the Window menu.
3. From here, select the Close All sub-menu item.
All the open instruments will be closed if you select this option. You
will see a dialog box asking you to confirm closing each instrument.
Closing the Instrument
Data will be received and collected until you close an instrument.
To do this, click on the open instrument to make it the active window,
then pull down the Instruments menu bar and select Close, or click on
the Close button from the toolbar. You may also press
<SHIFT><PgUp>. The system will open a dialog box asking you to
confirm closing the instrument.
®
operating system.
42
Click the OK button to close the instrument, or click the Cancel
button to continue collecting data with the open instrument.
Page 51

CHAPTER 5 Setting up the Instrument Parser
Chapter
In programming language the term to parse means to break up a long
string of data into individual data segments.
SWD-Collect will receive data until the specified Number of Timeouts
occur. You indicate the Timeout duration and the Number of Timeouts
in the Instrument Configuration, described in Chapter 3 (see Figure 3.3,
Page 20). At this point the program will have a block of data from the
instrument in memory. This block could be as simple as one number, or
it could be many numbers and characters spread over several lines.
Before the program can make use of this data it must break it up into
smaller usable parts. That is to say, the program must parse the data.
Through the Instrument Parser Setup you can tell the program just
how to break up the block of data into smaller parts. If no Parser is
specified, the program will not modify the data.
NOTE: You will find it much easier to create the Parser in stages,
checking your work as you progress by displaying the resulting data
to the screen. You should first be familiar with opening your instrument
and sending commands through SWD-Collect, so that you may check
the Parsers in stages.
Setting up the
5
Instrument Parser
Basic Steps to Creating a Parser
There are two aspects to setting up a Parser.
1. You must tell the program how to recognize the data.
2. You must tell the program which components of the data to save and
which components to discard.
43
Page 52
CHAPTER 5 Setting up the Instrument Parser
Once the data is parsed correctly, you can add Macros sequences
of keystrokes and characters that are entered before or after the data.
Macros are often used to add extra details to the data such as the date
and time, or to make sure the data appears in a desired format.
Accessing the Parser Setup
1. Open your instrument (see Quick Start, Page 15 or Opening
Instruments, Page 29) to see what the data that is transmitted from
the instrument looks like. Write down some of the data you see for
reference later, when you must decide what type of Parser to use.
Also, you should consult the User Manual for your instrument
to determine if the data is transmitted in a set format. Then Close
the instrument.
2. Pull down the Configure Menu and select Instrument to open
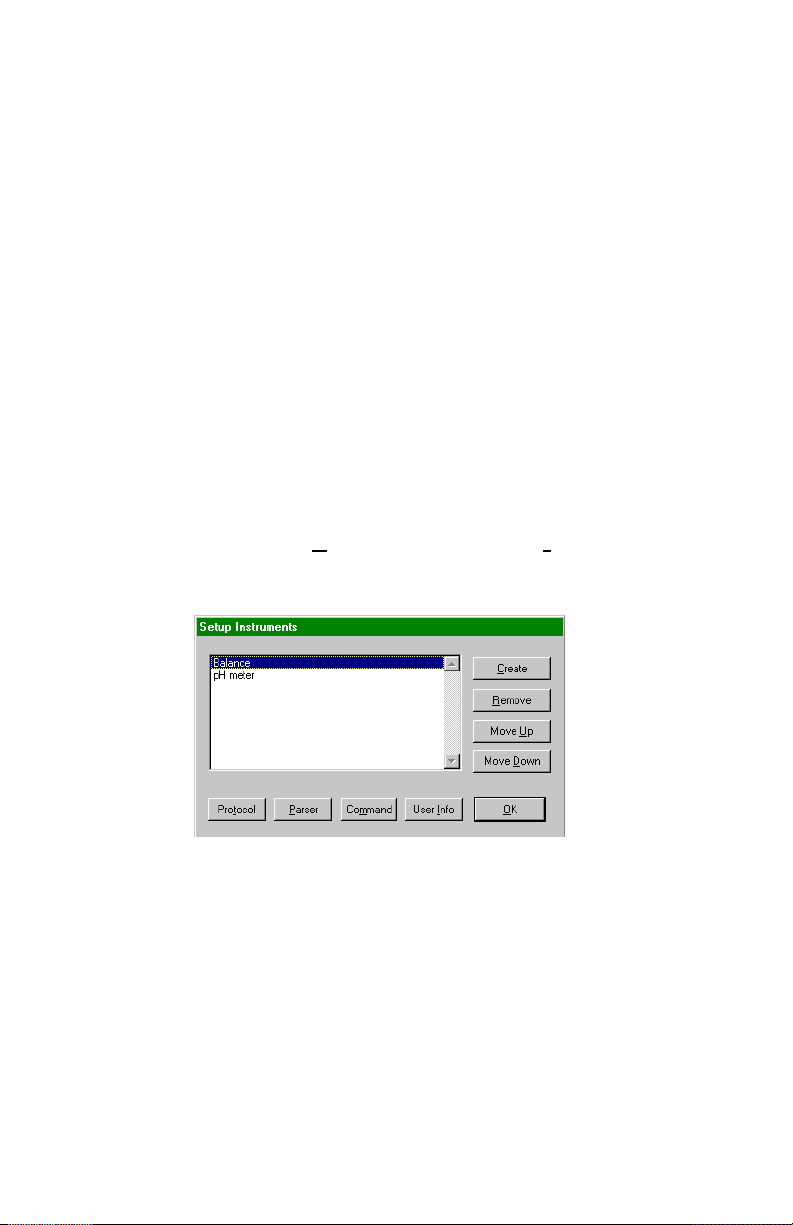
the [Setup Instruments] dialog box, as seen in Figure 5.1.
44
Figure 5.1: Setup Instruments dialog box
3. Highlight your instruments name by clicking on it.
4. Click on the Parser button to set up a parser for the selected
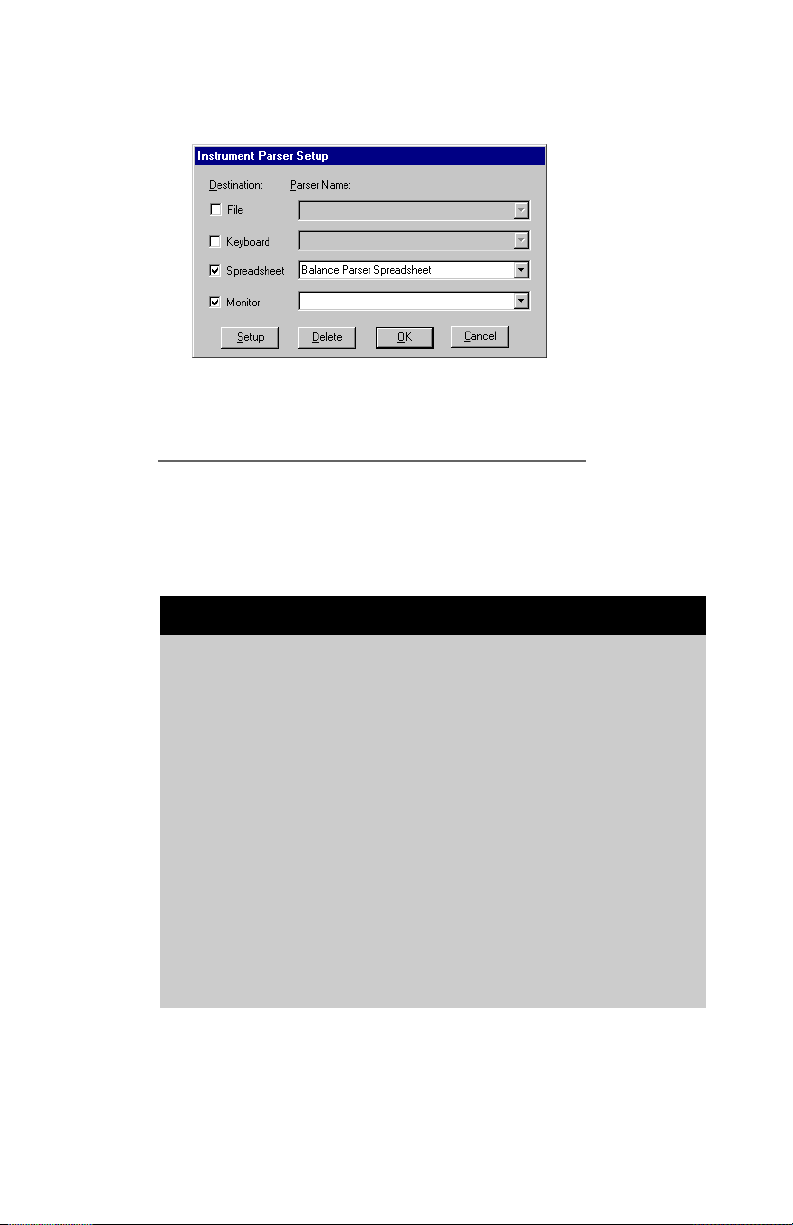
instrument. The [Instrument Parser Setup] dialog box will open,
similar to the example shown in Figure 5.2 (see Page 45).
Page 53
CHAPTER 5 Setting up the Instrument Parser
Figure 5.2: Instrument Parser Setup dialog box
Defining a Destination for Incoming Data
There are four possible destinations for incoming data; File;
Spreadsheet; Keyboard; Monitor. Each is marked along the left side of
the [Instrument Parser Setup] dialog box, seen in Figure 5.2.
Supplementary Notes on Defining a Destination
· An indicator appears in the check-box beside each destination
name when you select it.
· You can select the destination either here or in the [Instrument
Data Destination] dialog box when you actually open the
instrument (see Figure 4.3, Page 31). Simply click on the
destination name to insert or remove the indicator.
· All destinations have access to all previously defined Parsers.
· You are able to specify a different Parser for each destination, if
necessary.
· At least one destination must be selected to create or modify a
Parser.
45
Page 54
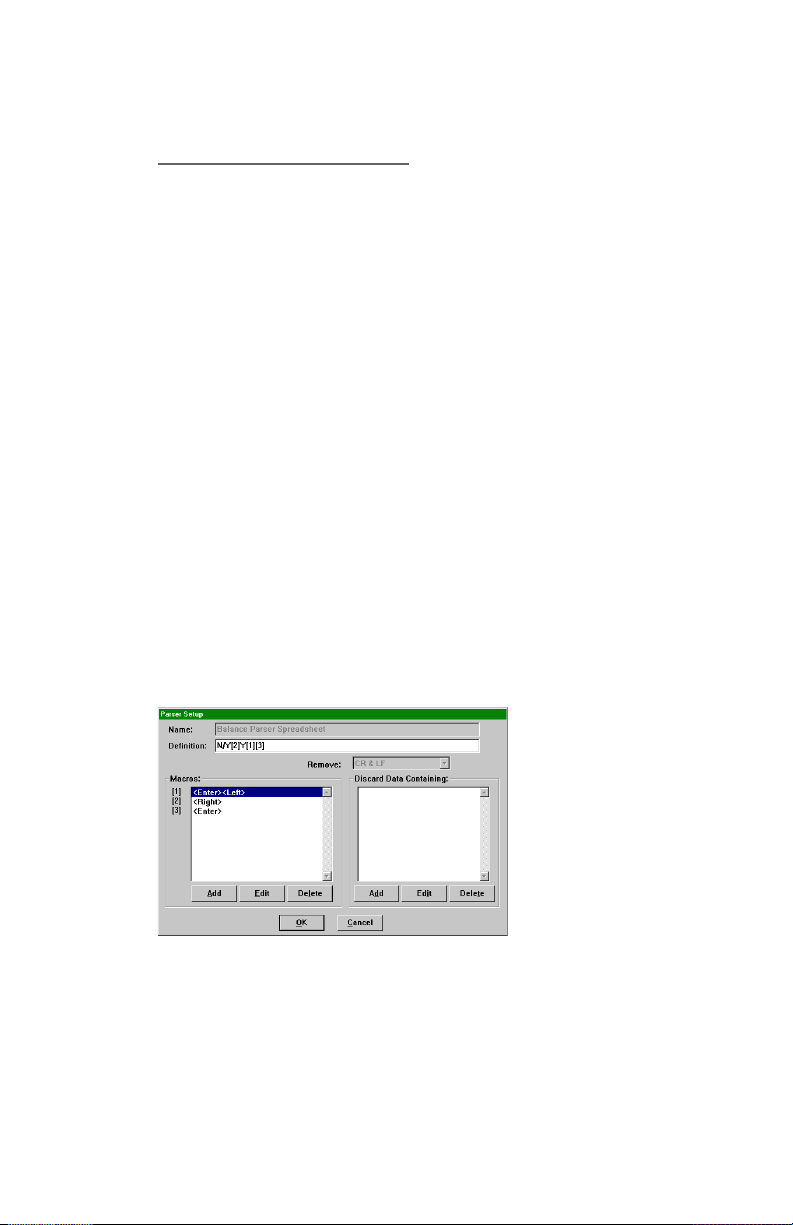
CHAPTER 5 Setting up the Instrument Parser
Defining a Parser Name
Referring back to Figure 5.2 (see Page 45), a text box is located adjacent
to each destination. Here is where the name of the Parser is entered.
1. When creating a new Parser, click in the text box to show the cursor,
and enter a name for it.
2. When editing a Parser for an instrument that is currently open,
simply click on the Parser Name to highlight it.
3. When editing an existing Parser for a closed instrument, click on
the arrow to the right of this box to reveal your list of Parsers, then
select the one to be changed.
Setting up the Parser
With a Parser Name highlighted in the [Instrument Parser Setup] dialog
box (see Figure 5.2, Page 45), click on the Setup button located along
the bottom of the box. You will advance to the [Parser Setup] dialog
box, similar to the example shown in Figure 5.3.
46
Figure 5.3: Parser Setup dialog box
Note the name of the Parser will appear dimmed in the top box. The
name cannot be changed on this screen. The cursor will be flashing in
the Definition text box.
Page 55

CHAPTER 5 Setting up the Instrument Parser
Specifying the Parser
The Definition line is where you enter the actual Parser itself. The
Parser always follows a particular format it always begins with the
Parser Type, then depending on the Type it includes details such as
Parser Selectors and Parser Positions. The Parser Type, Selectors
and Positions are separated by slashes /. Please refer to the section
Designing a Parser, later in this chapter (see Page 49).
You can also specify Macros on this line, which are identified within
square brackets [ ]. Please refer to the section Using Macros, later in
this chapter (see Page 58).
Removing the Carriage Return or Line Feed from
the Data
The Remove field is active only when you specify a Delimiter type (D)
parser in the Definition line. It allows you to specify whether the parser
should automatically remove the carriage return (CR) and/or line feed
(LF) characters from the data. The Remove field has a drop-down list
of four options: CR & LF; CR; LF or Nothing. When you have entered
a D in the Definition Line, you are then able to select one of these
four choices. The carriage return and/or line feed will be removed
before the parser itself is carried out.
Defining Macros
When defining a Parser, you are able to create and specify Macros. A
Macro is simply a sequence of keystrokes and characters. You can
insert a Macro before or after each segment of data. Please refer to the
section Using Macros later in this chapter (see Page 58).
It is also a good idea to complete the Parser first, and then add the
Macros one at a time.
Discarding Data using Identifiers
This feature gives the ability to ignore certain data that contain strings
sent from the instrument. For example, some instruments such as a
balance will send special characters like T or TA, along with a data
47
Page 56
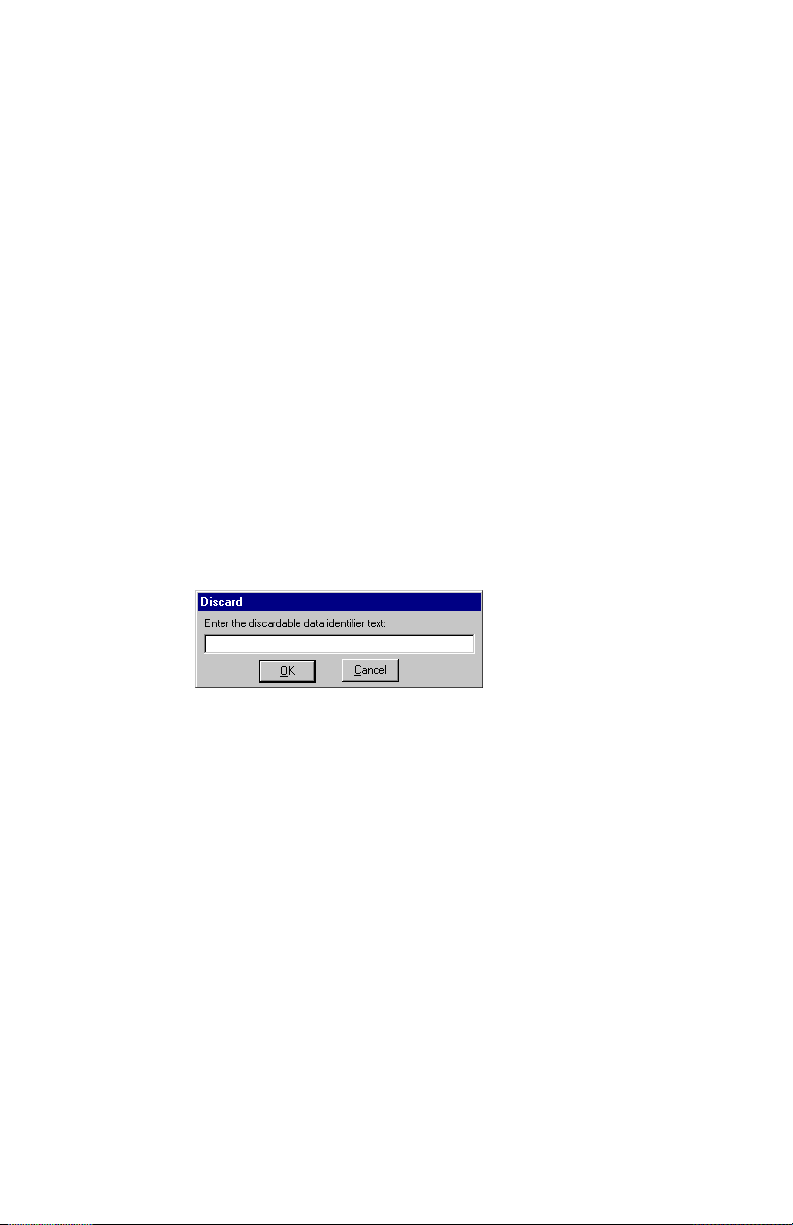
CHAPTER 5 Setting up the Instrument Parser
value, when being tarred. While a Parser Definition can be set up to
isolate only numeric values, it wont make judgments based on
accompanying characters and therefore the tare value would be treated
as any other. But by telling SWD-Collect to discard data containing
the string T or TA, the decision is made by the Parser before the
data can be isolated.
The key here is to know what strings are sent with the data from your
instrument. The Users Manual for your instrument should help you
determine these. If you know that certain strings consistently
accompany the data you dont want to keep, you can specify these as
identifiers for discarding data.
1. Click on the Add button located at the bottom of the area called
Discard Data Containing:. Youll see the [Discard] dialog box
(see Figure 5.4), prompting you to Enter the discardable data
identifier text.
48
Figure 5.4: Enter the discardable data identifier text
2. Type in the text (up to 64 characters) that accompanies the data
you want discarded. This entry is case sensitive.
3. Click on the OK button to save this string and it will be added to
the list of identifiers.
You may Add as many identifiers as necessary, but the more you add,
the slower the parser will be. Each identifier must be entered separately.
You may also Edit or Delete entries.
Page 57

CHAPTER 5 Setting up the Instrument Parser
Designing a Parser
When determining a parser solution for your data, it is best to first
collect the instruments raw data. This means collecting data without
the use of any parser, following the procedures described in chapters
2 and 3 of this manual. Once you carefully examine the data in its raw
format, a parser can easily be designed to handle the data.
Tips to follow when trying to designing a suitable Parser
1. Make your Parser in stages. After each change you make to the
Parser, save the new configuration by clicking on the OK button
in the [Instrument Parser Setup] dialog box (see Figure 5.2, Page
45).
2. Click the OK button in the [Setup Instruments] dialog box (see
Figure 5.1, Page 44) to make your open instrument the active
window again.
3. If necessary, send the appropriate command to prompt the
instrument to begin transmitting data again.
4. Carefully look at the incoming data to verify that the change was
correct.
5. Return to the [Parser Setup] dialog box (see Figure 5.3, Page 46)
to make more changes, if necessary.
6. It is also a good idea to complete the Parser first, and then add
the Macros one at a time.
Parser Types
The first step in designing a Parser is to select the Type. There are five
different types of Parsers that specify how to break up the data that is
transmitted to the computer. The types along with a description are
presented in Table 5.1.
49
Page 58

CHAPTER 5 Setting up the Instrument Parser
N Numbers Data is parsed on a numbers-only basis. All numbers
C Numbers Data is parsed similarly to the N type, except the format
P Position Data is parsed based on position. This can be used
S Scales For parsing data from scales operating in continuous
D Delimiter Data is parsed based on a leading and trailing pair of
are extracted from the data and only numbers are used.
This type should be used for decimal numbers (i.e. 35.6).
Please note a number is considered any continuous
string of numeric digits, including decimals, and negative
signs. When the program encounters any other character, the number is considered complete. (See Page 52
for examples).
of the numbers uses a comma (i.e. 35,6), which is a
common format in Europe. This type cannot be used for
comma delimited data. Please note a number in this
case is considered any continuous string of numeric
characters, including commas, and negative signs. (See
Page 52 for examples).
where the data is always in the same position. (See
Page 53 for examples).
send mode. The Scales Parser Type is specific to a
particular Balance brand and model number. (See Pages
54-56 for examples).
delimiters. The delimiter may be a comma, a space (ASCII
32), or any other literal character or group of characters. (See Pages 56-57 for examples)
Table 5.1: Parser Types
50
Each Parser can have only one type selected. Therefore, the first
character in a Parser must be a N, C, P, S, or a D, followed by a slash /
. Most balances and similar instruments can use a simple Numbers
parser and should be fairly straightforward to work with.
Each Parse Type along with relevant examples is described in a
corresponding section within this chapter.
Parser Syntax
Each type of parser also has its own syntax, as shown in the following:
· N/SELECTOR/COMMENT
· C/SELECTOR/COMMENT
· P/POSITIONS/COMMENT
· S/DATA FORMAT/MACRO/TOLERANCE/COMMENT
· D/DELIMITER/SELECTOR/COMMENT
Page 59

CHAPTER 5 Setting up the Instrument Parser
The COMMENT is the only part of the Parser Syntax that is optional.
All other components must be specified. The Parser Definition can
hold up to 200 characters representing up to 500 Parser components,
including Y or N values and macros.
Parser Selector
The Numbers and Delimiter types of Parsers are not very selective in
defining what data is to be kept. The Delimiter type defines all of the
data, while the Numbers types will extract all the numbers. Please recall
that a number is considered any continuous string of numeric
characters, including the decimal (N Type) or comma (C Type). The
Selector in the Parser allows you to specify the data that is saved.
The Selector is a list of Ys and Ns, such as /YYNNY. A Y(es) instructs
the program to keep the data, and an N(o) means do NOT keep the
data. In this example, the first, second and fifth data values will be
saved. The third and fourth will be ignored.
Several short forms can be used for repeating sequences in the Selector.
Examples:
N/NNNYYYYYYYNN can be written as:
N/3N7Y2N
D/{32}/YYYYNYNYNY can be written as:
D/{32}/4Y3(NY)
N/Y[1]Y[1]Y[1]Y[1]Y[2] can be written as:
N/4(Y[1])Y[2]
Parser Comment
The Parser Comment can be a brief statement describing what the Parser
does. The length allowed for the comment will depend on the amount of
space available on the Parser Definition line after the other Parser
components have been specified. The Parser Comment can consist of
any alphanumeric characters except the forward slash (i.e., /).
51
Page 60

CHAPTER 5 Setting up the Instrument Parser
Choosing a Suitable Parser Type
Using the Numbers Parser Type
Select the N or C types if only numbers are required from the data. This
is the easiest Type to use, and the following is the syntax for such a
parser setup:
N/SELECTOR/COMMENT
C/SELECTOR/COMMENT
The Parser will be an N or C followed by a slash /. This is followed
by a series of Ys and Ns to indicate which numbers are to be saved.
Again, please recall that a number is considered any continuous
string of numeric characters, including the decimal (N Type) or comma
(C Type). So a number can be a single digit or several numeric characters.
Example 1: N/Y/keep weight
As a simple example, suppose that you collect the following data from
your balance:
52
193.67 mg
The Numbers Parser N/Y/keep weight will parse the data so that the
number is saved (23.5) and the units (mg) are ignored.
Example 2: N/YNYY/no units
C/YNYY/comment (The C Type is for num-
bers in comma format,
common in Europe, such
as 35,6.)
As a more complicated example, suppose that your instrument transmits
a line with the following 4 data values:
23.5 units,0.7 units,27.6 units,25.6 units
The Numbers Parser N/YNYY/no units would parse the data so that
Page 61

CHAPTER 5 Setting up the Instrument Parser
the first number is saved (23.5), the second is ignored (0.7), and then the
third (27.6) and fourth (25.6) are kept. The units appearing after each
number are always ignored.
Later in this chapter, you will see how to use Macros to organize the data in
the specified destination (see Page 58). For example, between each selector
in the above Numbers Parser you might place a Macro to press the <Enter>
key so that each number appears on a new line.
Using the Position Parser Type
Many instruments generate data that is always in the same position. For
example, a balance may always have the weight in positions 1 to 7 and the
unit always in positions 9-10.
If the data is always in the same position, a Parser Type of Position (P) can
be used. The following is the syntax for such a parser setup:
P/POSITIONS/COMMENT
This Parser consists of a P followed by a /. This is followed by the
positions that are to be saved. The Position is a sequence of number ranges
separated by commas.
Example 1: P/1-7/comment
Suppose that you collect the following data from your balance:
0193.67 mg
The example Parser P/1-7/comment will extract data in positions 1 to 7.
Example 2: P/12-15,6-6,5-9/Comment
Now suppose that you collect the following data from your instrument:
READ4T-mg//23.5
The positions indicated in the above Parser are 12 to 15, 6 to 6, and 5 to 9.
The numbers here represent the positions in the data string that contain
53
Page 62

CHAPTER 5 Setting up the Instrument Parser
the required values. Each sequence must state a start and end position.
In the example, the first data value consists of characters in positions
12 to 15 inclusive (23.5). The second data value consists of one character
in position 6 (T). And the third consists of characters in position 5,6,7,8
and 9 (4T-mg).
You can arrange the position numbers in any order (see how the 6-6 is
listed after the 12-15 in the example). As the data is transferred it will be
processed in the order listed.
If necessary, you can use a position more than once. The above example
uses position 6 in both ranges 6-6 and 5-9. Only list those positions
which contain data that is to be saved. In the above example data in
positions 1-4 and 10-11 are not required and therefore are not listed.
Using the Scales Parser Type
If your instrument is a scale that transmits data in continuous send
mode, the Scales Type (S) Parser can be used. Please note this type is
rarely used, as it is specifically tailored to one brand of balances. The
following is the syntax for such a parser setup:
54
S/DATA FORMAT/MACRO/TOLERANCE/COMMENT
Example: S/1/[1][2]/0.35
A scale that transmits data in continuous send mode will generate
continuous data values that will arrive at SWD-Collect as one long
string. The program needs some way to determine which data values
are to be kept. Scales follow certain standard formats when transmitting
the data, and you can specify a Scales type parser to match the data
format from your scale. Currently, three formats are handled by SWD-
Collect:
S/1: HH,dataUUU<CR><LF>
S/2: HH,U,data<CR><LF>
S/3: HH_data_U...U<CR><LF>
where HH is the header sent by the instrument (e.g. ST, WT, QT, S_)
when it has a stable value;
Page 63

CHAPTER 5 Setting up the Instrument Parser
UUU, U, or U...U is the units of measurement (e.g. g, lb.);
and data- is the weight reading.
The S/1, S/2 or S/3 appear as the first two components in a Scales
Parser (S/DATA FORMAT). The data sent from your scale must match
one of these formats. If your scale is capable of sending additional
information such as an ID number, turn these features off, if you can,
when using SWD-Collect.
SWD-Collect follows three steps when parsing the data with a Scales
Parser:
1. First, SWD-Collect looks for the header (HH) to determine if the
reading is stable.
2. Second, the program compares the stable reading with the
tolerance level that you specify. You probably dont want SWD-
Collect to keep every stable value that is transmitted from the
scale, so you need to tell the program what the tolerance level is.
The tolerance level is the minimum value that you expect for a
stable reading. SWD-Collect will ignore all the transmitted data
values between 0 and this number (positive and negative), and
save the first stable value outside this range. The tolerance level
is specified at the end of the Parser.
For example, if you set the tolerance level at (+/-) 0.35, SWD-
Collect will not keep the stable zero reading that is continuously
sent from the scale when nothing is being weighed. When you do
put something on the scale, SWD-Collect will wait for the first
stable reading above 0.35, and then keep it.
3. Thirdly, SWD-Collect looks for the next stable value within the
range set by the tolerance level that you specify. While it wont
keep this value, the program will recognize that the scale has
returned to zero and will begin again at step 1. So if you set the
tolerance level at (+/-) 0.35, the next stable value within the range
-0.35 to +0.35 will be recognized but not kept.
The following is an example of a Scales Parser setup:
55
Page 64

CHAPTER 5 Setting up the Instrument Parser
Example: S/1/[1][2]/0.35
Macro [1] <Header><Right><Data><Right><Units>
[2] <Enter>
Please note the tolerance level of 0.35 as the last component of the
Parser.
You will also notice that the Macros [1] and [2] are included in the
Parser. Please refer to the section on Using Macros for further details
on creating Macros and adding them to a Parser. The <Header>, <Data>
and <Units> components of Macro [1] are selected from the list of
Special Functions (at the bottom) in the [Define Macro] dialog box.
These will extract the header (HH), weight reading (data), and
units (UUU) respectively. Once SWD-Collect has determined a stable
value is to be kept, this Macro will extract the necessary details from
the data string.
You must at least include one Macro that includes the <Data> Special
Function in order to extract a weight reading.
56
Using the Delimiter Parser Type
If none of the above Parser Types are suitable for the data from your
instrument, you may need to use the Delimiter Type (D). A DELIMITER
is a computer term for any character that separates units of data. The
comma and the space are common delimiters.
Look at the data and see if some unique characters can be found
between the data that is required. These could be any characters except
the forward slash /. The comma and the space are common separators,
but even words can be used provided that none of the letters in the
word are also part of the required data.
The following is the syntax for such a parser setup:
D/DELIMITER/SELECTOR/COMMENT
The D Parser consists of a list of the valid delimiters, followed by a
list of Ys and Ns (selectors) to indicate the data that is to be saved. In
Page 65

CHAPTER 5 Setting up the Instrument Parser
this case the data will be whatever string of characters appears
Example: D/{32},/YNNNYNYN/COMMENT
In this example, the delimiters are a space (ASCII 32) and a comma. If
either of these characters are encountered in the data string, the
program knows that one segment of data ends and another one starts.
Suppose your instrument transmits a string of data as follows:
23.5 units,0.7 units,27.6 units,25.6 units
The Delimiter Parser D/{32},/YNNNYNYN/COMMENT would
identify 8 segments of data but only save the first, fifth and seventh the numbers 23.5, 27.6 and 25.6. The second number (0.7)and
all units are ignored.
If several of these delimiters occur in sequence one after the other, the
program will treat each as a separate delimiter. For example, in the
string 45,,67 the second element is a blank because there is nothing
between the two commas. A blank will be transferred as the data for the
second element, along with any associated Macros.
You can list as many delimiters as you wish. If they are standard
printable (keyboard) characters, simply list them in the Parser (i.e. D/
,g+#/YYNN/comment). If they are not printable characters, you must
list them in the form of an ASCII character enclosed in {} brackets,
such as {32} for a file that is space delimited.
Please note that the carriage return (ASCII 13) and line feed (ASCII 10)
are not recognized as delimiters by the program. If your data string is
long and consists of more than one line (i.e., it has a <LF> <CR> in the
middle of the data), then you are able to remove these characters with
the Remove field described earlier.
If the data cannot be parsed with any of these Types, contact the
OMEGA Customer Service Department. Other programs are available
with much more powerful Parsers.
57
Page 66

CHAPTER 5 Setting up the Instrument Parser
Using Macros
When defining a Parser, you are able to create and specify Macros. A
Macro is simply a sequence of keystrokes and characters. You can
insert a Macro before or after each segment of data.
Please note that the use of Macros is optional. Use them only when and
where they are required. As an example, consider getting several weight
measurements from a balance and adding these to a spreadsheet. The
weights can go into column A, starting at A1.
The Parser will isolate the weight from the rest of the data sent by the
balance. The weight will then be sent to the cursor position in the
spreadsheet so that it will be displayed in cell A1.
A problem occurs when the second weight arrives, however. It will also
go into cell A1 since no one has pressed <ENTER> to move the cursor
to cell A2. The Macros are used to automatically press <ENTER> for
you between each weight. All you have to do is define one of the
Macros as the <ENTER> key and then insert it into the Parser after the
weight.
58
Such a modified Parser will then add an <ENTER> key to the end of
each weight as it is being sent to the active Windows®-based application.
Any key or combination of keys can be specified as part of a Macro.
The Macro can be inserted in front of or after each segment of data.
Defining a Macro
A Macro has to be defined in order for it to do anything in the Parser. In
the [Parser Setup] dialog box there is an area for listing Macros that are
defined exclusively for that Parser. These are listed by numbers
contained within square brackets, such as [1], [2] etc.
1. If this is the first Macro for the Parser, the list should be blank and
the top line opposite [1] should be highlighted. Simply click on the
Edit button located below the Macros box on the [Parser Setup]
dialog box (see Figure 5.3, Page 46). This will open the [Define
Macro] dialog box, as seen in Figure 5.5 (see Page 59).
Page 67
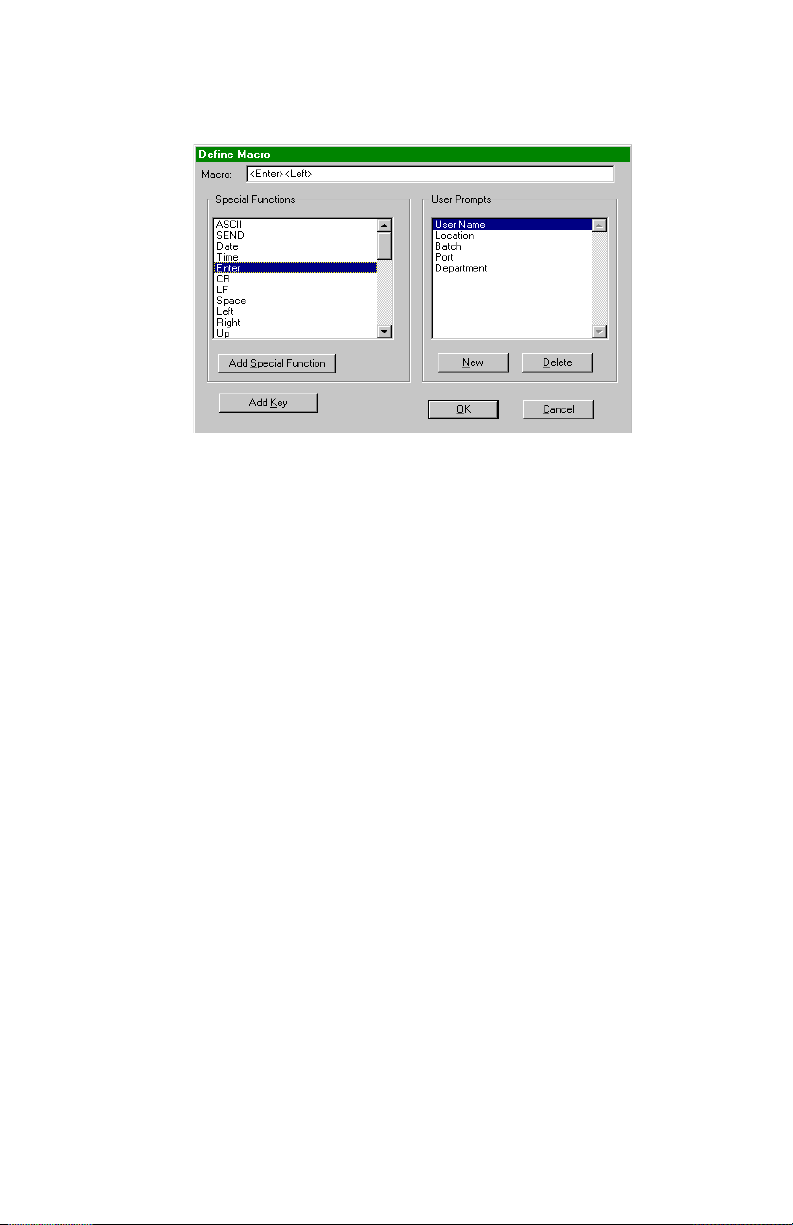
CHAPTER 5 Setting up the Instrument Parser
Figure 5.5: Define Macro dialog box
2. If you are adding new Macros after defining the first one [1], click
on the Add button located below the Macros box on the [Parser
Setup] dialog box (see Figure 5.3, Page 46) to add as many new
numbers in the margin as are required.
3. Click inside the box opposite a Macro number to highlight that
line (see Figure 5.3, Page 46), then click on the Edit button to
open the [Define Macro] dialog box, shown in Figure 5.5.
4. If you are editing Macros that have already been created, highlight
the line with that Macro and click on the Edit button located
below the Macros box on the [Parser Setup] dialog box (see
Figure 5.3, Page 46). This will open the [Define Macro] dialog box.
Please refer to Figure 5.5.
The cursor will be flashing in the Macro text box at the top. You can
define the macro with up to 125 characters. Although unlikely, if the
macro is to be larger than this, you can simply define another macro
and place them side by side in the Parser. (See Adding a Macro to a
Parser, Page 64). There are three types of entries that can be used in
the Macro: Keyboard Characters, Special Functions and ASCII
Characters.
59
Page 68
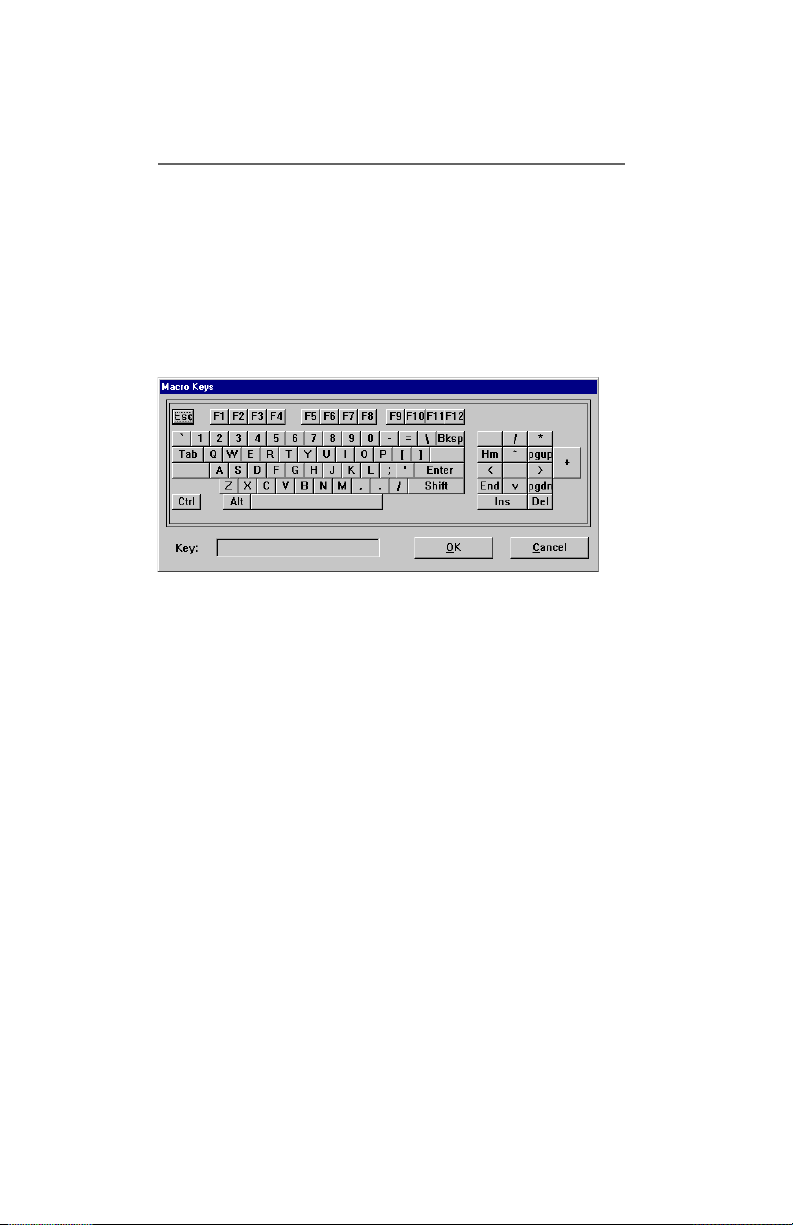
CHAPTER 5 Setting up the Instrument Parser
Including Keyboard Characters in the Macro
A keyboard character is any character that you can enter directly from
the keyboard. It includes all of the numbers, letters, and punctuation
keys. If you want to enter function keys or other special keys such as
<CTRL> and <ALT>, place the cursor in the correct position in the
Macro, then click on the Add Key button. You will see the [Macro
Keys] dialog box, as shown in Figure 5.6.
Figure 5.6: Macro Keys dialog box
60
1. Click on any key that you want to include in the Macro. Certain
special keys will only appear if they are combined with a second
letter. For example, if you wanted to add <ALT><F7> to the Macro,
first click on the <ALT> key, then on the <F7> key. Your selection
will appear dimmed in the text box beside Key: at the bottom of the
dialog box.
2. Click the OK button. You will see the [Define Macro] dialog box
again (see Figure 5.5, Page 59), and your key selection will be
added to the Macro. For example, you will see <Alt F7>.
As described, certain keys such as the <Alt> key will appear in the
[Macro Keys] dialog box only if they are combined with a second one.
However, the second component will occasionally get lost during
parsing. For example, clicking on the <Alt> key and the <F> key will
insert the combination <Alt F> in the Key: box. But in this case, the
F will occasionally be lost when the data is parsed and the macro is
applied.
Page 69

CHAPTER 5 Setting up the Instrument Parser
To be certain that this second component does not get lost, please
follow these steps:
a) Go to the new macro keys that have been added to the macro. For
example, go to the <Alt F>.
b) Delete the second component by placing the cursor before it and
pressing the <Delete> key. For the <Alt F> example, you would
place the vertical cursor immediately left of the F and press the
<Delete> key once.
c) Ensure that you leave a space between the first component and
the right > bracket. For example, <Alt > and NOT <Alt>.
d) Re-type the deleted second component immediately to the right
of the > bracket. For example, <Alt >F.
This correction will ensure that the macro works properly.
Including Special Functions in the Macro
Certain Keyboard Characters cannot actually be typed into the Macro
because they control the cursor and other functions. These include
the cursor arrow keys, <ESC>, <ENTER>, <F1>, <HOME> and <END>.
These characters instead can be selected from the list of 37 Special
Functions, on the left side of the [Define Macro] dialog box (see Figure
5.5, Page 59).
To add one of these characters to the Macro, do one of the following:
1. Double-click on the Special Function or highlight it and press
<ENTER>. You will see the selected character(s) appear in the
Macro definition box, within < > brackets.
2. Highlight the Special Function. Click on the Add Special
Function button. You will see the selected character(s) appear in
the Macro definition box, within < > brackets.
Use the scroll bar to see the complete list of Special Functions. Most
are simply non-printable key strokes. But some Special Functions carry
out some tasks, including date and time stamping, which will
automatically insert particulars for the date and/or time with the data.
61
Page 70

CHAPTER 5 Setting up the Instrument Parser
Other functions that may be inserted include:
1. The Cumulative Time, which records the time that has elapsed
since the instrument was opened (in minutes, seconds or
milliseconds).
2. A Serial Number that assigns a unique number to each data value.
This numbering is continuous; starting at zero when SWD-Collect
is first installed and increasing by one for each data value that is
parsed with this Special Function.
3. A Counter, which simply assigns a number to each data value
starting at zero each time the instrument is opened.
4. Send, which opens a [Send] dialog box when you add it to the
Macro like the one shown here. You may enter any text, up to 64
characters, to be sent to the instrument. ASCII characters may be
entered within curly brackets {}.
5. Data, Header, and Units, all for use in conjunction with the Scales
Type Parser.
62
6. Beep, which causes the computer to beep. This could be used to
audibly indicate when data is parsed.
All entries can be used in any order and you can place any characters
between the entries.
For example, if you wanted the Date to be stamped with the data
going into a spreadsheet application, you first position the cursor in
the Define Macro text box. You could type DATE: to have this
heading appear with the date stamp. Then you would scroll down
through the Special Functions list and double-click on <Right> to
have SWD-Collect press the right arrow key, to move to the next cell.
Next you would double-click on <Date> to include it in the Macro, and
double-click on <Right> again to press the right arrow key following
the date.
The <Date> Special Function will stamp the date in the format set up in
your Windows
®
Control Panel.
Page 71
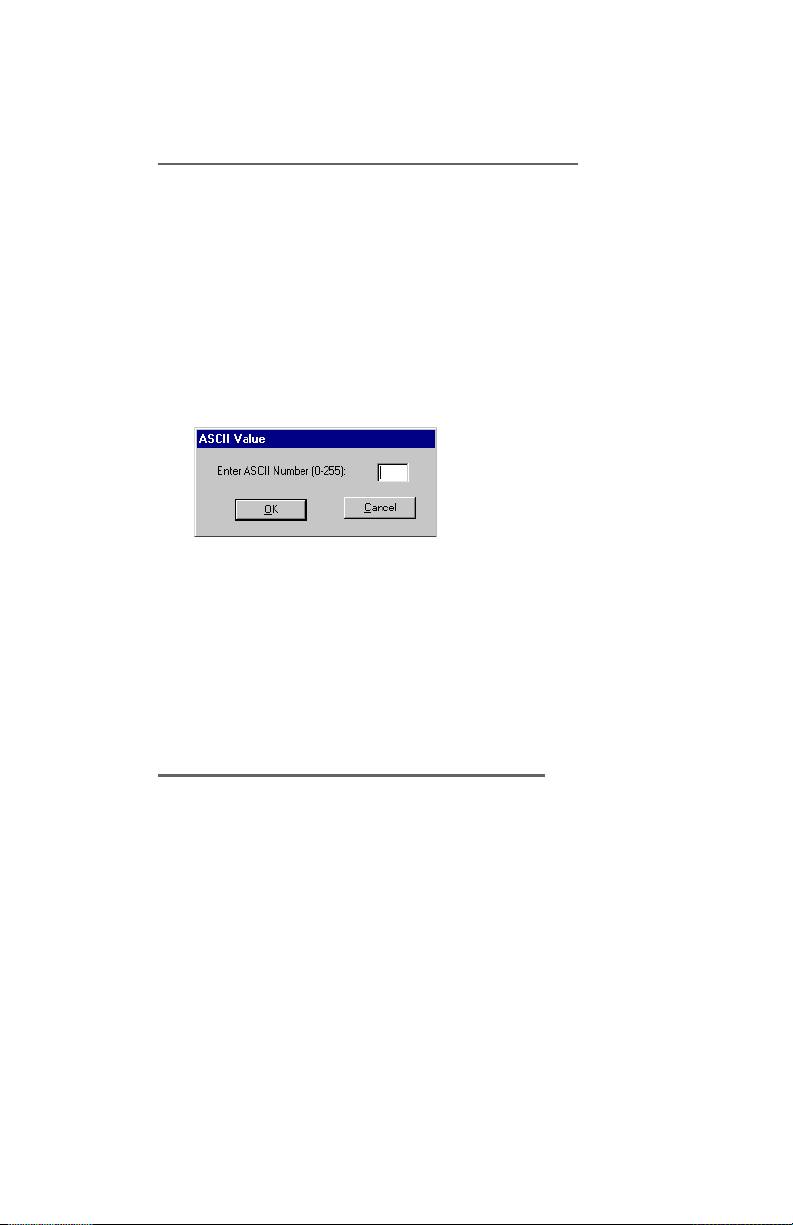
CHAPTER 5 Setting up the Instrument Parser
Including ASCII Characters in the Macro
One of the entries on the Special Functions list can be used to enter
ASCII characters. To enter an ASCII character in your Macro, follow
these steps:
1. Position the cursor in the correct position in your Macro definition.
2. Double-click on ASCII from the Special Functions list, and you
will see an [ASCII Value] dialog box, similar to the example shown
in Figure 5.7.
Figure 5.7: ASCII Value dialog box
3. Enter the desired ASCII Number, between 0-255. For a list of ASCII
Numbers, see Appendix A at the end of this manual.
4. Click the OK button. The ASCII code will appear in the Macro
within triangular brackets, such as <ASCII 32>.
Including User Prompts in the Macro
User prompts will prompt the operator to enter information at the time
the instrument is opened. These are inserted into the Macro definition.
For example, you could add the operators name, the type of sample
being measured, or the batch number.
To use this feature, you must first define a User Prompt.
1. Click the New button located below the User Prompts: box in the
[Define Macro] dialog box (see Figure 5.5, Page 59). The [New
User Prompt] dialog box will appear as shown in Figure 5.8 (see
Page 64).
63
Page 72
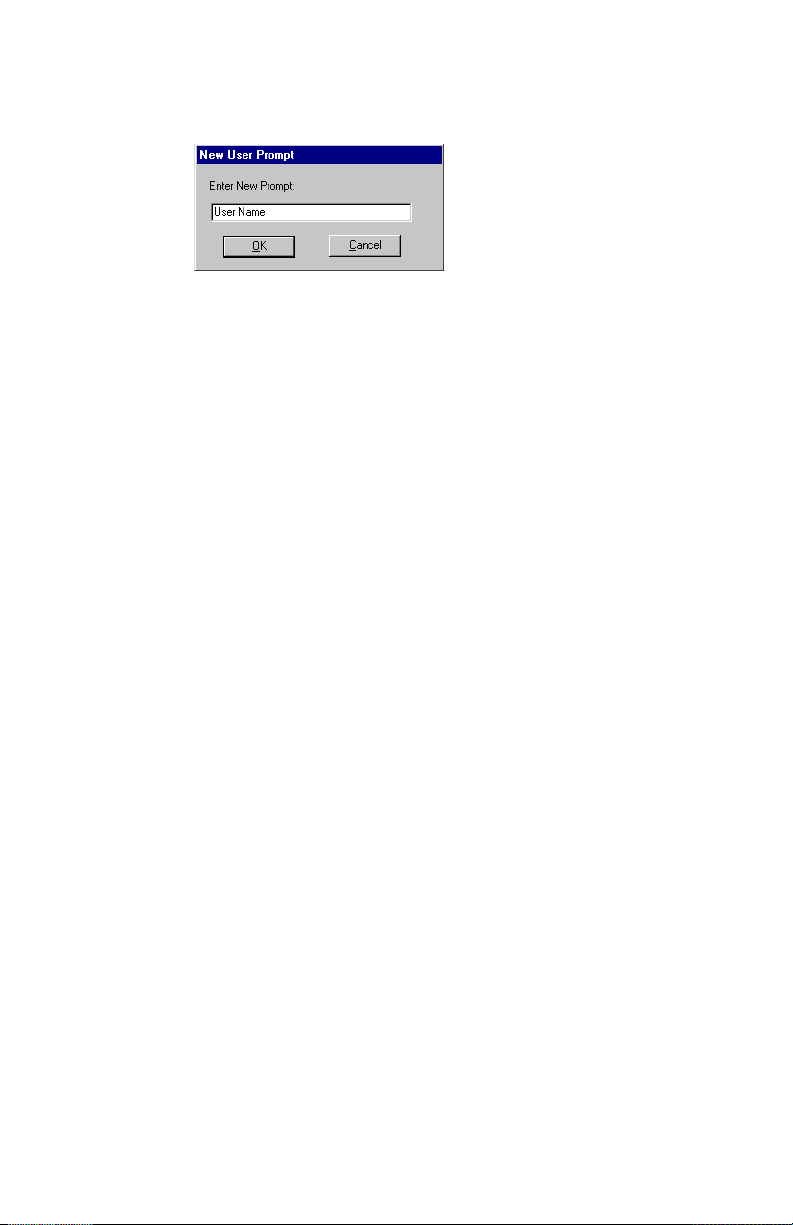
CHAPTER 5 Setting up the Instrument Parser
Figure 5.8: New User Prompt dialog box
2. Enter the new prompt, which will ask the operator for specific
information. For example, you could have Operators Name as
the prompt.
3. Click on the OK button. The prompt will appear on the list of
User Prompts.
4. Position the cursor in the Macro definition where you want the
prompt to appear.
5. Double-click on the User Prompt to include it in the Macro.
64
This now allows you to click on the User Info button on the [Setup
Instruments] dialog box (see Figure 5.1, Page 44) to specify a pre-set
value for the User Prompts (see Figure 5.9, Page 66). You must <OK>
out of the [User Prompts] dialog box, and repeat this procedure (i.e.,
click on the User Info button) to add an additional pre-set value .
Repeat this action for any supplementary entries.
When you have completed defining the Macro, click on the OK
button to return to the [Parser Setup] dialog box (see Figure 5.3, Page
46). The Macro will appear on the list of Macros.
Adding a Macro to a Parser
Macros are used by adding them to the Parser. A Macro is identified
by placing the Macro number inside square [ ] brackets. They can then
be inserted as illustrated in the following examples.
Page 73

CHAPTER 5 Setting up the Instrument Parser
Examples:
P/[1],1-7,[3]
D/,/Y[2]Y[2]
P/12-15,6-6,[4],5-9
D/,{32}/[5][4][1]YNYY
N/[1]Y[2]N[3]Y[4]
The first Parser has two Macros, the [1] and the [3]. The Macro [1] will
be added before the data (1-7) and the Macro [3] will be added at the
end of the data. In this example, the Macro [1] could add a format
character so that the data is formatted correctly. The Macro [3] could
be an <ENTER> to position the cursor on the next line, ready for the
next data point.
Macros can be used as frequently as required, and the same Macro
can be used several times as illustrated in the second Parser example.
This example could also be rewritten as D/,/2(Y[2])
Several Macros can also be linked together forming one large Macro
as shown in the fourth example. The [5][4][1] acts as one large Macro
since the program will perform one after the other.
Removing Macros from a Parser
From the [Parser Setup ] dialog box (see Figure 5.3, Page 46), position
the cursor before the Macro in the Definition text box and press the
<Delete> key to delete the square brackets as well as the Macro number.
To delete the contents of an established Macro, highlight it and click
on the Delete button. Note that the number reference of the Macro
remains displayed.
65
Page 74
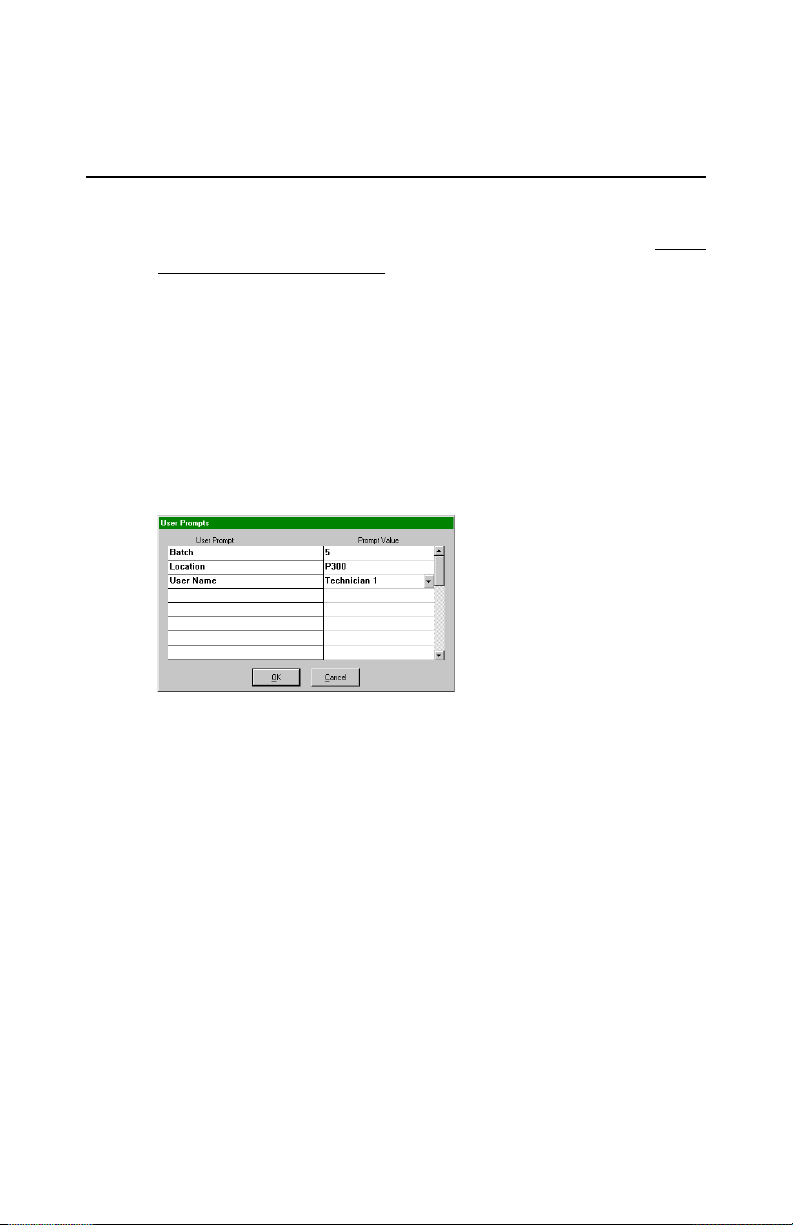
CHAPTER 5 Setting up the Instrument Parser
Displaying the User Prompts
In the [Setup Instruments] dialog box you will see the User Info
button. The User Info button will reveal a list of User Prompts only if
you have specified a Parser that includes User Prompts asking the
operator to enter information. Selecting this button allows you to enter
Prompt Values for responding to the user prompts when the instrument
is opened.
Once you have created a Parser for the instrument that includes User
Prompts, you can click on the User Info button in the [Setup
Instruments] dialog box (see Figure 5.1, Page 44) to see the [User
Prompts] dialog box, similar to the sample shown in Figure 5.9.
66
Figure 5.9: User Prompts dialog box
On the left side are the User Prompts defined within the Macro. You
should enter the appropriate Prompt Value on the right side of the
dialog box.
1. Click on the cell that is opposite to the User Prompt.
2. Click on the down arrow to reveal a list of any previously entered
Prompt Values.
3. Click on the appropriate value to select it.
4. If the appropriate response is not listed, double-click on the cell
and type in your response to the prompt. For example, if the prompt
asks for the Operators Name, you would enter your name.
Page 75
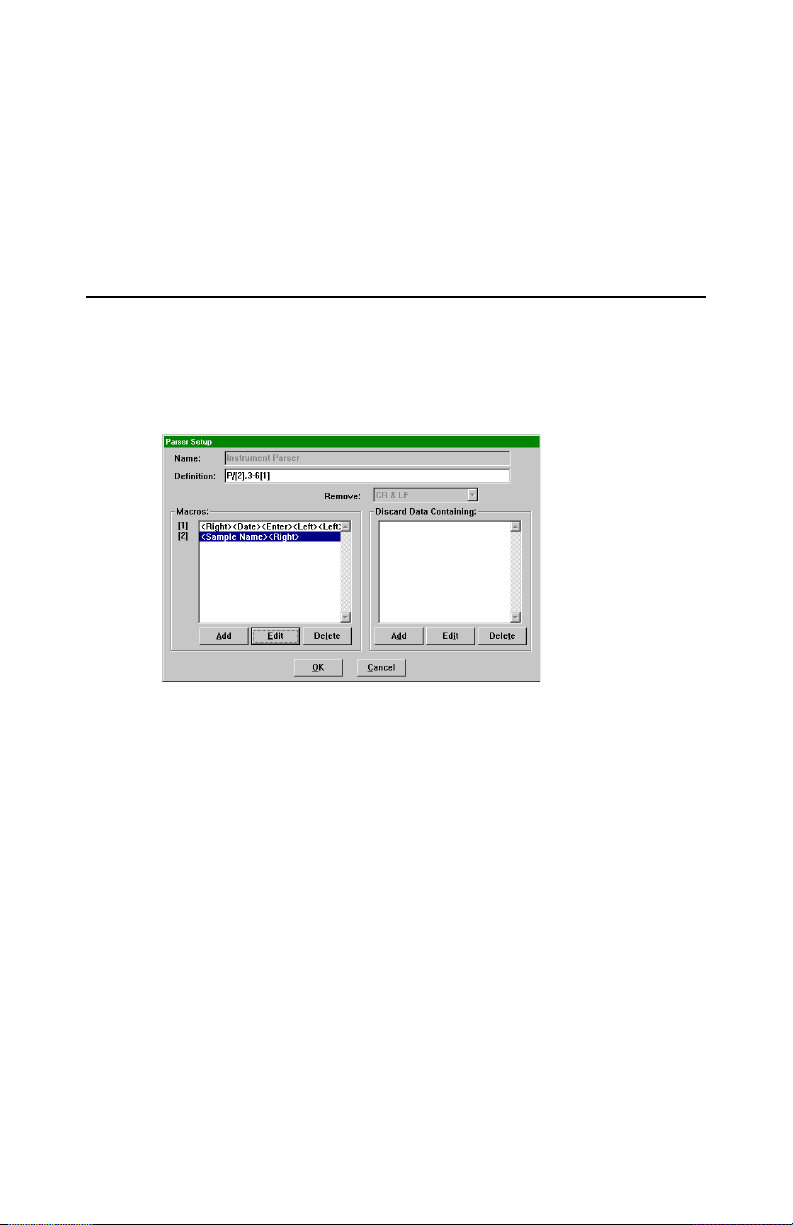
CHAPTER 5 Setting up the Instrument Parser
5. Click on the OK button to save the User Info details, and you
will see the [Setup Instruments] dialog box (Figure 5.1, Page 44)
again.
Using What We have Learned so far
This Parser Setup example illustrates the use of Parsers, Macros and
User Prompts. The example shown in Figure 5.10 could be used to add
data from an instrument such as a balance into the built-in QuickSheet.
Figure 5.10: Example of a Parser Setup
The P in the Parser indicates that the data is parsed by Position. The
characters in positions 3 to 6 will be saved. Macro number [2] is inserted
before the data and Macro [1] is inserted after the data.
Macro [2] consists of the User Prompt <SAMPLE NAME>, followed
by a right arrow key. Macro [1] consists of a right arrow key, a Date
stamp, and the Enter Key followed by two left cursor keys.
The resulting spreadsheet would appear similar that shown in Figure
5.11 (see Page 68).
67
Page 76
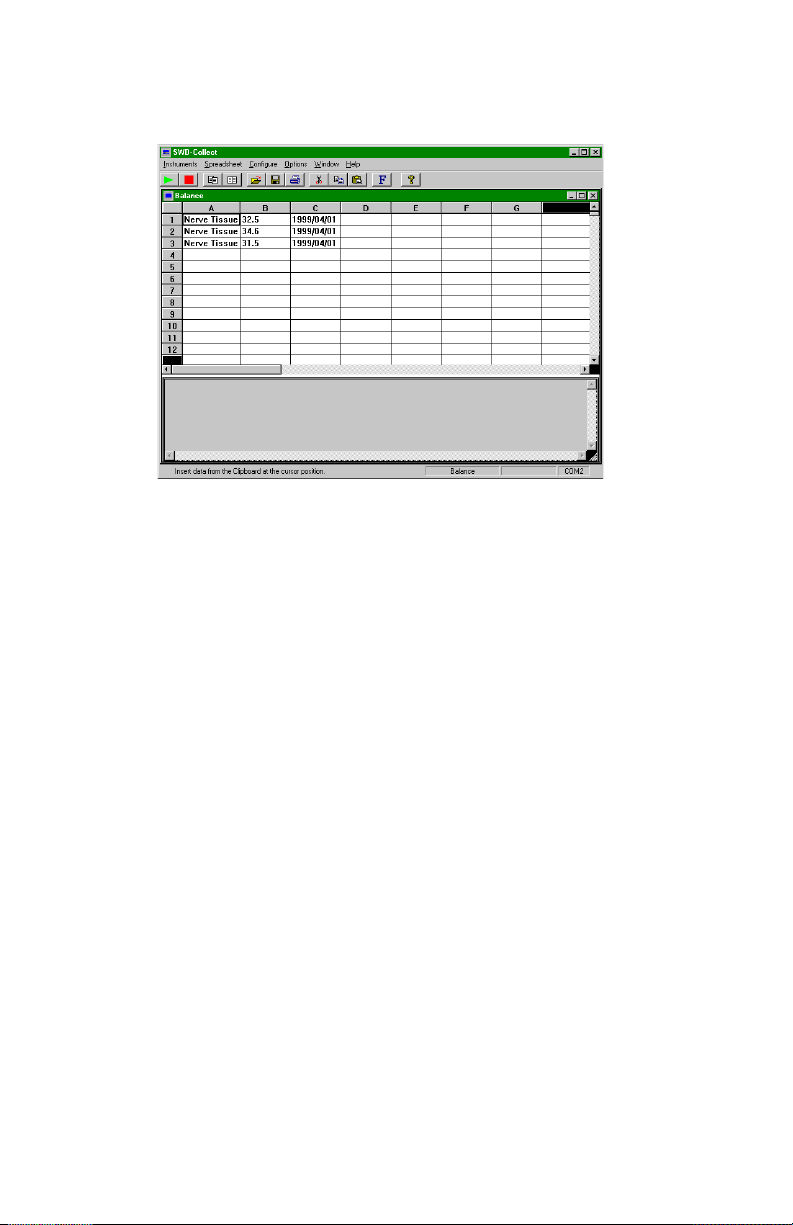
CHAPTER 5 Setting up the Instrument Parser
Figure 5.11: Example of the resulting spreadsheet
When the instrument is opened, Macro [2] prompts the operator to
enter the <Sample Name>, such as Nerve Tissue. The Macro enters
this into the spreadsheet in column A, and presses the right arrow key
to allow data to be entered into column B. Macro[1] presses the right
cursor key after the data has been entered, then enters the Date stamp
in column C. The Macro then presses enter to move to row 2, and two
left arrow keys to return to column A for the next value to be transmitted.
68
Page 77

CHAPTER 6 The SWD-Collect Spreadsheet
Chapter
One of the possible destinations for data that is collected is the builtin spreadsheet, known as the QuickSheet. This chapter can be read
as a separate reference for using the Spreadsheet.
The SWD-Collect
6
Spreadsheet
Spreadsheet Basics
When opening an instrument, select Spreadsheet as one of the
destinations. SWD-Collect will open a new spreadsheet, and the data
from your instrument can be entered directly into it. You may save the
data within the spreadsheet as a separate spreadsheet file, which you
may also open at another time to add more data to it. Please read this
Chapter for complete details.
The spreadsheet is a grid of 400 rows and 26 columns. Each cell is the
intersection of a row and a column and it has a unique address, or
reference. For example, the cell where column B and row 5 intersect is
cell B5. You use cell references when you write formulas or refer to
cells.
Generally, you first select the cell or cells you want to work with, and
then you enter data or choose a command. Selected cells appear
highlighted on your screen. The active cell is the cell in which data is
entered when you start typing. Only one cell is active at a time. The
active cell is shown by a heavy border.
Using the Menu Commands
Menu commands pertaining to the Spreadsheet are grouped into the
Spreadsheet Menu on the menu bar across the top. Pull down this
menu to see the available menu options and to make your selections.
69
Page 78

CHAPTER 6 The SWD-Collect Spreadsheet
Using the Toolbar Buttons
To choose a toolbar button, click it. Using these buttons requires a
mouse. Placing the mouse cursor on a toolbar button will cause the
program to display a help line, at the bottom of the window, which
explains the function of the toolbar.
Choosing Commands
There is usually more than one method to achieve the same result. For
example, there are several equivalent ways to copy data. Choose the
method that suits you best.
Remember you must select the cells or objects you want to work
with before choosing most commands.
Selecting Cells
70
Selections are always rectangular blocks of cells.
To select: Do the following:
A single cell Click on it. The cell will be highlighted with a
heavy border.
A range of cells Position the mouse pointer over the first cell,
then hold down the left mouse button and drag
diagonally from the first cell to the last cell. Release the mouse button, and the range will be
highlighted.
An entire row Click the row heading.
An entire column Click the column heading.
The entire spreadsheet Click on the square button that is above row 1
and to the left of column A.
Page 79
CHAPTER 6 The SWD-Collect Spreadsheet
Moving Around in a Spreadsheet
Use: To Move:
Arrow keys up, down, left, right one cell
<PAGE UP> or
<PAGE DOWN>
<HOME> to the beginning of the current row
<END> in the current row, to the last column containing data
<CTRL> + <HOME> to the top left corner of the spreadsheet
<CTRL> + <END> to the bottom row of the last column containing data
<TAB> to the next cell in the same row
<Shift> + <TAB> to the previous cell in the same row
up or down one window
in the spreadsheet
Scrolling Through the Spreadsheet
Action Move the pointer to the down arrow in the vertical scroll bar on
the right edge of the window, and then click the right mouse
button.
Result The spreadsheet scrolls down one row.
Action Click the scroll bar area below the scroll box.
Result The spreadsheet scrolls down one screen.
Action Move the pointer into the scroll box. Hold the mouse button down,
move the pointer back to the top of the vertical scroll bar, and
then release the mouse button. This is called dragging.
Result The spreadsheet scrolls back up to the first row.
Loading a Spreadsheet
To load a spreadsheet that you have previously saved, do one of
the following.
1. Pull down the Spreadsheet Menu.
2. Select Load.
or
1. Click on the Load button, shown in the margin.
71
Page 80
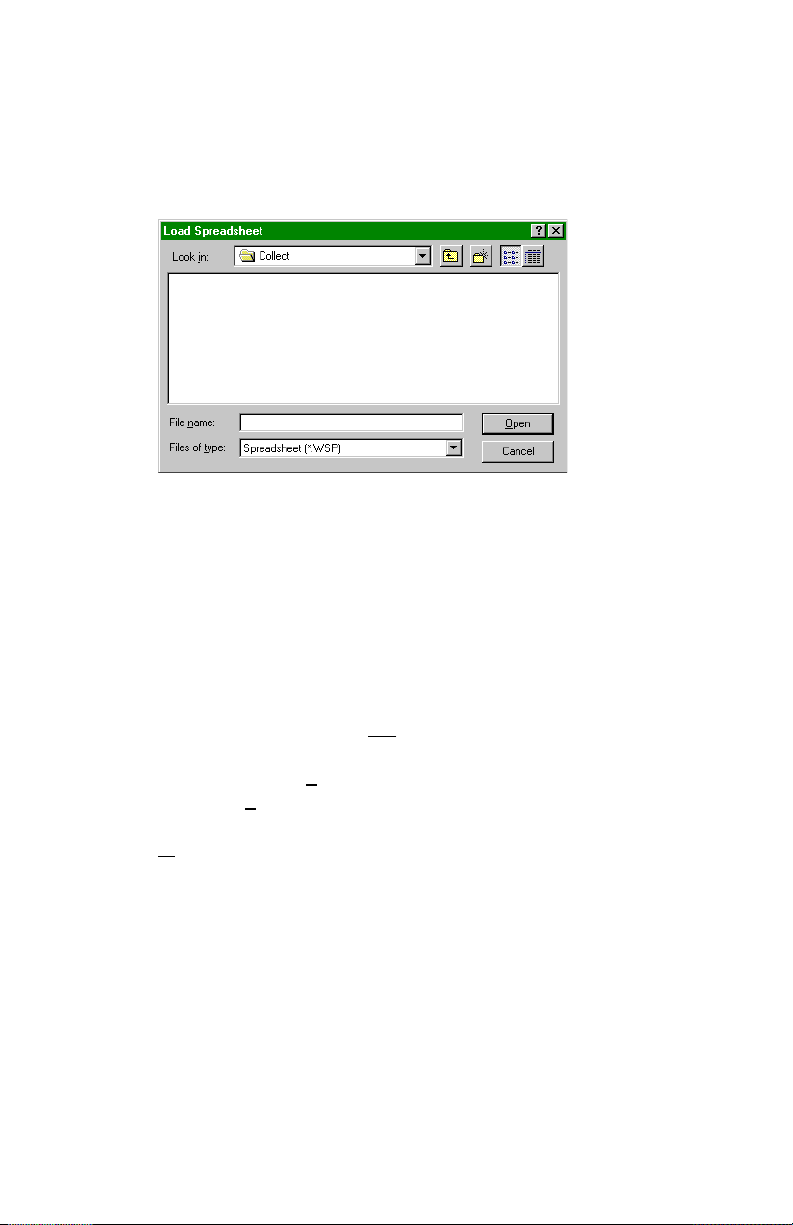
CHAPTER 6 The SWD-Collect Spreadsheet
In either case, you will advance to the [Load Spreadsheet] dialog box,
similar to the example shown in Figure 6.1.
Figure 6.1: Specify the file to load
Specify the required information to load a spreadsheet.
Click the OK button to load the desired spreadsheet.
72
Saving a Spreadsheet
To save a spreadsheet, do one of the following:
1. Pull down the Spreadsheet menu.
2. Select Save.
or
3. Click on the Save button, shown in the margin.
In either case, if you havent saved the spreadsheet previously, or if
you opened it as read-only, the[Save as] dialog box appears, similar to
the example shown in Figure 6.2 (see Page 73).
Page 81
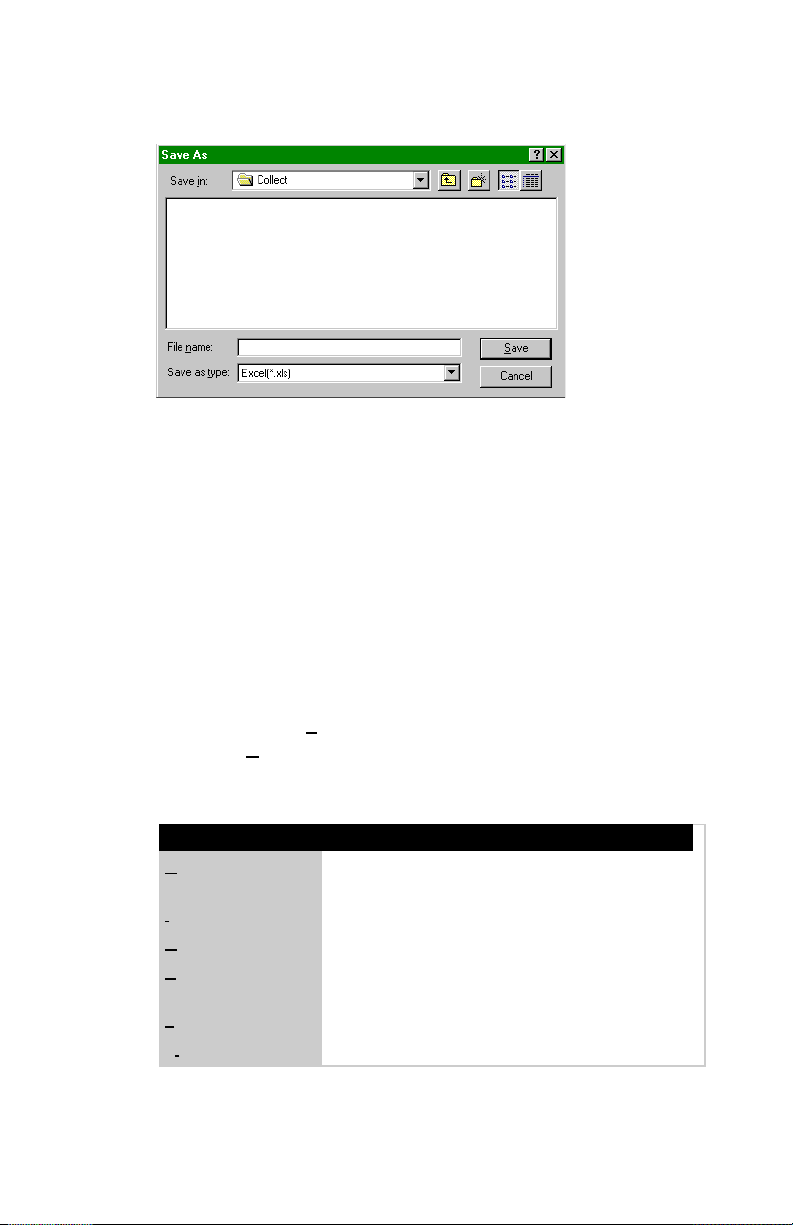
CHAPTER 6 The SWD-Collect Spreadsheet
Figure 6.2: Saving a spreadsheet
Here you can specify the required information for saving the
spreadsheet. Please note the Save as Type box at the bottom. Here
you can specify whether to save the spreadsheet as a Spreadsheet
File (*.WSP), an Excel File (*.XLS) or a Text File (*.TXT).
Click the OK button to complete this process.
Formatting the Spreadsheet
1. Pull down the Spreadsheet menu.
2. Select Format. A list of sub-menu items is available allowing you
to format the cell contents.
Menu Option Description
Align Allows you to specify the format of the cell contents
to be aligned Left, Center, or Right.
Increase Decimals Increases the number of decimals displayed by one.
Decrease Decimals Decreases the number of decimals displayed by one.
Set Decimals Allows you to choose the number of decimals from a
list.
Text Allows you to specify that the entry in a cell is Text.
Float Allows you to specify that the entry in a cell is Float.
73
Page 82

CHAPTER 6 The SWD-Collect Spreadsheet
Making Entries in the Spreadsheet
There are two basic kinds of entries in a spreadsheet: constant values
and formulas. When a cell is highlighted, you can make any type of
entry in it.
A constant value is data that you type directly into a cell. It can be a
numeric value, called Float (Real Numbers or Integers), or it can be
Text such as a date, time, currency, or percentage. Constant values do
not change unless you select the cell and edit the value yourself.
As you make your entry, the program will automatically determine if it
is either a Text type or Float type entry:
· If you enter numbers with or without decimal places, it will be
considered a Float type entry.
· If you type any characters other than numbers in a cell, it will
automatically be a Text type entry.
A formula is a sequence of values, cell references, names, functions,
or operators that produces a new value from existing values. Formulas
always begin with an equal sign (=), and the program recognizes
automatically when a formula is entered. A value that is produced as
the result of a formula can change when other values in the spreadsheet
change.
74
To change the type of entry, follow these steps:
1. Select the cell or range of cells to be changed.
2. Pull down the Spreadsheet menu.
3. Select the Format sub-menu.
4. Make your selection from either Text or Float.
Displayed Value vs. Stored Value
The number you see in a cell is based on the cell number format and
may differ from the number stored. For example, if a cell is formatted to
display only two decimal places and you type 26.006 in that cell, the
spreadsheet displays 26.01. The stored number is used for calculations,
no matter how it is displayed on the screen.
Page 83
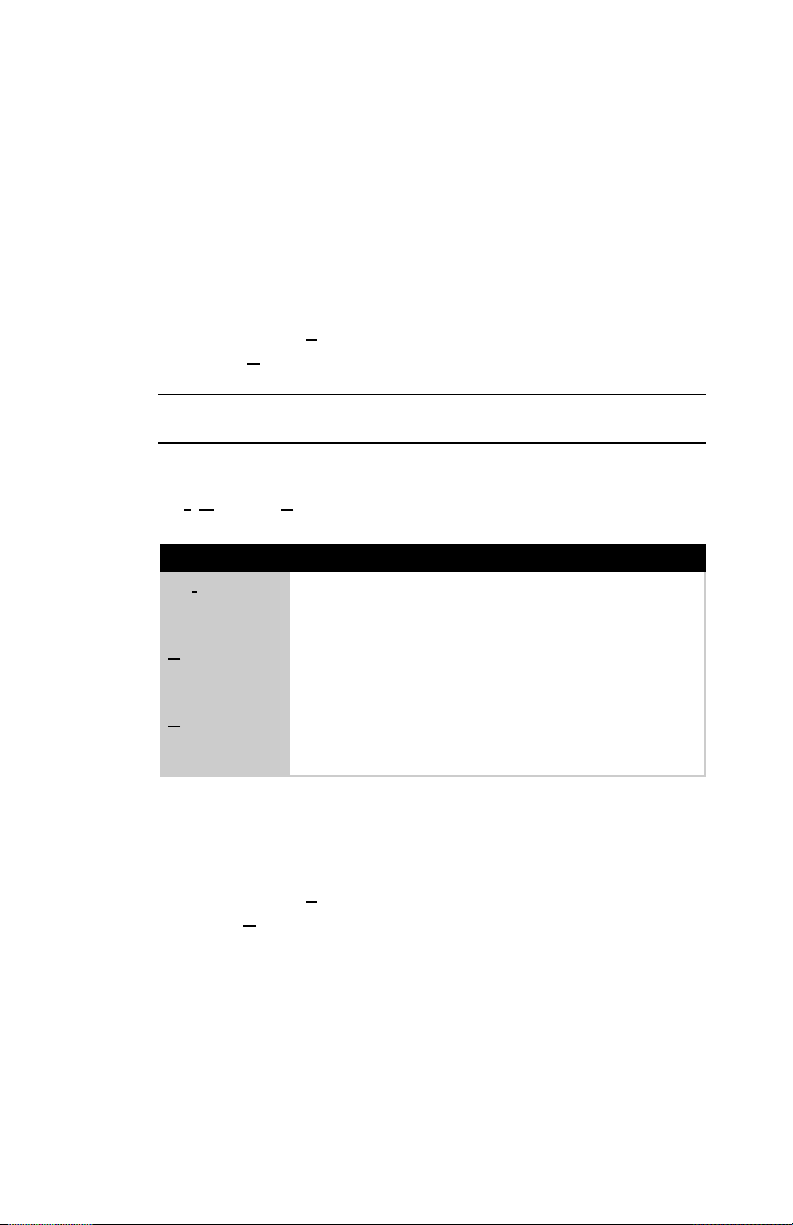
CHAPTER 6 The SWD-Collect Spreadsheet
To see the stored number in a cell, double-click on that cell. The stored
number will be shown highlighted.
Copying and Moving Cells in the
Spreadsheet
1. Pull down the Spreadsheet menu.
2. Select Edit. A list of sub-menu items becomes available.
Please Note: Before using any of the sub-menu options, select the
cells that will be affected by the menu option.
Copying and moving cells can be performed by a combination of the
Cut, Copy and Paste sub-menu options.
Menu Option Description
Cut Removes the selected characters from the cell and
Copy Makes a copy of the selected characters and places
Paste Places the contents of the Clipboard in a cell at the
places them on the Clipboard.
Pressing <Shift><Delete> will also perform this function.
them on the Clipboard.
Pressing <Crtl><Insert> will also perform this function.
insertion point.
Pressing <Shift><Insert> will also perform this function.
Filling a Series of Cells
1. Pull down the Spreadsheet menu.
2. Select Edit.
3. From here, select the Fill sub-menu item. This will advance you to
the [Fill Cell] dialog box, similar to the example shown in Figure 6.3
(see Page 76).
75
Page 84
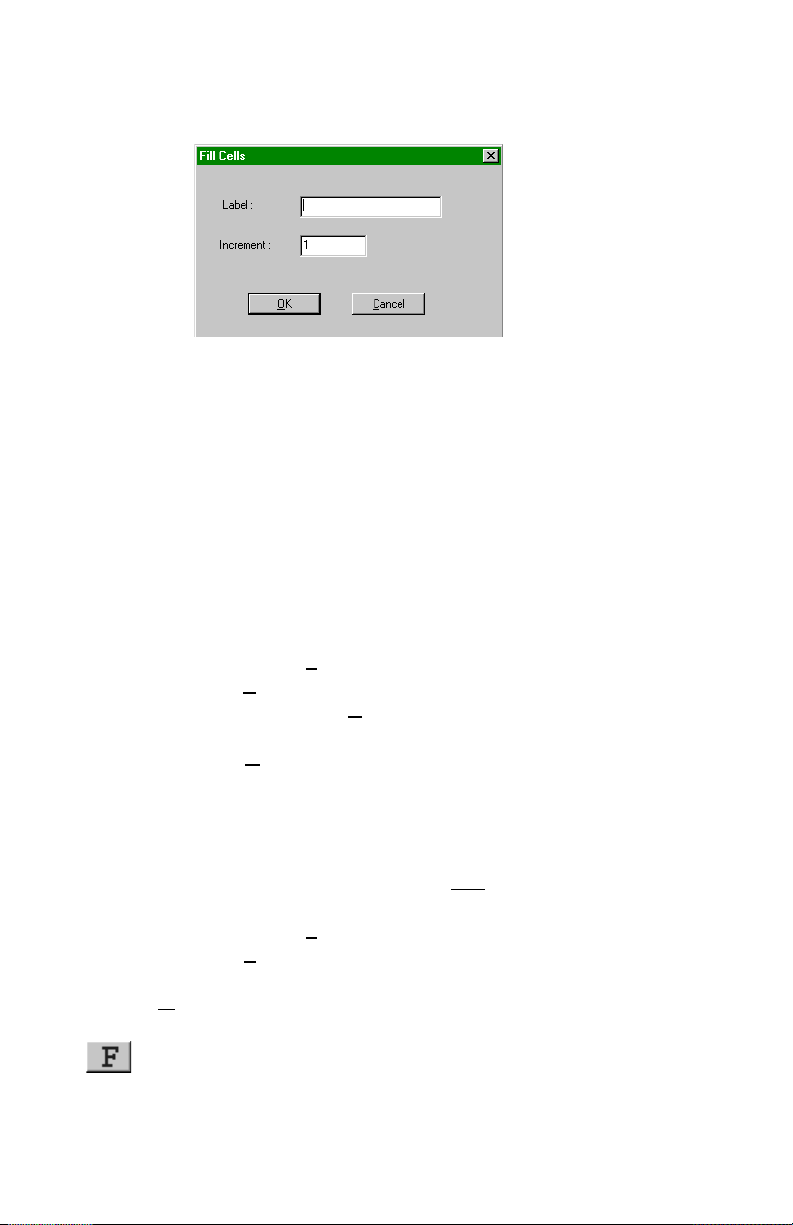
CHAPTER 6 The SWD-Collect Spreadsheet
Figure 6.3: Fill Cell dialog box
The Fill options allows you to fill a series of cells with a single entry.
The entered value can be specified as well as an increment value. The
latter will increment numeric entries. This option is very useful for
entering sequential sample IDs. If cells already contain information,
the filling process will skip over these cells and not increment the
counter for these cells.
Clearing the Spreadsheet
76
1. Pull down the Spreadsheet menu.
2. Select Edit.
3. From here, click on Clear to remove the contents of the entire cell,
or delete selected characters (highlighted) from the cell. Select the
Clear All sub-menu item to clear the entire spreadsheet.
Setting Fonts in a Spreadsheet
To set the fonts on a spreadsheet, do one of the following.
1. Pull down the Spreadsheet menu.
2. Select Font.
or
1. Click on the Font button, shown in the margin.
Page 85
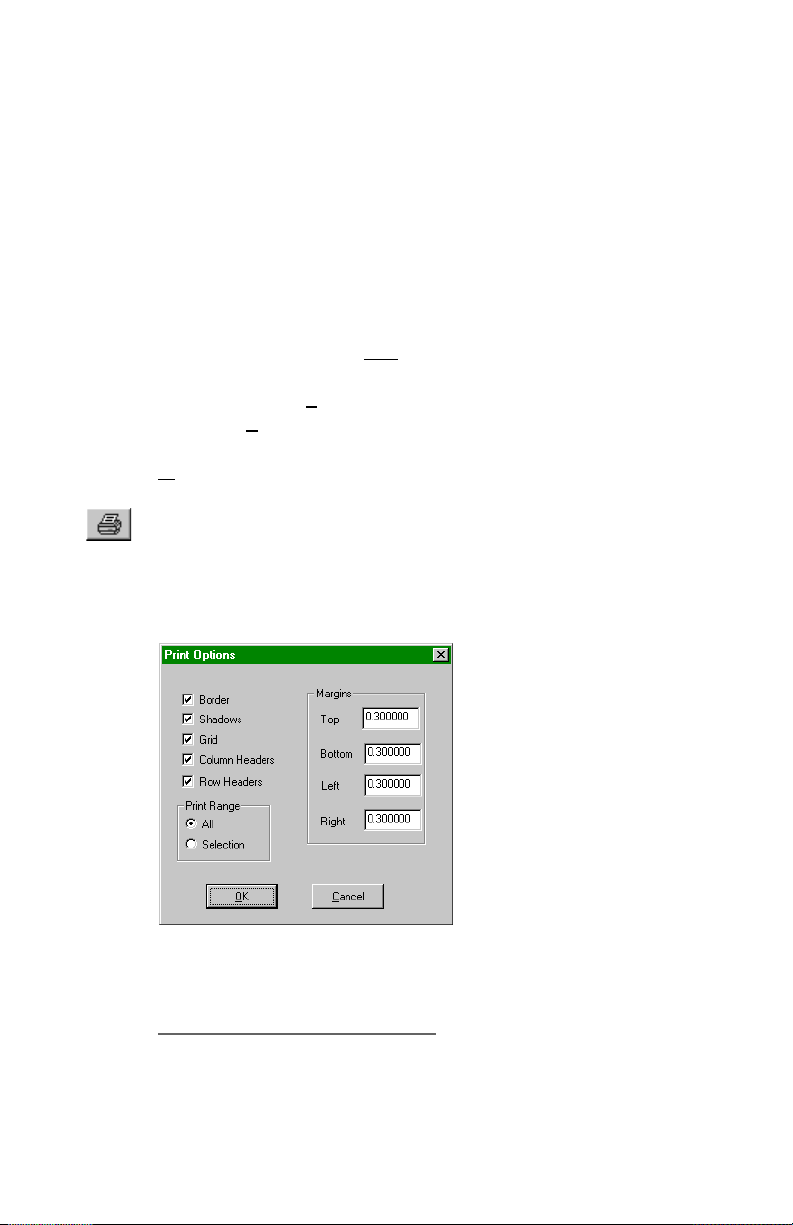
CHAPTER 6 The SWD-Collect Spreadsheet
In either case, you will advance to the [Font] dialog box.
From here you can set the font, font style, size, effects and color of
each cell.
Printing a Spreadsheet
To print a spreadsheet, do one of the following.
1. Pull down the Spreadsheet menu.
2. Select Print.
or
1. Click on the Print button, shown in the margin.
In either case, you will advance to the [Print Options] dialog box,
similar to the example shown in Figure 6.4.
Figure 6.4: Printing a spreadsheet
Defining the Print Options
Figure 6.4 presents a variety of options related to the spreadsheet
printout.
77
Page 86
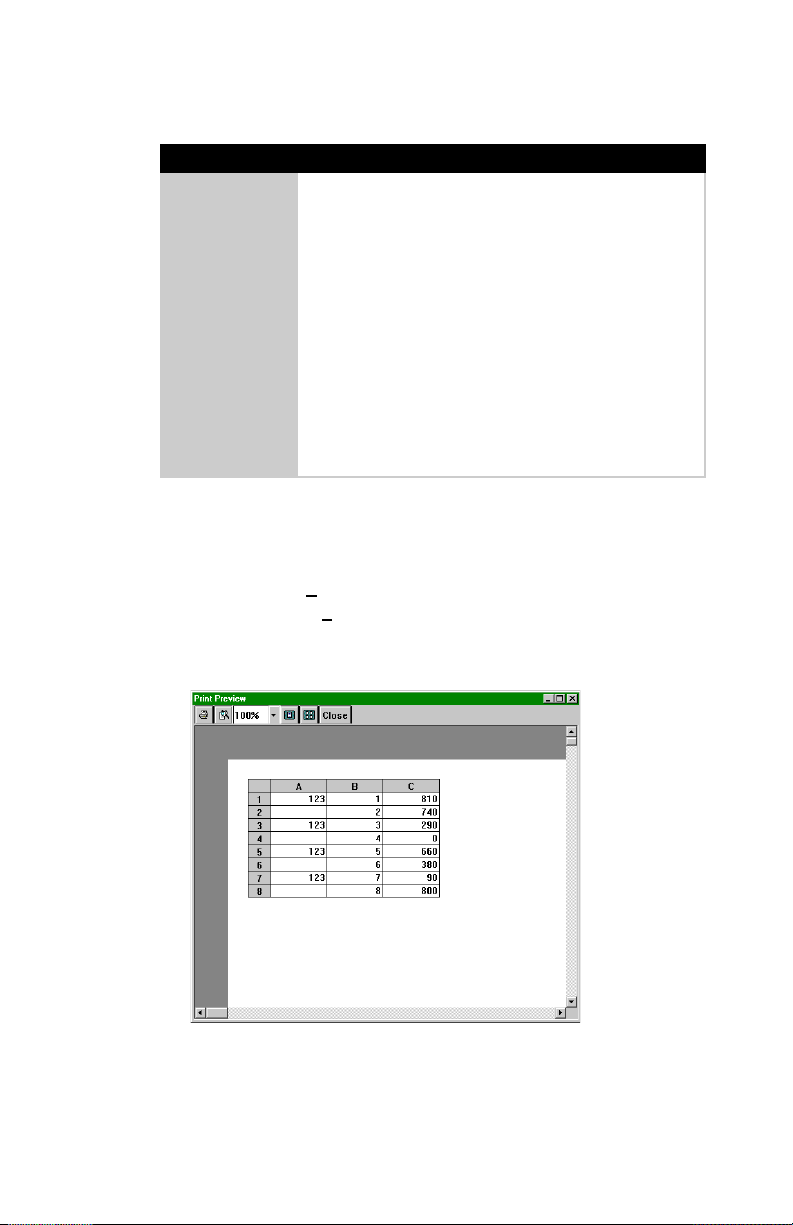
CHAPTER 6 The SWD-Collect Spreadsheet
Printing Option Description
Border Click on this check box to print the spreadsheet bor-
Shadows Click on this check box to print any colored areas with
Grid Click on this check box to print the vertical and hori-
Column Headers Click on this check box to print the column labels.
Row Headers Click on this check box to print the row labels.
Print Range Click on the radio button (All or Selection) to specify
Margins You can specify the margins by entering a number, in
der.
shading.
zontal lines of the spreadsheet.
the range to be printed.
inches, in the Margin box (e.g., Top, Bottom, Left, Right).
Previewing the Print
1. Pull down the Spreadsheet menu.
2. Select Print Preview. This will advance you to the [Print Preview]
dialog box, similar to the example shown in Figure 6.5.
78
Figure 6.5: Print Preview dialog box
Page 87

CHAPTER 6 The SWD-Collect Spreadsheet
Enhanced Spreadsheet Features
Using Formulas to Analyze Your Data
Using a formula can help you analyze data on a spreadsheet. With a
formula you can perform operations, such as addition, multiplication
and comparison on spreadsheet values. Use a formula when you want
to enter calculated values on a spreadsheet.
· A formula always begins with an equal sign (=).
· A constant is a numeric or text value that you type directly into a
cell.
A simple formula combines constant values with operators, such as a
plus or minus sign, in a cell to produce a new value from existing
values. Think of a formula as one side of an equation whose result is
shown in the cell.
The following is an example of a formula:
=(B4/25)+100
Formula Operators
Valid operators in a formula are:
+ Addition
- Subtraction
^ Power operator
* Multiplication
/ Division
& Logical And
| Logical Or
! Negation
> Greater Than
< Less Than
= Equality
: Sum a range of cells
79
Page 88
CHAPTER 6 The SWD-Collect Spreadsheet
Formula Functions
Valid functions in a formula are:
ABS(Coord or Value) Returns the absolute value of the
ADD(a,b) Adds the two elements, which can be
EXP(Coord or Value) Returns e to the power of the specified
IF(a,b,c) If a is true, cell is assigned b; if false, cell
ISEMPTY(Coord) Returns TRUE if cell is empty, FALSE
LN(Coord or Value) Returns the Natural Log for the specified
LOG(Coord or Value) Returns Log Base 10 for the specified
NEG(Coord or Value) Returns the negative of the specified cell
NOT(Coord or Value) Returns the logical NOT of the specified
ROUND UP(Coord or Value,
# of Decimals) Returns the specified cell or value,
ROUND(Coord or Value,
# of Decimals) Returns the specified cell or value,
SUM(Start Cell:End Cell) Returns the sum of the defined range of
TRUNCATE(Coord or Value,
# of Decimals) Returns the specified cell or value,
specified cell or value.
cell coordinates or values.
cell or value.
is assigned c. The elements a, b and c can
be cell coordinates or values.
otherwise.
cell or value.
cell or value.
or value.
cell or value.
rounded up to the next integer. The # of
Decimals specifies the number of decimal
places to which the original value should
be rounded. It must be a whole number,
and negative numbers are permitted to
indicate places to the left of the decimal
point.
rounded up (when >=.5) or down.
cells.
truncated at the given number of
decimals.
80
Page 89

CHAPTER 6 The SWD-Collect Spreadsheet
Examples of valid formulas:
SUM(A1:A10) Sums the first column, rows 1 through
10.
3.1415*C6 PI times the value in C6.
A# * G# The value of cell column A, this row,
multiplied by the value of the cell at
Column G, same row.
(A1 + B1) * C1 Adds the first two cells and multiplies
the result by the third.
IF(A1>5, A1*2, A1*3) If the contents of A1 are greater than 5,
then multiply A1 by 2, else multiply A1
by 3.
LOG(A1 + B1) Adds the first two cells and then returns
the Log Base 10 for the result.
Combining Expressions With Parentheses
If a formula contains operators with the same priority, the spreadsheet
evaluates the operators from left to right. If you want to alter the order
of evaluation, use parentheses to group expressions in your formula.
Example:
This formula Produces this value
=4*2+4*6/2 20
=4*(2+4)*6/2 72
81
Page 90

CHAPTER 6 The SWD-Collect Spreadsheet
Displaying Formulas on the Spreadsheet
A cell containing a formula normally displays the formulas resulting
value on the spreadsheet. When you move the cursor over a cell
containing a formula, the formula is displayed in the tool tip for your
reference.
Editing Within a Cell
You can edit a cell on your spreadsheet by typing a new entry over an
existing one or by editing part of the information within the cell. To edit
within a cell, double-click the cell. Selecting the cell and pressing <ESC>
will also switch to editing mode. When you edit a cell containing a
formula, the formula is displayed and the value is hidden.
Changing Column Widths and Row
Heights
82
You can adjust both the column width and the row height as needed.
Rows automatically adjust to accommodate wrapped text or the largest
font entered into the row.
In a new spreadsheet all the columns are set to the standard width.
You can change the standard width setting to adjust all columns on
the sheet, or you can adjust only the columns you want to change.
These changes are performed by placing the cursor between two rows
or two column headings, until it changes to a double arrow, and then
hold down the left mouse button and drag the line to its new location.
Page 91

APPENDIX A ASCII Numbers
Appendix
If your data is delimited by a particular keyboard printable character, you
can type it directly into the parser. However, if the delimiter is nonprintable, you must enter the appropriate ASCII number within { }
brackets. The hexadecimal equivalents (HEX #) are also shown.
ASCII # HEX # Common Delimiters Control Character
0 00h (null) NUL
1 01h SOH
2 02h STX
3 03h ETX
4 04h EOT
5 05h ENQ
6 06h ACK
7 07h (beep) BEL
8 08h (backspace) BS
9 09h (tab) HT
10 0Ah (line feed) LF
11 0Bh (home / hard return) VT
12 0Ch (form feed / page break) FF
13 0Dh (carriage return) CR
14 0Eh (page / column break) SO
15 0Fh SI
16 10h DLE
17 11h DC1
18 12h DC2
19 13h DC3
20 14h (paragraph marker ¶) DC4
21 15h NAK
22 16h SYN
23 17h ETB
24 18h CAN
25 19h EM
2 6 1Ah SUB
27 1 Bh ESC
28 1Ch (cursor right) FS
29 1Dh (cursor left) GS
30 1Eh (cursor up) RS
31 1Fh (cursor down) US
32 20h (space)
ASCII Numbers
A
83
Page 92

APPENDIX A ASCII Numbers
For your reference, additional ASCII and hexadecimal numbers are
shown here.
ASCII HEX # Char.
33 21h !
34 22h
35 23h #
36 24h $
37 25h %
38 26h &
39 27h
40 28h (
41 29h )
42 2Ah *
43 2Bh +
44 2Ch ,
45 2Dh 46 2Eh .
47 2Fh /
48 30h 0
49 31h 1
50 32h 2
51 33h 3
52 34h 4
53 35h 5
54 36h 6
55 37h 7
56 38h 8
57 39h 9
58 3Ah :
59 3Bh ;
60 3Ch <
61 3Dh =
62 3Eh >
63 3Fh ?
64 40h @
65 41h A
66 42h B
67 43h C
68 44h D
69 45h E
70 46h F
71 47h G
72 48h H
73 49h I
74 4Ah J
75 4Bh K
ASCII HEX # Char.
76 4Ch L
77 4Dh M
78 4Eh N
79 4Fh O
80 50h P
81 51h Q
82 52h R
83 53h S
84 54h T
85 55h U
86 56h V
87 57h W
88 58h X
89 59h Y
90 5Ah Z
91 5Bh [
92 5Ch \
93 5Dh ]
94 5Eh ^
95 5Fh _
96 60h
97 61h a
98 62h b
99 63h c
100 64h d
101 65h e
102 66h f
103 67h g
104 68h h
105 69h i
106 6Ah j
107 6Bh k
108 6Ch l
109 6Dh m
110 6Eh n
111 6Fh o
112 70h p
113 71h q
114 72h r
115 73h s
116 74h t
117 75h u
118 76h v
ASCII HEX # Char.
119 77h w
120 78h x
121 79h y
122 7Ah z
123 7Bh {
124 7Ch |
125 7Dh }
126 7Eh ~
127 7Fh
128 80h Ç
129 81h ü
130 82h é
131 83h â
132 84h ä
133 85h à
134 86h å
135 87h ç
136 88h ê
137 89h ë
138 8Ah è
139 8Bh ï
140 8Ch î
141 8Dh ì
142 8Eh Ä
143 8Fh Å
144 90h É
145 91h æ
146 92h Æ
147 93h ô
148 94h ö
149 95h ò
150 96h û
151 97h ù
152 98h ÿ
153 99h Ö
154 9Ah Ü
155 9Bh ¢
156 9Ch £
157 9Dh ¥
158 9Eh §
159 9Fh
160 A0h á
161 A1h í
84
Page 93

APPENDIX A ASCII Numbers
ASCII HEX # Char.
162 A2h ó
163 A3h ú
164 A4h ñ
165 A5h Ñ
166 A6h ª
167 A7h º
168 A8h ¿
169 A9h _
170 AAh ¬
171 ABh ½
172 ACh ¼
173 ADh ¡
174 AEh «
175 AFh »
176 B0h ?
177 B1h ?
178 B2h ?
179 B3h d
180 B4h $
181 B5h a
182 B6h b
183 B7h V
184 B8h U
185 B9h c
186 BAh Q
187 BBh W
188 BCh ]
189 BDh \
190 BEh [
191 BFh 192 C0h
193 C1h 4
194 C2h ,
195 C3h
196 C4h
197 C5h <
198 C6h ^
199 C7h _
200 C8h Z
201 C9h T
202 CAh i
203 CBh f
204 CCh
205 CDh P
206 CEh l
207 CFh g
208 D0h h
ASCII HEX # Char.
209 D1h d
210 D2h e
211 D3h Y
212 D4h X
213 D5h R
214 D6h S
215 D7h k
216 D8h j
217 D9h 85
218 DAh
219 DBh ?
220 DCh ?
221 DDh ?
222 DEh
223 DFh ?
224 E0h ±
225 E1h ß
226 E2h ?
227 E3h À
228 E4h £
229 E5h Ã
230 E6h µ
231 E7h Ä
232 E8h ¦
233 E9h ?
234 EAh ©
235 EBh ´
236 ECh
237 EDh Æ
238 EEh µ
239 EFh )
240 F0h a
241 F1h ±
242 F2h e
243 F3h d
244 F4h
245 F5h !
246 F6h ÷
247 F7h H
248 F8h °
249 F9h
250 FAh ·
251 FBh
252 FCh
253 FDh ²
254 FEh
255 FFh (blank)
85
Page 94
APPENDIX A ASCII Numbers
86
Page 95

APPENDIX B Troubleshooting
Appendix
Problem:
No data is received by the software or the data that is received consists
of garbage (characters that dont make sense).
Possible Solutions:
1. The program may not be active. Exit SWD-Collect, then try starting
2. The Instrument Protocol Setup (see Figure 2.3, Page 10 or Figure
B Troubleshooting
the program again.
3.3, Page 20) may not be correct. This usually results in data being
captured but the data does not make sense. There are some key
communication parameters associated with serial (RS232)
communication that must be matched exactly between your
instrument and the configuration in SWD-Collect. In particular, if
the Baud Rate, Data Bits, Stop Bits, and Parity are not matched
exactly between the instrument and SWD-Collect, serial data
transfer will not work. The computer does not automatically
determine what these parameters are for your instrument - YOU
MUST ENTER THEM IN THE SOFTWARE.
3. The cable between the instrument and the computer may be
incorrect. This will usually result in no data being received. Try a
different cable and confirm that the wiring is correct by contacting
the instrument manufacturer.
4. The computer hardware, especially the RS232 port, may not be
working. Check the Comport configuration in your operating
system, or try a different COM port, preferably on a different
computer.
87
Page 96

APPENDIX B Troubleshooting
5. The instrument may not be sending the data. The instrument may
need to be set up differently or its RS232 port is not functional.
Try a different instrument, the simpler the better, to confirm that
the computer end is working properly.
88
Page 97

Index
Table of Contents
INDEX
Symbols
<Data> 56
<Header> 56
<Units> 56
A
ASCII numbers 14, 25, 83
autoload 41
automatic focus locking 32
autoopen commands 37, 41
autoscroll 40
autostart 40
C
clear 79
close all 42
close instrument 18, 42
commands
autoopen 37
interrupt button 26, 37
interval 26
paced 26
repeated 26
cycle time 26
sending 17
configure instrument 10, 19
conventions 2
copy protection 7
copyright 8
D
date stamping 61
delimiter 56
destination 16, 31, 45
file 32
keyboard 32
monitor 33
spreadsheet 33
discard data containing 47
E
exit 5
external control 13, 24
F
file destination 32
fill 76
float 73
formula
functions 80
operators 79
parentheses 81
H
hot key 3
I
import file 38
installation
contents of package 6
installing the software 7
instrument
closing 18, 42
configure 10, 19
create 10, 20
open 15, 29
instrument command setup
13, 24
instrument comport 11, 21
instrument name 11, 21
instrument protocol setup
11, 12, 20
instruments menu
import file 38
user info 38
interrupt 26, 37
Index - 1
Page 98

INDEX
K
keyboard destination 32
M
macros 47, 58
add button 59
add key button 60
adding to a parser 64
ASCII characters 63
counter 62
cumulative time 62
date/time stamping 61
defining 58
edit macro button 58
keyboard characters 60
removing 65
serial number 62
special functions 61
user prompts 63
menu
spreadsheet 42
font 77
format 73
save as 76
window 42
monitor destination 33
mouse
click and drag 4
double-clicking 4
procedures 4
N
number of timeouts 12, 22
O
on-line help 5
open instrument 15, 29
options menu
autoload 41
autoopen commands 37, 41
autoscroll 40
autostart 40
view monitor 39
view spreadsheet 39
other applications 35
P
parser
comment 51
definition 47
designing 49
destination 45
macros 47, 58
name 46
remove 47
scales
tolerance level 55
selector 51
setup 43
setup button 46
syntax 50
types 49
delimiter 56
numbers 52
position 53
scales 54
protocol 12, 22
Q
quick start 9
QuickSheet 69
S
scales 54
setup instruments 10, 19
user info button 66
special functions
data 56
header 56
units 56
special keys 3
spreadsheet
changing columns/rows 82
editing a cell 82
float entry 74
formula 74
formulas 79
loading 71
moving around 71
saving 72
scolling 71
Index - 2
Page 99

selecting cells 70
text entry 74
spreadsheet destination 33
spreadsheet menu 42
edit
clear 79
fill 76
font 77
format 73
float 73
save as 76
status line 5
T
time stamping 61
timeout 12, 22
tolerance level 55
U
user info 30, 66
user prompts 63
V
INDEX
view monitor 39
view spreadsheet 39
W
window menu 42
close all 42
Index - 3
Page 100
INDEX
Index - 4
 Loading...