

Page 1
ST50 MASS FLOW METER
Installation and Operation Guide
Pre-Installation
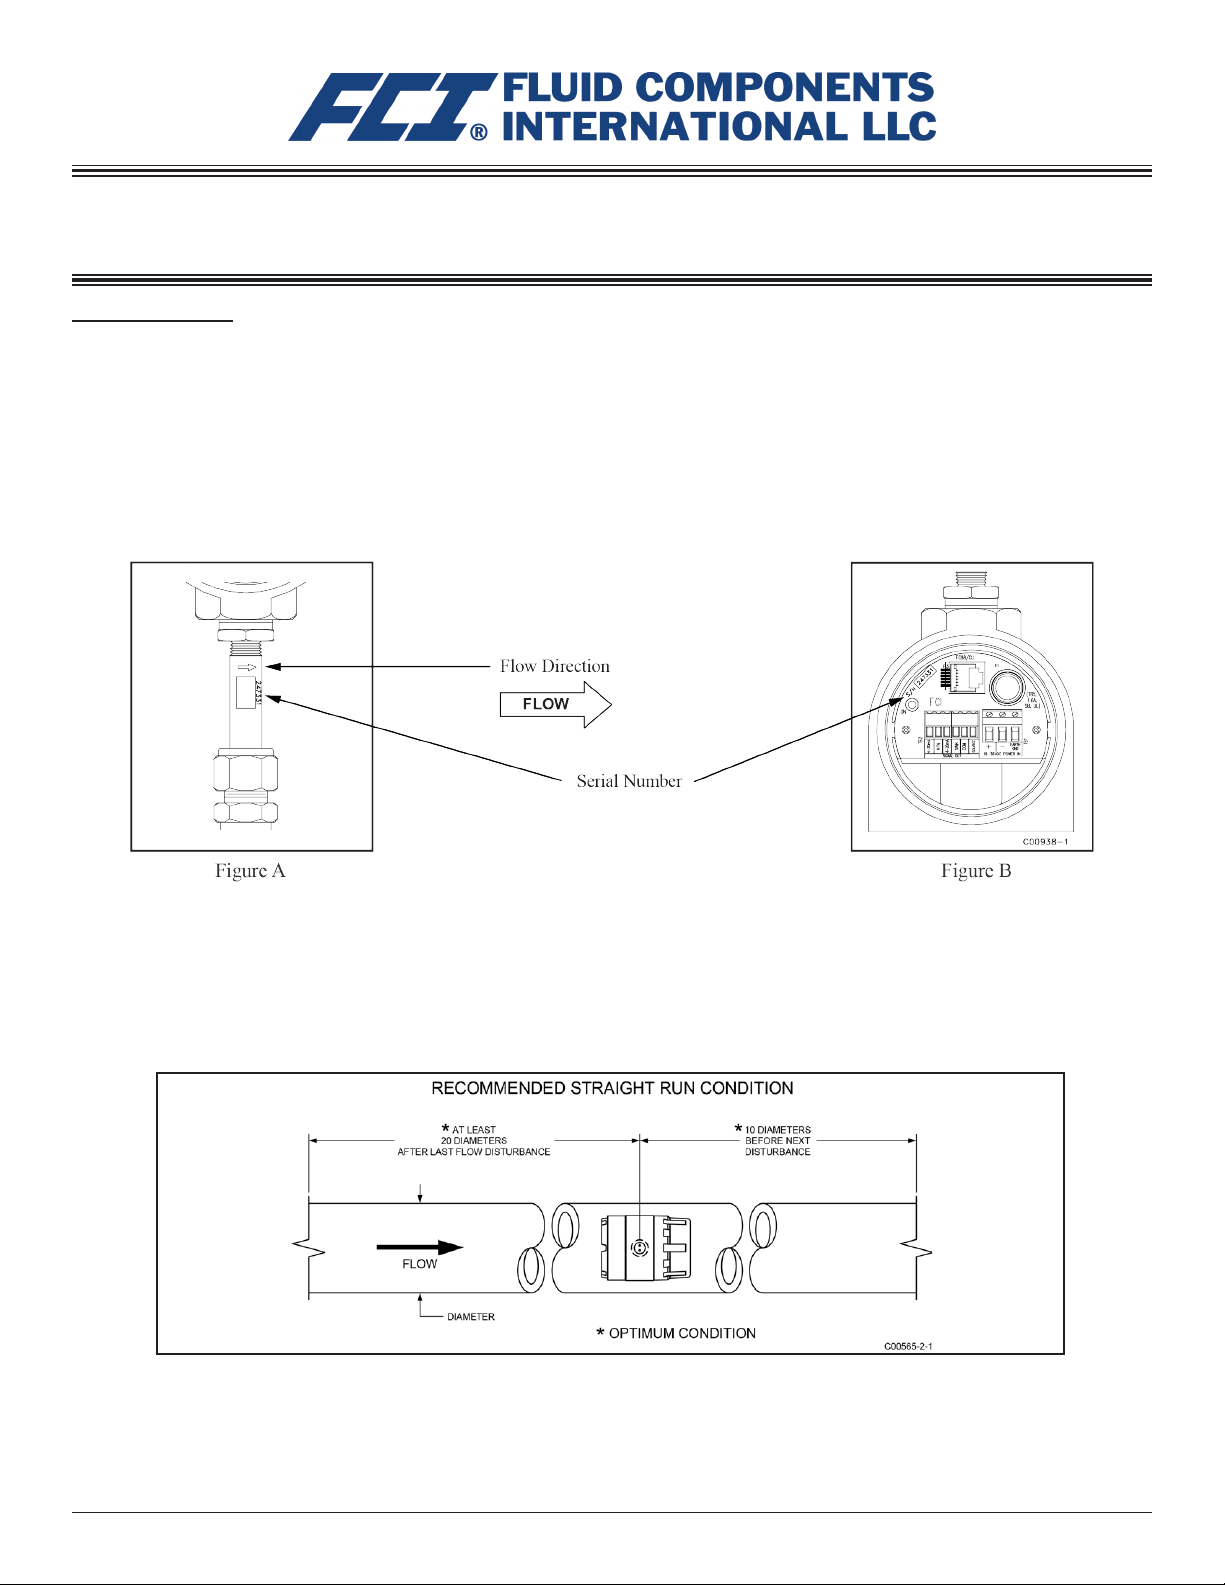
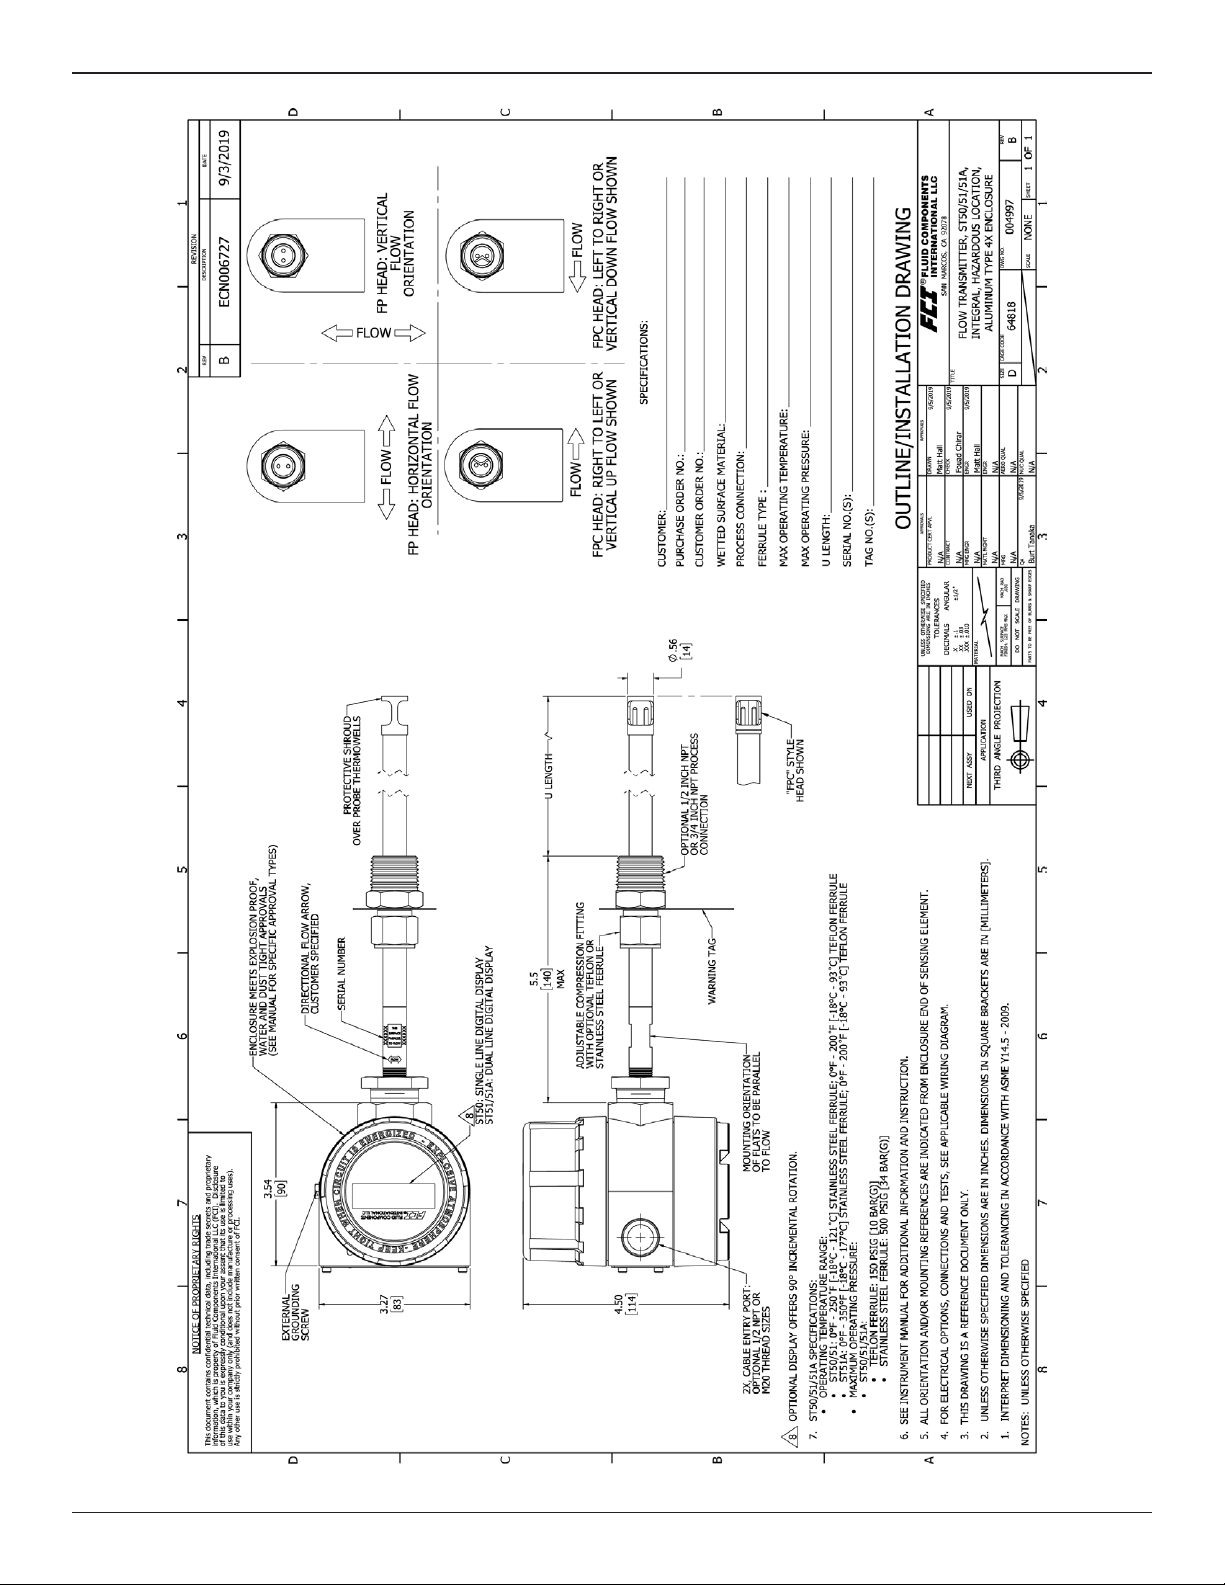
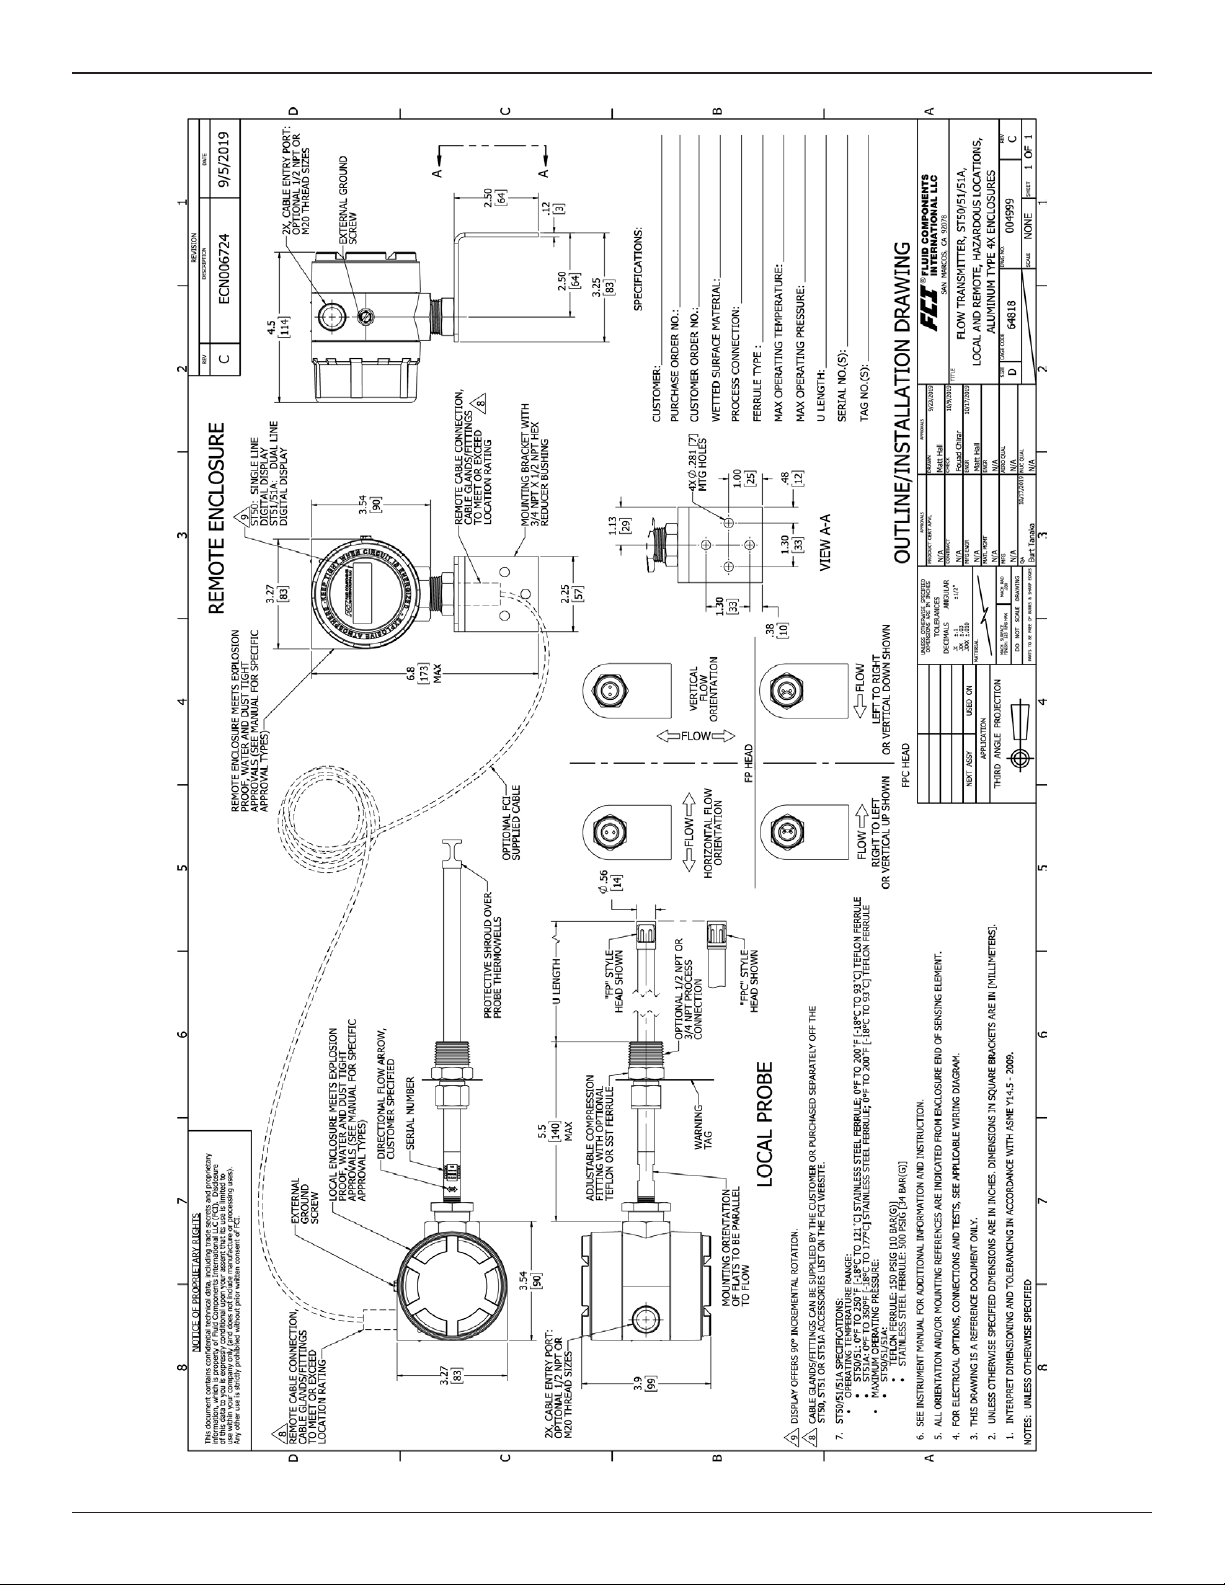
The ST50 can be specied with integral or remote electronics. The ow element has a serial number etched into the side of the
extension pipe as shown in Figure A. The transmitter circuit card has a serial number noted on the board as shown in Figure B. The
ow sensor and transmitter circuit have been calibrated as a matched set and should be paired together in service unless otherwise
approved by a factory technician.
Flow Direction Alignment
All sensor elements have a ow arrow indicator marked on the element assembly at the reference at. These ow elements have
been calibrated in a particular direction and are designed to be used in service with the ow arrow facing in the same direction as
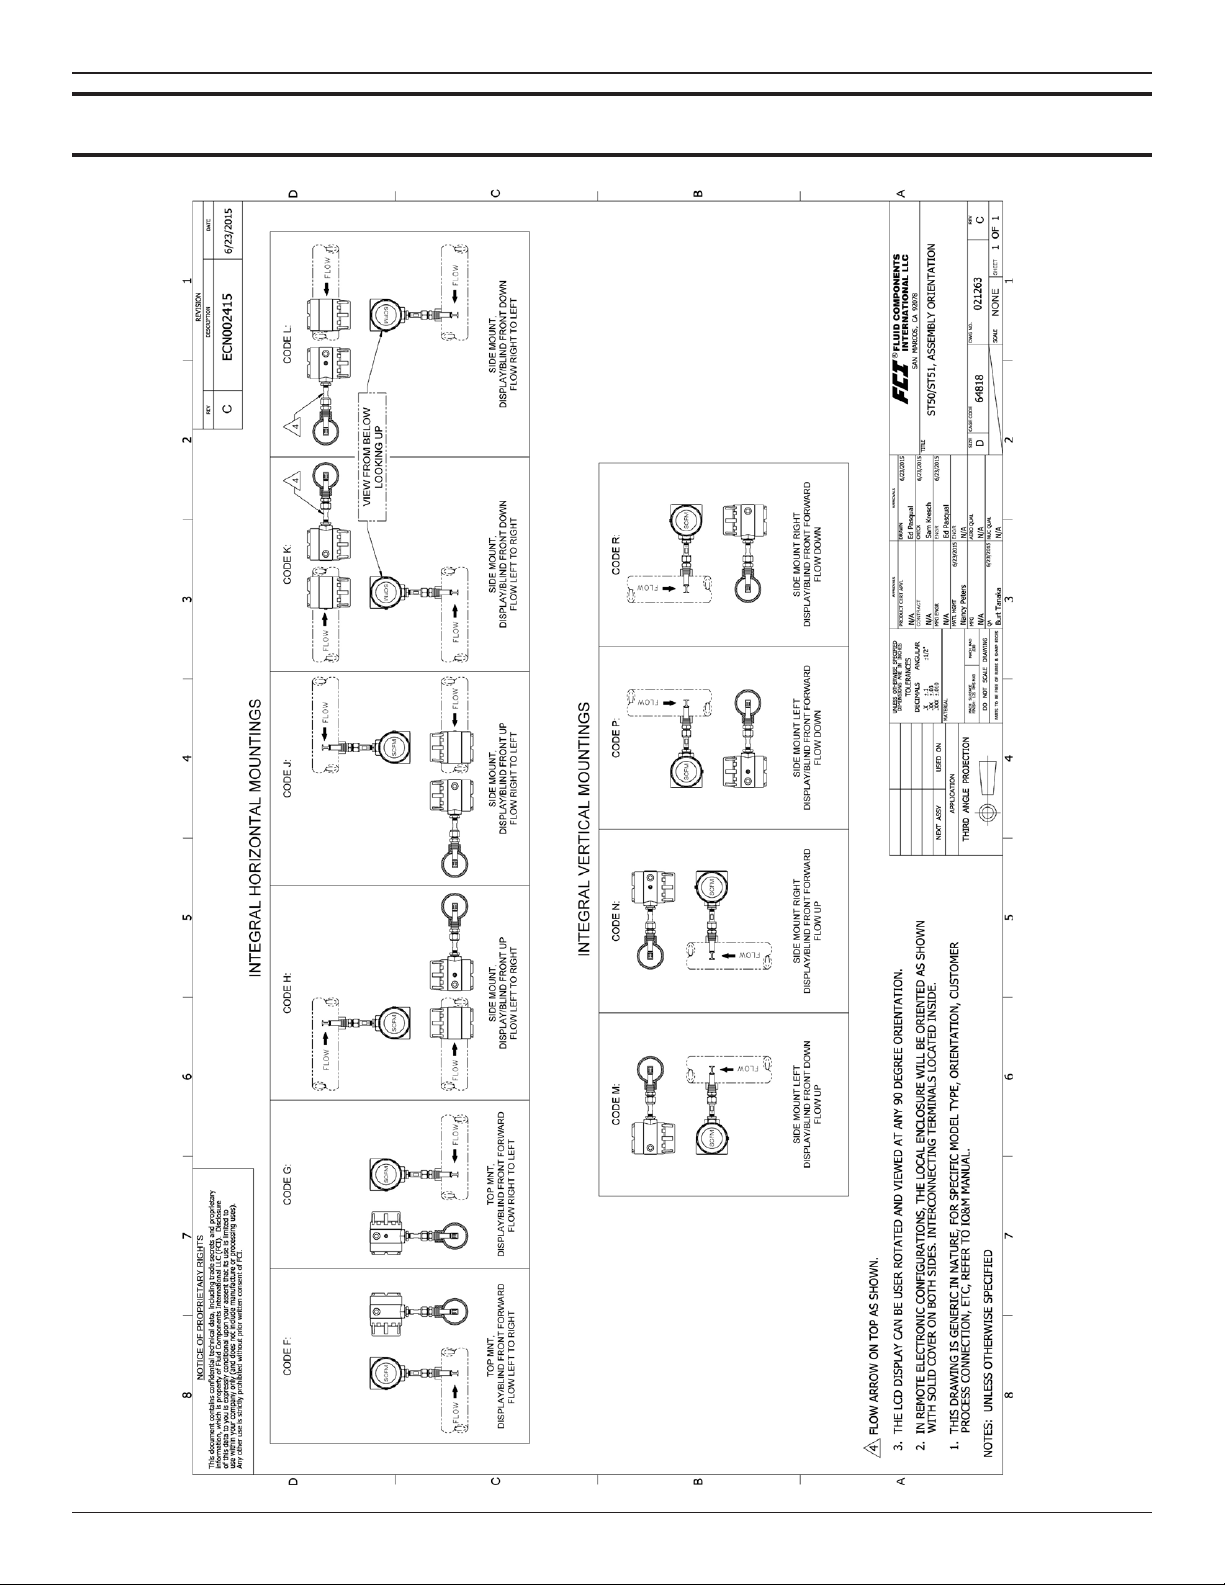
ow in the pipe stream. See Appendix C for orientation and factory calibration details.
Recommended Straight Run
To optimize ow meter system performance, FCI recommends installation with a minimum of 20 pipe diameters upstream
straight run and 10 pipe diameters of downstream straight run. Where straight run limitations signicantly reduce the available
pipe diameters, FCI uses Vortab ow conditioners to produce a transferable ow prole from the calibration installation to actual
eld installations. FCI’s proprietary AVAL software is available to make ow meter installation evaluations where straight run
limitations are considered. See Figure C for recommended installation.
Figure C
FCI ow meters may be installed with less than the recommended straight run, but may have performance limitations. FCI offers
Vortab ow conditioners for use in applications that have signicant straight run limitations. FCI uses the AVAL application
modeling software to predict meter performance in each installation. AVAL outputs are available to review prior to order
placement and will indicate performance expectations both with and without Vortab ow conditioning.
This page is subject to proprietary rights statement on last page 1 06EN003367 Rev. F
Page 2
Fluid Components International LLC ST50 Mass Flow Meter
Specications
Instrument
Media Compatibility:
Pipe/Line Size Compatibility:
Range:
Air, compressed air, or nitrogen: 0.75 SFPS to 400 SFPS
[0.23 MPS to 122 MPS]
Accuracy: Standard: ±2% of reading, ±0.5% of full scale
Optional: 0 °F to 250 °F [-18 °C to 121 °C]
Repeatability:
±0.5% reading
Temperature Compensation:
Standard: 40 °F to 100 °F [4 °C to 38 °C]
Optional: 0 °F to 250 °F [-18 °C to 121 °C]
Turndown Ratio:
Agency Approvals:
FM (US):
Class I, Div 1, GPS B,C,D
Class I, Div 2, GPS A,B,C,D
Class II/III, Div 1, GPS E,F,G
T4: -40°C<Ta<60°C
Type 4X, IP66
CSA (Canada):
Class I, Div 2, GPS A,B,C,D
T4: -40°C<Ta<60°C
Type 4X, IP66
ATEX/IECEx:
II 3 G EEx nA II T6
II 3 D T65°C
(DC input power only)
Warranty:
One year
Air, compressed air, and nitrogen
23 to 24 [51 mm to 610 mm]
″ ″
3:1 to 100:1
Flow Element (Standard or FPC Type)
Installation: Insertion, variable length with 1/2″ or 3/4″ NPT(M)
compression tting.
Type:
Thermal Dispersion
Material of Construction:
Hastelloy C thermowell sensors, 316 stainless steel compression
tting with Teon or stainless steel ferrule.
Pressure (Maximum Operating without Damage):
Stainless steel ferrule: 500 psig [34 bar(g)]
Teon ferrule: 150 psig [10 bar(g)]
Retractable packing gland: 500 psig [34 bar(g)]
Temperature (Maximum Operation):
Stainless steel ferrule: 0 °F to 250 °F [-18 °C to 121 °C]
Teon ferrule: 0 °F to 200 °F [-18 °C to 93 °C]
316 stainless steel body with
Process Connection:
1/2″ MNPT or 3/4″ MNPT with stainless steel or Teon ferrule
Retractable packing gland,
1/2″ or 3/4″
MNPT with graphite
or Teon packing
Insertion Length (Field Adjustable):
1″ to 6″ [25 mm to 152 mm]
1″ to 12″ [25 mm to 305 mm]
1″ to 18″ [25 mm to 457 mm]
Flow Transmitter
Enclosure:
with either 1/2″ Female NPT or M20x1.5 entries. Epoxy coated.
Analog Output Signals:
rate and/or temperature (500 ohms max impedance) and a pulse
output for total ow.
Output Pulse Source:
Pulse width at 50% duty cycle for rates 1 to 500 Hz, 0.5 second
pulse width for pulse rates below 1 Hz. 25 mA maximum load
pulsed, 10 mA maximum load if state set to normally on.
Output Pulse Sink:
width at 50% duty cycle for rates 1 to 500 Hz, 0.5 second pulse
width for rates below 1 Hz. Customer power source and load not
to exceed 40 VDC and 150 mA.
Communication Port: RS-232C, standard
Input Power:
DC: 18 VDC to 36 VDC (6 watts max.)
AC:
Power Filter Board:
Littelfuse TR5 Series
Breaking Capacity 50A @ 250 VAC
Operating Temperature:
0 °F to 140 °F [-18 °C to 60 °C]
Maximum Relative Humidity:
Maximum Altitude:
Digital Display:
user scalable to ow rate units or as 0-100%. For applications in
Div. 1 / Zone 1 environments and/or for dual-line digital display
with built-in totalizer display, refer to FCI Model ST51.
NEMA 4X [IP67], aluminum, dual conduit ports
Dual 4-20 mA, congurable to ow
Totalized ow or alarm setpoint. 15 VDC.
Totalized ow or alarm set point. Pulse
85 VAC to 265 VAC (12 watts max.; 1.6 A fuse)
CE Mark Approval from 100 VAC to 240 VAC)
Amp Code Rated Current Voltage Rating
374 1160 0410
1160 1.60 A 250 V
For Indoor or Outdoor use,
100%
12,000 ft. [3,658 m]
±9999 Counts LCD, 0.45″ H [11.4 mm] characters,
This page is subject to proprietary rights statement on last page 2 06EN003367 Rev. F
Page 3
ST50 Mass Flow Meter Fluid Components International LLC
Installing Flow Element
Compression Fitting Mounting
Caution: The element is shipped with a protective sleeve surrounding the ow element. After removing the sleeve, take
care to prevent the element from sliding through the compression tting and contacting the opposing wall with any force
as it may cause damage to the element and potentially upset the calibration.
The ST50 is available with both Teon compression tting ferrules and metal ferrules. While the Teon ferrule conguration
can be readjusted, it is possible for over-tightening to cause permanent positioning or damage to the extension pipe that makes
future adjustment difcult. While Teon provides for some adjustability, it has a lower process pressure rating and is not designed
for continuous adjustments. The metal ferrule version can only be tightened down once and it becomes permanently positioned.
The ferrule type is indicated in the instrument part number displayed on the instrument tag. This can be cross referenced to the
ordering information sheet.
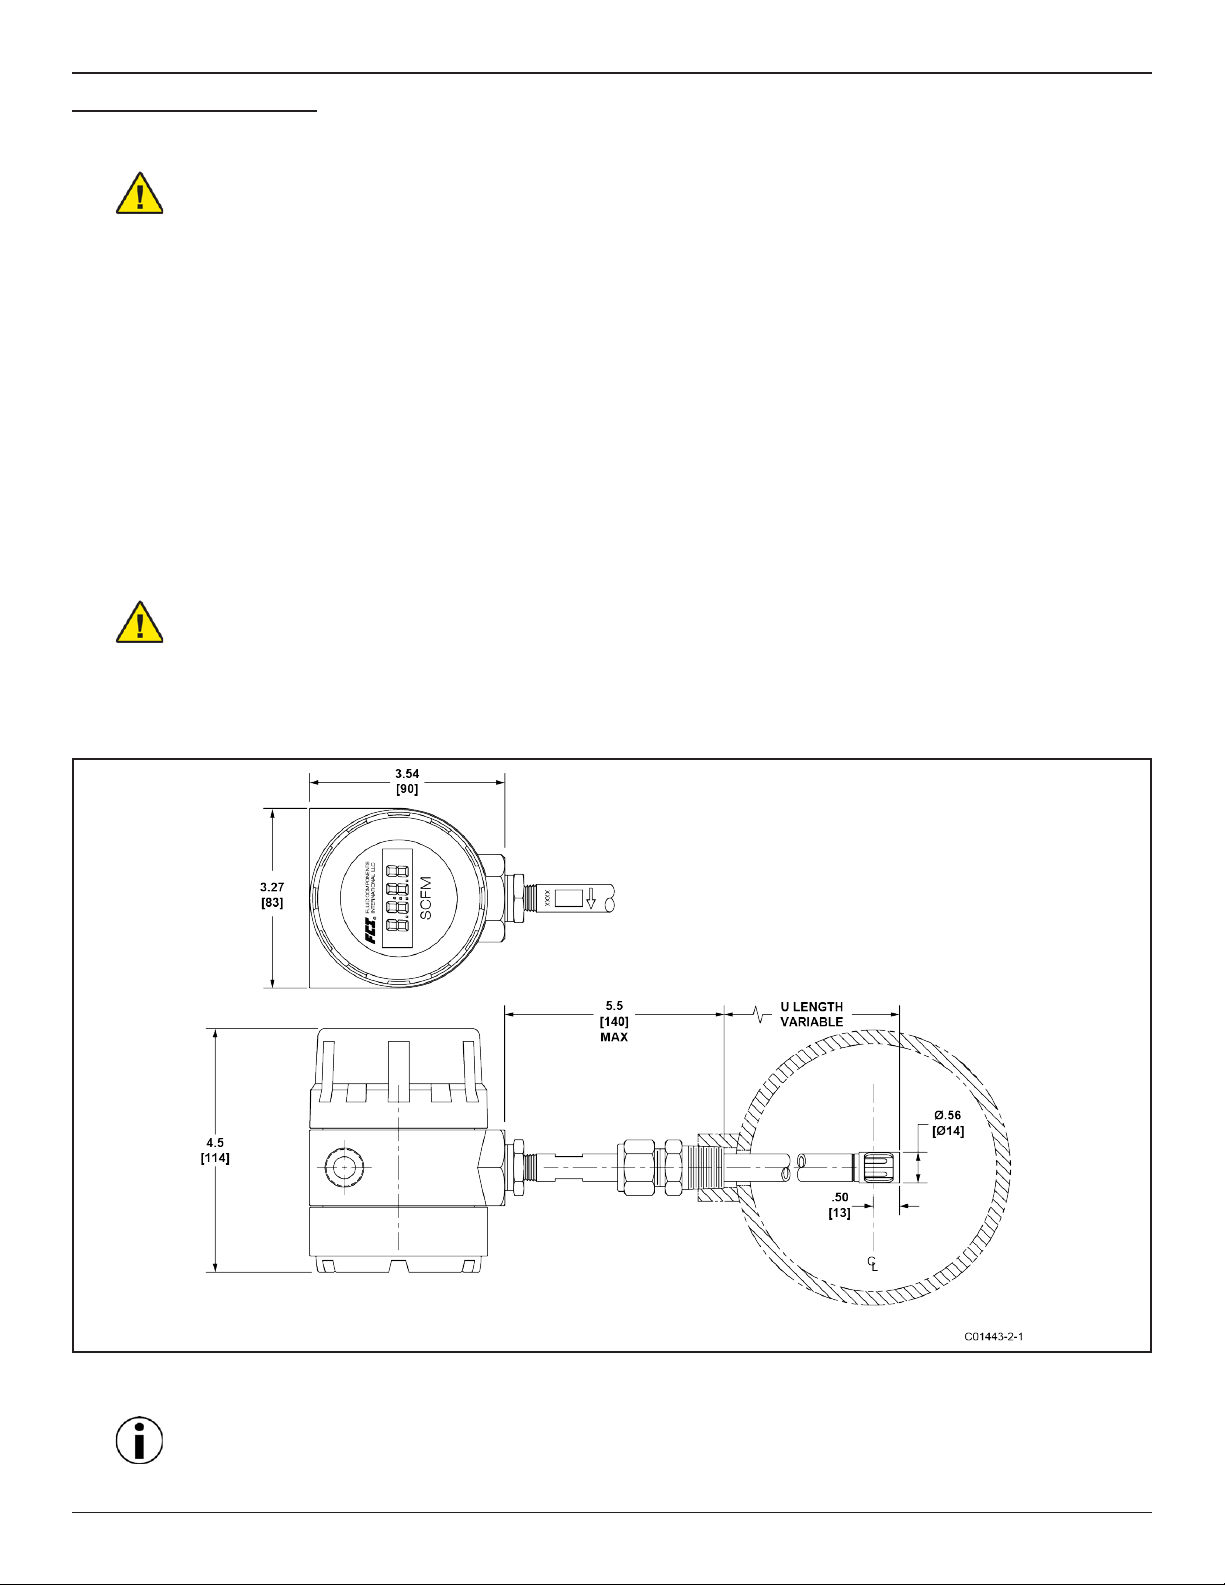
All ow meters have been calibrated with the ow element located at the centerline of the pipe and ow stream as indicated in
Figure D. Couplings and threadolets come in various dimensions. Proper installation requires that the element be measured with
consideration to process connection dimensions and pipe centerline. FCI recommends that the element be rst installed in the line
with the compression tting lightly tightened around the extension, then slowly move the pipe extension forward until the element
is at centerline as shown.
Caution: On top mount installations, particularly, take care to prevent the element from sliding through the compression
tting and contacting the opposing wall with any force as it may cause damage to the element and potentially upset the
calibration.
FLOW ELEMENT INSTALLATION & “U” LENGTH ADJUSTMENT
Figure D
Note: For proper performance install the element so that probe tip is .50 inches [13 mm] past pipe centerline. Instrument
is specically calibrated for centerline referenced installation, which is critical for line sizes 4″ [25 mm] and smaller.
This page is subject to proprietary rights statement on last page 3 06EN003367 Rev. F
Page 4
Fluid Components International LLC ST50 Mass Flow Meter
To assist in nal installation, FCI suggests making a readable mark on the extension pipe to indicate the nal desired compression
tting position that will place the element at the centerline reference once the system is tightened down into place. With the
compression tting lightly tightened, hold the element assembly along the outside of the installation, or directly above, to visually
check the compression tting’s centerline installation. To calculate the actual “U” length dimension, take the inside diameter
of the pipe or duct divide by 2, then add 0.25″, then add for the pipe wall thickness and the process tting offset that allows the
compression tting to securely seat in the process port. See Figure D above.
Align the at parallel to ow and adjust the instrument depth. Upon determination of the nal compression tting location on
the extension pipe, apply the proper thread sealant to the NPT threads and rmly tighten the compression tting into the mating
process connection. Torque varies per application. Tighten the compression nut to the torque indicated with the corresponding
ferrule material. Manufacturer recommends 1-1/4 turns from hand-tight baseline.
Ferrule Torque
Teon 65 in-lbs
316 SST 65 ft-lbs
Retractable Packing Gland Mounting
A retractable packing gland, with ½″ MNPT or ¾″ MNPT threads and graphite or Teon packing, is a process connection option.
FCI single point ow meters are calibrated at the centerline of the process pipe. The ow element is properly mounted when the
tip of the ow element is located .50 inches (13 mm) past the pipe centerline. Follow the below steps to install/retract instruments
with the retractable packing gland option.
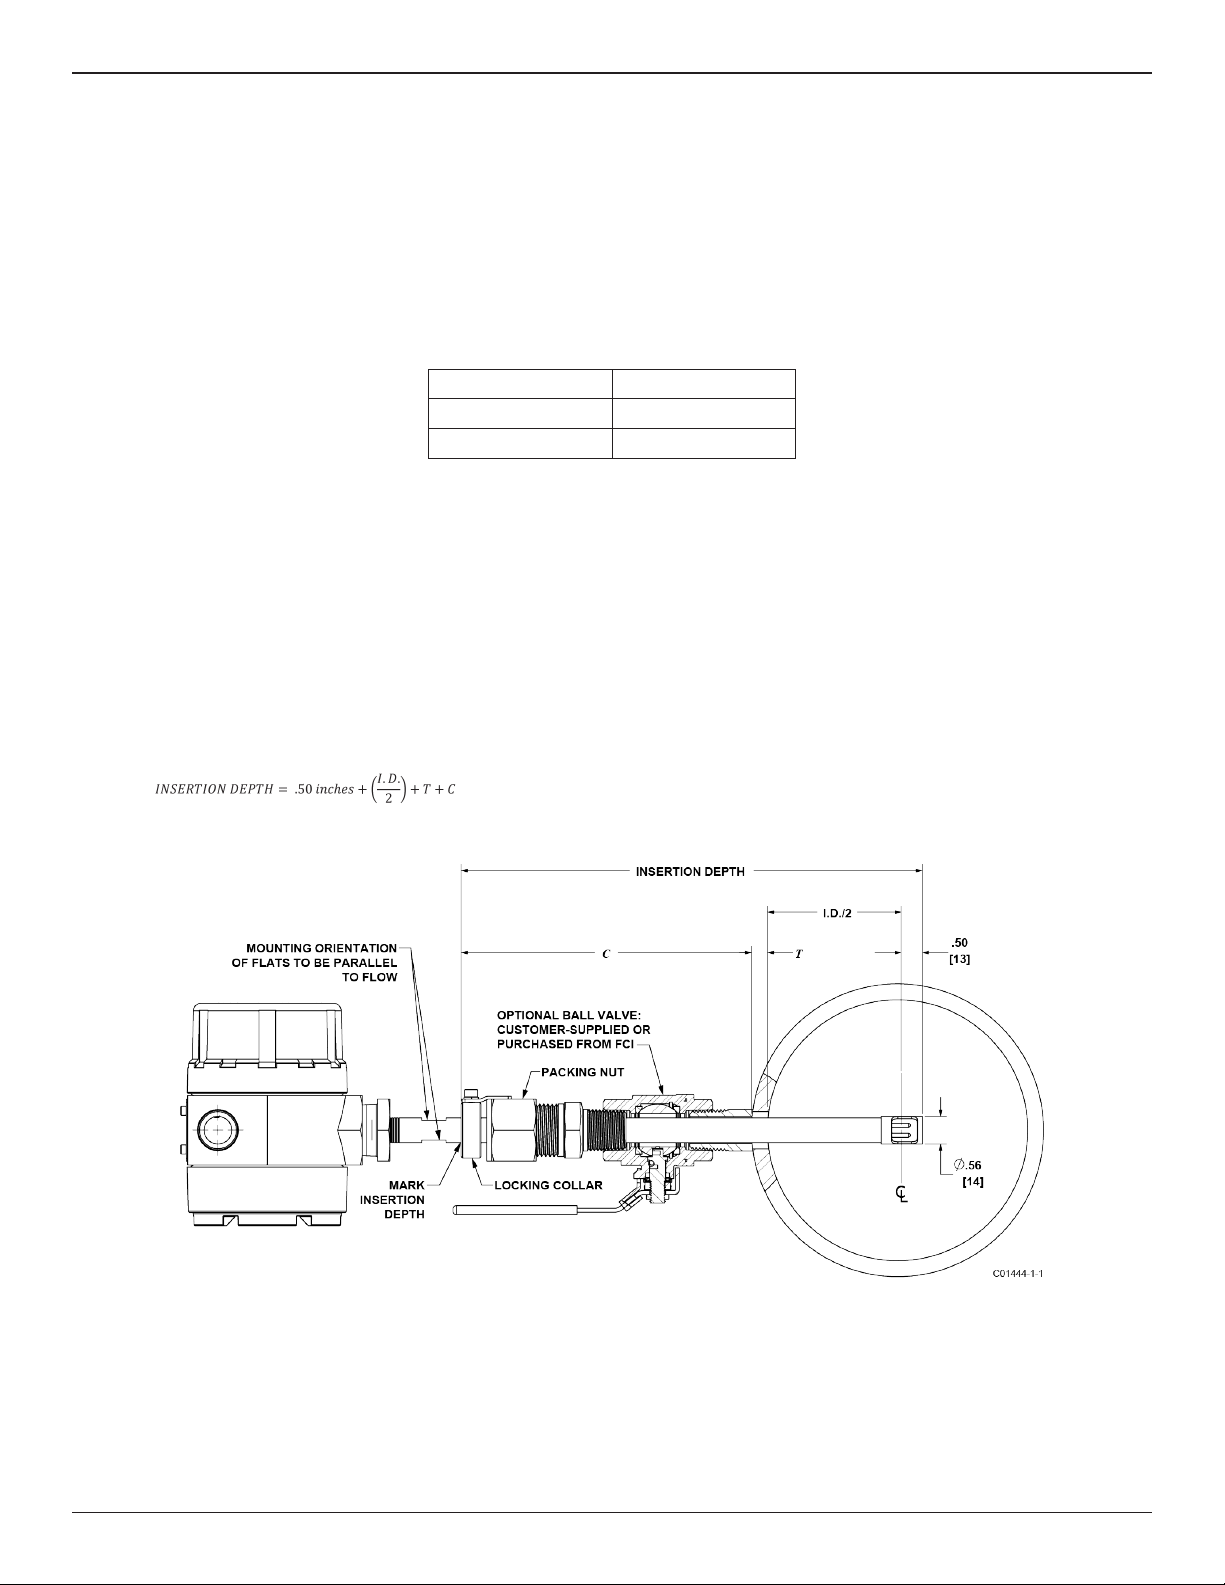
1. The scale etched on the side of the insertion probe indicates the length to the tip of the ow element. Calculate the insertion
depth using the equation, variables, and Figure E below.
ID = Inside Diameter of Pipe
T = Pipe Wall Thickness
C = Mounting Coupling with Optional Ball Valve and Installed Packing Gland Length
INSERTION DEPTH = ______________
Figure E
2. Mark the insertion pipe at the calculated insertion depth.
3. Ball Valve Applications Only: If a ball valve is required, install the ball valve to the process mounting coupling. Close the
ball valve to prevent the process media from leaking out when installing the packing gland with the process line pressurized.
4. Apply the proper thread sealant compatible with the process media to the male threads of the packing gland. Fully retract the
insertion probe into the cavity of the packing gland and install the packing gland into the process mounting coupling or ball
valve. If a ball valve is not used, make sure to rst depressurize the process line before installing.
This page is subject to proprietary rights statement on last page 4 06EN003367 Rev. F
Page 5
ST50 Mass Flow Meter Fluid Components International LLC
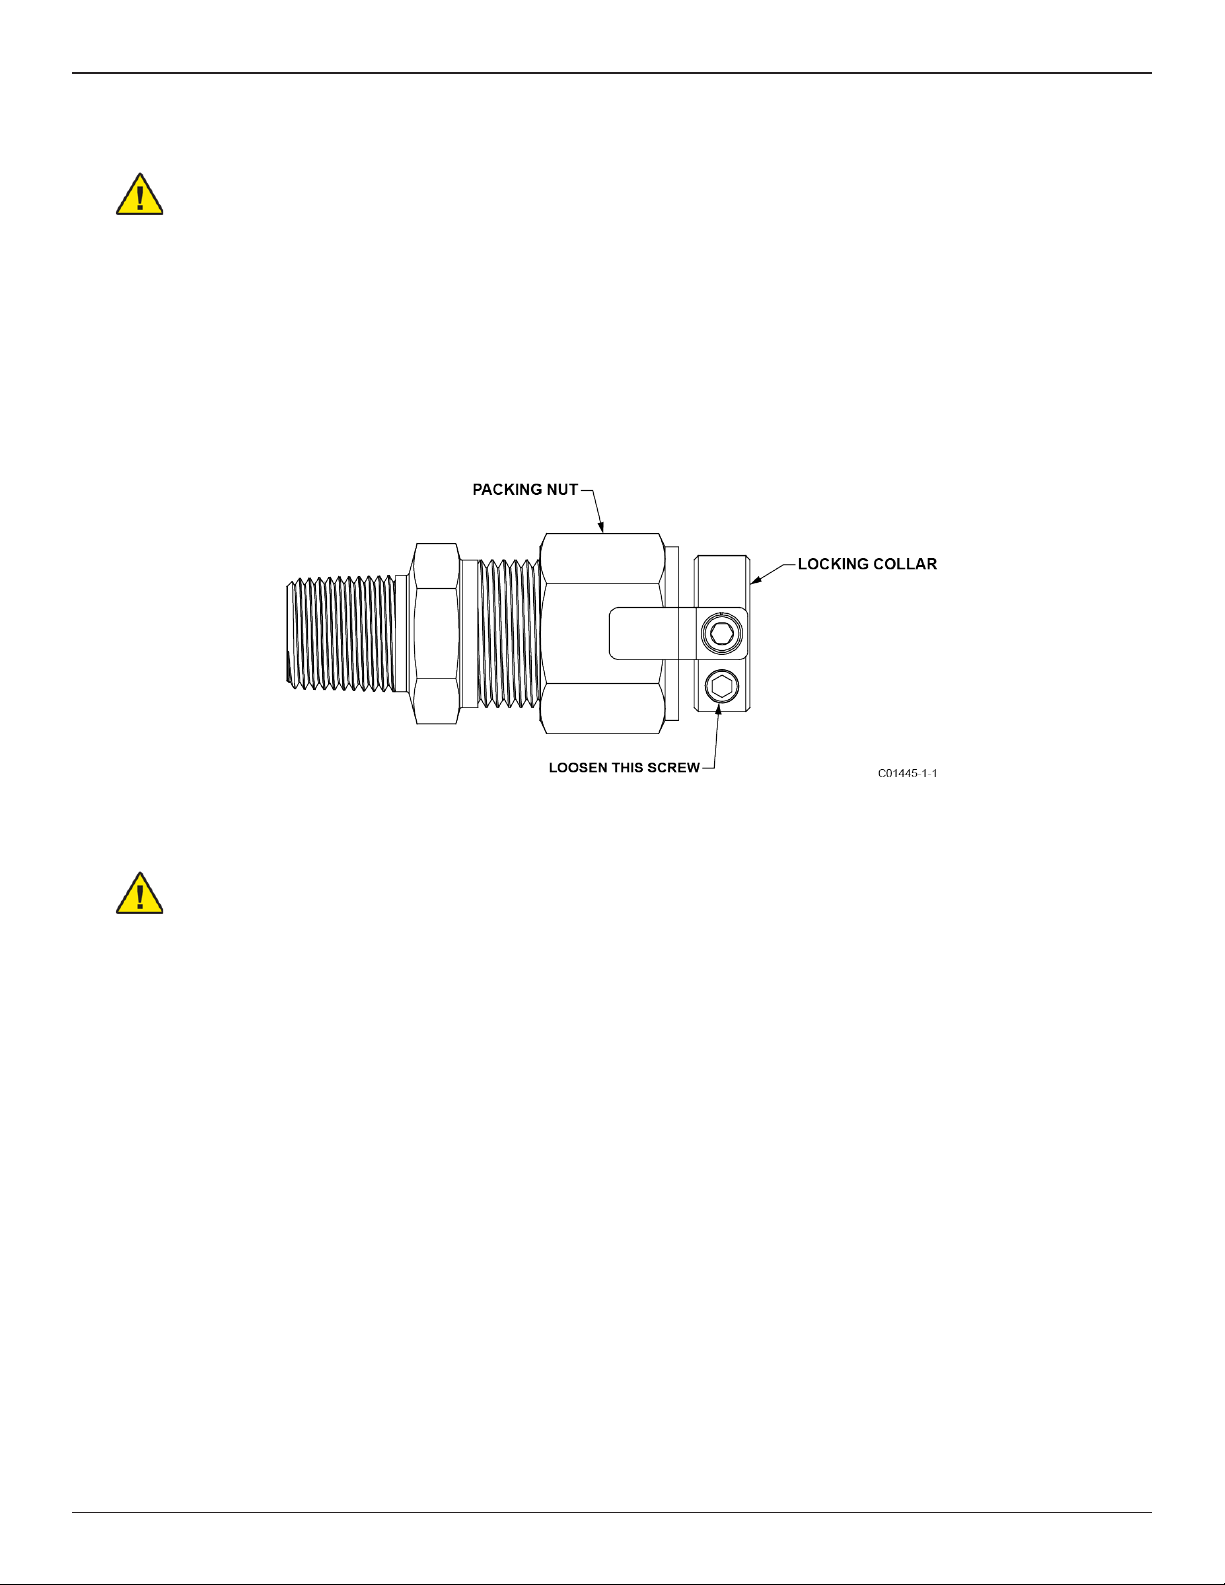
5. Tighten the packing nut until the internal packing is tight enough to prevent excess process leakage, but also allow the
insertion probe to be inserted into place. For ball valve applications, open the ball valve after the packing nut has been
tightened.
Caution: For applications where the process media is pressurized to greater than 232 psig [16 bar(g)] make sure to rst
depressurize the process line before making the insertion.
6. Align the orientation at and ow arrow parallel to the ow direction and proceed to insert the ow element into the process
media pipe up to the insertion depth mark.
7. Tighten the packing nut another ½ to 1 turn tight (approximately 20 ft-lbs) until the packing has created a full seal.
8. Ensure the locking collar is properly secured to the back of the packing gland. Torque the two No. 8-32 socket head cap
screws on the locking collar to 20 in-lbs using a 9/64″ hex key.
Retraction/Removal Procedure
1. Loosen the socket head cap screw on the side of the locking collar. See Figure F below.
Figure F
Caution: For applications where the process media is pressurized to greater than 232 psig [16 bar(g)] make sure to
rst depressurize the process line before retracting the ow element. At 232 psig [16 bar(g)], the effective force on the
insertion probe is 45.5 lbs (20.6 kg), which is the limit at which the ow element can be safely guided by hand. When
using hands to restrain the retraction, be prepared for a rapid pressure impulse of the ow element. Make sure that there
are no objects directly behind the ow element as the insertion probe may retract very quickly.
2. Slowly loosen the packing nut until the insertion probe begins to retract. Use hands as needed to help control the retraction.
If the probe does not begin to retract itself, gently shake and pull the insertion probe until the ow element has been fully
retracted into the packing gland.
3. For ball valve applications, close the ball valve immediately after retraction to seal off the process. After closing the ball
valve it is then safe to remove the ow element from the back end of the ball valve. If a ball valve is not being used, make
sure to rst depressurize the process line before removing the ow element.
This page is subject to proprietary rights statement on last page 5 06EN003367 Rev. F
Page 6
Fluid Components International LLC ST50 Mass Flow Meter
Instrument Wiring
Before the instrument is opened to connect power and signal, FCI recommends that the following ESD precautions be observed:
Use a wrist band or heel strap with a 1 megohm resistor connected to ground. If the instrument is in the shop setting, there should be
a static conductive mat on the work table or oor with a 1 megohm resistor connected to ground. Connect the instrument to ground.
Apply antistatic agents such as Static Free made by Chemtronics (or equivalent) to hand tools to be used on the instrument. Keep high
static producing items away from the instrument.
The above precautions are minimum requirements. The complete use of ESD precautions can be found in the U.S. Dept of Defense
Handbook 263.
Make sure power is OFF before wiring the instrument. Pull the power and signal output wires through the port, using care not to
damage wires. FCI recommends using crimp lugs on the output wires to ensure proper connection with the terminal strip. Connect the
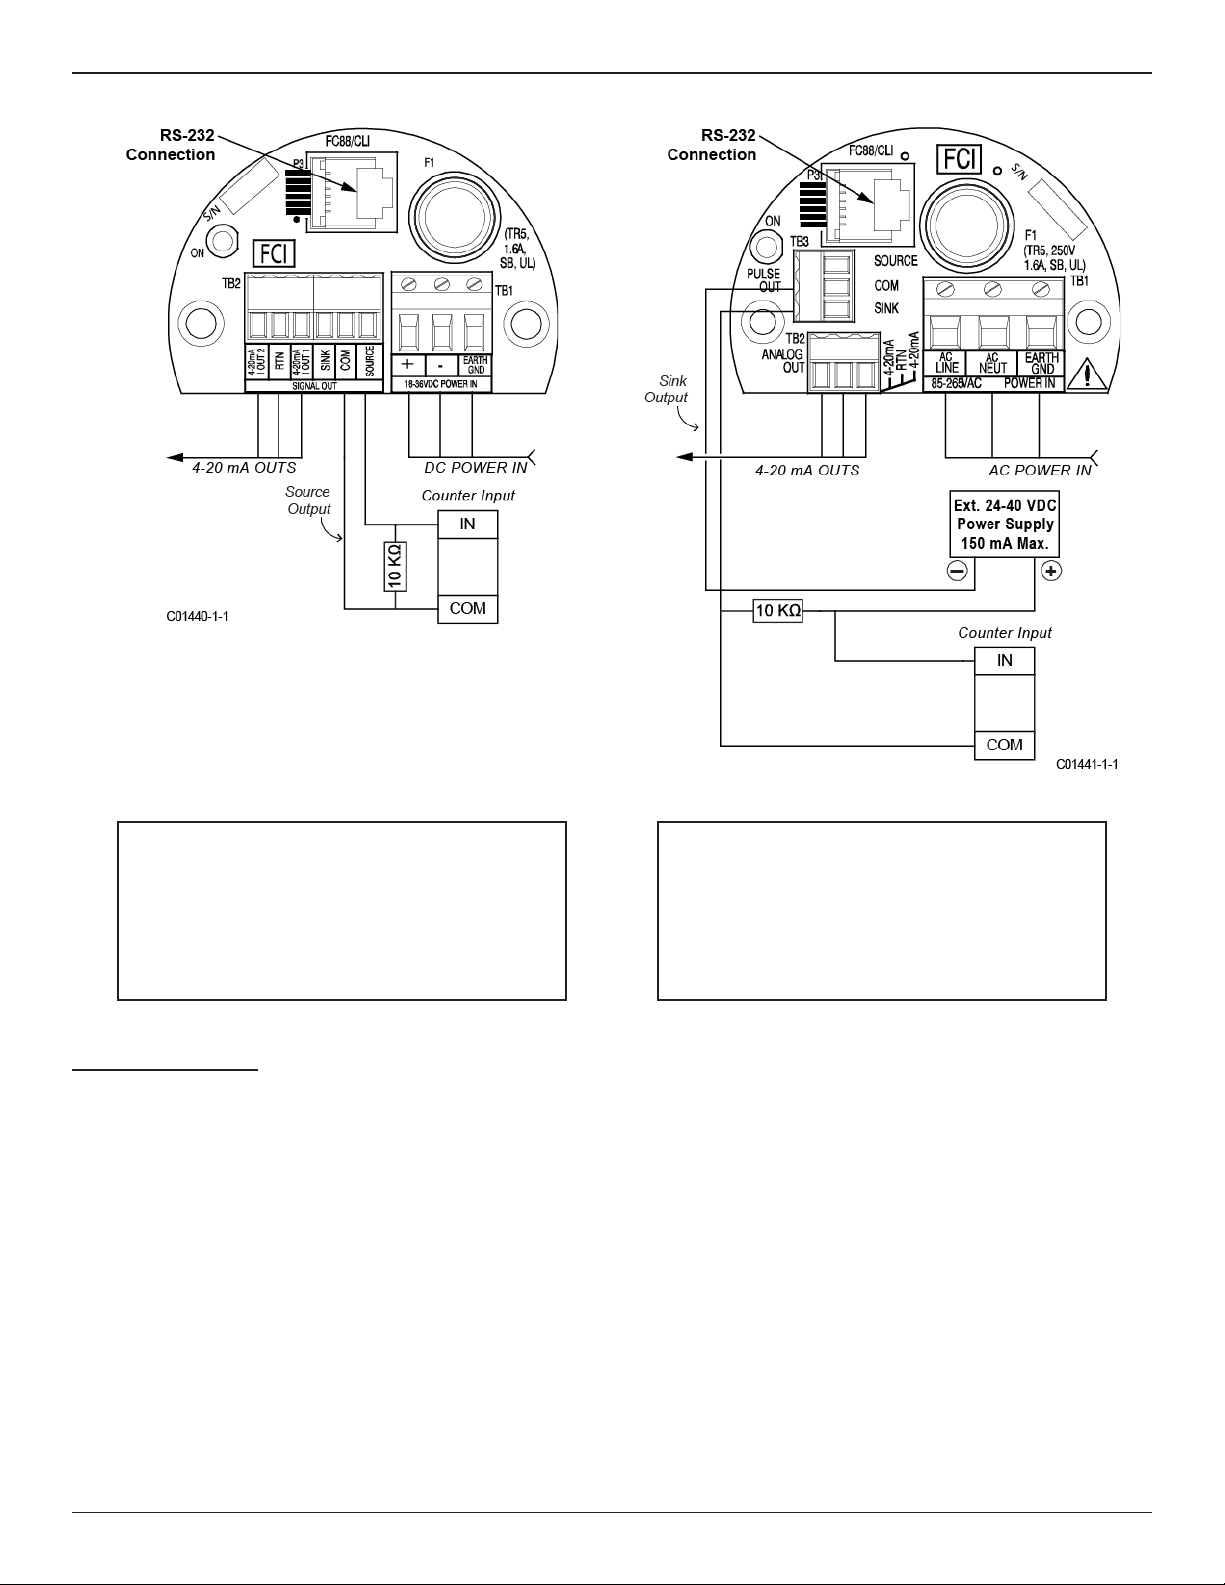
output wires as shown on Figures G and H.
Warning: Only qualied personnel are to wire or test this instrument. The operator assumes all responsibility for safe
practices while wiring and troubleshooting.
Install an input power disconnect switch and fuse near the instrument to interrupt power during installation and
maintenance. Operator must have power disconnected before wiring.
Safety instructions for the use of the ST50 series (18 to 36 VDC only) in Hazardous Areas. Approval, KEMA
06ATEX0207 X for Category 3 GD protection EEx nA T6 T65°. Special conditions for safe use:
1) Provision shall be made to prevent the rated voltage from being exceeded by transient disturbances of more than 40%.
2) For applications in explosive atmospheres caused by air/dust mixtures, cables and conduit entries shall be provided a
degree of protection of at least IP65 according to EN60529.
Input Power
The ST50 is available with both
VDC and VAC input power congurations. Customers selecting VDC input power will have
a VDC input board only. Similarly, the VAC power board is supplied only with VAC powered units. In addition, both boards
are marked for either DC or AC power. Only connect the power specied on the wiring module as shown in Figures G and H
respectively. Both DC and AC inputs require a Gnd wire to be connected. Input power terminal blocks accept 14-26 AWG wire.
Analog Output
4-20 mA: The instrument is provided with two 4-20 mA outputs. By default Output 1 is congured for ow and Output 2 is
congured for temperature. Terminal blocks accept 14-28 AWG wires, 500 ohms max. load per output. Note that when the 4-20
mA outputs are used simultaneously, a single return lead is used.
Modify the analog output conguration using one of the below listed methods:
1. The RS232 port, a PC terminal program or FS88 handheld terminal and single-letter commands as summarized in Appendix
B, Table 5. Use the ‘V’ menu to congure the instrument analog outputs.
2. The RS232 port, a computer and the CLI commands as summarized in Appendix B, Table 6.
This page is subject to proprietary rights statement on last page 6 06EN003367 Rev. F
Page 7
ST50 Mass Flow Meter Fluid Components International LLC
VDC Power Connection
VAC Power Connection
Figure G
VDC Power
As Shown:
18-36 VDC power connected with gnd
4-20 mA connected for ow and temperature
Pulse Out in source mode
Note: In source mode, 15 VDC Output max, 50 mA max.
Power Dissipation
DC Version
Power dissipation values under nominal conditions:
Instrument (Electronics + Sensor): 4.5 watts
Sensor only: 0.25 watts
Power dissipation values under max. load conditions:
Instrument (Electronics + Sensor): 6 watts
Sensor only: 0.30 watts
Figure H
VAC Power
As Shown:
85-265 VAC power connected with gnd
4-20 mA connected for ow and temperature
Pulse Out in sink mode
Note: In sink mode, 40 VDC max, 150 mA max customer
supplied power source.
AC Version
Power dissipation values under nominal conditions:
Instrument (Electronics + Sensor): 11.6 watts
Sensor only: 0.25 watts
Power dissipation values under max. load conditions:
Instrument (Electronics + Sensor): 12 watts
Sensor only: 0.30 watts
This page is subject to proprietary rights statement on last page 7 06EN003367 Rev. F
Page 8
Fluid Components International LLC ST50 Mass Flow Meter
Pulse Output Activation
The ST50 provides an optional pulse output feature. Instruments ordered with this feature and volumetric or mass ow units will be
factory set with totalizer and pulse output activated. The mode can be changed in the eld. See the examples of source and sink output
wiring in Figures G and H above. Though only one conguration is shown with the VAC and VDC power supplies, the source or sink
can be used with either power input.
Source Mode: 15 VDC output, 50 mA max.
Sink Mode: 40 VDC max, 150 mA max. Customer-supplied power source.
Pulse Output Setup
The ST50 mass ow meter pulse output can be congured for either a pulse train (factory standard) for an external counter and/
or ow rate indication or an alarm. The pulse output can be wired to use a source or sink outputs. The maximum frequency of the
pulse output is 500 Hz. Set up the totalizer rst, then congure the sink/source pulse output as required for the application (sink/
source output, pulse factor, sample period and pulse state.
Source mode: In this mode the ow meter electronics supplies the voltage and current for the pulse. Maximum 15 VDC and
50 mA (depends on the connected load).
Sink mode: If the connected load requires >15 VDC and 50 mA an external power supply is required. Maximum 40 VDC
and 150 mA.
Pulse factor: Number of pulses per selected engineering unit. Default = 1
Example in NCMH:
1 = 1 pulse per NCM
0.1 = 1 pulse per 0.1 NCM (10 pulses per 1 NCM)
10 = 1 pulse per 10 NCM
Range pulse factor 0.001 – 1000
Sample time: Time in seconds before calculating the next number of pulses.
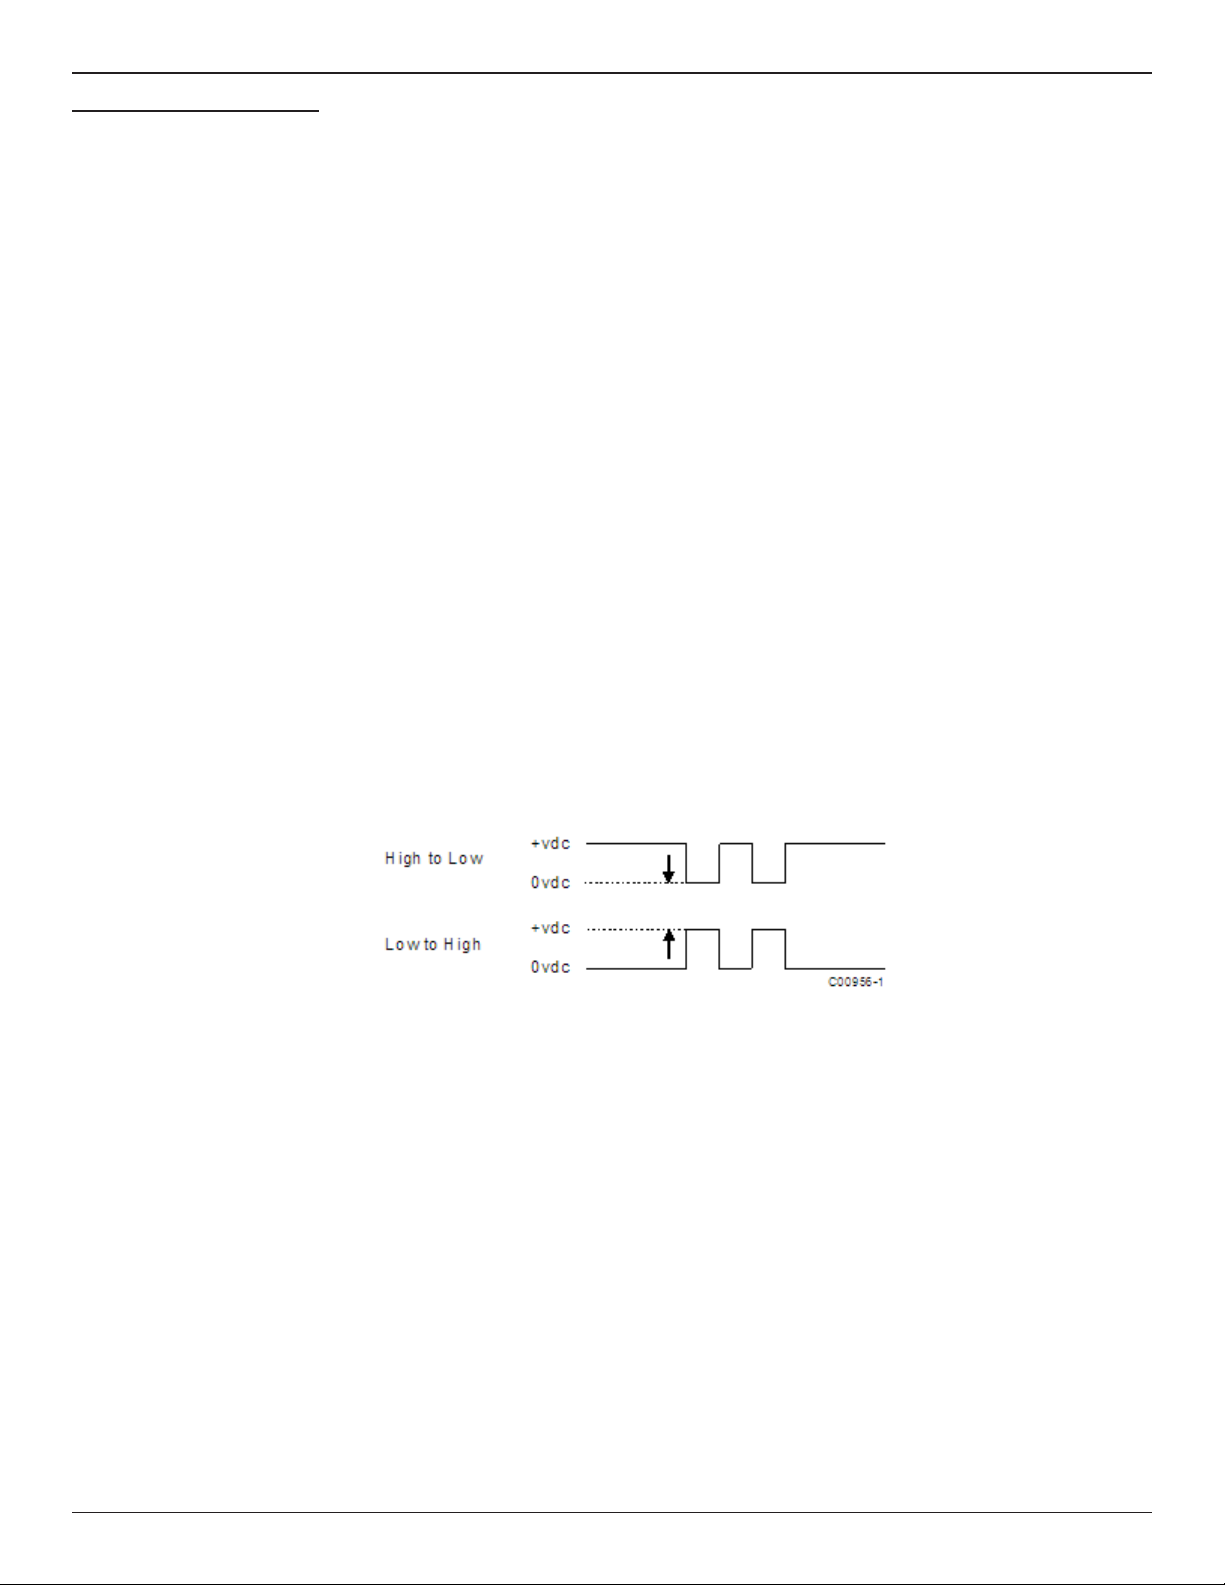
Pulse state: Transitions High to Low or Low to High. Meaning the pulse is normally high or low.
Pulse Output Functions
Alarm: Set in Source or Sink mode. With this function selected, the transistor driver state changes from high to low or
low to high, depending on the selected pulse state, at a set ow rate (pulse factor and sample time not required).
Counter: Set in Source or Sink mode. The transistor driver outputs the calculated number of pulses* based on the
indicated ow. And external display will indicate the totalized ow.
Flow rate: Set in Source or Sink mode. The transistor driver outputs the calculated number of pulses* based on the
indicated ow. External display set to calculate ow from incoming pulses.
* Each sample period the number of pulses are calculated and output by the open collector. Any remaining fractional pulse in the calculation will be added to the
next sample. Example:
Flow = 90 NCMM (= 1.5 NCMS), Pulse factor =1, sample time is 1.
After 1 second the number of calculated pulses is 1.5, pulse out is 1. Remainder = 0.5
After the next second the number of pulses is 2 (1.5+0.5), pulses out is 2. Remainder = 0
This page is subject to proprietary rights statement on last page 8 06EN003367 Rev. F
Page 9

ST50 Mass Flow Meter Fluid Components International LLC
Setup Interface
All parameters on this meter are set through the RS232 interface connection (modular jack P3). The RS232 interface allows the
instrument to be set up with either an FC88 hand held communicator or a computer. The FC88 is powered through the meter and
comes with the serial interface cable. If a computer interface is used, an adapter (RJ to 9-pin PC serial port) is required. The adapter
can be obtained from FCI: Part No. 014108-02.
Using a serial comm/terminal program (e.g., HyperTerminal, TeraTerm, Putty, etc.) congure the PC’s serial port (the one intended to
be connected to the instrument) as listed below.
COM Port Number: Number of COM port connected to instrument (COM1, COM2, etc.)
Baud Rate: 9600
Number of Bits: 8
Stop Bits: 1
Parity: None
Flow Control: None
Terminal Emulation: VT100
After conguring the serial port (and making the PC-to-instrument connections) start a communications session with the applicable
serial port. Enter any of the meter’s single letter commands in the program’s terminal window to execute a function. See "Table 5.
ST50 List of Single Letter Commands" on page 21 (Appendix B) for the complete command list.
An additional command line interface (CLI) is available through the RS232 port. This interface is accessed with the “Y” command
using a computer or FC88. The command line password is “357.” See "Table 6. ST50 List of CLI Commands" on page 21 in
Appendix B for command line details.
This page is subject to proprietary rights statement on last page 9 06EN003367 Rev. F
Page 10
Fluid Components International LLC ST50 Mass Flow Meter
Startup and Commissioning
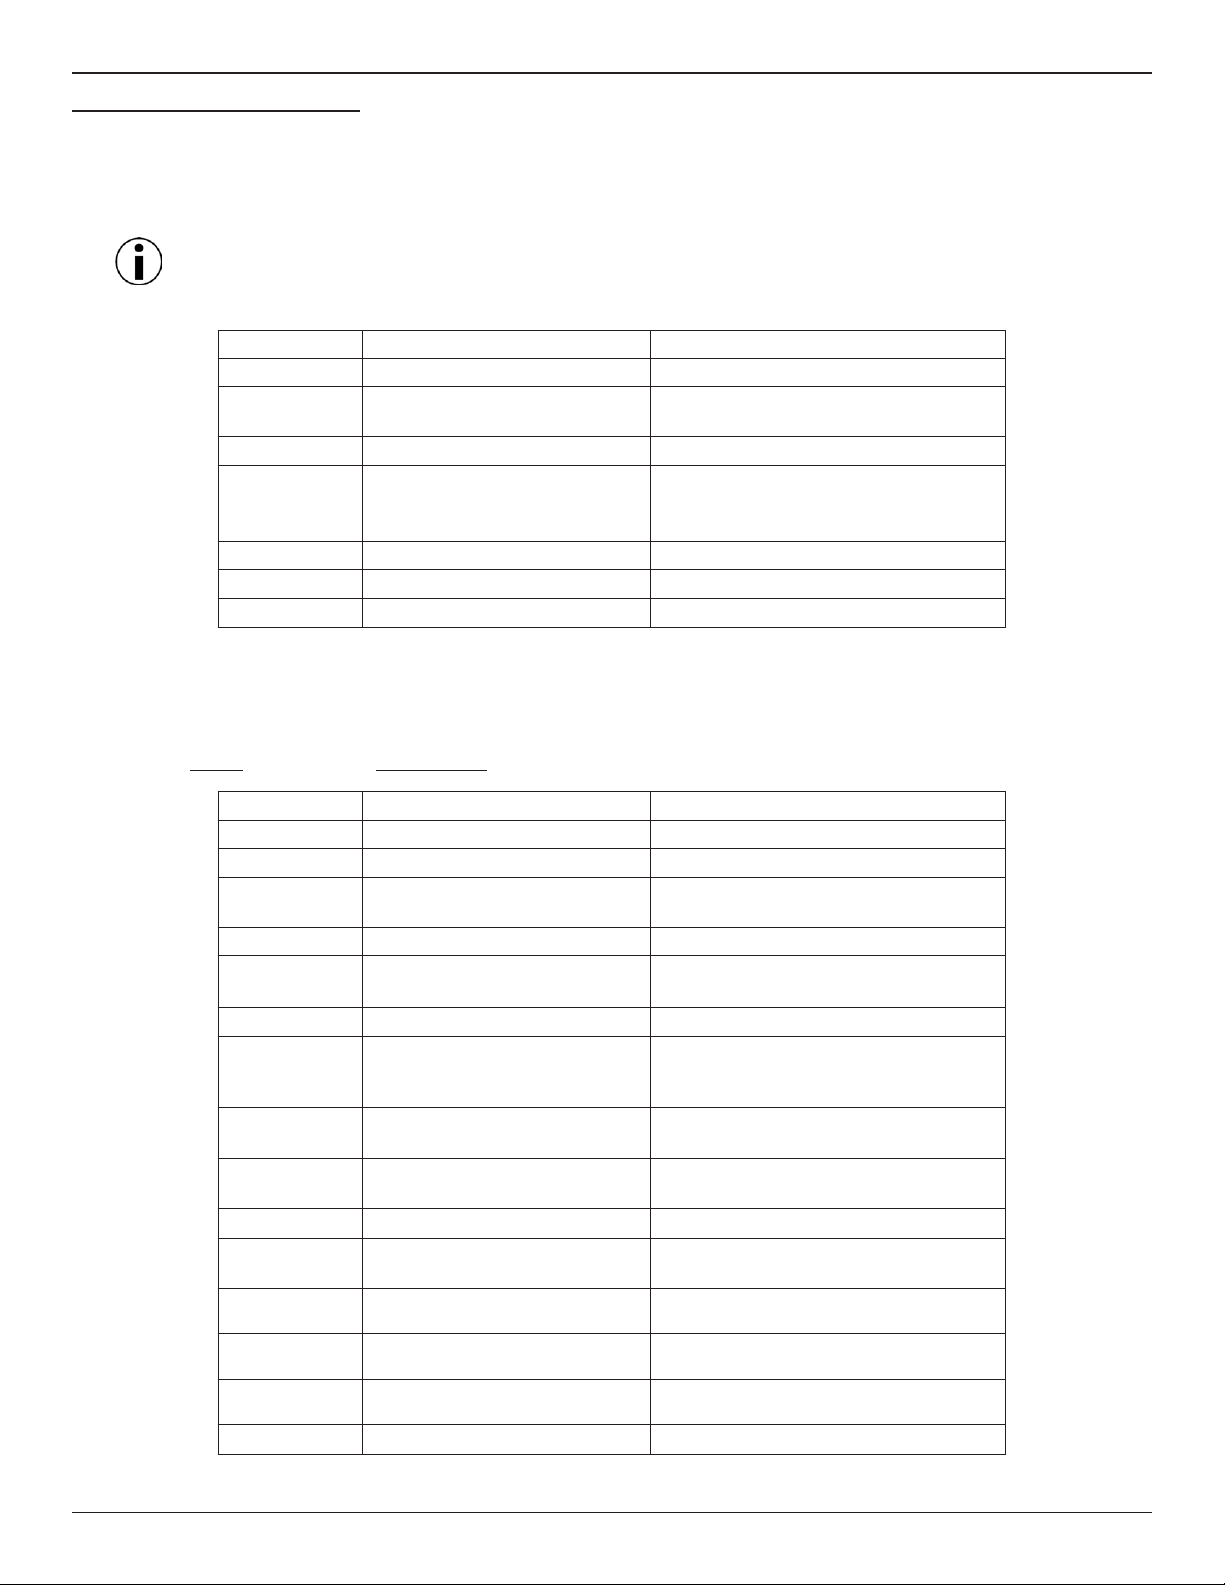
1. Verify all input power and output signal wiring is correct and ready for initial power startup.
2. Apply power to instrument. The instrument initializes in the Normal Operation Mode with all outputs active. An instrument
with the display option will show ow with the factory-set ow units. Allow 30 minutes for the instrument to warm up and
reach thermal equilibrium.
Note: Thirty (30) minute warm-up required before calibration check.
The following FC88 commands are typical commands that are used during startup and commissioning:
Command Name Description
T Normal Operation Mode All outputs are active
Z Flow Unit Setup Select Flow Units (5 English, 8 Metric), Pipe
Dimensions
W Totalizer Enable/Disable
V Output Conguration Select a conguration:
Pulse and/or Alarm, Pulse factor and/or setpoint, and source/sink polarity.
F K-Factor (default = 1) Flow factor
N Warm Reset Reinitialize C/B
S Totalizer Menu Enables W menu (Option)
An installed instrument indicates 0.000 with the process ow at zero. The ow engineering units are indicated on the instrument bezel.
Additional units indicators are provided via self-adhesive labels if the instrument’s ow units are changed in the future.
Flow Unit Modification
Example: SCFM Flow Units and 3-inch Sch 40 round pipe size setup:
Enter Display Description
Enter menu: > From Normal Operation Mode
Z E for English M for Metric> Flow Unit Set-up menu
E 0=SFPS, 1=SCFM, 2 =SCFH,
3=LB/H, 4=GPM #
1 R round duct or S rectangular> Select standard cubic ft./minute (SCFM)
R Dia.: 4.0260000
Change? (Y/N)>
Y Enter value: #
3.068 area: 7.3926572 CMinow:
0.0000000
Change? (Y/N)>
N Maximum ow: 462.04
Enter to continue
Y Cmaxow: 462.04
Change? (Y/N)>
Y #
462.04 CMintemp (F): -40.00000
Change? (Y/N)>
N
N
N
N
CMaxtemp (F): 250.00000
Change? (Y/N)>
Percent of Range is: OFF
Change to ON?>
LCD Mult Factor x1
Change? (Y/N)>
100.0 SCFM
English units
Select Round Duct
3-inch Sch. 40 pipe I.D.
Instrument back in Normal Operation Mode
This page is subject to proprietary rights statement on last page 10 06EN003367 Rev. F
Page 11
ST50 Mass Flow Meter Fluid Components International LLC
RS232 / FC88
Menu Control and Organization
Most entries require at least two key strokes; a capital letter and the [ENTER] key, or one or more numbers and the [ENTER] key.
All user entries begin at the input mode prompt “>”, except when the instrument is in the Main Function Mode (just press the
desired function letter and [ENTER] to make an entry).
Backspaces are made using the backspace [BKSP] key. Some entries are case sensitive between numbers and letters. Be sure the
SHIFT key is pressed to indicate the correct case. A square after the prompt caret indicates the FC88 is in lower case. A slightly
raised rectangle in the same spot indicates the FC88 is in the upper case.
It is recommended that the FC88 be plugged into the instrument before power is applied. If the FC88 is plugged in while the
instrument power is ON and the FC88 does not respond, press [ENTER]. If there is still no response press [N] or cycle the power.
Note: The Zero and Span may be changed from the original calibration, provided the new values are within the original
calibrated range; i.e., if the original calibration was 1 to 100 SCFM (4-20 mA), the new zero (4 mA) must be equal to or
greater than 1 SCFM, and the new span (20 mA) must be equal to or less than 100 SCFM.
Some entries require a Factory pass code. If this occurs contact FCI Field Service to continue programming the instrument. The
instrument will prompt the user when this is necessary. Do not change any parameters that require this code unless there is an
absolute understanding of the instrument’s operation. The user cannot exit some routines unless all entries are completed or the
power is cycled.
Note: Always press “T” before unplugging the FC88. If a frozen meter display is observed, reconnect the FC88 and wait
5 seconds for the meter to initialize. Disconnect the FC88 and conrm your meter display is varying.
The top level of the menu is shown in "Table 5. ST50 List of Single Letter Commands" on page 21. Enter the command letter
mnemonic as listed in the tables below and in Appendix B to run a command. Exit a command at any time by entering “Q”
[ENTER] in the menus D, K, V, W, or Z.
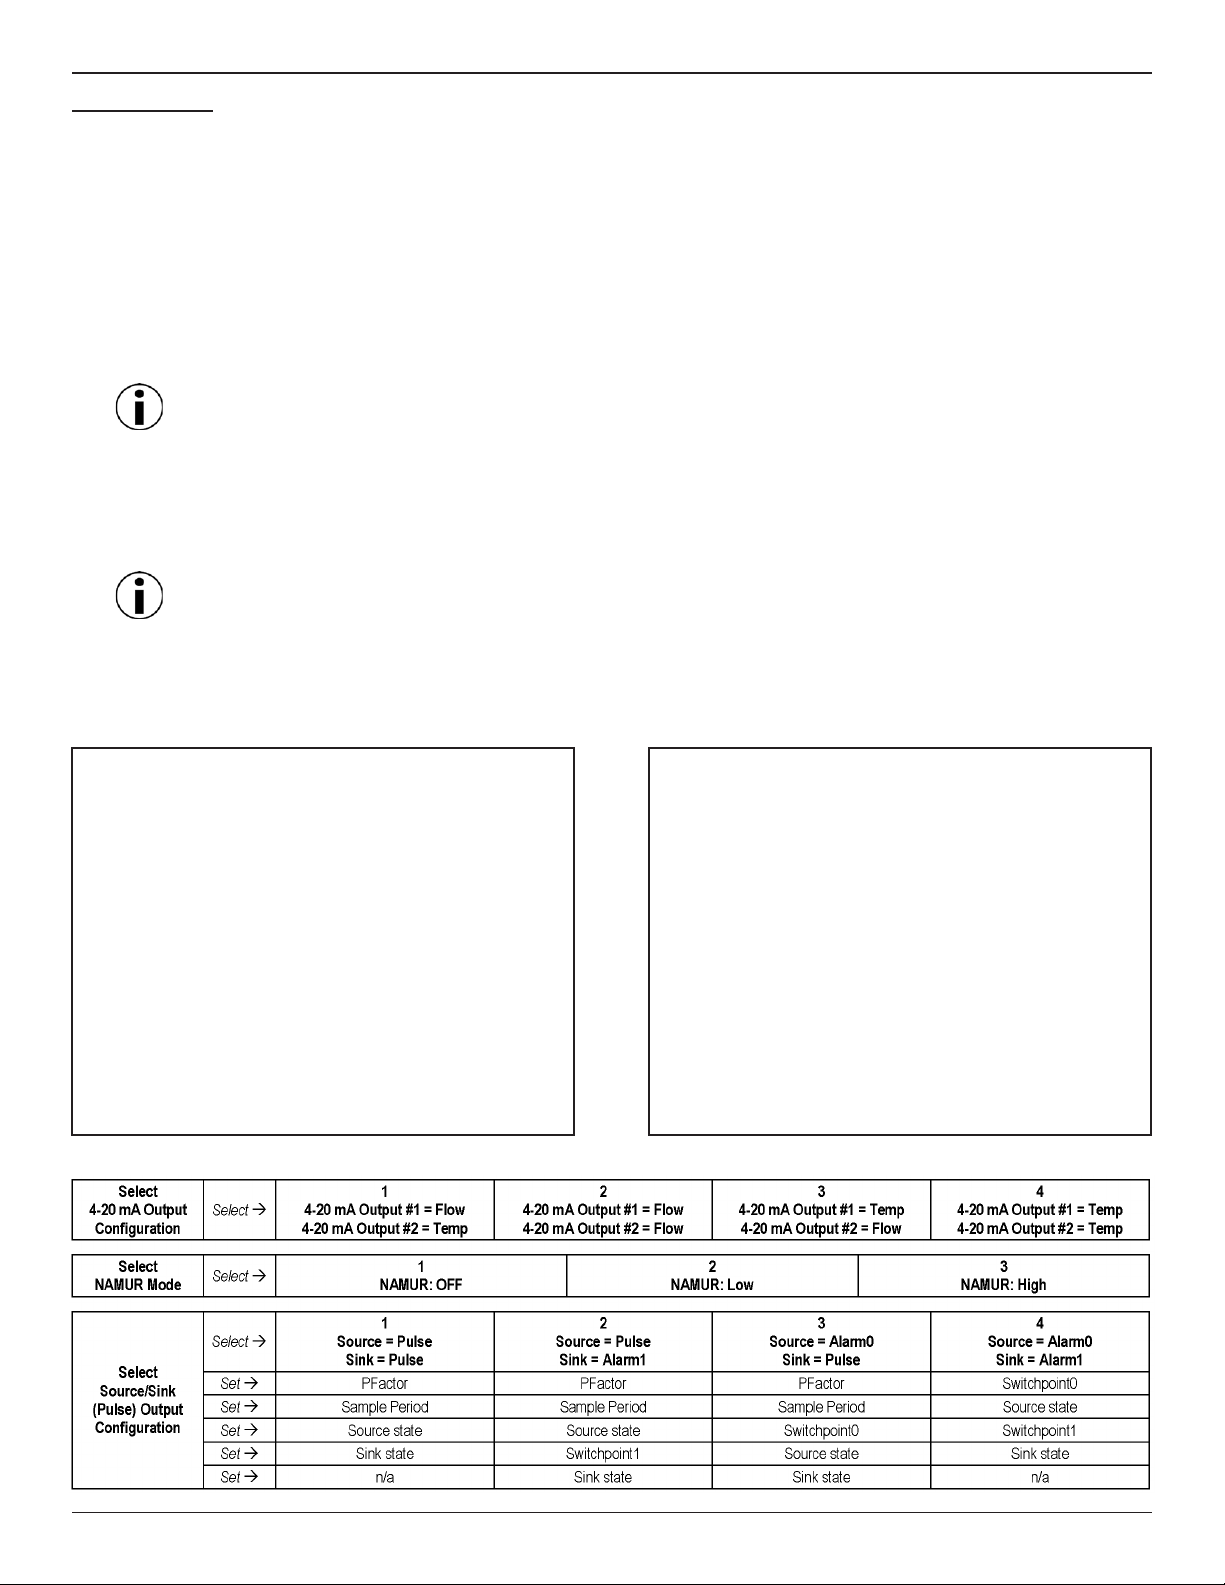
able 1. Diagnostics and Factory Settings
T
C Calibration Information
Display only: A/D, Delta-R, Ref-R data values.
D Diagnostics
Display only: List of unit parameters.
K Factory Calibration Settings
Display only: Cal. parameters; i.e., linearization and
temperature compensation coefcients.
R Factory Reset
Replaces user data with factory calibration data
Table 3. V Menu – Output Conguration Setup
Table 2. “Z” Flow Units Set-Up and Scaling
Units
Select E=English M=Metric
Select 0= SFPS 5 = SMPS
or 1 = SCFM 6 = NCMH
or 2 = SCFH 7 = NCMM
or 3 = LBS/H 8 = KG/H
or 4 = GPM 9 = LPM
10 = SCMH
11 = NMPS
12 = SCMM
For Volumetric or Mass Flow
Select R = Round pipe or duct
or S = Square duct
Set Diameter or Wide X High (in inches or mm)
Set CMaxow = Maximum ow rate (span)
Set CMinow = Minimum ow rate (zero)
Note: Changing units requires rescaling the unit (set new zero and span).
This page is subject to proprietary rights statement on last page 11 06EN003367 Rev. F
Page 12
Fluid Components International LLC ST50 Mass Flow Meter
“V” Menu Output Conguration Setup
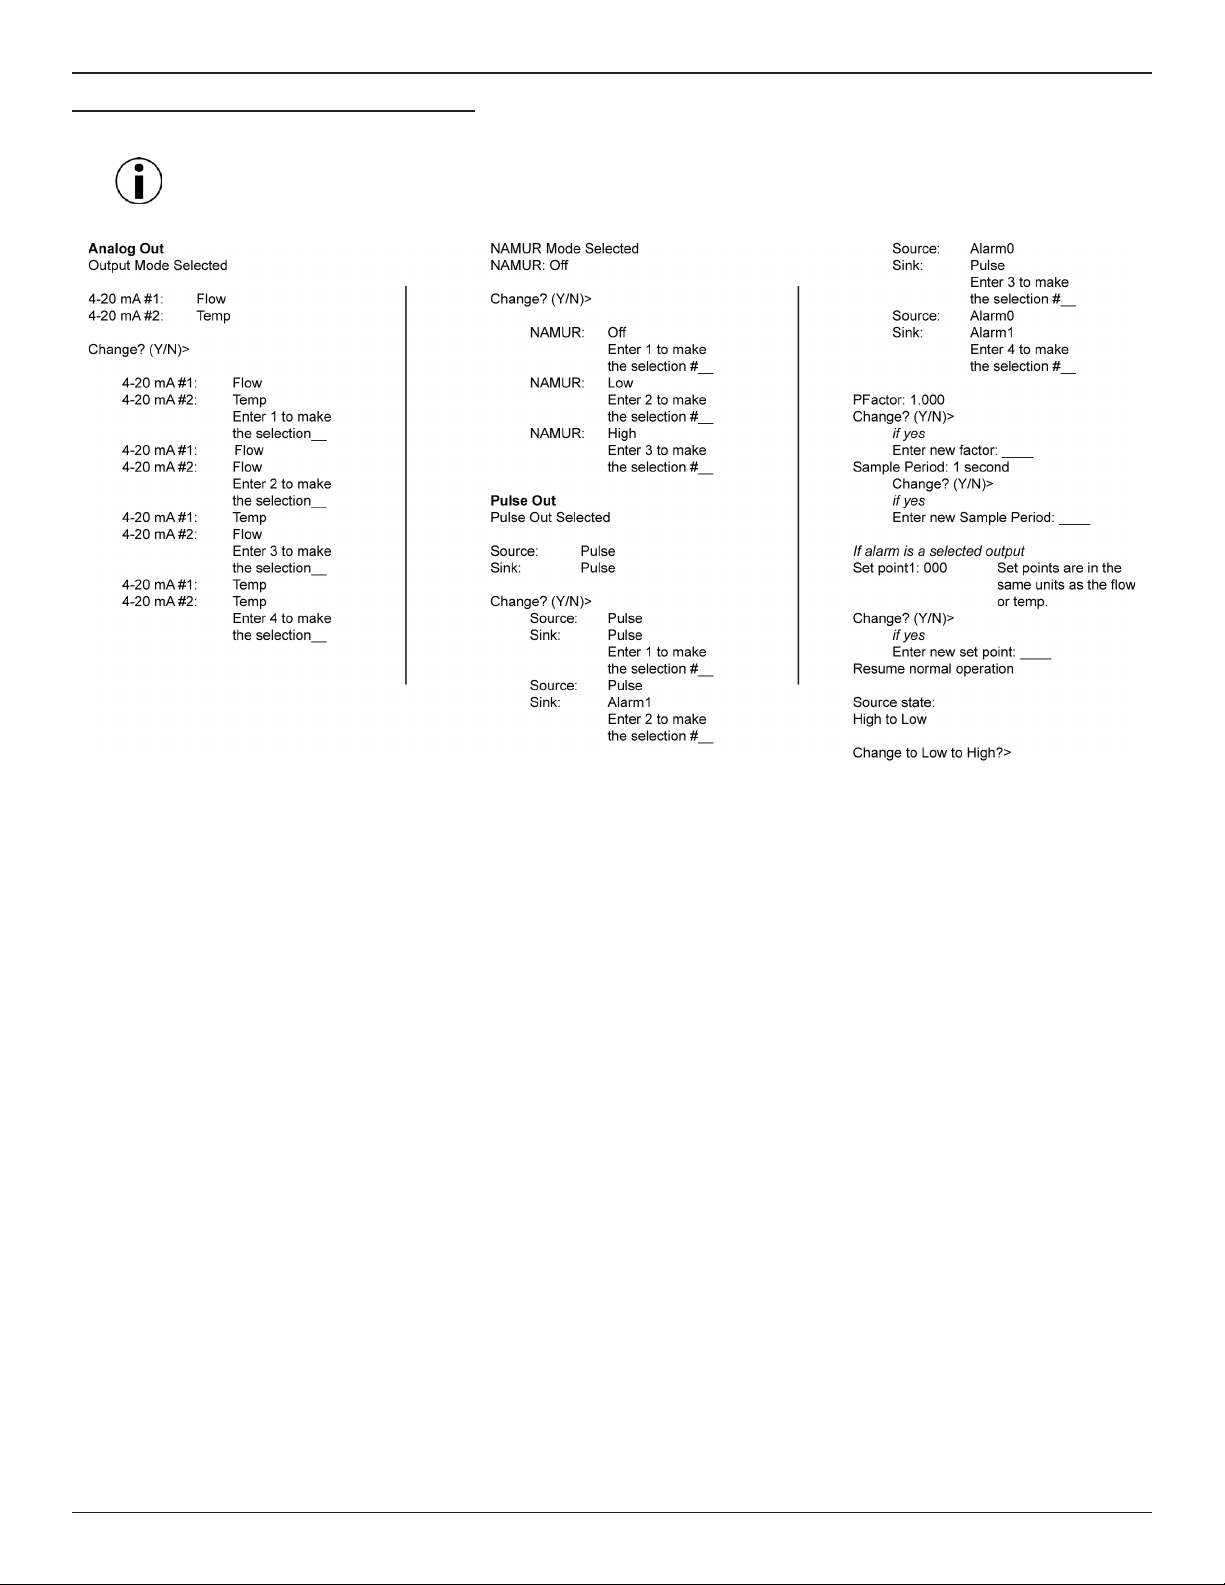
Use the V menu to set up the 4-20 mA analog outputs (including NAMUR conguration) and source/sink (pulse) outputs.
Note: The display comes up to the last setting saved and stays for 2 seconds. If N or [ENTER] is entered, the menu
proceeds to the Pulse out. If Y is entered, the display moves to the selection options and/or asks for conrmation. If you
miss the option, select [Enter] repeatedly to loop around.
Example: COMMAND V (Reference Table 3)
Case: 4-20 mA #1 = Flow, 4-20 mA #2 = Temperature, NAMUR = Low, Source Out = Pulse, Sink = Alarm1
Pressing [V] [ENTER] will display “Output Mode Selected” :
The last saved mode of the next menu item displays:
“4-20 mA #1 = Flow” “4-20 mA #2 = Temp” ...followed by the prompt:
“Change? (Y/N)”
Press [ENTER] (no change).
The last saved mode of the next menu item displays:
“NAMUR: Off” ...followed by the prompt:
“Change? (Y/N)” Select Y [Enter]. The display reads,
“NAMUR: Off” ...followed by the prompt:
“Enter 1 to make the selection #.” Select [ENTER] Bypassing “1” the next display reads,
“NAMUR: Low” ...followed by the prompt:
“Enter 2 to make the selection #.” Select 2 and [ENTER] “2” sets the new NAMUR conguration.
The last saved mode of the next menu item displays:
“Source: Pulse” “Sink: Pulse” ...followed by the prompt:
“Change? (Y/N)” Select Y [Enter]. The display reads,
“Source: Pulse” “Sink: Pulse” ...followed by the prompt:
“Enter 1 to make the selection #.” Select [ENTER]. Bypassing “1” the next display reads,
“Source: Pulse” “Sink: Alarm1” ...followed by the prompt:
“Enter 2 to make the selection #.” Select 2 [ENTER]. “2” sets the new source/sink conguration.and
The last saved mode of the next menu item displays:
“PFactor: 1.000” ...followed by the prompt:
“Change? (Y/N)>” Respond with “Y” to enter a factor anywhere from
0.001 to 1000. A pulse factor of 1.000 outputs 1
pulse per unit of ow. If no change, select N and/or
[ENTER] to continue.
This page is subject to proprietary rights statement on last page 12 06EN003367 Rev. F
Page 13

ST50 Mass Flow Meter Fluid Components International LLC
The last saved mode of the next menu item displays:
“Sample Period” ...followed by the prompt:
“Change? (Y/N)>” Respond with “Y” to enter a sample period value
from 0.5 to 5 seconds.
If no change, select N and/or [ENTER] to continue.
The last saved mode of the next menu item displays:
“Source state: ” “High to Low” ...followed by the prompt:
Change to “Low to High?>” Respond with “Y” to toggle to the alternate setting.
If no change, select N and/or [ENTER] to continue.
The last saved mode of the next menu item displays:
“Switchpt1” “0.0000000” ... followed by the prompt:
“Change? (Y/N)>” Respond with “Y” to enter a setpoint value (value
is in same units as the ow and must be within the
calibrated range).
If no change, select N and/or [ENTER] to continue.
The last saved mode of the next menu item displays:
“Sink state: ”
“High to Low” ...followed by the prompt:
“Change to “Low to High?>” Respond with “Y” to toggle to the alternate setting.
If no change, select N and/or [ENTER] to continue to normal operation (programming nished).
Maintenance
The FCI instrument requires little maintenance. There are no moving parts or mechanical parts subject to wear in the instrument. The
sensor assembly, which is exposed to the process media, is composed of 316 SS and Hastelloy C.
Without detailed knowledge of the environmental parameters of the application surroundings and process media, FCI cannot make
specic recommendations for periodic inspection, cleaning, or testing procedures. However, some suggested general guidelines for
maintenance steps are offered below. Use operating experience to establish the frequency of each type of maintenance.
Calibration
Periodically verify the calibration of the output and recalibrate if necessary. FCI recommends every 18 months at a minimum.
Note: Thirty (30) minute warm-up required before calibration check.
Electrical Connections
Periodically inspect cable connections on terminal strips and terminal blocks. Verify that terminal connections are tight and
physically sound with no sign of corrosion.
Remote Enclosure
Verify that the moisture barriers and seals protecting the electronics in the local enclosure is adequate and that no moisture is
entering the enclosure.
Electrical Wiring
FCI recommends occasional inspection of the system’s interconnecting cable, power wiring and ow element wiring on a
“common sense” basis related to the application environment. Periodically inspect the conductors for corrosion and check the
cable insulation for signs of deterioration.
Flow Element Connections
Verify that all seals are performing properly and that there is no leakage of the process media. Check for deterioration of the
gaskets and environmental seals used.
Insertion Type Flow Element Assembly
Periodically remove the ow element for inspection based on historical evidence of debris, foreign matter, or scale build-up and
appropriate plant shutdown schedules and procedures. Check for corrosion, stress cracking, and/or build-up of oxides, salts,
or foreign substances. The thermowells must be free of excessive contaminants and be physically intact. Any debris or residue
build-up could cause inaccurate ow indication. Clean the ow element, as necessary, with a soft brush and available solvents
(compatible with stainless steel).
This page is subject to proprietary rights statement on last page 13 06EN003367 Rev. F
Page 14

Fluid Components International LLC ST50 Mass Flow Meter
Troubleshooting
Application Verification
After verifying that the ow meter is functioning, review the application parameters as shown below to verify the calibration
matches the process media.
Equipment Needed
Flow Instrument Calibration Data
Process Parameters and Limits
Check Serial Numbers
Verify that the serial number of the ow element and the ow transmitter electronics are the same. The ow element and the ow
transmitter are a matched set and cannot be operated independently of each other.
Check the Instrument Installation
Verify correct mechanical and electrical installation. Verify the ow element is mounted at least 20 diameters downstream and 10
diameters upstream from any bends or interference in the process pipe or duct.
Check for Moisture
Check for moisture on the ow transmitter. Moisture may cause intermittent operation. Check for moisture on the ow element. If
a component of the process media is near its saturation temperature it may condense on the ow element. Place the ow element
where the process media is well above the saturation temperature of any of the process gases.
Check Application Design Requirements
Application design problems may occur with rst time application instruments, although the design should also be checked on
instruments that have been in operation for some time. If the application design does not match eld conditions, errors occur.
1. Review the application design with plant operation personnel and plant engineers.
2. Ensure that plant equipment such as pressure and temperature instruments conform to the actual conditions.
3. Verify operating temperature, operating pressure, line size, and gas medium.
Verify Standard Versus Actual Process Conditions
The ow meter measures the mass ow rate. The mass ow rate is the mass of the gas owing through a pipe per time. Other ow
meters, such as an orice plate or a pitot tube, measure the volumetric ow rate. The volumetric ow rate is the volume of gas per
time. If the readings displayed do not agree with another instrument, some calculations may be necessary before comparing them.
To calculate the mass ow rate, the volumetric ow rate, and the pressure and temperature, the point of measurement must be
known. Use the following equation to calculate the mass ow rate (Standard Volumetric Flow rate) for the other instrument:
Equation:
Q Q
Where:
Q
P
P
PSIA and °R are used for pressure and temperature units.
Example: (Metric: PS = 1.01325 bar(a)
P
P
This page is subject to proprietary rights statement on last page 14 06EN003367 Rev. F
= × ×
S A
A
A
P
T
= Volumetric Flow QS = Standard Volumetric Flow
A
= Actual Pressure T = Actual Temperature
= Standard Pressure TS = Standard Temperature
S
= 1212.7 ACFM QS = 1485 SCFM
A
= 9.7 PSIA TA = 120 °F (580 °R)
= 14.7 PSIA TS = 70 °F (530 °R)
S
T
A
A
S
P
S
1212.7 ACFM
(
(Metric: Where bar(a) and °K are
used for pressure and temperature.)
A
TS = 21.1°C (294.1K)) Q
19.7 PSIA
1
)
580 °R
(
)
(
530 °R
14.7 PSIA
= 1485 SCFM
)
Page 15

ST50 Mass Flow Meter Fluid Components International LLC
Calibration Parameters Verification
The instrument uses a set of predetermined calibration parameters to process ow signals. Most of these parameters should not
change. A data package included with the instrument (typically on a CD-ROM) contains the ST50 Delta R Data Sheet. The data
sheet contains the calibration parameters stored in the ow transmitter at the factory. To verify that these parameters have not
changed, complete the following:
1. Identify the appropriate Delta R data sheets by instrument serial number.
2. Press [D] [ENTER] to examine each of the parameters. The [ENTER] key allows scrolling one message at a time. Use Table
4 below to record actual instrument parameters. Compare with the Delta R data sheet’s ST50 parameters.
Table 4. Diagnostic Test Sequence on Display
S/W Version: dR Min: T SpanIDAC 0:
Flow Factor: dR Max: T ZeroIDAC 0:
Cmin Flow: Cal Ref: T SpanIDAC 1:
Cmax Flow: Tcslp: T ZeroIDAC 1:
Eng Units: Tcslp 0: State 0:
Line Size 0: Tcslp 2: Switch Pt 0:
Line Size 1: Tot Menu: State 1:
Cmin Temp: Tot Flag: Switch Pt 1:
Cmax Temp: Totalizer: K factor 1:
Min Flow: Rollover Cnt: K factor 2:
Max Flow: Fix Pt Flag: K factor 3:
Density: Pulse Factor: K factor 4:
*C1 [1]: Pulse Out: I factor:
*C1 [2]: Hours: Temp Flag:
*C1 [3]: Sample Period: Out Mode:
*C1 [4]: dR Slope: Namurmode:
*C1 [5]: dR Off Set: Boxcar Max:
Break Pt: Refr Slope: RTD-SLP-385:
*C2 [1]: Refr Off Set: % of Range:
*C2 [2]: SpanIDAC 0: User Name:
*C2 [3]: ZeroIDAC 0: Shop Order #:
*C2 [4]: SpanIDAC 1: Serial No.:
*C2 [5]: ZeroIDAC 1: Model#:
An issue may exist if parameters with an asterisk (*) have changed. Contact Customer Service if this is the case. If the parameters
have not changed, continue with the next section.
This page is subject to proprietary rights statement on last page 15 06EN003367 Rev. F
Page 16
Fluid Components International LLC ST50 Mass Flow Meter
Hardware Verification
Equipment Required:
• Digital Multimeter
• Screwdriver
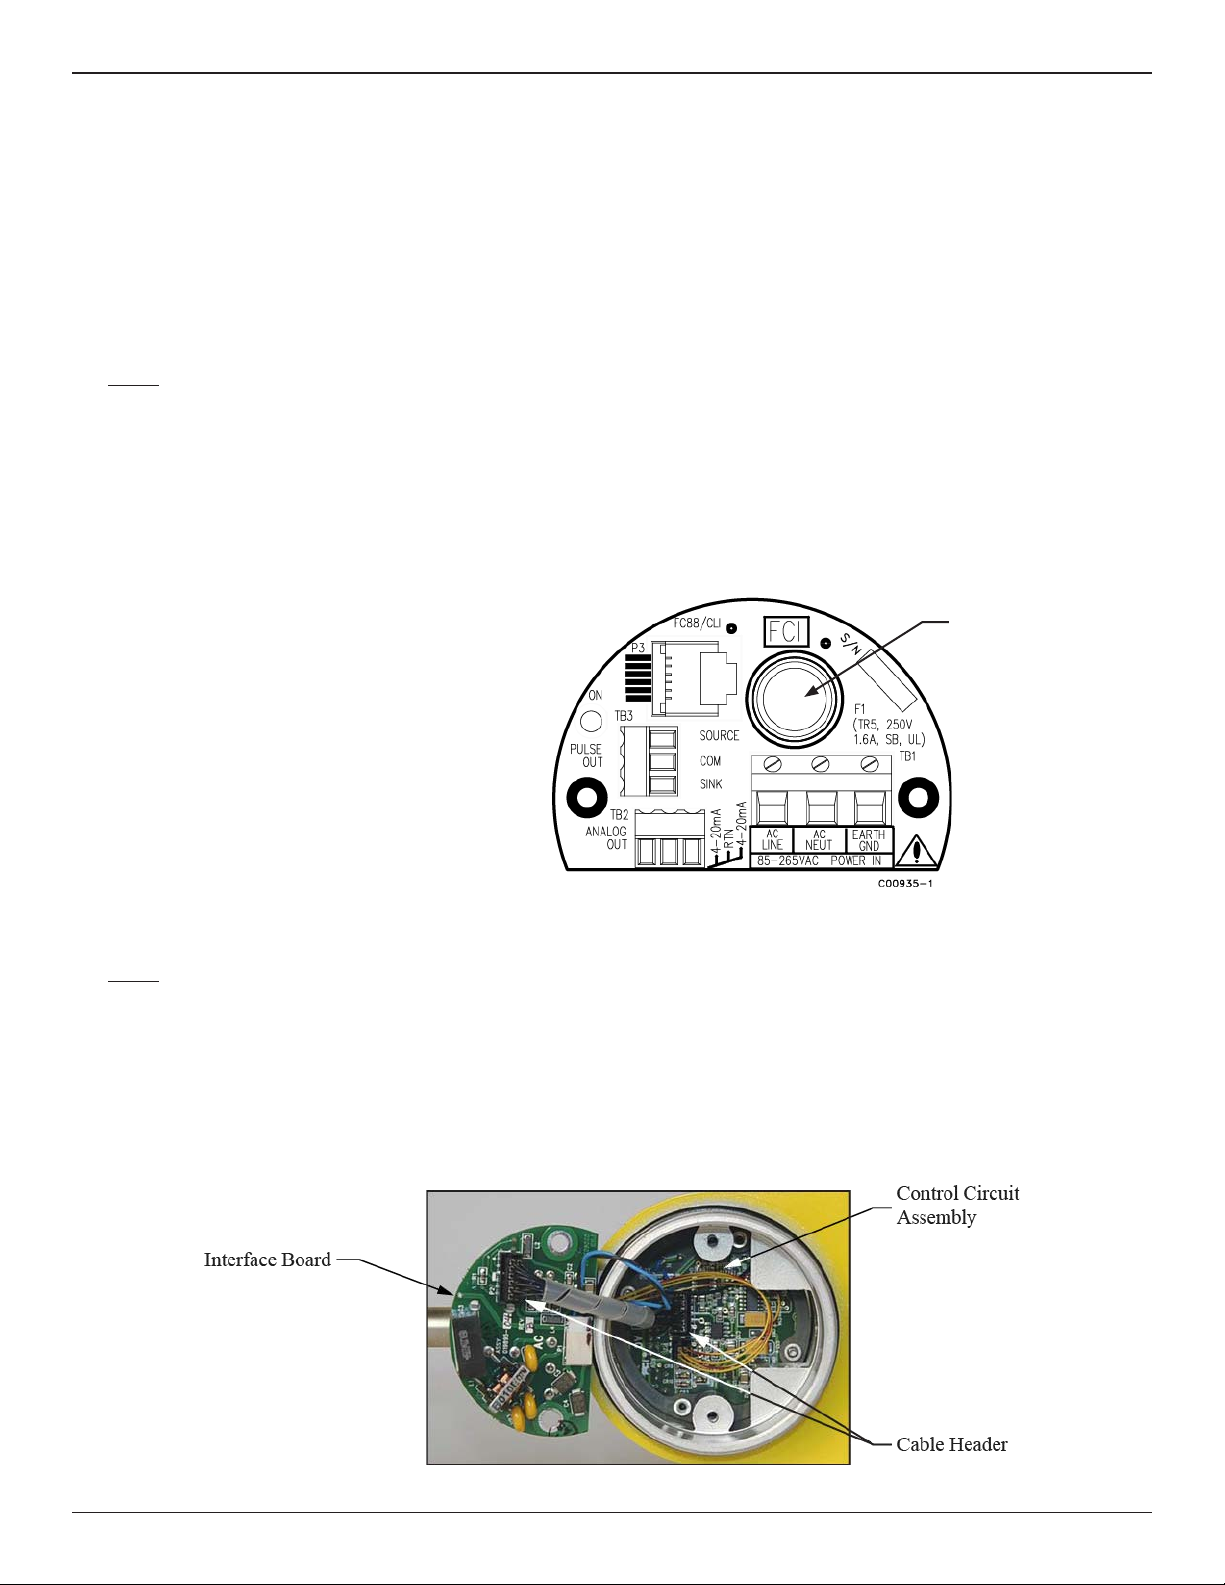
The ST50 ow meter is made up of these basic components:
• Sensor element
• Customer interface circuit board
• Control circuit assembly circuit board module
• Electronics enclosure
Step 1
Verify fuse (F1) located on the customer interface circuit board is in normal working condition.
Remove power from the instrument. Open the electronics enclosure exposing the customer interface circuit board. This circuit
board is located under the shorter enclosure lid along with all of the power and input/output connections. Unscrew the clear cover
on the fuse and pull the fuse out of the fuse holder. Check the fuse for continuity. If fuse reads open, replace with equivalent
component (FCI part no. 019933-01), Wickmann Inc. Series 374, 1.6 A (amp code 1160), package 0410 (short radial leads).
Fuse (F1)
AC power customer interface circuit board shown.
Fuse (F1) on DC power customer interface circuit
board located in similar position.
Step 2
Verify interconnecting cable from the customer interface board and the control circuit board assembly module are correctly seated
into the appropriate header.
Remove power from the instrument. Open the electronics enclosure exposing the customer interface circuit board. This circuit
board is located under the shorter enclosure lid along with all of the power and input/output connections. Remove the 2 screws
securing the interface circuit board to the electronics enclosure. Carefully lift the interface face board exposing the interconnecting
cable between the interface board and the control circuit assembly. Verify cable is seated rmly at both ends of the cable header.
This page is subject to proprietary rights statement on last page 16 06EN003367 Rev. F
Page 17
ST50 Mass Flow Meter Fluid Components International LLC
Step 3
Verify sensor element continuity and resistance.
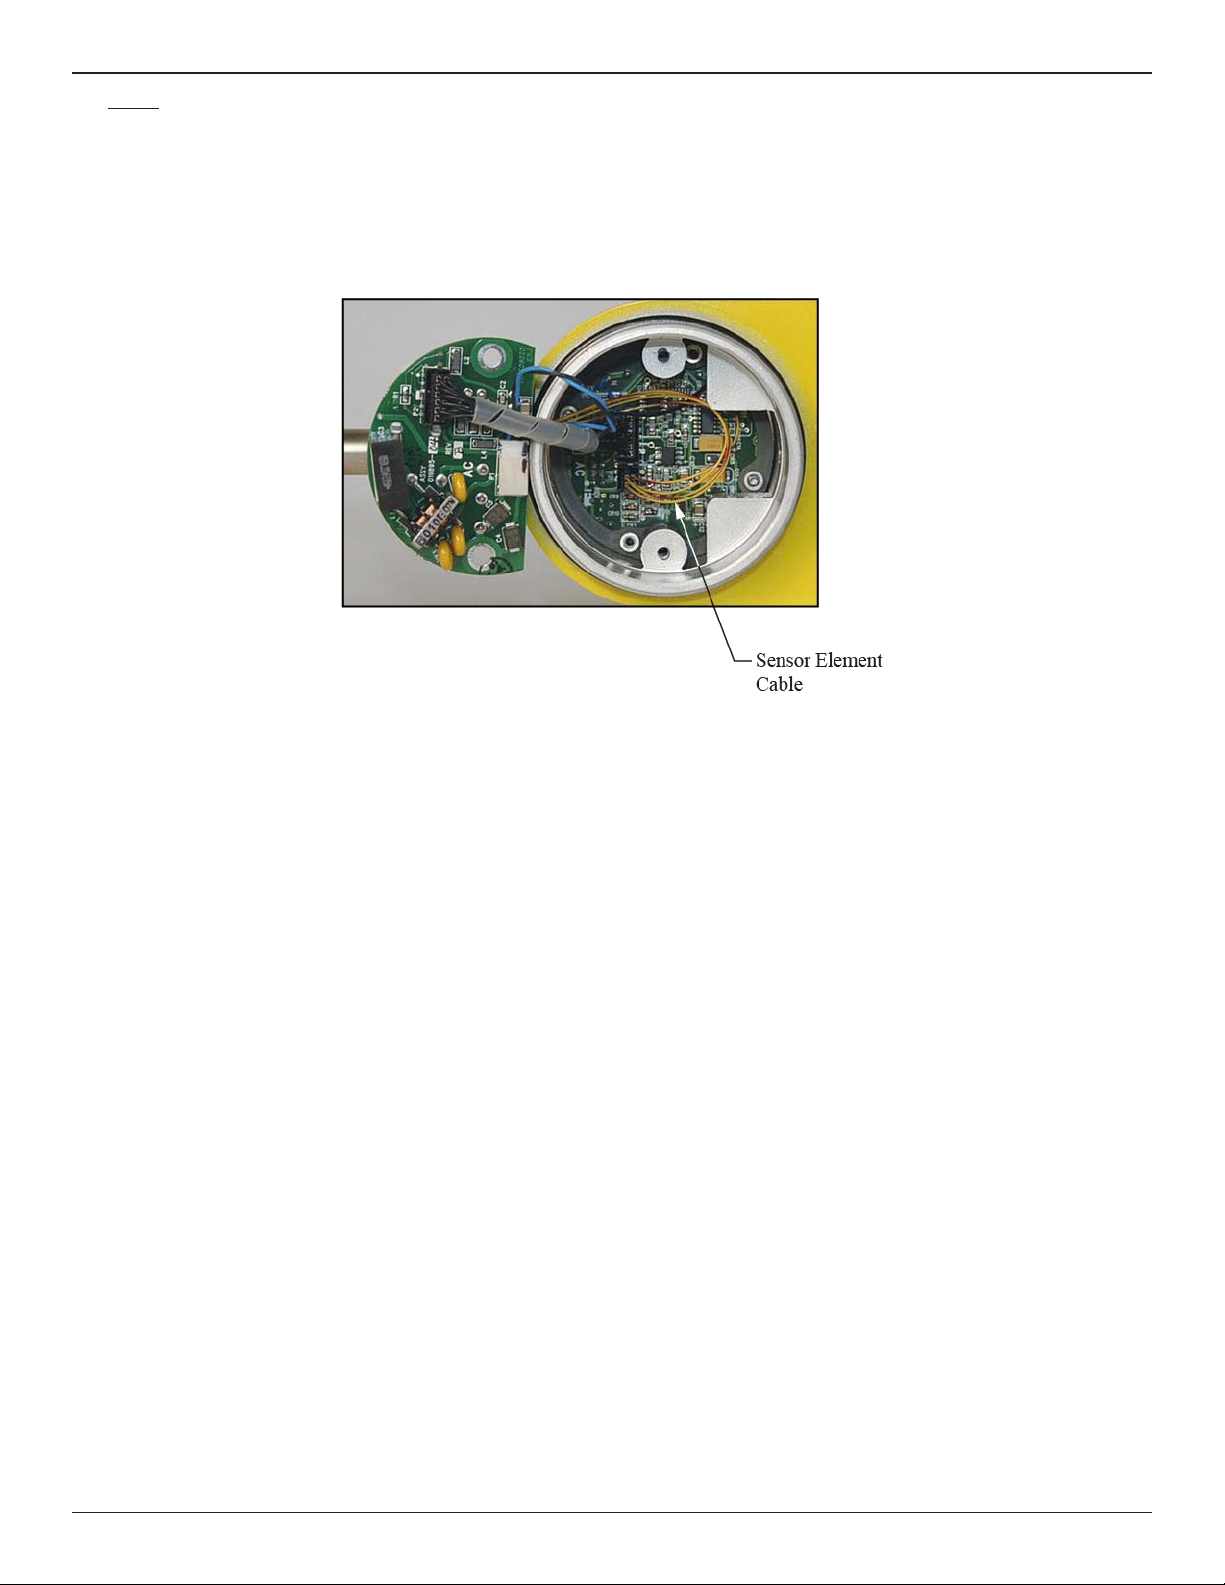
Remove sensor element cable from the bottom of the control circuit assembly. Note that 2 of the wires have a red stripe and are
located closest to the interconnecting cable header. Using an ohmmeter verify that resistance between the 2 red striped wires is
approximately 1100 ohms ±20. This resistance is temperature dependant. The resistance at 70 degrees F is about 1082 ohms.
Verify the resistance between the 2 natural colored wires are approximately the same.
FCI provides full in-house technical support. Additional technical representation is also provided by FCI eld representatives.
Before contacting a eld or in-house representative perform the troubleshooting techniques outlined in this document. If problems
persist, contact FCI Customer Service at 1-800-854-1993 or 1-760-744-6950.
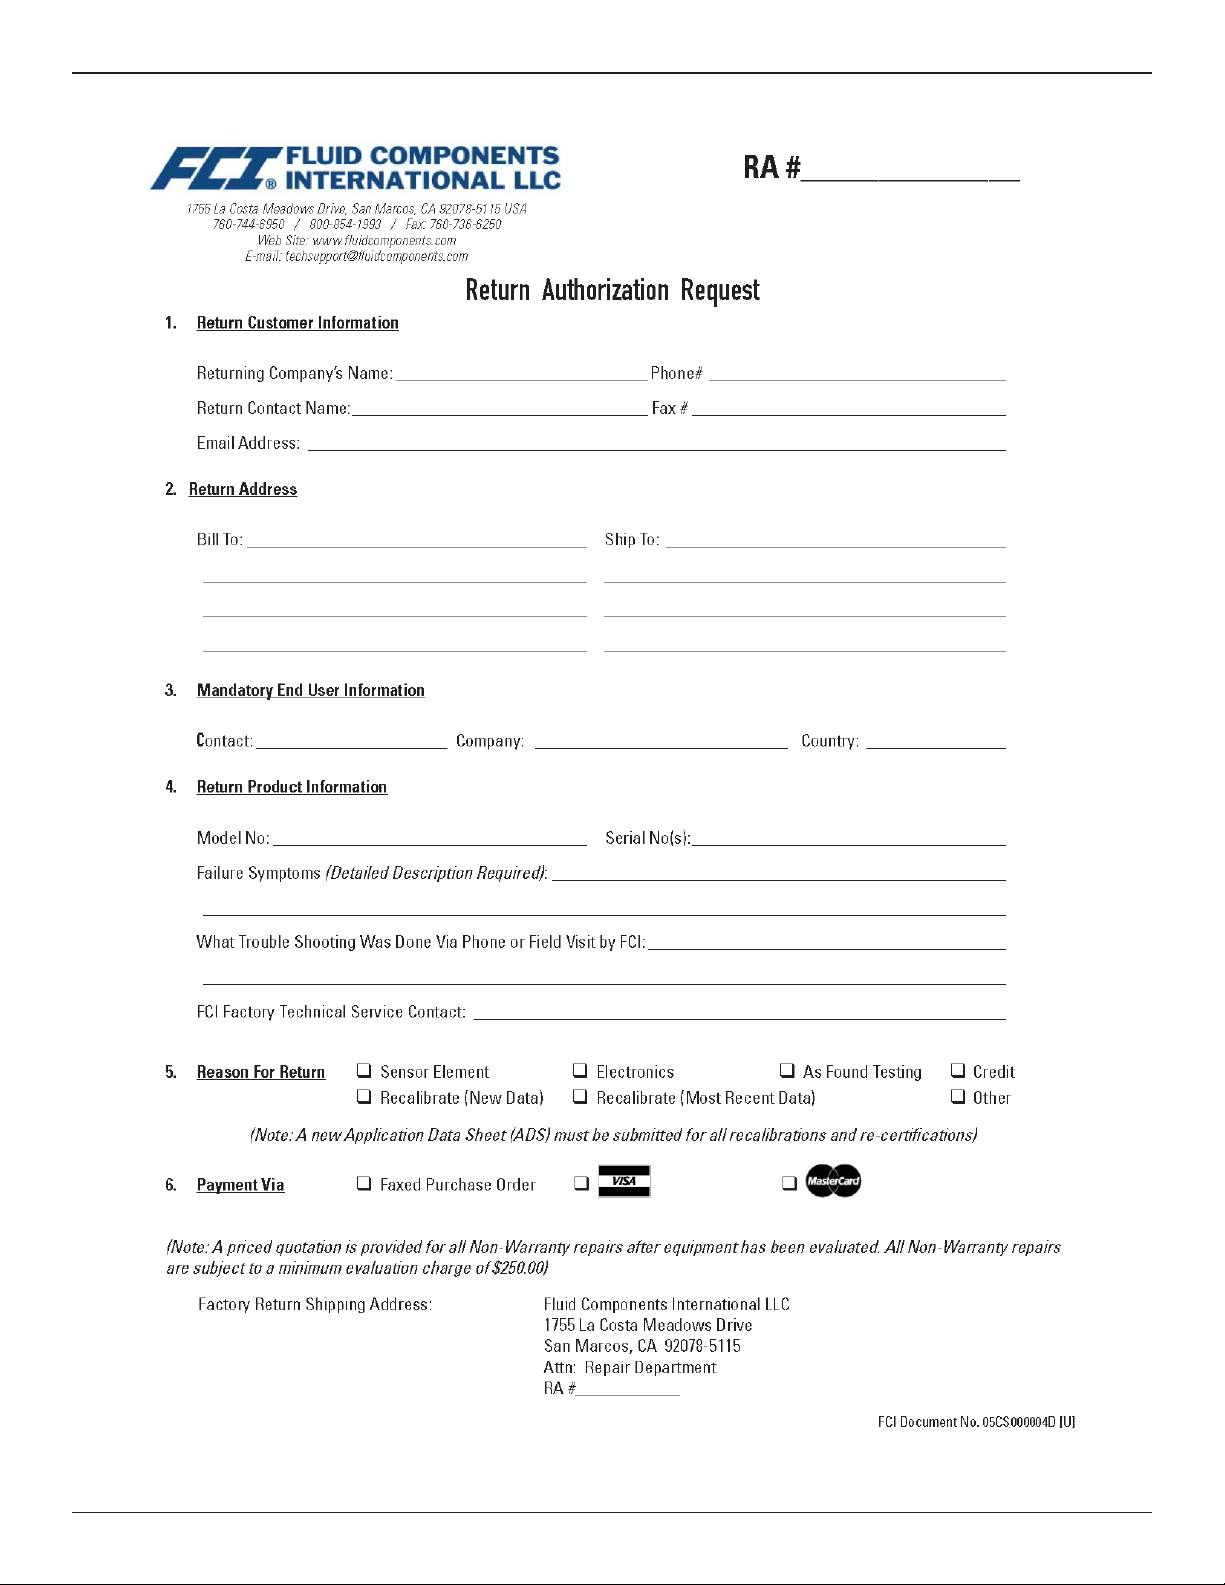
Contact FCI to obtain an Return Authorization before returning the instrument. The form contains a declaration of
decontamination cleaning information with which the instrument must comply before it is shipped to FCI.
This page is subject to proprietary rights statement on last page 17 06EN003367 Rev. F
Page 18
Fluid Components International LLC ST50 Mass Flow Meter
Transmitter Circuit Calibration Check (Delta R Verification)
References
• Delta ‘R’ Data Sheet
Equipment
• FC88 Communicator or equivalent.
• DMM
• Delta R Data Sheet – Match by serial numbers
• 2 ea. precision decade resistance boxes, 0.1% (Largest steps: 1k ohm, smallest steps 0.01 ohms)
• 250-ohm axial lead precision resistor, 0.1% or better, 1 W
• Small at blade screwdriver, 3/32 inches wide blade
• FCI normalization cable, FCI part number 006407
Procedure
Note: Thirty (30) minute warm-up required before calibration check.
1. Verify all “D” mode calibration parameters are correct according to the meter’s Delta R data sheet before starting
verication.
2. Turn power OFF.
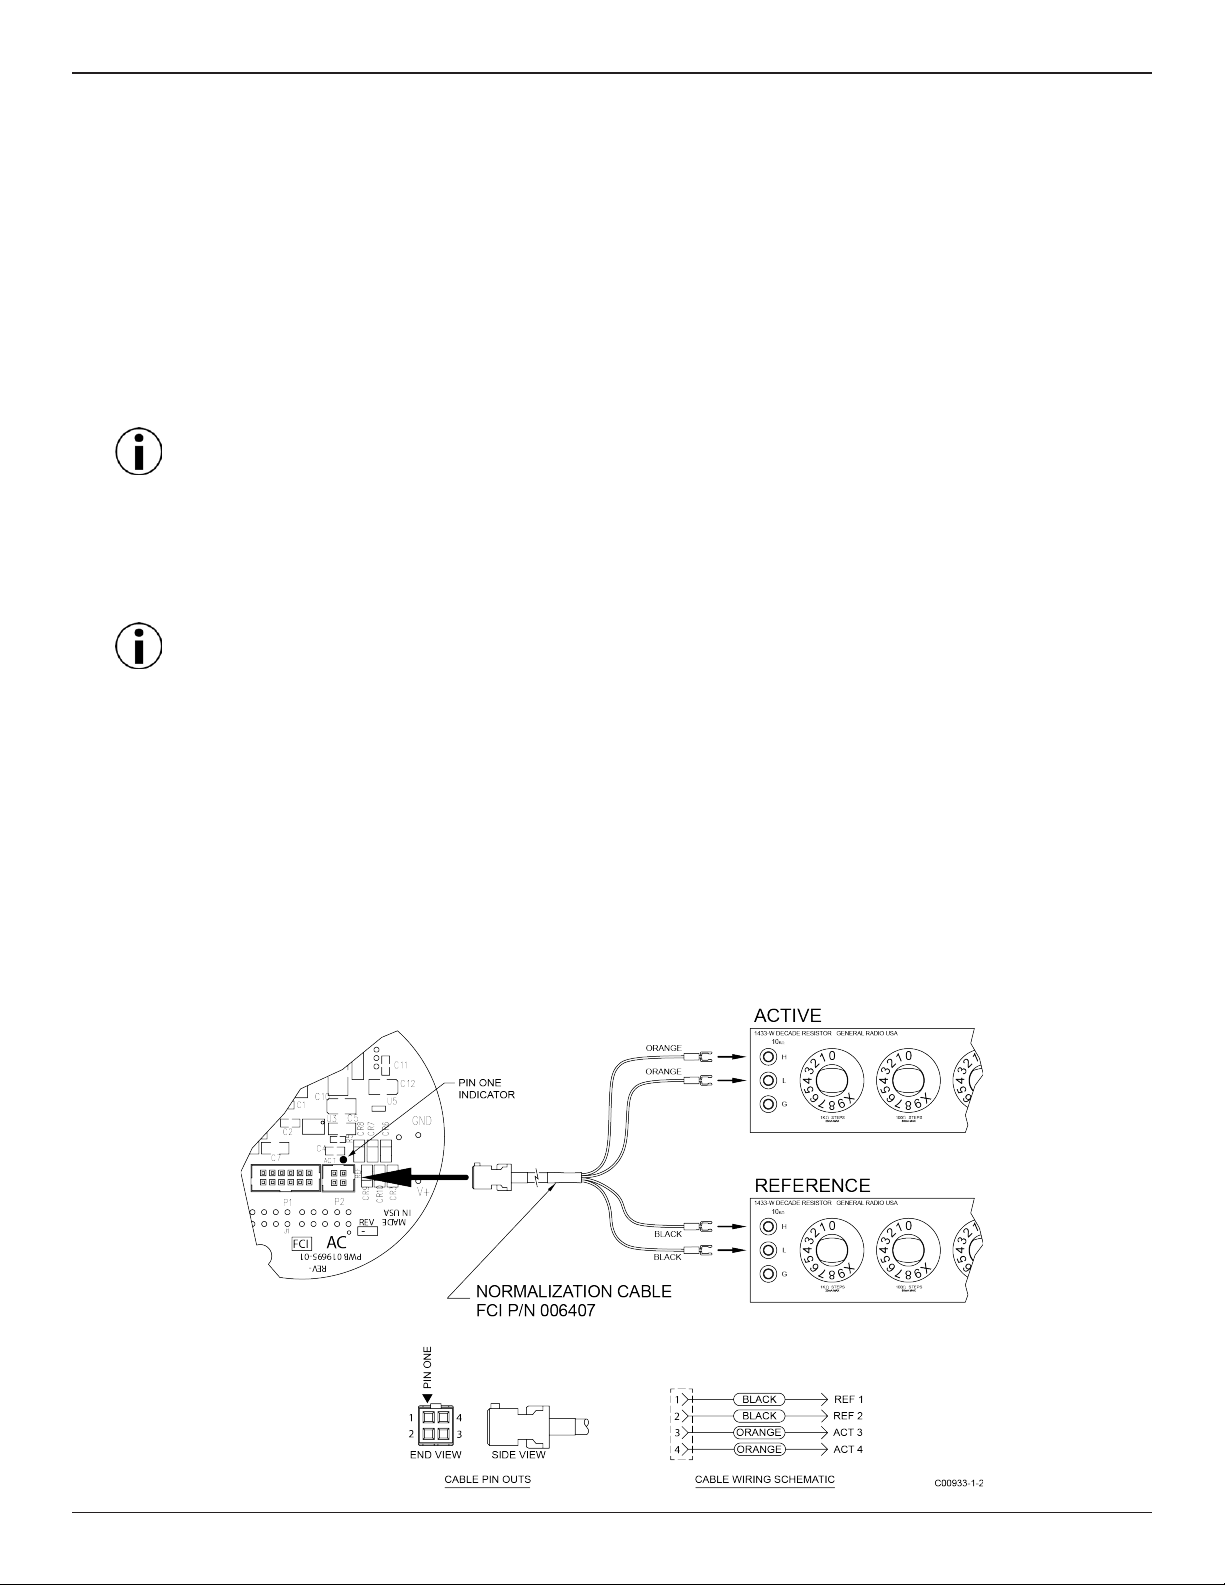
3. Mark all sensor element wires connected to the circuit board for easy reconnection to the proper terminals. Disconnect the wires.
4. Connect the resistance decade box to the electronics as per the appropriate wiring diagram for the ST50.
Note: Interconnector wiring (resistance decade box to electronics) must be same gauge and length to avoid any
inaccuracies in the Delta R verication caused by unequal wire lengths and/or wire gauges. Use of the FCI normalization
cable avoids this issue.
5. Connect the 250-ohm precision resistor across the 4-20 mA output terminals.
6. Set both decade boxes for the nominal resistance value (1000 ohms) ±0.01%.
7. Connect DMM, set to volts DC (V), to the meter’s output termination and monitor the meter output.
8. Turn power ON and allow the instrument 5 minutes to stabilize.
9. With the FC88 connected press [T] [Enter] to view the normal operating mode.
10. Adjust the Active Decade Box (Reference decade box remains xed @ 1000 ohms) to achieve the appropriate Delta R for
the displayed ow value and output, noted on the meter’s Delta R data sheet.
11. Note the [C] mode and verify the meters displayed TCDR and REFR values corresponding to the displayed ow rate as
per the meter’s Delta R data sheet.
12. Return to normal mode operation ([T] mode).
This page is subject to proprietary rights statement on last page 18 06EN003367 Rev. F
Page 19
ST50 Mass Flow Meter Fluid Components International LLC
Appendix A - Approval Information
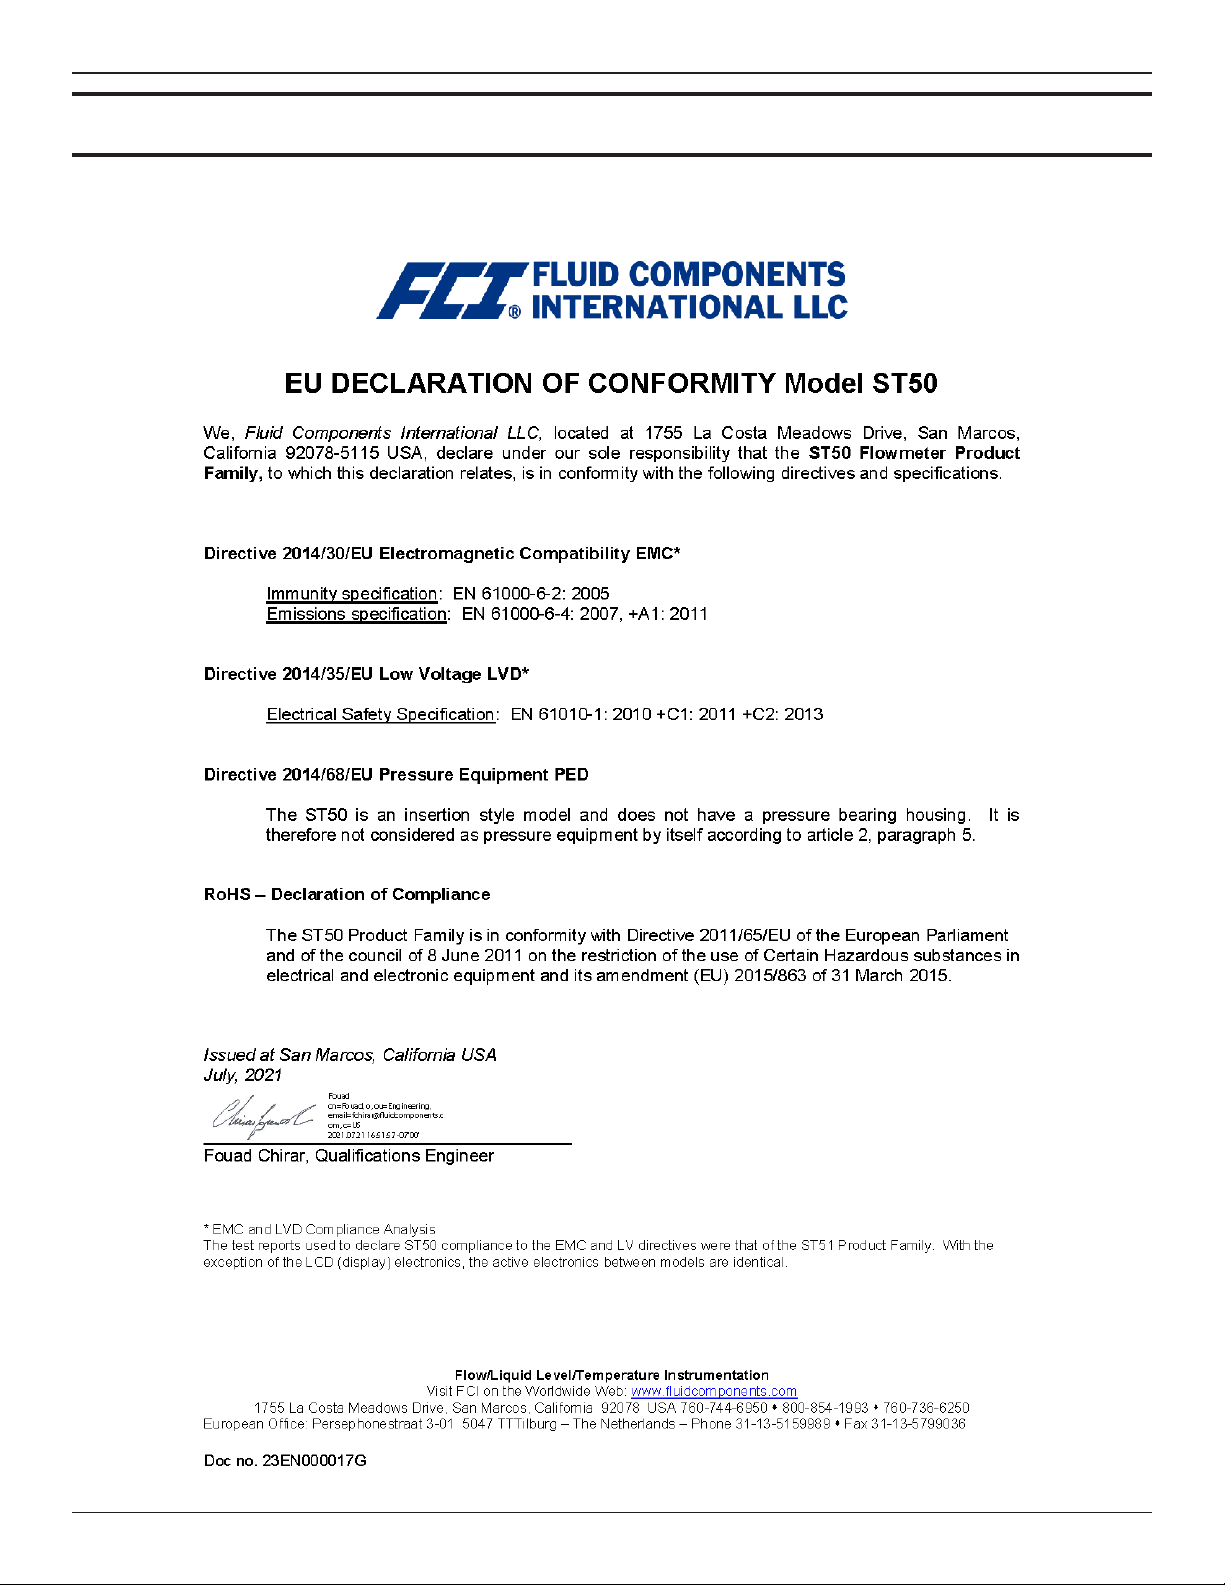
EU Information
This page is subject to proprietary rights statement on last page 19 06EN003367 Rev. F
Page 20

Fluid Components International LLC ST50 Mass Flow Meter
INTENTIONALLY LEFT BLANK
This page is subject to proprietary rights statement on last page 20 06EN003367 Rev. F
Page 21
ST50 Mass Flow Meter Fluid Components International LLC
Appendix B - List Commands
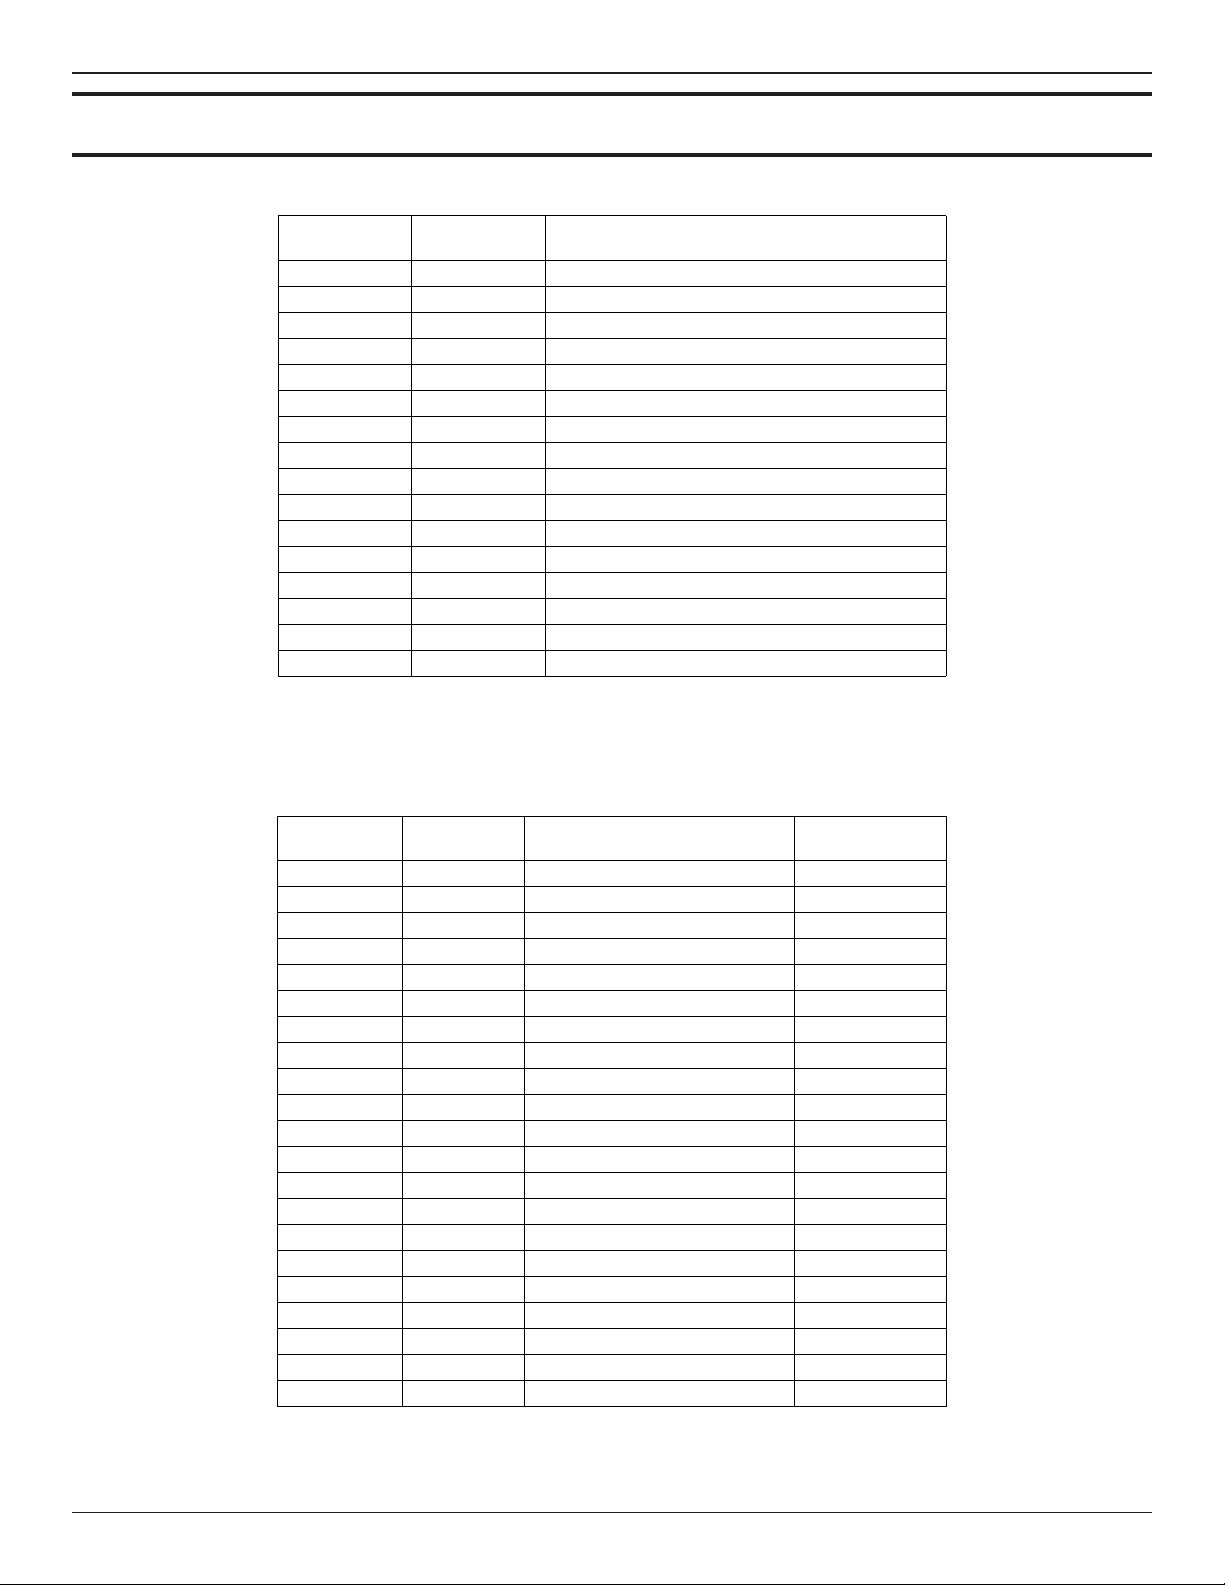
Table 5. ST50 List of Single Letter Commands
Command
Mnemonic
A R AvgDelta_r, AvgRef
B R Delta_r, Ref_r
C R Tcdelta_r, Ref_r
D R Diagnostics
F R/W Kfactors
G R/W Clear FlashEE, Boxcar Count, ADC to Ohms Cal
K R/W Cal Parameters
L R/W Output Cal
N W Warm Restart
R W Factory Restore
S R/W Totalizer Menu On/Off
T R Normal Mode
V R/W Output Cong
W R/W Totalizer
Y W Command Line Interface
Z W Flow units, Pipe Size, and LCD Scaling
Command
Function
Command Description
Table 6. ST50 List of CLI Commands
Command
Mnemonic
BK R/W Break Point Float
BM R/W Boxcar Filter Max Integer
CM R/W Cminow Float
CR R/W Calibration Ref Float
CX R/W Cmaxow Float
C1[1-5] R/W Coefcients set1 Float
C2[1-5] R/W Coefcients set2 Float
DI R Diagnostics Null
DM R/W DeltaR Minimum Float
DN R/W Density Float
DR R Delta R Float
DX R/W DeltaR Maximum Float
DS R/W DeltaR Slope Float
DF R/W DeltaR Offset Float
EU R/W Engineering Units Integer
FF R/W Flow Factor Float
FP R/W Fix Point Flag Integer
F0 R/W Pulse Out State0 Integer
F1 R/W Pulse Out State1 Integer
HR R/W Tot Dump Hours Cntr Integer
IF R/W I Factor Float
Command
Function
Command Description Data Type
This page is subject to proprietary rights statement on last page 21 06EN003367 Rev. F
Page 22
Fluid Components International LLC ST50 Mass Flow Meter
Table 6. ST50 List of CLI Commands, Cont.
Command
Mnemonic
K[1-4] R/W K Factors
Command
Function
Command Description Data Type
Float
L0 R/W Line Size 0 Float
L1 R/W Line Size 1 Float
MN R/W Minow Float
MX R/W Maxow Float
NN R/W Namur Mode Integer
OM R/W Outmode Integer
PF R/W Pulse Factor Float
PL R/W Pulse Out Integer
PS R/W Pulse Sample Period Float
W
PW R/W Pulse
idth Float
P0 R/W Switch Point0 Integer
P1 R/W Switch Point1 Integer
RO R/W RollOver Cntr Long
RR R Reference R Float
RS R/W RefR Slope Float
RF R/W RefR Of
fset Float
SF R SFPS Flow Float
SN R/W Serial Number String (16 chars max.)
SO R/W Shop Order Number String (16 chars max.)
S0 R/W SpanDAC0 for 4-20mA
#1 Integer
S3 R/W SpanDAC1 for 4-20mA #2 Integer
S2 W Save FACT
ORY N/A
TC R TCDeltaR Float
TD R/W Tcslp Float
TF R/W Totalizer OFF/ON Flag Integer
TM R/W Cmintemp Float
P R/W Totalizer
T
TT R/W Totalizer
Temperature Flag Integer
Value Float
TX R/W Cmaxtemp Float
TZ R Temperature Float
T0 R/W Tcslp0 Float
T2 R/W
Tcslp2 Float
T3 R/W TSpanDAC0 for 4-20mA #1 Integer
T7 R/W TSpanDAC1 for 4-20mA #2 Integer
T5 R/W TZeroDAC0 for 4-20mA #1 Integer
T8 R/W TZeroDAC1 for 4-20mA #2 Integer
UF R User Flow Float
UK R User FlowK Float
UN R/W User Name String (16 chars max.)
VN R V
ersion Number String (16 chars max.)
XX R/W Test Flow Rate (SFPS) Float
XY W Delete T
est Flow Rat e Float
Z0 R/W ZeroDAC0 for 4-20mA #1 Integer
Z2 R/W ZeroDAC1 for 4-20mA #2 Integer
Command Line Password: 357
This page is subject to proprietary rights statement on last page 22 06EN003367 Rev. F
Page 23

ST50 Mass Flow Meter Fluid Components International LLC
Note: When invoking a Write Function, there must be a space separating the Command characters and the data value. All
Read and Write Functions are completed with a <CR>. To exit CLI, press <CR> following the last Command <CR>.
Examples: RBK<CR> (Read Breakpoint)
WBK 2222<CR> (Write Breakpoint 2222)
RC11<CR> (Read Coefcient C1,1)
WC11 –234.567<CR> (Write Coefcient C1,1, -234.567)
<CR> (Leave Command Line Mode)
This page is subject to proprietary rights statement on last page 23 06EN003367 Rev. F
Page 24

Fluid Components International LLC ST50 Mass Flow Meter
INTENTIONALLY LEFT BLANK
This page is subject to proprietary rights statement on last page 24 06EN003367 Rev. F
Page 25
ST50 Mass Flow Meter Fluid Components International LLC
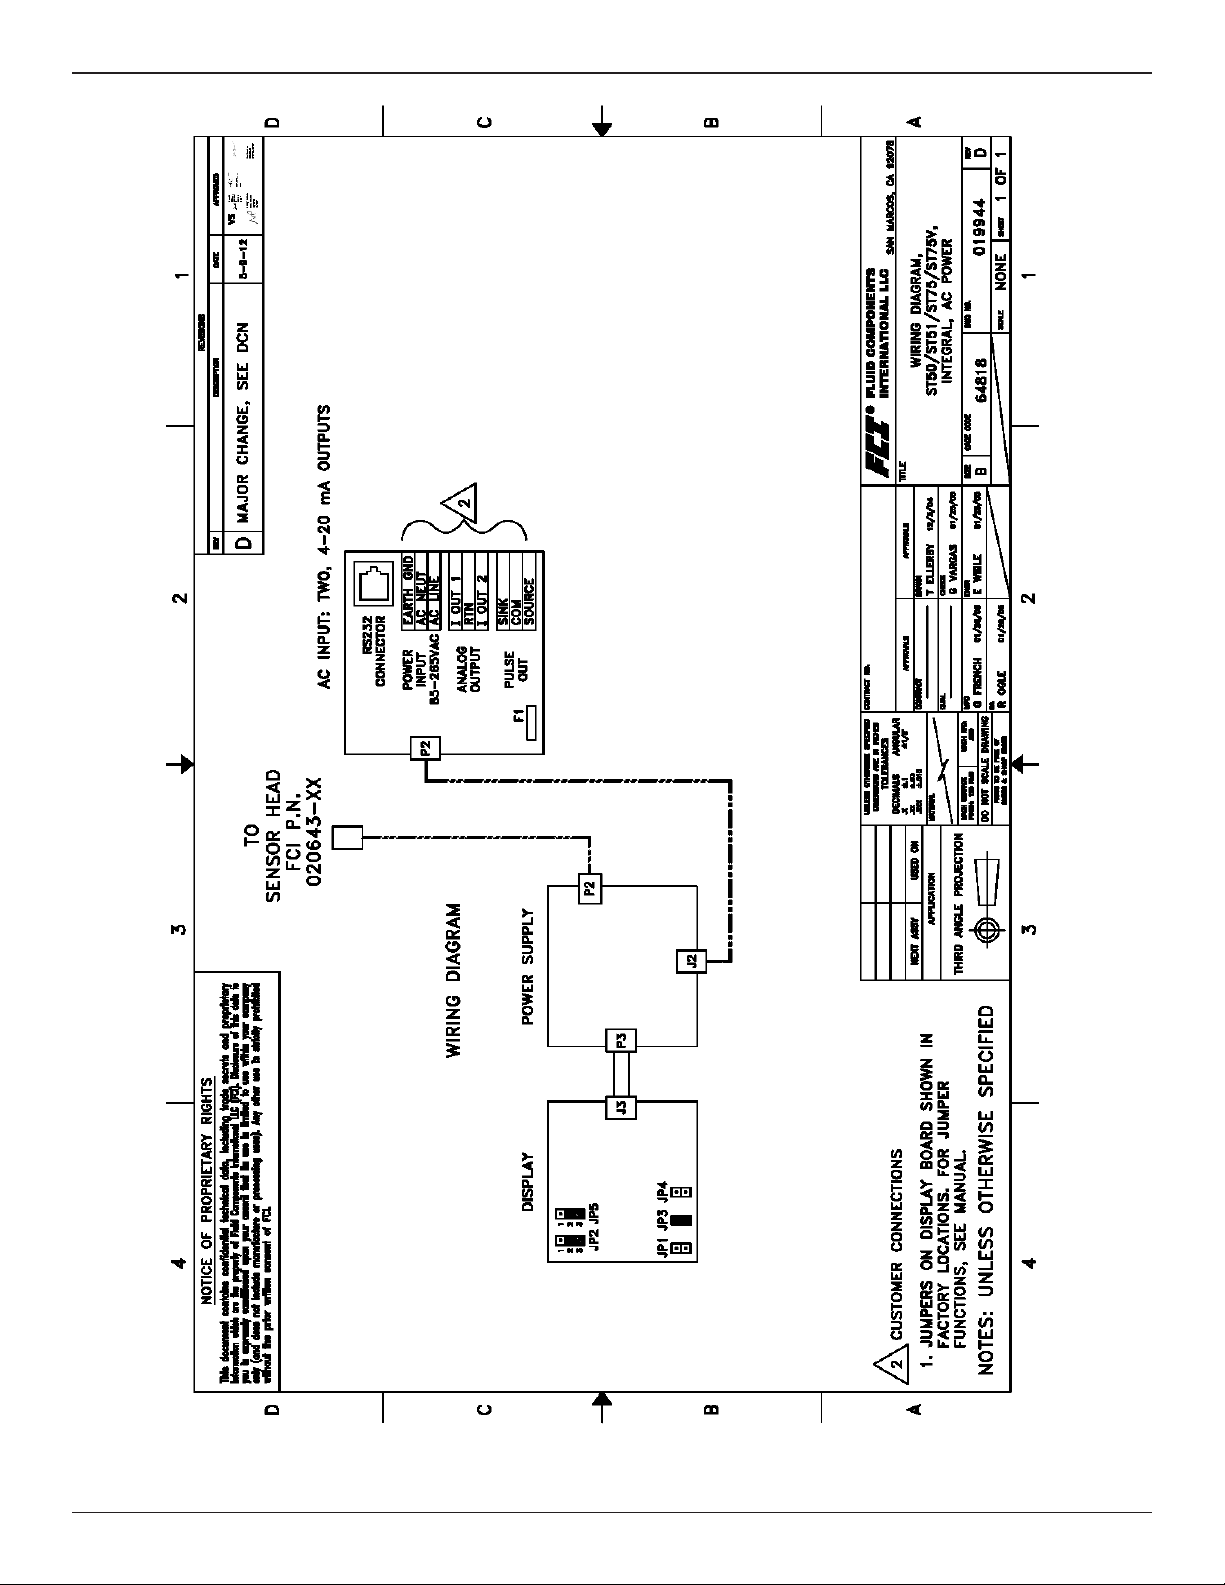
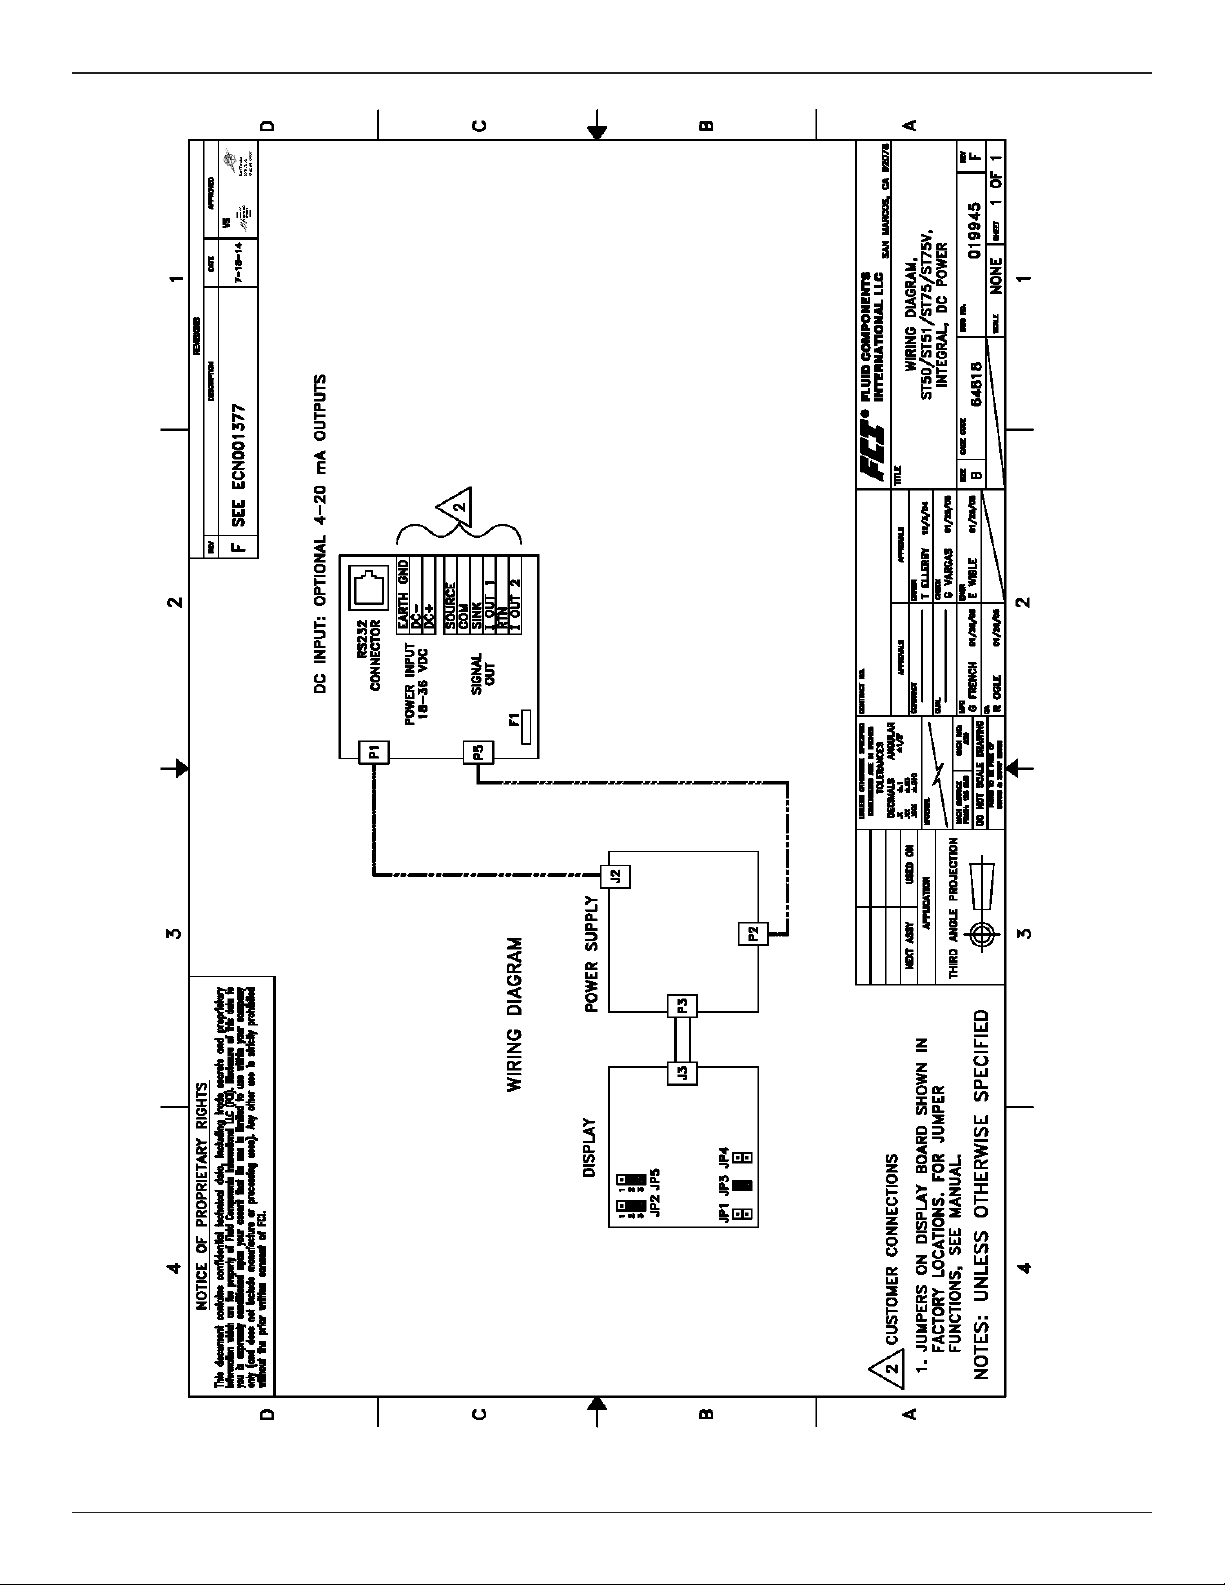
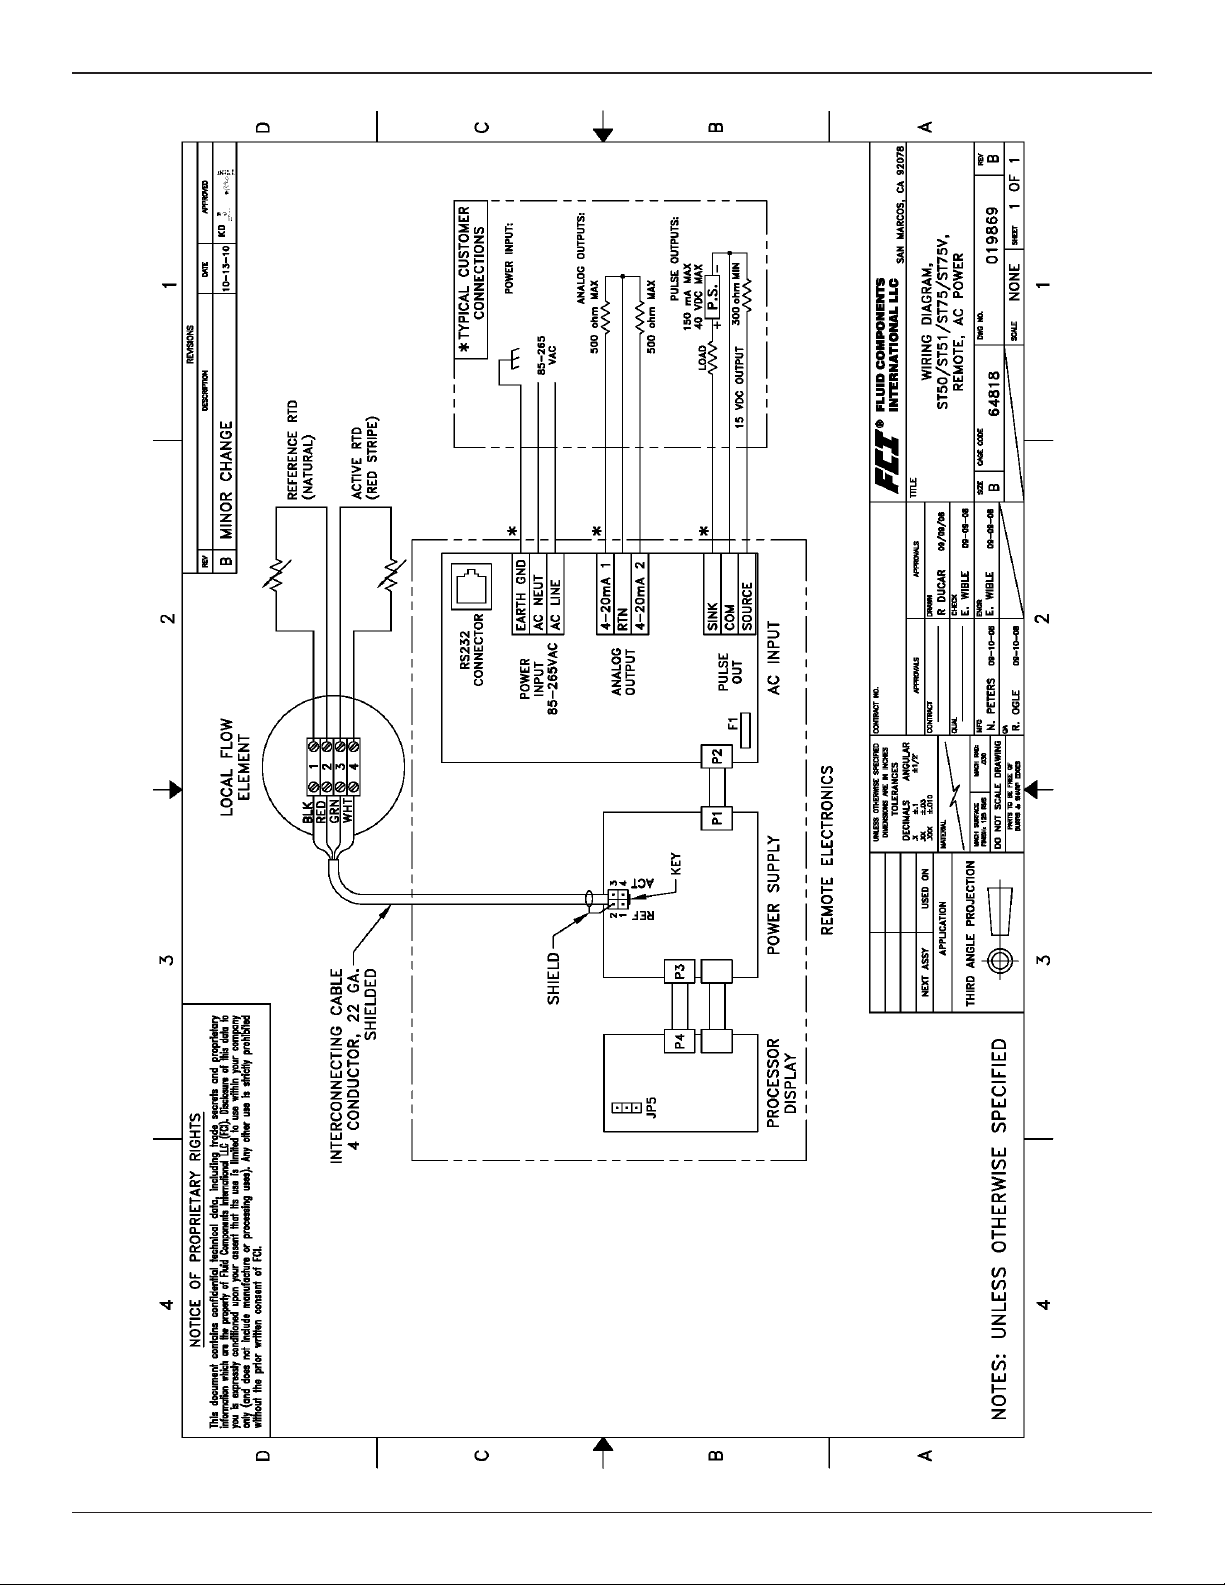
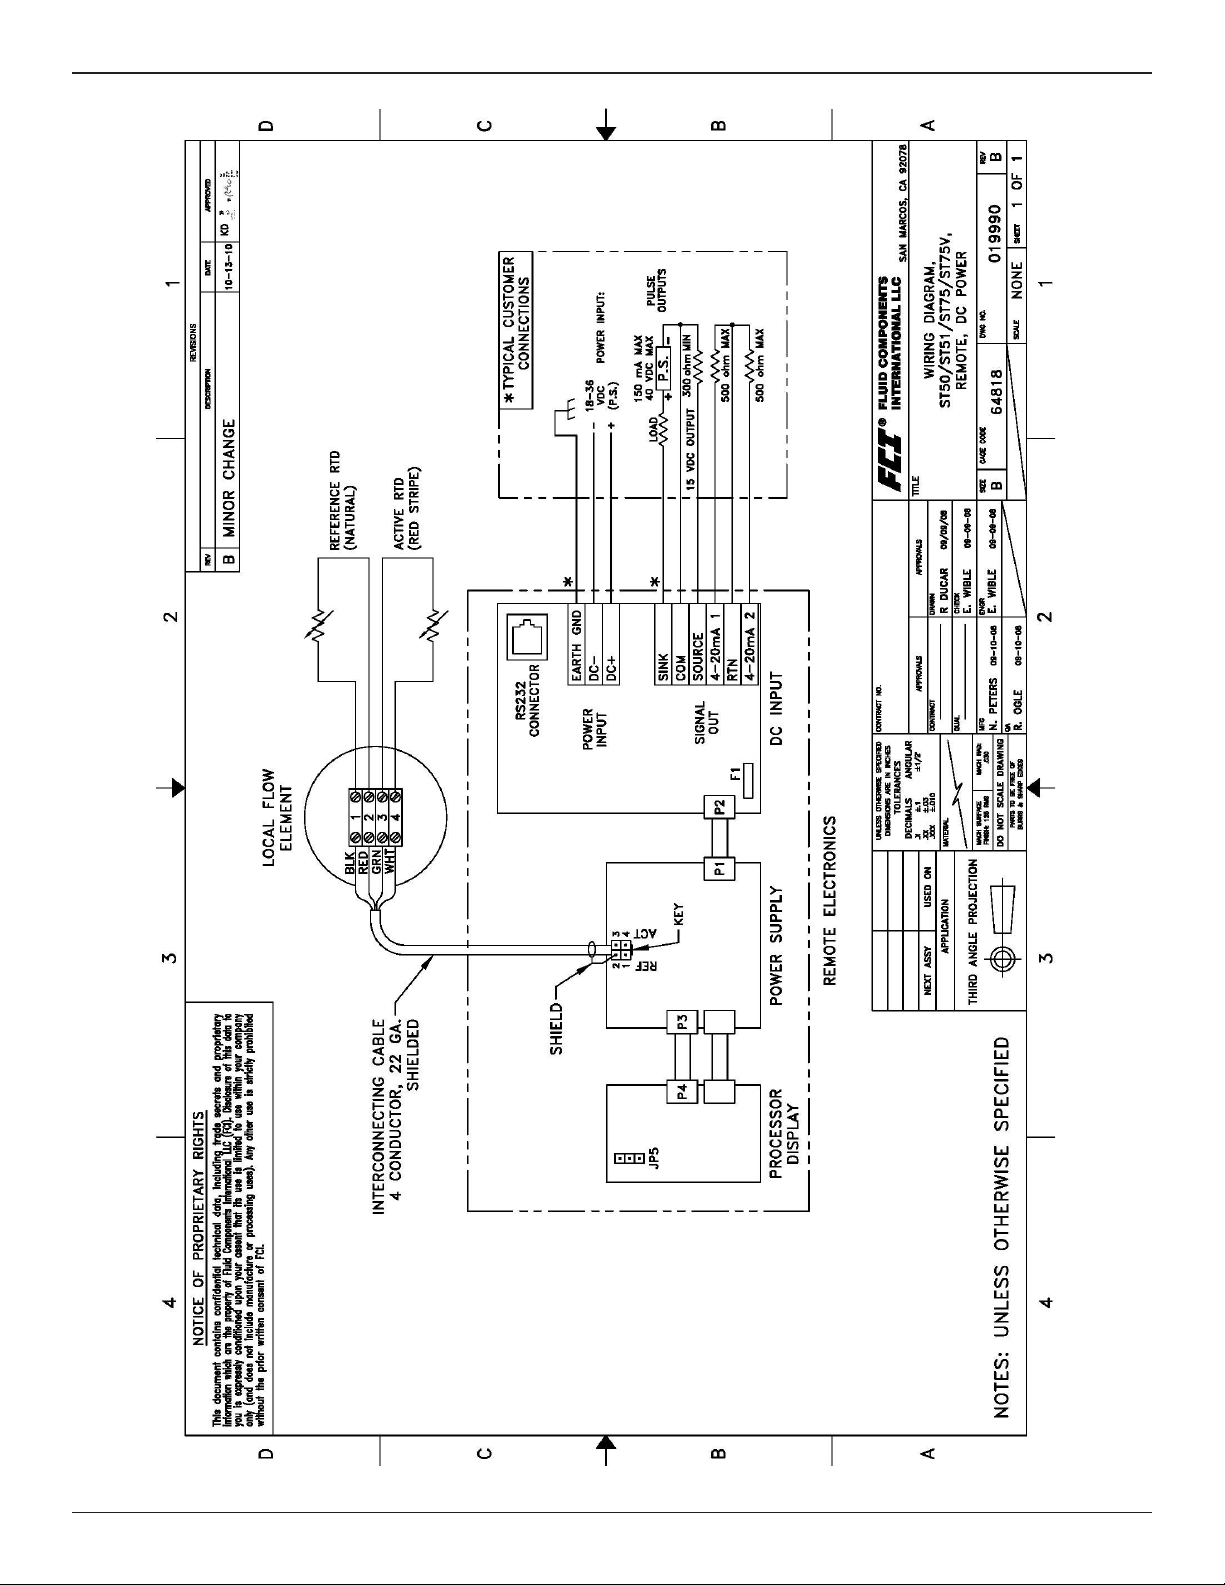
Appendix C - Drawings
This page is subject to proprietary rights statement on last page 25 06EN003367 Rev. F
Page 26
Fluid Components International LLC ST50 Mass Flow Meter
This page is subject to proprietary rights statement on last page 26 06EN003367 Rev. F
Page 27
ST50 Mass Flow Meter Fluid Components International LLC
This page is subject to proprietary rights statement on last page 27 06EN003367 Rev. F
Page 28
Fluid Components International LLC ST50 Mass Flow Meter
This page is subject to proprietary rights statement on last page 28 06EN003367 Rev. F
Page 29
ST50 Mass Flow Meter Fluid Components International LLC
This page is subject to proprietary rights statement on last page 29 06EN003367 Rev. F
Page 30
Fluid Components International LLC ST50 Mass Flow Meter
This page is subject to proprietary rights statement on last page 30 06EN003367 Rev. F
Page 31
ST50 Mass Flow Meter Fluid Components International LLC
This page is subject to proprietary rights statement on last page 31 06EN003367 Rev. F
Page 32

Fluid Components International LLC ST50 Mass Flow Meter
INTENTIONALLY LEFT BLANK
This page is subject to proprietary rights statement on last page 32 06EN003367 Rev. F
Page 33

ST50 Mass Flow Meter Fluid Components International LLC
Appendix D - Customer Service
Customer Service/Technical Support
FCI provides full in-house technical support. Additional technical representation is also provided by FCI eld representatives. Before
contacting a eld or in-house representative, perform the troubleshooting techniques outlined in this document.
By Mail
Fluid Components International LLC
1755 La Costa Meadows Dr.
San Marcos, CA 92078-5115 USA
Attn: Customer Service Department
By Phone
Contact the area FCI regional representative. If a eld representative is unable to be contacted or if a situation is unable to be
resolved, contact the FCI Customer Service Department toll free at 1 (800) 854-1993
By Fax
To describe problems in a graphical or pictorial manner, send a fax including a phone or fax number to the regional representative.
Again, FCI is available by facsimile if all possibilities have been exhausted with the authorized factory representative. Our fax
number is 1 (760) 736-6250; it is available 7 days a week, 24 hours a day.
By Email
FCI Customer Service can be contacted by email at: techsupport@uidcomponents.com. Describe the problem in detail making
sure a telephone number and best time to be contacted is stated in the email.
International Support
For product information or product support outside the contiguous United States, Alaska, or Hawaii, contact your country’s FCI
International Representative or the one nearest to you.
After Hours Support
For product information visit FCI’s website at www.uidcomponents.com. For product support call 1 (800) 854-1993 and follow
the prerecorded instructions.
Point of Contact
The point of contact for service, or return of equipment to FCI is your authorized FCI sales/service ofce. To locate the ofce
nearest you, visit the FCI website at www.uidcomponents.com.
Warranty Repairs or Returns
FCI prepays ground transportation charges for return of freight to the customer’s door. FCI reserves the right to return equipment
by the carrier of our choice.
International freight, handling charges, duty/entry fees for return of equipment are paid by the customer.
Non-Warranty Repairs or Returns
FCI returns repaired equipment to the customer either collect or prepaid and adds freight charges to the customer invoice.
Return to Stock Equipment
The customer is responsible for all shipping and freight charges for equipment that is returned to FCI stock from the customer
site. These items will not be credited to the customer’s account until all freight charges are cleared, along with applicable return to
stock charges, from the credit invoice. (Exceptions are made for duplicate shipments made by FCI.)
If any repair or return equipment is received at FCI, freight collect, without prior factory consent, FCI bills the sender for these charges.
This page is subject to proprietary rights statement on last page 33 06EN003367 Rev. F
Page 34

Fluid Components International LLC ST50 Mass Flow Meter
Field Service Procedures
Contact an FCI eld representative to request eld service.
A eld service technician is dispatched to the site from either the FCI factory or one of the FCI representative ofces. After the
work is complete, the technician completes a preliminary eld service report at the customer site and leaves a copy with the
customer.
Following the service call, the technician completes a formal, detailed service report. The formal report is mailed to the customer
within ve days of the technician’s return to the factory or ofce.
Field Service Rates
All eld service calls are billed at the prevailing rates as listed in the FCI Price Book unless specically excepted by the FCI
Customer Service Manager.
Customers are charged for all travel expenses including airfare, auto rental, meals and lodging. In addition, the customer shall pay
all costs of transporting parts, tools or goods to and from the job site. Invoicing travel time, eld service work and other expenses
will be performed by FCI’s Accounting Department.
This page is subject to proprietary rights statement on last page 34 06EN003367 Rev. F
Page 35
ST50 Mass Flow Meter Fluid Components International LLC
This page is subject to proprietary rights statement on last page 35 06EN003367 Rev. F
Page 36
Fluid Components International LLC ST50 Mass Flow Meter
This page is subject to proprietary rights statement on last page 36 06EN003367 Rev. F
Page 37

ST50 Mass Flow Meter Fluid Components International LLC
Instrument Warranty
Goods furnished by the Seller are to be within the limits and of the sizes published by the Seller and subject to the
Seller’s standard tolerances for variations. All items made by the Seller are inspected before shipment, and should any
of said items prove defective due to faults in manufacture or performance under Seller approved applications, or fail to
meet the written specications accepted by the Seller, they will be replaced or repaired by Seller at no charge to Buyer
provided return or notice of rejection of such material is made within a reasonable period but in no event longer than
one (1) year from date of shipment to Buyer, and provided further, that an examination by Seller discloses to Seller’s
reasonable satisfaction that the defect is covered by this warranty and that the Buyer has not returned the equipment in
a damaged condition due to Buyer’s or Buyer’s employees’, agents’, or representatives’ negligence and Buyer has not
tampered, modied, redesigned, misapplied, abused, or misused the goods as to cause the goods to fail. In addition,
this warranty shall not cover damage caused by Buyer’s exposure of the goods to corrosive or abrasive environments.
Moreover, Seller shall in no event be responsible for (1) the cost or repair of any work done by Buyer on material
furnished hereunder (unless specically authorized in writing in each instance by Seller), (2) the cost or repair of any
modications added by a Distributor or a third party, (3) any consequential or incidental damages, losses, or expenses
in connection with or by reason of the use of or inability to use goods purchased for any purpose, and Seller’s liability
shall be specically limited to free replacement, or refund of the purchase price, at Seller’s option, provided return or
rejection of the goods is made consistent with this paragraph, and the Seller shall in no event be liable for transportation,
installation, adjustment, loss of good will or prots, or other expenses which may arise in connection with such returned
goods, or (4) the design of products or their suitability for the purpose for which they are intended or used. Should the
Buyer receive defective goods as dened by this paragraph, the Buyer shall notify the Seller immediately, stating full
par-ticulars in support of his claim, and should the Seller agree to a return of the goods, the Buyer shall follow Seller’s
packaging and transportation directions explicitly. In no case are the goods to be returned without rst obtaining a return
authorization from the Seller. Any repair or replacement shall be at Seller’s factory, unless otherwise directed, and shall be
returned to Seller transportation prepaid by Buyer. If the returned goods shall prove defective under this clause they will
be replaced or repaired by Seller at no charge to Buyer provided the return or rejection of such material is made within a
reasonable period, but in no event longer than (1) year from the date of shipment of the returned goods or the unexpired
terms of the original warranty period whichever is later. If the goods prove to be defective under this paragraph, the Buyer
shall remove the goods immediately from the process and prepare the goods for shipment to Seller. Continued use or
operation of defective goods is not warranted by Seller and damage occurring due to continued use or operation shall
be for Buyer’s account. Any description of the goods contained in this offer is for the sole purpose of identifying them,
and any such description is not part of the basis of the bargain, and does not constitute a warranty that the goods will
conform to that description. The use of any sample or model in connec-tion with this offer is for illustrative purposes only,
is not part of the basis of the bargain, and is not to be construed as a warranty that the goods will conform to the sample
or model. No afrmation of that fact or promise made by the Seller, whether or not in this offer, will constitute a warranty
that the goods will conform to the afrmation or promise. THIS WARRANTY IS EXPRESSLY IN LIEU OF ANY AND ALL
OTHER EXPRESS OR IMPLIED WARRANTIES WITH RESPECT TO THE GOODS OR THEIR INSTALLATION, USE,
OPERATION, REPLACEMENT OR REPAIR, INCLUDING ANY IMPLIED WARRANTY OF MERCHANTABILITY OR
FITNESS OF PURPOSE; AND THE GOODS ARE BEING PURCHASED BY BUYER “AS IS”. SELLER WILL NOT BE
LIABLE BY VIRTUE OF THIS WARRANTY OR OTHERWISE FOR ANY SPECIAL, INCIDENTAL OR CONSEQUENTIAL
LOSS OR DAMAGE RESULTING FROM THE USE OR LOSS OF USE OF THE GOODS.
This page is subject to proprietary rights statement on last page 37 06EN003367 Rev. F
Page 38
ST51 Mass Flow Meter
Notice of Proprietary Rights
This document is the property of Fluid Components International LLC (FCI) and contains condential and proprietary information including, without limitation, trade secrets, design,
manufacturing, processing, form t and function data, technical data, and/or cost and pricing information, developed exclusively at FCI’s private expense. Disclosure of this information
to you is expressly conditioned on your assent that its use is limited to use only within your company (and does not include manufacturing or processing uses). Any other use, including re-procurement, replication of FCI products, or other use directly or indirectly in any way detrimental to FCI’s interests is strictly prohibited without prior written consent of FCI.
This document is subject to the protections of 18USC1905 (Trade Secrets Act), 5USC552 (Freedom of Information Act), Executive Order 12600 of 6/23/87, 18USC1832 (Economic
Espionage and Trade Secrets Act of 1996), and Cal. Civ. Code 3426 et seq (Uniform California Trade Secrets Act). Recipients of this document agree to maintain this legend and afx
it to any duplication or reproduction, in whole or in part, of the document.
Visit FCI on the Worldwide Web: www.uidcomponents.com
1755 La Costa Meadows Drive, San Marcos, California 92078 USA – 760-744-6950 – 800-854-1993 – Fax 760-736-6250
© Copyright 2022 by Fluid Components International LLC. All rights reserved. FCI is a registered trademark of Fluid Components International LLC. Information subject to change without notice.
Fluid Components International LLC 06EN003367 Rev. F
 Loading...