

Page 1
User’s Guide
Shop online at
omega.com
e-mail: [email protected]
For latest product manuals:
www.omegamanual.info
®
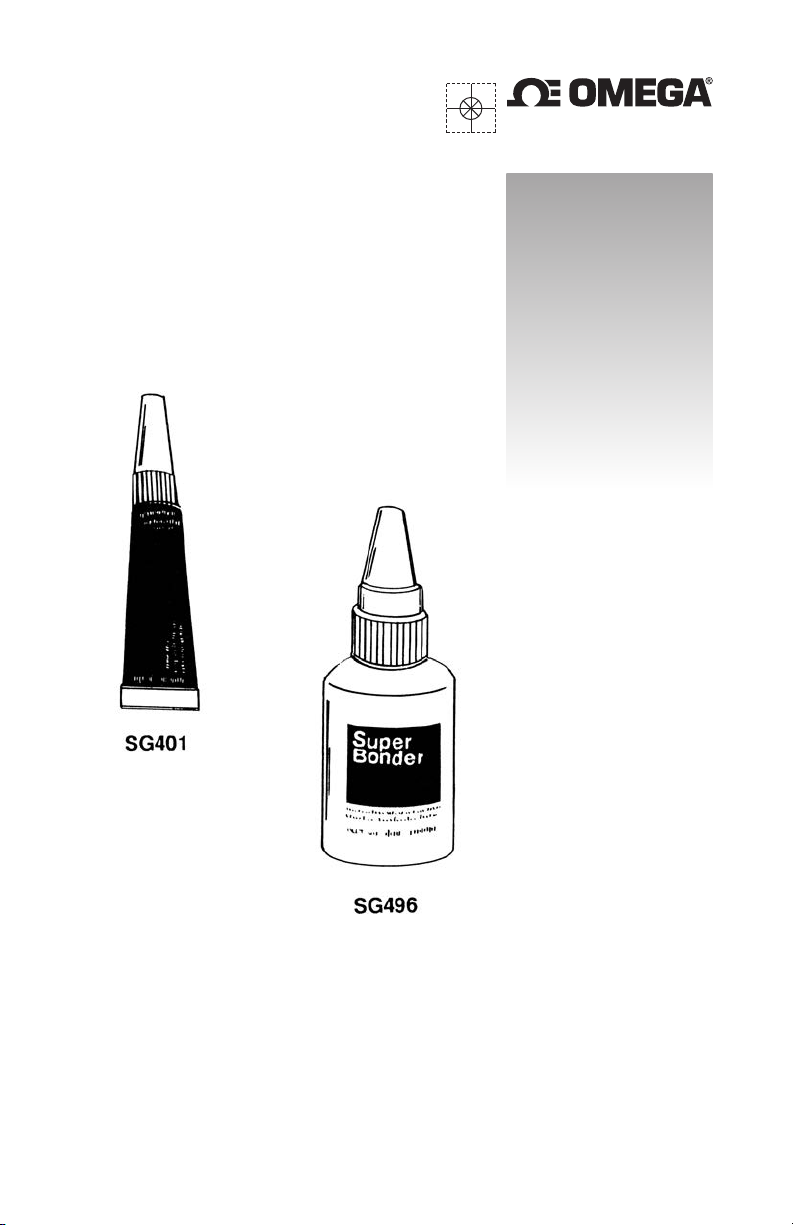
SG401 and SG496
Rapid Cure Strain Gauge
Adhesives
Page 2
SG401 and SG496 Rapid Cure Strain Gauge Adhesives
SECTION 1 - INTRODUCTION
OMEGA’s Rapid Cure Adhesives, SG401 and SG496 are modified versions of a solvent-free cyanide-acrylate adhesive specially developed to
apply strain gauges of the bonded-resistance type. They are suitable for
all series of strain gauges and compatible with most metals of common
use and with most synthetic materials. They are not suitable, however,
for use with porous materials such as concrete, wood, foam plastic, etc.
This series of Strain Gauge Adhesives is supplied in three different
packages. Their part numbers and weights are listed below:
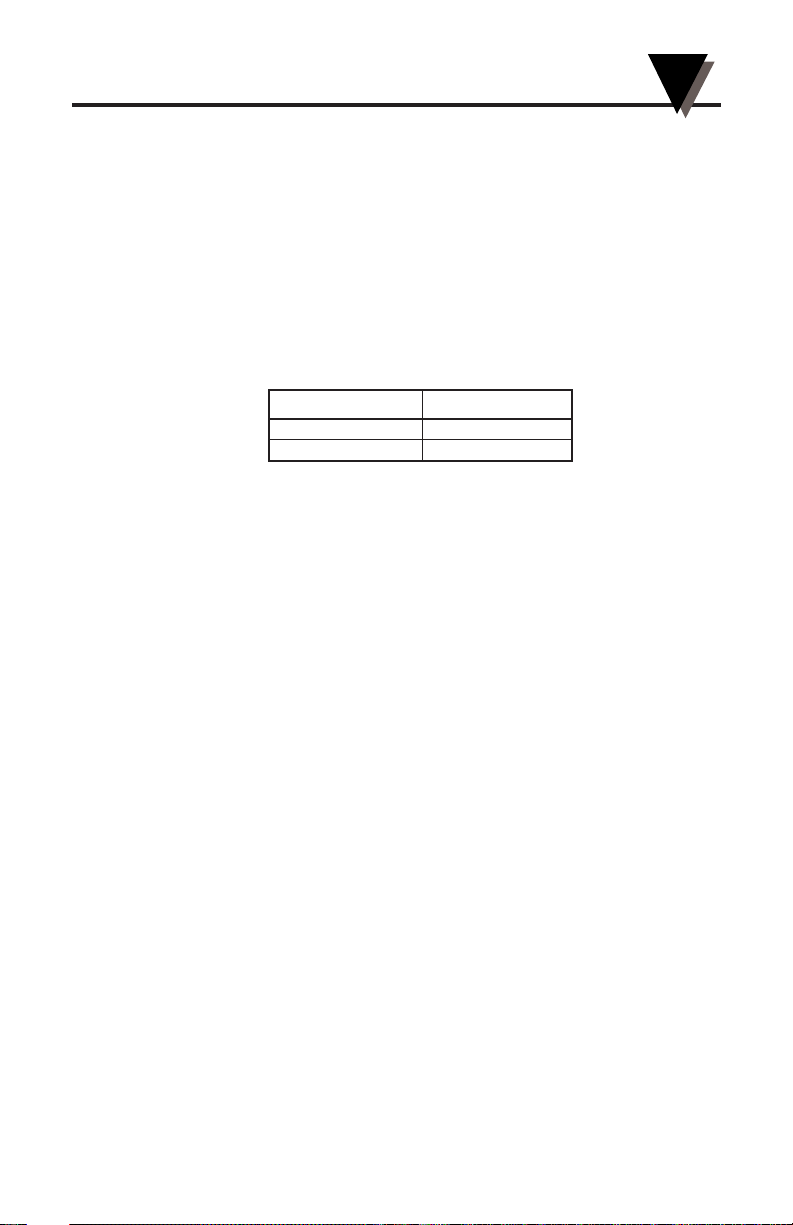
Part Number Net Weight
SG401 0.10 oz.
SG496 1.00 oz.
SECTION 2 - SETTING AND CURING NOTES
Polymerization (setting) of cyanide-acrylate adhesives occurs by the
catalytic reaction of moisture absorbed from the air. The most favorable
conditions are given by a relative humidity (RH) between 40% and 70%.
In the case of RH less than 30%, the reaction is noticeably retarded and
in extreme cases, completely stopped. More than 80% RH causes shock
setting. Internal stresses in the adhesive layer caused by shock setting
reduce the maximum extensibility of the bond. One should, therefore,
always ensure that the limit values of 30% and 80% RH are not exceeded.
Complete setting in the given time is achieved only with thin films.
Thick layers of adhesive set very slowly and incompletely; therefore,
extremely rough contact surfaces are unsuitable.
The setting speed depends on the chemical condition of the components
to be bonded. Alkaline materials accelerate polymerization, whereas
acid materials not only retard but can completely prevent setting. (In
the latter case, a neutralizer should be used.) Representative figures
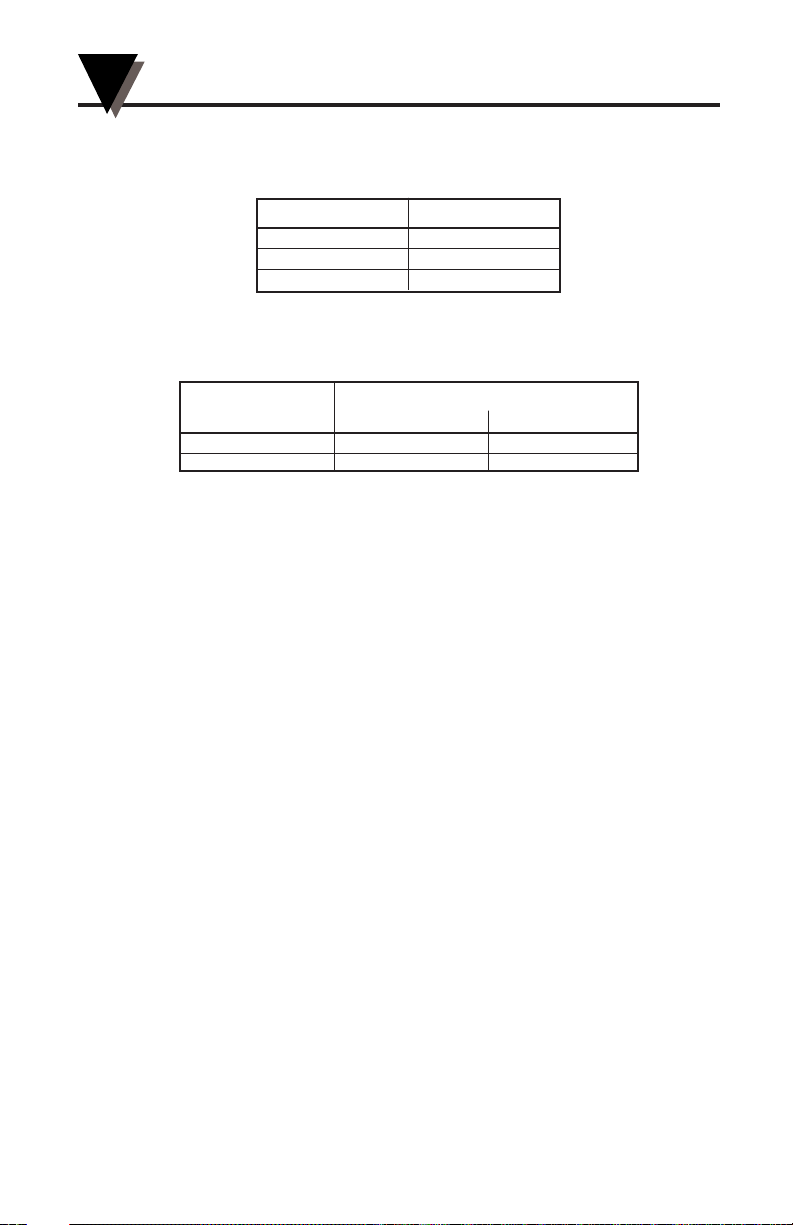
for the setting time and its dependence upon the quoted materials at a
temperature of 20°C (68°F) and an RH of 65% are given in Table 2-1. At
the end of these periods, the adhesive will have set sufficiently to allow
cable connection to be initiated. Ultimate curing is achieved after some
24 hours. However, measurements can be taken after the periods quoted
in Table 2-2.
1
Page 3
SG401 and SG496 Rapid Cure Strain Gauge Adhesives
TABLE 2-1
MINIMUM SETTING TIME FOR BONDING
Material Setting Time
Steel 60 to 120 sec.
Aluminum 50 to 100 sec.
Plastics 10 to 60 sec.
TABLE 2-2
MINIMUM CURING TIME FOR MEASUREMENT
Type of Curing Time
Measurement At 5°C (41°F) 20°C (68°F)
Dynamic 90 min. 10 min.
Static 120 min. 15 min.
SECTION 3 - PREPARING THE SURFACE
The object of preparation is to create a smooth surface that can be wetted. The following steps, which require attention or can be bypassed,
depends on the condition of the test piece.
3.1 Coarse Cleaning
Rust, scale, paint, and other such contaminants must be removed from
the test area and its surroundings.
3.2 Smoothing Surface
Pitting, protrusions, scratches, and other such imperfections must be
removed by grinding, filing, or other suitable methods.
3.3 De-greasing
The choice of a cleaning agent depends on the nature of the contamination and whether the surface is adversely affected by a given cleanser.
Powerful grease solvents such as Freon TF, Chlorothene NU, methylethyl-ketone, acetone, and trichlorethylene are normally used. Wax and
similar substances dissolve in toluene.
The surface to be cleaned should be washed with gauze pads soaked in
solvent. Initial treatment should cover a somewhat larger area than that
which is ultimately required. As each new pad of gauze is taken, the
zone that receives attention should be progressively reduced to minimize the possibility of continually introducing new particles of dirt from
the edges of the zone. Large areas can be brushed with water and an
abrasive powder (e.g. AJAX, COMET, etc.). After rinsing, there should
remain a surface which is completely wetted with an unbroken film of
water. The surface is then dried with a clean cloth (paper towel) or by
heat. Ultrasonic cleaning baths or steam degreasing apparatuses can
also be used with good effect.
2
Page 4
SG401 and SG496 Rapid Cure Strain Gauge Adhesives
NOTE
The solvent must be chemically clean and should leave no
residue. It should never be used directly from the container
in which it is stored. A quantity should be transferred to a
clean bowl and used from there. Unused fluid in the bowl
should never be returned to stock! Use pads of gauze just
once and then dispose of them. Never dip a used pad into
the solution a second time!
3.4 Surface Roughening
The adhesion between bonded parts depends on the adhesion of the
cement with the surfaces wetted by it. Roughening of the surface on the
specimen will improve the adhesion by increasing the active surface.
Emery paper or cloth should be moved in circles in order to avoid any
preferred direction of grooves. Make sure to use only fresh emery paper
of a grade that matches the hardness of the specimen material (e.g.,
for steel use grade 80 to 180; for aluminum use grade 220 to 360). If the
roughness becomes too great, air bubbles might form which would
prevent effective bonding. The material must be absolutely free of oil
and grease. Any surface grooving that might have resulted from the
foregoing process must be removed.
If one is familiar with etching processes, this too is possible. If no
interference with the surface finish of the test piece is acceptable, the
adhesives can be used on smooth or polished surfaces, although its
maximum extensibility is then reduced.
3.5 Fine Cleaning
All dirt and dust resulting from the roughening process should be
removed carefully. This is achieved with gauze pads soaked in one of
the solvents noted in section 3.3. Each pad should be held with clean
tweezers and passed over the surface only once. The process should be
repeated until the pads show no trace of discoloration. Possible remaining lint should be removed with clean tissue paper. Keep the cleaned
area dry! Do not blow with breath or touch with fingers!
To avoid the incidence of new oxidation, the mechanical or chemical
treatment of the surface should occur just before adhesion.
3
Page 5
SG401 and SG496 Rapid Cure Strain Gauge Adhesives
SECTION 4 - PREPARATION OF THE STRAIN GAUGE
Prior to attaching the gauge, some users prefer to solder the connections
between the gauge and terminal pad, while others prefer to solder after
attaching the gauge.
The bonding side of the strain gauge should be carefully cleaned with
a gauze pad soaked in Freon, Frigen, or carbon-tetrachloride. Residual
moisture must be dried by a radiant heater or a hot-air blower. During
this procedure, the strain gauge must be held by tweezers.
SECTION 5 - ATTACHING THE STRAIN GAUGE
Because of the short curing time, it is not possible to readjust the position of the strain gauge once the adhesion process has been initiated.
The gauge width should be extended with a short length of adhesive
tape affixed to the upper surface of the gauge, away from the connections. If soldering is to be done after attaching the gauge, protect the
solder terminals with tape.
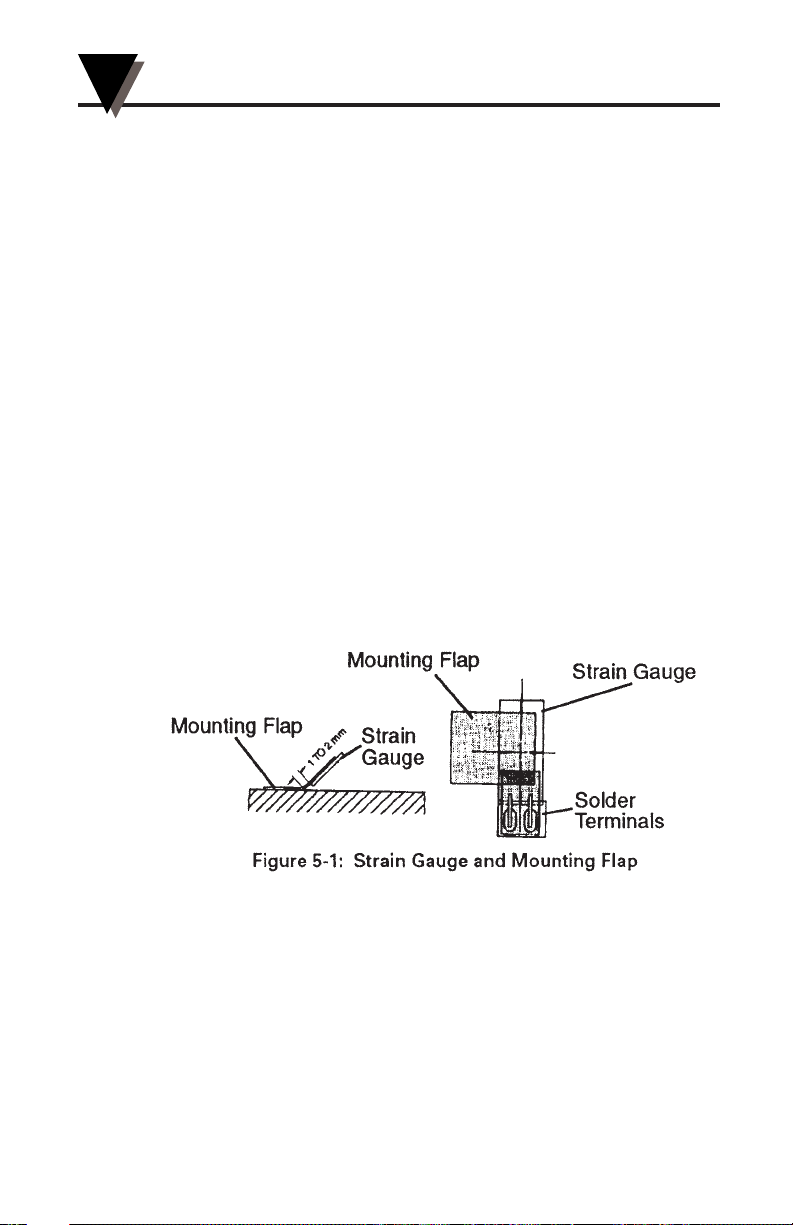
The strain gauge is laid onto the cleaned area of the test piece, and after
careful alignment, the protruding part of the adhesive tape is pressed
onto the surface (use tweezers). This results in a hinge-like fixture that
allows the strain gauge to flap up and down without changing its alignment (see Figure 5-1).
Flip the strain gauge up to expose the adhesion area. Cut off a length
of the Teflon
®
film. If the adhesion area is more than 15 mm (0.6 inch)
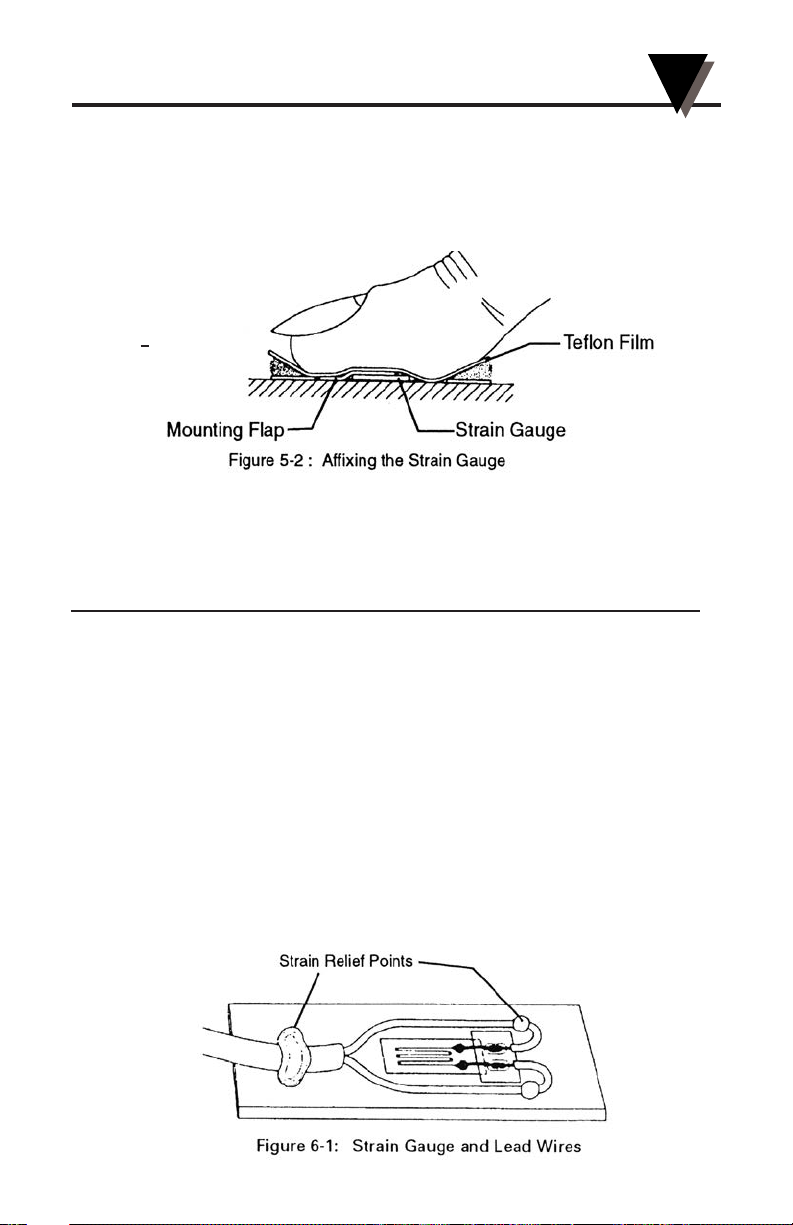
wide, cut the Teflon strip diagonally. Place one drop of the adhesive onto
the adhesion area. Using the Teflon film, distribute the adhesive into a
uniformly thin layer by brushing over it just once and lightly pressing the
Teflon film downwards. Use as little pressure as possible (see Figure 5-2)
because the adhesive will cure immediately if the pressure is too great.
Acid materials delay or inhibit setting of the adhesive. If the bonding
surface is acidic, apply a thin coat of neutralizer onto the bonding side of
the strain gauge, just enough to wet it. Allow this to dry.
The strain gauge is then carefully flapped over to meet the adhesive sur-
4
face and covered with Teflon film. Press the Teflon film covering the
Page 6
SG401 and SG496 Rapid Cure Strain Gauge Adhesives
adhesive tape and strain gauge until the adhesive has set (see Table 2-1).
After a few minutes, remove the Teflon film and carefully release the strain
gauge connections from the adhesive. The thickness of the adhesive film
in a correctly adhered gauge is 8 micrometers ± 20%. After curing, remove
the alignment adhesive tape by peeling it back onto itself at an acute angle.
CAUTION
Experience has shown that problems with the setting of cyanideacrylates are due mainly to layers of adhesive that are too thick.
Therefore, a neutralizer should be used only if a very thin adhesive
layer can be guaranteed. The measuring point should be protected
against damp chemicals and mechanical damage.
Experience has shown that problems with regard to the setting of cyanide-acrylates are due mainly to layers of adhesive which are too thick.
Therefore, a neutralizer should be used only if a very thin adhesive layer
can be guaranteed. The measuring point should be protected against
damp chemicals and mechanical damage.
SECTION 6 - ATTACHING THE LEAD WIRES
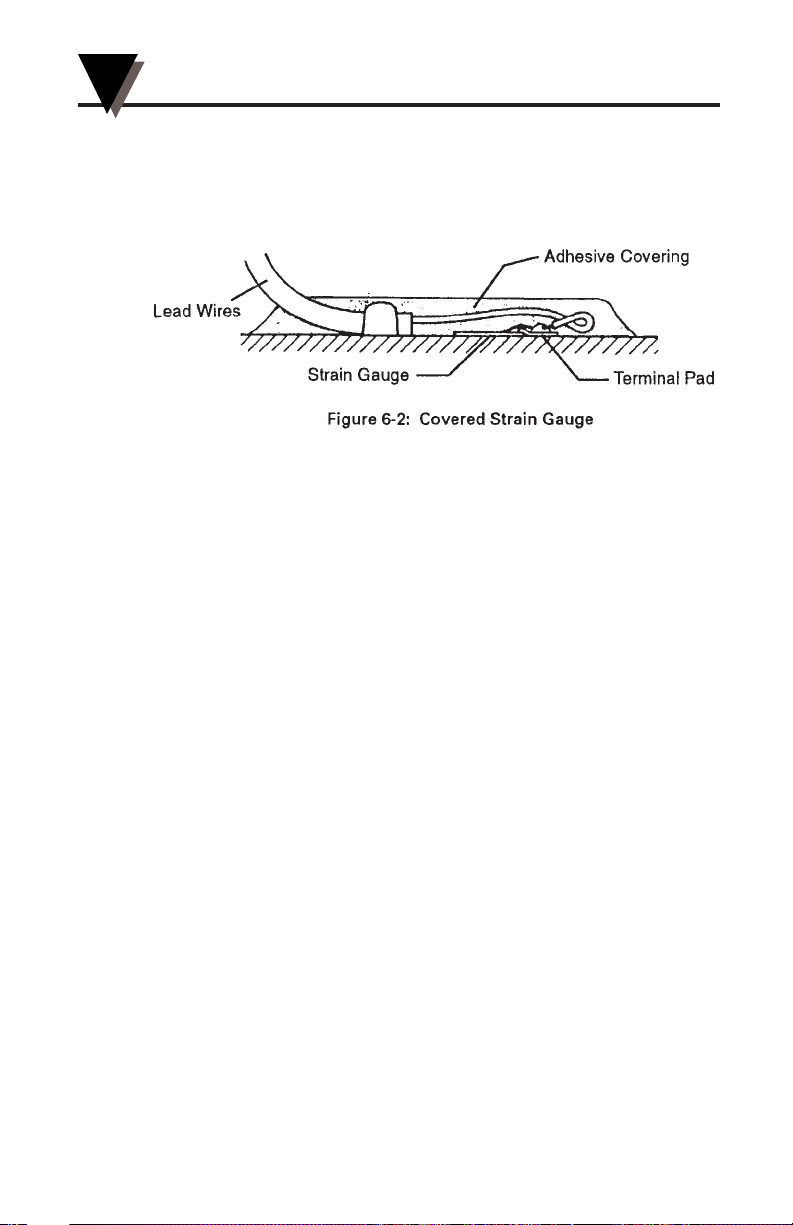
Solder all terminals and secure the instrumentation wire in place, either
with adhesive or by mechanical means (see Figure 6-1). After soldering, it is imperative that all soldering points are cleaned of flux residues
(even non-corrosive fluxes are hygroscopic and require cleaning).
5
Page 7
SG401 and SG496 Rapid Cure Strain Gauge Adhesives
A covering should be used to protect the strain gauge from environmental effects. De-grease the entire area and apply the covering (a layer
of adhesive) over the strain gauge and lead wire assembly, as shown in
Figure 6-2. Cover at least 20 mm (0.8 inch) of the lead wire.
SECTION 7 - STORAGE
Keep the bottle (or tube) in an upright position, to prevent the adhesive
from dripping out and hardening at the drip nozzle and on the screw
cap thread. If the adhesive has not been used for a long time, it will
harden and seal the tip. Once the tip has been cleaned or cut, the adhesive can be reused.
Protect the adhesive from heat, sunlight, and humidity. Store it in a cool,
dry place. The adhesive can be used until its viscosity rises considerably.
A virtually unlimited storage life can be achieved if the adhesive is kept
frozen at -15°C (5°F). Before use, defrost the adhesive, making sure it
has reached ambient temperature. Repeated freezing does not affect the
adhesive.
SECTION 8 - SAFETY MEASURES
Observe the safety regulations, valid in your country, which are
designed to avoid accidents associated with the use of adhesives and
solvents.
The adhesive itself can do no serious physiological harm. Since it clings
to the skin, however, contact should be avoided. Protective goggles
should be used. Should, however, the adhesive come into contact with
the eyes, rinsing thoroughly with water or boracic solution is necessary.
A doctor should be consulted immediately. From previous experience,
it has been found that corneal damage heals within a few days and sight
remains unimpaired.
6
Page 8

omega.com [email protected]
Servicing North America:
U.S.A.: Omega Engineering, Inc., One Omega Drive, P.O. Box 4047
Stamford, CT 06907-0047 USA
Toll-Free: 1-800-826-6342 (USA & Canada only)
Customer Service: 1-800-622-2378 (USA & Canada only)
Engineering Service: 1-800-872-9436 (USA & Canada only)
Tel: (203) 359-1660 Fax: (203) 359-7700
e-mail: [email protected]
For Other Locations Visit omega.com/worldwide
The information contained in this document is believed to be correct, but OMEGA accepts no liability for any errors it
contains, and reserves the right to alter specifications without notice.
WARNING: These products are not designed for use in, and should not be used for, human applications.
OMEGA ENGINEERING, INC. warrants this unit to be free of defects in materials and workmanship for a period of 13
WARRANTY/DISCLAIMER
months from date of purchase. OMEGA’s WARRANTY adds an additional one (1) month grace period to the normal
one (1) year product warranty to cover handling and shipping time. This ensures that OMEGA’s customers receive
maximum coverage on each product.
If the unit malfunctions, it must be returned to the factory for evaluation. OMEGA’s Customer Service Department will
issue an Authorized Return (AR) number immediately upon phone or written request. Upon examination by OMEGA,
if the unit is found to be defective, it will be repaired or replaced at no charge. OMEGA’s WARRANTY does not apply
to defects resulting from any action of the purchaser, including but not limited to mishandling, improper interfacing,
operation outside of design limits, improper repair, or unauthorized modification. This WARRANTY is VOID if the unit
shows evidence of having been tampered with or shows evidence of having been damaged as a result of excessive
corrosion; or current, heat, moisture or vibration; improper specification; misapplication; misuse or other operating
conditions outside of OMEGA’s control. Components in which wear is not warranted, include but are not limited to
contact points, fuses, and triacs.
OMEGA is pleased to offer suggestions on the use of its various products. However, OMEGA neither
assumes responsibility for any omissions or errors nor assumes liability for any damages that result from
the use of its products in accordance with information provided by OMEGA, either verbal or written.
OMEGA warrants only that the parts manufactured by the company will be as specified and free of
defects. OMEGA MAKES NO OTHER WARRANTIES OR REPRESENTATIONS OF ANY KIND WHATSOEVER,
EXPRESSED OR IMPLIED, EXCEPT THAT OF TITLE, AND ALL IMPLIED WARRANTIES INCLUDING
ANY WARRANTY OF MERCHANTABILITY AND FITNESS FOR A PARTICULAR PURPOSE ARE HEREBY
DISCLAIMED. LIMITATION OF LIABILITY: The remedies of purchaser set forth herein are exclusive, and
the total liability of OMEGA with respect to this order, whether based on contract, warranty, negligence,
indemnification, strict liability or otherwise, shall not exceed the purchase price of the component upon
which liability is based. In no event shall OMEGA be liable for consequential, incidental or special damages.
CONDITIONS: Equipment sold by OMEGA is not intended to be used, nor shall it be used: (1) as a “Basic Component”
under 10 CFR 21 (NRC), used in or with any nuclear installation or activity; or (2) in medical applications or used on
humans. Should any Product(s) be used in or with any nuclear installation or activity, medical application, used on
humans, or misused in any way, OMEGA assumes no responsibility as set forth in our basic WARRANTY / DISCLAIMER
language, and, additionally, purchaser will indemnify OMEGA and hold OMEGA harmless from any liability or damage
whatsoever arising out of the use of the Product(s) in such a manner.
Direct all warranty and repair requests/inquiries to the OMEGA Customer Service Department. BEFORE RETURNING ANY
PRODUCT(S) TO OMEGA, PURCHASER MUST OBTAIN AN AUTHORIZED RETURN (AR) NUMBER FROM OMEGA’S CUSTOMER SERVICE DEPARTMENT (IN ORDER TO AVOID PROCESSING DELAYS). The assigned AR number should then be
marked on the outside of the return package and on any correspondence.
The purchaser is responsible for shipping charges, freight, insurance and proper packaging to prevent breakage in transit.
FOR WARRANTY RETURNS, please have the following
information available BEFORE contacting OMEGA:
1. Purchase Order number under which the product was
PURCHASED,
2. Model and serial number of the product under warranty,
and
3. Repair instructions and/or specific problems relative to the
product.
OMEGA’s policy is to make running changes, not model changes, whenever an improvement is possible. This affords our
customers the latest in technology and engineering. OMEGA is a registered trademark of OMEGA ENGINEERING, INC.
© Copyright 2013 OMEGA ENGINEERING, INC. All rights reserved. This document may not be copied, photocopied, reproduced,
translated, or reduced to any electronic medium or machine-readable form, in whole or in part, without the prior written consent of
OMEGA ENGINEERING, INC.
RETURN REQUESTS / INQUIRIES
FOR NON-WARRANTY REPAIRS,
rent repair charges. Have the following information available
BEFORE contacting OMEGA:
1. Purchase Order number to cover the COST of the repair,
2. Model and serial number of the product, and
3. Repair instructions and/or specific problems relative to the
product.
consult OMEGA for cur-
M1270/1213
 Loading...