

Page 1
Page 2

Servicing North America:
USA: One Omega Drive, Box 4047
ISO 9001 Certified Stamford, CT 06907-0047
Tel: (203) 359-1660 FAX: (203) 359-7700
e-mail: [email protected]
Canada: 976 Bergar
Laval (Quebec) H7L 5A1
Tel: (514) 856-6928 FAX: (514) 856-6886
e-mail: [email protected]
For immediate technical or application assistance:
USA and Canada: Sales Service: 1-800-826-6342 / 1-800-TC-OMEGASM
Customer Service: 1-800-622-2378 / 1-800-622-BESTSM
Engineering Service: 1-800-872-9436 / 1-800-USA-WHENSM
TELEX: 996404 EASYLINK: 62968934 CABLE: OMEGA
Mexico and
Latin America: Tel: (95) 800-826-6342 FAX: (95) 203-359-7807
En Espan˜ol: (95) 203-359-7803 e-mail: [email protected]
Servicing Europe:
Benelux: Postbus 8034, 1180 LA Amstelveen, The Netherlands
Tel: (31) 20 6418405 FAX: (31) 20 6434643
Toll Free in Benelux: 0800 0993344
e-mail: [email protected]
Czech Republic: ul. Rude armady 1868, 733 01 Karvina-Hranice
Tel: 420 (69) 6311899 FAX: 420 (69) 6311114
Toll Free: 0800-1-66342 e-mail: [email protected]
France: 9, rue Denis Papin, 78190 Trappes
Tel: (33) 130-621-400 FAX: (33) 130-699-120
Toll Free in France: 0800-4-06342
e-mail: [email protected]
Germany/Austria: Daimlerstrasse 26, D-75392 Deckenpfronn, Germany
Tel: 49 (07056) 3017 FAX: 49 (07056) 8540
Toll Free in Germany: 0130 11 21 66
e-mail: [email protected]
United Kingdom: One Omega Drive, River Bend Technology Centre
ISO 9002 Certified Northbank, Irlam, Manchester
M44 5EX, England
Tel: 44 (161) 777-6611 FAX: 44 (161) 777-6622
Toll Free in the United Kingdom: 0800-488-488
e-mail: [email protected]
It is the policy of OMEGA to comply with all worldwide safety and EMC/EMI regulations that apply. OMEGA is constantly pursuing certification of
its products to the European New Approach Directives. OMEGA will add the CE mark to every appropriate device upon certification.
The information contained in this document is believed to be correct, but OMEGA Engineering, Inc. accepts
no liability for any errors it contains, and reserves the right to alter specifications without notice.
WARNING: These products are not designed for use in, and should not be used for, patient-connected applications.
Page 3

Omega Model PX750 Smart Pressure Transmitters
RETROFITTING OVERVIEW
The procedure for retrofitting a transmitter is divided into three parts:
1.Removing the analog electronics assembly.
2.Installing the smart electronics kit.
3.Characterizing the retrofitted transmitter.
Two tools are required to remove the analog electronics and to install
the smart electronics:
•Flat-bladed screwdriver
•¼-in. nut driver or wrench
The following equipment is needed to characterize the retrofitt ed
transmitter:
•A Omega Model HC275 Communicator with
SMART FAMILY
®
Interface
•An accurate pressure source, preferably 0.025% accuracy or
better
•A 250 ohm resistor
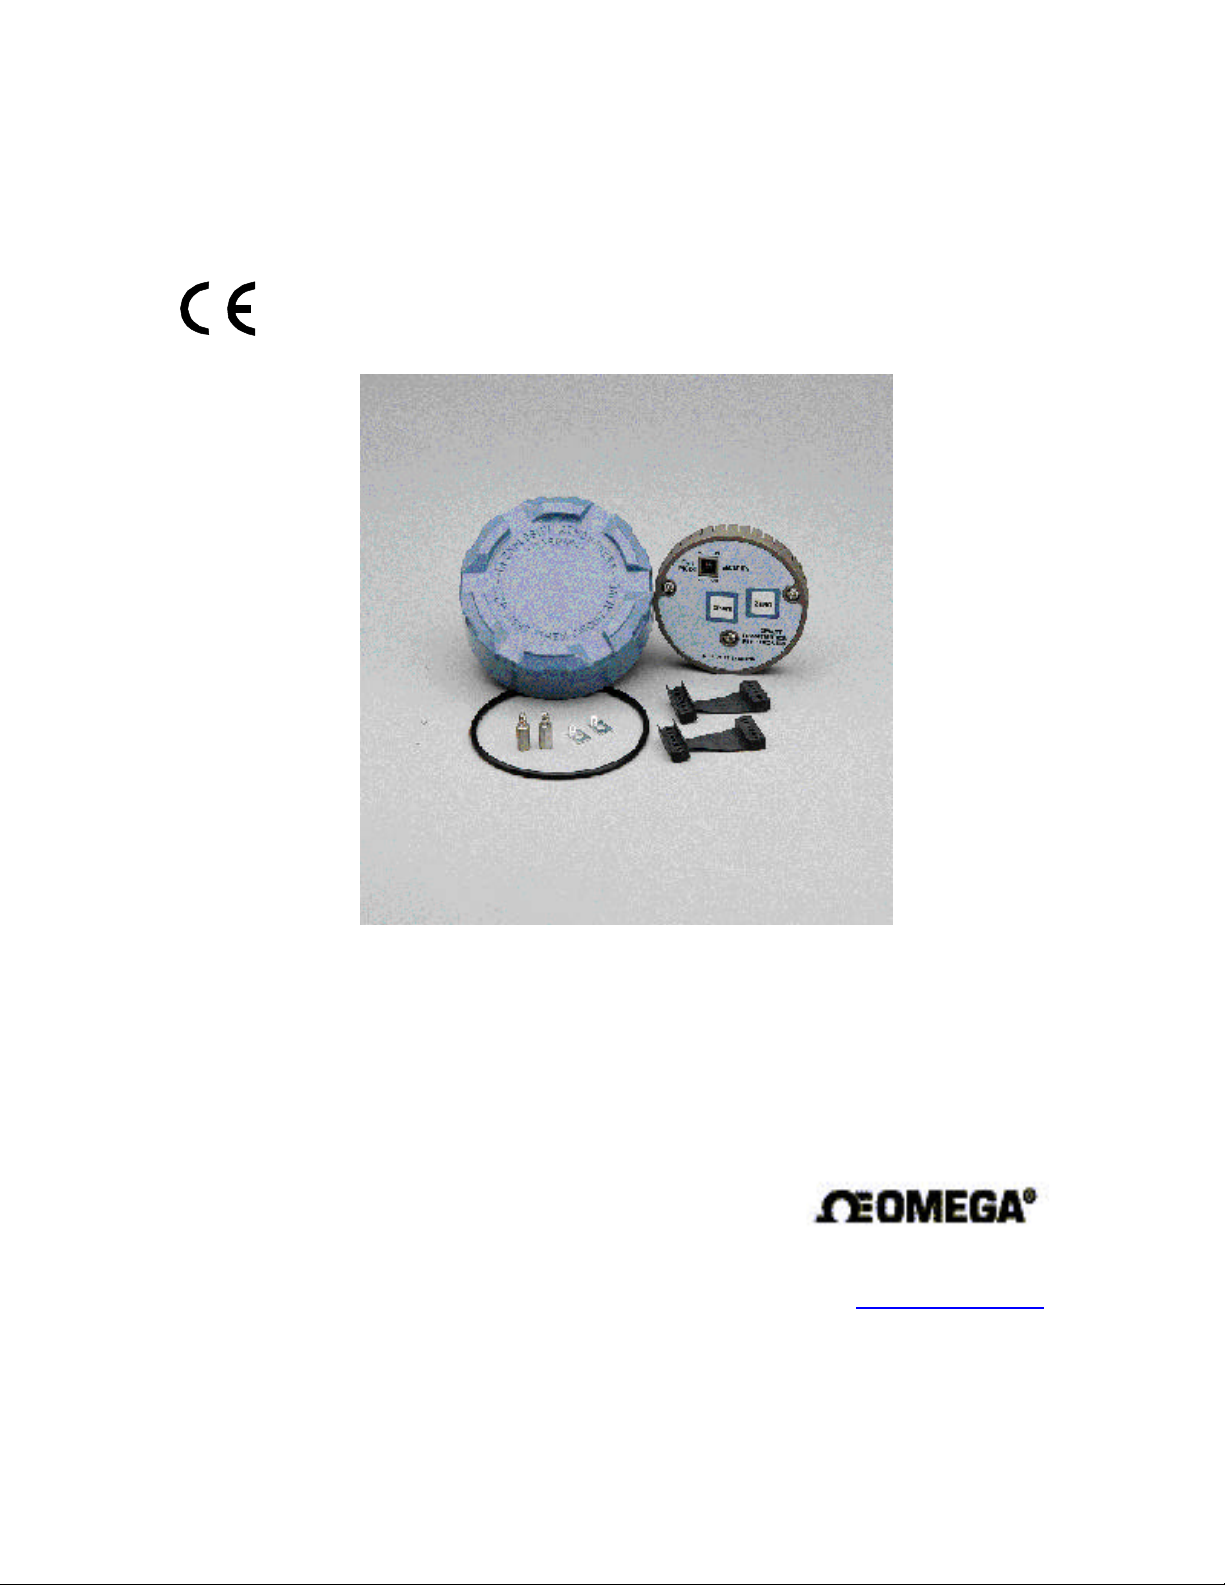
The Smart Retrofit Kit, P/N PX750-SMART-KIT, contains the following items:
Quantity Description
1 Smart electronic assembly
1 Electronics cover
1Cover O-ring
2 Terminal eyelets
2 Board spacers
2Standoffs
REMOVING THE ANALOG
ELECTRONICS ASSEMBLY
Use proper earth grounding techniques when handling the
smart electronics assembly. The smart electronics
assembly is potentially sensitive to electric static discharge.
The vast majority of installed Model PX750 Transmitters have either
4–20 mA linear or 4–20 mA square root output .
The following steps describe how to remove the analog electronics
assembly from transmitters for smart retrofitting.
NOTE
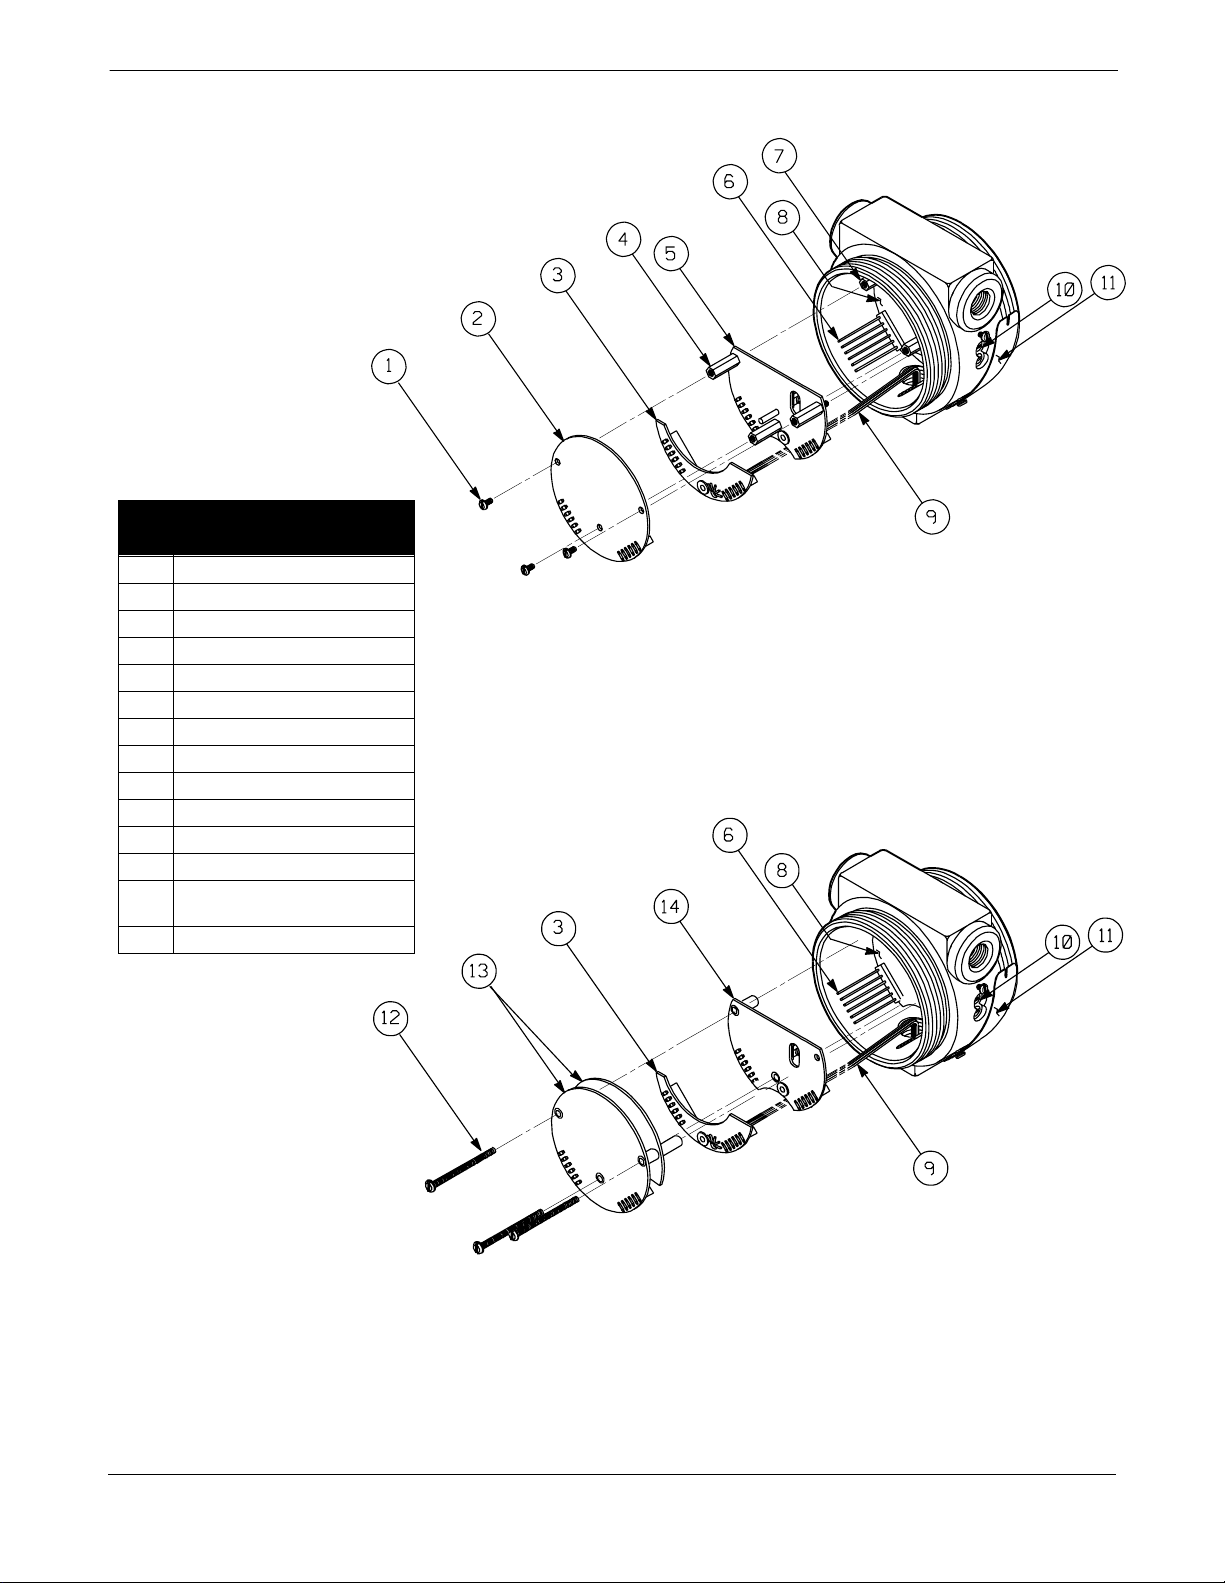
Numbers in parentheses indicate parts shown in Figure C-1.
S-1
Page 4
Smart Kit
FIGURE C-1. Model PX750 Analog Electronics.
Ref.
Part
No.
Description
1 Retainer Screws (Linear)
2 Amplifier Board (Linear)
3 Header Board Assembly
4 Standoff Screws (Linear)
5 Calibration Board (Linear)
6 Bayonet Connector Pins
7 Standoff Screws (Linear)
8 Sensor Module Electronics
9Wiring
10 Zero and Span Adjust Screws
11 Housing Cover
12 Retainer Screws (Square Root)
13 Two-board Amplifier/Squaring
Assembly (Square Root)
14 Calibration Board (Square Root)
LINEAR OUTPUT
S-2
SQUARE ROOT OUTPUT
1151-1151E02A 1151-1151D02B
Page 5
Smart Kit
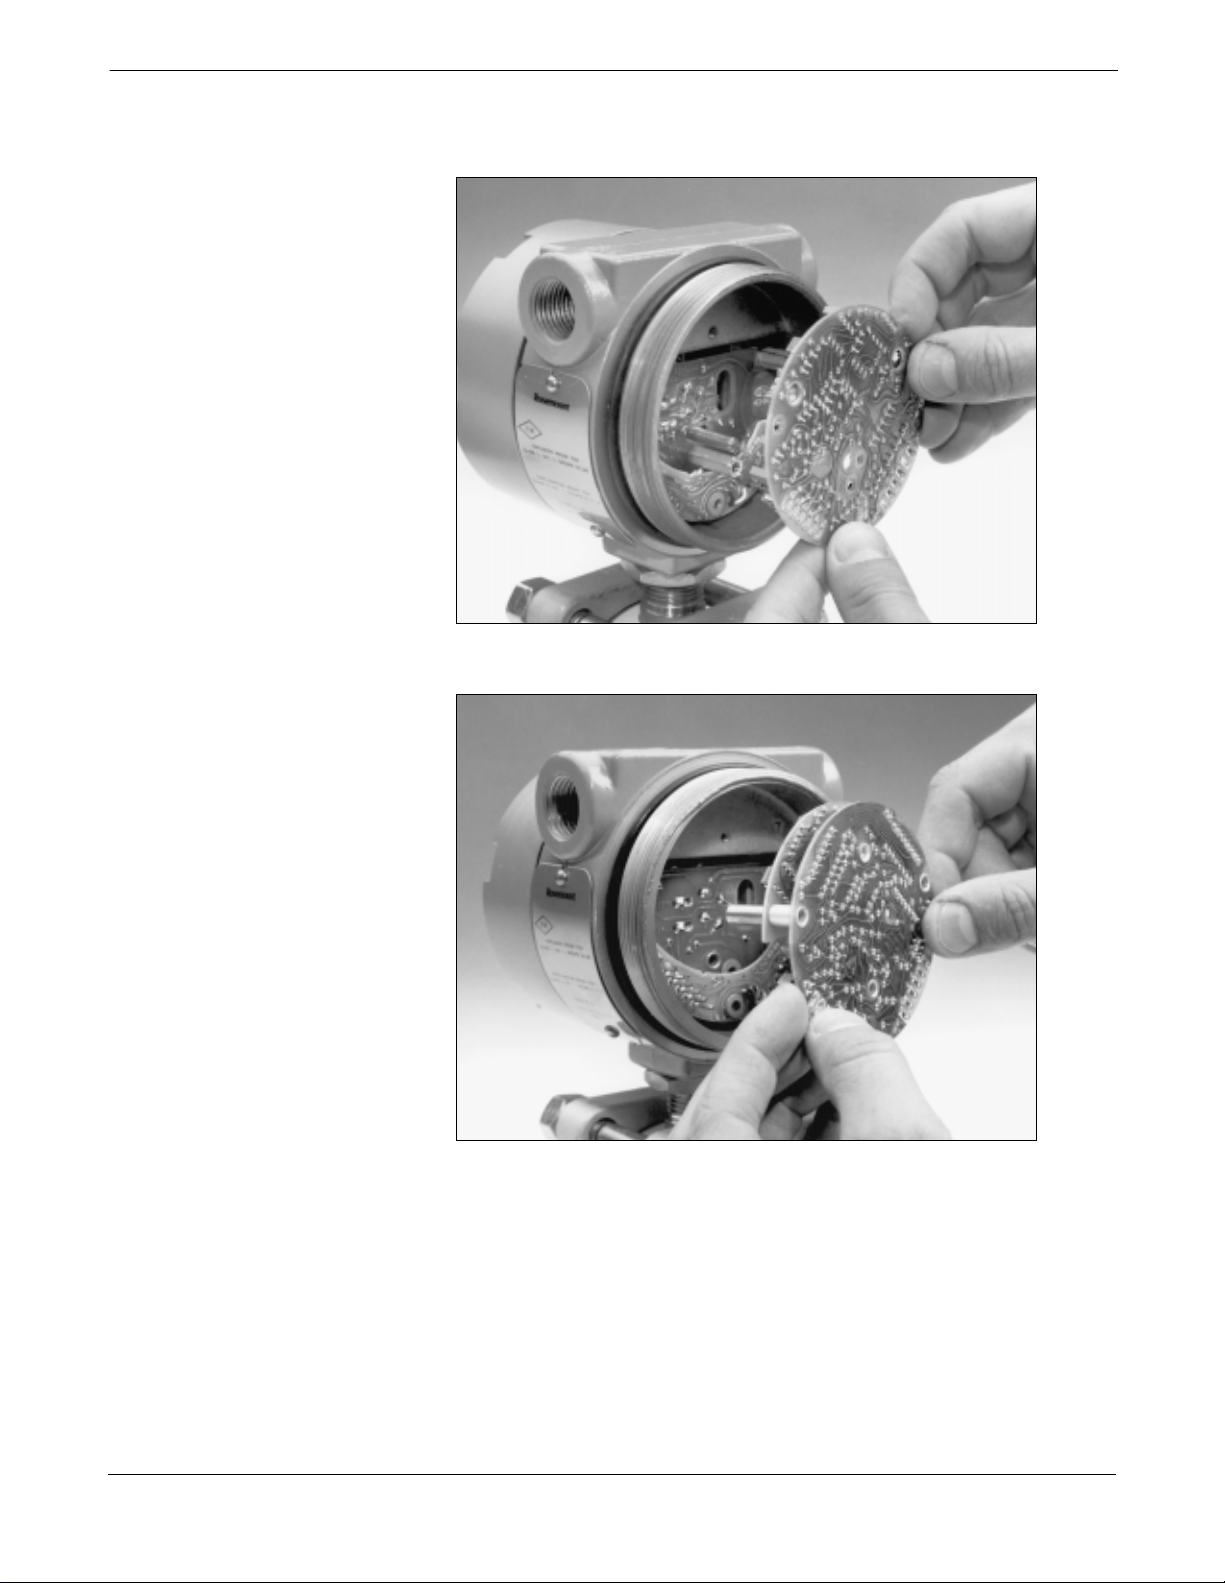
1-4 With power disconnected, remove cover and three retainer screws (1/12).
Pull the amplifier board (2/13) directly off the bayonet connectors (6).
1151-006AB
1151-007AB
S-3
Page 6
Model PX750 Smart Pressure Transmitters
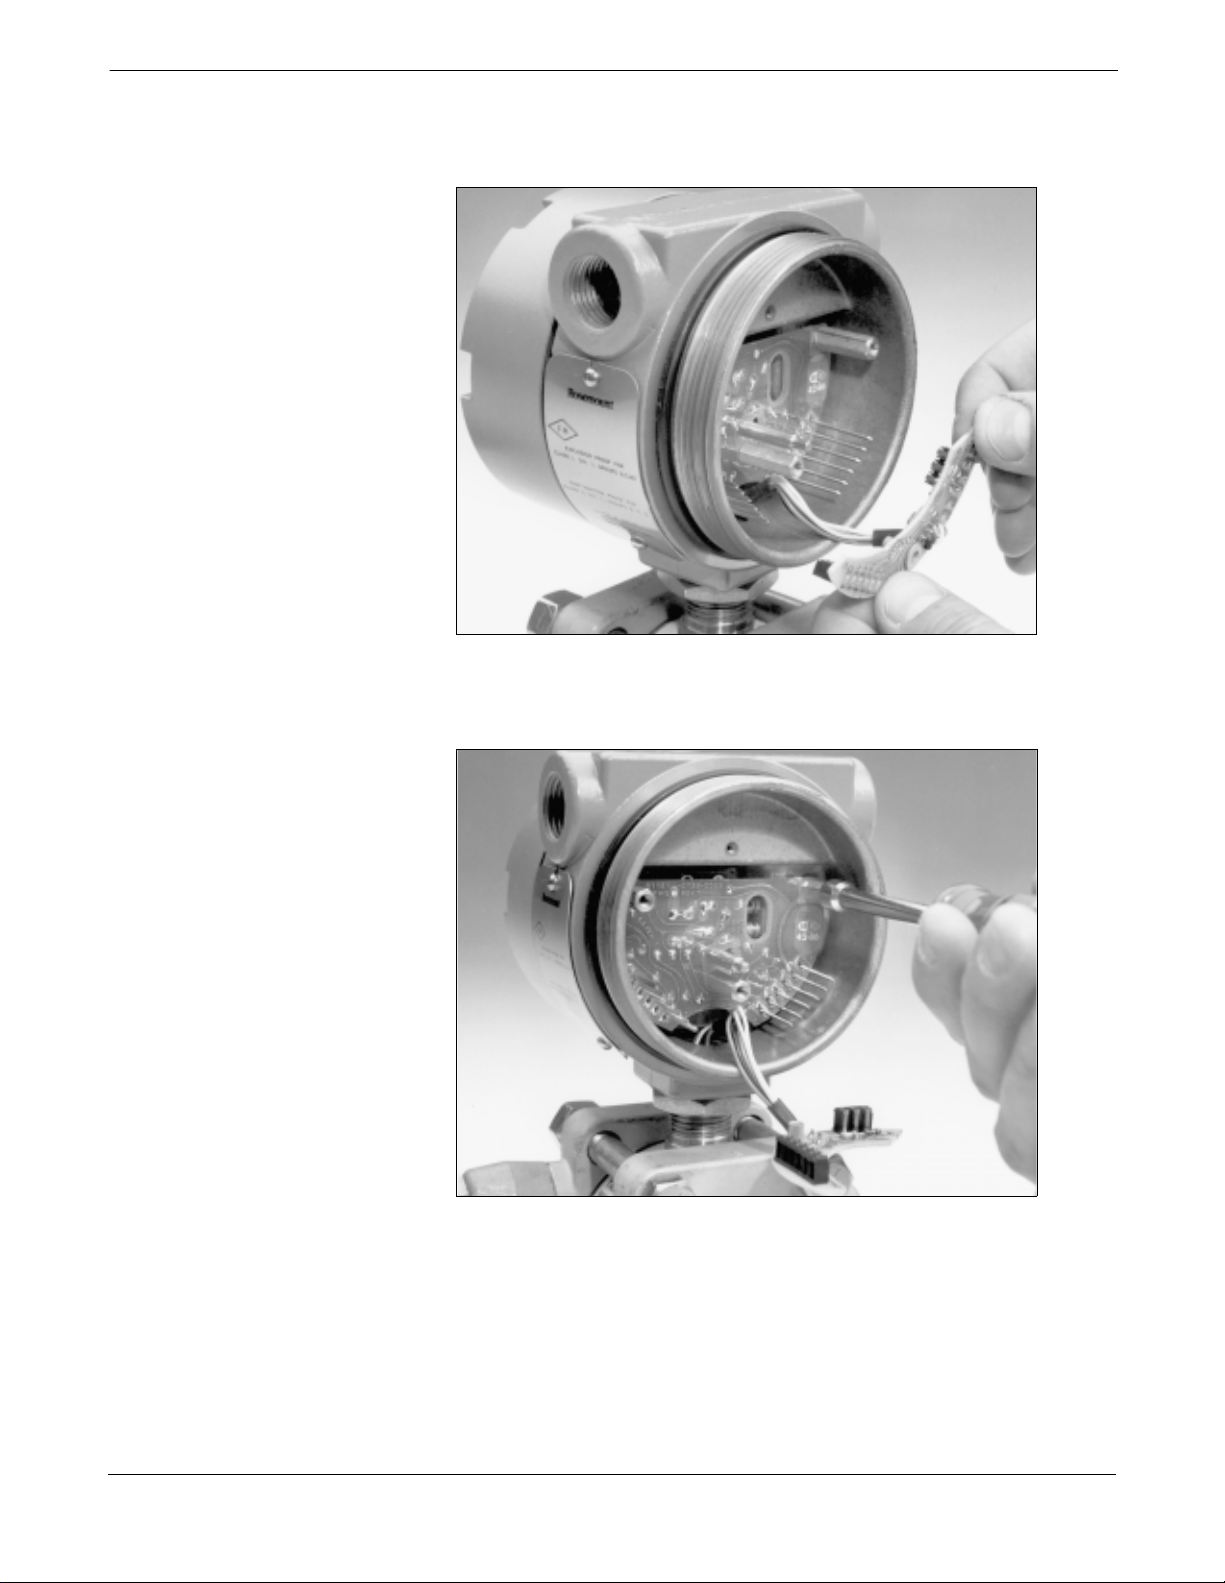
5.Pull the header board assembly (3) off the bayonet connectors.
The header board must be reinserted. Do not cut the wires (9) or
remove the header board.
1151-008AB
6.If the transmitter has linear output electronics, remove the three
standoffs (4). Use a ¼-in. nut driver or wrench.
1151-009AB
S-4
Page 7
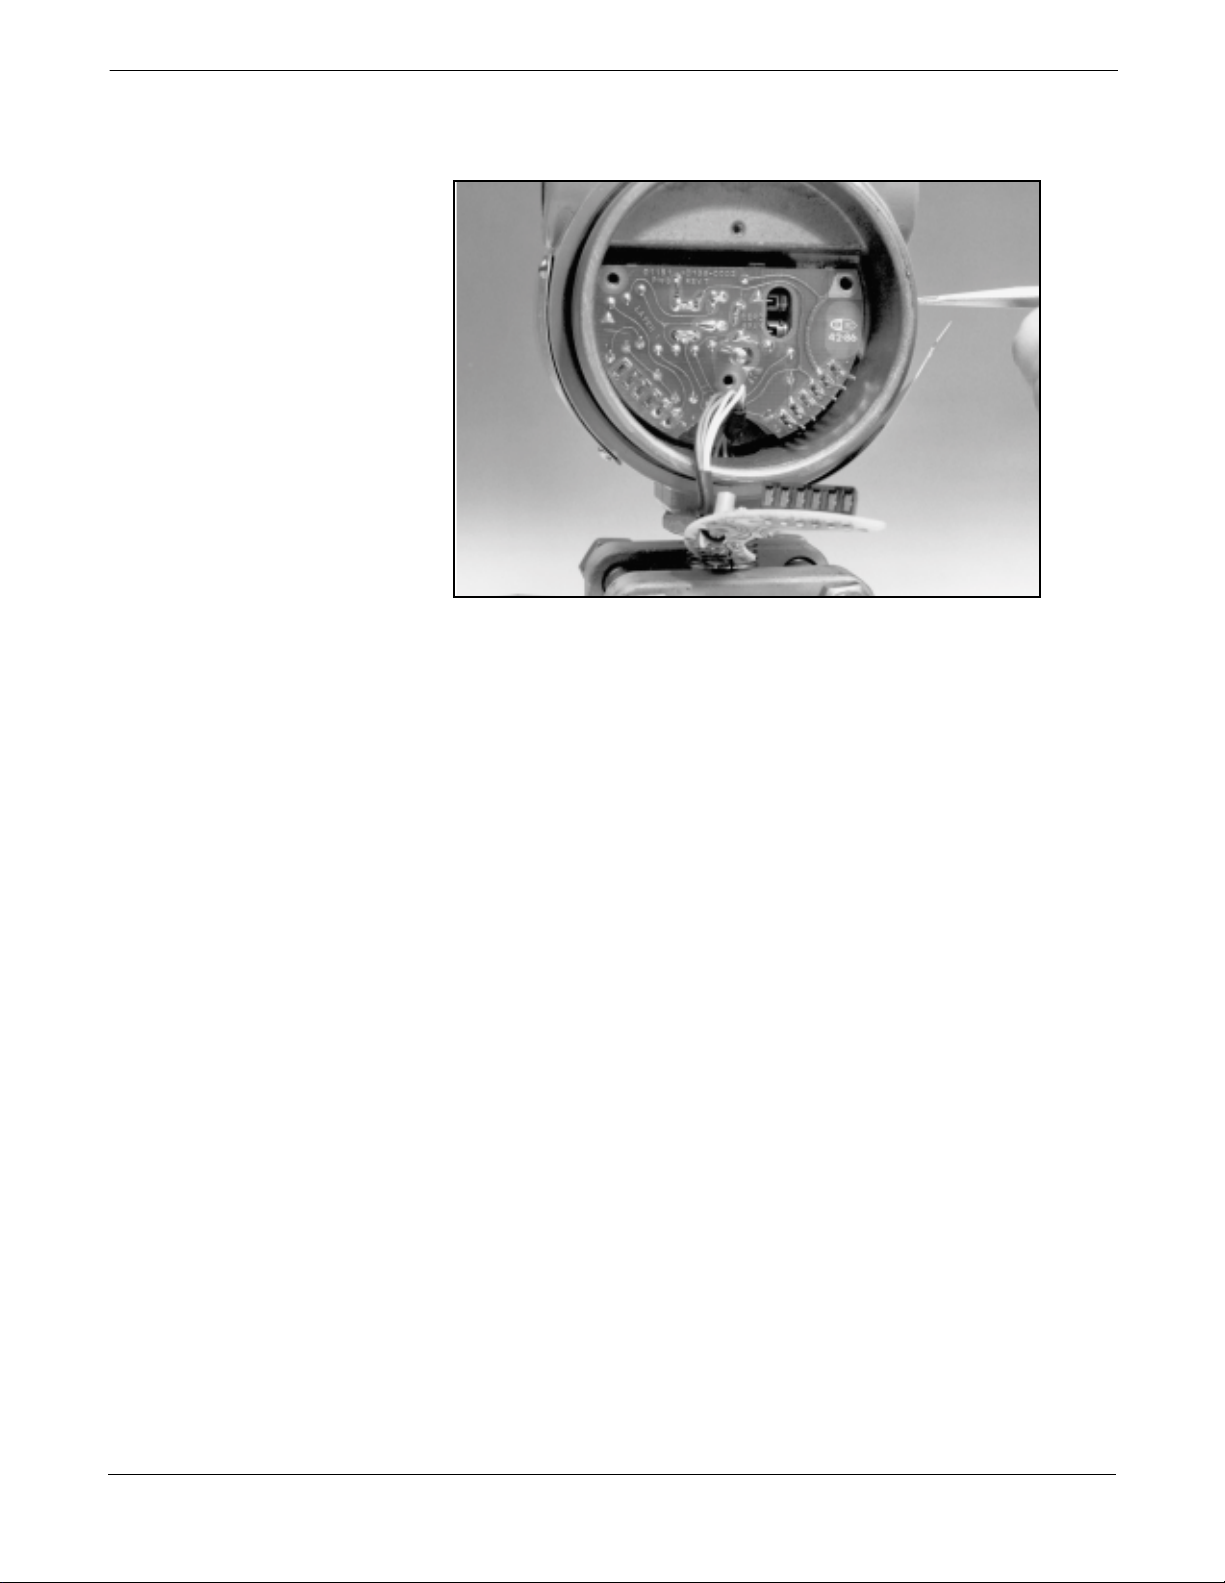
7.Align the zero and span adjust screws (10) so that the
potentiometer blades are perpendicular to the board.
Smart Kit
1151-010AB
S-5
Page 8
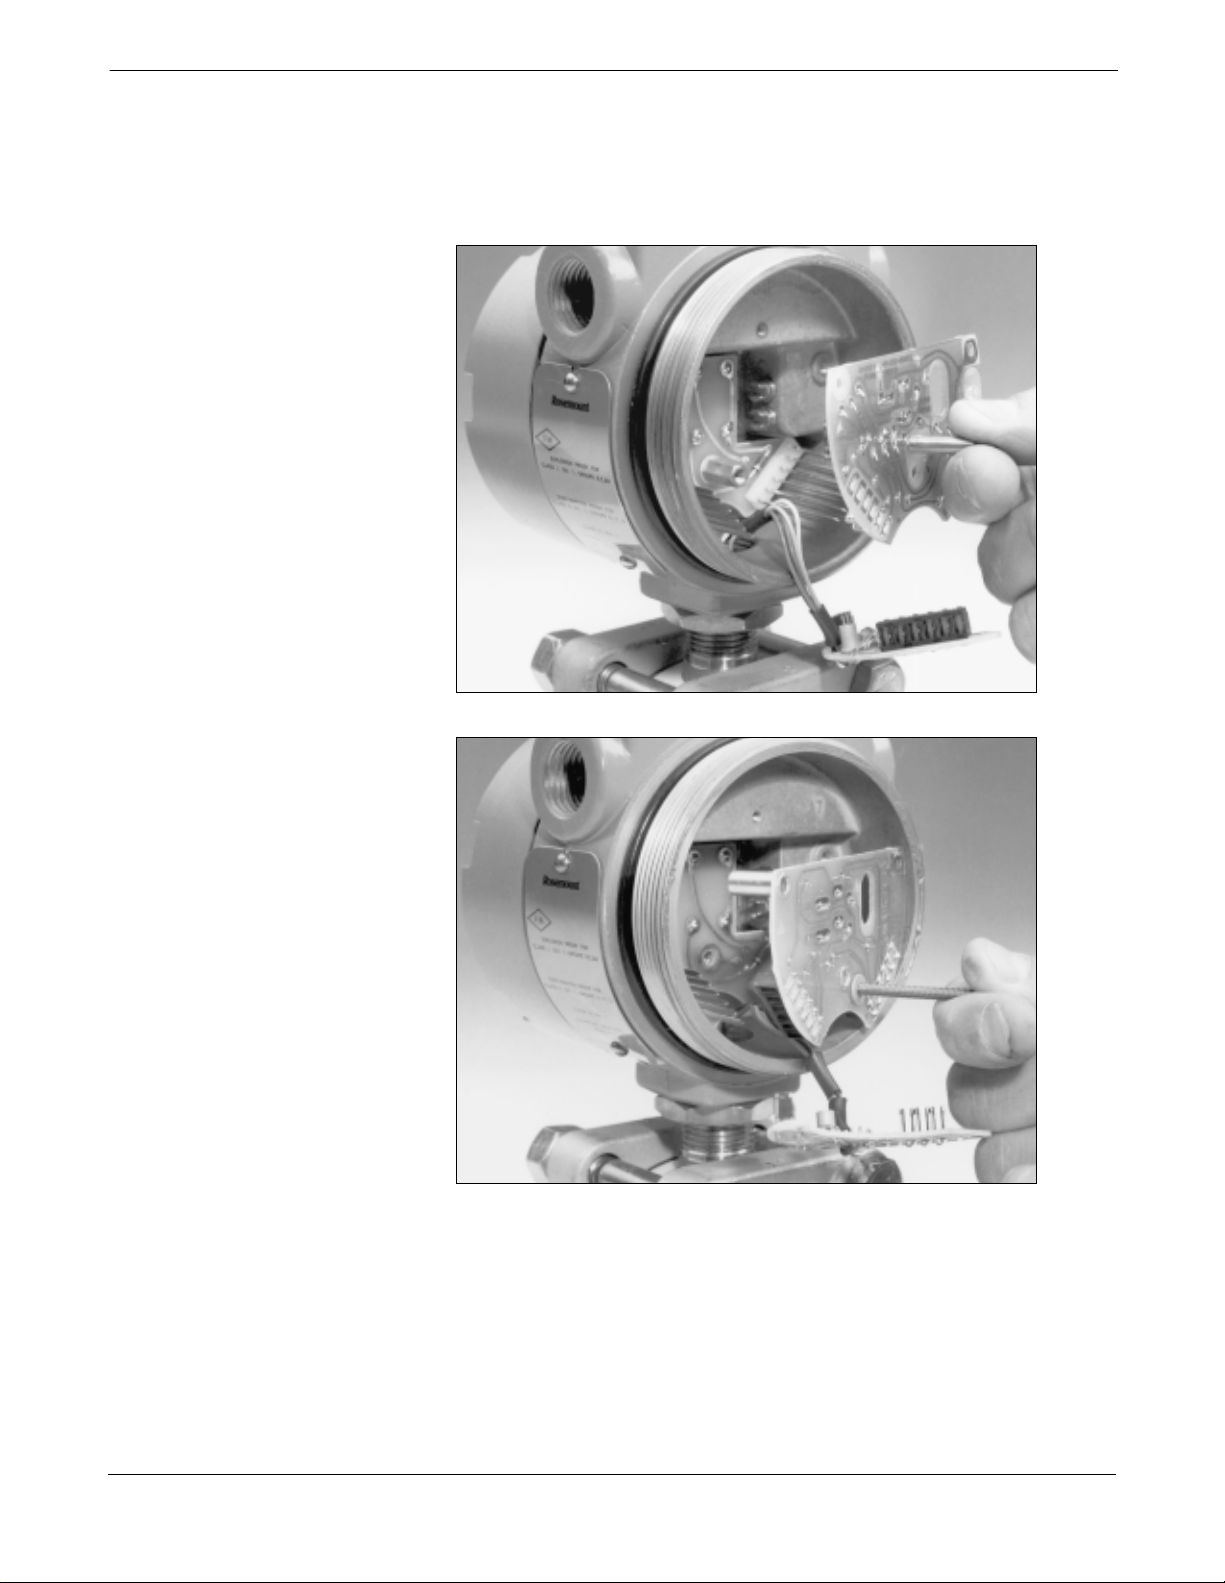
Model PX750 Smart Pressure Transmitters
8.For linear output models, grip the calibration board (5) by the
interface pin. For square root output modes insert a retainer
screw into the threaded rivet for use as a handle. Pull out the
calibration board. (Removing the calibration board disables the
conventional zero and span screws.)
1151-011AB
1151-012AB
S-6
Page 9
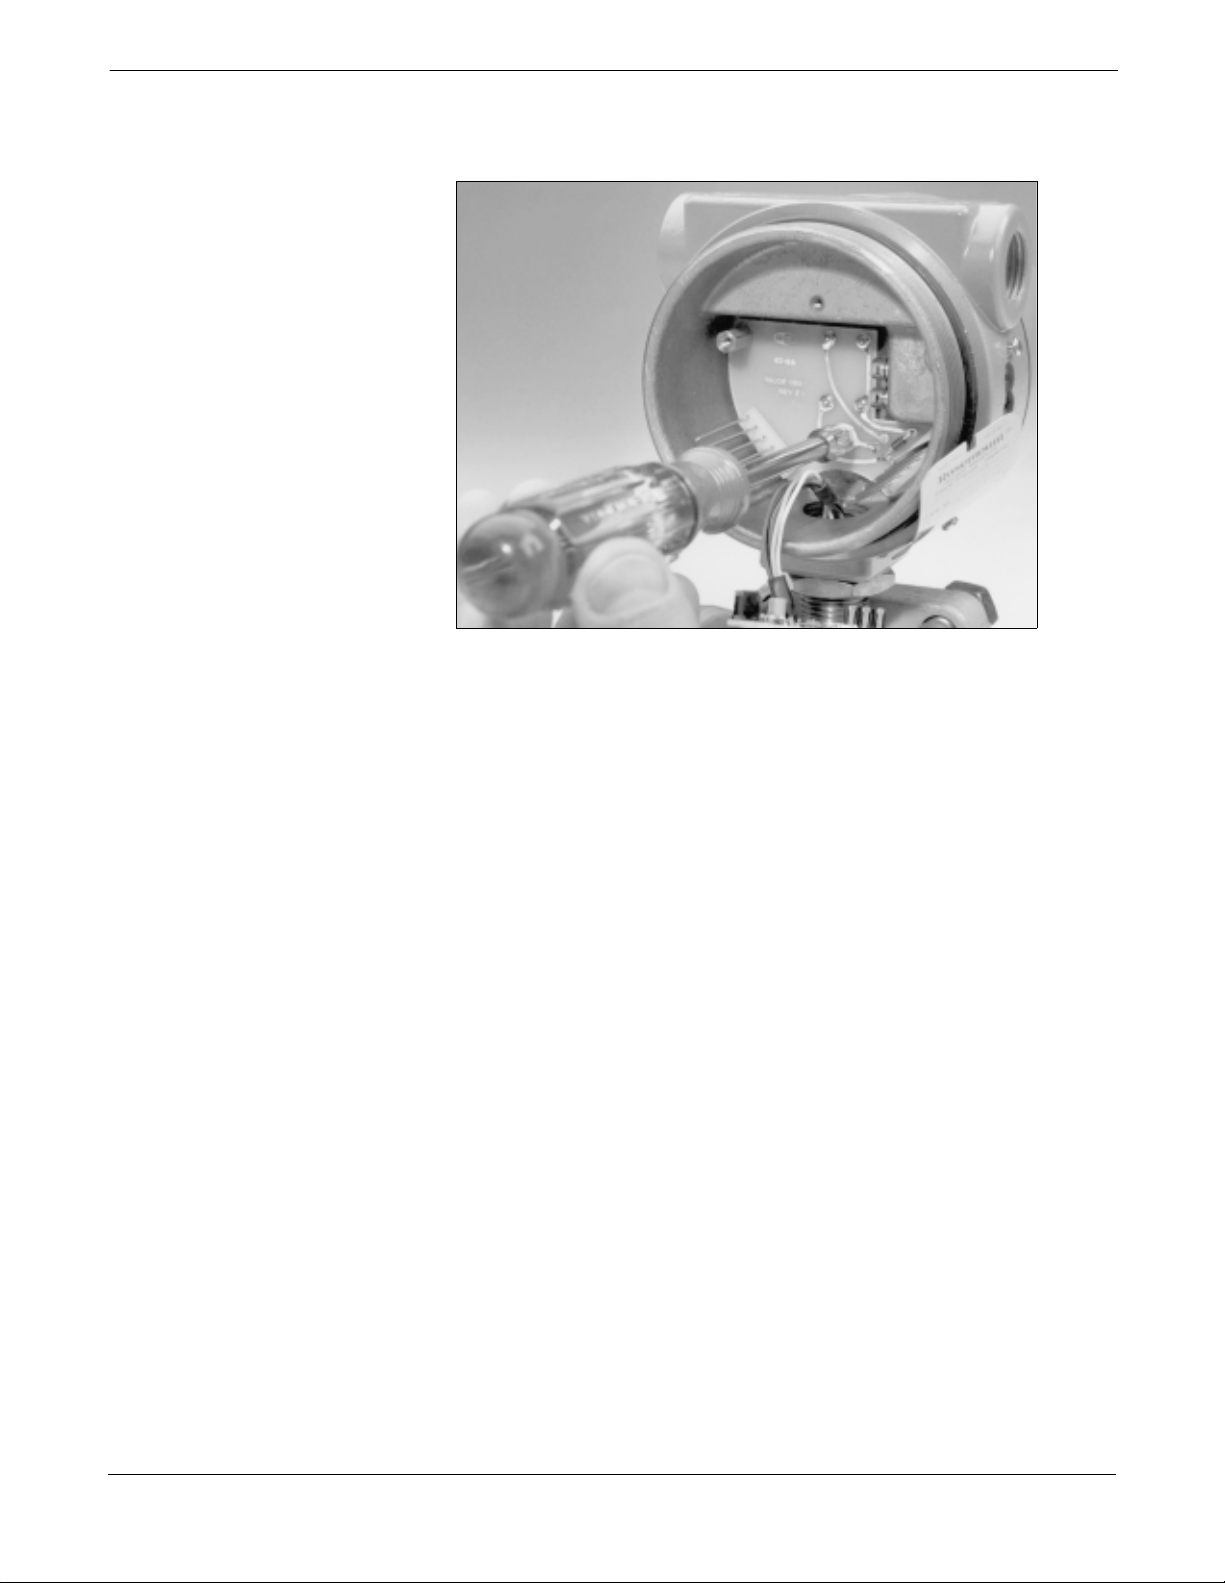
Smart Kit
Insert the standoffs (7), if necessary. The transmitter is now ready to
receive the plug-in smart electronics assembly.
1151-013AB
S-7
Page 10
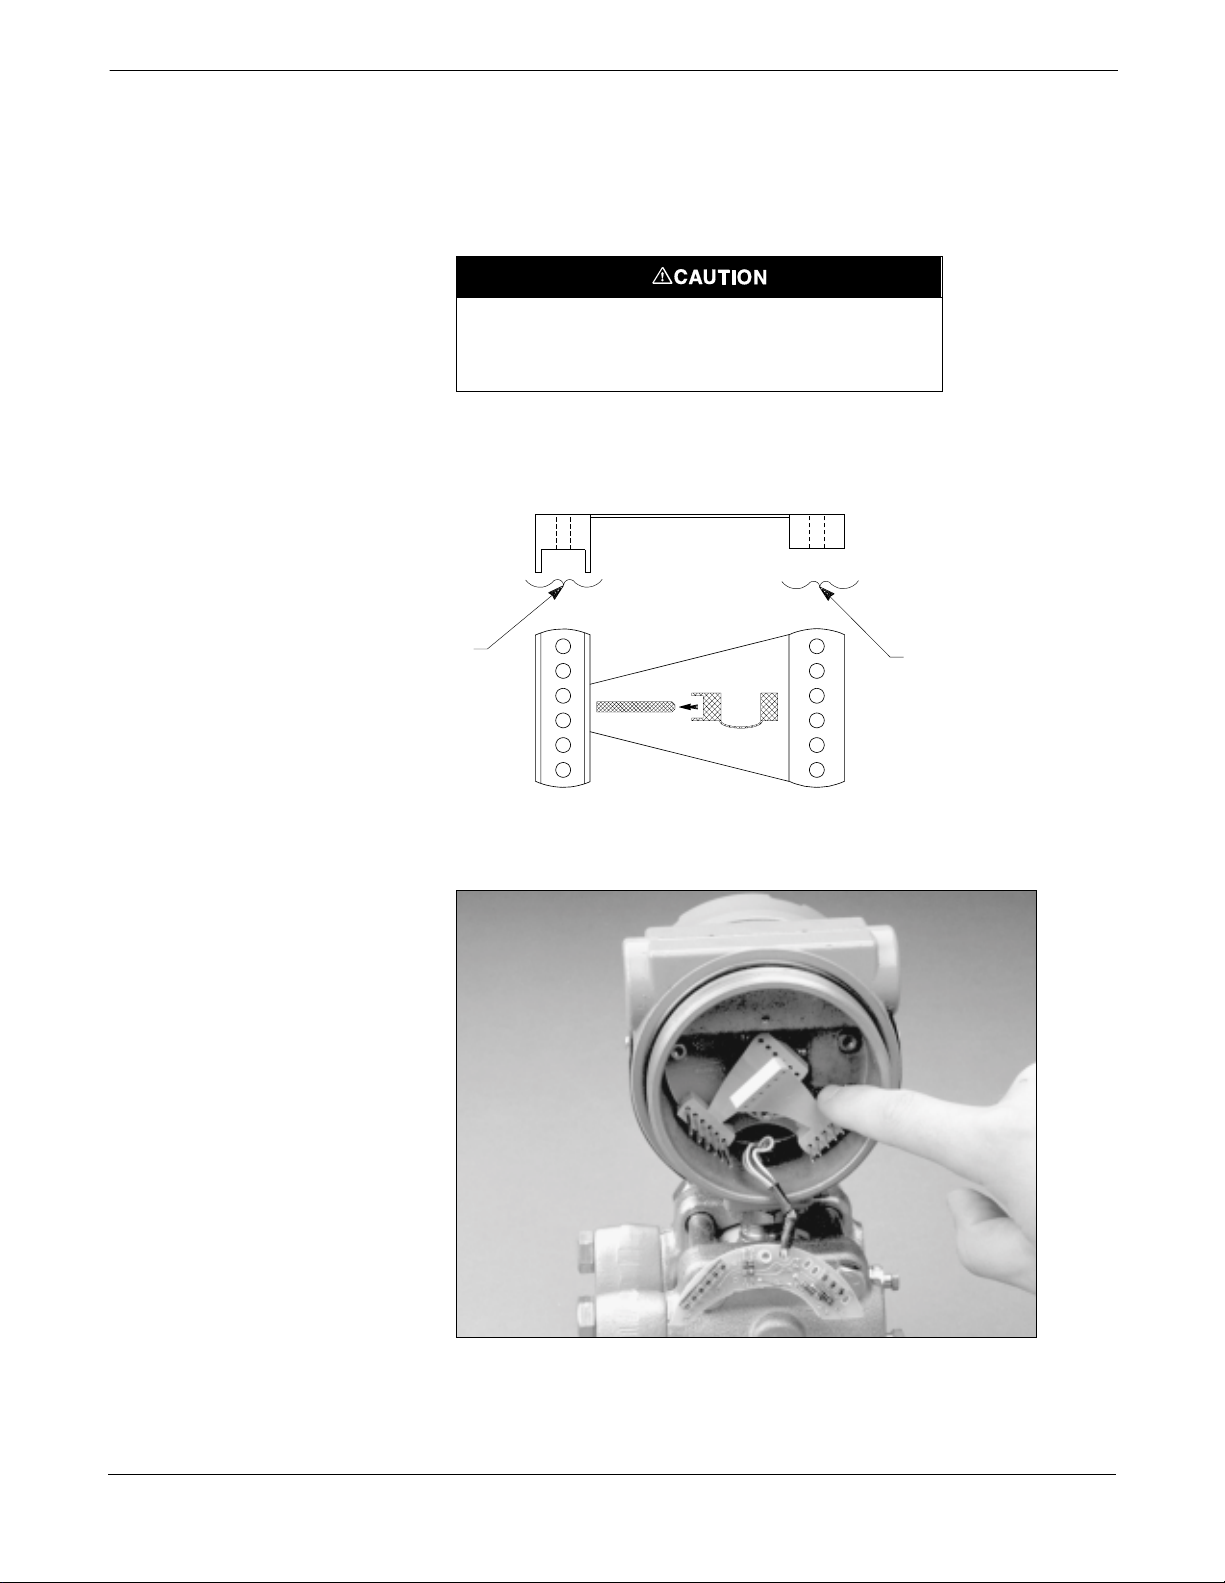
Model PX750 Smart Pressure Transmitters
INSTALLING
THE SMART RETROFIT KIT
FIGURE C-2. Spacer Assembly.
This side faces bottom
of electronics assembly
Installing the smart retrofit electronics kit in the transmitter requires
installing plastic spacers to accommodate the retrofit kit and securing
the retrofit electronics. After the retrofit kit has been installed, it is
necessary to attach eyelets to the terminal side of the transmitter. The
eyelets enable hook-up with a HART-based communicator (see Figure
C-2).
Use proper earth grounding techniques when handling the
smart electronics assembly. The smart electronics
assembly is potentially sensitive to electric static discharge.
This side faces toward
electronics housing cover
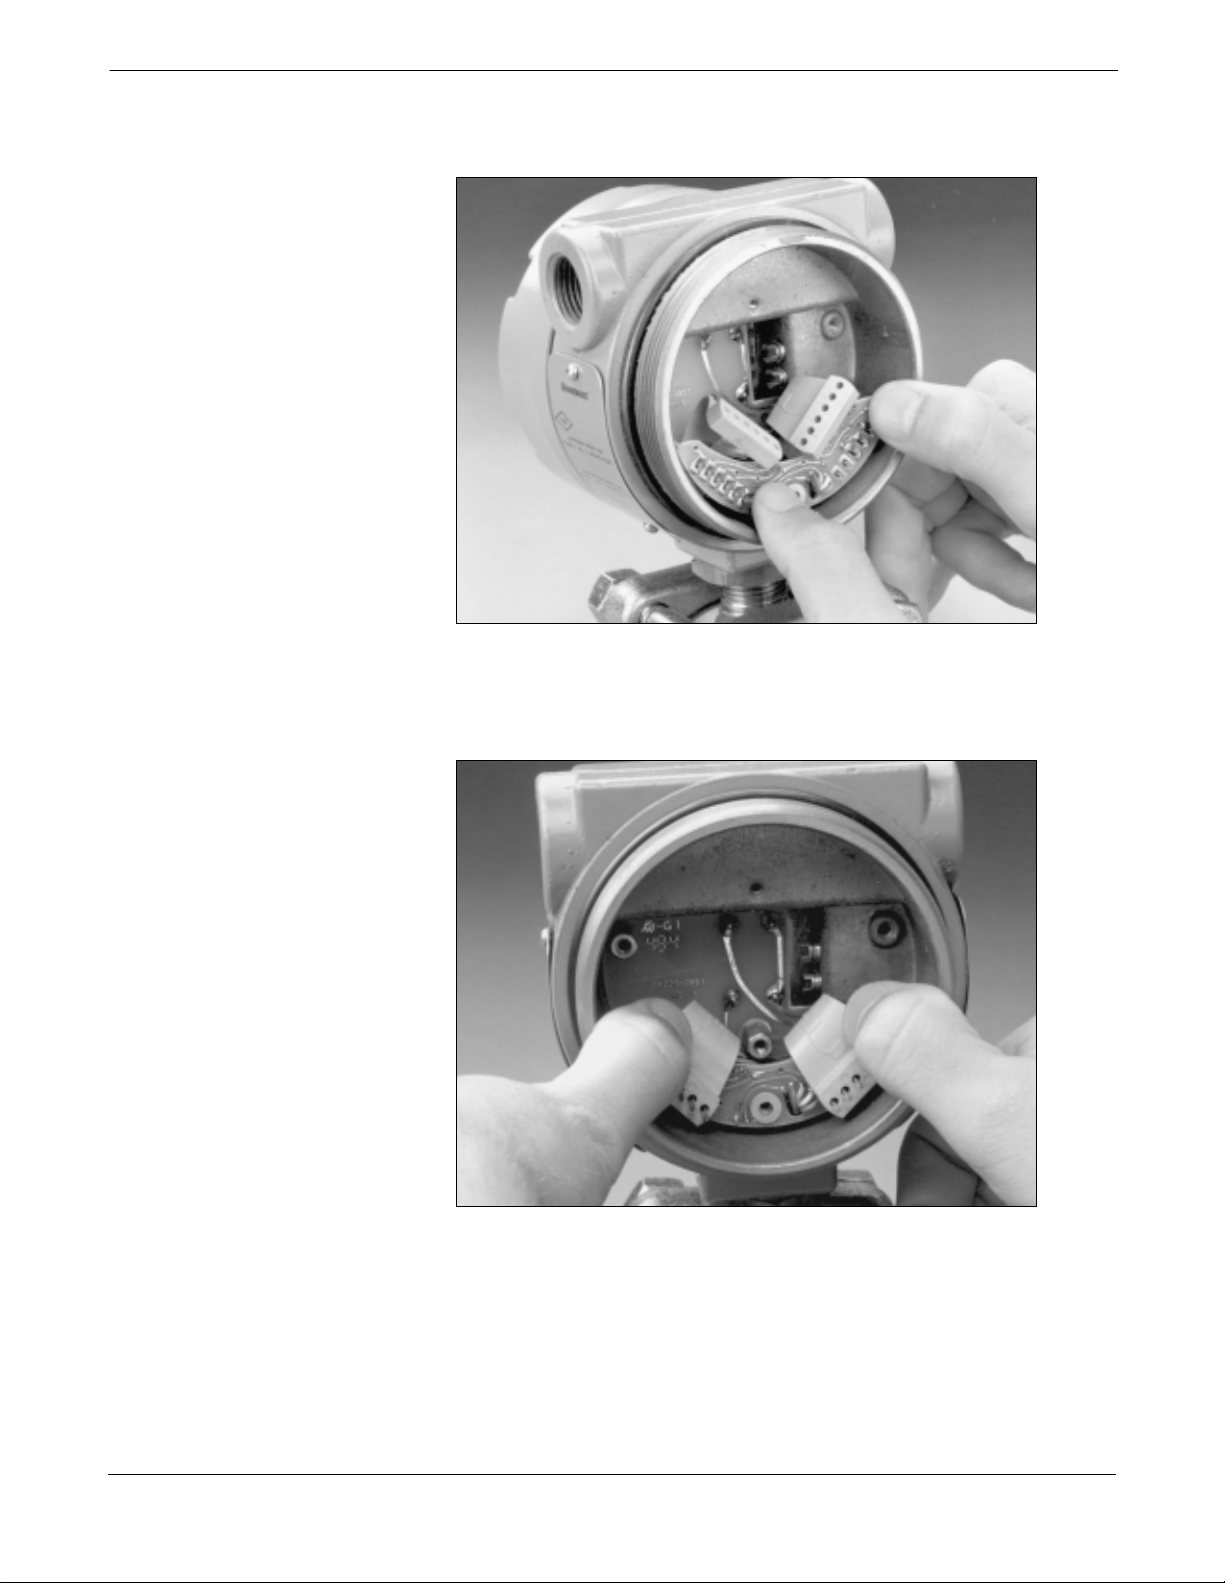
1.Slide the bottom ha lf of one spacer over one of th e rows of bayonet
connectors. Then repeat the procedure for the other row.
1151-014AB
1151-0763A01B
S-8
Page 11
Smart Kit
2.Align the header board with the bayonet connector pins, and slide
the header board halfway down the pins.
1151-015AB
3.Align the tops of both spacers with the bayonet connector pins,
and slide them down the pins, pushing firmly on b ot h the spacers
and the header board to seat the board.
1151-016AB
S-9
Page 12

Model PX750 Smart Pressure Transmitters
4. Align the smart electronics assembly with the bayonet connector
5. Tighten the three captive screws on the smart electronics assembly to
6. Attach the electronics cover provided in the smart retrofit kit, and
7. Remove the cover from the terminal side of the transmitter.
Two eyelets that fit under the + and – signal terminal screws are
provided to facilitate connections to HART-based communicator.
The signal terminal is the upper block as indicated on the transmitter
housing.
8. Remove the signal terminal + and – screws. Attach an eyelet to each
pins, making sure all pins line up with the proper receptacles.
Next push the assembly slowly inward until it is fully seated.
secure it in place.
tighten securely.
screw, and reinsert the screws.
9. Reattach the cover on the terminal side, and tighten securely.
S-10
Page 13

Model PX750 Smart Pressure Transmitters
CHARACTERIZATION The transmitter is now ready to be characterized. Characterization is a one-time
calibration of the sensor in the Model PX750 Transmitter. During characterization,
known pressures are applied to the sensor, and corresponding digital values are stored
in the EEPROM located in the smart transmitter electronics. The microprocessor uses
these values to make linearization corrections. The digital-to-analog converter then
converts the corrected digital signal into a 4-20 mA dc output. The Model PX750
Transmitter will stay in high alarm (approximately 22 mA output) until the
characterization sequence is completed.
NOTE
The transmitter must be re-characterized if either the sensor module or the smart
transmitter electronics are repaired or replaced.
Before Characterizing the 1. Be prepared to answer the following questions:
Transmitter Module type?
Module range?
Pressure units on your pressure source?
Serial number?
2. Connect the pressure source.
3. Remove the terminal side cover of the Model PX750 Smart Pressure
Transmitter.
4. Connect power supply leads to the terminal block. Apply power to
the transmitter.
NOTE
Failure to use accurate equipment may result in a transmitter that
Cannot meet its accuracy specification
.
Characterizing with a 1. Connect the Model HC275 Hart communicator electrical
Model 275 Communicator connections to the SIGNAL terminal block. The Model HC275
connections are not polarity sensitive.
2. Turn the Model HC275 on by pushing the I/O button.
3. Follow the HC275 menus to characterize:
§ Device setup
§ Detailed setup
§ Sensor
§ Pressure sensor
§ Sensor service
§ Characterize
4. Follow the instructions on the screen.
5. Verify the new transmitter configuration:
§ Tag
§ Range points
§ Linear/square root
§ Damping
6. Verify that the Fail Safe Mode Switch and the Transmitter Security Switch on
the smart electronics circuit board are correct.
7. Attach the electronics cover and tighten.
8. Put the transmitter back in service.
S-11
Page 14

WARRANTY/DISCLAIMER
problems relative to the product.
OMEGA ENGINEERING, INC. warrants this unit to be free of defects in materials and workmanship for a
period of 13 months from date of purchase. OMEGA Warranty adds an additional one (1) month grace period to
the normal one (1) year product warranty to cover handling and shipping time. This ensures that OMEGA’s
customers receive maximum coverage on each product.
If the unit malfunctions, it must be returned to the factory for evaluation. OMEGA’s Customer Service
Department will issue an Authorized Return (AR) number immediately upon phone or written request. Upon
examination by OMEGA, if the unit is found to be defective, it will be repaired or replaced at no charge.
OMEGA’s WARRANTY does not apply to defects resulting from any action of the purchaser, including but not
limited to mishandling, improper interfacing, operation outside of design limits, improper repair, or
unauthorized modification. This WARRANTY is VOID if the unit shows evidence of having been tampered with
or shows evidence of having been damaged as a result of excessive corrosion; or current, heat, moisture or
vibration; improper specification; misapplication; misuse or other operating conditions outside of OMEGA’s
control. Components which wear are not warranted, including but not limited to contact points, fuses, and triacs.
OMEGA is pleased to offer suggestions on the use of its various products. However, OMEGA neither assumes
responsibility for any omissions or errors nor assumes liability for any damages that result from the use of its
products in accordance with information provided by OMEGA, either verbal or written. OMEGA warrants only
that the parts manufactured by it will be as specified and free of defects. OMEGA MAKES NO OTHER
WARRANTIES OR REPRESENTATIONS OF ANY KIND WHATSOEVER, EXPRESS OR IMPLIED,
EXCEPT THAT OF TITLE, AND ALL IMPLIED WARRANTIES INCLUDING ANY WARRANTY OF
MERCHANTABILITY AND FITNESS FOR A PARTICULAR PURPOSE ARE HEREBY DISCLAIMED.
LIMITATION OF LIABILITY: The remedies of purchaser set forth herein are exclusive, and the total liability of
OMEGA with respect to this order, whether based on contract, warranty, negligence, indemnification, strict
liability or otherwise, shall not exceed the purchase price of the component upon which liability is based. In no
event shall OMEGA be liable for consequential, incidental or special damages.
CONDITIONS: Equipment sold by OMEGA is not intended to be used, nor shall it be used: (1) as a “Basic
Component” under 10 CFR 21 (NRC), used in or with any nuclear installation or activity; or (2) in medical
applications or used on humans. Should any Product(s) be used in or with any nuclear installation or activity,
medical application, used on humans, or misused in any way, OMEGA assumes no responsibility as set forth in
our basic WARRANTY / DISCLAIMER language, and, additionally, purchaser will indemnify OMEGA and
hold OMEGA harmless from any liability or damage whatsoever arising out of the use of the Product(s) in such
a manner.
RETURN REQUESTS / INQUIRIES
Direct all warranty and repair requests/inquiries to the OMEGA Customer Service Department. BEFORE
RETURNING ANY PRODUCT(S) TO OMEGA, PURCHASER MUST OBTAIN AN AUTHORIZED RETURN
(AR) NUMBER FROM OMEGA’S CUSTOMER SERVICE DEPARTMENT (IN ORDER TO AVOID
PROCESSING DELAYS). The assigned AR number should then be marked on the outside of the return package
and on any correspondence.
The purchaser is responsible for shipping charges, freight, insurance and proper packaging to prevent breakage
in transit.
FOR WARRANTY RETURNS,
please have the following information available
BEFORE contacting OMEGA:
1. Purchase Order number under which
the product was PURCHASED,
2. Model and serial number of the
product under warranty, and
3. Repair instructions and/or specific
OMEGA’s policy is to make running changes, not model changes, whenever an improvement is possible.
This affords our customers the latest in technology and engineering.
OMEGA is a registered trademark of OMEGA ENGINEERING, INC.
© Copyright 1999 OMEGA ENGINEERING, INC. All rights reserved. This document may not be copied, photocopied,
reproduced, translated, or reduced to any electronic medium or machine-readable form, in whole or in part, without the prior
written consent of OMEGA ENGINEERING, INC.
FOR NON-WARRANTY REPAIRS, consult OMEGA for
current repair charges. Have the following information available
BEFORE contacting OMEGA:
1. Purchase Order number to cover the
COST of the repair,
2. Model and serial number of the product, and
3. Repair instructions and/or specific problems
relative to the product.
Page 15

Where Do I Find Everything I Need for
Process Measurement and Control?
OMEGA…Of Course!
TEMPERATURE
√√ Thermocouple, RTD & Thermistor Probes, Connectors, Panels & Assemblies
√√ Wire: Thermocouple, RTD & Thermistor
√√ Calibrators & Ice Point References
√√ Recorders, Controllers & Process Monitors
√√ Infrared Pyrometers
PRESSURE, STRAIN AND FORCE
√√ Transducers & Strain Gauges
√√ Load Cells & Pressure Gauges
√√ Displacement Transducers
√√ Instrumentation & Accessories
FLOW/LEVEL
√√ Rotameters, Gas Mass Flowmeters & Flow Computers
√√ Air Velocity Indicators
√√ Turbine/Paddlewheel Systems
√√ Totalizers & Batch Controllers
pH/CONDUCTIVITY
√√ pH Electrodes, Testers & Accessories
√√ Benchtop/Laboratory Meters
√√ Controllers, Calibrators, Simulators & Pumps
√√ Industrial pH & Conductivity Equipment
DATA ACQUISITION
√√ Data Acquisition & Engineering Software
√√ Communications-Based Acquisition Systems
√√ Plug-in Cards for Apple, IBM & Compatibles
√√ Datalogging Systems
√√ Recorders, Printers & Plotters
HEATERS
√√ Heating Cable
√√ Cartridge & Strip Heaters
√√ Immersion & Band Heaters
√√ Flexible Heaters
√√ Laboratory Heaters
ENVIRONMENTAL MONITORING AND CONTROL
√√ Metering & Control Instrumentation
√√ Refractometers
√√ Pumps & Tubing
√√ Air, Soil & Water Monitors
√√ Industrial Water & Wastewater Treatment
√√ pH, Conductivity & Dissolved Oxygen Instruments
M-3265/0799
 Loading...