

Page 1
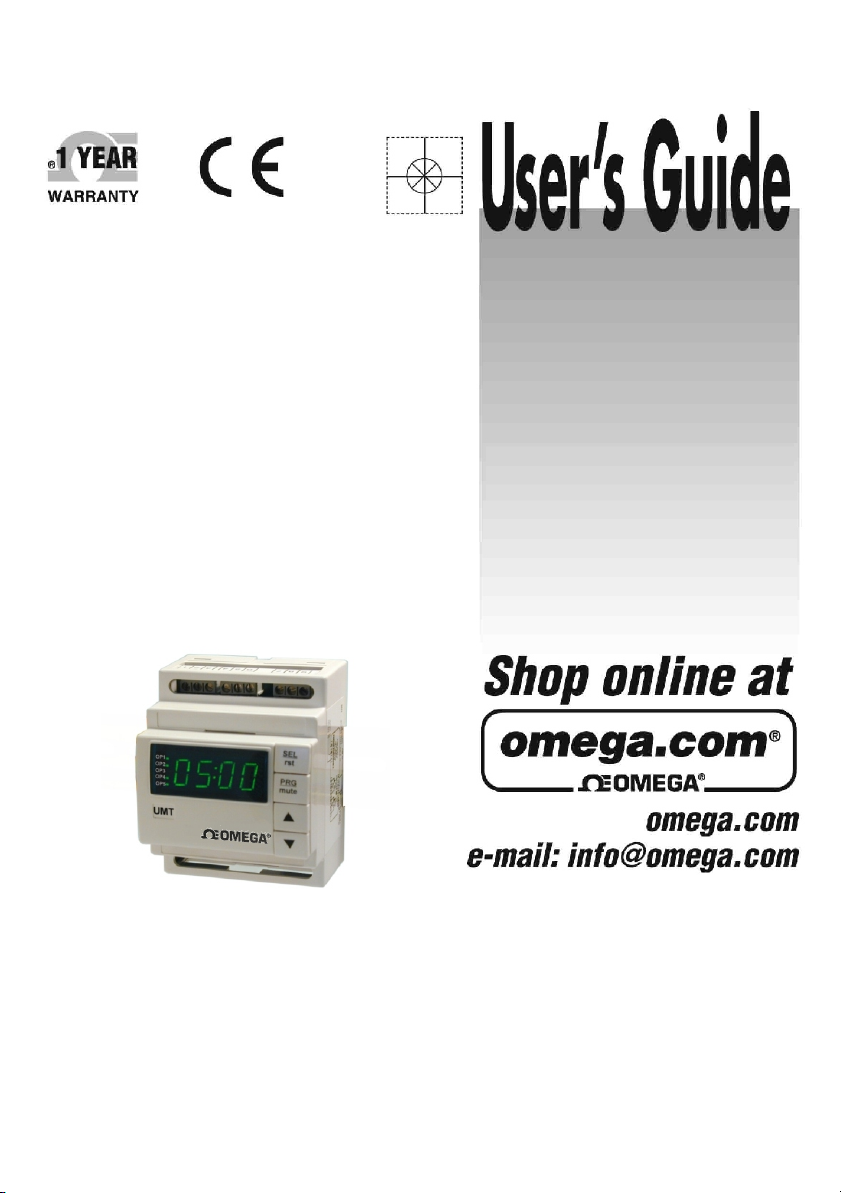
PTC-15
Programmable Timing Controller
Page 2
PTC-15 Programmable Timing ControllerPTC-15 Programmable Timing Controller
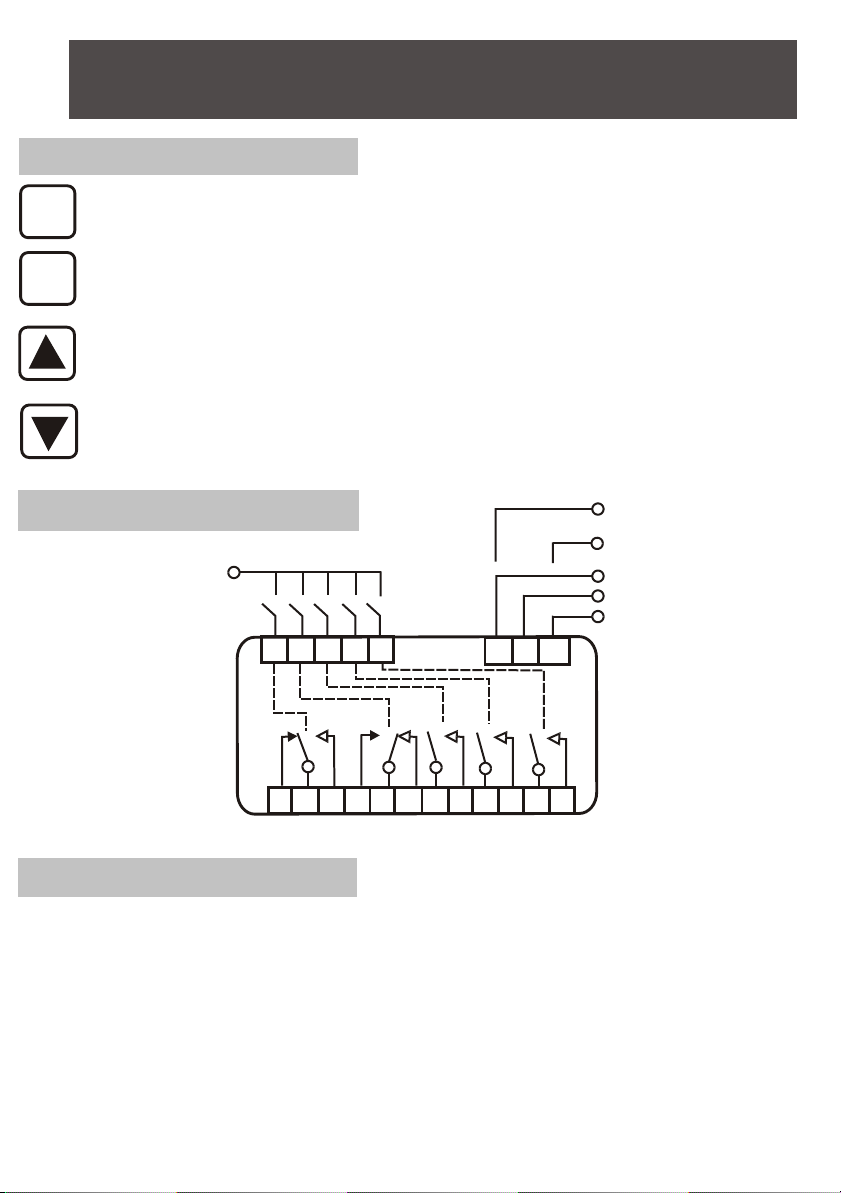
FRONT PANEL FUNCTIONS
Selects view set time mode. Allows access to set point for adjustment in set mode. Moves adjustment
to the next digit in set and program mode. Allows access to parameters for adjustment in program
SEL
mode.
Selects set mode. Selects program mode when held for >4 seconds. Steps through individual timer
PRG
functions when in program mode. Exits program mode when held for >4 seconds at Mde prompt in
program mode.
Increments the timer being displayed in view mode. Increments the timer being adjusted in set mode.
Increases a single digit in set mode. Steps up through the function menu in program mode. Increases
a parameter value or option in program mode.
Decrements the timer being displayed in view mode. Decrements the timer being adjusted in time set
mode. Decreases a single digit in set mode. Steps up through function menu in program mode.
Decreases a parameter value or option in program mode.
WIRING DIAGRAM
To Pin 6 or 7
Contacts
5A @ 240Vac
ML type
Input switches
MH type
1 2 3 4 5
9 10 11 12 13 14 15 16 17 18 19 20
Output 1
Output 2
OP3
6 7 8
OP4
12/24 Vac/dc
240 Vac
110 Vac
Neutral
OP5
VIEW MODE
The view mode is used to determine which timer is displayed, or to view (but not change) the set times. To
change the timer being viewed during normal running :-
1. Press /\ or \/ to show the currently selected timer (T1 at default).
2. Press /\ or \/ again to change the selected timer. The timer number (e.g. T3 = Timer 3) will be displayed for 3
seconds and that timer will then be in view. If the timer selected is set to relay mode, the display will show "rly".
To view set times:-
3. Press SEL. The display will show the timer and set point number (e.g. St21 = timer 2, set time 1) for 3
seconds and then shows that set time for a further 3 seconds. If there is a second set time (i.e. in cct and dodo
modes) this can be displayed by pressing SEL again.
4. Use /\and \/ while viewing the set time to select the timer set point to be displayed.
5. The timer will return to normal running after displaying the set time. The last timer to be displayed will now
be in view. To view a different timer while running, repeat steps 1 and 2 above.
Page 3
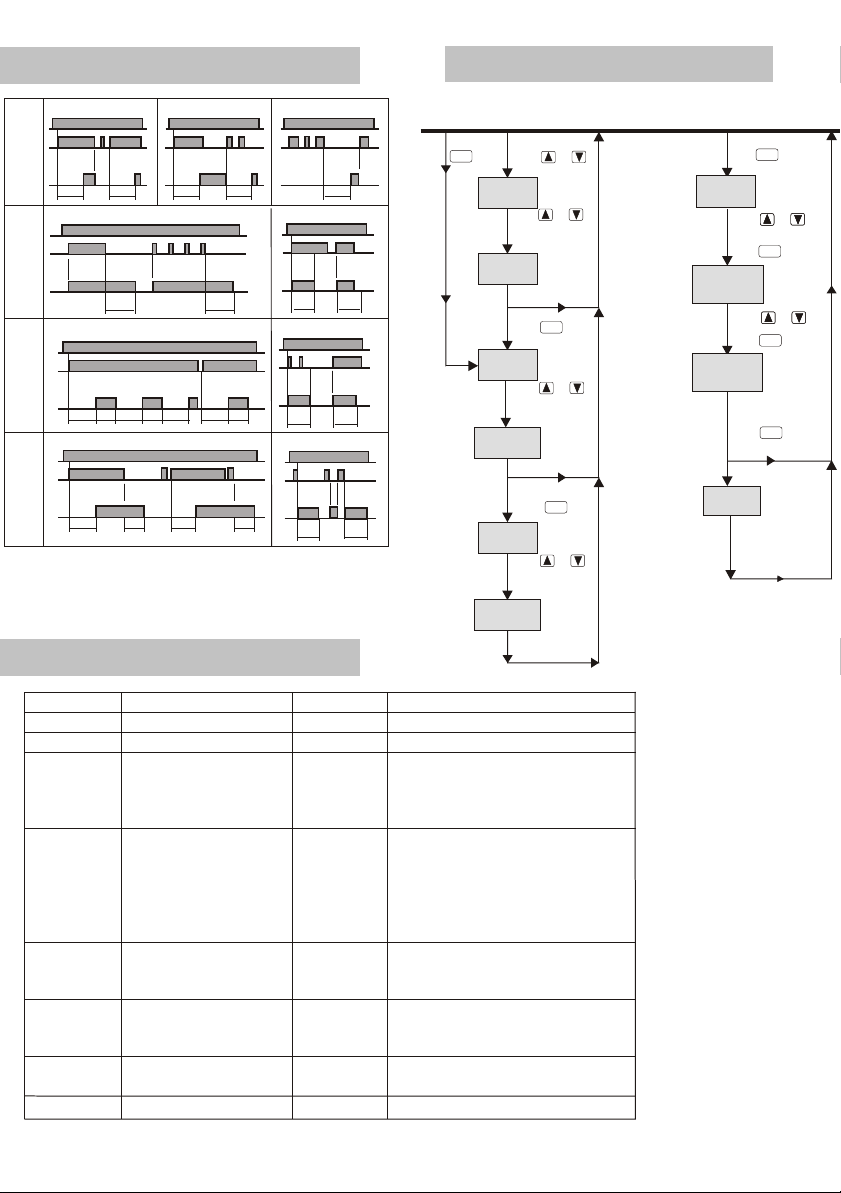
TIMING MODES
PROGRAM PARAMETER MAP
Supply
Input*
O/P
Supply
Input*
O/P
Supply
Input*
O/P
Supply
Input*
O/P
dE (CtS) dE (PtS) dE (Ptr)
T T
T T T
dd
T
cct
T1
T2 T2
T1
* Input refers to terminals 1 to 5
Terminal 1 is input for Timer1
Terminal 2 is input for Timer 2 etc
T1T1 T1
dodo
T2 T2
T1
PROGRAM PARAMETERS
VIEW MODE
Press
SEL
Press or
Displays
Timer(n )
Displays
View set point 1
Timer(n)
Dual timer
options
Displays
View set point 2
Timer(n)
T(n)
Press or
to increment or
decrement timer
in view
View
Press
St(n)1
Press or
to increment or
decrement timer
number (n)
Single timer options
Press
St(n)2
Press or
to increment or
decrement timer
in view
SEL
SEL
Int (CtS)
T
T
T2
T
Int (PtS)
T
Int (Ptr)
T
T
T
SET MODE
Press
PRG
Displays
St(n)1
Press or to
increment or decrement
timer to be set then
press
SEL
Displays value
with lsd (right)
digit flashing
Press or
to set digit then
press
SEL
Displays value
with next digit
flashing
Repeat previous
step for remaining
digits, then
press
PRG
Single timer options
Dual timer
options
Displays
St(n)2
Repeat as
for St(n)1
Note : These routines apply to
programming from default values.
Once another set-up has been
programmed, parameters will
start from the previous settings.
Normal running - viewing timer (n)
Parameter Function Default Range/Option
St11-St51 First timing value 9000 0 to Timing range
St12-St52 Second timing value 9000 0 to Timing range
PASS Password to access 0000 0 = No Password
Program 1 - 4999 for adjustable times
5000-9999 for locked times
1996 Override Password
MODE Timing Mode dE dE = Delay On
(ndE1-5) Selection int = Interval Time
dd = Delay Off
cct = Cycling Timer
dodo = Delay On Delay Off
rLy = Relay Mode
r nG1 Timing Range SECS SECS = 0.1 to 999.9 secs
r nG2 Selection M-S = 1sec to 99min59sec
H-M = 1min to 99hrs59min
St Start Mode CtS CtS = Close to Start
PtS = Pulse to Start
Ptr = Pulse to Reset
ncYc Cycle Counter 0000 0000 = Continuous
1-9999 cycles
tdir Counting Direction uP uP or dn = Up or Down
Page 4
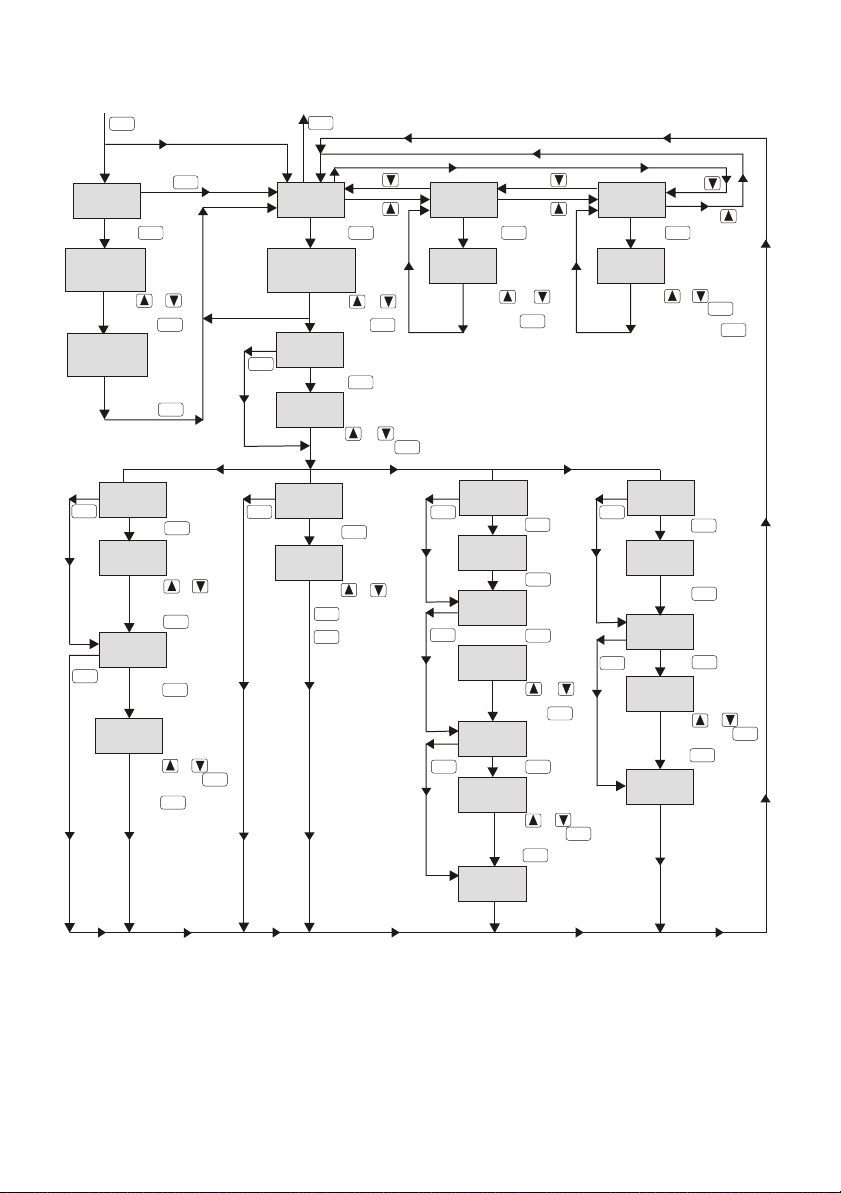
PROGRAM MODE
Press & hold
PRG
Password =0000
Normal running - viewing timer (n)
Press & hold to exit Program mode
PRG
Displays
PASS
Press
Displays value
with msd (left)
digit flashing
Press or
until digit correct
then press
Displays value
with next digit
flashing
Repeat above step
for all four digits,
then press
dE & Int modes
Press
Displays
PRG
Displays
CtS
Displays
St(n)1
Press
PRG
Displays
900.0
Press
PRG
SEL
SEL
PRG
St
Press
SEL
Press or
to select start
mode then
press
PRG
Press
SEL
Press or to
set time. Press
to move to next digit
PRG
Press when set
SEL
relay mode
Press
PRG
Press
PRG
Displays
Mde1....5
Press
Displays
dE, Int, dd, cct,
dodo or rLy
Press or
to select mode
then press
Displays
r nG1
Press
Displays
SECS
Press or to select
range then press
dd mode
Displays
St(n)1
Press
Displays
900.0
Press or
to set time. Press
to move to
SEL
next digit. Press
when set
PRG
SEL
SEL
SEL
Press
Press
PRG
PRG
Press
PRG
Press
PRG
Press
PRG
Displays
Displays
tdir
Press
SEL
Up
Press or
to select UP or dn
then press
cct mode
Displays
r nG2
Press
Displays
SECS
Press
Displays
nCyC
Press
Displays
0000
Press or to
select No of cycles
then press
Displays
St(n)1
Press
Displays
900.0
Press or to
set time. Press
to move to next digit
press when set
Displays
St(n)2
Repeat step for
set point 1 (St(n)1)
Press
Press
PRG
SEL
SEL
SEL
SEL
PRG
PRG
SEL
Displays
PASS
Press
Displays
0000
Press or to set
digit, then press
Repeat untll code is
correct then press
dodo mode
Press
Displays
PRG
Displays
SECS
Displays
St(n)1
Press
PRG
Displays
Displays
St(n)2
Press
Press
SEL
SEL
r nG2
Press
SEL
SEL
Press
Press
SEL
900.0
Press or to
set time. Press
to move to next digit
PRG
press when set
Repeat step for
set point 1 (St(n)1)
PRG
SEL
Page 5
SET MODE
Set mode is used to change the set times.
1. Press PRG. The display will show the timer and set point number (e.g. ST21 = timer 2, set time 1).
2. Use /\ and \/ to select the timer to be set.
3. When the relevant timer is selected, press SEL to allow the set time to be changed.
4. Adjust the set time one digit at a time using /\ and \/. Press SEL to move between digits.
5. When adjustment is complete, press PRG to store the new setting and move on to the second set
time if selected. If a single time mode is in use, the timer will return to run mode.
6. Repeat steps 4 and 5 to set the second time.
7. Press PRG to return to run mode. The last timer to be set will now be in view. To view a different
timer while running, repeat steps 1 & 2 in view mode above.
ADJUSTING SET TIME
Program mode is used to set up the operating functions and parameters of the timer. (Refer to the
parameter map for programming details)
1. Press and hold PRG. The display will show PASS (if a password>0 has been set). Press SEL and
use /\ and \/ to enter each digit of the password. Use SEL to move between password digits. When
complete press PRG to access the program functions. NOTE : if no password is set (PASS=0000) the
display will go directly to the first program parameter (MdE1).
2. Use /\ and \/ to move around the program menu (Mde1, Mde2, Mde3, Mde4, Mde5, tdir, PASS Mde1, Mde2 … etc.)
3. Press SEL to access the program parameter to be changed, use /\ and \/ to change the parameter
(using SEL to move between digits where required).
4. Press PRG to store the change and move on to the next variable within a particular timer set up (
eg. Mde1, rng1, St, St11 - Mde1, rng1…etc)
5. Use /\ and \/ at the Mde prompt to move around the program menu.
6. Press and hold PRG at any Mde prompt to exit program mode. The timer active when exiting from
program mode will now be in view. To view a different timer while running, repeat steps 1 & 2 in view
mode above.
NOTES
1. Set and program modes will time out if no buttons are pressed for 1 minute. The timer will return to
run mode.
2. When the program routine has been accessed all timing stops, is reset and all outputs are deenergised.
3. Timing continues in set mode. The new set times take effect when the timer is next started.
4. The output indicator will light when the relevant output is energised.
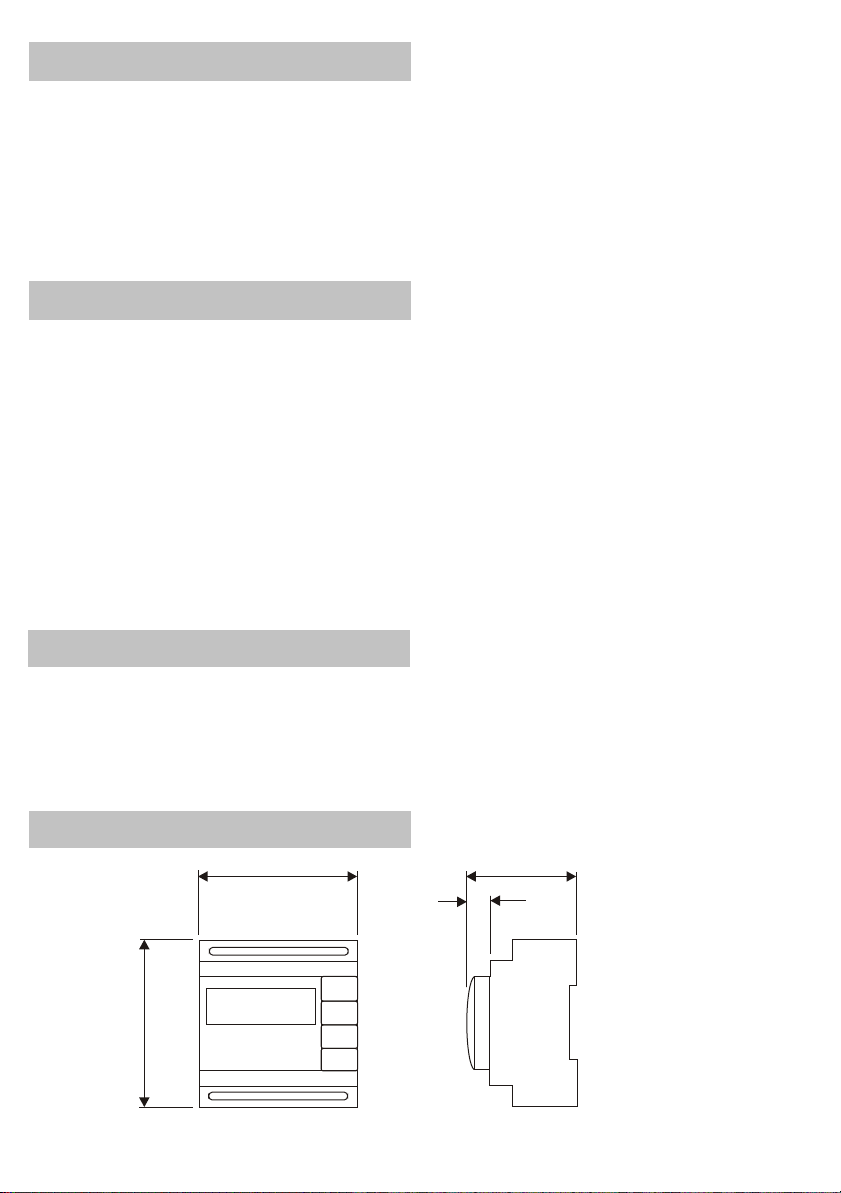
DIMENSIONS
2.76 (70) 2.56 (65)
0.6
(15)
3.46 (88)
Panel cut-out 2.755 x 1.77 (70 x 45)
All dimensions in inches (mm)
 Loading...