

Page 1

Poll-Ease
™
Remote Monitoring
Software
User’s Guide
Page 2

2 POLL-EASE REMOTE MONITORING SOFTWARE USER’S GUIDE
Poll-Ease™
Remote Monitoring
Software
User’s Guide
Version 3.2.9
February 2000
Page 3

4 POLL-EASE REMOTE MONITORING SOFTWARE USER’S GUIDE
Table of Contents
CHAPTER 1 | POLL-EASE REMOTE MONITORING SOFTWARE
OVERVIEW................................................................................................................................................6
TYPICAL REMOTE MONITORING APPLICATIONS INCLUDE:......................................................................................6
WHO CAN USE POLL-EASE REMOTE MONITORING SOFTWARE? ...........................................................................7
CHAPTER 2 | GETTING STARTED...................................................................................................................9
USING THE USER'S GUIDE ...................................................................................................................................9
SYSTEM REQUIREMENTS ................................................................................................................................... 10
INSTALLING A MODEM...................................................................................................................................... 11
INSTALLING POLL-EASE REMOTE MONITORING SOFTWARE ............................................................................... 11
UNINSTALLING POLL-EASE REMOTE MONITORING SOFTWARE........................................................................... 13
STARTING AND USING POLL-EASE REMOTE MONITORING SOFTWARE ................................................................ 14
COMMUNICATIONS SETUP................................................................................................................................. 14
EXECUTING COMMANDS................................................................................................................................... 18
ON-LINE HELP ................................................................................................................................................. 19
CHAPTER 3 | ACCESSING THE SITE DATABASE.......................................................................................21
SITE DATABASE................................................................................................................................................ 21
SITE SETUP....................................................................................................................................................... 21
INPUT SETUP ....................................................................................................................................................25
AUTOMATIC REMOTE MONITOR SETUP ............................................................................................................. 28
CHAPTER 4 | ON-DEMAND REAL-TIME MONITORING AND DATA
COLLECTION........................................................................................................................................ 29
ON-DEMAND REAL-TIME MONITORING ............................................................................................................. 29
ON-DEMAND DATA LOG DOWNLOAD ................................................................................................................ 31
ON-DEMAND MANUAL MODE CALLING (USER INTERACTIVE SESSION) .............................................................. 31
ENDING AN ON-DEMAND CALL......................................................................................................................... 32
CHAPTER 5 | AUTOMATIC DATA COLLECTION....................................................................................... 33
SCHEDULING CALLS AND COLLECTING DATA .................................................................................................... 33
AUTOMATIC UNATTENDED CALLING................................................................................................................. 33
CHAPTER 6 | ALARM HANDLING................................................................................................................. 35
AUTOMATIC ANSWER ALARM DIAL IN .............................................................................................................. 36
ACKNOWLEDGING ALARMS .............................................................................................................................. 36
ALARM LIST ..................................................................................................................................................... 37
ALARM LOG..................................................................................................................................................... 38
ALARM DIAL-IN MODEM CONSIDERATIONS ....................................................................................................... 38
CHAPTER 7 | USING THE SITE MAP............................................................................................................. 39
SITE ICON PLACEMENT .....................................................................................................................................40
Page 4

POLL-EASE REMOTE MONITORING SOFTWARE USER’S GUIDE 5
MAP LAYERS.................................................................................................................................................... 40
MAP FUNCTIONS .............................................................................................................................................. 41
MAP STATUS BAR............................................................................................................................................. 42
CHAPTER 8 | PRODUCING REPORTS...........................................................................................................43
ON-DEMAND REPORTS AND CHARTS................................................................................................................. 43
VIEWING OR PRINTING REPORTS .......................................................................................................................43
TANK LEVEL REPORT EXAMPLE........................................................................................................................ 44
TANK ALARM REPORT EXAMPLE ...................................................................................................................... 45
DATA ANALYSIS CHARTS ................................................................................................................................. 45
DATA PLOT SETUP ............................................................................................................................................ 47
CHAPTER 9 | COMMAND REFERENCE........................................................................................................ 49
FILE MENU....................................................................................................................................................... 49
DATABASE MENU............................................................................................................................................. 50
SITES MENU ..................................................................................................................................................... 52
COMMUNICATION MENU ................................................................................................................................... 54
ANALYSIS MENU .............................................................................................................................................. 55
REPORTS MENU................................................................................................................................................ 56
STATUS MENU .................................................................................................................................................. 56
WINDOW MENU................................................................................................................................................ 58
HELP MENU ..................................................................................................................................................... 58
CHAPTER 10 | INDEX.......................................................................................................................................59
Page 5

6 POLL-EASE REMOTE MONITORING SOFTWARE USER’S GUIDE
Chapter 1 | Poll-Ease Remote Monitoring Software Overview
Poll-EaseTM Remote Monitoring Software provides the ability to communicate with multiple sites
monitored by remote monitors.
The Poll-Ease remote monitoring system is a full-featured remote monitoring package, designed to reduce
the need for manpower in data collection and analysis. It works with existing control systems −
delivering, to wherever it is needed, up-to-the-moment, accurate, information about any conditions being
monitored.
The Poll-Ease remote monitoring system enables operations and maintenance management personnel to
monitor current and historical conditions at remote locations and produce easy-to-read reports.
The ability to monitor conditions from a remote location results in substantial savings in travel time and
associated costs.
Poll-Ease Remote Monitoring Software simplifies the task of managing hundreds of remote sites. It works
together with the entire line of remote monitoring and control systems to create an easy-to-use, wide-area
monitoring network.
Typical remote monitoring applications include:
1) Tank Level Monitoring
2) Tank Inventory
3) Equipment Monitoring & Diagnostics
4) SCADA via Telephone or Cell Phone
The Poll-Ease remote monitoring systems were designed and engineered to make complex data
acquisition tasks simple. With Poll-Ease Remote Monitoring Software, you can automatically collect and
store data from hundreds of remote sites. Alarm status is indicated graphically. Once set up, Poll-Ease
Remote Monitoring Software can run automatically in an unattended mode or it can be run interactively
by non-technical personnel.
The Remote Monitoring System linked to Poll-Ease Remote Monitoring Software, enables you to:
§ View the status of hundreds of remote sites.
§ Diagnose problems from your office.
Page 6

POLL-EASE REMOTE MONITORING SOFTWARE USER’S GUIDE 7
§ Automatically collect and archive important performance and diagnostics data.
§ Share data with spreadsheet, billing, and other software.
Who Can Use Poll-Ease Remote Monitoring Software?
Despite its advanced capabilities, Poll-Ease Remote Monitoring Software is easy to learn and simple to
use.
Successful utilization of the Poll-Ease remote monitoring system depends on:
§ A working familiarity with personal computers and Windows-based software.
§ A commitment to learning what Poll-Ease Remote Monitoring Software can do and understanding
how it can work for you. As you first get started, we suggest using the software and manual together,
whenever possible.
§ Utilization of good computer work habits, such as closing programs before turning off your computer
and having a formal plan of backing up your data.
Page 7

Page 8

POLL-EASE REMOTE MONITORING SOFTWARE USER’S GUIDE 9
Chapter 2 | Getting Started
This chapter includes information that will help you put Poll-Ease Remote Monitoring Software to work
for you. It includes system requirements and installation procedures as well as information about using
the documentation and other available Help facilities.
Using the User's Guide
This User’s Guide is your road map to the capabilities of Poll-Ease Remote Monitoring Software.
It has been organized in a way that more than likely parallels how you will use the system after you
have installed the software and set up your communications link. Topics include:
§ Entering site and input setup information.
§ Scheduling automatic data collection.
§ Using the site map.
§ Monitoring your sites.
§ Handling alarms.
§ Analyzing the data.
§ Producing reports.
§ Customizing Poll-Ease Remote Monitoring for your needs.
Obviously, you are not locked into this order of learning or using Poll-Ease Remote Monitoring
Software. Other than installation of the software, specification of remote site information, and
configuration of your inputs, each section in the User’s Guide stands on its own.
You are encouraged to have the system work the way you work. The software has been designed to
be user friendly and accommodate your habits and workflow.
We welcome comments and suggestions that will make future versions of this User’s Guide even
more reflective of your needs.
Style Conventions
This Poll-Ease Remote Monitoring Software User’s Guide is written to be understood by the
people who typically use Poll-Ease Remote Monitoring Software and is not necessarily for
the computer professional.
Page 9

10 POLL-EASE REMOTE MONITORING SOFTWARE USER’S GUIDE
As such, we have minimized the use of traditional documentation conventions that, while
“second nature” to the computer pro, creates hurdles for the rest of us.
What you will find in this User’s Guide:
§ Each process will be numbered “1), 2), 3), …” and explained step-by-step.
§ Helpful information about a step will follow that step and appear in this font style.
§ ⇒ Important information will appear bold proceeded by an arrow.
§ Information intended to provide additional understanding about a step will appear in
italic.
§ Various elements on the desktop, such as menus, commands, dialog boxes, buttons, etc.,
appear in bold and Title Caps. Their descriptors appear in roman, lower case. For
example, the File menu, Options dialog box, and OK button.
System Requirements
Before installing Poll-Ease Remote Monitoring Software, be sure your computer meets the
following hardware and software requirements:
§ A personal computer with a 150 MHz or higher Pentium processor.
§ Microsoft Windows 95 or Windows 98 operating systems (with Service Pack 1 or 2
installed), or Windows NT 4.0 operating system (with Service Pack 3 installed).
§ 32 MB RAM.
§ Hard disk with 100 MB to 2.0 GB (or more) of free space, depending on your data collection
and storage requirements.
§ CD-ROM drive (or network access to a CD-ROM drive).
§ A SGVA display monitor with 800 x 600 (or higher) resolution.
§ An internal or external Hayes-compatible modem, 2400 baud or higher.
The following items, although not required, will enhance the reliability and performance of your
Poll-Ease remote monitoring software:
§ Color printer (Hewlett-Packard HP DeskJet 1600C or equivalent).
§ A tape or CD-ROM drive back-up system supported by Windows.
§ Uninterruptible power supply.
§ Fast display adapter with 2.0 MB+.
Page 10

POLL-EASE REMOTE MONITORING SOFTWARE USER’S GUIDE 11
§ A SGVA display monitor with 1024 x 768 resolution.
§ Surge-protected power and telephone outlets.
Installing a Modem
A modem is required for telephone-line access to the remote monitors. Poll-Ease Remote
Monitoring Software is designed to access any internal or external modem connected to one of the
computer’s serial communications ports.
Poll-Ease Remote Monitoring Software can use the Windows Telephony Services if a modem was
installed by the Windows Install New Modem Wizard. For Windows 95, simply connecting a
modem prior to turning on the computer will cause the plug and play modem installation wizard to
run. Otherwise, from the Windows Control Panel (Start menu, Settings), double click the
Modems Icon and click Add. Portable computers typically use PC Card (PCMCIA) type modems
and the same basic procedures apply.
⇒ These instructions are not intended to be specific. Please consult your hardware
manufacturer’s installation guide.
Installing Poll-Ease Remote Monitoring Software
The following instructions are designed to ensure simple installation of Poll-Ease Remote
Monitoring Software.
Poll-Ease Remote Monitoring Software includes an automated installation program that will create
a program directory and guide you through the steps with on-screen directions.
This installation program will:
§ Transfer files from the Poll-Ease Remote Monitoring Software compact disc to a folder that is
created on your hard disk.
§ Create an item on your Windows Start menu.
§ Add an icon to your desktop.
§ NOT overwrite existing site databases.
„ To install Poll-Ease Remote Monitoring Software
1) Close all applications.
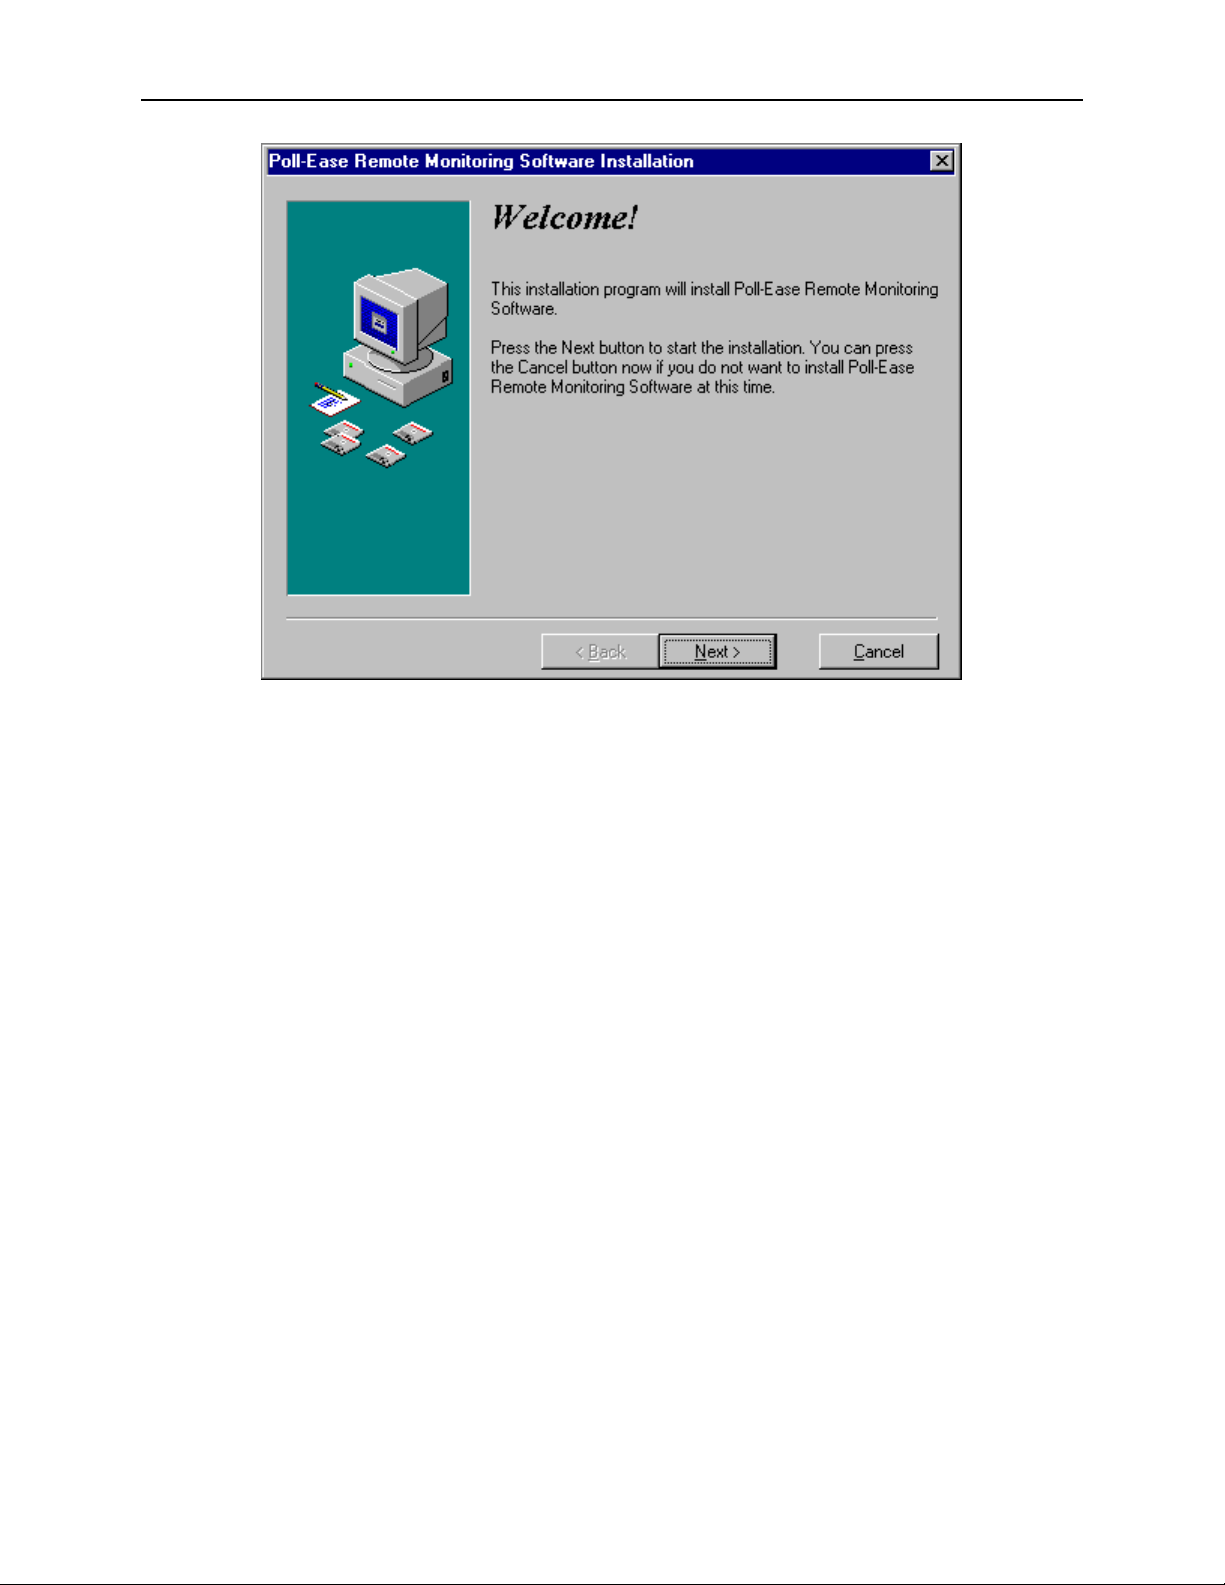
2) Insert the Poll-Ease Remote Monitoring Software compact disc into the CD-ROM drive. The
installation program will automatically start and take you through the Poll-Ease Remote
Monitoring Software installation process.
Page 11
12 POLL-EASE REMOTE MONITORING SOFTWARE USER’S GUIDE
If this screen does not appear, perform the following steps –
Click Start on the Windows desktop and then click Run. Click Browse to locate the setup program, or
type the CD-ROM drive letter and name of the setup program in the Run dialog box – “d:\setup.exe” (d is
the CD-ROM drive letter and setup.exe is the name of the setup program). Click OK.
You should now be at the Poll-Ease Remote Monitoring Software installation screen.
3) To start the installation, press Next.
⇒ You can press Cancel at any time to terminate the installation.
You will be asked to select a destination directory for Poll-Ease Remote Monitoring Software files.
It is recommended that you use the default location provided by the program.
4) Press Next.
You will be asked if you want to create a backup copy of the files replaced during the installation.
5) Click Yes and then press Next.
6) You will be asked to select the directory in which these replaced files will be copied. It is
recommended that you use the default location provided by the program.
7) Press Next.
8) You are now ready to install Poll-Ease Remote Monitoring Software.
9) Press Next to begin the installation.
Page 12
POLL-EASE REMOTE MONITORING SOFTWARE USER’S GUIDE 13
10) The Installing dialog boxes will follow the progress of the installation. This process will take a
few minutes. An Updating System Configuration. Please Wait notice will appear and remain
for a short time.
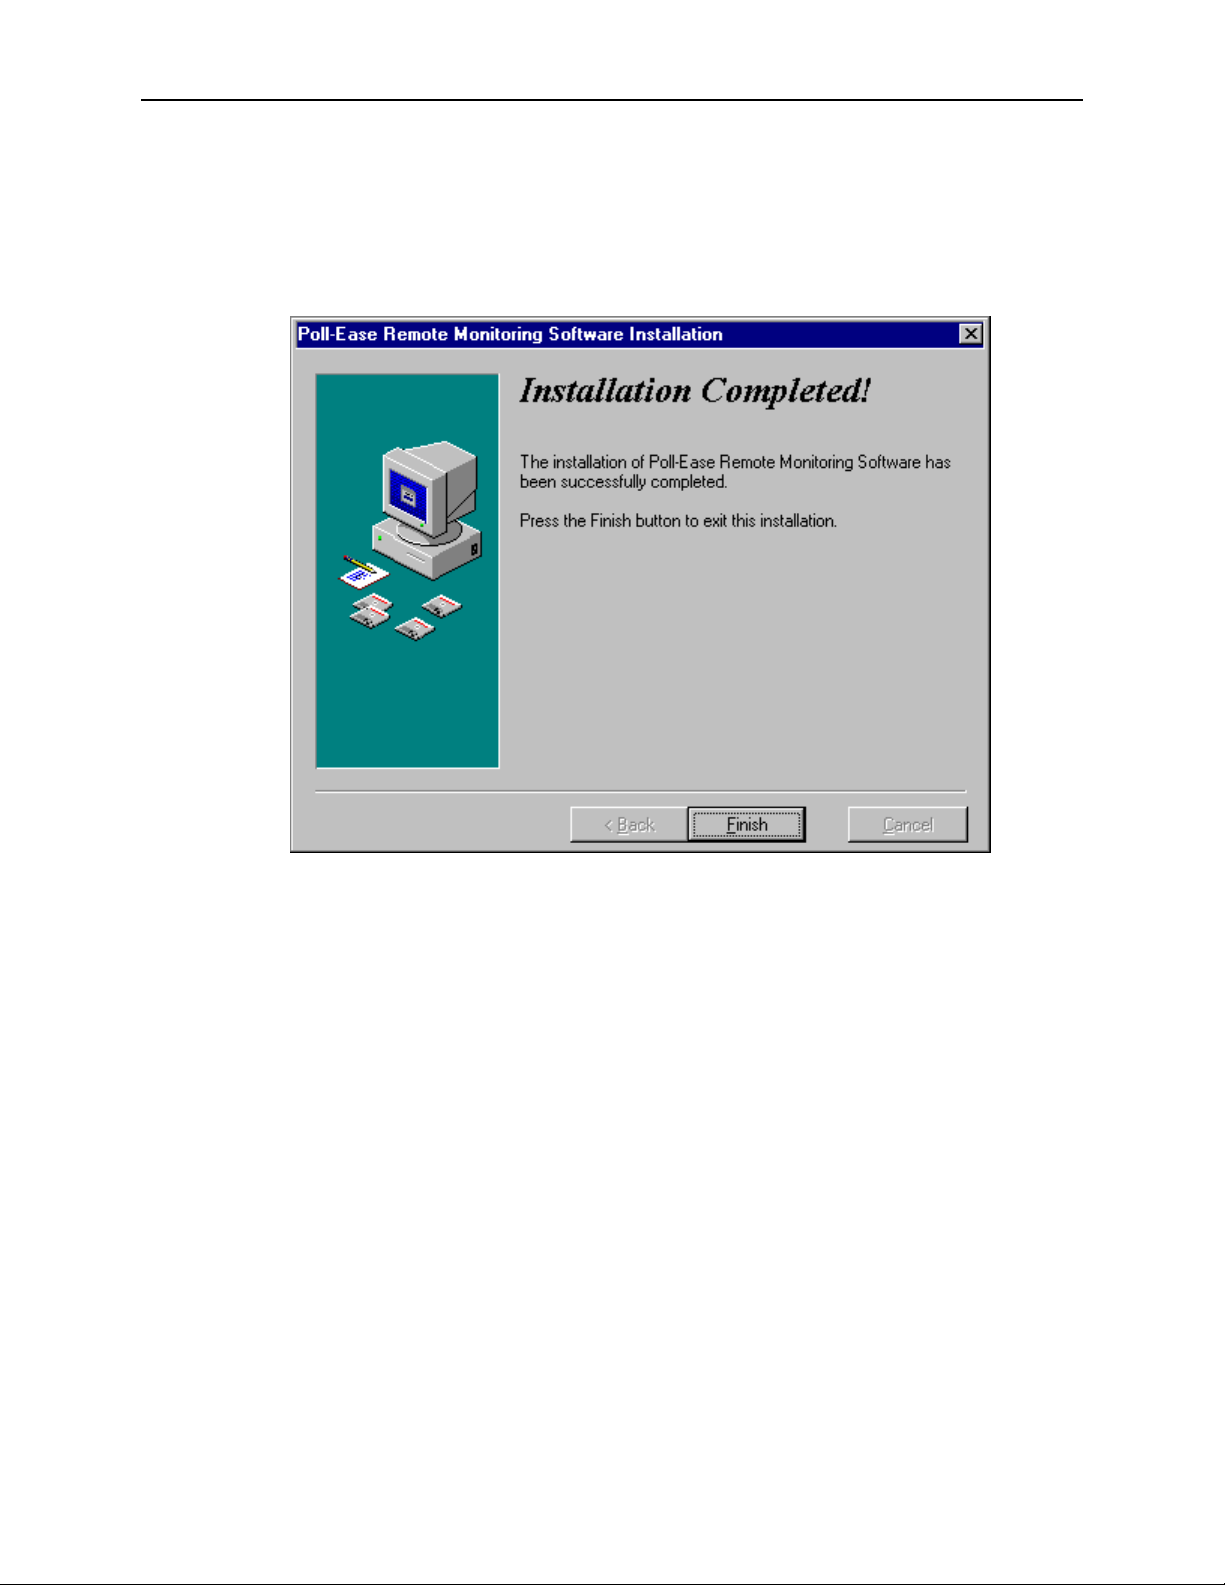
When the software installation has been successfully completed, this screen will appear.
11) Press Finish to exit the installation.
If you are asked to restart the system in order to complete the installation, follow the on-screen
instructions. You may have to repeat this installation procedure after Windows restarts.
Uninstalling Poll-Ease Remote Monitoring Software
„ To uninstall Poll-Ease Remote Monitoring Software
1) Click the Start button on the taskbar.
2) Click Settings.
3) Click Control Panel.
4) From the Control Panel, double-click Add/Remove Programs.
5) From the Add/Remove Programs dialog box, click Poll-Ease Remote Monitoring Software
in the software list.
Page 13

14 POLL-EASE REMOTE MONITORING SOFTWARE USER’S GUIDE
6) Click Add/Remove to uninstall.
7) In the Uninstall Poll-Ease Remote Monitoring Software, you will be asked to choose an
uninstall method. Choose Automatic to remove all files, or Custom to allow selection of files.
8) Follow the on-screen instructions. It is recommended that you accept all the default selections.
All files created during installation will be removed including the sample site database, even if new
sites were added. Use the Database Maintenance Automatic command to backup database file to
“c:\dbBackup” and optionally copy to tape. New site databases and other files created after
installation are not removed, but may be manually removed using the Windows file explorer.
Starting and Using Poll-Ease Remote Monitoring Software
To begin using Poll-Ease Remote Monitoring Software, do one of the following:
§ On the Windows desktop, double-click Poll-Ease Remote Monitoring Software icon to start.
§ On the Windows task bar, click the Start button, then point to Programs, folder, and click the
Poll-Ease Remote Monitoring Software command.
Communications Setup
Poll-Ease Remote Monitoring Software requires a modem to be connected to your computer for
communications to remote monitors.
The Communications menu contains a Use Telephony Services command, which, when checked,
enables the use of a Windows-installed modem. When Use Telephony Services is un-checked, this
software will use its own internal method for finding and configuring the modem.
Each method has its own benefits. Choose the one that works best for you. By default, Telephony
Services are not used. If you want to use location-dependent dialing (automatic area code/country
code), this feature is only available when the Use Telephony Services command is checked.
Internal Modem Access Method
When Use Telephony Services is un-checked, Poll-Ease Remote Monitoring Software will
automatically locate the first available modem and “find” correct modem initialization commands
appropriate for the remote monitor being called. This information is stored permanently and
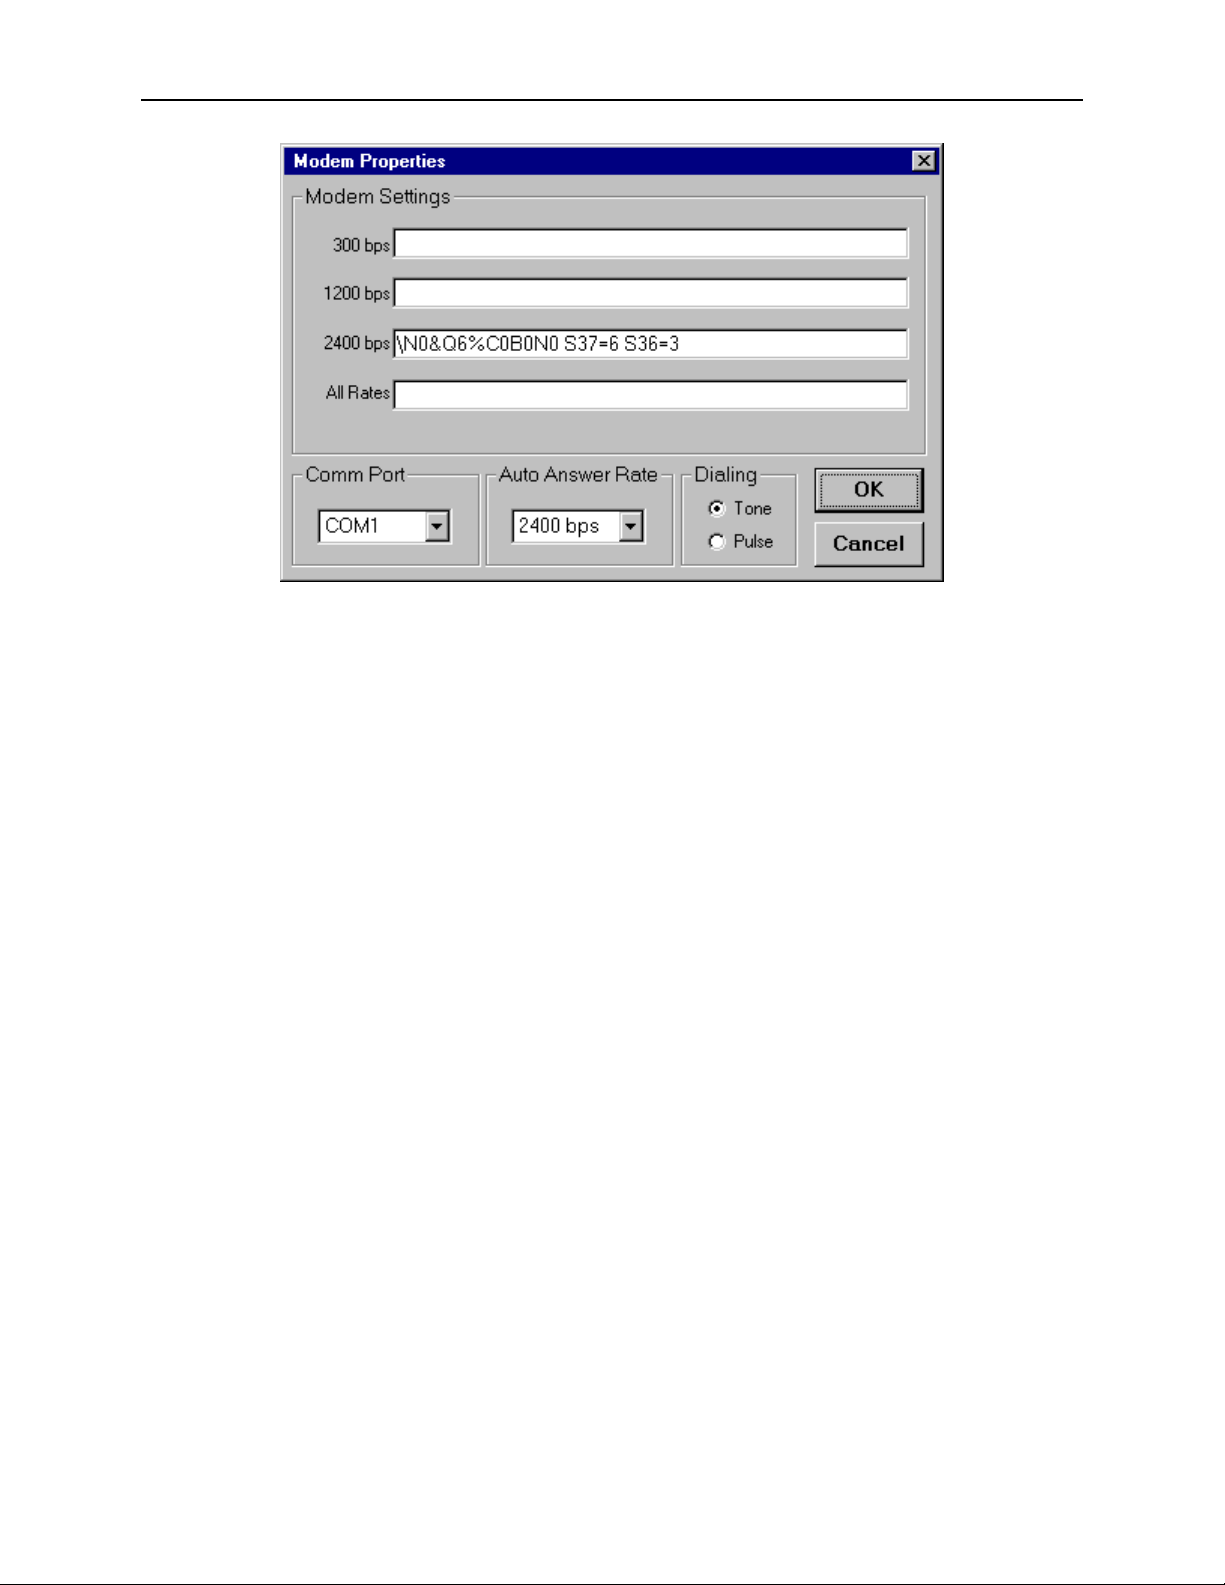
displayed in the Modem Setup dialog box, which may be modified by the user, if necessary. Each
time a call is made, the modem is configured according to the requirements of the remote device
and/or the user’s intentions. The user must specify the correct alarm Auto Answer Rate and
Dialing mode – tone or pulse.
The Properties command on the Communications menu opens the Modem Setup dialog box.
Page 14
POLL-EASE REMOTE MONITORING SOFTWARE USER’S GUIDE 15
Windows Telephony Services
When Use Telephony Services is checked, Poll-Ease Remote Monitoring Software will expect to
find a Windows-installed modem. If you wish to use the Telephony Services, follow the procedure
below to properly configure your modem.
From the Windows Task Bar, click Start, Settings, and then Control Panel. In the Control Panel,
double-click Modem to open the Modem Properties dialog box. If no modems are listed, click
Add to open the Install New Modem dialog box and respond as required to dialog box questions.
The Remote Monitors require that Error Control is disabled.
From the Modem Properties box, click the modem being used and then click Properties. Click
the Connection tab and click Advanced. In the Advanced Connection Settings dialog box, clear
(disable) the Use Error Control check box, and press OK. This is the modem that must be
specified in Poll-Ease Remote Monitoring Calling Properties “Connect (Error Control OFF)” field.
If your RMU is capable of 33,600 bps operation, or if other communications software uses a
modem, you must add another modem, using the same COM port as specified above, except that
Error Control is enabled, following the procedure above. This is the modem that must be specified
for the Calling Properties “Connect (Error Control ON)” field.
The appropriate modem setup will be automatically chosen, depending on the model of the remote
monitor being called.
If you haven’t specified dialing preferences (area code, etc.), click Dialing Properties and enter
your dialing information into the dialog box. Click OK and then click Close in the Modem
Properties box to complete the task.
Page 15
16 POLL-EASE REMOTE MONITORING SOFTWARE USER’S GUIDE
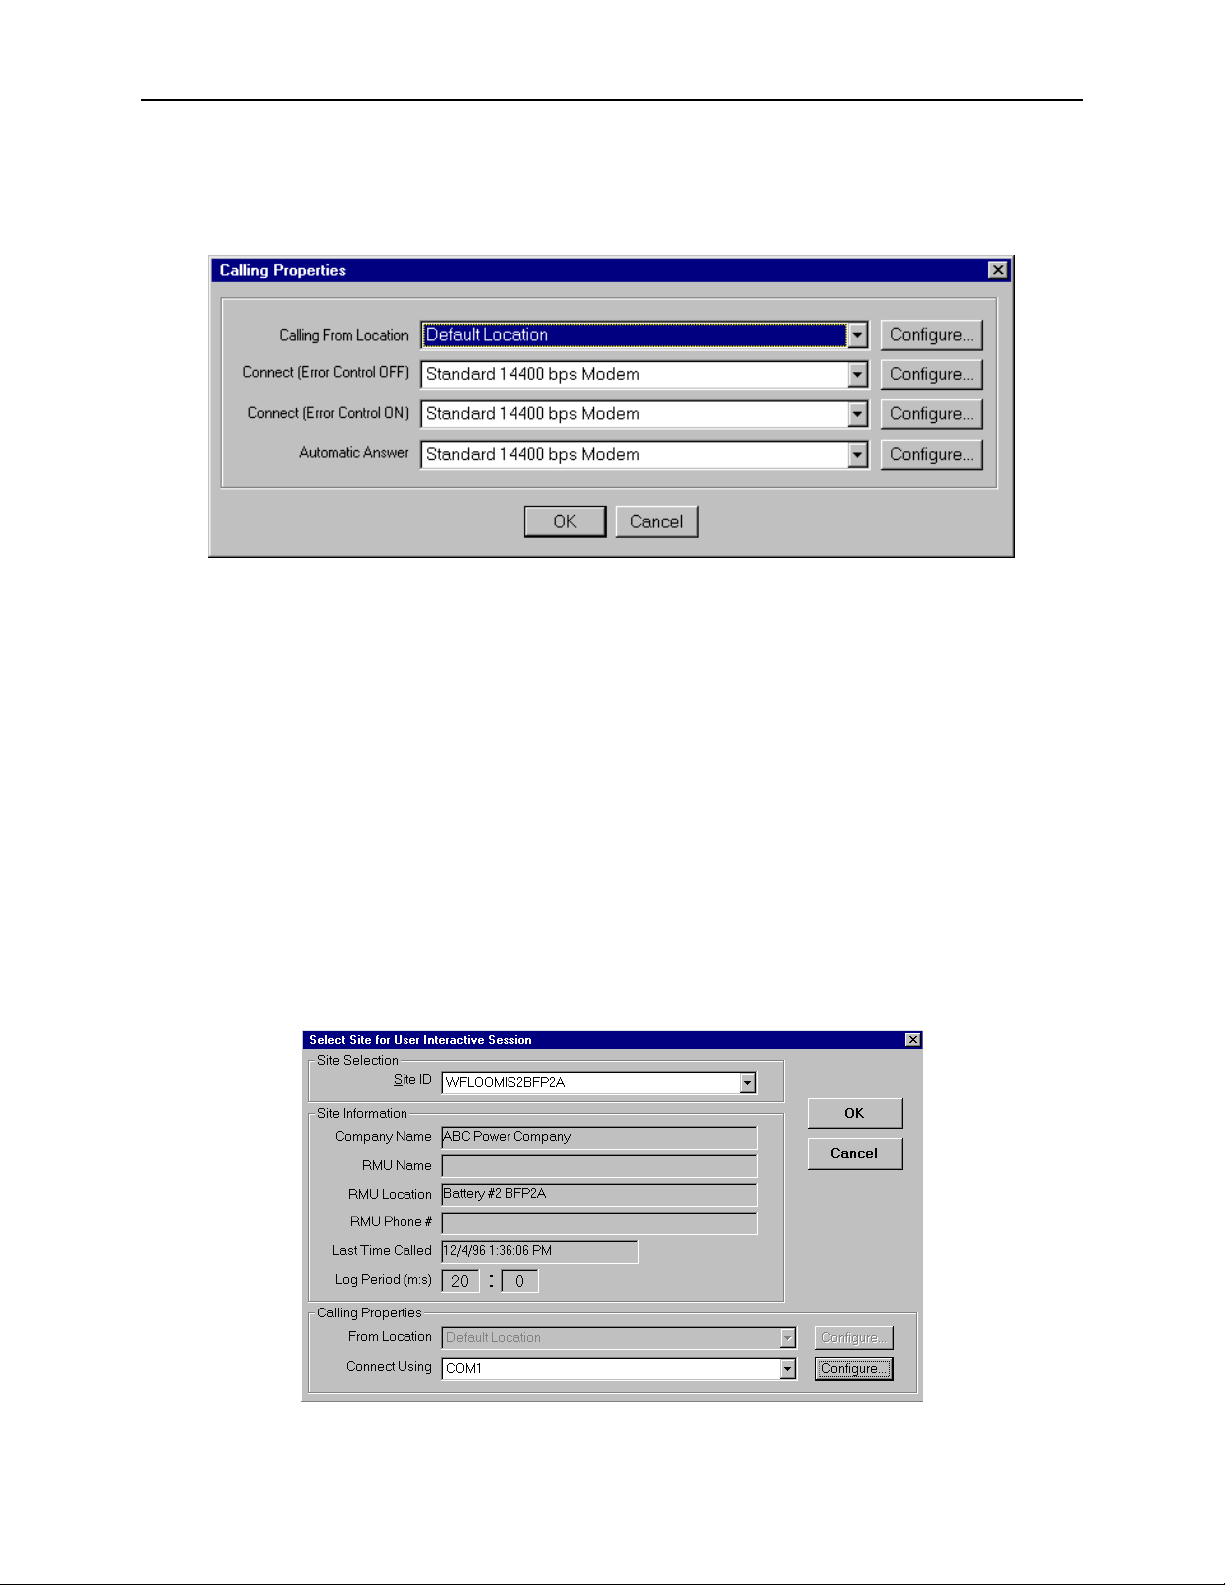
From the Poll-Ease Remote Monitoring Software Communications menu, choose Properties to
open the Calling Properties dialog box. Dialing Properties may be modified from the Poll-Ease
Remote Monitoring Software Calling Properties box.
The location your are calling from may be selected by clicking on the desired location in the
dropdown list. The Calling from Location list may be added to or the selected location may be
permanently modified by clicking Configure.
In the Connect box, select the modem to connect to the remote monitor according to the modem’s
error control setting (as described above). You may verify the modem’s properties by clicking
Configure. Changes to the modem’s properties will not be restored when Poll-Ease Remote
Monitoring Software is restarted. Use the Control Panel Modem Properties to make permanent
changes as described above.
Specify the modem to be used for automatic alarm answer, which is compatible with
all remote monitors programmed to initiate an alarm dial out call.
Direct Connection (RS-232)
Page 16
POLL-EASE REMOTE MONITORING SOFTWARE USER’S GUIDE 17
The remote monitor supports a direct serial connection using the RS-232 communications
(COMM) port of the computer. Direct connection is desirable for on-site support and diagnostics
applications or when the use of a telephone line is impractical. A “straight-through” serial cable,
with two nine-pin “D”-type connectors (one male, one female), is required. By choosing any
available communications port (one to nine) from the Connect Using box in any of the Select Site
for … dialog boxes, you can initiate a “call” directly to a locally connected remote monitor.
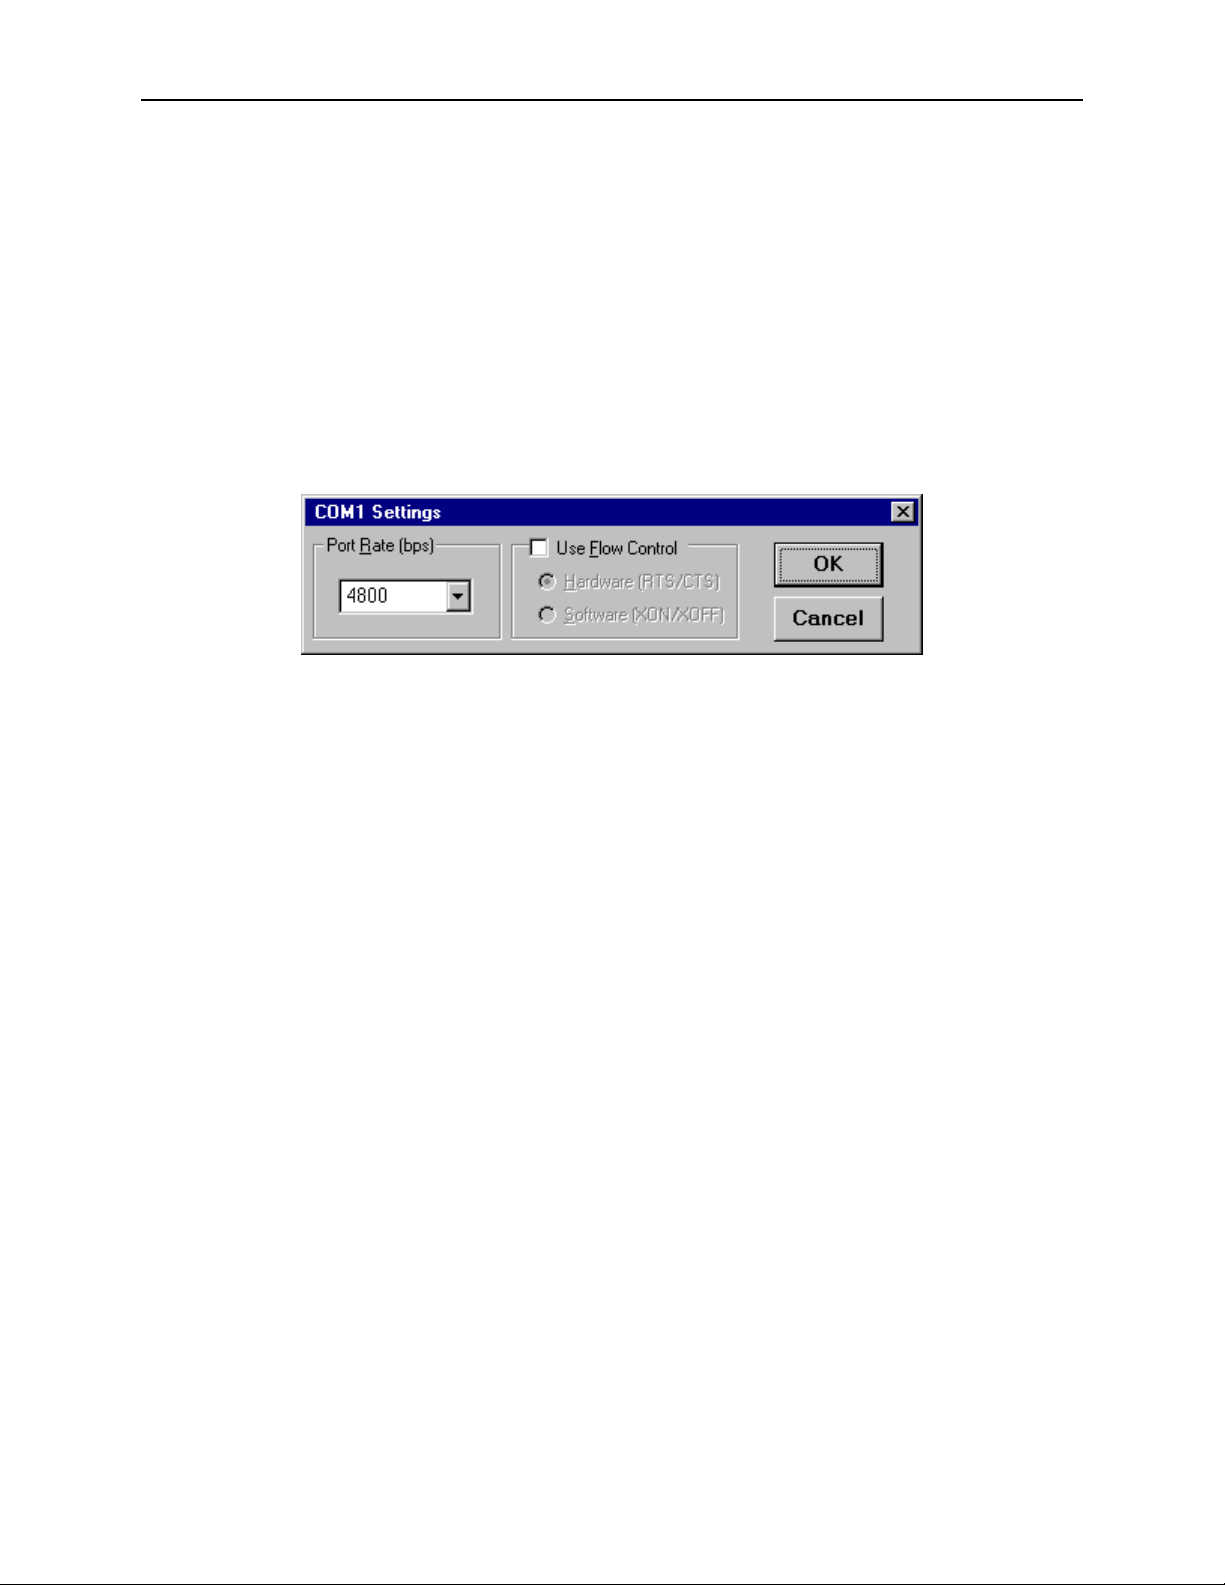
The port settings may be modified by clicking the Configure button to the right of the Connect
Using box. Port rates above 4800 bits per second (bps) require flow control. Select the Use Flow
Control check box and click Hardware (RTS/CTS). Only units capable of 33,600 bps modem
operation support serial port rates higher than 4800 bps. Software flow control is not supported in
any case.
Tested & Approved Modems
Almost all modems will work with Poll-Ease Remote Monitoring Software. The following
modems, however, have been tested and are known to work.
External Modems
§ Hayes ACCURA 336 Voice Modem
§ Hayes ACCURA 288 V.34 +Fax
§ Hayes Smartmodem OPTIMA 288 V.34/V.FC +Fax
§ Practical Peripherals PC288LCD
§ Practical Peripherals FXMT14400
§ Boca V.34
§ Cardinal 33.6 V.34/V.FC +Fax
§ Intel 144/144e
§ US Robotics Sportster
Internal Modems
§ Prometheus 14.4 Data Faxmodem
PC Card (Laptop) Modems
§ US Robotics MegaHertz 33.6 (XJ4336)
§ 3COM EtherLink III
Many other generic high- and low-speed modems have been tested successfully with Poll-Ease
Remote Monitoring Software.
Page 17
18 POLL-EASE REMOTE MONITORING SOFTWARE USER’S GUIDE
Executing Commands
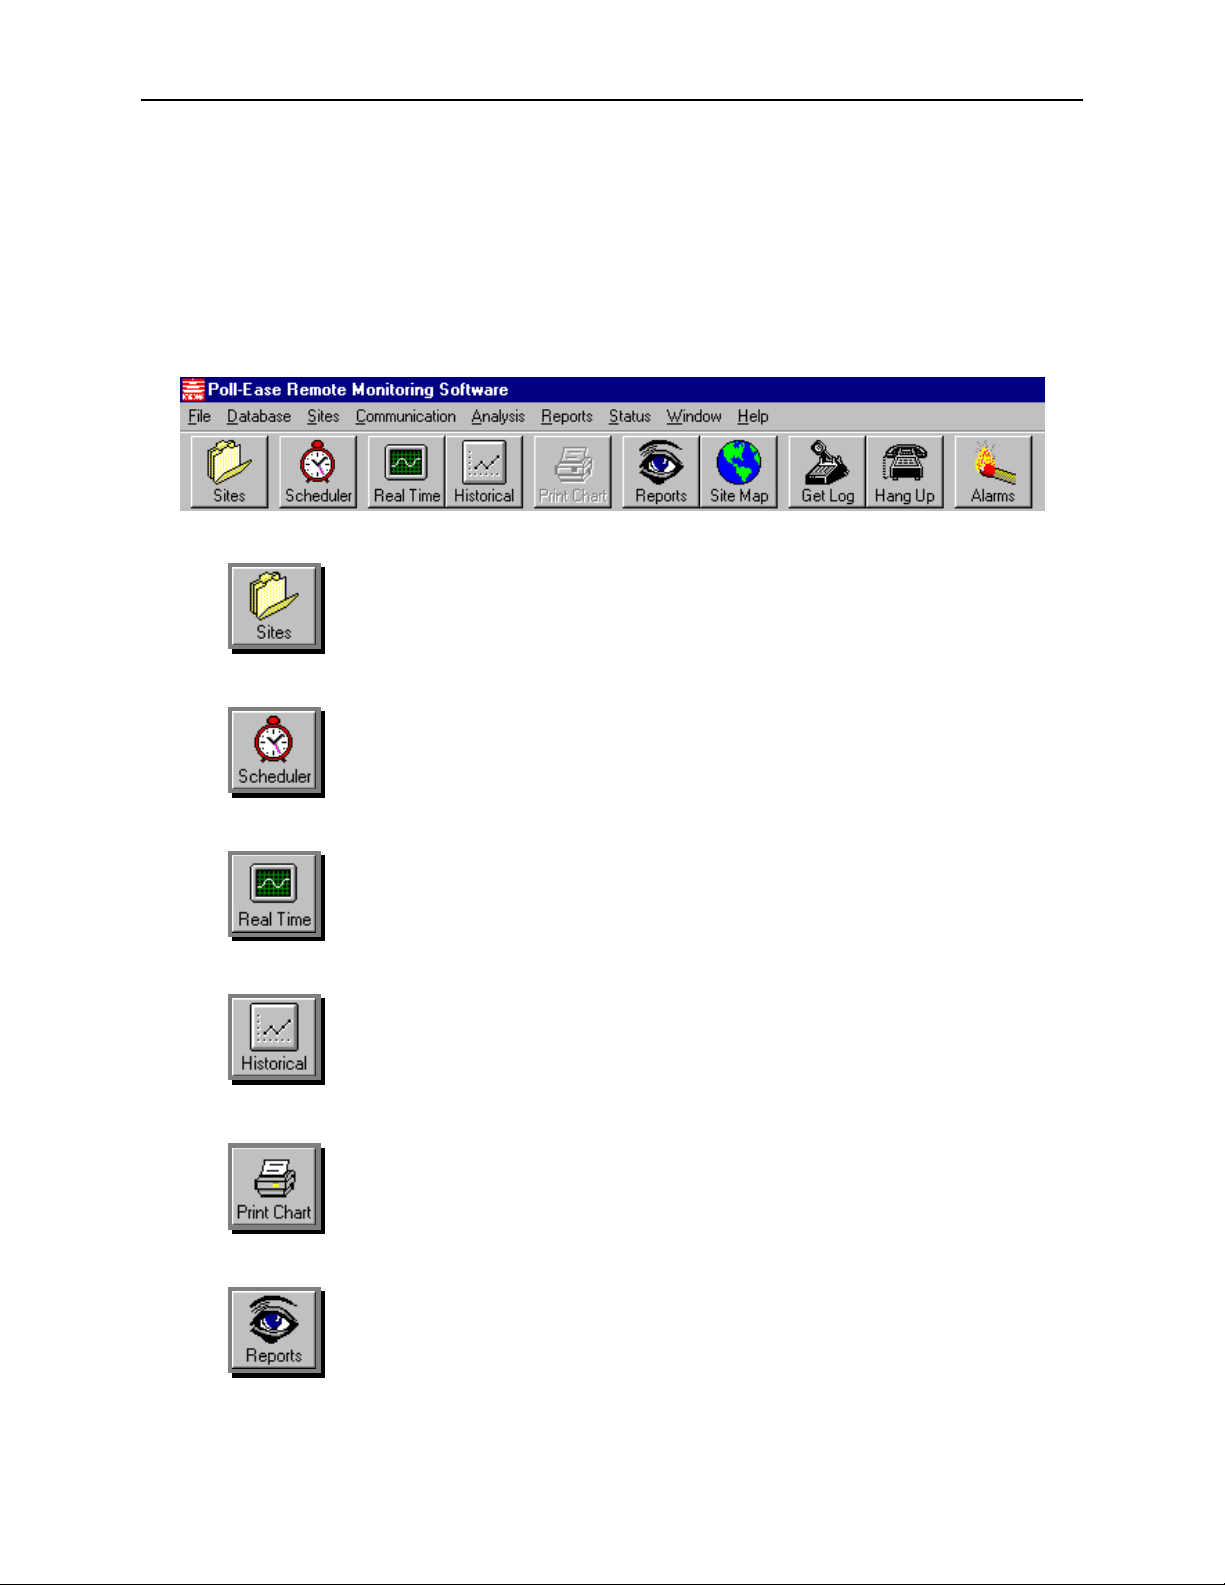
Most common commands can be executed by using one of the toolbar buttons described below.
The relevant toolbar button will be illustrated when such a shortcut is available to you. The
other commands — accessed through a command menu — are described in detail in the command
reference section at the end of this Guide.
Sites - This command is used to add, delete or modify site
information in the site database. Refer to Chapter 3 | Accessing the
Site Database for further information.
Scheduler – This command starts or stops scheduling of calls to
remote sites for data log download. Refer to Chapter 5 | Automatic
Data Collection for further information.
Real-Time – This command is used to get real-time data for all
inputs in both a “moving graph” and text format. The information
graph is refreshed continuously from the remote site.
Historical – This command is used to select a site and date range to
display historical data from a site. All inputs are displayed on one
“zoomable,” printable graph. Refer to Chapter 8 | Producing
Reports for further information.
Print Chart – This command is used to print a graph currently
being displayed.
Reports – This command is used to view and print all report pages
except for data plots. Refer to Chapter 8 | Producing Reports for
further information
Page 18
POLL-EASE REMOTE MONITORING SOFTWARE USER’S GUIDE 19
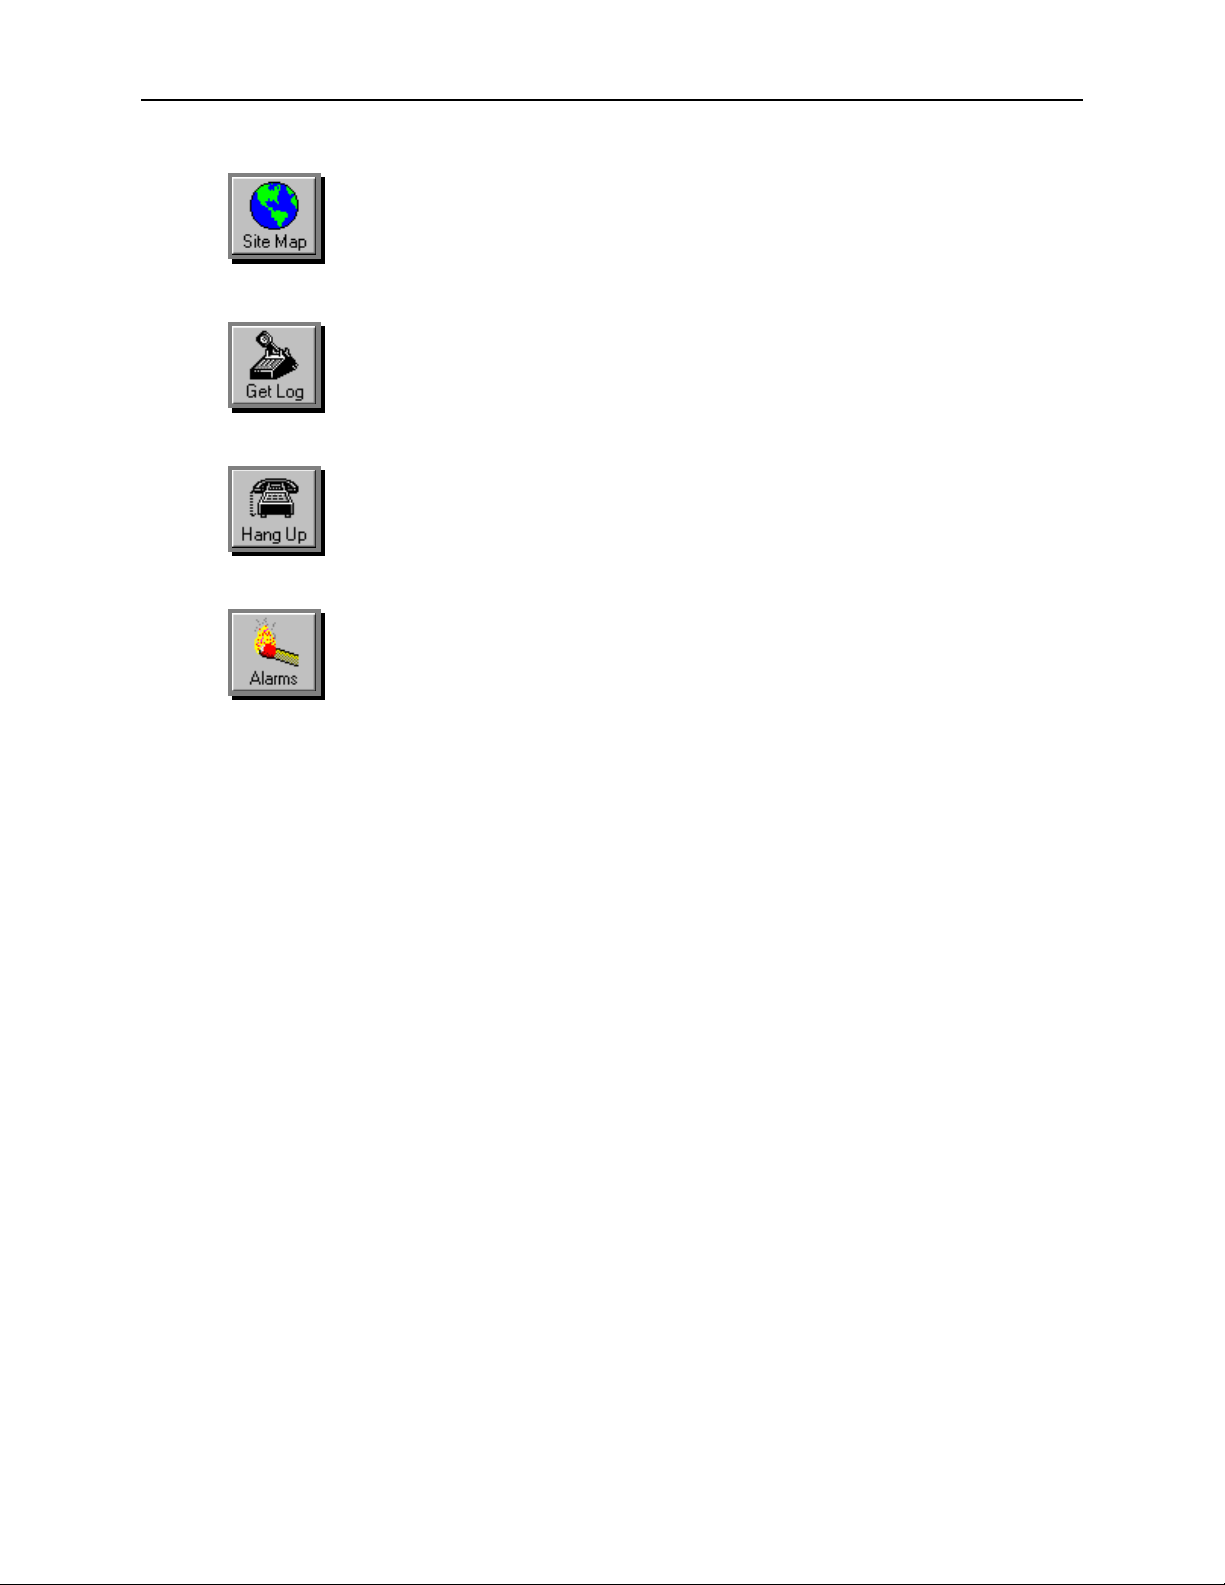
Site Map – This command is used to display a map of all site
locations and indicates alarm condition of each by a color-coded
icon. Refer to Chapter 7 | Using the Site Map for further
information
Get Log – This command gets a data log from the selected remote
site and stores it in database.
Hang Up – This command is used to immediately terminate any
“on-demand” call.
Alarms – This command enables automatic alarm dial-in answering
and logging. Refer to 0
On-Line Help
The features of Poll-Ease Remote Monitoring Software are documented in detail in this printed
User’s Guide. Extensive on-line help is also available through the Help menu. Changes to the
documentation can be found in a readme.txt file located in the installation folder.
Page 19

Page 20

POLL-EASE REMOTE MONITORING SOFTWARE USER’S GUIDE 21
Chapter 3 | Accessing the Site Database
Poll-Ease Remote Monitoring Software maintains a central repository of information – a database – that
contains information about your remote sites. The information in this database includes remote monitor
setup and related site information as well as the complete history of activity for each monitored site.
Poll-Ease Remote Monitoring Software incorporates a robust database engine developed by Microsoft
Corporation. The database supports high-end functionality, including multi-user support, remote access,
and automatic database maintenance. Being a Microsoft Corporation "standard," the database is
compatible with numerous third-party software packages.
The information in this database is used for reporting, analysis and a variety of other purposes. Although
Poll-Ease Remote Monitoring Software handles much of the database work for you, a basic understanding
of its use and operation will enable you to better utilize your investment.
Site Database
The entire Poll-Ease Remote Monitoring Software database is contained in a single file, with an
".mdb" file name extension. This “start-up” sample database contains a small amount of sample
data. This database can serve as your primary database — simply add new sites to it or create a
new database with a different name. Although only one database is needed (regardless of how
many locations are being monitored), you may want to create multiple databases to segregate
classes or owners of equipment.
„ To create a new database
1) On the Database menu, click New.
2) In the Create New Database File dialog box, type a new file name, followed by the .mdb
extension.
3) Click Open.
Site Setup
„ To add new site information
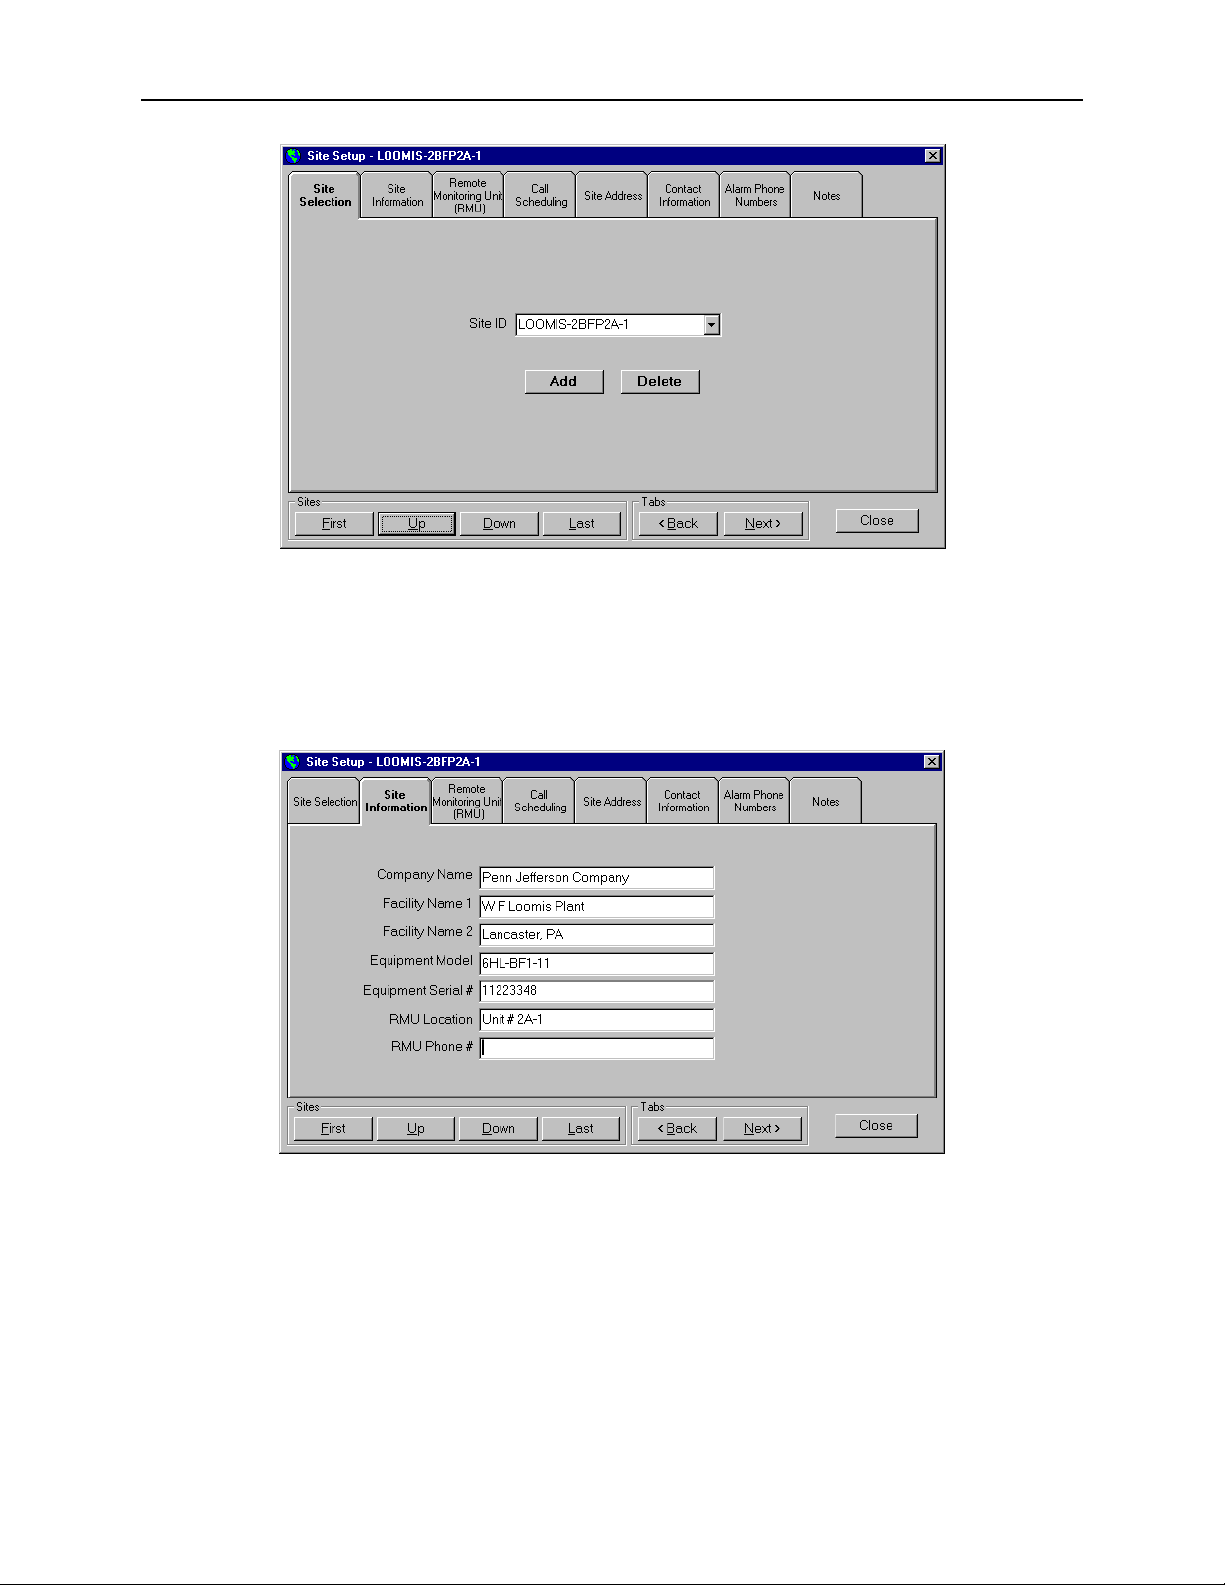
1) On the Sites menu, click Site Setup or on the tool bar, click Sites.
2) Choose the Site Selection tab. Click Add. In the Site ID box, enter a unique 16-character site
identification name.
Page 21
22 POLL-EASE REMOTE MONITORING SOFTWARE USER’S GUIDE
3) Choose the Site Information tab. This tab contains information that describes the facility and
equipment being monitored. Enter the requested information. Also enter the Remote
Monitoring Unit (RMU) Location (the location of the RMU within the facility) as well as the
RMU Phone # (the telephone number used by Poll-Ease Remote Monitoring Software to
establish a connection with the RMU).
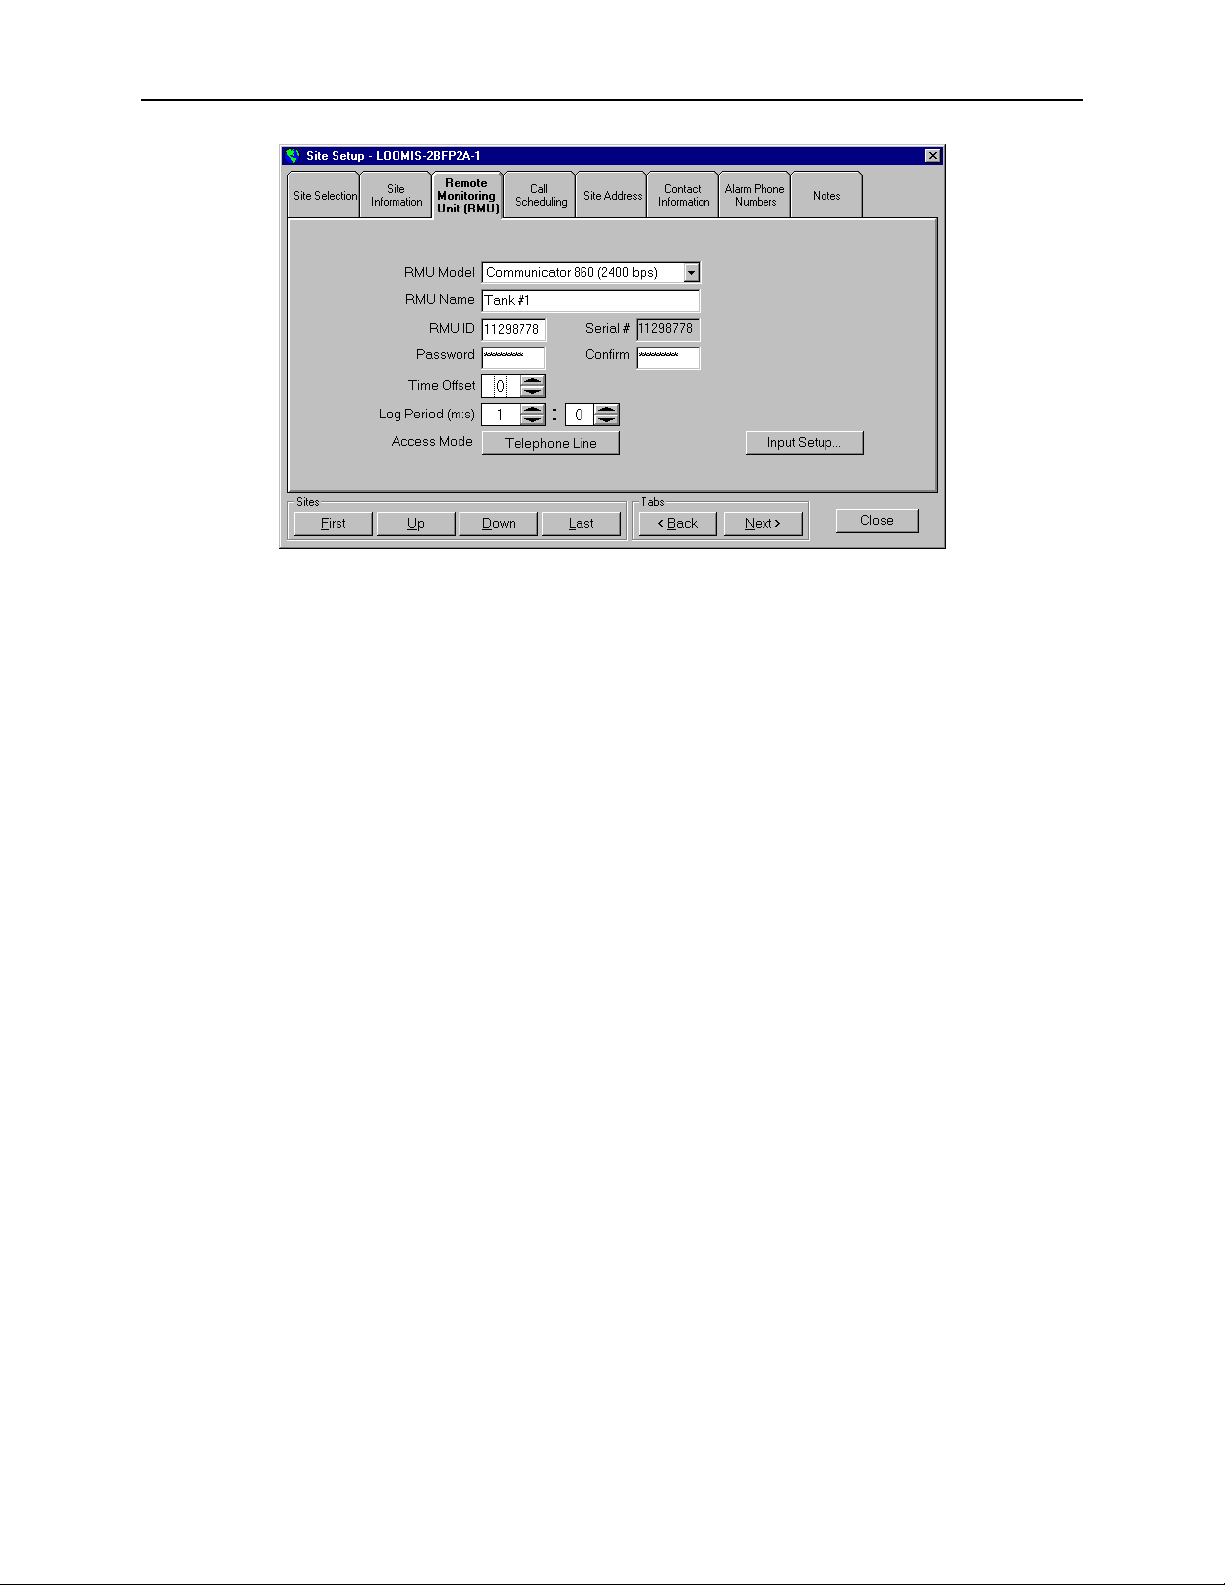
4) Choose the Remote Monitoring Unit (RMU) tab. Select the correct RMU Model from the
drop down list.
Page 22
POLL-EASE REMOTE MONITORING SOFTWARE USER’S GUIDE 23
5) Enter an RMU Name. Assign an RMU ID (usually the serial number of the RMU), a property
tag number or an account number. The RMU ID is used to identify the remote site during alarm
dial-in.
6) Enter the Password required to access the RMU. The factory default is eight ones
(“11111111”). You may change this if you wish. (Please refer to the Remote Monitor Users
Guide.)
7) Enter the Time Offset (in hours) to specify the time difference between the local time of the
RMU and your local time.
8) Specify the Log Period according to the nature of the input signal and/or the desired frequency
for logging the data.
9) Set the Access Mode to Telephone Line for a RMU connected directly to the telephone line
and Gateway for a RMU connected by RS-232 serial cable to another RMU connected to the
telephone line.
Gateway should be selected only if the remote site has two RMUs, where the second RMU is
connected by RS-232 cable to the master (primary) RMU, which is connected to the phone line.
When Gateway is selected, data will be collected from the slave (secondary) RMU. You must
create two separate sites to handle each.
10) At this point, you may wish to click Input Setup and configure each of the inputs attached to
the remote monitor.
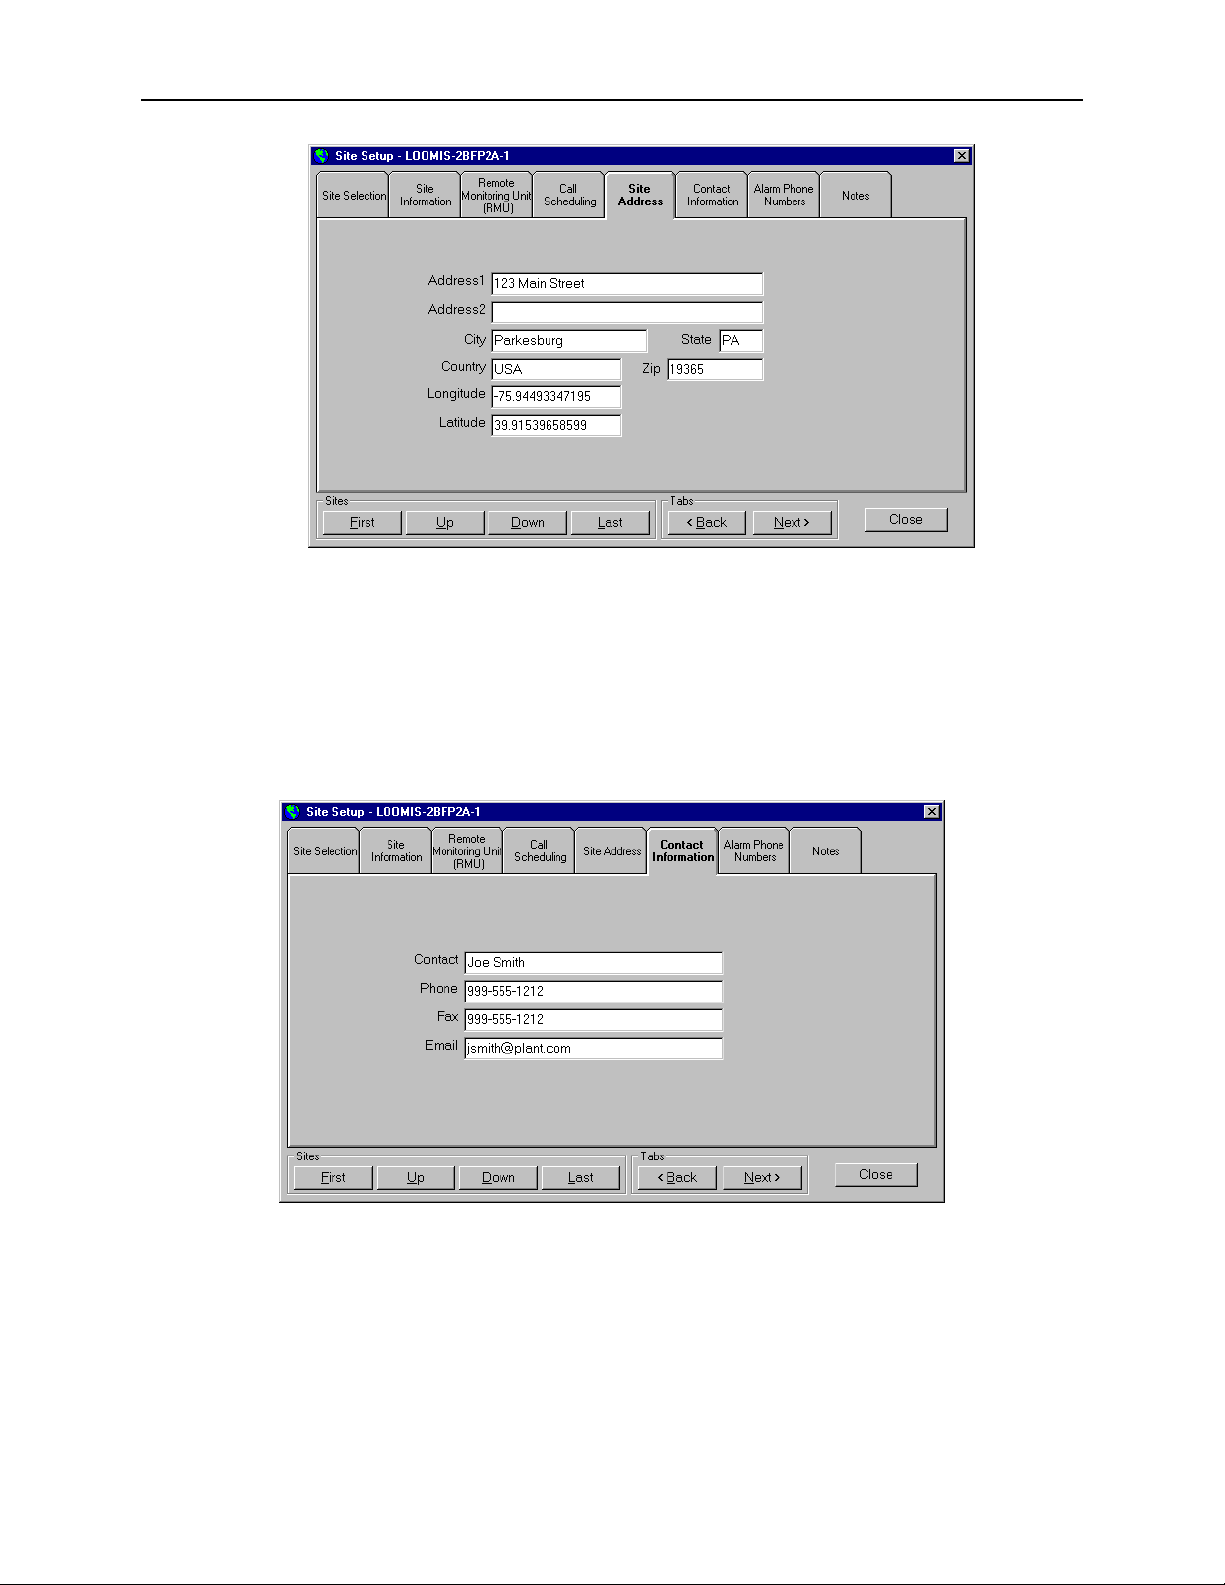
11) Click the Site Address tab and type the requested information. Site icon placement on the site
map will be “geo-coded” according to zip code if located in the United States and Longitude
and Latitude fields are blank.
Page 23
24 POLL-EASE REMOTE MONITORING SOFTWARE USER’S GUIDE
If a remote site is outside the USA or if zip code is unknown, enter an approximate Longitude and
Latitude (e.g. –90 and 25, respectively, for the Gulf of Mexico), then re-locate the icon on the site
map by holding the CTRL key while dragging the mouse pointer to the new location.
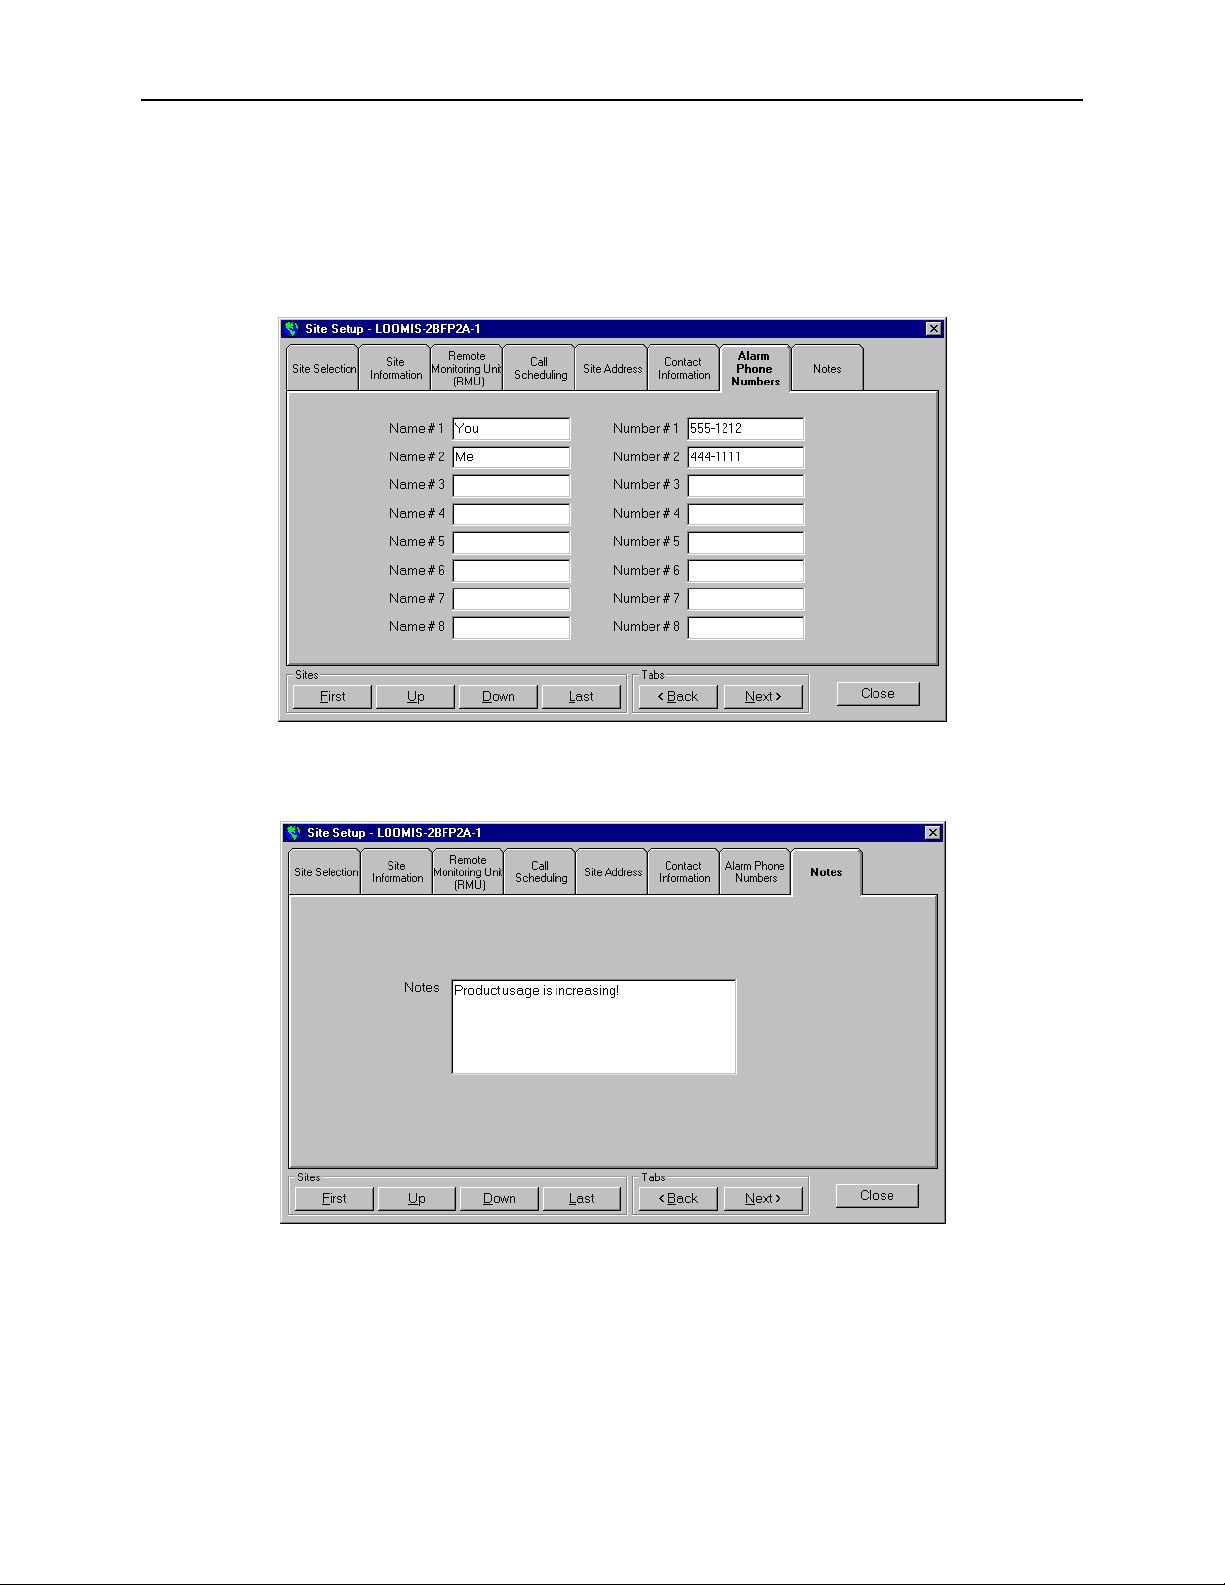
12) Click the Contact Information tab and type the name and other requested information about
the individual responsible for the monitoring equipment at the remote site.
Page 24
POLL-EASE REMOTE MONITORING SOFTWARE USER’S GUIDE 25
13) Click the Alarm Phone Numbers tab and type the name and phone number of those
individuals to be called – in the sequence they are to be called – when an alarm occurs.
14) Click the Notes tab and type requested site information.
Input Setup
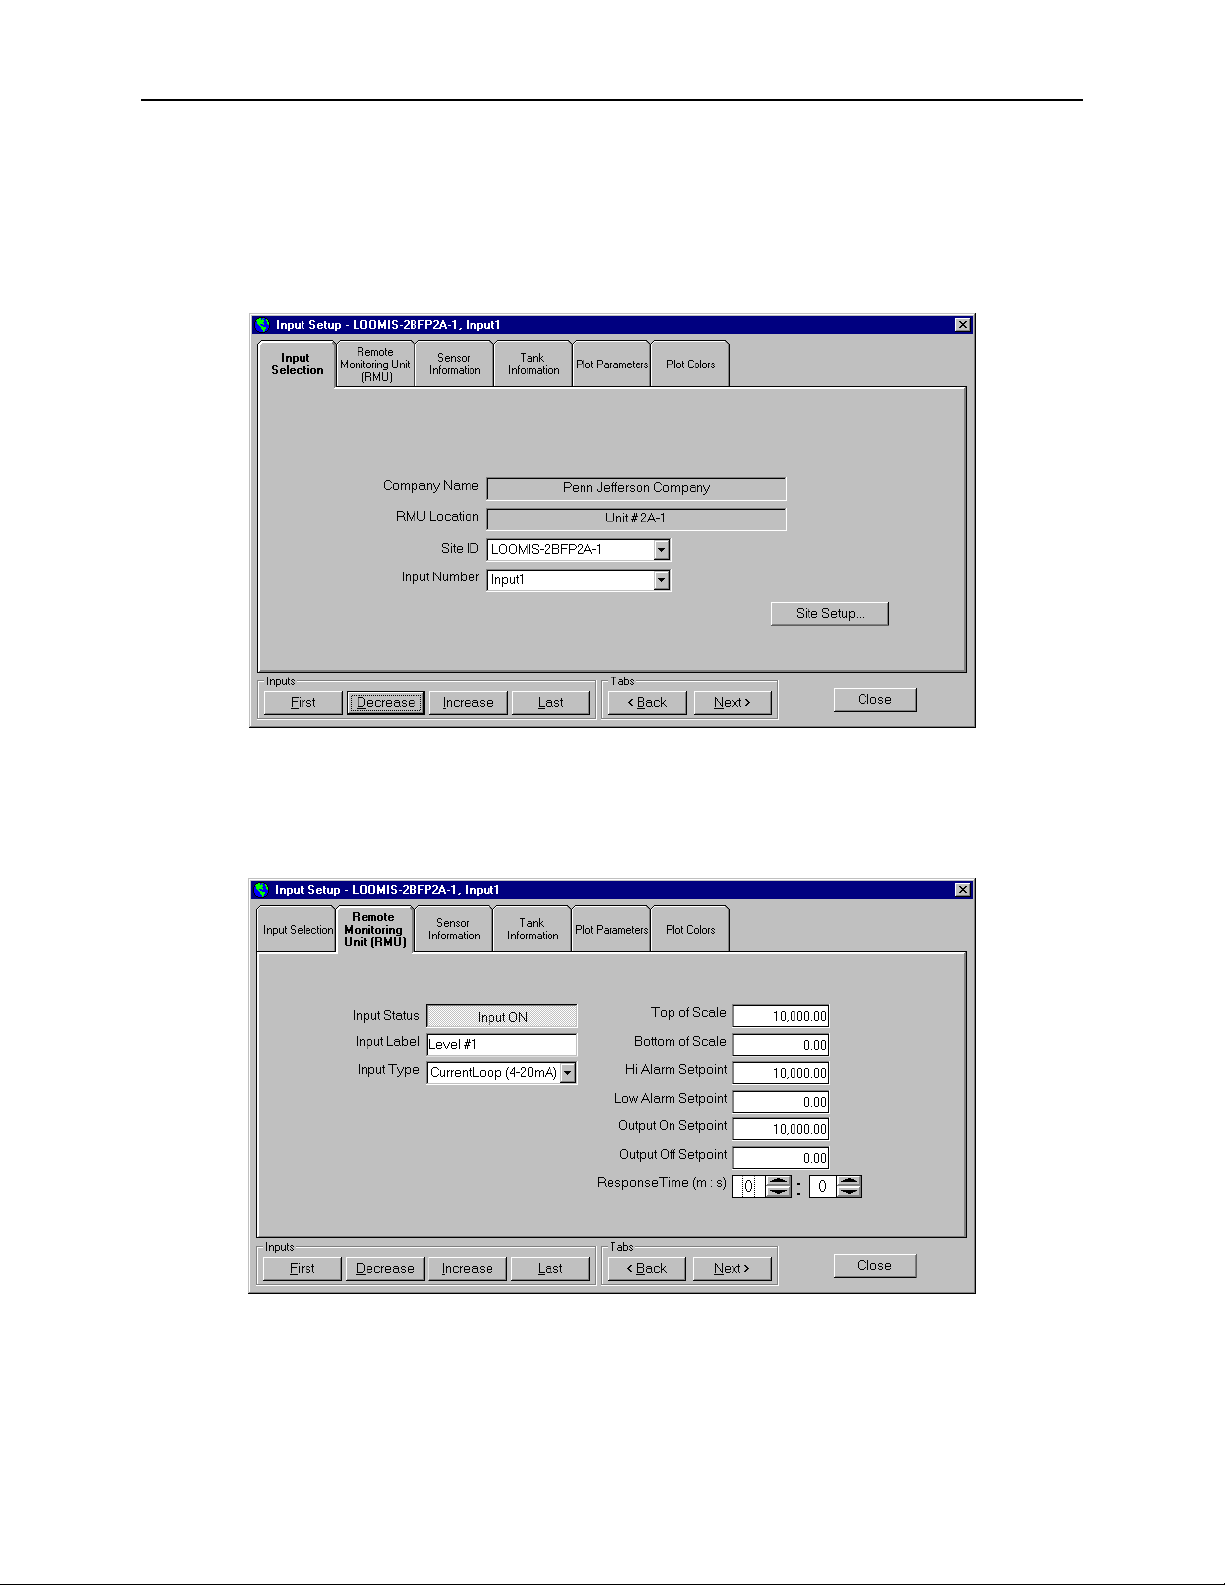
The information entered in this section is used to specify input configuration and provide
scale to engineering units for data plots and for use by the remote programming function.
Page 25
26 POLL-EASE REMOTE MONITORING SOFTWARE USER’S GUIDE
„ To set up an input
1) On the Sites menu, click Input Setup.
2) Choose the Input Selection tab. Select an input from the Input Number box.
3) Click the Remote Monitoring Unit (RMU) tab and type the scaling and set point information.
In the Input Label box, type the label name. This eight-character label is also used for Y-axis
labels of charts. In the Input Type box, enter information by typing or clicking the input type.
Page 26
POLL-EASE REMOTE MONITORING SOFTWARE USER’S GUIDE 27
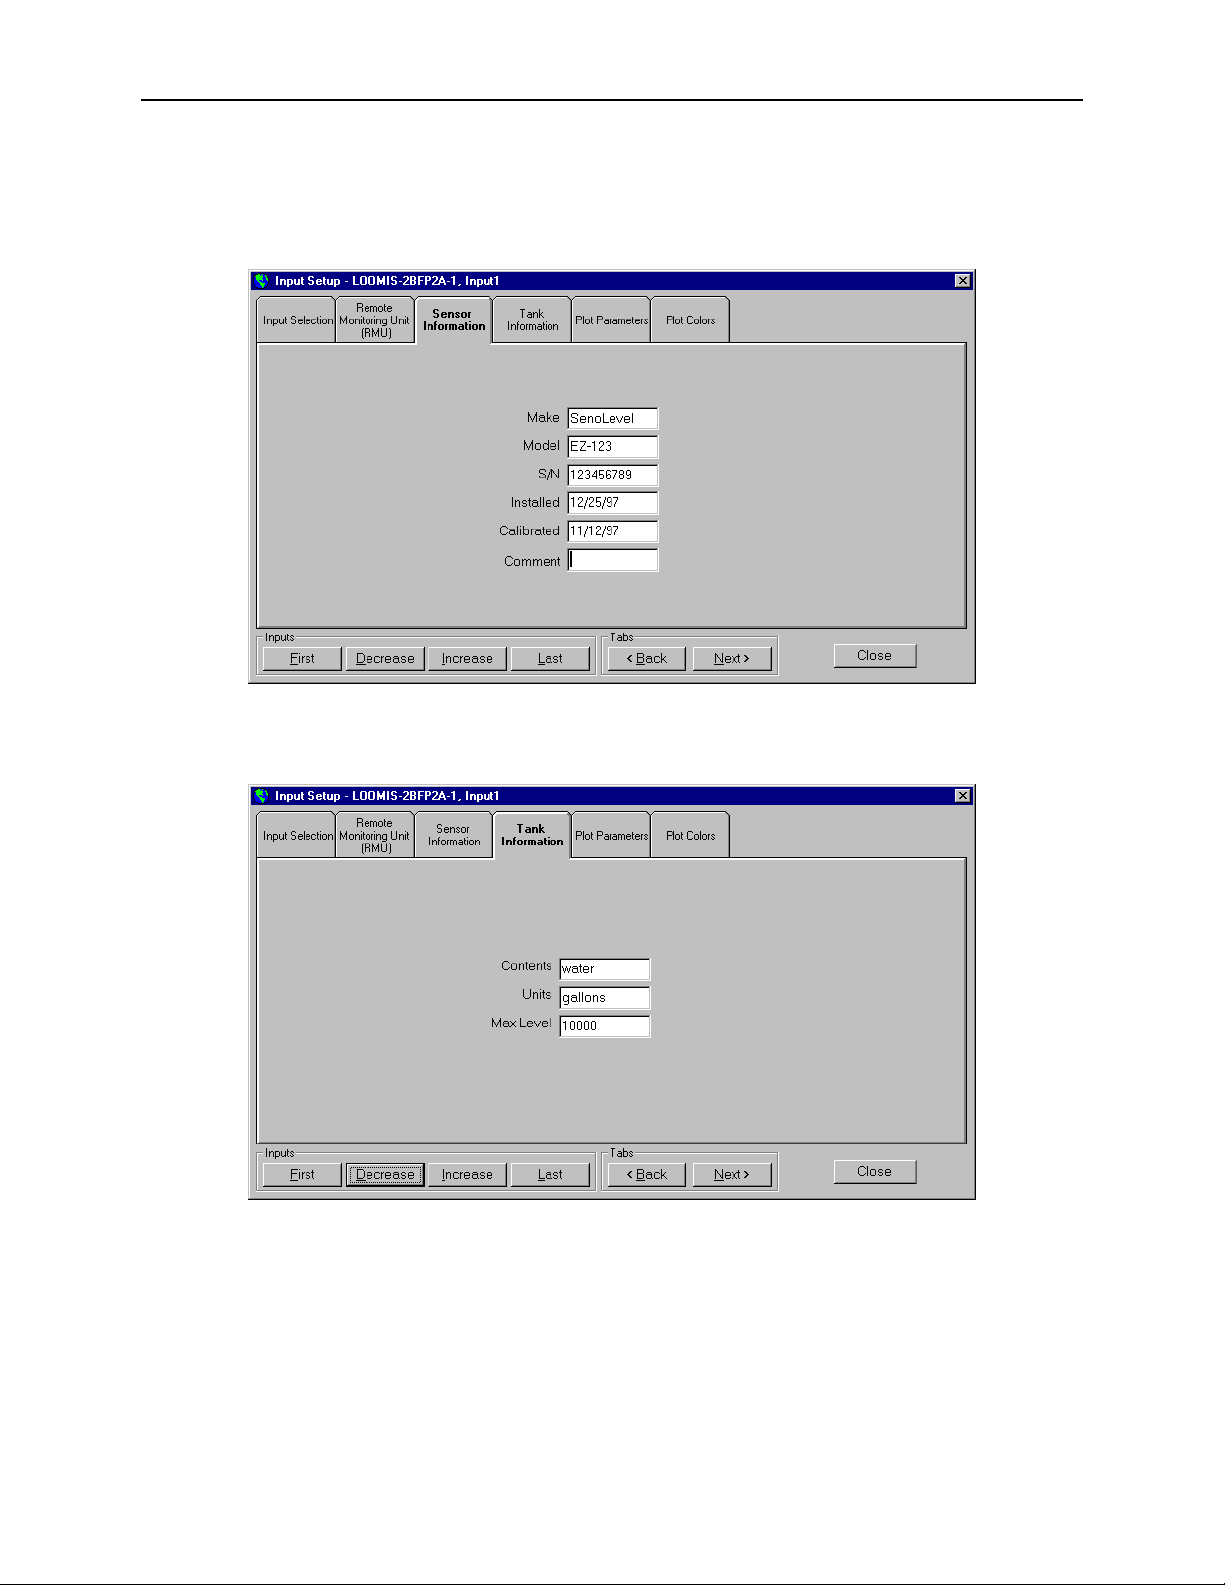
4) Click the Sensor Information tab and type information about the sensor attached to the input.
5) Click the Tank Information tab and type information about the Tank attached to the input.
Page 27
28 POLL-EASE REMOTE MONITORING SOFTWARE USER’S GUIDE
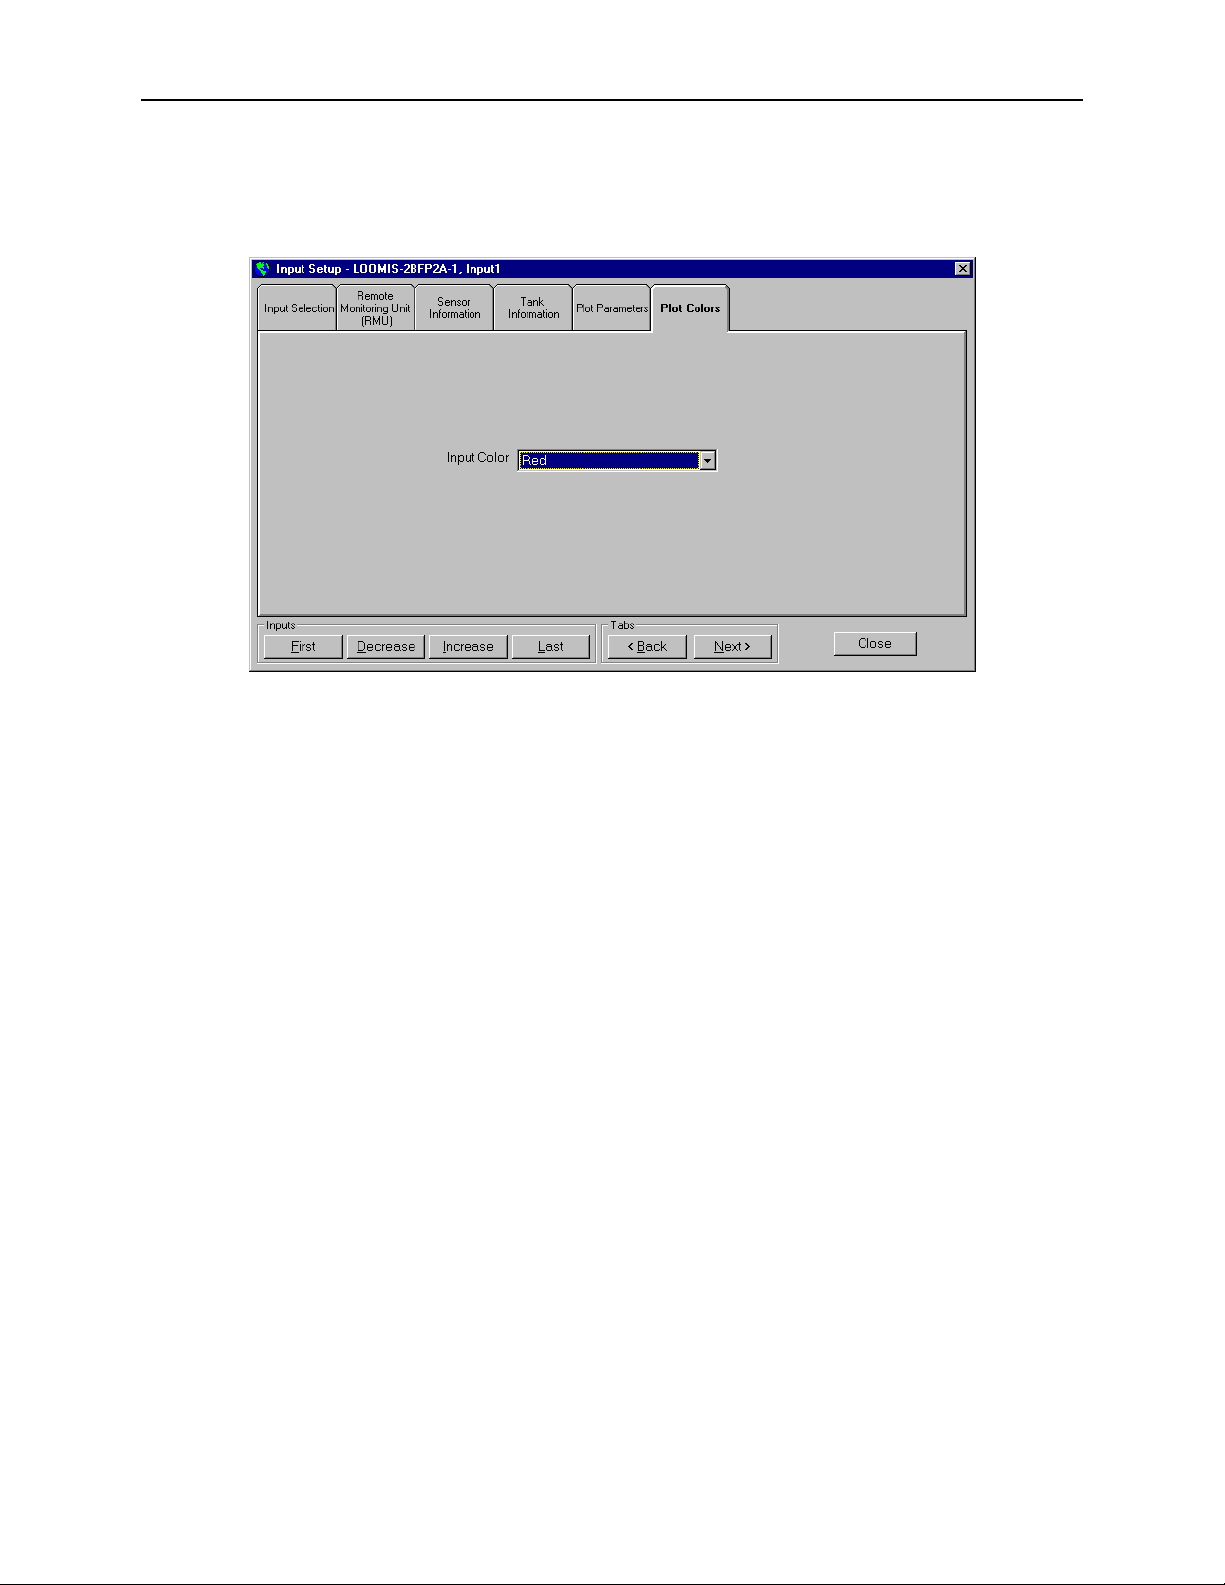
6) Choose the Plot Colors tab and specify the line color to be used on displayed screen plots for
Historical Trending and Real-Time Charting. Line colors are preset for Min/Max/Average
charts.
Automatic Remote Monitor Setup
The Auto Remote Monitor Setup command in the Sites menu is used to automatically remotely
program the remote monitor. The parameters that are programmed are: RMU Name, RMU ID,
Input Setup, Data Logging, Real-Time Clock, and Alarm Dial-Out Phone Numbers.
Once you have provided the required information – you may select this command to call the site
and automatically program the remote monitor.
Page 28
POLL-EASE REMOTE MONITORING SOFTWARE USER’S GUIDE 29
Chapter 4 | On-Demand Real-Time Monitoring and Data Collection
On-demand tasks are initiated by you. You can perform real-time monitoring of a remote site, data log
transfer for historical trend analysis, and manual-mode communications with the remote monitor when
necessary.
On-Demand Real-Time Monitoring
Monitoring conditions at a remote location in real-time is one of the most often-used features of Poll-Ease
Remote Monitoring Software. Whether using a personal computer in your office or a laptop computer
while on site, you can monitor multiple channels of data in a scrolling strip chart or tabular format.
„ To call a site and view the current data:
1) On the Analysis menu, click Real-Time or on the tool bar, click Real-
Time.
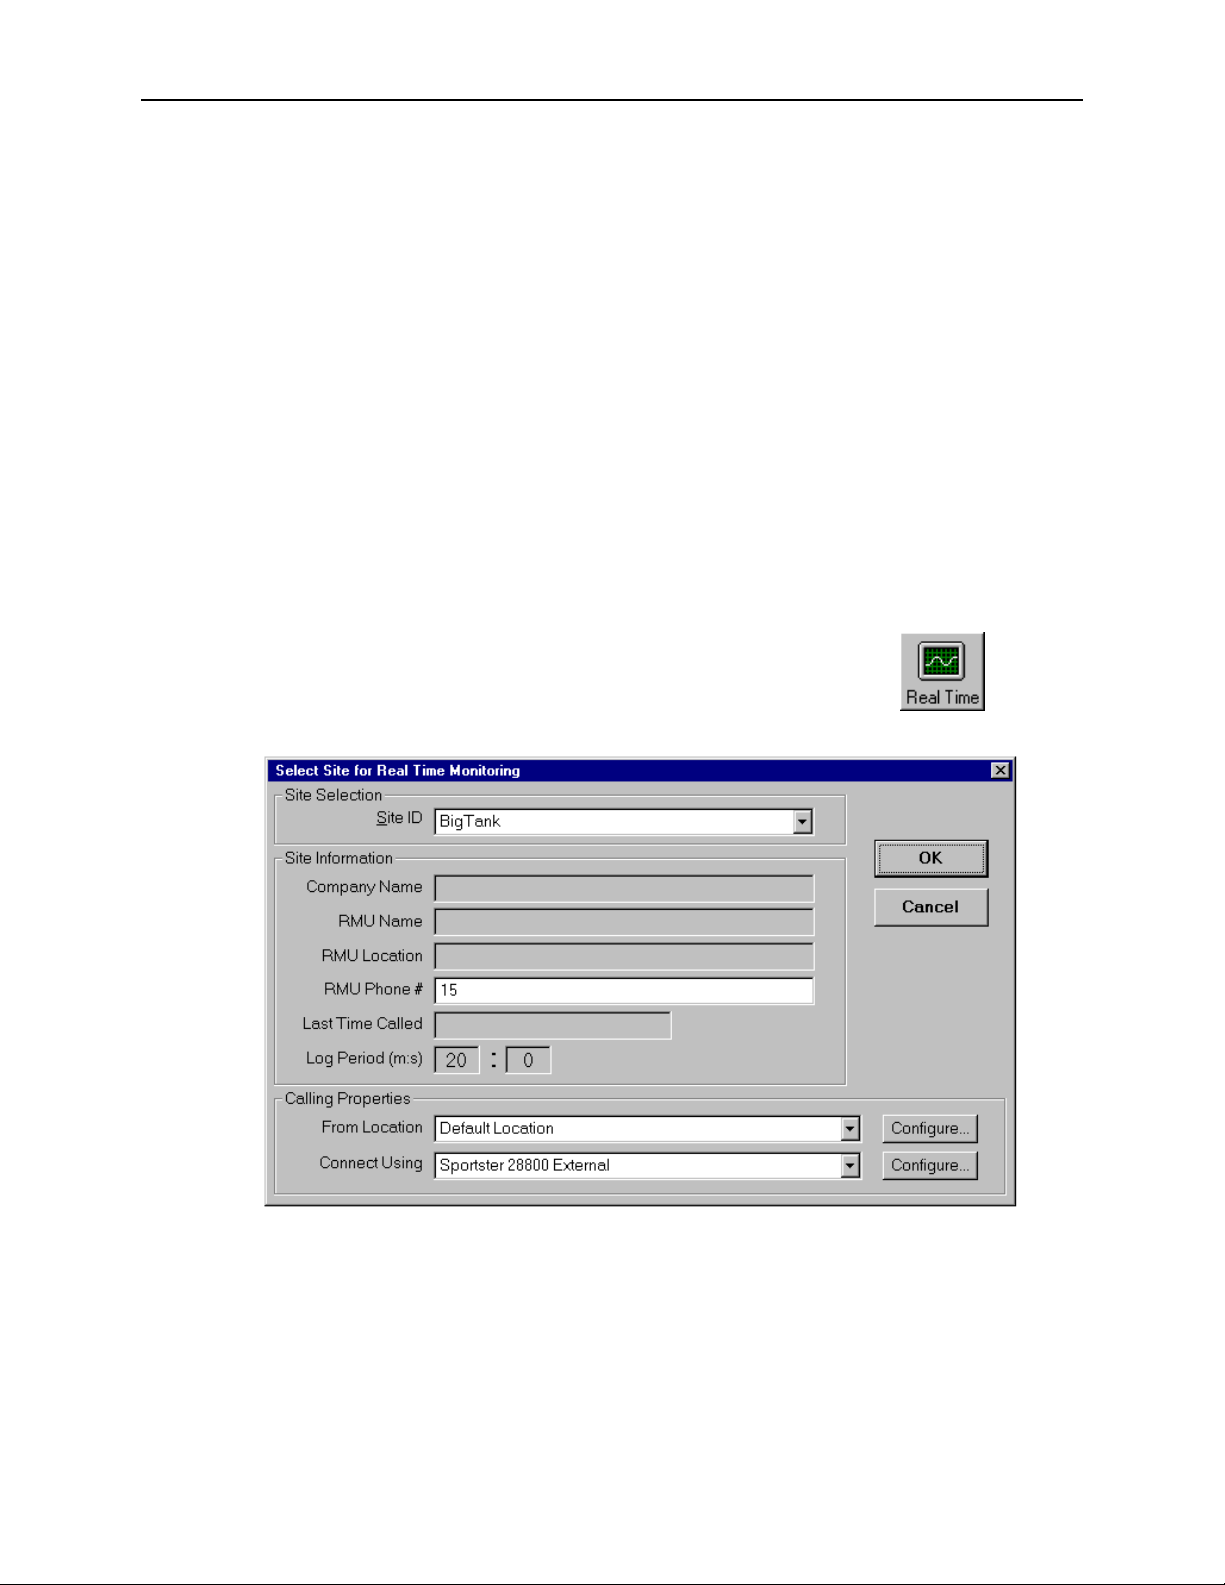
2) In the Site Selection group, click the Site ID box to select a site for Real-Time Analysis.
3) In the Site Information group, edit or add the RMU Phone # (if necessary).
4) In the Calling Properties group, select your calling location in the From Location box.
5) In the Connect Using box, select the appropriate modem or communications port.
Page 29
30 POLL-EASE REMOTE MONITORING SOFTWARE USER’S GUIDE
6) Click OK to have the Poll-Ease Remote Monitoring Software automatically call the site and
establish a connection.
This process may take up to a minute.
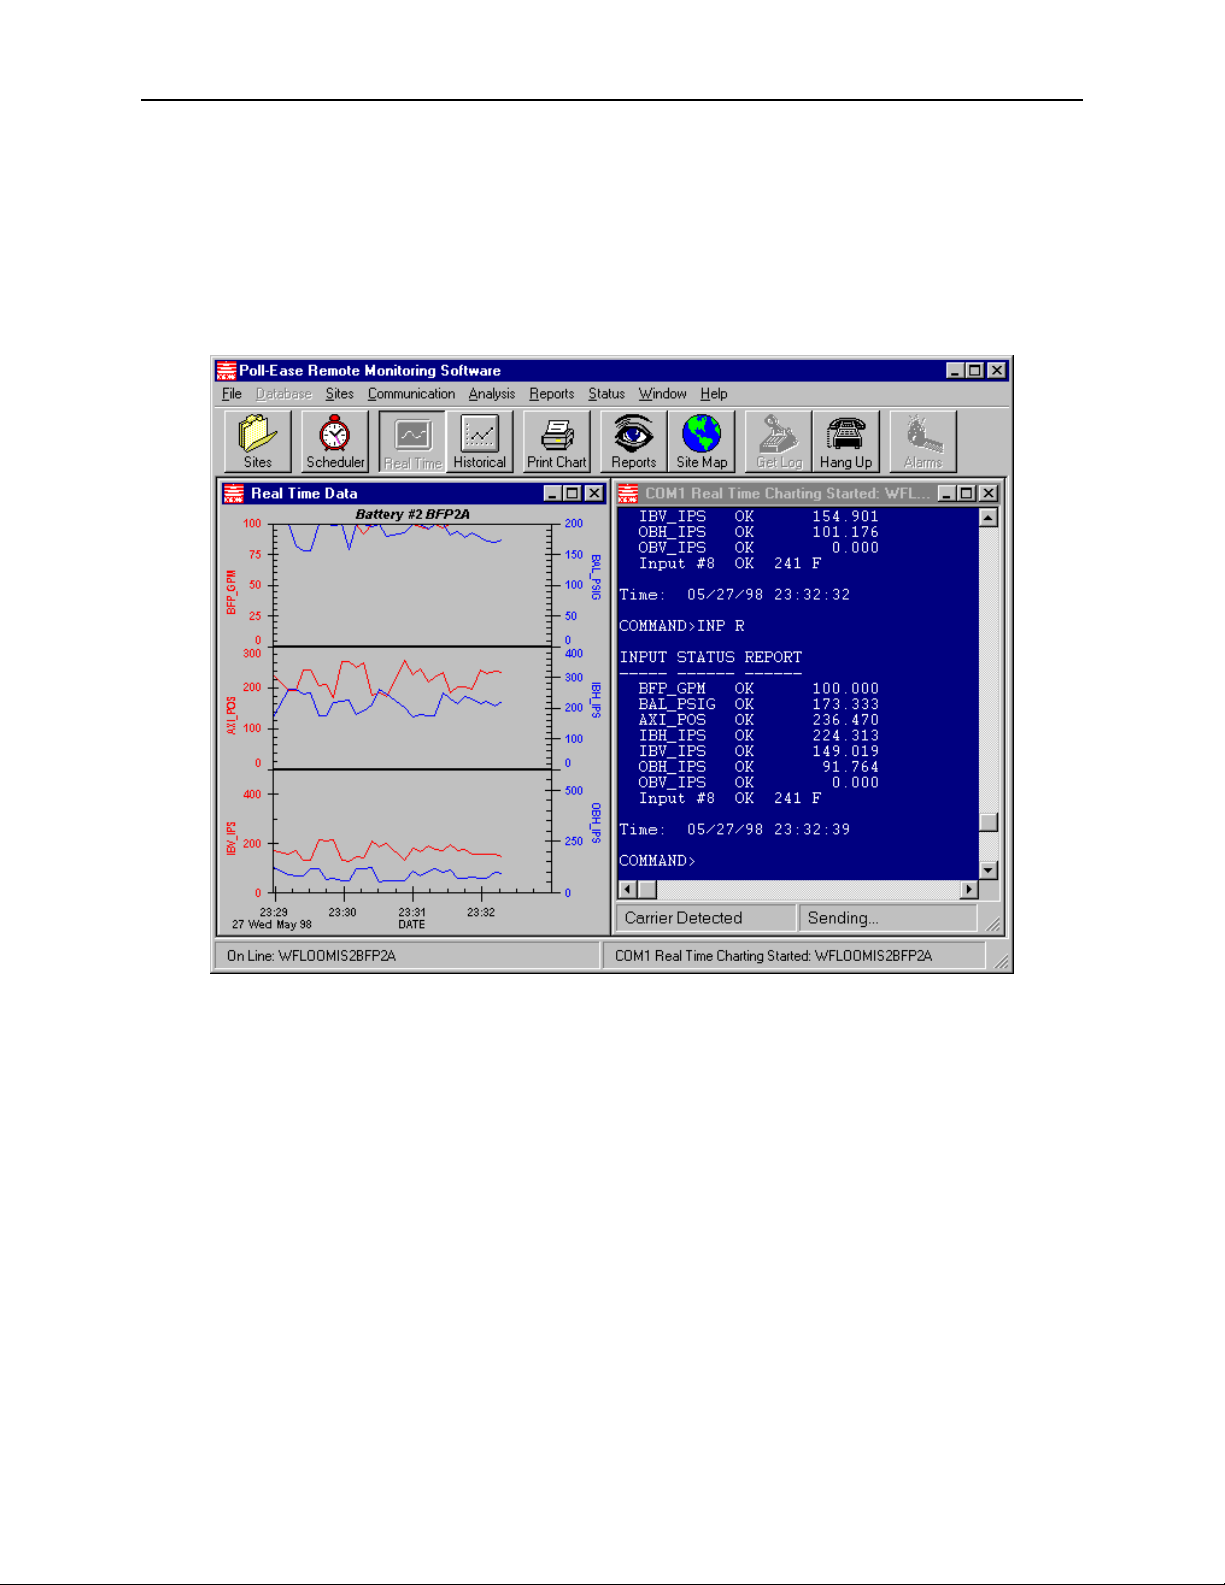
7) When that connection is established, two windows appear– a Real-Time Chart and the Real-
Time Communications window.
Real-Time Chart
On the Real-Time Chart, the data will scroll from left to right.
„ To zoom in on any area of the Real-Time Chart
1) Drag the mouse (left click and hold) diagonally over the real-time chart to form a
rectangle over the area to be zoomed.
2) When the mouse button is released, the selected area will be magnified:
3) To zoom out, click the right mouse button.
Although real-time charting is designed to chart fewer than eight active inputs from an Input
Status Report, it assumes that active inputs will start with Input #1 and will not skip inputs.
The Real-Time Chart does not plot discrete input types or output states.
Page 30
POLL-EASE REMOTE MONITORING SOFTWARE USER’S GUIDE 31
Real-Time Data
The Real-Time Communications window displays the actual data as it is being received
from the remote monitor. Note that the reports, labels information, and time stamps in the
box are generated by the remote monitor, not by Poll-Ease Remote Monitoring Software.
On-Demand Data Log Download
„ To call a site and download the data log
1) On the Communication menu, click the Get Remote Data Log
command. or on the tool bar, click Get Log
2) In the Site Selection group, click the Site ID box to select a site for Data Log Download.
3) In the Site Information group, edit or add the RMU Phone # (if necessary).
4) In the Calling Properties group, select your calling location in the From Location box.
5) In the Connect Using box, select the appropriate modem or communications port.
6) Click OK to have the Poll-Ease Remote Monitoring Software call the site and establish a
connection.
This function will download the data log from the RMU and store it in the site database. This task
generally takes several minutes. The log data was acquired automatically at specific intervals by the
RMU.
On-Demand Manual Mode Calling (User Interactive Session)
It is sometimes necessary to bypass the automatic data collection features of the Poll-Ease Remote
Monitoring Software and communicate directly with your remote monitor in manual mode.
Refer to the Remote Monitor User’s Guide for further information on this mode of operation.
„ To call a site in manual mode
1) On the Communication menu, click the Call Remote Site command.
2) In the Site Selection group, click the Site ID box to select a site for Data Log Download.
3) In the Site Information group, edit or add the RMU Phone # (if necessary).
4) In the Calling Properties group, select your calling location in the From Location box.
5) In the Connect Using box, select the appropriate modem or communications port.
Page 31

32 POLL-EASE REMOTE MONITORING SOFTWARE USER’S GUIDE
6) Click OK to have the Poll-Ease Remote Monitoring Software automatically call the site and
establish a connection.
Manual mode (User Interactive) calls allow you to type commands directly to the remote monitor.
This type of call is useful for setting up the remote monitor for your application, acknowledging
alarms, etc.
Ending an On-Demand Call
A data log download will complete and end the call after the entire log is transferred. If you need to
abort the call prior to completion or would like to end Real-Time Charting or a Manual-Mode call,
perform one of the following:
„ To end an On-Demand Call
1) On the Communication menu, click Hang Up/On-Demand Call
Port or on tool bar, click Hang Up.
2) For Real-Time Charting, on the Analysis menu, click End Real-Time or on the tool bar,
click Real-Time
Note: Any communications windows that were open prior to this step will remain visible until
manually closed.
Page 32
POLL-EASE REMOTE MONITORING SOFTWARE USER’S GUIDE 33
Chapter 5 | Automatic Data Collection
Poll-Ease Remote Monitoring Software can automatically call remote monitors at specified times and
frequencies. Each site has its own call schedule. When a site is called, its data log is automatically
downloaded and appended to the Poll-Ease Remote Monitoring Software database.
Scheduling Calls and Collecting Data
„ To specify the calling schedule for each site
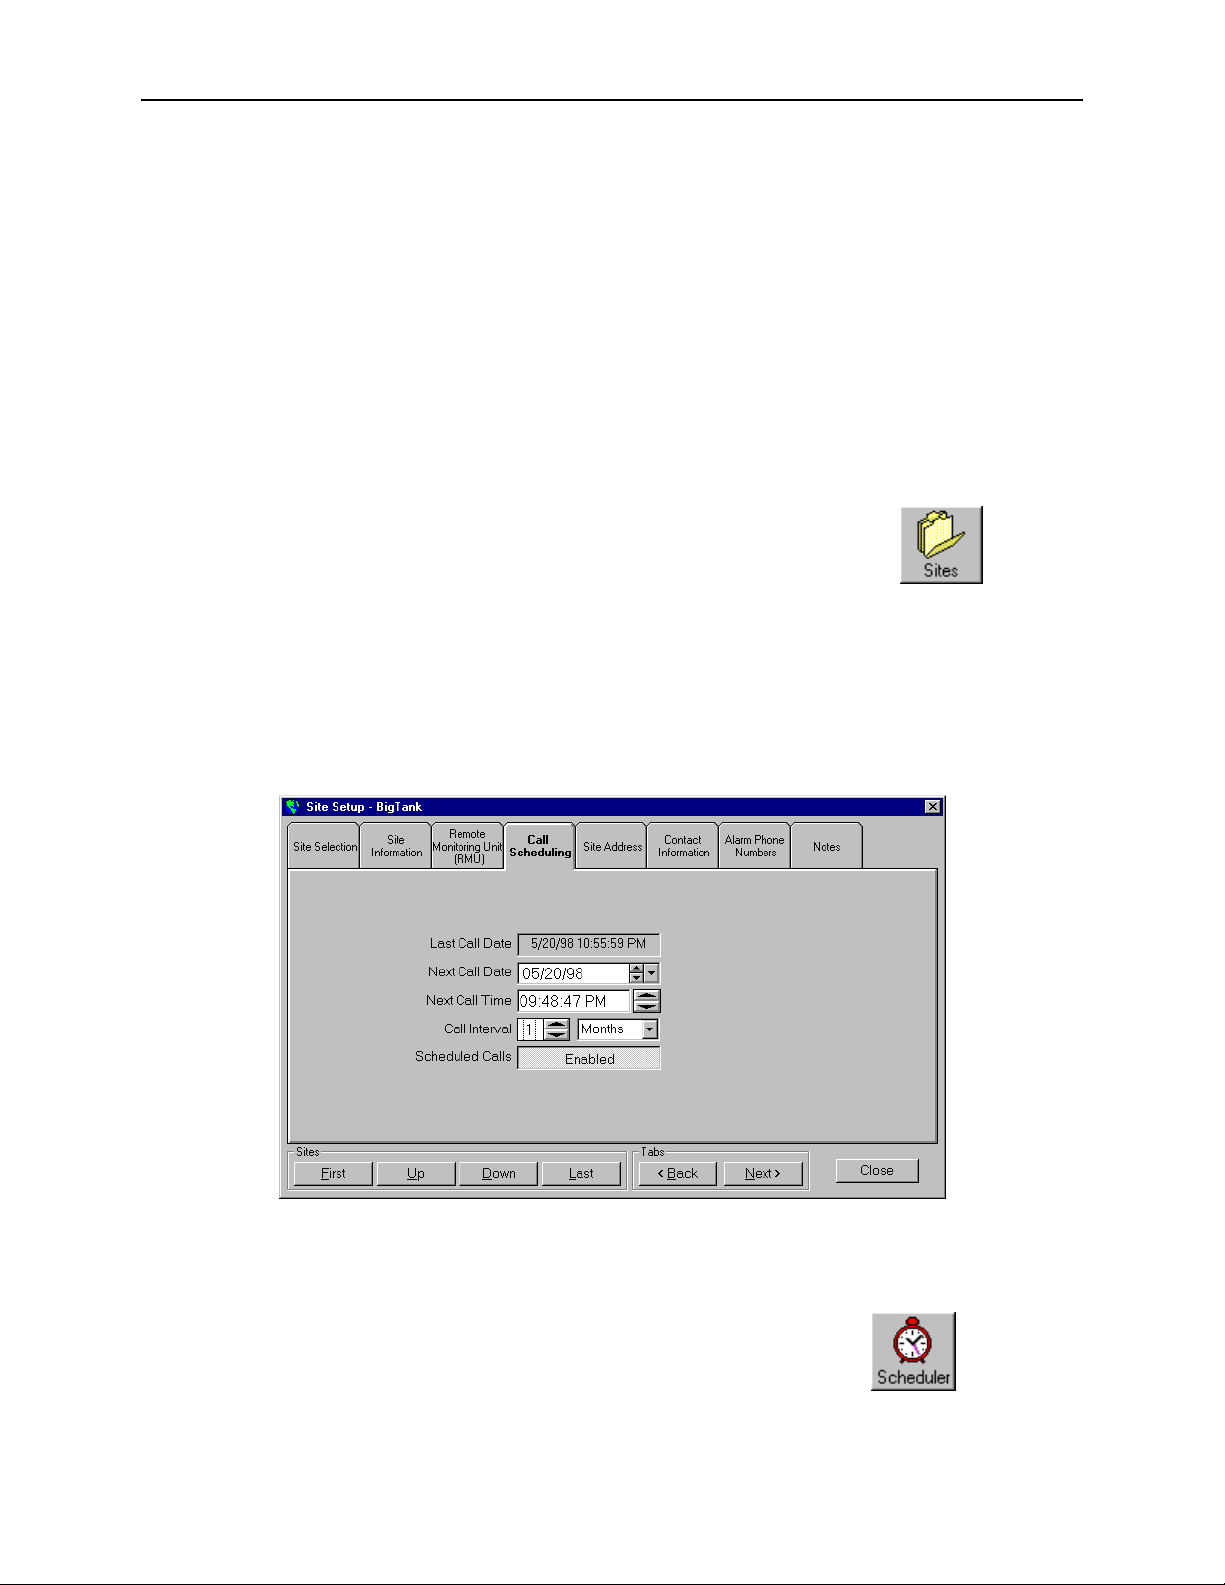
1) On the Sites menu, click Site Setup or on the tool bar, click Sites.
2) In the Site Setup dialog box, click the Call Scheduling tab and enter Next Call Date, Next
Call Time and Call Interval information to set a call schedule for the identified site.
3) The Scheduled Calls button must read Enabled for this site to be called automatically. When
the Scheduled Calls reads Disabled, click it to change its state. If you wish to exclude a site
from being called, click Scheduled Calls to read Disabled.
Automatic Unattended Calling
„ To start the automatic call feature
§ On the Communication menu, make sure the Call Scheduler
Enabled command is checked (“ü”) or the Scheduler toolbar button
is depressed.
Page 33

34 POLL-EASE REMOTE MONITORING SOFTWARE USER’S GUIDE
⇒ Automatic remote data collection from each site will only occur when the
Scheduler toolbar button is depressed AND the Schedule Calls button in
the Call Scheduling tab reads Enabled for each site.
The call interval is based on logging rate and size of data logger. The data logger uses a cyclical buffer,
which will overwrite itself without warning. Remote monitors can log about 2000 records before
overwrite occurs. You must determine the call interval so that data logs are collected before log records
are overwritten. Redundant log records are ignored upon storage into the local database. At a 20-minute
logging period (three per hour), remote monitors can log data for about one month before overwrite
occurs.
Also see Chapter 4 | On-Demand Real-Time Monitoring and Data Collection
Page 34

POLL-EASE REMOTE MONITORING SOFTWARE USER’S GUIDE 35
Chapter 6 | Alarm Handling
An alarm is generated when a monitored condition at a remote location falls outside its preset operating
limits, such as when a product inventory level is below its re-order point.
The occurrence of an alarm causes the remote monitor to trigger an alarm mechanism, the nature of which
depends on the RMU in use and the way it is configured.
The actions generally start with a pre-alarm, followed by a remote notification sequence. The remote
notification process initiates the remote monitor auto-dialer.
If on-site personnel fail to acknowledge an alarm within a predetermined time, a “round-robin” dialing
sequence commences. The auto-dialer repeatedly calls numbers on its telephone list – up to eight
telephone numbers may be contained on the dial-out list – until someone answers and provides a correct
password.
The auto-dialer then reports the alarm and allows the called party an opportunity to acknowledge it. When
someone on the call list acknowledges the alarm, dialing will cease. At that point, the responsibility to act
is on the called party.
Typically, the remote monitor will be configured to first dial a computer running Poll-Ease Remote
Monitoring Software and deliver an alarm message, which is stored and presented to the operator.
The remote monitor will then dial the list of responsible personnel. Poll-Ease Remote Monitoring
Software will receive and process incoming alarms but does not automatically acknowledge the alarms.
Poll-Ease Remote Monitoring Software does, however, permit manual intervention for purposes of alarm
acknowledgement.
Upon completion of an incoming alarm report, the “Code” from the calling remote monitor is matched
with an RMU ID in the Poll-Ease Remote Monitoring Software database. If no match is found, the Alarm
List entry will contain the Site Name (if any), input(s) in alarm, input level, and alarm status. Otherwise,
if a match is found, the Site ID and alarm set points will be included as well.
Poll-Ease Remote Monitoring Software maintains detailed information concerning the
alarms it has processed. This information is contained in the Alarm List and Alarm Log.
Open the Status menu and choose the desired command.
Page 35
36 POLL-EASE REMOTE MONITORING SOFTWARE USER’S GUIDE
Alarm Detection
Alarm detection is performed at every logon and logoff, using alarm status information from the remote
monitor.
If a new or unacknowledged alarm is detected:
§ An Input Status report will be requested. This report will be stored in the Poll-Ease
Remote Monitoring Software database.
§ You will be alerted by a beep.
§ An updated Alarm List will be displayed.
§ An ASCII text Alarm Log will also be created.
Automatic Answer Alarm Dial in
„ To automatically answer alarm dial-in calls
1) On the Communications menu, when Auto Answer Alarms is
checked, or when the tool bar Alarms button is depressed, it is
enabled. Click either to change state.
2) The Auto Answer Communications window indicates Alarm Auto Answer Enabled. If not,
be sure the modem is operating and available.
3) Set up a test to cause the remote monitor to dial your modem’s phone number when an alarm
exists.
⇒ See Chapter 3 | Accessing the Site Database for information on Alarm Phone Numbers,
Alarm Set Points, and Automatic Remote Programming.
If an alarm dial-in call is detected:
§ An Input Status Report will be provided by the remote monitor. This report will be
stored in the Poll-Ease Remote Monitoring Software database.
§ You will be alerted by a beep.
§ An updated Alarm List will be displayed.
§ An ASCII text Alarm Log will also be created.
Acknowledging Alarms
Poll-Ease Remote Monitoring Software will not automatically acknowledge an alarm.
Page 36
POLL-EASE REMOTE MONITORING SOFTWARE USER’S GUIDE 37
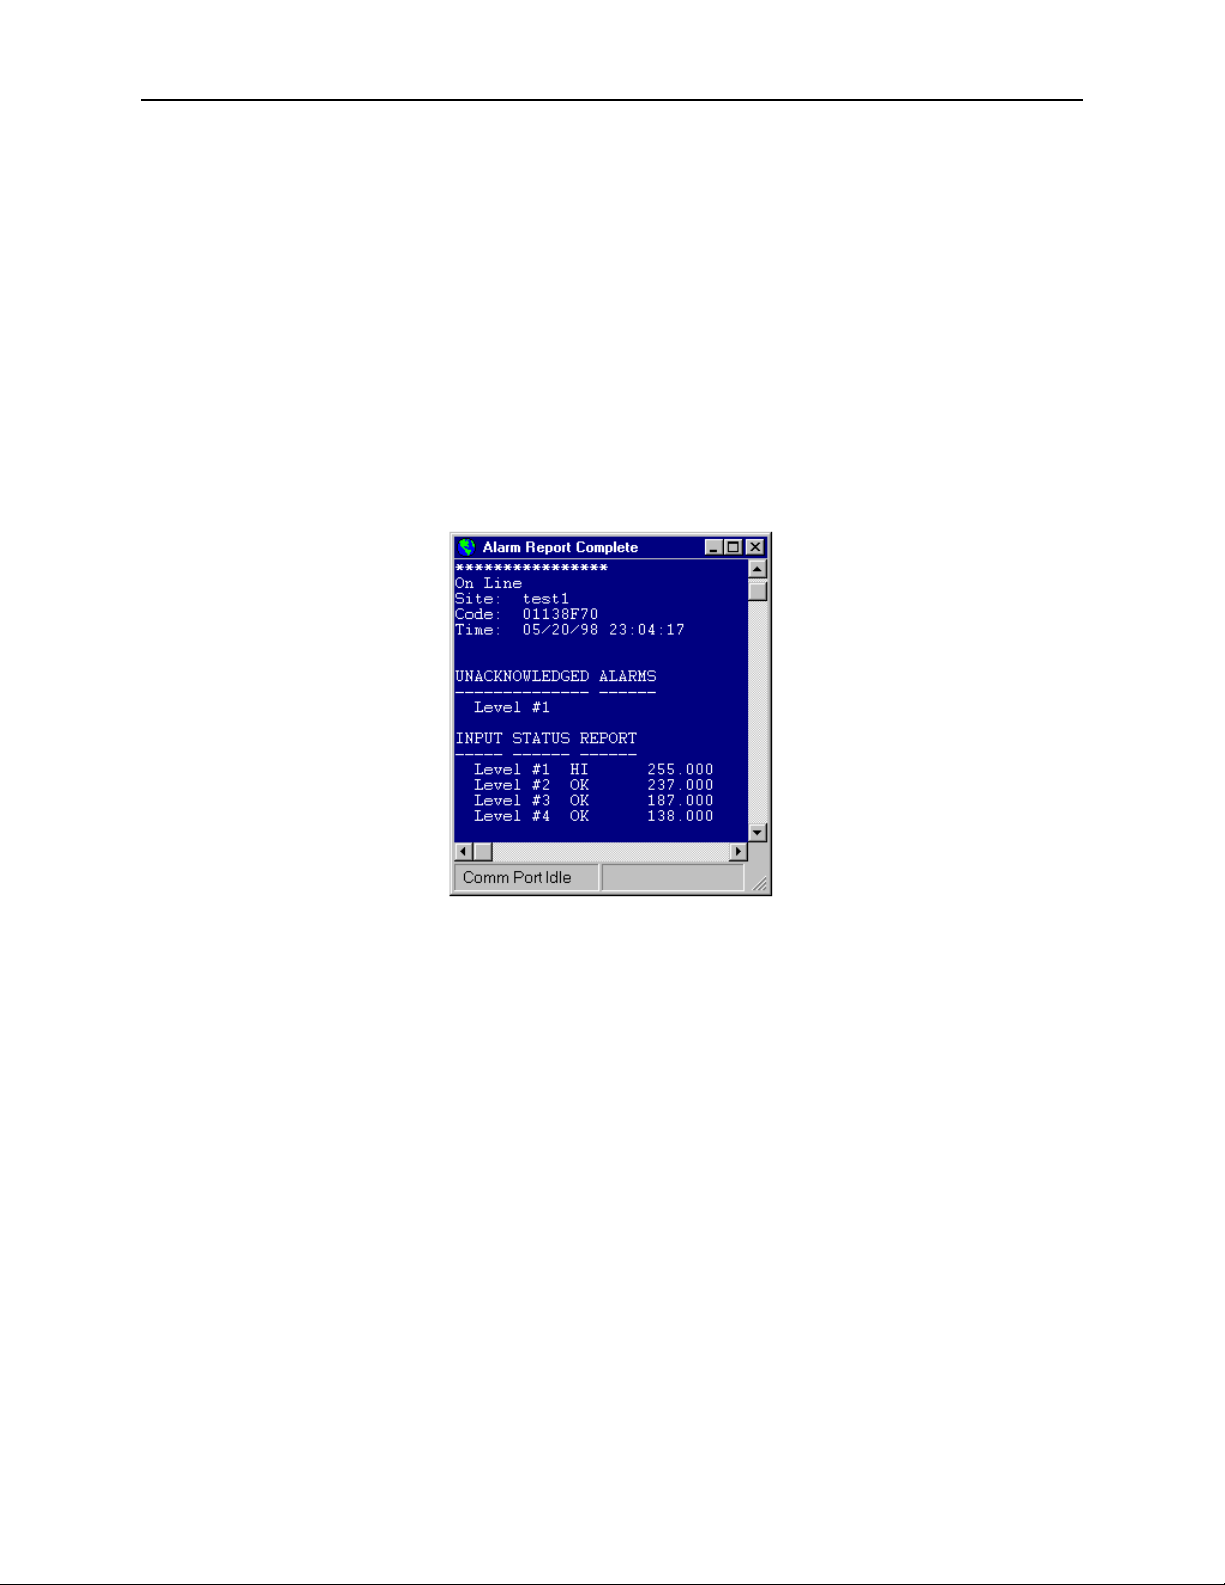
„ To manually acknowledge an alarm after an Auto-Answer Alarm Report:
1) From within the Auto-Answer Alarm Communications window, press any key within 10
seconds after the alarm report has been displayed in the window.
2) Type your eight-digit security code upon request by the remote monitor.
3) After the security code has been acknowledged, type “ALM R” and press ENTER to learn the
cause of the alarm report. Press “Y” or “N” to acknowledge the alarm.
4) You may investigate further by issuing other commands. Conclude the session by typing
“BYE” and press ENTER.
5) Minimize or close the Alarm Communications window if you wish.
Alarm List
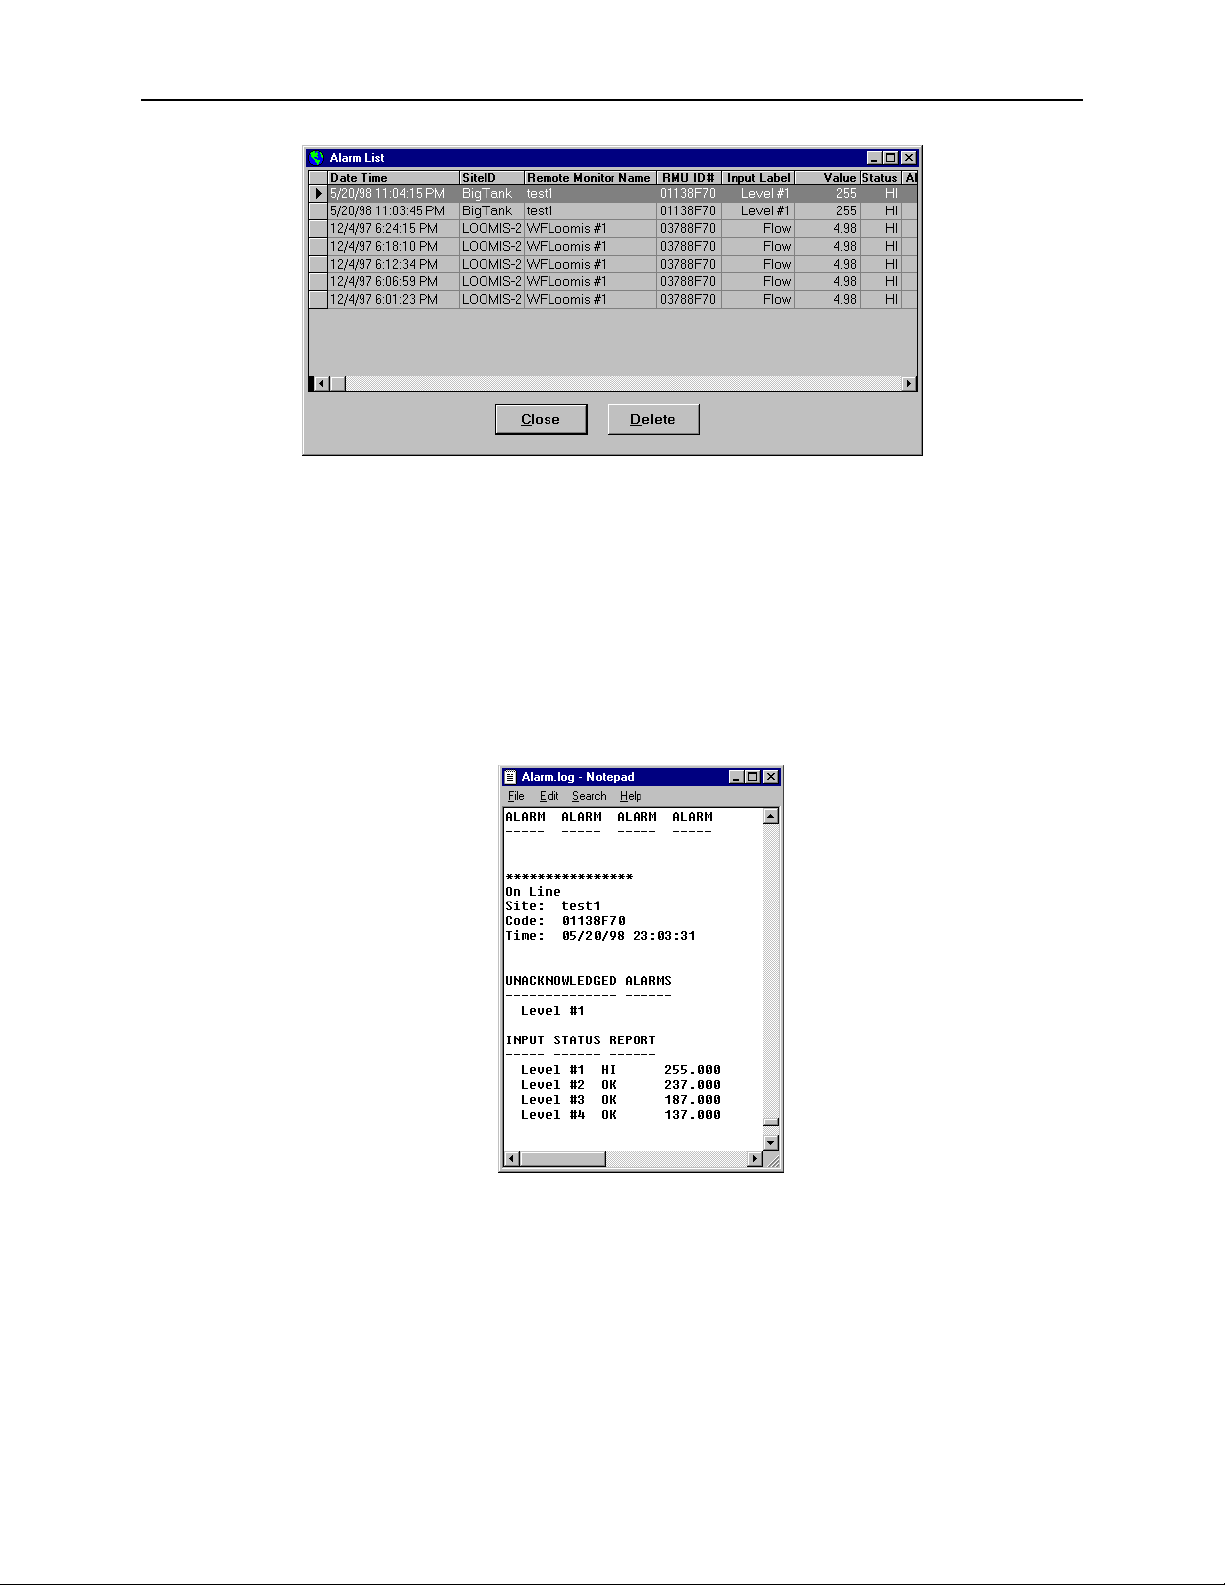
The Alarm List dialog box is a recap of all detected alarms. You can manually delete entries from the
Alarm list at any time.
Accessing the Alarm List
„ To review the list of detected alarms
1) On the Status menu, click Alarm List.
2) Highlight an alarm record and click Delete to permanently remove the alarm record.
Page 37
38 POLL-EASE REMOTE MONITORING SOFTWARE USER’S GUIDE
Alarm Log
The Alarm Log is an ASCII text record of all alarms, maintaining extensive information of the
conditions and alarm status at the remote site.
„ To review alarm activity at your remote site
§ On the Status menu, click Alarm Log.
Alarm Dial-In Modem Considerations
Poll-Ease Remote Monitoring Software supports modem sharing between it and another
communications application when Auto Answer is disabled by “releasing” the communications
port when not in use. However, if Auto Answer is enabled, the communications port will remain
open (unavailable to other applications) and the modem will respond to an alarm dial-in call from
the remote monitor. The default dial-in transfer data rate is 2400 bps.
Page 38
POLL-EASE REMOTE MONITORING SOFTWARE USER’S GUIDE 39
Chapter 7 | Using the Site Map
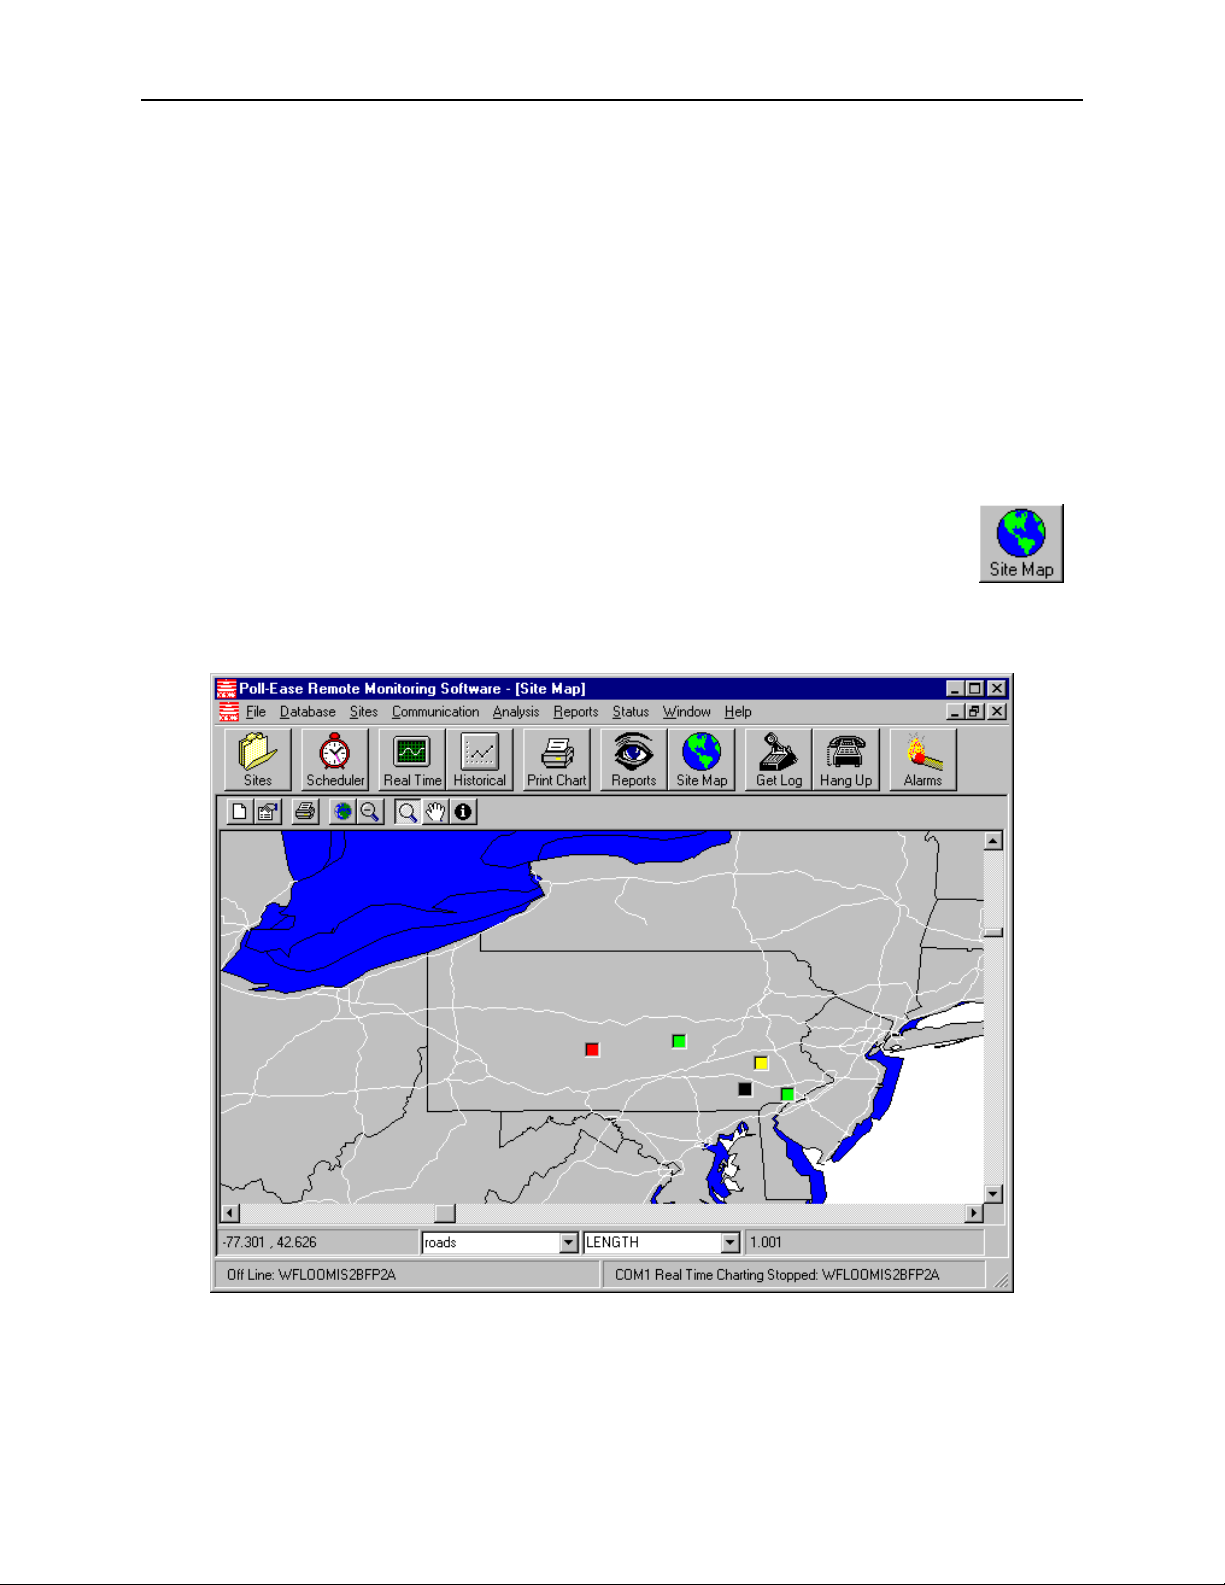
Poll-Ease Remote Monitoring Software provides a very powerful way to view remote conditions at a
glance. The Site Map is a world map that allows you to zoom or pan to an area of interest. Any location
monitored by an RMU is considered a site. Sites are represented by small, square icons on the Site Map.
Color-coded icons are automatically placed according to zip code or longitude and latitude.
„ To show the Site Map
• On the Reports menu, click Show Site Map or on the toolbar, click Site Map button.
Positioning the mouse cursor over a site will identify it in the status bar of the Site Map.
Double-click a site icon to initiate a call to the site.
Page 39
40 POLL-EASE REMOTE MONITORING SOFTWARE USER’S GUIDE
Site Map Icons
Each site is represented by an icon on the map. The color of the icon indicates the last known alarm
status.
§ Green is normal, no alarms exist.
§ Red is new alarm, this site requires attention.
§ Yellow is acknowledged alarm. This indicates that an alarm currently exists, but has been
acknowledged.
§ Black is unknown alarm status. This is the state of a new site before it has been called.
Site Icon Placement
All sites located in the United States are placed on the map automatically using site
zip code and the geo-coding feature of the software.
„ To change site location information
1) On the Sites menu, click Site Setup or, on the tool bar, click Sites.
2) Click the Site Address tab and type the zip code or longitude and latitude of the
site. Site icon placement on the map will be automatically “geo-coded” according to zip code if
located in the United States and Longitude and Latitude fields are blank.
„ To move a site icon location manually
• With the mouse pointer over the site icon, press the CTRL key while dragging the mouse
pointer to the new location. To drag, hold left mouse button down while moving mouse. The
mouse must be moved at least outside the icon to re-locate the icon’s position. Zoom in on the
map to locate icon more precisely.
• If a remote site is outside the USA, enter an approximate Longitude and Latitude (e.g. –90
and 25, respectively, for the Gulf of Mexico), then re-locate the icon on the site map by holding
the CTRL key while dragging the mouse pointer to the new location.
Map Layers
The Site Map consists of a collection of geo-graphic shape data known as “Layers”. The default
map layers are World countries, USA states/counties/roads, Mexico states, and Canada provinces.
You have the option to add, delete, or modify these map layers according to your needs. For
example, you may want to add US cities and color them white.
Page 40
POLL-EASE REMOTE MONITORING SOFTWARE USER’S GUIDE 41
Map Functions
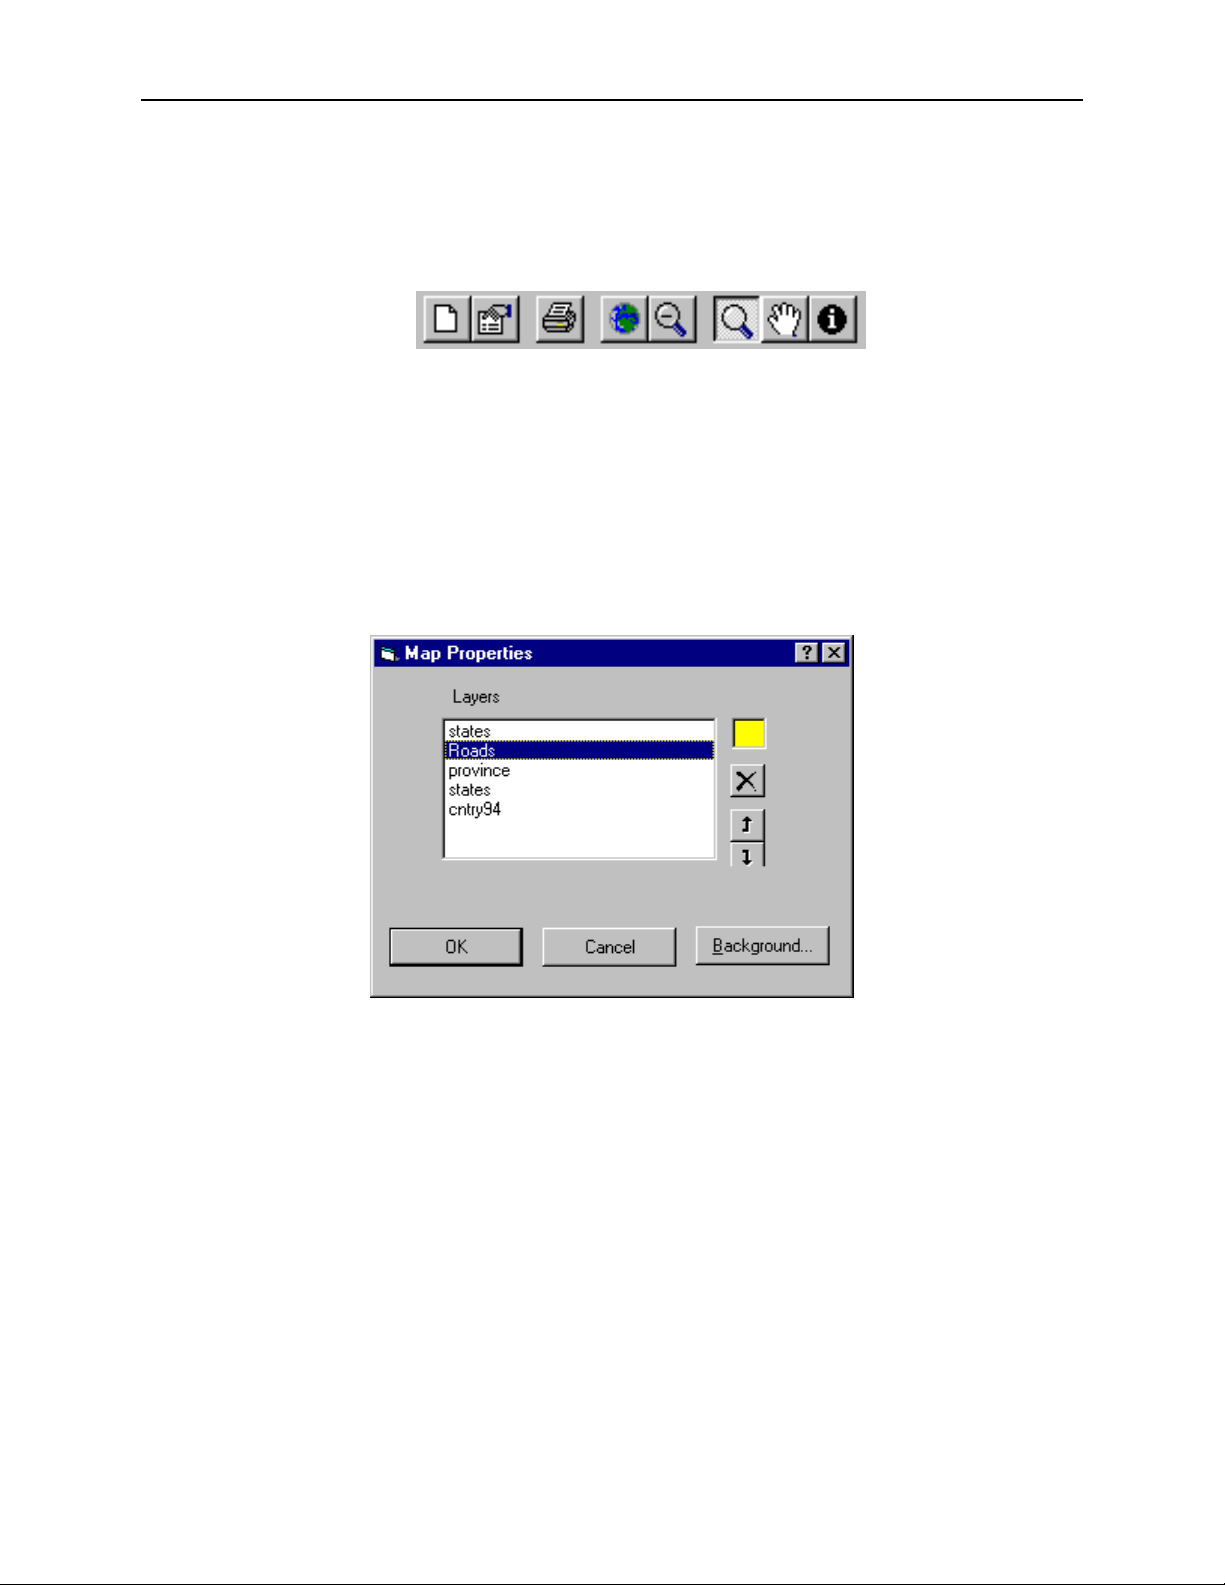
The Mapping Functions include (left to right on toolbar) New Layer, Layer Properties, Print Map,
Full Zoom Out, 2x Zoom Out, Zoom In, Pan, and Information:
§ New Layer – map layers are located in a folder named “\MapData” below the main program
folder. Select one or more additional layers such as counties, roads, and cities. Selected layers
will be restored when program is restarted.
§ Layer Properties – opens the Layer Properties dialog box to change or delete a map layer.
Layer color and order may be modified and will be restored upon program restart. To change
color, click on the Color box and select a new color from the color dialog. To change layer
order, click the Up or Down arrow buttons. To delete a layer, click the “X” button. To change
the map background color, click Background.
§ Print – prints the map to the currently selected printer.
§ Zoom Out – returns to the fullest extent (world map).
§ Zoom Out 2x – each time this or right mouse button is clicked, the map zooms out two times.
§ Zoom In – when this button is depressed, you can zoom in on a specific area of the map by
holding the left mouse button down and dragging over the area of interest.
§ Pan – when this button is depressed, click and drag entire map to center on the area of interest.
§ Information – click on map for details on currently selected layer. You may change the selected
layer and/or which information to display by using the drop-down lists in the Map Status Bar,
described below.
Page 41
42 POLL-EASE REMOTE MONITORING SOFTWARE USER’S GUIDE
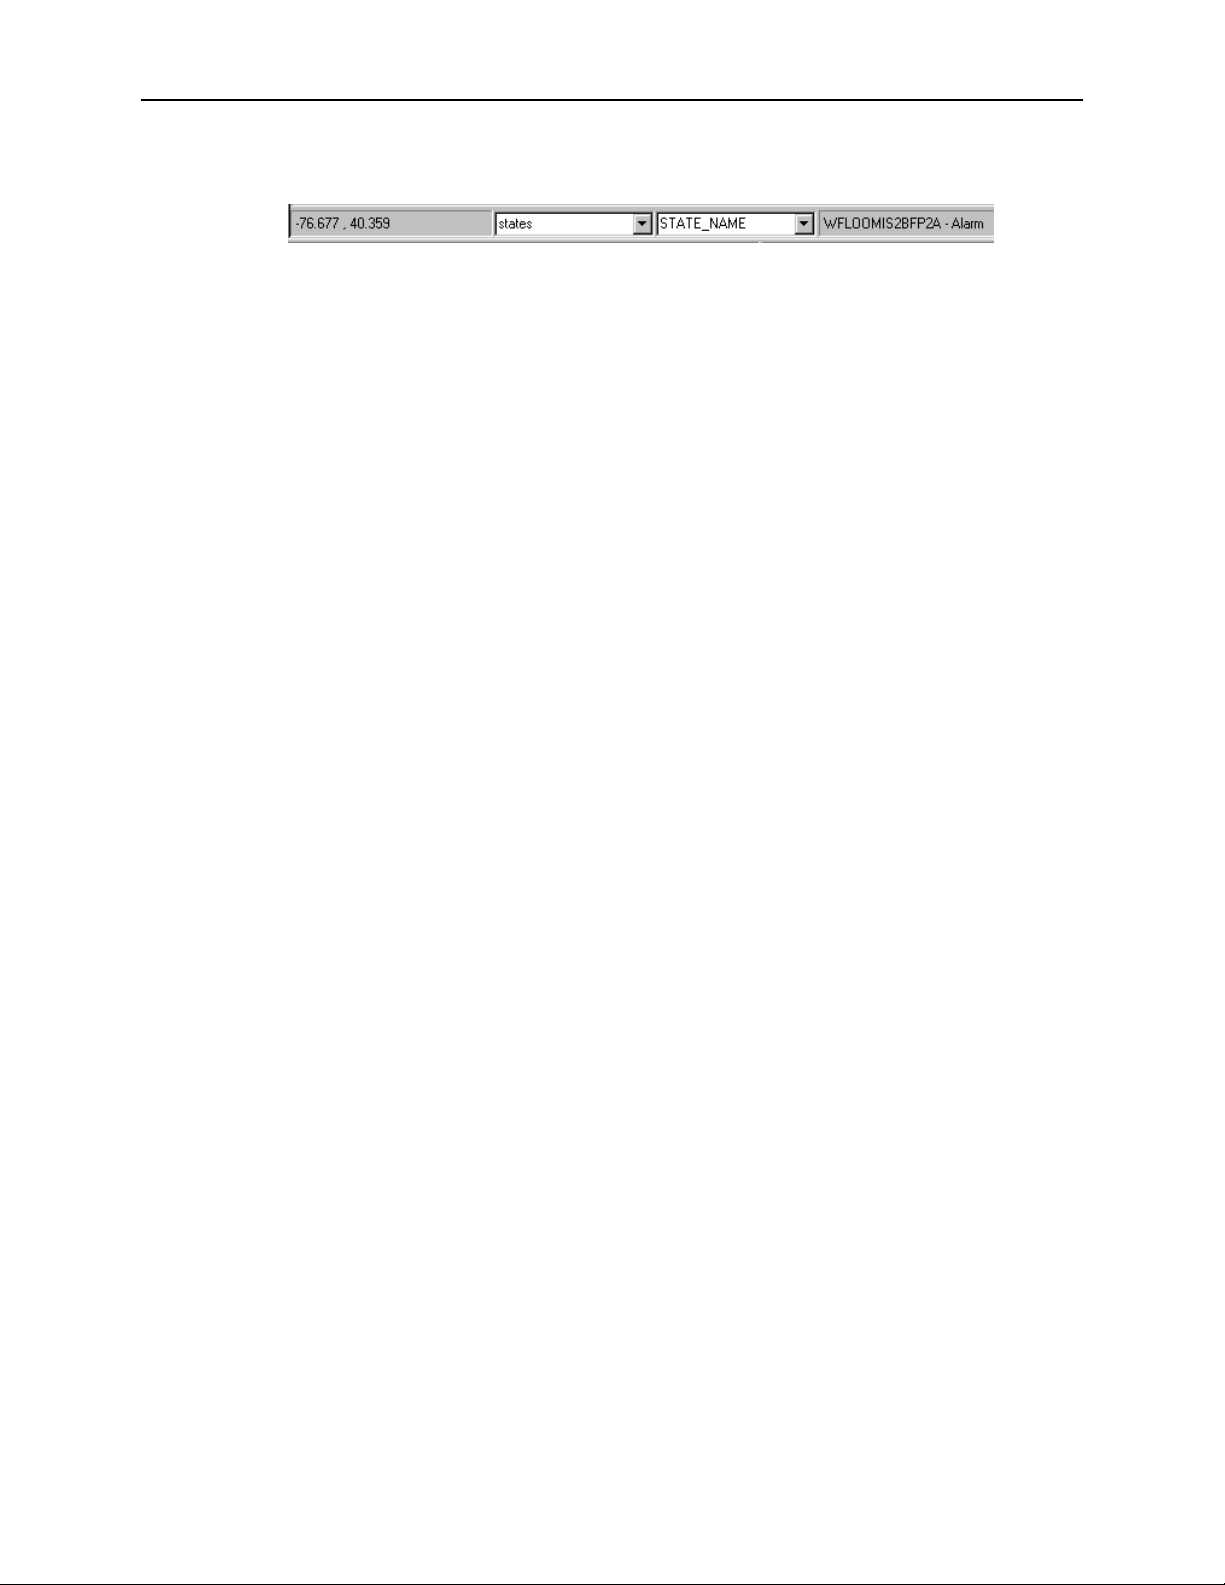
Map Status Bar
The Site Map status bar indicates current longitude and latitude of the mouse pointer position in the
left-most panel, and allows you to select which layer of information is displayed as the mouse
pointer is moved over and clicked on the map. Select the layer name and information type from the
drop-down list boxes. The Site ID and its alarm condition are also indicated as the mouse is moved
over a site icon in the right-most panel.
Page 42

POLL-EASE REMOTE MONITORING SOFTWARE USER’S GUIDE 43
Chapter 8 | Producing Reports
Poll-Ease Remote Monitoring Software allows you to analyze remote site conditions to assist plant
operations, maintenance, and other key personnel in making decisions without anyone being at the site.
While the data that serves as the foundation for this report is automatically gathered from the remote site
and processed on the local computer, you are required to specify date ranges, chart parameters, and other
site-specific operating conditions to produce accurate, reliable results.
On-Demand Reports and Charts
Tank Level Reports
§ Historical Level (Selected Site)
§ Current Levels (All Sites)
§ Current Alarms (All Sites)
Data Analysis Charts
§ Min/Max/Average
§ Historical Trend
§ Real-Time
Viewing or Printing Reports
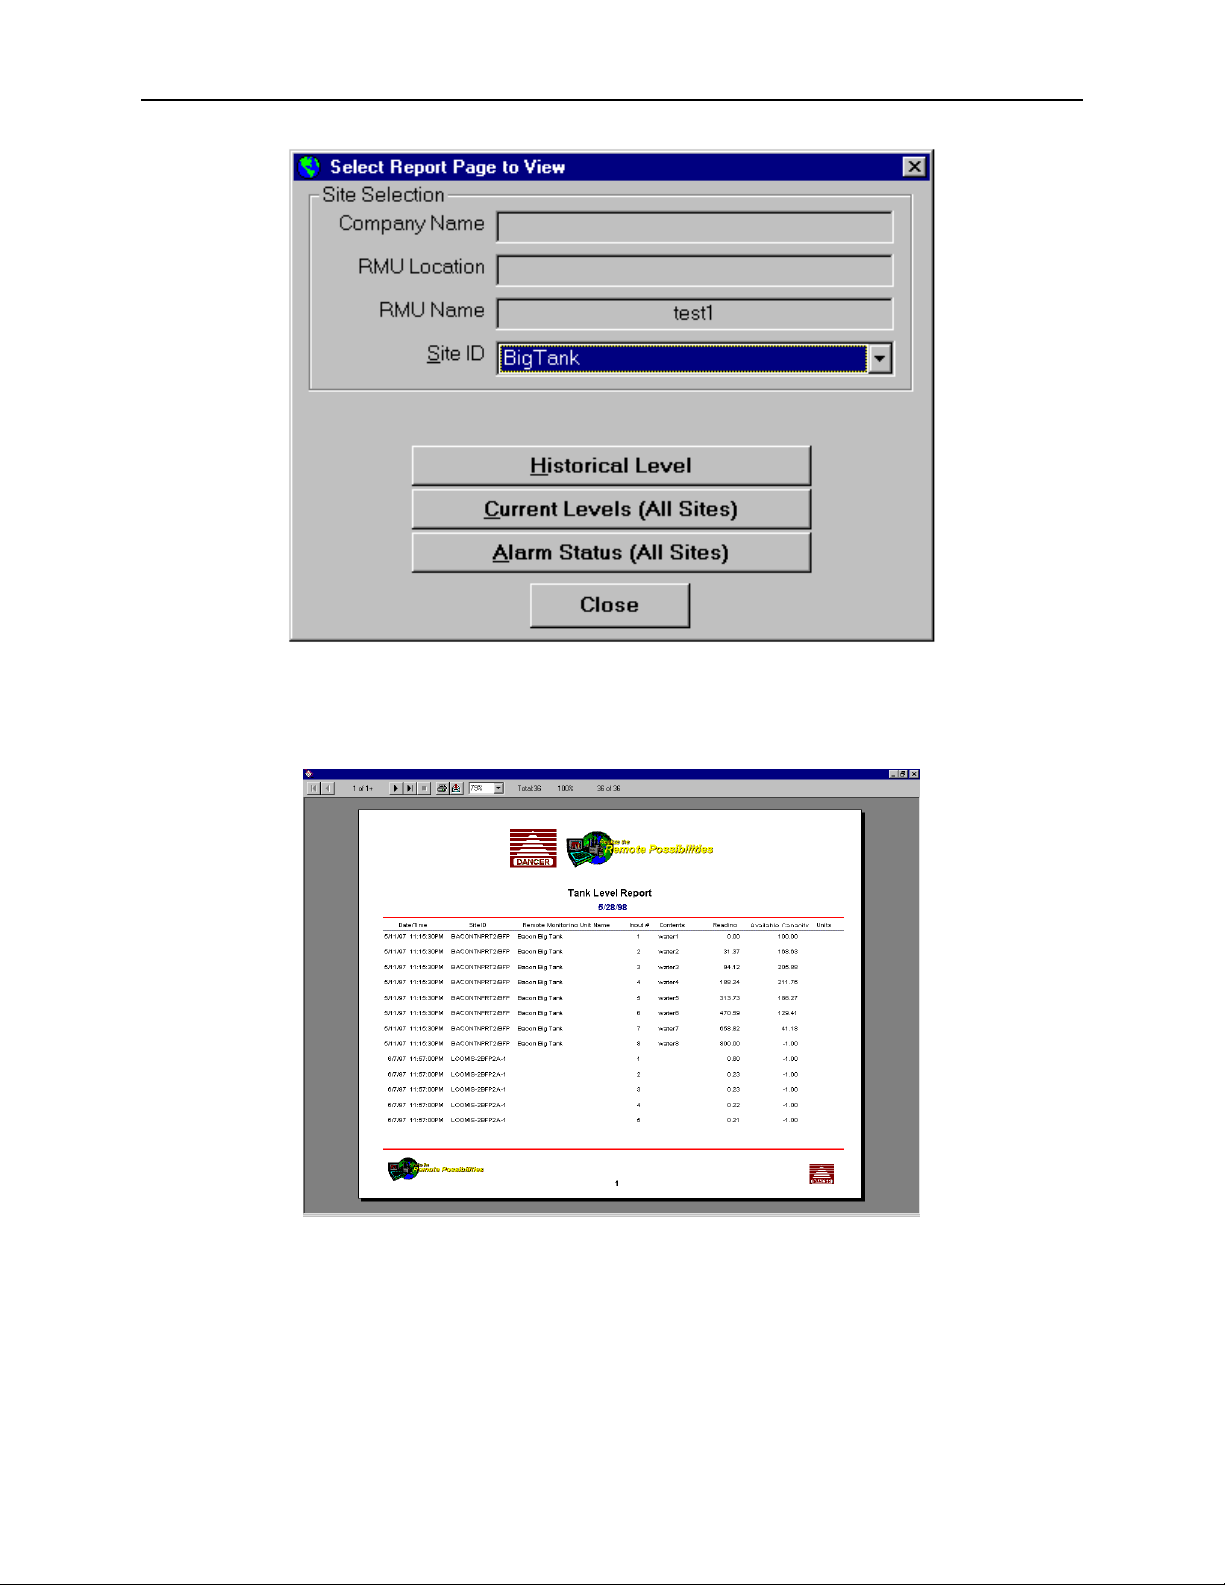
„ To view or print a single report page:
1) On the Reports menu, click View Report or click tool bar Reports.
2) Under Site Selection in the Site ID box, click the arrow to select a site.
3) The Company Name, RMU Location, and RMU Name corresponding to site will appear.
4) From the group of Report buttons, click the one you want to view.
Page 43
44 POLL-EASE REMOTE MONITORING SOFTWARE USER’S GUIDE
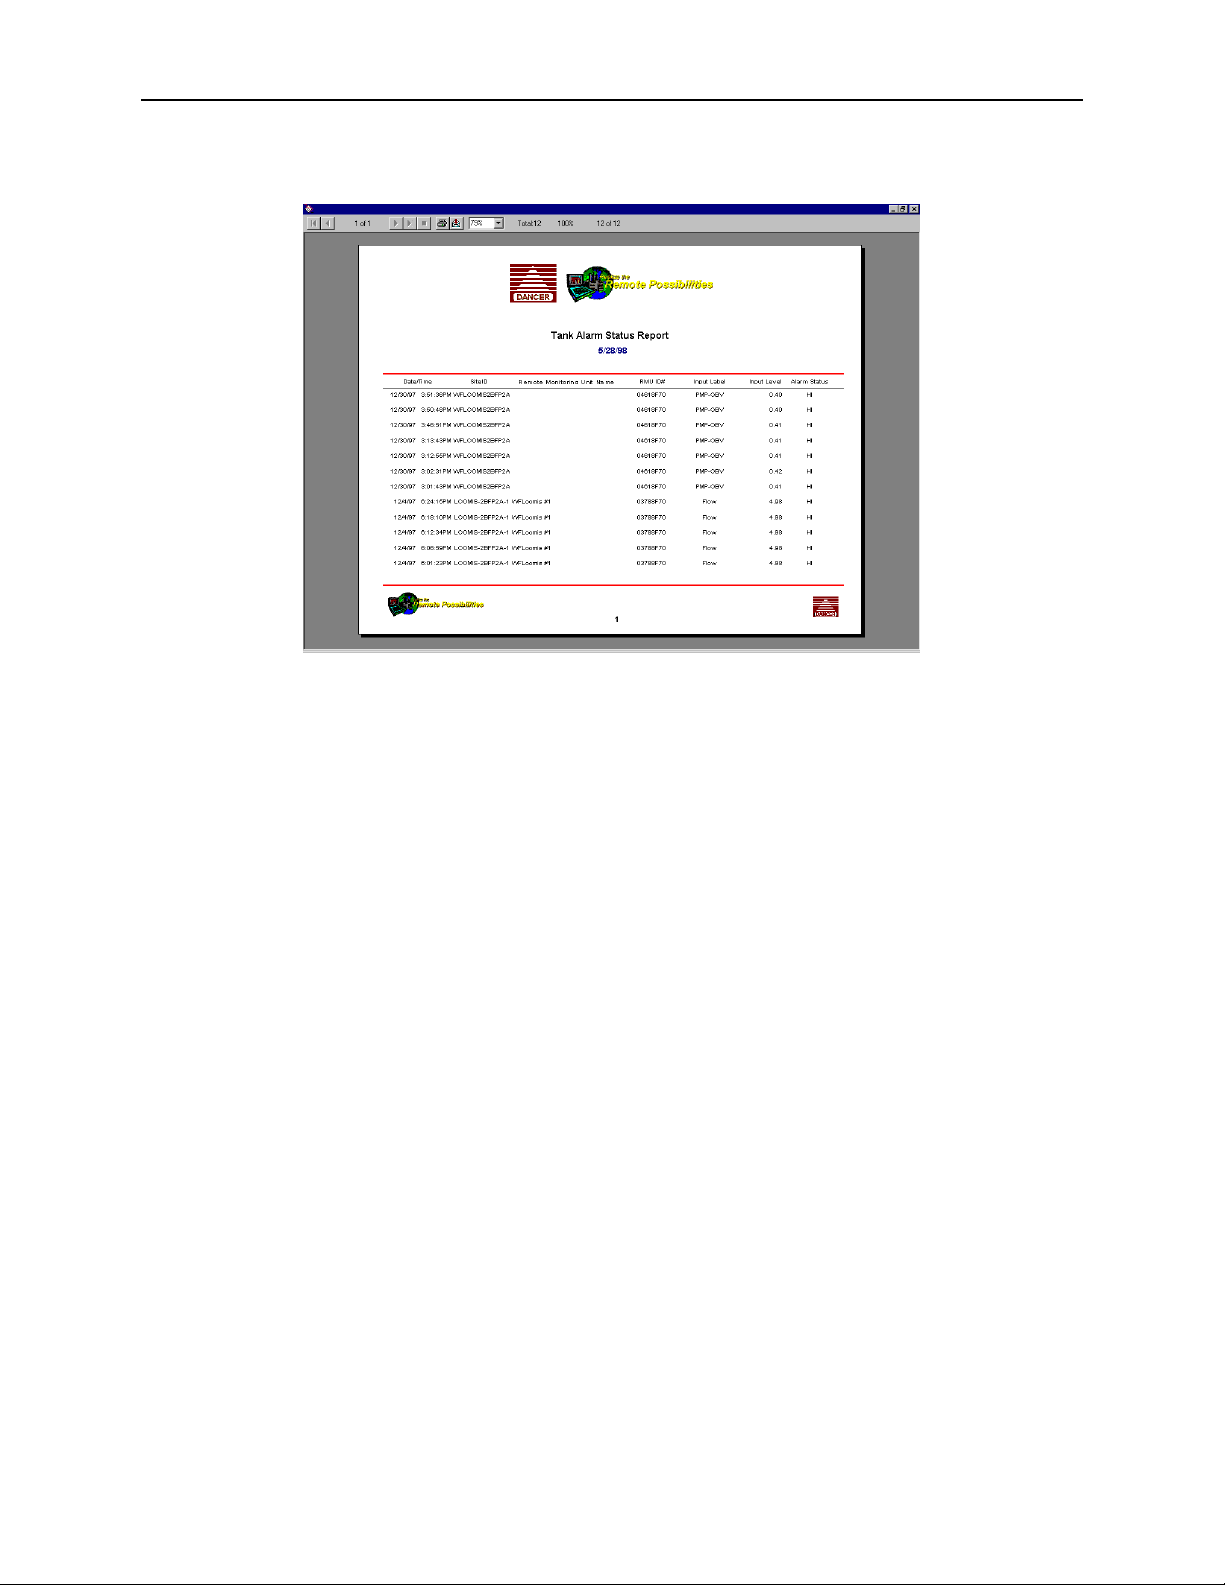
Tank Level Report Example
Page 44
POLL-EASE REMOTE MONITORING SOFTWARE USER’S GUIDE 45
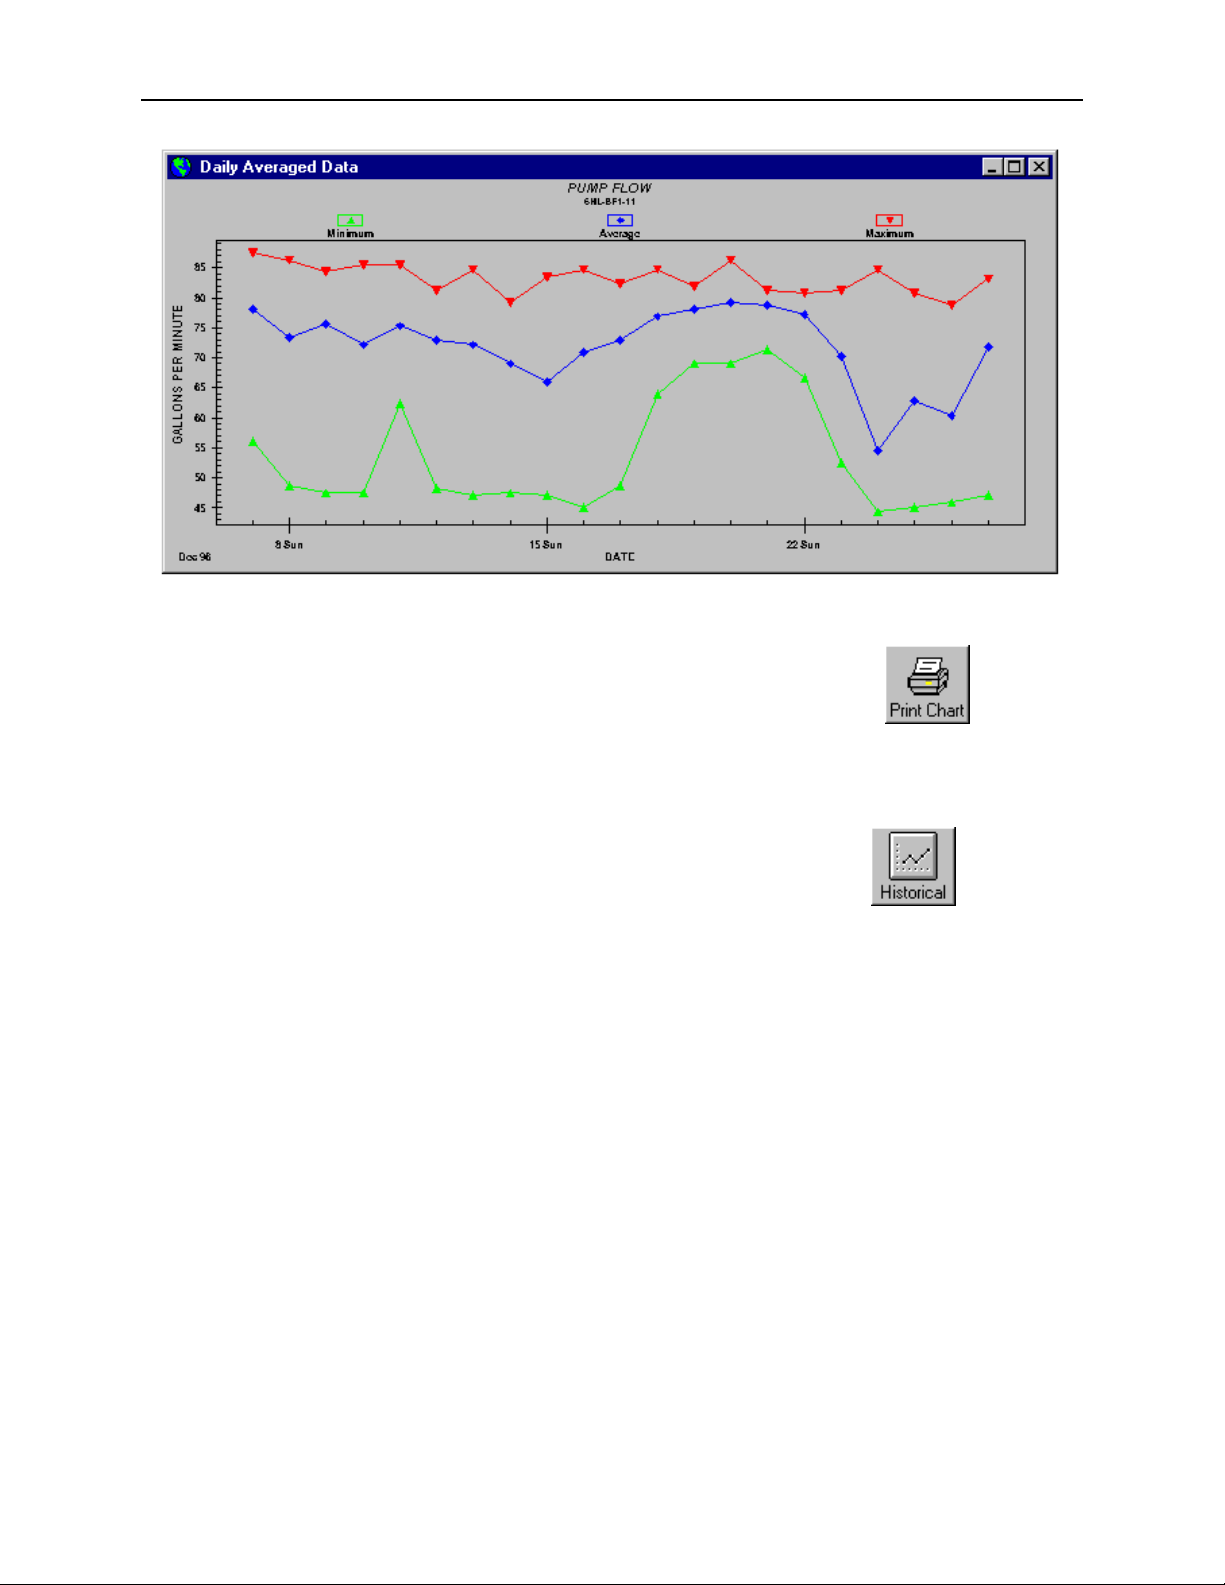
Tank Alarm Report Example
Data Analysis Charts
Min/Max/Average Data Chart
„ To select a site for a Min/Max/Average Data Charts
1) On the Analysis menu, click Min/Max/Average.
2) Under Site Selection in the Site ID box, click the arrow to select a site.
3) The Company Name, RMU Name, RMU Location, Last Time Called, and Log Period
corresponding to that site will appear.
4) Under Date Range, in the Begin Date, End Date, Begin Time, and End Time boxes, use the
arrows to set the date range desired.
5) Press OK.
Page 45
46 POLL-EASE REMOTE MONITORING SOFTWARE USER’S GUIDE
„ To print a Min/Max/Average Data Plot
§ With the Min/Max/Average plot displayed on the screen and selected,
click the Analysis menu, and then click Print Chart.
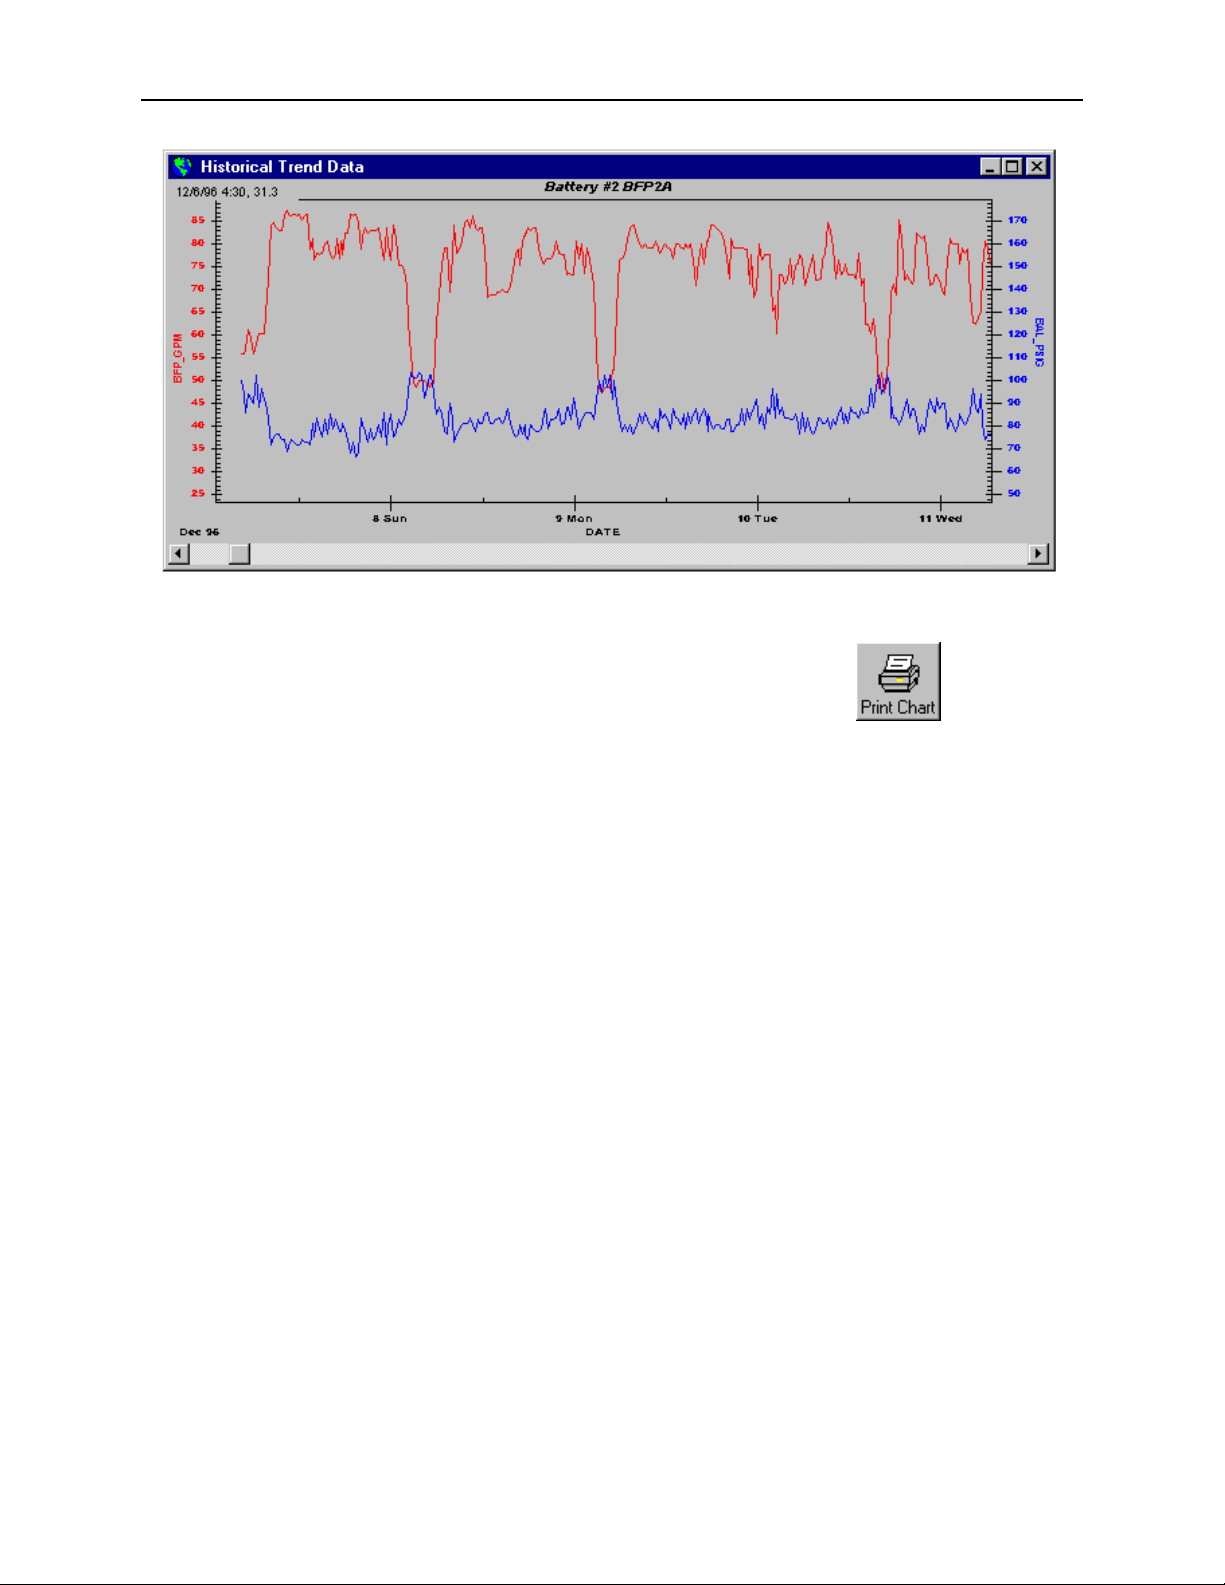
Historical Trend Data Chart
„ To select a site for a Historical Trend Data Chart
1) On the Analysis menu, click Historical Trend or click tool bar
Historical.
2) Under Site Selection in the Site ID box, click the arrow to select a site.
3) The Company Name, RMU Name, RMU Location, RMU Phone Number, Last Time Called,
and Log Period corresponding to that site will appear.
4) Under Date Range, in the Begin Date, End Date, Begin Time, and End Time boxes, use the
arrows to set the date range desired.
5) Press OK.
Page 46
POLL-EASE REMOTE MONITORING SOFTWARE USER’S GUIDE 47
„ To print a Historical Trend Data Chart
§ With the Historical Trend chart displayed on the screen, click the
Analysis menu, and then click Print Chart.
Data Plot Setup
Plot Parameters
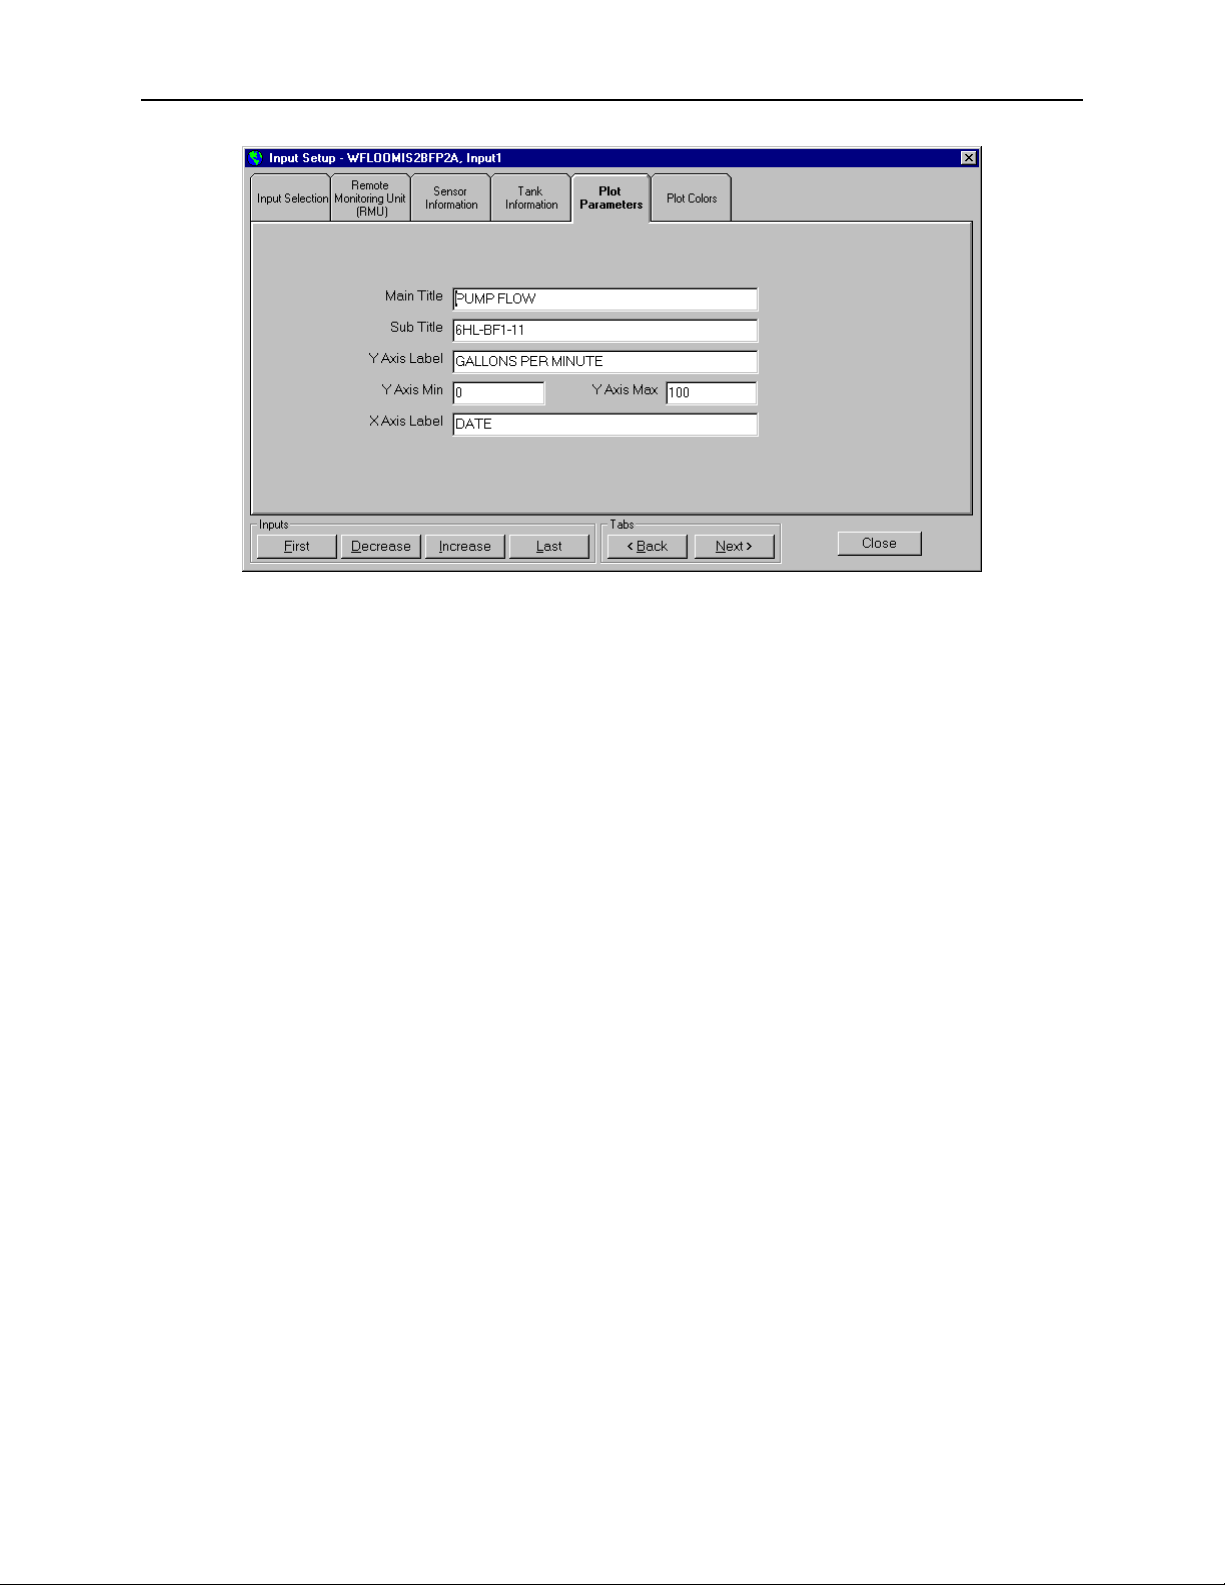
The Plot Parameters dialog box enables you to specify titles, axis labels, and axis scaling for
Min/Max/Average Data Charts.
„ To enter Plot Parameters
1) On the Sites menu, click Report Setup and then Plot Parameters.
Page 47
48 POLL-EASE REMOTE MONITORING SOFTWARE USER’S GUIDE
2) If you wish to change the selected site, click the Input Selection tab. In the Site ID box, click
the arrow to make your Site ID selection. In the Input Number box, select the desired input.
3) In the Main Title box, type the title for the report plot.
4) In the Sub Title box, type the subtitle for the report plot.
5) In the Y-Axis Label box, type the appropriate information.
6) In the Y-Axis Min and Y-Axis Max boxes, type the appropriate information.
7) In the X-Axis Label box, type the appropriate information.
8) Click Increase or Decrease to change selected input.
9) Press Close when finished.
Page 48
POLL-EASE REMOTE MONITORING SOFTWARE USER’S GUIDE 49
Chapter 9 | Command Reference
This chapter describes the Poll-Ease Remote Monitoring Software menu commands. Please read this
chapter thoroughly to familiarize yourself with the menu commands.
File Menu
The file menu contains a set of commands that are used for creating and opening documents in
notepad, and selecting printer setup.
New
This command creates a new document in Notepad. This command will cause the Windows
Notepad editor program to appear.
Open
This command opens an existing document in Notepad. Invoking this command will cause
the Open File dialog box for the Windows Notepad editor program to appear.
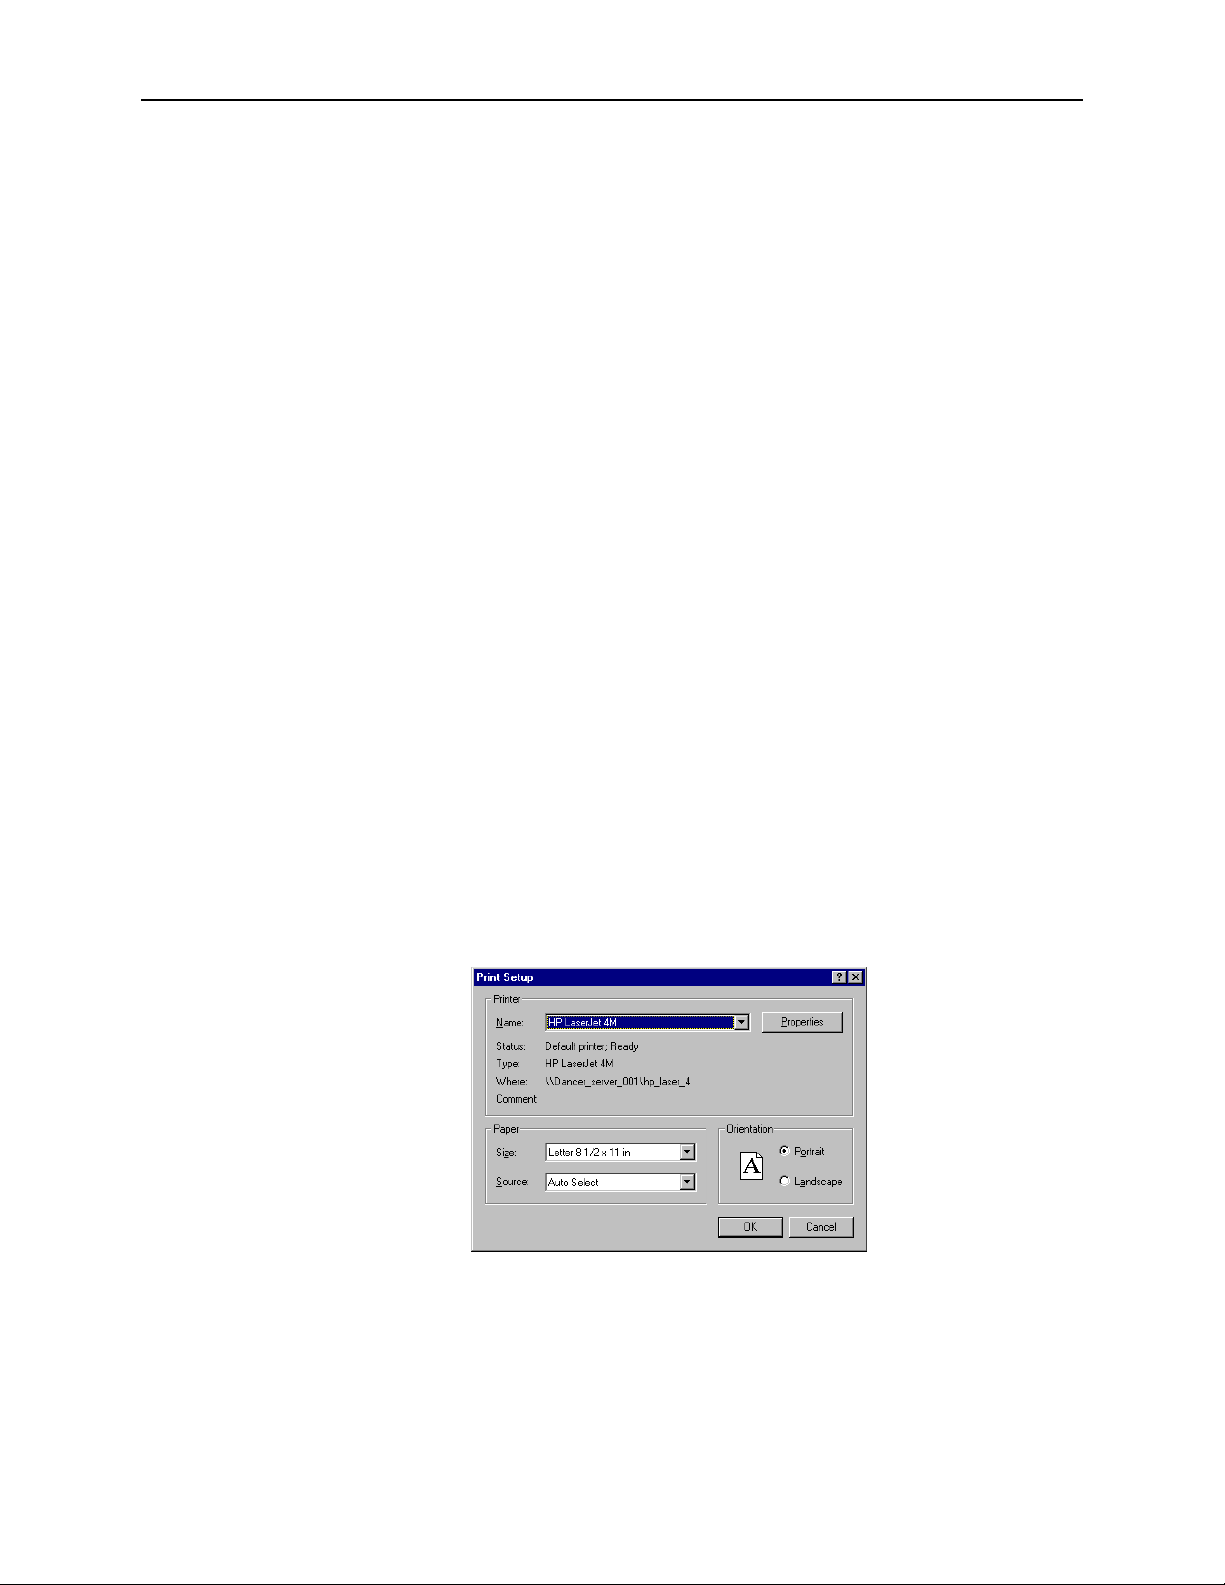
Print Setup
This command selects the default printer and printer properties. Invoking this command
will cause the Print Setup dialog box to appear.
Exit
This command exits the program.
Page 49
50 POLL-EASE REMOTE MONITORING SOFTWARE USER’S GUIDE
Database Menu
These commands are used to create, open, save as, import, and perform maintenance on the
database.
New
This command creates a new database.
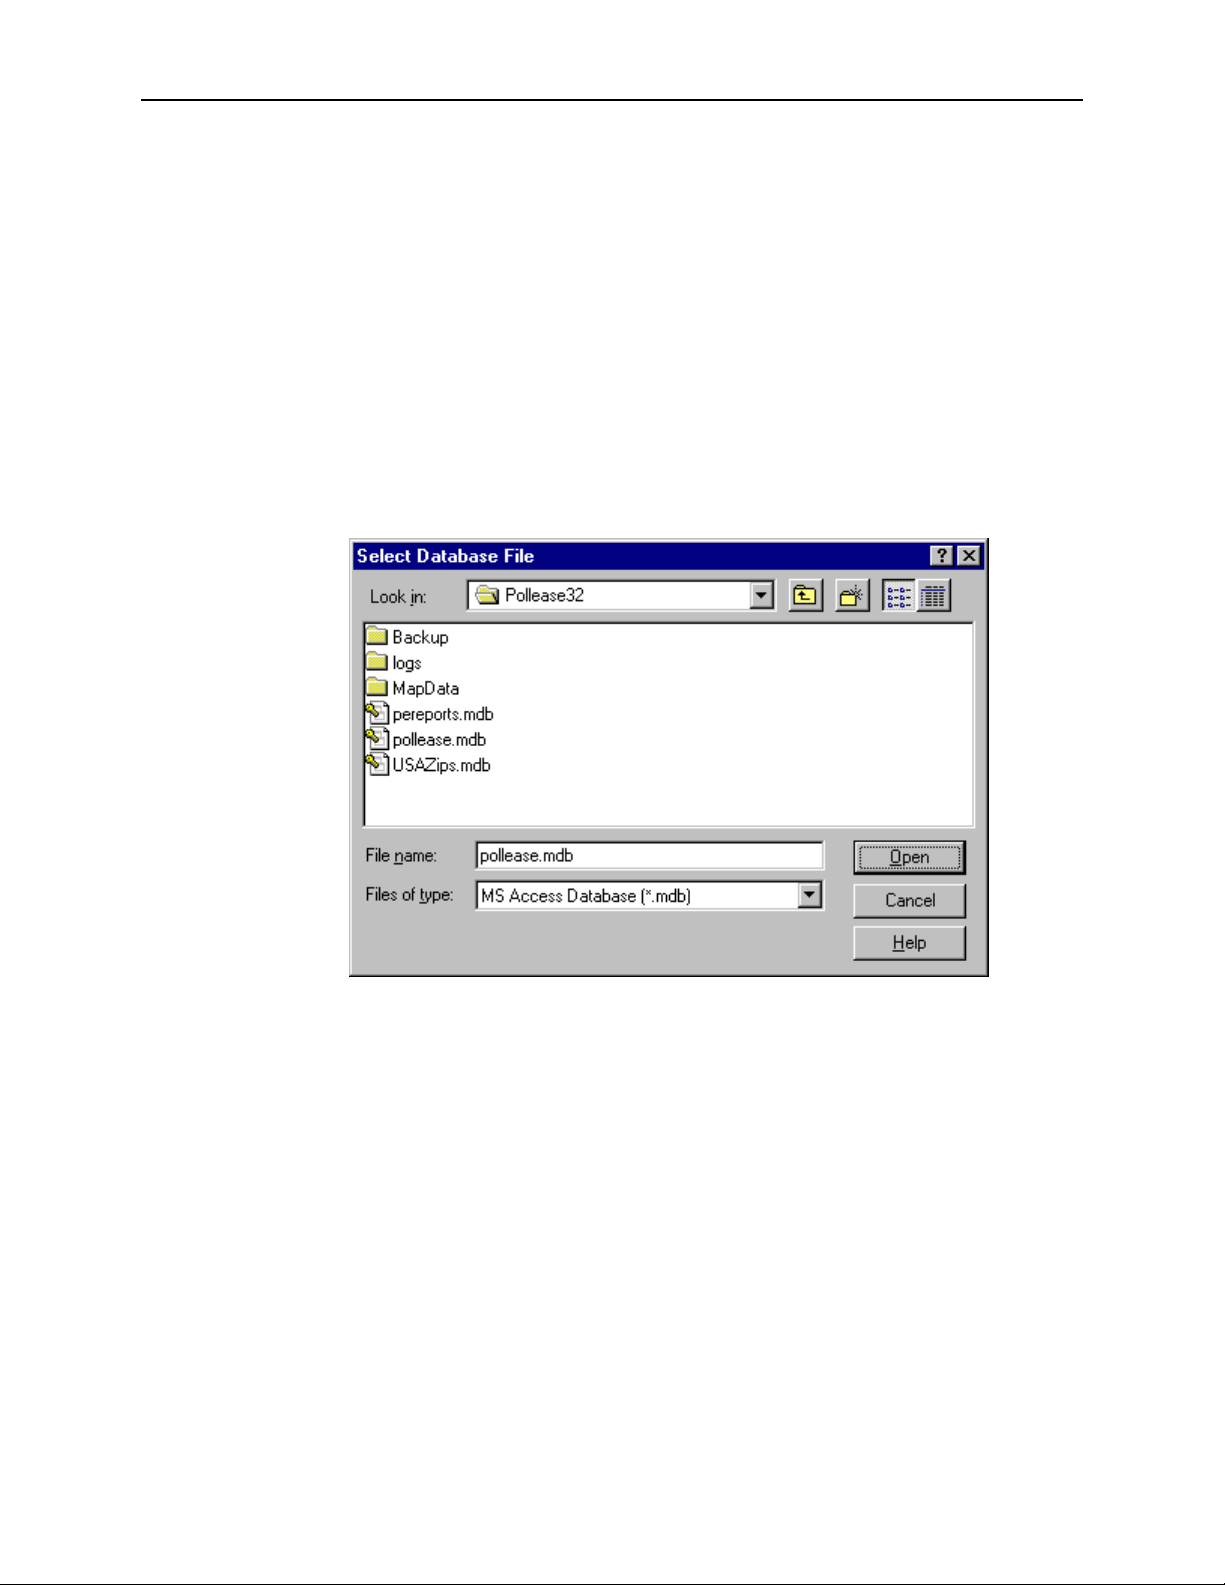
Open
This command opens a local database. Invoking this command will cause the Select
Database File dialog box to appear.
Save As
This command saves a database file under another name. Invoking this command will cause
the Save dialog box to appear.
Open External
This command selects an “external” database for retrieving site information or data.
Invoking this command causes the Select External Database File dialog box to appear.
The external database could reside locally or on a remote computer accessed through a local
or dial-up network
Page 50
POLL-EASE REMOTE MONITORING SOFTWARE USER’S GUIDE 51
Import Information
This command allows you to select a site ID from which to get site information from an
external database. You must first specify a valid external database.
Import Data
This command allows you to select a site ID from which to get input signal data from an
external database. You must first specify a valid external database.
Import Data Log File
This command allows you to select a site ID from which to import a data log file previously
downloaded from another source. This is useful in cases where logged data was previously
collected by other means or for some reason was impossible to get and store the log at the
time.
Maintenance
These commands perform various database maintenance tasks.
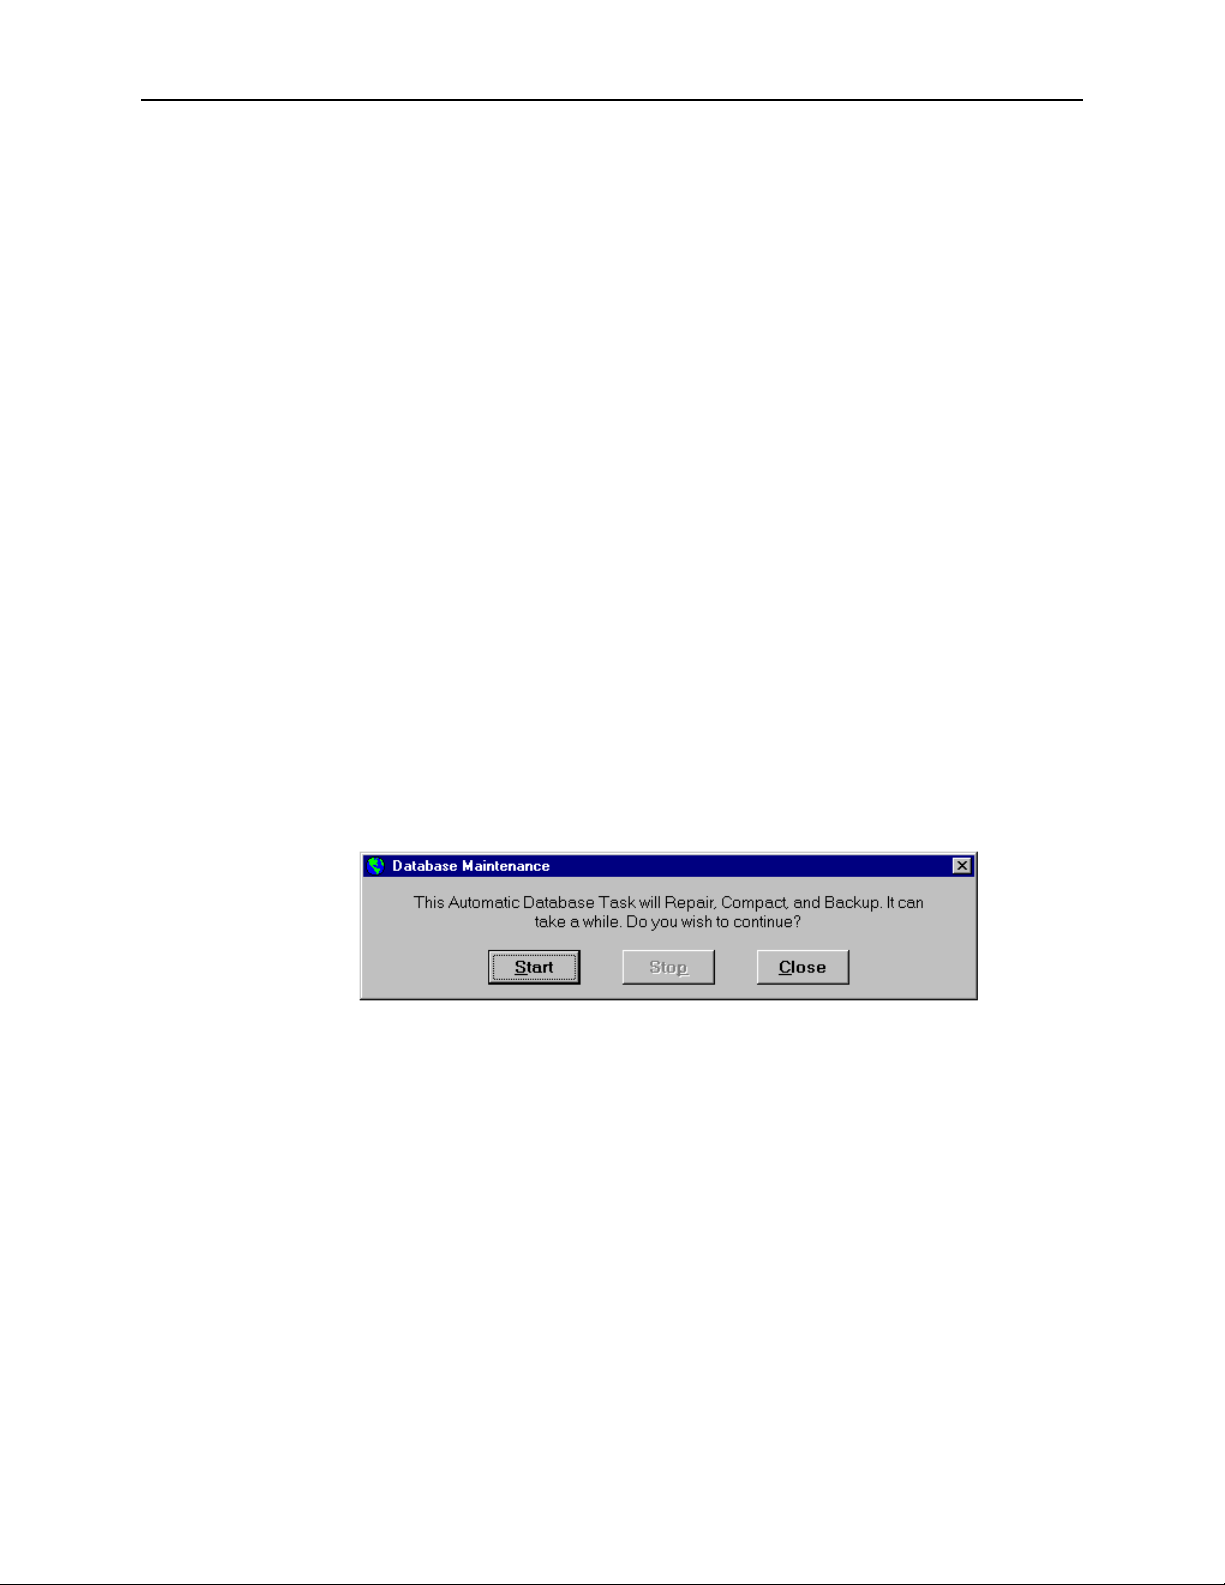
Automatic
This command performs database maintenance tasks – Repair, Compact, and Backup –
described below.
Repair
This command checks the integrity of the database and performs repairs if necessary. This
task may take a few minutes.
Compact
This command copies the current database file to a backup directory, reorders the table
indices and eliminates fragmentation, reduces the database size and increases access speed.
This task may take a few minutes.
Page 51
52 POLL-EASE REMOTE MONITORING SOFTWARE USER’S GUIDE
Back Up
This command initiates a backup of a database file from the backup directory created prior to
compaction. Work is allowed to continue while backup is in progress. Invoking this
command will cause the Microsoft Backup utility dialog box to appear. This task may take
a few minutes.
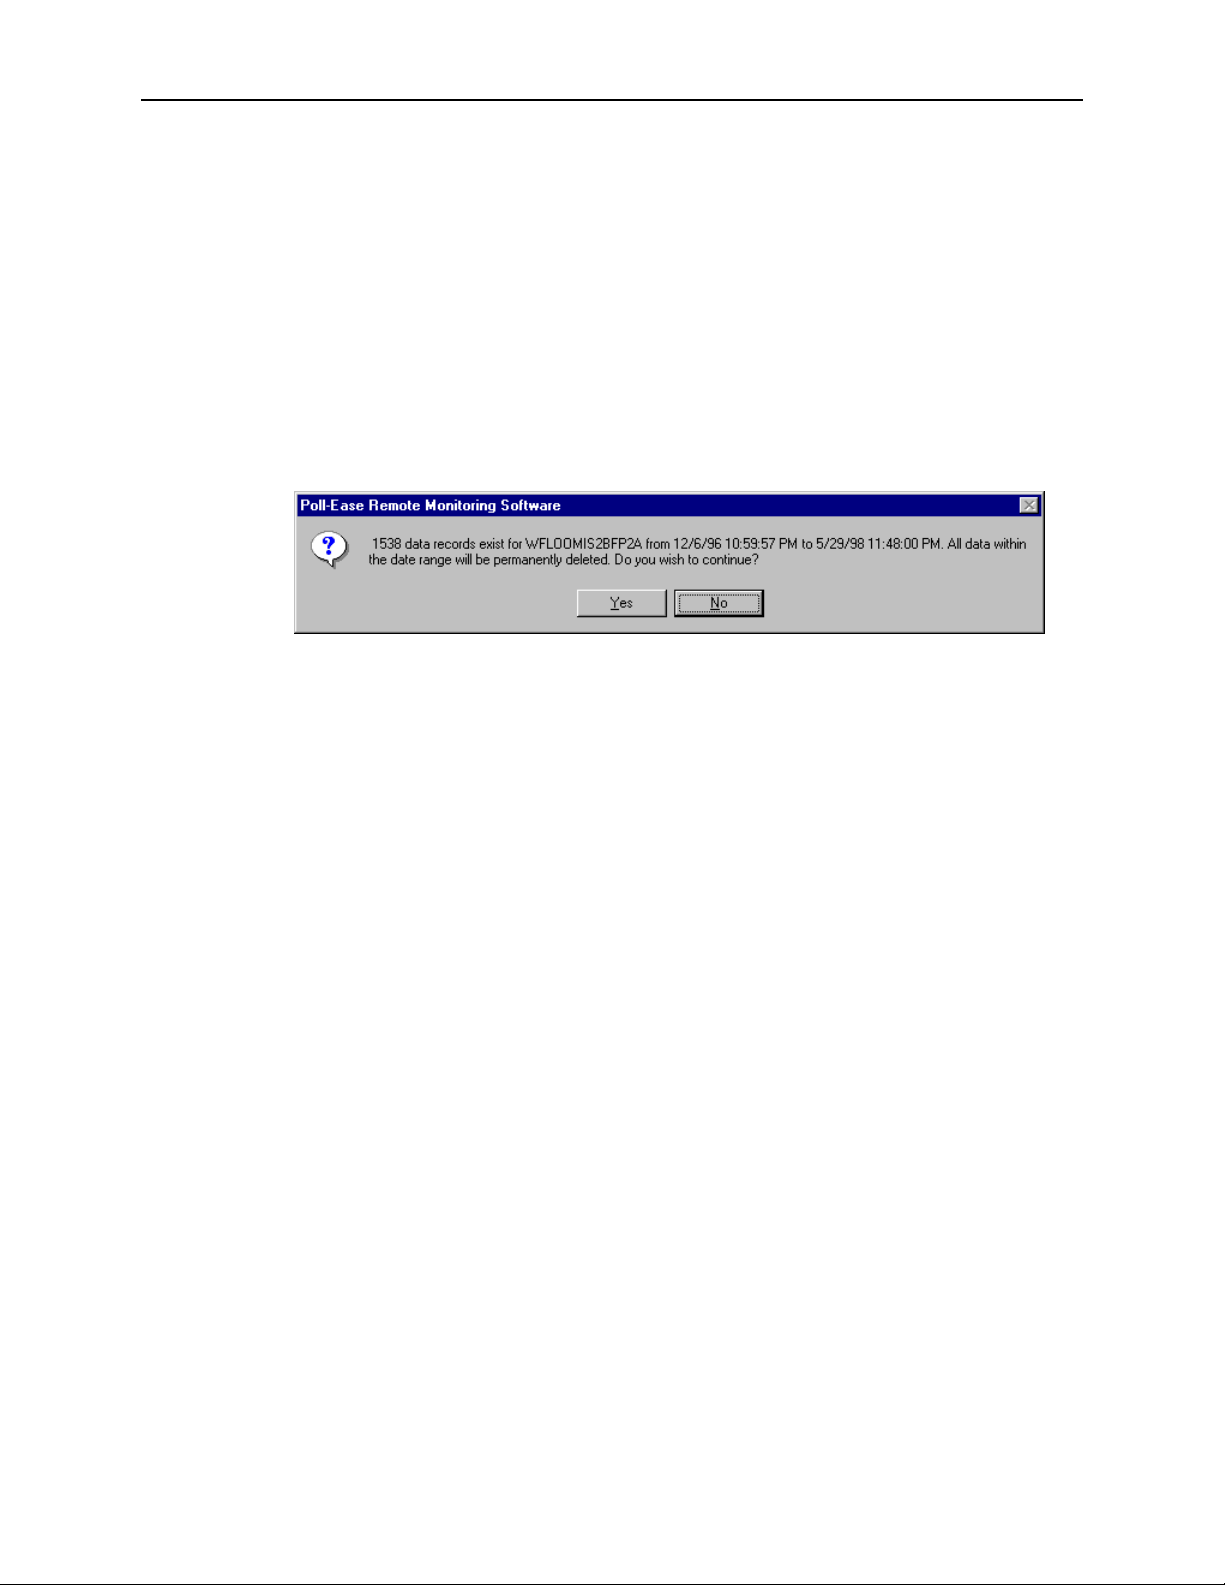
Data Reduction
This command deletes data records in order to reduce apparent log rates to the specified rate.
After selecting the site on which to perform data reduction, the following dialog box will
appear, asking if you wish to proceed.
Delete Specified Data Points
This command deletes data points within a time and date range for a specified site. This task
may take a few minutes.
Delete All Data Points
This command deletes all data points for a specified site. This task may take a few minutes.
Rebuild Min/Max/Ave Tables
This command performs recalculation of minimum/maximum/average tables. This task may
take a few minutes.
Update Database
This command performs updates to database table structures as a result of program upgrades.
Sites Menu
The Sites menu contains a set of commands used to enter site information and input configuration.
Automatic setup of a remote data monitor is also performed from this menu.
Site Setup
This command adds, edits, or deletes sites in the site database. This command displays the
Site Information dialog box.
Page 52

POLL-EASE REMOTE MONITORING SOFTWARE USER’S GUIDE 53
Input Setup
This command is used to edit input names, parameters, and plot selections for reporting. This
command displays the Input Configuration dialog box.
Auto Remote Monitor Setup
This command selects a site for automatic remote setup. The parameters from the Input
Setup dialog are automatically programmed into the selected remote monitor.
Report Setup
Plot Parameters
This command displays the Plot Parameters dialog box.
Page 53

54 POLL-EASE REMOTE MONITORING SOFTWARE USER’S GUIDE
Communication Menu
This menu contains commands to enable/disable the call scheduler, show/hide the communications
windows, call a remote site, auto answer alarms, configure the modem, and perform dial-up
networking.
Call Remote Site
This command calls a site, logs on, and allows you to communicate directly with the remote
monitor.
Get Remote Data Log
This command gets the data log from a remote site and stores it in the database.
Hang Up
This menu contains commands to terminate modem communications sessions and hang up
selected modems.
All Ports
This command terminates all active communications sessions and hangs up all modems.
On-Demand Call Port
This command terminates an active communications session and hangs up the on-demand
dial out modem.
Auto Alarm Answer Port
This command terminates an active communications session and hangs up the auto-answer
alarm dial in modem.
Auto Answer Alarms
This command enables/disables the auto-answer alarm dial in and logging feature.
Show Comm Windows
This command makes the communication windows visible or invisible.
Properties
This command displays a communications properties dialog box.
Page 54

POLL-EASE REMOTE MONITORING SOFTWARE USER’S GUIDE 55
Use Telephony Services
This command enables/disables use of Windows Telephony Services.
Dial-up Networking
Dial-up networking is a feature of the Windows operating system, which permits your PollEase Remote Monitoring Software to access via telephone the database of a second
computer running Poll-Ease Remote Monitoring Software. A thorough understandings of
Microsoft's Dial-up Networking feature (and its limitations) is needed to configure and use
this capability.
Analysis Menu
This menu contains commands to display real-time charts, min/max/average charts, and historical
trend charts.
Real-Time
This command calls and gets real-time data for a selected site for all eight sensor inputs and
displays them on one graph.
Min/Max/Average
This command calls and gets minimum, maximum, and average data from the database for a
selected site. This command will cause the Select Site for… dialog box to appear. Select a
site and date range to display min/max/ave data from all active inputs each on a separate
graph.
Historical Trend
This command will get historical data from the database for a selected site. Invoking this
command will cause the Select Site for… dialog box to appear. Select a site and date range
to display historical data from all inputs on a graph.
Print Chart
Prints currently selected chart.
Zoom Out Chart
Select this command or right click mouse over the graph to restore original view.
Page 55

56 POLL-EASE REMOTE MONITORING SOFTWARE USER’S GUIDE
Reports Menu
This menu contains commands to print or view reports and display Site Map.
View Report
This command displays reports that can be printed or sent to others by email using the
appropriate toolbar buttons at the top of the window.
Show Site Map
This command displays the Site Map that provides an easy way to quickly analyze current
remote site status conditions.
Status Menu
This menu contains commands to show the alarm list, alarm log, and the activity log.
Alarm List
This command displays the Alarm List dialog box.
Alarm Log
This command displays the Alarm Dial In log in Notepad.
Activity Log
This command displays the program Activity log in Notepad.
Poll-Ease Remote Monitoring Software maintains a detailed activity log named
“activity.log”. The activity log contains program information, as well as operational status
messages. It is self-explanatory and is very useful for maintaining records or for
troubleshooting various types of problems. This file will continue to grow and should be
saved and deleted periodically.
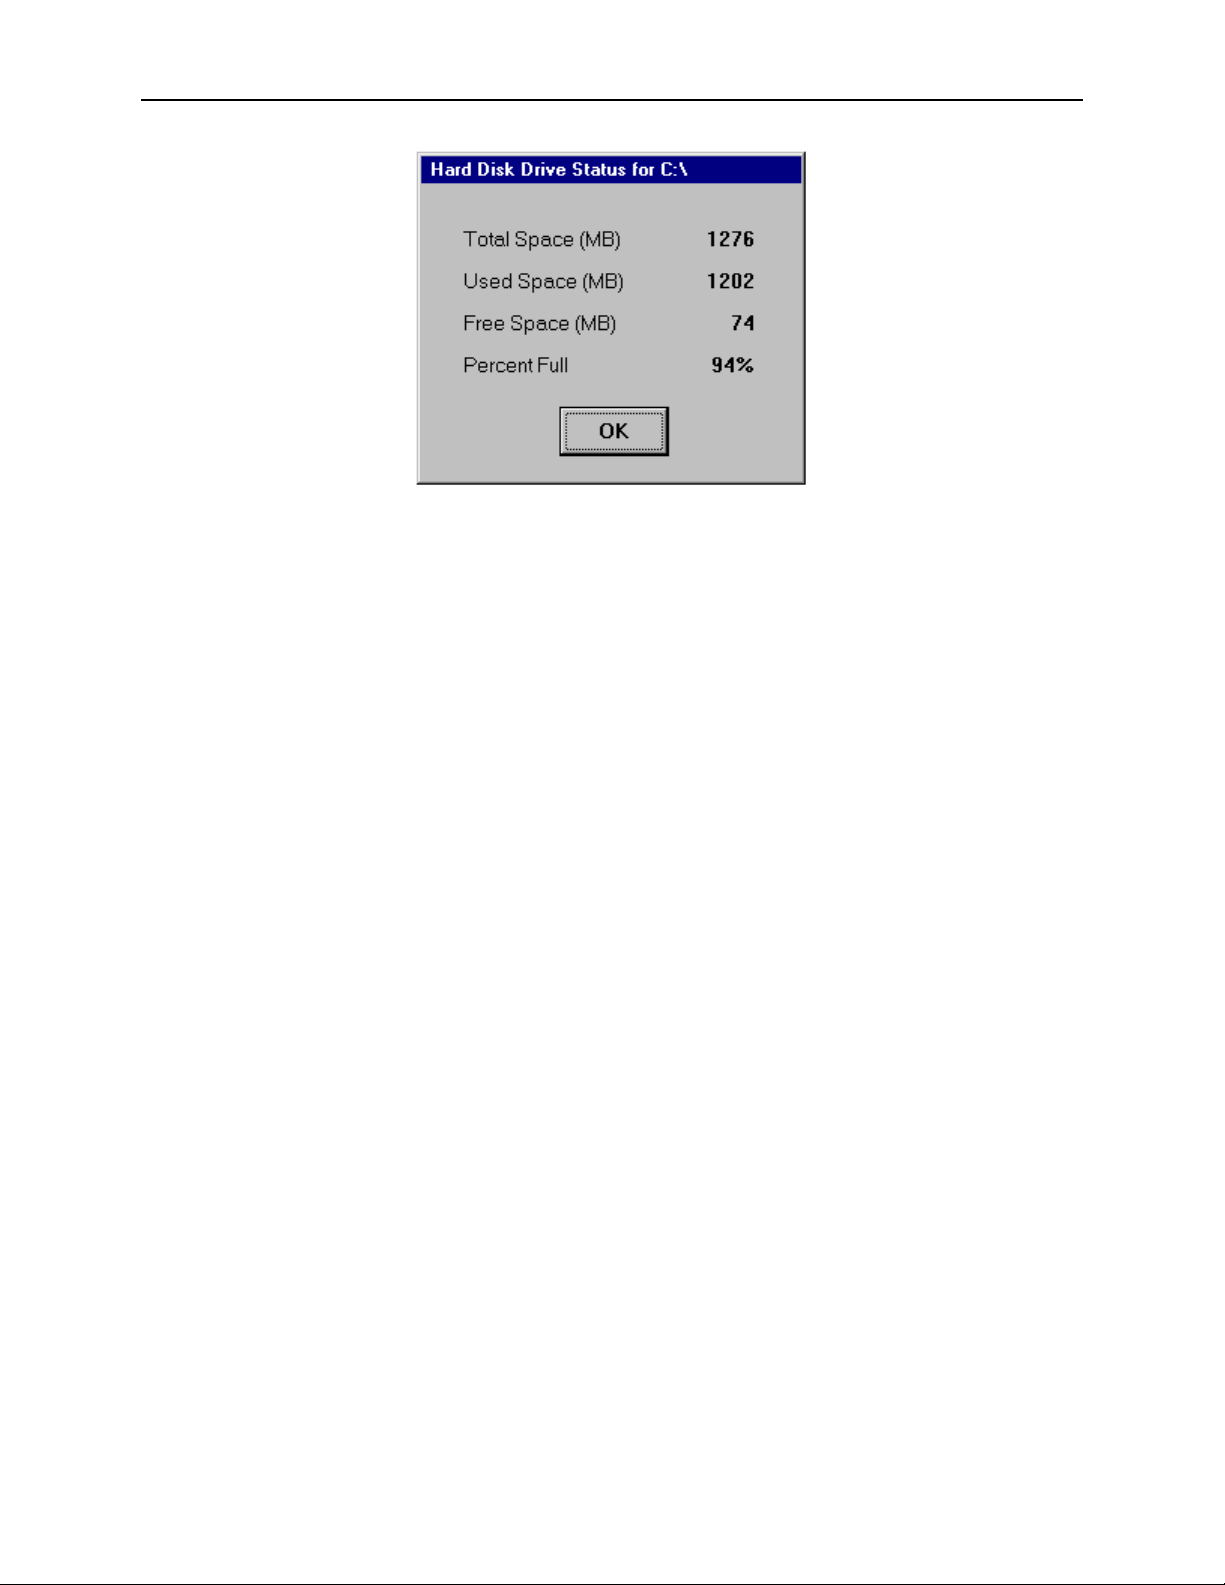
Disk Drive
This command displays the following information about the hard drive – total byte capacity,
bytes used, bytes free, and percent-full information on hard disk.
Page 56
POLL-EASE REMOTE MONITORING SOFTWARE USER’S GUIDE 57
Page 57

58 POLL-EASE REMOTE MONITORING SOFTWARE USER’S GUIDE
Window Menu
This menu contains commands to organize and access open windows.
Cascade
This command arranges all windows in a stepped order.
Tile Horizontally
This command arranges all windows more wide than tall.
Tile Vertically
This command arranges all windows more tall than wide.
Minimize All
Arrange Icons
Close All
(Window List)
Help Menu
Help Topics
This command minimizes – to icons – all visible windows.
This command evenly spaces minimized windows in an orderly way.
This command hides all visible windows.
This last section of the Window menu is a list of all currently open windows. Click a
window name to place it into view and move focus to it. The window list indicates the
currently selected window by a check mark before its name.
This command displays on-line help.
About
This command displays the software version and other information about the Poll-Ease
Remote Monitoring Software.
Page 58

POLL-EASE REMOTE MONITORING SOFTWARE USER’S GUIDE 59
Chapter 10 | Index
About, 58
Accessing the Site Database, 21
acknowledge, 37
Acknowledging Alarms, 36
Activity Log, 56
Alarm Detection, 36
Alarm Dial In, 38
Alarm List, 35, 37, 56
Alarm Log, 38, 56
Alarm Phone Numbers, 25
Alarms, 19
Analysis Menu, 55
Arrange icons, 58
Auto Answer Alarms, 54
Automatic, 51
Automatic Answer Alarm Dial in, 36
Automatic Remote Monitor Setup, 28, 53
Back Up Database, 52
Call Remote Site, 31, 54
Call Scheduling, 33
Cascade, 58
Close All, 58
Communication Menu, 54
Communication Properties, 54
Communications and Modem Setup, 14
Compact Database, 51
Contact Information, 24
Data Analysis Charts, 43
Data Charts, 45
Data Plot Setup, 47
Data Reduction, 52
Database Maintenance, 51
Database Menu, 50
Delete All Data Points, 52
Delete Specified Data Points, 52
Dial-up Networking, 55
Direct Connect, 16
Disk Drive Status, 56
Ending an On-Demand Call, 32
Exit, 49
File Menu, 49
Get Log, 19
Get Remote Data Log, 54
Hang Up, 19, 54
Help, 19
Help Menu, 58
Help Topics, 58
Historical, 18
Historical Trend, 55
Historical Trend Data Chart, 46
How to Format Plots, 47
Import Data, 51
Import Data Log, 51
Import Information, 51
Input Selection, 26
Input Setup, 25, 53
Input Status Report, 36
Installing a Modem, 11
Installing Poll-Ease Remote Monitoring Software, 11
Map Functions, 41
Map Layers, 40
Map Status Bar, 42
Min/Max/Average, 55
Min/Max/Average Data Chart, 45
Minimize All, 58
move a site icon, 40
New, 49
New Database, 50
Notes, 25
On-Demand Data Log Download, 31
On-Demand Manual Mode Calling, 31
On-Demand Real-Time Monitoring, 29
On-Demand Reports, 43
Open, 49
Open Database, 50
Open External Database, 50
Plot Colors, 28
Plot Parameters, 47, 53
Print Chart, 18, 55
Print Setup, 49
Real Time, 18, 55
Real-Time Chart, 30
Rebuild Min/Max/Ave Tables, 52
Remote Monitoring Unit, 22, 26
Repair Database, 51
Report Setup, 53
Reports, 18
Reports Menu, 56
Save Database As, 50
Scheduler, 18, 33
Scheduling Calls and Collecting Data, 33
Sensor Information, 27
Show Comm Window, 54
Show Site Map, 39, 56
Site Address, 23
Site Database, 21
Site Icon Placement, 40
Site Information, 22, 52
Site Map, 19
Site Map Icons, 40
Site Selection, 21
Site Setup, 21, 52
Sites, 18
Sites Menu, 52
Status Menu, 56
Style Conventions, 9
System Requirements, 10
Tank Alarm Report Example, 45
Tank Information, 27
Tank Level Report Example, 44
Tank Level Reports, 43
Tested & Approved Modems, 17
Tile Horizontally, 58
Tile Vertically, 58
Page 59

60 POLL-EASE REMOTE MONITORING SOFTWARE USER’S GUIDE
Uninstalling Poll-Ease Remote Monitoring Software, 13
Update Database, 52
Use Telephony Services, 55
User Interactive Session, 31
Using the Site Map, 39
View Report, 56
Viewing or Printing Single Report Pages, 43
Window List, 58
Window Menu, 58
Windows Telephony Services, 15
Zoom Out Chart, 55
 Loading...