

Page 1
Page 2

Page 3
2
Page 4

TABLE OF CONTENTS
Title Page
1. SPECIFICALTIONS.................................................................................1
1-1 General Information................................................................................1
1-2 Electrical Specifications..........................................................................2
2. FRONT PANEL DESCRIPTION..............................................................3
3. pH TEMPERATURE COMPENSATION..................................................5
4. CALIBRATING PROCEDURE.................................................................5
4-1 pH Calibrating Procedure........................................................................5
4-2 Temperature Calibrating Procedure........................................................7
5. MEASURING PROCEDURE...................................................................7
5-1 pH Measurement ....................................................................................7
5-2 mV Measurement.................................................................................... 7
5-3 Temperature Measurement ....................................................................7
5-4 Auto Data Hold........................................................................................8
5-5 Data Record (Record & Read & Clear)...................................................8
6. SETTING PROCEDURE.........................................................................8
7. ELECTRODE PRECAUTIONS AND LIMITATIONS..............................10
8. MAINTENANCE....................................................................................11
8-1 Cleaning the pH Bulb............................................................................11
8-2 Recondition the pH Bulb.......................................................................11
9. BATTERY REPLACEMENT..................................................................11
10. DATALOGGING..................................................................................12
10-1 Software..............................................................................................12
10-2 Parameter Settings.............................................................................18
10-3 Download datalogger (pH Meter è PC).............................................19
10-4 Data Invert ..........................................................................................22
10-5 Communicating Operation..................................................................27
Page 5

1. SPECIFICALTIONS
1-1 General Information
Circuit : Custom one-chip of microprocessor circuit.
Display : 76.5mm×50.5mm×2.7mm super large LCD
dual display.
Measurement : pH : 0 to 14 pH
mV : 0 to 1999mV
Temperature : 0 to 100( 32 to 200)
Temperature compensation
for pH range : Manual(MTC): 0 to 100(32 to200),
adjusting by push
button or button on
front panel.
Automatic(ATC):
0 to 100(32 to 200),adjusting with the
optional temperature probe.
Calibration for pH range : Built in (pH4.010 and pH7.000) calibration
on front panel, high reliability.
Auto data hold : The A indicator will halt in LCD from flash
status when the electrode output becomes
stable.
Memory recall : Single recording: 99 records.
Continuous recording: Have 99 sets of records,
MAX. 3000 points.
Auto power off : 10 minutes.
Over input indication : Indicate by “ ---- ”
pH electrode : Any kind of Ph electrode can be connected
with BNC connector.
Operating temperature : 0 to 50( 32 to 122).
Operating humidity : Max 80% RH.
Sampling rate : About 1.5 time per second.
Battery life : Approx. 120 hours.
Calibration date : Record the last data of adjustment.
1
Page 6

Power supply : 6 AA Batteries.
Power current : Approx. DC 20mA.
Data output : RS232 PC serial interface.
Dimensions : 187(L) × 73(W) × 53(H)
Weight : Approx. 320g with batteries.
Application range :
StainsLotionChemicalBrewBacteriologyFil
thy
waterPulpPharmacyFermentElectroplateDr
inkAquaculture etc.
Accessories : Carrying case, Instruction manual, Software,
Batteries, RS-232 Cable, 9pin to 25pin Gender
changer.
Option Accessories : pH 4 buffer solution, pH 7 buffer solution,
pH electrode, Temperature probe.
1-2 Electrical Specifications
( 23 ±5 )
Measurement Range Resolution Accuracy
pH 0 to 14pH 0.001pH
mV
0 to 600mV
601mV to 1999mV
0.1mV
±0.01pH
±(0.05%+1d)
±0.1%
Temp () 0 to 100 0.1 ±0.5
Temp () 32 to 200 0.1 ±0.9
2
Page 7
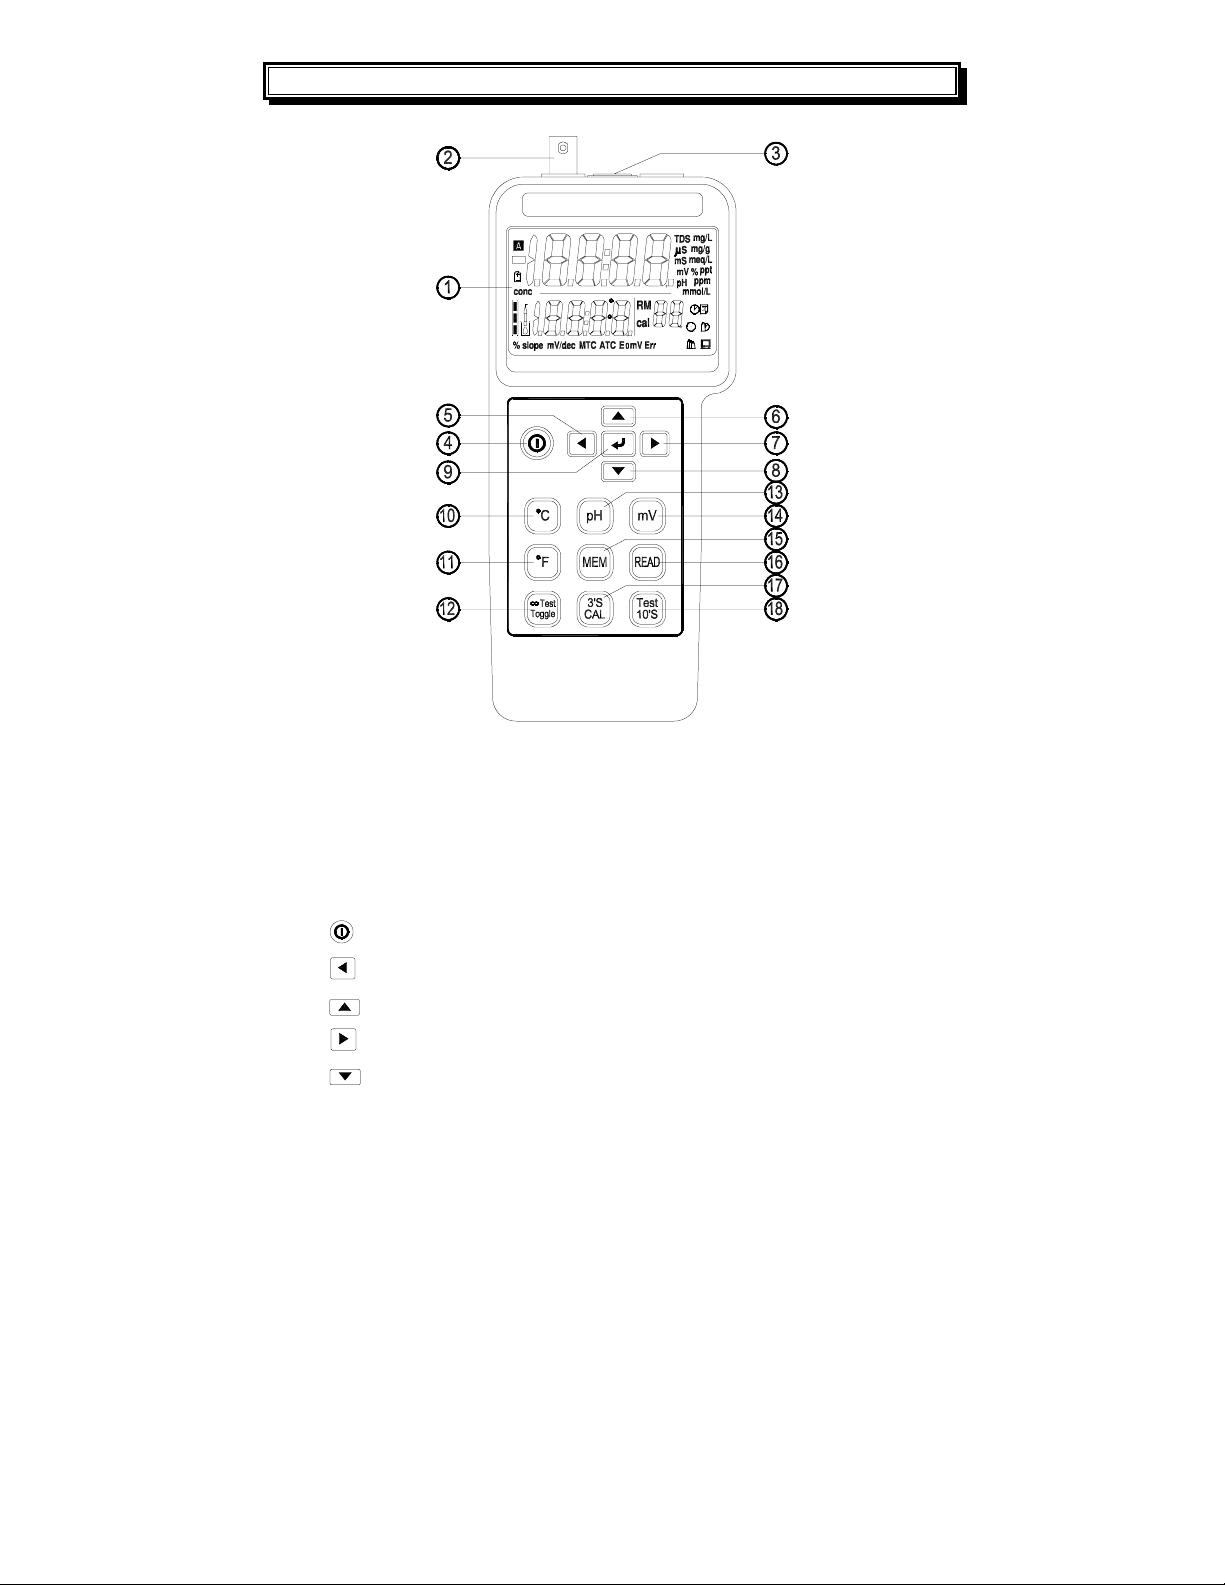
2. FRONT PANEL DESCRIPTION
(Fig-1)
1). LCD : Measured values, unit, symbols, and decimal points are
displayed.
2). Input socket : BNC connector for pH and mV.
3). Input socket : Earphone jack for temperature probe.
4). : Button for power on/off.
5). : Button for moving to the desired parameters.
6). : Button for increasing the value of parameters.
7). : Button for moving to the desired parameters.
8). : Button for decreasing the values of parameters.
3
Page 8

9). : Button for entering/escaping the mode of parameter settings.
Don’t release the key to increase the value rapidly.
Press button, it will display calendar year and month, day,
hour, minute, second.
If user press & hold the button for 2 seconds, it will perform
as the following:
Parameters (in sequence):
Calendar year (from Year 2000 to Year 2099)
Calendar month-day ( from 01-01 to 12-31)
Calendar hour-minute ( from 00h:00m to 23h:59m)
MTC (from 0.0 to 100.0 or 32.0 to 200.0)
Interval time (from 002s to 255s)
10). : Button for selecting temperature unit .
11). : Button for selecting temperature unit .
12). : In continuous measurement mode, pH Meter will not stop
measuring even the reading is same as previous reading.
Press
button again to hold the reading.
13). : Button for measuring pH.
14). : Button for measuring mV.
15).
: Single record : Press
button to get and memorise the
reading.
Continuous recording : Press & hold button for 2 secs, it will
start continous recording. (M1~M99 sets, MAX 3000 points/1 set).
Memory Clearing: Press & hold button and to re-power on the
meter, LCD will appear “ Clr ” indicator, it means that the
memories have been cleared.
16). : To read the memorized value for pHmVtemperature (R1~R99
sets).
17). : Press & hold button for 3 secs to enter into the adjustment mode,
select the reference calibrated value of pH or temperature by
pressing
, then pess button to complete the
adjustment.
4
Page 9
18).
: Press
button, the A indicator will flash and halt in LCD
(around 10 secs), the reading is also held , the meter stops
measuring at this moment.
3. pH TEMPERATURE COMPENSATION
Enable the meter to read solutions at various tem peratur es, the meter will
make the correc t electrode’s tem perature dependenc y to measure the pH
value. The compensation m ay be manual with a button adjustm ent on the
meter, or it may be automatic with an optional tem perature sensing pr obe
immersed in the test solution.
Ø Temperature compensation mode :
1). Automatic temperature compensation: To connect the optional
temperature probe with earphone jack and immerse in the test
solution, LCD will appear “ATC” sign.
2). Manual temperature compensation: You can enter temperature
between 0.0 to 100.0manually. (An ATC probe will override
manual compensation.) The preset temperature of pH Meter 0 is
25.Use
button or button to change temperature. Pr ess
to enter the value and move on.
4. CALIBRATING PROCEDURE
4-1 pH Calibrating Procedure
It is necessary to make the following calibration procedures, if user
intends to keep the instrum ent and the electrode at high accur acy or it is
the first time for user to use the meter and the electrode.
If the inaccuracy of the electrode is too large, LCD will display “Err”.
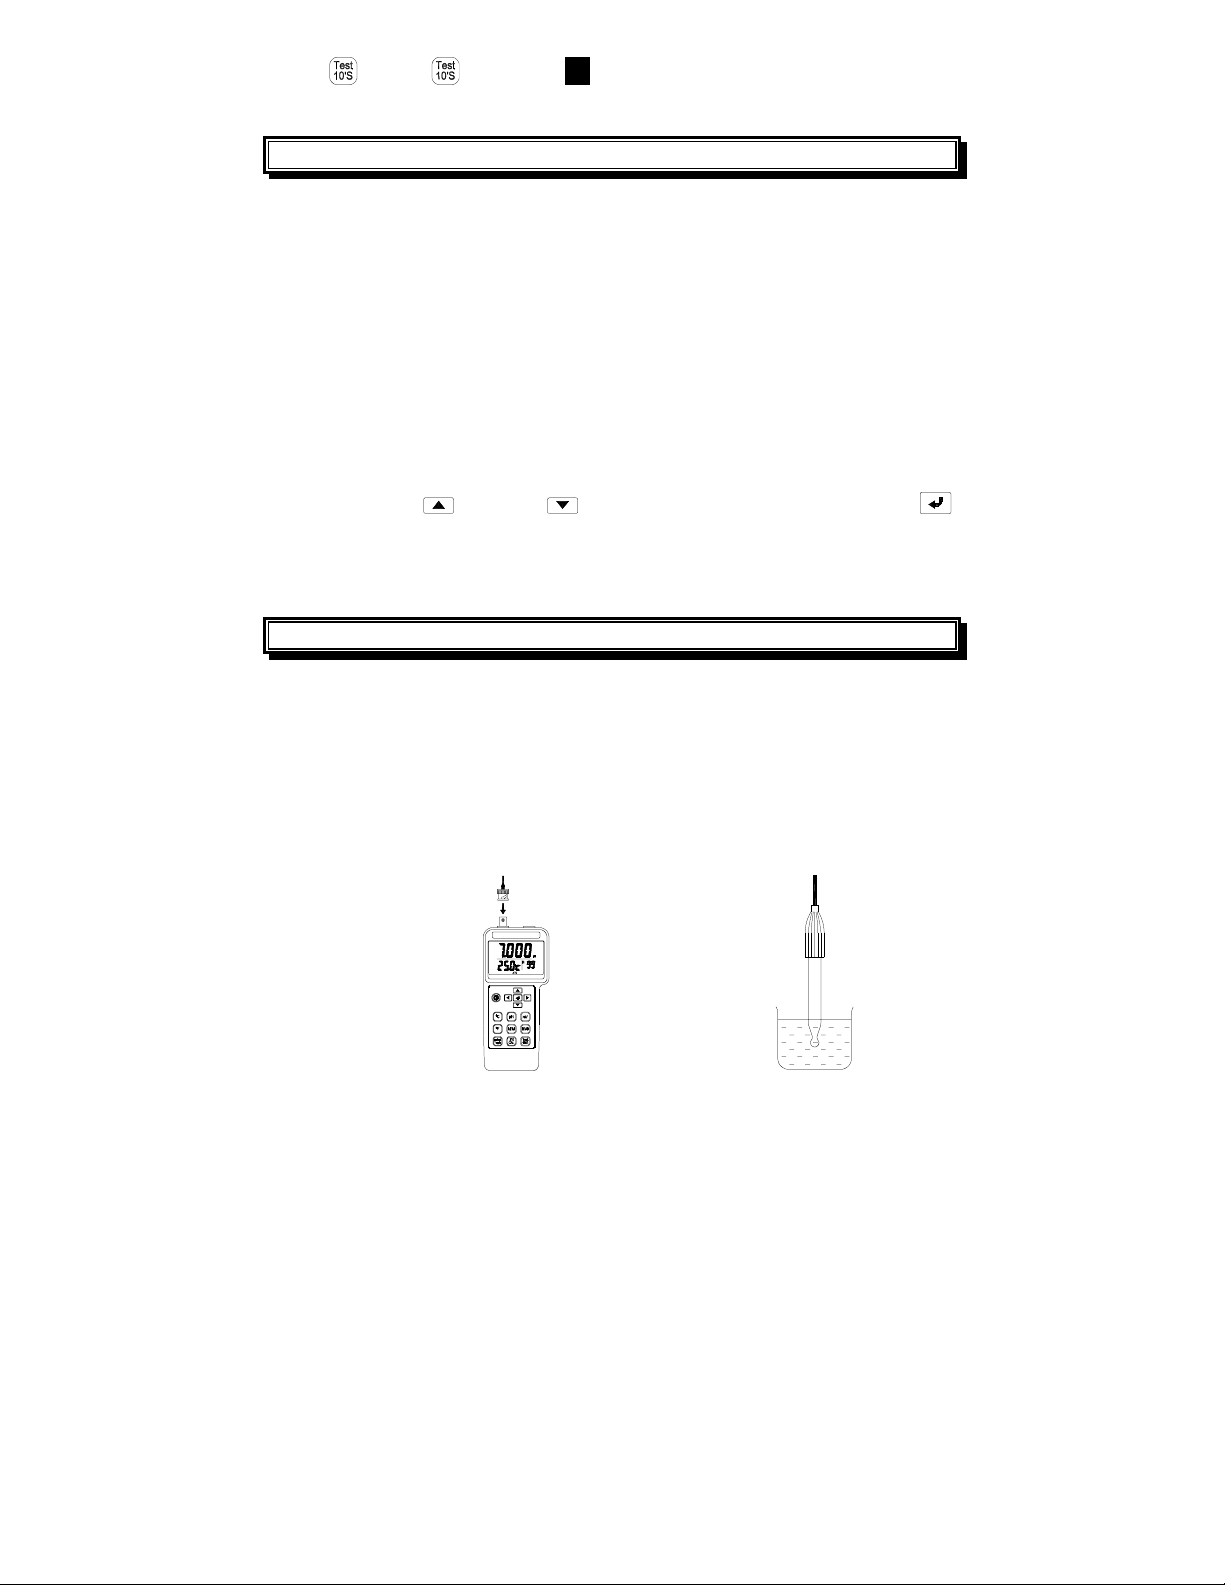
1). Connect the combination pH electrode to the BNC socket and place the
electrode into the buffer solution (pH 7.00).
(Fig-2) (Fig-3)
5
Page 10
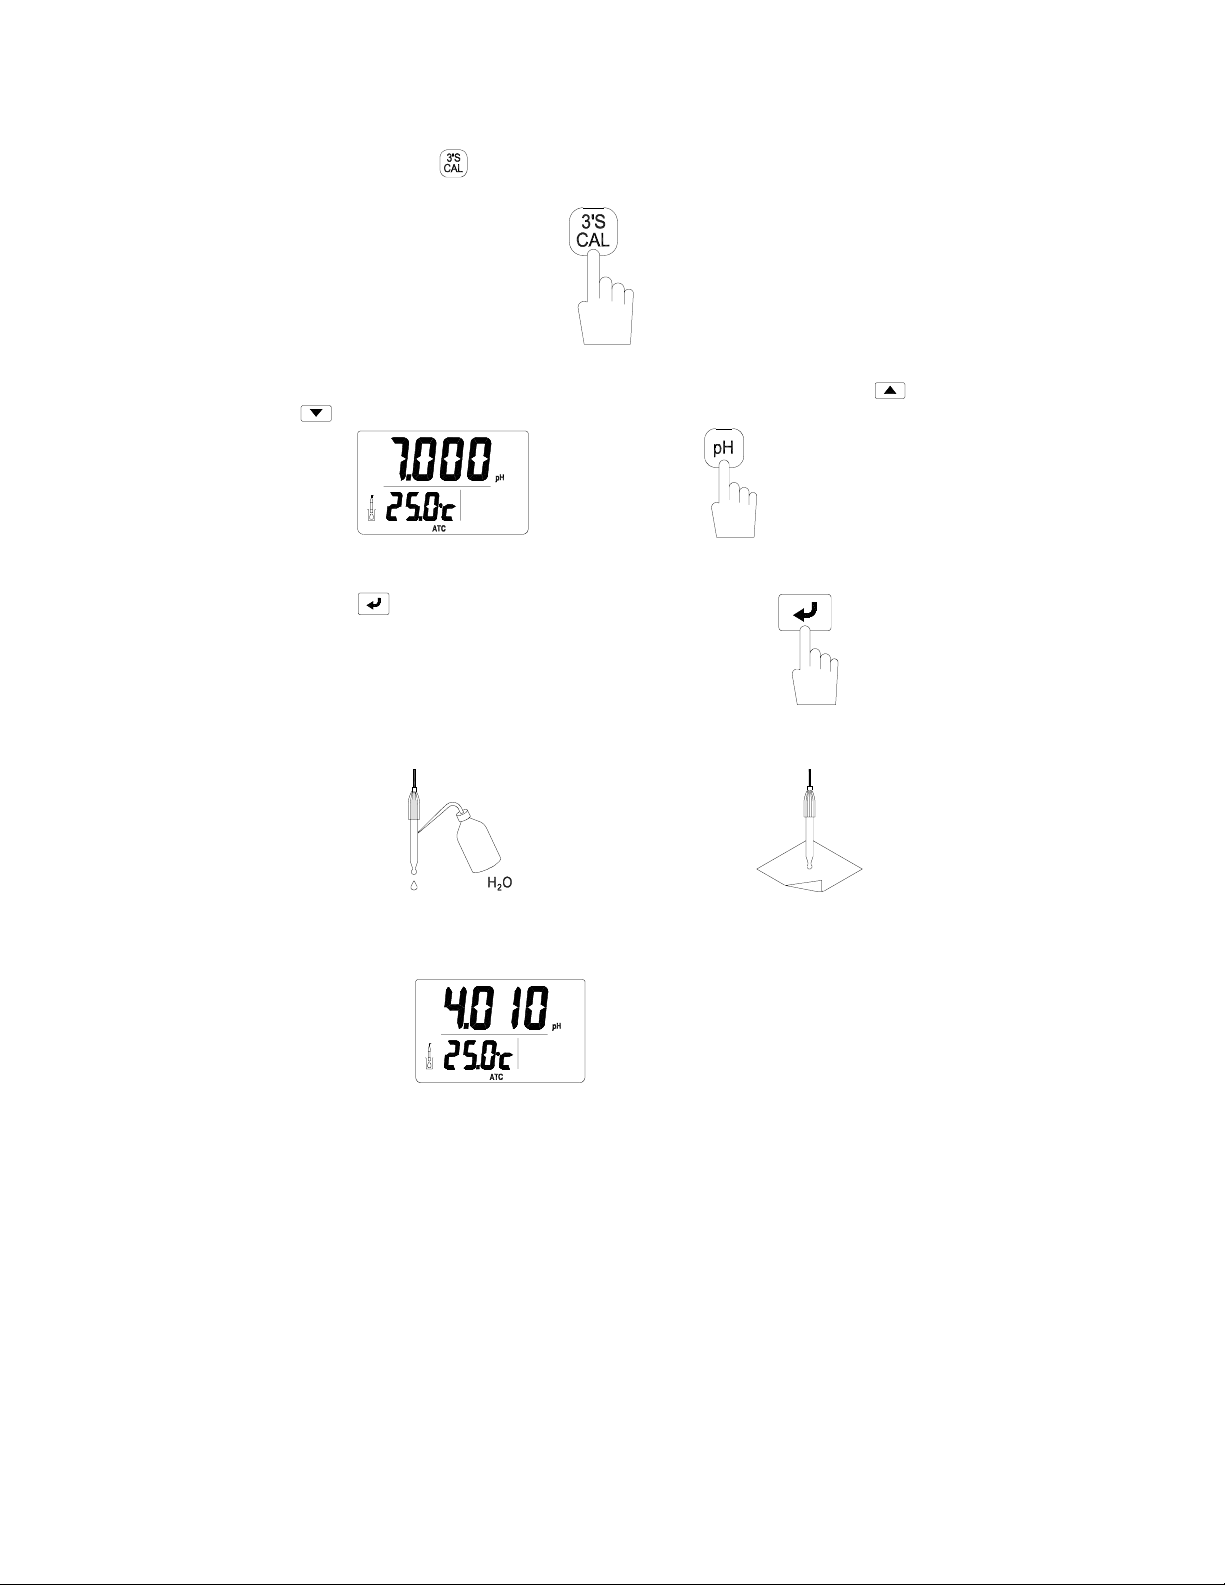
2). Select ATC mode or MTC mode.
3). Waiting for the reading to be stable.
4). Press and hold button for 3 seconds to enter into the calibration
mode.
(Fig-4)
5). Select pH mode (The preset value is pH 7.000 or user can press or
to select).
(Fig-5) (Fig-6)
6). Press button to complete offset calibration.
7). Rinse electrode and blot with lint-free tissue.
(Fig-8) (Fig-9)
8). Slope calibration (pH 4.010), repeat steps 2 to 7.
6
(Fig-7)
Page 11

(Fig-10)
9). Press button for 3 seconds, LCD will display the date of last
adjustment.
4-2 Temperature Calibrating Procedure
1). Plug in the “optional temperature probe“ into the earphone jack. Place
the temperature probe into the 0 ice solution.
2). Press
button is hold 3 seconds.
3). Select mode.
4). Press button then complete calibration.
5. MEASURING PROCEDURE
5-1 pH Measurement
Calibrate the instruments and pH electrode before measuring.
1). Connect the combination pH electrode to the BNC socket.
2). Power on the instrument by pushing the power on/off button.
3). If the operation is under the “ATC”, then please refer to 3-1 measuring
procedures.
4). If the operation is under the “MTC”, then please refer to 3-2 measuring
procedures.
5). Place the electrode into the measured solution, the instrument will
display the pH value.
6). After making the measurement, please rinse the electrode with distilled
water.
5-2 mV Measurement
The instrument builds in mV measuring function letting you make ORP or
other precised mV measurements.
Select the mV function, the meter will show the mV values on the display.
5-3 Temperature Measurement
1). Plug in the “optional temperature probe” into the earphone jack.
2). Press or button to select temperature units.
3). Place the temperature probe into the tested solution, then the meter
will show the temperature value and ATC sign.
If take the temperature probe out, then the meter will show the MTC
sign.
7
Page 12

5-4 Auto Data Hold
Press and hold button dur ing measurement. W hen the reading is
stable,
A indicator will flash and then halt on LCD.
If you want to cancel the data hold status, press button again to
revert to the measuring status and
A will disappear.
Press button again to hold the reading.
5-5 Data Record (Record & Read & Clear)
1). Memorize the readings
pH Meter can memorize the readings up to 99 records. Press button
to record data represented by M(1~99). If press
button and hold
around 2 seconds, it will enter into continuous recording status.
(M1~M99 sets, MAX 3000 points).
2). Recalling memory
Press READ button, LCD will show the last record.
Press or button to review the data you recorded.
R1 to R99 indicates the order of readings you measured.
3). Memories Clearance
Press and hold button to re-power on the meter. It will enter into the
measuring mode until LCD shows “ Clr ” symbol.
6. SETTING PROCEDURE
Pls. follow the following steps to set up the parameters for Calendar
Year,
compensation,
Monty-Day & Time (Hour:Minute), Manual temperature
Interval time of record.
1). Press around 2 secs until hearing second beeping and the digit is
flicking in LCD, then you are entering into the setting mode.
2). To set up for Year by pressing.
8
Page 13
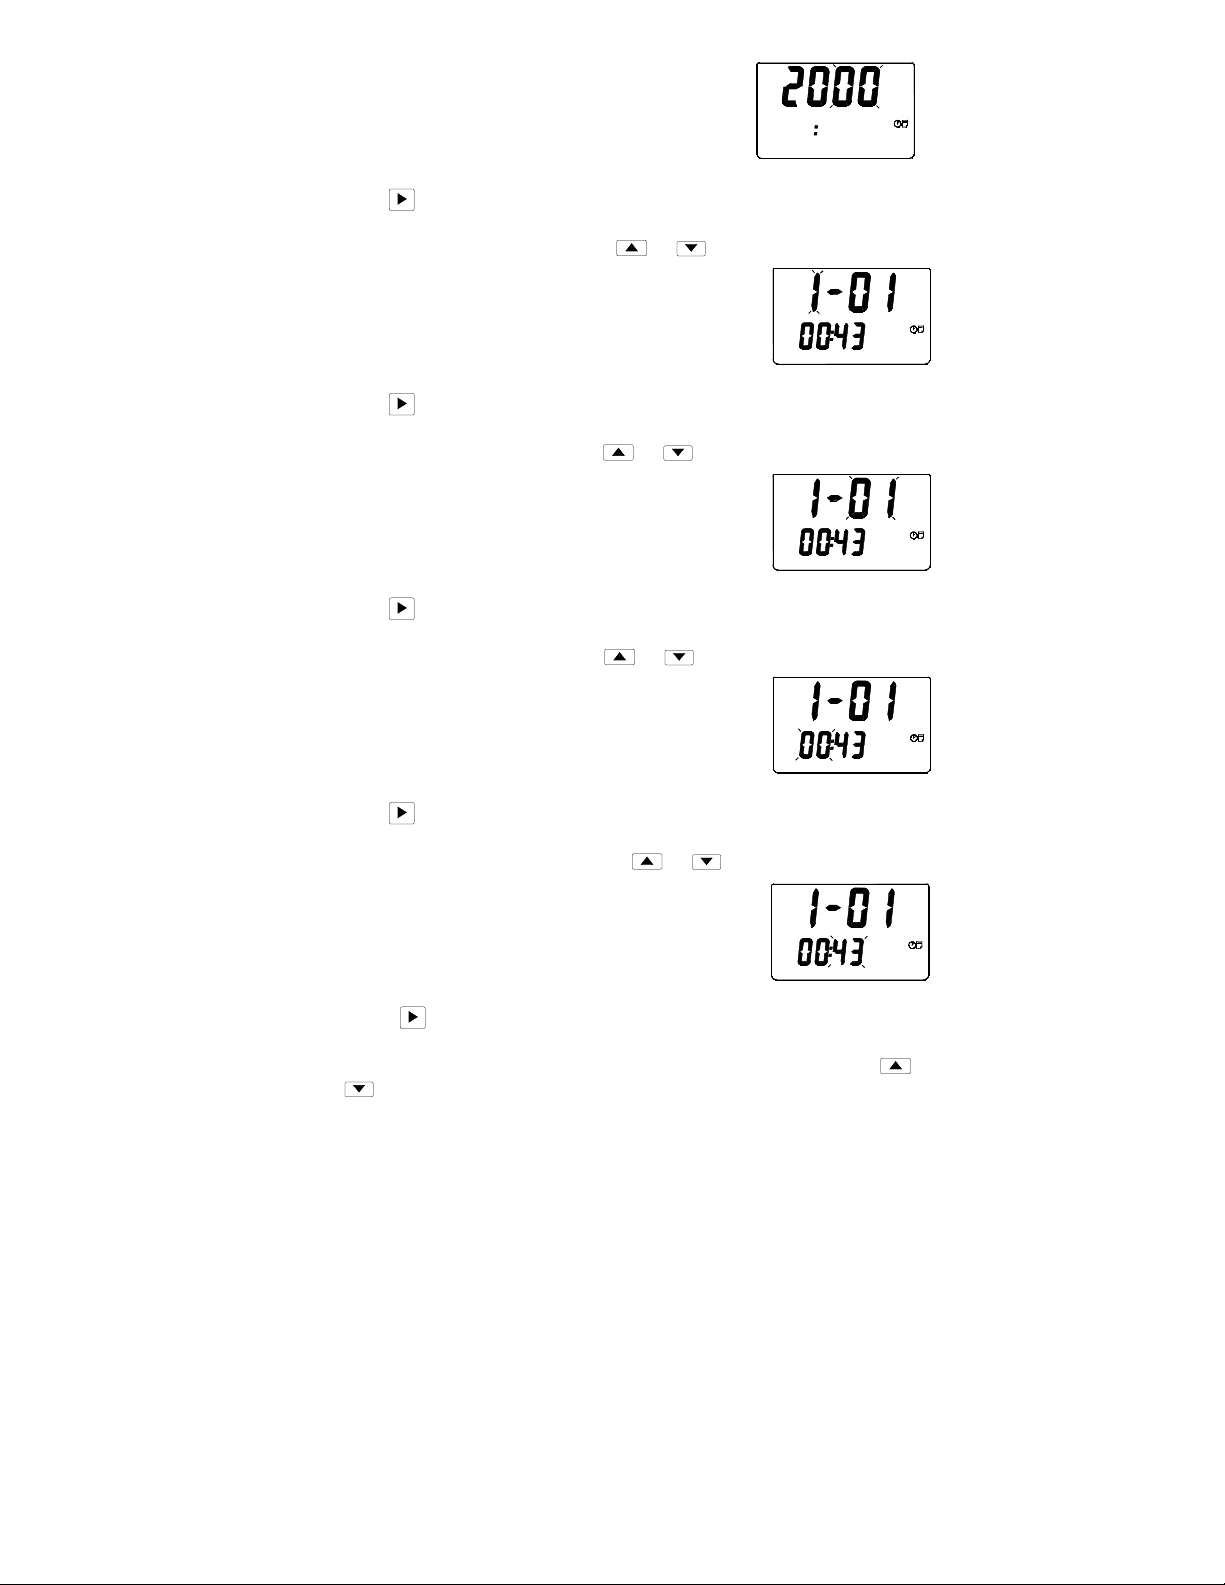
3). Press to set up for next parameter.
4). To set up for Month by pressing or button.
5). Press to set up for next parameter.
6). To set up for Date by pressing or button.
7). Press to set up for next parameter.
8). To set up for Hour by pressing or button.
31
31
31
9). Press to set up for next parameter.
10). To set up for Minute by pressing or button.
31
11). Press to set up for next parameter.
12). To set up for Manual temperature compensation by pressing or
button.
9
31
Page 14
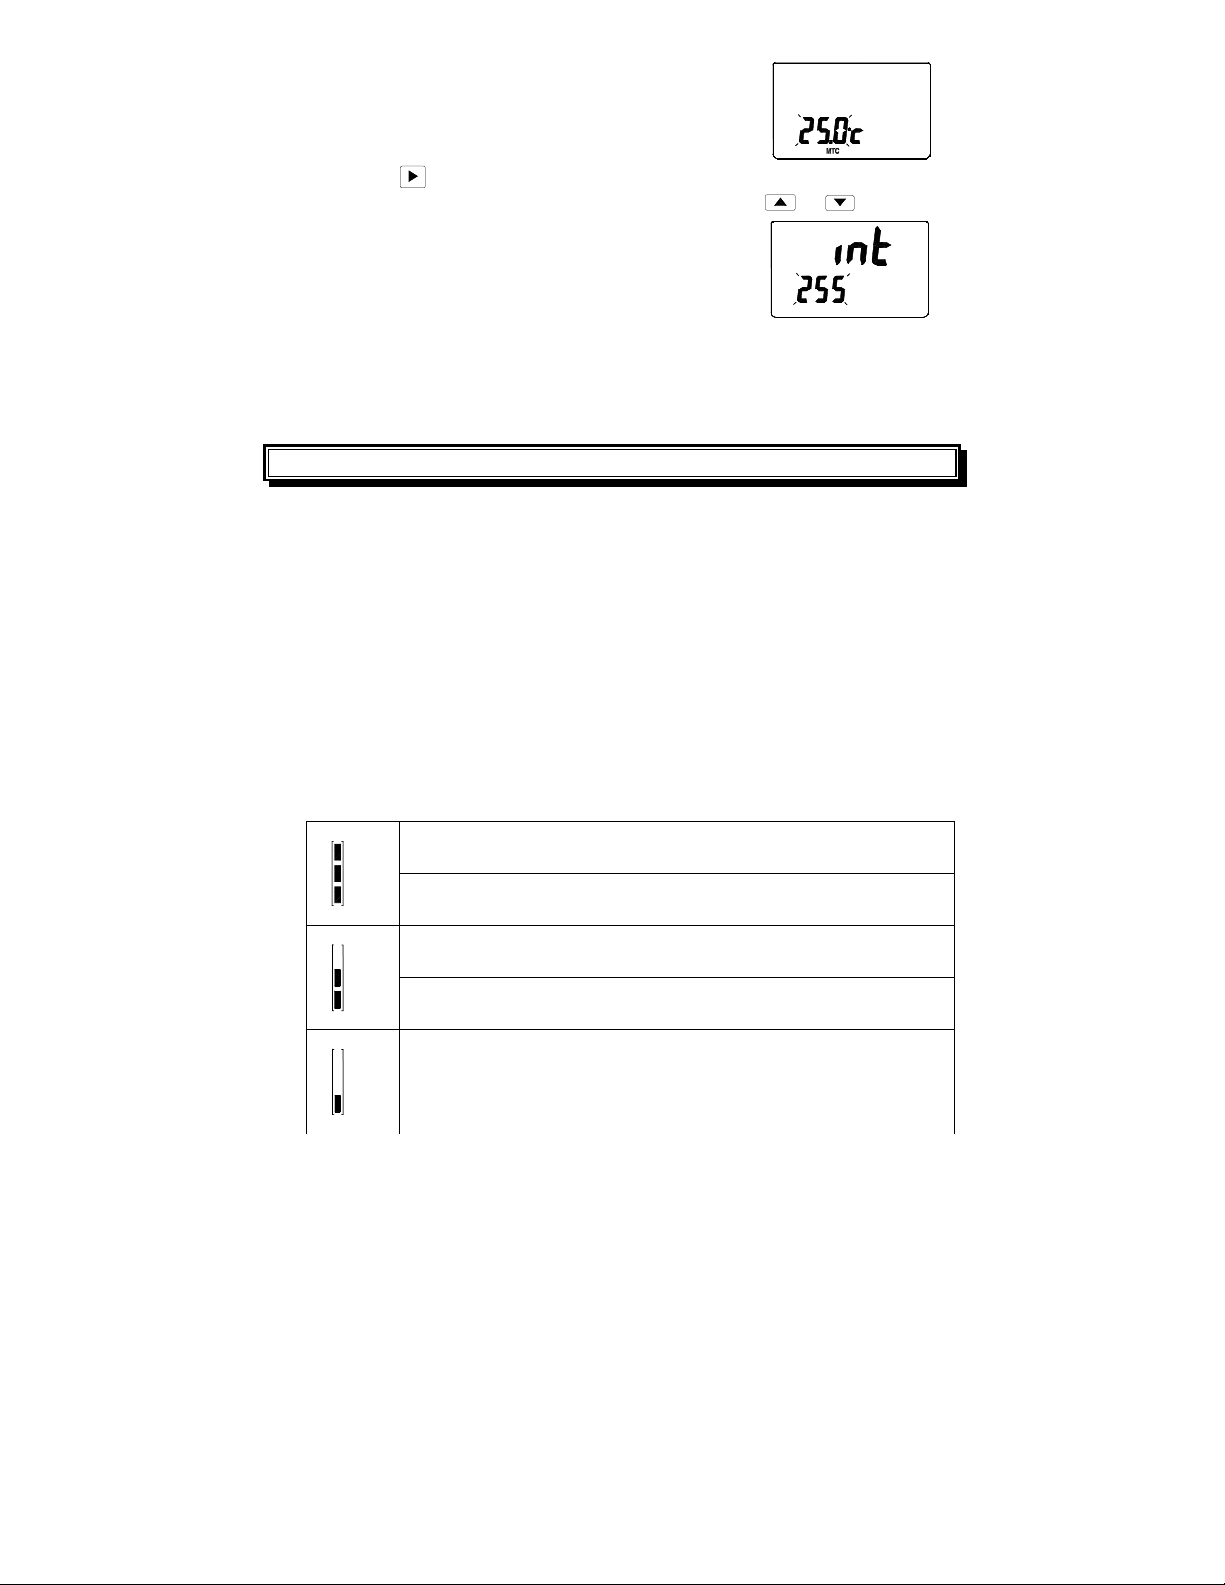
13). Press to set up for next parameter.
14). To set up for Interval time of record by pressing or button.
15). Press enter to finish the settings and return to measuring mode.
7. ELECTRODE PRECAUTIONS AND LIMITATIONS
1). Do not allow the electrode to go dry.
2). Do not wipe the electrode tip. Blot it with a lint-free tissue.
3). Do not leave the electrode in organic solvents, strongly basic solutions,
concentrated fluoride solutions or hydrofluoric acid f or ex tended per iods.
If measurem ents are m ade in these solutions , readings should be taken
quickly and the electrode should be rinsed immediately with deionized
water. After rinsing the electrode, soak it in 7.0 buffer for two hours
before using again.
4). Do not use the electrodes in solutions that exceed a temperature range
of 0to100.
5). pH only
98.0 – 102.0%
Electrode is in good condition.
95.0 – 97.9%
Electrode needs to be cleaned.
92.0 – 94.9%
10
Page 15
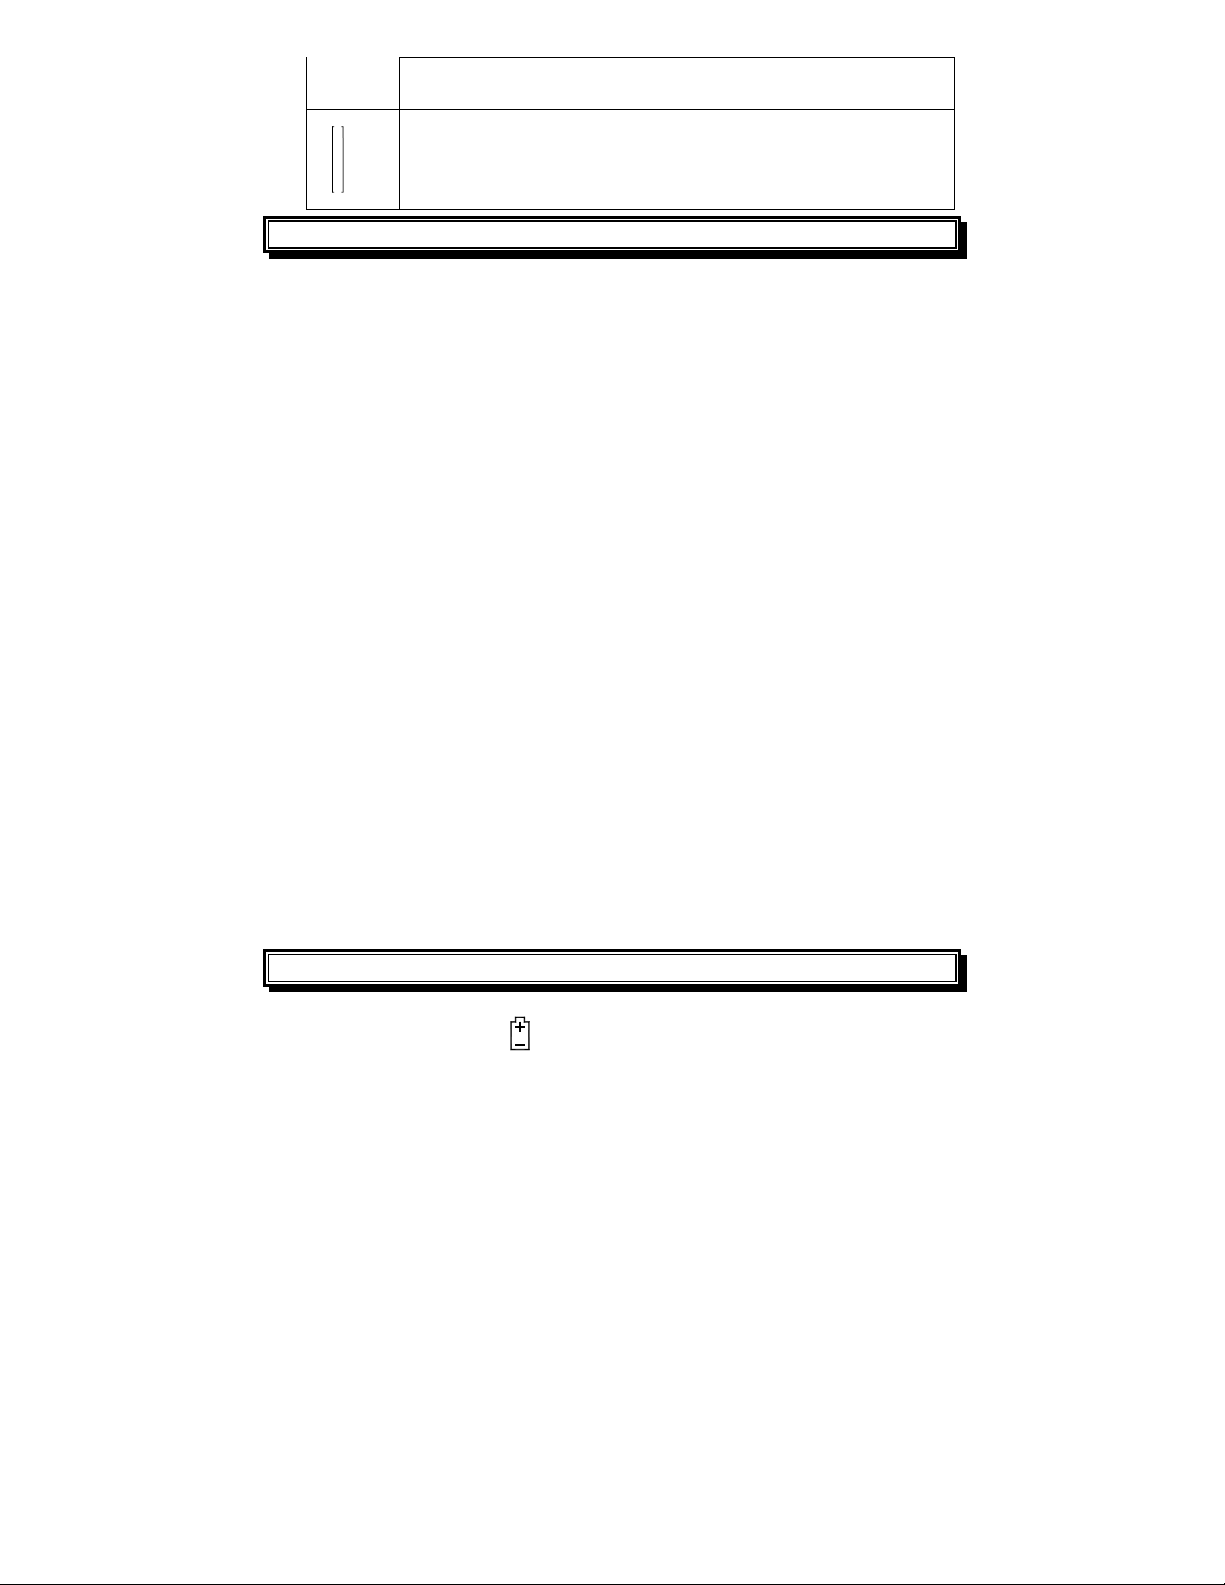
Electrode needs to be cleaned.
Electrode needs to be renewed.
8. MAINTENANCE
The proper way of using and protecting the electrode, it will prolong the life
of the glass membrane. If your pH electrode is exhibiting by slow
response, low slope values, continuous drift, or erratic readings, f ollow the
procedures listed below.
8-1 Cleaning the pH Bulb
1). Protein contamination: Soak the electr ode bulb/tip in a 10% solution of
pepsin for 30 minutes. Rinse with deionized water and soak the
electrode in 7.0 buffer for two hours before using.
2). Oil contamination: Wash the electrode with a 50% water-acetone
solution. Do not soak the electrode in the acetone solution, or it will
deteriorate the bottom seals of the plastic electrode. Rinse with deionized
water and soak the electrode in 7.0 buffer for two hours before using.
8-2 Recondition the pH Bulb
Only resort to this procedure if the preceding maintenance and cleaning
procedures fail to restore acceptable electrode performance. Rinse
immediately with deionized water and soak in 7.0 buffer for two
hoursbefore using.
CAUTION: To prevent permanent damage, care should be taken to
prevent liquid permeating the pH Meter. Meanwhile, the
batteries should be taken out if user will not use the meter for a
long period. Also, to choose the fitted pH electrode is required.
9. BATTERY REPLACEMENT
1). When the LCD show “ ”, it indicates that the normal battery output is
less than 6.8V. It is time to replace the battery.
11
Page 16
2). Remove the battery cover.
3). Replace with 6 AA (heavy duty type) and place back the cover.
4). Make sure the battery cover is secured after replacing the battery.
10. DATALOGGING
10-1 Software
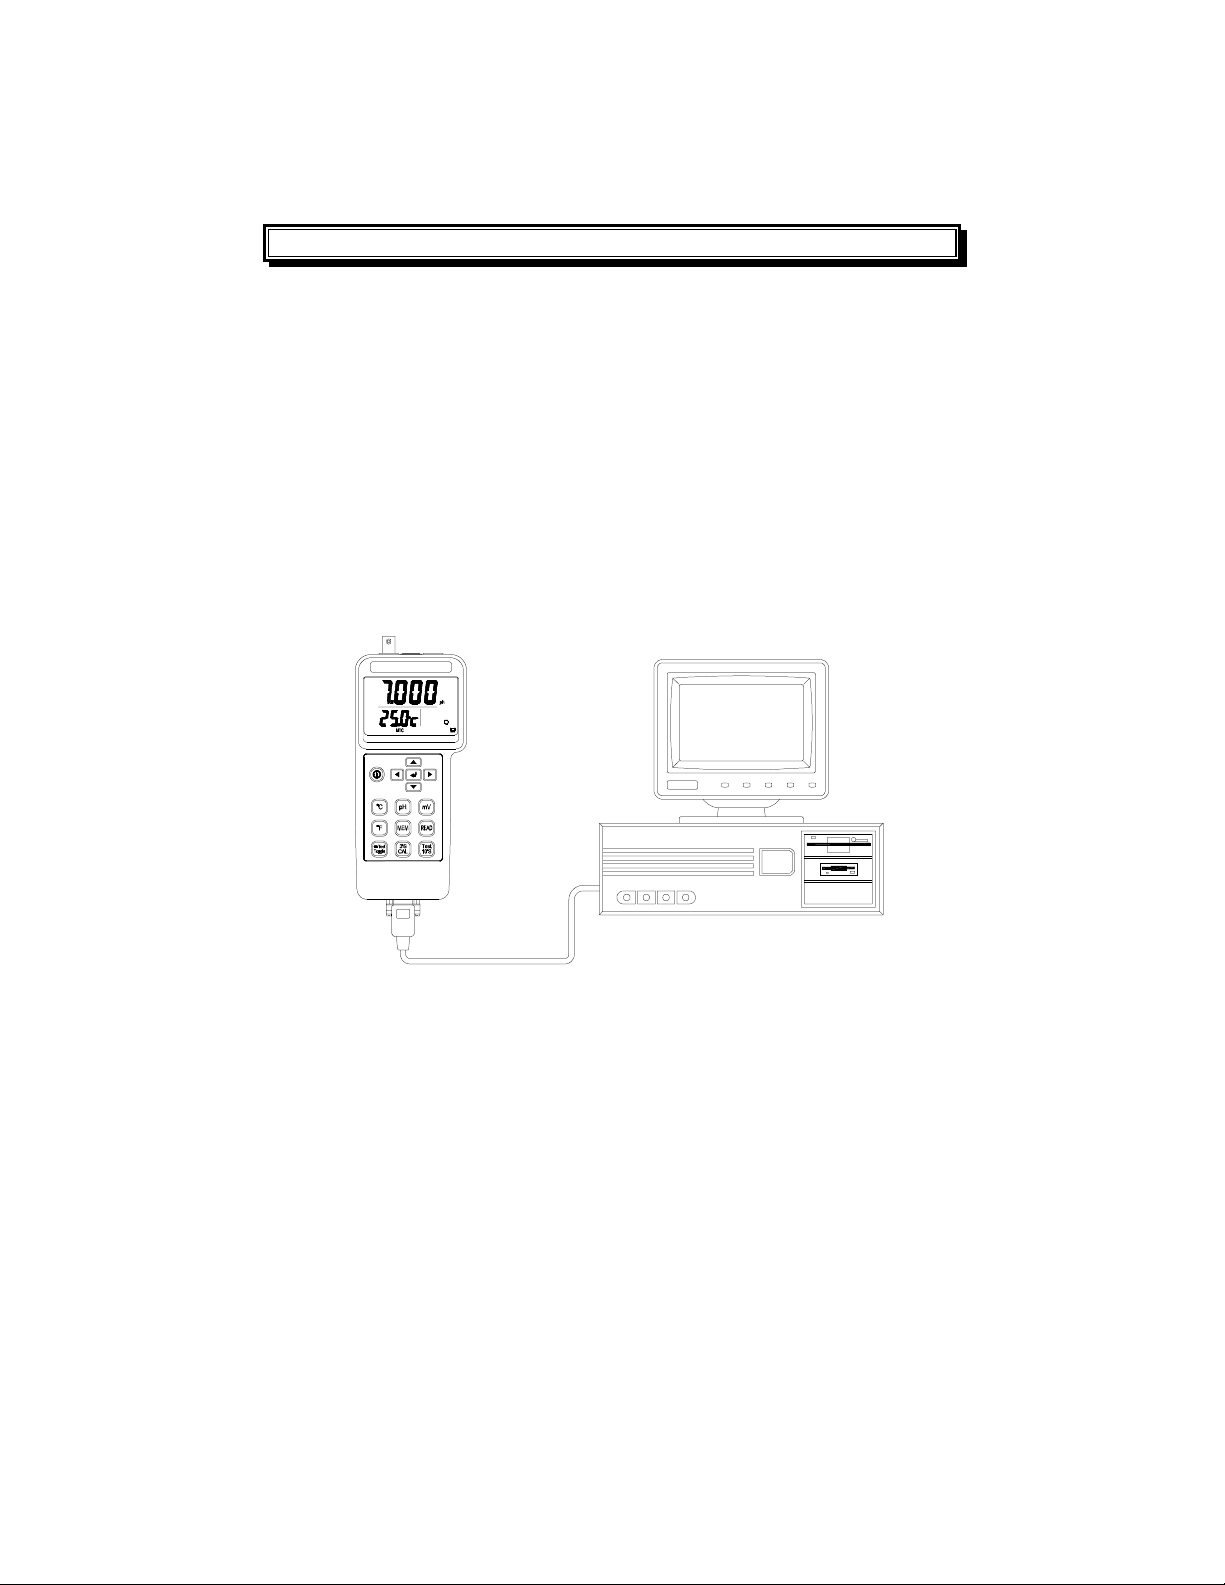
1). PC Hardware requirements
q HDD 1.44MB disk, 486 PC or above, with COM1, COM2 commports.
q EGA or higher monitor.
q 4M bytes or more memory size.
2). PC Hardware setup :
Switch off all power related to your PC.
Connect the socket (female) of RS-232 cable to PC’s COM1 or
COM2 commport.
Switch on all power.
Connect the socket (male) of RS-232 cable to pH Meter.
12
Page 17
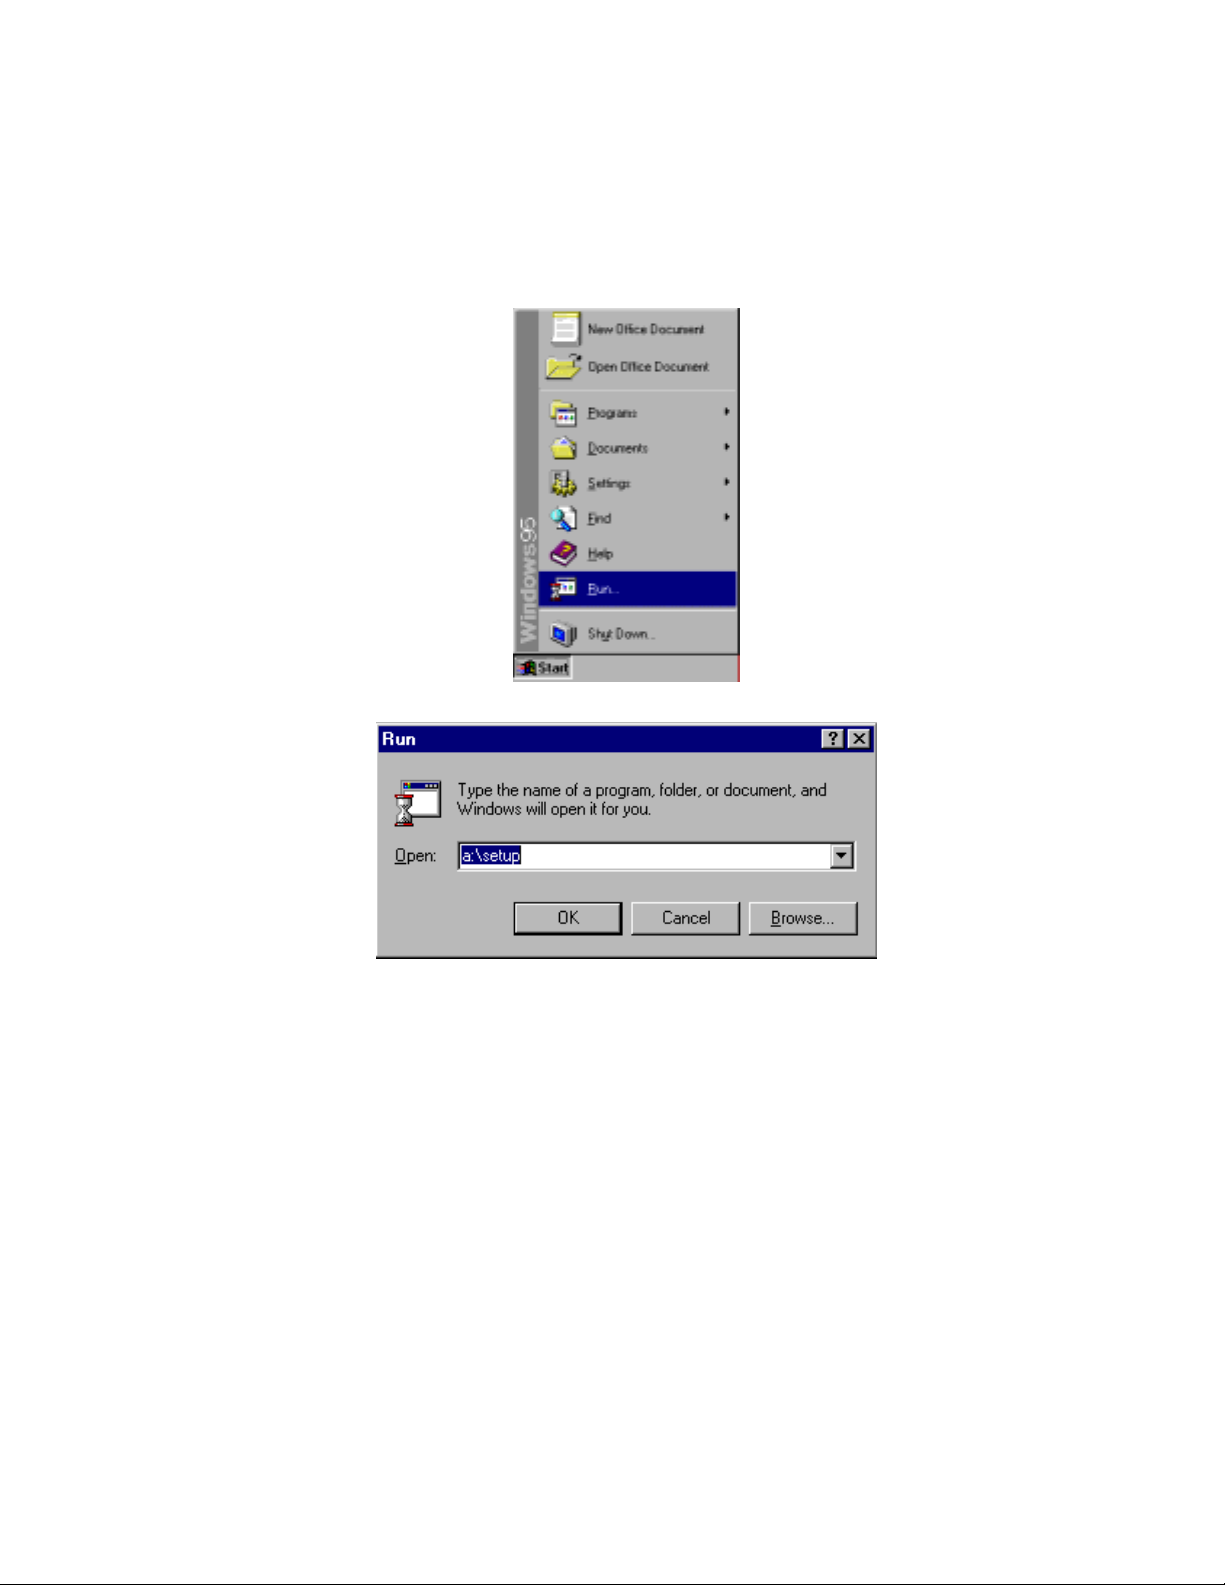
3). Software Installation
Before installing the software of pH Meter, start up windows 95/98
operating ststem.
Close all application.
Insert the pH Meter disk1 into drive A or drive B.
Click “ Start ” menu and move mouse pointer to “ Run ”, then click this
button.
A “ Run ” window appears then user need to key in “A:\SETUP” or
“B:\SETUP” and click “OK”.
Setup program will run automatically.
13
Page 18
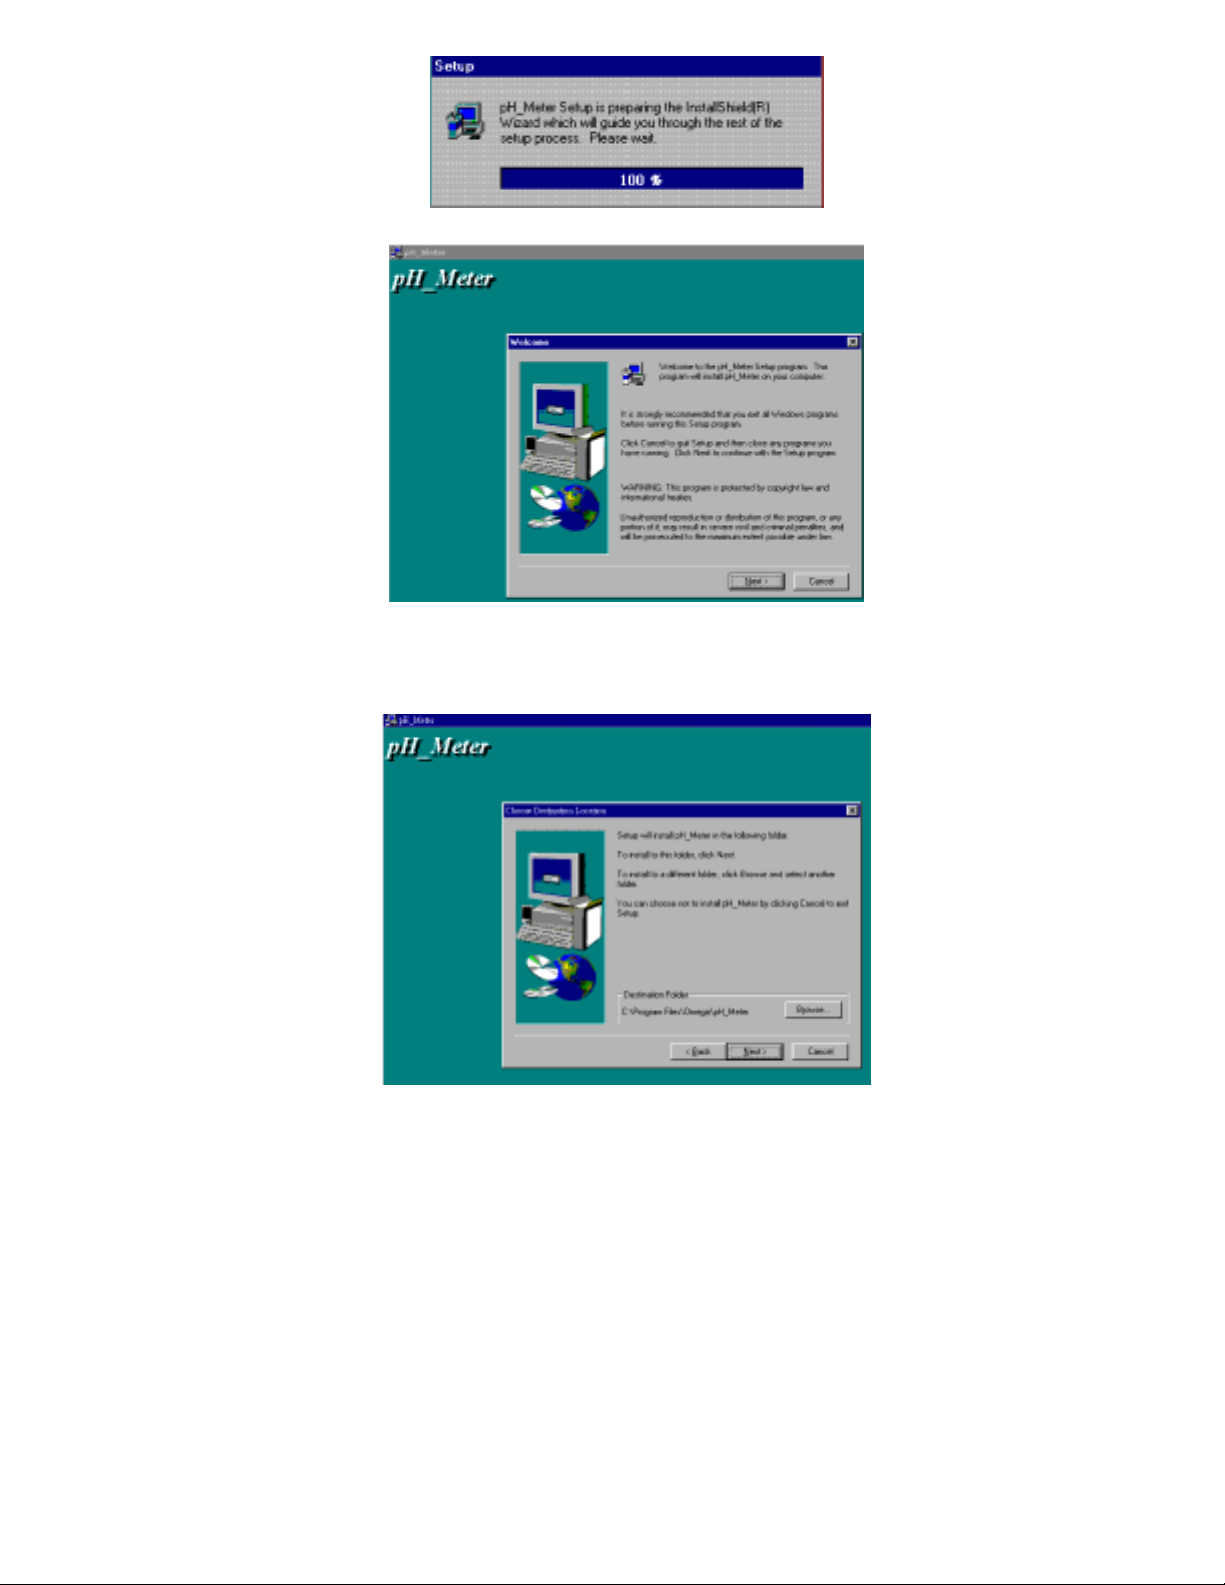
Click “ NEXT ”
ê
ê
14
Page 19
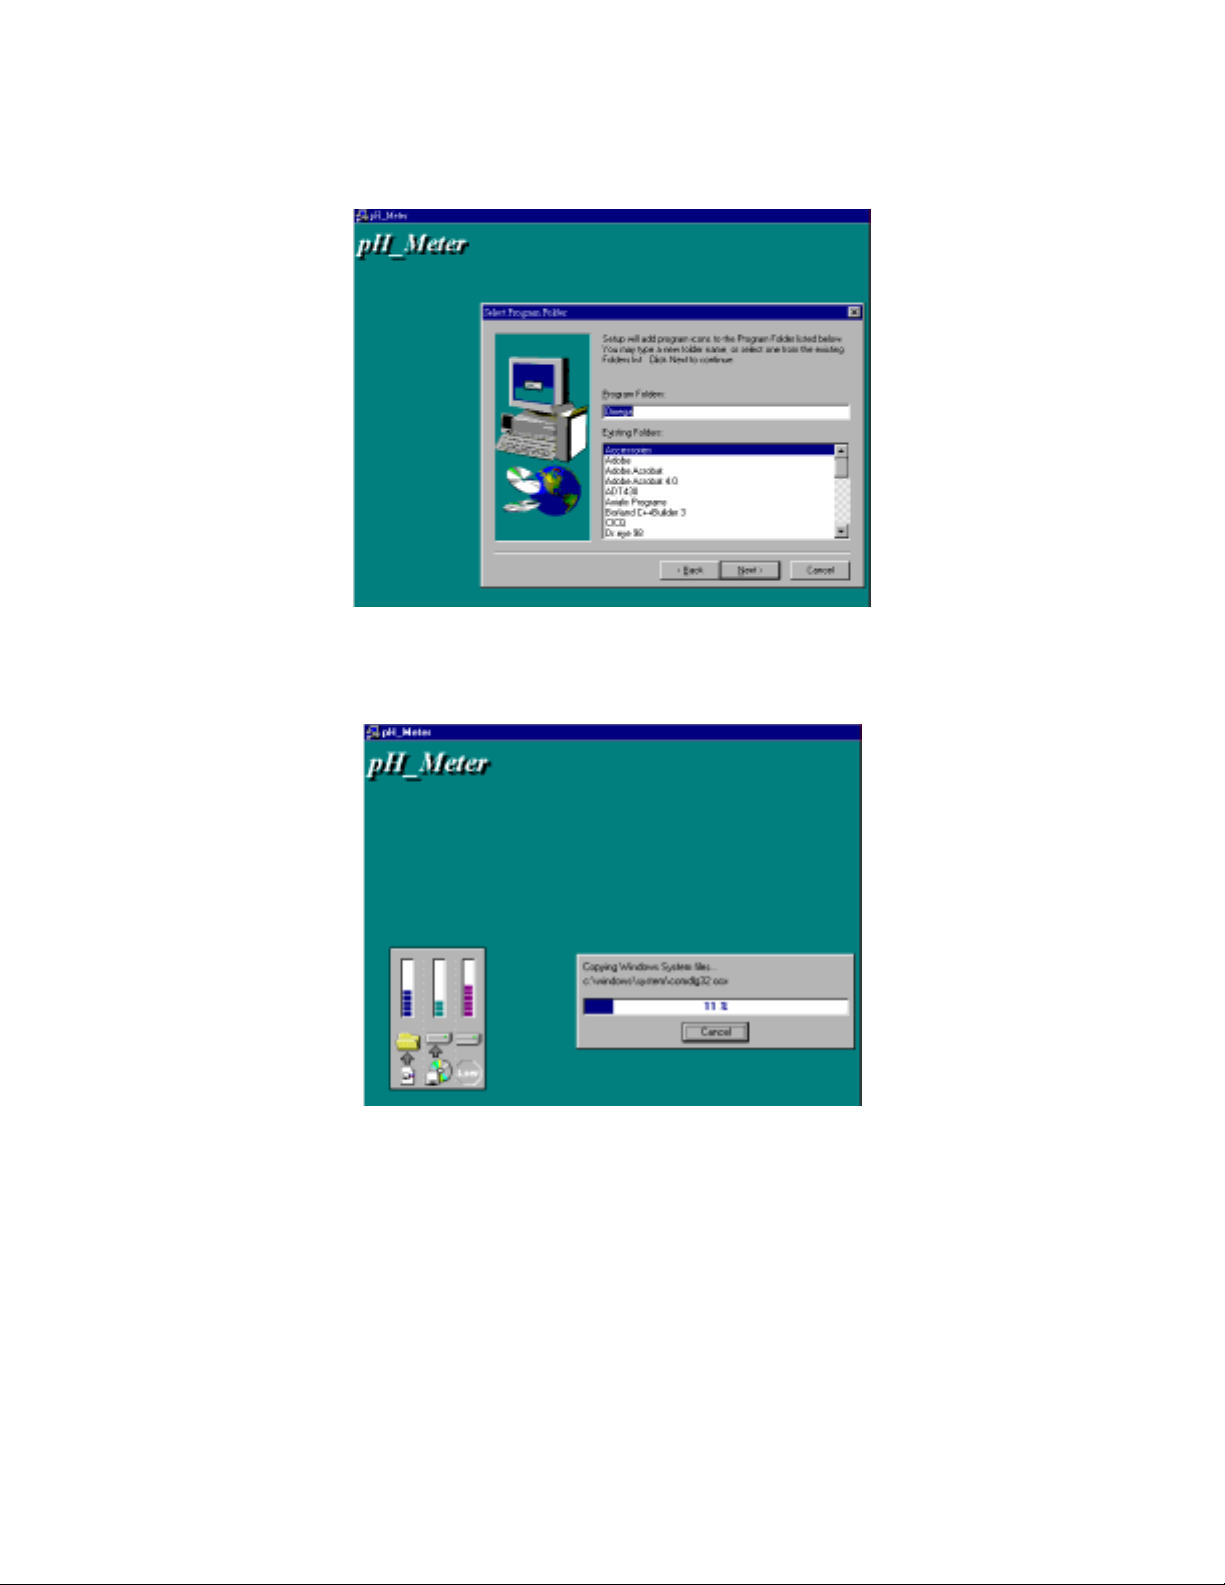
a). Click “ NEXT ”
or
b). If user is willing to set up on a different folder, click “ Browse ”.
ê
Click “ NEXT ”
ê
15
Page 20
ê
ê
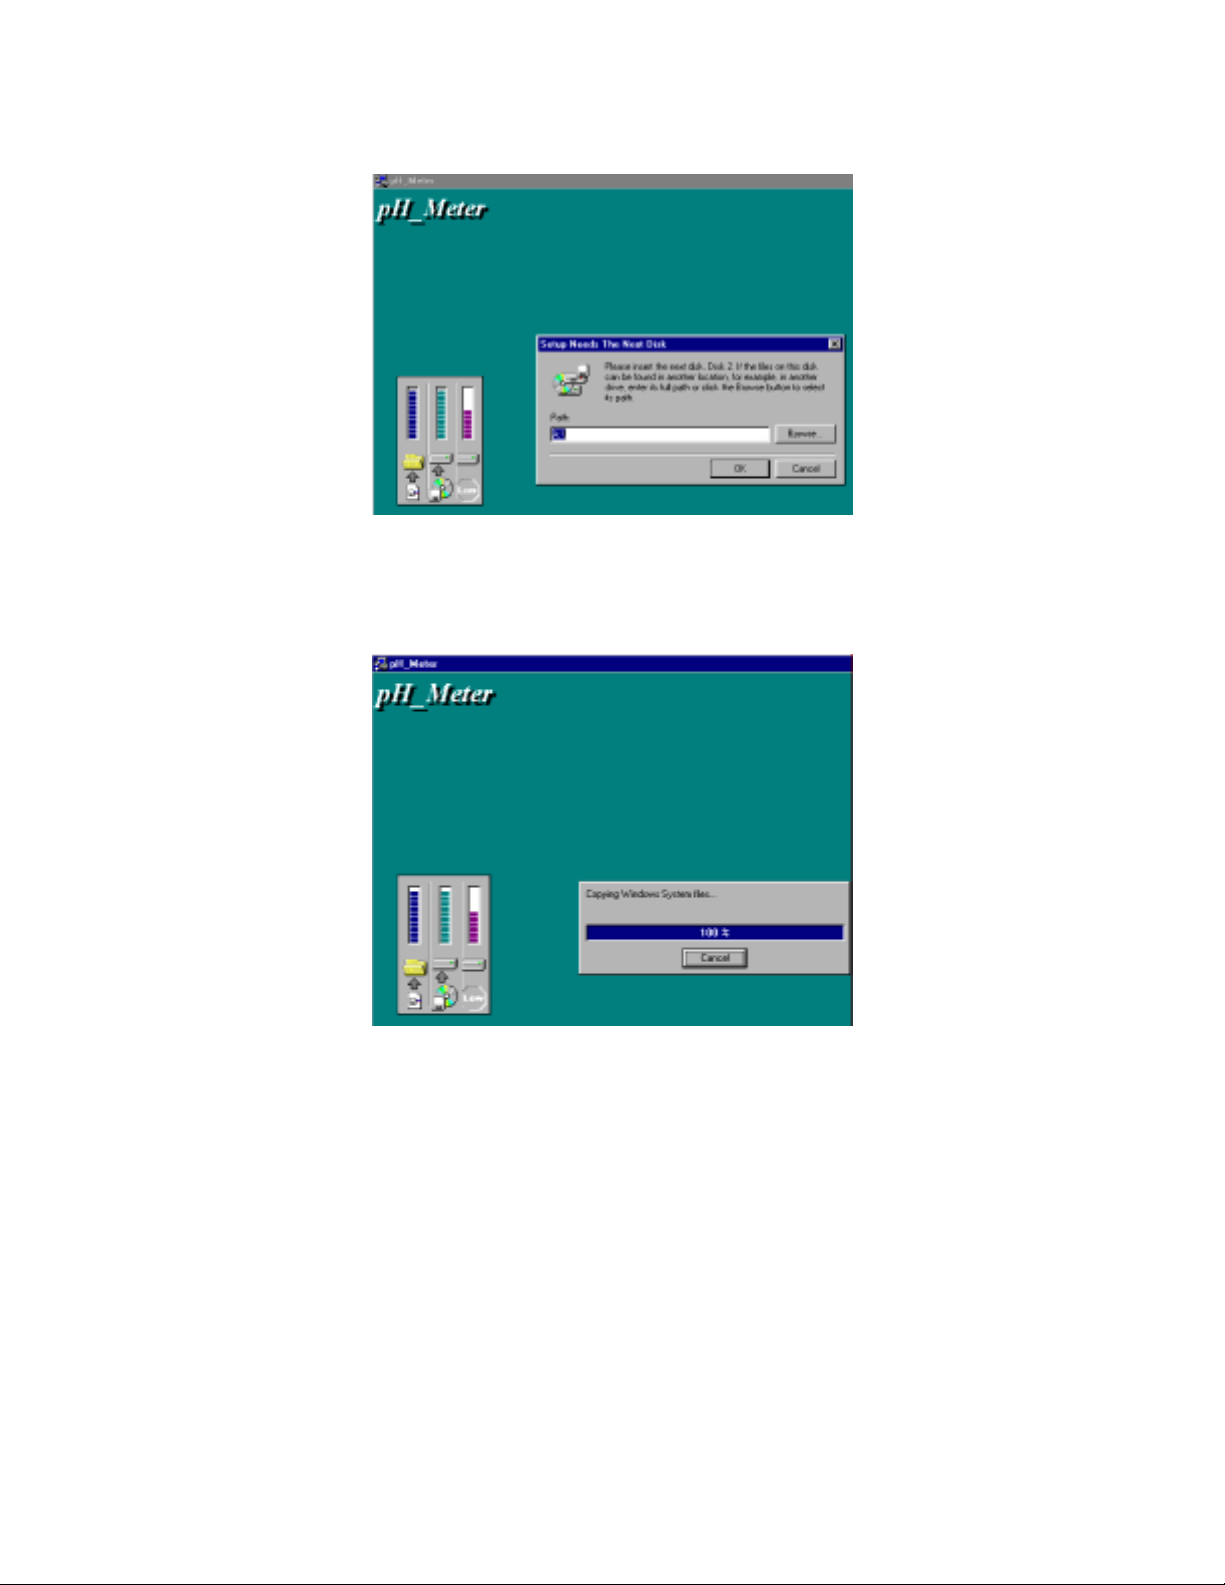
Insert the pH Meter Disk2 into drive A or B, and then click “OK”.
16
Page 21

17
Page 22
10-2 Parameter Settings
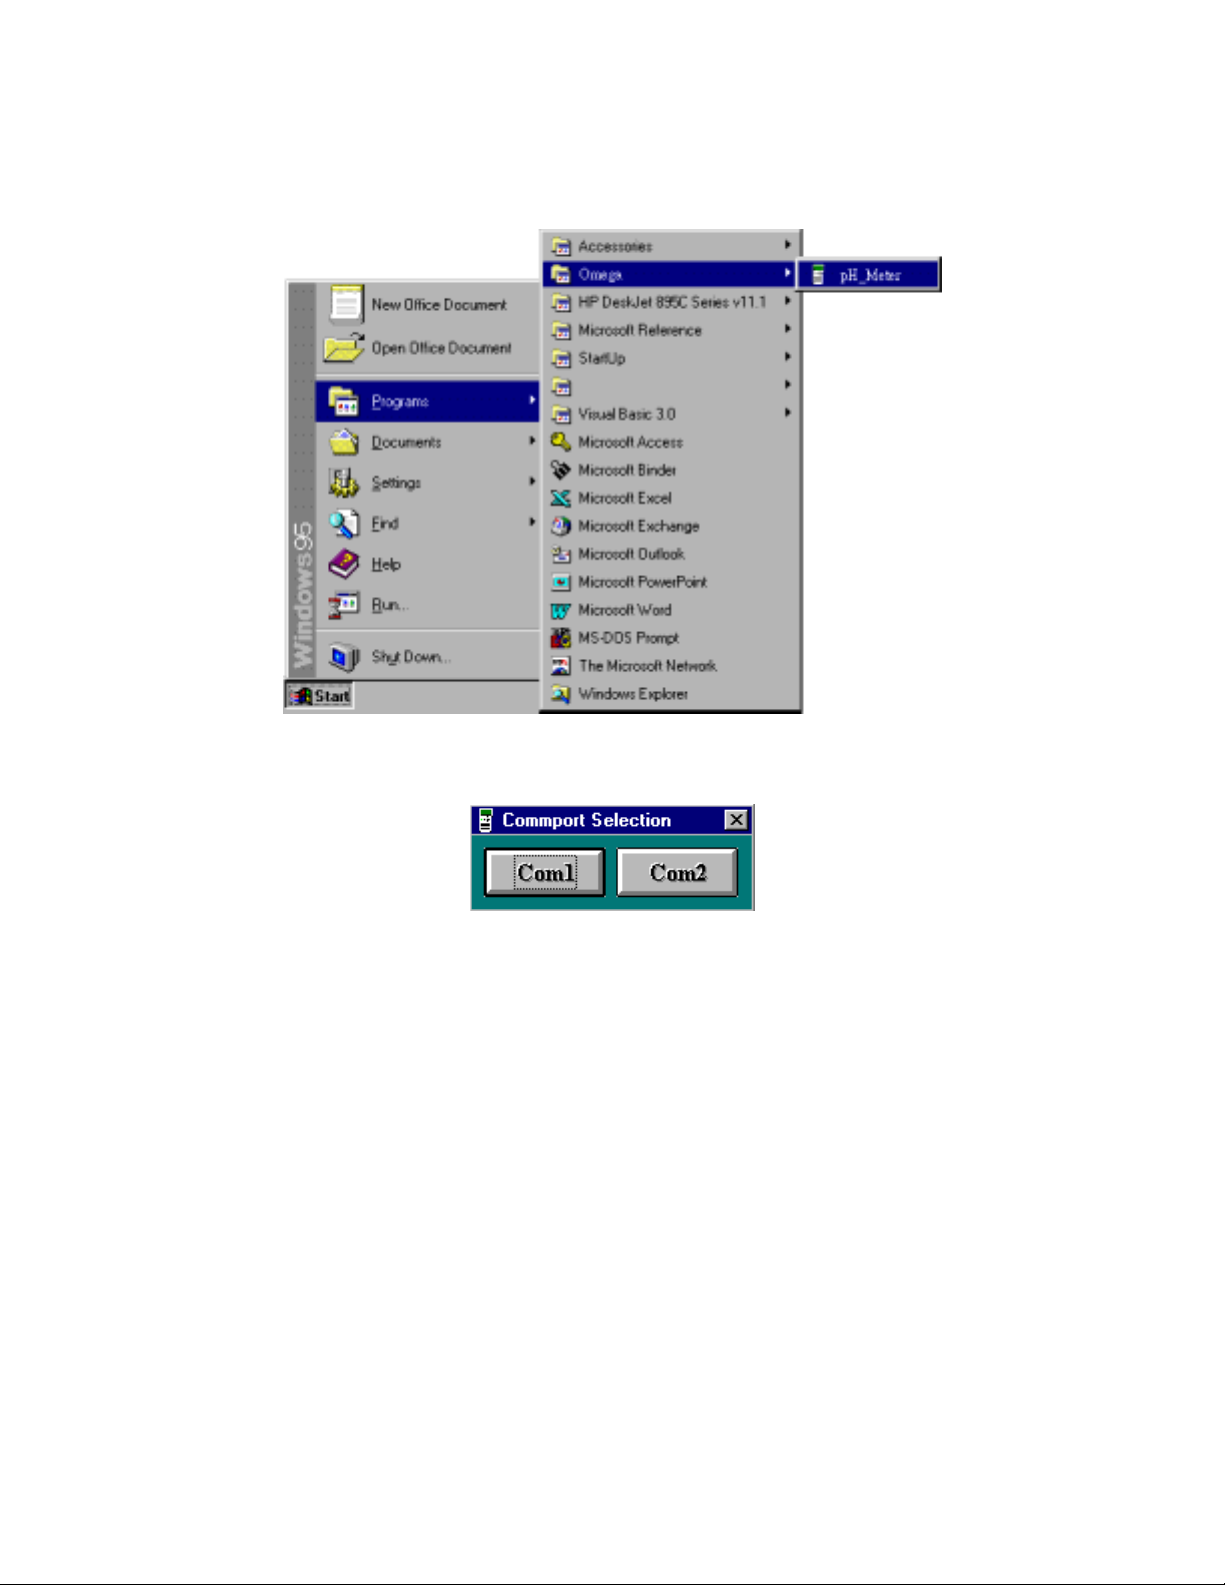
1). Start up program:
Run the pH Meter software
Click “ Start ” from Start menu, m ove m ouse pointer to “ Program s ”,
then move pointer to “ Omega ” (default), move m ouse pointer to “pH
Meter ” then click.
Move mouse pointer to available commport (COM1 , COM2) then click.
2). RS-232 Settings :
Baud rate : 9600 Parity : None
Data bits : 8 Stop bit : 1
18
Page 23
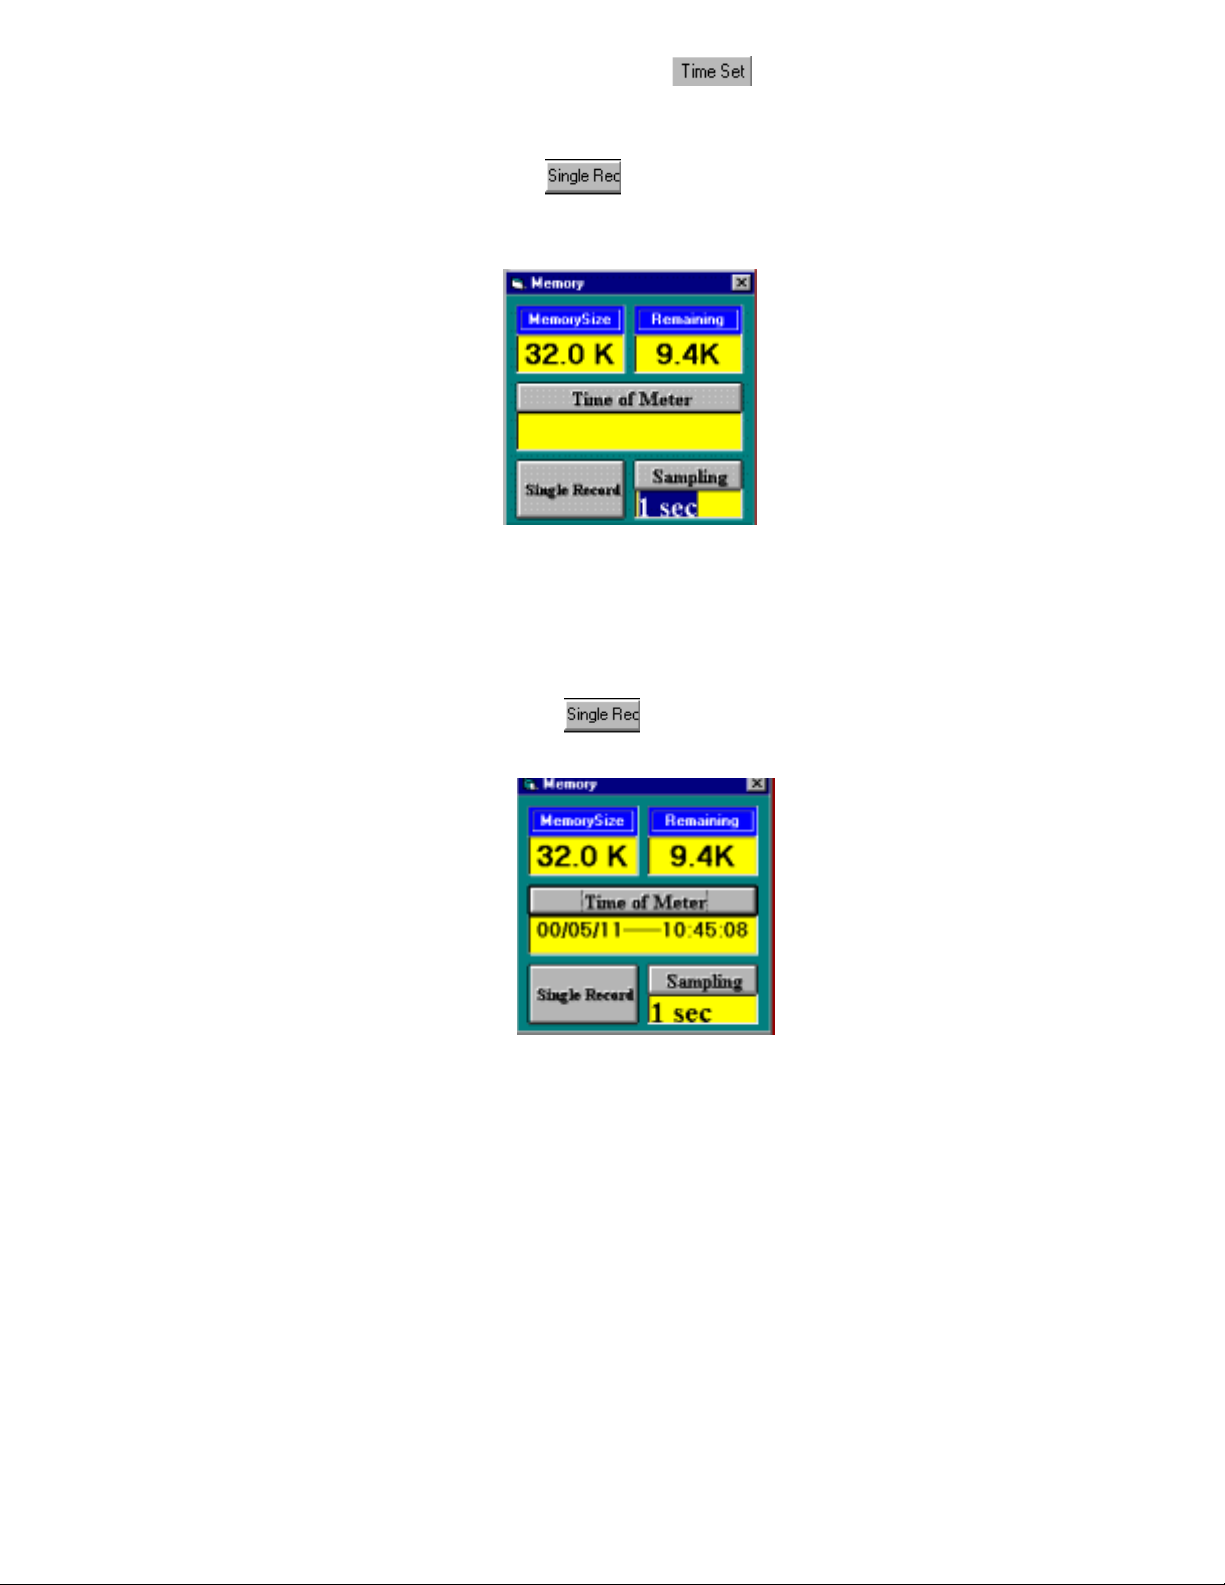
3). Time SettingsMove mouse pointer to and click it to input
the time of PC to the pH Meter.
4). Inner sampling time of pH Meter
Move mouse pointer to then click it.
In the “Memory” window, drag mouse to highlight the values of “
Sampling ”.
Input the sampling time that you intend to set up, then click
“Sampling” button to complete it.
10-3 Download datalogger (pH Meter è PC)
To read recorded data in memory (EEPROM).
1). Single Record
Move mouse pointer to and click it.
A “Memory” window appears.
As above, the total memory size is 32K, 9.4K is remained. The inner
time of pH Meter is 00/05/11-10:45:08.
19
Page 24
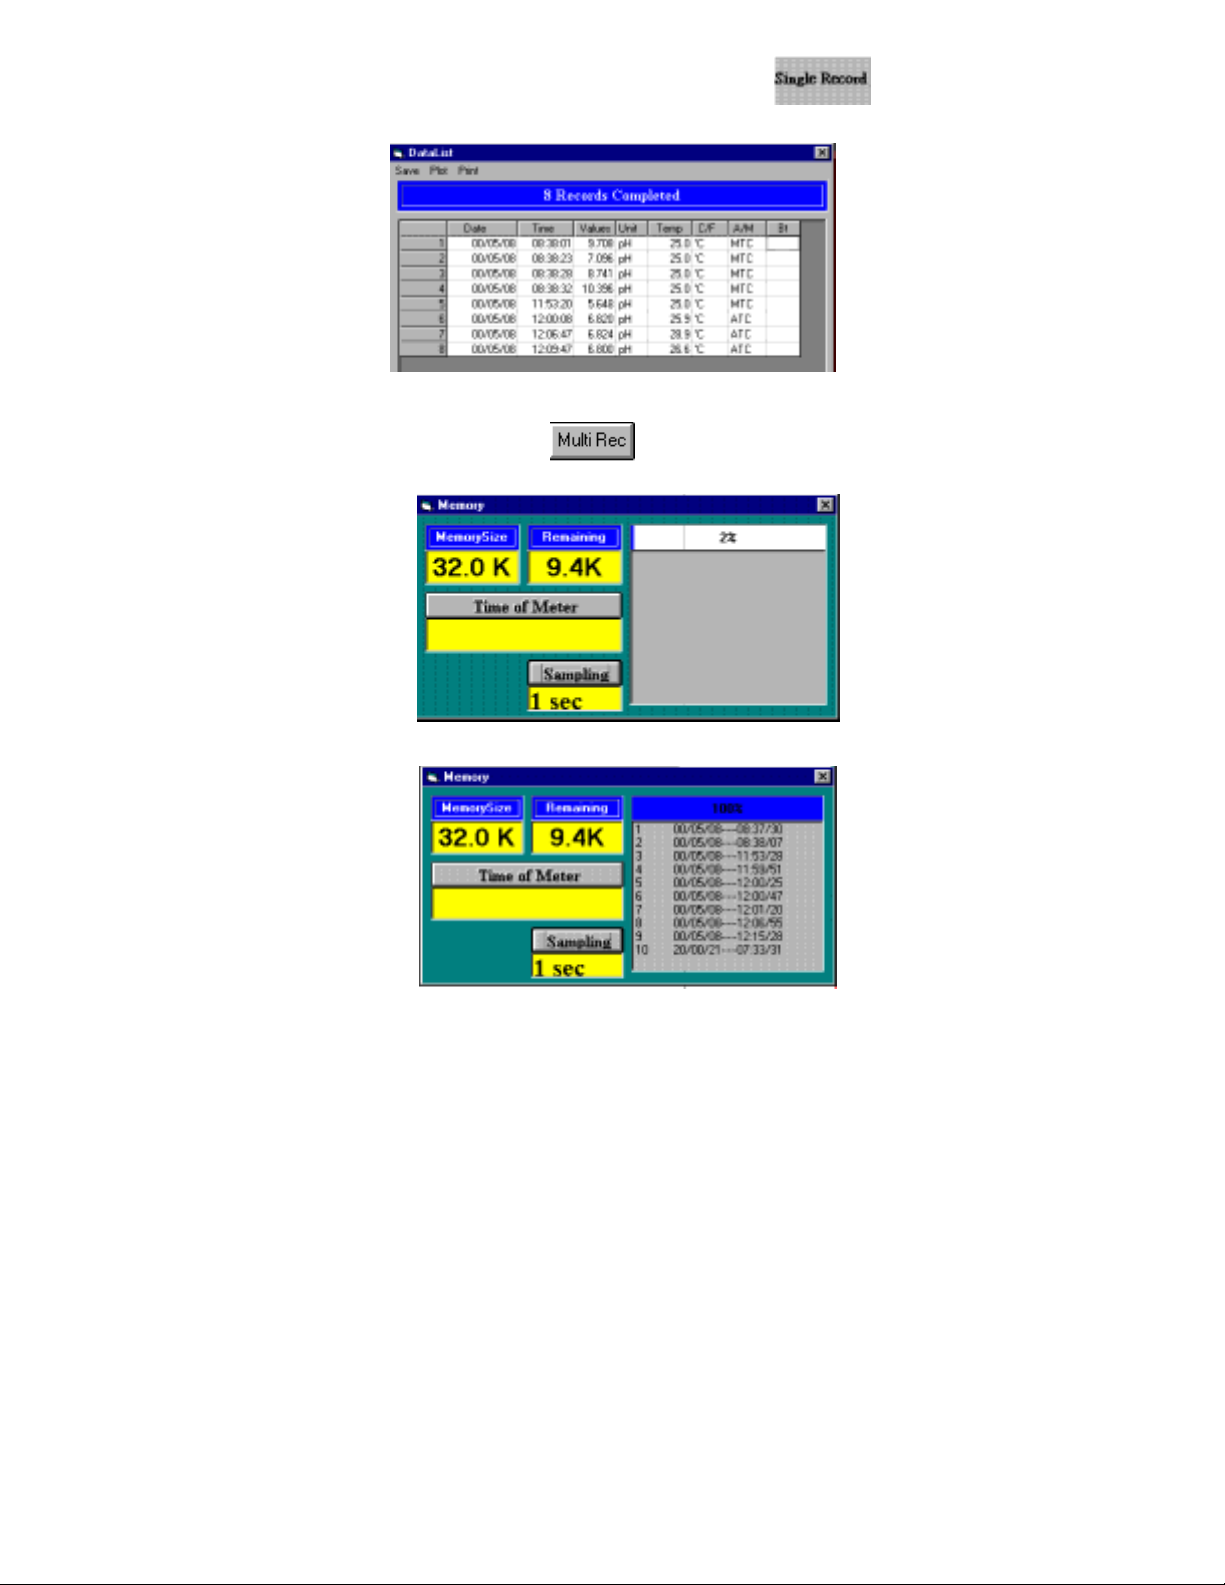
In the “Memory” window, move mouse pointer to (at the
left bottom corner of “Memory” window) then click to read.
2). MultiRecords
Move mouse pointer to and click it A “Memory” window
appears.
ê
The blue bar will display downloaded percentage. Please wait while
downloading.
As above, the total memory size is 32K, 9.4K is remained.
The inner time of pH Meter is 00/05/11-10:45:08.
20
Page 25
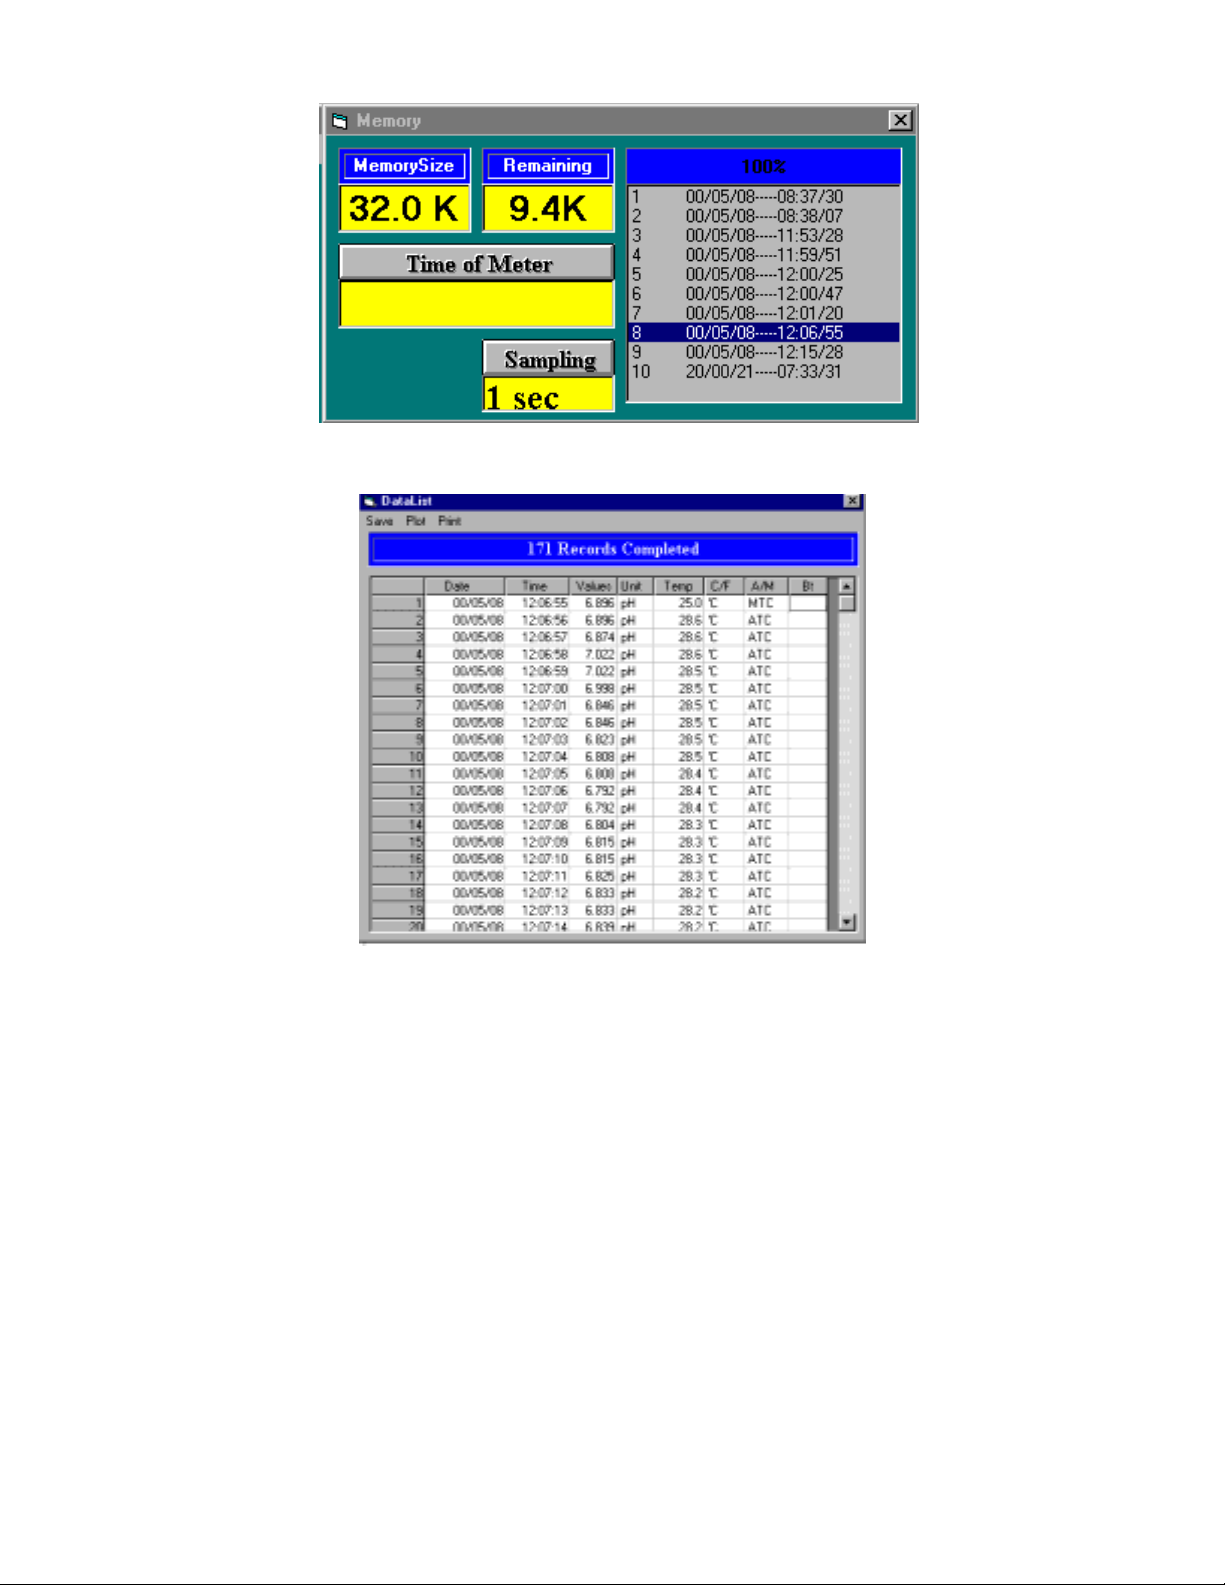
Move mouse pointer to the listed record and then click if willing to read.
ê
SAVE To save recorded data in HDD applying for other applications
such as EXCEL, WORD. For example, P.23.
21
Page 26
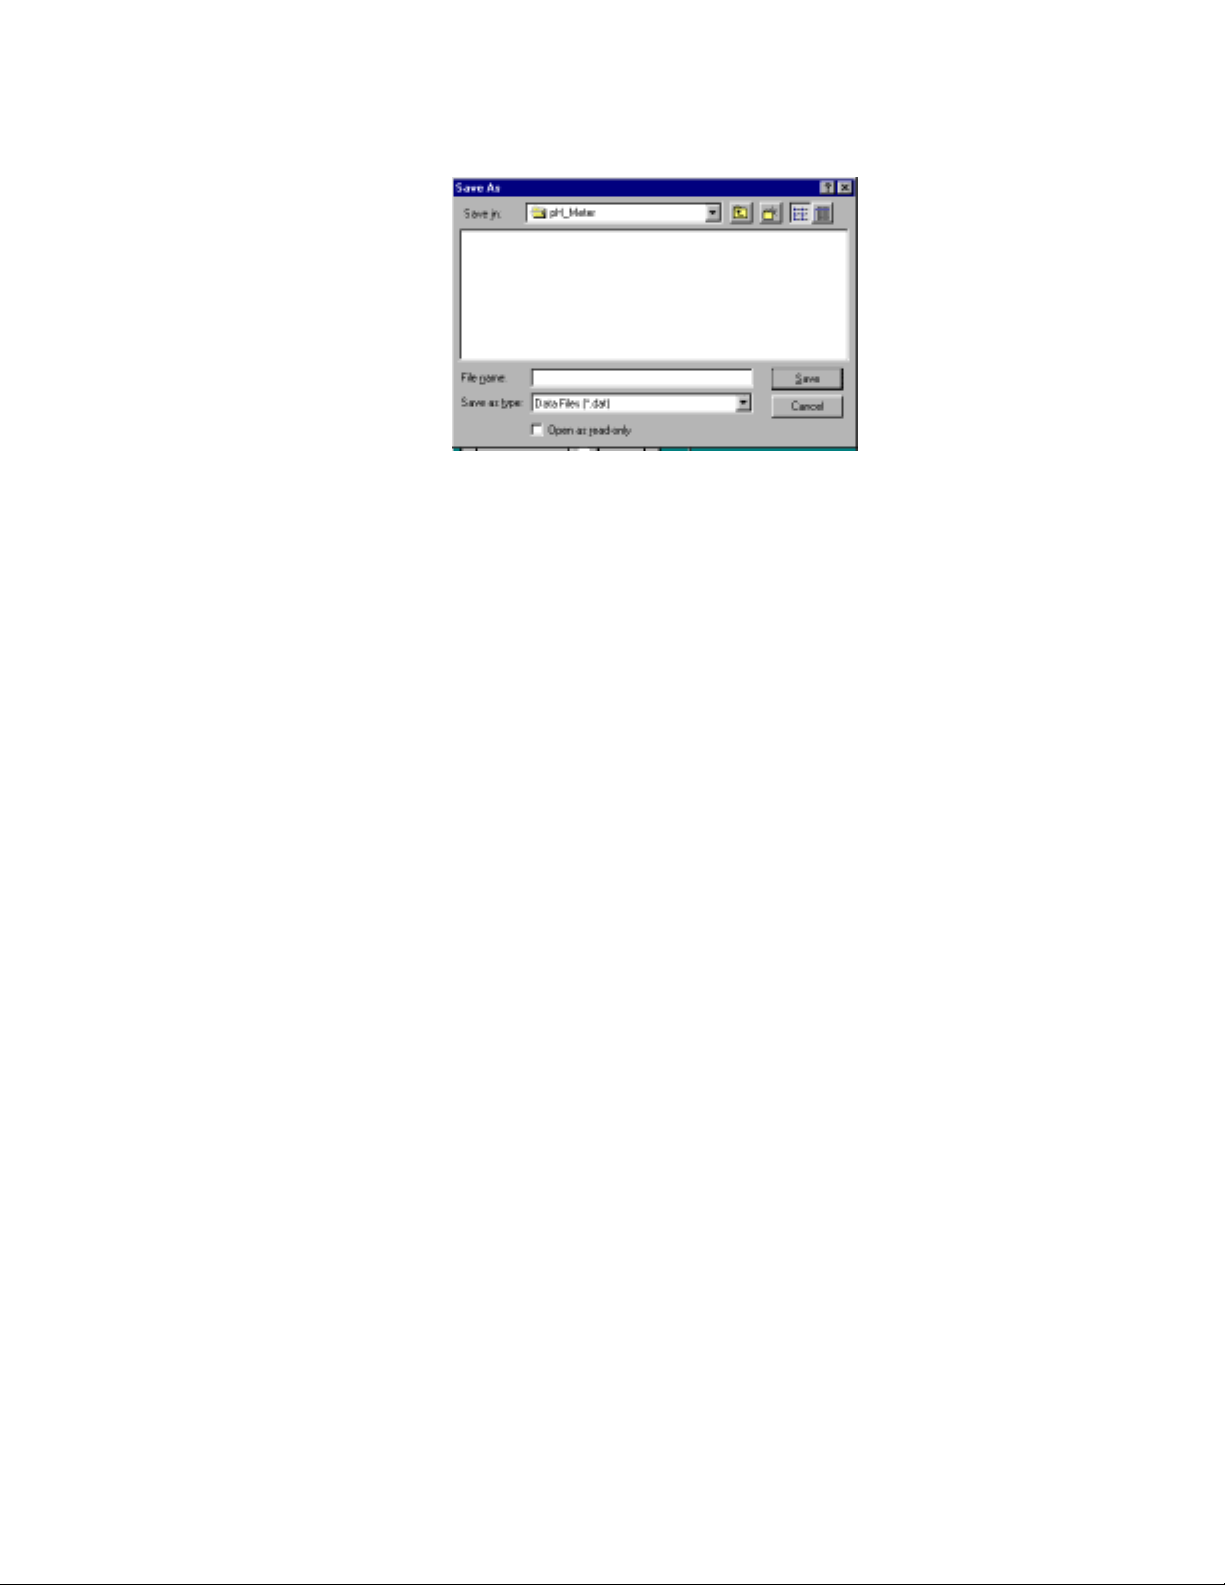
a). Move mouse pointer to “ SAVE “ then click this button.
b). A dialog box will come up. Input the name of the file if willing to
save as.
c). Click “ Save ”.
10-4 Data Invert
1). Save data by RS-232 communication port in PC.
Run pH Meter software, check if pH Meter connected with PC well. If not
connected, the “ NO COM ” signal will display, please be sur e RS-232
cable line is connected with COM1 or COM2. After connection, the
reading will be shown, and COM1 or COM2 also will be shown in the
screen.
22
Page 27
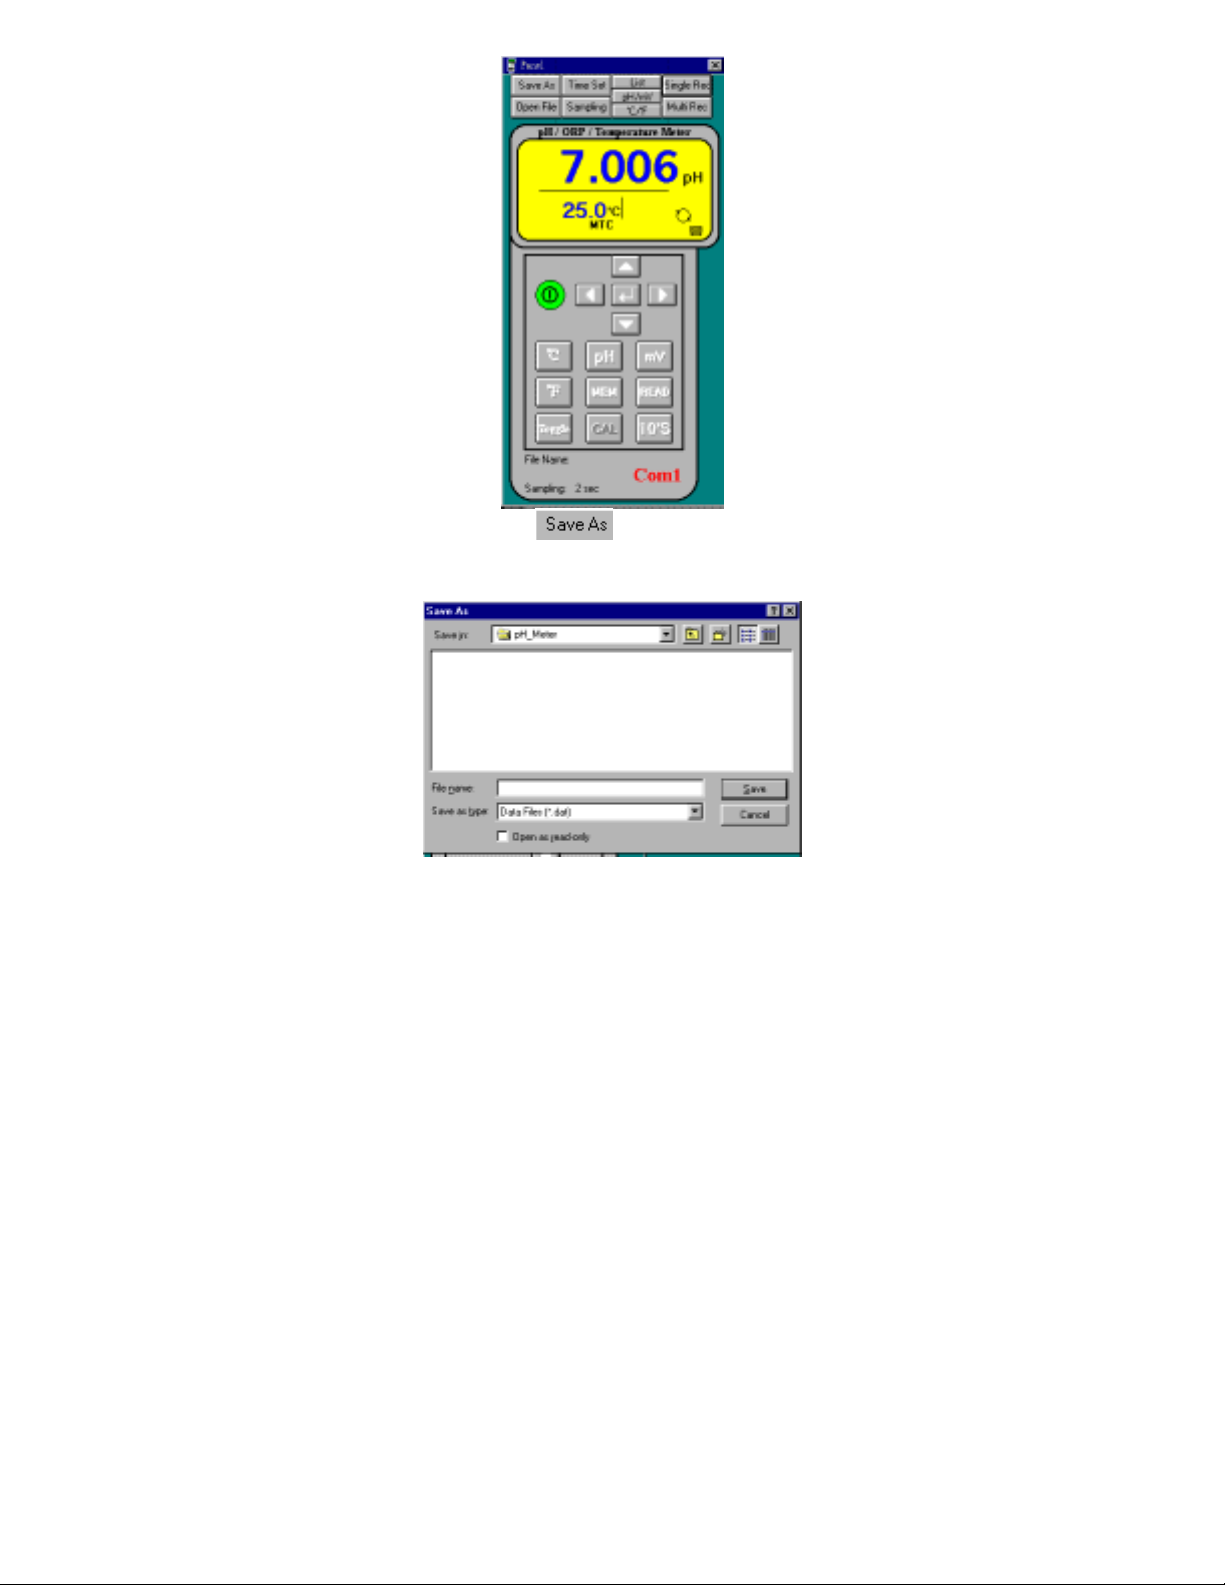
Move mouse pointer to and clic k this button, you can find the
“ Save As ” dialog box, please change to new file name: *.xls from
original file *.dat then press enter. For example : test.xls
ê
23
Page 28
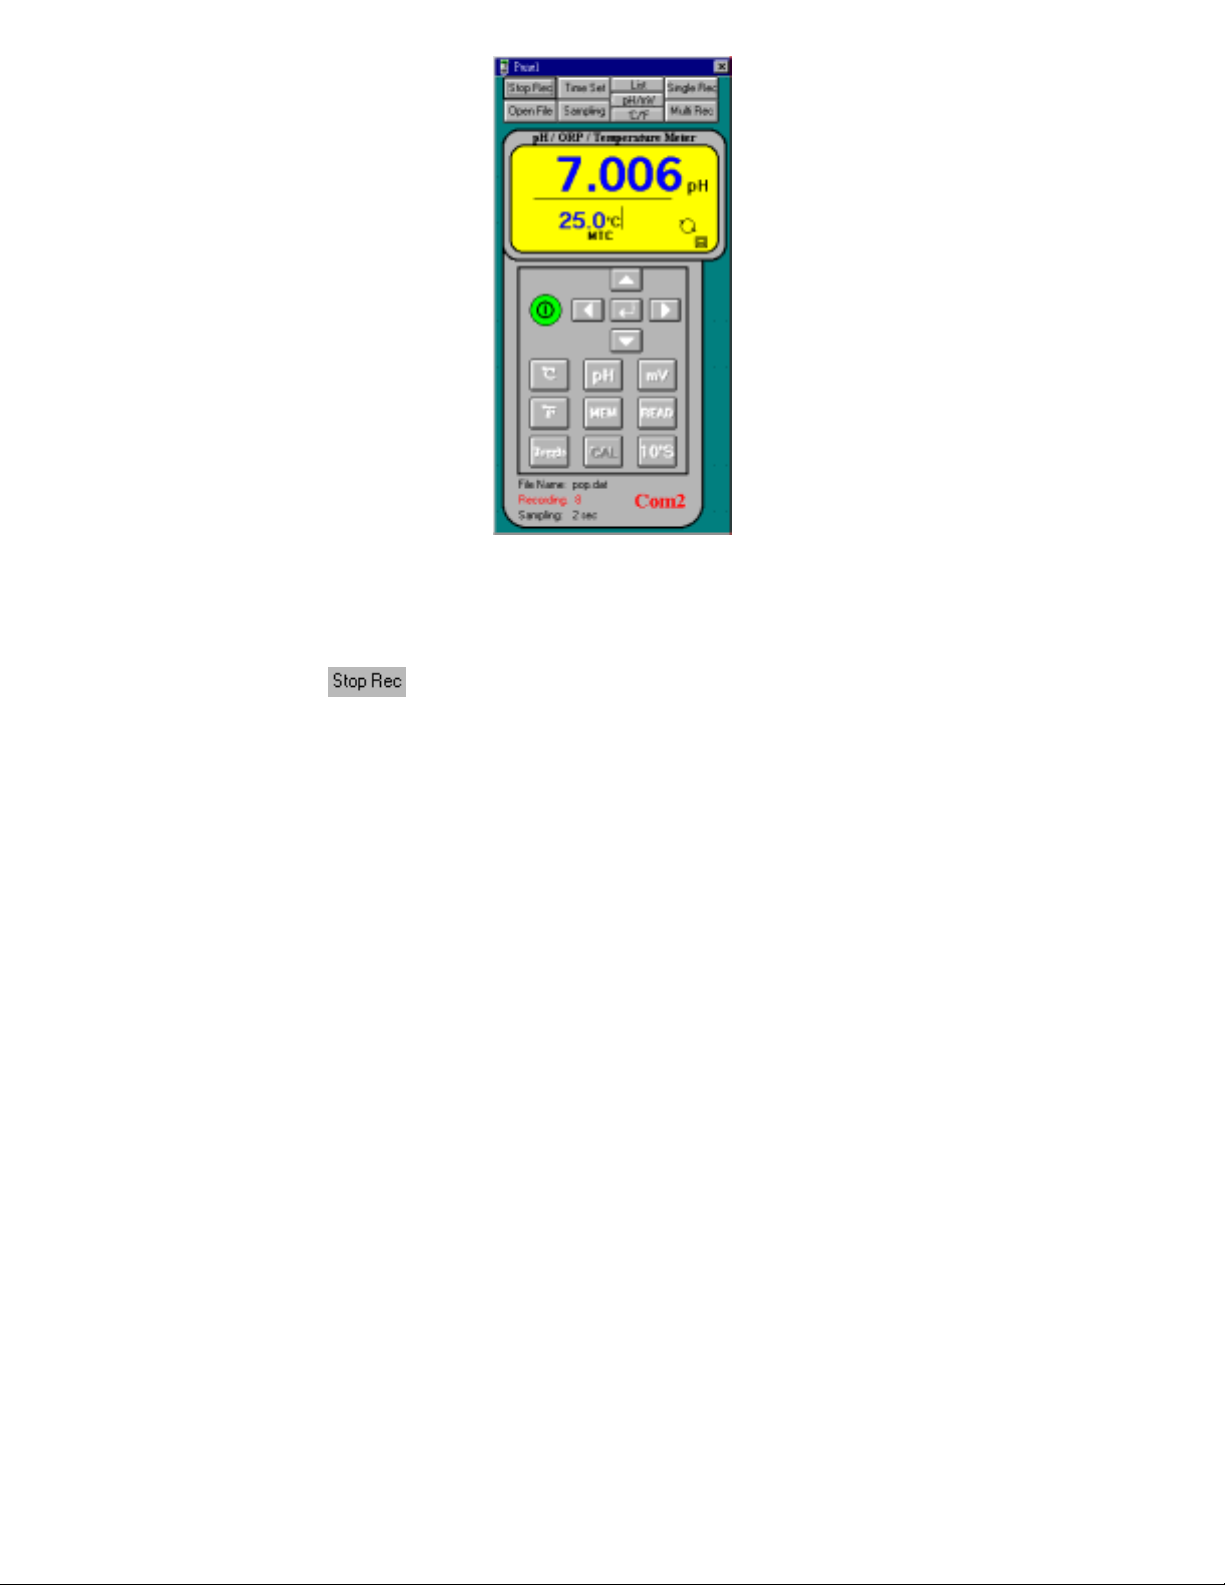
In the “ File Name ” column, the file name you key-in will be shown.
In the “Recording” column, No. of PC recor d will be displayed from 1 up to
end.
If user intead to end this record, please move mouse pointer to
and click it. The “ Recording ” signal will disappear.
2). Apply for Excel :
Open Microsoft EXCEL, go to “open file ”, from the searching function.
a). Find the EXCEL type. For example, test.xls. Select test.xls then
click “open” button.
24
Page 29
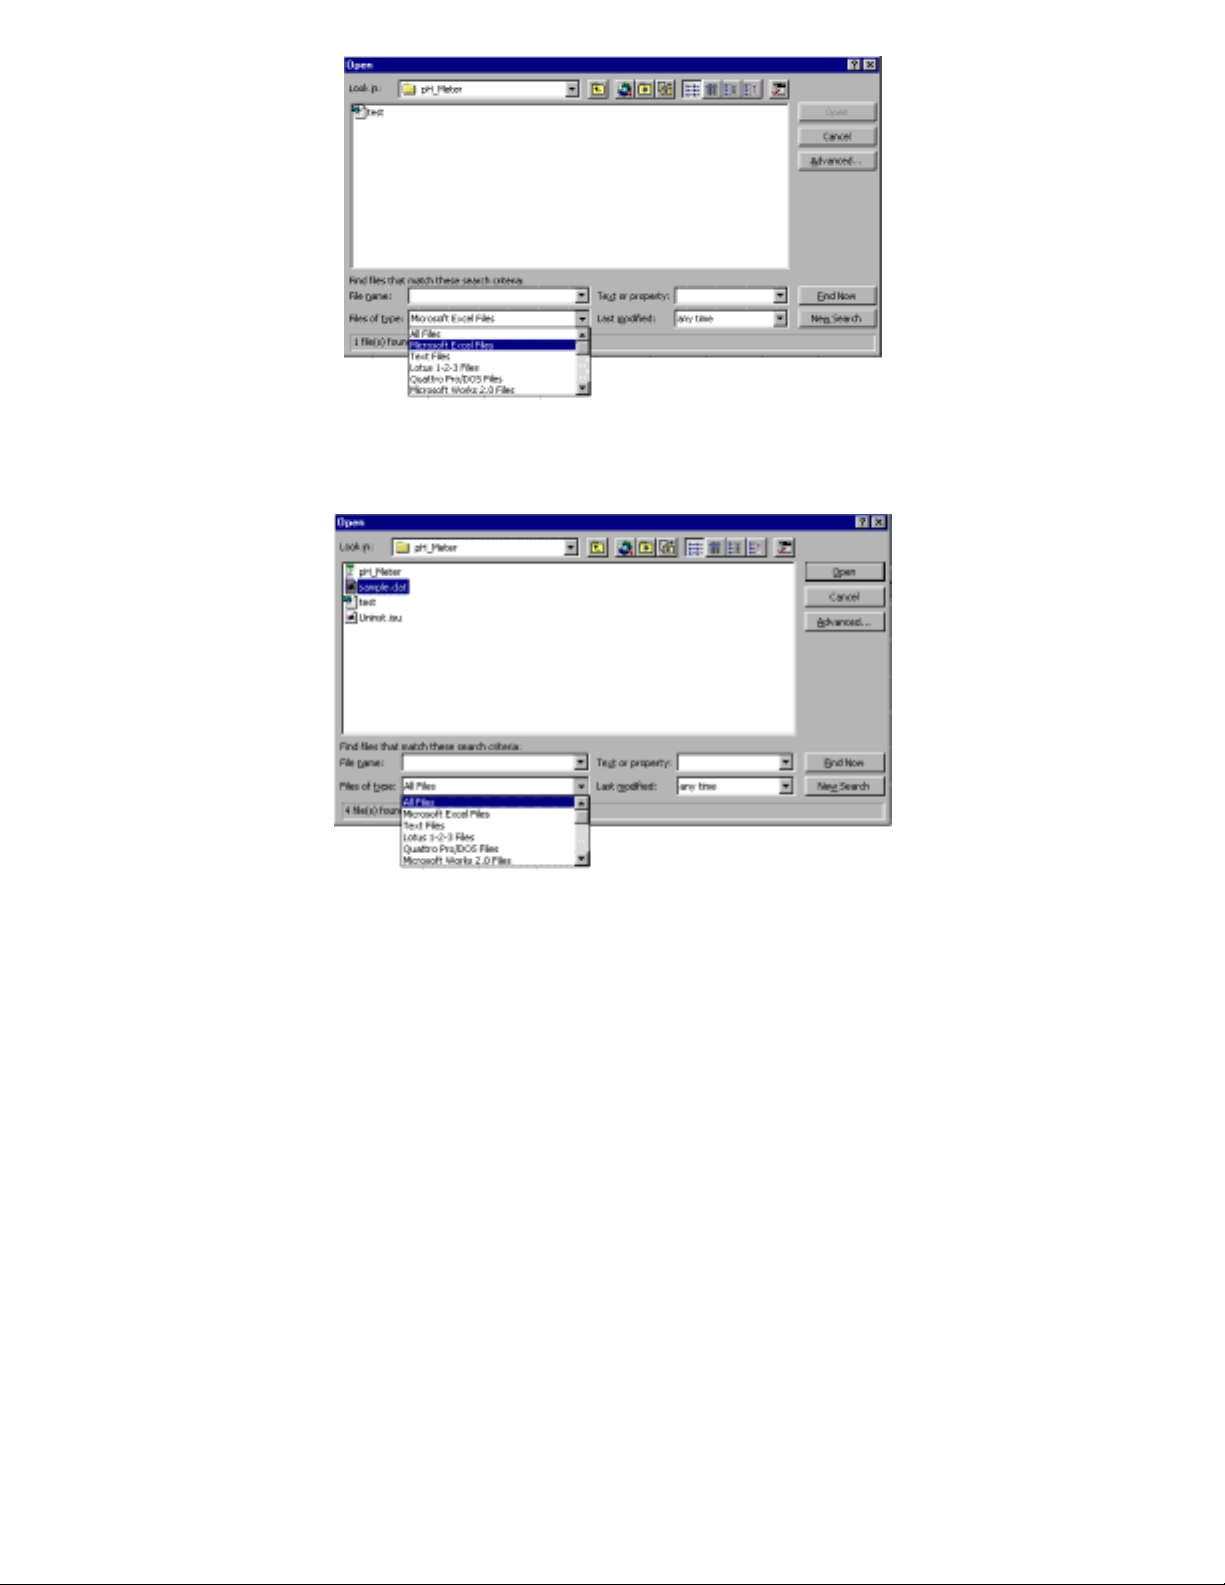
b). From the “ Files of type ”, click the pull down pointer, then choose
“All Files ”, select sample.dat then click “open” button.
The “ Test Import Wizard ” then appears, click finish button, the
selected data will show in excel type.
25
Page 30
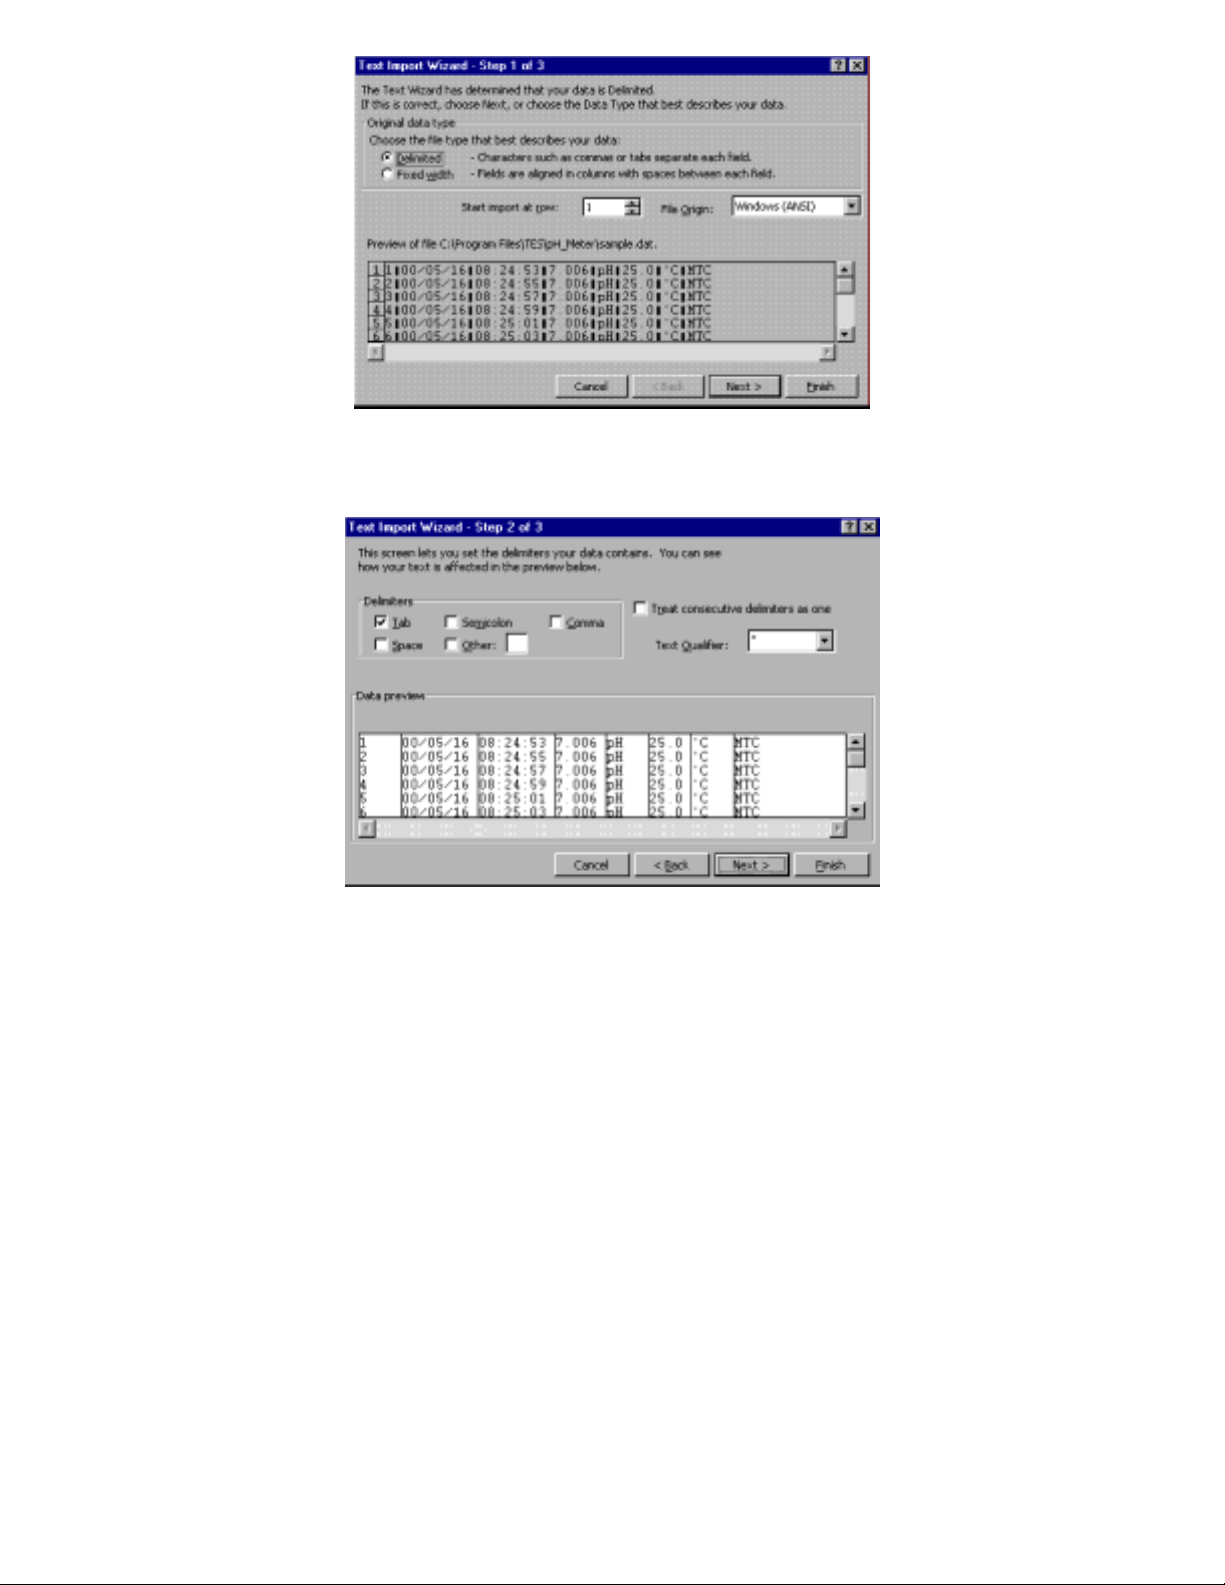
click “ Next ”
click “ Next ”
ê
ê
26
Page 31
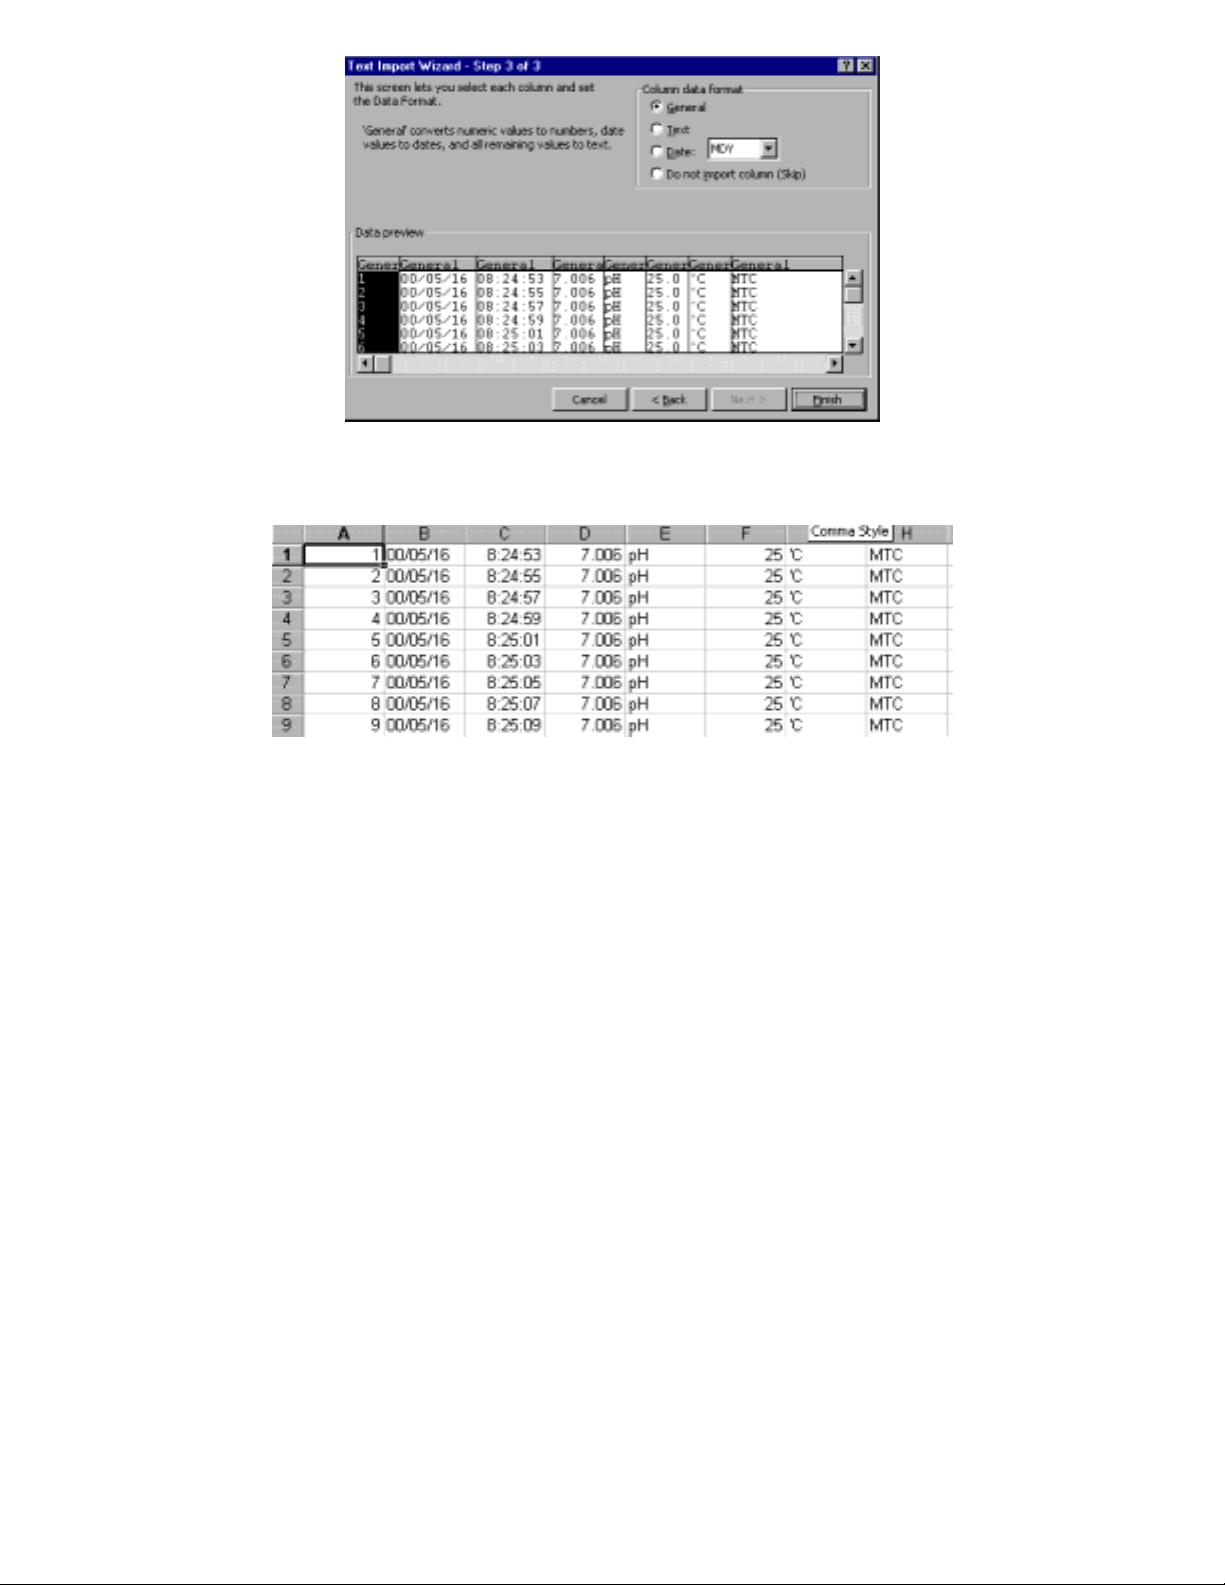
click “ Next ”
ê
10-5 Communicating Operation
27
Page 32
1). Switch off all power related to your PC.
2). Connect the socket (female) of RS-232 cable to PC’s COM1 or COM2
commport.
3). Switch on all power.
4). Connect the socket (male) of RS-232 cable to pH Meter.
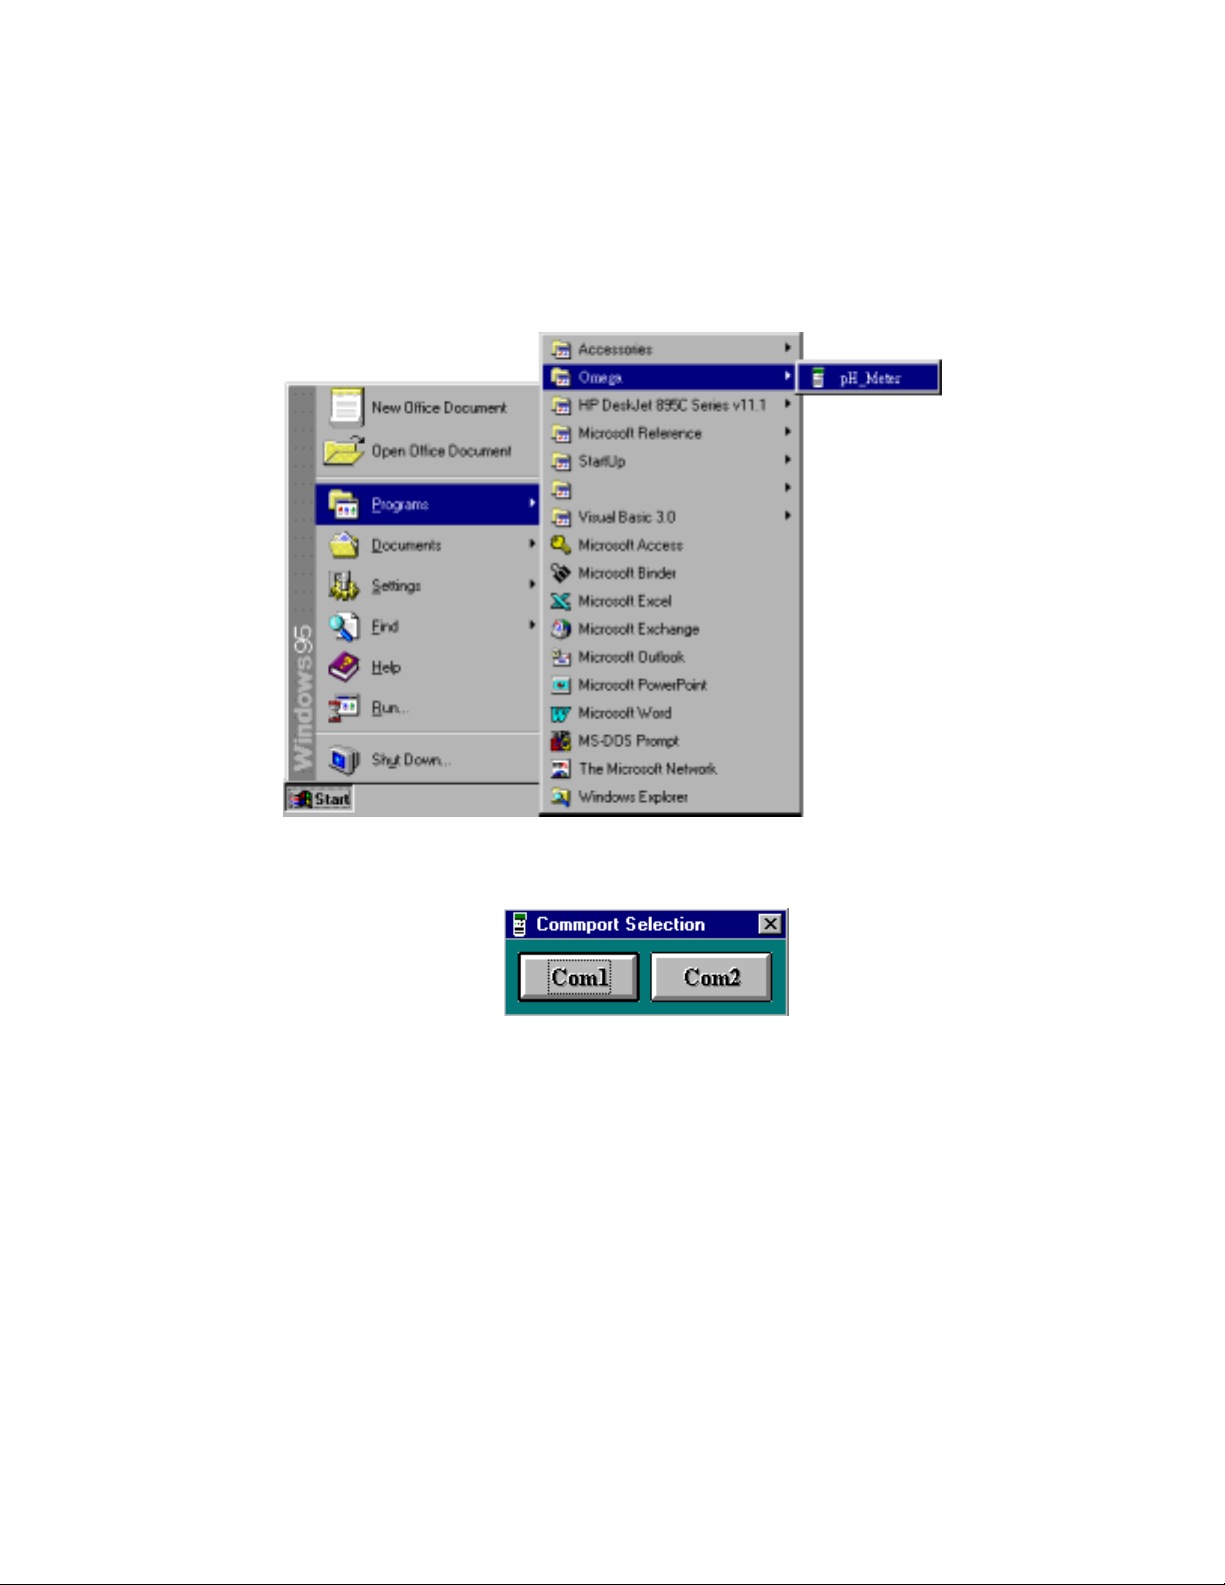
5). Run the pH Meter software
Click “ Start ” fr om Start menu, move mous e pointer to “Programs”,
then move pointer to “ Om ega” (default), move m ouse pointer to “pH
Meter ” then click.
6). Move mouse to available commport (COM1 , COM2) then click.
7). Main tableau
28
Page 33
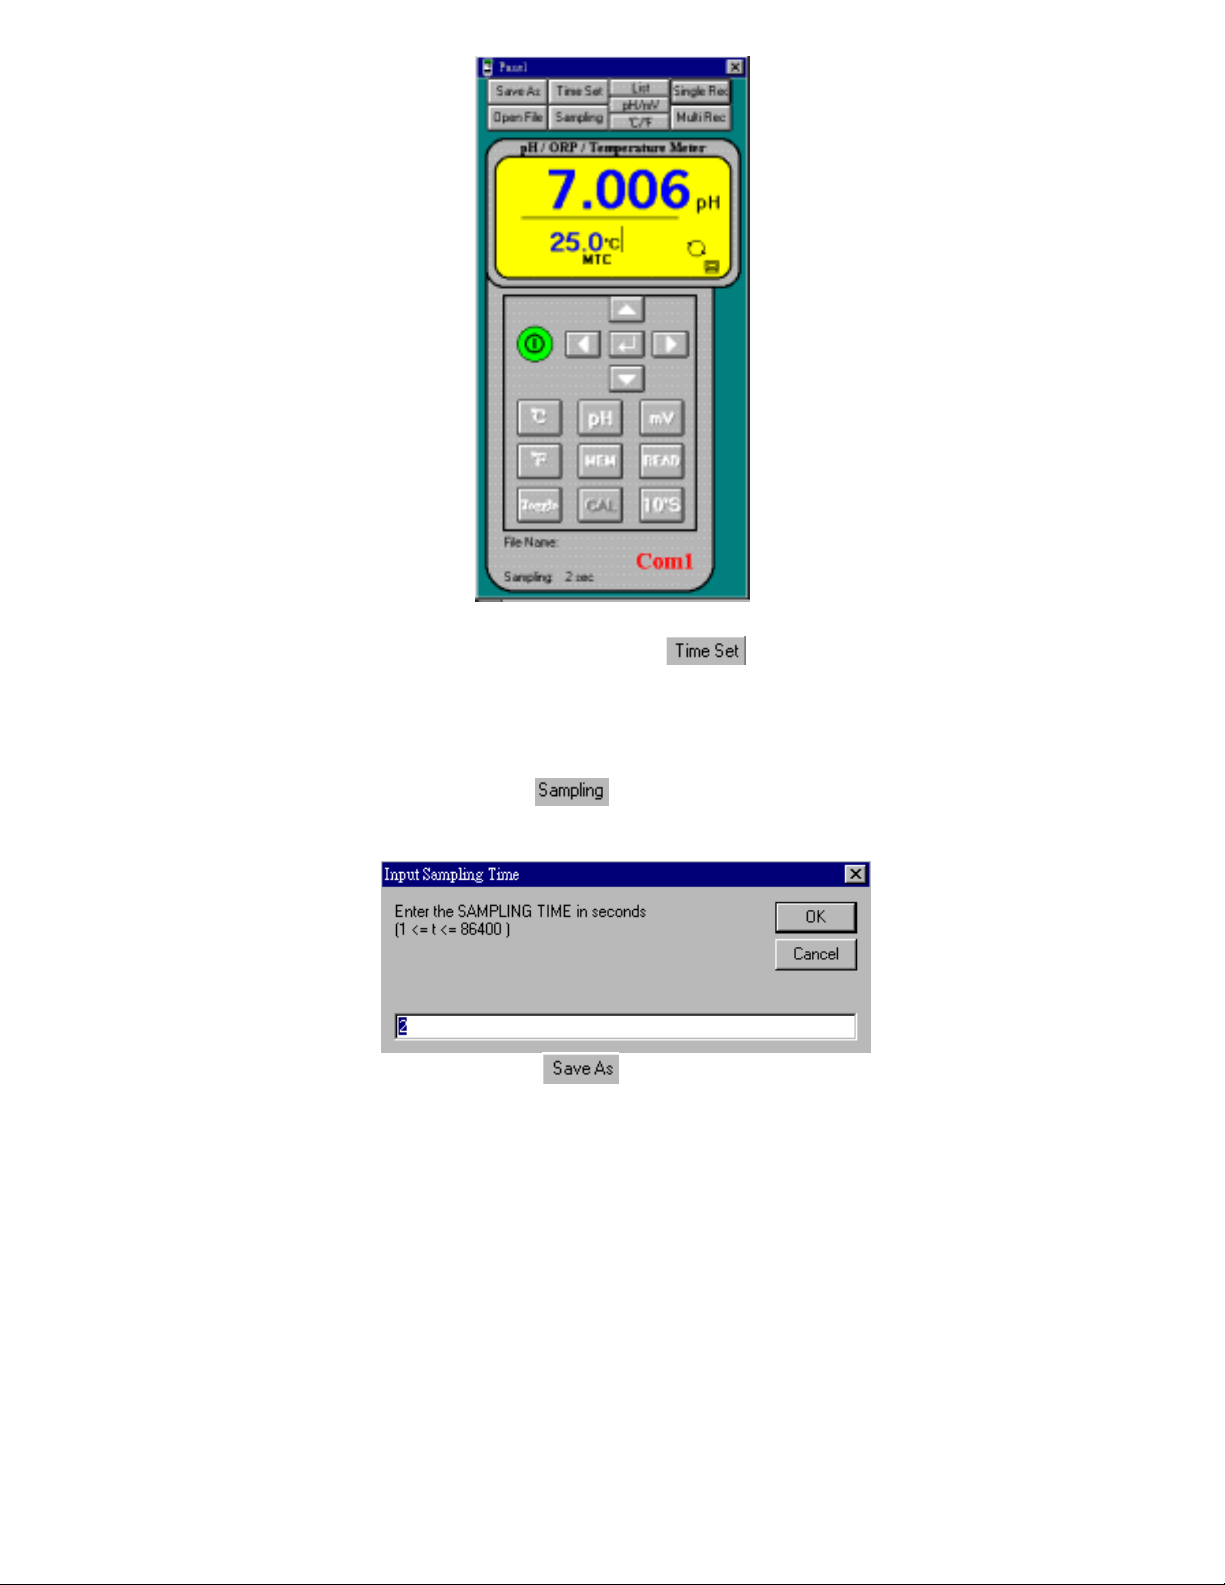
Time SettingsMove mouse pointer to and click it to input
the time of PC to the pH Meter..
PC SAMPLING(Default : 2 seconds). Change the sampling time of
PC.
Move mouse pointer to . The dialog box - “Input Sampling
Time “ will be shown. Input the sampling time that you intead to set,
then click “ OK ” to complete this setting.
Move mouse pointer to then click this button. You can f ind
the “ Save As ” dialog box, please change to new file name : *.xls from
29
Page 34
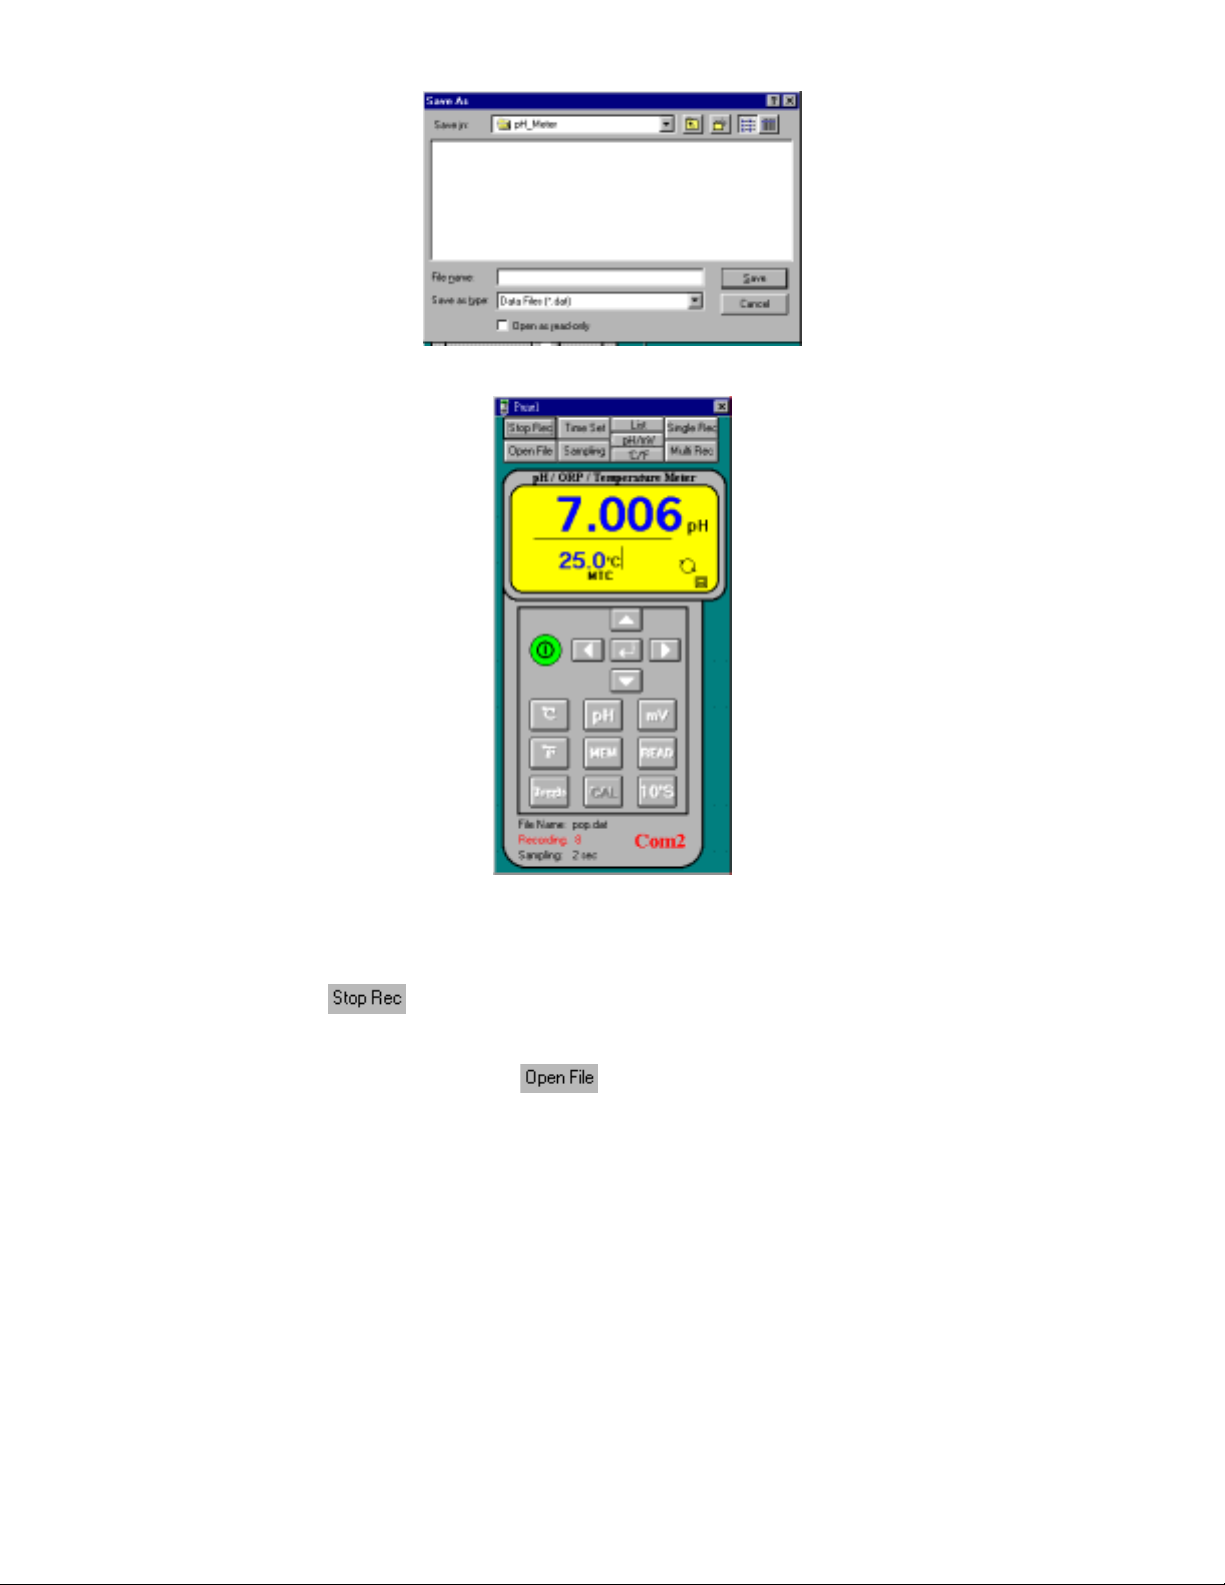
original file *.dat then press enter. For example : test.xls
ê
In “ File Name ”, the file name C:\…\TEST.XLS will be displayed.
In “Recording” column, the No.of PC record will be displayed from 1 up to end.
If user intead to end this record, please move mouse pointer to
, then click this button. The “ Recording ” signal will
disappear.
Move mouse pointer to then click this button. There comes a
30
Page 35
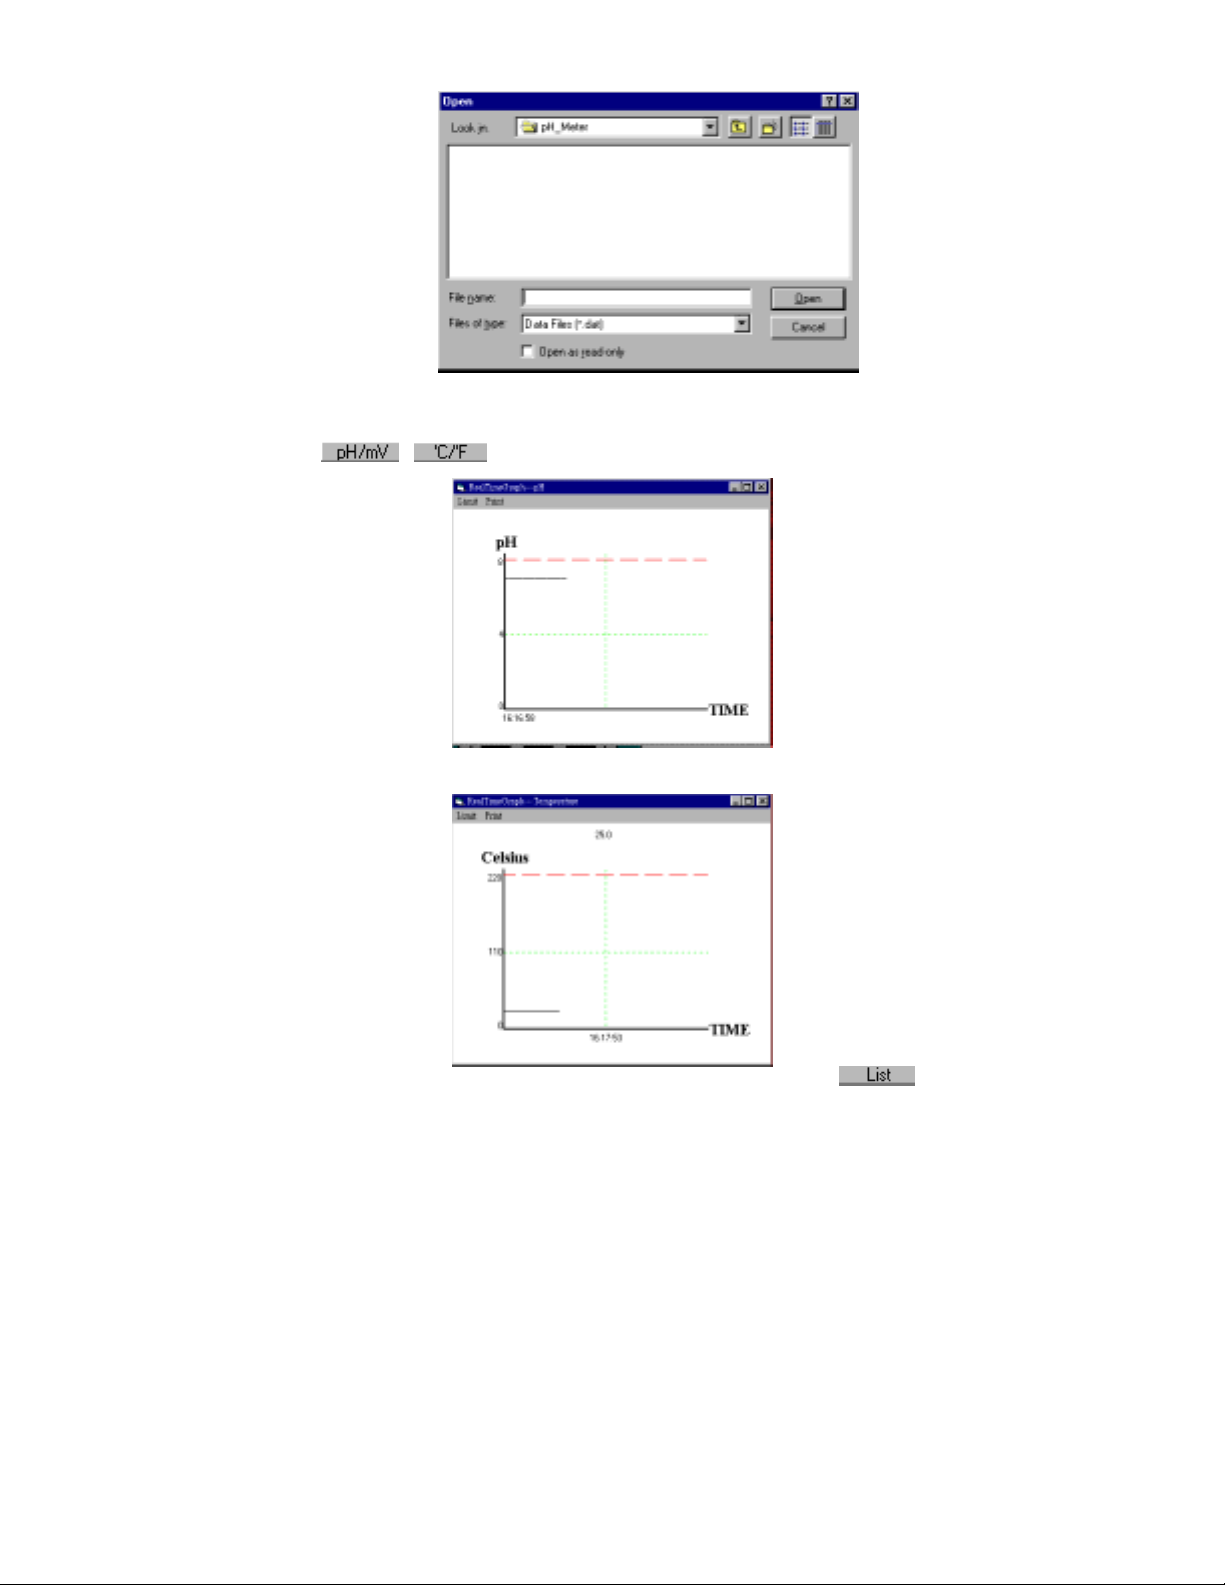
dialog box to open file. Input the saved file name to read.
To show reading values in “ GRAPH ” type, move mouse pointer to
/ then click. Choose the unit if willing to read.
To show reading values in LIST type, move mouse pointer
31
Page 36
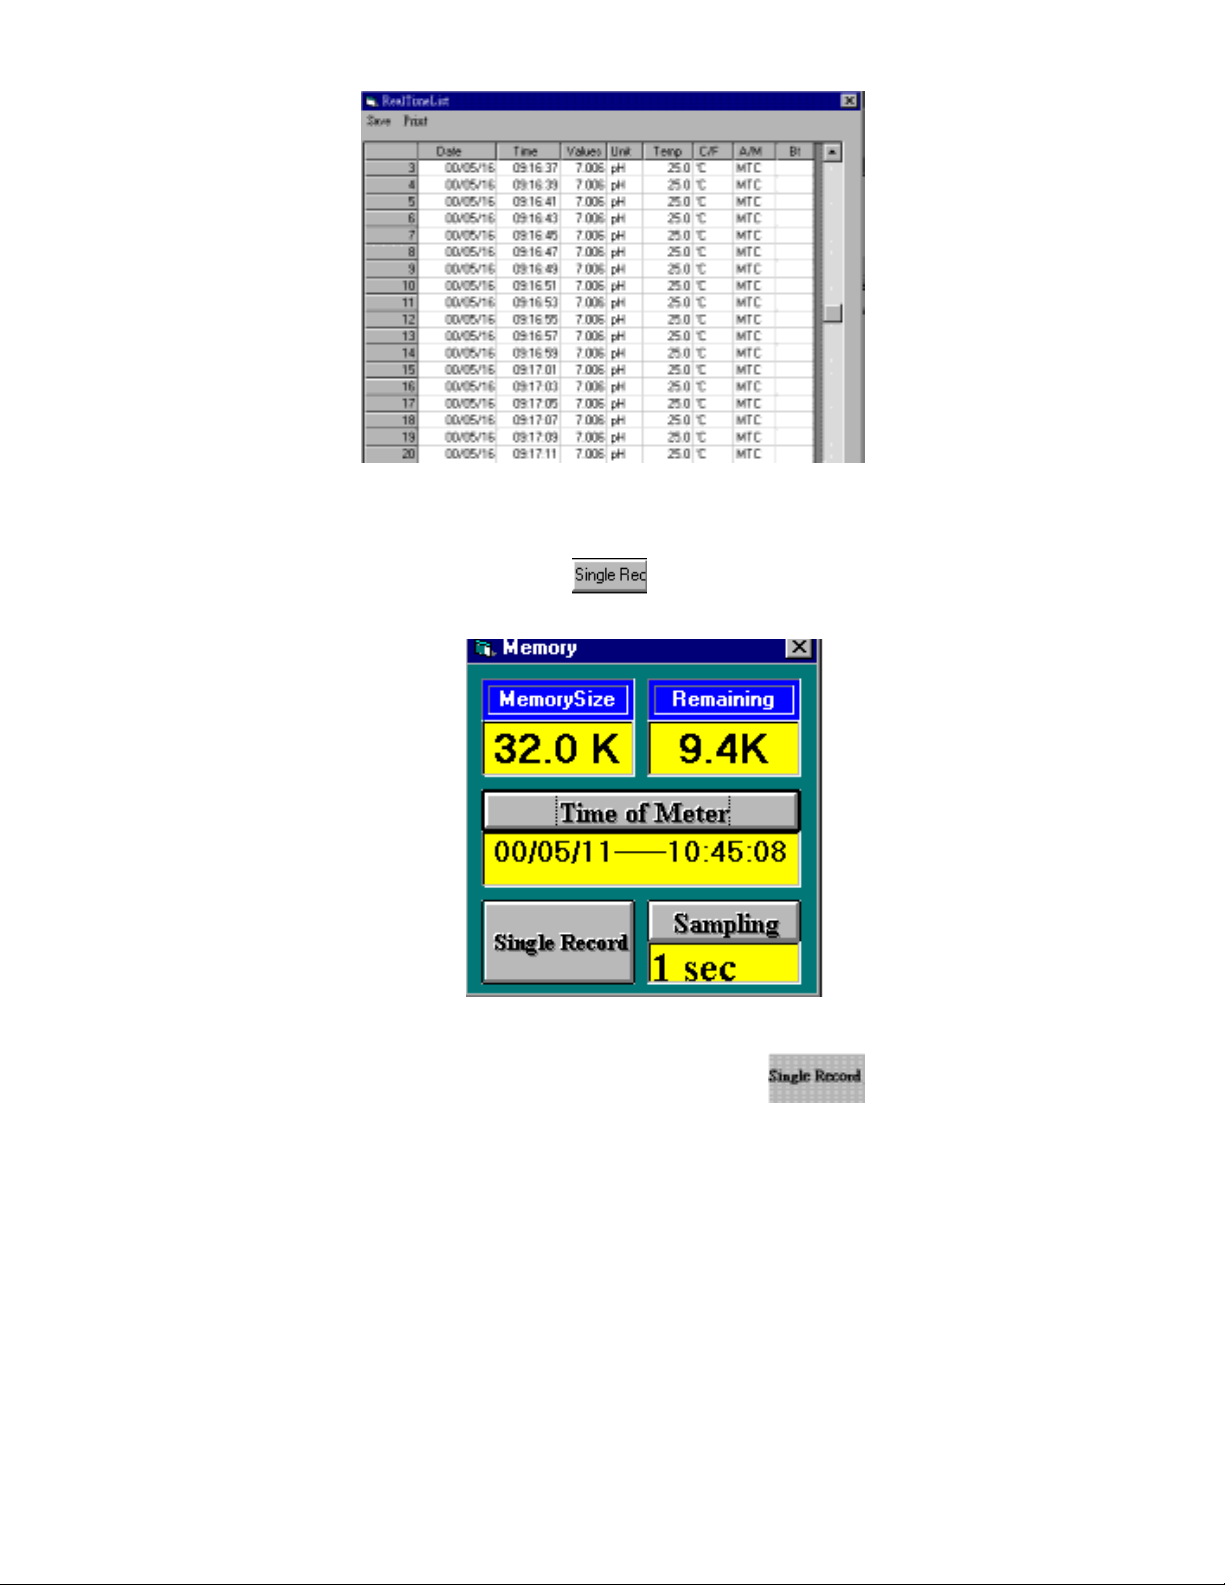
and then click this button to launch.
To read recorded data in memory (EEPROM).
a). Single Record :
ð Move mouse pointer to and then click this button.
A “Memory” window appears.
As above, the total memory size is 32K, 9.4K is remained. The inner
time of pH Meter is 00/05/11-10:45:08.
ð In the “Memory” window, move mouse pointer to (at the
32
Page 37
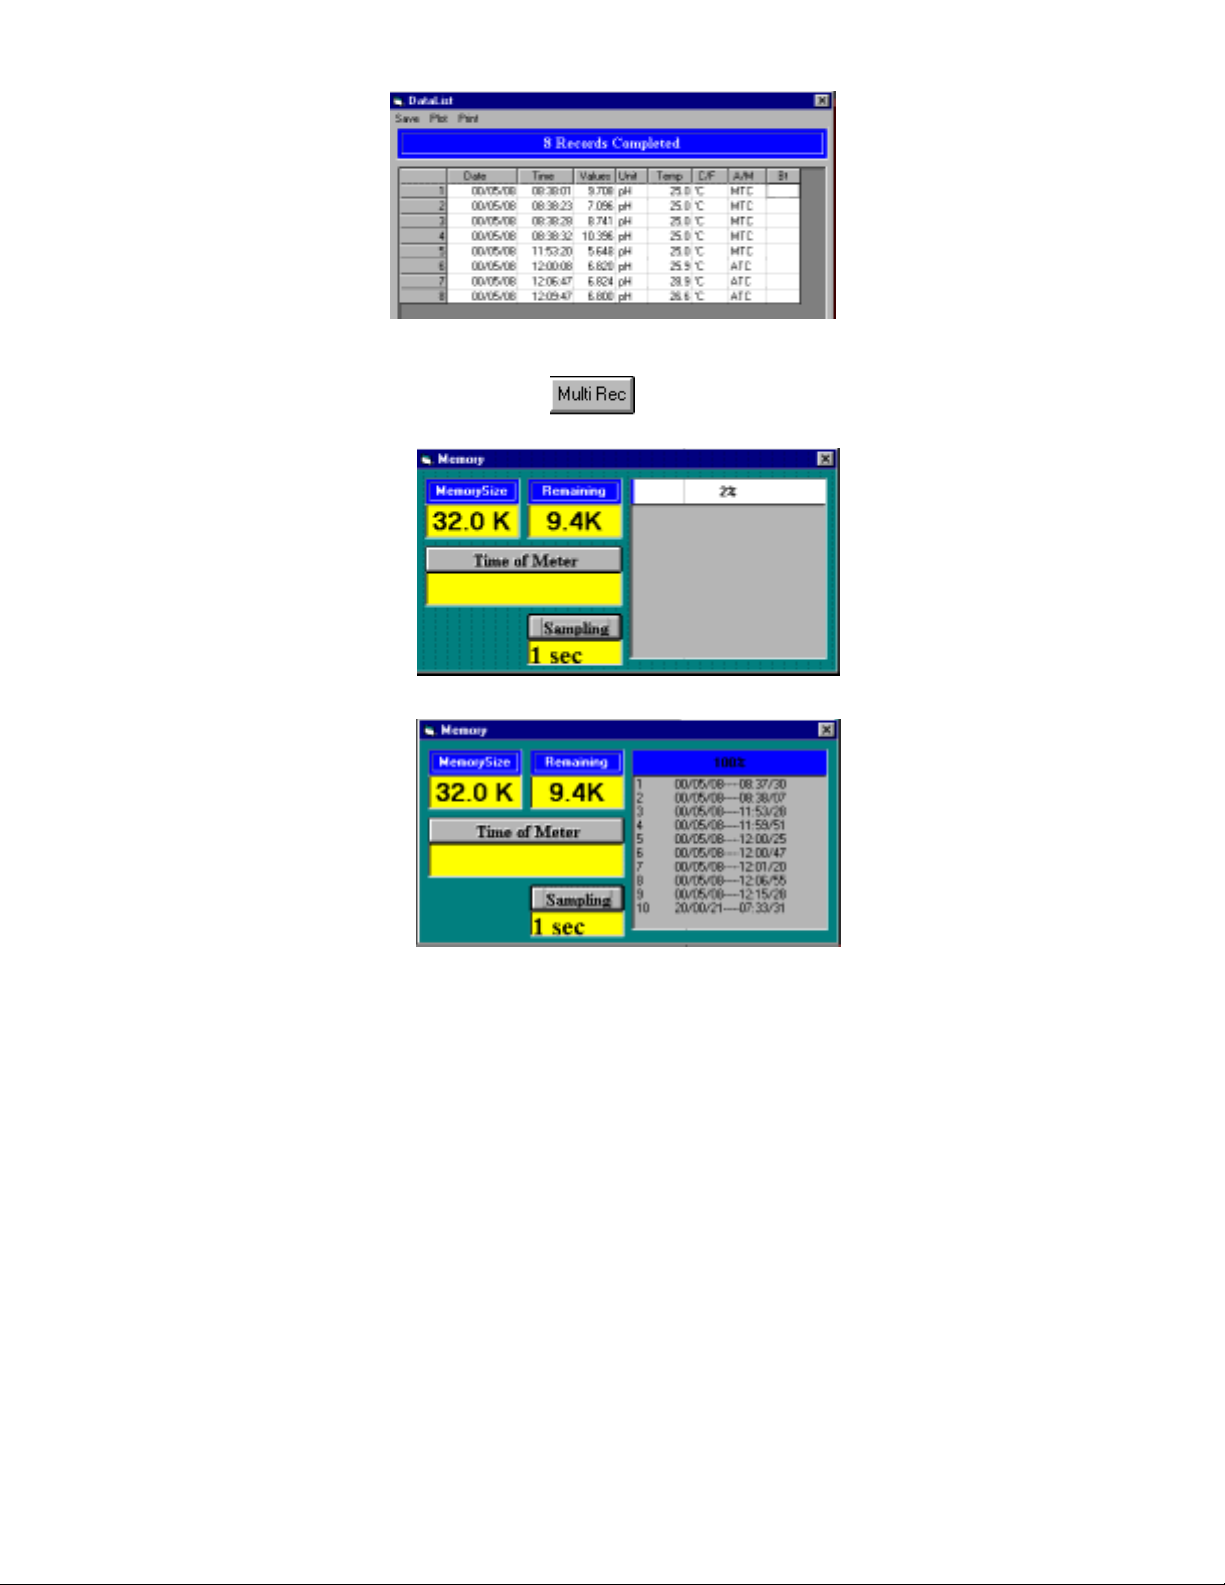
left bottom corner of “Memory” window) then click to read.
b). MultiRecords :
ð Move mouse pointer to and then click this button.
A “Memory” window appears.
ê
The blue bar will display downloaded percentage pleas wait while downloading.
As above, the tatal memorysize is 32K, 9.4K remained.
The inner time of pH Meter is 00/05/11-10:45:08.
ð Move mouse pointer to the listed record and then click if willing to read.
33
Page 38
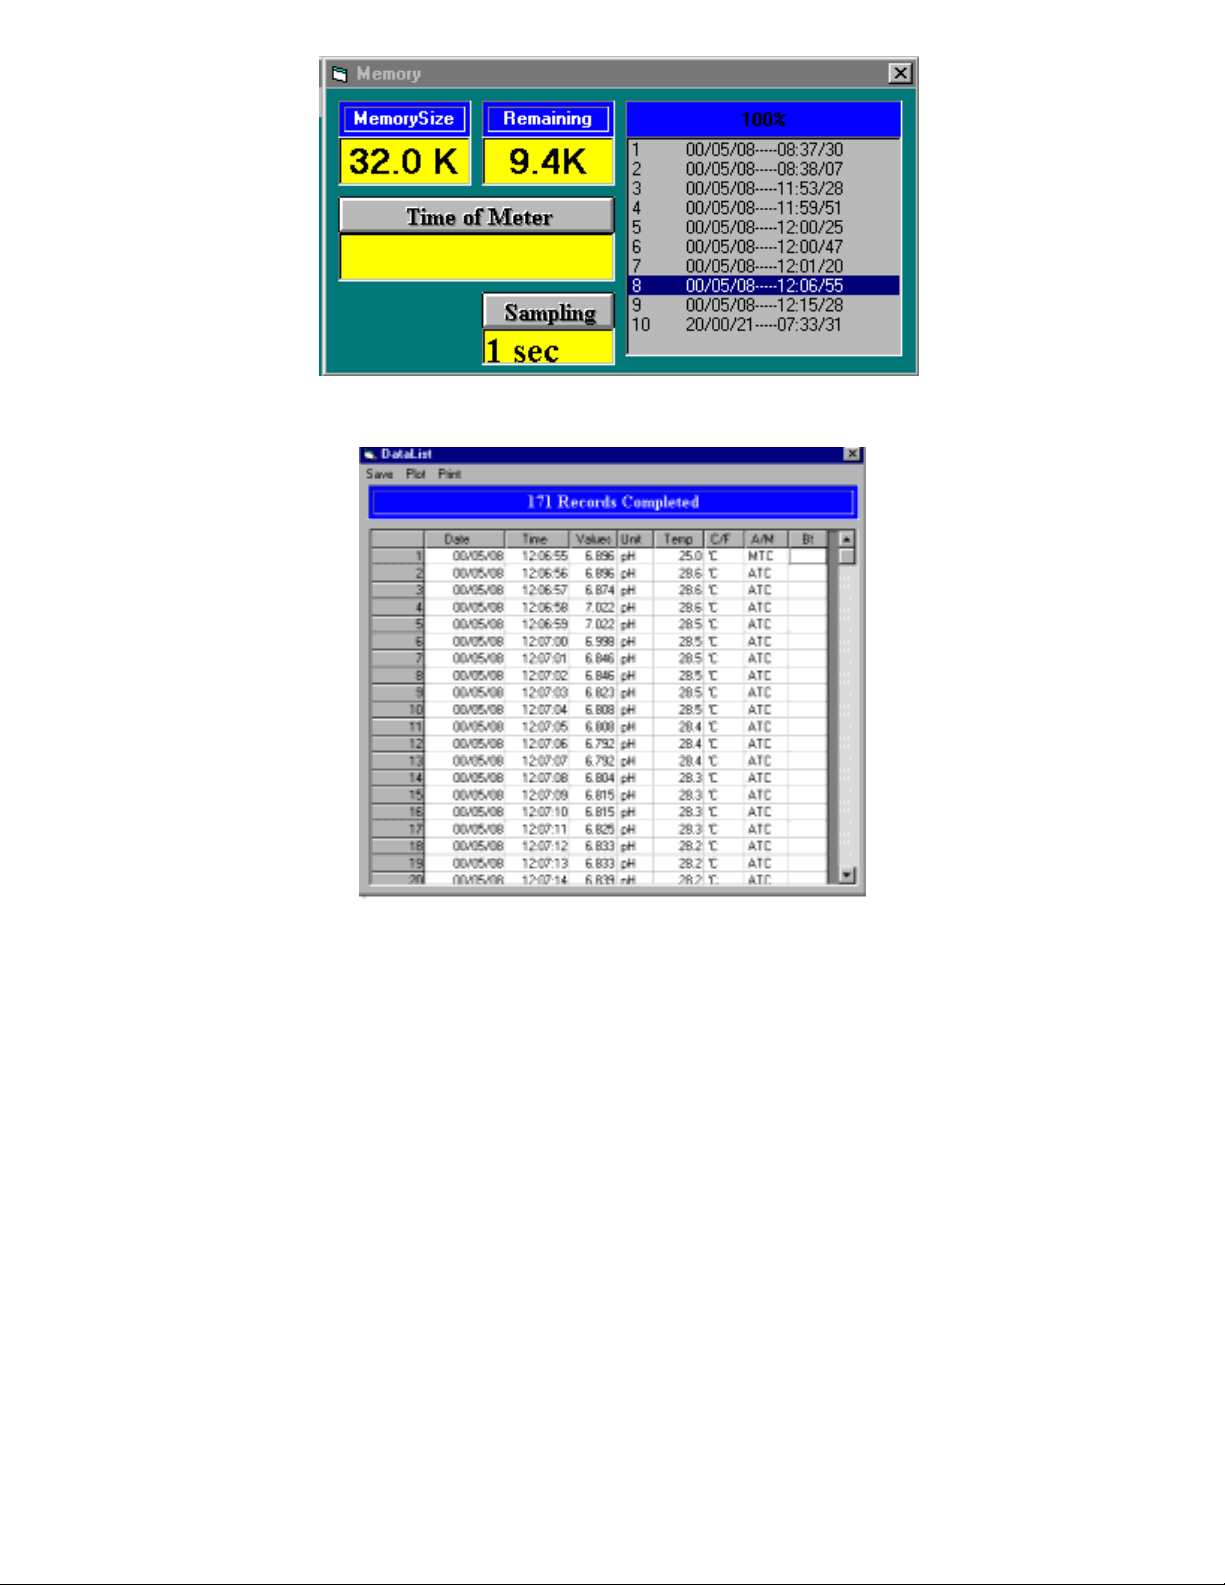
ê
SAVE To save recorded data in HDD applying for other applications
such as EXCEL, WORD. For example, P.23.
q Move mouse pointer to “ Save ” then click this button.
34
Page 39
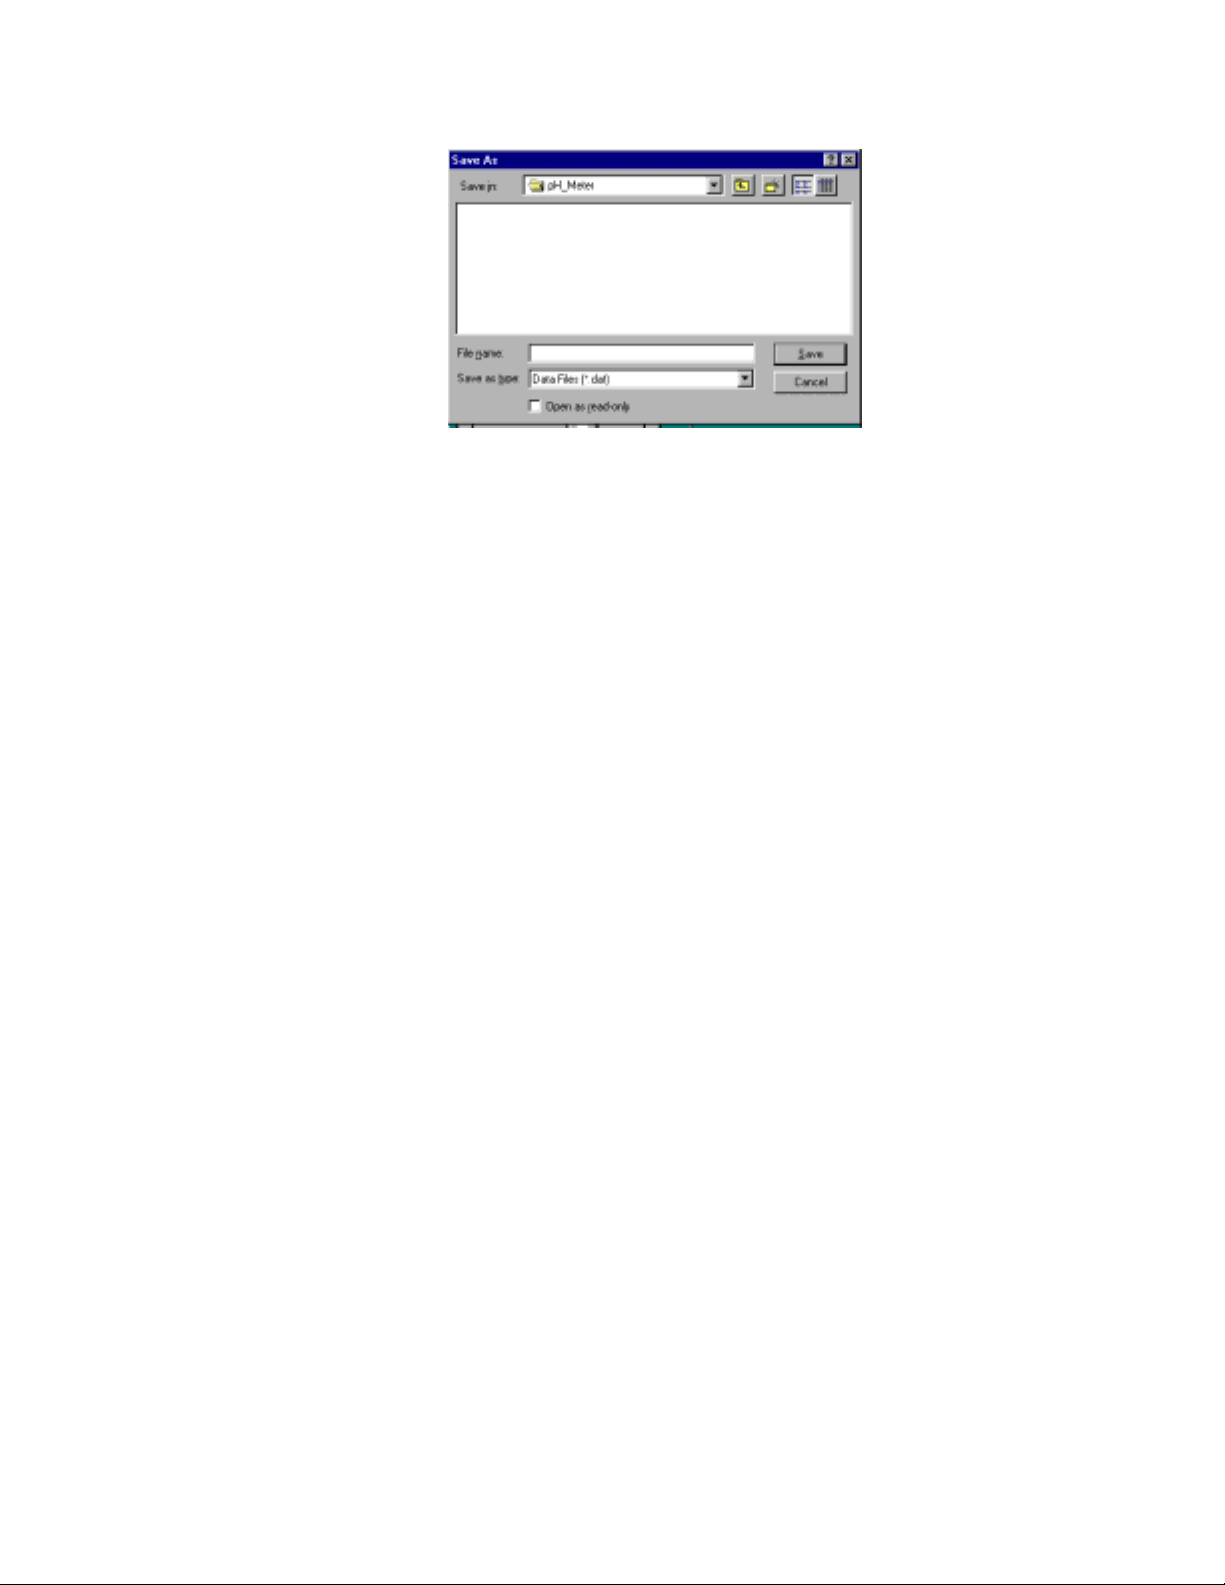
q A dialog box will come up. Input the name of the file if user
intead to save as.
q Click “ Save ”.
35
Page 40
Page 41

Page 42

2
Page 43
3
 Loading...