

Page 1
2
TM
User’s Guide
Shop online at
omega.com
e-mail: [email protected]
For latest product manuals:
omega.com/en-us/pdf-manuals
PHH444
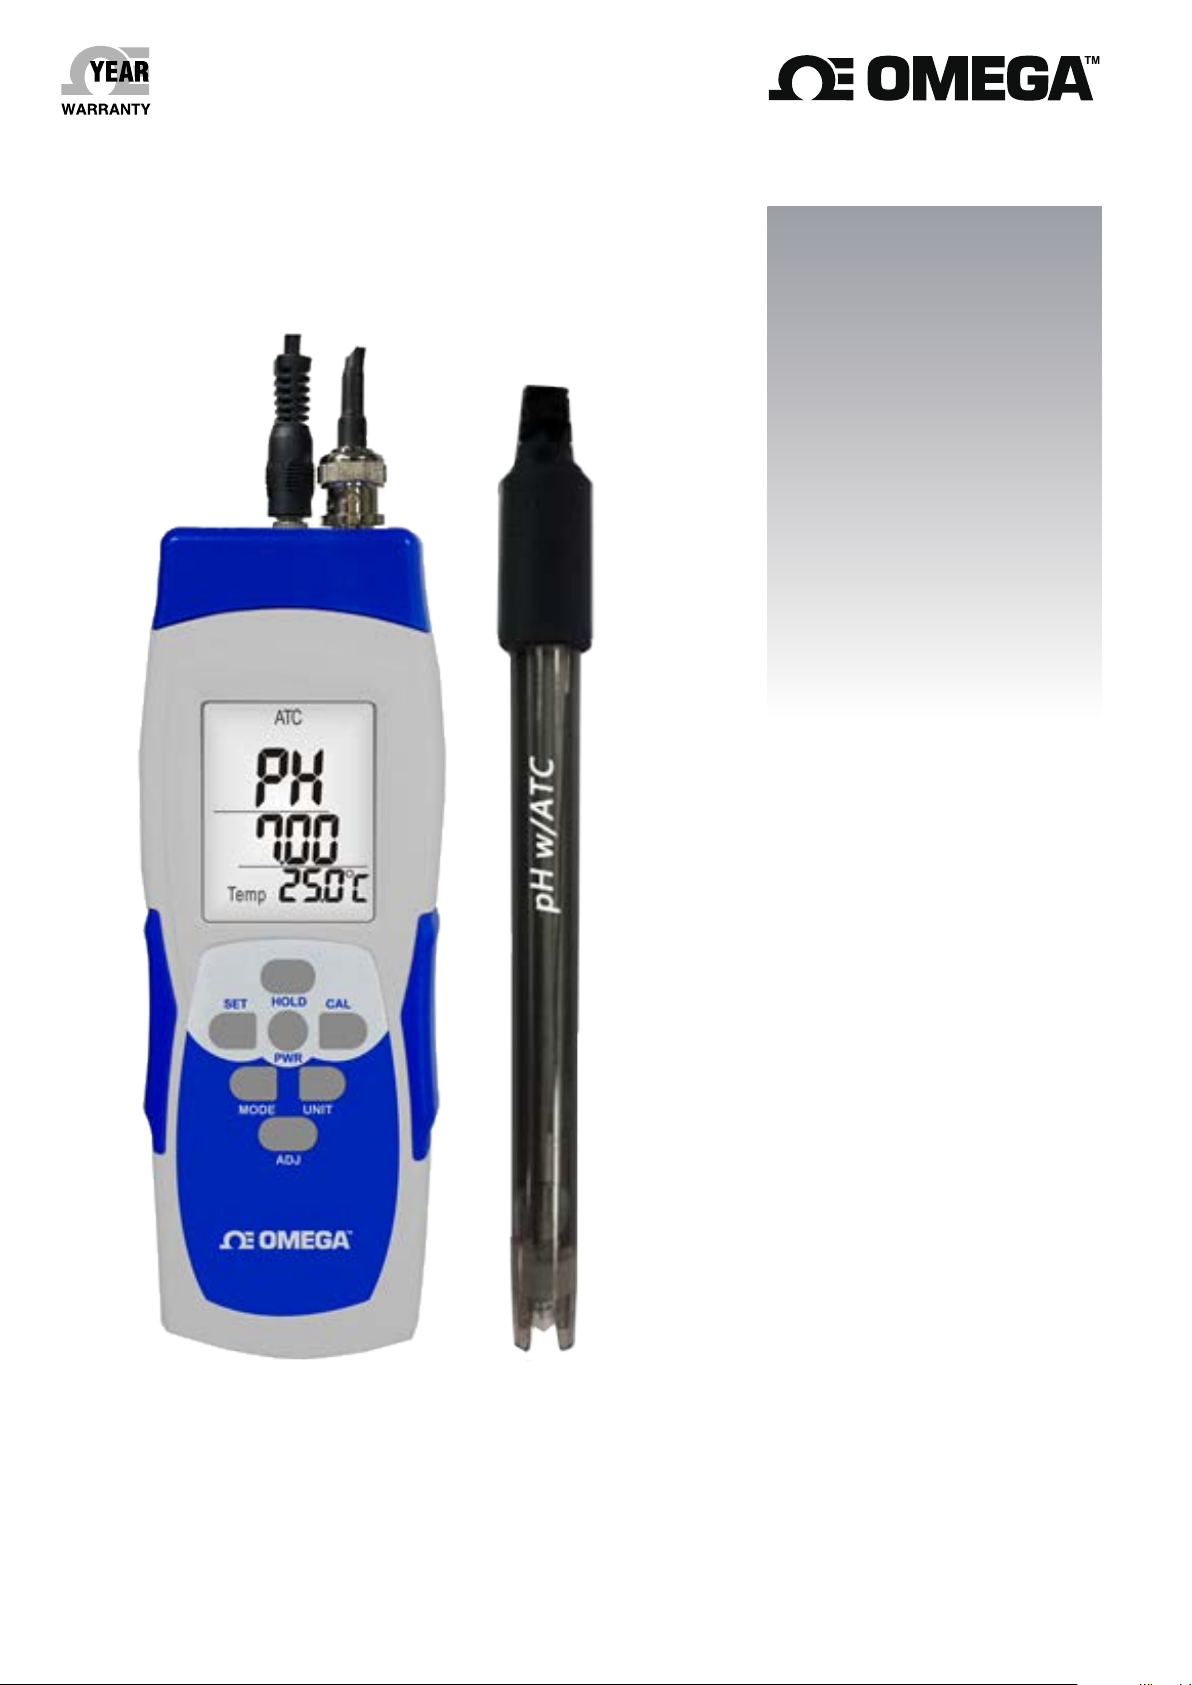
Handheld pH/mV Meter and pH Electrode Kit
Page 2

omega.com [email protected]
Servicing North America:
U.S.A. Omega Engineering, Inc.
Headquarters: Toll-Free: 1-800-826-6342 (USA & Canada only)
Customer Service: 1-800-622-2378 (USA & Canada only)
Engineering Service: 1-800-872-9436 (USA & Canada only)
Tel: (203) 359-1660 Fax: (203) 359-7700
e-mail: [email protected]
For Other Locations Visit omega.com/worldwide
The information contained in this document is believed to be correct, but OMEGA accepts no liability for any errors it contains, and
reserves the right to alter specifications without notice.
Page 3

FEATURES
Model
Parameter
pH
Data Hold
Freeze the display reading.
Meter dimension
175mm x 58mm x 32mm (With BNC connector)
Power supply
AAA batteries x 3 pcs
Temperature
0~90 ℃
Temp. accuracy
±0.5 ℃
pH
Measurement range
pH
0 to 14 pH
mV
414.12 mV to -414.12 mV
Accuracy
±0.02 pH + 2 digit
pH Calibration
pH 4, pH 7, pH 10 3 points calibration
Ensure the best linearity and accuracy.
Resolution
0.01(pH)
Automatic temperature
Compensation (ATC)
YES
Dimension
12x120mm
Electrode body
PC
Sensor type
Glass bulb
ATC Temperature
sensor electrode port
(pH)
3.5 mm diameter phone jack
Cable length
1 M
Professional look design accurate portable meters with large LCD display, BNC connector.
All electrodes with BNC connector compatible to any other electrodes.
Hold function, low battery icon indicator, automatic power off in 15 minutes and may be disabled.
Built-in different temperature compensation selectable: Thermistor 30K, 10K ohm and not 25.0 (manual
compensation).
RFS (Recover to Factory Setting) function is included.
3 points pH calibration: 4.01, 7, 10.01 (Adjustable). Calibration buffer solution is included with soaking
solution.
Tripod receptacle mountable design for long time monitoring purposes.
All electrodes are well calibrated before shipment.
Warranty period of meter is two years. Electrode is one year.
SUPPLIED
Meter
Electrode x 1 pc (pH)
Battery-AAA x 3 pcs
pH buffer solution x 3 pcs (pH 4, pH7, pH10)
Soaking Solution x 1 pc
Black carrying case
Calibration certificate
SPECIFICATION
PHH444
1
Page 4
KEY PAD (CONTROLS)
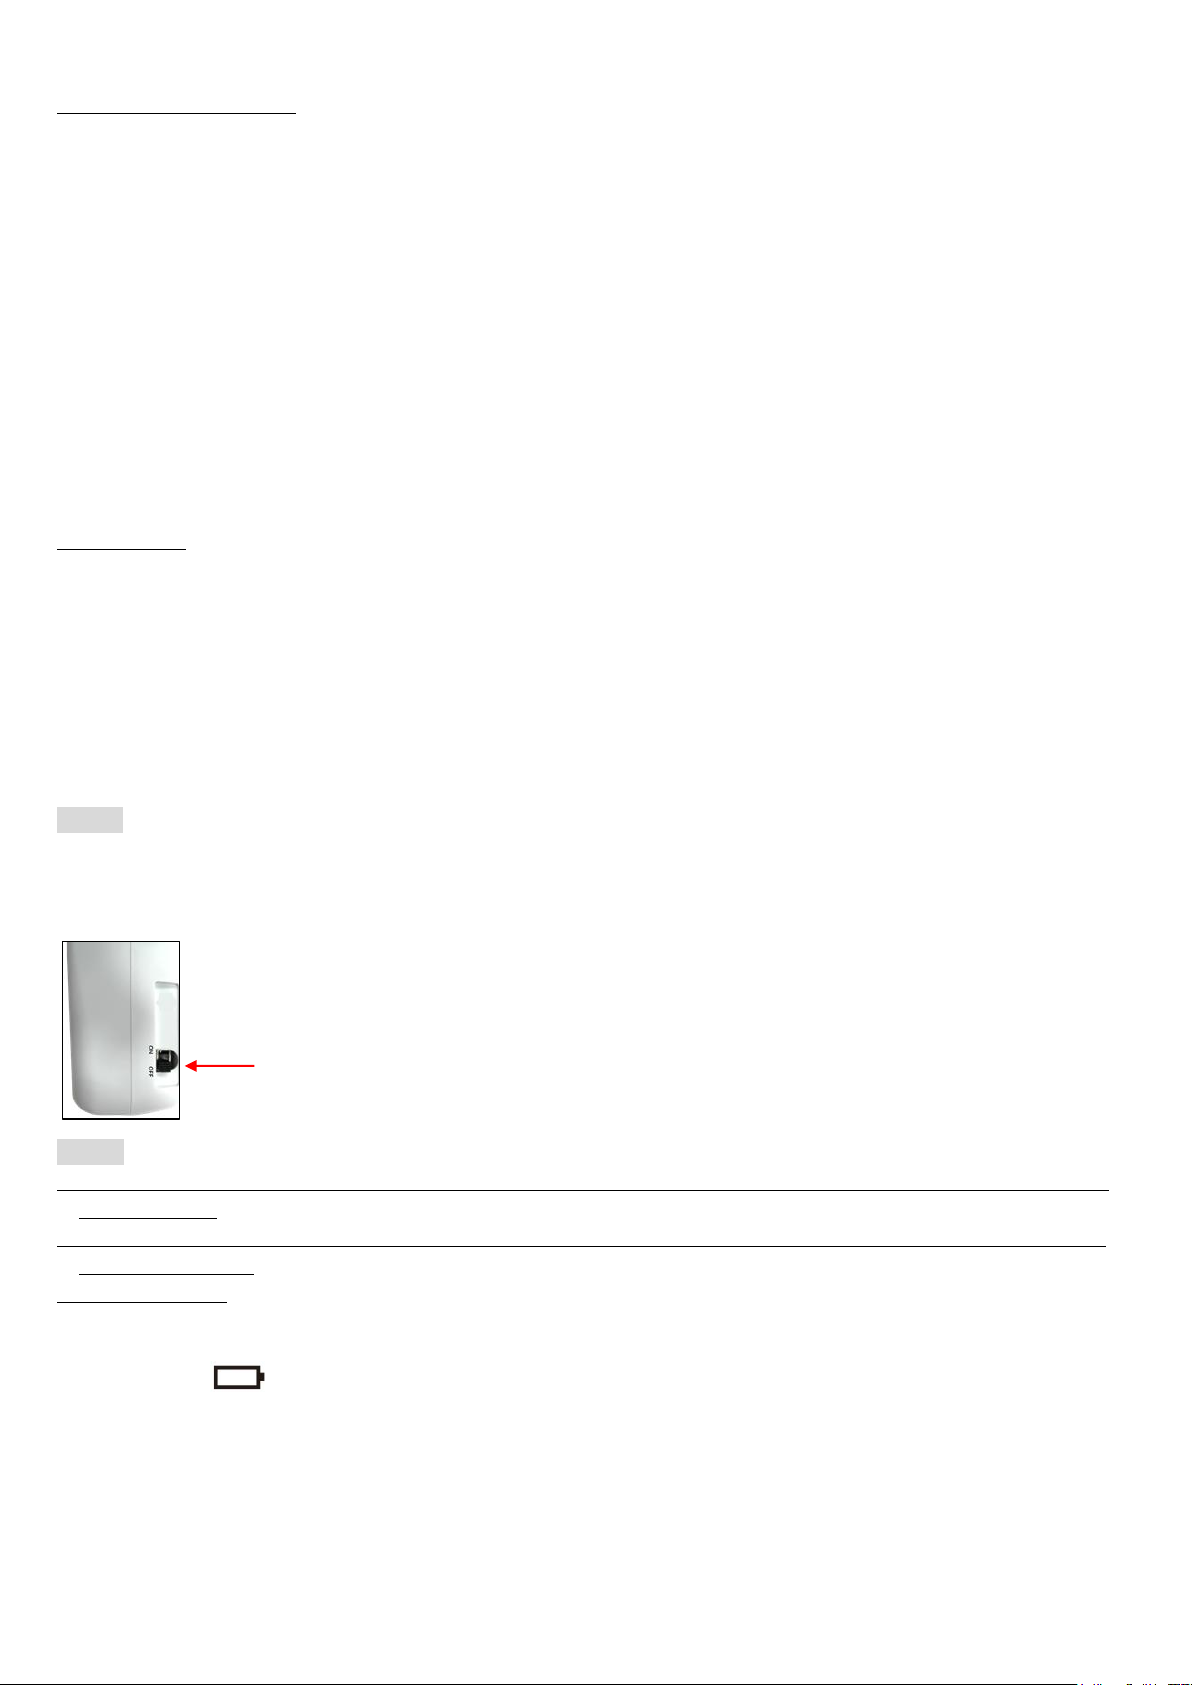
Pull down
the switch
PWR: Power on (Press in one second) or power off (Press more than 2 seconds when operation).
SET: Move to left digit. (Under setting mode). Long pressing to save setting or calibrate the reading.
CAL: Move to right digit. (Under setting mode).
MODE: Check pH in mV measurement. Select pH4, pH7, pH10 calibration mode.
UNIT: Short pressing to change temperature unit ℃/℉. Long pressing to select temperature electrode type.
Short pressing to select NTC: Negative Temperature Coefficient)/ NOT: no remote temperature probe.
Long pressing again to save electrode type.
HOLD: Freeze current readings (Hold shows at top of LCD). Increase value. (Under setting mode).
ADJ: Decrease value. (Under setting mode).
SET+UNIT: Recover to factory setting. (Under pH calibration mode)
MODE+CAL: pH Calibration.
HOLD+PWR: Disable Auto Power Off.
OPERATION
pH INSTALLATION (BNC connector):
a) Insert the pH electrode into the top of right hole. And insert the 3.5mm Ø diameter phone jack ATC sensor
parts into the middle of hole.
b) Hold the BNC connector in one hand; with the other, insert the braid into the center of the connector.
Continuing pushing the braid into the connector until it will not go in any farther. Do this gently and slowly;
do not bend the braid.
c) Turn the BNC connector in a clockwise direction, until you cannot turn it any more.
NOTE: Remove batteries when not use!
Power-off switch: When the meter is turned off, the internal CPU does not shut down completely, it will keep
detecting the buttons per milliseconds, letting meter know if the user wants to activate the meter or not. It will
consume the power by each detecting, in order to save the power, you may pull down the switch.
NOTE:
For each operation, make sure you are using fresh batteries, same brand, same power of batteries is
required, and
otherwise meter shows erratic readings or leakage. Warranty is void if not follow the notices. (Note:
remove batteries
when not use!)
1. Power supply:
(a) AAA batteries x 3pcs.
(b) Battery icon indicates when power is weak, replace with new batteries immediately as the readings
now on
LCD are incorrect due to weak power.
Battery life: Approx. 50 hours for continuous used.
2. Make sure sensor electrode and meter are well connected. Don’t attempt to detach sensor probe from meter
while in operation.
2
Page 5
3. When Meter shows erratic readings, it must be sensor failed or power is weak.
NTC 10K:
Negative Temperature Coefficient 25℃ = 10 K
NTC 30K:
Negative Temperature Coefficient 25℃ = 30 K
NOT:
External temperature probe is excluded, user can enter the temperature degree by their own
temperature instrument, default: 25℃ Adjustable range: 0.0℃~90.0℃
4. Only select one of the two electrodes while measuring the same water zone, otherwise meter appears erratic
readings. Read two parameters at the same time are only available for measuring two different water sources.
(1) POWER
NOTE: Make sure you have connected the electrode to the meter before power on.
Momentarily press PWR button to turn on the meter, press and hold PWR button to turn off meter.
(2) Check PH mV value
Short press MODE to check pH in mV unit.
(3) CHANGE THE TEMP. UNIT TO ℃/℉
Short press UNIT button to toggle ℃ or ℉.
(4) HOLD
Freeze the current readings of pH, then icon “Hold” will appear on the top left of screen.
(5) AUTO POWER OFF
Meter will turn off automatically in 15 minutes when no use, to disable auto power off function by pressing
HOLD and PWR button, “n” momentarily shows on screen, now meter is at non-sleep mode, then turns to
normal measurement, Meter default auto power off.
(6) FACTORY RESET
a) pH electrode
Whenever replacing a new pH electrode. Long pressing MODE+CAL to enter pH calibration mode then strongly
recommend doing factory reset by pressing SET+UNIT under pH4/7/10 calibration mode, screen will
show “rFS” momentarily.
(7) TEMPERATURE PROBE TYPE SELECTION
NOTE: If using NTC 10K probe but select 30K type. The temperature value will not be accurate.
Default setting is NTC 10K. User can change it depends on the electrode type to get the correct value.
Step 1: Must select correct probe type before measurement, otherwise the value would be incorrect.
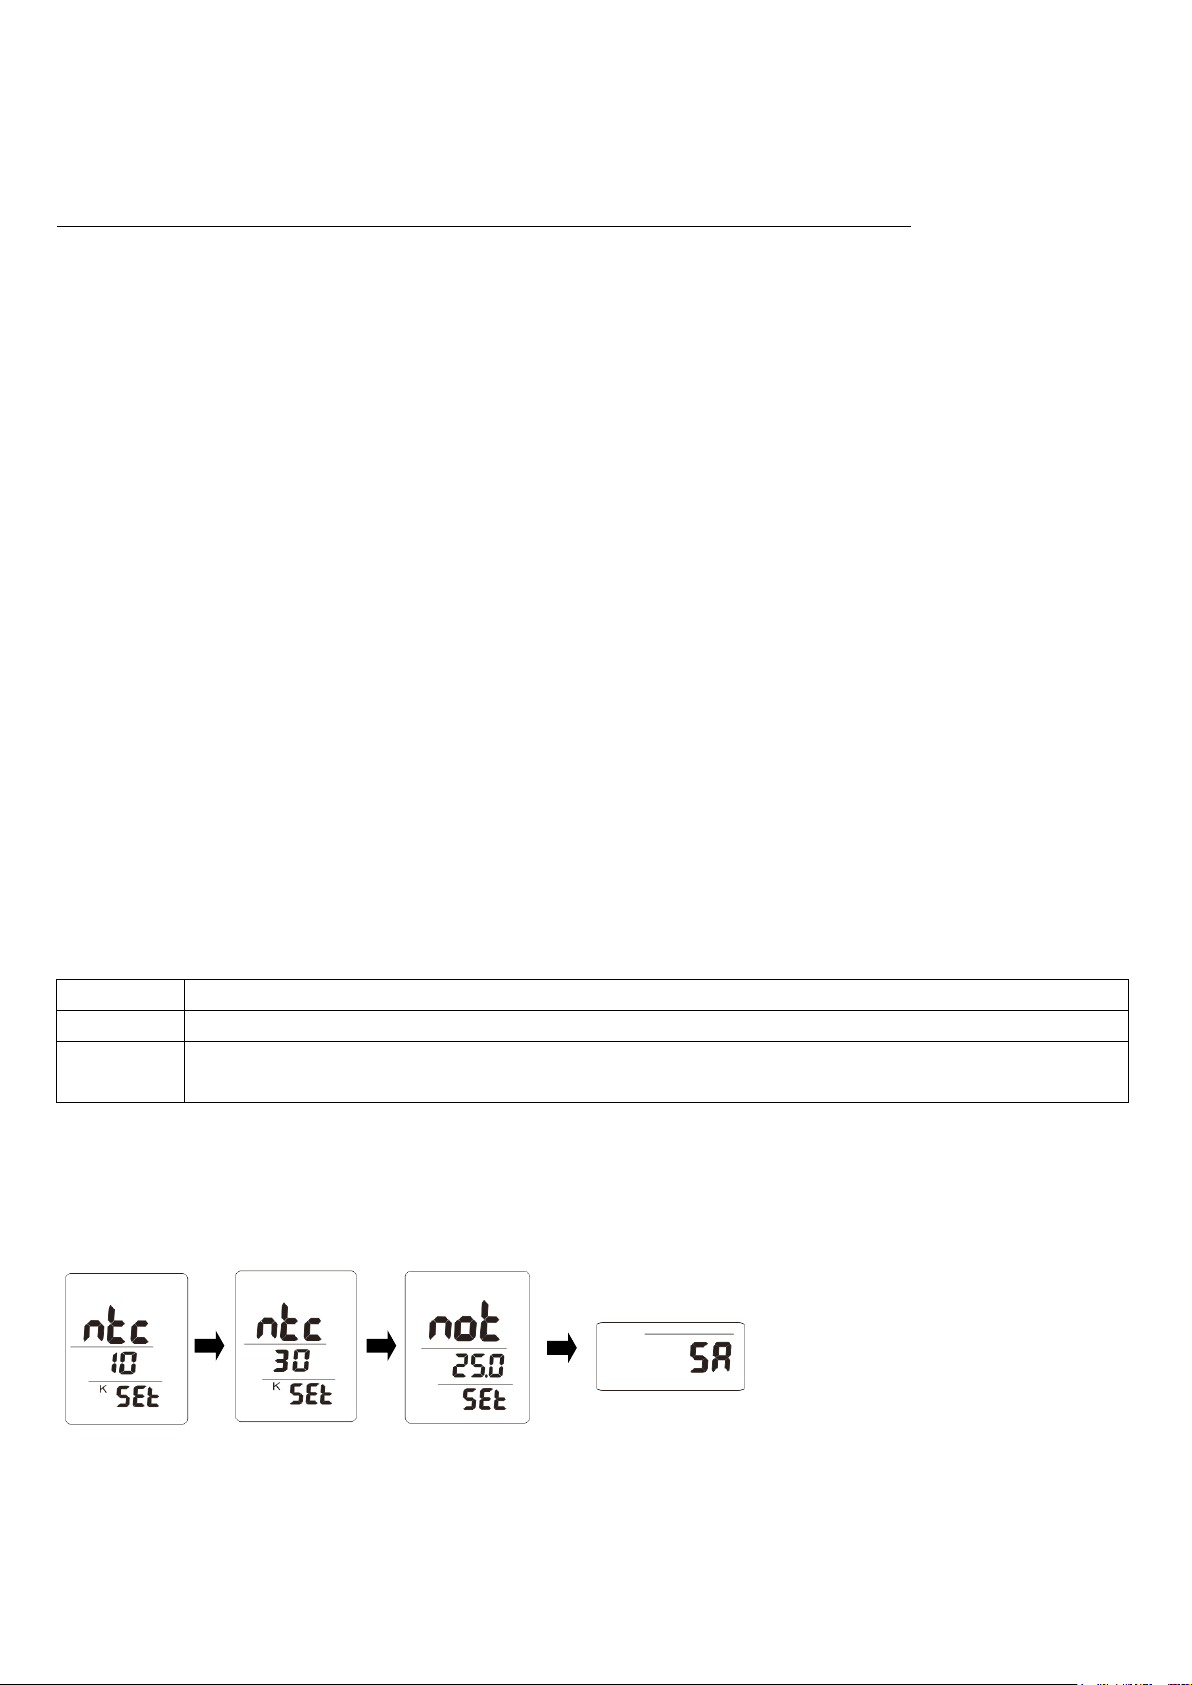
Step 2: Long pressing UNIT button, the meter default is “ntc 10k”, short pressing UNIT button to toggle ntc 30k
→ not.
Step 3: Long pressing UNIT button again to save the setting, meter shows “SA” at the bottom of LCD and then
return to normal measurement mode.
3
Page 6
“ATC” ICON INDICATION
Probe type
ntc 10K (Default)
ntc 30K
not
Plug in
Temp. XX.X
Temp. XX.X
Manual
temp.
Un-plugged
“─ ─ ─”
“─ ─ ─”
ATC icon
O
O
X
Calibration Points
Adjustable/Calibration range
pH4
3.75 to 4.25
pH7
6.75 to 7.25
pH10
9.75 to 10.25
pH/mV CALIBRATION PROCEDURE and MEASURING
NOTE: When not use the electrode, it should immerse the “Electrode sensing head” into the “Protection bottle.”
NOTE: Calibration is necessary before operation, the calibration procedures refer to as below“ a) to b)” :
a) Required Equipment for calibration:
1) pH electrode.
2) pH buffer solution.
NOTE: Make sure to use fresh solution each time due to the contaminants in the solution will affect the
calibration and the accuracy.
b) Calibration Procedure:
1) Prepare the pH electrode, install the “probe plug” into the right “BNC port” of the meter.
2) Power on the meter by pressing PWR button.
3) Long pressing MODE + CAL buttons to enter pH calibration mode. Immerse the pH probe to pH buffer
solution. Meter will automatically recognize pH buffer values.
NOTE: Calibrating the pH in the incorrect buffer solution, “Er 3” will appear on the bottom of screen.
4) User can do 1, 2 or 3 points calibration.
Rinse the probe with de-ionized water before doing each pH buffer calibration.
If you are doing multipoint calibration, short pressing MODE button to select pH 4 or pH7 or pH 10
calibration mode.
HOLD: ↑to increase ADJ: ↓to decrease SET: ← to left digit CAL: → to right digit
Referring to the Adjust range as below:
NOTE: Before doing pH 4, 7, 10 calibrations, if the value is out of above adjustable range, the meter
displays “CAL Err”. Please immerse the electrodes to distilled water or tap water to see if the value is
within the adjustable range first. After entering the calibration mode, immerse the electrode to
calibration solution to do the calibration.
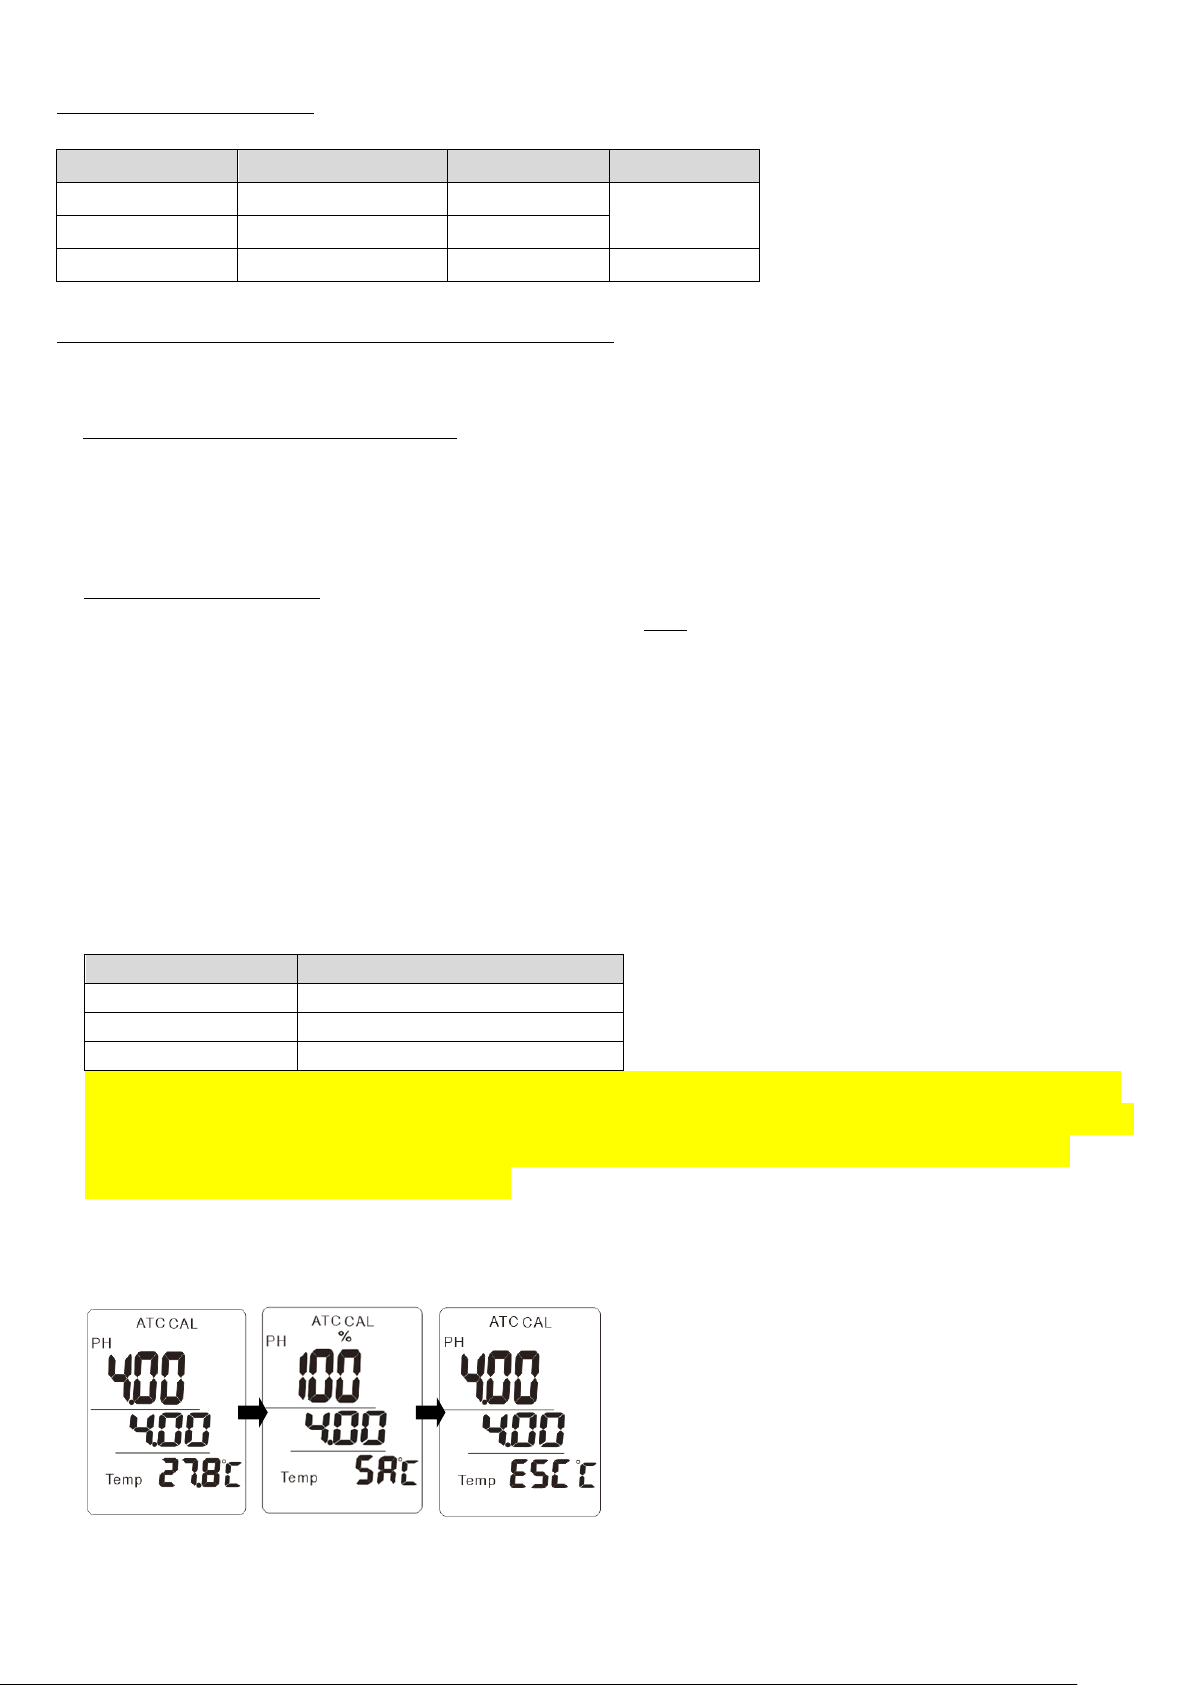
5) Long pressing SET button to save and complete calibration, then screen shows “SA”.
To escape calibration mode, long pressing MODE+CAL button, the bottom of screen will show “ESC” in few
seconds and return to normal measurement mode.
4
Page 7

NOTE: After calibrating pH4 or pH10 by long pressing SET button, there is a slope value show in pH block
Slope Range
Description
Between 70%~130%
First clean the electrode and then calibrate.
<70% or >130%
You need to change the electrode, it is no longer usable.
in few seconds which stands for the electrodes conditions.
If the slope value is:
c) pH measurement (ATC, automatic Temperature):
NOTE: Without connecting ATC probe, the temperature value will display dashes“─ ─ ─”.
1) The pH electrode should be with ATC feature, and then immerse the sensing probe into the measurement
solution until the value is stable.
2) The main display will show the pH value, the bottom display will show the sensing Temp. value of the
measured solution (measured from ATC probe).
d) pH measurement (Manual Temp. compensation):
NOTE: This function is used for your pH electrode without connecting the ATC probe.
1) Power on the meter by short pressing PWR button.
2) Prepare the pH electrode, installing the “probe plug” into the right “BNC port” of the meter.
3) Adjust the manual Temp. value by following steps:
Long pressing UNIT button, the meter default is “ntc 10k”, short pressing UNIT button to select “not” type.
HOLD: ↑to increase ADJ: ↓to decrease SET: ← to left digit CAL: → to right digit
Long pressing UNIT again to save setting until screen shows “SA” and back to normal measurement mode.
4) Hold the Electrode Handle by hand and let the Sensing Head immersed wholly into the measured solution.
Stir gently and wait until the display be stabilized.
5) The main display will show the pH value, the bottom display will show the setting manual temperature.
e) pH convert to mV:
1) Under normal measurement mode, short pressing MODE button to toggle Cond. to mV measurement.
2) The display will show the mV value.
3) Short pressing MODE button again to return Cond. measurement.
ELECTRODE MAINTENANCE
Proper maintenance will ensure faster measurements, improve accuracy and extend the lifetime of
the electrode.
pH probe
When not in use
pH electrodes should be stored in pH electrode storage solution.
This insures that the electrode glass remains hydrated, ready to measure accurately and quickly. The
storage solution also helps keep the reference junction fully charged with KCl (Soaking solution).
NOTE: Storing pH electrodes in distilled or deionized water is not recommended.
User already use the electrode for a certain period
Whenever user cannot calibrate the meter properly or the meter’s reading value is not stable, please check
5
Page 8
the electrode to see if the electrolyte in the electrode is run out. If yes, please fill the electrolyte and make
Code
Description
- - -
The electrode was not in a solution. Dashes in the temp. mode indicates that probe without
ATC or manual temp. setting. The electrode of cond. measured in pure water or ultra-pure water.
Select the wrong temp. electrode type (refer to page 4).
OL2
Measurement is out of range of the display.
the new calibration.
Electrode Cleaning Techniques
When your pH or ORP electrode gets slow, fouled and coated with contaminants, there are several things
that you can do to restore performance. The reason for this is that the sensing glass membrane becomes
coated. These coatings range from organics such as oil, grease, proteins to metal ions or other
contaminants. Removing them usually requires soaking or washing in a solution which will remove the
coating; similar to cleaning your eyeglasses.
a) Cleaning metal ions, some proteins and organics
Soaking the electrode in 0.01N. HCl for 10-20 minutes. Follow this by soaking in pH electrode storage solution
for 1-2 hours. Rinse the electrode in deionized water, as usual, and recalibrate.
b) Cleaning grease and oils
Washing with acetone or methanol and then warm tap water and dishwashing liquid. Use care if cleaning
mechanically as the pH or ORP glass is fragile. Electrodes washed in this manner also need to be
conditioned by storing in pH/ORP electrode storage solution and recalibrated.
c) Salt Build-Up
Salt crystals can accumulate when water in a salt solution evaporates during contact with air. These salt
crystals can be removed by rinsing the area with warm water.
TROUBLE SHOOTING
Q1: pH display erratic readings or calibration errors??
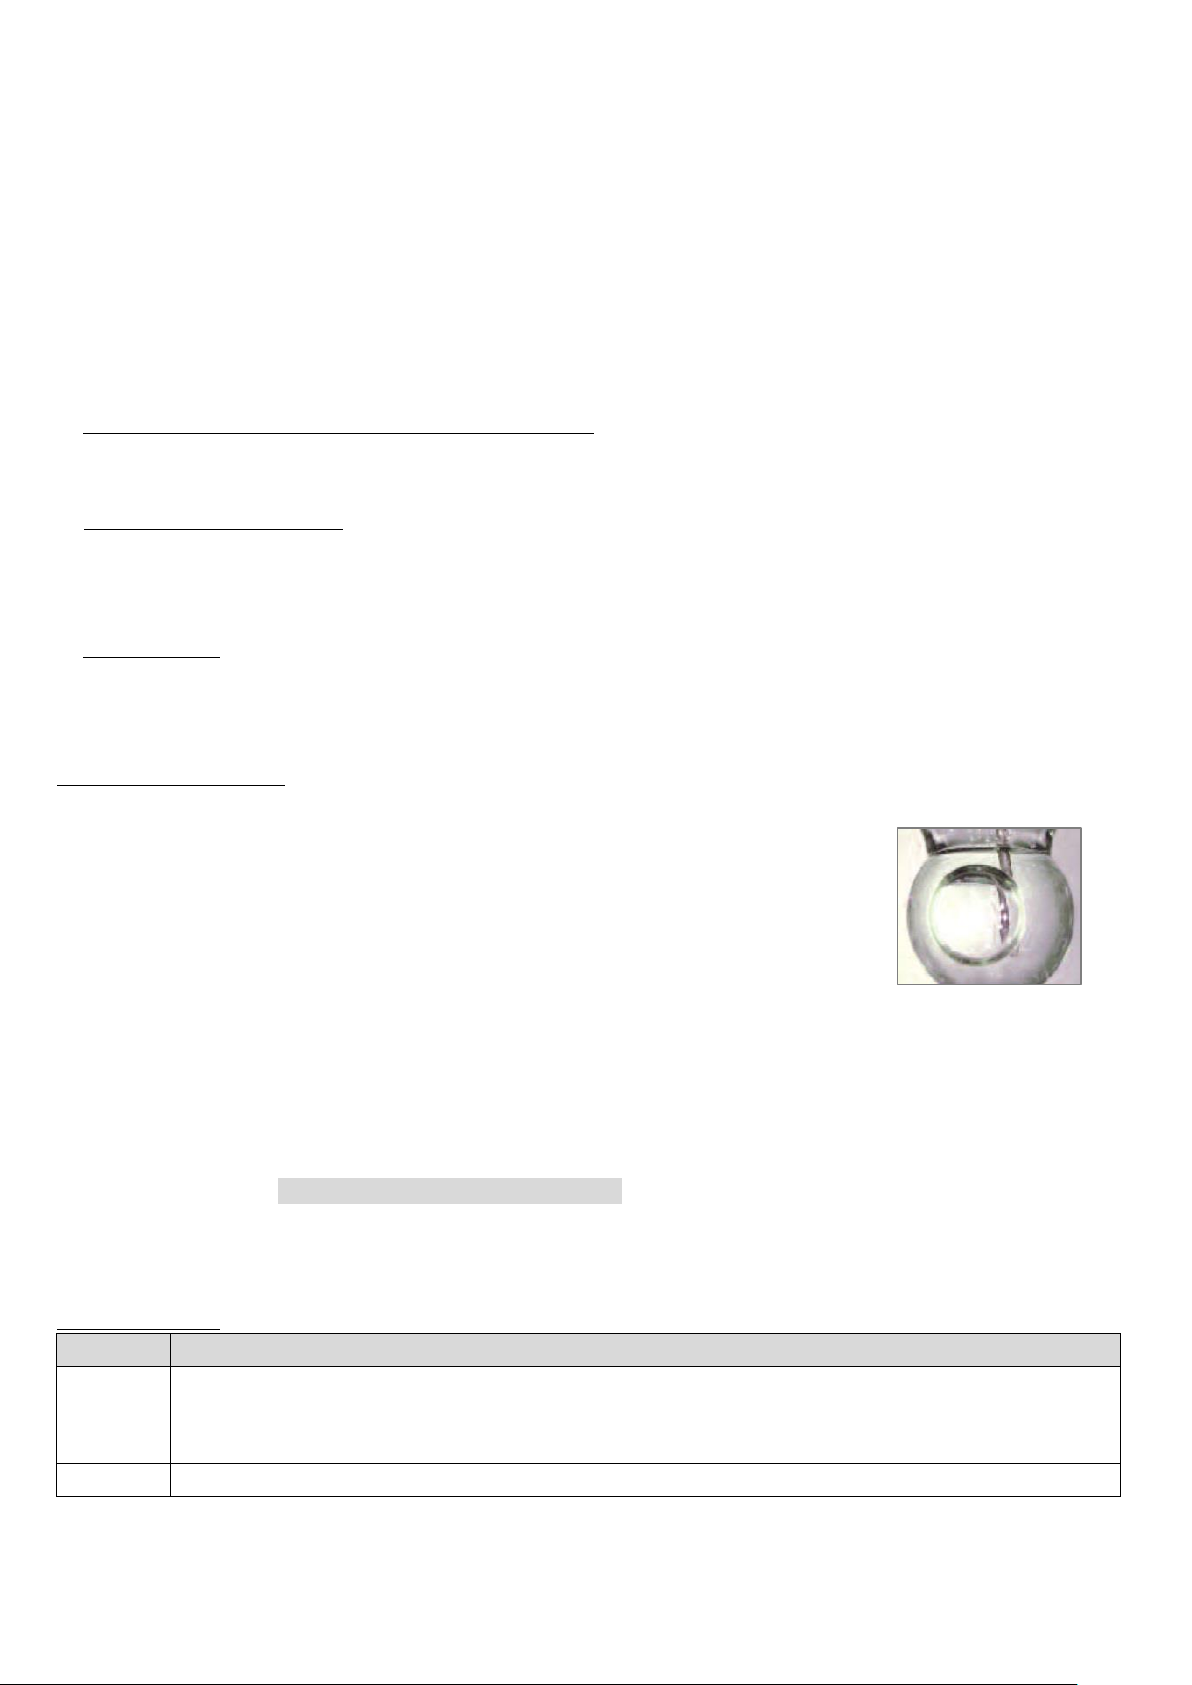
A1: Air Bubble in Glass Bulb
During shipment, horizontal storage, and from general use, sometimes
allowing air bubbles into the glass Bulb. Before each use, it is recommended
to inspect that the glass bulb is no visible air bubbles.If there are, shake the
electrode in a downward motion to force air bubbles out of the glass bulb.
Dirty Glass Bulb
Some contaminants remain on the glass surface. Refer to page 9 for specific guidelines for the
most suitable cleaning solution for the specific contamination you have.
Un-plugged the electrode
The readings keep changing on the screen are not referable.
Q2: Wrong temperature??
A2: Refer to page 4 (pH TEMPERATURE PROBE TYPE), you must select the correct temperature sensor
type or adjust temperature manually (Long press UNIT button then press UNIT to select “not”).
Q3: Appear “Error codes”??
A3: Make sure if Hold is appeared on LCD.
ERROR CODES
6
Page 9

WARRANTY/DISCLAIMER
OMEGA ENGINEERING, INC. warrants this unit to be free of defects in materials and workmanship for
a period of 25 months from date of purchase. OMEGA’s WARRANTY adds an additional one (1)
month grace period to the normal two (2) year product warranty to cover handling and shipping
time. This ensures that OMEGA’s customers receive maximum coverage on each product.
If the unit malfunctions, it must be returned to the factory for evaluation. OMEGA’s Customer Service
Department will issue an Authorized Return (AR) number immediately upon phone or written request.
Upon examination by OMEGA, if the unit is found to be defective, it will be repaired or replaced at no
charge. OMEGA’s WARRANTY does not apply to defects resulting from any action of the purchaser,
including but not limited to mishandling, improper interfacing, operation outside of design limits,
improper repair, or unauthorized modification. This WARRANTY is VOID if the unit shows evidence of
ha ving been tampered wi th or shows e vi d ence of havin g been dama ged as a
result of e xcessive c orrosion; or c urrent, h eat, moi sture or vi bration; improp er
specific ation ; m i sap plicatio n; misuse or other operat ing c o nd it ions o ut si de o f
OMEGA’s control. Components in which wear is not warranted, include but are not
limited to contact points, fuses, and triacs.
OMEGA is pleased to offer s
OM EGA neither a ssumes responsibil ity for a ny omissio ns or e rrors n o r
assumes l ia bility for any damages that result from the use of its products
in a cc ordance with informa t i o n p rovide d by OME G A , e i ther v erba l o r
written. OMEGA warrants only that the p a rts manufactured by it will be as
specified and free of defects. OMEGA MAKES NO OTHER WA RRANTIES O R
REPRESENTATIONS OF ANY KIND WHATSOEVER, EXPRESS OR IMPLIED, EXCEPT
THAT OF TITLE, AND ALL IMPLIED WARRANTIES INCLUDING ANY WARRANTY OF
MERCHANTABIL I T Y AND FITNESS FOR A PARTICULAR PURPOSE A RE H EREBY
DISCLAIMED. LIMITATION OF LIABILITY: The remedies of purchaser set forth herein are
exclusive, and the
based on contract, warranty, negligence, indemnification, strict liability or otherwise,
shall not exceed the purch ase price of the component upon which liability
is based. In no event shall OMEGA be liable for consequential, incidental or special damages.
CONDITIONS: Equipment sold by OMEGA is not intended to be used, nor shall it be used: (1) as a
“Basic Component” under 10 CFR 21 (NRC), used in or with any nuclear installation or activity; or (2)
in medical applications or used on humans. Should any Product(s) be used in or with any nuclear
installation or activity, medical application, used on huma
no responsibility as set forth in our basic WARRANTY / DISCLAIMER language, and, additionally,
purchaser will indemnify OMEGA and hold OMEGA harmless from any liability or damage whatsoever
arising out of the use of the Product(s) in such a manner.
total liability of OMEGA with respect to this order, whether
uggestions on the use of its various products. However,
ns, or misused in any way, OMEGA assumes
RETURN REQUESTS/INQUIRIES
Direct all warranty and repair requests/inquiries to the OMEGA Customer Service Department.
BEFORE RETURNING ANY PRODUCT(S) TO OMEGA, PURCHASER MUST OBTAIN AN AUTHORIZED
RETURN (AR) NUMBER FROM OMEGA’S CUSTOMER SERVICE DEPARTMENT (IN ORDER TO AVOID
PROCESSING DELAYS). The assigned AR number should then be marked on the outside of the return
package and on any correspondence.
The purchaser is responsible for shipping charges, freight, insurance and proper packaging to prevent
breakage in transit.
FOR WARRANTY RETURNS, please have the
following information available BEFORE
contacting OMEGA:
1. Purchase Order number under which the
product was PURCHASED,
2. Model and serial number of the product under
warranty, and
3. Repair instructions and/or specific problems
relative to the product.
OMEGA’s policy is to make running changes, not model changes, whenever an improvement is possible. This affords
our customers the latest in technology and engineering.
OMEGA is a trademark of OMEGA ENGINEERING, INC.
© Copyright 2018 OMEGA ENGINEERING, INC. All rights reserved. This document may not be copied, photocopied,
reproduced, translated, or reduced to any electronic medium or machine-readable form, in whole or in part, without the
prior written consent of OMEGA ENGINEERING, INC.
FOR NON-WARRANTY REPAIRS,
for current repair charges. Have the following
information available BEFORE contacting OMEGA:
1. Purchase Order number to cover the COST
of the repair,
Model and serial number of the product, and
2.
3. Repair instructions and/or specific problems
relative to the product.
consult OMEGA
M5743/0719
 Loading...