

Page 1

OMEGA... Your Source
f
Process Measurement and
TEMPERATURE
&
B
Thermocouple, RTD
Probes, Connectors, Panels
B
Wire: Thermocouple, RTD &Thermistor
m
Calibrators
B
Recorders, Controllers
B
Infrared Pyrometers
&
Ice Point References
Thermistor
81
Assemblies
&
Process Monitors
PRESSURE/STRAIN FORCE
&
@’
Transducers
@
Load Cells
@’
Displacement Transducers
0
Instrumentation
Strain Gages
&
Pressure Gauges
&
Accessories
FLOW/ LEVEL
b?
Rotameters, Gas Mass
Plow Computers
0
Air Velocity Indicators
0
Turbine/Paddlewheel Systems
Totalizers
0
&
Batch Controllers
Blowmeters
&
H/CONDUCTIVITY
&
&
@
Bet-&top/Laboratory Meters
0
Controllers, Calibrators, Simulators
Pumps
0
Industrial
M1811/0694
pl-I
Rr
AccessoriespH Electrodes, Testers
&
Conductivity Equipment
DATA ACQUISITION
@’
Data Acquisition and Engineering
Software
B
Communications-Based Acquisition
Systems
0
Plug-in Cards for Apple, IBM
Compatibles
0
Datalogging Systems
0
Recorders, Printers
HEATERS
I.aboratory
Cable
&
Strip Heaters
&
Band Heaters
Heaters
0
Heating
0
Cartridge
0
Immersion
0
Flexible Heaters
0
ENVIRONMENTAL MONITOR-
ING AND CONTROL
&
0
Metering
m
Refractometers
0
Pumps &Tubing
0
Air, Soil
0
Industrial Water
Treatment
RI-l,
@’
Instruments
Control Instrumentation
&
Water Monitors
Conductivity
i&trol
&
&
Plotters
&
Wastewater
Fr
Dissolved Oxygen
PHCN-4 10
pH
Controller
MEOMEGA”]
Operator’s Manual
Page 2

Servicing USA and
One
Stamford, CT 06907-0047 USA
Telephone: (203) 359-1660
FAX: (203)
Engineering Service: l-806-872-9436
USA
Omega Drive, Box 4047
359-7700
Customer Service: l-800-622-2378
996404
TELEX:
Canada: Call OMEGA Toll Free
Canada
976
Bergar
LavaI
(Quebec)
Telephone: (514) 856-6928
FAX:
(514) 8566886
l-800-TC-OMEGASM
/
Sales Service: l-800-826-6342
l-BOO-622-BESTS”
/
l-SOO-USA-WHENsM
/
EASYLINK: 62968934 CABLE OMEGA
H7L
5Al
Servicing Europe: United Kingdom Sales and Distribution Center
L&ester&&e
AstIey,
2.5
Telephone: 44 (0455) 285520
-~‘“c:P,x%$?~.q~?~zY?~
G.<:>b:,:.+,
Direct
Call
203-359-7807.
BEFORE
NUMBER FROM OUR CUSTOMER SERVICE DEPARTMENT (IN ORDER TO AVOID
The assigned AR number should then be marked on
dence.
FOR
towing information available BEFORE contacting
OMEGA:
1. P.O. number under which the product was
2.
3. Repair instructions
OMEGA ’s policy is to make running changes, not
Our
OMEGA is a registered trademark of OMEGA ENGINEERING. INC.
0
copied. reproduced. translated. or reduced to any
without prior written consent of OMEGA ENGINEERING. INC.
<..,<_.,,,~_.~:..,,
._ I ..,,
all
warranty
toll free in
RETURNtNG
w
PURCHASED,
Model and serial number of the product under
warranty, and
you are having with the product.
customers the latest in technology and engineering.
COpyriQht
1994 OMEGA ENGINEERING. INC. All rights reserved. This documentation may not be copied,
RmUR
and repair requests/inquiries to the
the USA and Canada:
ANY
RETURNS. please have the
and/or specific problems
N
PRODUCT(S)
1-800-622-2378.
6TU,
England
LE9
REQUESTS
TO OMEGA, YOU MUST OBTAIN AN
fol-
model changes, whenever an improvement is possible. This affords
eleRronic
FAXz
OMEGA
FAX:
me
outside of the return package and on any correspon-
FOR
consult OMEGA for current repair/calibration charges.
Have the following information available BEFORE con-
tacting OMEGA:
1. P.O. number to cover the COST of the of the
reoairlcalibration.
Model
2.
3. Repair instructions
are having with the product.
medium or machine-readable form, in whole or in
Swarmington Road, Broughton
44 (0455) 283912
INQUIRIES
/
ENGlNEEAtNG
203-359-7811;
B
and serial number of product, and
International:
~~~~~~~:s~~~~~~~~~~~
Customer Service Department.
AUTHORtZED
PROCESStNG
REPAIRS OR
and/or
specific problems you
203-359-1660.
RETURN
DELAYS).
CALIBRATION.
FAX:
photo
(AR)
pan,
Controller Operator ’s Manual
pH
SECTION
Section 1 Getting Started
the
&packing
.I1
1.2
Controller Description
1.3
Keypad Description
1.4
Front Panel
1.5 General Information
Controller.. .........................................................
................................................................
....................................................................
Displays
.................................................................
....................................................................
Section 2 Installing the Controller
2.1
Mounting the Controller
the
2.2 W iring
2.2.1
2.2.2
2.2.3
Controller..
Connect ac Power
Making Input Connections
Making Output
Section 3 Calibrating the
3.1
Calibrating the
pH
pH Electrode
..........................................................
...............................................................
Connections..
Electrode
.........................................................
.........................................
...................................
.....................................................
Page 3
Section 4
Operating the Controller
4.1
4.2 Error Messages
Section
5
Section 5.1 Specifications
pH
Controller Operator ’s Manual
Entering PHCN-410 Hi/Lo Setpoints
4.1.1
4.1.2
To Enter the Hi
To
Enter the Lo
..........................................................................
Specifications
......................................................................
Setpoint
Value
Setpoint Value..
....................................
..................................
...............................
.4-l
4-l
4-l
4-2
5-l
..
.l
.1 .
Unpacking the Controller
Remove the Packing List and verify that you have received all
equipment. If you have questions about the shipment, please call
the OMEGA Customer Service Department at l-800-622-2378 or
(203) 359-1660.
Upon receipt of shipment, inspect the container and equipment for
any signs of damage. Note any evidence of rough handling in
transit. Immediately report any damage to the shipping agent.
The carrier will not honor
shipping material is saved
examining and removing contents, save packing
material in the event reshipment is necessary.
ii
CI& claims unless all
for
their examination. After
Page 4

Getting Started
1.2 Controller Description
The OMEGA” PHCN-410
pH controller with automatic temperature compensation, a 4-digit
LED display, two SPDT mechanical relays, and a fixed 4-20
output.
Figure
1-2
pH
controller is a microprocessor-based
l-l.
Front Panel Display
mA
1.3
Keypad Description
The PHCN-410 features four keys for entering all set-up
parameters and performing calibration. (Refer to Figure l-l).
SElITEMP
CAl/ENIER
4
A
reby modes (Lo and Hi)
setpoint
Select
Initiate
buffers
setpoint
Select
Select number from
calibmtion procedure using standard
7.00,4.01
values
numeticol position from right to left
or
10.01 to enter
O-9
Page 5
.
1.4 Front Panel Displays
P”
CAL
Hi
lo
1.5 General Information
We recommend that you bench-test all equipment prior to
installation. This requires wiring the equipment and checking relay
and output functions as well as
also a good time to initially calibrate the
(see section 3).
Controller in
pH
calibration
and 10.01; CAL annunciator off when calibration
complete
High alarm relay activated
Low
pH
mode
mode;
display shows
alone
relay activated
pH
input (see section 2.2). This is
pH
7.OO,4.01,
electrode to the meter
Installing the Controller
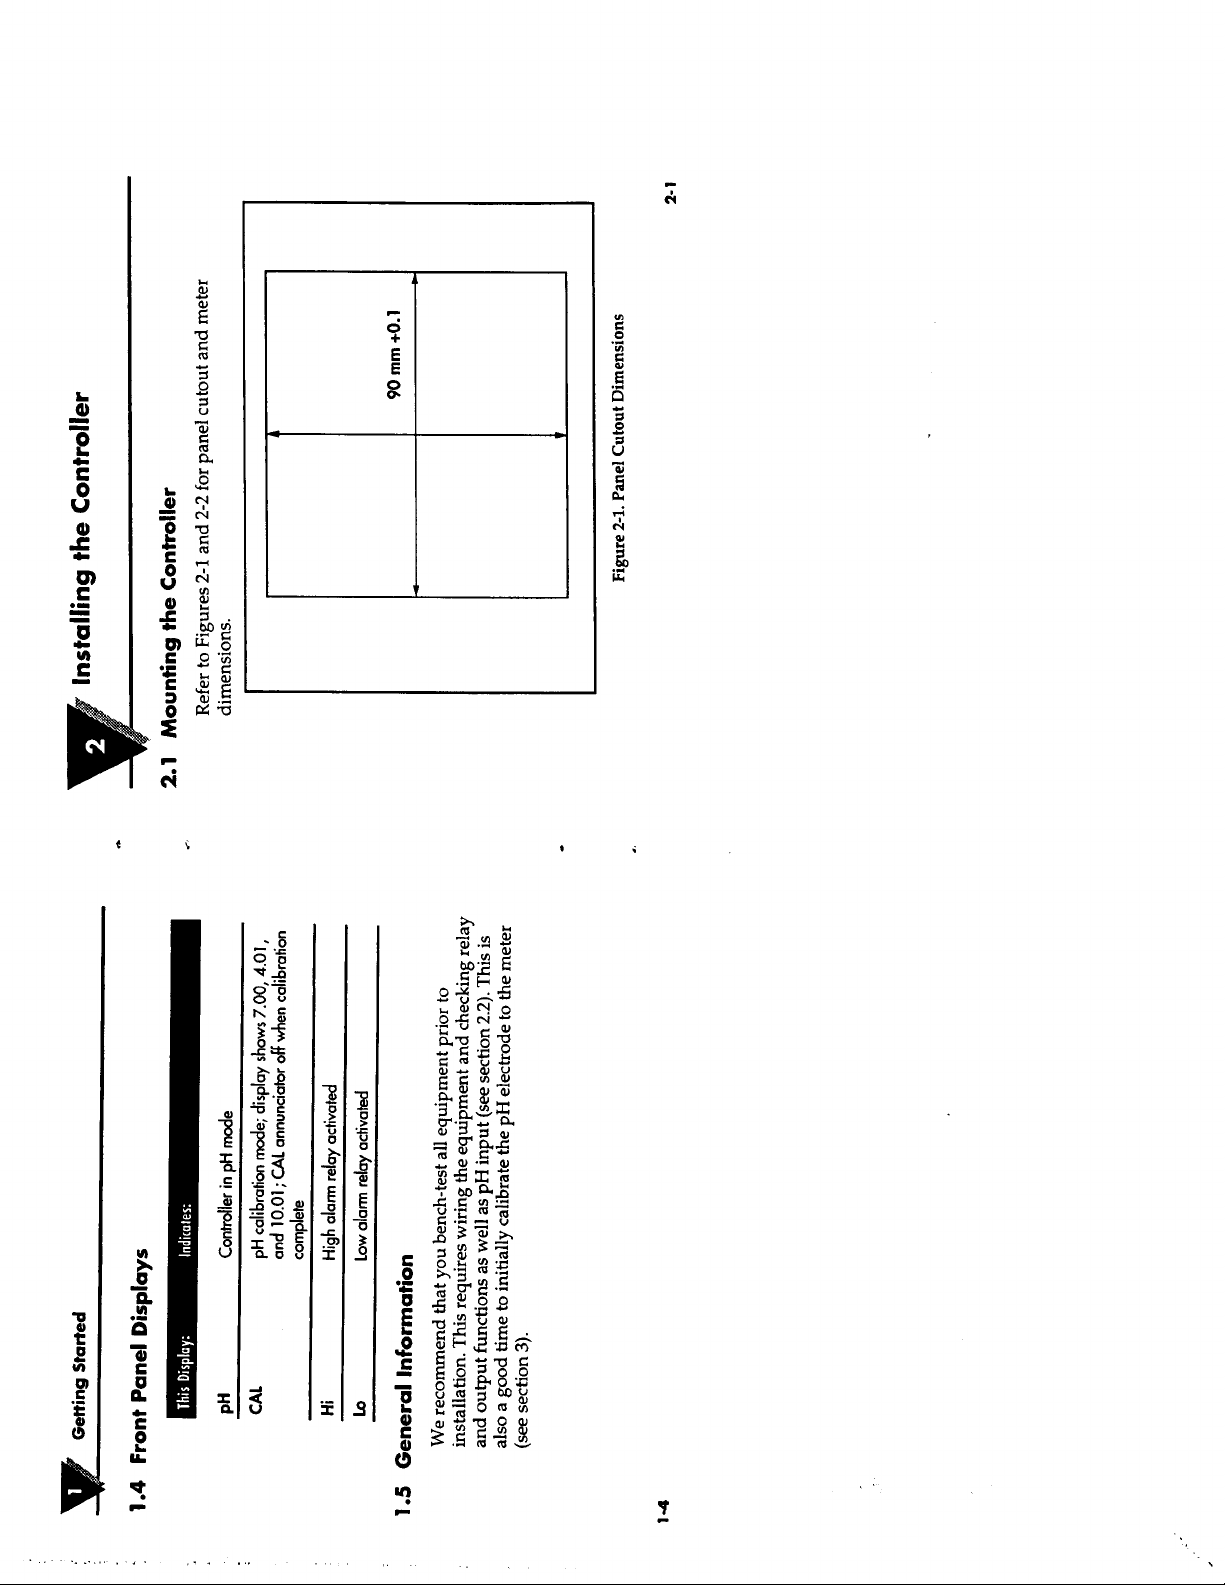
2.1 Mounting the Controller
Refer to Figures 2-l and 2-2 for panel cutout and meter
dimensions.
&
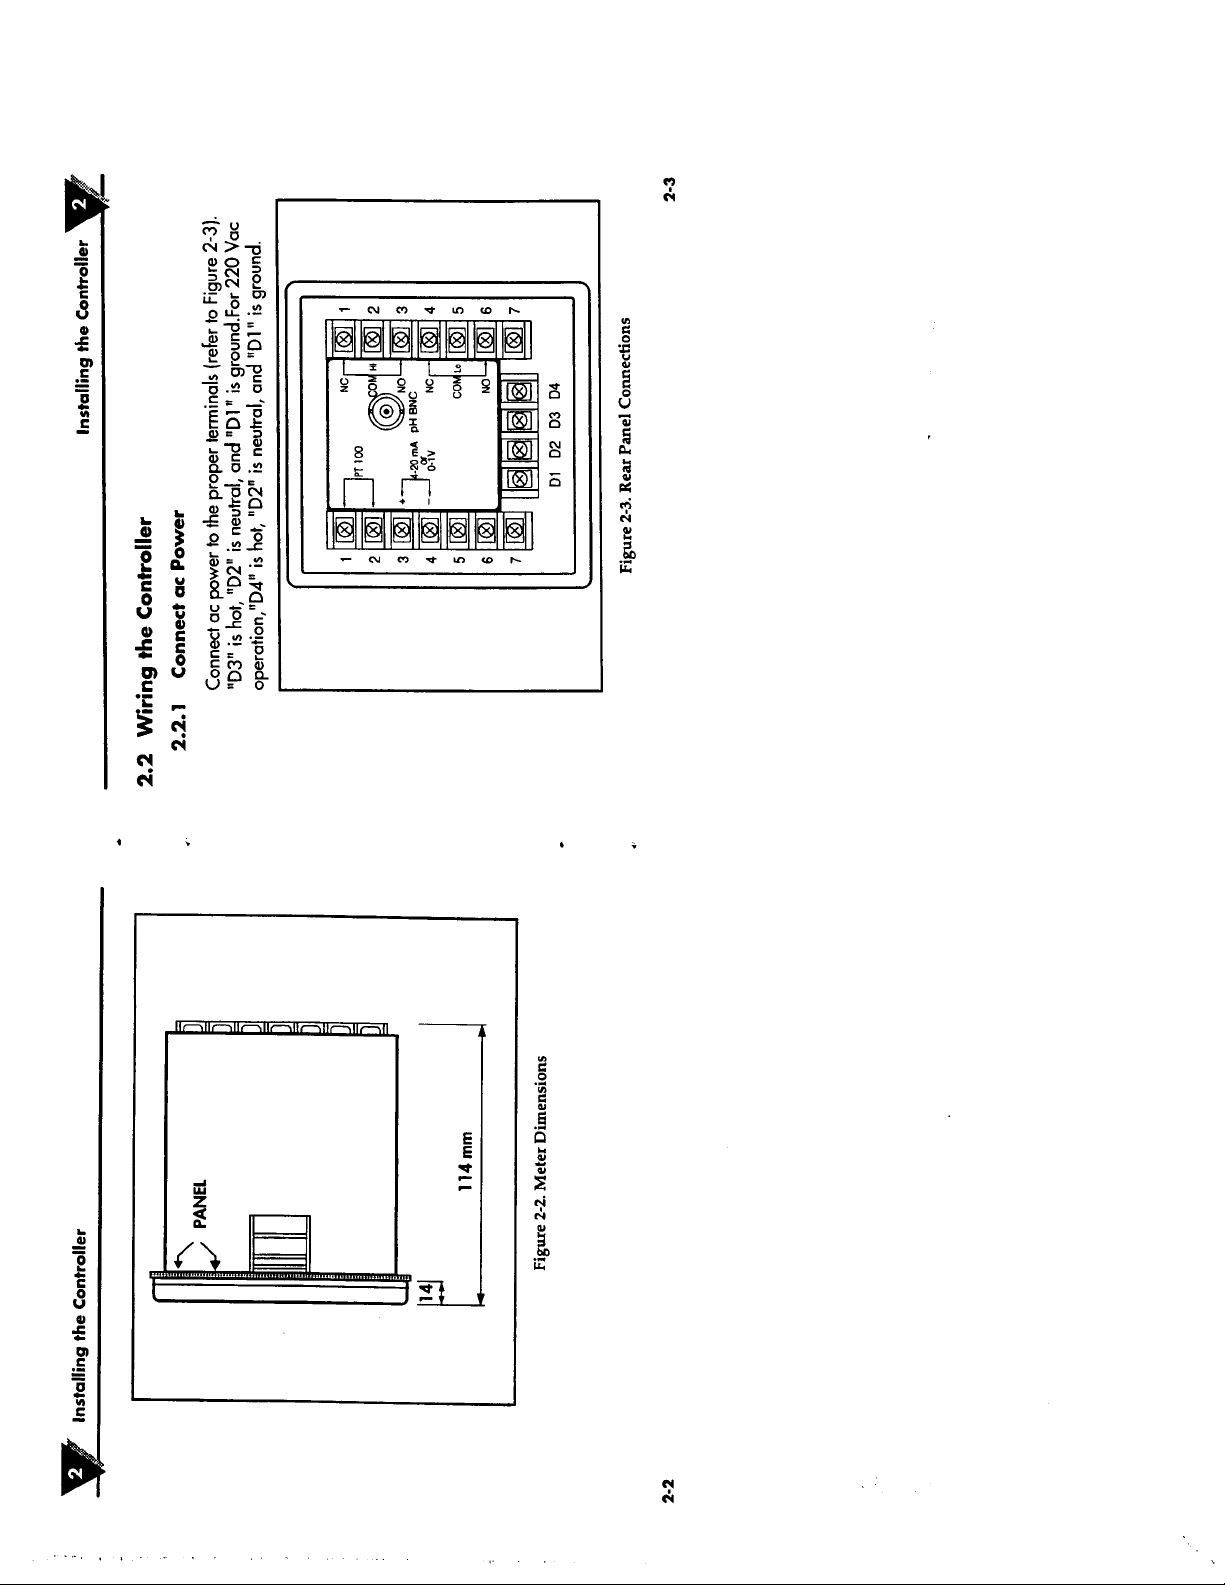
Figure 2-1. Panel Cutout Dimensions
90
mm
l-4
Page 6
.
‘
), . . .
Page 7

Installing the Controller
2.2.2 Making Input Connections
combination electrode to the BNC connector on the
pH
1.
Connect the
bock of the unit.
2.
If using
100 ohm Pt RTD
2 (no
polarity
Automatic Temperoture Compensotion (ATC), connect the
of the
temperature
2-3).
leads
-
see Figure
The 100 ohm Pt RTD temperature probe can be separate from
the
pH
electrode, built into the body of the
selected models) built into the mounting assembly of the
electrode.
If an ATC input is not provided to the meter, the temperature
reading will default to 25°C. If the process temperature is constant,
25”C,
but not
a precision resistor can be used to simulate the
appropriate temperature value to the unit. For example, if the
O”C,
control process runs at
a resistor with a value of 100 ohms can
be wired to Terminals 1 and 2. The temperature display will show
approximately 0°C. For a complete temperature versus resistance
table, consult the OMEGA Temperature Measurement Handbook
Encyclopediam.
and
probe to Terminals 1
pH
electrode or (in
pH
ond
The PHCN-410
Compensotion;
displayed.
2.2.3
Making Output Connections
For Hi and Lo
Connect the proper load to the NO and COM terminols or the NC
and
COM
Setpoint Relays:
terminals.
features
however, the temperature
Automatic
When the load is connected to the NO and COM, the relay is
open until the
setpoint is reached. When the load is connected
to the NC and COM, the relay is closed until the
reached. The wiring configuration is application dependent.
The PHCN-410 has a fixed 4-20
mA
Installing the Controller
Temperoture
output.
2-4
Page 8

Installing the Controller
Notes
Calibrating the
3.1 Calibrating the
Calibration of the electrode to the
pH measurement. It is also necessary to recalibrate the electrode
periodically. The frequency of recalibration is system dependent.
pH calibration procedure is as follows:
The
1.
Connect the combinotion
compensation
Figure
2-3).
2.
Apply power to the instrument.
3.
Remove the electrode protector from the end of the
rinse the electrode with distilled woter, and
7.00
buffer
solution. Press the CAL key.
pH
pH
Electrode
pH
probe (if using
Electrode
pH
meter is essential for accurate
electrode ond temperoture
ATC) to the meter (refer to
2-6
At this time
the “CAL”
annunciator
light will appear. When the
light goes off, the first point is calibrated. If “7-E” appears in the
pH
display, this means the
buffer 7.00 was not used or the
electrode has failed.
Page 9

Calibrating the
Electrode
pH
Operating the Controller
3-2
pH
4.
Remove the
electrode with distilled
pH buffer 4.01 or 10.01. Press the CAL Key.
electrode from the
water
pH buffer 7.00. Rinse
place
ond
the electrode
At this time the “CAL” annunciator light will appear. When the
light goes off, the slope is calibrated.
the
stondord
in
Hi/Lo
4.1. 1
4.1. 2
To
Enter the Hi
Press the SET/TEMP keypad, until the Hi
1.
front ponel.
4
Use the
2.
desired value.
When the desired value is showing in the
3.
CAL/ENTER
and
keypod
To Enter the lo
panel.
the
SET/TEMP
4
ond
value.
keypod
Press the
1.
front
Use
2.
desired
When the desired value is showing in the display, press the
3.
CAL/ENTER
Setpoint
A
keys to
k
store this
Setpoint
keypod,
A
keys to change the
to store this value into memory.
Setpoints
4.1 Entering PHCN-410
Value:
change
the
v&e
into memory.
Value:
until the Lo onnunciotor is
annunciator
displayed
display,
displayed
Page 10

Notes
Notes
Page 11

 Loading...