

Page 1
DATALOGGER OS1327D
Infrared / Type K Thermometer
Remote Temperature Measurement
( Non-Contact )
INSTRUCTION MANUAL
※※※※
Enclosed CD : Software & Protocol Inside.
Page 2

Page 3

CONTENTS
Title Page
1. INTRODUCTION............................................................. 1
2. SAFETY INFORMATION ................................................ 2
3. FEATURES ..................................................................... 4
4. SPECIFICATIONS...........................................................4
5. FRONT PANEL DESCRIPTION......................................7
7. EMISSIVITY ADJUSTMENT...........................................9
8. TEMPERATURE MEASUREMENT .............................. 12
9. SETTING MODE...........................................................14
10. BATTERY REPLACEMENT........................................ 16
11. SOFTWARE INSTALLATION AND OPERATION....... 17
Page 4

1. INTRODUCTION
The Datalogger Infrared Thermometer is digital and is used
with a type-K thermocouple input, being a dual
measurement product.
Although its precise design, the hand-held Infrared
Thermometer is easy to operate. Furthermore, the backlight
illumination function is helpful to user who is accustomed to
measure in dark places. The Infrared Thermometer will also
indicate a Laser symbol on LCD as a reminder and its
additional auto hold reading & auto power off functions
are practical to users.
The Infrared Thermometer is a non-contact thermometer
with laser pointer. It can be used to measure the
temperature of objects’ surface that is improper to be
measured by traditional (contact) thermometer (such as
moving object, surface with electricity current or objects that
are difficult to reach).
1
Page 5
2. SAFETY INFORMATION
1. Read the following safety information carefully before
attempting to operate or service the meter.
2. Use the meter only as specified in this manual; otherwise,
the protection provided by the meter may be impaired.
Warning
If user pulls the trigger while the symbol is showing on
LCD, then the meter will radiate the laser. At this moment,
user has to avoid the laser radiating to your eyes to prevent
any hurts.
˙ If the measured object with smooth surface and will
reflect the laser, pls. prevent the reflected laser to radiate
your eyes.
˙Pls. don’t radiate the laser to inflammable gas to avoid
dangers.
3. Precautions:
a). Do not operate the thermometer near large electrical or
magnetic fields.
b). Keep the thermometer away from direct sunlight or
strong source of light, hot objects (70℃/158℉), high
temperature, high humidity, or dust during use and
storage.
c). If the thermometer is in an environment where the
temperature changes drastically, please wait until the
thermometer returns to a stable status before starting
the measuring.
2
Page 6

d). Condensation may form on the focal lens if the
thermometer is moved quickly from a cold to a hot
environment. Before taking measurements, please wait
for the condensation to dissipate.
e). Do not touch the focal lens.
4. Environmental conditions:
a). Altitude up to 2000 meters.
b). Relative humidity 80% max.
c). Operating Ambient 0 ~ 50℃
5. Maintenance & Clearing:
a). Repairs or servicing that are not covered in this manual
and should be performed by qualified personnel only.
b). Periodically wipe the case with a dry cloth. Do not use
abrasives or solvents on the instrument.
c). When servicing, use only specified replacement parts.
6. Safety symbols:
Comply with EMC
3
Page 7

3. FEATURES
℃ / ℉ Selectable.
Backlight LCD display.
Laser targeting.
Adjustable Emissivity .
Audible and visible alarm.
Manual Data memory and read function.
Type K thermometer.
Auto Datalogger & USB PC interface.
4. SPECIFICATIONS
4-1 General Information :
Display : Backlight LCD Display.
Auto power off : Approx. 15 sec.
Manual Data memory capacity : 99 sets. (Direct reading
from LCD display)
Auto Datalogger capacity : 10000 sets. (Only download to PC)
Over range indication : “OL” or “-OL”.
Low battery indication : The + symbol is displayed on
LCD when the battery voltage
drops below the operating
voltage.
Power supply : Single 9V battery 006P 9V or IEC6F22, or
NEDA1604.
4
Page 8

Battery life : Approx. 100 hours (laser pointer and
backlight aren’t on use) (Alkaline batteries)
Operating temperature and humidity : 0℃ to 50℃ (32℉
to 122℉), below 80%RH.
Storage temperature and humidity: -10℃ to 60℃ (14℉ to
140℉), below 70%RH.
Dimensions : 172(L)×118(W)×46(H) mm
6.8(L)×4.6(W)×1.8(H) inches.
Weight : Approx. 220g with battery.
Accessories : instruction manual, battery, CD software
and USB cable.
Optional : AC adaptor (IN-OUT Isolated type), 9VDC
150mA.
4-2 Electrical Specifications :
Measuring range : -35℃ to 500℃ (-31℉ to 932℉)
Resolution : 0.1℃ , 0.2℉
Accuracy : ± 2% reading or ± 2℃ or ±4℉, whichever is
greater.
Temperature coefficient : 0.1 times the applicable accuracy
specification per ℃ from 0℃ to 18
℃ and 28℃to 50℃ (32℉to 64℉
and 82℉ to 122℉).
Responding time : 2.0 times per second.
Spectral Response : 6 ~ 14um.
5
Page 9

Field of view : 12:1 ; optics ratio with a 1” min target.
Emissivity : 0.17 ~ 1.00
Sighting : Laser marker 1mw (class 2).
Sensor : Thermopile.
Type K
Measuring range : -150℃ to 1350℃ (-238℉ to 1999℉).
Resolution : 0.1℃, 1℃, 0.1℉, 1℉.
Responding time : Once per second.
Basic accuracy : (@ 23±5℃ calibration) accuracy are ±
(…% of reading + degree) at 18℃ to
28℃ with relative humidity up 80%.
Function Resolution Range Accuracy
0.1℃
1℃ 200℃~1350℃ ±( 0.2%rdg + 2℃)
0.1℉
1℉ 200℉~1999℉ ±( 0.2%rdg + 4℉)
-150℃~0℃ ±( 0.2%rdg + 1.0℃)
0℃~200℃ ±( 0.1%rdg + 1.0℃)℃
-238℉~32℉ ±( 0.2%rdg + 2℉)
32℉~200℉ ±( 0.1%rdg + 2℉)℉
Temperature Coefficient :
0.1 times the applicable accuracy specification per ℃ from 0℃
to 18℃ and 28℃ to 50℃ ( 32℉ to 64℉ and 82℉ to 122℉ ).
Note : The basic accuracy specification does not include the
error of the probe. Please refer to the probe accuracy
specification for additional details.
6
Page 10
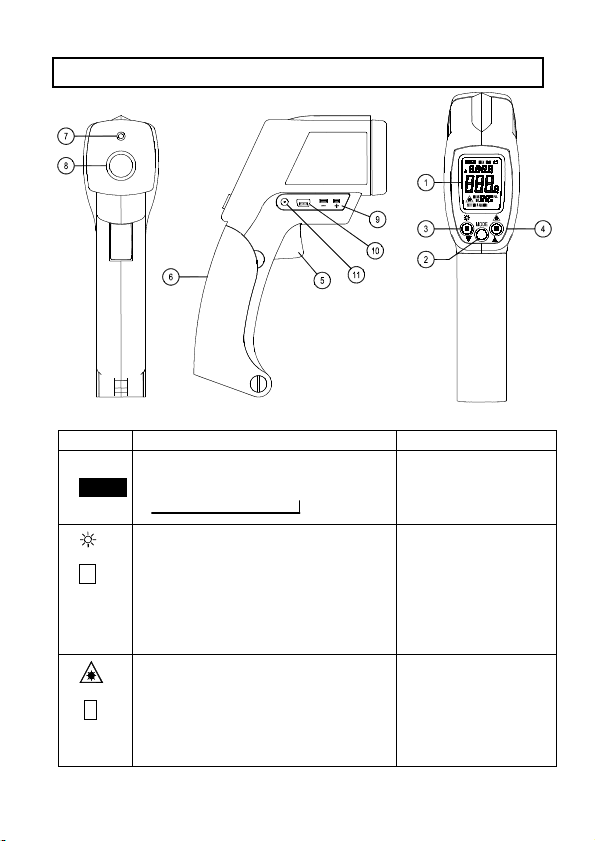
5. FRONT PANEL DESCRIPTION
1. Display.
Key Press one time
Enter to MAX/MIN recorder mode.
2. MODE
3.
M
▼
4.
R
▲
MAXMINCurrent reading (MAX/MIN)
In normal mode will turn on or off
the backlight.
In Read mode can decrease
gradually to select the desired
memory reading.
In SET mode can decrease
gradually to set the desired values.
In normal mode will turn on or off
the laser mark.
In Read mode can increase gradually
to select the desired memory reading.
In SET mode can increase
gradually to set the desired values.
7
K
°C
°F
Press and hold 3 seconds
In MAX/MIN mode
will exit this mode.
In normal mode will
enter to setting mode.
Memory the LCD
reading.
Read the memory
data.
Page 11
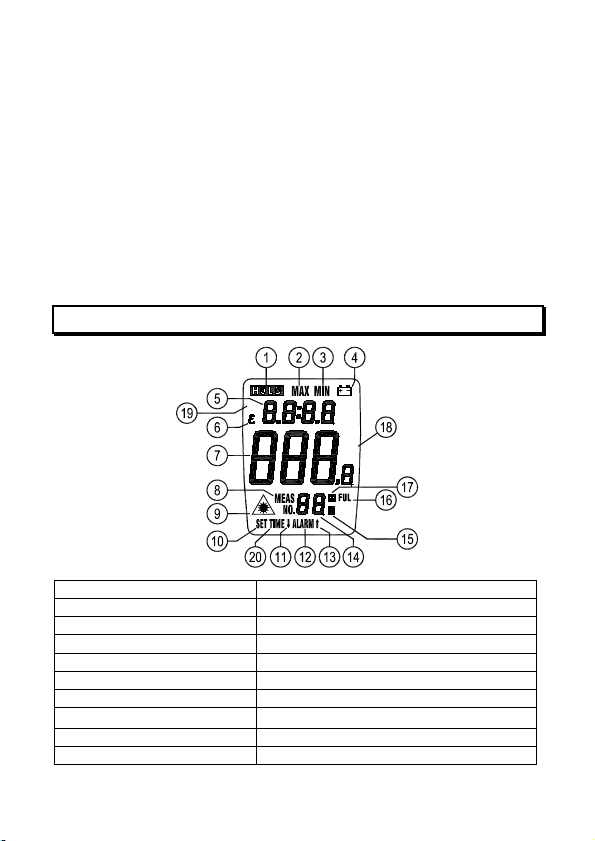
5. Measuring trigger :
Trigger for powering on.
Pull the trigger to turn on the thermometer.
In SET mode, pull the trigger will stored the setting value
and exit this mode.
6. Battery cover.
7. Laser aperture.
8. Focal lens.
9. Type K thermocouple input socket.
10. USB interface socket.
11. AC adaptor, input socket.
6. LCD DISPLAY DESCRIPTION
K
°C
°F
1. Hold function 11. Lo alarm
2. Maximum reading 12. Alarm function
3. Minimum reading 13. Hi alarm
4. Low battery mark 14. Memory and Read address number
5. Emissivity / Type K value 15. Read memory data
6. Emissivity value setting 16. Memory full indicator
7. Infrared measuring value 17. Store data to memory
8. Measure indicator
9. Laser indicator 19. Type K measuring indicator
10. SET symbol 20. Auto datalogger indicator
18. Unit “ ℃ , ℉ ”
8
Page 12
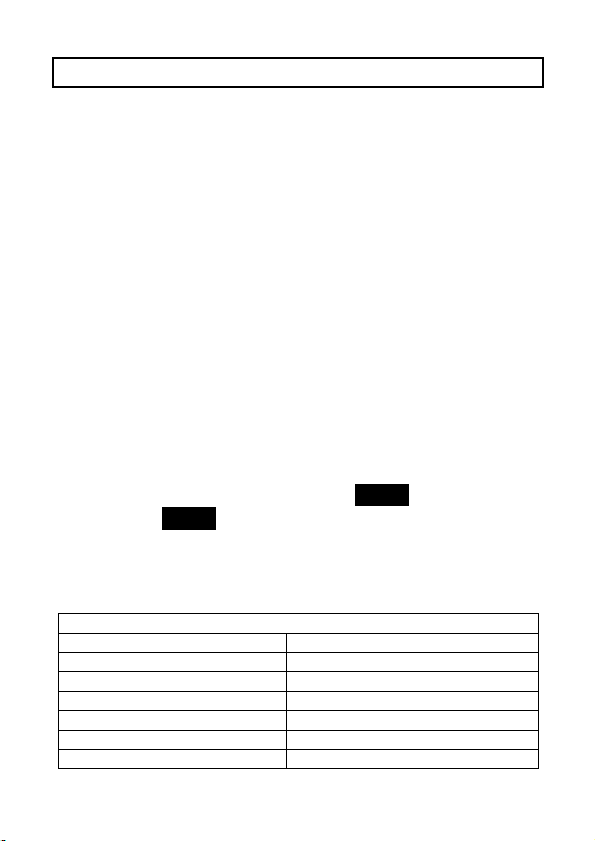
7. Emissivity Adjustment
1. Emissivity : Emissivity is a value between 0.17 and 1
that indicates an object’s ability to emit infrared energy.
Emissivity is determined primarily by the object’s
composition and surface finish.
The thermometer’s sensitivity to emissivity “ε ” was set at
0.95 before shipment because in 90% of the time, objects’
emissivity is set at 0.95.
2. Emissivity Adjustment
Apply black tape, black mat paint or black magic marker
to the object if it is safe.
“ε” is set at 0.95 to measure the dark surface.
To aim the laser at dark surface, pull trigger to get
measurement as T1.
Remove the black tape or black mat paint and aim laser
at the same area again then pull trigger to get the
measurement as (T).
Change & reset a value for emissivity “ε” to get
measurement (T) until T equal to T1.
a). Enter to setting mode (refer to MODE key).
b). Press MODE key to select the εvalue setting.
c). Press ▲ or ▼ keys to set desired values.
d). Pull the trigger to store the setting value and exit this mode.
Emissivity VALUES
Typical Emissivity Values-Metals (cont.)
SURFACE EMISSIVITY
Zinc (oxidized) 0.1*
Galvanized iron 0.3
Tin-plated steel 0.1*
Gold (polished) 0.1*
Silver (polished) 0.1*
Chromium (polished) 0.1*
9
Page 13

Emissivity Values-Non-Metals
Refractory & Building Materials
Red brick (rough) 0.75 to 0.9
Fire clay 0.75
Asbestos 0.95
Concrete 0.7
Marble 0.9
Carborundum 0.85
Plaster 0.9
Alumina (fine grain) 0.25
Alumina (coarse grain) 0.45
Silica (fine grain) 0.4
Silica (coarse grain) 0.55
Zirconium silicate up to 500℃
Zirconium silicate at 850℃
Quartz (rough) 0.9
Carbon (graphite) 0.75
Carbon (soot) 0.95
Timber (various) 0.8 to 0.9
Miscellaneous
Enamel (any color) 0.9
Oil paint (any color) 0.95
Lacquer 0.9
Matte black paint 0.95 to 0.98
Aluminum lacquer 0.5
Water 0.98
Rubber (smooth) 0.9
Rubber (rough) 0.98
Plastics (various, solid) 0.8 to 0.95
Plastic films (05 mm thick) 0.5 to 0.95
Polythene film (03 mm thick) 0.2 to 0.3
Paper and cardboard 0.9
Silicone polish (03 mm thick) 0.7
Emissivity values with purity
*
EMISSIVITY VALUES
Typical Emissivity Values-Metals
SURFACE EMISSIVITY
0.85
0.6
10
Page 14
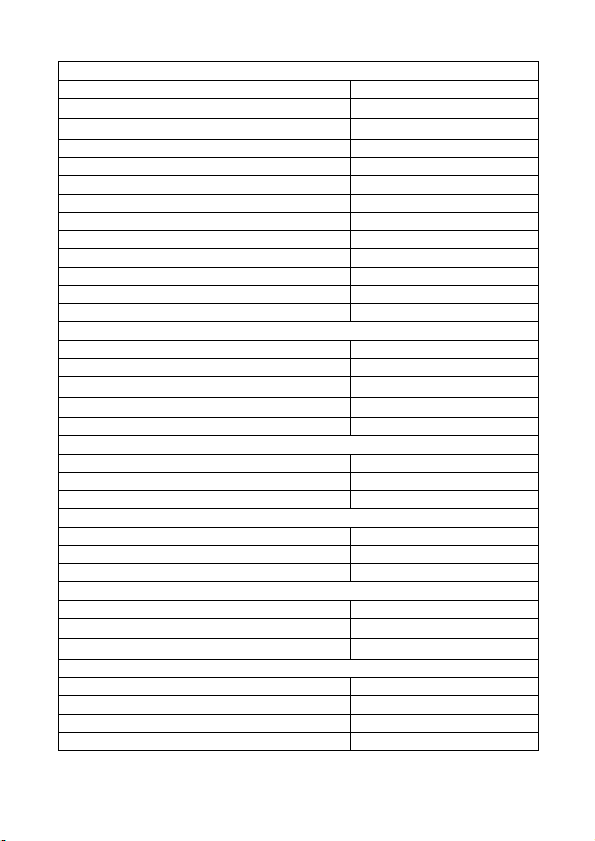
Iron and Steel
Cast iron (polished) 0.2
Cast iron (turned at 100℃)
Cast iron (turned at 1000℃)
Steel (ground sheet) 0.6
Mild steel 0.3 to 0.5
Steel plate (oxidized) 0.9
Iron plate (rusted) 0.7 to 0.85
Cast iron (rough) rusted 0.95
Rough ingot iron 0.9
Molten cast iron 0.3
Molten mild steel 0.3 to 0.4
Stainless steel (polished) 0.1
Stainless steel (various) 0.2 to 0.6
Aluminum
Polished aluminum 0.1*
Aluminum (heavily oxidized) 0.25
Aluminum oxide at 260℃
Aluminum oxide at 800℃
Aluminum Alloys various 0.1 to 0.25
Brass
Brass (polished) 0.1*
Brass (roughened surface) 0.2
Brass (oxidized) 0.6
Copper
Copper (polished) 0.05*
Copper plate (oxidized) 0.8
Molten copper 0.15
Lead
Lead (pure) 0.1*
Lead (oxidized at 25℃)
Lead (oxidized , reated to 200℃)
Nickel and its alloys
Nickel (pure) 0.1*
Nickel plate (oxidized) 0.4 to 0.5
Nichrome 0.7
Nichrome (oxidized) 0.95
0.45
0.6 to 0.7
0.6
0.3
0.3
0.6
11
Page 15
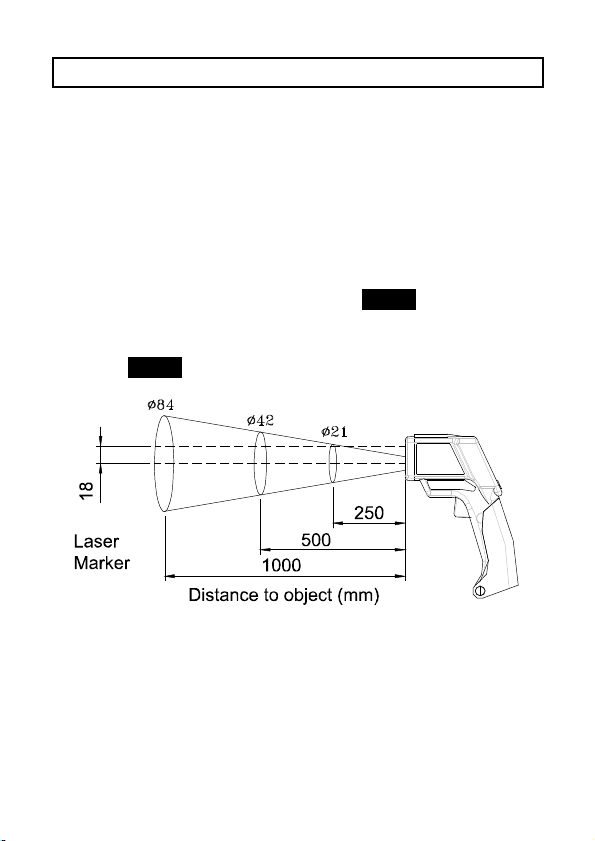
8. TEMPERATURE MEASUREMENT
ε
1. Measurement :
Pull the trigger to power on the meter and start measuring.
Release the trigger to stop measuring and auto hold the
reading. The meter will turn off automatically after 15 seconds.
Auto detection type K thermocouple plug-in or pull-out. If
plug-in type K thermocouple, the infrared
change to type K measuring temperature value.
2. MAX/MIN hold function :
Pull & hold the trigger then press MODE for “1 time” to
cycle select maximum (MAX), minimum (MIN) and current
reading (MAX/MIN).
Press MODE for “3 seconds” to exit this mode.
Note:
Laser offset: The laser beam is offset 18mm(0.71in)
from the focal lens. Choose a sampling spot that is large
enough to include the laser offset.
Surface Temperatures: The thermometer will measure
the first surface it detects, even a glass cover, dust or
fog. Make sure the object is not obstructed.
value will auto
12
Page 16

3. Selecting
While powering on the meter, the temperature unit that appears in
LCD would be the last unit you measured. If user wants to change
the temperature unit, pull trigger to turn on the meter, then press
MODE for “3 seconds” until “SET” mark appears on the LCD to
enter SET mode, press ▲ or ▼ to select desired ℃ / ℉ unit, pull
trigger to store the unit.
4. Manual Memorize / Read function (99 readings)
To memorize the reading :
Press and hold down " M " key until the " M " mark is
displayed (about 3 seconds), then release " M " key, stores
one set logged reading in memory, LCD will show " M " and
memory location numbers (1 to 99).
To recall and read the reading :
a). Press "
b). Press "" or "" key to scroll through the logged readings.
c). Press
To clean the memory :
a). Under power off status, press and hold M key then pull
b). Press ▲ or ▼ to select “YES” or “no”, then press MODE
5. Auto Datalogger Function
To setting interval time :
a). Pull trigger to power on the meter. Press & hold MODE
b). Press MODE key 5 times, the “TIME” mark is displayed
c). Press ▲ or ▼ key to select desired interval time from 1
d). Pull trigger to exit this mode.
℃℃℃℃/℉℉℉℉
unit :
R " key for 3 seconds to recall the reading memory
data mode. LCD will show " R " and memory location numbers.
MODE
key to exit READ mode.
trigger until “ CLR no ” shows on LCD.
key two times to exit this mode. If you select “YES” the all
memory will be cleared.
for “3 seconds” until “SET” appears on the LCD to enter
the setting mode.
to enter the interval time setting mode.
second to 10 minutes.
13
Page 17
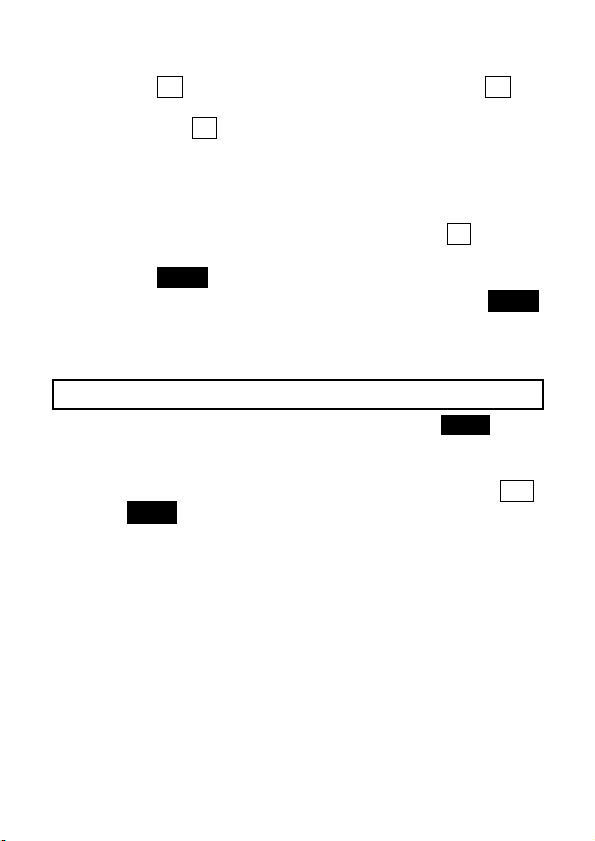
To enter auto datalogger mode
a). Press M key for 6 seconds until the “TIME” and “ M ”
marks are displayed to enter the auto datalogger mode.
When the “ M ” mark is disappear one time, one set of
reading is stored to the memory.
b). The maximum memory capacity is 10000 sets.
c). Pull trigger to exit this mode.
To clear auto datalogged memorized data
a). Under power off status, press and hold down M key then
pull trigger until “CLR no” show on LCD.
b). Press MODE key one time, the “TIME” mark is displayed.
c). Press ▲ or ▼ key to select “YES” or “no”, then press MODE
key one time to exit this mode. If you select “YES” the all
memory will be cleared.
9. SETTING MODE
Pull trigger to power on the meter. Press & hold MODE for “3
seconds” until “SET” appears on the LCD to enter the setting mode.
1. Parameter settings for measuring :
Under the infrared parameter setting mode, LCD will show SET.
Press MODE to select setting of “℃/ ℉”, “ALM ON/OFF” ,
“ALM” “ALM”, emissivity “ε” and auto datalogger interval
time “TIME”. Pull trigger to exit the setting mode and return to
the general measurement.
2. Parameter settings :
“℃/ ℉” : Temperature unit ℃/ ℉, press ▲ or ▼ to select units
℃or ℉.
ALM (Alarm function ON/OFF) : Press ▲ or ▼ to select alarm
function on or off.
ALM (Lo Alarm Function) : Press ▲ or ▼ to set up a value
as an alarm value. When this Lo alarm value is exceeded, the
beeper will beep and “ALM” symbol will appear on LCD.
14
Page 18

ALM (Hi Alarm Function) : Press ▲ or ▼ to set up a value as
an alarm value. When this Hi alarm value is exceeded, the
beeper will beep and “ALM” symbol will appear on LCD.
Example :
If you want alarm warning to exceed 100℃ and below 0℃,
can setting Hi Alarm point is 100℃,
Lo Alarm point is 0℃.
Setting procedure :
a). Press MODE key for 3 seconds until LCD display “SET”
mark.
b). Press “▲” key select ℃ unit.
c). Press MODE key one time, enter to ALARM ON/OFF
choice, press ▲ or ▼ keys select “ON” mode.
d). Press MODE key one time enter to ALARM (Lo Alarm
point) setting.
Press ▲ or ▼ keys setting display to 0.0℃.
e). Press MODE key one time enter to ALARM (Hi Alarm
point) setting.
Press ▲ or ▼ keys setting display to 100.0℃.
f). Pull trigger to store the setting and exit this setting mode.
ε (Emissivity) : User can press ▲ or ▼ to adjust parameter.
TIME : Press ▲ or ▼ to setting the desired auto datalogger
interval time from 1 seconds to 10 minutes.
▲ : Key for increasing the value of Parameters. Hold down
will increase the parameter rapidly.
▼ : Key for decreasing the value of Parameters. Hold down
will decrease the parameter rapidly.
Note: After setting procedure is terminated, the parameter
will be memorized until next setting.
Under setting mode, Backlight, Laser light, Memory and
Read functions will be disabled.
Pull trigger to exit setting mode.
15
Page 19
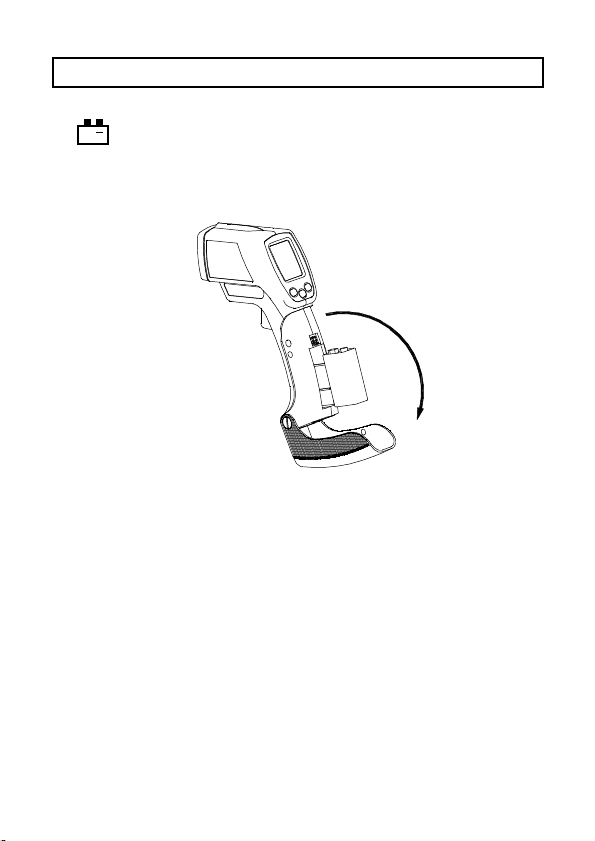
10. BATTERY REPLACEMENT
1. As battery power is not sufficient, LCD will display the symbol
+
. Replace old battery with a new one.
2. Open battery cover then take out the battery from instrument
and replace with a new 9-Volt battery. Put back the battery
cover.
OPEN
16
Page 20

11. SOFTWARE INSTALLATION and OPERATION
1. For the detailed instruction, please refer to the content of
attached CD-ROM, which has the complete instruction of
software operation and relevant information.
2. Protocol : are enclosed within the content of CD-ROM, please
open the CD-ROM for details.
17
Page 21
Page 22

M5009/0311
 Loading...