

Page 1

OM-HAP & OM-HAP-LITE
Page 2

OMEGAnetSM On-Line Service
http://www.omega.com
Servicing North America:
Internet e-mail
USA:
Canada:
One Omega Drive, Box 4047
Stamford, CT 06907-0047
Tel: (203) 359-1660
e-mail: [email protected]
976 Berger
Laval (Quebec) H7L 5A1
Tel: (514) 856-6928
e-mail: [email protected]
FAX: (203) 359-7700
FAX: (514) 856-6886
For immediate technical or application assistance:
USA and Canada:
Mexico and
Latin America:
Sales Service: 1-800-826-6342 / 1-800-TC-OMEGA
Customer Service: 1-800-622-2378 / 1-800-622-BEST
Engineering Service: 1-800-872-9436 / 1-800-USA-WHEN
TELEX: 996404 EASYLINK: 62968934 CABLE: OMEGA
Tel: (95) 800-TC-OMEGA
En Espanol: (95) 203-359-7803
SM
FAX: (95) 203-359-7807
e-mail: [email protected]
SM
SM
SM
Servicing Europe:
Benelux:
Czech Republic:
France:
Germany/Austria:
United Kingdom:
It is the policy of OMEGA to comply with all worldwide safety and EMC/EMI regulations that
apply. OMEGA is constantly pursuing certification of its products to the European New Approach
Directives. OMEGA will add the CE mark to every appropriate device upon certification.
The information contained in this document is believed to be correct but OMEGA Engineering, Inc. accepts
no liability for any errors it contains, and reserves the right to alter specifications without notice.
WARNING: These products are not designed for use in, and should not be used for, patient connected applications.
Postbus 8034, 1180 LA Amstelveen, The Netherlands
Tel: (31) 20 6418405
Toll Free in Benelux: 06 0993344
e-mail: [email protected]
ul. Rude armady 1868
733 01 Karvina-Hranice
Tel: 420 (69) 6311899
e-mail:[email protected]
9, rue Denis Papin, 78190 Trappes
Tel: (33) 130-621-400
Toll Free in France: 0800-4-06342
e-mail: [email protected]
Daimlerstrasse 26, D-75392 Deckenpfronn, Germany
Tel: 49 (07056) 3017
Toll Free in Germany: 0130 11 21 66
e-mail: [email protected]
25 Swannington Road,
Broughton Astley, Leicestershire,
LE9 6TU, England
Tel: 44 (1455) 285520
FAX: 44 (1455) 283912
Toll Free in England: 0800-488-488
e-mail: [email protected]
FAX: (31) 20 6434643
FAX: 420 (69) 6311114
FAX: (33) 130-699-120
FAX: 49 (07056) 8540
P.O. Box 7, Omega Drive,
Irlam, Manchester,
M44 5EX, England
Tel: 44 (161) 777-6611
FAX: 44 (161) 777-6622
Page 3

1 What is HAP
1.0 Terminology
HAP - HyperWareTM Automation Program. A proprietary software package for use with
the Omega Engineering Inc. OM-320/OMP-MNL/OMP-MODL Family of Data Loggers.
This manual describes HAP.
PC - IBM compatible Personal Computer
HyperWare - OM-320/OMP-MNL/OMP-MODL family programming and processing PC
based software package. HAP and HyperWare are two separate software packages. An
understanding of HyperWare Net Programs is suggested before attempting to use HAP.
See Omega Engineering Inc. manuals “Using the OM-320/OMP-MNL/OMP-MODL” or
“Using the OM-320/OMP-MNL/OMP-MODL” for HyperWare description.
1.1) HAP Basic Description
The HyperWare Automation Program (HAP) is a powerful software package designed to
automate the collection of data, generate reports, or alarm from any telephone modem,
RS232, or RF modem linked OM-320/OMP-MNL/OMP-MODL based data loggers.
HAP is a Windows 95 or NT based application that can execute in the background while
other Windows tasks are processing.
When HAP is executing on an IBM compatible Personal Computer (PC), the PC
automatically interrogates remote OM-320/OMP-MNL/OMP-MODL sites and transfers
data from the OM-320/OMP-MNL/OMP-MODL to the PC. The downloaded files can be
converted into a format that includes Microsoft Excel, Standard Comma Delimited (CSV)
file, or HyperPlot format (HLD). Each site is configurable by setting parameters in a site
file. Site configuration parameters include interrogation interval, start time, number of
interrogations, report options, download memory data options, and communication
parameters. The HAP initiated interrogation is useful for periodic updates of an OM320/OMP-MNL/OMP-MODL system.
An OM-320/OMP-MNL/OMP-MODL may initiate communications with HAP. After the
Logger has established a connection with HAP, HAP interrogates the Logger with options
selected by the user during the HyperWare Net Program creation. The same options
available for a HAP initiated interrogation are available with a OM-320/OMP-MNL/OMPMODL initiated interrogation. In addition, the OM-320/OMP-MNL/OMP-MODL
initiated interrogations provide for an alarm capability, notifying the user of a condition in
the Logger system. The OM-320/OMP-MNL/OMP-MODL initiated communications are
useful for alarm conditions and conditional logger interrogations.
1.2) Logger Communication Methods
Page 4

Methods of PC to Logger communications include RS232, PC Modem, and RF Modem.
These communication methods are AutoPoll site and AutoAnswer user configurable.
1.3) A few typical scenarios for HAP
1.3.1) Water Quality
Monitor remote location water temperature, pH, dissolved oxygen, conductivity,
hydrocarbons, and turbidity. The Logger is powered from batteries and has an RF Modem
installed. The Logger is then remote requiring no phone line. If your measurements
exceed threshold value the logger automatically notifies you by a displaying a popup
message on your PC when arriving at the office in the morning.
1.3.2) Irrigation System Monitoring and Control
Irrigation systems commonly combine measurement of meteorological
parameters (temperature, relative humidity, wind, etc.) with measurement of
water level and flow. Water quality can also be monitored. The datalogger's
control capabilities allow it to operate pumps, gates, valves, and even alarms.
Watermasters can install networks of dataloggers to monitor entire irrigation
districts. Water reports are generated automatically on a weekly basis using HAP AutoPoll feature. HAP executes in the background and automatically prints the report for each
irrigation site. Every week HAP generates a hard copy of the irrigation report for each
site.
1.3.3) Utilities and Energy
Monitor and control temperature, duty cycle, on/off status, position, pressure,
flow, load, depth, and strain. Automatic reporting using HAP’s report feature.
1.3.4) Civil and Structural Engineering
Consultants and governmental agencies use Omega Engineering equipment to monitor
conditions such as slope stability, loads, temperatures and other variables on
dams, roads, bridges, and building walls. Analyze the data on a daily basis using HAP’s
automatic report generation with Excel using your calculations and Macros. In addition,
set up alarm conditions to automatically notify on your PC.
1.3.5) Geotechnical and Mining
Assess tunnel subsidence and roof sag, wall movement, foundation deformation
and settlement, crack and joint displacement, stress (in materials), pore pressure, and slope
stability. Monitor mining equipment, gases, stresses, temperatures, and air flows. Use
the dataloggers with a PC running HAP to periodically report and notify alarm conditions.
1.3.6) Factory Machine Monitoring
Automatic report of a number of machine cycles and maintenance conditions on a daily
basis for the Factory Manager.
Page 5

2 PC System Configuration and System Requirements
2.1) Software Requirements
1) Version 4.0 HyperWare for Microsoft Windows
2) Version 4.0 Firmware for OM-320/OMP-MNL/OMP-MODL Family
3) HAP for Microsoft Windows
2.2) Data Logger Requirements -
Omega Engineering Inc. OM-320, OM-420, OMP-MNL, or OMP-MODL
2.3) PC Configuration
1) IBM Compatible PC with Windows 95, Windows 98, Windows 2000, XP or
NT
2) Minimum 16 Mbytes RAM
3) Free RS232 port, PC modem, or RF modem
2.4) PC Modem Configuration (If using PC modem)
1) Hayes Compatible Modem
2) The Modem init string must have verbal result codes “ON”. If dip switches can
be set, verbal result codes are “ON”. Most commonly, Hayes compatible
init strings include are “Q”,“V” and “X”. Check your modem manual for
the correct commands. By selecting verbal result the modem displays
“RING” by using terminal emulation program when the modem is called.
3) The Modem must be configured for hardware flow control. Typically, a “F”
command.
4) The modems dip switch Auto Answer is off. Make sure the Auto Answer
feature is off in the HAP Modem init string.
2.5) Excel Requirements (Optional)
The report feature of HAP requires Microsoft Excel be installed on the PC. If
your don’t use the report capability, Excel is not required. HAP is compatible with
Excel version 5.0 and above.
Page 6
3 Software Installation
3.1) Installation Instructions
HAP installation comes with 3 diskettes. Each one of the diskettes contains compressed
files. Follow the steps described below to install:
1) Insert HAP Installation Disk 1 in the PC 3.5 inch 1.44 Mbytes floppy drive.
2) Launch Microsoft Explorer and select the floppy program “setup.exe”. (The alternative
is to Start-Run <floppy>:setup.exe.)
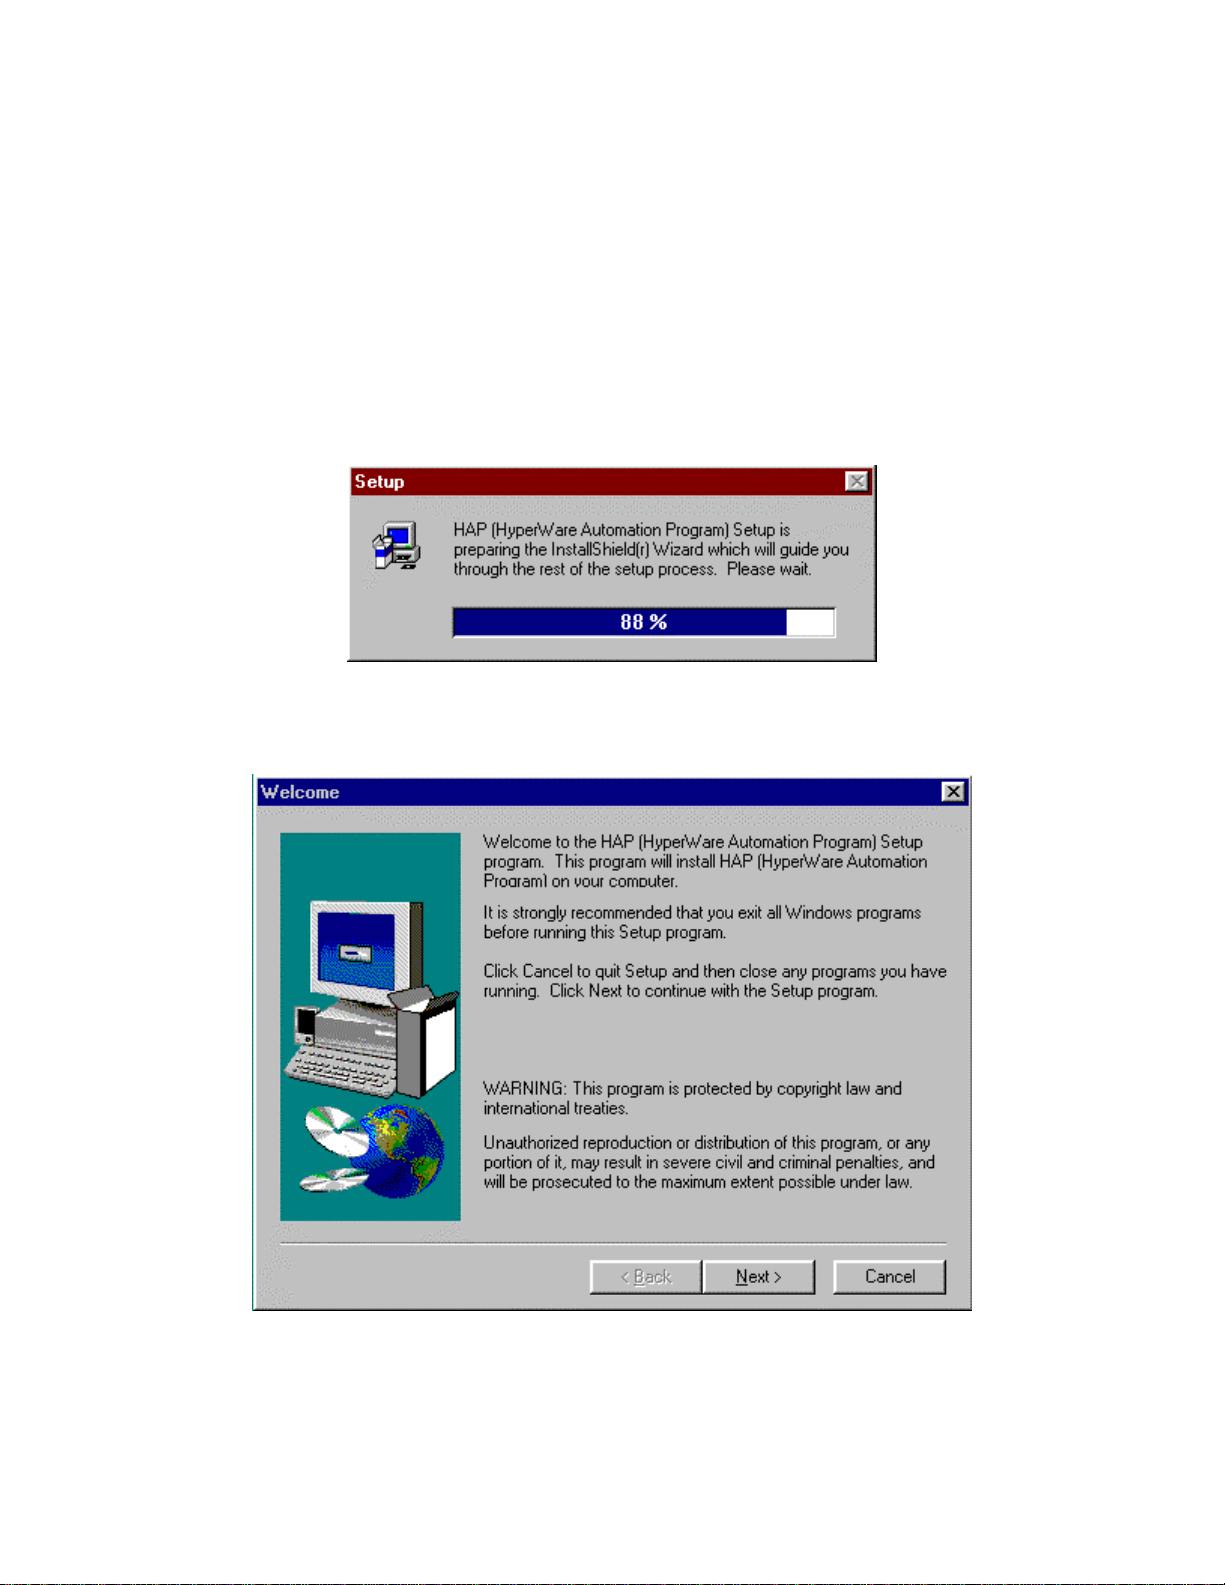
3) Once setup.exe is executing the Setup Dialog opens:
Figure 3.1a Setup Dialog - The first installation dialog
4) Upon completion of the Setup Dialog, the Welcome Dialog opens:
Figure 3.1b Welcome Dialog
Select “Next”
5) The “Choose Destination Location Dialog” opens
Page 7
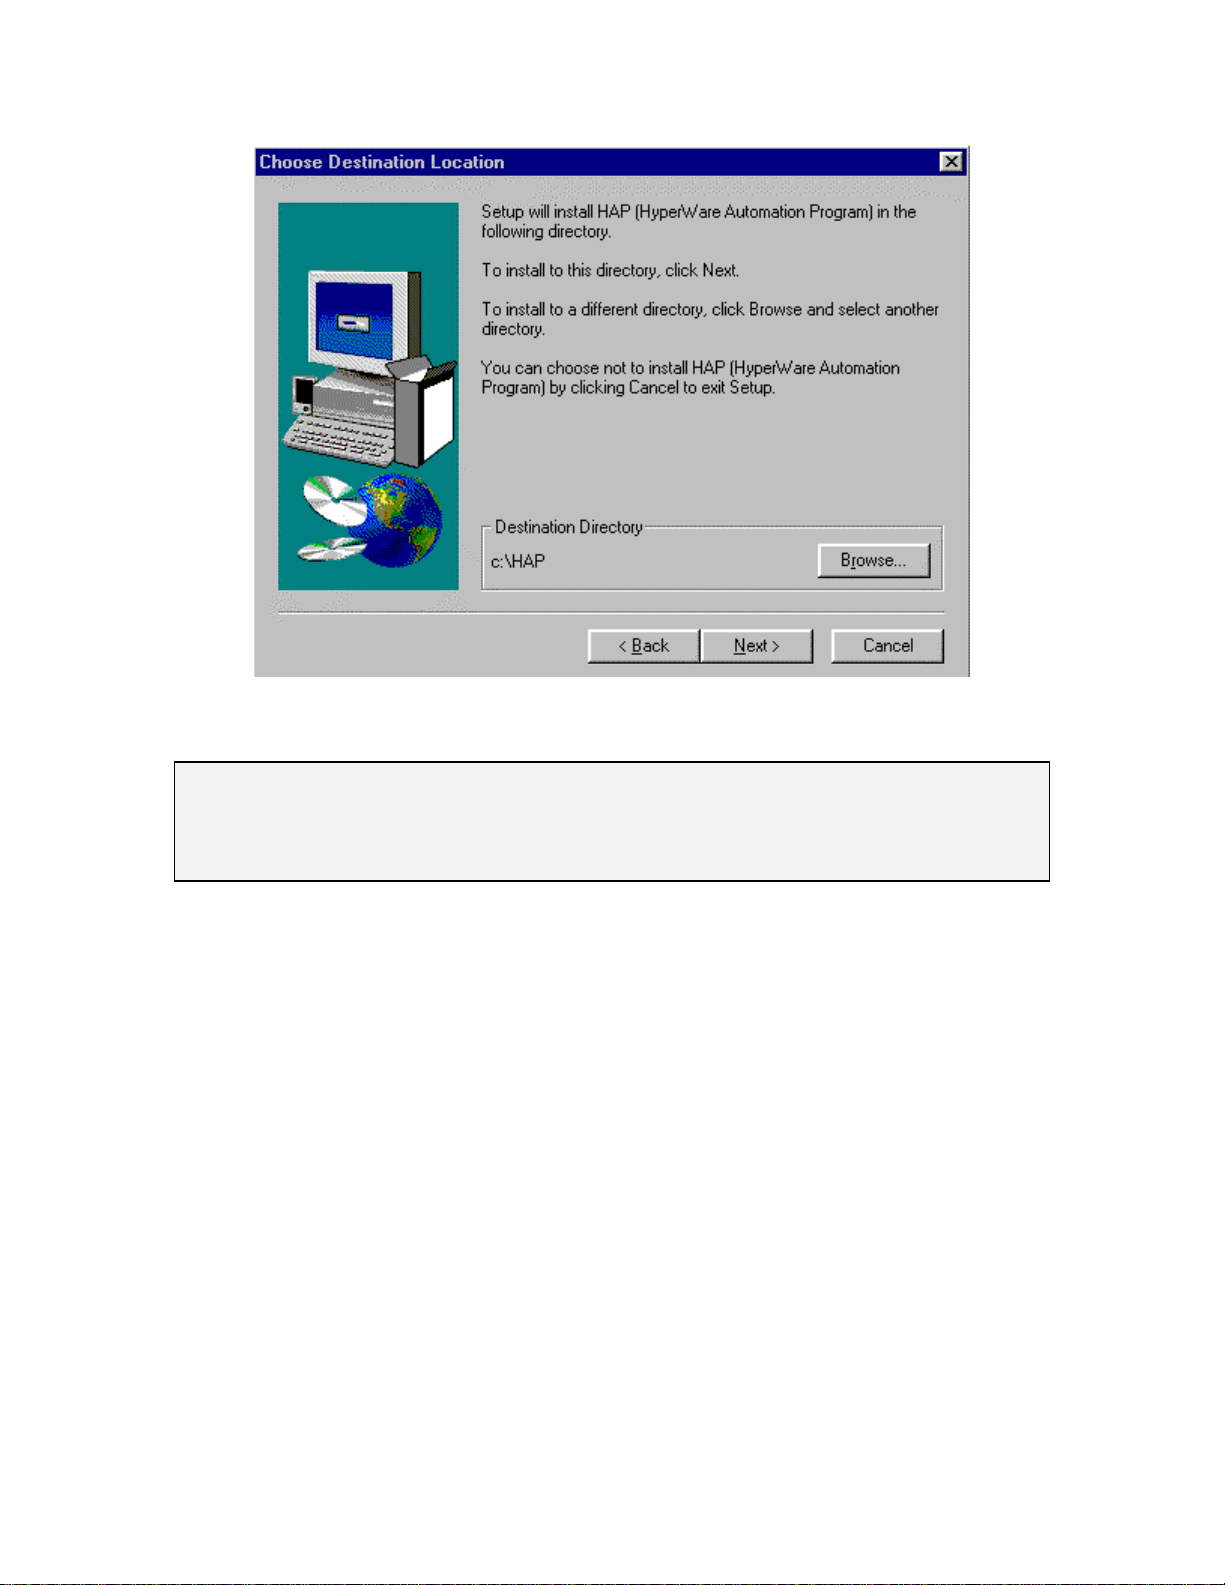
Figure 3.1c Choose Destination Location Dialog
You may select a destination directory or select “Next” to accept the default directory.
Note
You may not execute multiple instances of HAP. Installing a second copy of HAP in
second directory makes the first copy of HAP a non-executable
6) Copy Files dialog opens and the files necessary to run HAP are copied to the PC.
During the copy file process, the user is prompted for disk 2 and disk 3.
7) If you wish to install any one of the HAP Icon’s on your Window’s Desktop, select
the Icon from the HAP Application Window then drag and drop the Icon onto the
Desktop.
3.2) Files Installed
The following files are installed:
1) <HAP>ap.exe
2) <HAP>timer.exe
3) <HAP>hapreport.exe
4) <HAP>hapregister.exe
5) <HAP>HAP.lbi
6) <HAP>LBIgeneric.txt
7) <HAP>lic.inf
8) <HAP>mmnoprt.txt
9) <HAP>mmprt.txt
10) <HAP>ap.reg
Page 8

11) <HAP>timer.reg
12) <HAP>hapreport.reg
13) <HAP>ap.hlp
14) <HAP>readme.txt
15) <WindowSystem>mfco42d.dll , if same date or newer
16) <WindowSystem>mfc42d.dll , if same date or newer
17) <WindowSystem>msvbvm50.dll , if same date or newer
18) <WindowSystem>msvcrtd.dll , if same date or newer
19) <WindowSystem>olepro32.dll , if same date or newer
20) <WindowSystem>oleaut32.dll , if same date or newer
21) <WindowSystem>mscomm32.ocx , if same date or newer
22) <WindowSystem>comctl32.ocx , if same date or newer
23) <WindowSystem>comctl32.dll , if same date or newer, by user
24) <WindowSystem>regsvr32.exe , if same date or newer
25) <WindowSystem>comdlg32.ocx, if same date or newer
3.3) Files Registered
1) ap.reg
2) timer.reg
3) hapreport.reg
4) mfco42d.dll
5) olepro32.dll
6) oleaut32.dll
7) mscomm32.ocx
8) comdlg32.ocx
9) comctl32.ocx
3.4 Uninstall Instructions
1) Select Start - Settings - Control Panel. Select Add/Remove Programs. Select HAP
from the Install/Uninstall property page, and select the Add/Remove Button.
2.) Delete the <HAP> directory from your computer
Page 9
4 HAP Usage
4.0 Launching HAP
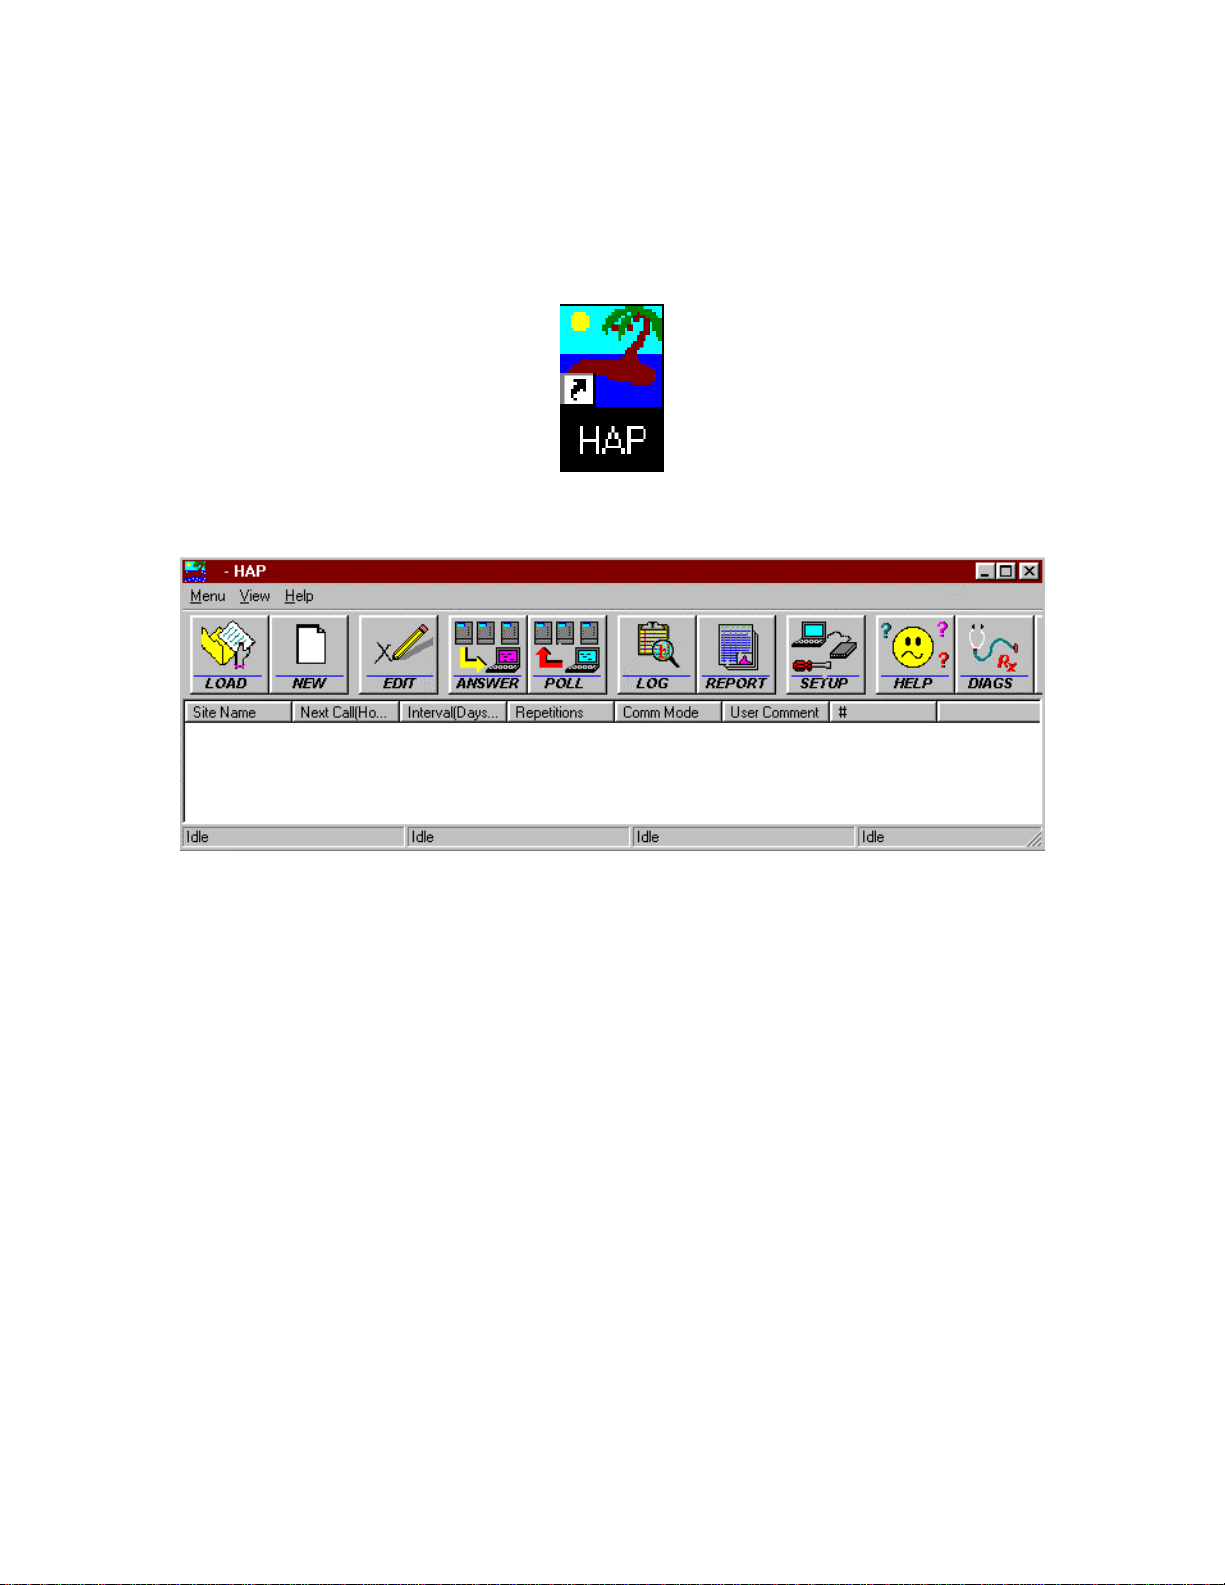
Select the HAP Desktop Icon illustrated below in figure 4.0a
Figure 4.0a HAP Desktop Icon
Figure 4.0b illustrates HAP’s Main Dialog after Launch:
Figure 4.0b HAP’s Main Dialog after Launch
4.1 AutoPoll
4.1.1 Overview
AutoPoll is a feature of HAP that provides for PC originated automatic data download
and report generation of data acquired with Omega Engineering Data Loggers. The
Logger interrogation options include periodic programmable data download, configurable
report generation, and multiple site interrogation. AutoPoll executes in the background
while other processes are executing on the PC. A rigorous Log File tracks AutoPoll
operations as the polling sequence progresses.
4.1.2 Construction of a Site
The HAP dialog to create a site is illustrated below:
Page 10
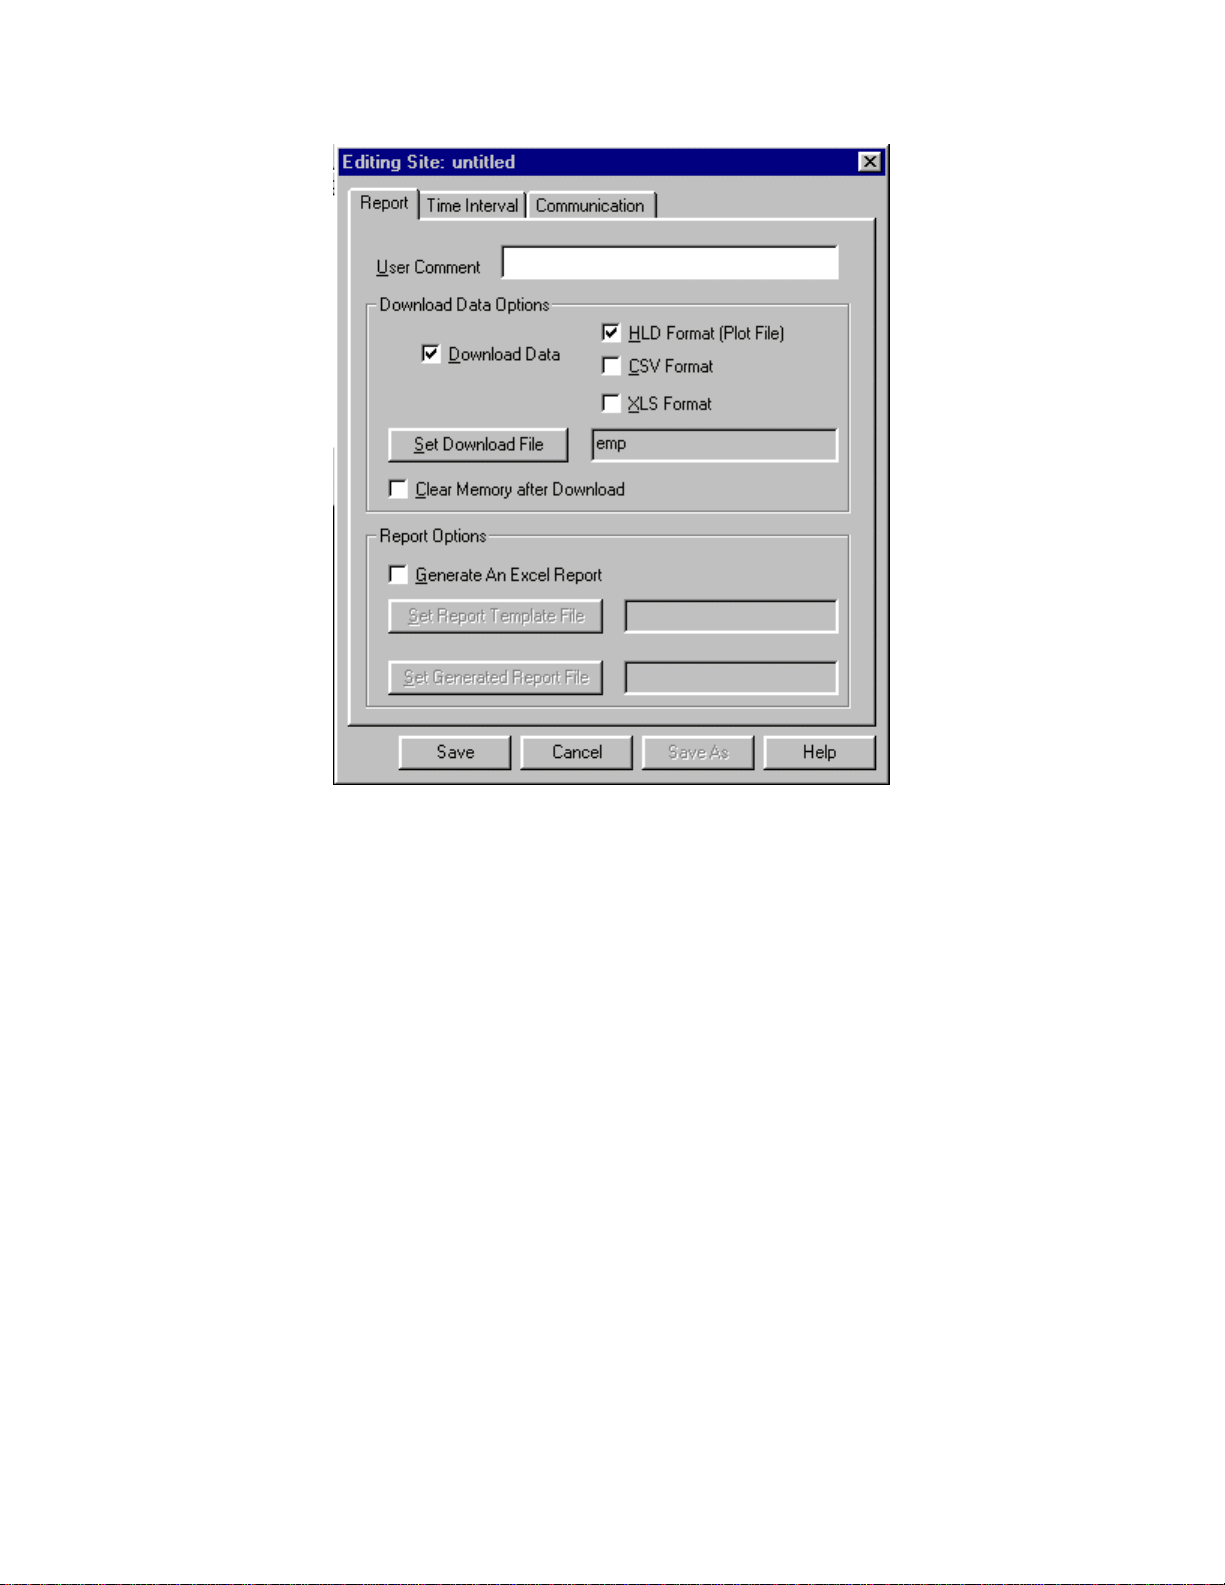
Figure 4.1.1 - Editing Site Dialog
The Editing Site Dialog may be accessed to generate a new site by:
1.) Launch HAP program
2.) Select “New” from the Main Dialog
3.) Select “New Site” from the Edit Polling File Dialog
The Editing Site Dialog is a Windows standard 3 tabbed property sheet. Each tab is
selected to access Report, Time Interval, or Communication Parameters.
4.1.2.1 Report Tab
Each Parameter on the Report Tab is defined below:
1) User Comment: This is user typed text message that appears in the Log and
downloaded Logger files.
2) Download Data - Selecting this option provokes a memory data download from the
Logger. The format of the downloaded file must be selected; HLD, XLS, or CSV.
3.) HLD Format - Selecting this option generates a *.HLD file subsequent to a Logger
download. A HLD is an Omega Engineering specific text file containing Logger acquired
data. The HLD file is used by the Omega Engineering HyperPlot utility.
Page 11
4.) CSV Format - Selecting this option generates a *.CSV file subsequent to a Logger
download. A CSV is a generic comma delimited text file containing Logger acquired
data. 3rd party packages such as Mat Lab or Excel use the CSV file.
5.) XLS Format - Selecting this option generates a *.XLS file subsequent to a Logger
download. A XLS is a Microsoft Excel Binary file containing Logger acquired data. Only
Microsoft Excel uses this XLS file.
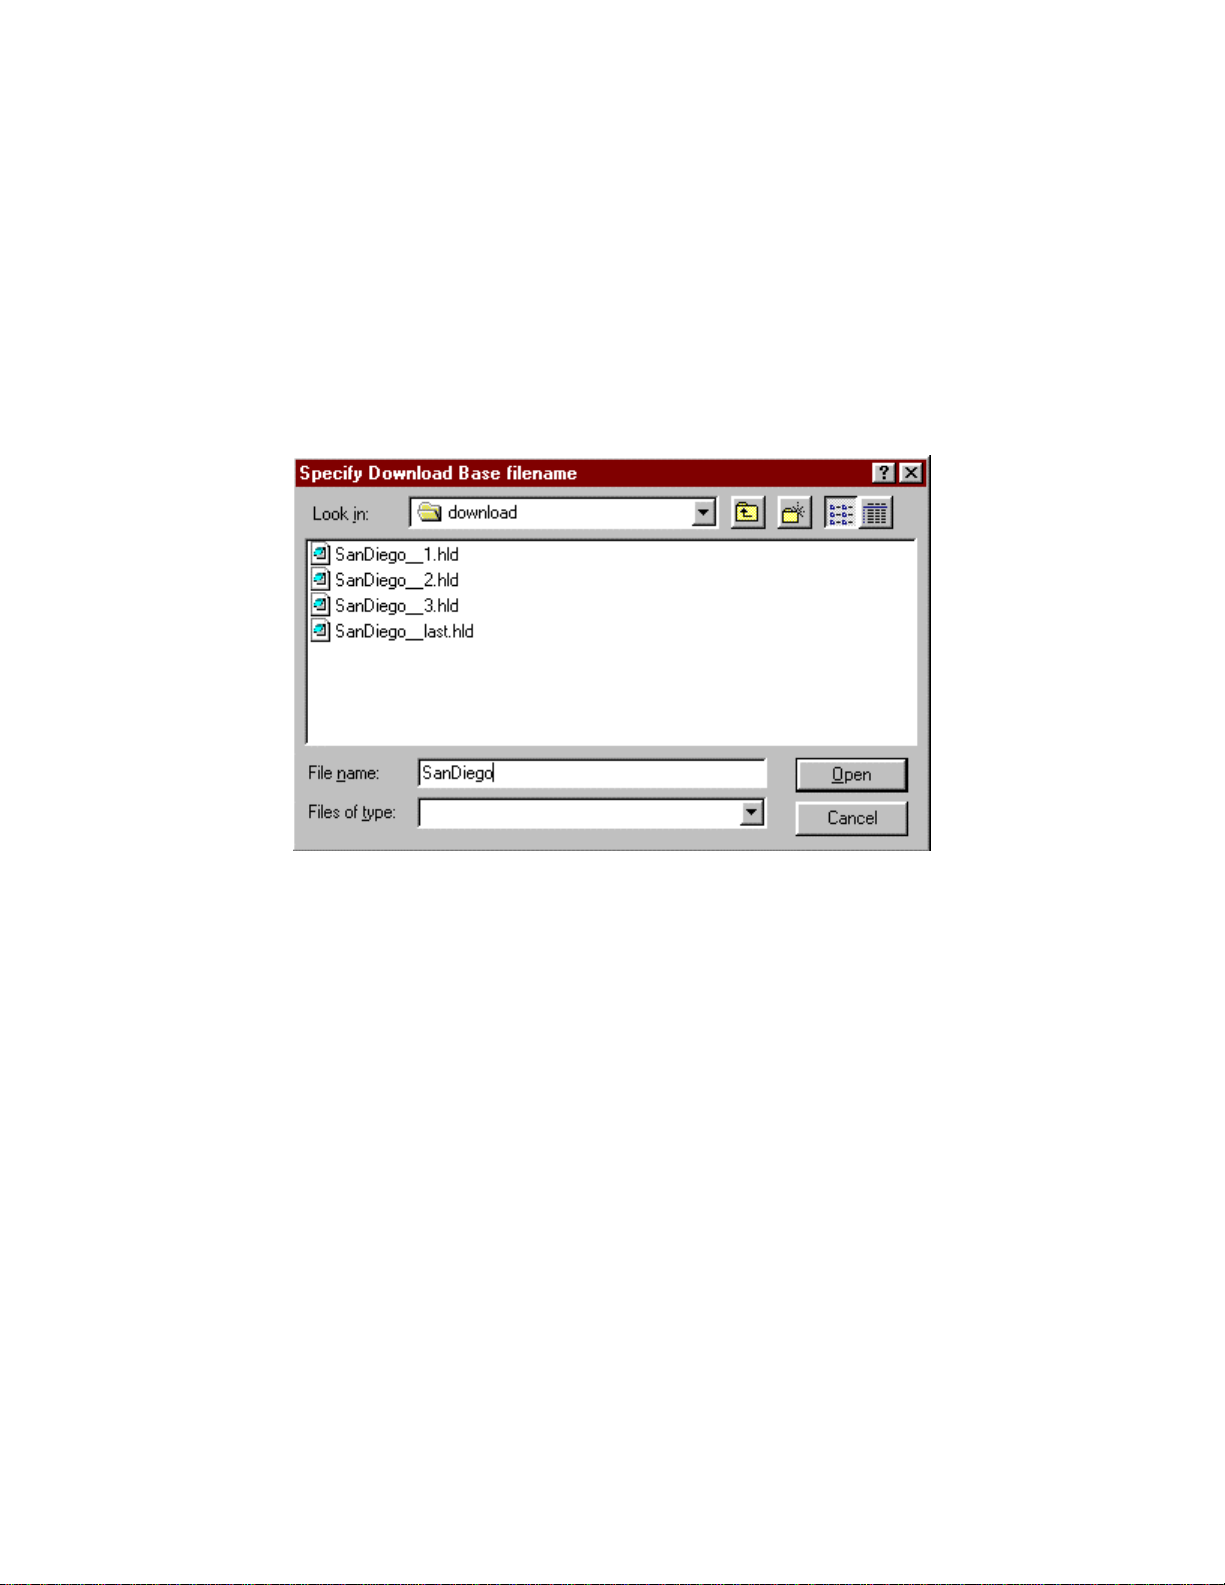
6.) Set Download File - After Selecting this button the standard Windows File Selection
Dialog appears:
Figure 4.1.2.1a Specify Download base filename Dialog
In Figure 4.1.2.1a above the user has typed in “SanDiego” as a site file name. The 4 files
that appear in the file dialog window of previous Logger downloads.
HAP appends on the “__1” , “__2”, “__3”, and “__last” to the SanDiego site
filename during the downloaded file generation. Each file “__1”, “__2”, “__3”, and
“__last” corresponds to subsequent downloads by HAP from the Data Logger. The most
recently downloaded file is “SanDiego__last.hld”.
When the user specifies “SanDiego” as a filename and polling takes place,
“SanDiego_last.hld” gets copied to “SanDiego__4.hld”. Therefore the next HLD
downloaded file is “SanDiego__last.hld”.
7) Clear Memory after Download - Selecting this option causes HAP to issue a “Clear”
Command to the Data Logger after the Data is Downloaded and a report is generated.
8) Generate an Excel Report - This option activates the Excel Report Generator upon
timed polling of a site. If this option is selected, the “Set Report Template File” button
must be selected for the user to provide a Excel template file name. In addition, the “Set
Generated Report File” must be selected for the user to provide an Excel report file name.
Page 12
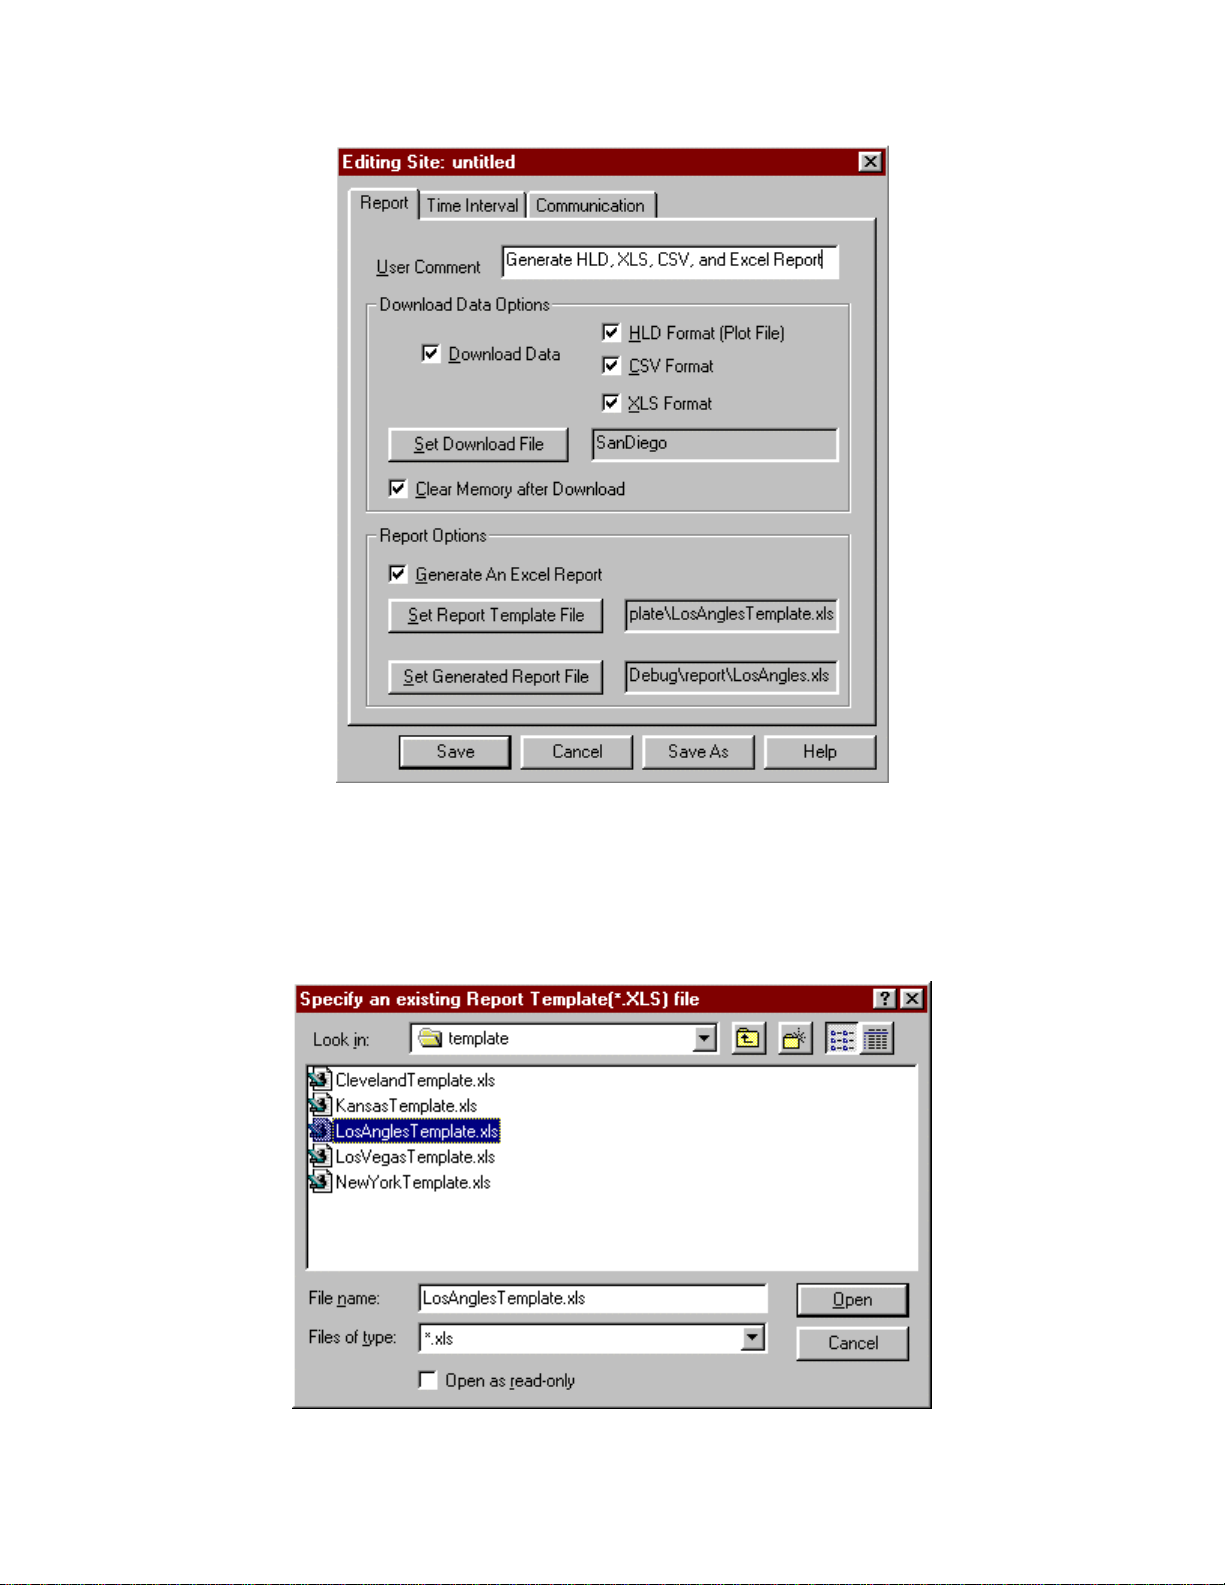
Figure 4.1.2.1b Editing Site Report Tab
Figure 4.1.2.1b illustrates a Editing Site Report Tab with all the options selected.
9) Set Report Template File - This option, “Generate An Excel Report” is selected.
Subsequent to selection, the file dialog appears:
Figure 4.1.2.1c Specify an existing Report Template (*.XLS) file Dialog
Page 13
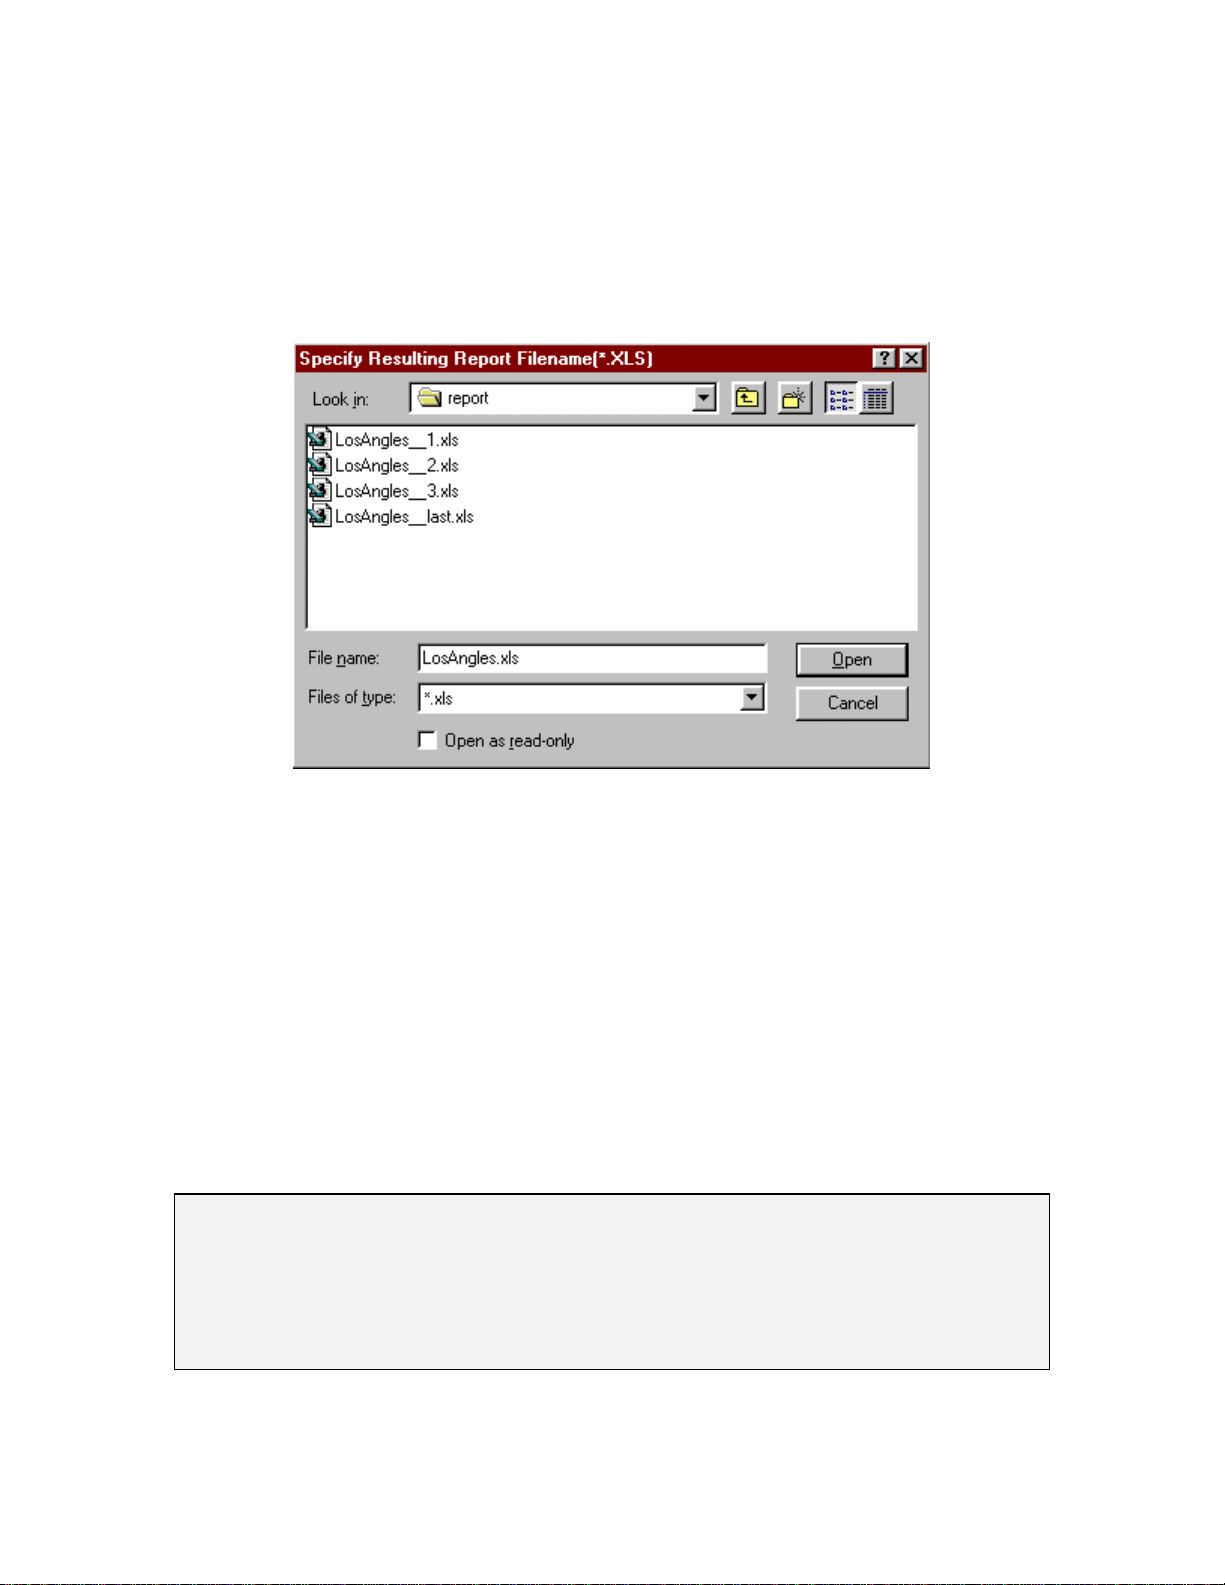
Figure 4.1.2.1c above illustrates the user selecting the “LosAnglesTemplate.xls” Excel
Template file. The “LosAnglesTemplate.xls” file has been created with the HAP Report
Generator, see Section 4.3 for a description of the HAP Report Generator.
9) Set Generate Report File - This option is selected after selecting “Generate An Excel
Report”. Subsequent to selection, the file dialog appears:
Figure 4.1.2.1d Specify Resulting Report Filename (*.XLS) Dialog
Figure 4.1.2.1d above illustrates the user selecting the “LosAngles.xls” Excel Report file.
The 4 files that appear in the file dialog window are previous Logger Reports.
HAP has appended “__1” , “__2”, “__3” and “__last” to the LosAngles report
file name during previous report file generation. The most recent report file is always
append with a “__last”. “__1”, “__2”, and “__3” are reports generated previous to
“__last”.
Prior to generating the next “__last” report, HAP renames the current “__last” file
to “__4”. This provides for a backup of all previous reports with the same filename.
Therefore, the next HAP report generation does:
i.) Renames the “LosAngles__last.xls” to “LosAngles__4.xls”.
ii) Generates a new “LosAngles__last.xls” with the current logger report
information.
Warning
Early versions of Microsoft Excel require directory paths and file name prefix less than 8
characters. HAP appends on 6 characters to the report file name. If you use Microsoft
Excel that has a limit of 8 characters in the path and file name, you can not use
more that 2 characters in the report file name and no more than 8 characters in any
directory path.
4.1.2.2 Time Interval Tab
Page 14
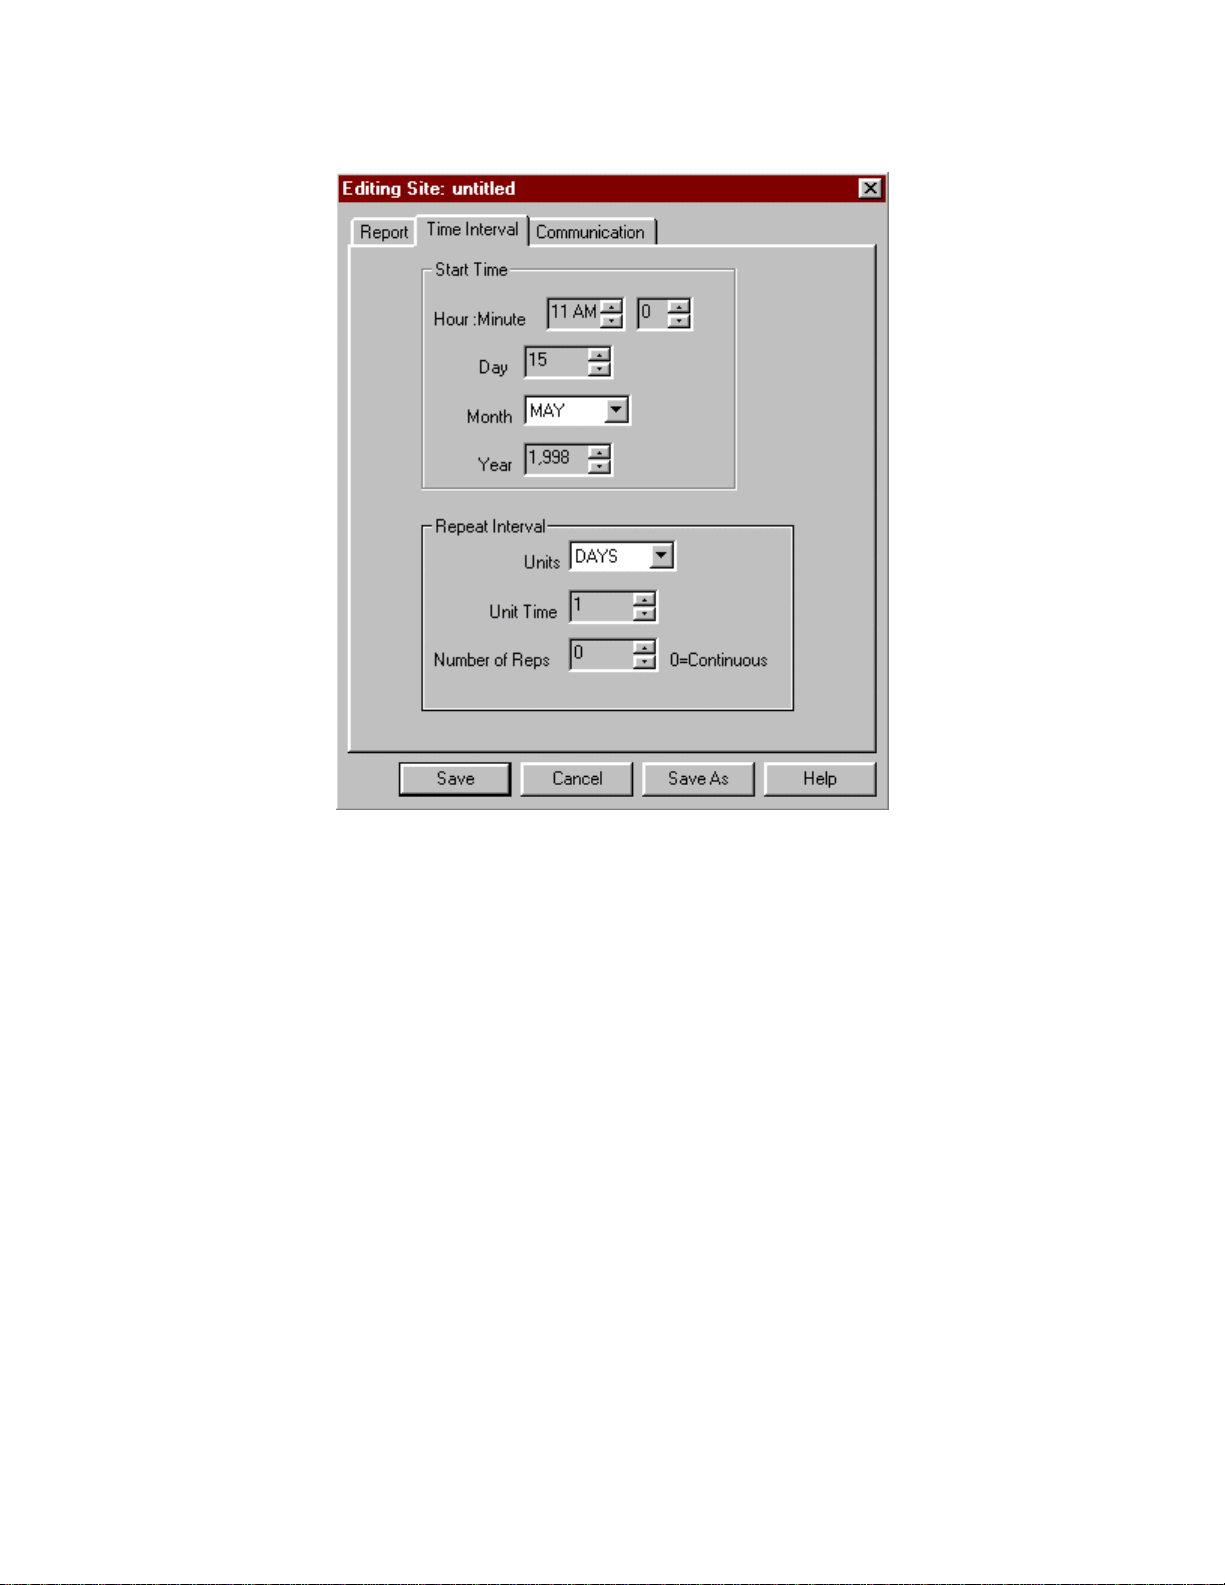
Figure 4.1.2.2 below illustrates the Time Interval Tab:
Figure 4.1.2.2 Time Interval Tab
Each Parameter on the Time Interval Tab is defined below:
1) Start Time Hour : Minute - This parameter corresponds to the start time hours and
minutes of logger interrogation.
2) Start Time Day - The day of the month for starting the logger interrogation.
3) Start Time Month - The month for starting the logger interrogation.
4) Start Time Year - The year start time.
5) Repeat Interval Units - the units of the repeat interval. Options for units correspond to
Minutes, Hours, Days, or Weeks.
6) Repeat Interval Unit Time - The time associated with the Repeat Interval Units. In
Figure 4.1.2.2 - the unit time is “1”. This corresponds to a repeat interval of 1 day. HAP
polls the logger daily, once a day.
If the Repeat Interval is “2”, the logger is called every other day.
7) Repeat Interval Number of Reps - The number of times the logger is interrogated for
the selected interval. In Figure 4.1.2.2 above, “0” is selected indicating continuous
Page 15
polling. If HAP is in continuous polling mode, only the user can terminate the cycle of
polling by turning off polling or exiting HAP.
If Number of Reps is “2” then HAP interrogates the logger two times only. Polling then
terminates for that site.
Note
HAP is year 2K compliant.
4.1.2.3 Communications Tab
HAP can be connected to a Logger using RS232, PC modem, or RF modem.
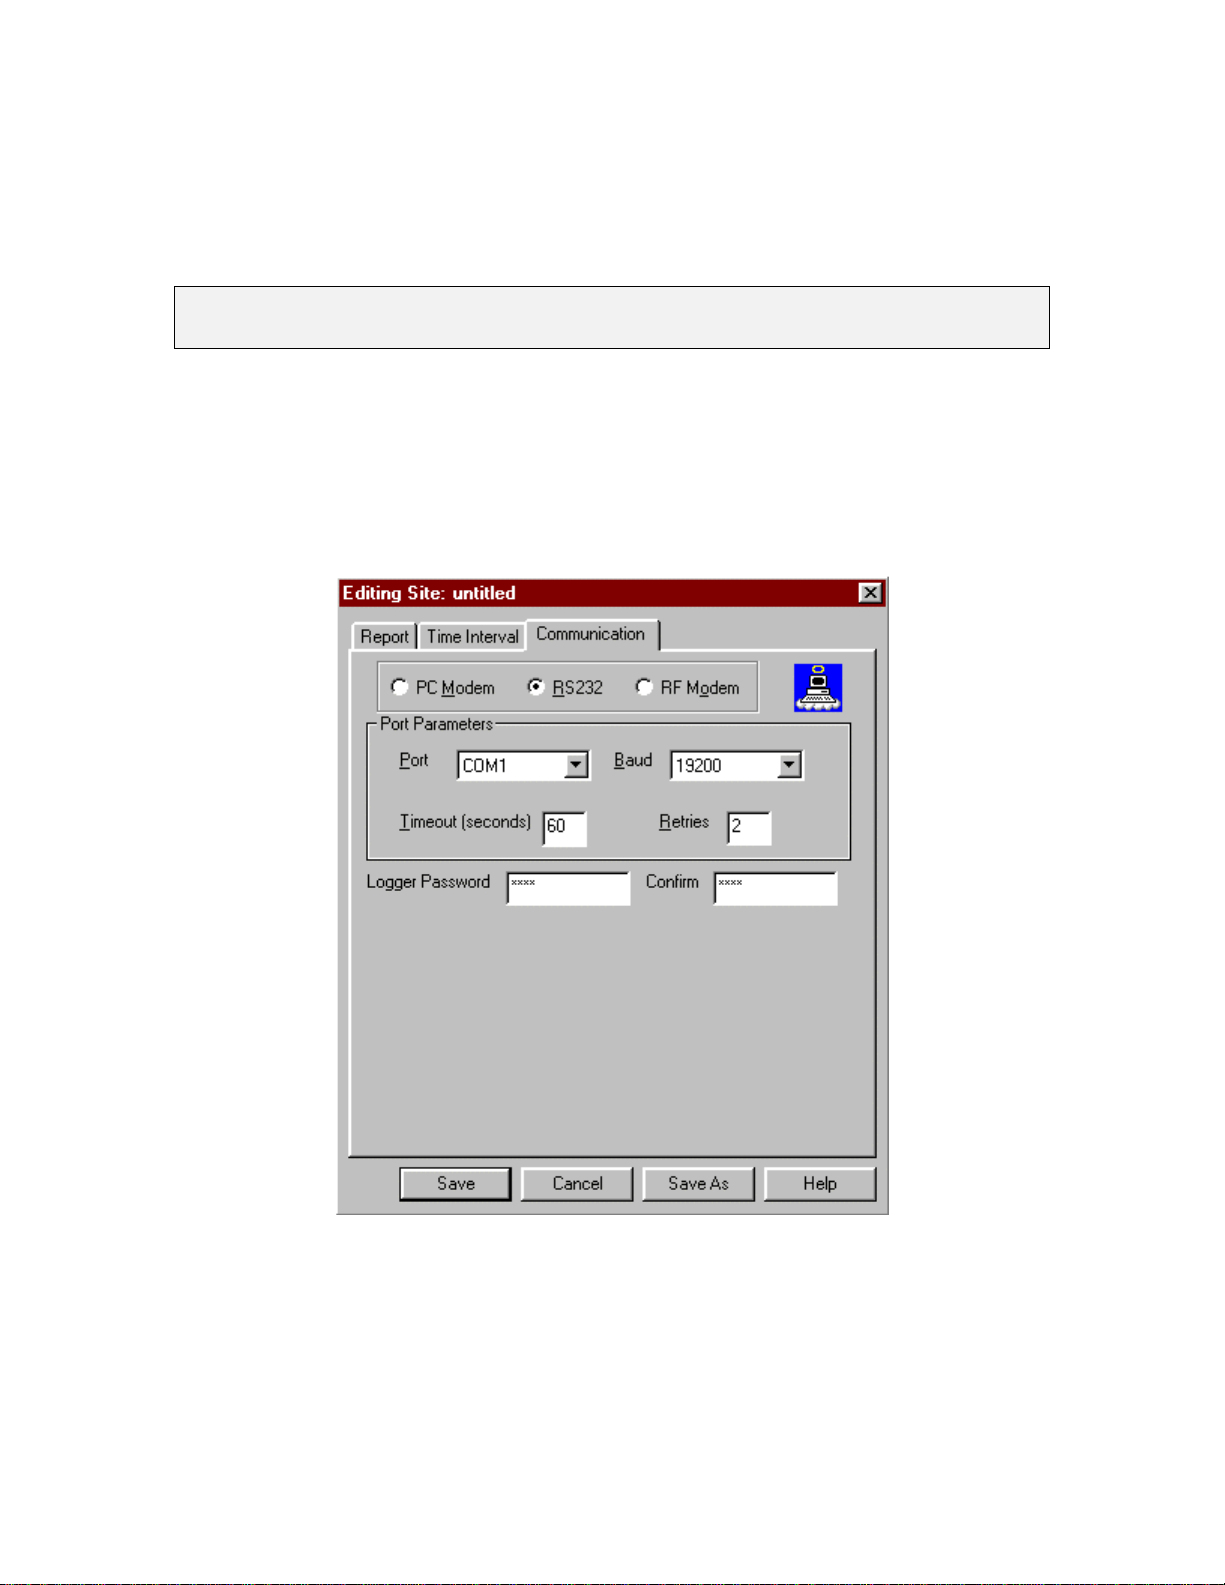
Figure 4.1.2.3a below illustrates the Communication Tab for a typical RS232
configuration:
Figure 4.1.2.3a Communication Tab for RS232
Each Parameter on the Communications Tab for RS232 is defined below:
1)Port Parameters Port - The PC’s COM port. The available options include COM1,
COM2, COM3, and COM4.
Page 16
2) Port Parameters Baud Rate - The COM port baud rate. Available options include 1200,
2400, 4800, 4800, 9600, 14400, 19200, 28800, 38400, and 57600.
Note
Omega Engineering Data Loggers have a fixed RS232 baud rate of 19200. PC
Modem and RF Modem have selectable baud rates.
3) Port Parameters Timeout - The maximum amount of time allowed to establish and
verify communication with the Data Logger. Each attempt to communicate with a Logger
has the same “Timeout”.
4) Port Parameter Retries- The number of retry attempts to establish communication with
a logger. A retry will attempt communication for a “Timeout” amount of time.
5) Logger Password-: If the Omega Engineering Data Logger has been programmed with
a password, AutoPoll requires that password during interrogation.
6) Confirm - A duplicate of the password typed in above. This provides error detection of
the password.
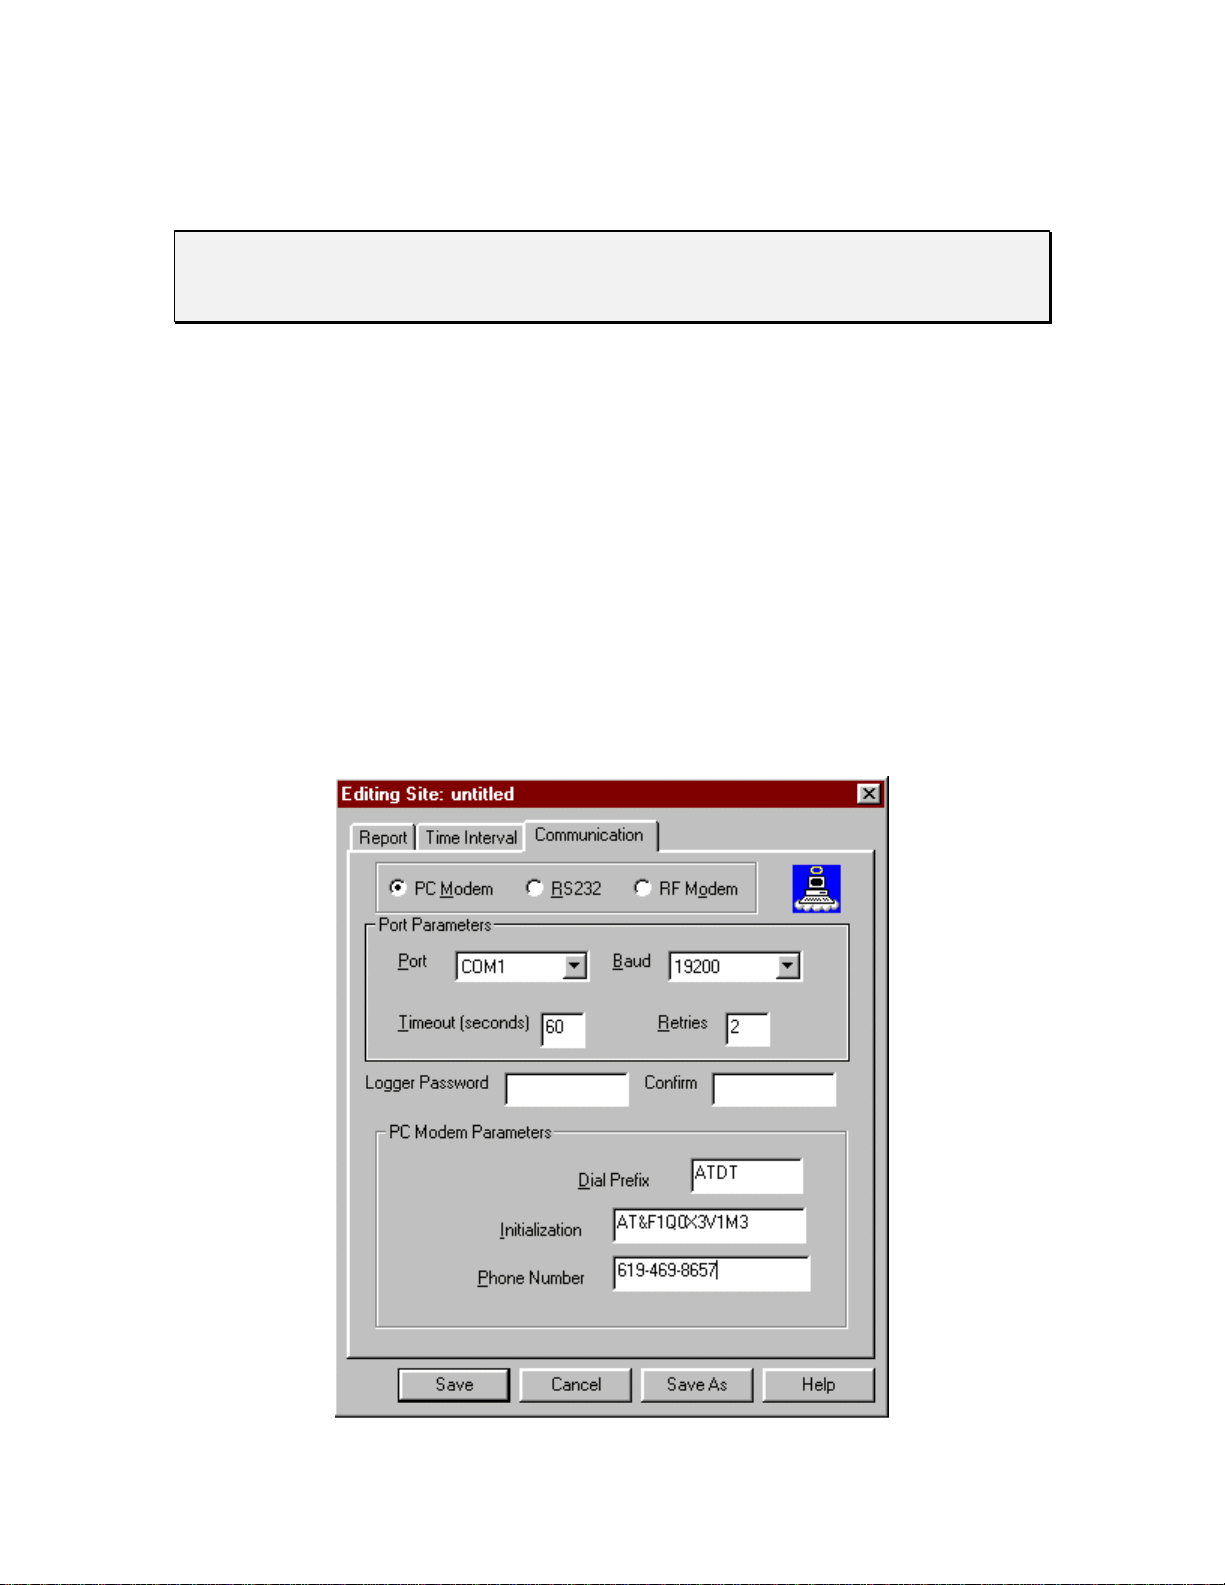
Figure 4.1.2.3b below illustrates the Communication Tab for a typical PC Modem
configuration:
Page 17

Figure 4.1.2.3b Communication Tab for PC Modem
Each new Parameter on the Communications Tab for PC Modem is defined below: HAP
is compatible with any Modem that emulates the Hayes Command Set.
1) Dial Prefix: The Modem command prefix that precedes the telephone number.
Typically, most phones are touch-tone and require the “ATDT” prefix. Rotary phones can
be used with the “ATD” prefix.
2) Initialization - The modem initialization string. The initialization string illustrated in
figure 4.1.2.3b is for a U.S. Robotics 28,800 Sportster Modem. HAP requires the
following Modem configuration: (Refer to your modem documentation for proper init
string configuration)
a) Hayes Compatible Modem
b) The Modem init string must have verbal result codes “ON”. If dip switches can
be set, verbal result codes are “ON”. Most commonly, Hayes compatible
init strings include are “Q”,“V” and “X”. Check your modem manual for
the correct commands. By selecting verbal result the modem displays
“RING” by using terminal emulation program when the modem is called.
c) The Modem must be configured for hardware flow control. Typically, an “F”
command.
d) The modems dip switch Auto Answer is off. Make sure the AutoAnswer
feature is off in the HAP Modem init string.
3) Phone Number - The phone number of the Omega Engineering Data Logger to be
polled.
Figure 4.1.2.3c below illustrates the Communication Tab for a typical RF Modem
configuration:
Page 18
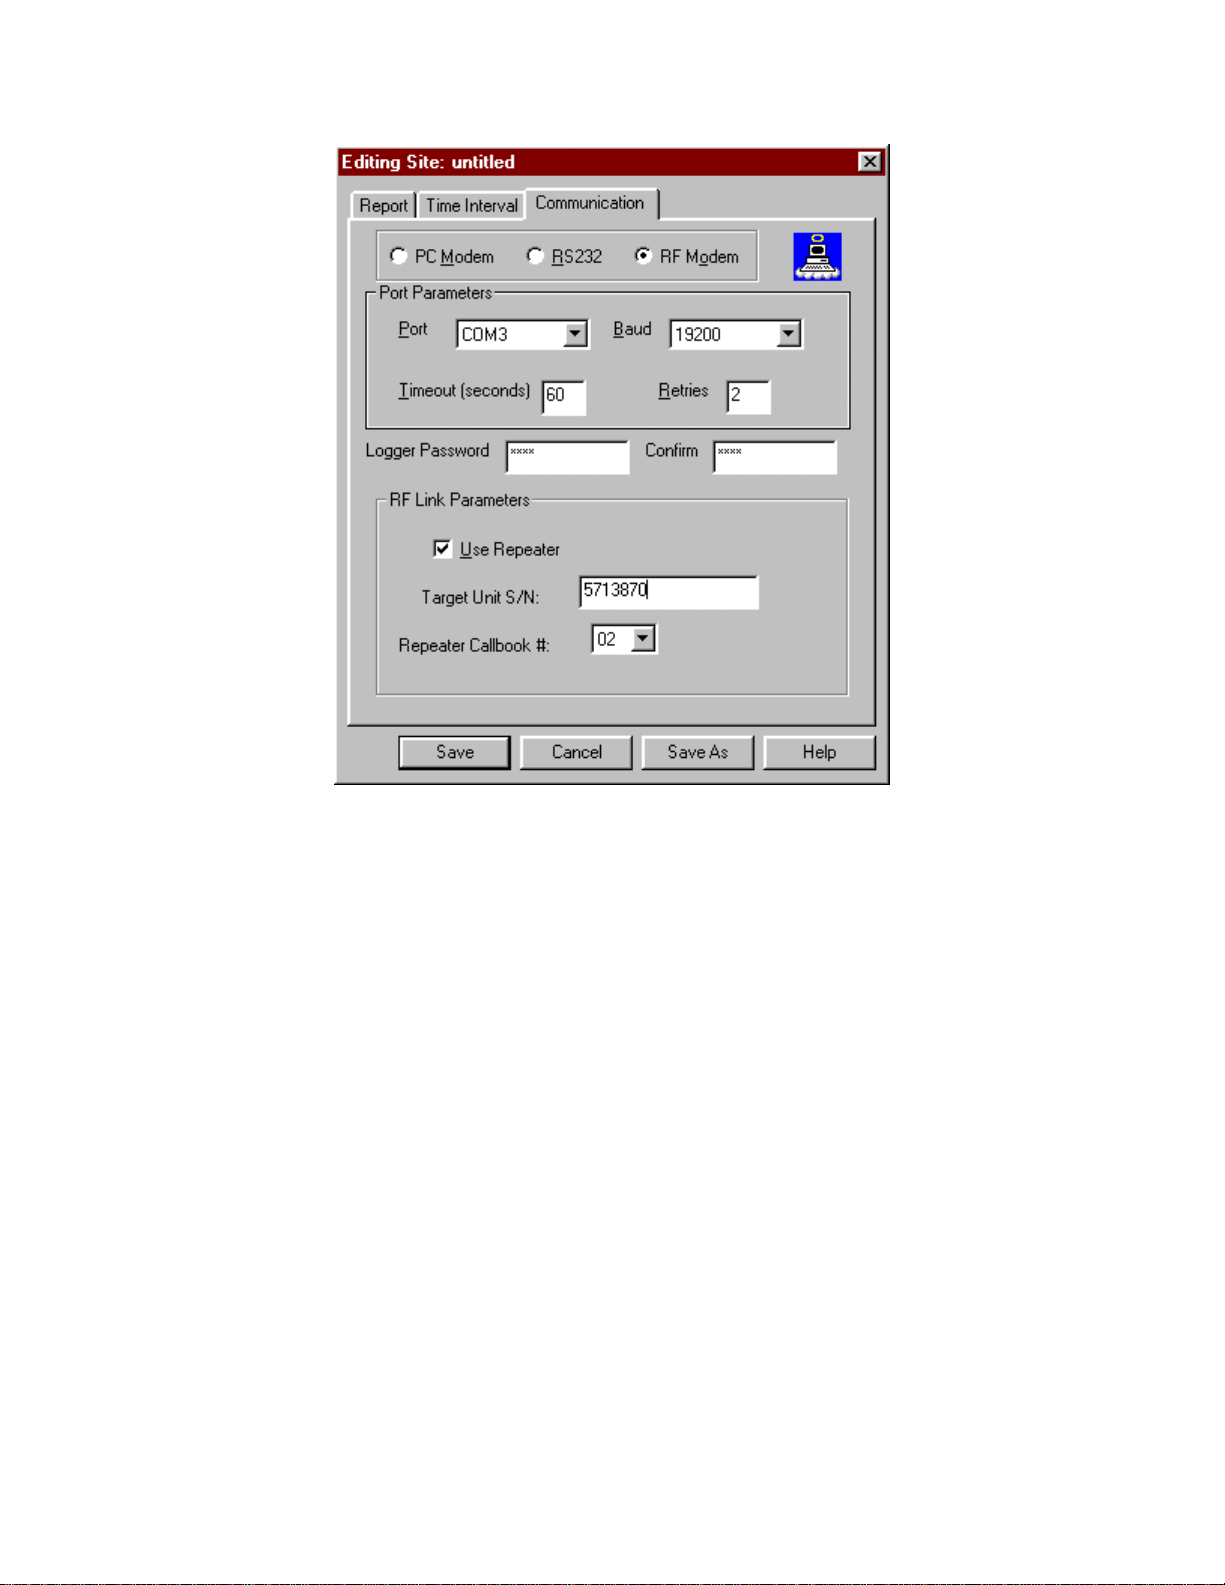
Figure 4.1.2.3c Communication Tab for RF Modem
The Polling software is designed to be compatible with “FreeWave” model DGR-115 RF
modem.
Each new Parameter on the Communications Tab for RF Modem is defined below:
1) Use Repeater - Provides for the RF Modem option of using repeaters in the RF Modem
configuration. The Repeater is a “FreeWave” Hardware device that serves as a
communications link between two RF Modems. The Repeater is used to extend the
operational distance of the RF Modems. Up to 2 repeaters may be used in an RF Modem
configuration. The repeater takes the form of a “FreeWave” model DGR-115 RF Modem,
configured as a repeater.
2) Target SN - The “FreeWave” serial number of the RF Modem being called. The RF
Modem is the one attached to the Omega Engineering data logger.
3) Repeater Callbook # - The number only applies when the “Use Repeater” is selected.
The “Repeater Callbook #” corresponds to a configuration parameter required by the
“FreeWave” RF Modem when in Repeater Mode.
4.1.3 Construction of a Polling File
The HAP dialog to create a Polling File is illustrated below:
Page 19
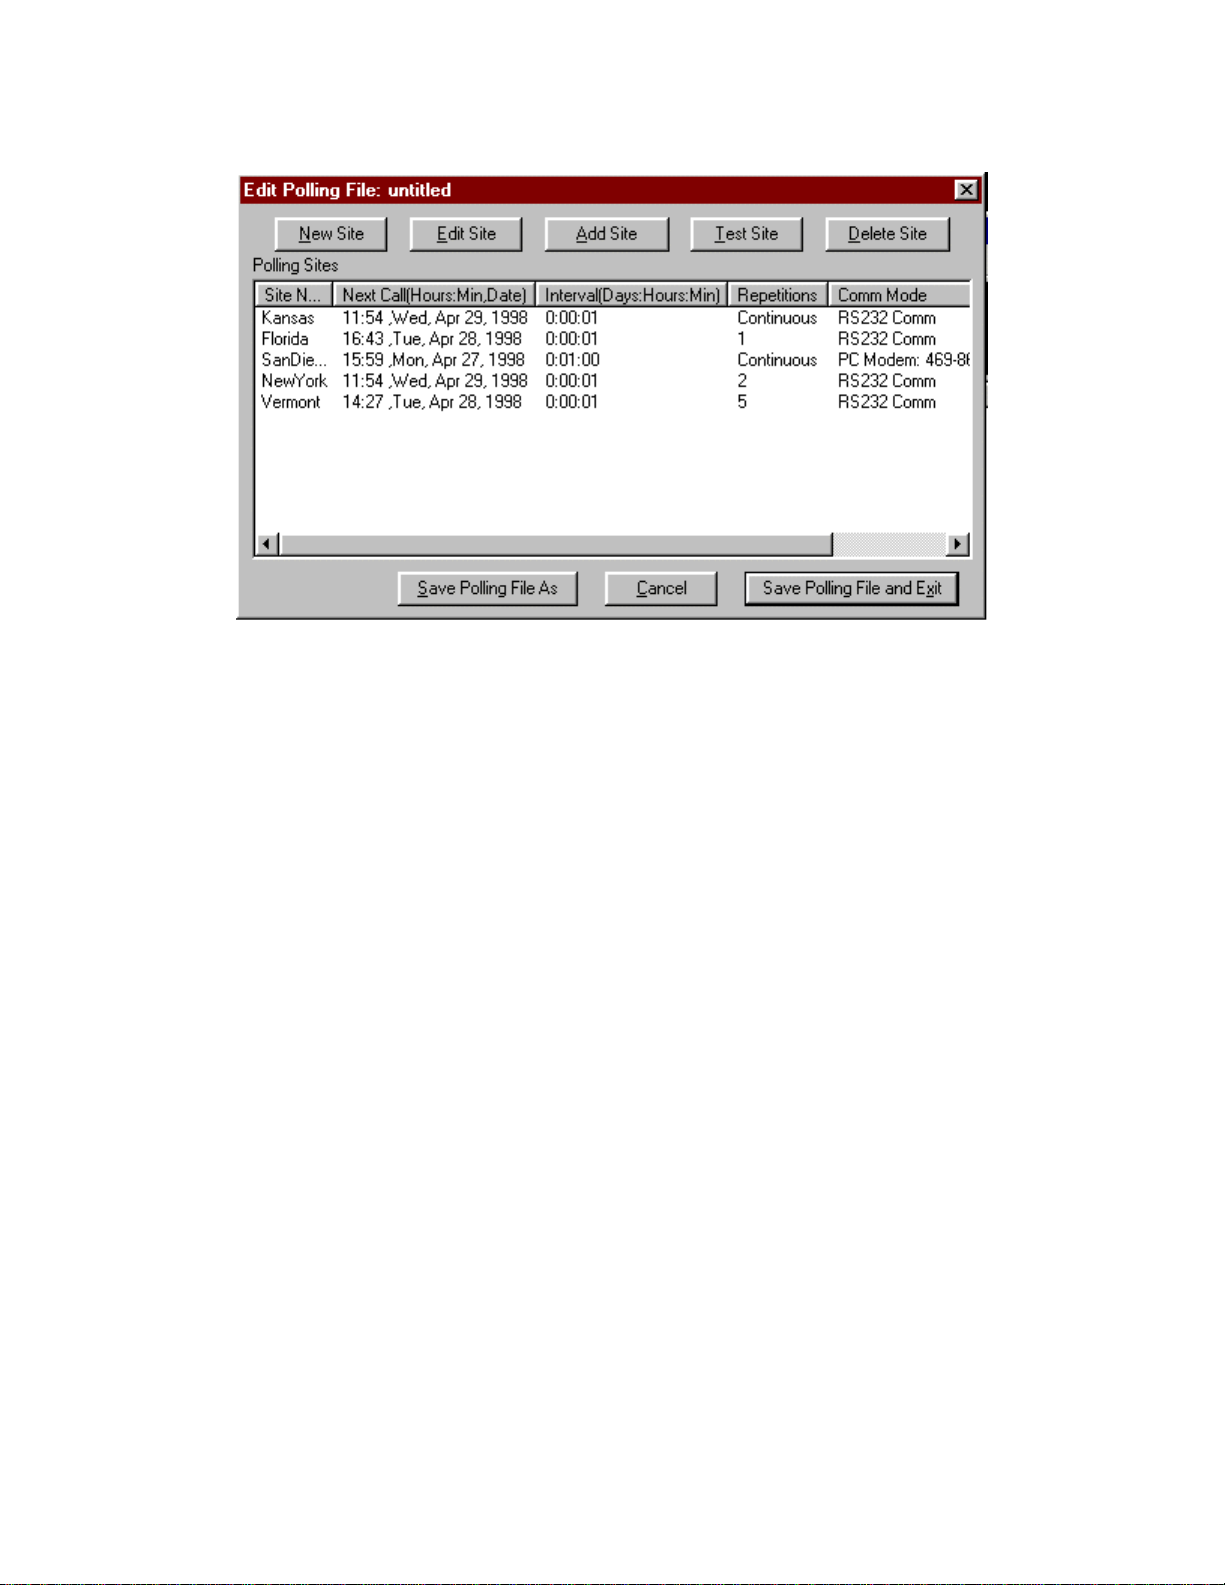
Figure 4.1.3a Edit Polling File Dialog
Figure 4.1.3a illustrates the listing of sites in a new polling file. Each site has been added
by selecting the “Add Site” button and the Polling File has not been saved yet. All of the
sites have been previously generated with the Site Editor.
The Edit Polling File Dialog may be accessed to generate a new site by:
1) Launch HAP program
2) Select “New” from the Main Dialog
Each Selection on the Edit Polling File Dialog is defined below:
1) New Site - Selecting “New Site” activates the Editing Site Dialog illustrated in Figure
4.1.1. This allows the user to create a new site as discussed in section 4.1.2.
2) Edit Site - Selecting “Edit Site” activates a Standard Windows File Selection dialog
with a list of Sites. The user then selects a site and the Editing Site Dialog illustrated in
Figure 4.1.1 is activated. This allows the user to edit a existing site.
3) Add Site - Selecting “Add Site” activates a Standard Windows File Selection dialog
with a list of Sites. The user then selects a site and that site is added to the polling file.
4) Delete Site - Selecting “Delete Site” eliminates the previously created selected site from
the polling file. The following figure illustrates the “LosAngles” site selected prior to
selecting “Delete Site”:
Page 20
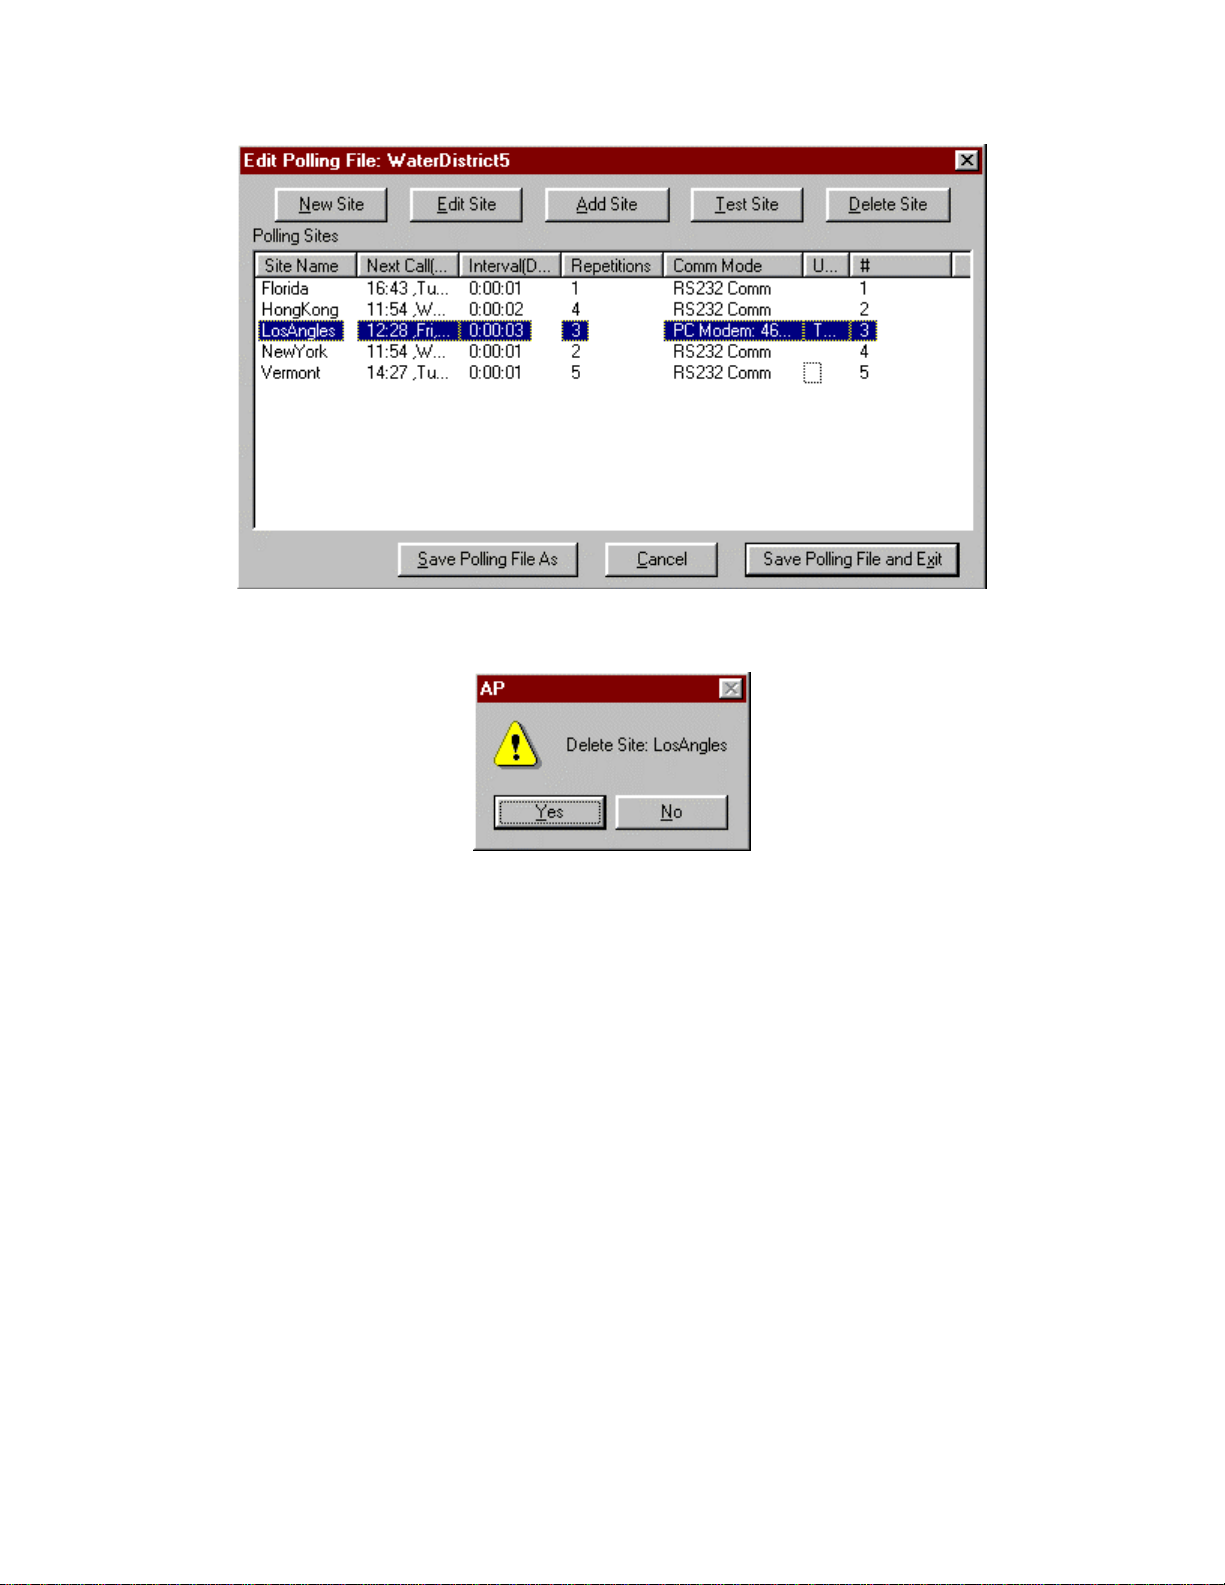
Figure 4.1.3b Edit Polling File Dialog with Selection
Subsequently to selecting “Delete Site” the user is presented with a confirmation dialog:
Figure 4.1.3c Delete Site Confirmation Dialog
5) Test Site - Selection of test site immediately activates polling for the selected site.
Figure 4.1.3b illustrates selection of a site. Once the site is activated for polling, the same
site configuration options are active, except for the options selected in the Time Interval
Tab Dialog.
6) Save Polling File As - Selecting “Save Polling File As” activates a Standard Windows
File Selection dialog. The user then selects a polling file name and the polling file is saved
to disk.
7) Save Polling File And Exit - Selecting “Save Polling File And Exit” activates a Standard
Windows File Selection dialog. The user then selects a polling file name and the polling
file is saved to disk. The Edit Polling file Dialog is then exited.
4.1.4 Start Polling
Figure 4.1.4a below illustrates the HAP’s main dialog with Polling enabled:
Page 21
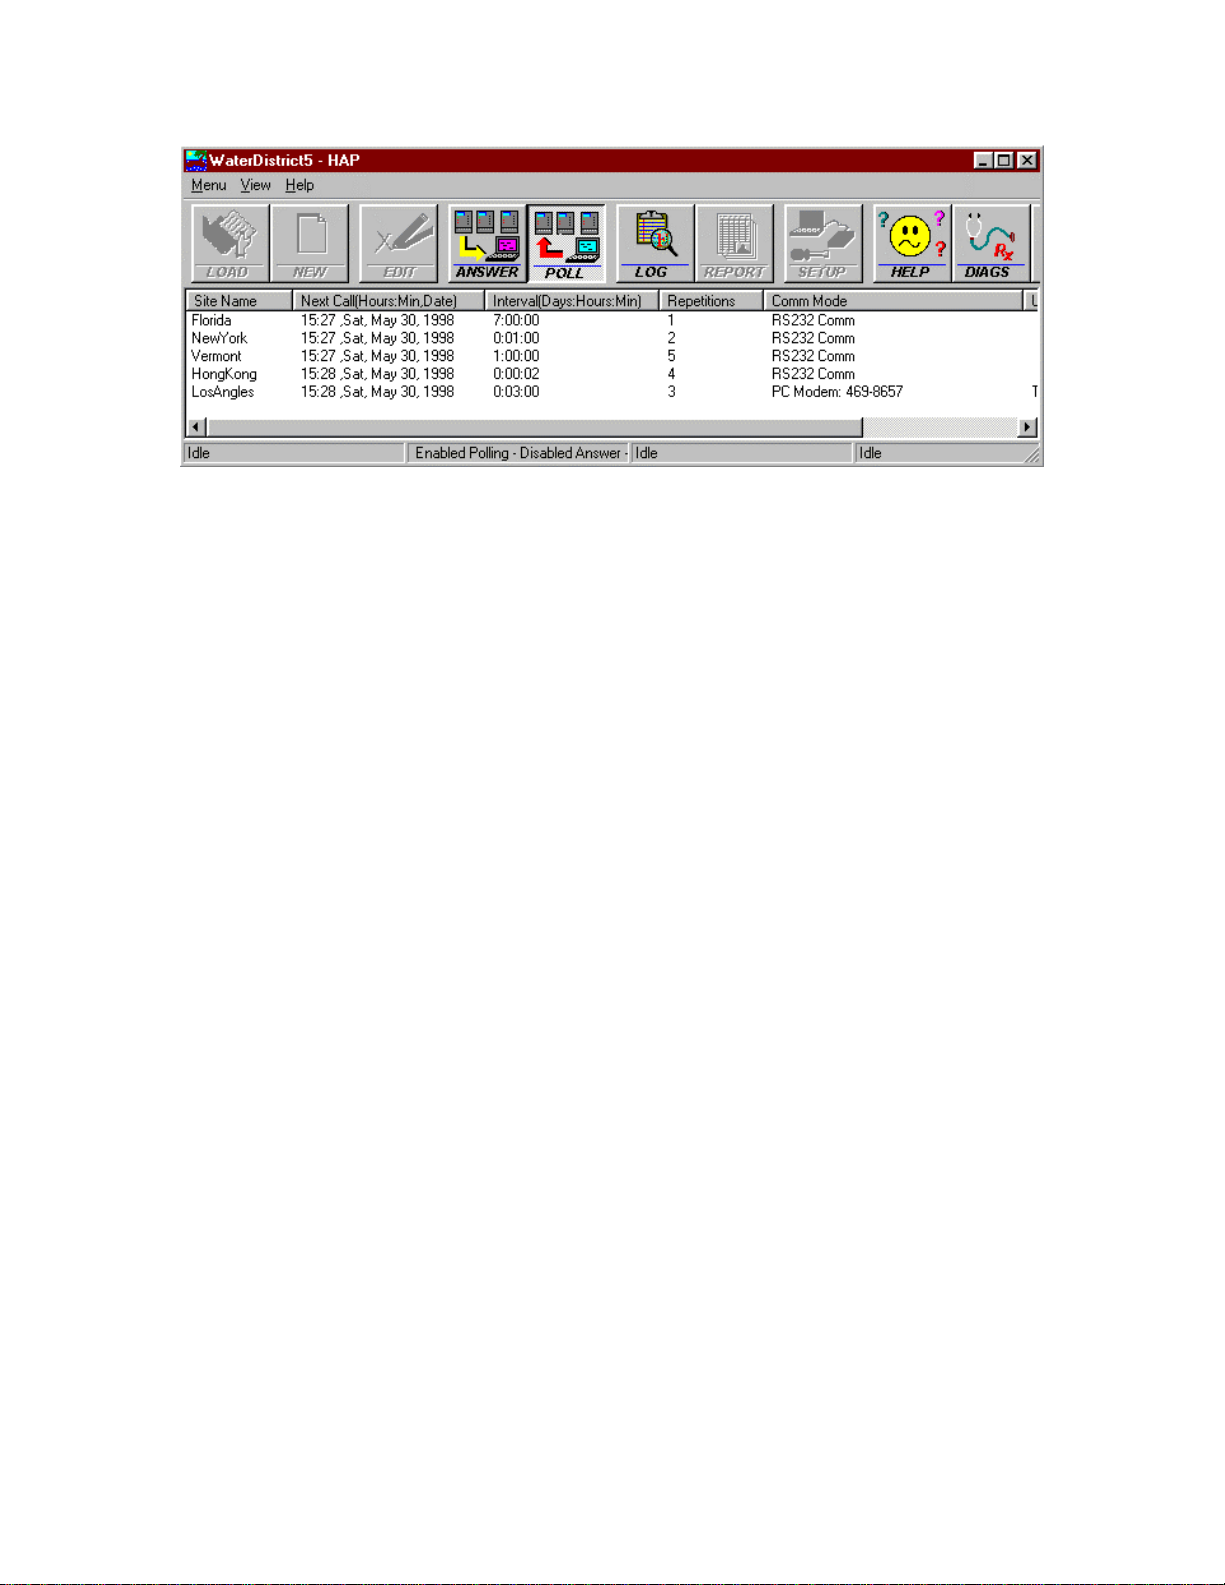
Figure 4.1.4 HAP’s Main Dialog with Polling Enabled
To Enable Polling
1.) Launch HAP program
2.) Select “Load” from HAP’s main Dialog - then select a polling file.
3.) Select “Poll” from HAP’s main Dialog.
When polling is enabled, the polling file name is displayed on the Dialog’s title bar. The
Dialog Status Bar (at bottom of illustration), displays status of HAP. The Dialog’s list
window displays some information contained in the selected polling file:
1) Site Name - The name of the site.
2) Next Call (Hours:Minute:Date) - The next scheduled call for that site. The sites are
displayed in chronological order, with the next site to be polled at the top of the site list
window.
3) Interval (Day:Hours:Minutes) - The interval between logger interrogation for that site.
4) Repetitions - The Number of interrogation repetitions remaining for that site
5) Comm Mode - How the comm port is used. RS232, PC Modem, or RF Modem.
4.1.5) Termination of Polling
Method for termination of polling consists of:
1) All sites have satisfied the “Number of Repetitions”.
2) The user selects the enabled “Poll” poll button, which disables polling.
4.2) AutoAnswer
4.2.1) Overview
AutoAnswer is a feature of HAP that provides for Omega Engineering Data Logger
originated automatic data download and report generation. The Logger interrogation
Page 22
options include programmable data download, configurable report generation, and
automated alarming. AutoAnswer executes in the background while other processes are
executing on the PC. A rigorous Log File tracks AutoAnswer operations as each logger
calls.
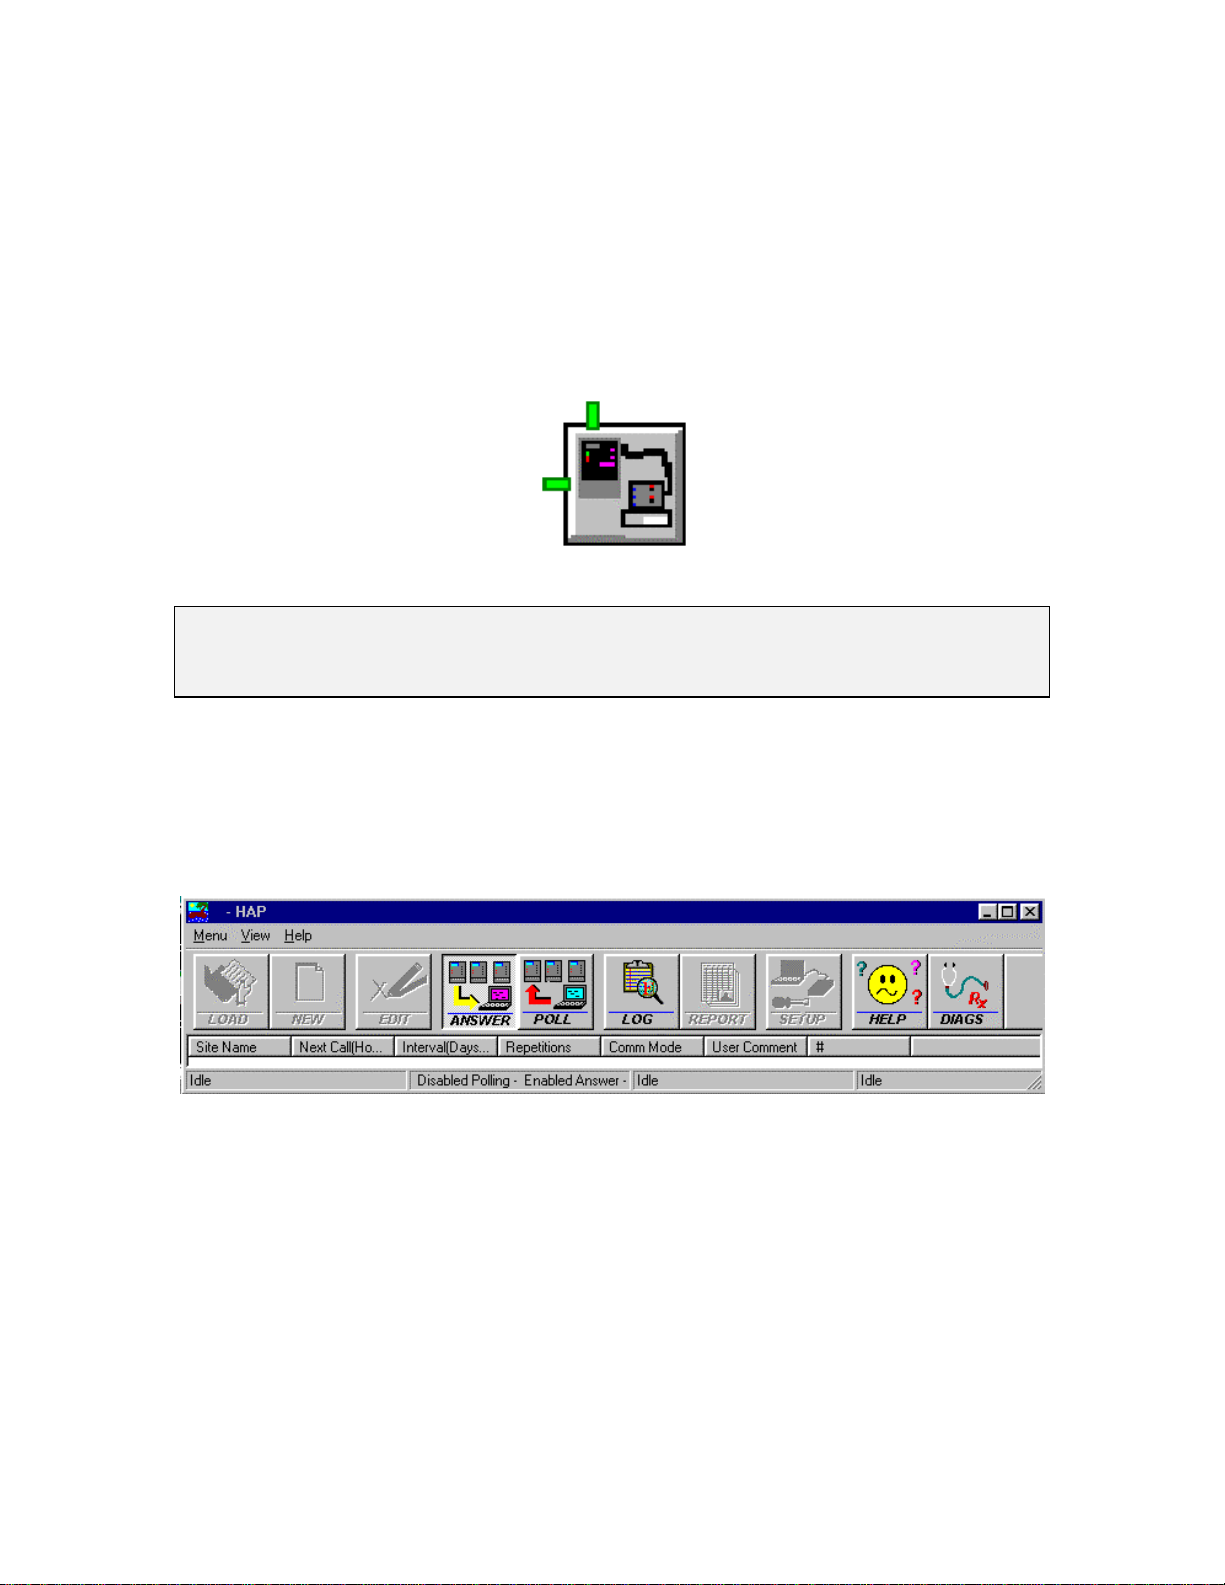
The Omega Engineering Data Logger is programmed using Omega Engineering
HyperWare with a “HAP” icon in the program net. Once the HAP Icon is activated, the
Data Logger initiates a callout to a PC with HAP executing. The HyperWare HAP Icon is
illustrated below. For a more complete description of HyperWare see the HyperWare
Manual.
Figure 4.2.1 HyperWare HAP Icon
Note
The above Icon illustrated in figure 4.2.1 above is not a part of HAP. The Icon is a part
of Omega Engineering HyperWare software.
4.2.2) Turning AutoAnswer On and Off
Figure 4.2.2 below illustrates the HAP Main Dialog with AutoAnswer On. The user has
selected the “Answer” button to turn on AutoAnswer. The PC running HAP is now ready
to receive calls from an Omega Engineering Logger with the HAP Icon activated.
Figure 4.2.2 HAP with AutoAnswer On
When AutoAnswer is on, the comm port is opened with the parameter specified in the
Setup Dialog. See the next section for a description of those parameters.
AutoAnswer is disabled by selected the enabled “Answer” button. Once disabled
the comm port is freed for other applications using the comm port.
4.2.3) Setup Of AutoAnswer
To Access AutoAnswer
1.) Launch HAP program
2.) Select “Setup” from HAP’s main Dialog
Page 23
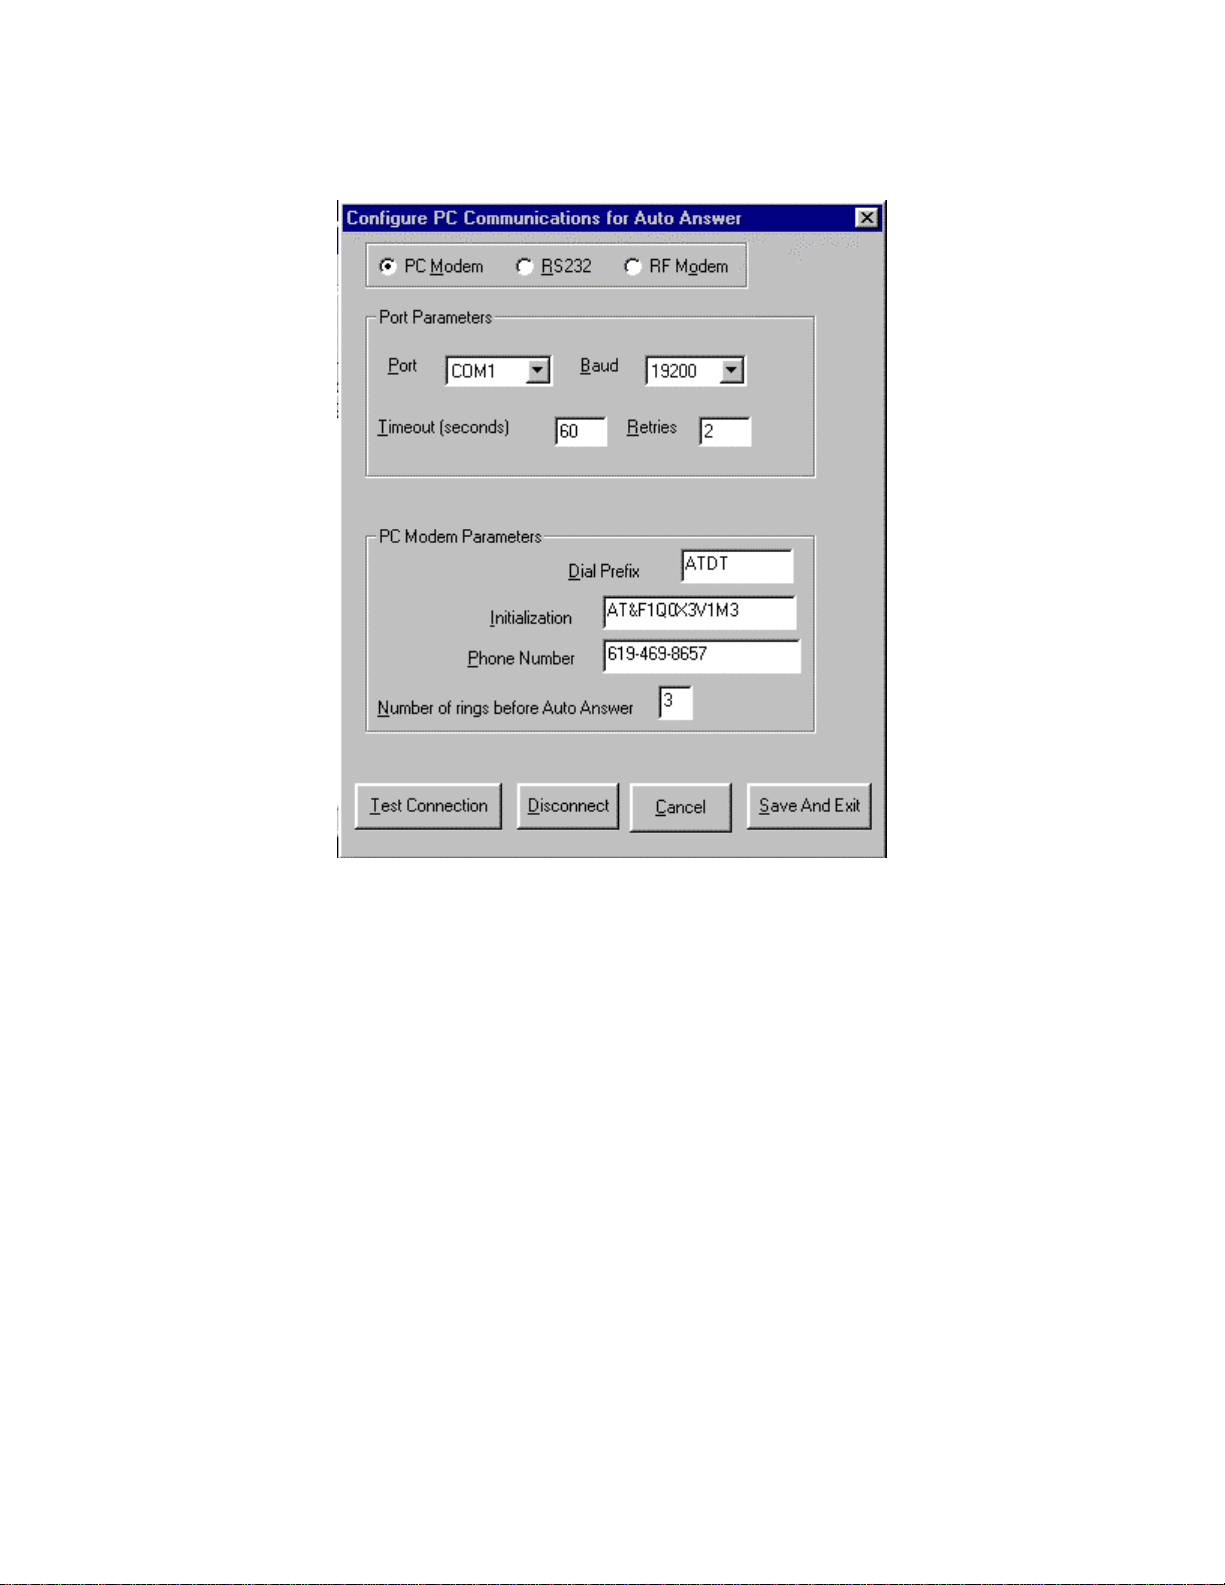
Figure 4.2.3a below illustrates AutoAnswer configured to communicate with a Logger in
PC Modem mode.
Figure 4.2.3a AutoAnswer Setup Dialog Configured for PC Modem
Description of each Parameter and button on the AutoAnswer Setup Dialog:
1) Port - PC port for AutoAnswer activation.
2.) Baud - PC Port Baud Rate
3) Timeout - N/A in AutoAnswer Mode - only used when testing the connection. See
“Test Connection” button.
4) Retries - N/A in AutoAnswer Mode - only used when testing the connection.
5) Dial Prefix - Hayes compatible prefix. ATDT for touch tone and ATD for rotary.
6) Initialization - Hayes compatible mode initialization string . See section 4.1.2 for some
initialization guidelines.
7) Phone Number - N/A in AutoAnswer Mode - only used for testing the connection.
Page 24
8) Number of rings before Auto Answer - the number of times the phone rings before
HAP connects to the calling logger. This option allows the user to answer the phone,
bypassing HAP.
9) Test Connection - Performs a Logger callup using the displayed parameters.
10) Disconnect - Hangs-up on the logger
11) Cancel - Exit without saving parameters
12) Save and Exit - stores the displayed parameter and uses them with AutoAnswer is
activated.
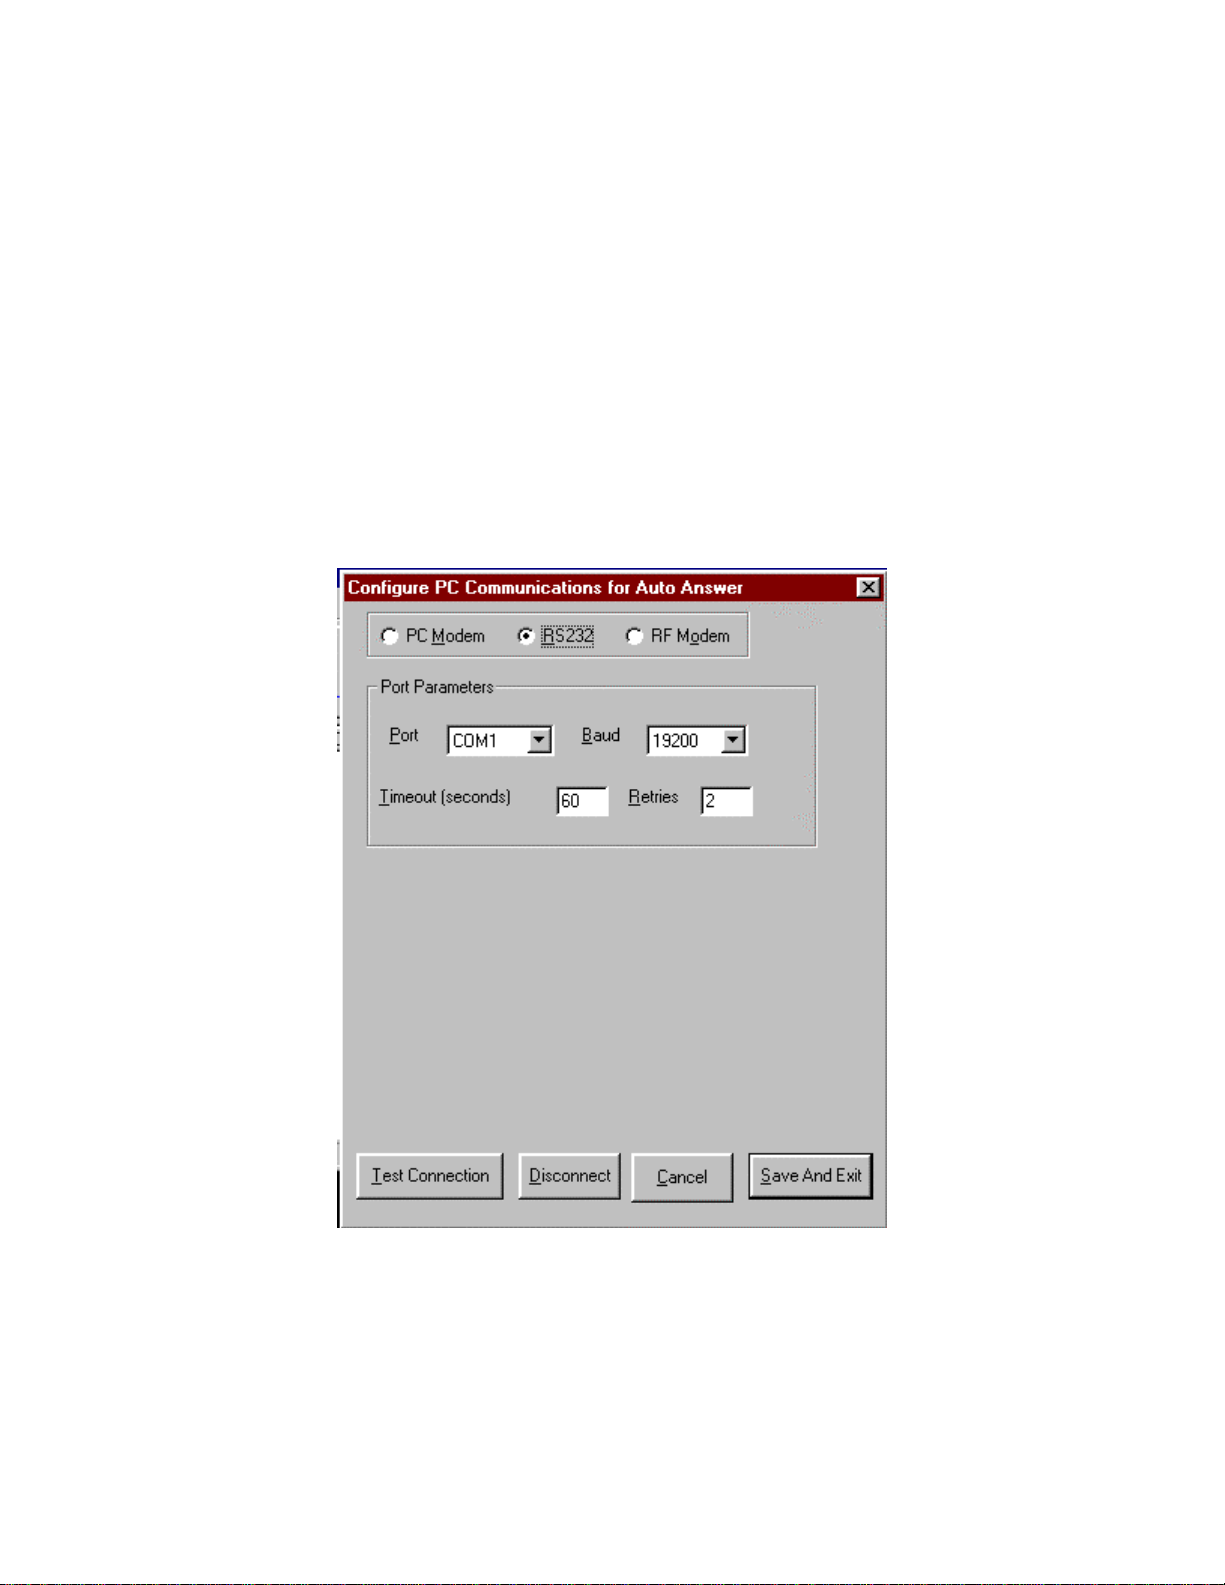
Dialog Figure 4.2.3b below illustrates AutoAnswer configured to communicate with a
Logger using the RS232
Figure 4.2.3b AutoAnswer Setup Dialog Configured for RS232
For a description of the RS232 parameters see the above section.
Dialog Figure 4.2.3c below illustrates AutoAnswer configured to communicate with a
Logger using the RF Modem.
Page 25
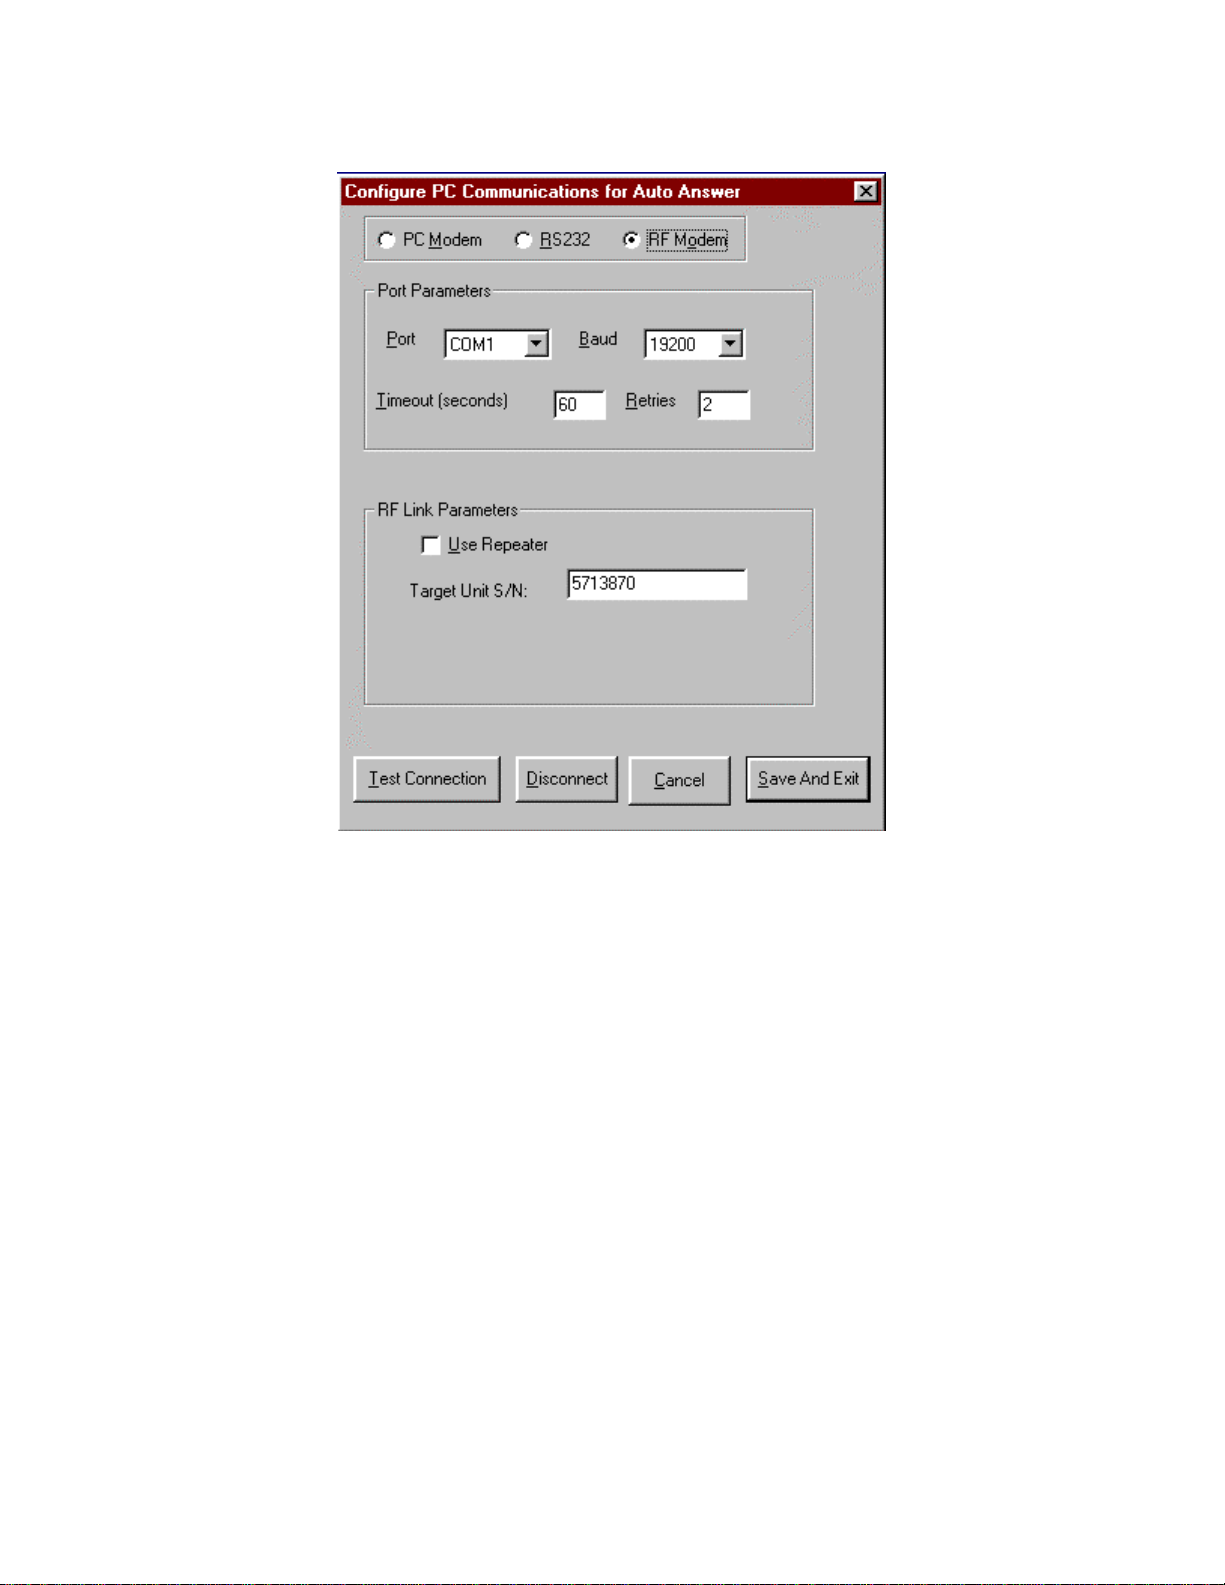
Figure 4.2.3c AutoAnswer Setup Dialog Configured for RF Modem
See the section above and Section 4.1.2.3 above for a description of RF Modem
parameters.
4.2.4) AutoAnswer Options
Omega Engineering HyperWare is used to select options for HAP AutoAnswer.
HyperWare is the PC Windows platform application used to program Omega Engineering
Data Loggers. See the Omega Engineering HyperWare Manual for a complete description
of HyperWare.
Figure 4.2.4 below illustrates the HyperWare HAP Icon Dialog. The Dialog is accessed
by:
1.) Launch HyperWare
2) Select Design a Net Program Icon
3) Select the “Insert a Hap Output Icon” button from the Toolbar
4) Drag and Drop the Hap Icon into the programming window.
5) Double Click on the Hap Icon. The HyperWare HAP Icon Dialog is illustrated below:
Page 26
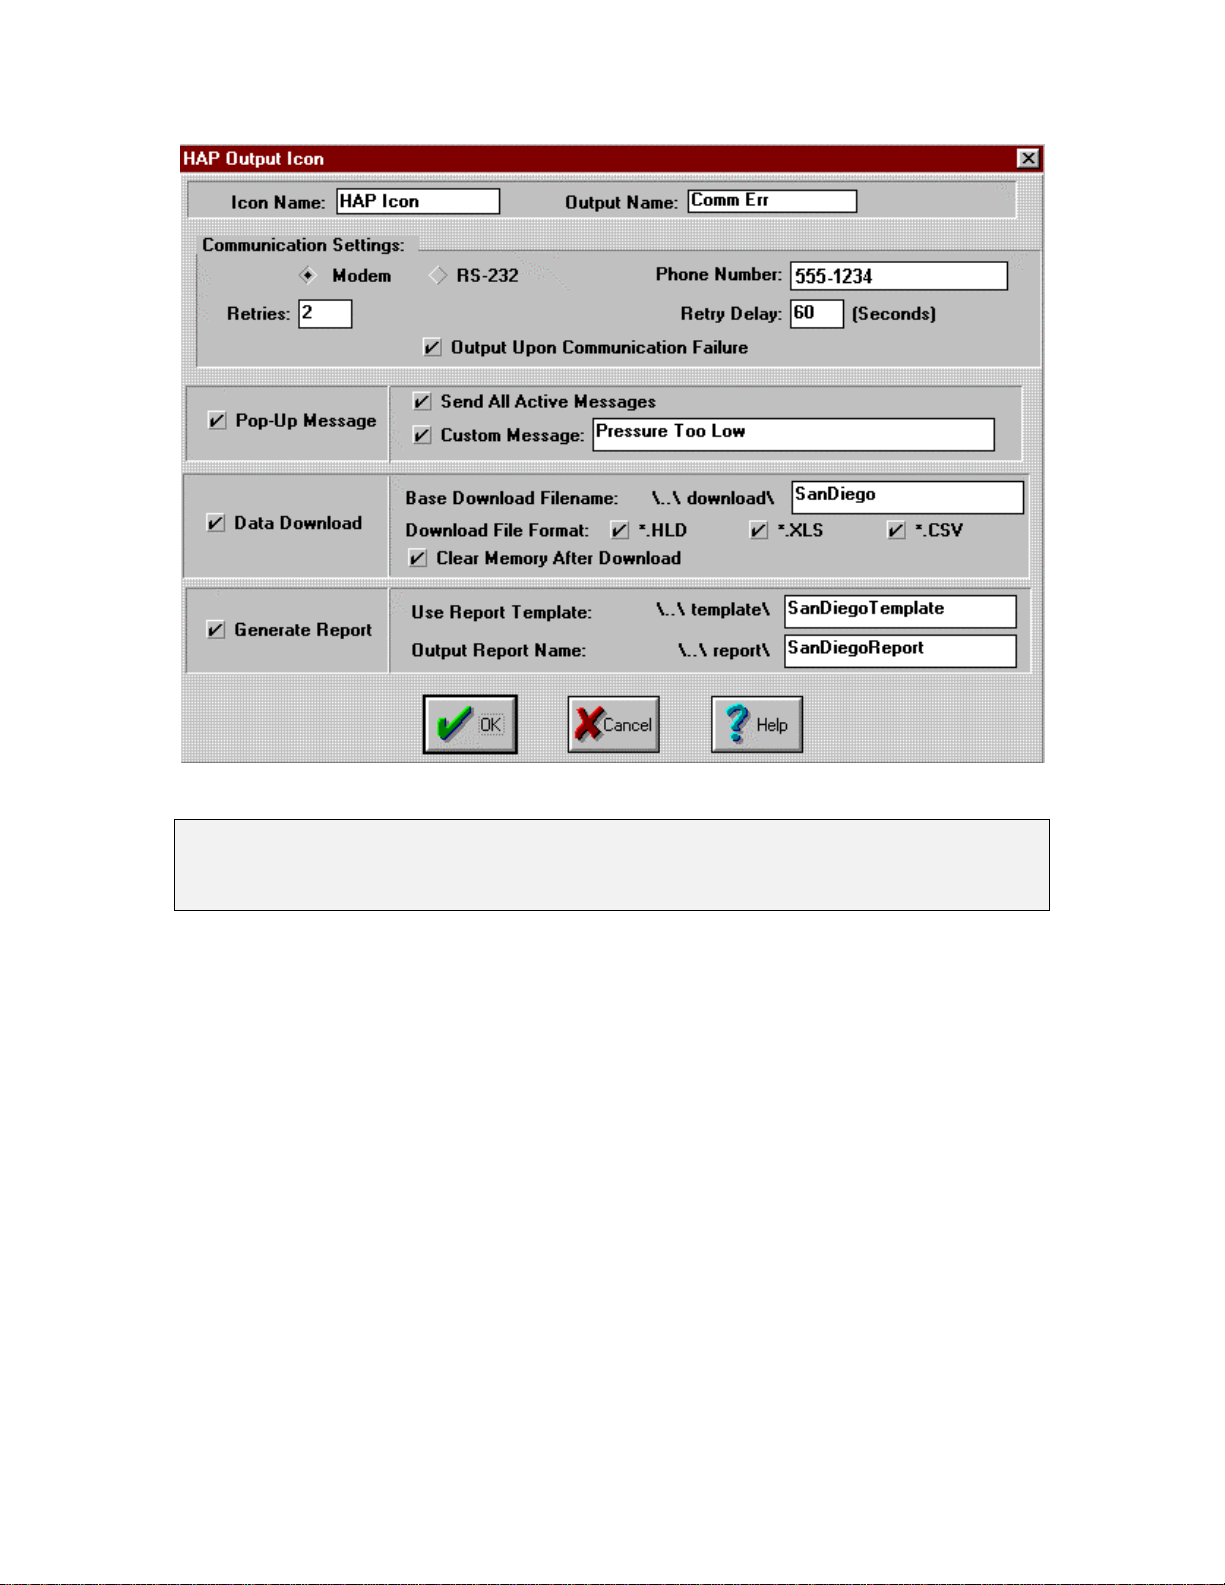
Figure 4.2.4a HyperWare HAP Icon Dialog
Note
The above Dialog illustrated in figure 4.2.4a above is not a part of HAP. The Dialog is a
part of Omega Engineering HyperWare software.
Description of each Parameter and button in figure 4.2.4 - HyperWare HAP Icon Dialog
1) Telephone Mode, RS232, or RF Modem - the comm method the data logger uses to
communicate with HAP.
2) Retries - The number of retries the logger will attempt if the first communication
attempt is unsuccessful.
3) Retry Delay: The seconds between retries.
4) Output on Communication failure - Optional parameter that installs an output node on
the HAP Icon. An example of using this option: Connect the Hap Output Node to a
Pager Icon with a alphanumeric message. If a communication failure occurs, the Pager
Icon is activated.
5) Phone Number- The telephone Number of the PC with HAP installed and AutoAnswer
enabled. The Logger uses this telephone number when the HAP Icon is activated.
Page 27
6) RF Mode Serial Number - See section 4.1.2.3 above for a description of this parameter.
7) Use Repeater - See section 4.1.2.3 above for a description of this parameter.
8) Repeater Number - See section 4.1.2.3 above for a description of this parameter. This
parameter is the same as “Repeater Callbook #”
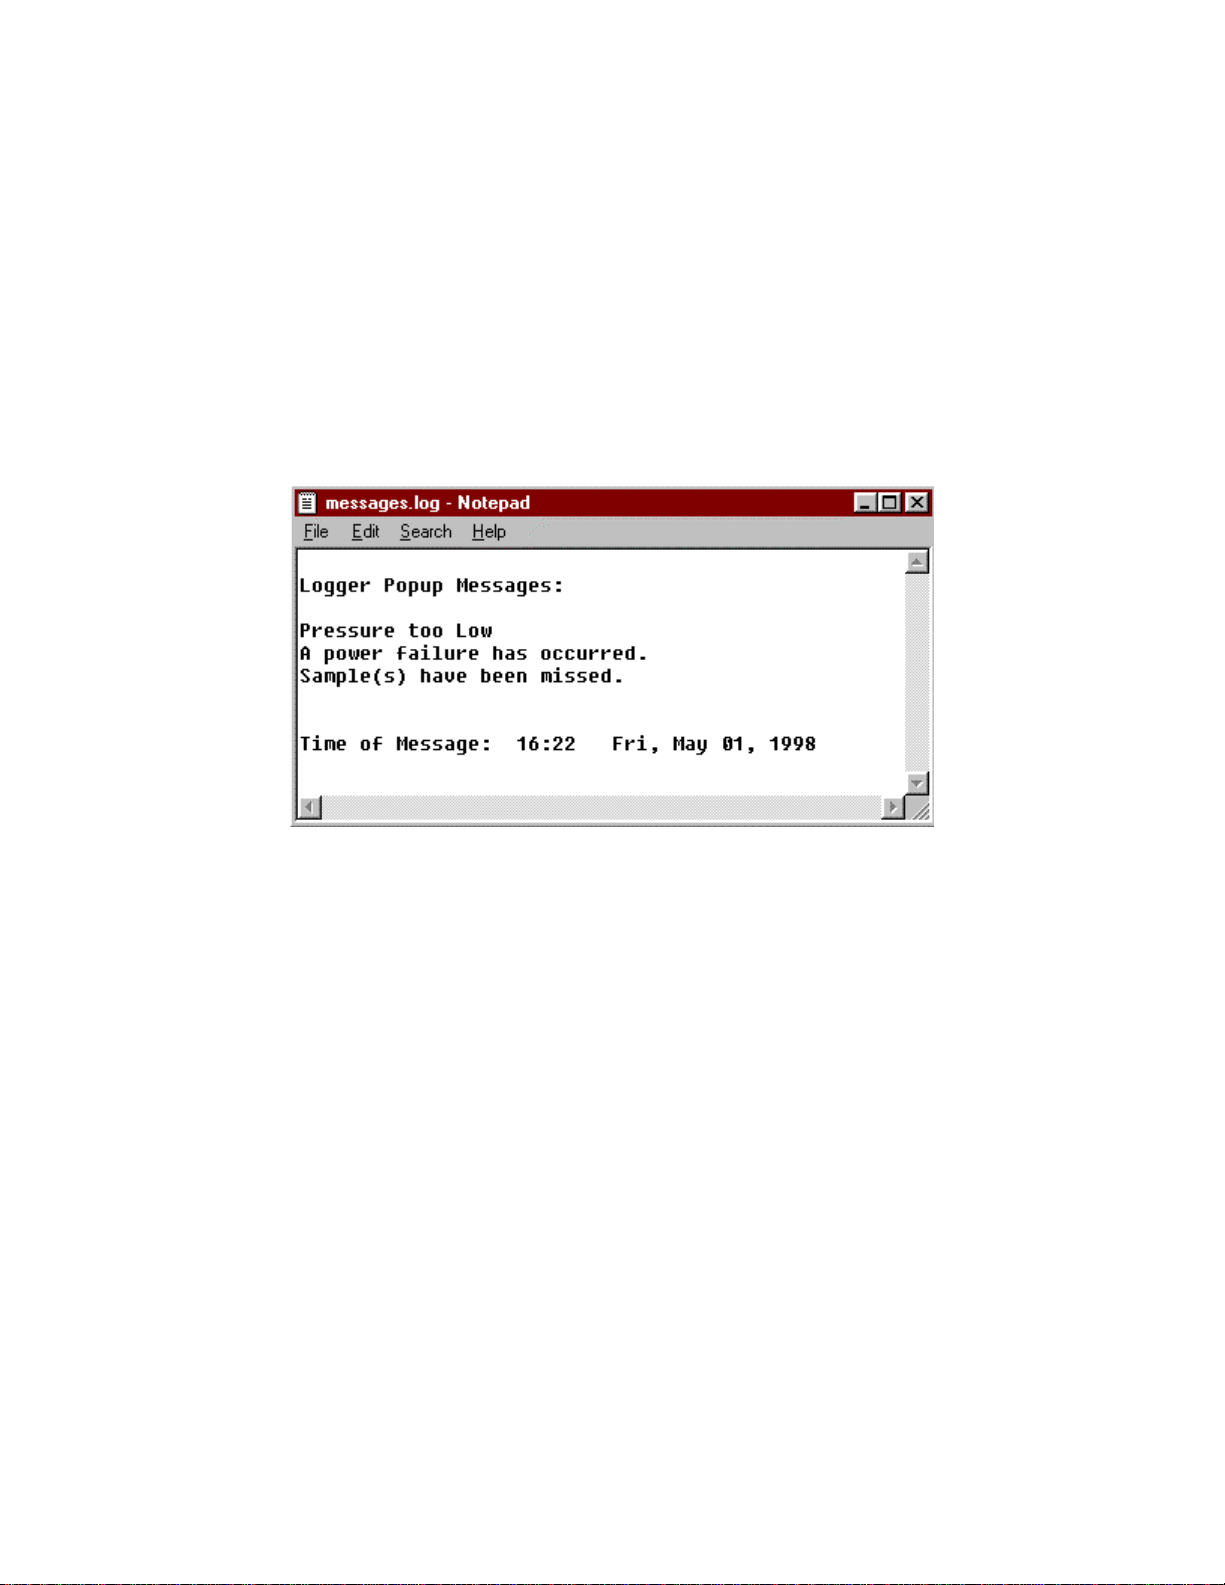
9) Popup Message - HAP displays all active messages and custom messages after the
logger call HAP. HAP uses Microsoft NotePad to display the popup messages.
Example of Popup Message:
Figure 4.2.4b Alarm - Popup Message displayed by HAP
Figure 4.2.4b Alarm - Popup messages consists of three message types:
a) The first message “Pressure too Low” is a custom message, typed in by the user
when configuring the HAP Icon from HyperWare.
b) Alarm - Popup messages 2 and 3 “A power failure has occurred.” and
“Sample(s) have been missed” are Logger Active message used to indicate
system failures.
c) A message that has been programmed into the Logger net by using the LCD
message Icon.
10) Data Download - Indicates HAP should download memory data from the logger.
11) Base download Filename - The file name HAP assigns to the downloaded memory
data.
12) HLD - HAP will create a HLD format downloaded logger data. The HLD format is
used by HyperPlot utility. File name convention is explained to section 4.1.2.1.
13) CSV - HAP will create a CSV format downloaded logger data. The CSV format is
the generic comma delimited text file used by Mat Lab or Excel.
Page 28
14) XLS - HAP will create a XLS format downloaded logger data. The XLS format is the
binary format used by Microsoft Excel.
15) Generate Report - HAP generates an Microsoft Excel report as explained in section
4.1.2.1
16) User Report Template - File name of the Excel template as explained in section
4.1.2.1. Generating an Excel Template is explained in section 4.3 of this manual.
17) Output Report Name - HAP generate a Excel Report with this file name.
18) Clear Memory after Download - Clears the Logger memory after the data download.
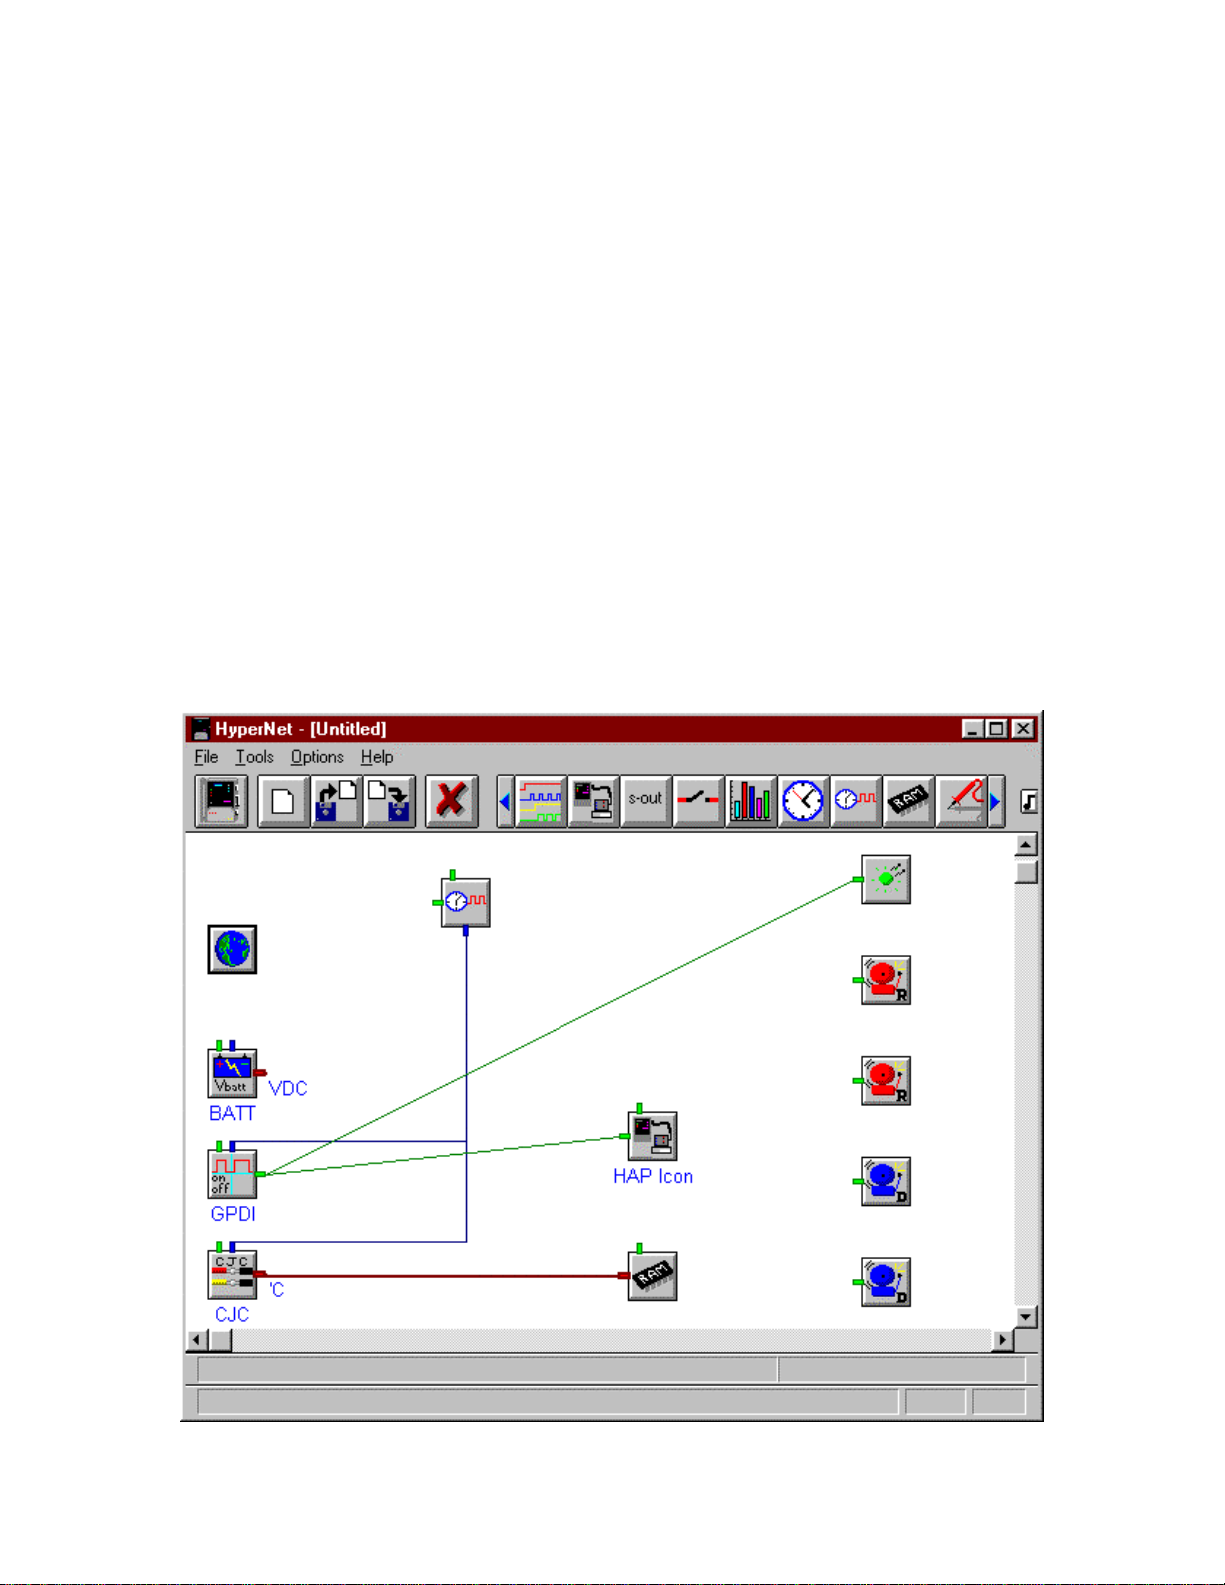
Figure 4.2.4c, below illustrates a simple HyperWare net using the HAP icon. Once this
net is uploaded to the logger and the GPDI input is activated, the logger calls a PC
running HAP. HAP AutoAnswer Options are specified by double clicking the HAP Icon.
Figure 4.2.4a HyperWare HAP Icon Dialog above illustrates the Dialog once the HAP
Icon is selected. This Dialog allows the user to configure HAP AutoAnswer with
interrogation options initialed by the Logger.
Page 29
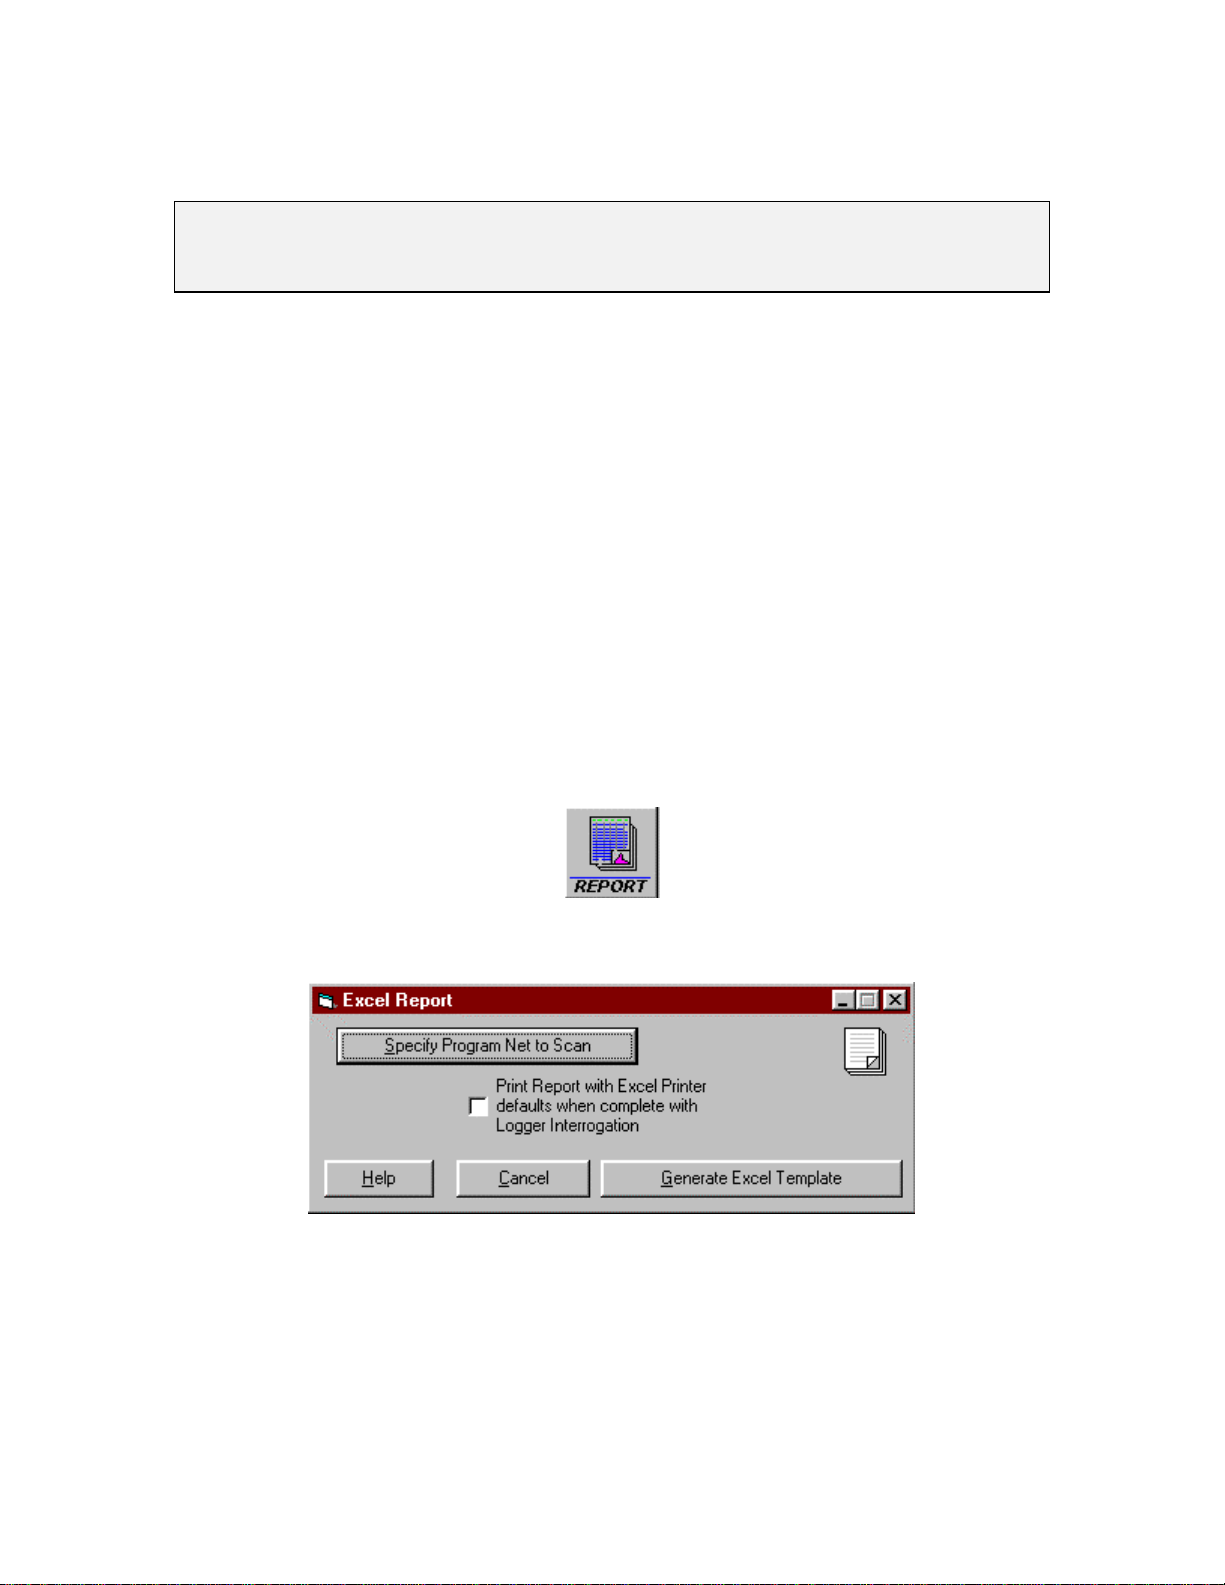
Figure 4.2.4c HyperWare Simple Net With HAP Icon
Note
The above Dialog illustrated in figure 4.2.4a above is not a part of HAP. The Dialog is a
part of Omega Engineering HyperWare software.
4.3) Excel Report Configuration
4.3.1) Overview
HAP can easily be configured to generate an Excel report subsequent to a logger
interrogation. HAP uses a Microsoft Excel file as a “template”. The “template” file is
configured with Data Logger commands. During the Logger interrogation, HAP scans
the template file for Logger commands, interrogates the Logger with appropriate logger
commands, and writes an Excel report file. The “template” file specifies report file format,
interrogation options, and Excel Macros. Both AutoPoll and AutoAnswer can use the
Excel Report generation option of HAP. The user generates a “template” using the HAP
Excel template generation feature, the template is specified in AutoPoll or AutoAnswer
configuration, then HAP generates an Excel Report during Logger interrogation. HAP is
compatible with Microsoft Excel version 5.0 and above.
4.3.2) Creating an Excel Template for HAP
Figure 4.3.2a below illustrates the Report button used to activate the Excel Template
generation feature of HAP.
Figure 4.3.2a Report Button on HAP’s Main Dialog
After selecting the Report button the Excel Report Dialog appears:
Figure 4.3.2b Excel Report Dialog for HAP Excel Template Generation
Description of each Parameter and button in figure 4.3.2b
1) Specify Program Net to Scan - The Hyperware program *.net file is selected. The
logger contains a net program. The net is saved as a PC *.net file. HAP requires the *.net
file prior to “Generate Excel Template”. See the HyperWare Manual for description of a
net program. The file dialog to select a *.net file illustration:
Page 30
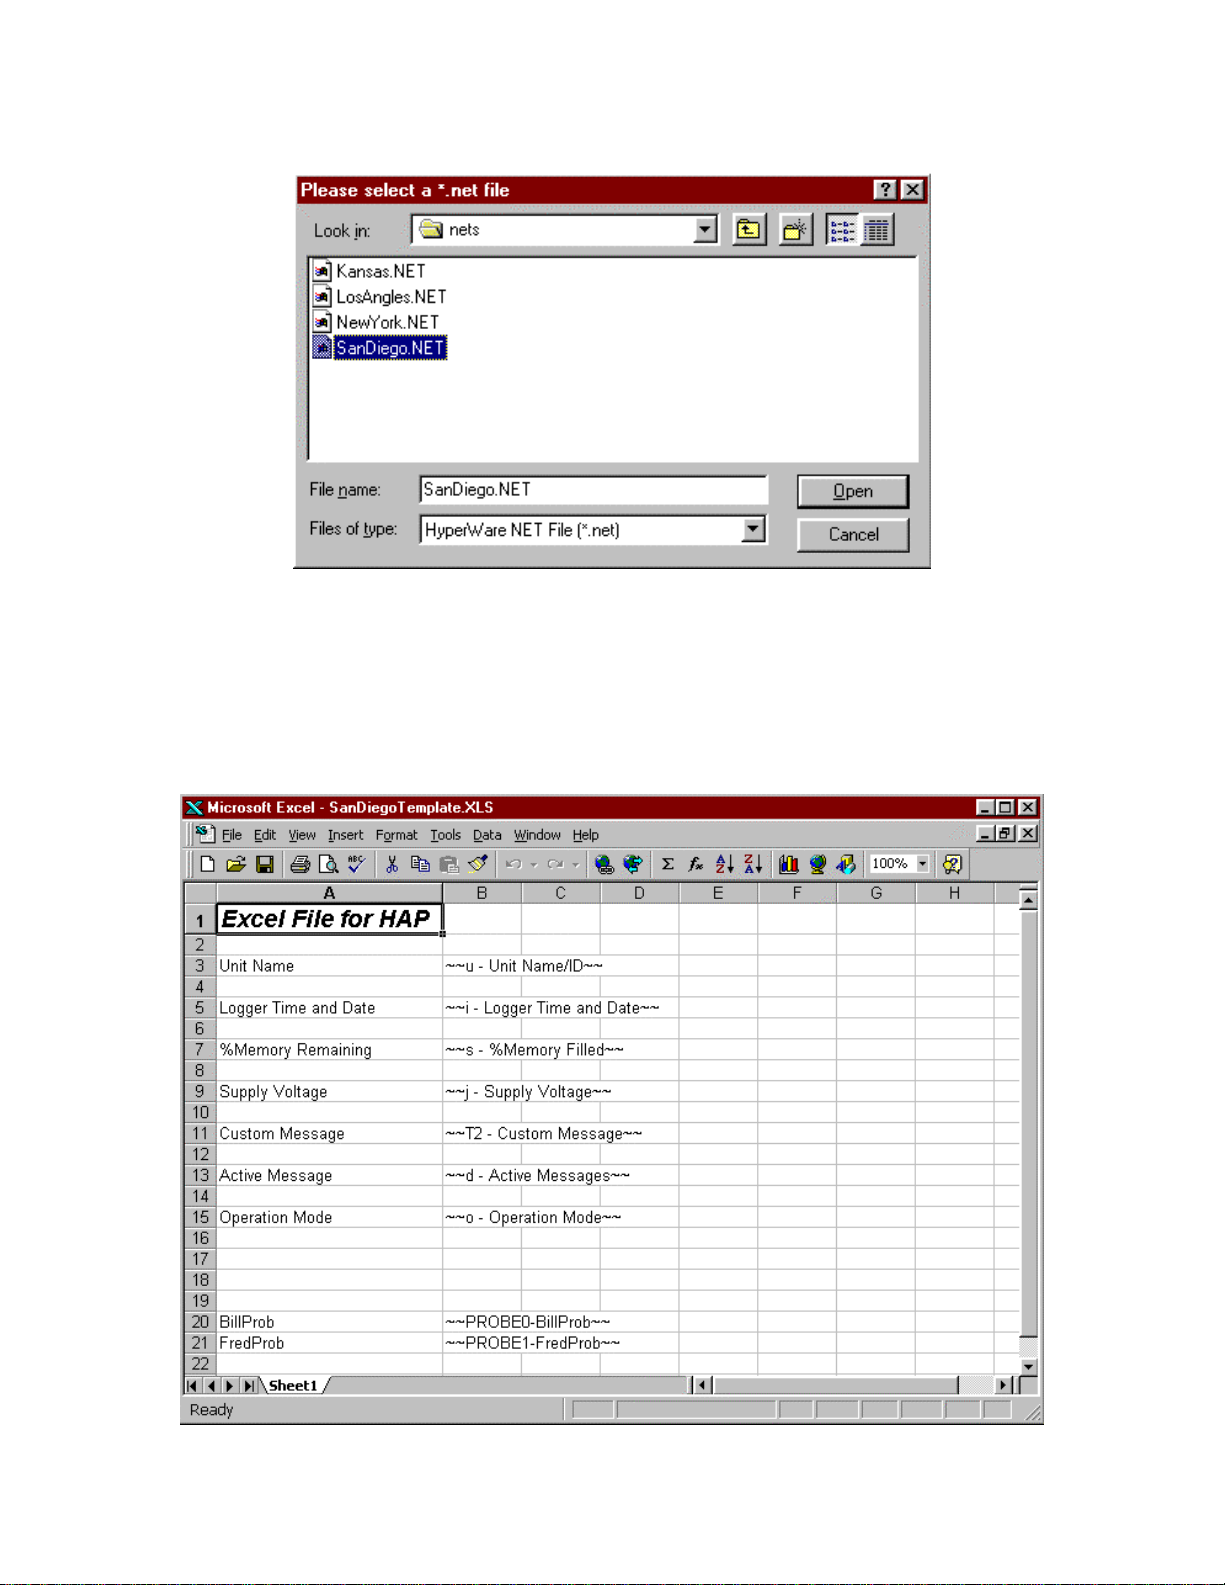
Figure 4.3.2c HAP file Dialog for Selection of *.net file
2) Print Report with Excel defaults when complete with Logger Interrogation - HAP
prints the Excel Report file upon completion of Logger Interrogation.
3) Generate Excel Template - this option generates the Excel Template and then displays
Excel. The user may modify the format or add Excel Macros prior to saving the Excel
template. Figure 4.3.2d below illustrates a Excel Template for HAP:
Page 31
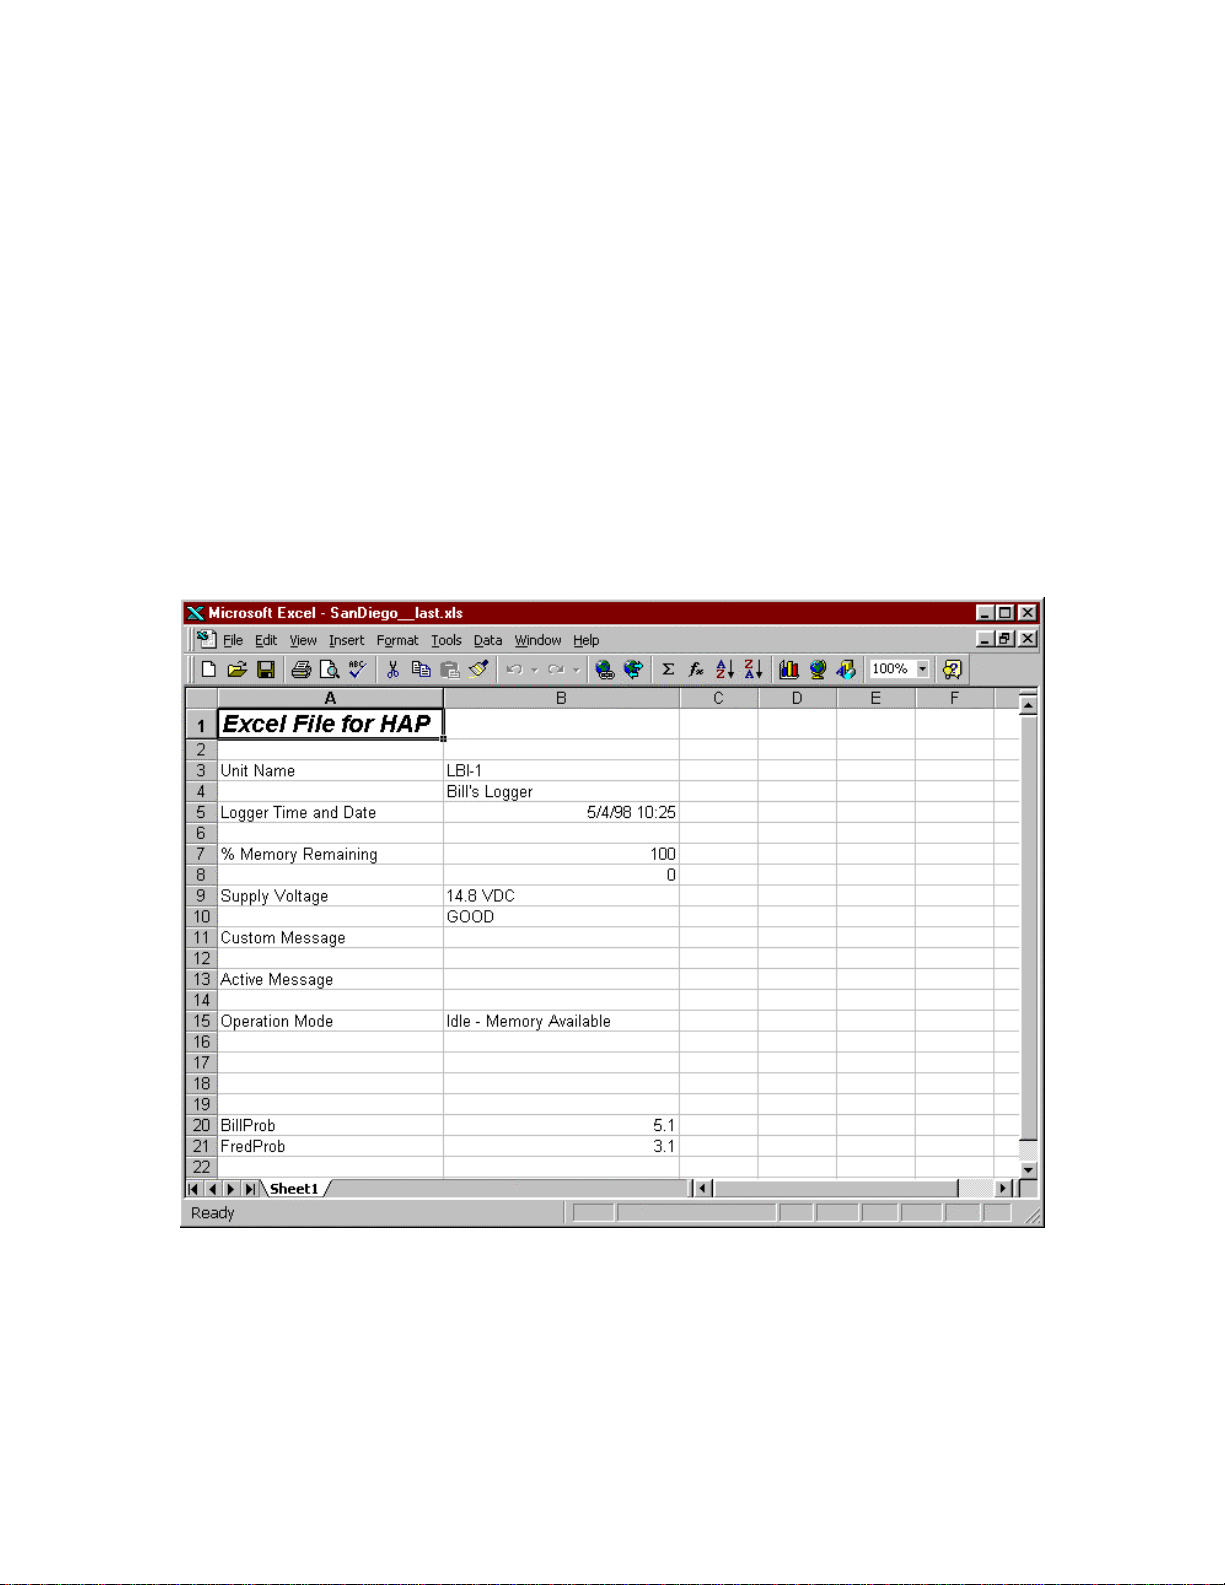
Figure 4.3.2d Microsoft Excel Template for HAP
4.3.3)Explanation of Excel Template for HAP
During Logger interrogation and Excel Report Generation, HAP scans the Excel template
file for Logger commands. Figure 4.3.2.d above illustrates a Excel Template File. Each
cell on the worksheet is scanned for a Logger command. A Logger command is delimited
by ~~ (double tilde). The report is configured in this template file. For example, if
“Operation Mode” is not required in the report the ~~o - Operation Mode ~~ text is
removed from the worksheet. Logger commands may be deleted from a worksheet but
not added. The available Logger commands are imported into Excel prior to template
generation.
Text , formatted text, and Macros may be added to the Excel template. HAP
executes the HAP custom Macro : “MasterMac” during report generation. Macro calls
may be added to “MasterMac” for execution of any user defined macros during report
generation.
Figure 4.3.3 Microsoft Excel Report Generated by HAP
Figure 4.3.3 illustrates the Excel Report File generated using the Template file illustrated
in figure 4.3.2d.
Page 32
5 Step by Step Examples - using HAP
5.1) AutoPoll - One site example
5.1.1) Generating a Program Net with HyperWare, example 5.1
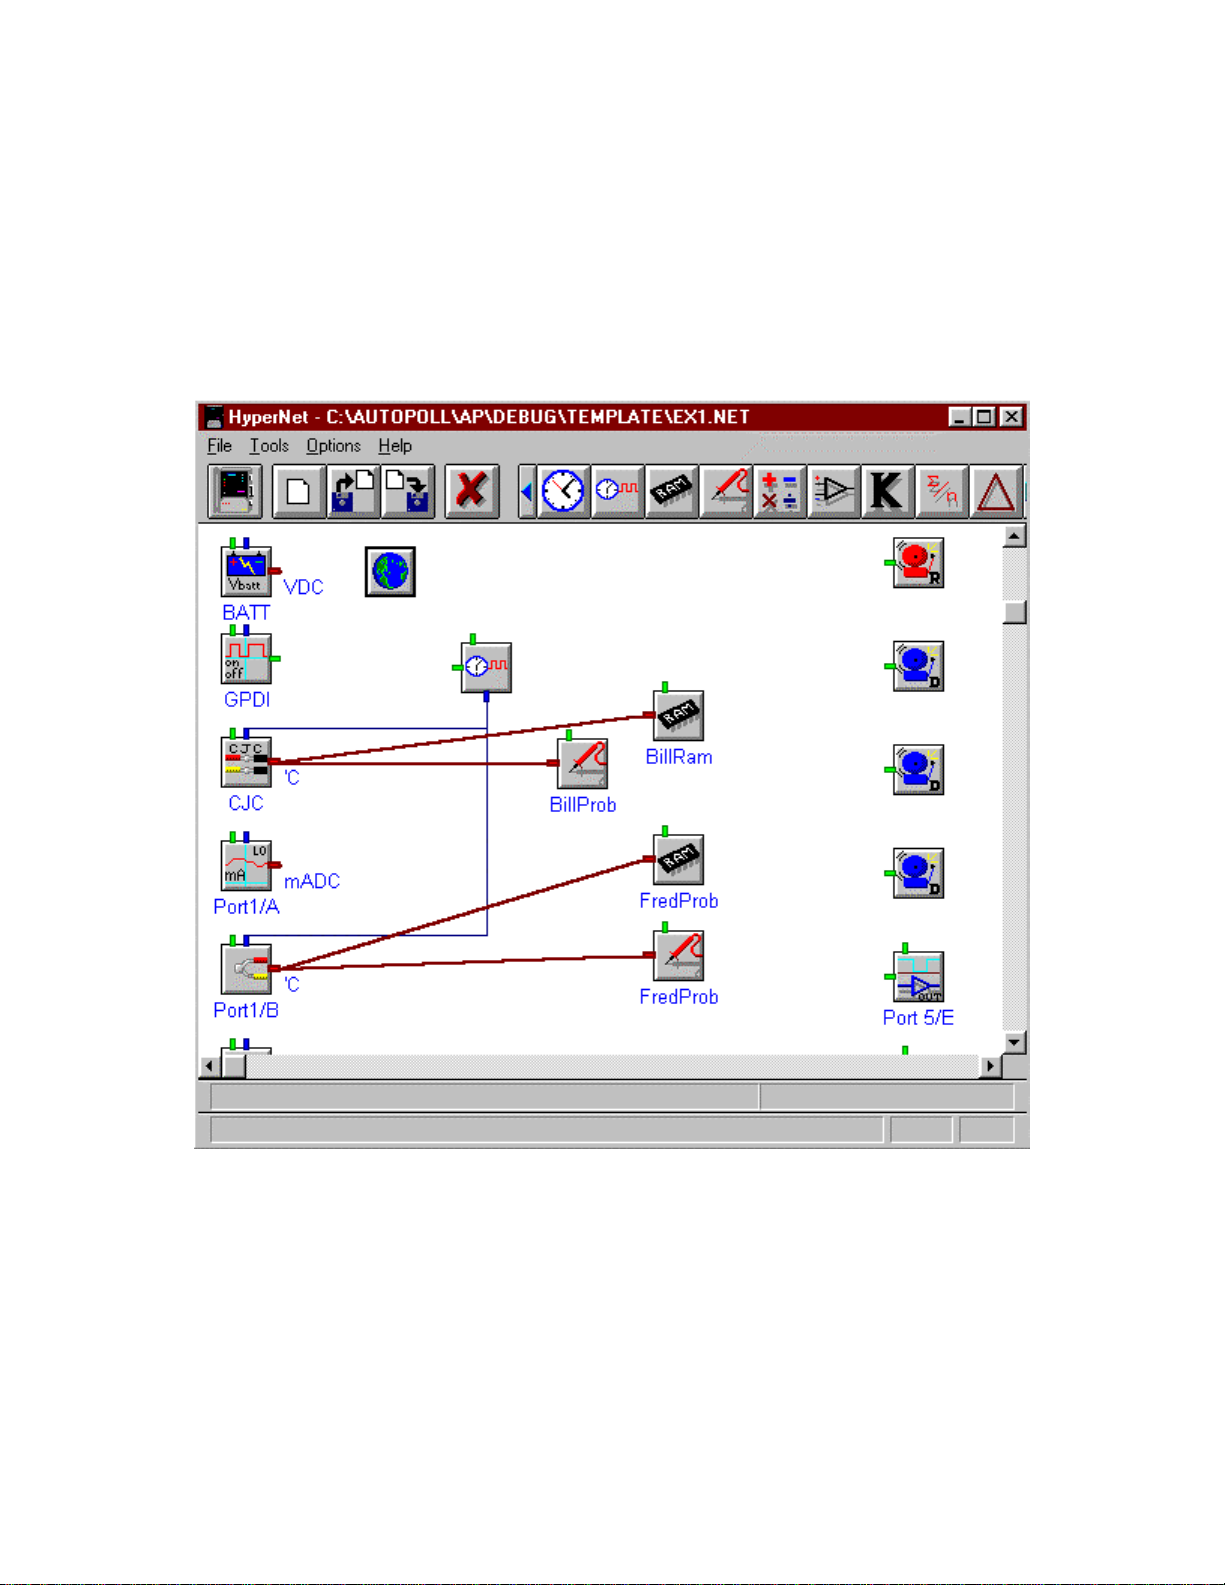
Figure 5.1.1 below illustrates example 5.1 HyperWare net program.
Figure 5.1.1 HyperWare net program, Example 5.1
1) Generate the above net, using HyperWare.
2) Save the net program as “ex1.net”, using HyperWare.
3) Upload the net to the Logger, using HyperWare.
4) Enable the Logger, using HyperWare.
5.1.2) Generating a HAP Excel Template with HAP, example 5.1
1) Launch HAP
2) Select “Report”
3) Select “Specify Program Net to Scan”
Page 33
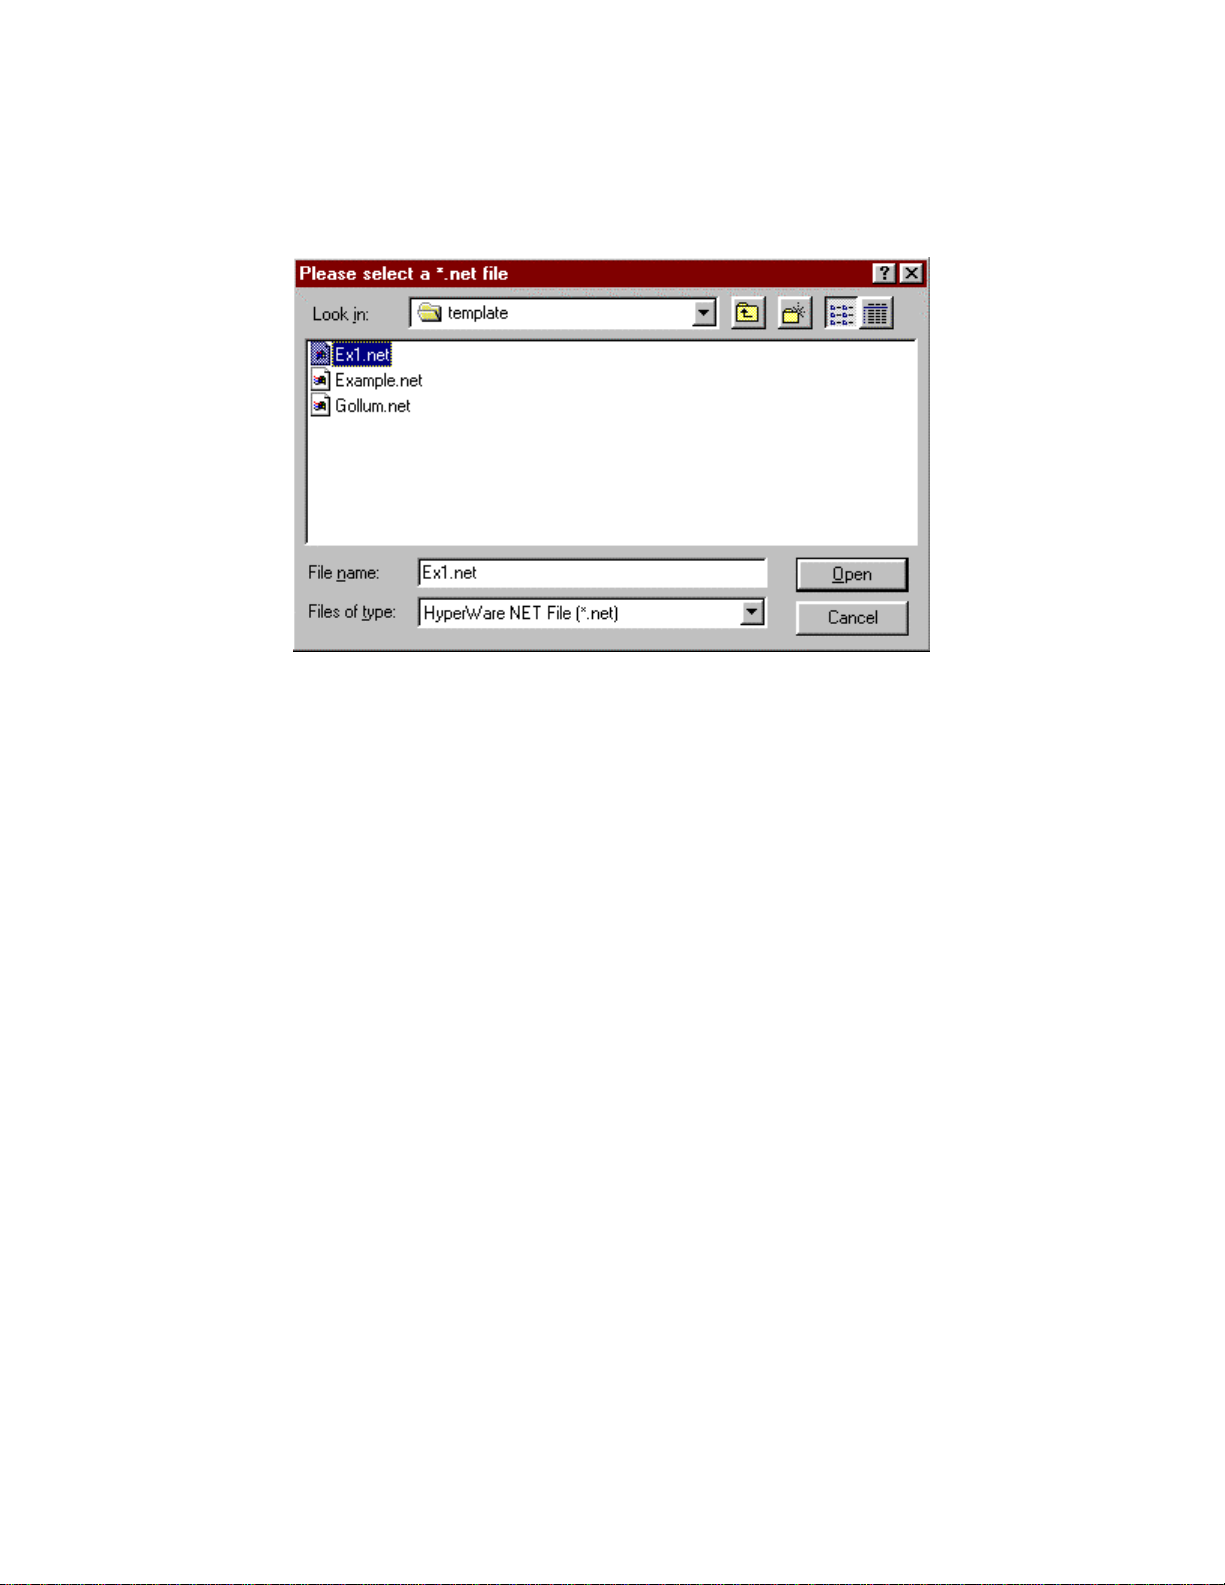
4) Select “ex1.net”, the net illustrated in figure 5.1.1. Figure 5.1.2a below illustrates the
selection of “ex2.net”. This file dialog appears subsequent to selecting “Specifiy Program
Net” from HAP’s Report Generator.
Figure 5.1.2a Selecting the *.net file with HAP’s Report Generator, Example 5.1
5) Select “Generate Excel Template” From HAP Report Generator Dialog. Excel is
launched with the Generic template displayed:
Page 34
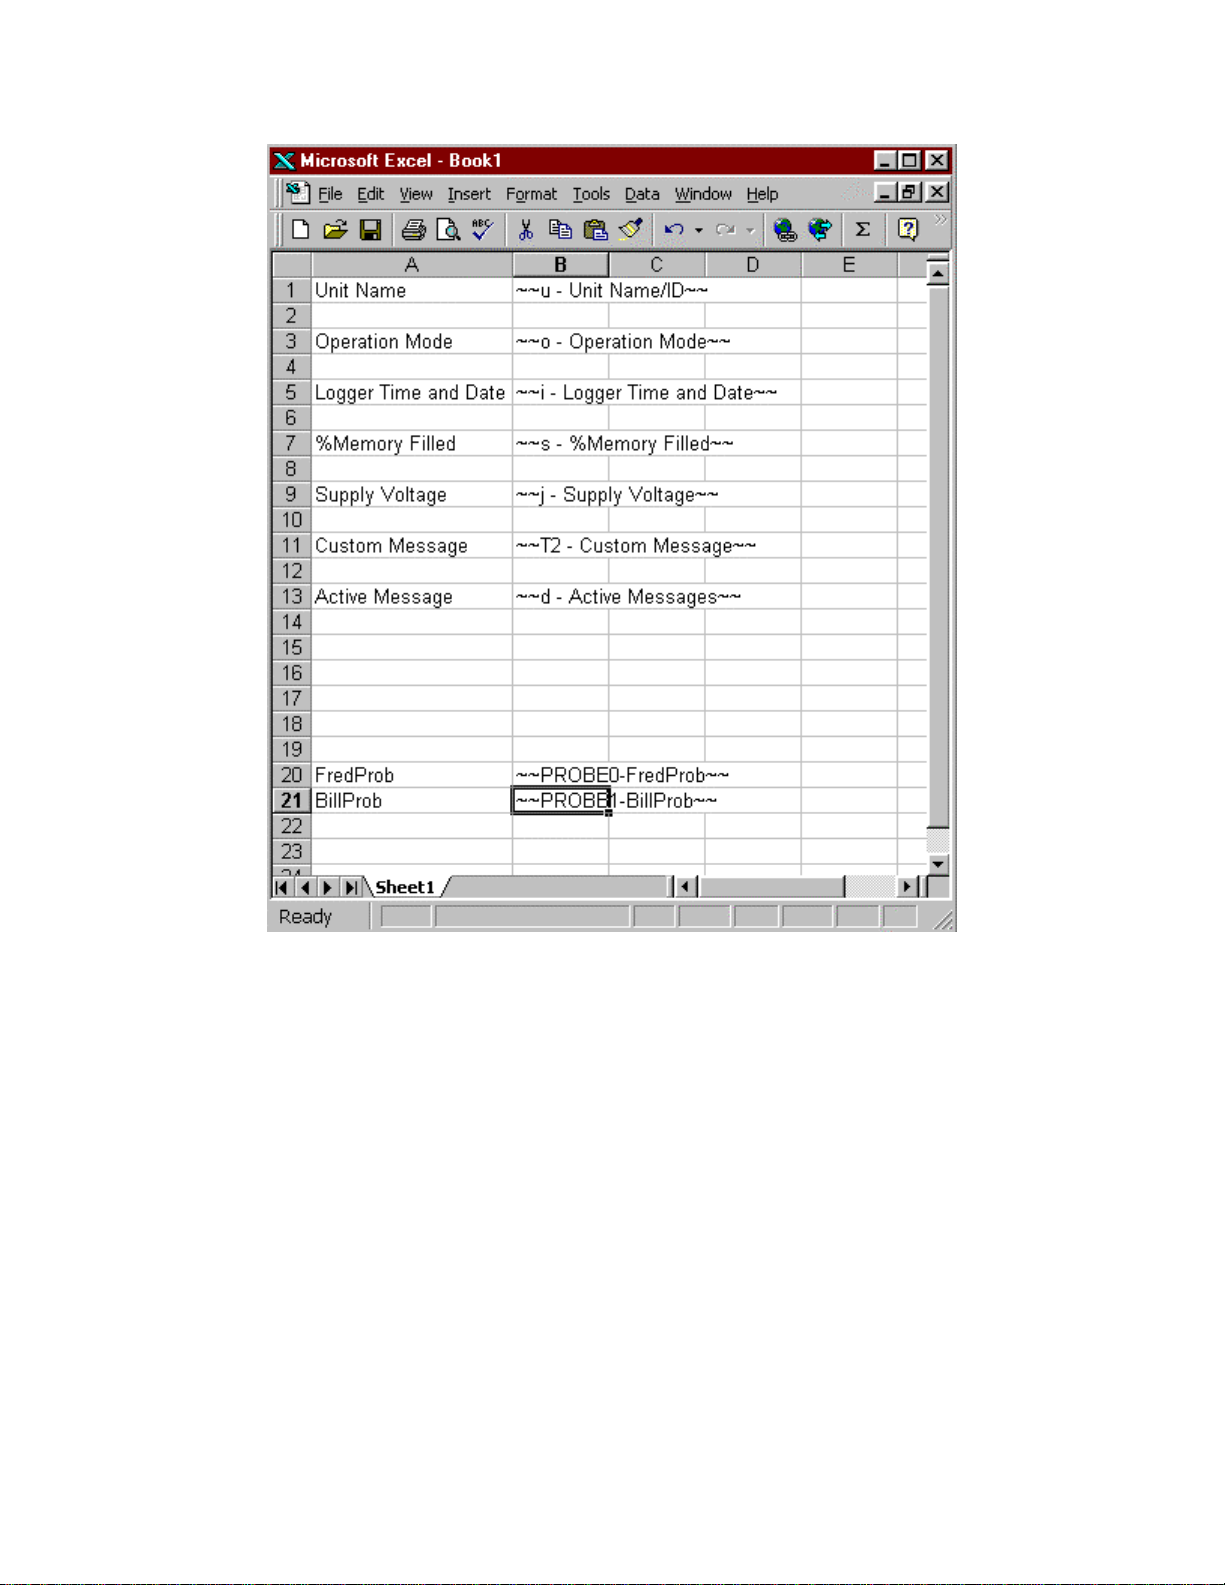
Figure 5.1.2b Generated Template by HAP before user edit, Example 5.1
6) Edit the template illustrated in Figure 5.1.2b. After edit, the template is illustrated by:
Page 35
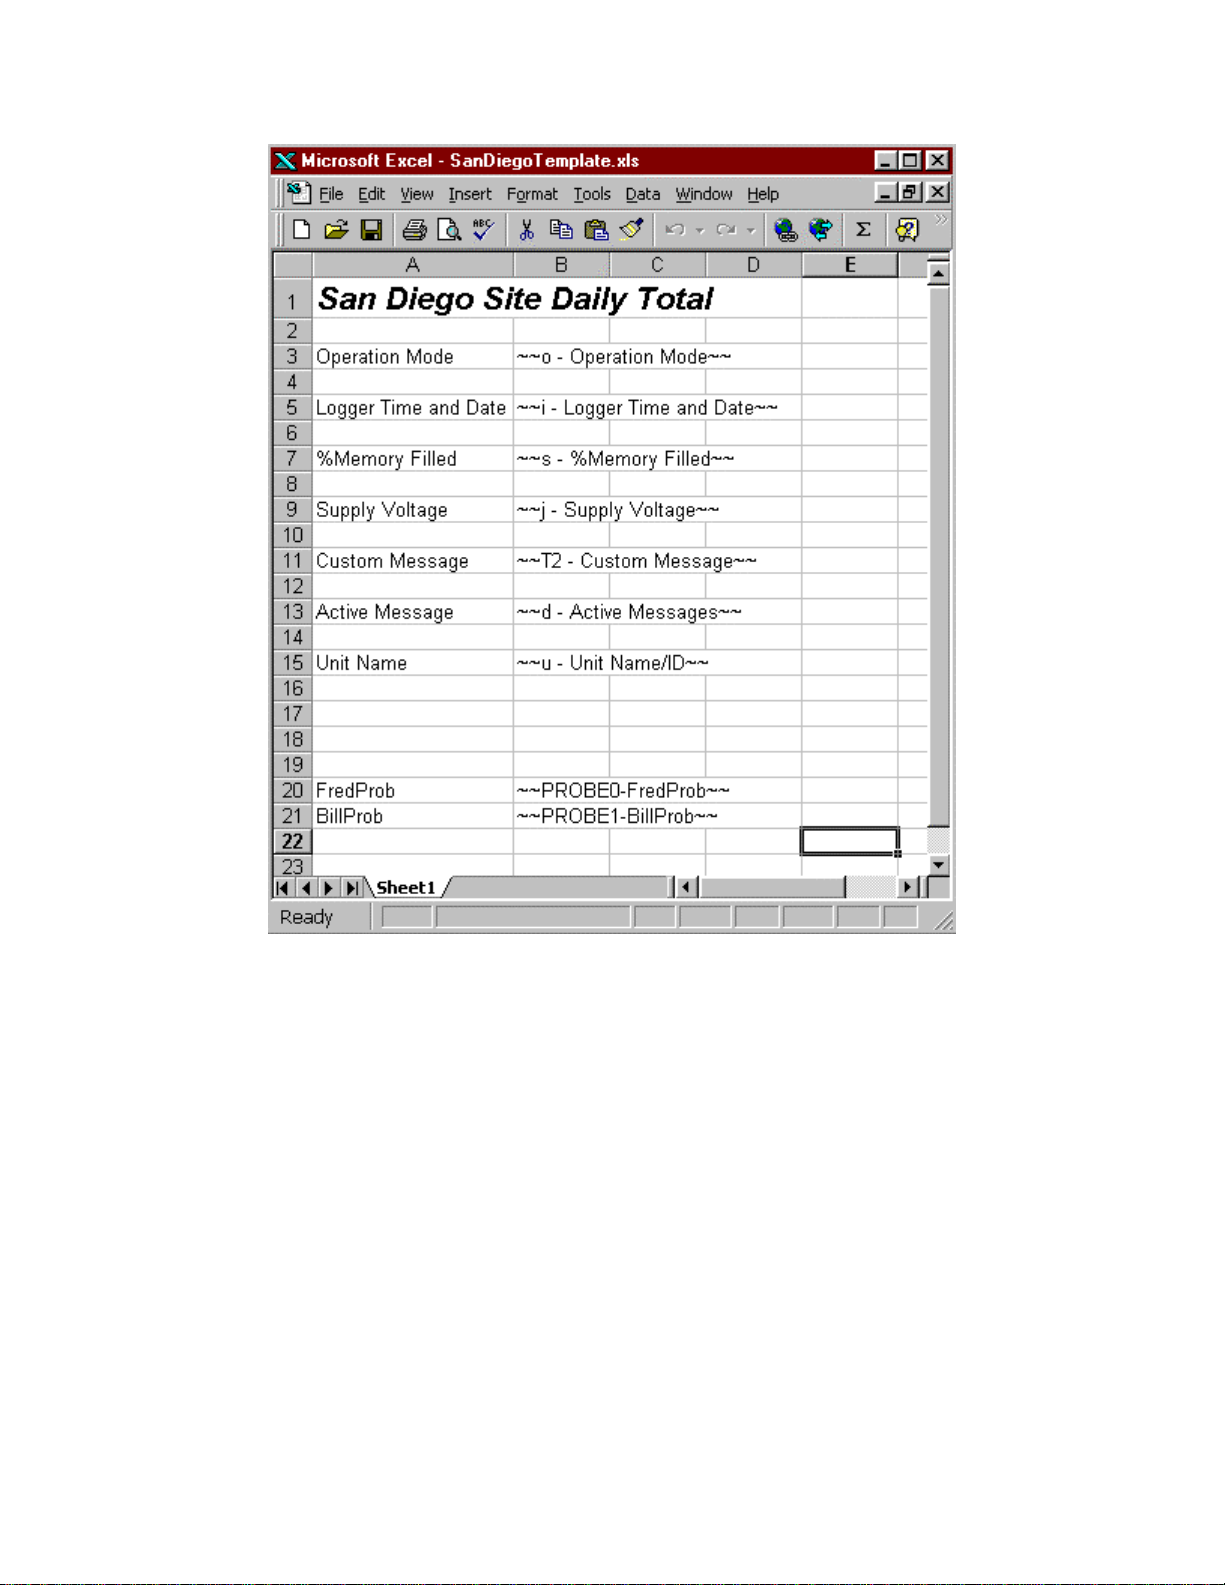
Figure 5.1.2c User Edited HAP Excel Template, Example 5.1
7) Make the Excel Template illustrated above.
8) Save the template as “SanDiegoTemplate.xls”.
5.1.3) Generating a Site and Polling file HAP, example 5.1
1) Select “New” from HAP’s main dialog.
2) Select “New Site” from the Edit Polling File Dialog. The Dialog illustrated in figure
4.1.1 now appears.
3) Select the following Report options as illustrated in figure 5.1.3a below:
Page 36
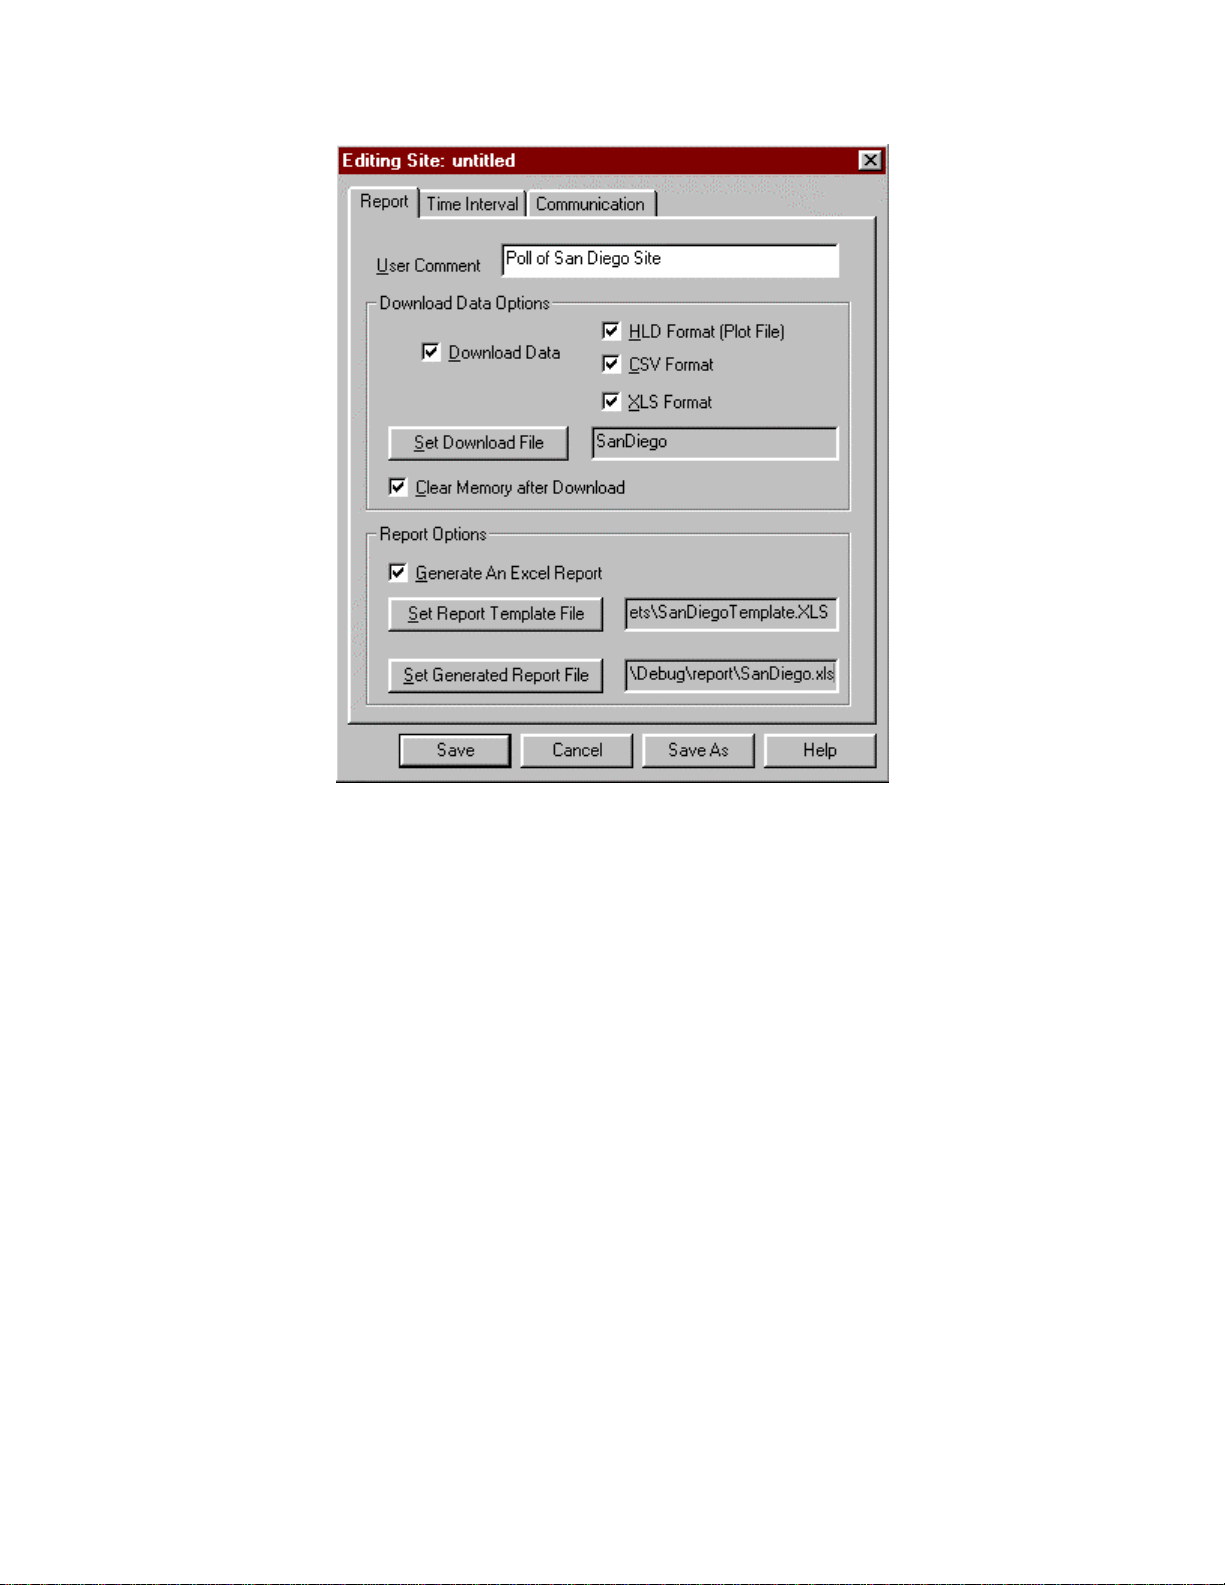
Figure 5.1.3a Report Tab, Example 5.1
4) Select the following Time Interval options as illustrated in figure 5.1.3b below:
Page 37
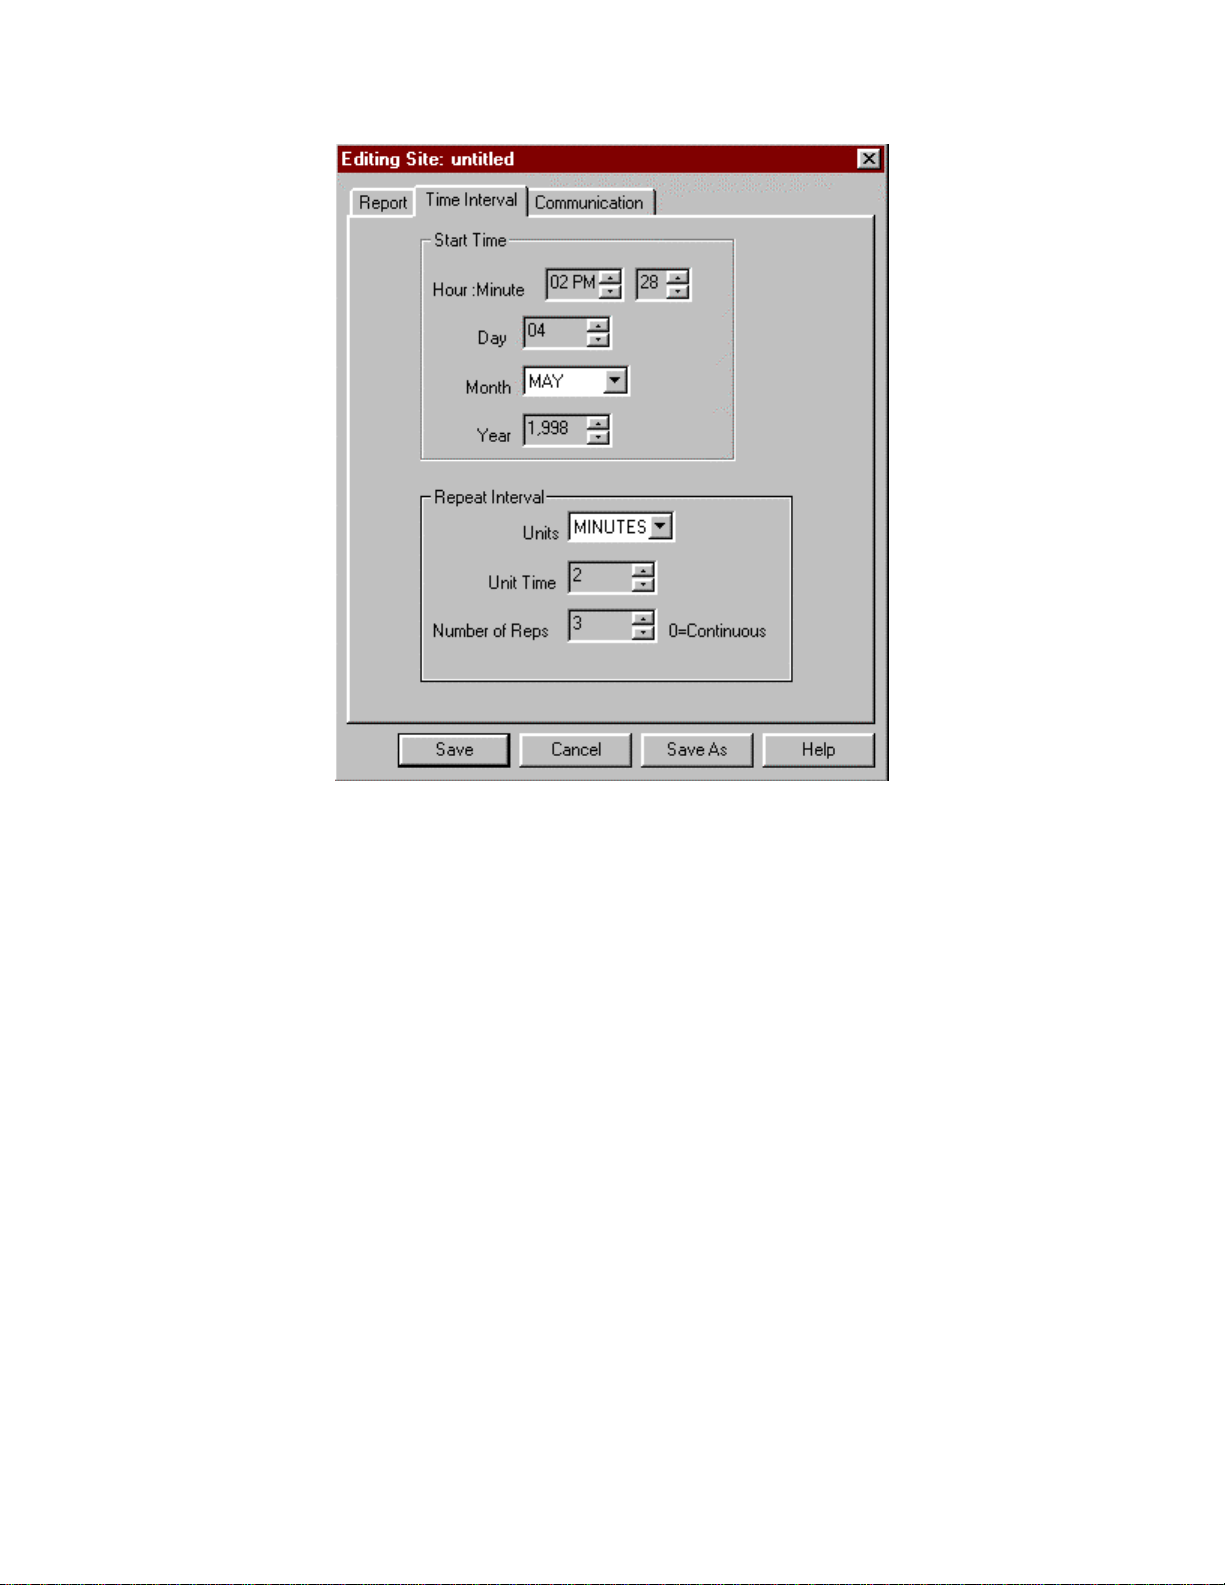
Figure 5.1.3bTime Interval Tab, Example 5.1
5) Select communication parameters. The 5.1.3.c below illustrates a logger connected to
the RS232 Comm 1 port, with no password:
Page 38
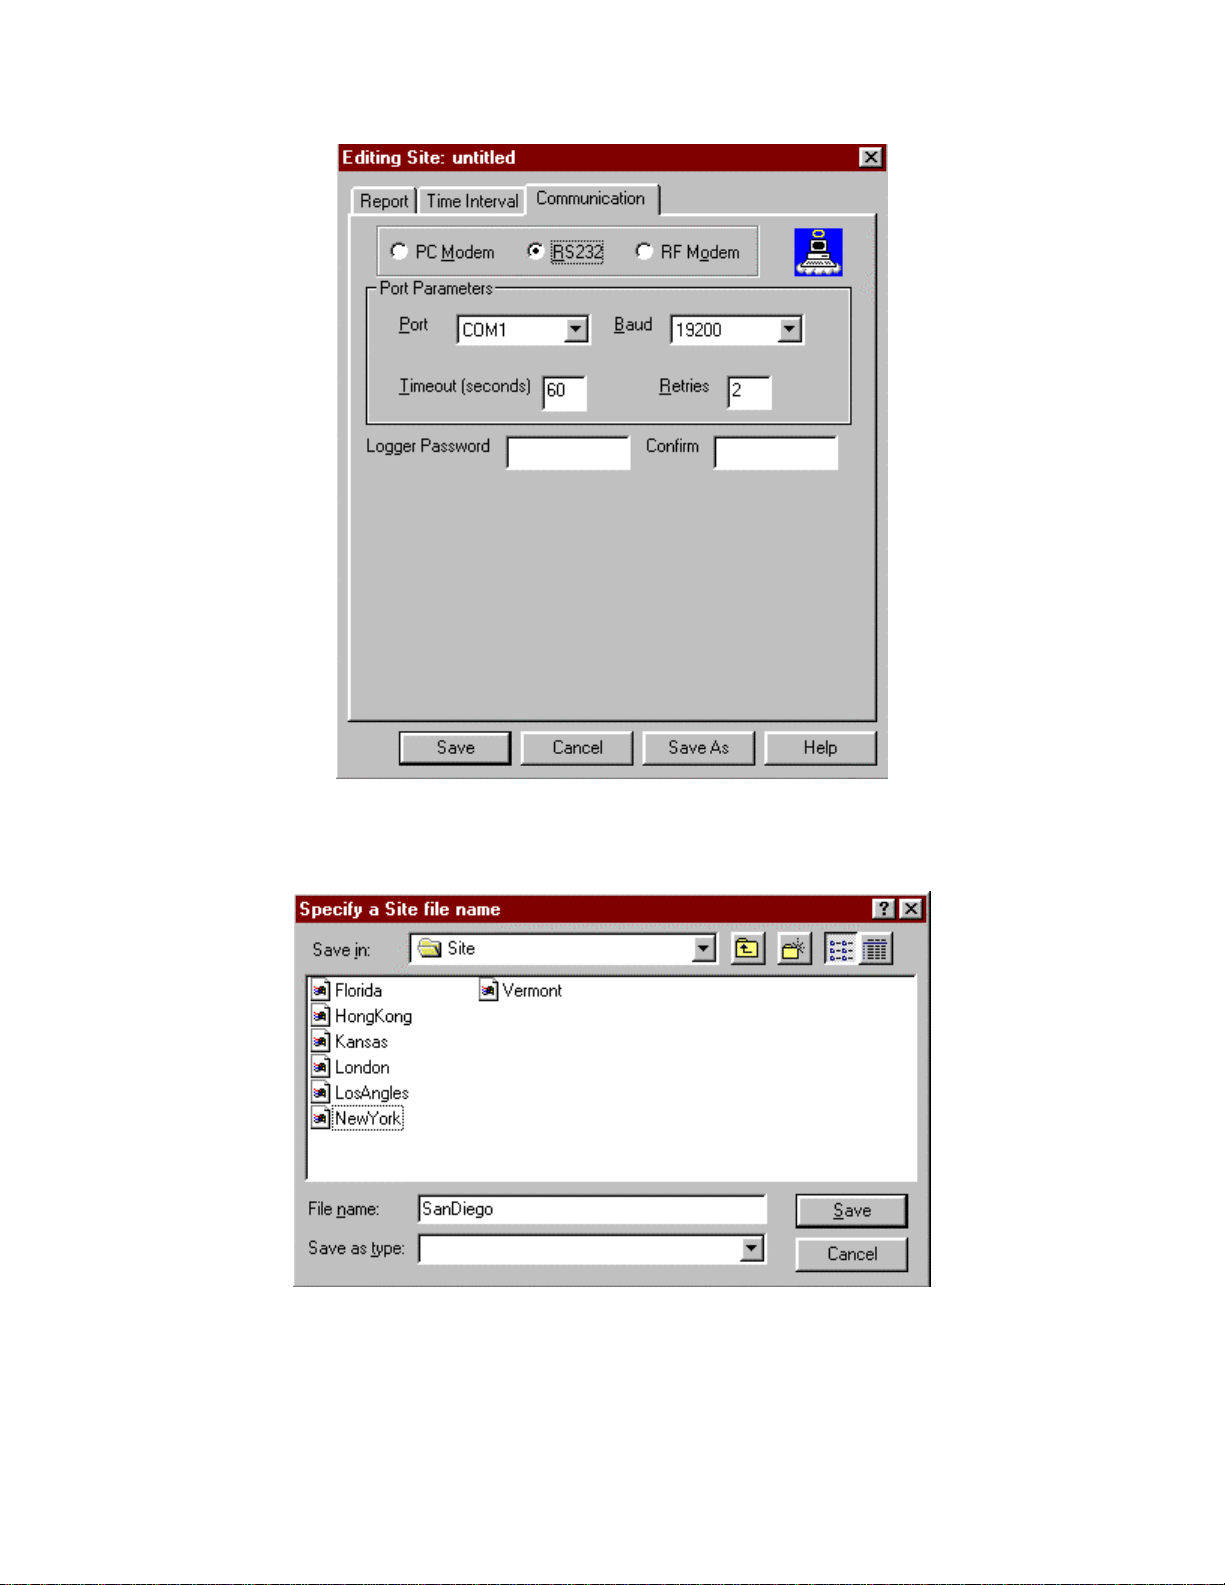
Figure 5.1.3c Communications Tab, Example 5.1
6) Select “Save” from the Editing Site Dialog. Save the site as “SanDiego”.
Figure 5.1.3d Saving the Site, Example 5.1
The Edit Polling File Dialog contains a listing that includes the SanDiego Site, as below in
figure 5.1.3e.
Page 39
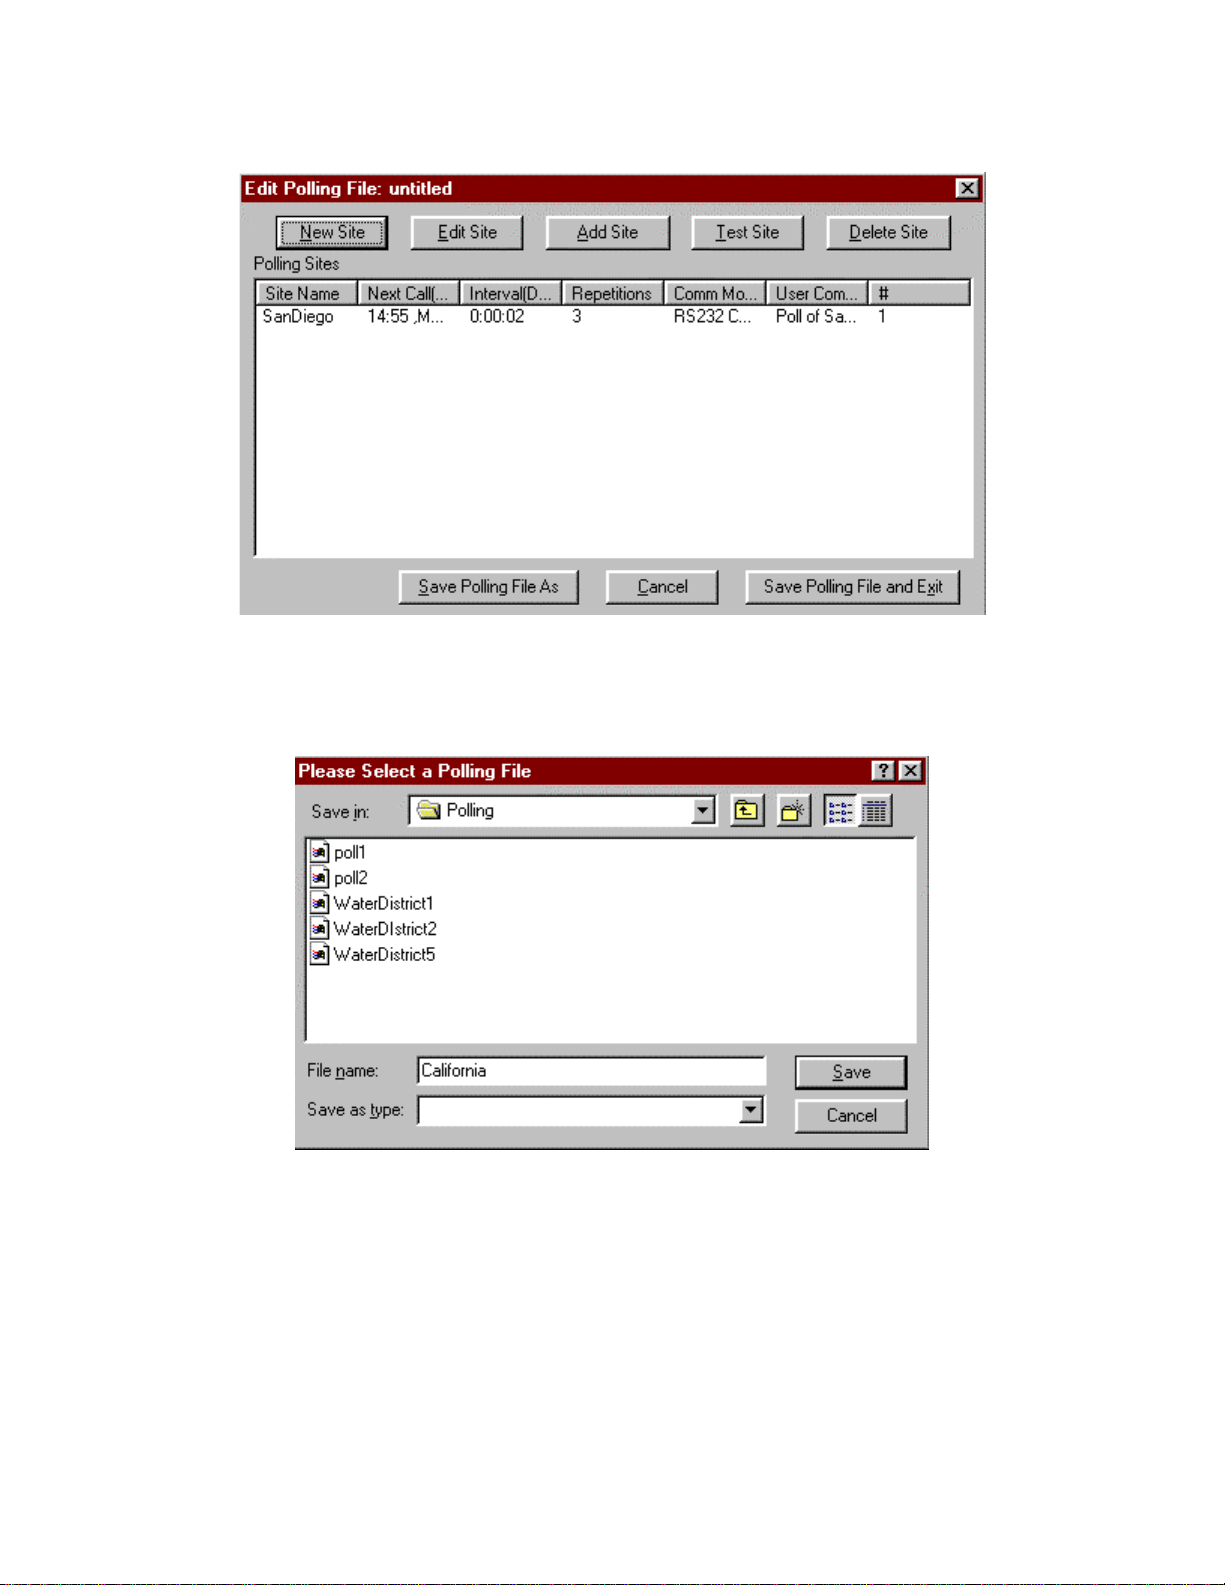
Figure 5.1.3e Edit Polling File Dialog, Example 5.1
7) Select “Save Polling File and Exit” from the Edit Polling file Dialog. Save the polling
file as California. Figure 5.1.3f illustrates saving the polling file as “California”.
Figure 5.1.3f Saving the polling file, Example 5.1
5.1.4) Enabling AutoPoll, example 5.1
1) Load the polling file “California”. Select “Load” from HAP’s main dialog:
Page 40
Figure 5.1.4a Load Button for HAP, Example 5.1
2) Select Poll from HAP main Dialog:
Figure 5.1.4b Poll Button for HAP, Example 5.1
After “Poll” is selected the “Adjust Start Time” illustrated in figure 5.1.4c appears
Figure 5.1.4c Adjust Start Time Dialog, Example 5.1
Prior to polling, all the site information in the polling file is checked for start times. If any
of the start times are historical, the start times may automatically adjusted by selecting
“Reset Start Times to Next Interval”, and continue polling. If you wish to manually adjust
the start times , it must be done through the site editor.
5.1.5) Watching HAP Poll , example 5.1
Figure 5.1.5a below illustrates HAP’s main dialog during the poll of the SanDiego site.
The 4 status panes at the bottom of the dialog indicate Data Memory is being downloaded
and it is more than 50% complete.
Page 41
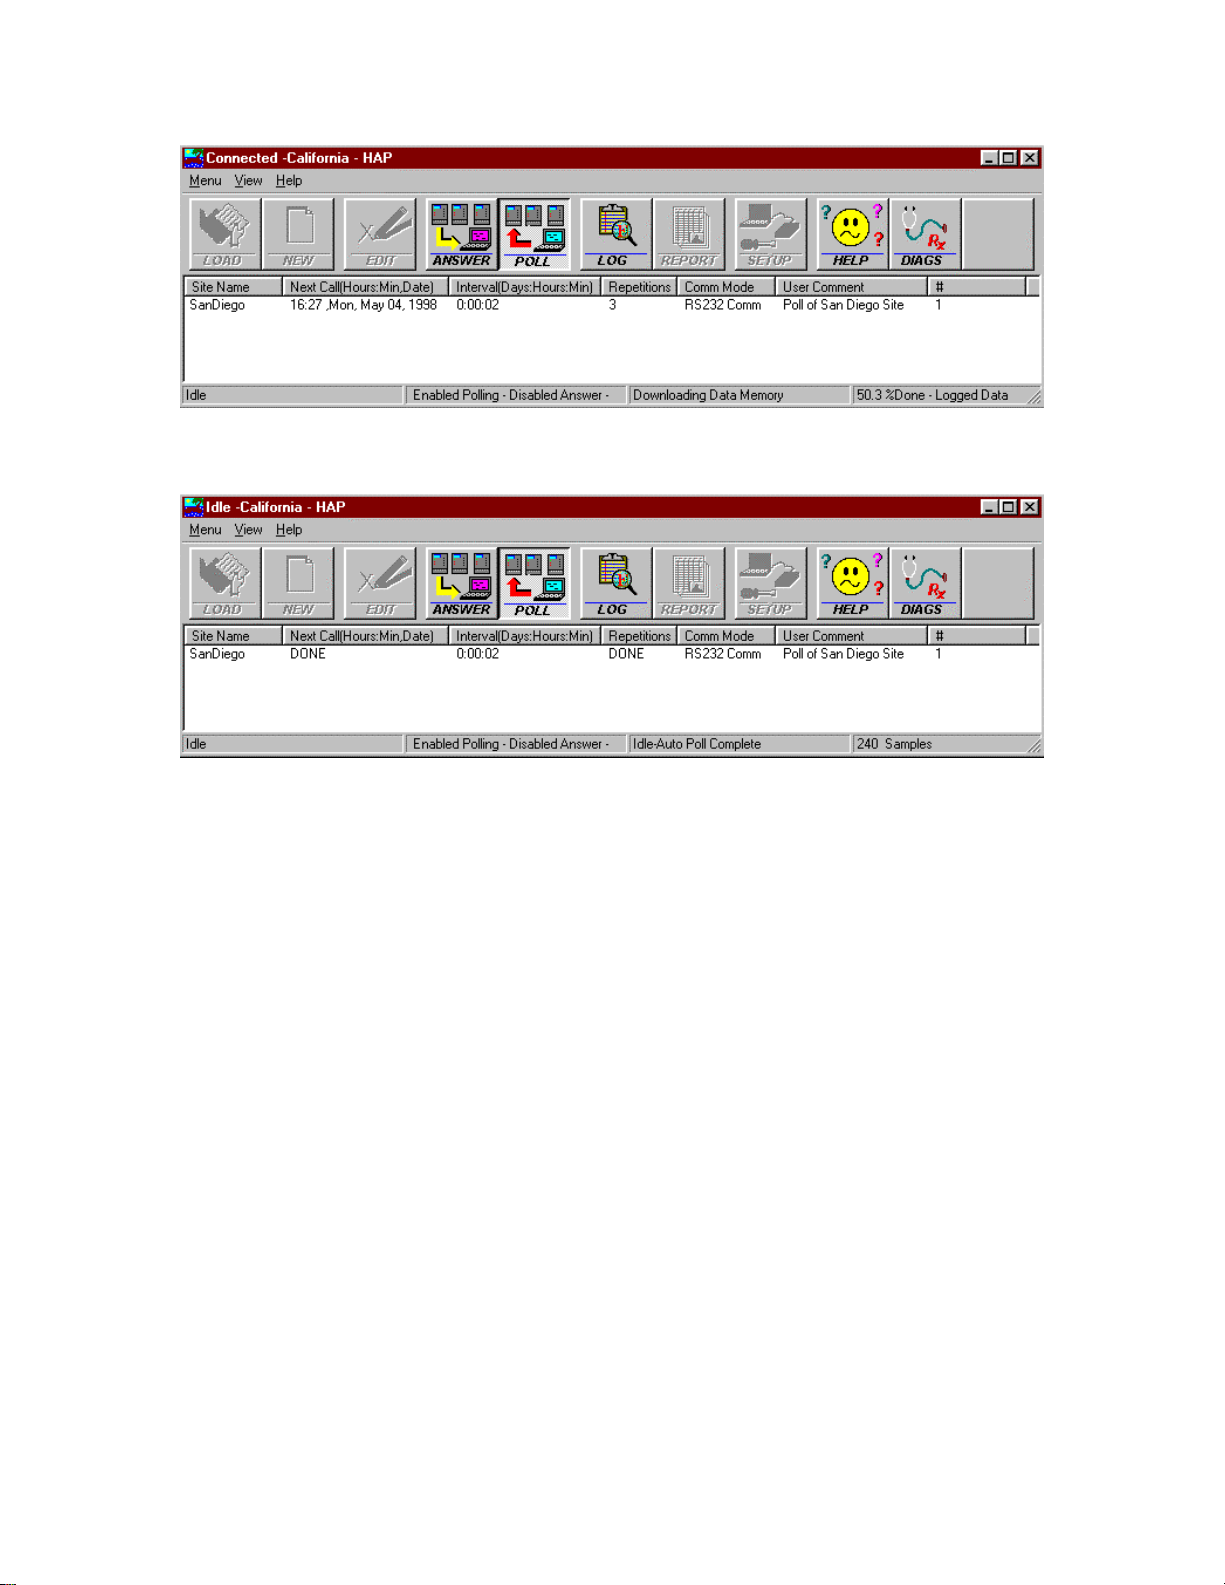
Figure 5.1.5a Watching HAP poll - downloading data, Example 5.1
Figure 5.1.5b below illustrates HAP’s main dialog with polling complete.
Figure 5.1.5b Watching HAP poll - polling is complete, Example 5.1
5.1.6) Checking HAP’s Log File, example 5.1
Select the “Log” button to display the log file. Figure 5.1.6 below illustrates a the log file
after example 5.1 is finished polling.
Page 42
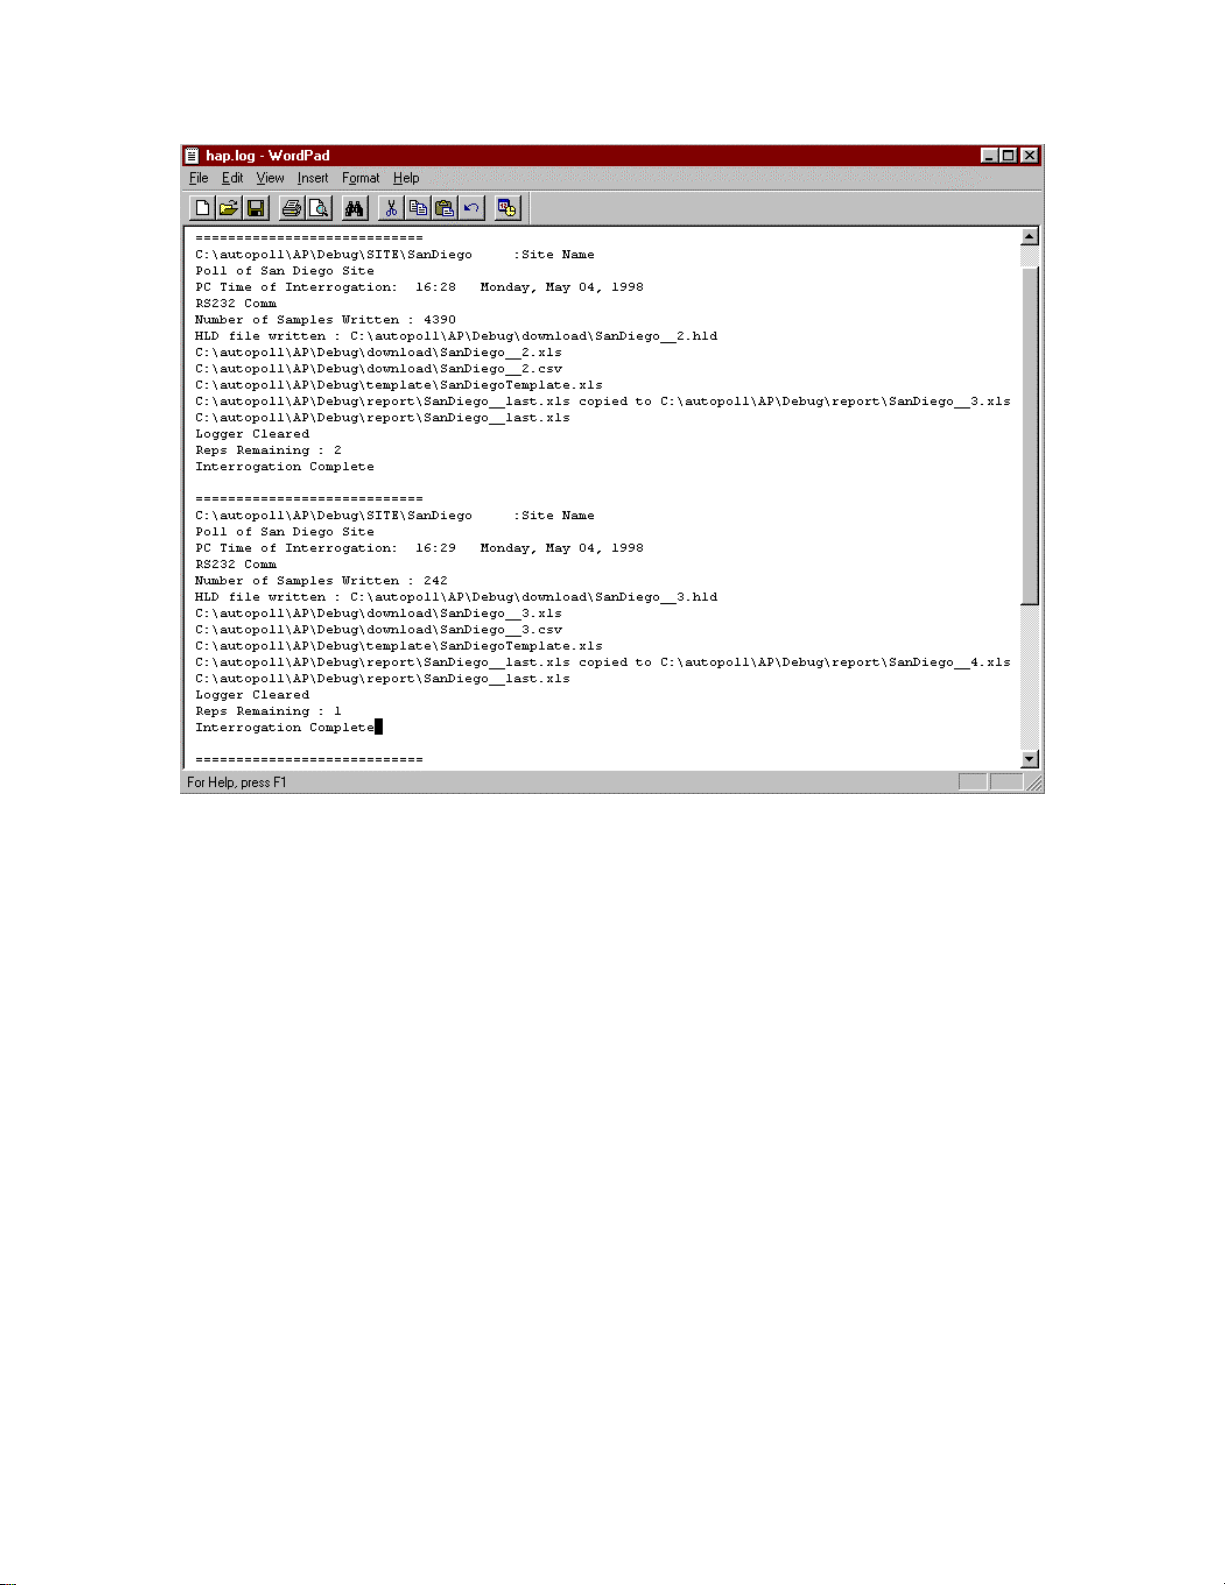
Figure 5.1.6 HAP Log file after polling, Example 5.1
5.1.7) Data Analysis, example 5.1
Example 1 generates the following output files:
1) download\SanDiego__1.hld, download\SanDiego__2.hld, and
download\SanDiego__last.hld. These correspond to the downloaded data logger memory
file in HyperPlot format. SanDiego__last.hld is the most current file.
2) download\SanDiego__1.csv, download\SanDiego__2.csv, and
download\SanDiego__last.csv. These files are CSV (comma delimited text file), with the
same information that is in the HLD file. The most current CSV file is
SanDiego__last.csv.
3) download\SanDiego__1.xls, download\SanDiego__2.xls, and
download\SanDiego__last.xls. These files are XLS (Excel binary file), with the same
information as what is in the HLD file. The most current file is SanDiego__last.xls.
Figure 5.1.7 illustrates SanDiego__last.xls with some additional calculations added by the
user:
Page 43
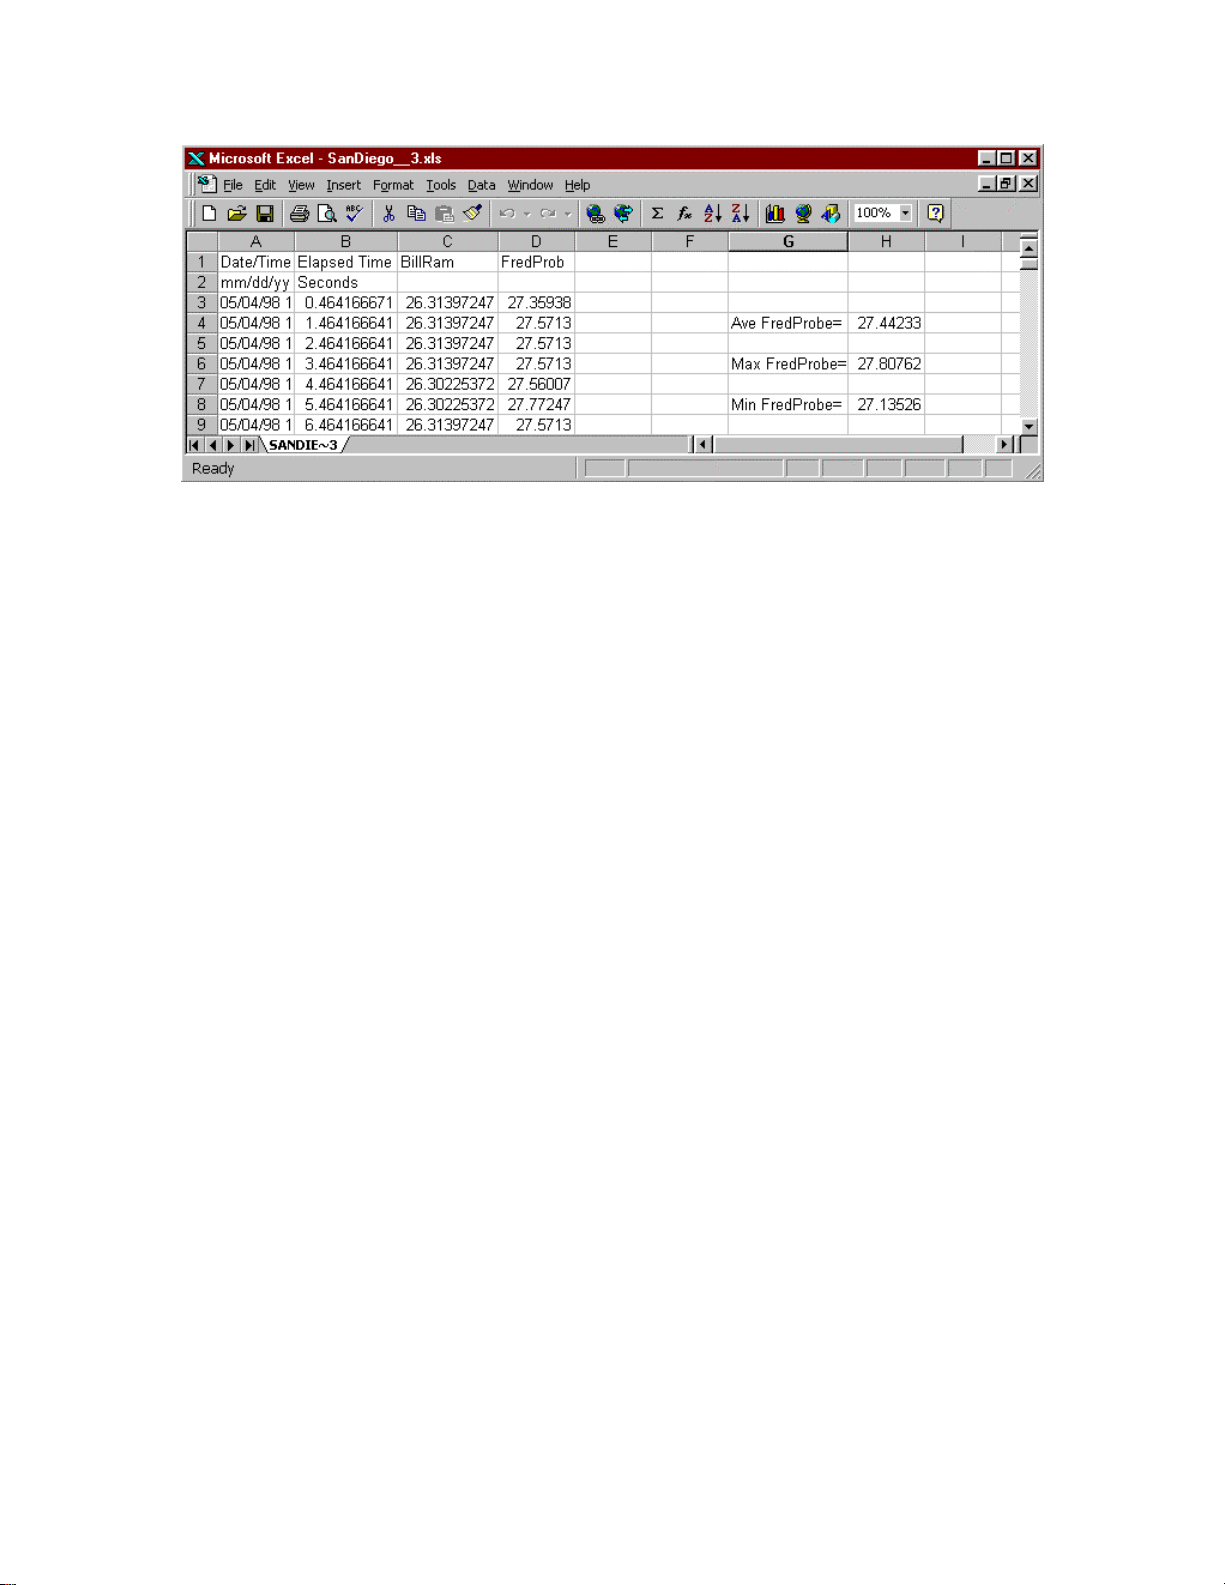
Figure 5.1.7 SanDiego__last.xls with some additional calculations, Example 5.1
Additional calculations in Figure 5.1.7 include Average FredProbe, Max FredProbe and
Min FredProbe in column H. These calculation were performed using the standard Excel
formula calculation features.
4) report\SanDiego__1.xls, report\SanDiego__2.xls, and report\SanDiego__last.xls.
These files are the Excel Report files. The most current file is SanDiego__last.xls.
5.2) AutoPoll - Five site example
Example 5.2 requires an understanding of example 5.1. Please read Example 5.1 before
continuing. In this example the “California” polling file is edited to create 4 additional
sites. Each site has one logger with a telephone modem connected. The loggers have
been pre-programmed with nets similar as illustrated in figure 5.1.1. This five site example
downloads data from each logger on a periodic basis.
5.2.2) Modification of Polling File, example 5.2
1) Launch HAP.
2) Edit polling file “California”
3) Select “New Site”
4) Create the new site “Sacramento”. Figures 5.2.2a through 5.2.2d illustrates creation of
the site “Sacramento”
Page 44
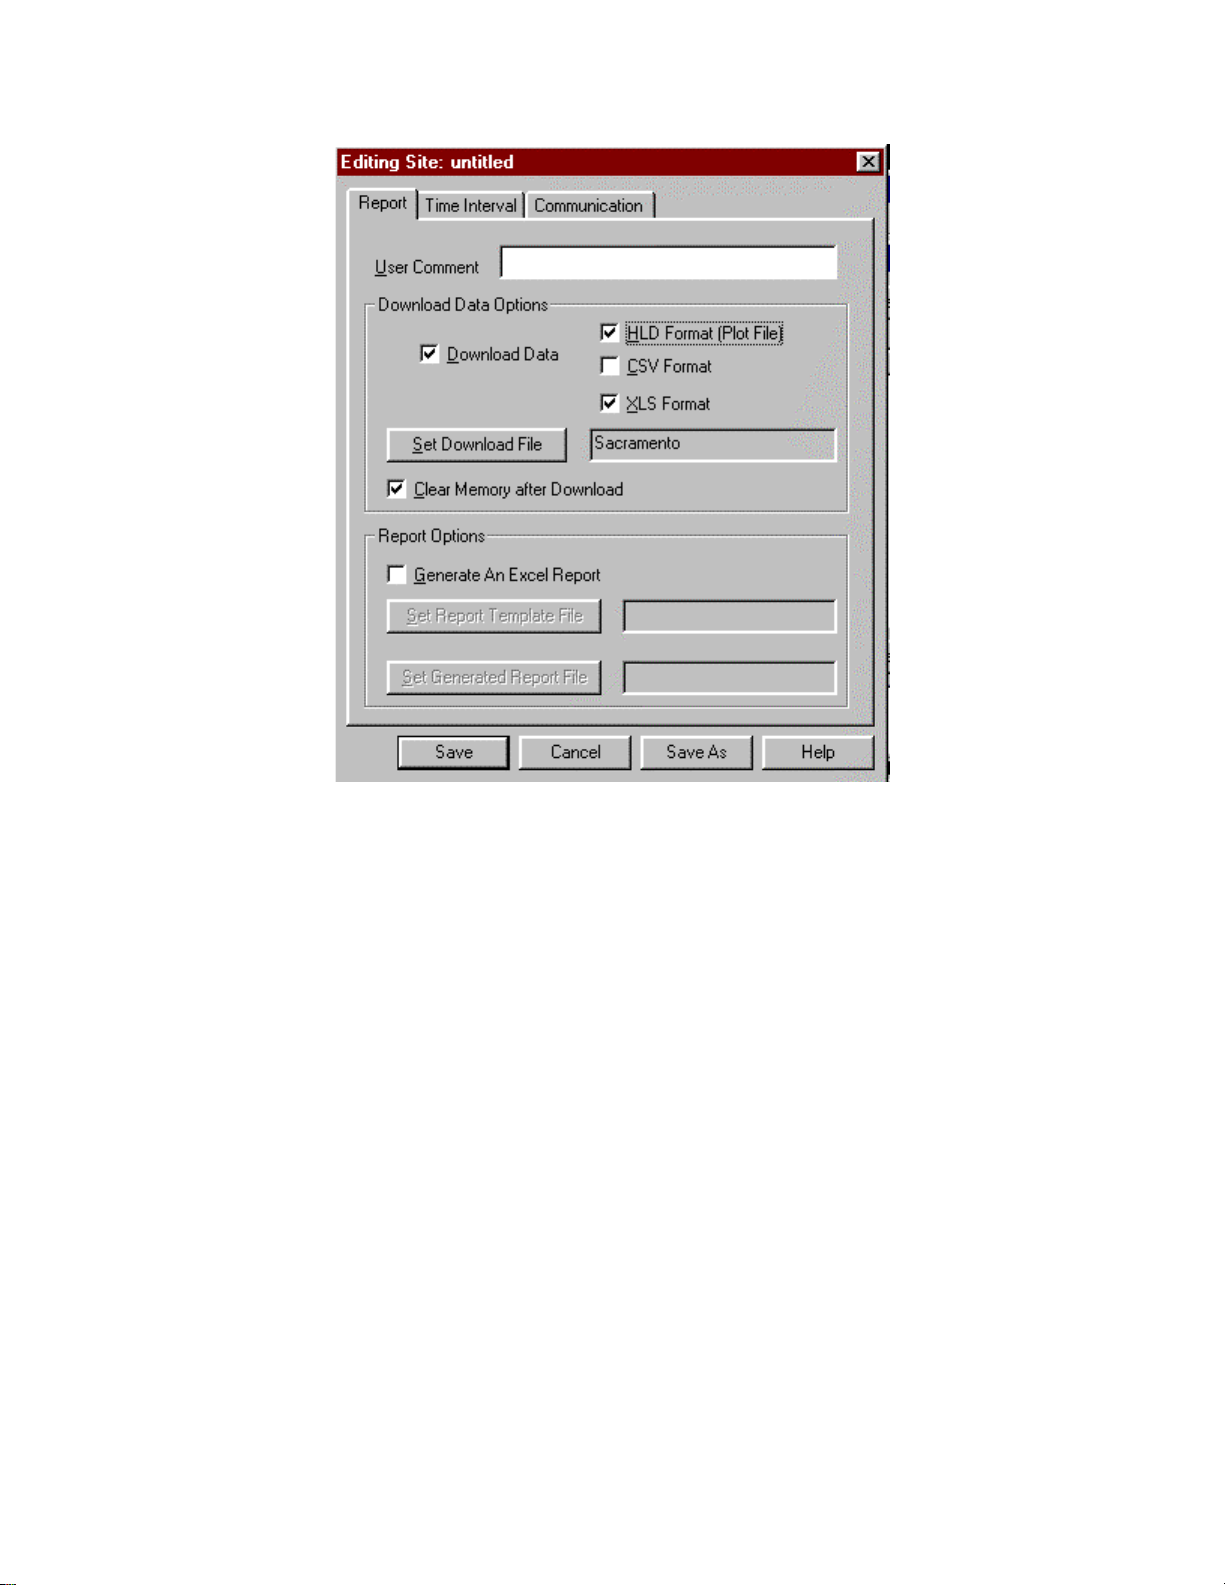
Figure 5.2.2a Report Tab for creation of a new site, Example 5.2
Page 45
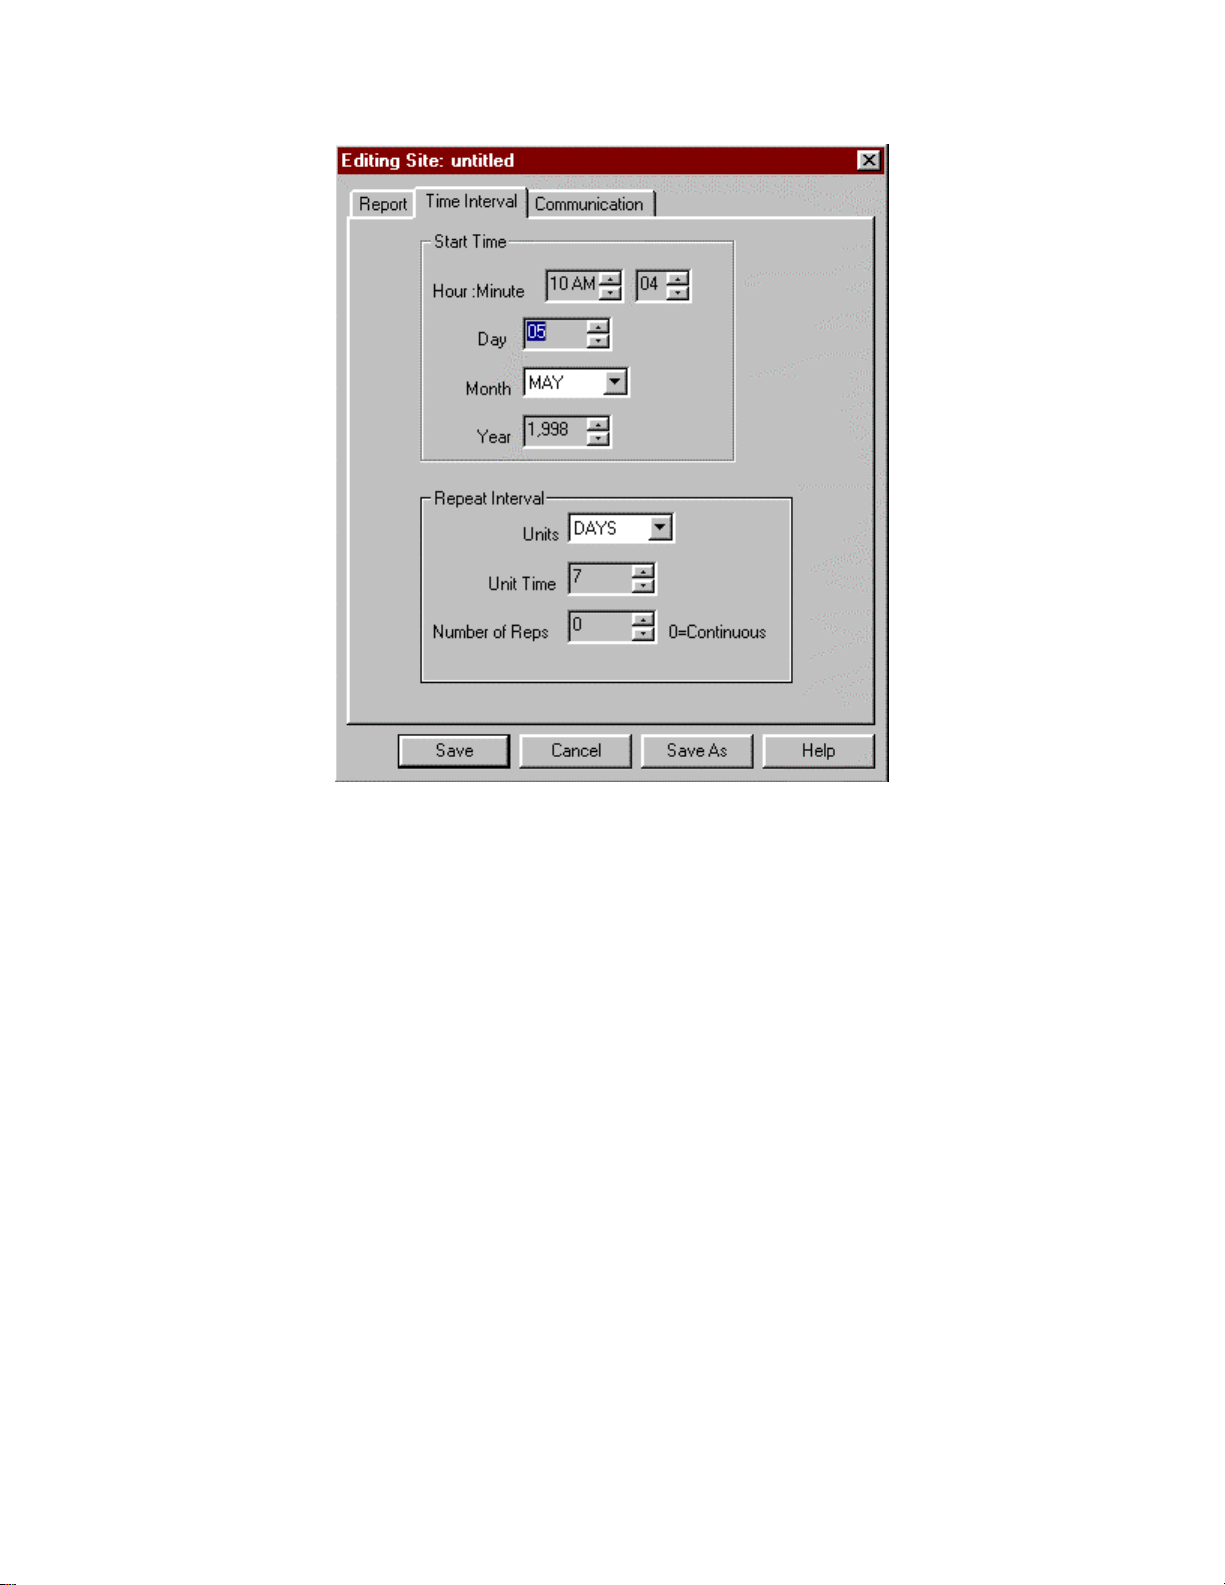
Figure 5.2.2b Time Interval Tab for creation of a new site, Example 5.2
Page 46
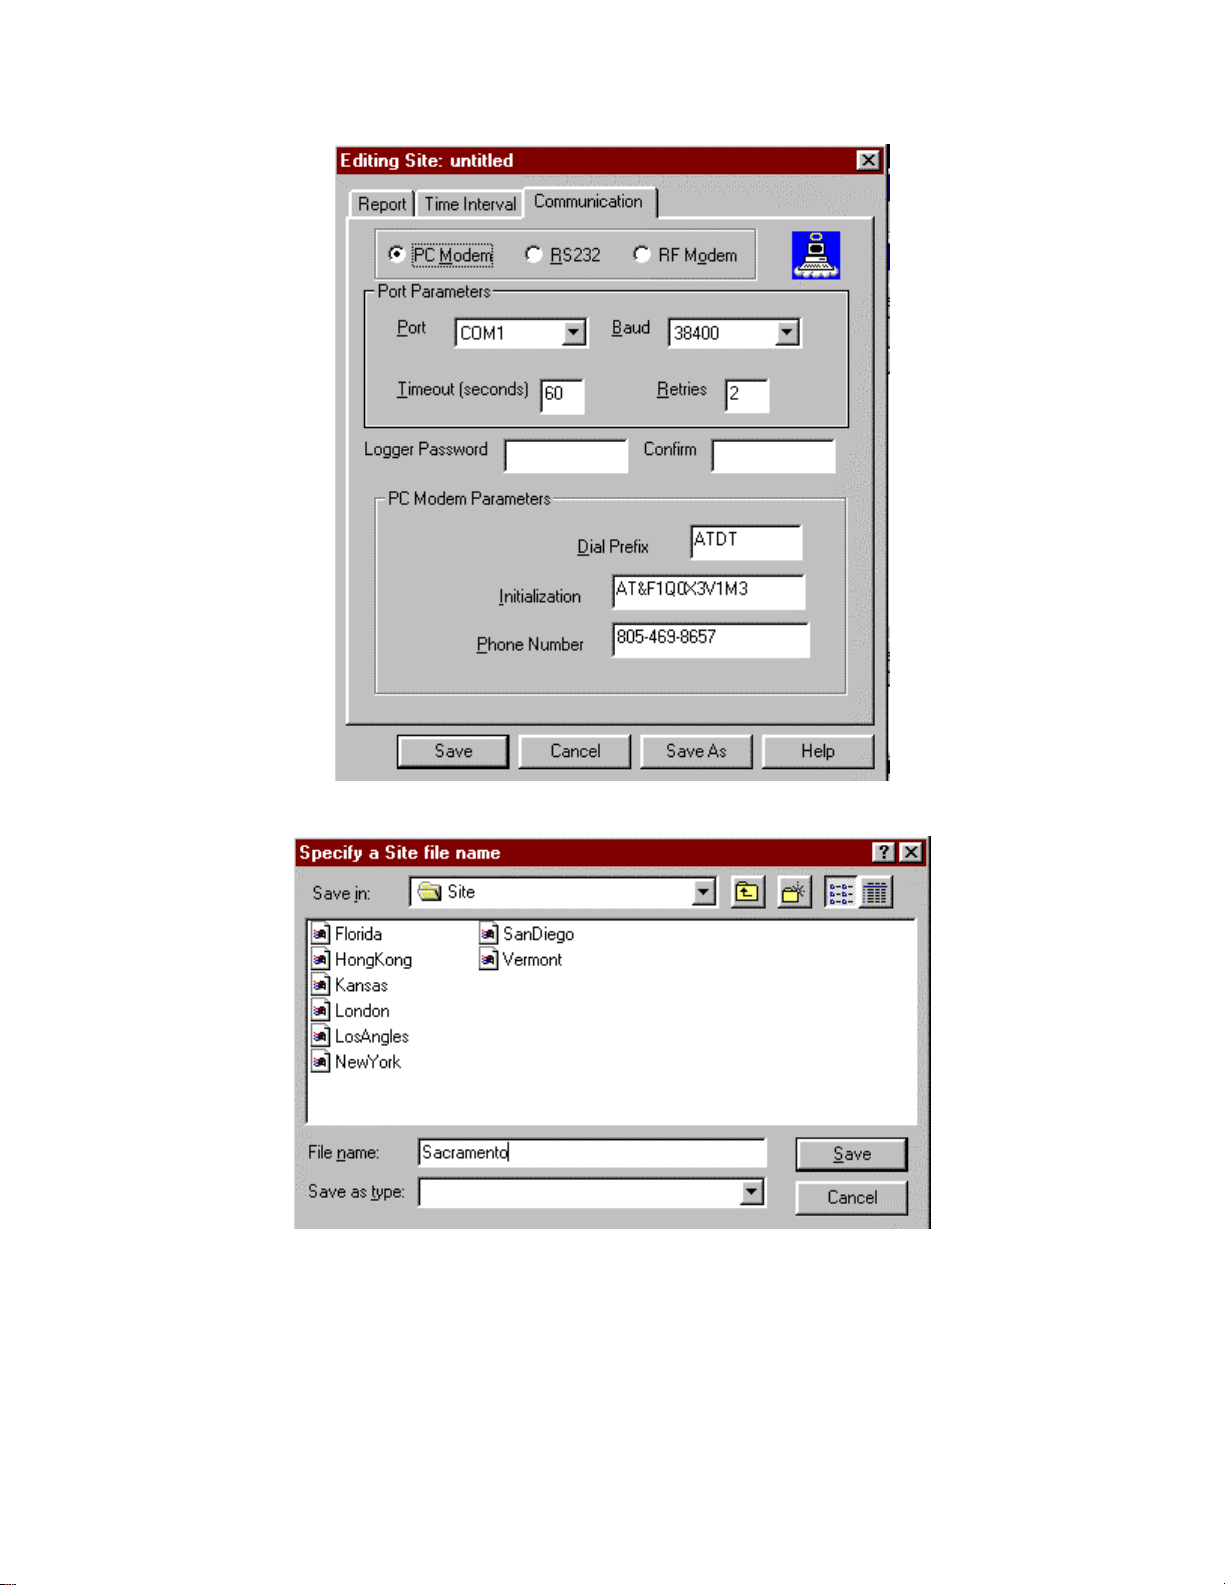
Figure 5.2.2c Communications Tab for creation of a new site, Example 5.2
Figure 5.2.2d Saving the Site Dialog, Example 5.2
5) Create the additional sites: SanFran, ElCentro, and Riverside.
Page 47
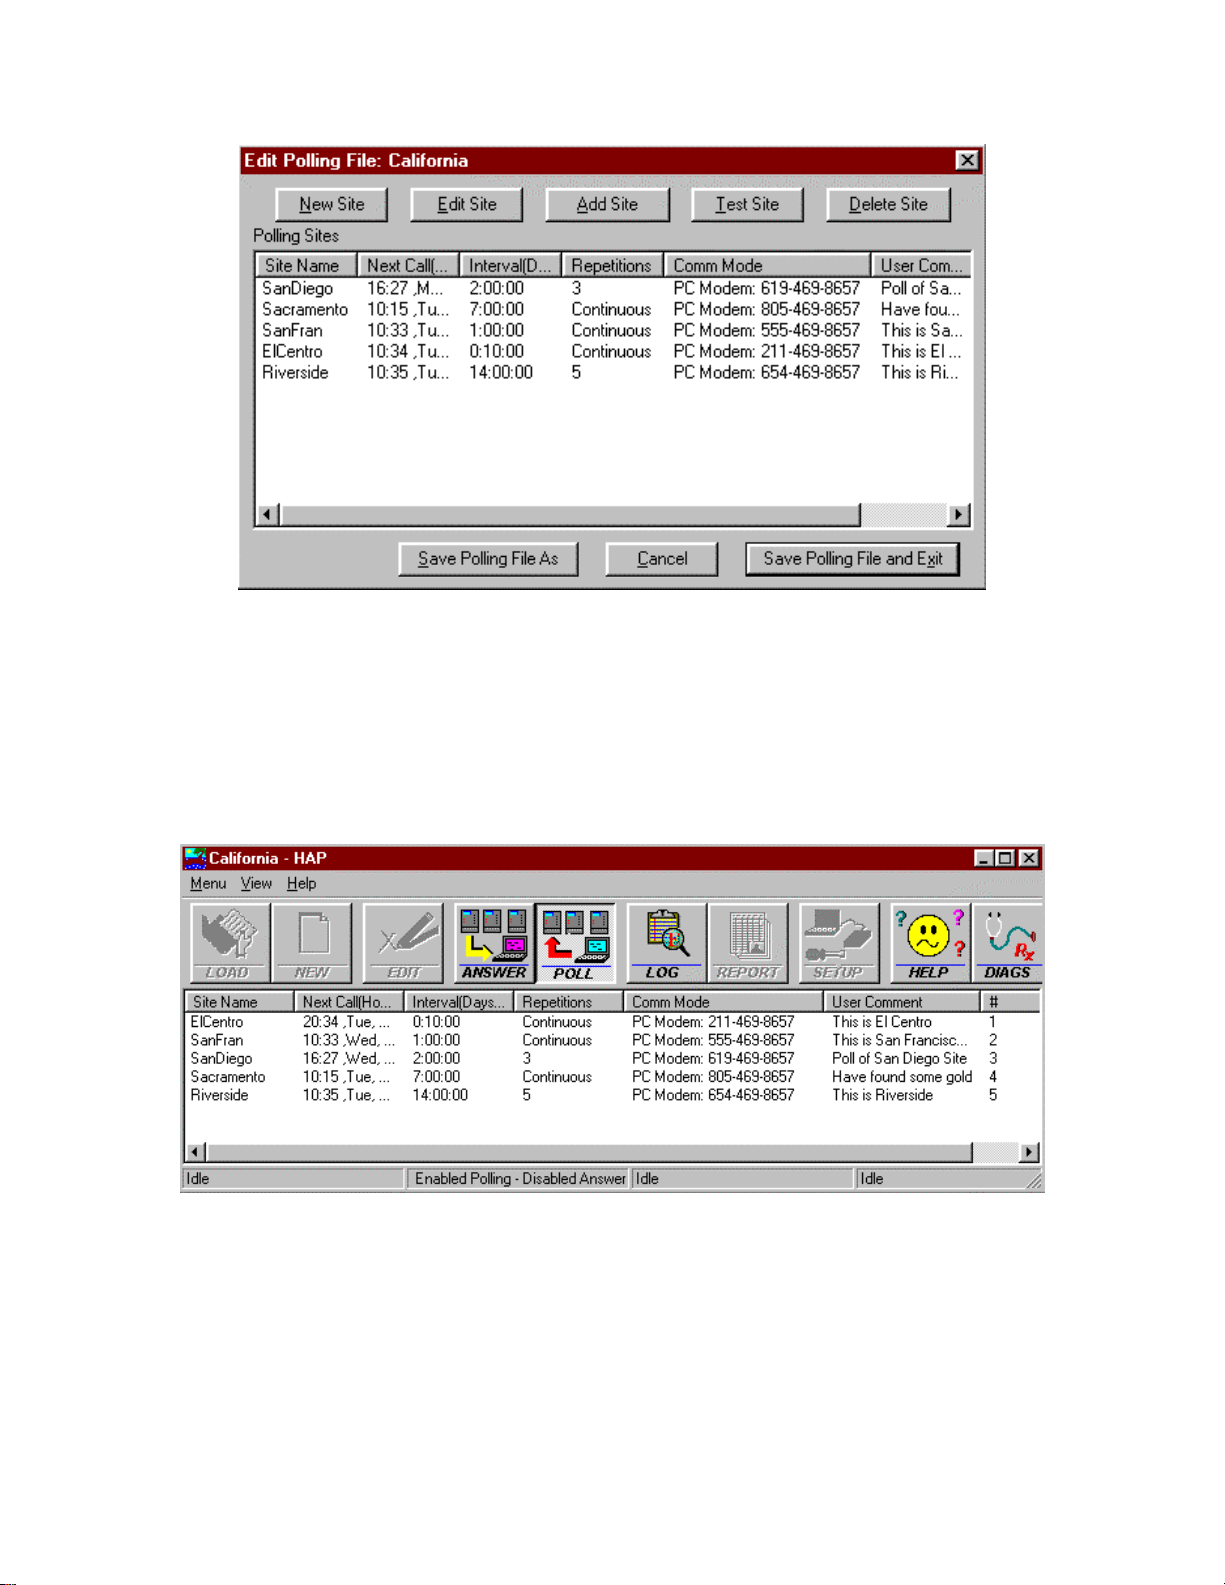
Figure 5.2.2e Edit Polling File after creating 5 sites, Example 5.2
6) Select “Save Polling File and Exit” from the Edit Polling file Dialog illustrated above.
5.2.3) Executing AutoPoll, example 5.2
1) Load the “California” polling file by selecting “Load” from HAP’s main dialog.
2) Enable Autopolling by selecting “Poll” from HAP’s main dialog
Figure 5.2.1 illustrates HAP AutoPoll Enabled using the “California”
Figure 5.2.3 HAP’s main dialog with AutoPoll Enabled, Example 5.2
3) HAP is minimized, and can execute in the background. The PC running HAP must not
be shut off when AutoPoll is enabled. HAP’s main dialog Next Call column lists the next
call time for each site. The Interval Column lists the time interval between each poll. The
Repetitions Column lists the number of times the site is called. The Comm Mode column
lists the telephone number of each site.
Page 48
4) HAP continues to poll sites until “Poll” is selected again, disabling AutoPoll. The log
file lists the status of the poll. Select “Log” from HAP’s main dialog to display the log
file.
5.3) AutoAnswer - Logger calling PC with HAP.
5.3.1) HyperWare’s creation of net program with HAP Icon, example 5.3
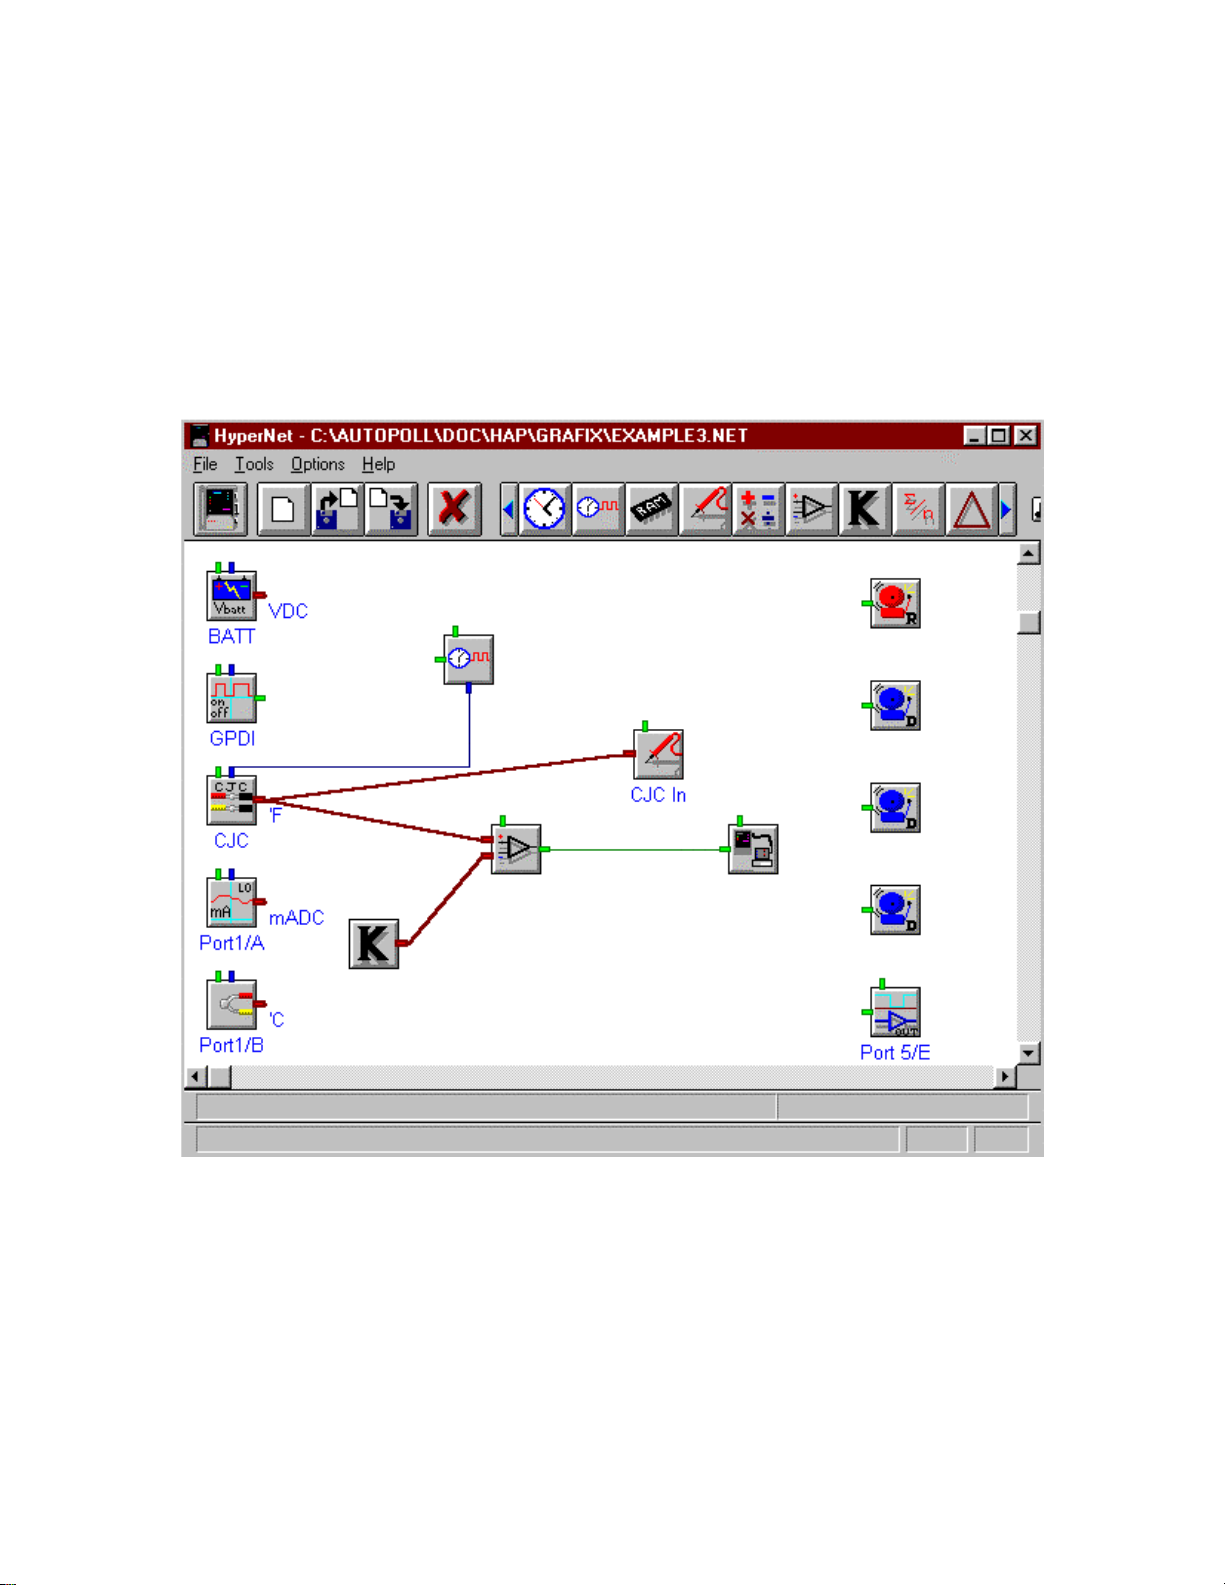
1) Create the net illustrated below in figure 5.3.1a.
Figure 5.3.1a HyperWare Net Program, Example 5.3
The above Net program uses the CJC logger external input wired to a thermister. The
constant “K” is set at 80 degrees. Once the room warms up to 80 degrees the HAP Icon
is activated and the PC executing HAP is called.
2) Configure the HAP icon as illustrated below in figure 5.3.1b, except use the telephone
number connected to your PC.
Page 49
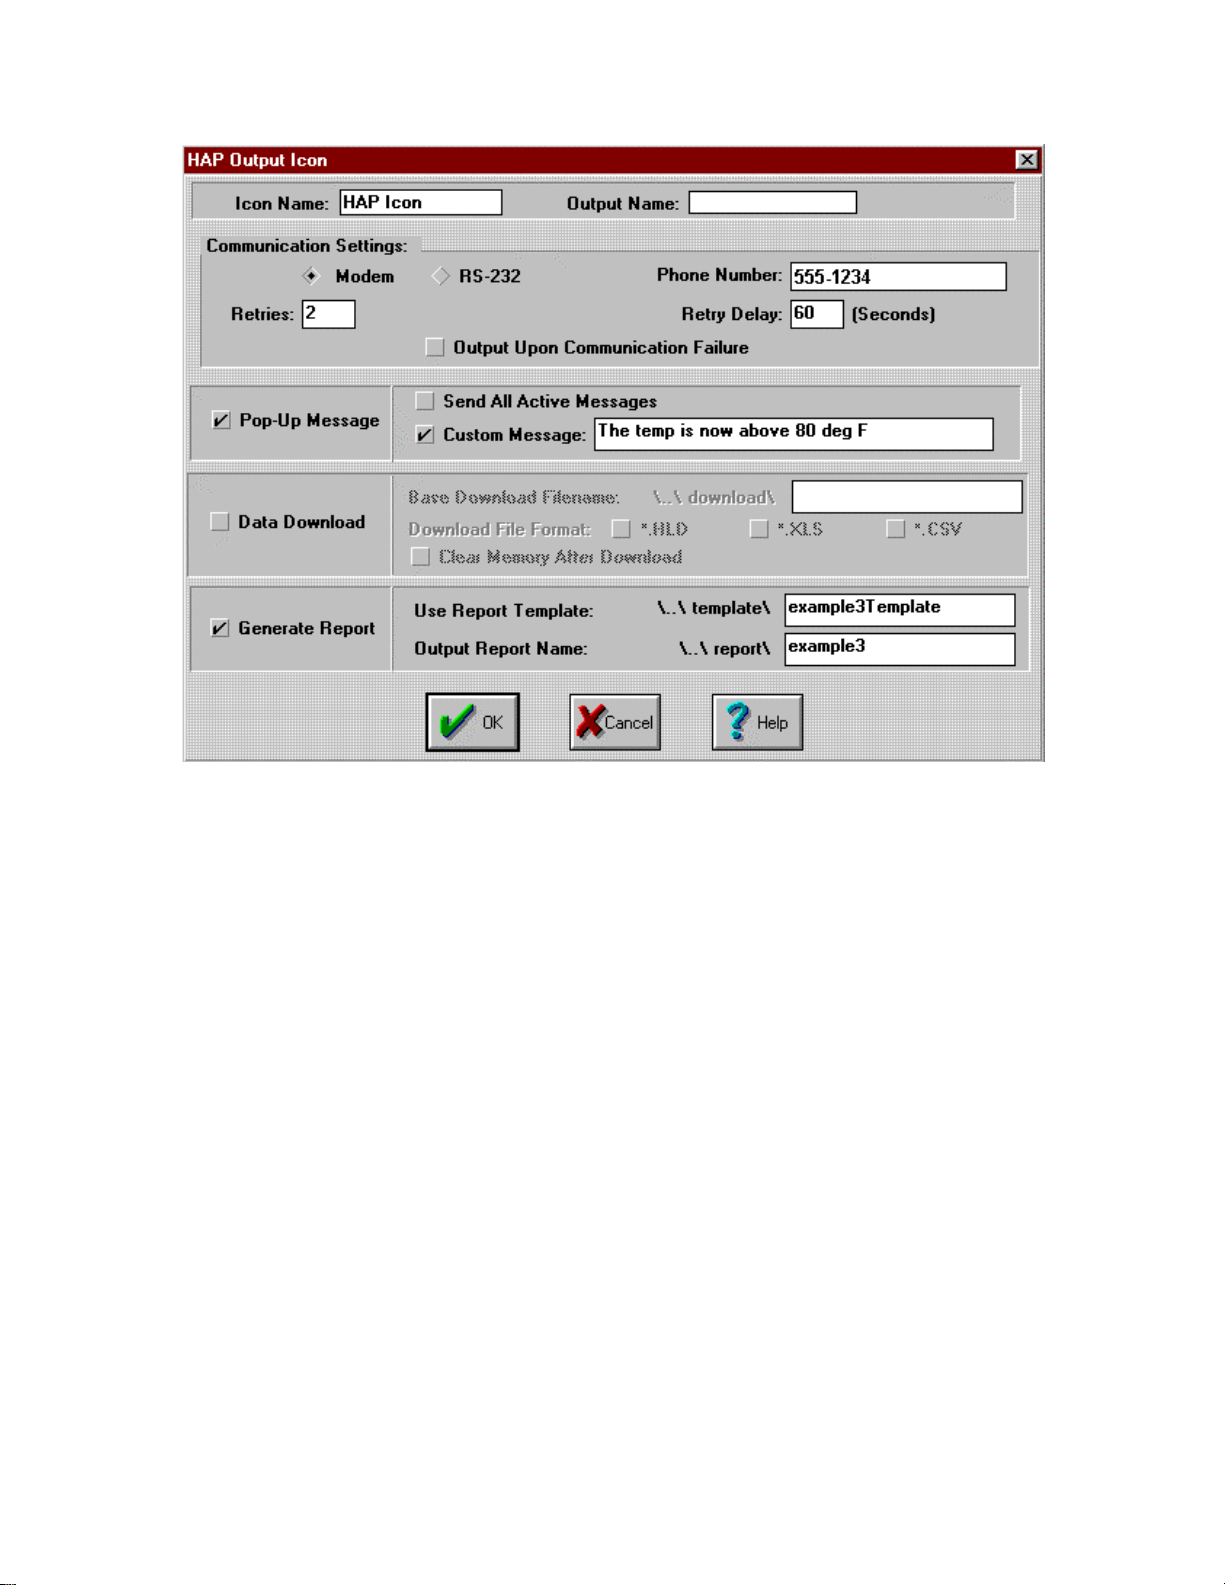
Figure 5.3.1b HyperWare HAP Icon Dialog, Example 5.3
3) Upload the net to the logger.
When the room temperature goes above 80 degrees F, the logger initiates a callup using
the phone number illustrated in figure 5.3.1b above. The phone number has a PC modem
connected with HAP AutoAnswer enabled. For test purposes you can set the “K”
temperature to anything for a HAP Icon activation.
5.3.2) HAP’s Excel Template creation, example 5.3
1) Launch HAP.
2) Select “Report” from HAP’s main dialog.
3) Select “Specify Program Net to Scan”.
4) Select the net file illustrated in figure 5.3.1a.
5) Select “Generate Excel Template”.
6) Microsoft Excel now appears with the generic HAP template. Modify the template file
as illustrated below:
Page 50
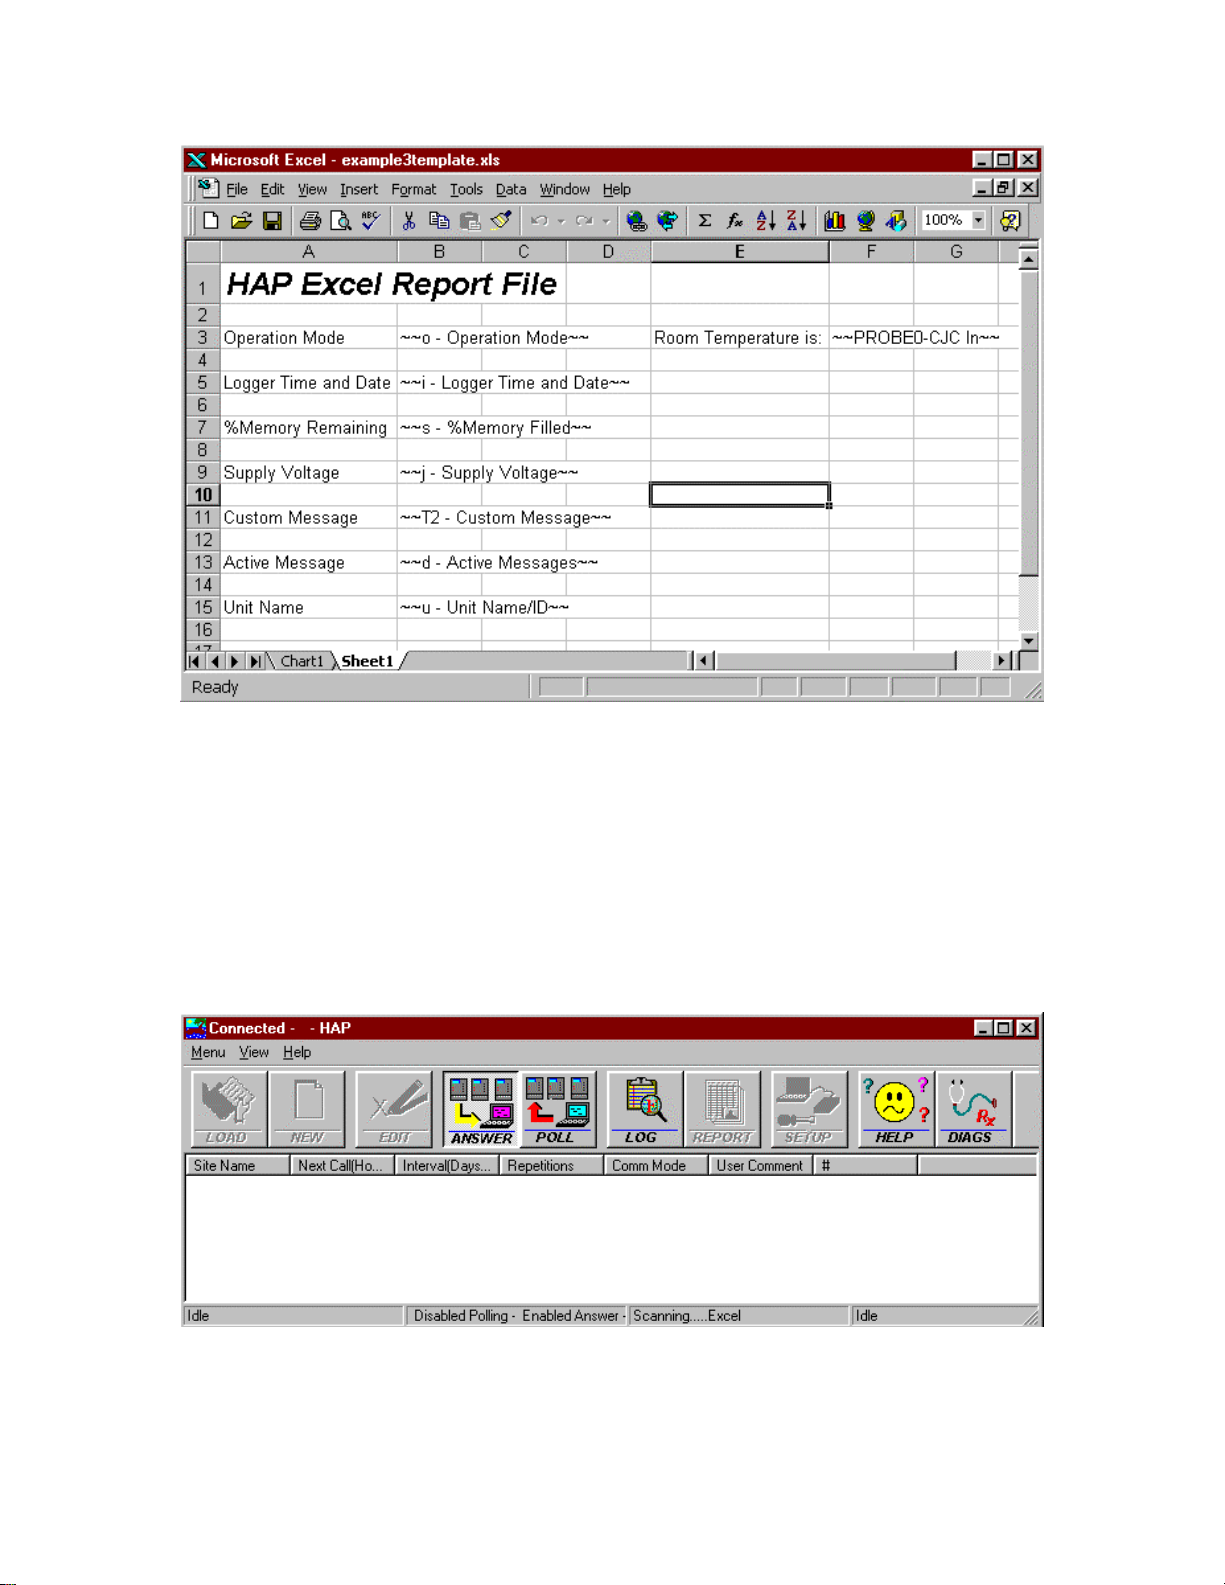
Figure 5.3.1c Excel Template File for HAP, Example 5.3
7) Save the file as “example3template.xls”. Exit Excel.
5.3.3) Enable AutoAnswer and process , example 5.3
1) Enable AutoAnswer.
2) Once the room warms to 80 degrees, HAP starts processing the Logger call. Figure
5.3.3a below illustrates HAP processing:
Figure 5.3.3a HAP processing AutoAnswer, Example 5.3
3) Once HAP completes processing, the popup message illustrated in figure 5.3b below
appears:
Page 51
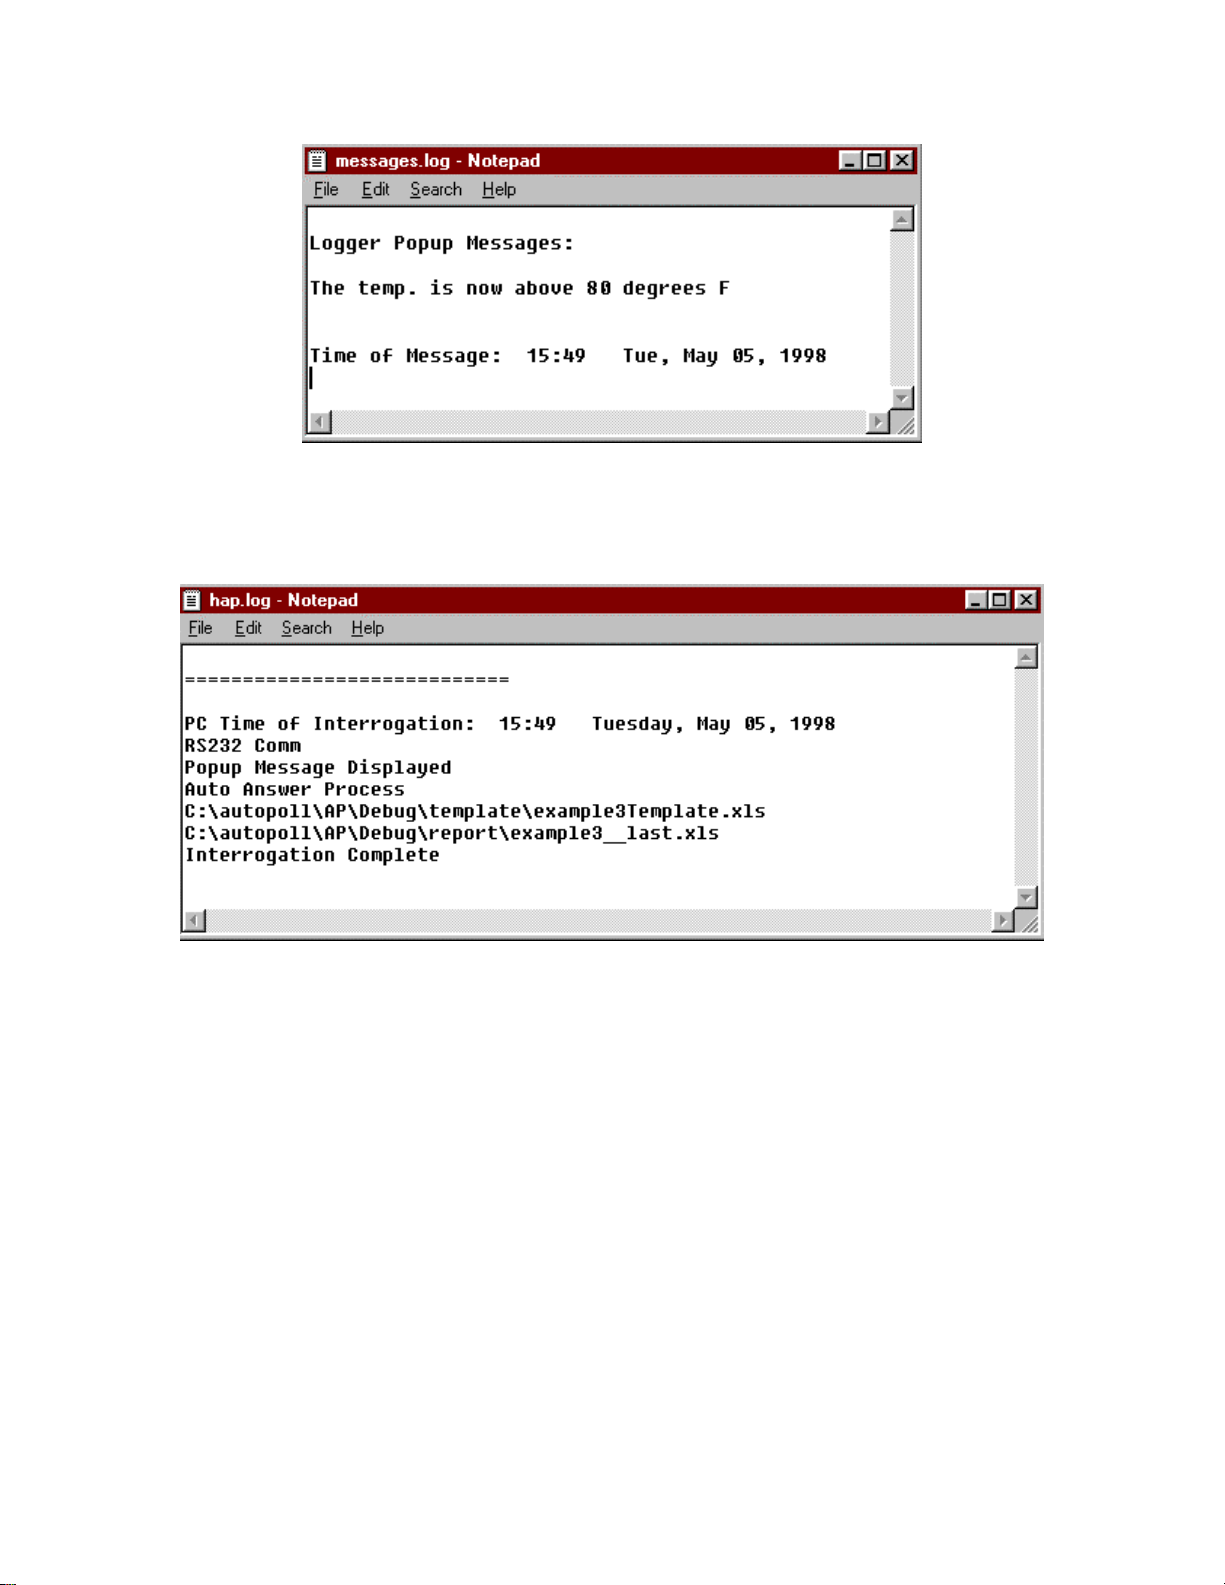
Figure 5.3.3b Popup message, Example 5.3
4) Check the log file by selecting “Log” from the main dialog. Figure 5.3.3c below
illustrates the log file:
Figure 5.3.3c Log File, example 5.3
5.3.4) Checking the output , example 5.3
Figure 5.3.3c illustrates the file “example3__last.xls” was written. This file is the HAP
generated report. HAP generated this file by using the template file
“example3Template.xls”. During Logger interrogation, HAP scans the template file for
Logger commands. HAP interrogates the Logger and then deposits the result in the
report file “example3__last.xls”. Figure 5.3.4 below illustrates “example3_last.xls”:
Page 52
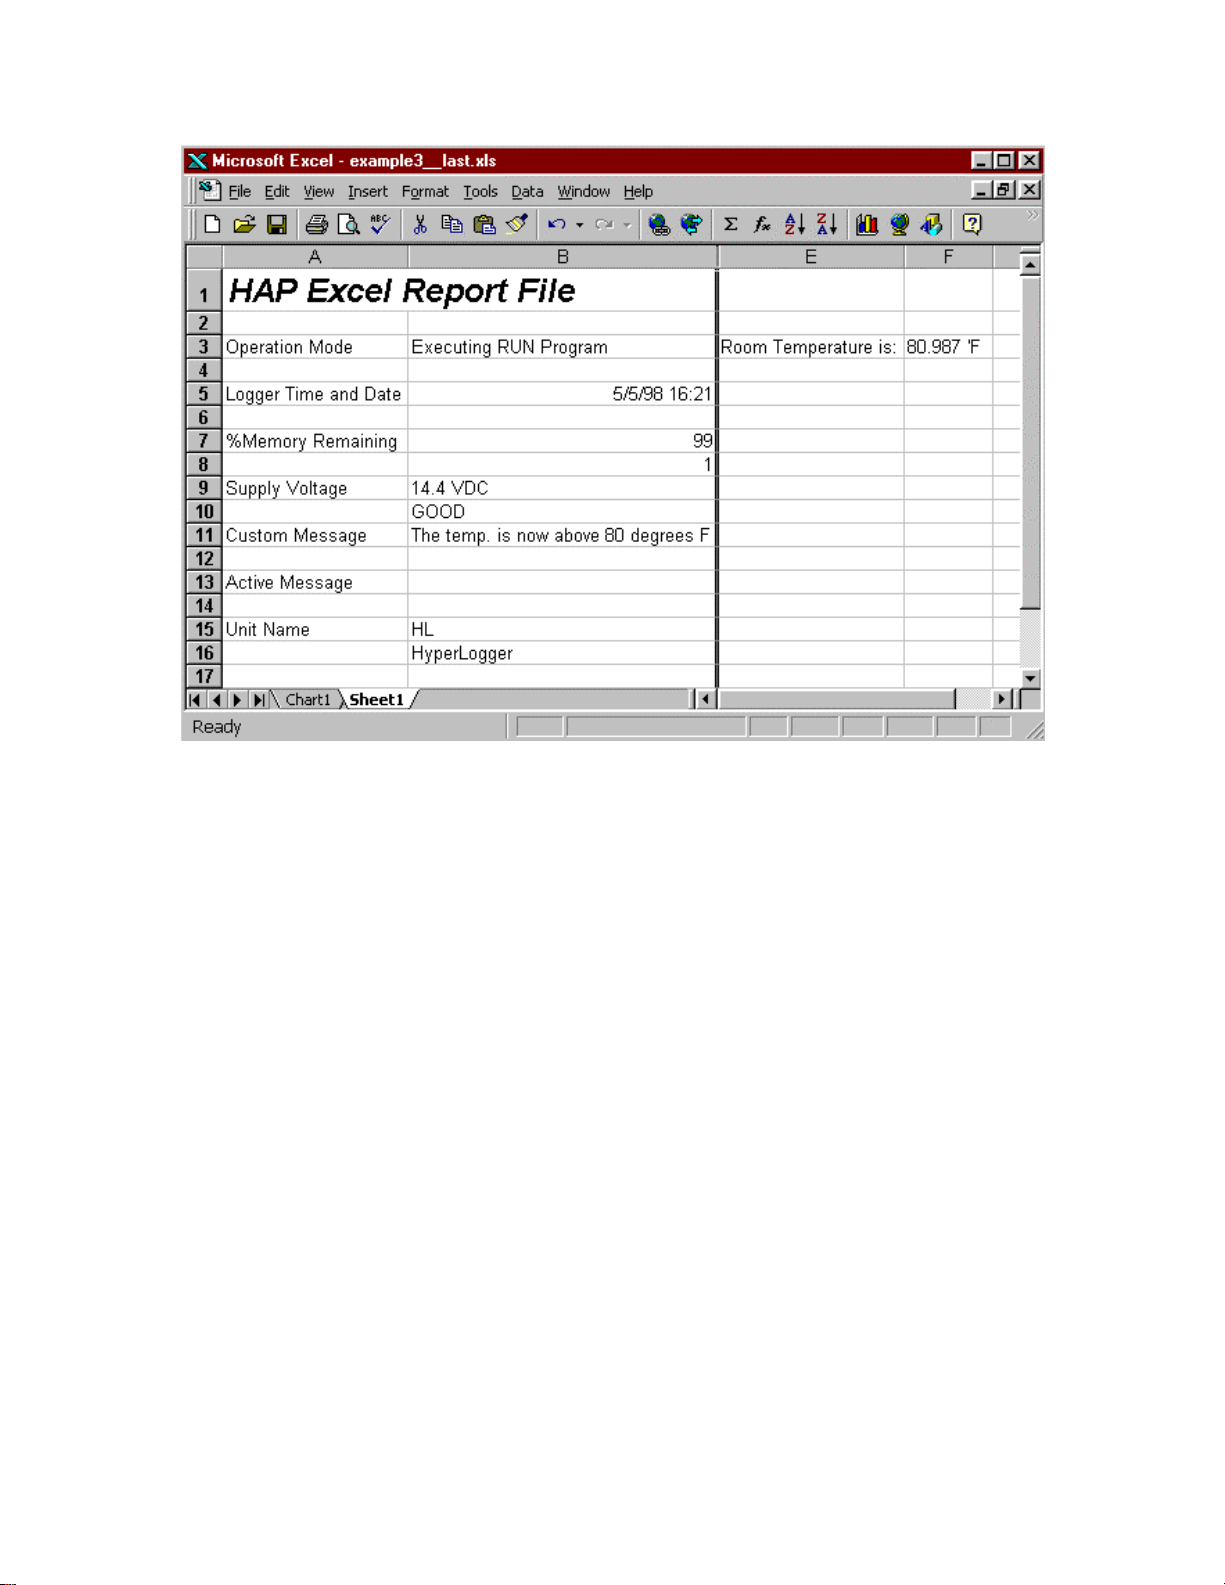
Figure 5.3.4 Excel Report File generated by HAP, Example 5.3
Page 53

6 For Your Information
6.1) Excel macro writing for report. Use of Master Mac.
Every time a HAP initiated Microsoft Excel report gets generated, the Macro
“MasterMac” is executed. When the report is generated, HAP installs “Master
Mac” in the Excel report file and executes the Macro. You may modify “Master
Mac” by editing the “MasterMac” Macro in the Excel Template file used by HAP
during report generation. Illustrated below is “MasterMac” with a print report
Macro already installed. “User1” and “User2” are Macros installed by the you.
User1 and User2 popup a message box indicating that Macro has been called.
Sub MasterMac()
ActiveWindow.SelectedSheets.PrintOut Copies:=1
'Call the user macros here
User1
User2
End Sub
Sub User1
MsgBox (“This is User1 Macro”)
End Sub
Sub User2
MsgBox(“This is User2 Macro”)
End Sub
6.2)Excel Report Automatic Calculations
Performing automatic calculations in Excel is easy. To perform an automatic
calculations on the HAP generated Excel report file, modify the Excel Template
file. The illustration below illustrates an average calculation installed into cell A9
in a Excel Worksheet:
Page 54
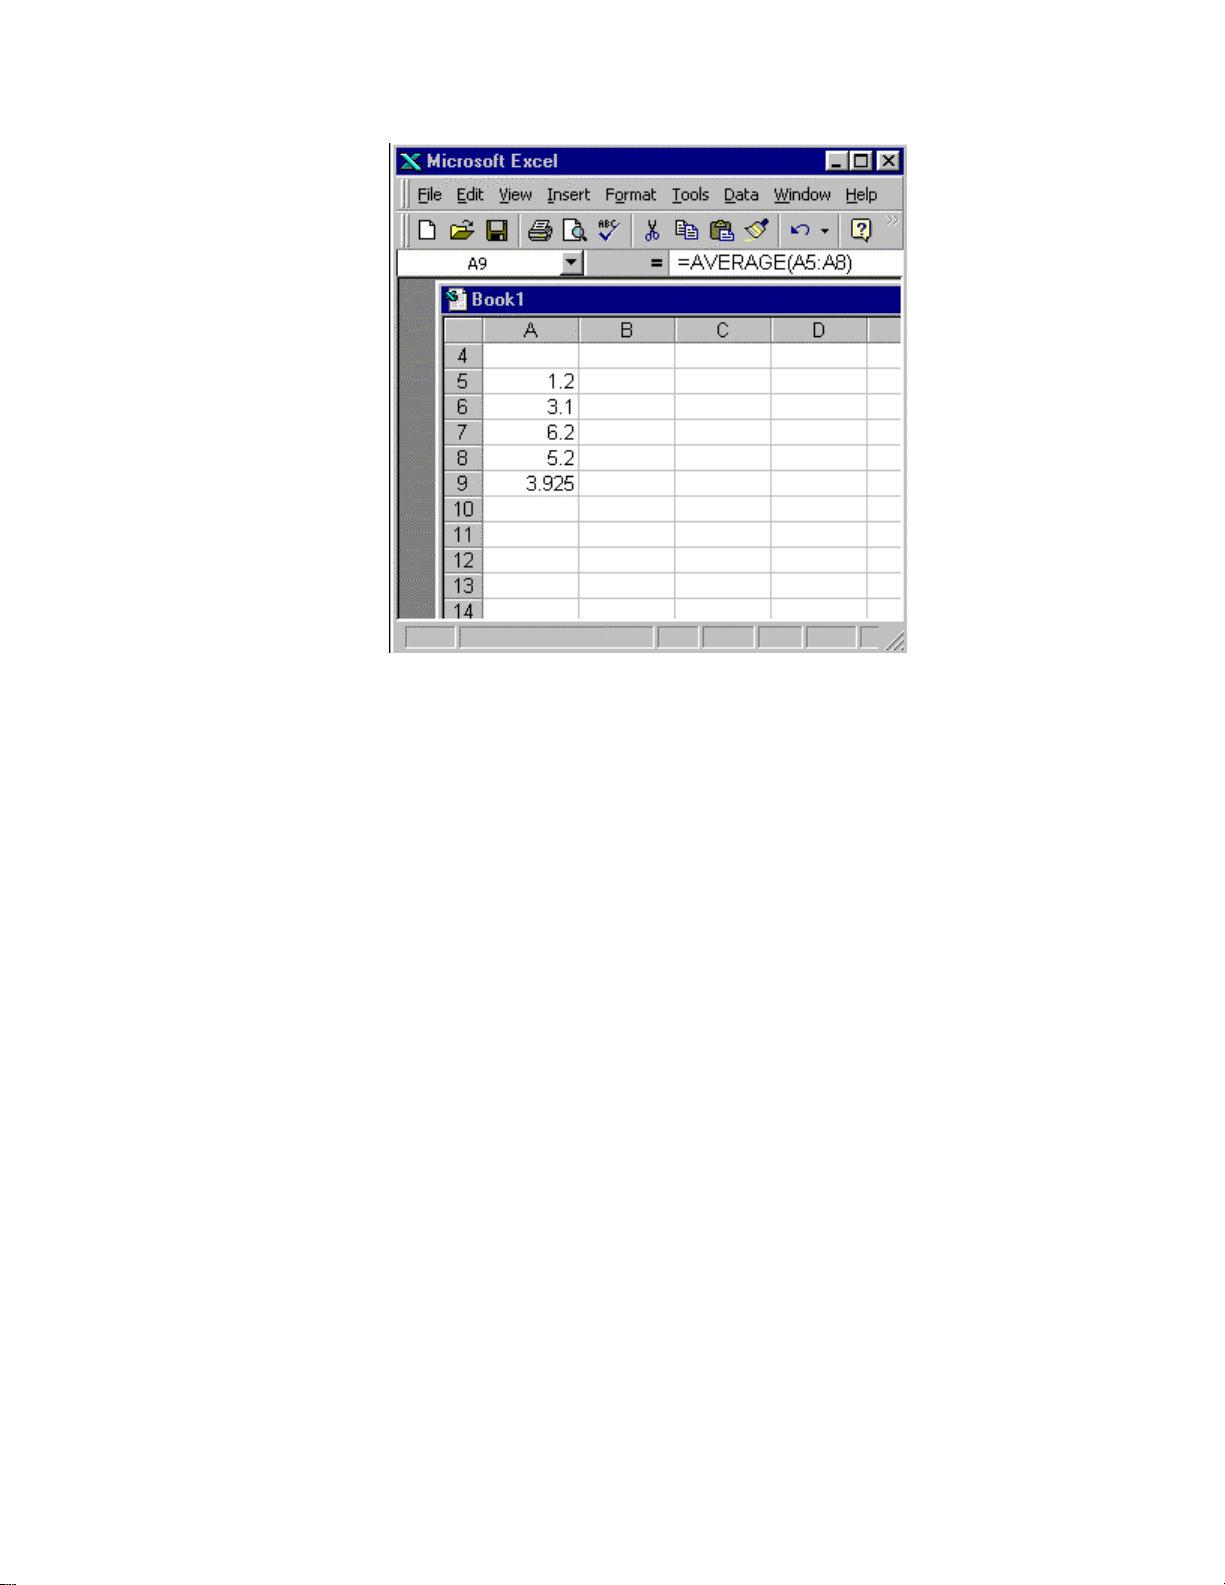
Figure 6.1 - Excel Worksheet with Calculation
6.3) Comm port AutoAnswer tie up.
When HAP is executing with Auto-Answer enabled, the Comm port configured in
the “Setup Dialog” is busy. HAP opens the comm port and is idle waiting for a
Logger to initiate communication. Other applications may not use the same comm
port HAP has opened.
6.4) Using AutoAnswer and AutoPoll at the same time.
Auto-Answer and Auto-Poll may be enabled at the same time. If the PC receives a
call from the Logger and Auto-Poll requires an interrogation, the Auto-Poll
interrogation is delayed until Auto-Answer is finished. If Auto-Poll is
interrogating a Logger and a Logger is trying to initiate a Auto-Answer, the calling
Logger receives a busy signal and the Auto-Answer is not processed.
6.5) Can’t run more than one copy of HAP
Only one copy of HAP may execute on a PC at a time. HAP senses if more than
one copy is running, and denies access to the second copy.
6.5) How HAP operates in background
Once Auto-Answer or Auto-Poll are enabled HAP may be minimized. Other
Windows application may be executing with HAP minimized and processing in
AutoPoll or AutoAnswer enabled.
Page 55

6.6) Logger Memory Modes -
Omega Engineering Inc. loggers have 3 memory modes
1) Log to Full Memory and Stop processing - Stops the loggers net
program after memory is full.
2) Log to Full Memory and Continue processing - Continues processing
after memory is full, but no additional samples are replaced in
memory.
3) Rotary Memory - Once memory is filled, the additional samples are then
added to memory by replacing the most historical sample. This
memory mode works much like a ring buffer.
HAP supports all 3 memory modes. If memory is downloaded and you select the
“Clear” command after file download the following events occur for each memory
mode
1) Log to Full Memory and Stop - If the logger is not stopped, the memory
is downloaded, the logger is cleared, processing then continues. If
the logger is stopped, memory is downloaded, the Logger is
cleared, and the Logger remains stopped.
2) Log to Full Memory and Continue Processing - Works the same way as
Log to Full Memory and Stop but the Logger does not stop if the
Memory is Filled. Once the Logger memory is filled and then
downloaded and cleared, logging resumes to memory.
3) Rotary Memory - During memory download, the logger is stopped,
memory is downloaded, memory is cleared, and the logger is
restarted. Selecting the HAP “Clear” command for the logger has
no affect on downloading memory.
6.7) A word about passwords
If the Logger contains a password, that password must be entered for that site
during Auto-Poll site parameter configuration. If the Logger contains a password
and the Logger initiates the interrogation (Auto-Answer), the user is not required
to supply a password.
6.8) Using the Diagnostics Button
Figure 6.2 below illustrates HAP’s diagnostics button. The diagnostics button is
accessed from the main dialog. The diagnostics button is used to trouble shoot
comm problems. Do not access diagnostics unless instructed to do so by a Omega
Engineering Inc. technician.
Figure 6.2 - HAP’s Diagnostics Button
Page 56

6.9) Server Busy Message
If a dialog opens indicating the “Server is Busy”, one of HAP’s clients is
attempting to access a server that is locked. Attempt to satisfy the “Server is
Busy” by closing all applications except HAP and selecting “OK” from the dialog.
If you repeatedly get the “Server is Busy” dialog, re-booting Windows is
necessary. The problem could also be with “Taskman”, see section 6.10 below.
6.10) Known problem with Taskman
Some copies of Windows cause execution problems with the HAP report
generator. If you attempt for create an Excel Template from HAP and HAP the
“Server is Busy” dialog opens, Taskman could be intercepting system messages.
Taskman may be disabled. The work around is rename <Windows>Taskman.exe
to another name or delete Taskman.exe. If you have this problem and are using
Taskman.exe, contact Omega Engineering Inc.
6.11) Running Excel and editing the Template or Report file
If the HAP’s report generator and your are running Excel at the same time and
editing the HAP Excel Template or Report generator file, the Excel report will not
be generated. Excel does not permit the same file to be opened twice.
6.12) RS232 input signal grounding problems
Some RS232 comm port are floating. If the comm port is floating and toggling
between states, HAP encounters many events from the comm port. If this occurs,
HAP’s Diagnostic Dialog is filled with RS232 events for those lines that are
floating. If you are experiences difficulty with RS232 communication contact
Omega Engineering Inc. for further information and the fix.
Page 57

Page 58

Appendix A: Status Messages
The status messages are displayed at the bottom of HAP’s main dialog.
HAP contains 4 separate areas for displaying status messages. The 4 areas from left to
right consist of
1.) Comm Status
2.) Auto Poll/ Answer Status
3.) Logger Interrogation Status
4) Memory Data Download Progress - Indicates the progress of Logger Memory
Download in percentage.
Possible Comm Status Messages include:
1) Opening Com Port
2) Resetting Modem
3) Initializing Modem
4) Modem Initialized
5) Dialing....
6) Waiting for Carrier Detect
7) Waiting for Modem OK
8) Verifying connection with Logger
9) Connection Complete
10) Idle
Possible Auto Poll/ Answer Status Messages include:
1) Idle
2) Enabled Polling
3) Disabled Polling
4) Enabled Answer
5) Disabled Answer
Possible Logger Interrogation Status Message include:
1) Logger Interrogation Error
2) Error Connecting to Logger
3) No Memory Data in Logger
4) Waiting For Connection
5) Connection Successful
6) Logger in Rotary Mode
7) Downloading Net Program
8) Downloading Data Memory
9) Stopping Logger
10) Clearing Data Memory
11) Restarting Logger
12) Shutting Down Interrogation
13) Interrogation Complete
14) Starting Report Generation
15) Scanning Report Template File
Page 59

16) Sending Logger Value to Report
17) Writing Excel Report
18) Generation Report
19) Writing HLD File
20) Writing CSV File
21) Writing XLS File
22) Error in Post Processing
23) Post Processing Done
24) Idle
25) ERROR: Comm Timeout
26) ERROR: Interrogation Aborted
27) Idle-Auto Answer Complete
28) Idle-Auto Poll Complete
29) Idle-AA Abnormal Termination
30) Idle-AP Abnormal Termination
31) ERROR: Logger Requires Password - Idle
32) ERROR: An Unknown error - program download - Idle
Page 60
Appendix B: Log File Messages
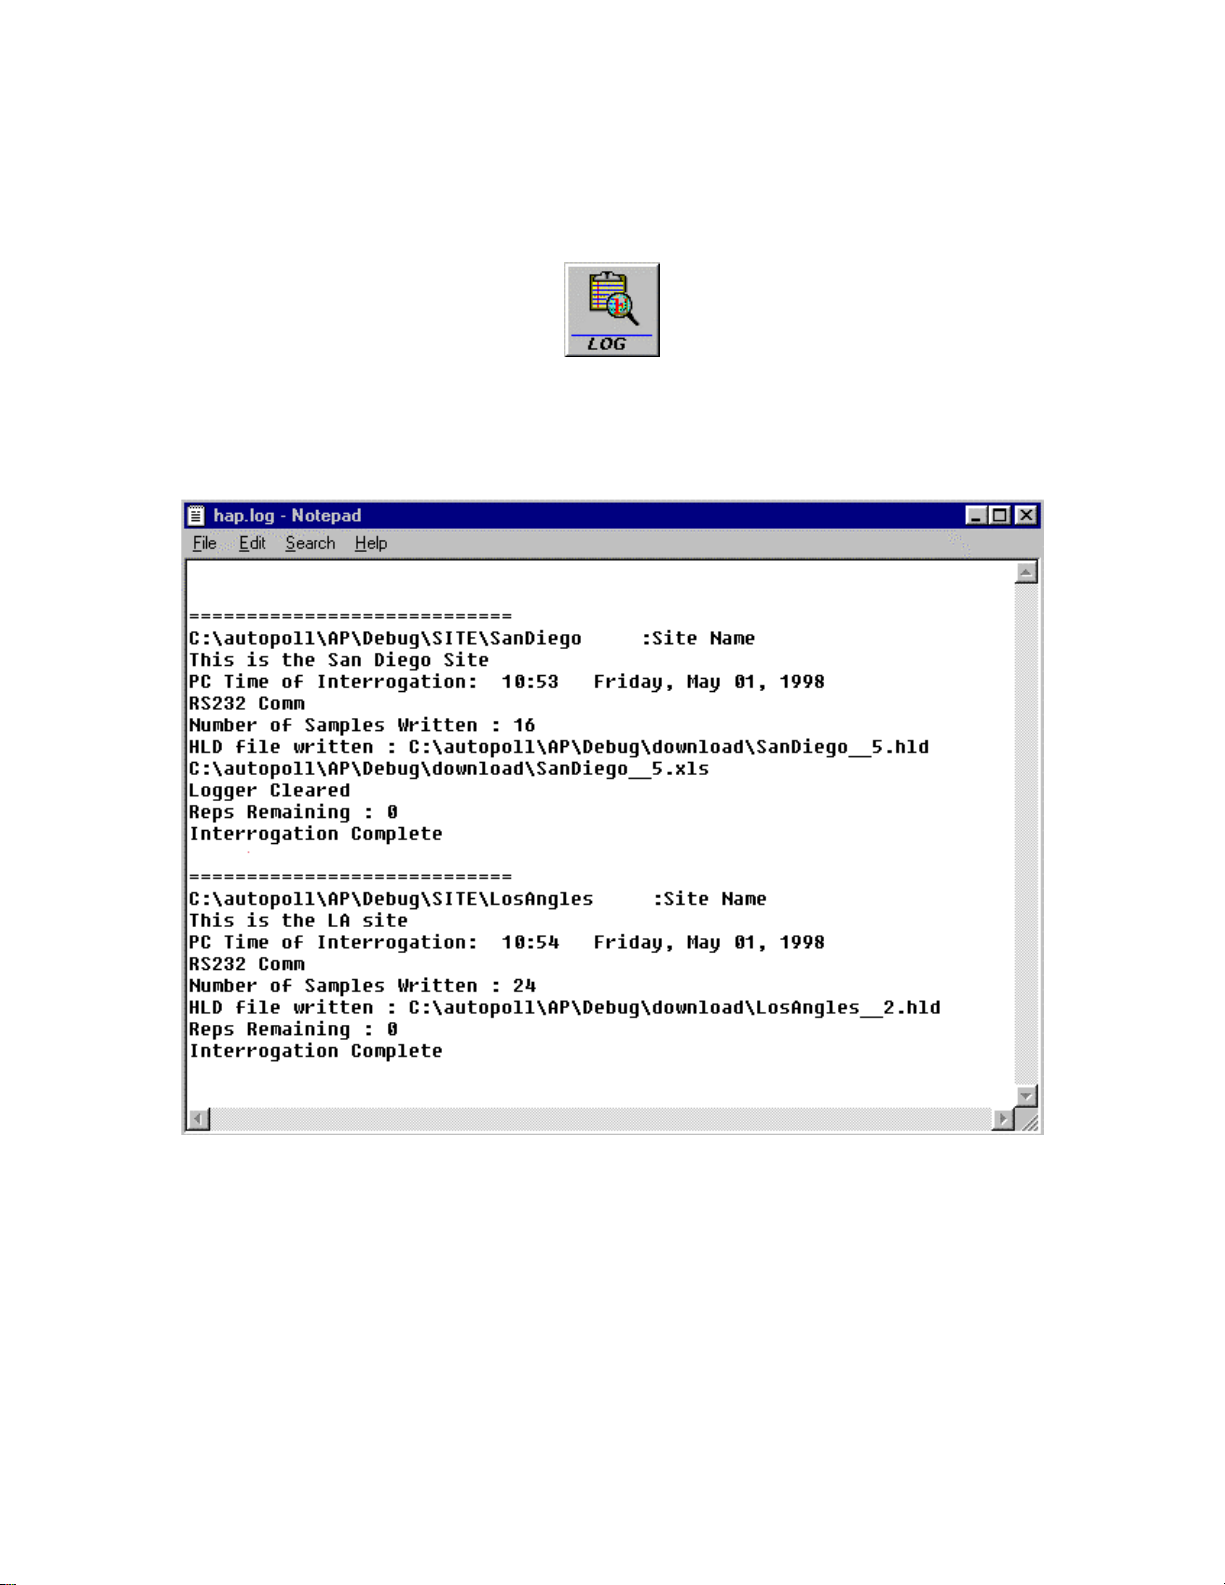
The HAP log file is a used to track logger interrogation progress. Log File message are
displayed by selecting the “Log” button from HAP main dialog:
Figure 4.5a Log Button on HAP’s Main Dialog
Selecting the “Log” button launches Microsoft Notepad with a copy of hap.log in
Notepad’s editor:
Figure 4.5b Displayed Log File
Figure 4.5b above illustrates the Log File that results in polling two sites; SanDiego and
LosAngles. This log file shows the site name, site user comment, time of interrogation,
comm mode, number of samples written, files written during the poll, repetitions, and
“Interrogation Complete”. The “Interrogation Complete” message indicates no errors
occurred during interrogation.
Messages in the Logger can consist of filename written to disk, some of the site
parameters, and the following messages:
1) Site Name including path is site file
Page 61

2) User Comment
3) Comm Mode
4) PC Time of Interrogation
5) Interrogation Complete
6) User Initiated Premature Termination
7) Abnormal Termination
8) Number of Samples Written
9) Reps Remaining
10) WARNING: No Samples in Logger
11) Number of Samples Written
12) HLD file written
13) Reps Remaining
14) Auto Answer Process
15) ERROR: Opening Comm Port - Abort
16) ERROR: Opening Comm Port 'Timeout' - Abort"
17) ERROR: Comm Modem Reset - Abort";
18) ERROR: Comm Modem InitString - Abort"
19) ERROR: Comm Modem InitString 'OK' - Aborting"
20) ERROR: Comm Sending Logger Verification - Abort
21) ERROR: Comm Timeout waiting for verification from Logger - Abort
22) ERROR: Logger Requires a Password
23) ERROR GP - UNKNOWN - Aborting
24) ERROR Incorrect Password for logger
25) ERROR Password Match - Aborting
26) COMM Connection ERROR - Aborting Interrogation
27) ERROR - Getting Logger ID - Aborting
28) ERROR - Getting Logger Time - Aborting
29) ERROR - Getting Logger Current Time - Aborting
30) ERROR: Net or Memory Download Timeout, Aborting..
31) WARNING: No Data in Logger
32) ERROR: Password required for Interrogation - Aborting
33) ERROR: An Unknown error occurred during Program download - Aborting
34) Logger in Rotary Mode
35) ERROR - Rotary Mode - Stop
36) ERROR - Stopping Logger
37) Logger Stopped
38) ERROR - Clearing Logger
39) Logger Cleared
40) ERROR - Enabling Logger
41) Logger Re-Started
42) Failed Connection to HAP Report
43) ERROR: Excel Template File not Found
44) ERROR: HAP failed to copy Excel template file to report file
45) ERROR - Getting Logger Probe Points
46) ERROR - Getting Logger Op Mode
Page 62

47) ERROR - Getting Logger Active Messages
48) ERROR - Getting Logger Memory
49) ERROR - Getting Battery Voltage
50) ERROR - Getting Logger HAP CMD Word - Aborting
51) ERROR - Getting HAP Popup Message - Aborting
52) ERROR - Getting Logger HAP Rep Template Name - Aborting
53) ERROR - Getting Logger HAP Report Name - Aborting
54) ERROR - Getting Logger HAP Download File Name - Aborting
55) ERROR - Getting Logger HAP ICON - Aborting
56) ERROR - Logger - Getting Password - Aborting
57) ERROR: There is a Password in Logger - Aborting
58) Popup Message Displayed
Page 63

Appendix C: Directory Structure
HAP creates a default directory structure for polling files, site files, report files, template
files, and downloaded memory data files. If HAP is installed in the directory <HAP> the
default directories are:
1) Polling files: <HAP>\polling
2) Site files: <HAP>\site
3) Report files (XLS): <HAP>\report
4) Template files (XLS): <HAP>\template
5) Downloaded data files (HLD, CSV, and XLS): <HAP>\download
Page 64

Table of Contents
HAP (HyperWareTM Automation Program) Contents
1 What is HAP
1.0) Terminology
1.1) HAP Basic Description
1.2) Logger Communication Methods
1.3) A few typical scenarios for HAP.
1.3.1) Water Quality
1.3.2) Irrigation System Monitoring and Control
1.3.3) Utilities and Energy
1.3.4) Civil and Structural Engineering
1.3.5) Geotechnical and Mining
1.3.6) Factory Machine Monitoring
2 PC System Configuration and Requirements
2.1) Software Requirements
2.2) Data Logger Requirements
2.3) PC Configuration
2.4) PC Modem Configuration
2.5) Excel Requirements (optional)
3 Software Installation
3.1) Installation Instructions
3.2) Files Installed
3.3) Files Registered
3.4) Uninstall Instructions
4 HAP Usage (Operation)
4.0) Launching HAP
4.1 AutoPoll
4.1.1) Overview
4.1.2) Construction of site
4.1.2.1) Report Tab
4.1.2.2) Interval Tab
4.1.2.3) Communication Tab
4.1.3) Construction of Polling File
4.1.4) Start Polling
4.1.5) Termination of Polling
4.2) Auto Answer
4.2.1) Overview
4.2.2) Turning Auto Answer On and Off
Page 65

4.2.3) Setup of Auto Answer
4.2.2) Auto Answer Options
4.3) Excel Report Configuration
4.3.1) Overview
4.3.2) Creating an Excel Template for HAP
4.3.3) Explanation of Excel Template for HAP
5 Step by Step Examples - using HAP
5.1) Auto Poll - One site example
5.2) Auto Poll - Five site example
5.2.3) Executing AutoPoll, example 5.2
5.3) Auto Answer - Logger calling PC with HAP.
5.3.1) HyperWare creation of net program with HAP Icon, example 5.3
5.3.3) Enable AutoAnswer and process , example 5.3
5.3.4) Checking the output , example 5.3
6 For Your Information
6.1) Excel macro writing for report. Use of Master Mac
6.2) Comm port auto answer tie up.
6.3) Using Auto Answer and Auto Poll at the same time.
6.4) Can’t run more than one copy of HAP
6.5) How HAP operates in background
6.6) Logger Memory Modes - Rotary, Continue and Stop - consequences in
continue mode - must download before clear - In rotary - must stop before
downloading - clear and restart
6.7) A word about passwords
6.8) Using the Diagnostics Button
6.9) Background processing and “Server Busy Message”
6.10) Known problem with Taskman
6.11) Running Excel and editing the Template or Report file
6.12) RS232 input signal grounding problems
Appendix A: Status Messages
Appendix B: Log File Messages
Appendix C: Directory Structure
List of Figures
3.1a Setup Dialog - The first installation dialog
3.1b Welcome Dialog
3.1c Choose Destination Location Dialog
4.0a HAP Desktop Icon
4.0b HAP’s Main Dialog after Launch
4.1.1 - Editing Site Dialog
4.1.2.1a - Specify Download base filename Dialog
Page 66

4.1.2.1b - Editing Site Report Tab
4.1.2.1c - Specify an existing Report Template (*.XLS) file Dialog
4.1.2.1d Specify Resulting Report Filename (*.XLS) Dialog
4.1.2.2 Time Interval Tab
4.1.2.3a Communication Tab for RS232
4.1.2.3b Communication Tab for PC Modem
4.1.2.3c Communication Tab for RF Modem
4.1.3a Edit Polling File Dialog
4.1.3b Edit Polling File Dialog with Selection
4.1.3c Delete Site Confirmation Dialog
4.1.4 HAP’s Main Dialog with Polling Enabled
4.2.1 HyperWare HAP Icon
4.2.2 HAP with Auto Answer On
4.2.3a Auto Answer Setup Dialog Configured for PC Modem
4.2.3b Auto Answer Setup Dialog Configured for RS232
4.2.3c Auto Answer Setup Dialog Configured for RF Modem
4.2.4a HyperWare HAP Icon Dialog
4.2.4b Alarm - Popup Message display by HAP
4.2.4c HyperWare Simple Net with HAP Icon
4.3.2a Report Button on HAP’s Main Dialog
4.3.2b Excel Report Dialog for HAP Excel Template Generation
4.3.2c HAP file Dialog for Selection of *.net file
4.3.2d Microsoft Excel Template for HAP
4.3.3 Microsoft Excel Report Generated by HAP
4.5a Log Button on HAP’s Main Dialog
4.5b Displayed Log File
5.1.1 HyperWare net program, Example 5.1
5.1.2a Selecting the *.net file with HAP’s Report Generator, Example 5.1
5.1.2b Generated Template by HAP before user edit, Example 5.1
5.1.2c User Edited HAP Excel Template, Example 5.1
5.1.3a Report Tab, Example 5.1
5.1.3b Time Interval Tab, Example 5.1
5.1.3c Communications Tab, Example 5.1
5.1.3d Saving the Site, Eample 5.1
5.1.3e Edit the Polling File Dialog, Example 5.1
5.1.3f Saving the polling file, Example 5.1
5.1.4a Load Button for HAP, Example 5.1
5.1.4b Poll Button for HAP, Example 5.1
5.1.4c Adjust the Start Time Dialog, Example 5.1
5.1.5a Watching HAP poll - downloading data, Example 5.1
5.1.5b Watching HAP poll - polling is complete, Example 5.1
5.1.6 HAP Log file after polling, Example 5.1
5.1.7 SanDiego__last.xls with some additional calculations, Example 5.1
5.2.2a Report Tab for creation of a new site, Example 5.2
Page 67

5.2.2b Time Interval Tab for creation of a new site, Example 5.2
5.2.2c Communications Tab for creation of a new site, Example 5.2
5.2.2d Saving the Site Dialog, Example 5.2
5.2.2e Edit Polling File after creating 5 sites, Example 5.2
5.2.3 HAP’s main dialog with AutoPoll Enabled, Example 5.2
5.3.1a HyperWare Net Program, Example 5.3
5.3.1b HyperWare HAP Icon Dialog, Example 5.3
5.3.1c Excel Template File for HAP, Example 5.3
5.3.3a HAP processing AutoAnswer, Example 5.3
5.3.3b Popup message, Example 5.3
5.3.3c Log File, Example 5.3
5.3.4 Excel Report File generated by HAP, Example 5.3
6.1 - Excel Worksheet with Calculation
6.2 - HAP’s Diagnostics Button
 Loading...