

Page 1
ODW702WB/ODW702XB
12 place settings12 place settings
half-load function
Page 2
For d e t ailed o pe ra t ing read the c orr es pon d in g con ten t in the in s truc ti on ma nual .ins tru ctions
Switch on the appliance Press the Power switch button to switch on the appliance,Open the door.
Witheachwashcycle.
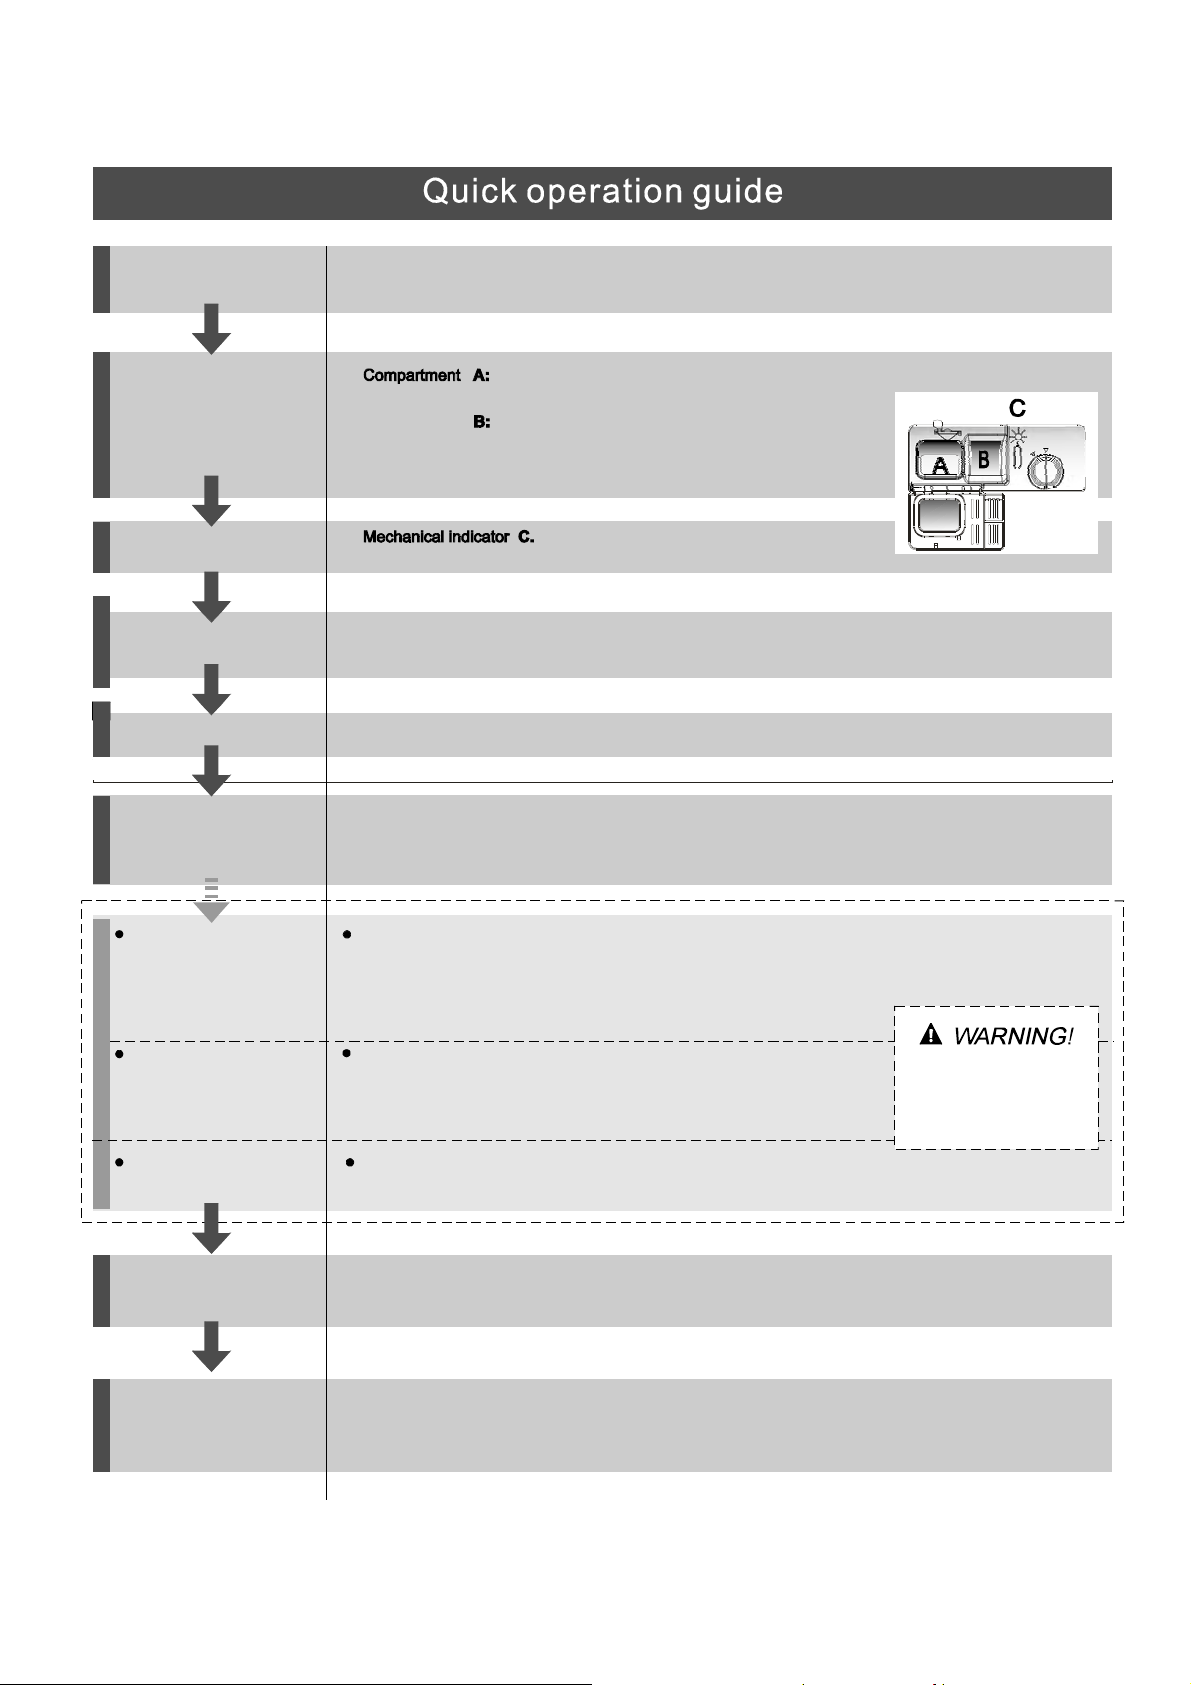
Fill the detergent dispenser
Compartment
For programmes with pre-wash only.
(Follow the user instructions!)
Check the rinse aid level
Load the baskets
Select a programme
Running thedishwasher
Changing the programme
Add forgottendishes in the
dishwasher.
Electric indicator on control panel(if provided).
Scrapeoff any large amount of leftover food. Soften remnants ofburnt foodin pa ns,
thenload the baskets. Referto the dishwasherloadinginstructions.
Press the Programme button until the selected programme lights up.
( See the section entitled Operationg instruc tion )“”
Close the door, turn on the water tap and press the Start/Pause button. The machine will start working
after about 10 seconds.
1.A running cycle can onlybe modified if it has been runningfor a short time.O therwise the deterg ent
may have already been released and the water alreadydrained. If this is the case, the detergent
dispenser mustbe refilled.
2. Press the Start/Pause button ,than press the program button morethan 3 seconds to cancel the
running programme.
3. Select a new programme.
4. Restartthe dishwasher.
1.Press the start/pause button to stop the machine.
2.Open the door.
3.Add the forgotten dishes.
4.Close the door, then press the start/pause button, the dishwasher will
start running again after 10 seconds.
Open the door careful ly.
Hots team may esc ape
when thedoorisopened!
If the appliance is switched
off during a wash cycle.
Switch off the appliance
Turn off the water tap,
unload the baskets
If the appliance is switched off during a wash cycle, when switched
on again, please re-select the washing cycle and operate the dishwasher
according to the original Power-on state ).
When the working cycle has finished, the buzzer of the
dishwasher will sound 8 times, then stop.
Turn off the appliance using the Power button.
Warning: wait a few minutes (about 15 minutes) before unloading the dishwasher to avoidhandling
the dishes and utensils while they are still hot and more susceptible to break.
They will alsodry better.Unload the appliance, starting from the lower basket.
Page 3
Dear Customer,
This appli ance isintended t o be used in
household
and si m ilar applicat i ons such as:
domestic
-staff kitch en areas in shops, off ices and other
workingenvironments;
-farm houses;
-by cli ents inhotels, mo tels and other res idential
ty pe envir onme nts;
-bedandbreakfasttypeenvironmen ts.
Pleasecarefully r eadthism anualbeforeusingthe
dishwasher,it willhelpyou to useandmaintainthe
dishwasher properly.
Keep it as a r e f er in t he late r days .
Passit onto any subsequentownerof the appliance.
Thismanual containssections on safetyInstructions,
Operating Instructio ns, InstallationInstructionsand
Trouble sho o tin g Tip s, etc.
Contr ol Pane l.... ... . ... ........ ... . ... ............... ... .. .. ...2
Dishwasher Features.................................. ... ..2
A Fill theRinseAid Dispenser.......... ... .. ..3、 ..... ...
B F unctionof Detergent .........................4、 ........
AttentionbeforeorafterloadingtheDishwasher
Baskets..........................................................6
The Met hod Load ing Normal D ishware
............ ..7
WashCycleTable.. .........................................9
Turning on th e Appl ian ce. ... ..... . ... ..... . .. ... .... .. ..9
Changethe Programme.............. ................10....
At theEnd of the Wash Cycle..... ............. .........10
FilteringSystem.............................................11
Caringf ort he Dishwasher..................... .........12.
To re view the section on t roublesho oting Tips
will help you t osolve some common problems
byyourself .
Ifyou can not solve the problems by yo urself ,
please ask fo r the help of p rofessional technician s.
The manufactu rer,following a p olicy ofconstant
development a nd updati ng of the product, may
make modificatio ns witho ut givi ng prior notice.
PositioningtheA pplian ce................... ..........13..
AboutPowerConnection........................ .......13.
Water Connecti on..... .. .... ... .. . ..... ... . ..... . .. .. .... .1 4.
Startof dishwasher.............. ........ .......... ......15..
Befo re call ing for ser vic e.. ... .. ... .. .. .. ......... .. ... . .1 6.
Errorcodes.................................... ..............17.
Technical information. .............. ............... .....18..
Page 4
When using your dishwas he r, follow the pr ecaut i ons lis t ed bel ow:
This appliance must be grounded. In the event of a
malfunction or breakdown, grounding will reduce
the risk of anelectric shock by providing a path of
least resistance of electric current. This appliance
is equipped with a cord having an equipmentgrounding conductor and a grounding plug.
The plug must be plugged into an appropriate outlet
that is installed and grounded in accordance with
all local codes and ordinances.
Donotabuse,siton,orstandonthedoorordish
rack of the dishwasher.
Do not touch theheating element during or
immediately after use.
(This instruction is only applicable to machines
with a visual heating element.)
Do not operate your dishwasher unless all
enclosure panels are properly in place. Open
the door very carefully if the dishwasher is
operating, there is a risk of water squirting out.
Do not place any heavy objects the
door when it is open. The appliance could tip
forward.
When loadin g items to be washed :
1) Locate sharp items so t hat theyare not likely
to damage the door seal;
2 Warni ng: Knives and other u tensils with
)
sharp points must be l oaded in t he ba sket
with their points down orplaced in a
horizontalposition.
When using y our dishwasher, you should
pr ev ent plastic ite m s fr om c oming in t o co ntact
with the h eating element.(T his inst ruction is only
applicable to machines with a v isual he ating
element. )
Check that th e deterge nt comparm ent is e mpty
after completio n of the wash cycle.
Do not wash plastic items unless they are marked
dishwasher safe or the equivalent. For plastic items
n
ot so marked, check the manufacturer's
recommendations.
Use only det ergent and rinse additives
design ed for an a ut omati c dishwas her.
Never use so ap, laun dry dete rgent, or h and
washing dete rgent in your dishwasher. Keep
these pr oducts o ut of th e reach of chi ldren.
on or stand on
Improper connection of the equipment-grounding
conductor can result in the risk of an electric shock.
Check with a qualified electrician or service
representative if you are in doubt whether the
appliance is properly grounded. Do not modify the
plug provided with the appliance; If it does not fit
the outlet. Have a proper outlet installed by a
qualified electrician.
Keep children away from detergent and rinse aid, keep
child away from the open door of the dishwasher,
ren
there could still be some detergent left inside.
This appliance is not intended for use by persons
(including children with reduced physical, sensory or
mental capabilities, or lack of experience and
knowledge ,unless they have been given supervision
or instruction concerning use of the appliance by a
person responsible for their safety.
Children should be supervised to ensure that they do
not play with the appliance.
Dishwasher de tergents are strongly al kaline, th ey
can be extr emely dangerou s if swallowed.Avoid
contact with ski n and e yes and keep children away
from t he dishwasher when the door is open.
The door sh ould n ot be left open,
since this could increase t he ris k of tripping.
Ifthes upplycordis damaged,it mustbe replaced
bythemanufactureroritsserviceagentora
similar ly q uali fi ed pers on in order to av oid a
hazard.
Remove the door to the washing compartment when
removing an old dishwasher from service or discarding it.
Pleasedispose ofpacking m aterials properly.
Use the dishwasher only for its intended function.
During installat ion, the power suppl y must n ot
be exces sively or d angerously bent or f latten ed.
Do not tamper with controls.
The applianc e is to be connec ted to the water
mains us ing new hose sets and that old hose-sets
should not be reused.
The maximum number of place sett ings to be
washed is 12 .
The maximum permissible i nlet wa ter pressure is
1Mpa.
The minimum permissible i nlet wat er press ure is
0.04Mpa.
)
Page 5
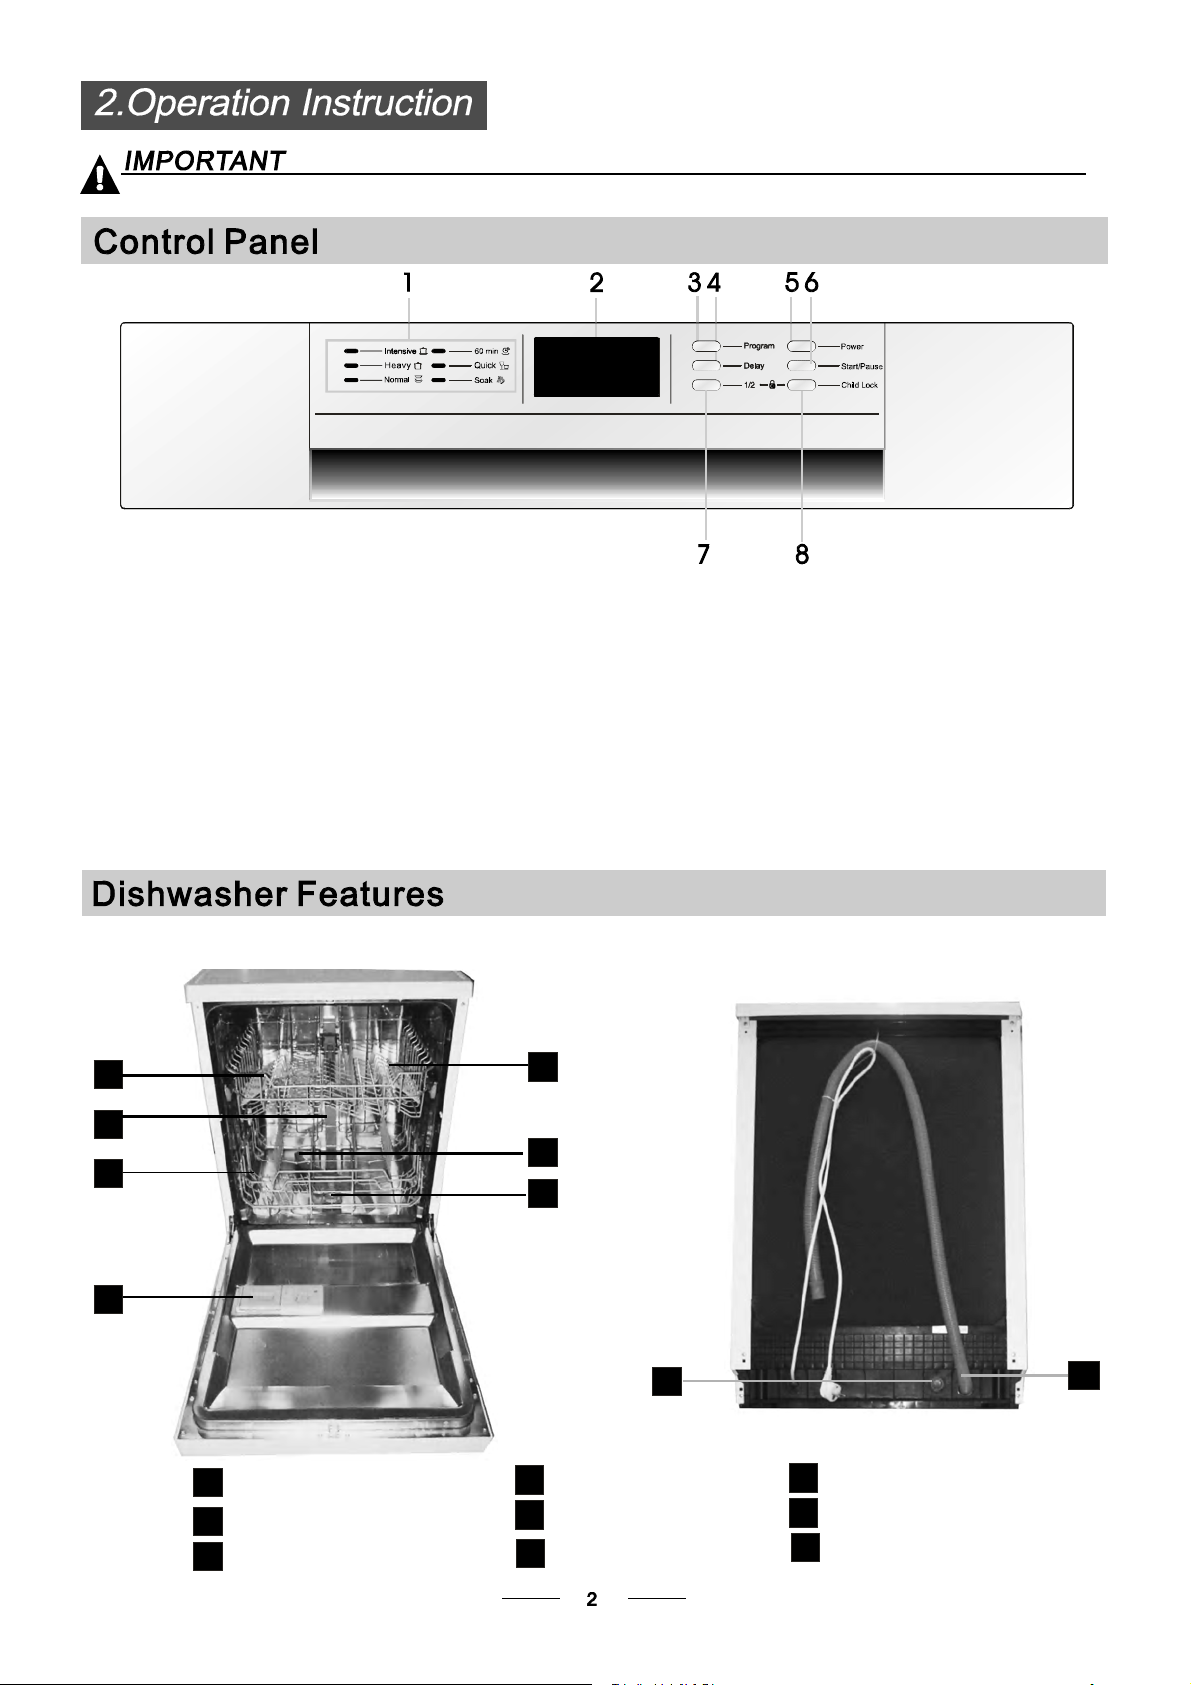
To g etthe best performancefromyour dishwasher,read all operatingins tructions
beforeusing it for the first time.
1
1.Pr ogram indicators: to show which
program youhavechosen;
2.Display screen: to show the r emin ding time
and the state(r unnin g state, d elay time et c )
3.Program Button : To Press the button to select
appropriate Program.
4.Delay Bu tto n : Press the button to d elay.
5.Power Button: Toturn on/off the power supply.
6.Start /Pause button: To start the selected
washing program or pause the washing prog ram
when them achine i s working.
313
Front view
1
7.I f you have on l y ab out or less than h alf of full lo ad
dishes of the dishwasher, you can sel ect the half load
function and your desired pr ogram accordin g to the
dishes contaminate d degree (The rapid and soak programs
can’t s elect t his function).
Aprogram select th e half load f unction, it can save time,
energy,and water compa re to the program h asn’t select
the half load function.
Aftert he half load functio n is selected, al l the spray arms
are r unning, y ou can l oad al l the basket s .
8.Child lock button: press thetwo buttons
simultaneously to lock the program.
Back View
5
2
3
4
Upper Basket
1
Inner pipe
2
Lower Basket
3
6
7
Dispenser
4
CupShelf
5
Spraya rms
6
8
Filterassembly
7
Inletpipe connector
8
Drainpipe
9
9
Page 6
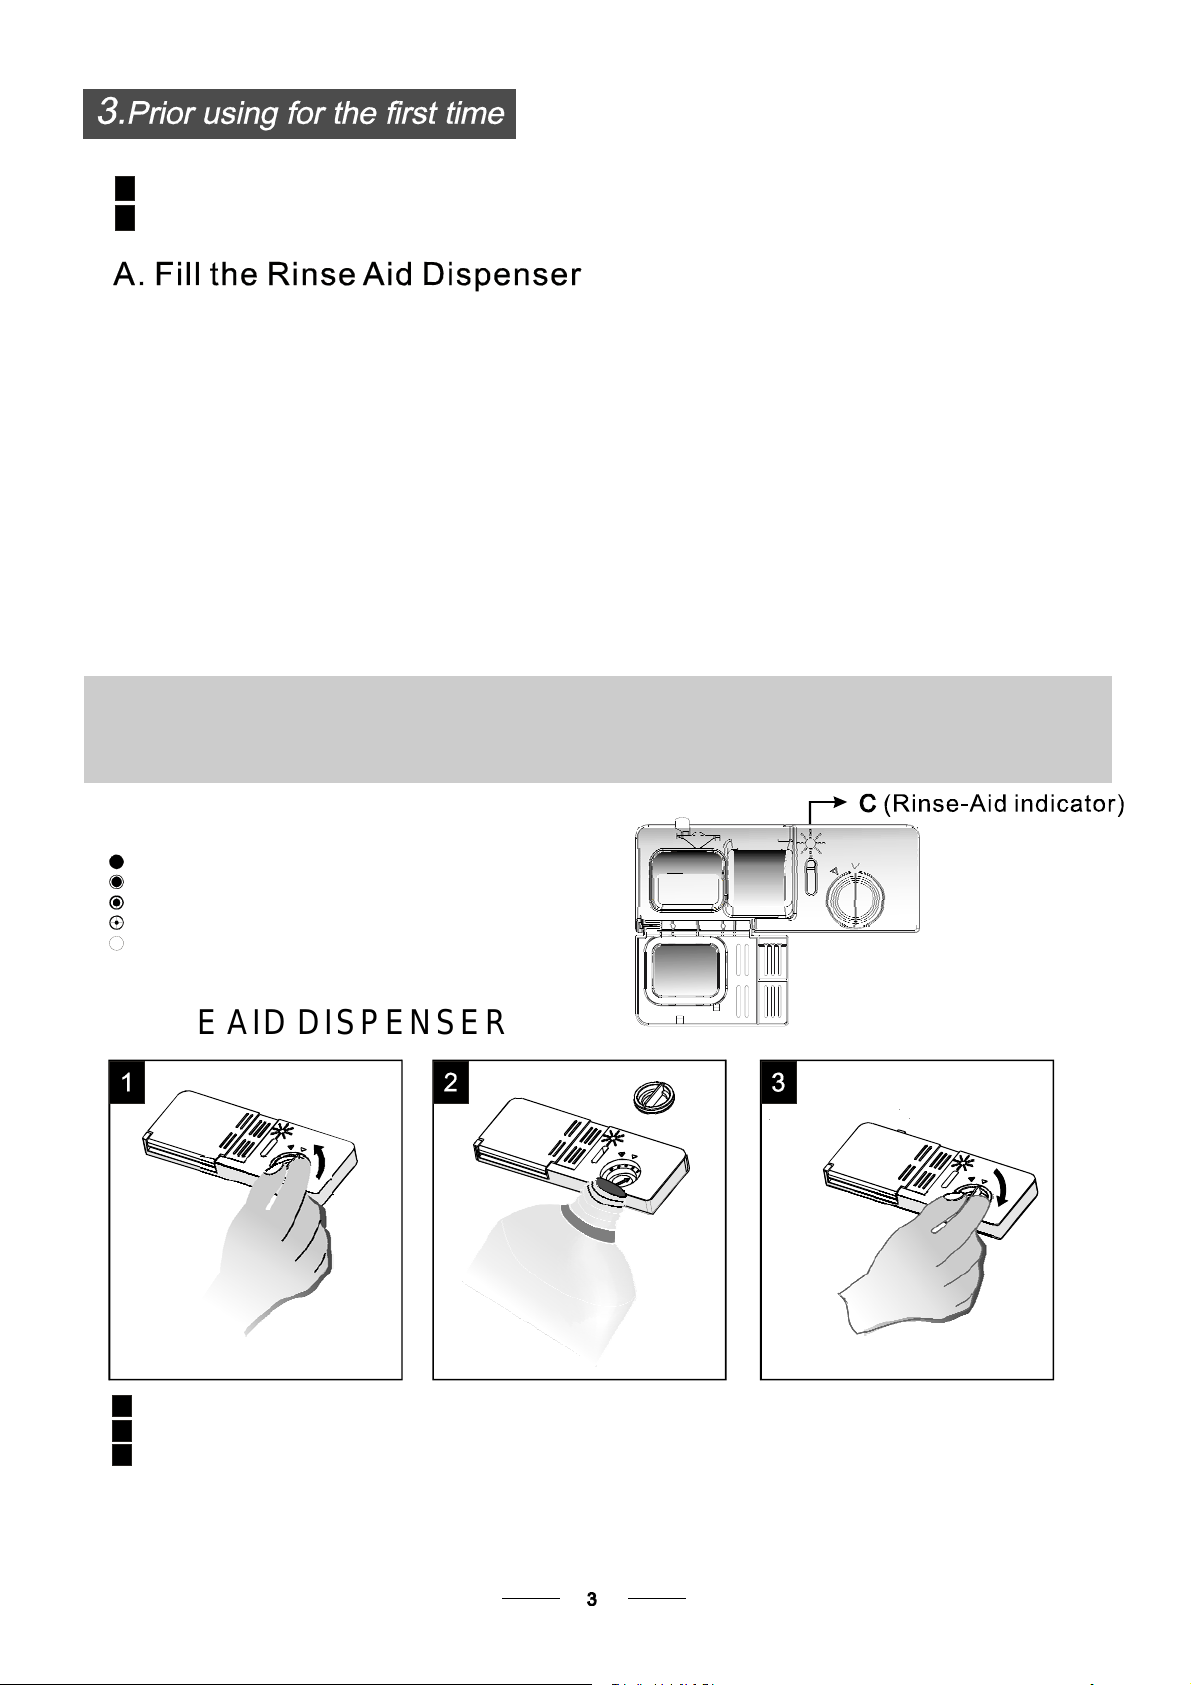
Before usi ng you r dishwas her fo r the first tim e:
A. Fill therinsea iddispenser
B. F i ll in de te rge nt
Rin seAi d D isp ens er
The r inseaid isreleasedduringthe finalrinseto preventwaterfrom forming droplets on yourdishes,which can
leave spotsandstreaks. It also improves dryingby allowing water to rolloff thedishes.Your dishwasheris
designed to useliquidrinse aids. The rinseaid dispenser is locatedinsidethe doornext to thedetergentdispenser.
To fil l the dispenser,o pen the cap and pour the rinse ai d into the dispenser until th e level indi cator t urns completely
black.The volumeoftherinseaid container is about110ml.
Functi on of Rin seAid
Rinse aid is automatical ly added du ring the last rin se, e nsuring thoro ugh r insi ng, an d spo t an d st reak fr ee drying.
Attenti on!
Only use brand edrinse aid for dishwasher. Neverfill therinse a iddispenserwith any other substances
(e.g. Dis hwasher clean ing a gent , liqu id detergen t). This would damage t he ap plia nce.
When to Re fill the RinseAid D isp enser
If there is no ri nse-aid warning light in the contr ol pane l, you can judg e the amount o f rin se-aid by the color ofthe
optical level
indicator "C" located next to the cap. Whe n the rinse-ai d contai ner is full, thewhole i ndica tor will be dark . As th e
rinse-aid
diminishes, the s ize of the dark dot decre ases. Youshould never let t he r inse ai d get below 1 / 4 ful l.
As the rinse aid diminishes, the size of the bl ack dot
on the rinse aid l ev el indica tor c hanges, as illust rated be low.
Full
3/4full
1/2full
1/4full-Shouldrefilltoeliminatespotting
Empty
RINSEAID DISPENSER
To o pen t he dispe nser,turn the cap to the "open" (l eft) ar row and lift it out.
1
Pour th e r inse aid into t he dispen se r, being careful not to o verf ill.
2
Replace the capby insertingit alignedwith "open"arrowand turning itto the closed(right)arrow.
3
Be careful not to over fill the dispenser, because this could cause over sudsing. Wi pe away any spill s
withadampcloth. Don't forgetto replace the cap beforeyou closedishwasherdoor.
Attention!
Clean up any rinse ai d spl it duri ng filling w ith an absorbe nt cloth toavoid e xcess f oaming
during the nextwash.
Page 7

Clean up an y rinse aid spilled while during f illing w ith an absorbent cl oth to avoid excess ive foamin g
during thenext wash.
Don't for get to replacethe cap before you close dishwasher d oor.
Adjust ing Rins eAid Di spenser
The rin se aid di spen ser has s ix or four s ettin gs.A lways s tart with the dispenser
set on "4 ". If spots and poor dryi ng ar e a problem, incr ease t he am ount of rinse
aid dispensed by removing thedispenserlidandrotating thedial to "5".If the
dishes still are not drying p roperly or are show spots, adjust the di al to t he next
higher le ver until your d ishes are s pot- free. The r ecommend ed setting is "4".
(Factoryval ue is "4".)
Increase th e dose if there are drops of water o r li me spot s on t he di shes af ter wa shing.
Reduce it i f the re are sticky whit ish stai ns on your dish es or a bluish f ilm on g lassw are or
knifeblades.
Detergents w ith its c hemi cal i ngredients a re ne cessary t o rem ove dirt , c rush dirt and transpo rt it out of t he dish washer.
Most of th e co mmercial quality de tergent s are suitable for t his p urpose.
Concentrated Detergent
Based ontheirchemicalcomposition, detergentscan be split intwobasic types:
conventi onal, alkaline d etergent s with caustic compon ents
low alkal ine conc entrated detergents with natural enzy mes
The us e of normal washingprograms in combination with concent rated de tergents
reduces pollutiona ndis good for yourdishes ;thesewashprogramsare specif icallymatched
to the dirt-dissolving pr operties of the enzymes of the co ncentrat ed detergent . For this reason
normal wash progra ms in which concentrated de tergents are used can achieve the same
“”
results that can oth erwise o nly be ac hieved usin g intensive programs.
“”
“”
Detergent Tablets
Detergent t ablets o f different brand s dissolve at different speeds. For this reason some
detergent t ablets ca nnot dis solve an d develop their f ull cleaning power du ring sho rt
programs. Ther efore please use lon g progra ms when using d etergent tabl ets, to
ensure the completeremoval of detergentresiduals.
Detergent Dispenser
Thedispenser mus t be refilledbefore the starto f each washcyclefollowingtheinstruction s
provided in the was h cycle t able . Yourdishwasher uses less detergent an d rin se aid t han
Conventional dishwasher. Generally,only one ta blespoon of detergent is needed for
a normal wash load. Moreheavily soiled itemsneedmore detergent. Alwaysadd the
detergent j ust b efore st arting t he dis hwashe r,other wise i t could g et d amp and will not
dissolve pr operly.
Page 8

Amountof DetergenttoUse
If t he lid is closed: press r e lease bu tton. T he l i d will spring op en.
Always add the detergent jus t be fore star ting eac h wash c ycle.
Only use brande d deterg ent aidf or d ishwasher.
Deter gen t powd er
Detergent tablet
Dishwasherdetergentiscorrosive!Takecare to keepitout ofreach of children.
Proper Use of Detergent
Use only det ergent specifically ma de for t he us e in d ishwasher s. Keep your detergent fresh and dry.
Don't put pow dered d etergent into the di spenser until you'r e ready to wash dishes.
Fill in Det ergent
Fill the deterge nt di spenser with detergent.
Themarkingindicates the dosinglevels, as
illustrated ontheright:
The place o f main wa sh cycle de tergent pl aced.
A
The place o f pre-wa sh cycle det ergent placed.
B
Please observe the manufacture rs dosing an d storag e
Rec ommendations as stated on the d eter gent p acka ging.
Close thelidandpress until it locksin place.
Ifthedishesare heavily soiled, place an additional
detergent dose in the pre-wa sh dete rgent chamber.T his deterge nt wi ll take e ffect duri ng the pr e-wash phase.
You find infor mation abou t the a mount of detergen t for the single pr ogramme on t he washing cycle ta ble.
Pleaseaware, th at accor ding tothe level soi ling an d th e specif ic hardness of w ater differences are pos sible.
Pleaseobserve t he manu facturer 'srecommen dations onthe detergent packaging.
Page 9

Consider buying utensils whichareidentified as dishwasher-proof.
Use a mild detergentthatis described as'kind to dishes'. Ifnecessary, seekfurther
information from the detergent manufacturers.
Forparticularitems,select aprogramwith as lowatemperatureaspossible.
To prev ent da ma ge, do not take glass a nd c utle ry out of the di shwas he r i mmed iatel y
after t he p rog ram me h as e nde d.
Are n ot s uitable
Cutlerywith w ooden,hornchinaor
mother-of-pearl handles
Plastic ite ms that are not h eat resis tant
Older cutl ery with glued parts t hat a re not
temperature resistant
Bonded cutl ery ite ms or dishes
Pewter or cooper items
Crystal glass
Steel items subject t o rusting
Wooden platters
Items madefrom synthetic fibres
(For best perf ormance of the di shwasher,follow the se loading guidelines.
Features and ap peara nce of baske ts and cutlery ba skets may var y fr om your mod el.)
Scrape off any large amount s o f leftover food. Soften r emnants of burnt f ood in pans.
It is no t necess ary to ri nse t he d ishes under running water.
Place obje cts in t he dis hwasher in following way:
1.Itemssuch as cups, g lasses, pots/pans, etc. a re faced downwards.
2.Curvedi tems, or ones with recesses, shoul d be loade d asla nt so th at water can run off.
3.Allu tensils a re stacked securely and can not tip over.
4.Allutensils are placed in t he way t hat the spray arms can rotate f reely during washin g.
Ve ry sm all it ems should n ot be w ashed in the dishwas her as th ey could easily fall out of the basket.
Are of limitedsuitability
Some types ofglasses c an become
dull after a large number of washes
Silver an d a lumi num parts have a
tendencytodiscolour duringwashing
Glazedpatterns mayfade ifmachine
washed frequent ly
Load hollow it ems suc h as cup s, glasses, pans etc. With the opening facing downwards so that
wat e r canno t collec t in the c ontai n e r or a deepb a se.
Dishesand items of cutlery mustnot lieins ide oneanother, or cover each other.
Toavoid da mage to glasses, th ey mus t not touch.
Load larg e ite ms which are most difficul t to c lean int o the lower basket.
The upper basket is de signed to hold more d elicate and lighter d ishware such as glasses , coffee
andtea cups
Long blad ed kni ves sto red in a n upr ight po sition are a potenti al haza rd!
Long and/or sharp itemsof cutlery such as carving knives must bepositione d
horizon tally in the upper b aske t.
Please do not ove rload yo ur di shwashe r. T his is importan t for g ood resu lts a nd for
reasonab le consu mption of energy.
To prevent water dripping fr om the upper basket into the lower basket, w e re commend that you
empty the lower basket first and t hen the upper ba sket.
Page 10

The u pper basket is designed t o ho ld more delicate
and lighter di shware such as glasses, coffee and
teacupsandsaucers, aswellas plates,smallbowls
andshallow pans(aslongasthey arenottoodirty).
Positionthe dishes andcookwareso that they will
notgetmoved by thespray ofwater.
Please be remin ded that :
Pots,servingbowls,etc,mustalwaysbeplacedtopdown.
D eep pots sh o u ld be slanted t o allow wate r to f low out .
The B otto m B ask et fe atur es folding sp ikes so tha t l arge r or more po t s an d p ans can be l o aded.
We sugges t tha t you pl ace large items and t he m ost
difficult to cleanitemsare tobeplacedintothe lower
basket: su ch a s pots, p ans, lids, serving dishes and
bowls, as show n in th e figur e bel ow. It is preferable t o
pla ce s ervi n g di shes a nd li ds on the s i d e of the rack s
in order to avoid blocking t he ro tation of the top spray
arm.
Adju sting th e Upper B asket
The height of the upper basket can be adjusted i n order to
create mor e sp ace for la rge uten sils bot h for t he upp er
/lower basket. The height o f the upper ba sket ca n be
adjusted bylift up t he bask et fo r the uppe r posit ion, and up
press the handle to lowe r the upper basket, s ee the picture
below:
Foldin g back the cu p sh elves
For better st acking ofpo ts a nd pans ,
the spikes c an b e fol de d down as
show in th e pict ure ri ght .
Foldin g S pikes of Lower Bask et
Forbetterstackingofpotsandpans,
the spikes c an be f olded do wn as
show in t he pictur e righ t.
Page 11

Cutlery sho uld be pl aced in th e cu t le ry baske t wi t h th e ha ndle s at th e bottom . If t he r ack ha s si d e ba skets, the
spoons should b e loaded separately into the appr opriate s lots, esp ecially l ong utensils should b e placed in the
horizontal posit ion at th e fr o nt of t he u pp er baske t as sho wn in t h e p ic t ure.
Donot le t any item extend through the b ottom.
Always loadsharputensilswith thesharppoint down!
For personal safety and a to p qu ality clea ning, place the silver ware i n the bas ket
making surethat:
They do n ot nest together.
Silverware is placed with the h andles-down.
Butplaceknivesa ndotherpotentially dangerousutensils are placed handles-up.
Max. Dishes
LowerPositionmax.Φ
Upp er P o si t io n m a x.Φ
Max. Dishes
To p baske t
26cm
21cm
Bottom bask et
25cm
30cm
Page 12

()
Means:need tofill the Rinse-Aid Dispenser.
Intensive
Heavy
Normal
(*AS/NZS2007.1)
60 min
Quick
Soa k
For theheaviestsoil ed
loads, suchas pots, pans,
casseroledi shes and dishes
thathave beensittingwith
driedfood on them for a
while.
For heavily so iled load s ,
such as pots,plates,glasses
and lightly soiled pans .
Fornormally soiled loads,
suchas , plates,glasses
pot s
andlightlysoiledp ans.
standarddaily c ycle.
Daily wash i n only 1 hour.
For lightl y an d norma lly
soiled plates and pan s
for everyday.
Ashorter wash for lightly
soiled loadsthatdonot
needdrying.
A shorter wash for lightly
soiledloadsthat do not
need drying.
Pre-wash(50 )
Wash(65 )
℃
℃
Rinse
Rinse
Rinse(55 )
℃
Drying
Pre-wash(45 )
Wash(55 )
℃
℃
Rinse
Rinse (60 )
℃
Drying
Wash(55 )
℃
Rinse
Rinse(50 )
℃
Drying
Pre-wash(50 )
wash(6 0 )
Rinse (50 )
℃
℃
℃
Dryi ng
Wash (40 )
℃
Rinse
Rinse (45 )
℃
Pre-Wash
5/25g
(OrAll )in1
5/25g
(OrAll )in1
5/25g
(OrAll )in1
5/25g
20g
160
170
140
60
35
80.1
1.4
1.2
0.88
0.88
0.5
18
14.5
10.5
10
11
3.5
* : This progr am is the test cy cle. The information fo r com parabil ity test
AS/NZS 2007.1
inaccordance wit h , as follo ws:
AS/NZS 2007.1
Capacity: 12 setting
Position Upper basket: upper w heels on rails
Rinse aid setting: 6
Open the door slightly 50mm to assist i n drying of the dishes after every wa sh
Startin g a cycl e wash
1 Draw out the lower and up per bask et, load thedishes and push the m back.
It is c ommended to load th e lower basket fi rst, then the upper one (see the section en titled
“”
Loadingthe Dishwasher ).
2 Pour in the d etergent (see the section entit led Detergent and R inseAid ).
“”
3 I nsert the pl ug int o the socket. The power supply is 220-240 VAC/50 HZ, the specification
of th esocket is 1 0A 250VAC. Makesure that t he w ater supply is turned on to full pressure.
4 Clos e the do or,press the P button, to switch on the machine.
ower
5 Pres s the pro gram bu tton ,the wash pr ogram w ill be ch ange d a s foll ows dire ction:
Intensive->Heavy ->Normal->60m in->Quick ;->Soak
If ap rogram isselected, the response ligh t will li ght. Then p ress the Start/Pause button, the
dishwasher b egins to start.
Page 13

When you press the S tart/Pause button to pause during washing, the will
stop bli nking and the every minute unless you press the St art/Paus e but ton
to start.
Premise:
Acycl e that is underw ay can on ly be modified if it has only been r unning for a short time. O therw ise, the
1
detergent m ay hav e alr eady be en re leased, a nd the appliance m ay have alrea dy dr ained the wash water.
If t his is the case, th e deter gent disp enser must be refi lled ( see t he section ent itled "Loading the
Detergent " ).
Press the Start/Pau se but ton , the mach ine will be in st andby s tate, press the program b utton mo re tha n
2
3s then you can cha nge t he pro gram to the desired cycle setting (see thesection en titled " Startin g a wash
cycle. . ." ).
buzzerwill sound
running indicato r
Ifyou open the door , the machinew illpause. T he programlightwill
durin g a wash c y cl e
stop bli nki ng a nd th e buzz er wil l sou nd eve ry minute unl es s y o u clos e the d oor . A ft er
you c l o se th e door , the m achi n e will s ta rt workin g af ter 1 0 sec onds .
Aforgottendish can be added any time before the detergent cup opens.
Press the Start/Pause button
1
Open thedoor a little to stop the washing.
2
After the spray arms stop working,you can open the door
3
completely.
When th e workin g cy cle has finished, the buzzer o f th e di s hwas h e r wi l l so u nd for 8 seco n d s , th en stop. Turn o ff
the a pp lian c e us ing t he P ow er switch bu tton , shut of f the water supp ly and o pe n t h e do or of t he d ishwa s her.
Wait for a few minutes bef ore unlo ading th e dishwa sher to a voi dhandlin g the dishes and utensils while th ey
are still hot and m ore suscept ible tobreakage. The y will al so dry be tter.
Add forgotten dishes.
4
Close the door
5
Press the button, the dishwasher will run
6
after 10 seconds.
Start/Pause
SwitchOff the Dishwasher
The program light is on but is n ot blinkin g, only in this case the program me has e nded.
2.Turn off thewatertap!
Power1.Switchoff the dishwa sher by pressing the button.
Openthe door carefully.
Hot dishes are sensitive to knocks. The di shes shou ld theref ore be a llowed t o cool d own arou nd 15 minutes
beforeremoving from the appliance.
Open the d ishwasher's door,leave it ajar and wai t a few minutes before remov ing the dishes. In this way they
will be cool er and t he dryi ng will be improved.
Unloadingthe dishwasher
Itis normal that the di shwasher is wet insid e.
Empty the l ower ba sket first a nd the n the upperone. Thi s will avoid water dripping from the upper Basket onto
the dishes in the lower one.
Washth e arms in soapy a nd w arm wa ter and use a sof t bru sh t o
clean thejets.Replacethemafter rinsingthem thoroughly.
When following this procedure from step1 to step 3, the filter system will be removed;
when following it from Step 3 to Step 1, the f ilter system will be installed.
It is dan gerous to ope n th e door when was hi ng , be c a us e the hot wat e r may scald y ou .
Page 14

The filter prevents lar ger remnants of food or ot her obj ects from getting insi de th epump.
Theresidues may block thefilter, in thiscase they must be removed.
The filter system c onsists of a coarse fi lter,aflat ( Main f ilter)
An d a microfilter(F i ne filt er).
1
2
3
2
1
3
Main filter
Foodand soil particles trapped inthisfilterarepulverized by a
special jet on the l ower spr ay arm an d washe d down todrain.
Coarse filter
Large r items, suc h as p i e c esof bones or gl ass, tha t coul d block
thedrain are trapped inthe coarsefilter. To remove the items
caught by the fil ter,gen tly s queeze the tap on th e top of this
filterandlift out.
Fine filter
This filterholdssoiland food residues in thesum pareaa nd
prevents it frombeingredeposit onthedishes duringwashcycle.
Filterassembly
Thefilterefficiently
For best performance and results, the filte r must be cleaned re gularly. this reaso n, it is a goo d idea t o
remove th e larger food par ticles tr apped in the filter after each wash cyc le by rin sing the semicirc ular filte r and
cup unde r runnin g water. To re move th e filt er device , pull th e cup handle in t he upwa rd direct ion.
removes food particles fro m the wa sh wate r,al lowing it to be rec ycled du ring t he cycl e.
For
Th e d is h washer m us t n e ver beused w i thout the filter s.
Improper replacement of the filter may reduce the performanc e level of the appliance
anddamagedishes andutensils.
1
2
Step 1 Turn the filter in ant i-clockwise d irection,:
Step 2 lift the filter assy up:
When following this procedure from step1 to step 2, the filter system will be removed;
when following it from Step 2 to Step 1, the f ilter system will be installed.
Page 15

Remarks:
- Inspect t he filter s for blo cking a fter e very time th e dis hwasher ha s been u sed.
- By unscrew ing the c oarse fi lter, you can remove the filter syst em. Re move any foo d remna nts and
clean thefilters under running water.
Theentire filterassemblyshouldbe cleanedoncea week.
Cleaning the Filter
To cl ean the coa rse f ilter and t he fine filt e r, use a cleaning brush . R e as semble t hefilter p ar t s as s ho wn in t h e f i gures
on the la st page a nd r eins ert the e nti re assembly in the dis hwa sher, pos itio ning it in its seat and pressing dow nwar ds.
Whenc leaningthefilters,don'tknockonthem.Otherwise,thefilterscouldbe
contorted and theperformanceofthedishwasher could bedecreased.
The control p anel can be clea ned by u sing a l ightly dam pened c loth.
After cleaning, m ake sureto dry it thoroughly.
For the exterior, use a good a pp lia nc e po lish w ax .
Neveruse sharp objects, sco uring pads o r har sh clean ers on a ny part o f the dishwasher.
CleaningThe Door
To cle an th eedge around the door, you sho uld u se only a soft wa rm, damp cloth.
To avoi d pene tration o f water i nto t he door lock and elect rical com ponents, do not
usea spray cleaner of any kind.
Never use a spr ay c leaner t o clean t he d oor panel as it m ay damage the door loc k
and electricalcomponents.
Abrasive agents o r som e paper towels should not be used b ecause of the risk of
scra tching or leaving sp ots on the s t ainl es s steel s urfa ce.
Protec tAga inst Freez ing
please t ake frost protection meas ures o nthe di shwasher in winter. Every fter washing c ycles,
please op erate as follows
1.Cut offthe electrical powertothedishwasher.
2.Turnoff the water su pply an d disconnec t th e water i nlet pi pe from the water val ve.
3.Drain the water from the inlet pipe an d water valve. (Use a pan to gather the w ater)
4.Reconnect the wate r inlet pipe to t he wate r valve.
5.Remove the filte r at the bottom of the tub and use a sponge to soak up water in the sump.
:
If your dishwasher cannot work because of t he ice,
please con tact pr ofessiona l service persons.
timea
Cleani ng the SprayArms
It is ne ce ssar y to c l e an t h e sp ray a r ms regularly fo r ha r d
water chemicalswillclog the spray armjetsandbearings.
Tore m ov e the u pper sp r a y a rm , hold t he nut, rot ate the arm
clockwisetoremove it.
To remove thelowerspray arm, pull out the sprayarm upward.
Washthe arms in soapy and w arm water and use a soft brush to
clean the jets . Repl ace them after rinsin g them thoroughly.
Page 16

AfterEvery Wash
After ever y wash, turn off the w ater supply to th e
appliance and leave th e doo r slightl y open sot ha t
moisture a nd odour s ar e not tra pped in side.
Removethe Plug
Before cleani ng or p erformi ng mainten ance, always
remove the plug from the socket.
No Sol vent s or Abras ive Cleani ng
To cleantheexteriorand rubber partsof the dishwasher,
donot usesolventsor abrasive cleani ngproducts.
Only use a clo th with warm so apy wate r.
Torem ove s p ots o r st a ins from the sur face of t he
interi or, use a clot h da mpe ned with wa ter ana l ittle
vinegar,o r a cleaning pro duct mad e speci fically for
dishw ashers.
Position the applia nce in the desired location. The back should rest agai nst the w all behi nd i t, and t he si des,
along the adjacent cabi nets or walls
or squash ed.
the right or the left sides to facilitate prop er i nstallati on.
. The dishwas her is e quipped with water s upply a nd drain hoses tha t can be positioned either to
however ensure that the h oses atthe rear o f theappliance are not kinked
Whennotin Use for aLongTime
It isrecommend that yourunawash cyclewith the
dishwasher empt y and the n remove th e plu g from the
socket, turn o ff the wa ter supp ly and l eave the door of
the app lian c e sl ight ly op en. Th is will help th e d oo r
sealsto lastlonger and prevent odoursfrom forming
withinthe appliance.
Moving theApplia nce
If the app liance m ust be moved, try to keep it in the
vertical position. Ifabsolutelynecessary, itcanbe
positioned on its back.
Seals
Oneofthefactorsthatcauseodourstoforminthe
dishwasher is foo d th at remain s trappe din the seals.
Periodic cleaning with a damp sponge will prev ent t his
fro m occurr ing.
Once the appliance is positioned for levelling, t he height of the dishw ashe r
may be altered v ia adjust ment of the screwing level of the feet. In any case,
the applia nce should not be inclin ed more than 2 .
For personal safety:
DO NOT USE AN EXTENSION CORD OR AN ADAPTER PLUG WITH THIS APPLIANCE.
DONOT, UNDERANYCIRCUMSTANCES, CUT OR REMOVETHE EARTHING
CONNECTION FROM THE POWER CORD.
Please look at therating label to know the r ating v oltage a nd conn ect t he dishwash er to the appropr iate pow er suppl y.
Use the r equired fuse 10 amp , tim e delay f use orcircuit bre aker rec ommended and prov ide separate circuit s erving
only this appliance.
Ensure the v oltage a nd frequenc y of thepower being correspond s to
those on the rating plate . Only insert the p lug into an electrica l socket which is earthed
properly.Ifthe el ectrical sock et to wh ich the a pplianc e must b e conne cted is not
appropriate f or the plug , replacethesocket, ratherthanusinga adaptors or the likeas
theycould causeove rheatingandburns.
This appliance must be earthed. In the event of a malfunction or breakdown, earthing will reduce the risk of
electric shock by providing a path of least resistance for the electric current. This appliance is equipped with a
cord havingan equipm ent-earthing conductor andan earthing plug. The plug mustbe plugged into an
appropriate outlet that is installed and earthed in accordance with all local standards and requirements.
Page 17

Improper connection of the equipment earthing conductor can result in the risk of an
electric shock.
Check with a qualified electrician or service representative if you are in doubt whether the
appliance is properly earthed.
Do not modify the plug provided with the appliance. If the plug does not fit properly to the
outlet, please have a qualified electrician to install a proper outlet.
for personal safety:
DO NOT USE AN EXTENSION CORD OR AN ADAPTER PLUG WITH THIS APPLIANCE.
DO NOT, UNDER ANY CIRCUMST ANC ES, CUT OR REMOVE THE
CONNECTION
Connect thecold w ater supp ly hose to a thread ed 3/4 (inch) connector and m ake su re
that it isfastened tightly in place.
If the w ater pi pes are new or havenot been used for an extended period of t ime, let the
water run to make sure that the water is clear.This p recauti on is need ed to avoid the
risk of the water inlet to be blocked an d damage theapplian ce.
The water s uppl y to the appliance ca n also b e connec ted tot he ho usehold hot water
line (such as, central system, he ating sy stem),as l ong as it does not exceed a
temperatur e of 60 C . In this case, th e wash cycle time w ill beshortene dby abo ut 15
minutes andthe wash efficiency slightly reduced.
The connection must be made to the hot wate r line fo llowi ng the same procedures as
described i nthesectionfor the connectionto the coldwaterline.
In order to avoidthat there is mo re water staying in the inlet hose, pleaseclose
thehydrant after u sing.(Not applicable to appli ances without aqua-stop.)
FROM THE POWER CORD.
EARTHING
Insert the drainhose into adrain p ipe with a minimum diameter of 4 0mm, or let it run into the sink, making sure to
avoidbendingor crimpingit. The top of the hosemust belessthan 1000mm.
Front
Counter
NOTE
The top of the hose
must be l ess than
A
1000mm.
Drain pipe
B
φ 40mm
Page 18

How to Drain ExcessWaterFromHoses
If the sink is 1 000 hi gher from t he floor, th e ex c ess w a ter i n ho ses cannot be dr ained dire c tl y
into the sink. Itwill be necessaryto drainexcess w ater fromhoses intoa bowl o rsuitable
container that is held out side and lower than t he si nk.
Wat er Outl e t
Connect the water dr ain hose. Th e drain hose must be correctly f itted t o avoi d water leaks.
Ensure that the water drain hose is not kinked or sq uashed .
Extension Hose
Ifyou need a drain hose extension,makesure touseasimilardrainhose.
Totallength shouldnotexcee d4 metres;othe rwise thecleaning effect ofthedishwashercould be reduced.
Syphon Conn ection
The waste conn ecti on must be at a he ight less t han 1000 m m (maxi m u m) fr om thebottom of t he d ish.
The water dr ain hose should be f ixed .
Thefollowingthings shouldbe checkedbefore startingthe dishwasher.
1
Thedishwasheris levelandfixed properly
2
The i nle t va lv e is open
3
Thereis a leakageat the connections ofthe conducts
4
Thewires aretightly connected
5
The poweris switched on
6
The i nlet and drain hoses are k notte d
7
Allpacking materials and printingsshouldbe taken out fromthe dishwasher
After installation, please make sure tokeep this manual.
The conten t of this manual is very he lpfulto the users.
Page 19

Fuse blown, or the
circuit breakeracted
Replace fuse or reset circuit breaker. Remove any other
appliance s sharing the same circuit with the dishwasher
Power supplyis not
turned on
Water pressure is low
Door of dishwasher
not properly closed.
Kink in drain hose
Filter clogged
Kitchen sink clogged
Improper detergent
Spilled rinse-aid
Make sure the dishwasher is turned on and the door is
closed securely.
Make sure the power cord is properly plugged into the
wall socket.
Check that the water supply is connected properly and
the water is turned on.
Make sure to close the door properly and latch it.
Check drain hose.
Check coarse the filter
(see section titled )" Cleaning The Filter "
Check the kitchen sink to make sure it is draining well.
If the problem is the kitchen sink not draining ,you may
need a plumber rather than a serviceman for dishwashers.
Use only the special dishwasher detergent to avoidsuds.
If this occurs, open the dishwasher and let suds evaporate.
Add 1 gallon of cold water to the tub. Close and latch the
dishwasher, then select anycycle. Dishwasherwill drain
outthewaterat the first step.Openthe doorafter draining
is stop and check if the suds is disappeared.
Repeat if necessary.
Always wipe up rinse-aid spills immediately.
Detergent with
colourant was used
Hard wat er minerals
The affected items are
notcorrosion resistant.
A programme was not
run after dishwasher
salt wasadded.
Traces of salt have
gotten into the wash cycle.
The lid of the softer
is loose
r
Aspayarmis
knocking against
an itemin a basket
Items of crockery
are loose in the
wash cabinet
This may be caused
by on-site installation
or the cross-section of
the piping.
Make sure that the detergent is the one without
colourant.
To clean the interior, use a damp sponge with
dishwasher detergent and wear rubber gloves.
Never use any other cleaner than dishwasher
detergent for the risk of foaming or suds.
Always run the quick wash programme .
without any crockery in the dishwasher and
without selecting the Turbo function (if present),
after adding dishwasher salt.
Check the lip .Ensure the fixis fine.
Interrupt the programme, and rearrange the items
which are obstructing the sp ay arm.r
Interrupt the programme,
and rearrange the items of crockery.
This hasno influence on the dishwasher function.
if in doubt, contact a suitably qualified plumber.
Page 20

The dishes were not
loaded correctly.
See notes in " Loading the Dishwasher Baskets ".
Theprogramme was
notpowerful enough.
Not enough detergent
wasdispensed.
Items are blocking
the path of sp ay arms.r
The filter combination
inthebaseofwash
cabinet is not clean or
is not correctly fitted.
This may cause
the sp ay arm jets
r
to get blocke d.
Combination of soft
water and too much
detergent.
Aluminum utensils
have rubbed against
dishes.
Dishes block
detergent cups.
Improper loading
Too little rinse-aid
Select a more intensive programme.
See" Wash Cycle Table ."
Use more detergent, or change your detergent.
Rearrange the items so that the sp ay can rotate freely.r
Clean and/or fit the filter combination correctly.
Clean the sp ay arm jets. See "Cleaning the Spray
Arms".
Use less detergent if you have soft water and select
a shortest cycle to wash the glassware and to get
them clean.
Use a mild abrasive cleaner to eliminate those marks.
Re-loadin g the dishes properly.
Load the dishwasher as suggested in the directions.
Increase the amount of rinse-aid/refill the rinse-aid
dispenser.
r
Dishes are removed
too soon
Wrong program
has been selected
Use of cutlery with
a low-quality coating
Do not empty your dishwasher immediately after
washing. Open the door slightly so that the steam can
escape. Begin unloadingthe dishwasher only once t
he dishes are barely warm to the touch. Empty the low
basket first. This prevents water form dropping off
dishes in the upper basket.
In short program the washing temperature is lower.
This also lowers cleaning performance. Choose
a program with a long washing time.
Water drainage is more difficult with these items.
Cutlery or dishes of this type are not suitable for
washing in the dishwasher.
When some malfunctions come on, the appliance will display error codes to warn you:
E1
E4
Longer inlet time.
Overflow.
Faucets is not opened, or water intake is
restricted,or water pressure is too low.
Some element of dishwasher leaks .
Page 21

If overflow occurs, turn off the main water supply before calling a service.
If there is water in the base pan because of an overfill or small leak,
the water should be removed before restarting the dishwasher.
Height: 845mm
Width : 598mm
Depth: 600mm
Water pre ssur e: 0.04-1.0 M Pa
Hot water connection : max 60 ℃
Pow er s up pl y: see r at in g la b el
Capacity: 12place settings
Page 22

Cups
1
2
Saucers
3
Glasses
Dinnerplates
Soupplates
6
6
5
7
4
Dessert d ishes
6
6
Cutlery basket
Page 23

Forks
1
Soup s poons
2
3
Dessertspoons
Te aspo ons
4
5
Knives
 Loading...