

Page 1
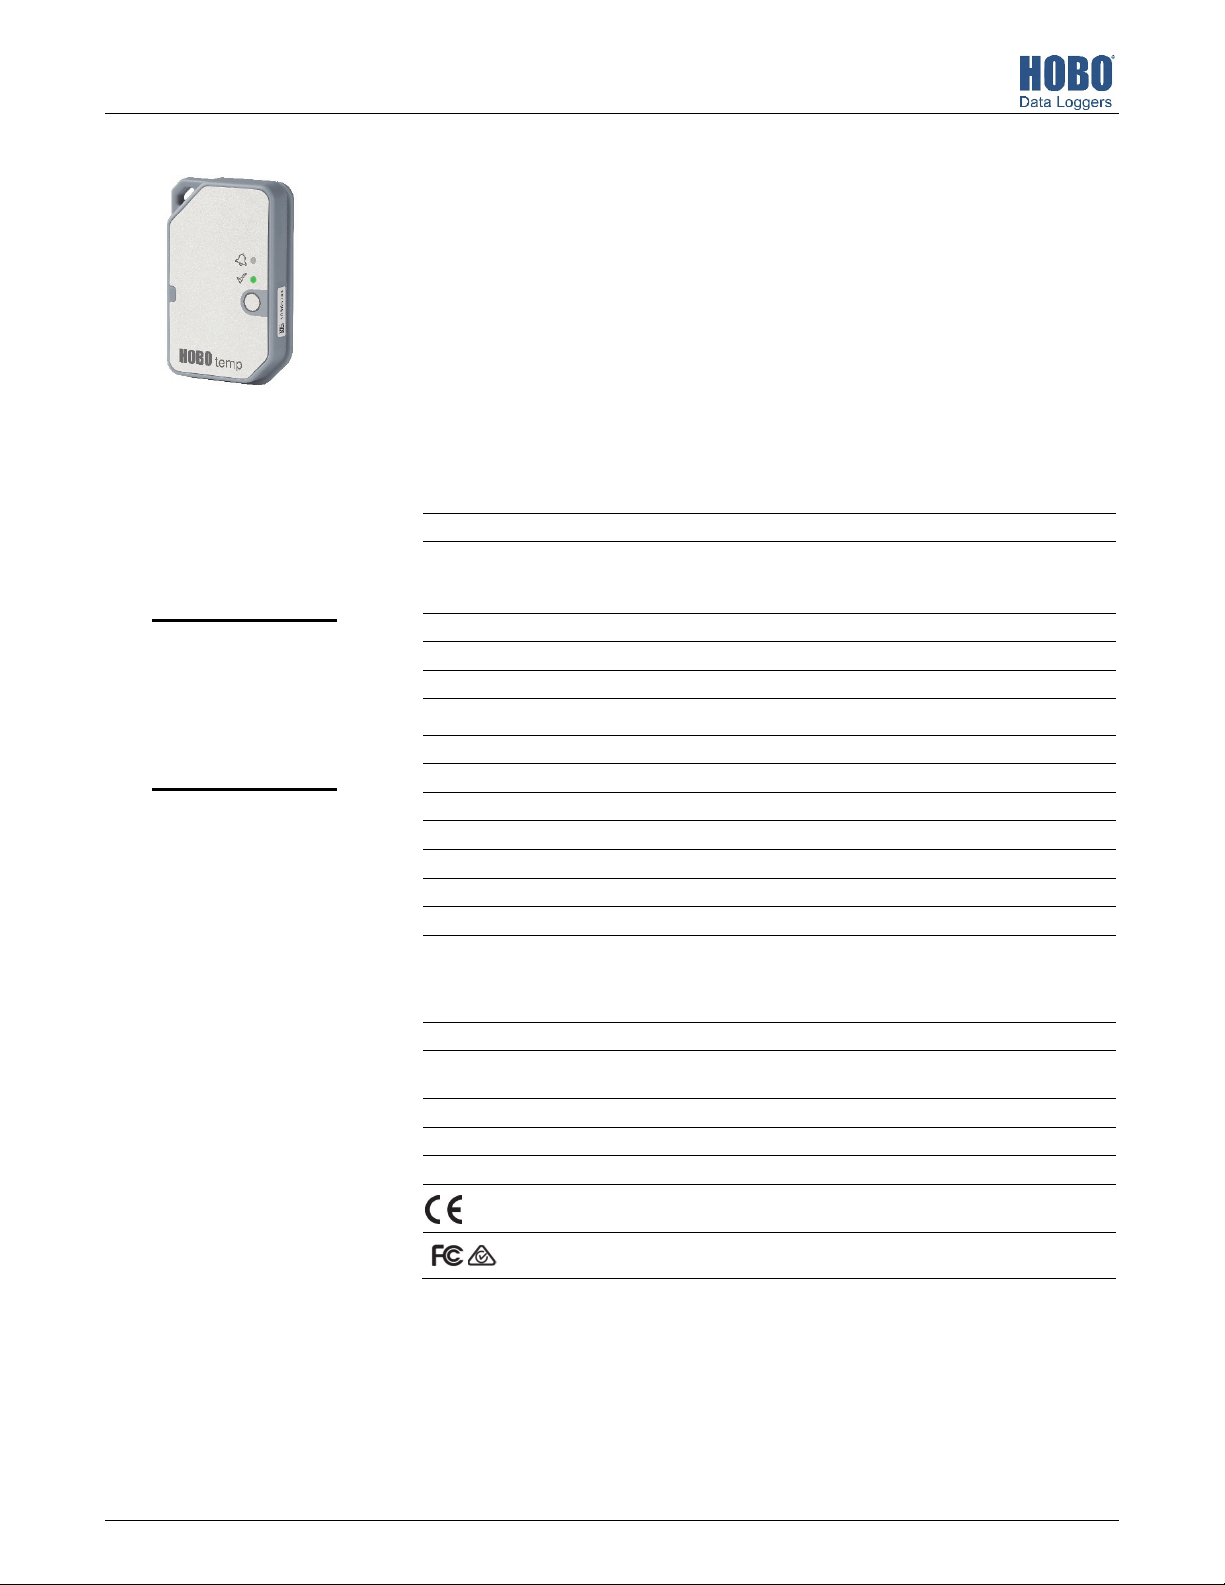
HOBO® MX100 Temp Logger Manual
W
The HOBO MX100 Temp logger measures temperature in indoor environments. With an IP67
environmental rating, the logger can be deployed in indoor locations where moisture may
form. This Bluetooth® Low Energy-enabled logger is designed for wireless communication with
a mobile device. Using the HOBOmobile® app, you can easily configure the logger, read it out,
and view data on your phone or tablet, or automatically upload the data to HOBOlink® for
further analysis. The logger has a built-in alarm you can configure to trip at thresholds you
specify. Designed with a non-replaceable lithium battery, this logger also has a power-saving
mode that allows you to use the Bluetooth signal only when needed to maximize battery life.
Note: This logger is not supported by the HOBO MX Gateway. Contact Onset Technical Support
for questions on MX100 logger compatibility with the gateway.
Specifications
Temperature Sensor
Range -30° to 70°C (-22° to 158°F)
Accuracy ±1.0°C from -30° to -5°C (±1.8°F from -22° to 23°F)
HOBO MX100
Temp Logger
Resolution 0.04°C (0.072°F)
Required Items:
• HOBOmobile app
• Device with iOS or
Android™ and
Bluetooth
Drift <0.01°C (0.018°F) per year
Response Time 6 minutes typical to 90% in open air moving 1 m/s, unmounted
Logger
Logger Operating Range -30° to 70°C (-22° to 158°F)
Radio Power 1 mW (0 dBm)
Transmission Range Approximately 30.5 m (100 ft) line-of-sight
Wireless Data Standard Bluetooth Low Energy (Bluetooth Smart)
Logging Rate 1 second to 18 hours
Time Accuracy ±1 minute per month at 25°C (77°F)
Battery CR2450 3V lithium, not replaceable
Battery Life 1 year, typical with logging interval of 1 minute and Bluetooth Always Off
Memory 30,000 measurements
Full Memory Download
Time
Dimensions 6.9 x 4.5 x 1.1 cm (2.71 x 1.76 x 0.42 inches)
eight 25.5 g (0.90 oz)
Environmental Rating IP67
Passed RTCA DO160G, part 21H
±0.5°C from -5° to 50°C (±0.9°F from 23° to 122°F)
±1.0°C from 50° to 70°C (±1.8°F from 122° to 158°F)
disabled; 2 years, typical with logging interval of 1 minute and Bluetooth
Always Off enabled. Faster logging intervals, remaining connected with
the app, excessive downloads, and paging may impact battery life.
Approximately 30 seconds; may take longer the farther the device is
from the logger
The CE Marking identifies this product as complying with all relevant
directives in the European Union (EU).
See last page
20813-E
Page 2
HOBO MX100 Temp Logger Manual
Logger Components and Operation
Mounting
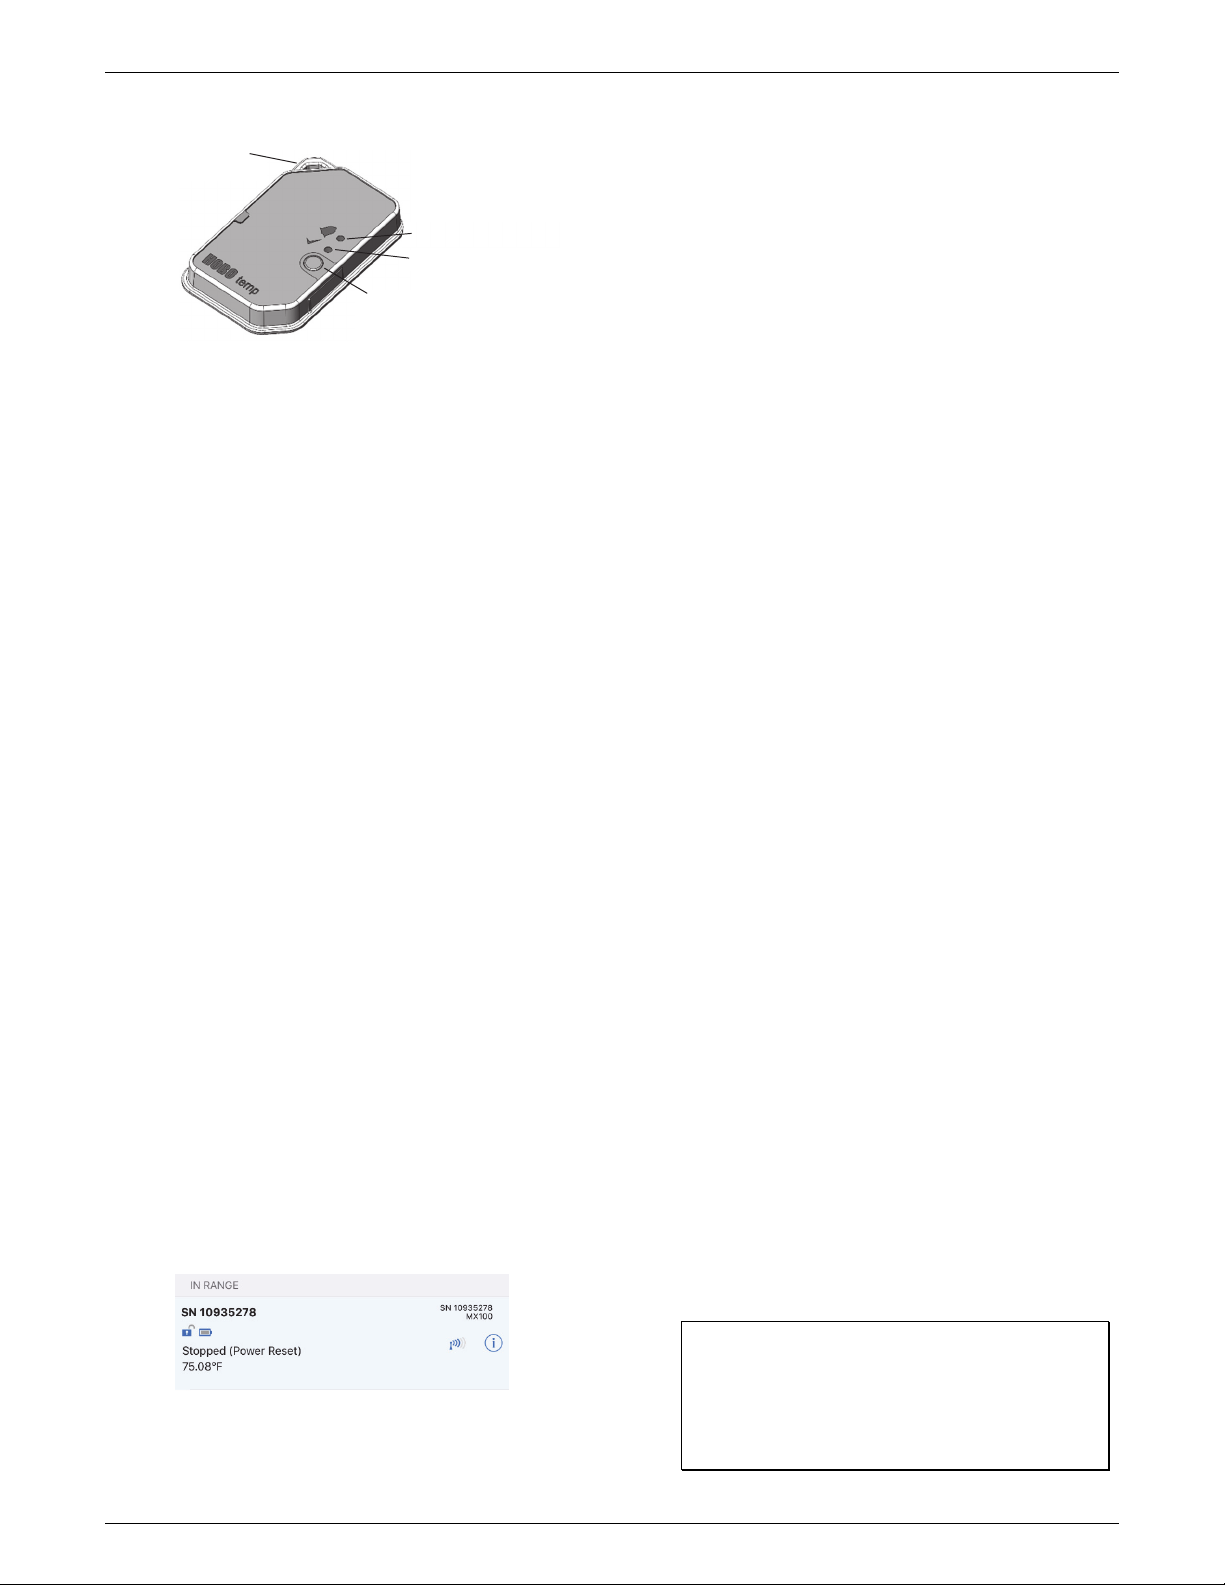
Loop
Alarm LED
Status LED
Start Button
Mounting Loop: Use this when deploying the logger by tying it
to an object.
Alarm LED: This LED blinks red every 4 seconds when an alarm
is tripped (unless Show LED is disabled as described in
Configuring the Logger). Both this LED and the status LED will
blink once when you press the start button to wake up the
logger before configuring it. If you select Page Logger LED in the
HOBOmobile app, both LEDs will be illuminated for 4 seconds.
Status LED: This LED blinks green every 4 seconds when the
logger is logging (unless Show LED is disabled as described in
Configuring the Logger). If the logger is waiting to start logging
because it was configured to start “On Button Push” or with a
delayed start, it will blink green every 8 seconds.
Start Button: Press this button for 1 second to wake up the
logger; both the alarm and status LEDs will blink. Once the
logger is awake, press this button for 1 second to move it to the
top of the loggers list in HOBOmobile. Press this button for 4
seconds to start or stop the logger when it is configured to start
or stop “On Button Push” (see Configuring the Logger). Both
LEDs will blink four times when you press the button to start or
stop logging. Press this button for 10 seconds to reset a
password.
Downloading HOBOmobile and
Connecting to a Logger
Install the HOBOmobile app to connect to and work with the
logger.
1. Download the HOBOmobile app from the App Store® or
Google Play™.
2. Open the app and enable Bluetooth in the device settings if
prompted.
3. Press the button on the logger to wake it up.
4. Tap the the HOBOs icon (on Android devices) or tap the
Devices icon and then tap Loggers at the top of the screen
(on Apple® devices). Tap the logger in the list to connect to
it.
• Make sure the logger is “awake” by pressing the start
button. The alarm and status LEDs will blink once when
the logger wakes up. You can also press the button a
second time to bring it to the top of the list if you are
working with multiple loggers.
• Make sure the logger is within range of your mobile
device. The range for successful wireless communication
is approximately 30.5 m (100 ft) with full line-of-sight.
• If your device can connect to the logger intermittently or
loses its connection, move closer to the logger, within
sight if possible.
• If the logger appears in the list, but you cannot connect
to it, close HOBOmobile and power cycle the mobile
device. This forces the previous Bluetooth connection to
close.
Once the logger is connected, you can select one of the
following actions:
• Configure. Select logger settings and load them onto the
logger to start logging. See Configuring the Logger.
• Readout. Download logger data. See Reading Out the
Logger.
• Full Status Details. Check the battery level and view the
configuration settings currently selected for the logger.
• Start Logging. Select this option to begin logging (if the
logger is configured to start “On Button Push” as
described in Configuring the Logger).
• Stop Logging. Stop the logger from recording data. This
overrides any other Stop Logging settings that may be
configured.
• Page Logger LED. Press and hold this option to illuminate
the alarm and status LEDs for 4 seconds.
• Logger Password. Select this to create a password for the
logger that will be required if another mobile device
attempts to connect to it. To reset a password, connect
to the logger, tap Set Logger Passkey, and select Reset to
Factory Default. You can also press the button on the
logger for 10 seconds to reset the password.
• Update Firmware. When new logger firmware is
available, this action appears in the list. Select it and
follow the instructions on the screen. A logger readout
will be completed automatically at the beginning of the
firmware update process. If the connection is lost
between the logger and the mobile device during the
firmware update, a Firmware Update Pending Status
displays for the logger in the HOBOs list. Connect to the
logger and select Restore Logger (or Update Firmware if
that option is available) to continue updating the
firmware.
Important: Before updating the firmware on the
logger, check the remaining battery level by selecting
If the logger does not appear in the list or if it is having
trouble connecting, follow these tips.
1-800-LOGGERS 2 www.onsetcomp.com
Full Status Details and make sure it is no less than 30%.
Make sure you have the time to complete the entire
update process, which requires that the logger remains
connected to the device during the upgrade.
Page 3
HOBO MX100 Temp Logger Manual
• Force Offload. This may appear if an error was
encountered when loading configure settings. Select this
to offload all the data on the logger before reconfiguring
it.
Configuring the Logger
Use HOBOmobile to set up the logger, including selecting the
logging interval, start and stop logging options, configuring
alarms, and other settings.
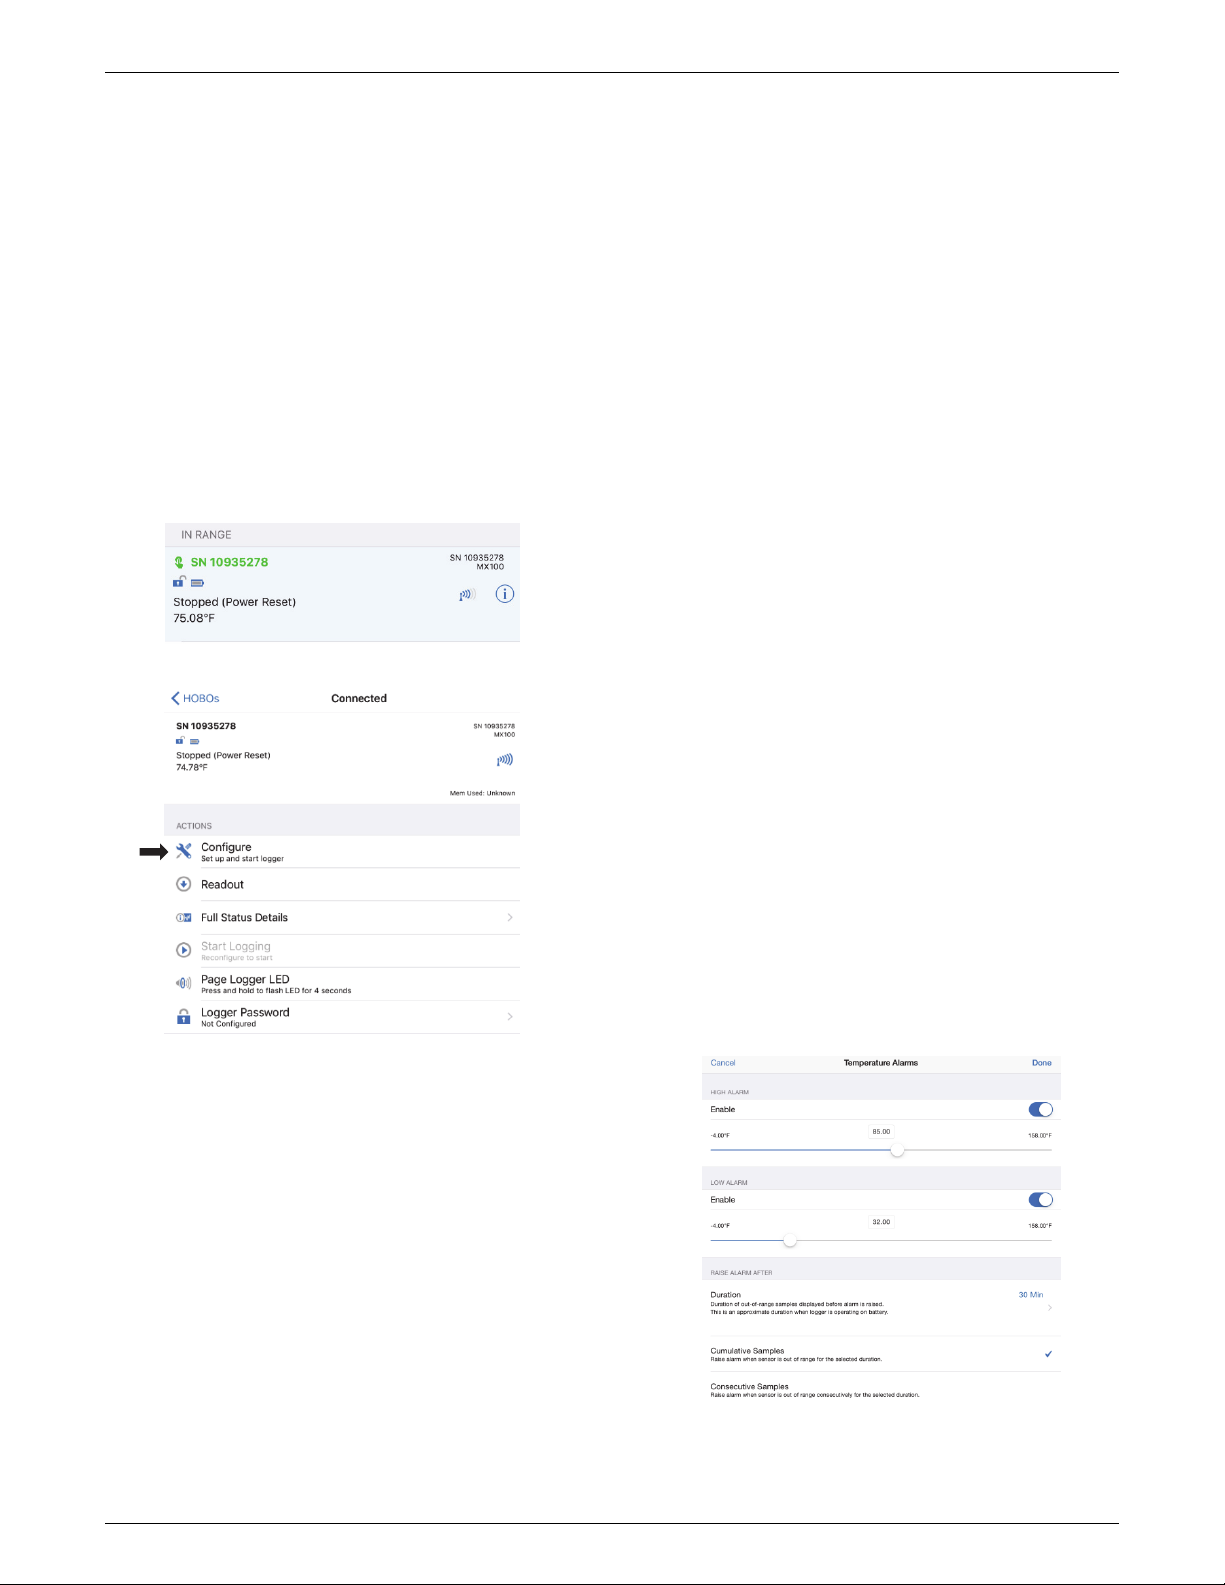
1. Press the button on the logger to wake it up.
2. Find the logger in the list and tap it to connect to it. If you
are working with multiple loggers, you can press the button
on the logger a second time to bring it to the top of the list.
The logger name (or serial number if no name has been
assigned) turns green when the logger moves to the top of
the list. Note that the current temperature is displayed
even when the logger is not logging.
3. Once connected, tap Configure.
• On Date/Time. Logging will begin at a date and time you
specify. Select the Date and time and tap Done.
Tap Done in the Start Logging screen.
8. Tap Stop Logging and select the options for when logging
will end.
a. Choose one of two memory options:
• When Memory Fills. The logger will continue recording
data until the memory is full.
• Never (Wrap When Full). The logger will continue
recording data indefinitely, with newest data
overwriting the oldest.
b. Select On Button Push if you want to be able to stop
logging by pushing the button on the logger for 4
seconds. Note that if you also choose On Button Push for
the Start Logging option, then you will not be able to stop
logging until 30 seconds after logging begins.
c. Select one of the following time options for when to stop
logging:
• Never.
• On Date/Time. Select this if you want the logger to
Select this if you do not want the logger to stop
at any predetermined time frame.
stop logging on a specific date and time. Select the
date and time and then tap Done.
4. Tap Name and type a name for the logger up to 20
characters (optional). Tap Done. If no name is selected, the
logger serial number is used as the name.
5. Tap Group to add the logger to the Favorites group, an
existing custom group, or create a new group name up to
20 characters (optional). Tap Done.
6. Tap Logging Interval and choose how frequently the logger
will record data.
7. Tap Start Logging and select when logging will begin:
• Now. Logging will begin immediately after tapping Start
in the Configure screen.
• After. Select this if you want to control how long the
logger should continue logging once it starts. Choose
the amount of time you want the logger to log data
and then tap Done. For example, select 30 days if you
want the logger to log data for 30 days after logging
begins.
d. Tap Done in the Stop Logging screen.
9. Tap the Temperature sensor to configure alarms (optional).
a. Enable the High Alarm if you want an alarm to trip when
the sensor reading rises above the high alarm value. Drag
the slider to the reading that will trip the alarm or tap the
value field and type a specific reading. In this example, an
alarm will trip when the temperature rises above 85°F.
• On Next Logging Interval. Logging will begin at the next
even interval as determined by the selected logging
interval.
• On Button Push. Logging will begin once you press the
button on the logger for 4 seconds.
1-800-LOGGERS 3 www.onsetcomp.com
b. Enable the Low Alarm if you want an alarm to trip when
the sensor reading falls below the low alarm value. Drag
the slider to the reading that will trip the alarm or tap the
Page 4
HOBO MX100 Temp Logger Manual
value field and type a specific reading. In the example, an
alarm is configured to trip when the temperature falls
below 32°F. Note: The actual values for the high and low
alarm limits are set to the closest value supported by the
logger.
c. Under Raise Alarm After, select the duration before an
alarm is tripped and tap Done in the Alarm Duration.
d. Select either Cumulative or Consecutive Samples. If you
select Cumulative Samples, then the alarm will trip when
the time the sensor is out of range over the course of the
deployment is equal to the selected duration. If you
select Consecutive Samples, then the alarm will trip when
the time the sensor is continuously out of range is equal
to the selected duration. For example, the high alarm for
temperature is set to 85°F and the duration is set to 30
minutes. If Cumulative is selected, then an alarm will trip
once a sensor reading has been at or above 85°F for a
total of 30 minutes since the logger was configured;
specifically, this could be 15 minutes above 85°F in the
morning and then 15 minutes above 85°F again in the
afternoon. If Consecutive is selected, then an alarm will
trip only if all sensor readings are 85°F or above for a
continuous 30-minute period.
e. Tap Done in the Temperature Alarms screen. Back in the
Configure screen, a setting to maintain the alarm until
the logger is reconfigured is enabled automatically. This
cannot be disabled.
10. Enable or disable Show LED. If Show LED is disabled, the
alarm and status LEDs on the logger will not be illuminated
while logging (the alarm LED will not blink if an alarm trips).
You can temporarily turn on LEDs when Show LED is
disabled by pressing the button on the logger for 1 second.
11. Enable or disable Bluetooth Always Off. If Bluetooth Always
Off is disabled, the logger will “advertise” or regularly send
out a Bluetooth signal for the phone or tablet to find via
HOBOmobile while it is logging, which uses battery power.
When Bluetooth Always Off is enabled, the logger will only
advertise during logging when you press the button on the
logger to wake it up, thereby preserving as much battery
power as possible.
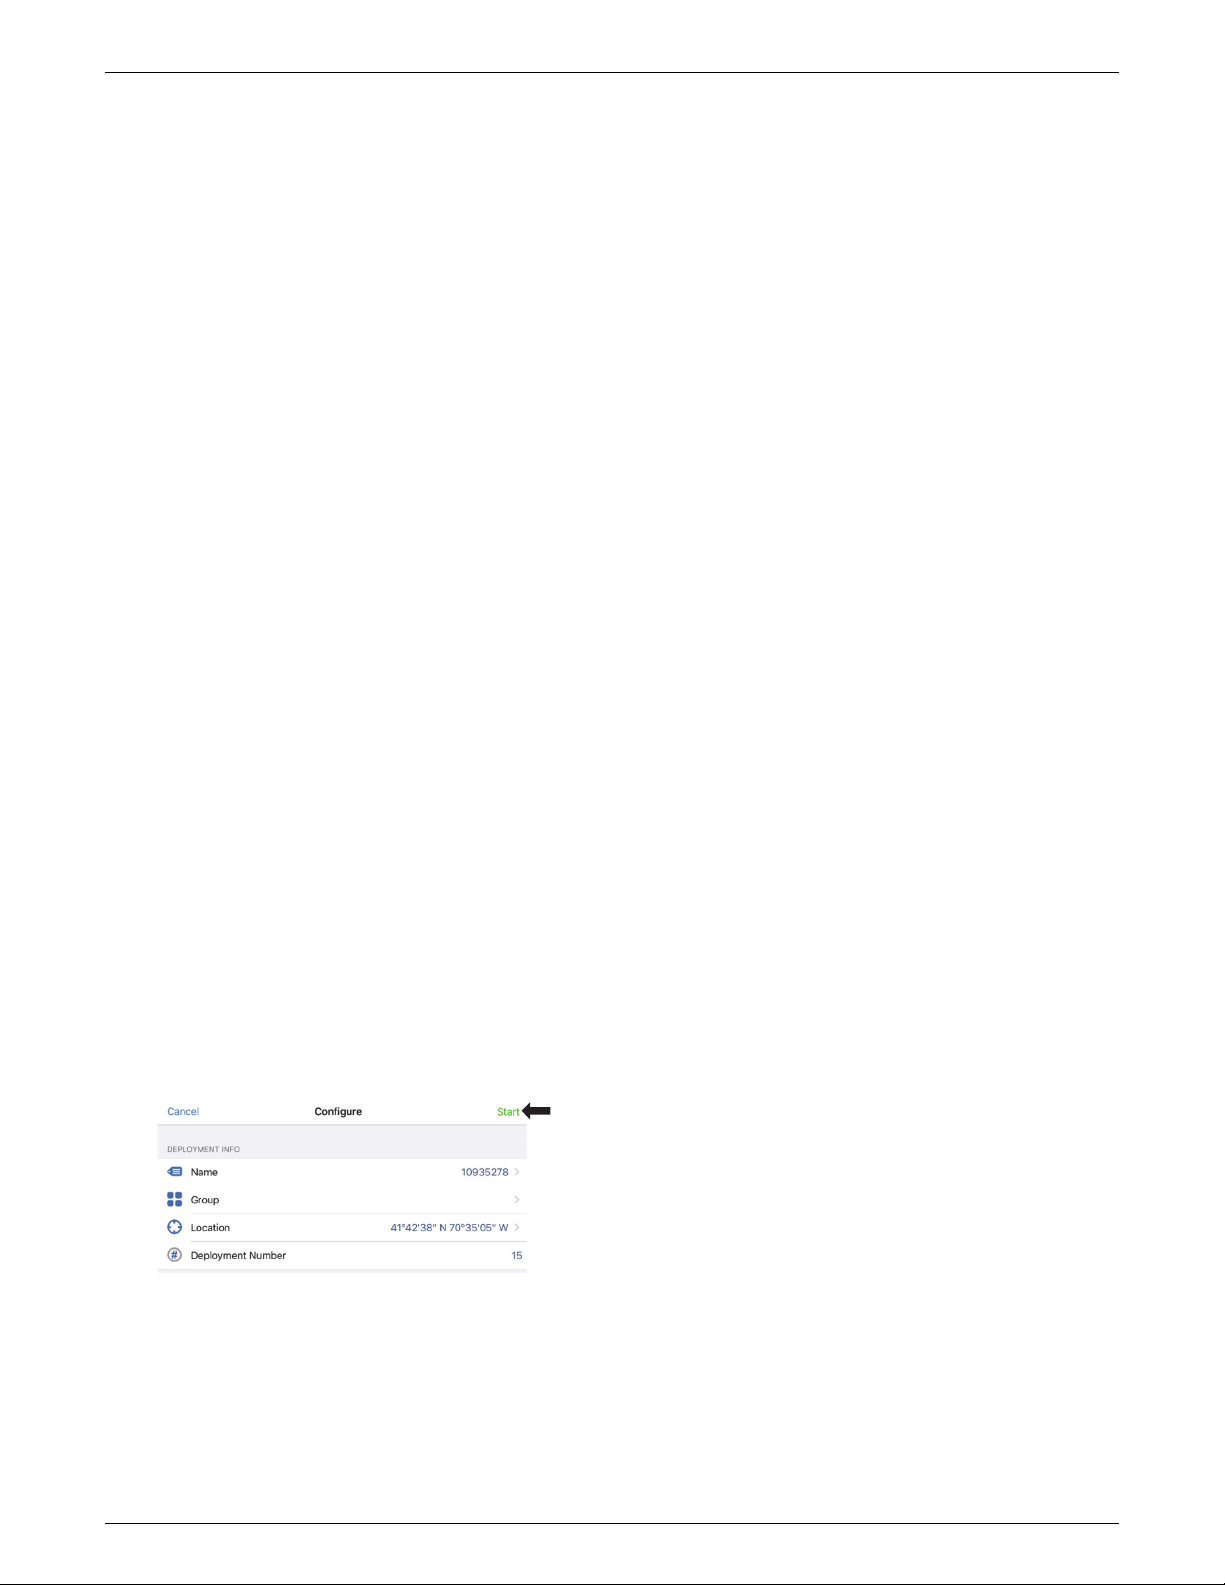
12. Tap Start in the upper right corner of the Configure screen
to load the settings onto the logger.
returns to a normal range, the alarm indicator will not clear in
the app and the alarm LED will continue to blink.
Setting a Password
You can create an encrypted password for the logger that will
be required if another phone or tablet attempts to connect to
it. This is recommended to ensure that a deployed logger is not
mistakenly stopped or purposely altered by others. This
password uses a proprietary encryption algorithm that changes
with every connection.
To set a password:
1. Tap the HOBOs icon (on Android devices) or tap the Devices
icon and then tap Loggers at the top of the screen (on Apple
devices). Select a logger in the In Range list to connect to it.
2. Tap Logger Password.
3. Type a password up to 10 characters.
4. Tap Save.
Only the phone or tablet used to set the password can then
connect to the logger without entering a password; all other
mobile devices will be required to enter the password. For
example, if you set the password for the logger with your tablet
and then try to connect to the device later with your phone,
you will be required to enter the password on the phone but
not with your tablet. Similarly, if others attempt to connect to
the logger with different devices, then they would also be
required to enter the password. To reset a password, connect
to the logger, tap Set Logger Passkey, and select Reset to
Factory Default or press the button on the logger for 10
seconds.
Reading Out the Logger
To download data from the logger:
1. Tap the HOBOs icon (on Android devices) or tap the Devices
icon and then tap Loggers at the top of the screen (on Apple
devices). Tap the logger to connect to it. If the logger was
configured with Bluetooth Always Off enabled, press the
button on the logger to wake it up. When working with
multiple loggers, you can also press the button on the
logger to bring it to the top of the list.
2. Once connected, tap Readout.
3. Tap the Data Files icon to view a mini-graph of the
downloaded data.
4. Tap the mini-graph to view a larger version of the graph or
to share the file. See the HOBOmobile User’s Guide for
details on viewing graphs and sharing data.
Logging will begin based on the settings you selected. See
Deploying the Logger for details on mounting and see Reading
Out the Logger for details on downloading.
If the logger was configured with alarm settings, an alarm will
trip when the temperature reading is outside the range
specified in the logger configuration. When an alarm trips, the
logger alarm LED blinks every 4 seconds (unless Show LED is
disabled), an alarm icon appears in the app, and an Alarm Out
of Range event is logged. Even if the temperature reading
1-800-LOGGERS 4 www.onsetcomp.com
Data can also be uploaded automatically to HOBOlink, Onset’s
web-based software. Tap the Settings icon to enable the
HOBOlink Upload Data option (this requires a HOBOlink
account at www.hobolink.com). See the HOBOmobile User’s
Guide for more details on this setting and see the HOBOlink
help for details on working with data in HOBOlink. Note:
MX100 loggers are not supported by the HOBO MX Gateway.
Contact Onset Technical Support for questions on MX100
logger compatibility with the gateway.
Page 5
HOBO MX100 Temp Logger Manual
The logger can be placed in indoor locations that experience
Logger Events
The logger records the following events to track logger
operation and status. To plot events in HOBOmobile, tap a
mini-graph and then tap . Select the events you wish to plot
and then tap again. You can also view events in shared or
exported data files.
Event Name Definition
Host Connect The logger was connected to a mobile
Started The logger started logging.
Stopped The logger stopped logging.
Alarm Out of
Range/In Range
Safe Shutdown The battery level dropped below a safe
device.
An alarm has occurred because the reading
was outside the alarm limits or back within
range. Note: Although the reading may
return to a normal range, the alarm
indicator will not clear in the app and the
alarm LED will continue to blink until you
reconfigure the logger.
operating voltage and performed a safe
shutdown.
condensation. Although the logger can withstand incidental
splashing with water, do not deploy it in a permanently wet
location.
Protecting the Logger
Note: Static electricity may cause the logger to stop logging.
The logger has been tested to 8 KV, but avoid electrostatic
discharge by grounding yourself to protect the logger. For more
information, search for “static discharge” on
www.onsetcomp.com.
Battery Information
The logger uses one CR2450 non-replaceable lithium battery.
Battery life is 1 year, typical with a logging interval of 1 minute,
but may be extended to 2 years when the logger is configured
with Bluetooth Always Off enabled. Expected battery life varies
based on the ambient temperature where the logger is
deployed and the frequency of connections, downloads, and
paging. Deployments in extremely cold or hot temperatures or
a logging interval faster than 1 minute can impact battery life.
Estimates are not guaranteed due to uncertainties in initial
battery conditions and operating environment.
Deploying the Logger
You can deploy the logger by using tape or the mounting loop.
(185°F), or recharge the lithium battery. The battery may
explode if the logger is exposed to extreme heat or conditions
that could damage or destroy the battery case. Do not dispose
WARNING: Do not cut open, incinerate, heat above 85°C
• On the back of the logger, remove the backing on the
tape that is adhered to the top and bottom of the logger
and then mount it on a flat surface.
• Use the mounting loop to tie the logger to another
object.
of the logger or battery in fire. Do not expose the contents of
the battery to water. Dispose of the battery according to local
regulations for lithium batteries.
Federal Communication Commission Interference Statement
This equipment has been tested and found to comply with the limits for a Class B digital device, pursuant to Part 15 of the FCC Rules. These limits are designed to provide
reasonable protection against harmful interference in a residential installation. This equipment generates uses and can radiate radio frequency energy and, if not installed and
used in accordance with the instructions, may cause harmful interference to radio communications. However, there is no guarantee that interference will not occur in a
particular installation. If this equipment does cause harmful interference to radio or television reception, which can be determined by turning the equipment off and on, the user
is encouraged to try to correct the interference by one of the following measures:
• Reorient or relocate the receiving antenna
• Increase the separation between the equipment and receiver
• Connect the equipment into an outlet on a circuit different from that to which the receiver is connected
• Consult the dealer or an experienced radio/TV technician for help
This device complies with Part 15 of the FCC Rules. Operation is subject to the following two conditions: (1) This device may not cause harmful interference, and (2) this device
must accept any interference received, including interference that may cause undesired operation.
FCC Caution: Any changes or modifications not expressly approved by the party responsible for compliance could void the user's authority to operate this equipment.
Industry Canada Statements
This device complies with Industry Canada license-exempt RSS standard(s). Operation is subject to the following two conditions: (1) this device may not cause interference, and
(2) this device must accept any interference, including interference that may cause undesired operation of the device.
Avis de conformité pour l’Industrie Canada
Le présent appareil est conforme aux CNR d'Industrie Canada applicables aux appareils radio exempts de licence. L'exploitation est autorisée aux deux conditions suivantes : (1)
l'appareil ne doit pas produire de brouillage, et (2) l'appareil doit accepter tout brouillage radioélectrique subi, même si le brouillage est susceptible d'en compromettre le
fonctionnement.
To comply with FCC and Industry Canada RF radiation exposure limits for general population, the logger must be installed to provide a separation distance of at least 20cm from
all persons and must not be co-located or operating in conjunction with any other antenna or transmitter.
© 2016–2019 Onset Computer Corporation. All rights reserved. Onset, HOBO, HOBOmobile, and HOBOlink are
registered trademarks of Onset Computer Corporation. Apple is a registered trademark and App Store is a service
mark of Apple Inc. Android and Google Play are trademarks of Google LLC. Bluetooth and Bluetooth Smart is a
1-800-LOGGERS (564-4377) • 508-759-9500
www.onsetcomp.com/support/contact
registered trademark of Bluetooth SIG, Inc. All other trademarks are the property of their respective companies.
Patent #: 8,860,569 20813-E
 Loading...