

Page 1
e-mail: [email protected]
For latest product manuals:
omegamanual.info
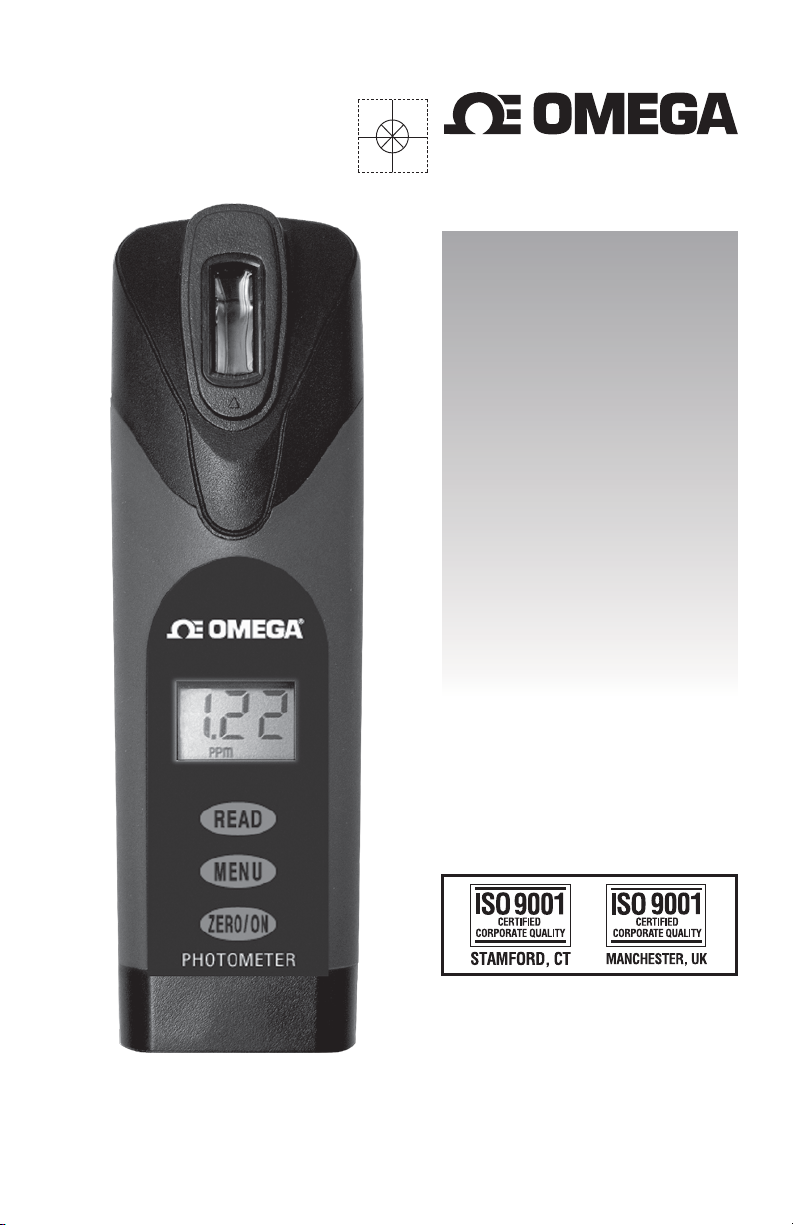
HHWT-12
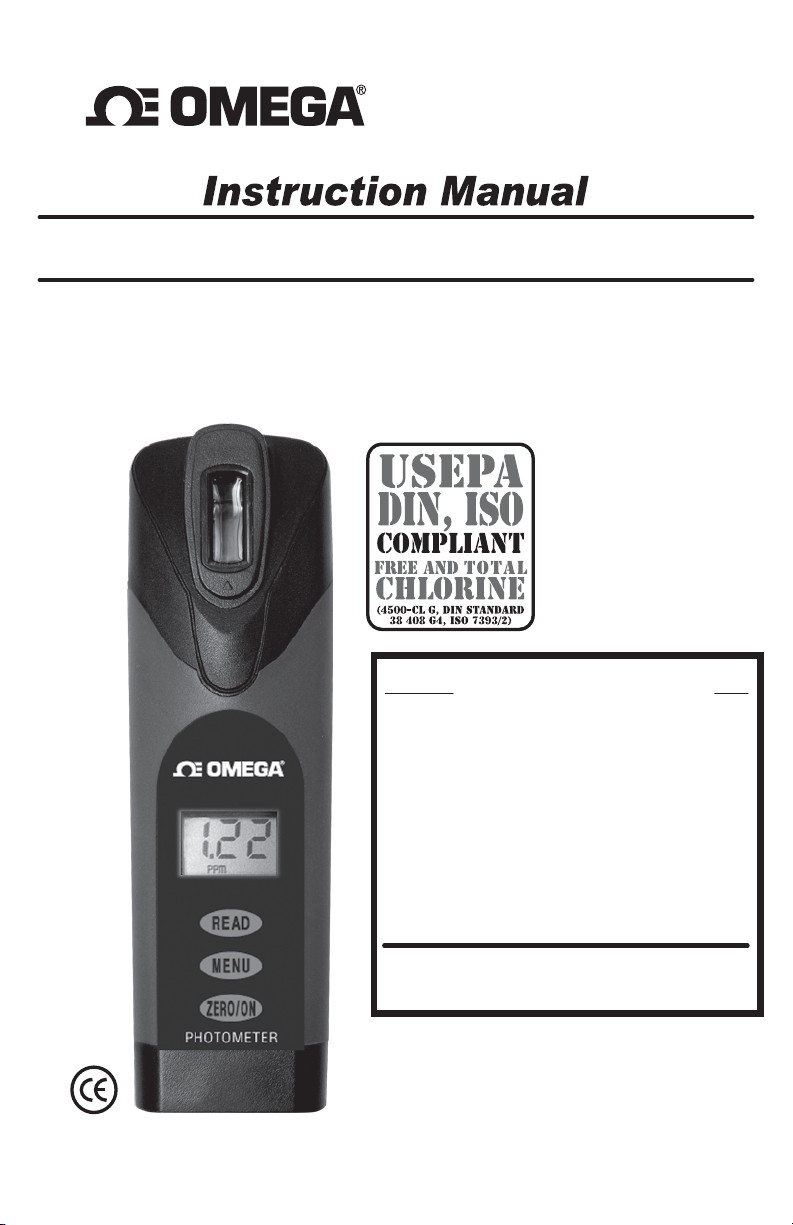
Handheld Photometer
Transmission Test Instructions
Shop online at
omega.com
®
User’s Guide
®
Page 2

Servicing North America:
U.S.A.:
Omega Engineering, Inc., One Omega Drive, P.O. Box 4047
ISO 9001 Certified
Stamford, CT 06907-0047 USA
Toll Free: 1-800-826-6342 TEL: (203) 359-1660
FAX: (203) 359-7700 e-mail: [email protected]
Canada:
976 Bergar
Laval (Quebec), H7L 5A1 Canada
Toll-Free: 1-800-826-6342 TEL: (514) 856-6928
FAX: (514) 856-6886 e-mail: [email protected]
For immediate technical or application assistance:
U.S.A. and Canada:
Sales Service: 1-800-826-6342/1-800-TC-OMEGA
®
Customer Service: 1-800-622-2378/1-800-622-BEST
®
Engineering Service: 1-800-872-9436/1-800-USA-WHEN
®
Mexico/
En Español: 001 (203) 359-7803 FAX: 001 (203) 359-7807
Latin America:
Servicing Europe:
Benelux
: Managed by the United Kingdom Office
Czech Republic:
Frystatska 184
733 01 Karviná, Czech Republic
Toll-Free: 0800-1-66342 TEL: +420-59-6311899
FAX: +420-59-6311114 e-mail: [email protected]
France:
Managed by the United Kingdom Office
Toll-Free: 0800 466 342 TEL: +33 (0) 161 37 29 00
FAX: +33 (0) 130 57 54 27 e-mail: [email protected]
Germany/Austria:
Daimlerstrasse 26
D-75392 Deckenpfronn, Germany
Toll-Free: 0800 6397678 TEL: +49 (0) 7056 9398-0
FAX: +49 (0) 7056 9398-29 e-mail: [email protected]
United Kingdom:
OMEGA Engineering Ltd.
ISO 9001 Certified
One Omega Drive, River Bend Technology Centre, Northbank
Irlam, Manchester M44 5BD United Kingdom
Toll-Free: 0800-488-488 TEL: +44 (0) 161 777-6611
FAX: +44 (0) 161 777-6622 e-mail: [email protected]
OMEGAnet®Online Service Internet e-mail
omega.com [email protected]
It is the policy of OMEGA Engineering, Inc. to comply with all worldwide safety and EMC/EMI
regulations that apply. OMEGA is constantly pursuing certification of its products to the European New
Approach Directives. OMEGA will add the CE mark to every appropriate device upon certification.
The information contained in this document is believed to be correct, but OMEGA accepts no liability for any
errors it contains, and reserves the right to alter specifications without notice.
WARNING: These products are not designed for use in, and should not be used for, human applications.
®
Page 3
Index:
Parameter Page
Chloride 4
Chlorine Dioxide 5
Chromium 6
Cyanuric Acid 7
Hydrogen Peroxide (Low Range) 8
Hydrogen Peroxide (Mid Range) 9
Hydrogen Peroxide (High Range) 10
Iodine 11
Manganese 12
Peracetic Acid 13
Phosphate 14
Sulfate 15
6XO¿GH
Total Hardness (Low Range) 17
Total Iron (TPTZ) & Iron (II) 18
Turbidity 19
Tips for Best Accuracy 20
Error Messages 21
Battery Installation 21
Reorder Information 22
IDEAL FOR DRINKING WATER, POOLS AND SPAS,
ENVIRONMENTAL, & EDUCATIONAL TESTING
HHWT-12
Advanced Photometer System
This manual covers transmission tests only. For instructions for HHWT-12 direct
read tests, consult manual M-5099 that came with the meter and is also available
at Omega.com/manuals.
Page 4
Rev. 021213-BT
%T
90
80
70
60
50
40
30
20
10
0
9876543 2 1 0
4
CH
TR0
HHWT-481657 - for 4mL Sample
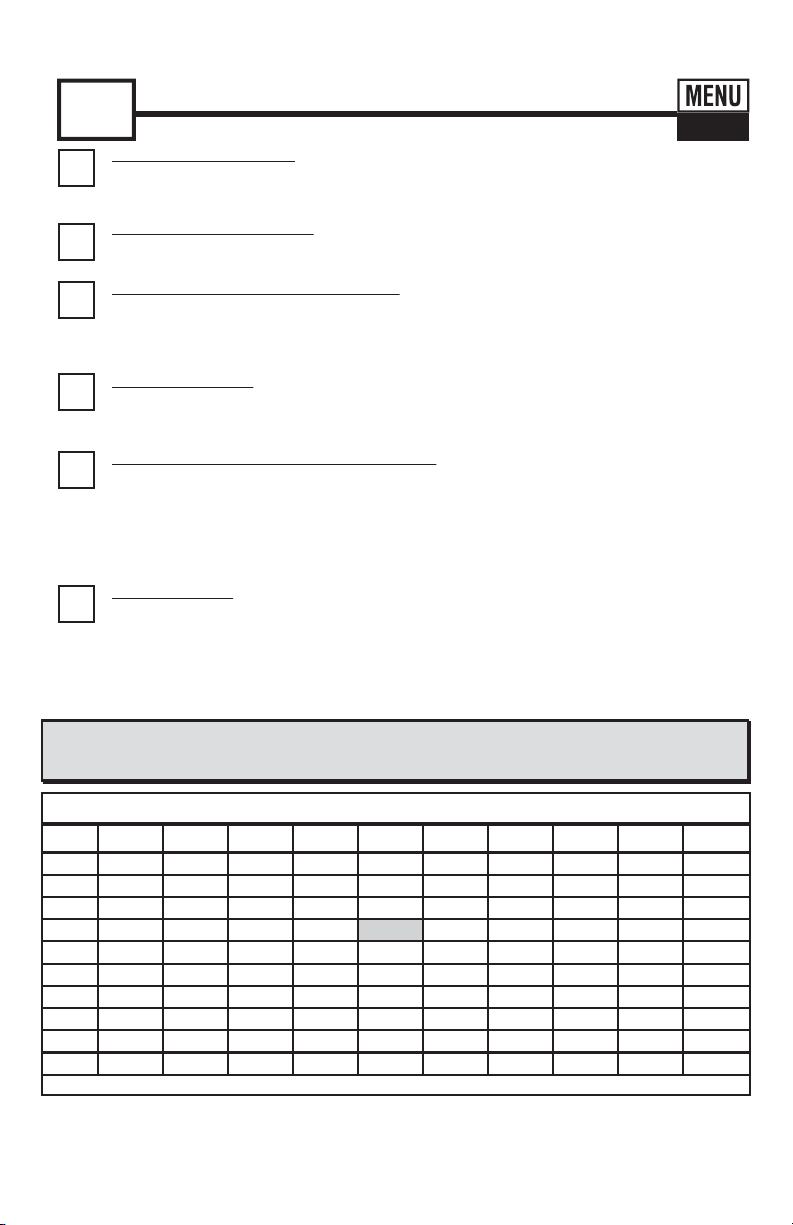
Sodium Chloride results require the table below. Follow Chloride (as NaCl) Test Procedure (above)
using
HHWT-481657. NOTE: To convert the NaCl value to Chloride (as Cl–), multiply the value
from the chart below by 0.6. (Example: 115ppm NaCl = 69ppm Cl
–
)
Chloride (as NaCl) Table
6
Find the “TR” result in the table below to determine the Chloride concentration in ppm (parts
per million). (Example: a “TR” result of 65.3 (use only the 65 for the chart) equals a Chloride
value of 70 ppm). Record result.
After testing is completed, rinse cell immediately.
USE TABLE
5
Dip the HHWT-481657 into the CELL and immediately press READ. This starts the 20
SECOND countdown timer. During this time move the strip in a gentle back and forth motion.
Remove and discard the strip after “1” on the display disappears*.
The cursor will move
across the display
while the meter prepares to measure the sample. Record result displayed
(this result is automatically stored in TR0).
DIP STRIP AND PRESS “READ”
4
Press the ZERO/ON button.
The cursor will move across the display,
followed by 100 %T.
Sample is ready for testing.
ZERO METER*
3
Rinse the CELL at least 3 times with the water sample you will be testing - rinsing minimizes
WKHSRWHQWLDOIRUFURVVFRQWDPLQDWLRQIURPDSUHYLRXVWHVW)LQDOO\¿OOFHOOWRFDSDFLW\P/
with the water sample.
FILL METER WITH SAMPLE
2
Press and re-press the MENU button until the display shows the parameter TR0.
SELECT TEST: TR0
1
Press the ZERO/ON button to power the meter on; the display will show all annunciators,
then the current MENU selection, followed by the last reading.
TURN METER ON
Chloride (as NaCl) Test Procedure
For Tap Water
0 0 2 6 8 12 18 20
26 28 32 36
50 52 58 60 62 66 68 70
72 76 78 80 82 86 88 90
92 96 98 100 102 105 106 108
110 112 116 117 118 120 122 126
128 130 132 136 138
150 152 156 158 162 168 170
176 180 188 192 198 210 216 226
256 272 280 288 290 >290 >290
*NOTE: When testing outdoors (sunlight), for best accuracy, use the Mixing Cap/Cell Cover when Zeroing and Reading the sample.
Page 5
Chlorine Dioxide Test Procedure
5
C lo
2
TURN METER ON
1
Press the ZERO/ON button to power the meter on; the display will show all annunciators, then
the current MENU selection, followed by the last reading.
SELECT TEST: TR0
2
Press and re-press the MENU button until the display shows the parameter TR0.
FILL METER WITH SAMPLE
3
Rinse the CELL at least 3 times with the water sample you will be testing - rinsing minimizes
WKHSRWHQWLDOIRUFURVVFRQWDPLQDWLRQIURPDSUHYLRXVWHVW)LQDOO\¿OOFHOOWRFDSDFLW\P/
with the water sample.
DIP STRIP AND PRESS “READ”
4
Dip the HHWT-484014 into the CELL and immediately press READ. This starts the 20 SECOND
countdown timer. During this time move the strip in a gentle back and forth motion. Remove and
discard the strip after “1” on the display disappears*. T
while the meter prepares to measure the sample (ignore this result).
display
ZERO METER*
5
Press the ZERO/ON button. The cursor will move across the display, followed by 100 %T.
DIP STRIP AND PRESS “READ”
6
Dip the HHWT-486633 into the CELL and immediately press READ. This starts the 20 SECOND
countdown timer. During this time move the strip in a gentle back and forth motion. Remove and
discard the strip after “1” on the display disappears*.
while the meter prepares to measure the sample. Record result displayed (this result is
display
automatically stored in TR0).
USE TABLE
7
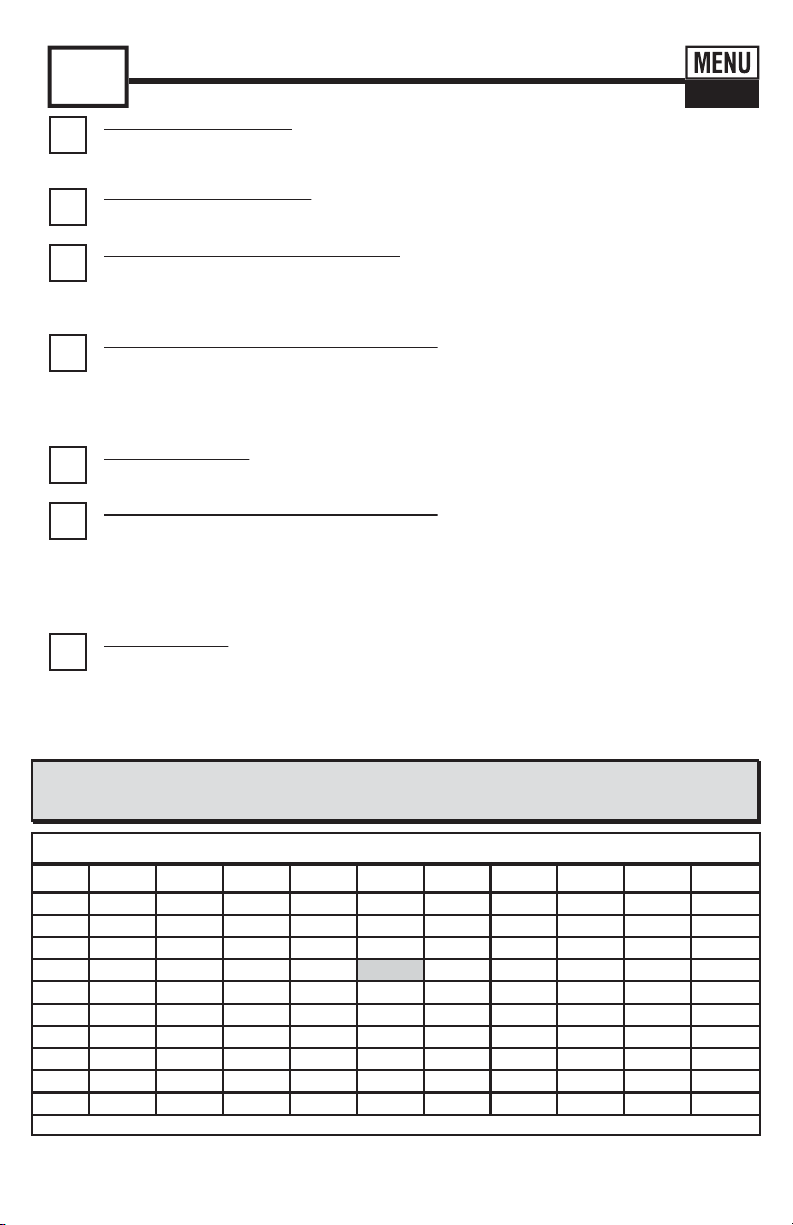
Find the “TR” result in the table below to determine the Chlorine Dioxide concentration in ppm
(parts per million). (Example: a “TR” result of 65.3 (use only the 65 for the chart) equals a Chlorine
Dioxide value of 1.03 ppm). Record result. After testing is completed, rinse cell immediately.
he cursor will move across the
The cursor will move across the
TR0
TR0
Chlorine Dioxide Table
Chlorine Dioxide results require the table below. Follow Chlorine Dioxide
%T
90
80
70
60
50
40
30
20
10
9876543 2 1 0
0 0 0 0 0.04 0.06 0.08 0.12 0.14 0.16
0.21 0.25 0.27 0.29 0.33 0.35 0.37 0.41 0.45 0.47
0.49 0.54 0.58 0.62 0.66 0.70 0.74 0.78 0.80 0.82
0.86 0.91 0.95 0.99 1.03 1.07 1.11 1.15 1.19 1.24
1.28 1.32 1.36 1.40 1.44 1.48 1.56 1.61 1.65 1.69
1.73 1.81 1.85 1.94 1.98 2.06 2.10 2.14 2.22 2.28
2.35 2.43 2.47 2.55 2.64 2.72 2.80 2.88 2.92 3.01
3.09 3.17 3.29 3.38 3.46 3.58 3.66 3.79 3.91 4.03
4.16 4.28 4.45 4.57 4.73 4.90 5.11 5.31 5.48 5.72
5.97 6.26 6.56 6.88 7.25 7.74 8.28 9.02 10 >10
0
*NOTE: When testing outdoors (sunlight), for best accuracy, use the Mixing Cap/Cell Cover when Zeroing and Reading the sample.
Test Procedure (above) using
HHWT-486633 - for 4mL Sample
HHWT-486633
Rev. 122812-BT
Page 6
Rev. 122812-BT
%T
90
80
70
60
50
40
30
20
10
0
9876543 2 1 0
6
Cr
TR0
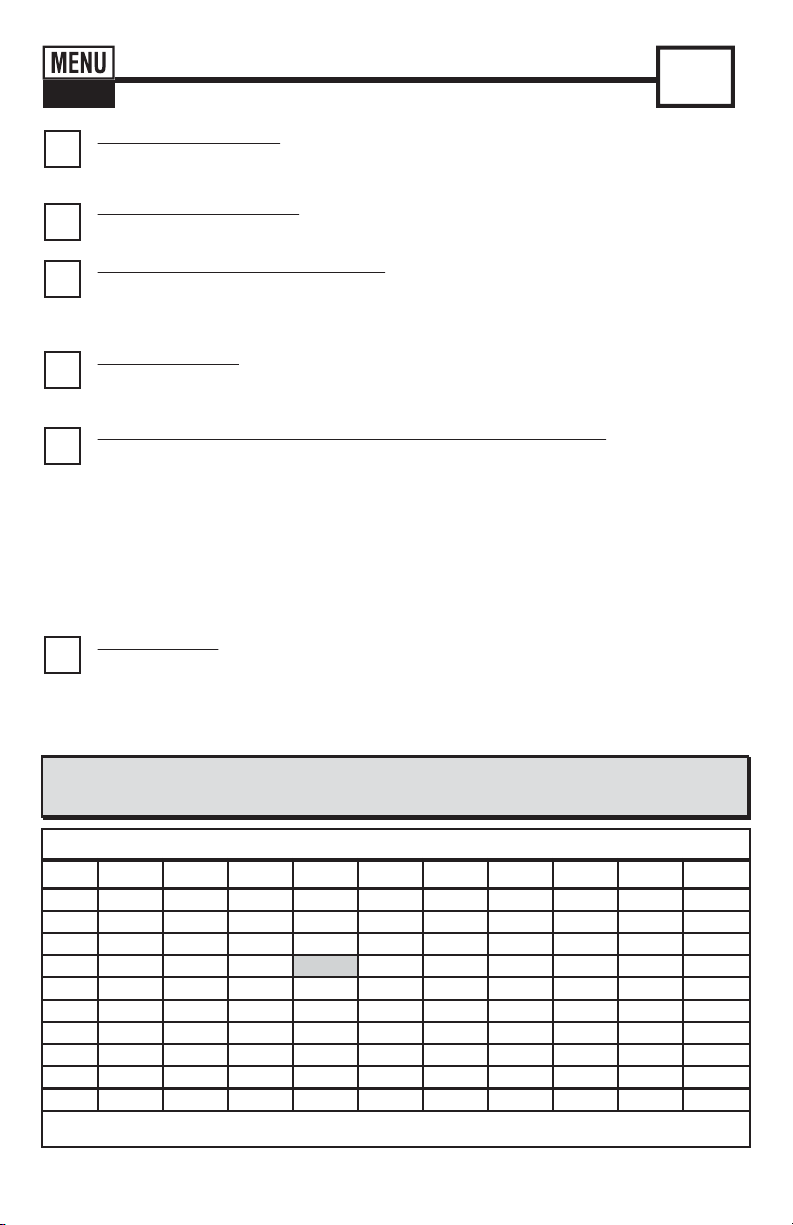
This test is designed to detect Chromium (VI).
Note: To convert Chromium(VI) to Dichromate (Cr207) multiply the value with 2.07 factor and as Chromate (CrO4) multiply with 2.23.
HHWT-486614 - for 4mL Sample
Chromium results require the table below. Follow Chromium (VI) Test Procedure
(above) using
HHWT-486614. This test can also be used for testing in salt water.
Chromium (VI) Table
6
Find the “TR” result in the table below to determine the Chromium (IV) concentration in ppm (parts
per million). (Example: a “TR” result of 66.3 (use only the 66 for the chart) equals a Chromium (IV)
value of 0.14 ppm). Record result.
After testing is completed, rinse cell immediately.
USE TABLE
5
Dip the HHWT-486614 (8mm strip) into the CELL and immediately press READ. This starts the 20
SECOND countdown timer. During this time move the strip in a gentle back and forth motion.
Remove and discard the strip after “1” on the display disappears*. T
he cursor will move
across the display
while the meter prepares to measure the sample (ignore this result). Time the
reaction in the cell for 220 seconds (timer not included). For salt water, wait for 460 seconds.
During this time, meter will shut off. When seconds have elapsed, turn on the meter and wait for the
last reading to be displayed and then press READZKLFKZLOOVWDUWD¿QDO20 SECOND countdown.
The cursor will move across the display
, informing you that it is about to measure the sample.
Record result displayed (this result is automatically stored in TR0).
DIP STRIP -
(read carefully and follow procedure closely)
4
Press the ZERO/ON button. The cursor will move across the display, followed by 100 %T.
Sample is ready for testing.
ZERO METER*
3
Rinse the CELL at least 3 times with the water sample you will be testing - rinsing minimizes
WKHSRWHQWLDOIRUFURVVFRQWDPLQDWLRQIURPDSUHYLRXVWHVW)LQDOO\¿OOFHOOWRFDSDFLW\P/ZLWK
the water sample.
FILL METER WITH SAMPLE
2
Press and re-press the MENU button until the display shows the parameter TR0.
SELECT TEST: TR0
1
Press the ZERO/ON button to power the meter on; the display will show all annunciators, then
the current MENU selection, followed by the last reading.
TURN METER ON
Chromium (VI) Test Procedure
0 0 0 0.01 0.02 0.02 0.02 0.03 0.03 0.04
0.04 0.05 0.05 0.05 0.06 0.06 0.06 0.07 0.07 0.08
0.08 0.08 0.09 0.09 0.10 0.10 0.11 0.11 0.11 0.12
0.12 0.13 0.13 0.14 0.14 0.14 0.15 0.15 0.16 0.16
0.17 0.17 0.18 0.18 0.19 0.19 0.20 0.20 0.21 0.21
0.22 0.23 0.23 0.24 0.24 0.24 26.00 0.26 0.27 0.28
0.29 0.29 0.30 0.31 0.32 0.33 0.34 0.35 0.36 0.37
0.38 0.39 0.41 0.42 0.43 0.44 0.46 0.47 0.49 0.51
0.53 0.55 0.57 0.60 0.62 0.65 0.68 0.72 0.75 0.79
0.83 0.90 0.96 1.03 1.11 1.22 1.34 1.49 1.70 >1.70
*NOTE: When testing outdoors (sunlight), for best accuracy, use the Mixing Cap/Cell Cover when Zeroing and Reading the sample.
Page 7
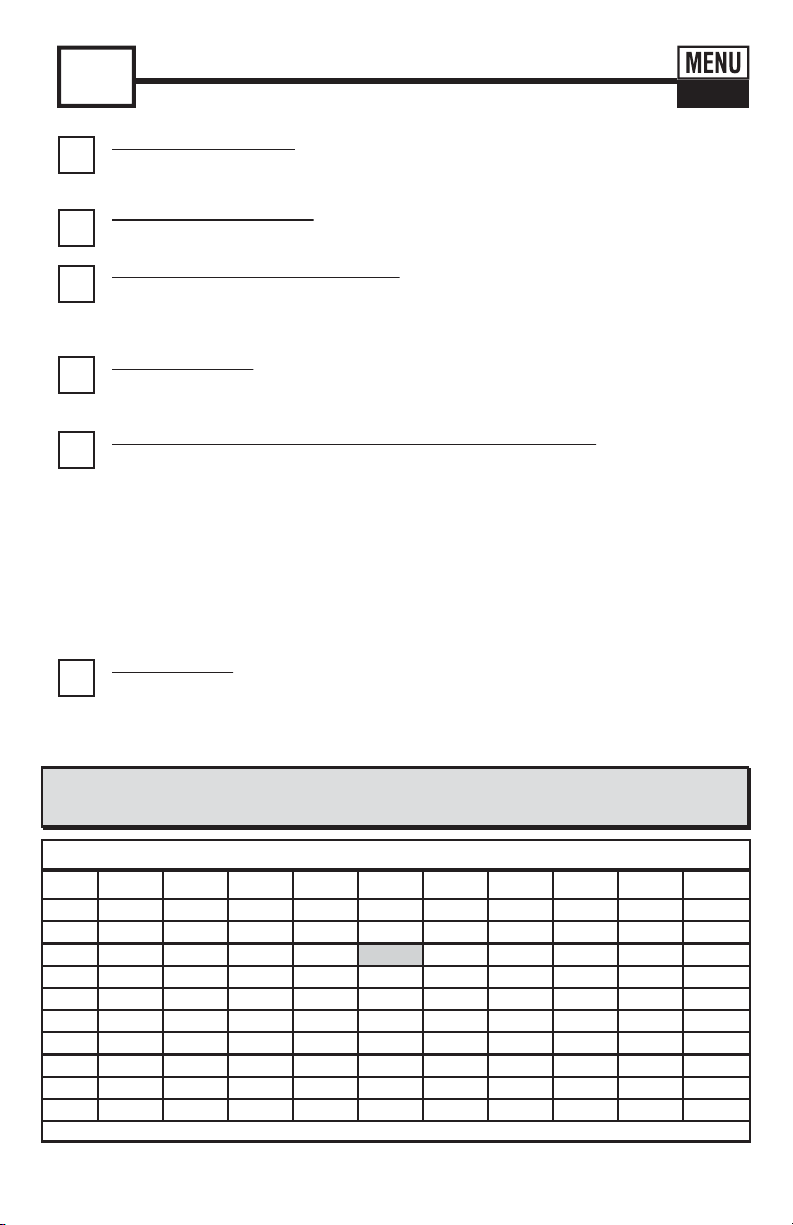
Cyanuric Acid Table
Cyanuric Acid results require the table below. Follow Cyanuric Acid Test Procedure (above) using
HHWT-481652.
NOTE: For levels above 90ppm Cyanuric Acid, dilute the sample ½ or ¼ with distilled water and retest.
HHWT-481652 - for 4mL Sample
Rev. 011613-BT
%T
90
80
70
60
50
40
30
20
10
0
9876543 2 1 0
7
5
Shake the bottle of HHWT-481652WRPL[WKHFKHPLFDOLQWKHERWWOH7KHQDGG¿YHGURSVRI
Reagent CY to the cell and cap meter cell with mixing cap.
Press READ to start timer, place thumb
RU¿QJHURYHUFDSDQGPL[WKHVDPSOHE\WXUQLQJWKHPHWHUXSVLGHGRZQUHSHWLWLYHO\GXULQJWKH
20 SECONDFRXQWGRZQ127(&RYHUWKHFDSFRPSOHWHO\DQGKROG¿UPO\
When timer
displays 1SODFHPHWHURQÀDWVXUIDFH7LPHWKHUHDFWLRQLQWKH&(//IRU40 seconds (timer not
included). After the 40 seconds, press READ again to start another
20 SECOND
countdown*.
At the end of the 20 seconds, the cursor will move across the display while the meter prepares to
measure the sample. Record result displayed (this result is automatically stored in TR0). After
testing, rinse cell immediately and use brush to remove any residual from previous test.
ADD REAGENT, CAP, PRESS “READ”, AND MIX
6
Find the “TR” result in the table below to determine the Cyanuric Acid concentration in ppm
SDUWVSHUPLOOLRQ([DPSOHD³75´UHVXOWRIXVHRQO\WKHIRUWKHFKDUWHTXDOVD
Cyanuric Acid value of 8.1 ppm). Record result.
After testing is completed, rinse cell immediately.
USE TABLE
4
Press the ZERO/ON button. The cursor will move across the display, followed by 100 %T.
Sample is ready for testing.
ZERO METER*
1
Press the ZERO/ON button to power the meter on; the display will show all annunciators,
then the current MENU selection, followed by the last reading.
TURN METER ON
2
3UHVVDQGUHSUHVVWKHMENU button until the display shows the parameter TR0.
SELECT TEST: TR0
3
Rinse the CELLDWOHDVWWLPHVZLWKWKHZDWHUVDPSOH\RXZLOOEHWHVWLQJULQVLQJPLQLPL]HV
WKHSRWHQWLDOIRUFURVVFRQWDPLQDWLRQIURPDSUHYLRXVWHVW)LQDOO\¿OOFHOOWRFDSDFLW\P/
with the water sample.
FILL METER WITH SAMPLE
Cyanuric Acid Test Procedure
CY
TR0
0 1 1.4 1.8 2.1 2.8
4 4.2 4.6 4.9 6 6
6.7 7 7.4 7.7 8.1 8.4 8.8 9.1 9.8
10.2 10.9 11.6 12 12.7
14.1 14.8 16.2 16.9 17.2 17.9
19 19.7 20.4 21.1 21.8 22.1 22.9
26.7 27.4 28.1 28.8
40
42 44 47 48
60 66 70 80 90 >90 >90
*NOTE: When testing outdoors (sunlight), for best accuracy, use the Mixing Cap/Cell Cover when Zeroing and Reading the sample.
Page 8
Rev. 122812-BT
%T
90
80
70
60
50
40
30
20
10
0
9876543 2 1 0
8
TR0
HP
About Our Hydrogen Peroxide Tests with HHWT-12
We offer two different Hydrogen Peroxide tests and they all develop a colorimetric red color by a slow oxidation reaction of hydrogen peroxide (H2O2) with
Iodide to form Iodine. The iodine then reacts instantly with the DPD indicator to form a red color. To speed up the reaction a catalyst, Molybdate salt, is added
in the Low range and Mid Range products.
The Low Range product (HHWT-486616) is buffered to about a pH of 5.0 to 5.5, and the chemistry is essentially complete in 2 minutes at this pH if the water
sample is at room temperature (between 18°C to 22°C). Cold samples (below 14C) will require 4 minutes or more to complete the reaction. Warm samples
(above 23°C) will read about 10% higher. Follow directions as written to get accurate results. For values above 1.8 PPM you should dilute with distilled or
Deionized water and retest.
The Mid range product (HHWT-486648) is buffered to about a pH of 2.1 to 2.4. This slows the catalytic reaction and allows the test to measure higher levels
of hydrogen peroxide. This test is only accurate if your sample is at room temperature and if you follow directions as written.
The High Range product (HHWT-486676) uses no Molybdate catalyst; and therefore the reaction proceeds slowly. This allows for the detection range to be
H[SDQGHGWR3307KLVWHVWLVDFFXUDWHZKHQGLUHFWLRQVDUHIROORZHGDQGVDPSOHWHPSHUDWXUHLVDW)&6DPSOHWHPSHUDWXUHKDVVLJQL¿FDQWHIIHFW
on High Range results; at 13°C values are about 40% low, and at 33°C values are about 40% high.
*NOTE: When testing outdoors (sunlight), for best accuracy, use the Mixing Cap/Cell Cover when Zeroing and Reading the sample.
HHWT-486616 - for 4mL Sample
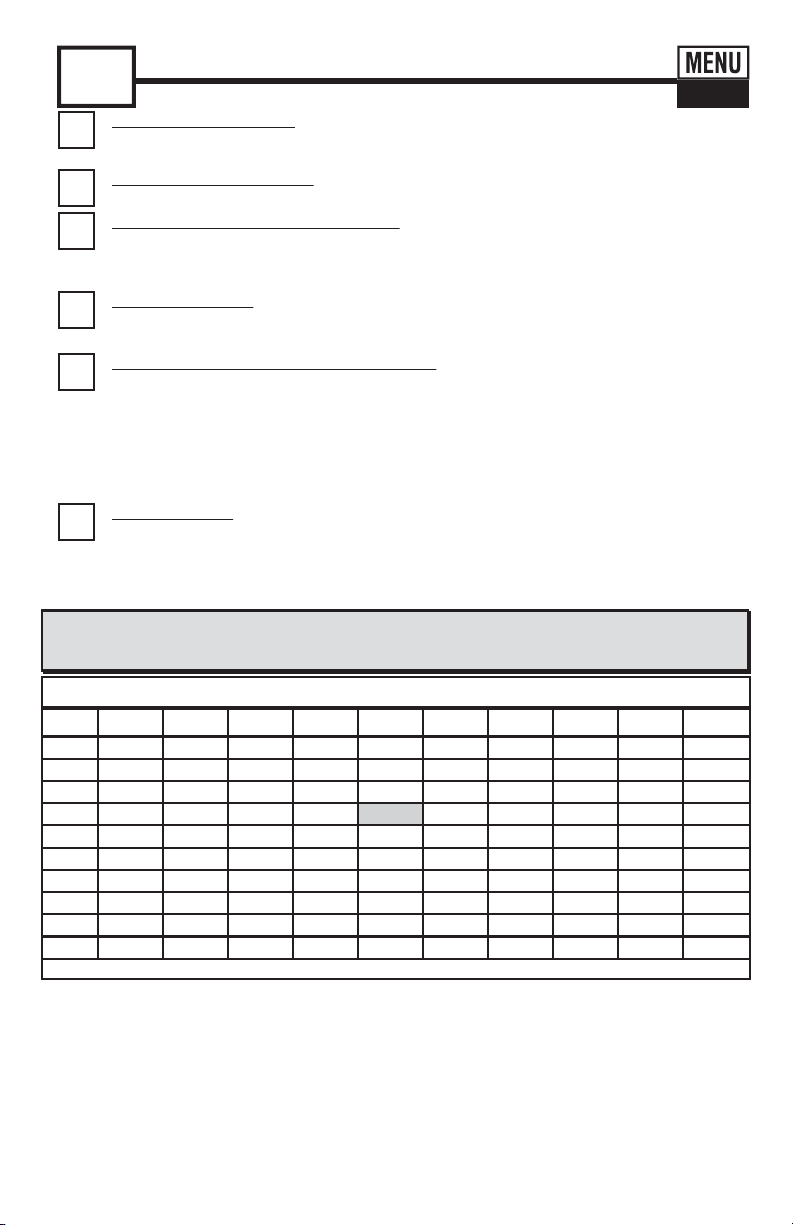
Peroxide results require the table below. Follow Hydrogen Peroxide LR
Test Procedure (above) using
HHWT-486616.
Hydrogen Peroxide LR Table
6
Find the “TR” result in the table below to determine the Peroxide concentration in ppm (parts per
million). (Example: a “TR” result of 65.3 (use only the 65 for the chart) equals a Peroxide value of
0.23 ppm). Record result.
After testing is completed, rinse cell immediately.
USE TABLE
5
Dip the HHWT-486616 into the CELL and immediately press READ. This starts the 20 SECOND
countdown timer. During this time move the strip in a gentle back and forth motion. Remove and discard
the strip after “1” on the display disappears*. The cursor will move across the display while the meter
prepares to measure the sample (ignore this result). Time the reaction in the CELL for 100 seconds (timer
not included). Press READ again. This starts another 20 SECOND countdown timer. After the 20 seconds,
the cursor will move across the display while the meter prepares to measure the sample. Record result
displayed (this result is automatically stored in TR0).
DIP STRIP AND PRESS “READ”
4
Press the ZERO/ON button. The cursor will move across the display, followed by 100 %T.
Sample is ready for testing.
ZERO METER*
3
Rinse the CELL at least 3 times with the water sample you will be testing - rinsing minimizes
WKHSRWHQWLDOIRUFURVVFRQWDPLQDWLRQIURPDSUHYLRXVWHVW)LQDOO\¿OOFHOOWRFDSDFLW\P/ZLWK
the water sample.
FILL METER WITH SAMPLE
2
Press and re-press the MENU button until the display shows the parameter TR0.
SELECT TEST: TR0
1
Press the ZERO/ON button to power the meter on; the display will show all annunciators, then
the current MENU selection, followed by the last reading.
TURN METER ON
Hydrogen Peroxide LR Test Procedure
0 0 0 0 0.01 0.02 0.03 0.05 0.06 0.07
0.07 0.08 0.09 0.1 0.1 0.11 0.12 0.12 0.13 0.14
0.14 0.15 0.15 0.16 0.17 0.17 0.18 0.19 0.19 0.2
0.2 0.21 0.22 0.22 0.23 0.24 0.24 0.25 0.25 0.26
0.27 0.27 0.28 0.29 0.3 0.3 0.31 0.32 0.32 0.33
0.34 0.35 0.35 0.36 0.37 0.38 0.39 0.40 0.41 0.41
0.42 0.43 0.44 0.45 0.47 0.48 0.49 0.50 0.51 0.53
0.54 0.56 0.57 0.59 0.61 0.63 0.65 0.67 0.70 0.73
0.75 0.79 0.82 0.86 0.90 0.94 0.99 1.03 1.08 1.12
1.16 1.22 1.27 1.33 1.39 1.49 1.57 1.80 2.00 >2.00
Page 9
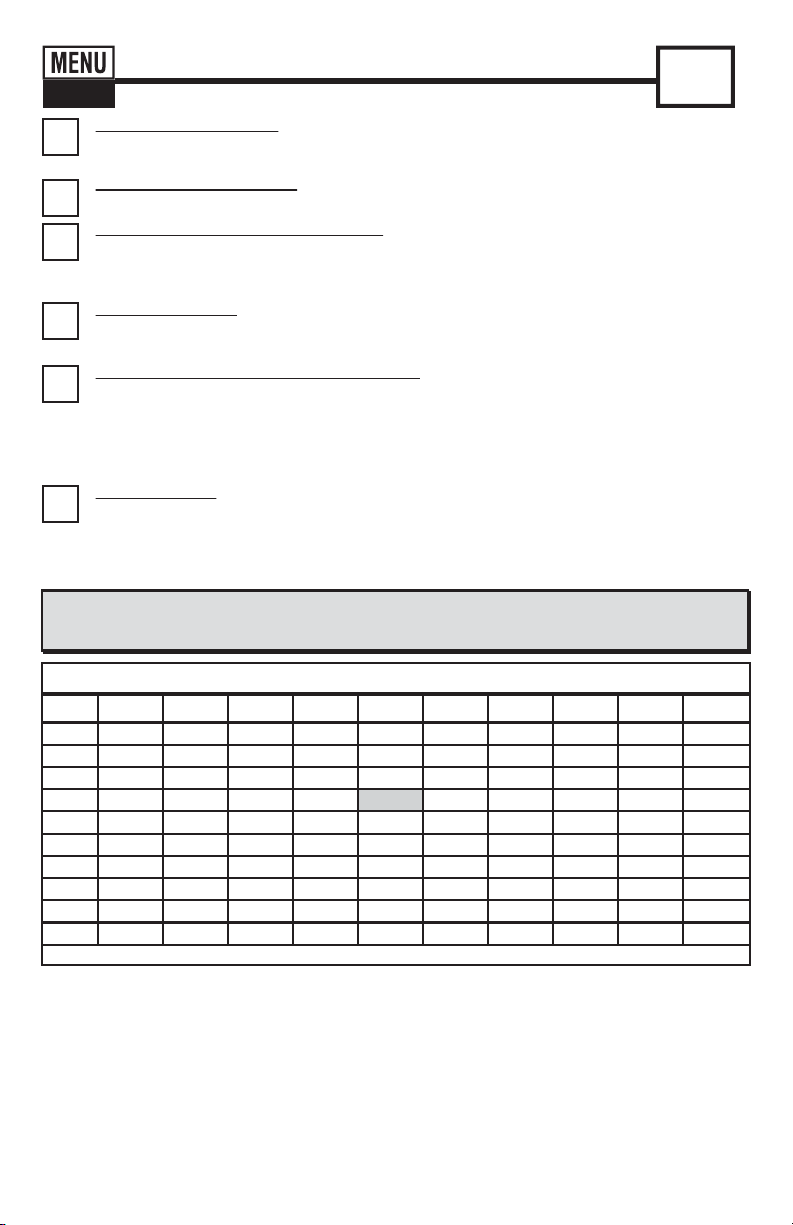
0 0 0 0 0 0 0 0 0 0
0 0 0 0 0 0 0 0 0 0
0 0 0 0 0 0 0 0 0 1
1.2 1.4 1.7 1.9 2.1 2.3 2.5 2.7 2.8 3
3.2 3.4 3.6 3.7 3.8 4 4.1 4.3 4.4 4.6
4.7 4.8 5 5.1 5.2 5.4 5.5 5.7 5.8 6
6.1 6.2 6.4 6.5 6.7 6.8 7 7.2 7.3 7.5
7.7 7.9 8 8.2 8.4 8.6 8.8 9 9.2 9.4
9.7 10 10.2 10.5 10.9 11.2 11.5 11.8 12.1 12.5
13 13.5 14 14.8 15.7 16.8 18 20 >20 >20
Rev. 010213-BT
%T
90
80
70
60
50
40
30
20
10
0
9876543 2 1 0
9
H2O2 MR
TR0
HHWT-486648 - for 4mL Sample
Peroxide results require the table below. Follow Hydrogen Peroxide
MR Test Procedure (above) using
HHWT-486648.
Hydrogen Peroxide MR Table
6
Find the “TR” result in the table below to determine the Peroxide concentration in ppm (parts per
million). (Example: a “TR” result of 65.3 (use only the 65 for the chart) equals a Peroxide value of
2.1 ppm). Record result.
After testing is completed, rinse cell immediately.
USE TABLE
5
Dip the HHWT-486648 into the CELL and immediately press READ. This starts the 20 SECOND
countdown timer. During this time move the strip in a gentle back and forth motion. Remove and
discard the strip after “1” on the display disappears*.
The cursor will move across the display
while the meter prepares to measure the sample. Record result displayed (this result is
automatically stored in TR0).
DIP STRIP AND PRESS “READ”
4
Press the ZERO/ON button. The cursor will move across the display, followed by 100 %T.
Sample is ready for testing.
ZERO METER*
3
Rinse the CELL at least 3 times with the water sample you will be testing - rinsing minimizes
WKHSRWHQWLDOIRUFURVVFRQWDPLQDWLRQIURPDSUHYLRXVWHVW)LQDOO\¿OOFHOOWRFDSDFLW\P/ZLWK
the water sample.
FILL METER WITH SAMPLE
2
Press and re-press the MENU button until the display shows the parameter TR0.
SELECT TEST: TR0
1
Press the ZERO/ON button to power the meter on; the display will show all annunciators, then
the current MENU selection, followed by the last reading.
TURN METER ON
Hydrogen Peroxide MR Test Procedure
About Our Hydrogen Peroxide Tests with HHWT-12
We offer two different Hydrogen Peroxide tests and they all develop a colorimetric red color by a slow oxidation reaction of hydrogen peroxide (H2O2) with
Iodide to form Iodine. The iodine then reacts instantly with the DPD indicator to form a red color. To speed up the reaction a catalyst, Molybdate salt, is added
LQWKH/RZUDQJHDQG0LG5DQJHSURGXFWV
7KH/RZ5DQJHSURGXFW++:7LVEXIIHUHGWRDERXWDS+RIWRDQGWKHFKHPLVWU\LVHVVHQWLDOO\FRPSOHWHLQPLQXWHVDWWKLVS+LIWKHZDWHU
sample is at room temperature (between 18°C to 22°C). Cold samples (below 14C) will require 4 minutes or more to complete the reaction. Warm samples
(above 23°C) will read about 10% higher. Follow directions as written to get accurate results. For values above 1.8 PPM you should dilute with distilled or
Deionized water and retest.
The Mid range product (HHWT-486648) is buffered to about a pH of 2.1 to 2.4. This slows the catalytic reaction and allows the test to measure higher levels
of hydrogen peroxide. This test is only accurate if your sample is at room temperature and if you follow directions as written.
The High Range product (HHWT-486676) uses no Molybdate catalyst; and therefore the reaction proceeds slowly. This allows for the detection range to be
H[SDQGHGWR3307KLVWHVWLVDFFXUDWHZKHQGLUHFWLRQVDUHIROORZHGDQGVDPSOHWHPSHUDWXUHLVDW)&6DPSOHWHPSHUDWXUHKDVVLJQL¿FDQWHIIHFW
on High Range results; at 13°C values are about 40% low, and at 33°C values are about 40% high.
*NOTE: When testing outdoors (sunlight), for best accuracy, use the Mixing Cap/Cell Cover when Zeroing and Reading the sample.
Page 10
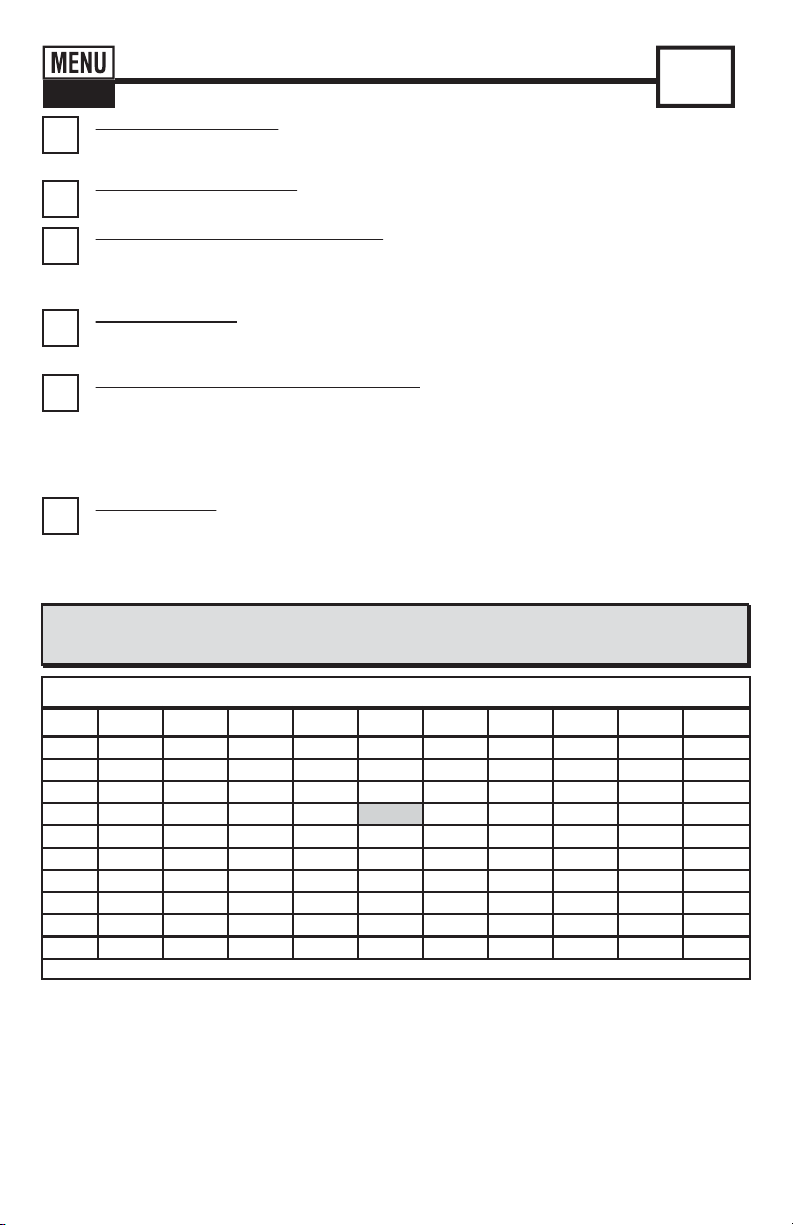
Hydrogen Peroxide HR Table
Peroxide results require the table below. Follow Hydrogen Peroxide
HR Test Procedure (above) using
HHWT-486676.
HHWT-486676 - for 4mL Sample
Rev. 011413-BT
%T
90
80
70
60
50
40
30
20
10
0
9876543 2 1 0
5
Dip the HHWT-486676 into the CELL and immediately press READ. This starts the 20 SECOND
countdown timer. During this time move the strip in a gentle back and forth motion. Remove and
discard the strip after “1” on the display disappears*.
The cursor will move across the display
while the meter prepares to measure the sample. Record result displayed (this result is
automatically stored in TR0).
DIP STRIP AND PRESS “READ”
6
Find the “TR” result in the table below to determine the Peroxide concentration in ppm (parts per
million). (Example: a “TR” result of 65.3 (use only the 65 for the chart) equals a Peroxide value of
140 ppm). Record result.
After testing is completed, rinse cell immediately.
USE TABLE
4
Press the ZERO/ON button. The cursor will move across the display, followed by 100 %T.
Sample is ready for testing.
ZERO METER*
1
Press the ZERO/ON button to power the meter on; the display will show all annunciators, then
the current MENU selection, followed by the last reading.
TURN METER ON
2
Press and re-press the MENU button until the display shows the parameter TR0.
SELECT TEST: TR0
3
Rinse the CELL at least 3 times with the water sample you will be testing - rinsing minimizes
WKHSRWHQWLDOIRUFURVVFRQWDPLQDWLRQIURPDSUHYLRXVWHVW)LQDOO\¿OOFHOOWRFDSDFLW\P/ZLWK
the water sample. NOTE: Temperature of the water sample should be around 73°F/23°C.
FILL METER WITH SAMPLE
Hydrogen Peroxide HR Test Procedure
10
H2O2 HR
TR0
0 0 0 0 7 10 14 17 21 23
28 34 37 41 45 48 55 59 62 69
72 76 83 85 90 97 100 103 110 117
120 124 131 138 140 144 152 159 166 172
179 186 193 200 205 210 214 221 228 235
241 255 262 269 276 283 289 303 310 317
331 338 345 359 366 379 393 400 414 428
436 448 462 476 490 503 525 539 552 572
594 614 635 655 676 704 731 766 794 828
876 924 973 1035 1111 1201 1332 1500 >1500 >1500
About Our Hydrogen Peroxide Tests with HHWT-12
We offer two different Hydrogen Peroxide tests and they all develop a colorimetric red color by a slow oxidation reaction of hydrogen peroxide (H2O2) with
Iodide to form Iodine. The iodine then reacts instantly with the DPD indicator to form a red color. To speed up the reaction a catalyst, Molybdate salt, is added
LQWKH/RZUDQJHDQG0LG5DQJHSURGXFWV
7KH/RZ5DQJHSURGXFW++:7LVEXIIHUHGWRDERXWDS+RIWRDQGWKHFKHPLVWU\LVHVVHQWLDOO\FRPSOHWHLQPLQXWHVDWWKLVS+LIWKHZDWHU
sample is at room temperature (between 18°C to 22°C). Cold samples (below 14C) will require 4 minutes or more to complete the reaction. Warm samples
(above 23°C) will read about 10% higher. Follow directions as written to get accurate results. For values above 1.8 PPM you should dilute with distilled or
Deionized water and retest.
The Mid range product (HHWT-486648) is buffered to about a pH of 2.1 to 2.4. This slows the catalytic reaction and allows the test to measure higher levels
of hydrogen peroxide. This test is only accurate if your sample is at room temperature and if you follow directions as written.
The High Range product (HHWT-486676) uses no Molybdate catalyst; and therefore the reaction proceeds slowly. This allows for the detection range to be
H[SDQGHGWR3307KLVWHVWLVDFFXUDWHZKHQGLUHFWLRQVDUHIROORZHGDQGVDPSOHWHPSHUDWXUHLVDW)&6DPSOHWHPSHUDWXUHKDVVLJQL¿FDQWHIIHFW
on High Range results; at 13°C values are about 40% low, and at 33°C values are about 40% high.
*NOTE: When testing outdoors (sunlight), for best accuracy, use the Mixing Cap/Cell Cover when Zeroing and Reading the sample.
Page 11
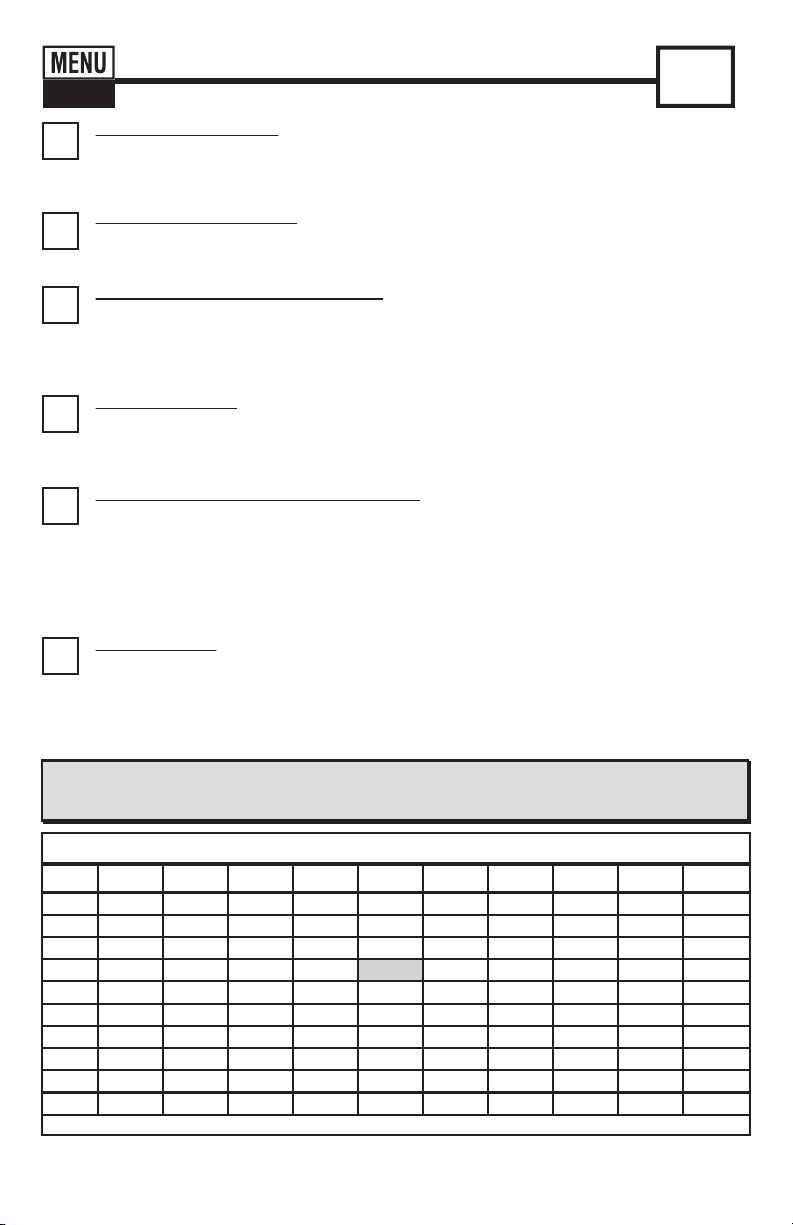
Iodine Table
Iodine results require the table below. Follow Iodine Test Procedure (above) using
HHWT-486627.
HHWT-486627 - for 4mL Sample
Rev. 011513-BT
%T
90
80
70
60
50
40
30
20
10
0
9876543 2 1 0
5
Dip the HHWT-486627 into the CELL and immediately press READ. This starts the 20 SECOND
countdown timer. During this time move the strip in a gentle back and forth motion. Remove and
discard the strip after “1” on the display disappears.
The cursor will move across the display
while the meter prepares to measure the sample. Record result displayed (this result is
automatically stored in TR0).
DIP STRIP AND PRESS “READ”
6
Find the “TR” result in the table below to determine the Iodine concentration in ppm (parts per
million). (Example: a “TR” result of 65.3 (use only the 65 for the chart) equals an Iodine value of
1.43 ppm). Record result.
After testing is completed, rinse cell immediately.
USE TABLE
4
Press the ZERO/ON button. The cursor will move across the display, followed by 100 %T.
Sample is ready for testing.
ZERO METER
1
Press the ZERO/ON button to power the meter on; the display will show all annunciators, then
the current MENU selection, followed by the last reading.
TURN METER ON
2
Press and re-press the MENU button until the display shows the parameter TR0.
SELECT TEST: TR0
3
Rinse the CELL at least 3 times with the water sample you will be testing - rinsing minimizes
WKHSRWHQWLDOIRUFURVVFRQWDPLQDWLRQIURPDSUHYLRXVWHVW)LQDOO\¿OOFHOOWRFDSDFLW\P/ZLWK
the water sample.
FILL METER WITH SAMPLE
Iodine Test Procedure
11
CL
TR0
0 0 0.06 0.11 0.15 0.17 0.23 0.28 0.3 0.34
0.4 0.42 0.46 0.51 0.54 0.57 0.63 0.69 0.72 0.74
0.8 0.85 0.89 0.92 0.97 1.03 1.05 1.09 1.14 1.2
1.26 1.32 1.37 1.4 1.43 1.49 1.54 1.6 1.66 1.72
1.77 1.83 1.85 1.89 1.95 2 2.06 2.12 2.17 2.23
2.29 2.4 2.46 2.52 2.57 2.63 2.69 2.8 2.86 2.92
2.97 3.09 3.2 3.26 3.32 3.43 3.55 3.6 3.72 3.78
3.89 4 4.12 4.23 4.35 4.46 4.58 4.69 4.86 4.98
5.15 5.32 5.49 5.66 5.86 6.06 6.29 6.52 6.75 7.04
7.32 7.72 8.05 8.52 9.04 9.73 10.53 11.3 12 >12
Page 12
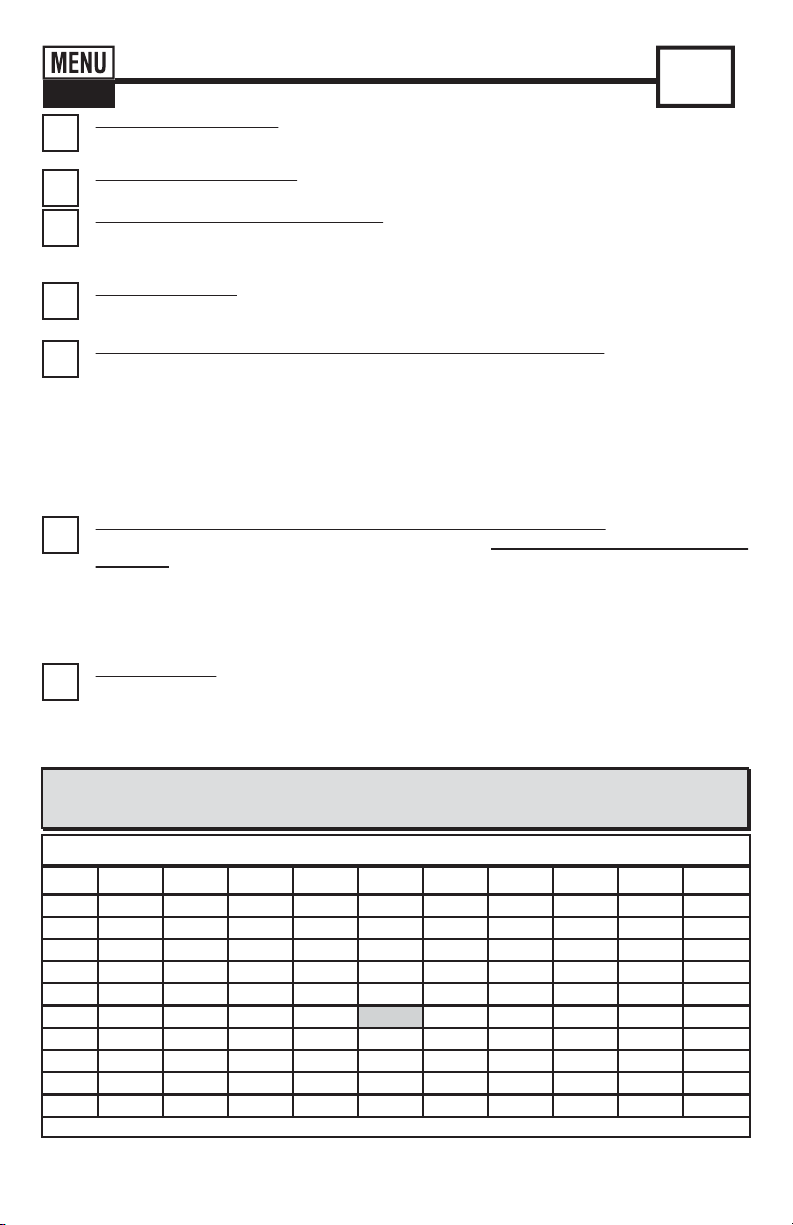
Manganese (as Mn+2) Table
Manganese results require the table below. Follow Manganese Test Procedure (above) using
HHWT-481020-1, HHWT-481020-2, HHWT-486606-R.
HHWT-481020-1, HHWT-481020-2, & HHWT-486606-R - for 4mL Sample**
Rev. 122812 MN
%T
90
80
70
60
50
40
30
20
10
0
9876543 2 1 0
7
Find the “TR” result in the table below to determine the Manganese concentration in ppm (parts
per million). (Example: a “TR” result of 45.3 (use only the 45 for the chart) equals a Manganese
value of 0.05 ppm). Record result.
After testing is completed, rinse cell immediately.
USE TABLE
4
Press the ZERO/ON button. The cursor will move across the display, followed by 100 %T.
Sample is ready for testing.
ZERO METER*
1
Press the ZERO/ON button to power the meter on; the display will show all annunciators,
then the current MENU selection, followed by the last reading.
TURN METER ON
2
Press and re-press the MENU button until the display shows the parameter TR0.
SELECT TEST: TR0
3
Rinse the CELL at least 3 times with the water sample you will be testing - rinsing minimizes
WKHSRWHQWLDOIRUFURVVFRQWDPLQDWLRQIURPDSUHYLRXVWHVW)LQDOO\¿OOFHOOWRFDSDFLW\P/
with the water sample.
FILL METER WITH SAMPLE
12
5
Dip the HHWT-481020-1 into the CELL and immediately press READ. This starts the 20 SECOND
countdown timer. During this time move the strip in a gentle back and forth motion. Remove and discard
the strip after “1” on the display disappears*. The cursor will move across the display while the meter
prepares to measure the sample (ignore this result). Next, Dip the HHWT-481020-2 into the CELL and
immediately press READ. This starts a 20 SECOND countdown timer. During this time move the strip in
a gentle back and forth motion. Remove and discard the strip after “1” on the display disappears*
(CAUTION: discard this strip in regular trash that is inaccessible to children and pets). The cursor will
move across the display while the meter prepares to measure the sample (ignore this result again). Press
the ZERO/ON button. The cursor will move across the display, followed by 100 %T.
DIP STRIP -
(read carefully and follow procedure closely)
6
Shake the bottle of
HHWT-486606-R
and add three (3) drops (Precaution: make sure that the bottle
is straight)DQGFRYHUWKHPHWHU&(//ZLWKWKHPL[LQJFDS3UHVVREAD to start timer, place thumb over
the cap and mix the sample by turning the meter upside-down repetitively during the 20 SECOND
countdown.
When the time displays 1, hold the meter upright. Time the reaction in the cell for 100
seconds (timer not included). After the 100 seconds, press
READ. The cursor will move across the
display
while the meter prepares to measure the sample. Record result displayed (this result is
automatically stored in TR0).
ADD REAGENT, CAP, MIX, AND WAIT 2 MINUTES
MN
Manganese (as Mn+2) Test Procedure
TR0
This table was calibrated using Mn+2 Manganese Standards
*NOTE: When testing outdoors (sunlight), for best accuracy, use the Mixing Cap/Cell Cover when Zeroing and Reading the sample.
**Kit contents not sold separately
0 0 0 0 0 0 0 0 0 0
0 0 0 0 0 0 0 0 0 0
0 0 0 0 0 0 0 0 0 0
0 0 0 0 0 0 0 0 0 0
0 0 0 0 0 0 0 0 0 0
0.02 0.03 0.04 0.05 0.05 0.06 0.07 0.08 0.09 0.09
0.10 0.11 0.12 0.13 0.14 0.15 0.16 0.17 0.18 0.20
0.21 0.22 0.23 0.24 0.26 0.27 0.29 0.31 0.32 0.34
0.36 0.37 0.39 0.41 0.43 0.46 0.49 0.52 0.54 0.57
0.61 0.66 0.70 0.75 0.82 0.89 0.99 1.13 1.30 >1.30
(Manganese Kit HHWT-486606 - Reagent and Strips)
Page 13
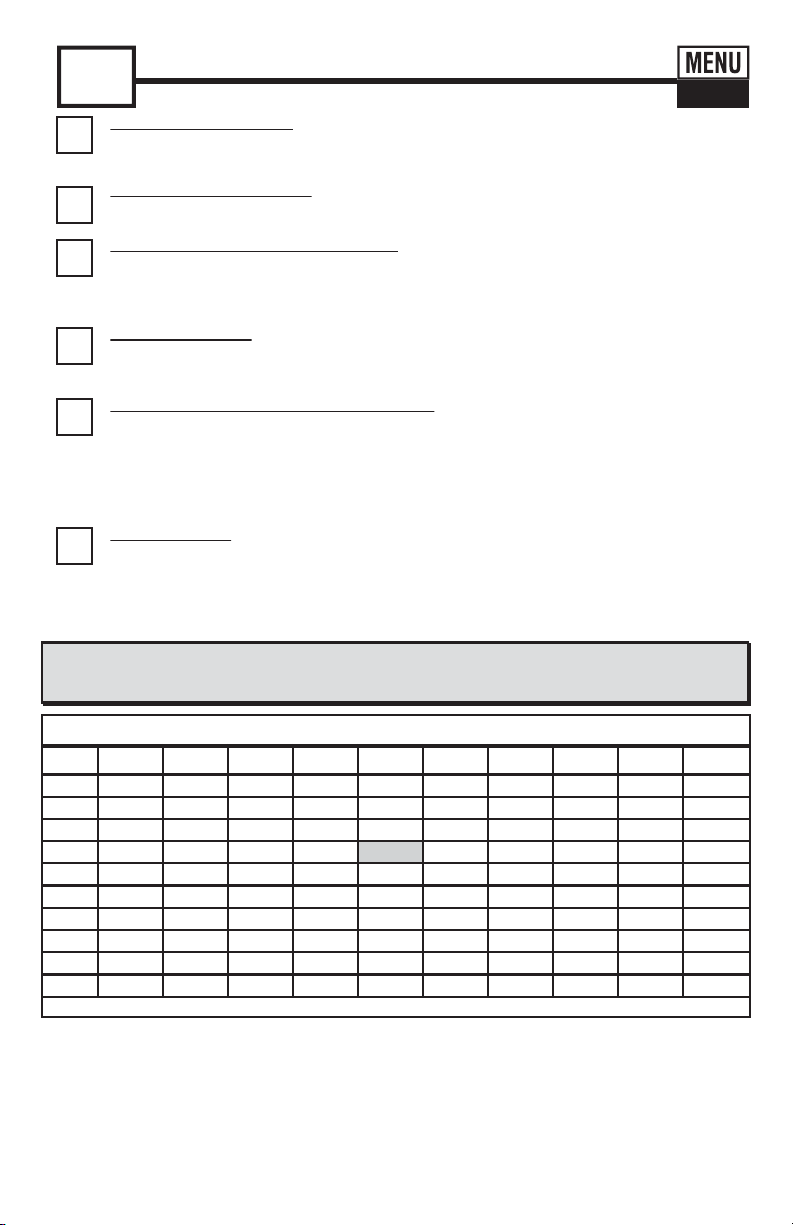
Peracetic Acid Table
Peracetic Acid results require the table below. Follow Peracetic Acid Test Procedure (above) using
HHWT-486674.
HHWT-486674 - for 4mL Sample
Rev. 122812-BT
%T
90
80
70
60
50
40
30
20
10
0
9876543 2 1 0
5
Dip the HHWT-486674 into the CELL and immediately press READ. This starts the 20 SECOND
countdown timer. During this time move the strip in a gentle back and forth motion. Remove and
discard the strip after “1” on the display disappears*.
The cursor will move across the
display
while the meter prepares to measure the sample. Record the result displayed (this result
is automatically stored in TR0).
DIP STRIP AND PRESS “READ”
6
Find the “TR” result in the table below to determine the Peracetic Acid concentration in ppm
(parts per million). (Example: a “TR” result of 65.3 (use only the 65 for the chart) equals a
Peracetic Acid value of 0.52). Record result.
After testing is completed, rinse cell immediately.
USE TABLE
4
Press the ZERO/ON button. The cursor will move across the display, followed by 100 %T.
Sample is ready for testing.
ZERO METER*
1
Press the ZERO/ON button to power the meter on; the display will show all annunciators,
then the current MENU selection, followed by the last reading.
TURN METER ON
2
Press and re-press the MENU button until the display shows the parameter TR0.
SELECT TEST: TR0
3
Rinse the CELL at least 3 times with the water sample you will be testing - rinsing minimizes
WKHSRWHQWLDOIRUFURVVFRQWDPLQDWLRQIURPDSUHYLRXVWHVW)LQDOO\¿OOFHOOWRFDSDFLW\P/
with the water sample.
FILL METER WITH SAMPLE
Peracetic Acid Test Procedure
13
PAA
TR0
NOTE: Various oxidizing agents such as halogens, ferric ions, and cupric ions will produce high test
results. The detection of peracetic acid is very selective in the presence of peroxide and tests can
tolerate up to 35 times excess of Peroxide to Peracetic Acid ratio. If your Hydrogen Peroxide to
Peracetic Acid ratio is in excess of 35, it is recommended that Hydrogen Peroxide interference be
removed by adding a small amount of catalase enzyme to the test solution before testing.
*NOTE: When testing outdoors (sunlight), for best accuracy, use the Mixing Cap/Cell Cover when Zeroing and Reading the sample.
0 0.02 0.06 0.08 0.1 0.12 0.13 0.15 0.16
0.18 0.19 0.21 0.22 0.23 0.25 0.26 0.27 0.29 0.3
0.31 0.33 0.35 0.37 0.38
0.5 0.52 0.53 0.55 0.56 0.58 0.6
0.61 0.63 0.65 0.67 0.69 0.71 0.73 0.75 0.77 0.79
0.81 0.86 0.89 0.91 0.97 0.99 1.03 1.06
1.08 1.11 1.15 1.18 1.22 1.25 1.29 1.32 1.36
1.52 1.56 1.61 1.65 1.70 1.79
1.89 1.95 2.00 2.06 2.13 2.19 2.27 2.35
2.65 2.79 3.12 3.30 3.50 5.00 >5.0
Page 14
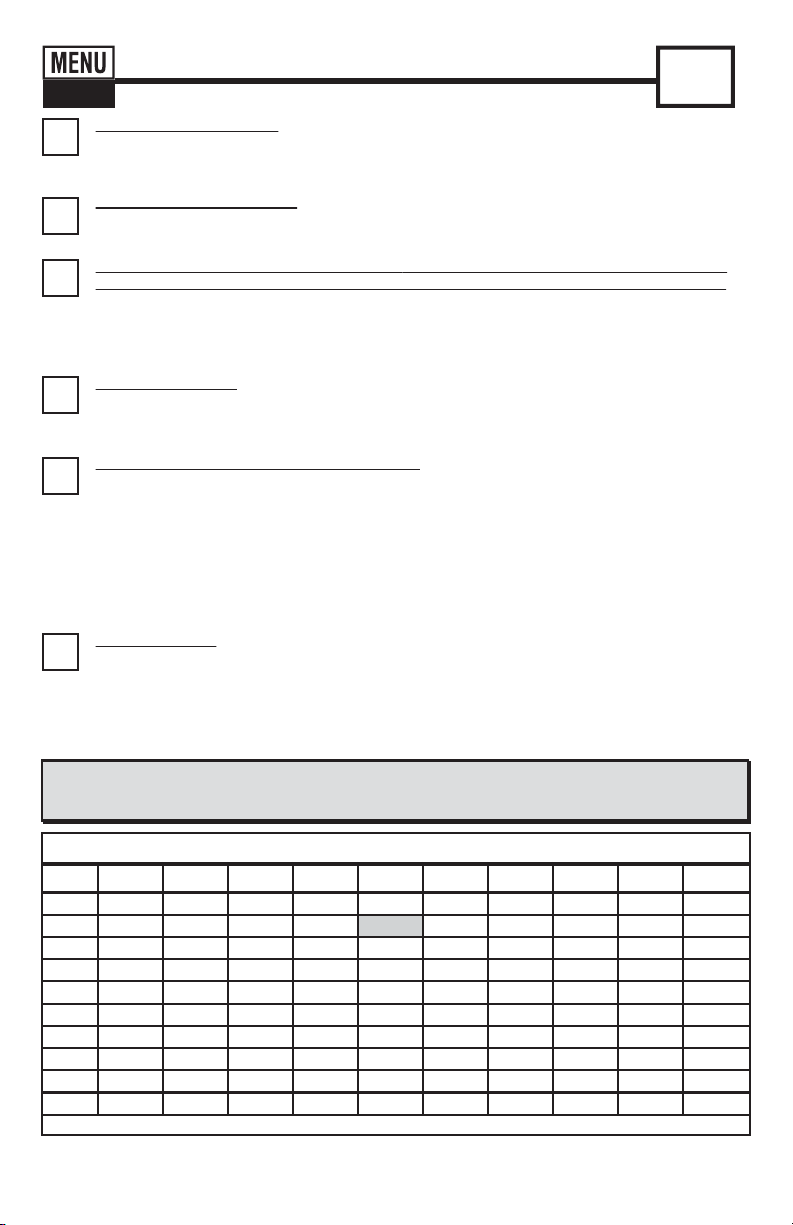
Phosphate Table
Iron results require the table below. Follow Phosphate Test Procedure (above)
using
HHWT-486814. This Test can also be used for Salt Water Testing.
6
Find the “TR” result in the table below to determine the Phosphate concentration in ppm (parts per
million). (Example: a “TR” result of 85.3 (use only the 85 for the chart) equals a Phosphate value of
0.36 ppm). Record result.
After testing is completed, rinse cell immediately.
USE TABLE
4
Press the ZERO/ON button. The cursor will move across the display, followed by 100 %T.
Sample is ready for testing.
ZERO METER
1
Press the ZERO/ON button to power the meter on; the display will show all annunciators,
then the current MENU selection, followed by the last reading.
TURN METER ON
2
Press and re-press the MENU button until the display shows the parameter TR0.
SELECT TEST: TR0
3
Clean the cell with Distilled vinegar (5%), 0.1 N HCl or Muriatic Acid before starting this test.
Rinse the CELL at least 3 times with the water sample you will be testing - rinsing minimizes the
SRWHQWLDOIRUFURVVFRQWDPLQDWLRQIURPDSUHYLRXVWHVW)LQDOO\¿OOFHOOWRFDSDFLW\P/ZLWKWKH
water sample.
FILL METER WITH SAMPLE -
(See Accuracy Tips 19 & 20 on Page 20)
14
5
Dip the HHWT-486814 into the CELL and immediately press READ. This starts the 20 SECOND
countdown timer. During this time move the strip in a gentle back and forth motion. Remove and
discard the strip after “1” on the display disappers.
The cursor will move across the display
while the meter prepares to measure the sample (ignore this result). Time the reaction in the cell for
100 seconds (timer not included). Press READ again. This starts another 20 SECOND
countdown timer.
The cursor will move across the display
while the meter prepares to measure
the sample. Record result displayed (this result is automatically stored in TR0).
DIP STRIP AND PRESS “READ”
HHWT-486814 - for 4mL Sample
Rev. 011613-BT
%T
90
80
70
60
50
40
30
20
10
0
9876543 2 1 0
Phosphate Test Procedure
TR0
PO
4
<0.03 <0.03 <0.03 <0.03 0.03 0.05 0.08 0.11 0.17
0.20 0.25 0.30 0.33 0.36 0.52
0.56 0.63 0.66 0.70 0.78 0.82 0.86
1.02 1.07 1.10 1.15 1.28 1.33
1.38 1.52 1.56 1.62 1.68 1.73 1.78 1.83
2.01 2.06 2.13 2.26 2.32
2.52 2.60 2.67 2.75 2.83 3.08 3.16 3.26
3.35 3.66 3.76 3.87 !
! ! ! ! ! ! ! ! ! !
! ! ! ! ! ! ! ! ! !
Page 15
5
Dip the HHWT-486608 into the CELL and immediately press READ. This starts the 20 SECOND
countdown timer. During this time move the strip in a gentle back and forth motion. Remove and
discard the strip after “1” on the display disappears*.
The cursor will move across the
display
while the meter prepares to measure the sample. Record result displayed (this result is
automatically stored in TR0).
DIP STRIP AND PRESS “READ”
6
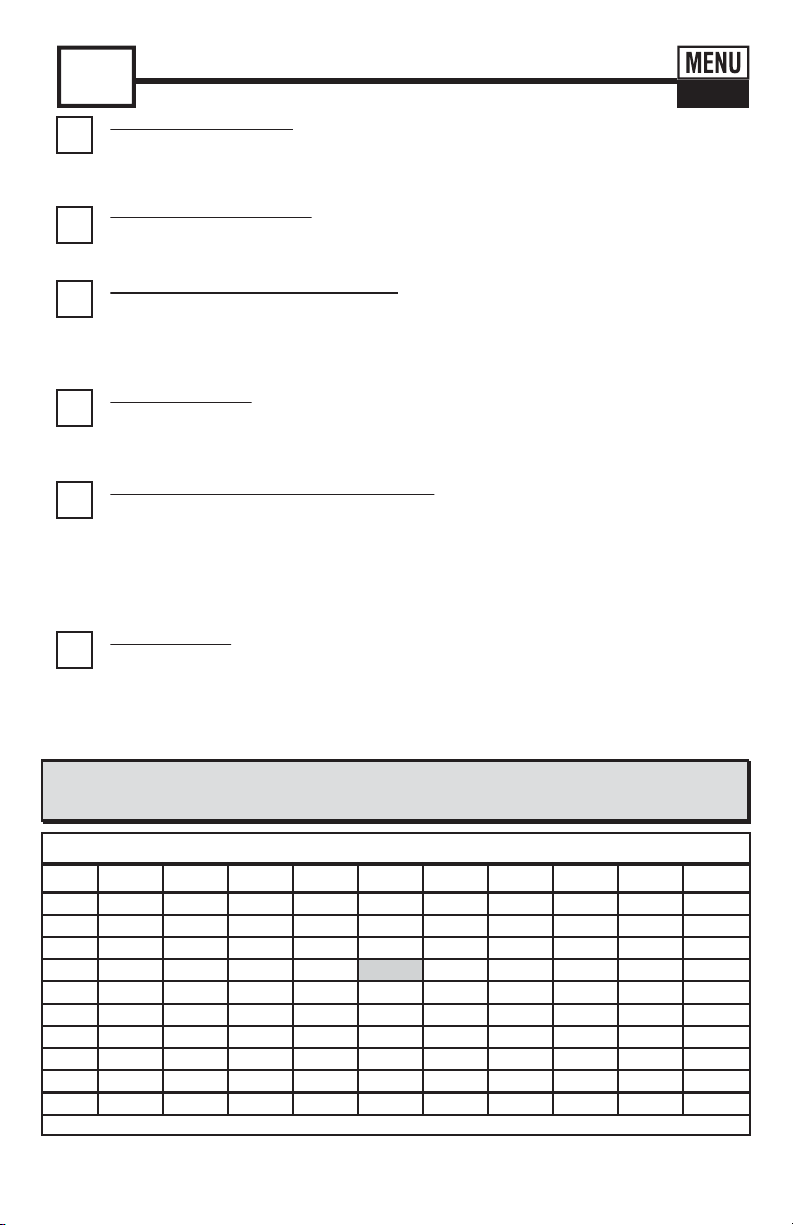
Find the “TR” result in the table below to determine the Sulfate concentration in ppm (parts per
million). (Example: a “TR” result of 65.3 (use only the 65 for the chart) equals a Sulfate value of
22 ppm). Record result.
After testing is completed, rinse cell immediately.
USE TABLE
4
Press the ZERO/ON button. The cursor will move across the display, followed by 100 %T.
Sample is ready for testing.
ZERO METER*
1
Press the ZERO/ON button to power the meter on; the display will show all annunciators,
then the current MENU selection, followed by the last reading.
TURN METER ON
2
Press and re-press the MENU button until the display shows the parameter TR0.
SELECT TEST: TR0
3
Rinse the CELL at least 3 times with the water sample you will be testing - rinsing minimizes
WKHSRWHQWLDOIRUFURVVFRQWDPLQDWLRQIURPDSUHYLRXVWHVW)LQDOO\¿OOFHOOWRFDSDFLW\P/
with the water sample.
FILL METER WITH SAMPLE
Sulfate (SO
4
-2
) Test Procedure
Sulfate (SO
4
-2
) Table
Sulfate results require the table below. Follow Sulfate (SO
4
-2
) Test Procedure (above) using
HHWT-486608.
HHWT-486608 - for 4mL Sample
Rev. 011613-BT
%T
90
80
70
60
50
40
30
20
10
0
9876543 2 1 0
15
SO
4
TR0
*NOTE: When testing outdoors (sunlight), for best accuracy, use the Mixing Cap/Cell Cover when Zeroing and Reading the sample.
0 0 1 1 2 2 3 3 5
5 6 6 7 8 8 9 9 10 10
11 12 13 13 15 15 16 17 18
18 19 20 21 22 23 23 25
26 27 28 29 30 31 32 33 35
36 37 38 39
50 52 53 55 56 58 59 61
63 65 67 68 70 73 75 77 80 82
88 90 97 100 105 108 112 117
123 129 137 155 165 185 200 220 >220
Page 16
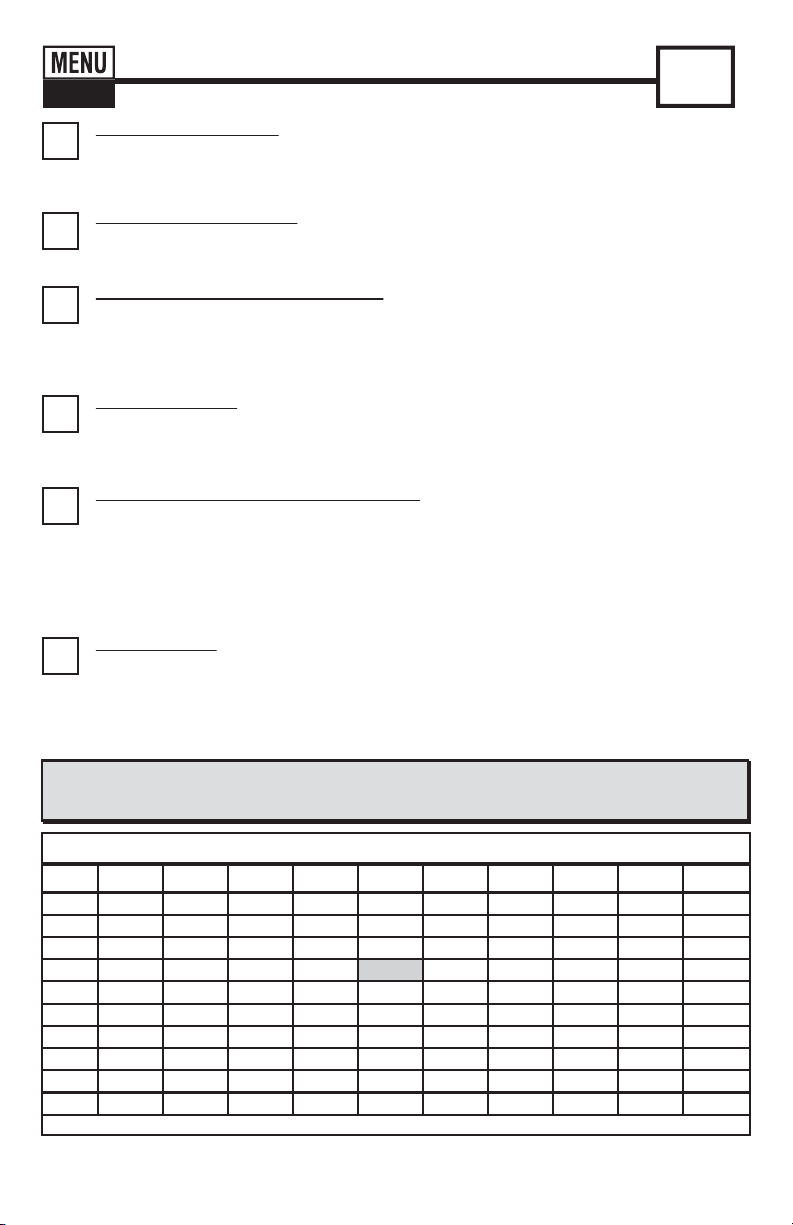
6XOÀGHDV+267DEOH
6XO¿GHUHVXOWVUHTXLUHWKHWDEOHEHORZ)ROORZ6XO¿GH7HVW3URFHGXUHDERYHXVLQJ
HHWT-486646.
++:7IRUP/6DPSOH
5HY%7
7
9
7
5
2
2
5
'LSWKHHHWT-486646 LQWRWKH&(//DQGLPPHGLDWHO\SUHVVREAD7KLVVWDUWVWKH6(&21'
FRXQWGRZQWLPHU'XULQJWKLVWLPHPRYHWKHVWULSLQDJHQWOHEDFNDQGIRUWKPRWLRQ5HPRYHDQG
GLVFDUGWKHVWULSDIWHU³´RQWKHGLVSOD\GLVDSSHDUV
7KHFXUVRUZLOOPRYHDFURVVWKHGLVSOD\
ZKLOHWKHPHWHUSUHSDUHVWRPHDVXUHWKHVDPSOH5HFRUGUHVXOWGLVSOD\HGWKLVUHVXOWLV
DXWRPDWLFDOO\VWRUHGLQ75
',3675,3$1'35(66´5($'µ
6
)LQGWKH³75´UHVXOWLQWKHWDEOHEHORZWRGHWHUPLQHWKH6XO¿GHFRQFHQWUDWLRQLQSSPSDUWVSHU
PLOOLRQ([DPSOHD³75´UHVXOWRIXVHRQO\WKHIRUWKHFKDUWHTXDOVD6XO¿GHYDOXHRI
SSP5HFRUGUHVXOW
$IWHUWHVWLQJLVFRPSOHWHGULQVHFHOOLPPHGLDWHO\
86(7$%/(
4
3UHVVWKHZERO/ONEXWWRQ7KHFXUVRUZLOOPRYHDFURVVWKHGLVSOD\IROORZHGE\7
6DPSOHLVUHDG\IRUWHVWLQJ
=(520(7(5*
1
3UHVVWKHZERO/ONEXWWRQWRSRZHUWKHPHWHURQWKHGLVSOD\ZLOOVKRZDOODQQXQFLDWRUVWKHQ
WKHFXUUHQW0(18VHOHFWLRQIROORZHGE\WKHODVWUHDGLQJ
78510(7(521
2
3UHVVDQGUHSUHVVWKHMENUEXWWRQXQWLOWKHGLVSOD\VKRZVWKHSDUDPHWHU75
6(/(&77(6775
3
5LQVHWKH&(//DWOHDVWWLPHVZLWKWKHZDWHUVDPSOH\RXZLOOEHWHVWLQJULQVLQJPLQLPL]HV
WKHSRWHQWLDOIRUFURVVFRQWDPLQDWLRQIURPDSUHYLRXVWHVW)LQDOO\¿OOFHOOWRFDSDFLW\P/ZLWK
WKHZDWHUVDPSOH
),//0(7(5:,7+6$03/(
6XOÀGHDV+267HVW3URFHGXUH
16
H2S
TR0
127(:KHQWHVWLQJRXWGRRUVVXQOLJKWIRUEHVWDFFXUDF\XVHWKH0L[LQJ&DS&HOO&RYHUZKHQ=HURLQJDQG5HDGLQJWKHVDPSOH
! ! !
Page 17
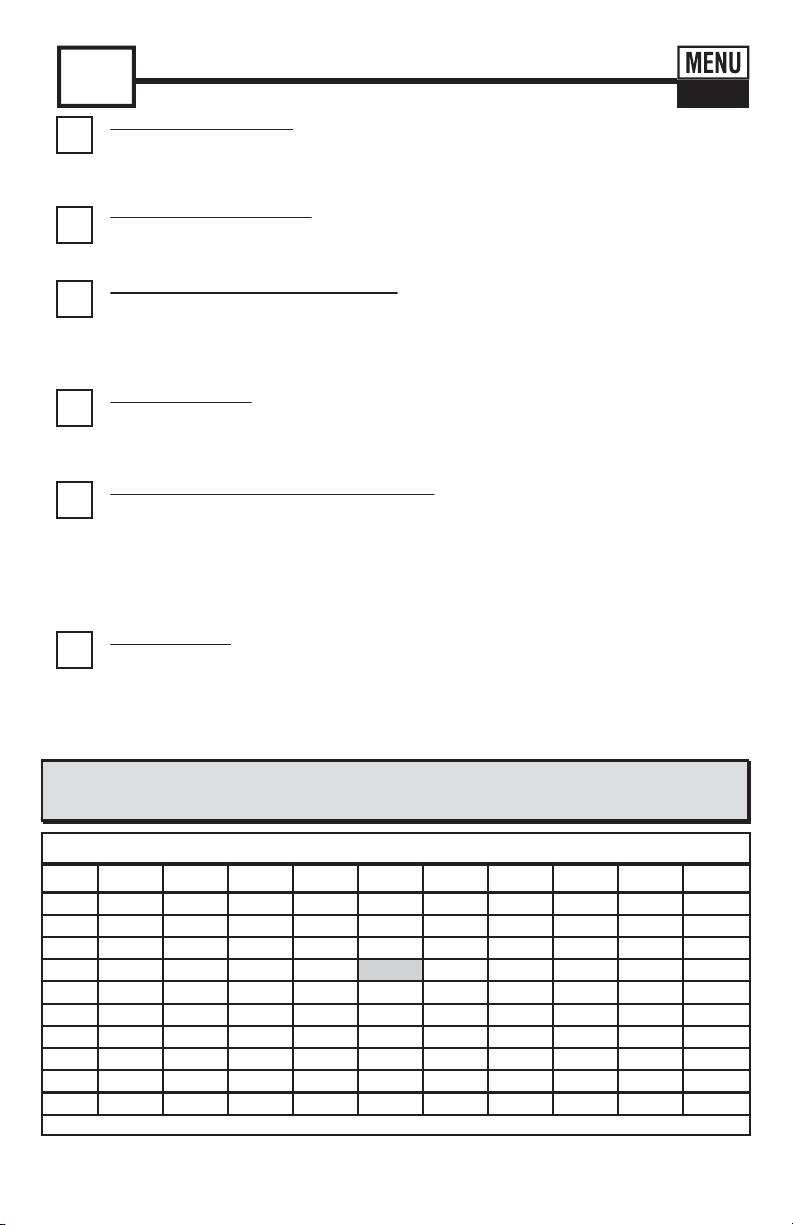
Total Hardness Low Range Table
Low Range Total Hardness results require the table below. Follow Total
Hardness Low Range Test Procedure (above) using
HHWT-486630.
HHWT-486630 - for 4mL Sample
Rev. 011513-BT
%T
90
80
70
60
50
40
30
20
10
0
9876543 2 1 0
5
Dip the HHWT-486630 into the CELL and immediately press READ. This starts the 20 SECOND
countdown timer. During this time move the strip in a gentle back and forth motion. Remove and
discard the strip after “1” on the display disappears*.
The cursor will move across the
display
while the meter prepares to measure the sample. Record result displayed (this result is
automatically stored in TR0).
DIP STRIP AND PRESS “READ”
6
Find the “TR” result in the table below to determine the Total Hardness concentration in ppm
(parts per million). (Example: a “TR” result of 65.3 (use only the 65 for the chart) equals a Total
Hardness value of 9.5 ppm). Record result.
After testing is completed, rinse cell immediately.
USE TABLE
4
Press the ZERO/ON button. The cursor will move across the display, followed by 100 %T.
Sample is ready for testing.
ZERO METER*
1
Press the ZERO/ON button to power the meter on; the display will show all annunciators,
then the current MENU selection, followed by the last reading.
TURN METER ON
2
Press and re-press the MENU button until the display shows the parameter TR0.
SELECT TEST: TR0
3
Rinse the CELL at least 3 times with the water sample you will be testing - rinsing minimizes
WKHSRWHQWLDOIRUFURVVFRQWDPLQDWLRQIURPDSUHYLRXVWHVW)LQDOO\¿OOFHOOWRFDSDFLW\P/
with the water sample.
FILL METER WITH SAMPLE
17
TH
Total Hardness Low Range Test Procedure
TR0
This table was calibrated using CaCO3 Standards
*NOTE: When testing outdoors (sunlight), for best accuracy, use the Mixing Cap/Cell Cover when Zeroing and Reading the sample.
0 0 0 0 0 0 0 0 0 0
0 1 1.3 1.5 1.7 2.1 2.5 2.8 3 3.5
3.9 5.1 5.6 6 6.5 6.9 7.3 7.5
7.7 8.2 8.6 9 9.5 10 10 11 11 12
12 13 13 15 15 16 16 17
18 18 19 19 20 21 21 22 23
25 26 27 28 28 29 30 31 32
33 35 36 37 38 39
50 51 53 55 58 60 62.7
66 70 73 78 83 89 95 100 >100 >100
Page 18
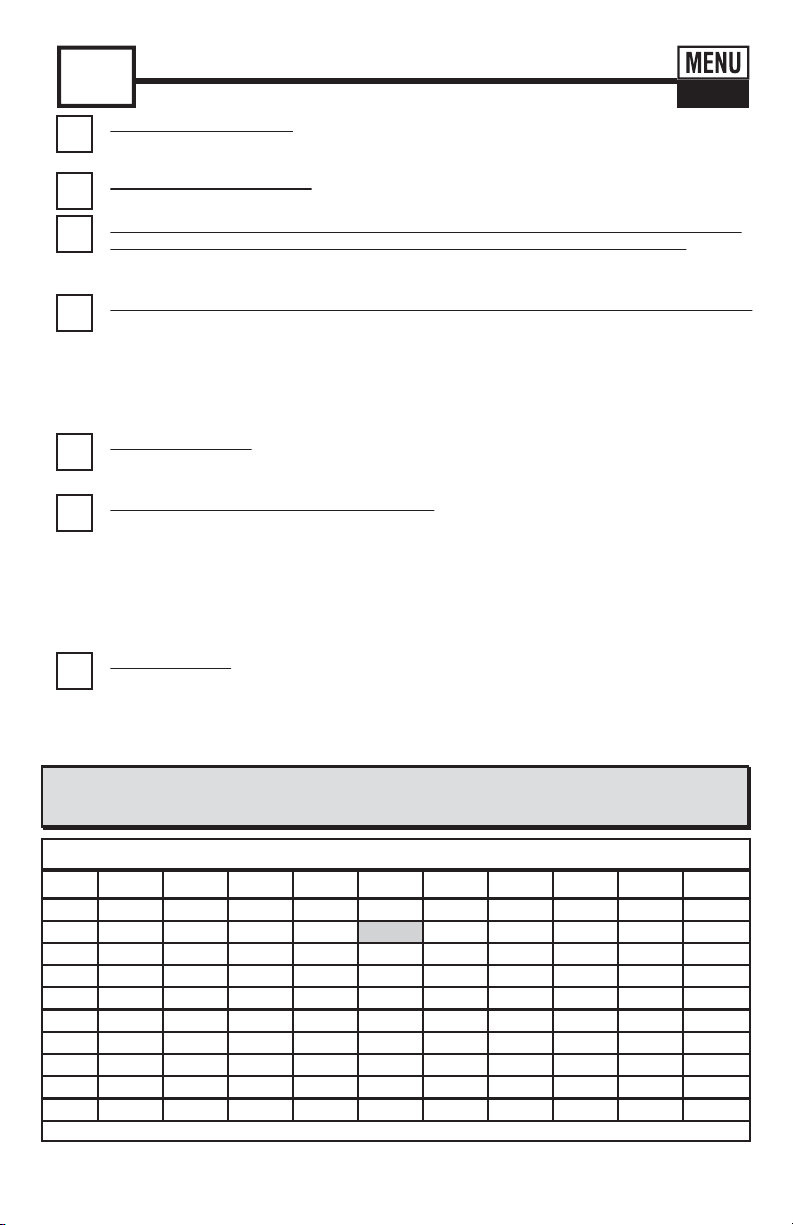
Total Iron, TPTZ (Fe+2/Fe+3) Table
Iron results require the table below. Follow Total Iron, TPTZ (Fe+2/Fe+3)
& Iron (II) Test Procedure (above) using
HHWT-486650.
HHWT-486650 - for 4mL Sample**
Rev. 011613-BTThis table was calibrated using Fe+2 Iron Standards
%T
90
80
70
60
50
40
30
20
10
0
9876543 2 1 0
7
Find the “TR” result in the table below to determine the Iron concentration in ppm (parts per
million). (Example: a “TR” result of 85.3 (use only the 85 for the chart) equals an Iron value of
0.11 ppm). Record result.
After testing is completed, rinse cell immediately and clean with brush.
USE TABLE
5
Press the ZERO/ON button. The cursor will move across the display, followed by 100 %T. Sample
is ready for testing.
ZERO METER*
4
Tilt meter to discard about 0.2mL water in order to leave room for powder reagent. Add the contents of
one HHWT-486601 powder pillow to the CELL and cap meter cell with mixing cap. Press READ to
start the 20 SECOND countdown timer, place thumb over cap to keep cap securely in place, and mix
the sample by turning the meter upside-down repetitively. When time displays 1, hold the meter
XSULJKWDQGWKHFXUVRUZLOOÀDVKDQGWKHPHWHUZLOOEHJLQWRFRXQWXSWRVHFRQGV$IWHUWKH
seconds, a result will be displayed (ignore this result).
ADD REAGENT, CAP, AND MIX -
Skip this step if testing only Iron (II)
1
Press the ZERO/ON button to power the meter on; the display will show all annunciators,
then the current MENU selection, followed by the last reading.
TURN METER ON
2
Press and re-press the MENU button until the display shows the parameter TR0.
SELECT TEST: TR0
3
Clean the cell with Distilled vinegar (5%), 0.1 N HCl or Muriatic Acid before starting this test. Rinse the
CELL at least 3 times with the water sample you will be testing - rinsing minimizes the potential for
FURVVFRQWDPLQDWLRQIURPDSUHYLRXVWHVW)LOOFHOOWRFDSDFLW\P/ZLWKWKHZDWHUVDPSOH
FILL METER WITH SAMPLE -
(See Accuracy Tips 19 & 20 on Page 20)
18
6
Dip the HHWT-486631 into the CELL and immediately press READ. This starts the 20 SECOND
countdown timer. During this time, move the strip in a gentle back and forth motion. Remove and
discard the strip after “1” on the display disappears*. The cursor will move across the display
while the meter prepares to measure the sample (ignore this result). Wait 20 seconds (timer not
included) and press READ to start an additional 20 SECOND countdown. When time displays 1,
the cursor will move across the display while the meter prepares to measure the sample. Record
result displayed (this result is automatically stored in TR0).
DIP STRIP AND PRESS “READ”
Total Iron, TPTZ (Fe+2/Fe+3) & Iron (II) Test Procedure
TR0
FE
<0.02 <0.02 <0.02 <0.02 <0.02 <0.02 <0.02 0.02 0.03 0.05
0.06 0.07 0.08 0.09 0.11 0.13 0.16 0.17 0.18
0.21 0.23 0.23 0.25 0.26 0.28 0.30 0.32 0.32
0.37 0.39 0.39 0.51 0.53
0.55 0.58 0.59 0.62 0.62 0.66 0.69 0.71
0.76 0.78 0.83 0.85 0.87 0.90 0.92 0.97 1.01
1.03 1.08 1.10 1.13 1.17 1.20 1.26 1.31 1.33
1.38 1.52 1.56 1.61 1.66 1.70 1.75 1.82
1.86 1.93 2.00 2.07 2.21 2.30 2.58
2.69 2.83 2.98 3.11 3.30 3.52 3.77 !
*NOTE: When testing outdoors (sunlight), for best accuracy, use the Mixing Cap/Cell Cover when Zeroing and Reading the sample.
7RWDO,URQ737=.LW++:73RZGHU3LOORZVDQG6WULSV
**Kit contents not sold separately
Page 19
19
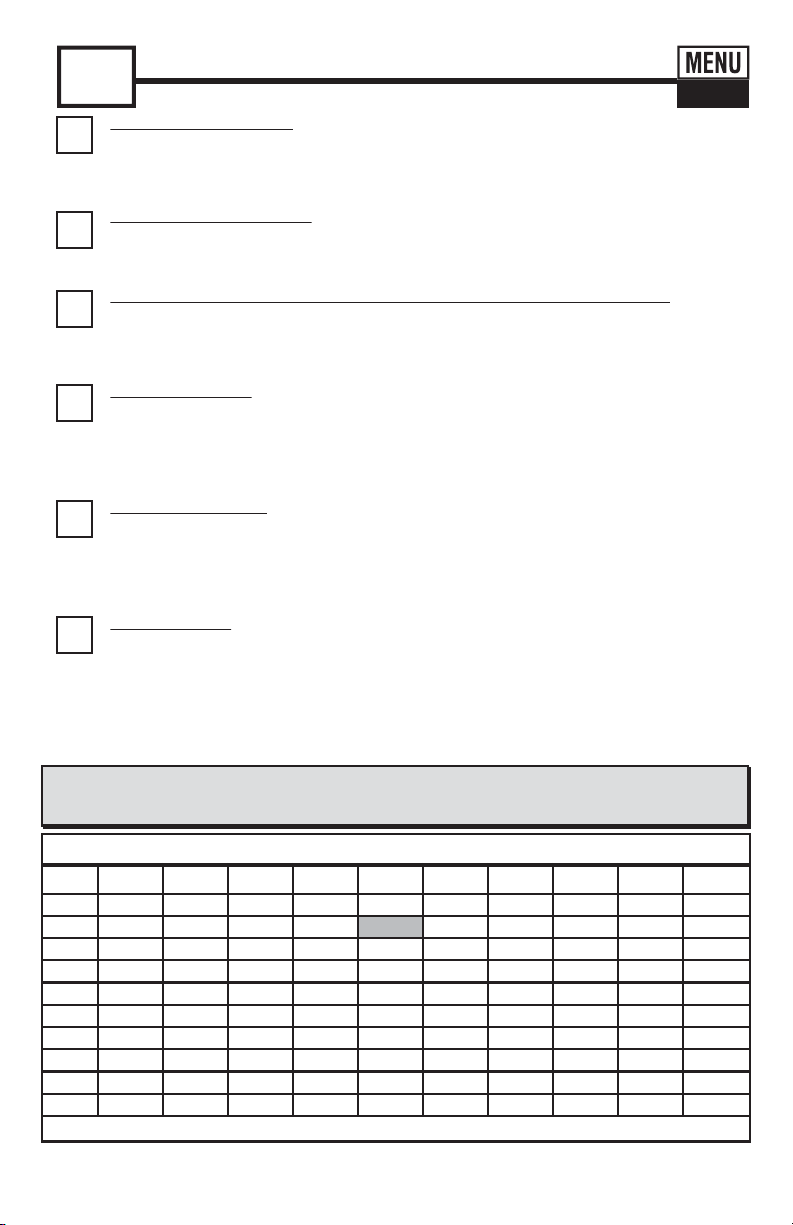
Turbidity results require the table below. Follow Turbidity Test
Procedure (above). Values below are not for Compliance Testing.
Rev. 121012-BT
%T
90
80
70
60
50
40
30
20
10
0
98765432 1 0
This table was calibrated using stabilized Formazin Turbidity Standards.
Turbidity Table
(NOTE: These Turbidity values are not for Potable water Compliance Testing)
5
Press READ; this starts the 20 SECOND countdown timer. Press READ* again and the
cursor will move across the display, informing you that it is about to measure the sample.
Record result displayed (This result is automatically stored in TR0).
PRESS “READ”
6
Find the “TR” result in the table below to determine the Turbidity concentration in NTU
(Nephelometric Turbidity Units). (Example: a “TR” result of 85.3 (use only the 85 for the chart)
equals a Turbidity value of 36 NTU). Record Turbidity result.
USE TABLE
4
Press the ZERO/ON button. The cursor will move across the display, followed by 100 %T.
'LVFDUGWKHGLVWLOOHGRUGHLRQL]HGZDWHU5LQVHWKHPHWHUFHOODWOHDVWWLPHVDQG¿QDOO\¿OO
cell to capacity (4mL) with water to be tested for Turbidity.
ZERO METER*
1
Press the ZERO/ON button to power the meter on; the display will show all annunciators,
then the current MENU selection, followed by the last reading.
TURN METER ON
2
Press and re-press the MENU button until the display shows the parameter TR0.
SELECT TEST: TR0
3
Rinse the CELLDWOHDVWWLPHVZLWKGLVWLOOHGRUGHLRQL]HGZDWHU)LQDOO\¿OOFHOOWRFDSDFLW\
(4mL) with the distilled or deionized water.
FILL METER WITH DISTILLED OR DEIONIZED WATER
Turbidity Test Procedure
TU
TR0
<4 7 10 11 14 16 18 20 22 25
28 30 32 34 36 39 42 44 46 50
53 55 57 60 64 68 70 72 74 78
81 85 88 90 92 96 99 103 106 109
113 117 120 124 127 131 138 142 145 149
152 158 162 166 170 174 180 184 191 198
202 209 212 223 227 234 237 245 251 259
269 276 283 290 301 308 319 325 336 350
361 372 386 400 416 435 450 468 490 514
540 574 609 650 706 758 800 >800 >800 >800
*NOTE: When testing outdoors (sunlight), for best accuracy, use the Mixing Cap/Cell Cover when Zeroing and Reading the sample.
Page 20

20
1.
2.
3.
4.
5.
6.
7.
8.
9.
10.
11.
12.
13.
14.
15.
16.
17.
18.
19.
20.
Become familiar with the meter and the different tests by reading the instructions carefully.
The Free Chlorine, Combined Chlorine, and Total Chlorine reagents are compliant for meeting
USEPA (4500-Cl G); ISO 7393/2; and German DIN 38408 G4-2 requirements.
Observe the dip time (as required for the test) for accurate results.
7HVWLPPHGLDWHO\DIWHU¿OOLQJWKHCELL with water sample when testing for oxidizers such as
Chlorine and Bromine (Ozone can be measured in CL3 MENU).
Be sure the CELL LV¿OOHGWRFDSDFLW\P/HVSHFLDOO\IRUS+DQG7RWDO$ONDOLQLW\
Rinse the CELL with clean water immediately after completing each test. Some reagents may
stain the CELL if not rinsed shortly after use. Other reagents including Cyanuric Acid, Chloride,
DQG&DOFLXP+DUGQHVVPD\FRDWWKH&(//ZDOO,WLVUHFRPPHQGHGDIWHUWKHVHWHVWVWRXVHWKH
Cell Cleaning Brush with water to clean the CELL.
Just before testing, rinse the sample CELL with the sample water several times to get a
representative sample. (Use deionized or distilled water for rinsing if you have a limited amount of
sample).
Store the meter and all test materials out of direct sunlight and away from chemical storage areas.
Minimize exposure of meter and test reagents to heat above 32°C (90°F).
Dry the outside of the meter when testing is complete or before storage of the meter.
When running a DPD-1 Free Chlorine test AFTER a Total Chlorine DPD-3, a Total Chlorine
'3'RUD+5&KORULQHWHVWULQVLQJLVYHU\LPSRUWDQWWRUHPRYHUHVLGXDO.,ZKLFKPD\LQWHUIHUH
Each Strip Micro is valid for ONLY one test. Discard strip after single use in regular refuse that is
inaccessible to children and pets.
Each bottle of Strip Micro contains the quantity of strips notated on the bottle. Due to the strip
VOLWWLQJSURFHVV\RXPD\¿QGRQHRUWZRVWULSVWKDWDUHQRWLFHDEO\VPDOOHURUODUJHULQZLGWKWKDQ
the normal strips in the bottle. These should be discarded. Using these strips may give unreliable
results.
(YHU\ORRNXSWDEOHKDVDXQLTXHUHYLVLRQQXPEHUORFDWHGLQWKHERWWRPULJKWFRUQHU:H
recommended you visit www.omega.com every 6 months for updated revisions.
7KH++:70HWHULVQRWFRPSDWLEOHIRUXVHZLWK'3''3'DQG'3'SRZGHUSLOORZV
tablets, and liquids available from other manufacturers. Accurate results can only be guaranteed
by using genuine Micro strips or reagents (reorder information on page 22).
2XUODEWHVWLQJZLWKWKH++:7PHWHUKDVVKRZQWKDW]HURLQJDQGPHDVXULQJRIWKHVDPSOH
normally does not require any cell cover for accurate results, except in sunlight. To obtain optimal
accuracy when testing with the meter outdoors (sunlight), use the Mixing Cap/Cell Cover when
zeroing and reading the sample.
Remove batteries when meter is not used for more than a month (Warranty Requirement).
,WLVUHFRPPHQGHGWKDW3RRODQG6SDVDPSOHVIRUR[LGL]HUVVXFKDV&KORULQHEHWDNHQLQFKHV
below the surface as follows: submerge meter with open cell facing down 18 inches, and then turn
PHWHUXSULJKWDWWKDWGHSWKWR¿OOWKHFHOO5HPRYHPHWHUIURPZDWHUZLWKWKHVDPSOHIRUWHVWLQJ
&OHDQFHOOZLWK1+&O'LVWLOOHG9LQHJDURU0XULDWLF$FLGEHIRUH¿OOLQJWKHPHWHUZLWKWKH
sample to be tested for Iron and Phosphate. This is especially important when testing low levels of
,URQDIWHUUXQQLQJD6XO¿GHWHVWZKLFKXVHVDQ,URQUHDJHQW,WLVUHFRPPHQGHGWKDW,URQWHVWLQJEH
GRQHEHIRUH6XO¿GHWHVWLQJLISRVVLEOH
If running multiple tests in a row, using the same water sample, for Iron or Phosphate, the CELL
does not have to be rinsed or cleaned with acid between each test. It is recommended that the
CELL be rinsed three times with the sample water.
HHWT-12 Tips For Best Accuracy
Page 21
21
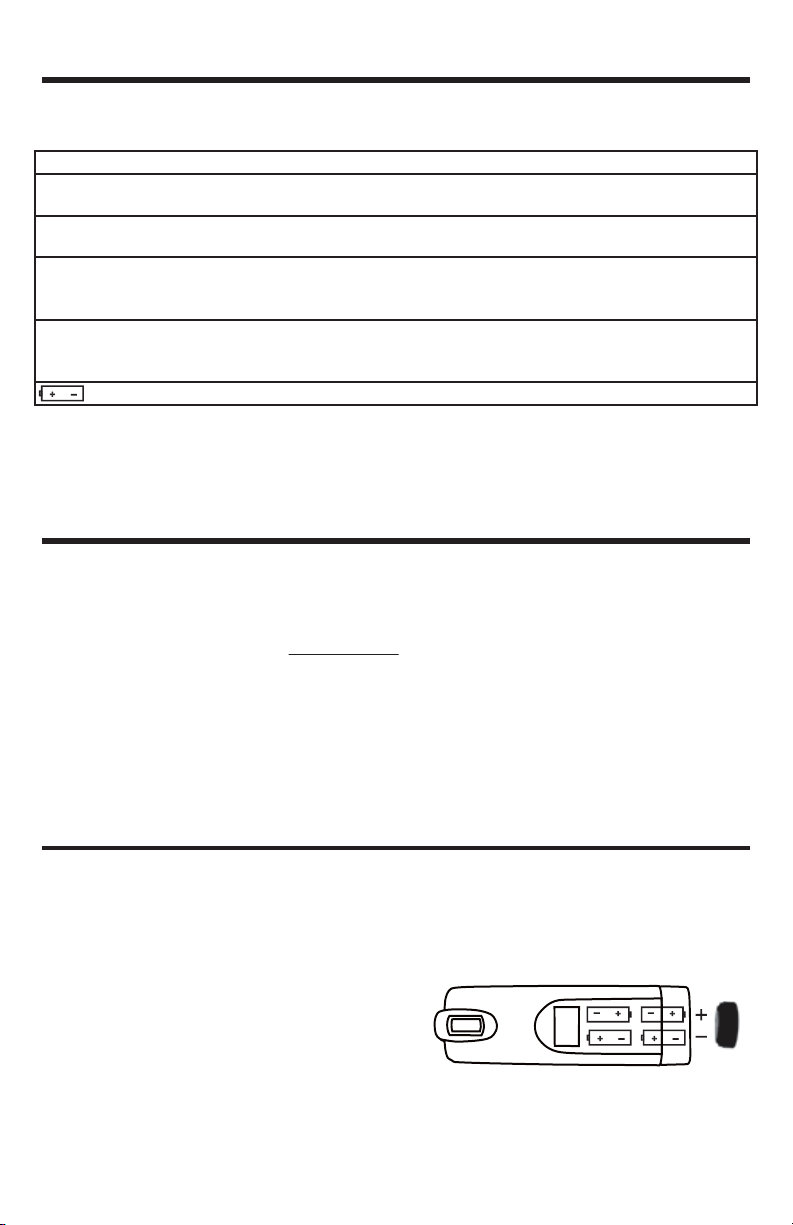
The following are some common messages that may be displayed, including error messages. If an
error message other than those listed below is displayed, please contact Omega technical support in
the USA at (800) 872-9436.
HHWT-12 Meter Messages
LCD Message
HI
LO
LO
ER
Description
In READ mode: test sample concentration is above
WKHPHDVXUHPHQWUDQJHWHVWVSHFL¿F
In READ mode: test sample concentration is below
WKHPHDVXUHPHQWUDQJHWHVWVSHFL¿F
In ZERO mode: sample absorbance (due to a
cloudy or colored sample or a dirty cell) is too high
to zero, the meter will read “LO”.
Excessive stray light detected. Normally this
does not occur, even when testing in sunlight.
Low battery indication.
Corrective Action
Dilute and retest.
Sample value is below measurement
range.
'LOXWHVDPSOH¿OWHUVDPSOHRUFOHDQFHOO2QHRI
these options should remedy the problem.
Place the LIGHT BLOCKING CAP over the CELL
for zeroing and for reading result. Moving
WRDVKDGHGDUHDFDQDOVR¿[WKLVSUREOHP
Replace the batteries.
About The Built-In Cell
The built-in CELLLVWUDQVSDUHQWSODVWLFDQGZKHQ¿OOHGWRWKHWRSFRQWDLQVPO7KHVWXUG\CELL design
will last for over 20,000 readings. Scratches on the CELL will not interfere or compromise the accuracy of
WKHUHDGLQJVEHFDXVHRILWV¿[HGSRVLWLRQ)RUEHVWDFFXUDF\ULQVHFHOOZLWKFOHDQZDWHULPPHGLDWHO\DIWHU
a test is completed. Do not use solvents, such as acetone, to clean the cell. When the CELL becomes
stained or cloudy from repeated testing, or when the meter does not blank when you press the ZERO/ON
button, the cell needs to be cleaned. Clean as follows)LOOFHOOZLWKFOHDQZDWHUDQGPRYHWKHCell
cleaning brush up-and-down and back-and-forth along the walls of the cell. Afterwards, rinse the cell and
the meter is ready for use again. Cleaning the cell regularly is especially recommended after you run a
test that is using turbidity or precipitation chemistry for analysis (Calcium Hardness and Cyanuric Acid).
1. Unscrew the O-ring sealed battery cover counter-clockwise. Use proper sized pliers if necessary.
Do not disturb the sealing O-ring. Batteries are not included.
2. Remove the used batteries and install 4 new AAA batteries following the diagram for
correct polarity (see diagram). We recommend high quality AAA alkaline batteries be used.
4. Replace the battery cover. Be sure to tighten the cover securely. This is necessary for meter to
be waterproof.
5. Dispose of the used batteries in accordance with your
local regulations.
3UHVV=(5221EXWWRQWRFRQ¿UPWKHPHWHUWXUQVRQ
The meter is now ready for operation.
7. Meter will not work if battery orientation is incorrect.
To Install/Replace “AAA” Batteries:
TOP VIEW
Page 22
22
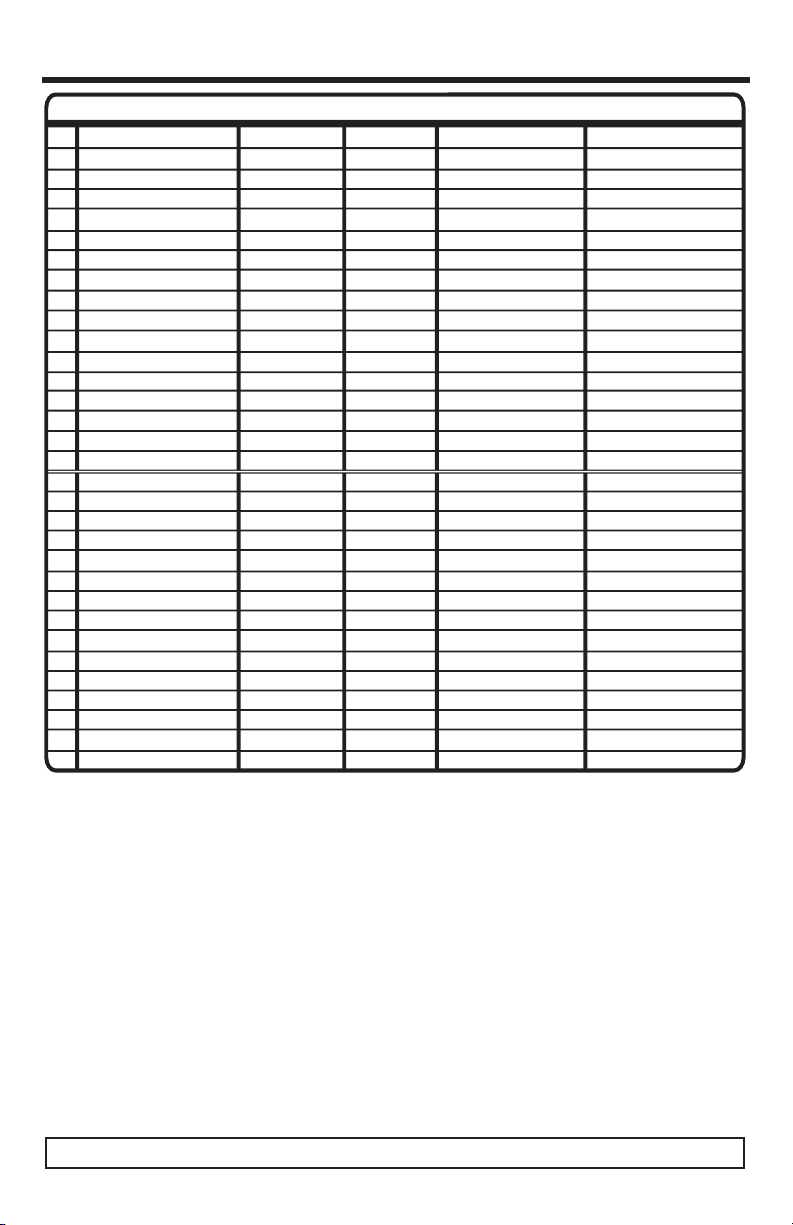
Strip Reagent Reorder Information
* Results utilize the TR (Transmission) meter function and require the use of a conversion table. See respective test procedures for more information and tables.
7RWDO&KORULQH'3'7HVWUHTXLUHV)UHH&KORULQH'3'++:7WREHUXQ¿UVW 5
Consult manual M-5099 for complete instructions on Direct Read Test procedures.
N/A
SSP
SSP
SSP
SSP
SSP
SSP
SSP
SSP
SSP
SSP
S+
SSP
SSP
SSP
SSP
SSP
SSP
N/A
SSP
SSP
SSP
SSP
SSP
SSP
SSP
SSP
SSP
SSP
SSP
178
PARAMETER
No.
PART NO. # OF TESTS DETECTION RANGE CHEMISTRY
6WULS0LFURP/5HDJHQW6SHFLÀFDWLRQV)RUXVHZLWK++:7
Reference Standard
Alkalinity, Total
Bromine (DPD-1)
Chlorine, Free (DPD-1)
Chlorine, High Range
Chlorine, Total (DPD-3)**
Chlorine, Total (DPD-4)
Copper (Cu
+2
)
Hardness, Total (as CaCO
3
)
Ozone (DPD-4)
Permanganate (DPD-1)
pH
Nitrate (as NO
3
-
)
Nitrite (as NO
2
-2
)
Chloride (as NaCl) II*
Chlorine Dioxide (DPD-1)*
Chromium (VI)*
Cyanuric Acid II*
Glycine
(used for Chlorine Dioxide)
Hydrogen Peroxide LR*
Hydrogen Peroxide MR*
Hydrogen Peroxide HR*
Iodine (DPD-1)*
Total Iron, TPTZ (Fe
+2
/Fe
+3
)*
LR Total Hardness (as CaCO
3
)*
Manganese*
Peracetic Acid (DPD-4)*
Phosphate*
Sulfate*
6XO¿GHDV+6
Turbidity*
1
2
3
4
6
7
8
11
12
13
14
16
17
18
21
22
23
24
26
27
28
++:7
HHWT-486641
HHWT-486636
HHWT-486637
HHWT-486672
HHWT-486638
++:7
HHWT-486632
HHWT-486673
HHWT-486634
HHWT-486626
++:7
++:7
HHWT-486623
++:7
HHWT-486633
HHWT-486614
++:7
++:7
HHWT-486616
HHWT-486648
HHWT-486676
HHWT-486627
++:7
++:7
++:7
HHWT-486674
HHWT-486814
++:7
HHWT-486646
None
24
N/A
N/A
Alizarin Red S + Citrate
DPD
DPD
KI + Buffer
Kl
DPD + Kl
Biquinoline
Phthalein Purple
DPD + Kl
DPD
Phenol Red
Zinc Reduction
Chromotropic Acid
Silver (ppt)
DPD
Diphenylcarbazide
Melamine (ppt)
Glycine
DPD + PO4 + MoO4 + KI
DPD + MoO4 + KI + acid
DPD + KI
DPD
TPTZ + PP
Phthalein Purple
PAN + Cyanide
DPD + KI
Molybdate Method
Barium (ppt)
Nitroprusside
Turbidity
,I\RXUUHTXLUHGSURFHGXUHLVQRWOLVWHGLQWKLVPDQXDOSOHDVHVHHWKHEDFNSDJHIRURXUFRQWDFWLQIRU PDWLRQ
NOTE: Because most of our products are test strips or use reagents that have little or no hazard in the quantity sold, MSDS sheets are not
supplied with the test.
To ensure optimal performance, store your eXact® kit in a cool, dry place away from excess heat (below
100°F / 38°C), moisture, and oxidizers such as Chlorine and Bromine.
Page 23

23
WARRANTY/DISCLAIMER
OMEGA ENGINEERING, INC. warrants this unit to be free of defects in materials and workmanship for a
period of 13 months from date of purchase. OMEGA’s WARRANTY adds an additional one (1) month
grace period to the normal one (1) year product warranty to cover handling and shipping time. This
ensures that OMEGA’s customers receive maximum coverage on each product.
If the unit malfunctions, it must be returned to the factory for evaluation. OMEGA’s Customer Service
Department will issue an Authorized Return (AR) number immediately upon phone or written request.
Upon examination by OMEGA, if the unit is found to be defective, it will be repaired or replaced at no
charge. OMEGA’s WARRANTY does not apply to defects resulting from any action of the purchaser,
including but not limited to mishandling, improper interfacing, operation outside of design limits,
improper repair, or unauthorized modification. This WARRANTY is VOID if the unit shows evidence of
having been tampered with or shows evidence of having been damaged as a result of excessive corrosion;
or current, heat, moisture or vibration; improper specification; misapplication; misuse or other operating
conditions outside of OMEGA’s control. Components in which wear is not warranted, include
limited to contact points, fuses, and triacs.
OMEGA is pleased to offer suggestions on the use of its various products. However,
OMEGA neither assumes responsibility for any omissions or errors nor assumes liability for any
damages that result from the use of its products in accordance with information provided by
OMEGA, either verbal or written. OMEGA warrants only that the parts manufactured by the
company will be as specified and free of defects. OMEGA MAKES NO OTHER WARRANTIES OR
REPRESENTATIONS OF ANY KIND WHATSOEVER, EXPRESSED OR IMPLIED, EXCEPT THAT OF
TITLE, AND ALL IMPLIED WARRANTIES INCLUDING ANY WARRANTY OF MERCHANTABILITY
AND FITNESS FOR A PARTICULAR PURPOSE ARE HEREBY DISCLAIMED. LIMITATION OF
LIABILITY: The remedies of purchaser set forth herein are exclusive, and the total liability of
OMEGA with respect to this order, whether based on contract, warranty, negligence,
indemnification, strict liability or otherwise, shall not exceed the purchase price of the
component upon which liability is based. In no event shall OMEGA be liable for
consequential, incidental or special damages.
CONDITIONS: Equipment sold by OMEGA is
Component” under 10 CFR 21 (NRC), used in or with any nuclear installation or activity; or (2) in medical
applications or used on humans. Should any Product(s) be used in or with any nuclear installation or
activity, medical application, used on humans, or misused in any way, OMEGA assumes no responsibility
as set forth in our basic WARRANTY/DISCLAIMER language, and, additionally, purchaser will indemnify
OMEGA and hold OMEGA harmless from any liability or damage whatsoever arising out of the use of the
Product(s) in such a manner.
not intended to be used, nor shall it be used: (1) as a “Basic
but are not
RETURN REQUESTS/INQUIRIES
Direct all warranty and repair requests/inquiries to the OMEGA Customer Service Department. BEFORE
RETURNING ANY PRODUCT(S) TO OMEGA, PURCHASER MUST OBTAIN AN AUTHORIZED RETURN
(AR) NUMBER FROM OMEGA’S CUSTOMER SERVICE DEPAR TMENT (IN ORDER TO AVOID
PROCESSING DELAYS). The assigned AR number should then be marked on the outside of the return
package and on any correspondence.
The purchaser is responsible for shipping charges, freight, insurance and proper packaging to prevent
breakage in transit.
FOR WARRANTY
following information available BEFORE
contacting OMEGA:
1. Purchase Order number under which the product
was PURCHASED,
2. Model and serial number of the product under
warranty, and
3. Repair instructions and/or specific problems
relative to the product.
OMEGA’s policy is to make running changes, not model changes, whenever an improvement is possible. This affords
our customers the latest in technology and engineering.
OMEGA is a registered trademark of OMEGA ENGINEERING, INC.
© Copyright 2012 OMEGA ENGINEERING, INC. All rights reserved. This document may not be copied, photocopied,
reproduced, translated, or reduced to any electronic medium or machine-readable form, in whole or in part, without the
prior written consent of OMEGA ENGINEERING, INC.
RETURNS, please have the
FOR NON-WARRANTY REPAIRS,
for current repair charges. Have the following
information available BEFORE contacting OMEGA:
1. Purchase Order number to cover the COST
of the repair,
2. Model and serial number of the product, and
3. Repair instructions and/or specific problems
relative to the product.
consult OMEGA
Page 24

24
Where Do I Find Everything I Need for
Process Measurement and Control?
OMEGA…Of Course!
Shop online at omega.com
TEMPERATURE
Thermocouple, RTD & Thermistor Probes, Connectors, Panels & Assemblies
Wire: Thermocouple, RTD & Thermistor
Calibrators & Ice Point References
Recorders, Controllers & Process Monitors
Infrared Pyrometers
PRESSURE, STRAIN AND FORCE
Transducers & Strain Gages
Load Cells & Pressure Gages
Displacement Transducers
Instrumentation & Accessories
FLOW/LEVEL
Rotameters, Gas Mass Flowmeters & Flow Computers
Air Velocity Indicators
Turbine/Paddlewheel Systems
Totalizers & Batch Controllers
pH/CONDUCTIVITY
pH Electrodes, Testers & Accessories
Benchtop/Laboratory Meters
Controllers, Calibrators, Simulators & Pumps
Industrial pH & Conductivity Equipment
SM
DATA ACQUISITION
Data Acquisition & Engineering Software
Communications-Based Acquisition Systems
Plug-in Cards for Apple, IBM & Compatibles
Data Logging Systems
Recorders, Printers & Plotters
HEATERS
Heating Cable
Cartridge & Strip Heaters
Immersion & Band Heaters
Flexible Heaters
Laboratory Heaters
ENVIRONMENTAL
MONITORING AND CONTROL
Metering & Control Instrumentation
Refractometers
Pumps & Tubing
Air, Soil & Water Monitors
Industrial Water & Wastewater Treatment
pH, Conductivity & Dissolved Oxygen Instruments
M-5282/0413
 Loading...