

Page 1
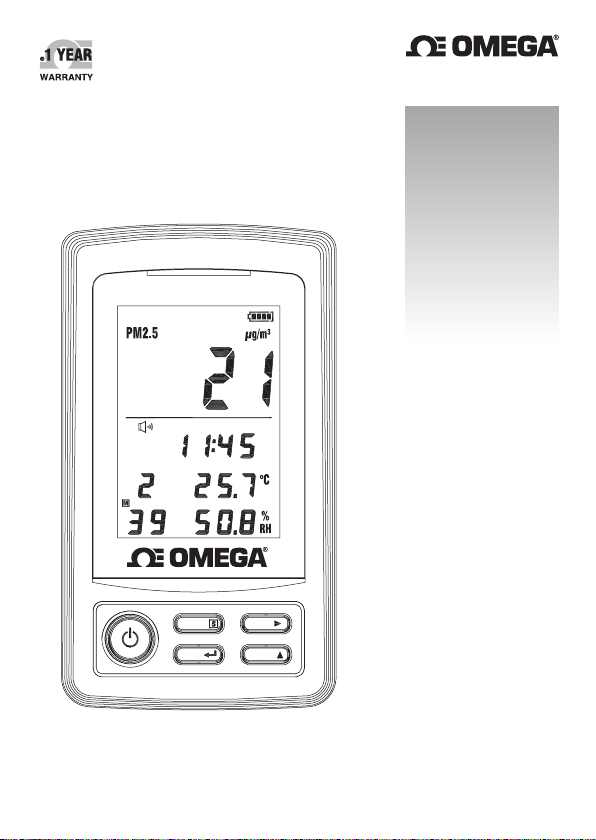
HHTP21
User’s Guide
ALM
Health
Index
MODE MEM
MAX
Shop online at
omega.com
e-mail: [email protected]
For latest product manuals:
omegamanual.info
READ
HHTP21
Air Quality Monitor
SM
Page 2

omega.com [email protected]
Servicing North America:
U.S.A.: Omega Engineering, Inc., One Omega Drive, P.O. Box 4047
Stamford, CT 06907-0047 USA
Toll-Free: 1-800-826-6342 (USA & Canada only)
Customer Service: 1-800-622-2378 (USA & Canada only)
Engineering Service: 1-800-872-9436 (USA & Canada only)
Tel: (203) 359-1660 Fax: (203) 359-7700
e-mail: [email protected]
For Other Locations Visit omega.com/worldwide
The information contained in this document is believed to be correct, but OMEGA accepts no
liability for any errors it contains, and reserves the right to alter specifications without notice.
Page 3

OMEGA ENGINEERING, INC. warrants this unit to be free of defects in materials and workmanship for a period of 13 months from date of purchase. OMEGA’s Warranty adds an additional
one (1) month grace period to the normal one (1) year product warranty to cover handling
and shipping time. This ensures that OMEGA’s customers receive maximum coverage on each
product.
If the unit malfunctions, it must be returned to the factory for evaluation. OMEGA’s Customer
Service Department will issue an Authorized Return (AR) number immediately upon phone or
written request. Upon examination by OMEGA, if the unit is found to be defective, it will be
repaired or replaced at no charge. OMEGA’s WARRANTY does not apply to defects resulting
from any action of the purchaser, including but not limited to mishandling, improper interfacing, operation outside of design limits, improper repair, or unauthorized modification. This
WARRANTY is VOID if the unit shows evidence of having been tampered with or shows evidence
of having been damaged as a result of excessive corrosion; or current, heat, moisture or vibration; improper specification; misapplication; misuse or other operating conditions outside of
OMEGA’s control. Components in which wear is not warranted, include but are not limited to
contact points, fuses, and triacs.
OMEGA is pleased to offer suggestions on the use of its various products. However,
OMEGA neither assumes responsibility for any omissions or errors nor assumes
liability for any damages that result from the use of its products in accordance with
information provided by OMEGA, either verbal or written. OMEGA warrants only
that the parts manufactured by the company will be as specified and free of defects.
OMEGA MAKES NO OTHER WARRANTIES OR REPRESENTATIONS OF ANY KIND
WHATSOEVER, EXPRESSED OR IMPLIED, EXCEPT THAT OF TITLE, AND ALL IMPLIED
WARRANTIES INCLUDING ANY WARRANTY OF MERCHANTABILITY AND FITNESS
FOR A PARTICULAR PURPOSE ARE HEREBY DISCLAIMED. LIMITATION OF LIABILITY:
The remedies of purchaser set forth herein are exclusive, and the total liability of
OMEGA with respect to this order, whether based on contract, warranty, negligence,
indemnification, strict liability or otherwise, shall not exceed the purchase price of
the component upon which liability is based. In no event shall OMEGA be liable for
consequential, incidental or special damages.
CONDITIONS: Equipment sold by OMEGA is not intended to be used, nor shall it be used: (1) as
a “Basic Component” under 10 CFR 21 (NRC), used in or with any nuclear installation or activity;
or (2) in medical applications or used on humans. Should any Product(s) be used in or with any
nuclear installation or activity, medical application, used on humans, or misused in any way,
OMEGA assumes no responsibility as set forth in our basic WARRANTY/ DISCLAIMER language,
and, additionally, purchaser will indemnify OMEGA and hold OMEGA harmless from any liability
or damage whatsoever arising out of the use of the Product(s) in such a manner.
WARRANTY/ DISCLAIMER
Direct all warranty and repair requests/inquiries to the OMEGA Customer Service Department.
BEFORE RETURNING ANY PRODUCT(S) TO OMEGA, PURCHASER MUST OBTAIN AN
AUTHORIZED RETURN (AR) NUMBER FROM OMEGA’S CUSTOMER SERVICE DEPARTMENT
(IN ORDER TO AVOID PROCESSING DELAYS). The assigned AR number should then be marked
on the outside of the return package and on any correspondence. The purchaser is responsible for
shipping charges, freight, insurance and proper packaging to prevent breakage in transit.
FOR WARRANTY RETURNS, please have
the following information available BEFORE
contacting OMEGA:
1. Purchase Order number under which the
product was PURCHASED,
2. Model and serial number of the product under
warranty, and
3. Repair instructions and/or specific problems
relative to the product.
OMEGA’s policy is to make running changes, not model changes, whenever an improvement is
possible. This affords our customers the latest in technology and engineering.
OMEGA is a registered trademark of OMEGA ENGINEERING, INC.
© Copyright 2015 OMEGA ENGINEERING, INC. All rights reserved. This document may not be copied,
photocopied, reproduced, translated, or reduced to any electronic medium or machine-readable form,
in whole or in part, without the prior written consent of OMEGA ENGINEERING, INC.
RETURN REQUESTS/ INQUIRIES
FOR NON-WARRANTY REPAIRS,
OMEGA for current repair charges. Have
the following information available BEFORE
contacting OMEGA:
1. Purchase Order number to cover the COST
of the repair,
2. Model and serial number of the product, and
3. Repair instructions and/or specific problems
relative to the product.
consult
Page 4

1. SAFETY INFORMATION
❑ Read and keep the instruction manual.
❑ Follow all warnings and instructions.
❑ Avoid any adhesive particle like oil, etc. from gettng onto the meter.
❑ Do not install or operate the meter close to noise generator, such as
electric dust collector, fluorescent lighting, etc.
❑ Avoid use on mechanical vibration.
❑ Avoid use in moisture.
❑ Do not use the meter near water, such as a sink, wash basin, or bathtub.
❑ Do not spill any liquids onto or into the meter.
❑ Do not push any objects into the openings of the meter.
❑ Do not use any liquid or spray cleaners on the meter.
Clean only with dry cloth.
❑ Do not install or operate near any source of heat.
❑ Do not use the meter in direct sunlight or other bright light source.
❑ Air sampling port shall not be covered when in use.
❑ Place the meter in a flat and safe surface to prevent it from dropping.
While the meter can detect levels of airborne particulates it cannot
determine the health impact for any given individual.
Respiratory ailments and allergic symptoms are caused by a variety
of factor. The meter is not meant to be used in the treatment or
mitigation of any medical condition.
Health Disclaimer
2. INTRODUCTION
Particle pollution comes from many different type of sources. Fine particle
(2.5 micrometers in diameter and smaller) include power plants, industrial
processes, vehicle tailpipes, wood stoves, and wildfires. Coarse particles
(between 2.5 and 10 micrometers) come from crushing and grinding
operations, road dust, and some agricultural operations.
Particle pollution is linked a number of health problems, including coughing,
wheezing, reduced lung function, asthma attacks, heart attacks and strokes.
It also is linked to early death.
-1-
Page 5

Some people may be at greater risk from particle pollution. They include:
People with cardiovascular disease (diseases of the heart and blood
❑
vessels).
People with lung disease, including asthma and COPD.
❑
Children and teenagers.
❑
Older adults.
❑
Research indicates that obesity or diabetes may increase risk.
❑
New or expectant mothers may want to take precaution to protect the
❑
health of their babies.
The meter is a real-time air quality monitor instrument used to monitor the
concentration of PM2.5, humidity and temperature in the indoor environment.
The meter convert the concentration of PM2.5 in the air into visual data, and
evaluate the air quality comprehensively. Visual and audio alarm will be actived
when the air quality reached a critical or alarm limit values.
2-1 Features:
Fine particulate matter (PM2.5) measurement.
❑
Temperature and Humidity measurements.
❑
Health index (0 ~ 9) detection and alarm.
❑
PM2.5 time weighted average reading.
❑
Data hold and MAX/MIN with time stamp function.
❑
Six-color LED indication Air Quality Index Category.
❑
Preset warning point of buzzer alarm, LED and alarm output.
❑
Manual data memory and read function.
❑
2-2 Applications:
Sensitive individuals can monitor their personal space at home and work.
❑
Evaluate effectiveness and placement of air filtration devices.
❑
❑
Investigate the effectiveness of different strategies to reduce particulates.
❑
Correlate health related issues to changes in particulate levels.
❑
Indoor air quality investigations.
❑
Evaluate effectiveness of air filtration.
❑
Continuous monitoring of building conditions (continuous commissioning)
❑
Troubleshooting/optimization of filtration methods.
❑
Sales tool for understanding filtration needs.
-2-
Page 6

3. SPECIFICATIONS
Measurement Range
❑
PM2.5
: 0 to 500 g
Humidity
Temperature: -20°C to +60°C (-4°F to +140°F)
Resolution: 1g/m
❑
Accuracy:
❑
PM2.5
: ±10% of reading±10 g
:
3
µ
/m
: 1% to 99%R.H.
3
, 0.1% R.H., 0.1°C, 0.1°F
µ
µ
Temperature: ±0.8°C, ±1.5°F
Humidity: ±3%RH (at 25°C, 30 to 80% RH).
±5%RH (at 25°C, 0 to 20% RH and 80 to 100% RH).
❑
Sensor type:
PM2.5: Optical sensing with an IRLED and a photodiode sensor.
Humidity: Precision capacitance sensor
Temperature: Thermistor sensor
Response time:
❑
PM2.5
:≤1min
Humidity
: 45%R.H. to 95% R.H. 1
95%R.H. to 45%R.H.3min
≤
min
≤
Temperature : 10°C/2 sec.
Flow rate: 0.115m
❑
Sampling rate: 1 sample/second.
❑
Data Memory Capacity: 39 sets. (Direct reading from LCD display)
❑
Alarm Output: Open-collect output. Input impedance: 490Ω
❑
3
/min (4.135 CFM)
Maximum applied Voltage: 24V DC
Maximum drive current: 50mA DC
Operating temperature and humidity: 0°C to 60°C, below 95% R.H.
❑
❑
Storage temperature and humidity: -10°C to 60°C, below 70% R.H.
Power supply: Four 1.5V LR-6/AA size batteries, AC adapter
❑
y life: Approx. 8 hour
Batter
❑
Dimensions: 165mm(L)×93mm(W)×75mm(T), (6.5"L×3.7"W×3"T)
❑
❑
Weight: Approx. 380g (13.4oz)
Accessories: Instruction manual, Battery, AC adaptor DC6V 1000mA.
❑
-3-
Page 7
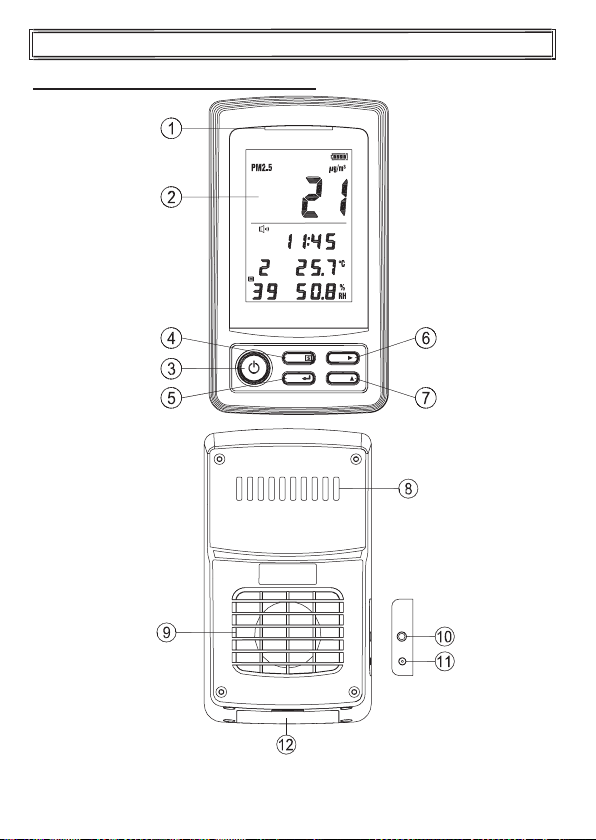
4. PARTS & CONTROLS
4-1 Description of Parts & Control keys:
ALM
Health
Index
MODE MEM
READMAX
-4-
Page 8
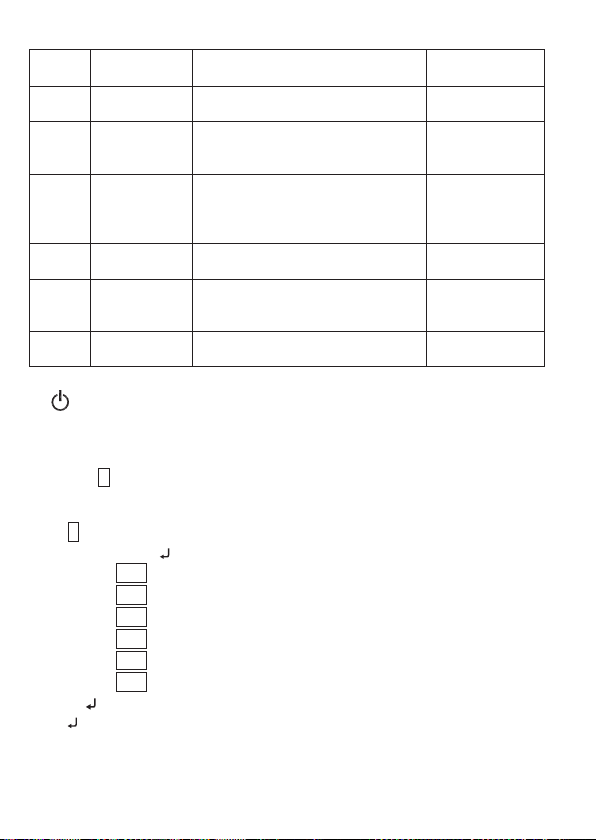
1. PM2.5 LED Air quality indicator
LED
Red
Air Quality
Index
Good
(0 – 50)
Moderate
(51 – 100)
Unhealthy
for Sensitive
Groups
(101 – 150)
Unhealthy
(151~200)
Who Needs to Be Concerned ?
24-hour average
No one. Air quality is good for
everyone.
Some people may be unusually
sensitive to particle pollution and
may need to take precautions.
Sensitive groups include people
with heart or lung disease, older
adults, children and teenagers.
Everyone can be affected. 55.5 – 150.4
Color
Green
Yellow
Orange
Very
Purple
Unhealthy
Everyone 150.5 – 250.4
(201 – 300)
Maroon
Hazardous
(301 – 500)
Everyone 250.5 – 500
2. LCD display.
3. Power and Backlight control key:
Press this key to turn on the meter.
Press this key again to turn on or off the LCD backlight.
Press this key for 3 seconds to turn off the meter.
4. MODE S key:
MODE
key: Press this key to cycle the Measurement, PM2.5 TWA
(Time-Weighted Average) and Current Date reading.
S key: Press this key for 3 seconds to enter the Setting Mode.
Press key to exit this mode.
SET dAtE
SET bEEP
SET UNit
SET PM2.5 TWA
SET cA
SET ALM
5. MAX key:
: Real-time setting mode.
: Alarm sound on/off setting mode.
: Temperature unit °C/°F setting mode.
: PM2.5 TWA average time setting mode.
: User calibration setting mode.
: Alarm limit values setting mode.
key: In the setting mode, press this key to store the setting data and exit.
MAX
key: Press this key to enter the MAX (maximum) /
Recording Mode.
µ
PM2.5 (
g/m
0.0 – 12.0
12.1 – 35.4
35.5 – 55.4
MIN (minimum)
3
)
-5-
Page 9
Press this key to circulate the MAX and MIN reading.
Press this key for 3 seconds to exit this mode and store one set recorded
datas to memory.
u
key:
6. MEM
u key: In the setting mode, press this key to move cursor to the desired
position.
MEM key
a).
b).
7. READ
p
READ key
:
Memory function
Clear the stored data
again. There shows “
YES
“
” or “no” to erase the memory data.
key:
p
key
: In the setting mode, press this key to increase the parameter.
: Press this key one time to store a measuring data.
: Press and hold this key, then turn on the meter
rEC CLr no
” mark on LCD. Press p key to select
: Press this key to enter the READ mode, then press this key
again to select the desired stored number of data to read.
Press !key to exit.
8. Air sampling inlet port.
9. Air sampling outlet port.
10. Alarm output jack:
Alarm signal is available this jack.
11. AC adaptor power jack (DC 6V, 1000mA).
12. Battery compartment.
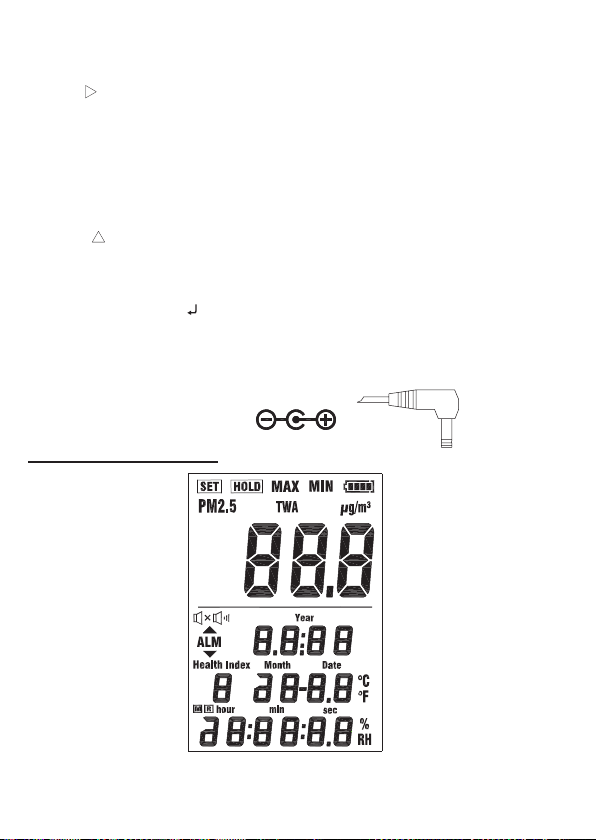
4-2 Description of Display:
-6-
Page 10
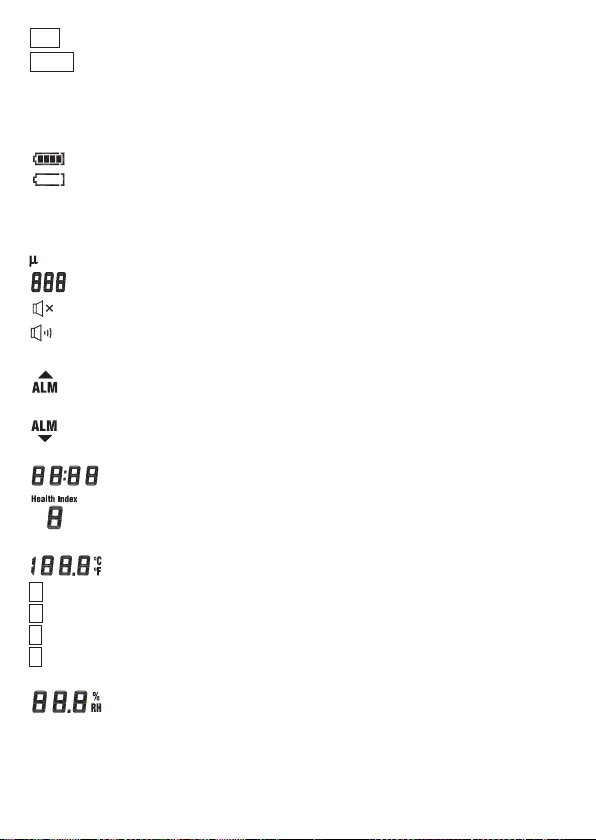
SET
: Setting mode indication.
HOLD
: In the user calibration setting mode, the measuring data hold
indication for calibration.
MAX
: In the MAX/MIN recording mode, maximum value indication.
MIN
: In the MAX/MIN recording mode, minimum value indication.
MAX MIN
: In the MAX/MIN recording mode, current value indication.
: Battery capacity indication.
: Low battery indication.
PM2.5
: Fine particulate matter (PM2.5) measurement value indication.
PM2.5 TWA
g/m
: Fine particulate matter (PM2.5) measurement TWA value
indication.
3
: PM2.5 measurement unit.
: PM2.5 measurement value.
: Disable alarm sound indication.
: Enable alarm sound indication.
ALM
: Enable the alarm function indication.
: Measurement value upper to the high limit value or setting the high limit
value indication.
: Measurement value below to the low limit value or setting the low limit
value indication.
: Current time (hour:minute) indication.
: PM2.5 air particle pollution is based on a scale from 0 – 9 indication.
0: Very good, 1: Good, 2 – 4: Moderate, 5 – 8: Poor, 9: Very poor.
: Temperature measurement value.
M
: Store one set of data into memory.
M 39
: Manual memory address number indication.
R
: Read mode indication.
R 39
: Recall manual memory address number indication.
Hour 24
: PM2.5 TWA average time indication or setting.
: Relative humidity measurement value.
Year Month Date hour min sec
: Real-time or MAX/MIN recorded stamp time
indication.
-7-
Page 11
5. BEFORE OPERATION
or
the
en
not
5-1 Power Supply:
The meter can be powered by two ways: Four AA-size alkaline batteries
the AC adaptor.
5-2 Install the Batteries:
Insert four AA-size batteries as indicated by the diagram located on
inside of the battery compartment.
The meter is disigned to operate only with alkaline batteries.
When the battery voltage drop below the operating voltage, the “
mark will be blink displayed, it indicates the batteries need to be changed.
5-3 AC Adaptor:
The AC adaptor allows you to power the meter from a wall outlet. Wh
using the AC adaptor, the batteries (if installed) will be by passed. The AC
adaptor is not a battery charger.
5-4 Air Sampling Port:
Always ensures that the meter air sampling inlet and outlet port are
blocked and open to the atmosphere.
6. OPERATING INSTRACTIONS
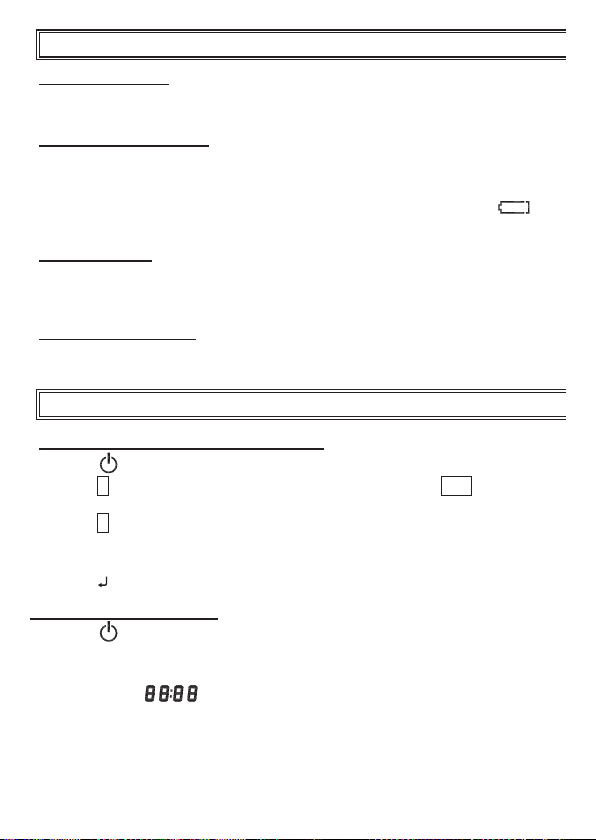
6-1 Selecting Temperature Unit °C or °F :
1. Press
2. Press S key for 3 seconds to enter the setting mode, the “
key to turn on the meter.
SET
” and “
dAtE
marks are displayed.
3. Press S key 2 times to enter the temperature unit °C /°F setting mode, the
Unit
“
” mark is displayed.
4. Press u key to select “°C” or “°F” unit now blink on the display.
5. Press key to store the desired measure unit.
6-2 Taking Measurements:
1. Press key to turn on the meter.
2. The display will shows the PM2.5 concentration reading (PM2.5 g/m3),
µ
Temperature reading (°C or °F ), Humidity reading (%RH), Real-time
hour:minute (
), and PM2.5 air particle pollution (Health Index 0 –
9 ). The Health Index 5 – 9 will be blink display for warning.
3. The PM2.5 LED air quality indicator in a color format, the Red, Purple and
Maroon colors will be blink.
”
”
-8-
Page 12
4. Press
MODE
key to cycle the Measurement, PM2.5 TWA and Real-time
display. If the measurement time arrive ahead of the TWA average setting
5. Press
6. Press key for 3 seconds to turn off the meter.
6-3 Setting the TWA Average Time:
1. Press
2. Press S key for 3 seconds to enter the setting mode, the “
3. Press S key 3 times to enter the PM2.5 TWA average time setting mode,
4. Press p key to select the desired average time from 1 to 24 hours.
5. Press key to store the setting value and exit this mode.
6-4 Setting the Real-Time:
1. Press
2. Press S key for 3 seconds to enter the real-time setting mode, the “
3. Using u key to position the cursor on the date or time element to adjust.
4. Press
5. Press key to complete the action.
6-5 Taking Maximum (MAX) and Minimum (MIN) Recorder Measurements:
1. Press key to turn on the meter.
2. Press
3. If you wish to read previously recorded data, press
4. Press
time, the “
displayed.
the “
The meter internal clock is used in the display and for time-stampling
recorded measurements.
dAtE
OLd dAtA
display the recorded data, then press
mode. Otherwise press
auto clear the previous recorded data.
Current measurement reading, the “
hour - -:
” will be displayed.
key again to turn on or off the LCD backlight.
key to turn on the meter.
SET PM2.5 TWA hour
key to turn on the meter.
” mark is displayed.
key to change the selected date or time element value.
MAX
key to enter the read previous recorded data mode, the “
” mark is displayed.
MAX
key to cycle through the
MAX.
reading for PM2.5, temperature and humidity, the “
displayed.
MAX.
reading for PM2.5 TWA, temperature and humidity, the “
TWA
” mark is displayed.
” mark is displayed.
MAX
MAX
key again to enter the recorder mode and
key for 3 seconds to exit this
MAX MIN
-9-
” mark is displayed.
READ
SET
” mark is
key to cycle
MAX
” mark is
MAX
SET
rEAd
Page 13

MIN.
reading for PM2.5, temperature and humidity, the “
displayed.
MIN.
reading for PM2.5 TWA, temperature and humidity, the “
TWA
” mark is displayed.
MAX.
PM2.5 reading with its temperature and humidity reading, the
PM2.5
“
” mark is blinks.
MIN.
PM2.5 reading with its temperature and humidity reading, the
PM2.5
“
” mark is blinks.
MAX
. temperature reading with its PM2.5 and humidity reading, the “°C
°F
or
” mark is blink.
MIN.
temperature reading with its PM2.5 and humidity reading, the
“°C or °F ” mark is blink.
MAX.
humidity reading with its PM2.5 and temperature reading, the
%RH
“
” mark is blink.
11
MIN.
humidity reading with its PM2.5 and temperature reading, the
%RH
“
” mark is blink.
Under to
11
steps, users also can get the occurred time by press
key to display the occurred time, press
display.
11
Under to
5. Press
steps, the “R” mark is displayed.
MAX
key for 3 seconds to exit this mode and store the recorded
data to memory.
MODE
key again to exit time
MIN
MIN
” mark is
MODE
6-6 Taking Alarm Operation:
1. Quantity for alarm operation
Alarm setpoints
:
A alarm monitors the quantity chosen for the alarm operation. When the
measured value is in between the “
high
is OFF. When choosing low value as “
low
“
” value, the alarm is OFF when the measured value is not between
low
” and “
high
” limit values, the alarm
” value and higher value as
the setpoints. You can also set only one setpoint.
The figure for illustrative examples of the different measurement-based
alarm operation modes.
Hysteresis function is to prevent the alarm operation back and forth when
the measured value is near to the setpoint values. Hysteresis value should
be smaller than the difference of the setpoints.
-10-
Page 14
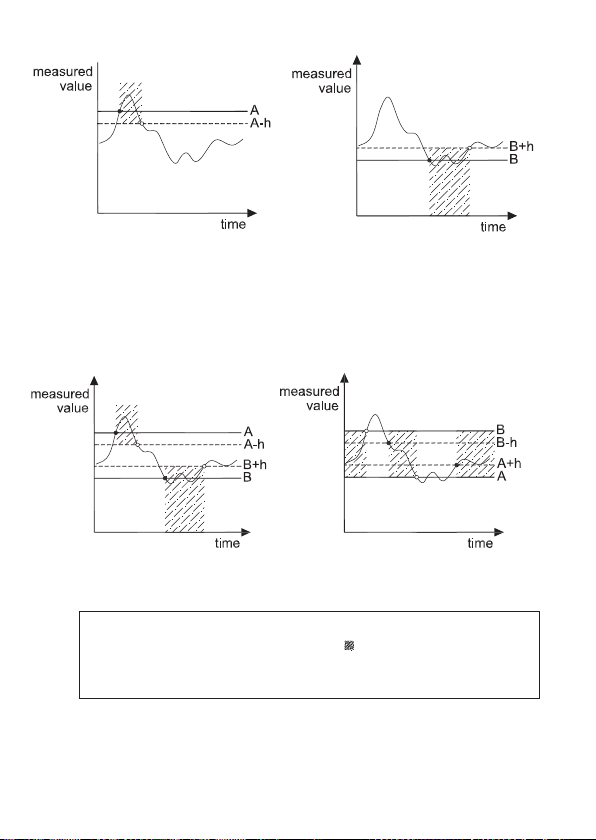
Mode 1: Only “high” setpoint set.
MODE 2: Only “low” setpoint set.
Alarm is ON when value is
above the setpoint.
Mode 3: Both setpoints set
“high” > “low”.
Alarm is ON when value is
outside the setpoints.
Legend
A: “high” setpoint value Alarm is ON
B: “low” setpoint value
h: Hysteresis value
Alarm is ON when value is
below the setpoint.
Mode 4: Both setpoints set
“high” < “low”.
Alarm is OFF when value is
outside the setpoints.
Alarm is ON
¢
Alarm is OFF
-11-
Page 15
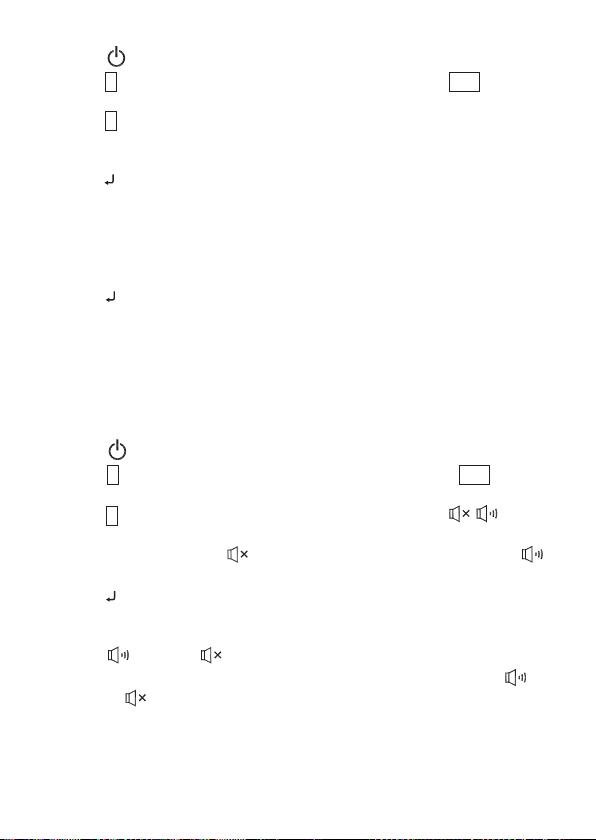
2. Setting the alarm limit values
Press
Press S key for 3 seconds to enter the setting mode, the “
displayed.
Press S key 5 times to enter the PM2.5 alarm mode select, the “
ALM
Press p key to select the desired PM2.5 alarm mode from 1 to 4, then
press key to select and to enter the alarm limit values setting mode.
The “
the “p
the “p
Press p key to set the desired value, the p key can be held down to
increase the speed.
Press key to move the next setting value or to enter the temperature
alarm mode select, the “°C or °F
Repeat step and above to complete the temperature limit value
setting, and to enter the humidity alarm mode select, the “
and “
Repeat step and above to complete the humidity limit value setting,
and exit the alarm limit values setting mode.
3. Setting the alarm sound ON/OFF
Press key to turn on the meter.
Press S key for 3 seconds to enter the setting mode, the “
displayed.
Press S key 1 times to enter this mode, the “
are displayed.
Press p key to select “
for enable the alarm sound.
Press key to exit this mode.
4. To turn-on and turn-off alarm function.
Press
ALM
“
Press
or “
key to turn on the meter.
no-x
” and “
ALM
ALM
ALM
no-x
READ
ALM
” marks are displayed.
q” mark indication setting the low limit value,
” mark indication setting the high limit value, and
q” mark indication setting the hysteresis value.
ALM
” and “
”marks are displayed.
” for disable the alarm sound or select “
READ
key for 3 seconds to turn on the alarm function, the
ALM
” or “
key one time to turn off the alarm function, the “
” mark is disappeared.
” mark is displayed.
no-x
” marks are displayed.
bEEP
” and “
SET
” mark is
PM2.5
%RH, ALM
SET
” mark is
” marks
ALM
”
”
”
-12-
Page 16

6-7 Manual data Memory and Read Mode:
1. To clear the manual memorized data
Press
Press and hold down
LCD show “
Press p key to select “
If you select “YES” the memorized data will be cleared.
2. To memorized the reading
Press
the memory. At this moment, LCD will show the memory address
number and the “M” mark will be disappear one time. Total memory size
is 39 sets.
When the memory is full, LCD will show “
3. To recall the memorized data.
❑ Press
and the memory address number.
❑ Press
display.
❑ Press
again to exit the date and time display.
❑ Press key to exit.
6-8 User Friendly Calibration Procedure:
6-8-1
Use standard PM2.5 meter for 2-point calibration, use standard
1. Press key to turn on the meter.
2. Press S key for 3 seconds to enter the setting mode, the “
displayed.
3. Press S key 4 times to enter the calibration mode, “
4. Wait about 10 minutes, until the meter and the standard meters all readings
are stable, then press key to hold the meter measured values, the
HOLD
“
5. Press and hold down the key to increase the PM2.5 first point value or
press and hold down the key to decrease the value, until the PM2.5
value is same as the PM2.5 standard meter.
key to turn off the meter.
rEC CLr no
MEM
key each time will store one set of the measured value into
READ
READ
MODE
temperature meter for 1-point calibration, and use standard humidity
meter for 1-point calibration.
” mark is displayed and the “
MEM
” mark.
YES
key to enter the READ mode, the LCD will show “R” mark
key to select the desired memory address number data for
key to display the stored date and time, press
p
key then press key to turn on the meter,
” or “no”, then press key to exit.
rEC FULL
PM2.5 1
” mark is blinking.
u
” mark.
SET
CA 1
” mark is displayed.
MODE
” mark is
key
-13-
Page 17
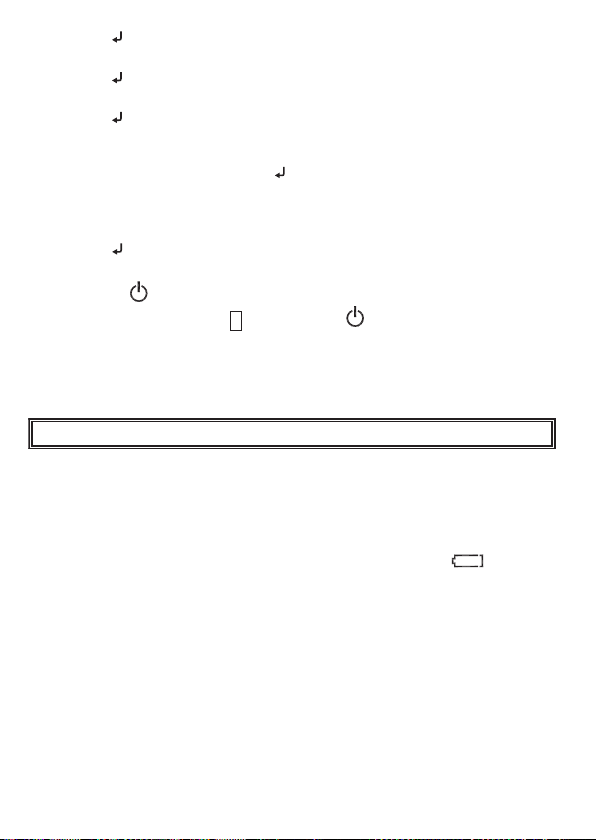
6. Press key, the “°C or °F ” mark is displayed, press or key until
the temperature value is same as the standard temperature meter.
7. Press key, the “
humidity value is same as the standard humidity meter.
8. Press key to enter the PM2.5 second point calibration mode, the “
2
” mark is displayed.
9. Wait about 10 minutes, until the meter and PM2.5 standard meter
reading are stable, then press key to hold the meter measured value,
HOLD
the “
10. Press or key until the PM2.5 second point value is same as the
11. Press key to complete the calibration procedure and exit this mode.
6-8-2 Reset to factory calibration
pu
PM2.5 standard meter.
1. Press
2. Press and hold down S key then press key to turn on the meter,
CA Fact no
the “
3. Press key to select “
factory calibration.
%RH
” mark is displayed, press or key until the
” mark is displayed and the “
key to turn off the meter.
” mark is displayed.
YES
” or “no”. If you select “
PM2.5 2
pu
pu
” mark is blink.
YES
” will reset to
7. MAINTENANCE
7-1 Cleaning
Periodically wipe the case with a dry or damp cloth and mild detergent.
Do not use abrasives or solvents to clean this instrument.
7-2 Battery Replacement
When the battery power is not sufficient, LCD will show “ ” mark is
blink, the four 1.5V “AA” alkaline batteries must be replaced.
1. Turn the meter off.
2. Remove the meter’s battery cover.
3. Replace the batteries observing polarity.
4. Affix the battery cover.
CA
-14-
Page 18
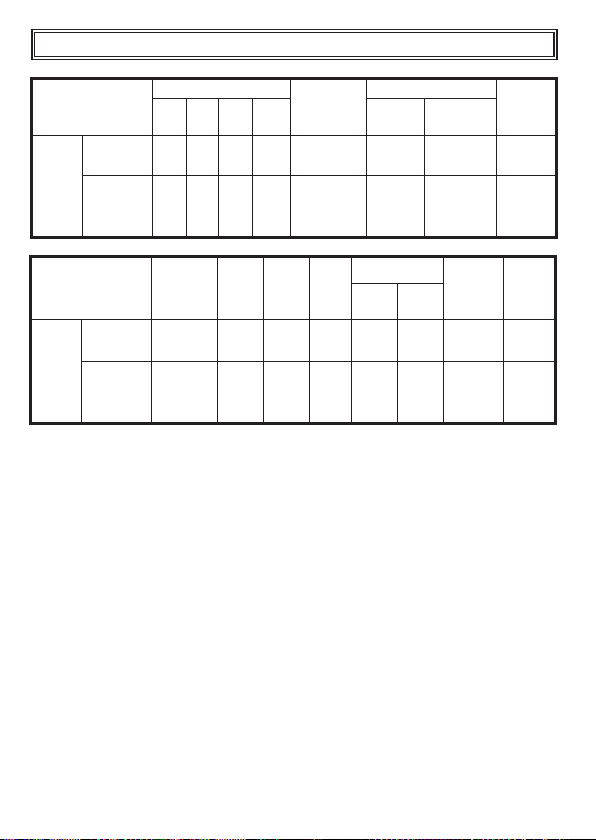
8. AIR POLLUTION REGULATION
PM2.5
µ
g/m
Yearly
average
3
average
IT-1 IT-2 IT-3 AQG
35 25 15 10 25 12 12 -
Daily
75 50 37.5 25 - 35 - 30
(24-hour)
Australi
Japan
a
8 15 - 35 15 35 25 15
25 35 - 75 35 75 50 35
PM2.5
µ
g/m
average
3
average
Yearly
Daily
(24-hour)
South
Korea
European
Union
Hong
Kong
United
California
States
China
Class1 Class2
ASU OHW
Canada
Thailand Taiwan
-15-
Page 19

NOTES:
Page 20

Where Do I Find Everything I Need for
Process Measurement and Control?
OMEGA…Of Course!
Shop online at omega.com
SM
TEMPERATURE
MU
Thermocouple, RTD & Thermistor
Probes, Connectors, Panels &
Assemblies
MU
Wire: Thermocouple, RTD &
Thermistor
MU
Calibrators & Ice Point References
MU
Recorders, Controllers & Process
Monitors
MU
Infrared Pyrometers
PRESSURE, STRAIN AND
FORCE
MU
Transducers & Strain Gages
MU
Load Cells & Pressure Gages
MU
Displacement Transducers
MU
Instrumentation & Accessories
FLOW/LEVEL
MU
Rotameters, Gas Mass Flowmeters
& Flow Computers
MU
Air Velocity Indicators
MU
Turbine/Paddlewheel Systems
MU
Totalizers & Batch Controllers
pH/CONDUCTIVITY
MU
pH Electrodes, Testers &
Accessories
MU
Benchtop/Laboratory Meters
MU
Controllers, Calibrators, Simulators
& Pumps
MU
Industrial pH & Conductivity
Equipment
DATA ACQUISITION
MU
Data Acquisition & Engineering
Software
MU
Communications-Based Acquisition
Systems
MU
Plug-in Cards for Apple, IBM &
Compatibles
MU
Data Logging Systems
MU
Recorders, Printers & Plotters
HEATERS
MU
Heating Cable
MU
Cartridge & Strip Heaters
MU
Immersion & Band Heaters
MU
Flexible Heaters
MU
Laboratory Heaters
ENVIRONMENTAL
MONITORING AND CONTROL
MU
Metering & Control
Instrumentation
MU
Refractometers
MU
Pumps & Tubing
MU
Air, Soil & Water Monitors
MU
Industrial Water & Wastewater
Treatment
MU
pH, Conductivity & Dissolved
Oxygen Instruments
M5486/1015
 Loading...