

Page 1
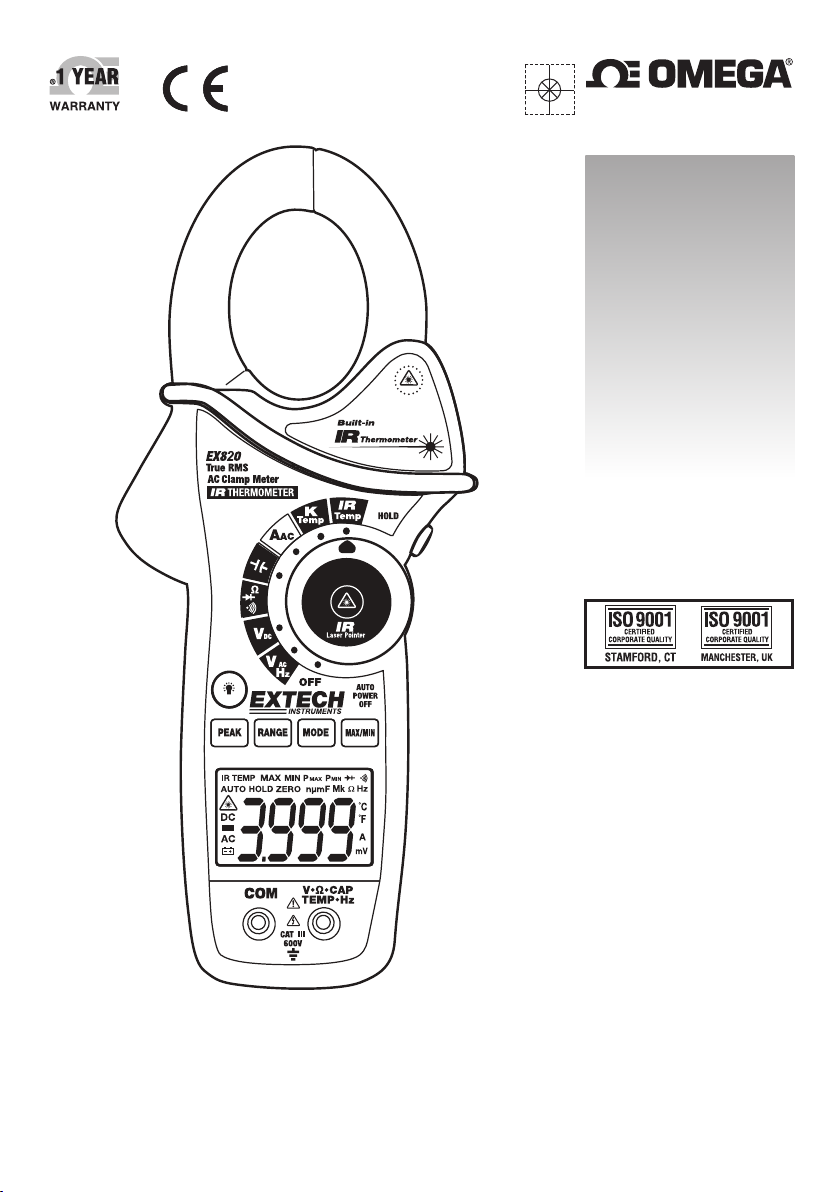
User’s Guide
Shop online at
omega.com
e-mail: [email protected]
For latest product manuals:
omegamanual.info
MADE IN CHINA
®
HHM-EX830
True RMS 1000 Amp
Clamp Meter with IR Thermometer
Page 2

OMEGAnet®Online Service Internet e-mail
omega.com [email protected]
Servicing North America:
U.S.A.: Omega Engineering, Inc., One Omega Drive, P.O. Box 4047
ISO 9001 Certified
Stamford, CT 06907-0047
Toll-Free: 1-800-826-6342 Tel: (203) 359-1660
FAX: (203) 359-7700 e-mail: [email protected]
Canada: 976 Bergar
Laval (Quebec), H7L 5A1 Canada
Toll-Free: 1-800-826-6342 TEL: (514) 856-6928
FAX: (514) 856-6886 e-mail: [email protected]
For immediate technical or application assistance:
U.S.A. and Canada: Sales Service: 1-800-826-6342/1-800-TC-OMEGA
Customer Service: 1-800-622-2378/1-800-622-BEST
Engineering Service: 1-800-872-9436/1-800-USA-WHEN
Mexico En Español: 001 (203) 359-7803 FAX: 001 (203) 359-7807
Latin America [email protected] e-mail: [email protected]
®
®
®
Servicing Europe:
Benelux: Managed by the United Kingdom Office
Czech Republic: Frystatska 184
France: Managed by the United Kingdom Office
Germany/ Austria: Daimlerstrasse 26
United Kingdom: OMEGA Engineering Ltd.
ISO 9001 Certified
733 01 Karviná, Czech Republic
Toll-Free: 0800-1-66342 TEL: +420-59-6311899
FAX: +420-59-6311114 e-mail: [email protected]
Toll-Free: 0800 466 342 TEL: +33 (0) 161 37 29 00
FAX: +33 (0) 130 57 54 27 e-mail: [email protected]
D-75392 Deckenpfronn, Germany
Toll-Free: 0800 6397678 TEL: +49 (0) 7056 9398-0
FAX: +49 (0) 7056 9398-29 e-mail: [email protected]
One Omega Drive, River Bend Technology Centre, Northbank
Irlam, Manchester M44 5BD United Kingdom
Toll-Free: 0800-488-488 TEL: +44 (0) 161 777-6611
FAX: +44 (0) 161 777-6622 e-mail: [email protected]
It is the policy of OMEGA Engineering, Inc. to comply with all worldwide safety and EMC/EMI
regulations that apply. OMEGA is constantly pursuing certification of its products to the European New
Approach Directives. OMEGA will add the CE mark to every appropriate device upon certification.
The information contained in this document is believed to be correct, but OMEGA accepts no liability for any
errors it contains, and reserves the right to alter specifications without notice.
WARNING: These products are not designed for use in, and should not be used for, human applications.
Page 3
Introduction
Congratulations on your purchase of the Extech EX830 True RMS 1000A Clamp Meter. This meter
measures AC/DC Voltage, AC/DC Current, Resistance, Capacitance, Frequency, Duty Cycle, Diode
Test, Continuity, Type k thermocouple thermometer plus Non-Contact IR Temperature. Proper use
and care of this meter will provide many years of reliable service.
Safety
International Safety Symbols
This symbol, adjacent to another symbol or terminal, indicates the user must refer to the
manual for further information.
This symbol, adjacent to a terminal, indicates that, under normal use, hazardous voltages
may be present
Double insulation
SAFETY NOTES
• Do not exceed the maximum allowable input range of any function.
• Do not apply voltage to meter when resistance function is selected.
• Set the function switch OFF when the meter is not in use.
• Remove the battery if meter is to be stored for longer than 60 days.
WARNINGS
• Set function switch to the appropriate position before measuring.
• When measuring volts do not switch to current/resistance modes.
• Do not measure current on a circuit whose voltage exceeds 600V.
• When changing ranges always disconnect the test leads from the circuit under test.
Function Maximum Input
A AC, ADC 1000A DC/AC
V DC, V AC 600V DC/AC
Resistance, Capacitance, Frequency, Diode Test 250V DC/AC
Type K Temperature 60V DC, 24V AC
2
EX830-EU-EN-V5.2-3/12
Page 4

CAUTIONS
• Improper use of this meter can cause damage, shock, injury or death. Read and understand
this user manual before operating the meter.
• Always remove the test leads before replacing the battery or fuses.
• Inspect the condition of the test leads and the meter itself for any damage before operating the
meter. Repair or replace any damage before use.
• Use great care when making measurements if the voltages are greater than 25VAC rms or
35VDC. These voltages are considered a shock hazard.
• Always discharge capacitors and remove power from the device under test before performing
Diode, Resistance or Continuity tests.
• Voltage checks on electrical outlets can be difficult and misleading because of the uncertainty
of connection to the recessed electrical contacts. Other means should be used to ensure that
the terminals are not "live".
• If the equipment is used in a manner not specified by the manufacturer, the protection provided
by the equipment may be impaired.
• This device is not a toy and must not reach children’s hands. It contains hazardous objects as
well as small parts that the children could swallow. In case a child swallows any of them,
please contact a physician immediately
• Do not leave batteries and packing material lying around unattended; they can be dangerous
for children if they use them as toys
• In case the device is going to be unused for an extended period of time, remove the batteries
to prevent them from training
• Expired or damaged batteries can cause cauterization on contact with the skin. Always,
therefore, use suitable hand gloves in such cases
• See that the batteries are not short-circuited. Do not throw batteries into the fire.
• Do not directly view or direct the laser pointer at an eye. Low power visible lasers do not
normally present a hazard, but may present some potential for hazard if viewed directly for
extended periods of time
3
EX830-EU-EN-V5.2-3/12
Page 5
Description
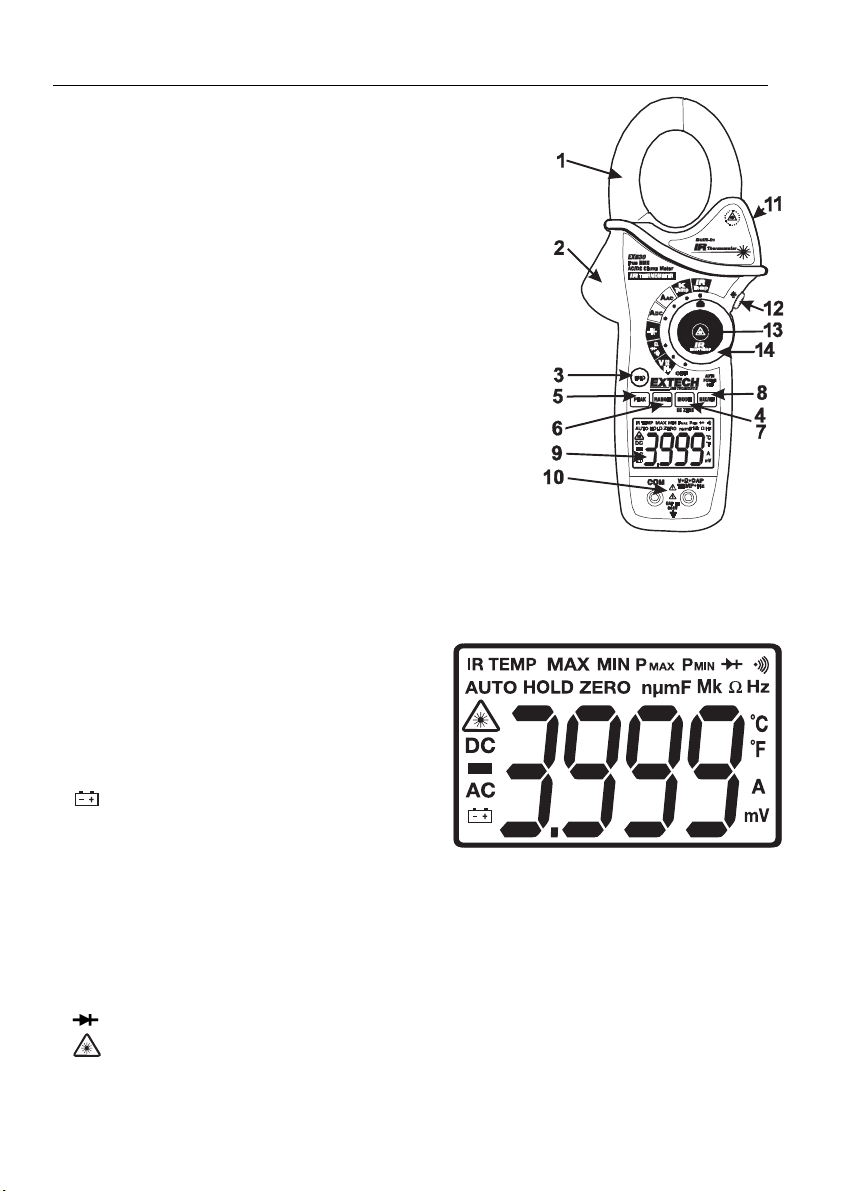
Meter Description
1. Current clamp
2. Clamp opening trigger
3. Data Hold Button
4. Mode
5. Peak
6. Range
7. DCA Zero (EX830 only)
8. MIN/MAX
9. Backlit LCD Display
10. Test lead input jacks
11. IR thermometer and laser pointer (rear)
12. Backlight Button
13. Laser pointer button
14. Function switch
Display icons Description
HOLD Data Hold
Minus sign Negative reading display
0 to 3999 Measurement display digits
ZERO Zero
P Peak value
AUTO Auto Range mode
DC/AC Direct Current / Alternating
Current
MAX Max reading
MIN Min reading
Low battery
mV or V Milli-volts or Volts (Voltage)
Ω Ohms (Resistance)
A Amperes (Current)
F Farad (Capacitance)
Hz Hertz (Frequency)
o
F and oC Fahrenheit and Celsius units (Temperature)
n, m, μ, M, k Unit of measure prefixes: nano, milli, micro, mega, and kilo
)
)
•
) Continuity test
Diode test
Laser pointer
4
EX830-EU-EN-V5.2-3/12
Page 6
Operation
NOTES: Read and understand all Warning and Caution statements in this operation manual prior
to using this meter. Set the function select switch to the OFF position when the meter is not in use.
AC Current Measurements
WARNING: Ensure that the test leads are disconnected from the meter before making current
clamp measurements.
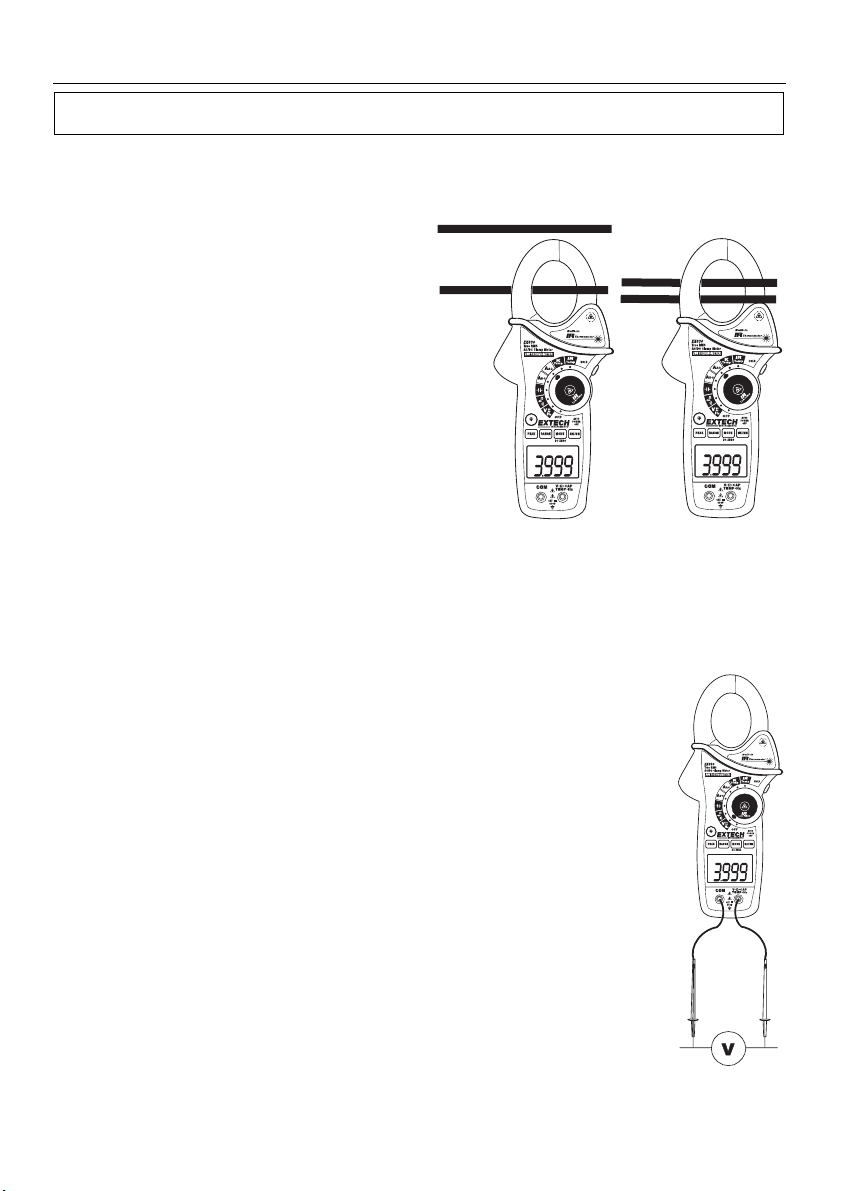
1. Set the Function switch to the A
range
2. Press the trigger to open the jaw. Fully
enclose only one conductor. For optimum
results, center the conductor in the jaw.
3. The clamp meter LCD will display the
reading.
DCA ZERO
The DC Zero feature removes offset values and
improves accuracy for DC current
measurements. To perform a zero, select ADC
and with no conductor in the jaw:
1. Press the DC ZERO button to
zero the display. “ZERO” will appear in the
display. The offset value is now stored andr
emoved from all measurements.
2. To view the stored value, press the DC ZERO button. “ZERO” will flash and the stored value
will be displayed.
3. To exit this mode, press and Hold the ZERO button until “ZERO” is no longer in the display.
AC or ADC
Correct
Incorrect
AC/DC Voltage Measurements
1. Insert the black test lead into the negative COM terminal and the red test lead
into the positive V terminal.
2. Set the function switch to the V
3. Use the MODE button to select AC or DC Voltage (EX830 only).
4. Connect the test leads in parallel to the circuit under test.
5. Read the voltage measurement on the LCD display.
AC or VDC position.
5
EX830-EU-EN-V5.2-3/12
Page 7
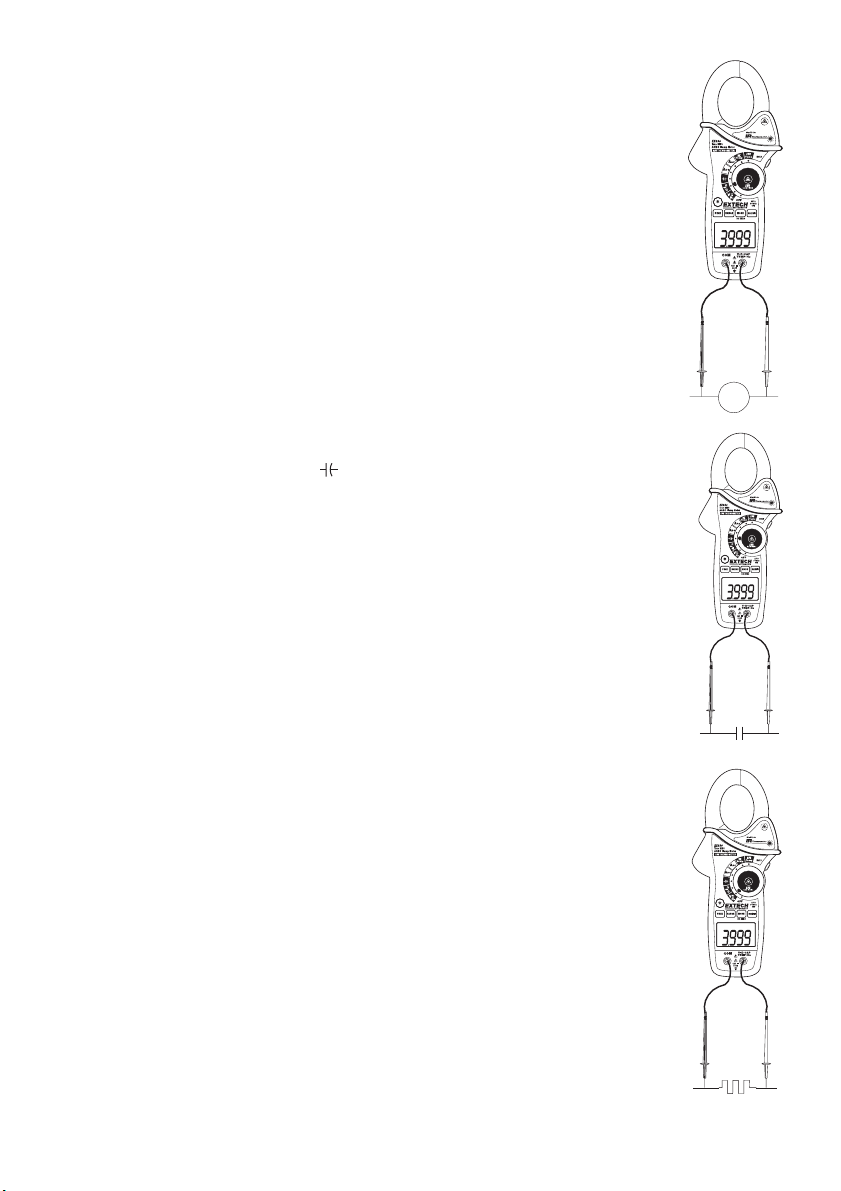
Resistance Measurements
Note: Remove power before making resistance measurements
1. Insert the black test lead into the negative COM terminal and the red test lead
into the Ω positive terminal.
2. Set the function switch to the Ω position.
3. Touch the test probe tips across the circuit or component under test.
4. Read the resistance on the LCD display.
Capacitance Measurements
WARNING: To avoid electric shock, discharge the capacitor under test before
1. Set the function switch to the
2. Insert the black test lead banana plug into the negative COM jack
3. Press MODE to zero any stray capacitance.
4. Touch the test probe tips across the part under test.
5. Read the capacitance value in the display.
6. The display will indicate the proper decimal point and value.
Note: For very large values of capacitance measurement time can be several minutes
measuring. If “dISC” appears in the display, remove and discharge
the capacitor.
capacitance position.
and the red test lead banana plug into the CAP positive jack.
before the final reading stabilizes.
Frequency Measurements
1. Set the function switch to the V Hz Position.
2. Press and hold the MODE button to select the Frequency (Hz)
function. “k Hz” will appear in the display.
3. Insert the black test lead banana plug into the negative COM jack
and the red test lead banana plug into the Hz positive jack.
4. Touch the test probe tips across the part under test.
5. Read the Frequency value on the display.
6. The display will indicate the proper decimal point and value.
7. Press and hold the MODE button again to return to the voltage mode
Ù
CAP
Hz
6
EX830-EU-EN-V5.2-3/12
Page 8
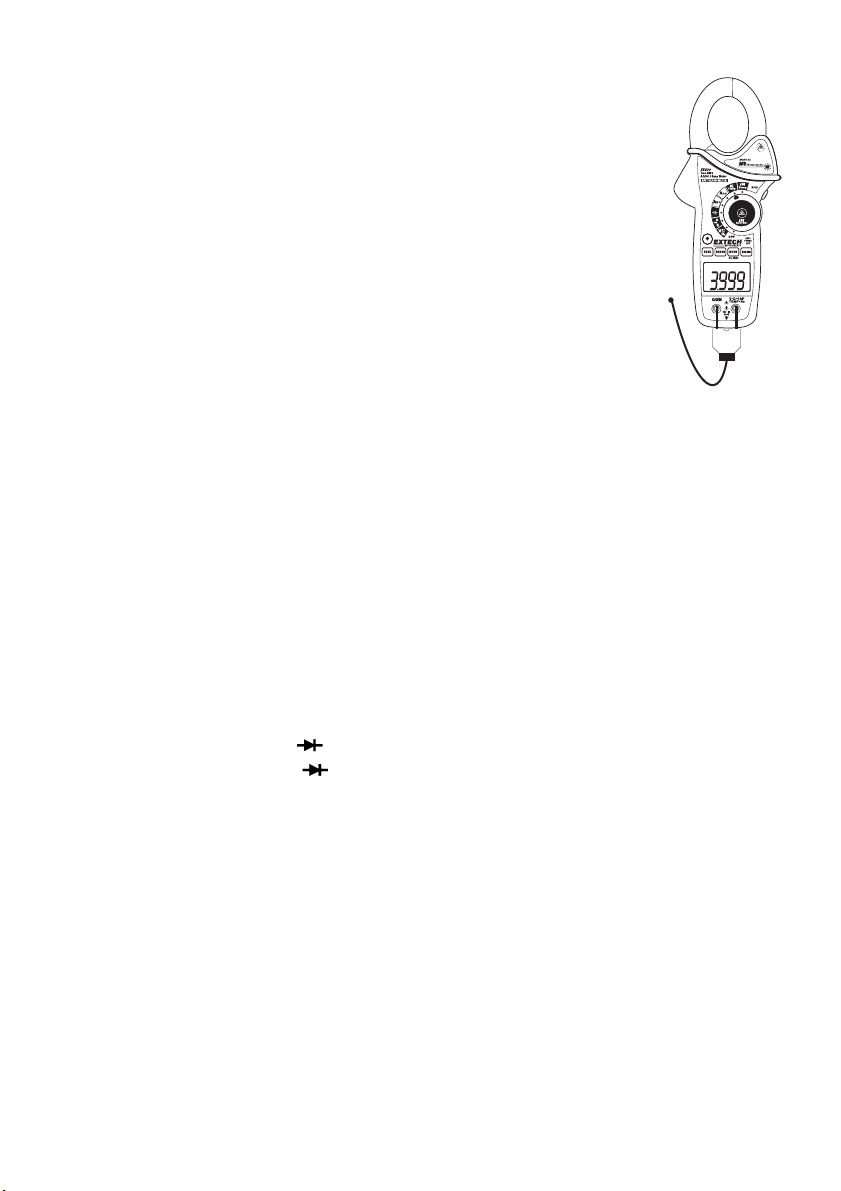
Type K Temperature Measurements
1. Set the function switch to the K Temp position.
2. Insert the Temperature Probe into the negative COM and the positive TEMP
jacks, observing polarity.
3. Touch the Temperature Probe tip to the device under test. Continue to
touch the part under test with the probe until the reading stabilizes.
4. Read the temperature on the display. The digital reading will indicate the
proper decimal point and value.
WARNING: To avoid electric shock, be sure the thermocouple probe has been
removed before changing to another measurement function.
Note: An open input or a temperature overrange the meter will display “OL” and
beep.
Note: See the “Temperature Units” paragraph to select °F or °C
Note: The temperature range of the supplied thermocouple probe is -20 to 250°C
(-4 to 482°F)
Continuity Measurements
1. Insert the black test lead into the negative COM terminal and the red test lead into the Ω
positive terminal.
2. Set the function switch to the
3. Use the MODE button to select continuity
button is pressed.
4. Touch the test probe tips across the circuit or component under test.
5. If the resistance is < 40Ω, a tone will sound.
•))) position.
•))). The display icons will change when the MODE
Diode Test
1. Insert the black test lead banana plug into the negative COM jack and the red test
lead banana plug into the positive jack
2. Turn the function switch to position. Use the MODE button to select the diode function if
necessary (diode symbol will appear on the LCD when in Diode test mode)
3. Touch the test probe tips to the diode or semiconductor junction under test. Note the meter
reading
4. Reverse the test lead polarity by reversing the red and black leads. Note this reading
5. The diode or junction can be evaluated as follows:
If one reading displays a value (typically 0.400V to 0.900V) and the other reading displays
OL, the diode is good.
If both readings display OL the device is open.
If both readings are very small or ‘0’, the device is shorted.
7
EX830-EU-EN-V5.2-3/12
Page 9
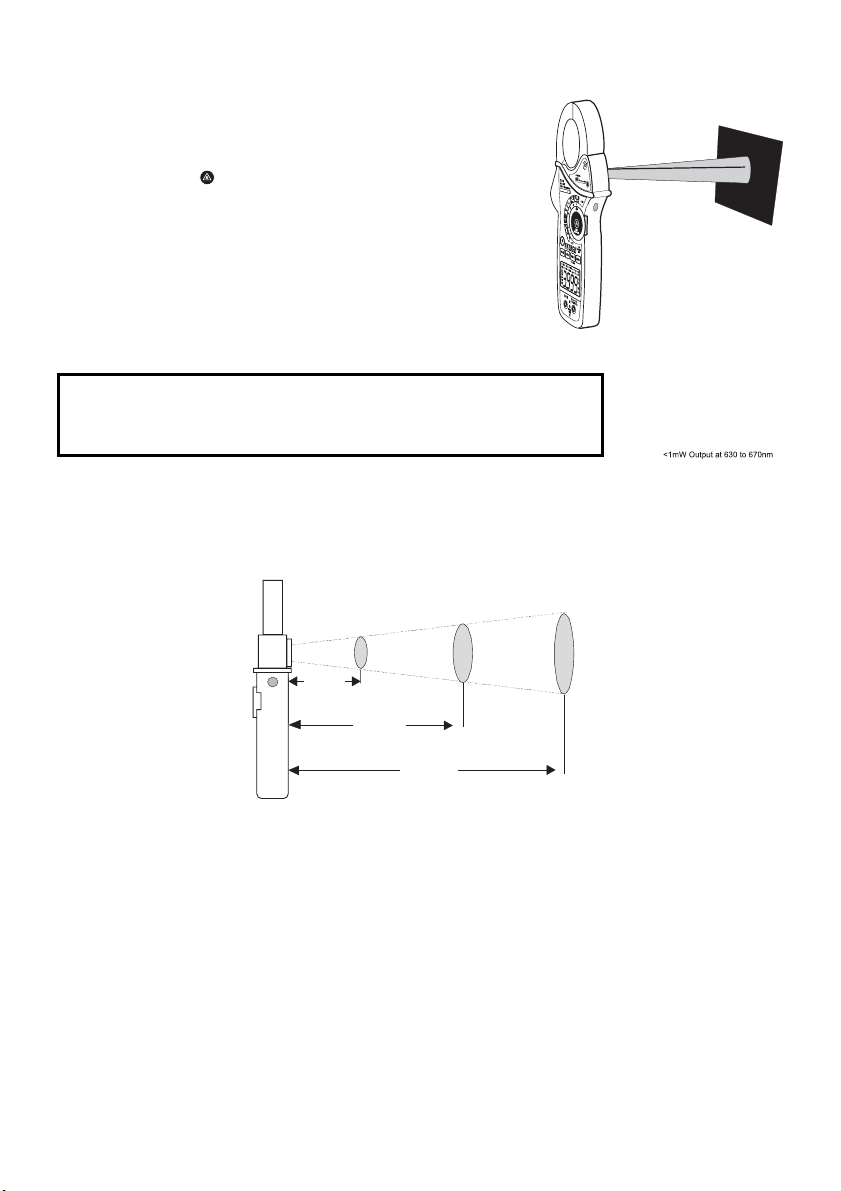
Non-Contact InfraRed Temperature Measurements
1. Set the function switch to the IR Temp position.
2. Aim the infrared sensor (rear of the meter) at the surface
to be measured.
3. Press the button in the center of the rotary function
switch to turn on the laser pointer and identify the
surface spot to be measured.
4. The area of the surface to be measured must be larger
than the spot size as determined by the distance to spot
size specification.
5. Read the temperature in the display.
o
60cm
F or oC
2.5cm
7.5cm
Note: See the “Temperature Units” paragraph to select
WARNING: Do not directly view or direct the laser pointer at an eye.
Low power visible lasers do not normally present a hazard, but may
present some potential for hazard if viewed directly for extended periods
of time.
IR Spot to Distance Diagram
The 8:1 spot to distance ratio determines the size of the measured surface area with respect to the
distance the meter is held away from the surface.
10cm
Diameter of spot
1.25cm
20cm
Distance to object
IR Measurement Notes
1. The object under test should be larger than the spot (target) size calculated by the field of view
diagram.
2. If the surface of the object under test is covered with frost, oil, grime, etc., clean before taking
measurements.
3. If an object's surface is highly reflective, apply masking tape or flat black paint to the surface
before measuring.
4. The meter may not make accurate measurements through transparent surfaces such as glass.
5. Steam, dust, smoke, etc. can obscure measurements.
6. To find a hot spot, aim the meter outside the area of interest then scan across (in an up and
down motion) until the hot spot is located.
8
EX830-EU-EN-V5.2-3/12
Page 10

Data Hold
To freeze the LCD reading, press the HOLD button. While data hold is active, the HOLD icon
appears on the LCD. Press the HOLD button again to return to normal operation.
Peak Hold
The Peak Hold function captures the peak AC or DC voltage or current. The meter can capture
negative or positive peaks as fast as 1 millisecond in duration.
1. Turn the function switch to the A or V position.
2. Use the MODE button to select AC or DC
3. Allow time for the display to stabilize.
4. Press and Hold the PEAK button until “CAL” appears in the display. This procedure will zero
the range selected.
5. Press the PEAK button, Pmax will display.
6. The display will update each time a higher positive peak occurs.
7. Press the PEAK button again, Pmin will display. The display will now update and indicate the
lowest negative peak.
8. To return to normal operation, press and hold the PEAK button until the Pmin or Pmax
indicator switches off.
Note: If the Function switch position is changed after a calibration the Peak Hold calibration must
be repeated for the new function selected.
MAX/MIN
1. Press the MAX/MIN key to activate the MAX/MIN recording mode. The display icon "MAX" will
appear. The meter will display and hold the maximum reading and will update only when a new
“max” occurs.
2. Press the MAX/MIN key and “MIN” will appear The display icon "MIN" will appear. The meter
will display and hold the minimum reading and will update only when a new “min” occurs
3. Press the MAX/MIN key and a blinking “MAX MIN” will appear. The meter will display the
present reading, but will continue to update and store the max and min readings.
4. To exit MAX/MIN mode press and hold the MAX/MIN key for 2 seconds.
Temperature Units (˚F / ˚C)
The temperature units selection switch is located in the battery
compartment. To change the units, remove the battery door, lift out the
battery and set the switch for the desired units.
Units Switch
F
C
LCD Backlight Button
The LCD is equipped with backlighting for easier viewing, especially in
dimly lit areas. Press the backlight button to turn the backlight on. Press
again to turn the backlight off.
Automatic Power OFF
In order to conserve battery life, the meter will automatically turn off after approximately 25 minutes.
To turn the meter on again, turn the function switch to the OFF position and then to the desired
function position.
9
EX830-EU-EN-V5.2-3/12
Page 11

Maintenance
WARNING: To avoid electrical shock, disconnect the meter from any circuit, remove the test leads
from the input terminals, and turn OFF the meter before opening the case. Do not operate the meter
with an open case.
Cleaning and Storage
Periodically wipe the case with a damp cloth and mild detergent; do not use abrasives or
solvents. If the meter is not to be used for 60 days or more, remove the battery and store it
separately.
Battery Replacement
1. Remove the Phillips head screw that secures the rear battery door
2. Open the battery compartment
3. Replace the 9V battery
4. Secure the battery compartment
You, as the end user, are legally bound (EU Battery ordinance) to return all used
batteries, disposal in the household garbage is prohibited! You can hand over your
used batteries / accumulators at collection points in your community or wherever batteries
/ accumulators are sold!
Disposal: Follow the valid legal stipulations in respect of the disposal of the device at the
end of its lifecycle
10
EX830-EU-EN-V5.2-3/12
Page 12
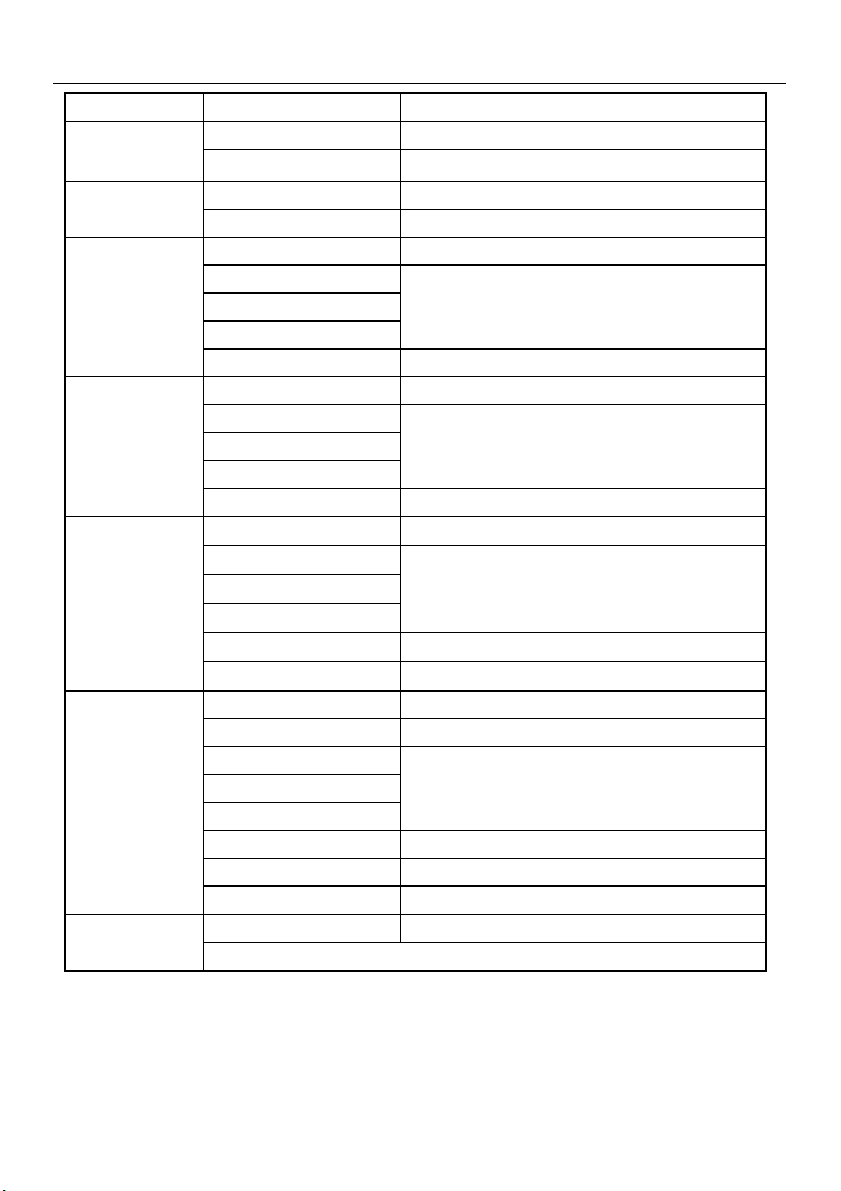
Specifications
Function Range & Resolution Accuracy (% of reading + digits)
50/60 Hz
DC Current
AC Voltage
50/60Hz
DC Voltage
Resistance
Capacitance
Frequency
400.0 AAC ± (2.5% + 8d) AC Current
1000 AAC ± (2.8% + 5d)
400.0 ADC ± (2.5% + 5d)
1000 ADC ± (2.8% + 5d)
400.0 mVAC ± (1.0% + 10d)
4.000 VAC
40.00 VAC
400.0 VAC
600 VAC ± (2.0% + 5d)
400.0 mVDC ± (0.8% + 2d)
4.000 VDC
40.00 VDC
400.0 VDC
600 VDC ± (2.0% + 2d)
400.0Ω
4.000kΩ
40.000kΩ
400.0kΩ
4.000MΩ
40.00MΩ
4.000nF ± (5.0% + 30d)
40.00nF ± (5.0% + 20d)
400.0nF
4.000µF
40.00µF
400.0µF ± (4.0% + 10d)
4.000mF ± (10% + 10d)
40.00mF unspecified
4.000kHz ± (1.5% + 2d)
Sensitivity: 100V (<50Hz); 50V (50 to 400Hz); 5V (401Hz to 4000Hz)
± (1.5% + 5d)
± (1.5% + 2d)
± (1.0% + 4d)
± (1.5% + 2d)
± (2.5% + 3d)
± (3.5% + 5d)
± (3.0% + 5d)
11
EX830-EU-EN-V5.2-3/12
Page 13

Function Range and Resolution Accuracy (% of reading + digits)
Temperature
(type-K)
Temp
(IR)
-4 to 1400oF ± (3%rdg + 9oF)
-20 to 760
o
C ± (3%rdg + 5oC)
-58 to -4°F ± 9 °F
±2.0% reading or
-4 to 518°F
± 4°F
whichever is >
-50 to -20°C ±5°C
-20 to 270°C
±2.0% reading or ±2°C
whichever is >
Clamp jaw opening 43mm (1.7") approx.
Display 3-3/4 digits (4000 counts) backlit LCD
Continuity check Threshold 40Ω; Test current < 0.5mA
Diode test Test current of 0.3mA typical;
Open circuit voltage < 3VDC typical
Low Battery indication Battery symbol is displayed
Over-range indication ‘OL’ display
Measurement rate 2 readings per second, nominal
PEAK Captures peaks >1ms
Thermocouple sensor Type K thermocouple required
IR Spectral response 6 to 16µm
IR Emissivity 0.95 fixed
IR distance ratio 8:1
Input Impedance 10MΩ (VDC and VAC)
AC bandwidth 50 to 400Hz (AAC and VAC)
AC response True rms (AAC and VAC)
Crest Factor 3.0 in 40A and 400A ranges, 1.4 in 1000A range (50/60Hz and 5% to
100% of range)
Operating Temperature 5°C to 40°C (41°F to 104°F)
Storage Temperature -20°C to 60°C (-4°F to 140°F)
Operating Humidity Max 80% up to 31°C( 87°F) decreasing linearly to 50% at 40°C
(104°F)
Storage Humidity <80%
Operating Altitude 2000meters (7000ft) maximum.
Battery One (1) 9V Battery (NEDA 1604)
Auto power OFF After approx. 25 minutes
Dimensions & Weight 270x110x50mm (10.6x4.3x2”); 386g (13.6 oz)
Safety For indoor use and in accordance with the requirements for double
insulation to IEC1010-1 (2001): EN61010-1 (2001) Overvoltage
Category III 600V and Category II 1000V, Pollution Degree 2.
Patent notice U.S. Patent 7163336
Copyright © 2012 Extech Instruments Corporation (a FLIR company)
All rights reserved including the right of reproduction in whole or in part in any form.
www.extech.com
12
EX830-EU-EN-V5.2-3/12
Page 14

WARRANTY/DISCLAIMER
OMEGA ENGINEERING, INC. warrants this unit to be free of defects in materials and workmanship
for a period of 13 months from date of purchase. OMEGA’s WARRANTY adds an additional one (1)
month grace period to the normal one (1) year product warranty to cover handling and shipping
time. This ensures that OMEGA’s customers receive maximum coverage on each product.
If the unit malfunctions, it must be returned to the factory for evaluation. OMEGA’s Customer
Service Department will issue an Authorized Return (AR) number immediately upon phone or
written request. Upon examination by OMEGA, if the unit is found to be defective, it will be repaired
or replaced at no charge. OMEGA’s WARRANTY does not apply to defects resulting from any action
of the purchaser, including but not limited to mishandling, improper interfacing, operation outside
of design limits, improper repair, or unauthorized modification. This WARRANTY is VOID if the unit
shows evidence of having been tampered with or shows evidence of having been damaged as a
result of excessive corrosion; or current, heat, moisture or vibration; improper specification;
misapplication; misuse or other operating conditions outside of OMEGA’s control. Components in
which wear is not warranted, include but are not limited to contact points, fuses, and triacs.
OMEGA is pleased to offer suggestions on the use of its various products. However,
OMEGA neither assumes responsibility for any omissions or errors nor assumes liability
fo r any dam a ges tha t resul t from the us e of its pr o duct s in acco r danc e wi th
information provided by OMEGA, either verbal or written. OMEGA warrants only that
the parts manufactured by the company will be as specified and free of defects.
OMEG A M AKE S N O OTHER WAR RANTI ES OR REPRE SENTA TIONS OF AN Y K IND
WHATSOEVER, EXPRESSED OR IMPLIED, EXCEPT THAT OF TITLE, AND ALL IMPLIED
WARRANTIES INCLUDING ANY WARRANTY OF MERCHANTABILITY AND FITNESS FOR
A PARTICULAR PURPOSE ARE HEREBY DISCLAIMED. LIMITATION OF LIABILITY: The
remedies of purchaser set forth herein are exclusive, and the total liability of OMEGA
wi th res p ect to th is o r der, wh ethe r base d on cont r act, warra n ty, ne g lig e nce,
indemnification, strict liability or otherwise, shall not exceed the purchase price of the
com ponent upon which liability is based. I n no e vent shall OMEGA be liab le for
consequential, incidental or special damages.
CONDITIONS: Equipment sold by OMEGA is not intended to be used, nor shall it be used: (1) as a
“Basic Component” under 10 CFR 21 (NRC), used in or with any nuclear installation or activity; or
(2) in medical applications or used on humans. Should any Product(s) be used in or with any
nuclear installation or activity, medical application, used on humans, or misused in any way,
OMEGA assumes no responsibility as set forth in our basic WARRANTY / DISCLAIMER language,
and, additionally, purchaser will indemnify OMEGA and hold OMEGA harmless from any liability
or damage whatsoever arising out of the use of the Product(s) in such a manner.
Direct all warranty and repair requests/inquiries to the OMEGA Customer Service Department.
RETURN REQUESTS/INQUIRIES
BE F O R E RE T U R N I NG ANY PRODUCT(S) TO OMEGA, PURCHASER MUST OBTAI N AN
AUTHORIZED RETURN (AR) NUMBER FROM OMEGA’S CUSTOMER SERVICE DEPARTMENT (IN
ORDER TO AVOID PROCESSING DELAYS). The assigned AR number should then be marked on the
outside of the return package and on any correspondence.
The purchaser is responsible for shipping charges, freight, insurance and proper packaging to
prevent breakage in transit.
FOR WARRANTY
following information available BEFORE
contacting OMEGA:
1. Purchase Order number under which
the product was PURCHASED,
2. Model and serial number of the product
under warranty, and
3. Repair instructions and/or specific
problems relative to the product.
OM EGA ’ s poli cy is to make run ni n g cha n ge s , not mod e l cha nge s, whe nev e r an impr ove m en t i s pos sib l e.
This affords our customers the latest in technology and engineering.
OMEGA is a registered trademark of OMEGA ENGINEERING, INC.
© Copyright 2012 OMEGA ENGINEERING, INC. All rights reserved. This document may not be copied, photocopied, repro-
duced, translated, or reduced to any electronic medium or machine-readable form, in whole or in part, without the prior
written consent of OMEGA ENGINEERING, INC.
RETURNS, please have the
FOR NON-WARRANTY REPAIRS,
consult OMEGA
for current repair charges. Have the following
information available BEFORE contacting OMEGA:
1. Purchase Order number to cover the
COST of the repair,
2. Model and serial number of the
product, and
3. Repair instructions and/or specific problems
relative to the product.
Page 15

Where Do I Find Everything I Need for
Process Measurement and Control?
OMEGA…Of Course!
Shop online at omega.com
TEMPERATURE
䡺⻬
Thermocouple, RTD & Thermistor Probes, Connectors, Panels & Assemblies
䡺⻬
Wire: Thermocouple, RTD & Thermistor
䡺⻬
Calibrators & Ice Point References
䡺⻬
Recorders, Controllers & Process Monitors
䡺⻬
Infrared Pyrometers
PRESSURE, STRAIN AND FORCE
䡺⻬
Transducers & Strain Gages
䡺⻬
Load Cells & Pressure Gages
䡺⻬
Displacement Transducers
䡺⻬
Instrumentation & Accessories
FLOW/LEVEL
䡺⻬
Rotameters, Gas Mass Flowmeters & Flow Computers
䡺⻬
Air Velocity Indicators
䡺⻬
Turbine/Paddlewheel Systems
䡺⻬
Totalizers & Batch Controllers
pH/CONDUCTIVITY
䡺⻬
pH Electrodes, Testers & Accessories
䡺⻬
Benchtop/Laboratory Meters
䡺⻬
Controllers, Calibrators, Simulators & Pumps
䡺⻬
Industrial pH & Conductivity Equipment
SM
DATA ACQUISITION
䡺⻬
Data Acquisition & Engineering Software
䡺⻬
Communications-Based Acquisition Systems
䡺⻬
Plug-in Cards for Apple, IBM & Compatibles
䡺⻬
Data Logging Systems
䡺⻬
Recorders, Printers & Plotters
HEATERS
䡺⻬
Heating Cable
䡺⻬
Cartridge & Strip Heaters
䡺⻬
Immersion & Band Heaters
䡺⻬
Flexible Heaters
䡺⻬
Laboratory Heaters
ENVIRONMENTAL
MONITORING AND CONTROL
䡺⻬
Metering & Control Instrumentation
䡺⻬
Refractometers
䡺⻬
Pumps & Tubing
䡺⻬
Air, Soil & Water Monitors
䡺⻬
Industrial Water & Wastewater Treatment
䡺⻬
pH, Conductivity & Dissolved Oxygen Instruments
M5138/0612
 Loading...