

Page 1

User’s Guide
®
Shop online at
omega.com
e-mail: [email protected]
For latest product manuals:
omegamanual.info
MADE IN TAIWAN
®
HHB-ISCOPE
(iBorescope)
Page 2

OMEGAnet®Online Service Internet e-mail
®
omega.com [email protected]
Servicing North America:
U.S.A.: Omega Engineering, Inc., One Omega Drive, P.O. Box 4047
ISO 9001 Certified
Canada: 976 Bergar
Stamford, CT 06907-0047
Toll-Free: 1-800-826-6342 Tel: (203) 359-1660
FAX: (203) 359-7700 e-mail: [email protected]
Laval (Quebec), H7L 5A1 Canada
Toll-Free: 1-800-826-6342 TEL: (514) 856-6928
FAX: (514) 856-6886 e-mail: [email protected]
For immediate technical or application assistance:
U.S.A. and Canada: Sales Service: 1-800-826-6342/1-800-TC-OMEGA
Mexico En Español: 001 (203) 359-7803 FAX: 001 (203) 359-7807
Latin America [email protected] e-mail: [email protected]
Customer Service: 1-800-622-2378/1-800-622-BEST
Engineering Service: 1-800-872-9436/1-800-USA-WHEN
®
®
®
Servicing Europe:
Benelux: Managed by the United Kingdom Office
Czech Republic: Frystatska 184
France: Managed by the United Kingdom Office
Germany/ Austria: Daimlerstrasse 26
United Kingdom: OMEGA Engineering Ltd.
ISO 9001 Certified
Irlam, Manchester M44 5BD United Kingdom
733 01 Karviná, Czech Republic
Toll-Free: 0800-1-66342 TEL: +420-59-6311899
FAX: +420-59-6311114 e-mail: [email protected]
Toll-Free: 0800 466 342 TEL: +33 (0) 161 37 29 00
FAX: +33 (0) 130 57 54 27 e-mail: [email protected]
D-75392 Deckenpfronn, Germany
Toll-Free: 0800 6397678 TEL: +49 (0) 7056 9398-0
FAX: +49 (0) 7056 9398-29 e-mail: [email protected]
One Omega Drive, River Bend Technology Centre, Northbank
Toll-Free: 0800-488-488 TEL: +44 (0) 161 777-6611
FAX: +44 (0) 161 777-6622 e-mail: [email protected]
It is the policy of OMEGA Engineering, Inc. to comply with all worldwide safety and EMC/EMI
regulations that apply. OMEGA is constantly pursuing certification of its products to the European New
Approach Directives. OMEGA will add the CE mark to every appropriate device upon certification.
The information contained in this document is believed to be correct, but OMEGA accepts no liability for any
errors it contains, and reserves the right to alter specifications without notice.
WARNING: These products are not designed for use in, and should not be used for, human applications.
Page 3

Introduction . . . . . . . . . . . . . . . . . . . . . . . . . . . . . . . . . . . . . . . . . . 3
Key Features . . . . . . . . . . . . . . . . . . . . . . . . . . . . . . . . . . . . . . . . . 3
Safety Instructions . . . . . . . . . . . . . . . . . . . . . . . . . . . . . . . . . . . . . 4
What’s in the Case . . . . . . . . . . . . . . . . . . . . . . . . . . . . . . . . . . . . . 4
Product Overview . . . . . . . . . . . . . . . . . . . . . . . . . . . . . . . . . . . 4 –5
Setup Instructions . . . . . . . . . . . . . . . . . . . . . . . . . . . . . . . . . . 5 –6
Charge the Battery . . . . . . . . . . . . . . . . . . . . . . . . . . . . . . . . 5
Download the App . . . . . . . . . . . . . . . . . . . . . . . . . . . . . . . . . 5
Operating Instructions . . . . . . . . . . . . . . . . . . . . . . . . . . . . . . . 6 –9
Viewing Video . . . . . . . . . . . . . . . . . . . . . . . . . . . . . . . . . . . . 7
Taking and Viewing Pictures . . . . . . . . . . . . . . . . . . . . . . . . . 7
Using the Probe . . . . . . . . . . . . . . . . . . . . . . . . . . . . . . . . . . . 8
Installing Accessories . . . . . . . . . . . . . . . . . . . . . . . . . . . 8 –9
Advanced Settings . . . . . . . . . . . . . . . . . . . . . . . . . . . . . . . . . 9
Specifications . . . . . . . . . . . . . . . . . . . . . . . . . . . . . . . . . . . . . . . 10
Operating & Maintenance Tips . . . . . . . . . . . . . . . . . . . . . . . 10 –11
2
Page 4

Thank you for purchasing Omega’s IScope. Please read this manual carefully
and thoroughly before using the instrument.
IScope is a unique instrument that can wirelessly stream high-quality video
from a camera at the tip of a long probe to a nearby iPhone or iPad screen.
Typical applications include inspections of hard-to-reach or hard-to-see areas
like crowded engine compartments, equipment enclosures or HVAC ductwork.
To receive the video, the iPhone or iPad must install and run a free app (also
®
called iBorescope), downloadable from the iTunes
App Store. A soft button on
the app allows the user to take snapshots of the video stream and store them
on the iPhone or iPad. The pictures can be viewed immediately and shared
immediately via text message, or shared later via e-mail or Skype. All transfers
between IScope and the iPhone/iPad are wireless, via an ad hoc WiFi hot spot
(without Internet access) generated by the instrument.
• Generates ad hoc WiFi network (without Internet access) for transmitting
transmit probe video to app-enabled iPhone or iPad
• Long (35 in./900mm), thin (0.39 in./9.8mm diameter) flexible-obedient probe
captures VGA (640 x 480 pixel) resolution video. Longer and thinner probes
for specific applications are also available. Visit www.generaltools.com
for details.
• Ideal camera depth of field of 1/2 in. to 12 in. (12.7 to 305mm)
• App’s SNAP SHOT soft button captures still .jpg images of live video stream
and saves files to Photos folder on iPhone/iPad. Photos can be viewed
immediately, shared immediately by text, or shared later by e-mail or Skype.
• Non-replaceable Li-ion battery charges through included USB cable
(compatible with iPhone/iPad Power Adapter and all computers). Full charge
is good for three hours of operation.
• Thumbwheel on pistol grip controls camera lighting
• Adjustable video attributes (brightness, contrast, hue, saturation)
• Video Out jack and cable and Low Battery indicator
• Includes three useful probe tip accessories (45° mirror, pickup hook,
magnetic pickup)
3
Page 5
WARNING!
Do not use IScope to inspect spaces or enclosures known or suspected to
contain live electrical wiring.
The IScope’s grip and probe come pre-attached in a protective hard plastic
case along with a USB charging cable (compatible with the iPhone/iPad Power
Adapter and all computers), a video cable, three probe tip accessories (a 45°
mirror, a magnetic pickup and a pickup hook) and this user’s manual.
Fig. 1 shows the controls, indicators and physical features of the IScope
instrument. Fig. 2 shows the unit’s standard accessories. Familiarize yourself
with the names and functions of all components before moving on to the Setup
Instructions and Operating Instructions.
1
6
2
7
3
4
5
8
Fig. 1. The controls, indicators and physical features of IBorescope
1. WiFi status light: Red = Preparing hot spot; Green = Hot spot available
2. Video Out jack
3. DC5V charging jack
4. (Charging) light: Orange = Charging; Off = Fully charged
5. LOW battery charge light (glows red)
4
9
Page 6
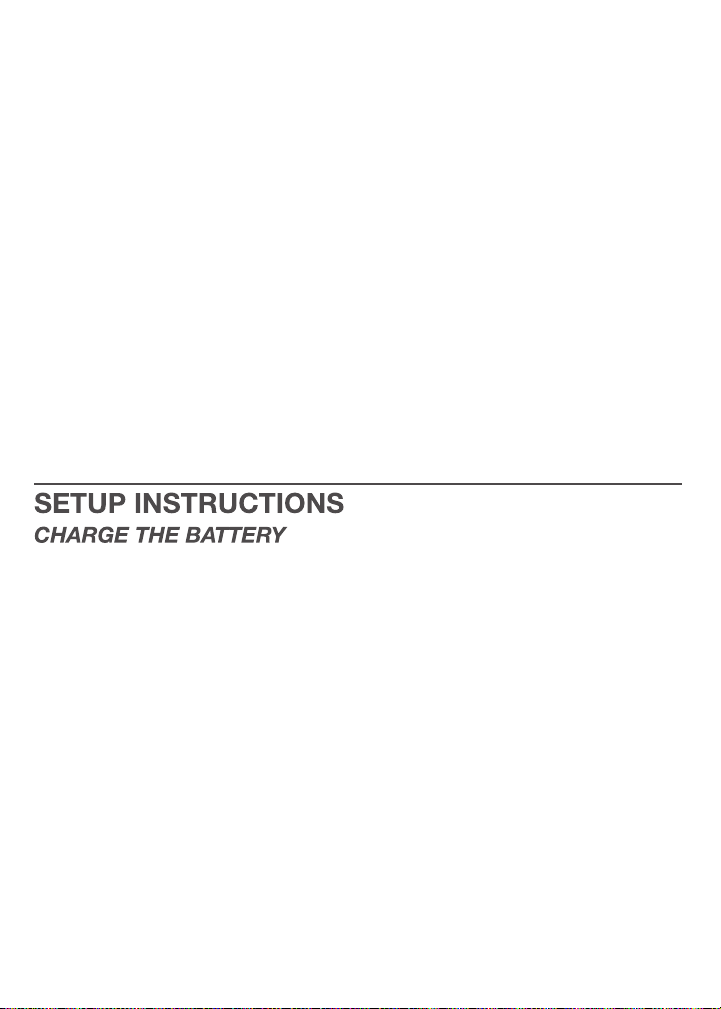
6. Power switch/brightness adjustment thumbwheel
7. Pistol grip
8. Camera-tipped probe
9. Camera head
Fig. 2. IScope’s standard accessories
10. 45° mirror 11. Pickup hook
12. Magnetic pickup 13. Video cable
14. USB charging cable
To charge the IScope’s battery, insert the USB plug end of the provided
charging cable into the charging port on your iPhone’s or iPad’s Power Adapter
(see figures below). Insert the other end of the cable into the DC5V jack (Fig. 1,
Callout 3) on IScope.
USB charging cable iPad Power Adapter (not included)
USB charging cable iPhone Power Adapter (not included)
5
Page 7
Alternatively, you can charge IScope by inserting the USB plug end of the cable
into a USB port of any computer.
While IScope is charging, the light on the right side of the grip
(Fig. 1, Callout 4) will glow orange. When the unit is fully charged, the light will
go out.
It takes about 3 hours to fully charge a depleted IScope battery. While you
wait, you can 1) download the app for the instrument (see next section) and
2) begin learning how the unit works while connected to a source of charging
current.
To download the free iBorescope app that enables IScope (the instrument), go
to http://itunes.apple.com/app/id509964514 and touch the Free App link at
the upper left of the page.
First, you will be prompted to sign in to the iTunes Store using your Apple ID
and password. If you do not have an Apple ID, you can create one now.
Before downloading the app, you will be shown Apple’s Privacy Policy page.
Select the box indicating that “I have read and agree to these terms and
conditions.” Then touch Agree. Doing so will return you to the landing page of
the iBorescope app and begin downloading it.
1. Turn on IScope by rolling the power switch/brightness adjustment
thumbwheel (Fig. 1, Callout 6) to the right until you hear a click.
The WiFi status light on top of the unit will glow red for 30 seconds while
IScope prepares to generate an ad hoc hot spot (without Internet
connectivity).
2. When the red light turns green, power on your device and touch the
Settings icon to open your Settings screen.
3. Touch the WiFi row to enter the WiFi Networks screen. The iBorescope hot
spot should appear in the list of available networks. Touching the iBorescope
row connects the instrument to the network, enabling wireless transmission
of probe video to a nearby iPhone or iPad running the iBorescope app. Be
aware that while you are connected to the ad hoc iBorescope WiFi network,
your iPhone/iPad will not have Internet connectivity.
6
Page 8

The first time you try to connect to the hot spot, you will be prompted to enter
the app’s password (the default password is 12345678). Thereafter, you will not
be asked for a password; the iBorescope line will already have a check mark.
4. Touch the button on your iPhone/iPad to back out of the Settings screen.
5. Locate the iBorescope icon among your apps
and touch it. The app’s green splash screen
(shown at right) will appear.
6. There are three soft buttons at the bottom of
the iBorescope app. Initially, the left button
is the only one that is active. Touch it to view
live video captured by IScope’s camera tipped
probe.
7. Enabling live video activates the other two
buttons at the bottom of the app. Touching the
middle VIDEO button toggles the display
between live video and a freeze frame of the
video. The freeze frame remains on-screen
until you touch the middle button again, but it
is not saved in memory. Touching the middle VIDEO button also toggles its
icon between and.
1. To save a still image (also called a screen grab) of live video or paused video,
touch the SNAP SHOT soft button at the bottom of the app. The familiar
sound of a camera shutter confirms that a picture was taken. Pictures are
stored as .jpg files within the Photos folder of your iPhone/iPad.
2. To view your pictures, touch the button on your device to back out of the
iBorescope app. Locate your Photos icon and select it. By default, all of the
photos you take with iBorescope are stored in the Camera Roll subfolder of
the Photos folder with a thumbnail view. Touch any thumbnail to expand the
image to fill the screen of your iPhone/iPad.
3. While your iPhone/iPad is connected to iBorescope's ad hoc WiFi network,
your mobile device will not have Internet access. So if you want to share any
snapshots immediately, you must do so by attaching them to text messages
you send over your cellular network. After you have disconnected your device
from the iBorescope network, you can connect to another WiFi network with
Internet access and share your pictures using e-mail or Skype.
7
Page 9
Once your IScope’s battery has fully charged (indicated by the orange
light going out), you can disconnect the USB charging cable from the unit
and begin using it as a battery-powered instrument. A fully charged battery
will power the instrument for about 3 hours.
If you are unfamiliar with video borescopes, be aware that professional users
like contractors and technicians typically insert a borescope probe into an
orifice (a hole in a wall or an engine’s cylinder, for example) or into an
inaccessible or hazardous area (the back or an equipment rack or an engine
compartment, for example) to view components or environments that would
otherwise be invisible. Use the brightness adjustment thumbwheel (Fig. 1,
Callout 6) to match the intensity of camera lighting to the application
environment.
In practice, professionals usually insert flexible-obedient probes like the one
that comes with IScope head-on into an orifice or area as a first step. They
then pull the probe out and adjust its bend one or more times until the camera
in the tip is pointing directly at the target or area of interest. With the probe
inserted, you can twirl it until video appears right-side up, but in many cases
you cannot change the probe’s angle of approach very much.
IScope comes with three accessories (see left photo below) in a Ziploc bag
that attach to the camera-tipped end of the probe. Each accessory has a
specific purpose:
• The 45° mirror lets the probe see around corners.
• The pickup hook lets you retrieve otherwise inaccessible items seen by
the probe—for example, a wedding ring accidentally dropped down a sink
drain.
• The magnetic hook lets you retrieve lost or dropped metal objects—nuts
and bolts, for example—located by the probe.
8
Page 10

To attach an accessory:
1. Hold its metal stem with your thumb and index finger.
2. Slide the accessory—plastic clasp first—past the camera head at the probe
tip until the clasp is in the channel 1/4 in. from the end of the probe.
3. Squeeze the clasp until you hear a click (see right photos on previous page),
indicating that the two halves have joined.
To detach an accessory:
1. Use the nail of your index finger to unhook the clasp, opening it up.
2. Hold the accessory’s metal stem with your thumb and index finger and slide
the accessory and clasp past the camera head.
3. Put the accessory back in the Ziploc bag it came in.
To open the iBorescope app’s
advanced settings screen (shown at
right), touch the Setting button at
upper right.
As the screen shot shows, you can
change iBorescope’s WiFi Service
Set Identifier (SSID) or password or
adjust its video settings while
watching live video in the window in
the middle of the screen.
The default WiFi SSID for the unit is
iBORESCOPE. The default WiFi
password is 12345678.
You can change either value to any
combination of letters and numbers
that is at least eight digits long.
Enter the new value in the
appropriate field and click Apply.
To restore either default value, click the Restore button.
To adjust the brightness, contrast, hue or saturation of the live probe video
displayed on your iPhone/iPad, move its slider to the left or right.
9
Page 11

Compatible withiPad, iPad2, “iPad3”, iPhone3GS, iPhone4 or
iPhone 4S running iOS4.1 or later
Security Wi-Fi (WEP) password
Video Resolution640 x 480 pixels (VGA)
Frame Rate 30 frames per second (fps)
Streaming Video FormatMPEG4
WiFi Range 60 ft. (18m),
Camera Lighting 2 white LEDs
Camera Head Diameter0.39 in. (9.8mm)
Camera Depth of Field 1/2 in. to 12 in. (12.7 to 305mm)
Probe Length35 in. (900mm)
Probe Minimum Bending Radius 1.77 in. (45mm)
Dust & Water Resistance Rating IP67
(Probe & Camera Head only)
Operating Voltage3.7V internal from 5V input
Current Consumption600 mA, max @ 5VDC
Operating Temperature 32° to 104°F (0° to 40°C)
Power Supply Rechargeable 2300 mAh Li-ion battery
with 5V/1A output
Life of Full Battery Charge3 hours, typical
max (unobstructed
)
Never insert the probe into a fuel tank or a flammable liquid or gas such as
unleaded gasoline, diesel fuel, machine oil, DOT 4 brake fluid or transmission
fluid.
The probe contains thin wires running along its entire length. Accordingly,
handle it with care:
• Do not bend it more than 90° anywhere along its length.
• Do not bend the probe more than 70° within 1.2 in. (30mm) of its camera tip.
• Do not bundle the probe into a tight circle to store it.
10
Page 12

• Never use the camera end to clear its own path of debris.
• Do not overtighten the collar that secures the probe to the handle.
To clean the camera lens and LEDs, use a cotton swab and a small amount of
mild detergent.
The grip requires no routine maintenance other than periodic cleaning with a
soft, dry cloth. Never use a wet cloth, corrosive liquids, solvents or water. Avoid
getting the grip wet.
Operate and store IScope only in a cool (under 140°F or 60°C), dry, wellventilated place. Avoid exposing the unit to sunlight for long periods of time.
iBorescope is designed for industrial and environmental use only. Never use it
for human or any other biological inspection.
11
Page 13

OMEGA ENGIN EER ING, INC. warra nts this unit to be free of de fec ts in materials and
WARRANTY/ DISCLAIMER
workmanship for a period of 13 months from date of purchase. OMEGA’s WARRANTY adds
an additional one (1) month grace period to the normal one (1) year product warranty to
cover handling and shipping time. This ensures that OMEGA’s customers receive maximum
coverage on each product.
If the unit malfunctions, it must be returned to the factory for evaluation. OMEGA’s Customer
Service Department will issue an Authorized Return (AR) number immediately upon phone
or written request. Upon examination by OMEGA, if the unit is found to be defective, it will
be repaired or replace d at no charge. OMEGA’s WAR RANTY does not appl y to defects
result ing fr om any action of the purch ase r, inclu ding but not li mit ed to mi shandling,
improper interfacing, operation outside of design limits, improper repair, or unauthorized
modification. This WARRANTY is VOID if the unit shows evidence of having been tampered
with or shows evid ence of having been damag ed as a result of e xcessive corrosion; or
current, heat, moisture or vibration; improper specification; misapplication; misuse or other
ope ratin g condi tions outs ide of OME GA ’s cont rol. Comp one nt s in which wear is no t
warranted, include but are not limited to contact points, fuses, and triacs.
OME GA is p lease d to of fer sugges tions o n the use of its vario us pr od uct s.
However, OMEGA neither assumes responsibility for any omissions or errors nor
assumes liability for any damages th at result from the u se of its products i n
acc ordan ce wi th info rmati on prov ided by OMEG A, ei th er verbal or writ ten.
OMEGA warrants only that the parts manufactured by the company will be as
spe ci fie d and free of defec ts. O ME GA MAKE S NO OT HE R WAR RANTI ES OR
REP RE SEN TA TIONS O F ANY K IN D WHA TSOEV ER, EXPRES SE D OR IMPLI ED,
EXC EP T THAT OF TIT LE, AND A LL I MPLIE D WARR ANTIE S INCL UDING A NY
WARRANTY OF MERCHANTABILITY AND FITNESS FOR A PARTICULAR PURPOSE
ARE HEREBY DISCLAIMED. LIMITATION OF LIABILITY: The remedies of purchaser
set forth herein are exclusive, and the total liability of OMEGA with respect to this
order, whether based on contract, warranty, negligence, indemnification, strict
liability or otherwise, shall not exceed the purchase price of the component upon
which liability is based. In no event shall OMEGA be liable for consequential,
incidental or special damages.
CONDITIONS: Equipment sold by OMEGA is not intended to be used, nor shall it be used: (1)
as a “Basic Component” under 10 CFR 21 (NRC), used in or with any nuclear installation or
activity; or (2) in medical applications or used on humans. Should any Product(s) be used in
or with any nuclear installation or activity, medical application, used on humans, or misused
in any way, OMEGA assumes no responsibility as set fo rth in our basic WARRA NTY/
DIS CLA IMER langu age, and, addit ion ally, pu rch aser will inde mni fy OMEGA an d hold
OMEGA harmless from any liability or damage whatsoever arising out of the use of the
Product(s) in such a manner.
Direct all warranty and repair requests/inquiries to the OMEGA Customer Service Department.
BE FO RE RET UR NIN G ANY PRO DU CT(S) TO OME GA , PU R CH A SE R MU ST OBTAI N AN
AUTHORIZED RETURN (AR) NUMBER FROM OMEGA’S CUSTOMER SERVICE DEPARTMENT (IN
ORDER TO AVOID PROCESSING DELAYS). The assigned AR number should then be marked on
the outside of the return package and on any correspondence.
The purchaser is responsible for shipping charges, freight, insurance and proper packaging to
prevent breakage in transit.
FOR WARRANTY
the following information available
BEFORE contacting OMEGA:
1. Purchase Order number under which
the product was PURCHASED,
2. Model and serial number of the product
under warranty, and
3. Repair instructions and/or specific
problems relative to the product.
OMEGA’s policy is to make running changes, not mo del changes, whenever an improvemen t is possibl e.
This affords our customers the latest in technology and engineering.
OMEGA is a registered trademark of OMEGA ENGINEERING, INC.
© Copyright 2012 OMEGA ENGINEERING, INC. All rights reserved. This document may not be copied, photo-
copied, reproduced, translated, or reduced to any electronic medium or machine-readable form, in whole or in
part, without the prior written consent of OMEGA ENGINEERING, INC.
RETURN REQUESTS/INQUIRIES
RETURNS, please have
FOR NON-WARRANTY REPAIRS,
for current repair charges. Have the following
information available BEFORE contacting OMEGA:
1. Purchase Order number to cover the
COST of the repair,
2. Model and serial number of the
product, and
3. Repair instructions and/or specific problems
relative to the product.
consult OMEGA
Page 14

Where Do I Find Everything I Need for
Process Measurement and Control?
OMEGA…Of Course!
Shop online at omega.com
TEMPERATURE
䡺⻬
Thermocouple, RTD & Thermistor Probes, Connectors, Panels & Assemblies
䡺⻬
Wire: Thermocouple, RTD & Thermistor
䡺⻬
Calibrators & Ice Point References
䡺⻬
Recorders, Controllers & Process Monitors
䡺⻬
Infrared Pyrometers
PRESSURE, STRAIN AND FORCE
䡺⻬
Transducers & Strain Gages
䡺⻬
Load Cells & Pressure Gages
䡺⻬
Displacement Transducers
䡺⻬
Instrumentation & Accessories
FLOW/LEVEL
䡺⻬
Rotameters, Gas Mass Flowmeters & Flow Computers
䡺⻬
Air Velocity Indicators
䡺⻬
Turbine/Paddlewheel Systems
䡺⻬
Totalizers & Batch Controllers
pH/CONDUCTIVITY
䡺⻬
pH Electrodes, Testers & Accessories
䡺⻬
Benchtop/Laboratory Meters
䡺⻬
Controllers, Calibrators, Simulators & Pumps
䡺⻬
Industrial pH & Conductivity Equipment
DATA ACQUISITION
䡺⻬
Data Acquisition & Engineering Software
䡺⻬
Communications-Based Acquisition Systems
䡺⻬
Plug-in Cards for Apple, IBM & Compatibles
䡺⻬
Datalogging Systems
䡺⻬
Recorders, Printers & Plotters
HEATERS
䡺⻬
Heating Cable
䡺⻬
Cartridge & Strip Heaters
䡺⻬
Immersion & Band Heaters
䡺⻬
Flexible Heaters
䡺⻬
Laboratory Heaters
ENVIRONMENTAL
MONITORING AND CONTROL
䡺⻬
Metering & Control Instrumentation
䡺⻬
Refractometers
䡺⻬
Pumps & Tubing
䡺⻬
Air, Soil & Water Monitors
䡺⻬
Industrial Water & Wastewater Treatment
䡺⻬
pH, Conductivity & Dissolved Oxygen Instruments
SM
M5186/0712
 Loading...