

Page 1
User’s Guide
User Guide
User Guide
i
i
HHB1600
High-Performance
Data Logging Video
Borescope System
Shop online at
MADE IN
TAIWAN
e-mail: [email protected]
For latest product manuals:
omegamanual.info
omega.com
OMEGAnet
North America:
U.S.A.:
ISO 9001 Certified
OMEGA Engineering, Inc., One Omega Drive,
P.O. Box 4047, Stamford, CT 06907-0047 USA
Toll-Free: 1-800-826-6342 TEL: (203) 359-1660
FAX: (203) 359-7700 e-mail: [email protected]
Canada:
976 Bergar
Laval (Quebec), Canada H7L 5A1
Toll-Free: 1-800-826-6342 TEL: (514) 856-6928
FAX: (514) 856-6886 e-mail: [email protected]
®
Servicing
liam-e tenretnIecivreS eniL-nO
moc.agemo@ofnimoc.agemo
For immediate technical or
application assistance:
U.S.A. and Canada:
Sales Service: 1-800-826-6342/1-800-TC-OMEGA
Customer Service: 1-800-622-2378/1-800-622-BEST
Engineering Service: 1-800-872-9436/1-800-USA-WHEN
Mexico:
En Español: 001 (203) 359-7803
FAX: (001) 203-359-7807
e-mail: [email protected]
®
®
®
Page 2
User Guide
ii
User Guide
iii
Benelux:
Managed by the United Kingdom Office
Toll-Free: 0800 099 3344 TEL: +31 20 347 21 21
FAX: +31 20 643 46 43 e-mail: [email protected]
Czech Republic:
Frystatska 184, 733 01 Karviná, Czech Republic
Toll-Free: 0800-1-66342 TEL: +420-59-6311899
FAX: +420-59-6311114
e-mail: [email protected]
It is the policy of OMEGA Engineering, Inc. to comply with all worldwide safety and EMC/EMI regulations that apply. OMEGA is constantly pursuing certification of its products to the European New Approach Directives. OMEGA will add the CE mark to every appropriate device upon
certification.
The information contained in this document is believed to be correct, but OMEGA accepts no liability for any errors it contains,
and reserves the right to alter specifications without notice.
WARNING: These products are not designed for use in, and should not be used for, human applications.
Direct all warranty and r epair requests/ inquiri es to the OMEGA Customer Service Departme nt. BEFORE RETURNING ANY
PRODUCT(S) TO OMEGA, PURCHASER MUST OBTAIN AN AUTHORIZED RETURN (AR) NUMBER FROM OMEGA’S CUSTOMER
SERVICE DEPARTMENT (IN ORDER TO AVOID PROCESSING DELAYS). The assigned AR number should then be marked on the
outside of the return package and on any correspondence. The purchaser is responsible for shipping charges, freight, insurance
and proper packaging to prevent breakage in transit.
FOR WARRANTY RETURNS, please have the following
information available BEFORE contacting OMEGA:
1.Purchase Order number under which the product was
PURCHASED,
2.Model and serial number of the product under warranty, and
3.Repair instructions and/or specific problems relative to the
product.
OMEGA’s policy is to make running changes, not model changes, whenever an improvement is possible. This affords our customers
the latest in technology and engineering.OMEGA is a registered trademark of OMEGA ENGINEERING, INC.
© Copyright 2009 OMEGA ENGINEERING, INC. All rights reserved. This document may not be copied, photocopied, reproduced,
translated, or reduced to any electronic medium or machine-readable form, in whole or in part, without the prior written consent of
OMEGA ENGINEERING, INC.
Servicing Europe:
France:
Managed by the United Kingdom Office
Toll-Free: 0800 466 342 TEL: +33 (0) 161 37 29 00
FAX: +33 (0) 130 57 54 27 e-mail: [email protected]
Germany/Austria:
Daimlerstrasse 26
D-75392 Deckenpfronn, Germany
Toll-Free: 0 800 6397678 TEL: +49 (0) 7059 9398-0
FAX: +49 (0) 7056 9398-29 e-mail: [email protected]
RETURN REQUESTS / INQUIRIES
FOR NON-WARRANTY REPAIRS,
for current repair charges. Have the following
information available BEFORE contacting OMEGA:
1. Purchase Order number to cover the COST of the repair,
2.Model and serial number of the product, and
3.Repair instructions and/or specific problems relative to the
product.
United Kingdom: ISO 9001 Certified
OMEGA Engineering Ltd.
One Omega Drive, River Bend Technology
Centre, Northbank, Irlam, Manchester
M44 5BD England
Toll-Free: 0800-488-488
TEL: +44 (0)161 777-6611
FAX: +44 (0)161 777-6622
e-mail: [email protected]
consult OMEGA
OMEGA ENGINEERING, INC. warrants this unit to be free of defects in materials and workmanship for a period of 13 months from
WARRANTY/DISCLAIMER
date of purchase. The OMEGA®WARRANTY adds an additional one (1) month grace period to the normal one (1) year product
warrant y t o cover handling and shipping time. T his ensures that OM EGA’s cu stomers receive maximum coverage on each
product.
If the unit malfunctions, it must be returned to the factory for evaluation. OMEGA’s Customer Service Department will issue an Authorized
Return (AR) number immediately upon phone or written request. Upon examination by OMEGA, if the unit is found to be defective, it will
be repaired or replaced at no charge. OMEGA’s WARRANTY does not apply to defects resulting from any action of the purchaser, including
but not limited to mishandling, improper interfacing, operation outside of design limits, improper repair, or unauthorized modi fication. This
WARRANTY is VOID if the unit shows evidence of having been tampered with or shows evidence of having been damaged as a result of
excessive corrosion; or current, heat, moisture or vibration; improper specification; misapplication; o
outside of OMEGA’s control. Components in which wear is not warranted, include but are not limited to contact points, fuses, and triacs.
OMEGA is pl eased to of fer suggestions on the use of its various product s. Howev er, OMEGA n either assumes
responsibility for any omissio ns or errors nor assumes liability for any damages that result fro m the use of its
products in accordance with information provided by OMEGA, either verbal or written. OMEGA warrants only that the
par ts man uf act ur ed by the compa ny will be as sp eci fi ed and free of de fec ts . OMEGA MA KES NO OTH ER
WARRANTIES OR REPRESE NTATIONS OF ANY KIND WHAT SOEVER, EXPRESSED OR IMPLIED, EXCEPT THAT OF
TITLE, AND ALL IMPLIED WARRANTIES INCLUDING ANY WARRANTY OF MERCHANTABILITY AND FITNESS FOR A
PARTICULAR PURPOSE ARE HEREBY DISCLAIMED. LIMITATION OF LIABILITY: The remedies of purchaser set forth
herein are exclusive, and the total liability of OMEGA with respect to this order, whether based on contract, warranty,
negligence, indemnification, strict liability or otherwise, shall not exceed the purchase price of the component upon
which liability is based. In no event shall OMEGA be liable for consequential, incidental or special damages.
CONDITIONS: Equipment sold by OMEGA is not intended to be used, nor shall it be used: (1) as a “Basic Component” under 10 CFR 21
(NRC), used in or with any nuclear installation or activity; o
used in or with any nuclear installation or activity, medical application, used on humans, or misused in any way, OMEGA assumes no
responsibility as set forth in our basic WARRANTY/DISCLAIMER language, and, additionally, purchaser will indemnify OMEGA and hold
OMEGA harmless from any liability or damage whatsoever arising out of the use of the Product(s) in such a manner.
r (2) in medical applications or used on humans. Should any Product(s) be
r misuse or other operating conditions
Page 3

iv
User Guide
User Guide
1
CONTENTNOTES:
Product Features------------------------------------ 2
First Time Use---------------------------------------- 4
System Modes---------------------------------------- 4
Multi-function keys---------------------------------- 5
Manual Screen--------------------------------------- 6
Operating Instructions----------------------------- 8
Power On/Off------------------------------------------ 8
Adjust the brightness------------------------------ 8
Taking Photos-----------------------------------------8
Video Recording------------------------------------- 9
Viewing photos/videos-----------------------------9
Setting Time/Date------------------------------------10
Setting Time Display--------------------------------10
Viewing on a TV monitor---------------------------------11
Setting video format---------------------------------------11
Deleting a specific photo (Browse mode only)---12
Deleting all photos-----------------------------------------12
Setting auto power off------------------------------------13
Re-charging the battery----------------------------------13
Creation of Memory Card Folder--------------------- 13
Specifications-----------------------------------------------15
Troubleshooting--------------------------------------------16
Insert Tube Maintenance---------------------------------17
Cautions for Use--------------------------------------------18
Page 4
User Guide
2
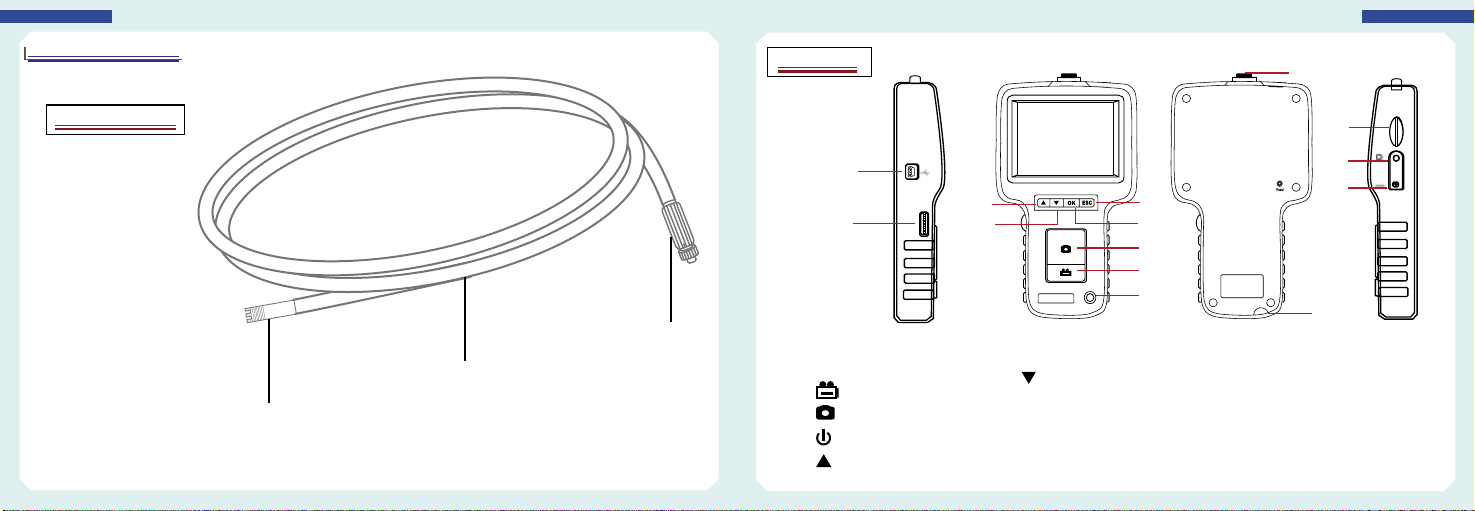
Product Features
HHB1600
(14)
User Guide
3
INSERT TUBE
1-Insert Tube
(1) Insert tube
(2) Camera and lens
(3) Insert tube connector
(2)
(3)
(1)
(Please read the entire instruction manual before usage)
(11)
(4)
(12)
(5)
2-CONSOLE
(1) RECORD
SNAP
(2)
POWER
(3)
(4)
PREVIOUS
NEXT
(5)
(6) OK
(7) ESC
(8) SD Port
(9) TV out
(8)
(9)
(10)
(7)
(6)
(2)
(1)
(3)
(13)
(10) AC Jack
(11) USB port
(12) Light adjustment
(13) Hanger Hole
(14) Console Connector
Page 5
User Guide
4
First Time Use
Multi-function keys
User Guide
5
STEP 1-Insert the insert tube into the connector according to the direction of the arrow and tighten the
screw nut.
STEP 2-Press and hold down the power button on the console for 3 seconds until the image is displayed
on the monitor.
STEP 3-Aim the camera lens at the selected object. Press SNAP to capture a .jpg image, or RECORD to
begin recording a .asf video.
System Modes
The HHB1600 provides three simple working modes: Preview, Browse and Manual Mode.
Preview Mode The Preview Mode is activated as soon as the unit is turned on. The image received by the
Browse Mode In Browse Mode, users may view photos and video, and conduct basic file maintenance.
Manual Mode In Manual Mode, users may customize their set up preferences.
Note: The system returns to Preview Mode automatically after 10 seconds without any response in Manual Model.
camera is displayed in real time on the video monitor. The user can capture photos and
record video while in the Preview Mode.
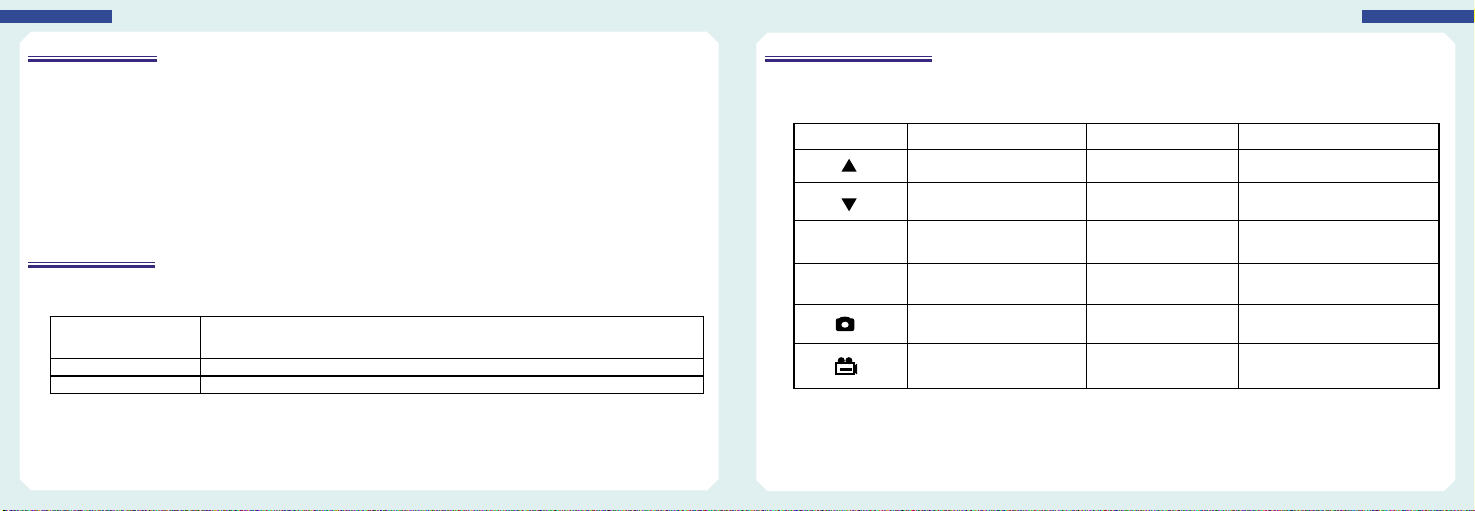
Each console button performs a unique function depending upon the Mode in which the system is being
operated
Push-Buttons Preview Mode Browse Mode Manual Mode
Switch to Browse Mode to view
photos and videos.
Switch to Browse Mode to view
photos and videos.
Enter Manual Mode. Delete photo or video. Execute selected command.
Move to previous photo or
video.
Move to next photo or
video.
Move upward through the main
manual.
Move the light bar downward.
OK
ESC
Return to Preview Mode. Return to Preview Mode. Return to Preview Mode.
Capture a .jpg photo View the next photo or
Start and stop video recording Return to Preview Mode Return to Preview Mode
pause/play video clips.
Display various data for repair
Page 6
User Guide
6
Manual Screen
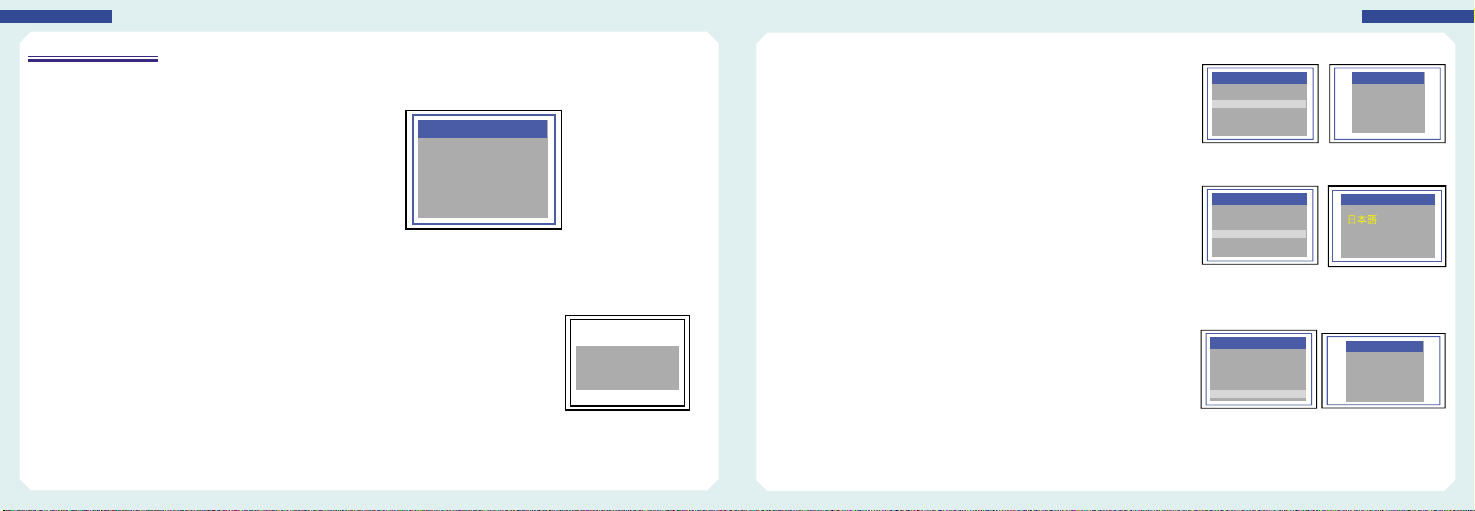
The user may press the MENU button in Manual Mode to execute desired commands as indicated below.
MENU
DELETE ALL
VIDEO OUTPUT
DATE/TIME SETUP
LANGUAGE
VIDEO FORMAT
AUTO POWER OFF
•
DELETE ALL
After initiating this command, select “yes” or “no” by pressing up or down
arrow buttons. To delete all, select “yes”. Exit by pressing the OK button.
•
VIDEO OUTPUT
This command will send the video signal out through the AV port. The monitor will turn black until you
execute this command again.
MANUAL
DELETE ALL
VIDEO OUTPUT
DATE/TIME SETUP
LANGUAGE
VIDEO FORMAT
AUTO POWER OFF
(Figure.1)
ERASE ALL
yes no
(Figure.2)
•
DATE/TIME SETUP
Use the arrow buttons to select Year/Month/Day or Hour/Min/Sec.
Press RECORDING to increase the number, or press SNAP to
decrease. Select “Display ON” to print the date on the photo.
•
LANGUAGE
Use this command to select the desired language.
•
VIDEO FORMAT
Set up your video format.
•
AUTO POWER OFF
Set the auto power off feature to your desired length of time.
MANUAL
MENU
DELDTE ALL
VIDEO OUTPUT
DATE/TIME SETUP
LANGUAGE
VIDEO FORMAT
AUTO POWER OFF
MANUAL
MENU
DELDTE ALL
VIDEO OUTPUT
DATE/TIME SETUP
LANGUAGE
VIDEO FORMAT
AUTO POWER OFF
MANUAL
MENU
DELDTE ALL
VIDEO OUTPUT
DATE/TIME SETUP
LANGUAGE
VIDEO FORMAT
AUTO POWER OFF
(Figure.3)
(Figure.4)
(Figure.5)
User Guide
TIME SETUP
2000/01/101
10:22:22
DISPLAY OFF
LANGUAGE
ENGLISH
LANGUAGE
ENGLISH
ESPANOL
FRENCH
ITALIAN
TIME SET
POWER OFF
DISABLE
5 MIN
10 MIN
15 MIN
30 MIN
POWER OFF
7
Page 7
User Guide
8
Operating Instructions
Video Recording
User Guide
9
Power On/Off
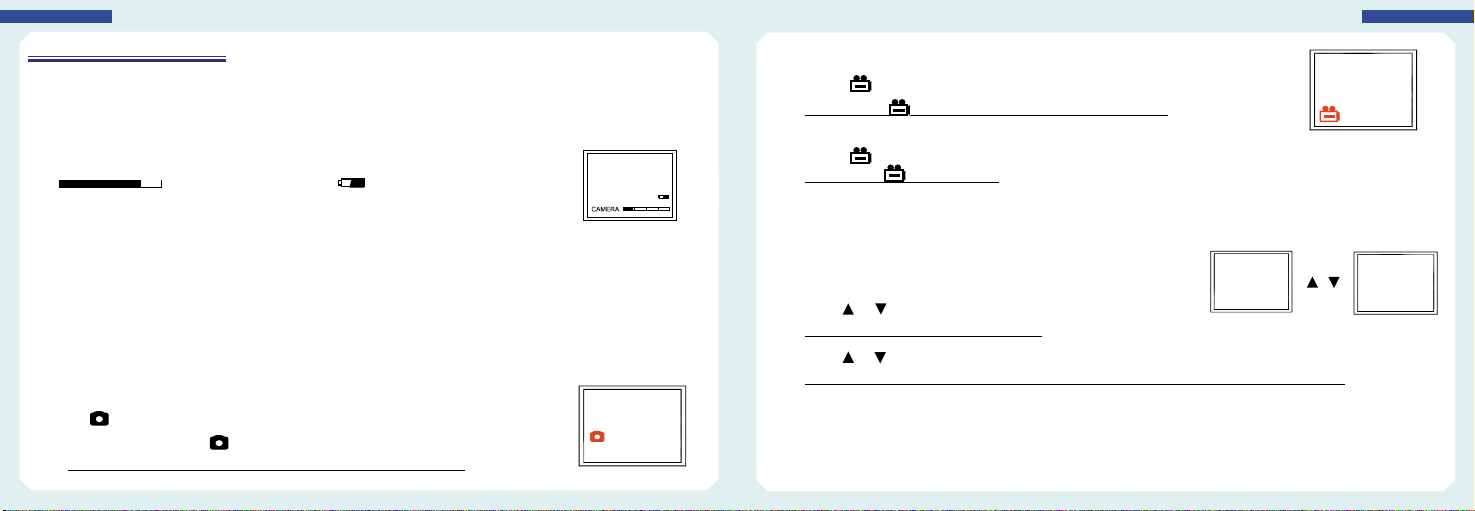
STEP1: To turn the console on, press the power button for 3~5 seconds until you see the sign below
appear on your monitor.
(
STEP2: Press the power button for 3~5 seconds to turn the console off.
SD card memory capacity Battery capacity)
(Figure.6)
Adjust the brightness
When the objects on the screen or "fully-blank (light over)", it might be because the light source is too
bright. In this case, please turn the light switch counterclockwise to reduce the brightness. Turn the light
switch clockwise to increase the brightness.
Taking Photos
Press button during Preview mode to take the photo.
Or, continue pressing the
Image Status: Returns to Preview Mode automatically after photo is taken.
button to show the photo that has just been taken.
(Figure.7)
(P.6)
1. Press button to start video recording.
Image Status: sign will appear at the left bottom of the screen.
/
(Figure.8)
(P.9)
(Figure.8)
2. Press button again to stop recording.
Image Status: sign disappears.
Note: User may return to Preview Mode anytime by pressing button regardless of working under Browse
mode or Manual mode.
ESC
Viewing photos/videos
1. Press or during preview mode.
Image Status: Display the latest photo/video.
2. Press or again to view the oldest or second to last photo/video.
Image Status: All �les will be stored according to the time sequence of photo capture/video recording.
Note: When viewing videos, the video will be displayed automatically until it ends and then the next photo or video
will be displayed.
Page 8
User Guide
10
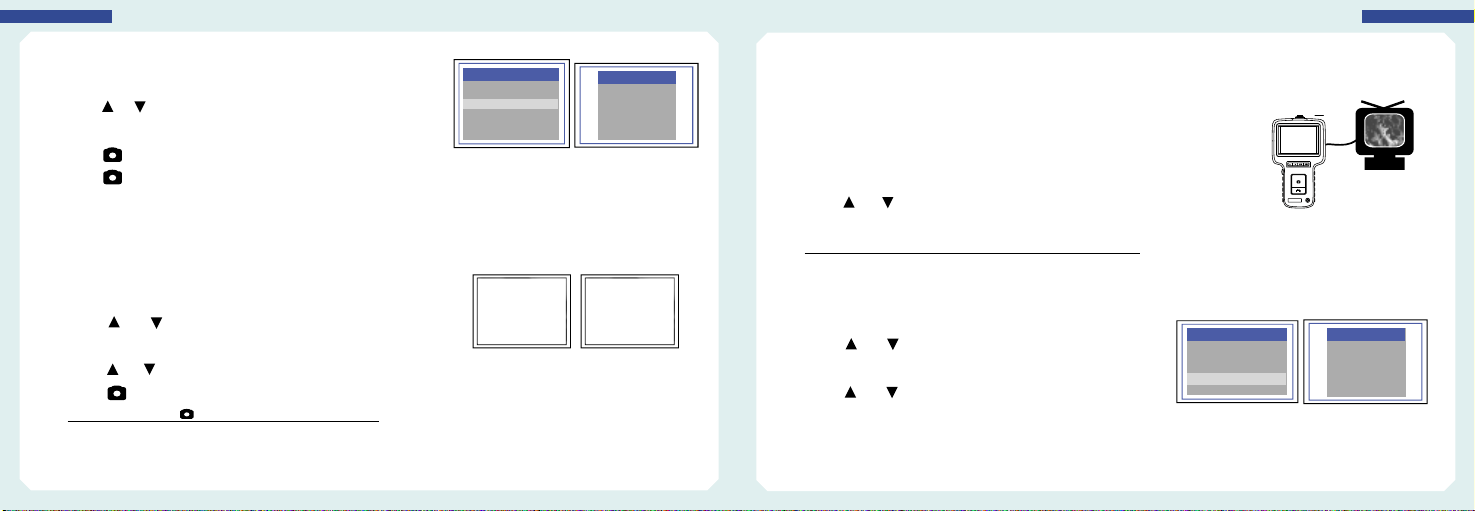
Setting Time/Date
1.Press
OK
2.Press or to move to Date/Time command.
3.Press to initiate the command.
OK
4.Press to increase the number or to decrease.
5.Press for next adjustment.
6.Repeat step 4 and 5 until the correct time/date are set.
OK
7.Press to complete the set up.
Setting Time Display
1.Press
OK
2.Press or to move to “Date/Time” command.
3.Press
OK
4.Press or for “Display” option.
5.Press to switch the “Display” function between ON/OFF.
Image Status: Press once for ON, press again for OFF.
6. Press to complete set up.
7. Press to return to Preview mode.
OK
ESC
MANUAL
MENU
DELDTE ALL
VIDEO OUTPUT
DATE/TIME SETUP
LANGUAGE
VIDEO FORMAT
AUTO POWER OFF
(Figure.9)
2000/01/10 10:22:22
(P.10)
(Figure.10)
TIME SET
TIME SET
2000/02/14
17:30:51
DISPLAY
OFF
DISPLAYNOT DISPLAY
Viewing on a TV monitor
1. Plug the included AV cord into the AV socket located on the right side of the console.
Notice: Please plug the other end of the AV cord into the “AV in” socket on the
external monitor.
2.Press
OK
3.Press or to move to “Video output” option.
4.Press
OK
Image Status: image will be transmitted to the external monitor.
Setting video format
1.Press
OK
2.Press or to move to “Video Format” option.
3.Press
OK
4.Press or to select NTSC/PAL.
5.Press
OK
MANUAL
MENU
DELDTE ALL
VIDEO OUTPUT
DATE/TIME SETUP
LANGUAGE
VIDEO FORMAT
AUTO POWER OFF
(Figure.12)
(Figure.11)
TV OUTPUT
TIME SET
NTSC
PAL
User Guide
11
Page 9
User Guide
12
Deleting a speci�c photo
(Browse mode only)
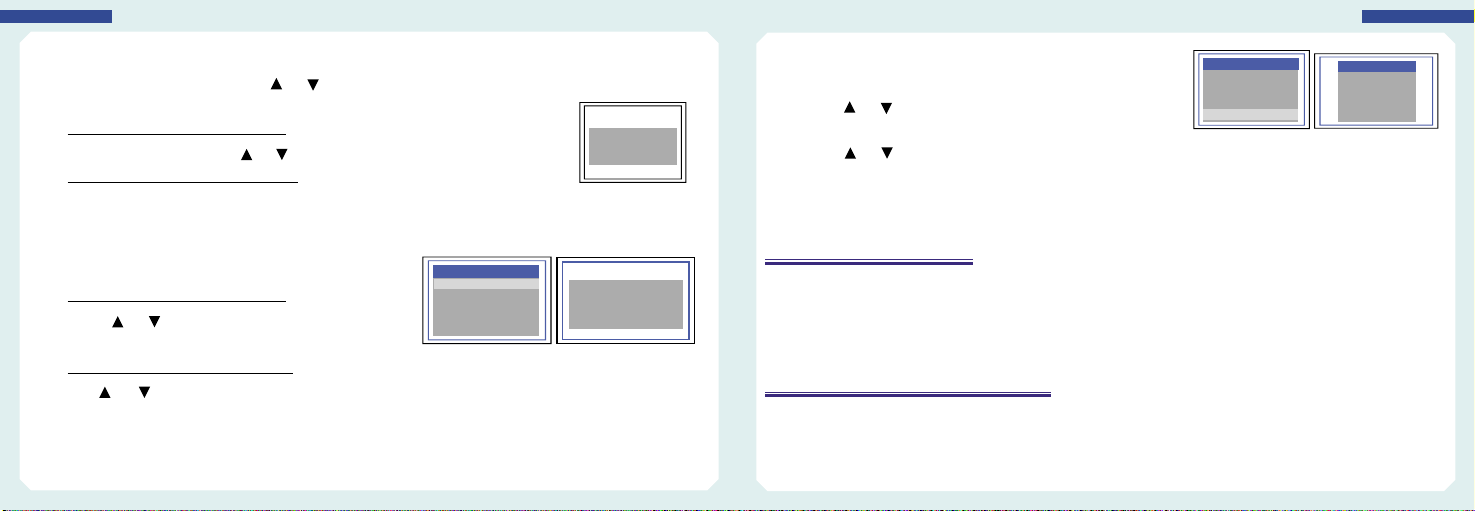
1. Enter Browse mode, then press or to locate the photo or video you wish to delete.
2. Press
OK
Image Status: “Delete yes or no” options
3. To select your option, press or
Image Status: The selected option �ashes.
4. Press to execute your selected option or press ESC to cancel.
OK
DELETE
yes no
(Figure.13)
Setting auto power off
OK
1.Press during Preview mode.
2.Press or for “Auto power off” command.
OK
3.Press
MANUAL
MENU
DELDTE ALL
VIDEO OUTPUT
DATE/TIME SETUP
LANGUAGE
VIDEO FORMAT
AUTO POWER OFF
(Figure.15)
4.Press or to select desired time length or choose “Disable”.
5.Press
OK
The console will automatically turn off if it has not been used for this preset length of time.
User Guide
TIME SET
POWER OFF
DISABLE
5 MIN
10 MIN
15 MIN
30 MIN
POWER OFF
13
Deleting all photos
1. Press during Preview mode.
2. Press or for “Delete All” command.
3. Press
4. Use or to select “yes”.
5. Press to execute.
OK
Image Status: Showing the Main Manual
OK
Image Status: “yes” or “no” option appears
OK
MANUAL
MENU
DELDTE ALL
VIDEO OUTPUT
DATE/TIME SETUP
LANGUAGE
VIDEO FORMAT
AUTO POWER OFF
(Figure.14)
ERASE ALL
yes no
Re-charging the battery
Re-charging the console battery
Plug the adapter into the outlet and plug the power jack into the socket on the console.
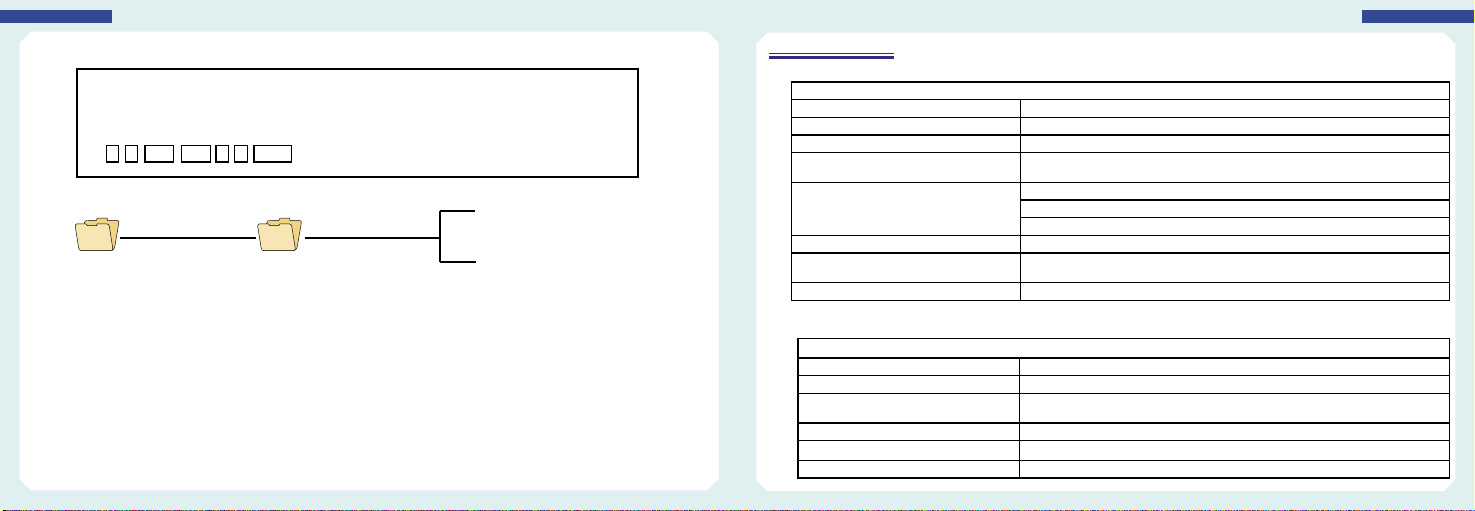
Creation of Memory Card Folder
The following information applies to the included SD card only. All photos and videos are stored in the
[100MEDIA] folder under the [DCIM] folder. All �les will be named according to the time/date setup.
Page 10
14
User Guide
Specifications
User Guide
15
The original setup date 1 Month 1 Date 6:14:23 Name of the �le
The original setup date 1 Month 1 Date 6:14:23 Name of the file 11061423.JPG
1 1 0 6 1 4 2 3 .JPG Month Date Hour: Minute: Second Extension
1 1 0 6 1 4 2 3 .JPG
Month Date Hour: Minute: Second Extension
11061423.JPG
DCIM 100MEDIA
11061435.ASF
�Users should complete the time/date setup before usage in order to achieve accurate �le management.
�The time/date is pre-set to 2007/1/1. Users may identify this when the �le name begins with the
digits 11.
�File names are not labeled by serial number. They are labeled according to the current time/date.
�Both photos and videos are named in the same way but with different �le extensions, .jpg and .asf.
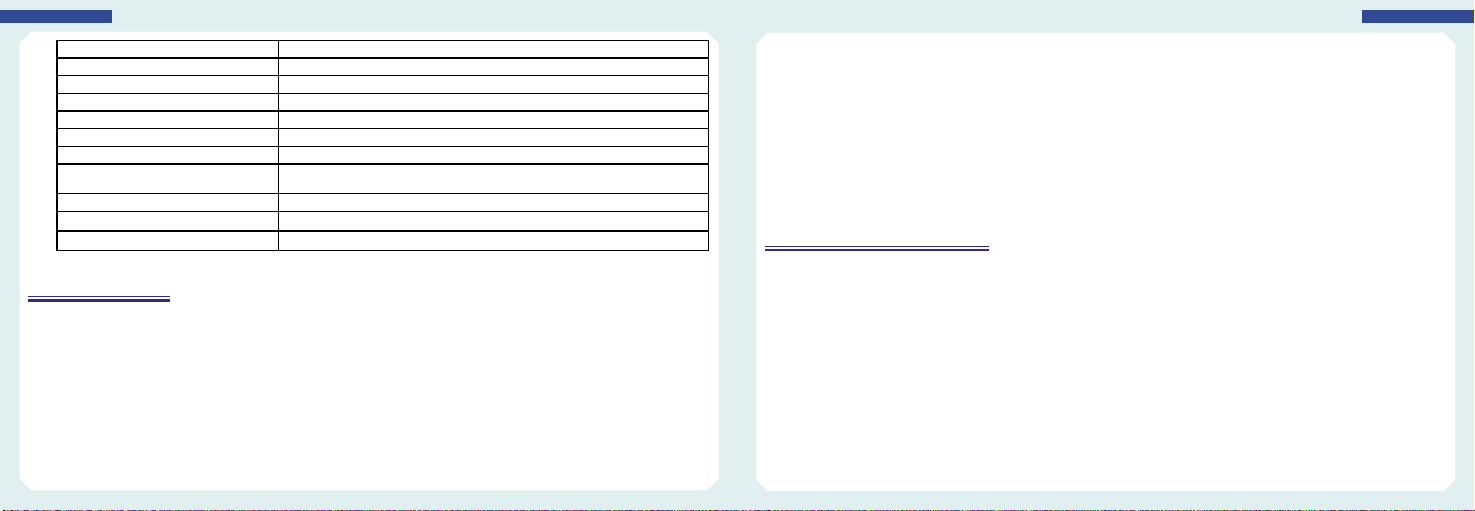
Camera System and Insert Tube
0.2” Diameter Insert Tube 325(H)*250(V)
Housing Steel
Light Source White LED
Length OBEDIENT 3.3', 6.6', 9.8' (1M, 2M, 3M)SOFT METAL 3.3', 6.6', 9.8', 16.4',
Field of View Horizontal field angle 46 º
Depth of Field (DOF) 0.4” ~ 2.4”
Water Resistant Only the InsertionInsert tube is water resistant
Working Temperature 32°F to 131°F
32.8', 98.4' (1M, 2M, 3M, 5M, 10M, 30M)
Vertical field angle 34º
Diagonal field angle 56º
System Console
System Dimension 8.5” x 4.7” x 1.4” (215 x 120 x 36 mm)
System Weight 380g
Power Battery rechargeable Li-Polymer battery 3.7V power supply AC 100-240V
Display
3.5 TFT LCD QVGA
Recording Medium 1G SD CARD
Video Out Format NTSC & PA
50-60Hz power consumption DC5.5 1.8A
Page 11
User Guide
16
Interface AV out
Compression Format Compliant with MPEG4
Still Image Storage Format jpeg (640*480)
Frame Rate ~30 fps
Exposure Automatic
White Balance Fix
S/N Ratio 42dB or more
Language English // Japanese // German // Spain // French // Italian // Traditional Chinese
Recharge Temperature 32°F to 104°F
Working Temperature -4°F to 140°F
Storage Temperature -4°F to 140°F
// Simplified Chinese
Troubleshooting
•
1. Unable to turn on the console
Users will not be able to turn on the console when the battery is very low or empty. Please re-charge
before use.
User Guide
•
2. Can turn on the unit but the image does not appear on the monitor
Please check the insert tube connector or simply re-connect the insert tube to correct the problem.
•
3. Unable to capture photos/video
Please check the status of the SD card. Users will not be able to capture photos or video if the SD card is
not installed properly or if it is full, write protected or damaged.
Insert Tube Maintenance
»
To avoid danger, please do not put the insert tube into any �ammable liquid or gas.
»
To ensure long-term reliability, do not bend the insert tube more than 180 degrees, and always bend the
insert tube in as large an arc as possible during usage and storage.
»
Camera Lens cleaning
User may clean the camera lens with a cotton swab and small amount of cleaning naphtha
17
.pit aremac eht fo scinortcele dna scitpo eht lortnoc taht seriw llams fo seires a sniatnoc ebut tresni ehT
Page 12
User Guide
18
Cautions for Use
»
Do not remove the SD card during capturing photos or video. This can cause a loss of the image or
video and may damage the SD card.
»
Video recording requires an SD card with fast writing speed. We recommend 80X (or above) writing
speed SD cards for better video quality.
»
This is designed for industrial use only. Do not use the system for human or any other
biological inspection.
»
Do not insert the insert tube into any �ammable gas or liquid (such as a fuel tank) to avoid dangers.
»
Do not use this Video Boresco pe in a fuel tank or other dangerous environment
such as a gasoline or alcohol storage tank.
Where Do I Find Everything I Need for Process Measurement
and Control? OMEGA…Of Course!
Shop online at omega.com
TEMPERATURE
Thermocouple, RTD & Thermistor Probes,
Connectors, Panels & Assemblies
Wire: Thermocouple, RTD & Thermistor
Calibrators & Ice Point References
Recorders, Controllers & Process Monitors
Infrared Pyrometers
PRESSURE, STRAIN AND FORCE
Transducers & Strain Gages
Load Cells & Pressure Gages
Displacement Transducers
Instrumentation & Accessories
FLOW/LEVEL
Rotameters, Gas Mass Flowmeters & Flow Computers
Air Velocity Indicators
Turbine/Paddlewheel Systems
Totalizers & Batch Controllers
pH/CONDUCTIVITY
pH Electrodes, Testers & Accessories
Benchtop/Laboratory Meters
Controllers, Calibrators, Simulators & Pumps
Industrial pH & Conductivity Equipment
DATA ACQUISITION
HEATERS
ENVIRONMENTAL MONITORING
AND CONTROL
SM
Data Acquisition & Engineering Software
Communications-Based Acquisition Systems
Plug-in Cards for Apple, IBM & Compatibles
Datalogging Systems
Recorders, Printers & Plotters
Heating Cable
Cartridge & Strip Heaters
Immersion & Band Heaters
Flexible Heaters
Laboratory Heaters
Metering & Control Instrumentation
Refractometers
Pumps & Tubing
Air, Soil & Water Monitors
Industrial Water & Wastewater Treatment
pH, Conductivity & Dissolved Oxygen Instruments
User Guide
M4834/1109
19
 Loading...