

Page 1
User’s Guide
Shop online at
omega.com
e-mail: [email protected]
For latest product manuals:
omegamanual.info
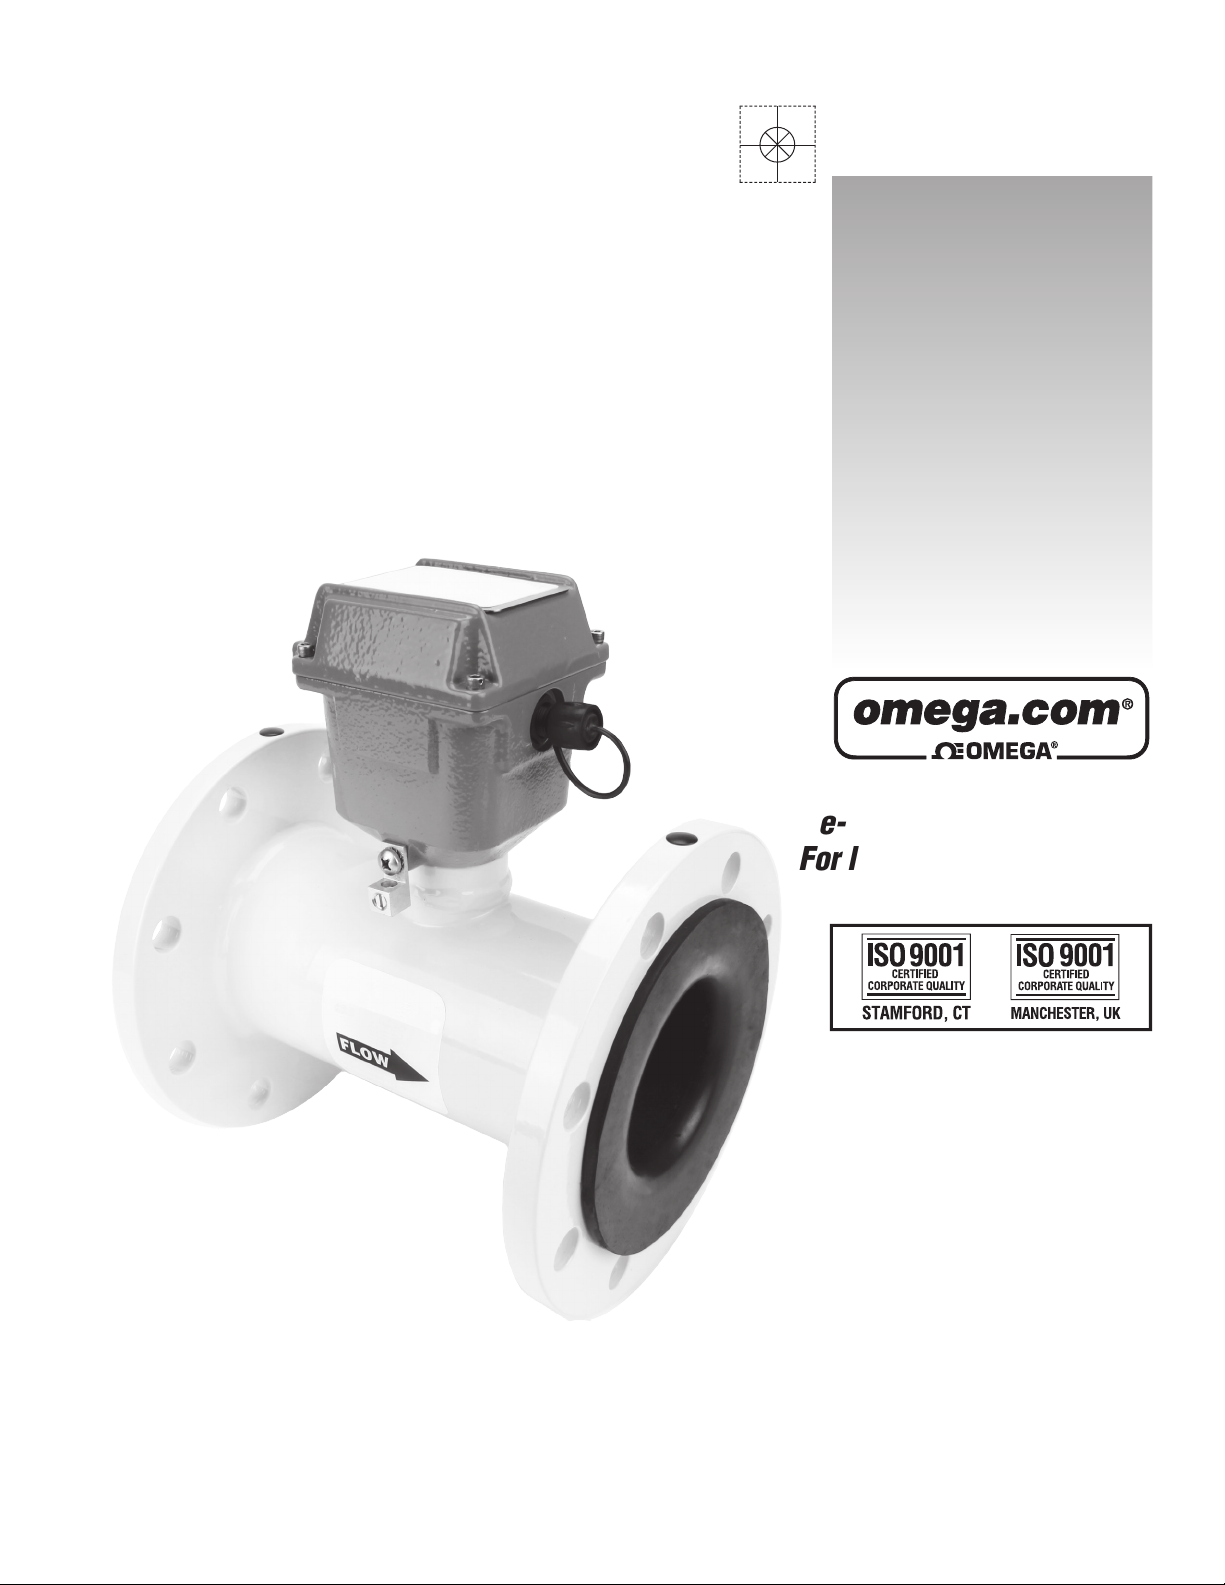
FMG-2000/2100 SERIES
Municipal/Industrial Magmeter
Xxxxx Xxxxxxxx
XXXXXX
Page 2

OMEGAnet®Online Service Internet e-mail
U.S.A.:
ISO 9001 Certified
omega.com [email protected]
Servicing North America:
Omega Engineering, Inc., One Omega Drive, P.O. Box 4047
Stamford, CT 06907-0047 USA
Toll Free: 1-800-826-6342 TEL: (203) 359-1660
FAX: (203) 359-7700 e-mail: [email protected]
Canada:
976 Bergar
Laval (Quebec), Canada H7L 5A1
Toll-Free: 1-800-826-6342 TEL: (514) 856-6928
FAX: (514) 856-6886 e-mail: [email protected]
For immediate technical or application assistance:
U.S.A. and Canada: Sales Service: 1-800-826-6342/1-800-TC-OMEGA
Customer Service: 1-800-622-2378/1-800-622-BEST
Engineering Service: 1-800-872-9436/1-800-USA-WHEN
Mexico: En Español: 001 (203) 359-7803 FAX: (001) 203-359-7807
®
®
®
Servicing Europe:
Benelux:Managed by the United Kingdom Office
Czech Republic: Frystatska 184
733 01 Karviná, Czech Republic
Toll-Free: 0800-1-66342 TEL: +420-59-6311899
FAX: +420-59-6311114 e-mail: [email protected]
France:
Managed by the United Kingdom Office
Toll-Free: 0800 466 342 TEL: +33 (0) 161 37 29 00
FAX: +33 (0) 130 57 54 27 e-mail: [email protected]
Germany/Austria: Daimlerstrasse 26
D-75392 Deckenpfronn, Germany
Toll-Free: 0 800 6397678 TEL: +49 (0) 7059 9398-0
FAX: +49 (0) 7056 9398-29 e-mail: [email protected]
United Kingdom: OMEGA Engineering Ltd.
ISO 9001 Certified One Omega Drive, River Bend Technology Centre, Northbank
Irlam, Manchester M44 5BD England
Toll-Free: 0800-488-488 TEL: +44 (0)161 777-6611
FAX: +44 (0)161 777-6622 e-mail: [email protected]
It is the policy of OMEGA Engineering, Inc. to comply with all worldwide safety and EMC/EMI
regulations that apply. OMEGA is constantly pursuing certification of its products to the European New
Approach Directives. OMEGA will add the CE mark to every appropriate device upon certification.
The information contained in this document is believed to be correct, but OMEGA accepts no liability for any
errors it contains, and reserves the right to alter specifications without notice.
WARNING: These products are not designed for use in, and should not be used for, human applications.
Page 3

TABLE OF CONTENTS
General Information
General Information, Features .......................................................................................................Page 1
Specications
Specications, Dimensions, Flow Range .........................................................................................Page 3
Installation and Grounding
Positioning the Meter,
Calibration, Chemical Injection, Metal Pipe Installations, Plastic Pipe Installations.......................Page 6
Straight Pipe Recommendations .................................................................................................Page 7
Full Pipe Recommendations ..............................................................................................................Page 8
Inputs/Outputs and Operation
External Power and Wiring, Pulse Output, Serial Output, Digital and Relay Outputs ...........................Page 9
Troubleshooting
Problem, Probable Cause, Things to Try ..............................................................................................Page 13
Straight Pipe Recommendations, Full Pipe Recommendations, Fittings,
TABLES, DIAGRAMS & CHARTS
Features ...................................................................................................................................................Page 1-2
Specications ...........................................................................................................................................Page 3
Flow Range, Accuracy, Dimensions..........................................................................................................Page 4-5
Metal Pipe Installation, Plastic Pipe Installation .......................................................................................Page 6
Straight Pipe Recommendations ............................................................................................................. Page 7
Full Pipe Recommendations .................................................................................................................... Page 8
Wire Function .......................................................................................................................................... Page 10
Display Operation .................................................................................................................................... Page 11
Troubleshooting ....................................................................................................................................... Page 13
Page 4
GENERAL INFORMATION
The FMG2000/2100-Series is the most economical anged
electromagnetic owmeter on the market. It is used in 3” to 12”
pipe in municipal or industrial water, wastewater, pump stations
and packaged plant applications. The FMG2000/2100 have no
moving parts with electrodes designed to discourage fouling.
This magmeter requires much less frequent maintenance in
applications where debris would impede mechanical meters.
There is no rotor to stop turning or bearings to wear out. Minimal
straight pipe requirements allow FMG2000/2100-Series
meters to be used in piping congurations where there is little
space between the meter and an elbow.
FEATURES
FMG2000/2100-Series meters are rated IP68 for applications
where the meter may be under water up to a depth of 10 feet (3
meters) for prolonged periods of time.
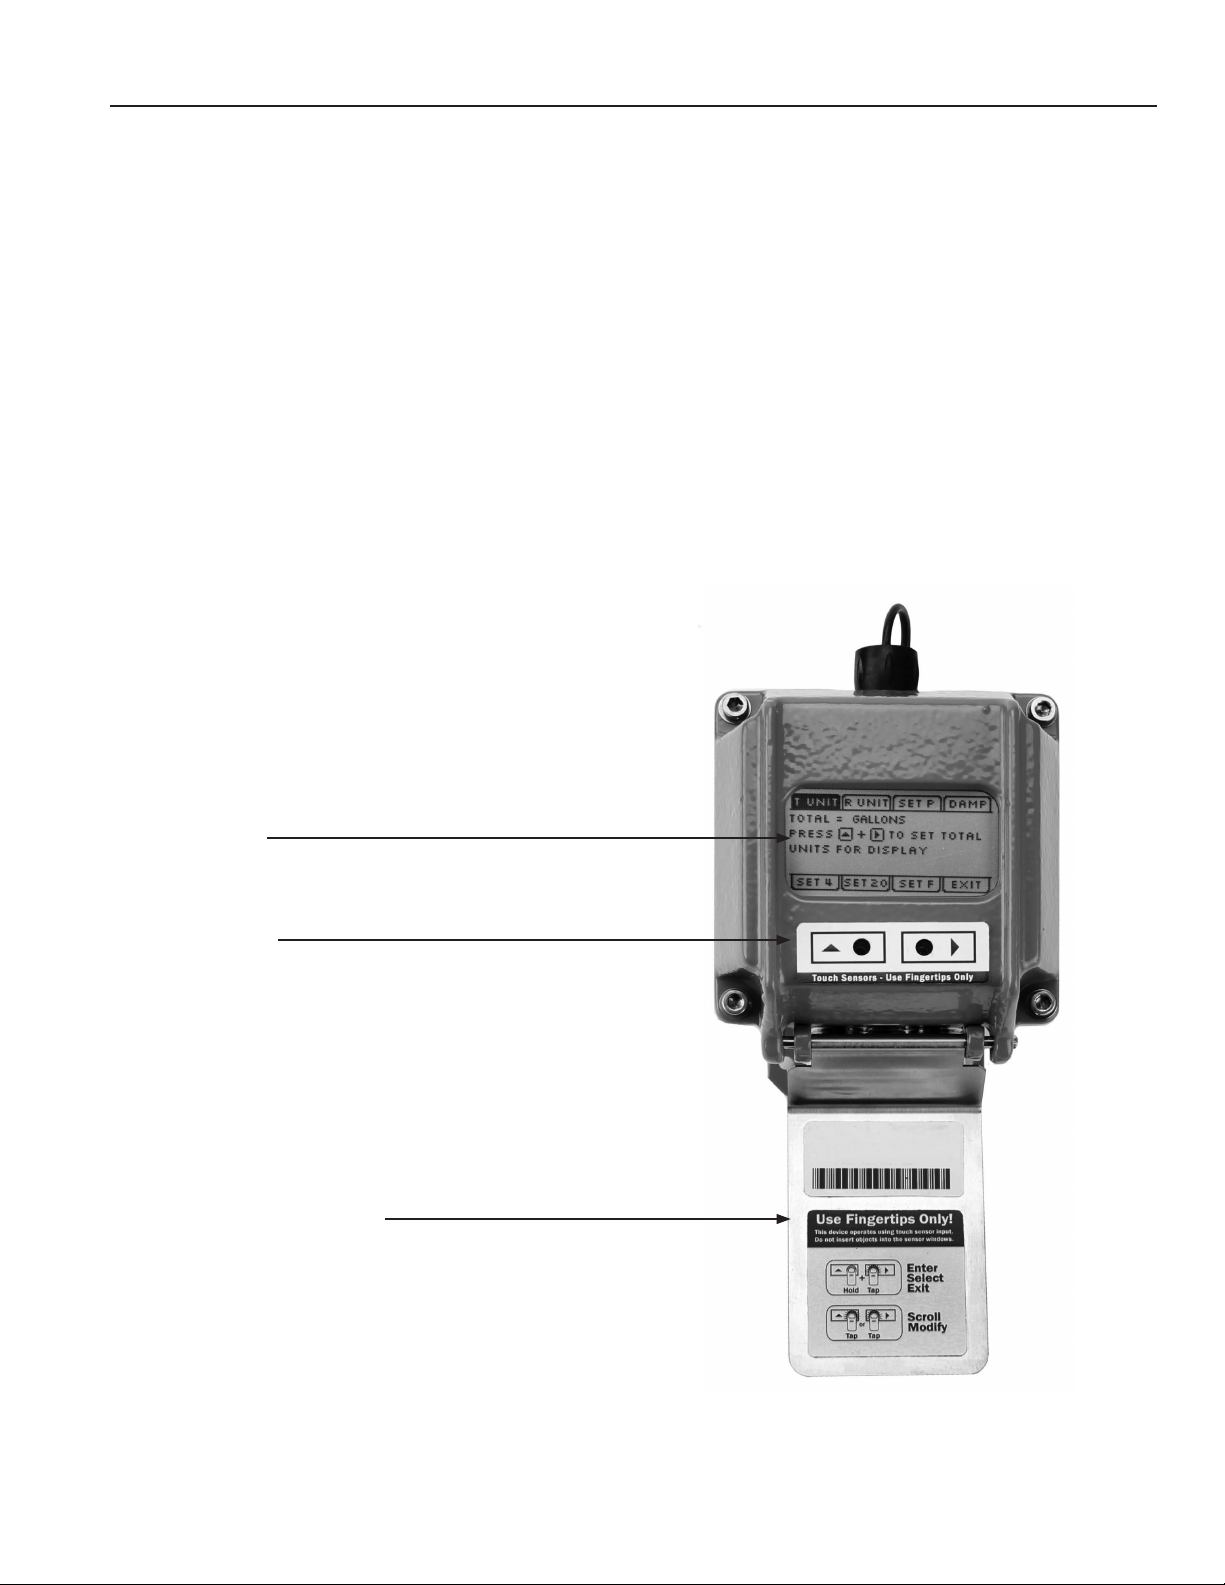
Rate and total indication are standard. Settings (units, pulse
output, etc.) are user settable via front panel touch key pad.
The standard 20-foot (6 meter) cable also provides outputs for
use with a variety of Omega and other displays and controls
for remote reading, data logging and telemetry applications.
4-20mA passive current loop and high frequency outputs are
optional. The FMG2100 remote display meter can be supplied
with an optional internal AC power supply or can be externally
powered with 9-36 Vdc at 30 mA.
Multifunction Display
Light Sensor Keypad
Protective Cover with Magnetic Seal
Page 1
Page 5
GENERAL INFORMATION
FEATURES Continued
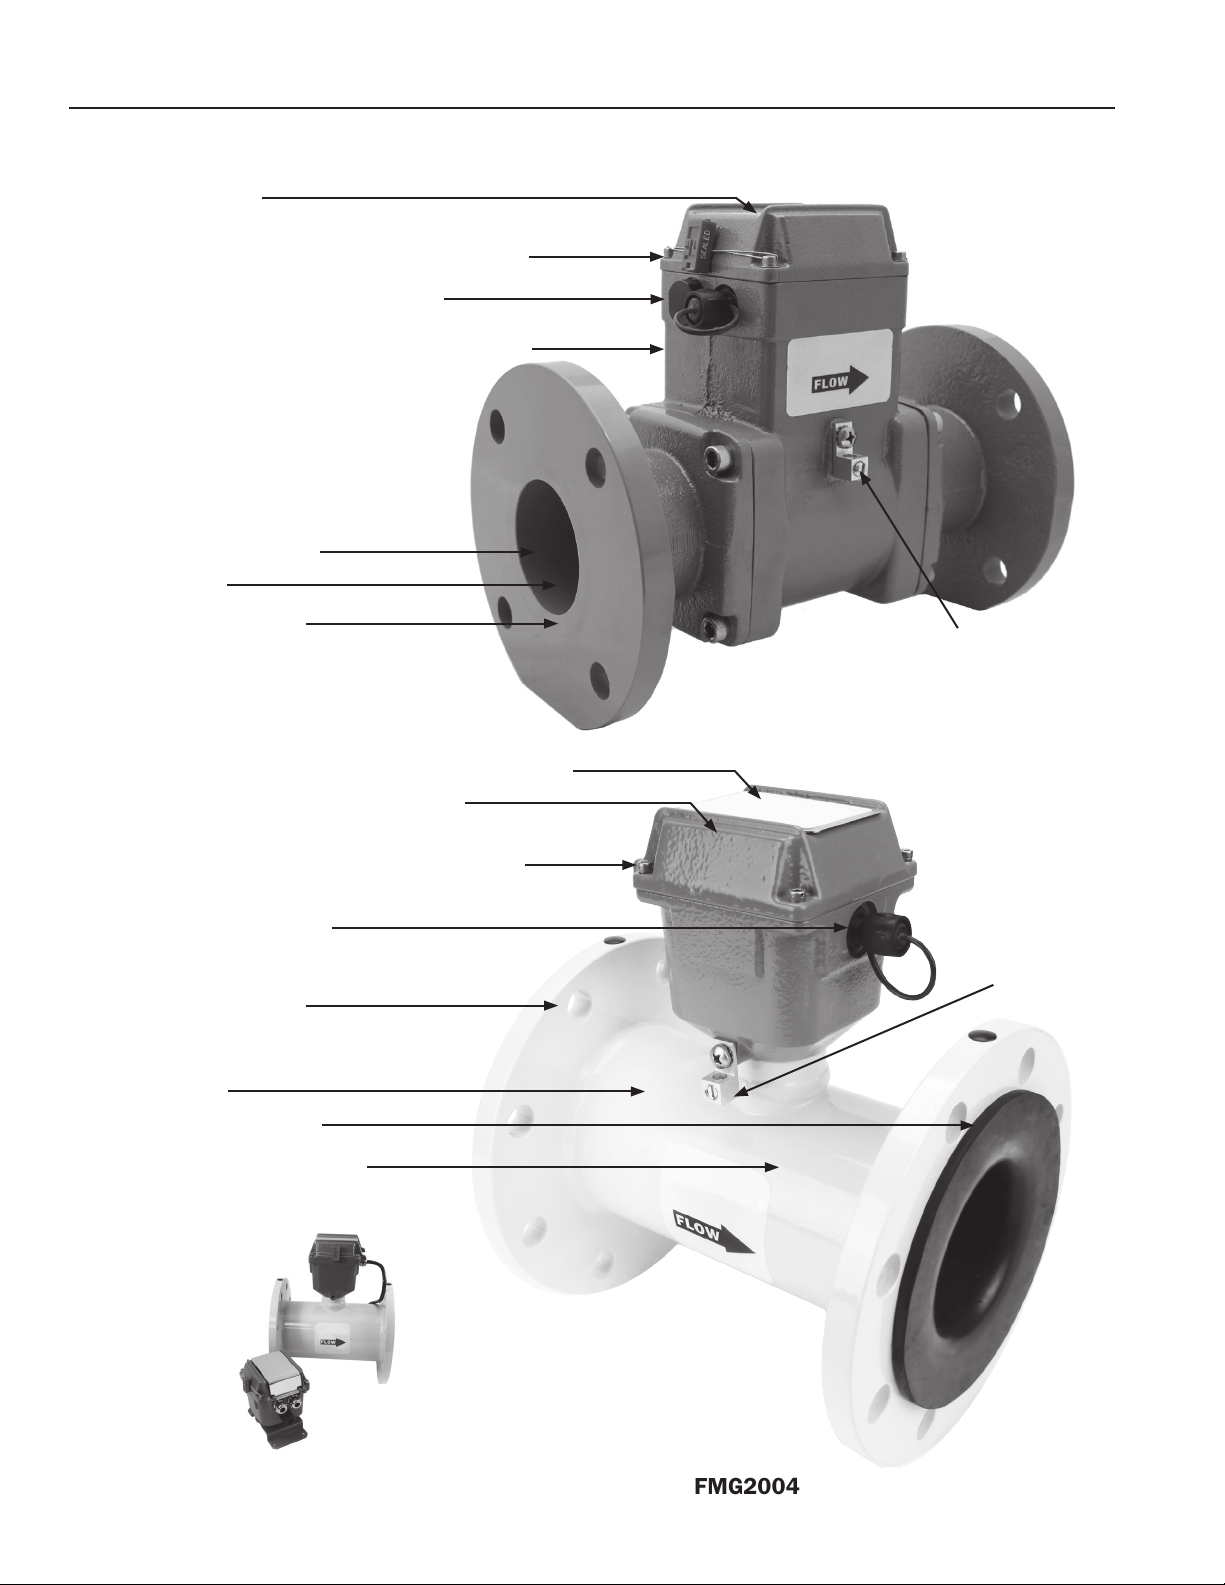
Rate and total indicator
Security seal & cross-drilled screws (2) for tamper-evidence
Power/Output cable port access, tamper-sealed
Powder-coated ductile cast iron body & electronics housing
Glass lled molded plastic liner
316SS electrodes
Flanges, 150 lb. ANSI pattern
Rate and total indicator with protective cover and keypad sensors
Powder-coated ductile cast iron electronics housing
Security seal & cross-drilled screws (2) for tamper-evidence
Power/Output cable port access
Flanges, 150 lb. ANSI pattern
316SS electrodes
Santoprene/Polypropylene Liner
Welded steel epoxy-coated ow tube
Equalization lug
FMG2003
Equalization lug
FMG2104
(Remote indicator)
FMG2004
Page 2
Page 6
SPECIFICATIONS
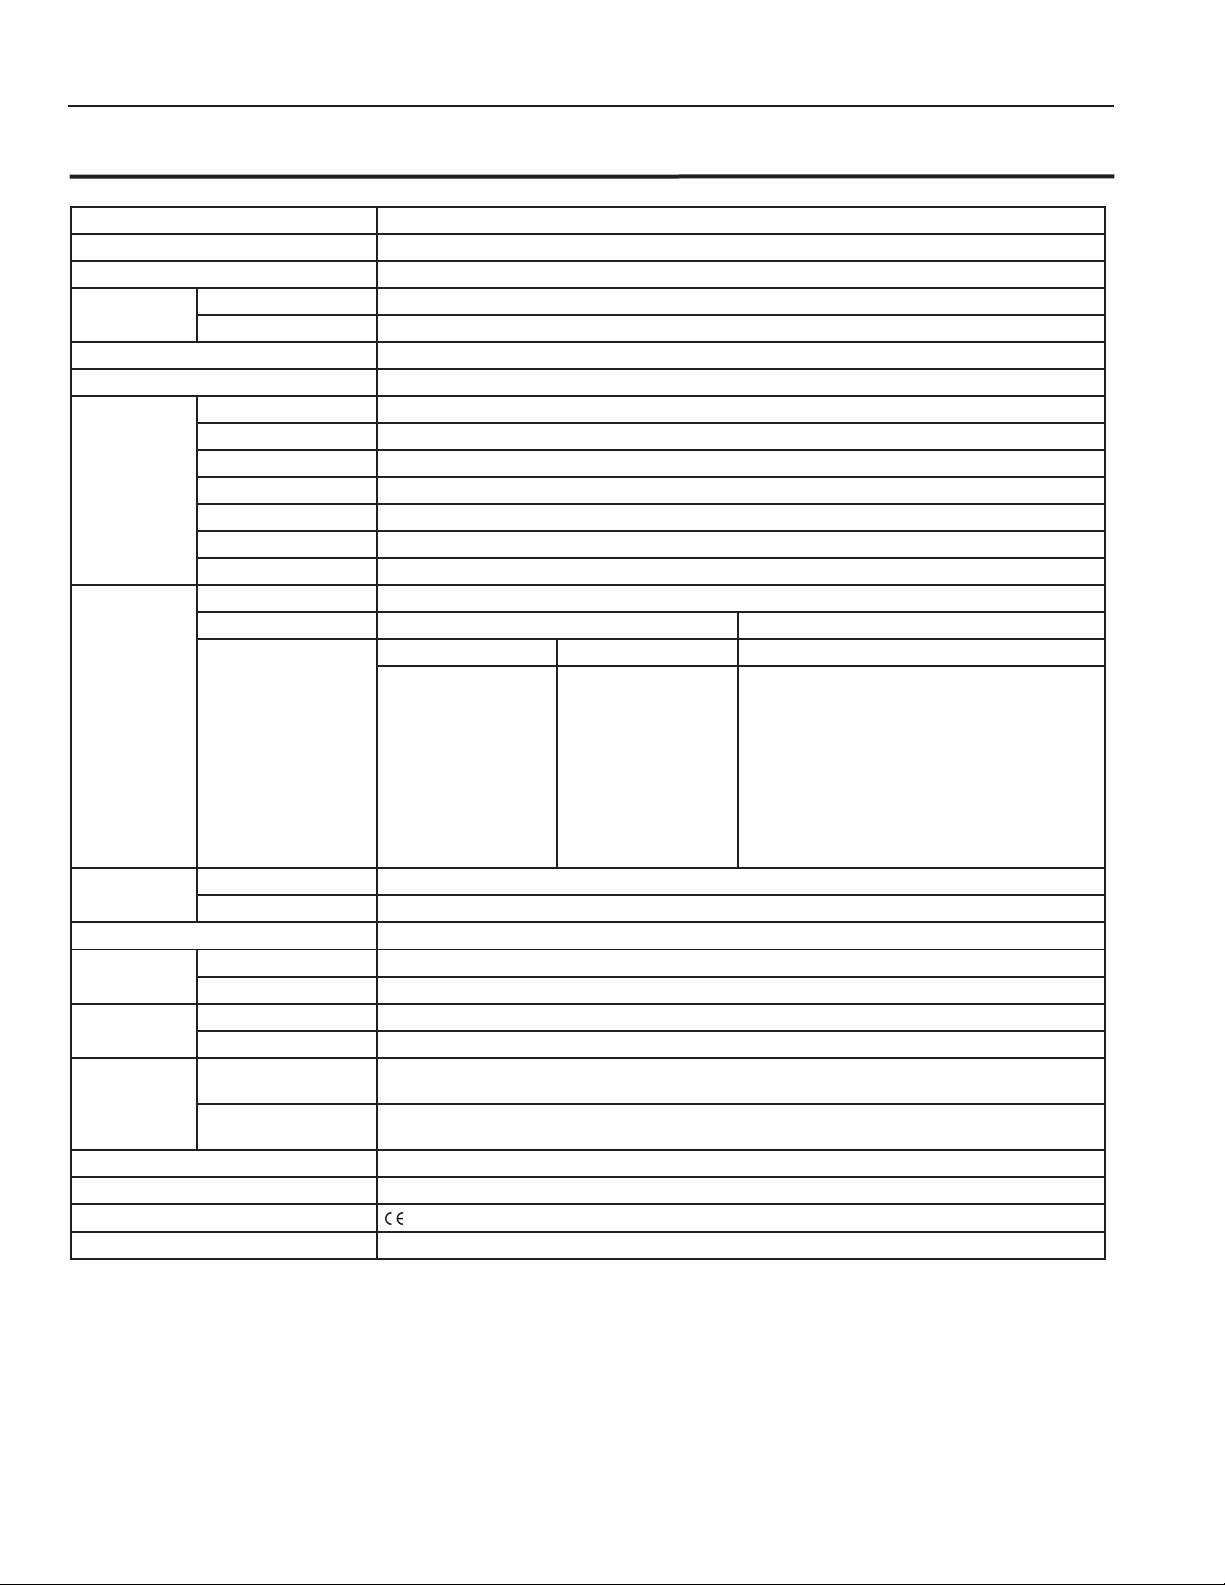
SPECIFICATIONS*
Pipe Sizes 3”,4”, 6”, 8”, 10”,12”
Flanges 150 lb. ANSI pattern
Pressure 150 psi (10.3 bar) working pressure
Temperature Operating 10˚ to 130˚ F (-12˚ to 54˚ C)
Storage -40˚ to 158˚ F (-40˚ to 70˚ C)
Accuracy +/- 1% of reading +/- 0.04% of full-scale ow from low ow cutoff to maximum ow rate of 10 m/sec
Low Flow Cutoff 0.5% of maximum ow rate
Materials Body (3” Only) Ductile cast iron, powder-coated w/epoxy powder
Body (4”-12”) Welded steel, epoxy-coated
Liner (3” Only) PPO/PS Blend
Liner (4”-12”) Santoprene/Polypropylene
Electronics Housing Ductile cast iron, powder-coated
Electrodes 316 stainless steel
O-ring (3” Only)
Display Type 128x64 dot-matrix LCD
Digits 5 Digit Rate 8 Digit Total
Units Rate Volume Units Rate Time Units Total Volume Units
EPDM
Gallons
Liters
Cubic Feet
Cubic Meters
Million Gallons
Mega Liters
Imperial Gallons
Million Imperial Gallons
Second
Minute
Hour
Day
Gallons
Gallons x 1000
Million Gallons
Liters
Liters x 1000
Mega Liters
Cubic Meters
Cubic Meters x 1000
Cubic Feet
Cubic Feet x 1000
Imperial Gallons
Imperial Gallons x 1000
Million Imperial Gallons
Power DC Power 9-36 Vdc @ 250 mA max, 30 mA average
AC Power
Telemetry Output
Pulse Frequency
Output
2
Signal Current sinking pulse, isolated, 36 Vdc at 10 mA max
Pulse Rates User-settable volume units/pulse. Pulse width is one-half of pulse period, 200 pulses/sec max
Options 4-20mA Current Loop Isolated, passive, 6-36Vdc, +/- 0.1% of pulse/frequency output HART compliant
1
85-264Vac, 50/60Hz, 0.12A
3.3V asynchronous receive and transmit (UART) signals, ASCII command-response protocol
2
Digital Output Isolated, open collector, 36Vdc @ 10mA max., frequency output up to 10kHz
Cable Control Cable Six-conductor water-blocked cable, polyurethane jacket, 20ft (6m) standard length for power, pulse
frequency or optional outputs
Remote Display Cable
(FMG2100)
30ft (9m) standard length (may be shortened). Additional cable can be ordered and attached with the use
of a junction box up to 100ft (30m) total
Conductivity >20 microSiemens/cm
Empty Pipe Detection Hardware/software, conductivity-based
Regulatory
(EN 61326) pending
Environmental IP68 to 10ft (3m) depth
*Specications subject to change. Please consult our website for the most current data.
1
FMG2000 only, FMG2001 requires external AC power supply
2
Available in 2014
Page 3
Page 7
10
0
1
2
3
4
5
33 0 5 10 15 20 25 30
SPECIFICATIONS
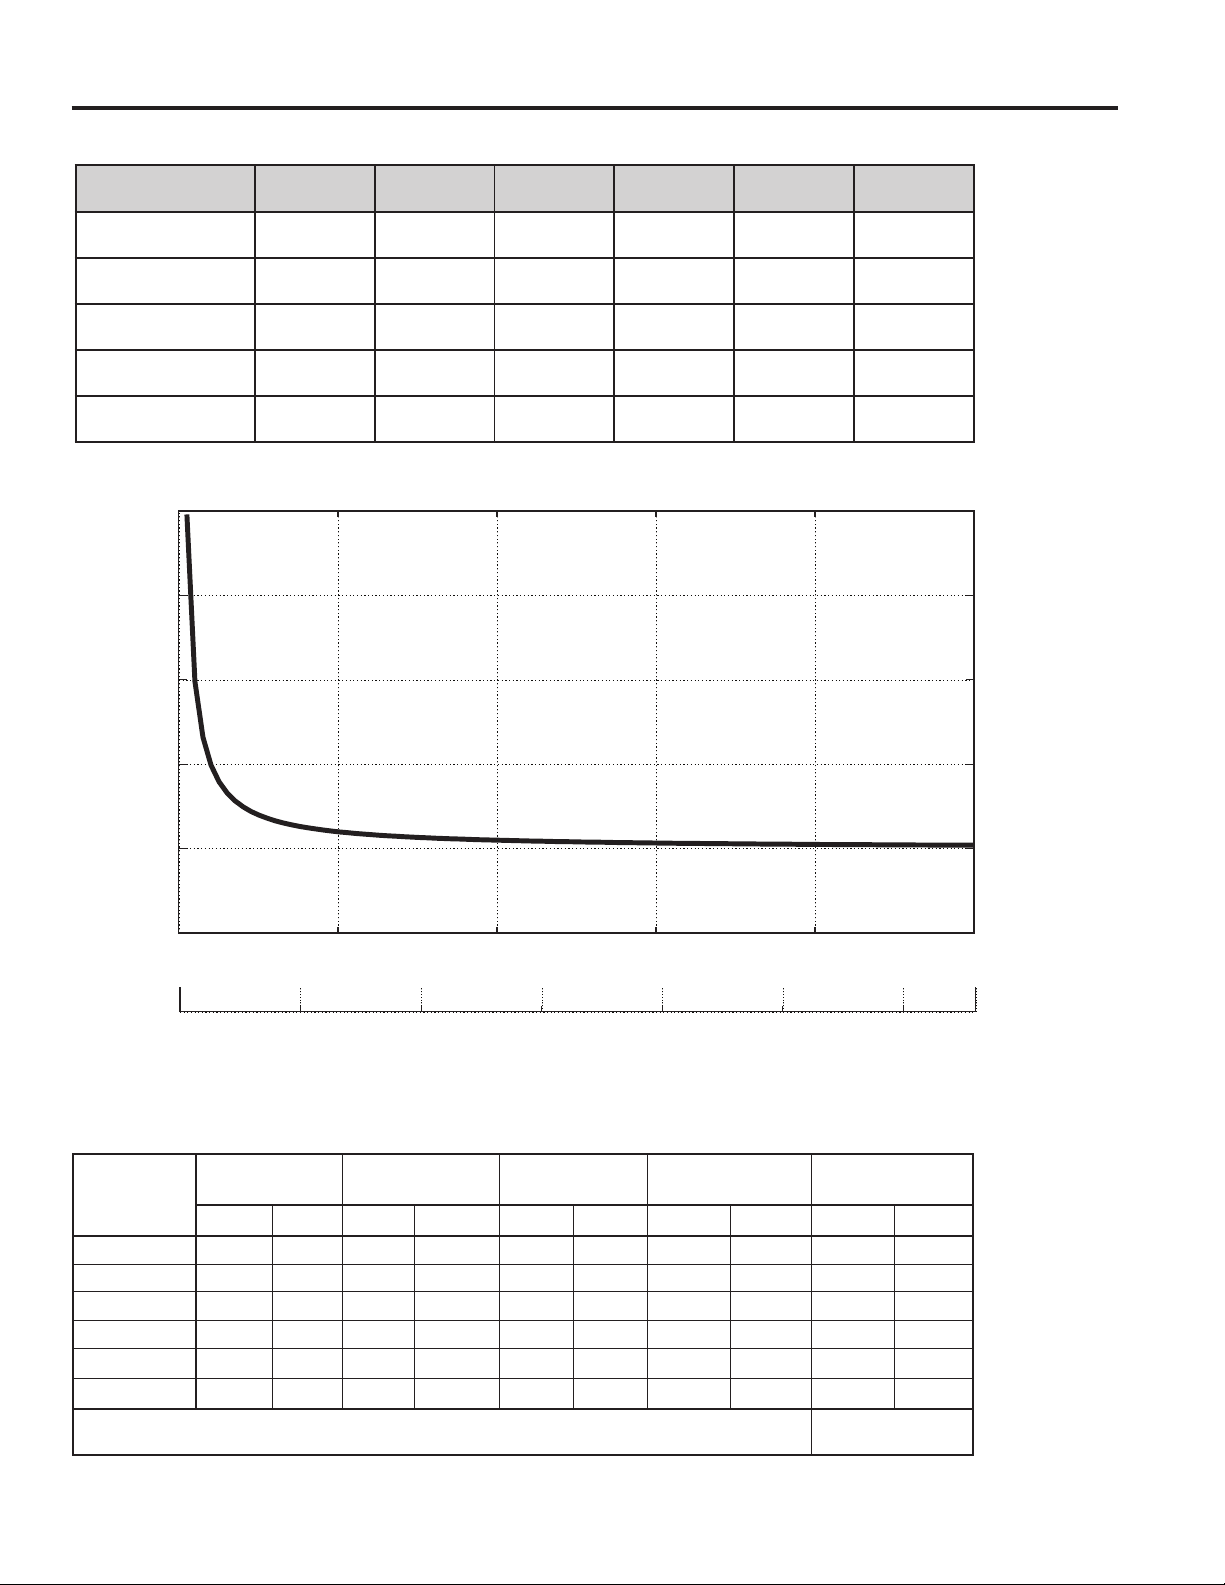
FLOW RANGE (3” - 12”)
Pipe Size
(Inches in diameter)
Max Flow Velocity
(Meters/Second)
Max Flow Rate
(Gallons/Minute)
Max Flow Rate
(Liters/Second)
Turn Down Flow Rate
(Gallons/Minute)
Turn Down Flow Rate
(Liters/Second)
5
5
4
4
3
3
3” 4” 6” 8” 10” 12”
10 10 10 10 10 10
723 1285 2891 5140 8031 11565
46 81 182 324 507 730
3.62 6.43 14.46 25.70 40.15 57.82
0.23 0.41 0.91 1.62 2.54 3.65
Accuracy
2
2
Accuracy (%)
1
1
0
0
0 2 4 6 8
0
5
10 15
420 6 8 10
20
25 30
33
(m/s)
(ft/s)
Flow Velocity
Dimensions
Meter
Size
3”
4”
6”
8”
10”
12”
L
inch mm
12.0 305
10.24 260
12.27 312
14.24 362
18.18 462
19.68 500
H
inch mm
6.80 173
8.12 206
9.22 234
10.22 260
11.22 285
12.28 312
T
inch mm
.68 17.3
.62 20.9
.69 23.3
.69 23.3
.69 23.3
.81 20.6
ID
inch mm
2.60 66.04
3.12 79.25
5.05 128.27
6.44 163.58
8.61 218.69
10.55 267.97
Shipping Weight
pounds Kg
41 19
35 16
50 23
72 33
128 58
170 78
Flanges Standard ANSI 150 lb. drilling Cable 1 lb.
Page 4
Page 8
SPECIFICATIONS
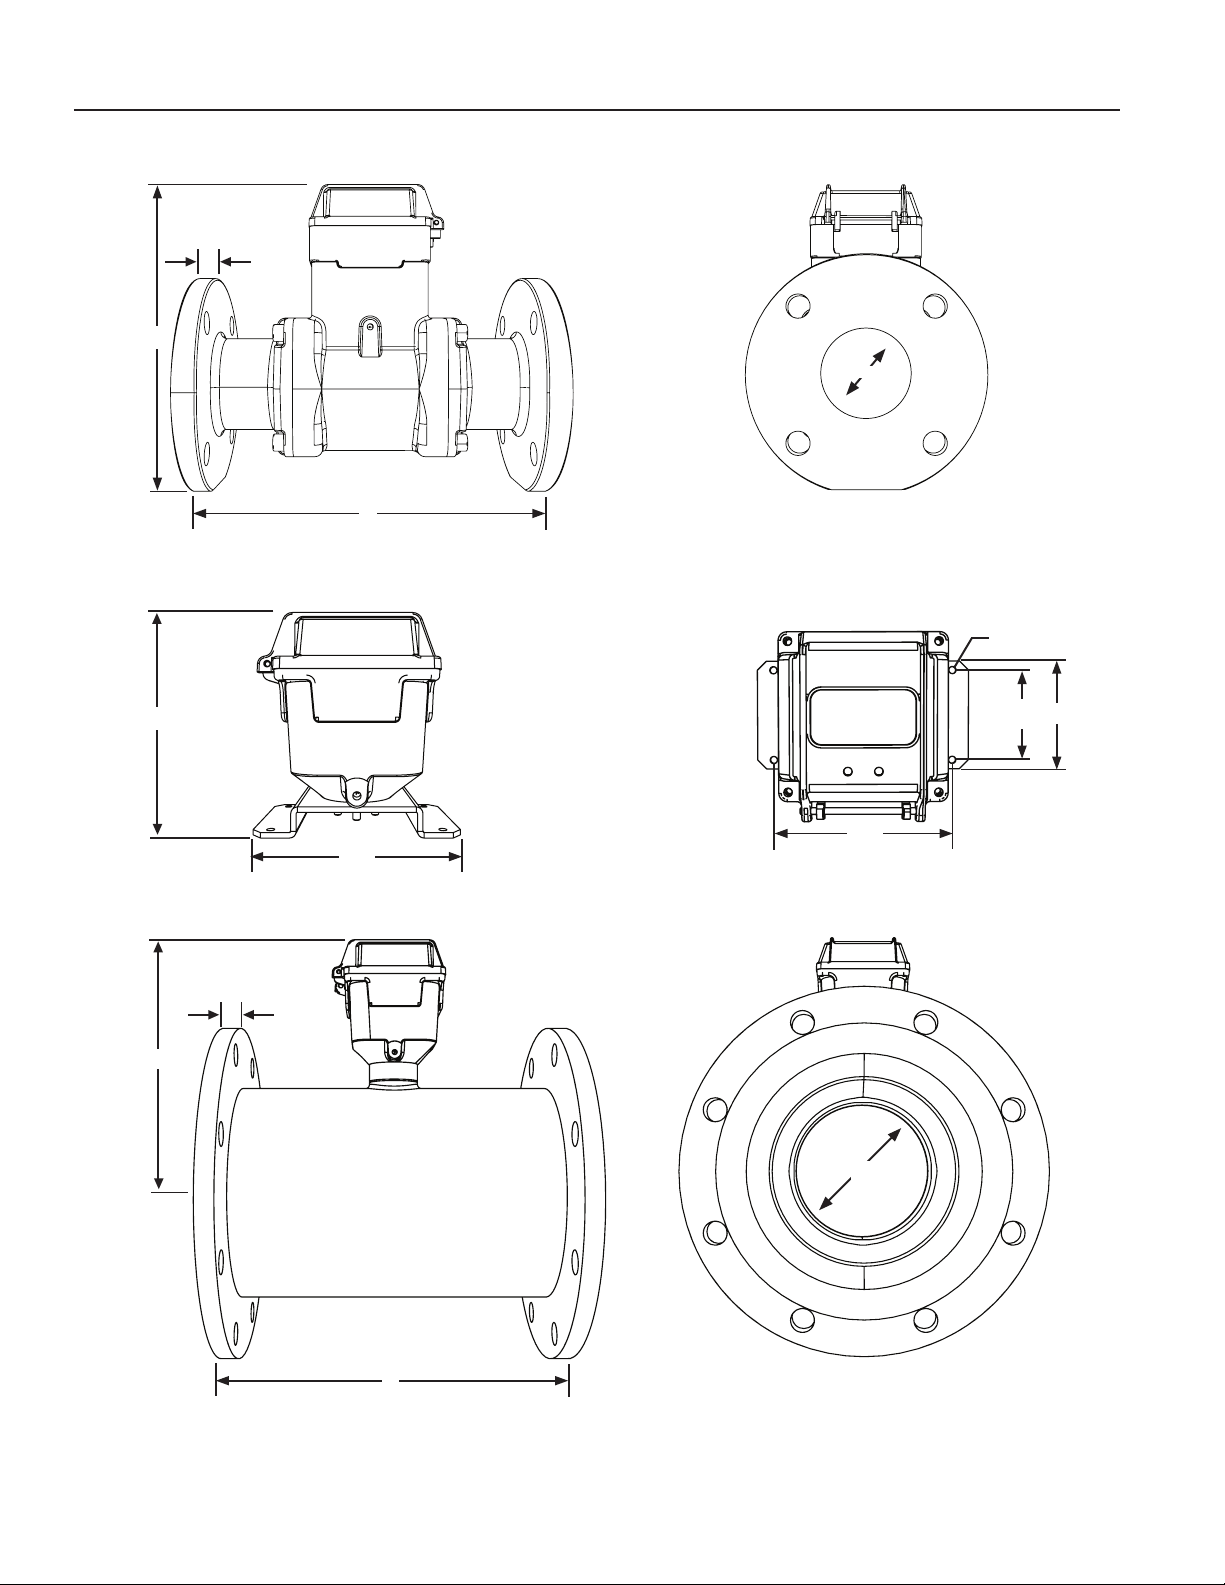
DIMENSIONS
H
T
(Metal Flange)
L
(Including Rubber Gaskets)
FMG2003 Shown
ID
FMG2100 Remote Shown
.20” Dia.
5.62”
H
T
(Metal Flange)
5.27”
FMG2004-2012 Shown
4.38”
ID
2.5”
3”
Page 5
L
(Including Rubber Gaskets)
Page 9
INSTALLATION and GROUNDING
INSTALLATION
Caution: These ow sensors are not recommended
where installation fault may expose the ow sensor to
boiler pressure and temperature. Maximum
recommended operating temperature is 130˚ F.
Positioning the Meter. These meters can be installed
horizontally, vertically, and in any radial position. Using a
check valve on the upstream side of the meter, and/or an air
vent (vacuum relief valve) in the same, unobstructed run of
pipe as the meter, is required in any installation where the
meter may be exposed to suction when the system is not in
normal operation. Suction can cause damage to the liner.
Liner damage caused by suction, without the use of a check
valve and/or air vent, may void the warranty.
Straight Pipe Recommendations. As with most ow meters,
the FMG2000/2100 requires straight pipe before and
after the meter for best accuracy. However, the ability of
electromagnetic meters to average the ow across the entire
pipe allows for shorter straight pipe recommendations than
most mechanical meters (see page 7).
EQUALIZATION AND GROUNDING
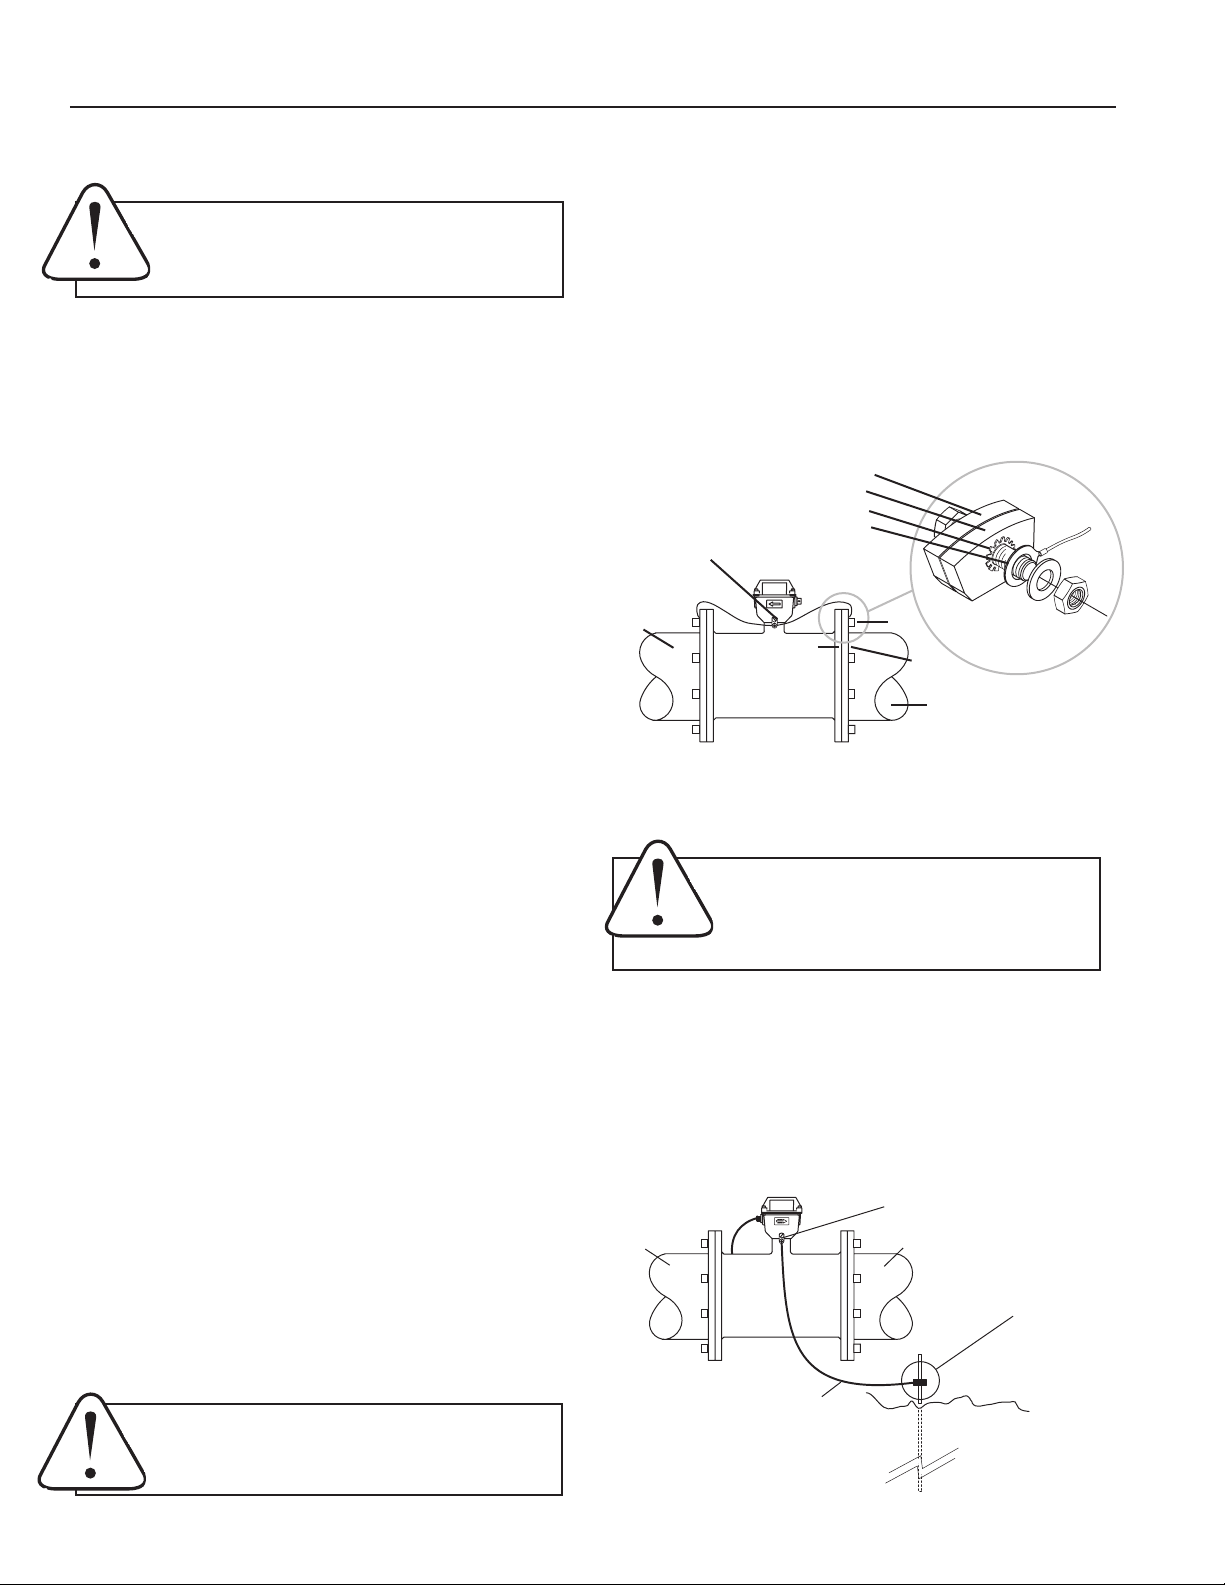
Metal Pipe Installations. To equalize the electrical potential
of the uid, the iMAG meter, and the surrounding pipe, secure
the ange plates (factory-installed on the equalization wire)
to both pipe anges at one of the bolt holes, as shown below.
Be sure the lockwasher ts between the pipe ange and the
ange plate. For the best electrical bonding, remove rust
and paint to expose clean, bare metal where the equlization
ange plate lockwasher contacts the pipe ange. Connection
must be inspected periodically for corrosion to maintain the
necessary low resistance connection.
Meter Flange
Pipe Flange
Lockwasher
Flange Plate
Equalization Lug
Metal
Pipe
Meter
Flange
Bolt
Pipe
Flange
Metal
Pipe
Full Pipe Recommendations. All magmeters require a
method for determining that the pipe is empty, to prevent false
reading. This meter is designed to indicate ‘EMPTY PIPE’ if one
or more electrodes is exposed. For highest accuracy, install
the meter so that the pipe will be full when there is ow. If air
bubbles may be present in the pipe or sludge accumulation
is an issue, rotate the meter by one ange hole to position
the control housing at a 45˚ angle (see diagrams on page 8).
Fittings. The FMG2000/2100 anges have standard ANSI
150 lb. drilling pattern and mate with any other ANSI 150
lb. ange.
Calibration. The FMG2000/2100 is factory-calibrated and
will not require any form of eld calibration.
Chemical Injection. When any magmeter, by any manufacturer, is used in a chemical injection application, the chemical
injection point must be placed downstream of the magmeter OR far enough upstream for complete mixing to occur
before the uid reaches the meter. When unmixed chemical
alternates with water passing through the meter, the rapid
changes in conductivity may cause sudden spikes and drops
in the meter’s reading, resulting in inaccurate measurement.
The magmeter will restabilize, however, with a steady ow of
uid of uniform conductivity.
Caution: In chemical injection applications, install
chemical injection point downstream of magmeter,
or far enough upstream to allow complete mixing
of uids.
Equalization Diagram
Run wire from equalization lug to both pipe anges;
secure ange plates under bolt heads as shown.
WARNING: ELECTRICAL SHOCK HAZARD When
the meter is externally AC powered the piping
system must be grounded to meet national and
local electrical safety codes. Failure to do so can
result in electrical shock and/or burn.
Plastic Pipe Installations. When the FMG2000/2100 is installed in a plastic piping system, it is not necessary to use
the equalization straps, but very important to ground the meter to avoid electrical shock hazard and electrostatic interference with meter function. If the rate display is unstable,
grounding rings may be necessary.
Meter Equalization Lug
Plastic Pipe Plastic Pipe
Exothermically weld when
corrosion is a concern
#6 AWG Stranded
Copper Ground Wire
Ground Clamp
Earth
8’ Ground Rod
Page 6
Page 10
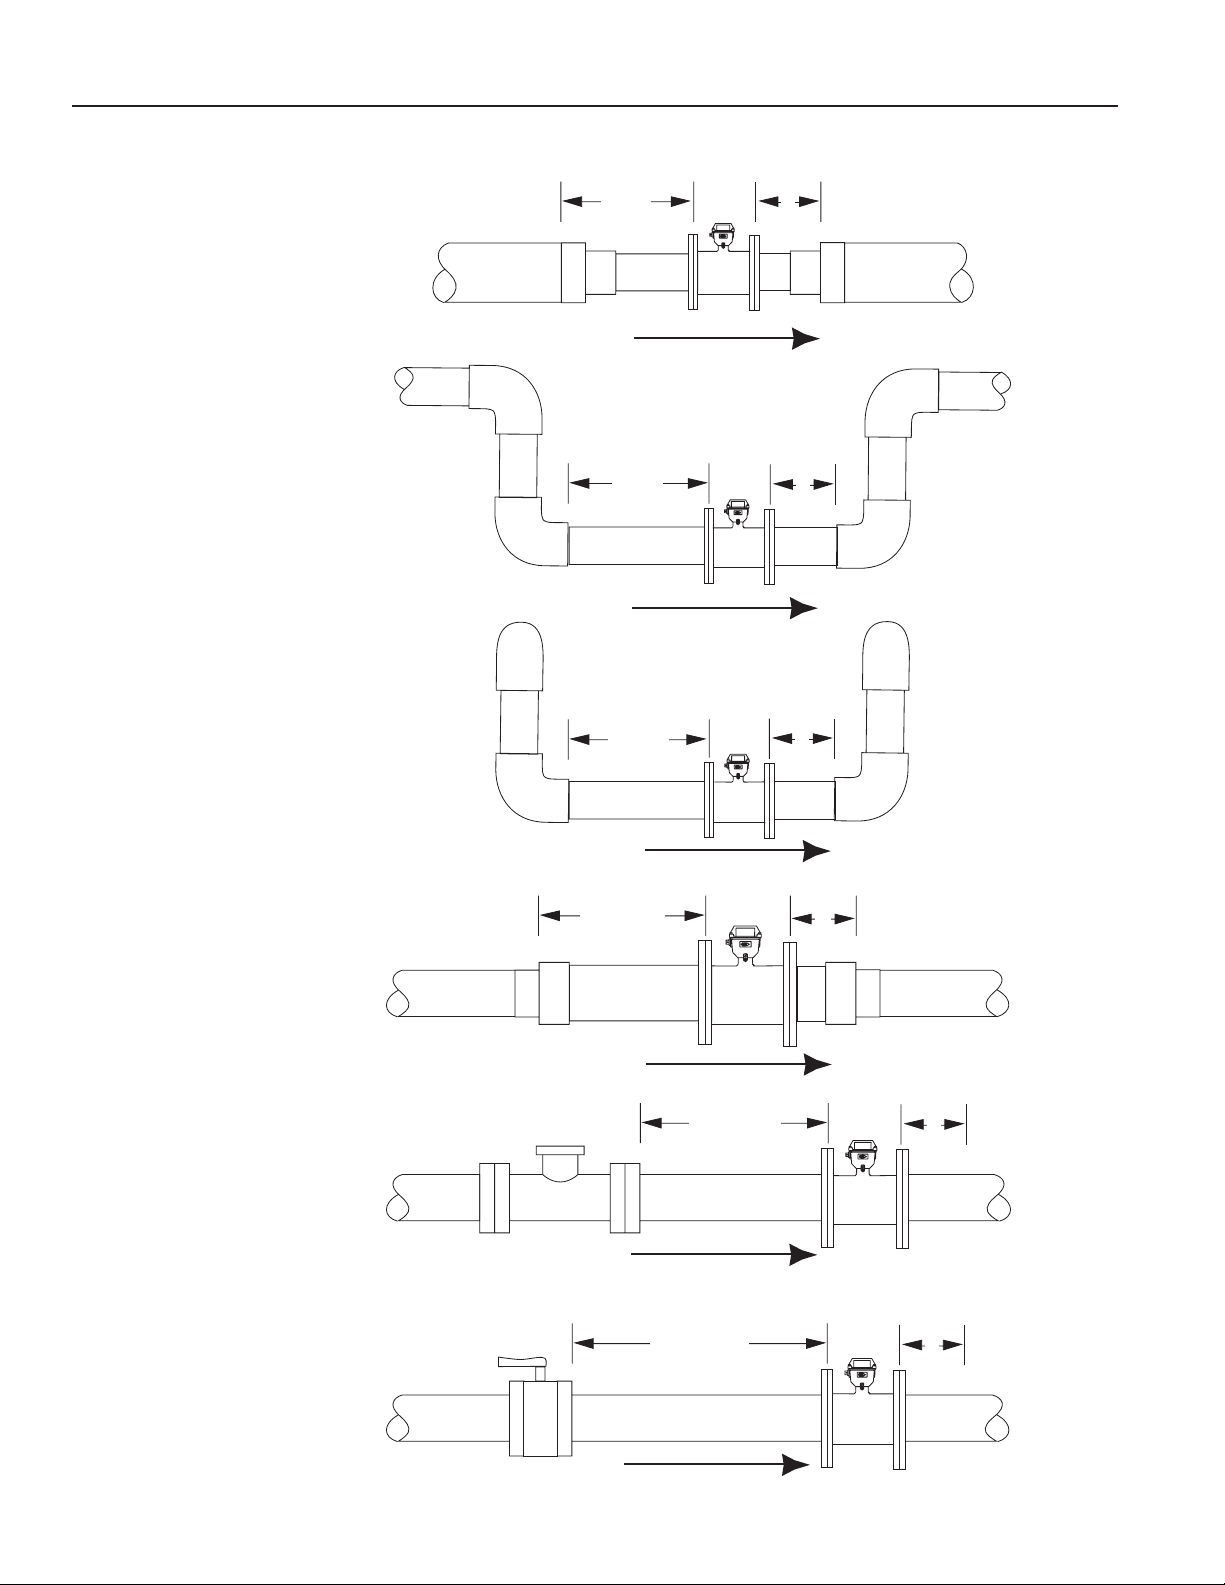
STRAIGHT PIPE RECOMMENDATIONS
(X = diameter)
Reduced Pipe
Two Elbows In Plane
Two Elbows, Out Of Plane
1X
2X
Meter
1X
2X
Meter
1X
2X
Expanded Pipe
Swirling Flow
Propeller Meter
5X
5X
Meter
Meter
5X
1X
1X
Meter
1X
Page 7
Swirling Flow
Partially Open
Buttery Valve
Meter
Page 11
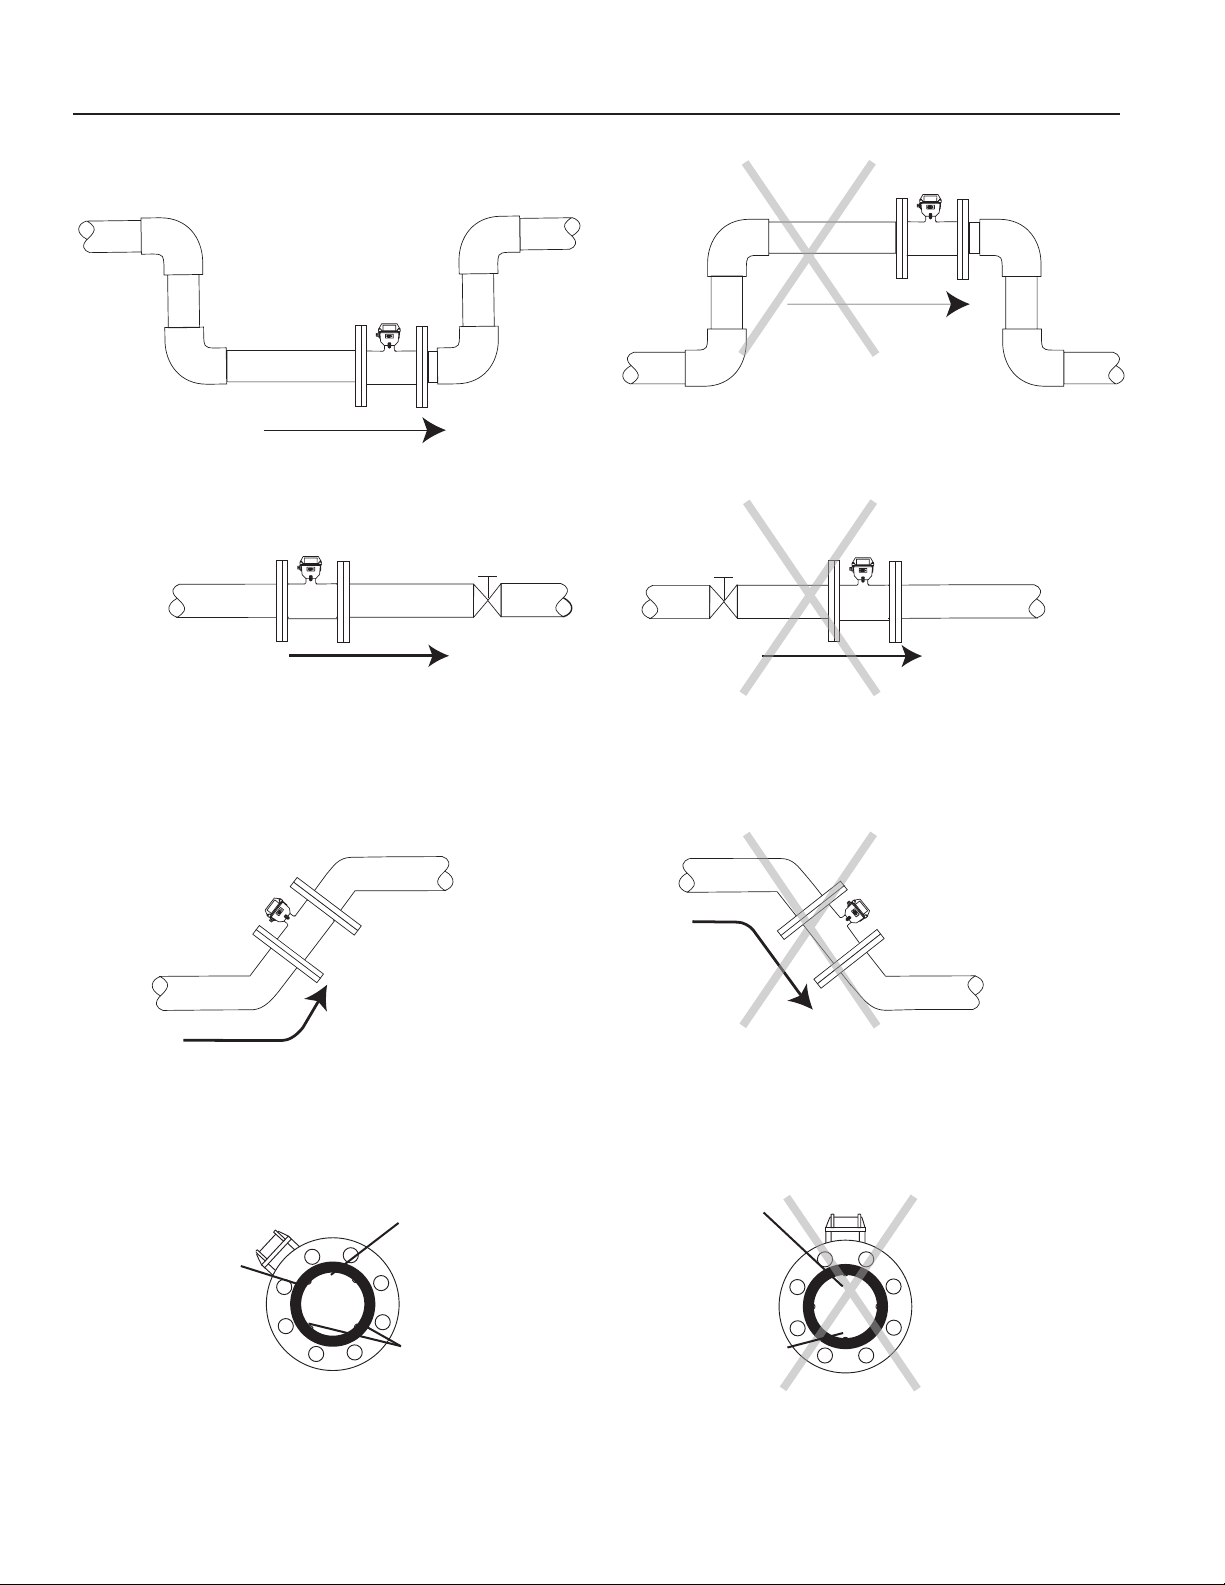
FULL PIPE RECOMMENDATIONS
Recommended:
Keep pipe full at meter for accuracy
Meter
Meter
Not Ideal:
Allows air pockets to form at meter
Meter
Recommended:
Keeps pipe full at meter for accuracy
Meter
Recommended:
Allows air to bleed off
Intermittent air
Electrode
moved from
top by rotating
meter
Meter
miss electrode
Electrodes free
from sediment
bubbles
build-up
Meter
Not Ideal:
Post-valve cavitation can create air pocket
Meter
Not Ideal:
Air can be trapped
Intermittent air
bubbles
pass over
electrode
Possible
sediment
build-up
Meter
Recommended:
Improved accuracy results from
unimpeded electrodes
Not Ideal:
Air bubbles and sediment on the
electrodes can affect accuracy
Page 8
Page 12
INPUTS/OUTPUTS and OPERATION
g
.20” Splice4” Wire Length
Contr
AC
Sealing Nut
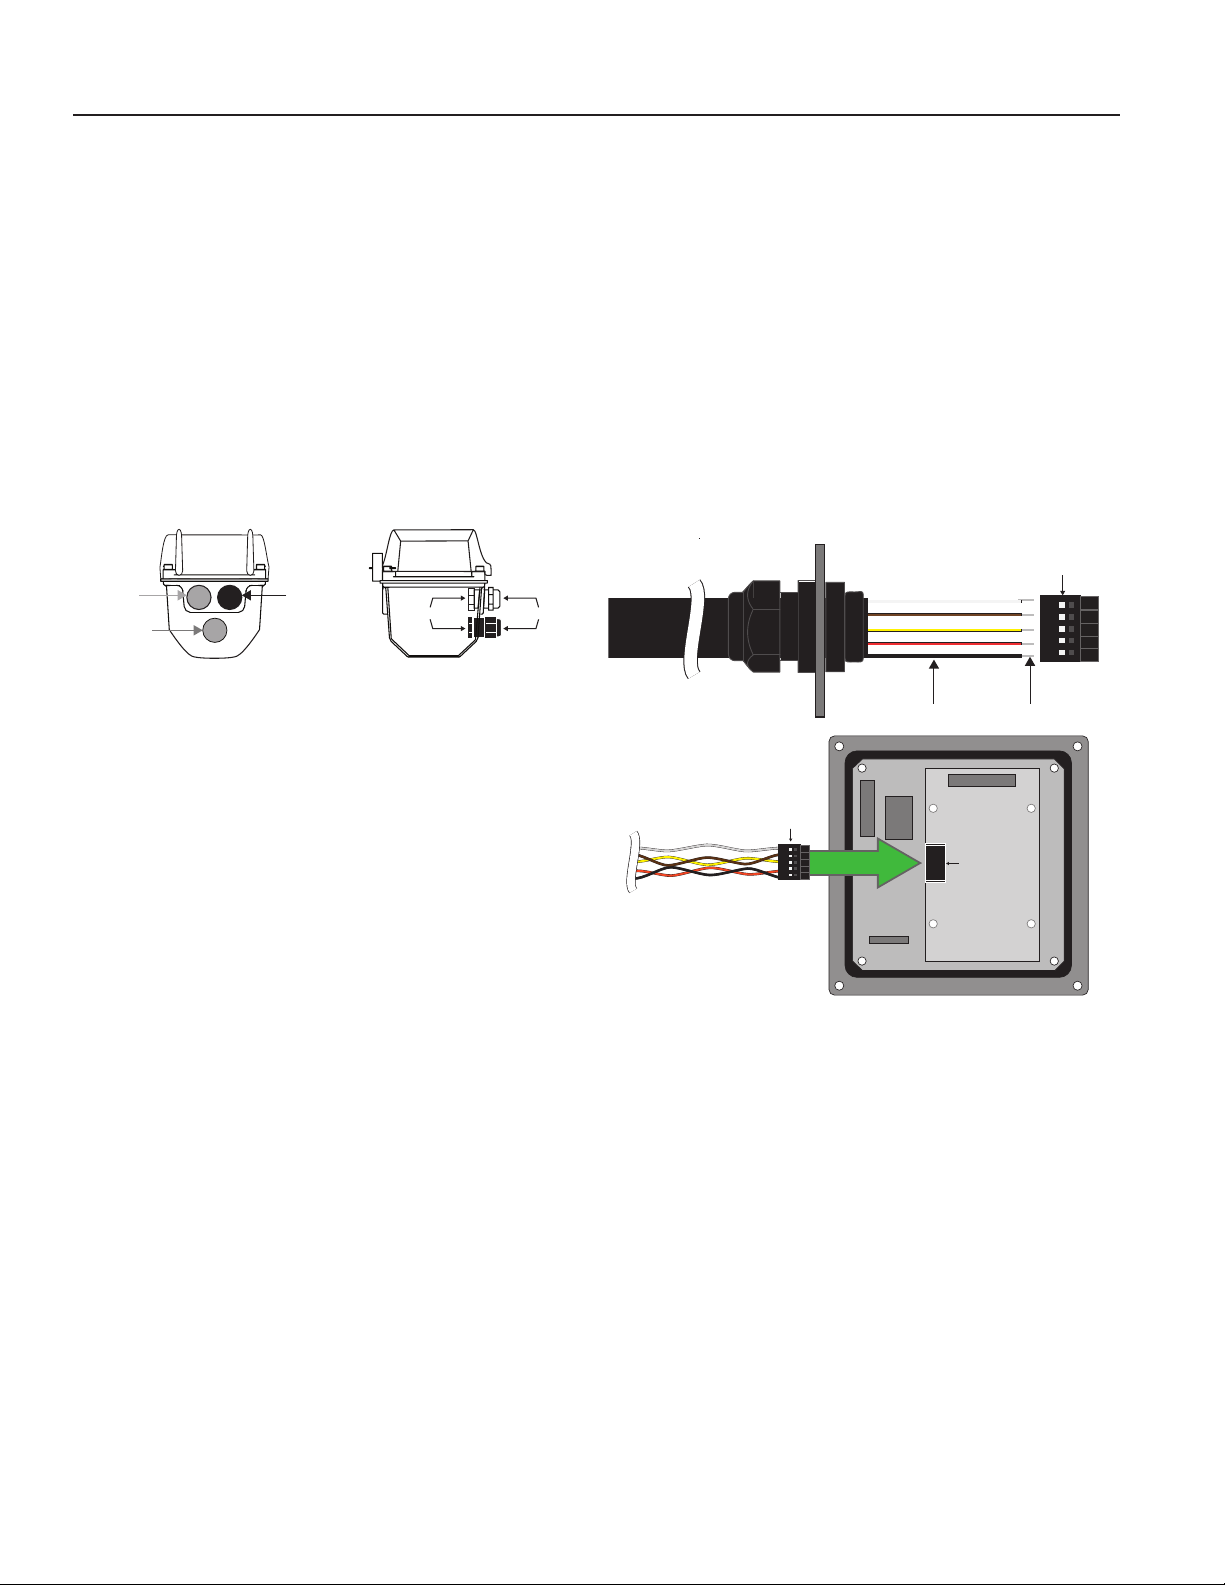
REMOTE SENSOR CABLE INSTALLATION (FMG2100 ONLY)
The standard 30 foot cable connecting the FMG2100
sensor body to the remote display head is shipped with the
cable disconnected at the display end. To connect during
installation:
1. Remove the four cap screws securing the top housing
to the lower housing and swing the top open to expose the
internal wiring (see photo.)
2. Remove the sensor cable hole plug and discard.
3. After removing the cable gland bulkhead nut, insert the
5-postion plug and cable gland threaded bushing into the
open hole. (see drawing.) Do not loosen the cable jacket
sealing nut.
ol Cable
Power Cable
Sensor Cable
Bulkhead Nut
4. Install the bulkhead nut back onto the cable gland threads
inside the housing and tighten securely. A loose nut could
cause moisture ingress and compromise the meter head’s
IP68 rating, voiding the warranty.
5. Insert the ve-position plug into the mating receptacle on
the small circuit board attached to the larger main display
circuit board.
6. Close the top cover and replace the four cap screws,
securing tightly to reseal the housing against moisture
ingress.
and tighten securely. A loose nut could cause moisture ingress
and compromise the meter head’s IP68 rating, voiding the
warranty.
6. Slide the cable outward through the loosened cable gland
until the jacket just protrudes past the cable gland bulkhead
threads.
7. Retighten the gland sealing nut until cable cannot be
pushed in by hand and then tighten an additional full turn.
Pull on cable to assure sufcient tightness.
8. Insert the ve-position plug into the mating receptacle on
the small circuit board attached to the larger main display
circuit board.
9. Close the top cover and replace the four cap screws,
securing tightly to reseal the housing against moisture ingress.
Lower Housing Bulkhead
5-Position Plu
Cable from
Sensor
5-Position Plug
1
2
3
4
5
Position 1 - Drain
Position 2 - Brown
Position 3 - Yellow
Position 4 - Orange
Position 5 - Black
Top Housing
Mating Receptacle
1
2
3
4
5
Shortening the Sensor Cable. The sensor cable may be
shortened by cutting the cable at the display head end. Under
no circumstances should the cable gland at the sensor body
end be removed as this will compromise the IP68 moisture
ingress protection causing meter failure and voiding the
warranty. To shorten the cable follow the steps below:
1. Before cutting, loosen the cable gland sealing nut and slide
the gland back past where the cable will be cut.
2. After cutting, remove the jacket and outer braid shield
and cut and strip conductors to the dimensions shown in the
drawing (right). Tinning the bare wire ends is recommended
when possible for easier reinsertion into the 5-position plug.
3. Insert a small jeweler’s screwdriver or pick into the slot
next to the black wire on the 5-position plug and pull the wire
out. Then insert the black wire from the shortened cable into
the same position as the wire just removed. Repeat this step,
one wire at a time, for all ve positions.
4. Remove the sensor cable hole plug and discard.
5. After removing the cable gland bulkhead nut, insert the
plug and cable gland bushing through the open hole. Install
the nut back onto the cable gland threads inside the housing
Page 9
Lengthening the Sensor Cable. Replacing the entire cable
with a longer cable is not recommended. To extend the
distance from the sensor body to the remote display head:
1. Install a junction box with two holes for 5/8” connector
bushings at the cable splicing location.
2. Install the sensor cable gland threaded bushing into one
junction box hole and secure with the bulkhead nut.
3. Obtain the required additional length of 2-pair Seametrics
sensor cable and two additional cable glands, installing the
additional cable and glands from the junction box to the
display head. Secure all cable gland sealing and bulkhead
nuts to tightness required to prevent moisture ingress as
described in previous instructions. Use pull test to assure
sufcient tightness.
4. Splice wires in junction box using moisture-sealed wire
connectors or pot to seal against moisture ingress. Replace
junction box sealing cover.
5. Connect 5-position plug to the small circuit board receptacle
in the display head as described in previous instructions.
Page 13
INPUTS/OUTPUTS and OPERATION
Sealing Nut
Contr
AC
Sealing Nut
Control Cable
AC
2in (50mm)
(10mm)
(Nor
GROUND
NEUTRAL
th America)
LINE
WIRING TO POWER SOURCES AND EXTERNAL MONITORING
AND CONTROL EQUIPMENT
The six-conductor Control Cable exiting the display head
provides user connections for DC power as well as for external
monitoring and control equipment needed for pump control,
SCADA equiment, Programmable Logic Controllers, remote
displays and other monitoring equipment. A four-character
Option Identier (OID) code found in the “Control Cable Wiring”
table on page 11 shows available combinations of external
wiring connections. In addition, it gives the corresponding
electrical function for each of the wires in the cable. The OID
code is also included in the model number on the meter as well
as on the label attached to the control cable as shipped from
the factory. The rst character in the OID code identies the
power source as either external DC (D) or internal AC (A). The
next two characters identify the functions of the other wiring
options such as Pulse Output (P), Telemetry (T), Analog Output
(L), Digital Output (D), Relay Output (R) or Serial Output (SS.)
(The fourth character (X) is reserved for future applications.)
Application, wiring and other electrical interface guidelines for
each of these is outlined in the following paragraphs.
Sensor Cable
Power Cable
Bulkhead Nut
DC Power Connection. When the rst OID code character is
a “D”, connect the RED and BLACK wires to the positive and
negative terminals respectively of a clean (low-noise) source
of dc power in the range of 9-32Vdc and able to supply at least
250mA. AC line-operated power supplies with outputs greater
than 18Vdc must be regulated. Where possible, connections
from either power supply terminal to the cable shield or any
other ground should be avoided.
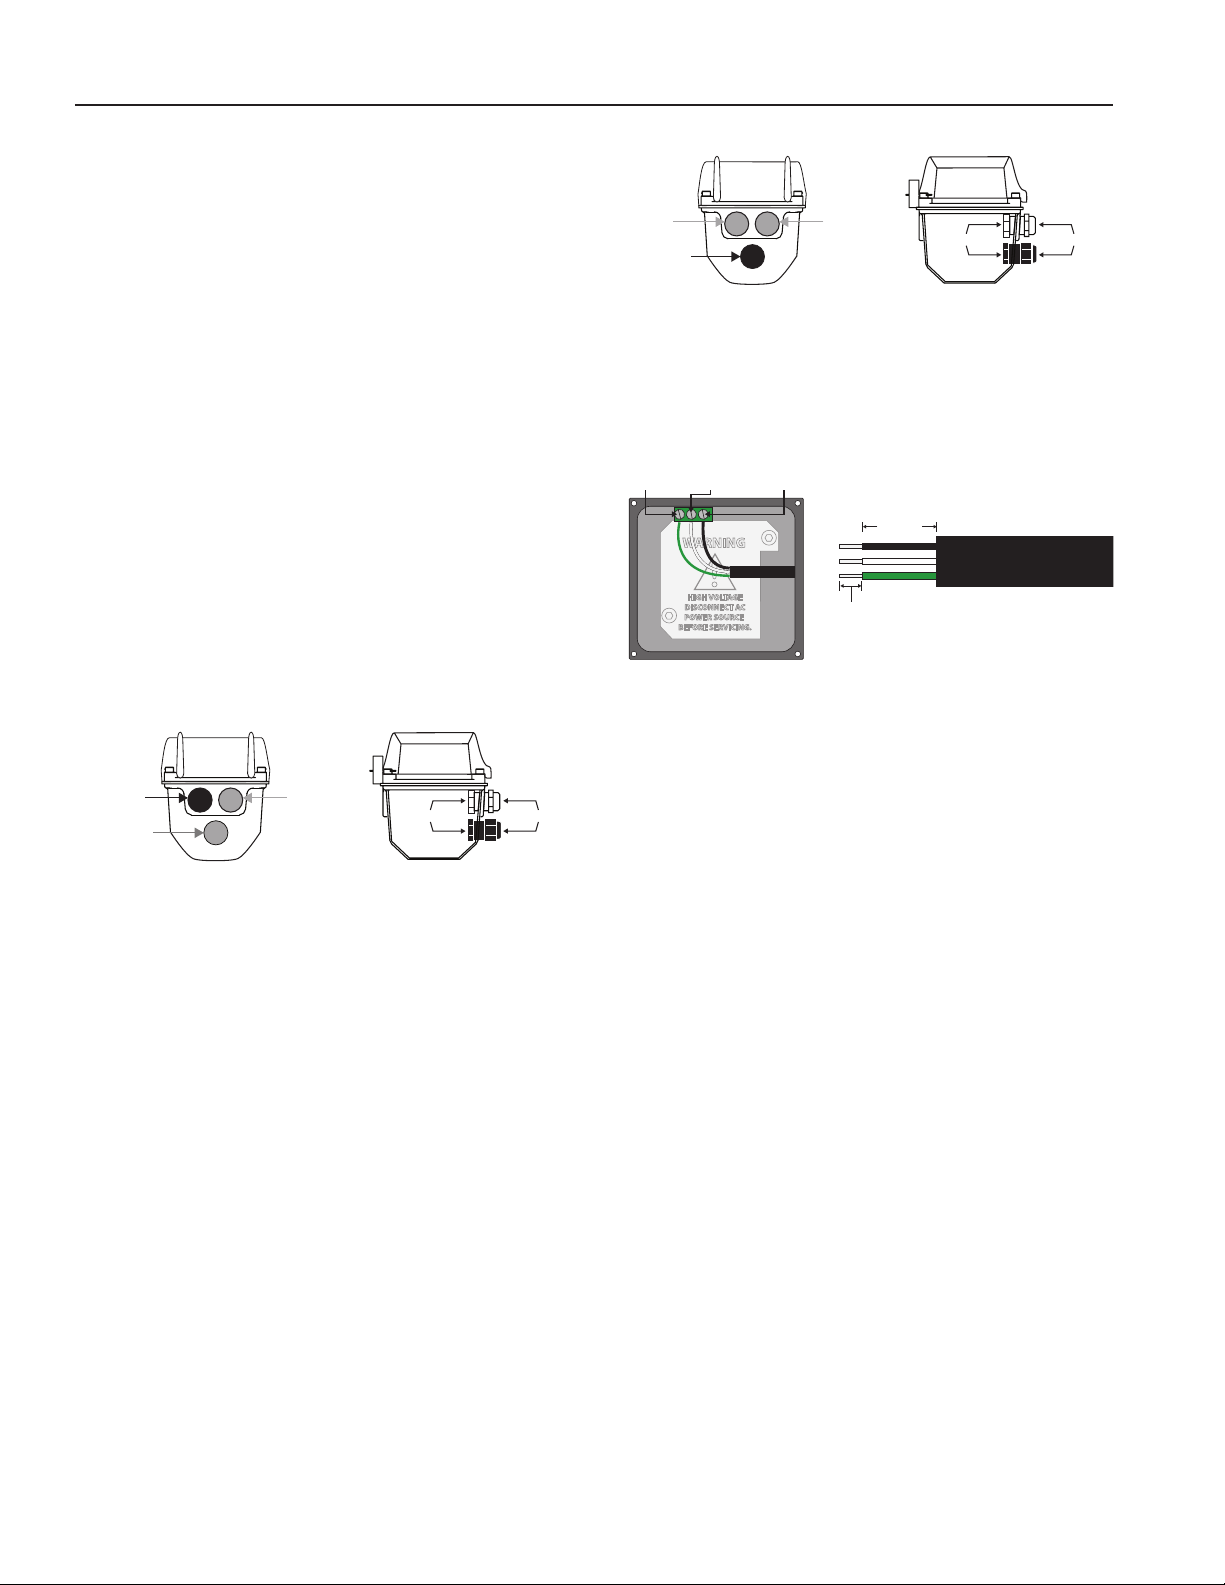
AC Power Connection. When the rst OID code character
is “A”, the RED and BLACK wires are not used. Instead, 85264Vac power is supplied to the ow meter via a separate
meter housing cable-entry gland and user-supplied threeconductor power cord having local regulatory agency approval.
If installed outdoors or less than 33 ft. (10m) from a utility
power service entrance, ac power should be supplied via a
properly-grounded surge suppression device. See diagrams
below for wiring instructions.
1. Using a 5/32” hex driver, remove the four cap screws
securing the top housing to the lower housing and swing the
top open to expose the internal wiring and components.
2. Loosen the cable gland sealing nut, remove the plug and
insert the unconnected cable end through the open hole.
ol Cable
Power Cable
Sensor Cable
Bulkhead Nut
3. Strip cable jacket and conductors (see below) and install
3-conductor power cable and wire to Line (L), Neutral (N)
and Ground (G) positions on power supply terminal block
as shown below
Green
th America)
Green-Yellow
(International)
White
(North America)
Blue
(International)
WARNING
!
HIGH VOLTAGE
DISCONNECT AC
POWER SOURCE
BEFORE SERVICING.
Black
(Nor
Brown
(International)
3/8 in
4. Tighten terminal block screws securely using 1/8”
(3mm) screwdriver. Tighten the cable gland sealing nut
securely. A loose nut could cause moisture ingress and
compromise the meter head’s IP67 rating, voiding the warranty.
5. Close the top cover and replace the four cap screws,
securing tightly to reseal the housing against moisture
ingress.
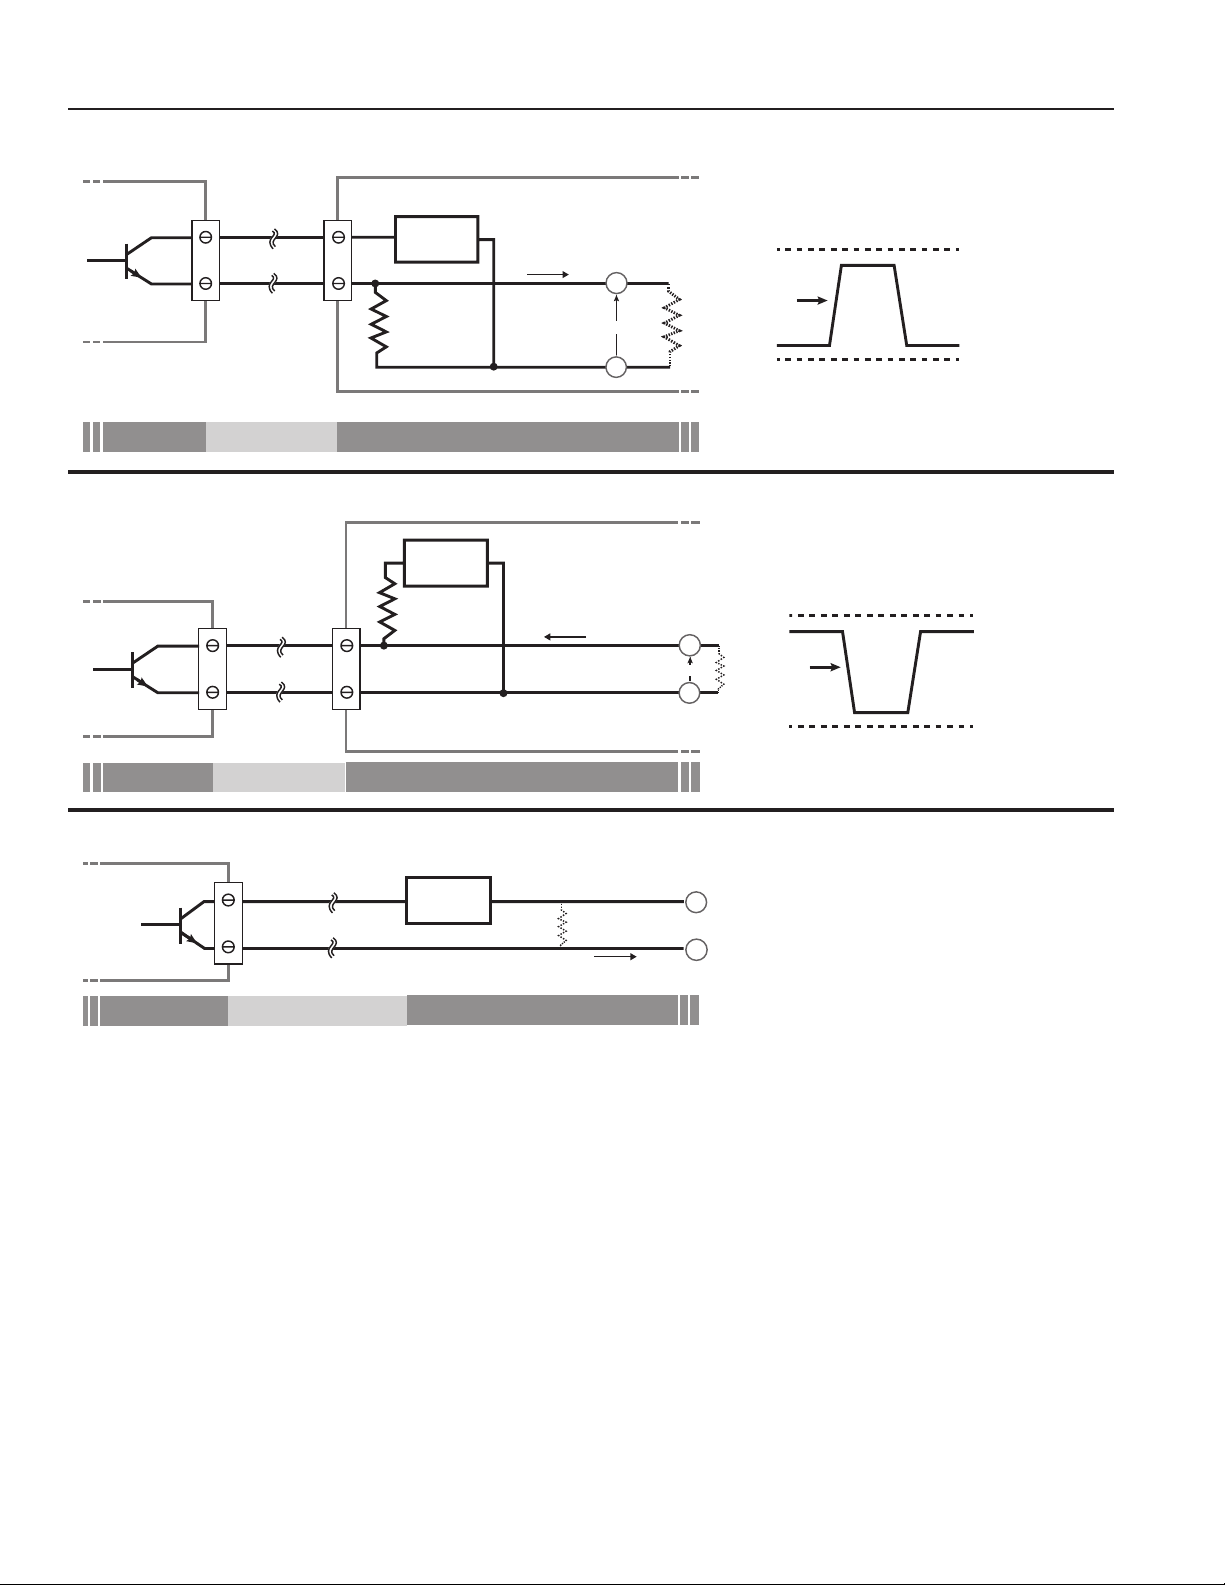
Pulse Output Connection. When the second OID code
character is “P”, refer to the “Digital Output Application”
diagrams on page 12 for recommended pulse output
connections to external equipment. Since this is an isolated
output, the external equipment must include a dc power
source to regenerate the pulse from the open-collector
output (transistor equivalent of a contact closure). A pull-up
or pull-down resistor may be needed if not included in the
user equipment as shown in the diagrams. Both the power
source and resistor may be supplied internally in some
types of control and monitoring devices. If not, as for most
PLC discrete input modules, they must be added externally
at the module input terminals. Pulse output rate in volume
units/pulse is user-settable via the SET P tab on the meter’s
setup menus.
Analog Output (4-20mA) Connection. When the second or
third OID code character is “L”, refer to the “Analog Output
Application” diagram on page 12 for 4-20mA current loop
output connections to external analog input devices. Since
the meter’s analog output is isolated and passive loop
power must be supplied externally as shown. (In addition, an
external resistor RL will be needed to convert the loop current
to voltage for voltage-only input devices.) The meter’s loop
Page 10
Page 14

INPUTS/OUTPUTS and OPERATION
transmitter minimum voltage drop is 6V which, with wiring
resistance and loop power supply voltage, will determine the
maximum resistance for RL. The ow rates corresponding to
4 and 20mA are user-settable via the SET 4 and SET20 tabs
on the meter’s setup menus.
Digital Output Connection. When the second or third OID
code character is “D”, refer to “Digital Output Application”
diagrams on page 12 for recommended connections to
external equipment. These outputs are essentially the same
as the Pulse Output described above except they are capable
of output frequencies up to 10kHz. Frequency output scaling
is user-settable via the FOUT tab on the meter’s setup menus.
Control Cable Wiring
Serial Communication Connection. When the second and
third OID code characters are “SS”, refer to “Control Cable
Wiring” table below for recommended connections to external
equipment. These connections provide a half-duplex, isolated,
RS485 serial communications port using the Modbus
messaging protocol. The port is recongurable by internal
jumper settings to full-duplex RS232 or 3.3V CMOS. The TXD
connection is the transmitted data output from the meter and
RXD is the received data input to the meter. Optionally, the
RTS input can be used to open the port. Contact Seametrics
customer service for supported Modbus message protocol
and electrical interface specications.
Cable Shield. In general, the cable shield and its bare drain
wire should be left unconnected at the user equipement end
of the cable to minimize “ground loop” problems.
Power
Source
DC
DC
DC
DC
AC
AC
AC
AC
Options
Installed
4-20mA Output DPLX DC PWR + DC PWR - Pulse + Pulse - 4-20mA Out + 4-20mA Out -
Two Digital Outputs DDDX DC PWR + DC PWR - Out 1 + Out 1 - Out 2 + Out 2 -
4-20mA Output 1 Digital Output DDLX DC PWR + DC PWR - Out 1 + Out 1 - 4-20mA Out + 4-20mA Out -
One Pulse Output DPXX DC PWR + DC PWR - Pulse + Pulse - Do Not Connect Do Not Connect
4-20mA Output APLX Do Not Connect Do Not Connect Pulse + Pulse - 4-20mA Out + 4-20mA Out -
Two Digital Outputs ADDX Do Not Connect Do Not Connect Out 1 + Out 1 - Out 2 + Out 2 -
4-20mA Output 1 Digital Output ADLX Do Not Connect Do Not Connect Out 1 + Out 1 - 4-20mA Out + 4-20mA Out -
One Pulse Output APXX Do Not Connect Do Not Connect Pulse + Pulse - Do Not Connect Do Not Connect
OID
Codes
Red Black Green White Orange Blue
Cable Conductor Usage
Page 11
Page 15
INPUTS/OUTPUTS and OPERATION
Current Sourcing Pulse
Digital Output Application - Sourcing Mode (Recommended for Rin < 30kΩ)
Open
Collector
Transistor
+
_
Green*
White*
+
_
Power
+
Source
V
s=3-36Vdc
47k Ω
Pull-down
Resistor
_
і
out
+
V Out
Rin
_
Vs
V Out
0
Meter Cable User Equipment
Digital Output Application - Sinking Mode (Recommended for Rin > 30kΩ)
Power
_
Source
Open
Collector
Transistor
+
_
Green*
White*
+
V
s=3-36Vdc
Pull-up
Resistor**
+
_
і
out
+
V Out
_
Rin
Current Sinking Pulse
Vs
V Out
0
Waveform
Waveform
Meter Cable User Equipment
Analog (4-20mA Current Loop) Output Application
+
_
Orange*
*
Blue
Analog
Output
+
_
Meter Cable User Equipment
* Wire colors shown are typical but because there are exceptions, always refer to the color codes shown on the cable label
or “Control Cable Wiring” table on page 11.
** Minimum resistor value is (100 x Vs) ohms. Higher resistances maybe used depending on frequency and cable length.
Longer cables and high frequencies require lower resistance.
*** Resistor RL converts 4-20mA current to voltage for voltage input only devices.
Power
Source
+
Vs=6-36Vdc
_
RL***
_
4-20 mA
Current Output***
+
і
Loop
Page 12
Page 16
Tap
Tap
Hold Tap
INPUTS/OUTPUTS and OPERATION
1.2345678
1.2345678
100
TOTAL
CU FT
X1000
RATE
GPM
T UNIT R UNIT S ET PDAMP
SET 4SET 20 S ET F EXIT
TOTAL = GALLONS
PRESS + TO SET TOTAL
UNITS FOR DISPLAY
Hold Tap
Tap
Hold Tap
Tap
Tap
Tap
Tap
Hold Tap
Tap
Hold Tap
1.2345678
100
TOTAL
CU FT
X1000
RATE
GPM
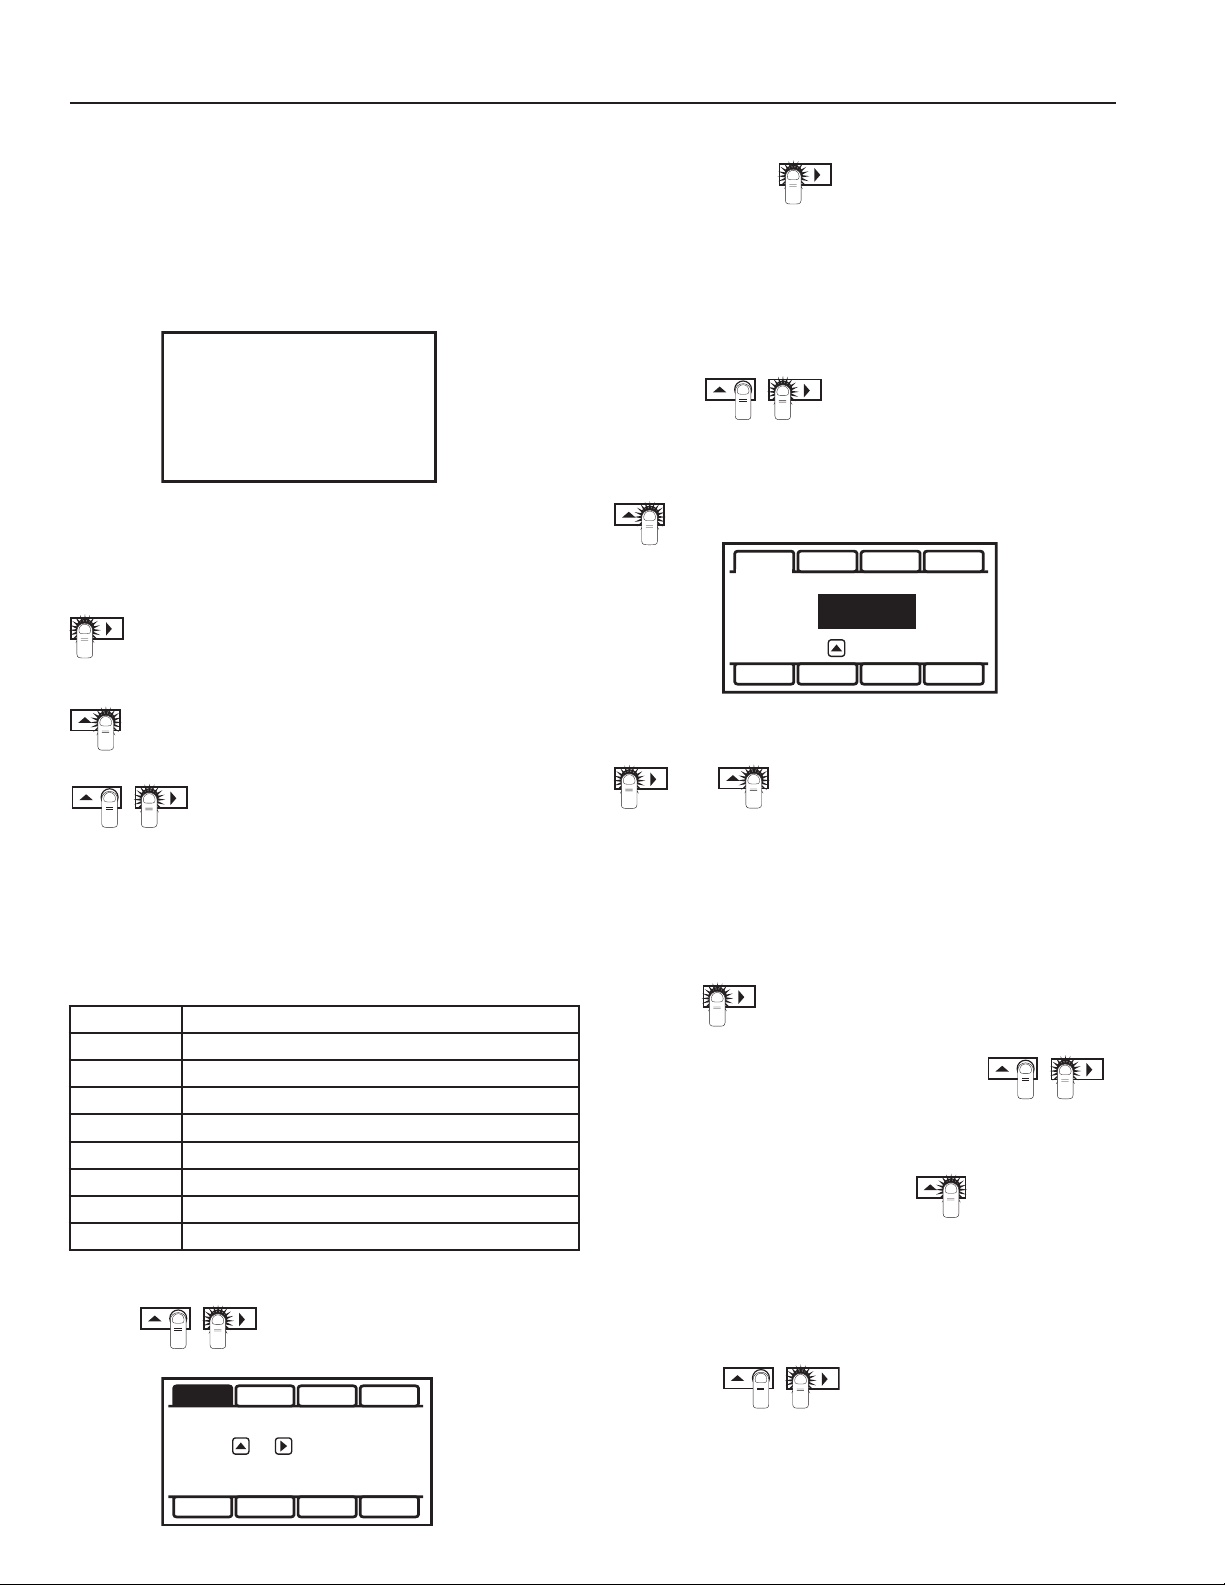
CHANGING FLOWMETER SETTINGS
The HOME Screen. The HOME Screen shown below is the
normal screen which displays TOTAL ow volume and ow RATE
along with status conditions such as Empty Pipe. Two buttons
below the LCD display are used to access menu screens for
viewing and changing meter setup parameters.
100
Button Sensors. The two buttons are light sensors which can
detect when a nger is covering them. Only three button touch
actions are needed to control navigation through the menus,
settings changes and back to the home screen. They are:
HORIZONTAL SCROLLING: Tap right-hand button
to scroll horizontally through menu tabs or move
horizontally within a tab dialog when applicable.
SELECT: Tap left-hand button to change a highlighted
item within a tab dialog.
+
Main Menu. All menu screens consist of two rows of tabs
surrounding a dialog box that lets you view and change setup
parameters. For the MAIN MENU, the tabs have the following
functions:
TAB FUNCTION
T UNIT View or change TOTAL volume units
R UNIT View or change ow RATE units
SET P View or change pulse output scaling
DAMP View or change lter settings
SET 4 View or change ow rate corresponding to 4mA
SET 20 View or change ow rate corresponding to 20mA
F OUT View or change high frequency output scaling
EXIT Return to HOME SCREEN or Enter SUBMENU
To enter the MAIN MENU perform the hold and tap sequence:
ENTER/EXIT: Hold left button while tapping
right button once to enter or exit a tab dialog
or to navigate between the HOME and other
menu screens.
+
T UNIT R UNIT S ET PDAMP
TOTAL = GALLONS
PRESS + TO SET TOTAL
UNITS FOR DISPLAY
TOTAL
CU FT
X1000
RATE
GPM
Once in the main menu you can move from tab to tab by
tapping the button:
In the dialog box for the currently highlighted tab you will
see that tab parameter’s current value. In the previous
screen illustration, the rst line indicates that the current unit for the TOTAL is GALLONS. The next two lines in
the dialog box tell you what to do next. If you would like
to change the TOTAL units, just perform the hold and tap
sequence to bring up a dialog box that will
tell you how to change the setting.
+
You select the new setting by scrolling through a list of
selections as in the screen illustration below by tapping
to nd a different TOTAL unit.
T UNIT R UNIT S ET PDAMP
TOTAL:
PRESS TO CHANGE
SET 4SET 20 S ET F EXIT
GALLONS
Similiarly, for the SET tabs, the dialog box instructions will
tell you how to change a numerical value using both the
and buttons.
To accept any changes you’ve made just hold and tap
again, and the changes will be saved and you will be
returned to the MAIN MENU screen where you can move to
another tab.
When you are nished making changes, move to the EXIT
tab using:
To return to the HOME screen, hold and tap:
+
Submenu. The EXIT tab in the MAIN MENU has a second
function. If, instead of using the hold and tap sequence to
return to the HOME screen, you tap four times.
You will be redirected to a SUBMENU screen which provides access to more information about the meter, such
Serial Numbers and rmware revisions. Navigation in this
SUBMENU is the same as for the MAIN MENU. Whenever
you wish, go to the EXIT tab in the SUBMENU and use the
hold and tap sequence to return to the MAIN
MENU.
+
Page 13
SET 4SET 20 S ET F EXIT
Page 17

TROUBLESHOOTING
PROBLEM PROBABLE CAUSES Try…
Blank Display Faulty wiring from power source to
meter or faulty AC power supply
Flow rate reads zero continuously
regardless of ow
Flow rate shows ‘REVERSE FLOW’
continuously when ow is greater
than cutoff
Flow rate reading uctuates excessively when ow is unchanging
Flow is below cutoff Increase ow above cutoff
Meter is installed backwards Reinstall correctly
Excessively turbulent or unsteady
ow due to partially closed valves
or other ow obstructions
Check for miswiring. Measure voltage with DMM
where red and black wires connect to terminal
block TB2 inside meter display head. Verify correct polarity and conrm that voltage is steady and
between 9Vdc and 32Vdc
Eliminate or minimize causes of ow disturbances
or increase meter damping
Flow Rate appears correct but
pulse/ frequency output is low,
erratic or absent
Flow Rate appears correct but
pulse/frequency output is erratic
and/or too high
Pipe not full.
Pulsing ow due to combining multiple upstream ow sources
Insufcient mixing of upstream
chemicals
Low uid conductivity < 20 µS/cm
Noisy electrical environment
Defective or noisy ac switching
power supply
Wiring incorrect
External device input impedance
too low
Cable too long
Electrical noise sources interfering
with pulse frequency signal
Wrong type of cable
Provide back pressure or other means to ensure
pipe is lled
Move connection point further upstream
Move chemical injection downstream from meter
Replace with different type of meter
Improve grounding at meter and nearby potential
ly noisy electrical equipment. Increase distance
between meter and electrical noise sources.
Replace power supply
Compare wiring with appropriate wiring recommendations
Use sourcing rather than sinking interface connec-
tion
Reduce interface pull-up resistance
Isolate, remove or reduce noise sources. Move
meter control cable away from noise sources.
Use only twisted pair cable and ensure both signal
wires are on same twisted pair
Flow rate reads “COMM FAIL”
instead of rate (FMG2100 only)
Grounding problem
Cable between ow sensor body
and display head is disconnected,
miswired or damaged
Improve or try different grounding method.
Inspect cable for damage. Check cable connection
inside display head for correct wiring to ve-position connector, ensure that connector is properly
inserted, inspect for broken connections.
Page 14
Page 18

NOTES
Page 19

WARRANTY/DISCLAIMER
FOR NON-WARRANTY REPAIRS,
OMEGA ENGINEERING, INC. warrants this unit to be free of defects in materials and workmanship for a
period of 13 months f rom date of purchase. OMEGA’s WARRANTY adds an additional one (1) month
grace period to the normal one (1) year product warranty to cover handling and shipping time. This
ensures that OMEGA’s customers receive maximum coverage on each product.
If the unit malfunctions, it must be re t u rned to the factory for evaluation. O M E G A ’s Customer Serv i c e
D e p a rtm ent will issue an Authorized Return (AR) number immediately upon phone or written re q u e s t .
Upon examination by OMEGA, if the unit is found to be defective, it will be re p a i red or replaced at no
c h a rge. O M E G A ’s WARRANTY does not apply to defects resulting from any action of the purc h a s e r ,
including but not limited to mishandling, improper interfacing, operation outside of desi
i m p roper re p a i r, or unauthorized modification. This WARRANTY is VOID if the unit shows evidence of
having been tampered with or shows evidence of having been damaged as a result of excessive corro s i o n ;
or current, heat, moisture or vibration; improper specification; misapplication; misuse or other operating
conditions outside of OMEGA’s c o n t r ol. Components in which wear is not warranted, include but are not
limited to contact points, fuses, and triacs.
OMEGA is pleased to offer suggestions on the use of its various products. Howev er,
OMEGA neither assumes responsibility for any omissions or e
damages that result from the use of its products in accordance with information provided by
OMEGA, either verbal or written. OMEGA warrants only that the parts manufactured by the
company will be as specified and free of defects. OMEGA MAKES NO OTHER WARRANTIES OR
R E P R E S E N T ATIONS OF ANY KIND WHATSOEVER, EXPRESSED OR IMPLIED, EXCEPT THAT OF
TITLE, AND ALL IMPLIED WARRANTIES INCLUDING ANY W
AND FITNESS FOR A PA R TICULAR PURPOSE ARE HEREBY DISCLAIMED. LIMITATION OF
L I A B I L I T Y: The remedies of purchaser set forth herein are exclusive, and the total liability of
OMEGA with respect to this ord e r , whether based on contract, warr a n t y, negligence,
indemnification, strict liability or otherwise, shall not exceed the purchase price of the
component upon whic h lia bilit y is base d. In no even t sha ll OMEG A be liab l e for
co
nsequential, incidental or special damages.
CONDITIONS: Equipment sold by OMEGA is not intended to be used, nor shall it be used: (1) as a “Basic
Component” under 10 CFR 21 (NRC), used in or with any nuclear installation or activity; or (2) in medical
applications or used on humans. Should any Product(s) be used in or with any nuclear installation or
a c t i v i t y , medical application, used on humans, or misused in any way, OMEGA assumes no re s p o n s i b i l i t y
as set forth in our basic WA R R A N T Y/ D ISCLAIMER language, and, additionally, purchaser will indemnify
OMEGA and hold OMEGA h a rmless from any liability or damage whatsoever arising out of the use of the
P roduct(s) in such a manner.
rrors nor assumes liability for any
ARRANTY OF MERCHANTA B I L I T Y
gn limits,
RETURN REQUESTS/INQUIRIES
Direct all warranty and repair requests/inquiries to the OMEGA Customer Service Department. BEFORE
RETURNING ANY PRODUCT(S) TO OMEGA, PURCHASER MUST OBTAIN AN AUTHORIZED RETURN
(AR
) NUMBER FROM OM E G A’ S CUS T O M ER S E RV I C E D E PA R TM EN T (IN ORDER TO AV O I D
PROCESSING DELAYS). The assigned AR number should then be marked on the outside of the return
package and on any correspondence.
The purchaser is responsible for shipping charges, freight, insurance and proper packaging to prevent
breakage in transit.
WARRANTY RETURNS, please have the
FOR
following information available BEFORE
contacting OMEGA:
1 . P u r chase Order number under which the pro d u c t
was PURCHASED,
2. Model and serial number of the product under
warranty, and
3. Repair instructions and/or specific problems
relative to the product.
OMEGA’s policy is to make running changes, not model changes, whenever an improvement is possible. This affords
our customers the latest in technology and engineering.
OMEGA is a registered trademark of OMEGA ENGINEERING, INC.
© Copyright 2005 OMEGA ENGINEERING, INC. All rights reserved. This document may not be copied, photocopied,
reproduced, translated, or reduced to any electronic medium or machine-readable form, in whole or in part, without the
prior written consent of OMEGA ENGINEERING, INC.
for current repair charges. Have the following
information available BEFORE contacting OMEGA:
1. Purchase Order number to cover the COST
of the repair,
2. Model and serial number of the product, and
3. Repair instructions and/or specific problems
relative to the product.
consult OMEGA
Page 20

W h e r e Do I Find Eve rything I Need for
P r ocess Measurement and Control?
OME GA…Of Cours e !
Shop online at omega.com
T E M P E R A T U R E
Thermocouple, RTD & Thermistor Probes, Connectors, Panels & Assemblies
Wire: Thermocouple, RTD & Thermistor
Calibrators & Ice Point References
Recorders, Controllers & Process Monitors
Infrared Pyrometers
PRESSURE, STRAIN AND FO R C E
Transducers & Strain Gages
Load Cells & Pressure Gages
Displacement Transducers
Instrumentation & Accessories
F L OW / L E V E L
Rotameters, Gas Mass Flowmeters & Flow Computers
Air Velocity Indicators
Turbine/Paddlewheel Systems
Totalizers & Batch Controllers
p H / C O N D U C T I V I T Y
pH Electrodes, Testers & Accessories
Benchtop/Laboratory Meters
Controllers, Calibrators, Simulators & Pumps
Industrial pH & Conductivity Equi
pment
DATA AC Q U I S I T I O N
Data Acquisition & Engineering Software
Communications-Based Acquisition Systems
Plug-in Cards for Apple, IBM & Compatibles
Datalogging Systems
Recorders, Printers & Plotters
H E A T E R S
Heating Cable
Cartridge & Strip Heaters
Immersion & Band Heaters
Flexible Heaters
Laboratory Heaters
E N V I R O N M E N T A L
M O N I T ORING AND CONTRO L
Metering & Control Instrumentation
R e f r a c t o m e t e r s
Pumps & Tubing
Air, Soil & Water Monitors
Industrial Water & Wastewater Treatment
pH, Conductivity & Dissolved Oxygen Instruments
PL-OM-103338-061314
6/13/2014
M-5384/0614
 Loading...