

Page 1
Specications
Voltage Input:
Range: 10mV to +200V; Impedance: >100K ohms
Overvoltage: 200V rms, max.
Current Input:
Range: 1mA to +100mA; Impedance: 20 ohms, typical
Overcurrent: 170mA rms, max.
Overvoltage: 60VDC (self-resetting fuse)
Common Mode (Input to Gnd): 1800VDC, max.
LED Indicators:
Input (Green):
>110%input:8Hzash
<10%input:4Hzash
Setpoint (Red):
Tripped: Solid red
Safe: Off
Limit Differential (Deadband):
>50mV/5mA: 0.25% to 100% of span
<50mV/5mA: 1% to 100% of span
Response Time:
Dynamic Deadband:
Relay status will change when proper setpoint/process condition
exists for 100msec.
NormalMode(analogltering):<250mSec,(10-90%)
Setpoints:
Effectivity: Setpoints are adjustable over 100% of the selected input
span.
Repeatability (constant temp.):
>50mV/5mA: 0.1% of full scale
<50mV/5mA: 0.2% of full scale
Stability:
Temperature: +0.05% of full scale/°C, max.
Excitation Voltage:
24VDC, 20mA, maximum
Common Mode Rejection:
DC to 60Hz: 120dB
Terminal Connection Terminal Connection
A1 Relay A, N.O. C4 24 VDC Excitation
A2 Relay A, Common C5 Input (-)
A3 Relay A, N.C. C6 Input (+)
A4 Relay B, N.O. P1 AC Power (Hot)
A5 Relay B, Common P2 Not Used
A6 Relay B, N.C. P3 Not Used
C1, C2, C3 Not Internally Connected P4 AC Power (Neutral)
OMEGA ENGINEERING, INC., warrants this unit to be free of defects in materials and workmanship for a period of 13 months from date of purchase.
omega.com info@omega.
Servicing North America:
U.S.A.:
Omega Engineering, Inc., One Omega Drive,
P.O. Box 4047, Stamford, CT 06907-0047 USA
Toll-Free: 1-800-826-6342 (USA & Canada only)
Customer Service: 1-800-622-2378
(USA & Canada only)
Engineering Service: 1-800-872-9436
(USA & Canada only)
Tel: (203) 359-1660
Fax: (203) 359-7700
e-mail: info @omega.com
For Other Locations Visit
omega.com/worldwide
The information contained in this document is
believed to be correct, but OMEGA accepts no
liability for any errors it contains, and reserves
the right to alter specifications without notice.
com
OMEGA’s WARRANTY adds an additional one (1) month grace period to the normal one (1) year product warranty to cover handling and shipping
time. This ensures that OMEGA’s customers receive maximum coverage on each product.
If the unit malfunctions, it must be returned to the factory for evaluation. OMEGA’s Customer Service Department will issue an Authorized Return
(AR) number immediately upon phone or written request. Upon examination by OMEGA, if the unit is found to be defective, it will be repaired
or replaced at no charge. OMEGA’s WARRANTY does not apply to defects resulting from any action of the purchaser, including but not limited to
mishandling, improper interfacing, operation outside of design limits, improper repair, or unauthorized modification. This WARRANTY is VOID if
the unit shows evidence of having been tampered with or shows evidence of having been damaged as a result of excessive corrosion; or current,
heat, moisture or vibration; improper specification; misapplication; misuse or other operating conditions outside of OMEGA’s control. Components
in which wear is not warranted, include but are not limited to contact points, fuses, and triacs.
OMEGA is pleased to offer suggestions on the use of its various products. However, OMEGA neither assumes responsibility for any omissions
or errors nor assumes liability for any damages that result from the use of its products in accordance with information provided by OMEGA,
either verbal or written. OMEGA warrants only that the parts manufactured by the company will be as specified and free of defects. OMEGA
MAKES NO OTHER WARRANTIES OR REPRESENTATIONS OF ANY KIND WHATSOEVER, EXPRESSED OR IMPLIED, EXCEPT THAT OF TITLE, AND
ALL IMPLIED WARRANTIES INCLUDING ANY WARRANTY OF MERCHANTABILITY AND FITNESS FOR A PARTICULAR PURPOSE ARE HEREBY
DISCLAIMED. LIMITATION OF LIABILITY: The remedies of purchaser set forth herein are exclusive, and the total liability of OMEGA with respect to
this order, whether based on contract, warranty, negligence, indemnification, strict liability or otherwise, shall not exceed the purchase price of
the component upon which liability is based. In no event shall OMEGA be liable for consequential, incidental or special damages.
CONDITIONS: Equipment sold by OMEGA is not intended to be used, nor shall it be used: (1) as a “Basic Component” under 10 CFR 21 (NRC), used
in or with any nuclear installation or activity; or (2) in medical applications or used on humans. Should any Product(s) be used in or with any nuclear
installation or activity, medical application, used on humans, or misused in any way, OMEGA assumes no responsibility as set forth in our basic
WARRANTY/DISCLAIMER language, and, additionally, purchaser will indemnify OMEGA and hold OMEGA harmless from any liability or damage
whatsoever arising out of the use of the Product(s) in such a manner.
Direct all warranty and repair requests/inquiries to the OMEGA Customer Service Department. BEFORE RETURNING ANY PRODUCT(S) TO OMEGA,
PURCHASER MUST OBTAIN AN AUTHORIZED RETURN (AR) NUMBER FROM OMEGA’S CUSTOMER SERVICE DEPARTMENT (IN ORDER TO AVOID
PROCESSING DELAYS). The assigned AR number should then be marked on the outside of the return package and on any correspondence.
The purchaser is responsible for shipping charges, freight, insurance and proper packaging to prevent breakage in transit.
FOR WARRANTY RETURNS, please have the following
information available BEFORE contacting OMEGA.
1. Purchase order number which the product was PURCHASED,
2. Model and serial number of the product under warranty, and
3. Repair instructions and/or specific problems relative to
the product.
OMEGA’s policy is to make running changes, not model changes, whenever an improvement is possible. This affords custo mers the late st
technology and engineering. OMEGA is a registered trademark of OMEGA ENGINEERING, INC.
© COPYRIGHT 2015 OMEGA ENGINEERING, INC. All rights reserved. This document may not be copied, photocopied, translated, or reduced to
any electronic medium-readable form, in whole or in part, without the prior written consent of OMEGA ENGINEERING, INC.
Isolation:
1800VDC between contacts, input and power
ESD & Transient Susceptibility: Meets IEC 801-2, Level 3 (8KV)
Humidity (Non-Condensing):
Operating:15to95%@45°C
Soak:90%for24hours@65°C
Temperature Range :
Operating: 0 to 55°C (32 to 131°F)
Storage: -25 to 70°C (-13 to 158°F)
Power: 2.5W max.,100 to 240VAC +10%, 50Hz -400Hz
Relay Contacts: 2 SPDT (2 form C) Relays; 1 Relay per setpoint
Current Rating (resistive) 120VAC:5A; 240VAC: 2A; 28VDC: 5A
Material:Goldashoversilveralloy
Electrical Life:105 operations at rated load
Note: External relay contact protection is required for use with
inductive loads.
Mechanical Life: 107 operations
Wire Terminations: Screw terminations for 12-22 AWG
Weight : 0.56 lbs.
Agency Approvals:
ULrecognizedperstandardUL508(FileNoE99775)
CE EN61326, EN61010-1
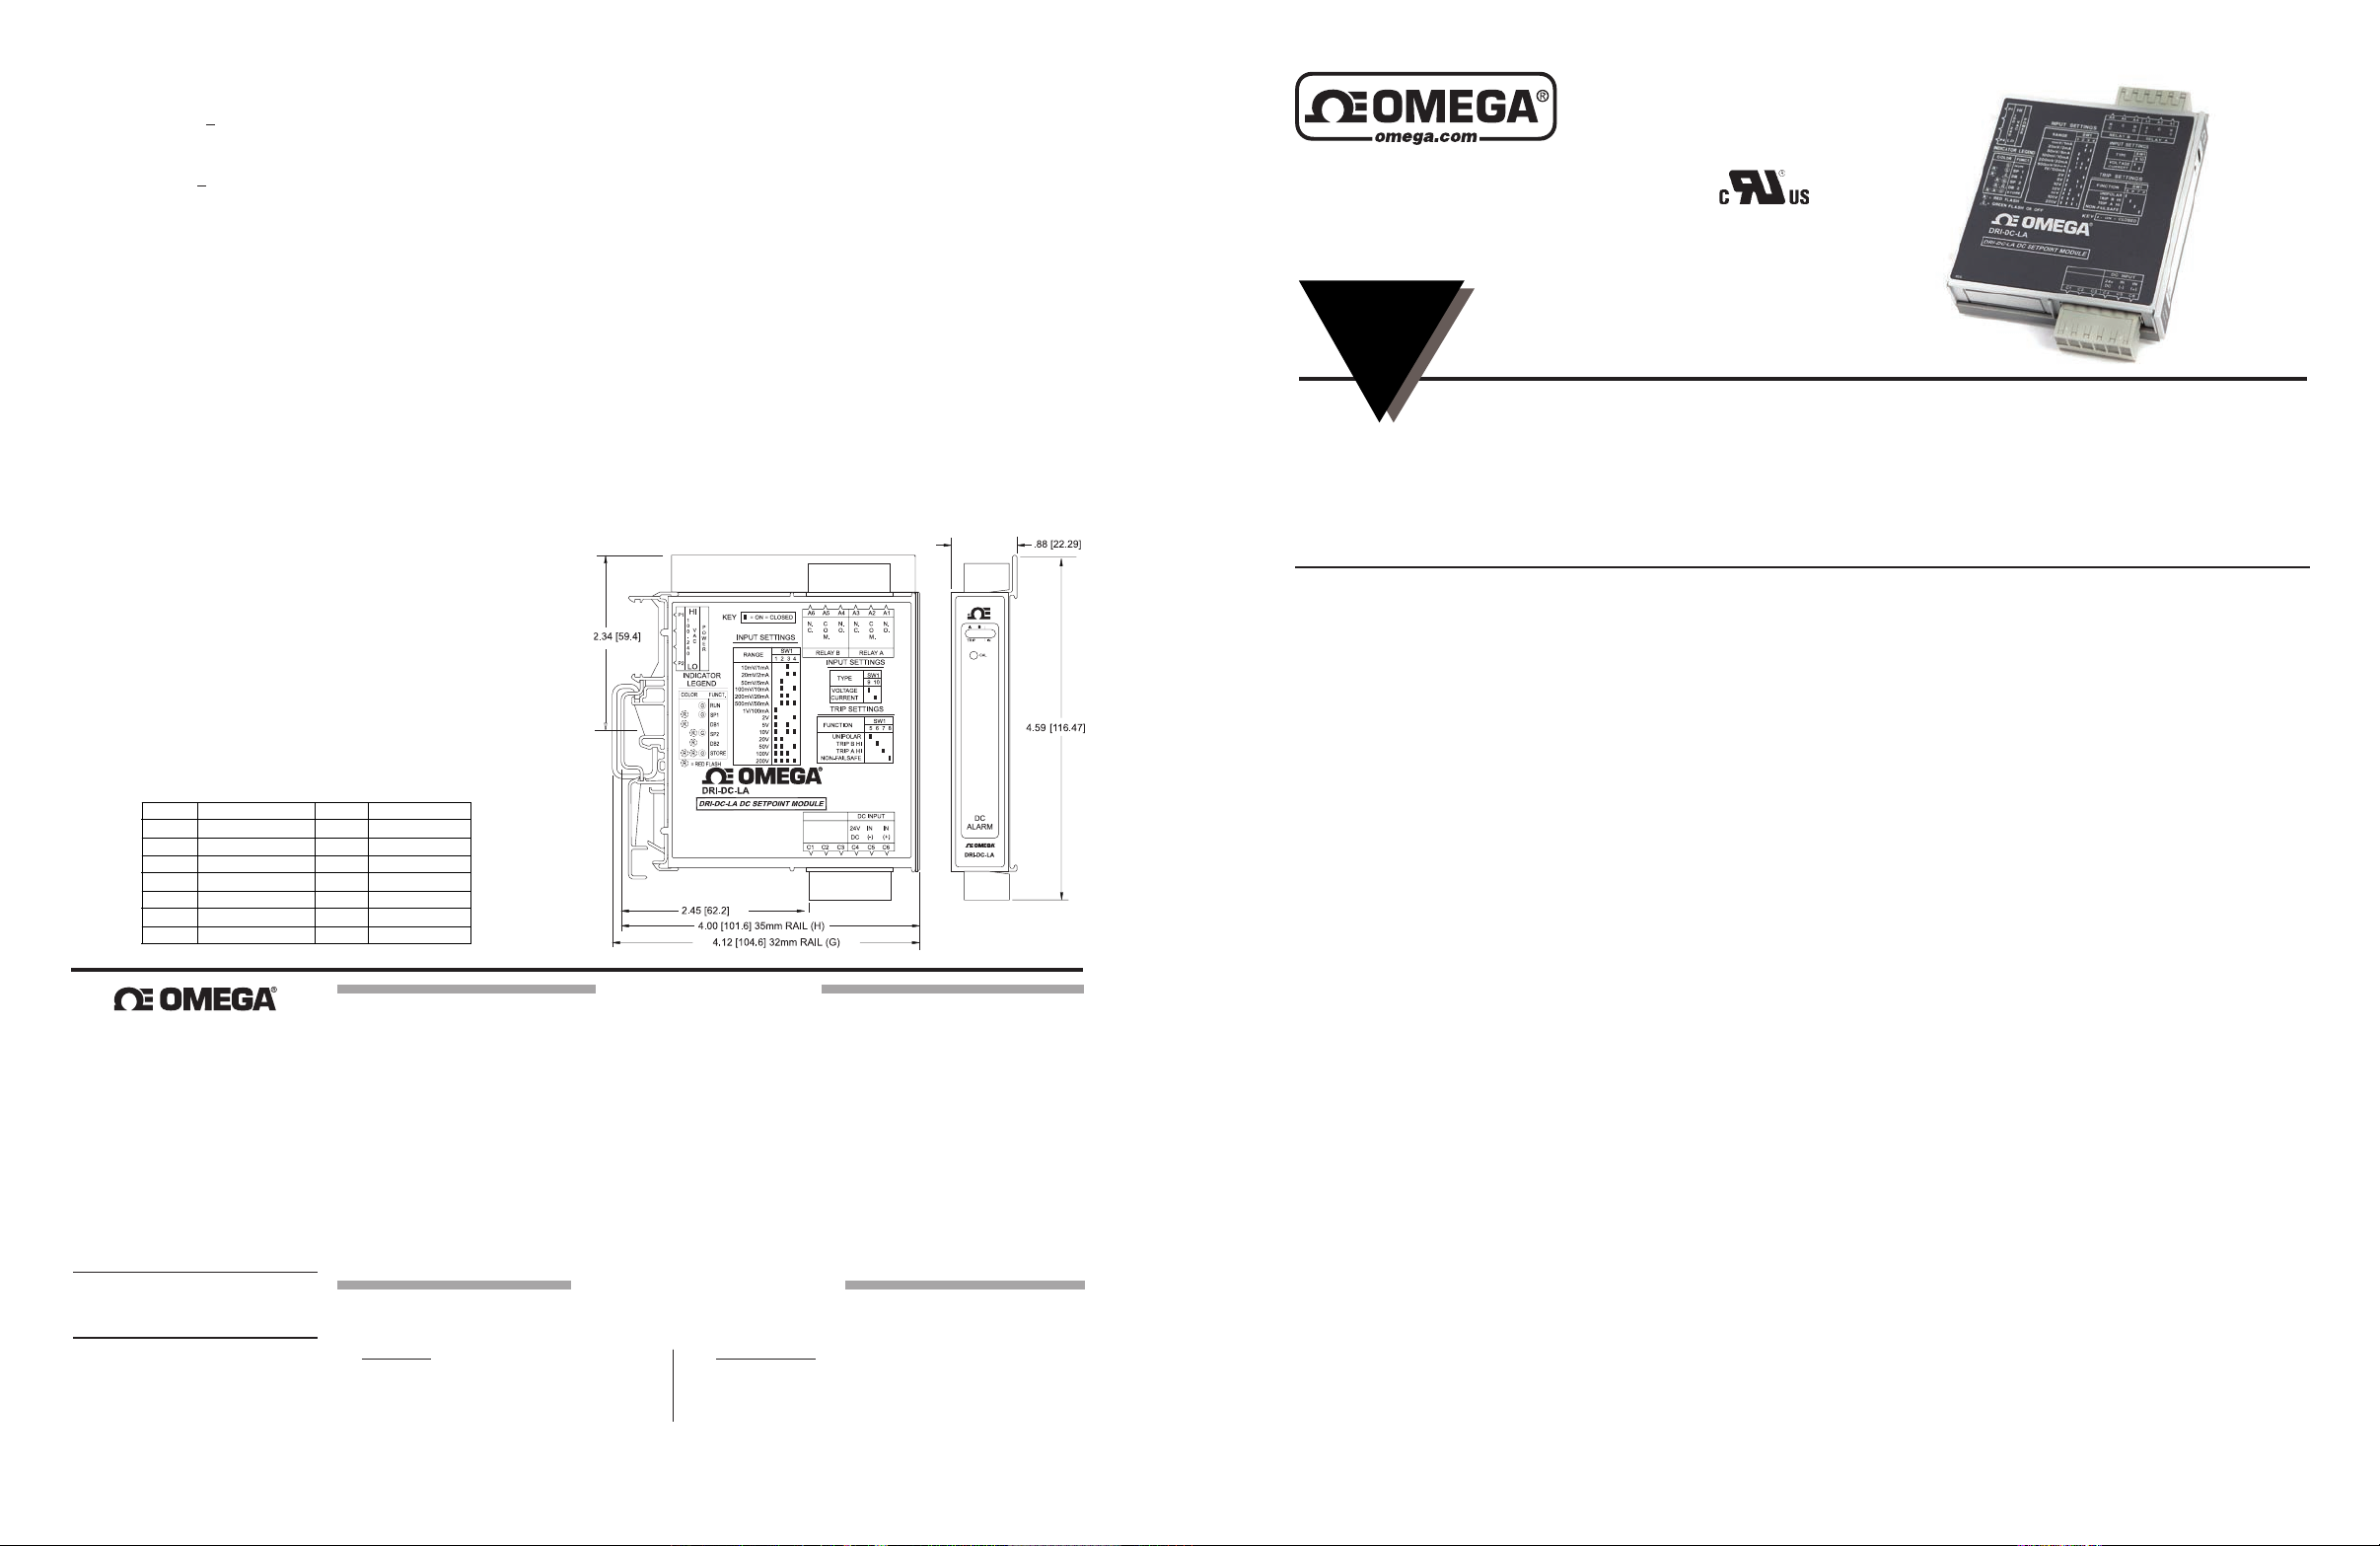
Dimensions
WARRANTY/DISCLAIMER
RETURN REQUESTS/INQUIRIES
FOR NON-WARRANTY RETURNS, consult OMEGA for current repair
charges. Have the following information available BEFORE contacting
OMEGA.
1. Purchase Order number to cover the COST of the repair,
2. Model and serial number of the product and
3. Repair instructions and/or specific problems relative to the product.
DRI-DC-LA
AC Powered DC Input
DIN Rail Limit Alarm
INSTRUCTION
SHEET
Shop online at omega.comSM e-mail: [email protected]
For latest product manuals: www.omegamanual.info
FieldCongurableInputRanges
Touch Calibration Technology
Setpoints Programmable HI or LO and Failsafe or
Non-Failsafe
DIN Rail Mounting
Description
The model DRI-DC-LA is a DIN rail mount, DC voltage or current
input limit alarm with dual setpoints and two contact closure
outputs.Theeldcongurableinputandalarmfunctionsoffer
exiblesetpointcapability.Inputvoltagespansfrom10mVto
200Vandinputcurrentspansfrom1mAto100mAcanbeeld
congured.Bipolarinputsarealsoaccepted.
The DRI-DC-LA is congurable as a single or dual setpoint
alarm, with HI or LO trips and failsafe or non-failsafe operation.
Also included are adjustable deadbands (up to 100% of full scale
input) for each setpoint, a 24VDC voltage source (isolated from
line power) for transducer excitation, and a universal AC power
supply which accepts any voltage between 85 and 265VAC.
Touch Calibration Technology
The DRI-DC-LA has simplied setpoint calibration. Using
a pushbutton instead of potentiometers, improvements in
calibration resolution and reliability are realized due to the
elimination of the potentiometers’ mechanical variability.
For calibration, simply input the signal level of the desired trip
and press the pushbutton to store it in non-volatile memory.
Deadband is entered the same way with another pushbutton
press to store.
Diagnostic LEDS
The DRI-DC-LA is equipped with three front panel LEDs. The
green LED is a dual function LED labeled IN, which indicates line
power and input signal status. Active AC power is indicated by
the illuminated LED. If this LED is off, check AC power and wiring
connections.Iftheinputsignalis7%aboveorbelowthecongured
inputrangethegreenLEDwillashat8Hzor4Hz,respectively.
The two red LEDs indicate the relay state of each setpoint.
An illuminated red LED indicates the tripped condition for the
respective setpoint.
Output
The DRI-DC-LA is equipped with two SPDT (form C) relays,
rated at 120VAC or 28VDC at 5 amperes. Each of these
relays is independently controlled by the eld congurable
M5476/0715
Provides Relay Contact Closures
at a Preset DC Input Level
Universal AC Power 85 to 265 VAC
24VDC Transducer Excitation
Plug-in Terminals
ASIC Technology for Enhanced Reliability
setpoint and deadband.
Operation
TheDRI-DC-LAlimitalarmsetpointscanbeconguredforHI
or LO, failsafe or non-failsafe operation. Each of the setpoints
has a respective HI or LO deadband. In a tripped condition,
the setpoint is exceeded and the appropriate red LED will
illuminate. The trip will reset only after the process falls below
the HI deadband or rises above the low deadband (see Figure
1). For proper deadband operation, the HI setpoint must be
set above the LO setpoint. In failsafe operation, the relay is
energized when the process is below the HI setpoint or above
the LO setpoint (opposite for non-failsafe). In the failsafe mode,
a power failure results in an alarm state output.
Dynamic Deadband
Circuitry in the DRI-DC-LA prevents false trips by repeatedly
sampling the input. The input must be beyond the setpoint
for 100 milliseconds, uninterrupted, to qualify as a valid trip
condition. Likewise, the input must fall outside the deadband
and remain there for 100 milliseconds to return the alarm to an
untripped condition. This results in a “dynamic deadband” —
based on time— in addition to the normal deadband.
Conguration
Unlessotherwisespecied,thefactorypresetstheModelDRI-
DC-LA as follows:
Input: Current
Range: 0-20mA
Output: Dual, SPDT
Trip: A: HI, B: LO
Failsafe: No
Deadband: A, B: 0.25%
The AC power input accepts any AC source between 85 and
265VAC.
Note: An ACPB rail is required to power the modules. See
ordering information.
ForotherI/Oranges,refertoTable1andFigure5.Recongure
switch SW1 for the desired input type, range and function.
Page 2
Voltage Current
Input Range
Selector SW1
1 2 3 4
10 mV 1 mA
20 mV 2 mA
50 mV 5 mA
100 mV 10 mA
200 mV 20 mA
500 mV 50 mA
1V 100 mA
2V
5V
10V
20V
50V
100V
200V
Key: = 1 = ON or Closed
Flashing
Input Trip A
Signal Level
Input Trip B
Signal Level
On
Off
Green LED
Red LED
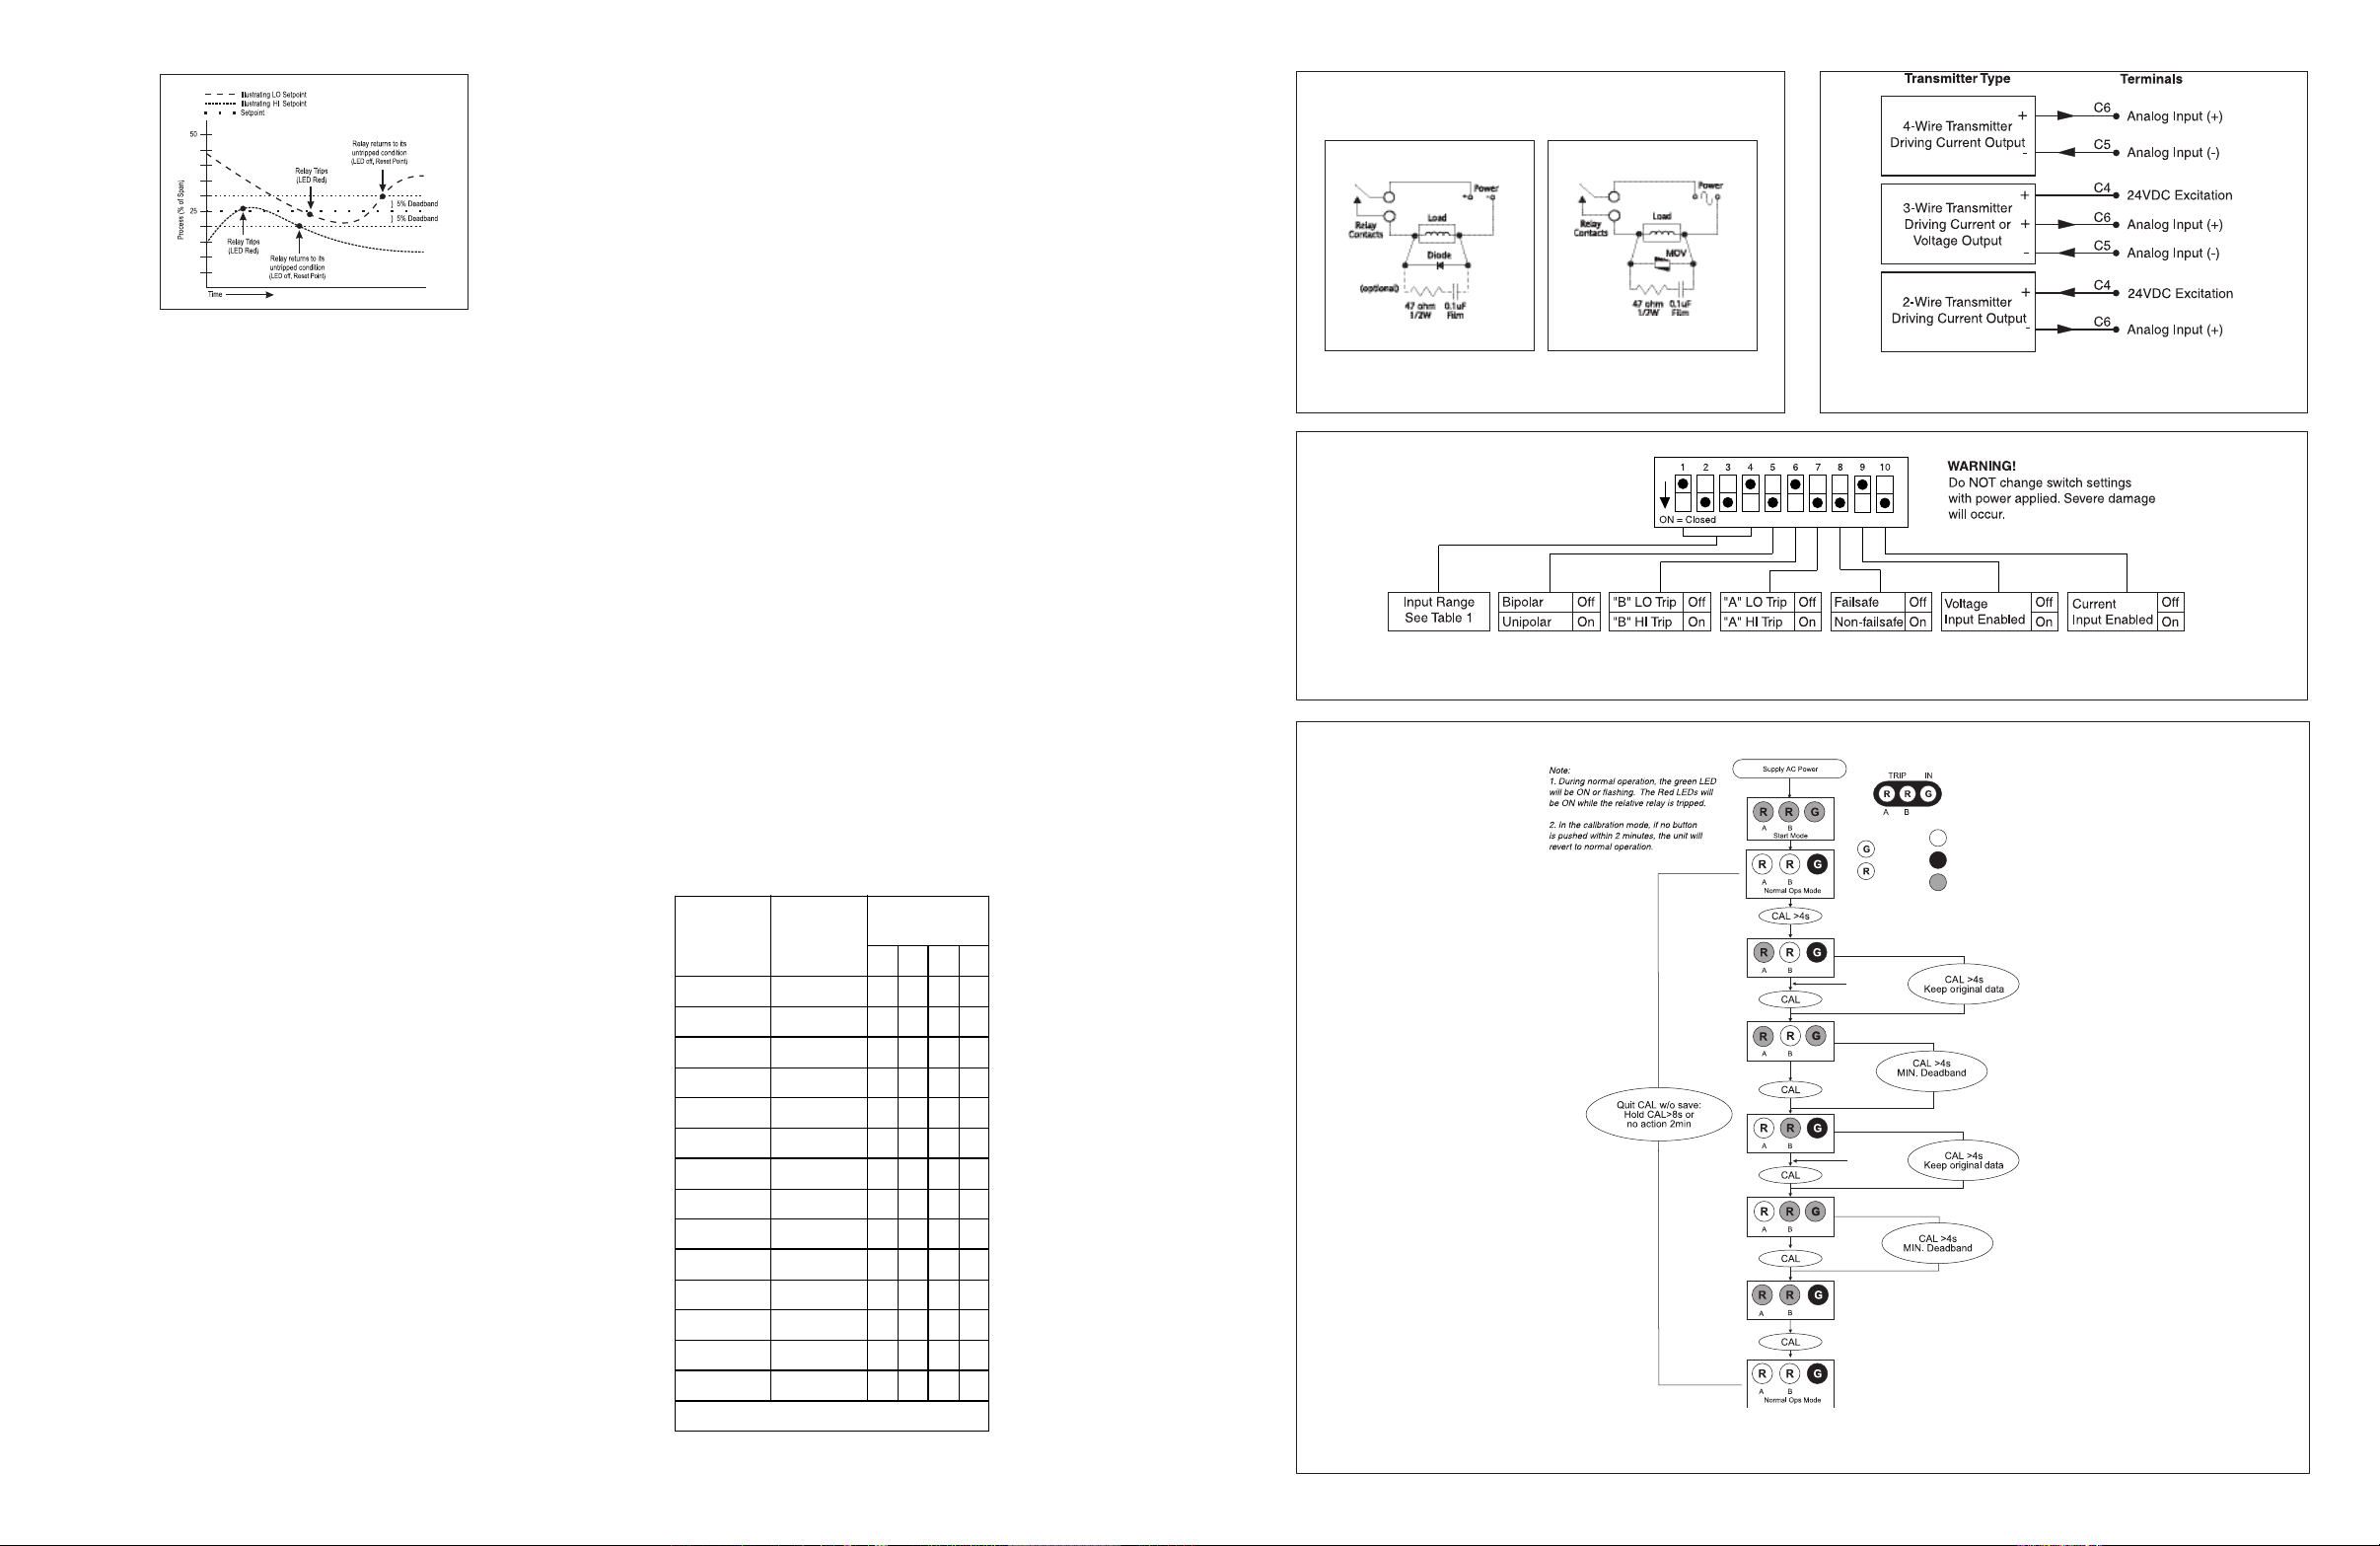
Figure 1: Limit alarm operation and effect of deadband.
WARNING: Do not change switch settings with power applied.
Severe damage will result!
level (green LED turns off) to the desired deadband level and
push the CAL button. The green LED will be on and the red
Relay"B"LEDwillbeashing.
5. Setpoint “B”: Input the desired trip level for Relay “B” and push
the CAL button. The green and the red Relay “B” LED will be
ashing.NotethatthegreenLEDwillstopashingwhenthe
input drops below a high setpoint or rises above a low setpoint.
6. Deadband “B”: For minimum deadband (approximately
0.25%), press and hold the CAL button for 4 seconds. For
high setpoints lower the input level (green LED turns off) to
the desired deadband point and push the CAL button. For low
setpoints increase the input level to the desired deadband level
and push the CAL button. The green LED will be on and both
theredLEDswillbeashing.
Figure 2: DC Inductive Loads
Figure 3: AC Inductive Loads
Figure 4: Typical Connections for Voltage or Current for
DRI-DC-LA
1. With the module removed from the rail and not powered, snap
off the face plate by lifting the right edge away from the heat
sink. Note the input switch (SW1) is located under the face plate.
Setpositions9&10forvoltageorcurrentinput(seeTable1).
2. Set positions 1 through 4 of input range switch “SW1” for the
desired input range (see Table 1).
3. Set position 5 of input range switch “SW1” to ON (closed) for
unipolar (e.g., zero based, 0-20mA) range or OFF (open) for
bipolar (e.g. -100% offset, -20 to 20mA) range.
4. Set positions 6 and 7 of input range switch “SW1” to ON for
a HI trip setpoint or OFF for a LO trip setpoint.
5. Set position 8 of input range switch “SW1” to ON for nonfailsafe operation or OFF for failsafe operation (e.g., alarm trips
on power failure).
Calibration
1. After conguring the DIP switches, connect the input to a
calibrated DC source and apply power. Refer to the terminal
wiringinthespecicationssection.
Note: For best results, calibration should be performed in the
operating environment, mounted on a DIN rail, allowing at least
one hour for thermal equilibrium of the system.
2.AfterapplyingpowertotheunitallthreeLEDswillashfor
approximately 10 seconds. Adjust the input signal level for the
Relay “A” setpoint. The green LED should be on. Press and
hold the CAL button for four seconds (until the red LED starts
ashing)toenterthecalibrationmode.ThegreenLEDwillbe
onandtheredRelay“A”LEDwillbebeashing.
NOTE:IfthegreenLEDisashing,theinputisoutofrange(i.e.
7%aboveorbelowtheconguredrange).Checktomakesure
theinputsignaliswithin the DIP switch conguration range.
Double check the DIP switch settings.
3. Setpoint "A": Input the desired trip level for Relay "A" and press
the CAL button. The green LED and the red Relay "A" LED will
beashing.NotethatthegreenLEDwillstopashingwhenthe
input drops below a high setpoint or rises above a low setpoint.
4. Deadband "A": For minimum deadband (approximately
0.25%), press and hold the CAL button for 4 seconds. For high
setpoints, lower the input level to the desired deadband point
and push the CAL button. For low setpoints increase the input
7. Press the CAL button once again to exit the calibration mode.
Check the setpoint and deadband to validate calibration.
Relay Protection and EMI Suppression
When switching inductive loads, maximum relay life and transient
EMI suppression is achieved by using external protection (see
Figures 2 and 3). Place all protection devices directly across the
load and minimize lead lengths. For AC inductive loads, place
a properly rated MOV across the load in parallel with a series
RCsnubber.Usea0.01to0.1mFpulselmcapacitor(foilpolypropylenerecommended) of sufcientvoltage, and a47 ohm,
1/2W carbon resistor. For DC inductive loads, place a diode
across the load (PRV > DC supply, 1N4006 recommended) with
(+) to cathode and (-) to anode (the RC snubber is an optional
enhancement).
Table 1: DRI-DC-LA Input Range Switch
Figure 5: DRI-DC-LA Input Range/Function Selection (SW1) Factory Default Settings
Note: For voltage inputs Current Enable must be off. For current inputs Voltage Enable must be off.
Figure 6: DRI-DC-LA Calibration Flow Chart
 Loading...