

Page 1
User’s Guide
Shop online at
e-mail: [email protected]
For latest product manuals:
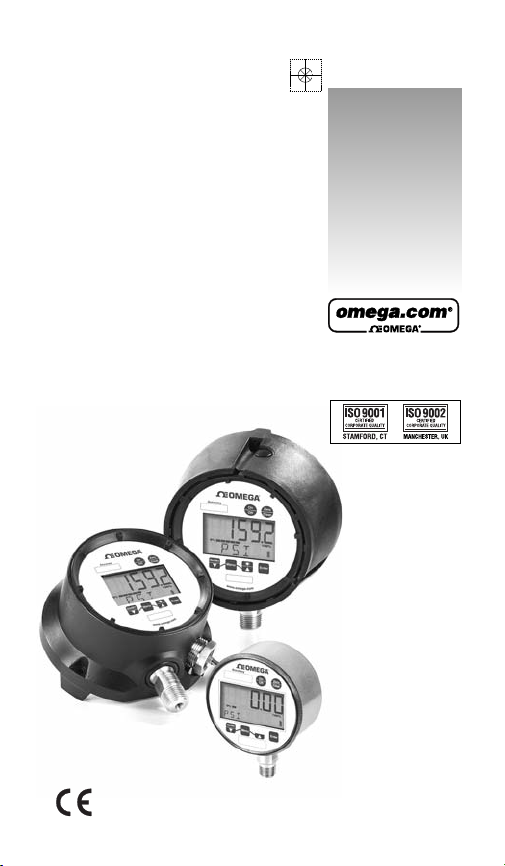
Digital Industrial Gauge
omega.com
omegamanual.info
DPG9031
DPG9131
DPG9231
DPG9046
DPG9146
DPG9246
DPG9045
DPG9145
DPG9245
DPG9030
DPG9130
DPG9230
Page 2

– 2–
Page 3

OMEGAnet®Online Service Internet e- mail
www.omega. com [email protected]
Servicing North America:
USA: One Omega Drive, Box 4047
ISO 9001 Certified Stamford CT 06907-0047
Canada: 976 Bergar
Tel: (203) 359-1660 FAX: (203) 359-7700
e-mail: [email protected]
Laval (Quebec) H7L 5A1, Canada
Tel: (514) 856-6928 FAX: (514) 856-6886
e-mail: [email protected]
For immediate technical or application assistance:
USA and Canada: Sales Service: 1-800-826-6342 / 1-800-TC-OMEGA
Mexico: En Espan˜ol: (001) 203-359-7803 e-mail: [email protected]
Customer Service: 1-800-622-2378 / 1-800-622-BEST
Engineering Service: 1-800-872-9436 / 1-800-USA-WHEN
TELEX: 996404 EASYLINK: 62968934 CABLE: OMEGA
FAX: (001) 203-359-7807 [email protected]
®
®
®
Servicing Europe:
Benelux: Postbus 8034, 1180 LA Amstelveen, The Netherlands
Czech Republic: Frystatska 184, 733 01 Karvina, Czech Republic
France: 11, rue Jacques Cartier, 78280 Guyancourt, France
Germany/Austria: Daimlerstrasse 26, D-75392 Deckenpfronn, Germany
United Kingdom: One Omega Drive, River Bend Technology Centre
ISO 9002 Certified Northbank, Irlam, Manchester
Tel: +31 (0)20 3472121 FAX: +31 (0)20 6434643
Toll Free in Benelux: 0800 0993344
e-mail: [email protected]
Tel: +33 (0)1 61 37 2900 FAX: +33 (0)1 30 57 5427
Toll Free in France: 0800 466 342
e-mail: [email protected]
Tel: +49 (0)7056 9398-0 FAX: +49 (0)7056 9398-29
Toll Free in Germany: 08
e-mail: [email protected]
M44 5BD United Kingdom
Tel: +44 (0)161 777 6611 FAX: +44 (0)161 777 6622
Toll Free in United Kingdom: 0800-488-488
e-mail: [email protected]
00 6
39 7678
It is the policy of OMEGA to comply with all worldwide safety and EMC/EMI regulations that
apply. OMEGA is constantly pursuing certification of its products to the European New Approach
Directives. OMEGA will add the CE mark to every appropriate device upon certification.
The information contained in this document is believed to be correct, but OMEGA Engineering, Inc. accepts
no liability for any errors i
WARNING: These products are not designed for use in, and should not be used for, human applications.
t contains, and reserves the right to alter specifications without notice.
– 3–
Page 4

Congratulations on your purchase of the Omega
®
digital industrial gauge. This feature-packed gauge
offers a menu-driven display for easy customization.
User selectable features include 12 units of measure-
ment, password protected calibration and disable
functions, adjustable bar graph and update rate. A
five digit display for maximum resolution is standard.
Optional 4-20mA output, switching and line- po
wer
add to the versatility of the gauge. With the range
printed on the keypad, Omega digital gauges meet
ASME B40.7 specification. See a complete listing of
product features and specifications on pages 18.
– 4–
Page 5

TABLE OF CONTENTS
Quick Reference ............................................6-7
Keypad Functions ..........................................8-9
• ON/OFF KEY
• ZERO/CLEAR KEY
• MIN/MAX KEY
(down arrow key)
• MENU KEY
• BACKLITE KEY
(up arrow key)
• ENTER KEY
MENU Functions (MENU Mode) ..............................10-17
• Engineering Units
• CONFIG Mode
• Set Password
• Recalibration of Gauge
• Zero Key Adjustment
• Disabling Menu Options
• Bar Graph Options
• Auto Off Options
• Update Options for Displayed Pressure
• Dampen
ing O
ptions
• Backlite Options (Backlite Optional)
• Set Switch(es) Option(s) (Switches Optional)
Specifications ................................................18
Ranges ........................................................19
Display Messages ..........................................19
Wiring Diagrams ........................................20-30
Gauge Installation & Maintenance ....................32-34
• Mounting
• Battery Replacement & Installation
– 5–
Page 6
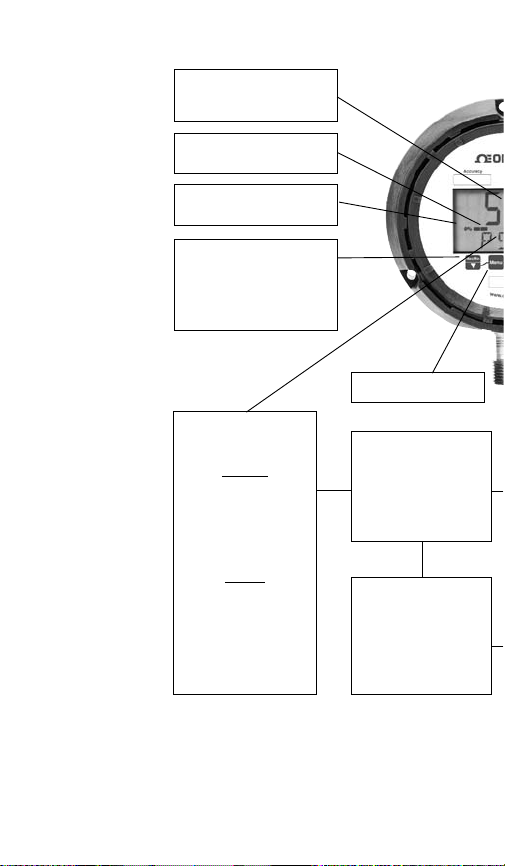
.88˝ high digital display (41⁄2˝ case)
.60 high digital display(3˝ case)
Bar graph
% of full scale
Flashing display when unit
pressured below zero
Press to indicate minimum
or maximum pressure
gauge has measured
Press again to return to
pressure units
UNITS (Pressure)
ENGLISH
INHG
PSI*
INH2O
@ 4°C, 20°C, 60°F
FTW
FTSW
METRIC
BAR
MBAR
KPA
CMH2O
KG/CM2
QUICK RE
Press to read menu
UPDATE RATE
(Pressure measurement
per second)
10x (100 MS)*
5x (200 MS)
2x (500 MS)
1x (1 Sec)
BACKLITE
(Off options)
Never
2 SEC
5 SEC*
15 MIN
30 MIN
– 6–
Page 7
FERENCE
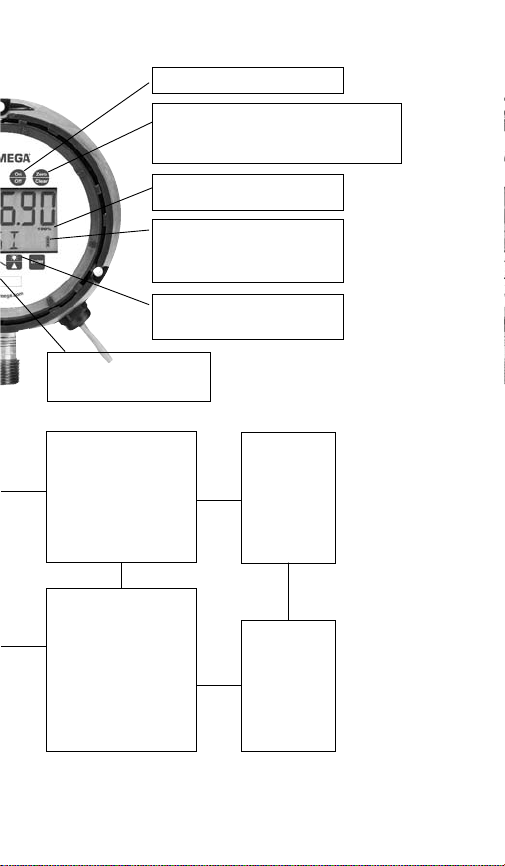
Range on keypad;
complies with ASME B40.7
AUTO OFF
(Turns unit off after
option selected)
2 minutes
5 minutes
15 minutes
30 minutes
DAMPENING
(Takes pressure reading
and averages
process pressure
Press to turn unit on or off
While in unit of measurement mode (eg: psi),
press the ZERO CLEAR button to rezero the
gauge. This feature functions when displayed
pressure is within ±5% or 10% of zero value
Flashing display when unit
pressurized beyond full-scale
This bar graph indicates battery level;
the more segments, the closer the
battery is to full charge (only dis-
played on units with battery
Press to turn backlite on or off
(backlite optional)
Never*
None*
Avg 2
Avg 4
Avg 6
Avg 8
CALIBRATE
Zero and span
adjustments,
password
protected
DISABLE
Allows for
“lockout” of
MENU
options
*Indicates Default
– 7–
Page 8
KEYPAD FUNCTIONS
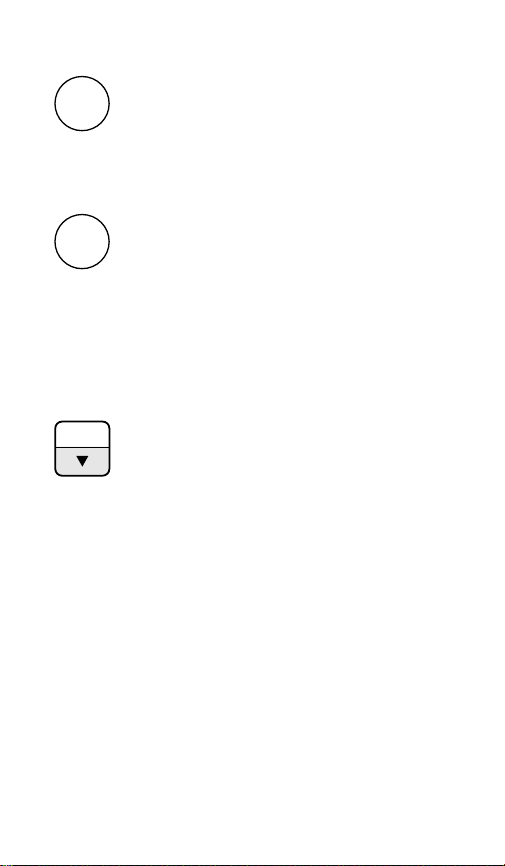
Turns the gauge on and off. When pressing the
ON/OFF
ON/OFF key while in the off position, gauge startup display first indicates the software version
followed by the model number and gauge pressure range. The gauge will then display indicated
pressure and be ready for use.
Press this key for one second prior to gauge
ZERO
usage to rezero any initial zero shift. If zero shift
CLR
is greater than programmed zero al
gauge will display OFSET (blinking) for 1 second, then return to the measure mode. To clear
minimum and maximum values, press
ZERO/CLR button (when min/max values are
indicated). Gauge will auto advance once zeroed.
lowance, t
he
MAX/MIN
The Max/Min key allows review of minimum and
maximum pressure values since unit start-up or
last push of the clear key. Press key to:
1) Indicate maximum pressure.
2) Indicate minimum pressure.
3) Exit MAX/MIN mode and return the unit to
pressure measurement mode. To clear minimum and maximum values press ZERO/CLR
key (must be in MAX/MIN mode).
(down arrow key) is used in the MENU
The
mode, see f
ollowing MENU key section.
– 8–
Page 9
MENU
Key for gauge
with Backlite
Key for gauge
without Backlite
displayed with
(up arrow
icon only)
EYPAD FUNCTIONS
K
This key allows for customization of the gauge.
Pressing the MENU key allows cycling through
the main MENU items; UNITS, CONFIG, GRAPH,
OFF, UPDAT & DAMP. Any item changed in the
Menu become the new default setting(s).
Revised settings are saved in the event of power
loss.
The
(up arrow key) or (down arrow key)
on the keypad allows for scrolling through the
MENU options to increase or decrease numeric
values as required. If in the menu mode, gauge
will automatically advance to measure mode
once selected MENU item has been set.
This key manually turns the backlite on or off.
five options are available. They include NEVER,
10 sec, 30, sec, 1 min, 5 min*. With the NEVER
option, the gauge BACKLITE will remain lit
whenever the gauge is in the ON mode or until
the BACKLITE button is pushed again. Options,
sec, 30 sec, 1 min, 5 min*. allow the BACK-
10
LITE to automatically turn-off after a selected
period of time.
To use the BACKLITE option:
Step 1: Press the MENU key.
Step 2: Press the
(up arrow key) or (down
arrow key) until the word LITE appears.
Step 3: Press ENTER.
Step 4: Press the
(up arrow key) or (down
arrow key) to select the BACKLITE option.
Step 5: Press the ENTER key to finalize your
choice of LITE
options.
– 9–
Page 10

KEYPAD FUNCTIONS
This key allows for selecting gauge features in the
ENTER
menu finalizing selection. Use of the enter key is
described throughout operating instructions.
MENU OPTIONS
UNITS: 12 units of measurement are available: psi, mmHG,
inH
O with three temperature options: 20°C, 60°F, 4°C*,
2
mBar, inHg, ftH
O, mPa, kPa, kg/cm2and bar.
2
Step 1: Press the MENU key until the word UNITS appears.
Step 2: Press Enter.
Step 3: Press the
(up arrow key) or (down arrow
key) to select the required unit of measure.
Step 4: Press ENTER to finalize the UNIT selection.
Note: For inH
press the
0 range with three temperature options,
2
(up arrow key) and (down arrow key) to
select the desired temperature, then press ENTER to finalize the UNIT selection.
CONFIG: This option allows access to additional Menu
options. Options include:
• ENTPW or enter password (this appears as a sub-menu
in the CONFIG mode if a user password has been set).
• RECAL (allows for zero, span and mid-scale calibra-
on of the gauge).
ti
• 0bUTN or zero key (allows for adjustment of % of
range that can be zeroed),
• dISAb, allows for disabling MENU options.
• SETPW: This feature allows for a user defined numer-
ic password. If a user password is not set, all features
in the CONFIG mode will be accessible without a
password. If a user password is set, all items in the
CONFIG menu options are accessible with or without
r password. If a user password is programmed,
a use
it will be required to access the CONFIG menu options.
*Indicates default.
– 10 –
Page 11

K
EYPAD FU
NCTIONS
MENU FUNCTIONS
How to Use Your Menu Functions
To set a user password (SETPW):
Step 1: Press the Menu key on the keypad
Step 2: Press the
(up arrow key) or (down arrow
key) until the word CONFIG appears.
Step 3: Press Enter. The word SETPW appears on the
gauge display
Step 4: Press Enter. A five digit numeric password is now
required.
Step 5: Press the
(up arrow key) or (down arrow
key) on the keypad to select the first digit of the password.
Step 6: Press ENTER.
Step 7: Repeat until the five-digit password is shown on
the gauge display.
Step 8: Press ENTER.
Note: to erase password at any time while in the SETPW
(set password) mode, press the ZERO/CLEAR key. The
user will be prompted to reprogram the password once the
five-digit password is entered. The gauge will display SAVE.
Step 9: Press Enter to save the
password setting.
ENTPW: Once a user password has been established and
entry into the CONFIG mode is required, the user will be
prompted to ENTPW or enter password.
Follow setup steps 4-8 above.
RECAL: or recalibrate allows for zero, mid-scale, full-scale
and factory default calibration of the gauge. The RECAL
feature also allows for recalibration of gauges with
4-20mA output.
*Indicates default.
– 11 –
Page 12

ENU FUNCTIONS
M
To use RECAL option:
Step 1: Press the Menu key on the keypad
Step 2: Press the
(up arrow key) or (down arrow
key) on the keypad until the word CONFIG appears.
Step 3: Press Enter.
Step 4: Enter user password if it has been programmed.
Step 5: Press
(up arrow key) or (down arrow key)
until the word RECAL appears.
Step 6: Press Enter.
Step 7: The gauge will now flash between INPUT and unit
of measure on the lower line and .00 on the top line. Apply
zero pressure to the gauge.
Step 8: Press Enter. Zero pressure is now set.
Step 9: The gauge will display full-scale pressure. Apply
full-scale pressure to the gauge.
Step 10: Press Enter. Full-scale pressure is now set.
Step 11: The gauge will now display mid-scale pressure.
Apply mid-scale pressure to the gauge.
Step 12: Press Enter. Mid-scale pressure is now set.
Note: For compound ranges this recalibration is zero,
(
full-scale, mid-scale and full-vac.)
FOR FACTORY CALIBRATED SETTINGS:
Step 13: To reinstate factory calibrated settings for zero,
full-scale and mid-scale press the
(down arrow key)
Menu key until the word FACT appears.
Step 14: Press Enter. Factory calibration settings are now
reinstated.
Step 15: After zero, full-scale and/or mid-scale or factory
ault calibration have been set, the word SAVE appears
def
on the gauge display.
Step 16: Press Enter to finalize calibration.
*Indicates default.
– 12 –
Page 13

MENU FUNCTIONS
Note: Calibration of Zero, mid-scale or span can be set independently of each other. For instance, if only full-scale calibration is required, press the
(down arrow key) until the
gauge display indicates full-scale pressure. Press Enter and
proceed as indicated above. Calibration of zero, midscale and
full-scale is recommended when recalibrating the gauge.
ZERO KEY (0bUTN): This feature allows
the user to select
percent of full-scale at which the gauge can be rezeroed
using the Zero/Clear key on the keypad. Options include 5%
full-scale*, 10% full-scale or DISAB (disable of the zero key).
To use ZERO option:
Step 1: Press the Menu key on the keypad.
Step 2: Press the
(up arrow key) or (down arrow
key) until the word CONFIG appears.
Step 3: Press Enter.
Step 4: Enter user password, if it has been
Step 5: Press the
(up arrow key) or (down arrow
programmed.
key) until the word 0bUTN (zero key) appears.
Step 6: Press Enter.
Step 7: Press the
(up arrow key) or (down arrow
key) to select 5PCT (5% full-scale), dISAb (disable zero
key) or 10PCT (10% full-scale).
Step 8: Press Enter to finalize the selection.
DISAB: or disable: This feature allows the user to dISAb
(or disable) or ENAb (enable) items in
the MENU. Some
keypad keys can also be enabled or disabled. Any or all
MENU items can be enabled or disabled.
To use DISAB option:
Step 1: Press the Menu key on the keypad.
Step 2: Press the
(up arrow key) or (down arrow
key) until the word dISAb appears.
*Indicates default.
– 13 –
Page 14

MENU FUNCTIONS
Step 3: press ENTER. The current setting (ENAB or dISAB)
will be displayed.
Step 4: Press the
(up arrow key) or (down arrow
key) on the keypad to select a setting.
Step 5: Press ENTER To finalize the setting.
GRAPH: This option allows the user to change the BAR
graph on the gauge display to correspond to any desired
pressure within the pressure limits of the gauge. This
option is useful w
hen identifying a select portion of the
full-scale range of the gauge. The default setting for the
GRAPH is zero and full-scale pressure. For compound
gauges, the default setting for zero is set at full-scale vacuum. Full-scale pressure is set at the positive pressure as
displayed on the gauge keypad.
For gauges supplied with the 4-20mA output option, the
default is 4mA equals 0% of the bar graph and 2
0 mA
equals 100% of the bar graph.
Changing the bar graph to a pressure other than 0 and
100% of range will also change the 4-20mA output to correspond with the new bar graph pressures for 0 and 100%.
To use GRAPH option:
Step 1: Press the MENU key.
Step 2: Press the
(up arrow key) or (down arrow key)
on the keypad until the word until the word GRAPH appears.
Step 3: Press ENTER . The gauge display will
indicate the
set full scale pressure range setting on the top line. The
middle line indicates the bar graph at 100% of full-scale.
The bottom line of the display will indicate SETFS to set
the full-scale range as displayed by the bar graph and 420mA.
Step 4: Press the
(up arrow key) or (down arrow key)
on the keypad to increase or decrease gauge value at
100% of range.
*Indicates default.
– 14 –
Page 15

MENU FUNCTIONS
Step 5: Press the ENTER key to finalize your choice. The
gauge display will now display SET. After two seconds the
screen will display the pressure value for 0% on the top
line. The middle line indicates the bar graph at 100% of
fullscale. The bottom line will display SET 0.
Step 6: Press the
(up arrow key) or (down arrow
key) on the keypad to increase or decrease gauge value at
0% of range.
Step 7: Press
the ENTER key to finalize your choice. The
new values for the bar graph and 4/20mA settings have
now been saved.
OFF: This option sets the amount of time before the gauge will
turn itself off. Offerings are Never*, 30MIN,10MIN, 5MIN, 2
MIN.
To use the OFF option:
Step 1: Press the MENU key.
Step 2: Press the
(up arrow key) or (down arrow
key) until the word OFF appears.
Step 3: Press ENTER.
Step 4: Press the
(up arrow key) or (down arrow
key) to select the desired OFF time.
Step 5: Press the Enter key to finalize the OFF setting.
UPDATE: This option allows for changing the rate at which
pressure is updated on the display screen. This feature is
useful with rapid changes in process pressure that may
cause flutter of the display. Options are 100ms*, 1 sec,
500ms and 200ms, updates per second or 100ms*.
ustomer processes vary, update rates should be
Since c
selected based on the application.
To use the UPDATE option:
Step 1: Press the MENU key.
*Indicates default.
– 15 –
Page 16

M
ENU FUNCTIONS
Step 2: Press the (up arrow key) or (down arrow
key) until the word UPDATE appears.
Step 3: Press Enter.
Step 4: Press the
(up arrow key) or (down arrow
key) to select an update rate.
Step 5: Press ENTER to finalize the selection.
DAMP or dampening: with five different options, this mode
allows for taking process pressure readings and averaging
them. This option is particularly useful to stabilize m
inor
process fluctuations. The options are NONE*, AVG 8, AVG
6, AVG 4, AVG 2.
Step 1: Press the MENU key until the word dAMP appears.
Step 2: Press Enter
Step 3: Press the
(up arrow key) or (down arrow
key) to select a dampening option.
Step 4: Press the ENTER key to finalize your Damp option.
(This Menu item is only seen on units with the switch option)
SWSET: Allows for setting switch setpoints. The gauge is
offered with one or two SPDT switches. If (one) SPDT
switch is ordered the menu option is SW1. If (two) SPDT
switches are ordered, the MENU options are SW1 and SW2.
Step 1: Press the MENU key.
Step 2: Press the
(up arrow key) or (down arrow
key) on the keypad to select the switch to be set. (If two
switches are present.)
Step 3: Press ENTER. The top line of the gauge display will
indicate pressure a
t 60% of the full-scale gauge range* or
the most recent switch setpoint. The middle line of the display will indicate a bar graph that displays the pressure
position within the pressure range. The bottom line will
display SETPT (blinking).
*Indicates default.
– 16 –
Page 17

M
ENU FUNCTIONS
Note: Setpoints are limited to the full-scale pressure range
of the gauge.
Step 4: Press the
(up arrow key) or (down arrow key)
on the keypad to increase or decrease switch set-point
Step 5: Press the ENTER key to finalize switch setpoint. The
gauge will display SET. After two seconds, the top line will
indicate RETRP pressure. The bottom line will read SET.
Step 6: Repeat above to set RETRP (ret
rip value) If the
gauge is supplied with (one) setpoint, the screen will
advance to the measurement mode. If (two) switches are
supplied the display will advance to SW2.
Repeat the aforementioned if the gauge is supplied with
two switches.
Notes: The bar graph will increase or decrease as any
setpoint pressure is adjusted. The bar graph indicates
switch setpoint position within the full-scale pressure
ran
ge of the gauge.
The switch setpoint unit of pressure measurement corresponds with the current set unit of measure of the gauge.
If gauge unit of measurement is changed after switch(es)
is set, switch setpoint(s) will automatically be updated to
correspond with revised unit of measurement. Switch
deadband is the difference between the SETPT (setpoint)
and the RETRP (retrip) pressure.
– 17 –
Page 18

DIGITAL INDUSTRIAL GAUGE SPECIFICATIONS:
Type: Battery: DPG9030, DPG9032 (3˝)
Accuracy: .25% Full Scale, terminal point
Case Size: 3˝, 41⁄2˝
Case Material: 3˝ SS, 4
Case Encl. Rating: Weatherproof, IP65
Wetted Materials: 17-4 SS (sensor), 316SS (socket)
Socket Size:
Socket Location: Lower, 3, 9 and 12 o’clock
Ranges: Vac. thru 20,000 psi (see eng. units below for other units)
Operating Temp.: 14/140°F (10/60°C)
Storage Temp.: –4/158°F (-20/70°C)
DISPLAY
Type: LCD
Display Digits: Five (5)
Character Height: 3˝ .60˝, 41⁄2˝ .88˝
Backlite: Optional
Bar Graph: Yes
Battery Life: 3˝ >1000 hrs., 41⁄2˝ >3600 hrs.
Agency Approvals: CE, FM* (Intrinsically Safe Class1, Div 1), CSA and CENELEC
KEYPAD FUNCTIONS
On/Off: Manually turns unit on and off (auto off options in menu)
Zero/Clear: Zeros display or clears min. and max. values when displayed
Min/Max
(down) Stores min and max values, arrow key allows for
Arrow Key: scrolling thru menu items
Menu Key: Provides access to menu options
Backlite
(up) Manually turns backlite on and off (auto off options in
Arrow Key: menu), arrow key allows for five menu options.
(Backlite optional) arrow key allows for scrolling thru menu options
Enter: Selects items in the menu
MENU MODE
Engineering Units: 10 units of measurement are available; psi, In. H
Configuration Mode Allows for changes to default settings of gauge
(Config): Including zero disable feature
Bar Graph (Graph): Allows for adjustment of bargraph and 4-20 (optional feature)
Auto Off (Off): Allows for changes to auto off of gauge, five options:
Update Rate
(Update): Four options: 100 ms, 200 ms, 500 ms, 1 sec
Dampening (Damp): Six options: None, average, 2, 4, 6, 8 times per 100ms
Backlite: Five options: Never, 10 sec., 30 sec., 1 min., 5 min.
Field Recalibration: Allows for recalibration of zero, midscale and span
OPTIONS
4-20mA Display: 12-36 Vdc, mA with unlimited turndown (within gauge range)
Line Powered: 12-36 Vdc, 2VA max.
Switching*: (1) or (2) SPDT switches,(max. contact 30Vdc, 1 amp,
DPG9045, DPG9046 (4.5˝)
Loop: DPG9130 , DPG9031 (3˝)
DPG9145, DPG9146 (4.5˝)
Line: DPG9230, DPG9231 (3˝)
DPG9245, DPG9246
1
⁄2˝ fiberglass reinforced thermoplastic or
black epoxy coated aluminum
1
⁄4 or 1⁄2 NPT, JIS, DIN, SAE, (1⁄2 NPT only with 41⁄2˝ case,
others on application)
*FM is not available with the following: 4
case, SPDT switch option(s) (XU1, U2) or Backlite (XBL) option)
three temp. options: 20°C, 60°F, 4°C*), Ft. H
kPa, kg/cm2, Bar, inHg and mmHg
1
⁄2˝ polypropylene
O (with
2
O, mPa, mBar,
2
(up)
Never, 2 min., 5 min., 15 min., 30 min.
(password protected)
125Vac .5 Amp, Switches adjustable to 100% of range
– 18 –
Page 19
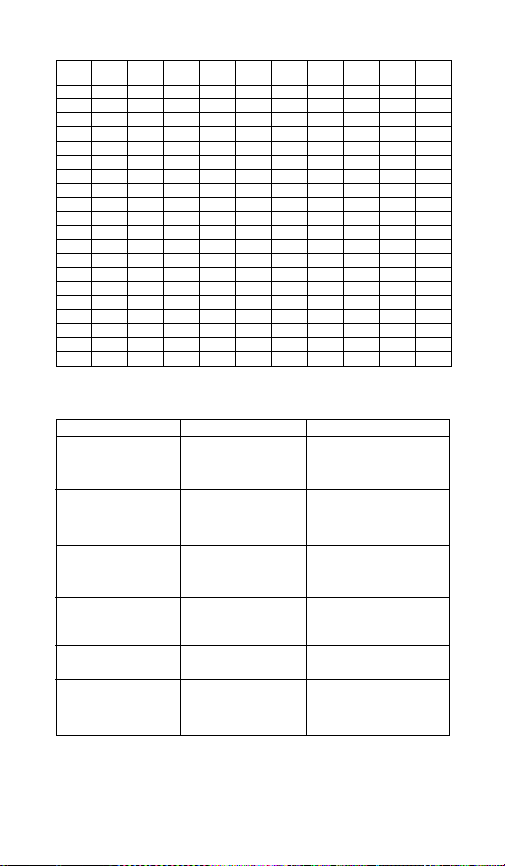
DIGITAL INDUSTRIAL GAUGE RANGES:
Comp. mmHg in.Hg In. mm ft. Bar/
psi (psi) (press.) (press.) H2OH2O mBar H2O mPa kPa ksc
-15/0/15
1500 60 800 60 250 30 6 200 2
-15/0/30
2000 100 1000 100 300 60 10 300 4
-15/0/60
30
60 300 300 600 300 800 16
100 400 400 1000 400 1000 25
160 600 600 1500 600 1600 40
200 800 800 2000 1000 2500 60
300 1000 1000 2500 4000 100
600 1600 4000 6000 160
800 2000 5000 8000 250
1000 3000 400
1500 6000 500
2000 800
3000 1000
5000
8000
10,000
15,000
20,000
3000 160 160 400 160 50 400 6
-15/0/100
200 200 500 200 600 10
DISPLAY MESSAGES:
Display/Problem Description Action
No Battery Icon
Display (applicable to
gauges with batteries
OFSET (blinking)
Menu button disabled
easure
m
Unit of
selected in Menu
displays N/A
I can’t set the
password I want
I can’t access items in
the main Menu
Gauge has <10%
battery life left
Zero/Clear button
pushed when pressure
displayed is beyond set
rezero pressure limit
Gauge is in
Max/Min mode
Resolution at full scale
pressure range
exceeds 50,000 counts
00000 is not a valid
password
Items that cannot be
accessed have been
disabled
Replace batteries
Only rezero the gauge within
limits of setting in Menu
Push Max/Min button until
unit of measure is displayed
on keypad
Choose another unit of
measure
Select a different password
Enable item(s) in the Menu.
See Menu/CONFIG and
diSAb or DISABLE
– 19 –
Page 20
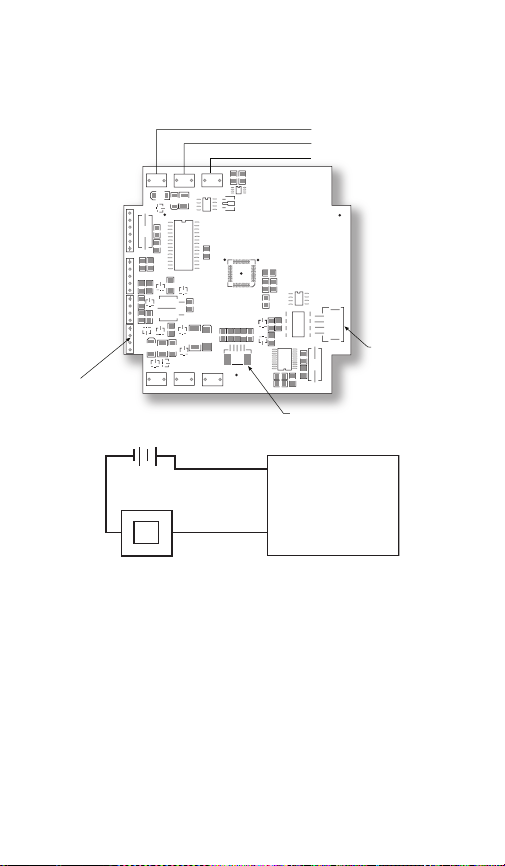
WIRING DIAGRAM
Loop Powered 4-20mA (Type DPG 9130, DPG 9131,
DPG 9145, DPG 9146)
2 conductor, 20 AWG shielded
Red (+ exec.) A
Black (– exec.) B
Q1
FID6
C1
R8
FO7
Q2
R1
C10
J3
C4
V+
V–
R5
L1
C9
R6
C6
R4
Keypad Input
C5
C8
DQ/TB 2003
Shield
J2
U4
Y2
GAUGE
FID2
Sensor Input
LOOP+
LOOP–
T9
D10
C14
T7
D9
D7
Y1
F1D1
V1
C3
J1
1
R2
C7
1
R7
J6
R22
R20 C17
D11
D14
D1
U7
R14R16
R24
R18
J3
D5
R23
1
D13
J7
Q4
D16
D6
D15
D12
D3
T12
–
POWER
SUPPL Y
–
METER
PLC
SCADA
T10
GND
+24V
+
+
Battery Input
Installation Procedure
U5
C15
Red
Black
R19
ECND
R21
V6
T8
Q3
C2
FID5
FID4
V2
R9
R10
R11
R12
R13
D8
J5
FID3
T11
321CO21–
EGND
(+)
(A)
(–)
(B) (–)
ESD precautions should be taken. See page 33 for details.
1. Ensure all power is off/disconnected from the circuit.
2. Connect the red wire (A) to the positive power terminal.
3. Connect the black wire (B) to the positive terminal on the
meter.
4. Connect the negative side of the meter to
power terminal.
the negative
Note: Meter should be installed on the black wire only.
– 20 –
Page 21

Load Limitations 4-20mA Output Only
1000
750
500
OPERATING
250
RL-Loop Resistance in Ohms
REGION
0
0 362010
Loop Supply Voltage (Vdc)
30
Vdc MIN = 12V + [0.022A X (RL) ]
= RS+ R
R
L
W
RL= Loop Resistance (ohms)
= Sense Resistance (ohms)
R
S
= Wiring Resistance (ohms)
R
w
– 21 –
Page 22
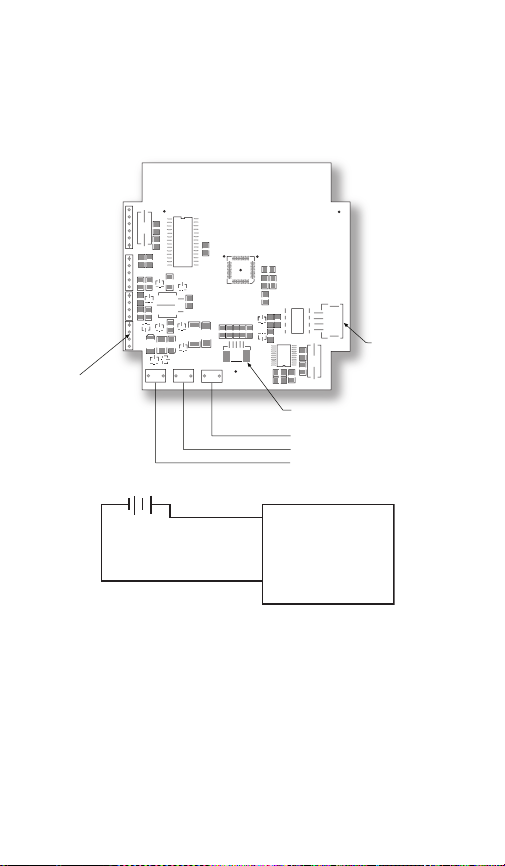
WIRING DIAGRAM
POWER
Line Powered (Type DPG 9230, DPG 9231, DPG 9245,
DPG 9246)
2 conductor, 20 AWG shielded
Y1
F1D1
Battery Input
SUPPL Y
–
J1
1
R2
1
J6
R22
R14R16
J3
1
J7
Q4
D16
D12
C3
C7
R7
R20 C17
D14
D1
R24
R23
D13
T10
+24V
+
V1
U7
D5
D6
D15
D3
T12
GND
Red (C)
Black (D)
C2
FID5
FID6
C1
FID4
D11
C15
R18
R8
V2
FO7
R1
C10
Q1
R9
R10
R11
R12
R13
D8
T11
EGND
FID3
321CO21–
(+)
C9
R6
Q2
J5
J3
C4
V+
( – )
V–
R5
L1
C5
C8
DQ/TB 2003
C6
R4
Keypad Input
Shield
Black (–exec.) D
Red (+exec.) C
FID2
J2
U4
Y2
GAUGE
Sensor Input
Installation Procedure
ESD precautions should be taken. See page 33 for details.
1. Ensure all power is off/disconnected from the circuit.
2. Connect the red wire (C) to the positive power terminal.
3. Connect the black wire (D) to the negative power terminal.
– 22 –
Page 23
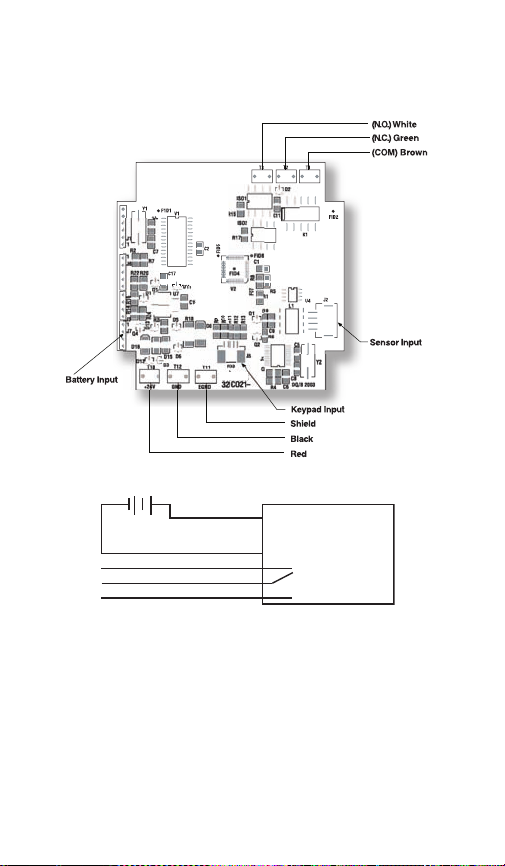
WIRING DIAGRAM
Line Powered with (1) SPDT switch (Type DPG 9230_-S1,
DPG 9231_-S1, DPG 9245_-S1, DPG 9246_-S1)
5 conductor, 22 AWG shielded
(–exec.) F
(+exec.) E
POWER
SUPPL Y
+
–
Red (E)
Black (F)
White (NO)
Brown (Common)
Green (NC)
(+)
V+
(–)
GAUGE
V–
•
Installation Procedure
ESD precautions should be taken. See page 33 for details.
1. Ensure all power is off/disconnected from the circuit.
2. Connect the red wire (E) to the positive power terminal.
3. Connect the black wire (F) to the negative power terminal.
Wiring the Switch:
ally Open: Use the white and brown wires.
Norm
Normally Closed: Use the green and brown wires.
– 23 –
Page 24
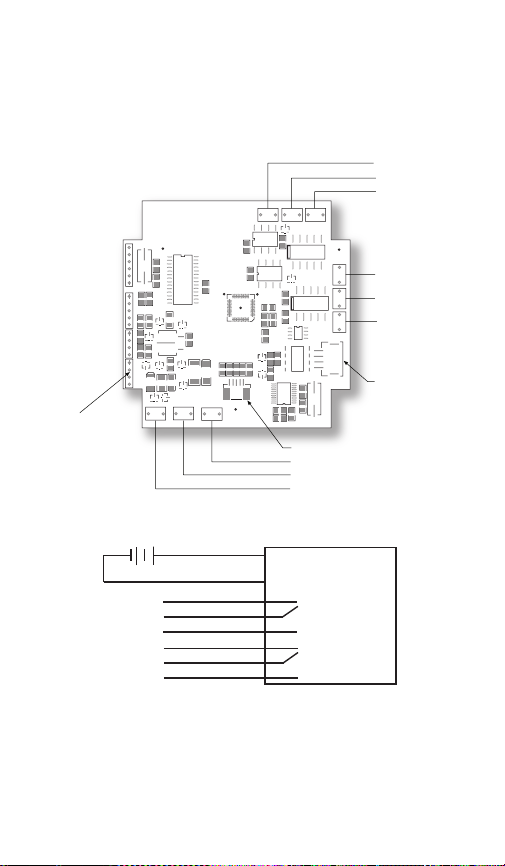
WIRING DIAGRAM
Line Powered with (2) SPDT switches (Type DPG 9230_-S2,
DPG 9231_-S2, DPG 9245_-S2, DPG 9246_-S2)
8 conductor, 22 AWG shielded
SWITCH 1
(N.O .) White
(N. C. ) Green
(COM) Brown
FID2
SWITCH 2
T5
(N.O.) Yellow
T6
(N.C.)
Blue
(COM) Orange
T4
J2
Sensor Input
Y2
Battery Input
J1
1
R2
1
J6
R22
R14 R16
J3
1
J7
Q4
D16
POWER
SUPPLY
–
Switch 1
Switch 2
Y1
F1D1
V1
C3
C7
R7
R20 C17
D14
D1
U7
R24
D5
R23
D13
D6
D15
D12
D3
T12
T10
GND
+24V
Red (G)
+
Black (H)
Blue (NO)
Brown (Common)
Orange (NC)
Violet (NO)
Grey (Common)
Yellow (NC)
T2
T3
FID6
C1
R8
FO7
C10
Q1
Q2
J3
C4
D2
C11
C13
C12
R5
R1
L1
C9
R6
C6
R4
Shiel d
Blac k (–exec.) G
Red (+exec.) H
V+
V–
T1
K1
K2
K2
U4
C5
C8
DQ/TB 2003
Ke ypad Input
GAUGE
•
ISO 1
R15
ISO 2
R17
C2
FID5
FID4
D11
V2
C15
R1 8
R9
R10
R11
R12
R13
D8
J5
FID3
T11
321CO21–
EGND
(+)
(–)
•
– 24 –
Page 25

Installation Procedure
ESD precautions should be taken. See page 33 for details.
1. Ensure all power is off/disconnected from the circuit.
2. Connect the red wire (G) to the positive power terminal.
3. Connect the black wire (H) to the positive meter terminal.
Wiring Switch 1:
Normally Open: Use the white and brown wires.
Normally Closed: Use the green and brown wires.
Wiring Switch 2:
Normally Open: Use
Normally Closed: Use the blue and orange wires.
the yellow and orange wires.
– 25 –
Page 26
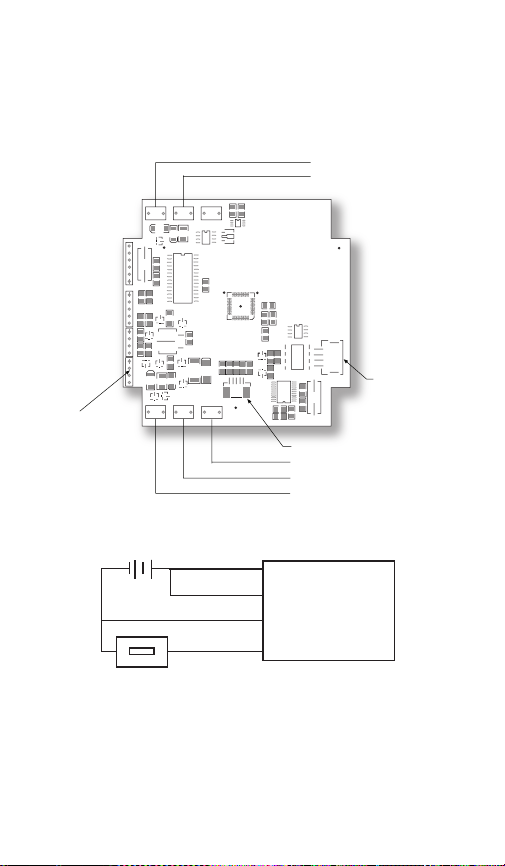
WIRING DIAGRAM
Line Powered/Loop Powered 4-20mA (Type DPG 9230_-A,
DPG 9131_-A, DPG 9245_-A, DPG 9246_-A)
4 conductor, 20 AWG shielded
Red (I)
Black (J)
LOOP–
D10
C14
V1
U7
D5
D6
D15
D3
T12
GND
Red (I)
White (K)
Green (L)
Black (J)
+
R19
ECND
R21
T9
D11
V6
T8
Q3
U5
C2
FID5
FID6
C1
FID4
R8
V2
FO7
C15
R18
T11
EGND
R1
C10
Q1
R9
R10
R11
R12
R13
D8
FID3
321CO21–
C9
R6
Q2
J5
J3
C4
FID2
R5
J2
U4
L1
C5
C8
DQ/TB 2003
C6
R4
Sensor Input
Y2
Keypad Input
Shield
Green (L)
White (K)
(+)
V+
(+)
(–)
(–)
GAUGE
V–
Battery Input
–
POWER
SUPPLY
–
METER
PLC
SCADA
J1
1
R2
1
J6
R22
R14R16
J3
1
J7
Q4
D16
D12
LOOP+
T7
D9
D7
Y1
C3
C7
R7
R20 C17
D14
D1
R24
R23
D13
T10
+24V
+
F1D1
– 26 –
Page 27

Installation Procedure
ESD precautions should be taken. See page 33 for details.
1. Ensure all power is off/disconnected from the circuit.
2. Connect the white wire (K) to the positive power terminal.
3. Connect the green wire (L) to the negative power terminal.
4. Connect the red wire (I) to the positive power terminal.
5. Connect the black wire (J) to the positive meter terminal.
6. Connect the n
meter terminal.
Note: Meter should be installed on the black wire only.
If red/black wires are connected prior to the green/white
and power is connected, output may be damaged due to
overloading.
Warning: Using multiple power sources for line and loop
power is not recommended as it may cause damage to
the unit.
egative power terminal with the negative
– 27 –
Page 28
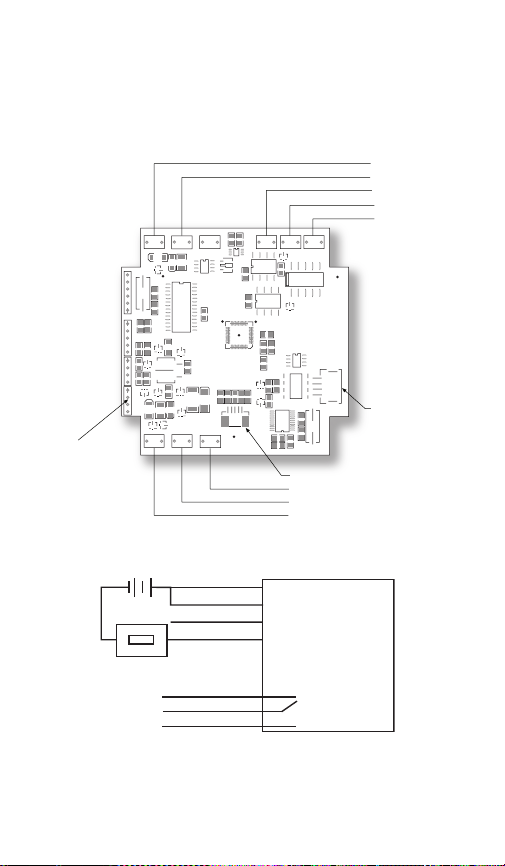
WIRING DIAGRAM
Line Powered/Loop Powered 4-20mA with (1) SPDT switch
(Type DPG 9230_-AS1, DPG 9231_-AS1, DPG 9245_-AS1,
DPG 9346_-AS1)
7 conductor, 22 AWG shielded
Red M
Blac k N
(N.O.) Blue
(N.C.) Orange
(COM) Brown
FID2
J2
Sensor Input
Y2
Battery Input
–
POWER
SUPPLY
–
METER
PLC
SCADA
Switch
J1
1
R2
1
J6
R22
R14R16
J3
1
J7
Q4
D16
LOOP+
T7
D9
D7
Y1
C3
C7
R7
R20 C17
D14
D1
R24
R23
D13
D12
T10
+24V
LOOP–
ECND
T9
D10
C14
F1D1
U5
V1
C2
D11
U7
C15
R18
D5
D8
D6
D15
D3
T12
T11
GND
EGND
Red (M)
+
White (P)
Green (O)
Black (N)
+
Blue (NO)
Brown (Common)
Orange (NC)
T8
R19
Q3
R15
FID5
R9
R10
FID3
321CO21–
T2
T3
FID6
C1
R8
FO7
Q1
Q2
J5
C11
R5
R1
C10
C9
R6
J3
C4
R4
V+
V–
T1
D2
K1
K2
U4
L1
C5
C8
DQ/TB 2003
C6
Keypad Input
Shield
Green (–exec.) O
White (+exec .) P
GAUGE
R21
V6
ISO1
ISO2
R17
FID4
V2
R11
R12
R13
(+)
(+)
(–)
(–)
•
– 28 –
Page 29

Installation Procedure
ESD precautions should be taken. See page 33 for details.
1. Ensure all power is off/disconnected from the circuit.
2. Connect the white wire (P) to the positive power terminal.
3. Connect the green wire (O) to the negative power terminal.
4. Connect the red wire (M) to the positive power terminal.
5. Connect the black wire (N) to the positive meter terminal.
6. Connect the n
meter terminal.
Note: Meter should be installed on the black wire only.
If red/black wires are connected prior to the green/white
and power is connected, output may be damaged due to
overloading.
Wiring the Switch:
Normally Open: Use the blue and brown wires.
ormally Closed: Use the orange and brown wires.
N
egative power terminal with the negative
– 29 –
Page 30
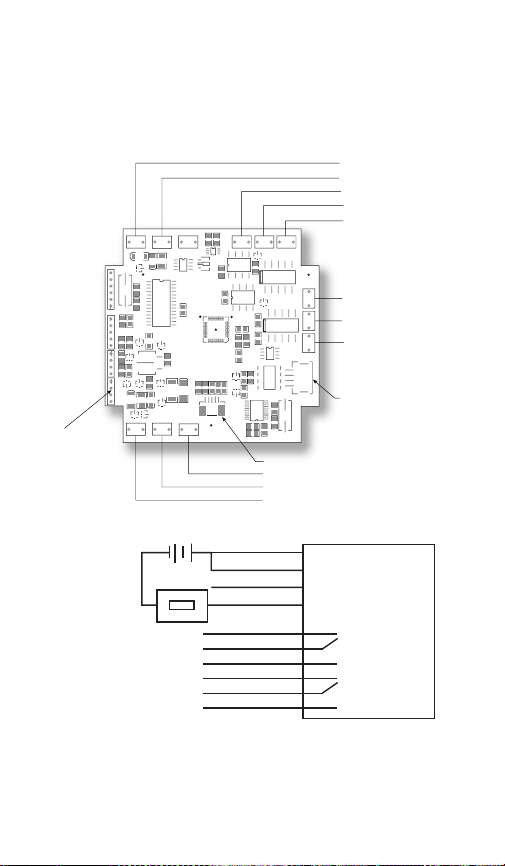
WIRING DIAGRAM
Line Powered/Loop Powered 4-20mA with (2) SPDT switches
(Type DPG 9230_-AS2, DPG 9231_-AS2, DPG 9245_-AS2,
DPG 9246_-AS2) 10 conductor, 22 AWG shielded
SWITCH 1
Red Q
Blac k R
(N.O .) Blue
(N.C .) Orang e
Battery Input
LOOP+
T7
D9
D7
Y1
C3
J1
1
R2
C7
1
R7
J6
R22
R20 C17
D14
D1
R14 R16
R24
J3
R23
1
D13
J7
Q4
D16
D12
T10
+24V
LOOP–
D10
F1D1
D5
D15
D3
GND
–
–
Switch 1
Switch 2
T9
C14
V1
D11
U7
R18
D6
T12
POWER
SUPPLY
METER
PLC
SCADA
ECND
T8
U5
C2
C15
D8
T11
EGN D
+
R19
T3
R21
V6
ISO1
Q3
R15
C11
ISO2
R17
FID5
FID6
C13
C1
C12
FID4
R8
V2
R5
FO7
R1
C10
Q1
R9
R1 0
R1 1
R1 2
R1 3
C9
R6
Q2
J5
J3
FID3
C4
321CO21–
R4
Red (Q)
White (T)
Green (S)
Black (R)
+
Blue (NO)
Brown (Common)
Orange (NC)
Violet (NO)
Grey (Common)
Yellow (NC)
T2
T1
D2
K1
K2
K2
U4
L1
C5
C8
DQ/TB 2003
C6
Ke ypad Input
Shiel d
Green
Whit e
(+)
Y2
(-exec.) S
(+exec.) T
(+)
(–)
(–)
(COM) Br ow n
FID2
SWITCH 2
T5
(N.C.) Violet
T6
(N.O .) Ye llo w
(COM) Gre y
T4
J2
Sensor Input
V+
GAUGE
V–
•
•
– 30 –
Page 31

Installation Procedure
ESD precautions should be taken. See page 33 for details.
1. Ensure all power is off/disconnected from the circuit.
2. Connect the white wire (T) to the positive power terminal.
3. Connect the green wire (S) to the negative power terminal.
4. Connect the red wire (Q) to the positive power terminal.
5. Connect the black wire (R) to the positive meter terminal.
6. Connect the negati
meter terminal.
Note: Meter should be installed on the black wire only.
Wiring Switch 1:
Normally Open: Use the blue and brown wires.
Normally Closed: Use the orange and brown wires.
Wiring Switch 2:
Normally Open: Use the violet and grey wires.
Normally Closed: Use the yellow and grey wires.
ve power terminal with the negative
– 31 –
Page 32

GAUGE INSTALLATION:
The Ashcroft digital industrial gauge comes standard with
1
either
⁄4 or 1⁄2 NPT connection. Good piping practices recommend using teflon tape or a pipe sealant on the gauge
threads. Utilize a
9
⁄16˝ (3˝ case), 5⁄8˝ (41⁄2˝ case) wrench on
the wrench flat of the gauge to tighten the gauge to the
process.
NEVER TIGHTEN GAUGE THREADS BY HOLDING THE
BODY OF THE GAUGE. DOING SO MAY DAMAGE THE
GAUGE AND MAKE
HE GAUGE INOPERABLE.
T
Battery Installation and Replacement:
The Type 2074 comes standard with batteries installed.
The 3˝ case uses qty (2) AA alkaline batteries, the 41⁄2˝ case
uses qty (2) C alkaline batteries. Use either Duracell
MN2400, MX2400 or Energizer E92BP, X92RP AAA alkaline, non-rechargeable batteries.
Batteries have a life of approximately 1500 hours (3˝ case).
3600 hours (4
1
⁄2˝ case). Battery life is dependent on gauge
usage, backlite settings and power off settings. When the
lower bar of the battery icon of the gauge display flashes,
the gauge has approximately 7 hours of life remaining.
To replace the batteries (3˝ case):
1) Remove the single screw on the back of the gauge case.
2) Hold the keypad in the palm of hand.
3) Carefully remove the two batteries from the ho
lder and
replace batteries. Use only AA alkaline non-rechargeable
batteries
1
To replace the batteries (4
⁄2˝ case):
1) Remove the ring on the front of the gauge case.
2) Looking at the gauge case, carefully pull the front face
out of the case.
3) Lay the gauge, face down on a flat surface.
4) Carefully remove the two batteries from the holder and
replace the batteries. Use only C alkaline non-recharge-
e batteries.
abl
– 32 –
Page 33

ESD PRECAUTIONS
Care should be taken to minimize exposure to ESD.
Proper proto-call should be followed as outlined in:
ANSI/ESD S20.20-2007
ESD ADV1.0-2009
ANSI/ESD S541-2008
Additional ESD Precautions on Proper Handling:
Avoid carpets in cool, dry areas as well as other static
generating materials such as plastic, cellophane, paper, or
cardboard.
Leave digital gauges in their anti-static packagi
ready to be installed.
Dissipate static electricity before handling the digital
gauge or using keypad by touching a well-grounded metal
object, such as the system unit unpainted metal chassis.
If possible, use antistatic devices, such as wrist straps and
floor mats.
When installing batteries, avoid touching (including clothing) the contacts and components.
When making wiring connection to dig
nals, place digital gauge on grounded mat prior to making
connection, and take care to avoid touching (including
clothing) any components.
Take care when connecting or disconnecting cables. A
damaged cable can cause a short in the electrical circuit.
When disconnecting a cable, always pull on the cable connector, case, or strain-relief loop, not on the cable itself.
ital g
ntil
ng u
auge termi-
– 33 –
Page 34
4.00
1.860
.17
CLAMPING RING (1278G ONLY)
WASHER
SPACER POST
(3 REQ’D)
“B” (3 REQ’D)
PANEL
MOUNTING
RING
6˝ RING
DIA.
5.65˝
PANEL
OPENING
5/16˝ MAX PANEL
THICKNESS
Notes:
1) Do not mix ages or brands of batteries.
2) Do not replace batteries in hazardous areas.
3) To provide maximum battery life, replace both batteries
4) To provide maximum battery life, replace both batteries.
Pipe to which gauge is attached must be properly
grounded.
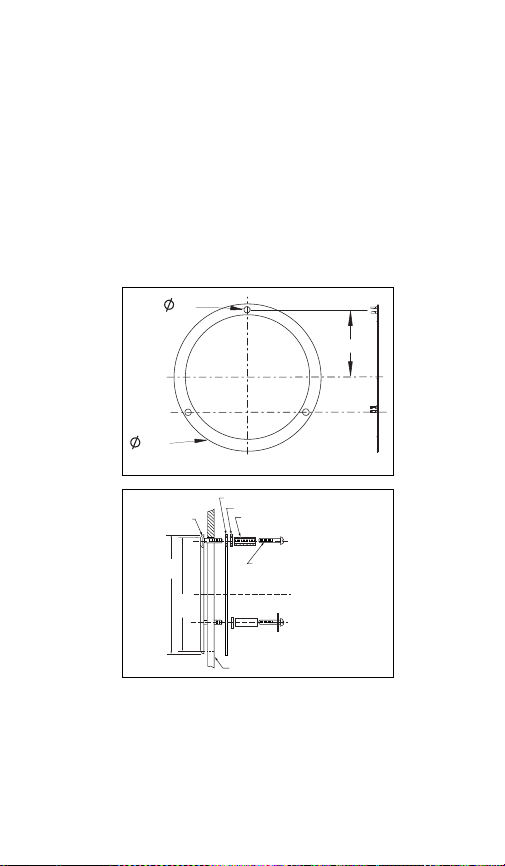
PANEL MOUNTING DIMENSIONS:
HOLE
CUTOUT
DIAMETER
3.406
13
⁄32±1⁄32)
(3
3˝ CASE
41⁄2˝ CASE
– 34 –
Page 35

OMEGA ENGINEERING, INC. warrants this unit to be free of defects in materials and
workmanship for a period of 13 months from date of purchase. OMEGA’s Warranty
adds an additional one (1) month grace period to the normal one (1) year product
warranty to cover handling and shipping time. This ensures that OMEGA’s customers
receive maximum coverage on each product.
If the unit malfunctions, it must be returned to the factory for evaluation. OMEGA’s
Customer Service Department will issue an Authorized Return (AR) number immediately upon phone or written request. Upon examination by OMEGA, if the unit is found to
be defective, it will be repaired or replaced at no charge. OMEGA’s WARRANTY does not
apply to defects resulting from any action of the purchaser, including but not limited to
mishandling, improper interfacing, operation outside of design limits, improper repair, or
unauthorized modification. This WARRANTY is VOID if the unit shows evidence of having
been tampered with or shows evidence of having been damaged as a result of excessive
corrosion; or current, heat, moisture or vibration; improper specification; misapplication;
misuse or other operating conditions outside of O
wear are not warranted, including but not limited tocontact points, fuses, and triacs.
OMEGA is pleased to offer suggestions on the use of its various products. However,
OMEGA neither assumes responsibility for any omissions or errors nor assumes liability for any damages that result from the use of its products in accordance with
information provided by OMEGA, either verbal or written. OMEGA warrants only
that the parts manufactured by it will be as specified and free of defects. OMEGA
MAKES NO OTHER WARRANTIES OR REPRESENTATIONS OF ANY KIND WHATSOEVER, EXPRESS OR IMPLIED, EXCEPT THAT OF TITLE, AND ALL IMPLIED WARRANTIES INCLUDING ANY WARRANTY OF MERCHANTABILITY AND FITNESS FOR
A PARTICULAR PURPOSE ARE HEREBY DISCLAIMED. LIMITATION OF LIABILITY:
The remedies of purchaser set forth herein are exclusive, and the total liability of
OMEGA with respect to this order, whether based on contract, warranty, negligence, indemnification, strict liability or otherwise, shall not exceed the purchase
price of the component upon which liability is based. In no event shall OMEGA be
liable for consequential, incidental or special damages.
CONDITIONS: Equipment sold by OMEGA is not intended to be used, nor shall it be
used: (1) as a “Basic Component” under 10 CFR 21 (NRC), used in or with any nuclear
installation or activity; or (2) in medical applications or used on humans. Should any
Product(s) be used in or with any nuclear installation or activity, medical application,
used on humans, or misused in any way, OMEGA assumes no responsibility as set forth
in our bas ic WARRANTY / DISCLAI MER la nguage, and, ad ditionally, purchaser will
indemnify OMEGA and hold OMEGA harmless from any liability or damage whatsoever
arising out of the use of the Product(s) in such a manner.
Direc t al l warr anty and r epair requests/ inquiries to the OMEGA Customer Service
Department. BEFORE RETURNING ANY PRODUCT(S) TO OMEGA, PURCHASER MUST
OBTAI N AN AUT HORIZ ED R ETURN (A R) N UMBER FR OM O MEGA’S CUSTOM ER
SERVICE DEPARTMENT (IN ORDER TO AVOID PROCESSING DELAYS). The assigned AR
numbe r shou ld the n be marked on the outside of the re turn p ackage and o n any
correspondence.
The purchas er i s res ponsibl e for shi pping charges, freig ht, insurance and prope r
packaging to prevent breakage in transit.
FOR WARRANTY RETURNS, please have
the following information available
BEFORE contacting OMEGA:
1. Purchase Order number under which
the product was PURCHASED,
2. Model and serial number of the product
under warranty, and
3. Repair instructions and/or specific
problems relative to the product.
OMEGA’s policy is to make running changes, not model changes, whenever an improvement is possible.
This affords our customers the latest in technology and engineering.
OMEGA is a registered trademark of OMEGA ENGINEERING, INC.
© Copyright 2004 OMEGA ENGINEERING, INC. All rights reserved. This document may not be copied, pho-
tocopied, reproduced, translated, or reduced to any electronic medium or machine-readable form, in whole
or in part, without the prior written consent of OMEGA ENGINEERING, INC.
WARRANTY/DISCLAIMER
MEGA’s control. Components which
RETURN REQUESTS/INQUIRIES
FOR NON-WARRANTY REPAIRS,
sult OMEGA for current repair charges.
Have the following information available BEFORE contacting OMEGA:
1. Purchase Order number to cover the
COST of the repair,
2. Model and serial number of the prod-
uct, and
3. Repair instructions and/or specific
problems relative to the product.
con-
– 35 –
Page 36

Where Do I Find Everything I Need for
Process Measurement and Control?
OMEGA…Of Course!
TEMPERATURE
˛
Thermocouple, RTD & Thermistor Probes, Connectors, Panels & Assemblies
˛
Wire: Thermocouple, RTD & Thermistor
˛
Calibrators & Ice Point References
˛
Recorders, Controllers & Process Monitors
˛
Infrared Pyrometers
PRESSURE, STRAIN AND FORCE
˛
Transducers & Strain Gages
˛
Load Cells & Pressure Gages
˛
Displacement Transducers
˛
Instrumentation & Accessories
FLOW/LEVEL
˛
Rotameters, Gas Mass Flowmeters & Flow Computers
˛
Air Velocity Indicators
˛
Turbine/Paddlewheel Systems
˛
Totalizers & Batch Controllers
pH/CONDUCTIVITY
˛
pH Electrodes, Testers & Accessories
˛
Benchtop/Laboratory Meters
˛
Controllers, Calibrators, Simulators & Pumps
˛
Industrial pH & Conductivity Equipment
DATA ACQUISITION
˛
Data Acquisition & Engineering Software
˛
Communications-Based Acquisition Systems
˛
Plug-in Cards for Apple, IBM & Compatibles
˛
Datalogging Systems
˛
Recorders, Printers & Plotters
HEATERS
˛
Heating Cable
˛
Cartridge & Strip Heaters
˛
Immersion & Band Heaters
˛
Flexible Heaters
˛
Laboratory Heaters
ENVIRONMENTAL
MONITORING AND CONTROL
˛
Metering & Control Instrumentation
˛
Refractometers
˛
Pumps & Tubing
˛
Air, Soil & Water Monitors
˛
Industrial Wat
˛
er & Wastewater Treatment
pH, Conductivity & Dissolved Oxygen Instruments
– 36 –
M-4226/0711
 Loading...