

Page 1
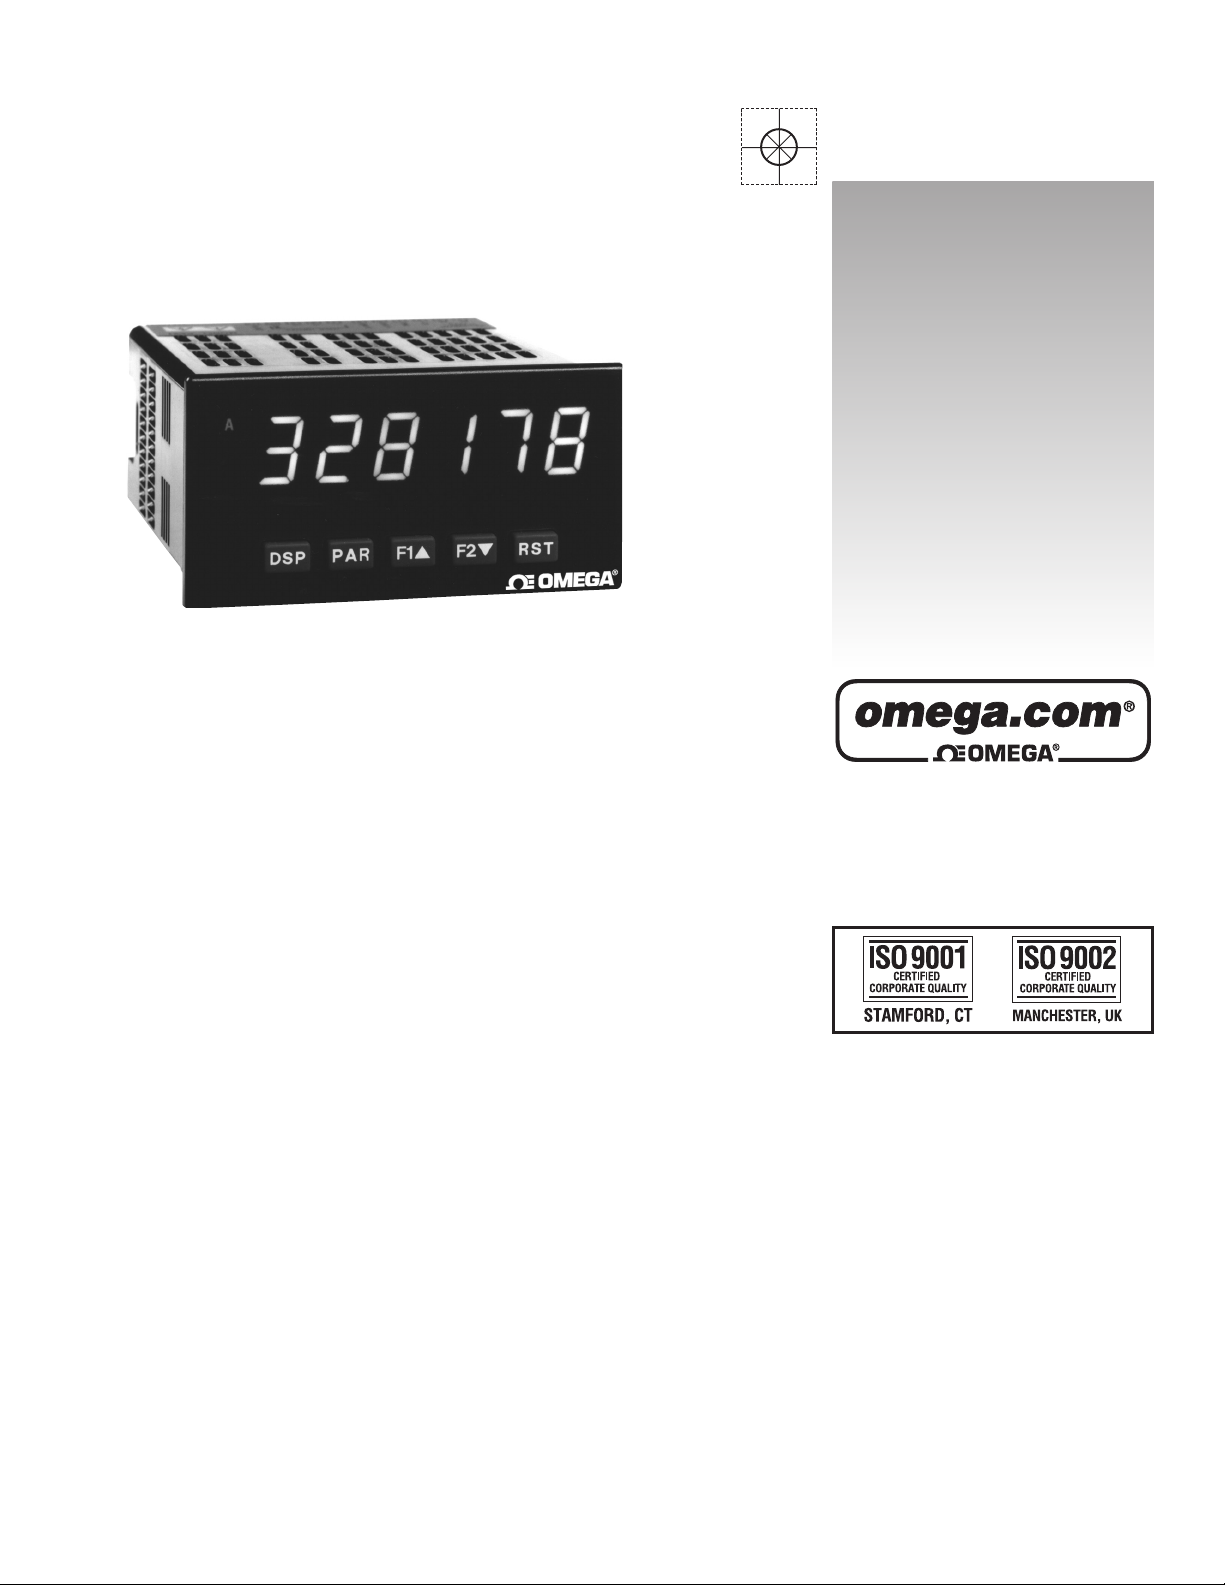
User’s Guide
Shop online at
omega.com
e-mail: [email protected]
For latest product manuals:
omegamanual.info
DPF9100/DPF9101
DPF9200/DPF201
DPF9300/DPF9301
Digital Input Panel Meters
LP0704C
Page 2

®
OMEGAnet
OMEGAnet
U.S.A.: One Omega Drive, P.O. Box 4047
U.S.A.: One Omega Drive, P.O. Box 4047
ISO 9001 Certified Stamford, CT 06907-0047
ISO 9001 Certified Stamford, CT 06907-0047
TEL: (203) 359-1660 FAX: (203) 359-7700
TEL: (203) 359-1660 FAX: (203) 359-7700
e-mail: [email protected]
e-mail: [email protected]
Canada: 976 Bergar
Canada: 976 Bergar
Laval (Quebec) H7L 5A1, Canada
Laval (Quebec) H7L 5A1, Canada
TEL: (514) 856-6928 FAX: (514) 856-6886
TEL: (514) 856-6928 FAX: (514) 856-6886
e-mail: [email protected]
e-mail: [email protected]
For immediate technical or application assistance:
For immediate technical or application assistance:
U.S.A. and Canada: Sales Service: 1-800-826-6342/1-800-TC-OMEGA
U.S.A. and Canada: Sales Service: 1-800-826-6342/1-800-TC-OMEGA
Customer Service: 1-800-622-2378/1-800-622-BEST
Customer Service: 1-800-622-2378/1-800-622-BEST
Engineering Service: 1-800-872-9436/1-800-USA-WHEN
Engineering Service: 1-800-872-9436/1-800-USA-WHEN
Mexico: En Español: (001) 203-359-7803 e-mail: [email protected]
Mexico: En Español: (001) 203-359-7803 e-mail: [email protected]
®
Online Service
Online Service
omega.com
omega.com
Servicing North America:
Servicing North America:
Internet e-mail
Internet e-mail
®
®
®
®
®
®
Servicing Europe:
Servicing Europe:
Czech Republic: Frystatska 184, 733 01 Karviná, Czech Republic
Czech Republic: Frystatska 184, 733 01 Karviná, Czech Republic
TEL: +420 (0)59 6311899 FAX: +420 (0)59 6311114
TEL: +420 (0)59 6311899 FAX: +420 (0)59 6311114
Toll Free: 0800-1-66342
Toll Free: 0800-1-66342
e-mail: [email protected]
e-mail: [email protected]
Germany/Austria: Daimlerstrasse 26, D-75392 Deckenpfronn, Germany
Germany/Austria: Daimlerstrasse 26, D-75392 Deckenpfronn, Germany
TEL: +49 (0)7056 9398-0 FAX: +49 (0)7056 9398-29
TEL: +49 (0)7056 9398-0 FAX: +49 (0)7056 9398-29
Toll Free in Germany: 0800 639 7678
Toll Free in Germany: 0800 639 7678
e-mail: [email protected]
e-mail: [email protected]
United Kingdom: One Omega Drive, River Bend Technology Centre
United Kingdom: One Omega Drive, River Bend Technology Centre
ISO 9002 Certified Northbank, Irlam, Manchester
ISO 9002 Certified Northbank, Irlam, Manchester
M44 5BD United Kingdom
M44 5BD United Kingdom
TEL: +44 (0)161 777 6611 FAX: +44 (0)161 777 6622
TEL: +44 (0)161 777 6611 FAX: +44 (0)161 777 6622
Toll Free in United Kingdom: 0800-488-488
Toll Free in United Kingdom: 0800-488-488
e-mail: [email protected]
e-mail: [email protected]
It is the policy of OMEGA Engineering, Inc. to comply with all worldwide safety and EMC/EMI
It is the policy of OMEGA Engineering, Inc. to comply with all worldwide safety and EMC/EMI
regulations that apply. OMEGA is constantly pursuing certification of its products to the European New
regulations that apply. OMEGA is constantly pursuing certification of its products to the European New
Approach Directives. OMEGA will add the CE mark to every appropriate device upon certification.
Approach Directives. OMEGA will add the CE mark to every appropriate device upon certification.
The information contained in this document is believed to be correct, but OMEGA accepts no liability for any
The information contained in this document is believed to be correct, but OMEGA accepts no liability for any
errors it contains, and reserves the right to alter specifications without notice.
errors it contains, and reserves the right to alter specifications without notice.
WARNING : These products are not designed for use in, and should not be used for, human applications.
WARNING : These products are not designed for use in, and should not be used for, human applications.
Page 3
C
U
R
L
US LISTED
IND. CONT. EQ.
51EB
COUNT, DUAL COUNTER, RATE AND SLAVE DISPLAY
0.56” RED SUNLIGHT READABLE DISPLAY
VARIABLE INTENSITY DISPLAY
10 POINT SCALING FOR NON-LINEAR PROCESSES (DPF93)
FOUR SETPOINT ALARM OUTPUTS (W/Option Card)
RETRANSMITTED ANALOG OUTPUT (W/Option Card) (DPF93)
COMMUNICATION AND BUS CAPABILITIES (W/Option Card) (DPF93)
PROGRAMMING SOFTWARE (DPF93)
ETHERNET(W/ External Gateway) (DPF93)
NEMA 4X/IP65 SEALED FRONT BEZEL
GENERAL DESCRIPTION
The Digital Input Panel Meters offer many features and performance
capabilities to suit a wide range of industrial applications. Available in three
different models, DPF92 Counter/Dual Counter, DPF91 Rate Meter and the
DPF93 which offers both counting and rate in the same package. Refer to pages
5 - 6 for the details on the specific models. The DPF92 and DPF91 offer only the
Setpoint Option, while the DPF93 is the fully featured version offering all the
capabilities as outlined in this bulletin as well as a slave display feature. The
optional plug-in output cards allow the opportunity to configure the meter for
present applications, while providing easy upgrades for future needs.
The meters employ a bright 0.56" LED display. The meters are available with
a red sunlight readable or standard green LED display. The intensity of the
display can be adjusted from dark room applications up to sunlight readable,
making it ideal for viewing in bright light applications.
The meters accept digital inputs from a variety of sources including switch
contacts, outputs from CMOS or TTL circuits, magnetic pickups and all
standard sensors. The meter can accept directional, uni-directional or Quadrature
signals simultaneously. The maximum input signal varies up to 34 KHz
depending on the count mode and function configurations programmed. Each
input signal can be independently scaled to various process values.
The Rate Meters provide a MAX and MIN reading memory with programmable
capture time. The capture time is used to prevent detection of false max or min
readings which may occur during start-up or unusual process events.
The meters have four setpoint outputs, implemented on Plug-in option cards.
The Plug-in cards provide dual FORM-C relays (5A), quad FORM-A (3A), or
either quad sinking or quad sourcing open collector logic outputs. The setpoint
alarms can be configured to suit a variety of control and alarm requirements.
Communication and Bus Capabilities are also available as option cards for
the DPF93 only. These include RS232 and RS485. Readout values and setpoint
alarm values can be controlled through the bus. Additionally, the meters have a
feature that allows a remote computer to directly control the outputs of the
meter. With an RS232 or RS485 card installed, it is possible to configure the
meter using Omega’s DP6-SOFT software. The configuration data can be saved
to a file for later recall.
A linear DC output signal is available as an optional Plug-in card for the DPF93
only. The card provides either 20 mA or 10 V signals. The output can be scaled
independent of the input range and can track any of the counter or rate displays.
Once the meters have been initially configured, the parameter list may be
locked out from further modification in its entirety or only the setpoint values
can be made accessible.
The meters have been specifically designed for harsh industrial environments.
With NEMA 4X/IP65 sealed bezel and extensive testing of noise effects to CE
requirements, the meter provides a tough yet reliable application solution.
SAFETY SUMMARY
All safety related regulations, local codes and instructions that appear in this
literature or on equipment must be observed to ensure personal safety and to
prevent damage to either the instrument or equipment connected to it. If
equipment is used in a manner not specified by the manufacturer, the protection
provided by the equipment may be impaired.
Do not use this meter to directly command motors, valves, or other actuators
not equipped with safeguards. To do so can be potentially harmful to persons or
equipment in the event of a fault to the meter.
CAUTION: Risk of Danger.
Read complete instructions prior to
installation and operation of the unit.
CAUTION: Risk of electric shock.
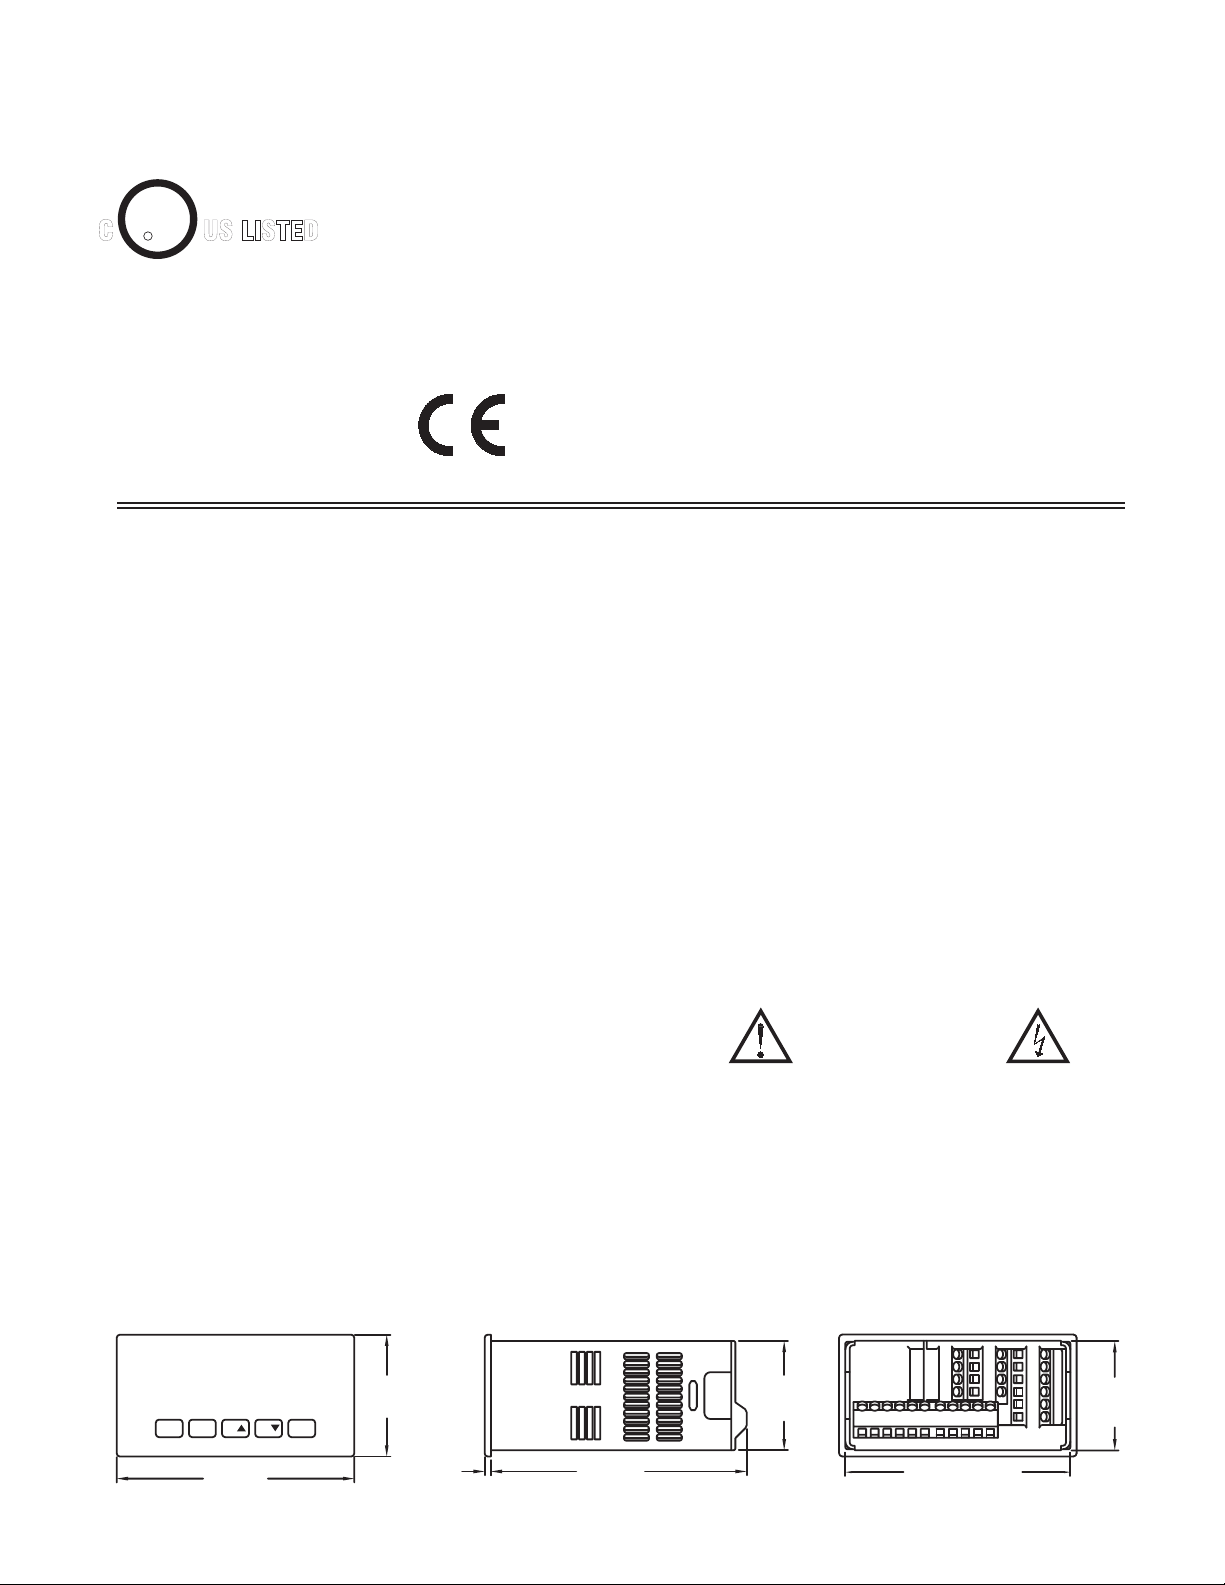
DIMENSIONS In inches (mm)
A
B
8.8.8.8.8.8
C
SP1 SP3
SP2
1
F2
F
PAR
3.80
(96.5)
SP4
RSTDSP
1.95
(49.5)
.10
(2.5)
Note: Recommended minimum clearance (behind the panel) for
mounting clip installation is 2.1" (53.4) H x 5" (127) W.
1.75
(44.5)
4.10
(104.1)
1
5
6
2
3
4
3.60 (91.4)
3
12
16
20
13
14
15
7
8
9
21
17
22
18
19
23
24
25
11
10
1.75
(44.5)
Page 4
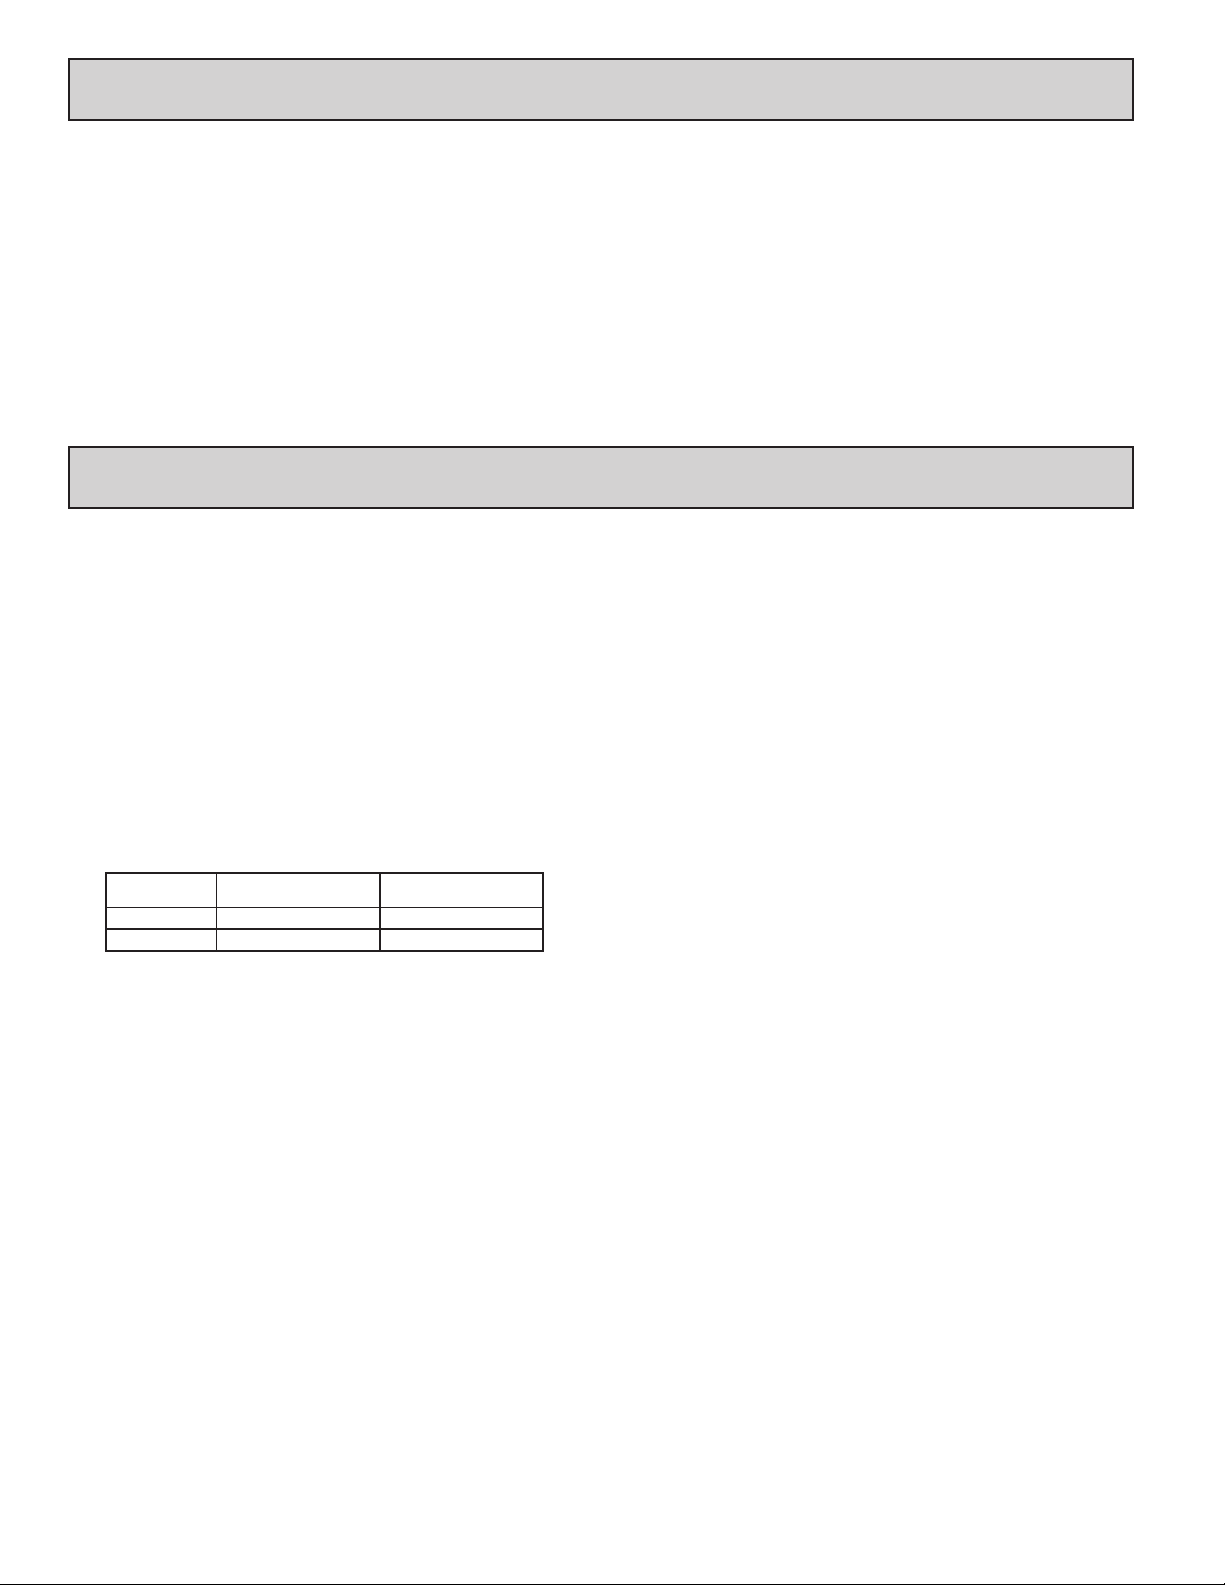
Table Of COnTenTs
General Meter Specifications .............4
DPF92 Counter ........................5
DPF91 Rate Meter .....................5
DPF93 Counter/Rate Meter. . . . . . . . . . . . . . . 6
Optional Plug-In Output Cards ............7
Installing the Meter .....................8
Setting the Jumper and DIP Switches ......8
Wiring the Meter ......................10
Reviewing the Front Buttons and Display ...12
Programming the Meter. . . . . . . . . . . . . . . . . 12
Factory Service Operations ..............29
Troubleshooting .......................30
Parameter Value Chart .................31
Programming Overview .................32
Installing Plug-In Cards ..................9
General MeTer speCifiCaTiOns
1. DISPLAY: 6 digit, 0.56" (14.2 mm) red sunlight readable or standard green
LED
2. POWER:
AC Versions:
AC Power: 85 to 250 VAC, 50/60 Hz, 18 VA
Isolation: 2300 Vrms for 1 min. to all inputs and outputs. (300 V working)
DC Versions:
DC Power: 11 to 36 VDC, 14 W
(derate operating temperature to 40° C if operating <15 VDC and three
plug-in option cards are installed)
AC Power: 24 VAC, ± 10%, 50/60 Hz, 15 VA
Isolation: 500 Vrms for 1 min. to all inputs and outputs (50 V working).
3. SENSOR POWER: 12 VDC, ±10%, 100 mA max. Short circuit protected
4. KEYPAD: 3 programmable function keys, 5 keys total
5. USER INPUTS: Three programmable user inputs
Max. Continuous Input: 30 VDC
Isolation To Sensor Input Commons: Not isolated
Logic State: Jumper selectable for sink/source logic
INPUT STATE
Active VIN < 0.9 VDC VIN > 2.4 VDC
Inactive VIN > 2.4 VDC VIN < 0.9 VDC
Response Time: 6 msec. typical; function dependent. Certain resets, stores
and inhibits respond within 25 µsec if an edge occurs with the associated
counter or within 6 msec if no count edge occurs with the associated
counter. These functions include , , , ,
SINKING INPUTS
5.1 KΩ pull-up to +12 V
SOURCING INPUTS
5.1 KΩ pull-down
, , and . Once activated, all functions are latched for
50 msec min. to 100 msec max. After that period, another edge/level may
be recognized.
6. MEMORY: Nonvolatile memory retains all programmable parameters and
display values when power is removed.
7. CERTIFICATIONS AND COMPLIANCES:
SAFETY
UL Recognized Component, File #E70366, UL61010A-1, CSA C22.2 No.
61010-1
Recognized to U.S. and Canadian requirements under the Component
Recognition Program of Underwriters Laboratories, Inc.
UL Listed, File #E313547, UL508, CSA C22.2 No. 14-M95
LISTED by Und. Lab. Inc. to U.S. and Canadian safety standards
Type 4X Enclosure rating (Face only), UL50
IEC 61010-1, EN 61010-1: Safety requirements for electrical equipment
for measurement, control, and laboratory use, Part 1.
IP65 Enclosure rating (Face only), IEC 529
IP20 Enclosure rating (Rear of unit), IEC 529
ELECTROMAGNETIC COMPATIBILITY
Emissions and Immunity to EN 61326:2006: Electrical Equipment for
Measurement, Control and Laboratory use.
Immunity to Industrial Locations:
Electrostatic discharge EN 61000-4-2 Criterion A
4 kV contact discharge
8 kV air discharge
Electromagnetic RF fields EN 61000-4-3 Criterion A
Fast transients (burst) EN 61000-4-4 Criterion A
Surge EN 61000-4-5 Criterion A
RF conducted interference EN 61000-4-6 Criterion A
Power freq magnetic fields EN 61000-4-8 Criterion A
AC power EN 61000-4-11
Short interruptions Criterion C
Emissions:
Emissions EN 55011 Class A
Notes:
1. Criterion A: Normal operation within specified limits.
2. Criterion C: Temporary loss of function where system reset occurs.
Refer to EMC Installation Guidelines section of the bulletin for additional
information.
8. ENVIRONMENTAL CONDITIONS:
Operating Temperature Range: 0 to 50°C (0 to 45°C with all three plug-in
cards installed)
Storage Temperature Range: -40 to 60°C
Operating and Storage Humidity: 0 to 85% max. relative humidity non-
condensing
Vibration According to IEC 68-2-6: Operational 5 to 150 Hz, in X, Y, Z
direction for 1.5 hours, 2 g.
Shock According to IEC 68-2-27: Operational 25 g (10 g relay), 11 msec in 3
directions.
Altitude: Up to 2000 meters
9. CONNECTIONS: High compression cage-clamp terminal block
Wire Strip Length: 0.3" (7.5 mm)
Wire Gage: 30-14 AWG copper wire
Torque: 4.5 inch-lbs (0.51 N-m) max.
10. CONSTRUCTION: This unit is rated for NEMA 4X/IP65 outdoor use.
IP20 Touch safe. Installation Category II, Pollution Degree 2. One piece
bezel/case. Flame resistant. Synthetic rubber keypad. Panel gasket and
mounting clip included.
11. WEIGHT: 10.1 oz. (286 g)
10 V/m (80 MHz to 1 GHz)
3 V/m (1.4 GHz to 2 GHz)
1 V/m (2 GHz to 2.7 GHz)
2 kV power
1 kV I/O signal
2 kV I/O signal connected
to power
power 1 kV L to L, 2 kV L to G
signal 1 kV
3 Vrms
30 A/m
Voltage dip Criterion A
0% during 1 cycle
40% during 10/12 cycle
70% during 25/30 cycle
0% during 250/300 cycles
4
Page 5
MOdel dpf92 - 1/8 din COunTer
6-DIGIT LED DISPLAY (Alternating 8 digits for counting)
DUAL COUNT QUAD INPUTS
UP TO 3 COUNT DISPLAYS
SETPOINT ALARM OUTPUTS (W/Plug-in card)
DPF92 SPECIFICATIONS
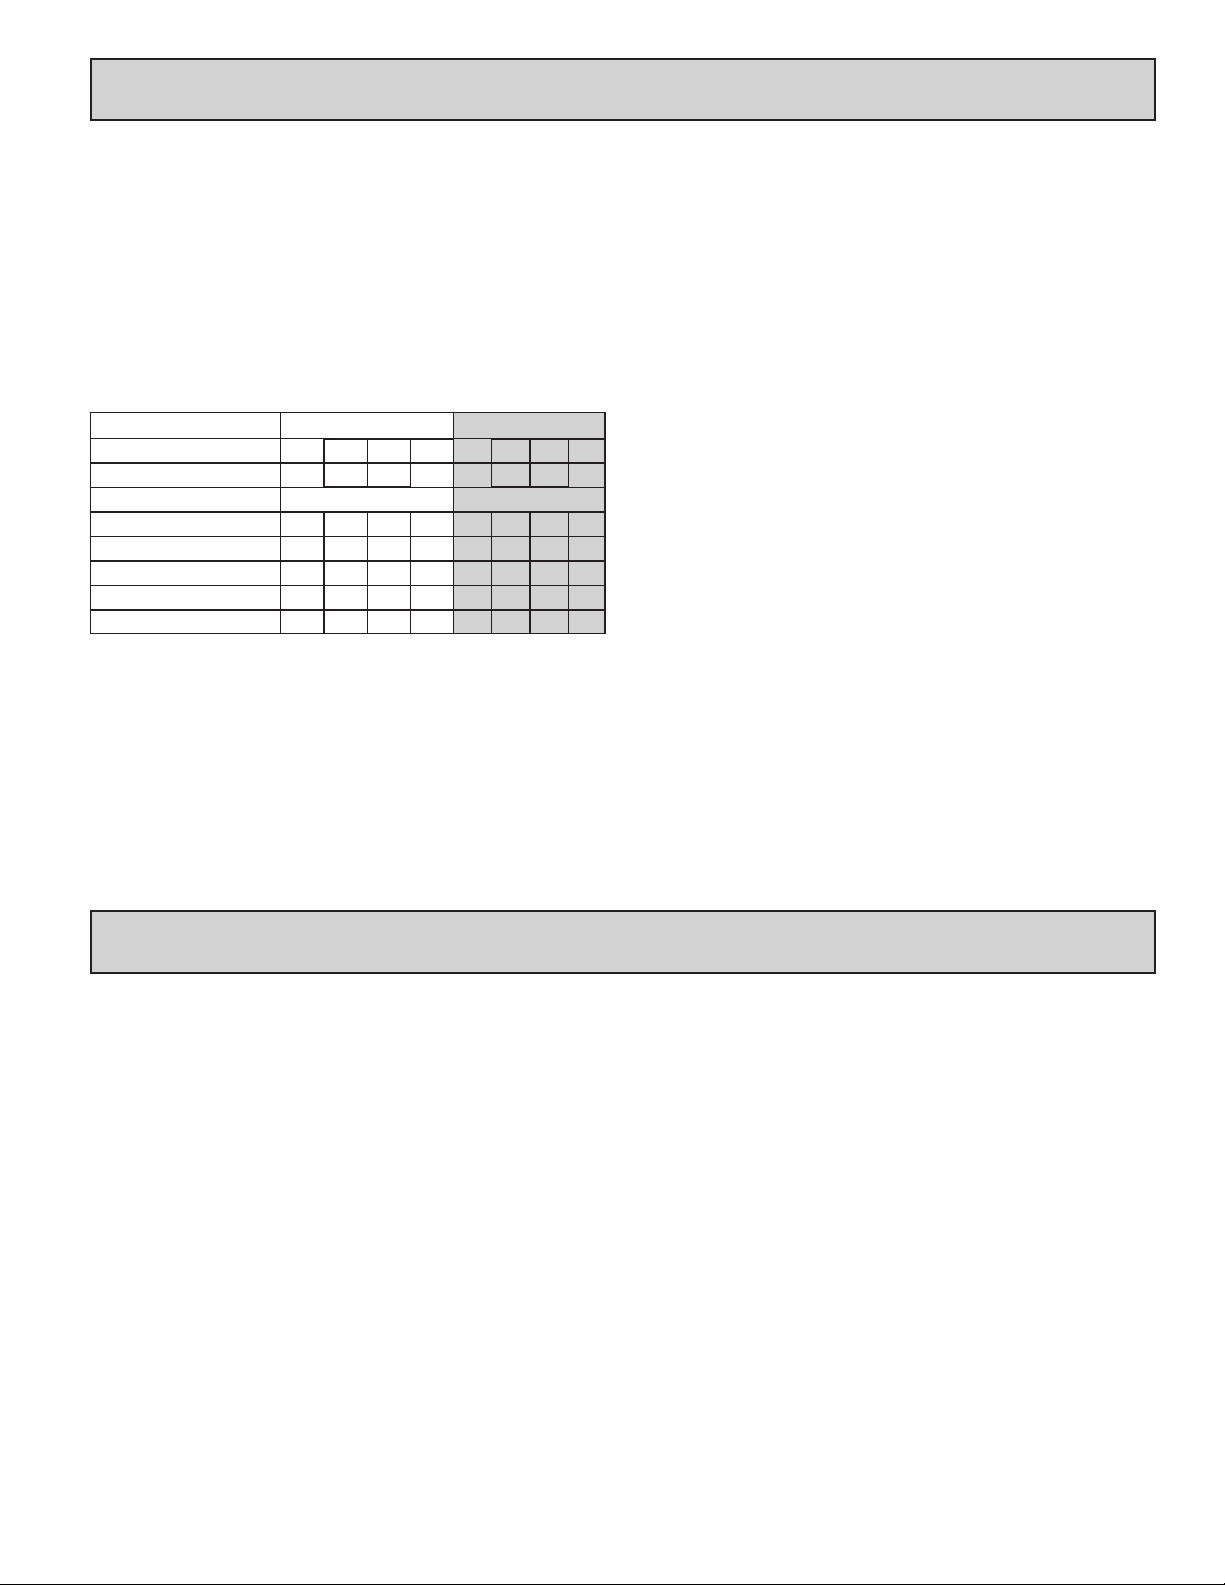
MAXIMUM SIGNAL FREQUENCIES:
To determine the maximum frequency for the input(s), first answer the
questions with a yes (Y) or no (N). Next determine the Count Mode to be
used for the counter(s). If dual counters are used with different Count Modes,
then the lowest frequency applies to both counters.
FUNCTION QUESTIONS Dual: Counter A & BSingle: Counter A or B
Are any setpoints used? N
Is Counter C used? N
COUNT MODE (Values are in KHz) (Values are in KHz)
Count x1 34
Count x2 17 13 9 7 9 7 5 4
Quadrature x1 22 19 12 10 7 6 4 3.5
Quadrature x2 17 13 9 7 7 6 4 3.5
Quadrature x4 8 6 4 3
N Y Y
Y N
25 18 15
Y N
N
N Y Y
Y N
13
12 9 7.5
Notes:
1. Counter Modes are explained in the Module 1 programming section.
2. Listed values are with frequency DIP switch set on HI frequency.
Y
ANNUNCIATORS:
A - Counter A
B - Counter B
C - Counter C
- Upper significant digit display of counter
SP1 - setpoint 1 output state
SP2 - setpoint 2 output state
SP3 - setpoint 3 output state
SP4 - setpoint 4 output state
COUNTER DISPLAYS:
Maximum display: 8 digits: ± 99999999 (greater than 6 digits, display
alternates between high order and low order.)
INPUTS A and B:
DIP switch selectable to accept pulses from a variety of sources including
switch contacts, TTL outputs, magnetic pickups and all standard RLC
sensors.
LOGIC: Input trigger levels VIL = 1.5 V max.; VIH = 3.75 V min.
Current sinking: Internal 7.8 KΩ pull-up to +12 VDC, I
Current sourcing: Internal 3.9 KΩ pull-down, 7.3 mA max. @ 28 VDC,
V
= 30 VDC.
MAX
Filter: Damping capacitor provided for switch contact bounce. Limits
input frequency to 50 Hz and input pulse widths to 10 msec. minimum.
DUAL COUNT MODES:
When any dual count mode is used, then User Inputs 1 and/or 2 will
accept the second signal of each signal pair. The user inputs do not have
the Logic/Mag, HI/LO Freq, and Sink/Source input setup switches. The
user inputs are inherently a logic input with no low frequency filtering.
Any mechanical contacts used for these inputs in a dual count mode
must be debounced externally. The user input may only be selected for
sink/source by the User Jumper placement.
MAX
= 1.9 mA.
MOdel dpf91 - 1/8 din raTe MeTer
5-DIGIT LED DISPLAY
RATE INDICATION
MINIMUM/MAXIMUM RATE DISPLAYS
SETPOINT ALARM OUTPUTS (W/Plug-in card)
DPF91 SPECIFICATIONS
ANNUNCIATORS:
- Rate
- Maximum (High) Rate
- Minimum (Low) Rate
SP1 - setpoint 1 output state
SP2 - setpoint 2 output state
SP3 - setpoint 3 output state
SP4 - setpoint 4 output state
RATE DISPLAY:
Accuracy: ±0.01%
Minimum Frequency: 0.01 Hz
Maximum Frequency: 34 KHz
Maximum Display: 5 Digits: 99999
Adjustable Display (low) Update: 0.1 to 99.9 seconds
Over Range Display: “ ”
INPUT A:
DIP switch selectable to accept pulses from a variety of sources including
TTL outputs, magnetic pickups and all standard sensors.
LOGIC: Input trigger levels VIL = 1.5 V max.; VIH = 3.75 V min.
Current sinking: Internal 7.8 KΩ pull-up to +12 VDC, I
Current sourcing: Internal 3.9 KΩ pull-down, 7.3 mA max. @ 28 VDC,
V
= 30 VDC.
MAX
MAGNETIC PICKUP:
Sensitivity: 200 mV peak
Hysteresis: 100 mV
Input impedance: 3.9 KΩ @ 60 Hz
Maximum input voltage: ±40 V peak, 30 Vrms
MAX
= 1.9 mA.
55
Page 6
MOdel dpf93 - 1/8 din COunTer/raTe MeTer
COUNT, RATE AND SLAVE DISPLAY
6-DIGIT 0.56" RED SUNLIGHT READABLE DISPLAY
VARIABLE INTENSITY DISPLAY
10 POINT SCALING (FOR NON-LINEAR PROCESSES)
FOUR SETPOINT ALARM OUTPUTS (W/OPTION CARD)
RETRANSMITTED ANALOG OUTPUT (W/OPTION CARD)
COMMUNICATION AND BUS CAPABILITIES (W/OPTION CARD)
BUS CAPABILITIES; MODBUS
PROGRAMMING SOFTWARE
DPF93 SPECIFICATIONS
MAXIMUM SIGNAL FREQUENCIES TABLE
To determine the maximum frequency for the input(s), first answer the
questions with a yes (Y) or no (N). Next determine the Count Mode to be used
for the counter(s). If dual counters are used with different Count Modes, then
the lowest frequency applies to both counters.
Dual: Counter A & B or Rate not assigned to active single counterSingle: Counter A or B (with/without rate) or Rate onlyFUNCTION QUESTIONS
(Values are in KHz)(Values are in KHz)(Values are in KHz)(Values are in KHz)COUNT MODE
4 *5 *4 *5 *7 *9 *7 *9 *787912161317Count x2
3 *3.5 *3.5 *4 *5 *6 *6 *7 *1011101217201922Quadrature x1
3 *3.5 *3.5 *4 *5 *6 *6 *7 *687912161317Quadrature x2
Notes:
1. Counter Modes are explained in the Module 1 programming section.
2. If using Rate with single counter with direction or quadrature, assign it to Input A for the listed frequency.
3. * Double the listed value for Rate frequency.
4. Listed values are with frequency DIP switch set on HI frequency.
5. Derate listed frequencies by 20% during serial communications. (Placing a 5 msec. delay between serial characters will eliminate the derating.)
YYYYNNNNYYYYNNNNAre any setpoints used?
YYNNYYNNYYNNYYNNIs Prescaler Output used?
YNYNYNYNYNYNYNYNIs Counter C used?
797.59111312131113151817212534Count x1
34346868Quadrature x4
N/A21N/A34N/A21N/A34Rate Only
ANNUNCIATORS:
A - Counter A
B - Counter B
C - Counter C
- Rate
- Maximum (High) Rate
- Minimum (Low) Rate
- Upper significant digit display of counter
SP1 - setpoint 1 output state
SP2 - setpoint 2 output state
SP3 - setpoint 3 output state
SP4 - setpoint 4 output state
RATE DISPLAY:
Accuracy: ±0.01%
Minimum Frequency: 0.01 Hz
Maximum Frequency: see Max Signal Frequencies Table.
Maximum Display: 5 Digits: 99999
Adjustable Display (low) Update: 0.1 to 99.9 seconds
Over Range Display: “ ”
COUNTER DISPLAYS:
Maximum display: 8 digits: ± 99999999 (greater than 6 digits, the display
alternates between high order and low order.)
INPUTS A and B:
DIP switch selectable to accept pulses from a variety of sources
including switch contacts, TTL outputs, magnetic pickups and all
standard RLC sensors.
LOGIC: Input trigger levels VIL = 1.5 V max.; VIH = 3.75 V min.
Current sinking: Internal 7.8 KΩ pull-up to +12 VDC, I
Current sourcing: Internal 3.9 KΩ pull-down, 7.3 mA max. @ 28 VDC,
V
= 30 VDC.
MAX
Filter: Damping capacitor provided for switch contact bounce. Limits
input frequency to 50 Hz and input pulse widths to 10 msec. minimum.
MAGNETIC PICKUP:
Sensitivity: 200 mV peak
Hysteresis: 100 mV
Input impedance: 3.9 KΩ @ 60 Hz
Maximum input voltage: ±40 V peak, 30 Vrms
DUAL COUNT MODES:
When any dual count mode is used, then User Inputs 1 and/or 2 will
accept the second signal of each signal pair. The user inputs do not have
the Logic/Mag, HI/LO Freq, and Sink/Source input setup switches. The
user inputs are inherently a logic input with no low frequency filtering.
Any mechanical contacts used for these inputs in a dual count mode
must be debounced externally. The user input may only be selected for
sink/source by the User Jumper placement.
PRESCALER OUTPUT:
NPN Open Collector: I
VDC max. With duty cycle of 25% min. and 50 % max.
66
= 100 mA max. @ VOL = 1 VDC max. VOH = 30
SNK
MAX
= 1.9 mA.
Page 7
OpTiOnal pluG-in OuTpuT Cards
WARNING: Disconnect all power to the unit before
installing Plug-in cards.
Adding Option Cards
The DP and LDP series meters can be fitted with up to three optional plug-in
cards. The details for each plug-in card can be reviewed in the specification
section below. Only one card from each function type can be installed at one time.
The function types include Setpoint Alarms (LDP6-CDS), Communications
(LDP6-CDC), and Analog Output (LDP6-CDL). The plug-in cards can be
installed initially or at a later date.
DPF93 COMMUNICATION CARDS (LDP6-CDC)
A variety of communication protocols are available for the DP and LDP
series. Only one of these cards can be installed at a time. When programming
the unit via LDP6, a Windows® based program, the RS232 or RS485 Cards must
be used. Note: For Modbus communications use RS485 Communications Output
Card and configure Communication Type parameter (tYPE) for Modbus.
LDP6-CDC10 - RS485 Serial (Terminal)
LDP6-CDC1C - RS485 Serial (Connector)
LDP6-CDC20 - RS232 Serial (Terminal)
LDP6-CDC2C - RS232 Serial (Connector)
SERIAL COMMUNICATIONS CARD
Type: RS485 or RS232
Communication Type: RLC Protocol (ASCII), Modbus RTU, and Modbus
ASCII
Isolation To Sensor & User Input Commons: 500 Vrms for 1 min.
Working Voltage: 50 V. Not Isolated from all other commons.
Data: 7/8 bits
Baud: 1200 to 38,400
Parity: no, odd or even
Bus Address: Selectable 0 to 99 (RLC Protocol), or 1 to 247 (Modbus
Protocol), Max. 32 meters per line (RS485)
Transmit Delay: Selectable for 0 to 0.250 sec (+2 msec min)
SETPOINT CARDS (LDP6-CDS)
The DP and LDP series has 4 available setpoint alarm output plug-in cards.
Only one of these cards can be installed at a time. (Logic state of the outputs can
be reversed in the programming.) These plug-in cards include:
LDP6-CDS10 - Dual Relay, FORM-C, Normally open & closed
LDP6-CDS20 - Quad Relay, FORM-A, Normally open only
LDP6-CDS30 - Isolated quad sinking NPN open collector
LDP6-CDS40 - Isolated quad sourcing PNP open collector
DUAL RELAY CARD
Type: Two FORM-C relays
Isolation To Sensor & User Input Commons: 2000 Vrms for 1 min.
Working Voltage: 240 Vrms
Contact Rating:
One Relay Energized: 5 amps @ 120/240 VAC or 28 VDC (resistive load),
1/8 HP @120 VAC, inductive load
Total current with both relays energized not to exceed 5 amps
Life Expectancy: 100 K cycles min. at full load rating. External RC snubber
extends relay life for operation with inductive loads
Response Time: 5 msec. nominal pull-in with 3 msec. nominal release
Timed Output Accuracy: Counter = ± 0.01% + 10 msec.
Rate = ± 0.01% + 20 msec.
QUAD RELAY CARD
Type: Four FORM-A relays
Isolation To Sensor & User Input Commons: 2300 Vrms for 1 min.
Working Voltage: 250 Vrms
Contact Rating:
One Relay Energized: 3 amps @ 250 VAC or 30 VDC (resistive load), 1/10
HP @120 VAC, inductive load
Total current with all four relays energized not to exceed 4 amps
Life Expectancy: 100K cycles min. at full load rating. External RC snubber
extends relay life for operation with inductive loads
Response Time: 5 msec. nominal pull-in with 3 msec. nominal release
Timed Output Accuracy: Counter = ± 0.01% + 10 msec.
Rate = ± 0.01% + 20 msec.
QUAD SINKING OPEN COLLECTOR CARD
Type: Four isolated sinking NPN transistors.
Isolation To Sensor & User Input Commons: 500 Vrms for 1 min.
Working Voltage: 50 V. Not Isolated from all other commons.
Rating: 100 mA max @ V
Response Time: Counter = 25 µsec; Rate = Low Update time
Timed Output Accuracy: Counter = ± 0.01% + 10 msec.
Rate = ± 0.01% + 20 msec.
QUAD SOURCING OPEN COLLECTOR CARD
Type: Four isolated sourcing PNP transistors.
Isolation To Sensor & User Input Commons: 500 Vrms for 1 min.
Working Voltage: 50 V. Not Isolated from all other commons.
Rating: Internal supply: 24 VDC ± 10% , 30 mA max. total
External supply: 30 VDC max., 100 mA max. each output
Response Time: Counter = 25 µsec; Rate = Low Update time
Timed Output Accuracy: Counter = ± 0.01% + 10 msec.
Rate = ± 0.01% + 20 msec.
= 0.7 V max. V
SAT
MAX
= 30 V
DPF93 LINEAR DC OUTPUT (LDP6-CDL)
Either a 0(4)-20 mA or 0-10 V retransmitted linear DC output is available
from the analog output plug-in card. The programmable output low and high
scaling can be based on various display values. Reverse slope output is possible
by reversing the scaling point positions.
LDP6-CDL10 - Retransmitted Analog Output Card
ANALOG OUTPUT CARD - Self-Powered Output (Active)
Types: 0 to 20 mA, 4 to 20 mA or 0 to 10 VDC
Isolation To Sensor & User Input Commons: 500 Vrms for 1 min.
Working Voltage: 50 V. Not Isolated from all other commons.
Accuracy: 0.17% of FS (18 to 28°C); 0.4% of FS (0 to 50°C)
Resolution: 1/3500
Compliance: 10 VDC: 10 KΩ load min., 20 mA: 500 Ω load max.
Response Time: 50 msec. max., 10 msec. typ.
PROGRAMMING SOFTWARE
DP6-SOFT software is a Windows® based program that allows configuration
of the meter from a PC. DP6-SOFT offers standard drop-down menu commands,
that make it easy to program the meter. The meter’s program can then be saved
in a PC file for future use. A serial plug-in card is required to program the meter
using the software.
7
7
Page 8
1.0 insTallinG The MeTer
REAR TERMINALS
Installation
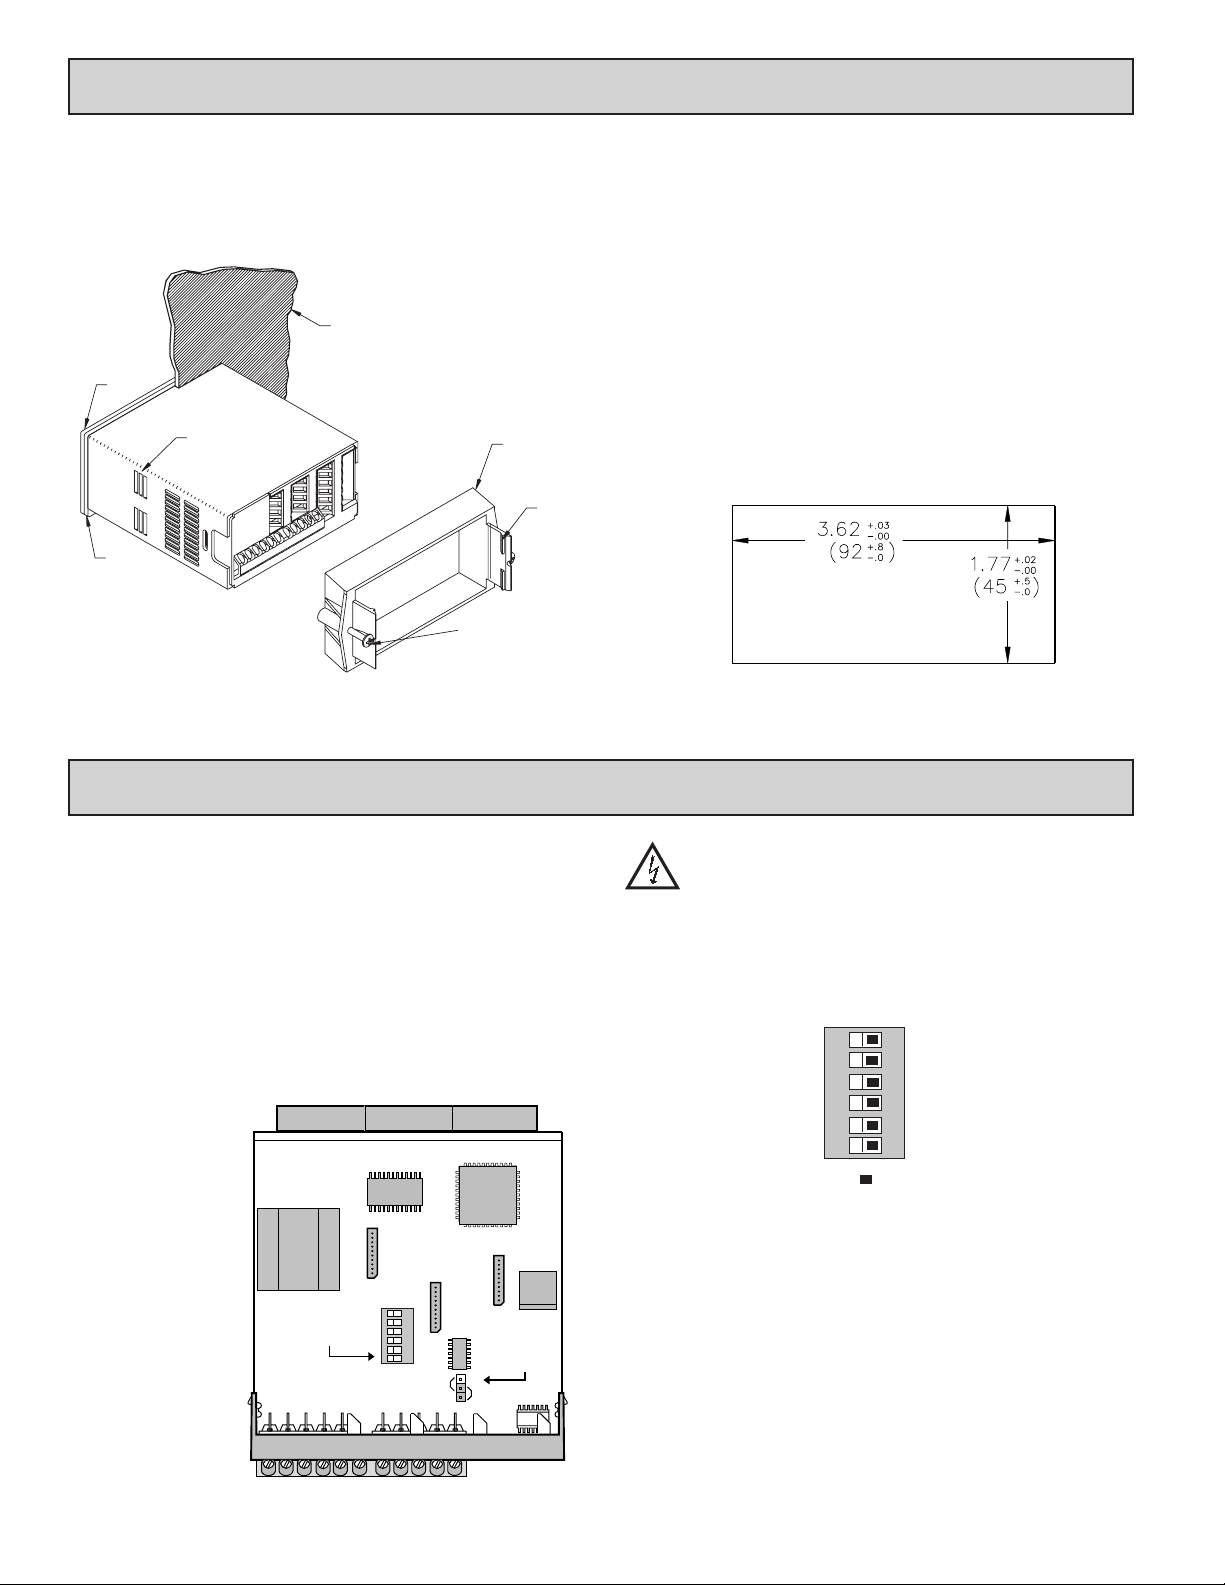
The meter meets NEMA 4X/IP65 requirements when properly installed.
The unit is intended to be mounted into an enclosed panel. Prepare the panel
cutout to the dimensions shown. Remove the panel latch from the unit. Slide
the panel gasket over the rear of the unit to the back of the bezel. The unit
should be installed fully assembled. Insert the unit into the panel cutout.
PANEL
BEZEL
PANEL
GASKET
LATCHING
SLOTS
PANEL
LATCH
PANEL
MOUNTING
SCREWS
LATCHING
TABS
While holding the unit in place, push the panel latch over the rear of the unit
so that the tabs of the panel latch engage in the slots on the case. The panel
latch should be engaged in the farthest forward slot possible. To achieve a
proper seal, tighten the latch screws evenly until the unit is snug in the panel
(Torque to approximately 7 in-lbs [79N-cm]). Do not over-tighten the screws.
Installation Environment
The unit should be installed in a location that does not exceed the operating
temperature and provides good air circulation. Placing the unit near devices
that generate excessive heat should be avoided.
The bezel should only be cleaned with a soft cloth and neutral soap product.
Do NOT use solvents. Continuous exposure to direct sunlight may accelerate
the aging process of the bezel.
Do not use tools of any kind (screwdrivers, pens, pencils, etc.) to operate the
keypad of the unit.
PANEL CUT-OUT
2.0 seTTinG The JuMper and dip swiTChes
To access the jumper and switches, remove the meter base from the meter
case by firmly squeezing and pulling back on the side rear finger tabs. This
should lower the latch below the case slot (which is located just in front of the
finger tabs). It is recommended to release the latch on one side, then start the
other side latch.
2.1 SETTING THE JUMPER
The meter has one jumper for user input logic. When using the user inputs
this jumper must be set before applying power. The Main Circuit Board figure
shows the location of the jumper and DIP switch.
The user input jumper determines signal logic for the user inputs, when they
are used with user functions or for input signal direction. All user inputs are set
by this jumper.
FRONT DISPLAY
Main
Circuit
Board
INPUT SET-UP
DIP SWITCHES
6
5
4
3
2
1
SRC
USER
INPUT
JUMPER
SN
Warning: Exposed line voltage exists on the circuit boards. Remove
all power to the meter and load circuits before accessing inside of
the meter.
2.2 SETTING THE INPUT DIP SWITCHES
The meter has six DIP switches for Input A and Input B terminal set-up that
must be set before applying power. NOTE: The DPF91 only uses switches 1-3.
Input B LO Freq.
Input B SRC.
Input B MAG.
Input A LO Freq.
Input A SRC.
Input A MAG.
ON
HI Freq.
6
SNK.
5
4
Logic
3
HI Freq.
2
SNK.
1
Logic
Factory Setting
SWITCHES 1 and 4
LOGIC: Input trigger levels VIL = 1.5 V max.; VIH = 3.75 V min.
MAG: 200 mV peak input (must also have SRC on). Not recommended with
counting applications.
SWITCHES 2 and 5
SRC.: Adds internal 3.9 KΩ pull-down resistor, 7.3 mA max. @ 28 VDC,
V
= 30 VDC.
MAX
SNK.: Adds internal 7.8 KΩ pull-up resistor to +12 VDC, I
SWITCHES 3 and 6
HI Frequency: Removes damping capacitor and allows max. frequency.
LO Frequency: Adds a damping capacitor for switch contact bounce. Also
limits input frequency to 50 Hz and input pulse widths to 10 msec.
MAX
= 1.9 mA.
88
Page 9
3.0 insTallinG pluG-in Cards
Internal Supply
The Plug-in cards are separately purchased optional cards that perform
specific functions. These cards plug into the main circuit board of the meter. The
Plug-in cards have many unique functions when used with the PAX.
Note: The DPF92 and DPF91 only use the setpoint option card.
CAUTION: The Plug-in card and main circuit board contain static sensitive
components. Before handling the cards, discharge static charges
from your body by touching a grounded bare metal object. Ideally,
handle the cards at a static controlled clean workstation. Also, only
handle the cards by the edges. Dirt, oil or other contaminants that
may contact the cards can adversely affect circuit operation.
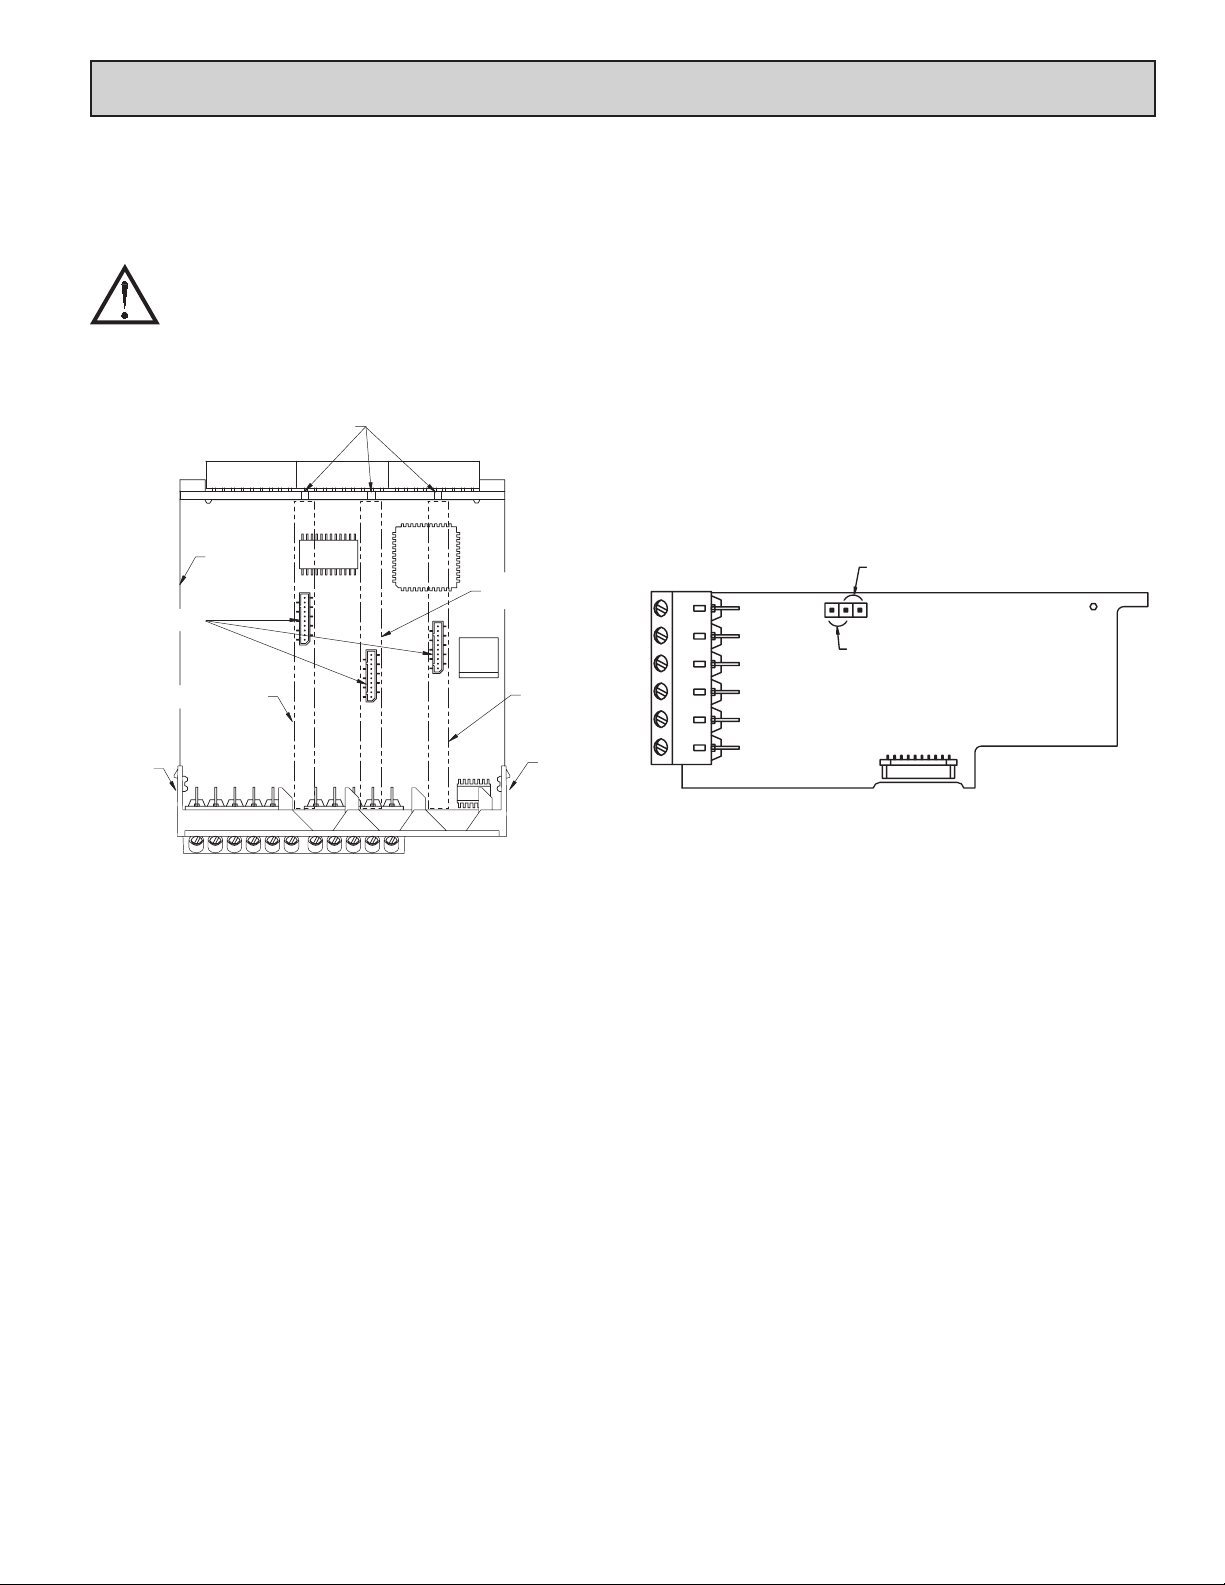
TOP VIEW
Alignment
Slots
Main
Circuit
Connectors
Communications
Board
Serial
Card
Analog Output
Card
Setpoint
Output
Card
To Install:
1. With the case open, locate the Plug-in card connector for the card type to be
installed. The types are keyed by position with different main circuit board
connector locations. When installing the card, hold the meter by the rear
terminals and not by the front display board.*
2. Install the Plug-in card by aligning the card terminals with the slot bay in the
rear cover. Be sure the connector is fully engaged and the tab on the Plug-in
card rests in the alignment slot on the display board.
3. Slide the meter base back into the case. Be sure the rear cover latches fully
into the case.
4. Apply the Plug-in card label to the bottom side of the meter in the designated
area. Do Not Cover the vents on the top surface of the meter. The surface of
the case must be clean for the label to adhere properly.
Quad Sourcing Open Collector Output Card Supply Select
* If installing the Quad sourcing Plug-in Card (LDP6-CDS40), set the
jumper for internal or external supply operation before continuing.
(18 V unregulated)
External Supply
(30 V )
max
Finger
Hold
Finger
Hold
99
Page 10
4.0 wirinG The MeTer
DC+
7
USER1
8
USER2
COMM
109
USER3
+
-
(30V max.)
SUPPLY
V
WIRING OVERVIEW
Electrical connections are made via screw-clamp terminals located on the
back of the meter. All conductors should conform to the meter’s voltage and
current ratings. All cabling should conform to appropriate standards of good
installation, local codes and regulations. It is recommended that the power
supplied to the meter (DC or AC) be protected by a fuse or circuit breaker.
When wiring the meter, compare the numbers embossed on the back of the
meter case against those shown in wiring drawings for proper wire position.
Strip the wire, leaving approximately 0.3" (7.5 mm) bare lead exposed (stranded
wires should be tinned with solder.) Insert the lead under the correct screwclamp terminal and tighten until the wire is secure. (Pull wire to verify
tightness.) Each terminal can accept up to one #14 AWG (2.55 mm) wire, two
#18 AWG (1.02 mm), or four #20 AWG (0.61 mm).
EMC INSTALLATION GUIDELINES
Although this meter is designed with a high degree of immunity to ElectroMagnetic Interference (EMI), proper installation and wiring methods must be
followed to ensure compatibility in each application. The type of the electrical
noise, source or coupling method into the meter may be different for various
installations. The meter becomes more immune to EMI with fewer I/O
connections. Cable length, routing, and shield termination are very important
and can mean the difference between a successful or troublesome installation.
Listed below are some EMC guidelines for successful installation in an
industrial environment.
1. The meter should be mounted in a metal enclosure, which is properly
connected to protective earth.
2. Use shielded (screened) cables for all Signal and Control inputs. The shield
(screen) pigtail connection should be made as short as possible. The
connection point for the shield depends somewhat upon the application.
Listed below are the recommended methods of connecting the shield, in order
of their effectiveness.
a. Connect the shield only at the panel where the unit is mounted to earth
ground (protective earth).
b. Connect the shield to earth ground at both ends of the cable, usually when
the noise source frequency is above 1 MHz.
c. Connect the shield to common of the meter and leave the other end of the
shield unconnected and insulated from earth ground.
3. Never run Signal or Control cables in the same conduit or raceway with AC
power lines, conductors feeding motors, solenoids, SCR controls, and
heaters, etc. The cables should be ran in metal conduit that is properly
grounded. This is especially useful in applications where cable runs are long
and portable two-way radios are used in close proximity or if the installation
is near a commercial radio transmitter.
4. Signal or Control cables within an enclosure should be routed as far as possible
from contactors, control relays, transformers, and other noisy components.
5. In extremely high EMI environments, the use of external EMI suppression
devices, such as ferrite suppression cores, is effective. Install them on Signal
and Control cables as close to the unit as possible. Loop the cable through the
core several times or use multiple cores on each cable for additional
protection. Install line filters on the power input cable to the unit to suppress
power line interference. Install them near the power entry point of the
enclosure. The following EMI suppression devices (or equivalent) are
recommended:
Ferrite Suppression Cores for signal and control cables:
Fair-Rite # 0443167251
TDK # ZCAT3035-1330A
Steward # 28B2029-0A0
Line Filters for input power cables:
Schaffner # FN2010-1/07
Schaffner # FN670-1.8/07
Corcom # 1 VR3
Note: Reference manufacturer’s instructions when installing a line filter.
6. Long cable runs are more susceptible to EMI pickup than short cable runs.
Therefore, keep cable runs as short as possible.
7. Switching of inductive loads produces high EMI. Use of snubbers across
inductive loads suppresses EMI.
4.1 POWER WIRING
AC Power
Terminal 1: VAC
Terminal 2: VAC
AC
1 2
DC Power
Terminal 1: +VDC
AC
Terminal 2: -VDC
1 2
-
+
DC-
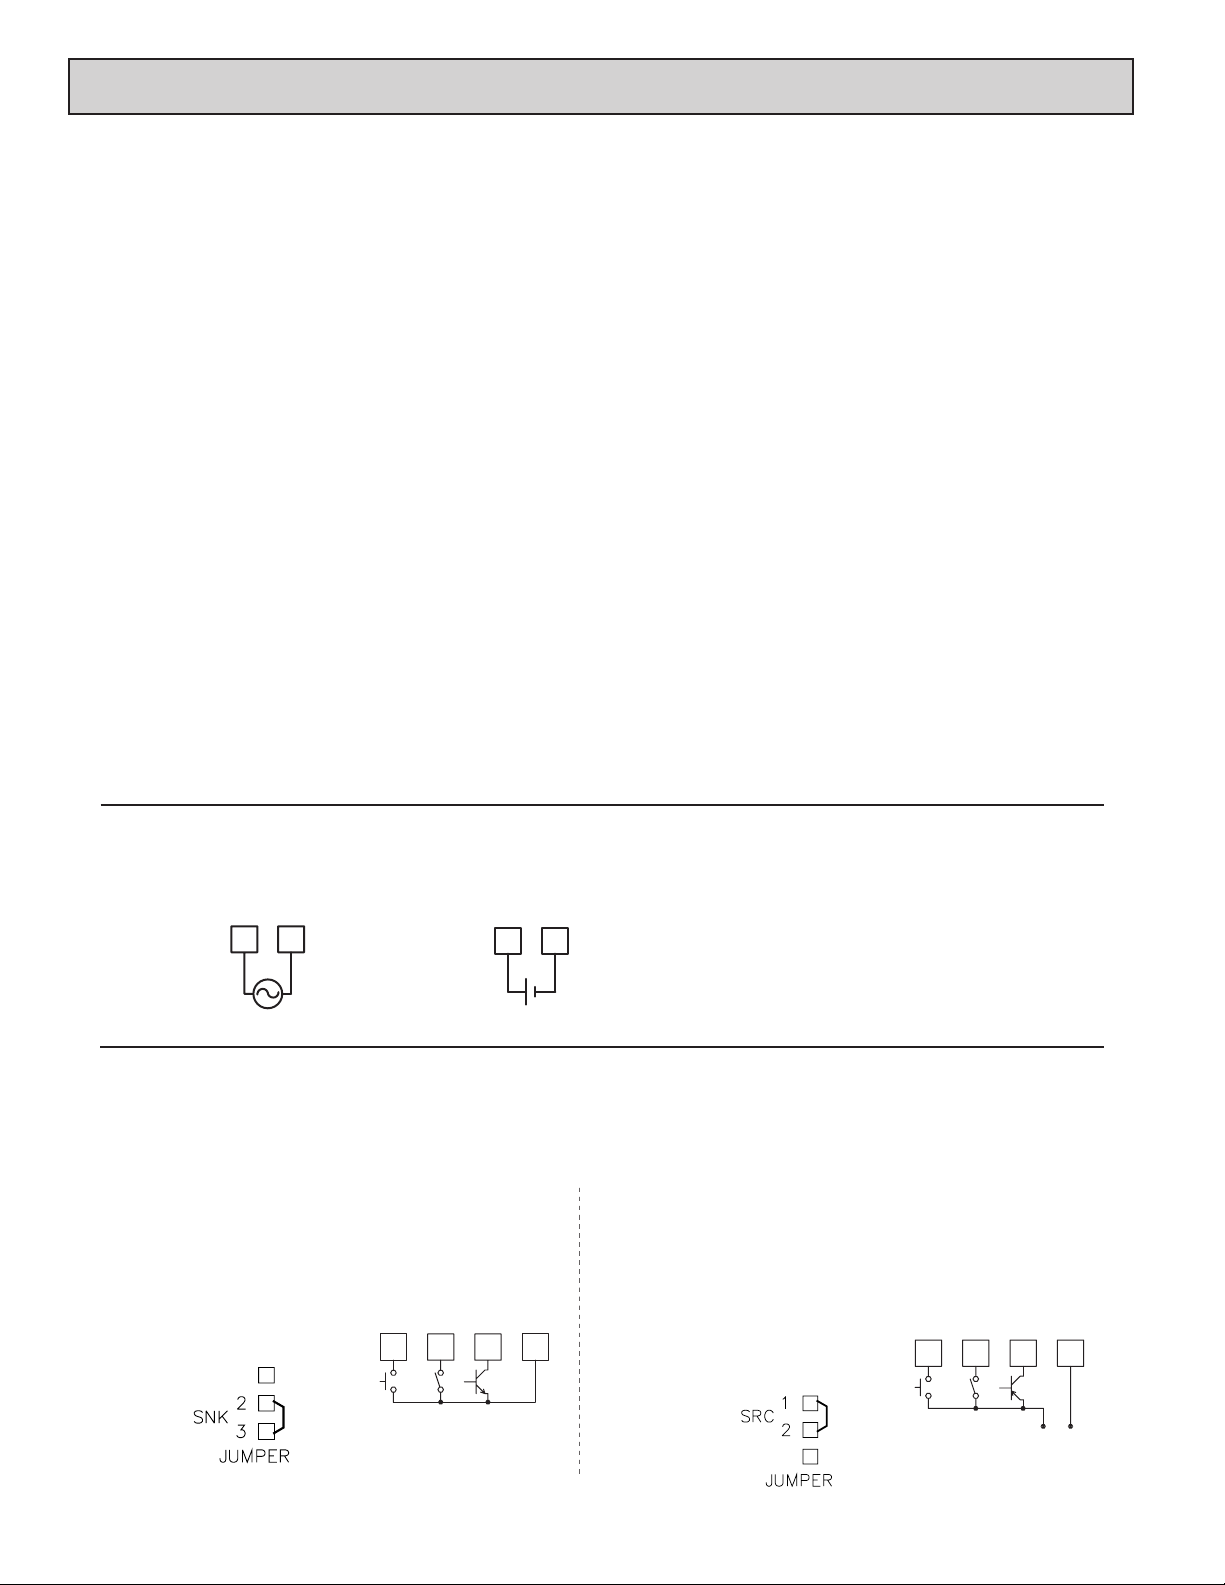
4.2 USER INPUT WIRING
Before connecting the wires, the User Input Logic Jumper should be verified for proper position. If User Input 1 and/
or 2 are wired for quadrature or directional counting, an additional switching device should not be connected to that User
Input terminal. Only the appropriate User Input terminal has to be wired.
Sinking Logic
Terminals 7-9
Terminal 10
The user inputs of the meter are
internally pulled up to +12 V with 5.1 K
resistance. The input is active when it is
pulled low (<0 .9 V).
Connect external switching device between the
}
appropriate User Input terminal and User Comm.
USER3
USER2
USER1
7 8 9 10
Sourcing Logic
Terminals 7-9:
Terminal 10:
COMM
+ VDC through external switching device
-VDC through external switching device
The user inputs of the meter are internally
pulled down to 0 V with 5.1 K resistance.
The input is active when a voltage greater
than 2.4 VDC is applied.
1010
Page 11
-+
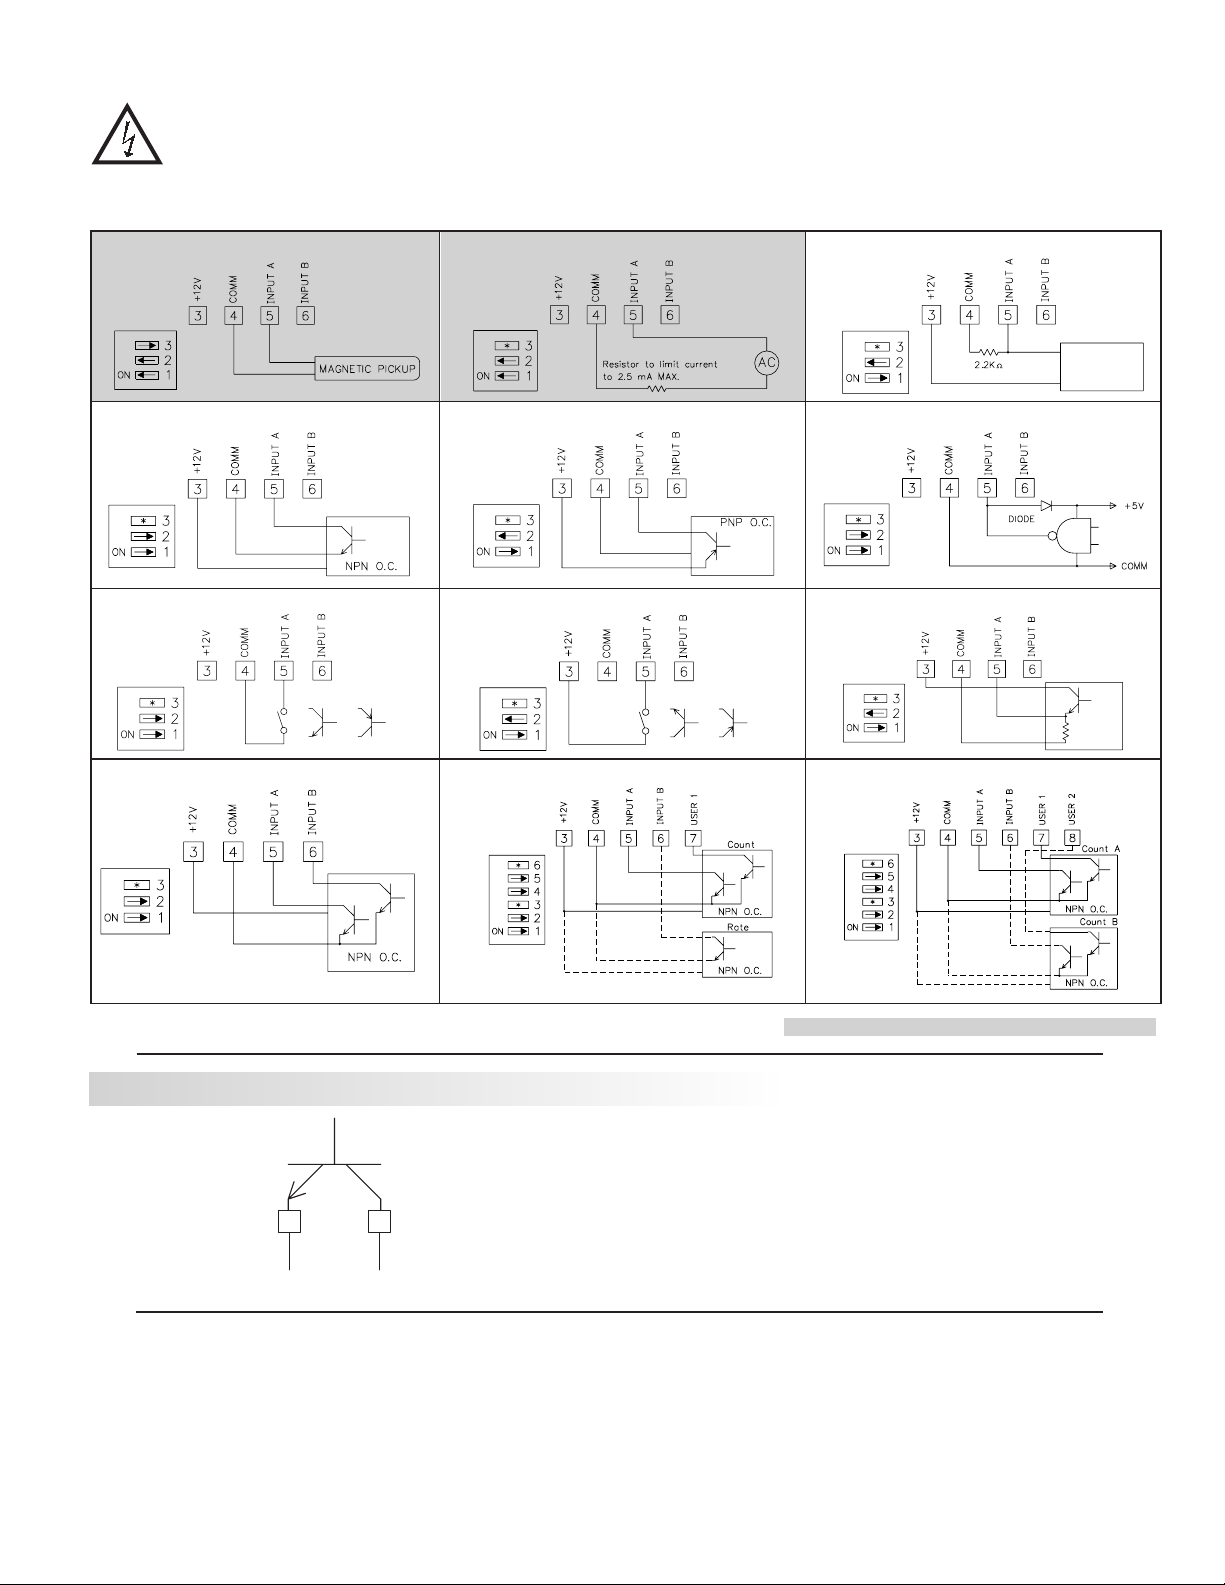
4.3 INPUT WIRING
CAUTION: Sensor input common is NOT isolated from user input common. In order to preserve the safety of the meter application, the sensor input
common must be suitably isolated from hazardous live earth referenced voltage; or input common must be at protective earth ground potential. If not,
hazardous voltage may be present at the User Inputs and User Input Common terminals. Appropriate considerations must then be given to the potential
of the user input common with respect to earth ground; and the common of the isolated plug-in cards with respect to input common.
If you are wiring Input B, connect signal to Terminal 6 instead of 5, and set DIP switches 4, 5, and 6 to the positions shown for 1, 2, and 3.
Magnetic Pickup
Current Sinking Output
Switch or Isolated Transistor; Current Sink
Current Sink Output; Quad/Direction
Input A
Input A
Input A
Single Counter A
AC Inputs From Tach Generators, Etc.
Input A
Current Sourcing Output
Switch or Isolated Transistor; Current Source
Current Sink Output; Quad/Direction
Input A
Input A
Counter A
& Rate B
Two Wire Proximity, Current Source
Input A
Interfacing With TTL
Input A
Emitter Follower; Current Source
Input A
Current Sink Output; Quad/Direction
Counter A &
Counter B
If using single Counter B, then wire signal to 6,
and Quad/Direction to 8. Set switch positions
4, 5, and 6 as shown for 1, 2, and 3.
Switch position is application dependent.
User Input Jumper
in Sink Position
Shaded areas not recommended for counting applications.
4.4 DPF93 PRESCALER OUTPUT WIRING (NPN O.C.)
COMM
10 11
4.5 SETPOINT (ALARMS) WIRING
4.6 SERIAL COMMUNICATION WIRING
4.7 ANALOG OUTPUT WIRING
PS OUT
See appropriate plug-in card bulletin for wiring details.
User Input Jumper
in Sink Position
1111
Page 12
5.0 reviewinG The frOnT buTTOns and display
Counter
Readout
Legends*
A
B
8.8.8.8.8.8
C
SP1 SP3
SP2
F1F2
PAR
SP4
RSTDSP
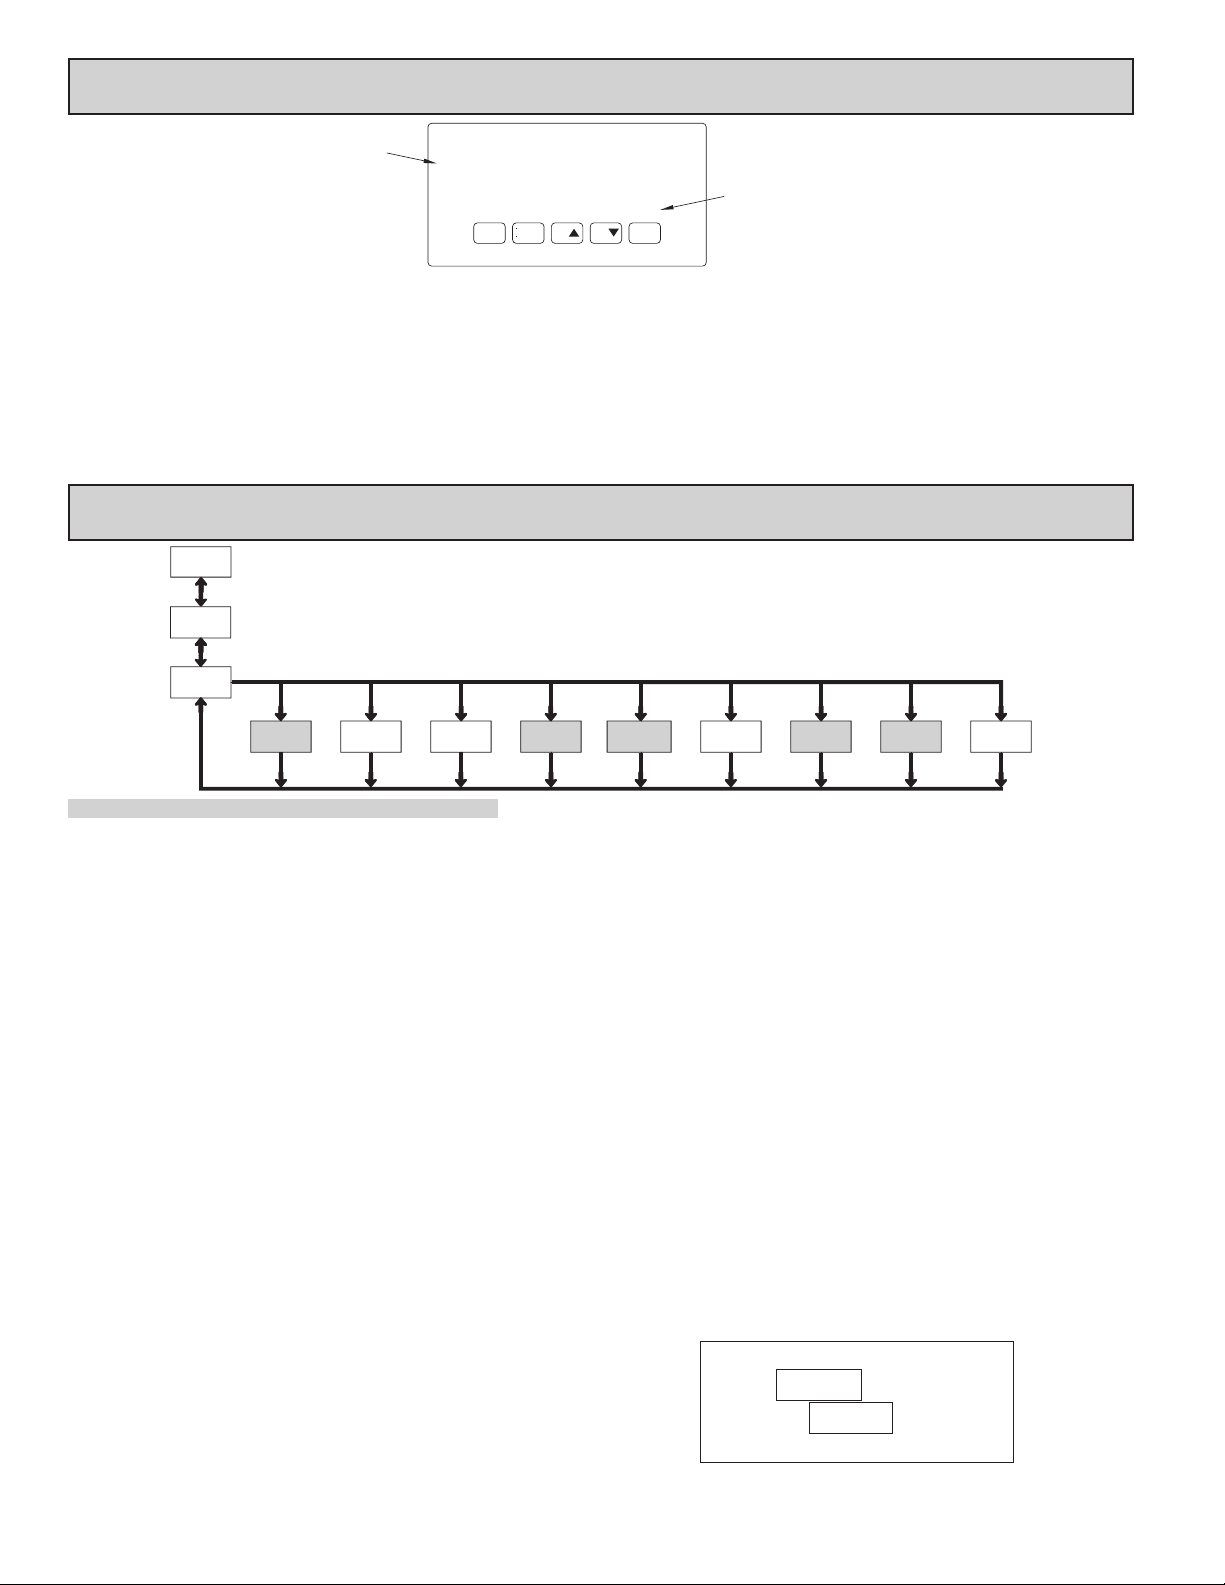
KEY DISPLAY MODE OPERATION PROGRAMMING MODE OPERATION
DSP Index display through the selected displays. Quit programming and return to Display Mode
PAR Access Programming Mode Store selected parameter and index to next parameter
F1 Function key 1; hold for 3 seconds for Second Function 1 ** Increment selected parameter value or selections
F2
RST Reset (Function key) *** Advances digit location in parameter values
* Counters B, and C are locked out in Factory Settings (DPF92 and DPF93 only).
** Factory setting for the F1, and F2 keys is NO mode.
*** Factory setting for the RST key is (Reset Display).
Function key 2; hold for 3 seconds for Second Function 2 ** Decrement selected parameter value or selections
6.0 prOGraMMinG The MeTer
DISPLAY
MODE
PAR
NO
Pro
User Input/
Counter A
& B Input
Parameters
F1/F2
Keys
1-INP
Function
Key
Parameters
PAR PAR PAR PAR PAR PAR PAR PAR PAR
2-FNC
Display/
Program
Lock-out
Parameters
3-LOC
OVERVIEW
PROGRAMMING MENU
Rate
Input
Parameters
4-rtE
Parameters Parameters Operations
Setpoint Alarm
Annunciators
Setpoint*Serial*
Communication(Alarm)Counter C
Parameters
6-SPt5-CtrC 7-SrL
Parameters
FactoryAnalog*
ServiceOutput
9-FCS8-AnA
Shaded areas represent program access that is model dependent.
PROGRAMMING MODE ENTRY (PAR KEY)
The meter normally operates in the Display Mode. No parameters can be
programmed in this mode. The Programming Mode is entered by pressing the
PAR key. If it is not accessible then it is locked by either a security code, or a
hardware lock.
Two types of programming modes are available. Quick Programming Mode
permits only certain parameters to be viewed and/or modified. All meter
functions continue to operate except the front panel keys change to Programming
Mode Operations. Quick Programming Mode is configured in Module 3. Full
Programming Mode permits all parameters to be viewed and modified. In this
mode, incoming counts may not be recognized correctly, the front panel keys
change to Programming Mode Operations and certain user input functions are
disabled. Throughout this document, Programming Mode (without Quick in
front) always refers to “Full” Programming.
MODULE ENTRY (ARROW & PAR KEYS)
The Programming Menu is organized into nine modules. These modules group
together parameters that are related in function. The display will alternate between
and the present module. The arrow keys (F1 and F2) are used to select
the desired module. The displayed module is entered by pressing the PAR key.
MODULE MENU (PAR KEY)
Each module has a separate module menu (which is shown at the start of each
module discussion). The PAR key is pressed to advance to a particular parameter
to be changed, without changing the programming of preceding parameters.
After completing a module, the display will return to . Programming may
continue by accessing additional modules.
SELECTION / VALUE ENTRY (ARROW & PAR KEYS)
For each parameter, the display alternates between the present parameter and
the selections/value for that parameter. The arrow keys (F1 and F2) are used
to move through the selections/values for that parameter. Pressing the PAR key,
stores and activates the displayed selection/value. This also advances the meter
to the next parameter.
For numeric values, the RST key may be used to select a specific digit to be
changed. Once a digit is selected, the arrow keys are used to increment or
decrement that digit to the desired number.
* Only accessible with appropriate plug-in card.
PROGRAMMING MODE EXIT (DSP KEY or at PAR KEY)
The Programming Mode is exited by pressing the DSP key (from anywhere
in the Programming Mode) or the PAR key (with displayed). This will
commit any stored parameter changes to memory and return the meter to the
Display Mode. If a parameter was just changed, the PAR key should be pressed
to store the change before pressing the DSP key. (If power loss occurs before
returning to the Display Mode, verify recent parameter changes.)
PROGRAMMING TIPS
It is recommended to start with Module 1 for counting and Module 4 for rate.
If lost or confused while programming, press the DSP key and start over. When
programming is complete, it is recommended to record the parameter
programming on the Parameter User Chart and lock out parameter programming
with a user input or lock-out code.
FACTORY SETTINGS
Factory Settings may be completely restored in Module 9. This is a good
starting point for programming problems.
ALTERNATING SELECTION DISPLAY
In the explanation of the modules, the following dual display with arrows will
appear. This is used to illustrate the display alternating between the parameter
on top and the parameter’s Factory Setting on the bottom. In most cases,
selections and values for the parameter will be listed on the right.
Indicates Program Mode Alternating Display
1212
Parameter
Factory Settings are shown.
Selection/Value
Page 13
6.1 MOdule 1 - COunT a & b inpuT paraMeTers ()
dpf92 & 93
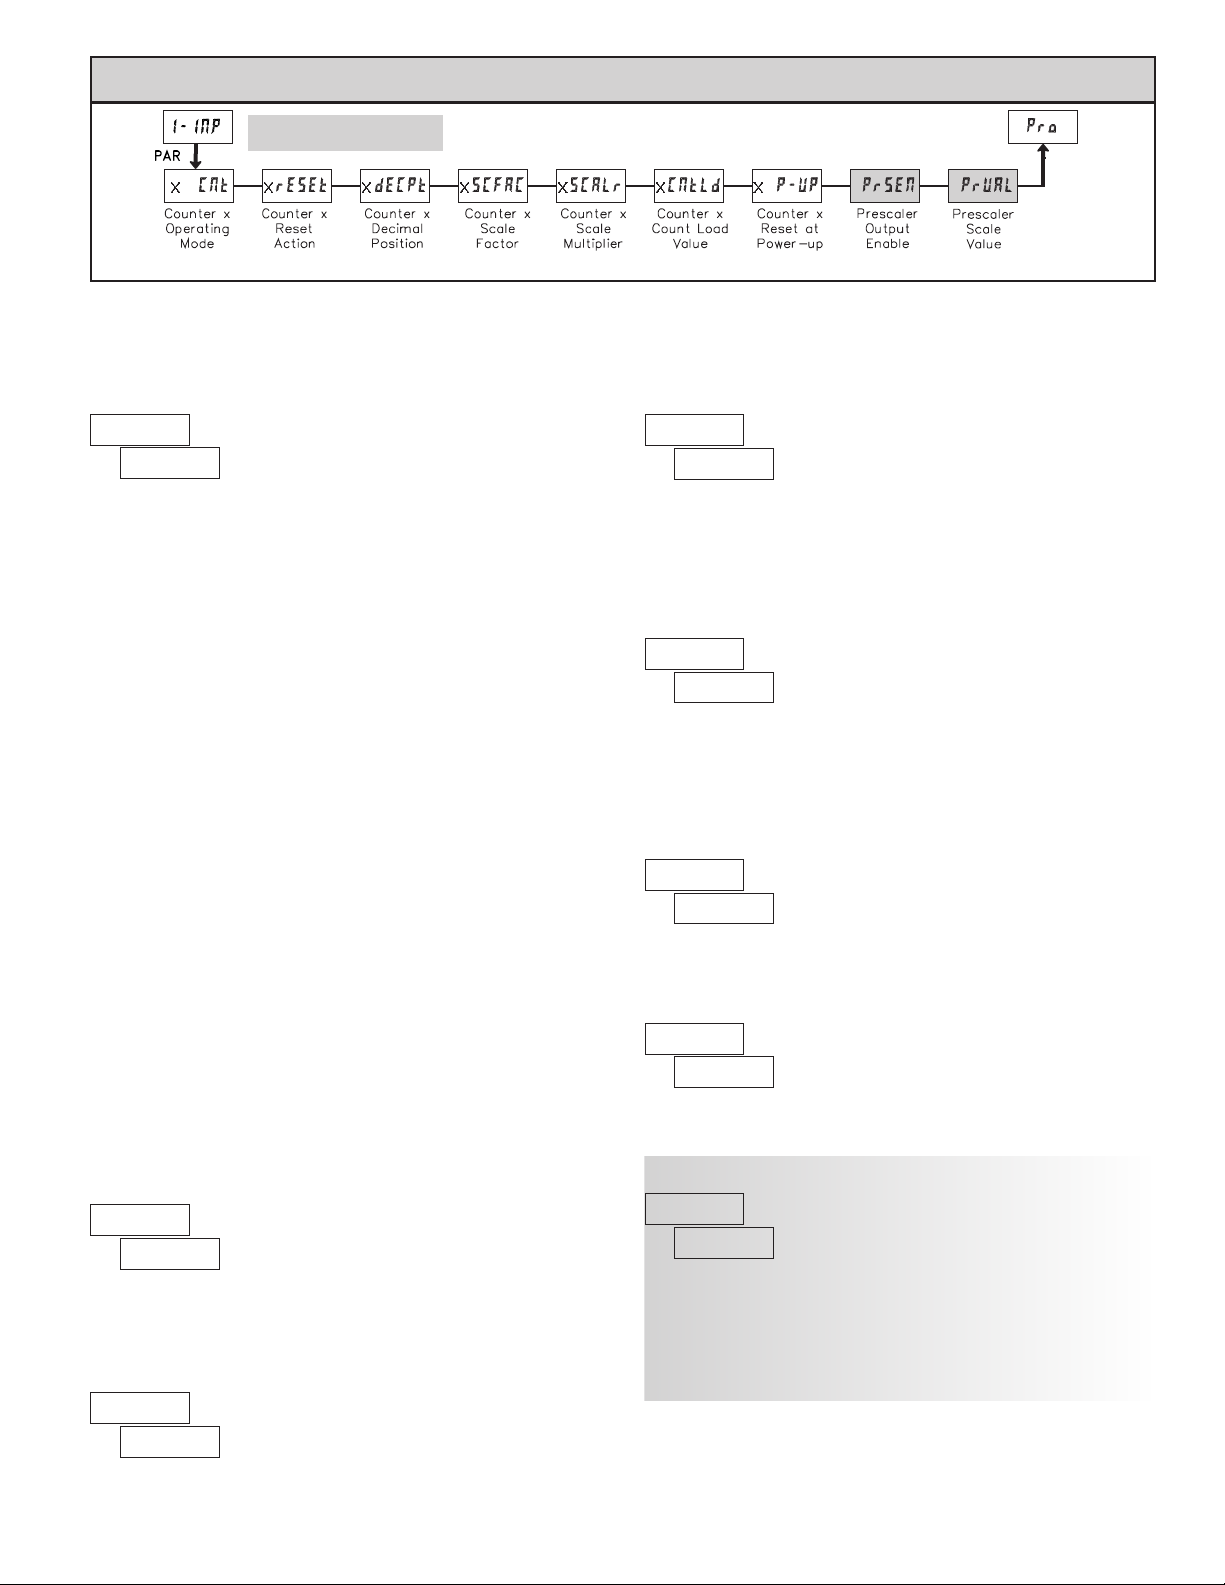
x = Counter A or Counter B
Module 1 is the programming for Counter A, Counter B and the Prescaler Output. Counter B parameters follow the Prescaler parameters. For
maximum input frequency, the counters should be set to mode NONE and the Prescaler to NO when they are not in use. When set to NONE
or NO, the remaining related parameters are not accessible. A corresponding annunciator indicates the counter being shown in the Display
Mode. An Exchange Parameter Lists feature for scale factors and count load values is explained in Module 2.
COUNTER A OPERATING MODE
Select the operating mode for Counter A.
SELECTION MODE DESCRIPTION
Does not count.
Count X1 Adds Input A falling edge.
Count X1
w/direction
Count X1
w/direction
Quad X1 Adds Input A rising edge when Input B is high.
Quad X2 Adds Input A rising edge when Input B is high and
Quad X4 Adds Input A rising edge when Input B is high, Input
Quad X1 Adds Input A rising edge when User 1 is high.
Quad X2 Adds Input A rising edge when User 1 is high and
Count X2 Adds Input A rising and falling edges.
Count X2
w/direction
Count X2
w/direction
Adds Input A falling edge if Input B is high. Subtracts
Input A falling edge if Input B is low.
Adds Input A falling edge if User 1 is high. Subtracts
Input A falling edge if User 1 is low.
Subtracts Input A falling edge when Input B is high.
Input A falling edge when Input B is low. Subtracts
Input A falling edge when Input B is high and Input A
rising edge when Input B is low.
A falling edge when Input B is low, Input B rising
edge when Input A is low, and Input B falling edge
when Input A is high. Subtracts Input A falling edge
when Input B is high, Input A rising edge when Input
B is low, Input B rising edge when Input A is high,
and Input B falling edge when Input A is low.
Subtracts Input A falling edge when User 1 is high.
Input A falling edge when User 1 is low. Subtracts
Input A falling edge when User 1 is high and Input A
rising edge when User 1 is low.
Adds Input A rising and falling edges if Input B is
high. Subtracts Input A rising and falling edge if Input
B is low.
Adds Input A rising and falling edges if User 1 is
high. Subtracts Input A rising and falling edge if User
1 is low.
PARAMETER MENU
The number of input counts is multiplied by the scale factor and the scale
multiplier to obtain the desired process value. A scale factor of 1.00000 will
result in the display of the actual number of input counts. (Details on scaling
calculations are explained at the end of this section.)
The number of input counts is multiplied by the scale multiplier and the scale
factor to obtain the desired process value. A scale multiplier of 1 will result in
only the scale factor affecting the display. (Details on scaling calculations are
explained at the end of this section.)
When reset to count load action is selected, Counter A will reset to this value.
Counter A may be programmed to reset at each meter power-up.
COUNTER A SCALE FACTOR
COUNTER A SCALE MULTIPLIER
to
COUNTER A COUNT LOAD VALUE
to
COUNTER A RESET POWER-UP
COUNTER A RESET ACTION
When Counter A is reset, it returns to zero or Counter A count load value.
This reset action affects all Counter A resets, except the Setpoint Counter Auto
Reset in Module 6.
This selects the decimal point position for Counter A and any setpoint value
assigned to Counter A. The selection will also affect Counter A scale factor
calculations.
COUNTER A DECIMAL POSITION
DPF93: PRESCALER OUTPUT ENABLE
This enables the prescaler output. The prescaler output is useful for providing
a lower frequency scaled pulse train to a PLC or another external counter. On
each falling edge of Input A, the prescaler output register increments by the
prescaler scale value (). When the register equals or exceeds 1.0000, a
pulse is output and the register is lowered by 1.0000. The prescaler register is
reset to zero whenever Counter A is reset (except for Setpoint Counter Auto
Reset). (See Prescaler Output Figure.)
13
13
Page 14
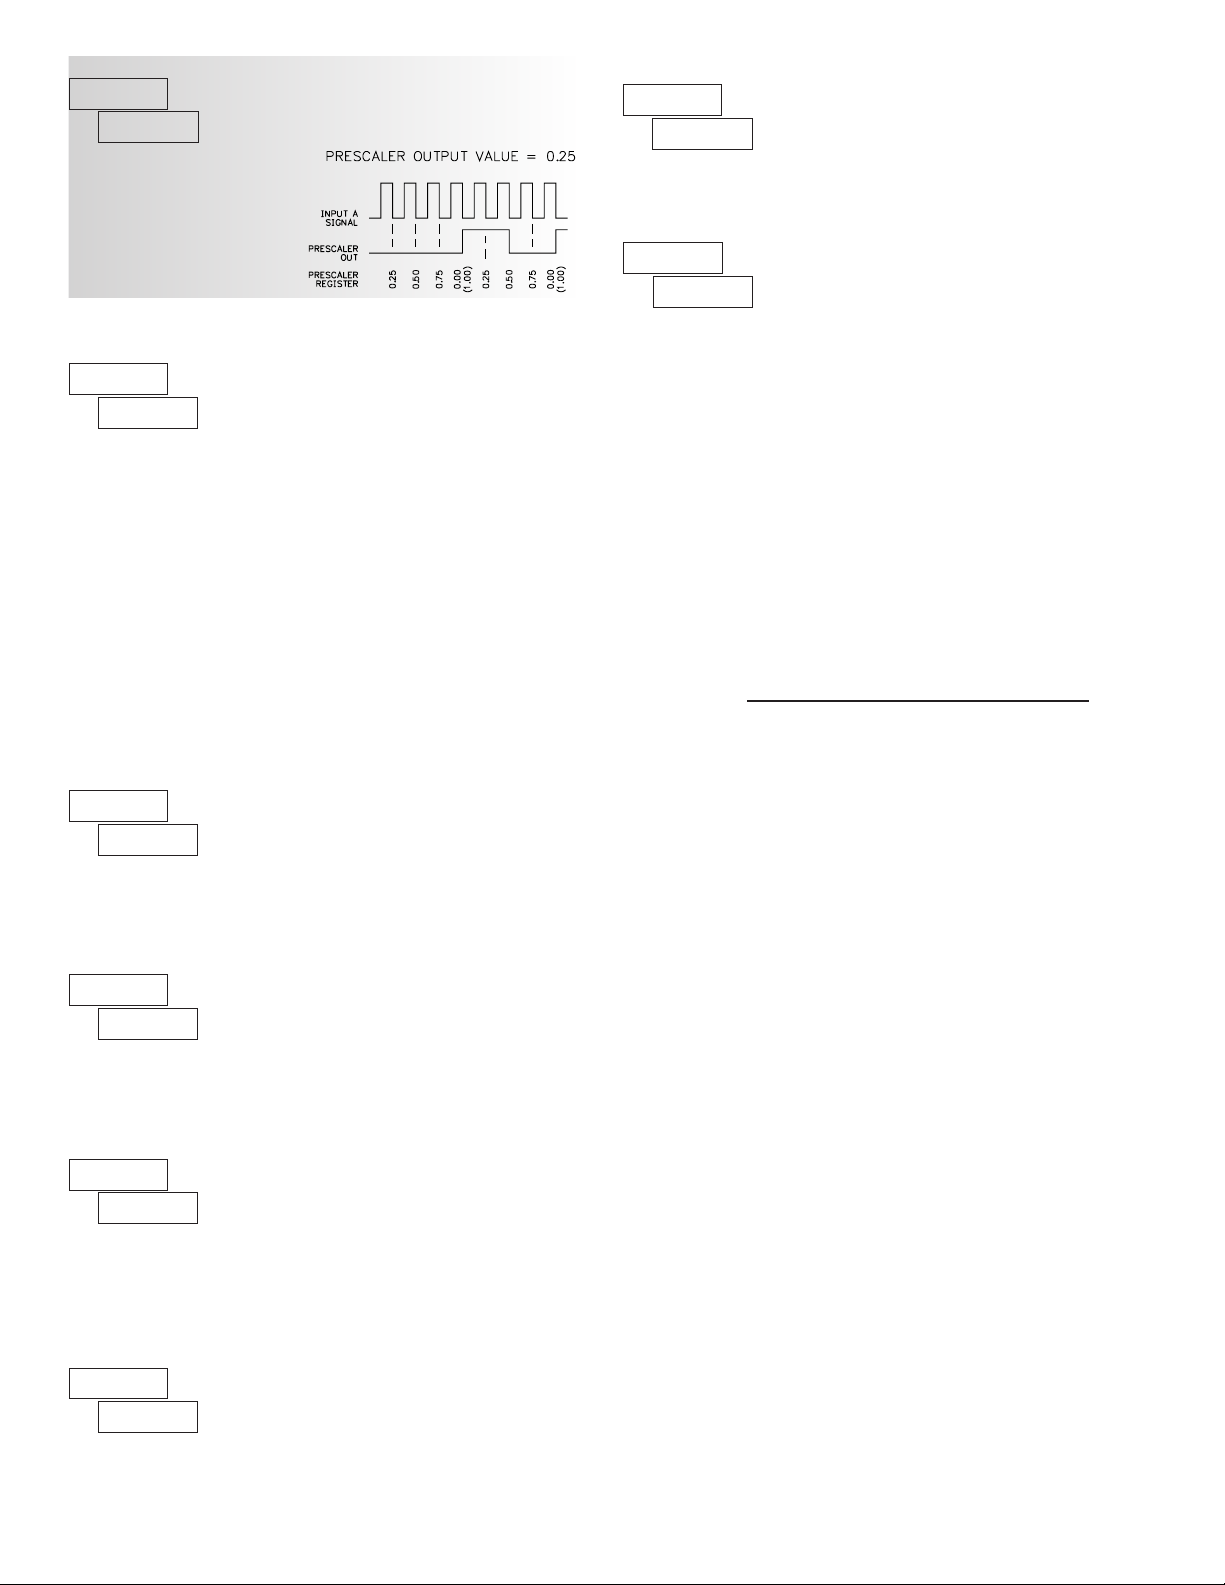
DPF93: PRESCALER SCALE VALUE
The prescaler output frequency
is the Input A frequency times the
prescaler scale value.
to
COUNTER B COUNT LOAD VALUE
When reset to count load action is selected, Counter B will reset to this value.
to
COUNTER B RESET POWER-UP
COUNTER B OPERATING MODE
Select the operating mode for Counter B.
SELECTION MODE DESCRIPTION
When Counter B is reset, it returns to zero or Counter B count load value.
This reset action affects all Counter B resets, except the Setpoint Counter Auto
Reset Action in Module 6.
This selects the decimal point position for Counter B and any setpoint value
assigned to Counter B. The selection will also affect Counter B scale factor
calculations.
The number of input counts is multiplied by the scale factor and the scale
multiplier to obtain the desired process value. A scale factor of 1.00000 will
result in the display of the actual number of input counts. (Details on scaling
calculations are explained at the end of this section.)
The number of input counts is multiplied by the scale multiplier and the scale
factor to obtain the desired process value. A scale multiplier of 1 will result in
only the scale factor affecting the display. (Details on scaling calculations are
explained at the end of this section.)
Does not count.
Count X1 Adds Input B falling edge.
Count X1
w/direction
Quad X1 Adds Input B rising edge when User 2 is high.
Quad X2 Adds Input B rising edge when User 2 is high and
Count X2 Adds Input B rising and falling edges.
Count X2
w/direction
Adds Input B falling edge if User 2 is high. Subtracts
Input B falling edge if User 2 is low.
Subtracts Input B falling edge when User 2 is high.
Input B falling edge when User 2 is low. Subtracts
Input B falling edge when User 2 is high and Input B
rising edge when User 2 is low.
Adds Input B rising and falling edges if User 2 is
high. Subtracts Input B rising and falling edge if User
2 is low.
COUNTER B RESET ACTION
COUNTER B DECIMAL POSITION
COUNTER B SCALE FACTOR
COUNTER B SCALE MULTIPLIER
to
Counter B may be programmed to reset at each meter power-up.
8 DIGIT COUNT VALUES
Any counter display value below -99999 or above 999999 (less decimal
point) will consist of a two part display. This display alternates between the
least 6 significant digits and the remaining most significant digits beginning
with “” in the display. If the display exceeds ± 99999999 the display will roll
to zero and continue counting. Outputs cannot be set to counter values above 6
digits. The annunciator, indicating the counter being displayed, will flash when
the value is above 6 digits.
SCALING CALCULATIONS
Each counter has the ability to scale an input signal to a desired display
value. This is accomplished by the counter mode (x-), scale factor (x),
scale multiplier (x) and decimal point (x). The scale factor is
calculated using:
SF (x) = Desired Display Decimal DDD
(Number of pulses per ‘single’ unit x CM x SM)
Where:
Desired
Display
Decimal DDD
1 0 None
10 0.0 Tenths
100 0.00 Hundredths
1000 0.000 Thousandths
10000 0.0000 Ten Thousandths
100000 0.00000 Hundred Thousandths
Number of pulses per ‘single’ unit: pulses per unit generated by the
process (i.e. # of pulses per foot)
CM: Counter Mode(x-) times factor of the mode 1,2 or 4.
SM: Scale Multiplier (x) selection of 1, 0.1 or 0.01.
Example:
1. Show feet to the hundredths (0.00) with 100 pulses per foot:
Scale Factor would be 100 / (100 x 1 x 1) = 1
(In this case, the scale multiplier and counter mode factor are 1)
2. Show feet with 120 pulses per foot: Scale Factor would be 1 / (120 x 1 x 1)
= 0.0083333. (In this case, the scale multiplier of 0.01 could be used: 1 / (120
x 1 x 0.01) = 0.83333 or show to hundredths (0.00): 100 / (120 x 1 x 1) =
0.8333.)
General Rules on Scaling
1. It is recommended that, the scale factor be as close as possible to, but not
exceeding 1.00000. This can be accomplished by increasing or decreasing
the counter decimal point position, using the scale multiplier, or selecting a
different count mode.
2. To double the number of pulses per unit, use counter modes direction X2 or
quad X2. To increase it by four times, use counter mode quad X4. Using
these modes will decrease the maximum input frequency.
3. A scale factor greater than 1.00000 will cause Counter display rounding. In
this case, digit jumps could be caused by the internal count register rounding
the display. The precision of a counter application cannot be improved by
using a scale factor greater than 1. 00000.
4. The number of pulses per single unit must be greater than or equal to the
DDD value for the scale factor to be less than or equal to one.
5. Lowering the scale factor can be accomplished by lowering the counter
decimal position. (Example: 100 (Hundredths)/10 pulses = 10.000 lowering
to 10 (Tenths)/10 = 1.000.)
x
Counter Decimal Selection
14
Page 15
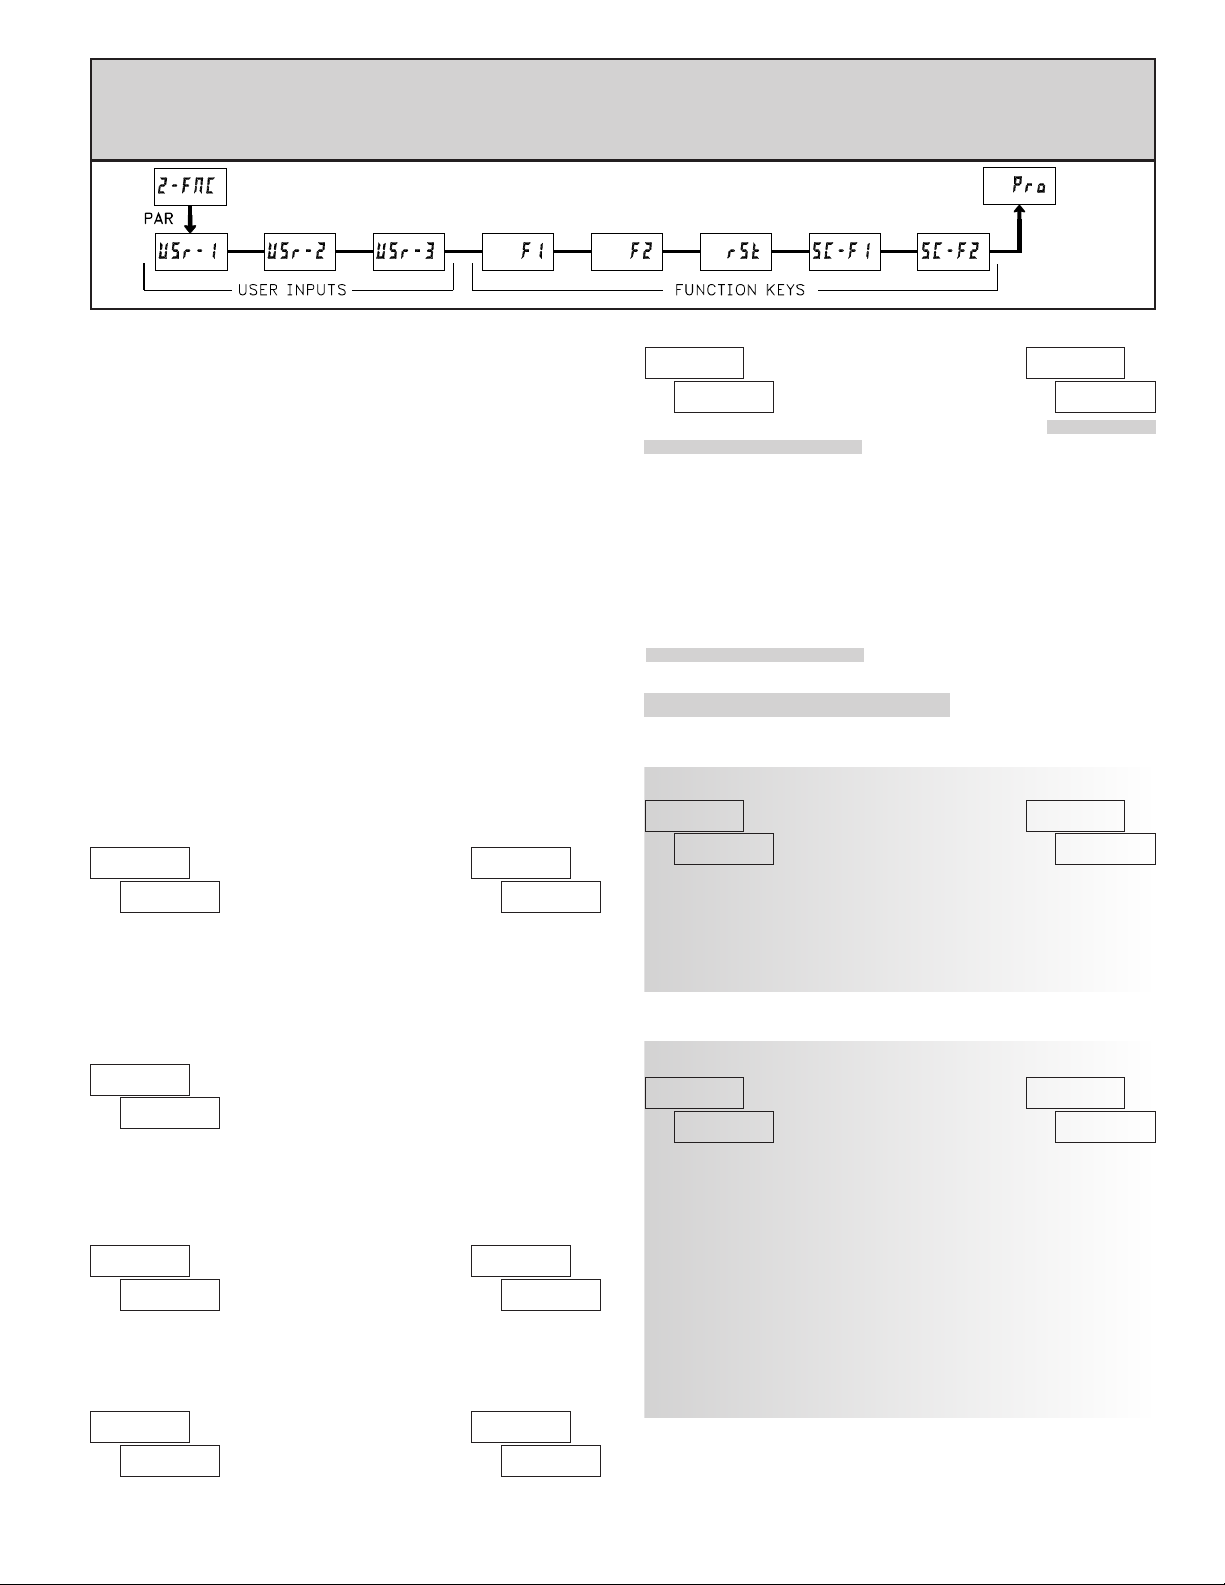
6.2 MOdule 2 - user inpuT and frOnT panel funCTiOn Key
paraMeTers ()
PARAMETER MENU
Module 2 is the programming for rear terminal user inputs and front panel
function keys.
Three rear terminal user inputs are individually programmable to perform
specific meter control functions. While in the Display Mode, the function is
executed when the user input transitions to the active state. (Refer to the user
input specifications for active state response times.) Certain user input functions
are disabled in “full” Programming Mode.
Three front panel function F1, F2 and RST keys are also individually
programmable to perform specific meter control functions. While in the Display
Mode, the primary function is executed when the key is pressed. Holding the
F1 and F2 function keys for three seconds executes a secondary function. It is
possible to program a secondary function without a primary function. The front
panel key functions are disabled in both Programming Modes.
In most cases, if more than one user input and/or function key is programmed
for the same function, the maintained (level trigger) actions will be performed
while at least one of those user inputs or function keys are activated. The
momentary (edge trigger) actions are performed every time any of those user
inputs or function keys transition to the active state. All functions are available
to both user inputs and function keys.
Some of the user functions have a sublist of parameters. The sublist is
accessed when PAR is pressed at the listed function. The function will only be
performed for the parameters entered as . If a user input or function key is
configured for a function with a sublist, then that sublist will need to be scrolled
through each time to access the following user inputs or function keys
parameters.
NO FUNCTION
With this selection, NO function is performed. This is the factory setting for
all user inputs and function keys except the Reset (RST) Key.
NOTE: When a user input is used to accept a quad or directional input
signal, then that user input should be programmed for NO function.
EXCHANGE PARAMETER LISTS
Two lists of values are available for , , , , , ,
, , , . The two lists are named and .
If a user input is used to select the list then is selected when the user
input is not active and and is selected when the user input is active,
(maintained action). If a front panel key is used to select the list then the list will
toggle for each key press, (momentary action). The meter will suspend ALL
operations for approximately 1 msec. while the new values are loaded. The
display will only indicate which list is active when the list is changed or when
entering any Programming Mode.
To program the values for and , first complete the programming
of all the parameters. Exit programming and switch to the other list. Re-enter
programming and enter the values for , , , , , ,
, , , . If any other parameters are changed then the
other list values must be reprogrammed.
Shaded parameters do not apply to the DPF91.
DPF93: PRINT REQUEST
The meter issues a block print through the serial port when activated. The
data transmitted during the print request is configured in Module 7. If the user
input is still active after the transmission is complete (about 100 msec.), an
additional transmission will occur. Only one transmission will take place with
each function key depression. This selection will only function when a serial
communications Plug-in card is installed in the meter.
PROGRAMMING MODE LOCK-OUT
configured to allow complete programming access during user input lockout.
Function keys should not be programmed for .
When activated (momentary action), the display advances to the next display
that is not locked out from the Display Mode.
When activated (momentary action), the shown display is reset. This is the
factory setting for the Reset (RST) Key.
Programming Mode is locked-out, as long as activated
(maintained action). In Module 3, certain parameters can
be setup where they are still accessible during
Programming Mode Lockout. A security code can be
ADVANCE DISPLAY
RESET DISPLAY
DPF93: PRINT REQUEST AND RESET DISPLAYS
The meter issues a block print through the serial port when activated just like
the Print Request function. In addition, when activated (momentary action), the
meter performs a reset of the displays configured as . The print aspect of this
action only functions when a serial communication plug-in card is installed.
The reset action functions regardless.
15
DISPLAY DESCRIPTION FACTORY
Counter A
Counter B
Counter C
Maximum
Minimum
Page 16

MAINTAINED (LEVEL) RESET AND INHIBIT
DEACTIVATE SETPOINT MAINTAINED (LEVEL)
The meter performs a reset and inhibits the displays configured as , as
long as activated (maintained action).
DPF91: MAINTAINED (LEVEL) RESET AND INHIBIT
The meter performs a reset and inhibits the displays configured as , as
long as activated (maintained action).
When activated (momentary action), the meter resets the displays configured as
. (Momentary resets improve max. input frequencies over maintained resets.)
DPF91: MOMENTARY (EDGE) RESET
When activated (momentary action), the meter resets the displays configured as
. (Momentary resets improve max. input frequencies over maintained resets.)
The meter inhibits the displays configured as , as long as activated
(maintained action).
The meter holds (freeze) the displays configured as , as long as activated
(maintained action). Internally the counters and max. and min. values continue to
update.
DISPLAY DESCRIPTION FACTORY
MOMENTARY (EDGE) RESET
DISPLAY DESCRIPTION FACTORY
Counter A
Counter B
Counter C
Maximum
Minimum
Maximum
Minimum
Counter A
Counter B
Counter C
Maximum
Minimum
Maximum
Minimum
INHIBIT
Counter A
Counter B
Counter C
Maximum
Minimum
STORE DISPLAY
Counter A
Counter B
Counter C
Maximum
Minimum
FACTORYDESCRIPTIONDISPLAY
FACTORYDESCRIPTIONDISPLAY
FACTORYDESCRIPTIONDISPLAY
FACTORYDESCRIPTIONDISPLAY
The meter deactivates the setpoints configured as , as long as activated
(maintained action). This action only functions with a Setpoint card installed.
When activated (momentary action), the meter deactivates the setpoints
configured as . This action only functions with a Setpoint card installed.
The meter holds the state of the setpoints configured as , as long as
activated (maintained action). This action only functions with a Setpoint plug-in
card installed.
The meter activates the setpoints configured as , as long as activated
(maintained action). This action only functions with a Setpoint card installed.
When activated (momentary action), the meter activates the setpoints
configured as . This action only functions with a Setpoint card installed.
When activated (momentary action), the display intensity changes to the next
intensity level (of 4). The four levels correspond to Display Intensity Level
() settings of 0, 3, 8 & 15.
16
DEACTIVATE SETPOINT MOMENTARY (EDGE)
Setpoint 1
Setpoint 2
Setpoint 3
Setpoint 4
FACTORYDESCRIPTIONDISPLAY
DISPLAY DESCRIPTION FACTORY
Setpoint 1
Setpoint 2
Setpoint 3
Setpoint 4
HOLD SETPOINT STATE
ACTIVATE SETPOINT MAINTAINED (LEVEL)
Setpoint 1
Setpoint 2
Setpoint 3
Setpoint 4
FACTORYDESCRIPTIONDISPLAY
ACTIVATE SETPOINT MOMENTARY (EDGE)
Setpoint 1
Setpoint 2
Setpoint 3
Setpoint 4
FACTORYDESCRIPTIONDISPLAY
DISPLAY DESCRIPTION FACTORY
CHANGE DISPLAY INTENSITY LEVEL
Setpoint 1
Setpoint 2
Setpoint 3
Setpoint 4
Page 17
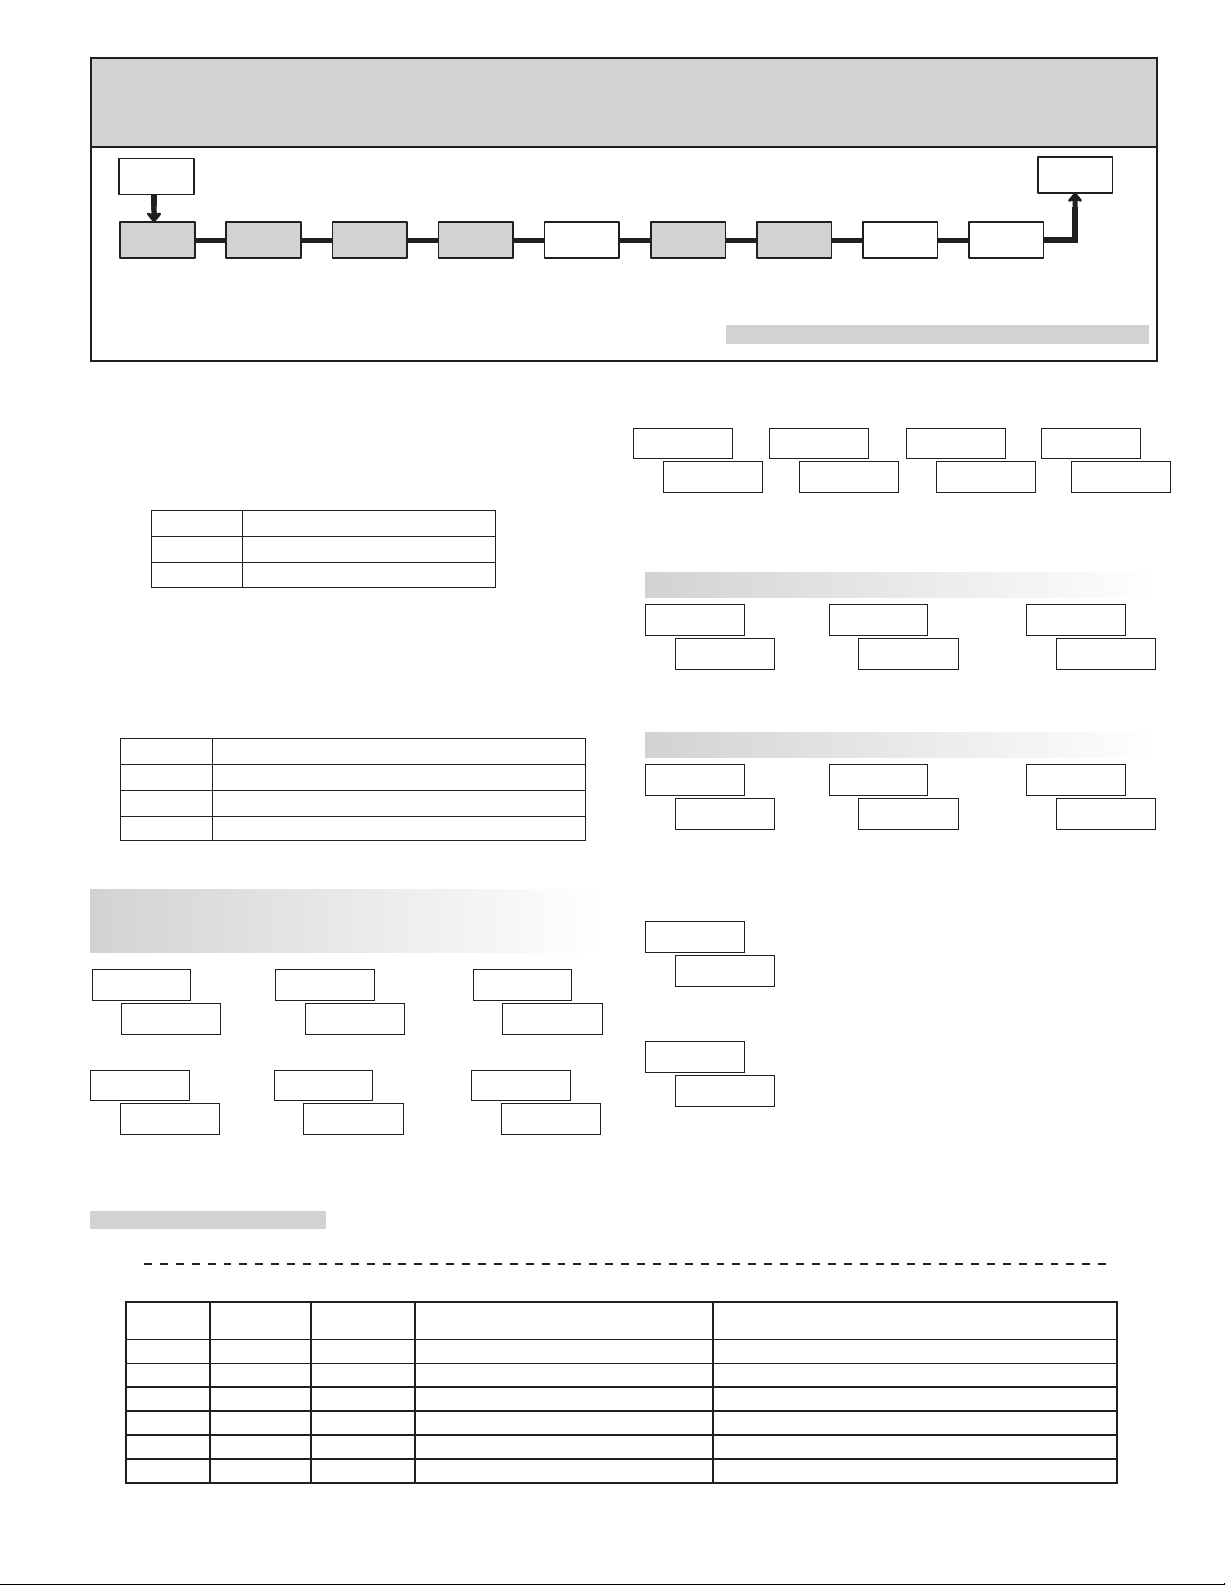
6.3 MOdule 3 - display and prOGraM lOCK-OuT
xx
paraMeTers ()
3-LOC
PAR
rAtE CNtLd SCFAC
Counter x
Display
Lock-out
x = Counter A , Counter B, and then Counter C
n = Setpoints 1 to 4
Module 3 is the programming for Display lock-out and “Full” and “Quick”
Program lock-out.
When in the Display Mode, the available displays can be read consecutively
by repeatedly pressing the DSP key. An annunciator indicates the display being
shown. These displays can be locked from being visible. It is recommended that
the display be set to when the corresponding function is not used.
“Full” Programming Mode permits all parameters to be viewed and
modified. This Programming Mode can be locked with a security code and/or
user input. When locked and the PAR key is pressed, the meter enters a Quick
Programming Mode. In this mode, setpoint, count load, scale factor values, and
the Display Intensity Level () parameter can still be read and/or changed
per the selections below.
Rate Display
Lock-out
DESCRIPTIONSELECTION
Visible in Display Mode
Not visible in Display Mode
DESCRIPTIONSELECTION
Visible but not changeable in Quick Programming Mode
Visible and changeable in Quick Programming Mode
Not visible in Quick Programming Mode
Max Display
Lock-out
LO HI
Min Display
Lock-out
PARAMETER MENU
SP-nCNt
Setpoint 1-4
Access
Pro
x
Counter x
Count Load
Access
following table). Accessible only with the Setpoint Plug-in card installed.
COUNT LOAD A B C ACCESS LOCK-OUT
The setpoint displays can be programmed for , , or (See the
The Count Load Values can be programmed for , , or .
SCALE FACTOR A B C ACCESS LOCK-OUT
The Scale Factor values can be programmed for , , or .
Scale
Factor x
Access
Shaded areas represent program access that is model dependent.
SETPOINT 1 to 4 ACCESS LOCK-OUT
d-LEV
Display
Intensity
Access
COdE
Security
Code
COUNTER A B C DISPLAY LOCK-OUT
RATE DISPLAY LOCK-OUT
MAX. MIN. DISPLAY LOCK-OUT
These displays can be programmed for or .
Shaded areas are model dependent.
SECURITY
CODE
0
>0
>0
>0
0
0
Throughout this document, Programming Mode (without Quick in front) always refers to “Full” Programming (all meter parameters are accessible).
USER INPUT
CONFIGURED
not
not
USER INPUT
STAT E
———— “Full” Programming Immediate access.
———— Quick Programming After Quick Programming with correct code # at prompt.
Active Quick Programming After Quick Programming with correct code # at prompt.
Not Active “Full” Programming Immediate access.
Active Quick Programming No access
Not Active “Full” Programming Immediate access.
PROGRAMMING MODE ACCESS
WHEN PAR KEY IS
PRESSED
access the “Full” Programming Mode. Access will only be allowed after entering
a matching security code or universal code of . With this lock-out, a user input
would not have to be configured for Program Lock-out. However, this lock-out is
overridden by an inactive user input configured for Program Lock-out.
DISPLAY INTENSITY ACCESS LOCK-OUT
The Display Intensity Level can be programmed for
, , or .
SECURITY CODE
to
Entry of a non-zero value will cause the prompt to appear when trying to
“FULL” PROGRAMMING MODE ACCESS
17
Page 18
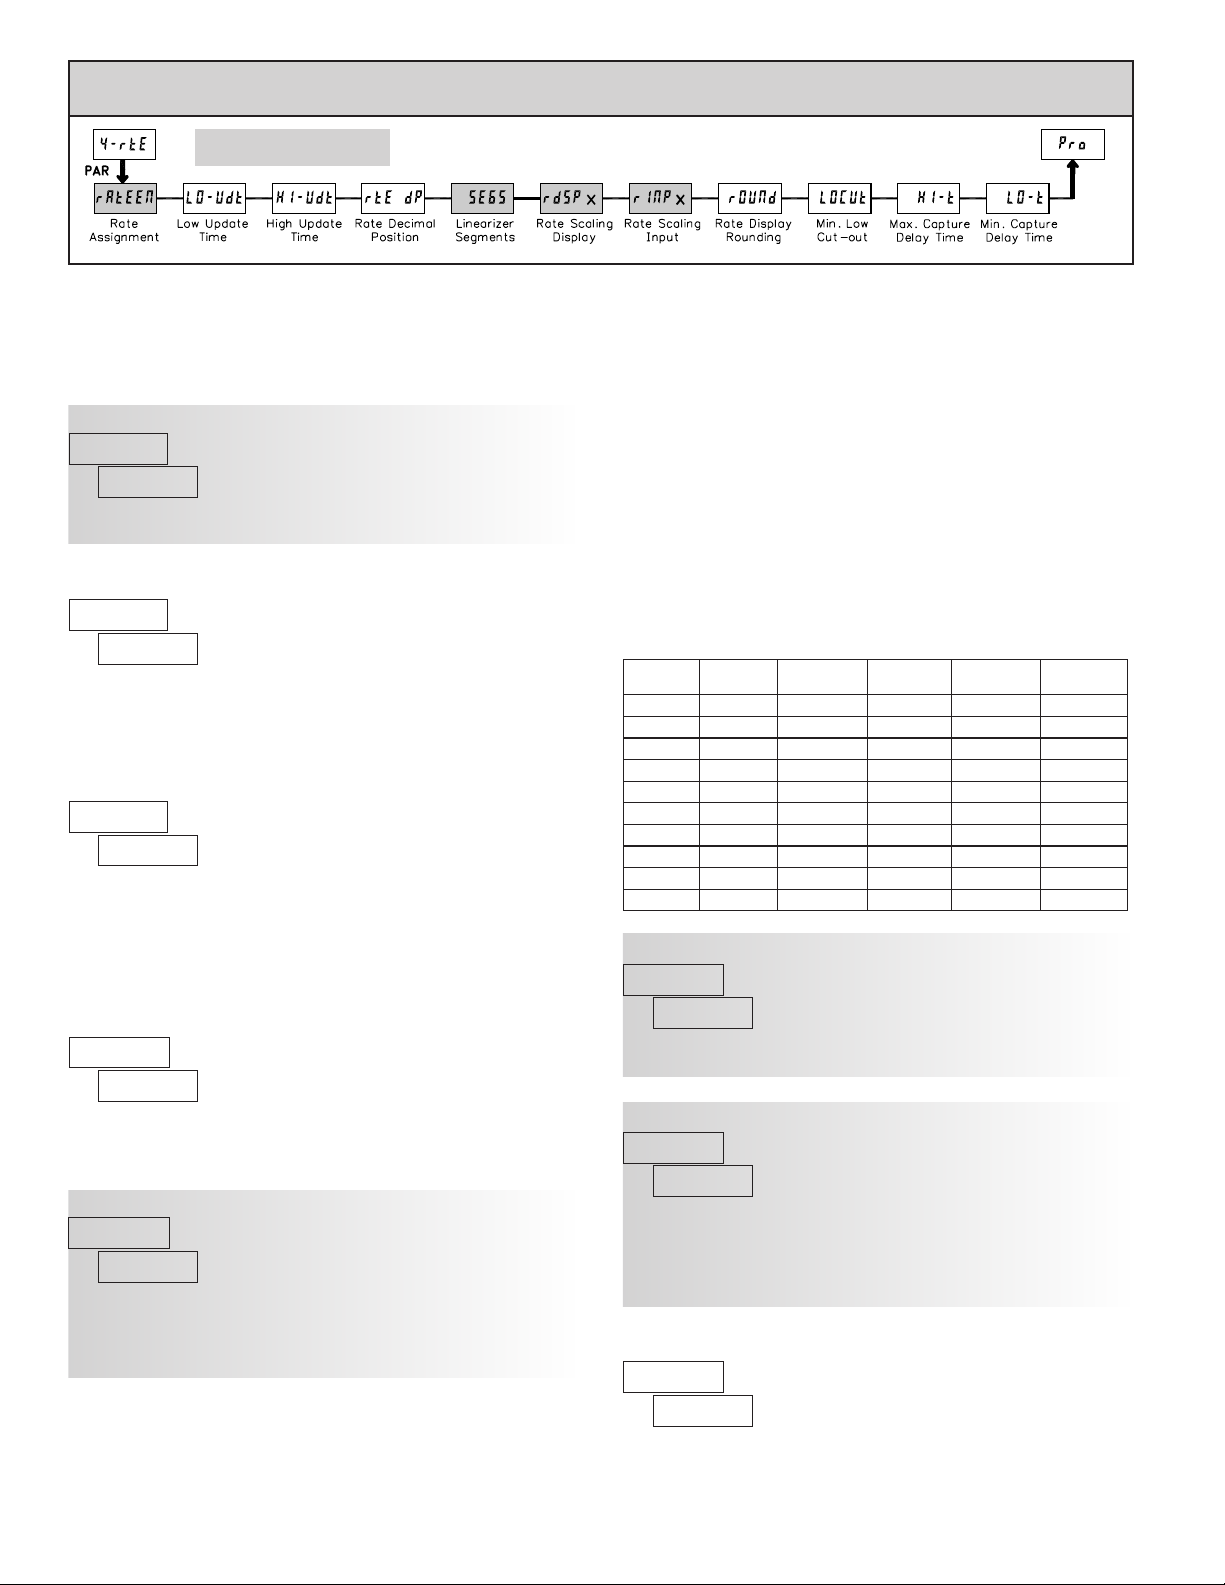
6.4 MOdule 4 - raTe inpuT paraMeTers ()
dpf91 & 93
Module 4 is the programming for the Rate parameters. For maximum input
frequency, Rate assignment should be set to when not in use. When set to
PARAMETER MENU
, the remaining related parameters are not accessible. The Rate value is
shown with an annunciator of ‘’ in the Display Mode.
Note: For DPF91, is actually on the unit’s display and
is actually on the unit’s display.
DPF93: RATE ASSIGNMENT
For measuring the rate (speed) of pulses on Input A, select . For Input
B select . This assignment is independent of the counting modes.
The Low Update Time is the minimum amount of time between display
updates for the Rate display. Values of 0.1 and 0.2 seconds will update the
display correctly but may cause the display to appear unsteady. The factory
setting of 1.0 will update the display every second minimum.
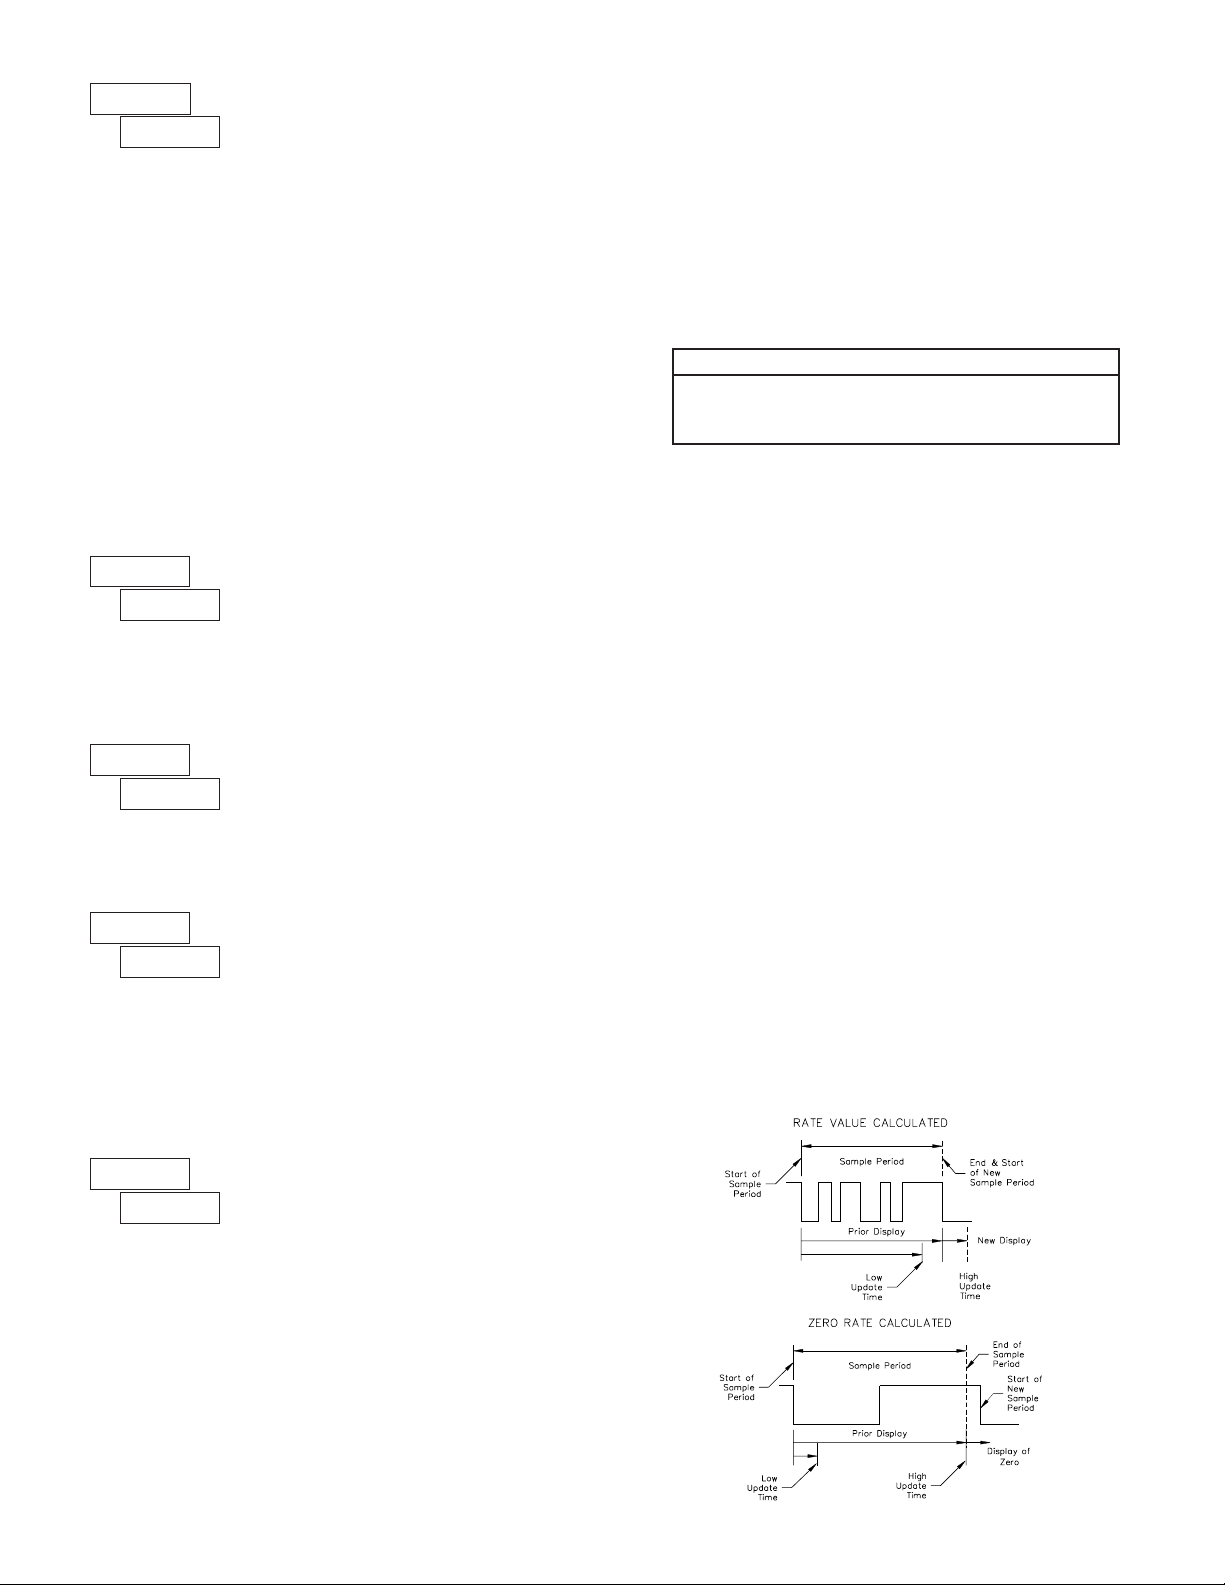
The High Update Time is the maximum amount of time before the Rate
display is forced to zero. (For more explanation, refer to Input Frequency
Calculation.) The High Update Time must be higher than the Low Update Time
and higher than the desired slowest readable speed (one divided by pulses per
second). The factory setting of 2.0, will force the display to zero for speeds
below 0.5 Hz or a pulse every 2 seconds.
This selects the decimal point position for Rate, Minimum and Maximum
rate displays and any setpoint value assigned to these displays. This parameter
does not affect rate scaling calculations.
DPF93: LINEARIZER SEGMENTS
This parameter specifies the number of linear segments used for the Rate
Scaling function. Each linear segment has two scaling points which define the
upper and lower endpoints of the segment. The number of segments used
depends on the linearity of the process and the display accuracy required as
described below.
Linear Application – 2 Scaling Points
Linear processes use a single segment (two scaling points) to provide a linear
Rate display from 0 up to the maximum input frequency. For typical zero based
frequency measurements (0 Hz = 0 on display), leave (factory setting).
For non-zero based 2 scaling point applications, set , to enter both the
zero segment ( & ) and segment 1 ( & ).
LOW UPDATE TIME (DISPLAY UPDATE)
to seconds
HIGH UPDATE TIME (DISPLAY ZERO)
to seconds
RATE DECIMAL POSITION
to
Non-linear Application – Up to 10 Scaling Points
Non-linear processes may utilize up to nine segments (ten scaling points) to
provide a piece-wise linear approximation representing the non-linear function.
The Rate display will be linear throughout each individual segment (i.e.
between sequential scaling points). Thus, the greater the number of segments,
the greater the conformity accuracy. Several linearization equations are
available in the software.
About Scaling Points
Each Scaling Point is specified by two programmable parameters: A desired
Rate Display Value () and a corresponding Rate Input Value ().
Scaling points are entered sequentially in ascending order of Rate Input Value.
Two scaling points must be programmed to define the upper and lower
endpoints of the first linear segment. Setting , automatically factory sets
the first scaling point to 0.0 for typical single segment, zero based applications.
When multiple segments are used, the upper scaling point for a given segment
becomes the lower scaling point for the next sequential segment. Thus, for each
additional segment used, only one additional scaling point must be programmed.
The following chart shows the Scaling Points, the corresponding Parameter
mnemonics, and the Factory Default Settings for each point.
SEGMENT
DPF93: RATE DISPLAY VALUE FOR SCALING POINT 1
Confirm the Rate Display Value for the first Scaling Point is 0. This parameter
is automatically set to 0 and does not appear when . (See Note)
DPF93: RATE INPUT VALUE FOR SCALING POINT 1
Confirm the Rate Input Value for the first Scaling Point is 0.0. (See Note)
Note: For all linear and most non-linear applications, the Scaling Point 1
parameters ( and ) should be set to 0 and 0.0 respectively.
Consult the factory before using any non-zero values for Scaling Point 1. These
parameters are automatically set to 0 and do not appear when .
Enter the desired Rate Display Value for the second Scaling Point by using
the arrow keys.
SCALING
POINT
1
21
32
43
54
65
76
87
98
109
RATE DISPLAY VALUE FOR SCALING POINT 2
DISPLAY
PARAMETER
to
to
to
DISPLAY
DEFAULT
000000
001000
002000
003000
004000
005000
006000
007000
008000
009000
INPUT
PARAMETER
INPUT
DEFAULT
00000.0
01000.0
02000.0
03000.0
04000.0
05000.0
06000.0
07000.0
08000.0
09000.0
18
Page 19
RATE INPUT VALUE FOR SCALING POINT 2
Enter the corresponding Rate Input Value for the second Scaling Point by
using the arrow keys. Rate Input values for scaling points can be entered by
using the Key-in or the Applied method described below.
Key-in Method:
Enter the Rate Input value () that corresponds to the entered Rate
Display value () by pressing the F1 or F2 keys. This value is always in
pulses per second (Hz).
Applied Method:
Apply an external rate signal to the appropriate input terminals. At the Rate
Input Value () press and hold the F1 and F2 keys at the same time. The
applied input frequency (in Hz) will appear on the display. (To verify correct
reading wait for at least the length of the Low Update Time. Then press and
hold the F1 and F2 keys at the same time again. The new value should be ±
0.1% of the previous entered value.) Press PAR to enter the displayed
frequency as the Rate Input value. To prevent the displayed value from being
entered, press DSP. This will take the meter out of Programming Mode and the
previous Rate Input value will remain.
Rounding values other than one round the Rate display to the nearest
increment selected (e.g. rounding of ‘5’ causes 122 to round to 120 and 123 to
round to 125). Rounding starts at the least significant digit of the Rate display.
The Low Cut Out value forces the Rate display to zero when the Rate display
falls below the value entered.
When the Rate value is above the present Maximum rate value for the
entered amount of time, the meter will capture that Rate value as the new
Maximum value. A delay time helps to avoid false captures of sudden short
spikes. Maximum detection will only function if Rate is assigned to Input A or
B. The Maximum rate value is shown with an annunciator of ‘’ in the display
and will continue to function independent of being displayed.
MAXIMUM CAPTURE DELAY TIME
to
RATE DISPLAY ROUND
LOW CUT OUT
to
to seconds
RATE SCALING
To scale the Rate, enter a Scaling Display value with a corresponding Scaling
Input value. (The Display and Input values can be entered by Key-in or Applied
Methods.) These values are internally plotted to a Display value of 0 and Input
value of 0 Hz. A linear relationship is formed between these points to yield a rate
display value that corresponds to the incoming input signal rate. The DPF93 and
91 are capable of showing a rate display value for any linear process.
KEY-IN SCALING METHOD CALCULATION
If a display value versus input signal (in pulses per second) is known, then
those values can be entered into Scaling Display (x) and Scaling Input
(x). No further calculations are needed.
If only the number of pulses per ‘single’ unit (i.e. # of pulses per foot) is
known, then it can be entered as the Scaling Input value and the Scaling Display
value will be entered as the following:
RATE PER
NOTES:
1. If # of pulse per unit is less than 10, then multiply both Input and Display
values by 10.
2. If # of pulse per unit is less than 1, then multiply both Input and Display
values by 100.
3. If the Display value is raised or lowered, then Input value must be raised
or lowered by the same proportion (i.e. Display value for per hour is
entered by a third less (1200) then Input value is a third less of # of pulses
per unit). The same is true if the Input value is raised or lowered, then
Display value must be raised or lowered by the same proportion.
4. Both values must be greater than 0.0.
EXAMPLE:
1. With 15.1 pulses per foot, show feet per minute in tenths. Scaling Display
= 60.0 Scaling Input = 15.1.
2. With 0.25 pulses per gallon, show whole gallons per hour. (To have greater
accuracy, multiply both Input and Display values by 10.) Scaling Display
= 36000 Scaling Input = 2.5.
INPUT FREQUENCY CALCULATION
The meter determines the input frequency by summing the number of falling
edges received during a sample period of time. The sample period begins on the
first falling edge. At this falling edge, the meter starts accumulating time
towards Low Update and High Update values. Also, the meter starts
accumulating the number of falling edges. When the time reaches the Low
Update Time value, the meter looks for one more falling edge to end the sample
period. If a falling edge occurs (before the High Update Time value is reached),
the Rate display will update to the new value and the next sample period will
start on the same edge. If the High Update Time value is reached (without
receiving a falling edge after reaching Low Update Time), then the sample
period will end but the Rate display will be forced to zero. The High Update
Time value must be greater than the Low Update Time value. Both values must
be greater than 0.0. The input frequency calculated during the sample period, is
then shown as a Rate value determined by either scaling method.
INPUT (x)DISPLAY (x)
# of pulses per unit1Second
# of pulses per unit60Minute
# of pulses per unit3600Hour
MINIMUM CAPTURE DELAY TIME
When the Rate value is below the present Minimum rate value for the entered
amount of time, the meter will capture that Rate value as the new Minimum
value. A delay time helps to avoid false captures of sudden short spikes.
Minimum detection will only function if Rate is assigned to Input A or B. The
Minimum rate value is shown with an annunciator of ‘’ in the display and will
continue to function independent of being displayed.
RATE DISPLAY EXCEEDED
If the rate of the input signal causes a display that exceeds the capacity of the
Rate display (5 digits, 99999), then the display will indicate an overflow
condition by showing “ ”. During this overflow condition, the Minimum
and Maximum rate values will stay at their values even during resets.
to seconds
19
Page 20
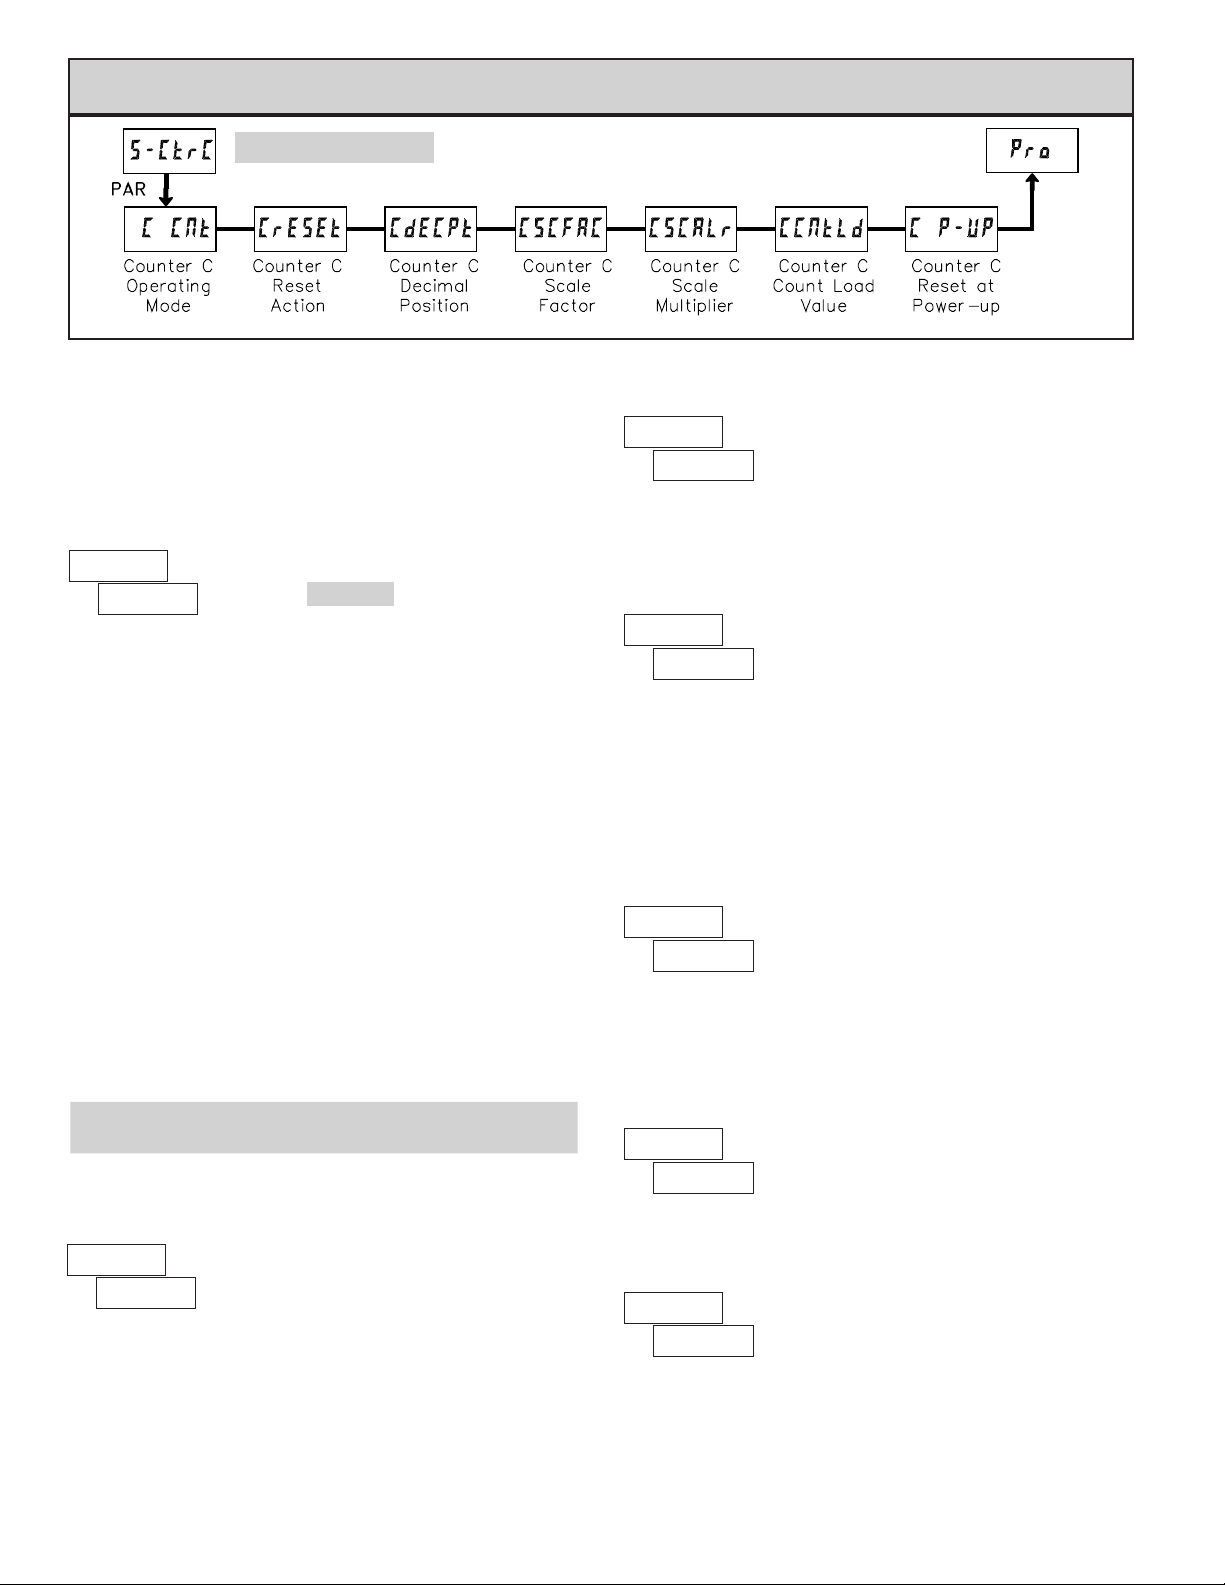
6.5 MOdule 5 - COunTer C inpuT paraMeTers ()
dpf92 & 93
Module 5 is the programming for Counter C. For maximum input frequency,
the counter operating mode should be set to when not in use. When set to
the remaining related parameters are not accessible. The C annunciator
indicates that Counter C is being shown in the Display Mode. An Exchange
Parameter List feature for scale factor and count load values is explained in
Module 2.
COUNTER C OPERATING MODE
Does not count.
Counter C counts the incoming pulses from Counter A input as
per Counter A mode of operation. The signal is scaled only
according to Counter C parameters.
Counter C counts the incoming pulses from Counter A and B
inputs as per Counter A and B modes of operation. The result
is scaled only according to Counter C parameters. (Example:
If Counter A is set for Count X1 mode and Counter B is set for
Count X2 mode, then Counter C will increment by 1 for each
pulse received on Input A and increment by 2 for each pulse
received on Input B. Counter C scale settings are then applied
and the result is displayed.)
Counter C counts the incoming pulses from Counter A and B
inputs as per Counter A and B modes of operation and
subtracts the B counts from the A counts. The result is scaled
only according to Counter C parameters. (Example: If Counter
A is set for Count X1 mode and Counter B is set for Count X2
mode, then Counter C will increment by 1 for each pulse
received on Input A and decrement by 2 for each pulse
received on Input B. Counter C scale settings are then applied
and the result is displayed.)
See Serial Communications for details.
COUNTER C RESET ACTION
Select the operating mode for Counter C.
Note: When using Add Ab or Sub Ab, Counter A, B and C must all be reset
at the same time for the math to be performed on the display values.
(DPF93 only)
PARAMETER MENU
COUNTER C DECIMAL POSITION
This selects the decimal point position for Counter C and any setpoint value
assigned to Counter C. The selection will also affect Counter C scale factor
calculations.
The number of input counts is multiplied by the scale factor and the scale
multiplier to obtain the desired process value. A scale factor of 1.00000 will
result in the display of the actual number of input counts. For the mode of
operation, the input signal is scaled directly. For and modes of
operation, the math is performed on the input signals and then the result is
scaled. To achieve correct results, both Input A and Input B must provide the
same amount of pulses per unit of measurement. (Details on scaling calculations
are explained at the end of Module 1 section.)
The number of input counts is multiplied by the scale multiplier and the scale
factor to obtain the desired process value. A scale multiplier of 1 will result in
only the scale factor affecting the display. (Details on scaling calculations are
explained at the end of Module 1 section.)
When reset to count load action is selected, Counter C will reset to this value.
COUNTER C SCALE FACTOR
COUNTER C SCALE MULTIPLIER
to
COUNTER C COUNT LOAD VALUE
to
When Counter C is reset, it returns to zero or Counter C count load value.
This reset action affects all Counter C resets, except the Setpoint Counter Auto
Reset Action in Module 6.
COUNTER C RESET POWER-UP
Counter C may be programmed to reset at each meter power-up.
20
Page 21
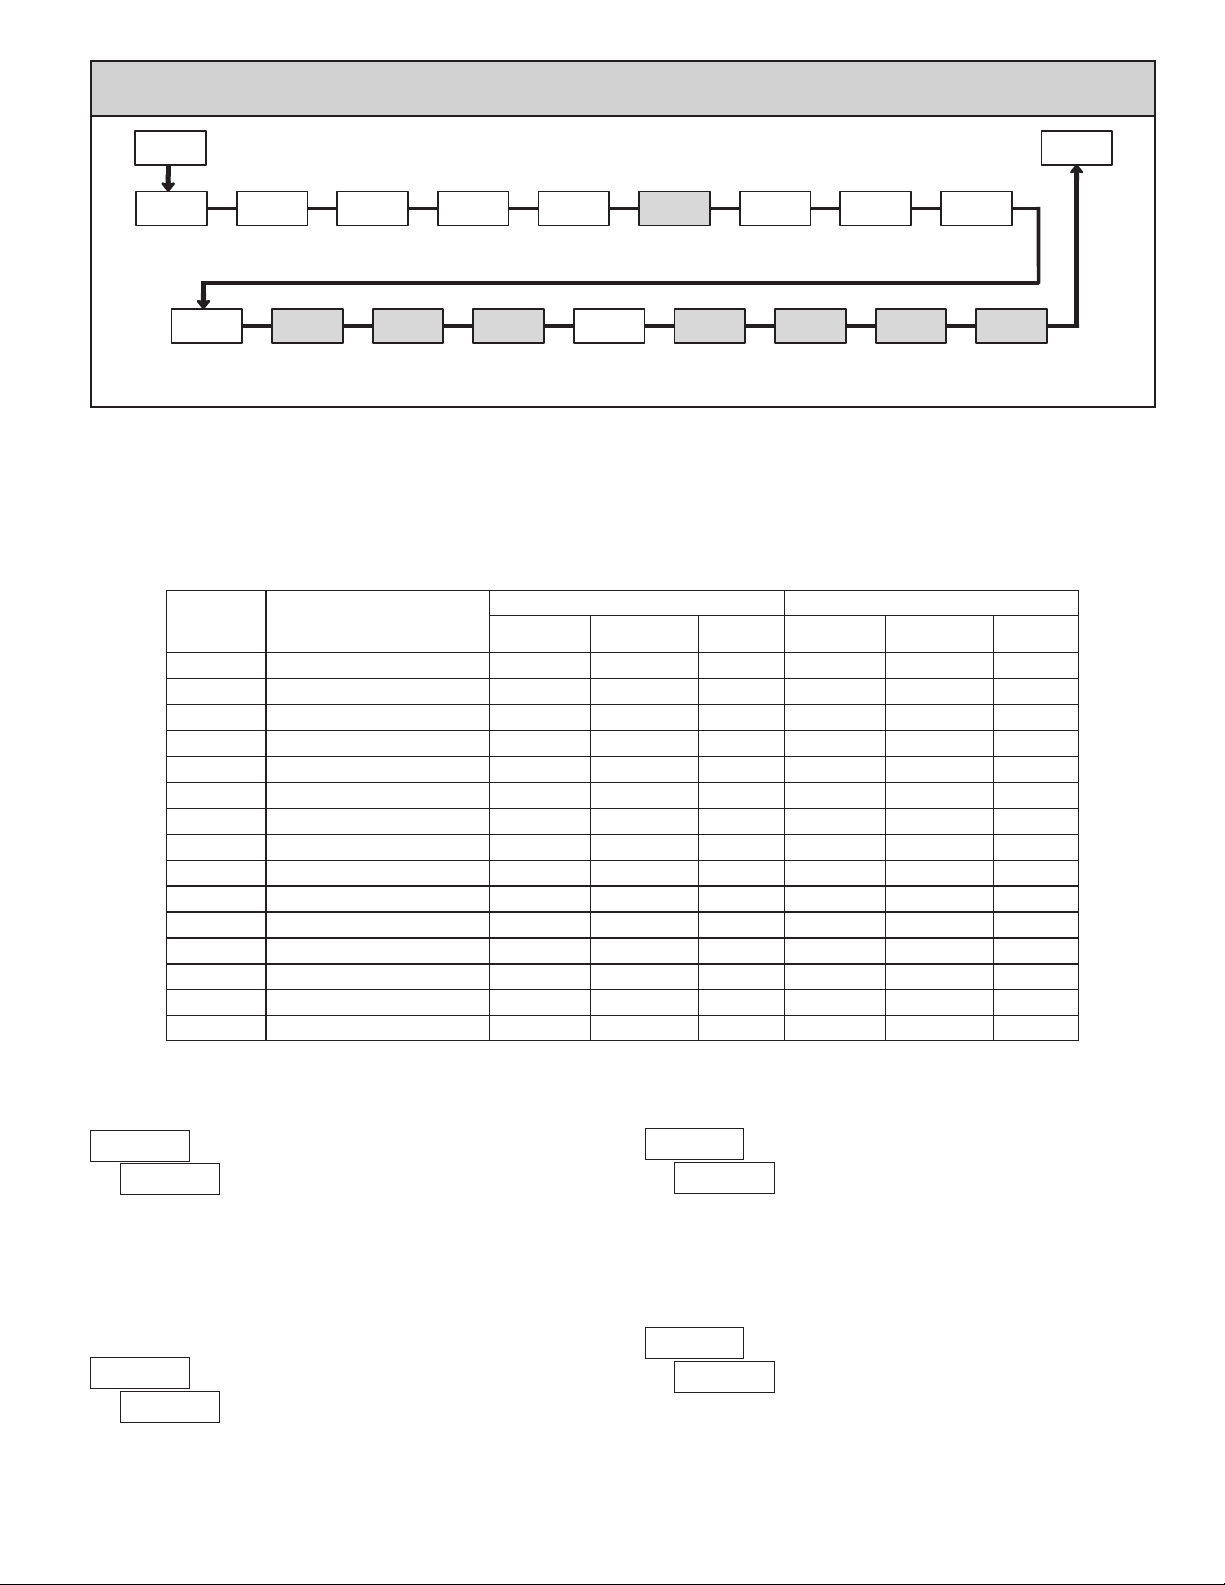
6.6 MOdule 6 - seTpOinT (alarM) paraMeTers ()
6-SPt
PAR
SPSEL
Setpoint
PARAMETER MENU
Lit-n
Setpoint
Select
PAR
Annunciators
Stb-n
Standby
Operation
Module 6 is the programming for the setpoint (alarms) output parameters. To have setpoint outputs, a setpoint Plug-in card needs to
be installed in the meter (see Ordering Information). Depending on the card installed, there will be two or four setpoint outputs
available. For setpoint hardware and wiring details, refer to the bulletin shipped with the plug-in card. For maximum input frequency,
unused Setpoints should be configured for action.
The setpoint assignment and the setpoint action determine certain setpoint feature availability. The chart below illustrates this.
HYS-n
Setpoint
Hysteresis
OUt-n
Output
Logic
tOFF-n
Off Time
SUP-n ACt-n ASN-n SP-n trC-n tYP-n
Delay
Power-up
State
tON-n
On Time
Delay
Setpoint
Action
tOUt-n
Time-out
Value
Setpoint
Assignment
AUtO-n
Counter
Auto Reset
Setpoint
Value
rSd-n rSAS-n
W/Display
Reset
Reset
Setpoint
Tracking
Reset
w/SPn+1
Activates
Boundary
SETPOINT PARAMETER AVAILABILITY
PARAMETER
DESCRIPTION
TIMED OUT
BOUNDARY
LATCH
TIMED OUT
COUNTERRATE
BOUNDARY
Type
rSAE-n
Reset
w/SPn+1
Deactivates
Pro
LATCH
YesYesYe sYesYe sYe sAnnunciators
YesYesYe sYesYe sYe sOutput Logic
YesYesYe sYesYe sYe sPower Up State
YesYesYe sYesYe sYe sSetpoint Value
YesYesYe sYesYe sYe sSetpoint Tracking
NoYesNoYe sYesYe sBoundary Type
NoYesNoYe sYesYe sStandby Operation
NoNoNoNoYe sNoSetpoint Hysteresis
NoNoNoNoYe sNoSetpoint Off Delay
NoNoNoYesYesYesSetpoint On Delay
NoNoYesNoNoYe sSetpoint Time Out
YesNoYesNoNoNoCounter Auto Reset
YesNoYesNoNoNoReset With Display Reset
YesNoYesNoNoNoReset When SPn+1 Activates
YesNoYesNoNoNoReset When SPn+1 Deactivates
SETPOINT SELECT
Select a setpoint (alarm output) to open the remaining module menu. (The
“” in the following parameters will reflect the chosen setpoint number.) After
the chosen setpoint is programmed, the display will default to . Select
the next setpoint to be programmed and continue the sequence for each setpoint.
Pressing PAR at will exit Module 6.
disables the display of the setpoint annunciator. Normal () displays
the corresponding setpoint annunciator of an “on” alarm output. Reverse ()
displays the corresponding setpoint annunciator of an “off” alarm output.
flashes the display and the corresponding setpoint annunciator of an
“on” alarm output.
SETPOINT ANNUNCIATORS
SETPOINT OUTPUT LOGIC
Normal () turns the output “on” when activated and “off” when
deactivated. Reverse () turns the output “off” when activated and “on” when
deactivated.
will restore the output to the same state it was at before the meter was
powered down. will activate the output at power up. will deactivate the
output at power up.
21
SETPOINT POWER UP STATE
Page 22

SETPOINT ACTION
SETPOINT STANDBY OPERATION
: When not using a setpoint, it should be set to (no action).
For Counter Assignments:
For Rate Assignments:
DPF92 & 93: SETPOINT ASSIGNMENT
Select the display that the setpoint is to be assigned.
With Timed Out action, the setpoint output activates when the
count value equals the setpoint value and deactivates after the
Time Out value. This action is not associated with Boundary types.
With boundary action, the setpoint output activates when the count
value is greater than or equal to (for = ) or less than or equal
to (for = ) the setpoint value. The setpoint output will
deactivate when the count value is less than (for = ) or
greater than (for = ) the setpoint value.
With Latch action, the setpoint output activates when the count
value equals the setpoint value. The output remains active until
reset. This action is not associated with Boundary types.
With Timed Out action, the setpoint output cycles when the rate
value is greater than or equal to (for = ) or less than or equal
to (for = ) the setpoint value. The Setpoint Time Out
() and Setpoint On Delay () values determine the
cycling times.
With Boundary action, the setpoint output activates when the rate
value is greater than or equal to (for = ) or less than or equal
to (for = ) the setpoint value. The setpoint output will
deactivate (Auto reset) as determined by the hysteresis value.
With Latch action, the setpoint output activates when the rate value
is equal to the setpoint value. The setpoint output remains active
until reset. If after reset, the rate value is greater than or equal to
(for = ) or less than or equal to (for = ) the setpoint
value, the output will reactivate.
Selecting will disable low acting setpoints at a power up until the display
value crosses into the alarm “off” area. Once in the alarm “off” area, the
setpoint will function according to the configured setpoint parameters.
DPF93 & 91: SETPOINT HYSTERESIS
The hysteresis value is added to (for = ), or subtracted from (for =
), the setpoint value to determine at what value to deactivate the associated
setpoint output. Hysteresis is only available for setpoints assigned to the Rate
with boundary action.
DPF93 & 91: SETPOINT OFF DELAY
This is the amount of time the Rate display must meet the setpoint
deactivation requirements (below hysteresis for high acting and above
hysteresis for low acting) before the setpoint’s output deactivates.
DPF93 & 91: SETPOINT ON DELAY
This is the amount of time the Rate display must meet the setpoint activation
requirements (below setpoint for = and above setpoint for = ) before
the setpoint’s output activates. If the Rate Setpoint Action is Timed Out, this is
the amount of time the output is off during the on / off output cycling.
to
to seconds
to seconds
SETPOINT VALUE
Enter the desired setpoint value. Setpoint values can also be entered in the
Quick Programming Mode when the setpoint is configured as in Module 3.
(See Module 2 for Exchange Parameter Lists explanation.)
If a selection other than NO is chosen, then the value of the setpoint being
programmed (“n”) will track the entered selection’s value. Tracking means that
when the selection’s value is changed, the “n” setpoint value will also change
(or follow) by the same amount.
to
SETPOINT TRACKING
SETPOINT BOUNDARY TYPE
activates the output when the assigned display value ( ) equals or
exceeds the setpoint value. activates the setpoint when the assigned display
value is less than or equal to the setpoint.
SETPOINT TIME OUT
ACTION
No auto reset.
Reset to zero at the start of output activation.
Reset to count load value at the start of output activation.
Reset to zero at the end of output activation. ( action only).
Reset to count load value at the end of output activation. (
action only).
to seconds
If the setpoint action is Timed Out and the setpoint is assigned to Rate, then
this is the amount of time the output is on during the on / off output cycling. If
the setpoint action is Timed Out and the setpoint is assigned to Count, then this
is the amount of time the output will activate once the count value equals the
setpoint value.
DPF92 & 93: COUNTER AUTO RESET
This automatically resets the display value of the Setpoint Assignment
() counter each time the setpoint value is reached. This reset may be
different than the Counter’s Reset Action (x) in Module 1 or 5.
SELECTION
22
Page 23
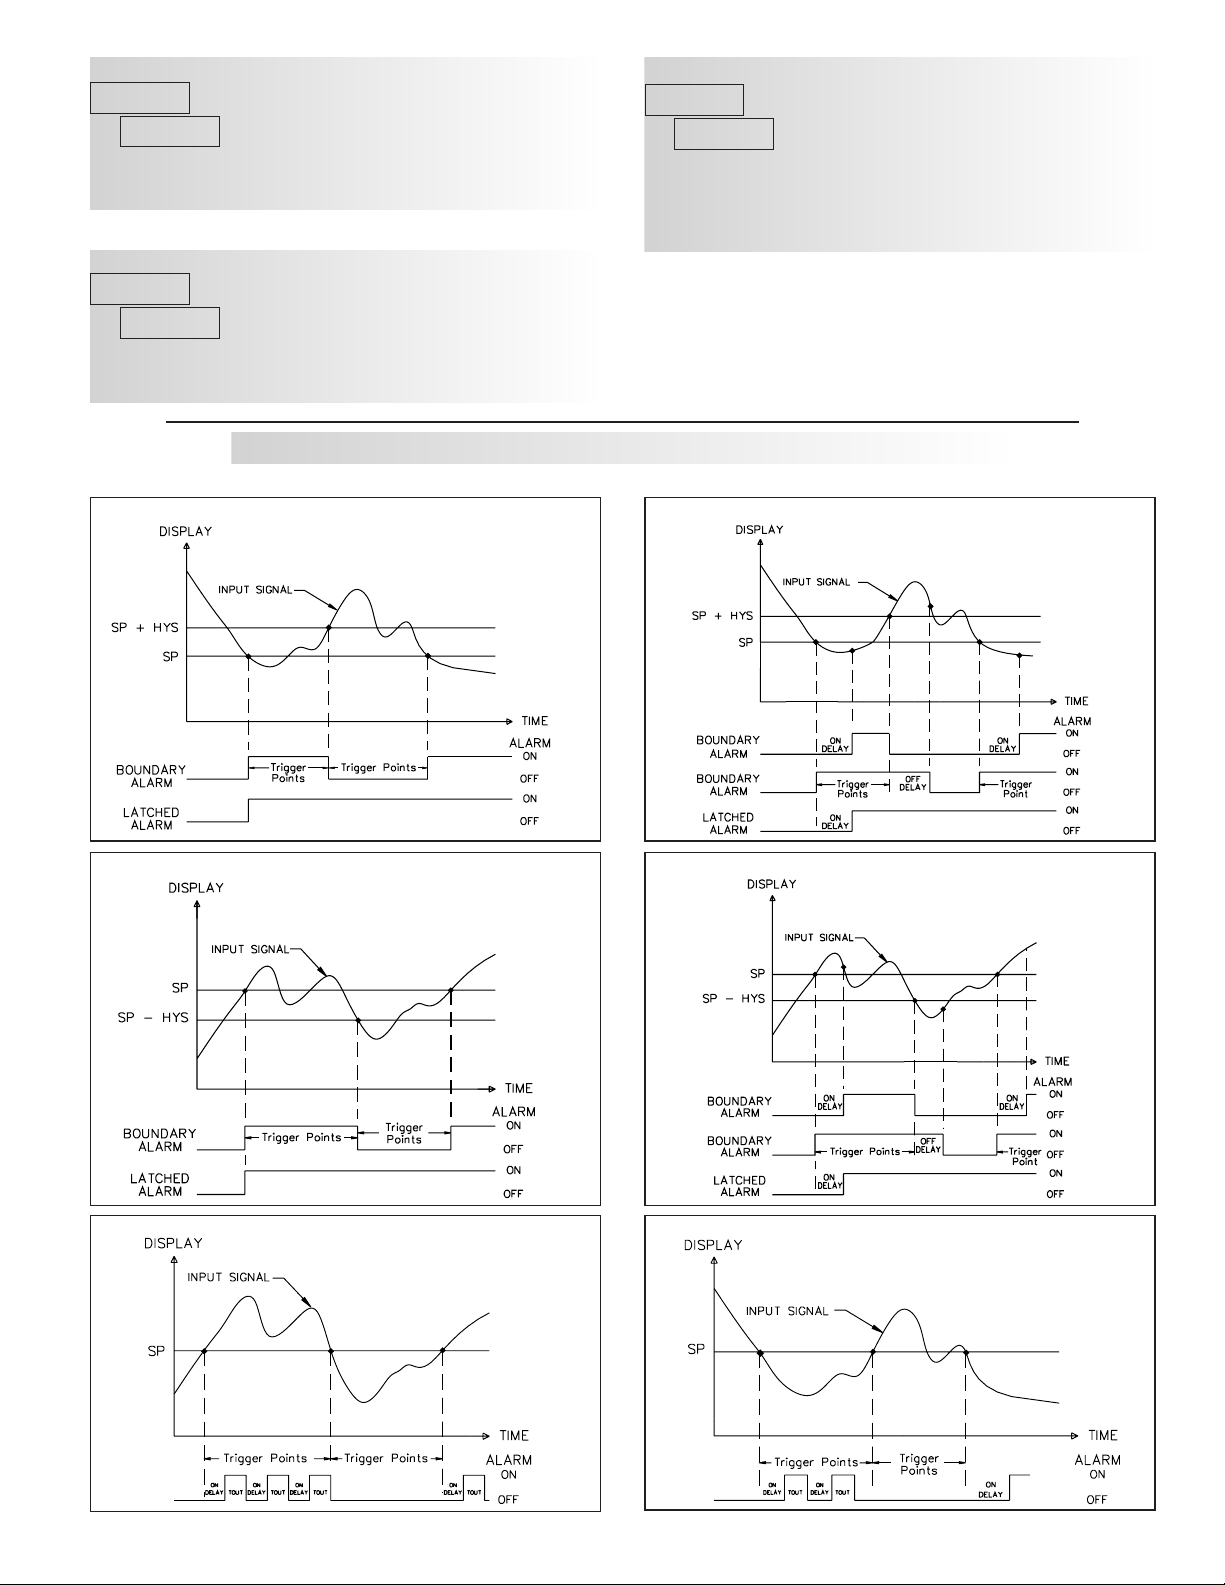
DPF92 & 93: SETPOINT RESET WITH DISPLAY RESET
DPF92 & 93: SETPOINT RESET WHEN SPn+1 DEACTIVATES
Select , so the setpoint output will deactivate (reset) when the Setpoint
Assignment () counter display resets. The only exception is if the
assigned counter is reset by a Counter Auto reset generated by another setpoint.
DPF92 & 93:
Select , so the setpoint output will deactivate (reset) when SPn +1
activates. (Example: SP1 deactivates when SP2 activates and SP4 when SP1
activates.) The last setpoint will wrap around to the first.
SETPOINT RESET WHEN SPn+1 ACTIVATES
DPF91 & 93: SETPOINT (ALARM) FIGURES FOR RATE
(For Reverse Action, The Alarm state is opposite.)
LOW ACTING WITH NO DELAY
Select , so the setpoint output will deactivate (reset) when SPn +1
activates and then times out (deactivates). This function may only be used if the
SPn+1 is programmed for Setpoint Action of . (Example SP1 deactivates
when SP2 is activated and then times out.) The last setpoint will wrap around
to the first.
LOW ACTING WITH DELAY
HIGH ACTING WITH NO DELAY HIGH ACTING WITH DELAY
HIGH ACTING WITH TIMEOUT LOW ACTING WITH TIMEOUT
23
Page 24
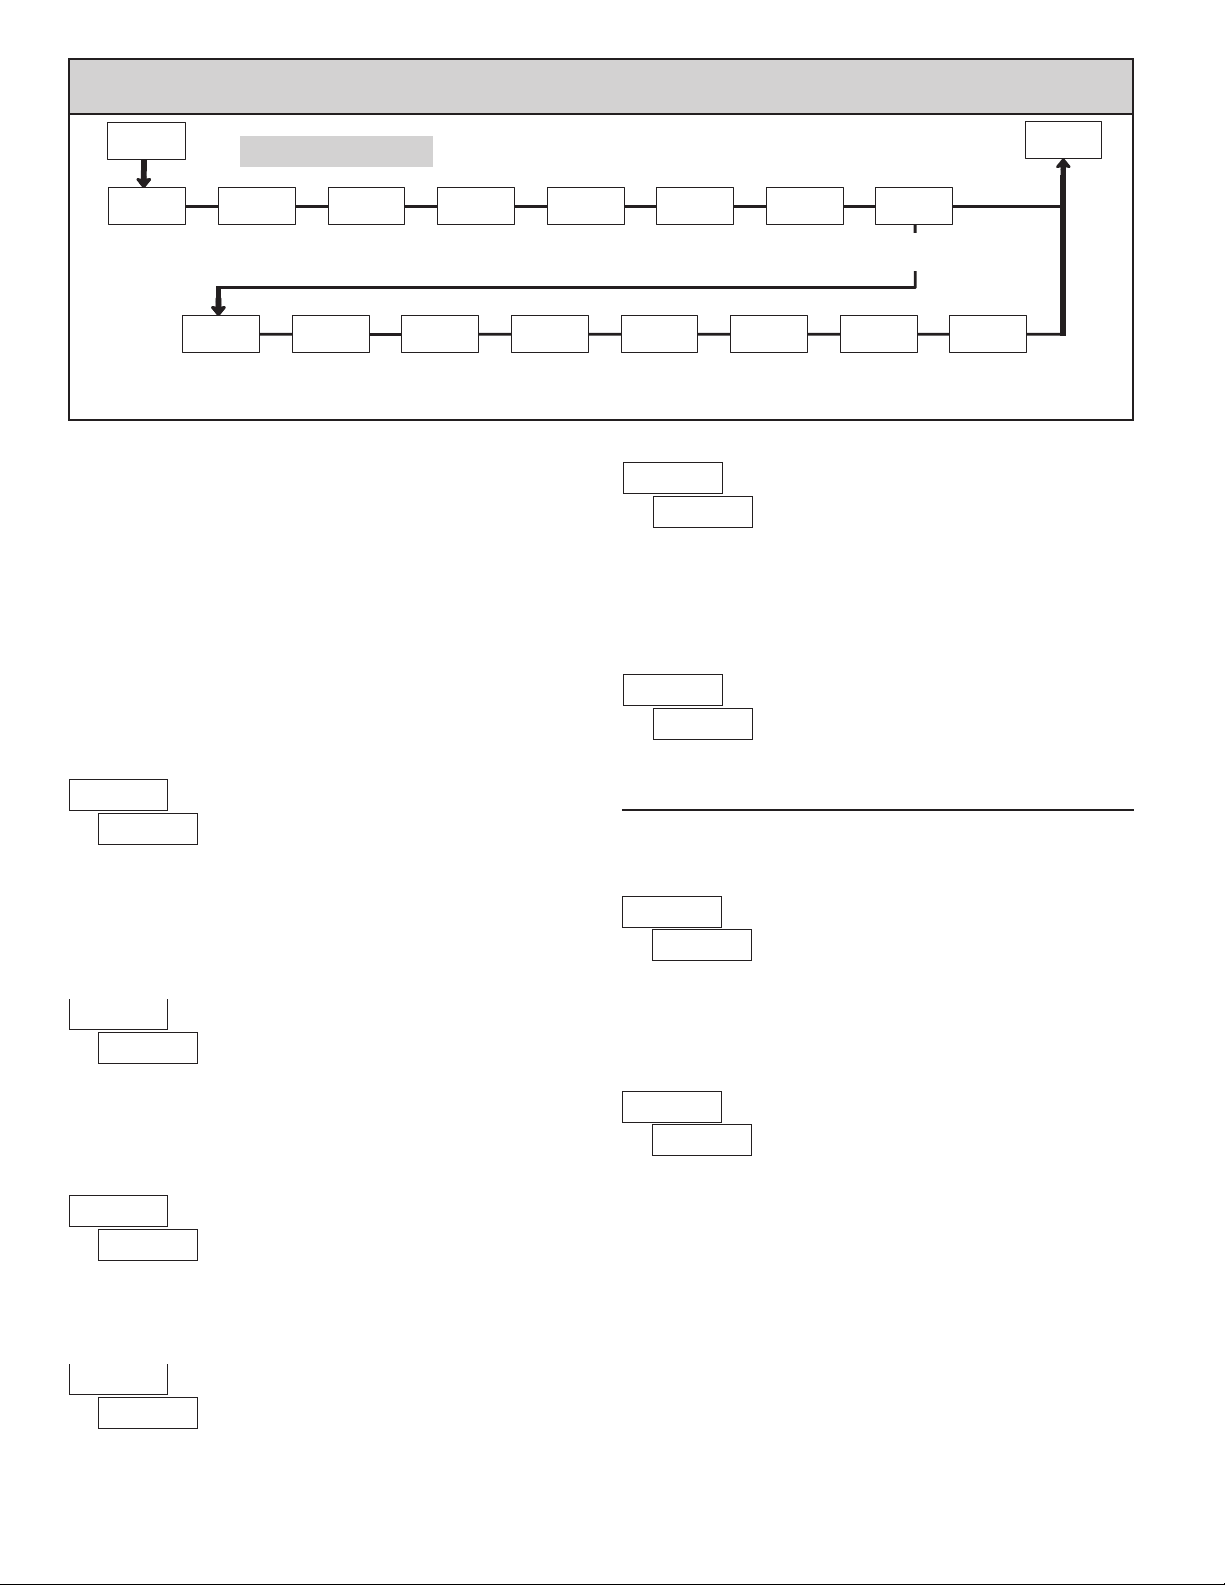
6.7 MOdule 7 - s
erial COMMuniCaTiOns paraMeTers
()
7-SrL
PAR
tYPE
Comms
Type
PAR
dpf93 Only
bAUd
Baud
Rate
dAtA
Data Bit Parity Bit Meter
A CNt
Print
Counter A
Module 7 is the programming module for the Serial Communications
Parameters. These parameters are used to match the serial settings of the DPF93
with those of the host computer or other serial device, such as a terminal or
printer. This programming module can only be accessed if an RS232 or RS485
Serial Communications card is installed.
This section also includes an explanation of the commands and formatting
required for communicating with the DPF93. In order to establish serial
communications, the user must have host software that can send and receive
ASCII characters or Modbus protocol. Omega’s DP6-SOFT software can be
used for configuring the DPF93. For serial hardware and wiring details, refer to
the bulletin shipped with the plug-in card.
COMMUNICATIONS TYPE
u
Select the desired communications protocol. Modbus protocol provides
access to all meter values and parameters. Since Modbus is included within the
DPF93, the Modbus option card, LDP6-CDC40, should not be used. The
LDP6-CDC1 (RS485), or LDP6-CDC2 (RS232) card should be used instead.
Set the baud rate to match the other serial communications equipment on the
serial link. Normally, the baud rate is set to the highest value that all the serial
equipment is capable of transmitting and receiving.
Select either 7 or 8 bit data word lengths. Set the word length to match the
other serial communications equipment on the serial link.
Set the parity bit to match that of the other serial communications equipment
on the serial link. The meter ignores the parity when receiving data and sets the
parity bit for outgoing data. If no parity is selected with 7 bit word length, an
additional stop bit is used to force the frame size to 10 bits.
u - Modbus RTU
- Modbus ASCII
- RLC Protocol (ASCII)
Print
Counter B
BAUD RATE
00 800
9600 900 800
DATA BIT
PARITY BIT
Print
Counter C
PARAMETER MENU
PAr
Addr dELAY
Address
rAtE CNtLdSCFAC SPNt
Print
Rate
Pro
AbrV OPt
NO
Transmit
Delay
Abbreviated
Printing
Print
Options
YES
HILOC CNtb CNt
Print
Max/Min
Enter the serial meter (node) address. The address range is dependent on the
parameter. With a single unit, configured for RLC protocol ( =
), an address is not needed and a value of zero can be used. With multiple
units (RS485 applications), a unique 2 digit address number must be assigned
to each meter.
will wait this minimum amount of time before issuing a serial response.
() is set to .
Following a transmit value (‘*’ terminator) or Modbus command, the DPF93
Parameters below only appear when Communications Type parameter
Select for full print or Command T transmissions (meter address,
parameter data and mnemonics) or for abbreviated print transmissions
(parameter data only). This will affect all the parameters selected in the print
options. (If the meter address is 0, it will not be sent during a full transmission.)
- Enters the sub-menu to select the meter parameters to appear during a
print request. For each parameter in the sub-menu, select for that parameter
information to be sent during a print request or for that parameter information
not to be sent. A print request is sometimes referred to as a block print because
more than one parameter information (meter address, parameter data and
mnemonics) can be sent to a printer or computer as a block.
PARAMETER DESCRIPTION FACTORY MNEMONIC
*Setpoints are plug-in card dependent.
Print
Scale
Factors
ABBREVIATED PRINTING
Counter A
Counter B
Counter C
Rate
Max. & Min.
A B C Scale Factors
A B C Count Load
1 2 3 4 Setpoints *
Print
Count
Loads
METER ADDRESS
Setpoint
Values
to - Modbus
to - RLC Protocol
TRANSMIT DELAY
to seconds
PRINT OPTIONS
Print
CTA
CTB
CTC
RTE
MIN MAX
SFA SFB SFC
LDA LDB LDC
SP1 SP2 SP3 SP4
24
Page 25
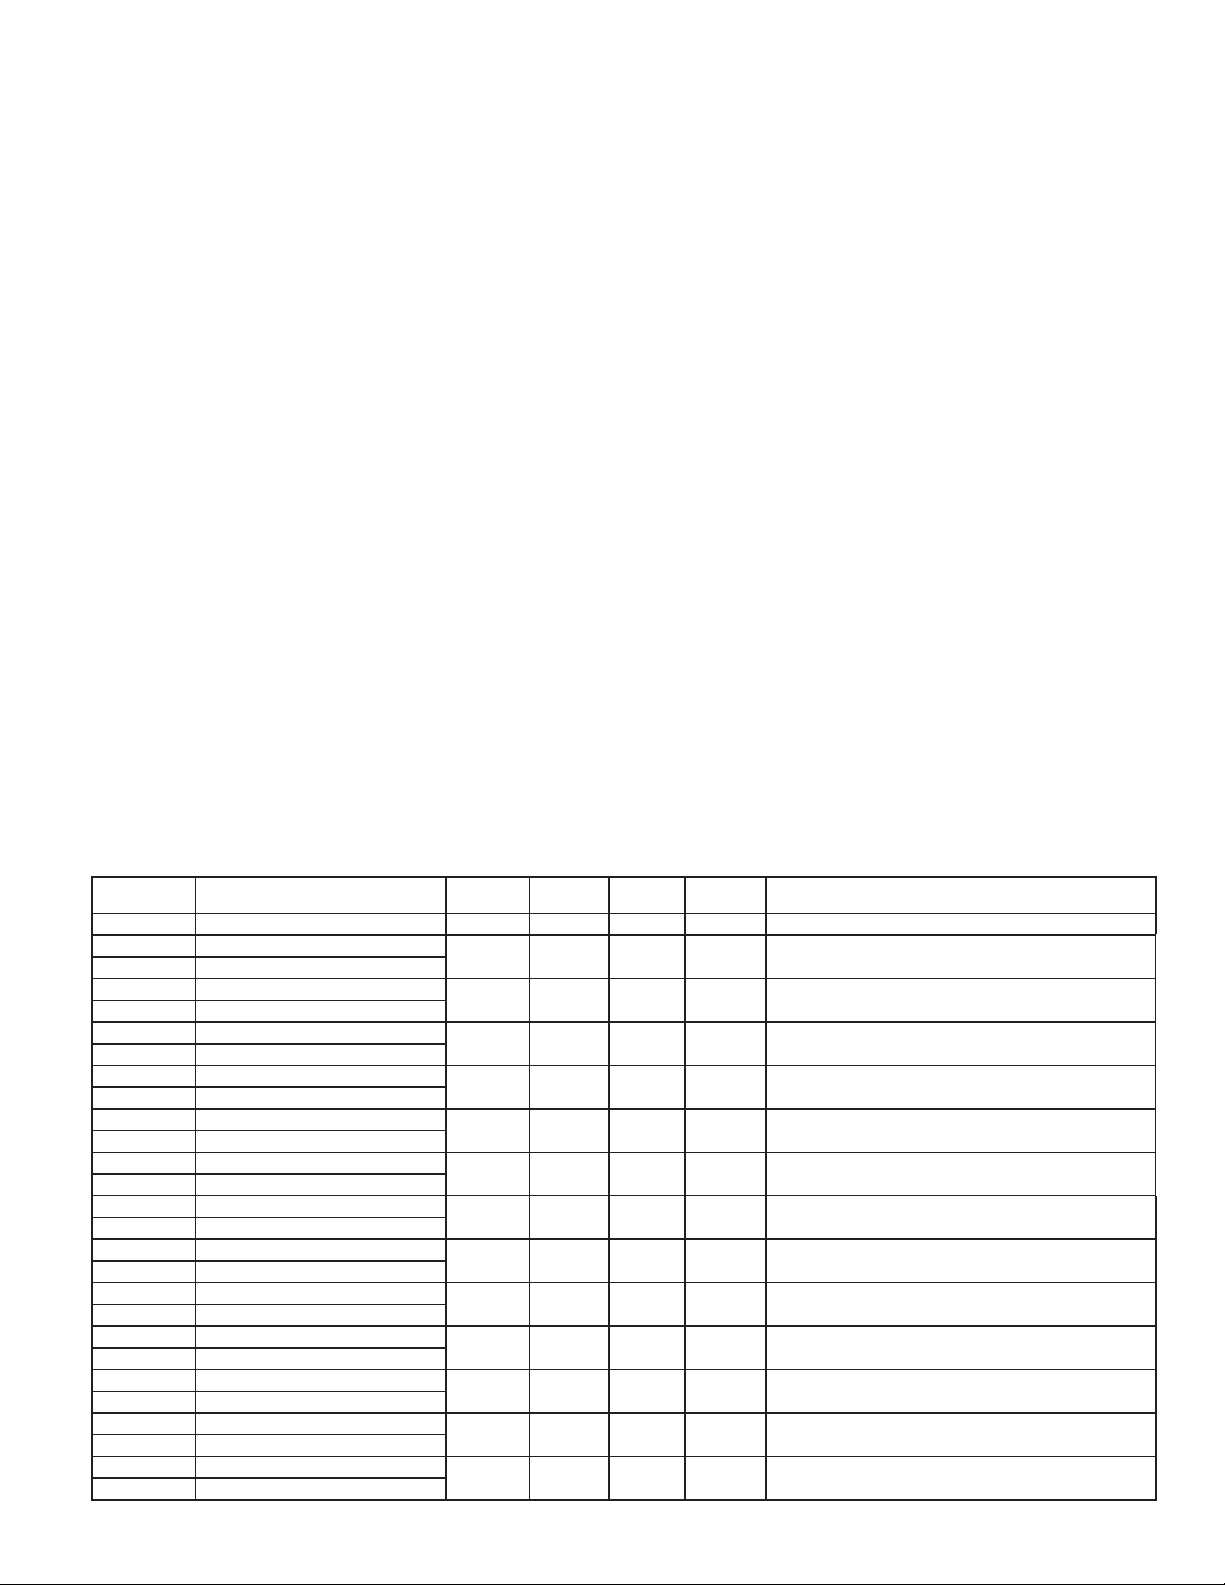
SERIAL MODBUS COMMUNICATIONS
Modbus Communications requires that the Serial Communications Type
Parameter (tYPE) be set to Modbus RTU (Mbrtu) or Modbus ASCII (MbASC).
DPF93 CONFIGURATION USING DP6-SOFT AND
SERIAL COMMUNICATIONS CARD
1. Install DP6-SOFT software.
2. Install RS232 or RS485 card and connect communications cable from DPF93
to PC.
3. Supply power to DPF93.
4. Configure serial parameters to Modbus RTU (Mbrtu), 38,400 baud, address
247. (Note:These are the factory default settings.)
5. Create a new file (File, New) or open an existing DPF93 V3.0+ database.
6. Configure DP6-SOFT Link options (Link, Options) to the serial port which
the communication cable is attached (in step 2).
SUPPORTED FUNCTION CODES
FC03: Read Holding Registers
1. Up to 64 registers can be requested at one time.
2. HEX <8000> is returned for non-used registers.
FC04: Read Input Registers
1. Up to 64 registers can be requested at one time.
2. Block starting point can not exceed register boundaries.
3. HEX <8000> is returned in registers beyond the boundaries.
4. Input registers are a mirror of Holding registers.
FC06: Preset Single Register
1. HEX <8001> is echoed back when attempting to write to a read only register.
2. If the write value exceeds the register limit (see Register Table), then that
register value changes to its high or low limit. It is also returned in the
response.
FC16: Preset Multiple Registers
1. No response is given with an attempt to write to more than 64 registers at a
time.
2. Block starting point cannot exceed the read and write boundaries (40001-
41280).
3. If a multiple write includes read only registers, then only the write registers
will change.
4. If the write value exceeds the register limit (see Register Table), then that
register value changes to its high or low limit.
FC08: Diagnostics
The following is sent upon FC08 request:
Module Address, 08 (FC code), 04 (byte count), “Total Comms” 2 byte count,
“Total Good Comms” 2 byte count, checksum of the string
“Total Comms” is the total number of messages received that were addressed
to the DPF93. “Total Good Comms” is the total messages received by the
DPF93 with good address, parity and checksum. Both counters are reset to
0 upon response to FC08 and at power-up.
SUPPORTED EXCEPTION CODES
01: Illegal Function
Issued whenever the requested function is not implemented in the meter.
02: Illegal Data Address
Issued whenever an attempt is made to access a single register that does not
exist (outside the implemented space) or to access a block of registers that falls
completely outside the implemented space.
03: Illegal Data Value
Issued when an attempt is made to read or write more registers than the meter
can handle in one request.
07: Negative Acknowledge
Issued when a write to a register is attempted with an invalid string length.
This table shows the most commonly used registers for the DPF93.
DPF93 MODBUS REGISTER TABLE
Values less than 65,535 will be in (Lo word). Values greater than 65,535 will continue into (Hi word). Negative values are represented by two’s complement of the
combined (Hi word) and (Lo word). The DPF93 should not be powered down while parameters are being changed. Doing so may corrupt the non-volatile memory
resulting in checksum errors.
REGISTER
ADDRESS
FREQUENTLY USED REGISTERS
40001 Counter A Value (Hi word)
40002 Counter A Value (Lo word)
40003 Counter B Value (Hi word)
40004 Counter B Value (Lo word)
40005 Counter C Value (Hi word)
40006 Counter C Value (Lo word)
40007 Rate Value (Hi word)
40008 Rate Value (Lo word)
40009 Min (Lo) Value (Hi word)
40010 Min (Lo) Value (Lo word)
40011 Max (Hi) Value (Hi word)
40012 Max (Hi) Value (Lo word)
40013 Counter A Scale Factor (Hi word)
40014 Counter A Scale Factor (Lo word)
40015 Counter B Scale Factor (Hi word)
40016 Counter B Scale Factor (Lo word)
40017 Counter C Scale Factor (Hi word)
40018 Counter C Scale Factor (Lo word)
40019 Counter A Count Load (Hi word)
40020 Counter A Count Load (Lo word)
40021 Counter B Count Load (Hi word)
40022 Counter B Count Load (Lo word)
40023 Counter C Count Load (Hi word)
40024 Counter C Count Load (Lo word)
40025 Setpoint 1 Value (Hi word)
40026 Setpoint 1 Value (Lo word)
REGISTER NAME LOW LIMIT HIGH LIMIT
-99999999 999999999 0 Read/Write 1 = 1 Display Unit
-99999999 999999999 0 Read/Write
-99999999 999999999 0 Read/Write 1 = 1 Display Unit
0 99999 0 Read/Write 1 = 1 Display Unit
0 99999 0 Read/Write 1 = 1 Display Unit
0 99999 0 Read/Write 1 = 1 Display Unit
1 999999 100000 Read/Write Active List (A or B)
1 999999 100000 Read/Write Active List (A or B)
1 999999 100000 Read/Write Active List (A or B)
-99999 999999 500 Read/Write Active List (A or B)
-99999 999999 500 Read/Write Active List (A or B)
-99999 999999 500 Read/Write Active List (A or B)
-199999 999999 100 Read/Write Active List (A or B)
FACTORY
SETTING
ACCESS COMMENTS
1 = 1 Display Unit
25
Page 26
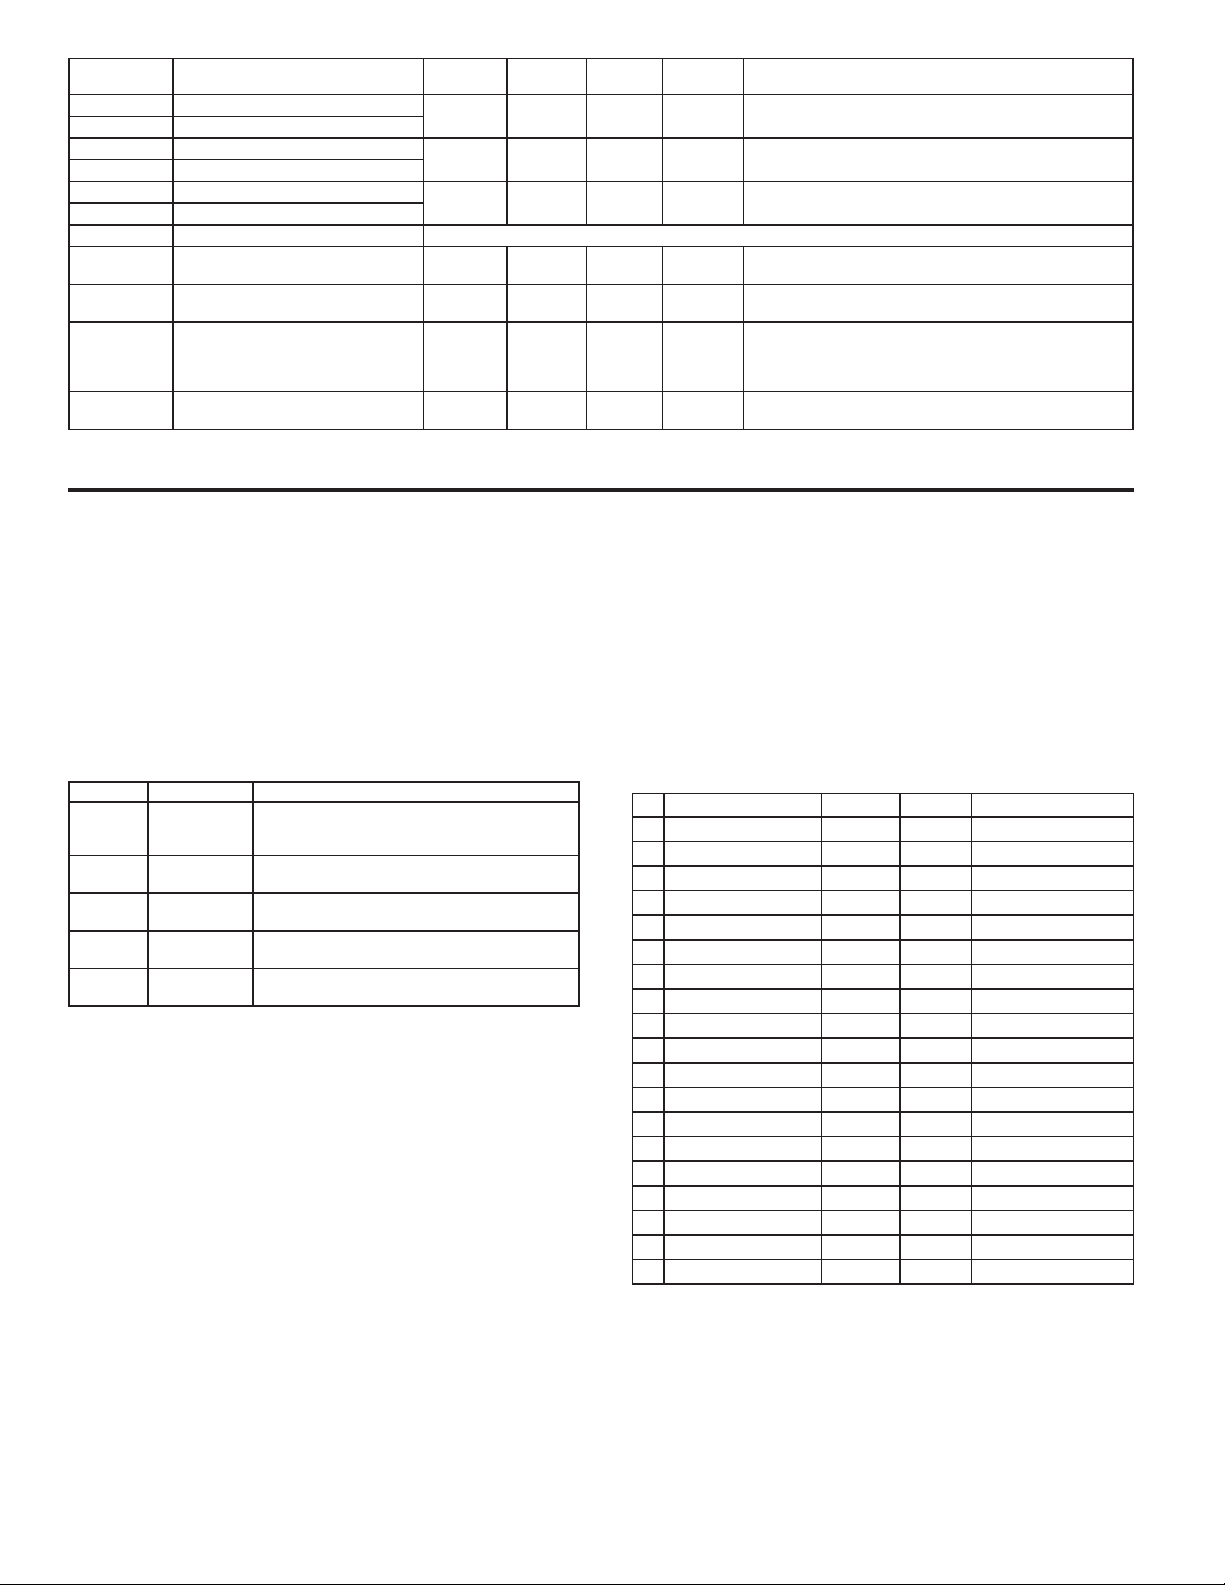
REGISTER
ADDRESS
40027 Setpoint 2 Value (Hi word)
40028 Setpoint 2 Value (Lo word)
40029 Setpoint 3 Value (Hi word)
40030 Setpoint 3 Value (Lo word)
40031 Setpoint 4 Value (Hi word)
40032 Setpoint 4 Value (Lo word)
Manual Mode Registers
40036 Manual Mode Register (MMR) 0 31 0 Read/Write
40037 Analog Output Register (AOR) 0 4095 0 Read/Write
40038 Setpoint Output Register (SOR) 0 15 N/A Read/Write
40039 Reset Output Register 0 15 0 Read/Write
REGISTER NAME LOW LIMIT HIGH LIMIT
-199999 999999 200 Read/Write Active List (A or B)
-199999 999999 300 Read/Write Active List (A or B)
-199999 999999 400 Read/Write Active List (A or B)
FACTORY
SETTING
SERIAL RLC PROTOCOL COMMUNICATIONS
RLC Communications requires the Serial Communications Type Parameter
(tYPE) be set to RLC Protocol (rLC).
SENDING SERIAL COMMANDS AND DATA TO THE METER
When sending commands to the meter, a string containing at least one
command character must be constructed. A command string consists of a
command character, a value identifier, numerical data (if writing data to the
meter) followed by a command terminator character * or $. The <CR> is also
available as a terminator when Counter C is in the SLAVE mode.
Command Chart
COMMAND DESCRIPTION NOTES
N Node (Meter)
Address
Specifier
T Transmit Value
(read)
V Value Change
(write)
R Reset Reset a register or output. Must be followed by
P Block Print
Request
Address a specific meter. Must be followed by a
two digit node address. Not required when
address = 00.
Read a register from the meter. Must be followed
by register ID character
Write to register of the meter. Must be followed by
register ID character and numeric data.
register ID character.
Initiates a block print output. Registers are defined
in programming.
Command String Construction
The command string must be constructed in a specific sequence. The meter
does not respond with an error message to invalid commands. The following
procedure details construction of a command string:
1. The first characters consist of the Node Address Specifier (N) followed by a
1 or 2 character address number. The address number of the meter is
programmable. If the node address is 0, this command and the node address
itself may be omitted. For node address 1 through 9, a leading zero character
is not required. (The only exception is a numeric transmission when Counter
C is set for slave mode.) This is the only command that may be used in
conjunction with other commands.
2. After the optional address specifier, the next character is the command
character.
3. The next character is the Register ID. This identifies the register that the
command affects. The P command does not require a Register ID character.
It prints according to the selections made in print options.
4. If constructing a value change command (writing data), the numeric data is
sent next.
5. All command strings must be terminated with the string termination
characters *, $ or when Counter C is set for slave mode <CR>. The meter
does not begin processing the command string until this character is received.
See Timing Diagram figure for differences between terminating characters.
Sending Numeric Data
Numeric data sent to the meter must be limited to the digit range shown under
transmit details in the Register Identification Chart. Leading zeros are ignored.
Negative numbers must have a minus sign. The meter ignores any decimal point
and conforms the number to the scaled resolution. (For example: the meter’s
scaled decimal point position = 0.0 and 25 is written to a register. The value of
the register is now 2.5.
Note: Since the meter does not issue a reply to value change commands, follow
with a transmit value command for readback verification.
Register Identification Chart
ID VALUE DESCRIPTION MNEMONIC COMMAND TRANSMIT DETAILS
A Count A CTA T, V, R 6 digit (V), 8 digit (T)
B Count B CTB T, V, R 6 digit (V), 8 digit (T)
C Count C CTC T, V, R 6 digit (V), 8 digit (T)
D Rate RTE T, V 5 digit, positive only
E Min (Lo) Value MIN T, V, R 6 digit, positive only
F Max (Hi) Value MAX T, V, R 6 digit, positive only
G Scale Factor A SFA T, V 6 digit, positive only
H Scale Factor B SFB T, V 6 digit, positive only
I Scale Factor C SFC T, V 6 digit, positive only
J Counter Load A LDA T, V 5 negative / 6 positive
K Counter Load B LDB T, V 5 negative / 6 positive
L Counter Load C LDC T, V 5 negative / 6 positive
M Setpoint 1 SP1 T, V, R 5 negative / 6 positive
O Setpoint 2 SP2 T, V, R 5 negative / 6 positive
Q Setpoint 3 SP3 T, V, R 5 negative / 6 positive
S Setpoint 4 SP4 T, V, R 5 negative / 6 positive
U Auto/Manual Register MMR T, V 0 – auto, 1 - manual
W Analog Output Register AOR T, V 0 – 4095 normalized
X Setpoint Register SOR T, V 0 – not active, 1 – active
Command String Examples:
1. Address = 17, Write 350 to Setpoint 1.
2. Address = 5, Read Count A value.
3. Address = 0, Reset Setpoint 4 output.
ACCESS COMMENTS
Bit State: 0 = Auto Mode, 1 = Manual Mode Bit 4 = S1, Bit 3
= S2, Bit 2 = S3, Bit 1 = S4, Bit 0 = Linear Output
Linear Output Card written to only if Linear Output is in
Manual Mode (MMR bit 0 = 1).
Status of Setpoint Outputs. Bit State: 0=Off, 1=On.
Bit 3 = S1, Bit 2 = S2, Bit 1 = S3, Bit 0 = S4.
Outputs can only be activated/reset with this register when the
respective bits in the Manual Mode Register (MMR) are set.
Bit State: 1= Reset Output, bit is returned to zero following
reset processing; Bit 3 = S1, Bit 2 = S2, Bit 1 = S3, Bit 0 = S4
String: N17VM350$
String: N5TA*
String: RS*
26
Page 27
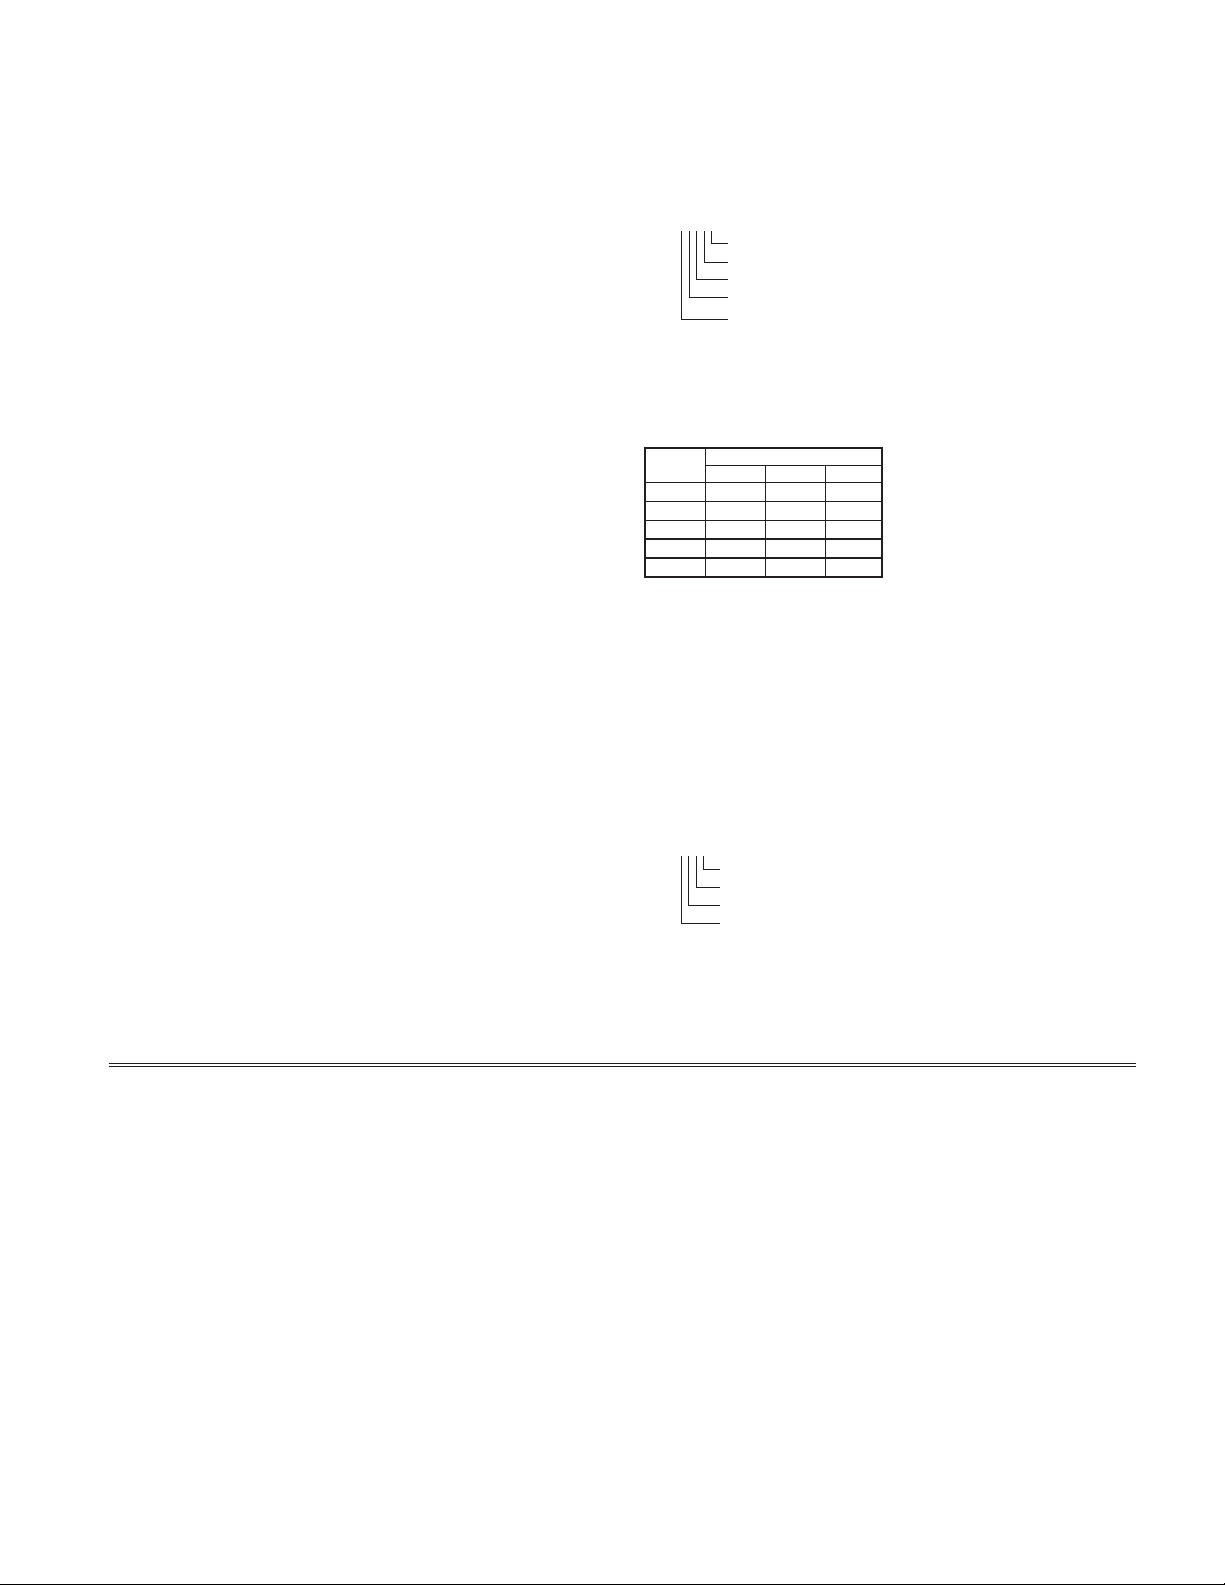
RECEIVING DATA FROM THE METER
Data is transmitted by the meter in response to either a transmit command (T),
a print block command (P) or User Function print request. The response from
the meter is either a full field transmission or an abbreviated transmission. The
meter response mode is established in Module 7.
Full Field Transmission (Address, Mnemonic, Numeric data)
Byte Description
1, 2 2 byte Node (meter) Address field [00-99]
3 <SP> (Space)
4-6 3 byte Register Mnemonic field
7-18 12 byte data field, 10 bytes for number, one byte for sign, one byte for
decimal point
19 <CR> carriage return
20 <LF> line feed
21 <SP>* (Space)
22 <CR>* carriage return
23 <LF>* line feed
* These characters only appear in the last line of a block print.
The first two characters transmitted (bytes 1 and 2) are the unit address. If the
address assigned is 00, two spaces are substituted. A space (byte 3) follows the
unit address field. The next three characters (bytes 4 to 6) are the register
mnemonic. The numeric data is transmitted next.
The numeric field (bytes 7 to 18) is 12 characters long. When the requested
value exceeds eight digits for count values or five digits for rate values, an *
(used as an overflow character) replaces the space in byte 7. Byte 8 is always a
space. The remaining ten positions of this field (bytes 9 to 18) consist of a minus
sign (for negative values), a floating decimal point (if applicable), and eight
positions for the requested value. The data within bytes 9 to 18 is right-aligned
with leading spaces for any unfilled positions.
The end of the response string is terminated with <CR> (byte 19), and <LF>
(byte 20). When a block print is finished, an extra <SP> (byte 21), <CR> (byte
22), and <LF> (byte 23) are used to provide separation between the transmissions.
Abbreviated Transmission (Numeric data only)
Byte Description
1-12 12 byte data field, 10 bytes for number, one byte for sign, one byte for
decimal point
13 <CR> carriage return
14 <LF> line feed
15 <SP>* (Space)
16 <CR>* carriage return
17 <LF>* line feed
* These characters only appear in the last line of a block print.
Meter Response Examples:
1. Address = 17, full field response, Count A = 875
17 CTA 875 <CR><LF>
2. Address = 0, full field response, Setpoint 2 = -250.5
SP2 -250.5<CR><LF>
3. Address = 0, abbreviated response, Setpoint 2 = 250, last line of block print
250<CR><LF><SP><CR><LF>
AUTO/MANUAL MODE REGISTER (MMR) ID: U
This register sets the controlling mode for the outputs. In Auto Mode (0) the
meter controls the setpoint and analog output. In Manual Mode (1) the outputs
are defined by the registers SOR and AOR. When transferring from auto mode
to manual mode, the meter holds the last output value (until the register is
changed by a write). Each output may be independently changed to auto or
manual. In a write command string (VU), any character besides 0 or 1 in a field
will not change the corresponding output mode.
U abcde
e = Analog Output
d = SP4
c = SP3
b = SP2
a = SP1
Example: VU00011* places SP4 and Analog in manual.
ANALOG OUTPUT REGISTER (AOR) ID: W
This register stores the present signal value of the analog output. The range
of values of this register is 0 to 4095, which corresponds to the analog output
range per the following chart:
Register
Value
0 0.00 4.00 0.000
1 0.005 4.004 0.0025
2047 10.000 12.000 5.000
4094 19.995 19.996 9.9975
4095 20.000 20.000 10.000
Output Signal*
0-20 mA 4-20 mA 0-10 V
*Due to the absolute accuracy rating
and resolution of the output card, the
actual output signal may differ 0.15%
FS from the table values. The output
signal corresponds to the range selected
(0-20 mA, 4-20 mA or 0-10 V).
Writing to this register (VW) while the analog output is in the Manual Mode
causes the output signal level to update immediately to the value sent. While in
the Automatic Mode, this register may be written to, but it has no effect until the
analog output is placed in the manual mode. When in the Automatic Mode, the
meter controls the analog output signal level. Reading from this register (TW)
will show the present value of the analog output signal.
Example: VW2047* will result in an output of 10.000 mA, 12.000 mA or
5.000V depending on the range selected.
SETPOINT OUTPUT REGISTER (SOR) ID: X
This register stores the states of the setpoint outputs. Reading from this
register (TX) will show the present state of all the setpoint outputs. A “0” in the
setpoint location means the output is off and a “1” means the output is on.
X abcd
d = SP4
c = SP3
b = SP2
a = SP1
In Automatic Mode, the meter controls the setpoint output state. In Manual
Mode, writing to this register (VX) will change the output state. Sending any
character besides 0 or 1 in a field or if the corresponding output was not first in
manual mode, the corresponding output value will not change. (It is not
necessary to send least significant 0s.)
Example: VX10* will result in output 1 on and output 2 off.
COUNTER C SLAVE COMMUNICATIONS
Counter C may be programmed for , to act as a serial slave display. By
doing this, the carriage return <CR> is added as a valid command terminator
character for all serial command strings. The <CR> as a terminator may be very
useful for standard serial commands, even if Counter C is never displayed or
sent a slave message. The $ terminator should not be used in the slave mode. If
numeric values are not to be saved to memory, then send the value as a literal
transmission with <CR> terminator.
The Counter C slave display is right aligned. It has a capacity of displaying
six characters. When less than six characters are received, blank spaces will be
placed in front of the characters. If more than six characters are sent, then only
the last six are displayed. The meter has a 192 character buffer for the slave
display. If more than 192 characters are sent, the additional characters are
discarded until a terminator is received. Counter C processes numeric and literal
transmissions differently.
Numeric Transmissions
When a string that does not begin with #, T, V, P or R is received, the meter
processes it as a Numeric transmission. In this case, only the recognized
numbers and punctuation are displayed. All other characters in the string are
discarded. If a negative sign appears anywhere in the string the resulting number
will be negative. Only the most significant decimal point is retained. If no
numerical characters are received, then the numeric value will be zero. The
numeric display can be used for setpoint (boundary action only) and analog
output functions. When using this display for setpoint and analog output values,
the decimal point position must match the programming entered through the
front panel. The numeric value is retained in Counter C memory until another
Numeric transmission is received.
Recognized Numbers = 0, 1, 2, 3, 4, 5, 6, 7, 8, 9
Recognized Punctuation = period, comma, minus
Literal Transmissions
When a string that begins with # is received, the meter processes it as a Literal
transmission. In this case, any unrecognized characters will be replaced with a
space. A Literal display will replace a Numeric value in the Counter C display.
However, it will not remove a previous Numeric value from Counter C memory
or prevent the Counter C outputs from functioning with the Numeric value.
Literal transmissions are only possible when using RS232 or RS485 cards.
Recognized Characters = a, b, c, d, e, f, g, h, i, j, l, n, o, p, q, r, s, t, u,
y, z (in upper or lower case)
Recognized Numbers = 0, 1, 2, 3, 4, 5, 6, 7, 8, 9
Recognized Punctuation = period, comma, minus, blank
27
Page 28
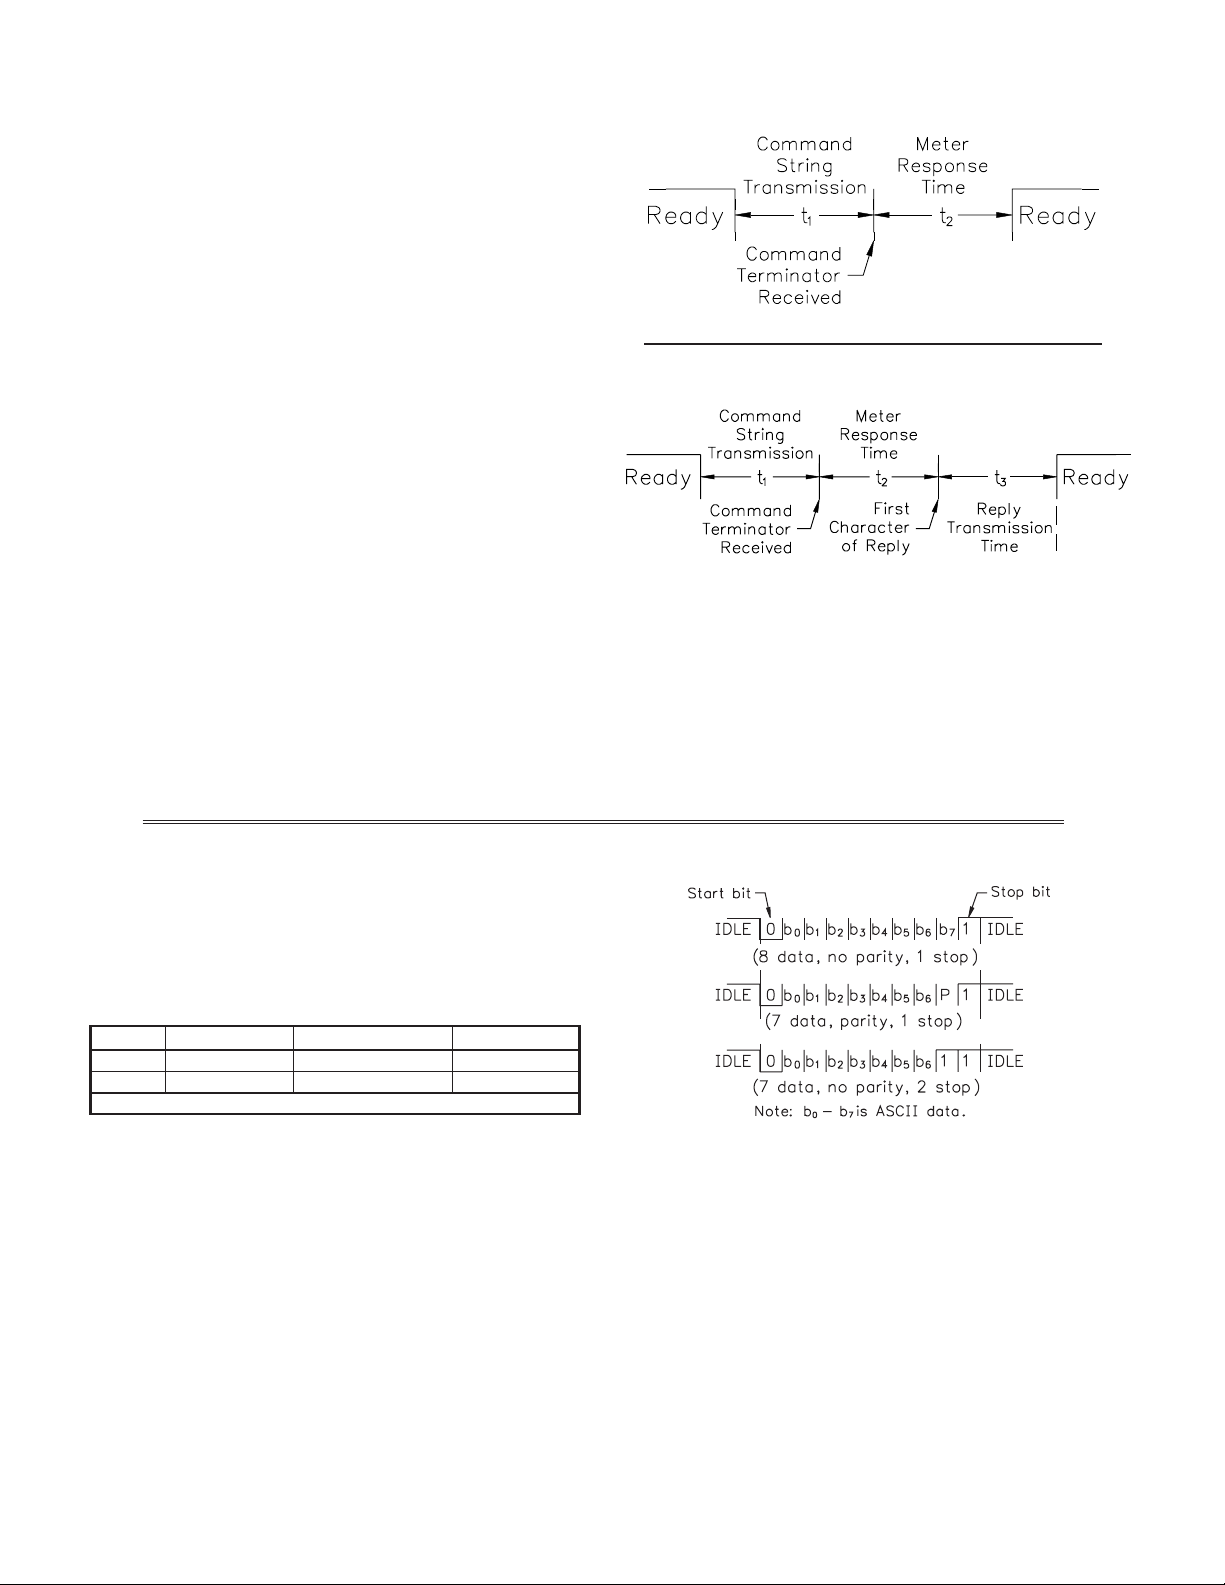
COMMAND RESPONSE TIME
The meter can only receive data or transmit data at any one time (half-duplex
operation). During RS232 transmissions, the meter ignores commands while
transmitting data, but instead uses RXD as a busy signal. When sending
commands and data to the meter, a delay must be imposed before sending
another command. This allows enough time for the meter to process the
command and prepare for the next command.
At the start of the time interval t1, the computer program prints or writes the
string to the com port, thus initiating a transmission. During t1, the command
characters are under transmission and at the end of this period, the command
terminating character (*, $ or slave only <CR>) is received by the meter. The
time duration of t1 is dependent on the number of characters and baud rate of
the channel.
t1 = (10 times the # of characters) / baud rate
At the start of time interval t2, the meter starts the interpretation of the
command and when complete, performs the command function. This time
interval t2 varies from 2 msec to 15 msec. If no response from the meter is
expected, the meter is ready to accept another command.
If the meter is to reply with data, the time interval t2 is controlled by the use
of the command terminating character and the Serial Transmit Delay parameter
(dELAY). The ‘*’ or ‘<CR>’ terminating character results in a response time
window of the Serial Transmit Delay time (dELAY) plus 15 msec. maximum. The
dELAY parameter should be programmed to a value that allows sufficient time for
the release of the sending driver on the RS485 bus. Terminating the command
line with “$” results in a response time window (t2) of 2 msec minimum and 15
msec maximum. The response time of this terminating character requires that
sending drivers release within 2 msec after the terminating character is
received.
At the beginning of time interval t3, the meter responds with the first
character of the reply. As with t1, the time duration of t3 is dependent on the
number of characters and baud rate of the channel. At the end of t3, the meter is
ready to receive the next command.
t3 = (10 times the # of characters) / baud rate
Timing Diagrams
NO REPLY FROM METER
RESPONSE FROM METER
The maximum serial throughput of the meter is limited to the sum of the
times t1, t2 and t3.
COMMUNICATION FORMAT
Data is transferred from the meter through a serial communication channel.
In serial communications, the voltage is switched between a high and low level
at a predetermined rate (baud rate) using ASCII encoding. The receiving device
reads the voltage levels at the same intervals and then translates the switched
levels back to a character.
The voltage level conventions depend on the interface standard. The table
lists the voltage levels for each standard.
LOGIC RS232* RS485*INTERFACE STATE
1 TXD,RXD; -3 to -15 V a-b < -200 mVmark (idle)
0 TXD,RXD; +3 to +15 V a-b > +200 mVspace (active)
* Voltage levels at the Receiver
Data is transmitted one byte at a time with a variable idle period between
characters (0 to ∞). Each ASCII character is “framed” with a beginning start bit,
an optional parity bit and one or more ending stop bits. The data format and
baud rate must match that of other equipment in order for communication to
take place. The figures list the data formats employed by the meter.
Start bit and Data bits
Data transmission always begins with the start bit. The start bit signals the
receiving device to prepare for reception of data. One bit period later, the least
significant bit of the ASCII encoded character is transmitted, followed by the
remaining data bits. The receiving device then reads each bit position as they are
transmitted.
Character Frame Figure
Parity bit
After the data bits, the parity bit is sent. The transmitter sets the parity bit to
a zero or a one, so that the total number of ones contained in the transmission
(including the parity bit) is either even or odd. This bit is used by the receiver
to detect errors that may occur to an odd number of bits in the transmission.
However, a single parity bit cannot detect errors that may occur to an even
number of bits. Given this limitation, the parity bit is often ignored by the
receiving device. The PAX meter ignores the parity bit of incoming data and
sets the parity bit to odd, even or none (mark parity) for outgoing data.
Stop bit
The last character transmitted is the stop bit. The stop bit provides a single bit
period pause to allow the receiver to prepare to re-synchronize to the start of a
new transmission (start bit of next byte). The receiver then continuously looks
for the occurrence of the start bit. If 7 data bits and no parity is selected, then 2
stop bits are sent from the DPF93.
2828
Page 29
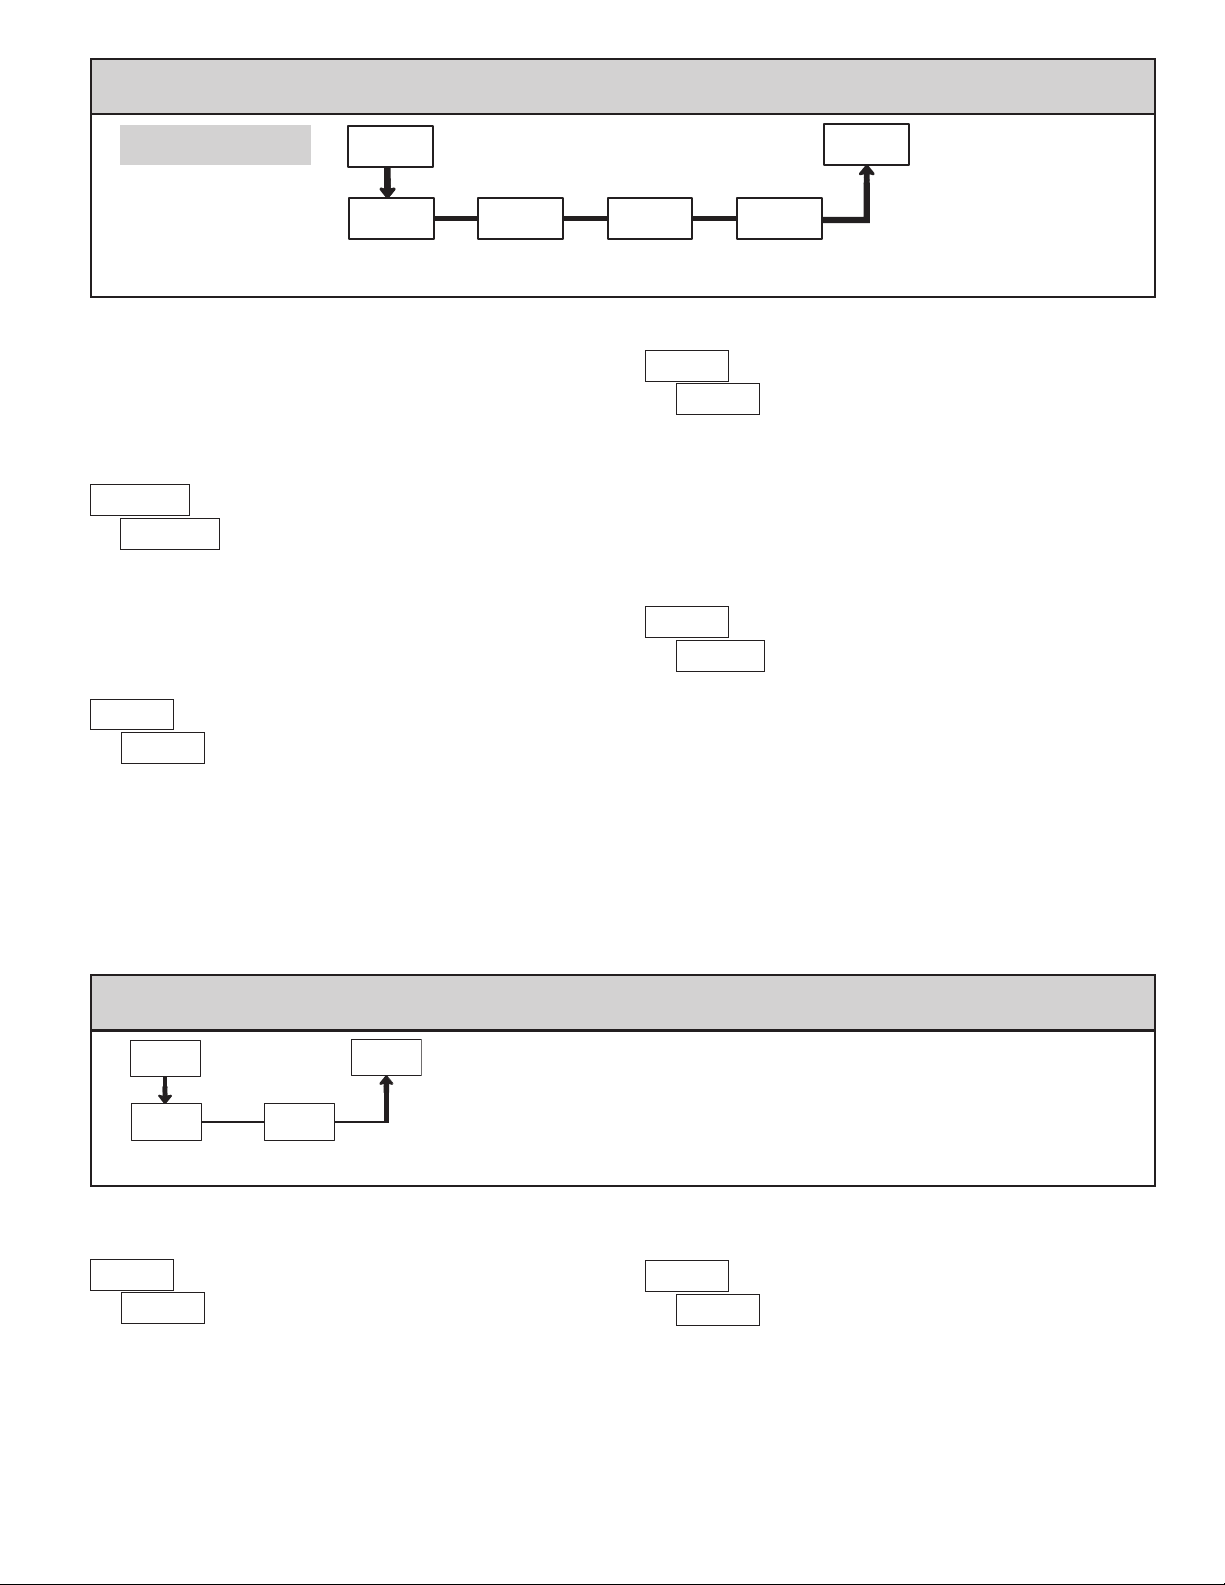
6.8 MOdule 8 - analOG OuTpuT paraMeTers ()
dpf93 Only
Module 8 is the programming for the analog output parameters. To have an
analog output signal, an analog output plug-in card needs to be installed. For
analog output hardware and wiring details, refer to the bulletin shipped with the
plug-in card.
ANALOG TYPE
Enter the analog output type. For voltage output use terminals 16 and 17. For
current output use terminals 18 and 19. Only one range can be used at a time.
Select the display that the analog output is to follow:
SELECTION RANGE
ANALOG ASSIGNMENT
8-AnA
PAR
tYPE AN-LO AN-HI
Analog
Type
0 to 20 mA
00
4 to 20 mA
0
0 to 10 V
00
PARAMETER MENU
ASIN
Analog
Assignment
Pro
Analog Low
Scale Value
Enter the display value within the selected Analog Assignment that
corresponds to the low limit of the type selected.
The decimal point is determined by the decimal point setting of the assigned
counter or rate. The scale value can not be set to read values with more than 6
digits. Reverse acting output is possible by reversing the scaling values.
Enter the display value within the selected Analog Assignment that
corresponds to the high limit of the type selected.
The decimal point is determined by the decimal point setting of the assigned
counter or rate. The scale value can not be set to read values with more than 6
digits. Reverse acting output is possible by reversing the scaling values.
Analog High
Scale Value
ANALOG LOW SCALE VALUE
99999 to 999999
ANALOG HIGH SCALE VALUE
99999 to 999999
= Counter A Value = Rate Value
= Counter B Value = Minimum Value
= Counter C Value = Maximum Value
6.9 MOdule 9 - faCTOry serviCe OperaTiOns ()
9-FCS
PAR
d-LEV
Display
Intensity Level
COdE
Factory
Service Code
DISPLAY INTENSITY LEVEL
Enter the desired Display Intensity Level (0-15) by
using the arrow keys. The display will actively dim or
brighten as the levels are changed. This parameter also
appears in Quick Programming Mode when enabled.
Pro
PARAMETER MENU
Pressing the PAR and DSP keys at the same time on power-up will load the
factory settings and display . This allows operation in the event of a
memory failure or corrupted data. Immediately press RST key and reprogram
the meter. If the meter is powered down again before pressing the RST key, the
existing dynamic data will not be overwritten.
RESTORE FACTORY DEFAULTS
Use the arrow keys to display and press PAR .
The meter will display and then returns to .
Press DSP key to return to the Display Mode. This will
overwrite all user settings with the factory settings.
29
29
Page 30
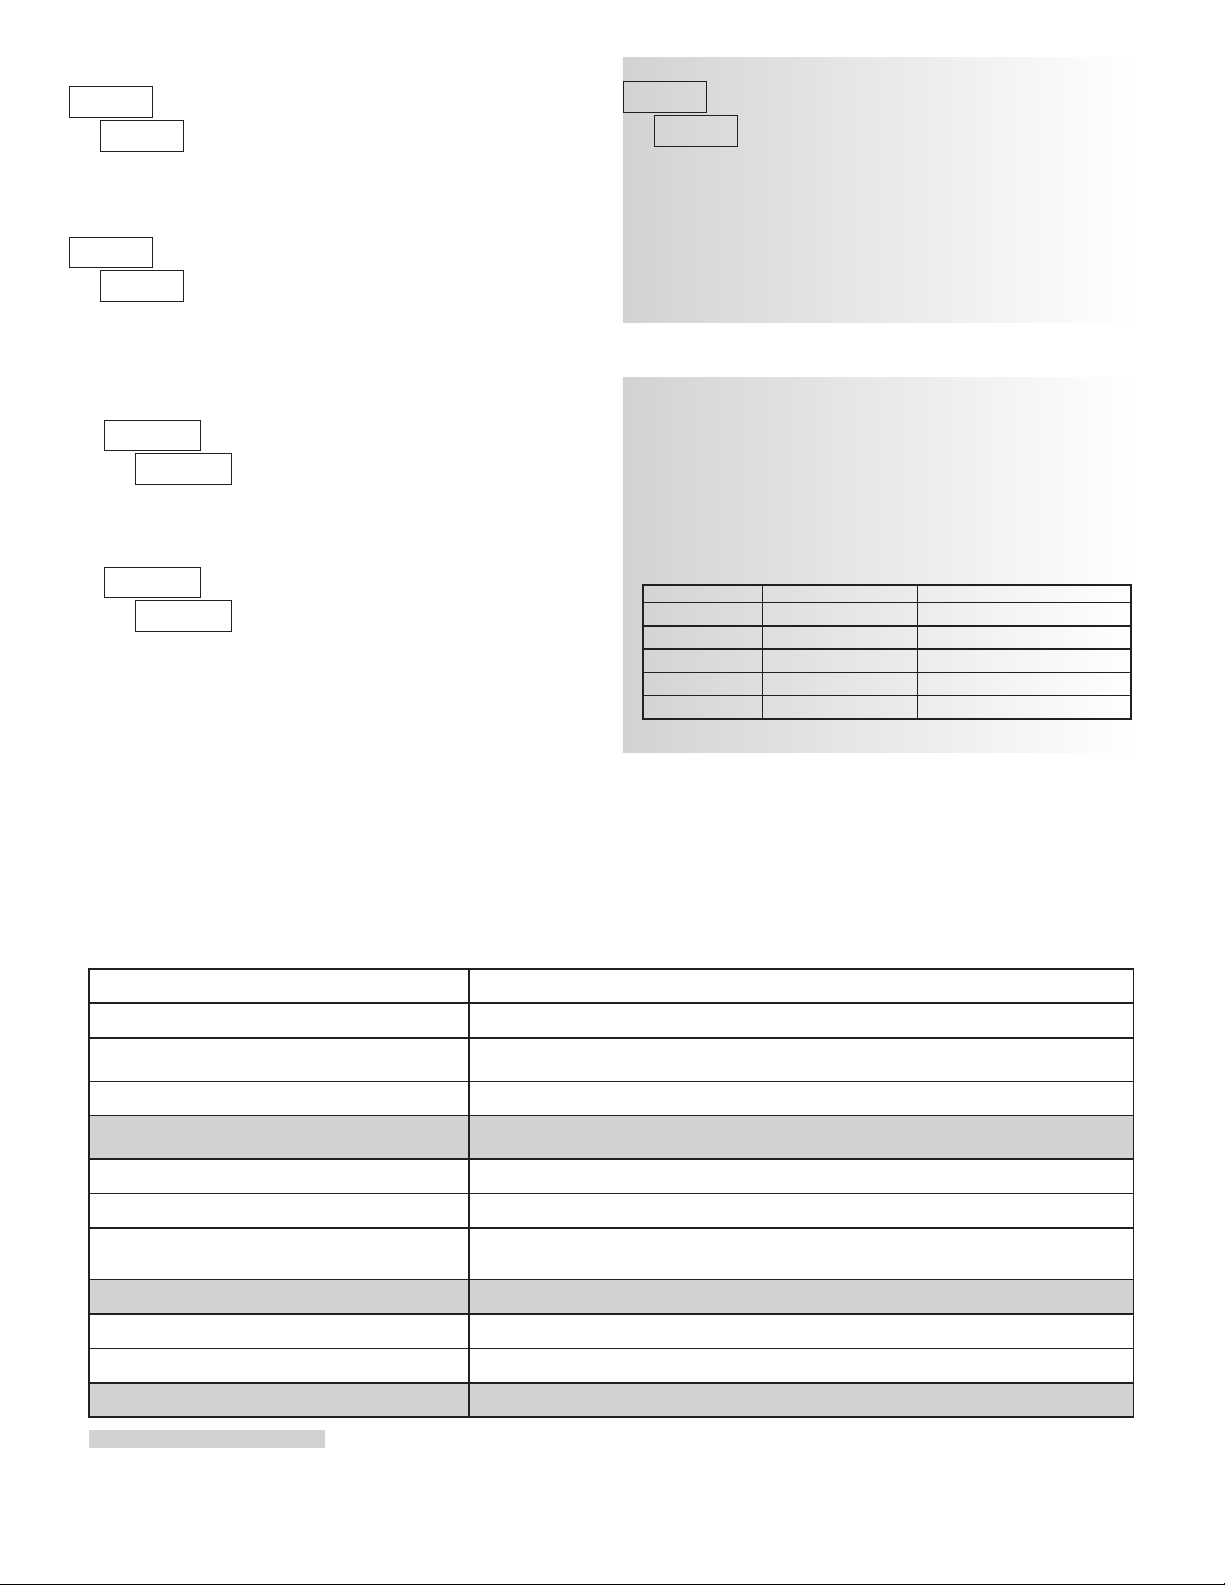
UNIT TYPE AND VERSION
The meter briefly displays the unit type followed by the
current firmware version ( x.x), and then returns to
. This information is also displayed during the
meter power-up sequence.
INPUT A AND B LOGIC SELECTION
The Count Inputs A and B are factory configured for falling edge triggered
(active low) operation in single edge count modes. The Counter Operating Mode
descriptions in the Input programming section reflect this logic. If an application
is better suited to use rising edge triggered (active high) operation, the Input
Logic for Input A and/or Input B can be changed by entering Code 55.
Selecting sets the Input A logic to rising edge triggered (active high)
operation. Be advised that all references to Input A falling edge and Input A
rising edge will be reversed for the Counter Operating Mode descriptions.
Selecting sets the Input B logic to rising edge triggered (active high)
operation. Be advised that all references to Input B falling edge and Input B
rising edge will be reversed for the Counter Operating Mode descriptions.
DPF93: CALIBRATION
4. If the meter appears to be indicating incorrectly or inaccurately, refer to the
Troubleshooting section.
When Analog Out recalibration is required (generally every 2 years), it
should be performed by qualified technicians using appropriate equipment.
Calibration does not change any user programmed parameters.
Calibration may be aborted by disconnecting power to the meter before
exiting Module 9. In this case, the existing calibration settings remain in effect.
Note: Allow a 30 minute warm-up period before staring calibration.
Analog Output Card Calibration
Before starting, verify that a precision meter with an accuracy of 0.05% or
better (voltmeter for voltage output and/or current meter for current output) is
connected and ready. Then perform the following procedure:
1. Use the arrow keys to display and press PA R.
2. is displayed. Use the arrow keys to select and press PAR.
3. Using the chart below, step through the five selections to be calibrated. At
each prompt, use the DPF93 arrow keys to adjust the output so that the
external meter display matches the selection being calibrated. When the
external reading matches, or if the range is not being calibrated, press PAR .
SELECTION EXTERNAL METER ACTION
00
0
00
00
4. When appears, press PAR twice and remove the external meters.
The only item in the DPF93 meter that can be calibrated
is the Analog Output. The Count A and B values are scaled
using the parameters in Module 1, Counter C value is scaled
using Module 5 and the Rate value is scaled using Module
0.00 Adjust if necessary, press PAR
4.00 Adjust if necessary, press PAR
20.00 Adjust if necessary, press PAR
00
0.00 Adjust if necessary, press PAR
10.00 Adjust if necessary, press PAR
TROUBLESHOOTING
For further assistance, contact technical support at the appropriate company numbers listed.
PROBLEM REMEDIES
NO DISPLAY CHECK: Power level, power connections
PROGRAM LOCKED-OUT
CERTAIN DISPLAYS ARE LOCKED OUT CHECK: Module 3 programming
INCORRECT DISPLAY VALUE or NOT
COUNTING
USER INPUT NOT WORKING CORRECTLY CHECK: User input wiring, user input jumper, user input being used for signal, Module 2
OUTPUT DOES NOT WORK CHECK: Corresponding plug-in card installation, output configuration, output wiring
JITTERY DISPLAY
“ ” RATE
MODULES or PARAMETERS NOT ACCESSIBLE CHECK: Corresponding plug-in card installation, related controlling parameter selected
ERROR CODE ( )
SERIAL COMMUNICATIONS CHECK: Wiring, connections, meter and host settings
Shaded areas are model dependent.
CHECK: Active (lock-out) user input
ENTER: Security code requested
CHECK: Input wiring, DIP switch setting, input programming, scale factor calculation,
input signal level, user input jumper, lower input signal frequency
CHECK: Wiring is per EMC installation guidelines, input signal frequency, signal quality,
scaling, update time, DIP switch setting
CHECK: Lower input signal frequency, reduce rate scaling
PRESS: Reset key (if unable to clear contact factory.)
30
30
Page 31

PARAMETER VALUE CHART Programmer ________________ Date ________
Model Number _________ Meter# _____________ Security Code __________
Counter A & B Input Parameters - DPF92 & 93 only
DISPLAY PARAMETER
FACTORY
SETTING
USER SETTING
COUNTER A OPERATING MODE
COUNTER A RESET ACTION
COUNTER A DECIMAL POSITION
COUNTER A SCALE FACTOR (A)
COUNTER A SCALE FACTOR (B) *
COUNTER A SCALE MULTIPLIER
COUNTER A COUNT LOAD VALUE (A)
COUNTER A COUNT LOAD VALUE (B)*
00
COUNTER A RESET POWER-UP
PRESCALER OUTPUT ENABLE
PRESCALER SCALE VALUE
COUNTER B OPERATING MODE
* See Module 2, Exchanging Parameter Lists, for details on programming this value.
Shaded areas are model dependent.
COUNTER B RESET ACTION
COUNTER B DECIMAL POSITION
COUNTER B SCALE FACTOR (A)
COUNTER B SCALE FACTOR (B)*
COUNTER B SCALE MULTIPLIER
COUNTER B COUNT LOAD VALUE (A)
COUNTER B COUNT LOAD VALUE (B)*
COUNTER B RESET POWER-UP
User Input and Function Key Parameters
DISPLAY PARAMETER USER SETTING
USER INPUT 1
USER INPUT 2
USER INPUT 3
FUNCTION KEY 1
FUNCTION KEY 2
RESET KEY
2nd FUNCTION KEY 1
2nd FUNCTION KEY 2
FACTORY
SETTING
Display and Program Lockout Parameters
DISPLAY PARAMETER
COUNTER A DISPLAY LOCK-OUT
COUNTER B DISPLAY LOCK-OUT
COUNTER C DISPLAY LOCK-OUT
RATE DISPLAY LOCK-OUT
MAX DISPLAY LOCK-OUT
MIN DISPLAY LOCK-OUT
SETPOINT 1 ACCESS LOCK-OUT
SETPOINT 2 ACCESS LOCK-OUT
SETPOINT 3 ACCESS LOCK-OUT
SETPOINT 4 ACCESS LOCK-OUT
COUNT LOAD A ACCESS
COUNT LOAD B ACCESS
COUNT LOAD C ACCESS
SCALE FACTOR A ACCESS
SCALE FACTOR B ACCESS
SCALE FACTOR C ACCESS
DISPLAY INTENSITY ACCESS
SECURITY CODE 0
Shaded areas are model dependent.
FACTORY
SETTING
USER SETTING
Rate Input Parameters
DISPLAY PARAMETER USER SETTING
6
0
0
6
6
8
8
9
9
Shaded areas are model dependent.
RATE ASSIGNMENT
LOW UPDATE TIME
HIGH UPDATE TIME
RATE DECIMAL POINT
LINEARIZER SEGMENTS
SCALING PT. 1 - DISPLAY VALUE
SCALING PT. 1 - INPUT VALUE
SCALING PT. 2 - DISPLAY VALUE
SCALING PT. 2 - INPUT VALUE
SCALING PT. 3 - DISPLAY VALUE
SCALING PT. 3 - INPUT VALUE
SCALING PT. 4 - DISPLAY VALUE
SCALING PT. 4 - INPUT VALUE
SCALING PT. 5 - DISPLAY VALUE
SCALING PT. 5 - INPUT VALUE
SCALING PT. 6 - DISPLAY VALUE
SCALING PT. 6 - INPUT VALUE
SCALING PT. 7 - DISPLAY VALUE
SCALING PT. 7 - INPUT VALUE
SCALING PT. 8 - DISPLAY VALUE
SCALING PT. 8 - INPUT VALUE
SCALING PT. 9 - DISPLAY VALUE
SCALING PT. 9 - INPUT VALUE
SCALING PT. 10 - DISPLAY VALUE
SCALING PT. 10 - INPUT VALUE
RATE DISPLAY ROUNDING
MINIMUM LOW CUT OUT
MAX CAPTURE DELAY TIME
MIN CAPTURE DELAY TIME
Counter C Input Parameters
DISPLAY PARAMETER
-
DPF93 & 91 only
FACTORY
SETTING
0
0
0
0
0
00
000
0000
000
0000
000
0000
000
0000
000
0000
6000
60000
000
0000
8000
80000
9000
90000
0
0
0
-
DPF92 & 93 only
FACTORY
SETTING
USER SETTING
COUNTER C OPERATING MODE
COUNTER C RESET ACTION
COUNTER C DECIMAL POSITION
COUNTER C SCALE FACTOR (A)
COUNTER C SCALE FACTOR (B)*
COUNTER C SCALE MULTIPLIER
COUNTER C COUNT LOAD VALUE (A)
COUNTER C COUNT LOAD VALUE (B)*
00
COUNTER C RESET POWER-UP
* See Module 2, Exchanging Parameter Lists, for details on programming this value.
3131
Page 32

FACTORY
SETTING
00
00
0
000
000
00
USER SETTING
FACTORY
SETTING
6 Setpoint (Alarm) Parameters
PARAMETERDISPLAY
* See Module 2, Exchanging Parameter Lists, for details on programming this value.
Shaded areas are model dependent.
SETPOINT ANNUNCIATORS
SETPOINT OUTPUT LOGIC
SETPOINT POWER UP STATE
SETPOINT ACTION
SETPOINT ASSIGNMENT
SETPOINT VALUE (A)
SETPOINT VALUE (B)*
SETPOINT TRACKING
SETPOINT BOUNDARY TYPE
STANDBY OPERATION
SETPOINT HYSTERESIS (rate)
SETPOINT OFF DELAY
SETPOINT ON DELAY
SETPOINT TIME OUT
COUNTER AUTO RESET ACTION
SETPOINT RESET WITH DISPLAY
RESET WHEN SPn+1 ACTIVATES
RESET WHEN SPn+1 DEACTIVATES
00
00
0
000
000
00
USER SETTING
FACTORY
SETTING
00
00
0
000
000
00
USER SETTING
FACTORY
SETTING
00
00
0
000
000
00
USER SETTING
Serial Communication Parameters
DISPLAY PARAMETER
COMMUNICATIONS TYPE Mbrtv
BAUD RATE 800
DATA BIT 8
PARITY BIT
METER ADDRESS
TRANSMIT DELAY 000
ABBREVIATED PRINTING
PRINT COUNTER A
PRINT COUNTER B
PRINT COUNTER C
PRINT RATE
PRINT MAX & MIN
PRINT SCALE FACTORS
PRINT COUNT LOAD VALUES
PRINT SETPOINT VALUES
FACTORY
SETTING
-
DPF93 only
USER SETTING
8 Analog Output Parameters
DISPLAY
ANALOG TYPE
PARAMETER
ANALOG ASSIGNMENT
ANALOG LOW SCALE VALUE
ANALOG HIGH SCALE VALUE
FACTORY
9 Factory Service Parameters
DISPLAY
DISPLAY INTENSITY LEVEL
-
DPF93 only
SETTING
0
0
000
FACTORY
SETTING
USER SETTING
USER SETTINGPARAMETER
3232
Page 33
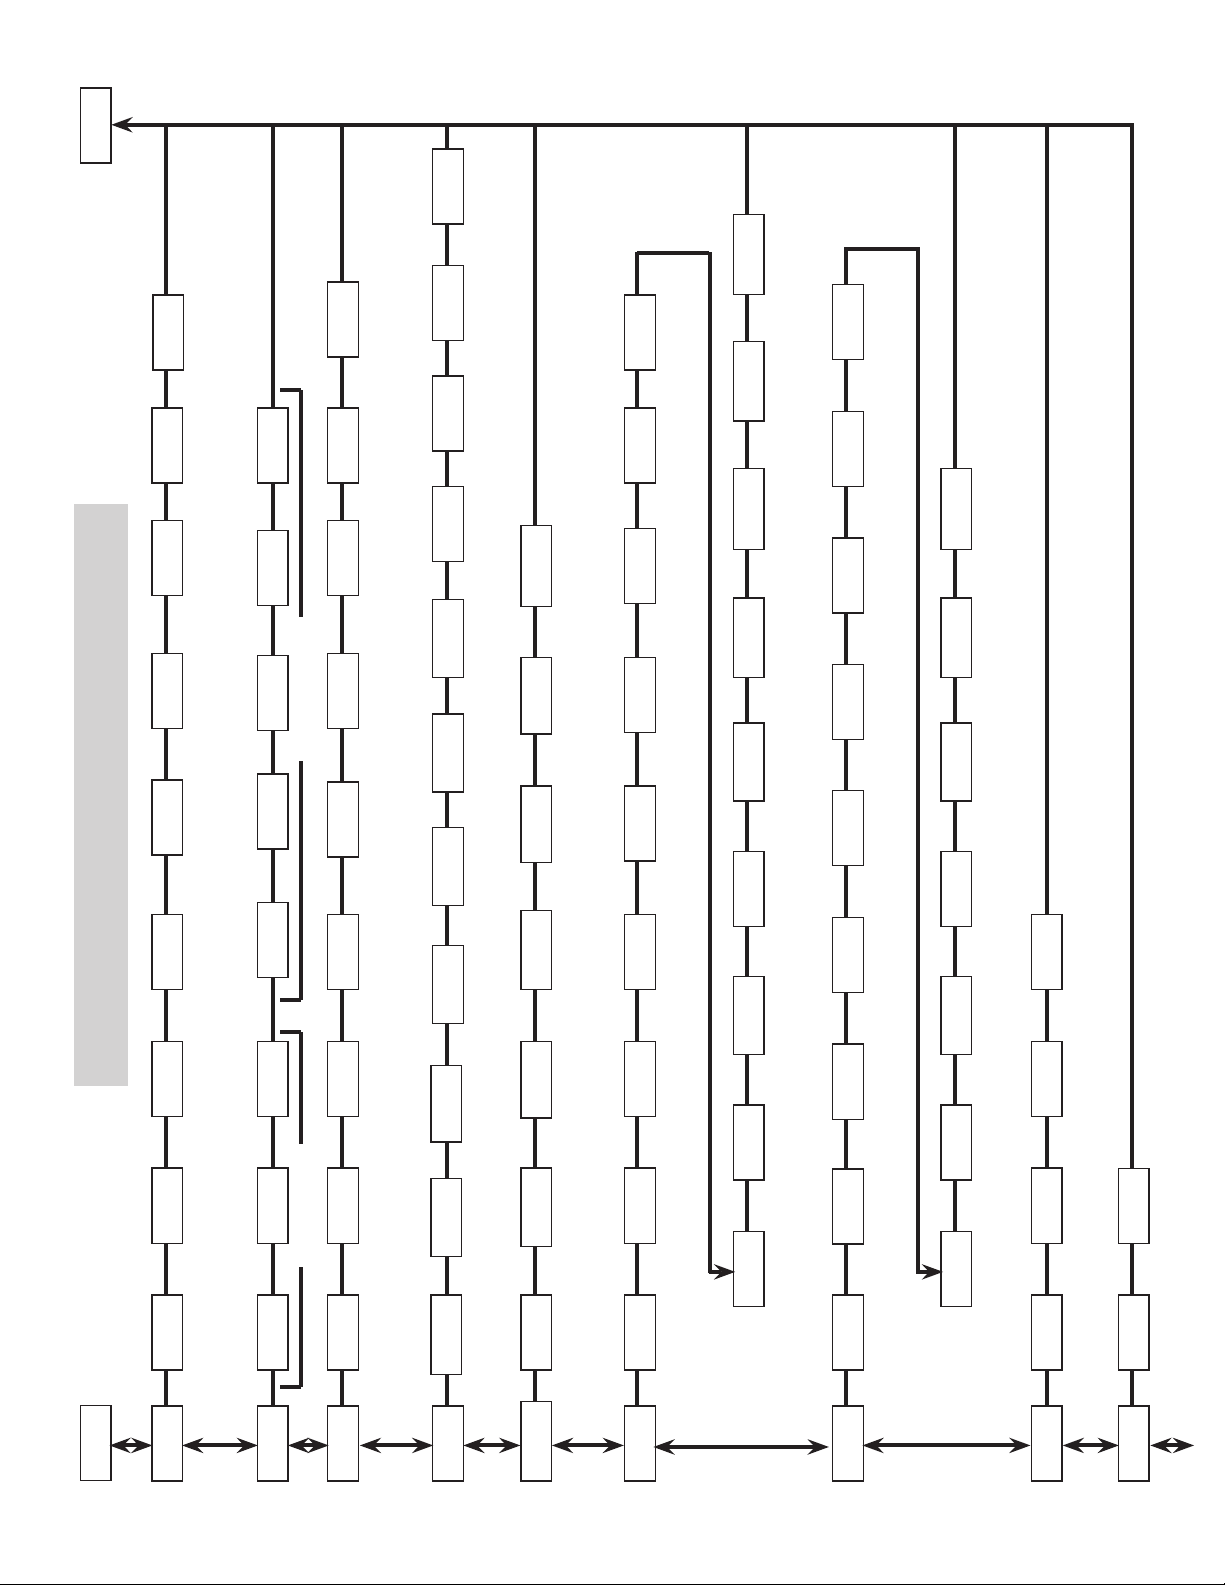
Prescaler
Output
Prescaler
Value
Scale
Enable
PROGRAMMING QUICK OVERVIEW
Delay Time
Min. Capture
SPn+1
Reset w/
Deactivates
Code
Security
Access
Display
Intensity
Delay Time
Max. Capture
Cut-out
Min. Low
Boundary
Setpoint
Type
Tracking
SPn+1
Reset w/
Activates
Print
Counter A
Print
Options
x = Counter A, B, or C
= Setpoint number
# = Scaling Points (0-9)
Reset at
Power-up
Counter x
Value
Counter x
Count Load
Scale
Access
Factor x
Access
Counter x
Count Load
FUNCTION KEYS
Rate Display
Rate Scaling
# #
Scale
Multiplier
Counter x
Scale
Factor
Counter x
Counter parameters apply to the DPF92 and DPF93, while the
rate parameters apply to the DPF91 and DPF93.
Position
Decimal
Counter x
x x
Access
Setpoint 1-4
Min
Display
Max
Display
Lock-out
Lock-out
Rate Scaling
Linearizer
Rate Decimal
High Update
Rounding
Input
Display
Segments
Position
Time
Reset at
Power-up
Counter C
Value
Counter C
Count Load
Scale
Multiplier
Counter C
Scale
Factor
Counter C
Position
Decimal
Counter C
Setpoint
Setpoint
Setpoint
Power-up
Output
Value
Assignment
Action
State
Logic
Reset
Display
Reset w/
Counter
Auto Reset
Value
Time-out
Delay
On Time
Delay
Off Time
Setpoint
Hysteresis
Printing
Abbreviated
Delay
Transmit
Address
Data Bit Parity Bit Meter
Values
Print Setpoint
Print Count
Load Values
Factors
Print Scale
Min
Print Rate Print Max/
Print
Counter C
Scale Value
Analog High
Analog Low
Scale Value
F1/F2 Keys
Reset
Counter x
x x x x x x x
Counter x
Operating
Action
Mode
USER INPUTS
Rate
x
Counter x
Display
Lock-out
Display
Lock-out
Time
Low Update
Rate
Assignment
Reset
Counter C
Operating
Counter C
Action
Mode
3333
Setpoint
Setpoint
Annunciators
Select
Standby
Operation
Rate
Baud
Type
Comms
Print
Counter B
Analog
Assignment
Type
Analog
Factory
Service Code
Display
Intensity Level
Page 34
parT nuMber infOrMaTiOn
DESCRIPTION PART NUMBERS
Counter/Dual Counter, 85-250 VAC power DPF9200
Counter/Dual Counter, 11-36 VDC/24 VAC power DPF9201
Rate Meter, 85-250 VAC power DPF9100
Rate Meter, 11-36 VDC/24 VAC power DPF9101
Counter/Dual Counter; Rate Meter; Slave Display, 85-250 VAC power DPF9300
Counter/Dual Counter; Rate Meter; Slave Display, 11-36 VDC/24 VAC power DPF9301
aCCessOries
DESCRIPTION PART NUMBERS
Setpoint Alarms
Dual Setpoint relay output Card LDP6-CDS10
Quad Setpoint relay output Card LDP6-CDS20
Quad Setpoint sinking open collector output Card LDP6-CDS30
Quad Setpoint sourcing open collector output Card LDP6-CDS40
Analog Output
Analog Output card LDP6-CDL10
Communications
RS485 serial communications output card with terminal block LDP6-CDC10
Extended RS485 serial communications output card with dual RJ11 connectors LDP6-CDC1C
RS232 serial communications output card with terminal block LDP6-CDC20
Extended RS232 serial communications output card with 9-pin D connector LDP6-CDC2C
3434
Page 35

WARRANTY/DISCLAIMER
OMEGA ENGINEERING, INC. warrants this unit to be free of defects in materials and workmanship for a
period of 25 months from date of purchase. OMEGA’s WARRANTY adds an additional one (1) month
grace period to the normal two (2) year product warranty to cover handling and shipping time. This
ensures that OMEGA’s customers receive maximum coverage on each product.
If the unit malfunctions, it must be returned to the factory for evaluation. OMEGA’s Customer Service
Department will issue an Authorized Return (AR) number immediately upon phone or written request.
Upon examination by OMEGA, if the unit is found to be defective, it will be repaired or replaced at no
charge. OMEGA’s WARRANTY does not apply to defects resulting from any action of the purchaser,
including but not limited to mishandling, improper interfacing, operation outside of design limits,
improper repair, or unauthorized modification. This WARRANTY is VOID if the unit shows evidence of
having been tampered with or shows evidence of having been damaged as a result of excessive
corrosion; or current, heat, moisture or vibration; improper specification; misapplication; misuse or
other operating conditions outside of OMEGA’s control. Components in which wear is not warranted,
include but are not limited to contact points, fuses, and triacs.
OMEGA is pleased to offer suggestions on the use of its various products. However, OMEGA
neither assumes responsibility for any omissions or errors nor assumes liability for any
damages that result from the use of its products in accordance with information provided
by OMEGA, either verbal or written. OMEGA warrants only that the parts manufactured by
the company will be as specified and free of defects. OMEGA MAKES NO OTHER
WARRANTIES OR REPRESENTATIONS OF ANY KIND WHATSOEVER, EXPRESSED OR
IMPLIED, EXCEPT THAT OF TITLE, AND ALL IMPLIED WARRANTIES INCLUDING ANY
WARRANTY OF MERCHANTABILITY AND FITNESS FOR A PARTICULAR PURPOSE ARE
HEREBY DISCLAIMED. LIMITATION OF LIABILITY: The remedies of purchaser set forth
herein are exclusive, and the total liability of OMEGA with respect to this order, whether
based on contract, warranty, negligence, indemnification, strict liability or otherwise, shall
not exceed the purchase price of the component upon which liability is based. In no event
shall OMEGA be liable for consequential, incidental or special damages.
CONDITIONS: Equipment sold by OMEGA is not intended to be used, nor shall it be used: (1) as a “Basic
Component” under 10 CFR 21 (NRC), used in or with any nuclear installation or activity; or (2) in medical
applications or used on humans. Should any Product(s) be used in or with any nuclear installation or
activity, medical application, used on humans, or misused in any way, OMEGA assumes no responsibility
as set forth in our basic WARRANTY/DISCLAIMER language, and, additionally, purchaser will indemnify
OMEGA and hold OMEGA harmless from any liability or damage whatsoever arising out of the use of the
Product(s) in such a manner.
RETURN REQUESTS/INQUIRIES
Direct all warranty and repair requests/inquiries to the OMEGA Customer Service Department. BEFORE
RETURNING ANY PRODUCT(S) TO OMEGA, PURCHASER MUST OBTAIN AN AUTHORIZED RETURN
(AR) NUMBER FROM OMEGA’S CUSTOMER SERVICE DEPARTMENT (IN ORDER TO AVOID PROCESSING
DELAYS). The assigned AR number should then be marked on the outside of the return package and on
any correspondence.
The purchaser is responsible for shipping charges, freight, insurance and proper packaging to prevent
breakage in transit.
FOR WARRANTY RETURNS, please have the
following information available BEFORE
contacting OMEGA:
1. Purchase Order number under which the product
was PURCHASED,
2. Model and serial number of the product under
warranty, and
3. Repair instructions and/or specific problems relative
to the product.
OMEGA’s policy is to make running changes, not model changes, whenever an improvement is possible. This affords our
customers the latest in technology and engineering.
OMEGA is a registered trademark of OMEGA ENGINEERING, INC.
© Copyright 2006 OMEGA ENGINEERING, INC. All rights reserved. This document may not be copied, photocopied,
reproduced, translated, or reduced to any electronic medium or machine-readable form, in whole or in part, without the
prior written consent of OMEGA ENGINEERING, INC.
FOR NON-WARRANTY REPAIRS, consult OMEGA
for current repair charges. Have the following
information available BEFORE contacting OMEGA:
1. Purchase Order number to cover the COST of the
repair,
2. Model and serial number of the product, and
3. Repair instructions and/or specific problems relative
to the product.
Page 36

Where Do I Find Everything I Need for
Process Measurement and Control?
OMEGA…Of Course!
Shop online at omega.com
TEMPERATURE
] Thermocouple, RTD & Thermistor Probes, Connectors, Panels & Assemblies
] Wire: Thermocouple, RTD & Thermistor
] Calibrators & Ice Point References
] Recorders, Controllers & Process Monitors
] Infrared Pyrometers
PRESSURE, STRAIN AND FORCE
] Transducers & Strain Gages
] Load Cells & Pressure Gages
] Displacement Transducers
] Instrumentation & Accessories
FLOW/LEVEL
] Rotameters, Gas Mass Flowmeters & Flow Computers
] Air Velocity Indicators
] Turbine/Paddlewheel Systems
] Totalizers & Batch Controllers
pH/CONDUCTIVITY
] pH Electrodes, Testers & Accessories
] Benchtop/Laboratory Meters
] Controllers, Calibrators, Simulators & Pumps
] Industrial pH & Conductivity Equipment
DATA ACQUISITION
] Data Acquisition & Engineering Software
] Communications-Based Acquisition Systems
] Plug-in Cards for Apple, IBM & Compatibles
] Datalogging Systems
] Recorders, Printers & Plotters
HEATERS
] Heating Cable
] Cartridge & Strip Heaters
] Immersion & Band Heaters
] Flexible Heaters
] Laboratory Heaters
ENVIRONMENTAL
MONITORING AND CONTROL
] Metering & Control Instrumentation
] Refractometers
] Pumps & Tubing
] Air, Soil & Water Monitors
] Industrial Water & Wastewater Treatment
] pH, Conductivity & Dissolved Oxygen Instruments
M4535/1013
 Loading...