

Page 1
Page 2
DFG55 Digital Force Gauges User’s Guide
1
Page 3
DFG55 Digital Force Gauges User’s Guide
Thank you…
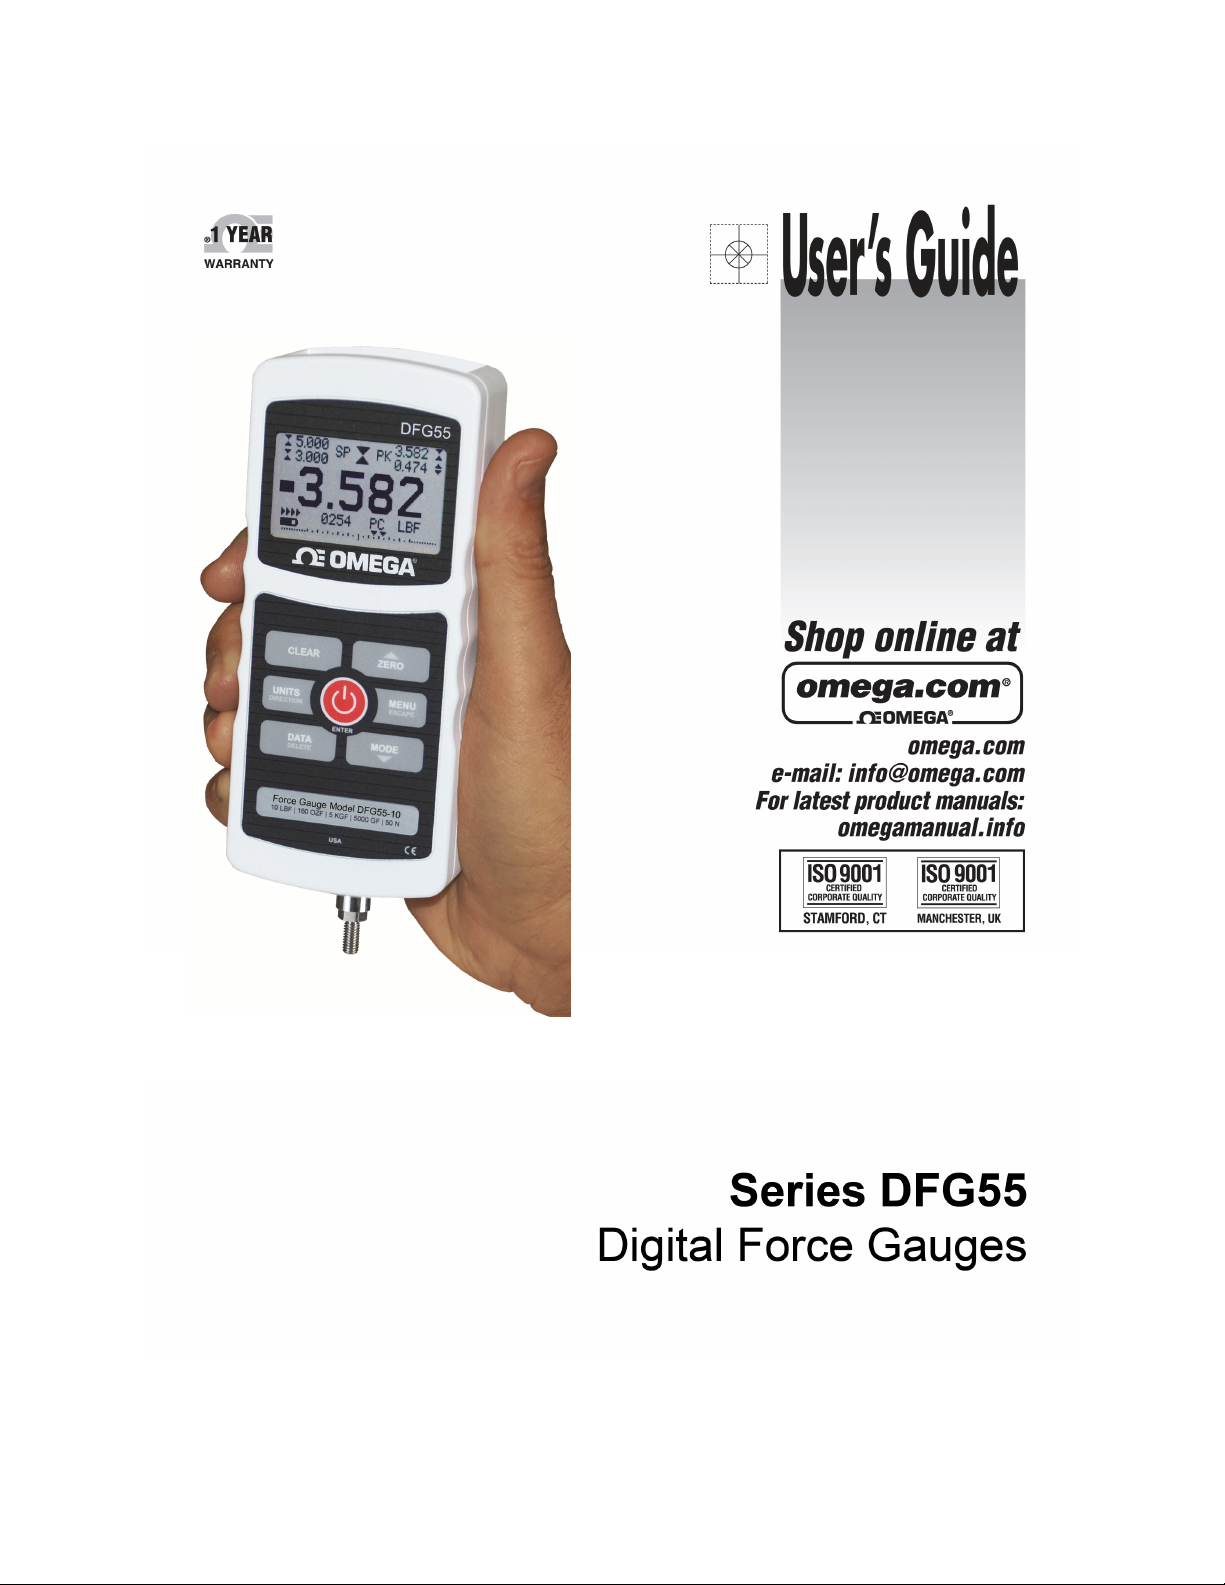
Thank you for purchasing an Omega DFG55 digital force gauge, designed for tension and compression
force testing applications from 0.12 lb to 500 lb (0.5 N to 2,500 N) full scale. The DFG55 is an essential
component of a force testing system, typically also comprising a test stand, grips, and data collection
software.
With proper usage, we are confident that you will get many years of great service with this product.
Omega force gauges are ruggedly built for many years of service in laboratory and industrial
environments.
This User’s Guide provides setup, safety, and operation instructions. Dimensions and specifications are
also provided. For additional information or answers to your questions, please do not hesitate to contact
us. Our technical support and engineering teams are eager to assist you.
Before use, each person who is to use the DFG55 force gauge should be fully trained in
appropriate operation and safety procedures.
TABLE OF CONTENTS
OVERVIEW .........................................................3
POWER ...............................................................4
SETUP ................................................................6
HOME SCREEN AND CONTROLS ...................7
OPERATING MODES .........................................9
DIGITAL FILTERS ............................................11
SET POINTS .....................................................12
DATA MEMORY AND STATISTICS ................13
COMMUNICATIONS ........................................15
CALIBRATION .................................................20
PASSWORDS ...................................................24
OTHER SETTINGS ...........................................25
SPECIFICATIONS ............................................28
2
Page 4
DFG55 Digital Force Gauges User’s Guide
1 OVERVIEW
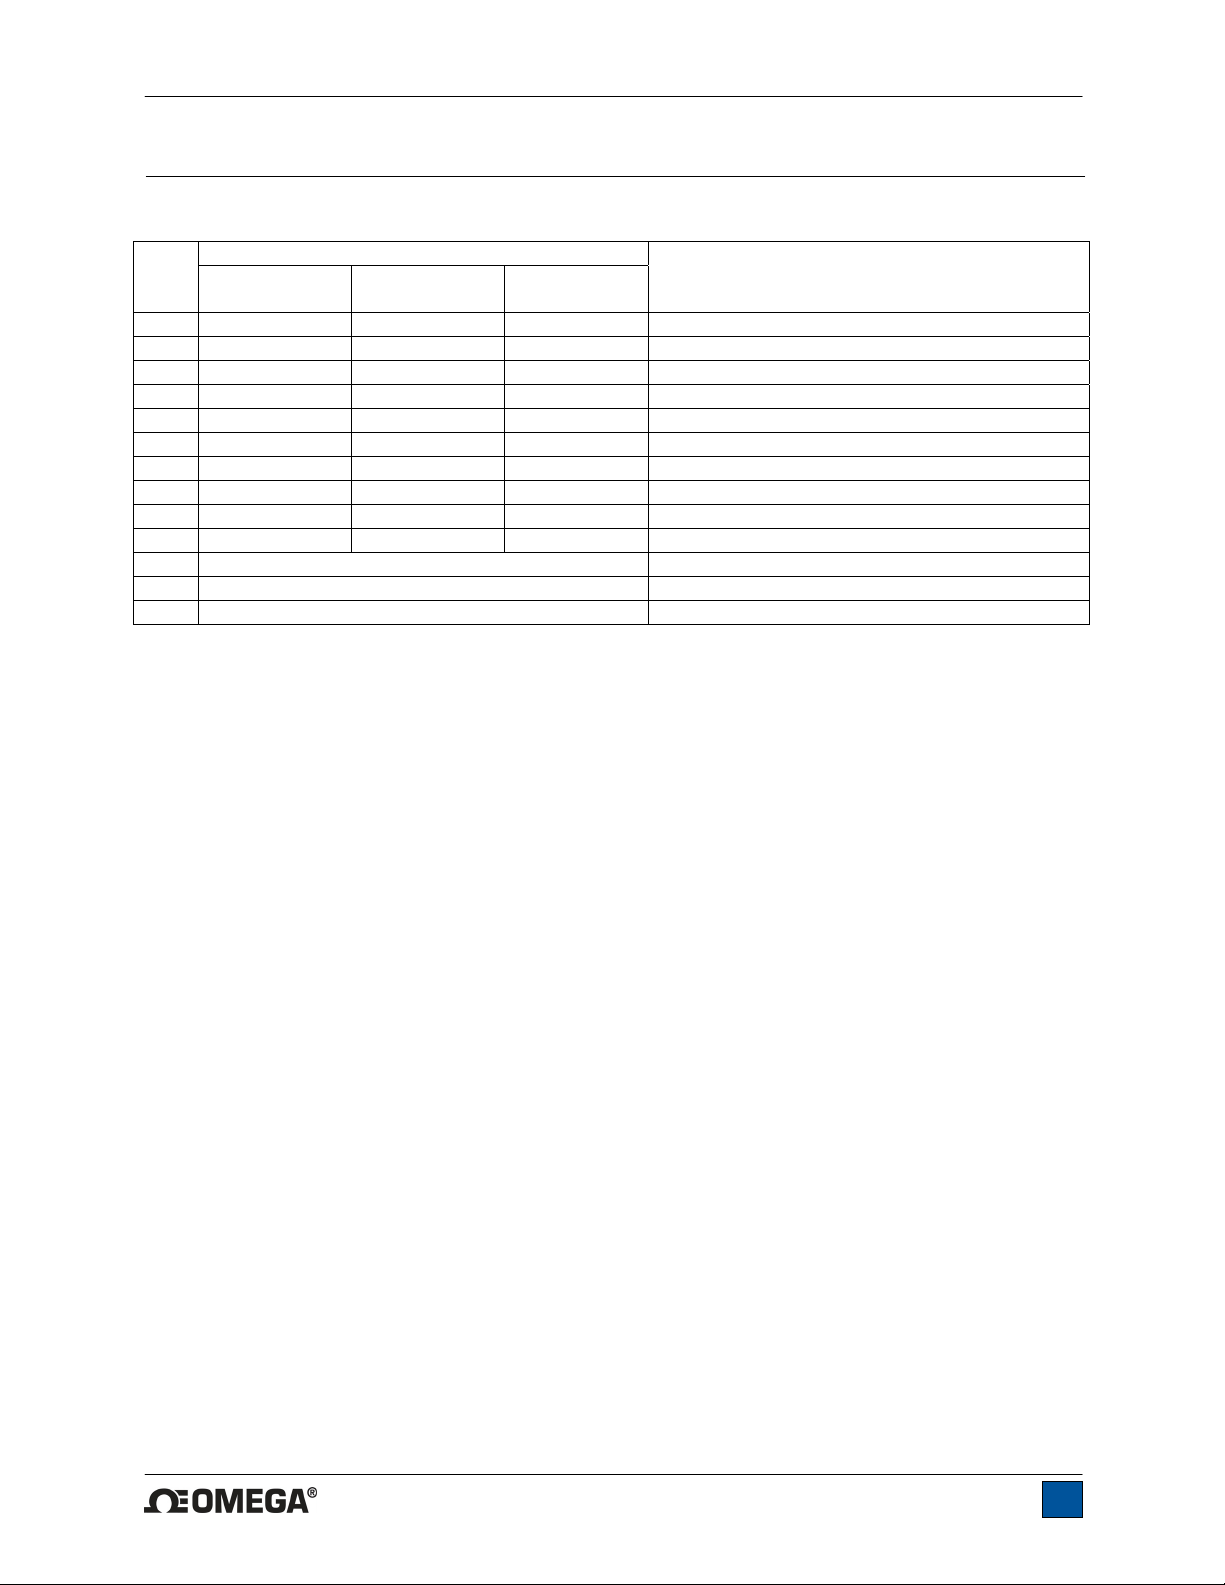
1.1 List of included items
Part No.
DFG55-0.12 –
Qty.
1 12-1049 12-1049 12-1049 Carrying case
1 08-1022 08-1022 08-1022 AC adapter body with US, EU, or UK prong
1 08-1026 08-1026 08-1026 Battery (inside the gauge)
1 G1024 G1024 G1031 Extension rod
1 G1026 G1026 G1033 Cone
1 G1025 G1025 G1032 Chisel
1 G1027 G1027 G1034 V-groove
1 G1029 G1029 G1036 Flat
1 G1028 G1038 G1035 Hook
1 N/A G1039 G1037 Coupling
1 - Certificate of calibration
1 09-1165 USB cable
1 - Resource CD (USB driver, user’s guide)
1.2 Safety / Proper Usage
DFG55-20
DFG55-50 –
DFG55-100
DFG55-200 –
DFG55-500
Description
Caution!
Note the force gauge’s capacity before use and ensure that the capacity is not exceeded.
Producing a force greater than 150% of the gauge’s capacity can damage the internal load cell. An
overload can occur whether the gauge is powered on or off.
Typical materials able to be tested include many manufactured items, such as springs, electronic
components, fasteners, caps, films, mechanical assemblies, and many others. Items that should not be
used with the gauge include potentially flammable substances or products, items that can shatter in an
unsafe manner, and any other components that can present an exceedingly hazardous situation when
acted upon by a force.
The following safety checks and procedures should be performed before and during operation:
1. Never operate the gauge if there is any visible damage to the AC adapter or the gauge itself.
2. Ensure that the gauge is kept away from water or any other electrically conductive liquids at all
times.
3. The gauge should be serviced by a trained technician only. AC power must be disconnected and
the gauge must be powered off before the housing is opened.
4. Always consider the characteristics of the sample being tested before initiating a test. A risk
assessment should be carried out beforehand to ensure that all safety measures have been
addressed and implemented.
5. Wear eye and face protection when testing, especially when testing brittle samples that have the
potential to shatter under force. Be aware of the dangers posed by potential energy that can
accumulate in the sample during testing. Extra bodily protection should be worn if a destructive
failure of a test sample is possible.
6. In certain applications, such as the testing of brittle samples that can shatter, or other applications
that could lead to a hazardous situation, it is strongly recommended that a machine guarding
system be employed to protect the operator and others in the vicinity from shards or debris.
3
Page 5
DFG55 Digital Force Gauges User’s Guide
7. When the gauge is not in use, ensure that the power is turned off.
2 POWER
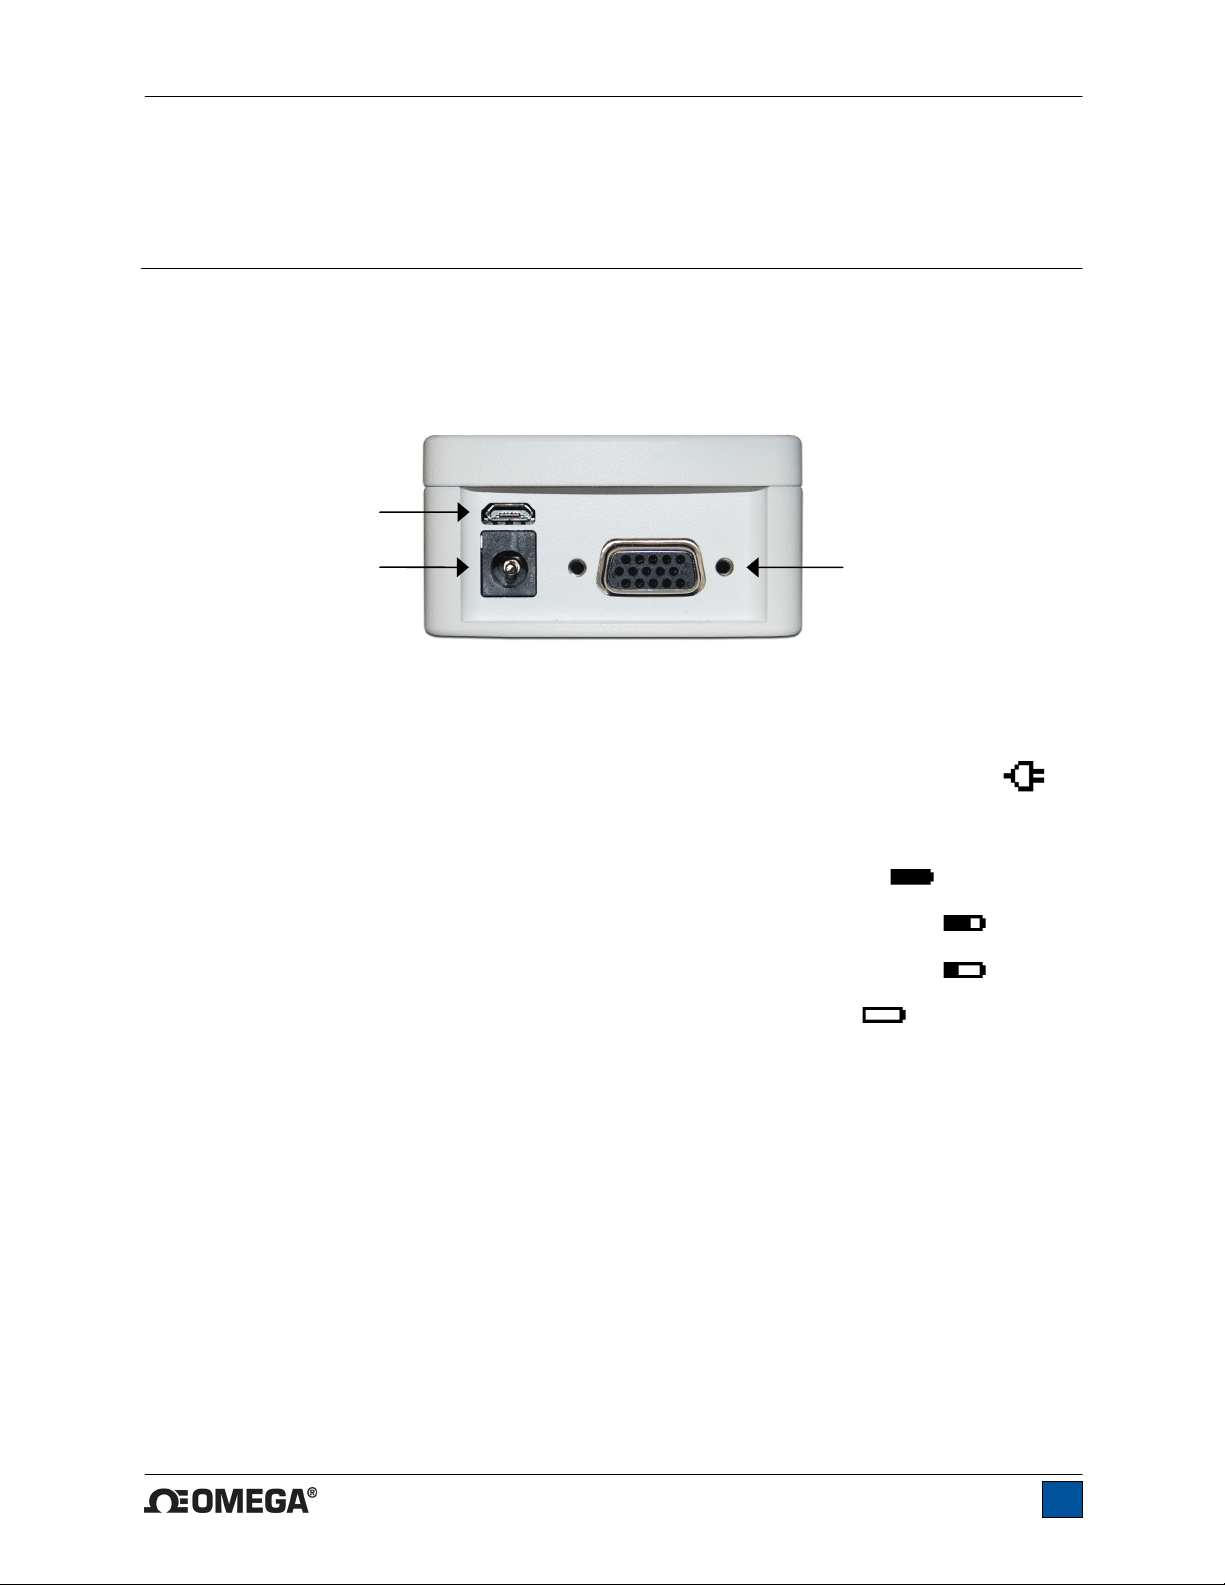
The gauge is powered either by an 8.4V NiMH rechargeable battery or by an AC adapter. Since these
batteries are subject to self discharge, it may be necessary to recharge the unit after a prolonged period
of storage. Plug the accompanying charger into the AC outlet and insert the charger plug into the
receptacle on the gauge (refer to the illustration below). The battery will fully charge in approximately 8
hours.
USB connector
Power input jack
Serial connector
Caution!
Do not use chargers or batteries other than specified or instrument damage may occur.
If the AC adapter is plugged in, an icon appears in the lower left corner of the display, as follows:
If the AC adapter is not plugged in, battery power drainage is denoted in a five-step process:
1. When battery life is greater than 75%, the following indicator is present:
2. When battery life is between 50% and 75%, the following indicator is present:
3. When battery life is between 25% and 50%, the following indicator is present:
4. When battery life is less than 25%, the following indicator is present:
5. When battery life drops to approximately 2%, the indicator from step 4 will be flashing.
Several minutes after (timing depends on usage and whether the backlight is turned on or
off), a message will appear, “BATTERY VOLTAGE TOO LOW. POWERING OFF”. A 4-tone
audio indicator will sound and the gauge will power off.
The gauge can be configured to automatically power off following a period of inactivity. Refer to the Other
Settings section for details.
If battery replacement is necessary, the battery may be accessed by separating the two halves of the
gauge. Refer to the Mechanical Setup section for details.
4
Page 6
DFG55 Digital Force Gauges User’s Guide
3 SETUP
3.1 Mechanical Setup
3.1.1 Loading shaft orientation
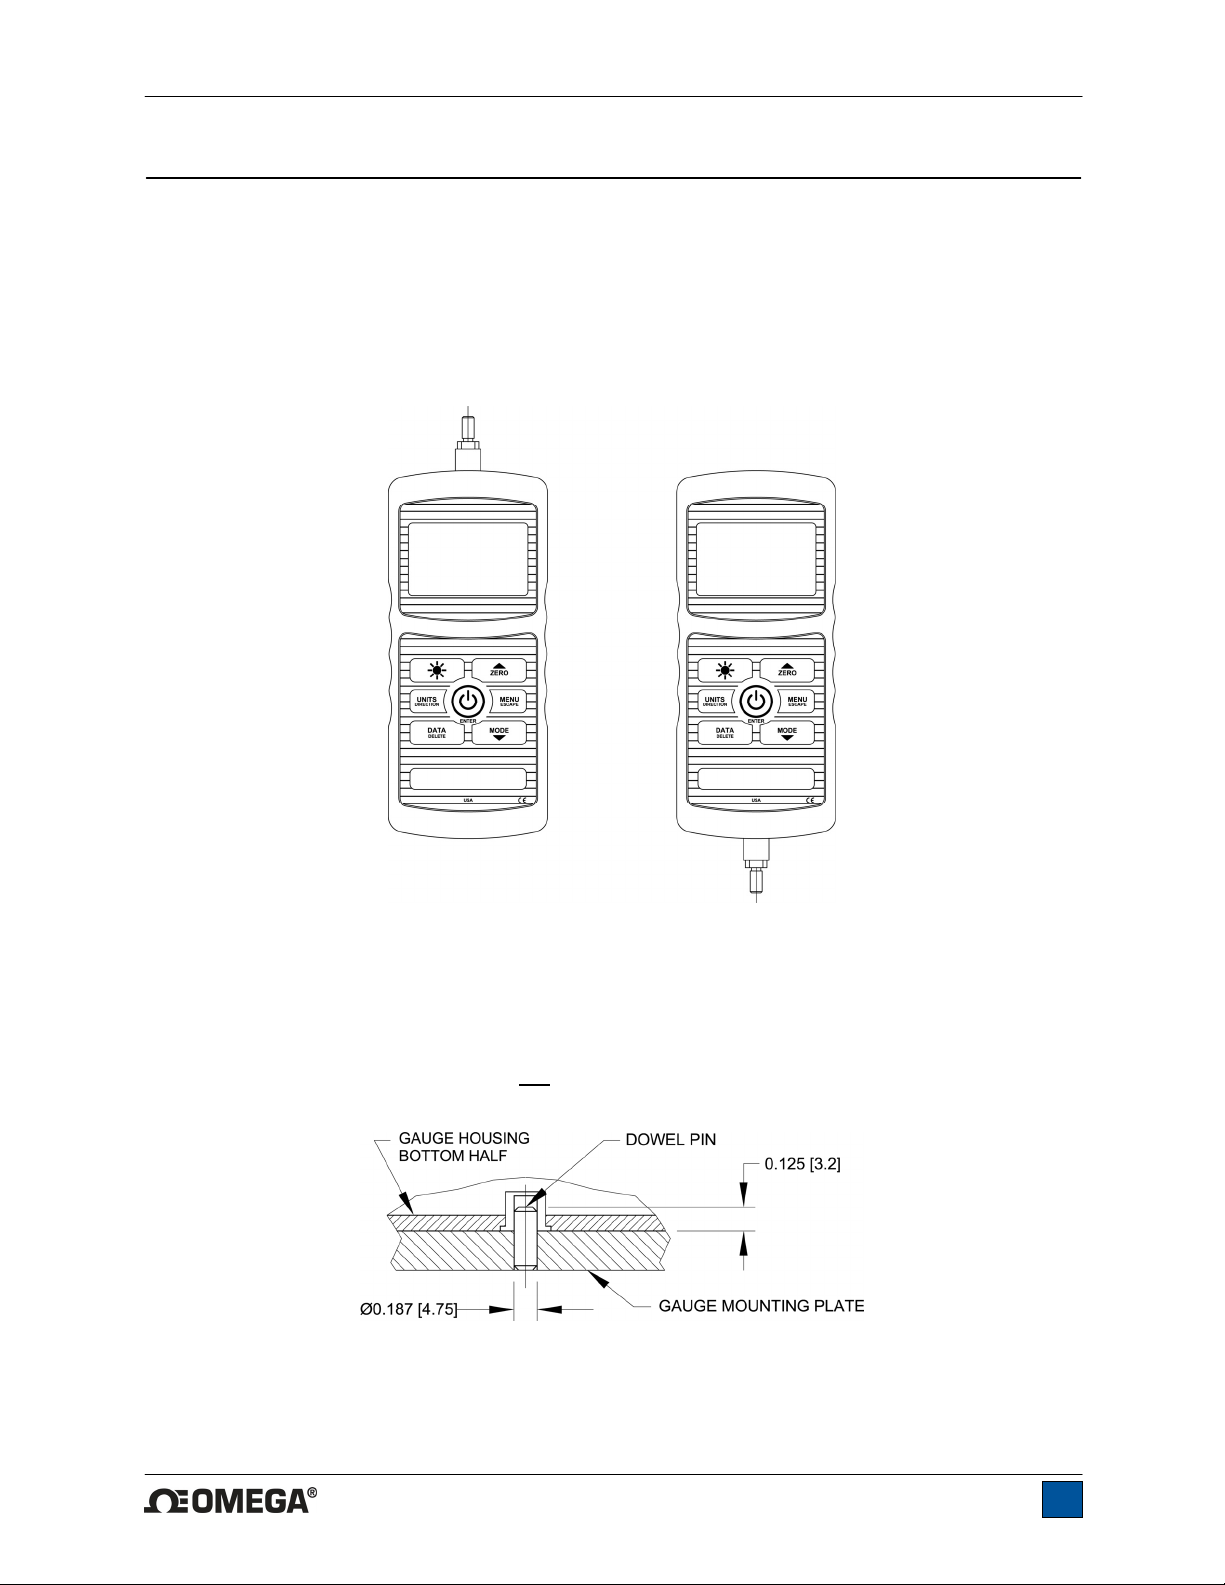
In order to accommodate a variety of testing requirements, the orientation of the loading shaft may be set
up in either of the two positions shown below. In order to change the loading shaft orientation, loosen the
two captive screws on the back side of the housing, separate the two housing halves, rotate one half 180
degrees, and reassemble. Contact between the two halves is made by the spring pins and contact pads
on the printed circuit boards.
Load cell shaft up Load cell shaft down
3.1.2 Mounting to a plate
Although the gauge may be used by hand, proper mounting is important if attached to a fixture or test
stand. The round steel insert with a hole in the back of the housing is provided to withstand the load
during a test. A mating dowel pin should be used (see illustration below). There are four threaded holes
located near the corners of the housing. These holes are designed to accommodate screws in order to
hold the gauge in place. The screws must not
pin properly can result in a hazardous situation.
3.1.3 Mounting attachments to the gauge
The force gauge’s threaded loading shaft is designed to accommodate common grips and attachments
with female mounting holes. To mount a grip, gently thread it onto the shaft. Other mounting adapters are
also available to prevent rotation. Ensure that the grip or fixture is positioned to ensure axial load with
be used for load bearing purposes. Failure to use a dowel
5
Page 7

DFG55 Digital Force Gauges User’s Guide
respect to the loading shaft of the force gauge. When using a grip, ensure that it secures the sample in
such a way that it is prevented from slipping out during a test, preventing a potential safety risk to the
operator and others in the vicinity. If using a grip or fixture from a supplier other than Omega, ensure that
it is constructed of suitably rugged materials and components.
Do not use jam nuts or tools to tighten grips or attachments onto the shaft. Finger-tighten only
rotation mounting adapters are available.
3.2 Installing the USB driver
If communicating via USB, install the USB driver provided on the Resource CD. Installation instructions
may also be found on the CD.
. Anti-
Caution!
Install the USB driver before physically connecting the gauge to a PC with the USB cable.
Further instructions for configuring and using the gauge’s outputs are provided in the Communications
and Outputs section.
6
Page 8
DFG55 Digital Force Gauges User’s Guide
4 HOME SCREEN AND CONTROLS
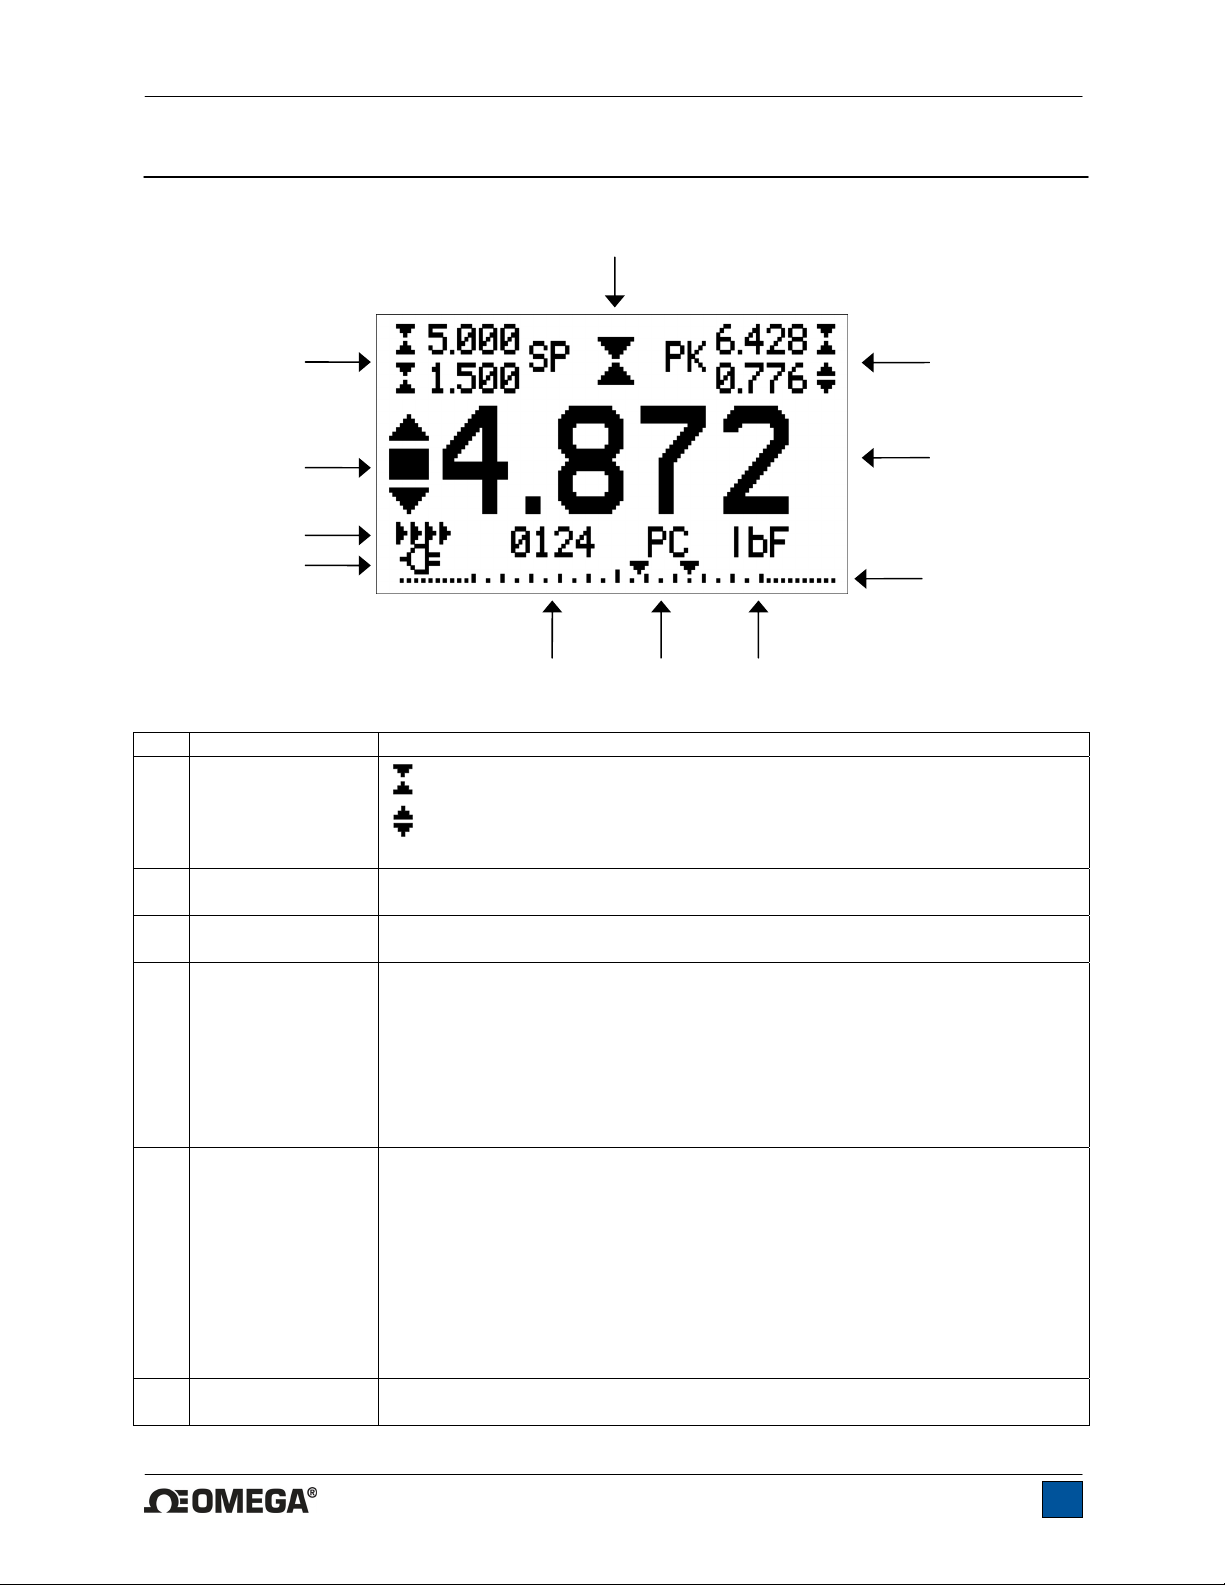
4.1 Home Screen
1
11
10
9
8
No. Name Description
1 Measurement
direction
2 Peaks
3 Primary reading
4 Load bar
5 Units
6 Mode
- indicates a compression (push) direction
- indicates a tension (pull) direction
These indicators are used throughout the display and menu.
The maximum measured compression and tension readings. These readings
are reset by pressing ZERO or by powering the gauge off and on.
The current displayed force reading. See Operating Modes section for
details.
Analog indicator to help identify when an overload condition is imminent. The
bar increases either to the right or to the left from the midpoint of the graph.
Increasing to the right indicates compression load, increasing to the left
indicates tension load. If set points are enabled, triangular markers are
displayed for visual convenience. This indicator reflects the actual load, which
may not correspond to the primary reading (depends on operating mode).
The ZERO key does not reset the load bar. See Operating Modes section for
details.
The current measurement unit. Abbreviations are as follows:
lbF – Pound-force
ozF – Ounce-force
kgF – Kilogram-force
gF – Gram-force
N – Newton
kN – Kilonewton
mN – Millinewton
Note: not all gauge capacities measure in all the above units. Refer to the
capacity / resolution table in the Specifications section for details.
The current measurement mode. Abbreviations are as follows:
RT – Real Time
567
2
3
4
7
Page 9
DFG55 Digital Force Gauges User’s Guide
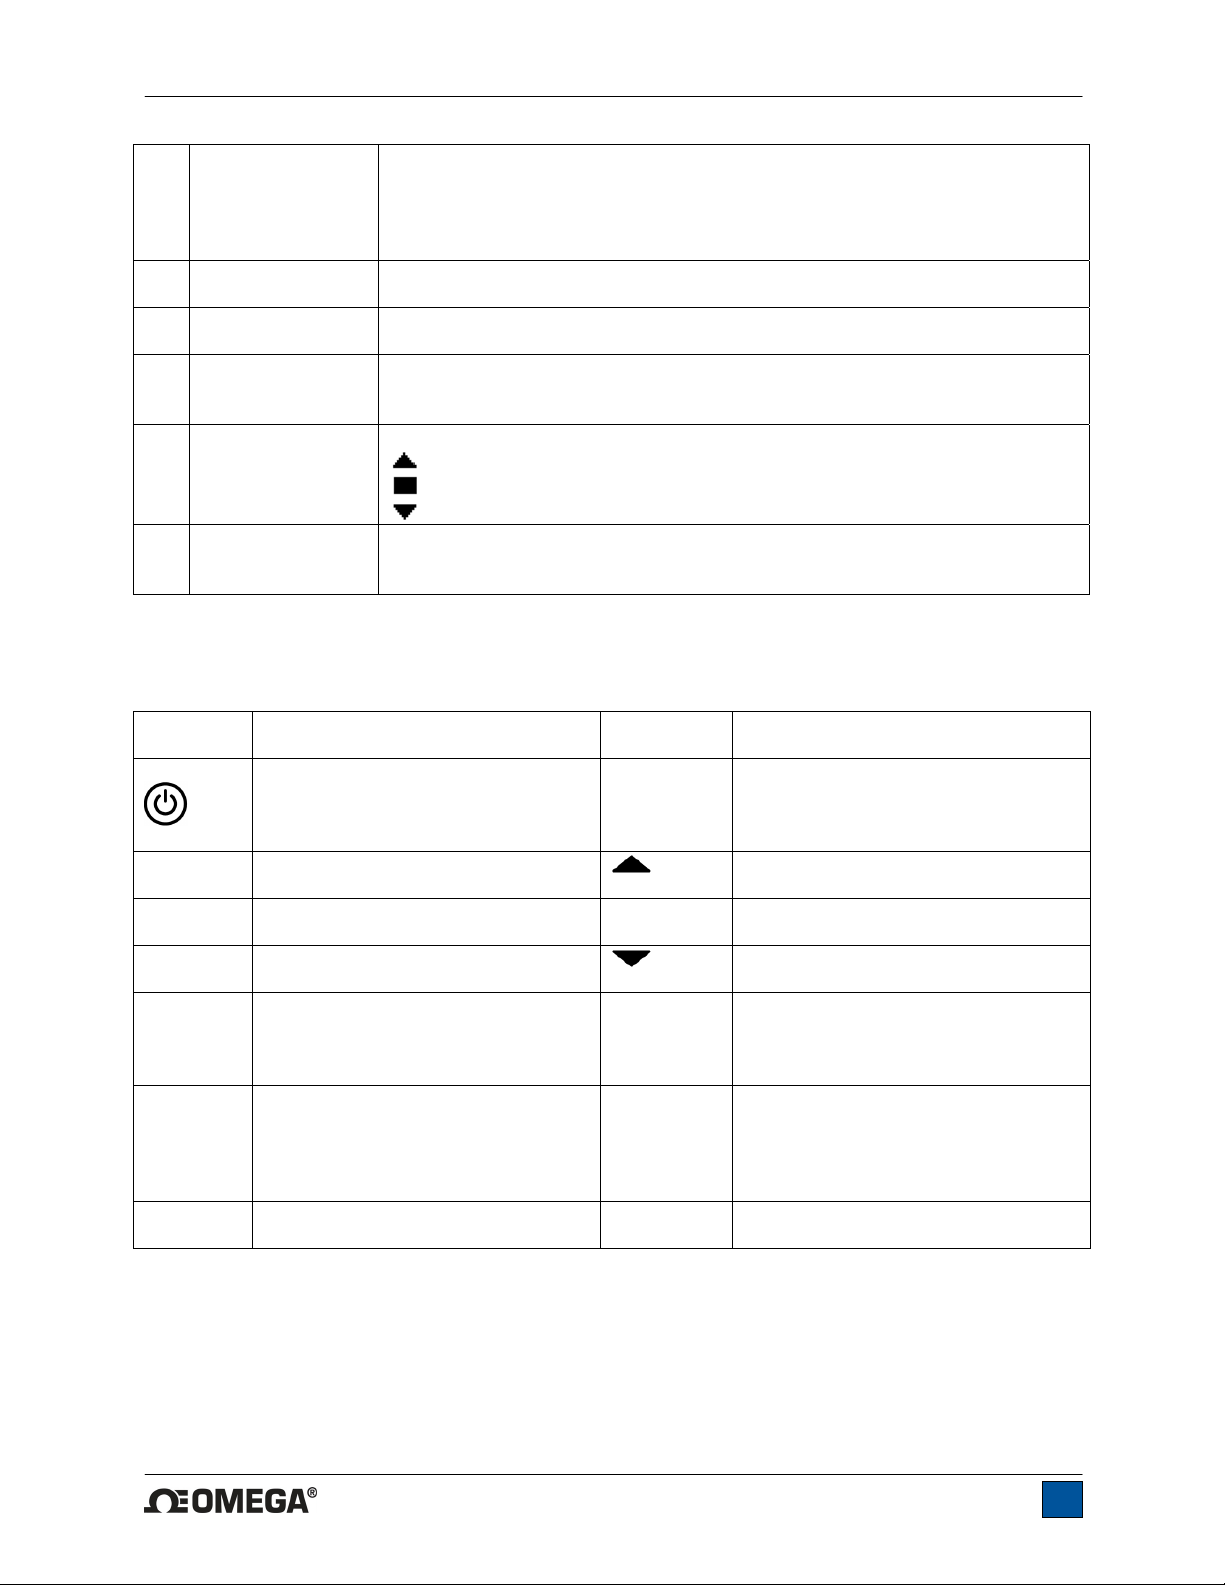
PC – Peak Compression
PT – Peak Tension
A – Average Mode
ET – External Trigger Mode
See Operating Modes section for details about each of these modes
7 Number of stored
data points
8 Battery / AC
adapter indicator
9 Automatic data
output indicator
The number of stored data points in memory, up to 1000. Displayed only if
Memory Storage is enabled for the DATA key.
Either the AC adapter icon, battery icon, or no icon will be shown, depending
on power conditions. Refer to the Power section for details.
If Auto Output has been enabled under Serial / USB Settings, this indicator
is displayed. When automatic data output is occurring, the icon becomes
animated. See Communications section for details.
10 High / low limit
indicators
Correspond to the programmed set points. Indicator definitions are as follows:
– the displayed value is greater than the upper force limit
– the displayed value is between the limits
– the displayed value is less than the lower force limit
11 Set points
The programmed force limits. Typically used for pass/fail type testing. 1, 2, or
no indicators may be present, depending on the configuration shown in the
Set Points menu item.
4.2 Controls
Primary
Label Primary Function
Powers the gauge on and off. Press
briefly to power on, press and hold
to power off. Active only when the
home screen is displayed.
ZERO
Zeroes the primary reading and
peaks.
MENU
MODE
Enters the main menu.
Toggles between measurement
modes.
DATA
Stores a value to memory, transmits
the current reading to an external
device, and/or initiates automatic
data output, depending on setup.
UNITS
Toggles between measurement
units.
CLEAR
Zeroes the peak readings, but
retains the primary reading.
Secondary
Label Secondary Function
ENTER
Various uses, as described in the
following sections.
(UP)
ESCAPE
Navigates up through the menu and
sub-menus .
Reverts one step backwards through
the menu hierarchy.
(DOWN)
DELETE
Navigates down through the menu
and sub-menus.
Enables and disables Delete mode
while viewing stored data.
DIRECTION
Reverses the display during
calibration, and toggles between
tension and compression directions
while configuring set points and other
menu items.
N/A
N/A
8
Page 10
DFG55 Digital Force Gauges User’s Guide
4.3 Menu navigation basics
Most of the gauge’s various functions and parameters are configured through the main menu. To access
the menu press MENU. Use the UP and DOWN keys to scroll through the items. The current selection is
denoted with clear text over a dark background. Press ENTER to select a menu item, then use UP and
DOWN again to scroll through the sub-menus. Press ENTER again to select the sub-menu item.
For parameters that may be either selected or deselected, press ENTER to toggle between selecting and
deselecting. An asterisk (*) to the left of the parameter label is used to indicate when the parameter has
been selected.
For parameters requiring the input of a numerical value, use the UP and DOWN keys to increment or
decrement the value. Press and hold either key to auto-increment at a gradually increasing rate. When
the desired value has been reached, press ENTER to save the change and revert back to the sub-menu
item, or press ESCAPE to revert back to the sub-menu item without saving. Press ESCAPE to revert one
step back in the menu hierarchy until back into normal operating mode.
Refer to the following sections for details about setting up particular functions and parameters.
5 OPERATING MODES
Caution!
In any operating mode, if the capacity of the instrument has been exceeded by more than 110%,
the display will show “OVER” to indicate an overload. A continuous audible tone will be sounded
until the MENU key has been pressed or the load has been reduced to a safe level.
Five operating modes are possible with DFG55 gauges. To cycle between the modes, press MODE while
in the home screen.
5.1 Real time (RT)
The primary reading corresponds to the live measured reading.
5.2 Peak Compression (PC)
The primary reading corresponds to the peak compression reading observed. If the actual force
decreases from the peak value, the peak will still be retained in the primary reading area of the display.
Pressing ZERO will reset the value.
5.3 Peak Tension (PT)
Same as Peak Compression, but for tension readings.
5.4 Average Mode (AVG)
Average mode is used to obtain an average force reading over a specified period of time. Applications
include measurement of peel force, muscle strength, frictional force, and other tests requiring timeaveraged readings.
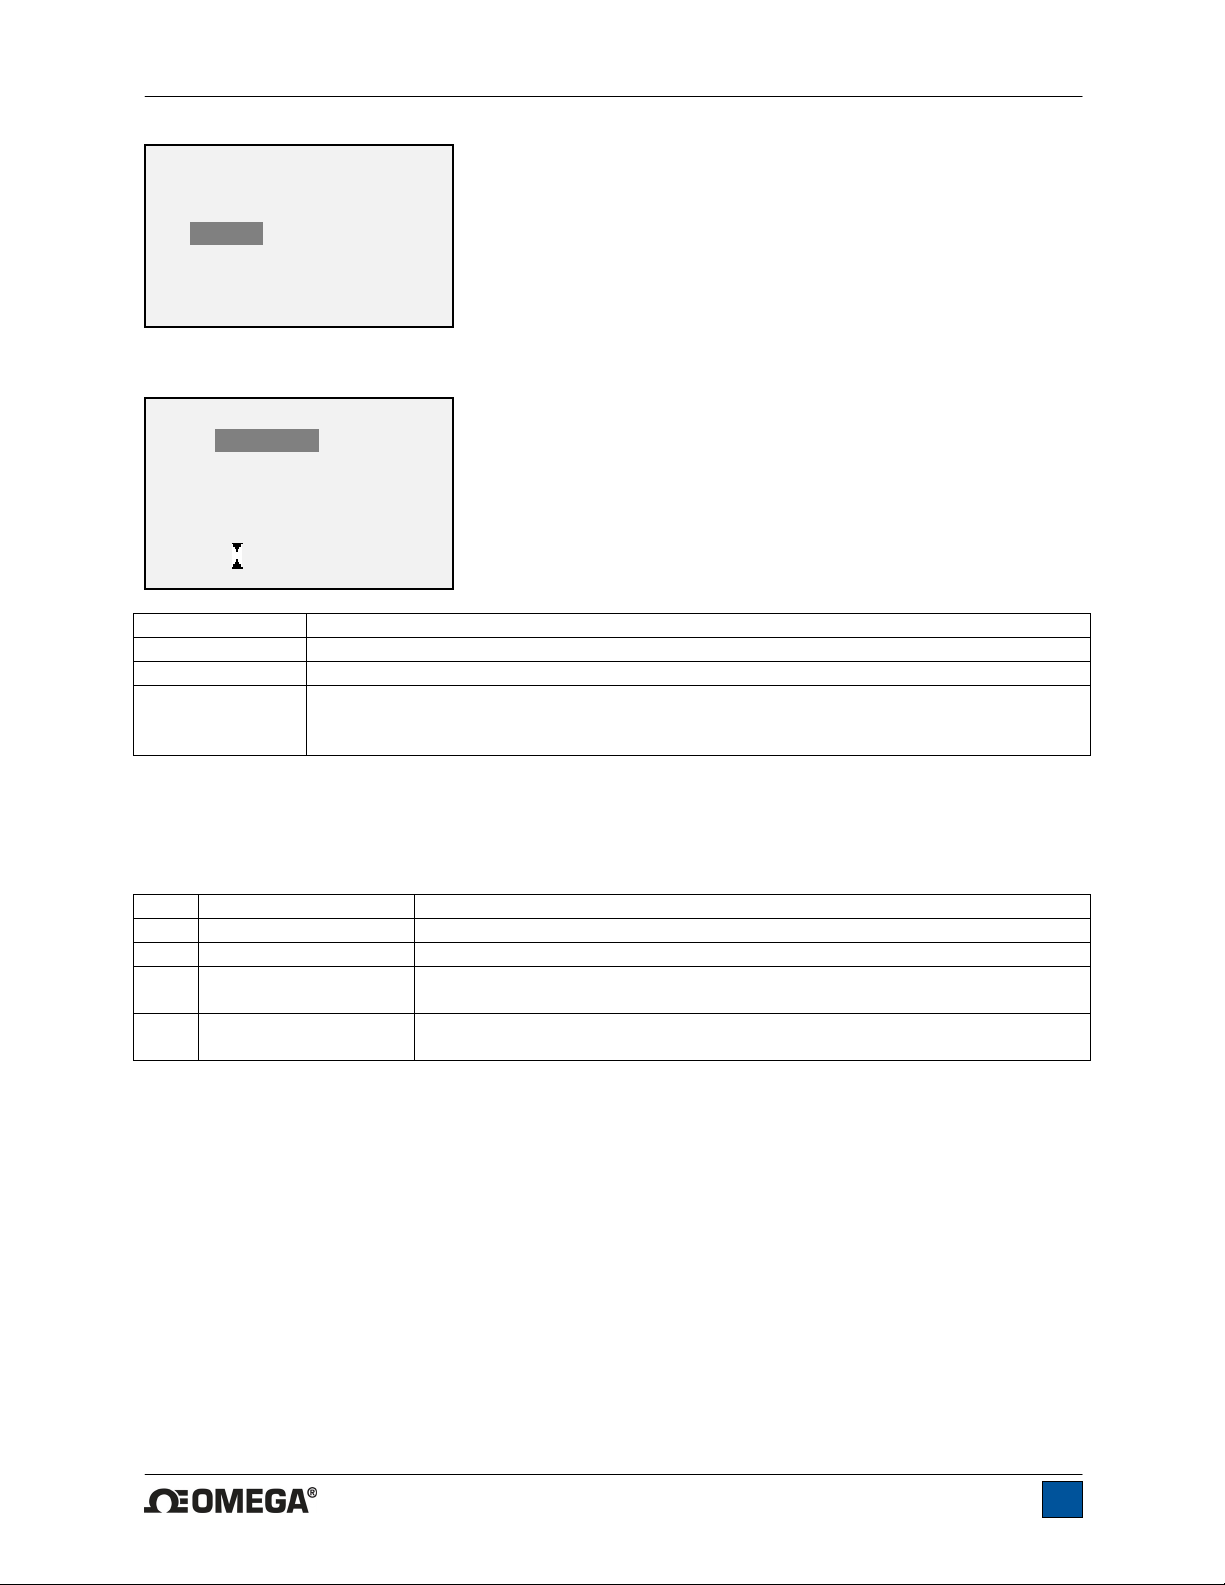
Before the parameters of Average Mode can be configured, it must be enabled. To do so, select Average
Mode from the menu, scroll to Enable and press ENTER. The display appears as follows:
9
Page 11
DFG55 Digital Force Gauges User’s Guide
AVERAGE MODE
Disabled
* Enabled
+ Settings
Then, scroll to Settings, and press ENTER to configure the parameters. The parameters are as follows:
AVERAGE MODE SETTINGS
Initial Delay
0.0
Averaging Time
5.5
Trigger Force
1.200
Parameter Description
Initial Delay The time delay, in seconds, before the averaging sequence commences.
Averaging Time The time duration, in seconds, of the averaging sequence.
Trigger Force
The minimum force required to start the averaging sequence. Toggle between
compression and tension directions by pressing the DIRECTION key. Initial delay
follows the trigger force.
After the parameters have been configured and the menu has been exited, press MODE until AVG is
displayed. Then press ZERO. Average mode is now armed, and the averaging sequence will commence
when the trigger force has occurred. The current status of the average sequence is displayed below the
primary reading, as follows:
Step Status Abbreviation Description
1 TRIG WAIT The trigger force has not yet occurred.
2 INIT DLY The initial delay is currently taking place.
3 AVERAGING The gauge is collecting readings. The status will be flashing until
averaging has been completed.
4 AVRG DONE Averaging has been completed. The average force is displayed in the
primary reading.
At the completion of the averaging sequence, the peak values are retained until ZERO is pressed.
Another averaging sequence may be started after ZERO has been pressed. To exit Average mode, press
MODE and select the desired measuring mode.
5.5 External Trigger (ET)
This mode of operation is useful for measuring electrical contact activation force as well as
synchronization of multiple instruments for a “snapshot” view of applied forces. It is possible to capture
the reading with a normally open contact (high to low transition of the trigger signal) or a normally closed
contact (low to high transition).
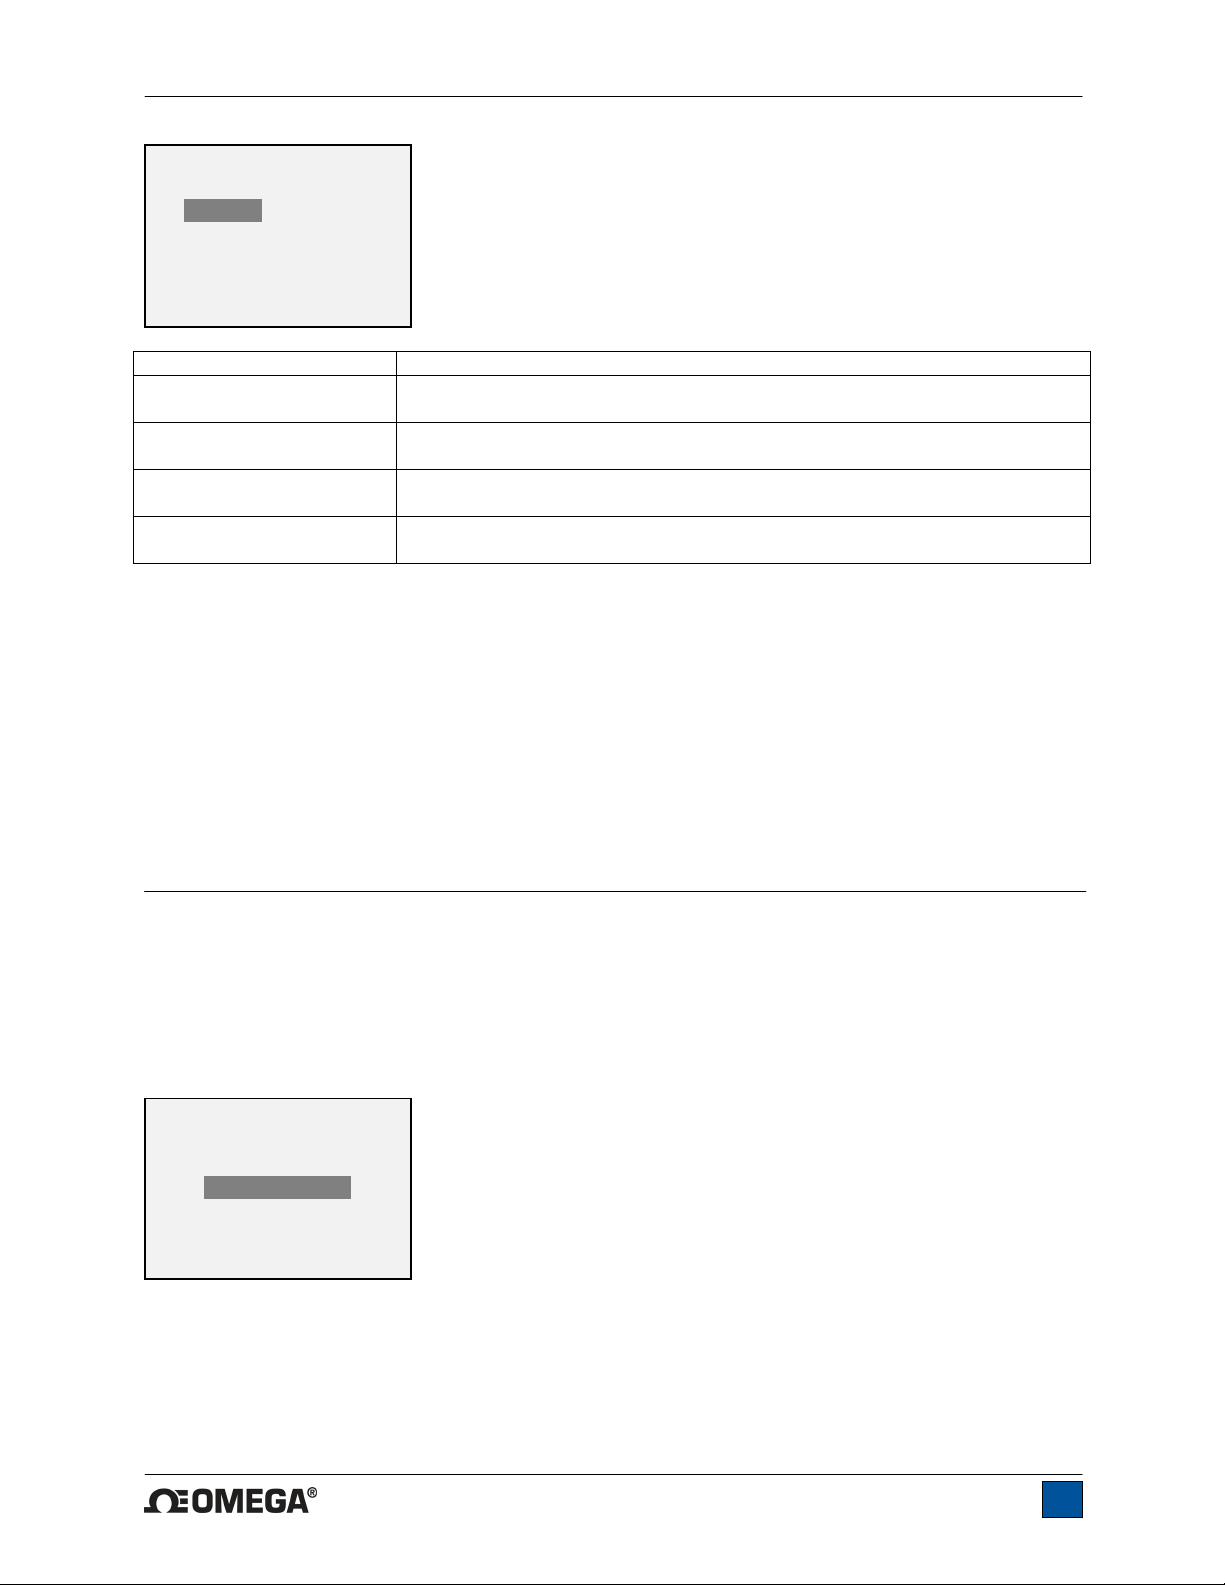
Before the parameters of External Trigger Mode can be configured, it must be enabled. To do so, enter
the main menu, select External Trigger, scroll to one of the four available options and press ENTER.
The options are as follows:
10
Page 12
DFG55 Digital Force Gauges User’s Guide
EXTERNAL TRIGGER
* Disabled
Momentary Hi->Lo
Momentary Lo->Hi
Maintained High
Maintained Low
Option Description
Momentary High Low The display will freeze the captured reading until ZERO is pressed. Applies
Momentary Low High The display will freeze the captured reading until ZERO is pressed. Applies
Maintained High The display will show the captured reading only for as long as a high signal
Maintained Low The display will show the captured reading only for as long as a low signal
After the selection has been made and the menu has been exited, press MODE until ET is displayed.
External Trigger mode is now armed. Refer to the pin diagram in the Communications section for
connection information.
To exit External Trigger mode, press MODE and select the desired measuring mode.
Note: As long as external trigger has been enabled, it is still active even if the gauge is in Real Time
mode. After the display freezes, any programmed set points will be active. However, if the gauge is in
External Trigger mode, any programmed set points will be inactive.
to a high to low transition of the trigger signal.
to a low to high transition of the trigger signal.
is maintained.
is maintained.
6 DIGITAL FILTERS
Digital filters are provided to help smooth out the readings in situations where there is mechanical
interference in the work area or test sample. These filters utilize the moving average technique in which
consecutive readings are pushed through a buffer and the displayed reading is the average of the buffer
contents. By varying the length of the buffer, a variable smoothing effect can be achieved. The selection
of 1 will disable the filter since the average of a single value is the value itself.
To access digital filter settings, select Filters from the menu. The display will appear as follows:
DIGITAL FILTERS
(1 = Fastest)
Current Reading
1
Displayed Reading
1
Two filters are available:
Current Reading – Applies to the peak capture rate of the instrument.
Displayed Reading – Applies to the primary reading on the display.
11
Page 13
DFG55 Digital Force Gauges User’s Guide
Available settings: 1,2,4,8,16,32,64,128,256,512,1024. It is recommended to keep the current reading
filter at its lowest value for best performance, and the displayed reading filter at its highest value for best
stability.
7 SET POINTS
7.1 General Information
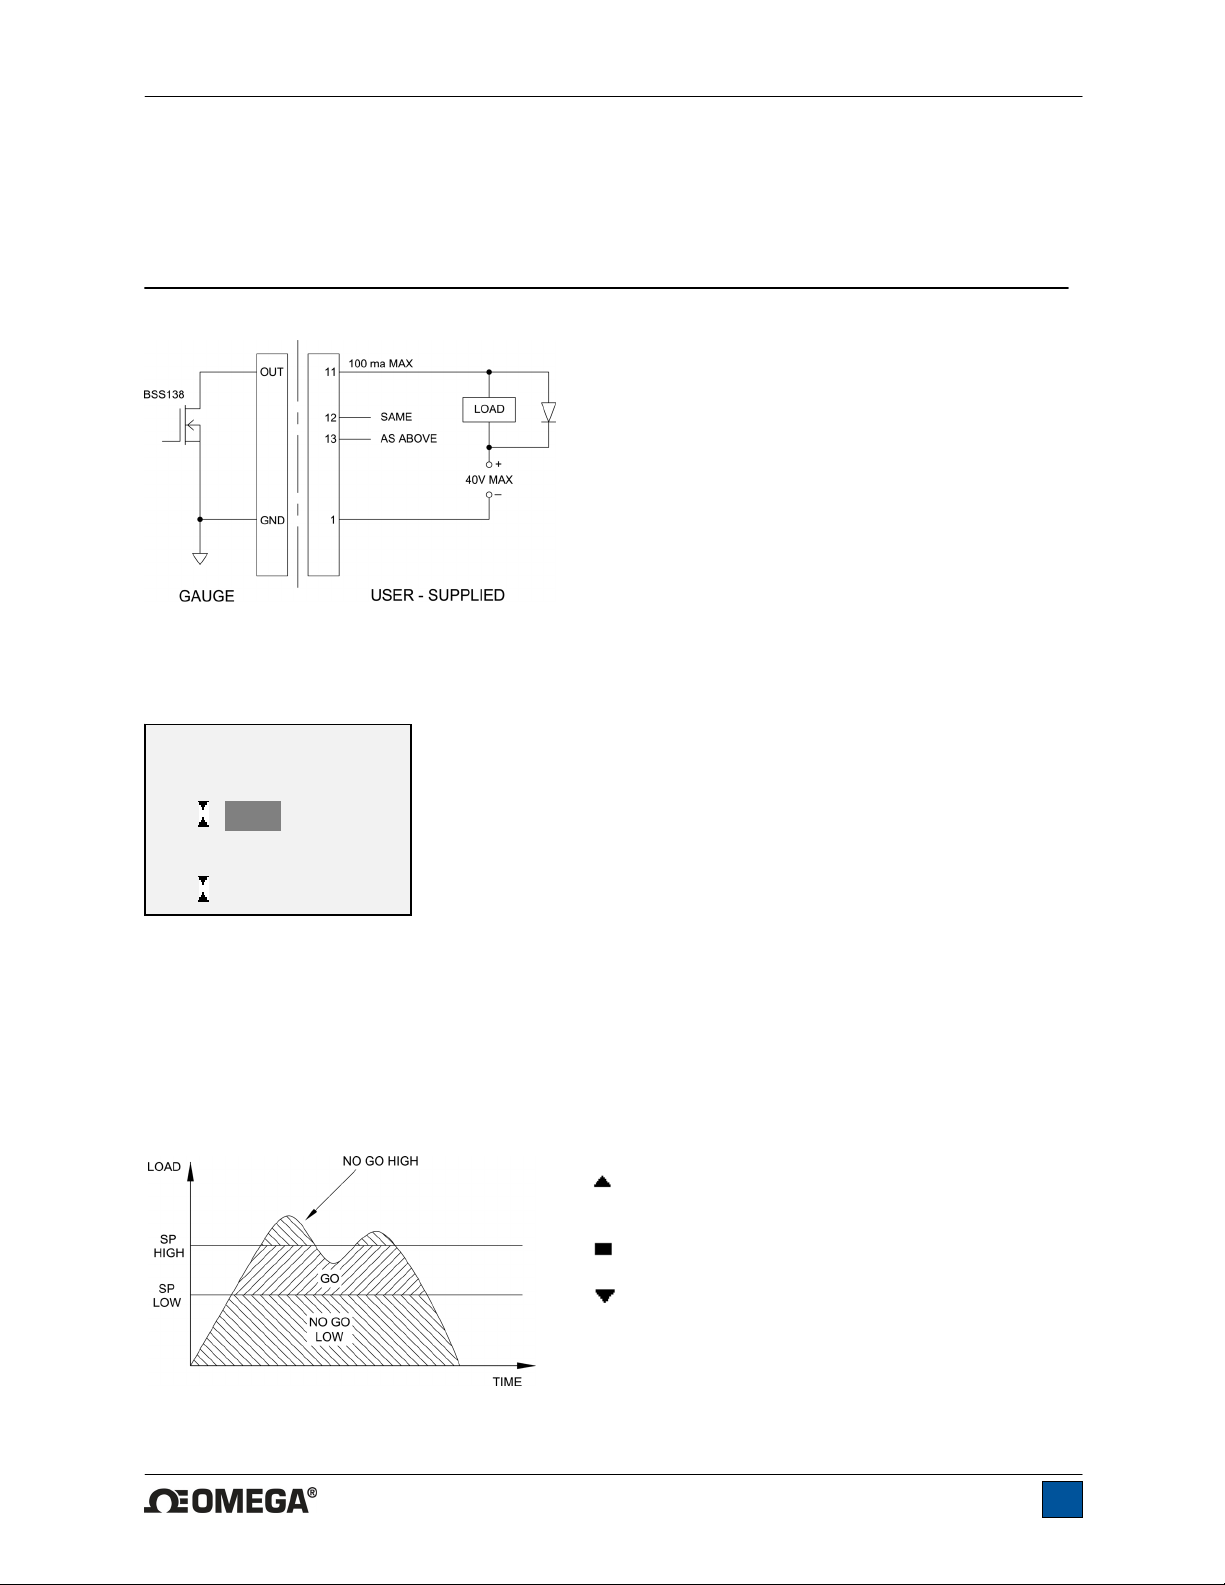
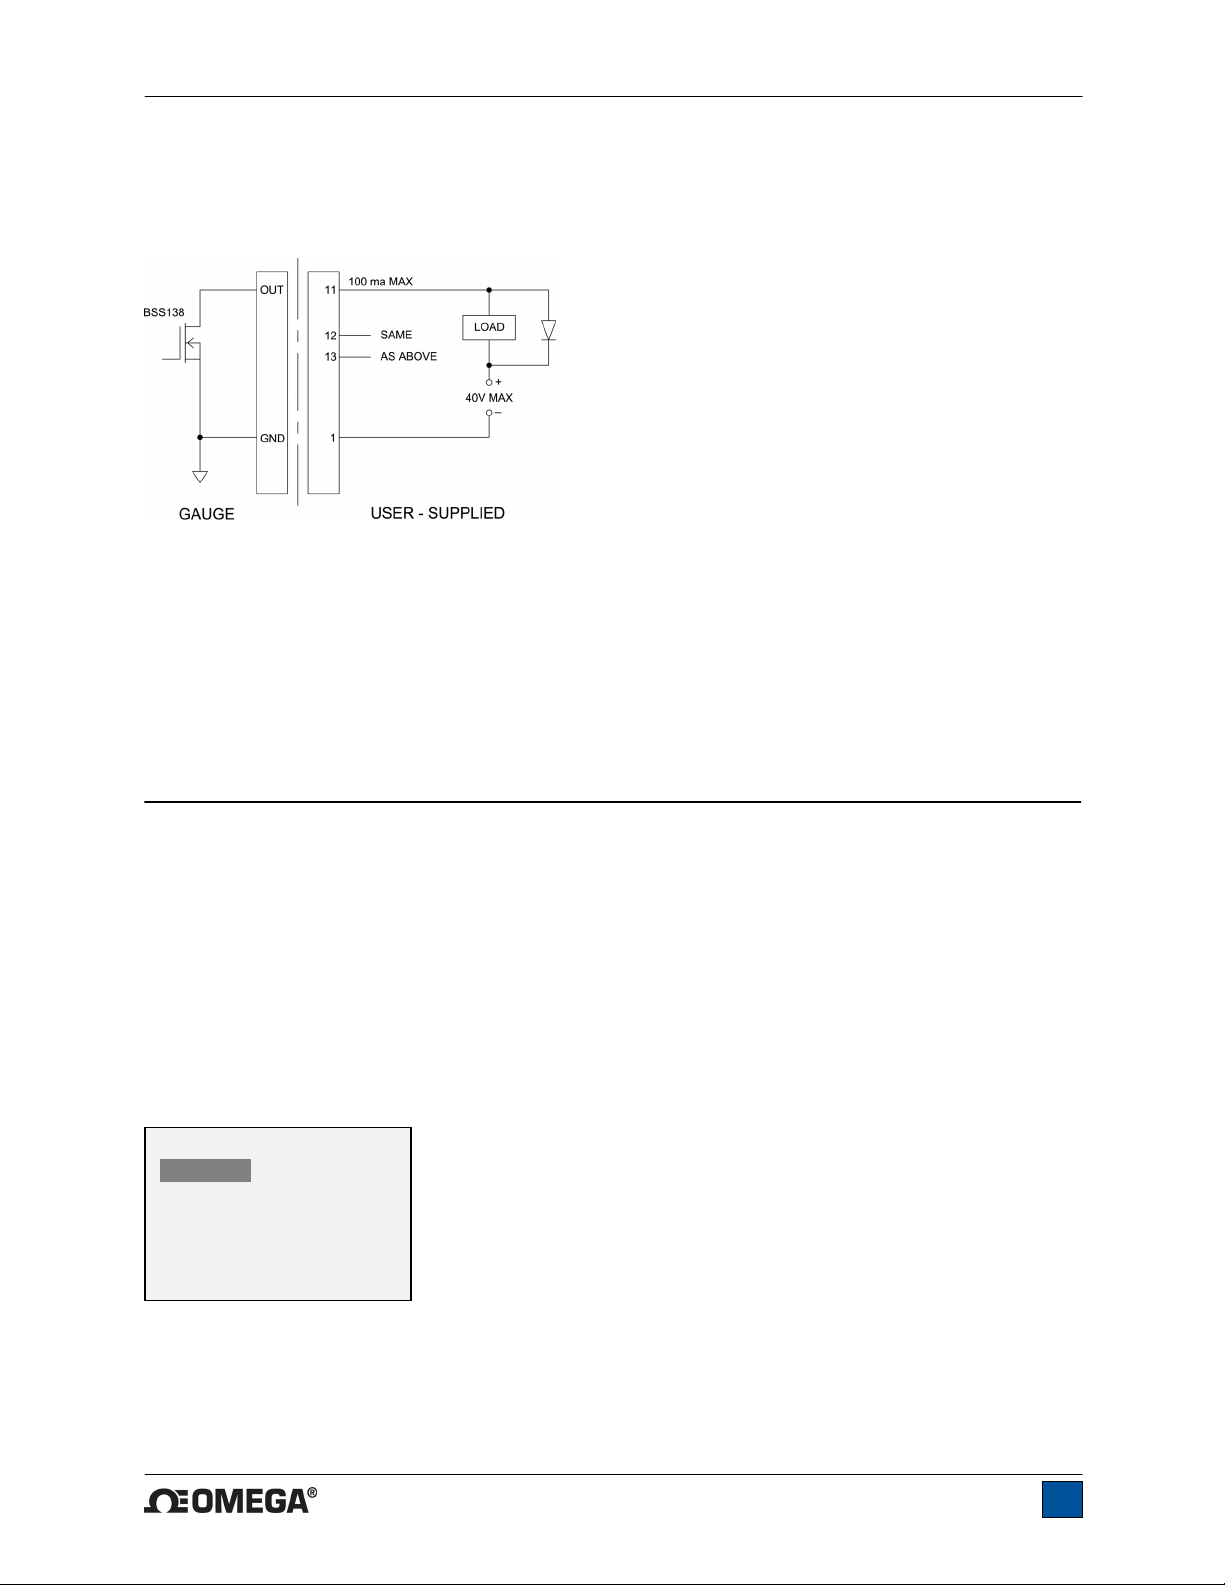
Set points are useful for tolerance checking (pass/fail),
triggering an external device such as a motorized test
stand, or alarm indication in process control applications.
Two limits, high and low, are specified and stored in the
non-volatile memory of the instrument and the primary
reading is compared to these limits. The results of the
comparisons are indicated through the three outputs
provided on the 15-pin connector, thus providing “under”,
“in range”, and “over” signaling. These outputs can be
connected to indicators, buzzers, or relays as required
for the application.
7.2 Configuration
To configure set points, select Set Points from the menu. The screen will appear as follows:
SET POINTS
Upper Disabled
* Upper Enabled
5.000
Lower Disabled
* Lower Enabled
3.500
Either one, two, or none of the set points may be enabled. To toggle between the tension and
compression directions, press the DIRECTION key.
If two set points have been enabled, they are displayed in the upper left corner of the display. If only one
set point has been enabled, the word “OFF” will appear in place of the value. If no set points have been
enabled, the upper left corner of the display will be blank.
When set points are enabled, the following indicators are shown to the left of the primary reading:
Set point indicators and outputs reference the displayed reading, not necessarily the current live load.
– the displayed value is greater than the upper
force limit (NO GO HIGH)
– the displayed value is between the limits (GO)
– the displayed value is less than the lower force
limit (NO GO LOW)
12
Page 14
DFG55 Digital Force Gauges User’s Guide
Interactions with External Trigger Mode
Even if set points have been enabled, they are inactive when the gauge is in External Trigger
mode.
7.3 Set Point Outputs Schematic
7.4 Using Set Points to Control a Mark-10 ESM301 Motorized Test Stand
When using set points to stop/cycle crosshead motion on an ESM301 stand, the upper set point must
always be a value in the tension direction, and the lower set point must always be a value in the
compression direction. Both set points must be set, even if the intended application is to stop/cycle at
only one of the set points. The opposite set point should be a value sufficiently large that it does not get
triggered during the course of the test.
For certain other test stands, the tension and compression directions are reversed.
8 DATA MEMORY AND STATISTICS
DFG55 gauges have storage capacity of 1,000 data points. Readings may be stored, viewed, and output
to an external device. Individual, or all, data points may be deleted. Statistics are calculated for the data
presently in memory.
To enable memory storage, select DATA Key from the menu, then scroll to Memory Storage and press
ENTER. Then exit the menu. In the home screen, the data record number 0000 will appear below the
primary reading. Press DATA at any time to save the displayed reading. The record number will
increment each time DATA is pressed. If DATA is pressed when memory is full the message “MEMORY
FULL” will be flashed at the bottom of the display and a double audio tone will be sounded.
To view, edit, and output stored readings and statistics, select Memory from the menu. The screen
appears as follows:
MEMORY
View Data
View Statistics
Output Data
Output Statistics
Output Data & Stats
Clear All Data
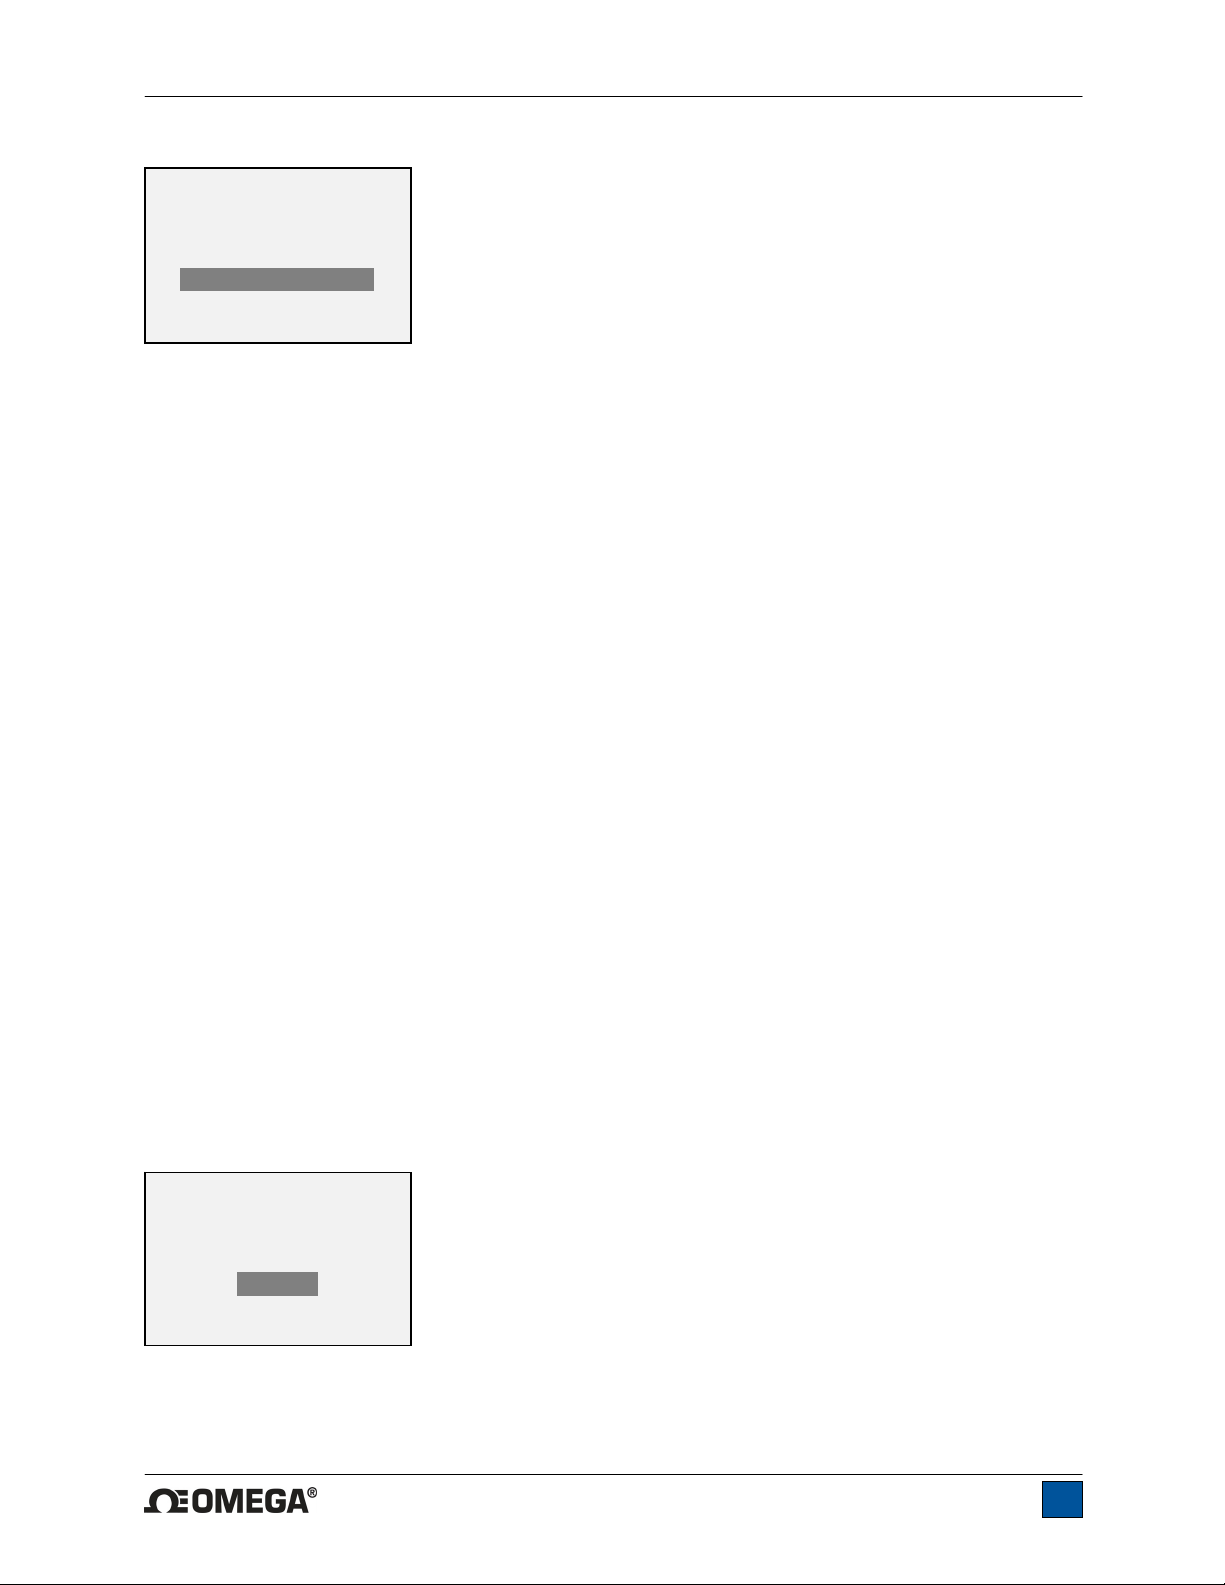
8.1 View Data
All the saved data points may be viewed. The record number is displayed, along with the corresponding
value and presently set unit of measurement. Any readings may be deleted individually. To do so, scroll
to the desired reading and press DELETE. The letter “D” will appear to the left of the record number,
indicating that the gauge is in Delete mode, as follows:
13
Page 15
DFG55 Digital Force Gauges User’s Guide
0001 2.458 lbF
0002 2.224 lbF
0003 2.446 lbF
0004 1.890 lbF
D 0005 2.098 lbF
0006 1.998 lbF
0007 2.042 lbF
Press ENTER to delete the value. To exit Delete mode, press DELETE again. Any number of readings
may be individually deleted, however, all readings may also be cleared simultaneously. Refer to the Clear
All Data section for details.
8.2 Statistics
Statistical calculations are performed for the saved values. Calculations include number of readings,
minimum, maximum, mean, and standard deviation.
8.3 Output Data
Press ENTER to output data to an external device. The display will show, “SENDING DATA…”, then
“DATA SENT”. If there was a problem with communication, the display will show, “DATA NOT SENT”.
Saved data can be downloaded by some Omega data collection programs. Refer to their respective
user’s guides for details.
8.4 Output Statistics
Press ENTER to output statistics to an external device. The display will show, “SENDING STATS…”, then
“STATS SENT”. If there was a problem with communication, the display will show, “STATS NOT SENT”.
8.5 Output Data & Stats
Press ENTER to output data and statistics to an external device. The display will show, “SENDING
DATA”, then “SENDING STATS…”, then “DATA SENT”, then “STATS SENT”. If there was a problem with
communication, the display will show, “DATA NOT SENT” and/or “STATS NOT SENT”.
8.6 Clear All Data
Press ENTER to clear all data from the memory. A prompt will be shown, “CLEAR ALL DATA?”. Select
Yes to clear all the data, or No to return to the sub-menu.
For output of data and/or statistics, RS-232 or USB output must be enabled. Data formatting is
<CR><LF> following each value. Units can be either included or excluded. Output of data via the Mitutoyo
output is possible, however, output of statistics is not. Refer to the Communications section for details.
Note: Data is not retained while the gauge is powered off. However, the gauge protects against
accidental or automatic power-off. If manually powering the instrument off, or if the inactivity time limit for
the Automatic Shutoff function has been reached, the following warning message will appear:
*** WARNING ***
DATA IN MEMORY
WILL BE LOST
CANCEL
POWER OFF
If no option is selected, this screen will be displayed indefinitely, or until battery power has been depleted.
14
Page 16
DFG55 Digital Force Gauges User’s Guide
9 COMMUNICATIONS
Communication with DFG55 force gauges is achieved through the micro USB or 15-pin serial ports
located at the bottom of the instrument, as shown in the illustration in the Power section. Communication
is possible only when the gauge is in the main operating screen (i.e. not in a menu or configuration area).
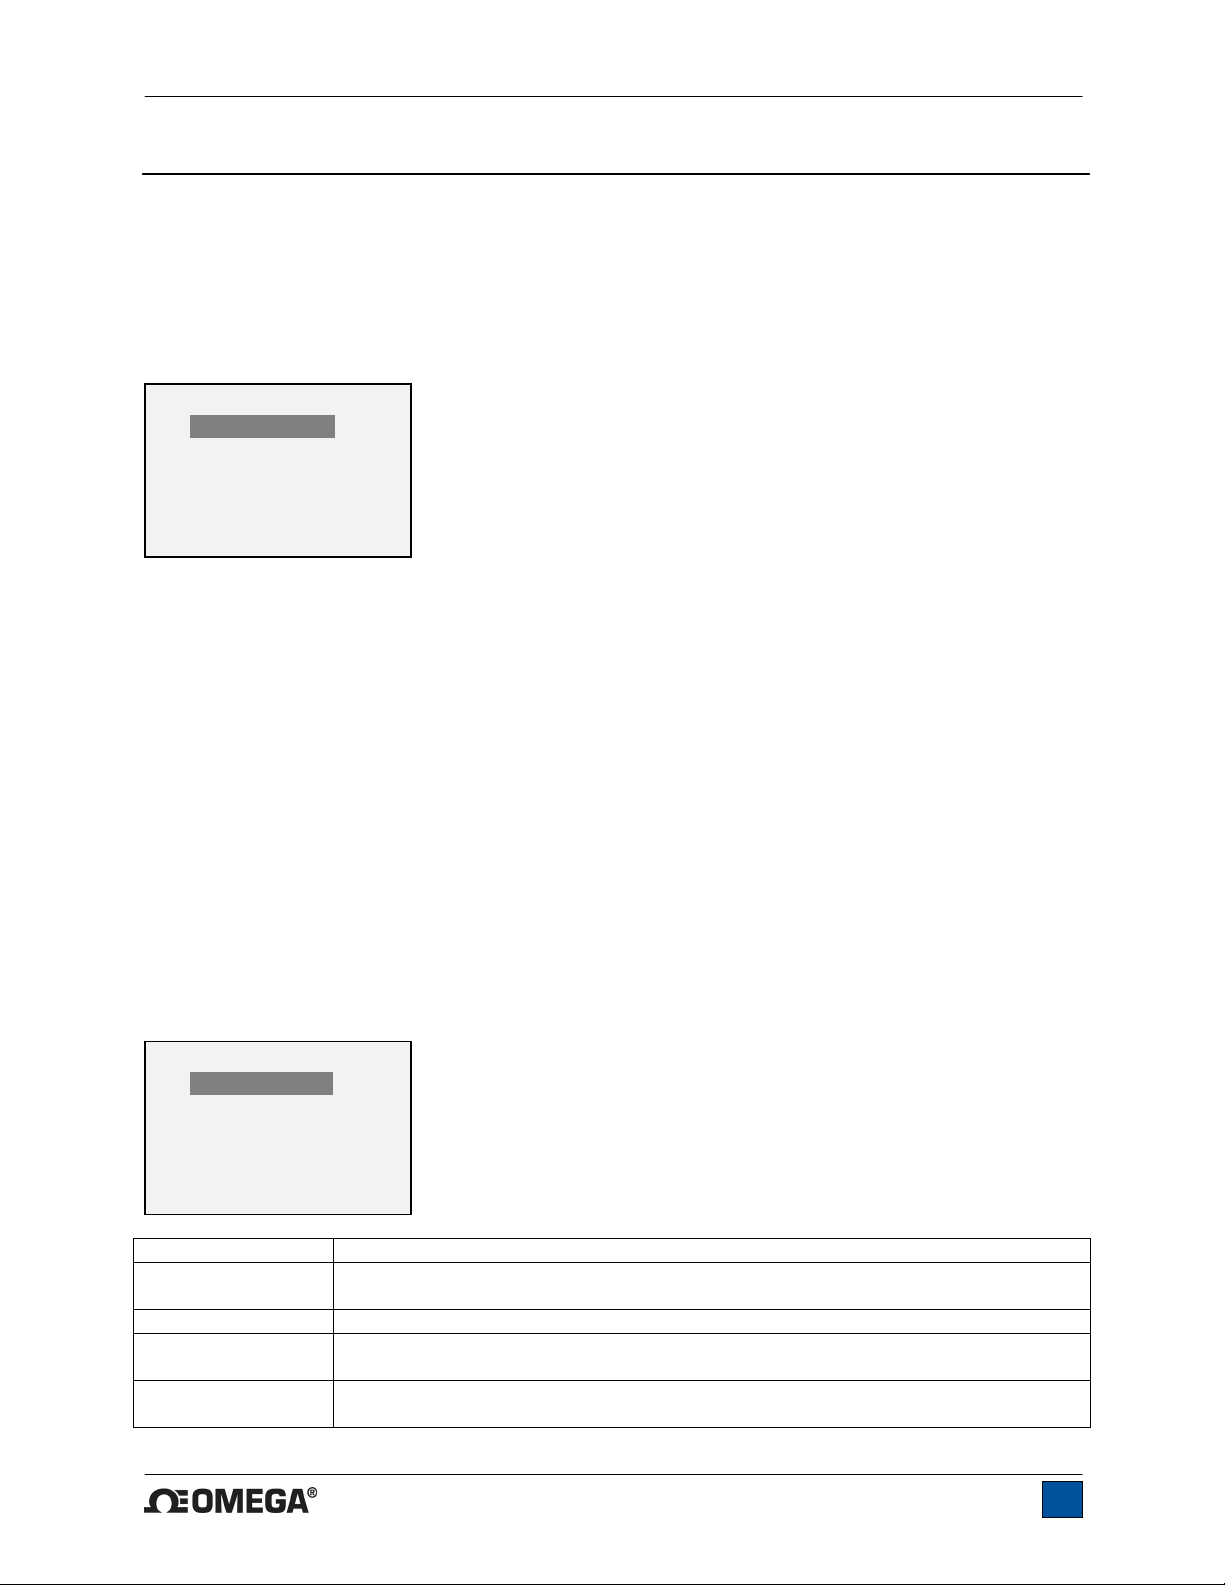
9.1 Serial / USB
To set up RS-232 and USB communication, select Serial/USB Settings from the menu. The screen
appears as follows:
SERIAL/USB SETTINGS
* RS232 Selected
USB Selected
+ Baud Rate
+ Data Format
+ Auto Output
Select either RS-232 or USB input (output is always simultaneous through both the USB and RS-232
ports). RS-232 must be selected when communicating through a Mark-10 test stand controller. When
communicating from the gauge directly to a PC or data collector, either RS-232 or USB can be selected
as required. Press DATA to transmit individual data points or to commence an automatic output
sequence (see Automatic Output sub-section for details). Single point or continuous data may also be
requested via ASCII commands from an external device (see Command Set sub-section for details).
Communication settings are permanently set to the following:
Data Bits: 8
Stop Bits: 1
Parity: None
Other settings are configured as follows:
9.1.1 Baud Rate
Select the baud rate as required for the application. It must be set to the same value as the receiving
device. When communicating with a Mark-10 test stand controller, the baud rate must be set to 9,600.
9.1.2 Data Format
Select the desired data format. The screen appears as follows:
DATA FORMAT
* Numeric + Units
Numeric Only
Invert Polarity
Omit Polarity
Selection Description
Numeric + Units Output format includes the value and unit of measure. Compression values have
positive polarity, tension values have negative polarity.
Numeric Only Output format includes the value only. Polarity same as above.
Invert Polarity Compression values have negative polarity, tension values have positive polarity.
May be selected in addition to the Numeric + Units / Numeric Only selection.
Omit Polarity Both directions are formatted with positive polarity. May be selected in addition to
the Numeric + Units / Numeric Only selection.
15
Page 17
DFG55 Digital Force Gauges User’s Guide
9.1.3 Automatic Output
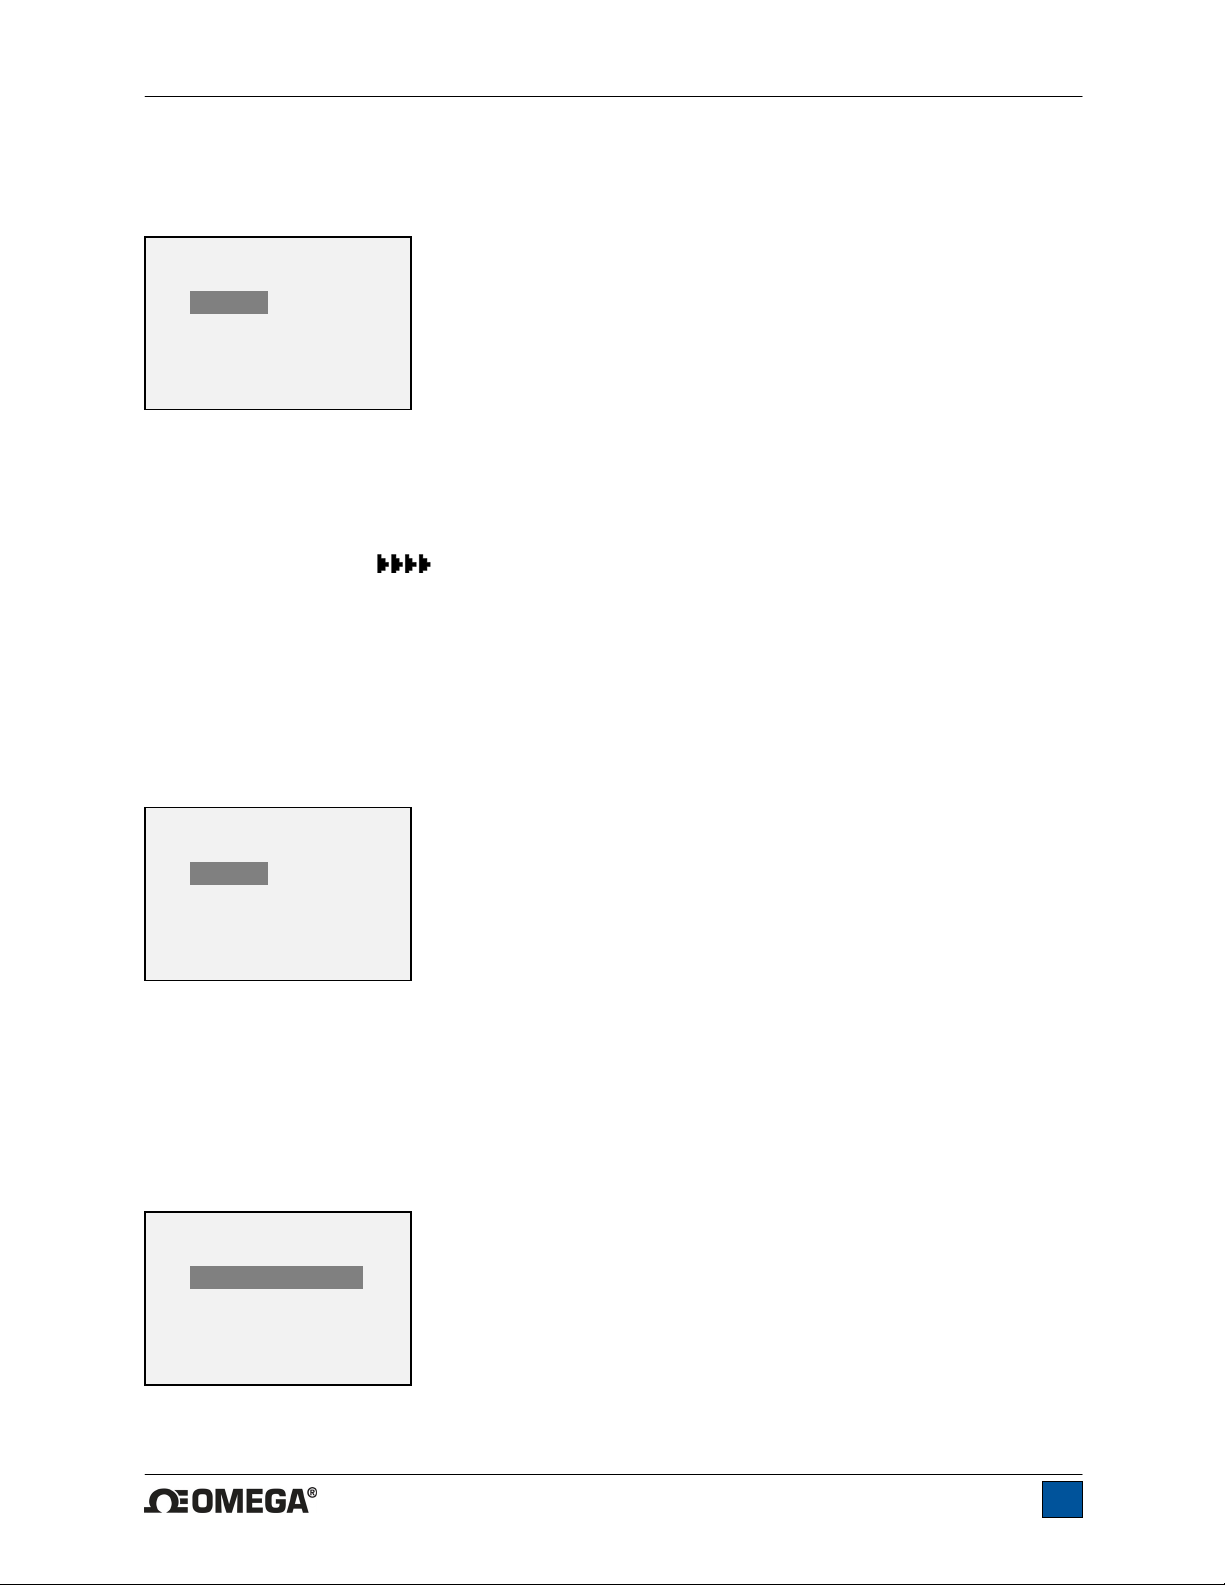
The gauge has the ability to output data continuously via RS-232 or USB. To enable automatic output,
select Auto Output from the Serial/USB Settings sub-menu. The screen appears as follows:
AUTO OUTPUT
* Disabled
Enabled
Outputs per Sec.
10
Select Enabled to activate automatic output. The number of outputs per second can be set to 1, 2, 5, 10,
25, 50, 125, or 250. The capabilities of the receiving device should be considered when selecting the data
output rate.
After the settings have been saved, revert to the home screen. An icon will appear in the lower left corner
of the display, as follows:
This indicates that automatic data output has been armed. Automatic
output of data may be initiated by pressing DATA or by sending the appropriate ASCII command from an
external device (see Command Set sub-section for details). The icon will become animated, signaling
that automatic output is occurring. Press DATA again to end the data transmission.
9.2 Mitutoyo BCD settings
This output is useful for connection to data collectors, printers, multiplexers, or any other device capable
of accepting Mitutoyo BCD data. Individual data points may be transmitted by pressing DATA or by
requesting it from the Mitutoyo communication device (if available). To enable Mitutoyo output, select the
desired format – either with polarity or without polarity. The screen appears as follows:
MITUTOYO BCD
* Disabled
Ena w/o Polarity
Ena w/Polarity
9.3 Analog Output
This output can be used for chart recorders, oscilloscopes, data acquisition systems, or any other
compatible devices with analog inputs. The output produces ±1 volt at full scale of the instrument. The
polarity of the signal is positive for compression and negative for tension.
9.4 DATA Key Functions
The DATA key can be configured to perform several functions. To configure the DATA key, select DATA
Key from the menu. The display will appear as follows:
DATA KEY
* RS232/USB Output
Mitutoyo Output
Memory Storage
Three options are available. Any combination of the below functions may be selected:
16
Page 18
DFG55 Digital Force Gauges User’s Guide
Selection Function when pressing DATA
RS232/USB Output
Mitutoyo Output
Memory Storage
Outputs data via the serial and USB ports
Outputs data via Mitutoyo (Digimatic) through the serial port
Stores a reading to memory (refer to the Memory section for details)
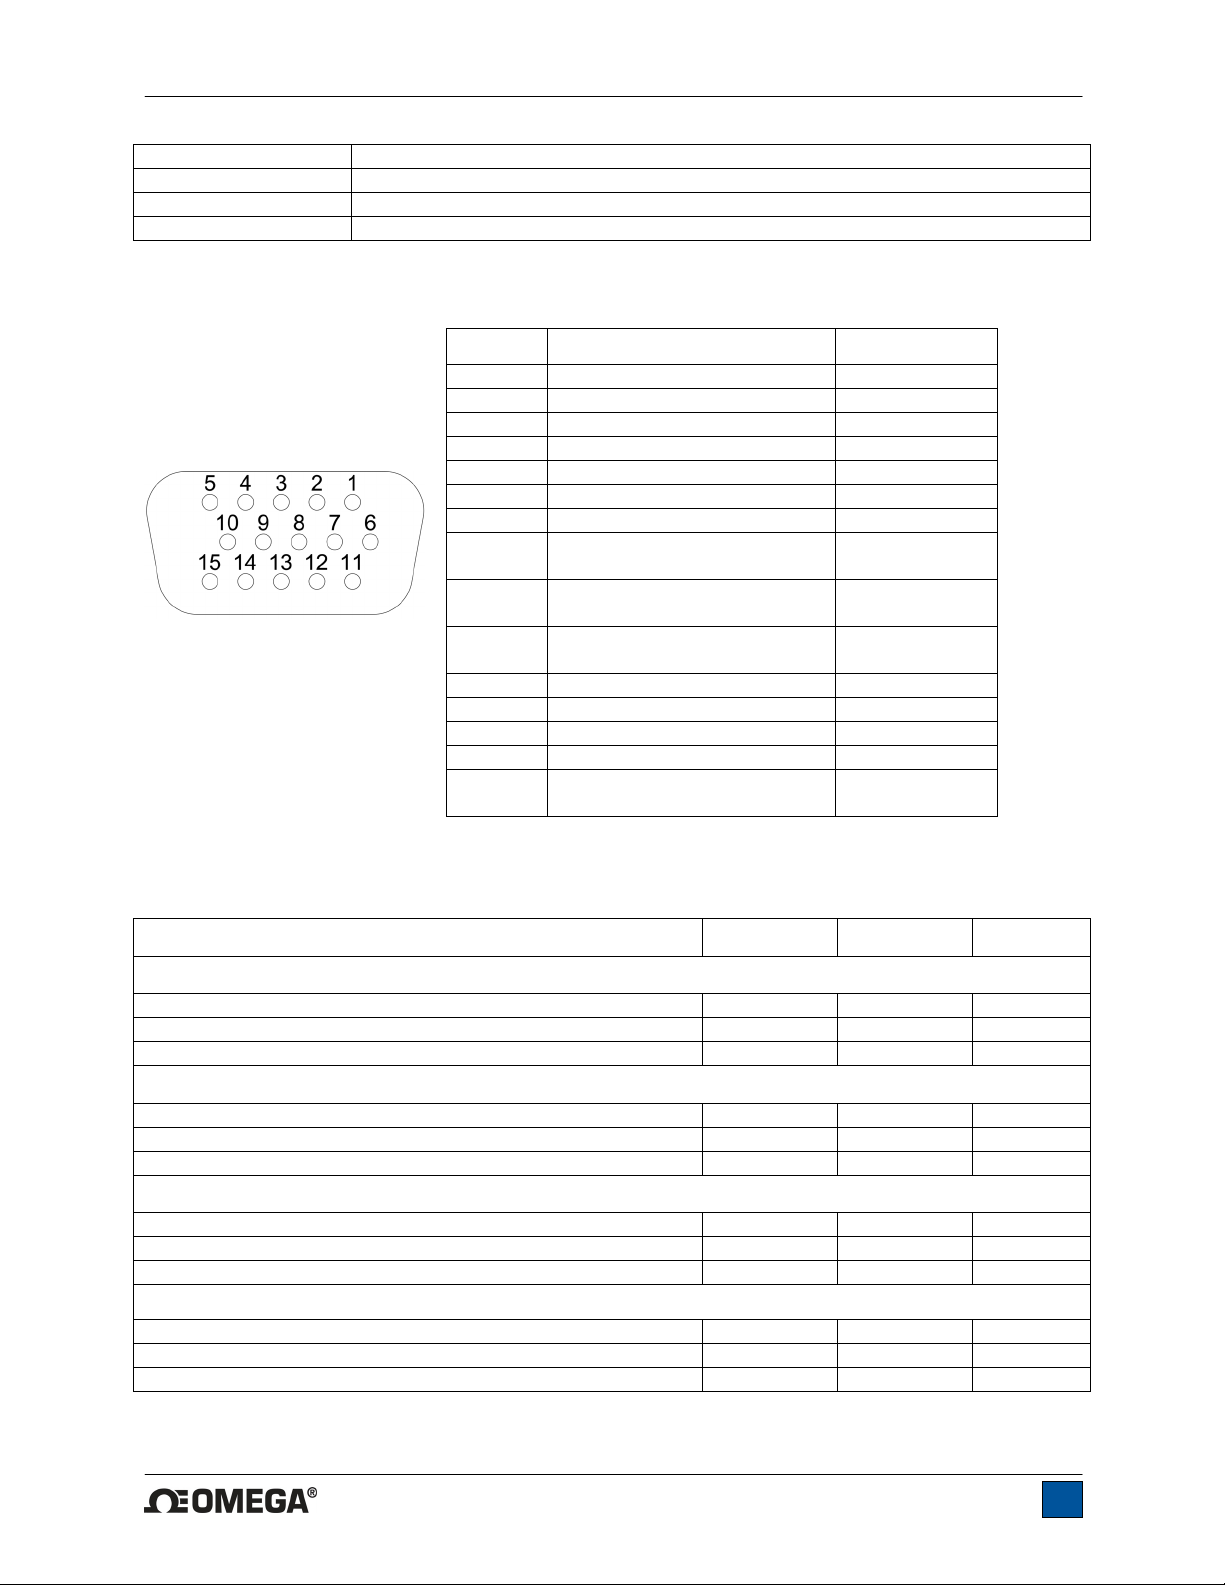
9.5 I/O Connector Pin Diagram (DB-9HD-15 female)
Pin No. Description Input / Output
1 Signal Ground --2 Tension Overload Output
3 RS-232 Receive Input
4 RS-232 Transmit Output
5 +12V DC Output
6 Analog Output Output
7 Compression Overload Output
8 Mitutoyo Clock
Output
Output Bit 2
9 Mitutoyo Data
10 Mitutoyo Request
11 * Set Point Pin 1 * Output *
12 * Set Point Pin 2 * Output *
13 * Set Point Pin 3 * Output *
14 External Trigger Input
15 Mitutoyo Ready
Output Bit 0
Input Bit 3
Output Bit 1
Output
Input
Output
* The output assignments depend on several factors described in the table below. Output functions
always reference the primary reading on the display, regardless of the current mode.
Force Pin 11 Pin 12 Pin 13
Upper and Lower Set Points are Compression
Greater than or equal to upper set point On Off Off
Between upper and lower set points Off Off On
Less than or equal to lower set point Off On Off
Upper and Lower Set Points are Tension
Greater than or equal to upper set point Off On Off
Between upper and lower set points Off Off On
Less than or equal to lower set point On Off Off
Upper Set Point is Compression, Lower Set Point is Tension
Greater than or equal to upper set point, in compression Off On Off
Between upper and lower set points Off Off On
Greater than or equal to lower set point, in tension On Off Off
Upper Set Point is Tension, Lower Set Point is Compression
Greater than or equal to upper set point, in tension Off On Off
Between upper and lower set points Off Off On
Greater than or equal to lower set point, in compression On Off Off
9.6 Command Set / Gauge Control Language 2 (GCL2)
17
Page 19
DFG55 Digital Force Gauges User’s Guide
DFG55 force gauges may be controlled by an external device through the RS-232 or USB channel. The
following is a list of supported commands and their explanations. All commands must be terminated with
a Carriage Return character or with a Carriage Return/Line Feed combination. The gauge responses are
always terminated with a Carriage Return/Line Feed.
Request Readings
? Request the displayed reading (dependant on operating mode)
?C Request the current (real time) reading
?PT Request the peak tension reading
?PC Request the peak compression reading
?ET Request the reading obtained during the External trigger mode
?A Request the average reading obtained during the Average mode
Units
LB Switch units to pound-force
OZ Switch units to ounce-force
KG Switch units to kilogram-force
G Switch units to gram-force
N Switch units to Newtons
MN Switch units to Milli-Newtons
KN Switch units to Kilo-Newtons
Basic Functions
CUR Current mode (real time mode) for primary reading
PT Peak Tension mode for primary reading
PC Peak Compression mode for primary reading
CLR Clear peaks
Z Zero display and perform the CLR function
Filters
FLTCn Digital filter for displayed readings
FLTPn Digital filter for current readings
n= 0-10, filter = 2
n
, ex: n=0= no filter, n=10=1024 samples averaged
Memory & Statistics
MEM Transmit all stored readings
STA Transmit statistics
Set Points
SPHD Disable high set point
SPLD Disable low set point
SPHn High set point. n=value (+ for compression, - for tension)
SPLn Low set point. n=value (+ for compression, - for tension)
Note: High set point value must be greater than low set point value if both values
are set to the same polarity.
USB/RS-232 Communication
FULL USB/RS-232 transmission with units
NUM USB/RS-232 transmission without units (only numeric values)
AOUTn Auto-transmit n times per second n=1,2,5,10,25,50,125,250. 0=disabled
Note: n = 1 = yields 50 times per second. This is provided for backward
compatibility with legacy gauges.
Mitutoyo Communication
MIT Enable Mitutoyo output
MITD Disable Mitutoyo output
18
Page 20
DFG55 Digital Force Gauges User’s Guide
POL Mitutoyo output with polarity (+ for compression, - for tension)
NPOL Mitutoyo output without polarity (absolute value)
PM Print/send data to a Mitutoyo-compatible device
Averaging
A Enable Average mode
AD Disable Average mode
AM Select Average mode (if enabled) for primary reading
ATn Average time. n=0.1-300.0 seconds
DELn Initial delay. n=0.1-300.0 seconds
TRFn Trigger force. n=value (+ for compression, - for tension)
External Trigger
ETH Enable high level-triggered External trigger mode
ETL Enable low level-triggered External trigger mode
ETHL Enable reading captured on a high to low transition
ETLH Enable reading captured on a low to high transition
ETD Disable External trigger mode
Input / Output Bits
Sn Set output bit (open drain, pull to ground). n=0,1,2
Cn Clear output bit. n=0,1,2
Rn Read current status of output bit or level of input pin. n=0,1,2,3
Personality
RN Read product name
RM Read model number
RV Read firmware version number
RS Read serial number
Other Commands
AOFFn Auto-shutoff. n=0-30 minutes. 0=auto shutoff disabled
SAVE Save current settings in nonvolatile memory
LIST List current settings and status
Following is an example LIST output: V1.00;LBF;CUR;FLTC8;FLTP1;AOUT00;AOFF5;FULL;MIT;POL;B0
All fields are separated by “;”. The first field shows the firmware version, the last field shows the remaining
battery power (B0=full charge, B3=minimum power). All other fields show the status of settings and
features using the same abbreviations as the commands to set them.
Any detected errors are reported back by means of the following error codes:
*10 Illegal command
*11 Not applicable
*12 Invalid specifier
*22 Value too large
19
Page 21
DFG55 Digital Force Gauges User’s Guide
10 CALIBRATION
10.1 Initial Physical Setup
The gauge should be mounted vertically to a test stand or fixture rugged enough to withstand a load
equal to the full capacity of the instrument. Certified deadweights or master load cells should be used,
along with appropriate mounting brackets and fixtures. Caution should be taken while handling such
equipment.
10.2 Calibration Procedure
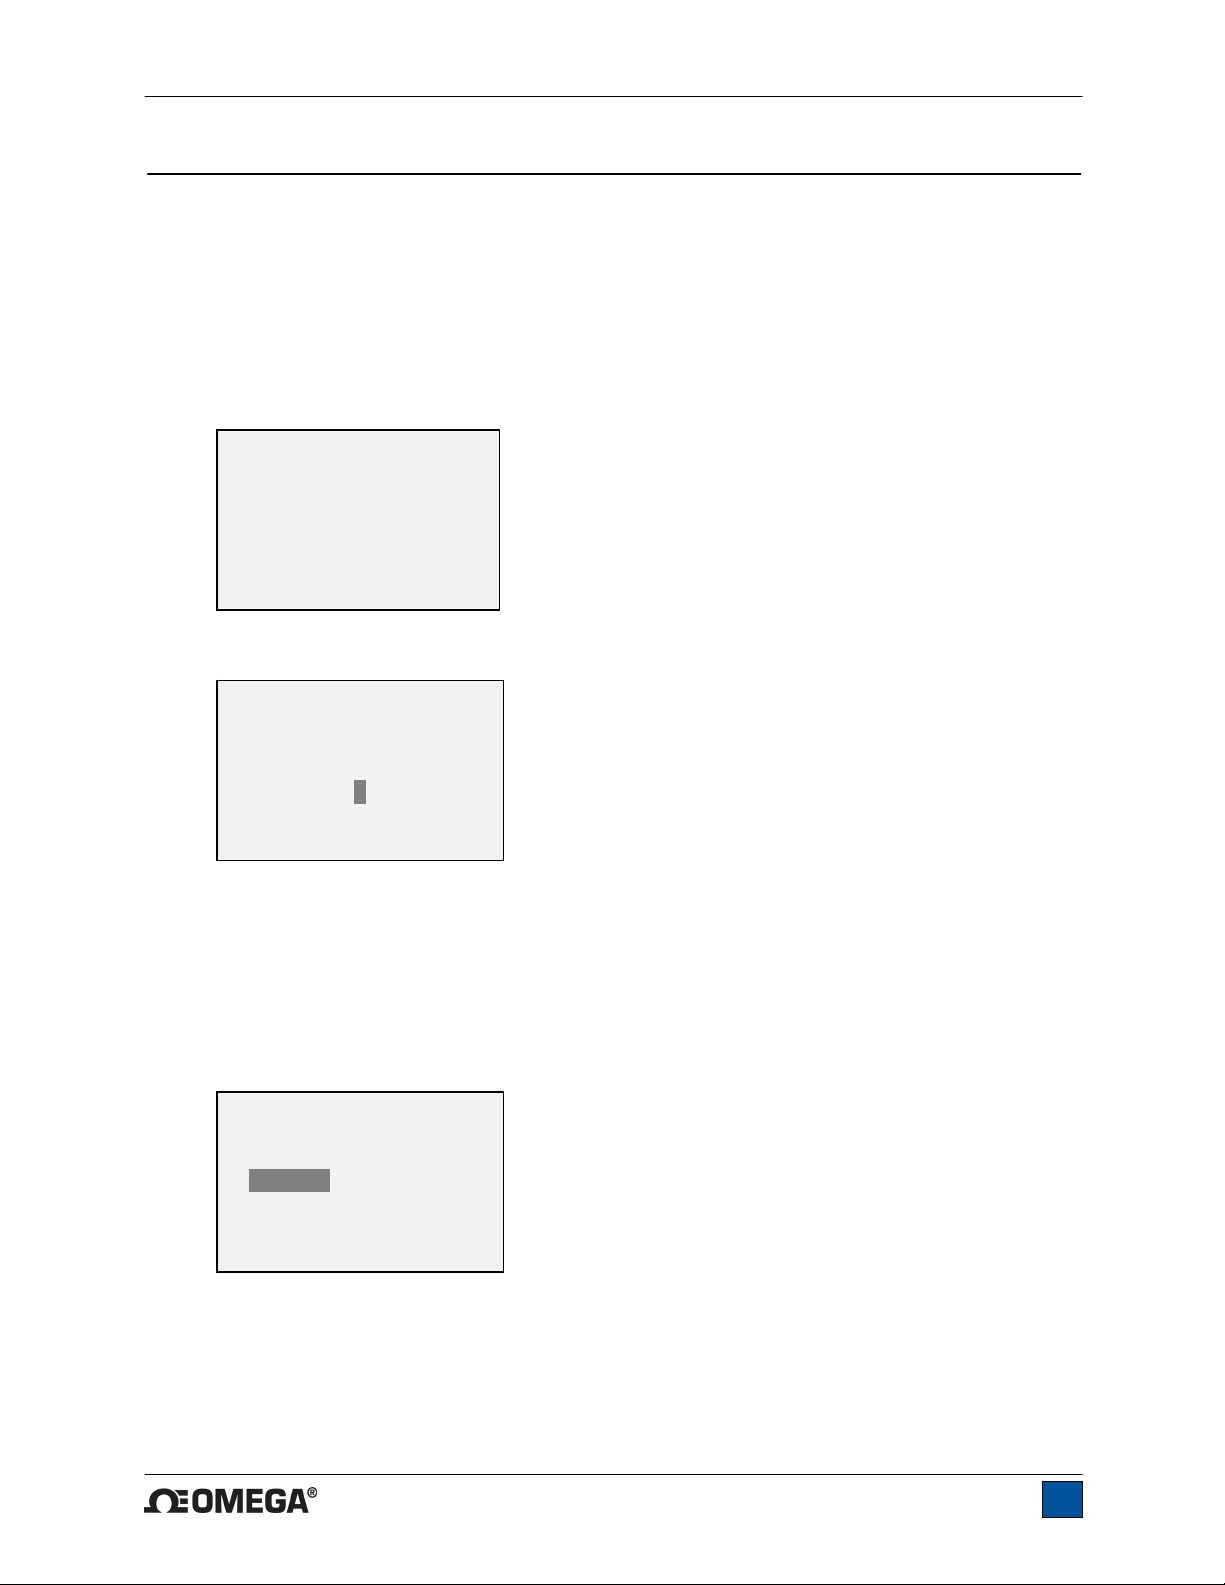
1. Select Calibration from the menu. The display will appear as follows:
CALIBRATION
To invert the
display, press the
DIRECTION button.
THEN PRESS ENTER
2. Press DIRECTION to invert the display, if desired. ENTER to continue. The display will appear as
follows:
CALIBRATION
ENTER # CAL POINTS
(1 TO 10)
COMPRESSION:
5
TENSION :
5
The gauge can be calibrated at up to 10 points in each direction. Enter the number of calibration
points for each direction (compression and tension). At least one point must be selected for each
direction.
Note: To achieve the accuracy specification of ±0.1%, it is recommended to calibrate the gauge
at 5 or more even increments in both the tension and compression directions. For example, a
gauge with capacity of 10 lbF should be calibrated at 2, 4, 6, 8, and 10 lb loads in each direction.
3. To escape the Calibration menu at any time, press ESCAPE. The display will appear as follows:
CALIBRATION
NOT COMPLETE
CANCEL
EXIT W/O SAVING
Selecting “CANCEL” will revert back to the Calibration setup. Selecting “EXIT W/O SAVING” will
return to the menu without saving changes.
4. After the number of calibration points has been entered, press ENTER. The display will appear as
follows:
20
Page 22
DFG55 Digital Force Gauges User’s Guide
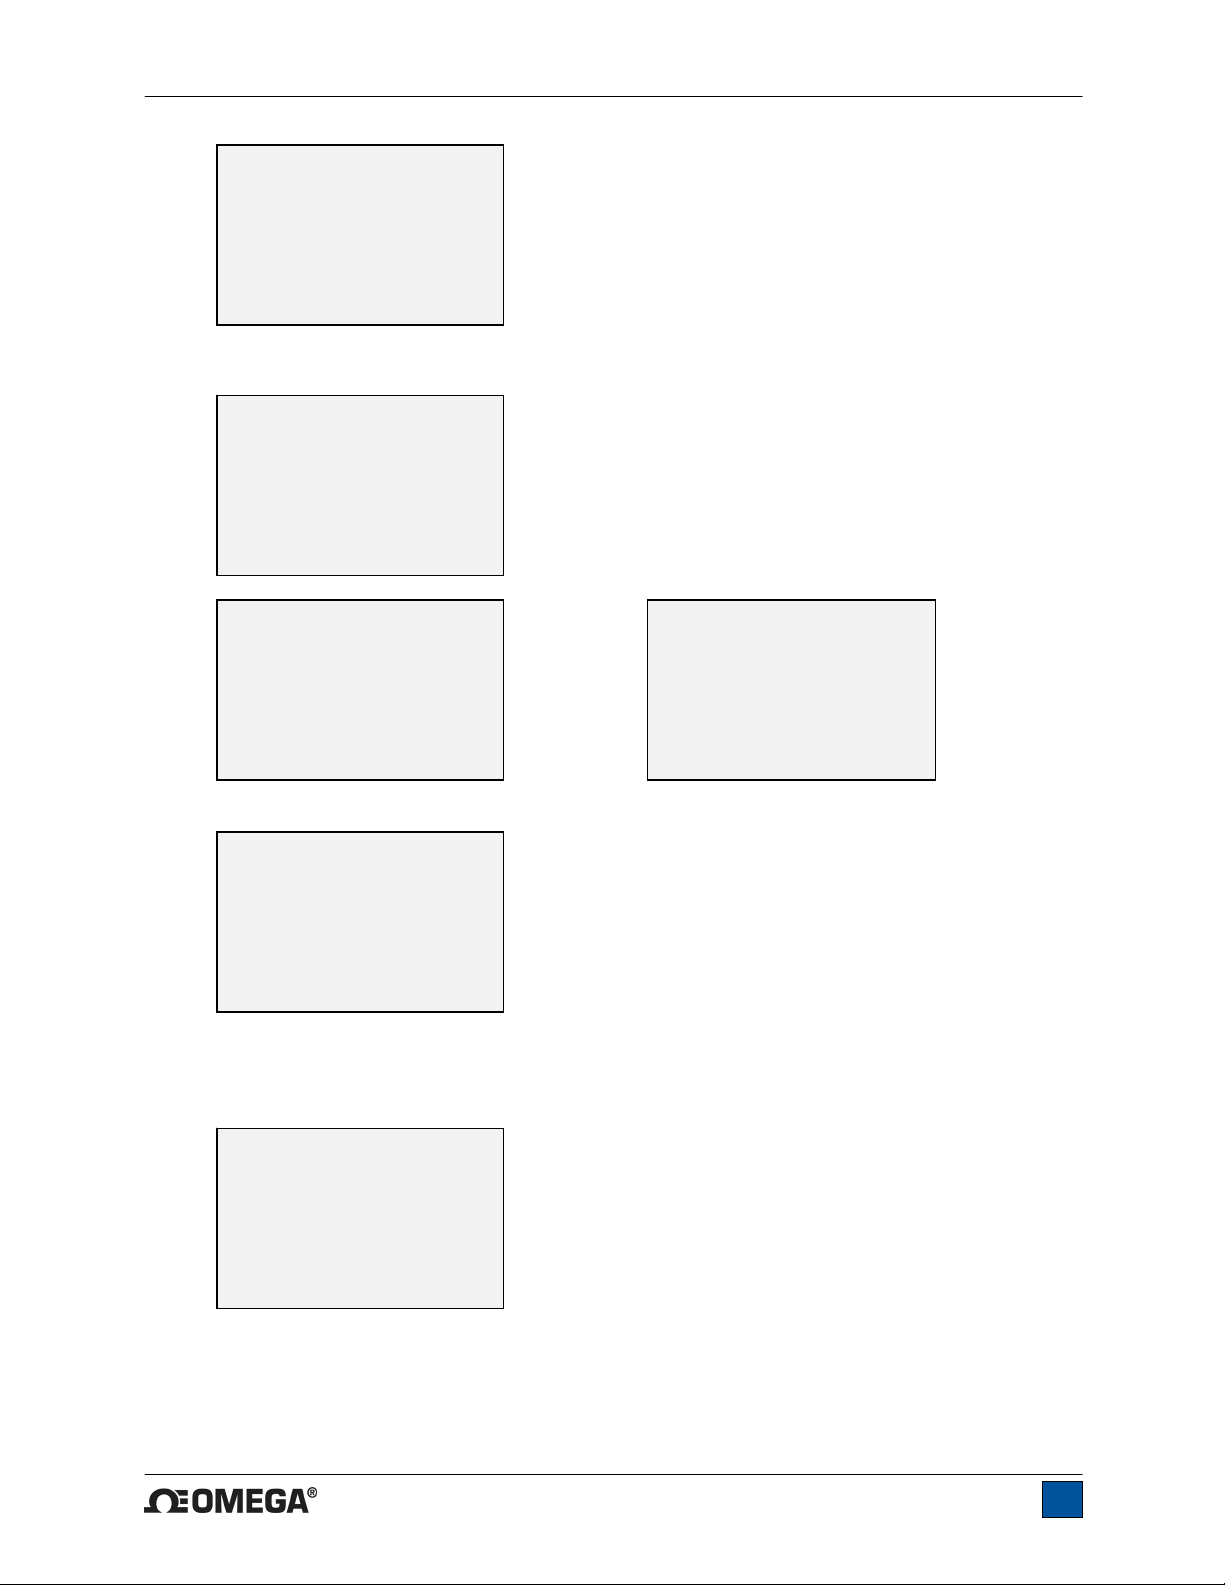
CALIBRATION
OFFSET
Place force gauge
horizontal
THEN PRESS ZERO
5. Place the force gauge horizontally on a level surface free from vibration, then press ZERO. The
gauge will calculate offsets, and the display will appear as follows:
CALIBRATION
OFFSET
Please wait…
CALIBRATION
CALIBRATION
OFFSET
Sen.Offset Adj.Passed
Ana.Offset Adj.Passed
Sen.Offset Adj.Failed
Ana.Offset Adj.Failed
If failed:
6. The following screen appears after the offsets have been calculated:
CALIBRATION
COMPRESSION
Attach necessary
weight fixtures.
THEN PRESS ENTER
Attach weight fixtures (brackets, hooks, etc), as required. Do not yet attach any weights or apply
any calibration loads. Then press ENTER.
7. The display will appear as follows:
CALIBRATION
COMPRESSION
Optionally exercise
load cell a few times.
THEN PRESS ENTER
Optionally exercise the load cell shaft several times (at full scale, if possible), then press ENTER.
8. The display will appear as follows:
OFFSET
21
Page 23
DFG55 Digital Force Gauges User’s Guide
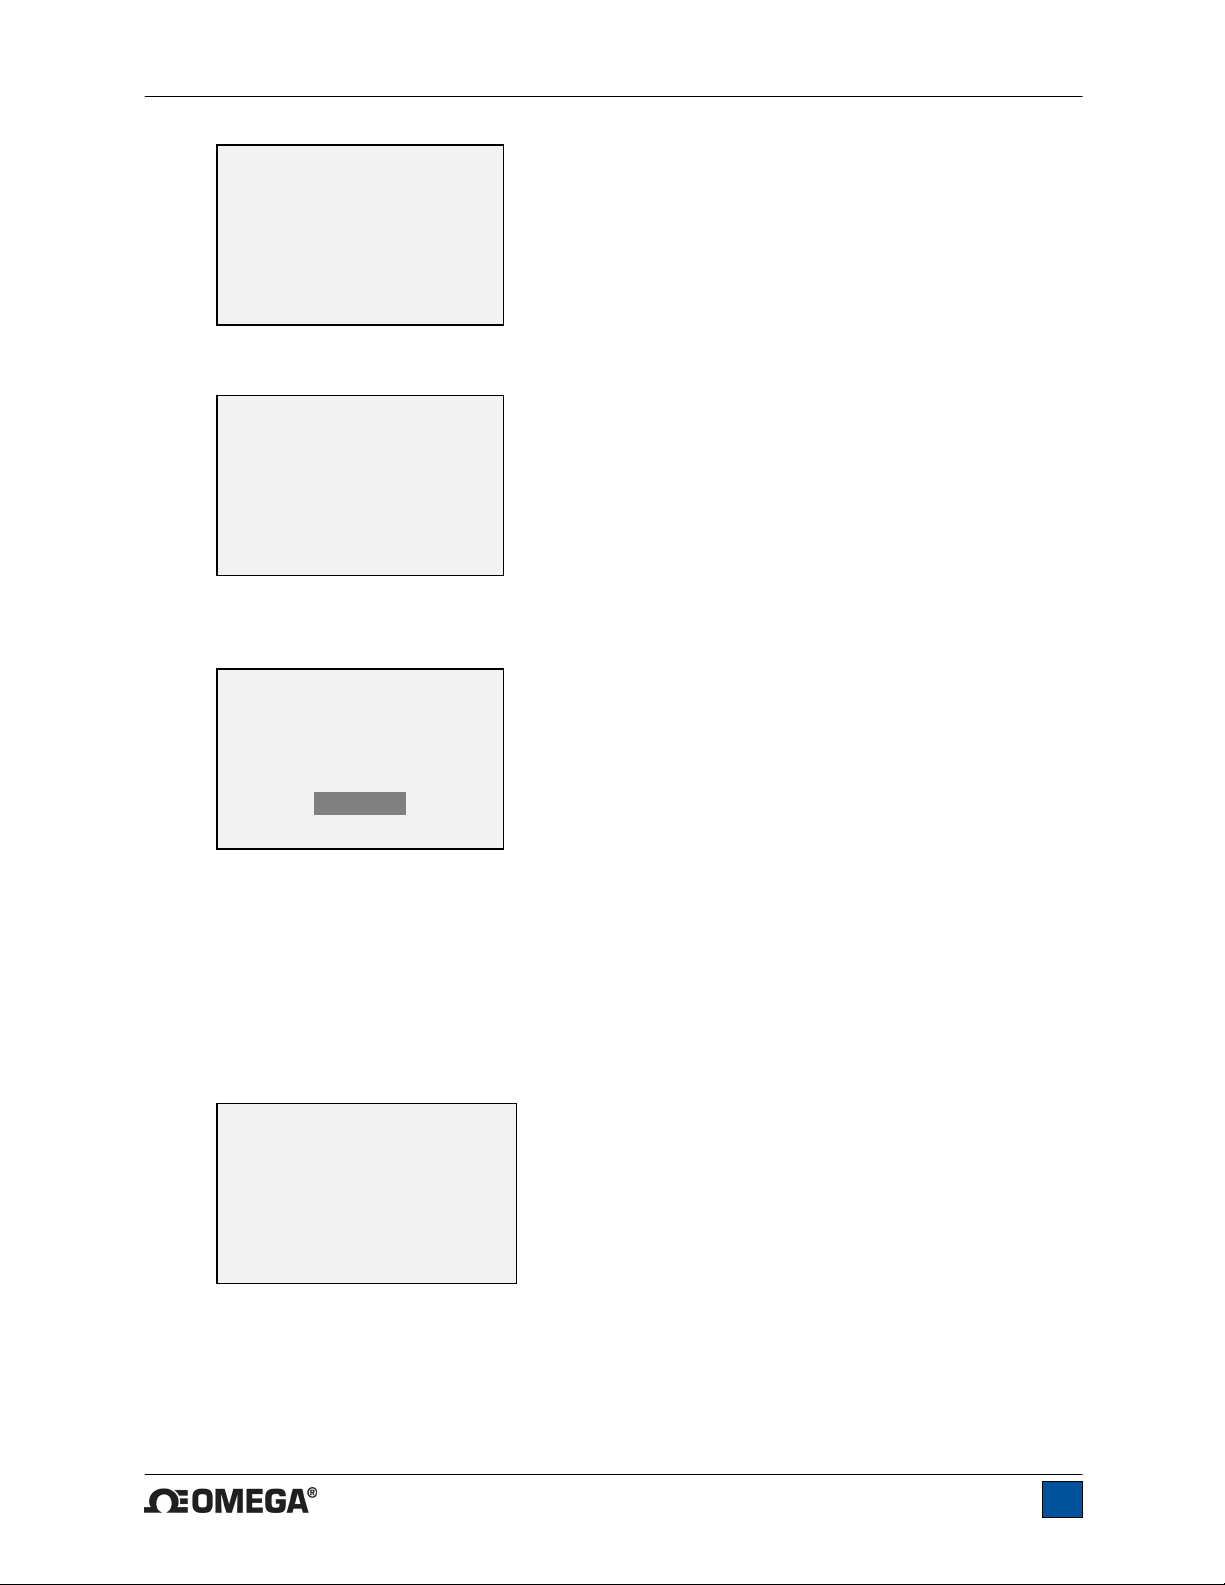
CALIBRATION
COMPRESSION
GAIN ADJUST
APPLY FULL SCALE LOAD
10.000 LBF +/-20%
THEN PRESS ENTER
Apply a weight equal to the full scale of the instrument, then press ENTER.
9. After displaying “PLEASE WAIT…” the display will appear as follows:
CALIBRATION
COMPRESSION
ENSURE NO LOAD
THEN PRESS ZERO
Remove the load applied in Step 8, leave the fixtures in place, then press ZERO.
10. The display will appear as follows:
CALIBRATION
COMPRESSION
APPLY LOAD
1 OF 5
ENTER LOAD:
2.000 LBF
THEN PRESS ENTER
Use the UP and DOWN keys to adjust the load value as required. The load values default to even
increments, as indicated by the previously entered number of data points (even increments are
recommended for best results). For example, if a 50 lbF capacity gauge is calibrated, and 5 data
points were selected, the load values will default to 10, 20, 30, 40, and 50 lb. Apply the calibration
load. Then press ENTER.
Repeat the above step for the number of data points selected.
11. After all the compression calibration points have been completed, the display will appear as
follows:
CALIBRATION
COMPRESSION COMPLETE
REVERSE DIRECTION
FOR TENSION
Attach necessary
weight fixtures.
THEN PRESS ENTER
Press ENTER.
12. The display will appear as follows:
22
Page 24
DFG55 Digital Force Gauges User’s Guide
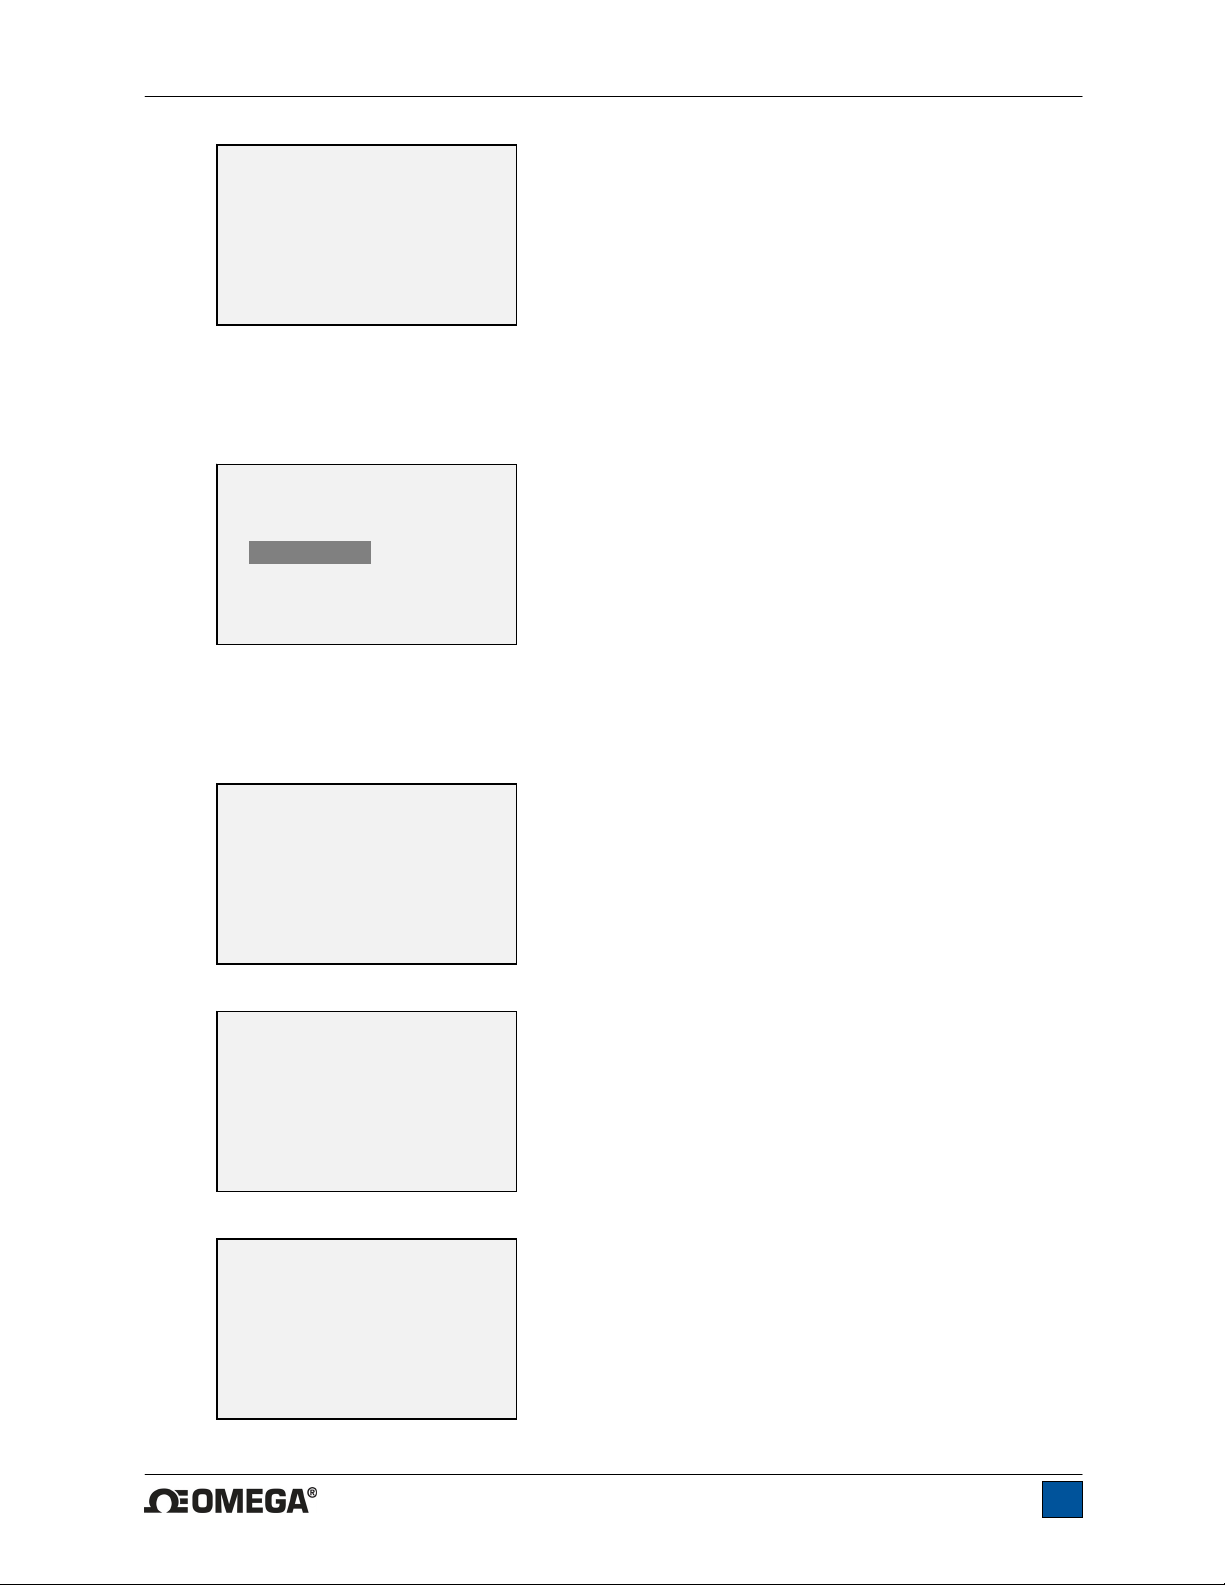
CALIBRATION
To invert the
display, press the
DIRECTION button.
THEN PRESS ENTER
Reverse the orientation of the load cell shaft by rotating the gauge 180 degrees. Press
DIRECTION to invert the display. Then attach weight fixtures. The following screens will step
through the same procedure as with the compression direction. Proceed in the same manner.
13. At the completion of the tension calibration, the display will appear as follows:
CALIBRATION
COMPLETE
SAVE & EXIT
EXIT W/O SAVING
To save the calibration information, select “SAVE & EXIT”. To exit without saving the data select
“EXIT W/O SAVING”.
14. Any errors are reported by the following screens:
CALIBRATION
Units must be gF.
PLEASE TRY AGAIN
PRESS ENTER
Displayed at the start of calibration if a disallowed unit is selected.
LOAD NOT STABLE
PLEASE TRY AGAIN
Ensure that the load is not swinging, oscillating, or vibrating in any manner. Then try again.
CALIBRATION
COMPRESSION
LOAD TOO LOW
PLEASE TRY AGAIN
23
Page 25
DFG55 Digital Force Gauges User’s Guide
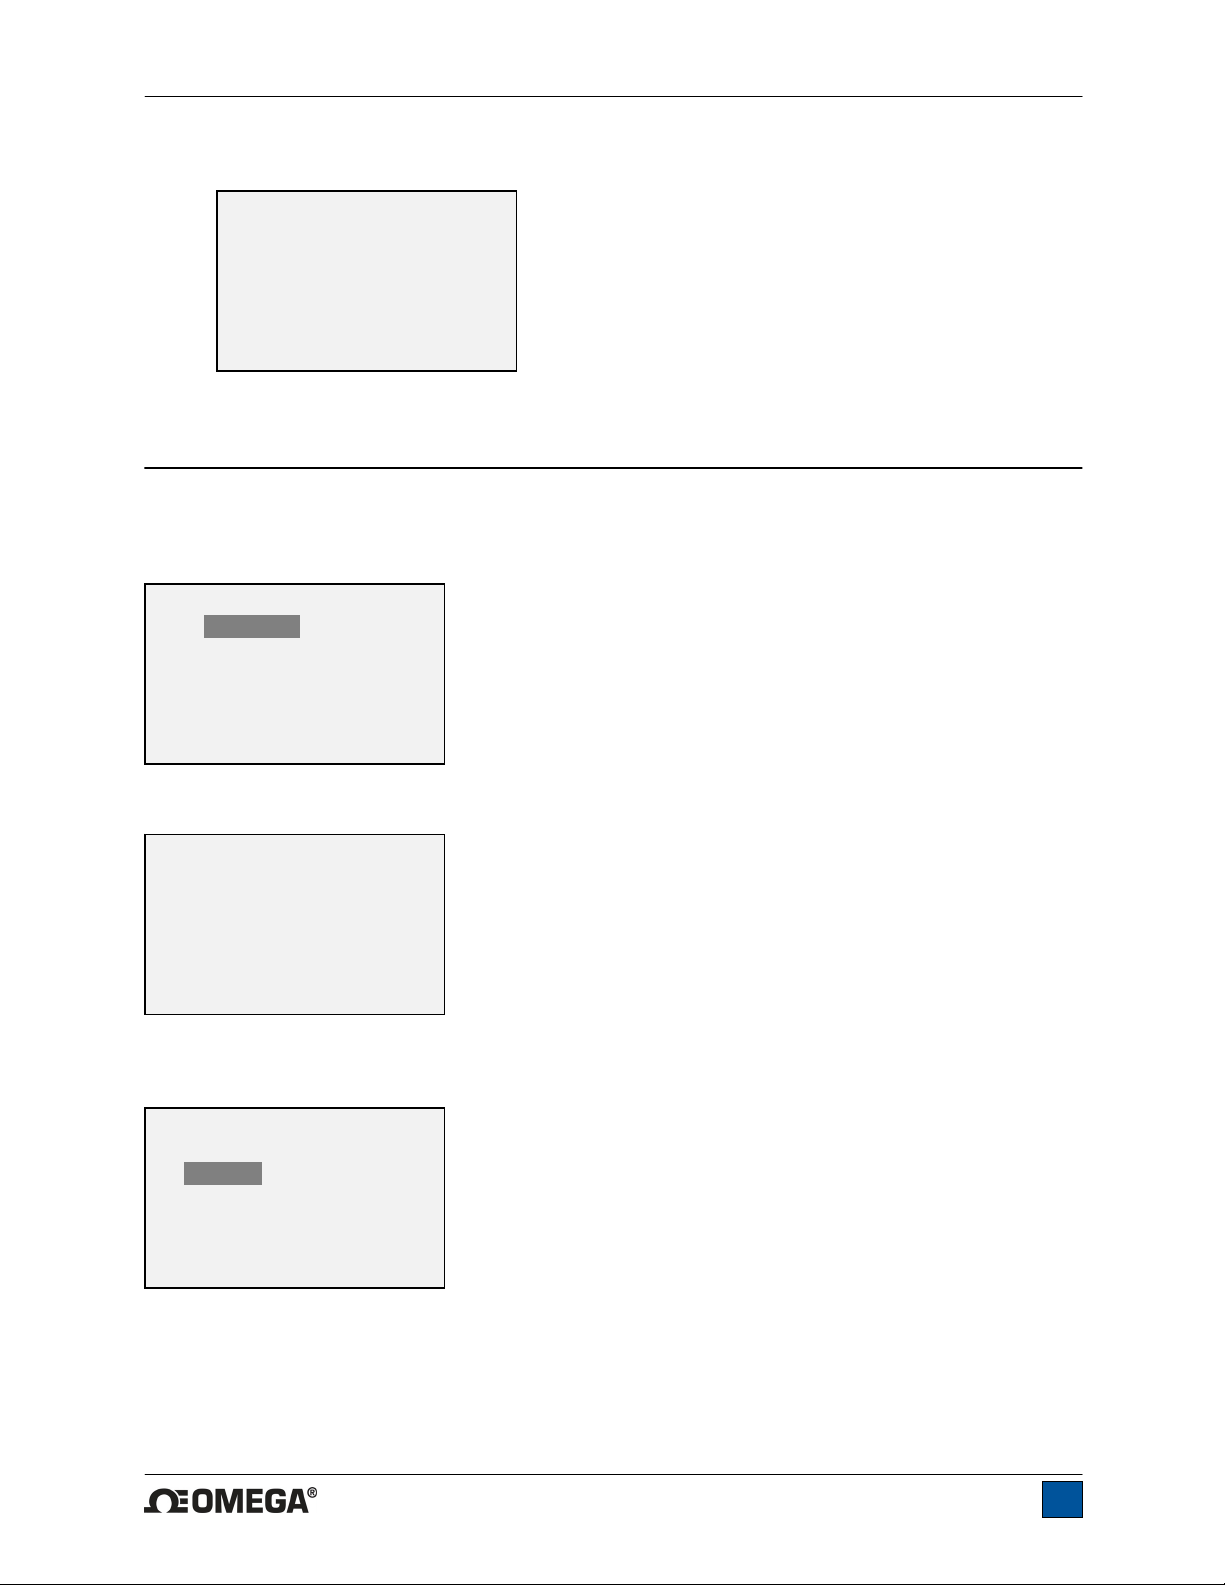
The calibration weight does not match the set value.
CALIBRATION
TENSION
LOAD TOO CLOSE
TO PREVIOUS
PLEASE TRY AGAIN
The entered calibration point is too close to the previous point.
11 PASSWORDS
Two separate passwords may be set to control access to the Calibration section and to the menu and
other keys. To access the passwords setup screen, select Passwords from the menu. The display
appears as follows:
PASSWORDS
Calibration
Menu Key
Units Key
Mode Key
Zero Key
+ More
Select “+ More” for additional options:
PASSWORDS
Data Key
Clear Key
Power Key
11.1 Calibration Password
Select Calibration from the sub-menu. The display appears as follows:
CALIBRATION PASSWORD
* Disabled
Enabled
Set Password
(0000 – 9999)
5000
To set the password, select Enabled, then Set Password. Use the UP and DOWN keys to increment and
decrement the value, from 0 to 9999. When the desired value has been selected, press ENTER, then
ESC to exit the sub-menu.
24
Page 26
DFG55 Digital Force Gauges User’s Guide
11.2 Menu Key Password
If enabled, every time the MENU key is selected, a password must be provided. Select Menu Key from
the sub-menu. Follow the same procedure as described in the previous sub-section.
11.3 Locking Out Other Keys
Other keys may be locked out individually. Select any combination of keys (UNITS, MODE, ZERO,
DATA, CLEAR, POWER) by pressing ENTER in the Passwords sub-menu. Pressing a locked key will
prompt the message “KEY PROTECTED” instead of performing the key’s function.
11.4 Password Prompts
If passwords have been enabled, the following will be displayed when pressing the MENU key or
accessing the Calibration section:
ENTER PASSWORD
(0000 – 9999)
5000
Use the UP and DOWN keys to select the correct password, then press ENTER to continue.
If the incorrect password has been entered, the display appears as follows:
INCORRECT PASSWORD
Reset password
Request code:
XXXX
Press ENTER or ESC
To re-enter the password, press ESC to exit to the home screen. Then, access the desired function and
enter the password again when prompted.
If the password has been misplaced, it can be reset. Press ENTER to generate a request code. The
request code must be supplied to Omega, who will then provide a corresponding authorization code.
Enter the activation code to disable the password.
12 OTHER SETTINGS
12.1 Automatic Shutoff
The gauge may be configured to automatically power off following a period of inactivity while on battery
power. Inactivity is defined as the absence of any key presses or load changes of 100 counts or less. To
access these settings, select Automatic Shutoff from the menu. The display will appear as follows:
25
Page 27
DFG55 Digital Force Gauges User’s Guide
AUTOMATIC SHUTOFF
* Disabled
Enabled
Set Minutes
5
Select Disabled to disable automatic shutoff. Select Enabled to enable it. The length of time of inactivity
is programmed in minutes via the Set Minutes parameter. Available settings: 5-30, in 5 minute
increments.
Note: If the AC adapter is plugged in, the gauge will ignore these settings and remain powered on until
the POWER key is pressed.
12.2 Backlight
Although the backlight may be turned on and off at any time by pressing the BACKLIGHT key, there are
several available initial settings (applicable upon powering on the gauge). To access these settings,
select Backlight from the menu. The display will appear as follows:
BACKLIGHT
Off
On
* Auto
Set Minutes
1
Select Off for the backlight to be off upon powering on the gauge.
Select On for the backlight to be on upon powering on the gauge.
Select Auto for the backlight to be on upon powering gauge, but will shut off after a period of inactivity (as
defined in the Automatic Shutoff sub-section). The backlight will turn on again when activity resumes.
The length of time of inactivity is programmed in minutes via the Set Minutes parameter. Available
settings: 1-10, in 1 minute increments.
Note: If the AC adapter is plugged in, the gauge will ignore these settings and keep the backlight on,
unless the BACKLIGHT key is pressed. Selecting the On or Off setting in the Backlight menu will
manually turn the backlight on or off as if the Backlight button were pressed.
12.3 LCD Contrast
The contrast of the display may be adjusted. Select LCD Contrast from the menu. The screen will appear
as follows:
LCD CONTRAST
Set Contrast
10
26
Page 28
DFG55 Digital Force Gauges User’s Guide
Press ENTER to modify the contrast. Select a value from 0 to 25, 25 producing the most contrast.
12.4 Tones
Audible tones can be enabled for all key presses and alerts, such as overload, set point value reached,
etc. The Set Point alert can be configured to be either a momentary tone or a continuous tone (until the
load is restored to a value between the set points). To configure the functions for which audible tones will
apply, select Tones from the menu. The screen will appear as follows:
TONES
Keys
* Alerts
Set Points
* Momentary
Continuous
12.5 Initial settings
This section is used to configure the initial settings upon powering on the gauge. The initial units of
measurement and the primary reading measurement mode may be configured. To access these settings,
select Initial Settings from the menu. The screen will appear as follows:
INITIAL SETTINGS
Units
LBF
Mode
Real Time
The default values are LBF and Real Time.
12.6 Information / Welcome Screen
The following screen is displayed at power up and can be accessed at any time by selecting Information
from the menu:
Digital Force Gauge
Series DFG55
Model No: DFG55-50
Serial No: 1234567
Version: 1.0
www.omega.com
27
Page 29
DFG55 Digital Force Gauges User’s Guide
13 SPECIFICATIONS
13.1 General
Accuracy:
Sampling rate:
Power:
Battery life:
Measurement units:
Outputs:
Configurable
settings:
Safe overload:
Weight:
Included accessories:
Environmental requirements:
Warranty:
Conformance:
±0.1% of full scale ±1 digit
7,000 Hz
AC or rechargeable battery. Low battery indicator appears when battery level is
low, and gauge powers off automatically when power reaches critical stage.
Backlight on:
Backlight off:
lbF, ozF, gF, kgF, N, kN, mN (depending on model)
USB / RS-232:
Language 2 for full computer control.
Mitutoyo (Digimatic):
devices.
Analog:
General purpose:
Set points:
Digital filters, outputs, automatic output (via USB/RS-232), automatic shutoff,
default settings, averaging mode, external trigger, passwords, key tones, audio
alarms, backlight, calibration
150% of full scale (display shows “OVER” at 110% and above)
1.0 lb [0.45 kg]
Carrying case, chisel, cone, V-groove, hook, flat, extension rod, AC adapter,
battery, USB cable, resource CD (USB driver and user’s guide), NIST-traceable
certificate of calibration with data
40 - 100°F, max. 96% humidity, non-condensating
3 years (see individual statement for further details)
CE
up to 7 hours of continuous use
up to 24 hours of continuous use
Fully configurable up to 115,200 baud. Includes Gauge Control
Serial BCD suitable for all Mitutoyo SPC-compatible
±1 VCD, ±0.25% of full scale at capacity,
Three open drain outputs, one input.
Three open drain lines.
28
Page 30
DFG55 Digital Force Gauges User’s Guide
13.2 Factory Settings
Parameter Setting
Set points
Upper Disabled (defaults to 80% of full scale, compression, when enabled)
Lower Disabled (defaults to 40% of full scale, compression, when enabled)
Filters
Current 8
Displayed 1024
Average mode Disabled
Initial Delay 0
Trigger Force 10% of full scale
Averaging Time (sec.) 5.0
External Trigger Disabled
DATA Key Functions
RS-232/USB Output Enabled
Mitutoyo Output Disabled
Memory Storage Enabled
Backlight Auto
Minutes 1
Serial/USB
RS-232 Output Selected Enabled
USB Output Selected Disabled
Baud Rate 115,200
Data Format Numeric + units
Auto Output Disabled
Outputs per Sec. 125
Mitutoyo BCD Output Disabled
Automatic Shutoff Enabled
Minutes 5
Tones
Keys Enabled
Alerts Enabled
Set Points Momentary
LCD Contrast 10
Initial Settings
Units lbF
Mode Real Time
Passwords All passwords disabled
29
Page 31
DFG55 Digital Force Gauges User’s Guide
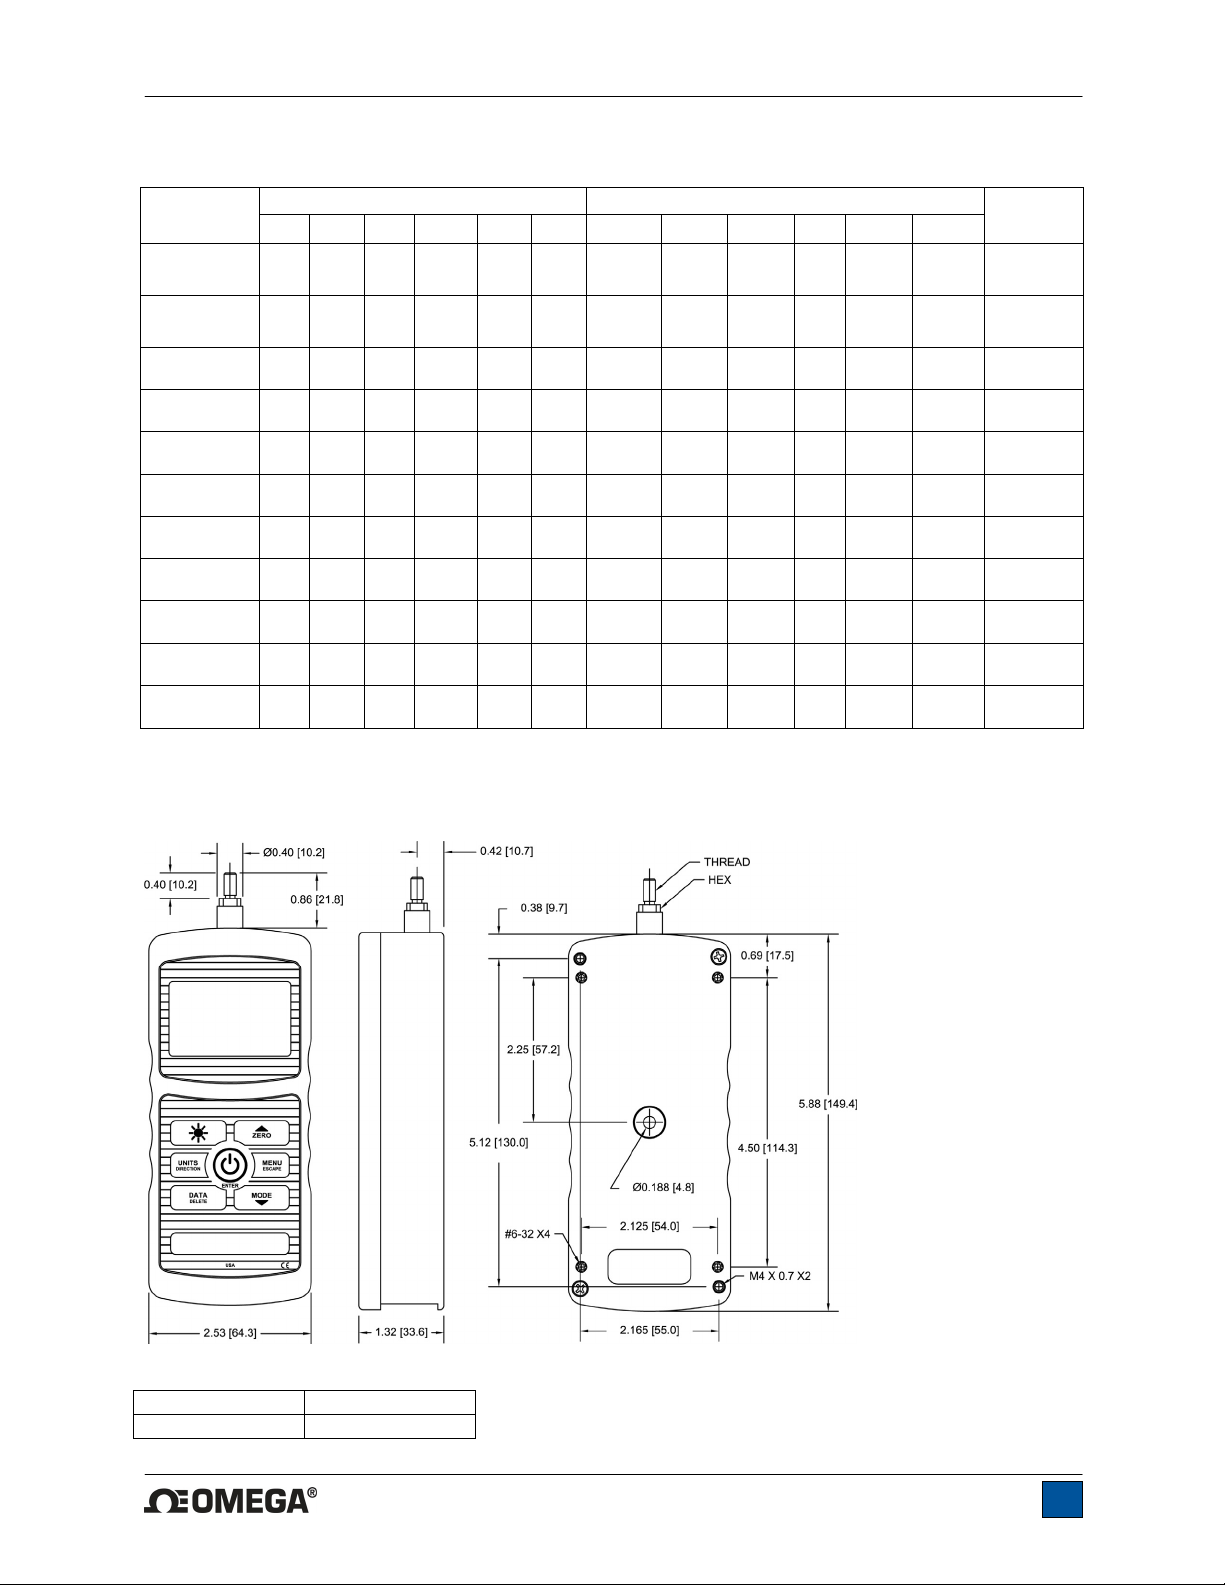
13.3 Capacity, Resolution & Load Cell Deflection
Model
DFG55-0.12 0.12 2 - 50 0.5 500 0.00002 0.0005 - 0.01 0.0001 0.1
DFG55-0.25 0.25 4 - 100 1 1000 0.00005 0.001 - 0.02 0.0002 0.2
DFG55-0.5 0.5 8 - 250 2.5 2500 0.0001 0.002 - 0.05 0.0005 0.5
DFG55-2 2 32 1 1000 10 - 0.0005 0.01 0.0002 0.2 0.002 -
DFG55-5 5 80 2.5 2500 25 - 0.001 0.02 0.0005 0.5 0.005 -
DFG55-10 10 160 5 5000 50 - 0.002 0.05 0.001 1 0.01 -
DFG55-20 20 320 10 10000 100 - 0.005 0.1 0.002 2 0.02 -
DFG55-50 50 800 25 25000 250 - 0.01 0.2 0.005 5 0.05 -
DFG55-100 100 1600 50 50000 500 - 0.02 0.5 0.01 10 0.1 -
DFG55-200 200 3200 100 - 1000 1* 0.05 1 0.02 - 0.2 0.0002*
DFG55-500 500 8000 250 - 2500 2.5* 0.1 2 0.05 - 0.5 0.0005* 0.010
* kN units
lbF ozF kgF gF N mN lbF ozF kgF gF N mN
Capacity Resolution
Load Cell
Deflection
in [mm]
0.005
[0.13]
0.010
[0.25]
0.010
[0.25]
0.010
[0.25]
0.010
[0.25]
0.010
[0.25]
0.010
[0.25]
0.010
[0.25]
0.010
[0.25]
0.010
[0.25]
[0.25]
13.4 Dimensions
IN [MM]
Thread Hex
#10-32 UNF 5/16 [7.94]
30
Page 32
DFG55 Digital Force Gauges User’s Guide
NOTES:
31
Page 33
DFG55 Digital Force Gauges User’s Guide
32
Page 34
DFG55 Digital Force Gauges User’s Guide
dfg
M-4982/0716
33
 Loading...