

Page 1
MADE IN
Shop online at
Page 2

Servicing North America:
USA: One Omega Drive, Box 4047
ISO 9001 Certified Stamford CT 06907-0047
Tel: (203) 359-1660 FAX: (203) 359-7700
e-mail: [email protected]
Canada: 976 Bergar
Laval (Quebec) H7L 5A1, Canada
Tel: (514) 856-6928 FAX: (514) 856-6886
e-mail: [email protected]
For immediate technical or application assistance:
USA and Canada: Sales Service: 1-800-826-6342 / 1-800-TC-OMEGA
®
Customer Service: 1-800-622-2378 / 1-800-622-BEST
®
Engineering Service: 1-800-872-9436 / 1-800-USA-WHEN
®
TELEX: 996404 EASYLINK: 62968934 CABLE: OMEGA
Mexico: En Espan˜ol: (001) 203-359-7803 e-mail: [email protected]
FAX: (001) 203-359-7807 [email protected]
Servicing Europe:
Benelux: Postbus 8034, 1180 LA Amstelveen, The Netherlands
Tel: +31 (0)20 3472121 FAX: +31 (0)20 6434643
Toll Free in Benelux: 0800 0993344
e-mail: [email protected]
Czech Republic: Frystatska 184, 733 01 Karvina´, Czech Republic
France: 11, rue Jacques Cartier, 78280 Guyancourt, France
Tel: +33 (0)1 61 37 2900 FAX: +33 (0)1 30 57 5427
Toll Free in France: 0800 466 342
e-mail: [email protected]
Germany/Austria: Daimlerstrasse 26, D-75392 Deckenpfronn, Germany
Tel: +49 (0)7056 9398-0 FAX: +49 (0)7056 9398-29
Toll Free in Germany: 0800 639 7678
e-mail: [email protected]
United Kingdom: One Omega Drive, River Bend Technology Centre
ISO 9002 Certified Northbank, Irlam, Manchester
M44 5BD United Kingdom
Tel: +44 (0)161 777 6611 FAX: +44 (0)161 777 6622
Toll Free in United Kingdom: 0800-488-488
e-mail: [email protected]
OMEGAnet®Online Service Internet e-mail
www.omega.com [email protected]
It is the policy of OMEGA to comply with all worldwide safety and EMC/EMI regulations that
apply. OMEGA is constantly pursuing certification of its products to the European New Approach
Directives. OMEGA will add the CE mark to every appropriate device upon certification.
The information contained in this document is believed to be correct, but OMEGA Engineering, Inc. accepts
no liability for any errors it contains, and reserves the right to alter specifications without notice.
WARNING: These products are not designed for use in, and should not be used for, human applications.
Page 3

Omega Model CYD211 User’s Manual
TABLE OF CONTENTS
Chapter/Paragraph Title Page
1 INTRODUCTION ............................................................................. 1-1
1.0 GENERAL ..............................................................................1-1
1.1 DESCRIPTION .......................................................................1-1
1.2 SPECIFICATIONS ..................................................................1-3
1.3 SAFETY SUMMARY .............................................................1-8
1.4 SAFETY SYMBOLS...............................................................1-9
2 INSTALLATION.............................................................................. 2-1
2.0 GENERAL ..............................................................................2-1
2.1 INSPECTION AND UNPACKING..........................................2-1
2.2 REAR PANEL DEFINITION...................................................2-2
2.3 POWER INPUT CONNECTOR ...............................................2-2
2.4 EXTERNAL POWER SUPPLY...............................................2-3
2.5 SENSOR INPUT .....................................................................2-3
2.5.1 Input/Output Connector ........................................................2-3
2.5.2 Sensor Lead Cable................................................................2-4
2.5.3 Shielding Sensor Leads.........................................................2-5
2.5.4 Instrument Grounding...........................................................2-5
2.5.5 Sensor Polarity.....................................................................2-6
2.5.6 Four-Lead Sensor Measurement............................................2-6
2.5.7 Two-Lead Sensor Measurement............................................2-7
2.5.8 Lowering Measurement Noise ..............................................2-7
2.6 ANALOG OUTPUT ................................................................2-8
2.7 RELAYS .................................................................................2-8
2.8 PANEL MOUNTING ..............................................................2-9
3 OPERATION................................................................................... 3-1
3.0 GENERAL ..............................................................................3-1
3.1 TURNING POWER ON ..........................................................3-1
3.2 DISPLAY DEFINITION..........................................................3-1
3.3 LED ANNUNCIATORS & DISPLAY MESSAGES.................3-2
3.4 KEYPAD DEFINITION ..........................................................3-3
3.4.1 Key Descriptions..................................................................3-3
3.4.2 General Keypad Operation....................................................3-3
3.5 INPUT SETUP ........................................................................3-4
3.5.1 Input Type ...........................................................................3-4
3.5.2 Curve Selection....................................................................3-5
3.5.3 Display Units Selection ........................................................3-6
3.6 ALARM SETUP AND OPERATION.......................................3-6
3.7 RELAY SETUP.......................................................................3-7
Table of Contents i
Page 4

Omega Model CYD211 User’s Manual
TABLE OF CONTENTS (Continued)
Chapter/Paragraph Title Page
3.8 ANALOG OUTPUT SETUP ...................................................3-8
3.9 ANALOG OUTPUT TO TEMPERATURE CONVERSION ....3-9
3.10 LOCKING AND UNLOCKING THE KEYPAD.................... 3-10
3.11 RESETTING THE 211 TO DEFAULT VALUES .................. 3-10
3.12 CHECKING CODE DATE REVISION .................................3-10
3.13 CURVE ENTRY & STORAGE............................................. 3-11
3.13.1
3.13.2
4 REMOTE OPERATION................................................................... 4-1
4.0 GENERAL.............................................................................. 4-1
4.1 SERIAL INTERFACE OVERVIEW........................................ 4-1
4.1.1 Physical Connection.............................................................4-1
4.1.2 Hardware Support ................................................................ 4-2
4.1.3 Character Format................................................................. 4-3
4.1.4 Message Strings ................................................................... 4-3
4.1.5 Message Flow Control ......................................................... 4-4
4.1.6 Serial Interface Basic Programs............................................ 4-5
4.1.7 Trouble Shooting ............................................................... 4-12
4.2 SERIAL INTERFACE COMMAND SUMMARY .................4-12
4.2.1 Interface Commands .......................................................... 4-15
5 SERVICE........................................................................................ 5-1
5.0 GENERAL.............................................................................. 5-1
5.1 ERROR MESSAGES ..............................................................5-2
5.2.1 Instrument Hardware Errors .................................................5-2
5.2.2 Limit Errors......................................................................... 5-3
5.3 OPENING THE ENCLOSURE................................................5-3
5.4 FIRMWARE REPLACEMENT............................................... 5-4
5.5 CONNECTOR DEFINITIONS ................................................5-6
5.5.1 Serial Interface Cable Wiring ............................................... 5-8
5.6 CALIBRATION PROCEDURE............................................... 5-9
6 OPTIONS AND ACCESSORIES...................................................... 6-1
6.0 GENERAL.............................................................................. 6-1
6.1 MODELS ................................................................................ 6-1
6.2 ACCESSORIES ...................................................................... 6-1
6.3 WIRES.................................................................................... 6-2
6.4 SENSORS............................................................................... 6-2
APPENDIX A – CURVE TABLES...........................................................A-1
Curve Header Parameters............................................... 3-11
Curve Breakpoints .......................................................... 3-12
ii Table of Contents
Page 5

Omega Model CYD211 User’s Manual
Figure No. Title Page
1-1 Model CYD211 Front Panel ................................................................1-1
2-1 Model CYD211 Rear Panel..................................................................2-2
2-2 Power Connector .................................................................................2-3
2-3 Input/Output Connector .......................................................................2-4
2-4 Panel Mounting Details .......................................................................2-9
2-5 2111 & 2112 Panel Mount Adapters...................................................2-10
3-1 Model CYD211 Display......................................................................3-2
5-1 Model CYD211 Main PCB Layout ......................................................5-5
5-2 Power Connector .................................................................................5-6
5-3 Input/Output Connector .......................................................................5-6
5-4 RS-232 (DTE) Connector ....................................................................5-7
LIST OF TABLES
Table No. Title Page
1-1 Temperature Range of Typical Omega Sensors.....................................1-2
1-2 Sensor Input Performance Chart...........................................................1-6
3-1 Sensor Input Types ..............................................................................3-4
3-2 Standard Curves ..................................................................................3-5
3-3 Analog Output Range Scales................................................................3-9
3-4 Analog Output Scales in Sensor Units..................................................3-9
3-5 Conversion Parameters for Temperature in K .......................................3-9
3-6 Model CYD211 Default Values .........................................................3-10
3-7 Recommended Curve Parameters.......................................................3-12
4-1 Serial Interface Specifications..............................................................4-3
4-2 Serial Interface Program Control Properties..........................................4-6
4-3 Visual Basic Serial Interface Program ..................................................4-8
4-4 Quick Basic Serial Interface Program.................................................4-11
4-5 Interface Commands..........................................................................4-14
LIST OF ILLUSTRATIONS
5-1
A-1 Omega DT-470 Silicon Diode.............................................................A-1
A-2 Omega DT-670 Silicon Diode.............................................................A-2
A-3 CTI Curve C Silicon Diode.................................................................A-3
A-4 Omega PT-100/-1000 Platinum RTD Curves.......................................A-4
Calibration Table for Resistive Ranges....................................5-11
Table of Contents iii
Page 6
Page 7
Omega Model CYD211 User’s Manual
CHAPTER 1
INTRODUCTION
1.0 GENERAL
This chapter provides an introduction to the Model CYD211 Temperature
Monitor. The Model CYD211 was designed and manufactured in the United
States of America. A general description is provided in Paragraph 1.1,
specifications in Paragraph 1.2, safety summary in Paragraph 1.3, and
safety symbols in Paragraph 1.4.
1.1 DESCRIPTION
The Omega single-channel Model CYD211 Temperature Monitor provides
the accuracy, resolution, and interface features of a benchtop temperature
monitor in an easy to use, easily integrated, compact instrument. With
appropriate sensors, the Model CYD211 measures temperature from 1.4 to
800 K and in difficult sensing conditions, including high vacuum and
magnetic fields. Alarms, relays, user-configurable analog voltage or current
output, and a serial interface are standard features on the Model CYD211.
Backed by the Omega tradition of excellence in cryogenic and precision
temperature measurement for science and industry, the Model CYD211 is a
good choice for liquefied gas storage/monitoring, cryopump control, cryocooler, and materials science applications, and for applications that require
greater accuracy than thermocouples allow.
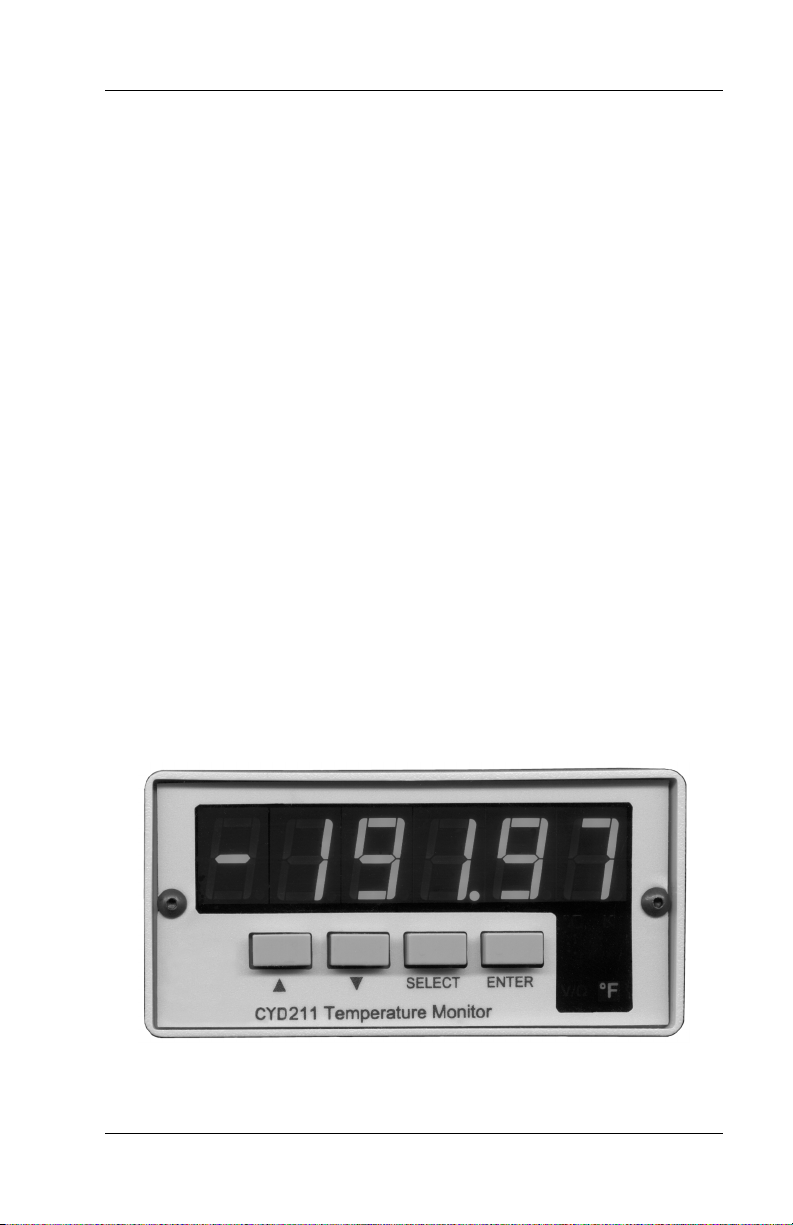
211_LED_Front.bmp
Figure 1-1. Model CYD211 Front Panel
Introduction 1-1
Page 8

General Description (Continued)
Omega Model CYD211 User’s Manual
The Model CYD211 Temperature Monitor supports diode temperature
sensors and resistance temperature detectors (RTDs). The Model CYD211
can be configured for the type of sensor in use from the instrument front
panel. Four-lead differential measurement and 24-bit analog-to-digital
conversion ensure high accuracy and 5-digit measurement resolution.
Temperature data can be read up to seven times per second over computer
interface; the display is updated twice each second.
The Model CYD211 converts voltage or resistance to temperature units
based on temperature response curve data for the sensor in use. Standard
temperature response curves for silicon diodes and platinum RTDs are
included in instrument firmware. The Model CYD211 also provides nonvolatile memory for one 200-point temperature response curve which can
be entered via the serial interface. Measurements are available in
temperature units K, °C, °F, or sensor units V or Ω.
With an RS-232C serial interface and other interface features, the Model
CYD211 is valuable as a stand-alone monitor and is easily integrated into
other systems. Setup and every instrument function can be performed via
serial interface or the front panel of the Model CYD211. High and low
alarms can be used in latching mode for error limit detection and in nonlatching mode in conjunction with relays to perform simple on-off control
functions. The analog output can be configured for either 0 to 10 V or 4 to
20 mA output.
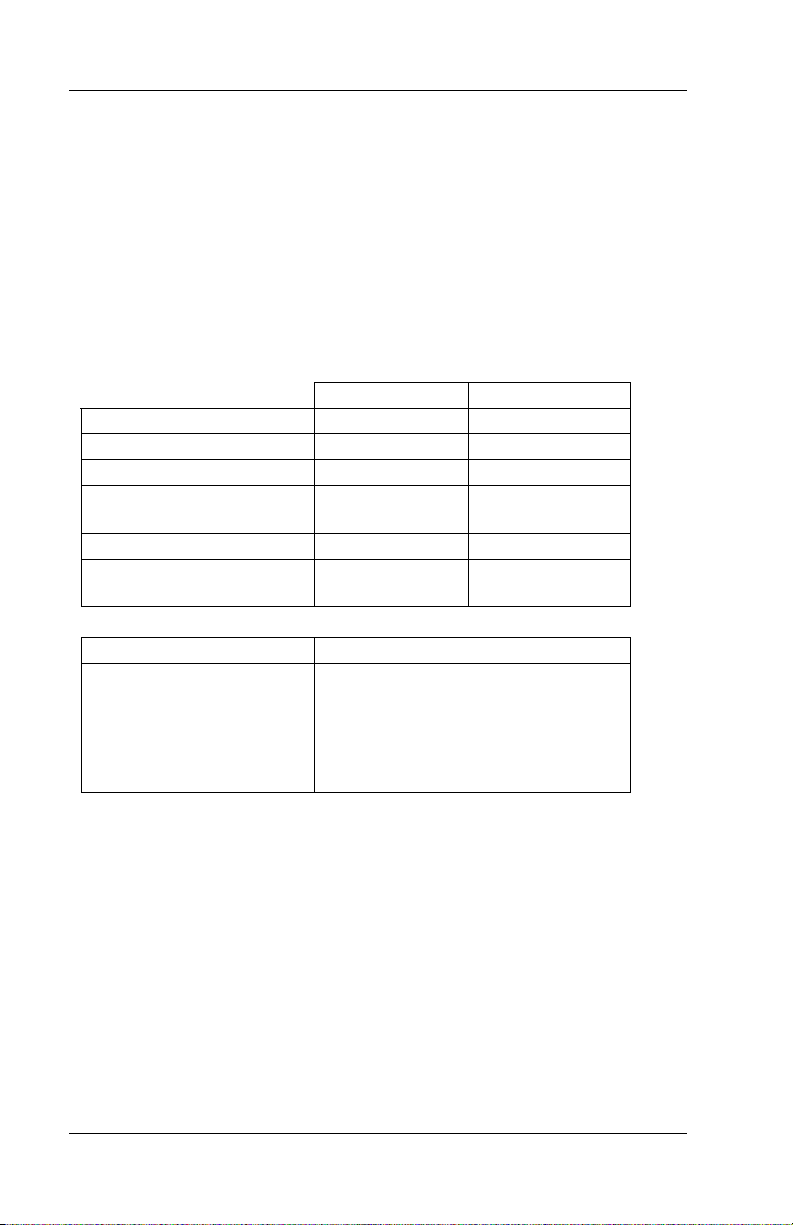
Table 1-1. Temperature Range of Typical Omega Sensors *
Diodes Model Useful Range
Silicon Diodes DT-670 1.4 – 500 K
GaAlAs Diode TG-120 1.4 – 475 K
Positive Temperature Coefficient (PTC) RTDs
100 Ω Platinum RTD PT-100, 250 Ω full scale
100 Ω Platinum RTD PT-100, 500 Ω full scale
Rhodium-Iron RTD RF-800-4 1.4 – 400 K
Negative Temperature Coefficient (NTC) † RTDs
Germanium RTD GR-200A-1000 2 – 100 K
Germanium RTD GR-200A-250 1.2 – 40 K
Carbon-Glass™ RTD CGR-1-500 3 – 325 K
Cernox™ RTD CX-1050 AA or SD 3.5 – 325 K
Cernox™ RTD CX-1030 AA or SD 2 – 325 K
High-Temperature Cernox™ RTD CX-1030-SD-HT 2 – 420 K
Rox™ Ruthenium Oxide RTD RX-102A 2 – 40 K
Rox™ Ruthenium Oxide RTD RX-202A 3 – 40 K
* Sensor s sold separately.
† Single excitation curr ent may limit the low temperature range of NTC r esistors.
30 – 675 K
30 – 800 K
1-2 Introduction
Page 9

Omega Model CYD211 User’s Manual
1.2 SPECIFICATIONS
Thermometry
Number of Inputs: 1
Measurement Type: 4-lead differential
Excitation: Constant current, 10 µA or 1 mA
Isolation: Measurement is not isolated from chassis ground
A/D Resolution: 24 bit
Input Accuracy: Sensor dependent. Refer to Table 1-2
Measurement Resolution: Sensor dependent. Refer to Table 1-2
Maximum Update Rate: 7 readings per second
Supported Sensors: Diodes: Silicon, GaAlAs;
RTDs: 100 Ω Platinum, 1000 Ω Platinum, Cernox, Carbon Glass, ROX
Standard Curves: DT-470, DT-670, CTI Curve C, PT-100, PT-1000
User Curve: One, 200 point CalCurve or User curve in non-volatile memor y
Settings: Sensor Type, Sensor Curve
Input Connector: DB-25
Front Panel
Display Type: 5 digit LED
Display Units: K, °C, °F, V, Ω
Display Update Rate: Twice per second
Temperature Display Resolution: 0.001° between 0
0.01° between 100
– 999.99°, 0.1° above 1000°
– 99.999°,
Sensor Units Display Resolution: Sensor dependent, to 5 digits
Display Annunciators: K, °C, °F, V/Ω
Keys: Select, Enter, s (Up Arrow), t (Down Arrow)
Front Panel Features: Display Units, Display Brightness,
Keypad Lockout, Instrument Reset
Interface
Serial Interface:
Format: RS-232C
Baud Rate: 9600 BAUD
Reading Rate: To 7 readings per second
Special Features: User Curve Entry, LabView Driver
Connector: DE-9
Alarms:
Number: 2, High and Low
Settings: High Setpoint, Low Setpoint, Dead band,
Latching or Non-Latching, Alarm On/Off
Actuators: Display message, relays
Introduction 1-3
Page 10
Interface Specifications (Continued)
Omega Model CYD211 User’s Manual
Relays:
Number: 2
Contacts: Normally Open (NO), Normally Closed (NC), and Common (C)
Contact Rating: 30 VDC at 1 A
Settings: manually off, manually on, follows alarms
Connector: DB-25 (shares input connector)
Analog Output:
Isolation: Output is not isolated from chassis ground
Update Rate: 7 readings per second
Voltage Current
Range: 0 – 10 V 4 – 20 mA
Resolution: 0.15 mV 0.3 µA
Accuracy: ±1.25 mV ±2.5 µA
Minimum Load Resistance:
500 Ω (short-
circuit protected)
NA
Compliance Voltage: NA 10 V
Load Regulation NA ±0.02% RDG
0 to 500 Ω
Scales:
Temperature Sensor Units (Fixed by type)
0 – 20 K
– 100 K
0
– 200 K
0
– 325 K
0
– 475 K
0
– 1000 K
0
Diodes: 1 V = 1V
100 Ω Platinum: 1 V = 100 Ω
1000 Ω Platinum: 1 V = 1000 Ω
NTC Resistor: 1 V = 1000 Ω
Settings: Voltage or current, scale
Connector: DB-25 (shares input connector)
General
Ambient Temperature: 15
– 40 °C (50 – 104 °F) at reduced accuracy
10
– 35 °C (59 – 95 °F) at rated accuracy,
Power Requirement: Regulated +5 VDC @ 300 mA, +15 VDC @ 75 mA,
–15 VDC @ 15 mA, 5 pin DIN
Size: 96 mm W × 48 mm H × 166 mm D (3.8 × 1.9 × 6.5 inches)
Mounting: Panel mount into 91 mm W × 44 mm H (3.6 × 1.7 inch) cutout
Weight: 0.65 kilograms (1.5 pounds)
Approval: CE Mark
1-4 Introduction
Page 11

Omega Model CYD211 User’s Manual
Ordering Information
Model
211S Model CYD211 with 100 – 250 V (universal input),
17 VA power supply
Power Options
VAC-120 Includes U.S. line cord
VAC-220 Includes European line cord
Accessories included with the Model CYD211 Temperature Monitor
106-253 Sensor input mating connector (DB-25)
106-264 Shell for sensor input mating connector
MAN-211 User’s manual
NOTE: Panel mount hardware installed at factory.
Calibration Options
8000 CalCurve Compact Disk (CD). Consists of a calibrated sensor
breakpoint table on a CD in ASCII format for customer download.
8001-211 CalCurve, factory installed. Consists of a calibrated sensor breakpoint
table factory-installed into non-volatile memory.
CAL-211 Instrument calibration with certificate.
CAL-211 DATA Instrument calibration with certificate and data.
Accessories Available
2111 Single ¼ DIN panel mount adapter (see Figure 2-5).
2112 Dual ¼ DIN panel mount adapter (see Figure 2-5).
Introduction 1-5
Page 12

Omega Model CYD211 User’s Manual
Table 1-2. Sensor Input Performance Chart
Sensor Type
Silicon Diod e GaAlAs Diode
Temperature Coefficient Negative Negative
Sensor Units Volts (V) Volts (V)
Input Range 0 – 2.5 V 0 – 7.5 V
Sensor Excitation (Constant Current)
10 µA ±0.01% 10 µA ±0.01%
Display Resolution (Sens or Units) 100 µV 100 µV
Example LSCI Sensor
DT-670-SD
with 1.4H Cal.
TG-120SD
with 1.4H Cal.
Temperature Range 1.4 – 475 K 1.4 – 475 K
Standard Sensor Curve DT-670 Requires Calibration
Typical Sensor Sensitivity
Measurement Resolution:
Sensor Units
Temperature Equivalence
Electronic Accuracy:
Sensor Units
Temperature Equivalence
Temperature Coefficient
Temperature Accuracy
including electronic accuracy,
CalCurve™ and calibrated
sensor
Magnetic Field Use
–31.6 mV at 4.2 K
–1.73 mV at 77 K
–2.3 mV at 300 K
–2.12 mV at 500 K
20 µV
0.6 mK at 4.2 K
11.6 mK at 77 K
8.7 mK at 300 K
9.4 mK at 500 K
±160 µV ±0.01% RDG
±10 mK at 4.2 K
±152 mK at 77 K
±94 mK at 300 K
±80 mK at 500 K
±10 µV ±5 PPM
of reading per °C
±31 mK at 4.2 K
±267 mK at 77 K
±154 mK at 300 K
±140 mK at 500 K
Recommended for
T >
60 K & B < 3 T
–180 mV/K at 10 K
–1.25 mV/K at 77 K
–2.75 mV/K at 300 K
–2.75 mV/K at 475 K
20 µV
1 mK at 10 K
16 mK at 77 K
10 mK at 300 K
10 mK at 475 K
±160 µV ±0.02% RDG
±6 mK at 10 K
±300 mK at 77 K
±150 mK at 300 K
±110 mK at 475 K
±20 µV ±5 PPM
of reading per °C
±21 mK at 10 K
±390 mK at 77 K
±140 mK at 300 K
±210 mK at 475 K
Recommended for
T > 4.2 K & B < 5 T
1-6 Introduction
Page 13

Omega Model CYD211 User’s Manual
Table 1-2. Sensor Input Performance Chart (Continued)
100 Ω Platinum RTD
500
Ω Full Scale
Positive Positive Negative
Ohms (Ω) Ohms (Ω) Ohms (Ω)
0 – 500 Ω 0 – 5000 Ω 0 – 7500 Ω
1 mA ±0.3% 1 mA ±0.3% 10 µA ±0.01%
10 mΩ 100 mΩ 100 mΩ
PT-103 with
14J Cal.
30 – 800 K 30 – 800 K 3.5 – 400 K
DIN 43760 Scaled from DIN 43670 Requires calibration
0.19 Ω/K at 30 K
0.42
Ω/K at 77 K
0.39 Ω/K at 300 K
0.35
Ω/K at 675 K
0.33
Ω/K at 800 K
2 m
Ω
10.6 mK at 30 K
10 mK at 77 K
10 mK at 300 K
10 mK at 675 K
10 mK at 800 K
±0.004
Ω ±0.02% RDG
±25 mK at 30 K
±18 mK at 77 K
±70 mK at 300 K
±162 mK at 675 K
±187 mK at 800 K
±0.2 mΩ ±5 PPM
of reading per °C
±45 mK at 30 K
±38 mK at 77 K
±105 mK at 300 K
±262 mK at 675 K
±287 mK at 800 K
Recommended for
T > 40 K & B <
* No longer available from Omega.
† Specified accuracy includes no effects of thermal EMF voltages. An error of 3 mΩ results
from each 1 µV of thermal EMF voltage. In well-designed systems, thermal EMF voltage
should be <10 µV.
2.5 T
1000 Ω Platinum RTD
PT-1001
*
with 1.4J Cal.
1.9
Ω/K at 30 K
4.2
Ω/K at 77 K
3.9 Ω/K at 300 K
3.3
Ω/K at 800 K
20 m
Ω
10.6 mK at 30 K
10 mK at 77 K
10 mK at 300 K
10 mK at 800 K
±0.06
Ω ±0.04% RDG
±40 mK at 30 K
±33 mK at 77 K
±135 mK at 300 K
±370 mK at 800 K
±2.0 mΩ ±5 PPM
of reading per °C
±60 mK at 30 K
±53 mK at 77 K
±170 mK at 300 K
±470 mK at 800 K
Recommended for
T > 40 K & B < 2.5 T
Cernox™ RTD
CX-1050-SD
with 4L Cal.
Ω/K at 4.2 K
–770
–1.5
Ω/K at 77 K
–0.1 Ω/K at 300 K
50 mΩ
1 mK at 4.2 K
33.3 mK at 77 K
500 mK at 300 K
±0.1
Ω ±0.04% RDG
±1 mK at 4.2 K
±88 mK at 77 K
±1.144 K at 300K
±20 mΩ ±15 PPM
of reading per °C
±9 mK at 4.2 K †
±138 mK at 77 K
±1.284 K at 300K
Recommended for
T > 2 K & B < 19 T
†
†
Introduction 1-7
Page 14

1.3 SAFETY SUMMARY
Omega Model CYD211 User’s Manual
Observe these general safety precautions during all phases of instrument
operation, service, and repair. Failure to comply with these precautions or
with specific warnings elsewhere in this manual violates safety standards of
design, manufacture, and intended instrument use. Omega assumes no
liability for Customer failure to comply with these requirements.
The Model CYD211 protects the operator and surrounding area from
electric shock or burn, mechanical hazards, excessive temperature, and
spread of fire from the instrument.
The Model CYD211 is designed for indoor use only. Improper use of the
instrument may pose a hazard to the operator and surrounding area.
The power supply included with the Model CYD211 meets or exceeds the
International Safety Standard for Information Technology Equipment,
IEC-60950.
Ground The Instrument
To minimize shock hazard, the optional instrument power supply is
equipped with a 3-conductor AC power cable. Plug the power cable into an
approved three-contact electrical outlet or use a three-contact adapter with
the grounding wire (green) firmly connected to an electrical ground (safety
ground) at the power outlet. The power jack and mating plug of the power
cable meet Underwriters Laboratories (UL) and International
Electrotechnical Commission (IEC) safety standards.
Do Not Operate In An Explosive Atmosphere
Do not operate the instrument in the presence of flammable gases or fumes.
Operation of any electrical instrument in such an environment constitutes a
definite safety hazard.
Keep Away From Live Circuits
Operating personnel must not remove instrument covers. Refer component
replacement and internal adjustments to qualified maintenance personnel.
Do not replace components with power cable connected. To avoid injuries,
always disconnect power and discharge circuits before touching them.
1-8 Introduction
Page 15
Safety Summary (Continued)
Omega Model CYD211 User’s Manual
Do Not Substitute Parts Or Modify Instrument
Do not install substitute parts or perform any unauthorized modification to
the instrument. Return the instrument to an authorized Omega
representative for service and repair to ensure that safety features are
maintained.
Cleaning
Do not submerge instrument. Clean only with a damp cloth and mild
detergent. Exterior only.
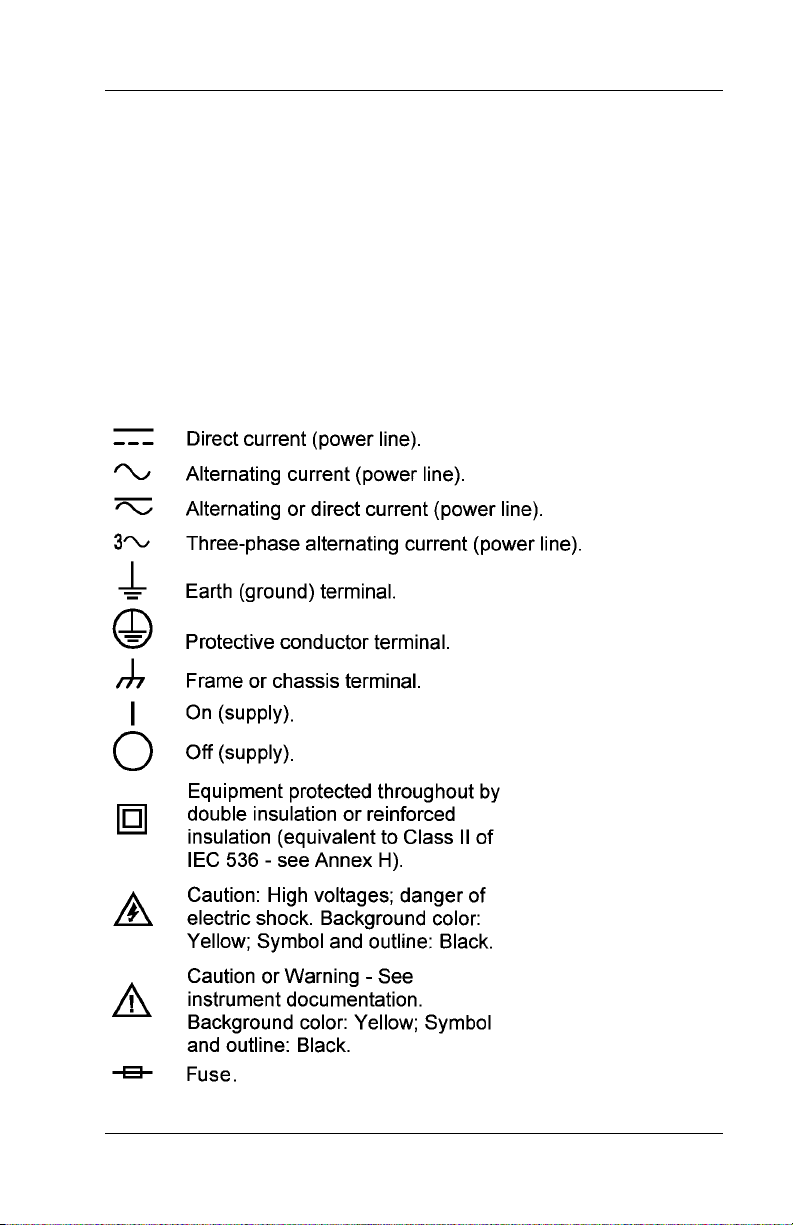
1.4 SAFETY SYMBOLS
Introduction 1-9
Page 16

Omega Model CYD211 User’s Manual
This Page Intentionally Left Blank
1-10 Introduction
Page 17

Omega Model CYD211 User’s Manual
CHAPTER 2
INSTALLATION
2.0 GENERAL
This chapter provides general installation instructions for the Model
CYD211. To ensure the best possible performance and to maintain operator
safety, please read the entire chapter before installing and operating the
instrument. Refer to Chapter 3 for operating instructions. Refer to Chapter 4
for computer interface installation and operation.
2.1 INSPECTION AND UNPACKING
Inspect shipping containers for external damage before opening. Photograph
any container that has significant damage before opening it. If there is
visible damage to the contents of the container, contact the shipping
company and Omega immediately, preferably within 5 days of receipt of
goods. Keep all damaged shipping materials and contents until instructed to
either return or discard them.
Open the shipping container and keep the container and shipping materials
until all contents have been accounted for. Check off each item on the
packing list as it is unpacked. Instruments may be shipped as several parts.
The items included with the Model CYD211 are listed as follows.
Items Included with Model CYD211 Temperature Monitor:
• Model CYD211 Instrument
• Model CYD211 User’s Manual
• Input/Output Mating Connector and Shell
• Panel Mount Hardware Installed at Factory
• Universal Input Power Supply
• Line Power Cord
Contact Omega immediately if there is a shortage of parts or accessories.
Omega is not responsible for any missing items if not notified within 60
days of shipment.
Inspect all items for both visible and hidden damage that occurred during
shipment. If damage is found, contact Omega immediately for instructions
on how to file a proper insurance claim. Omega products are insured against
damage during shipment but a timely claim must be filed before Omega
will take further action. Procedures vary slightly with shipping companies.
Keep all shipping materials and damaged contents until instructed to either
return or discard them.
Installation 2-1
Page 18
Omega Model CYD211 User’s Manual
2.2 REAR PANEL DEFINITION
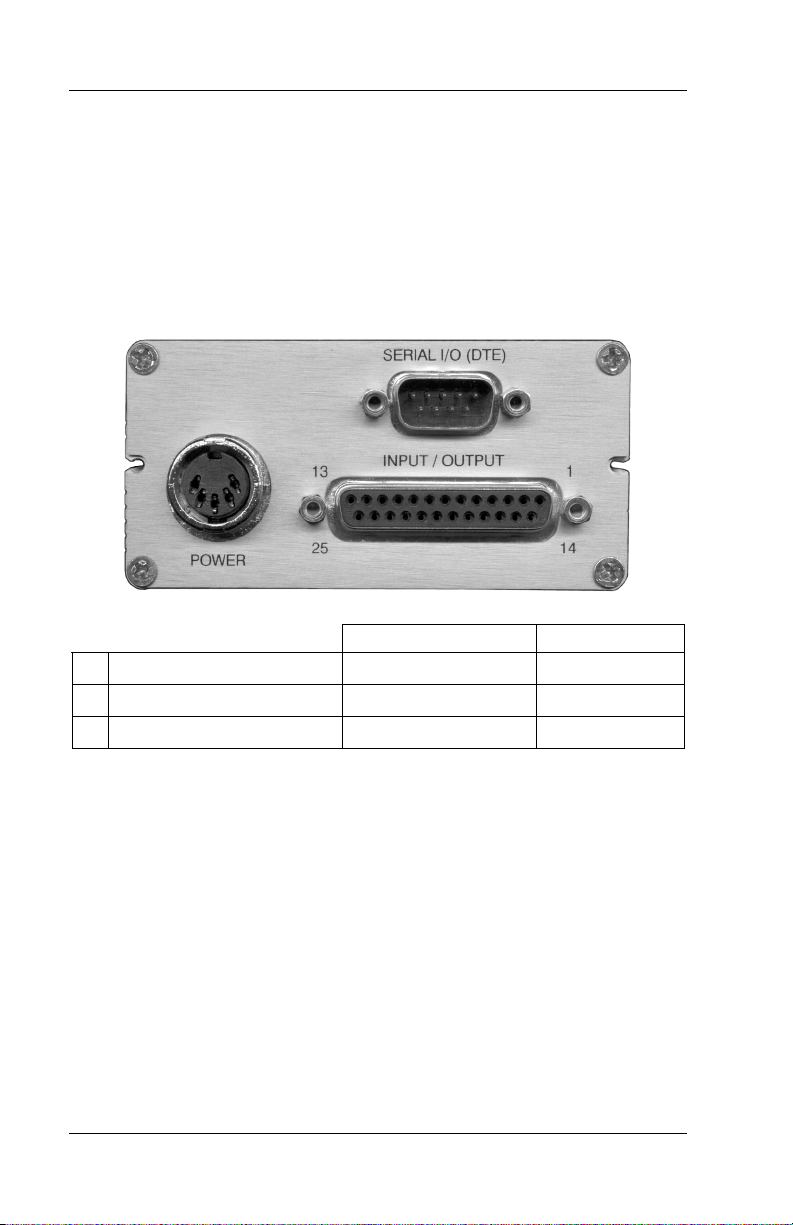
This paragraph describes the connectors on the rear panel of the Model
CYD211. See Figure 2-1. Readers are referred to paragraphs that contain
installation instructions and connector pin-outs for each feature. A summary
of connector pin-outs is provided in Paragraph 5.6.
CAUTION: Only make rear panel connections with power supply
disconnected.
211_Rear.bmp
Description Details
1 POWER 5-pin DIN Paragraph 2.3 Figure 5.2
2 SERIAL I/O (DTE) DE-9 Paragraph 4.1.1 Figure 5.4
3 INPUT/OUTPUT DB-25 Paragraphs 2.4 – 2.6 Figure 5.3
2.3 POWER INPUT CONNECTOR
Figure 2-1. Model CYD211 Rear Panel
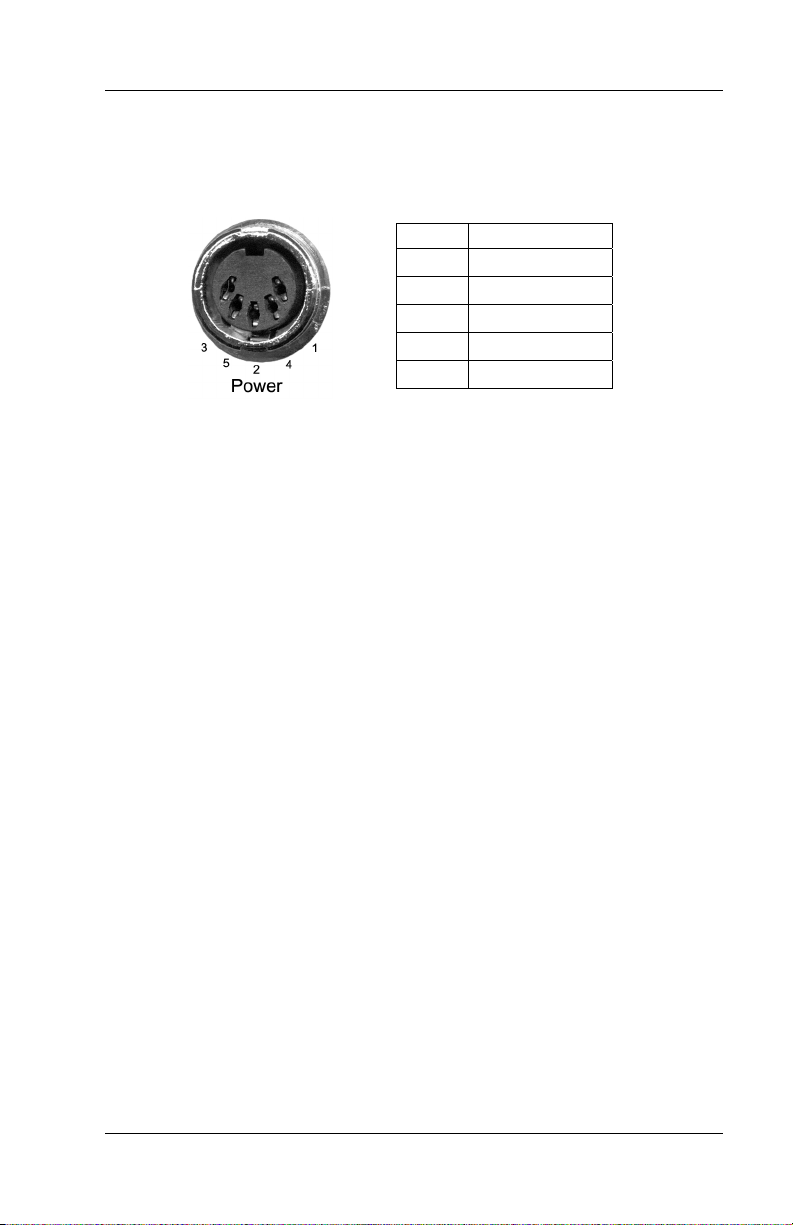
Power is supplied to the Model CYD211 through a 5-pin DIN connector
located on the rear panel of the instrument. There is no power switch on the
instrument, so it is off when not plugged in, or on when plugged in. Make
sensor connections before applying power to the instrument. The instrument
requires +5 V at 300 mA, +15 V at 75 mA, and –15 V at 15 mA. Refer to
Figure 2-2 for pin out descriptions.
2-2 Installation
Page 19
POWER INPUT CONNECTOR (Continued)
Omega Model CYD211 User’s Manual
WARNING: To prevent electrical fire or shock hazards, do not expose this
instrument, or its power supply, to rain or excess moisture.
Pin Description
1 Ground
2 Ground
3 +5V
4 –15V
5 +15V
2.4 EXTERNAL POWER SUPPLY
Figure 2-2. Power Connector
The Model CYD211 comes with the universal input power supply. This
power supply can accept input voltages from 100 to 240 VAC (±10%), 50
to 60 Hertz. It has an IEC 320-C14 line cord receptacle for input power and
a 5-pin DIN connector for the output. It can output +5 V at 1 A, +15 V at
400 mA, and –15V at 400 mA. One power supply can provide power for up
to three Model CYD211's with a user supplied adapter cable. The power
supply is CE Certified and meets or exceeds the following safety standards:
UL 1950, CSA C22.2, and IEC 60950.
2.5 SENSOR INPUT
This paragraph details how to connect diode and resistor sensors to the
Model CYD211 input. Refer to Paragraph 3.5 to configure the input. Sensor
installation instructions are provided in the Omega Temperature
Measurement and Control Catalog.
2.5.1 Input/Output Connector
Sensors are connected to the Model CYD211 through the Input/Output
connector on the rear panel of the instrument. The Input/Output connector is
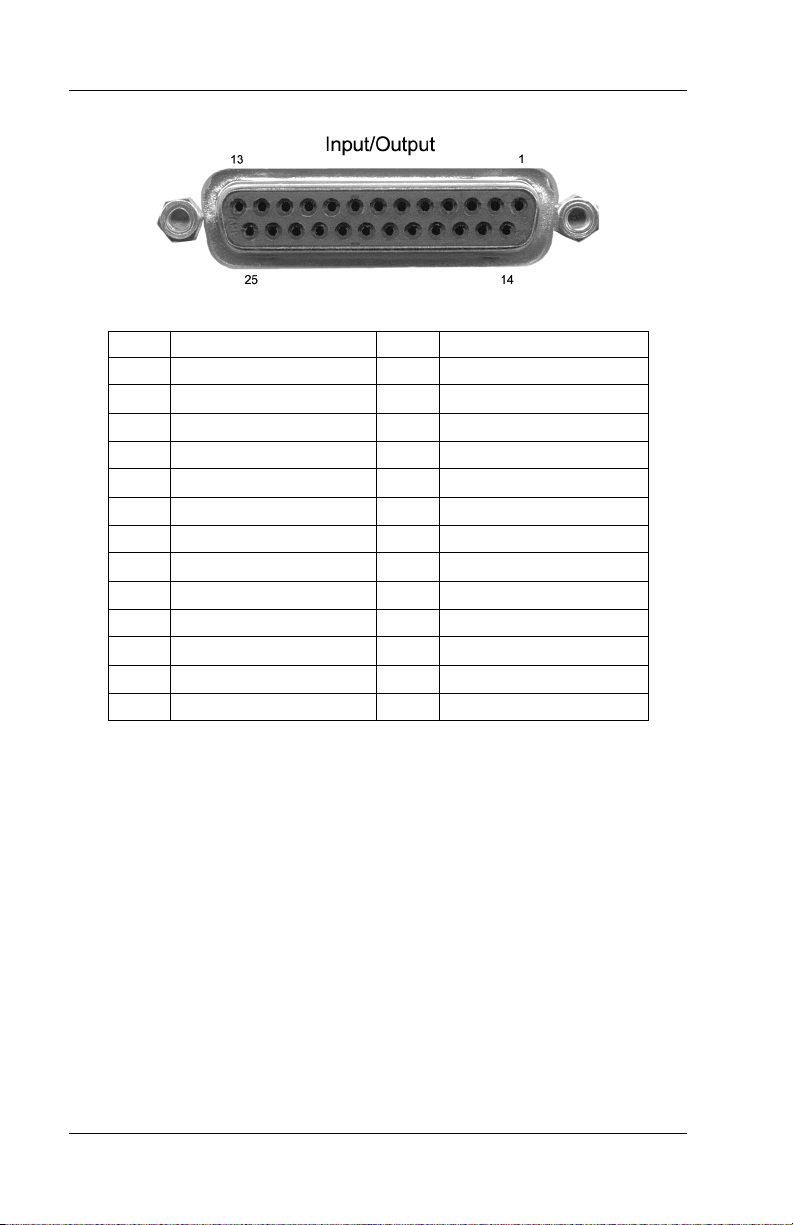
also used for the analog output and relay connections. Refer to Figure 2-3
for pin descriptions.
Installation 2-3
Page 20
Omega Model CYD211 User’s Manual
P-211-2-3.bmp
Pin Description Pin Description
1 No Connection — —
2 Shield 14 Shield
3 I+ 15 I–
4 V+ 16 V–
5 Shield 17 Shield
6 Analog Output Signal 18 Analog Output Ground
7 No Connection 19 No Connection
8 Low Alarm COM 20 Low Alarm N.O.
9 Low Alarm N.C. 21 No Connection
10 No Connection 22 No Connection
11 High Alarm COM 23 High Alarm N.O.
12 High Alarm N.C. 24 No Connection
13 No Connection 25 No Connection
2.5.2 Sensor Lead Cable
Figure 2-3. Input/Output Connector
The sensor lead cable used outside the cooling system can be much
different from what is used inside. Between the instrument and vacuum
shroud, heat leak is not a problem, but errors from noise pick up need to be
minimized. Larger conductor, 22 to 28 AWG stranded copper wire is
recommended because it has low resistance yet remains flexible when
several wires are bundled in a cable. The arrangement of wires in a cable is
also important. For best results, twist voltage leads, V+ and V– together and
twist current leads I+ and I– together. Cover the twisted pairs of voltage and
current leads with a braided or foil shield connected to the shield pin of the
instrument. This type of cable is available through local electronics
suppliers. Instrument specifications are given assuming 10 feet of sensor
cable. Longer cables, 100 feet or more, can be used but environmental
conditions may degrade accuracy and noise specifications.
2-4 Installation
Page 21

2.5.3 Shielding Sensor Leads
Omega Model CYD211 User’s Manual
Shielding the sensor lead cable is important to keep external noise from
entering the measurement. The sensor lead cable should be shielded
whenever possible. In many systems, it is impractical to shield the sensor
leads inside the cryostat. In theses cases, the cable shield should still be
used on the room temperature sensor leads up to the cryostat.
A shield is most effective when it is near the measurement potential, so the
Model CYD211 offers a shield pin on the Input/Output Connector that stays
close to the measurement. The shield pin is tied to chassis ground and
should be used as the connection point for the sensor cable shield.
Depending on how the instrument is grounded, the shield may or may not
need to be terminated at the opposite end. See Section 2.5.4 below on
instrument grounding.
2.5.4 Instrument Grounding
The Model CYD211 does not provide isolation between measurement
circuits and chassis ground. The measurement leads have a finite impedance
to chassis ground and should not be tied to ground outside the instrument or
an error in reading may result. The Model CYD211 has the best noise
performance when the chassis is tied to earth ground. This connection
should be made at only one point so as to avoid ground loops.
Many power supplies connect the common pins to earth ground. When
using this configuration, it should be the only connection between the
Model CYD211 and earth ground. If the sensor leads are shielded, the cable
shield should be tied to the shield pins on the Input/Output connector but
should not be terminated at the other end.
If the power supply does not connect the common pins to earth ground, the
connection should be made externally. If the sensor leads are shielded, one
end of the cable shield can be tied to the cryostat ground while the other end
is tied to the shield pins on the Input/Output connector. If the sensor leads
are not shielded the instrument chassis should be strapped to earth ground.
Installation 2-5
Page 22
Omega Model CYD211 User’s Manual
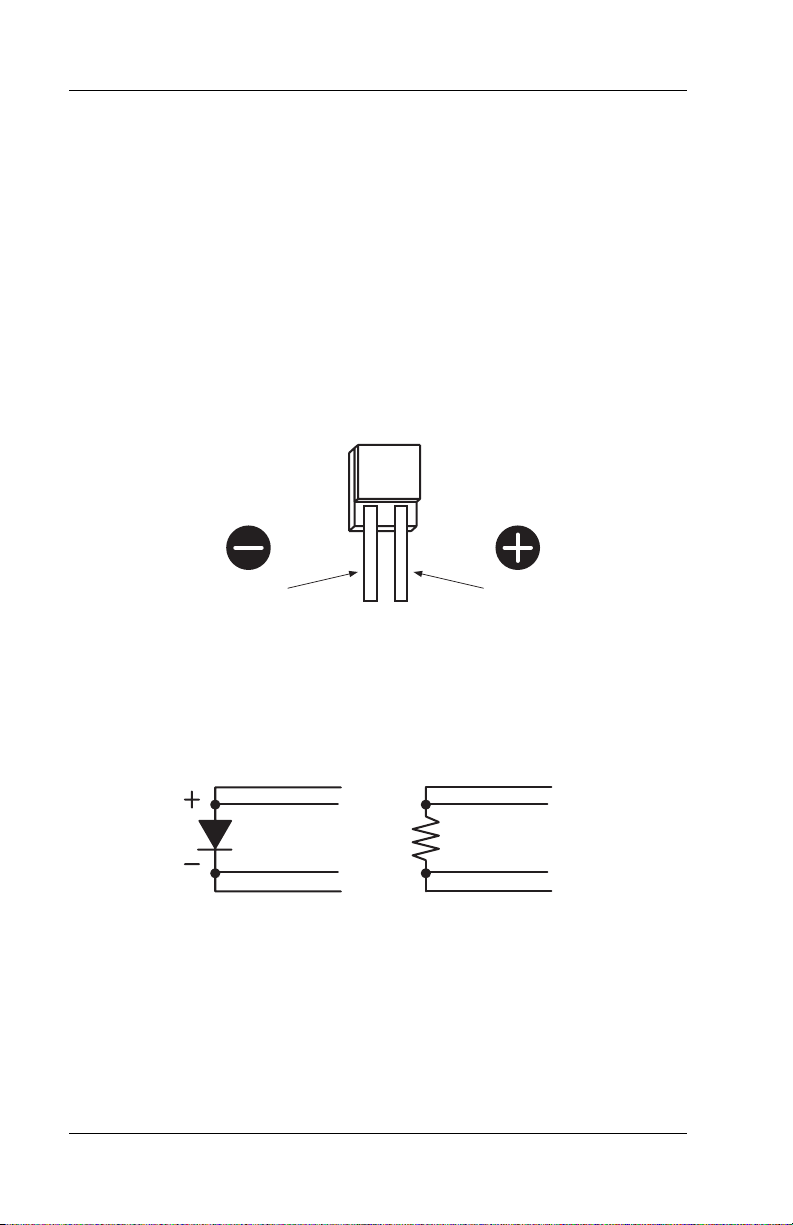
2.5.5 Sensor Polarity
Omega sensors ship with instructions that indicate which sensor leads are
which. It is important to follow these instructions for plus and minus leads
(polarity) as well as voltage and current when applicable. Diode sensors do
not operate in the wrong polarity. They look like an open circuit to the
instrument. Two-lead resistors can operate with any lead arrangement and
the sensor instructions may not specify polarity. Four-lead resistors may
depend more on lead arrangement. Follow any specified lead assignment for
four lead resistors. Mixing leads could give a reading that appears correct,
but is not the most accurate.
DT-670-SD
Diode Sensor Leads
Cathode
Anode
2.5.6 Four-Lead Sensor Measurement
All sensors, including both two-lead and four-lead can be measured with a
four-lead technique. Four-lead measurement eliminates the effect of lead
resistance on the measurement. If it is not taken out, lead resistance is a
direct error when measuring a sensor.
I+
V+
Four-Lead
Diode
V
I
Four-Lead
Platinum
I+
V+
V
I
In a four lead measurement, current leads and voltage leads run separately
to the sensor. With separate leads, there is little current in the voltage leads
so their resistance does not enter into the measurement. Resistance in the
current leads will not change the current as long as the voltage compliance
of the current source is not reached. When two lead sensors are used in four
lead measurements, the short leads on the sensor have an insignificant
resistance.
2-6 Installation
Page 23
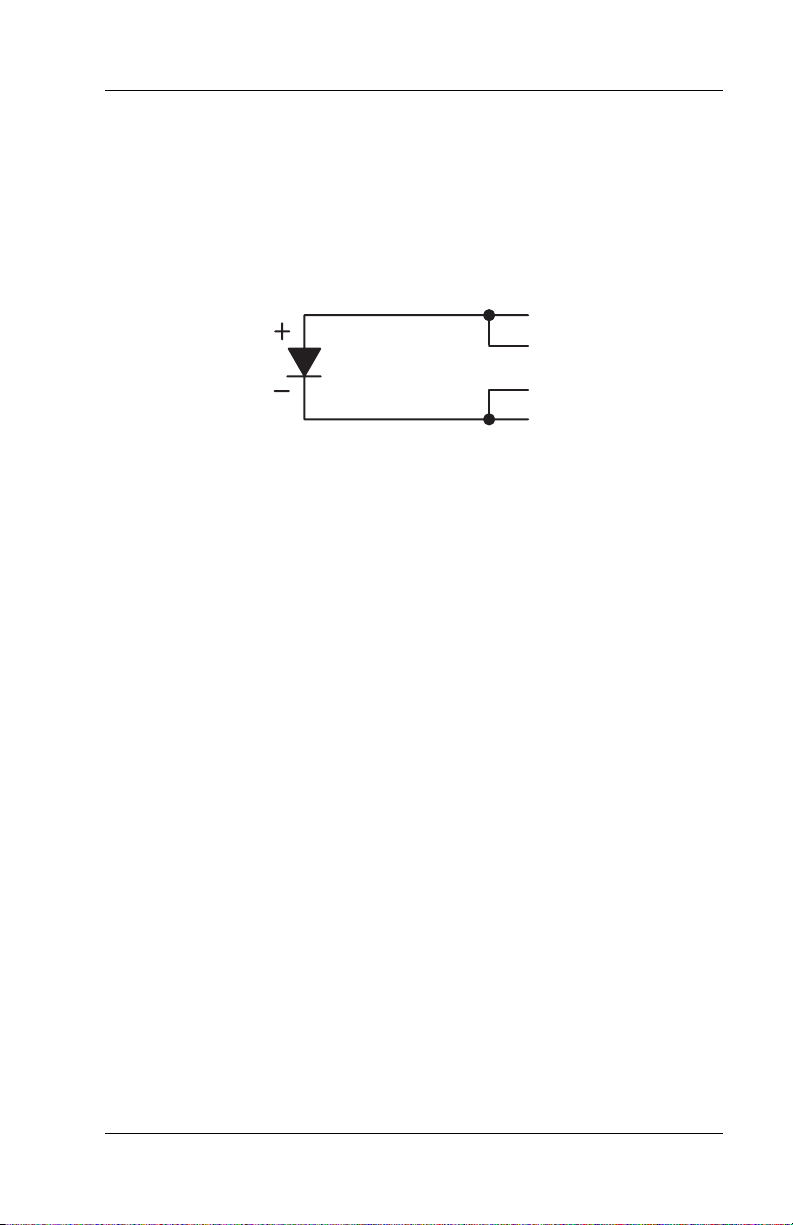
2.5.7 Two-Lead Sensor Measurement
Omega Model CYD211 User’s Manual
Sometimes a crowded cryogenic system forces users to read sensors in a
two-lead configuration because there are not enough feedthroughs or room
for lead wires. If this is the case, plus voltage to plus current and minus
voltage to minus current leads are attached at the back of the instrument or
at the vacuum feedthrough.
Two-Lead
Diode
I+
V+
V
I
The error in a resistive measurement is the resistance of the lead wire run
with current and voltage together. If the leads contribute 2 or 3 Ω to a 5 kΩ
reading, the error can probably be tolerated. When measuring voltage for
diode sensors the error in voltage can be calculated as the lead resistance
times the current, typically 10 µA. For example: a 10 Ω lead resistance
times 10 µA results in a 0.1 mV error in voltage. Given the sensitivity of a
silicon diode at 4.2 K the error in temperature would be only 3 mK. At 77 K
the sensitivity of a silicon diode is lower so the error would be close to
50 mK. Again, this may not be a problem for every user.
2.5.8 Lowering Measurement Noise
Good instrument hardware setup technique is one of the least expensive
ways to reduce measurement noise. The suggestions fall into two
categories: (1) Do not let noise from the outside enter into the measurement,
and (2) Let the instrument hardware features work to their best advantage.
• Use 4-lead measurement whenever possible.
• Do not connect sensor leads to chassis or earth ground.
• Use twisted shielded cable outside the cooling system.
• Attach the shield pin on the sensor connector to the cable shield.
• Do not attach the cable shield at the other end of the cable, not even to
ground without taking precautions to prevent ground loops.
• Run different inputs and outputs in their own shielded cable.
• Use twisted wire inside the cooling system.
• Use a grounded receptacle for the instrument power cord.
• Consider ground strapping the instrument chassis to other instruments or
computers.
Installation 2-7
Page 24

2.6 ANALOG OUTPUT
Omega Model CYD211 User’s Manual
The Analog Output available on the rear panel of the Model CYD211 can
be configured as either a voltage or current output that can be used for
monitor and control applications. Its most basic function is a temperature
monitor where it puts out a voltage or current that is proportional to
temperature. Refer to Paragraph 3.8 to configure the analog output.
In voltage mode the analog output can vary from 0 – 10 V with a resolution
of 0.15 mV or 0.0015% of full scale. The output can drive a resistive load
of no less than 500 Ω. The output is short-circuit protected so the instrument
is not harmed if the load resistance is too small. However, this practice is
not recommended as the additional load on the instrument power supply
causes noise on internal circuits.
In current mode, the analog output can vary from 4 to 20 mA with a
resolution of 0.3 µA or 0.0015% of full scale. The output is limited by a
10 V compliance voltage so the largest resistive load that the output can
drive in current mode is 500 Ω.
The output for the analog output is available from Pins 6 and 18 of the
Input/Output connector. See Figure 2-3. The terminal marked analog output
signal is the output voltage terminal, the terminal marked analog output
ground is the ground and is attached to chassis ground inside the instrument.
It is not recommended to attach the analog output ground to a ground
outside the instrument. The output should be read by an instrument with an
isolated or differential input wherever possible. Connecting to an external
ground can cause noise in the analog output voltage or the sensor input
measurement. If this cannot be avoided, try to keep the chassis of the two
instruments at the same potential with a ground strap.
2.7 RELAYS
The Model CYD211 has two relays, labeled high and low. The relays are
most commonly associated with the alarm feature. The relays can also be
placed in manual mode and controlled directly by the user from the front
panel or over the computer interface. Refer to Paragraph 3.7 and the
RELAY command in Chapter 4.
Normally Open (N.O.), Normally Closed (N.C.), and Common (COM)
contacts are available for each relay. All contacts (including common) are
isolated from the measurement and chassis grounds of the instrument. If a
relay is inactive (Off), it will be in its normal state of open or closed. When
the relay is active (On), it will be in the opposite state. Relay connections
are available on the Input/Output connector. See Figure 2-3.
2-8 Installation
Page 25
2.8 PANEL MOUNTING
Omega Model CYD211 User’s Manual
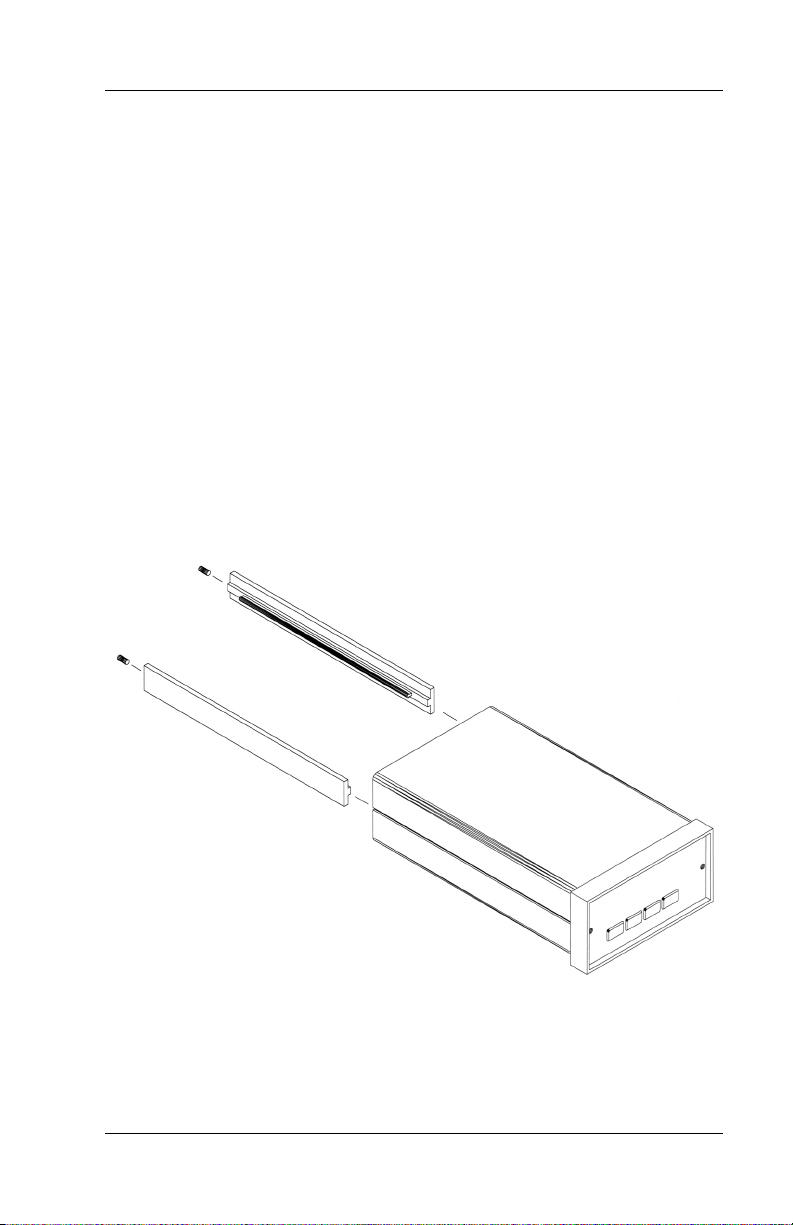
The Model CYD211 can be easily panel mounted using the panel mount
brackets included. The Model CYD211 fits in a 91
cutout. To panel mount the instrument, unplug the unit and then use a
× 44 mm (3.6 × 1.7 inch)
1
/16
inch hex wrench to remove the 2 set screws holding the brackets in place.
Remove the 2 panel mount brackets by sliding them towards the rear of the
unit. Then place the unit into the panel cutout. Slide the two panel mount
brackets back into the case of the instrument. Reinstall the 2 set screws and
tighten them until the instrument is secure.
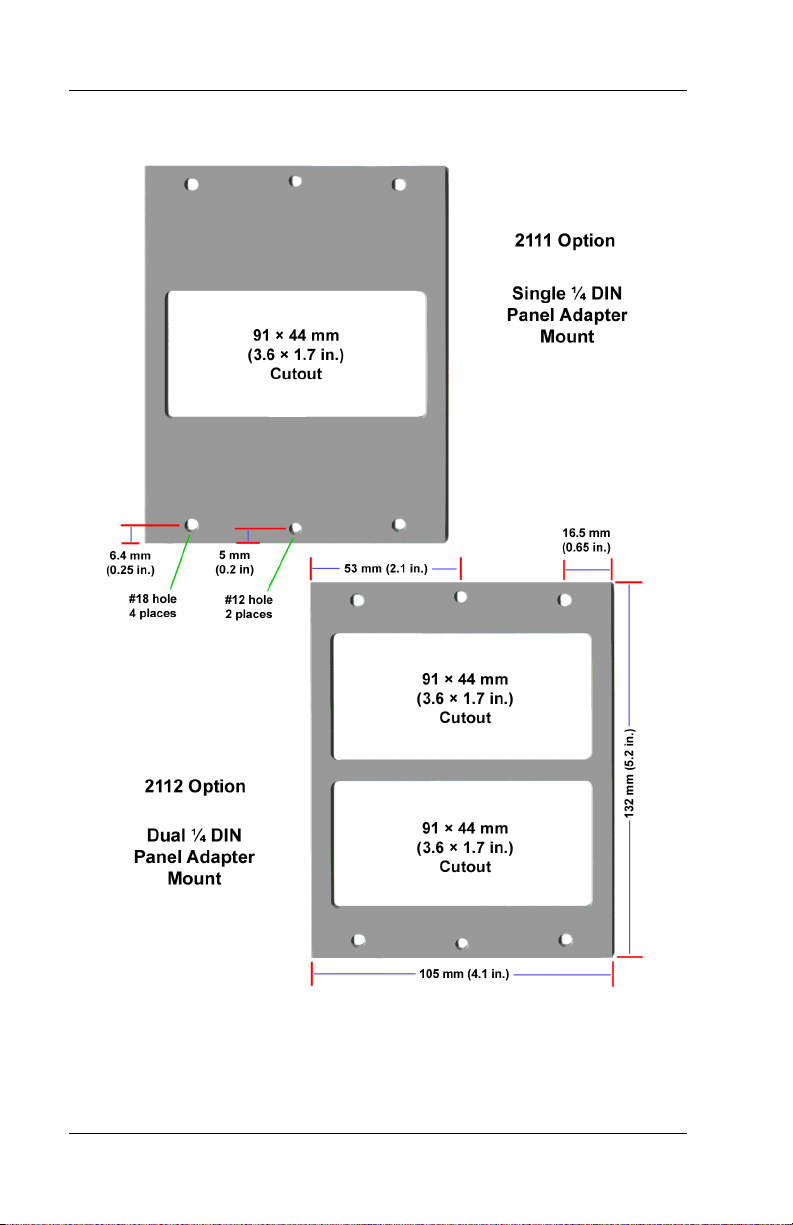
The Model CYD211 can also be purchased with either of two panel mount
adapters. The Model CYD2111 or 2112 will mount 1 or 2 Temperature
Monitors in a ¼ DIN cutout measuring 105 mm Wide × 132 mm High (4.1
× 5.2 inches). See Figure 2-5.
Panel.bm p
Figure 2-4. Panel Mounting Details
Installation 2-9
Page 26
Omega Model CYD211 User’s Manual
Cutout_Panels.bmp
Figure 2-5. 2111 and 2112 Panel Mount Adapters
2-10 Installation
Page 27

Omega Model CYD211 User’s Manual
CHAPTER 3
OPERATION
3.0 GENERAL
This chapter provides operating instructions for most features of the Model
CYD211 Temperature Monitor. Corresponding computer interface
instructions for these features are provided in Chapter 4.
3.1 INSTRUMENT POWER
The Model CYD211 is powered on by plugging in the power supply. There
is no power switch on the instrument. When the Model CYD211 is powered
on every segment on the display will illuminate for a few seconds to
indicate instrument initialization. Most of the instrument setup parameter
values are retained when powered off with one exception. The latching
alarm will reset itself on power-up. When the instrument is powered on for
the first time parameter values are set to their defaults, listed in Table 3-6.
When initialization is complete the instrument will begin its normal reading
cycle and temperature or sensor units readings should appear on the display.
Messages will appear in the reading location on the display if the
measurement input has not been fully configured. Messages listed in
Paragraph 5.3.1, Instrument Hardware Errors, are related to the instrument
hardware and may require help from Omega service. The messages listed in
Paragraph 5.3.2, Limit Errors, do not indicate a problem with the instrument
and will disappear when input setup is complete.
The Model CYD211 should be allowed to warm up for a minimum of 30
minutes to achieve rated accuracy.
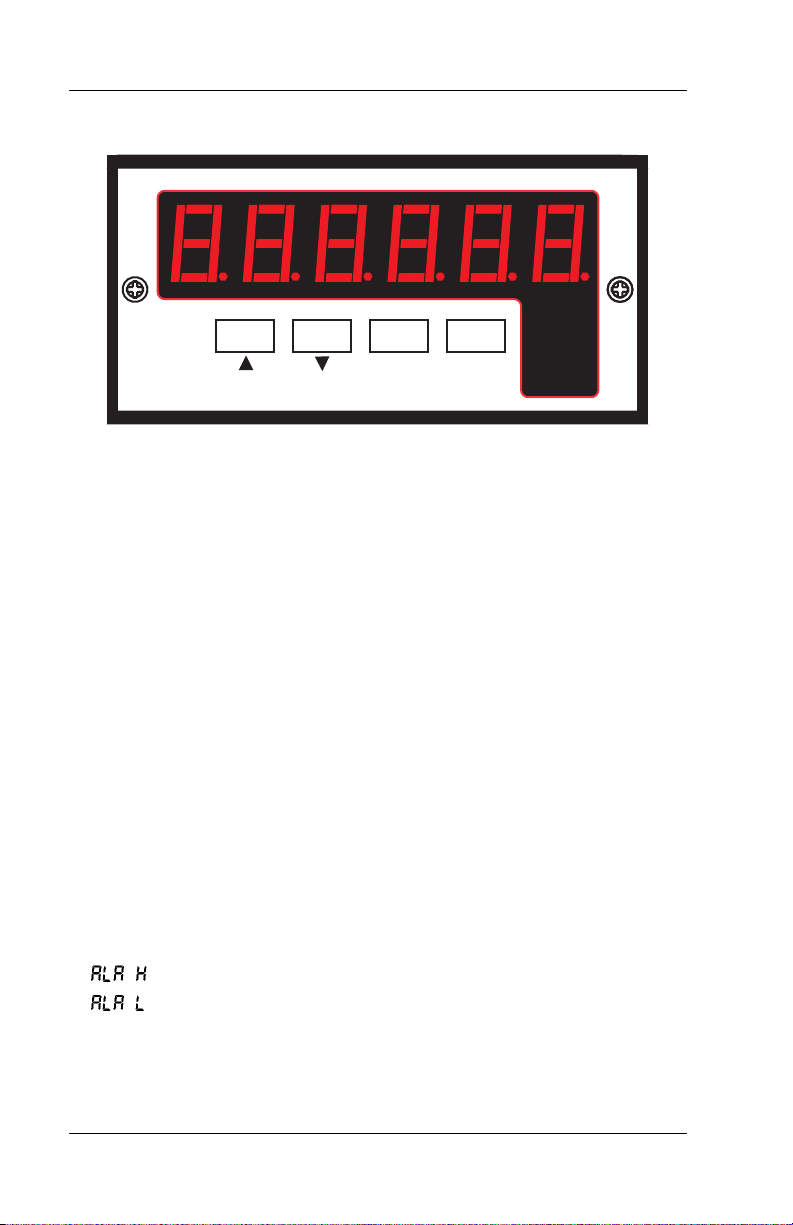
3.2 DISPLAY DEFINITION
The Model CYD211 has a 6-digit LED display capable of showing both
numeric and character data. In normal operation the display shows the
current sensor reading in sensor units or temperature units. The four
annunciators below the right hand side of the display indicate what units the
display is reading in. Other display configurations appear during parameter
setting and data entry operations. These displays are illustrated in their
individual operation paragraphs.
Operation 3-1
Page 28
Omega Model CYD211 User’s Manual
°C°FK
SELECT
CYD211 Temperature Monitor
ENTER
V/
W
211_Display.eps
Figure 3-1. Model CYD211 Display
3.3 LED ANNUNCIATORS AND DISPLAY MESSAGES
The display units are indicated using LED annunciators below the right side
of the main display.
LED Annunciators
°C The display units are in degrees Celsius.
K The display units are in Kelvin.
°F The display units are in degrees Fahrenheit.
V/Ω The display units are in sensor units, either volts or ohms
depending on input type.
Alarm messages are displayed alternately with the reading when an alarm
condition exists. If both a high and low alarm condition exists (can only
happen when latching alarms are active), then the display will alternate
between the current reading and the alarm high and alarm low messages.
Other display messages are described in Paragraph 5.3.
Alarm Messages
Indicates that the high alarm is active.
Indicates that the low alarm is active.
3-2 Operation
Page 29

3.4 KEYPAD DEFINITION
Omega Model CYD211 User’s Manual
The Model CYD211 has 4 keys on the front panel to setup instrument
functions. A list of front panel setup operations is shown in the Model
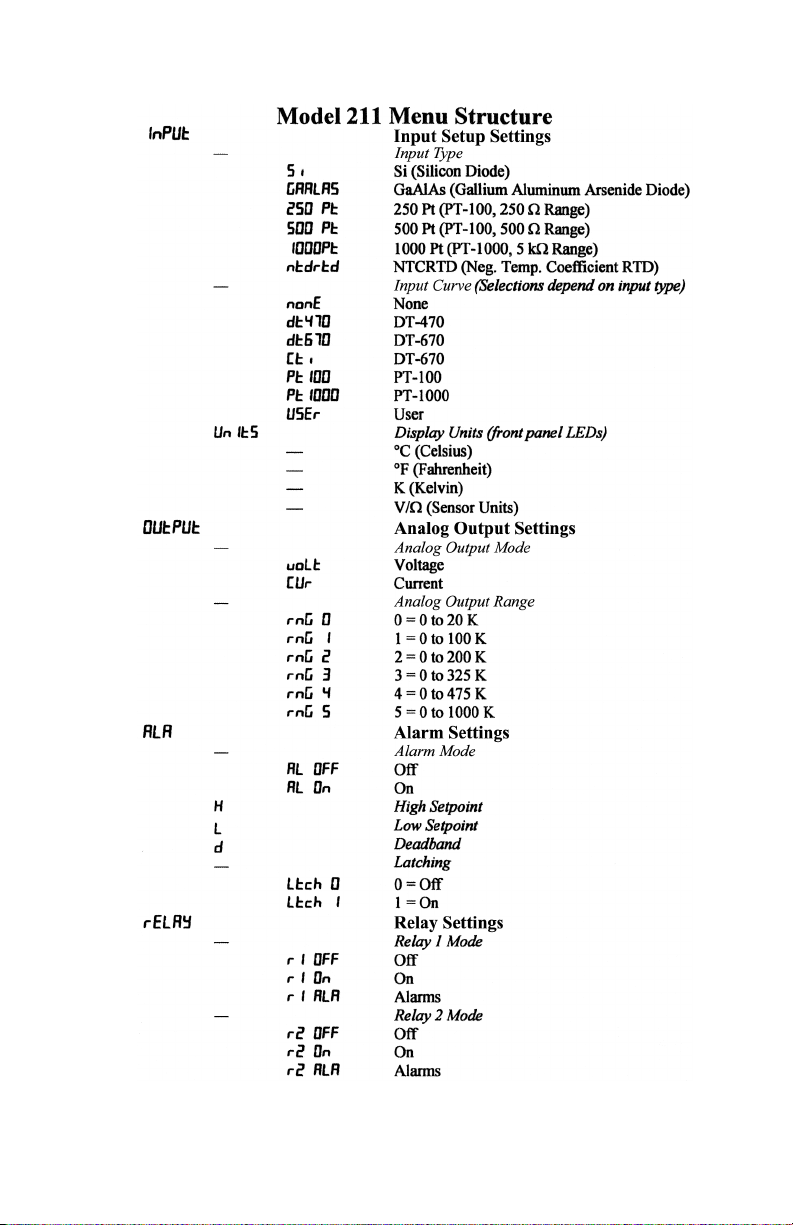
CYD211 Menu Structure located on the inside back cover of this manual.
3.4.1 Key Descriptions
s The up arrow serves two functions: to choose between parameters
during setting operations and to increment numerical data. Holding
the button in while setting numerical data increases setting speed.
t The down arrow serves two functions: to choose between
parameters during setting operations and to decrement numerical
data. Holding the button in while setting numerical data increases
setting speed.
Select Places the instrument into settings mode where all instrument
parameters can be setup. When pressed while in the settings mode,
it terminates the settings mode without changing the existing
parameter value. Press and hold to display code revision date.
Enter Completes setting function storing any changes to the parameter
value. Press and hold to lock or unlock the keypad.
3.4.2 General Keypad Operation
The CYD211 has two keypad operations: setting selection and data entry.
Setting Selection: Allows the user to select from a finite list of parameter
values. During setting selection the s and t keys are used to select a
parameter value. Enter is used to accept the change and advance to the next
parameter. Select will cancel the change to that parameter and return to the
normal display.
Data Entry: Allows the user to enter numeric parameter values using the
s and t keys. Press the s key to increase the value of the setting, or press
the t key to decrease its value. Holding either key down for a few seconds
will cause the number to change at a faster rate. Once the correct parameter
value is entered press Enter to accept the change and advance to next
parameter. Pressing Select will cancel the change to that parameter and
return to the normal display.
Related setting selection and data entry sequences are often chained
together under a single setting sequence. To skip over a parameter without
changing its value press Enter before pressing an arrow key. To return to
the normal display in the middle of a setting sequence press Select before
pressing an arrow key. Changes “entered” before Select is pressed are kept.
Operation 3-3
Page 30

Omega Model CYD211 User’s Manual
3.5 INPUT SETUP
3.5.1 Input Type
The Model CYD211 supports a variety of temperature sensors sold by
Omega and other manufactures. An appropriate sensor type must be
selected for the input. Refer to Table 3-1 for a list of common sensor types.
If a particular sensor is not listed in the Input Type selection, look at Table
3-1 to find a sensor with similar range and excitation.
To select sensor type, press the Select key, use the s or t keys to select
“input,” then press the Enter key. Use the s or t keys to cycle through
the sensor types shown in Table 3-1. When the desired type appears, press
the Enter key. Proceed to Paragraph 3.5.2 to select a temperature curve or
press the Select key to return to the normal display.
Table 3-1. Sensor Input Types
Display
Message
gaAlas
250 Pt
500 Pt
1000Pt
NtCrtd
Input
Type
2.5 V 10 µA Silicon Diode V/K Neg.
7.5 V 10 µA
250 Ω
500 Ω
5000 Ω
7500 Ω
Excit-
ation
1 mA
1 mA
1 mA
10 µA
Sensor
Type
GalliumAluminumArsenide
Diode
100 Ω Plat.
RTD <675K;
Rhodium-Iron
RTD
100 ΩPlat.
RTD >675K
1000 ΩPlat.
RTD
Negati ve
Temperature
Coefficient
(NTC) RTD
Curve
Format
V/K Ne g. TG-120 Series
Ω/K Pos.
Ω/K Pos.
log R/K Neg.
Coef-
ficient
Omega
Sensors *
DT-470,
DT-670
PT-100 Series
Platinum,
RF-800
Rhodium-Iron
—
Cernox, HighTemp Cernox,
Carbon Glass,
Germanium,
Rox, and
Thermox
* Refer to the Omega Temperature Measurement and Control Catalog for
complete details on all Omega Temperature Sensors.
3-4 Operation
Page 31

Omega Model CYD211 User’s Manual
3.5.2 Curve Selection
The Model CYD211 supports a variety of temperature sensors sold by
Omega and other manufacturers. After the appropriate sensor type is
selected for the input (Paragraph 3.5.1), an appropriate temperature
response curve may be selected. The Model CYD211 can use curves from
several sources. Standard curves are included with every instrument and
numbered 1 thru 7. A single user curve can be loaded via the serial interface
when a sensor does not match a standard curve. CalCurve option can be
stored as the user curve at the factory or by the customer. The complete list
of standard curves built in to the Model CYD211 is provided in Table 3-2.
Curve tables are listed in Appendix A of this manual.
During normal operation, only the curves related to the input type selected
are displayed. If the curve you wish to select does not appear in the
selection sequence make sure the curve format matches the recommended
format for the input type selected. Refer to Table 3-1.
NOTE: The sensor reading can always be displayed in sensor units.
If a temperature response curve is selected for an input, its
readings may also be displayed in temperature.
To select a curve, continue from the input type selection (Paragraph 3.5.1)
or press the Select key, use the s or t key to select "input," then press
the Enter key twice. The display will show the curve currently assigned to
the input. If no curve is attached “none” will be displayed. Use the s or t
keys to cycle through the temperature response curves. When the desired
type appears, press the Enter key. Proceed to Paragraph 3.5.3 to select the
display units or press the Select key to return to the normal display.
Curve
No.
0
1
2
3
6
7
21
Display
Name
NONE
DT470
DT670
PT100
PT1000
User
Table 3-2. Standard Curves
Sensor
Type
Omega
Sensor
Curve Name
Temperature
Range
None None None None
Silicon Diode DT-470 Curve 10 1.4 – 475 K
Silicon Diode DT-670 DT-670 1.4 – 500 K
Silicon Diode N/A CTI Curve C 10
100 Ω
Platinum RTD
1000 Ω
Platinum RTD
PT-100 DIN 43760 30
N/A DIN 43760 30
– 320 K
– 800 K
– 800 K
User defined — User defined User defined
Operation 3-5
Page 32

3.5.3 Display Units Selection
Omega Model CYD211 User’s Manual
The Model CYD211 has a 6-character LED display. During normal
operation it can display the senor reading in temperature (Kelvin, Celsius,
or Fahrenheit) or sensor units (V or Ω). The LEDs to the right of the keys
indicate what units are being displayed.
To select display units, continue from input curve selection (Paragraph
3.5.2) or press the Select key, use the s or t key to select "input," then
press the Enter key three times. The display shows “
” and a LED
shows the selected display units. Use the s or t key to cycle through the
display units. When the desired unit is highlighted, press the Enter key.
3.6 ALARM SETUP AND OPERATION
The input of the CYD211 has high and low alarm capability. Temperature
reading data in Kelvin can be compared to the alarm setpoint values. A
reading higher than the high setpoint or off the high end of the temperature
curve triggers the high alarm and a reading lower than the low alarm
setpoint or off the low end of the temperature curve triggers the low alarm.
NOTE: Alarm setpoints are always set in K, but the alarm feature will still
operate if the instrument displays °C or °F. If no temperature
response curve is chosen, the alarm function will not operate. Refer
to Paragraph 3.5.2 for curve selection.
If an alarm activates for the input, the display flashes between the current
reading and “
The two relays can also be tied to alarm functions (refer to Paragraph 3.7).
” or “ ” for high and low alarms respectively.
Latching Alarms. Often used to detect faults in a system or experiment that
require operator intervention. The alarm state remains visible to the operator
for diagnostics even if the alarm condition is removed. Relays often signal
remote monitors or for added safety take critical equipment off line.
Pressing the Select key clears latched alarms.
Non-Latching Alarms. Often tied to relay operation to control part of a
system or experiment. The dead band parameter can prevent relays from
turning on and off repeatedly when the sensor input reading is near an alarm
setpoint. Example: If the high alarm setpoint = 100 K and the dead band =
1 K, the high alarm triggers when sensor input temperature increases to
100 K, and it will not deactivate until temperature drops to 99 K.
To begin alarm setup press the Select key and use the s or t key to select
“ala” and press the Enter key. Use the s or t key to turn the alarm
function on or off. If the alarm function is powered on, the alarm will
continue with alarm setup otherwise no other settings need to be made and
the display will return to normal operation.
3-6 Operation
Page 33

Alarm Setup and Operation (Continued)
Omega Model CYD211 User’s Manual
The next setting is the high alarm point indicated by a “ ” on the left of the
display. The high alarm setpoint is always set in units of Kelvin. Use the s
or t key to set the high alarm setpoint. Holding the button in will increase
the rate of change. The minimum value is 0 K and the highest is 999.9 K.
Press the Enter key to store the high alarm setpoint.
The next setting is the low alarm setpoint indicated by a “L” on the left of
the display. Its setting is similar to the high alarm setpoint listed above.
Press the Enter key to store the low alarm setpoint.
The next setting is the alarm deadband indicated by a “D” on the left of the
display. Its setting is similar to the high and low alarm point settings except
that the maximum value that can be set is 99.9 K. Press the Enter key to
store the alarm deadband.
The final setting is alarm latching. The display will show “ ” along
with the setting, 0 indicating that the latch function is turned off and a 1
indicating that it is turned on. Use the s or t key to set the alarm latching
status. Press the Enter key to store the alarm latching status. The display
will return to normal operation.
3.7 RELAY SETUP
There are two relays on the CYD211 numbered 1 and 2. They are most
commonly thought of as alarm relays, but they may be manually controlled.
The relays are rated for 30 VDC and 1 A. The terminals are in the
Input/Output connector on the CYD211 rear panel. See Figure 2-3.
When using relays with alarm operation, set up the alarms first (Paragraph
3.6). Relay 1 is tied to the low alarm operation and relay 2 is tied to the high
alarm operation.
To begin relay setup press the Select key and use the s or t key to select
“relay” and press the Enter key. Relay 1 will be setup first indicated by
the ”R1” on the left of the display. Use the s or t key to select the
function of relay 1 from manually off (r1 off), manually on (r1 on), or
following the low alarm (r1 ALA). If the relay is set to follow the alarm, it
will turn on when the temperature drops below the low alarm setpoint. Press
the Enter key to store the relay setting.
The next setting is the relay 2 setup indicated by the ”R2” on the left of the
display. Use the s or t key to select the function of relay 2 from manually
off (r2 off), manually on (r2 on), or following the high alarm (r2 ALA).
If the relay is set to follow the alarm, it will turn on when the temperature
goes above the high alarm setpoint. Press the Enter key to store the relay
setting. The display will return to normal operation.
Operation 3-7
Page 34

3.8 ANALOG OUTPUT SETUP
Omega Model CYD211 User’s Manual
The Model CYD211 has a single analog output. It is normally configured to
provide an analog signal proportional to temperature to a strip chart
recorder or separate data acquisition system. Pins 6 and 18 on the DB-25
Input/Output connector are used for the analog output. See Figure 2-3.
The analog output is front panel configurable to be either a variable DC
voltage or current source. In voltage mode, the analog output can vary from
0 to 10 V with a resolution of 0.15 mV or 0.0015% of full scale. The output
can drive a resistive load of no less than 500 Ω. The output is short-circuit
protected so the instrument is not harmed if the load resistance is too small.
However, this practice is not recommended as the additional load on
instrument power supplies causes noise on internal circuits.
In current mode the analog output can vary from 4 to 20 mA with a
resolution of 0.2 µA or 0.0015% of full scale. The output is limited by a
10 V compliance voltage so the largest resistive load that the output can
drive in current mode is 500 Ω.
The analog output has two modes, voltage and current, and six ranges.
The ranges are listed in Table 3-3. The low output is the temperature that
produces zero output (0 V or 4 mA) and the high output is the temperature
that produces full output (10 V or 20 mA).
If no curve is selected for the input, the analog output range is fixed to
output a signal proportional to sensor units. Refer to Table 3-4.
NOTE: When a curve is selected for the input, the analog output always
works in units of Kelvin no matter what units are displayed.
To begin analog output setup press the Select key and use the s or t key
to select “0utput” and press the Enter key. Analog output mode will be
set up first. Use the s or t key to choose between voltage mode or current
mode. Press the Enter key to store the analog output mode.
The next setting is analog output range. Refer to Table 3-3 and use the
s or t key to select a range for the analog output. Press the Enter key to
store the analog output range. The display will return to normal operation.
3-8 Operation
Page 35

Table 3-3. Analog Table 3-4. Analog Output
Output Range Scales Scales In Sensor Units
Range
Numbe
Output
r
Omega Model CYD211 User’s Manual
Low
High
Output
Input
Type
Low
Output
High
Output
0 0 K 20 K Silicon Diode 0 V 10 V
1 0 K 100 K GaAlAs Diode 0 V 10 V
2 0 K 200 K
3 0 K 325 K
4 0 K 475 K PT-1000
5 0 K 1000 K NTC RTD
PT-100, 250 Ω 0 Ω 1 kΩ
PT-100, 500 Ω 0 Ω 1 kΩ
0 Ω 10 kΩ
0 Ω 10 kΩ
3.9 ANALOG OUTPUT TO TEMPERATURE CONVERSION
The output current or voltage is directly proportional to the temperature
reading. For the 4
– 20 mA output, the following formula converts output
current to temperature:
T = A + B × I
where T = temperature in Kelvin, I
OUT
= output current in mA, and A and B
OUT
are constants from Table 3-5.
For the 0 – 10 V output, the following formula converts output voltage to
temperature:
T = C × V
where T = temperature in Kelvin, V
OUT
= output voltage, and C is a constant
OUT
from Table 3-5.
Table 3-5. Conversion Parameters for Temperature in K
RANGE TEMP. (K) A (K) B (K/mA) C (K/V)
4 – 20 mA 0 – 10 V
0 0 – 20 –5.00 1.2500 2.0
1 0 – 100 –25.00 6.2500 10.0
2 0 – 200 –50.00 12.5000 20.0
3 0 – 325 –81.25 20.3125 32.5
4 0 – 475 –118.75 29.6875 47.5
5 0 – 1000 –250.00 62.5000 100.0
Operation 3-9
Page 36
3.10 LOCKING AND UNLOCKING THE KEYPAD
Omega Model CYD211 User’s Manual
The keypad lock feature prevents accidental changes to parameter values.
When the keypad is locked, only the alarm reset function of the Select key
still functions. All other key functions are ignored.
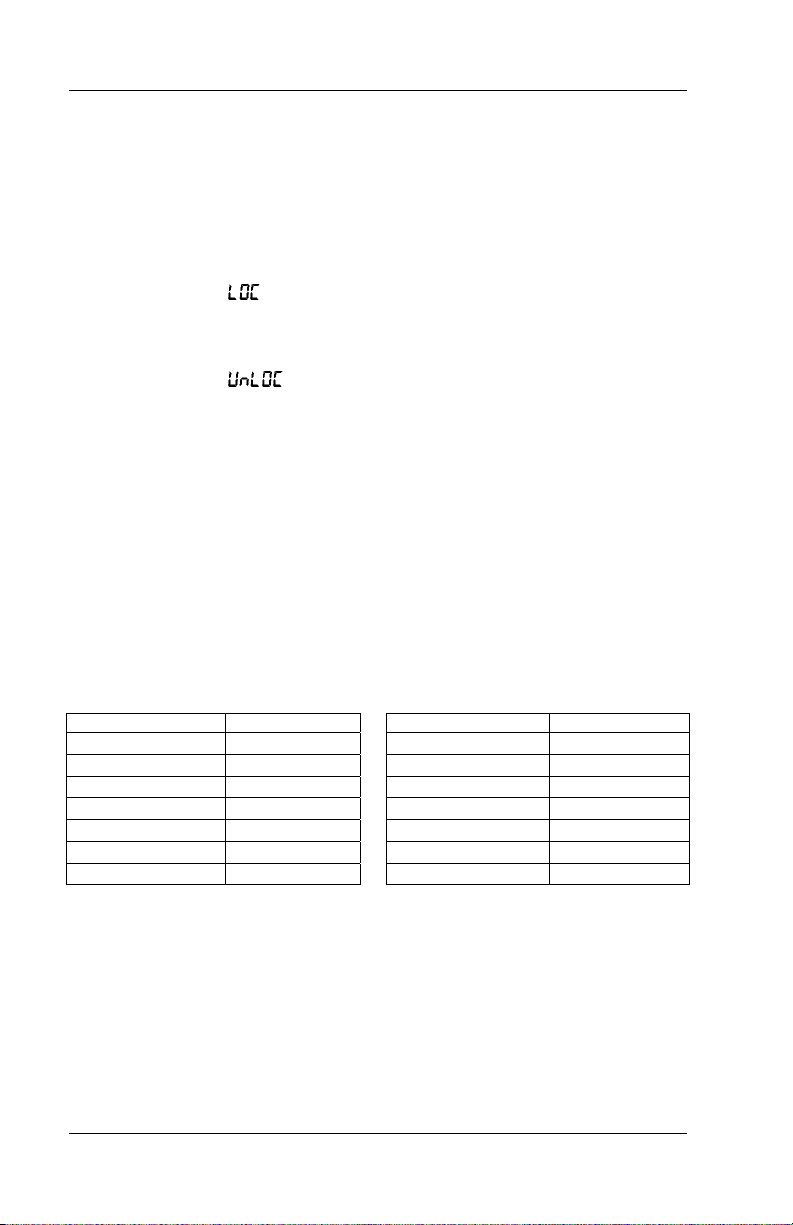
To lock the keypad, press and hold the Enter key for 10 seconds. The
display will show “
” indicating the keypad is now locked. Release the
Enter key and the display will return to normal operation.
To unlock the keypad, press and hold the Enter key for 10 seconds. The
display will show “
” indicating the keypad is now unlocked. Release
the Enter key and the display will return to normal operation.
3.11 RESETTING THE MODEL CYD211 TO DEFAULT VALUES
It is sometimes necessary to reset instrument parameters that are stored in
nonvolatile memory called EEPROM. The default values of the Model
CYD211 are shown below in Table 3-6. Resetting to default values does not
affect the user curve or the calibration data.
To reset the Model CYD211 to default values, press and hold both the s or
t keys for 10 seconds. All of the LED digits will illuminate when the
memory has been reset. Release the buttons and the display will return to
normal operation.
Table 3-6. Model CYD211 Default Values
Parameter Default Parameter Default
Input Type Silicon Diode Alarm Latch Off
Input Curve DT-470 Analog Mode Voltage
Display Units K Analog Range 5
Alarm Function Off Relay 1 Mode Off
Alarm High 0 K Relay 2 Mode Off
Alarm Low 0 K Keypad Lock Unlocked
Alarm Deadband 0 K Display Brightness 8
3.12 CHECKING CODE DATE REVISION
To check revision date of the firmware code, press and hold the Select key
until the display shows the code date. It is in the format of MMDDYY,
where MM is the month, DD is the day, and YY is the year of the code.
Release the key and the display returns to normal operation.
3-10 Operation
Page 37

3.13 CURVE ENTRY AND STORAGE
Omega Model CYD211 User’s Manual
The Model CYD211 has standard curve locations numbered 1 thru 20. At
present, not all locations are occupied by curves; the others are reserved for
future updates. Standard curves can not be changed by the user, and
reserved locations are not available for user curves.
The Model CYD211 has one user curve location. The user curve can only
be entered using the serial interface. Refer to Paragraph 4.2 for the serial
interface curve commands. The user curve location can hold from 2 to 200
data pairs (breakpoints) including a value in sensor units and a
corresponding value in Kelvin.
3.13.1 Curve Header Parameters
Each curve has a set of parameters that are used for identification and to
allow the instrument to use the curve effectively. The parameters must be
set correctly before a curve can be used for temperature conversion.
Curve Number: 1
– 21. Location 21 is for the user curve.
Name: Up to a 15-character name can be entered.
Serial Number: Up to a 10-character sensor serial number consisting of
both numbers and letters.
Format: The format parameter tells the instrument what breakpoint data
format to expect. Different sensor types require different formats.
Formats for Omega sensors are:
V/K: Volts vs. Kelvin for Diode sensors.
Ω/K: Resistance vs. Kelvin for platinum RTD sensors.
Log Ω/K: Log Resistance vs. Kelvin for NTC resistive sensors.
Limit: Temperature limit in Kelvin for the curve. Default is 375 K. This
limit is not used in this instrument but is left in to be compatible with
Omega temperature controllers.
Temperature Coefficient: The unit derives the temperature coefficient
from the first two breakpoints. The coefficient sent by the user is ignored.
If it is not correct when the curve header is queried, check for proper
entry of those points. A positive coefficient (P) indicates that the sensor
signal increases with increasing temperature. A negative coefficient (N)
indicates that the sensor signal decreases with increasing temperature.
The power must be cycled or the *RST command issued for the
instrument to calculate the temperature coefficient after curve points
have been entered.
Operation 3-11
Page 38

Omega Model CYD211 User’s Manual
3.13.2 Curve Breakpoints
Temperature response data of a calibrated sensor must be reduced to a table
of breakpoints before entering it into the instrument. Each breakpoint
consists of one value in sensor units and one temperature value in Kelvin.
Linear interpolation is used by the instrument to calculate temperature
between breakpoints. From 2 to 200 breakpoints can be entered as a curve.
The instrument will show an error message on the display if the sensor input
is outside the range of the breakpoints. No special endpoints are required.
Sensor units are defined by the format setting in Table 3-7.
Breakpoint setting resolution is six digits in temperature. Most temperature
values are entered with 0.001 resolution. Temperature values of 1000 K and
greater can be entered to 0.01 resolution. Temperature values below 10 K
can be entered with 0.0001 resolution. Temperature range for curve entry is
1500 K.
Setting resolution is also 6 digits in sensor units. The curve format
parameter defines the range and resolution in sensor units as shown in
Table 3-7. The sensor type determines the practical setting resolution.
Table 3-7 lists recommended sensor units resolutions. For most sensors,
additional resolution is ignored.
The breakpoints should be entered with the sensor units value increasing as
point number increases. There should not be any breakpoint locations left
blank in the middle of a curve. The search routine in the Model CYD211
interprets a blank breakpoint as the end of the curve.
Table 3-7. Recommended Curve Parameters
Type
Typical Lake
Shore Model
Unit Format
Limit
(K)
Coefficient
Recommended
Sensor Resolution
Silicon Diode DT-470 V V/K 475 Negative 0.00001 (V)
GaAlAs Diode TG-120 V V/K 325 Negative 0.00001 (V)
Platinum 100 PT-100 Ω Ω/K 800 Positive 0.001 (Ω)
Platinum 1000 PT-100 Ω Ω/K 800 Positive 0.01 (Ω)
Rhodium-Iron RF-100 Ω Ω/K 325 Positive 0.001 (Ω)
Carbon-Glass CGR-1-1000 Ω logΩ/K 325 Negative 0.00001 (logΩ)
Cernox CX-1030 Ω logΩ/K 325 Negative 0.00001 (logΩ)
Germanium GR-200A-100 Ω logΩ/K 325 Negative 0.00001 (logΩ)
Rox RX-102A Ω logΩ/K 40 Negative 0.00001 (logΩ)
3-12 Operation
Page 39

Omega Model CYD211 User’s Manual
CHAPTER 4
REMOTE OPERATION
4.0 GENERAL
The Model CYD211 is equipped with an RS-232C serial computer
interface. The interface allows computer automation of instrument setup
and temperature measurement data collection. Nearly every feature of the
instrument can be accessed through the computer interface. Interface
capabilities including setup information and example programs are provided
in Paragraph 4.1. Interface commands including a command summary are
described in Paragraph 4.2.
4.1 SERIAL INTERFACE OVERVIEW
The serial interface used in the Model CYD211 is commonly referred to as
an RS-232C interface. RS-232C is a standard of the Electronics Industries
Association (EIA) that describes one of the most common interfaces
between computers and electronic equipment. The RS-232C standard is
quite flexible and allows many different configurations. However, any two
devices claiming RS-232C compatibility cannot necessarily be plugged
together without interface setup. The remainder of this paragraph briefly
describes the key features of a serial interface that are supported by the
instrument. A customer supplied computer with similarly configured
interface port is required to enable communication.
4.1.1 Physical Connection
The Model CYD211 has a 9 pin D-Subminiature plug on the rear panel for
serial communication. The original RS-232C standard specifies 25 pins but
both 9- and 25-pin connectors are commonly used in the computer industry.
Many third party cables exist for connecting the instrument to computers
with either 9- or 25-pin connectors. Paragraph 5.6 gives the most common
pin assignments for 9- and 25-pin connectors. Please note that not all pins
or functions are supported by the Model CYD211.
The instrument serial connector is the plug half of a mating pair and must
be matched with a socket on the cable. If a cable has the correct wiring
configuration but also has a plug end, a “gender changer” can be used to
mate two plug ends together.
Remote Operation 4-1
Page 40

Physical Connection (Continued)
Omega Model CYD211 User’s Manual
The letters DTE near the interface connector stand for Data Terminal
Equipment and indicate the pin connection of the directional pins such as
transmit data (TD) and receive data (RD). Equipment with Data
Communications Equipment (DCE) wiring can be connected to the
instrument with a straight through cable. As an example, pin 3 of the DTE
connector holds the transmit line and pin 3 of the DCE connector holds the
receive line so the functions complement.
It is likely both pieces of equipment are wired in the DTE configuration. In
this case pin 3 on one DTE connector (used for transmit) must be wired to
pin 2 on the other (used for receive). Cables that swap the complementing
lines are called null modem cables and must be used between two DTE
wired devices. Null modem adapters are also available for use with straight
through cables. Paragraph 5.6.1 illustrates suggested cables that can be used
between the instrument and common computers.
The instrument uses drivers to generate the transmission voltage levels
required by the RS-232C standard. These voltages are considered safe under
normal operating conditions because of their relatively low voltage and
current limits. The drivers are designed to work with cables up to 50 feet in
length.
4.1.2 Hardware Support
The Model CYD211 interface hardware supports the following features.
Asynchronous timing is used for the individual bit data within a character.
This timing requires start and stop bits as part of each character so the
transmitter and receiver can resynchronized between each character. Half
duplex transmission allows the instrument to be either a transmitter or a
receiver of data but not at the same time. The serial output supports a
communication speed of 9600 baud.
Hardware handshaking is not supported by the instrument. Handshaking is
often used to guarantee that data message strings do not collide and that no
data is transmitted before the receiver is ready. In this instrument
appropriate software timing substitutes for hardware handshaking. User
programs must take full responsibility for flow control and timing as
described in Paragraph 4.1.5.
4-2 Remote Operation
Page 41

4.1.3 Character Format
Omega Model CYD211 User’s Manual
A character is the smallest piece of information that can be transmitted by
the interface. Each character is 10 bits long and contains data bits, bits for
character timing and an error detection bit. The instrument uses 7 bits for
data in the ASCII format. One start bit and one stop bit are necessary to
synchronize consecutive characters. Parity is a method of error detection.
One parity bit configured for odd parity is included in each character.
ASCII letter and number characters are used most often as character data.
Punctuation characters are used as delimiters to separate different
commands or pieces of data. Two special ASCII characters, carriage return
(CR 0DH) and line feed (LF 0AH), are used to indicate the end of a
message string.
Table 4-1. Serial Interface Specifications
Connector Type: 9-pin D-style plug
Connector Wiring: DTE
Voltage Levels: EIA RS-232C Specified
Transmission Distance: 50 feet maximum
Timing Format: Asynchronous
Transmission Mode: Half Duplex
Baud Rate: 9600
Handshake: Software timing
Character Bits: 1 Start, 7 Data, 1 Parity, 1 Stop
Parity: Odd
Terminators: CR(0DH) LF(0AH)
Command Rate: 20 commands per second maximum
4.1.4 Message Strings
A message string is a group of characters assembled to perform an interface
function. There are three types of message strings commands, queries and
responses. The computer issues command and query strings through user
programs, the instrument issues responses. Two or more command or query
strings can be chained together in one communication but they must be
separated by a semi-colon (;). The total communication string must not
exceed 64 characters in length.
Remote Operation 4-3
Page 42

Message Strings (Continued)
Omega Model CYD211 User’s Manual
A command string is issued by the computer and instructs the instrument to
perform a function or change a parameter setting. The format is <command
mnemonic><space><parameter data><terminators>. Command mnemonics
are listed in Paragraph 4.2. Parameters necessary for each one are described
in Paragraph 4.2.1. Terminators must be sent with every message string.
A query string is issued by the computer and instructs the instrument to
send a response. The query format is <query mnemonic><?><space>
<parameter data><terminators>. Query mnemonics are often the same as
commands with the addition of a question mark. Parameter data is often
unnecessary when sending queries. Query mnemonics are listed in
Paragraph 4.2. Parameter data if necessary is described in Paragraph 4.2.1.
Terminators must be sent with every message string. The computer should
expect a response very soon after a query is sent.
A response string is the instruments response or answer to a query string.
The response can be a reading value, status report or the present value of a
parameter. Response data formats are listed along with the associated
queries in Paragraph 4.2.1. The response is sent as soon as possible after the
instrument receives the query. Typically it takes 10 ms for the instrument to
begin the response. Some responses take longer.
4.1.5 Message Flow Control
It is important to remember that the user program is in charge of the serial
communication at all times. The instrument can not initiate communication,
determine which device should be transmitting at a given time, or guarantee
timing between messages. This is the responsibility of the user program.
When issuing commands only the user program should:
• Properly format and transmit the command including terminators as one string.
• Guarantee that no other communication is started for 50 ms after the last character
is transmitted.
• Not initiate communication more than 20 times per second.
When issuing queries or queries and commands together the user program
should:
• Properly format and transmit the query including terminators as one string.
• Prepare to receive a response immediately.
• Receive the entire response from the instrument including the terminators.
• Guarantee that no other communication is started during the response or for 50
ms after it completes.
• Not initiate communication more than 20 times per second.
4-4 Remote Operation
Page 43

Message Flow Control (Continued)
Omega Model CYD211 User’s Manual
NOTE: The serial interface will not function during front panel setup
operations. Do not use the front panel during serial communications.
Failure to follow these rules may result in inability to establish
communication with the instrument or intermittent failures in communication.
4.1.6 Serial Interface Basic Programs
Two BASIC programs are included to illustrate the serial communication
functions of the instrument. The first program was written in Visual Basic.
Refer to Paragraph 4.1.6.1 for instructions on how to setup the program.
The Visual Basic code is provided in Table 4-3. The second program was
written in Quick Basic. Refer to Paragraph 4.1.6.2 for instructions on how
to setup the program. The Quick Basic code is provided in Table 4-4.
Finally, a description of operation common to both programs is provided in
Paragraph 4.1.6.3. While the hardware and software required to produce and
implement these programs not included with the instrument, the concepts
illustrated apply to almost any application where these tools are available.
4.1.6.1 Visual Basic Serial Interface Program Setup
The serial interface program (Table 4-3) works with Visual Basic 6.0 (VB6)
on an IBM PC (or compatible) with a Pentium-class processor. A
Pentium 90 or higher is recommended, running Windows 95 or better, with
a serial interface. It uses the COM1 communications port at 9600 Baud.
Use the following to develop the Serial Interface Program in Visual Basic.
1. Start VB6.
2. Choose Standard EXE and select Open.
3. Resize form window to desired size.
4. On the Project Menu, click Components to bring up a list of additional
controls available in VB6.
5. Scroll through the controls and select Microsoft Comm Control 6.0.
Select OK. In the toolbar at the left of the screen, the Comm Control
will have appeared as a telephone icon.
6. Select the Comm control and add it to the form.
7. Add controls to form:
a. Add three Label controls to the form.
b. Add two TextBox controls to the form.
c. Add one CommandButton control to the form.
d. Add one Timer control to the form.
8. On the View Menu, select Properties Window.
Remote Operation 4-5
Page 44
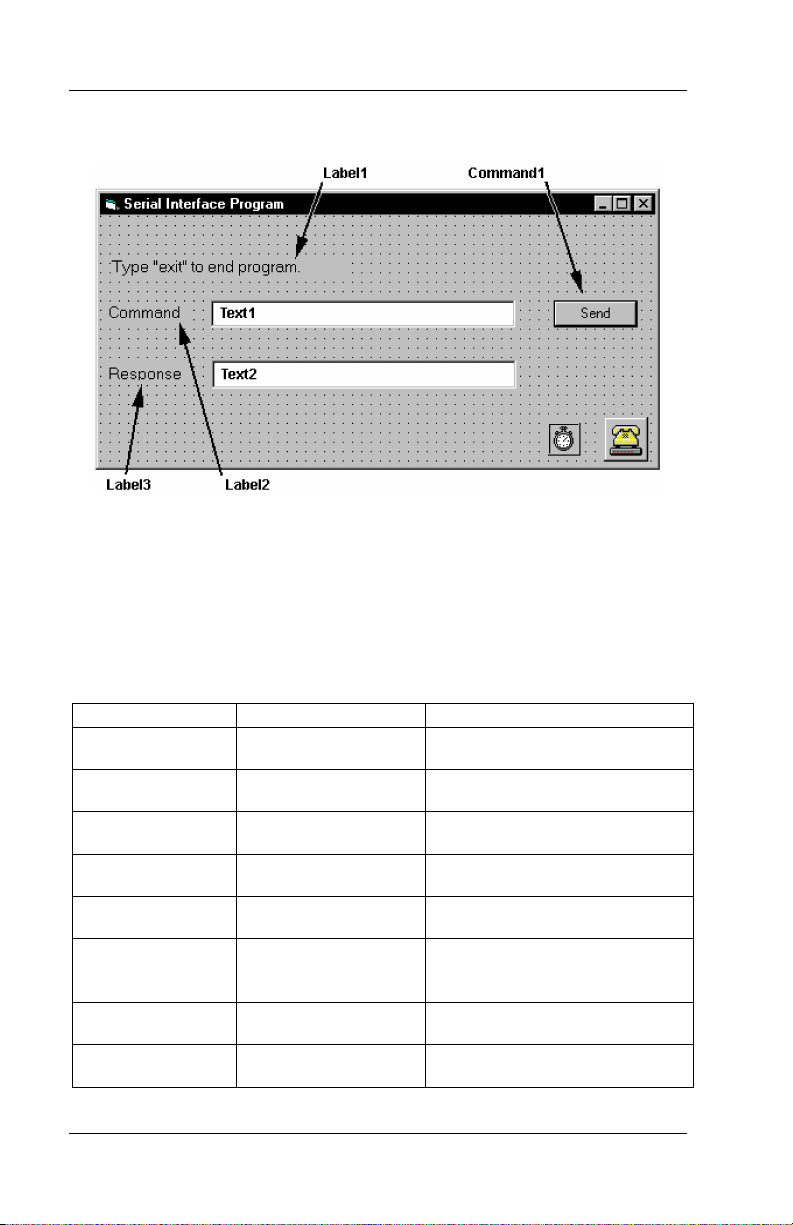
Visual Basic Serial Interface Program Setup (Continued)
Omega Model CYD211 User’s Manual
9. In the Properties window, use the dropdown list to select between the
different controls of the current project.
10. Set the properties of the controls as defined in Table 4-2.
11. Save the program.
Label1 Name
Label2 Name
Label3 Name
Text1 Name
Text2 Name
Command1 Name
Form1 Name
Timer1 Enabled
Table 4-2. Serial Interface Program Control Properties
Current Name Property New Value
lblExitProgram
Caption
Type “exit” to end program.
lblCommand
Caption
Command
lblResponse
Caption
Response
txtCommand
Text
<blank>
txtResponse
Text
<blank>
cmdSend
Caption
Default
Send
True
frmSerial
Caption
Serial Interface Program
False
Inter val
10
4-6 Remote Operation
Page 45
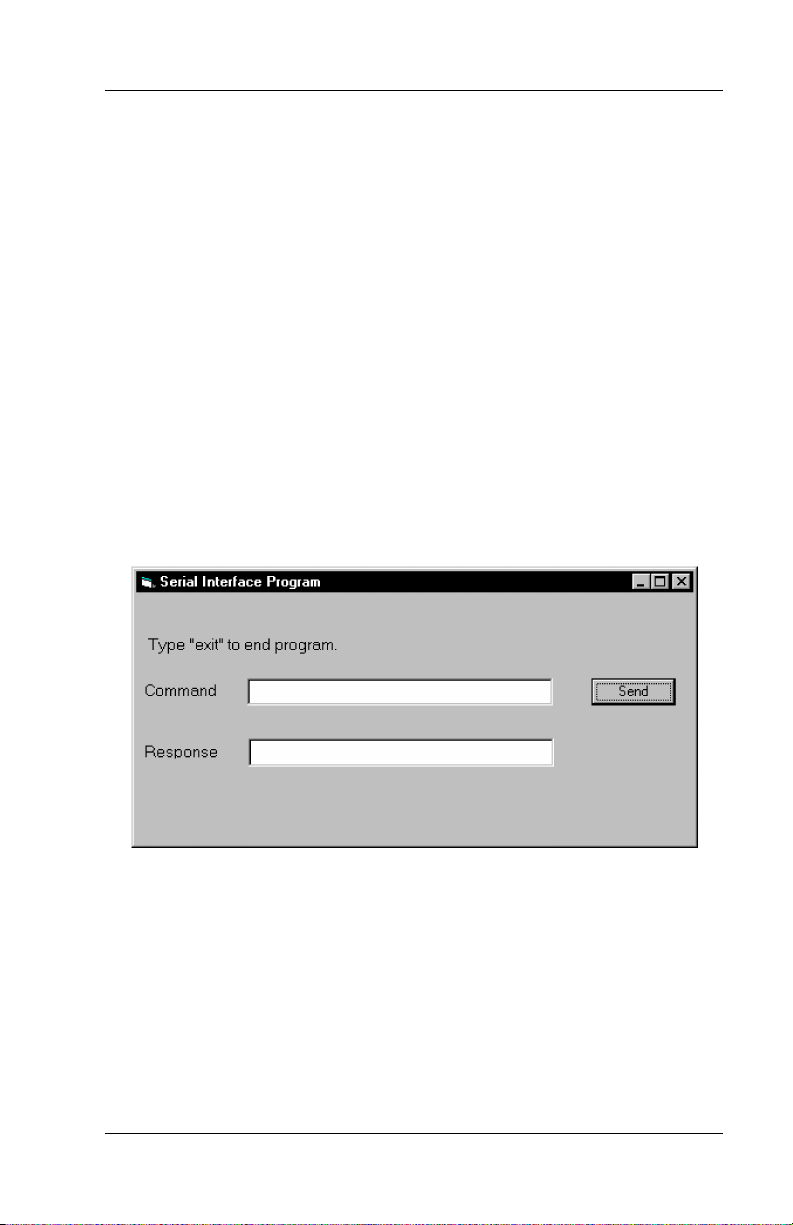
Visual Basic Serial Interface Program Setup (Continued)
Omega Model CYD211 User’s Manual
12. Add code (provided in Table 4-3).
a. In the Code Editor window, under the Object dropdown list,
select (General). Add the statement: Public gSend as Boolean
b. Double Click on cmdSend. Add code segment under Private Sub
cmdSend_Click( ) as shown in Table 4-3.
c. In the Code Editor window, under the Object dropdown list,
select Form. Make sure the Procedure dropdown list is set at
Load. The Code window should have written the segment of
code: Private Sub Form_Load( ). Add the code to this subroutine
as shown in Table 4-3.
d. Double Click on the Timer control. Add code segment under
Private Sub Timer1_Timer() as shown in Table 4-3.
e. Make adjustments to code if different Com port settings are
being used.
13. Save the program.
14. Run the program. The program should resemble the following.
15. Type in a command or query in the Command box as described in
Paragraph 4.1.6.3.
16. Press Enter or select the Send button with the mouse to send command.
17. Type Exit and press Enter to quit.
Remote Operation 4-7
Page 46

Omega Model CYD211 User’s Manual
Table 4-3. Visual Basic Serial Interface Program
Public gSend As Boolean 'Global used for Send button state
Private Sub cmdSend_Click() 'Routine to handle Send button press
gSend = True 'Set Flag to True
End Sub
Private Sub Form_Load() 'Main code section
Dim strReturn As String 'Used to return response
Dim strHold As String 'Temporary character space
Dim Term As String 'Terminators
Dim ZeroCount As Integer 'Counter used for Timing out
Dim strCommand As String 'Data string sent to instrument
frmSerial.Show 'Show main window
Term = Chr(13) & Chr(10) 'Terminators are <CR><LF>
ZeroCount = 0 'Initialize counter
strReturn = "" 'Clear return string
strHold = "" 'Clear holding string
If frmSerial.MSComm1.PortOpen = True Then '
Close serial port to change settings
frmSerial.MSComm1.PortOpen = False
End If
frmSerial.MSComm1.CommPort = 1 'Example of Comm 1
frmSerial.MSComm1.Settings = "9600,o,7,1" 'Baud,Parity,Data,Stop
frmSerial.MSComm1.InputLen = 1 'Read one character at a time
frmSerial.MSComm1.PortOpen = True 'Open port
Do
Do 'Wait loop
DoEvents 'Give up processor to other events
Loop Until gSend = True 'Loop until Send button pressed
gSend = False 'Set Flag as false
strCommand = frmSerial.txtCommand.Text 'Get Command
strReturn = "" 'Clear response display
strCommand = UCase(strCommand) 'Set all characters to upper case
If strCommand = "EXIT" Then 'Get out on EXIT
End
End If
Program continues on the next page...
4-8 Remote Operation
Page 47

Omega Model CYD211 User’s Manual
Table 4-3. Visual Basic Serial Interface Program (Continued)
frmSerial.MSComm1.Output = strCommand & Term 'Send command to instrument
If InStr(strCommand, "?") <> 0 Then 'Check to see if query
While (ZeroCount < 20) And (strHold <> Chr$(10)) 'Wait for response
If frmSerial.MSComm1.InBufferCount = 0 Then
'Add 1 to timeout if no character
frmSerial.Timer1.Enabled = True
Do
DoEvents 'Wait for 10 millisecond timer
Loop Until frmSerial.Timer1.Enabled = False
ZeroCount = ZeroCount + 1 'Timeout at 2 seconds
Else
ZeroCount = 0 'Reset timeout for each character
strHold = frmSerial.MSComm1.Input 'Read in one character
strReturn = strReturn + strHold 'Add next character to string
End If
Wend 'Get characters until terminators
If strReturn <> "" Then 'Check if string empty
strReturn = Mid(strReturn, 1, InStr(strReturn, Term) - 1) 'Strip terminators
Else
strReturn = "No Response" 'Send No Response
End If
frmSerial.txtResponse.Text = strReturn 'Put response in textbox on main
form
strHold = "" 'Reset holding string
ZeroCount = 0 'Reset timeout counter
End If
Loop
End Sub
Private Sub Timer1_Timer() 'Routine to handle Timer interrupt
frmSerial.Timer1.Enabled = False 'Turn off timer
End Sub
Remote Operation 4-9
Page 48

Omega Model CYD211 User’s Manual
4.1.6.2 Quick Basic Serial Interface Program Setup
The serial interface program (Table 4-4) works with QuickBasic 4.0/4.5 or
Qbasic on an IBM PC (or compatible) running DOS or in a DOS window
with a serial interface. It uses the COM1 communication port at 9600 Baud.
Use the following procedure to develop the Serial Interface Program in
Quick Basic.
1. Start the Basic program.
2. Enter the program exactly as presented in Table 4-4.
3. Adjust the COM port in the program as necessary.
4. Lengthen the "TIMEOUT" count if necessary.
5. Save the program.
6. Run the program.
7. Type a command query as described in Paragraph 4.1.6.3.
8. Type "EXIT" to quit the program.
4.1.6.3 Program Operation
Once either program is running, try the following commands and observe
the response of the instrument. Input from the user is shown in bold and
terminators are added by the program. The word [term] indicates the
required terminators included with the response.
ENTER COMMAND? *IDN? Identification query. Instrument will return a string
RESPONSE: LSCI,MODEL211,2110000,032502[term]
ENTER COMMAND? KRDG? Kelvin reading query. Instru ment will return a string
RESPONSE: +12.345[term]
ENTER COMMAND? INTYPE 0 Input type command. Instrument will change the
ENTER COMMAND? INTYPE? Input type query. Instrument will r eturn a string with
RESPONSE: 0[term]
ENTER COMMAND? INTYPE 0;INTYPE? Input type command followed by input
RESPONSE: 0[term]
identifying itself.
with the present Kelvin reading.
input type to silicon diode. No response will be sent.
the present input type setting.
type query. Instrument will change the input type to
silicon diode then return a string with the present
input type setting.
4-10 Remote Operation
Page 49

Omega Model CYD211 User’s Manual
Table 4-4. Quick Basic Serial Interface Program
CLS 'Clear screen
PRINT " SERIAL COMMUNICATION PROGRAM"
PRINT
TIMEOUT = 2000 'Read timeout (may need more)
BAUD$ = "9600"
TERM$ = CHR$(13) + CHR$(10) 'Terminators are <CR><LF>
OPEN "COM1:" + BAUD$ + ",O,7,1,RS" FOR RANDOM AS #1 LEN = 256
LOOP1: LINE INPUT "ENTER COMMAND (or EXIT):"; CMD$
'Get command from keyboard
CMD$ = UCASE$(CMD$) 'Change input to upper case
IF CMD$ = "EXIT" THEN CLOSE #1: END 'Get out on Exit
CMD$ = CMD$ + TERM$
PRINT #1, CMD$; 'Send command to instrument
IF INSTR(CMD$, "?") <> 0 THEN 'Test for quer y
RS$ = "" 'If query, read response
N = 0 'Clr return string and count
WHILE (N < TIMEOUT) AND (INSTR(RS$, TERM$) = 0)
'Wait for response
IN$ = INPUT$(LOC(1), #1) 'Get one character at a time
IF IN$ = "" THEN N = N + 1 ELSE N = 0
'Add 1 to timeout if no chr
RS$ = RS$ + IN$ 'Add next chr to string
WEND 'Get chrs until terminators
IF RS$ <> "" THEN 'See if return string is empty
RS$ = MID$(RS$, 1, (INSTR(RS$, TERM$) - 1))
'Strip off terminators
PRINT "RESPONSE:"; RS$ 'Print response to query
ELSE
PRINT "NO RESPONSE" 'No response to query
END IF
END IF 'Get next command
GOTO LOOP1
Remote Operation 4-11
Page 50

Program Operation (Continued)
The following are additional notes on using either Serial Interface program.
Omega Model CYD211 User’s Manual
• If you enter a correctly spelled query without a “?,” nothing will be
returned. Incorrectly spelled commands and queries are ignored.
Commands and queries and should have a space separating the
command and associated parameters.
• Leading zeros and zeros following a decimal point are not needed in a
command string, but they will be sent in response to a query. A leading
“+” is not required but a leading “–” is required.
4.1.7 Trouble Shooting
New Installation
1. Make sure transmit (TD) signal line from the instrument is routed to
receive (RD) on the computer and vice versa. (Use a null modem
adapter if not).
2. Always send terminators
3. Send entire message string at one time including terminators.
(Many terminal emulation programs do not.)
4. Send only one simple command at a time until communication is
established.
5. Be sure to spell commands correctly and use proper syntax.
Old Installation No Longer Working
1. Power instrument off then on again to see if it is a soft failure.
2. Power computer off then on again to see if communication port is
locked up.
3. Check all cable connections.
Intermittent Lockups
1. Check cable connections and length.
2. Increase delay between all commands to 100 ms to make sure
instrument is not being over loaded.
3. Do not use the front panel keys during serial communication.
4.2 SERIAL INTERFACE COMMAND SUMMARY
This paragraph provides a summary of the Serial Interface Commands. The
Interface Commands are detailed in Paragraph 4.2.1. A list of all commands
is provided in Table 4-5.
4-12 Remote Operation
Page 51
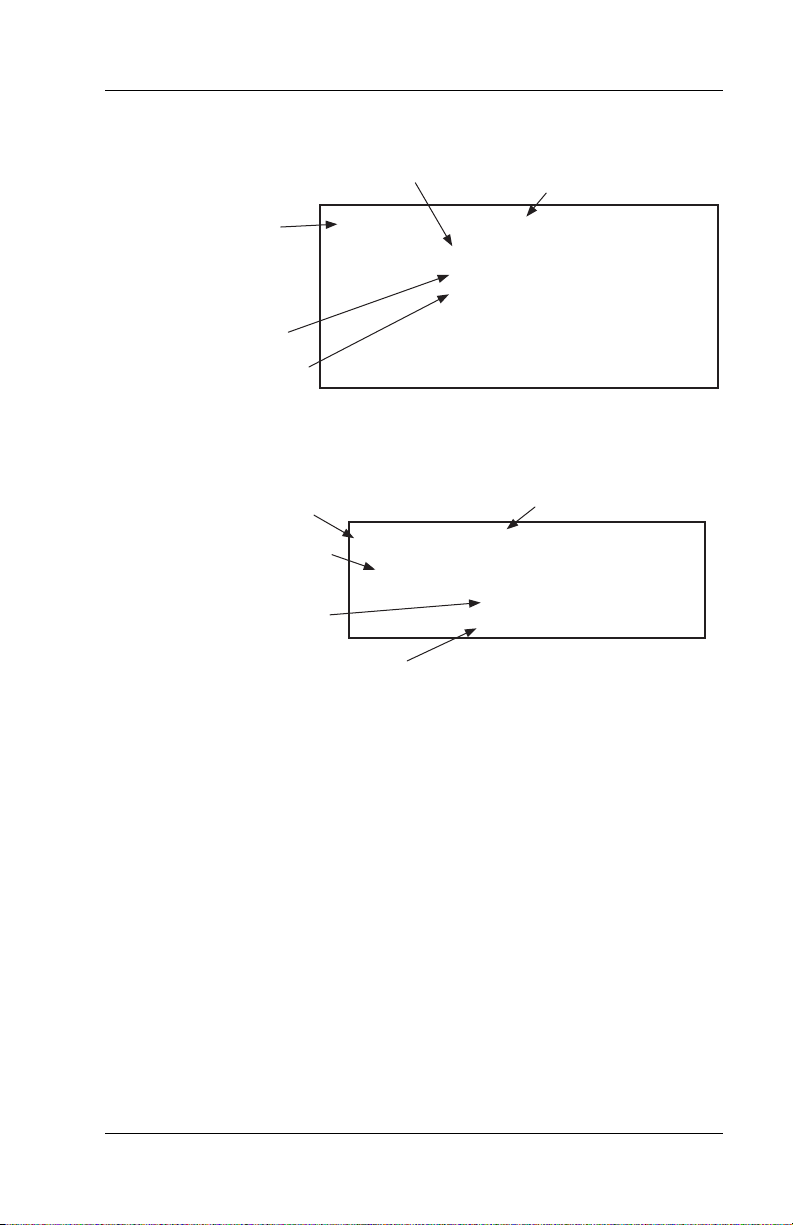
Serial Interface Command Summary (Continued)
Form of the command input
Omega Model CYD211 User’s Manual
Brief description of command
Command name
Syntax of user
parameter input
See Key below
Definition of parameter
Command.eps
BRIGT
Input:
Format:
Commands may additionally include
Display Brightness Command
BRIGT <bright>[term]
nn
<bright>
Remarks and Examples.
Sets the display
brightness. Valid
entries 0 - 15, 0 =
least bright, 15 = most
bright. Default = 8.
Query name
Form of the query input
Definition of
returned parameter
Syntax of returned parameter
Query.eps
BRIGT?
Input:
Returned:
Format:
Brief description of query
Display Brightness Query
BRIGT? <input>[term]
<bright>[term]
nn
(refer to command for description)
Key:
Q Begins common interface command.
? Required to identify queries.
aa… String of alpha numeric characters.
nn… String of number characters that may include
a decimal point.
[term] Terminator characters.
<…> Indicated a parameter field, many are command specific.
<state> Parameter field with only On/Off or Enable/Disable
states.
<value> Floating point values can have a varying resolution
depending on the type of command or query issued.
Remote Operation 4-13
Page 52

Omega Model CYD211 User’s Manual
Table 4-5. Interface Commands (Alphabetical Listing)
Command
Function Page
QIDN? Identification Query .......................................................15
QRST Reset Instrument Command............................................15
ALARM Input Alarm Parameter Command...................................15
ALARM? Input Alarm Parameter Query.........................................16
ALMRST Alarm Reset Status Command........................................16
ANALOG Analog Output Parameter Command...............................16
ANALOG? Analog Output Parameter Query.....................................16
AOUT? Analog Output Data Query.............................................16
BRIGT Display Brightness Command ........................................17
BRIGT? Display Brightness Query...............................................17
CRDG? Celsius Reading Query...................................................17
CRVDEL Curve Delete Command .................................................17
CRVHDR Curve Header Command ................................................17
CRVHDR? Curve Header Query ......................................................18
CRVPT Curve Data Point Command ...........................................18
CRVPT? Curve Data Point Query.................................................18
DFLT Factory Defaults Command............................................19
DISPFLD Displayed Field Command.............................................19
DISPFLD? Displayed Field Query ...................................................19
FRDG? Fahrenheit Reading Query..............................................19
INCRV Input Curve Number Command......................................19
INCRV? Input Curve Number Query............................................20
INTYPE Input Type Parameter Command ....................................20
INTYPE? Input Type Parameter Query...........................................20
KEYST? Keypad Status Query......................................................20
KRDG? Kelvin Reading Query....................................................20
LOCK Front Panel Keypad Lock Command ..............................21
LOCK? Front Panel Keypad Lock Query.....................................21
RDGST? Input Reading Status Query............................................21
RELAY Relay Control Parameter Command................................21
RELAY? Relay Control Parameter Query......................................22
SRDG? Sensor Units Input Reading Query..................................22
4-14 Remote Operation
Page 53

4.2.1 Interface Commands (In Alphabetical Order)
Omega Model CYD211 User’s Manual
*IDN? Identification Query
Input: *IDN?[term]
Returned: <manufacturer>,<model>,<serial>,<date>[term]
Format: aaaa,aaaaaaaa,aaaaaaa,mmddyy
<manufacture> Manufacturer ID
<model> Instrument model number
<serial> Serial number
<date> Instrument firmware revision date
Example: LSCI,MODEL211,1234567,013001
*RST Reset Instrument Command
Input: *RST[term]
Remarks: Sets instrument parameters to power-up settings.
ALARM Input Alarm Parameter Command
Input: ALARM <off/on>, <high value>, <low
value>, <deadband>,<latch enable>[term]
Format: n, +nnn.n, +nnn.n, +nn.n,n
<off/on> Determines whether the instrument checks
the alarm for input where 0 = off and 1 = on.
<high value> Sets the value the temperature is checked
against to activate the high alarm.
<low value> Sets the value the temperature is checked
against to activate low alarm.
<deadband> Sets the value that the temperature must
change outside of an alarm condition to
deactivate an unlatched alarm.
<latch enable> Specifies a latched alarm (remains active
after alarm condition correction)
where 0 = off (no latch) and 1 = on.
Remarks: Configures the alarm parameters for the input.
Example: ALARM 1,270.0,0,0,1[term] – Turns on alarm checking
for the input, activates high alarm if Kelvin reading is over
270, and latches the alarm when Kelvin reading falls below
270.
Remote Operation 4-15
Page 54

Omega Model CYD211 User’s Manual
ALARM? Input Alarm Parameter Query
Input: ALARM?[term]
Returned: <off/on>, <high value>, <low value>, <deadband>, <latch
enable> [term]
Format: n,+nnn.n,+nnn.n,+nn.n,n
(Refer to command for description)
ALMRST Reset Alarm Status Command
Input: ALMRST[term]
Remarks: Clears both the high and low status of the alarm, including
latching alarm.
ANALOG Analog Output Parameter Command
Input: ANALOG <mode>, <range>[term]
Format: n,n
<mode> Specifies mode in which analog output operates
where 0 = voltage mode and 1 = current mode.
<range> Sets temperature range that analog output uses as
full scale.
0 = 0 – 20 K 3 = 0 – 325 K
1 = 0 – 100 K 4 = 0 – 475 K
2 = 0 – 200 K 5 = 0 – 1000 K
Example: ANALOG 0,1[term] – Sets analog output to voltage mode
– 10V) 100.0 K at +100% output (+10.0 V) and 0.0 K at
(0
0% output (0.0 V).
ANALOG? Analog Output Parameter Query
Input: ANALOG?[term]
Returned:
Format: n,n (Refer to command for definition)
<mode>, <range> [term]
AOUT? Analog Output Data Query
Input: AOUT?[term]
Returned:
Format: +nnn.nn
Remarks: Returns the percentage of output of the analog output.
<analog output>[term]
4-16 Remote Operation
Page 55

Omega Model CYD211 User’s Manual
BRIGT Display Brightness Command
Input: BRIGT <bright>[term]
Format: nn
<bright> Sets display brightness. Valid entries: 0
– 15,
0 = least bright, 15 = most bright. Default = 8.
BRIGT? Display Brightness Query
Input: BRIGT?[term]
Returned: <bright>[term]
Format: nn (Refer to command for description)
CRDG? Celsius Reading Query
Input: CRDG?[term]
Returned: <temp value>[term]
Format: ±nnnnnn
Remarks: Also see the RDGST? command.
CRVDEL Curve Delete Command
Input: CRVDEL <curve>[term]
Format: nn
<curve> Specifies user curve to delete. Only valid entry is
(Curve number is used to retain compatibility with
21.
existing instrument line. Curve number 21 must be sent
with the command or else the command will be ignored.)
CRVHDR Curve Header Command
Input: CRVHDR <curve>, <name>, <SN>, <format>,
<limit value>, <coefficient>[term]
Format: nn,aaaaaaaaaaaaaaa,aaaaaaaaaa,n,+nnn.nnn,n
<curve> Specifies user curve. Valid entry: 21.
<name> Curve name. Limited to 15 characters.
<SN> Curve serial number. Limited to 10 characters.
<format> Curve data format. Valid entries:
2 = V/K, 3 = Ω/K, 4 = log Ω/K.
<limit value> Curve temperature limit in Kelvin (Unused).
<coefficient> Curves temperature coefficient.
Valid entries: 1 = negative, 2 = positive.
Remarks: Configures the user curve header.
Remote Operation 4-17
Page 56

Curve Header Command (Continued)
Omega Model CYD211 User’s Manual
Example: CRVHDR 21,DT-470,00011134,2,325.0,1[term] –
Configures User Curve 21 with a name of DT-470, serial
number of 00011134, data format of volts versus Kelvin,
upper temperature limit of 325 K, and negative coefficient.
CRVHDR? Curve Header Query
Input: CRVHDR? <curve>[term]
Format: nn
<curve> Valid entries: 1
– 21.
Returned: <name>,<SN>,<format>,<limit value>,<coefficient>[term]
Format: aaaaaaaaaaaaaaa,aaaaaaaaaa,n,+nnn.nnn,n
(Refer to command for description)
Remarks: Returns a standard or user curve header.
CRVPT Curve Data Point Command
Input: CRVPT <curve>, <index>, <units value>,
<temp value>[term]
Format: nn,nnn,±nnnnnnn,+nnnnnnn
<curve> Specifies which curve to configure. Valid entry:
21.
<index> Specifies curve points index. Valid entries: 1
<units value> Specifies sensor units for point to 6 digits.
<temp value> Specifies the corresponding temperature in
Kelvin for this point to 6 digits.
Remarks: Configures a user curve data point. To finalize curve entry,
send the *RST command or cycle the instrument power
after all the curve points have been entered.
Example: CRVPT 21,2,0.10191,470.000[term] – Sets User Curve 21
second data point to 0.10191 sensor units and 470.000 K.
CRVPT? Curve Data Point Query
Input: CRVPT? <curve>, <index>[term]
Format: nn,nnn
<curve> Specifies which curve to query: 1
<index> Specifies the points index in the curve: 1
Returned: <units value>, <temp value>[term]
Format: ±nnnnnnn,+nnnnnnn (Refer to command for description)
Remarks: Returns a standard or user curve data point.
– 21.
– 200.
– 200.
4-18 Remote Operation
Page 57

Omega Model CYD211 User’s Manual
DFLT Factory Defaults Command
Input: DFLT 99[term]
Remarks: Sets all configuration values to factory defaults and resets
the instrument. The "99" is included to prevent accidentally
setting the unit to defaults.
DISPFLD Displayed Field Command
Input: DISPFLD <source>[term]
Format: n
<source> Specifies input data to display. Valid entries:
0 = Kelvin, 1 = Celsius, 2 = sensor units, 3 =
Fahrenheit.
Example: DISPFLD 1[term] – Displays Kelvin reading for the input.
DISPFLD? Displayed Field Query
Input: DISPFLD?[term]
Returned: <source>[term]
Format: n (Refer to command for description)
FRDG? Fahrenheit Reading Query
Input: FRDG?[term]
Returned: <temp value>[term]
Format: ±nnnnnn
Remarks: Also see the RDGST? command.
INCRV Input Curve Number Command
Input: INCRV <curve number>[term]
Format: nn
<curve number> Specifies which curve the input uses. If
specified curve parameters do not match
the input, the curve number defaults to 0.
Valid entries: 0 = none, 1
curves, 21 = user curve.
Remarks: Specifies curve the input uses for temperature conversion.
Example: INCRV 21[term] – The input User Curve 21 for
temperature conversion.
– 20 = standard
Remote Operation 4-19
Page 58

Omega Model CYD211 User’s Manual
INCRV? Input Curve Number Query
Input: INCRV?[term]
Returned: <curve number>[term]
Format: nn (Refer to command for description)
INTYPE Input Type Parameter Command
Input: INTYPE <sensor type>[term]
Format: n
<sensor type> Specifies input sensor type. Valid entries:
0 = Silicon Diode 3 = 100 Ω Platinum/500
1 = GaAlAs Diode 4 = 1000 Ω Platinum
2 = 100 Ω Platinum/250 5 = NTC RTD
Example: INTYPE 0[term] – Sets input sensor type to silicon diode.
INTYPE? Input Type Parameter Query
Input: INTYPE?[term]
Returned: <sensor type>[term]
Format: n (Refer to command for description)
KEYST? Keypad Status Query
Input: KEYST?[term]
Returned: <keypad status>[term]
Format: n 1 = key pressed, 0 = no key pressed.
Remarks: Returns keypad status since the last KEYST?. KEYST?
returns 1 after initial power-up.
KRDG? Kelvin Reading Query
Input: KRDG?[term]
Returned: <Kelvin value>[term]
Format: +nnnnnn
Remarks: Also see the RDGST? command.
4-20 Remote Operation
Page 59

Omega Model CYD211 User’s Manual
LOCK Front Panel Keypad Lock Command
Input: LOCK <state>[term]
Format: n
<state> 0 = Unlocked, 1 = Locked
Remarks: Locks out all front panel entries. Refer to Paragraph 3.10.
Example: LOCK 1[term] – Enables keypad lock.
LOCK? Front Panel Keypad Lock Query
Input: LOCK?[term]
Returned: <state>[term]
Format: n (Refer to command for description)
RDGST? Input Reading Status Query
Input: RDGST?[term]
Returned: <status bit weighting>[term]
Format: nnn
Remarks: Integer returned represents sum of bit weighting of the input
status flag bits. “000” indicates a valid reading is present.
Bit Bit Weighting Status Indicator
1 2 A/D not responding
2 4 Alarm low
3 8 Alarm high
4 16 Temperature under range
5 32 Temperature over range
6 64 Sensor units zero
7 128 Sensor units over range
RELAY Relay Control Parameter Command
Input: RELAY <relay number>, <mode>[term]
Format: n,n
<relay number> Specifies which relay to configure: 1 =
low alarm relay, 2 = high alarm relay.
<mode> Specifies relay mode. 0 = Off, 1 = On, 2 =
Alarms.
Example: RELAY 1,2[term] – Low alarm relay activates when low
alarm activates.
Remote Operation 4-21
Page 60

Omega Model CYD211 User’s Manual
RELAY? Relay Control Parameter Query
Input: RELAY? <relay number>[term]
Format: n
<relay number> Specifies which relay to query: 1 = low
alarm relay, 2 = high alarm relay.
Returned: n (Refer to command for description)
SRDG? Sensor Units Input Reading Query
Input: SRDG?[term]
Returned: <sensor units value>[term]
Format: ±nnnnnn
Remarks: Also see the RDGST? command.
4-22 Remote Operation
Page 61

Omega Model CYD211 User’s Manual
CHAPTER 5
SERVICE
5.0 GENERAL
This chapter provides basic service information for the Model CYD211
Temperature Monitor. Factory trained service personnel should be
consulted if the instrument requires repair.
5.1 ERROR MESSAGES
The following messages appear on the instrument display when it identifies
a problem during operation. The messages are divided into two groups.
Instrument hardware messages are related to the instruments internal
circuits or non-volatile memory. If one of these messages persists after
power is cycled the instrument requires repair or recalibration. Limit
messages are most often associated with over voltage conditions caused by
an improperly selected range or excessive noise on the measurement leads.
If these messages persist after the input or output is configured properly the
instrument may require repair.
5.1.1 Instrument Hardware Errors
ErR 01 Indicates that there is a hardware problem in the instrument
memory. This error is not correctable by the user and the
factory should be consulted.
ErR 02 Indicates there is a soft error in the instrument memory. This
error can be corrected reinitializing memory. Reinitializing
memory sets the instrument to defaults and erases the user
curve. To reinitialize the memory after an Error 02, press both
the s and t keys simultaneously. The display will blank for
about 5 seconds while the memory is initialized.
ERR 03 Indicates the instrument has lost its calibration. To continue
using the instrument in an uncalibrated state, press the Enter
key after the Error 03 message appears. The Error 03
message is not cleared and will be displayed again on power
up until the unit is calibrated.
ERR 04 Indicates that the A/D converter is not communicating with
the microprocessor. This error is not correctable by the user.
Please contact the factory for instrument return information.
Service 5-1
Page 62

5.1.2 Limit Errors
Omega Model CYD211 User’s Manual
ERR 05 Input is at or under zero output.
ERR 06 Input is at or over full-scale.
ERR 07 Temperature conversion is off the low end of the curve
ERR 08 Temperature conversion is off the high end of the curve
ERR 09 No curve is selected for the input.
5.2 OPENING THE ENCLOSURE
WARNING: To avoid potentially lethal shocks, disconnect the power
cord from the instrument before performing this procedure.
Only qualified personnel should perform this procedure.
REMOVAL
1. Disconnect the power cord from rear of unit.
2. If attached, remove from panel mount.
3. Use a Phillips screwdriver to remove the four flat-head screws from the
corners of the rear panel.
4. Slide out the PC board assembly. The rear panel is attached to the PC
board.
INSTALLATION
1. Slide the PC board assembly in from the rear of the chassis making sure
the keypad aligns with the holes in the front panel.
2. Use a Phillips screwdriver to install four flat-head screws in the corners
of the rear panel.
3 If required, replace the instrument in the panel mount opening.
4. Connect power cord to rear of the unit.
5-2 Service
Page 63
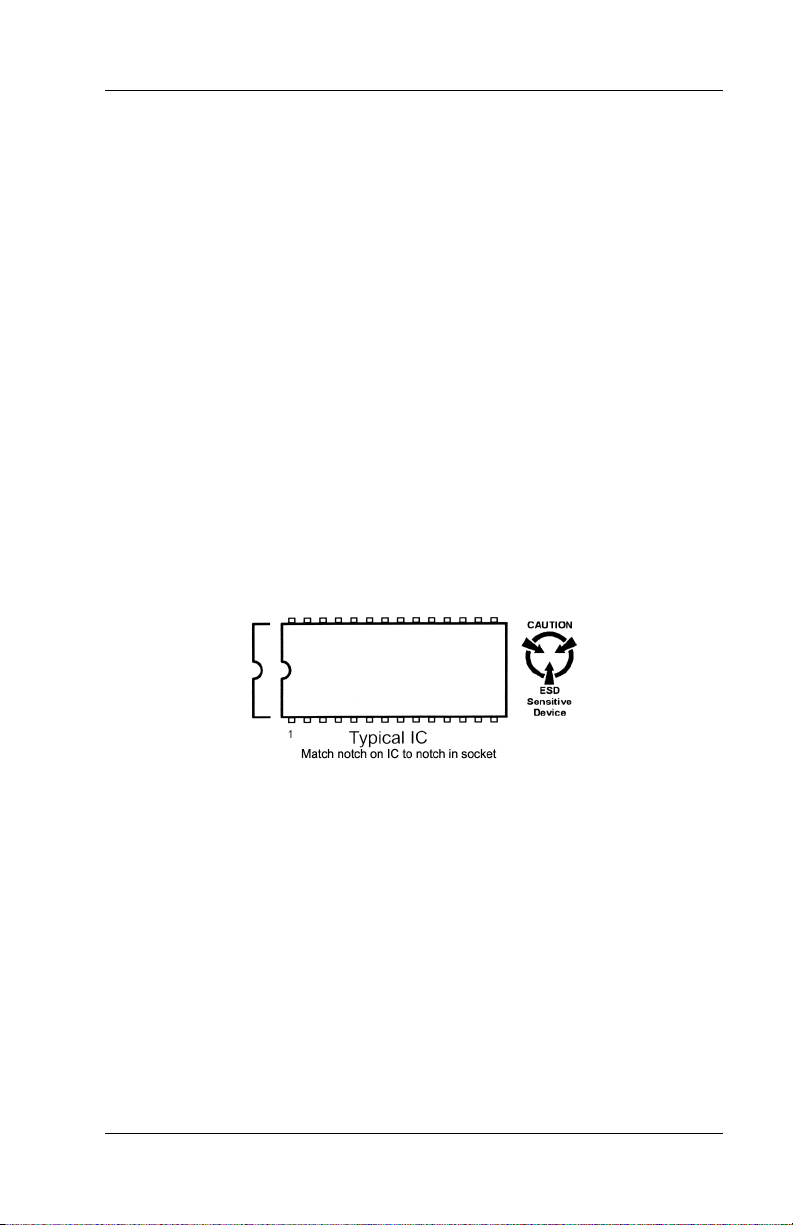
Omega Model CYD211 User’s Manual
5.3 FIRMWARE REPLACEMENT
There is one integrated circuit (IC) that may potentially require
replacement. See Figure 5-1 for IC location.
Firmware Microcontroller (U1) – Contains the software that runs the
entire instrument. Has a sticker on top labeled “M211F.HEX” and a version
number or date. Use the following procedure to replace this IC.
1. Follow the enclosure REMOVAL procedure in Paragraph 5.4.
2. Locate the IC on the main circuit board. See Figure 5-1. Note
orientation of existing IC.
CAUTION: The IC is an Electrostatic Discharge Sensitive (ESDS) device.
Wear shock-proof wrist straps (resistor limited to <5 mA) to
prevent injury to service personnel and to avoid inducing an
Electrostatic Discharge (ESD) into the device.
3. Use IC puller to remove existing IC from the socket.
4. Noting orientation of new IC, use an IC insertion tool to place new
device into socket.
IC_Notch.bmp
5. Follow the opening the enclosure INSTALLATION procedure in
Paragraph 5.4.
Service 5-3
Page 64
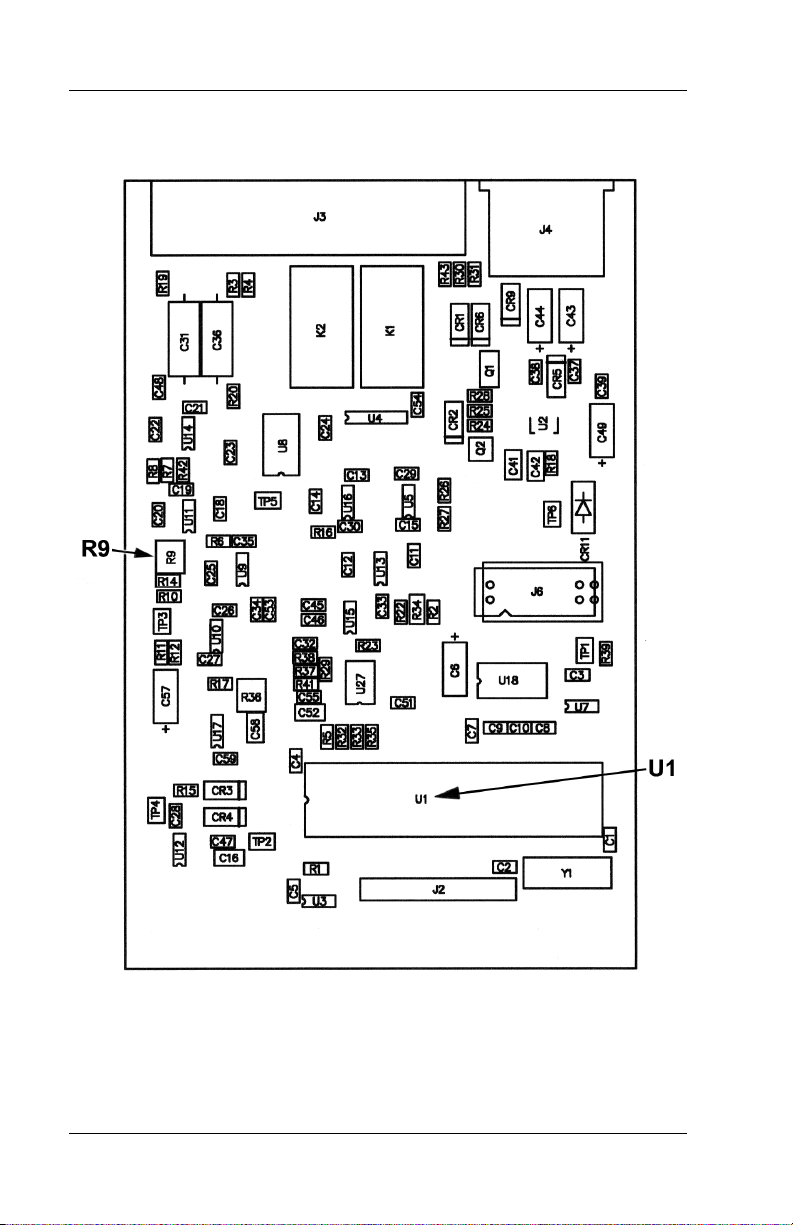
Omega Model CYD211 User’s Manual
211_PCB.bmp
Figure 5-1. Model CYD211 Main PCB Layout
5-4 Service
Page 65
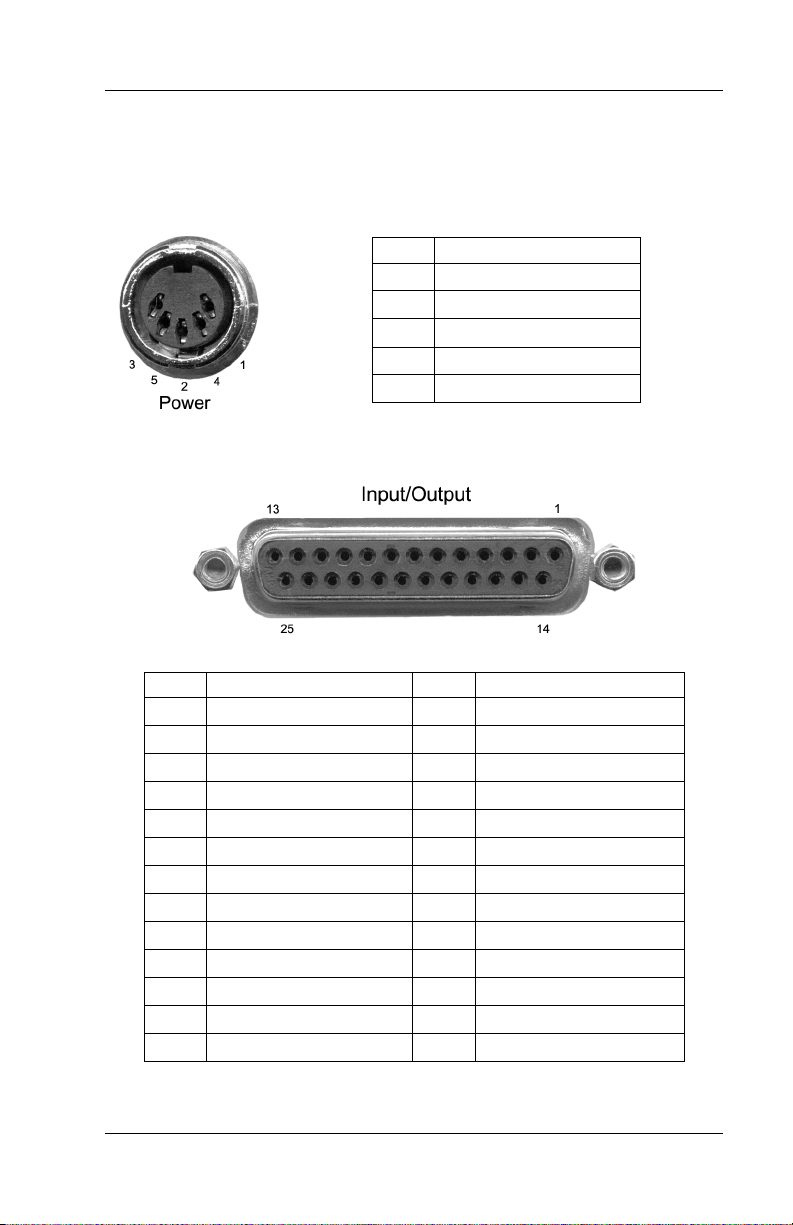
5.4 CONNECTOR DEFINITIONS
Omega Model CYD211 User’s Manual
The POWER, INPUT/OUTPUT, and RS-232 (DTE) connectors are defined
in Figures 5-2 thru 5-4.
Pin Description
1 Ground
2 Ground
3 +5V
4 –15V
5 +15V
Figure 5-2. Power Connector
P-211-2-3.bmp
Pin Description Pin Description
1 No Connection — —
2 Shield 14 Shield
3 I+ 15 I–
4 V+ 16 V–
5 Shield 17 Shield
6 Analog Output Signal 18 Analog Output Ground
7 No Connection 19 No Connection
8 Low Alarm COM 20 Low Alarm N.O.
9 Low Alarm N.C. 21 No Connection
10 No Connection 22 No Connection
11 High Alarm COM 23 High Alarm N.O.
12 High Alarm N.C. 24 No Connection
13 No Connection 25 No Connection
Figure 5-3. Input/Output Connector
Service 5-5
Page 66
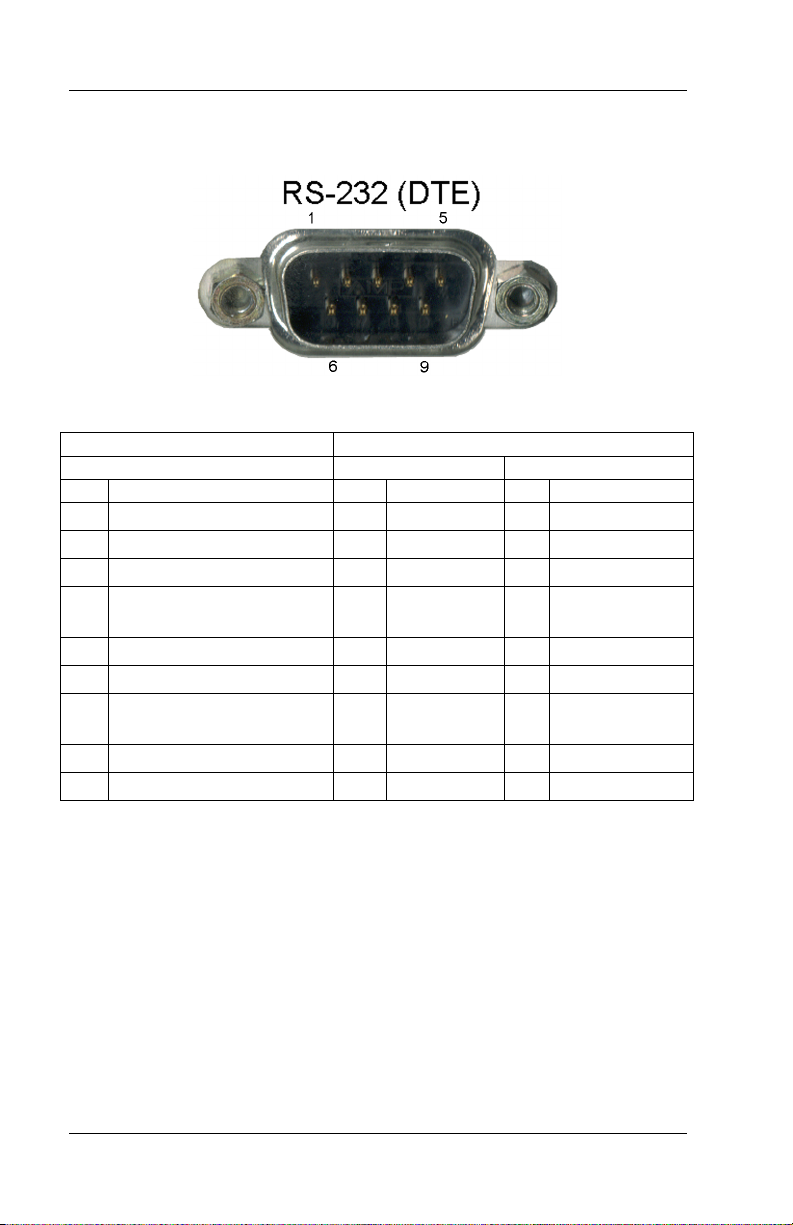
Omega Model CYD211 User’s Manual
Serial Connector .bmp
CYD211Temperature Monitor Typical Computers
DE-9P (DTE) DB-25P (DTE) DE-9P (DTE)
Pin Description Pin Description Pin Description
1 No Connection 2 TD (out) 1 DCD (in)
2 Receive Data (RD in) 3 RD (in) 2 RD (in)
3 Transmit Data (TD out) 4 RTS (out) 3 TD (out)
4 Data Terminal Ready
5 CTS (in) 4 DTR (out)
(DTR out)
5 Ground (GND) 6 DSR (in) 5 GND
6 No Connection 7 GND 6 DSR (in)
7 Data Terminal Ready
8 DCD (in) 7 RTS (out)
(DTR out) (tied to 4)
8 No Connection 20 DTR (out) 8 CTS (in)
9 No Connection 22 Ring in (in) 9 Ring in (in)
Figure 5-4. RS-232 (DTE) Connector
5-6 Service
Page 67
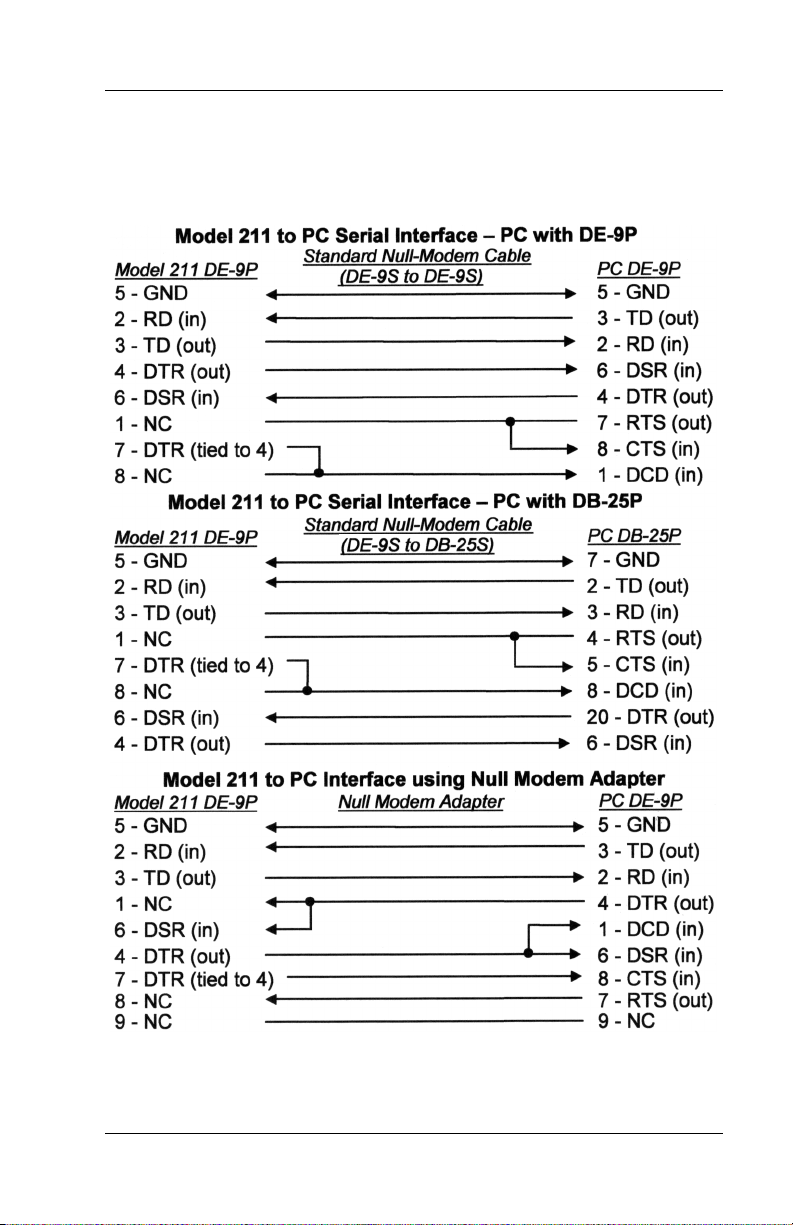
Omega Model CYD211 User’s Manual
5.4.1 Serial Interface Cable Wiring
The following are suggested cable wiring diagrams for connecting the
CYD211 Serial Interface to various Customer Personal Computers (PCs).
NOTE: Same as null modem cable design except PC CTS is provided
from the CYD211 on DTR.
Service 5-7
Page 68

Omega Model CYD211 User’s Manual
This Page Intentionally Left Blank
5-8 Service
Page 69

Omega Model CYD211 User’s Manual
CHAPTER 6
OPTIONS AND ACCESSORIES
6.0 GENERAL
This chapter provides lists of models, options, accessories, sensors, wires,
and special equipment available for the Model CYD211.
6.1 MODELS
A list of the available Temperature Monitor models are as follows:
Model Description
CYD
211S
6.2 ACCESSORIES
A list of accessories available for the Model CYD211 are as follows:
106-253*
106-264*
8001-211
CAL-211
CAL-211 DATA
MAN-211*
Model CYD211 Temperature Monitor with 100 – 250 V
(universal input) 17 VA power supply.
Power Options:
VAC-120 Includes U.S. line cord
VAC-220 Includes European line cord
Model Description of Accessory
Sensor input mating connector (DB-25)
Shell for sensor input mating connector
2111
Panel mount adapter for one CYD211 into 105 mm Wide ×
132 mm High (4.1 × 5.2 inches) mounting plate. See Fig. 2-4.
2112
Panel mount adapter for two CYD211s into 105 mm Wide ×
132 mm High (4.1 × 5.2 inches) mounting plate. See Fig. 2-4.
8000
CalCurve™, floppy disk. Consists of a calibrated sensor
breakpoint table on a floppy disk in ASCII format for customer
download
CalCurve™, factory installed. Consists of a calibrated sensor
breakpoint table factory-installed into nonvolatile memory
Instrument calibration with certificate.
Instrument calibration with certificate and data.
User’s manual
* Included with Model CYD211.
Options & Accessories 6-1
Page 70

Omega Model CYD211 User’s Manual
6.3 WIRES
Common cryogenic wire available from Omega. Other wire and installation
accessories are also available.
P/N Cable Description
9001-005
9001-006
9001-007
9001-008
Quad-Twist™ Cryogenic Wire. Two twisted pairs,
phosphor-bronze wire, 36 AWG, 0.127 mm (0.005 inch)
diameter.
Duo-Twist™ Cryogenic Wire. Single twisted pair,
phosphor-bronze wire, 36 AWG, 0.127 mm (0.005 inch)
diameter.
Quad-Lead™ Cryogenic Wire. Phosphor-bronze wire, flat,
32 AWG, 0.203 mm (0.008 inch) diameter.
Quad-Lead™ Cryogenic Wire. Phosphor-bronze wire, flat,
32 AWG, 0.127 mm (0.005 inch) diameter.
6.4 SENSORS
Silicon Diode sensors available from Omega. Other sensors are also
available.
Sensor No. Sensor Description
The smallest silicon diode Temperature Sensor available. For
Series DT-420
installation on flat surfaces. Sensor incorporates the same type
of silicon chip used in the Series DT-470 and DT-471.
Silicon Diode Miniature Temperature Sensor. Same silicon
Series DT-450
chip used in the DT-470 configured for installation in recesses
as small as 1.6 mm diameter by 3.2 mm deep.
Series DT-470
Series DT-471
Silicon Diode Temperature Sensor. Interchangeable,
repeatable, accurate, wide range customized for cryogenics.
An economical version of the DT-470 for applications where
temperature measurements below 10 K are not required.
Omega DT-670 diode temperature sensors offer the best
accuracy across the widest useful temperature range – 1.4 to
Series DT-670
500 K – of any silicon diode sensor in the industry. Sensors
within the DT-670 series are interchangeable to the Curve
DT-670.
6-2 Options & Accessories
Page 71

Omega Model CYD211 User’s Manual
APPENDIX A
CURVE TABLES
A1.0 GENERAL
The following curve tables are applicable to the CYD211 Temperature Monitor.
Curve 1 DT-470 Silicon Diode................................................Table A-1
Curve 2 DT-670 Silicon Diode................................................Table A-2
Curve 3 CTI Curve C Silicon Diode ........................................Table A-3
Curve 6 PT-100 Platinum RTD ..............................................Table A-4
Curve 7 PT-1000 Platinum RTD.............................................. Table A-4
Break-
point
1
2
3
4
5
6
7
8
9
10
11
12
13
14
15
16
17
18
19
20
21
22
23
24
25
26
27
28
29
Table A-1. Omega DT-470 Silicon Diode (Curve 10)
Temp.
(K)
475.0
470.0
465.0
460.0
455.0
450.0
445.0
440.0
435.0
430.0
420.0
410.0
400.0
395.0
380.0
365.0
345.0
330.0
325.0
305.0
300.0
285.0
265.0
250.0
235.0
220.0
205.0
190.0
180.0
Volts
0.09062
0.10191
0.11356
0.12547
0.13759
0.14985
0.16221
0.17464
0.18710
0.19961
0.22463
0.24964
0.27456
0.28701
0.32417
0.36111
0.41005
0.44647
0.45860
0.50691
0.51892
0.55494
0.60275
0.63842
0.67389
0.70909
0.74400
0.77857
0.80139
Break-
point
30
31
32
33
34
35
36
37
38
39
40
41
42
43
44
45
46
47
48
49
50
51
52
53
54
55
56
57
58
Temp.
(K)
170.0
160.0
150.0
145.0
140.0
135.0
130.0
125.0
120.0
115.0
110.0
105.0
100.0
095.0
090.0
085.0
080.0
075.0
070.0
065.0
058.0
052.0
046.0
040.0
039.0
036.0
034.0
033.0
032.0
Volts
0.82405
0.84651
0.86874
0.87976
0.89072
0.90161
0.91243
0.92317
0.93383
0.94440
0.95487
0.96524
0.97550
0.98564
0.99565
1.00552
1.01525
1.02482
1.03425
1.04353
1.05630
1.06702
1.07750
1.08781
1.08953
1.09489
1.09864
1.10060
1.10263
Break-
point
59
60
61
62
63
64
65
66
67
68
69
70
71
72
73
74
75
76
77
78
79
80
81
82
83
84
85
86
Temp.
(K)
031.0
030.0
029.0
028.0
027.0
026.0
025.0
024.0
023.0
022.0
021.0
019.5
017.0
015.0
013.5
012.5
011.5
010.5
009.5
008.5
007.5
005.2
004.2
003.4
002.6
002.1
001.7
001.4
Volts
1.10476
1.10702
1.10945
1.11212
1.11517
1.11896
1.12463
1.13598
1.15558
1.17705
1.19645
1.22321
1.26685
1.30404
1.33438
1.35642
1.38012
1.40605
1.43474
1.46684
1.50258
1.59075
1.62622
1.65156
1.67398
1.68585
1.69367
1.69818
Curve Tables A-1
Page 72

Break-
point
1
2
3
4
5
6
7
8
9
10
11
12
13
14
15
16
17
18
19
20
21
22
23
24
25
Temp.
(K)
500.0
491.0
479.5
461.5
425.5
390.0
346.0
320.0
298.5
279.0
261.0
244.0
228.0
213.0
198.5
184.5
171.5
159.5
148.0
137.5
127.5
118.0
109.0
100.5
93.5
Omega Model CYD211 User’s Manual
Table A-2. Omega DT-670 Silicon Diode
Volts
0.090570
0.110239
0.136555
0.179181
0.265393
0.349522
0.452797
0.513393
0.563128
0.607845
0.648723
0.686936
0.722511
0.755487
0.786992
0.817025
0.844538
0.869583
0.893230
0.914469
0.934356
0.952903
0.970134
0.986073
0.998925
Break-
point
26
27
28
29
30
31
32
33
34
35
36
37
38
39
40
41
42
43
44
45
46
47
48
49
50
Temp.
(K)
87.0
81.0
75.0
69.0
63.0
56.4
49.0
38.7
35.7
33.3
31.2
29.6
28.3
27.3
26.5
25.8
25.2
24.7
24.3
24.0
23.7
23.3
22.8
22.0
21.3
Volts
1.01064
1.02125
1.03167
1.04189
1.05192
1.06277
1.07472
1.09110
1.09602
1.10014
1.10393
1.10702
1.10974
1.11204
1.11414
1.11628
1.11853
1.12090
1.12340
1.12589
1.12913
1.13494
1.14495
1.16297
1.17651
Break-
point
51
52
53
54
55
56
57
58
59
60
61
62
63
64
65
66
67
68
69
70
71
72
73
74
75
Temp.
(K)
20.2
17.10
15.90
14.90
14.00
13.15
12.35
11.55
10.75
10.00
9.25
8.50
7.75
6.80
5.46
4.56
4.04
3.58
3.18
2.62
2.26
1.98
1.74
1.53
1.40
Volts
1.19475
1.24208
1.26122
1.27811
1.29430
1.31070
1.32727
1.34506
1.36423
1.38361
1.40454
1.42732
1.45206
1.48578
1.53523
1.56684
1.58358
1.59690
1.60756
1.62125
1.62945
1.63516
1.63943
1.64261
1.64430
A-2 Curve Tables
Page 73
Omega Model CYD211 User’s Manual
Table A-3. CTI Curve C Silicon Diode
Breakpoint Temp. (K) Volts
1
2
3
4
5
6
7
8
9
10
11
12
13
14
15
16
17
18
19
20
21
22
23
24
25
26
27
28
29
320.0
305.0
295.0
285.0
280.0
270.0
250.0
195.0
165.0
140.0
130.0
125.0
115.0
110.0
100.0
95.0
90.0
85.0
77.4
65.0
60.0
36.0
20.0
19.0
18.0
14.0
12.0
11.0
10.0
0.2968
0.3382
0.3640
0.3911
0.4050
0.4341
0.4896
0.6408
0.7255
0.7971
0.8245
0.8376
0.8625
0.8769
0.9049
0.9184
0.9314
0.9440
0.9626
0.9958
1.0100
1.0747
1.1162
1.1290
1.1500
1.3161
1.3656
1.3850
1.4000
Curve Tables A-3
Page 74

Omega Model CYD211 User’s Manual
Table A-4. Omega PT-100/-1000 Platinum RTD Curves
Break- PT-100 PT-1000
point Temp. (K)
Ohms (Ω)
Temp. (K)
Ohms (Ω)
1
2
3
4
5
6
7
8
9
10
11
12
13
14
15
16
17
18
19
20
21
22
23
24
25
26
27
28
29
030.0
032.0
036.0
038.0
040.0
042.0
046.0
052.0
058.0
065.0
075.0
085.0
105.0
140.0
180.0
210.0
270.0
315.0
355.0
400.0
445.0
490.0
535.0
585.0
630.0
675.0
715.0
760.0
800.0
3.820
4.235
5.146
5.650
6.170
6.726
7.909
9.924
12.180
15.015
19.223
23.525
32.081
46.648
62.980
75.044
98.784
116.270
131.616
148.652
165.466
182.035
198.386
216.256
232.106
247.712
261.391
276.566
289.830
030.0
032.0
036.0
038.0
040.0
042.0
046.0
052.0
058.0
065.0
075.0
085.0
105.0
140.0
180.0
210.0
270.0
315.0
355.0
400.0
445.0
490.0
535.0
585.0
630.0
675.0
715.0
760.0
800.0
38.20
42.35
51.46
56.50
61.70
67.26
79.09
99.24
121.80
150.15
192.23
235.25
320.81
466.48
629.80
750.44
987.84
1162.70
1316.16
1486.52
1654.66
1820.35
1983.86
2162.56
2321.06
2477.12
2613.91
2765.66
2898.30
A-4 Curve Tables
Page 75

WARRANTY/DISCLAIMER
OMEGA ENGINEERING, INC. warrants this unit to be free of defects in materials and
workmanship for a period of 13 months from date of purchase. OMEGA’s Warranty adds an
additional one (1) month grace period to the normal one (1) year product warranty to cover
handling and shipping time. This ensures that OMEGA’s customers receive maximum
coverage on each product.
If the unit malfunctions, it must be returned to the factory for evaluation. OMEGA’s Customer
Service Department will issue an Authorized Return (AR) number immediately upon phone or
written request. Upon examination by OMEGA, if the unit is found to be defective, it will be
repaired or replaced at no charge. OMEGA’s WARRANTY does not apply to defects resulting
from any action of the purchaser, including but not limited to mishandling, improper interfacing,
operation outside of design limits, improper repair, or unauthorized modification. This
WARRANTY is VOID if the unit shows evidence of having been tampered with or shows evidence
of having been damaged as a result of excessive corrosion; or current, heat, moisture or vibration; improper specification; misapplication; misuse or other operating conditions outside of
OMEGA’s control. Components which wear are not warranted, including but not limited to
contact points, fuses, and triacs.
OMEGA is pleased to offer suggestions on the use of its various products. However,
OMEGA neither assumes responsibility for any omissions or errors nor assumes liability
for any damages that result from the use of its products in accordance with information
provided by OMEGA, either verbal or written. OMEGA warrants only that the parts
manufactured by it will be as specified and free of defects. OMEGA MAKES NO OTHER
WARRANTIES OR REPRESENTATIONS OF ANY KIND WHATSOEVER, EXPRESS OR
IMPLIED, EXCEPT THAT OF TITLE, AND ALL IMPLIED WARRANTIES INCLUDING ANY
WARRANTY OF MERCHANTABILITY AND FITNESS FOR A PARTICULAR PURPOSE ARE
HEREBY DISCLAIMED. LIMITATION OF LIABILITY: The remedies of purchaser set forth
herein are exclusive, and the total liability of OMEGA with respect to this order, whether
based on contract, warranty, negligence, indemnification, strict liability or otherwise, shall
not exceed the purchase price of the component upon which liability is based. In no event
shall OMEGA be liable for consequential, incidental or special damages.
CONDITIONS: Equipment sold by OMEGA is not intended to be used, nor shall it be used: (1) as
a “Basic Component” under 10 CFR 21 (NRC), used in or with any nuclear installation or activity;
or (2) in medical applications or used on humans. Should any Product(s) be used in or with any
nuclear installation or activity, medical application, used on humans, or misused in any way,
OMEGA assumes no responsibility as set forth in our basic WARRANTY/ DISCLAIMER language,
and, additionally, purchaser will indemnify OMEGA and hold OMEGA harmless from any liability
or damage whatsoever arising out of the use of the Product(s) in such a manner.
RETURN REQUESTS/INQUIRIES
Direct all warranty and repair requests/inquiries to the OMEGA Customer Service Department.
BEFORE RETURNING ANY PRODUCT(S) TO OMEGA, PURCHASER MUST OBTAIN AN
AUTHORIZED RETURN (AR) NUMBER FROM OMEGA’S CUSTOMER SERVICE DEPARTMENT
(IN ORDER TO AVOID PROCESSING DELAYS). The assigned AR number should then be
marked on the outside of the return package and on any correspondence.
The purchaser is responsible for shipping charges, freight, insurance and proper packaging to
prevent breakage in transit.
FOR WARRANTY
RETURNS, please have
the following information available BEFORE
contacting OMEGA:
1. Purchase Order number under which
the product was PURCHASED,
2. Model and serial number of the product
under warranty, and
3. Repair instructions and/or specific
problems relative to the product.
FOR NON-WARRANTY REPAIRS,
consult
OMEGA for current repair charges. Have the
following information available BEFORE
contacting OMEGA:
1. Purchase Order number to cover the
COST of the repair,
2. Model and serial number of the
product, and
3. Repair instructions and/or specific problems
relative to the product.
OMEGA’s policy is to make running changes, not model changes, whenever an improvement is possible.
This affords our customers the latest in technology and engineering.
OMEGA is a registered trademark of OMEGA ENGINEERING, INC.
© Copyright 2003 OMEGA ENGINEERING, INC. All rights reserved. This document may not be copied, photocopied,
reproduced, translated, or reduced to any electronic medium or machine-readable form, in whole or in part, without
the prior written consent of OMEGA ENGINEERING, INC.
Page 76

Where Do I Find Everything I Need for
Process Measurement and Control?
OMEGA…Of Course!
Shop online at www.omega.com
TEMPERATURE
Thermocouple, RTD & Thermistor Probes, Connectors, Panels & Assemblies
Wire: Thermocouple, RTD & Thermistor
Calibrators & Ice Point References
Recorders, Controllers & Process Monitors
Infrared Pyrometers
PRESSURE, STRAIN AND FORCE
Transducers & Strain Gages
Load Cells & Pressure Gages
Displacement Transducers
Instrumentation & Accessories
FLOW/LEVEL
Rotameters, Gas Mass Flowmeters & Flow Computers
Air Velocity Indicators
Turbine/Paddlewheel Systems
Totalizers & Batch Controllers
pH/CONDUCTIVITY
pH Electrodes, Testers & Accessories
Benchtop/Laboratory Meters
Controllers, Calibrators, Simulators & Pumps
Industrial pH & Conductivity Equipment
DATA ACQUISITION
Data Acquisition & Engineering Software
Communications-Based Acquisition Systems
Plug-in Cards for Apple, IBM & Compatibles
Datalogging Systems
Recorders, Printers & Plotters
HEATERS
Heating Cable
Cartridge & Strip Heaters
Immersion & Band Heaters
Flexible Heaters
Laboratory Heaters
ENVIRONMENTAL
MONITORING AND CONTROL
Metering & Control Instrumentation
Refractometers
Pumps & Tubing
Air, Soil & Water Monitors
Industrial Water & Wastewater Treatment
pH, Conductivity & Dissolved Oxygen Instruments
M3943/0903
 Loading...