

Page 1

Guide technique / Technische Anleitung / Technical Guide TG-19-C-037-FDE A
Fait par: pelrom
Date: 11.04.2005
CALIBRE – KALIBER – CALIBRE
1680 B
111/2’’’
ø 25,60 mm
Hauteur mouvement
Werkhöhe 3,00 mm
Movement height
Hauteur sur pile / Höhe auf Batterie / Height on battery 3,75 mm
Nombre de rubis / Anzahl Rubine / Number of jewels 11
SW
ISS
11 ELEVEN JEW
ELS
M
3
M
1
M
2
M
4
M
5
M
6
R
1 imp. = 0,33 s/month
C
+
PL T
C Ð
1
6
8
0
B
E.O.L.
Fuseau horaire / Zeitzone / Time zone
QUANTIEME PERPETUEL / EWIGER KALENDER /
PERPETUAL CALENDAR
Quantième perpétuel / Thermocompensé
Ewiger Kalender / Thermokompensation
Français
Deutsch
English
Perpetual calendar / Thermocompensation
OMEGA SA WORLD SERVICE ORGANIZATION TG-19-C-037-FDE - A - PAGE 1 - 1680B
Page 2

Description
Le calibre 1680B est un mouvement à quartz
avec thermocompensation et calendrier perpétuel.
Ce mouvement comporte des aiguilles d’heures,
minutes et secondes, quantième perpétuel à
3 heures. Ce mouvement indique également
l’approche de la fi n de vie de la pile par avance de
l’aiguille de seconde toutes les 4 secondes (EOL).
Points importants
Fonctionnalité du Quantième Perpétuel
Il intègre un système de calendrier perpétuel et
ajuste ainsi, automatiquement la date à la fi n du
mois qui comporte moins de 31 jours.
Contrôle séquentiel de la programmation de
la date, du mois et de l’année avec retour à la
date:
La date est affi chée dans le guichet. En pressant
plus de 3 secondes sur la couronne (position -1)
puis en relâchant dès que l’indicateur tourne, on
affi che le mois (par le chiffre 1 à 12) pendant 8
secondes puis l’année (chiffre romain de I à IV)
également pendant 8 secondes. Ensuite le disque
quantième retourne à la date de départ.
Voir schéma page 16.
Corrections de la seconde, de la minute, de
l’heure, de la date, du mois et de l’année.
En corrigeant une de ces fonction, les fonctions
restantes restent inchangées. Pour éviter cet
incident, il est absolument indispensable de
procéder aux corrections dans l’ordre suivant:
A. Seconde et minute
B. Date et heure
C. Mois
D. Année
E. Après la correction, il est conseillé de faire un
contrôle supplémentaire de vos réglages en
effectuant le test de la programmation comme
indiqué au paragraphe précédent.
La marche à suivre détaillée se trouve à la page 17
Changement de pile
Ne jamais enlever la pile pendant la rotation
de l’indicateur ni avec la couronne en position
poussée (-1).
Mettre la nouvelle pile en place avec la couronne
en position 0 (neutre). Après avoir mis la
nouvelle pile, le mouvement ne démarre pas
automatiquement. Il faut donner une courte
pression sur la couronne (-1); la montre se met
à fonctionner et l’indicateur de quantième se
positionne sur le 1 comme point de référence
avant de retourner à la date d’arrêt de la montre.
Contrôle et correction du calendrier
Voir pages 16 à 20.
Posage aiguilles
Poser impérativement l’ensemble sur le posage
de pose aiguilles.
Porte-mouvement pour enlever la tige de mise
à l’heure Réf. 502 110 0741
Porte-mouvement pour posage aiguille,
Ø 25.6 mm Réf. 507 0017
Lubrifi ants
Moebius HP-1300 Réf. 504 5013
Moebius 9504 Réf. 504 5014
Moebius 9014 Quartz Oil Réf. 504 200 0031
Beschreibung
Das Kaliber 1680B ist ein Quarzwerk mit
Thermokompensation und Ewigem Kalender.
Das Werk ist mit einem Stunden-, Minuten- und
Sekundenzeiger ausgestattet und die Datumsanzeige befi ndet bei drei Uhr. Durch den Sprung
des Sekundenzeigers alle 4 Sekunden zeigt das
Werk das Ende der Batterielebensdauer (EOL) an.
Wichtiger Punkt zur Funktionalität des Ewigen
Kalenders
Das Ewige Kalendersystem stellt sich folgendermassen ein: das Datum wird automatisch bei
denjenigen Monaten korrigiert welche weniger als
31 Tage haben.
Fortlaufende Kontrolle des programmierten
Datums, Monat und Jahr mit der Rückkehr
zum Datum
Das Datum ist im Fenster angezeigt. Man hält die
Krone für etwas mehr als drei Sekunden gedrückt
(Position -1).Sobald sich die Datumsscheibe zu
drehen beginnt die Krone wieder loslassen. Nun
wird zuerst das Datum (mit den Ziffern 1-12)
für 8 Sekunden angezeigt, danach das Jahr (mit
den römischen Ziffern I bis IV) ebenfalls für 8
Sekunden. Nachher kehrt der Datumsanzeiger
wieder auf das Ausgangsdatum zurück. Siehe
Seite 16.
Einstellung der Sekunde, Minute, Stunde, des
Datums, des Monats, des Jahres
Um die Einstellungen korrekt vozunehmen muss
folgende Reihenfolge beachtet werden.
A. Sekunde und Minute
B. Datum und Stunde
C. Monat
D. Jahr
E. Nach der Korrektur ist es empfohlen
eine zusätzliche Kontrolle Ihrer Einstellung
vorzunehmen, wie in dem vorangehenden
Paragraphen beschrieben wurde.
Die Detaillierte Vorgehensweise befi ndet sich auf
der Seite 17
Batteriewechsel
Die Batterie darf nie herausgenommen werden,
während dem die Datumsscheibe dreht und nie
während die Krone gedrückt ist (Position -1).
Die Batterie wird eingesetzt wenn die Krone auf
Position 0 (neutral)steht. Nachdem man die neue
Batterie gesetzt hat, läuft das Werk nicht von
selbst an. Man muss die Krone kurz gedrückt
halten (Position - 1); danach beginnt die Uhr
zu laufen und der Kalender wird sich auf die
Referenzposition 1 begeben, später aber wieder
zu dem Datum welches vor dem Batteriewechsel
eingestellt wurde.
Kontrolle und Korrektur des Kalenders
Siehe Seite 16,17 und 21-23.
Zeigersetzten
Die Zeiger müssen unbedingt auf dem Werkhalter
zum Zeigersetzten gesetzt werden.
Werkhalter zum entfernen der Aufzugwelle
Ref. 502 110 0741
Werkhalter zum Zeigersetzten, Ø 25.6 mm
Ref. 507 0017
Schmiermittel
Moebius HP-1300 Ref. 504 5013
Moebius 9504 Ref. 504 5014
Moebius 9014 Quartz Oil Ref. 504 200 0031
Description
Calibre 1680B is a thermo-compensated quartz
movement equipped with a perpetual calendar.
The movement indicates hours, minutes and
seconds. The date is shown at 3 o’clock. The end
of life (EOL) of the battery is indicated by 4second jumps of the second hand.
Important Points
Functioning of the perpetual calendar
The watch has a perpetual calendar system that
automatically adjusts the date at the end of any
month with less than 31 days.
The month and the year must be preselected
or corrected in the following way: Month and
Year Cycle have to be preset and can be read or
adjusted the following way: Press the crown for
>3 seconds. The date disc will move and indicate
fi rst the month using the fi gures 1 - 12 of the
date indication. The month will be indicated for
8 seconds and then the date disc moves in order
to indicate the year cycle indicated with roman
fi gures (I-IV). The year cycle will be indicated for
8 seconds and after that the date disc turns back
into its initial position to indicate the date.
Correction of the second, minute, hour, date,
months and year.
For a correct adjustment of these functions the
following order must be respected.
A. Second and minute
B. Date and hour
C. Month
D. Y ear
E. After the correction it is recommended to
control the settings according the description in
the paragraph above.
For detailled instruction please refer to page 17.
Battery exchange
The battery must not be removed whilst the
date disc is rotating, or the crown in the pull-in
position (-1).
When changing the battery the crown must be in
neutral position (0). After exchange of the battery
the movement does not work and the crown must
be quickly pressed in; the movement will start
to work. The date disc will move to the fi gure
1 (reset fi gure) and will go back in its initial
position.
Check and correction of months and year cycle
See pages 16,17 and 24-25.
Hand setting
The hands must be fi t on the appropriate
movement holder with accurately adjusted jewel
support.
Movement holder for removing the winding stem
Ref. 502 110 0741
Movement holder for hand setting, Ø 25.6 mm
Ref. 507 0017
Lubricants
Moebius HP-1300 Ref. 504 5013
Moebius 9504 Ref. 504 5014
Moebius 9014 Quartz Oil
Ref. 504 200 0031
Informations générales - Allgemeine Informationen - General Information
OMEGA SA WORLD SERVICE ORGANIZATION TG-19-C-037-FDE - A - PAGE 2 - 1680B
Page 3

OMEGA SA WORLD SERVICE ORGANIZATION TG-19-C-037-FDE - A - PAGE 3 - 1680B
Différences entre versions 1680A et 1680B
Unterschiede zwischen 1680A und 1680B Versionen
Differences between 1680A and 1680B versions
1680A 1680B
Platine
Werkplatte
Main plate
1
6
8
0
1
6
8
0
B
Référence
Referenz
Reference
722 1680 100 722 1680B 1000
Gravage 1680
Gravur 1680
Engraved 1680
Gravage 1680B
Gravur 1680B
Engraved 1680B
Pont de rouage
Räderwerk
Wheel train bridge
Sans frein magnétique
Ohne magnetische Bremse
Without magnetic brake
Avec frein magnétique
Mit magnetische Bremse
With magnetic brake
Référence
Referenz
Reference
722 1680 110 722 1680B 1003
Roue de seconde
Sekundenrad
Second wheel
Roue avec 4 bras
4 Speichenrad
Wheel with 4 arms
Roue pleine
Rad ohne Speiche
Wheel without arms
Référence
Referenz
Reference
722 1680 227 722 1680B 1243.04
Module électronique
Elektronik-Baugruppe
Electronic module
SW
ISS
11 ELEVEN JEW
EL
S
Imprimé - Aufdruck - Printed
eleven 11 jewels
Imprimé - Aufdruck - Printed
11 eleven jewels
Référence
Referenz
Reference
722 1680 4000 722 1680B 4000
Page 4

14
13
7
12
11
6
10
9
5
4
8
2
3
1
1680B
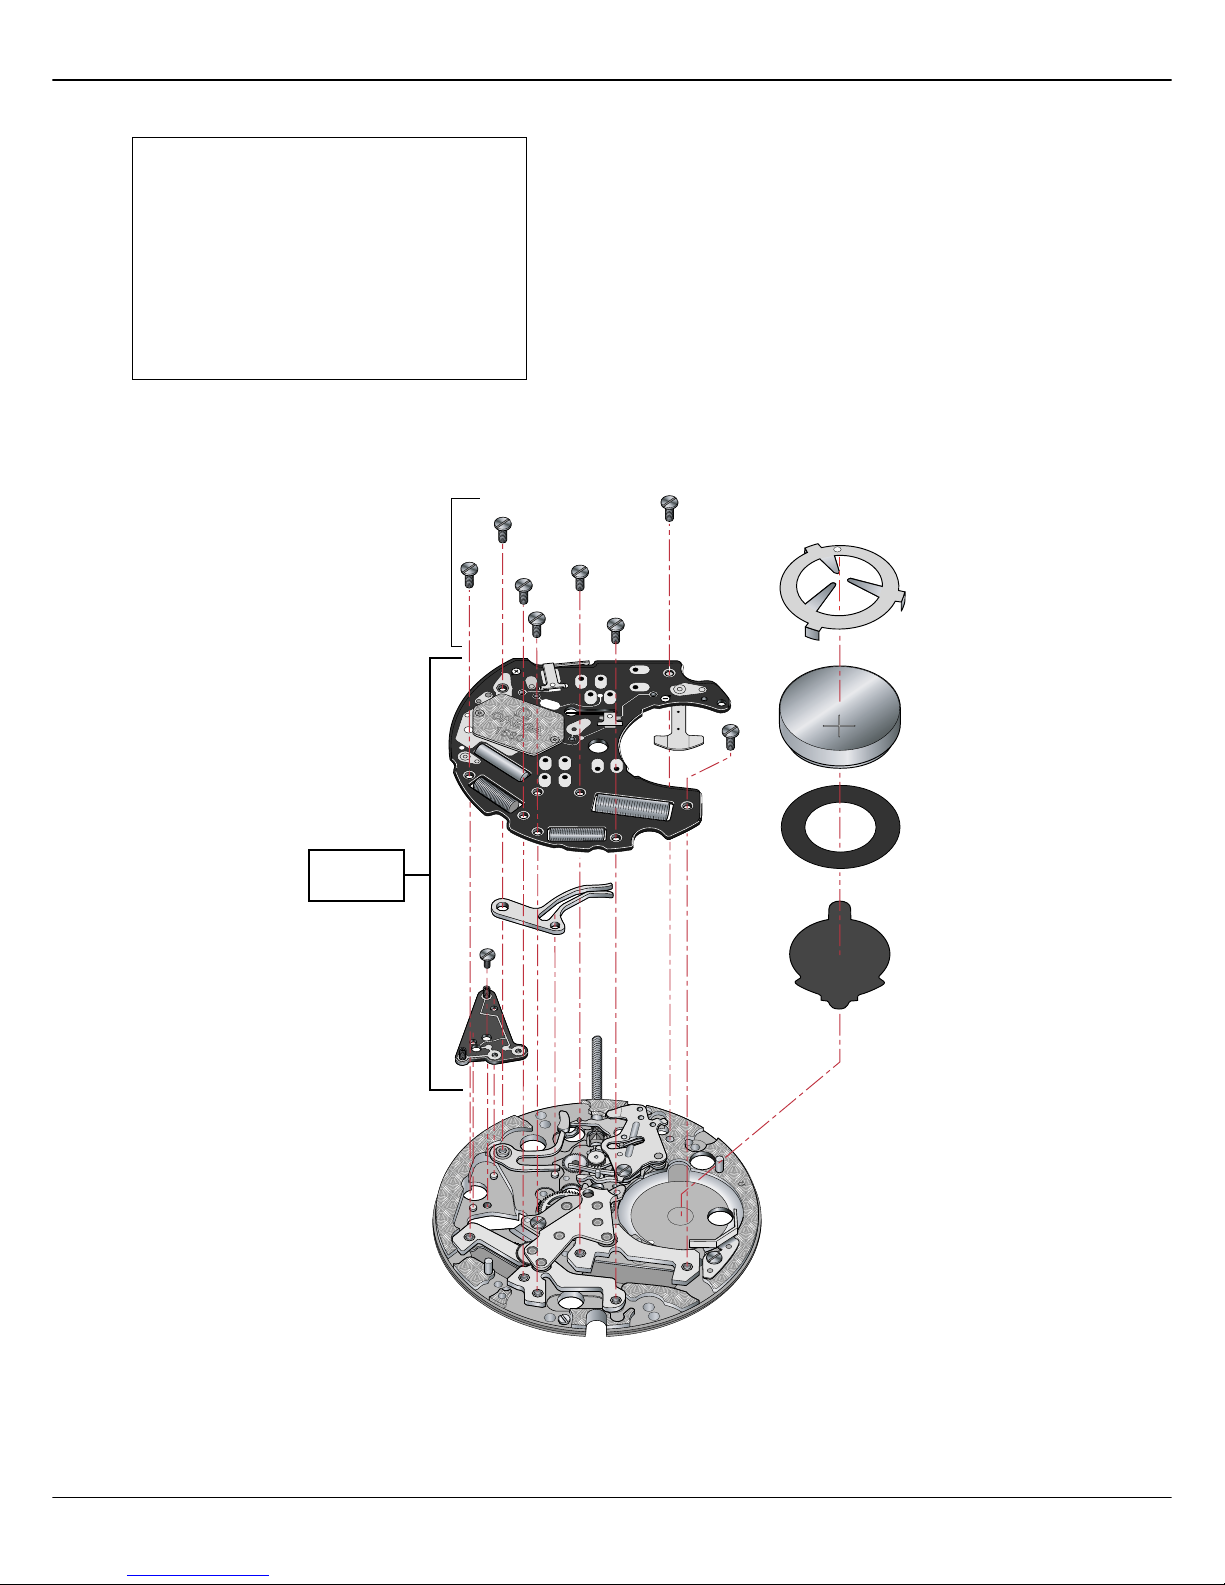
Lubrification – Schmierung – Lubrication
Huile fine
Dünnflüssiges Öl Moebius 9014 Quartz Oil
Fine Oil
Liste des fournitures par ordre d’assemblage
Bestandteilliste in Montagereihenfolge
Parts listed in order of assembly
1 = 1000 8 = 4211/1
2 = 4021/1 9 = 2543/1
3 = 4021 10 = 2543/2
4 = 4211 11 = 1003
5 = 210 12 = 5110 (1x)
6 = 1243.04 13 = 4407
7 = 203 14 = 54407 (1x)
OMEGA SA WORLD SERVICE ORGANIZATION TG-19-C-037-FDE - A - PAGE 4 -1680B
Page 5

OMEGA SA WORLD SERVICE ORGANIZATION TG-19-C-037-FDE - A - PAGE 5 - 1680B
1
5102
13
12
11
10
9
7
5
4
2
3
6
8
5102
1680
B
Lubrification – Schmierung – Lubrication
Graisse
Fett Moebius 9504
Grease
Huile épaisse
Dickflüssiges Öl Moebius HP-1300
Thick oil
Liste des fournitures par ordre d’assemblage
Bestandteilliste in Montagereihenfolge
Parts listed in order of assembly
1 = 1000 8 = 9435
2 = 407 9 = 435/1
3 = 2544 10 = 560
4 = 405 11 = 445
5 = 482 12 = 466
6 = 491 13 = 5466 (1x)
7 = 443
Page 6

OMEGA SA WORLD SERVICE ORGANIZATION TG-19-C-037-FDE - A - PAGE 6 - 1680B
13
14
15
16
17
18
19
20
21
22
23
24
25
26
27
28
29
30
1
I
II
III
IV
2
3
4
5
6
7
8
9
10
11
12
31
13
12
5
7
11
4
14
9
6
8
3
2
10
Voir page 8
Siehe Seite 8
See page 8
Voir page 8
Siehe Seite 8
See page 8
Positionnement de l'indicateur de quantième voir page 9
Position der Datumanzeige siehe Seite 9
Positioning of date indicator see page 9
Voir page 8
Siehe Seite 8
See page 8
1
*
Lubrification – Schmierung – Lubrication
Graisse
Fett Moebius 9504
Grease
Huile épaisse
Dünnflüssiges Öl Moebius HP-1300
Thick Oil
Très faible quantité
Sehr kleine Menge Moebius HP-1300
Very little quantity
*
Liste des fournitures par ordre d’assemblage
Bestandteilliste in Montagereihenfolge
Parts listed in order of assembly
1 = 1000 8 = 2543/3
2 = 450 9 = 2543/4
3 = 242 10 = 2630
4 = 260 11 = 2557/1
5 = 291 12 = 2740
6 = 2543/5 13 = 52740 (3x)
7 = 2556 14 = 250/1
Page 7
OMEGA SA WORLD SERVICE ORGANIZATION TG-19-C-037-FDE - A - PAGE 7 - 1680B
SWISS
11 ELEVEN JEWELS
M3
M2
M4
M5
M6
R
1 imp. = 0,33 s/month
C
+
PL T
M1
7
7
9
10
8
2
4
6
5
Voir page 10
Siehe Seite 10
See page 10
1
16
80B
Liste des fournitures par ordre d’assemblage
Bestandteilliste in Montagereihenfolge
Parts listed in order of assembly
1 = 1000 6 = 4000
2 = 4046 7 = 54000 (8x)
3 = 4430 8 = 4046/1
4 = 4011 9 = 9952
5 = 54011 (1x) 10 = 4412
Page 8

OMEGA SA WORLD SERVICE ORGANIZATION TG-19-C-037-FDE - A - PAGE 8 - 1680B
Contrôle à effectuer pendant
l’assemblage
Contrôler la position de l’interrupteur
de courant réf. 1680 4135. (voir image
A).
Le ressort doit se trouver exactement
au-dessus du marquage sur la platine.
Si le positionnement du ressort n’est pas
correcte, la correction se fait par pivotement de la base de l’interrupteur
à l’aide d’un tournevis.
Après le montage du circuit imprimé
réf. 1680 4011, contrôler la position de
l’interrupteur de courant réf. 1680 4135
(voir image B).
A
Durant l’assemblage de la roue intermédiaire de l’indicateur de quantième réf.
1680 2543/5, un de ses doigts doit être
orienté vers la marque se trouvant sur la
platine.
Le positionnement de la bascule d’enclenchement de l’indicateur de quantième réf. 1680 2630 doit être dans le prolongement du dégagement se trouvant
sur la plaque de maintien du mécanisme
de calendrier réf. 1680 2740 .
Kontrollen welche (durchzuführen) sind während dem
Zusammenbau
Kontrolle der Position des Strom-Unterbrechers ref. 1680 4135 (siehe Bild A).
Die Feder muss sich mit der Markierung auf der Platine decken.
Wenn die Position der Feder nicht stimmt, kann sie mit Hilfe eines Schraubenziehers an der Basis korrigiert werden.
Nach der Montage der Gedruckten
Schaltung Ref. 1680 4011, kontrolliert
man die Position des Strom-Unterbrechers 1680 4135 (siehe Bild B)
B
Wenn das Datums-Zwischenrad
Ref.1680 2543/5 montiert wird, muss
einer der Finger auf die Markierung der
Platine ausgerichtet werden.
Die Positionierung der Einrückwippe
für Datumanzeiger ref. 1680 2630 muss
in der Verlängerung der Aussparung auf
der Halteplatte für Kalender-Mechanismus ref. 1680 2740 erfolgen.
Controls during assembly
The position of the power switch
ref. 1680 4135 must be checked (See
drawing A). The spring position must
match with the mark on the main plate.
For adjustment, the power switch can
be turned with a screw driver at one of
the fi ngers pivoting point.
After assembling the printed circuit ref.
1680 4011, check the correct position
of the power switch ref. 1680 4135.
(See drawing A).
The intermediate date wheel ref. 1680
2543/5 must be positioned that one of
the fi ngers points to the mark on the
main plate.
The position of the spring of interlocking yoke for date indicator ref. 1680
2630 must be along the opening in the
bridge.
1680 4135
1680 4011
1680 2543/5
1680 2630
1680 2740
Page 9

OMEGA SA WORLD SERVICE ORGANIZATION TG-19-C-037-FDE - A - PAGE 9 - 1680B
1. Contrôle du bon position nement de l’indicateur de
quantième
1.1 Durant l’assemblage, faire attention
au positionnement de l’indicateur
de quantième.
La position de l’indicateur de
quantième dans l’image A est
correcte. Le chiffre doit être aligné
avec la tige de mise à l’heure.
1.2 La position de l’indicateur de
quantième dans l’image B est
incorrecte.
Kontrolle ob die Datumsanzeige richtig positioniert ist
1.1 Achten Sie beim Zusammenbau auf
die Position der Datumsanzeige
Die Position der Datumsanzeige auf
dem Bild A ist korrekt. Die Ziffer muss
in einer Linie mit der Aufzugwelle
stehen.
A
29
30
31
1.2 Die Position der Datumsanzeige auf
dem Bild B ist nicht korrekt.
B
28
29
30
31
1. Check of well positionning
of the date disc-indicator de
quantième
1.1 The date disc position must be
accurately checked during the
assembly.
The position of the date disc
as shown on the picture A is correct.
The fi gure must match with the
position of the stem.
1.2. The position of the date disc as
shown on the picture B is not
correct.
Page 10

OMEGA SA WORLD SERVICE ORGANIZATION TG-19-C-037-FDE - A - PAGE 10 - 1680B
2. Montage du module
électronique réf. 1680B 4000
Durant le montage du module
électronique réf. 1680B 4000, il est
important de contrôler que les con tacts du module entrent dans les res sorts du circuit imprimé réf. 1680
4011.
2. Montieren des Elektronik Baugruppe ref. 1680B 4000
Beim Montieren der Elektronik Baugruppe ref. 1680B 4000 ist es
wichtig darauf zu achten, dass die
Kontakte korrekt in die Federn der
Gedruckten Schaltung ref. 1680
4011 eingeführt werden.
a)
b)
Assembling of the electronic
module ref. 1680B 4000
It is important to pay attention that the
contact pins of the electronic module
ref. 1680B 4000 are properly positioned
in the cylindrical springs of the printed
circuit ref. 1680 4011.
Page 11

OMEGA SA WORLD SERVICE ORGANIZATION TG-19-C-037-FDE - A - PAGE 11 - 1680B
252 51
1
SW
ISS
11 ELEVEN JEW
ELS
M
3
M
1
M
2
M
4
M
5
M
6
R
1 imp. = 0,33 s/month
C
+
PL T
C Ð
2
1
R
252 511
SW
ISS
11 ELEVEN JEW
ELS
M
3
M
1
M
2
M
4
M
5
M
6
R
1 imp. = 0,33 s/month
C
+
PL T
C Ð
4
5b
5a
R
3
Contrôles électriques - Elektrische Kontrolle - Electrical tests
Contrôle de la marche
Contrôler la marche de la manière
suivante:
Le contrôle de la marche peut se faire à
l’aide d’un appareil à capter les impulsions du moteur comme le Witschi Q
Test 6000 permettant une intégration de
mesure de 480 secondes (8 min.) Il est
recommandé d’effectuer au minimum 2
mesures.
En cas de correction de la marche, il
faut en premier lieu tirer la couronne
en position 2.
Pour effectuer la correction de la marche, s’aider d’un câble de contact. La
pile doit être en place. Une des extrémités du câble est reliée au pôle + (par
ex. la pile) et avec l’autre extrémité on
exerce des contacts répétés sur la plage
C+ pour obtenir une avance ou sur la
plage C- pour obtenir un retard. Chaque
contact correspond à une correction de
± 0.33 secondes par mois. Par conséquent, il faut donner trois contacts pour
totaliser 1 seconde.
La programmation n’est pas perdue lors
du changement de pile.
Gangkontrolle
Die Gangkontrolle kann mit einem
Gerät wie dem Witschi Q-Test 6000 zur
Aufnahme der Motorimpulse erfolgen.
Die Integrationszeit beträgt 480 Sekunden (8 Min). Es ist empfohlen
Minimum 2 Messungen zu vollziehen.
Im falle einer Korrektur des Ganges
wird die Krone in Position 2 gezogen. Die Gangkorrektur erfolgt mit
eingesetzter Batterie und mit Hilfe
eines Kontaktkabels. Das eine Ende
des Kabels wird auf einen + Pol (z.B.
Batterie) gehalten. Mit dem anderen
Ende werden eine Anzahl Impulse auf
die Kontaktfl ächen C+ geben, um einen
Vorgang zu erzielen oder auf die Kontaktfl äche C-, um einen Nachgang zu
erzielen. Ein Kontakt entspricht +/- 0,33
Sekunden pro Monat. Um 1 Sekunde
zu korrigieren werden drei Kontakte
ausgeführt.
Die Programmierung wird durch einen
Batteriewechsel nicht gelöscht.
Rate check
The rate can be checked e.g. with a
Witschi Q-Test 6000 equipment able
to measure the motor impulses. The
measuring time is 480 seconds (8 min.).
For an accurate test result it is recommended to make at least two consecutive measures.
Correction of the rate: The battery is
fi t in. Pull out the crown completely in
position 2.
Use a contact wire and place one end
on the battery top (+ pole) and with the
other end touch the C+ (to gain time,
each contact = +0.33sec./day) or C- (to
loose time, each contact = -0.33sec./
day) contacts on the module.
The previous rate setting remains after a
battery exchange.
Page 12

Contrôles électriques – Elektrische Kontrollen – Electrical tests
Remarques
Bemerkungen
Remarks
Contrôle
Kontrolle
Test
Mesure
Messung
Measurement
Echelle de mesure
Einstellung Messgerät
Setting of apparatus
Position
Messpunkt
Position
1
2 V
(Ri ≥ 10kΩ / V)
1,55 V
≤ 1,30 V
Tension de la pile
Spannung der Batterie
Battery voltage
Mesure avec pile
Messung mit Batterie
Measurement with battery
2
1 V
(Ri ≥ 10kΩ / V)
L’aiguille du multimètre oscille en sens + et –.
Zeiger im Messgerät pulsiert im + und – Sinn.
Hand of the measuring apparatus oscillates in
+ and – direction.
Impulsions à la sortie du circuit
intégré: 1 par seconde.
Ausgangsimpulse am integrierten
Schaltkreis: 1 pro Sekunde.
Impulses at output of integrated
circuit: 1 per seconde.
Mesure avec une pile contrôlée.
Messung mit kontrollierter Batterie.
Measurement with controlled
battery.
3
2 V
Limite inférieure de la tension
de fonctionnement
Untere Funktionsspannungsgrenze
Lower working-voltage limit
Mesure sans pile, alimentation
extérieure variable, en descen dant
de 1,55 V à l’arrêt du mouvement.
Messung ohne Batterie mit
variabler Speisung von aussen,
Spannung von 1,55 V bis zum
Stillstand des Werkes reduzieren.
Measurement without battery, with
variable external power supply,
starting with 1.55 V, lower tension
until movement stops.
10 µA
≤ 1,30 µA
Consommation du mouvement
Stromaufnahme Uhrwerk
Consumption of movement
Mesure sans pile, avec
alimentation extérieure 1,55 V.
Messung ohne Batterie, mit
Speisegerät 1,55 V.
Measurement without battery,
with power supply unit 1.55 V.
4
10 kΩ
200 µA
1,6 - 2,0 kΩ
100 - 125 µA
Continuité du bobinage
Zustand der Spule
Condition of coil
Ohmmètre avec tension de mesure supérieure à 0,40 V inapproprié, tension recommandée 0,20 V. Température ambiante 20°C
• Ohmmeter mit Prüfspannung über 0,40 V ungeeignet, empfohlene Spannung 0,20 V. Raumtemperatur 20°C
Ohmmeter with a test voltage exceeding 0.40 V unsuitable, recommanded voltage 0.20 V Ambient temperature 20°C
≤ 0,5 µA
Fonctionnement de l’interrupteur en
pos. 2 de la tige de mise à l’heure.
Funktion des Stopphebels,
Pos. 2 der Zeigerstellwelle.
Function of stop lever, pos. 2
of handsetting stem.
Mesure sans pile, avec
alimentation extérieure 1,55 V.
Messung ohne Batterie, mit
Speisegerät 1,55 V.
Measurement without battery,
with power supply unit 1.55 V.
5 a, b
1,0 - 1,2 kΩ
Continuité du bobinage moteur pour
l’entraînement du quantième
Zustand der Spule Motor zum
Antrieb des Datums
Condition of coil
OMEGA SA WORLD SERVICE ORGANIZATION TG-19-C-037-FDE - A - PAGE 12 - 1680B
Page 13

OMEGA SA WORLD SERVICE ORGANIZATION TG-19-C-037-FDE - A - PAGE 13 - 1680B
Posage aiguilles détection visuelle du contact à 24H
Le calibre 1680B est équipé d’un saut
de date électronique. De ce fait, les
aiguilles doivent être synchronisées
avec le contact électronique pour que la
date puisse sauter à minuit.
Afi n de détecter visuellement le contact
à 24H, tirer la couronne en position 2
et la tourner dans le sens horaire. Le
cadran et les aiguilles ne doivent pas
être posés.
A l’aide d’une loupe, observer la fermeture de la lame de la bascule d’enclenchement de l’indicateur de quantième
réf. 1680 2630 contre le contact.
Note: La fermeture ne se produit que
lorsqu’on s’approche des 24H.
Une fois que la lame de la bascule
d’enclenchement de l’indicateur de
quantième réf. 1680 2630 est totalement
appuyée contre le contact, poursuivre
lentement la rotation jusqu’à l’ouverture
du contact.
Stopper la rotation lors de l’ouverture.
Il est 24H.
Poser le cadran et les aiguilles.
Important: Ne plus tourner la couronne.
Visuelle Feststellung des Kontaktes bei 24 Uhr
Da das Kaliber 1680 mit einer elektronischen Datumsschaltung versehen ist,
müssen die Zeiger mit dem elektronischen Kontakt synchronisiert werden,
damit das Datum um Mitternacht
schaltet.
Um den Kontakt bei 24 Uhr visuell
festzustellen wird die Krone in Position 2 gezogen und im Uhrzeigersinn
gedreht. Das Zifferblatt und die Zeiger
dürfen noch nicht gesetzt werden.
Mit Hilfe einer Lupe beobachtet man
wann die Klinge der Einrückwippe
für Datumsscheibe ref. 1680 2630 den
Kontakt schliesst.
Bemerkung: Der Kontakt schliesst sich
ausschliesslich gegen Mitternacht.
Wenn die Einrückwippe für Datumsscheibe (1630 2630 vollständig gegen
den Kontakt drückt die Krone langsam
weiterdrehen, bis sich der Kontakt öffnet. Das Drehen wird gestoppt, sobald
sich der Kontakt geöffnet hat. Es ist
24:00
Jetzt werden das Zifferblatt und die
Zeiger gesetzt.
Wichtig: Krone nicht weiterdrehen.
Positioning the hands for visual detection of the contact at
midnight
The calibre 1680B is equipped with an
automatic electronic date shift. For this
reason, the hands must be synchronised
with the electronic contact so that the
date can move forward at midnight.
In order to visually detect the contact at
midnight, pull out the button to position
2 and turn it in a clockwise direction.
The dial and the hands should not be
fi tted.
Using a magnifying glass, observe the
blade of the latching yoke of the date
indicator, ref. 1680 2630, as it closes
against the contact.
Note: The yoke only closes at a point
near midnight.
Once the blade of the latching yoke of
the date indicator, ref. 1680 2630, is
fi rmly pressed against the contact, continue to slowly rotate the button until
the contact opens.
Stop rotating the button when the contact opens. It is now midnight.
Fit the dial and the hands.
Important: Do not rotate the button any
further,
Page 14

Fournitures - Bestandteile - Materials
SWISS
11
EL
EVEN JEWELS
450
1003
482
491
560
4430
210
242
260
203
466
445443
435/1
4046/1
4046
4211
4211/1
4021
2557/1
2740
2630 4011 4021/1
291 405 407
9952 (399)
Ø 9,50 x 2,70
4407
9435
2543/1 2543/5
2543/2 2543/3 2543/4
1000
250/1
1243.04
2556 2544
4000
54011
54000
5110
5466
54407
52740
5102
5101
161
33.082
9711 9706
172/3
4412
4135
Liste des fournitures - Ersatzteilliste - Spare part list
Cal. No CS Désignation Bezeichnung Designation
1680B 1000 Platine, empierrée Werkplatte, mit Steinen Main plate, jewelled
1680B 1003 Pont de rouage, empierré Räderwerkbrücke, mit Steinen Train wheel bridge, jewelled
1680 161 Tube de centre Zentrumlagerrohr Centre tube
1680 172/3 Tenon de renvoi intermédiaire Lagerstift für Zwischen- Stud for intermediate setting
Zeigerstellrad wheel
1430 203 Roue intermédiaire Zwischenrad Intermediate wheel
1430 210 Roue moyenne Kleinbodenrad Third wheel
1680B 1243.04 Roue de seconde Sekundenrad Second wheel
1430 242 Chaussée avec entraîneur Minutenrohr mit Mitnehmer Cannon pinion with driver
1680 250/1 Roue des heures avec came Stundenrad mit Kontaktgeber- Hour wheel with contactor cam
Nocken
1680 260 Roue de minuterie Wechselrad Minute wheel
1680 291 Roue entraîneuse auxiliaire du Hilfsmitnehmerrad für Zeiger- Motion work auxiliary driving
rouage de minuterie werk wheel
1680 405 Tige de mise à l’heure Stellwelle, Gewindedurchmesser Handsetting stem, thread
Ø fi letage 0,90 mm 0,90 mm diameter 0,90 mm
1680 407 Pignon coulant Kupplungstrieb Sliding pinion
1680 435/1 Bascule de pignon coulant, montée Kupplungstriebhebel, montiert Yoke, assembled
1680 443 Tirette Winkelhebel Setting lever
1680 445 Sautoir de tirette Winkelhebelraste Setting lever jumper
1430 450 Renvoi Zeigerstellrad Setting wheel
1680 466 Couvre-mécanisme Wechselradbrücke Minute train bridge
1680 482 Ressort rappel de tirette Winkelhebelrückstellfeder Setting lever recall spring
OMEGA SA WORLD SERVICE ORGANIZATION TG-19-C-037-FDE - A - PAGE 14 - 1680B
Page 15

OMEGA SA WORLD SERVICE ORGANIZATION TG-19-C-037-FDE - A - PAGE 15 - 1680B
Liste des fournitures - Ersatzteilliste - Spare part list
Cal. No CS Désignation Bezeichnung Designation
1680 491 Levier de tirette Hebel für Winkelhebel Lever for setting lever
1680 560 Levier d’arrêt et interrupteur Stopphebel und Unterbrecher Stop lever and switch
1680 2543/1 Roue intermédiaire de Datum-Zwischenrad Nr 1 Intermediate date wheel No 1
quantième No 1
1680 2543/2 Roue intermédiaire de Datum-Zwischenrad Nr 2 Intermediate date wheel No 2
quantième No 2
1680 2543/3 Roue intermédiaire de Datum-Zwischenrad Nr 3 Intermediate date wheel No 3
quantième No 3
1680 2543/4 Roue intermédiaire de Datum-Zwischenrad Nr 4 Intermediate date wheel No 4
quantième No 4
1680 2543/5 Roue intermédiaire de Datum-Zwischenrad Nr 5 Intermediate date wheel No 5
quantième No 5
1680 2544 Pignon-correcteur de quantième Datumkorrektortrieb Date corrector pinion
1680 2556 Roue entraîneuse de l’indicateur Datumanzeiger-Mitnehmerrad Date indicator driving wheel
de quantième
1680 2557/1BL Indicateur de quantième Datumanzeiger (mit Kontaktstift Date indicator (with contact pin
(monté avec goupille de montiert), Fenster bei 3 Uhr, assembled), window at 3 o’clock, white
contact), guichet à 3h, blanc weiss
1680 2557/1J Indicateur de quantième Datumanzeiger (mit Kontaktstift Date indicator (with contact pin
(monté avec goupille de montiert), Fenster bei 3 Uhr, assembled), window at
contact), guichet à 3h, jaune gelb 3 o’clock, yellow
1680 91440BL Indicateur de quantième Datumanzeiger (mit Kontaktstift Date indicator (with contact pin
(monté avec goupille de contact), montiert), Fenster bei 3 Uhr, assembled), window at
guichet à 3h, noir/blanc schwarz/weiss 3 o’clock, black/white
1680 2630 Bascule d’enclenchement de Einrückwippe für Datumanzeiger Interlocking yoke for date
l’indicateur de quantième indicator
1680 2740 Plaque de maintien du méca- Halteplatte für Kalender- Calendar mechanism
nisme de calendrier Mechanismus maintaining plate
1430 33.082 Renvoi de correcteur Verbindungsrad für Korrektur Corrector setting wheel
1680B 4000 Module électronique Elektronik-Baugruppe Electronic module
1680 4011 Circuit imprimé Gedruckte Schaltung Printed circuit
1680 4021 Stator Stator Stator
1680 4021/1 Stator supplémentaire Zusatz-Stator Additional stator
1680 4046 Isolateur de pile, dessous Isolation für Batterie, unten Battery insulator, bottom
1430 4046/1
Isolateur de pile, sur bride- Isolation für Batterie, auf Bügel- Battery insulator, on bridle1680 4135 Interrupteur de courant Strom-Unterbrecher Power switch
1680 4211 Rotor Rotor Rotor
1680 4211/1
Rotor supplémentaire Zusatz-Rotor Additional rotor
1680 4407 Bride de masse Massen-Bügel Earth connector
1680 4412 Ressort de limitation de pile Begrenzungsfeder für Batterie Battery limiting spring
1680 4430 Levier de détection Detektorhebel Detection lever
1680 9435 Commande du levier stop Stopp-Schalthebel Stop operating lever
1680 9706 Pignon de correcteur Trieb für Korrektor Corrector pinion
correcteur Korrektor setting wheel
1680 9711 Renvoi intermédiaire de Zwischen-Verbindungsrad für Corrector intermediate
1680 9952 Pile, 399 Batterie, 399 Battery, 399
1680 5101 2x Vis de fi xage Schraube für Werkbefestigung Screw for case
1680 5102 2x Vis de fi xage, spéciale Schraube für Werkbefestigung, Screw for case, special
Spezial-Ausführung
1680 5110 1x Vis de pont de rouage Schraube für Räderwerkbrücke Screw for train wheel bridge
1680 52740 Vis de plaque de maintien Schraube für Halteplatte für Screw for date mechanism
du mécanisme de calendrier Kalender-Mechanismus maintaining plate
1680 5466 1x Vis couvre-mécanisme Schraube für Deckplatte für Screw for calendar mechanism
Kalender-Mechanismus maintaining plate
1680 54000 8x Vis de module électronique Schraube für Elektronik-Baugruppe Screw for electronic module
1680 54011 1x Vis de module de circuit imprimé Schraube für Gedruckt Schaltung Screw for printed circuit
1680 54407 1x Vis de bride de masse Schraube für Massen-Bügel Screw for earth connector
1) Vis identiques 5110
Identische Schrauben 5466
Identical screws 54407
}
1)
1)
1)
Page 16

OMEGA SA WORLD SERVICE ORGANIZATION TG-19-C-037-FDE - A - PAGE 16 - 1680B
QUANTIEME PERPETUEL EWIGER KALENDER PERPETUAL CALENDAR
1. Fonction de la montre 1. Uhrenfunktionen 1. Watch functions
Indicateur de quantième perpétuel Ewiger Kalender, mit Datum-und Perpetual calendar with date and
par affichage dans le guichet MonatszahlAnzeige im Fenster month displayed in window (valid
(valable jusqu’en 2099). (gültig bis 2099). until 2099).
Positions de la couronne
Positionen der Krone
Positions of the crown
Affi chage momentané du mois (ex. 6 = juin)
Momentane Anzeige des Monats ( z.B. 6 = Juni)
Brief display of month (e.g. = 6 June)
Affi chage momentané du cycle annuel (ex. IV = année bissextile)
Momentane Anzeige des Jahres-Zyklus (z.B. IV = Schaltjahr)
Brief display of the cycle of year (e.g. IV = leap year)
Date: retour à la date initiale
Datum: zurück zum Ausgangs-Datum
Date: return to the initial date
2. Contrôle de la programmation 2. Kontrolle der Programmation 2. Check of the programmed settings
Presser la couronne > 3 sec. en position (-1) pour démarrer le contrôle,
puis relâcher la couronne dès que l’affi chage change.
Die Krone für mehr als 3 Sekunden in die Position -1 drücken, um den
Kontrollvorgang zu starten. Sobald sich die Datumsscheibe zu drehen
beginnt die Krone wieder loslassen.
Press the crown for more than 3 seconds in position (-1) to start the
control precedure. As soon as the date discs start to mobe release the
crown.
3. Changement de fuseau horaire. 3. Wechsel der Zeitzone. 3. Changing the time zone.
La couronne tirée en position (1) Mit der Krone in Position (1), Pull out the button to position (1)
permet le changement de fuseau kann die Zeitzone mittels Stunden- to change the time zone by 1 hour
horaire par saut de 1h de l’aiguille zeiger in beide Richtungen um jeweils on the hour hand in both directions.
des heures dans les 2 sens. Faire 1 Stunde verstellt werden. Note the a.m. or p.m. setting to
attention de respecter AM ou PM Dabei gilt es aufzupassen, dass ensure that the day of the month
pour que le quantième saute der Datumssprung um Mitternacht moves forward correctly at
correctement à minuit. und nicht am Mittag erfolgt. midnight.
4. Mise à l’heure et changement des 4. Zeiteinstellung und Verändern der 4. Setting the time and changing the
paramètres: (voir page suivante). Parameter: (siehe folgende Seite). parameters: (see next page).
Mémoriser la date affi chée
Speichern des angezeigten Datums
Storing the displayed date
Page 17

OMEGA SA WORLD SERVICE ORGANIZATION TG-19-C-037-FDE - A - PAGE 17 - 1680B
Corrections de la seconde, de la
minute, de l’heure, de la date,
du mois et de l’année.
Lorsque vous voulez modifi er un critère, et
afi n de ne pas modifi er les réglages que vous
venez de réaliser, il est indispensable de procéder dans l’ordre suivant:
Réglage de la seconde et de la minute:
Couronne en position 2: régler la seconde et
la minute par rapport à une base de temps de
référence (ne pas s’occuper de
l’aiguille des heures). Pousser la couronne
en position 0 pour faire démarrer la montre au
top horaire.
Réglage de la date et de l’heure:
Tirer la couronne en position 1: régler la date
et l’heure en tournant la couronne dans le sens
horaire ou anti-horaire. A chaque passage de
l’aiguille d’heure à minuit (tous les 2 tours)
un changement de date se produit (en plus ou
en moins selon le sens de rotation). La date
étant correcte, positionner l’aiguille des heures
sur l’heure désirée en respectant avant-midi
(AM) ou après-midi (PM) par rapport au saut à
minuit. Pousser la couronne en position (0).
Réglage du mois:
Presser plus de 3 secondes sur la couronne
(position -1 puis relâcher) le mois s’affi che.
Si vous devez modifi er le mois, vous avez 8
secondes pour tirer la couronne en positiaon
1 et à chaque tour de cadran de l’aiguille des
heures, le mois change d’une unité. Quand
le mois est correct, pousser la couronne en
position 0.
Réglage du cycle de l’année:
Le disque vient alors se positionner sur l’année
(chiffre romain de I à IV). La correction est
identique à celle du mois qui est décrite cidessus.
L’affi chage de l’année étant correcte, remettre
l’aiguille des heures à l’heure exacte puis
pousser la couronne en position 0 le quantième
tournera pour indiquer la date programmée
précédemment.
I = 1re année après l’année bissextile.
II = 2e année après l’année bissextile.
III = 3e année après l’année bissextile.
IV = Année bissextile.
Contrôle supplémentaire:
Il est conseillé de faire un contrôle supplémentaire de vos réglages en effectuant le test de la
programmation comme indiqué au paragraphe
«Contrôle séquentiel de la programmation
de la date, du mois et de l’année avec retour
à la date» en page 16.
Dès lors, votre montre affi chera l’heure et la
date correctement jusqu’à la fi n de vie de la
pile.
Wenn Sie eines dieser Kriterien einstellen
möchten, ist es zwingend nach folgenden
Schritten vorzugehen:
Einstellung der Sekunde und Minute
Krone in die zweite Position ziehen:Richten
Sie den Sekundenzeiger und Minutenzeiger
nach einer Referenzuhr (der Stundenzeiger
muss für diese Korrektur noch nicht beatchtet
werden).. Krone in die Position 0 drücken um
die Uhr bei der exakten Zeit zu starten.
Einstellung des Datums und der Stunde:
Krone in Position 1 ziehen: das Datum oder
die Stunde wird eingestellt indem man die
Krone im Uhrzeigersinn oder gegen den
Uhrzeigersinn dreht. Jedes mal wenn der Stundenzeiger sich über Mitternacht (jede zweite
Umdrehung) bewegt wechselt das Datum
(nach vorne oder nach hinten je nach Drehsinn
des Zeigers). Ist das Datum korrigiert, kann
der Stundenzeiger auf die gewünschte Zeit
eingestellt werden, unter der Beachtung Vor(AM) oder Nachmittag (PM). Krone wieder in
die Position (0) drücken.
Einstellung des Monats:
Krone etwas mehr als drei Sekunden gedrückt
halten (Position -1 dann freilassen) danach
wird der Monat angezeigt. Wenn Sie den
angezeigten Monat wechseln möchten haben
Sie 8 Sekunden Zeit die Krone in die Position
1 zu ziehen und dann wird mit jeder vollen
Umdrehung des Stundenzeigers, der Monat
um eine Einheit verstellt. Wenn der korrekte
Monat eingestellt ist drückt man die Krone in
die Position 0.
Einstellung des Schaltjahrs
Die Datumsscheibe wird sich nun auf die
Anzeige der Jahre begeben (römische Ziffern I
bis IV) Um das Jahr einzustellen befolgt man
die gleichen Schritte wie bei der Einstellung
des Monats; wie bereits im oberen Abschnitt
erklärt. Wenn das korrekte Jahr angezeigt wird,
stellt man den Stundenzeiger auf die richtige
Stunde und drückt die Krone auf die Position
0. Die Datumsscheibe dreht sich nun bis zu
dem vor- programmiertem Datum.
I = Erstes Jahr nach dem Schaljahr
II = Zweites Jahr nach dem Schaltjahr
III = Drittes Jahr nach dem Schaltjahr
IV = Schaltjahr
Zusätzliche Kontrollen:
Es wird empfohlen eine zusätzliche Kontrolle Ihrer Einstellung vorzunehmen, welche
effektiv ein Test der Programmierung darstellt
wie im Paragraph Fortlaufende Kontrolle des
programmierten Datums, Monat und Jahr
mit der Rückkehr zum Datum auf Seite 16.
Die Zeit und das Datum wird nun korrekt
angezeigt, bis ans Lebensende der Batterie.
If you wish to alter any of these criteria and in
order to avoid changing the settings you have
just made, you must proceed in the following
sequence:
Adjust the second and the minute:
With the crown in position 2: adjust the second
and the minute in relation to a reference time
base (the hour hand can be disregarded for the
moment). Push in the button to position (0).
Setting the date and the hour:
Pull out the crown in position 1: set the
date and the hour by rotating the button in a
clockwise or anticlockwise direction. The date
is displayed (plus or minus, depending on the
direction of rotation) each time the hour hand
passes midnight (every 2 turns). When the
date is correct, position the hour hand on the
required hour (noting whether it is the morning
(a.m.) or afternoon (p.m.) in relation to the
skip forward at midnight. Push in the button to
position (0).
Setting the month:
Press in the button for more than 3 seconds
(position -1, then release); the month is
displayed. If the month has to be altered, you
have 8 seconds in which to pull the button out
to position 1 and, with each sweep of the dial
by the hour hand, the month changes by one
unit. When the month is correctly set, push in
the button to position (0).
Setting the annual cycle:
The disc is now set on the year (Roman
numerals from I to IV). The correction is made
exactly the same way as for the month, as
described above.
When the correct year is displayed, reset the
hour hand to the exact time and push in the
button to position (0). The day of the month
indicator turns to show the previously-programmed date.
I = First Year
II = Second Year
III = Third Year
IV = Leap year
Additional check:
You are advised to carry out an additional
check of your settings by testing the programming as indicated in the section headed.
«Sequential check of the programmed date,
month and year, with return to the date» on
page 16.
Your watch will now display the time and date
correctly until the battery is exhausted.
Korrektur der Sekunde ,der
Minute, der Stunde, des
Datums und des Jahres.
Corrections to the second, the
minute, the hour, the date, the
month and the year.
Page 18

OMEGA SA WORLD SERVICE ORGANIZATION TG-19-C-037-FDE - A - PAGE 18 - 1680B
2.3 Contrôle et correction du calendrier (date, mois, cycle annuel)
Page 19

OMEGA SA WORLD SERVICE ORGANIZATION TG-19-C-037-FDE - A - PAGE 19 - 1680B
2.3 Contrôle et correction du calendrier (date, mois, cycle annuel)
Page 20

OMEGA SA WORLD SERVICE ORGANIZATION TG-19-C-037-FDE - A - PAGE 20 - 1680B
2.3 Contrôle et correction du calendrier (date, mois, cycle annuel)
Page 21

OMEGA SA WORLD SERVICE ORGANIZATION TG-19-C-037-FDE - A - PAGE 21 - 1680B
2.3 Kontrolle und korrektur des Kalenders (Datum, Monat, Jahres-Zyklus)
Page 22

OMEGA SA WORLD SERVICE ORGANIZATION TG-19-C-037-FDE - A - PAGE 22 - 1680B
2.3 Kontrolle und korrektur des Kalenders (Datum, Monat, Jahres-Zyklus)
Page 23

OMEGA SA WORLD SERVICE ORGANIZATION TG-19-C-037-FDE - A - PAGE 23 - 1680B
2.3 Kontrolle und korrektur des Kalenders (Datum, Monat, Jahres-Zyklus)
Page 24

OMEGA SA WORLD SERVICE ORGANIZATION TG-19-C-037-FDE - A - PAGE 24 - 1680B
2.3 Checking and correcting the calendar (date, month, cycle of the year)
Page 25

OMEGA SA WORLD SERVICE ORGANIZATION TG-19-C-037-FDE - A - PAGE 25 - 1680B
2.3 Checking and correcting the calendar (date, month, cycle of the year)
Page 26

OMEGA SA WORLD SERVICE ORGANIZATION TG-19-C-037-FDE - A - PAGE 26 - 1680B
2.3 Checking and correcting the calendar (date, month, cycle of the year)
 Loading...