

Page 1
I/8
OPERATING INSTRUCTIONS
Page 2
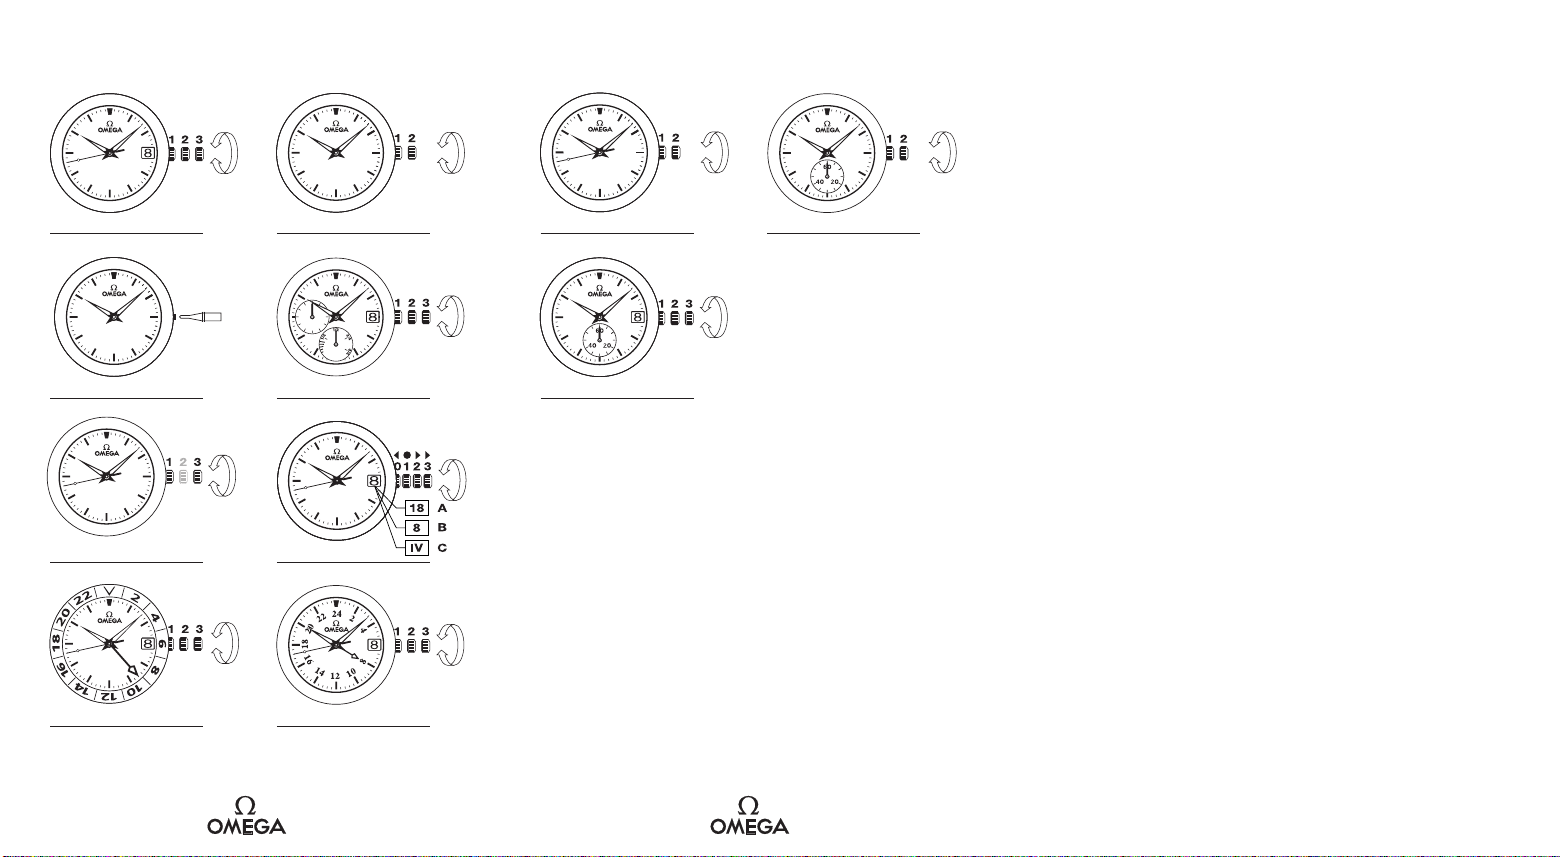
I
II
III
V
VI
VII
VIII
IV
VIII bis
IX
II bis
Page 3
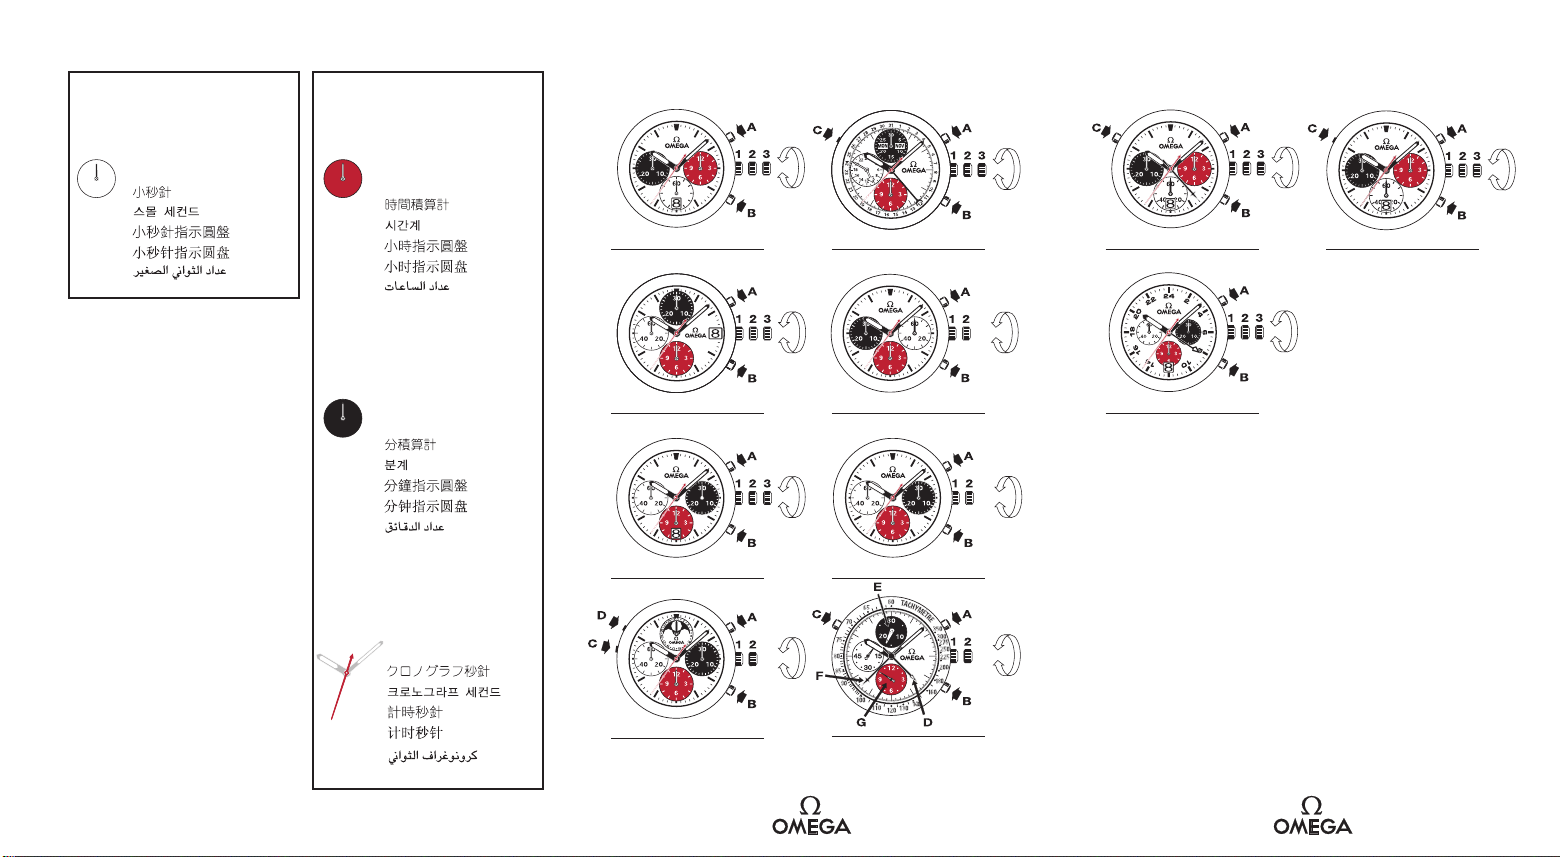
Minutes counter
Compteur minutes
Contador de minutos
Minutenzähler
Contatore dei minuti
cronografici
Small second
Petite seconde
Pequeño segundero
Kleine Sekundenanzeige
Piccoli secondi
XI
X
XII XIII
XIV XV
XVI
XVII
XIX
XVIII
XX
Hours counter
Compteur heures
Contador de horas
Stundenzähler
Contatore delle ore
cronografiche
Chronograph seconds
Seconde chronographe
Segundero de cronógrafo
Chronographsekunde
Secondi cronografici
Page 4

3
English
Contents
1
INTRODUCTION
•
Special recommendations 4
•
Environmental protection 5
•
Leather straps 5
•
Anti-reflective treatment 6
•
Screw-in crown 6
•
OMEGA International Warranty 7
2
OPERATING INSTRUCTIONS
•
Quartz watch
11
Cal. 1376 • 1424 • 1426 • 1456 • 1530 •
1532 • 1538 • 4000
•
Quartz Chronograph Cal. 1270 • 5200 13
•
Manual & Self-winding watch
16
Cal. 1120 • 2005 • 2200 • 2201 • 2202 •
2300 • 2403 • 2500 • 2520 • 2610 • 2627
•
Self-winding chronograph
18
Cal. 1151 • 1152 • 1164 • 3205 • 3220 •
3301 • 3303 • 3304 • 3313 • 3601 • 3602
•
Self-winding split-seconds chronograph
21
Cal. 3600 • 3612
•
Manual-winding chronograph
23
Cal. 1861 • 1863 • 1866 • 3604
•
Perpetual calendar Cal. 1680 25
•
Self-winding GMT & GMT Chronograph
28
Cal. 1128 • 2628 • 3603
3
PRECISION TOLERANCES
•
Mechanical watches • Quartz watches 31
4
SPECIFIC SECTIONS/GENERAL INFORMATION
•
Helium escape valve 33
•
Tachymeter scale 35
•
Rubber strap 36
•
Foldover clasps 38
•
Pictograms 40
Page 5

4
Special recommendations
What must I do to ensure that my OMEGA watch provides me with excellent service for many years?
Magnetic fields: avoid placing your watch on loudspeakers or refrigerators, since they generate powerful magnetic fields.
Swimming in the sea: always rinse your watch with warm
water afterwards.
Shocks: whether thermal or other, avoid them.
Screw-in crown: screw in the crown carefully to prevent
water from penetrating the mechanism.
Non screw-in crown: push it back into the neutral position
to prevent water from entering the mechanism.
Cleaning: for metal bracelets and water-resistant cases,
use a toothbrush with soapy water to clean and a soft
cloth for drying.
Chemical products: avoid direct contact with solvents,
detergents, perfumes, cosmetics etc., since they may
damage the bracelet, case or gaskets.
Temperature: avoid exposure to extreme temperatures
(greater than 60°C, or 140°F, less than 0°, or 32°F) or
extreme temperature changes.
Water resistance: a watch's water resistance cannot be
permanently guaranteed. It may be affected by ageing
of gaskets or by an accidental shock to the crown. As
stipulated in our service instructions, we recommend you
have the water resistance of your watch checked once a
year by an approved OMEGA service agent.
Chronograph push-pieces: Do not operate chronograph
pushers under water in order to prevent water entering
the mechanism.
Exception: The Seamaster 300 m Chronographs have
pushers which can function under water.
What are the service intervals?
Like any precision instrument, a watch needs regular
servicing to ensure that it functions perfectly. We cannot
indicate the frequency of such work, since it depends
Page 6
5
English
Used batteries, watch components and electronic watches
should not be thrown away. They should be recycled
correctly. We recommend you return them to your nearest
OMEGA retailer.
OMEGA recommends that you follow the steps below in
order to preserve the condition of your leather strap for as
long as possible:
•
Avoid contact with water and dampness to prevent
discoloration and deformation.
•
Avoid prolonged exposure to sunlight to prevent the
colour from fading.
•
Do not forget that leather is permeable! Therefore
avoid contact with greasy substances and cosmetic
products.
•
If you have a problem with your leather strap, please
contact your nearest OMEGA retailer.
Environmental protection
Leather straps
entirely on the model, the climate and the owner's individual care of the watch. As a general rule, a watch should
be serviced every 4 to 5 years, depending on the conditions in which it is used.
Who should I contact for a maintenance service or
battery replacement?
We recommend that you contact an approved OMEGA service centre or authorised OMEGA retailer, who are the only
entities equipped with the tools and apparatus required
to carry out the work and the necessary checks in a professional manner. Furthermore, only these entities can
guarantee that their work is carried out in accordance
with OMEGA's strict quality standards.
Special recommendations
Page 7

6
Anti-reflective treatment
t
Screw-in crown
The anti-reflective treatment on both sides of the sapphire
crystal improves the visibility of your watch’s dial. Wear
and tear may cause marks to appear. These are considered
normal and are therefore not covered by the warranty.
Some watches are fitted with a screw-in crown which
should be unscrewed before use. After use, push the crown
into position 1 then press and screw back in (water-resistance).
d
Page 8

7
English
OMEGA International Warranty
(Valid for U.S.A. only)
Your OMEGA® watch is warranted by OMEGA SA* FOR A
PERIOD OF TWENTY-FOUR (24) MONTHS, THIRTY-SIX (36)
MONTHS FOR WATCHES WITH A CO-AXIAL ESCAPEMENT,
FROM THE DATE OF PURCHASE under the terms and conditions of this warranty. The international OMEGA warranty covers material and manufacturing defects existing
at the time of delivery of the purchased OMEGA watch
(“defects”). The warranty only comes into force if the
warranty certificate is dated, fully and correctly completed and stamped by an official OMEGA dealer (“valid
warranty certificate”).
During the warranty period and by presenting the valid
warranty certificate, you will have the right to have any
defect repaired free of charge. In the event that repairs
are unable to restore the normal conditions of use of your
OMEGA watch, OMEGA SA guarantees its replacement by
an OMEGA watch of identical or similar characteristics.
The warranty for the replacement watch ends twenty-four
(24) months, thirty-six (36) months for watches with a
Co-Axial Escapement, after the date of purchase of the
replaced watch.
This manufacturer’s warranty does not cover:
–
the life of the battery;
–
normal wear and tear and aging (e.g. scratched crys-
tal; alteration of the colour and/or material of non
metallic straps and chains, such as leather, textile,
rubber);
–
any damage on any part of the watch resulting from
abnormal/abusive use, lack of care, negligence, accidents (knocks, dents, crushing, broken crystal, etc.),
incorrect use of the watch and non-observance of the
use directions provided by OMEGA SA;
Page 9

8
–
the OMEGA watch handled by non-authorized persons
(e.g. for battery replacement, service or repair) or
which has been altered in its original condition beyond
OMEGA SA’s control.
ALL APPLICABLE IMPLIED WARRANTIES, INCLUDING THE
IMPLIED WARRANTY OF MERCHANTABILITY AND OF FITNESS
FOR A PARTICULAR PURPOSE GIVEN TO YOU BY LAW ARE
HEREBY LIMITED IN DURATION TO THE DURATION OF THIS
WARRANTY. UNDER NO CIRCUMSTANCES WILL OMEGA SA BE
LIABLE FOR ANY INDIRECT OR CONSEQUENTIAL DAMAGES
OF ANY KIND.
Some states do not allow limitations on how long implied
warranties last, or exclusions or limitations of incidental
or consequential damages, so exclusions or limitations
mentioned may not apply to you. This warranty gives you
specific legal rights and you may also have other rights
which may vary from state to state.
OMEGA SA’s OBLIGATION IS STRICTLY LIMITED TO REPAIR
OR REPLACEMENT AS EXPRESSLY STATED IN THIS LIMITED
WARRANTY. YOUR OFFICIAL OMEGA DEALER CARRIES SOLE
RESPONSIBILITY FOR ANY OTHER GUARANTEES.
The OMEGA customer service ensures the perfect working
order of your OMEGA watch. If your watch needs maintenance, rely on an official OMEGA dealer or an authorized OMEGA Service Center as set forth in the enclosed
list: they can guarantee service according to OMEGA SA’s
standards.
*OMEGA SA
Rue Stämpfli 96, 2500 Bienne 4
©2002 OMEGA SA. All rights reserved.
OMEGA® and ® are registered trademarks
OMEGA International Warranty
Page 10

9
English
OMEGA International Warranty
Your OMEGA® watch is warranted by OMEGA SA* for a
period of twenty-four (24) months, thirty-six (36) months
for watches with a Co-Axial Escapement, from the date of
purchase under the terms and conditions of this warranty.
The international OMEGA warranty covers material and
manufacturing defects existing at the time of delivery of
the purchased OMEGA watch (“defects”). The warranty
only comes into force if the warranty certificate is dated,
fully and correctly completed and stamped by an official
OMEGA dealer** (“valid warranty certificate”).
During the warranty period and by presenting the valid
warranty certificate, you will have the right to have any
defect repaired free of charge. In the event that repairs
are unable to restore the normal conditions of use of your
OMEGA watch, OMEGA SA guarantees its replacement by
an OMEGA watch of identical or similar characteristics.
The warranty for the replacement watch ends twenty-four
(24) months, thirty-six (36) months for watches with a
Co-Axial Escapement, after the date of purchase of the
replaced watch.
This manufacturer’s warranty does not cover:
–
the life of the battery;
–
normal wear and tear and aging (e.g. scratched crys-
tal; alteration of the colour and/or material of non
metallic straps and chains, such as leather, textile,
rubber);
–
any damage on any part of the watch resulting from
abnormal/abusive use, lack of care, negligence, accidents (knocks, dents, crushing, broken crystal, etc.),
incorrect use of the watch and non-observance of the
use directions provided by OMEGA SA;
Page 11

10
–
indirect or consequential damage of any kind resulting
from e.g. the use, the non-functioning, the defects or
the inaccuracy of the OMEGA watch;
–
the OMEGA watch handled by non-authorized per-
sons (e.g. for battery replacement, service or repair)
or which has been altered in its original condition
beyond OMEGA SA’s control.
Any further claim against OMEGA SA e.g. for damages
additional to the above described warranty is expressly
excluded, except mandatory statutory rights the purchaser may have against the manufacturer.
The above manufacturer’s warranty:
–
is independent of any warranty that may be provided
by the seller, for which he carries sole responsibility;
–
does not affect the purchaser’s rights against the seller
nor any other mandatory statutory rights the purchaser
may have against the seller.
The OMEGA customer service ensures the perfect maintenance of your OMEGA watch. If your watch needs attention, rely on an official OMEGA dealer or an authorized
OMEGA Service Center as set forth in the enclosed list:
they can guarantee service according to OMEGA SA’s standards.
*OMEGA SA
Rue Stämpfli 96, 2500 Bienne 4
**OMEGA SA Specialist Dealer in EU Countries
OMEGA® and ® are registered trademarks
OMEGA International Warranty
Page 12

11
English
Quartz Watch
CALIBRES 1376, 1456 (fig. II)
The crown has 2 positions:
1. Normal position (wearing position): when pushed
into the case, the crown ensures that the watch is
water-resistant.
2. Time setting: pull the crown out to position 2, turn
the crown forwards or backwards. Push the crown back
to position 1.
CALIBRES 1426, 1530, 1532 (fig. I)
The crown has 3 positions:
1. Normal position (wearing position): when pushed
into the case, the crown ensures that the watch is
water-resistant.
2. Date setting: pull the crown out to position 2, turn
the crown forwards or backwards. Push the crown back
to position 1.
3. Time setting: pull the crown out to position 3. The
seconds hand will stop. Turn the crown forwards or
backwards. Synchronise the seconds by pushing the
crown back to position 1 to coincide with a given time
signal.
CALIBRES 1424, 1538 (fig. I)
The crown has 3 positions:
1. Normal position (wearing position): when pushed
into the case, the crown ensures that the watch is
water-resistant.
2. Time zone: pull the crown out to position 2. Turn the
crown forwards or backwards, the hour hand moves
forwards or backwards in one-hour jumps. Push the
crown back to position 1.
Page 13

12
CALIBRES 1424, 1538 (continued)
Date setting: the date can be moved forwards or
backwards by moving the hour hand past midnight
accordingly. Push the crown back to position 1.
3. Time setting: pull the crown out to position3.
The seconds hand will stop. Turn the crown forwards
or backwards. Synchronise the seconds by pushing
the crown back to position 1 to coincide with a given
time signal.
For calibres 1424, 1426, 1530, 1532 and 1538, the end
of battery life is indicated by the seconds hand making
4-second jumps. The watch will continue to function
for several days, but the battery must be removed and
replaced by an authorised OMEGA service agent as soon
as possible.
CALIBRE 4000 (fig. II
bis
)
This calibre does not have a visible crown. A corrector at
3 o’clock on the side of the case is used to change the
time by simply pressing with a corrector pen that comes
with the watch.
1. Time setting by pressing the corrector:
- Correcting the minutes: press briefly to advance the
hand by one minute;
- Correcting the hours: press for around 3 seconds to
correct by one hour. For corrections of more than one
hour, hold until the desired hour is displayed.
Quartz Watch
Page 14

13
English
Quartz chronograph
CALIBRE 1270 (fig. X)
The time functions (hours, minutes, seconds) are driven by a
primary motor using traditional quartz watch technology.
The chronograph functions are provided by a combination
of quartz and mechanical technology. The chronograph
hand, driven by a separate motor, makes 16 jumps per
second. Its movement appears continuous and it can be
read off the scale to within 1/10th of a second. The
reset function, like the minute and hour totaliser functions, is carried out mechanically. The return to zero is
instantaneous.
In order to reduce energy consumption to a minimum, the
chronograph automatically stops after more than 11 hours
of operation.
The crown has 3 positions:
Watch functions:
1. Normal position (wearing position): when pushed
into the case, the crown ensures that the watch is
water-resistant.
2. Date setting: pull the crown out to position 2, turn
the crown forwards until the required date is displayed,
then push the crown back to position 1.
NOTE: it is impossible to set the date between 8pm and
2am.
3. Time setting: pull the crown out to position 3. The
seconds hand will stop. Turn the crown forwards or
backwards. Synchronise the seconds by pushing the
crown back to position 1 to coincide with a given
time signal.
Chronograph functions:
•
Pusher A: start – stop, start – stop etc. Timing to within
1/10th of a second for up to 11 hours
.
Page 15

14
CALIBRE 1270 (continued)
•
Pusher B: reset (after stopping).
Note:
Though the chronograph stops after 11 hours in order
to conserve energy, it cannot be reset without pressing
pusher A beforehand.
CALIBRE 5200
The hour, minute, second and chronograph functions are
powered by 4 motors using conventional quartz technology.
The crown has three positions:
Watch functions:
1. Normal position, (wearing position): when pushed into
the case, the crown guarantees the watch’s water
resistance.
2. Time zone setting: resetting the 30-minute totaliser.
3. Time setting: pull the crown out to position 3.
The seconds hand will stop. Turn the crown forwards
or backwards. Synchronise the seconds by pushing
the crown into position 1 to coincide with a given
time signal; resetting the 1/10th of a second and 60second totalisers.
Chronograph functions:
Allows the time to be read
off to 1/10th of a second up
to 30 minutes in the simple,
addition or split modes
(reading split times).
Simple timing function
(crown in position 1):
•
Pusher A: Start – stop (read time)
•
Pusher B: Reset
Quartz chronograph
Page 16

15
English
Addition function (crown in position 1):
•
Pusher A: Start
•
Pusher A: Stop to read time
•
Pusher A: Press again to restart
•
Pusher A: Stop
At the end of the last step, the chronograph indicates
the total time
•
Pusher B: Reset
Split-time function (split seconds, crown in position 1):
•
Pusher A: Start
•
Pusher B: Stop to read the split time. The chronograph
continues to operate.
•
Pusher B: Restart
The chronograph hands catch up with the elapsed
time.
•
Pusher A: For the last stop and to display the total
time
•
Pusher B: Reset
ATTENTION: The hands should be reset to their original
position before the chronograph is used:
– Initialisation of the 30-minute totaliser hand: Pusher
B and crown in position 2;
– Initialisation of the 60-second totaliser hand: Pusher
A and crown in position 3;
– Initialisation of the 1/10th of a second hand: Pusher
B and crown in position 3.
Quartz chronograph
Page 17

16
CALIBRES 1120, 2500, 2520, 2610 (fig. I)
• 2627 (fig. III) • 2300 (fig. IX)
The crown has 3 positions, but only positions 1 and 3 are
functional for cal. 1120 jewellery version (fig. IV).
1. Normal position (wearing position): when pushed
into the case, the crown ensures that the watch is
water-resistant.
Occasional winding: if the watch has not been worn
for 44 hours or more, wind it up with the crown in
position 1.
2.
Date setting: pull the crown out to position 2, turn the
crown backwards and push it back to position 1.
For calibre 2610 only: date adjustment is made by
instantaneous jumps.
NOTE: date-setting is not recommended between 8pm
and 2am.
3. Time setting: hours – minutes – seconds. Pull the
crown out to position 3. The seconds hand will stop.
Turn the crown forwards or backwards. Synchronise
the seconds by pushing the crown back to position 1
to coincide with a given time signal.
Power reserve (cal. 2627)
Counter at 9 o’clock: small seconds.
Counter at 6 o’clock: power reserve indicator.
When the watch is fully wound, the power
reserve indicator hand points to 4/4. This
means that the power reserve is at least
44 hours.
Manual & Self-winding watch
Page 18

17
English
Power reserve (continued)
If the watch is not worn, or during periods of low
activity, the power reserve indicator hand progressively
moves anti-clockwise.
If the power reserve indicator hand is pointing to below
1/4, this means that the watch’s power reserve is less
than 10 hours. In this case, the watch should be worn or
wound by hand to prevent it stopping.
During manual winding (crown in position 1) or when
worn (self-winding), the power reserve indicator hand
moves clockwise.
CALIBRES 2005 (fig. II) • 2200, 2201, 2202
(fig. VIII
bis
) • 2403 (fig. VIII)
The crown has 2 positions:
1. Normal position (wearing position): when pushed
into the case, the crown ensures that the watch is
water-resistant. Occasional winding: if the watch has
not been worn for 44 hours or more, wind it up with
the crown in position 1.
CALIBRE 2201 (Manual-winding)
Winding: turn the crown forwards until it stops.
2. Time setting: hours – minutes. Pull the crown out
to position 2. Turn the crown forwards or backwards.
Push the crown back to position 1.
For calibres 2200, 2202 and 2403: synchronise the
seconds by pushing the crown back to position 1 to
coincide with a given time signal.
Manual & Self-winding watch
Page 19

18
CALIBRES 3205 (fig. XV) • 3220 (fig. XIII) •
3601 • 3602
The crown has 2 positions:
Watch functions:
1. Normal position (wearing position): when pushed
into the case, the crown ensures that the watch is
water-resistant.
Winding: if the watch has not been worn for 45 hours
or more, wind it up with the crown in position 1.
2. Time setting: hours – minutes – seconds. Pull the
crown out to position 2. The seconds hand will stop.
Turn the crown forwards or backwards. Synchronise the
seconds by pushing the crown back to position 1 to
coincide with a given time signal.
Chronograph functions:
Pusher A: start – stop, start – stop etc.
Timing to 1/8th of a second for up to 12 hours.
Pusher B: reset (after a stop).
Regatta function (cal. 3602)
Based on a 10-minute start period, as used in the America’s
Cup.
In addition to the counters for seconds, minutes and
hours, this movement has an indicator that displays the
countdown to a regatta start. This
indicator operates simultaneously with
the chronograph hands. Each circle on
the display corresponds to 1 minute.
Self-winding chronograph
Page 20

19
English
Regatta function (continued)
For a yacht race, the chronograph should be started at the
warning signal by pressing pusher A. Once the 5 circles on
the display have changed colour to blue, this means that
5 minutes have passed since the warning signal. Once the
circles have changed to red, this means that 10 minutes
have elapsed and that the starting line can be crossed.
NOTE: If the chronograph function is stopped, the regatta
function also stops, since the two functions are synchronised.
Apnea function (cal. 3601)
Pusher A: start – stop, start – stop etc. Timing to 1/8th
of a second.
Pusher B: reset (after a stop).
Apnea function based on a 14 minute dive:
In addition to the hours and minutes
hands, this movement has an indicator that displays the elapsed time
of a dive. This indicator operates
simultaneously with the chronograph
seconds hand. Each circle on the
display corresponds to 1 minute.
Before a dive, the chronograph should be started. Once
the 7 circles on the display have changed to red, this
means that 7 minutes have elapsed. Once the red colour
has disappeared from the 7 circles this means that 7 more
minutes have elapsed.
Self-winding chronograph
Page 21

CALIBRES 1151 (fig. XI) • 1152, 1164 (fig. XII)
• 3301, 3303, 3313 (fig. XIV) • 3304 (fig. XIX)
The crown has 3 positions:
Watch functions:
1. Normal position (wearing position): when pushed
into the case, the crown ensures that the watch is
water-resistant.
Winding: if the watch has not been worn for 45 hours
or more, wind it up with the crown in position 1.
2.
Date setting:
pull the crown out to position 2, turn the
crown forwards (backwards for cal. 1151), then push the
crown back to position 1
.
NOTE: the date cannot be corrected between 9pm and
12.30am or 4am (cal. 1151).
CALIBRE 3304 (fig. XIX)
Changing the date: press the corrector C at 10 o’clock.
CALIBRE 1151 (fig. XI)
Date setting:
pull the crown out to position 2, turn the
crown backwards, then push the crown back to position 1
.
Changing the day: press the corrector C at 10 o’clock.
Changing the month: automatic each time the date
hand passes 31.
3. Time setting: hours – minutes – seconds. Pull the
crown out to position 3. The seconds hand will stop.
Turn the crown forwards or backwards. Synchronise the
seconds by pushing the crown back to position 1 to
coincide with a given time signal.
Chronograph functions:
Pusher A: start – stop, start – stop etc. Timing to 1/8th
of a second for up to 12 hours.
Pusher B: reset (after a stop).
Self-winding chronograph with date
20
Page 22

21
English
Self-winding split seconds chronograph
CALIBRE 3600 (fig. XVII) • 3612 (fig. XVIII)
Watch functions (calibre 3600)
The crown has 2 positions:
1. Normal position (wearing position): when pushed
into the case, the crown ensures that the watch is
water-resistant.
2. Time setting: hour – minutes – seconds. Pull the
crown out to position 2. The seconds hand will stop.
Turn the crown forwards or backwards. Synchronise the
seconds by pushing the crown back to position 1 to
coincide with a given time signal.
Watch functions (calibre 3612)
The crown has 3 positions:
1. Normal position (wearing position): when pushed
into the case, the crown ensures that the watch is
water-resistant.
2.
Date setting: pull the crown out to position 2, turn the
crown backwards, then push the crown back to position 1.
NOTE: the date cannot be corrected between 9pm and
12.30am.
3. Time setting: hours – minutes – seconds. Pull the
crown out to position 3. The seconds hand will stop.
Turn the crown forwards or backwards. Synchronise the
seconds by pushing the crown back to position 1 to
coincide with a given time signal.
Occasional winding: if the watch has not been worn for
45 hours (cal. 3600) or 55 hours (cal. 3612) or more, wind
it up with the crown in position 1.
Chronograph functions:
Pusher A: start – stop, start – stop etc.
Timing to within 1/8th of a second for up to 12 hours.
Pusher B: reset (after a stop).
Page 23

22
Chronograph functions with split seconds:
The split-seconds function allows split times to be recorded
whilst the chronograph is running.
1. Start the chronograph by pressing pusher A (start).
2. To record a split time, press pusher C. The split-seconds
hand D stops, indicating the split time, whilst the
chronograph continues running.
NOTE: The split time should be read immediately, since
the chronograph totalisers for hours G, minutes E and
seconds F continue to measure the elapsed time.
For calibre 3600 only: Whilst the chronograph is run-
ning, do not leave the split-seconds hand D stopped
any longer than is necessary to read the split time,
otherwise the functioning of the split-seconds mechanism may be affected.
3. Press pusher C for the split-seconds hand to catch up
with the chronograph seconds hand F.
4. To record a new split time, start from step 2 above.
5. Press pusher A to stop the chronograph.
6. Press pusher B to reset.
NOTE: The split-seconds hand D must have caught up
with the chronograph seconds hand F, as explained in
step 3 above, before the chronograph is reset.
Self-winding split seconds chronograph
Page 24

23
English
CALIBRES 1861, 1863 (fig. XV) • 1866, 3604 (fig. XVI)
The crown has 2 positions:
Watch functions:
1. Normal position (wearing position): when pushed
into the case, the crown ensures that the watch is
water-resistant.
Winding: turn the crown forwards until it stops.
2. Time setting: hours – minutes – seconds. Pull the
crown out to position 2. Turn the crown forwards or
backwards. Synchronise the seconds by pushing the
crown back to position 1 to coincide with a given time
signal.
Chronograph functions:
Pusher A: start – stop, start – stop etc. Timing to 1/6th
of a second for up to 12 hours.
Pusher B: reset (after a stop).
Manual-winding chronograph
Page 25

CALIBRE 1866–Date and moon phase correction
Date setting (small counter at 12 o'clock): press
corrector C.
Setting the moon phase: press corrector D to move the
disc into the full-moon position. Then determine how
many days have elapsed since the last full moon (consult
a calendar) and press the corrector the equivalent number
of times.
When the watch is running, the date and moon phase
move forward automatically.
Important:
Avoid pressing correctors C and D (date and moon phase) if
the watch is displaying any time between 7 and 12 o'clock
(am or pm).
Do not set the date by moving the hour hand past midnight,
since this may desynchronise the date and moon phase indicators.
Manual-winding chronograph
24
Page 26

25
English
Perpetual calendar
CALIBRE 1680 (fig. V)
The particularity of the Gregorian calendar is that one
day (29th February) is added to the year every four years
to compensate for the length of the solar year, which is
365.242192 days, or almost 365 1/4 days. Such years are
called leap years and their number (e.g. 1996) is divisible by 4.
As the compensation of one day every four years is too
much, every 100 years (2100, 2200, …) the year is not a
leap year, even though it is divisible by four. However, even
this is not totally sufficient, since it leaves an error of one
day every 400 years. Therefore, if the number of the year is
divisible by 400 it is a leap year, as was the case with the
year 2000. Because of this, the perpetual calendar of your
watch is set to function correctly until 2100.
Thermocompensation
This movement is 10 times more precise than a conventional quartz movement thanks to an electronic module
that compensates for the effects of temperature on the
movement’s operation.
The crown has 3 positions:
Watch functions:
1.1. Neutral position 1, normal when the watch is worn:
in this position, the crown ensures that the watch is
water-resistant.
1.2. Setting the hands: minutes and seconds.
Pull the crown out to position 3 when the second
hand is at 12 o’clock. The seconds hand will stop.
Turn the crown forwards or backwards to set the
minute hand.
Push the crown back into position 1 to coincide with
a given time.
NOTE: To avoid inadvertently changing the date when
setting the time, it is important to always follow point
1.2 and then point 1.3.
Page 27

26
1.3. Setting the date and hour hands:
Pull the crown out to position 2.
Then turn the crown: the hand moves in 1-hour
jumps. If it is necessary to correct the date, (A),
continue to turn the crown and the date will change
automatically when switching from AM to PM, or the
contrary, depending on the direction the crown is
turned. Then push the crown back to position 1.
Important:
When setting the date, it is essential to check the
date. If need be, pass midday (no date change) or
midnight (date changes) to make sure the time is set
in AM or PM as appropriate.
NB: Corrections in position 3 have no effect on
the date, even if the hour hand passes midday or
midnight. The watch stores the date in its memory (including whether AM or PM) before the time
is reset. Setting the hours, minutes and seconds,
around midnight and midday may therefore result in
the calendar shifting by 12 hours.
2. Checking and correcting the calendar:
month, yearly cycle and date.
2.1. Display and correction of the month.
Press and hold the crown in position 0 for more than
3 seconds, the month will be displayed for 8 seconds,
(B). 1 = January, 2 = February, ..., 12 = December.
The month can be corrected during these 8 seconds.
Pull the crown out to position 2, turn the hour hand
through one full revolution. The month will move
forwards or backwards.
Repeat the procedure until the required month is
displayed, then put the crown back to position 1.
Perpetual calendar
Page 28

27
English
2.2. Display and correction of the yearly cycle.
Following display of the month (cf. 2.1.), the calendar
continues to function and the year cycle is displayed
in Roman numerals for 8 seconds, (C).
I = leap year +1 Example: 2005, 2009, 2013
II = leap year +2 Example: 2006, 2010, 2014
III = leap year +3 Example: 2007, 2011, 2015
IV = leap year Example: 2004, 2008, 2012
During these eight seconds, you can adjust the year
cycle. To do so, pull the crown out to position 2,
turn the hour hand through one full revolution. The
year cycle will move forwards or backwards.
Repeat the procedure until the required yearly cycle
is displayed. Push the crown back to position 1.
The calendar continues to function and displays the
date, A.
See point 1.3. for how to correct the date.
2.3. Changing the time zone or daylight saving time:
Pull the crown out to position 2 and turn it. Only the
hour hand will move forwards or backwards, without
affecting the minutes or seconds. Push the crown
back to position 1.
NOTE:
The end of battery life is indicated by the seconds hand
making 4-second jumps. The watch will continue to function for several days, but the battery must be removed
and replaced by an authorised OMEGA service agent as
soon as possible. Once the watch stops, a memory function stores the date for one month.
Perpetual calendar
Page 29
28
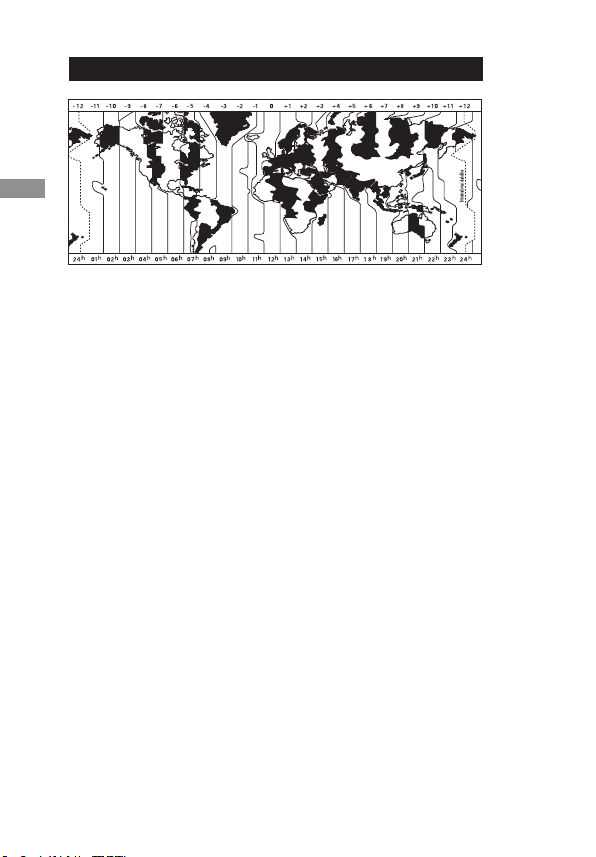
People travelling East, for example from London to Hong
Kong, should pull the crown out to position 2 and move
the hour hand forwards (in this case by 8 hours). The table
above can be used to calculate any time difference.
People travelling West, for example from London to New
York, should pull the crown out to position 2 and move the
hour hand backwards (in this case by 5 hours). The table
above can be used to calculate any time difference.
In both cases, the “24-hour” hand allows travellers to
read the time back home – London, in our example – at
a glance, using the 24-hour scale on the dial. The second
time zone – in this case Hong Kong or New York – is read
off the dial in the usual way.
Each time the hour hand crosses midnight, the date jumps
forwards or backwards, depending on whether the hour
hand is moved forwards or backwards.
CALIBRES 1128 (fig. VI) • 2628 (fig. VII)
• 3603 (fig. XX)
The crown has 3 positions:
1. Normal position (wearing position): when pushed
into the case, the crown ensures that the watch is
water-resistant.
Self-winding GMT & GMT Chronograph
Page 30

29
English
Self-winding GMT & GMT Chronograph
Occasional winding: if the watch has not been worn
for 44 hours (cal. 1128, 2628) or 55 hours (cal. 3603)
or more, wind it up with the crown in position 1.
2. Setting the time zone: pull the crown out to position
2 and turn it. Only the hour hand moves (clockwise or
anticlockwise), without affecting the precision of the
minutes or seconds. If the hand moves past midnight,
the date changes automatically. Push the crown back
to position 1.
Setting the date: pull the crown out to position 2, turn
it forwards or backwards to change the date each time
the hour hand passes midnight. The date moves forwards
(or backwards) one day. Repeat until the required date is
obtained. Push the crown back to position 1
.
Synchronisation of the hour hand and the
“24-hour” hand (calibre 1128, fig. VI)
The triangle on the rotating bezel must point to
12 o’clock on the dial.
Pull the crown out to position 2 and turn it to syn-
chronise the hour hand with the time indicated by the
“24-hour” hand on the 24-hour scale on the rotating
bezel. Make sure you set the hour hand in the correct
half of the day! Push the crown back to position 1.
Synchronisation of the hour hand and the
“24-hour” hand (calibre 2628, fig. VII,
calibre 3603, fig. XX)
Pull the crown out to position 2 and turn it to syn-
chronise the hour hand with the time indicated by the
“24-hour” hand on the 24-hour scale in the centre of
the dial. Make sure you set the hour hand in the correct half of the day!
After synchronising the hour hand with the “24-hour”
hand, you must set the local time on your watch. Push
the crown back to position 1.
Page 31

30
3. Setting the time: hours – minutes – seconds. Pull
the crown to position 3. The seconds hand will stop.
Turn the crown forwards or backwards. Synchronise the
seconds by pushing the crown back to position 1 to
coincide with a given time signal.
SECOND TIME ZONE (calibre 1128, fig. VI)
Thanks to the “24-hour” hand with its triangular point,
travellers can read the time back home at a glance on
the 24-hour scale on the rotating bezel. In order to do
so, the triangle on the bezel must point to 12 o’clock on
the dial.
The bi-directional turning bezel (calibre 1128)
allows a third time zone to be read. To do so, the bezel
must be turned so that the “24 hour” hand points to this
third time zone on the bezel. When read off against the
scale on the bezel, the “24 hour” hand will then indicate
the time in this third time zone.
In order to read the time back home, the triangle of the
bezel must be returned to point to 12 o’clock on the
dial.
SECOND TIME ZONE (calibre 2628, fig. VII, calibre
3603, fig. XX)
Thanks to the “24-hour” hand with its triangular point,
travellers can read the time back home at a glance on the
24-hour scale at the centre of the dial.
CHRONOGRAPH FUNCTIONS (calibre 3603, fig. XX)
•
Pusher A: start – stop, start – stop, etc. Timing to
within 1/10th of a second for up to 11 hours
.
•
Pusher B: reset (after stopping).
Self-winding GMT & GMT Chronograph
Page 32

31
English
Omega mechanical watches with a certified chronometer movement
Omega watches bearing the chronometer inscription (in
accordance with the certificate issued by your authorised Omega retailer) are high-precision timepieces that
have passed the precision tests of the Official Swiss
Chronometer Testing Institute (Contrôle Officiel Suisse
des Chronomètres, COSC).
This neutral and independent body individually tests each
movement for 360 consecutive hours, during which it is
placed in the five common wrist positions and exposed to
three different temperatures.
To earn the title of chronometer, the mechanical movement’s average daily variation in rate must be between
–4/+6 seconds per day, or a precision of 99.99%, the
highest precision attainable by a mechanical movement.
Precision tolerances
1,2 3,4 5,6 7,8 9,10
11 12 13 14,15
23°C 23°C 23°C 23°C 23°C
8°C 23°C 38°C 23°C
Temperature
Temperature
Days
Days
Position
Position
U
Page 33

32
The precision of a mechanical movement depends on the
individual habits of the wearer and can therefore vary. A
qualified Omega watchmaker can adjust the precision of
a watch to within the Omega tolerances, which are from
-1 to +6 seconds per day.
Other Omega mechanical watches
The majority of watches that do not have a chronometer
certificate have average precision tolerances of between
-1 and +11 seconds per day.
The precision of a mechanical movement depends on the
individual habits of the wearer and can therefore vary. A
qualified Omega watchmaker can adjust the precision of
a watch to within the Omega tolerances.
Quartz watches
All Omega quartz movements are produced in accordance
with Omega’s highly renowned procedures and quality
standards. Ambient temperature may affect the precision
of quartz movements, which can lead to variations of
between -0.5 and +0.7 seconds per day.
Quartz watches with thermocompensation
(calibre 1680)
This movement is fitted with an electronic module that compensates for the effects of temperature on the movement’s
precision. These watches are accurate to within +/- 0.055
seconds per day.
The precision of a mechanical watch cannot be compared
to that of a quartz watch, given that the two are based on
different technologies.
Precision tolerances
U
Page 34

33
English
Your OMEGA Seamaster Professional Diver is the watch for
professional and amateur divers, as well as demanding
sportsmen and –women. A robust design, the new helium
escape valve (exclusive OMEGA patent), together with
all the protection systems, offer optimal security and
reliability. In order to ensure that your watch remains
watertight, we recommend that you have it checked by
an authorised OMEGA partner every year.
Helium escape valve (fig. 1)
Why a helium escape valve? Air cannot be used for deepsea dives, since
nitrogen (a constituent element of air)
becomes toxic at a depth of 60 metres.
Therefore, when carrying out work
at great depths, professional divers
stay in a diving bell for several days,
breathing a mixture of gases containing a high proportion of helium. The
pressure is gradually increased to
reach the pressure at the working depth. The divers, still
inside the bell, are then lowered to the working site. They
leave the bell to carry out their work.
Once their work is complete, they re-enter the bell,
which is then raised to the surface. Pressure is then
returned to atmospheric levels and this is when the valve
must be opened (only for deepsea dives lasting several
days).
The helium molecules diffuse and penetrate the material of
the gaskets. The quantity is sufficient to push out the crystal
during the return to atmospheric pressure
. To avoid this,
the Seamaster Professional Diver is equipped with a valve
specially developed by OMEGA.
Helium escape valve
fig. 1
60
45
50
55
15
5
10
30
10
20
60
20
40
12
PROFESSIONAL
CHRONOMETER
300m/1000ft
8
Page 35

34
How to use the helium escape valve (fig. 2)
In its normal position (fig. 2.1), the OMEGA helium escape
valve is perfectly watertight thanks to gasket (B), but it is
not functional, since it is screwed in
.
During the decompression phase, unscrew the crown of the
valve in order to release the mechanism (fig. 2.2). The valve
is now watertight from the outside. As the interior pressure
becomes greater than the exterior pressure, it pushes the
gasket A out of its seating, thus releasing the gas (fig. 2.3).
Once the pressure is equalised, gasket A returns to its original position, pushed by the spring C (fig. 2.2).
This operation is automatically repeated several times
during the decompression phase. Once atmospheric pressure is reached, screw in the crown of the valve (fig.
2.1).
Note:
Even if the valve is unscrewed, the watch is still water resistant to 50 metres. However, complete water resistance is
guaranteed by gasket (B) when the valve is screwed in.
Helium escape valve
B
A
C
fig. 2.2
fig. 2.3
fig. 2.1
fig. 2
Page 36

35
English
To read the time, the position of the central seconds hand
is used. For observations over longer periods, the indications of the totalisers (hours and minutes) are also used.
Using the tachymetric scale
Example: calculating the speed of a car.
Record the time the car takes to cover a distance of 1
kilometre. Read off the speed on the tachymetric scale
indicated by the central seconds hand. In this case, the
car is travelling at 120 km/hr.
Tachymetric scale
Page 37

36
For your own peace of mind and convenience, we recommend that you have the length and position of
your rubber bracelet adjusted by an authorised OMEGA
service centre.
When adjusting the length of the strap, the clasp
should be set in its shortest position.
1)
Measure the circumference of
the wrist using the flexible
measure, placing the blank end
over the graduated part
.
2)
Remove the metal connectors
from the clasp by pushing in
the two spring pins
.
3) Cut off the two lengths below
the figure corresponding to
the number indicated on the
flexible measure when the
wrist was measured. If there
is any doubt as to the exact
measurement, it is preferable
to cut at the upper graduation.
Rubber strap
1
2
3
4
Page 38

37
English
4) Insert the two spring pins in the holes in the rubber
and attach the metal connector.
5) Insert the rubber sections with the connectors fitted
into the steel clasp by pushing in the two spring pins.
The side marked OMEGA should face the skin.
Rubber strap
5
6
Page 39
38
Only OMEGA leather straps, specially designed for this
foldover clasp, should be used. For your own peace of
mind and convenience, we recommend that you have
your new clasp fitted by an authorised OMEGA service
centre. You can always adjust the length of the bracelet
yourself.
a) Snap-fastening foldover clasps
Opening
To open your clasp, simply slide your finger or finger nail
under the OMEGA fastener and pull up firmly.
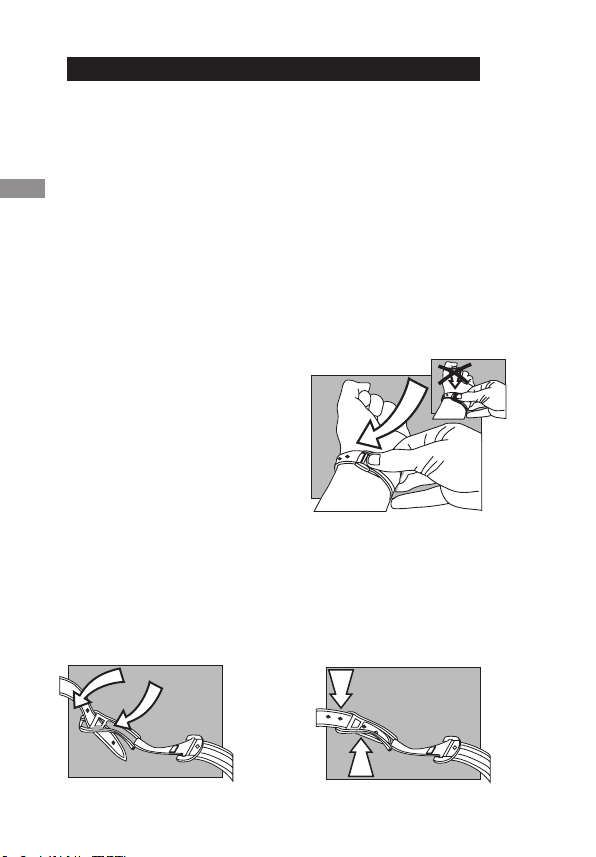
Closing (fig. 1, 2)
Place your OMEGA watch on
your wrist and close the clasp
by pushing with the thumb, as
indicated in figure 1. Press in
the direction of the arrow and
not as indicated in figure 2.
Adjusting the length (fig. 3, 4)
Free the longer section of the strap by removing the two
studs from the holes (fig. 3). Adjust the strap as required
and replace the two studs in the holes (fig. 4). Try the
watch for size and readjust if necessary.
Foldover clasps
fig. 1 fig. 2
fig. 3
fig. 4
Page 40

39
English
Foldover clasps
b) Foldover clasps with pushers
Opening (fig. 5)
To open the clasp, press the two
pushers either side of the Omega
buckle and pull upwards.
Closing (fig. 6)
Put the watch on your wrist and close
the clasp by pushing on it with your
thumb until you hear a click.
Adjusting the length (fig. 7)
fig. 5
fig. 7
fig. 6
Loosen the longer end of the
strap from the two holders
on the clasp and remove the
stud from the perforation.
Move the strap in the required direction, put the stud
back in the perforation then
adjust the bracelet under the
two holders on the clasp. Try
the watch for size and repeat
if necessary.
Page 41

40
O
V
l
U
c
P
a
i
S
Z
:
k
;
m
h
o
r
t
g
N
d
q
n
M
T
f
Y
e
s
é
b
Pictograms
Calibre number
Co-Axial
Self-winding
Chronometer
Manual-winding
Ω-matic
Quartz
Easy Time Zone Change
Power Reserve
Tachymeter
Split-seconds
Perpetual Calendar
Big date
Thermocompensated movement
End of battery life indicator
Sapphire crystal
Multi-layered anti-reflective treatment inside
Double anti-reflective treatment inside and outside
18-ct. gold
Platinum
Screw-in crown
Helium escape valve
Water-resistant to 30 metres/100 feet
Water-resistant to 50 metres/167 feet
Water-resistant to 100 metres/330 feet
Water-resistant to 120 metres/360 feet
Water-resistant to 150 metres/500 feet
Water-resistant to 200 metres/660 feet
Water-resistant to 300 metres/1000 feet
Water-resistant to 600 metres/2000 feet
Number of diamonds and carats
xxxx
Page 42

www.omegawatches.com
Printed in Switzerland ©Omega SA 11/05 – 320000 – 03090840 M
 Loading...