


Food Processors
Models FP-ES-0015, 0015-T, 0030
Instruction Manual
Revised - 9/11/2014
Toll Free: 1-800-465-0234
Fax: 905-607-0234
Email: sales@omcan.com
www.omcan.com

Table of Contents
Model FP-ES-0015 / Model FP-ES-0015-T / Model FP-ES-0030
Section
General Information
Safety and Warranty
Technical Specications
Installation
Operation
Maintenance
--------------------------------------------------------------------------------------- 5 - 6
--------------------------------------------------------------------------------------------- 7
------------------------------------------------------------------------------------ 7 - 9
-------------------------------------------------------------------------------- 3
--------------------------------------------------------------------------- 3 - 4
Page
---------------------------------------------------------------------- 4 - 5
Troubleshooting
Illustrated Diagrams
Parts Breakdowns
Electrical Schematics
Notes
Warranty Registration
------------------------------------------------------------------------------------------------- 18
----------------------------------------------------------------------------------- 10
-------------------------------------------------------------------------- 14 - 15
------------------------------------------------------------------------ 11 - 13
---------------------------------------------------------------------- 16 - 17
---------------------------------------------------------------------------- 19
2

General Information
Omcan Manufacturing and Distributing Company Inc. and Food Machinery of America, Inc. dba Omcan
are not responsible for any harm or injury caused due to any person’s improper or negligent use of
this equipment. The product shall only be operated by someone over the age of 18, of sound mind, and
not under the inuence of any drugs or alcohol, who has been trained in the correct operation of this
machine, and is wearing authorized, proper safety clothing. Any modication to the machine voids any
warranty, and may cause harm to individuals using the machine or in the vicinity of the machine while
in operation.
CHECK PACKAGE UPON ARRIVAL
Upon receipt of an Omcan shipment please inspect for external damage. If no damage is evident on the
external packaging, open carton to ensure all ordered items are within the box, and there is no concealed
damage to the machine. If the package has suffered rough handling, bumps or damage (visible or concealed),
please note it on the bill of lading before accepting the delivery and contact Omcan within 24 hours, so we may
initiate a claim with the carrier. A detailed report on the extent of the damage caused to the machine must be
lled out within three days, from the delivery date shown in the shipping documents. Omcan has no recourse
for damaged products that were shipped collect or third party.
Before operating the unit, please read this manual thoroughly. This manual should be retained for future
reference.
Safety and Warranty
This machine has moving mechanical parts and uses voltages which are potentially hazardous. Severe,
even life-threatening, personal injury could result if the instructions contained in this manual are not followed.
Before operating the unit, please read this manual thoroughly. This manual should be kept for future reference
and given to every user of the machine. The following clauses limit the liability of the manufacturer and its
representatives:
• THIS MACHINE SHOULD ONLY BE INSTALLED BY A QUALIFIED ELECTRICIAN.
• ONCE INSTALLED, DO NOT TAMPER WITH THE ELECTRICAL WIRING OF THE MACHINE.
• DO NOT USE THE MACHINE WITHOUT HAVING RECEIVED PREVIOUS INSTRUCTIONS ABOUT ITS
USE, MAINTENANCE AND SAFETY DEVICES FROM AN EXPERIENCED OPERATOR. BEFORE USING
THE MACHINE, READ THIS INSTRUCTION MANUAL CAREFULLY AND UNDERSTAND IT FULLY.
• DO NOT USE THE MACHINE WITHOUT THE PERSONAL SAFETY EQUIPMENT REQUIRED BY LAW.
• DO NOT TAMPER WITH THE MECHANICAL OR ELECTRICAL SAFETY DEVICES. ALWAYS KEEP
HANDS AT A SAFE DISTANCE FROM THE MOVING PARTS OF THE MACHINE. DO NOT LEAVE
MACHINE UNATTENDED WHILE SWITCHED ON OR IN OPERATION.
• ALWAYS DISCONNECT THE MACHINE FROM THE POWER SUPPLY BEFORE PROCEEDING WITH
CLEANING, MAINTENANCE OR REPAIRS. DO NOT OPEN THE MACHINE OR TAMPER WITH ITS
INTERNAL COMPONENTS. THERE ARE NO INTERNAL COMPONENTS THAT REQUIRE ADJUSTMENT
OR MAINTENANCE ON THE PART OF THE USER. SHOULD THE MACHINE MALFUNCTION, TURN IT
3

Safety and Warranty
OFF IMMEDIATELY AND NOTIFY THE SUPERVISOR.
Installation must be in accordance with the operating instructions and with local, provincial or state electrical
and safety codes. Compliance with codes is the responsibility of the owner and installer. Before operating the
machine, make sure that all phases are connected properly and that the machine is properly grounded and/
or connected to a circuit leakage breaker and thermal switch. Failure to do so could result in electric shock.
Make sure the safety signs and stickers are rmly afxed to the machine, that they are legible, and that they
do not become blurred or erased when the machine is cleaned. If they become damaged or lost, ask your
dealer for new ones and replace them. Keep your work area well lit and free of obstacles. When operating
the machine never wear loose clothing or jewelry which could get caught in the moving parts of the machine.
Unplug the machine when not in use. Keep children and on-lookers at a safe distance. To avoid damaging the
electrical cord, keep it out of areas where it can be stepped on. Do not alter or modify the original machine
design in any way. Should the machine need repairs, consult the ofcial distribution center where the machine
was purchased. Use only original spare parts and accessories and have them properly installed by a qualied
technician. This machine has been built exclusively for meat processing. Any other use of this machine is not in
accordance with its intended application. The manufacturer assumes no responsibility for any possible damage
or injury resulting from improper use of this machine. Additional operating instruction manuals are available
from your dealer. Your local dealer will be happy to answer any further questions you may have.
1 YEAR PARTS AND LABOR WARRANTY
WARNING:
The packaging components (cardboard, polyethylene, and others) are classied as normal solid urban waste
and can therefore be disposed of without difculty.
In any case, for suitable recycling, we suggest disposing of the products separately (differentiated
waste) according to the current norms.
DO NOT DISCARD ANY PACKAGING MATERIALS IN THE ENVIRONMENT!
Technical Specications
Not only as an all-purpose cutter/chopper, but also as an emulsier to produce ne, delicate pastes. The cutter/
chopper can chop to perfection any type of meat mixture (for cold-cuts, sausages, frankfurters, pâtés, etc.) or
other industrial food products (onions, potatoes, carrots, lettuce, etc.). The presentation of the nal product
is optimal since the mixture is never crushed, bruised, or drained. The meat should be de-boned and precut
before being introduced into the bowl for chopping. Use only those prime materials adequate for alimentary
purposes. The manufacturer assumes no liability if the machine is used in any way that conicts with the
application for which the cutter/chopper was designed. The temperature of the mixture is constantly monitored
by a digital thermometer. The machine comes equipped with thermal motor protection. The cutter/chopper
has an automatic knife-stop feature which is activated by lifting the lid. The cutting head can be removed from
4

Technical Specications
the machine in one piece for replacement or cleaning. The optional six knife grouping allows for perfect and
homogeneous blending and up to 17,000 cuts per minute (20,400 in 60 Hz models). The size of the pieces
varies depending on how long the mixture is processed. Controls via the speed control knob and main safety
switch to avoid unwanted start-ups after the power has been cut. Hermetically sealed control panel and touchbutton control at 24V for single-phase machines with variable speed control. The machine’s stainless steel
construction and functional, modern design with no difcult-to-reach corners greatly facilitates the cleaning
of the cutter/chopper. The lower part of the machine is closed to prevent the entry of water or dirt and is
supported by four anti-vibration legs; this facilitates both cleaning and transportation.
Model FP-ES-0015 FP-ES-0015-T FP-ES-0030
Features • Anti-noise lid
• 3-knife head
• Digital thermometer
• 2 speed-variable speed control
• All stainless steel
Bowl Volume 15 L / 4 gal 30 L / 8 gal
Mixture Bowl Capacity (approx.) 12 kg. / 26.4 lbs. 20 kg. / 44.1 lbs.
2.1 / 2.7 HP 4.8 / 6.5 HP
Total Horsepower
Knife Speed 1700 / 3400 RPM 1700 / 3400 RPM
Bowl Speed 22 / 45 RPM 22 / 45 RPM
Electrical 220V/60/1 220V/60/3 220V/60/3
Weight 441 lbs. 772 lbs.
Dimensions 40” × 31” × 30” 36.6” × 40.5” × 44.5”
• Anti-noise lid
• 3-knife head
• Digital thermometer
• 2 speed-variable speed control
• All stainless steel
Installation
STORAGE, TRANSPORT, AND DELIVERY
Always maintain the machine and its packaging in a vertical, upright position. Never pile machines one on
top of the other, nor put any weight on the machine or its packaging. The transport company assumes sole
responsibility for any damage received in transit; make sure that the machine is in proper condition upon
its delivery. If, after the proper checks have been undertaken, the condition of the machine is judged to be
satisfactory, proceed by installing it in a previously selected workspace. Because of its weight (approx. 771.6
lbs./350 kg), the unit should always be moved with a pallet mover or forklift, making sure that the blades of
the forklift are inserted properly under the lower part of the machine. Never use the knife shaft holder to lift the
machine since this could lead to serious damage of both the holder and the shaft (Pg. 13, Fig. 6). The machine
is delivered in protective packaging consisting of a wooden crate; please recycle this packaging. The total
contents of the packaging is as follows:
5

Installation
• Cutter/chopper.
• 2 wrenches for the assembly and dismantling of the knives (one double and one single).
• Instruction manual.
• If the machine comes with the option of a six-knife head, then four supplementary compensating rings will
be supplied so that the machine can additionally be used with just three knives in the head.
The machine should only be installed by a qualied technician and in compliance with local codes. The
electrical installation of the workplace should be equipped with power surge protection, which should then be
adjusted to the technical specications of your particular machine (see point 3, below).
1. Set the machine on a horizontal surface, leaving one meter’s space around the entire perimeter of the
machine in order to allow for safe and proper use, cleaning, and maintenance. The machine should be
positioned so that the plug is easily accessible. Also make sure that the work place has both sufcient
ventilation and good lighting. For the FP-ES-0015 table-model cutters/choppers, make sure that the surface
upon which the machine will be mounted is stable and solid enough to withstand the weight of the machine.
2. Make sure that the electrical data given on the machine’s specications plate (voltage, frequency, etc)
are compatible with those of the power source (there is a tolerance of ±10% for voltage and ±2% for
frequency). Except for FP-ES-0015 models with an optional single phase motor, the FP-ES-0015 - FPES-0030 cutter is a three-phase machine with a single voltage; therefore, it is not possible to change the
voltage of the motor. The electrical feed-cable/plug normally has 4 wires: 1 grounding (two-color yellow and
green), and 3 phases (either 3 black wires or 1 black wire, 1 brown wire and 1 gray wire). This color-coding
may vary depending on the norms of the country to which the machine has been shipped. It is possible to
install a lock on the main switch to eliminate the possibility of the machine being switched on accidentally
or in an unplanned fashion.
3. Before connecting the machine, use the wrenches provided to ensure that the knife grouping is properly
tightened (Pg. 13, Fig. 4). Tighten the knife grouping with the utmost care to avoid injury from accidentally
hitting the cutting head or the knives themselves.
4. With the machine completely disconnected and the main stainless steel lid open, turn the knives using a
plastic bar long enough to be able to reach the knives while remaining a safe distance from them. Make
sure the knives do not touch the bowl. To make sure that the knives do not rub against the lid, repeat the
aforementioned steps with the lid closed.
5. After verifying that the electrical specications are compatible to your power source, plug the machine in
and activate the main switch. The thermometer display on the switchboard should light up. Make sure that
the plug is appropriate for use with this type of machine. The machine is now ready to use.
IMPORTANT
Verify the proper turning direction of the knives and the bowl as follows: push the I-Start button. The machine
will begin to work and the bowl will start to turn counterclockwise. If the bowl turns in a clockwise direction, stop
the machine immediately and change 2 of the 3 phases at the power source/plug.
6

Operation
Before operating, clean the machine carefully, following the instructions in the MAINTENANCE section.
Do not overload the bowl; the mixture should not rise above the bowl’s rim. Do not rest mixture containers on
the edge of the bowl or on the safety guard as this could cause accidents or mechanical damage. Use extreme
caution when adding or removing the mixture; do not put your hands near the knives or reach into the bowl.
If necessary, use ice chips to lower the temperature of the mixture. Do not use cubes or blocks of ice as these
could damage the knife edge. Never reach into the bowl with your hands or arms while the cutter/chopper is
running. Never put your hands under the stainless steel lid. Eliminate any possibility of having your hands,
clothing or other personal effects trapped by or dragged under either of the lids or into the machine. This
machine is not designed to withstand permanent, uninterrupted use, but rather to run intermittently with pauses
to allow for the dissipation of built-up heat, the amount of which will vary depending on the consistency of the
mixture.
OPERATING INSTRUCTIONS FOR 2-SPEED ELECTRIC CUTTERS
Start with the machine totally off, that is, with both the main safety switch and the speed control knob in the
“0” (stop) position. Close the two lids one after the other (steel, then plastic). Be careful not to trap your hand
under either lid in this process. Turn the main safety switch to the “I” (on) position. The digital thermometer
display will light up. Turn the speed control knob to position “1” (low). The knives and the bowl will begin to turn.
The speed control knob has three positions: “0” (stop), “1” (slow), and “2” (fast). These can be selected as
needed at any given moment. To stop the machine completely, turn the speed control knob to the “0” (stop)
position. The knives and bowl will stop moving. Do not stop the machine using the main safety switch as this
should only be used with the speed control knob in the “0” (stop) position. Wait until the bowl and knives have
stopped completely before opening the knife lid. When nished using the machine, turn it off completely by
turning the main safety switch to the “0” position.
Maintenance
CLEANING
Always turn the machine off before proceeding with its cleaning. To do this, deactivate the auxiliary fuse board
switch and turn off the main operating switch. If possible, disconnect the machine from the power source
as well. The machine should be cleaned daily, both before and after its use. Given the easy access to all its
components, the unit is simple to clean using just warm water and a mild detergent. Never use bleach nor
any abrasive cleaners which could damage the stainless steel or other materials. Never use steam or a high
pressure jet of water to clean the cutter/chopper; avoid getting water in the interior of the machine, especially
through or around any electrical components. After every operating session, use a brush to carefully clean
the bowl, the knife shaft, and the interior part of the knife lid, as well as the plastic cover, the hinge of the lid,
and the lid holding screws if necessary. Do not put your hands near the cutting edge of the knives without
using adequate protection (gloves made of reinforced metal ber). The knife head can be removed in one
piece (Fig. 5) in order to clean it under running water; take care not to drop the knife head assemblage on the
oor or on your feet. Do not wash the knives in water hotter than 60°C or colder than 10°C. Do not wash the
7

Maintenance
knives immediately after using the machine since a brusque change in temperature could cause internal micro
ssures or deformations. It is extremely important to keep the surfaces holding the knives and separation rings
clean to avoid build-up of mixture residues. Such a build-up could create areas which bear more pressure than
others, possibly causing micro ssures that could damage or break the knife. To clean the machine manually,
always use appropriate safety equipment (latex gloves, plastic aprons, etc.). Always rinse the machine
thoroughly after using any kind of detergent or disinfectant and be sure to follow the manufacturers’ instructions
when using cleaning products. We recommend using the following products:
• Neutral detergent/degreaser pH 7. Due to its neutral pH, no special precautions are necessary. Rinse
thoroughly.
• Detergent/degreaser for manual cleaning. Use appropriate precautions and safety gear. Rinse thoroughly.
• Alkaline detergent with disinfectant and anti-corrosive components. Use appropriate precautions and safety
gear. Rinse thoroughly.
• Disinfectant based on quaternary ammonium salts. Use appropriate precautions and safety gear. Rinse
thoroughly.
Always follow the manufacturer’s recommendations carefully when using these or any other products.
Except for daily cleaning, the only maintenance required by the chopper is the changing of the transmission
belts after every 2,500 hours of operation. All mechanical or electrical repairs should be undertaken only by a
qualied specialist with proper training for the work required. After replacing the transmission belt, be sure to
position the turnbuckle roller parallel to the belt, tightening the nut which attaches the roller to its base securely.
If the electrical cord becomes damaged, have it replaced immediately with a cord of identical technical
characteristics (your local distributor can supply you with one).
DISMANTLING THE CUTTING HEAD
REMOVING THE WHOLE HEAD
In order to proceed with the cleaning or replacement of the cutting head while maintaining the settings of the
existing knives, the cutting head can be removed in one piece. Proceed as follows:
• Disconnect the machine by turning off the main switch; for added safety, turn off the isolating switch in the
main fuse board and unplug the machine.
• Never touch the knife-edge with your hands. Always use gloves made of metallic netting.
• With the wrenches provided unscrew the cap nut at the end of the knife shaft in a CLOCKWISE direction
(Pg. 13, Fig. 4 - step 1). Pull the entire assembly towards the left until you have separated it from the shaft
(Pg. 13, Fig. 5). If necessary, hit the base of the knife holder several times with a plastic mallet to remove it;
never hit the knives themselves with any instrument or tool.
To reassemble the cutting head, repeat the dismantling operations in reverse order, taking into account the
assembly recommendations listed in the section below.
DISMANTLING THE KNIVES SEPARATELY
In order to remove the knives separately while leaving the knife-head assembly attached to the shaft, proceed
as follows:
8

Maintenance
• Disconnect the machine by turning off the main switch; for added safety, turn off the isolating switch in the
main fuse board and unplug the machine.
• Never touch the knife-edge with your hands. Always use gloves made of metallic netting. With the
wrenches provided unscrew the cap nut at the end of the knife shaft in a CLOCKWISE direction (Pg. 13,
Fig. 4). With the same wrenches, but using two sides of the same width, unscrew (also in a CLOCKWISE
direction) and remove the knife xing nut ring.
• Remove the knives and the compensating rings separately, remembering rst to make a note of their order
and position (Pg. 12, Fig. 2).
To reassemble the knife head, repeat the dismantling operations in reverse order, making sure of the following:
• The xing nut for the knife grouping is not tightened completely until the knives have been turned (with the
help of a bar made of a pliant material) to ensure that the knives do not touch or rub against the bowl or the
lid.
• Adjust each knife so that there is a 2-3 mm space between each knife and the bowl (Pg. 12, Fig. 3). For
this adjustment we recommend using a space gauge made of a pliant material (cardboard, cork, etc.) to
follow the path marked by the end of each knife and a plastic mallet to adjust the knives accordingly.
• For safety reasons, do not try to leave a space of 0 mm between the knives and the bow. This is not
recommendable because the strong vibrations which result under certain operating conditions could cause
one or more of the knives to make contact with the bowl.
• The knives are equipped with a ange which functions as a knife stop. During installation, this ange
should stay in contact with the knife holder.
• Once the knife-head has been reassembled correctly, tighten both the head and the xing nut for the knife
assembly with the wrenches provided.
SHARPENING THE KNIVES
If the quality of the cutting/chopping should noticeably diminish, the knives should be sharpened by a qualied
professional, paying special attention to maintaining the length and weight of each of the knives in a given
group or head. The knives should only be sharpened by an expert specialized in the sharpening of tempered
knives. Before sharpening the knives, consider whether the resulting reduction in size will be substantial
enough to warrant the installation of completely new knives. In principle, the external knife-edge should not
be reduced more than 1 cm from its original size. Once the knives have been sharpened, before reinstalling
them in the machine, a small space should be led from the stop ange located in the hexagonal area (Fig. 3)
to compensate for any possible shortening of the knives. To clean the knife surfaces, use a product with anticorrosive properties. Always store the knives in their packaging; this will help maintain the cutting edge and it
will protect them from any accidental bumps or friction. Always transport the knives in their packaging when
possible. To adjust or move the knives always use adequate safety measures and equipment.
9

Troubleshooting
Problem Possible Causes Solution
Machine does not work. Machine is not connected to the
power source.
The main switch is in the 0-Stop
position.
No voltage in one or more phases. Check the fuses, plug and
Machine is connected to power
source but knives do not turn.
Bowl turns in the wrong direction. The phases are reversed. Switch 2 of the 3 phases in the
The stainless steel lid is not
closed.
The thermal protective clixon has
blown.
Connect the machine to the power
source.
Move the switch to the I (on)
position.
switches.
Close the stainless steel lid.
Let the machine cool down for a
few minutes, then switch it back
on.
power source connection.
10

Illustrated Diagrams
11
Fig. 1

Illustrated Diagrams
Fig. 2 - Different Knives
Assembly Systems
12
Fig. 3 - Knives Adjustment

Illustrated Diagrams
Step 1 Step 2
Fig. 4 - Knives
loosening procedure
13
Fig. 5 - Knives Head
Disassembly or
Assembly
Fig. 6 - How to
move the machine
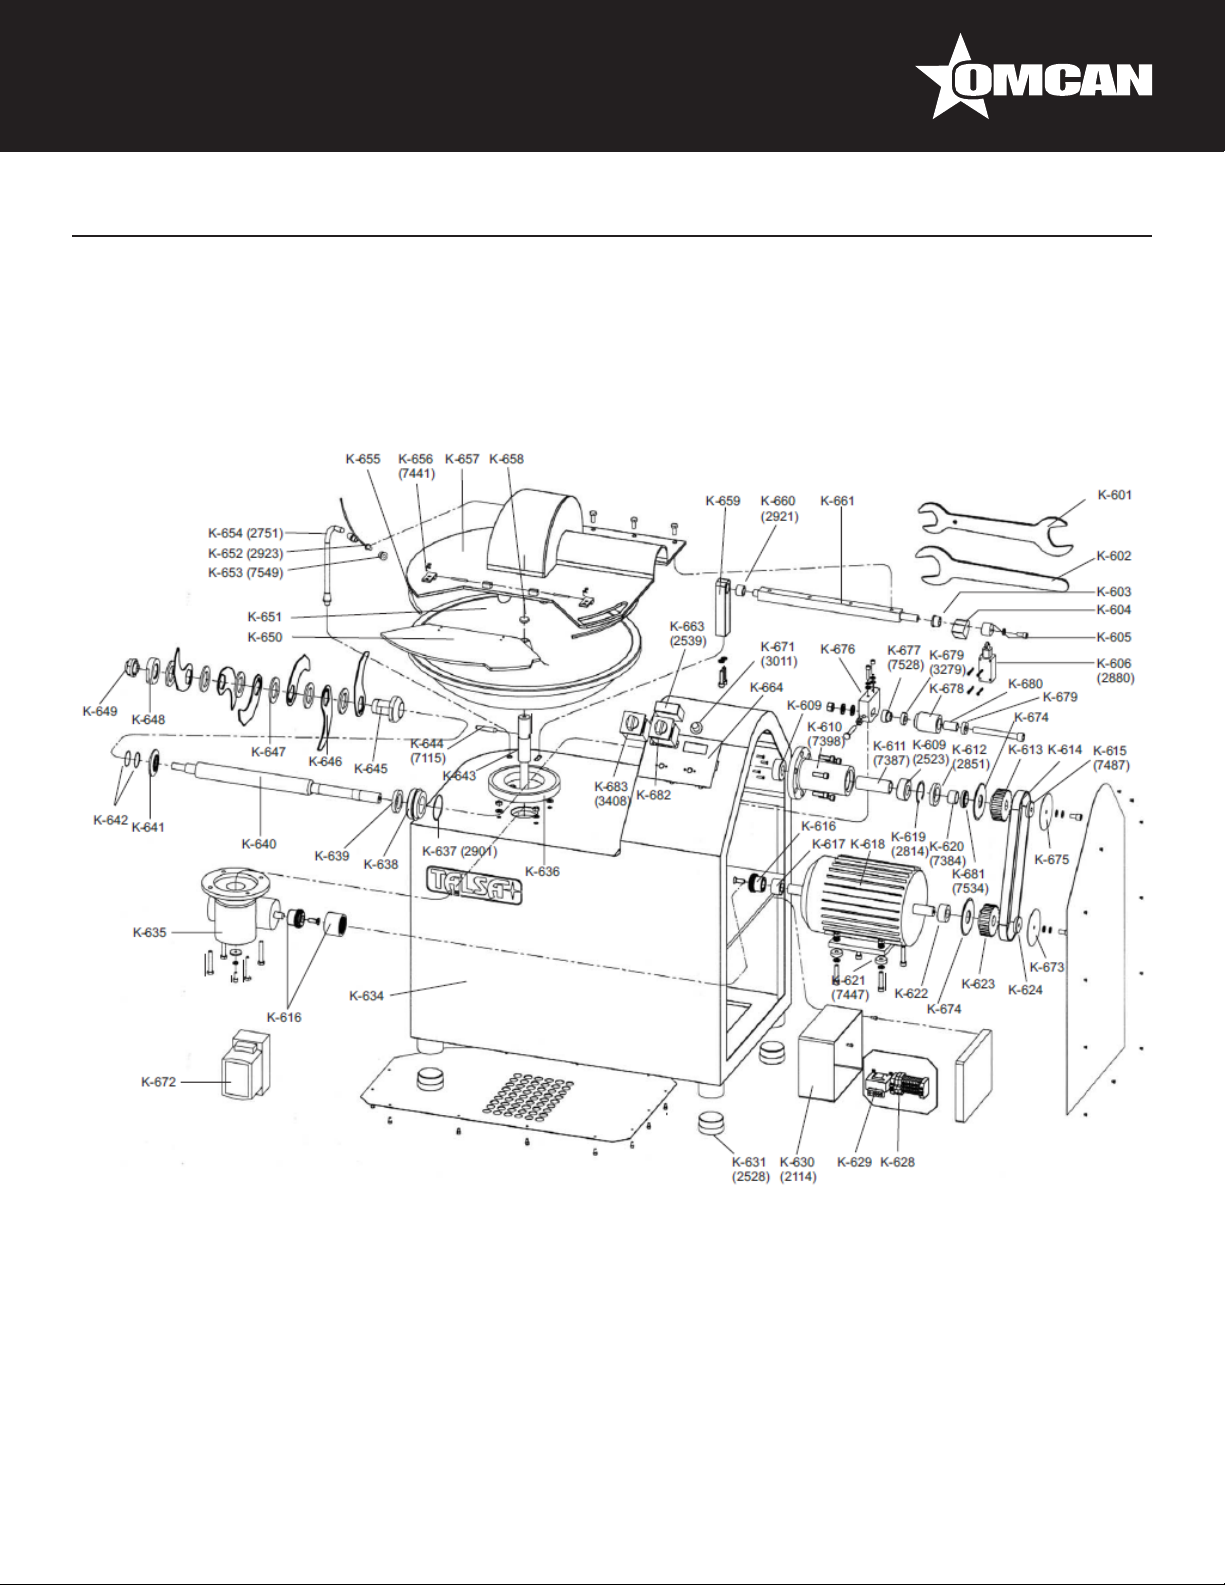
Parts Breakdown
Model FP-ES-0015 10875
Model FP-ES-0015-T 19256
Model FP-ES-0030 10878
14

Parts Breakdown
Model FP-ES-0015 10875
Model FP-ES-0015-T 19256
Model FP-ES-0030 10878
Description Position Description Position Description Position
Double Key Knife Disassembling K601 Isolating Electric Box K630 Tube Thermometer Sensor K654
Single Key Knife Disassembling K602 Anti-vibrating Foot K631 Lid/Bowl Friction Bar K655
Bronze Bearing K603 Machine Frame K634 Plastic Body Hinge Lid K656
Lid Lever K604 Bowl Gear Reducer K635 Stainless Steel Lid K657
Lid Lever for Microswitch K605 Plastic Bowl Ring K636 Bowl Screw Cap K658
Lid Safety Microswitch K606 Knives Shaft O-Ring K637 Lid Column Holder K659
Knives Shaft Bearing K609 Knives Shaft Dressing K638 Bronze Bearing K660
Knives Shaft Holder K610 Knives Shaft Bushing Gasket K639 Squared Shaft Lid Folding K661
Ring Bearing Separation K611 Knives Shaft Bushing Gasket K639 Digital Thermometer Display K663
Knives Bushing Gasket K612 Knives Shaft K640 Front Panel Board K664
Knives Shaft Pulley K613 Separator Ring K641 Speed Control Knob (Optional) K671
Belt K614 O-Ring Separator K642 Speed Controller (Optional) K672
Knives Shaft Pulley Washer K615 Bowl Shaft Reducer K642 External Washer K673
Elastic Coupling K616 Bowl Shaft Reducer Pin K644 Internal Washer K674
Safety Ring Pin K617
Motor K618 4 Cuts Knife K646 Holder Turnbuckle K676
Knives Shaft Locking Ring K619
Knives Shaft Ring K620
Motor Holder K621
Separator Motor Pulley K622
Motor Pulley K623 Locking Knives Nut K648
Motor Pulley Washer K624
Fuse K628 Transparent Anti-noise Lid K650
Transformer K629 Bowl K651
Transformer K629 Thermometer Sensor K652 2 Speeds Switch Selector K683
Hexagonal Knives Holder, Counterclockwise thread
Knives Spacer Ring 4 mm (FPES-0015 only)
Knives Spacer Ring 7 mm (FPES-0015 only)
Knives Spacer Ring 5 mm (FPES-0030 only)
Knives Spacer Ring 9 mm (FPES-0030 only)
Nut Blocked Final Knives Shaft
Counter-clockwise Thread
K645 External Washer K675
K647 Turnbuckle Pulley Washer K677
K647 Tension Wheel K678
K647 Turnbuckle Pulley Bearing K679
K647 Separation Ring Tensor Bearings K680
Separation Ring Knives Shaft
Pulley
K649 3-phase Switch with Disconnector K682
3/1-phase Switch with
Disconnector
3/1-phase Switch with
Disconnector
K681
K682
K682
15
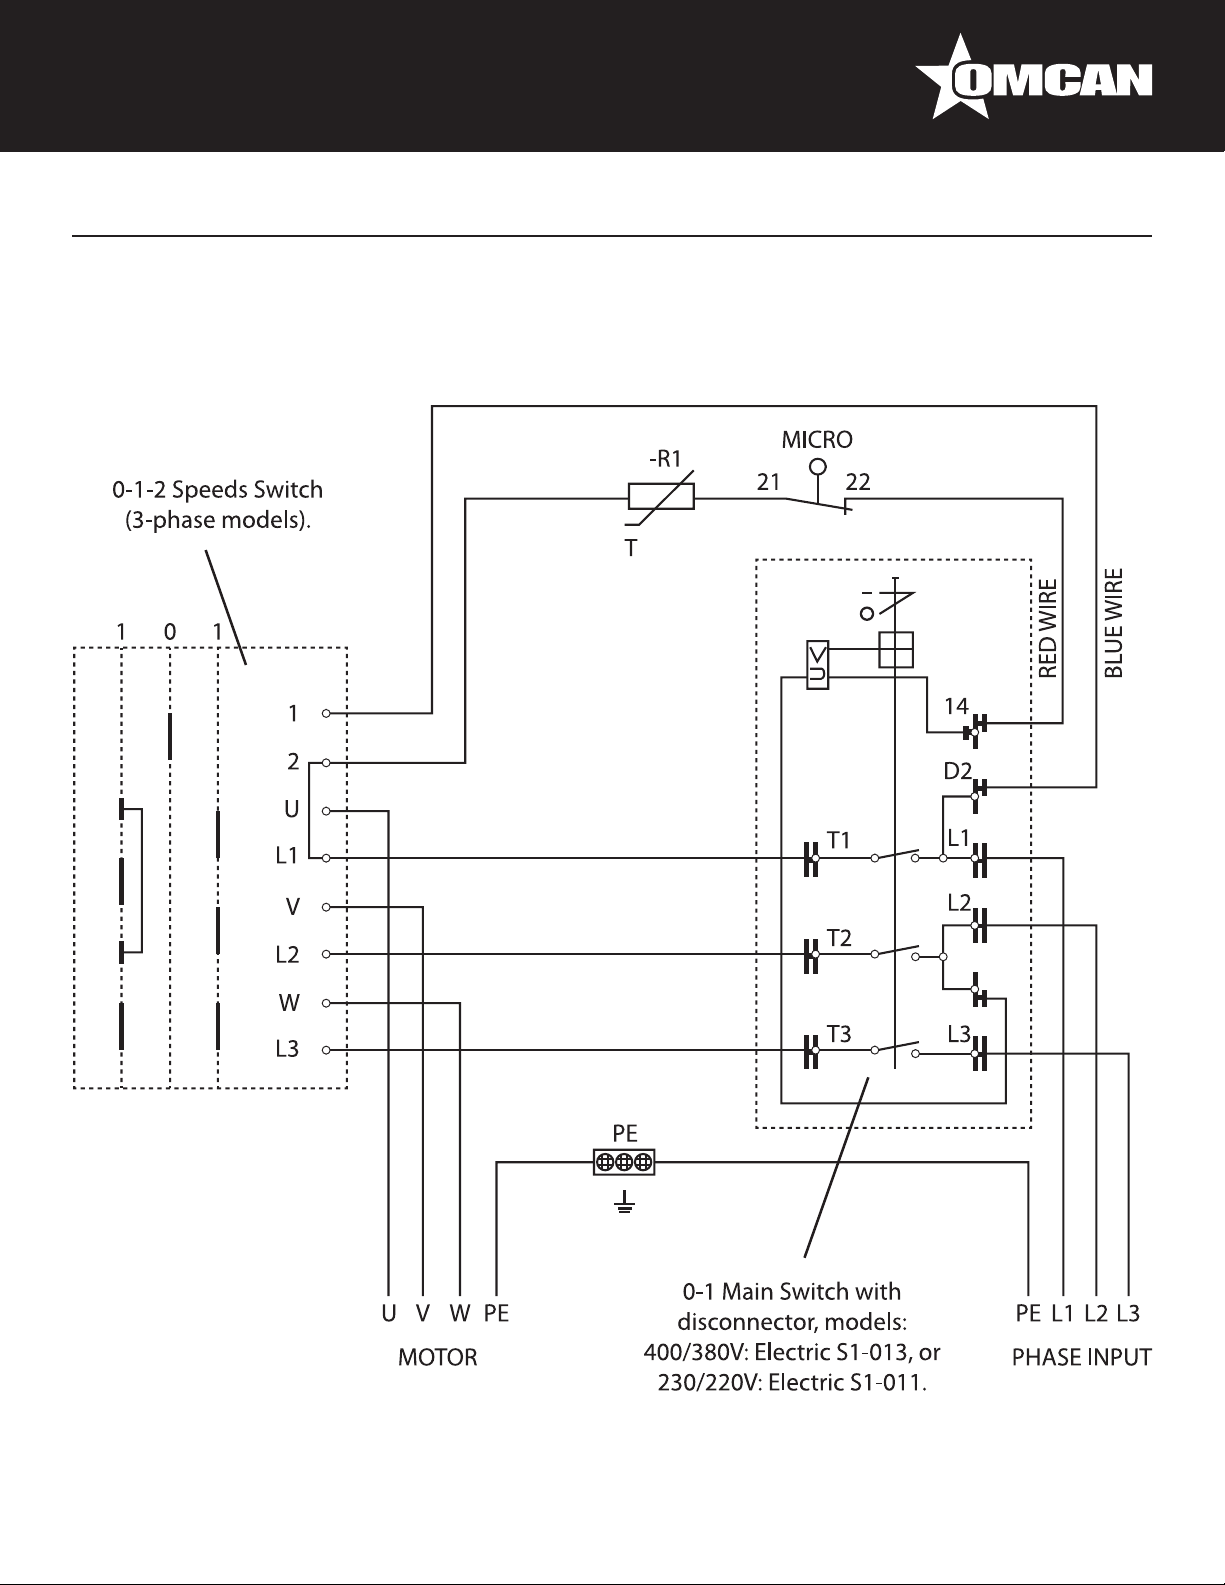
Electrical Schematics
Model FP-ES-0015-T 19256
Model FP-ES-0030 10878
16

Model FP-ES-0015 10875
Electrical Schematics
17

Notes
________________________________________________________________________________________
________________________________________________________________________________________
________________________________________________________________________________________
________________________________________________________________________________________
________________________________________________________________________________________
________________________________________________________________________________________
________________________________________________________________________________________
________________________________________________________________________________________
________________________________________________________________________________________
________________________________________________________________________________________
________________________________________________________________________________________
________________________________________________________________________________________
________________________________________________________________________________________
________________________________________________________________________________________
________________________________________________________________________________________
________________________________________________________________________________________
________________________________________________________________________________________
________________________________________________________________________________________
________________________________________________________________________________________
________________________________________________________________________________________
________________________________________________________________________________________
________________________________________________________________________________________
________________________________________________________________________________________
________________________________________________________________________________________
18

Warranty Registration
Thank you for purchasing an Omcan product. To register your warranty for this product, complete the information below, tear off the card at
the perforation and then send to the address specied below. You can also register online by visiting:
www.omcan.com/warrantyregistration.html
For mailing in Canada For mailing in the US
OMCAN INC.
PRODUCT WARRANTY REGISTRATION
3115 Pepper Mill Court,
Mississauga, Ontario
Canada, L5L 4X5
PRODUCT WARRANTY REGISTRATION
4450 Witmer Industrial Estates, Unit 4,
Niagara Falls, New York
OMCAN
USA, 14305
Purchaser’s Information
Name: Company Name:
Address:
Telephone:
City: Province or State: Postal or Zip: Email Address:
Country: Type of Company:
Restaurant Bakery Deli
Dealer from which Purchased: Butcher Supermarket Caterer
Dealer City: Dealer Province or State: Institution (specify):
Invoice: Other (specify):
Model Name: Model Number: Serial Number:
Machine Description:
Date of Purchase (MM/DD/YYYY): Date of Installation (MM/DD/YYYY):
Thank you for choosing Omcan
19

Over the last 65 years, Omcan has grown to become a leading supplier to the food
service industry in Canada and the USA. Our success over these many years is
directly attributed to our established relationships with all of our valued customers
and through providing them with Diverse, Dependable and Proven products.
Omcan continues to help our customers remain competitive.
With associates in North America, Europe, Asia, and South America, our global
footprint continues to expand as we hold to the principle that clients benet from
the accessibility and familiarity of our sales team. In 2013 as our geography and
brand recognition continued to grow, we changed to one name Omcan Food
Machinery.
In over 200,000 sq ft of warehouse space we stock over 2,500 quality food
equipment and supplies for the food preparation market.
 Loading...