

Page 1

Gravity Meat Slicers
Models MS-IT-0220-B, 0220-U, 0250-B, 0250-U, 0250-I, 0250-IP,
0275-I, 0275-IP, 0300-B, 0300-U, 0300-I
Items 13610, 13616, 13618, 13620, 13621, 13623, 13625, 13624,
13626, 13628, 21624
Instruction Manual
Revised - 01/18/2018
Toll Free: 1-800-465-0234
Fax: 905-607-0234
Email: service@omcan.com
www.omcan.com
Page 2

Table of Contents
Model MS-IT-0220-B / Model MS-IT-0220-U / Model MS-IT-0250-B
Model MS-IT-0250-U / Model MS-IT-0250-I / Model MS-IT-0250-IP
Model MS-IT-0275-I / Model MS-IT-0275-IP / Model MS-IT-0300-B
Model MS-IT-0300-U / Model MS-IT-0300-I
Section
General Information
Safety and Warranty
Technical Specications
Installation
Operation
Maintenance
Troubleshooting
----------------------------------------------------------------------------------------------------- 8 - 9
--------------------------------------------------------------------------------------------------------- 10
----------------------------------------------------------------------------------------------- 10 - 13
----------------------------------------------------------------------------------------- 3 - 4
---------------------------------------------------------------------------------------- 4 - 6
------------------------------------------------------------------------------------------- 14 - 15
Page
------------------------------------------------------------------------------------ 6 - 8
Instructions Français
Parts Breakdown
Electrical Schematics
Notes
Warranty Registration
-------------------------------------------------------------------------------------------------------------- 46
----------------------------------------------------------------------------------------- 28 - 43
------------------------------------------------------------------------------------ 16 - 27
------------------------------------------------------------------------------------ 44 - 45
----------------------------------------------------------------------------------------- 47
2
Page 3

General Information
Omcan Manufacturing and Distributing Company Inc., Food Machinery of America, Inc. dba Omcan
and Omcan Inc. are not responsible for any harm or injury caused due to any person’s improper or
negligent use of this equipment. The product shall only be operated by someone over the age of 18, of
sound mind, and not under the inuence of any drugs or alcohol, who has been trained in the correct
operation of this machine, and is wearing authorized, proper safety clothing. Any modication to the
machine voids any warranty, and may cause harm to individuals using the machine or in the vicinity of
the machine while in operation.
CHECK PACKAGE UPON ARRIVAL
Upon receipt of an Omcan shipment please inspect for external damage. If no damage is evident on the
external packaging, open carton to ensure all ordered items are within the box, and there is no concealed
damage to the machine. If the package has suffered rough handling, bumps or damage (visible or concealed),
please note it on the bill of lading before accepting the delivery and contact Omcan within 24 hours, so we may
initiate a claim with the carrier. A detailed report on the extent of the damage caused to the machine must be
lled out within three days, from the delivery date shown in the shipping documents. Omcan has no recourse
for damaged products that were shipped collect or third party.
Before operating any equipment, always read and familiarize yourself with all operation and safety
instructions.
Omcan would like to thank you for purchasing this machine. It’s of the utmost importance to save
these instructions for future reference. Also save the original box and packaging for shipping the
equipment if servicing or returning of the machine is required.
---------------------------------------------------------------------------------------------------------------------------------------------------
Omcan Fabrication et distribution Companie Limité et Food Machinery d’Amerique, dba Omcan et
Omcan Inc. ne sont pas responsables de tout dommage ou blessure causé du fait que toute personne
ait utilisé cet équipement de façon irrégulière. Le produit ne doit être exploité que par quelqu’un de
plus de 18 ans, saine d’esprit, et pas sous l’inuence d’une drogue ou d’acohol, qui a été formé pour
utiliser cette machine correctement, et est vêtu de vêtements de sécurité approprié. Toute modication
de la machine annule toute garantie, et peut causer un préjudice à des personnes utilisant la machine
ou des personnes à proximité de la machine pendant son fonctionnement.
VÉRIFIEZ LE COLIS DÈS RÉCEPTION
Dès réception d’une expédition d’Omcan veuillez inspecter pour dommages externes. Si aucun dommage
n’est visible sur l’emballage externe, ouvrez le carton an de s’assurer que tous les éléments commandés
sont dans la boîte, et il n’y a aucun dommage dissimulé à la machine. Si le colis n’a subi aucune mauvaises
manipulations, de bosses ou de dommages (visible ou cachée), notez-le sur le bond de livraison avant
d’accepter la livraison et contactez Omcan dans les 24 heures qui suivent, pour que nous puissions engager
une réclamation auprès du transporteur. Un rapport détaillé sur l’étendue des dommages causés à la machine
doit être rempli dans un délai de trois jours, à compter de la date de livraison indiquée dans les documents
d’expédition. Omcan n’a aucun droit de recours pour les produits endommagés qui ont été expédiées ou cueilli
par un tiers transporteur.
3
Page 4

General Information
Avant d’utiliser n’importe quel équipement, toujours lire et vous familiariser avec toutes les opérations
et les consignes de sécurité.
Omcan voudrais vous remercier d’avoir choisi cette machine. Il est primordial de conserver ces
instructions pour une référence ultérieure. Également conservez la boîte originale et l’emballage pour
l’expédition de l’équipement si l’entretien ou le retour de la machine est nécessaire.
---------------------------------------------------------------------------------------------------------------------------------------------------
Omcan Empresa De Fabricacion Y Distribucion Inc. Y Maquinaria De Alimentos De America, Inc. dba
Omcan y Omcan Inc. no son responsables de ningun daño o perjuicío causado por cualquier persona
inadecuada o el uso descuidado de este equipo. El producto solo podra ser operado por una persona
mayor de 18 años, en su sano juicio y no bajo alguna inuencia de droga o alcohol, y que este ha sido
entrenado en el correcto funcionamiento de esta máquina, y ésta usando ropa apropiada y autorizada.
Cualquier modicación a la máquina anúla la garantía y puede causar daños a las personas usando la
máquina mientras esta en el funcionamiento.
REVISE EL PAQUETE A SU LLEGADA
Tras la recepcion de un envio Omcan favor inspeccionar daños externos. Si no hay daños evidentes en el
empaque exterior, Habra el carton para asegurararse que todos los articulos solicitados ésten dentro de la
caja y no encuentre daños ocultos en la máquina. Si el paquete ha sufrido un manejo de poco cuidado, golpes
o daños (visible o oculto) por favor anote en la factura antes de aceptar la entrega y contacte Omcan dentro
de las 24 horas, de modo que podamos iniciar una reclamación con la compañia. Un informe detallado sobre
los daños causados a la máquina debe ser llenado en el plazo de tres días, desde la fecha de entrega que se
muestra en los documentos de envío. Omcan no tiene ningun recurso por productos dañados que se enviaron
a recoger por terceros.
Antes de utilizar cualquier equipo, siempre lea y familiarizarse con todas las instrucciones de
funcionamiento y seguridad.
Omcan le gustaría darle las gracias por la compra de esta máquina. Es de la mayor importancia para
salvar estas instrucciones para futuras consultas. Además, guarda la caja original y el embalaje para el
envío del equipo si servicio técnico o devolución de la máquina que se requiere.
Safety and Warranty
LIMITS OF USE – SAFETY NORMS
These machine were designed and built to slice foodstuff in compliance to the norms of the CE 2006/95/EEC,
93/68/EEC, 2006/42/EEC, 2002/72/EEC, 2004/108 CE, REG 1935/2004/EEC, 2002/95/CE (RoHS) and to the
following regulations EN1974, EN ISO12100-1, EN ISO12100-2, EN 294, EN60204-1, EN60335-1, EN603352-64.
4
Page 5

Safety and Warranty
GENERAL SAFETY REGULATIONS
The slicers must be used only by suitably trained personnel. Furthermore, this personnel must have read this
manual carefully. In particular, please comply to the following instructions:
• Install the machine according to the instructions contained in the “Installation” section.
• Do not modify nor exclude the mechanical and electrical safety devices.
• Do not use the machine with improvised connections, or provisional or non insulated cables.
• Check the power cable and gland plate on the machine body regularly and when necessary have them
replaced by qualied personnel.
• In case of anomalies, defective operation, incorrect movement, unusual noise, etc stop the machine
immediately.
• Before cleaning or servicing, disconnect the machine from the mains.
• Always use scratch-proof and non-slip gloves during cleaning or maintenance.
• Lay or remove the goods to be sliced on the sliding plate only when the latter is completely pushed back
and the thickness control knob positioned to 0.
• To move the carriage tray when slicing, use the handle or the product grip handle.
• For extraordinary maintenance (to replace the sharpener wheels, the blade, or others) please contact the
manufacturer or qualied and duly authorized personnel.
• Avoid running the slicers with no product on it.
• The slicers are equipped with a ventilated motor. Extended continual use is not recommended. Let the
motor cool down after 30 minutes of use.
MANUFACTURER’S WARRANTY AND LIABILITY
The manufacturer’s warranty covering the good functioning of the machines and their compliance to the
service for which they have been designed depends on the correct application of the instructions contained in
this manual. The Manufacturer assumes no liability either direct or indirect deriving from:
• Failure to comply with the instructions contained in this manual.
• Use of the machine by personnel who has not read or fully understood the content of this manual.
• Use not complying to the specic norms currently applicable in the country of installation.
• Unauthorized modications and/or repairs.
• Use of non original accessories or spare parts.
• Exceptional events.
ENVIRONMENTAL CONDITIONS OF USE
Temperature: from -5°C and 40°C / 23°F and 104°F.
Relative humidity: max 95%.
OPENING THE BOX
On reception check packaging integrity, otherwise inform the forwarding agent or the area agent immediately.
To unpack the machine, proceed as follows:
• Open the box and remove your copy of the manual of use and maintenance, then proceed according to the
5
Page 6

Safety and Warranty
instructions found on that manual.
• Lift the machine still wrapped in a transparent polyethylene sheet and extract it from the box.
• Now check the box content and make sure it corresponds to what shown on the external label.
1 YEAR PARTS AND LABOUR BENCH WARRANTY
Within the warranty period, contact Omcan Inc. at 1-800-465-0234 to schedule a drop off to either
an Omcan authorized service depot in the area, or to an Omcan Service warehouse to repair the
equipment.
Unauthorized maintenance will void the warranty. Warranty covers electrical and part failures, not
improper use.
Please see www.omcan.com/warranty.html for complete info.
WARNING:
The packaging components (cardboard, polyethylene, and others) are classied as normal solid urban waste
and can therefore be disposed of without difculty.
In any case, for suitable recycling, we suggest disposing of the products separately (differentiated
waste) according to the current norms.
DO NOT DISCARD ANY PACKAGING MATERIALS IN THE ENVIRONMENT!
Technical Specications
The machine is essentially made of a base supporting a circular blade mounted in a tilted position. This blade
is driven by an electrical motor to slice foodstuffs. The machine is equipped with a carriage holding a product
tray and sliding on a bar mounted under the base top, parallel to the blade. Slice thickness is adjusted by
means of a gauge plate mounted in front of the blade. This plate, against which rests the product to be sliced
is moved transversely with respect to the blade by a value corresponding to the desired slice thickness. The
product is fed to the machine (towards the gauge plate) by gravity. All the machine components are made of
polished and anodically oxidized aluminium alloy, of stainless steel and food grade plastic material. The blade
is driven by an electrical motor, transmission is by means of a longitudinally grooved belt. The machine is
started and stopped by a control button or switch provided with auxiliary circuit preventing accidental restarts
after an outage. Some of the machine models have a user-friendly and safe built-in blade sharpener.
MECHANICAL AND ELECTRICAL SAFETY DEVICES
The following mechanical safety devices were installed:
• A series of aluminium and transparent plastic guards on the product carriage.
6
Page 7

Technical Specications
On request the following are available:
• Safety micro-switch preventing the motor from starting when the blade guard is removed.
WARNING: RESIDUAL RISKS
Notwithstanding all the possible cautions taken during the design and the construction of the machine,
residual risks (cutting) still exist during use or during cleaning or maintenance. Therefore be careful
and PAY THE UTMOST ATTENTION to what you are doing. DO NOT use the machine if you are not in
perfect psychological and physical conditions. DO NOT ALLOW anyone near the machine when it is
in use. ALWAYS wear gloves that can resist cuts or tears when cleaning, lubricating or sharpening
the blade. Slice only the products mentioned as sliceable. NEVER try to slice products that have been
mentioned as non sliceable.
ACCESSORIES
If not otherwise dened at the moment of order, the machines are supplied together with the following:
• EU conformity declaration;
• Instructions manual for installation, use and maintenance.
PRODUCTS THAT CAN BE SLICED
• All types of cold cuts (raw, cooked, smoked).
• Meat without bone (raw or cooked, at a temperature not less than + 3 °C).
• Vegetables (all types).
PRODUCTS THAT MUST NOT BE SLICED:
• Frozen or deep-frozen food.
• Food containing bones (meat or sh).
• Any other non-food product.
• Cheese.
7
Page 8

Technical Specications
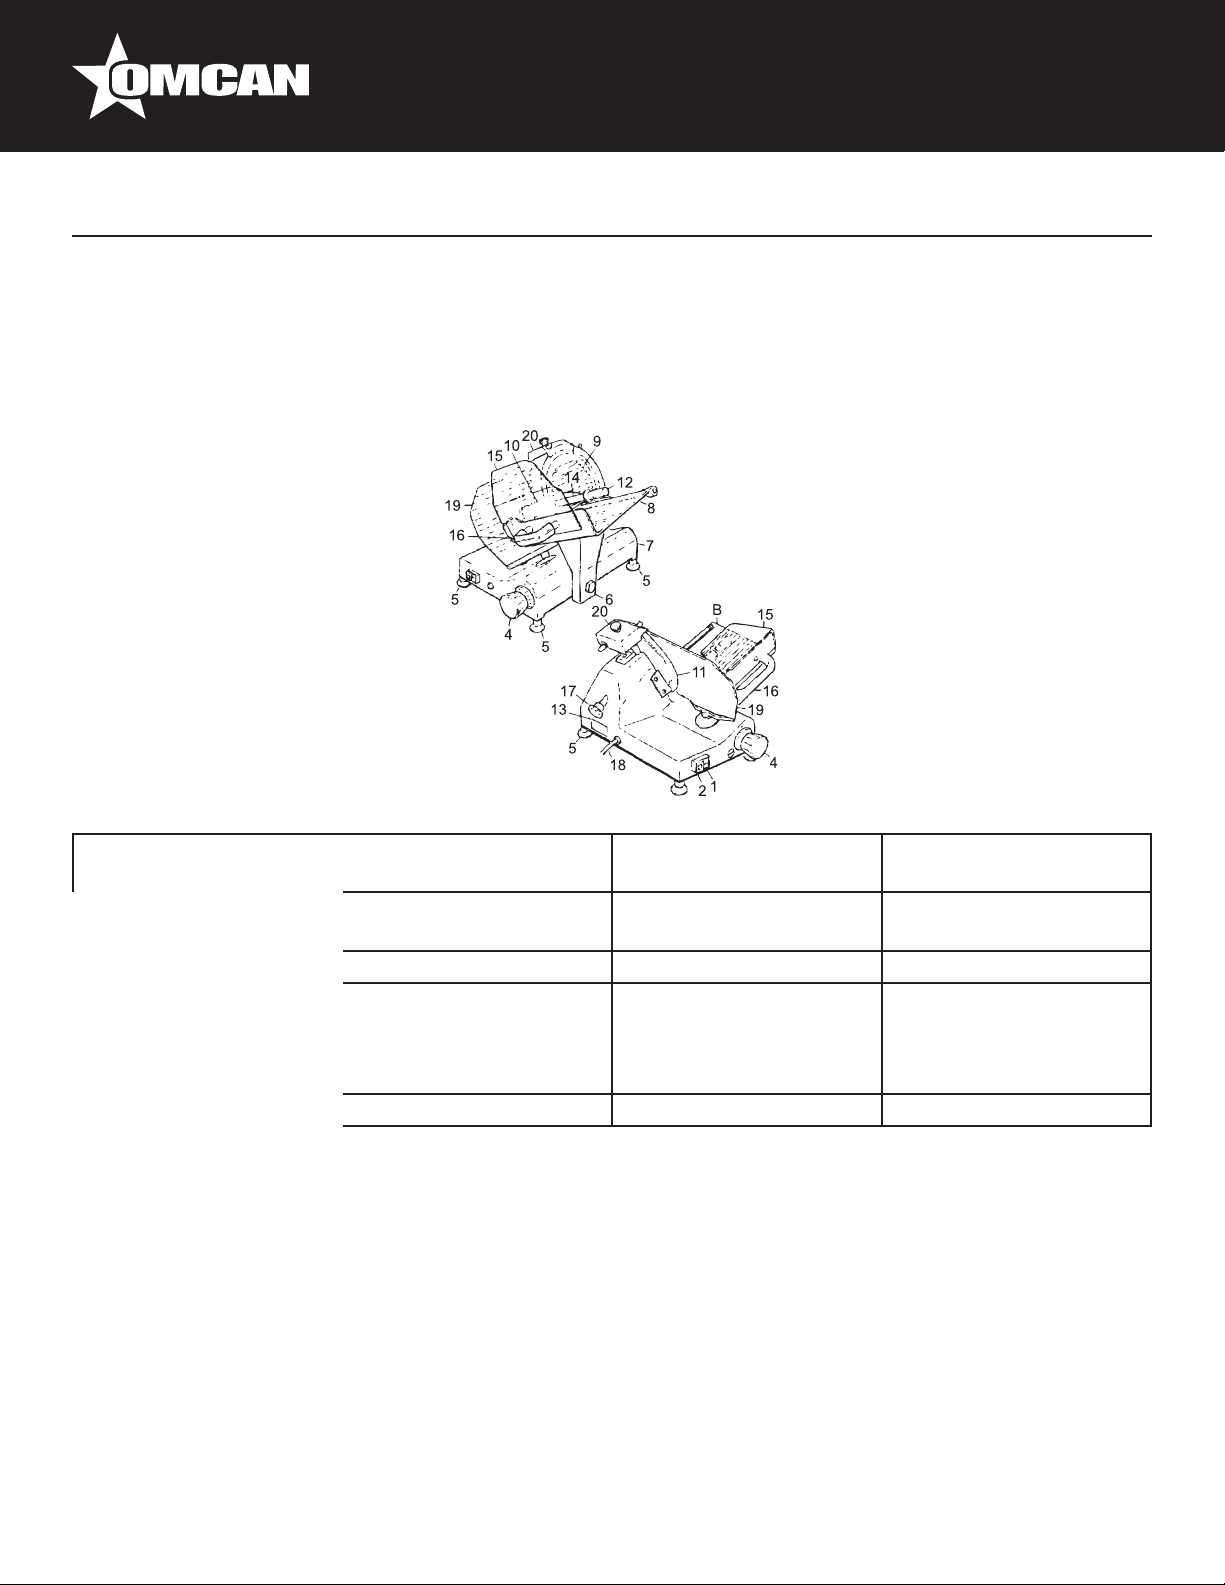
MAIN COMPONENTS
1. Startup Button (White
or Green)
5. Adjustable Foot 6. Carriage Tray Support 7. Base 8. Product Tray
9. Blade Plate 10. Product Grip 11. Blade 12. Product Grip Handle
13. Manufacturer
Identication Plate,
Machine Data and UE
Marks
17. Blade Plate Tie-Rod 18. Supply Cord 19. Gauge Plate 20. Sharpener
Illustrations may differ from actual machines.
2. Stop Button (Black or
Red)
14. Pusher Plate
Extension
3. N.A. 4. Slice Thickness
Control Knob
15. Product Tray Hand
Protection
16. Product Tray Handle
Installation
INSTALLING THE MACHINE
Position the machine on a well leveled, smooth and dry top suitably dimensioned to withstand the machine
weight.
ELECTRICAL CONNECTION
Install the machine near a compliant outlet derived from a system meeting the local norms.
8
Page 9

Installation
The user is responsible for ascertaining that the electrical system is suitably dimensioned and functions
correctly (supply line, outlet, distribution panel, differential protecting breaker, grounding).
Before carrying out the connection ascertain that the mains characteristics correspondent to those indicated
on the machine plate.
COMMANDS
START AND STOP BUTTONS / SWITCHES
• Turn switch or press the white or green button (1) to start running the blade.
• The light turns on to indicate that the machine works correctly.
• Turn switch or press the red or black button to stop the blade.
Slice thickness can be adjusted by turning the graduated knob (4) counterclockwise.
Thickness adjustment range: see paragraph “Technical description and conditions of use”.
FUNCTIONING TEST AND BLADE ROTATION DIRECTION
Start the machine and check whether the light is on; make sure that the blade rotates in the direction indicated
by the arrow (counterclockwise if you look at the machine from the blade plate side).
• Ascertain that the carriage and the product grip slide correctly.
• Ascertain that the gauge plate works and adjust thickness to desired value.
9
Page 10
Operation
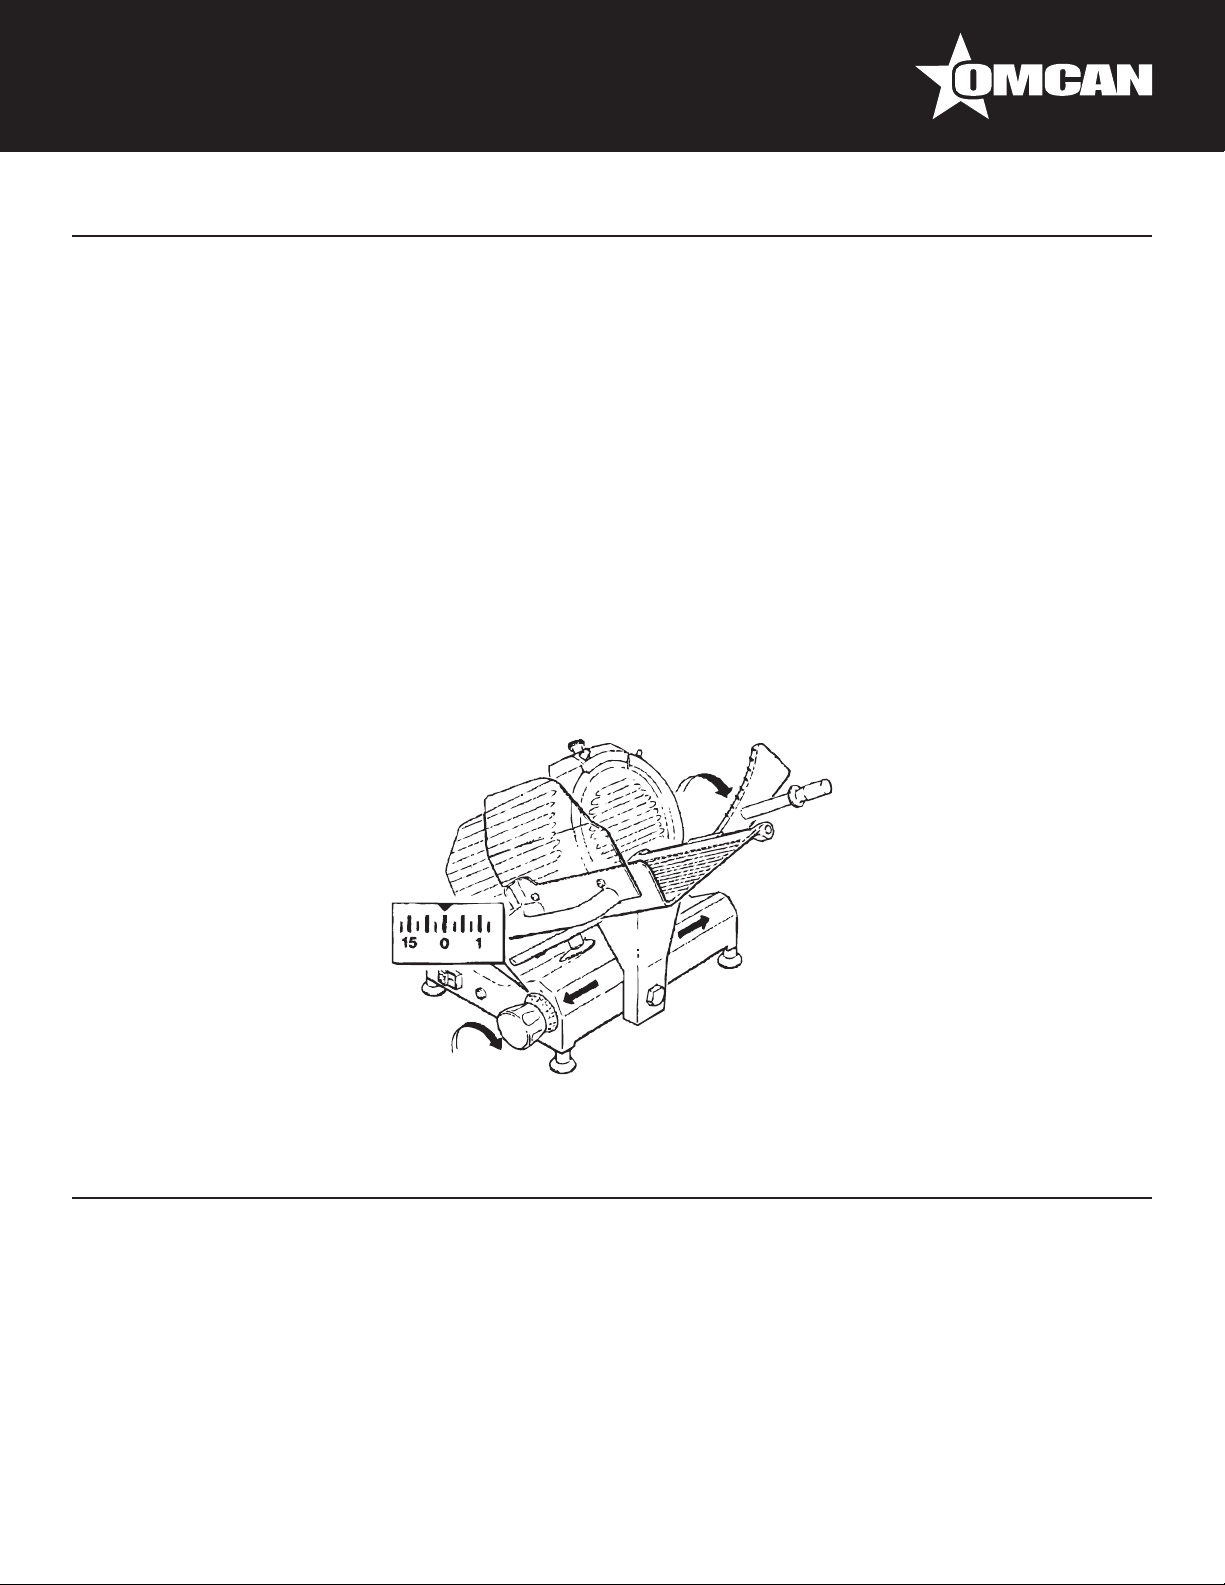
USING THE MACHINE
LOADING THE PRODUCT ON THE TRAY AND SLICING
• Ascertain that the thickness control knob is correctly positioned to ‘0’.
• Draw back the carriage completely (towards the operator) to loading position.
• Lift the product grip by pulling it away by 10 cm from the blade and put it in rest position.
• Lay the product to be sliced against the guide plate on the operator side.
• Secure by means of the product grip by exerting a slight pressure.
• Adjust the thickness gauge. Start the blade by turning the switch or by pressing on the white or green
button.
• Grip the handle afxed onto the plate and start the forward and backward cutting movement. The product
travels towards the guide plate by gravity.
• When the product weight or its dimensions do not provide a satisfactory cut by effect of the gravity, use the
product grip handle.
• When nished, return the thickness control knob to ‘0’ and draw the carriage back.
• Stop the blade by pressing the black or red button.
Maintenance
CLEANING THE SLICER
GENERAL
The machine must always be accurately cleaned at least once a day, and more often if necessary.
Always use protective gloves.
10
Page 11

Maintenance
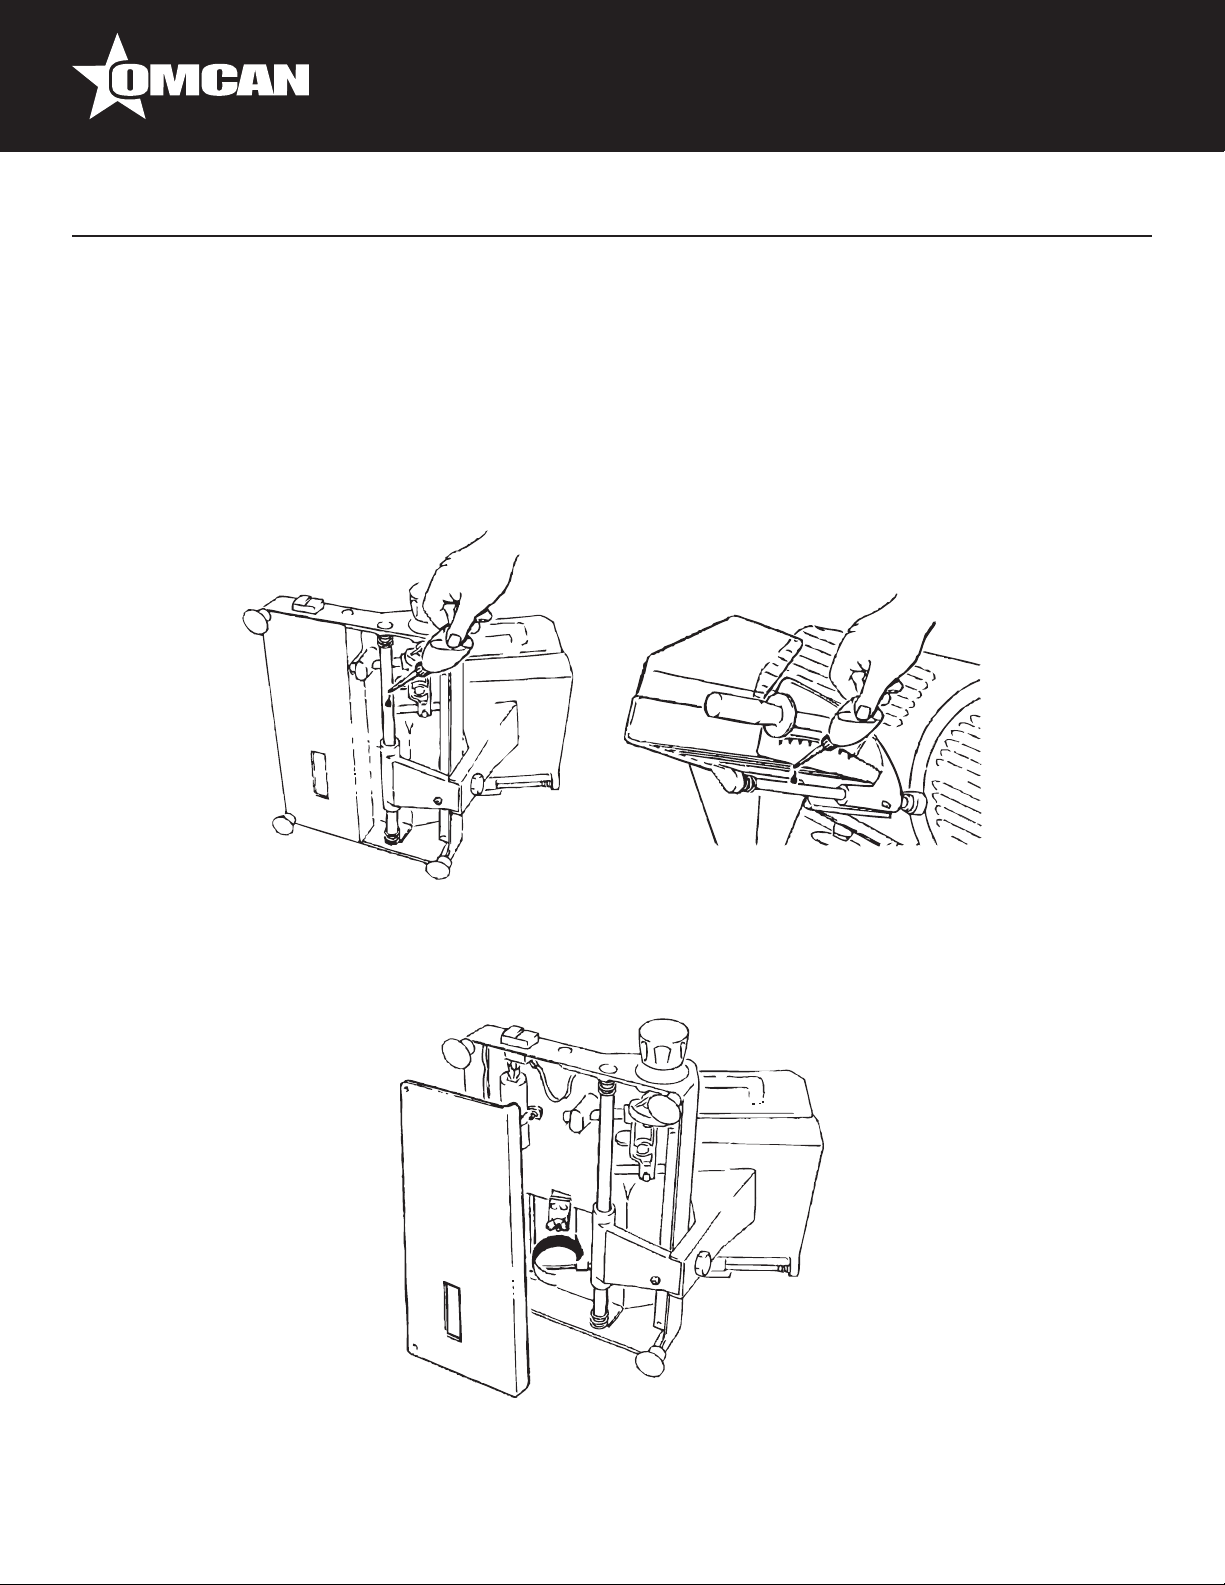
DISASSEMBLING THE MACHINE FOR CLEANING
• Disconnect the plug from the mains.
• Turn the gauge plate know to ‘0’.
• Remove the various components as described in the following paragraphs.
• Unscrew (counterclockwise) the blade guard tie-rod.
• If the blade guard is blocked, press on the rod knob to move it a little.
• Extract the rod and remove the blade guard using for this operation only the side knobs.
• Loosen and remove the two xing screws with knurled head.
• Remove the slice guard.
To clean the machine body and the blade use only a cloth damped with water and biodegradable
lathery detergent having 7-8 pH and at a temperature not below 30°C/86°F. Do not clean the machine by
using water or vapor sprays or similar systems.
WARNING:
Use scratch-proof and non-slip gloves to carry out the following operations. Proceed carefully and pay
attention to what you are doing. DANGER OF CUTTING!
REASSEMBLING THE MACHINE
Proceed as indicated for the previous operations but in reverse order.
GENERAL MAINTENANCE
The operator is allowed to perform the following maintenance operations:
• Blade sharpening: regularly (intervals and duration obviously depend on the use of the machine, time of
use and type of product sliced).
• Lubrication of carriage sliding guides: once a week.
• Lubrication of product grip sliding bar: once a week.
• Adjustment of motor belt tension: as required.
• Checking the power supply cord conditions and of the gland plate: from time to time.
11
Page 12

Maintenance
WARNING
Maintenance must always be carried out when the machine is disconnected from the mains and if no other
position is specically required, with the thickness control knob on ‘0’.
The following maintenance operations are to be entrusted only to personnel authorized by the
manufacturer:
• Replacing the blade.
• Replacing the sharpener stones.
• Replacing the motor transmission belt.
• Replacing electrical system components under the machine base.
• Repairing structural parts, repairing the components under the base.
BLADE SHARPENING
Before proceeding, clean the machine accurately as explained in the previous paragraphs.
WARNING
Sharpening can be done only up to 12 mm of the blade diameter value. Beyond this value, the BLADE
MUST BE REPLACED ONLY by personnel AUTHORIZED BY THE MANUFACTURER.
SHARPENING VERSIONS WITH BUILT-IN SHARPENER
To sharpen the blade periodically as soon as the cutting capacity decreases. Please proceed as per the
following instructions:
1. After disconnecting form the mains, clean the blade accurately using denaturized alcohol to degrease it.
2. Loosen the knob and turn the sharpener by 180° and insert the wheels on the slicer blade. Relock the
knob.
3. Operate the switch and press the button.
4. Allow the blade to rotate for about 30 to 40 seconds then use the switch to stop it. Brush a pencil lightly on
the external side of the blade to check for a slight spud.
We advise performing this operation with the utmost care as the blade is extremely sharp.
5. If some spud is found, operate the switch again for 3 to 4 seconds by pressing the buttons 4 and 5 at the
same time.
DO NOT PROLONG THIS OPERATION BEYOND THE FEW SECONDS MENTIONED OTHERWISE THE
BLADE EDGE WILL WARP.
6. After completing sharpening, we advise cleaning the wheels using a small brush and alcohol.
7. Now return the sharpener to its original position.
12
Page 13
Maintenance
LUBRICATION
Carriage sliding guides product grip (once a week)
Use only food grade mineral oil, or use white Vaseline oil. DO NOT USE VEGETABLE OILS.
• Spread a small quantity of oil on the bar and move the assembly 3 or 4 times.
Clean as required to remove excess of oil.
ADJUSTING THE MOTOR BELT TENSION
After a given period of service an unusual noise may occur because of the belt bedding. In this case, tighten
the belt-stretcher on the side of the motor under the machine base.
13
Page 14

Troubleshooting
The table below indicates the most common problems that may arise during slicing and the necessary
remedies.
PROBLEM POSSIBLE CAUSE REMEDY
The machine does not start
when the white or green button is
pressed.
When the switch is turned or
when the white or green button is
pressed, the machine starts, but
the white functioning light is not on.
The machine starts, but there are
vibrations. The motor is very hot
and there is a bad smell.
Under strain, the machine slows
down or comes to a stop.
Excessive resistance to product
slicing.
The slices are ragged and/or
shaped irregularly.
Unsatisfactory blade sharpening. Worn wheels. Replace the wheels; call technical
The product tray does not slide. Guides are insufciently lubricated. Lubricate.
When the switch is turned or when
the black or red button is pressed,
the machine does not stop.
No power supply. Ascertain that the plug is correctly
inserted.
The blade guard is not correctly
positioned.
Defective electrical control circuit. Call technical assistance.
Defective indicator. Do not use the machine when the
Defective motor or transmission. Do no use the machine, call
Defective transmission. Call technical assistance.
The blade is blunt. Sharpen the blade.
The blade is blunt. Sharpen the blade.
The blade is excessively worn out. Call technical assistance.
Defective electrical control circuit. Stop the machine, unplug
Check.
pilot lamp is not on; Call technical
assistance.
technical assistance.
assistance.
from mains and call technical
assistance.
DISMANTLING THE SLICER
These machines are made of the following elements:
• Aluminium frame.
• Stainless steel ttings and others.
• Electrical parts and cords.
• Electrical motor.
• Plastic materials, etc.
Whether dismantling is entrusted to third parties or done in-house (in that last case you will have to separate
the various materials) please note that disposal of the materials can only be carried out by duly authorized
businesses. In any case, please comply to the current norms of your country.
14
Page 15

Troubleshooting
WARNING
In any case, to remove the blade and dispose of it, you must contact the manufacturer or personnel
duly authorized by the manufacturer. NEVER DISPOSE OF WASTE IN AREAS WHERE ACCESS IS NOT
DELIMITED BY BARRIERS AND FORBIDDEN BY WARNING SIGNS AS THIS WASTE REPRESENTS A
SERIOUS DANGER, ESPECIALLY FOR CHILDREN AND ANIMALS. ANY RESPONSIBILITY ARISING
OUT OF INCORRECT DISPOSAL FALLS ON THE OWNER.
REFERENCE
Item Number Model Number Description Manufacturer Model Number
Meat Slicer Belt Driven 9” / 220mm Blade
13610 MS-IT-0220-B
13616 MS-IT-0220-U
13618 MS-IT-0250-B
13620 MS-IT-0250-U
13621 MS-IT-0250-I
13623 MS-IT-0250-IP
13625 MS-IT-0275-I
13624 MS-IT-0275-IP
13626 MS-IT-0300-B
13628 MS-IT-0300-U
21624 MS-IT-0300-I
0.25 HP / 186 W 120V/60/1 CE ETL
Sanitation
Meat Slicer Belt Driven 9” / 220mm Blade
0.25 HP / 186 W 120V/60/1 cETLus/ETL
Meat Slicer Belt Driven 10” / 250mm
Blade 0.3 HP / 224 W 120V/60/1 CE ETL
Sanitation
Meat Slicer Belt Driven 10” / 250mm Blade
0.3 HP / 224 W 120V/60/1 cETLus/ETL
Meat Slicer Belt Driven 10” / 250mm Blade
0.35 HP / 261 W 110V/60/1
Meat Slicer Belt Driven 10” / 250mm Blade
0.25 HP / 186 W 120V/60/1
Meat Slicer Belt Driven 11” / 275mm Blade
0.35 HP / 261 W 110V/60/1
Meat Slicer Belt Driven 11” / 275mm Blade
0.3 HP / 224 W 110V/60/1
Meat Slicer Belt Driven 12” / 300mm
Blade 0.35 HP / 261 W 120V/60/1 CE ETL
Sanitation
Meat Slicer Belt Driven 12” / 300mm Blade
0.35 HP / 261 W 120V/60/1 cETLus/ETL
Meat Slicer Belt Driven 12” / 300mm Blade
0.35 HP / 261 W 110V/60/1
220F
220AFUL
250E
F250E
250F
250R
275F
275E
300E
F300E
300R
15
Page 16

Instructions Français
SÉCURITÉ ET GARANTIE
LIMITES D’UTILISATION - NORMES DE SÉCURITÉ
Les machines ont été conçu et construit pour trancher des produits alimentaires en conformité aux normes
de la CE 2006/95 / CEE, 93/68 / CEE, 2006/42 / CEE, 2002/72 / CEE, 2004/108 CE, REG 1935/2004 / CEE,
2002/95 / CE (RoHS) et les règlements suivants EN1974, EN ISO12100-1, EN ISO12100-2, EN 294, EN
60204-1, EN60335-1, EN60335-2-64.
RÈGLES DE SÉCURITÉ
Les trancheuses doivent être utilisés que par un personnel qualié. En outre, ce personnel doit avoir lu
attentivement ce manuel. En particulier, s’il vous plaît respecter les instructions suivantes:
• Installez la machine selon les instructions contenues dans la section «Installation».
• Ne pas modier ni exclure les dispositifs de sécurité mécaniques et électriques.
• Ne pas utiliser la machine avec des connexions électriques, câbles provisoires ou non isolés.
• Vériez le câble d’alimentation et la plaque de la glande sur le corps de la machine régulièrement et si
nécessaire de les remplacer par du personnel qualié.
• En cas d’anomalies, d’un fonctionnement défectueux, mouvement incorrecte, un bruit inhabituel, etc arrêter
immédiatement la machine.
• Avant le nettoyage ou d’entretien, débranchez l’appareil du secteur.
• Toujours utiliser des gants anti-rayures et anti-dérapantes lors du nettoyage ou de la maintenance.
• Laïques ou supprimer les produits à trancher sur la plaque coulissante seulement lorsque celui-ci est
complètement repoussé et le bouton de contrôle de l’épaisseur positionné à 0.
• Pour déplacer le plateau du chariot lors du tranchage, utilisez la poignée ou la poignée de préhension du
produit.
• Pour l’entretien extraordinaire (remplacement des meules d’affûtage, la lame, ou autres) s’il vous plaît
contacter le fabricant ou du personnel qualié et dûment autorisés.
• Évitez de faire fonctionner les trancheuses sans produit sur elle.
• Les trancheuses sont équipées d’un moteur ventilé. Utilisation continue prolongée est déconseillée.
Laissez refroidir le moteur après 30 minutes d’utilisation.
GARANTIE ET RESPONSABILITÉ DU FABRICANT
La garantie du fabricant couvrant le bon fonctionnement des machines et de leur conformité au service pour
lequel ils ont été conçus dépend de l’application correcte des instructions contenues dans ce manuel. Le
fabricant décline toute responsabilité directe ou indirecte découlant de:
• Défaut de se conformer aux instructions contenues dans ce manuel.
• L’utilisation de la machine par du personnel qui n’a pas lu ou bien compris le contenu de ce manuel.
• Utilisez ne se conformant pas aux normes spéciques en vigueur dans le pays d’installation.
• Modications et / ou réparations non autorisées.
• L’utilisation d’accessoires non d’origine ou des pièces de rechange.
• Événements exceptionnels.
16
Page 17

Instructions Français
CONDITIONS D’UTILISATION DE L’ENVIRONNEMENT
Température: de -5 ° C et 40 ° C / 23 ° F et 104 ° F.
Humidité relative: 95% max.
OUVERTURE DE LA BOÎTE
A la réception contrôle d’intégrité de l’emballage, sinon informer le commissionnaire de transport ou de l’agent
de zone immédiatement. Pour déballer la machine, procéder comme suit:
• Ouvrez la boîte et à retirer votre copie du manuel d’utilisation et d’entretien, puis procéder selon les
indications contenues dans le manuel.
• Soulever la machine encore enveloppé dans une feuille de polyéthylène transparent et l’extraire de la
boîte.
• Maintenant, vériez le contenu de la boîte et assurez-vous qu’il correspond à ce qui gure sur l’étiquette
externe.
1 AN PIÈCES ET TRAVAIL BANC GARANTIE
Dans la période de garantie, contacter Omcan Inc. au 1-800-465-0234 pour planier une déposer soit
un dépôt Omcan de service autorisé dans la zone, ou à un entrepôt de service Omcan de réparer
l’équipement.
Entretien non autorisée annulera la garantie. La garantie couvre les pannes électriques et de pièces,
pas une mauvaise utilisation.
S’il vous plaît voir www.omcan.com/warranty.html pour info complète.
ATTENTION:
Les matériaux d’emballage (carton, de polyéthylène et autres) sont classés comme déchets solides urbains
normale et peuvent donc être éliminés sans difculté.
En tout cas, pour le recyclage approprié, nous suggérons au rebut des produits séparément
(différenciée des déchets) selon les normes actuelles.
NE PAS JETER MATÉRIAUX D’EMBALLAGE DANS L’ENVIRONNEMENT!
SPÉCIFICATIONS TECHNIQUES
La machine se compose essentiellement d’une base supportant une lame circulaire montée en position
inclinée. Cette lame est entraînée par un moteur électrique pour trancher des produits alimentaires. La
machine est équipée d’un chariot tenant un plateau de produits et de coulissement sur une barre montée
sous le plateau de base et parallèle à la lame. Tranche épaisseur est ajustée au moyen d’une plaque de
réglage montée à l’avant de la lame. Cette plaque, contre laquelle repose le produit à trancher est déplacé
17
Page 18

Instructions Français
transversalement par rapport à la lame d’une valeur correspondant à l’épaisseur de coupe souhaitée.
Le produit est introduit dans la machine (vers la plaque de pression manométrique) par gravité. Tous les
composants de la machine sont réalisées en alliage d’aluminium poli et anodisé, d’acier inoxydable et une
matière plastique de qualité alimentaire. La lame est entraînée par un moteur électrique, la transmission se fait
par l’intermédiaire d’une courroie rainurée longitudinalement. La machine est lancée et arrêtée par un bouton
de commande ou un interrupteur fourni avec circuit auxiliaire empêchant un redémarrage intempestif après
une coupure de courant. Certains des modèles de machines ont un taille-crayon intégré de la lame et sûr
conviviale.
DISPOSITIFS SÉCURITÉ ÉLECTRIQUE ET MÉCANIQUE
Les dispositifs de sécurité mécaniques suivants ont été installés:
• Une série de gardes de plastique transparent et aluminium sur le chariot de produit.
Sur demande, l’suivantes sont disponibles:
• Microcontact de sécurité empêchant le moteur de démarrer lorsque le protège-lame est retiré.
AVERTISSEMENT: RISQUES RESIDUELS
Malgré toutes les précautions possibles prises lors de la conception et de la construction de la
machine, les risques résiduels (de coupe) existent encore en cours d’utilisation ou pendant le
nettoyage ou l’entretien. Par conséquent être prudent et de payer la plus grande attention à ce que
vous faites. NE PAS utiliser la machine si vous n’êtes pas dans des conditions psychologiques et
physiques parfaits. Ne laissez personne près de la machine quand elle est en cours d’utilisation.
TOUJOURS porter des gants qui peuvent résister à des coupures ou des larmes quand le nettoyage, la
lubrication ou affûtage de la lame. Trancher uniquement les produits mentionnés comme tranchable.
JAMAIS essayer de couper des produits qui ont été mentionnés comme non tranchable.
ACCESSOIRES
Si pas autrement dénis au moment de la commande, les machines sont fournies avec les documents
suivants:
• Déclaration de conformité de l’UE;
• Manuel d’instructions pour l’installation, l’utilisation et la maintenance.
PRODUITS QUI PEUVENT ÊTRE TRANCHÉS
• Tous les types de charcuterie (crus, cuits, fumés).
• La viande sans os (crus ou cuits, à une température non inférieure à + 3 ° C).
• Légumes (tous types).
PRODUITS QUI NE DOIT PAS ÊTRE TRANCHÉS:
• Les aliments congelés ou surgelés.
18
Page 19
Instructions Français
• Les aliments contenant des os (viande ou poisson).
• Tout produit non alimentaire autre.
• Du fromage.
COMPOSANTS PRINCIPAUX
1. Bouton de démarrage
(blanc ou vert)
5. Pied réglable 6. Soutien chariot
9. Plate lame 10. Grip Produit 11. Lame 12. Poignée de produit
13. Plaque d’identication
du fabricant,
distributeur données
et UE Marques
17. Plate Lame Tie-Rod 18. Cordon d’alimentation 19. Jauge Plate 20. Taille crayon
Les illustrations peuvent différer des machines réelles.
2. Bouton d’arrêt (noir
ou rouge)
Plateau
14. Pusher plaque de
rallonge
3. N.A. 4. Slice contrôle de
l’épaisseur Knob
7. Base 8. Plateau de produit
15. Produit Plateau
Protection des mains
16. Poignée du tiroir de
produit
INSTALLATION
INSTALLATION DE LA MACHINE
Placez la machine sur un bien nivelé, supérieure lisse et sec convenablement dimensionnée pour supporter le
poids de la machine.
19
Page 20

Instructions Français
CONNEXION ÉLECTRIQUE
Installer la machine près d’une prise compatible dérivé d’un système répondant aux normes locales.
L’utilisateur est responsable pour déterminer que le système électrique est convenablement dimensionné
et fonctionne correctement (ligne d’alimentation, de sortie, panneau de distribution, disjoncteur différentiel de
protection, mise à la terre).
Avant d’effectuer le branchement vérier que l’alimentation caractéristiques correspondant à celles indiquées
sur la plaque de la machine.
COMMANDES
BOUTONS START ET STOP / COMMUTATEURS
• Tourner le commutateur ou appuyez sur le bouton blanc ou vert (1) pour commencer à courir la lame.
• La lumière allume pour indiquer que la machine fonctionne correctement.
• Tourner le commutateur ou appuyez sur le bouton rouge ou noir pour arrêter la lame.
Slice épaisseur peut être ajustée en tournant le bouton gradué (4) dans le sens antihoraire.
Plage de réglage Épaisseur: voir le paragraphe «description et les conditions d’utilisation technique».
ESSAI DE FONCTIONNEMENT ET LAME SENS DE ROTATION
Démarrer la machine et vérier si la lumière est allumée; assurez-vous que la lame tourne dans le sens
indiqué par la èche (dans le sens antihoraire, si vous regardez la machine du côté de la plaque de la lame).
• Vérier que le transport et la poignée de produits glissent correctement.
• Vérier que la plaque de calibrage fonctionne et ajuster l’épaisseur à la valeur souhaitée.
20
Page 21

Instructions Français
OPÉRATION
UTILISATION DE LA MACHINE
CHARGEMENT DU PRODUIT SUR LE PLATEAU ET SLICING
• Vérier que le bouton de commande de l’épaisseur est correctement positionné à ‘0’.
• Reculer le chariot (vers l’opérateur) à la position de chargement.
• Soulevez la poignée du produit en l’écartant de 10 cm à partir de la lame et le mettre en position de repos.
• Poser le produit à trancher sur la plaque de guidage sur le côté de l’opérateur.
• Fixer au moyen de la prise du produit en exerçant une légère pression.
• Ajuster la jauge d’épaisseur. Lancer la lame en tournant le bouton ou en appuyant sur le bouton blanc ou
vert.
• Saisir la poignée xée sur la plaque et commencer le mouvement de coupe vers l’avant et vers l’arrière. Le
produit se déplace vers la plaque de guidage par gravité.
• Lorsque le poids du produit ou de ses dimensions ne fournissent pas une coupe satisfaisante par l’effet de
la gravité, utilisez la poignée de préhension du produit.
• Lorsque vous avez terminé, ramener le bouton de contrôle de l’épaisseur à ‘0’ et reculer le chariot.
• Arrêter la lame en appuyant sur le bouton noir ou rouge.
ENTRETIEN
NETTOYAGE DE LA COUPE
GÉNÉRAL
La machine doit être soigneusement effectué au moins une fois par jour, et plus souvent si nécessaire.
Toujours utiliser des gants de protection.
21
Page 22

Instructions Français
DÉMONTAGE DE LA MACHINE DE NETTOYAGE
• Débrancher la che du secteur.
• Tourner la plaque de jauge savent à ‘0’.
• Retirez les différents composants tels que décrits dans les paragraphes suivants.
• Dévissez (dans le sens antihoraire) le protège-lame tirant.
• Si le protège-lame est bloquée, appuyez sur le bouton de la tige de se déplacer un peu.
• Extraire la tige et retirer la garde de lame à l’aide pour cette opération que les boutons latéraux.
• Desserrer et retirer les deux vis de xation à tête moletée.
• Retirer la protection de la tranche.
Pour nettoyer le corps de la machine et de l’utilisation de la lame uniquement un chiffon imbibé d’eau
et de détergent biodégradable ayant lathery 7-8 pH et à une température pas inférieure à 30 ° C / 86 ° F.
Ne pas nettoyer la machine à l’aide de jets d’eau ou de vapeur ou de systèmes similaires.
ATTENTION:
Utilisez anti-rayures et des gants antidérapants pour effectuer les opérations suivantes. Procédez avec
précaution et faire attention à ce que vous faites. DANGER DE COUPE!
REMONTÉ LA MACHINE
Procédez comme indiqué pour les opérations précédentes, mais dans l’ordre inverse.
ENTRETIEN GÉNÉRAL
L’opérateur est autorisé à effectuer les opérations de maintenance suivantes:
• Affûtage de lame: régulièrement (intervalles et la durée dépend évidemment de l’utilisation de la machine,
le temps d’utilisation et le type de produit en tranches).
• Lubrication des guides de chariot: une fois par semaine.
• Lubrication d’adhérence du produit barre coulissante: une fois par semaine.
• Réglage de tension de la courroie moteur: lorsque nécessaire.
• Vérication des conditions de la moelle de l’alimentation et de la plaque glande: de temps en temps.
22
Page 23

Instructions Français
ATTENTION
L’entretien doit toujours être effectué lorsque la machine est déconnectée du réseau et si aucun autre poste
est spéciquement requise, avec le bouton de contrôle de l’épaisseur sur ‘0’.
Les opérations de maintenance suivantes doivent être conés qu’à du personnel autorisé par le fabricant:
• Remplacement de la lame.
• Remplacement des pierres de taille-crayon.
• Remplacement de la courroie de transmission de moteur.
• Remplacement de composants du système électrique sous la base de la machine.
• Réparation des pièces de structure, la réparation des composants sous la base.
AFFÛTAGE
Avant de continuer, nettoyer la machine avec précision, comme expliqué dans les paragraphes précédents.
ATTENTION
Affûtage peut se faire que jusqu’à 12 mm de la valeur du diamètre de la lame. Au-delà de cette valeur, la
lame doit être remplacé que par du personnel autorisé PAR LE FABRICANT.
AFFÛTAGE VERSIONS AVEC TAILLE-CRAYON INTÉGRÉ
Pour aiguiser la lame régulièrement dès que la capacité de coupe diminue. S’il vous plaît procéder selon les
instructions suivantes:
1. Après avoir débranché former le réseau, nettoyer la lame en utilisant de l’alcool dénaturé pour la
dégraisser.
2. Desserrez le bouton et tournez l’affûteur de 180 ° et insérer les roues sur la lame de trancheuse.
Reverrouiller le bouton.
3. Actionner l’interrupteur et appuyez sur le bouton.
4. Laisser tourner la lame pendant environ 30 à 40 secondes puis utilisez l’interrupteur pour l’arrêter.
Badigeonner légèrement un crayon sur le côté externe de la lame pour vérier si une légère bavure.
Nous vous recommandons d’effectuer cette opération avec le plus grand soin que la lame est
extrêmement forte.
5. Si certains de la bavure, actionner l’interrupteur à nouveau pendant 3 à 4 secondes en appuyant sur les
boutons 4 et 5 dans le même temps.
NE PROLONGEZ PAS CETTE OPERATION AU-DELÀ DES QUELQUES SECONDES MENTION
CONTRAIRE LE BORD DE LAME SE DÉFORMERA.
6. Après avoir effectué l’affûtage, nous vous conseillons de nettoyer les roues à l’aide d’une petite brosse et
de l’alcool.
7. Maintenant, retournez l’affûteur à sa position initiale.
23
Page 24

Instructions Français
LUBRIFICATION
Carriage glissières produit poignée (une fois par semaine)
Utilisez uniquement de l’huile minérale de qualité alimentaire, ou utiliser de l’huile blanche de vaseline. NE
PAS utiliser des huiles végétales.
• Étendre une petite quantité d’huile sur la barre et déplacer l’ensemble 3 ou 4 fois.
Nettoyer si nécessaire pour enlever l’excès d’huile.
AJUSTEMENT DE LA TENSION MOTEUR COURROIE
Après une période de service donné un bruit inhabituel peut se produire en raison de la literie de ceinture.
Dans ce cas, serrer la ceinture-brancard sur le côté du moteur sous la base de la machine.
24
Page 25

Instructions Français
DÉPANNAGE
Le tableau ci-dessous indique les problèmes les plus courants qui peuvent survenir au cours de tranchage et
les mesures correctives nécessaires.
PROBLÈME CAUSE POSSIBLE REMÉDIER
La machine ne démarre pas
lorsque le bouton blanc ou vert est
enfoncé.
Lorsque le commutateur est activé
ou lorsque le bouton blanc ou vert
est enfoncé, la machine démarre,
mais la lumière de fonctionnement
blanc est pas.
La machine démarre, mais il ya
des vibrations. Le moteur est très
chaud et il ya une mauvaise odeur.
Sous tension, la machine ralentit
ou est à l’arrêt.
Une résistance excessive au
produit tranchage.
Les tranches sont en lambeaux et /
ou de forme irrégulière.
Insatisfaisant affûtage de la lame. Roues usées. Remplacer les roues; appeler
Le plateau du produit ne glisse
pas.
Lorsque le commutateur est activé
ou lorsque le bouton noir ou rouge
est enfoncé, la machine ne cesse
pas.
Pas d’alimentation. Vérier que la prise est
correctement insérée.
La garde de lame est pas
correctement positionné.
Circuit de commande électrique
défectueux.
Indicateur défectueux. Ne pas utiliser la machine lorsque
Transmission ou moteur
défectueux.
Transmission défectueuse. Appelez l’assistance technique.
La lame est émoussée. Aiguiser la lame.
La lame est émoussée. Aiguiser la lame.
La lame est trop usé. Appelez l’assistance technique.
Guides sont insufsamment
lubriés.
Circuit de commande électrique
défectueux.
Chèque.
Appelez l’assistance technique.
la lampe pilote est pas; Appelez
l’assistance technique.
Ne pas utiliser la machine, appeler
l’assistance technique.
l’assistance technique.
Lubrier.
Arrêtez la machine, débranchez
le cordon secteur et appeler
l’assistance technique.
DEMANTELEMENT DE LA TRANCHEUSE
Ces appareils sont les éléments suivants:
• Armature en aluminium.
• Acier Les raccords en acier et autres.
• Pièces et cordons électriques.
• Moteur électrique.
25
Page 26

Instructions Français
• Les matières plastiques, etc.
Que démantèlement est conée à des tiers ou fait en interne (dans ce dernier cas, vous aurez à séparer
les différents matériaux) s’il vous plaît noter que l’élimination des matériaux ne peut être effectuée par des
entreprises dûment autorisées. En tout cas, s’il vous plaît conformer aux normes en vigueur dans votre pays.
ATTENTION
En tout cas, pour enlever la lame et en disposer, vous devez contacter le fabricant ou le personnel
dûment autorisés par le fabricant. Ne jetez jamais les déchets dans les zones où l’accès est PAS
délimitée par les barrières et interdits par des panneaux d’avertissement ces déchets représente
un grave danger, NOTAMMENT POUR ENFANTS ET DES ANIMAUX. AUCUNE RESPONSABILITÉ
DÉCOULANT HORS DE élimination incorrecte tombe sur LE PROPRIÉTAIRE.
RÉFÉRENCE
Numéro
d’article
13610 MS-IT-0220-B
13616 MS-IT-0220-U
13618 MS-IT-0250-B
13620 MS-IT-0250-U
13621 MS-IT-0250-I
13623 MS-IT-0250-IP
13625 MS-IT-0275-I
13624 MS-IT-0275-IP
Numéro de
modèle
La description Numéro du fabricant Modèle
Ceinture de trancheuse à viande entraînée
9” / 220mm Lame 0.25 HP / 186 W
120V/60/1 CE ETL Sanitation
Ceinture de trancheuse à viande entraînée
9” / 220mm Lame 0.25 HP / 186 W
120V/60/1 cETLus/ETL
Ceinture de trancheuse à viande entraînée
10” / 250mm Lame 0.3 HP / 224 W
120V/60/1 CE ETL Sanitation
Ceinture de trancheuse à viande entraînée
10” / 250mm Lame 0.3 HP / 224 W
120V/60/1 cETLus/ETL
Ceinture de trancheuse à viande entraînée
10” / 250mm Lame 0.35 HP / 261 W
110V/60/1
Ceinture de trancheuse à viande entraînée
10” / 250mm Lame 0.25 HP / 186 W
120V/60/1
Ceinture de trancheuse à viande entraînée
11” / 275mm Lame 0.35 HP / 261 W
110V/60/1
Ceinture de trancheuse à viande entraînée
11” / 275mm Lame 0.3 HP / 224 W
110V/60/1
220F
220AFUL
250E
F250E
250F
250R
275F
275E
26
Page 27

13626 MS-IT-0300-B
13628 MS-IT-0300-U
21624 MS-IT-0300-I
Instructions Français
Ceinture de trancheuse à viande entraînée
12” / 300mm Lame 0.35 HP / 261 W
120V/60/1 CE ETL Sanitation
Ceinture de trancheuse à viande entraînée
12” / 300mm Lame 0.35 HP / 261 W
120V/60/1 cETLus/ETL
Ceinture de trancheuse à viande entraînée
12” / 300mm Blade 0.35 HP / 261 W
110V/60/1
300E
F300E
300R
27
Page 28

Parts Breakdown
Model MS-IT-0220-B 13610
Model MS-IT-0220-U 13616
28
Page 29

Parts Breakdown
Model MS-IT-0220-B 13610
Model MS-IT-0220-U 13616
Item No. Description Position Item No. Description Position Item No. Description Position
33922 Sharpener Base for 220F A1 14955 Strain Relief for 220F B20 14991 Cam for 220F B62
33923 Thumb Screw for Sharpener for 220F A2 14956 Tie Rod for 220F B21 14992 Cam Screw for 220F B63
33924 Washer for 220F A3 14866 Deector Screw for 220F B22 33918 Cam Screw for 220F B63
33925 Screw for 220F A4 14867 Slice Deector for 220F B23 33919 Slide Support for 220F B64
33926 Sharpener Shaft for 220F A5 14958 Screw for 220F B24 15019 Slide Support for 220F B64
33927 Screw for 220F A6 14959 Circlip for 220F B25 33920 Slide Pin for 220F B65
33928 Nut for 220F A7 14960 Circlip for 220F B26 14993 Screw TC for 220F B66
33929 Screw for 220F A8 33911 Pulley Bearing for 220F B27 14994 Screw TC for 220F B67
33930 Washer for 220F A9 14961 Pulley for 220F B28 14995 Nut for 220F B68
33931 Screw for 220F A10 14962 Belt for 220F B29 14996 Screw Testa CACC for 220F B69
33932 Push Knob for Sharpener for 220F A11 14963 Shaft for 220F B30 14997 Screw for 220F B70
33933 Ball Bearing for 220F A12 14964 Screw for 220F B31 14998 Plate for 220F B71
33934 Spring for 220F A13 14965 Screw TC for 220F B32 14999 Screw TC for 220F B72
33935 Washer for 220F A14 13585 Blade for 220F B33 15000 Slide Bar Spring for 220F
33936 Screw for 220F A15 14966 Screw for 220F B34 15001 Slide Bar for 220F B74
33937 Washer for 220F A16 14967 Blade Cover for 220F B35 15024 Carriage for 220F B75
33938 Sharpener Housing for 220F A17 14968 Nut for 220F B36 15003 Carriage Screw for 220F B76
33939 Grinding Shaft for 220F A18 33913 Omcan F Stone 40x08x06 for 220F B37 15004 Carriage Nut for 220F B77
33914 Grinding Stone for 220F A19 33914 Omcan G Stone 40x08x06 for 220F B38 15005 Pin for 220F B78
33941 Washer for 220F A20 14969 Pin for 220F B39 15006 Bearing for 220F B79
33942 Nut for 220F A21 14970 Pin for 220F B40 15007 Screw for 220F B80
17212 Finishing Stone for 220F A22 14971 Support for 220F B41 15008 Wing Nut for 220F B81
33944 Honing Shaft for 220F A23 14972 Spring for 220F B42 15009 Plate for 220F B82
33945 Sharpener Cover for 220F A24 14973 Spring for 220F B43 15010 Motor Adjustment Bar for 220F B83
33946 Spring for 220F A25 14974 Small Push Button for 220F B44 15011 Spring for Adjustment Bar for 220F B84
14938 Casing for 220F B1 14976 Wrist Guard Plate for 220F B46 15012 Motor for 220F B85
14939 Screw for 220F B2 33915 Meat Grip Knob for 220F B47 15013 Screw for 220F B86
14940 Index Knob for 220F B3 14894 Screw TPSV for 220F B48 15014 Ventosa for 220F B87
14942 Screw for 220F B4 14978 Meat Grip for 220F B49 15015
14943 Rivet for 220F B5 14979 Pin for 220F B50 15016 Circlip for 220F B89
14944 Screw for 220F B6 14980 Spring for 220F B51 14933 Foot for 220F B90
14945 Plate for 220F B7 14981 Lock for 220F B52 14934 Wrist Guard Screw for 220F B91
14922
64813
14946 Capacitor for 220F B9 14983 Screw for 220F B54 25162 Bottom Cover for 220F D4
14947 Clamp for 220F B10 14984 Knob for 220F B55 18933 Micro Switch for 220F D10
14948 Screw TC for 220F B11 14985 Meat Plate Support for 220F B56 33947 Tie Rod for Micro Switch for 220F D 11
14859 Power Cord for 220F B15 14903 Carriage Knob for 220F B57 33948 Screw for 220F D13
14950 Screw TE for 220F B16 14987 Screw for 220F B58 33949 Safety Switch Holder for 220F D14
14951 Washer for 220F B17 14988 Bar for 220F B59 33950 Pivot Chuck for 220F D15
14953 Support for 220F B18 14989 Screw for 220F B60 17685 Complete Meat Tray Assy. for 220F
14954 Thickness Adj. Plate for 220F B19 14990 Washer for 220F B61 44918 Complete Sharpening Assy. for 220F
On / Off Switch for 220F B8 14982 Meat Plate for 220F B53 15018 Pulley Assembly for 220F B93
Motor Pin for 220F B88
B73
29
Page 30

Parts Breakdown
Model MS-IT-0250-B 13618
Model MS-IT-0250-U 13620
30
Page 31

Parts Breakdown
Model MS-IT-0250-B 13618
Model MS-IT-0250-U 13620
Item No. Description Position Item No. Description Position Item No. Description Position
33968 Sharpener Base for 250E A1 15095 Thickness Adj. Plate for 250E B19 15127 Cam Screw for 250E B63
33969 Thumb Screw for Sharpener for 250E A2 15096 Strain Relief for 250E B20 15019 Slide Support for 250E B64
33970 Washer for 250E A3 15097 Tie Rod for 250E B21 33965 Slide Pin for 250E B65
33971 Screw for 250E A4 15098 Deector Screw for 250E B22 15128 Screw TC for 250E B66
33972 Sharpener Shaft for 250E A5 17687 Slice Deector for 250E B23 15129 Screw TC for 250E B67
33973 Screw for 250E A6 15099 Screw for 250E B24 15130 Nut for 250E B68
33974 Nut for 250E A7 33953 Circlip for 250E B25 15131 Screw Testa CACC for 250E B69
33975 Screw for 250E A8 33954 Circlip for 250E B26 15132 Screw for 250E B70
33976 Washer for 250E A9 33955 Pulley Bearing for 250E B27 15133 Plate for 250E B71
33977 Screw for 250E A10 33956 Pulley for 250E B28 15134 Screw TC for 250E B72
33978 Push Knob for Sharpener for 250E A11 15100 Belt for 250E B29 15135 Slide Bar Spring for 250E B73
33979 Ball Bearing for 250E A12 33957 Shaft for 250E B30 15136 Slide Bar for 250E B74
33980 Spring for 250E A13 33958 Screw for 250E B31 15137 Carriage for 250E B75
33981 Washer for 250E A14 15101 Screw TC for 250E B32 33966 Carriage Screw for 250E
33982 Screw for 250E A15 13586 Blade for 250E B33 15140 Carriage Nut for 250E B77
33983 Washer for 250E A16 15103 Screw for 250E B34 15141 Pin for 250E B78
33984 Sharpener Housing for 250E A17 15066 Blade Cover for 250E B35 15142 Bearing for 250E B79
33985 Grinding Shaft for 250E A18 15105 Nut for 250E B36 15143 Screw for 250E B80
33914 Grinding Stone for 250E A19 15106 Pin for 250E B39 15144 Wing Nut for 250E B81
33987 Washer for 250E A20 15107 Pin for 250E B40 15145 Plate for 250E B82
33988 Nut for 250E A21 15108 Support for 250E B41 15146 Motor Adjustment Bar for 250E B83
17212 Finishing Stone for 250E A22 15109 Spring for 250E B42 15147 Spring for Adjustment Bar for 250E B84
33990 Honing Shaft for 250E A23 15110 Spring for 250E B43 15148 Motor for 250E B85
33991 Sharpener Cover for 250E A24 15111 Small Push Button for 250E B44 15149 Screw for 250E B86
33992 Spring for 250E A25 15112 Screw for 250E B45 15150 Ventosa for 250E B87
15082 Casing for 250E B1 14976 Wrist Guard Plate for 250E B46 15151 Motor Pin for 250E B88
15083 Screw for 250E B2 33915 Meat Grip Knob for 250E B47 15152 Circlip for 250E B89
14940 Index Knob for 250E B3 14894 Screw TPSV for 250E B48 14933 Foot for 250E B90
33951 Screw for 250E B4 15114 Meat Grip for 250E B49 14934
15085 Rivet for 250E B5 15115 Pin for 250E B50 15154 Pulley Assembly for 250E B93
15086 Screw for 250E B6 15117 Lock for 250E B52 25162 Bottom Cover for 250E D4
15087 Plate for 250E B7 15118 Meat Plate for 250E B53 18933 Micro Switch for 250E D10
14922
64813
15088 Capacitor for 250E B9 15121 Meat Plate Support for 250E B56 33994 Screw for 250E D13
15089 Clamp for 250E B10 14903 Knob Support for 250E B57 25163 Tie Rod Ring for 250E D14
15090 Screw TC for 250E B11 15122 Screw for Support Bar for 250E B58 33996 Pivot Chuck for 250E D15
14859 Power Cord for 250E B15 15123 Support Bar for 250E B59 15081 Complete Meat Tray Assy. for 250E
15092 Screw for 250E B16 15124 Screw for 250E B60 33964 Slide Support Complete for 250E
15093 Washer for 250E B17 15125 Washer for 250E B61 41167 Complete Sharpening Assy. for 250E
15094 Support for 250E B18 15126 Cam for 250E B62
On / Off Switch for 250E B8 15119 Screw for 250E B54 33993 Tie Rod for Micro Switch for 250E D 11
Wrist Guard Screw for 250E B91
B76
31
Page 32

Parts Breakdown
Model MS-IT-0250-I 13621
32
Page 33

Parts Breakdown
Model MS-IT-0250-I 13621
Item No. Description Position Item No. Description Position Item No. Description Position
33997 Housing for 250F A1 15056 Screw TC for 250F A37 15071 Meat Deector for 250F A73
15026 Set Screw TC for 250F A2 15057 Clip for 250F A38 34026 Screw TC for 250F A74
15027 Set Screw TC for 250F A3 15058 Clip for 250F A39 34027 Copper Rivet for 250F A75
15028 Guide Plate Pin for 250F A4 15059 Bearing for 250F A40 34028 Index Knob for 250F A76
15029 Tapping Screw for 250F A5 15060 Spacer for 250F A41 34029 Screw Chrome for 250F A77
33998 Stop Plate for 250F A6 34002 Belt for 250F A42 34030 Light for 250F A78
33999 Strain Relief for 250F A7 15062 Spindle Pulley for 250F A43 15195 Switch - On / Off for 250F A79
15030 Set Screw TP for 250F A8 15063 Bearing and Shaft for 250F A44 34032 Carriage Rail for 250F A80
17686 Tie Rod for 250F A9 15064 Set Screw for 250F A45 34033 Bearing for 250F A81
15031 Sharpener Tie Rod for 250F A10 13586 Blade for 250F A46 34034 Bearing Pin for 250F A82
15032 Sharpener Support Bracket for 250F A11 15065 Screw TPSV for 250F A47 34035 Set Screw for 250F A83
15033 Washer for 250F A12 15066 Blade Shield for 250F A48 34036 Set Screw PVC for 250F A84
15034 Screw TE for 250F A13 14893 Meat Grip Handle for 250F A49 34037 Slide Bar Spring for 250F A85
15035 Shaft for Sharpener for 250F A14 15068 Meat Grip Handle Screw for 250F A50 34038 Carriage Support for 250F
15036 Sharpener Pin Spacer for 250F A15 15069 Meat Grip for 250F A51 34039 Screw TC for 250F A87
15037 Sharpener Pin for 250F A16 34005 Plastic Dowel for 250F A52 34040 Carriage Slide Bar for 250F A88
18016 Grinding Stone for 250F A17 34006 Meat Tray Shaft Spring for 250F A53 34041 Stop Plate for 250F A89
15038 Washer for 250F A18 34007 Meat Tray Shaft for 250F A54 15073 Foot for 250F A90
15039 Nut for 250F A19 34008 Meat Tray for 250F A55 15074 Capacitor for 250F A91
15040 Set Screw for 250F A20 34009 Guide Plate for 250F A56 34042 Capacitor Bracket for 250F A92
15041 Nut for 250F A21 34010 Meat Tray Support for 250F A57 34043 Screw TC for 250F A93
15042 Screw TGS for 250F A22 15070 Carriage Knob for 250F A58 34044 Motor Spring for 250F A94
15043 Sharpener Push Button for 250F A23 34011 Screw TE for 250F A59 34045 Motor Bracket for 250F A95
15044 Ball Bearing for 250F A24 34012 Screw TE for 250F A60 34046 Wing Nut for 250F A96
33032 Finishing Stone for 250F A25 34013 Guide Plate Support for 250F A61 34047 Washer for 250F A97
15045 Sharpener Pin for 250F A26 34014 Cam Plate for 250F A62 34048 Hinge for 250F A98
15046 Sharpener Pin Spring for 250F A27 34015 Screw TC for 250F A63 34049 Motor Support Shaft for 250F A99
15047 Sharpener Cover for 250F A28 34016 Set Screw TC for 250F A64 15075 Motor Tie Rod for 250F A100
15048 Sharpener Body for 250F A29 34017 Cam Guide for 250F A65 15076
15049 Sharpener Pin Spacer for 250F A30 34019 Nut for 250F A66 15078 Motor for 250F A103
15050 Washer for 250F A31 34020 Cam Screw for 250F A67 14859 Power Cord for 250F A104
15051 Screw TC for 250F A32 34021 Washer for 250F A68 36528 Index Knob Spacer for 250F A108
15052 Sharpener Push Button for 250F A33 34022 Set Screw for 250F A69 25161 Bottom Cover for 250F C4
15053 Sharpener Pin Spring for 250F A34 34023 Cam for 250F A70 15350 Complete Sharpening Assy. for 250F
15054 Stud Screw for 250F A35 34024 Screw TE for 250F A71 34018 Cam Assembly for 250F
15055 Washer for 250F A36 34025 Screw TC for 250F A72
Guide Plate Support Cover for 250F A101
A86
33
Page 34

Parts Breakdown
Model MS-IT-0250-IP 13623
34
Page 35

Parts Breakdown
Model MS-IT-0250-IP 13623
Item No. Description Position Item No. Description Position Item No. Description Position
34053 Sharpener Base for 250R A1 14859 Power Cord for 250R B15 34122 Washer for 250R B61
34054 Thumb Screw for Sharpener for 250R A2 34089 Screw TE for 250R B16 34123 Cam for 250R B62
34055 Washer for 250R A3 34090 Washer for 250R B17 34124 Cam Screw for 250R B63
34056 Screw for 250R A4 34091 Support for 250R B18 14906 Slide Support for 250R B64
34057 Sharpener Shaft for 250R A5 34092 Thickness Adj. Plate for 250R B19 34127 Slide Pin for 250R B65
34058 Screw for 250R A6 34093 Strain Relief for 250R B20 34128 Screw TC for 250R B66
34059 Nut for 250R A7 34094 Tie Rod for 250R B21 34129 Screw TC for 250R B67
34060 Screw for 250R A8 34095 Deector Screw for 250R B22 34130 Nut for 250R B68
34061 Washer for 250R A9 34096 Slice Deector for 250R B23 34131 Screw Testa CACC for 250R B69
34062 Screw for 250R A10 34097 Screw for 250R B24 34132 Screw for 250R B70
34063 Push Knob for Sharpener for 250R A11 34098 Circlip for 250R B25 34133 Plate for 250R B71
34064 Ball Bearing for 250R A12 34099 Circlip for 250R B26 34134 Screw TC for 250R B72
34065 Spring for 250R A13 34100 Pulley Bearing for 250R B27 34135 Slide Bar Spring for 250R B73
34066 Washer for 250R A14 34101 Pulley for 250R B28 34136
34067 Screw for 250R A15 34102 Belt for 250R B29 34137 Carriage for 250R B75
34068 Washer for 250R A16 34103 Shaft for 250R B30 34138 Carriage Screw for 250R B76
34069 Sharpener Housing for 250R A17 34104 Screw for 250R B31 34139 Carriage Nut for 250R B77
34070 Grinding Shaft for 250R A18 34105 Screw TC for 250R B32 34140 Pin for 250R B78
33914 Grinding Stone for 250R A19 13586 Blade for 250R B33 34141 Bearing for 250R B79
34072 Washer for 250R A20 34107 Screw for 250R B34 34142 Screw for 250R B80
34073 Nut for 250R A21 24541 Blade Cover for 250R B35 34143 Wing Nut for 250R B81
17212 Finishing Stone for 250R A22 15105 Nut for 250R B36 34144 Plate for 250R B82
34075 Honing Shaft for 250R A23 34108 Wrist Guard Plate for 250R B46 34145 Motor Adjustment Bar for 250R B83
34076 Sharpener Cover for 250R A24 33915 Meat Grip Knob for 250R B47 34146 Spring for Adjustment Bar for 250R B84
34077 Spring for 250R A25 14894 Screw TPSV for 250R B48 15012 Motor for 250R B85
34078 Casing for 250R B1 34111 Meat Grip for 250R B49 34148 Screw for 250R B86
34079 Screw for 250R B2 34112 Pin for 250R B50 15150 Ventosa for 250R B87
14940 Index Knob for 250R B3 34113 Spring for 250R B51 34150 Motor Pin for 250R B88
34081 Screw for 250R B4 34114 Lock for 250R
34082 Rivet for 250R B5 34115 Meat Plate for 250R B53 14933 Foot for 250R B90
34083 Screw for 250R B6 34116 Screw for 250R B54 14934 Wrist Guard Screw for 250R B91
34084 Plate for 250R B7 34117 Meat Plate Support for 250R B56 37121 Screw for 250R B93
14922
64813
14946 Capacitor for 250R B9 34119 Screw for Support Bar for 250R B58 34126 Slide Support Complete for 250R
34087 Clamp for 250R B10 34120 Support Bar for 250R B59 41167 Complete Sharpening Assy. for 250R
34088 Screw TC for 250R B 11 34121 Screw for 250R B60
On / Off Switch for 250R B8 14903 Carriage Knob for 250R B57 15022 Bottom Cover for 250R D4
B52 34151 Circlip for 250R B89
Slide Bar for 250R B74
35
Page 36

Parts Breakdown
Model MS-IT-0275-I 13625
36
Page 37

Parts Breakdown
Model MS-IT-0275-I 13625
Item No. Description Position Item No. Description Position Item No. Description Position
34254 Housing for 275F A1 34290 Screw TC for 275F A37 15071 Meat Deector for 275F A73
34255 Set Screw TC for 275F A2 34291 Clip for 275F A38 34329 Screw TC for 275F A74
34256 Set Screw TC for 275F A3 34293 Clip for 275F A39 34330 Copper Rivet for 275F A75
34257 Guide Plate Pin for 275F A4 34295 Bearing for 275F A40 34028 Index Knob for 275F A76
34258 Tapping Screw for 275F A5 34296 Spacer for 275F A41 34332 Screw Chrome for 275F A77
34260 Stop Plate for 275F A6 34297 Belt for 275F A42 34333 Light for 275F A78
34261 Strain Relief for 275F A7 34298 Spindle Pulley for 275F A43 15195 Switch - On / Off for 275F A79
34262 Set Screw TP for 275F A8 34299 Bearing and Shaft for 275F A44 34335 Carriage Rail for 275F A80
17686 Tie Rod for 275F A9 15064 Set Screw for 275F A45 34336 Bearing for 275F A81
34263 Sharpener Tie Rod for 275F A10 13590 Blade for 275F A46 34337 Bearing Pin for 275F A82
34264 Sharpener Support Bracket for 275F A11 34302 Screw TPSV for 275F A47 34338 Set Screw for 275F A83
34265 Washer for 275F A12 15158 Blade Shield for 275F A48 34339 Set Screw PVC for 275F A84
34266 Screw TE for 275F A13 14893 Meat Grip Handle for 275F A49 34340 Slide Bar Spring for 275F A85
34267 Shaft for Sharpener for 275F A14 14894 Meat Grip Handle Screw for 275F A50 34341 Carriage Support for 275F
34268 Sharpener Pin Spacer for 275F A15 15069 Meat Grip for 275F A51 34342 Screw TC for 275F A87
34269 Sharpener Pin for 275F A16 34005 Plastic Dowel for 275F A52 34343 Carriage Slide Bar for 275F A88
18016 Grinding Stone for 275F A17 34006 Meat Tray Shaft Spring for 275F A53 34344 Stop Plate for 275F A89
34271 Washer for 275F A18 34007 Meat Tray Shaft for 275F A54 15073 Foot for 275F A90
34272 Nut for 275F A19 34008 Meat Tray for 275F A55 34346 Capacitor for 275F A91
34273 Set Screw for 275F A20 34310 Guide Plate for 275F A56 34347 Capacitor Bracket for 275F A92
34274 Nut for 275F A21 34010 Meat Tray Support for 275F A57 34348 Screw TC for 275F A93
34275 Screw TGS for 275F A22 34312 Carriage Knob for 275F A58 34349 Motor Spring for 275F A94
34276 Sharpener Push Button for 275F A23 34313 Screw TE for 275F A59 34350 Motor Bracket for 275F A95
34277 Ball Bearing for 275F A24 34314 Screw TE for 275F A60 34351 Wing Nut for 275F A96
33032 Finishing Stone for 275F A25 34315 Guide Plate Support for 275F A61 34352 Washer for 275F A97
34279 Sharpener Pin for 275F A26 34316 Cam Plate for 275F A62 34353 Hinge for 275F A98
34280 Sharpener Pin Spring for 275F A27 34317 Screw TC for 275F A63 34354 Motor Support Shaft for 275F A99
34281 Sharpener Cover for 275F A28 34318 Set Screw TC for 275F A64 34355 Motor Tie Rod for 275F A100
34282 Sharpener Body for 275F A29 34319 Cam Guide for 275F A65 34356
34283 Sharpener Pin Spacer for 275F A30 34321 Nut for 275F A66 15078 Motor for 275F A103
34284 Washer for 275F A31 34322 Cam Screw for 275F A67 14859 Power Cord for 275F A104
34285 Screw TC for 275F A32 34323 Washer for 275F A68 36528 Index Knob Spacer for 275F A108
34286 Sharpener Push Button for 275F A33 34324 Set Screw for 275F A69 25161 Bottom Corner for 275F C4
34287 Sharpener Pin Spring for 275F A34 34325 Cam for 275F A70 34320 Cam Assembly for 275F
34288 Stud Screw for 275F A35 34326 Screw TE for 275F A71 15156 Complete Sharpening Assy. for 275F
34289 Washer for 275F A36 34327 Screw TC for 275F A72
Guide Plate Support Cover for 275F A101
A86
37
Page 38

Parts Breakdown
Model MS-IT-0275-IP 13624
38
Page 39

Parts Breakdown
Model MS-IT-0275-IP 13624
Item No. Description Position Item No. Description Position Item No. Description Position
34153 Sharpener Base for 275E A1 34189 Screw TE for 275E B16 34224 Cam Screw for 275E B63
34154 Thumb Screw for Sharpener for 275E A2 34190 Washer for 275E B17 34225 Slide Support for 275E B64
34155 Washer for 275E A3 34191 Support for 275E B18 34227 Slide Pin for 275E B65
34156 Screw for 275E A4 34192 Thickness Adj. Plate for 275E B19 34228 Screw TC for 275E B66
34157 Sharpener Shaft for 275E A5 34193 Strain Relief for 275E B20 34229 Screw TC for 275E B67
34158 Screw for 275E A6 15097 Tie Rod for 275E B21 34230 Nut for 275E B68
34159 Nut for 275E A7 34026 Deector Screw for 275E B22 34231 Screw Testa CACC for 275E B69
34160 Screw for 275E A8 15071 Slice Deector for 275E B23 34232 Screw for 275E B70
34161 Washer for 275E A9 34197 Screw for 275E B24 34233 Plate for 275E B71
34162 Screw for 275E A10 34198 Circlip for 275E B25 34234 Screw TC for 275E B72
34163 Push Knob for Sharpener for 275E A11 34199 Circlip for 275E B26 34235 Slide Bar Spring for 275E B73
34164 Ball Bearing for 275E A12 34200 Pulley Bearing for 275E B27 34236 Slide Bar for 275E B74
34165 Spring for 275E A13 34201 Pulley for 275E B28 34237 Carriage for 275E B75
34166 Washer for 275E A14 34202 Belt for 275E B29 34238 Carriage Screw for 275E
34167 Screw for 275E A15 34203 Shaft for 275E B30 34239 Carriage Nut for 275E B77
34168 Washer for 275E A16 34204 Screw for 275E B31 34240 Pin for 275E B78
34169 Sharpener Housing for 275E A17 34205 Screw TC for 275E B32 34241 Bearing for 275E B79
34170 Grinding Shaft for 275E A18 13589 Blade for 275E B33 34242 Screw for 275E B80
18016 Grinding Stone for 275E A19 34207 Screw for 275E B34 34243 Wing Nut for 275E B81
34172 Washer for 275E A20 23902 Blade Cover for 275E B35 34244 Plate for 275E B82
34173 Nut for 275E A21 37119 Nut for 275E B36 34245 Motor Adjustment Bar for 275E B83
33032 Finishing Stone for 275E A22 14976 Wrist Guard Plate for 275E B46 34246 Spring for Adjustment Bar for 275E B84
34175 Honing Shaft for 275E A23 33915 Meat Grip Knob for 275E B47 15148 Motor for 275E B85
34176 Sharpener Cover for 275E A24 14894 Screw TPSV for 275E B48 34248 Screw for 275E B86
34177 Spring for 275E A25 15114 Meat Grip for 275E B49 34249 Ventosa for 275E B87
34178 Casing for 275E B1 15115 Pin for 275E B50 34250 Motor Pin for 275E B88
34179 Screw for 275E B2 34213 Spring for 275E B51 15152 Circlip for 275E B89
14940 Index Knob for 275E B3 34214 Lock for 275E B52 14933 Foot for 275E B90
34181 Screw for 275E B4 15118 Meat Plate for 275E
34182 Rivet for 275E B5 34216 Screw for 275E B54 37120 Pin End Piece for 275E B92
34183 Screw for 275E B6 15121 Meat Plate Support for 275E B56 37121 Screw for 275E B93
34184 Plate for 275E B7 14903 Carriage Knob for 275E B57 37118 Bottom Cover for 275E D4
14922
64813
34186 Capacitor for 275E B9 34220 Support Bar for 275E B59 34226 Slide Support Complete for 275E
34187 Clamp for 275E B10 34221 Screw for 275E B60 15156 Complete Sharpening Assy. for 275E
34188 Screw TC for 275E B11 34222 Washer for 275E B61
14859 Power Cord for 275E B15 34223 Cam for 275E B62
On/Off Switch for 275E B8 34219 Screw for Support Bar for 275E B58 19283 Complete Meat Tray Assy. for 275E
B53 14934 Wrist Guard Screw for 275E B91
B76
39
Page 40

Parts Breakdown
Model MS-IT-0300-B 13626
Model MS-IT-0300-U 13628
40
Page 41

Parts Breakdown
Model MS-IT-0300-B 13626
Model MS-IT-0300-U 13628
Item No. Description Position Item No. Description Position Item No. Description Position
34359 Housing for 300E A1 34395 Clip - See A43 for 300E A38 34417 Copper Rivet for 300E A75
34360 Set Screw TC for 300E A2 34397 Clip - See A43 for 300E A39 15194 Index Knob for 300E A76
34361 Set Screw TC for 300E A3 15178 Bearing - See A43 for 300E A40 34418 Screw Chrome for 300E A77
34362 Guide Plate Pin for 300E A4 34399 Spacer - See A43 for 300E A41 34419 Light for 300E A78
34364 Tapping Screw for 300E A5 15179 Belt for 300E A42 15195 Switch - On / Off for 300E A79
34365 Stop Plate for 300E A6 15180 Complete Spindle Pulley Assy. for 300E A43 19240 Carriage Rail for 300E A80
34366 Strain Relief for 300E A7 34400 Bearing and Shaft - See A43 for 300E A44 30442 Bearing for 300E A81
34367 Set Screw TP for 300E A8 34401 Set Screw for 300E A45 34420 Bearing Pin for 300E A82
34440 Tie Rod for 300E A9 13594 Blade for 300E A46 34421 Set Screw for 300E A83
34368 Sharpener Tie Rod for 300E A10 15181 Screw TPSV for 300E A47 15196 Set Screw PVC for 300E A84
34369 Sharpener Support Bracket for 300E A 11 15182 Blade Shield for 300E A48 19246 Slide Bar Spring for 300E A85
34370 Washer for 300E A12 15183 Meat Grip Handle for 300E A49 15197 Carriage Support for 300E A86
34371 Screw TE for 300E A13 15184 Meat Grip Handle Screw for 300E A50 34422 Screw TC for 300E A87
34372
18934 Sharpener Pin Spacer for 300E A15 34403 Plastic Dowel for 300E A52 34424 Stop Plate for 300E A89
34373 Sharpener Pin for 300E A16 18937 Meat Tray Shaft Spring for 300E A53 15073 Foot for 300E A90
18016 Grinding Stone for 300E A17 18936 Meat Tray Shaft for 300E A54 15198 Capacitor for 300E A91
34375 Washer for 300E A18 15186 Meat Tray for 300E A55 34426 Capacitor Bracket for 300E A92
34376 Nut for 300E A19 17690 Guide Plate for 300E A56 34427 Screw TC for 300E A93
34377 Set Screw for 300E A20 34405 Meat Tray Support for 300E A57 34428 Motor Spring for 300E A94
34378 Nut for 300E A21 15187 Carriage Knob for 300E A58 34429 Motor Bracket for 300E A95
34379 Screw TGS for 300E A22 34406 Screw TE for 300E A59 34430 Wing Nut for 300E A96
34380 Sharpener Push Button for 300E A23 34407 Screw TE for 300E A60 34432 Hinge for 300E A98
34381 Ball Bearing for 300E A24 15188 Guide Plate Support for 300E A61 34433 Motor Support Shaft for 300E A99
33032 Finishing Stone for 300E A25 34408 Cam Plate for 300E A62 34434 Motor Tie Rod for 300E A100
34383 Sharpener Pin for 300E A26 34409 Screw TC for 300E A63 15199 Guide Plate Support Cover for 300E A101
34384 Sharpener Pin Spring for 300E A27 34410 Set Screw TC for 300E A64 15078
34385 Sharpener Cover for 300E A28 15189 Cam Guide for 300E A65 14859 Power Cord for 300E A104
34386 Sharpener Body for 300E A29 15190 Nut for 300E A66 36530 Index Knob Spacer for 300E A108
34387 Sharpener Pin Spacer for 300E A30 34412 Cam Screw for 300E A67 25161 Bottom Cover for 300E C4
34388 Washer for 300E A31 34413 Washer for 300E A68 34437 Bearing and Shaft for 300E C23
34389 Screw TC for 300E A32 34414 Set Screw for 300E A69 25164 Tie Rod Ring for 300E C24
34390 Sharpener Push Button for 300E A33 15191 Cam for 300E A70 34438 Set Screw for 300E C25
34391 Sharpener Pin Spring for 300E A34 34415 Screw TE for 300E A71 34439 Set Screw for 300E C26
34392 Stud Screw for 300E A35 34416 Screw TC for 300E A72 34440 Tie Rod for 300E C27
34393 Washer for 300E A36 15192 Meat Deector for 300E A73 34441 Micro Switch for 300E C28
34394 Screw TC for 300E A37 15193 Screw TC for 300E A74 15350 Complete Sharp. Assy. for 300E
Shaft for Sharpener for 300E A14 15185 Meat Grip for 300E A51 34423 Carriage Slide Bar for 300E A88
Motor for 300E A103
41
Page 42

Parts Breakdown
Model MS-IT-0300-I 21624
42
Page 43

Parts Breakdown
Model MS-IT-0300-I 21624
Item No. Description Position Item No. Description Position Item No. Description Position
34530 Housing for 300R A1 34567 Screw TC for 300R A37 34506 Meat Deector for 300R A73
34531 Set Screw TC for 300R A2 34569 Clip for 300R A38 15169 Screw TC for 300R A74
34532 Set Screw TC for 300R A3 34570 Clip for 300R A39 34607 Copper Rivet for 300R A75
34533 Guide Plate Pin for 300R A4 34572 Bearing for 300R A40 34608 Index Knob for 300R A76
34534 Tapping Screw for 300R A5 34573 Spacer for 300R A41 34609 Screw Chrome for 300R A77
34536 Stop Plate for 300R A6 34574 Belt for 300R A42 34610 Light for 300R A78
34537 Strain Relief for 300R A7 34575 Spindle Pulley for 300R A43 34611 Switch - On / Off for 300R A79
34538 Set Screw TP for 300R A8 34576 Bearing and Shaft for 300R A44 34612 Carriage Rail for 300R A80
34539 Tie Rod for 300R A9 34577 Set Screw for 300R A45 34613 Bearing for 300R A81
34540 Sharpener Tie Rod for 300R A10 13594 Blade for 300R A46 34614 Bearing Pin for 300R A82
34541 Sharpener Support Bracket for 300R A11 34579 Screw TPSV for 300R A47 34615 Set Screw for 300R A83
34542 Washer for 300R A12 24542 Blade Cover for 300R A48 34616 Set Screw PVC for 300R A84
34543 Screw TE for 300R A13 14893 Meat Grip Handle for 300R A49 34617 Slide Bar Spring for 300R A85
34544 Shaft for Sharpener for 300R A14 14894 Meat Grip Handle Screw for 300R A50 34618 Carriage Support for 300R
34545 Sharpener Pin Spacer for 300R A15 34582 Meat Grip for 300R A51 34619 Screw TC for 300R A87
34546 Sharpener Pin for 300R A16 34490 Plastic Dowel for 300R A52 34620 Carriage Slide Bar for 300R A88
18016 Grinding Stone for 300R A17 34584 Meat Tray Shaft Spring for 300R A53 34621 Stop Plate for 300R A89
34548 Washer for 300R A18 34585 Meat Tray Shaft for 300R A54 15073 Foot for 300R A90
34549 Nut for 300R A19 34586 Meat Tray for 300R A55 34623 Capacitor for 300R A91
34550 Set Screw for 300R A20 34587 Guide Plate for 300R A56 34624 Capacitor Bracket for 300R A92
34551 Nut for 300R A21 34588 Meat Tray Support for 300R A57 34625 Screw TC for 300R A93
34552 Screw TGS for 300R A22 34589 Carriage Knob for 300R A58 34626 Motor Spring for 300R A94
34553 Sharpener Push Button for 300R A23 34590 Screw TE for 300R A59 34627 Motor Bracket for 300R A95
34554 Ball Bearing for 300R A24 34591 Screw TE for 300R A60 34628 Wing Nut for 300R A96
33032 Finishing Stone for 300R A25 34592 Guide Plate Support for 300R A61 34629 Washer for 300R A97
34556 Sharpener Pin for 300R A26 34593 Cam Plate for 300R A62 34630 Hinge for 300R A98
34557 Sharpener Pin Spring for 300R A27 34594 Screw TC for 300R A63 34631 Motor Support Shaft for 300R A99
34558 Sharpener Cover for 300R A28 34595 Set Screw TC for 300R A64 34632 Motor Tie Rod for 300R A100
34559 Sharpener Body for 300R A29 34596 Cam Guide for 300R A65 34633
34560 Sharpener Pin Spacer for 300R A30 34598 Nut for 300R A66 34634 Motor for 300R A103
34561 Washer for 300R A31 34599 Cam Screw for 300R A67 14859 Power Cord for 300R A104
34562 Screw TC for 300R A32 34600 Washer for 300R A68 36531 Index Knob Spacer for 300R A108
34563 Sharpener Push Button for 300R A33 34601 Set Screw for 300R A69 25161 Bottom Cover for 300R C4
34564 Sharpener Pin Spring for 300R A34 34602 Cam for 300R A70 15350 Complete Sharpening Assy. for 300R
34565 Stud Screw for 300R A35 34603 Screw TE for 300R A71 34597 Cam Assembly for 300R
34566 Washer for 300R A36 34604 Screw TC for 300R A72
Guide Plate Support Cover for 300R A101
A86
43
Page 44

Electrical Schematics
Model MS-IT-0220-B 13610
Model MS-IT-0220-U 13616
Model MS-IT-0250-B 13618
Model MS-IT-0250-U 13620
Model MS-IT-0250-I 13621
Model MS-IT-0250-IP 13623
Model MS-IT-0275-I 13625
Model MS-IT-0275-IP 13624
Model MS-IT-0300-I 21624
44
Page 45

Model MS-IT-0300-B 13626
Model MS-IT-0300-U 13628
Electrical Schematics
45
Page 46

Notes
________________________________________________________________________________________
________________________________________________________________________________________
________________________________________________________________________________________
________________________________________________________________________________________
________________________________________________________________________________________
________________________________________________________________________________________
________________________________________________________________________________________
________________________________________________________________________________________
________________________________________________________________________________________
________________________________________________________________________________________
________________________________________________________________________________________
________________________________________________________________________________________
________________________________________________________________________________________
________________________________________________________________________________________
________________________________________________________________________________________
________________________________________________________________________________________
________________________________________________________________________________________
________________________________________________________________________________________
________________________________________________________________________________________
________________________________________________________________________________________
________________________________________________________________________________________
________________________________________________________________________________________
________________________________________________________________________________________
________________________________________________________________________________________
46
Page 47

Warranty Registration
Thank you for purchasing an Omcan product. To register your warranty for this product, complete the information below, tear off the card at
the perforation and then send to the address specied below. You can also register online by visiting:
Merci d’avoir acheté un produit Omcan. Pour enregistrer votre garantie pour ce produit, complétez les informations ci-dessous, détachez la
carte au niveau de la perforation, puis l’envoyer à l’adresse spécié ci-dessous. Vous pouvez également vous inscrire en ligne en visitant:
Gracias por comprar un producto Omcan usted. Para registrar su garantía para este producto, complete la información a continuación,
cortar la tarjeta en la perforación y luego enviarlo a la dirección indicada a continuación. También puede registrarse en línea en:
www.omcan.com/warrantyregistration.html
For mailing in Canada
Pour postale au Canada
Por correo en Canadá
OMCAN
PRODUCT WARRANTY REGISTRATION
3115 Pepper Mill Court,
Mississauga, Ontario
Canada, L5L 4X5
PRODUCT WARRANTY REGISTRATION
4450 Witmer Industrial Estates, Unit 4,
For mailing in the US
Pour diffusion aux États-Unis
Por correo en los EE.UU.
OMCAN
Niagara Falls, New York
USA, 14305
or email to: service@omcan.com
Purchaser’s Information
Name: Company Name:
Address:
Telephone:
City: Province or State: Postal or Zip: Email Address:
Country: Type of Company:
Restaurant Bakery Deli
Dealer from which Purchased: Butcher Supermarket Caterer
Dealer City: Dealer Province or State: Institution (specify):
Invoice: Other (specify):
Model Name: Model Number: Serial Number:
Machine Description:
Date of Purchase (MM/DD/YYYY): Date of Installation (MM/DD/YYYY):
Would you like to extend the warranty? Yes No
Thank you for choosing Omcan | Merci d’avoir choisi Omcan | Gracias por elegir Omcan
47
Page 48

Since 1951 Omcan has grown to become a leading distributor of equipment and supplies to the North
American food service industry. Our success over these many years can be attributed to our commitment
to strengthen and develop new and existing relationships with our valued customers and manufacturers.
Today with partners in North America, Europe, Asia and South America, we continually work to improve
and grow the company. We strive to offer customers exceptional value through our qualied local sales
and service representatives who provide convenient access to over 3,500 globally sourced products.
Depuis 1951 Omcan a grandi pour devenir un des “leaders” de la distribution des équipements et
matériel pour l’industrie des services alimentaires en Amérique du Nord. Notre succès au cours de ces
nombreuses années peut être attribué à notre engagement à renforcer et à développer de nouvelles
et existantes relations avec nos clients et les fabricants de valeur. Aujourd’hui avec des partenaires en
Amérique du Nord, Europe, Asie et Amérique du Sud, nous travaillons continuellement à améliorer et
développer l’entreprise. Nous nous efforçons d’offrir à nos clients une valeur exceptionnelle grâce à
nos ventes locales qualiées et des représentants de service qui offrent un accès facile à plus de 3500
produits provenant du monde entier.
Desde 1951 Omcan ha crecido hasta convertirse en un líder en la distribución de equipos y suministros
de alimentos en América del Norte industria de servicios. Nuestro éxito en estos años se puede atribuir
a nuestro compromiso de fortalecer y desarrollar nuevas relaciones existentes con nuestros valiosos
clientes y fabricantes. Hoy con socios de América del Norte, Europa, Asia y América del Sur, que trabajan
continuamente para mejorar y crecer la empresa. Nos esforzamos por ofrecer a nuestros clientes valor
excepcional a través de nuestro local de ventas y representantes de los servicios que proporcionan un
fácil acceso a más de 3,500 productos con origen a nivel mundial.
 Loading...