

Page 1

Electrical Meat Mixers
Models MM-IT-0080, 0120
Items 37450, 37451
Instruction Manual
Revised - 06/05/2017
Toll Free: 1-800-465-0234
Fax: 905-607-0234
Email: service@omcan.com
www.omcan.com
Page 2

Table of Contents
Model MM-IT-0080 / Model MM-IT-0120
Section
General Information
Safety and Warranty
Technical Specications
Installation
Operation
Maintenance
-------------------------------------------------------------------------------------------- 7
----------------------------------------------------------------------------------------- 8 - 9
--------------------------------------------------------------------------------- 10 - 12
--------------------------------------------------------------------------- 3 - 4
--------------------------------------------------------------------------- 4 - 6
Page
-------------------------------------------------------------------------- 6
Troubleshooting
Parts Breakdown
Electrical Schematics
Warranty Registration
----------------------------------------------------------------------------------- 12
---------------------------------------------------------------------------- 13 - 16
---------------------------------------------------------------------- 17 - 18
---------------------------------------------------------------------------- 19
2
Page 3

General Information
Omcan Manufacturing and Distributing Company Inc., Food Machinery of America, Inc. dba Omcan
and Omcan Inc. are not responsible for any harm or injury caused due to any person’s improper or
negligent use of this equipment. The product shall only be operated by someone over the age of 18, of
sound mind, and not under the inuence of any drugs or alcohol, who has been trained in the correct
operation of this machine, and is wearing authorized, proper safety clothing. Any modication to the
machine voids any warranty, and may cause harm to individuals using the machine or in the vicinity of
the machine while in operation.
CHECK PACKAGE UPON ARRIVAL
Upon receipt of an Omcan shipment please inspect for external damage. If no damage is evident on the
external packaging, open carton to ensure all ordered items are within the box, and there is no concealed
damage to the machine. If the package has suffered rough handling, bumps or damage (visible or concealed),
please note it on the bill of lading before accepting the delivery and contact Omcan within 24 hours, so we may
initiate a claim with the carrier. A detailed report on the extent of the damage caused to the machine must be
lled out within three days, from the delivery date shown in the shipping documents. Omcan has no recourse
for damaged products that were shipped collect or third party.
Before operating any equipment, always read and familiarize yourself with all operation and safety
instructions.
Omcan would like to thank you for purchasing this machine. It’s of the utmost importance to save
these instructions for future reference. Also save the original box and packaging for shipping the
equipment if servicing or returning of the machine is required.
---------------------------------------------------------------------------------------------------------------------------------------------------
Omcan Fabrication et distribution Companie Limité et Food Machinery d’Amerique, dba Omcan et
Omcan Inc. ne sont pas responsables de tout dommage ou blessure causé du fait que toute personne
ait utilisé cet équipement de façon irrégulière. Le produit ne doit être exploité que par quelqu’un de
plus de 18 ans, saine d’esprit, et pas sous l’inuence d’une drogue ou d’acohol, qui a été formé pour
utiliser cette machine correctement, et est vêtu de vêtements de sécurité approprié. Toute modication
de la machine annule toute garantie, et peut causer un préjudice à des personnes utilisant la machine
ou des personnes à proximité de la machine pendant son fonctionnement.
VÉRIFIEZ LE COLIS DÈS RÉCEPTION
Dès réception d’une expédition d’Omcan veuillez inspecter pour dommages externes. Si aucun dommage
n’est visible sur l’emballage externe, ouvrez le carton an de s’assurer que tous les éléments commandés
sont dans la boîte, et il n’y a aucun dommage dissimulé à la machine. Si le colis n’a subi aucune mauvaises
manipulations, de bosses ou de dommages (visible ou cachée), notez-le sur le bond de livraison avant
d’accepter la livraison et contactez Omcan dans les 24 heures qui suivent, pour que nous puissions engager
une réclamation auprès du transporteur. Un rapport détaillé sur l’étendue des dommages causés à la machine
doit être rempli dans un délai de trois jours, à compter de la date de livraison indiquée dans les documents
d’expédition. Omcan n’a aucun droit de recours pour les produits endommagés qui ont été expédiées ou cueilli
par un tiers transporteur.
3
Page 4

General Information5Safety and Warranty
Avant d’utiliser n’importe quel équipement, toujours lire et vous familiariser avec toutes les opérations
et les consignes de sécurité.
Omcan voudrais vous remercier d’avoir choisi cette machine. Il est primordial de conserver ces
instructions pour une référence ultérieure. Également conservez la boîte originale et l’emballage pour
l’expédition de l’équipement si l’entretien ou le retour de la machine est nécessaire.
---------------------------------------------------------------------------------------------------------------------------------------------------
Omcan Empresa De Fabricacion Y Distribucion Inc. Y Maquinaria De Alimentos De America, Inc. dba
Omcan y Omcan Inc. no son responsables de ningun daño o perjuicío causado por cualquier persona
inadecuada o el uso descuidado de este equipo. El producto solo podra ser operado por una persona
mayor de 18 años, en su sano juicio y no bajo alguna inuencia de droga o alcohol, y que este ha sido
entrenado en el correcto funcionamiento de esta máquina, y ésta usando ropa apropiada y autorizada.
Cualquier modicación a la máquina anúla la garantía y puede causar daños a las personas usando la
máquina mientras esta en el funcionamiento.
REVISE EL PAQUETE A SU LLEGADA
Tras la recepcion de un envio Omcan favor inspeccionar daños externos. Si no hay daños evidentes en el
empaque exterior, Habra el carton para asegurararse que todos los articulos solicitados ésten dentro de la
caja y no encuentre daños ocultos en la máquina. Si el paquete ha sufrido un manejo de poco cuidado, golpes
o daños (visible o oculto) por favor anote en la factura antes de aceptar la entrega y contacte Omcan dentro
de las 24 horas, de modo que podamos iniciar una reclamación con la compañia. Un informe detallado sobre
los daños causados a la máquina debe ser llenado en el plazo de tres días, desde la fecha de entrega que se
muestra en los documentos de envío. Omcan no tiene ningun recurso por productos dañados que se enviaron
a recoger por terceros.
Antes de utilizar cualquier equipo, siempre lea y familiarizarse con todas las instrucciones de
funcionamiento y seguridad.
Omcan le gustaría darle las gracias por la compra de esta máquina. Es de la mayor importancia para
salvar estas instrucciones para futuras consultas. Además, guarda la caja original y el embalaje para el
envío del equipo si servicio técnico o devolución de la máquina que se requiere.
Safety and Warranty
PROTECTIONS AND SAFETY FEATURES
ATTENTION
Before using the appliance make sure the safety protections are in their correct position and intact. Check they
function correctly before starting work (at the beginning of a new work shift). If there are problems contact the
maintenance team.
4
Page 5
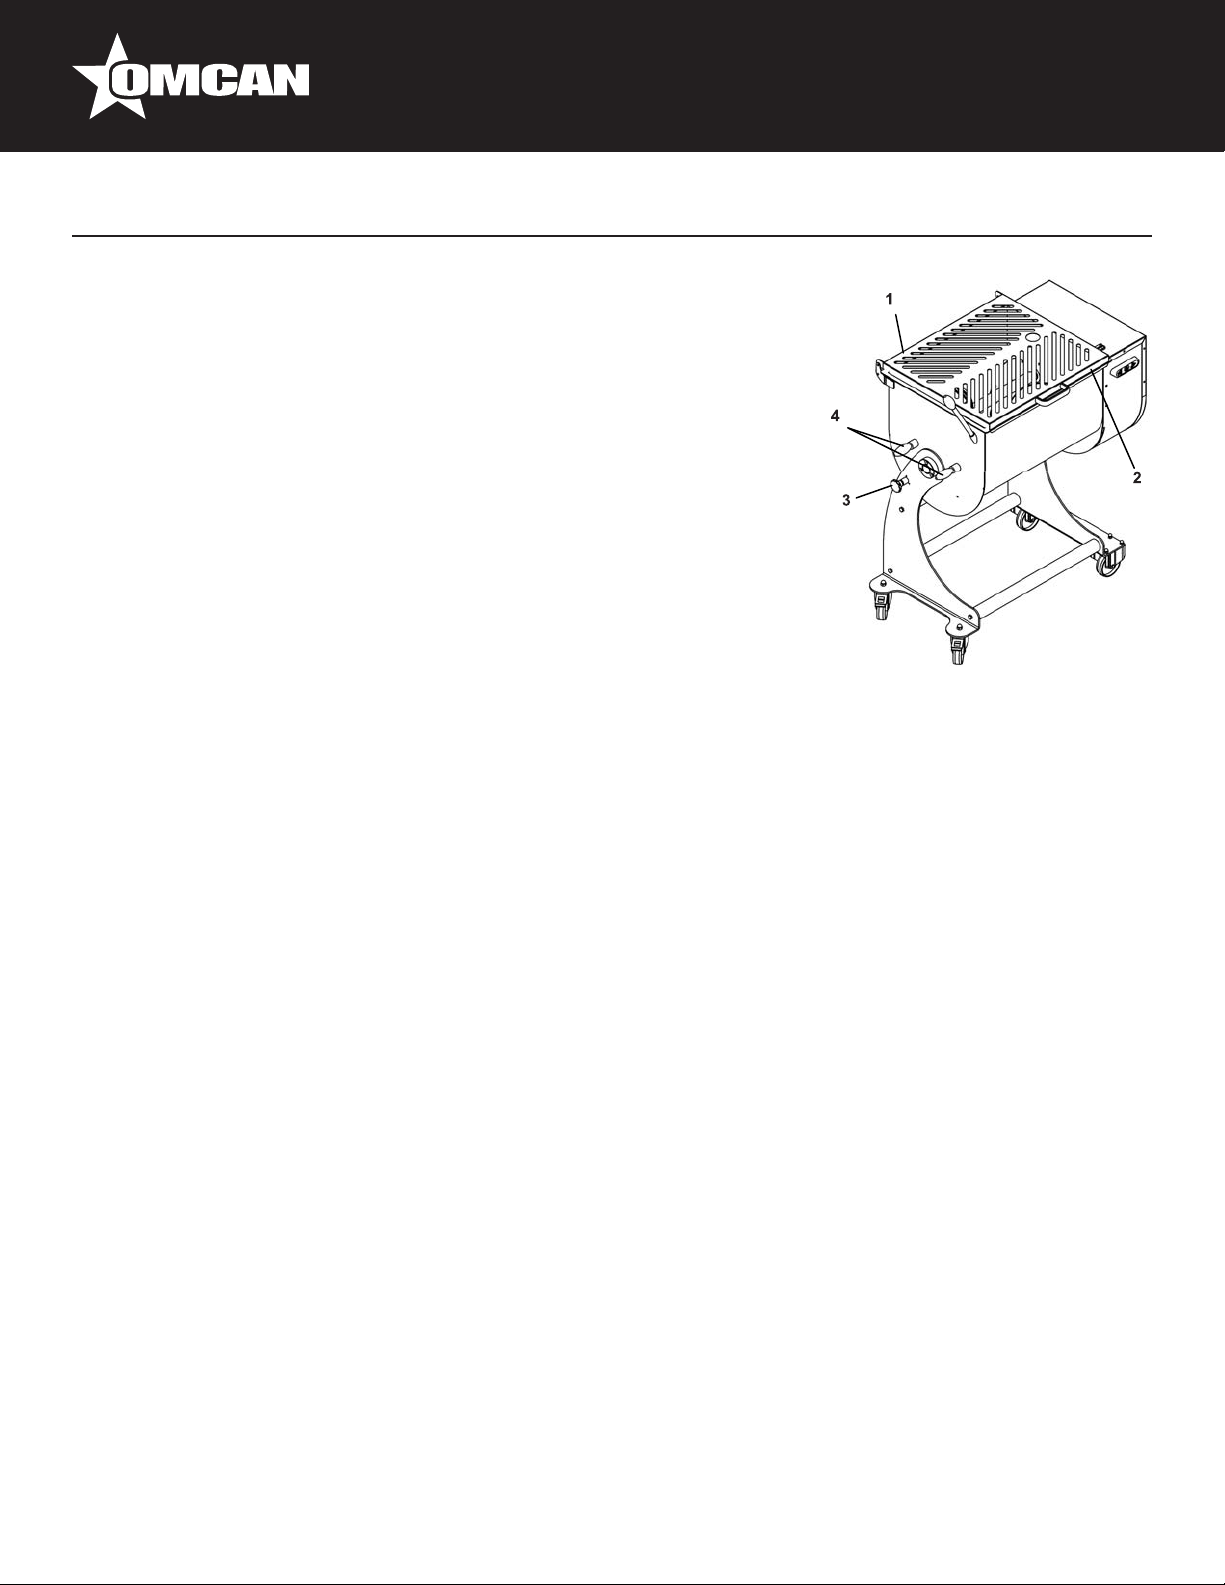
1. Rotor protection grille.
This safety feature impedes incidental contact with the rotor.
2. Micro-switch.
3. Knob to lock tank.
4. Ball grip for locking the rotor in position.
ATTENTION!
Do Not for any reason tamper with the safety features.
DANGER AND WARNING NOTICES
ATTENTION
When the appliance is connected to the electricity supply do not touch any
of the electronics. There is the risk of being electrocuted. Always respect the
information given on the warning notices. Non-observance can cause injuries
or even death. Make sure the warning notices are always in their correct
position and are legible. If for some reason they are missing or are illegible x them to the appliance or replace
them.
NON-PERMITTED USES
The mixer must only be used for the uses given by the manufacturer, and in particular:
• Do Not use the appliance for mixing food other than for meat.
• Do Not use the appliance if it has not been correctly installed with all the protections correctly mounted
avoiding any hazardous risk of injury.
• Do Not touch any of the electrical parts without having rst disconnected the appliance from the electricity
supply: there is risk of electrocution.
• Do Not mix quantities that cannot be contained in the mixing drum.
• Do Not wear clothing that does not conform with the accident prevention regulations. Ask your employer
regarding safety regulations and accident prevention clothing.
• Do Not turn on the appliance if faulty or out of service. Before using the appliance make sure any
hazardous working conditions have been eliminated. If there is a fault or problem with the appliance
immediately turn it off and inform the maintenance team.
• Do Not permit unauthorized staff to use the appliance. In case of an electrical accident the rst thing to do
is to pull the injured worker away from the appliance (normally in this situation the worker is unconscious).
However, be very careful as this is very dangerous. The injured worker in this situation is an electricity
conductor and touching him / her means being electrocuted. It is important to disconnect the electricity
supply by disconnecting the fuse box and if this is not possible use an insulated object or material (wooden
or PVC stick, fabric, leather, etc...) to pull the injured worker away. Immediately call the nearest casualty
department so the injured worker is admitted to hospital for treatment.
• Do Not use the appliance in environments where there is gas in the atmosphere creating a high risk of
combustion (explosion).
• Do Not repair the appliance without prior authorization.
• Always Respect the procedures for maintenance and technical assistance.
Page 6

Safety and Warranty
1 YEAR PARTS AND LABOUR WARRANTY
Within the warranty period, contact Omcan Inc. at 1-800-465-0234 to schedule an Omcan authorized
service technician to repair the equipment locally.
Unauthorized maintenance will void the warranty. Warranty covers electrical and part failures, not
improper use.
Please see www.omcan.com/warranty.html for complete info.
WARNING:
The packaging components are classied as normal solid urban waste and can therefore be disposed of
without difculty.
In any case, for suitable recycling, we suggest disposing of the products separately (differentiated
waste) according to the current norms.
DO NOT DISCARD ANY PACKAGING MATERIALS IN THE ENVIRONMENT!
Technical Specications
Model MM-IT-0080 MM-IT-0120
Power 559 W / 0.5 HP (x2) 735 W / 1 HP (x2)
Electrical 220 V / 60 / 1 220 V / 60 / 3
Tank Dimensions 24” x 20” / 620 x 500mm 26” x 21.7” / 660 x 550mm
Capacity 110 L / 80 kgs. 163 L / 120 kgs.
Dimensions 25” x 39” x 41” / 635 x 990 x 1400mm 27.6” x 43” x 40.5” / 700 x 1090 x 1030mm
Weight 198 lbs. / 90 kgs. 304.2 lbs. / 138 kgs.
Item Number 37450 37451
6
Page 7

Installation
ATTENTION!
The work surface or area where the appliance is to be installed must be horizontal and solid guaranteeing
stability and safety. When installing the appliance bear in mind that amp space must be left around the
appliance. This space allows you to work freely with the appliance and allows easy access when servicing or
repairing it. Provide suitable lighting around the appliance for the worker using the meat mixer.
INSTALLING
To move the package use a fork-lift truck or similar means. The appliance is in a carton box and packed on a
pallet.
• Remove the two plastic straps that hold the carton box to the pallet.
• Remove the carton box.
• Remove the cellophane wrapping and any other packaging materials.
DISPOSING OF PACKAGING
Packaging materials such as carton, nylon and wood are all products considered normal urban waste. These
materials can be disposed of as per normal procedures. If the appliance is destined to countries where there
are specic waste laws, dispose of packaging conforming with the local laws in force.
HANDLING APPLIANCE
As the following models 50 - 120 M/B 50 - 120 - 80 - 180 BA have wheels they can be manually moved by
pulling
CONNECTING TO ELECTRICITY SUPPLY
ATTENTION!
Check the electricity supply corresponds to the value given on the appliance ID plate. Electrical works can
only be carried out by specialised and authorized staff with prior authorisation by the person in charge of the
appliance. Connect the appliance to a circuit provided with an efcient earth socket. If necessary use suitable
extension leads guaranteeing safety. The section (thickness) of the extension lead must be greater than the
appliance power supply cable. This avoids any hazardous overheating. Avoid pulling or twisting the power
cable as this can damage the internal wires.
7
Page 8

Operation
LIST OF CONTROLS AND INDICATORS
CONTROL PANEL
1. Stop button.
- Black.
- Press to stop rotor motor.
2. Light indicator for tension.
- Green.
- Indicates power supply. On the stop button marked with “1” it is green and remains lit when the appliance
has power.
3. Start button.
- Grey.
- Press for starting the rotor.
4. Push button for inverting rotation.
- Grey.
- Press to invert rotation in the opposite direction to push button “3”.
5. Light indicators rotor in movement.
- Red / yellow-colored.
- Indicates that the rotor is in movement. This indicator is located near start push button “3”, and near push
button for inverting rotation “4”. It is red and lights up when the rotor command is given.
STAINLESS STEEL CONTROLS
1. Drive push-button (continuous).
- In stainless steel.
- Press to start the blade.
2. Stop push-button.
- Press to stop the propeller transmission motor.
3. Reverse drive push-button.
- In stainless steel.
- Press to start the blade in opposite direction to pus-button “1”.
4. Network presence indicator light.
8
Page 9

Operation
- Signals that the machine is connected to the electrical network.
5. Drive indicator light.
- Signals that the tool of the machine is in movement.
- Located close to the start push-button “3” and close to the reverse drive push-button “3”.
- Visible only when the control is operating.
TURNING THE APPLIANCE ON AND OFF
CHECKING CONNECTION TO ELECTRICITY SUPPLY
Switch the on/off switch on the appliance to position “I”. The green light “2”
should come on, indicating power on. Press push button “3” for starting, the
red indicator light “5” should come on, and then immediately press push button
“1” for stopping. This is to check that the appliance works correctly. Press push
button “4” for starting, the red indicator light “6” should come on, and then
immediately press push button “1” for stopping. This is to check that the rotor
rotates in an opposite direction to push button “3”.
CHECKING PROTECTIONS AND SAFETY FEATURES AND THEIR EFFICIENCY
1. Rotor Protection grille.
Visually check that the protection grille is intact.
2. Micro-switch.
With the appliance running, check that it automatically stops when the protection grille is raised. If this is
not the case contact you local authorised dealer or the manufacturer.
ATTENTION!
If the previously mentioned safety protections and casing are not intact, are damaged, missing or work
incorrectly, turn the appliance off and contact the aftersales assistance to repair the appliance.
TURNING ON THE APPLIANCE
Switch the power on/off switch from position “0” to “1”. Indicator “2” should light up indicating power on. Press
push button “3” for starting the rotor.
TURNING OFF THE APPLIANCE
To stop the appliance press push button “1” (stops the electric motor), the red indicator light “5” will go out.
Indicator light “2” will remain on indicating power on. Switch the power on/off switch to position “0” turning off
the power supply.
INVERSION
To invert rotor rotation press push button “4”.
Note: When a work shift is over always switch the on/off power switch to position “0”.
9
Page 10

Maintenance
EMPTYING AND CLEANING
EMPTYING THE MIXING BOWL
Turn off the mixer, the on/off switch is in position “0” unplug from main power
supply. The mixing bowl is designed to rotate to facilitate emptying.
• With the bowl in a horizontal position grip the handle on the bowl titling bar.
• Pull the tank locking knob.
• Once having released the mixing bowl rotate by pulling the tilting bar.
• Open the protection grille and empty the bowl.
CLEANING THE MIXING BOWL
With the machine off and switch in position “0” and with the plug removed from
the socket proceed with cleaning the bowl. Thanks to the possibility of rotating
the bowl cleaning operations are facilitated.
• With the bowl in a horizontal position grip the handle on the bowl titling bar
(1).
• Unhook and remove the pins which lock the mixing blades (2) in position.
• Unscrew the bowl locking knob (3) anti-clockwise.
• Once having released the mixing bowl rotate by pulling the tilting bar (1).
• Open the grille (4) and proceed with removing the mixing blades.
• Make sure the mixing blades are positioned to allow for enough space to
remove them.
• Grip the mixing blades one at a time (5) and pull outwards to remove.
• The surface is now smooth and easy to clean, clean the mixer thoroughly
and if necessary disinfect.
• With a sponge soaked with water and a neutral (pH 7) and non-toxic
degreaser (food grade) clean and remove any food product left on the mixer
and on the mixing blades. Do not use petrol, solvents or other ammable
liquids as detergents; only used authorised non-toxic and non-ammable
solvents. Take all the necessary precautions adopting also appropriate
protections required for the cleaning product being used when cleaning
and disinfecting the mixer. Always follow the instructions provided for the
cleaning product being used.
• To mount the mixing blades after cleaning, simply reverse the above steps.
CLEANING THE APPLIANCE
At the end of the work shift the appliance must be carefully cleaned and
disinfected.
• Stop the appliance and switch the on/off switch to “0” and remove the power
plug.
• With a sponge soaked with water and suitable neutral degreasers (non-toxic) remove and clean any traces
of food.
Do not use petrol, solvents or other inammable liquids such as detergents. Use authorised non-toxic and noninammable solvents.
Take suitable precautions when cleaning considering the products being used. Always follow the instructions
10
Page 11

Maintenance
for use given.
ATTENTION!
The mixer must always be off and the power plug removed from the power socket when servicing and
cleaning. The maintenance area must always be clean, dry and well illuminated. Do not allow unauthorized
staff to service the appliance. Do not put parts of your body, hands or arms into the mixer or openings not
protected where there is the risk of being injured. Always use protective clothing (suitable gloves, glasses etc.)
Do not use petrol, solvents or other inammable liquids such as detergents. Use authorised non-toxic and
non-inammable solvents. Do not compressed air to clean the appliance. If it is considered necessary to use
compressed air, use eye protection (glasses) with side protections and limit pressure to a max of 2 atm. (1,9
bar). Do not use a naked ame as lighting when servicing and repairing the appliance.
MAINTENANCE CHECKS
CHECKS AND TESTS TO BE CARRIED OUT WHEN INSTALLING
To make sure the appliance has not been damaged when delivered or when being installed, carry out the
following tests;
BEFORE SETTING TO WORK:
• Check that the power supply tension corresponds to the value given on the ID plate.
• Check that there are all the warning and ID plates and that they are not damaged.
• Check that the power supply cable is not damaged and is intact.
• Check that the safety features such as the magnetic sensors are intact and not damaged.
FUNCTIONAL CHECKS WITH THE APPLIANCE RUNNING:
• Check the efciency of the protections and safety features. There is the possibility that during transport
these have been damaged or are out of adjustment.
• Carry out several functional tests using pieces of food that are the same size that will be used in normal
working conditions.
PERIODICAL CONTROLS
To maintain reliability and performance in time, as well as proceeding as indicated, it is necessary to carry out
regular tests and checks as follows:
BEFORE EACH WORK SHIFT:
• Every day check safety features and protections work correctly.
• Check the power cable is intact.
THE END OF THE WORK SHIFT:
• Carefully clean the appliance removing any traces of food.
• Remove, clean and mount rotor and blades.
11
Page 12

Maintenance
LUBRICATION
Periodically grease gears (2).
• Unplug the machine from its power source.
• Take off the protective casing (1).
• Grease the gears using a brush.
• Reassemble the casing and fasten the screws.
The oil in the transmission reduction gears is long-life and does not need to be ever replaced.
Troubleshooting
Problem Cause Remedy
The appliance does not start. The on/off switch is in position “0”. Switch the switch to position “1”.
The grill is raised. Lower the grill.
The microswitch mounted on the
mixing drum does not work.
Either the electric motor or the
command circuit board is faulty.
The controls do not work or the
blades do not change direction.
Contact Omcan.
Contact Omcan.
Contact Omcan.
REFERENCE
Item Number Model Number Description
37450 MM-IT-0080
37451 MM-IT-0120
Meat Mixer 176 lbs. / 80 kgs.
2 x 0.5 HP / 2 x 559 W 220V/60/1
Meat Mixer 265 lbs. / 120 kgs.
2 x 1 HP / 2 x 735 W 220V/60/3 CE
12
Manufacturer Model
Number
IP80BA
IP120BA
Page 13

Model MM-IT-0080 37450
Parts Breakdown
13
Page 14

Parts Breakdown
Model MM-IT-0080 37450
Item No. Description Position Item No. Description Position Item No. Description Position
62601 Cavo + Spina CEE 2P + T for IP80BA 01 62623
62602 Power Lead, Motor TF/1,5 for IP80BA 02 78634 Knob P02 M10 for IP80BA 30 62645 Sher Din 125 D 10 for IP80BA 57
62603 Strain Relief + Nut for IP80BA 04 62624
62604 Dado Ott.Nich.PG 11 for IP80BA 05 62625
62605 Essacavo Plastica PG7 for IP80BA 06 62626 Door Support for Microswitch for IP80BA 33 62648 Ind Nut Din 1587 M5 for IP80BA 60
62606 Essacavo Plastica PG 11 for IP80BA 07 61569 Canotto Ferma Culla IP for IP80BA 34 62649 P Nut Din 1587 M6 for IP80BA 61
62607 Essacavo + Dado Plastica PG for IP80BA 08 61571 Spring for IP80BA 35 62650 P Nut Din 1587 M8 for IP80BA 62
61549 X GW 44207 for IP80BA 09 61570 Pin for IP80BA 36 62651 Dado Cieco Din 1587 M12 for IP80BA 63
62608
37258 Microswitch_SO Inox for IP80BA 11 62627 Female Blade for IP80BA 38 62653 Nguette Din 6885/A 8x7x28 for IP80BA 65
37260 Magnet M634 for IP80BA 12 62628 Male Blade for IP80BA 39 62654
62609
62610
62611 Stainless Steel Off Button for IP80BA 15 62630
62612 Circuit Board R3+Autom EQ for IP80BA 16 62631
62613 Cuscinetto 6205 ZZ for IP80BA 17 62632
62614
62615
62616 Gasket 40-62-7 for Mincer for IP80BA 20 62635
62617 Rondella Zinc. M8x30 H4 for IP80BA 21 62636
62618
62619
62620
62621
62622
79656 Knob for Fixing Container for IP80BA 27 62642
61556
Morsetto A Pettine X Equipotenz. BZ
for IP80BA
Frame for 3 Buttons Stainless Steel
Panel for IP80BA
Stainless Steel On Button with Lamp
Omega 24V for IP80BA
Cuscinetto Reg. SP 7205 ME 80 Evo
for IP80BA
Cap 40/7/C Pulley 1C SO1650 for
IP80BA
Dist. Rid-Corona Dent. ME 80 Evo for
IP80BA
Dist. Rid-Corona Dent. SP=20 ME Evo
for IP80BA
Dist. Plast. Cop. 10x6x4 ME BA Evo
for IP80BA
Cola Flang. JFM-1622-12 TCM-ME for
IP80BA
Handle 236-148 M6_Collection Tray for
IP80BA
Stainless Steel Non-Swivel.Caster D.100
for IP80BA
10 61564
13 61563 Blade Rod for IP80BA 40 62655 Vite Tbei Iso 7380 M6x25 for IP80BA 67
14 62629 Culla Inox ME 80 Evo Bialb for IP80BA 41 62656
18 62633
19 62634 Base SX ME 80 Evo Bialb for IP80BA 46 62661
22 62637 Corona Dentata ME 80 Evo for IP80BA 49 62664 TE Din 933 M10x20 T.F for IP80BA 76
23 62638
24 62639
25 62640
26 62641
28 62643 Flat Washer Din 125 D 6 for IP80BA 55 62670 B Overload Protection EQ for IP80BA 82
Ruota Mobile Con Fren D 100 C/Perno
for IP80BA
Mot. Pam 71 B 14 4 Poli Mono ME Evo
for IP80BA
Washer for Bone Saw SO 1650 Inox for
IP80BA
Lever Rod for Container Overturning
for IP80BA
Coperchio Vasca ME 80 Evo Bialb for
IP80BA
Carter Motore ME 80 Evo Bialb for
IP80BA
Fascia Carter Mot. ME 80 Evo Bialb for
IP80BA
Base DX Rid. ME 80 Evo Bialb for
IP80BA
Tubo Unione Basi ME 80 Evo Bialb for
IP80BA
Flangia Supp. Rid ME 80 Evo Bialb for
IP80BA
Staffa Blocco Riduttori ME 80 Evo for
IP80BA
Ridut. CM50 71 B14 I50 80 Evo Bialb
for IP80BA
Supp. Cusc. Rib. Lato SX Evo Bialb for
IP80BA
Perno Trasc.Femm L=220 ME 120 Evo
for IP80BA
Perno Trasc.Masc L=220 ME 120 Evo
for IP80BA
29 62644 AT Washer Din 125 D 8 for IP80BA 56
31 62646 Ina Elastica Din 1481 3x18 for IP80BA 58
32 62647 Ina Elastica Din 1481 5x20 for IP80BA 59
37 62652 T ES. Din 439 M10 Basso for IP80BA 64
Linguette Din 6885/AB 8x7x16 for
IP80BA
TE Autof.TC + Din 7981 D 3, 5x16 for
IP80BA
42 62657 Rew Tspei Din 7991 M8x20 for IP80BA 69
43 62658 TE Tspei Din 7991 M8x30 for IP80BA 70
44 62659
45 62660 Sher Large Din 9021 D 6x18 for IP80BA 72
47 62662 TE Din 933 M8x16 T.F. for IP80BA 74
48 62663 X.Screw Din 933 M8x20 for IP80BA 75
50 62665 TE Din 933 M12x30 T.F for IP80BA 77
51 62666 X.Nut Din 934 M8 for IP80BA 78
52 62667
53 62668 Cknut ES Din 982 M6 Alto for IP80BA 80
54 62669 TE Poeliers M4x10 for IP80BA 81
TE Tsp Torx Din 7991 M6x16 TX30 for
IP80BA
X.Socket Head Cap Screw M6x20 for
IP80BA
Athead CSK Screw Din 963 M5x25 for
IP80BA
66
68
71
73
79
14
Page 15

Model MM-IT-0120 37451
Parts Breakdown
15
Page 16

Parts Breakdown17Electrical Schematics
Model MM-IT-0120 37451
Item No. Description Position Item No. Description Position Item No. Description Position
61577
61578
61579
61556
61580
61581
18961
61564
78634
61569 Canotto Ferma Culla IP for IP120BA 11 61590
79656
61571 Spring for IP120BA 14 61592
61570 Pin for IP120BA 15 61593
37260 Magnet M634 for IP120BA 16 61594
61582
61583 Nut DIN 1587 M 6 for IP120BA 18 61596 Gasket 40-62-7 for Mincer for IP120BA 39 61610 Zinc Washer M8x30 H4 for IP120BA 100
Cradle INOX ME 120 EVO BIALB for
IP120BA
Tank Cover ME 120 EVO BIALB for
IP120BA
Mobile Wheel with Brake D 100 C/Perno
for IP120BA
Stainless Steel Non-Swivel Caster D.100
for IP120BA
Paddle Female IX ME 120 KG Bialbero
for IP120BA
Paddle Male IX ME 120 KG Bialbero for
IP120BA
Handle 236-148 M6 Collection Tray for
IP120BA
Lever Rod for Container Overturning for
IP120BA
Knob P02 M10 IP 80BA/G3S/SA for
IP120BA
Knob for Fixing Container IP 50-100 for
IP120BA
Screw TSP TORX DIN 7991 M 6x12
TX30 for IP120BA
1 61584
2 61585
3 61586 Bearing 6205 ZZ for IP120BA 21 61599
4 61549 Box GW 44207 for IP120BA 22 61600
5 41224
6 61587 Door Support for Microswitch for IP120BA 25 61561 Switch for PCB Taglioretti for IP120BA 48
8 37258
9 61588
10 61589
12 61591
17 61595
Carter Band MOT. ME 120 EVO BIALB
for IP120BA
Shaft Support SX EVO BIALB for
IP120BA
Circuit Board R3+AUTOM EQ_IP BA XP
for IP120BA
Microswitch SO INOX/IP BA/TC32F/GF
for IP120BA
Motor Cover ME 120 EVO BIALB for
IP120BA
Cap 40/7/C Pulley 1C SO1650 for
IP120BA
Washer for Bone Saw SO 1650 INOX
for IP120BA
Paddle Rod IX ME 120 KG Bialbero for
IP120BA
Flange Support ME 80 EVO BIALB for
IP120BA
RIDUT. CM63 80 B14 I50 120 EVO BA
for IP120BA
MOT. PAM 80 B 14 4 POLI TRIF ME EVO
for IP120BA
PERNO TRASC.FEMM L=220 ME 120
EVO for IP120BA
19 61597
20 61598
23 61601
26 37179
27 61602 Cable and Plug CEE 3P + T. for IP120BA 50
28 61604 Strain Relief + Nut for IP120BA 51
29 61603 Fuse OTT.NICH.PG 11 for IP120BA 51 A
31 61605 Ring Gear ME 80 EVO for IP120BA 53
33 61606
35 61607 Bushing ME 80 EVO for IP120BA 57
36 61608 Terminal Comb BZ for IP120BA 58
37 61609
Bearing Reg. SP 7205 ME 80 EVO for
IP120BA
PERNO TRASC.MASC L=220 ME 120
EVO for IP120BA
Base SX ME 120 EVO BIALB for
IP120BA
Base DX RID. ME 120 EVO BIALB for
IP120BA
Tube Union Bases ME 120 EVO BIALB
for IP120BA
Gaskey for Round Control Panel for
IP120BA
Bracket Lock Gear ME 120 EVO for
IP120BA
Door Screw 10x6x4 ME BA EVO for
IP120B
40
42
43
44
45
49
55
59
16
Page 17

Model MM-IT-0080 37450
Page 18

Electrical Schematics
Model MM-IT-0120 37451
18
Page 19

Warranty Registration
Thank you for purchasing an Omcan product. To register your warranty for this product, complete the information below, tear off the card at
the perforation and then send to the address specied below. You can also register online by visiting:
Merci d’avoir acheté un produit Omcan. Pour enregistrer votre garantie pour ce produit, complétez les informations ci-dessous, détachez la
carte au niveau de la perforation, puis l’envoyer à l’adresse spécié ci-dessous. Vous pouvez également vous inscrire en ligne en visitant:
Gracias por comprar un producto Omcan usted. Para registrar su garantía para este producto, complete la información a continuación,
cortar la tarjeta en la perforación y luego enviarlo a la dirección indicada a continuación. También puede registrarse en línea en:
www.omcan.com/warrantyregistration.html
For mailing in Canada
Pour postale au Canada
Por correo en Canadá
OMCAN
PRODUCT WARRANTY REGISTRATION
3115 Pepper Mill Court,
Mississauga, Ontario
Canada, L5L 4X5
PRODUCT WARRANTY REGISTRATION
4450 Witmer Industrial Estates, Unit 4,
For mailing in the US
Pour diffusion aux États-Unis
Por correo en los EE.UU.
OMCAN
Niagara Falls, New York
USA, 14305
or email to: service@omcan.com
Purchaser’s Information
Name: Company Name:
Address:
Telephone:
City: Province or State: Postal or Zip: Email Address:
Country: Type of Company:
Restaurant Bakery Deli
Dealer from which Purchased: Butcher Supermarket Caterer
Dealer City: Dealer Province or State: Institution (specify):
Invoice: Other (specify):
Model Name: Model Number: Serial Number:
Machine Description:
Date of Purchase (MM/DD/YYYY): Date of Installation (MM/DD/YYYY):
Would you like to extend the warranty? Yes No
Thank you for choosing Omcan | Merci d’avoir choisi Omcan | Gracias por elegir Omcan
19
Page 20

Since 1951 Omcan has grown to become a leading distributor of equipment and supplies to the North
American food service industry. Our success over these many years can be attributed to our commitment
to strengthen and develop new and existing relationships with our valued customers and manufacturers.
Today with partners in North America, Europe, Asia and South America, we continually work to improve
and grow the company. We strive to offer customers exceptional value through our qualied local sales
and service representatives who provide convenient access to over 3,500 globally sourced products.
Depuis 1951 Omcan a grandi pour devenir un des “leaders” de la distribution des équipements et
matériel pour l’industrie des services alimentaires en Amérique du Nord. Notre succès au cours de ces
nombreuses années peut être attribué à notre engagement à renforcer et à développer de nouvelles
et existantes relations avec nos clients et les fabricants de valeur. Aujourd’hui avec des partenaires en
Amérique du Nord, Europe, Asie et Amérique du Sud, nous travaillons continuellement à améliorer et
développer l’entreprise. Nous nous efforçons d’offrir à nos clients une valeur exceptionnelle grâce à
nos ventes locales qualiées et des représentants de service qui offrent un accès facile à plus de 3500
produits provenant du monde entier.
Desde 1951 Omcan ha crecido hasta convertirse en un líder en la distribución de equipos y suministros
de alimentos en América del Norte industria de servicios. Nuestro éxito en estos años se puede atribuir
a nuestro compromiso de fortalecer y desarrollar nuevas relaciones existentes con nuestros valiosos
clientes y fabricantes. Hoy con socios de América del Norte, Europa, Asia y América del Sur, que trabajan
continuamente para mejorar y crecer la empresa. Nos esforzamos por ofrecer a nuestros clientes valor
excepcional a través de nuestro local de ventas y representantes de los servicios que proporcionan un
fácil acceso a más de 3,500 productos con origen a nivel mundial.
 Loading...